

Toshiba B-EP Series, B-EP2DL-GH20, B-EP2DL-GH30, B-EP2DL-GH40, B-EP4DL-GH20 Operation Manual
...Page 1

TOSHIBA Portable Barcode Printer
B-EP Series
B-EP Setting Tool Operation Manual
First Edition: October 2008
Page 2

Table of Contents
TABLE OF CONTENTS 2
1. INTRODUCTION 1
SUPPORTED PRINTERS .......................................................................................................................................... 1
SOFTWARE LICENSE AGREEMENT .......................................................................................................................... 1
FEATURES............................................................................................................................................................. 1
NOTATION ............................................................................................................................................................. 2
SCREENS USED IN THIS DOCUMENT ....................................................................................................................... 2
TRADEMARK AND COPYRIGHT ................................................................................................................................2
OPERATIONAL CONDITIONS .................................................................................................................................... 3
Software (Operation System) .......................................................................................................................... 3
Hardware ......................................................................................................................................................... 3
Interface........................................................................................................................................................... 3
DISCLAIMER .......................................................................................................................................................... 3
2. INSTALLATION 4
INSTALLATION PROCEDURE .................................................................................................................................... 4
UNINSTALLATION ................................................................................................................................................... 6
3 PREPARATION 7
PC ....................................................................................................................................................................... 7
Language Selection......................................................................................................................................... 7
PRINTER ............................................................................................................................................................... 7
4 FUNCTIONS 8
MAIN SCREEN ....................................................................................................................................................... 8
Set Param........................................................................................................................................................ 9
Get Param ....................................................................................................................................................... 9
MENUS ............................................................................................................................................................... 10
File................................................................................................................................................................. 10
Edit .................................................................................................................................................................11
View............................................................................................................................................................... 12
Tool................................................................................................................................................................ 13
Help ............................................................................................................................................................... 15
Memory.......................................................................................................................................................... 16
Maintenance .................................................................................................................................................. 18
TAB.................................................................................................................................................................... 20
General.......................................................................................................................................................... 20
Option ............................................................................................................................................................ 24
Interface......................................................................................................................................................... 26
WLAN ............................................................................................................................................................ 30
WLAN Security .............................................................................................................................................. 33
SETUP ITEMS LIST ............................................................................................................................................... 37
General Tab................................................................................................................................................... 37
Option Tab ..................................................................................................................................................... 38
Interface Tab.................................................................................................................................................. 39
WLAN Tab ..................................................................................................................................................... 40
WLAN Security Tab ....................................................................................................................................... 41
MESSAGE LIST .................................................................................................................................................... 42
Page 3

1
1. Introduction
Thank you for purchasing the “B-EP Setting Tool,” a setting tool for the portable barcode printers of Toshiba TEC
Corporation (hereinafter referred to as “TOSHIBA TEC”).
This document gives you a general description of the “B-EP Setting Tool” (hereinafter referred to as “the
Product”) including the installation procedure and features.
Supported Printers
The Product supports the following printers:
B-EP2DL-GH20/30/40
B-EP4DL-GH20/30/40
B-EP4DL-TH30/40
Software License Agreement
Please read the following terms and conditions of this Agreement carefully before using this Software. This is a
legal agreement between you and TOSHIBA TEC. By installing this Software on your computer, you are
agreeing to be bound by the terms and conditions of this Agreement.
1. You may use this Software on a single TOSHIBA TEC barcode printer acquainted from affiliated company,
dealer or distributor of TOSHIBA TEC.
2. You shall not grant a sub-license, distribute, transfer, lend or otherwise dispose of this Software, in whole or in
part, for the use of any third party other than you except as otherwise expressly provided herein.
3. You shall not modify, reverse engineering, reverse compile or reverse disassemble this Software, in whole or
in part, except as otherwise expressly provided herein.
4. You shall not copy or make a duplicate (or backup copy) of this Software, in whole or in part, except as
otherwise expressly provided herein.
5. All title and copyrights in and to this Software are owned by TOSHIBA TEC or its licenser.
6. TOSHIBA TEC or its licenser makes no representation or warranty, expressed or implied, including but not
limited to the correction of any error or failure, maintenance and support relating to this Software.
7. IN NO EVENT SHALL TOSHIBA TEC OR ITS LICENSER BE LIABLE TO YOU OR ANY THIRD PARTIES
FOR ANY DAMAGES, INCLUDING ANY LOST PROFITS, LOST SAVINGS OR OTHER INCIDENTAL OR
CONSEQUENTIAL DAMAGE ARISING OUT OF THE USE OR INABILITY TO USE THIS PROGRAMS,
EVEN IF TOSHIBA TEC HAS ADVISED OF THE POSSIBILITY OF SUCH DAMAGES, NOR FOR ANY
CLAIMS BY A THIRD PARTY.
8. TOSHIBA TEC or its licenser will terminate this Agreement if you fail to comply with any of this terms and
conditions. Upon the termination of this Agreement, you agree to uninstall the Software and return it to
TOSHIBA TEC.
9. This Agreement shall become effective upon the installation or use of this Software by You. By installing or
using this Software you hereby indicate your acceptance of these terms and conditions.
Features
The Product is software, which allows you to use the setting features of the supported TOSHIBA TEC Portable
Barcode Printers under a Windows 2000/XP/Vista environment.
Please note the Product is targeted for a user who is familiar with the internal setting of the Supported Printers.
Page 4

2
Notation
Names of menus, screens, icons, buttons, tabs, and items are enclosed in square brackets ([ ]).
For example: Click the [OK] button.
Wordings shown on the computer monitor and the LCD message display of your printer are enclosed in
double quotation marks (“ “).
For example: “ON LINE”.
Titles of the chapters and sections to be referred to are enclosed in single quotation marks (‘ ‘).
For example: Please refer to ‘Introduction’.
Screens Used in This Document
Screens shown in this document are examples used for explaining operations. Unless otherwise specified, an
operation system used in this document is Windows XP. Please note that the screens shown may differ
depending on your usage environment and conditions.
Trademark and Copyright
Microsoft and Windows are trademarks of Microsoft Corporation in the United States and other countries.
Other company and product names may be registered trademarks or trademarks of others.
Each company’s registered trademarks and trademarks are not marked with
TM
or ®.
This document uses the following abbreviations.
Microsoft
®
Windows® 2000 Professional and Microsoft® Windows® 2000 Server: Windows 2000
Microsoft
®
Windows® XP Home Edition and Microsoft® Windows® XP Professional: Windows XP
Microsoft
®
Windows® Vista Ultimate and Microsoft® Windows® Vista Enterprise and
Microsoft
®
Windows® Vista Business and Microsoft® Windows® Vista Home Premium and
Microsoft
®
Windows® Vista Home Basic: Windows Vista
All technologies other than the above are exclusive property of TOSHIBA TEC.
Copyright of TOSHIBA TEC in Japan and other countries is expressed as:
Copyright© 2008 TOSHIBA TEC CORPORATION. All Rights Reserved.
Page 5

3
Operational Conditions
The Product can be used under the following system and environmental requirements.
Software (Operation System)
English operation systems of:
Windows 2000, Windows XP, Windows Vista
Hardware
A DOS/V (IBM AT compatible) machine must be used under the above Windows operation system and
mandatory or recommended conditions explained in the table below.
Mandatory Conditions Recommended Conditions
CPU
Intel
®
Pentium® II 400 MHz or higher Intel® Pentium® III 1 GHz or higher
Memory 64 MB or more 256 MB or more
HDD Free space of 10 MB or more
FDD 3.5-inch FDD
Interface
Connections are made through the following interface.
USB
However, the Product does not operate when more than one printer are connected at the same time.
Plug and Play requests printer driver installation. The Product does not need any printer driver. However,
printer driver installation is requested in every connection. If you use the Product frequently, it is recommended
to install a printer driver. For information about printer driver installation, please refer to our web site.
When the PC connection port is changed after you install a printer driver, you need to install it again. You can
avoid this by enabling printer’s USB serial number setting.
Disclaimer
The Product allows the Administrator/User to monitor printer statuses, check/change printer setting, and
download a setting file on the computer monitor for the Supported Printers. When an invalid setting is
made for the Supported Printers using the Product, they may malfunction and may not be used
afterwards.
The Product is intended to be used by the Administrator who is familiar with the internal setting of the
Supported Printers and general-purpose printers. The Setting Tool and Downloader must be used by
the Administrator or under instructions of the Administrator.
TOSHIBA TEC shall not be liable for any outcome resulted from a failure to follow the above instructions
(both the Product and the Supported Printers).
Page 6
4
2. Installation
Installation Procedure
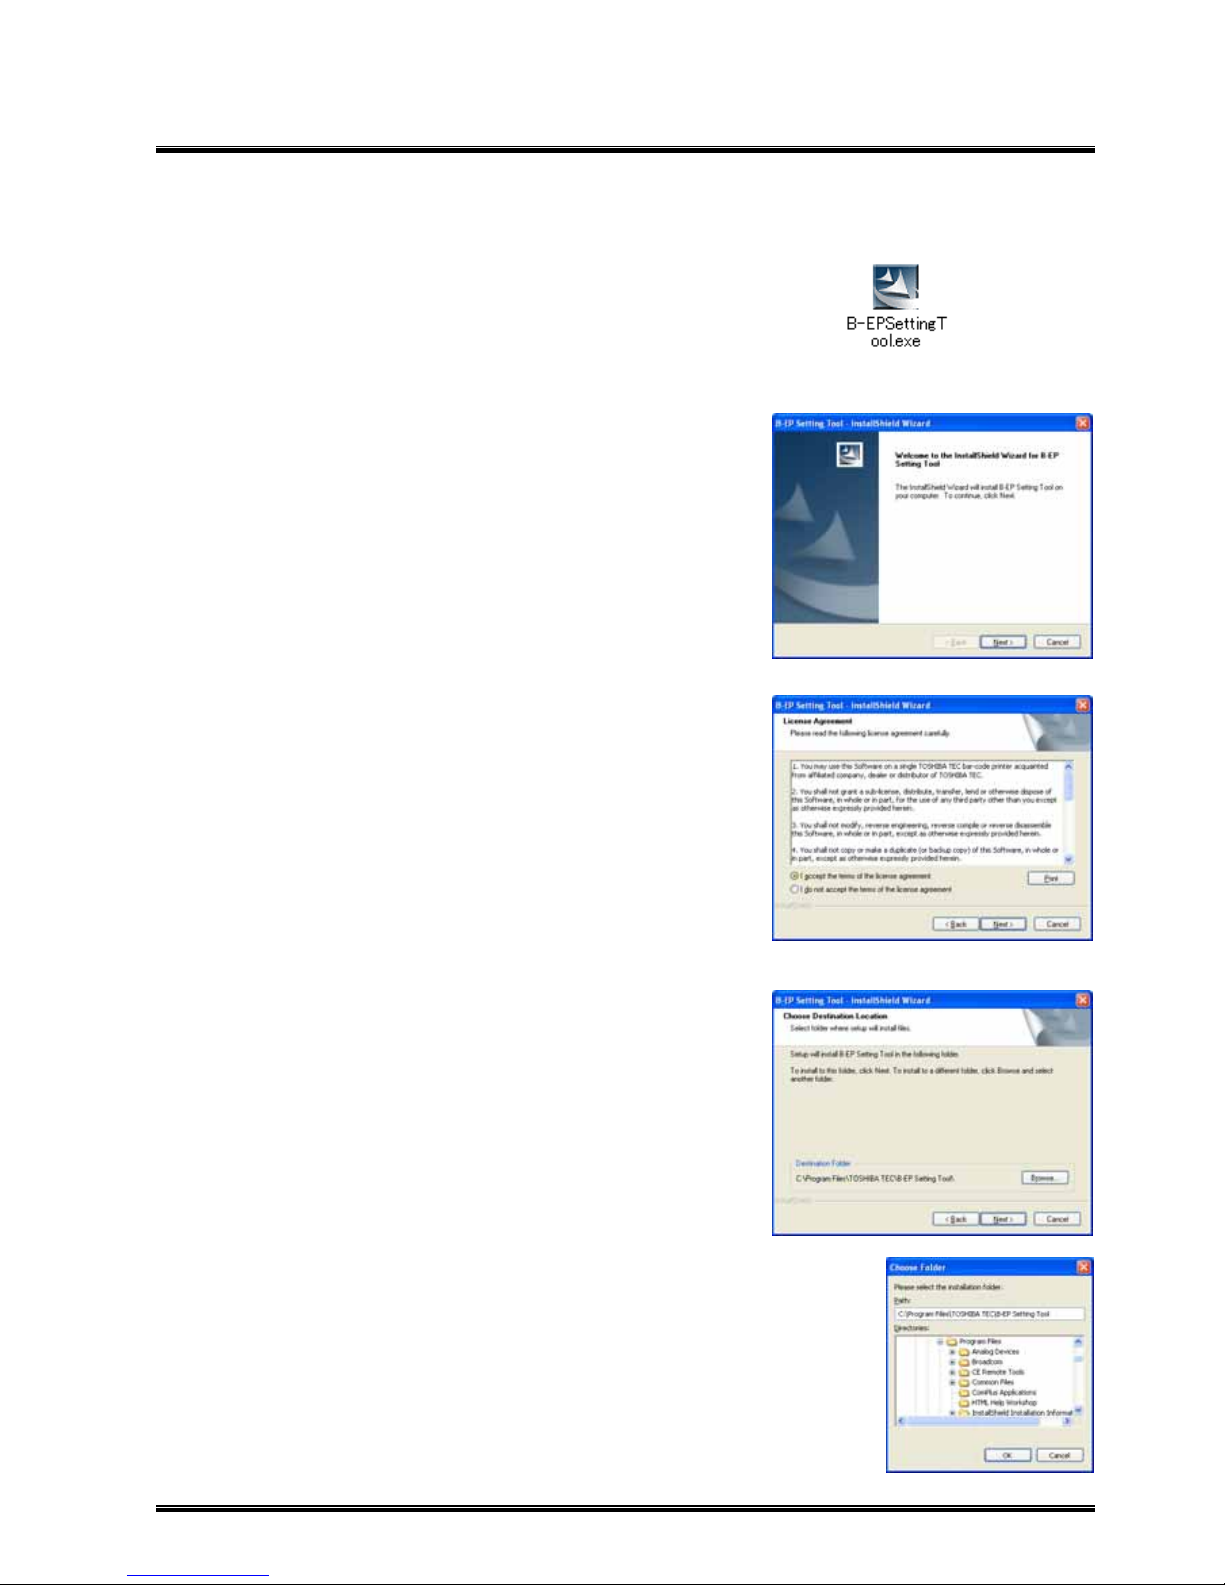
1. Double-click the setup program (B-EPSettingTool.exe)
of the Product.
Note: With Windows Vista, the User Account Control dialog
box may appear. In that case, click [Allow] to
continue.
2. The InstallShield Wizard starts. Click [Next].
3. The [License Agreement] screen appears.
When you agree, click [I accept the terms of the
license agreement] and click [Next].
‘Software License Agreement’
4. The [Choose Destination Location] screen appears.
Check the folder where the Product is going to be
installed, and click [Next].
When you want to change the location, click
[Browse…]. On the [Choose Folder] screen,
select a desired folder.
Page 7
5
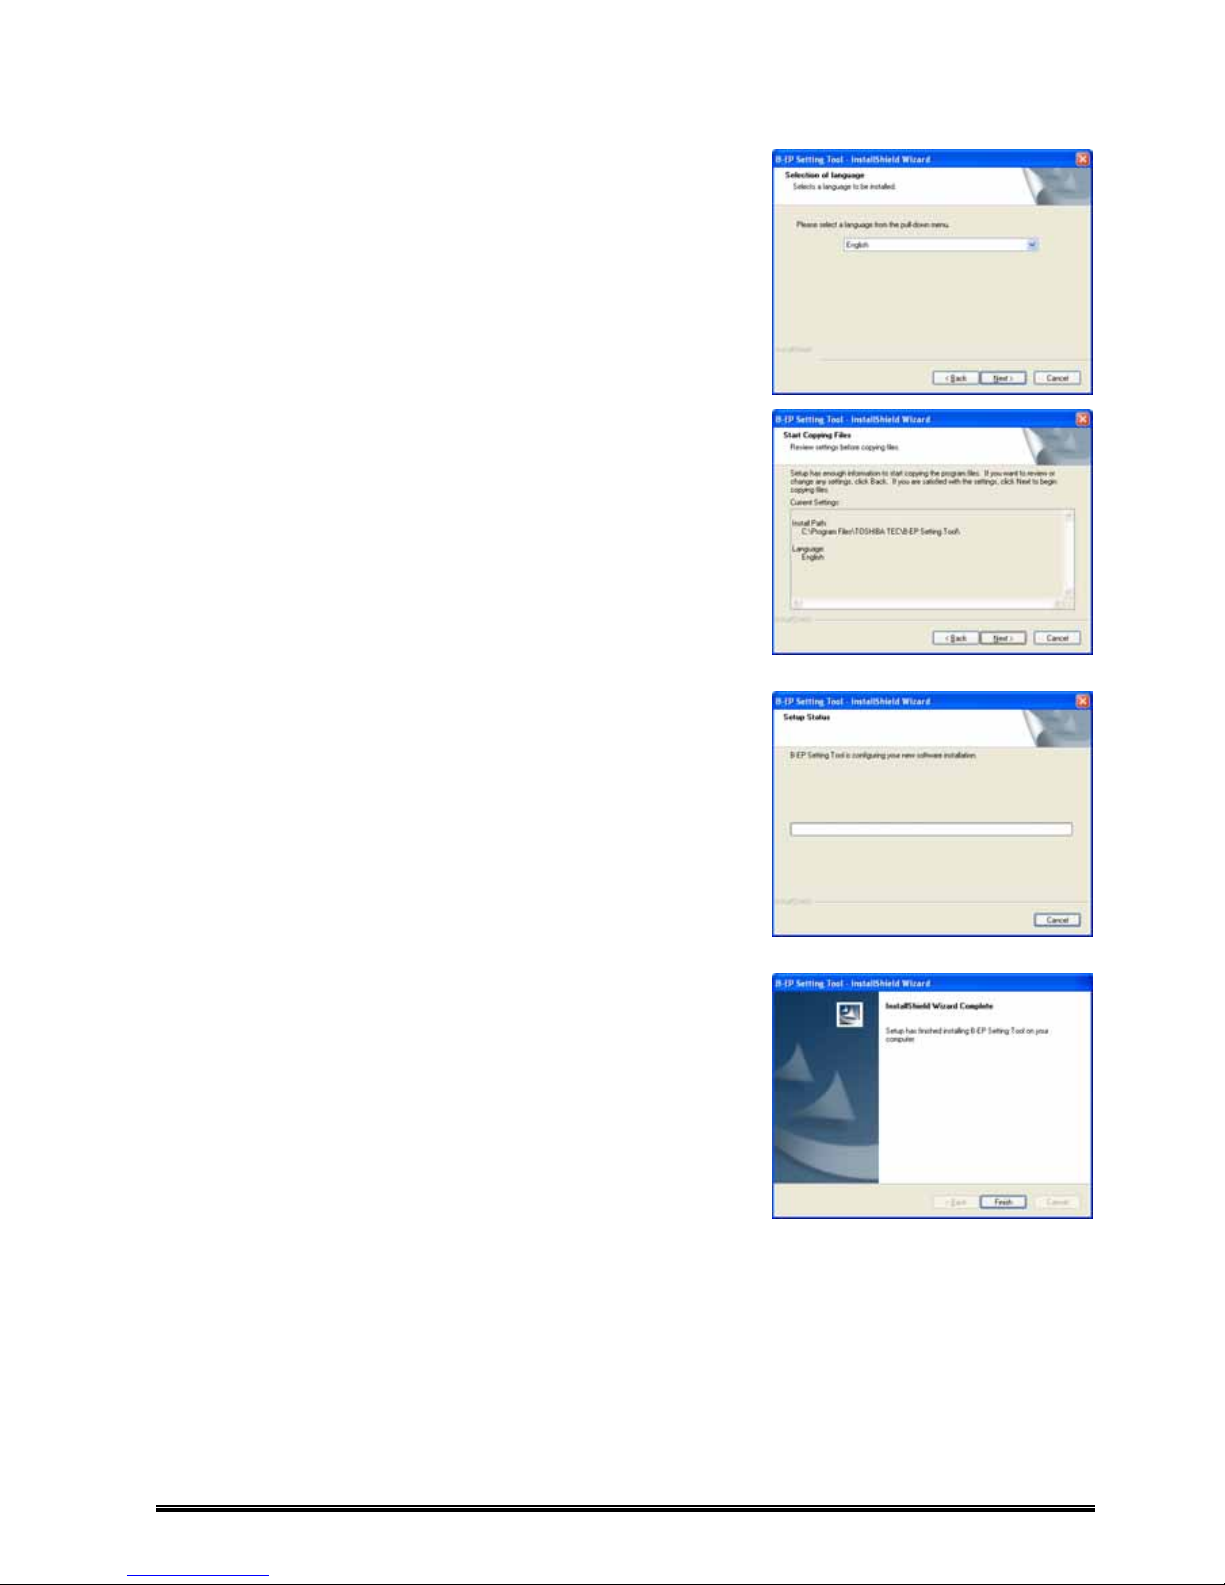
5. The [Selection of language] screen appears.
From a pull-down menu, select a language to be
displayed on the Product.
Here, select [English], then click [Next].
After the installation, you can use a menu to change
the language.
6. The [Start Copying Files] screen appears.
Check the descriptions under [Current Settings] and
click [Next] when the descriptions are correct. Then,
the installation starts.
When you want to change the setting, click [Back] until
the applicable screen appears, then make the change.
7. The installation is being performed.
Click [Cancel] to stop the installation.
8. The [InstallShield Wizard Complete] screen appears
when the installation is completed.
Click [Finish] to complete the operation.
Page 8
6
Uninstallation
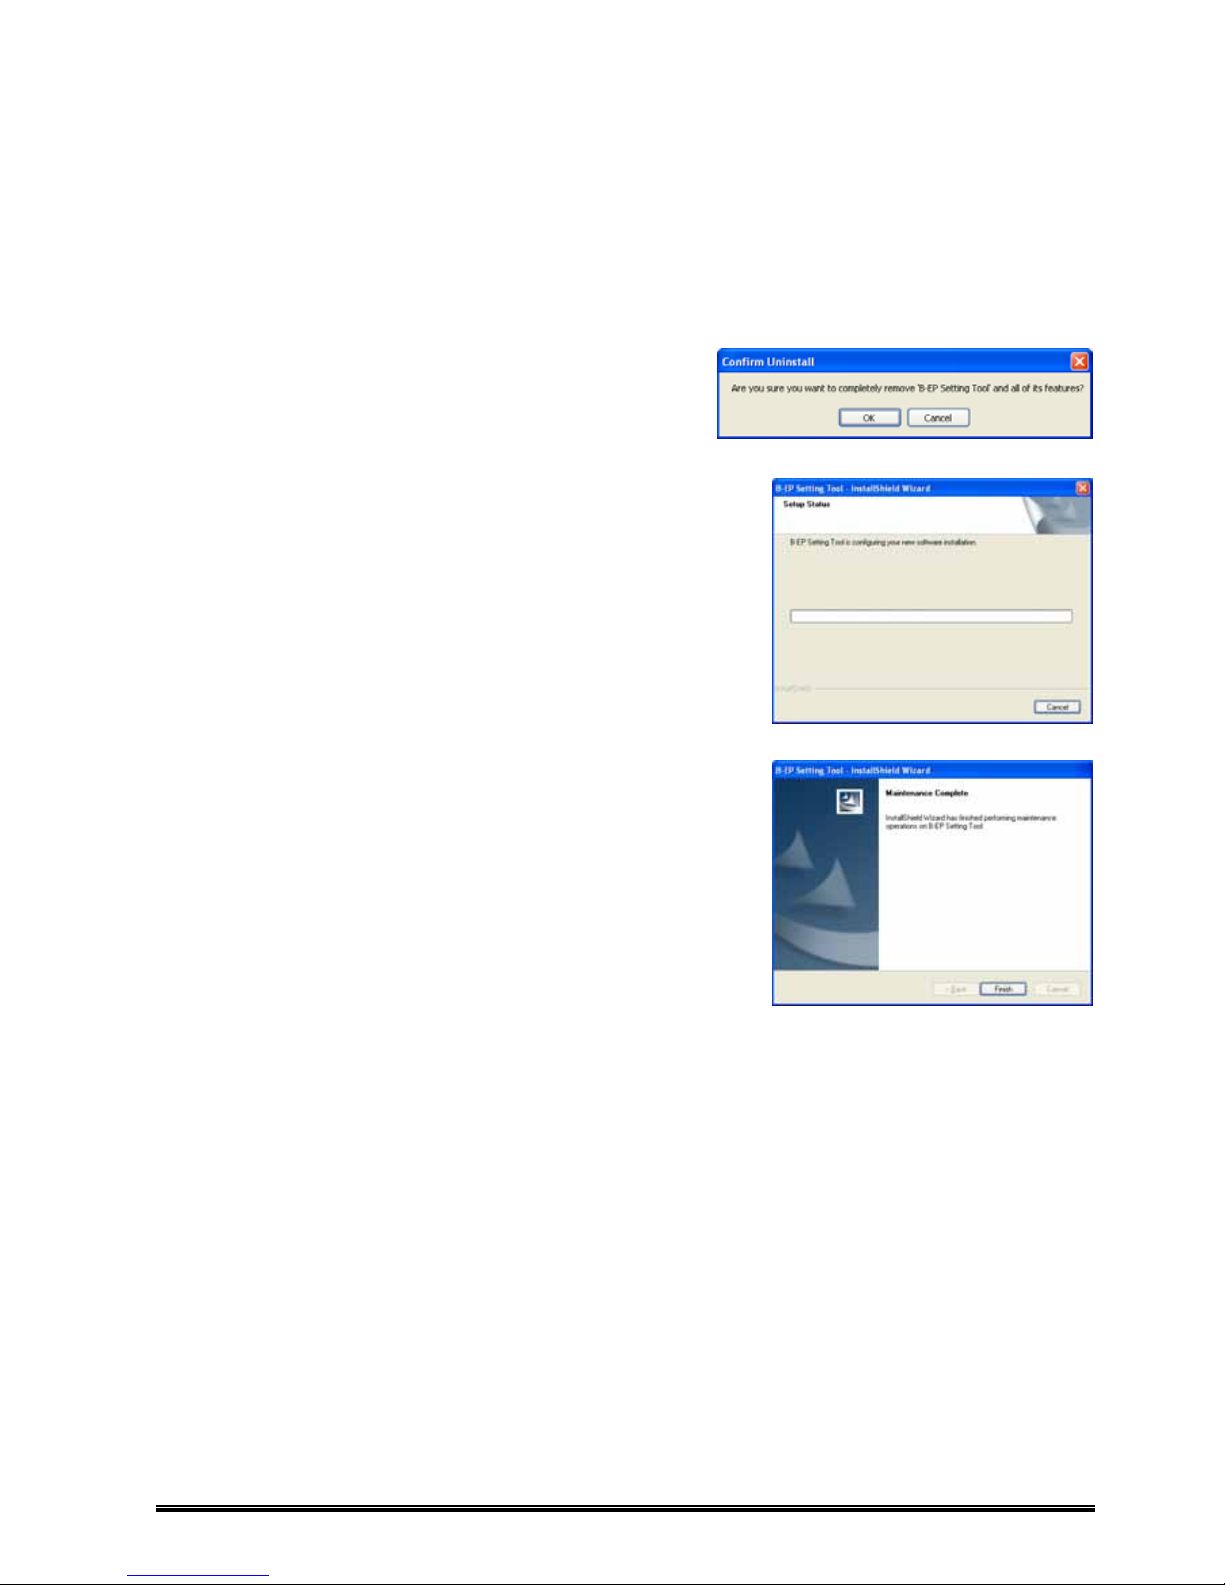
1. Select [Start] - [Control Panel] - [Add or Remove Programs].
Note: With Windows Vista, the User Account Control dialog box may appear. In that case, click [Allow] to
continue.
2. The [Confirm Uninstall] screen appears.
Clicking [OK] starts uninstallation.
3. The screen which shows a progress bar appears.
Clicking [Cancel] stops the operation.
4. The [Maintenance Complete] screen appears when
uninstallation is completed.
Click [Finish] to complete the operation.
Page 9
7
3 Preparation
PC
Connect the USB port on the PC and the mini USB port of the printer, using a general-purpose mini USB cable.
When the printer power is turned on, Plug and Play requests printer driver installation. Although you do not
install a printer driver, you can use the Product. If you use the Product frequently, it is recommended to install a
printer driver.
For information about printer driver installation, please refer to our web site.
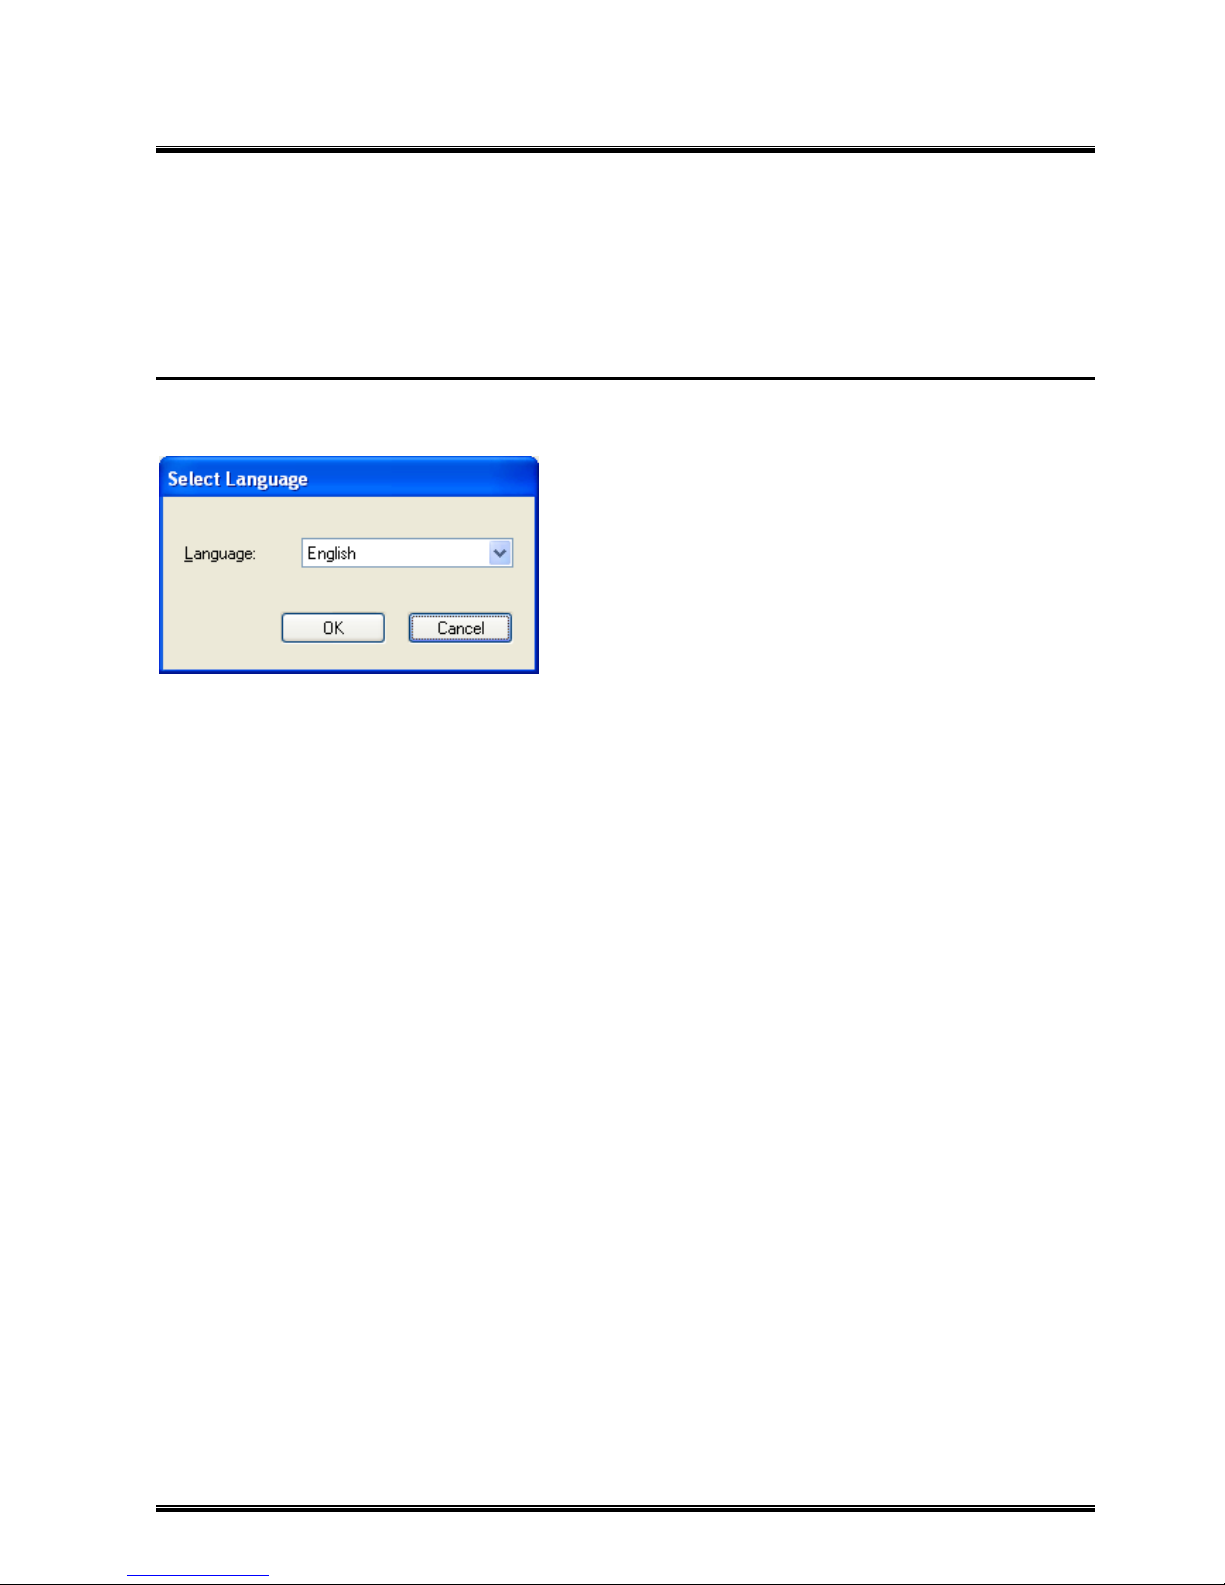
Language Selection
Select a language you use for display on the “B-EP Setting Tool.”
Select [Start] - [All Programs] - [TOSHIBA TEC] - [B-EP Setting Tool] and click [Language] to start language
selection.
Language:
You can select a language you use for display on the “B-EP Setting Tool.”
Select a language that can be displayed in your operating system.
To change the language while the “B-EP Setting Tool” is on, exit the tool and then change the language.
・Japanese
・English
The default language is a language selected during the installation.
Printer
To retrieve/update parameters or use the maintenance function, put the printer in SYSTEM mode.
When you turn on the power while holding down the [FEED] key, the printer enters SYSTEM mode. The printer
displays “SYSTEM MODE” and then “<0>SHUTDOWN” on the LCD. When the printer is not in SYSTEM mode,
the function to retrieve/update parameters and the maintenance function cannot be used.
To use the memory allocation function, put the printer in TPCL, TPCL1 or LABEL mode, and then put it in the idle
state.
To use the memory formatting function, put the printer in TPCL, TPCL1, LABEL, RECEIPT, or RECEIPT1 mode,
and then put it in the idle state.
You can use functions other than the above, regardless of printer mode.
The Product allows printer modes to be set, except for SYSTEM mode.
Updated parameters become valid when the printer is shut down.
However, when the printer is not normally shut down, for example, the battery is detached or attached, updates
are discarded.
Page 10
8
4 Functions
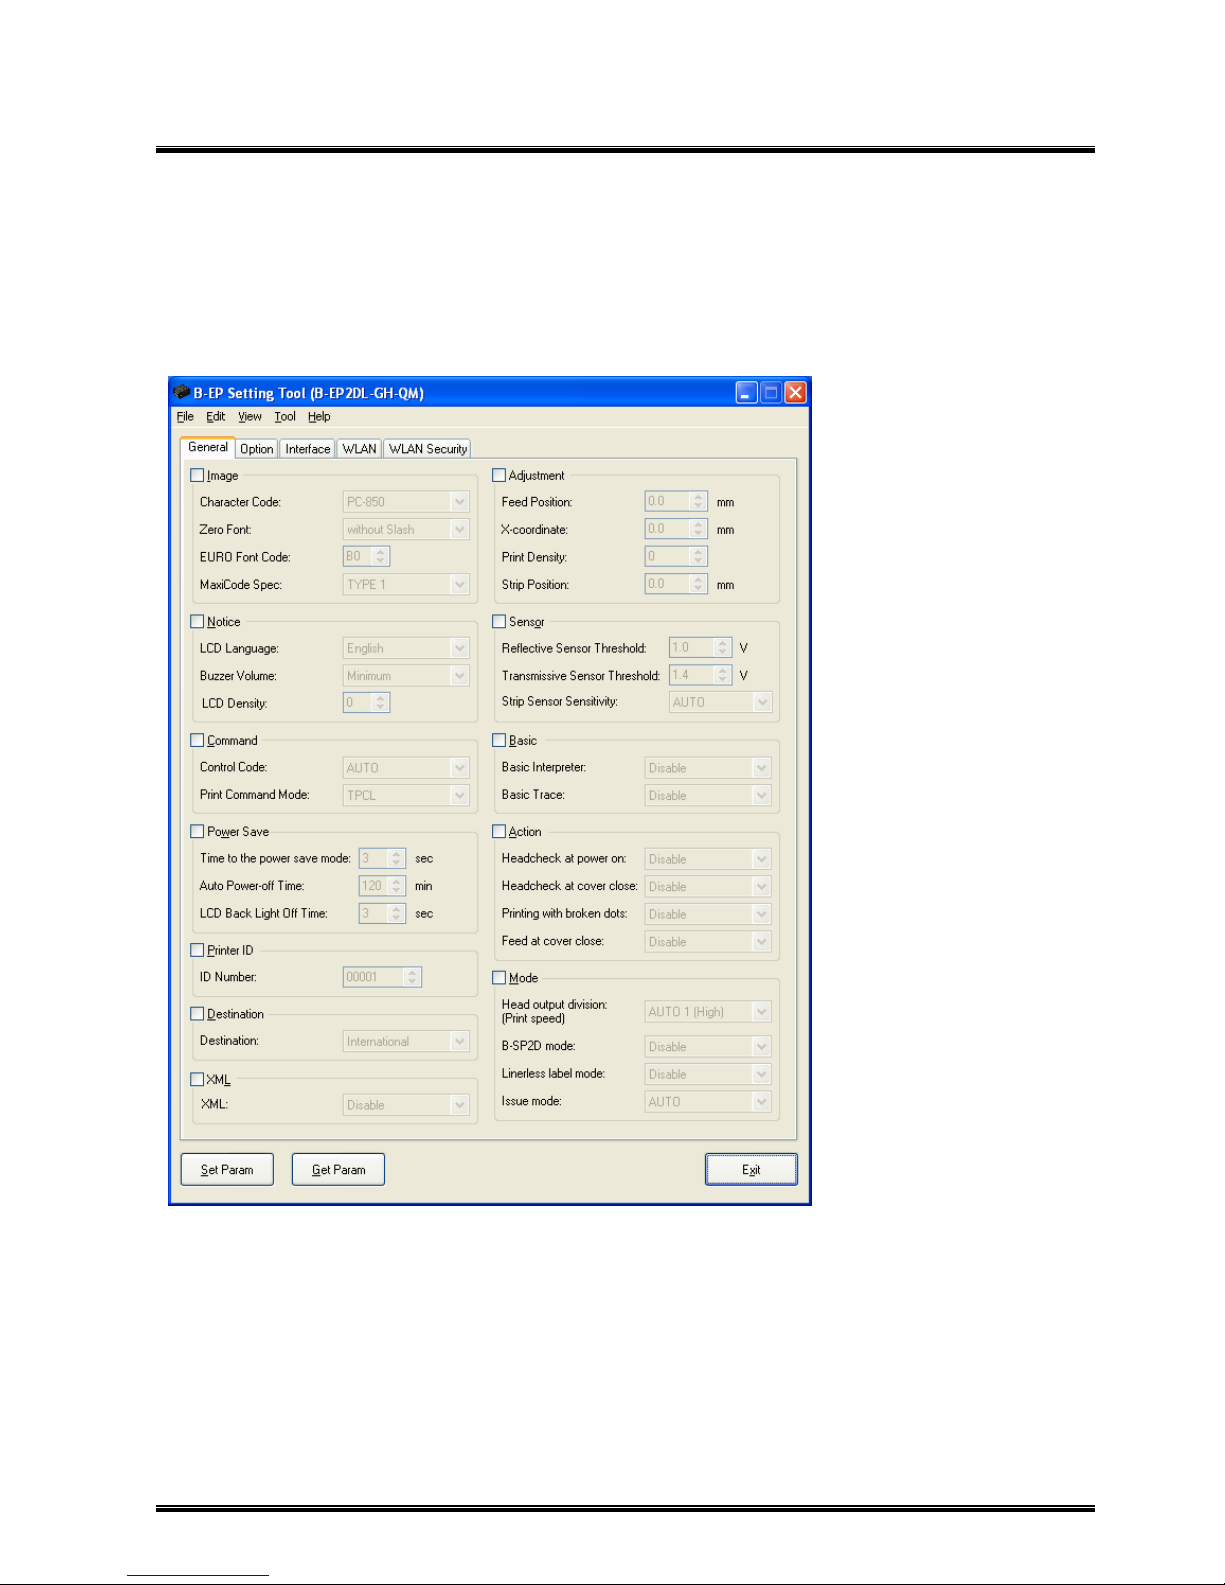
Main Screen
Select [Start] - [All Programs] - [TOSHIBA TEC] - [B-EP Setting Tool] - [Setting Tool] to start the “B-EP Setting
Tool.”
Just after the tool has started, the [General] tab is opened and the default values for the printer used last time are
displayed in all setup items.
When the printer model differs from the model displayed in the title, settings may not be updated properly.
Confirm the printer model before updating the settings.
(1) Setup group
Select a group to which your setup item belongs to, from sorted groups such as [Image], [Notice] and
[Command].
When the box at the left of a group is checked, all items belonging to the group become active.
(2) Setup item
Items in the checked group become active.
You can select an option or enter a desired value or text to specify each item.
(3) [Set Param]
You can use this button to change a printer parameter for an active item.
Updating processing is performed for active setup items in checked groups.
(1) (2) (3) (4) (5) (6)
Page 11
9
(4) [Get Param]
You can use this button to retrieve the current parameters from the printer and displays them on the screen.
Retrieval processing is performed whether setup groups are checked.
(5) Menu
You can use useful functions.
(6) [Exit]
This button is used to exit the “B-EP Setting Tool” while discarding the current settings.
All setup items are defaulted when the “B-EP Setting Tool” is started next time.
(7) Setup Confirmation
You can confirm settings by retrieving parameters.
Another way to confirm the settings is to enter SYSTEM mode, select [<1>DIAGNOSTIC] - [MAINTENANCE
CONT] and press the [POWER] key. The self-test results are printed. You can confirm the settings from
the printed results.
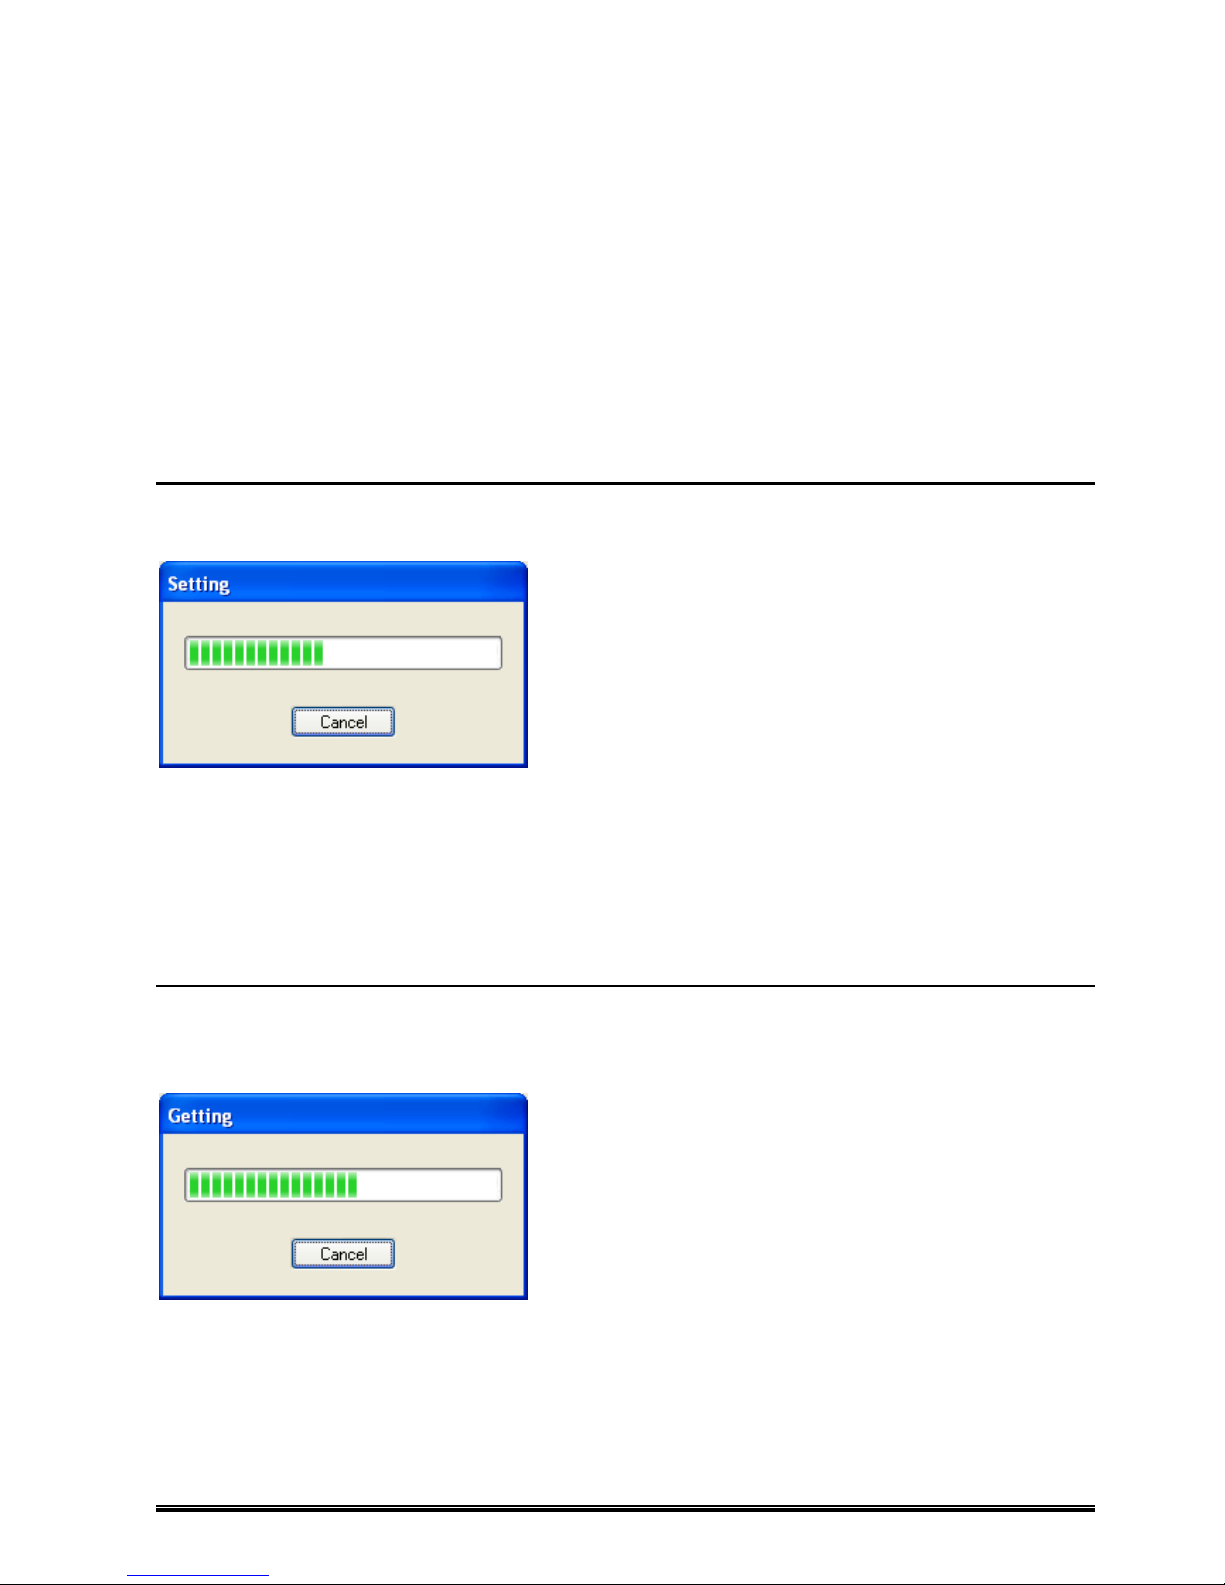
Set Param
Parameters set for items in checked groups on all tabs are updated in the printer.
Setting of items in checked groups is enabled.
During updating, the progress screen is displayed.
You can stop updating by clicking [Cancel].
When the confirmation message is displayed, click [OK] or [Cancel].
When updating is successfully completed, the progress screen disappears and the main screen is displayed
again.
When updating fails, an error message is displayed.
Data already processed before updating is canceled or fails are updated in the printer.
Get Param
Current parameters for all setup items on all tabs are retrieved from the printer.
However, part of parameters cannot be retrieved such as Bluetooth bonding information and supplicant file
information.
During retrieval, the progress screen is displayed.
You can stop retrieval by clicking [Cancel].
When the confirmation message is displayed, click [OK] or [Cancel].
When the retrieval is successfully completed, the progress screen disappears and the main screen is displayed
again. Retrieved set values are displayed.
When the retrieval fails, an error message is displayed.
When no parameters are retrieved, the main screen remains unchanged.
Page 12
10
Menus
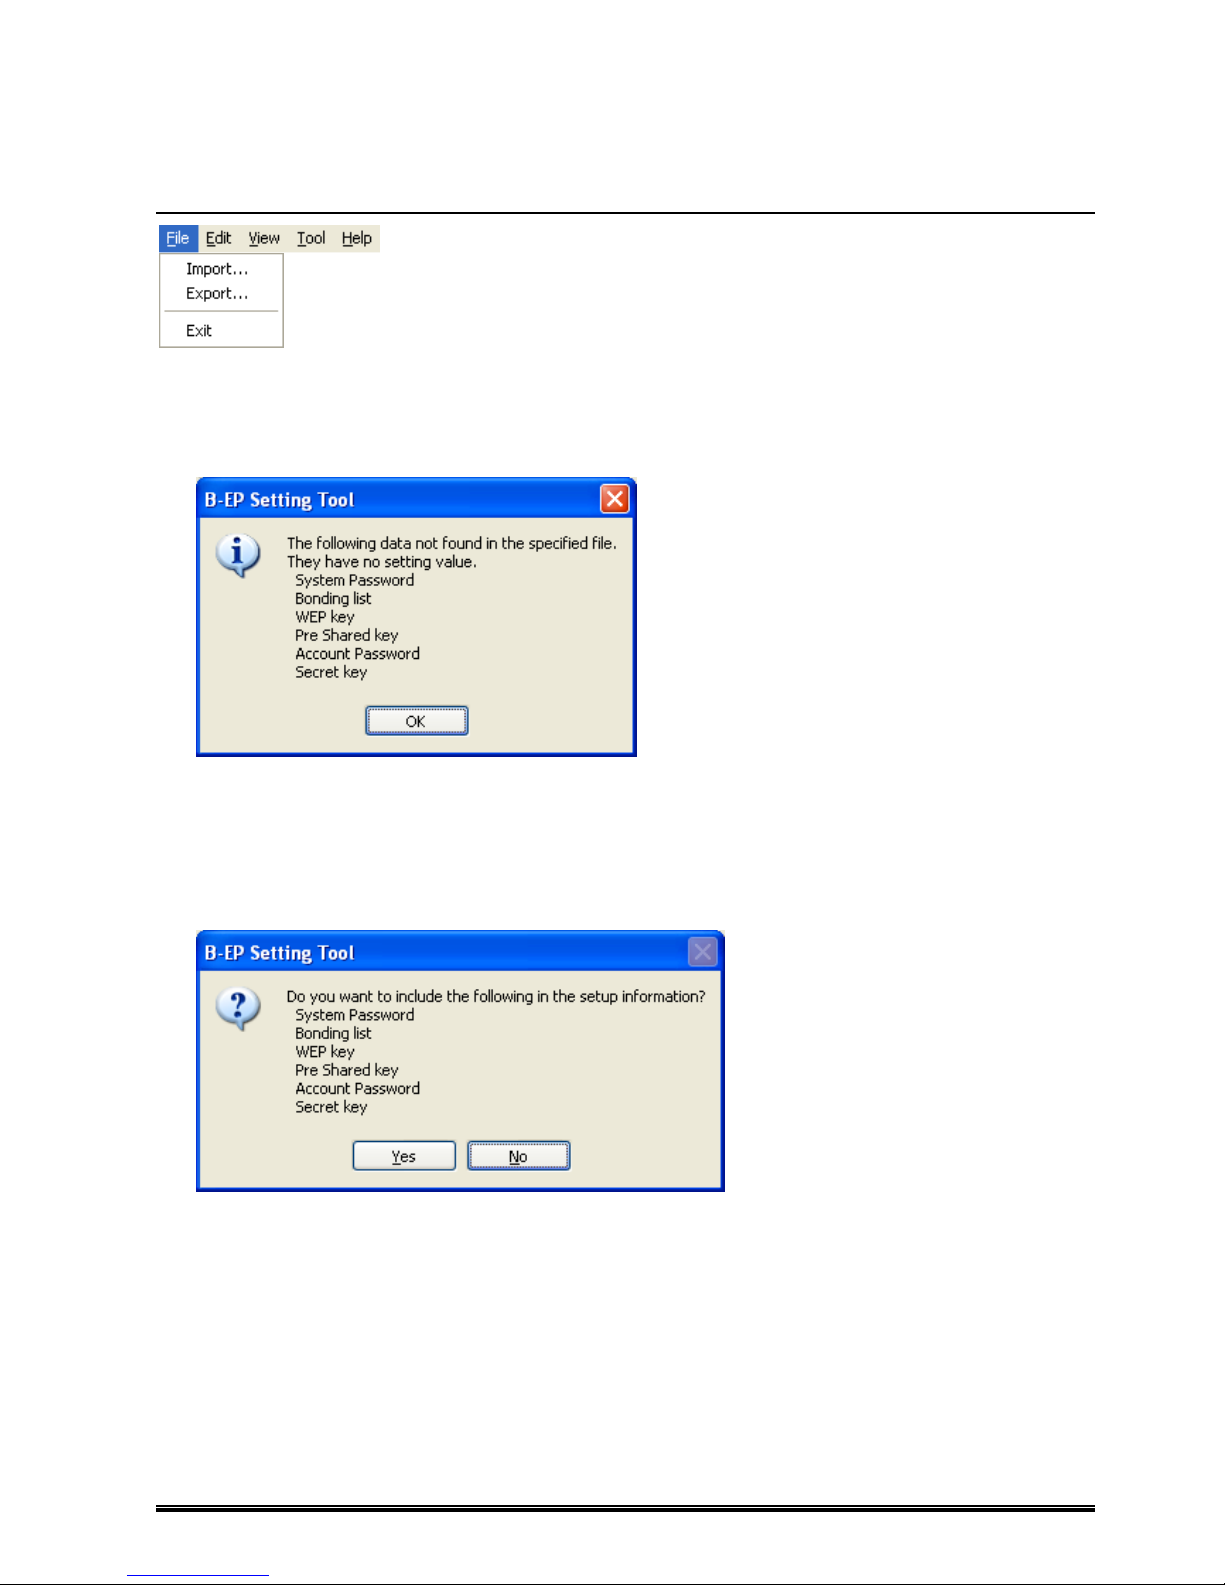
File
[Import...]
This menu is used to retrieve setup information from a specified file.
The setup screen status at storage can be reproduced.
In addition to parameters, the checkbox settings for groups are reproduced.
When no security information is found in the specified file, the following message is displayed.
When the specified file contains security information, imported security information is displayed as asterisks.
[Export...]
This menu is used to store setup information in a specified file.
It also stores the status of the current setup screen.
In addition to parameters, the checkbox settings for groups are reproduced.
Before storage, the following message is displayed.
When you want to store security information contained in the setup information, click [Yes]. Since security
information is important, be careful before storing files.
When you do not want to store security information, click [No].
[Exit]
This menu is used to exit the “B-EP Setting Tool” while discarding the current settings.
All setup items are defaulted when the when the “B-EP Setting Tool” is started next time.
Page 13

11
Edit
[Enable All]
This menu is used to check all checkboxes on all tabs.
[Disable All]
This menu is used to uncheck all checkboxes on all tabs.
[Enable All in Page]
This menu is used to check all checkboxes on the tab.
[Disable All in Page]
This menu is used to uncheck all checkboxes on the tab.
Page 14
12
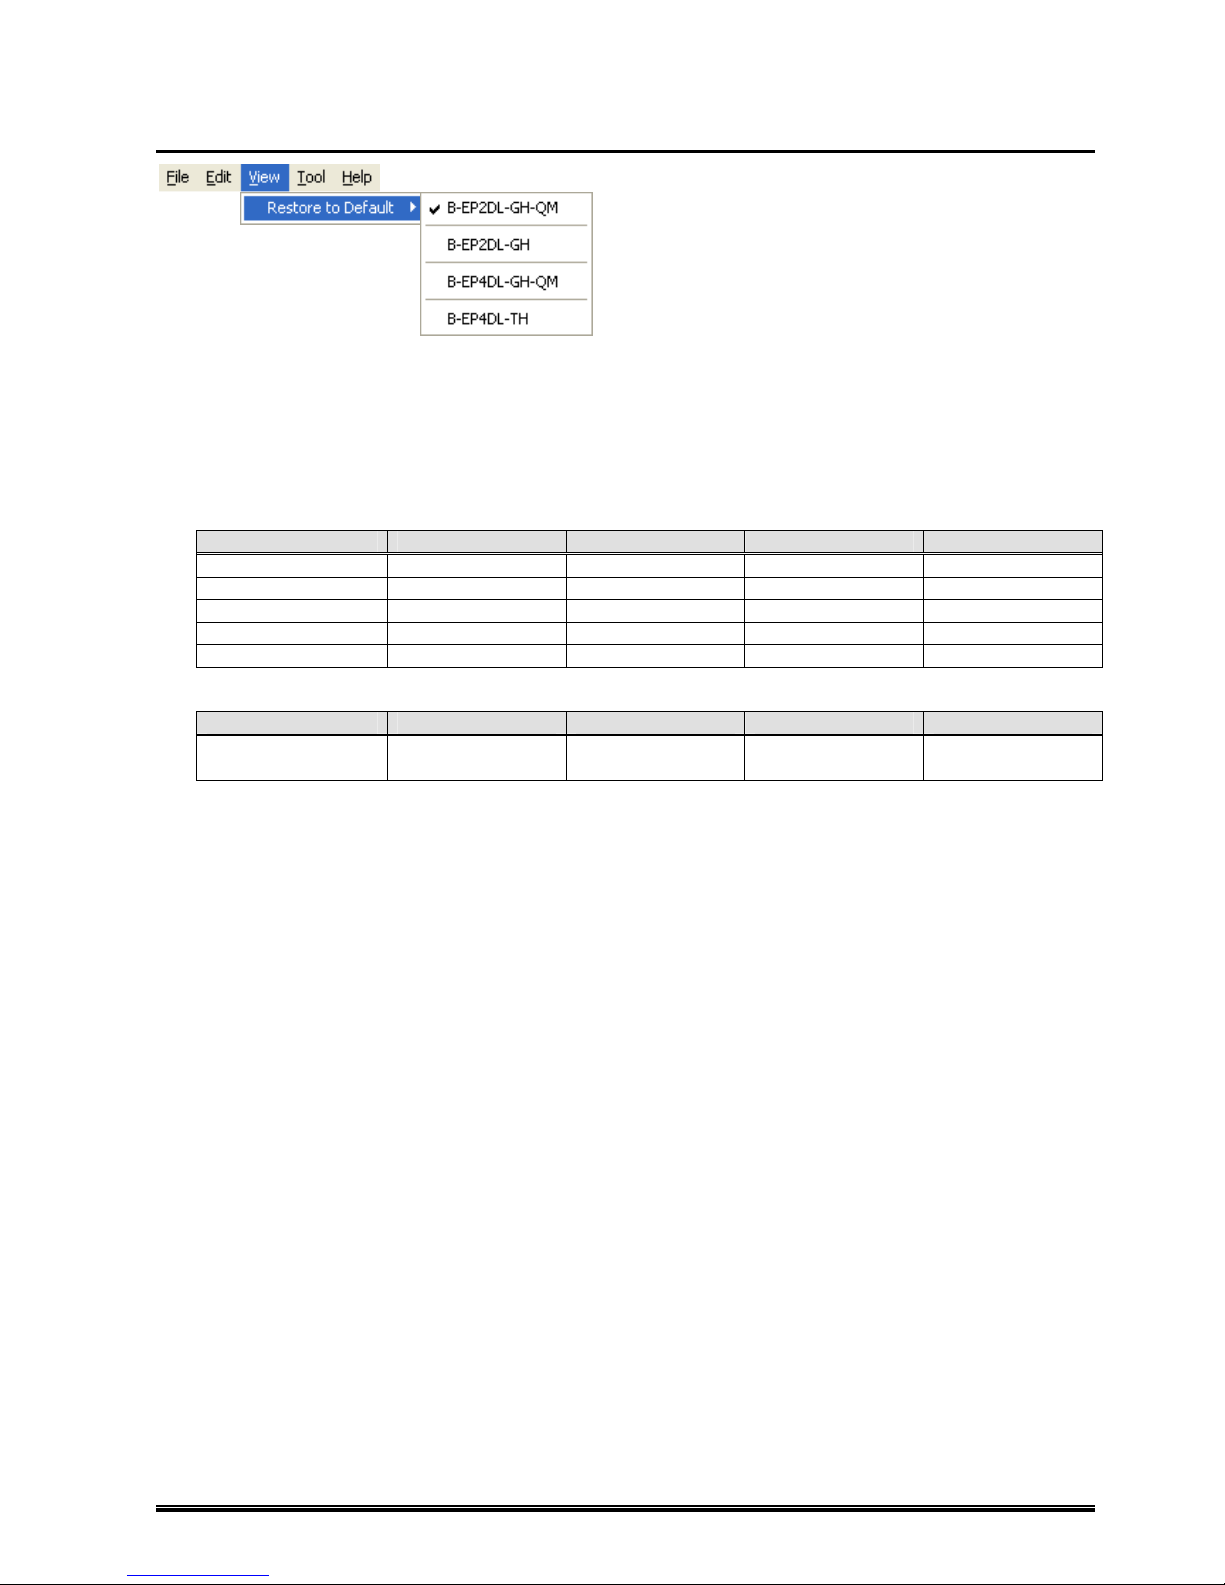
View
[Restore to Default]
This menu is used to default all setup items for the selected printer.
All checkboxes for setup groups are unchecked.
The printer is selected from “B-EP2DL-GH-QM,” “B-EP2DL-GH,” “B-EP4DL-GH-QM” and “B-EP4DL-TH.”
The default values for the checked printer are displayed when the “B-EP Setting Tool” is started next time.
When retrieval processing is performed, the printer from which parameters are retrieved is checked.
<< Difference in Default Values >>
B-EP2DL-GH-QM B-EP2DL-GH B-EP4DL-GH-QM B-EP4DL-TH
LCD Language English Japanese English Japanese
Destination International Japan International Japan
Backlash Step 1 1 1 8 8
Backlash Step 2 1 1 8 8
DBCS Mapping Chinese Japanese (kanji) Chinese Japanese (kanji)
<< Difference in Selected Item >>
B-EP2DL-GH-QM B-EP2DL-GH B-EP4DL-GH-QM B-EP4DL-TH
Head output division
(Print speed)
3 div. (Low) 3 div. (Low) 6 div. (Low) 6 div. (Low)
Page 15

13
Tool
[Send File...]
This menu is used to send all data in the selected file to the printer.
During transmission, the progress screen is displayed.
You can stop transmission by clicking [Cancel].
When a confirmation message is displayed, click [Yes] or [No]. Note that transmission continues while the
confirmation message is displayed.
When transmission is successfully completed, the progress screen disappears and the main screen is
displayed.
When transmission fails, an error message is displayed.
Data already processed before transmission is canceled or fails are updated in the printer.
This menu is available regardless of mode and status of the printer.
[Memory...]
This menu is used to allocate and format memory.
For details, refer to Memory.
[Maintenance...]
This menu is used to confirm/clear the maintenance counter and initialize parameters.
This menu is available only when the printer is in SYSTEM mode.
For details, refer to Maintenance.
[Reset]
This menu is used to reset the printer.
This menu is available regardless of printer’s mode and status.
Page 16

14
[Receive Log...]
This menu is used to output dump data for analysis, which is received from the printer to a specified file.
During reception, the progress screen is displayed.
Processing cannot be canceled during reception.
When reception is successfully completed, the progress screen disappears and the main screen is
displayed.
When reception fails, an error message is displayed.
Data already processed before reception is canceled or fails are output to the file.
This menu is available regardless of printer’s mode and status.
This menu is available regardless of mode and status of the printer.
Page 17

15
Help
[Contents...]
This menu is used to display the main screen for Help.
[About...]
This menu is used to display version information.
Page 18

16
Memory
Allocate
This field is used to allocate memory with size specified for each storage area.
[DBCS Mapping]:
Select a font installed on the printer.
Options: Not Installed
Japanese (Kanji)
Chinese
Korean (Hangul)
Allocatable memory capacity depends on the specified font.
DBCS Mapping Total capacity
Not Installed 3,200 KB
Japanese (Kanji) 1,344 KB
Chinese 1,024 KB
Korean (Hangul) 2,176 KB
Default values for each storage area depend on the specified font.
DBCS Mapping
Bitmap Writable
Character
Storage Area
BASIC File
Storage Area
Form
Storage Area
Graphic
Storage Area
PC Save
Storage Area
Not Installed 2,304 KB
Japanese (Kanji) 448 KB
Chinese 128 KB
Korean (Hangul) 1,280 KB
320 KB 192 KB 128 KB 256 KB
[Allocate]:
This button is used to allocate memory with the size specified for each storage area.
It is available when the printer is in TPCL, TPCL1 or LABEL mode and in the idle state.
Page 19

17
[Available Size]:
Total allocatable memory capacity is displayed.
This value is a sum of capacity of all storage areas.
[Bitmap Writable Character Storage Area]:
Select a size to be allocated to bitmap writable character storage in the range from 0 KB to the total
capacity.
[BASIC File Storage Area]:
Select a size to be allocated to BASIC file storage in the range from 0 KB to 896 KB.
[Form Storage Area]:
Select a size to be allocated to form storage in the range from 0 KB to 896 KB.
[Graphic Storage Area]:
Select a size to be allocated to graphic storage in the range from 0 KB to 192 KB.
[PC Save Storage Area]:
Select a size to be allocated to PC save storage in the range from 0 KB to the total capacity.
Format
This field is used to initialize memory for a specified storage area.
[Area]:
Select a range you want to format.
Options: PC Save & Bitmap Writable Character (*1)
PC Save (*1)
Bitmap Writable Character (*2)
Form (*3)
Graphic (*3)
Bitmap Writable Character & Form & Graphic (*3)
*1: In TPCL or TPCL1 mode
*2: In TPCL, TPCL1, LABEL, RECEIPT or RECEIPT1 mode
*3: In LABEL, RECEIPT or RECEIPT1 mode
[Format]:
This button is used to format memory for the specified storage area.
It is available when the printer is in TPCL, TPCL1, LABEL, RECEIPT or RECEIPT1 mode and in the idle
state.
[Close]:
This button is used to return to the main screen.
Page 20

18
Maintenance
Maintenance Counter
You can check the maintenance counters for the printer.
The counters are not normally displayed in the printer V1.0A or lower.
Print the maintenance counters through key operations.
You can clear the counters as necessary, except for the total feed distance and the total print distance.
[Total Feed Distance]:
The total feed distance from shipment to the present is displayed.
[Total Print Distance]:
The total print distance from shipment to the present is displayed.
[Feed Distance]:
The latest feed distance is displayed in the leftmost field.
The latest feed distance is a feed distance from the last counter clear to the present.
This distance is used to judge platen life.
Previous 1 to Previous 4 fields display the past four feed distances.
[Print Distance]:
The latest print distance is displayed in the leftmost field.
The latest print distance is a print distance from the last counter clear to the present.
This distance is used to judge print head life.
Previous 1 to Previous 4 fields display the past four print distances.
[Counter]:
Select a counter you want to clear.
All counters are cleared on the printer V1.0B or lower, regardless of settings.
Clear an individual counter through key operations.
Options: Print Distance
Feed Distance
All
[Clear]:
This button is used to clear the latest value of a specified counter to zero.
It takes a few seconds to clear the counter.
After the counter is cleared, the previous values are updated in sequence.
Page 21

19
Parameter Clear
[Destination]:
Select a destination of parameters you want to initialize.
Options: Japan
International
[Initialize]:
This button is used to initialize parameters using specified settings.
It takes a few seconds to initialize parameters.
[Close]:
This button is used to return to the main screen.
Page 22

20
TAB
General
[Image] Group
[Character Code]:
Select a character code table to be applied to the printer font.
Options: PC-850 PC-8 PC-852 PC-857
PC-851 PC-855 PC-1250 PC-1251
PC-1252 PC-1253 PC-1254 PC-1257
LATIN9 Arabic PC-866 UTF-8
[Zero Font]:
Select whether or not a slash is attached to the printer font character “0.”
Note that the no slash is attached for the following fonts, regardless of settings.
<Bitmap fonts> OCR-A, OCR-B, Gothic 725 Black, Kanji and Chinese
<Outline fonts> Price Font 1, Price Font 2 and Price Font 3
Options: without Slash
with Slash
Page 23

21
[EURO Font Code]:
Set printer font characters you want to assign to EURO fonts.
Enter two alphanumeric character from “0” to “F.”
Entries are not case-sensitive.
Two characters indicate one HEX character. (Example: “0” “30” or “A” “41”)
Range: 20 to FF
[Maxi Code Spec]:
Select a type of barcode font to create a MaxiCode.
Options: TYPE 1 (Interchangeable specification)
TYPE 2 (Interchangeable specification)
[Notice] Group
[LCD Language]:
Select a language of messages to be displayed on the LCD.
Options: English German French Dutch
Spanish Japanese Italian
[Buzzer Volume]:
Select buzzer volume.
Options: OFF
Minimum
Intermediate
Maximum
[LCD Density]:
Select density of display on the LCD.
Enter a number.
Range: -5 to 5
[Command] Group
[Control Code]:
Select a control code used for command analysis.
Options: AUTO
[ESC], [LF], [NUL]
{, |, }
[Print Mode]:
Select an issue mode.
Options: LABEL RECEIPT RECEIPT1
ESC/POS TPCL TPCL1
[Power Save] Group
[Time to the power save mode]:
Set a period of time from when the printer ceases to be used until it enters power save mode.
Enter a number.
Range: 1 to 30 (seconds)
[Auto Power-off Time]:
Set a period of time from when the printer ceased to be used until the printer power is automatically
turned off.
When 0 is set, the power is not turned off automatically.
Enter a number.
Range: 0 to 300 (minutes)
[LCD Back Light Off Time]:
Set a period time from when the printer ceases to be used until the LCD backlight goes off.
Enter a number.
Range: 0 to 30 (seconds)
Page 24

22
[Printer ID] Group
[ID Number]:
Assign the printer with an ID for identification.
This ID is used when IrDA: TEC Protocol is used.
Enter a 5-digit number. If the number of digits is less than 5, the number is padded with zeros.
Range: 00000 to 65535
[Destination] Group
[Destination]:
Select a destination.
Options: Japan
International
[XML] Group
[XML]:
Select whether or not XML is enabled.
To enable XML, select TPCL or TPCL1 as a print command mode.
Options: Disable
Enable
[Adjustment] Group
[Feed Position]:
Set a fine adjustment value for print position in units of 0.1 mm.
When the parameter is not retrieved, the value on the PC set with the print position fine adjust command
[AX] becomes 0.
Range: -50.0 to +50.0 mm
[X-coordinate]:
Set a fine adjustment value for the origin coordinate in X direction in units of 0.1 mm.
Range: -99.9 to +99.9 mm
[Print Density]:
Set a fine adjustment value for print density.
When the parameter is not retrieved, the value on the PC set with the print density fine adjust command
[AY] becomes 0.
Range: -30 to +30
[Strip Position]:
Set a fine adjustment value for strip position in units of 0.1 mm.
When the parameter is not retrieved, the value on the PC set with the print position fine adjust command
[AX] becomes 0.
Some values cannot be set on the printer V1.0B or lower. Set such a value through key operations.
Range: -2.0 to +3.0 mm
[Sensor] Group
[Reflective Sensor Threshold]:
Set a fine adjustment value for threshold to the reflective sensor output in units of 0.1 V.
Range: 0.0 to 4.0 V
[Transmissive Sensor Threshold]:
Set a fine adjustment value for threshold to the transmissive sensor output in units of 0.1 V.
Range: 0.0 to 4.0 V
[Strip Sensor Sensitivity]:
Select strip sensor sensitivity.
Options: AUTO
Low
High
Page 25

23
[Basic] Group
[Basic Interpreter]:
Select whether or not the basic interpreter is enabled.
To enable the basic interpreter, select TPCL or TPCL1 as a print command mode.
When “Enable” is selected on the printer V1.0B or lower, the “B-EP Setting Tool” is disabled. Select
“Disable” through key operations.
Options: Disable
Enable
[Basic Trace]:
Select whether or not the basic trace is enabled.
Options: Disable
Enable
[Action] Group
[Headcheck at power on]:
Select whether or not broken head dot check is enabled when the power is turned on.
Options: Disable
Enable
[Headcheck at cover close]:
Select whether or not broken head dot check is enabled after the cover is closed.
Options: Disable
Enable
[Printing with broken dots]:
Select whether or not printing continues after a broken head dot error occurs.
Options: Disable
Enable
[Feed at cover close]:
Select whether or not print position detection feed is performed after the cover is closed.
Options: Disable
Enable
[Mode] Group
[Head output division(Print speed)]:
Select a head output division method.
B-EP2DL-GH-QM/B-EP2DL-GH B-EP4DL-GH/B-EP4DL-TH
Options: AUTO 1 (High) AUTO 1 (High)
AUTO AUTO
3 div. (Low) 6 div. (Low)
[B-SP2D mode]:
Select whether or not the compatible mode is enabled to obtain print results same as on the B-SP2D.
Options: Disable
Enable
[Linerless label mode]:
Select whether or not labels without backing paper is used.
Options: Disable
Enable
[Issue mode]:
Select printer’s issue mode.
When “AUTO” is selected, operation depends on strip sensor status.
Option: AUTO
Batch
Strip
Page 26

24
Option
[Password] Group
[System Mode Password]:
Select whether or not the password used for entering SYSTEM mode is enabled.
To set this field, the old password is required.
When you enter an incorrect old password, you cannot change the password.
[New Password]:
Set a password to be used for entering SYSTEM mode.
To set the password, the old password is required.
When you enter an incorrect old password, you cannot change the password.
This field is effective only when SYSTEM mode password is enabled.
Enter four characters from “0” to “F.”
Entries are not case-sensitive.
Since passwords are security information, they are displayed as asterisks except when they are being
entered.
Range: 0000 to FFFF
Page 27

25
[Old Password]:
Enter the password currently set on the printer.
This password is set to cancel a password for entering SYSTEM mode.
Enter four characters from “0” to “F.”
Entries are not case-sensitive.
Since passwords are security information, they are displayed as asterisks except when they are being
entered.
To enable the new password, enter “0000.”
Range: 0000 to FFFF
[Module] Group
[Option Module]:
Select whether or not Bluetooth or wireless LAN optional module has been attached to the RS-232C
model.
Options: Disable
Enable
[SHELL] Group
[SHELL]:
This setting cannot be changed.
[Setting] Group
[Backlash Step 1]:
This setting cannot be changed.
[Backlash Step 2]:
This setting cannot be changed.
Page 28

26
Interface
[IrDA] Group
[IrDA I/F (Protocol)]:
Select whether or not IrDA communication is enabled.
To enable it, select the protocol.
Options: Disable
TEC Protocol
IrCOMM/IrOBEX
[(Max.) Baud rate]:
Set a baud rate for TEC Protocol communication or the maximum baud rate for IrCOMM/IrOBEX
communication.
The baud rate for IrCOMM/IrOBEX communication is adjusted to a value enabling communication by
the communicating device.
Options: 9600 bps
19200 bps
38400 bps
57600 bps
115200 bps
Page 29

27
[IrCOMM Status Response]:
Select whether or not automatic status response is enabled in IrCOMM communication.
Options: Disable
Enable
[RS-232C] Group
[RS-232C I/F]:
Select whether or not RS-232C communication is enabled.
To enable it, set a communication baud rate and parity.
Data length is fixed at 8 bits, the number of stop bit is fixed at 1 and flow control is fixed at XON/XOFF.
Options: Disable
Enable
[Baud rate]:
Set a communication baud rate.
Options: 9600 bps
19200 bps
38400 bps
57600 bps
115200 bps
[Parity]:
Set communication parity.
Options: Even
None
[Bluetooth] Group
This group can be set up only on Bluetooth model printers.
[Bluetooth I/F]:
Select whether or not Bluetooth communication is enabled.
Options: Disable
Enable
[Device Nickname]:
Assign a nickname to the Bluetooth device.
This name is used for detection by other devices.
Enter up to 32 alphanumeric characters.
When no name is entered, “TOSHIBATEC BT” is used.
[Inquiry]:
Select whether or not a response is made to an inquiry from the host.
When selecting “Enable (60 seconds),” a response is made to an inquiry only within 60 seconds after
the printer is turned on.
Options: Disable
Enable (60 seconds)
Enable
[Inquiry/Page Interval]:
Set an interval between responses to an inquiry or connection from the host.
Connectivity may be improved by decreasing the value under the environment where connection takes
time.
However, a small value causes printer power consumption to be increased.
Range: 18 to 4096
0.625 msec. per unit
Inquiry/Page Interval ≥ Inquiry/Page Window
[Inquiry/Page Window]:
Set s window of response to an inquiry or connection from the host.
Connectivity may be improved by increasing the value under the environment where connection takes
time.
However, a large value causes printer power consumption to be increased.
Range: 18 to 4096
0.625 msec. per unit
Page 30

28
[Security]:
Set communication security.
When selecting “No Security,” security is disabled, regardless of bonding settings.
When selecting “Link Level,” security for bonding settings is enabled.
Options: No Security
Link Level
[Bonding] Group
This group can be set up only on Bluetooth mode printers.
It takes time to register a bonding list.
[Bonding List]:
BD addresses and PIN codes of devices to be registered on the printer’s bonding table are listed.
Bonding information is registered on the printer using a specified registration method.
Up to 10 information records can be registered.
By double-clicking bonding information, you can edit or delete the information.
Since PIN codes are security information, they are displayed as asterisks except when they are being
entered.
[Registration Method]:
Select a method to register the bonding list on the printer.
When “Overwrite” is selected, the printer’s bonding table is replaced with the bonding list information.
When no information is registered on the bonding list, you can initialize the printer’s bonding table.
When “Addition” is selected, the information in the bonding list is added to the printer’s current bonding
table.
When the number of bonding information records registered on the printer exceeds 10, the oldest
records are overwritten.
When the same BD address already exists, the bonding information having this address is overwritten.
When “************” is set, bonding information except for “************” becomes invalid.
Options: Overwrite
Addition
[BD Address]:
Enter a BD address of a device you want to add to the bonding list, using 12 characters from “0” to “F.”
Entering “************” allows no connection destination to be specified.
[PIN Code]:
Enter the PIN code assigned to the device having the entered BD address, using one to 16
alphanumeric characters.
[Add]:
This button is used to add bonding information entered in [BD Address] and [PIN Code] to the bonding
list.
When a BD address already exists in the list, the information is overwritten.
When “************” is added, all bonding information except for “************” is deleted.
When “************” exists in the bonding list, “************” is deleted.
When the list already contains 10 records of bonding information, no more registration can be done.
[Remove]:
This button is used to delete bonding information selected in the bonding list.
Page 31

29
[USB] Group
[USB Serial Number]:
Select whether or not USB serial numbers are enabled.
When the numbers are disabled, connection to the USB port is established.
Whenever the USB port is changed, printer driver installation is required.
When the numbers are enabled, connection to the displayed serial number is established.
Printer driver installation is required for each serial number.
Options: Disable
Enable
A serial number is a number specific to the printer.
This setting cannot be changed.
Page 32

30
WLAN
[TCP/IP] Group
[WLAN I/F]:
Select whether or not wireless LAN communication is enabled.
Options: Disable
Enable
[IP Address]:
Set an IP address.
[Subnet Mask]:
Set a subnet mask.
[Default Gateway]:
Set an address of the default gateway.
Page 33

31
[Protocol] Group
[LPR]:
Select whether or not communication according to the LPR protocol is enabled.
Options: Disable
Enable
[Socket]:
Select whether or not socket communication is enabled.
Options: Disable
Enable
[Port Number]:
Set a port number used for socket communication.
Range: 0 to 65535
[Server] Group
[Host Name]:
Set a host name.
When no name is entered, the printer‘s MAC address is used.
Use up to 32 alphanumeric characters to enter a name.
[WINS]:
Select whether or not the WINS protocol is enabled.
When “Enable (STATIC)” is selected, [WINS Server Address] is used.
“Enable (DHCP)” is selected, [DHCP] is used.
Options: Disable
Enable (STATIC)
Enable (DHCP)
[WINS Server Address]:
Set the address of the WINS server.
[DHCP]:
Select whether or not DHCP clients are enabled.
Options: Disable
Enable
[DHCP ID]:
Set a DHCP ID, using up to 64 characters from “0” to “F.”
Entries are not case-sensitive.
Two characters indicate one HEX code. (Example: “01AB” “30314142”)
Entering an odd number of characters results in an error.
[WLAN Basic] Group
[Communication Standard]:
Select the wireless LAN standard.
Options: 802.11b
802.11g
802.11b/g
[802.11b] Group
[Channel]:
Set a channel for IEEE 802.11b.
The printer corrects channels that cannot be used due to country code settings.
Range: 1 to 14
[Max Rate]:
Select the maximum transmission rate for IEEE 802.11b.
The transmission rate is adjusted to a value enabling communication by the communicating device.
Options: 11 Mbps
5.5 Mbps
2 Mbps
1 Mbps
Page 34

32
[802.11g] Group
[Channel]:
Set a channel for IEEE 802.11g.
The printer corrects channels that cannot be used due to country code settings.
Range: 1 to 13
[Max Rate]:
Select the maximum transmission rate for IEEE 802.11g.
The transmission rate is adjusted to a value enabling communication by the communicating device.
Options: 54 Mbps 48 Mbps 36 Mbps
24 Mbps 18 Mbps 12 Mbps
9 Mbps 6 Mbps 11 Mbps
5.5 Mbps 2 Mbps 1 Mbps
[WLAN Detail] Group
[ESS ID]:
Set an ESS ID, using up to 32 alphanumeric characters.
[Beacon Transmitting Interval]:
Select an interval between transmissions to the beacon.
Range: 1 to 65535 msec.
[Roaming Threshold]:
Select a threshold of roaming sensitivity.
Range: 0 to 99
[Country Code]:
This setting cannot be changed.
[Priority AP] Group
[Priority]:
Select ANY SSID/priority AP.
Options: ANY SSID OFF
ANY SSID ON / Priority AP OFF
ANY SSID ON / Priority AP ON / Other AP OFF
ANY SSID ON / Priority AP ON / Other AP ON
[MAC Address 1] [MAC Address 2] [MAC Address 3] [MAC Address 4] [MAC Address 5]:
Set MAC addresses for access points that you want to connect preferentially.
The numbers indicate order of priority.
Connection to the MAC addresses is made in the order of descending priorities.
Use 12 characters from “0” to “F” to enter addresses.
Entries are not case-sensitive.
When no address is entered, you can disable the current settings.
Page 35

33
WLAN Security
[Authentication] Group
[(1) Connect Mode]:
Select the connection mode.
Options: Adhoc
Infrastructure
[(2) Encryption]:
Select the encryption scheme.
Displayed options depend on the [(1) Connect Mode] settings.
Options: Disable
WEP40
WEP104
TKIP
AES
[(3) Network Authentication]:
Select the network authentication system.
Displayed options depend on the [(1) Connect Mode] and [(2) Encryption] settings.
Page 36

34
Options: Open System
Shared Key
WPA-EAP
WPA-PSK
WPA2-EAP
WPA2-PSK
[(4) EAP Method]:
Select the EAP method.
Displayed options depend on the [(1) Connect Mode], [(2) Encryption] and [(3) Network Authentication]
settings.
Options: Disable
EAP-MD5
EAP-TLS
EAP-TTLS
LEAP
(Reserved)
PEAP
EAP-FAST
< Authentication System Settings >
(1) Connect Mode (2) Encryption (3) Network Authentication (4) EAP Method
Disable Open System Disable
WEP40 Open System Disable
Adhoc
WEP104 Open System Disable
Disable Open System Disable
Disable
EAP-MD5
EAP-TLS
EAP-TTLS
LEAP
(Reserved)
PEAP
Open System
EAP-FAST
Disable
WEP40
Shared Key
EAP-MD5
Disable
EAP-MD5
EAP-TLS
EAP-TTLS
LEAP
(Reserved)
PEAP
Open System
EAP-FAST
Disable
WEP104
Shared Key
EAP-MD5
EAP-TLS
EAP-TTLS
LEAP
(Reserved)
PEAP
WPA-EAP
EAP-FAST
TKIP
WPA-PSK Disable
EAP-TLS
EAP-TTLS
LEAP
(Reserved)
PEAP
WPA2-EAP
EAP-FAST
Infrastructure
AES
WPA2-PSK Disable
Page 37

35
[WEP] Group
[Default Key]:
Set a WEP key used by default.
Range: 1 to 4
[Input Type]:
Select the code for entering a WEP key.
When the code is changed, the WEP key is cleared.
Options: HEX
ASCII
[WEP Key #1] [WEP Key #2] [WEP Key #3] [WEP Key #4]:
Select the WEP key used for encrypting the authentication system.
Select the WEP key size and enter the WEP key.
When the WEP key size is changed, the WEP key is cleared.
<40 bits>
When HEX mode is used for entries, use ten characters from “0” to “F.”
Entries are not case-sensitive.
When ASCII mode is used for entries, use five alphanumeric characters.
<104 bits>
When HEX mode is used for entries, use 26 characters from “0” to “F.”
Entries are not case-sensitive.
When ASCII mode is used for entries, use 13 alphanumeric characters.
Since WEP keys are security information, they are displayed as asterisks except when they are being
entered.
Options: Disable
40 bits (64 bits)
104 bits (128 bits)
[WPA-PSK] Group
[Pre Shared Key]:
Set a key to be used for WPA encryption in network authentication, using 8 to 64 alphanumeric
characters.
Since the key is security information, it is displayed as asterisks except when it is being entered.
[Account] Group
[User Name]:
Set a username to authenticate the supplicant.
Use up to 32 alphanumeric characters.
[Password]:
Set a password to authenticate the supplicant.
Use up to 32 alphanumeric characters.
Since the password is security information, it is displayed as asterisks except when it is being entered.
[802.1X] Group
[Reauthentication Interval]:
Set an interval between reauthentications.
Range: 2 to 4320 min
[Supplicant] Group
[Server Certificate]:
Set an absolute path to the server certificate file to be transmitted.
The [...] button is used to select the path on the folder selection screen.
When no path is entered, data transmission is not performed.
When entering a path to a blank file without data, you can disable the current settings.
Setting a non-existent file results in an error.
Page 38

36
[Client Certificate]:
Set an absolute path to the client certificate file to be transmitted.
The [...] button is used to select a path on the folder selection screen.
When no path is entered, data transmission is not performed.
When entering a path to a blank file without data, you can disable the current settings.
Setting a non-existent file results in an error.
[Key File]:
Set an absolute path to the key file for client certificate to be transmitted.
The [...] button is used to select a path on the folder selection screen.
When no path is entered, data transmission is not performed.
When entering a path to a blank file without data, you can disable the current settings.
Setting a non-existent file results in an error.
[Secret Key]:
Set a secret key passphrase, using up to 64 alphanumeric characters.
Since the passphrase is security information, it is displayed as asterisks except when it is being entered.
[Random Seed]:
Set an absolute path to a SEED file for creating random values to be transmitted.
The [...] button is used to select a path on the folder selection screen.
When no path is entered, data transmission is not performed.
When entering a path to a blank file without data, you can disable the current settings.
Setting a non-existent file results in an error.
Page 39

37
Setup Items List
General Tab
Setup group Setup item Options or range Default
PC-850
PC-8
PC-852
PC-857
PC-851
PC-855
PC-1250
PC-1251
PC-1252
PC-1253
PC-1254
PC-1257
LATIN9
Arabic
PC-866
Character Code
UTF-8
PC-850
without Slash Zero Font
with Slash
without Slash
EURO Font Code 20 to FF B0
TYPE 1
Image
MaxiCode Spec
TYPE 2
TYPE 1
English
German
French
Dutch
Spanish
Japanese
LCD Language
Italian
QM : English
JP : Japanese
OFF
Minimum
Intermediate
Buzzer Volume
Maximum
Minimum
Notice
LCD Density -5 to +5 0
AUTO
[ESC], [LF], [NUL]
Control Code
{, |, }
AUTO
LABEL
RECEIPT
RECEIPT1
ESC/POS
TPCL
Command
Print Command Mode
TPCL1
TPCL
Time to the power save mode 1 to 30 (sec) 3
Auto Power-off Time 0 to 300 (min) 120
Power Save
LCD Back Light Off Time 0 to 30 (sec) 3
Printer ID ID Number 00000 to 65535 00001
Japan Destination Destination
International
QM: International
JP: Japan
Disable XML XML
Enable
Disable
Page 40

38
Feed Position -50.0 to +50.0 (mm) 0.0
X-coordinate -99.9 to +99.9 (mm) 0.0
Print Density -30 to +30 0
Adjust
Strip Position -2.0 to +3.0 (mm) 0.0
Reflective Sensor Threshold 0.0 to 4.0 (V) 1.0
Transmissive Sensor Threshold 0.0 to 4.0 (V) 1.4
Auto
Low
Sensor
Strip Sensor Sensitivity
High
Auto
Disable Basic Interpreter
Enable
Disable
Disable
Basic
Basic Trace
Enable
Disable
Disable Headcheck at power on
Enable
Disable
Disable Headcheck at cover close
Enable
Disable
Disable Printing with broken dots
Enable
Disable
Disable
Action
Feed at cover close
Enable
Disable
AUTO1 (High)
AUTO
Head output division
(Print speed)
3 Division (Low)
AUTO1 (High)
Disable B-SP2D mode
Enable
Disable
Disable Linerless label mode
Enable
Disable
AUTO
Batch
Mode
Issue mode
Strip
AUTO
Option Tab
Setup group Setup item Options or range Default
Disable System Mode Password
Enable
Disable
New Password 0000 to FFFF 0000
Password
Old Password 0000 to FFFF 0000
Disable Module Option Module
Enable
Disable
SHELL SHELL Disable Disable
Backlash Step 1 2-inch: 1
4-inch: 8
2-inch: 1
4-inch: 8
Setting
Backlash Step 2 2-inch: 1
4-inch: 8
2-inch: 1
4-inch: 8
Page 41

39
Interface Tab
Setup group Setup item Options or range Default
Disable
TEC Protocol
IrDA I/F (Protocol)
IrCOMM/IrOBEX
IrCOMM/IrOBEX
9600 bps
19200 bps
38400 bps
57600 bps
(Max.) Baud rate
115200 bps
115200 bps
Disable
IrDA
IrCOMM Status Response
Enable
Disable
Disable RS-232C I/F
Enable
Enable
9600 bps
19200 bps
38400 bps
57600 bps
Baud rate
115200 bps
9600 bps
Even
RS-232C
Parity
None
Even
Disable Bluetooth I/F
Enable
Enable
Device Nickname 1 to 32 characters TOSHIBA TEC BT
Disable
Enable (60 seconds)
Inquiry
Enable
Enable
Inquiry/Page Interval 18 to 4096 2048
Inquiry/Page Window 18 to 4096 36
No Security
Bluetooth
Security
Link Level
No Security
Bonding List Max. 10 information records 0 records
Overwrite Registration Method
Addition
Overwrite
BD Address Fixed at 12 characters Non-entered
Bonding
PIN Code 1 to 16 characters Non-entered
Disable
Enable
Disable
USB USB Serial Number
8S01FA590001 8S01FA590001
Page 42

40
WLAN Tab
Setup group Setup item Options or range Default
Disable WLAN I/F
Enable
Enable
IP Address 0.0.0.0 to 255.255.255.255 192.168.254.254
Subnet Mask 0.0.0.0 to 255.255.255.255 255.255.0.0
TCP/IP
Default Gateway 0.0.0.0 to 255.255.255.255 0.0.0.0
Disable LPR
Enable
Disable
Disable Socket
Enable
Enable
Protocol
Port Number 0 to 65535 8000
Host Name 0 to 32 characters Non-entered
Disable
Enable (STATIC)
WINS
Enable (DHCP)
Disable
WINS Server Address 0.0.0.0 to 255.255.255.255 0.0.0.0
Disable DHCP
Enable
Disable
Server
DHCP ID 0 to 64 characters Non-entered
802.11b
802.11g
WLAN Basic Communication Standard
802.11b/g
802.11b/g
ESS ID 0 to 32 characters TOSHIBATEC
Beacon Transmitting Interval 1 to 65535 (msec.) 1000
Roaming Threshold 0 to 99 70
WLAN Detail
Country Code JPN JPN
Channel 1 to 14 1
11 M bps
5.5 Mbps
2 Mbps
802.11b
Max Rate
1 Mbps
11 M bps
Channel 1 to 13 1
54 Mbps
48 Mbps
36 Mbps
24 Mbps
18 Mbps
12 Mbps
9 Mbps
6 Mbps
11 M bps
5.5 Mbps
2 Mbps
802.11g
Max Rate
1 Mbps
54 Mbps
ANY SSID OFF
ANY SSID ON / Priority AP OFF
ANY SSID ON / Priority AP ON /
Other AP OFF
Property
ANY SSID ON / Priority AP ON /
Other AP ON
ANY SSID OFF
MAC Address 1 Fixed at 12 characters Non-entered
MAC Address 2 Fixed at 12 characters Non-entered
MAC Address 3 Fixed at 12 characters Non-entered
MAC Address 4 Fixed at 12 characters Non-entered
Priority AP
MAC Address 5 Fixed at 12 characters Non-entered
Page 43

41
WLAN Security Tab
Setup group Setup item Options or range Default
Infrastructure (1) Connection Mode
Adhoc
Infrastructure
Disable
WEP40
WEP104
TKIP
(2) Encryption
AES
Disable
Open System
Shared Key
WPA-EAP
WPA-PSK
WPA2-EAP
(3) Network Authentication
WPA2-PSK
Open System
Disable
EAP-MD5
EAP-TLS
EAP-TTLS
LEAP
(Reserved)
PEAP
Authentication
(4) EAP Method
EAP-FAST
Disable
1
2
3
Default Key
4
1
HEX Input Type
ASCII
HEX
Disable
40 bits ASCII: Fixed at 5 chars.
HEX: Fixed at 10 chars.
WEP Key #1
104 bits ASCII: Fixed at 5 chars.
HEX: Fixed at 10 chars.
Disable
Disable
40 bits ASCII: Fixed at 5 chars.
HEX: Fixed at 10 chars.
WEP Key #2
104 bits ASCII: Fixed at 5 chars.
HEX: Fixed at 10 chars.
Disable
Disable
40 bits ASCII: Fixed at 5 chars.
HEX: Fixed at 10 chars.
WEP Key #3
104 bits ASCII: Fixed at 5 chars.
HEX: Fixed at 10 chars.
Disable
Disable
40 bits ASCII: Fixed at 5 chars.
HEX: Fixed at 10 chars.
WEP
WEP Key #4
104 bits ASCII: Fixed at 5 chars.
HEX: Fixed at 10 chars.
Disable
WPA-PSK Pre Shared Key 8 to 64 characters Non-entered
User name 0 to 32 characters Non-entered Account
Password 0 to 32 characters Non-entered
802.1X Reauthentication Interval 2 to 4320 (min) 2
Server Certificate Filename: MAX_PATH character Non-entered
Client Certificate Filename: MAX_PATH character Non-entered
Key File Filename: MAX_PATH character Non-entered
Secret Key 0 to 64 characters Non-entered
Supplicant
Random Seed Filename: MAX_PATH character Non-entered
Page 44

42
Message List
Message Explanation
No printer connected. No printer is connected to the PC.
More than one printer connected. Connect only
one printer.
More than one printer is connected to the PC.
This tool is operable only when one printer is connected.
Printer is not ready. Check the printer mode and
status.
The printer is not ready to use functions.
Please check the printer command mode or status.
For details about functions and statuses, see page 1.
Incorrect value entered.
“Tab name”/“Group name”/“Setup item name”
An entry for the displayed setup item is incorrect.
[“Tab name”/“Group name”/“Setup item name”] indicates a
place where an error has occurred.
Check the setup item entry and conditions.
Retrieval of the setup information failed.
“Tab name”/“Group name”
Setup information was not retrieved from the printer.
[“Tab name”/“Group name”/“Setup item name”] indicates a
place where an error has occurred.
Check the printer and try to retrieve information again.
Update of the setup information failed.
“Tab name”/“Group name”/“Setup item name”
Setup information was not updated in the printer.
[“Tab name”/“Group name”/“Setup item name”] indicates a
place where an error has occurred.
Check the printer and try to update information again.
Some setup items cannot be updated depending on
printer models.
The bonding list is full. The number of information records exceeds the upper
limit.
Incorrect value entered. The PIN code entry for bonding is incorrect.
Check the entry.
Export of the setup information file failed.
Confirm the specified file is proper.
Setup information cannot be written in the specified file.
Check to see if the specified file is inaccessible to
unauthorized personnel.
Incorrect file specified. Setup information cannot be retrieved from the specified
file.
Check to see if the specified file is the one exported by
this tool.
Data transmission failed. Transmission of data in the specified file failed.
Check the printer and try to transmit the data again.
Memory allocation failed. Memory allocation command transmission failed.
Check the printer and try to transmit the data again.
Memory format failed. Memory format command transmission failed.
Check the printer and try to transmit the data again.
Maintenance counter clear failed. The maintenance counter cannot be cleared.
Check the printer and try to clear the counter again.
Parameter initialization failed. Parameter initialization failed.
Check the printer and try to initialize the parameter again.
Page 45

43
Restoring the factory default failed. Restoring factory default settings failed.
Check the printer and try to restore the settings again.
Reset of the printer failed. Reset command transmission failed.
Check the printer and try to transmit the command again.
Receiving log failed. Log cannot be received in the specified file.
Check the printer and try to receive the file again.
No help file found. The Help file is not found.
Perform setup again.
Page 46

 Loading...