

Toshiba AW-SD120SM, AW-SD120SS Owner's Manual
FULLY AUTOMATIC
WASHING MACHINE
AW-SD120SM
AW-SD120SS
Thank you for purchasing TOSHIBA Fully Automatic
Washing Machine.
• Please read this manual carefully in order to
operate the machine properly.
• Sometimes you may find some water
remaining in the drainage hose at your first
operation. This is caused by the productionline test and nothing to worry about.
CONTENTS
WARNING ............................................ 2
CAUTION ......................................... 2~3
DESCRIPTION OF PARTS .................. 3
CONTROL PANEL
DESCRIPTION.................................4~5
OPERATION OF FULL AUTOMATIC
WASHING MACHINE........................... 6
HOW TO OPERATE ............................. 8
AUTOMATIC WASHING ....................... 9
WATER FLOW POWER ..................... 10
LID LOCK ........................................... 10
CUSTOM WASH CYCLES ................. 17
SUPER SPIN DRY .............................19
RECOMMENDED DETERGENT
AMOUNT............................................ 21
WASHING PROCESS........................ 22
LAUNDRY GUIDE .............................. 24
PRESET MODE .................................25
CHILD PROOF MODE ....................... 25
OPTION MODE.................................. 26
MAINTENANCE ...........................27~29
INSTALLATION ............................ 29~31
BEFORE CALLING THE
SERVICEMAN .............................32~35
SPECIFICATIONS.............................. 35
OWNER’S MANUAL
2
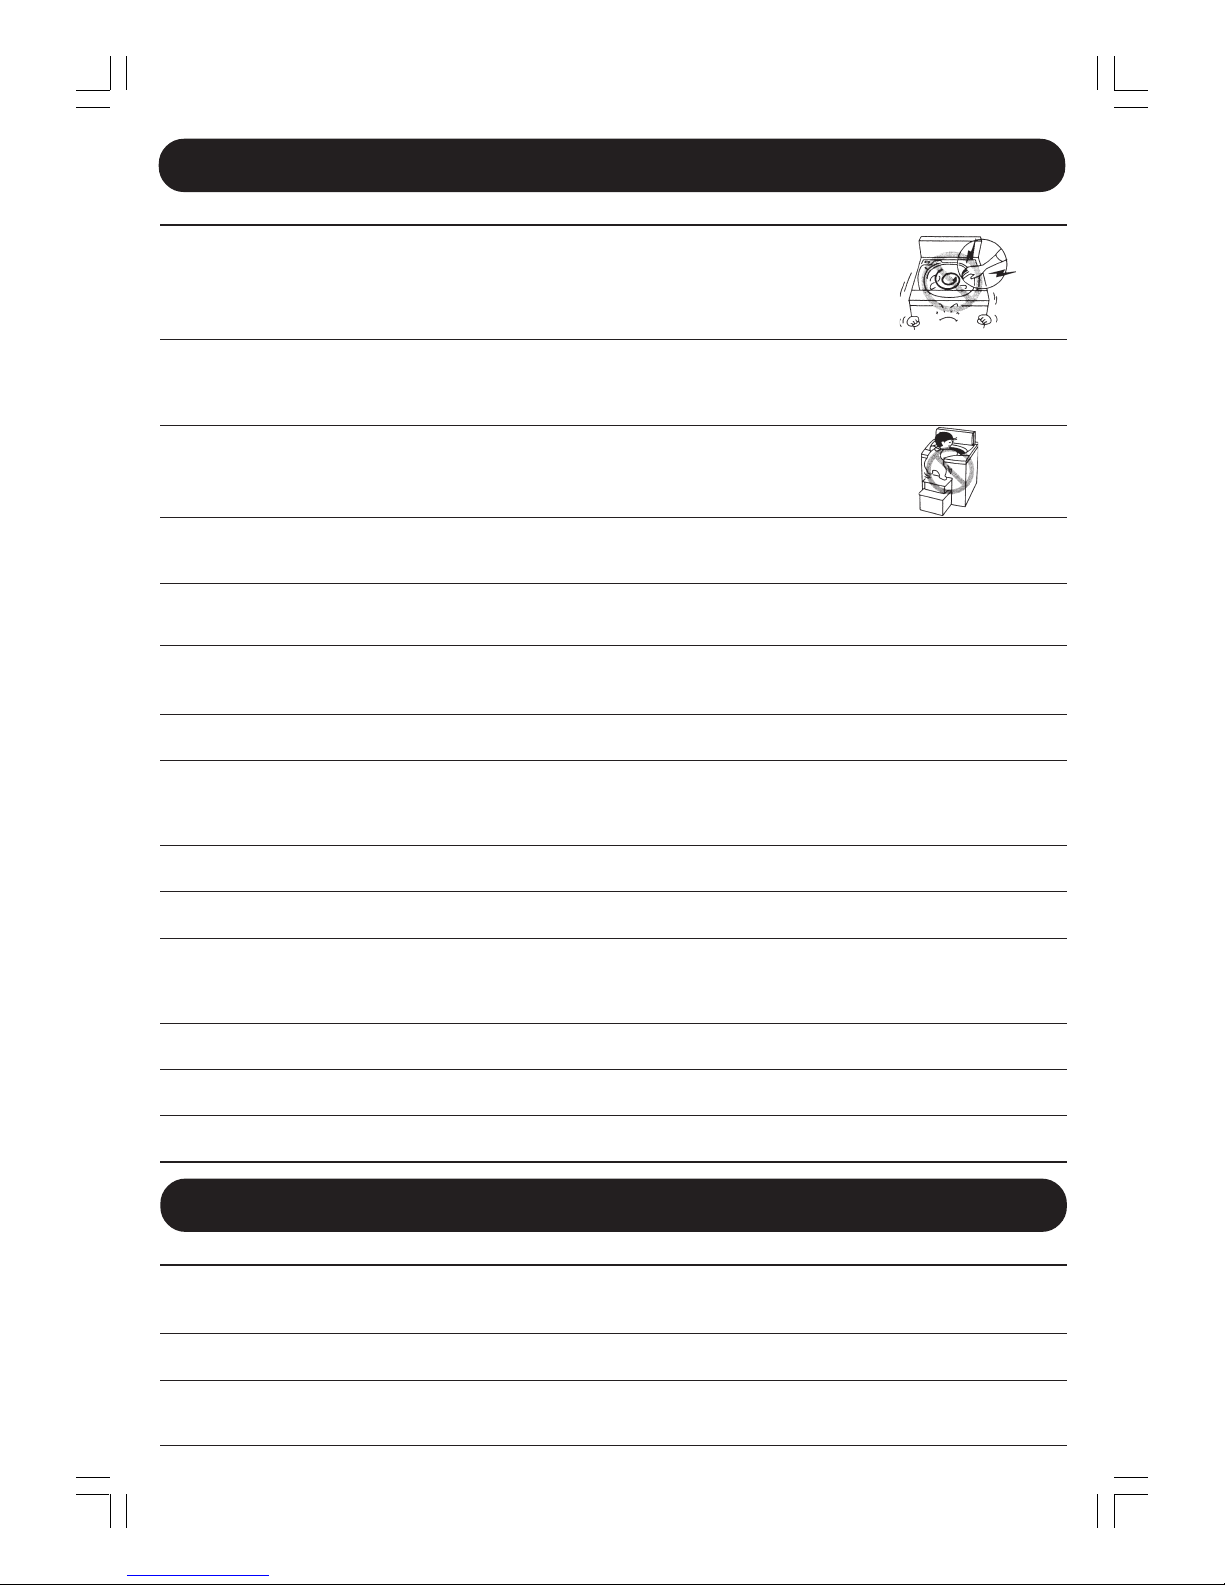
WARNING: This indicates an important item which incorrect operation may lead to injury or death.
Never attempt to touch laundry in the spin basket until the motion of the
basket stops completely.
Laundry in the basket may become wrapped around the hand, even when the basket is only
moving slowly.
Use particular caution when children are present.
Never operate washing machine by young children and infirm person.
This washing machine is not intended for use by persons (including children) with reduced physical, sensory or mental
capabilities, or lack of experience and knowledge unless they have been adequately supervised by a responsible person to
ensure that they can use the washing machine safety.
Never allow children to look into the basket or play around the washing
machine.
Do not place the stand or box near the washing machine.
Children may fall into the tub and get injured or drowned.
Never disassemble or modify the machine.
It can cause fire or electrical shock or malfunctions that lead to injuries.
Consult the store you bought the machine.
Use proper power source indicated in the rating label of the machine.
It can cause fire or electrical shock.
Failure to use a proper power source may result in the electrical outlet becoming excessively hot, leading to fire.
Unplug the power cord from the electrical outlet before attempting to service the washing machine.
Do not handle the power cord with wet hands.
It can cause electrical shock or malfunctions that lead to injuries.
Never use damaged power cord, plugs, or loose socket.
It can cause electrical shock or malfunctions that lead to injuries or fire.
Do not damage the power cord.
Do not attempt to damage, cut, or modify the power cord, or subject it to excessive bending, pulling, twisting, or binding. Also, do
not yank the metal portion, place heavy objects on the cord, or pinch the cord. Doing so may damage the cord, resulting in fire or
electrical shock.
Do not install in a bathroom or in area exposed to the strong sunshine.
Doing so may result in electrical shock.
Do not allow water to come into direct contact with the various parts of the outer body.
Doing so may result in electrical shock.
Do not place flammable materials in the basket.
Do not put any kerosene, gasoline, benzene, thinner, alcohol, other flammable materials, or the laundry soaked with such
materials in the basket.
It can cause explosion or fire.
Wipe away any buildup of dust or grime on the prongs of the power plug.
Buildup of dust or grime may cause fire.
Do not close the fire on plastic parts.
It can cause fire.
Make sure that water drains properly.
Using the washing machine with faulty drainage may cause water to back up within the machine, leading to electrical shock or fire.
WARNING
CAUTION: This indicates an important item where incorrect operation may lead to injury or material damage.
Do not pull the cord when unplug the appliance.
Hold the plug body to unplug.
It can cause electrical shock or malfunctions that lead to injuries.
Do not use water with temperatures over 50°C.
Water that is too hot can cause malfunctions and deformation of the machine, which may result in electrical shock.
Do not attempt to wash or rinse waterproofed sheets, mats, or clothing.*
Doing so may cause abnormal vibration or injury during the spin cycle.
*: This includes raincoats, fishing gear (jackets and waders), ski wear, sleeping bags, etc.
CAUTION
3
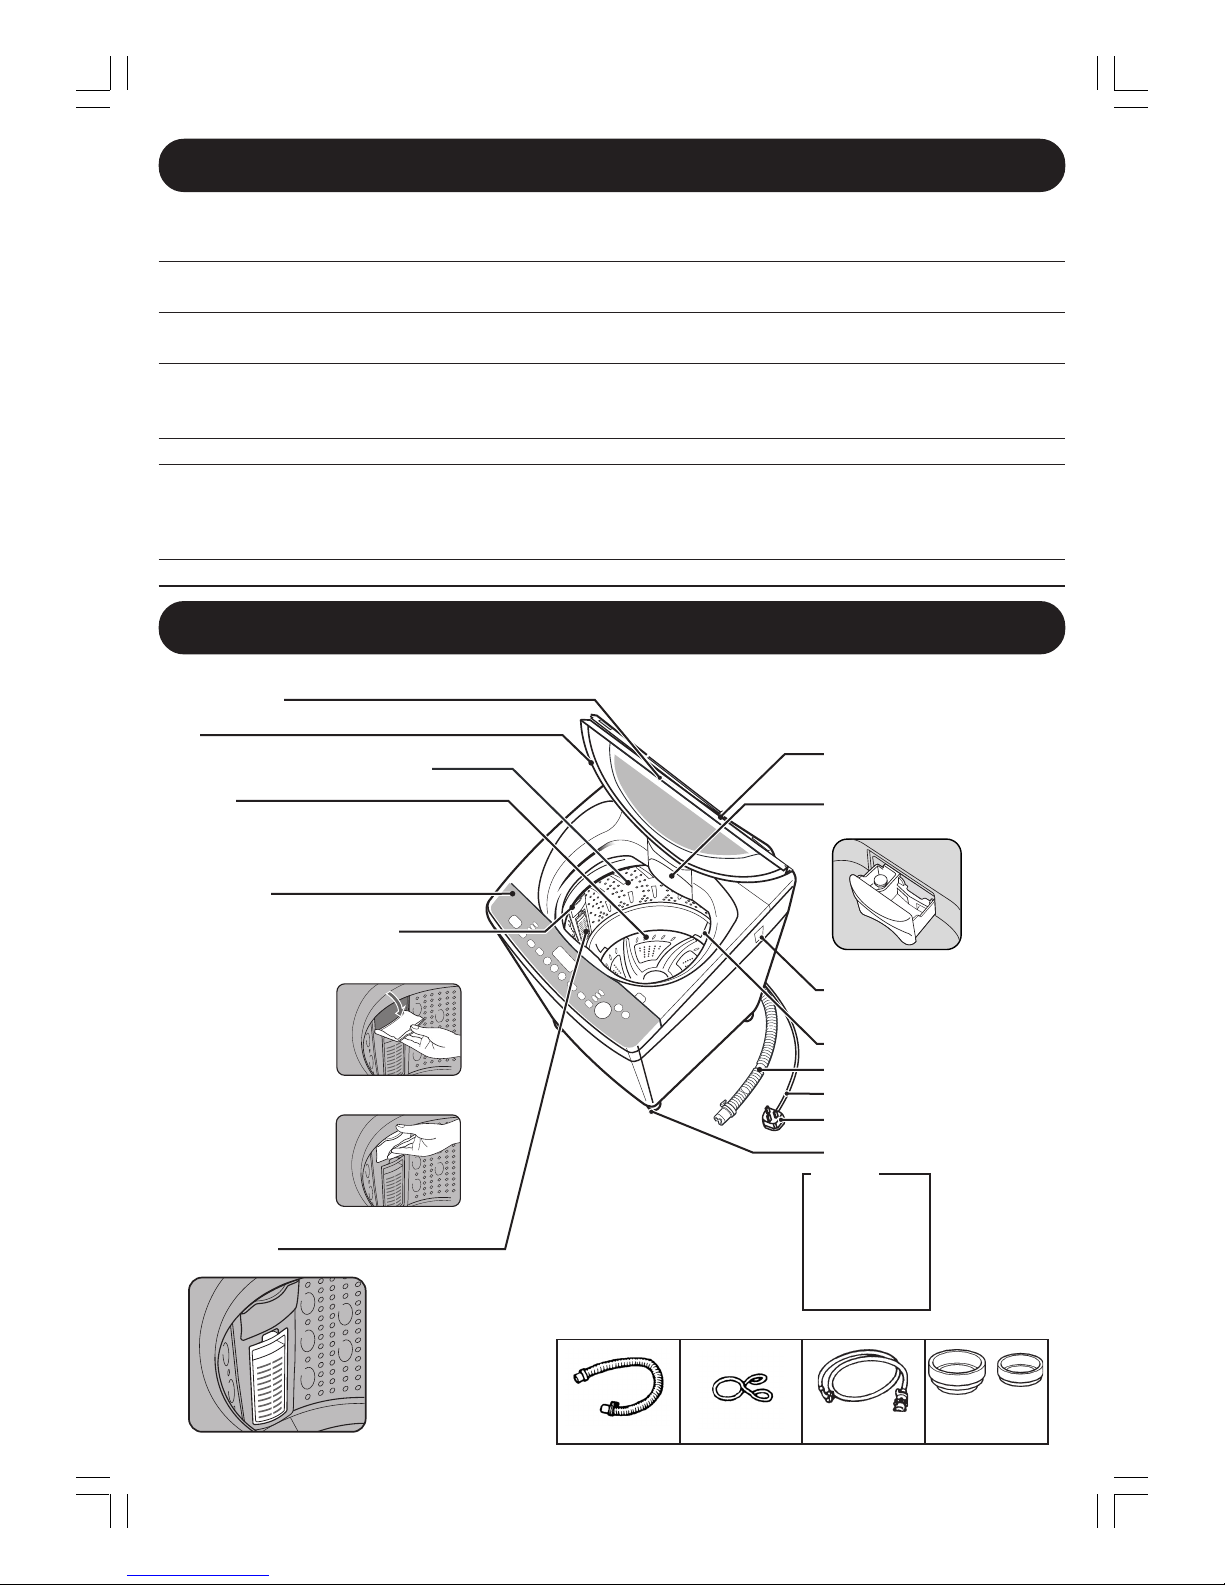
DESCRIPTION OF PARTS
CAUTION
Caution:
If the supply cord is
damaged, it must
be replaced by the
manufacturer or its
service agent or a
similarly qualified
person in order to
avoid a hazard.
Lid
Wash Basket (Wash Basket/Spin Tub)
Pulsator
Control Panel
Detergent and Bleach Dispenser
Hose Hook
Jet cover
Powder Detergent/
Softener
Dispenser case
Water Supply Port
Power Cord
Plug
Do not climb or place heavy objects on the washing machine.
Doing so may result in injury due to bending or breakage.
Pull out the power plug if you do not plan to use the machine for a long time.
Failure to do so may result in electrical shock or shorts due to deterioration of the insulation.
Do not place the hands or other objects under the washing machine while in operation.
Moving parts may cause injury.
Before use, make sure the faucet in open, and the connection with water supply hose is not loose or
leakage water.
Looseness of screws, hose connections, or other areas may cause water leakage or other damage.
The opening must not be obstructed by carpeting when the washing machine is installed on a carpet floor.
Do not overturn the washing machine during transportation, to avoid the damage of its structure,
which may cause danger.
If the electric wires are spoiled, you must have the manufacturer, service agent or similar qualified personnel change them to avoid
danger.
The opening must not be obstructed by carpeting when the washing machine is installed on a carpet floor.
Water supply hose
6mm 3mm
2 pieces for each
Leg cap
Accessories
Cassette Filter
Drainage Hose
Adjustable Leg (Front: 1 piece)
Opening and closing of the detergent
and bleach dispenser:
1 Hold the groove of
the entry gate with
fingers, and pull the
cover out while
pressing the hook.
2 After putting in
detergent, close
the cover until click
is heard.
Drainage hose bandDrainage hose
Air intake cover
4
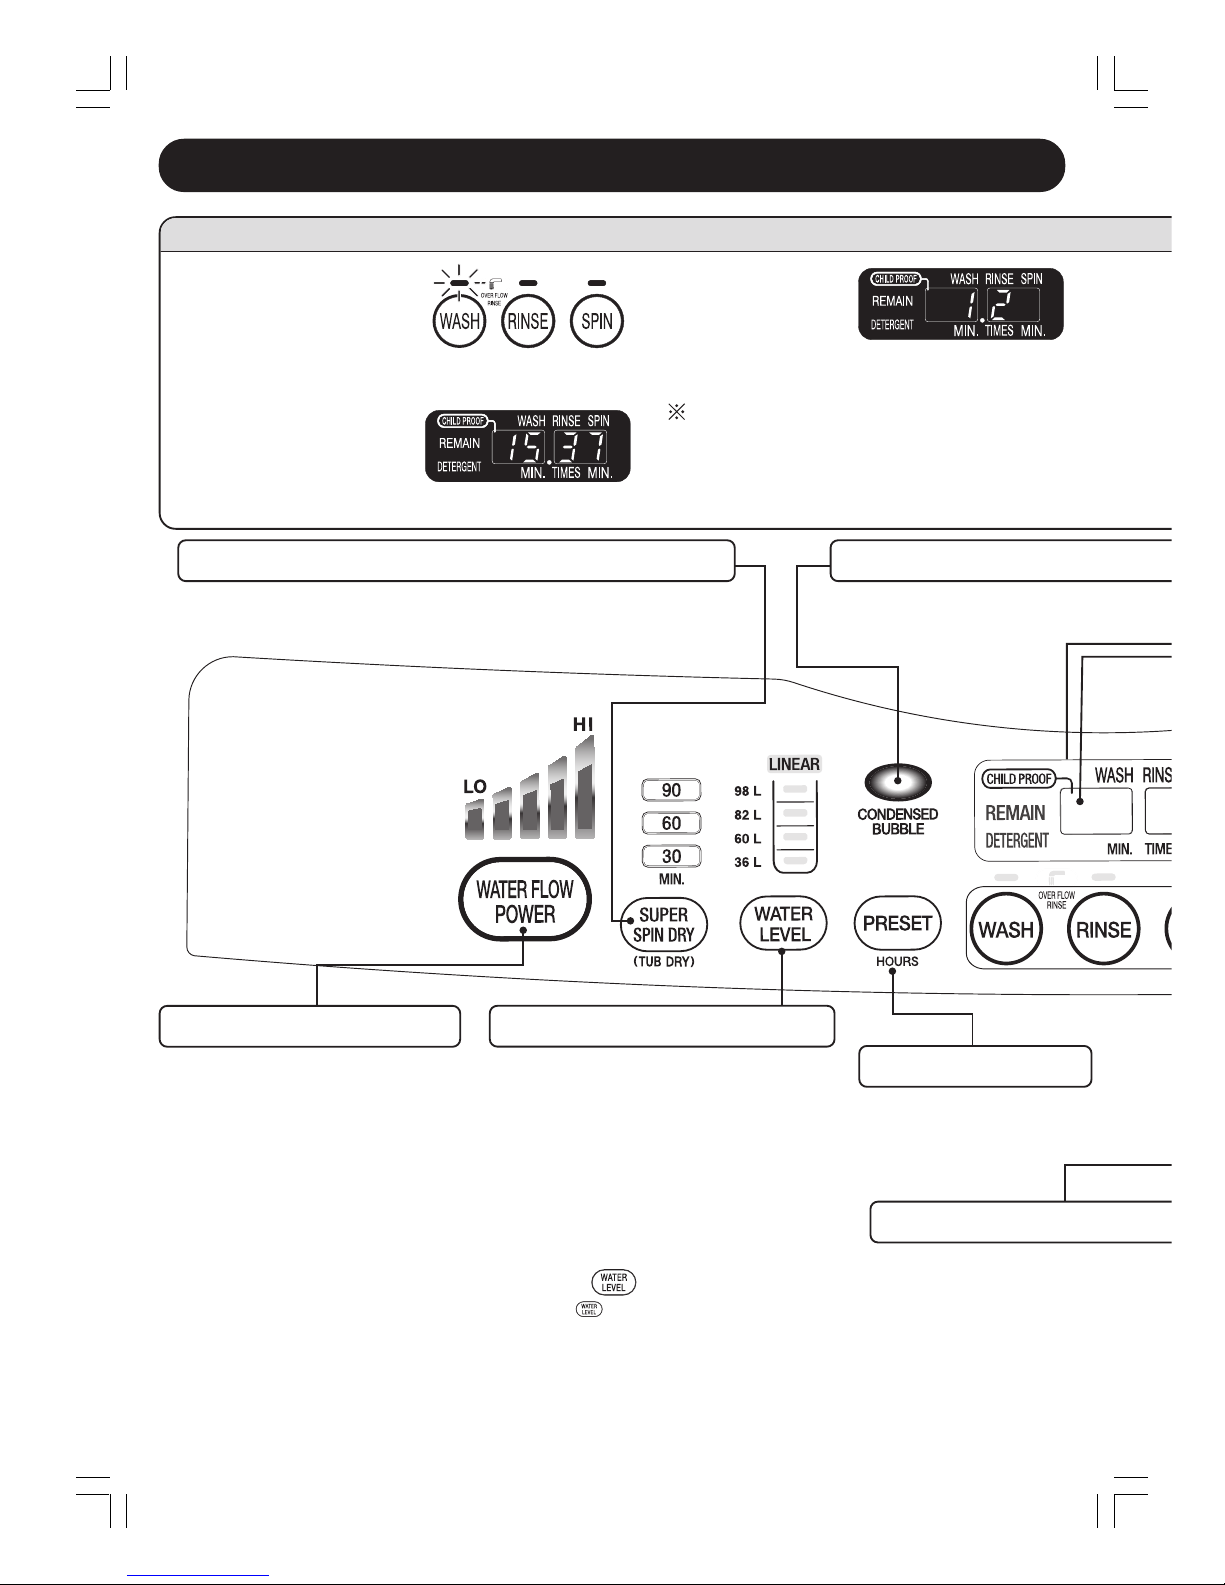
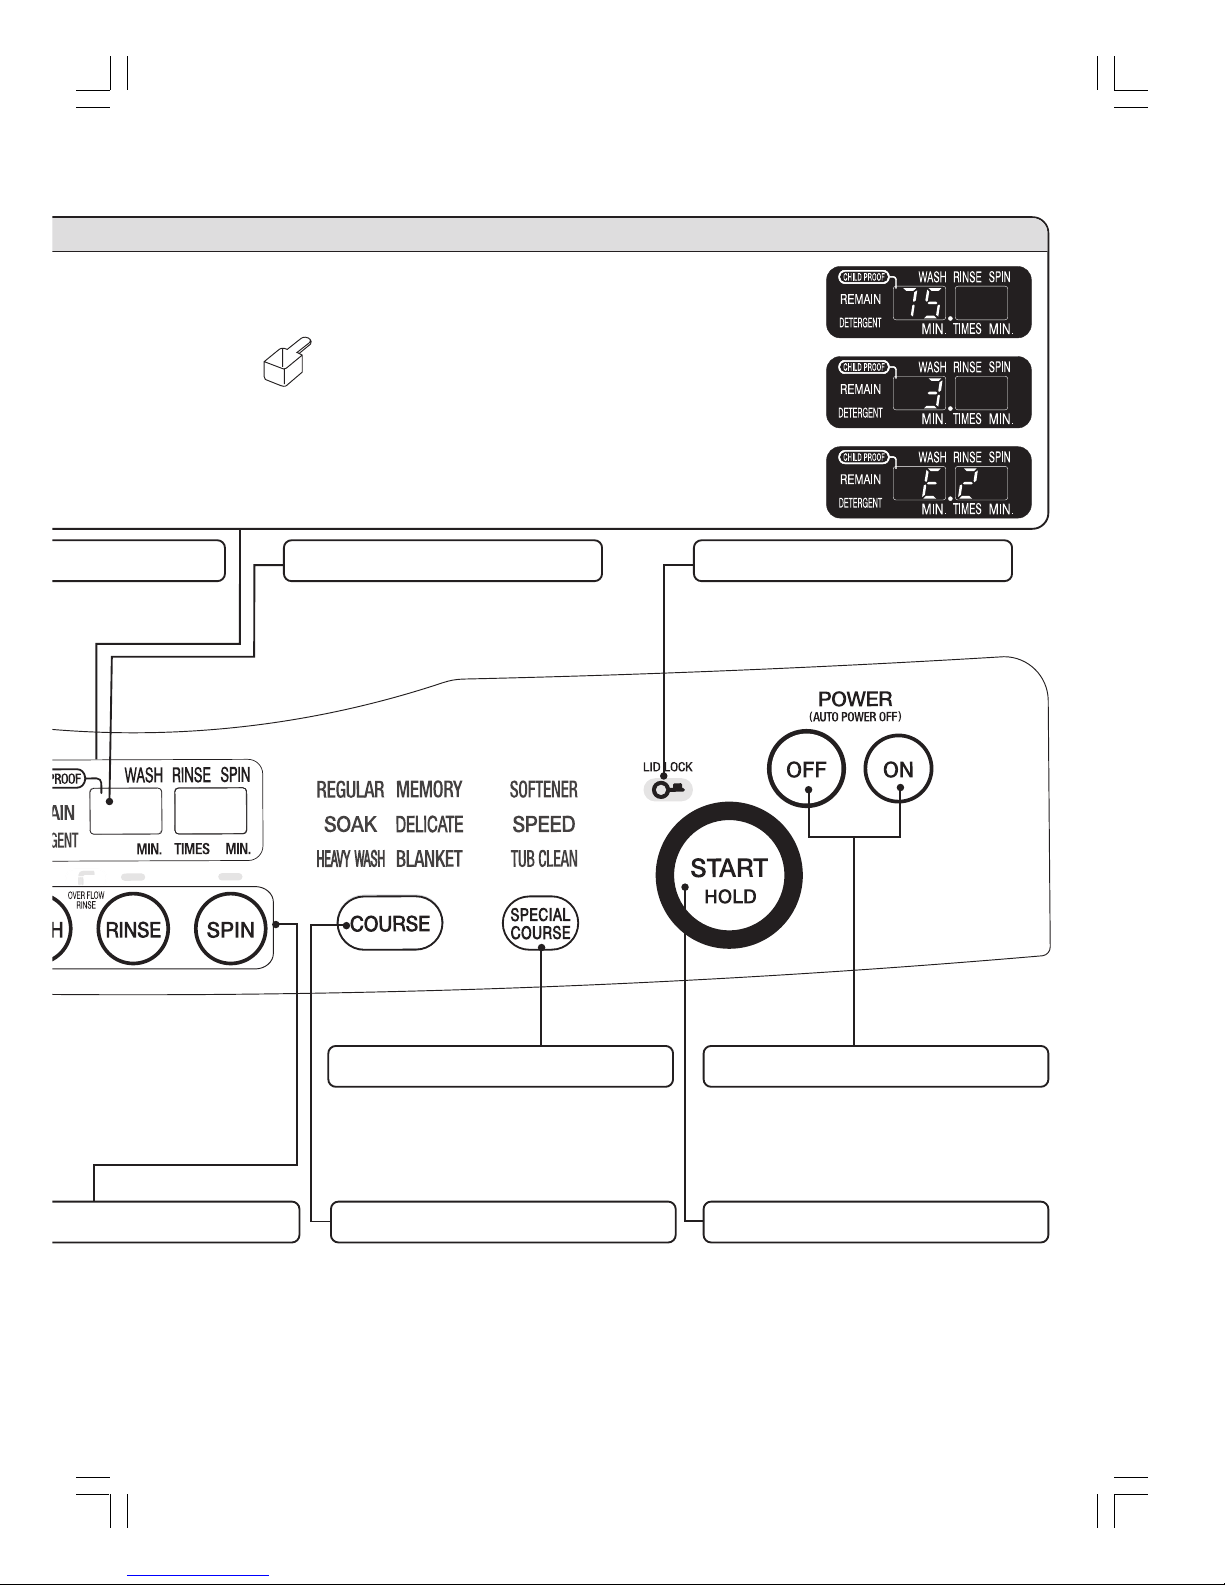
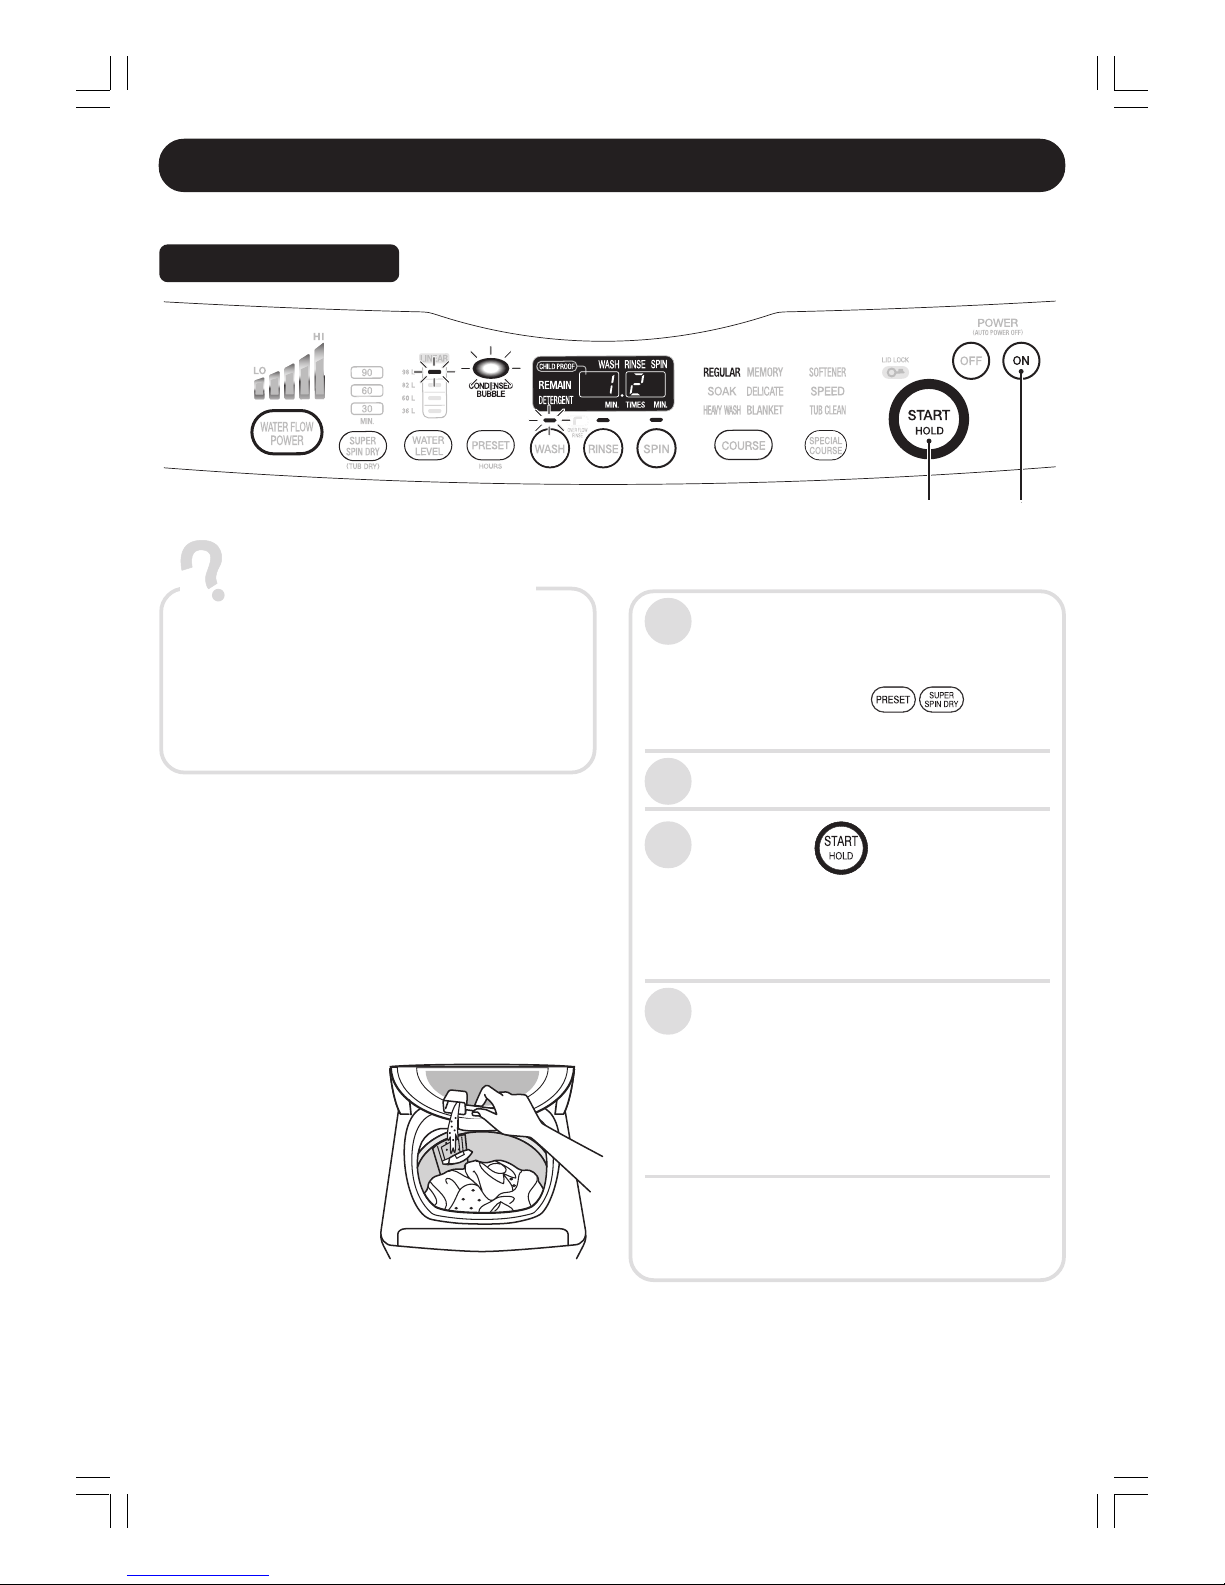
“WASH” “RINSE” “SPIN”
• The indicator will keep flashing during oper
a
ing according to the remaining operating t
• When the machine is powered on and th
e
cess is preset, time periods for washing, ri
n
ning will be displayed.
“PRESET” button
•
“SUPER SPIN DRY” button
• Timing drying operates based on selected time period. As soon as the button
is pushed, the indicator will be on until the selected time period ends.
• Indicator goes out according to the remaining operating time.
• The currently-running course
is displayed flashing and the
remaining courses are lighted
stably.
(ex.) When WASH course is in
operation
• When power is switched on
and a course is selected
Time for washing and spinning
as well as times for rinsing are
displayed.
Display section
• When the cover is opened
after starting
Detergent amount (reference
value) is displayed.
indicating 1.2 cup
The amount for 1 measuring scoop (cup) of detergent
differs according to specific type of detergent. Please
increase or decrease the amount of detergent
according to the detergent used and reference water
level displayed.
“WATER FLOW POWER” button
• Press the “WATER FLOW POWER” to
choose the water flow power.
• Selection can be made only when any of
“REGULAR”, and “MEMORY” is selected.
Water Level Indicator
• The set water level indicator will light up
when the water is at the set level.
Automatic Mode
• The water level is set linearly by adjusting to the
washing volume. If the water level is assigned
at the point with no particular indication, then
the nearest level will light up.
• If there is some water in the basket before the
operation, the indicator at the highest level will
light up.
Setting the button
• Press the button to choose the water level.
The indicator at the higher water level will light
up.
• While the water is flowing into the basket, the
indicator at “WATER LEVEL” will light off.
CONDENSED BUBBLE Displ
a
• The indicator will be on after
“CONDENSED BUBBLE” is selected, and kee
flashing during operation.
CONTROL PANEL DESCRIPTION
You can preset the time of all
washing process except
Delicate course.
5
p flashing during operation and lightremaining operating time.
eriods for washing, rinsing and spin-
“SPECIAL COURSE” button
• Push the button to select SPECIAL COURSE.
“COURSE” button
• When pressing this button, a lamp will light up.
Then select the program suitable with the laundry.
“POWER” “OFF/ON” button
• Press this button to power on/off.
• Power is automatically turned off about 15
seconds after the end of operation, or about 10
minutes later if the operation is not on.
“START/HOLD” button
• Press this button to start the process.
• Press this button to hold the operation.
Child Proof Mode Display
• After selecting this mode, “•” will light up.
• After the start of operation
If the lid is closed, the estimated
residual time to the end of washing
will be displayed.
• Reservation of the time to complete
washing
The preset hours are displayed.
• If an error occurs.
An error code will be displayed.
• The amount of supply using the
measure spoon accompanying the
compact detergent is displayed.
One measuring scoop of
detergent for the water: 55 liters
Lid Lock Mode Display
• When the child proof mode is selected, this
display will light up.
fter
6
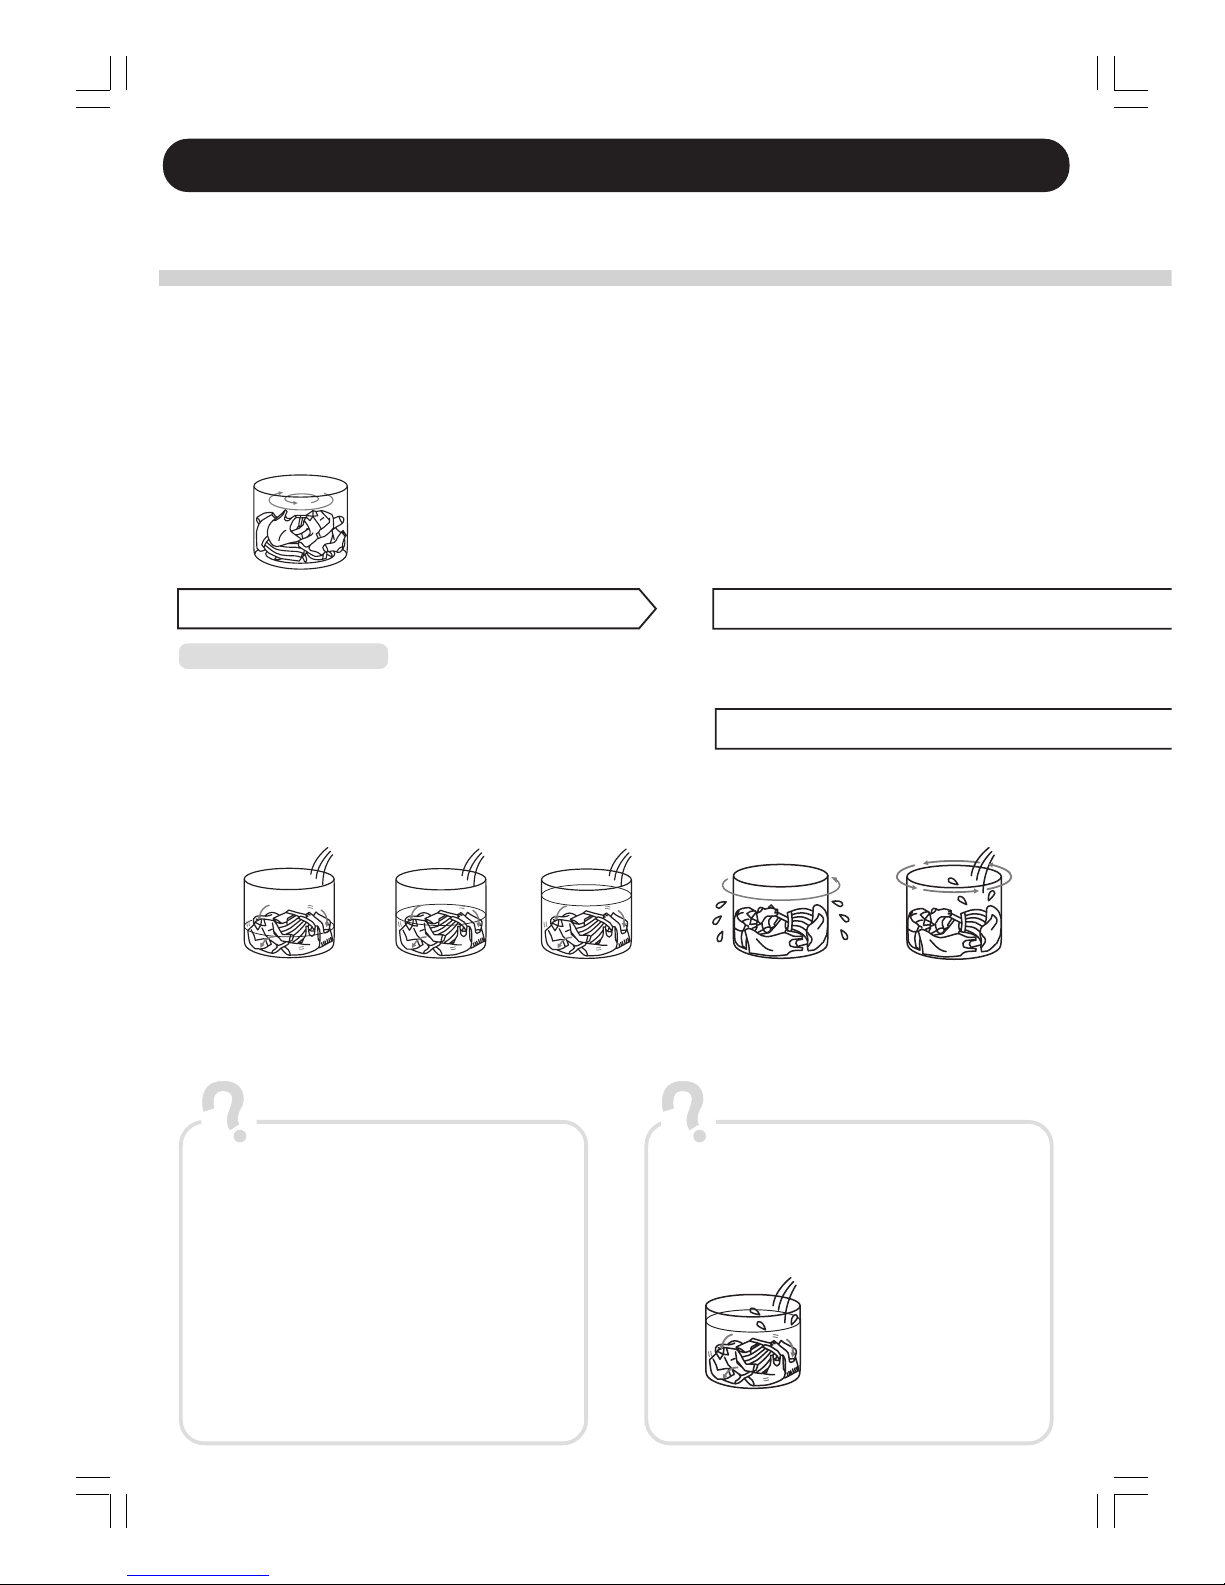
Full automatic washing machine washes clothes according to the following procedures.
Take the “REGULAR” course of the “CONDENSED BUBBLE” as an example.
Put the laundry in the basket and start the machine. The sensor will weigh clothes and begin flowing water.
The pulsator begins to
revolve 6 seconds after
startup under none-water
situation, and clothes are
weighed.
1
Flowing water starts. Put in
detergent according to the
reference value through
entry gate of “WashingSpinning Tub”, followed by
softening agent. Close the
lid. Display of detergent
amount
Reference value of
detergent amount
2
The water level indicator will
be lighted when flowing water
ends by reaching the preset
water level.
• When a chemical fiber, blending
fiber or spreadsheet is washed, the
water level may be a little bit low.
Adjust the water level by “WATER
LEVEL” button.
3
For the 1st and 2
nd
rinsing, the course is
executed for twice.
Stirring starts during flowing water while washing and flowing water are
executed simultaneously.
Times of flowing water differ depending on clothes weight and rinsing
frequency.
About the display of the
remaining time
The display is based on the flowing water amount of
15 liters/minute.
Under the following situations, washing time may be
longer than remaining time displayed, or the time
displayed may be changed during the process.
• Flowing water amount is smaller than 15 liters/
minute.
• Unsmooth water draining.
• Gravity center of clothes shifts.
When flowing water amount is
small, the tank may not be
filled up.
Washing
CONDENSED BUBBLE
Stirring after
flowing water
Stirring during
flowing water
Stirring after
flowing water
Spinning after
draining
Shower rinsing
Flowing water starts while
the spin basket revolves
slowly.
Why does the washing time appear a little bit
long? Is the time displayed changed?
What is shower rinsing?
During stirring, flowing water and rinsing are
executed simultaneously.
Rins
OPERATION OF FULL AUTOMATIC WASHING MACHINE
7
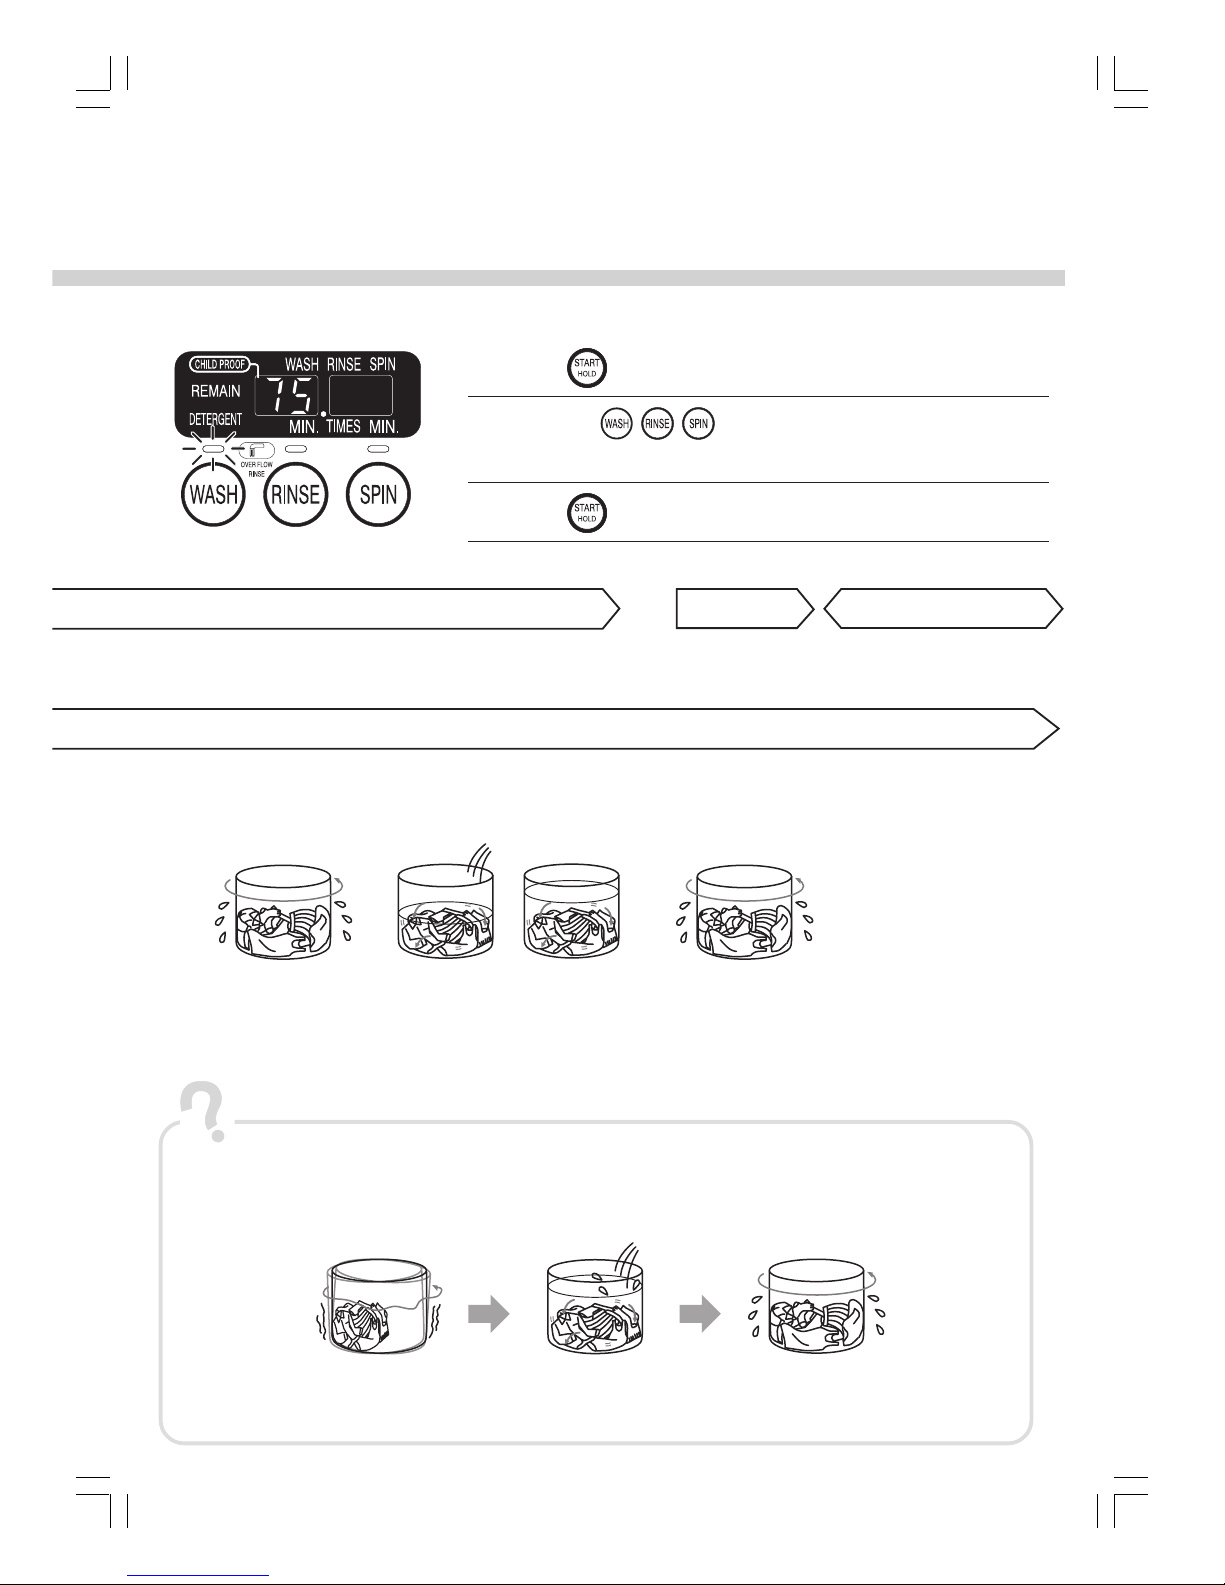
What happen if flow the water during spinning?
About the gravity center of the clothes
When the gravity center of the clothes shifts during spinning, the remaining time will become longer if the following
course is appended.
Stop spinning when
the gravity center
shifting is detected
flow water and
correct the shifting
Redo draining
and spinning process
Rinsing
The 3rd rinsing
Spinning after
draining
Soaking and washing
Water is flowed to the
preset water level.
Stirring Spinning after
draining
Spinning
Super Spin Dry
Set the Super Spin
Dry according to
your needs.
Setting method
About operation
Put softening agent into specialized box.
Lid Lock
L Washing process can be changed while the clothes are washed.
Press button.
Press the button of mode you want to change.
• “No-washing”, “No-rinsing” and “No-spinning” cannot be set.
• When “Super Spin Dry” is set, the spinning setting can not be changed.
Press button.
• Changeable items are same as the custom setting.
1
2
3
8
3
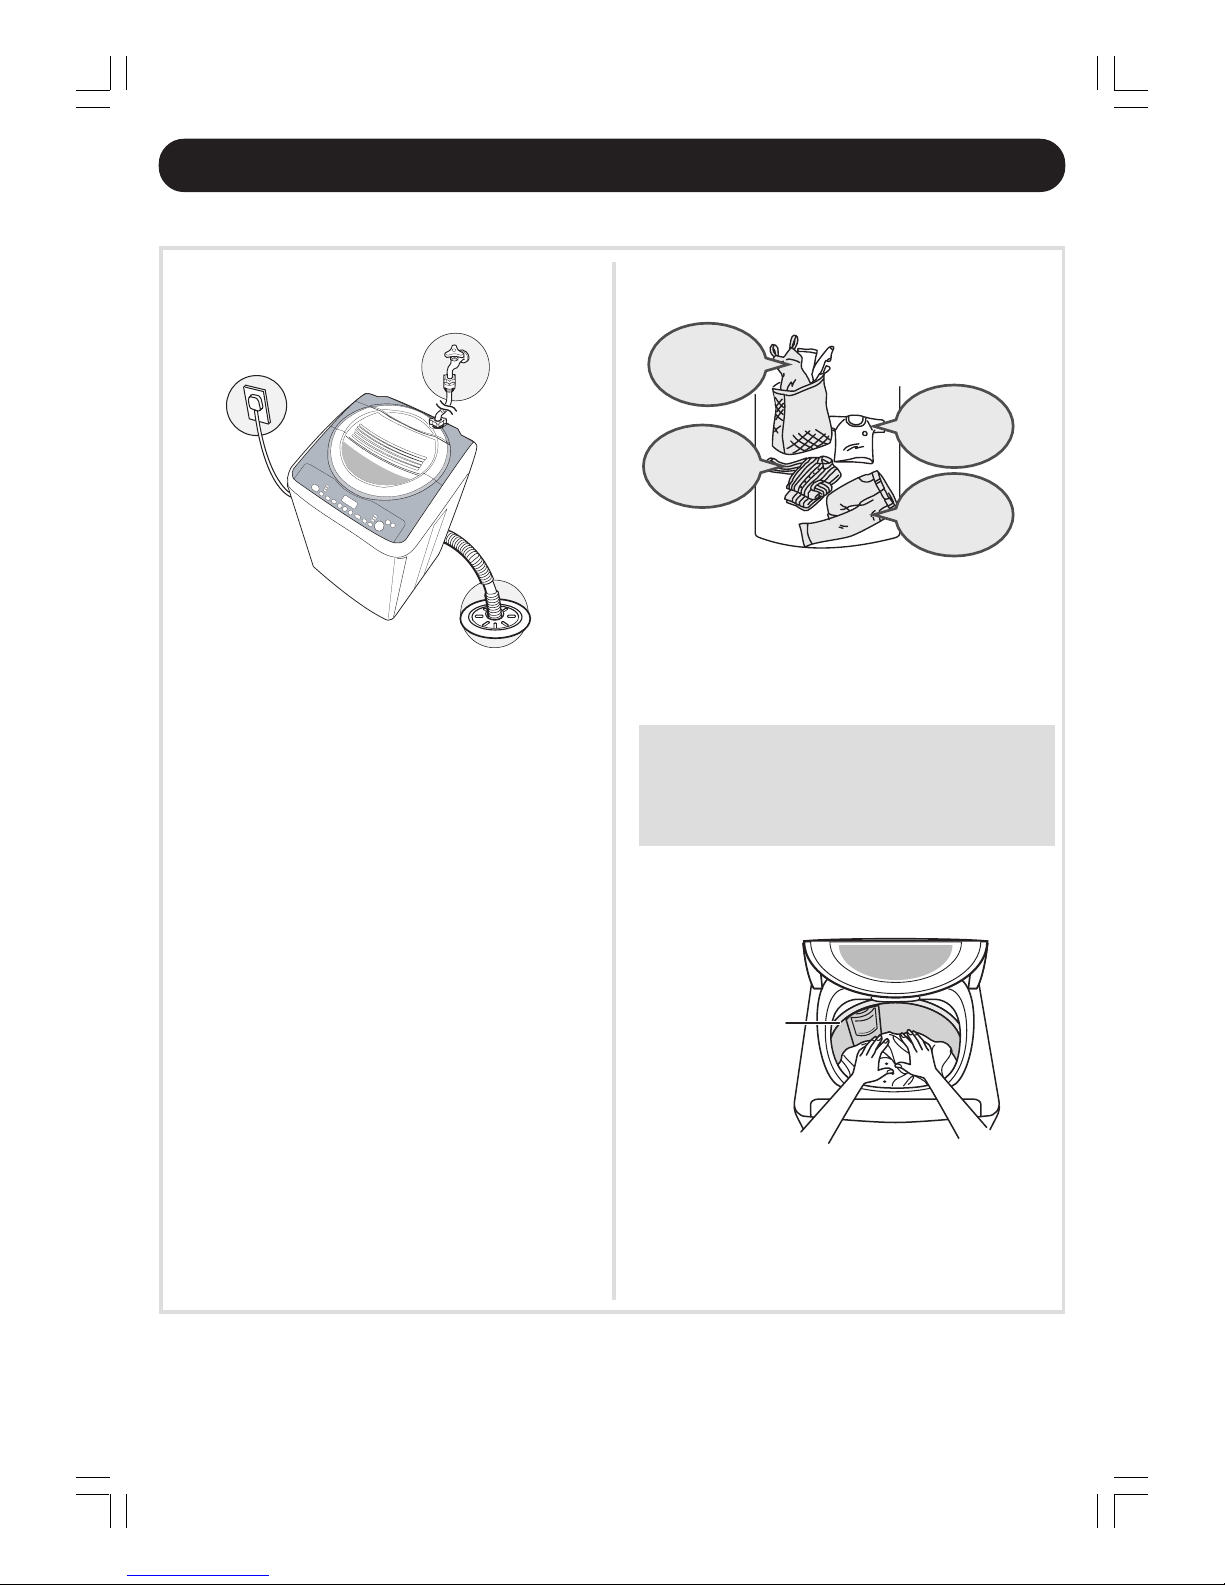
HOW TO OPERATE
Set the drainage hose and open the tap.
Pull the drainage hose out of the
machine body and make it ready for
draining.
Connect the power plug.
Tips
Make sure to attach the filter before running.
Otherwise the water may splash seriously and clothes are
subject to damage because of being hooked by
the mounting parts.
L Method of putting in clothes
L Put in larger clothes or buoyant ones first.
Preparation
1
2
L Baggy clothes which are subject to deform need to be
washed separately.
L Adding clothes during washing
Please press the HOLD button and add more clothes after
the machine fully stops. Press the clothes from above to
make them soaked with the detergent.
Press them to a
position lower than
the marking line.
Buoyant clothes such as
• 100% chemical fiber material, like overall.
• 100% chemical fiber or blending fiber material, like
flannelette.
(Chemical fiber means polyester fiber, acrylic emulsion or
nylon fiber.)
Even articles labeled as washable by washing machine,
such as pillow, cushion and buffer, can not be washed by
this type of machine, because they can not be sufficiently
immersed with detergent even press them after flowing
water. Furthermore, clothes may fly out of the tub or failure
will occur during spinning.
L Clothes need to be put in as evenly as possible and
fully pressed into the tub.
Put in the
fragile clothes
enclosed within
string bag at
last.
Put in lighter
clothes such as
shirt and frock
here.
Put in larger
clothes such as
sports wear and
pajamas.
Put in heavier
clothes such as
cotton-padded
trousers and jeans
wear first.
9
4
Normal clothes can be washed through the optimum courses from washing to spinning.
L Adding detergent
According to the display of detergent amount, add
the detergent to the “Detergent and bleach dispenser” inside of the spinning tub.
• Adjust the position of the entry gate if it is not so easy to
add detergent.
• Please press the “HOLD” button before adding the
detergent through the detergent case.
• Besides, please add the detergent directly around the
washing-spinning tub if the
flowing water has ended.
Too much detergent will cause excessive foam, resulting in lower cleaning performance.
AUTOMATIC WASHING
REGULAR course for normal clothes
When the clothes are
below 1.5 kg, please add
detergent directly around
the washing-spinning tub.
Turn the POWER on.
• The indicators of “REGULAR” and
“CONDENSED BUBBLE” will be lighted.
:Please select the buttons
according to your needs.
Put the laundry in the basket.
Press the button.
• The pulsator start to revolve before flowing
water, then the machine will weigh clothes
and display detergent amount (reference
value). (When the lid is opened.)
Based on the detergent
amount displayed, add
detergent to the detergent
case, and then close the lid.
• When operating with the lid opened, the
machine will stop before rinsing or spinning.
At the end of washing A “beep” sound
will be heard indicating that the course is over.
• Close the tap and clean the filter.
1
2
3
31
What is the CONDENSED BUBBLE?
Stirring starts at a low water level. Make detergent
froth to have clothes soaked. Flowing water and
washing go on simultaneously. Being soaked with
concentrate detergent, clothes can be cleaned
thoroughly.
(Please add the detergent through the “Detergent and
bleach dispenser” inside of the spinning tub.
Failing to do so will reduce the cleaning performance.)
10
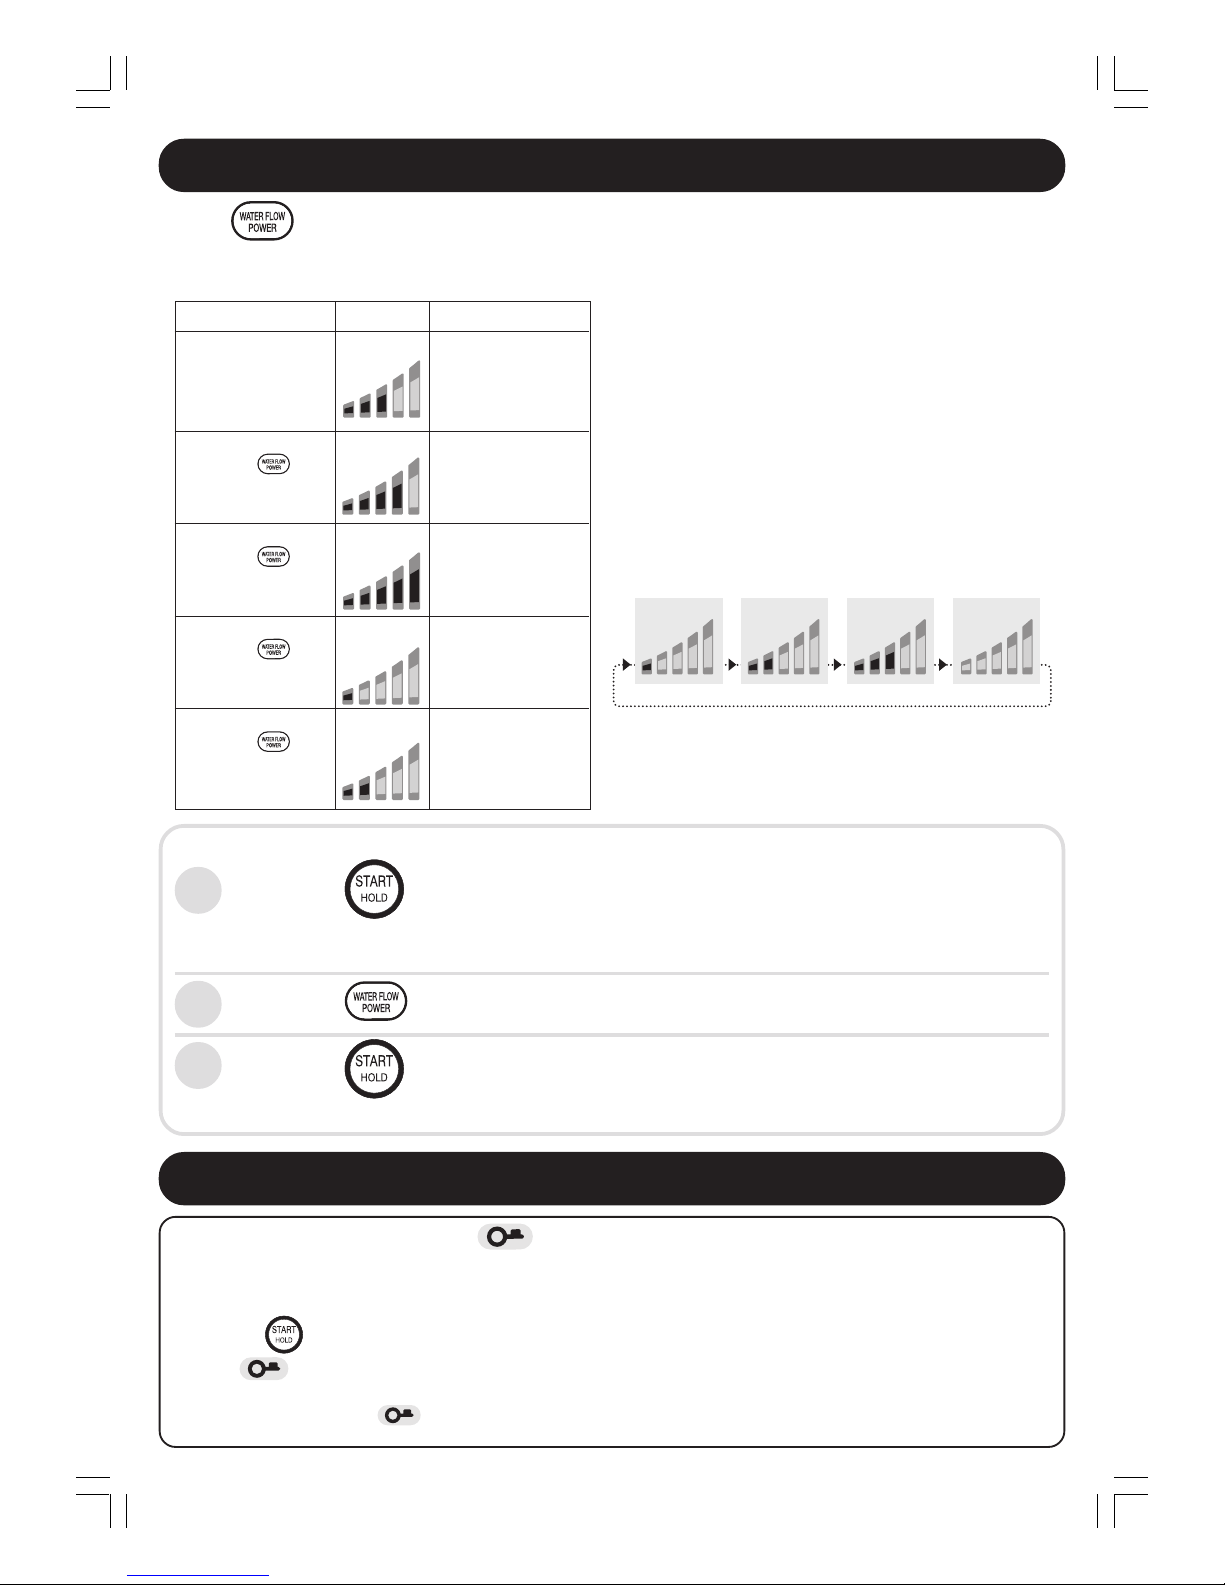
WATER FLOW POWER
L How to choose the water flow power
• The water flow power during rinsing cannot be changed.
• The water flow power can be adjusted only any of
“REGULAR” and “MEMORY” is selected.
• Clothes should not be washed by strong water flow power.
• When the “MEMORY” mode is set, the operation will start
with the water flow power preset.
• When the water level reaches to a designated level, the
water flow power will be indicated. Such indication will be
repeated in the following order. This means the operation is
being done under the water flow power preset.
Example (Standard water flow power)
Key operation Display Situation
Turn on the power. Standard water flow
(Default)
Press the When you need to
button once. wash rather strongly.
Press the When you need to
button twice. wash strongly.
Press the When you need to
button three times. wash softly.
Press the When you need to
button four times. wash rather softly.
Press button to choose the water flow power according to your needs such as what to be
washed or dirtiness level.
L When you need to change the water flow power during operation
Press the button to hold the operation.
• The water flow power will be gradually increased, and then be decreased. When you need to wash sensitive
clothes softly, hold the operation. Otherwise, such clothes may be damaged.
Press the button to choose the water flow power.
Press the button again.
• The water flow power will be changed during the operation when you select more than one levels of water.
1
2
3
LID LOCK
Instruction: Do not open the lid while lights up. (The lid may be damaged.)
At the end of washing, the lid will be automatically locked.
When you need to cancel the lid lock
L During operation
Press the button to hold the operation.
When
lights out, the lid can be open.
L While the power is off
Turn the power on. When lights out, the lid can be open.
(When the power is turned off or shut down during operation, the lid will be automatically locked.)
HI
LO
HI
LO
HI
LO
HI
LO
HI
LO
HI
LO
HI
LO
HI
LO
HI
LO
11
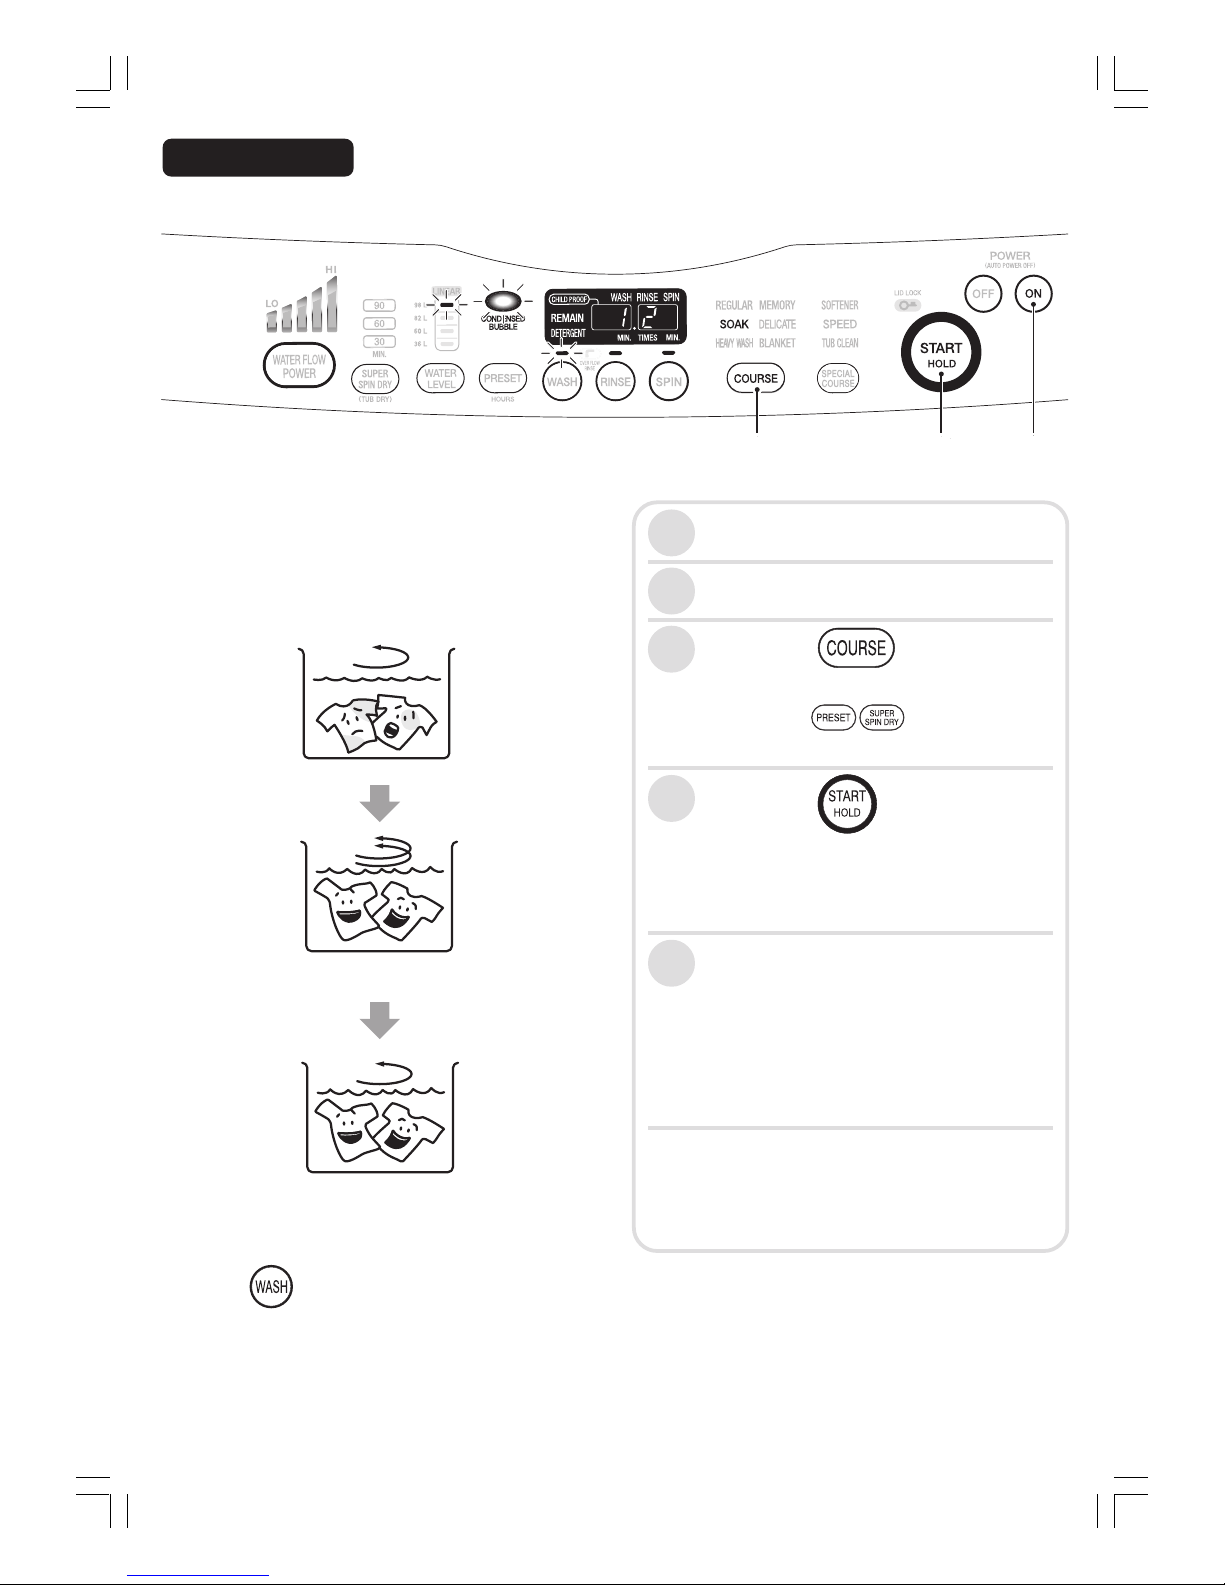
This method is used to wash clothing which easily absorbs
stain and clothes with noticeable stains such as underwear
and shirt as well as seriously dirty overall, gym suit and
thick socks.
Soak and wash them with highly condensed detergent.
L Implement the Soak Course according to the following
instructions.
• To prevent the clothes from turning yellow, use this course
once a month to ensure the optimum performance.
• Press the buttons and set the soaking time as 30 min,
1 hour, 2 hours, 4 hours, 6 hours or 8 hours, depending on
your preference.
• Since the washing time is quite long, please do not use this
course for clothes of fragile chemical fiber or unstable color.
SOAK Course When washing the seriously dirty clothes and expecting to
prevent them from turning yellow.
Turn the POWER on.
Put the laundry in the basket.
Press the
button then
select “SOAK”.
:Select the buttons
according to your needs.
Press the button.
• The pulsator starts to revolve before fowing
water, and the machine will weigh clothes
before displaying detergent amount (reference
value). (When the lid is opened.)
Based on the detergent
amount displayed, add
detergent to the detergent
case, and then close the lid.
• When operating with the lid opened, the
machine will stop before rinsing or spinning.
At the end of washing A “beep” sound
will be heard indicating that the course is over.
• Close the tap and clean the filter.
1
2
3
4
Pre-washing of the “CONDENSED BUBBLE”
First, have the clothes soaked with the detergent.
Soak and stir the clothes repeatedly with highly
condensed detergent to remove sebum smear.
Final washing
Make the smear easily removable by soaking
and washing, thus achieve further cleaning.
5
3
4
1
 Loading...