

Page 1
TOSHIBATOSHIBA
MULTIMEDIA
PORT REPLICATOR
USER’S MANUAL
R
Page 2

GB
Copyright
Disclaimer
Trademarks
© 2000 by Toshiba Corporation. All rights reserved. Under the copyright
laws, this manual cannot be reproduced in any form without the prior
written permission of Toshiba. No patent liability is assumed, with respect
to the use of the information contained herein.
Toshiba Multi Media Port Replicator User’s Manual
First edition March 2000
This manual has been validated and reviewed for accuracy. The
instructions and descriptions it contains are accurate for the Toshiba Multi
Media Port Replicator at the time of this manual’s production. However,
succeeding Multi Media Port Replicators and manuals are subject to
change without notice. Toshiba assumes no liability for damages incurred
directly or indirectly from errors, omissions or discrepancies between the
Multi Media Port Replicator and the manual.
PS/2 is a trademark of International Business Machines Corporation.
Windows and Windows NT are registered trademarks of Microsoft
Corporation.
Ethernet is a registered trademark and Fast Ethernet is a trademark of
Xerox Corporation.
Centronics is a registered trademark of Centronics Data Computer
Corporation.
Photo CD is a trademark of Eastman Kodak.
2 User’s Manual Multi Media Port Replicator
Page 3
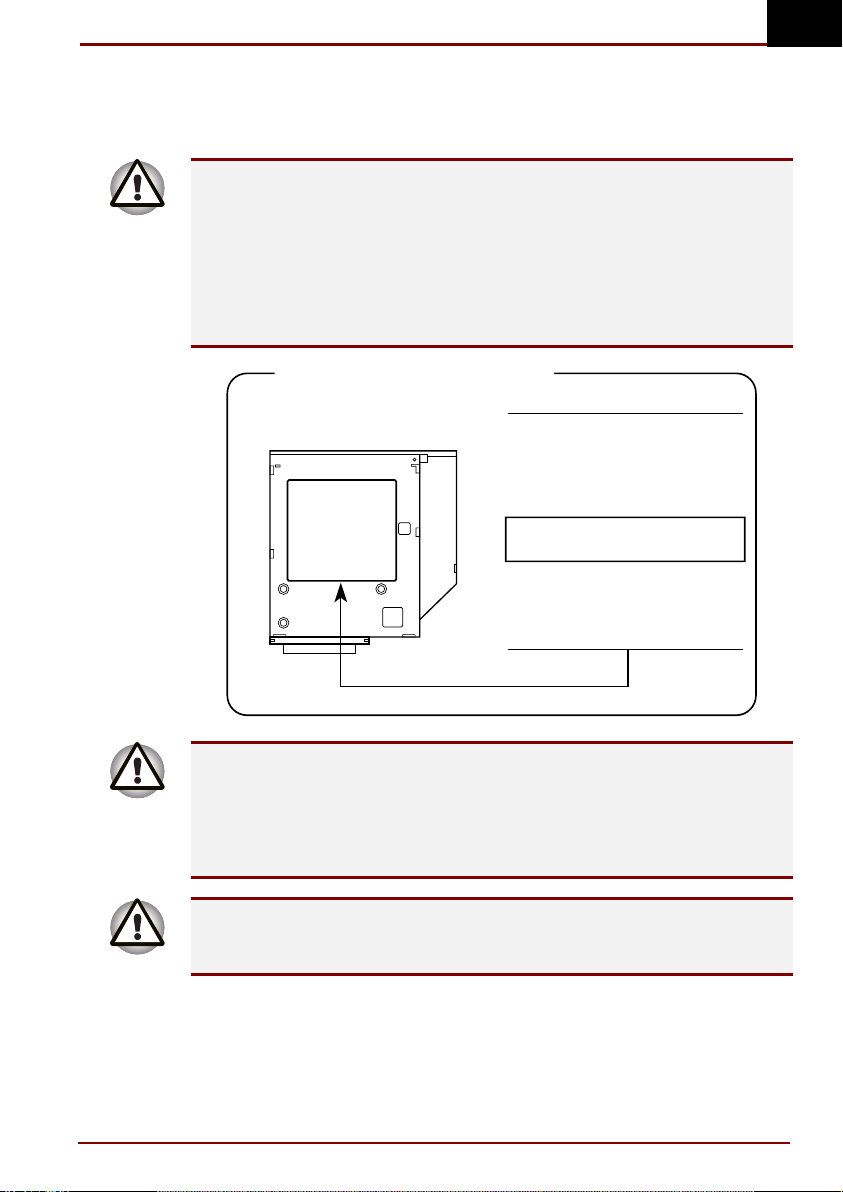
Toshiba DVD-ROM drive SD-C2302** safety instruction
** means any letters or numbers.
The DVD-ROM drive employs a laser system. To ensure proper use of this
product, please read this instruction manual carefully and retain for future
reference. Should the unit ever require maintenance, contact an
authorised service location.
Use of controls, adjustments or the performance of procedures other than
those specified may result in hazardous radiation exposure.
To prevent direct exposure to the laser beam, do not try to open the
enclosure.
Location of the required label
PRODUCT IS CERTIFIED BY THE
MANUFACTURER TO COMPLY
WITH DHHS RULES 21 CFR
SUBCHAPTER J APPLICABLE AT
THE DATE OF MANUFACTURE.
MANUFACTURED:
TOSHIBA CORPORATION
1-1, SHIBAURA 1-CHOME
MINATO-KU, TOKYO 105-8001,
JAPAN
GB
This appliance contains a laser system and is classified as a “CLASS 1
LASER PRODUCT.” To use this model properly, read the instruction
manual carefully and keep this manual for your future reference. In case of
any trouble with this model, please contact your nearest “AUTHORISED
service station.” To prevent direct exposure to the laser beam, do not try to
open the enclosure.
USE OF CONTROLS OR ADJUSTMENTS OR PERFORMANCE OF
Multi Media Port Replicator User’s Manual 3
PROCEDURES OTHER THAN THOSE SPECIFIED IN THE OWNER’S
MANUAL MAY RESULT IN HAZARDOUS RADIATION EXPOSURE.
Page 4
GB
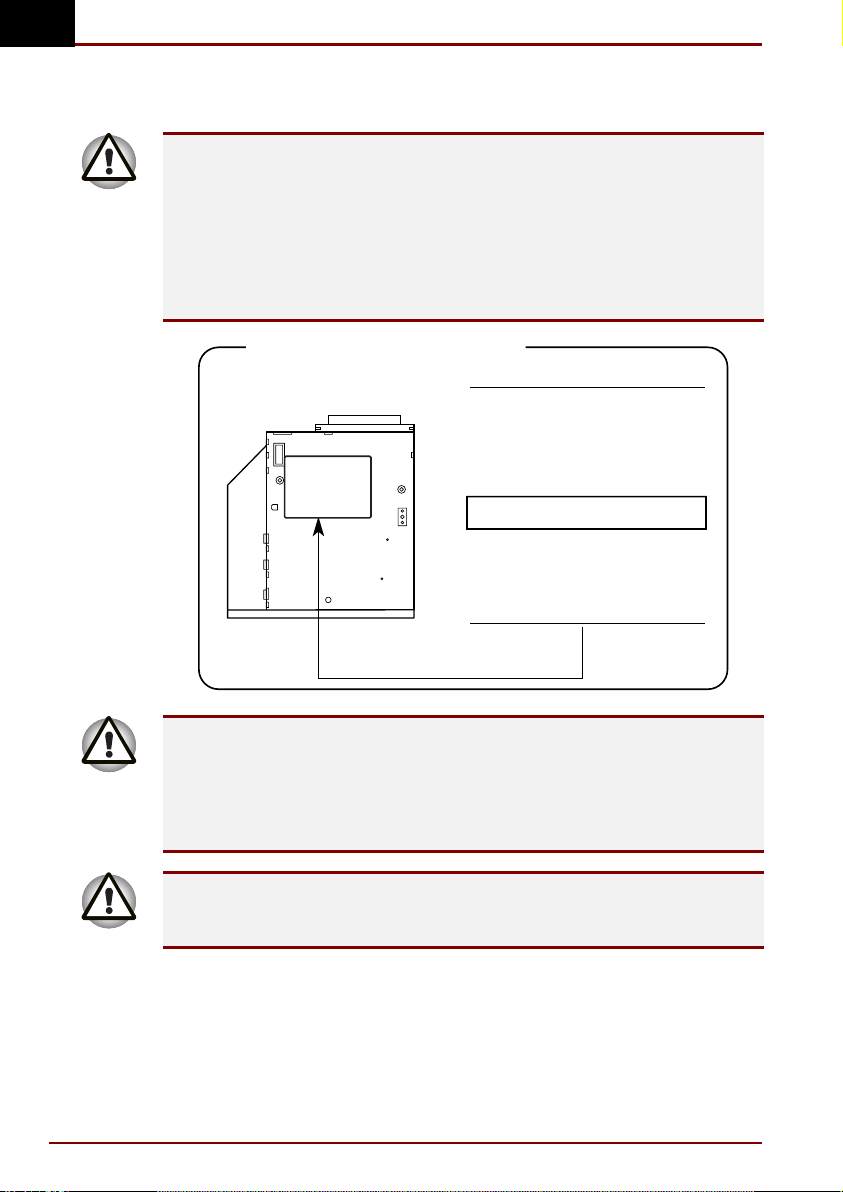
TEAC CD-ROM drive CD-224E safety instruction
The CD-ROM drive employs a laser system. To ensure proper use of this
product, please read this instruction manual carefully and retain for future
reference. Should the unit ever require maintenance, contact an
authorised service location.
Use of controls, adjustments or the performance of procedures other than
those specified may result in hazardous radiation exposure.
To prevent direct exposure to the laser beam, do not try to open the
enclosure.
Location of the required label
CERTIFICATION:
THIS PRODUCT COMPLIES WITH
DHHS RULES 21 CFR CHAPTER 1,
SUBCHAPTER J APPLICABLE AT
DATE OF MANUFACTURE.
MANUFACTURED:
TEAC CORPORATION
3-7-3 NAKA-CHO,
MUSASHINO-SHI
TOKYO, JAPAN
This appliance contains a laser system and is classified as a “CLASS 1
LASER PRODUCT.” To use this model properly, read the instruction
manual carefully and keep this manual for your future reference. In case of
any trouble with this model, please contact your nearest “AUTHORISED
service station.” To prevent direct exposure to the laser beam, do not try to
open the enclosure.
USE OF CONTROLS OR ADJUSTMENTS OR PERFORMANCE OF
4 User’s Manual Multi Media Port Replicator
PROCEDURES OTHER THAN THOSE SPECIFIED IN THE OWNER’S
MANUAL MAY RESULT IN HAZARDOUS RADIATION EXPOSURE.
Page 5

EU Declaration of Conformity
Toshiba declares, that this product conforms to the following Standards:
Supplementary Information: “The product complies with the requirements
of the Low Voltage Directive 73/23/EEC and the EMC Directive
89/336/EEC.”
This product is carrying the CE-Mark in accordance with the related
European Directives. Responsible for CE-Marking is Toshiba Europe,
Hammfelddamm 8, 41460 Neuss, Germany.
Notice to user of EN55022
Warning
This is a Class A product. In a domestic environment this product may
cause radio interference in which case the user may be required to take
adequate measures.
GB
Multi Media Port Replicator User’s Manual 5
Page 6

GB
Contents
Preface ........................................................................................... 8
Manual contents....................................................................................... 8
Conventions ............................................................................................. 9
Abbreviations........................................................................................ 9
Icons..................................................................................................... 9
Messages ............................................................................................. 9
Introduction ................................................................................. 10
Equipment checklist .............................................................................. 10
Overview ................................................................................................. 11
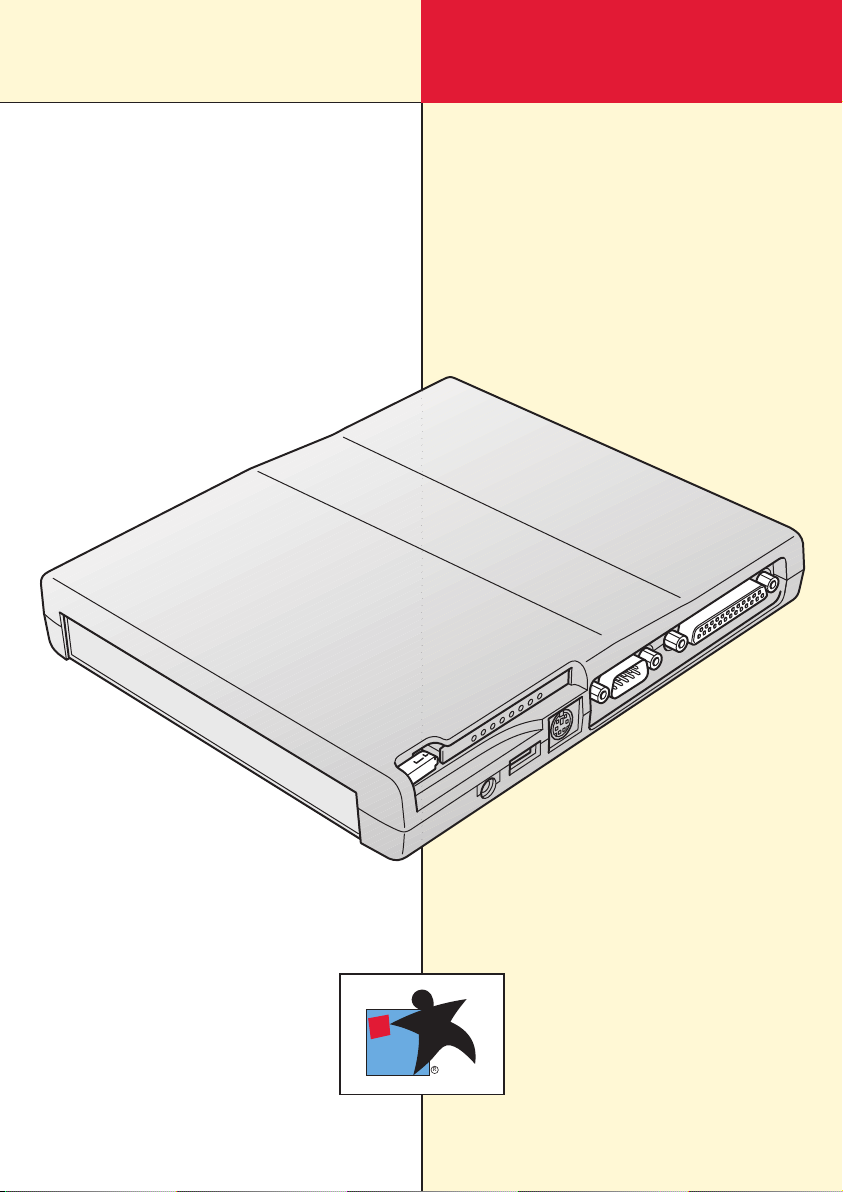
Front ................................................................................................... 12
Right side............................................................................................ 12
Back ................................................................................................... 13
Left side.............................................................................................. 14
AC adaptor.............................................................................................. 14
Connections ................................................................................ 15
Connecting the Multi Media Port Replicator........................................ 15
Connecting the AC adaptor................................................................... 16
Disconnecting the Multi Media Port Replicator ................................... 17
Optional Devices ......................................................................... 18
PC cards.................................................................................................. 18
Before you install ................................................................................ 18
Installing the PC card.......................................................................... 19
Removing the PC card........................................................................ 20
Installing a SelectBay module............................................................... 21
DVD-ROM drive....................................................................................... 22
CD-ROM drive......................................................................................... 24
Using DVD-ROM/CD-ROM drives.......................................................... 25
Loading disks...................................................................................... 25
Removing disks .................................................................................. 28
DVD/CD care ........................................................................................... 29
SelectBay HDD Adaptor II...................................................................... 29
Security lock........................................................................................... 31
6 User’s Manual Multi Media Port Replicator
Page 7

LAN................................................................................................32
Features...................................................................................................32
Using the LAN......................................................................................... 32
Connecting.......................................................................................... 32
Disconnecting .....................................................................................33
LAN driver...........................................................................................34
Troubleshooting...........................................................................35
Hardware checklist.................................................................................35
Connecting cable ................................................................................35
DVD-ROM drive ..................................................................................36
CD-ROM drive ....................................................................................37
Hard disk drive ....................................................................................38
PS/2 keyboard ....................................................................................38
PS/2 mouse ........................................................................................39
Serial mouse .......................................................................................39
Printer .................................................................................................40
Monitor................................................................................................41
Line-out...............................................................................................41
PC card...............................................................................................42
USB ....................................................................................................42
LAN.....................................................................................................43
Toshiba support......................................................................................43
Before you call ....................................................................................43
Where to write..................................................................................... 43
GB
Specifications...............................................................................44
Multi Media Port Replicator User’s Manual 7
Page 8

GB
Preface
Congratulations on your purchase of the Toshiba Multi Media Port
Replicator. This interface greatly increases the expandability of your
computer.
This manual tells how to set up and begin using your Multi Media Port
Replicator and provides tips on care and troubleshooting. It also provides
detailed information on using the DVD/CD-ROM drives and on built-in LAN
capability, including Ethernet® and Fast Ethernet™.
Manual contents
This manual is composed of five chapters and one appendix.
Chapter 1, Introduction, is an overview of the features of the Multi Media
Port Replicator and the AC adaptor.
Chapter 2, Connections, describes how to connect and disconnect the
Multi Media Port Replicator to and from the computer. It also tells how to
secure the Multi Media Port Replicator with a security lock.
Chapter 3, Optional Devices, provides information on PC cards, SelectBay
modules and security lock. It also tells how to use the DVD/CD-ROM drive
and how to care for DVD/CDs.
Chapter 4, LAN, describes how to connect the Multi Media Port Replicator
to a LAN network and provides precautions on using the LAN connector
and specifications for LAN compatibility.
Chapter 5, Troubleshooting, suggests courses of action if the Port
Replicator doesn’t seem to be working properly.
The Appendix provides technical information about your Multi Media Port
Replicator.
8 User’s Manual Multi Media Port Replicator
Page 9
Conventions
This manual uses the following formats to describe, identify, and highlight
terms and operating procedures.
Abbreviations
On first appearance, and whenever necessary for clarity, abbreviations are
enclosed in parentheses following their definition. For example: Read Only
Memory (ROM).
Icons
Icons identify ports, dials, and other parts of your Multi Media Port
Replicator. The indicator panel also uses icons to identify the components
it is providing information on.
Messages
Messages are used in this manual to bring important information to your
attention. Each type of message is identified as shown below.
Pay attention! A caution informs you that improper use of equipment or
failure to follow instructions may cause data loss or damage your
equipment.
GB
Please read. A note is a hint or advice that helps you make best use of
Multi Media Port Replicator User’s Manual 9
your equipment.
Page 10

GB
Introduction
This chapter provides an equipment checklist, and it identifies the Multi
Media Port Replicator’s features and accessories.
Equipment checklist
Carefully unpack your Multi Media Port Replicator. Save the box and
packing materials for future use.
Check to make sure you have all the following items:
Multi Media Port Replicator
Universal AC adaptor and power cord
Connecting cable
Multi Media Port Replicator User’s Manual
10 User’s Manual Multi Media Port Replicator
Page 11

Overview
The Multi Media Port Replicator provides the following:
SelectBay, which accommodates
• CD-ROM drive
• DVD-ROM drive
• SelectBay HDD Adaptor II (with 6, 12 or 18 GB secondary hard disk
drive)
Five ports
• Serial
• Parallel
• External monitor
• USB
• PS/2™ mouse/keyboard port
Jacks
• Line-out
• LAN
• DC-IN (two types)
PC card slot that accommodates a 5 mm card (type II)
The USB and the PC card slot can be used in addition to those on the
computer.
You must connect an AC adaptor to use the Multi Media Port Replicator’s
USB port or PC card slot.
You can use the external monitor port on either the computer or on the
Multi Media Port Replicator, but not both at the same time.
GB
Multi Media Port Replicator User’s Manual 11
Page 12
GB
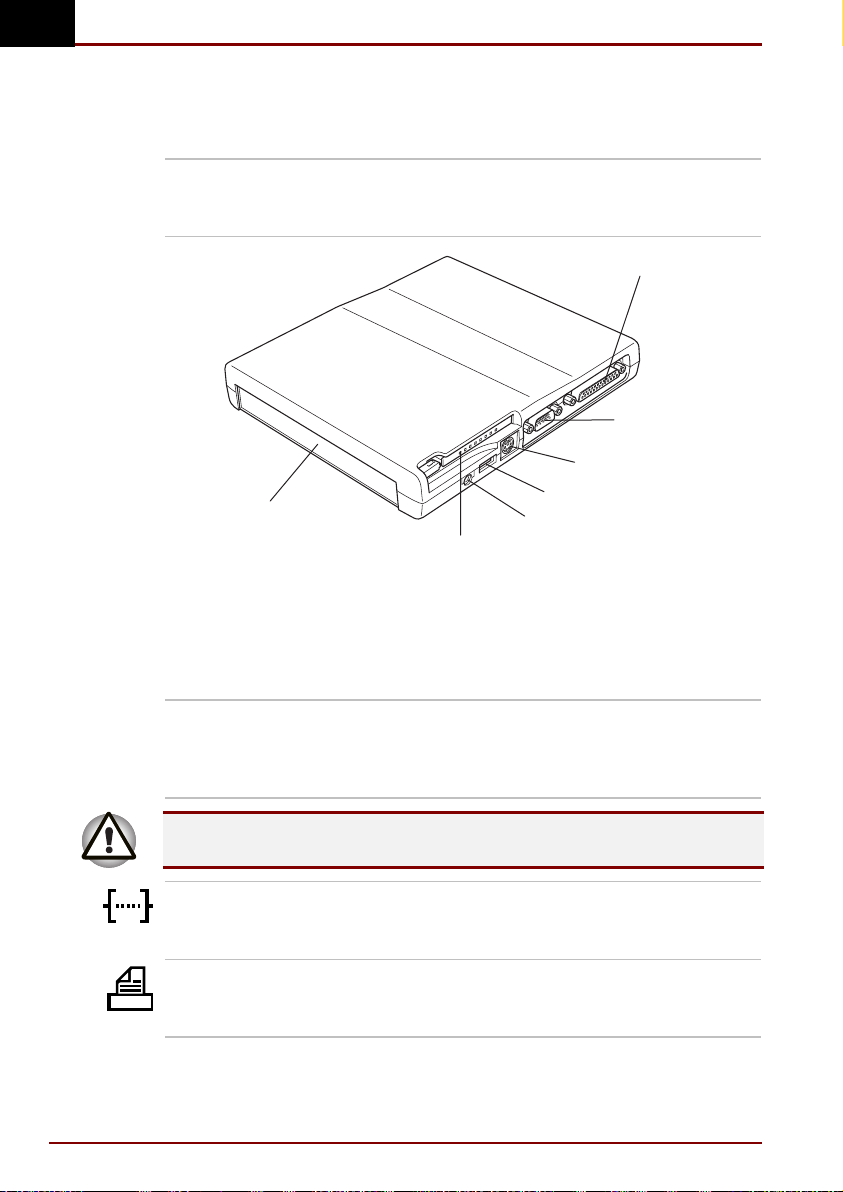
Front
The figure below shows the Multi Media Port Replicator’s front and
right side.
SelectBay You can install a CD-ROM drive, DVD-ROM drive
or SelectBay HDD Adaptor II with a 6, 12 or 18
GB secondary hard disk drive.
PARALLEL PORT
SERIAL PORT
PS/2 MOUSE/
KEYBOARD PORT
SELECTBAY
PC CARD SLOT
The front and right side
USB PORT
LINE-OUT JACK
Right side
Refer to figure above for the location of items on the Multi Media Port
Replicator’s right side.
PC card slot A PC card slot can accommodate one 5 mm
PC card (Type II). The slot supports CardBus
PC cards. An AC adaptor must be connected to use
the PC card slot. PC card sound is not supported.
Keep foreign objects out of the PC card slot. A pin or similar object can
12 User’s Manual Multi Media Port Replicator
damage the Multi Media Port Replicator’s circuitry.
Serial port Use this 9-pin port to connect serial devices such
as an external modem, serial mouse or serial
printer.
Parallel port Use this Centronics®-compatible, 25-pin parallel
port to connect a parallel printer or other parallel
device.
Page 13
GB
PS/2 mouse
keyboard port
Use this port to connect an external PS/2
compatible mouse or keyboard. The computer
automatically recognises which device is
connected when you turn on the power.
Universal Serial Bus
port
A Universal Serial Bus (USB) port enables chain
connection of a number of USB-equipped devices
to one port. You must connect an AC adaptor to
use the USB port.
Line-out jack A standard 3.5 mm mini line-out jack enables
connection of a stereo device for audio output.
Use this jack to play audio CDs. They will not
play through the computer’s internal speakers.
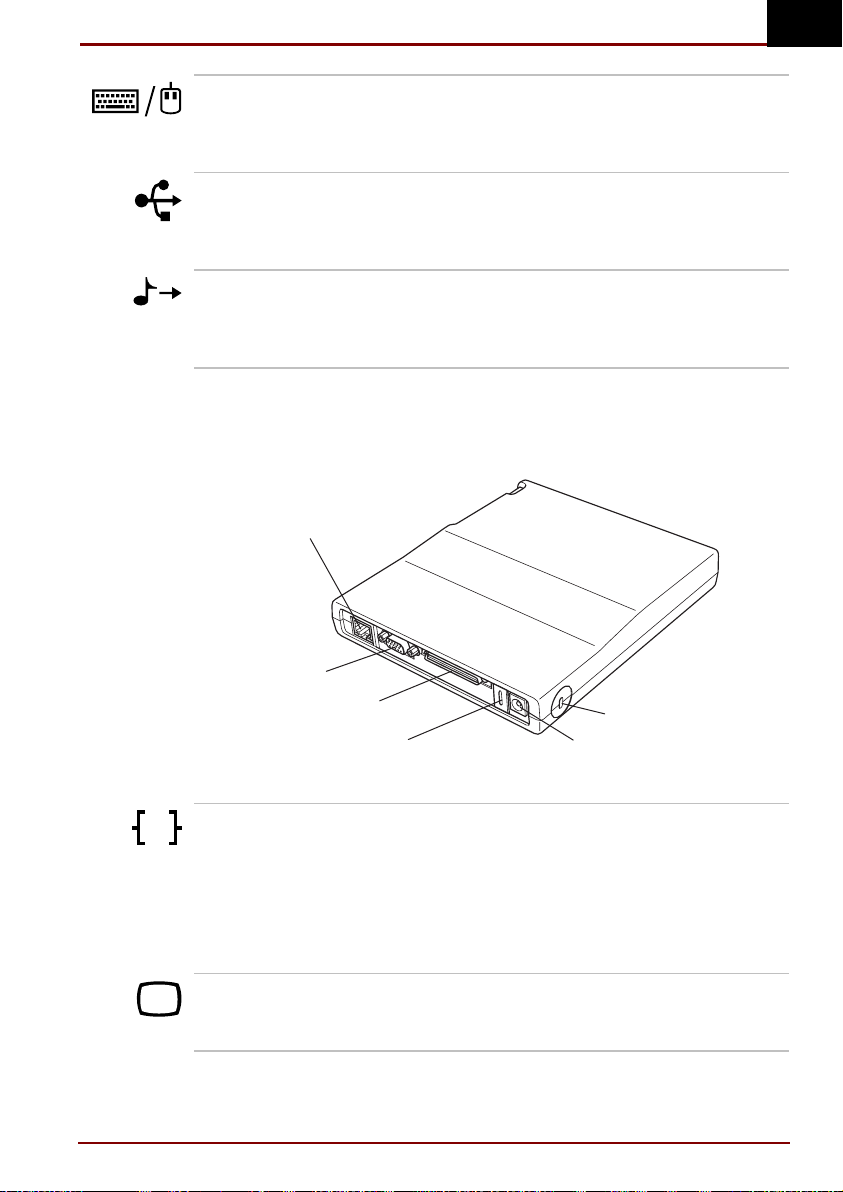
Back
The figure below shows the Multi Media Port Replicator’s back and
left side.
LAN JACK
EXTERNAL MONITOR PORT
COMPUTER CONNECTOR
The back and left side
LAN jack Plug a local-area network connector into this jack.
Ether
SECURITY LOCK SLOT
DC INDC IN COVER
LEDs on either side of the jack indicate the
condition of a LAN connection.
Green: The Multi Media Port Replicator is
connected to a LAN hub.
Yellow: Data is being transferred to or from
the LAN.
External monitor port This 15-pin port lets you connect an external
video monitor. Note that the Resume feature is
effective with an external monitor.
Multi Media Port Replicator User’s Manual 13
Page 14
GB
Computer connector The cable for computer connection is attached to
this connector.
Do not use the cable to connect two computers or two Multi Media Port
Replicators or other expansion devices.
DC IN 15V
DC IN There are two types of DC IN jacks: one for a
Left side
Refer to Figure above for the location of items on the Multi Media Port
Replicator’s left side.
Security lock slot This slot lets you secure a cable to the Multi
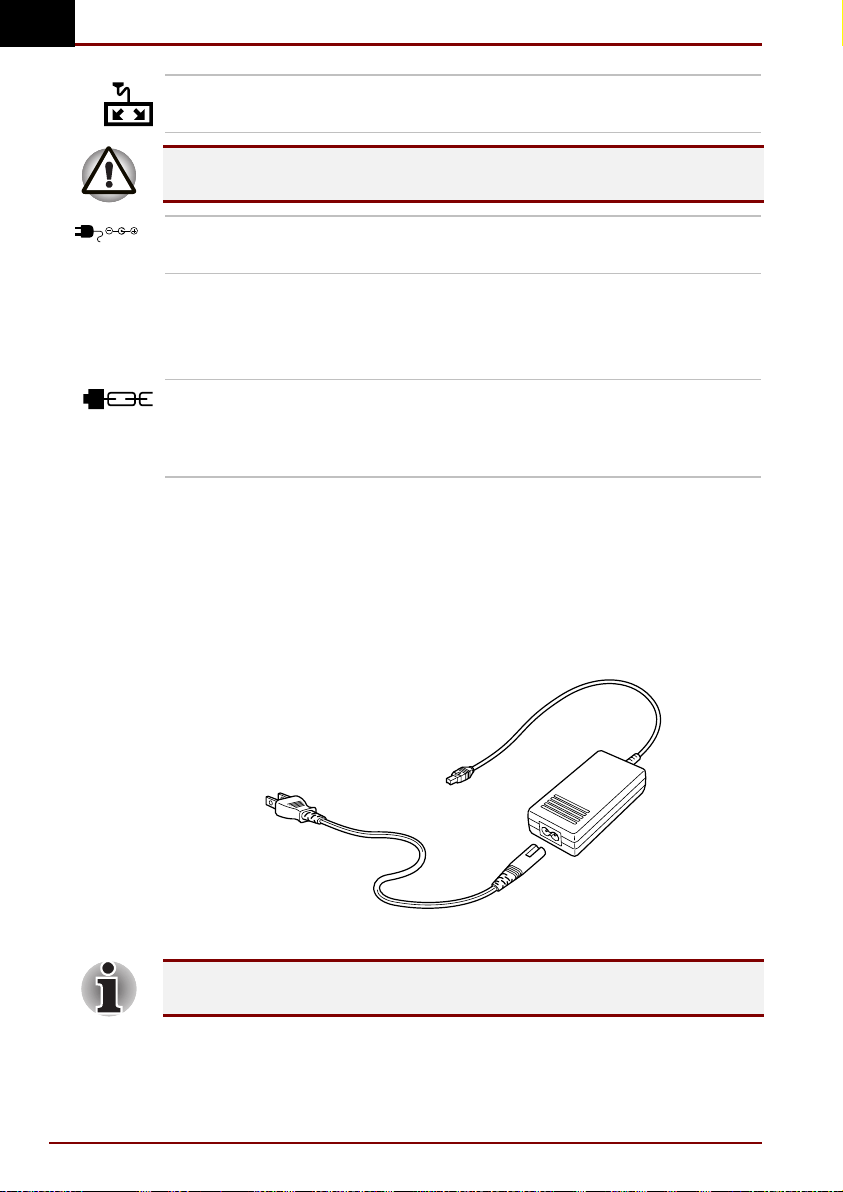
AC adaptor
The AC adaptor converts AC power to DC power and reduces the voltage
supplied to the Multi Media Port Replicator and computer. It can
automatically adjust to any voltage from 100 to 240 volts and to a
frequency of either 50 or 60 hertz, enabling you to use the computer in
almost any country. It supplies four amperes of current.
square connector and one for a round connector.
Media Port Replicator to deter theft. Attach the
other end of the cable to a desk or other large
object.
The AC adaptor
You can also use a Toshiba three-ampere AC adaptor. Refer to the
14 User’s Manual Multi Media Port Replicator
AC adaptor section in Chapter 2, Connections.
Page 15
Connections
The Multi Media Port Replicator is designed to ensure a secure connection
by a few simple operations.
The system supports hot docking and undocking. However, do not
disconnect the Multi Media Port Replicator from the computer while an
application is running.
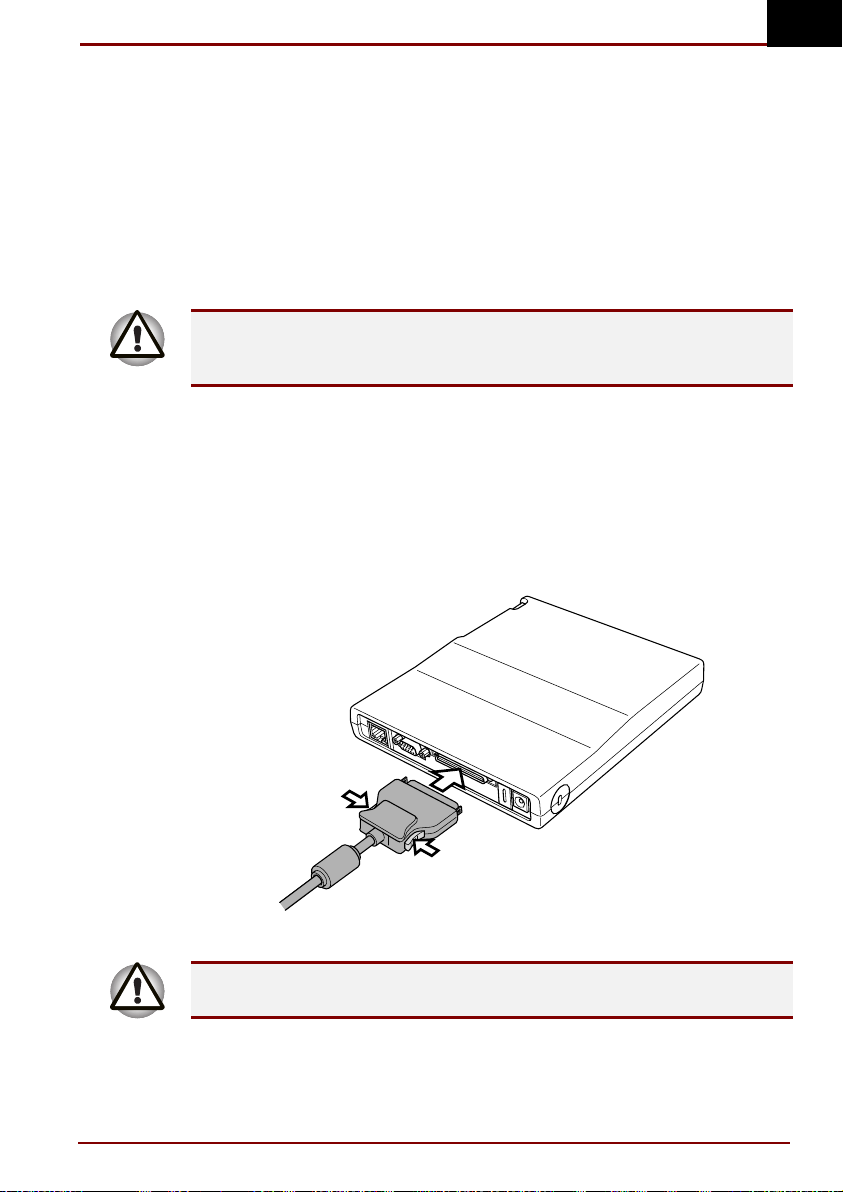
Connecting the Multi Media Port Replicator
To connect the Multi Media Port Replicator, follow the steps below.
1. Disconnect the AC adaptor and any other peripheral devices
connected to the computer.
2. Squeeze the latches on either side of the connector and plug the
connector into the computer connector. Press evenly to avoid
damaging the connector.
GB
Aligning the connectors
If you carry the computer and Multi Media Port Replicator while they are
Multi Media Port Replicator User’s Manual 15
connected, be very careful not to let them disconnect accidentally.
Page 16

GB
Connecting the AC adaptor
There are two jacks for AC adaptors. The AC adaptor supplied with the
Multi Media Port Replicator fits into the square jack. However, you can also
use other models of Toshiba AC adaptors that fit the round jack. A plastic
cover conceals one jack or the other.
Do not connect two AC adaptors to the Multi Media Port Replicator at the
same time.
Do not connect an AC adaptor to the Multi Media Port Replicator and
computer at the same time. Connect the AC adaptor to the Multi Media
Port Replicator only.
(model supplied with the Multi Media Port Replicator)
Connecting the AC adaptor
Connecting the AC adaptor (model not supplied)
If you do not connect an AC adaptor, the PC card slot and USB port will
16 User’s Manual Multi Media Port Replicator
not operate. All other ports and jacks can be used without connecting an
AC adaptor.
Page 17

Disconnecting the Multi Media Port Replicator
To disconnect the Multi Media Port Replicator, follow the steps below.
If you use hot undocking (computer power on) with the Multi Media Port
Replicator, be sure to select Eject PC from the Start menu. Wait for the
eject sequence to complete, then disconnect the device.
Warm undocking (computer power off in Suspend or Hibernate mode) is
not supported. Do not disconnect the Multi Media Port Replicator when the
computer’s power is off unless it was turned off in Shut Down (boot) mode.
1. Squeeze the latches on either side of the connector.
2. Pull the connector out of the computer connector.
GB
Disconnecting the cable
Multi Media Port Replicator User’s Manual 17
Page 18

GB
Optional Devices
A PC card slot can accommodate one 5 mm PC card (Type II). The slot
supports CardBus PC cards (32 bit).
A CD-ROM drive, DVD-ROM drive or SelectBay HDD Adaptor II with
secondary hard disk drive can be installed in the SelectBay. This chapter
describes how to install a SelectBay module and how to use the CD-ROM
and DVD-ROM drives. It also provides tips on care of your DVDs and
CD-ROMs.
PC cards
The Multi Media Port Replicator is equipped with one PC card expansion
slot. The slot can accommodate one 5 mm Type II card. Any PC card that
meets industry standards (manufactured by Toshiba or other vendor) can
be installed. The slot supports CardBus PC cards.
CardBus supports the new standard of 32-bit PC Cards. The bus provides
superior performance for the greater demands of multimedia data
transmission.
PC card sound is not supported.
Before you install
Before you insert a card into the Multi Media Port Replicator, read this
section carefully.
Preparing the computer
Make sure the computer is in boot mode.
Connect the Multi Media Port Replicator to the computer.
18 User’s Manual Multi Media Port Replicator
Page 19

Installing the PC card
A PC card slot accommodates one 5 mm PC card (Type II). Windows
allows hot installation of PC cards, which means you can install a card
while the computer’s power is on.
To install the PC card, follow the steps below.
1. A dummy card is installed in the Multi Media Port Replicator when it is
shipped. To eject the dummy, pull out the PC card eject button and
push it in to pop the dummy card out slightly.
2. Pull the dummy card out and store it in a safe place. Install the dummy
card to protect the slot whenever you remove the PC card.
Removing the dummy card
3. Insert the PC card. When the card is almost fully seated, you will feel
some resistance. Press gently to ensure a firm connection, but do not
force the card into position.
4. Pull the eject button out fully, then fold it down.
GB
Inserting the PC card
5. Check the configuration in the Hardware Setup or TSETUP program to
make sure it is appropriate for your card.
Multi Media Port Replicator User’s Manual 19
Page 20

GB
Removing the PC card
To remove the PC card, follow the steps below.
1. Open the PC Card Properties window and select Stop for the PC card
you want to remove or turn off the power in Shut Down (boot) mode.
2. Pull out the PC card eject button and push it in to pop the PC card out
slightly.
3. Grasp the card and pull it out.
Removing the PC card
4. Insert the dummy card. Do not leave the PC card slot empty. Pull the
eject button out fully, then fold it down.
Inserting the dummy card
20 User’s Manual Multi Media Port Replicator
Page 21

Installing a SelectBay module
To install a SelectBay module follow the steps below.
1. Turn the Multi Media Port Replicator upside down.
2. Slide the release latch to the unlock position.
3. Fit a coin into the notch in front of the release latch and twist to eject
the cover partially.
4. Grasp the cover and pull it out.
Removing the dummy module
5. If a module is in the cover, hold the module and cover firmly and pull
them a part.
6. Seat the new module in the cover.
7. Seat the module and tray in the SelectBay.
8. Brace the Multi Media Port Replicator with one hand and push the
module firmly toward the connector until the release latch clicks into the
lock position.
GB
Inserting a module
Multi Media Port Replicator User’s Manual 21
Page 22

GB
DVD-ROM drive
The full-size, maximum six-speed DVD-ROM drive module lets you run
either 12 cm (4.72") or 8 cm (3.15") DVDs or CDs without using an
adaptor. An ATAPI interface controller is used for DVD-ROM operation.
When the computer is accessing a DVD-ROM, an LED next to the eject
button glows.
The read speed is slower at the centre of a disk and faster at the outer
edge. The minimum (centre) and maximum (outer edge) for DVDs and
CDs are:
DVD 1.7-speed (centre) 6-speed (outer edge)
CD 10.3-speed (centre) 24-speed (outer edge)
This drive supports the following formats:
• Audio CD • CD-Rewritable (read only)
• CD-I FMV • Photo CD
• CD-G • CD-R (read only)
• Video CD • DVD-ROM
• CD-EXTRA • CD-DA
• CD-ROM • DVD-Video
• CD-ROM x A
Some high-bit-rate DVD-Video disks may not play smoothly.
22 User’s Manual Multi Media Port Replicator
Page 23

EJECT HOLE
EJECT BUTTON
GB
The DVD-ROM drive
DISK-IN-USE INDICATOR
Eject button Press the eject button to open the drawer
partially.
Eject hole Insert a slender object to open the drawer when
the power to the computer is off.
Disk-In-Use Indicator This indicator lights when the DVD-ROM drive is
being accessed.
Check the Disk-In-Use indicator when you use the DVD-ROM drive. Do
not press the eject button while the light is glowing. Doing so could
damage the DVD/CD or the drive.
DVD drives and media are manufactured according to the specifications of
six marketing regions. When you purchase DVD media, make sure it
matches your drive, otherwise it will not play properly.
Code Region
1 Canada, United States
2 Japan, Europe, South Africa, Middle East
3 Southeast Asia, East Asia
4 Australia, New Zealand, Pacific Islands, Central America, South
America, Caribbean
5 Russia, Indian Subcontinent, Africa, North Korea, Mongolia
6 China
Multi Media Port Replicator User’s Manual 23
Page 24

GB
CD-ROM drive
A full-size, maximum 24-speed CD-ROM drive module lets you run either
12 cm (4.72") or 8 cm (3.15") compact disks without using an adaptor. It
may be selected as a standard component or as an option.
This drive supports the following formats:
• Audio CD • CD-EXTRA
• Video CD • CD-R (read only)
• Photo CD • CD-DA
• CD-ROM • CD-G
• CD-ROM x A • CD-Rewritable (read only)
• CD-I FMV
DISK-IN-USE INDICATOR
EJECT HOLE
Eject button Press the eject button to open the drawer
partially.
Eject hole Insert a slender object to open the drawer when
the power to the computer is off.
Disk-In-Use Indicator This indicator lights when the CD-ROM drive is
being accessed.
Check the Disk-In-Use indicator when you use the CD-ROM drive. Do not
24 User’s Manual Multi Media Port Replicator
press the eject button, disconnect a drive or turn off the computer while the
light is glowing. Doing so could damage the CD or the drive.
EJECT BUTTON
The CD-ROM drive
Page 25

Using DVD-ROM/CD-ROM drives
This section describes how to load and remove DVD/CDs and how to care
for DVD/CDs. Illustrations and text describe the DVD-ROM drive.
Operations are the same for the CD-ROM drive.
DISK-IN-USE INDICATOR
GB
EJECT BUTTON
The DVD-ROM drive face
EJECT HOLE
Loading disks
To load DVD/CDs, follow the steps below and refer to the following figures.
1. a. When the power is on, press the DVD-ROM eject button to open the
drawer slightly.
Pressing the DVD-ROM drawer eject button
b. Pressing the eject button will not open the drawer when the
computer’s power is off. If the power is off, you can open the drawer by
inserting a slender object (about 1.5 cm) such as a straightened paper
clip into the eject hole just to the right of the eject button.
15mm
Manual release with the eject hole
Multi Media Port Replicator User’s Manual 25
Ø 1.0mm
Page 26

GB
2. Grasp the drawer gently and pull until it is fully opened.
Pulling the drawer open
3. Lay the DVD/CD label side up in the drawer.
Inserting a DVD/CD
26 User’s Manual Multi Media Port Replicator
Page 27

GB
4. Press gently at the centre of the DVD/CD until you feel it click into
place. The DVD/CD should lie below the top of the spindle, flush with
the spindle base.
5. Push the centre of the drawer to close it. Press gently until it locks into
place.
If the DVD/CD is not seated properly when the drawer is closed, the
DVD/CD might be damaged. Also, the drawer might not open fully when
you press the eject button.
Closing the DVD-ROM drawer
Multi Media Port Replicator User’s Manual 27
Page 28

GB
Removing disks
To remove the DVD/CD disk, follow the steps below.
Do not press the eject button while the computer is accessing the
DVD-ROM drive.
Wait for the drive indicator to go out before you open the drawer. Also, if
the DVD/CD is spinning when you open the drawer, wait for it to stop
before you remove it.
Turn the power off before you use the eject hole. If the DVD/CD is spinning
when you open the drawer, the DVD/CD could fly off the spindle and
cause injury.
1. To pop the drawer partially open, press the eject button or insert a
slender object into the eject hole. Gently pull the drawer out until it is
fully opened.
2. The DVD/CD extends over the sides of the drawer so you can grasp it.
Hold the DVD/CD gently and lift it out.
Removing the disk
3. Push the centre of the drawer to close it. Press gently until it locks into
place.
28 User’s Manual Multi Media Port Replicator
Page 29

DVD/CD care
Handle your DVD/CDs with care. The following simple precautions will
increase the lifetime of your DVD/CDs and protect the data stored on
them:
1. Store your DVD/CDs in the container they came in to protect them and
keep them clean.
2. Do not bend the DVD/CD.
3. Do not write on, apply a sticker to, or otherwise mar the surface of the
DVD/CD that contains data.
4. Hold the DVD/CD by its outside edge or the edge on the centre hole.
Fingerprints on the surface may prevent the drive from properly reading
data.
5. Do not expose to direct sunlight, extreme heat or cold. Do not place
heavy objects on your DVD/CDs.
6. If your DVD/CDs become dusty or dirty, wipe them with a clean dry
cloth. Wipe from the centre out, do not wipe in a circular direction
around the DVD/CD. If necessary, use a cloth dampened in water or a
neutral cleaner. Do not use benzine, thinner or similar cleaner.
SelectBay HDD Adaptor II
A 6.0 billion bytes (5.6GB), 12.07 billion bytes (11.24GB) or 18.15 billion
bytes (16.90GB), integrated, 2 ½" HDD is available for installation in the
SelectBay.
To install an HDD in the SelectBay HDD Adaptor II follow the steps below.
1. Slide the lock to the unlock position and open the lid.
GB
Opening the lid
Multi Media Port Replicator User’s Manual 29
Page 30

GB
2. Insert the HDD and push forward to ensure a firm connection.
Installing the HDD
3. Close the lid and slide the lock to the lock position.
Closing the lid
30 User’s Manual Multi Media Port Replicator
Page 31

Security lock
A security lock enables you to anchor the Multi Media Port Replicator to a
desk or other heavy object to help prevent unauthorised removal of the
Multi Media Port Replicator.
1. Attach one end of a cable to a desk or other heavy object.
2. Insert the other end into the Multi Media Port Replicator’s security lock
slot.
3. Secure it with the key.
GB
Security lock
Multi Media Port Replicator User’s Manual 31
Page 32

GB
LAN
Features
Using the LAN
A jack enables easy connection to a local-area network without the need of
a PC Card or other adaptor.
The Multi Media Port Replicator has built-in support for Ethernet LAN and
Fast Ethernet LAN.
The computer must be configured properly before connecting to a LAN.
Logging onto a LAN using the computer’s default settings could cause a
malfunction in LAN operation. Check with your LAN administrator
regarding set-up procedures.
If you are using Fast Ethernet LAN (100 megabits per second,
100BASE-TX), be sure to connect with a CAT5 cable. You cannot use a
CAT3 cable.
If you are using Ethernet LAN (10 megabits per second, 10BASE-T), you
can connect with either a CAT5 or a CAT3.
Connecting
To connect the LAN cable, follow the steps below.
The Wake-up on LAN feature will not work if an AC adaptor is not
32 User’s Manual Multi Media Port Replicator
connected.
1. Turn off the power to the computer and to all external devices
connected to the Multi Media Port Replicator and to the computer.
Page 33

GB
2. Plug one end of the cable into the Multi Media Port Replicator’s LAN
jack. Press gently until you hear the latch click into place.
Connecting the LAN cable
3. Plug the other end of the cable into a LAN hub connector. Check with
your LAN administrator before connecting to a hub.
When the Multi Media Port Replicator is accessing data on the LAN, the
LAN connector’s yellow LED glows. If the Multi Media Port Replicator is
connected to a LAN hub but not accessing data, the LAN connector’s
green LED glows.
GREEN YELLOW
LAN jack LED
Disconnecting
To disconnect the LAN cable, follow the steps below.
Before you disconnect the LAN cable, make sure the computer is not
Multi Media Port Replicator User’s Manual 33
accessing data. The green LED will glow when it is safe to disconnect.
1. Pinch the lever on the connector in the Multi Media Port Replicator and
pull out the connector.
2. Disconnect the cable from the LAN hub in the same manner. Check
with your LAN administrator before disconnecting from the hub.
Page 34

GB
LAN driver
This driver is preinstalled in the Portégé 3410/3440 series computers to
make the computer LAN-ready when it is connected to a LAN Port
Replicator.
The following parameters can be specified to optimise the computer’s LAN
performance. You can use the default settings, however, you may need to
set the duplex mode and speed to match the LAN hub’s functionality.
Follow the procedures below to change LAN parameters. Be very careful
when making changes.
1. Open the Control Panel.
2. Double-click the Network icon.
3. In the Network Components list box, select the LAN adaptor.
4. Click the Advanced button.
5. Set the Duplex Mode to Auto Duplex (default), Full Duplex or Half
Duplex.
Auto Duplex: Automatically recognises a full-duplex switch and uses
full duplex when possible.
Full Duplex: Packets can be sent and received simultaneously.
Half Duplex: Packets cannot be sent and received simultaneously.
If you set the duplex mode to full duplex or half duplex, you must set the
speed to 100 Mb/sec or 10 Mb/sec.
6. Set the speed to Automatic (default), 100 Mb/sec or 10 Mb/sec.
Automatic: Adjusts the speed to fit the connection.
100 Mb/sec or 10 Mb/sec: If you connect another adaptor using cross
cables, you must set the speed to 100 Mb/sec or 10 Mb/sec.
For any other parameter, please use the driver’s default settings.
34 User’s Manual Multi Media Port Replicator
Page 35

Troubleshooting
This chapter provides tips on correcting problems, should any occur. It also
describes how to contact Toshiba for problems that you cannot resolve.
But, first be sure to read the section Before you call. Also refer to general
troubleshooting advice at the beginning of Chapter 9, Troubleshooting, in
your computer user’s manual.
Hardware checklist
This section discusses problems caused by your Multi Media Port
Replicator’s hardware. Basic problems may occur in the following areas:
Connecting cable
DVD-ROM drive
CD-ROM drive
Hard disk drive
PS/2 keyboard
PS/2 mouse
Serial mouse
Printer
Monitor
Line-out
USB
PC card slot
LAN
GB
Connecting cable
Problem Procedure
None of the ports or
jacks or the SelectBay
work
Multi Media Port Replicator User’s Manual 35
There may be a faulty connection. Check the
cable connections between the computer and the
Multi Media Port Replicator.
If problems persist, contact your dealer.
Page 36

GB
DVD-ROM drive
Problem Procedure
You cannot access a
DVD/CD in the drive
Some DVD/CDs run
correctly, but others do
not
There may be a faulty connection. Check the
connection between the computer and the Multi
Media Port Replicator.
Make sure the drive’s drawer is securely closed.
Press gently until it clicks into place.
Open the drawer and make sure the DVD/CD is
properly seated. It should lie flat with the label
facing up.
A foreign object in the drawer could block laser
light from reading the DVD/CD. Make sure there
is no obstruction. Remove any foreign object.
Check whether the DVD/CD is dirty. If necessary,
wipe it with a clean cloth dipped in water or a
neutral cleaner. See the DVD/CD care section in
Chapter 3 for details on cleaning.
The software or hardware configuration may be
causing a problem. Make sure the hardware
configuration matches your software’s needs.
Check the DVD/CD’s documentation.
Check the type of DVD/CD you are using. The
drive supports:
DVD-ROM: DVD-ROM, DVD-Video
CD-ROM: Audio CD, Video CD, CD-EXTRA,
Photo CD, CD-R (read only),
CD-ROM, CD-Rewritable (read
only), CD-ROM x A, CD-DA, CD-I
FMV, CD-G
Check the region code on the DVD. It must
match that on the DVD drive. Region codes are
listed in the DVD-ROM drive section of
Chapter 3.
You cannot hear
audio CDs
36 User’s Manual Multi Media Port Replicator
Make sure you have a speaker connected to the
line-out jack. The computer’s internal speakers
cannot play audio CDs.
If problems persist, contact your dealer.
Page 37

CD-ROM drive
Problem Procedure
GB
You cannot access a
CD in the drive
Some CDs run
correctly, but others do
not
You cannot hear
audio CDs
Make sure the drive's drawer is securely closed.
Press gently until it clicks into place.
Open the drawer and make sure the CD is
properly seated. It should lie flat with the label
facing up.
A foreign object in the drawer could block laser
light from reading the CD. Make sure there is no
obstruction. Remove any foreign object.
Check whether the CD is dirty. If necessary, wipe
it with a clean cloth dipped in water or a neutral
cleaner. See the DVD/CD care section in Chapter
3 for details on cleaning.
The software or hardware configuration may be
causing a problem. Make sure the hardware
configuration match’s your software’s needs.
Check the CD’s documentation.
Check the type of CD you are using. The drive
supports:
Audio CD, Video CD, CD-EXTRA, Photo CD,
CD-R (read only), CD-ROM, CD-Rewritable
(read only), CD-ROM x A, CD-DA, CD-I FMV,
CD-G.
Make sure you have a speaker connected to the
line-out jack. The computer’s internal speakers
cannot play audio CDs.
If problems persist, contact your dealer.
Multi Media Port Replicator User’s Manual 37
Page 38

GB
Hard disk drive
Refer to Chapter 7, TSETUP and Passwords, in the computer user’s
manual for more information.
Problem Procedure
Computer does not boot
from hard drive
Slow performance Your files may be fragmented. Run SCANDISK
Insert a system diskette and reboot.
There may be a problem with your operating
system files. Refer to your OS documentation.
and defragmenter to check the condition of your
files and disk. Refer to your OS documentation or
online HELP for information on running
SCANDISK and the defragmenter.
Run the diagnostic test. Write down any reported
errors. If TDIAGS does not report any errors and
you have exhausted every troubleshooting
possibility, make sure you have backed up all
your files.
As a last resort, reformat the hard disk. Then,
reload the operating system and other files.
If problems persist, contact your dealer.
PS/2 keyboard
Keyboard problems can be caused by your setup configuration. For more
information refer to Chapter 5, The Keyboard and Chapter 7, TSETUP and
Passwords, in your computer user’s manual.
Problem Procedure
No response from
keyboard
Make sure the keyboard cable is firmly connected
to the PS/2 mouse/keyboard port on the Multi
Media Port Replicator.
Output to screen is
garbled
38 User’s Manual Multi Media Port Replicator
Make sure the software you are using is not
remapping the keyboard. Remapping involves
reassigning the meaning of each key. See your
software’s documentation.
If you are still unable to use the keyboard, consult
your dealer.
Page 39

PS/2 mouse
Problem Procedure
GB
No response from
PS/2 mouse
On-screen pointer
does not respond to
PS/2 mouse operation
Serial mouse
Problem Procedure
On-screen pointer
does not respond to
serial mouse operation
Make sure the PS/2 mouse cable is firmly
connected to the PS/2 mouse/keyboard port on
the Multi Media Port Replicator.
Check that the PS/2 mouse cable’s 6-pin
connector is firmly connected to the
mouse/keyboard port.
You may have connected the mouse after turning
the computer on. Turn off the computer, make
sure the mouse is firmly connected and turn the
computer back on.
Is the Pointing Devices option in Hardware Setup
or TSETUP program set properly?
Is your software configured to recognise the
mouse? Check the software documentation.
If problems persist, contact your dealer.
Check for a firm connection between the Multi
Media Port Replicator’s serial port and the cable’s
9-pin connector.
Did you connect the mouse before turning on the
computer?
Is the Serial port option in Hardware Setup or
TSETUP program set properly?
Is your software configured to recognise the
mouse? Check the software documentation.
If problems persist, contact your dealer.
Multi Media Port Replicator User’s Manual 39
Page 40

GB
Printer
Refer also to the Parallel printer section in Chapter 8, Optional Devices, of
the computer user’s manual. Check the troubleshooting and other relevant
sections in your printer and software documentation.
Problem Procedure
Printer does not turn on. Check that the printer is connected to an electric
outlet. Make sure the outlet is supplying power by
plugging in an appliance.
Computer/printer do not
communicate
Printer error Run the diagnostic test TDIAGS.
Make sure the printer is turned on and is online
(ready to use).
Inspect the cable connecting the printer to the
Multi Media Port Replicator for damage. Make
sure it is securely connected.
A parallel printer connects to the parallel port and
a serial printer to the serial port. Make sure the
ports are configured correctly.
Make sure your software is configured to
recognise the printer. Check your printer and
software documentation.
If problems persist, contact your dealer.
40 User’s Manual Multi Media Port Replicator
Page 41

Monitor
Refer also to Chapter 8, Optional Devices, in your computer user’s manual
and to your monitor’s documentation.
Problem Procedure
Monitor does not turn on Make sure that the external monitor’s power
switch is on. Confirm that the external monitor’s
power cable is plugged into a working power
outlet.
No display Try adjusting the contrast and brightness controls
on the external monitor.
Press hotkeys Fn + F5 to change the display
priority and make sure it is not set for the internal
display.
Display error occurs Check that the cable connecting the external
monitor to the computer is attached firmly.
Make sure there is no TV connected to the Video
out port.
Run the diagnostic test program.
If problems persist, contact your dealer.
Line-out
Refer also to Chapter 7, TSETUP and Passwords, in your computer user’s
manual.
GB
Problem Procedure
No sound is heard Adjust the volume control dial.
Check the software volume settings.
Make sure the line-out connection is secure.
Check Windows Device Manager. Make sure the
sound function is enabled and that settings for
I/O address, Interrupt level and DMA are correct
for your software and do not conflict with other
hardware devices that you may have connected
to the computer.
If problems persist, contact your dealer.
Multi Media Port Replicator User’s Manual 41
Page 42

GB
PC card
Refer also to Chapter 8, Optional Devices, in your computer user’s manual.
Problem Procedure
PC card error occurs Reseat the PC card to make sure it is firmly
connected.
Make sure the AC adaptor is connected. The PC
card slot will not function on the computer’s
battery power.
Make sure the connection between the external
device and the card is firm.
Check the type of card you are using. The slot
does not support 16-bit PC cards.
Check the card’s documentation.
If problems persist, contact your dealer.
USB
Refer also to your USB device’s documentation.
Problem Procedure
USB device does not
work
42 User’s Manual Multi Media Port Replicator
Check for a firm cable connection between the
USB ports on the Multi Media Port Replicator and
the USB device.
Make sure the AC adaptor is connected. The
USB port will not function on the computer’s
battery power.
If you are using an operating system that does
not support USB, you can still use a USB mouse
and/or USB keyboard. If these devices do not
work, make sure the USB Legacy Emulation item
in TSETUP is set to Enabled.
This feature works only for mouse and keyboard.
Also, the mouse and keyboard must be
connected, before you boot the computer.
If problems persist, contact your dealer.
Page 43

LAN
Problem Procedure
Cannot access LAN Check for a firm cable connection between the
Multi Media Port Replicator’s LAN jack and the
LAN HUB.
GB
Wake up on LAN does
not work
Toshiba support
If you require any additional help using your computer or if you are having
problems operating the Multi Media Port Replicator, you may need to
contact Toshiba for additional technical assistance.
Before you call
Some problems you experience may be related to software or the
operating system, it is important to investigate other sources of assistance
first. Before contacting Toshiba, try the following:
Review troubleshooting sections in the documentation for your
computer, software and peripheral devices.
If a problem occurs when you are running software applications,
consult the software documentation for troubleshooting suggestions.
Call the software company’s technical support for assistance.
Consult the dealer you purchased your computer and/or software from.
They are your best sources for current information and support.
Where to write
If you are still unable to solve the problem and suspect that it is hardware
related, write to Toshiba at the nearest location listed in appendix C of your
computer user’s manual.
Make sure the AC adaptor is connected. You
cannot use this feature without an AC adaptor.
If problems persist, consult your LAN
administrator.
Multi Media Port Replicator User’s Manual 43
Page 44

GB
Specifications
This appendix summarises the Multi Media Port Replicator’s technical
specifications.
Physical dimensions
Weight 600 grams
Size 166 (w) × 27/30 (h) × 190 (d) millimetres
Environmental Requirements
Conditions Ambient
Operating 5°C (41°F) to 35°C
Non-operating -20°C (-4°F) to 65°C
Thermal Gradient 20°C per hour maximum
Wet-bulb temperature 26°C maximum
Conditions Altitude (from sea level)
Operating -60 to 3,000 metres
Non-operating -60 to 10,000 metres maximum
Power Requirements
AC adaptor 100 - 240 volts AC
Multi Media 15 VDC
Port Replicator 3.0 amperes
Relative humidity
temperature
20% to 80%
(95°F)
10% to 95%
(149°F)
50 or 60 hertz (cycles per second)
44 User’s Manual Multi Media Port Replicator
Page 45

SelectBay
Ports
GB
CD-ROM drive Full-size, maximum 24-speed CD-ROM drive
module lets you run either 12 cm (4.72") or 8 cm
(3.15") compact disks without using an adaptor.
DVD-ROM drive Full-size, maximum six-speed DVD-ROM drive
module lets you run either 12 cm (4.72") or 8 cm
(3.15") DVDs or CDs without using an adaptor.
HDD Adaptor II Accommodates a 6, 12 or 18 GB secondary hard
disk drive.
Parallel Parallel printer or other parallel device
(ECP compatible)
Serial RS-232C compatible port (16550 UART
compatible)
External monitor 15-pin, analogue VGA port supports VESA
DDC2B compatible functions.
PS/2
Mouse/Keyboard
Computer connector A cable connects this connector to the
Line-out Enables connection of a stereo device for audio
Security lock slot Connects a security lock to anchor the Multi
Universal Serial Bus The Universal Serial Bus (USB) enables chain
Multi Media Port Replicator User’s Manual 45
Connects an external PS/2 mouse or PS/2
keyboard
computer’s Expansion port.
output.
Media Port Replicator to a desk or other large
object
connection of a number of USB-equipped devices
to one port on the Multi Media Port Replicator.
Page 46

GB
LAN connector
PC Card Slot
Built-in A jack enables easy connection to a local-area
network.
Built-in A PC card slot can accommodate one 5 mm
PC card (Type II). The slot supports CardBus
PC cards. An AC adaptor must be connected to
use the PC card slot. PC card sound is not
supported.
46 User’s Manual Multi Media Port Replicator
Page 47

TOSHIBA
Addendum Sheet
In a Windows® 98 environment, the computer might not recognize the
CD-ROM or DVD-ROM drive in an opt ional Multi Media Port Replicator, if a
PC card is installed in the computer or in the Multi Me dia Port Replicator.
In that case, follow the steps below.
1. Click Start on the Windows Task Bar, point to Settings and click Control
Panel.
2. Double-click the System icon to open the System Properties
window.
3. Click the Device Manager tab and dou ble-click Hard disk contr ollers.
4. Double-click Toshiba PCI-0105 IDE Controller.
5. Click the Resources tab and click the Use automatic settings check
box to clear the check mark.
6. Click an Input/Output Range and click the Change Setting … button to
open the Edit Input/Output Range dialog ue box.
NOTE: Some values cannot be changed. Select the one that can be.
7. Change the Value until the Conflict Information box displays the
message: No devices are conflicting.
8. Click OK to close the Input/Output Range dialog box.
9. Click OK to close the Resources dialogue box.
10. Click Yes to close the Creating a Forced Configuration
dialogue box.
11. Click Yes to restart the computer.
 Loading...