

OWNER'S MANUAL
Integrated Digital LCD TV
23HL900A
32EL900A
42HL900A
46HL900A
2012
Owner's Record
You will find the model number and serial number on
the back of the TV. Record these numbers in the spaces
provided below. Refer to them whenever you call upon
your TOSHIBA dealer regarding this product.
Model number:
Serial number:

Contents
Introduction................................................................................3
Welcome to Toshiba..............................................................3
Important Safety Instructions.................................................3
Installation........................................................................3
Use...................................................................................4
Service.............................................................................4
Cleaning.................................................................................5
Important information............................................................5
Getting started............................................................................7
Connecting an antenna...........................................................7
Exploring your new TV...........................................................7
Installing the remote control batteries..............................7
Effective range..................................................................7
Stand assembly instructions..................................................8
TV front and side panel controls..........................................10
TV back panel connections...................................................12
Learning about the remote control.......................................13
Learning about the menu system.........................................14
Turning on the TV................................................................14
Switching on the TV.......................................................14
Switching off the TV.......................................................14
Initial Installation..................................................................14
Setting the programmes.......................................................15
General Control....................................................................16
Selecting programme positions......................................16
Switching between two programme positions................16
Stereo and Bilingual transmissions................................16
Time Display..................................................................16
Quick Access..................................................................16
Information.....................................................................16
EPG................................................................................16
Changing picture format.......................................................17
Using the TV's features (General)............................................18
Picture..................................................................................18
Sound...................................................................................18
Setup....................................................................................19
Applications..........................................................................20
Preferences..........................................................................20
Media Player.........................................................................20
Start Media Player..........................................................20
Viewing Photos..............................................................21
Playing Music.................................................................21
Watching Videos........................................................... 21
To close the Media Player...............................................21
Connecting your TV..................................................................22
Connecting an HDMI or a DVI device...................................22
REGZA-LINK Connections....................................................23
Connecting a computer........................................................24
Connecting a USB Device.....................................................24
Reference Section....................................................................25
Troubleshooting...................................................................25
Specications.......................................................................26
Media Player Supported Format...........................................28
License Information used with Toshiba Televisions...............29
2
Introduction
Welcome to Toshiba
• Thank you for purchasing this Toshiba LCD Colour
Television. This manual will help you use the exciting
features of your new TV.
• Instructions in this manual are based on using the remote
control and not the buttons on the television.
• Please read all safety and operating instructions in this
manual carefully, and keep the manual for future reference.
Important Safety Instructions
Be sure to observe the following instructions and precautions to
ensure safe use of this TV.
Warning: To prevent injury, this apparatus must be securely
attached to the oor/wall in accordance with the installation
instructions. See page 3.
Installation
1) Always connect the power plug to an appropriate
electrical outlet equipped with 220-240V, AC 50Hz.
Never use the TV outside the specied voltage range. It
may cause a re or an electric shock.
2) Never insert or remove the power plug with wet hands.
This may cause an electric shock.
3) Never place the TV in an unstable location such as on a
shaky table, incline or location subject to vibration.
The TV may drop or fall off which may cause an injury
or damage.
4) Never block or cover the slots and openings in the
cabinet.
• Never place the TV so that it is facing upward or on
its side.
• Never place the TV in a closet, bookcase or other
similar area where the ventilation is poor.
• Never drape a newspaper, tablecloth or curtain on the
TV.
• When installing the TV against a wall, always keep
the TV at least 10cm away from the wall.
• Never place the TV on a soft unstable surface, such as
a carpet, or a cushion.
The inside of this TV will overheat if the ventilation
holes are covered, blocked or sealed, which may result in
a re.
5) Never place the TV near a heater or in direct sunlight.
The surface of the cabinet or power cord may melt and
result in a re or an electric shock.
6) Never place the TV in an area exposed to high humidity
levels, such as in a bathroom or close to a humidier.
This may cause a re or an electric shock.
7) Never place the TV next to a stove where it will be
exposed to oil, smoke, or steam, or in a location where
there is a large quantity of dust.
This may cause a re or an electric shock.
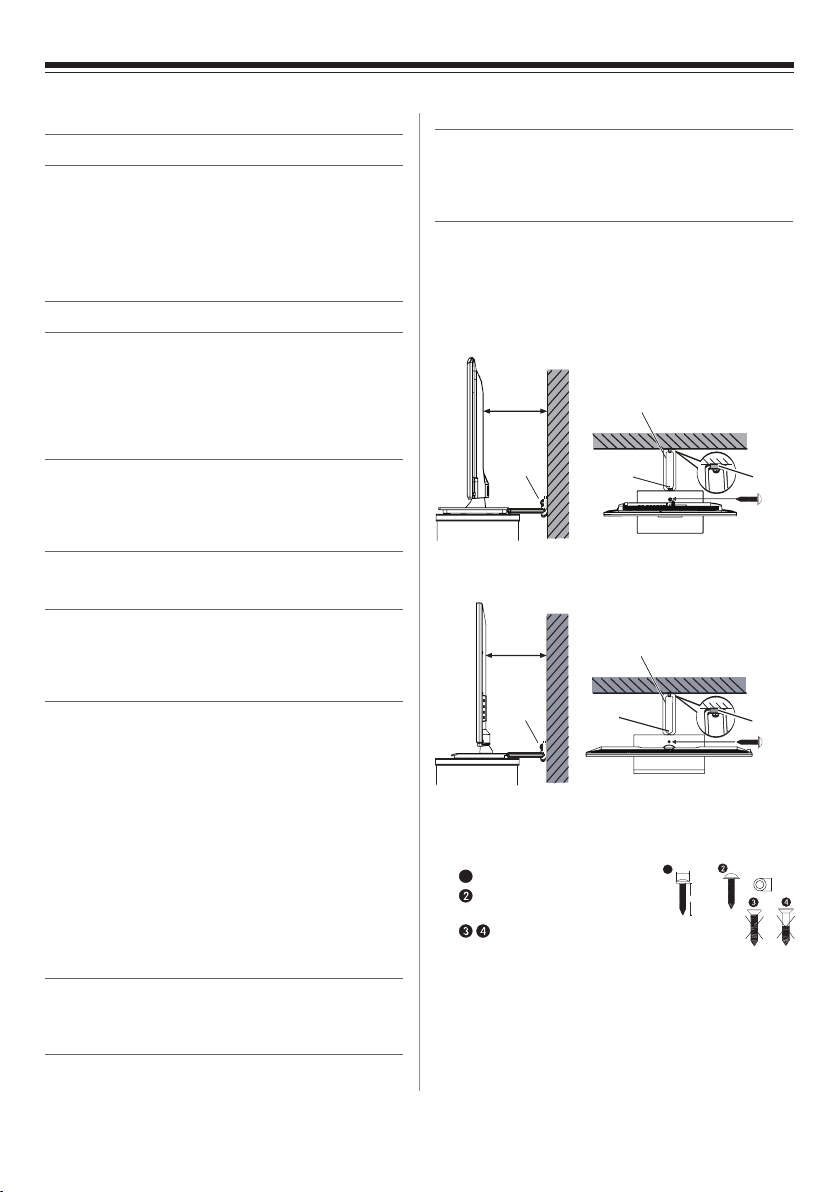
8) Always place the TV on the oor or a sturdy, level,
stable surface that can support the weight of the unit.
To secure the TV, use a sturdy strap from the base
plate backside hook to a wall stud, pillar, or other rm
immovable structure. Make sure the strap is tight, secure,
and parallel to the oor.
23HL900A
At least 10cm
Side view
Hook
Sturdy tie
(as short as possible)
Base plate
backside hook
Top view
Screw
(not supplied)
32EL900A/42HL900A/46HL900A
At least 10cm
Hook
Side view Top view
Wall mounting of the TV should only be performed
by qualied serving personnel. Use only with the wall
bracket specied by the manufacturer.
1
Panhead Screw: advised
Roundhead screw: a washer is
required
Flathead screw: can not be used
• The screw type is dependent on the actual mounting
surface. The metric thread size is 3.8-4.1mm
• Place the stand on a stable, level surface and secure
the TV set by using a single screw (not supplied)
through the fall prevention screw hole.
• Make sure to secure your TV set to a firm and
adequately thick surface.
*Stand style is dependent on model
Sturdy tie
(as short as possible)
Base plate
backside hook
1
9 ~ 10mm
metal masher
L ≥20mm
Hook
Hook
Screw
(not
supplied)
10mm
3

9) Precautions for moving the TV
When moving the TV, be sure to remove the plug from
the wall outlet and disconnect the antenna and audio/
video cables, as well as any steady ties.
Fire or electric shock may result if the power cord is
damaged.
When carry the TV, at least two people are needed. Be
sure to carry it upright.
Never carry the TV with the screen facing up or down.
• disconnect device, therefore the disconnect device
shall remain readily operable.
6) Never pull on the power cord when removing the plug
from the wall outlet.
Always hold the plug rmly when removing it. If the
power cord is yanked, the cord may become damaged
and a re or an electric shock may occur.
10) Precautions for installing an outdoor antenna
An outside antenna system should not be located in the
vicinity of overhead power lines, or other electric light or
power circuits.
If the antenna falls down or drop, it may cause injury or
electric shock.
Use
1) Never place hot objects or open ame sources, such as
lighted candles or nightlights, on or close to the TV.
High temperature can melt plastic and lead to res.
2) The apparatus shall not be exposed to dripping or
splashing and that no objects lled with liquid, such as
vases, shall be placed on the apparatus.
When liquids are spilled or small items are dropped
inside the TV, this may cause a re or an electric shock.
If small objects drop inside the TV, turn off the TV and
remove the power plug from the outlet immediately and
contact a service technician.
3) Never insert objects (metal or paper) or pour water
inside the TV through ventilation holes or other
openings.
These items may cause a re or an electric shock.
If these objects are inserted inside the TV, turn off the TV
and remove the power plug from the outlet immediately
and contact a service technician. Be specially careful that
children do not insert objects in the TV.
4) Never stand or climb on the TV.
Be specially careful in households with children to
prevent them from climbing on top of the TV.
It may move, fall over, break, become damaged or cause
an injury.
5) When the TV will not be used for a long period of time,
such as during vacation or travel, remove the power
plug from the wall outlet for safety.
• The TV is not completely disconnected from the
power supply line, as minute current is consumed
even when the power switch is turned off.
• The mains plug or an appliance coupler is used as the
7) Never cut, break, modify, twist, bunch up or bend the
cord or apply excessive force or tension to it.
Never place heavy objects on the power cord or allow it
to overheat as this may cause damage, a re or an electric
shock. Contact a service technician if the power cord is
damaged.
8) If there is thunder or lightning, never touch the antenna
cable or other connected cables.
You may suffer an electric shock.
Service
1) Never repair, modify or disassemble the TV by yourself.
It may cause a re or an electric shock. Consult a service
technician for inspection and repair.
2) When a malfunction occurs, or if smoke or an unusual
odour comes from the TV, turn off the TV and remove the
power plug from the outlet immediately.
Make sure that the smoke or smell has disappeared, then
contact a service technician. If the TV is still used in this
condition, it may cause a re or an electric shock.
3) If the TV is dropped or the cabinet is broken, turn off
the TV and remove the power plug from the outlet
immediately.
If the TV is still used in this condition, it may cause a re
or an electric shock. If the cabinet is broken, be careful
when handling the TV to prevent an injury. Contact a
service technician for inspection and repair.
4) When the TV reaches the end of its useful life, ask a
qualied service technician to properly dispose of the
TV.
Note:
The lamp unit contains a small amount of mercury.
Disposal of mercury may be regulated due to environmental
considerations.
Dispose of the used lamp unit by the approved method for
your area. For disposal or recycling information, please
contact your local authorities.
4
Cleaning
Avoid using chemicals (such as air refreshers, cleaning agents,
etc.) on or near the TV pedestal. Studies indicate that plastics
may weaken and crack over time from the combination effects of
chemical agents and mechanical stress (such as weight of TV).
Failure to follow these instructions could result in serious injury
and/or permanent damage to TV and TV pedestal.
1) Remove the power plug before cleaning.
Never use solvents such as gasoline or thinner to clean the
TV.
• These solvents may distort the cabinet or damage its
nish.
• If rubber or vinyl products remain in contact with the
TV for a long time, a stain may result.
If the cabinet becomes dirty, clean it with a soft, dry cloth.
When cleaning the surface of the LCD screen, wipe the
panel surface gently with a soft, dry cloth.
2) Periodically disconnect the power plug from the outlet
and check it.
If dust has collected on the power plug connectors, clean
off the dust with a dry cloth.
The dust may cause a re due to reduced insulation on the
plug.
1) About LCD screen
• If you have the LCD screen facing to the sun, the LCD
screen will be damaged.
• Be aware of locating the TV in the place such as
window side or outside of the room.
2) About cabinet and LCD screen
Never spray volatile compounds such as insecticide on the
cabinet and LCD screen.
This may cause a discolouration or damage the cabinet and
LCD screen.
3) Some pixels of the screen do not light up
The LCD display panel is manufactured using an extremely
high level of precision technology, however, sometimes
some pixels of the screen may be missing picture elements
or have luminous spots. This is not a sign of a malfunction.
Note: Interactive video games that involve shooting a “gun”
type of joystick at an onscreen target may not work with
this TV.
4) About interference
The LCD display may cause interference in image,
sound etc. of other electronic equipment that receives
electromagnetic waves (e.g. AM radios and video
equipment.)
Important information
If a television is not positioned in a sufciently stable location,
it can be potentially hazardous due to falling. Many injuries,
particularly to children, can be avoided by taking simple
precautions such as:
• U s i n g s t a n d s r e c o m m e n d e d b y t h e m a n u f a c t u r e r o f t h e
television.
•
Only using furniture that can safely support the television.
• E n s u r i n g t h e t e l e v i s i o n i s n o t o v e r h a n g i n g t h e e d g e o f t h e
supporting furniture.
•
Not placing the television on tall furniture (for e x a m p l e ,
cupboards or bookcases) without anchoring b o t h t h e f u r n i t u r e
and the television to a suitable support.
• N o t s t a n d i n g t h e t e l e v i s i o n o n c l o t h o r o t h e r m a t e r i a l s
placed between the television and supporting furniture.
• Educating c h i l d r e n a b o u t t h e d a n g e r s o f c l i m b i n g o n
furniture to reach the television or its controls.
Place the TV on a stable, level surface that can support the
weight of the TV. In order to maintain stability and prevent it
falling over, secure the TV to the level surface using the strap
located under the table top stand, or, to a wall using a sturdy tie
to the clip on the back of the table top stand.
5) About using under low temperature places
If you use the TV in a room of 0°C or less, the picture
brightness may vary until the LCD display warms up.
This is not a sign of a malfunction.
6) About afterimage
If a still picture is displayed, an afterimage may remain on
the screen, however, it will disappear soon. This is not a
sign of malfunction.
Exemptions
• Toshiba is not liable for any damage caused by res, natural
disaster (such as thunder, earthquake, etc.), acts by third
parties, accidents, owner’s misuse, or uses in other improper
conditions.
• Toshiba is not liable for incidental damages (such as prot
loss or interruption in business, modication or erasure of
record data, etc.) caused by use or inability to use of product.
• Toshiba is not liable for any damage caused by neglect of
the instructions described in the owner’s manual.
• Toshiba is not liable for any damage caused by misuse or
malfunction through simultaneous use of this product and
the connected equipment.
5
Trademark information
•
Manufactured under license from Dolby Laboratories.
Dolby and the double-D symbol are trademarks of Dolby
Laboratories.
•
The terms HDMI and HDMI High-Denition Multimedia
Interface, and the HDMI logo are trademarks or registered
trademarks of HDMI Licensing LLC in the United States
and other countries.
•
DVB is a registered trademark of Digital Video
Broadcasting Project.
• MPEG Layer-3 audio coding technology licensed from
Fraunhofer IIS and Thomson.
●
THIS PRODUCT IS LICENSED UNDER THE AVC
PATENT PORTFOLIO LICENSE FOR THE PERSONAL
AND NONCOMMERCIAL USE OF A CONSUMER TO
(i) ENCODE VIDEO IN COMPLIANCE WITH THE AVC
STANDARD (“AVC VIDEO”) AND/OR (ii) DECODE
AVC VIDEO THAT WAS ENCODED BY A CONSUMER
ENGAGED IN A PERSONAL AND NONCOMMERCIAL
ACTIVITY AND/OR WAS OBTAINED FROM A VIDEO
PROVIDER LICENSED TO PROVIDE AVC VIDEO. NO
LICENSE IS GRANTED OR SHALL BE IMPLIED FOR
ANY OTHER USE. ADDITIONAL INFORMATION
MAY BE OBTAINED FROM MPEG LA, LLC.
SEE HTTP://WWW.MPEGLA.COM
6
Getting started
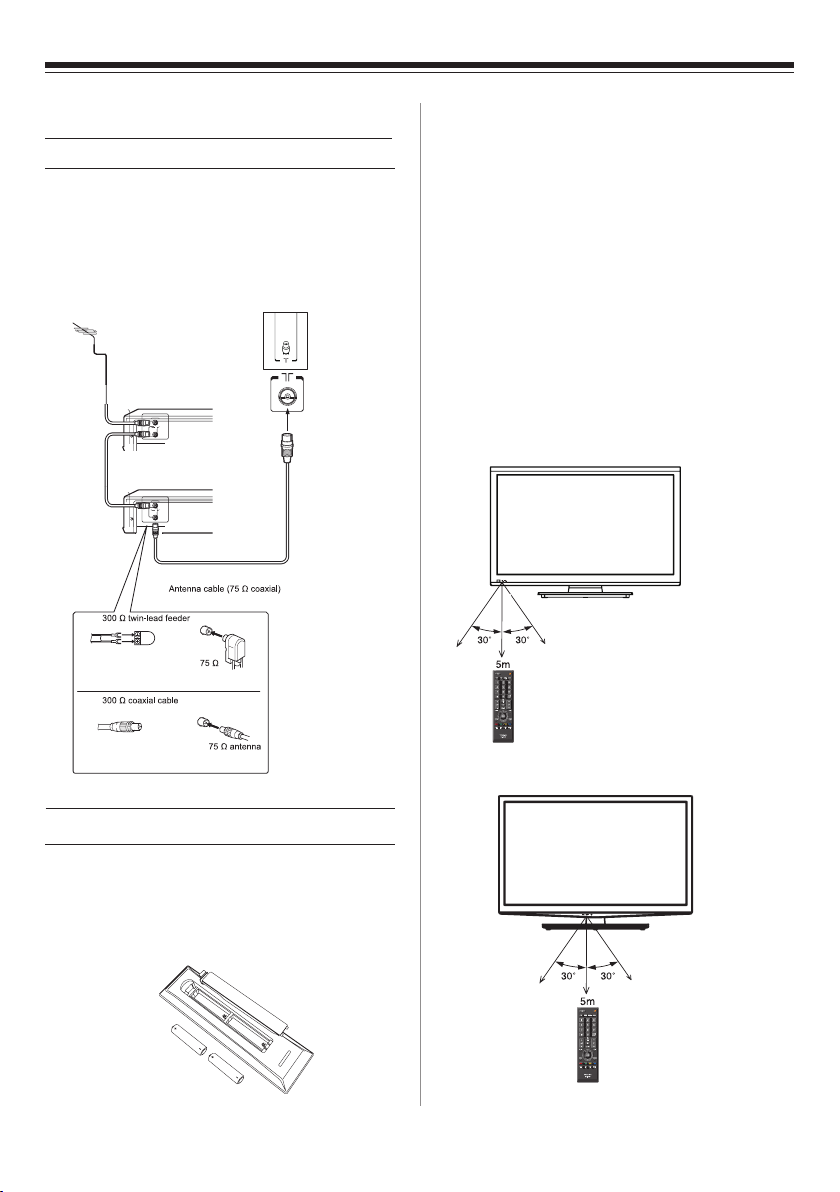
Connecting an antenna
Optimum reception of colour requires a good signal and will
generally mean that an outdoor antenna must be used. The
exact type and positioning of the antenna will depend upon
your particular area. Your Toshiba dealer or service personnel
can best advise you on which antenna to use in your area.
Before connecting the antenna cable, turn off all main power
switches.
Outdoor antenna
Decoder
TV back view
Media Recorder
Cautions:
• Dispose of batteries in a designated disposal area. Batteries
mustnotbeexposedtoexcessiveheatsuchassunshine,re
or the like.
• Attention should be drawn to the environmental aspects of
battery disposal.
• Never mix battery types or combine used batteries with new
ones.
Notes:
• If the remote control does not operate correctly, or if the
operating range becomes reduced, replace both batteries
with new ones.
• If the batteries are dead or if you will not use the remote
control for a long time, remove the batteries to prevent
battery acid from leaking into the battery compartment.
Effective range
23HL900A
Antenna adaptor
(not supplied)
Plug
(not supplied)
(not supplied)
antenna
terminal
terminal
Exploring your new TV
Installing the remote control batteries
Remove the battery cover.
Insert two AAA, 1.5V batteries matching the -/+ polarities of
the battery to the -/+ marks inside the battery compartment.
32EL900A/42HL900A/46HL900A
7
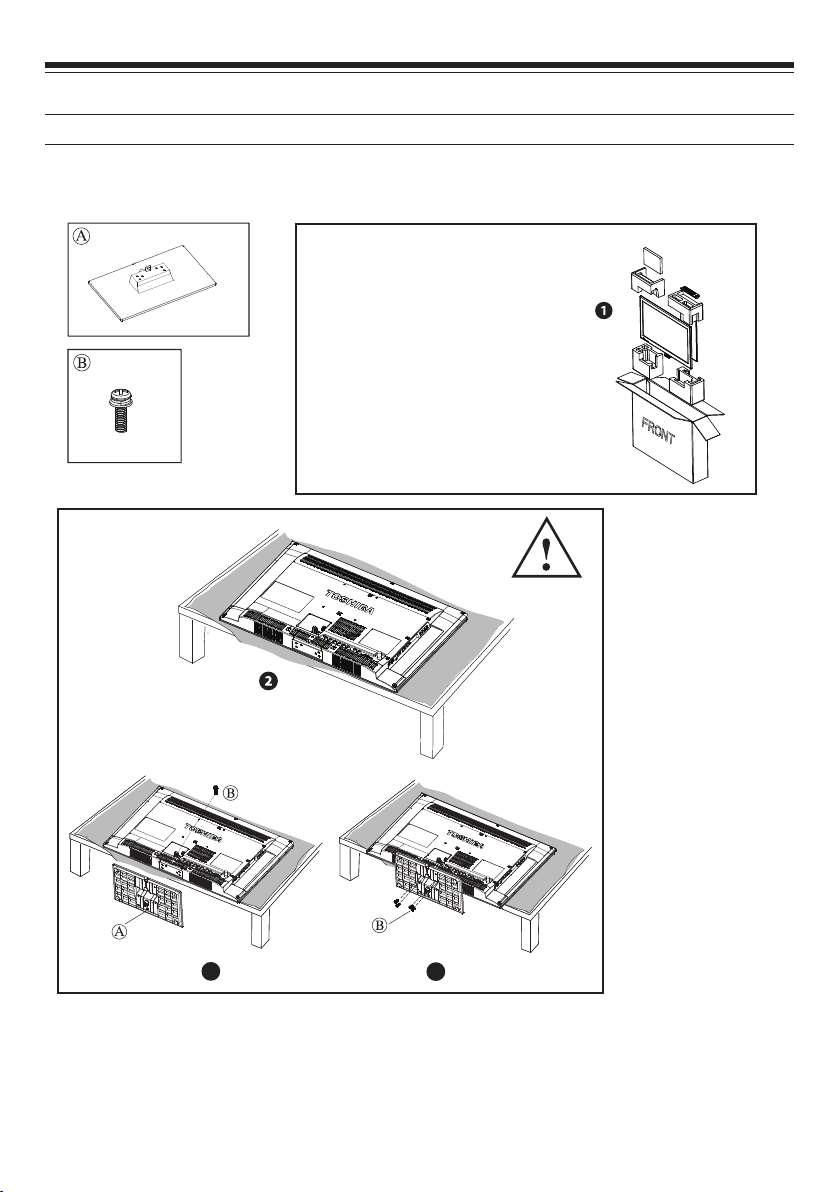
Stand assembly instructions
23HL900A
Parts included in box
x 5
x 1
Please take out parts according to the
instruction printed on the box
x 1
x 4
3
CAUTION: Before beginning pedestal assembly, carefully lay the front of the LCD panel face down on a flat, cushioned
surface such as a quilt or blanket. Leave the bottom of the unit protruding over the edge of the surface and assemble as
indicated above. Avoid using chemicals on or near TV pedestal or serious injury could result.
Note: Extreme care should always be used when attaching the pedestal stand to avoid damage to the LCD panel.
Warning: To prevent possible electric shock, protect the power cord from being pinched when attaching the pedestal stand.
4
8

32EL900A/42HL900A/46HL900A
Parts included in box
x 1
x 4
Please take out parts according to the instruction printed on the box
32EL900A/42HL900A
x 4
46HL900A
3
CAUTION: Before beginning pedestal assembly, carefully lay the front of the LCD panel face down on a flat, cushioned
surface such as a quilt or blanket. Leave the bottom of the unit protruding over the edge of the surface and assemble as
indicated above. Avoid using chemicals on or near TV pedestal or serious injury could result.
Note: Extreme care should always be used when attaching the pedestal stand to avoid damage to the LCD panel.
Push the pedestal stand horizontally into the main set until it is blocked.
Warning: To prevent possible electric shock, protect the power cord from being pinched when attaching the pedestal stand.
9

TV front and side panel control
You can operate your TV using the buttons on the TV control panel or the remote control. The back and side of the panel
provide the terminal connections to connect other equipment to your TV. (Refer to page 22 Connecting your TV)
23HL900A
Standby / On button
+/- control/volume buttons
Programme / Volume / AV Function
HDMI 1
1
HDMI 2
USB port
2
3 Digital audio output
Timer LED Window
Power LED Window
4 Headphone jack
32EL900A/42HL900A/46HL900A
HDMI 1
1
HDMI 2
2 USB port
3 Digital audio output
4 Headphone jack
10
IR Window
IR Window
Power LED Window
Timer LED Window
Standby /
On button
+/- control/
volume buttons
Programme /
Volume /
AV Function

Using the control panel on the front of the TV:
/
IR Window
Timer LED Window
Power LED Window
Point your remote control at this
area when selecting programme
position or adjusting the volume
level, etc.
Green LED:
“On Timer”/“Off Timer” /
“EPG Timer” On
Red LED: Standby
Green LED: Power On
Using the control buttons on the side of the TV:
• To alter the volume, press + or -. If the volume does not
change, press once and press + or - again.
• To alter the programme position, press + or -. If the
programme does not change, press once and press +
or - again.
• To select an external input, press and hold the
button until the “Input Source” list is displayed. To select an
external input, press repeatedly until the appropriate
input source is selected.
Using the terminals on the side panel:
1. HDMI 1 and HDMI 2: High-Denition Multimedia Interface
input receives digital audio and uncompressed digital video
from an HDMI device or uncompressed digital video from a
DVI device.
(Refer to page 22 Connecting an HDMI or a DVI device)
2. USB port: For use when inserting a USB device.
3. Digital audio output terminal: For use when connecting an
amplier with coaxial type digital audio input.
4. Headphone jack: For use with headphones.
Notes:
•Pleasealwaysrefertotheowner’smanualoftheequipmentto
be connected for full details.
•Insertingtheheadphoneplugwillmutethesoundfromall
speakers.
11

TV back panel connections
Before connecting any external equipment, turn off all main power switches. If there is no switch, remove the mains plug from the
wall socket.
23HL900A
5 6 7 8
32EL900A/42HL900A/46HL900A
AC IN~
5 6 7 8
5. AV terminal: Standard video and standard audio inputs
6. Component input terminals: For use when connecting
a high-denition component video device with standard
audio output.
7. RGB/PC Input terminals: For use when connecting a
computer. (Refer to page 24 Connecting a computer)
8. Antenna input terminal: Analogue TV/Digital DVB-T
antenna signal input.
12

Learning about the remote control
Location of control
Simple at-a-glance reference of your remote control.
3
4
7
8
10
14
16
18
20
21
22
12
5
6
9
12
11
13
15
17
19
24
23
1. For On/Standby mode
2. To select input from external sources
3. Still picture
4. To call up Teletext services
5. To turn the subtitle on/off
6. Stereo/Bilingual transmissions
7. Number buttons
8. To return to the previous programme
9. To toggle between ATV and DTV mode
10. To alter the volume
11. To change programme
12. In TV mode: To display onscreen information
In Text mode: To access index page
13. To mute the sound
14. To display Quick Access menu
15. To exit menus
16. To display the programme guide
17. To return to the previous level of the on-screen
menu
18. To display the on-screen menu
19.
on-screen menu
OK: To confirm the selection
20. Colour buttons: Text control buttons
21.
To reveal concealed text
22.
To hold a wanted page
23.
To enlarge text display size
24.
In normal picture mode: To
TV screen
In Teletext mode: To toggle between Teletext
and normal picture mode
up,
.
display clock on
13

Learning about the menu system
Turning on the TV
We suggest you familiarize yourself with the display charts
before using the menu system:
• Press MENU to display menu, then press ◄ or ► to select
main menu headings.
• Press OK, then press ▲ or ▼ to select sub menu headings.
• Press OK, ◄ or ► to select the required choice. Follow the
on-screen instructions. (The functions of each menu are
described in detail throughout the manual).
• Press RETURN to return the previous lever of the on-screen
menu.
• If you want to close the menu, press EXIT.
TV menu chart
OK
RETURN
EXIT
OK
RETURN
EXIT
OK
RETURN
EXIT
OK
RETURN
EXIT
OK
RETURN
EXIT
Enter
Select
Back
Exit
Adjust
Select
Back
Exit
Enter
Select
Back
Exit
Enter
Select
Back
Exit
Enter
Select
Back
Exit
PICTURE
Picture Settings
Active Backlight Control
3D Colour Management
Base Colour Adjustment
DNR
MPEG NR
SOUND
Dual
Bass
Treble
Balance
Base Boost
Surround Sound
Stable Sound
Dynamic Range Control
Digital Audio Output
SETUP
Channel Install
Channel Settings
Diagnostics
Automatic Power Down
Location
Software Upgrade
System Information
Reset TV
APPLICATIONS
EPG
Time Zone
Country Region
Clock
Sleep Timer
Demo
PREFERENCES
REGZA-Link Setup
Teletext
Panel Lock
Auto Format
4:3 Stretch
Blue Screen
Side Panel
Low
Low
Dual1
Home
As broadcaster
NSW/ACT
Auto
On
O
On
On
On
On
2
PICTURE menu
SOUND SETUP APPLICATIONS PREFERENCES
PICTURE
RETURN
SOUND menu
PICTURE
SOUND
SETUP APPLICATIONS PREFERENCES
RETURN
SETUP menu
PICTURESOUND
SETUP
APPLICATIONS PREFERENCES
RETURN
APPLICATIONS menu
PICTURE SOUND SETUP
APPLICATIONS
PREFERENCES
RETURN
PREFERENCES menu
PICTURESOUND SETUP APPLICATIONS
PREFERENCES
RETURN
Note for menu system:
●Ifyoudonotmakeaselectionforawhile,themenudisplay
disappears automatically.
Switching on the TV
Connect the power cord to a wall outlet, the power indicator
lights in red (standby mode).
Press the button on the remote control or the button on
the TV set to turn on the TV.
Switching off the TV
Press the button on the remote control or the button on
the TV set to switch to the standby mode.
Notes:
This TV is not fully disconnected from the main supply, as
•
minute current is consumed even when the TV is turned off.
When the TV will not be used for a long period of time, such
as during vacation or travel, remove the power plug from the
wall outlet.
If power is cut off while you are viewing the TV, the Last
•
Mode Memory function turns on the TV automatically when
...
power is applied again. If power is going to be off for a long
time and you are going to be away from your TV, unplug the
...
power cord to prevent the TV from turning on in your
absence.
Initial Installation
0
0
0
Before switching on the television put your decoder and
media recorder to Standby if they are connected and ensure
...
the antenna is connected to your television. To set up the
television, use the buttons on the remote control as described
on page 13.
...
...
1. Connect the mains plug and switch the TV on using the
...
...
...
...
...
...
...
...
side standby switch. Then the initial setup wizard will be
displayed. This wizard will appear the rst time that the
television is switched on and each time the television is
reset.
2. Press the OK button to start the wizard.
3. Select your Region by pressing the or button, then
press OK or to enter the next step.
4. Select your location by pressing the or button, then
press OK or to enter the next step. The location options
include Home and Store.
You can select either Home or Store mode.
• Press OK to enter the next step.
• Press or to select Scan, then press OK or to
automatically start searching for all available channels.
14

Notes:
• Home is recommended for normal home use. Select
Store when using a TV for displaying in a shop, etc.
•The searching progress bar will move along the line.
You must allow the television to complete the search.
5. You can also skip the initial setup process by selecting Skip
Scan.
6. During the setup, you can follow the hints available at
the bottom of the screen to return to the previous step by
pressing the ◄ button. Or press EXIT to exit or interrupt
the search halfway.
7. After the initial setup nishes, press OK to display the
channel list.
Setting the programmes
1. Press MENU, use or to select SETUP, then press OK
to enter.
2. Select Channel Install by pressing the or button, then
press OK or to enter the next step. The channel install
options include Automatic Search, Analogue Manual Scan
and Digital Manual Tune.
Channel Install
Automatic Search
Analogue Manual Scan
Digital Manual Tune
OK
Enter
Select
RETURN
Back
EXIT
Exit
...
...
...
Press the or button to select Automatic Search and
press OK to enter. The options include Digital & Analogue,
Digital and Analogue. Use the or button to select one,
then press OK to start channel scan.
Analogue Manual Scan
Analogue Manual Scan
System Australia
Search
Store Current Channel
Store as New Channel
Select
RETURN
Back
EXIT
Exit
44.00
Store
Store
Press the or button to select Analogue Manual Scan,
and press OK to enter. Use the or button to select your
System, then press the or button to select Search and
press OK to start channel scan. After scanning, select Store
Current Channel or Store as New Channel to store
selected channels.
Digital Manual Tune
Digital Manual Tune
Start Frequency (MHz)
0%
OK
RETURN
EXIT
Start Frequency (MHz) 0.00
Select
Back
Exit
Automatic Search
EXIT
Exit
Automatic Search
Status: Scanning...
Analogue Channels: 0
Digital Channels: 5
Press the or button to select Digital Manual Tune,
and press OK to enter the next step. Use the or button
to adjust Start Frequency, then press OK to start channel
scan.
3. After searching, the menu will remain on the screen for 10
62%
seconds, then the TV will enter the channel you searched.
Press on the remote control to browse all channels
you searched.
4. Press RETURN to go back to the previous menu. Press
EXIT to exit.
15

General Control
Selecting programme positions
After you have tuned the TV, you have several ways to navigate
through all programmes:
Press the Number buttons (a channel number has 3 digitals)
•
and you may omit the leading zeroes, which will be appended
automatically; (Please note that if you have channels with
different frequencies but the same channel number, the TV
will always tune to the first channel that has been stored into
the channel database. To view the other duplicating channels,
you can select the channels by using the buttons.)
Press to view the previous and next programme. The
•
channels are arranged in ascending order according to
the channel number.
Press OK when there is no menu on the screen. The Channel
•
List will appear. You can use ▲ or ▼ to choose the
programme you want. Then, press OK to show the
programme.
Switching between two programme positions
You can switch two programme positions without entering
actual position number each time.
1. Select the first programme position you want to view.
2. Select the second programme position with the Number
buttons (0-9).
3. Press , the previous channel will be displayed. Each time
you press the TV will switch back and forth between the
two programme positions.
Stereo and Bilingual transmissions
If stereo or dual language broadcasts are transmitted the word
Stereo or Dual will appear on the screen each time programme
positions are changed, disappearing after a few seconds. If the
broadcast is not in stereo the word Mono will appear.
Stereo: Press to select Stereo or Mono.
Bilingual: Bilingual transmissions are rare. If they are
transmitted the word Dual will display. Choose the required
programme number and if the word Dual appears press
to select Dual 1, Dual 2 or Mono.
Time Display
The time display facility allows the current broadcasted time to
be seen on the television screen.
Press on the remote control while watching a normal
television broadcast to see the time display from the
broadcaster. It will remain on screen for about 5 seconds.
Quick Access
Quick Access helps you access some options quickly such
as Picture Mode, Picture Size, Media Player and REGZA-
LINK. Press the QUICK button to display the Quick Access
menu and press▲or▼ to select the option you’d like to change.
Information
The on screen information will give the details of the
channel programme currently being viewed.
1. Press , the information screen will appear giving
details of the programme and event currently being
viewed.
2. Press again to close the information screen.
Electronic Programme Guide)
(
EPG
• Display the Electronic Programme Guide for digital
channels by pressing GUIDE, and the TV guide will
appear as below.
Wednesday, 20-Jan-2010,9:17:42
20/01/2010 9:00 10:00
20/01/2010 9:00 10:00
806 M6HD
806 M6HD
807 TF1 HD
807 TF1 HD
808 TV ONE
808 TV ONE
809 TV2
809 TV2
810 TVNZ 7
810 TVNZ 7
811 U
811 U
Pyt...
Pyt...
Back at Midday
Back at Midday
8:30-10:30 Wed, 20-Jan
8:30-10:30 Wed, 20-Jan
(No program details.)
(No program details.)
Next day Type filter
Next day Type filter
• Press or to navigate through different channels
and use or to navigate through different
programmes.
• Press the red button to list out the previous day's
programmes. Press the green button to list out the next
day's programmes.
• Press the yellow button to check detailed information,
if available, on a highlighted programme.
• To display the programme lter, press the blue button.
Use or to select Type.
• Press QUICK to bring up the schedule list menu. The
options include:
Channel Number: Select the channel you want to
watch.
Start Date: Set the watching date.
Start Time: Set the starting time of watching.
Repeat type: Set a repeat type for reminder.
Use / or / to select Add and press OK to add
the schedule into your schedule list. When the time
you set comes, a message will pop up to remind you to
switch to the scheduled channel.
• Press 0 to check all your schedule list information. If
you want to reedit or delete a schedule, use or to
select it and press OK to enter. Press the red button to
add more schedules.
• When TV is in standby, it will turn on and change to
the reserved channel automatically at the time you
set up.
Wednesday, 20-Jan-2010,9:17:42
Back at Midday
Back at Midday
Deal Or No Deal Mary, queen of shops
Deal Or No Deal Mary, queen of shops
Infomertial Will & Grace Hustle
Infomertial Will & Grace Hustle
News Summary
News Summary
Journey
Journey
Good morning
Good morning
Travel JournalsS pr...
Travel JournalsSpr...
QUICK
Entertainment
Entertainment
Add schedule Schedule list
No informationHindsight
No informationHindsight
16

Changing Picture Format
Depending on the type of broadcast being transmitted, programmes can be viewed in a number of formats. Press the QUICK button
and select Picture Size. Press OK to display the option list, including Wide, 4:3 Stretch, Super Live, 14:9, Subtitle, and Cinema.
Use the or button to select one format.
“Note: Using the special functions to change the size of the displayed image (i.e. changing the height/width ratio) for the purposes of
public display or commercial gain may infringe on copyright laws.”
Use this setting when watching a
widescreen DVD, widescreen video
tape or a 16:9 broadcast (when
Wide
4:3 Stretch
Super Live
14:9
available). Due to the range of
widescreen formats (16:9, 14:9 etc.)
black bars may be visible on the top
and bottom of the screen.
Use this setting to view a true 4:3
This stretches the left and right sides of
a normal picture (4:3 aspect ratio) to ll
the screen, without making the picture
appear unnatural. The top and bottom
of the picture are slightly cut off.
This zooms up the wide picture (14:9
aspect ratio) to the upper and lower
limits of the screen.
broadcast.
Subtitle
Cinema
When subtitles are included on a
letterbox format broadcast, this setting
will raise the picture to ensure that all
This zooms up the wide picture (16:9
the text is displayed.
aspect ratio) to the full screen.
17

Using the TV’s features (General)
Picture
Press MENU and select PICTURE by using the ◄ or ►
button. Press OK to enter the PICTURE menu.
PICTURE
Picture Settings
Active Backlight Control
3D Colour Management
Base Colour Adjustment
OK
Enter
Select
RETURN
Back
EXIT
Exit
DNR
MPEG NR
On
O
Low
Low
Picture Settings: press OK to enter its submenu. The options
are as below.
Picture Mode: selects a suitable picture effect. The options
include Standard, Dynamic, Mild, User and Movie.
Back Light: sets the backlight level.
Contrast: sets the lightness and darkness values of the picture.
Brightness: sets the brightness value for the picture.
Colour: sets the colour value for the picture.
Tint: sets the tint of the colour.
Sharpness: sets the sharpness value.
Black/White Level: sets the black/white level. The options
include Off, Low, Middle and High.
Cinema Mode: turns on or off the cinema mode.
Colour Temperature: press OK to display its submenu.
You can set Medium, Warm, Cool and User.
Game Mode: turn on or off the game mode. (not available in
TV mode.)
Reset: press OK and conrm OK to restore all picture
settings to the default.
Active Backlight Control: enables or disables the active
backlight control feature.
3D Colour Management: enables or disables the 3D colour
management feature. When set to On, the feature is enabled and
the Base Colour Adjustment is available.
Base Colour Adjustment: press OK to enter its submenu. You
can make adjustment for individual colours, Red, Green, Blue,
Yellow, Magenta and Cyan to suit personal preference. Or you
can select Reset and press OK to restore all the colour
adjustment to the default.
...
...
DNR: selects an option from Off, Low, Middle and High.
MPEG NR: selects an option from Off, Low, Middle and
High.
Press RETURN to go back to the previous menu.
Press EXIT to exit.
Sound
Press MENU and select SOUND by using the or button.
Press OK to enter the SOUND menu.
OK
Adjust
Select
RETURN
Back
EXIT
Exit
Dual: sets Dual1 or Dual2, if available, for an analogue TV.
Base: sets the base.
Treble: sets the treble.
Balance: sets the balance.
Bass Boost: when turned on, enhances the depth of the sound.
Surround Sound: turns on or off the surround sound feature.
Stable Sound: when turned on, reduces the volume level
differences between channels.
Dynamic Range Control: enables or disables the dynamic
range control feature. (Only available in TV and HDMI
modes)
Digital Audio Output: press OK to enter its submenu.
Audio Format: selects an audio format, PCM or Auto.
Note: When in HDMI mode, the Audio Format option
is grayed out and set to PCM only.
Audio Delay: sets to Auto or Manual for audio delay.
Audio Delay Time (ms): sets the audio delay time.
Headphone Setting: this setting is used to set the sound
output when headphones are connected. Options include
Speaker link and Headphone level.
Speaker
Link
On
Off
Sound is output
(–
Sound is output
(Headphone level
menu is available.)
SOUND
Dual
Bass
Treble
Balance
Base Boost
Surround Sound
Stable Sound
Dynamic Range Control
Digital Audio Output
Dual1
On
Headphone Speakers
+ is available.)
No sound
Sound is output
(–
+ is available.)
0
0
0
...
18

Press RETURN to go back to the previous menu.
Press EXIT to exit.
Setup
Press MENU and select SETUP by using the ◄ or ► button.
Press OK to enter the SETUP menu.
SETUP
Updating Wizard
Updating......
Please DO NOT unplug the USB dongle and turn o the TV set during rmware
updating!
38%
Channel Install
Channel Settings
Diagnostics
Automatic Power Down
OK
Enter
Select
RETURN
Back
EXIT
Exit
Location
Software Upgrade
System Information
Reset TV
Home
On
...
...
...
...
...
...
Channel Install: allows you to install the channels.
Channel Settings: allows you to make channel settings like
Channel Skip, Channel Sort, Subtitle and Audio, and
Parental Control.
Diagnostics: shows the signal strength, signal quality,
frequency, service ID, network ID and network name. (Only
available in DTV mode)
Automatic Power Down: turns on or off the automatic power
down feature. When set to On, the TV will turn into standby
if there is no operation for 4 hours. (Available when select
Home.)
Location: selects the location, Home or Store.
Software Upgrade: allows you to upgrade the TV's software.
Press OK to enter its submenu.
USB Upgrade: plug a USB device stored with the new
software to the TV rst. Then press OK to display the
following screen.
Updating Wizard
1: “V0.23” update to “V0.24”
When the updating process nishes, you can see the
following message on the screen.
Updating Wizard
Please remove the USB device and restart the TV again.
Power
Press the power button to turn the TV into standby and
again to restart the TV.
System Information: displays the system information such as
model name, version and serial number.
Reset TV: press OK and conrm OK to reset all the TV
settings to the default. Then the initial setup wizard will
appear.
Press RETURN to go back to the previous menu.
Press EXIT to exit.
Yes
No
Select NextE xit
EXIT
Use ▲ or ▼ to select "Yes" and press OK or ► to start
updating. The screen appears as below.
19

Applications
Press MENU and select APPLICATIONS by using the ◄ or
► button. Press OK to display the APPLICATIONS menu.
APPLICATIONS
EPG
Time Zone
Country Region
Clock
OK
Enter
Select
RETURN
Back
EXIT
Exit
Sleep Timer
Demo
As broadcaster
NSW/ACT
EPG: goes to electronic programme guide.
Time Zone: selects a time zone.
Country Region: selects a country region.
Clock: allows you set the date, time, power on timer, power on
channel and power off timer.
Note: either the power on timer or power off timer is activated,
the timer LED on the front cabinet will light up in green.
Sleep Timer: sets a time for sleep timer.
Demo: only available in Store mode.
Note: the hint of TV's switching off will appear during the last
minute if power off timer or sleep timer is activated. Press
EXIT to keep the TV on and cancel TV's shutting down.
Press RETURN to go back to the previous menu.
Press EXIT to exit.
...
...
...
one-touch play and system standby function between CEC
devices.
Teletext: selects a teletext mode, Auto or LIST.
Panel Lock: when set On, the side panel buttons are locked.
Note: only side power button is working in case of changing
from "On" to "Standby". And please use the remote control
when you turn on TV again!
Auto Format: turn on or off auto format function.
4:3 Stretch: turn on or off 4:3 stretch function.
Blue Screen: When set On, the TV will appear as a blue screen
and the sound will be muted if no signal is received.
Side Panel: when the picture format is 4:3 or 14:9, select a
kind of side panel to make viewing in bright or dark conditions
more comfortable.
Press RETURN to go back to the previous menu.
Press EXIT to exit.
Media Player
Start Media Player
• Plug in a USB device rst.
• To display the Media Player window, press QUICK on the
remote control and select Media Player by pressing the ▲
or ▼ button.
• Press OK to continue.
The following menu will be displayed automatically.
Media Player
Preferences
Press MENU and select PREFERENCES by using the or
button. Press OK to display the PREFERENCES menu.
PREFERENCES
REGZA-Link Setup
Teletext
Panel Lock
Auto Format
OK
Enter
Select
RETURN
Back
EXIT
Exit
4:3 Stretch
Blue Screen
Side Panel
Auto
On
On
REGZA-Link Setup: allows you to make REGZA-Link
settings. When CEC devices are connected to the HDMI
terminals, you can enable the REGZA-LINK function so that
...
2
Photo
Select Enter
Music Video
OK
Supported le formats:
Photo: JPEG
Music: MP3
Video: Detailed information is described on page 28
Notes:
• Some USB compliant devices may not be supported.
• If the USB device is not recognized after power off/on or
FirstTimeInstallation,rst,plugtheUSBdeviceoutand
power off/on the TV set. Plug the USB device in again.
• Do not use a USB Hub.
• Youmustobtainanyrequiredpermissionfromcopyright
owners to use copyright content. Toshiba cannot and does
not grant such permission.
20
EXIT
Exit

• DependingonthelesizeandamountinyourUSBstorage
device, it may take some time for loading to view. A message
willdisplayon-screenwhenloadinglesfromtheUSB
storage device.
• Some USB keys and USB products like digital cameras
or mobile phones are not fully compatible with USB 2.0
standard so they may not work with the Media Player.
Not all USB keys or devices are compatible with the USB
function. Not all above formats are supported. The encoding
formatsofyourleswilldeterminewhetherornottheycan
be used.
• Non-supportedcharacterswillbereplacedwithasquare
(□).
Viewing Photos
To display photos, if available.
1. Select Photo in Media Player by using the◄ or ► button,
then press OK to continue.
2. Press MENU to display the photo menu. The options
include
- Parser: You can select Recursive to display all photos
stored in the USB device.
3. Use the ▲/▼/◄/► button to select a photo.
4. Select a photo, press OK to watch, and a slide show begins
from the selected photo. Press OK to pause the photo if you
want to rotate the paused photo. Press MENU to display the
options which allow you to play, pause or rotate the photo or
select different play modes and displaying effects, etc..
5. Follow the instructions at the bottom of the TV to perform
relative functions, then press OK to continue.
:
- Sort: Sort folders and photos by modication Date or
Name.
- Audio only: Select it and press OK, you can listen to
music with the screen turned off. Any key press will turn
on the screen.
5. Follow the instructions at the bottom of the TV to perform
relative functions.
Watching Videos
To watch videos, if available.
1. Select Video in Media Player by using the ◄ or ►button,
then press OK to continue.
2. Press MENU to display the video menu. The options
include:
- Sort: Sort folders and videos by Type, modication Date
or Name.
- Parser: You can select Recursive to display all videos
stored in the USB device.
3. Use the ▲/▼/◄/► button to select a video.
4. Select a video, press OK to watch, and an automatic
playback begins from the selected video. Press MENU to
display the options which allow you to play or pause the
video, select different play modes, picture modes and picture
size settings.
5. Follow the instructions at the bottom of the TV to perform
relative functions.
To close the Media Player
• Press EXIT on the remote control to close the Media Player.
Playing Music
To play music, if available.
1. Select Music in Media Player by using the or button,
then press OK to continue.
2. Press MENU to display the music menu. The options
include:
- Sort: Sort folders and music by Name, Genre, Artist or
Album.
- Parser: You can select Recursive to display all music
stored in the USB device.
3. Use the / / / button to select a music.
4. Select a music, press OK to play, and an automatic playback
begins from the selected music. Press MENU to display the
options which allow you to play or pause the music, select
different play modes, etc..
- Show lyrics: This option is available for the music with
lyrics. Select it and use the or button to turn on/off
lyrics synchronized display.
21

Connecting your TV
Connecting an HDMI or a DVI device
The HDMI input on your television receives digital audio
and uncompressed digital video from an HDMI source device
or uncompressed digital video from a DVI (Digital Visual
Interface) source device.
This input is designed to accept HDCP (High-Bandwidth Digital
Content Protection) programme material in digital form from
EIA/CEA-861-D compliant consumer electronic devices (such
as a set-top box or DVD player with HDMI or DVI output).
Notes:
•Whenturningonyourelectroniccomponents,turnontheTV
rst,andthentheHDMIorDVIdevice.
•Whenturningoffyourelectroniccomponents,turnoffthe
HDMIorDVIdevicerst,andthentheTV.
• SomeearlyHDMIequipmentmaynotworkproperlywith
your latest HDMI TV.
• SupportedAudioformat:LinearPCM,samplingrate
32/44.1/48kHz.
23HL900A
HDMI
Input
Sockets
(Black)
HDMI device
To Connect an HDMI Device
Connect an HDMI cable (type A connector) to the HDMI
terminal.
For proper operation, it is recommended that you use an HDMI
cable with the HDMI Logo ( ).
Notes:
• If your HDMI connection is capable of 1080p and/or your
television is capable of refresh rates greater than 50Hz, you
will need a Category 2 cable. Conventional HDMI/DVI cable
may not work properly with this mode.
• HDMIcabletransfersbothvideoandaudio.Separate
analogueaudiocablesarenotrequired(seeillustration).
• ToviewtheHDMIdevicevideo,pressthe button to select
HDMI1 or HDMI2.
32EL900A/42HL900A/46HL900A
HDMI
Input
Sockets
(Black)
HDMI device
22

To Connect a DVI Device
Connect an HDMI-to-DVI adaptor cable (HDMI type A
connector) to the HDMI terminal.
Notes:
• TherecommendedHDMI-to-DVIadaptorcablelengthis
6.6 ft (2m).
• AnHDMI-to-DVIadaptorcabletransfersvideoonly.
23HL900A
HDMI
Input
Sockets
HDMI to DVI
Adapter Cable
(not supplied)
REGZA-LINK Connections
Note:ThetermsHDMIandHDMIHigh-DenitionMultimedia
Interface, and the HDMI logo are trademarks or registered
trademarks of HDMI Licensing LLC in the United States and
other countries.
The basic functions of connected audio/video equipment can
be controlled using the television's remote control if a REGZALINK compatible device is connected.
23HL900A
The back of your television
Playback equipment
AV amplier
HDMI out
Playback equipment
HDMI outHDMI in
HDMI out
32EL900A/42HL900A/46HL900A
HDMI to DVI
Adapter Cable
(not supplied)
HDMI
Input
Sockets
32EL900A/42HL900A/46HL900A
The back of your television
Playback equipment
HDMI out
23
AV amplier
HDMI outHDMI in
Playback equipment
HDMI out

Notes:
• It is recommended that for correct operation all audio/video
devices are connected using HDMI cables branded with the
HDMI logo ( ). If several devices are connected,
the REGZA-LINK feature may not operate properly. After
connectingtheequipmentusetheREGZA-LINK menu to
setupthedesiredoptions.Theconnectedequipmentmust
also be set. For details see the operation manual for each
connected device.
•TheREGZA-LINK feature uses CEC technology as
regulated by the HDMI standard. This feature is limited to
models incorporating Toshiba's REGZA-LINK. However,
Toshiba is not liable for those operations. Refer to
individual instruction manual for compatibility information.
Connecting a USB Device
Notes:
• You can connect a USB device to your TV by using the
USB port of the TV. This feature allows you to display/play
music,photoorvideolesstoredinaUSBdevice.
• ItispossiblethatcertaintypesofUSBdevices(e.g.MP3
players) may not be compatible with this TV.
• Youmaybackupyourlesbeforemakinganyconnections
to the TV set in order to avoid any possible data loss.
Notethatmanufacturerwillnotberesponsibleforanyle
damage or data loss.
• DonotpullouttheUSBdevicewhileplayingale.
CAUTION: Quickly plugging and unplugging USB devices
is a very hazardous operation. Especially, do not repeatedly
quicklyplugandunplugthedevices.Thismaycausephysical
damage to the TV and especially the USB device itself.
Connecting a Computer
To Connect a Computer
With either an RGB/PC or an HDMI connection, you can
watch your computer’s display on the television.
When connecting a PC to the PC input on television, use an
analogue RGB (15-pin) computer cable.
PC VGA Cable
(Not supplied)
To use a PC, set the monitor output resolution on the PC before
connecting it to the television. To display the optimum picture,
use the PC setting feature.
Notes:
• SomePCmodelscannotbeconnectedtothistelevision.An
adaptor is not needed for computers with a compatible mini
D-sub 15-pin terminal.
• DependingontheDVD’stitleandthespecicationsofthe
PC on which you are playing the DVD-Video, some scenes
may be skipped or you may not be able to pause during
multiangle scenes.
Or
USB Device Connection
Plug your USB device to the USB port of the TV.
USB Device
24

Reference Section
Troubleshooting
Before calling a service technician, please check the following
table for a possible cause of the symptom and some solution.
Symptom and solution
Why is there no sound or picture?
● Check that the television is on and that all connections
are made properly.
Why doesn't the video/DVD being played show on-screen?
● Make sure the VCR or DVD player is connected to the
television, then select the correct input by pressing .
.
Why is there a good picture but no sound?
● Check all cable connections and that the volume has not
been turned down or that the sound has not been muted.
Why doesn't the remote control work?
● Check that the batteries aren't dead or inserted
incorrectly.
Why are there problems with text?
● Good performance of the text depends on a strong
broadcast signal. If the text is unreadable or garbled,
check the antenna, satellite or cable connection. Go to
the main index page of the text service and look for the
User Guide. This will explain the basic operation of
text in some detail.
Why don’t the devices connected via HDMI operate
properly?
● Make sure to use cables with the HDMI logo. Some early
HDMI equipment may not work properly with the latest
HDMI TV products, due to adoption of new standards.
Why is the VCR/DVD picture in black and white?
● Check the correct input has been AV or COMPONENT.
Why did TV turn off by itself?
● After roughly 15 minutes without any input video signal
in TV mode, the TV will turn off to save power.
Why are the four coloured text numbers visible but no text?
● Text has been selected while viewing an external source.
No text will appear on screen or a box may appear
stating no information is available. Select a broadcasting
channel and press to access.
25

Specifications
Model
23HL900A, 32EL900A, 42HL900A, 46HL900A
Power source
~220-240V 50Hz
Power consumption
23HL900A: 36W
32EL900A: 70W
42HL900A: 85W
46HL900A: 110W
Standby (approx)
< 0.5W
Dimensions (includes foot stand)
23HL900A: 379.5mm(H) 552.3mm(W) 165.1mm(D)
32EL900A: 516.7mm(H) 748mm(W) 209.1mm(D)
42HL900A: 647.5mm(H) 973mm(W) 247.4mm(D)
46HL900A: 687.3mm(H) 1058.5mm(W) 247.3mm(D)
Mass (Weight)
23HL900A: 3.6kg
32EL900A: 8.5kg
42HL900A: 14.5kg
46HL900A: 17.5kg
Analogue TV system (Antenna input)
Channel coverage:
PAL B/G (CCIR) VHF 0 ~ 12
UHF 27 ~ 69
CATV C2, C10, C31,
S2 ~ S44
Digital TV System
Compliant Standard: DVB-T
Video Decoding: MP @ ML & MP @ HL
Audio Decoding: Dolby® Digital MPEG (1 & 11)
Audio Sampling Rate: 32, 44.1, 48 kHz
Digital TV Terrestrial Tuner / Demodulator
Frequency: 51~858 MHz
Bandwidth: 7 MHz/8MHz
Demodulator: COFDM
FFT Mode: 2K/8K
Constellation: QPSK, 64 QAM
Guard Interval: 1/8, 1/16
Inner Coding Rate: 2/3, 3/4
Component video input terminals (the signal format)
480i, 480p, 576i, 576p, 720p (50/60 Hz), 1080i (50/60Hz)
(These signal formats are converted to match the number
of pixels of the LCD panel.)
Composite colour system (analogue TV system)
PAL, SECAM, NTSC 3.58/4.43
Aspect ratio
16:9
Visible size (diagonal)
23HL900A: 58.5cm
32EL900A: 80cm
42HL900A: 107cm
46HL900A: 117cm
Number of pixels
23HL900A: 1920(H) x 1080(V) dots
32EL900A: 1366(H) x 768(V) dots
42HL900A: 1920(H) x 1080(V) dots
46HL900A: 1920(H) x 1080(V) dots
Sound output (at 10% distortion)
23HL900A: 3Wx2
32EL900A: 7Wx2
42HL900A: 10Wx2
46HL900A: 10Wx2
Input/Output terminals
Antenna Input: 75 Ω RF Input
Composite Input:
Video: RCA, CVBS
Audio: RCA, L/Mono+R
Component Input:
Video: RCA, Y, PB/CB, PR/CR
Audio: RCA, L/Mono+R
HDMI Input (type A): 19pin, A/V Digital
RGB/PC Input:
Mini D-sub: 15 pin, Analogue RGB
USB port: USB 2.0
Flash Drive thickness: 9mm (max.)
Media Player Interface:
Version: USB 2.0
26

USB class: Mass Storage
File system: FAT16 and FAT32
Digital Audio Output: Coaxial (Bitstream/PCM)
Headphone jack: 3.5mm (Diameter) stereo
Operation condition
Temperature: 0˚C - 35˚C (32˚F - 94˚F)
Humidity: 20% - 80% (No moisture condensation)
Wall mount information
23HL900A: VESA (100mm x 100mm, M4)
32EL900A: VESA (200mm x 100mm, M6)
42HL900A: VESA (400mm x 400mm, M8)
46HL900A: VESA (400mm x 400mm, M8)
Supplied accessories
Owner's manual (1)
Remote control (1)
Batteries (2)
Power cord (1) (Only supplied by 32EL900A, 42HL900A
and 46HL900A)
Registration card (1)
Warranty card (1)
Stand installation sheet (1)
Pedestal screws (4) (For 23HL900A, 5 screws are
supplied)
● Design and specifications are subject to change without
notice.
●NeverserviceorremodeltheTVbyyourself.Ifmay
expose you to a fire hazard or dangerous voltages.
27

Media Player Supported Format
Media
Movie
File
Extension
.avi
.mp4,
.mov,
.m4v
.mkv
.mpg,
.mpeg
Format
Video Audio (Maximum resolution/Bit rate etc.)
MPEG2 MP@HL
H.264 BP LV4
H.264 MP LV4
H.264 HP LV4
Motion JPEG
H.264 BP LV4,
H.264 MP LV4,
H.264 HP LV4
H.264 HP LV4
MPEG2 MP@HL,
MPEG1
MPEG1 layer2,
MP3,
AC3,
MPEG4 AAC-LC
MP3,
MPEG4 AAC-LC
MPEG1 layer1/2,
MP3,
AC3,
MPEG4 AAC-LC
MPEG1 layer2,
AC3,
LPCM
Motion JPEG: 320X240 / 30M bit/sec
MPEG1: 768x576 / 1.8M bit/sec,
MPEG2: 1920x1080 / 40M bit/sec
Remarks
1920x1080 / 40M bit/sec,
1920x1080 / 40M bit/sec
1920x1080 / 40M bit/sec
.ts,
.mpg,
.mpeg
MPEG2 MP@HL,
H.264 MP LV4,
H.264 HP LV4
MPEG1 layer2,
AC3,
MPEG2 AAC-LC,
MPEG4 AAC-LC,
MPEG4 HE-AAC
28
1920x1080 / 40M bit/sec
ces/tibK 023 ot 23 morf :etar tiB3PM3pm.cisuM
0468x06351=HxWgpj.otohP

License Information used with Toshiba Televisions
The software pre-installed in the TOSHIBA Digital Televisions consists of multiple, independent software components. Each
software component is copyrighted by TOSHIBA or a third party.
The TOSHIBA Digital Televisions use software components that are distributed as freeware under a third-party end-user
license agreement or copyright notice (hereinafter referred to as a "EULA"). Some EULAs require that the source code of the
applicable component be disclosed as the condition for distributing the software component in executable format.
You can check the software components subject to such EULA requirements on the following Home Page:
URL: http://www.mytoshiba.com.au
In addition, some of the software components which are used in Toshiba Digital Televisions include the software that are
made or developed originally by TOSHIBA. These software and accompanied documents are copyrighted by TOSHIBA, and
protected by Copyright Act, an international treaty's articles and other governing laws. The software components which are
made or developed originally by TOSHIBA and not subject to EULAs are not a target of source code offering.
The Toshiba warranty provided in respect of the Digital TV is the only warranty provided and no additional warranties are
provided in respect of the software components subject to EULAs.
Some of the software components distributed under EULAs are made available for use by the user on the premise that they
are not copyrighted or warranted by TOSHIBA or any third party. These software components are licensed to the user free of
charge and therefore not covered by any warranty within the scope of the applicable laws. These software components are
provided in "as is" condition without any warranty, whether express or implied. "Warranty" here includes, but not limited to, an
implied warranty for marketability or fitness for specific uses. All risks associated with the quality or performance of these
software components are assumed by the user. TOSHIBA shall not be liable whatsoever for any cost of repair or correction or
other incidental expense incurred in connection with a defect found in any of these software components. Unless specified
under the applicable laws or in a written agreement, a party who changes or redistributes the software with consent from the
copyright holders or based on the aforementioned licenses shall not be held liable whatsoever for any loss arising from the
use of or inability to use such software components. The same applies even when the copyright holders or relevant third
parties have been informed of the possibility of such loss. "Loss" here includes normal, special, incidental and indirect loss
(including, but not limited to, the loss of data or its accuracy; loss incurred by the user or any third party; and interface
incompatibility with other software). Please read each EULA for details on the use conditions and items that must be observed
regarding these software components.
The table below lists the software components pre-installed in the TOSHIBA Digital Televisions, which are subject to EULAs.
The user should read the applicable EULAs carefully before using these software components. The EULAs are exhibited in
their original text (English) as exactly written by the respective parties other than TOSHIBA.
Pre-Installed Software EULA (refer to website for details)
freetype
zlib
Unicode
png
http://www.freetype.org/FTL.TXT
http://www.zlib.net/zlib_license.html
http://source.icu-project.org/repos/icu/icu/trunk/license.html
http://www.libpng.org/pub/png/libpng.html
29

72-MT10AN-AUN1C
 Loading...