


26/32WL36
Owner's manual
Manuel de l'utilisateur
Bedienungsanleitung
Manual del usario
Manual d'uso per l'utente
Manual do proprietário
Gebruikershandleiding

English
2
Contents
SETTING UP
Safety precautions – Some do’s and don’ts for you to be aware of 3
Installation and important information 4
The remote control – an at-a-glance guide 5
Connecting external equipment – a guide to connecting equipment to the back of the TV 6
Connecting a computer – connecting a computer to the side of the TV 7
Connections and controls – switching on the TV, standby, using the front controls,
headphone socket, connecting equipment to the front of the TV 8
Tuning the TV using Quick setup – language, country, broadcast system 9
Programme sorting 9
Manual tune – an alternative to Quick setup, direct entry of channels, tuning a programme
position for a VCR 10
Programme skip 11
Auto tune 12
CONTROLS AND FEATURES
General controls – changing programme position, time display 12
Panel lock – disabling the buttons on the TV 12
Sound controls – volume, sound mute, bass boost, super woofer, bass/treble/balance 13
BBE
®
sound processor 13
Stereo and bilingual transmissions – stereo/mono or dual language broadcasts 13
Widescreen viewing 14
Picture controls – picture position, picture preferences (brightness, colour, contrast,
sharpness, tint), digital noise reduction (DNR), black stretch 15
Picture controls – colour temperature, automatic format (widescreen), grey screen,
back light, side panel adjustment 16
The timer – setting the TV to turn on and off 17
PC settings – clock phase, sampling clock 17
Input selection and AV connections – input and output sockets for connected equipment 18
TELETEXT
Setting up, general information, Auto and LIST modes 19
Control buttons 20
PROBLEM SOLVING
Questions and Answers – answers to some of the more common queries including
manual fine tuning and colour system 21
INFORMATION
Specifications and Accessories – technical information about the TV, supplied accessories 24

English
3
Safety Precautions
This equipment has been designed and manufactured to meet international safety standards but, like any
electrical equipment, care must be taken to obtain the best results and for safety to be assured. Please read
the points below for your own safety. They are of a general nature, intended to help with all electronic
consumer products and some points may not apply to the goods you have just purchased.
DON'T remove any fixed cover as this may expose
dangerous voltages.
DON'T obstruct the ventilation openings of the
equipment with items such as newspapers,
tablecloths, curtains, etc. Overheating will cause
damage and shorten the life of the equipment.
DON'T allow electrical equipment to be exposed to
dripping or splashing or objects filled with liquids,
such as vases, to be placed on the equipment.
DON’T place hot objects or naked flame sources,
such as lighted candles or nightlights on, or close to
equipment. High temperatures can melt plastic and
lead to fires.
DON'T use makeshift stands and NEVER fix legs
with wood screws. To ensure complete safety,
always fit the manufacturer’s approved stand or
legs with the fixings provided according to the
instructions.
DON'T listen to headphones at high volume, as
such use can permanently damage your hearing.
DON'T leave equipment switched on when it is
unattended, unless it is specifically stated that it is
designed for unattended operation or has a
standby mode. Switch off by withdrawing the plug,
make sure your family know how to do this. Special
arrangements may need to be made for infirm or
handicapped people.
DON'T continue to operate the equipment if you
are in any doubt about it working normally, or it is
damaged in any way – switch off, withdraw the
mains plug and consult your dealer.
ABOVE ALL – NEVER let anyone, especially
children, push or hit the screen, push
anything into holes, slots or any other
openings in the case.
NEVER guess or take chances with electrical
equipment of any kind – it is better to be safe
than sorry.
TO FULLY DISCONNECT THE TV, SWITCH OFF
THE MAINS SOCKET AND REMOVE THE
POWER PLUG.
Leave at least 10cm clearance around the television
to allow adequate ventilation. This will prevent
overheating and possible damage to the TV. Dusty
places should also be avoided.
Damage may occur if the TV is left in direct sunlight
or near a heater. Avoid places subject to extremely
high temperatures or humidity, or locations where
the temperature is likely to fall below 5°C (41°F).
The mains supply required for this equipment is
110-240v AC 50/60Hz. Never connect to a DC
supply or any other power source. DO ensure that
the TV is not standing on the mains lead. DO NOT
cut off the mains plug from this equipment, this
incorporates a special Radio Interference Filter, the
removal of which will impair its performance. It
should only be replaced by a correctly rated and
approved type and the fuse cover must be refitted.
IF IN DOUBT PLEASE CONSULT A COMPETENT
ELECTRICIAN.
DO read the operating instructions before you
attempt to use the equipment.
DO ensure that all electrical connections (including
the mains plug, extension leads and interconnections between pieces of equipment) are
properly made and in accordance with the
manufacturers’ instructions. Switch off and
withdraw the mains plug before making or
changing connections.
DO consult your dealer if you are ever in doubt
about the installation, operation or safety of your
equipment.
DO be careful with glass panels or doors on
equipment.
Air Circulation
Do not
Heat Damage
Mains Supply
Do

English
4
Installation and important information
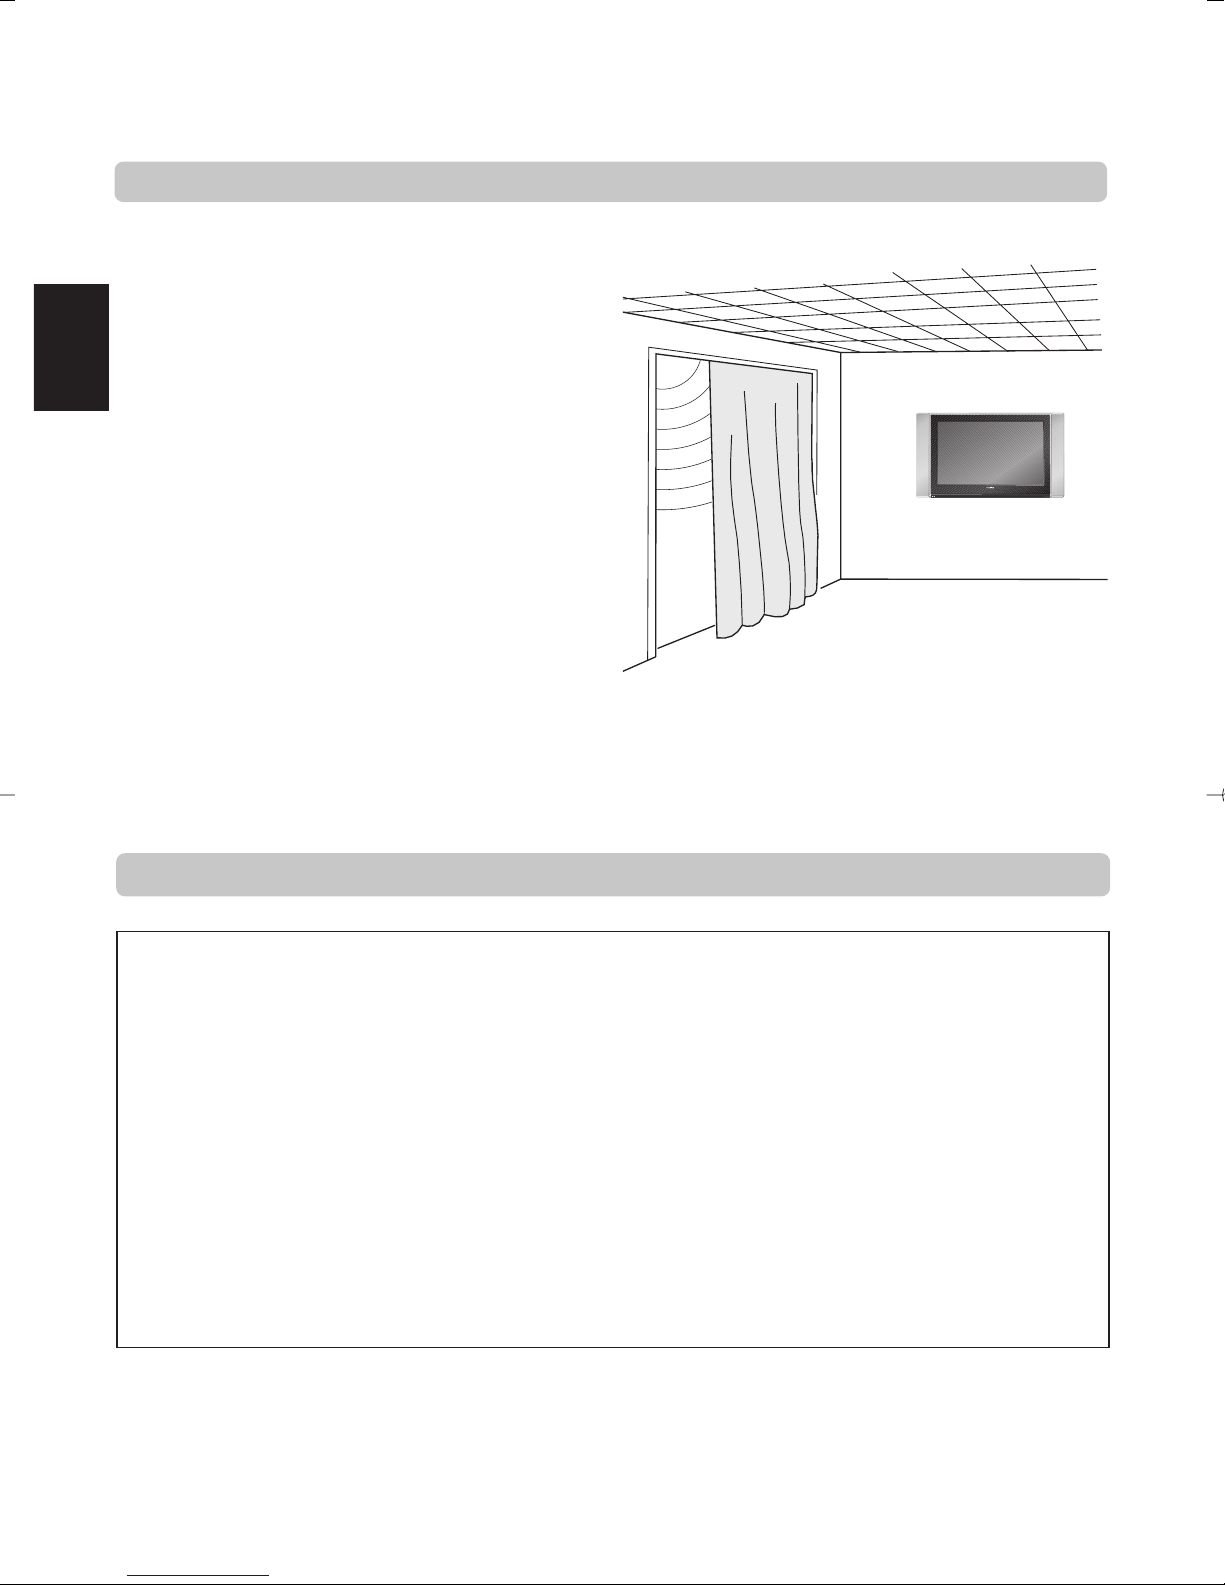
Where to install
Locate the TV away from direct sunlight and strong lights,
soft, indirect lighting is recommended for comfortable
viewing. Place on a sturdy platform, the mounting surface
should be flat and steady, it should then be secured to the
wall with a sturdy tie using the hook on the back of the
TV, this will prevent it from falling over. Use curtains or
blinds to prevent direct sunlight falling on the screen.
A floor and table top stand are available for this
television, or an angled bracket which enables the TV to
be wall-mounted.
The LCD display panels are manufactured using an
extremely high level of precision technology, however
sometimes some parts of the screen may be missing
picture elements or have luminous spots. This is not a
sign of a malfunction.
Make sure the TV is located in a position where it cannot
be pushed or hit by objects, as pressure will break or
damage the screen.
Please take note
EXCLUSION CLAUSE
Toshiba shall under no circumstances be liable for loss and/or damage to the product caused by:
i) fire;
ii) earthquake;
iii) accidental damage;
iv) intentional misuse of the product;
v) use of the product in improper conditions;
vi) loss and/or damage caused to the product whilst in the possession of a third party;
vii) any damage or loss caused as a result of the owner’s failure and/or neglect to follow the instructions set out in the owner’s
manual;
viii) any loss or damage caused directly as a result of misuse or malfunction of the product when used simultaneously with
associated equipment;
Furthermore, under no circumstances shall Toshiba be liable for any consequential loss and/or damage including but not limited
to the following, loss of profit, interruption of business, the loss of recorded data whether caused during normal operation or
misuse of the product.
If stationary images generated by teletext, channel identification logos, computer displays, video games, on screen menus, etc. are
left on the TV screen for any length of time they could become conspicuous, it is always advisable to reduce both the brightness and
contrast settings.
English
5
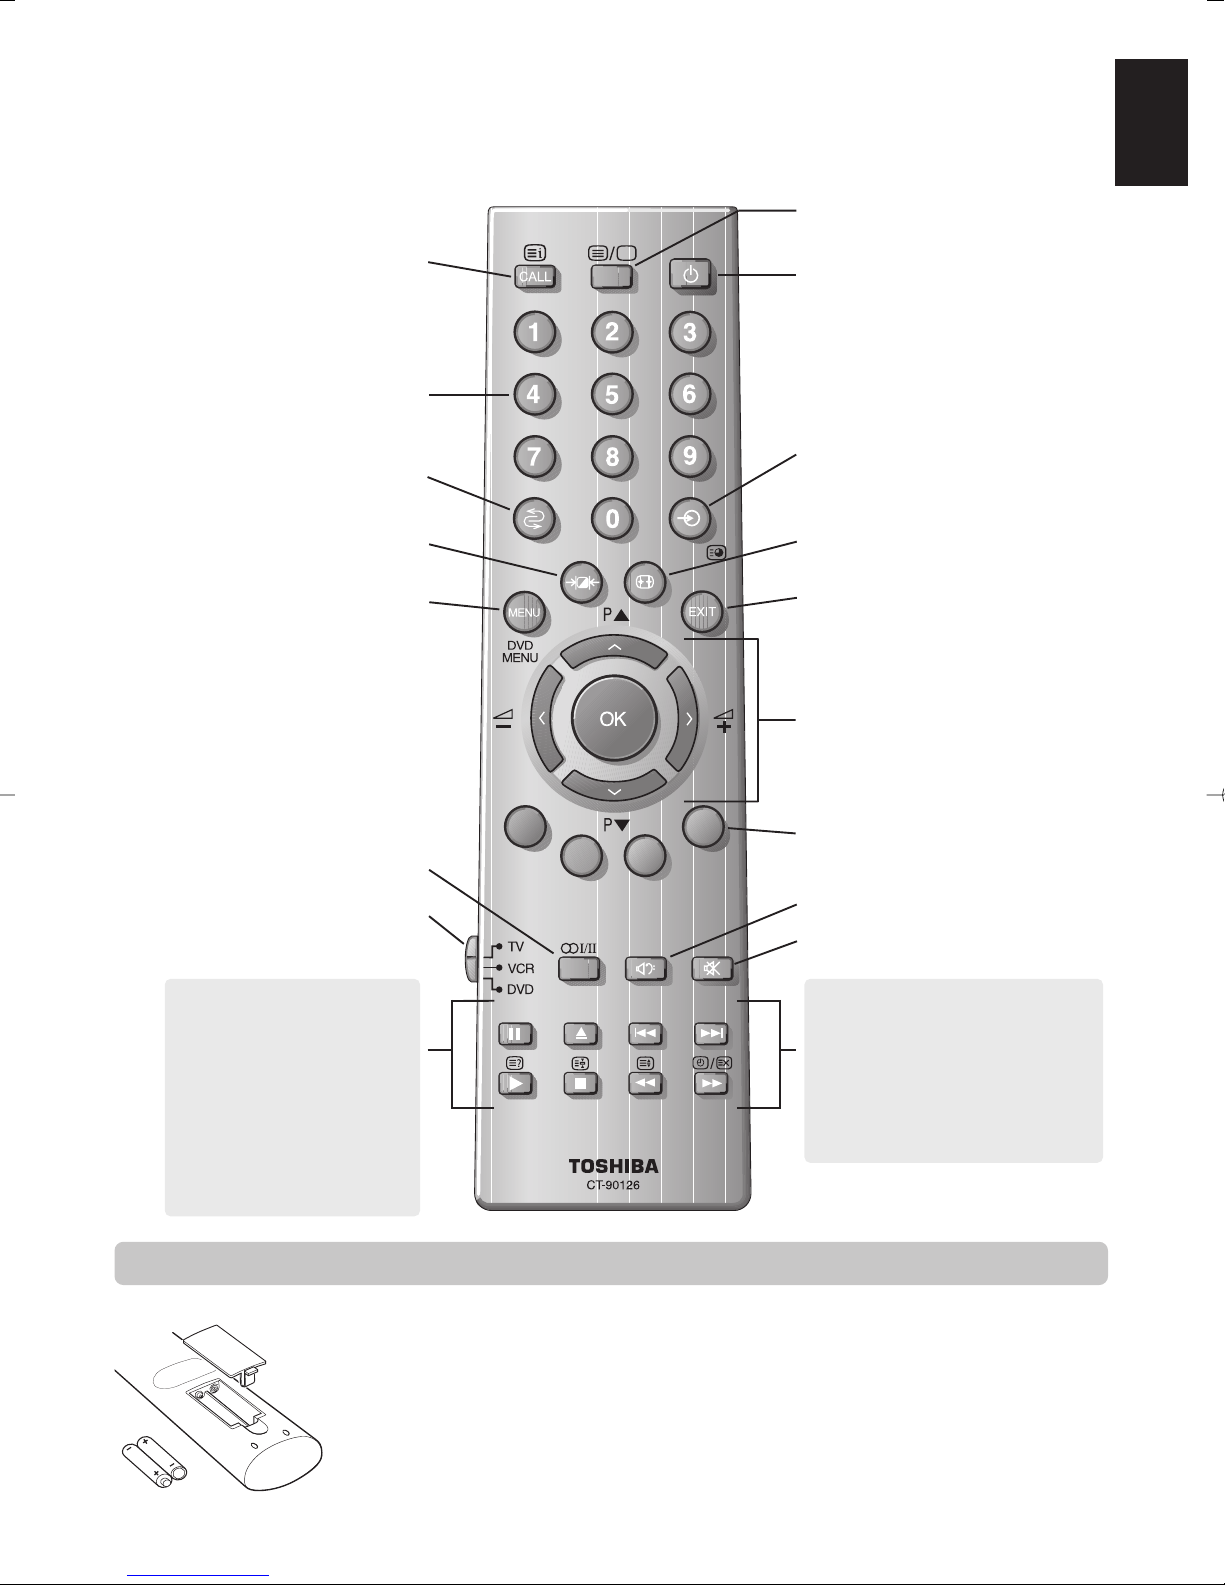
The remote control
UP
Remove the back cover to reveal the battery compartment and make sure the batteries are inserted
the right way round. Suitable battery types for this remote are UM-4, AAA, IEC R03 1.5V.
Do not combine a used, old battery with a new one or mix battery types. Remove dead batteries
immediately to prevent acid from leaking into the battery compartment. Dispose of them in a
designated disposal area.
The performance of the remote control will deteriorate beyond a distance of five metres or outside an
angle of 30 degrees from the centre of the TV. If the operating range becomes reduced the batteries
may need replacing.
Inserting batteries and effective range of the remote
Simple at-a-glance reference of your remote control.
To mute the sound
Teletext control buttons
To exit Menus
Bass Boost/Super Woofer
Stereo/Bilingual reception
To bring up on-screen information and
for the teletext initial/index function
To select input from external sources
To access sub-pages when in teletext
mode
To select mode
On-screen Menus
Selectable picture preferences
Widescreen viewing
Number buttons
To return to the previous programme
For On/Standby mode
To display teletext
When in VCR or DVD mode:
press
m
to PAUSE
press
w
to EJECT
press
l
q
to SKIP-REWIND
press
s
l
to SKIP-FORWARD
press
r
to PLAY
press
p
to STOP
press
q
to REWIND
press
s
to FAST FORWARD
To change programme positions and
teletext pages
To alter the volume
When using menus the arrows move the
cursor on the screen up, down, left or
right. OK to confirm your selection
When in TV mode:
8/9
Time display
When in Teletext mode:
r
To reveal concealed text
q
To hold a wanted page
s
To enlarge teletext display size
8/9
To select a page whilst viewing a
normal picture
English
6
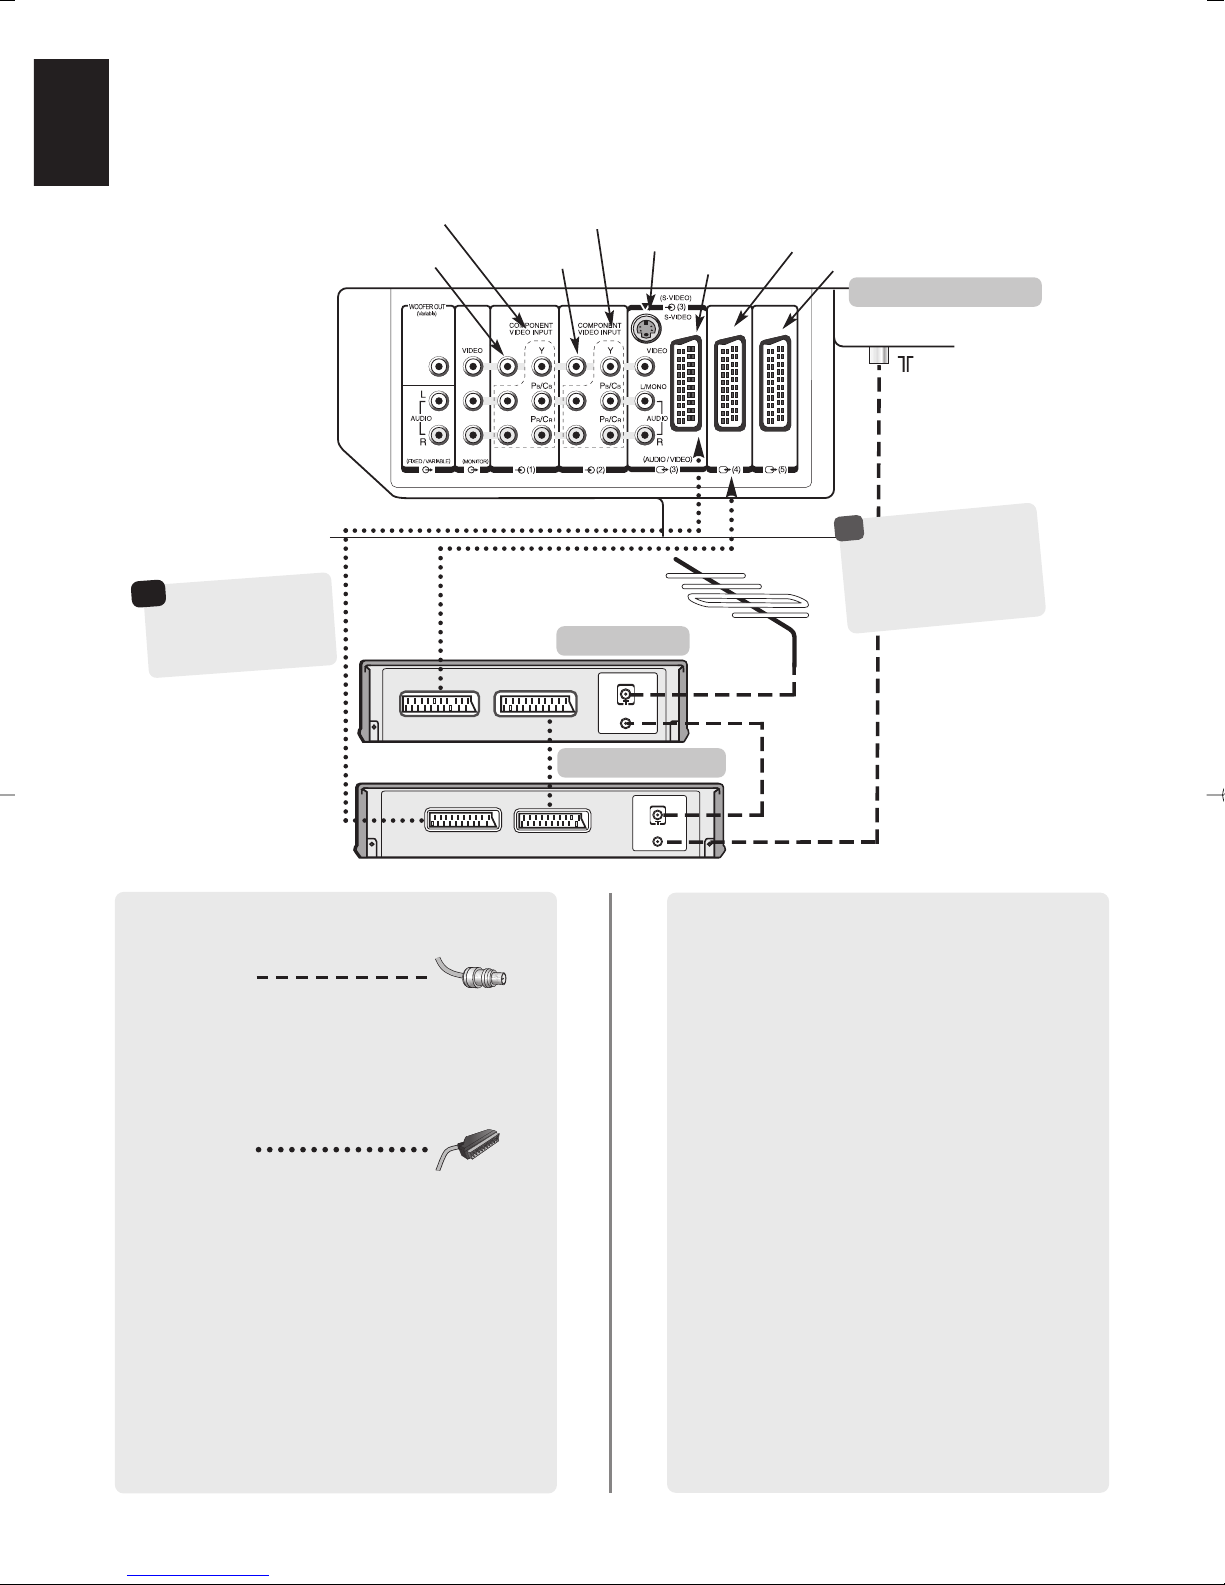
Connecting external equipment
Before connecting any external equipment, turn off all main power switches.
IN
OUT
IN
OUT
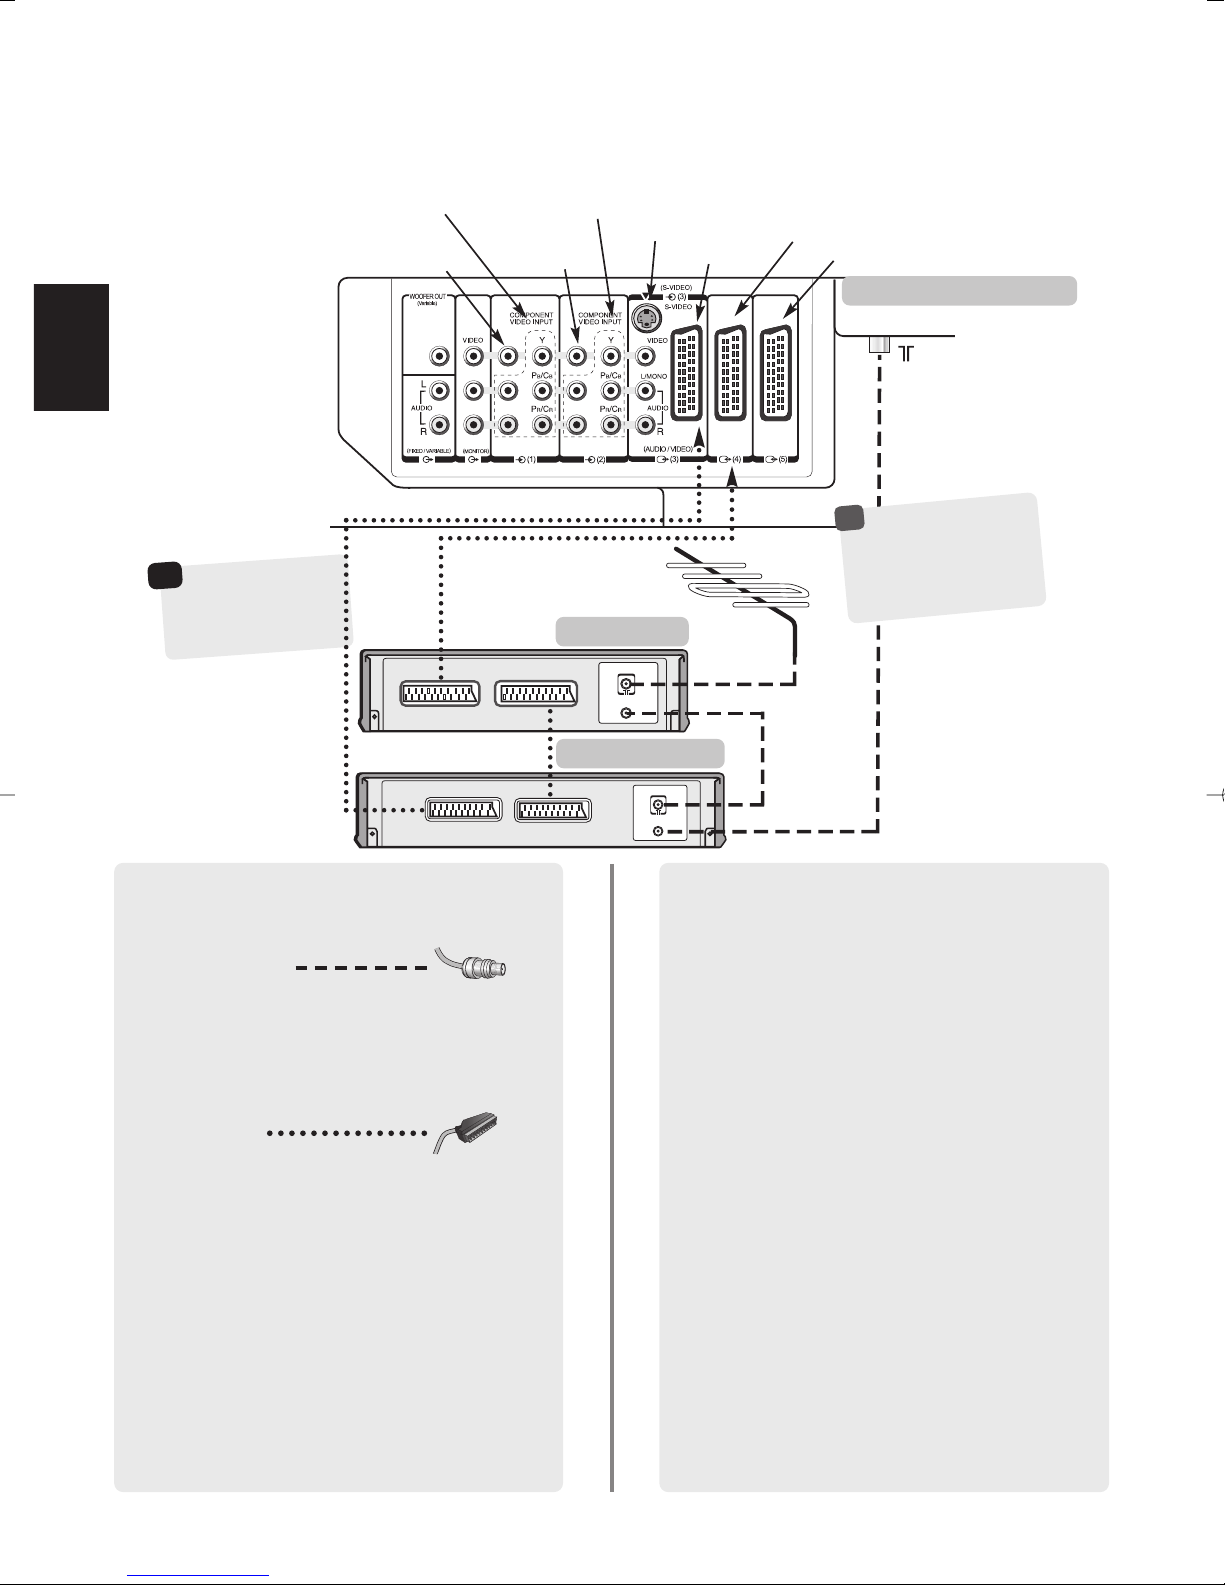
the back of your TV
video recorder
decoder*
SAT
IN/OUT
VCR
TV
SCART 5 (EXT 5)
SCART 4 (EXT 4)
SCART 3 (EXT 3)
INPUT 3 (EXT 3)
COMPONENT VIDEO INPUT (EXT 1)
COMPONENT VIDEO INPUT (EXT 2)
COMPOSITE VIDEO
INPUT (EXT 1)
COMPOSITE VIDEO
INPUT (EXT 2)
A wide variety of external equipment can be
connected to the back of the TV, therefore the
relevant owners manuals for all additional
equipment must be referred to.
We recommend Scart 4 or 5 for a decoder and Scart 3
for a VCR.
If connecting S-VIDEO equipment, set the INPUT for
EXT3. See page 40.
If the TV automatically switches over to monitor
external equipment, return to normal TV by pressing
the desired programme position button.
To recall external equipment, press Bto select
between EXT1, EXT2, EXT3, EXT4, EXT5, EXT6 or
RGB/PC.
WE RECOMMEND THAT YOU USE SCART LEADS IN
ADDITION TO AERIAL CABLES WHEREVER POSSIBLE
Aerial cables:
Connect the aerial to the socket on the rear of the
television. If you use a decoder* and/or a video
recorder it is essential that the aerial cable is connected
through the decoder and/or through the video
recorder to the television.
Scart leads:
Connect the video recorder IN/OUT socket to the TV.
Connect the decoder TV socket to the TV. Connect the
video recorder SAT socket to the decoder VCR socket.
Before running Auto tuning put your decoder and
video recorder to Standby.
The phono sockets alongside the COMPONENT VIDEO
INPUT sockets will accept L and R audio signals.
In addition there is a fixed/variable external audio
output which enables the connection to a suitable Hi-Fi
unit, make sure the Speaker option in the Sound
menu is set to Off.
*
a decoder could
be Digital Satellite or
any other compatible
decoder.
☛
DO NO
T connect
equipment to both the
Input 3 and Scart 3
(EXT3) terminals at the
same time.
!
English
7
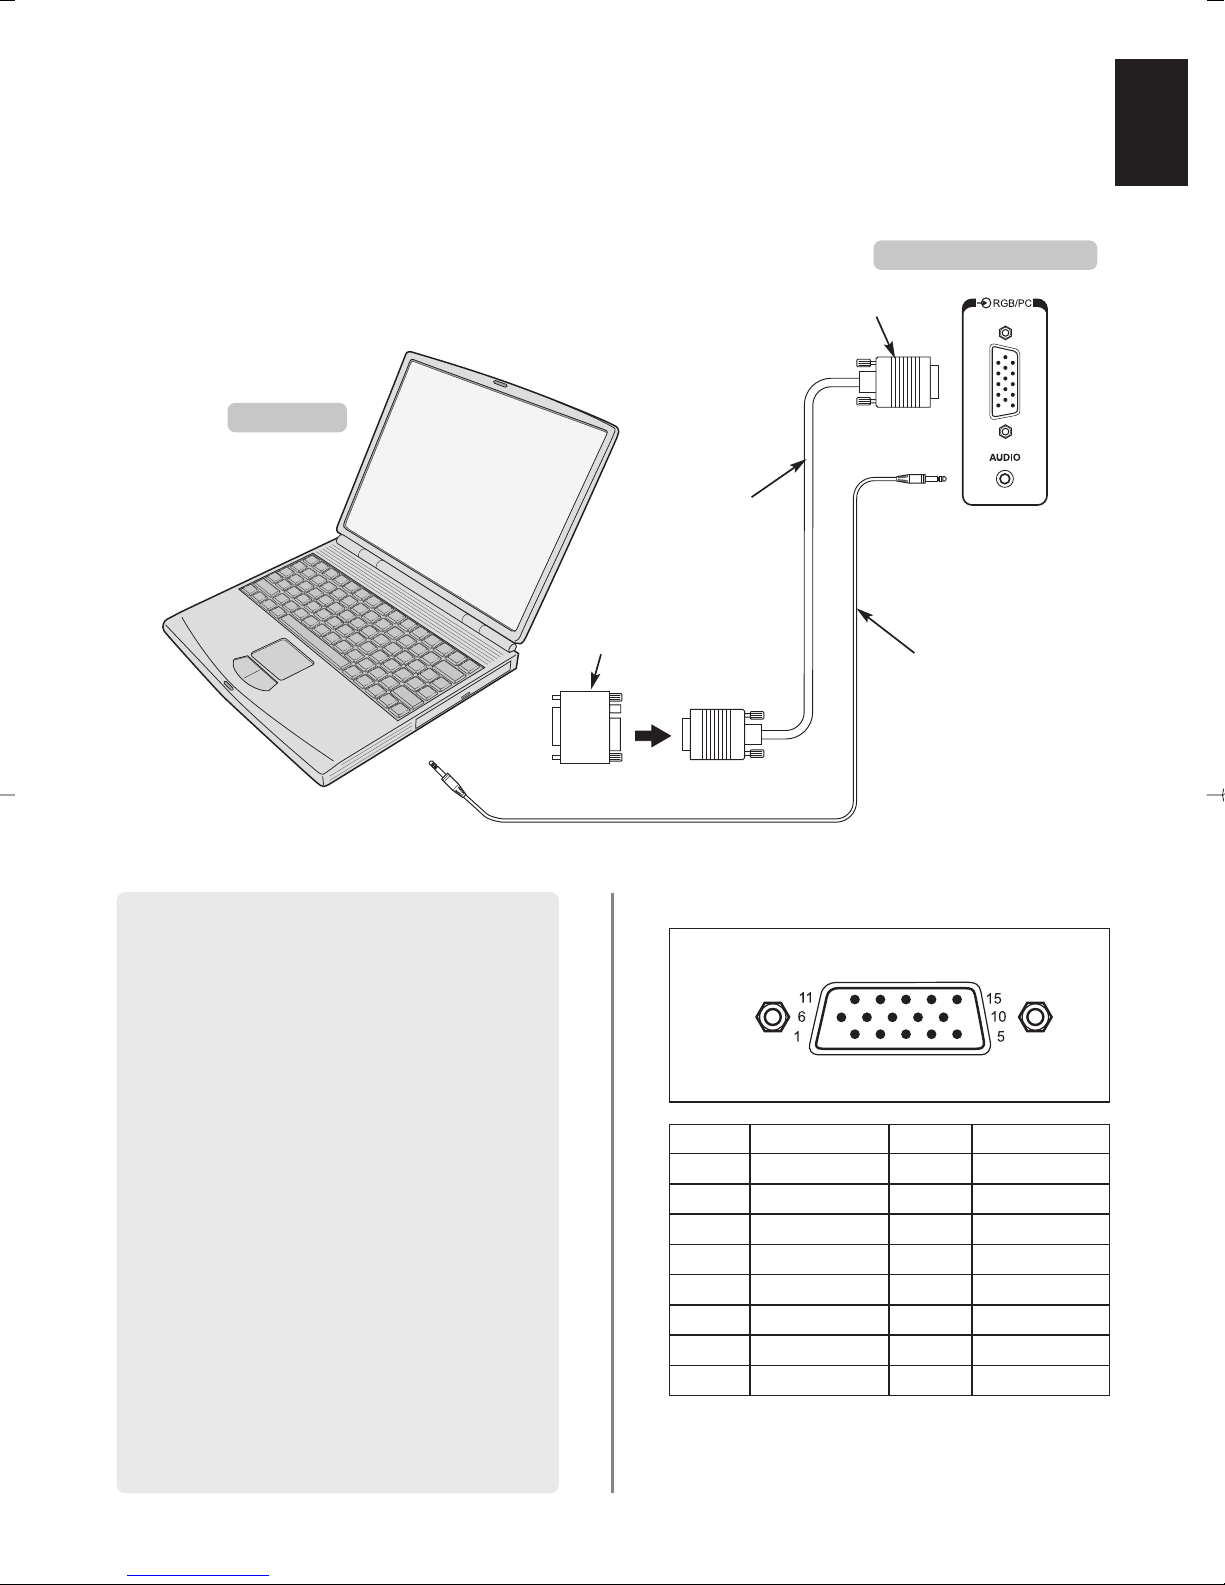
Connecting a computer
the left side of your TV
Computer
Audio cable for PC to
TV connection
(not supplied)
Conversion adaptor if
required (not supplied)
RGB PC cable
(not supplied)
Mini D-sub 15p connector
Before connecting any external equipment, turn off all main power switches.
Connect the PC cable from the computer to the
RGB/PC terminal of the left side of the television.
Press the Bto select PC mode.
The following signals can be displayed:
VGA: 640 x 480/60 Hz (VESA 480-60)
SVGA: 800 x 600/60 Hz (VESA 600-60)
XGA: 1024 x 768/60 Hz (VESA 768-60)
PLEASE NOTE:
Some PC models cannot be connected to this TV.
An adaptor is not needed for computers with a DOS/V
compatible mini D-sub 15p terminal.
A band may appear at the edges of the screen or parts
of the picture may be obscured. This is due to the
strength of the signal, it is not a malfunction.
When PC mode is selected some of the TV’s features will
be unavailable, these will be greyed out on the menu
lists and not selectable, when not in PC mode
PC Setting will be greyed out.
Signal information for Mini D-sub 15p connector
Pin assignment
for RGB/PC
terminal
Pin. No. Signal name Pin No. Signal name
1R9NC
2 G 10 Ground
3B11NC
4 NC (not connected) 12 NC
5 NC 13 H-sync
6 Ground 14 V-sync
7 Ground 15 NC
8 Ground
English
8
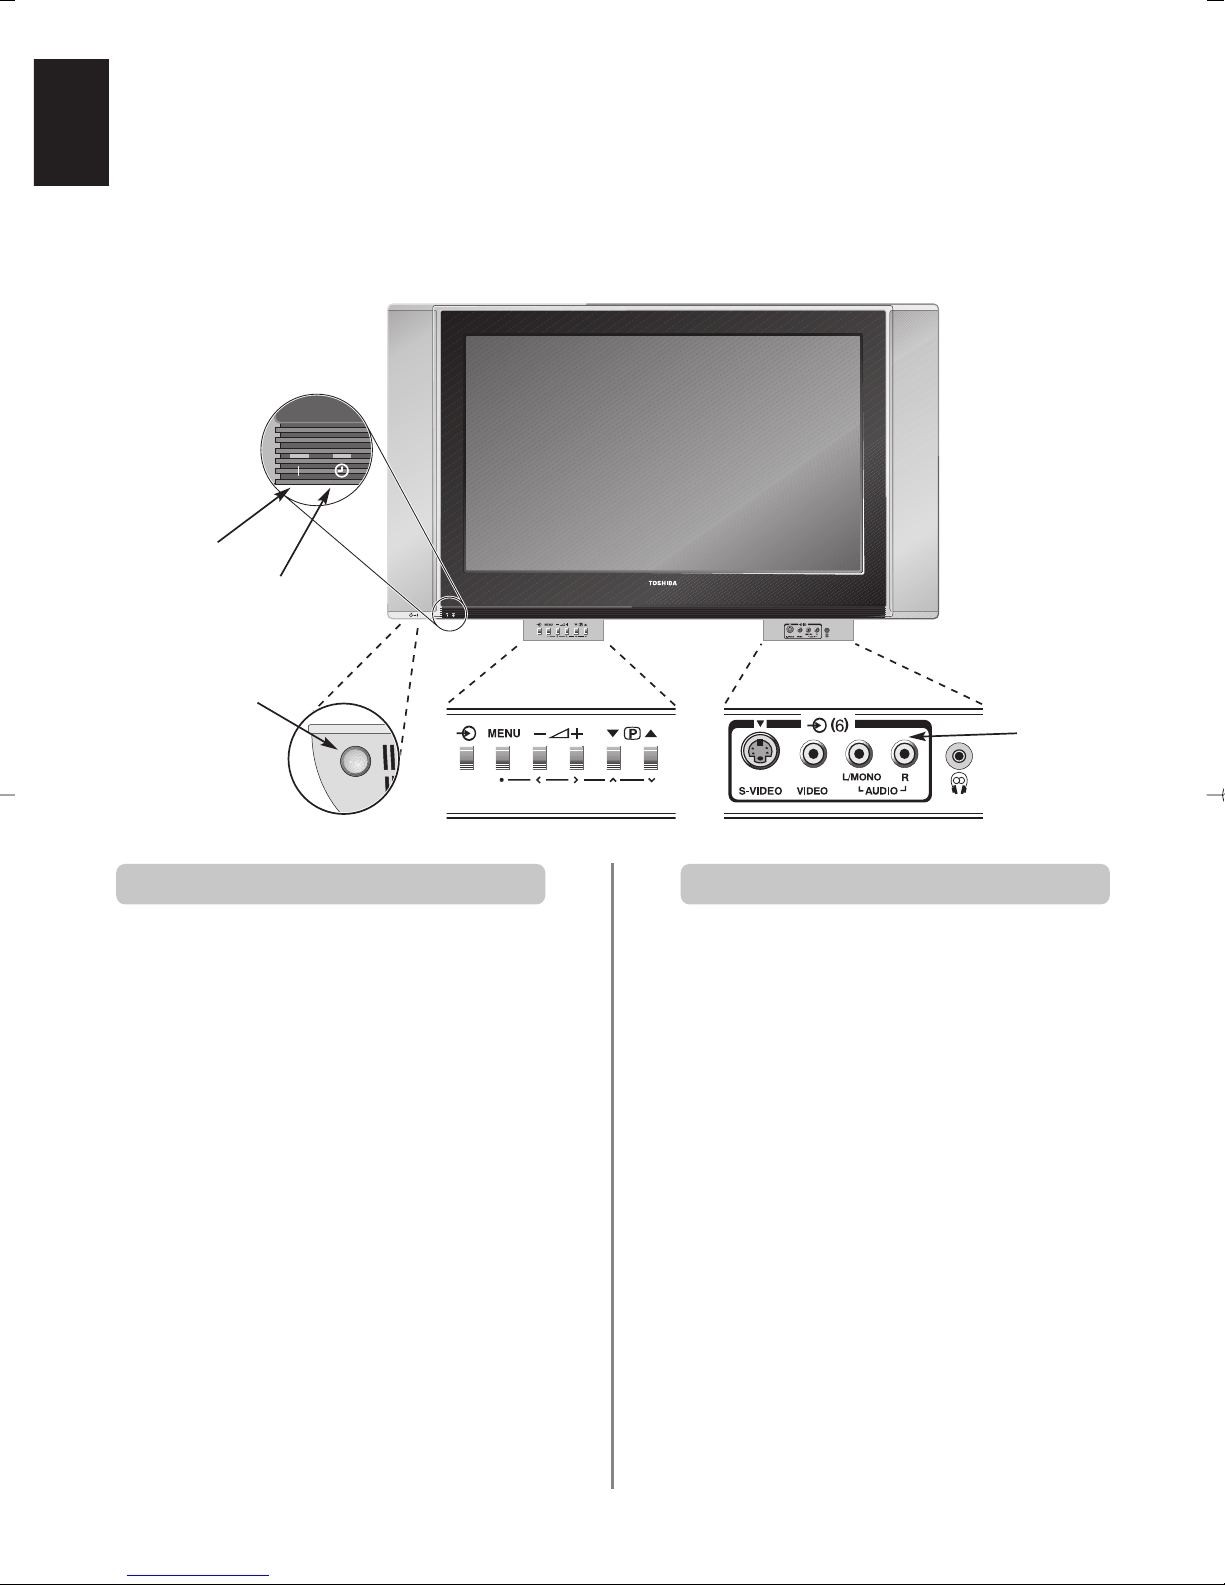
Connections and controls
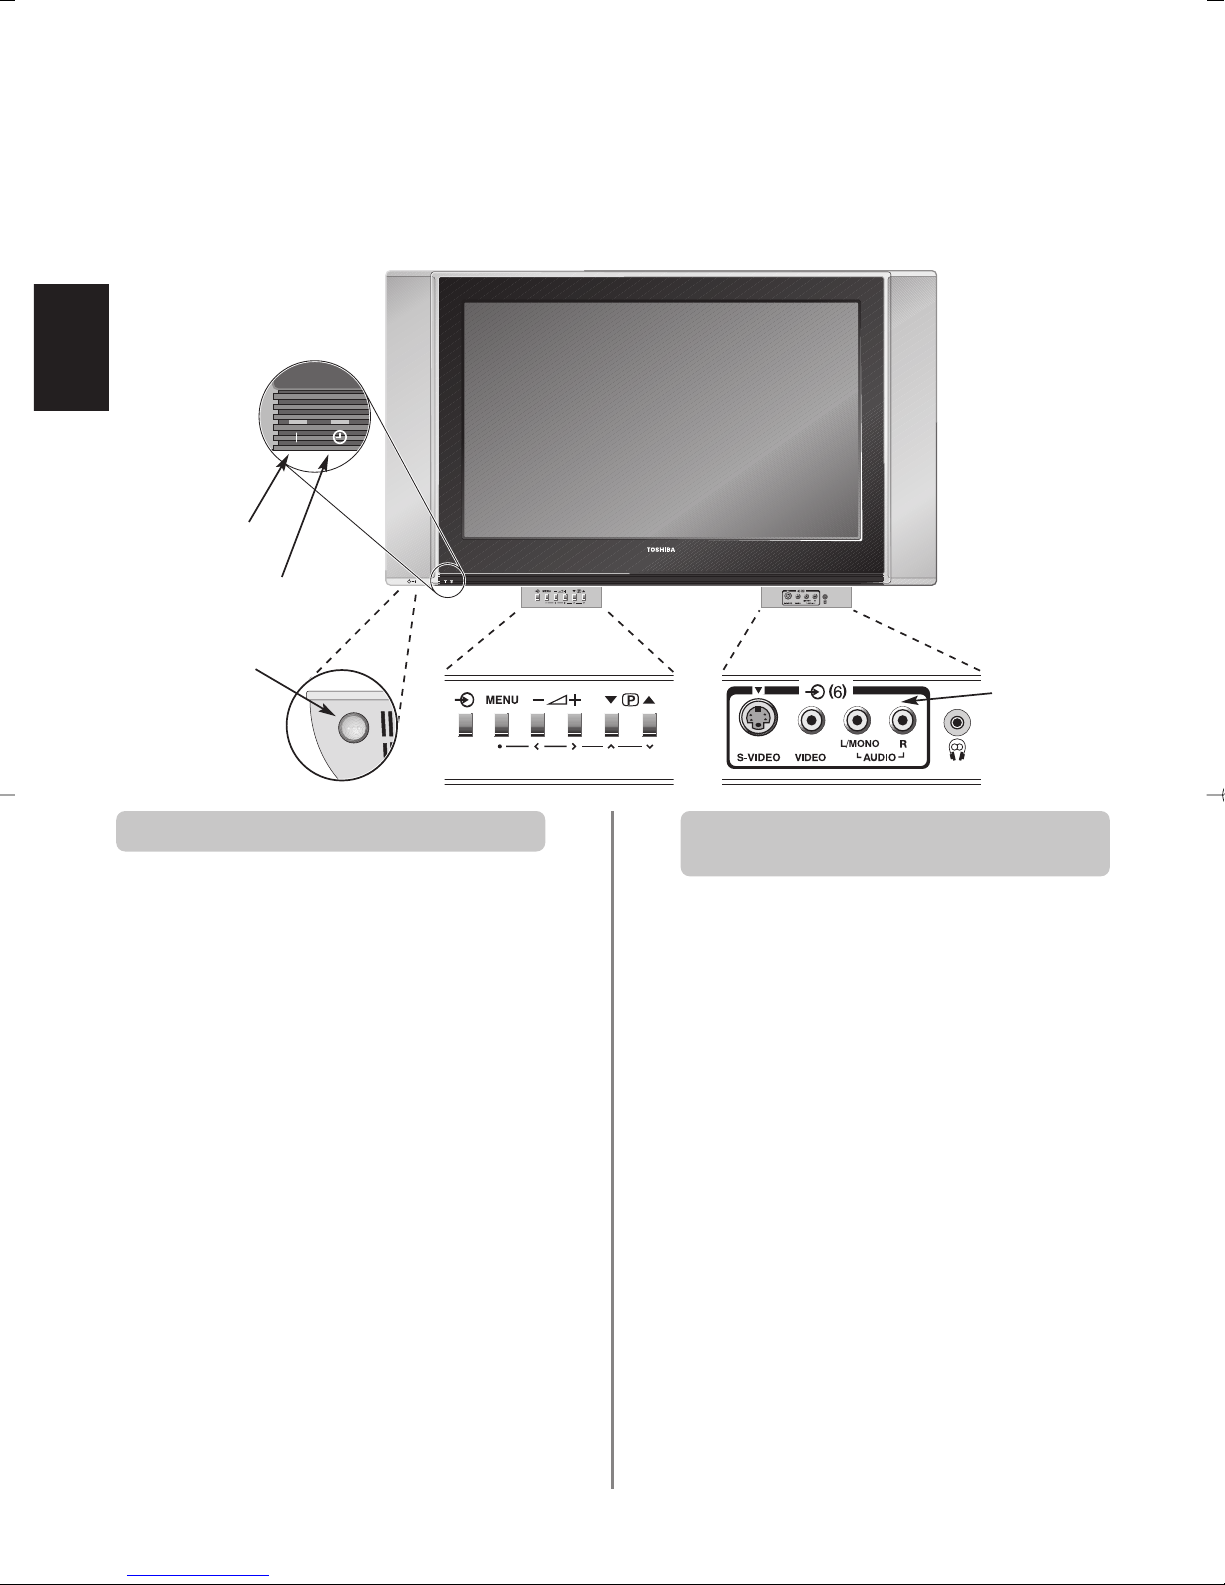
If the power-on light is unlit press the POWER button
underneath the bottom left corner of the TV to switch the
set on, then press a number button on the remote
control to see the screen, it may take a few moments.
To put the set into Standby press ion the remote
control. To view the TV press iagain or any of the
number buttons. The picture may take a few seconds to
appear. Standby should only be used for short periods
of time.
To set up the TV you will now need to use the on-screen
menus. Press the MENU button on the remote control to
see the menus.
The menu bar at the top of the screens will show five
different topics shown in symbols. As each symbol is
selected by pressing the Sor Rbutton on the remote
control, its respective options will appear below.
To use the options press the Q button on the remote
control to move down through them and OK, Sor Rto
select the required choice. Follow the on screen
instructions. The functions of each menu are described in
detail throughout the manual.
A wide variety of external equipment can be connected via the sockets located on the front of the TV.
Whilst all the necessary adjustments and controls for the TV are made using the remote control, the buttons on
the TV may be used for some functions.
To alter the volume press — j+.
To alter the programme position press
eeFff
.
Press MENU and S,R, Q or P to control the sound
and picture options.
Press MENU to finish.
When connecting mono sound equipment to EXT 6,
connect the audio output of the equipment to the
L/Mono socket onthe TV.
To select the Input, press Buntil the display shows
EXT6 as described on page 40. The TV will automatically
sense the type of signal.
Please always refer to the owner’s manual of the
equipment to be connected for full details.
Please note: Inserting the headphone jack will mute the
sound from all speakers.
Switching on Using the controls and connections
Power Button
Press the centre of
the flap to open it
Press the centre of
the flap to open it
RED – Power On
GREEN – On-timer set
INPUT 6
(EXT 6)

English
9
Tuning the TV using Quick setup,
Programme sorting
Before switching on the TV put your decoder and video recorder to Standby. To set up the TV use the buttons
on the remote control as detailed on page 27.
1
2
3
5
6
7
8
9
4
Press Q to highlight Language.
Press the power-on button. The Quick setup
screen will appear.
Using SorRselect your language, then press
OK.
Then press SorRto select your country and
press OK.
Your System will have been selected, if there is a
choice, press Rto select from the systems
displayed.
To start Auto tuning press OK.
The search will begin for all available stations.
The slide bar will move along the line as the
search progresses.
You must allow the television to complete
the search.
Quick setup
Select your language.
Language English
EXIT Watch TV Next
Auto tuning
Searching
Channel : 6 Station :
EXIT Stop
Quick setup
Auto Tuning complete.
Press OK to access the
Programme sorting menu.
EXIT Watch TV Next
B/G – Continental Europe, I– UK
D/K – Eastern Europe, L1, L2 – France
Programme sorting
Prog. Channel Station
1 22 BBC1
2 28 BBC2
3 25 ITV
4 32 CH4
5 69
6 69
Sort Store
MENU Back EXIT Watch TV
Use Q orPto move through the list to your
preferred position. As you do so the other stations
will move to make room.
Press Sto store your move.
Repeat as necessary, then press EXIT.
If the television cannot be connected to a
video/decoder with a Scart lead or if a station on
another system is required, use Manual tuning
to allocate a programme position, see page 32.
When the search is complete the TV will
automatically select programme position 1. This
may not be a clear picture or the signal may be
weak, so the station order can be changed using
Programme sorting which will appear in the
Quick setup screen.
Press OK to select Programme sorting.
With the list of stations now showing use Q or
P
to highlight the station you want to move and
press R.
The selected station will be moved to the right of
the screen.

English
10
Manual tuning
Prog. Sys. Channel Station
0 I 60 VCR
1 I 22 BBC1
2 I 25 ITV
3 I 28 BBC2
4 I 32 CH4
5I 69
Select
MENU Back EXIT Watch TV
4
Press Rto select System and use Por Q to
change (if required, see step 4 on page 9).
Then press Rto select Search.
Press Por Q to begin the search.
Search will appear and the television will show
the channel numbers.
Manual tune
Press OK to select. If the programme is skipped,
Programme skip must be removed before
storing.
The TV can be tuned-in manually using Manual tuning. For example: if the television cannot be connected
to a video/decoder with a Scart lead or to tune-in a station on another System (see page 9).
Programme: The number to be pressed on the remote control.
System: Specific to certain areas. See step 4 on page 9.
Colour system: Factory set to Auto, should only be changed if problems are experienced, i.e. NTSC input from
external source.
Programme skip:*means nothing has been stored or the facility to skip the channel is ON. See page 11.
Channel: The channel number on which a station is being broadcast.
Search: Search up and down for a signal.
Manual fine tuning: Only used if interference/weak signal is experienced. See page 21.
Station: Station identification. Use the Por Q and SorRbuttons to enter up to seven characters.
Station
Programme System
Colour
system
Channel Search
Programme
skip
Manual fine
tuning
Use Por Q to highlight the programme
position required e.g. we suggest Prog. 0 for
a video.
Press MENU and using Sor Rselect the SET UP
menu, with Q highlight Manual tuning, press
OK to select.
Different
Channel
numbers
may be
displayed
Continues on the next page
To allocate a programme position on the television for a decoder and VCR: turn the decoder on,
insert a pre-recorded tape in the video and press PLAY, then manually tune.
Use SandRto move across the screen and select any of these Manual Tune options.
1
2
3
Each signal will show on the television, if it is not
your VCR, press Por Q again to restart the
search.
7
5
6
Manual tuning
Search
0 I A 60 0
Store MENU Back EXIT Watch TV
Manual tuning
System
0IA 60 0VCR
Store MENU Back EXIT Watch TV
SET UP
Language English
Country UK
Auto tuning OK
Manual tuning OK
Programme sorting OK
MENU Back EXIT Watch TV

English
11
Manual tuning
Prog. Sys. Channel Station
0 I 60 VCR
1 I 22 BBC1
2 I 25 ITV
3 I 28 BBC2
4 I 32 CH4
5I 69
Select
MENU Back EXIT Watch TV
Manual tune continued
Programme skip
Press MENU and repeat from Step 2 or press
EXIT.
Each programme position has to be individually
selected. To turn Programme skip off, repeat the
procedure for each position.
Skipped programme positions cannot be selected
by Pf(P) and Pe(Q) or by the controls on
the front of the TV, but can still be accessed by the
number buttons on the remote control.
3
4
5
Use Por Q to highlight the programme position
to be skipped and press OK to select.
Press Rto select Programme skip.
Use Por Q to turn Programme skip on.
Press OK.
on the screen indicates a skipped
programme position.
To prevent certain programmes from being viewed, the
programme position can be skipped and the remote control
removed. The television can then be watched as normal
using the controls on the front, but the set will not show the
skipped programme position.
Programme skip
Select Manual tuning from the SET UP menu.
1
2
When your VCR signal is found, press Rto move
along to Station. With P, Q, Sand Rput in
the required characters, e.g. VCR.
This TV has direct channel entry if the
channel numbers are known.
Select the Manual tuning screen in Step 3. Enter the
Programme number, the System, then the
Channel number. Press OK to store.
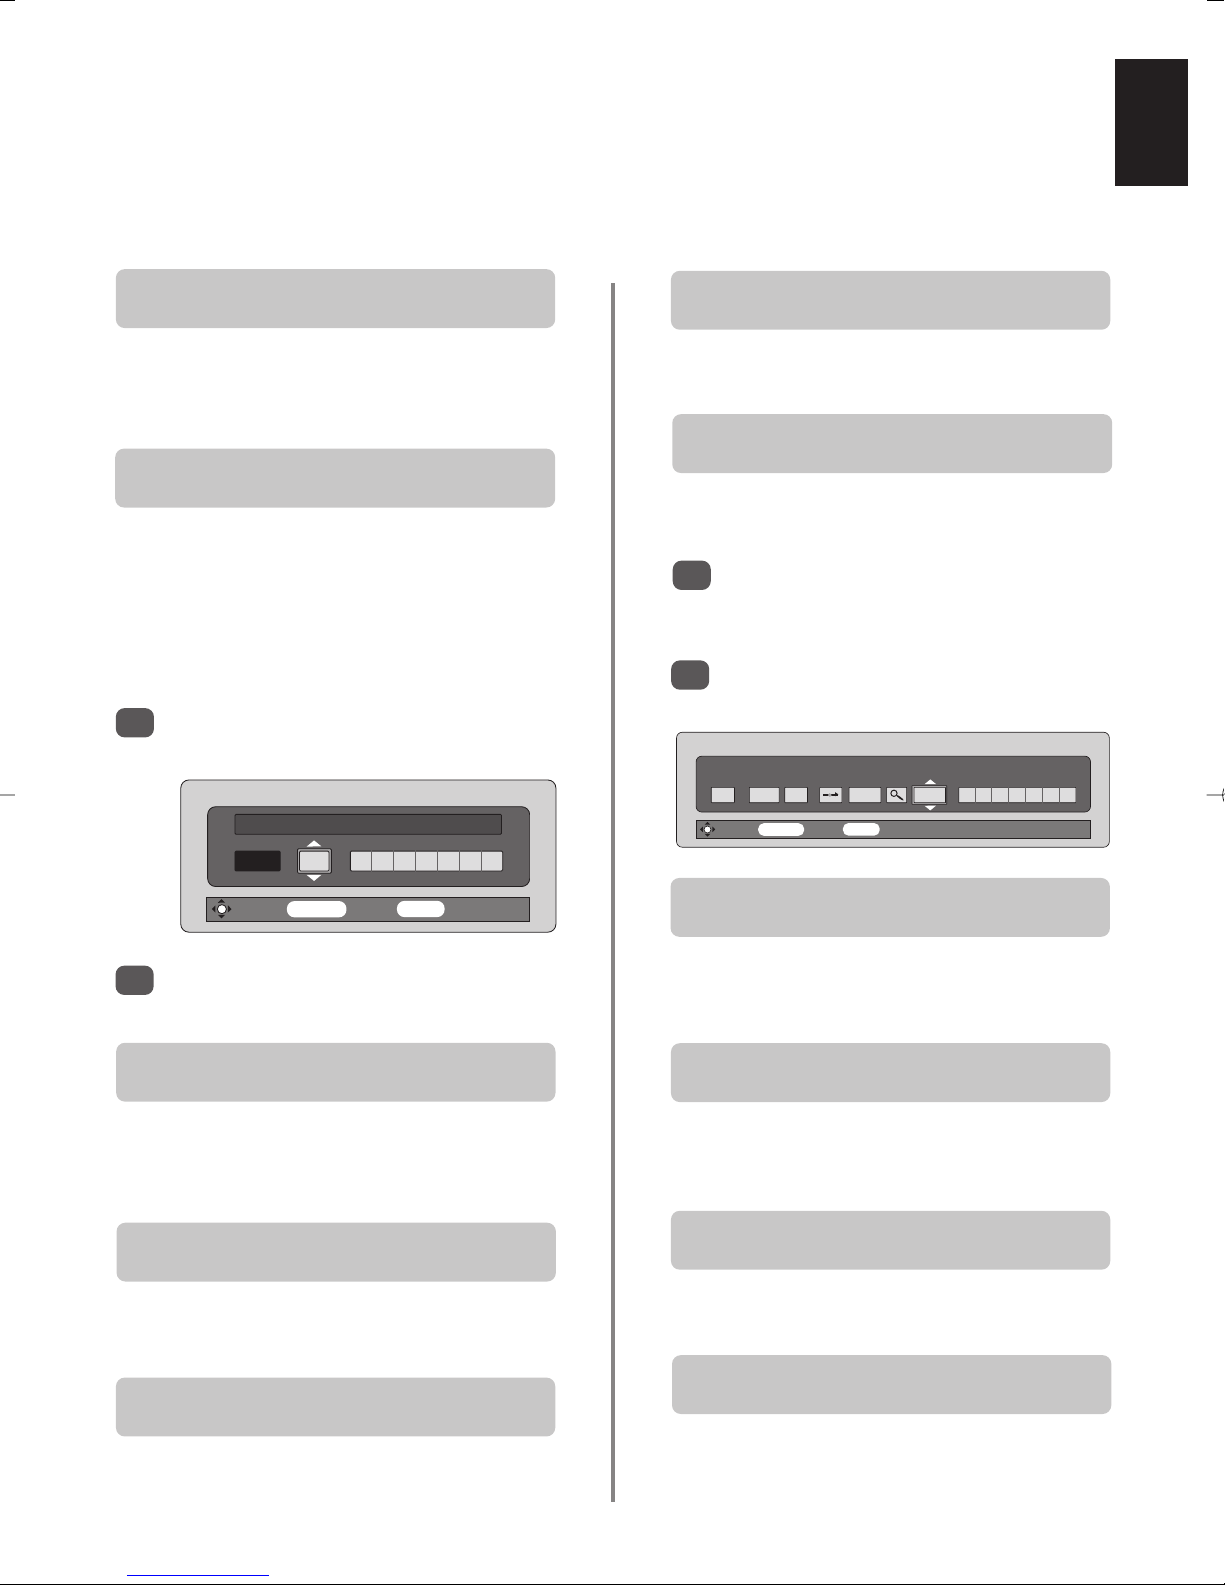
8
At any time by pressing OK a list will appear on
screen showing all stored programmes and
external equipment. Use Pand Q to highlight
and OK to select.
14
Press OK to store.
Repeat for each programme position you want
to tune or, press MENU to return to the list of
channels and select the next number to tune.
Press EXIT when you have finished.
To name external equipment, e.g. DVD on EXT2,
press Bto select EXT2, then select Manual
setting from the SET UP menu.
Press Rto select Label then using P, Q,
S
and Rput in the required characters.
10
11
12
13
9
PLEASE
NOTE
Manual tuning
Programme skip : On
1IA 22 0BBC1
Store MENU Back EXIT Watch TV
99
B
1
B
2DVD
B
3
B
4
B
5
B
6
PC
0 VCR
Manual setting
Label
EXT2 ADVD
Store MENU Back EXIT Watch TV
Manual tuning
Station
0 I A 32 0 V C R
Store MENU Back EXIT Watch TV

English
12
Auto tune, general controls,
time display, panel lock
Using Auto tuning
1
2
3
4
Press Q to highlight Language and SorRto
select.
Using Q highlight Country, then SorRto select.
The TV will now tune the stations for your country.
Press Q to highlight Auto tuning, then press OK.
To set up the TV using Auto tuning, press MENU
and use SorRto select the SET UP menu.
You must allow the television to complete the search.
When the search is complete the TV will automatically
select programme position 1. This may not be a clear
picture, so the station order can be changed using
Programme sorting, see page 9.
B/G – Continental Europe,
I
– UK
D/K – Eastern Europe, L1, L2 – France
5
Your System will have been selected, if there is a
choice, press SorRto select from the systems
displayed, then press OK.
SET UP
Language English
Country UK
Auto tuning OK
Manual tuning OK
Programme sorting OK
MENU Back EXIT Watch TV
Auto tuning
Previous settings will be lost!
Press EXIT for no change.
Press OK to start Auto tune
System I
MENU Back EXIT Watch TV
!
To select a programme position use the numbered
buttons on the remote control.
For programme positions below 10 use 0 and the
required number e.g. 01 for programme position 1.
Programme positions can also be selected using Pf(P)
and Pe(Q).
To revert to the previous programme position press ^^.
To display on-screen information i.e. programme position,
input mode or stereo/mono signal, press CALL.
Selecting programme positions
The time display facility allows the current (teletext) time to
be seen on the TV screen.
Press
8/9
whilst watching a normal TV broadcast to
see a time display from the broadcaster. It will remain on
screen for about 5 seconds.
The Time Display
From the FEATURE MENU select Panel lock and
choose On or Off usingSorR.
Panel lock disables the buttons on the front of the TV.
All buttons on the remote control can still be used.
Panel lock
1
When Panel lock is On, a reminder will appear when
any of the front panel buttons are pressed. Once the set
has been switched off it can ONLY be brought out of
standby using the remote control.
FEATURE MENU
Teletext Auto.
Panel lock On
Back light 16
Side Panel 0
PC Setting
MENU Back EXIT Watch TV
English
13
Sound controls, BBE sound processor,
stereo/bilingual transmissions
Volume
Press j— (S) or
j
+ (
R
) to adjust the volume.
Sound Mute
Press konce to turn the sound off and again to cancel.
Bass Boost – to enhance the depth of sound
Press nthen SorRto adjust the effect. The difference
will only be noticeable on sound with a strong bass. Press
n
again to turn Bass Boost off.
Super Woofer
When an active Super Woofer is connected pressing
n
will control it only if Woofer Ext. is chosen. Select AV
connection in the SET UP menu, press Quntil Woofer
is highlighted then press SorRto choose Ext.
When connecting to a Hi-fi unit, set the Speaker option
to Off. Then select Fixed or Variable for the Audio
output in the AV connection menu.
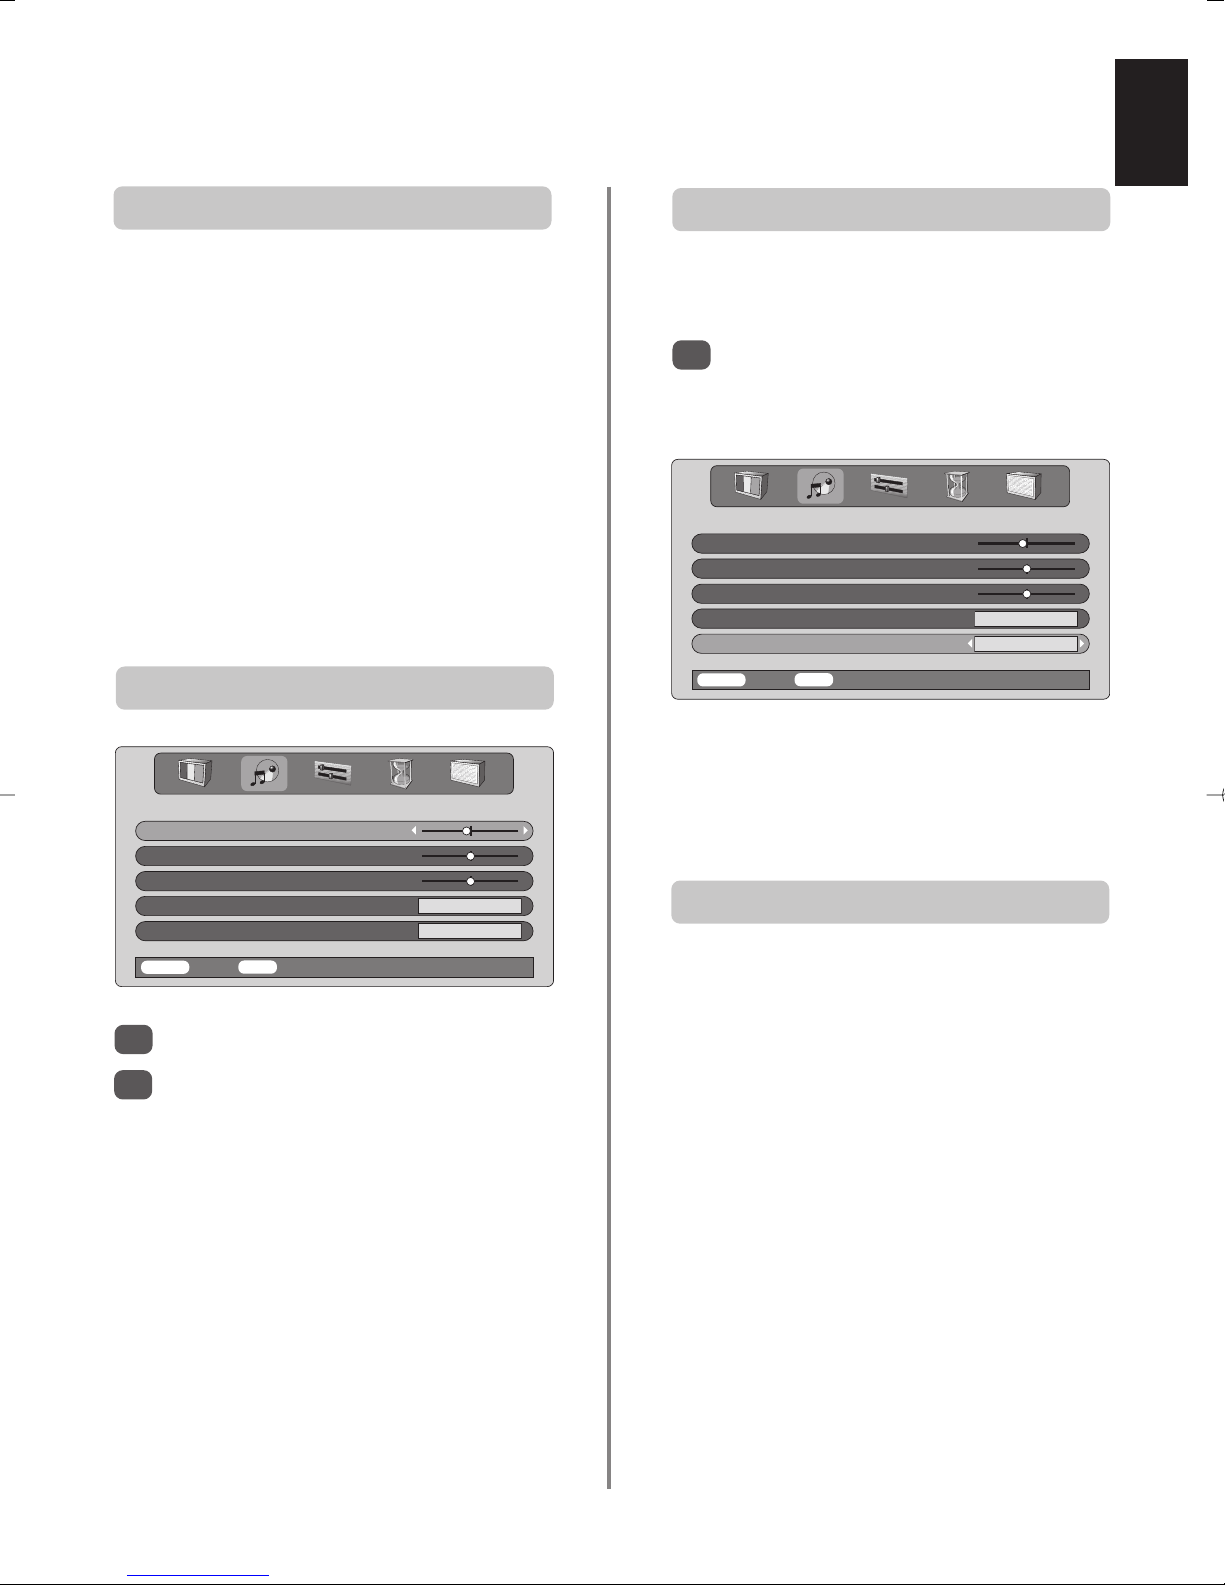
Sound controls
Press MENU and SorRto select SOUND.
Press Qto highlight Bass, Treble or Balance
and SorRto change the setting.
Bass, Treble and Balance
1
2
If stereo or dual language broadcasts are transmitted the
word Stereo or Dual will appear on the screen each time
programme positions are changed, disappearing after a
few seconds. If the broadcast is not in stereo the word
Mono will appear.
Stereo… Press
OI/II to select Stereo or Mono.
Bilingual… Bilingual transmissions are rare. If they are
transmitted the word Dual will display. Choose the
required programme number and if the word Dual
appears press OI/II to select Dual 1, Dual 2 or Mono.
Stereo and Bilingual transmissions
SOUND
Bass – 4
Treble 0
Balance 0
Speaker On
BBE On
MENU Back EXIT Watch TV
BBE®sound processor
BBE gives a more natural sound, improves speech clarity
and increases the dynamic range of music.
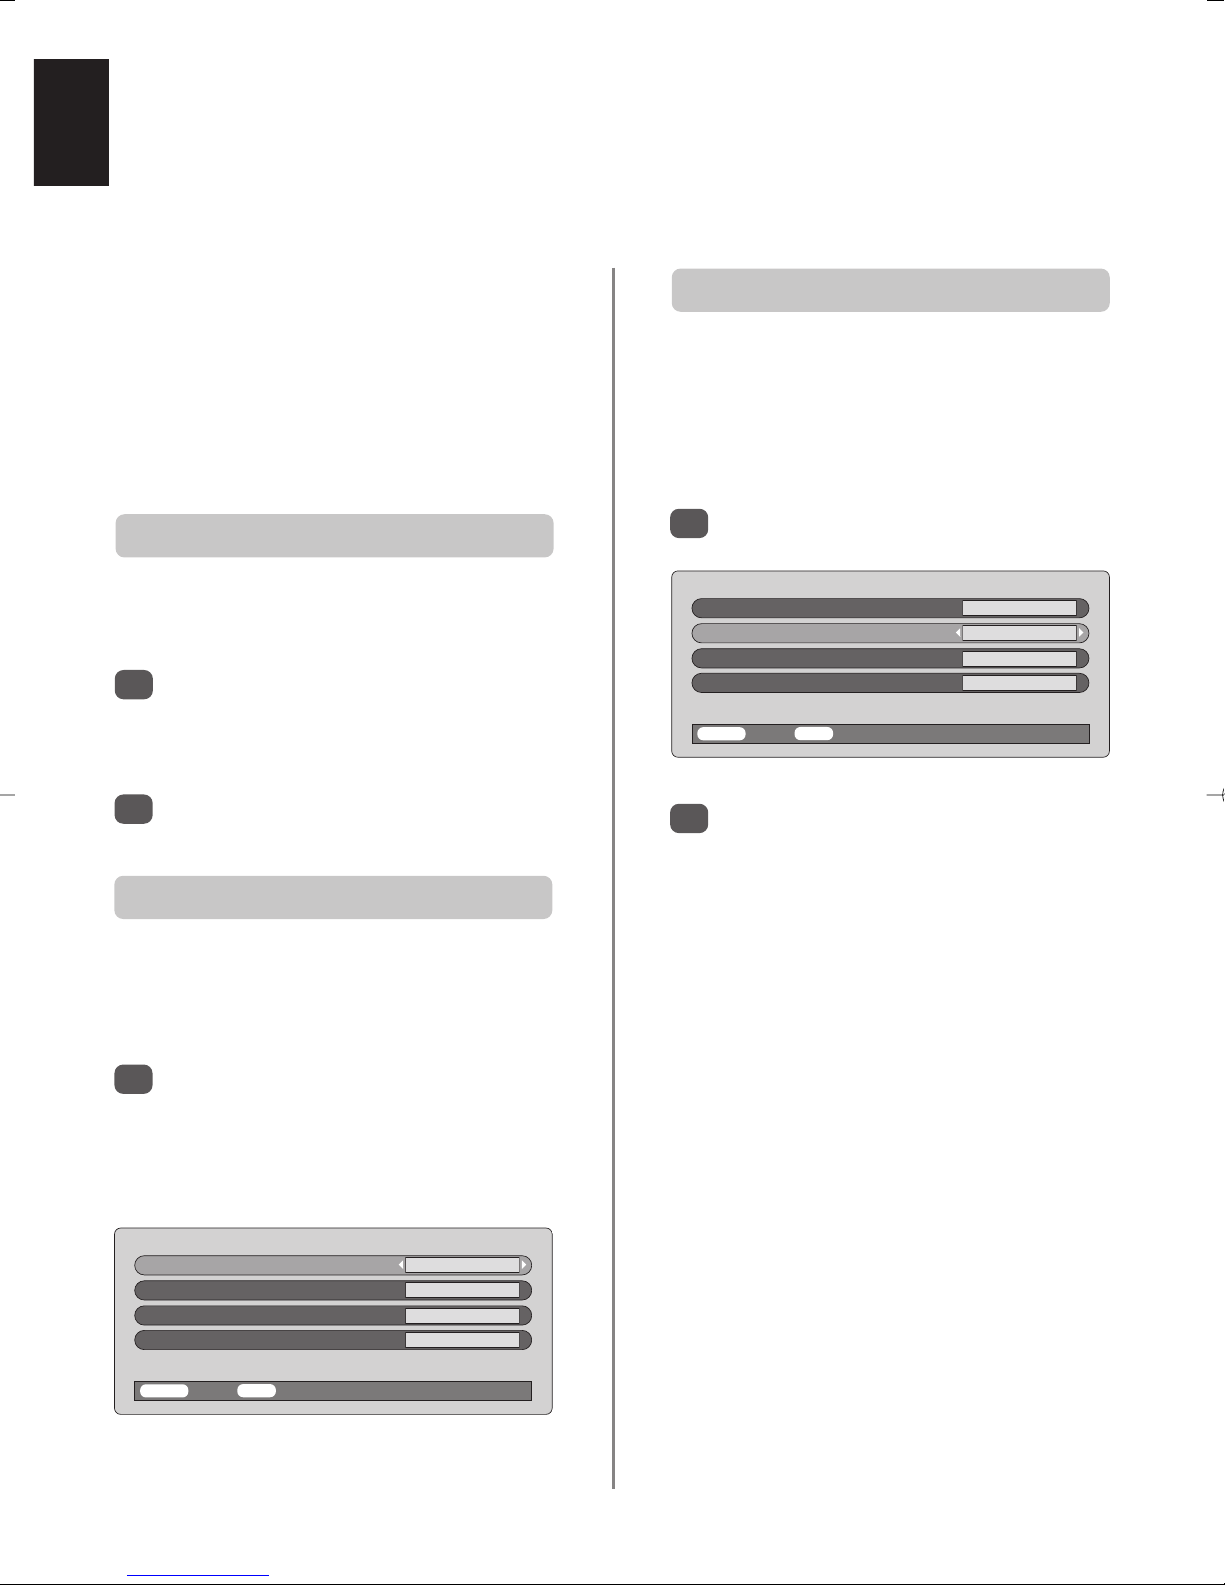
1
Press MENU and select the SOUND menu.
Use Por Q to highlight BBE then press
SorR
to select On or Off.
NOTE: Manufactured under license from BBE Sound, Inc.
Licensed by BBE Sound, Inc. under USP4638258 and
4482866. BBE and the BBE symbol are registered
trademarks of BBE Sound, Inc.
SOUND
Bass – 4
Treble 0
Balance 0
Speaker On
BBE On
MENU Back EXIT Watch TV
English
14
Widescreen viewing
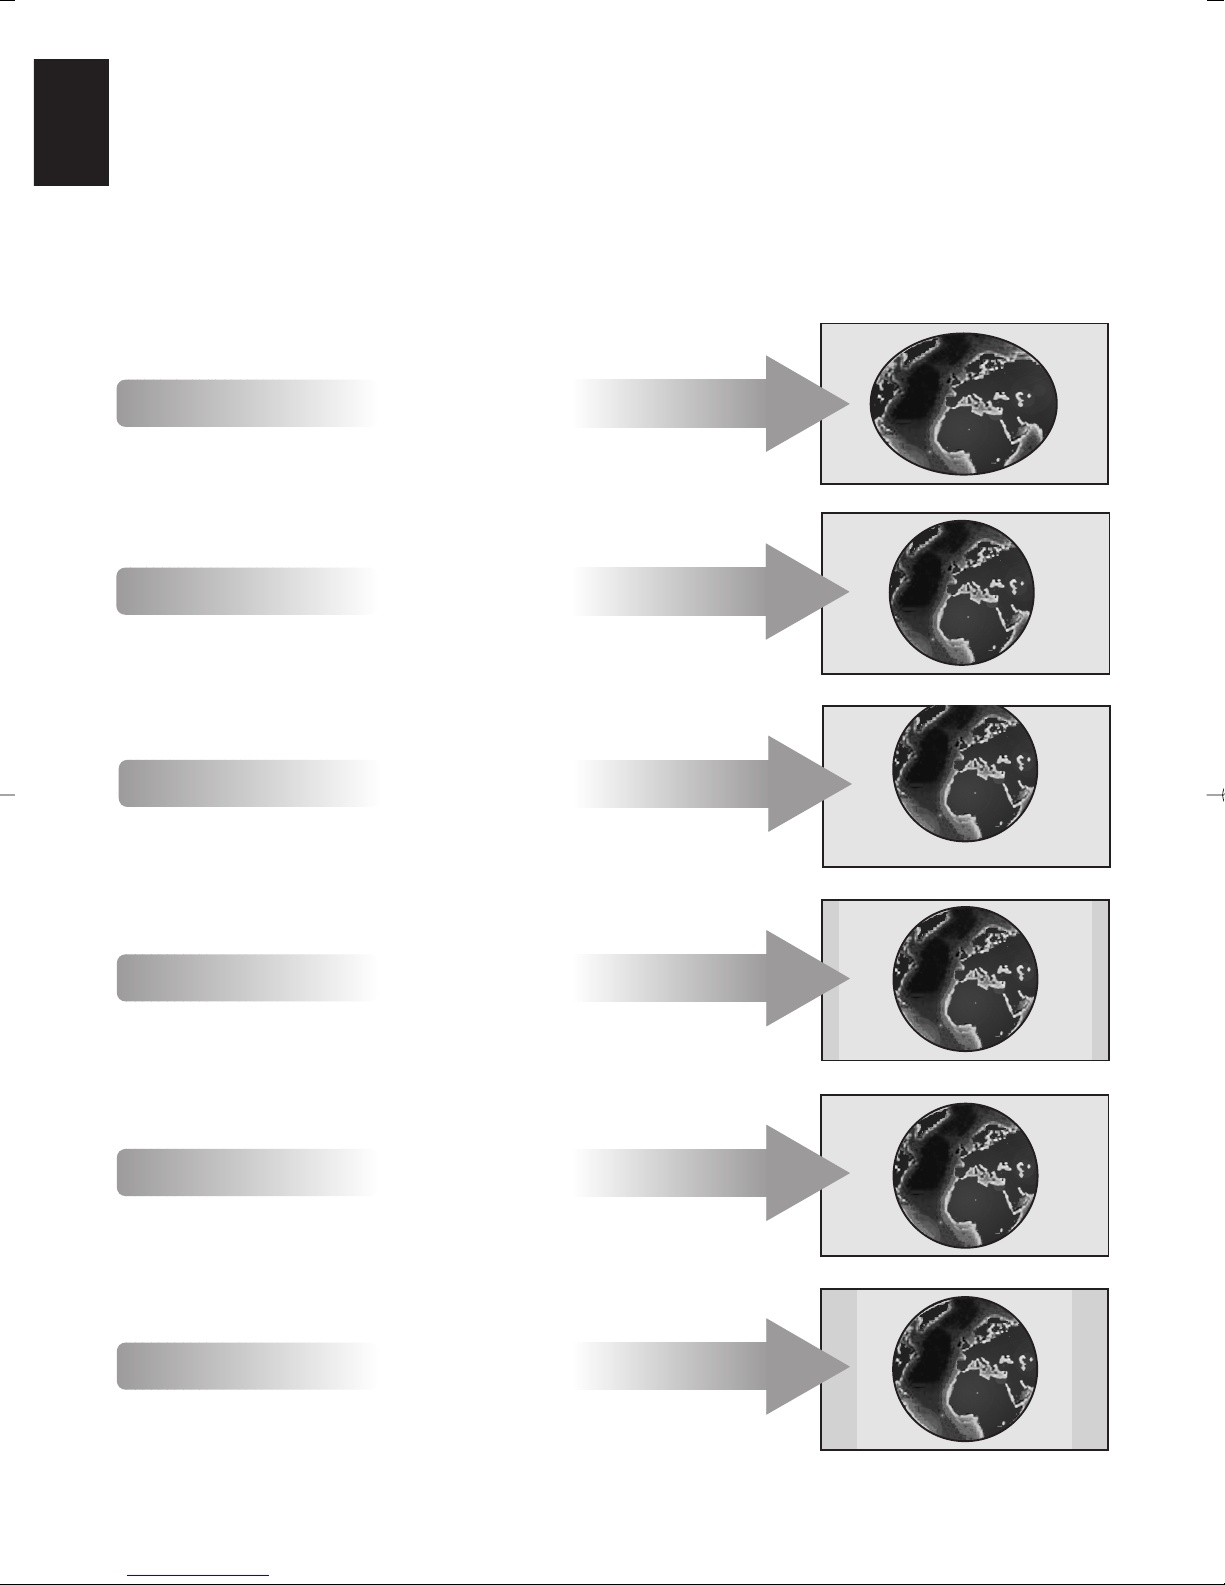
SUPER LIVE
This setting will enlarge the image to
fit the screen by stretching the image
horizontally, holding the correct
proportions at the centre of the image.
SUBTITLE
Depending on the type of broadcast being transmitted, programmes can be viewed in a number of formats.
Press the
{
button repeatedly to select between Super live, Cinema, Subtitle, 14:9, Wide and 4:3.
Please note: Whenever the MENU button is pressed the picture size setting will change while the menus are
ON the screen. This is to ensure that the menus do not overlap the edges of the viewable area.
CINEMA
When watching ‘letterbox format’
films/video tapes, this setting will
eliminate or reduce the black bars at
the top and bottom of the screen by
zooming in and selecting the image
without distortion.
When subtitles are included on a
letterbox format broadcast, this setting
will raise the picture to ensure that all
the text is displayed.
SUBTITLE
14:9
Use this setting when watching a 14:9
broadcast.
Use this setting when watching a
widescreen DVD, widescreen video
tape or a 16:9 broadcast
(when available). Due to the range of
widescreen formats (16:9, 14:9,
20:9 etc.) black bars may be visible
on the top and bottom of the screen.
WIDE
Use this setting to view a true 4:3
broadcast.
4:3
Using the special functions to change the size of the displayed image (i.e. changing the height/width
ratio) for the purposes of public display or commercial gain may infringe on copyright laws.

English
15
Picture controls
This television offers the choice of personalising the picture
style. Press
m
to view the different styles available:
Picture mode-1 to 3 are preset options and
Picture mode-M stores your own settings:
Use SorRto adjust the Contrast, Brightness,
Colour, Tint and Sharpness.
The Tint can only be adjusted on an NTSC signal
from an NTSC video recorder or DVD player when
the television is in AUTO or NTSC colour mode.
Select the PICTURE menu.
Picture preferences
1
2
PICTURE
Contrast 50
Brightness 50
Colour 50
Tint 0
Sharpness 0
MENU Back EXIT Watch TV
Picture position
The picture position may be adjusted to suit personal
preference and can be particularly useful for
external inputs.
In the SET UP menu press Quntil Picture
position is highlighted.
1
Press OK to view the options available for the
picture format that has been selected.
Press Pand Q to select an option, then Sor
R
to adjust the settings.
The options alter depending on the widescreen
format chosen and when viewing connected
equipment.
In Cinema:
2
3
DNR enables you to ‘soften’ the screen representation of a
weak signal to reduce the noise effect.
DNR – Digital Noise Reduction
Select DNR from the PICTURE menu. Use Sor
R
to adjust. The differences may not always be
noticeable (for the best result use lower settings as
picture quality can be lost if the setting is too high).
1
Black Stretch increases the strength of dark areas of the
picture which improves the definition.
Black Stretch
In the PICTURE menu press Quntil Black
Stretch is highlighted.
Press SorRto select between On and Off. The
effect depends on the broadcast and is most
noticeable on dark colours.
1
2
PICTURE
Colour 0
Tint 0
Sharpness 0
DNR 2
Black stretch On
MENU Back EXIT Watch TV
SET UP
Manual tuning OK
Programme sorting OK
AV connection OK
Picture position OK
Quick Setup OK
MENU Back EXIT Watch TV
Picture position
Horizontal position
Vertical position
Reset OK
MENU Back EXIT Watch TV

English
16
The Side Panel feature lightens or darkens the band each
side of the screen when in 4:3 or 14:9 format. This will
help prevent after-image of the band and can also make
viewing in bright or dark conditions more comfortable.
PICTURE
DNR 4
Black stretch On
Colour temperature Normal
Auto format Off
Grey screen On
MENU Back EXIT Watch TV
Picture controls continued
In the PICTURE menu press Quntil Colour
Temperature is highlighted.
Press SorRto select between Normal, Warm
and Cool to suit your preference.
1
2
Colour Temperature increases the ‘warmth’ or ‘coolness’
of a picture by increasing the red or blue tint.
Colour Temperature
In the FEATURE MENU press Quntil Back light
is highlighted.
Press OK to select, then SorRto adjust.
1
2
Adjusting the Back light can improve the clarity of the
screen when viewing in bright conditions.
Back light
Automatic format (Widescreen)
When this TV receives a true Widescreen picture and
Auto format is On, it will automatically be displayed in
Widescreen format, irrespective of the
TV’s previous setting.
Select
Auto format
from the PICTURE menu,
then select On or Off.
1
Grey screen
When Grey screen is selected the screen will turn grey
and the sound will be muted when no signal is received.
In the PICTURE menu press Por Q to highlight
Grey screen.
Press SorRto select On or Off.
1
2
In the FEATURE MENU press Quntil Side Panel
is highlighted.
Press OK to select, then SorRto adjust.
1
2
Side Panel adjustment
FEATURE MENU
Teletext Auto.
Panel lock Off
Back light 16
Side Panel 0
PC Setting
MENU Back EXIT Watch TV
FEATURE MENU
Teletext Auto.
Panel lock Off
Back light 16
Side Panel 0
PC Setting
MENU Back EXIT Watch TV

English
17
The timer, PC settings – clock phase,
sampling clock
Press Qto select On or Off timer. Use the
number buttons to set the required time. For
example, to switch the TV off in one and a half
hours enter 01:30.
If setting the Off timer, press EXIT to finish. If
setting the On timer, press Qto select On timer
Position, enter the programme position number
required, then press ito put the TV into
Standby. The GREEN On timer indicator on the
front of the TV will now be lit.
Any equipment connected with Scart leads must
also be put into Standby to prevent them from
being displayed when the timer switches on.
Once the On timer has been set the TV can be
switched on at any time by pressing i. The
Green On timer indicator will remain on until the
set time period as passed when the TV will go to
the chosen channel. This feature can help to
avoid missing favourite programmes.
To cancel the On timer, enter zero in each
position including the programme position.
The TV can be set to turn itself On or Off after a
certain time.
The Timer
3
2
3
4
Use SorRto adjust until the picture clears.
3
Use SorRto adjust until the picture clears.
1
Press MENU and SorRto select the TIMER
menu.
TIMER
Off timer 01:30
On timer 00:00
On timer Position 01
MENU Back EXIT Watch TV
In the FEATURE MENU press Quntil PC Setting
is highlighted.
Press OK to select, then Q to highlight Clock
phase.
1
2
The Clock phase matches the PC signal with the LCD
display. Adjusting this can clear horizontal stripes and
picture blur.
Clock phase
FEATURE MENU
Teletext
Panel lock Off
Back light 16
Side Panel 0
PC Setting OK
MENU Back EXIT Watch TV
In the FEATURE MENU press Quntil PC Setting
is highlighted.
Press OK to select, then Q to highlight Sampling
clock.
1
2
Adjusting the Sampling clock alters the number of pulses
per scan, this will clear vertical lines on the screen.
Sampling clock
PC Setting
Clock phase 9
Sampling clock 7
MENU Back EXIT Watch TV
PC Setting
Clock phase 7
Sampling clock 9
MENU Back EXIT Watch TV
English
18
Input selection and AV connections
Defining the INPUT and OUTPUT sockets so that the television recognises connected equipment. See page 6
for a clear view of the back connection recommendations.
Select AV connection.
Use SorRto change the EXT3 output option to:
MONITOR = The picture on screen.
TV = The last television programme selection.
EXT1 = The picture from equipment connected
to
B
1.
EXT2 = The picture from equipment connected
to
B
2.
EXT4 = The picture from equipment connected to
Scart 4.
EXT5 = The picture from equipment connected to
Scart 5.
EXT6 = The picture from equipment connected to
the front input sockets.
This enables selection of the source to output from
Scart 3. For example, to record transmissions in stereo
from a stereo decoder – connect a stereo decoder to
Scart 4 or 5 and stereo VCR to Scart 3, then select EXT4
or EXT5 as the EXT3 output. The signal received through
Scart 4 or 5 will output directly through Scart 3.
Most VCRs and decoders send a signal through the Scart
lead to switch the TV to the correct Input socket.
Alternatively press the external source selection button
B
until the picture from connected equipment is shown.
This button must be used to view equipment connected
using the COMPONENT VIDEO INPUT (EXT1 and EXT2).
An S e.g. B3S (EXT 3S), indicates the input is set for an
S-Video signal.
Use the Input Selection if the TV does not switch over
automatically.
Input selection
OUTPUT signal selection for Scart 3
1
This specifies the type of signal going into Scart 3 (EXT3)
on the back of the TV. Please refer to the manufacturers
instructions for the connected equipment.
In the SET UP menu press Quntil
AV connection is highlighted, then press OK.
With Sor Rselect either AV or S-VIDEO as the
required input for EXT3.
If the colour is missing try the alternative setting.
INPUT signal selection
1
1
2
2
AV connection
EXT3 input AV
EXT3 output EXT1
Woofer Ext.
Audio output Fixed
MENU Back EXIT Watch TV
AV connection
EXT3 input AV
EXT3 output EXT1
Woofer Ext.
Audio output Fixed
MENU Back EXIT Watch TV
Press Bto select B1, B2, B3, B4, B5,
B
6 (EXT1-6) or PC.
PC displays a computer connected to Input
RGB/PC on the side of the TV.
To return to TV mode press
B
again or one of
the numbered buttons.

English
19
Teletext – setting up,
general information, Auto and LIST modes
This TV has a multi-page teletext memory, which takes a few moments to load. It offers two Modes of viewing
text – Auto will display Fastext, if available. LIST will store your four favourite pages.
If Fastext is available four coloured titles will appear at
the base of the screen.
To access one of the four given subjects, press the
relevant coloured button on the remote control.
For further information on your particular text system(s),
see the broadcast teletext index page or, consult your
local Toshiba dealer.
To access the sub-pages press
X(B
) then use Pand Q
to view them. A bar with numbers will appear on the side
of the screen.
The sub-page you are viewing will be highlighted and, as
the television loads any additional sub-pages the colour
of the numbers will change, indicating that these pages
have been loaded.
These sub-pages will remain available to view until
another page is chosen or, in normal TV mode, the
channel is changed.
The
6/7
button:
To view teletext press
6/7
. Press again to superimpose
the teletext over a normal broadcast picture and again to
return to normal viewing. Programmes cannot be
changed until teletext is cancelled.
The first text page shown will be the initial page.
In Auto. mode this displays the main subjects available
and their relevant page numbers.
In LIST mode this displays whichever page number is
currently stored on the RED button.
In either mode any teletext page can be accessed by
entering the 3 digit page number using the numbered
buttons, pressing the coloured buttons or pressing
Pf(P ) to advance to the next page and P e(Q ) to
go back to the previous page.
Sub-pages
If there are sub-pages they will automatically load into
memory without changing the page on screen.
Navigating pages using Auto.
Teletext information
The four coloured choices at the bottom of the screen are
numbers – 100, 200, 300 and 400, which have been
programmed into the TV’s memory. To view these pages
press the relevant coloured buttons.
To change these stored pages press the relevant coloured
button and enter the 3 digit number. This number will
change in the top left of the screen and in the coloured
highlight.
Press OK to store. The bars at the bottom of the screen
will flash white. Whenever OK is pressed all four
page numbers showing at the bottom will be stored
and the previous ones will be lost.
If OK is not pressed the selection will be forgotten when
teletext is cancelled.
Other pages may be viewed by entering the 3 digit page
number – but DO NOT press OK or these pages will be
stored.
Navigating pages using LIST
Select Teletext from the FEATURE MENU.
With Sor Rchoose Auto. or LIST then press EXIT.
The teletext character set will be automatically chosen by
the language setting in the SET UP menu.
Selecting Modes
1
2
FEATURE MENU
Teletext Auto.
Panel lock Off
Back light 16
Side Panel 0
PC Setting
MENU Back EXIT Watch TV

English
20
Auto.
Press Tto access index pages. The one displayed is
dependant on the broadcaster.
LIST
Press Tto return to the page currently stored on the
RED button.
Remember to cancel teletext
before changing channels
– press the
6
/
7
button twice.
☛
Teletext continued
– control buttons
Below is a guide to the functions of the remote control teletext buttons.
Enter the page number then press
8/9
, a normal
picture will be displayed. The TV will indicate when the
page is present by displaying the page number at the top
of the screen. Press
6/7
to view the page.
To display news flashes:
Select the news flash page for the chosen teletext service
(see the index page of teletext service). Press
8/9
. The
news flashes will be displayed as and when they are
broadcast. Press
8/9
again to cancel the display.
The news flash page must be cancelled before
changing programmes.
To display an index/initial page:
T
At times it is convenient to hold a page of text. Press
q
and qwill appear in the top left of the screen. The
page will be held on screen until the button is pressed
again.
To hold a wanted page:
q
To discover the solutions on quiz and joke pages press the
r
button.
To reveal concealed text:
r
Press
6/7
to display teletext. Press again to
superimpose teletext over a normal broadcast picture.
Press again to return to normal TV viewing. Programmes
cannot be changed until you return to normal TV.
To display a page of teletext:
To select a page whilst viewing a
normal page:
8/9
6
/
7
Press sonce to enlarge the top half of the page, press
again to enlarge the bottom half of the page. Press again
to revert to normal size.
To enlarge the teletext display size:
s
For use with Pand Q to view sub-pages when available.
To access sub-pages:
X
English
21
Below are the answers to some of the most common queries.
A
Check the mains switch is on and check all
connections.
Check the TV is not in standby mode.
Why is there no sound or picture?
Q
A
Check the volume has not been turned down or
that sound mute has not been selected.
Why is there a picture but no sound?
Q
A
Check that Panel lock is not ON.
Why don’t the controls on the front of the TV
work?
Q
A
Check the Scart lead connection.
Why is there a good video picture but no sound?
Q
A
Make sure the VCR or DVD player is connected to
the TV as shown on page 6, then select the correct
input by pressing B.
Why doesn’t the video/DVD being played show
on screen?
Q
A
Check the correct input has been chosen,
S-VIDEO or AV. See AV connections.
Why is the video/DVD in black and white?
Q
A
When using an external source, for instance, a
poor quality video tape, if there is little or no
colour, improvements may sometimes be achieved. The
colour is factory set to Auto. to automatically display the
best colour system.
To check that you have the best colour:
There IS a picture, but why is there little or no
colour?
Q
With the external source playing, select Manual
setting from the SET UP menu.
With SorRchoose between Auto., PAL,
SECAM, NTSC 4. 43 or 3. 58.
1
2
Questions and Answers
Manual setting
Colour system : Auto.
EXT3 AVCR
Store MENU Back EXIT Watch TV
Select the Manual tuning menu. Highlight the
station and press OK, then press Rto select
Manual fine tuning
.
Using Por Q adjust to get the best picture and
sound. Press OK and then EXIT.
1
2
A
Interference or a weak signal. Try a different TV
station. Manual fine tuning may help.
What else can cause a poor picture?
Q
Manual tuning
Manual fine tuning
1 I A 22 + 2 B B C 1
Store MENU Back EXIT Watch TV
A
The Sampling clock may need adjustment. Select
PC Setting from the FEATURE MENU, highlight
Sampling Clock and adjust until the lines clear.
Why are there vertical stripes on the screen?
Q
A
The Clock phase may need adjustment. Select PC
Setting from the FEATURE MENU, highlight
Clock phase and adjust until the picture clears.
Why are there horizontal stripes and/or blurred
images on the screen?
Q
A
Check the side switch on the remote control is in
TV mode.
Check the batteries aren’t dead or inserted incorrectly.
Why doesn’t the remote control work?
Q

English
22
Questions and Answers continued
A
Good performance of text depends on a good
strong broadcast signal. This normally requires a
roof or loft aerial. If the Text is unreadable or garbled,
check the aerial. Go to the main index page of the teletext
service and look for the User Guide. This will explain the
basic operation of teletext in some detail. If further
information is needed on how to use text see the teletext
section.
Why are there problems with teletext?
Q
A
There are none broadcast or they have not yet
loaded. Press the X(B)
button to access.
(See teletext section).
Why are there no teletext sub-pages?
Q
A
Connect the source via a Scart lead and play.
Select Manual setting from the SET UP menu.
Why are the colours wrong when an NTSC
source is played?
Q
Set the Colour to Auto. and exit.
Go to the Picture menu and adjust the tint.
1
2
Manual setting
Colour system : Auto.
EXT3 AVCR
Store MENU Back EXIT Watch TV
A
Check the Speaker option in the Sound menu is
set to Off.
Why is there no sound from my connected
sound equipment?
Q
A
Remove it by pressing CALL.
Why is there a message permanently on the
screen?
Q
Cleaning the screen and cabinet…
Turn off the power, clean the screen and cabinet with a soft, dry cloth. We recommend that you do not use any proprietary polishes or
solvents on the screen or cabinet as this may cause damage.
Disposal…
The cold cathode fluorescent lamp in the LCD panel contains a small amount of mercury, when the set reaches the end of its useful
life please dispose of it in accordance with Local Government Regulations or at a recycling centre.

English
23
Specifications and accessories
Broadcast systems/channels
PAL-I UHF UK21-UK69
PAL-B/G UHF E21-E69
VHF E2-E12, S1-S41
SECAM-L UHF F21-F69
VHF F1-F10, B-Q
SECAM-D/K UHF R21-R69
VHF R1-R12
Video Input PAL, SECAM, NTSC 3.58/4.43
External connections
EXT1 Input Phono jacks Y, PB/CB, PR/C
R
High definition 1080i
Progressive scan
Phono jacks A/V
EXT2 Input Phono jacks Y, P
B/CB
, PR/C
R
High definition 1080i
Progressive scan
Phono jacks A/V
EXT3 Input/Output 21-pin Scart A/V, S-video
Selectable output
Input 4 pin S-video
Phono jack Video
Phono jacks Audio L + R
EXT4 Input/Output 21-pin Scart RGB, A/V
EXT5 Input/Output 21-pin Scart RGB, A/V
EXT6 Input (Front) 4 pin S-video
Phono jack Video
Phono jacks Audio L + R
RGB/PC Input Mini D-sub 15-pin Analog RGB signal
Input 3.5mm stereo jack Audio
Monitor Output Phono jacks A/V
Audio Output Fixed/Variable Phono jacks Audio L + R
Output to Active Super Woofer Phono socket
Toshiba Information Systems (U.K.) Limited
Consumer Products Division,
European Service Centre,
Admiralty Way, Camberley,
Surrey, GU15 3DT, UK
Specification is subject to change without notice.
Originated by Kensa Creative Solutions, Saltash, Cornwall.
© Toshiba Information Systems (U.K.) Limited
All rights reserved.
Reproduction in whole or part without written permission is strictly prohibited.
Printed on recycled paper. 100% Chlorine free.
Programme Positions 100
Stereo Nicam
2 carrier system
Visible Screen Size 26ins
(approx.) 32ins
Display 15:9
Sound output (at 10% distortion) Main 10W + 10W
Power consumption 26ins 150W
as specified in EN60107-1 : 1997 32ins 185W
Standby 26ins <1.3W
32ins <1.3W
Dimensions 26ins 48cm (H) 82cm (W) 14cm (D)
(approx.) 32ins 61cm (H) 107cm (W) 15cm (D)
Weight (approx.) 26ins 22kg
32ins 33kg
Headphone socket 3.5mm stereo
Accessories Remote control
2 batteries
(UM-4, AAA, IEC R03 1.5V)
Clip

Français
24
Sommaire
MISE EN ROUTE
Mesures de sécurité – Quelques conseils de sécurité à connaître et autres mesures à respecter 25
Installation et informations importantes 26
La télécommande – guide en image 27
Connexion des équipements externes – les instructions de connexion d'équipements à
l'arrière de votre téléviseur 28
Connexion d'un ordinateur – connecter un ordinateur sur le côté du téléviseur 29
Connexions et commandes – mise en marche du téléviseur, mode veille, utilisation des
commandes à l'avant, prise de casque d'écoute, connexion d'équipements à l'avant
du téléviseur 30
Réglage du téléviseur à l'aide de la Configuration rapide – langue, pays, système de diffusion 31
Attribution de programmes 31
Réglage manuel – en variante de la configuration rapide, il permet la mémorisation directe de
chaînes, le réglage d'une position de programme pour un magnétoscope 32
Saut de programme 33
Accord automatique 34
COMMANDES ET FONCTIONS
Commandes générales – changement de position de programme, affichage de l'heure 34
Verrouillage panneau – désactiver les touches sur le téléviseur 34
Commandes du son – volume, son coupé, super basses, ampli de basses, graves/aigus/balance 35
Processeur de son BBE® 35
Transmissions stéréo et bilingues – diffusions stéréo/mono ou en deux langues 35
Grand écran 36
Commandes de l'image – position de l'image, préférences d'image (lumière, couleur, contraste,
définition, teinte), réduction numérique du bruit (DNR), étirage du noir 37
Commandes de l'image – Température des couleurs, format automatique (grand écran),
écran gris, rétroéclairage, ajustement du panneau latéral 38
Minuterie – programmer le téléviseur pour qu'il se mette en marche et s'arrête 39
Réglages de l'ordinateur – phase de l'horloge, horloge d'échantillonnage 39
Sélection d'entrée et connexions AV – prises d'entrée et de sortie pour les équipements connectés 40
TELETEXTE
Configuration, informations d'ordre général, mode Auto 41
Mode LISTE, touches de commande 42
RESOLUTION DES PROBLEMES
Questions et réponses – réponses à certaines des questions les plus courantes y compris
accord fin manuel et système de couleur 43
INFORMATIONS
Spécifications et accessoires – informations techniques concernant le téléviseur et les
accessoires fournis 45

Français
25
Consignes de Sécurité
Cet appareil a été conçu et fabriqué conformément aux normes internationales de sécurité. Toutefois, comme
tout appareil électrique, il convient de respecter certaines consignes afin d’assurer un fonctionnement optimal
en toute sécurité. Veuillez lire attentivement ce qui suit pour votre propre sécurité. Il s’agit de remarques
d’ordre général s’appliquant à tous les appareils électroniques grand public : il est donc possible que
certaines ne concernent pas le produit que vous venez d’acquérir.
N’ENLEVER aucun cache fixe, ceci pouvant exposer des
tensions dangereuses.
N’OBSTRUEZ PAS les ouvertures de ventilation de
l’appareil, par exemple par des journaux, nappes,
rideaux, etc. Une surchauffe endommagera
l’équipement et réduira sa durée de vie.
NE LAISSEZ PAS l’appareil exposé à des gouttes ou
éclaboussures et n’y placez pas de récipients remplis de
liquides, comme des vases.
NE PLACEZ PAS d’objets chauds ou de sources de
flammes nues, comme des bougies ou des veilleuses, sur
l’appareil ou à proximité immédiate. Les températures
élevées peuvent faire fondre le plastique et provoquer
des incendies.
N’UTILISEZ PAS de supports de fortune et ne fixez
JAMAIS de pieds avec des vis à bois. Pour garantir une
sécurité totale, utilisez toujours le support ou les pieds
agréés du fabricant avec les fixations fournies, en suivant
les instructions.
N’ECOUTEZ PAS avec un casque à volume élevé, sous
peine d’entraîner une détérioration permanente de
l’ouïe.
NE LAISSEZ PAS votre appareil branché sans
surveillance à moins qu'il ne soit spécialement conçu
pour un fonctionnement sans surveillance ou qu'il
dispose d'un mode de veille. Débranchez l'appareil à la
prise de courant, et assurez-vous que tous les membres
de votre famille savent le faire. Des mesures particulières
seront éventuellement nécessaires pour les personnes
infirmes ou handicapées.
N’UTILISEZ PAS votre équipement si vous avez le
moindre doute quant à son bon fonctionnement, ou s’il
présente un dommage quelconque. Eteignez-le,
débranchez-le et consultez votre revendeur.
NE LAISSEZ PERSONNE, surtout des enfants,
pousser ou frapper l'écran, enfoncer des objets
dans les trous, les fentes ou tout orifice du boîtier.
NE CHERCHEZ JAMAIS à deviner quoi que ce soit et
ne prenez aucun risque avec des appareils
électriques – prudence est mère de sûreté.
POUR DEBRANCHER LE TELEVISEUR, ETEIGNEZ ET
RETIREZ LA PRISE.
Prévoyez un espace d’au moins 10 cm tout autour du
téléviseur pour permettre une ventilation adéquate et
éviter ainsi toute surchauffe susceptible d’endommager
l’appareil. Evitez également les endroits poussiéreux.
Votre téléviseur risque d’être endommagé par la lumière
directe du soleil ou par la chaleur d’un radiateur. Evitez
les endroits trop chauds ou humides, ou les lieux qui
pourraient être exposés à des températures inférieures
à 5°C.
L'alimentation secteur requise pour cet appareil est 110240 v CA 50/60Hz. Ne le raccordez jamais à une
source de courant continu ou toute autre source
d’alimentation électrique. ASSUREZ-VOUS que le cordon
d’alimentation n’est pas coincé sous l’appareil. NE
COUPEZ PAS la fiche secteur : elle contient un filtre
antiparasites spécial dont le retrait affectera le
fonctionnement du téléviseur.
EN CAS DE DOUTE, CONSULTEZ UN ELECTRICIEN
QUALIFIE.
LISEZ le mode d’emploi avant de mettre l’appareil en
marche.
ASSUREZ-VOUS que tous les branchements électriques,
y compris la fiche secteur, les rallonges et les
interconnexions entre les différents appareils sont corrects
et conformes aux instructions du fabricant. Eteignez et
débranchez l’appareil avant de faire ou de modifier un
branchement.
CONSULTEZ votre revendeur en cas de doute sur
l’installation, le fonctionnement ou la sécurité de votre
appareil.
FAITES ATTENTION aux panneaux ou aux portes en
verre de l’appareil.
Ventilation
Mises en garde
Chaleur excessive
Alimentation secteur
Conseils
Français
26
Installation et informations importantes
Où l'installer
Placez votre téléviseur à l'abri de la lumière directe du
soleil et des éclairages puissants. Un éclairage doux et
indirect est recommandé pour un meilleur confort de
visualisation. Placez le téléviseur sur une base solide, la
surface de support devant être plane et fixe. Fixez-la
ensuite au mur avec une attache solide en utilisant le
crochet à l'arrière du téléviseur. Ce dernier l'empêchera de
basculer. Utilisez des rideaux ou des stores pour empêcher
que la lumière du soleil n'éclaire directement l'écran.
Un support au sol et sur un dessus de table est disponible
pour ce téléviseur, ainsi qu'une équerre de fixation
permettant de le monter en applique contre un mur.
Les écrans à cristaux liquides sont fabriqués suivant une
technique utilisant un niveau de précision extrême ;
néanmoins, il peut arriver que certaines parties de l'écran
manquent d'éléments d'image ou présentent des points
lumineux. Ceci n'est pas un signe de mauvais
fonctionnement.
Assurez-vous que le téléviseur est placé en un endroit dans
lequel il ne peut pas être poussé ou heurté par des objets,
car toute pression pourrait briser ou endommager l'écran.
Veuillez prendre note
CLAUSE D’EXCLUSION
Toshiba ne pourra en aucun cas être tenu responsable de toute perte et/ou tout dommage du produit causés par :
i) un incendie ;
ii) un tremblement de terre ;
iii) un dommage accidentel ;
iv) une mauvaise utilisation délibérée ;
v) une utilisation du produit dans des conditions anormales ;
vi) une perte et/ou un dommage causés au produit alors qu’il était en possession d’un tiers ;
vii) tout dommage ou toute perte résultant du non-respect et/ou de la mauvaise application des instructions figurant dans le
manuel de l’utilisateur ;
viii) toute perte ou tout dommage résultant directement de la mauvaise utilisation ou d’un défaut de fonctionnement du produit
lorsqu’il est utilisé simultanément avec un appareil associé.
Par ailleurs, Toshiba ne pourra en aucun cas être tenu responsable de toute perte et/ou tout dommage consécutifs, notamment
mais non limitativement, les pertes de profit, les interruptions d’activité, la perte de données enregistrées, résultant du
fonctionnement normal ou d’une mauvaise utilisation du produit.
Si des images stationnaires produites par le télétexte, des logos d'identification de chaîne, des affichages informatiques, des jeux
vidéos, des menus à l'écran, etc., sont affichés sur l'écran de télévision pendant un certain temps, il est vivement conseillé de réduire
les réglages de luminosité et de contraste.

Français
27
Votre télécommande d’un coup d’oeil
Pour couper le son
Touches de commande du Télétexte
Pour quitter les Menus
Super Basses/Ampli basses
Réception stéréo/bilingue
Pour faire apparaître des informations à
l’écran et pour la fonction page
initiale/index du Télétexte
Pour sélectionner une entrée parmi des
sources externes
Pour accéder aux sous-pages en mode
Télétexte
Pour sélectionner le mode
Menus à l’écran
Sélection des préférences d’affichage
Représentation grand écran
Touches numériques
Pour revenir au programme précédent
Mode marche/veille
Pour afficher le Télétexte
En mode VCR (magnétoscope)
ou DVD :
appuyez sur
m
pour PAUSE
appuyez sur
w
pour EJECTION
appuyez sur
l
q
pour SAUT ARRIERE
appuyez sur
s
l
pour SAUT AVANT
appuyez sur
r
pour LECTURE
appuyez sur
p
pour ARRET
appuyez sur
q
pour RETOUR RAPIDE
appuyez sur
s
pour AVANCE RAPIDE
Pour modifier les positions de
programme et les pages Télétexte
Pour modifier le volume
Dans les menus, les flèches déplacent le
curseur en haut, en bas, à gauche ou à
droite de l’écran. OK pour confirmer
votre sélection
En mode TV :
8/9
Affichage de l’heure
En mode Télétexte :
r
Pour faire apparaître du texte caché
q
Pour conserver une page souhaitée
s
Pour agrandir la taille de l’affichage
Télétexte
8/9
Pour sélectionner une page tout en
regardant une chaîne
La Télécommande
UP
Retirez le cache arrière pour ouvrir le compartiment des piles et assurez-vous de bien respecter les
polarités. Des types de piles appropriés pour cette télécommande sont UM-4, AAA, IEC R03 1,5 V.
N'associez pas une pile usée ancienne avec une nouvelle pile et ne mélangez pas des types de piles
différents. Retirez les piles déchargées immédiatement pour éviter que de l'acide ne s'écoule dans le
compartiment des piles. Jetez les piles dans une zone de mise au rebut prévue à cet effet.
La performance de la télécommande se détériorera au-delà d'une distance de 5 m ou hors d'un angle
de 30 degrés par rapport au centre du téléviseur. Si la plage de fonctionnement se réduit, il peut être
nécessaire de remplacer les piles.
Insertion des piles et portée de la télécommande
Français
28
*
décodeur satellite
numérique ou tout
autre décodeur
compatible.
☛
Vous pouvez connecter un grand nombre
d’appareils à l’arrière du téléviseur.
Reportez-vous toujours au manuel d’utilisation
correspondant à chaque appareil.
Nous vous recommandons d’utiliser Péritel 4 ou Péritel
4 pour un décodeur et Péritel 3 pour un magnétoscope.
Si vous branchez un appareil S-VIDEO, sélectionnez
l’entrée correspondante pour EXT3. Voir page 40.
Si le téléviseur commute automatiquement sur la
chaîne de l’appareil externe, appuyez sur la touche de
position de programme souhaitée pour repasser en
affichage normal.
Pour repasser à la chaîne de l’appareil externe, appuyez
sur Bpour sélectionner EXT1, EXT2, EXT3, EXT4,
EXT5, EXT6 ou RGB/PC.
DANS LA MESURE DU POSSIBLE, NOUS VOUS
RECOMMANDONS D’UTILISER DES CBLES PÉRITEL
EN PLUS DES CBLES D’ANTENNE.
Câbles d’antenne :
Raccordez l’antenne à la prise située à l’arrière du
téléviseur. Si vous utilisez un décodeur* et/ou un
magnétoscope, il est nécessaire de raccorder le câble
d’antenne d’abord au décodeur et/ou au
magnétoscope, puis au téléviseur.
Câbles péritel :
Raccordez la prise IN/OUT du magnétoscope au
téléviseur. Raccordez le prise TV du décodeur au
téléviseur. Raccordez la prise SAT du magnétoscope à la
prise VCR du décodeur.
Avant de démarrer la recherche automatique, mettez
votre décodeur et votre magnétoscope en mode Veille.
Les prises phono à côté des prises ENTRÉE VIDEO
COMPOSANT accepteront des signaux audio L et R.
Une sortie audio externa fixe/variable est également
prévue pour raccorder une chaîne Hi-Fi appropriée ;
assurez-vous que l'option Haut-parleurs dans le menu
Son est sur Arrêt.
Connexion de l’équipement externe
Avant de connecter tout équipement extérieur, éteignez tous les appareils aux prises d'alimentation.
IN
OUT
IN
OUT
SAT
IN/OUT
VCR
TV
PERITEL 5 (EXT 5)
PERITEL 4 (EXT 4)
PERITEL 3 (EXT 3)
ENTRÉE 3 (EXT 3)
ENTRÉE VIDEO COMPOSANT (EXT 1)
ENTRÉE VIDEO COMPOSANT (EXT 2)
ENTRÉE VIDEO
COMPOSITE (EXT 1)
ENTRÉE VIDEO
COMPOSITE (EXT 2)
NE CONNECTEZ
PAS d'équipement à la
fois aux bornes
d'entrée 3 et de prise
péritel 3 (EXT3).
!
l'arrière de votre téléviseur
décodeur*
magnétoscope

Français
29
Connexion d'un ordinateur
côté gauche de votre téléviseur
ordinateur
Câble audio pour la connexion
de l'ordinateur au téléviseur
(non fourni)
Adaptateur de conversion
le cas échéant (non fourni)
Câble RGB PC
(non fourni)
Connecteur Mini D-sub 15 broches
Avant de connecter tout équipement extérieur, éteignez tous les appareils aux prises d'alimentation.
Connectez le câble PC de l'ordinateur à la borne RGB/PC
située du côté gauche du téléviseur.
Appuyez sur la toucheBpour sélectionner le mode PC.
Les signaux suivants pourront s'afficher :
VGA : 640 x 480/60 Hz (VESA 480-60)
SVGA : 800 x 600/60 Hz (VESA 600-60)
XGA : 1024 x 768/60 Hz (VESA 768-60)
REMARQUE :
Certains types d'ordinateurs ne peuvent pas être
connectés à ce téléviseur.
Un adaptateur n'est pas nécessaire pour les ordinateurs
pourvus d'une borne mini D-sub à 15 broches
compatible DOS/V.
Une bande pourra apparaître au niveau des bords de
l'écran ou certaines parties de l'image pourront être
cachées. Ceci est dû à la puissance du signal, il ne s'agit
pas d'un mauvais fonctionnement.
Un fois le mode PC sélectionné, certaines des fonctions du
téléviseur ne seront plus disponibles, elles apparaîtront en
grisé sur les listes des menus et ne pourront pas être
sélectionnées. Par ailleurs, lorsque le mode PC n'est pas
sélectionné, la fonction Réglage PC sera grisée.
Information de signal pour le connecteur Mini D-sub à 15
broches
Affectation des broches
pour la borne
RGB/PC
N° de Nom du signal N° de Nom du signal
broche broche
1R9NC
2 G 10 Terre
3B11NC
4 NC (non connectée) 12 NC
5 NC 13 H-sync
6 Terre 14 V-sync
7 Terre 15 NC
8 Terre
Français
30
Connexions et commandes
Si le voyant d'alimentation n'est pas allumé, appuyez sur
la touche MARCHE sous le coin inférieur gauche du
téléviseur pour mettre en marche l'appareil, puis
appuyez sur une touche numérique de la télécommande
pour allumer l'écran. Il faudra peut-être attendre
quelques instants pour que l'écran s'allume.
Pour mettre le poste en mode Veille, appuyez sur isur
la télécommande. Pour regarder la télévision, appuyez
une nouvelle fois sur iou sur une touche numérique
quelconque. L’image peut prendre quelques secondes
avant d’apparaître. Veillez à ne pas utiliser le mode Veille
pendant des périodes prolongées.
Pour régler votre téléviseur, vous allez maintenant devoir
utiliser les menus affichés à l’écran. Appuyez sur la
touche MENU de la télécommande pour faire
apparaître les menus.
La barre de menu en haut de l'écran indiquera cinq
rubriques différentes représentées par des symboles.
En sélectionnant un symbole grâce aux touches
S
ou Rde la télécommande, vous ferez apparaître ses
options respectives.
Pour accéder aux options, appuyez sur la touche Q de
la télécommande pour descendre dans la liste, et
appuyez sur OK, Sou Rpour sélectionner votre choix.
Suivez les instructions à l'écran. Les fonctions de chaque
menu sont décrites en détail dans ce manuel.
Un grand nombre d'équipements externes peut être raccordé par le biais des prises à l'avant du téléviseur.
Tous les réglages du téléviseur se font par la télécommande. Les touches à l’avant de l’appareil peuvent
toutefois être utilisées pour certaines fonctions.
Pour modifier le volume, appuyez sur — j +.
Pour modifier la position de programme, appuyez sur
eeFff
.
Appuyez sur MENU et S,R, Q ou P pour accéder aux
options du son et de l’image.
Appuyez sur MENU pour valider et sortir.
Lors du branchement d’un appareil mono à EXT6,
raccordez sa sortie audio à la prise L/Mono du téléviseur.
Pour sélectionner l'Entrée, appuyez sur Bjusqu'à ce
que le symbole EXT6 apparaisse, comme décrit
page 40. Le téléviseur détectera automatiquement le
type de signal.
Pour plus de détails, référez-vous toujours au mode
d’emploi de l’appareil à brancher.
Veuillez noter : l’insertion de la fiche du casque d’écoute
coupera le son des haut-parleurs.
Mise en marche
Utilisation des commandes et
des connexions
Interrupteur
marche/arrêt
ROUGE – Sous
tension
VERT – Minuterie
programmée
ENTRÉE 6
(EXT 6)
Appuyez sur la centre
du volet pour l’ouvrir
Appuyez sur la centre
du volet pour l’ouvrir

Français
31
Press Q to highlight Language.
Quick setup
Select your language.
Language English
EXIT Watch TV Next
Rég. Rapide
recherche auto terminée.
Appuyer sur OK pour accéder
au MENU Attribution
EXIT Retour TV Suivant
Réglage du téléviseur à l'aide du Réglage
rapide, Attribution de programmes
Avant de mettre en marche votre téléviseur, mettez sur mode de veille votre décodeur et votre
magnétoscope. Pour régler le téléviseur, utilisez les touches de la télécommande comme indiqué en détail à
la page 27.
1
2
3
5
6
7
8
9
4
Appuyez sur la touche marche. L'écran Quick
setup apparaîtra.
Sélectionnez votre langage à l'aide des touches
S
ou R, puis appuyez sur OK.
Ensuite, appuyez sur Sou Rpour sélectionner
votre pays, puis sur OK.
Votre Système sera sélectionné. S'il existe un
choix, appuyez surRpour sélectionner le système
voulu parmi ceux affichés.
Pour lancer le Recherche automatique,
appuyez sur OK.
La recherche commencera pour toutes les chaînes
disponibles. Le point se déplace le long de la ligne
pour indiquer la progression de la recherche.
Vous devez laisser le téléviseur mener la
recherche jusqu’à son terme.
Une fois la recherche terminée, le téléviseur
sélectionnera automatiquement la position de
programme 1. Il se peut que l' image ne soit pas
claire, ou bien que le signal soit faible ; dans ce
cas, l'ordre des chaînes peut être modifié en
utilisant la fonction de Attribution de
programmes qui apparaîtra dans l'écran de
Réglage rapide.
Appuyez sur OK pour sélectionner Attribution
de programmes.
La liste des chaînes étant indiquée, utilisez Q ou
P
pour mettre en surbrillance la chaîne que vous
souhaitez déplacer, et appuyez sur R.
La chaîne sélectionnée sera déplacée vers la
droite de l'écran.
Recherche automatique
Recherche
Canal : 6 Chaîne :
EXIT Arrêt
B/G – Europe Continental, I– Reino Unido
D/K – Europe Oriental, L1, L2 – Francia
Utilisez les touches Q ou Ppour vous déplacer
dans la liste jusqu'à votre position préférée. Les
autres chaînes se déplaceront en conséquence
pour faire de la place.
Appuyez sur Spour mémoriser votre
changement.
Répétez cette opération si nécessaire, puis
appuyez sur EXIT.
Si le téléviseur ne peut pas être connecté à un
magnétoscope/décodeur à l'aide d'une prise
péritel, ou si une chaîne est requise sur un autre
système, utilisez la fonction de Recherche
manuelle pour attribuer une position de
programme, voir page 32.
Attribution de programmes
Prog. Canal Chaîne
1 22 TF1
2 25 FR2
3 28 FR3
4 32 TV5
5 69
6 69
Trier Mémo
MENU Retour EXIT Retour TV

Français
Recherche manuelle
Prog. Sys. Canal Chaîne
0L1 60MAG
1 L1 22 TR1
2 L1 25 FR2
3 L1 28 FR3
4 L1 32 TV5
5L1 69
Valider
MENU Retour EXIT Retour TV
RÉGLAGES
Langage Français
Pays France
Recherche automatique OK
Recherche manuelle OK
Attribution de programmes OK
MENU Retour EXIT Retour TV
8
Chaque signal apparaîtra à l’écran. S’il ne s’agit
pas de votre magnétoscope, appuyez à nouveau
sur Pou Q pour relancer la recherche.
Lorsque le signal de votre magnétoscope est
localisé, appuyez sur Rpour sélectionner Chaîne.
A l’aide des touches P, Q, Set R, entrez les
caractères requis, par ex. MAG.
7
Appuyez sur OK pour sélectionner. Si le
programme est bloqué, il vous faudra annuler
Saut de chaîne avant de mémoriser.
Appuyez sur Rpour sélectionner Système et
utilisez les touches Pou Q ⁄ pour modifier.
(Le cas échéant, reportez-vous à l'étape 4, page 31).
Appuyez ensuite sur Rpour sélectionner Recherche.
Appuyez sur Pou Q pour lancer la recherche.
Recherche apparaîtra et le téléviseur affichera les
numéros des canaux.
Recherche manuelle
Le téléviseur peut être réglé manuellement à l'aide de la Recherche manuelle. Par exemple : s’il est
impossible de raccorder un magnétoscope/décodeur à l’aide d’un câble Péritel, ou pour régler une chaîne
sur un autre Système (voir page 31).
Appuyez sur la touche MENU et sélectionnez le
menu RÉGLAGES à l'aide des touches Sou R. En
utilisant Q, mettez Recherche manuelle en
surbrillance et appuyez sur OK pour valider.
Suite page suivante
Pour affecter une position de programme du téléviseur à un décodeur et un magnétoscope : mettez le décodeur sous tension, insérez
une cassette préenregistrée dans le magnétoscope et appuyez sur la touche LECTURE, puis procédez à une recherche manuelle.
Utilisez SetRpour naviguer sur l’écran et sélectionner l’une des options relatives à la Recherche manuelle.
1
2
3
4
5
6
Programme: La touche numérique à enfoncer sur la télécommande.
Système: Spécifique à certaines zones.
Voir l'étape 4, page 31.
Système couleur: Réglée en usine sur Auto, et ne devrait être modifiée que si vous avez des problèmes, c'est-à-dire
entrée NTSC depuis la source externe.
Saut de chaîne:*signifie que la mémoire est vide ou que la fonction de saut de chaîne est activée. Voir page 33.
Canal: Le numéro du canal sur lequel une chaîne est diffusée.
Recherche: Recherche d’un signal par balayage.
Accord fin manuel: Utilisé uniquement en cas de parasites/signal faible. Voir page 43.
Chaîne: Identification de la chaîne. Utilisez les touches
P
ou Qet SouRpour entrer jusqu’à sept caractères.
Chaîne
Programme Système Système
couleur
Canal Recherche
Saut de
chaîne
Accord fin
manuel
Appuyez sur Pou Q pour mettre en surbrillance
la position de programme requise (suggestion :
utilisez 0 pour un magnétoscope).
Différents
numéros
de Canal
peuvent
s’afficher
Recherche manuelle
Recherche
0 L1 A 32 0
Mémo MENU Retour EXIT Retour TV
Recherche manuelle
Système
0L1A 60 0MAG
Mémo MENU Retour EXIT Retour TV
32

Français
33
97
98
99
B
1
B
2DVD
B
3
B
4
B
5
0MAG
Recherche manuelle
Prog. Sys. Canal Chaîne
0
L1
60 MAG
1
L1
22 TF1
2
L1
25 FR2
3
L1
28 FR3
4
L1
32 TV5
5
L1
69
Valider
MENU Retour EXIT Retour TV
Recherche manuelle suite
Saut de chaîne
que ce téléviseur permet la saisie
directe des canaux, si vous
connaissez leurs numéros spécifiques. Sélectionnez
l’écran de Recherche manuelle à l’Etape 3. Entrez
le Numéro du programme, le Système, puis le
numéro du Canal. Appuyez sur OK pour mémoriser.
Appuyez sur OK pour mémoriser.
Répétez l’opération pour chaque position de
programme que vous souhaitez régler, ou
appuyez sur MENU pour retourner à la liste de
canaux et sélectionner le numéro suivant.
Appuyez sur EXIT pour sortir.
Pour identifier un équipement extérieur par son
nom, par exemple DVD sur EXT2, appuyez sur
B
pour sélectionner EXT2, puis sélectionnez
Rég. Manuel dans le menu des RÉGLAGES.
Appuyez sur Rpour sélectionner Etiquette, puis
à l'aide des touches P, Q, Set R, tapez les
caractères requis.
10
11
12
13
9
VEUILLEZ NOTER
Appuyez sur MENU et répétez depuis l’Etape 2
ou appuyez su EXIT pour sortir.
Chaque position de programme doit être
selectionée séparément. Pour désactiver le
Saut de chaîne, répétez la procédure pour
chaque position.
Les positions de programme bloquées ne
peuvent pas être sélectionnées par P
f
(P) et
P
e
(Q) ou par les commandes sur le devant de
l'appareil, mais peuven encore être accessibles
par les touches numériques sur la télécommande.
3
4
5
Utilisez les touches Pou Q pour mettre en
surbrillance la position de programme que vous
souhaitez bloquer et appuyez sur OK pour
sélectionner.
Appuyez sur Rpour sélectionner Saut de chaîne.
Utilisez Pou Q pour mettre en marche
Saut de chaîne. Appuyer sur OK.
Le symbole affiché à l’écran indique que
la position de programme est bloquée.
Pour empêcher l'accès à certains programmes, vous pouvez
bloquer la position de programme et emporter la
télécommande. Le téléviseur fonctionnera normalement à
l'aide des touches sur le devant de l'appareil, mais n'affichera
pas la chaîne bloquée.
Saut de chaîne
Sélectionnez Recherche manuelle dans le menu
RÉGLAGES.
1
2
Recherche manuelle
Chaîne
0 L1 A 32 0 M A G
Mémo MENU Retour EXIT Retour TV
En appuyant sur OK vous pouvez faire
apparaître à l'écran à tout moment une liste
indiquant tous les programmes mémorisés et les
équipements externes. UtilisezPet Q pour
mettre en surbrillance, et OK pour valider
votre choix.
14
Rég. Manuel
Etiquette
EXT2 ADVD
Mémo MENU Retour EXIT Retour TV
Recherche manuelle
Saut de chaîne : Marche
1L1A 22 0TF1
Mémo MENU Retour EXIT Retour TV

Français
34
AUTRES MENUS
Télétexte Auto.
Bloc. clavier Marche
Profondeur de noir 16
Côte de l’écran 0
Réglage PC
MENU Retour EXIT Retour TV
RÉGLAGES
Langage Français
Pays France
Recherche automatique OK
Recherche manuelle OK
Attribution de programmes OK
MENU Retour EXIT Retour TV
Recherche automatique, réglages généraux,
affichage de l’heure, blocage du clavier
Utilisation de la recherche automatique
1
2
3
4
Appuyez sur Q pour mettre Langage en
surbrillance, puis Sou Rpour sélectionner.
A l'aide de la touche Q, mettez Pays, en surbrillance,
puis utilisez SouRpour sélectionner. Le téléviseur
cherchera maintenant les chaînes pour votre pays.
Appuyez sur Q pour mettre Recherche
automatique en surbrillance, puis appuyez sur OK.
Pour régler le téléviseur à l'aide de la Recherche
automatique, appuyez sur MENU et, avec les
touches Sou R, sélectionnez le menu RÉGLAGES.
Vous devez laisser le téléviseur mener la
recherche jusqu’à son terme.
A l’issue de la recherche, le téléviseur repassera
automatiquement à la position de programme 1.
Si l'image n'est pas suffisamment nette, vous
pouvez modifier l’ordre des chaînes grâce à la
fonction Attribution de programmes,
voir page 31.
B/G – Europe continentale,
I
– R.-U.
D/K – Europe de l'Est, L1, L2 – France
5
Votre Système sera sélectionné. S'il existe un
choix, appuyez surSou Rpour sélectionner le
système voulu parmi ceux affichés. Ensuite,
appuyez sur OK.
Recherche automatique
Les réglages actuels seront effacés !!
Appuyer sue EXIT pour ne rien changer.
Appuyer sur OK pour commencer
Système L1
MENU Retour EXIT Retour TV
!
Sélection d’une position de programme
La fonction d'affichage de l'heure permet de voir l'heure
actuelle (télétexte) sur l'écran de télévision.
Lorsque vous regardez une émission, appuyez sur
8/9
pour faire apparaître l’heure (diffusée par la chaîne de
télévision). L’heure restera affichée pendant 5 secondes.
Dans AUTRES MENUS, sélectionnez
Bloc. clavier et choisissez Arrêt ou Marche à
l’aide des touches Sou R.
La fonction Blocage du clavier rend inactives les touches
sur le devant du téléviseur. Toutes les touches de la
télécommande peuvent encore être utilisées.
Blocage du clavier
Affichage de l’heure
1
Lorsque la fonction Blocage du clavier est activée, un
rappel s'affichera lorsque vous appuierez sur l'une
quelconque des touches du panneau avant. Une fois le
téléviseur éteint, il ne pourra être rallumé QU'en utilisant
la télécommande.
Pour sélectionner une position de programme, utilisez les
touches numériques de la télécommande.
Pour les positions de programme en dessous de 10,
utilisez 0 suivi du numéro souhaité (par ex. 01 pour la
position de programme 1).
Vous pouvez également sélectionner une position de
programme à l’aide des touches P
f
(P) et Pe(Q).
Pour revenir à la position de programme précédente,
appuyez sur
^^
.
Pour afficher des informations à l'écran, par exemple la
position de programme, le mode d'entrée ou le signal
mono/stéréo, appuyez sur CALL.

Français
35
Réglages du son, Processeur de son BBE
®
,
transmissions stéréo/bilingues
Volume
Appuyez sur les touches j— (S) ou j+ (R) pour
régler le volume.
Son coupé
Appuyez sur la touche kpour couper le son. Appuyez une
seconde fois pour remettre le son.
Super basses – pour améliorer la profondeur
du son
Appuyez sur la touche npuis sur les touches
SouR
pour obtenir l’effet recherché. La différence ne sera
perceptible que sur un son très grave. Appuyez à nouveau
sur la touche
n
pour désactiver la fonction Super basses.
Lorsque un Ampli de Basses actif est connecté, la touche
n
permettra de le commander uniquement si
Ampli Basses Externe est sélectionnée. Sélectionnez
Connexions AV dans le menu de RÉGLAGES, appuyez sur
la touche Qpour mettre l'option Ampli Basses en
surbrillance, puis appuyez sur SouRpour choisir Externe.
Appuyez sur MENU puis Sou Rpour sélectionner
l'option SON.
Appuyez sur la touche Qpour mettre en surbrillance
Graves, Aigus ou Balance et sur les touches
S
ou Rpour modifier la position de réglage.
Réglages du son
Réglages graves, aigus, balance
1
2
Lors de la connexion à une chaîne Hi-Fi, réglez l'option
Haut-parleurs sur Arrêt. Ensuite, sélectionnez Fixe ou
Variable pour la Sortie Audio dans le menu des
Connexions AV.
Processeur de son BBE
®
BBE fournit un son plus naturel, améliore la clarté des voix
et augmente la gamme dynamique de la musique.
1
Appuyez sur la touche MENU et sélectionnez le
menu SON.
Utilisez les touches Pou Q pour mettre en
surbrillance BBE, puis appuyez sur les touches
S
ou Rpour sélectionner Marche ou Arrêt.
REMARQUE : Fabriqué sous licence de BBE Sound, Inc.
Licence par BBE Sound, Inc., de numéro USP4638258 et
4482866. BBE et le symbole BBE sont des marques
déposées de BBE Sound, Inc.
Chaque fois que vous changez de chaîne, les mots Stéréo
ou Db. Langage s’afficheront à l’écran pendant quelques
secondes en cas de transmission d’émissions stéréo ou
bilingues. Si l’émission n’est pas en stéréo, le mot
Mono apparaîtra.
Stéréo… Appuyez sur
OI/II pour sélectionner Stéréo
ou Mono.
Bilingue… Les transmissions bilingues sont rares. Le cas
échéant, les mots Db. Langage s’afficheront à l’écran.
Choisissez le numéro de programme requis et, si les mots
Db. Langage apparaissent, appuyez alors sur OI/II
pour sélectionner Langue 1, Langue 2 ou Mono.
Transmissions stéréo et bilingues
SON
Graves – 4
Aigus 0
Balance 0
Haut-parleurs Marche
BBE Marche
MENU Retour EXIT Retour TV
SON
Graves – 4
Aigus 0
Balance 0
Haut-parleurs Marche
BBE Arrêt
MENU Retour EXIT Retour TV

Français
36
Représentation grand écran
CINÉMA
Ce réglage agrandira l'image pour
qu'elle remplisse l'écran en étirant
l'image horizontalement, en
maintenant les proportions correctes
au centre de l'image.
SOUS-TITRE
En fonction du type d'émission diffusé, les programmes peuvent être affichés en plusieurs formats. Appuyez
sur la touche
{
à plusieurs reprises pour choisir entre Cinéma, Zoom, Sous-titre, 14:9, Plein écran et
4:3. Remarque : Le réglage du format d'écran changera à chaque fois que vous appuierez sur la touche
MENU tant que les menus sont affichés sur l'écran. Cette mesure permet de garantir que les menus ne
dépassent pas des bords de la zone visible.
ZOOM
Lorsque vous regardez des
films/cassettes vidéo en format "boîte
aux lettres", ce réglage éliminera ou
réduira les bandes noires en haut et en
bas de l'écran en agrandissant et en
sélectionnant l'image sans la déformer.
Lorsque des sous-titrages sont inclus
dans une émission diffusée en format
boîte aux lettres, ce réglage fera
monter l'image pour garantir que tout
le texte est affiché.
SOUS-TITRE
14:9
Utilisez ce réglage lorsque vous
regardez une émission en format 14:9.
Utilisez ce réglage lorsque vous
regardez une émission d'un lecteur de
disque numérique vidéo grand écran,
une cassette vidéo grand écran ou
une émission 16:9 (lorsqu'elles sont
disponibles). En raison de la gamme
de formats grand écran (16:9, 14:9,
20:9 etc.) vous verrez peut-être
apparaître des bandes noires en haut
et en bas de l'écran.
PLEIN ÉCRAN
Utilisez ce réglage pour voir une
émission en format 4:3 véritable.
4:3
L’utilisation des fonctions spéciales visant à modifier la dimension de l’image affichée (notamment le
rapport hauteur/largeur) en vue d’une diffusion publique ou à des fins commerciales peut constituer une infraction aux droits d’auteur.

Français
37
RÉGLAGES
Recherche manuelle OK
Attribution de programmes OK
Connexions AV OK
Position d’image OK
Reg. rapide OK
MENU Retour EXIT Retour TV
Réglages de l’image
Ce téléviseur vous permet de personnaliser le style de
l’image. Appuyez sur la touche
m
pour afficher les
différents styles disponibles.
Image 1 à 3 pour les options préréglées, et
Image M pour mémoriser vos propres réglages :
Utilisez les touches SouRpour régler le
Contraste, la Lumière, la Couleur, la Teinte et
la Définition.
La Teinte ne peut être ajustée que sur un signal
NTSC provenant d'un magnétoscope NTSC ou d'un
lecteur de DVD lorsque le téléviseur est en mode
couleur AUTO ou NTSC.
Sélectionnez le menu IMAGE.
Préférences d’affichage
1
2
Position d'image
La position de l’image peut être ajustée en fonction de
vos préférences personelles ; cette fonction peut être
particulièrement utile pour les entrées externes.
Dans le menu RÉGLAGES, appuyez sur la touche
Q
jusqu'à ce que la fonction Position d'image
soit en surbrillance.
1
Appuyez sur OK pour voir les options disponsibles
pour le format d’image sélectionné.
Appuyez sur Pet Q pour sélectionner une
option, puis sur SouRpour ajuster les réglages.
Les options varient en fonction du format grand
écran choisi et de l’equipement éventuellement
raccordé.
En format Zoom :
2
3
IMAGE
Contraste 50
Lumière 50
Couleur 50
Teinte 0
Définition 0
MENU Retour EXIT Retour TV
Position d’image
Pos. H
Pos. V
Raz OK
MENU Retour EXIT Retour TV
La fonction DNR vous permet "d’adoucir" la représentation
à l'écran d'un signal faible afin de réduire l'effet de bruit.
DNR – Réduction numérique du bruit
1
Profondeur du noir accentue l'intensité des zones
foncées de l'image, ce qui améliore la définition.
Etirage du noir
Dans le menu IMAGE, appuyez sur la touche
Q
jusqu'à ce que la fonction Profondeur du noir
soit en surbrillance.
Appuyez sur Sou Rpour sélectionner Marche ou
Arrêt. L'effet dépendra de la diffusion et se
remarquera davantage sur les couleurs foncées.
1
2
Sélectionnez DNR dans le menu IMAGE. Ajustez
avec les touches SouR. Vous ne remarquerez
pas toujours de différences (pour obtenir les
meilleurs résultats, utilisez des réglages inférieurs
car la qualité de l'image pourrait être affectée si le
réglage est trop fort).
IMAGE
Couleur 50
Teinte 0
Définition 0
DNR 2
Profondeur du noir Marche
MENU Retour EXIT Retour TV

Français
38
Réglages de l’image suite
Dans le menu IMAGE, appuyez sur la touche
Q
jusqu'à ce que la fonction Tempér. couleur soit
en surbrillance.
Appuyez sur SorRpour choisir Normale,
Chaude ou Froide selon vos préférences.
1
2
L’option Tempér. couleur permet d’augmenter le
caractère "chaud" ou "froid" d’une image en renforçant la
teinte rouge ou la teinte bleue.
Température des couleurs
Format automatique (Grand écran)
Si ce téléviseur reçoit une image en format grand écran
véritable, et que la fonction Format auto. est activée,
l'émission sera automatiquement affichée en format grand
écran, indépendamment des réglages précédents du
téléviseur.
Sélectionnez Format auto. dans le menu
IMAGE, puis choisissez Marche ou Arrêt.
1
La fonction de Côte de l’écran latéral éclaircit ou fonce la
bande de chaque côté de l'écran en format 4:3 ou 14:9.
Ceci permettra d'éviter une image rémanente de la bande
et peut également rendre plus confortables les conditions
de visualisation dans des conditions de lumière vive ou
très sombre.
Dans AUTRES MENUS, appuyez sur Qjusqu'à ce
que Profondeur du noir soit mis en surbrillance.
Appuyez sur OK pour sélectionner, puis sur
S
ou Rpour ajuster.
1
2
L'ajustement du Profondeur du noir peut améliorer la
clarté de l'écran lorsque vous regardez la télévision dans
des conditions de lumière vive.
Rétroéclairage
Ecran gris
Lorsque vous sélectionnez Écran gris, l'écran deviendra gris
et le son sera coupé si aucun signal n'est reçu.
Dans le menu IMAGE, appuyez sur les touches
P
ou Q pour mettre en surbrillance Ecran gris.
Appuyez sur Sou Rpour sélectionner Marche ou
Arrêt.
1
2
AUTRES MENUS
Télétexte Auto.
Bloc. clavier Arrêt
Profondeur du noir 16
Côte de l’écran 0
Réglage PC
MENU Retour EXIT Retour TV
Dans AUTRES MENUS, appuyez sur Qjusqu'à ce
que Côte de l’écran latéral soit mis en
surbrillance.
Appuyez sur OK pour sélectionner, puis sur
S
ou Rpour ajuster.
1
2
Ajustement du panneau latéral
IMAGE
DNR 4
Profondeur du noir Marche
Tempér. couleur Normale
Format auto. Arrêt
Ecran gris Marche
MENU Retour EXIT Retour TV
AUTRES MENUS
Télétexte Auto.
Bloc. clavier Arrêt
Profondeur de noir 16
Côte de l’écran 0
Réglage PC
MENU Retour EXIT Retour TV

Français
39
MINUTERIE
Arrêt 01:30
Marche 00:00
Pos. Minuterie Marche 01
MENU Retour EXIT Retour TV
Minuterie, Réglages de l'ordinateur – phase
de l'horloge, horloge d'échantillonnage
La minuterie
Appuyez sur Qpour sélectionner Marche ou
Arrêt avec la Minuterie. Utilisez les touches
numériques pour taper l'heure souhaitée. Par
exemple, pour éteindre le téléviseur dans une
heure et demie, tapez 01:30.
Si vous choisissez Arrêt Minuterie, appuyez sur
EXIT pour sortir. Si vous réglez la minuterie sur
Marche Minuterie, appuyez sur Qpour
sélectionner la Pos. Minuterie Marche, tapez le
numéro de position de programme requis, puis
appuyez sur ipour mettre le téléviseur sur
veille. L'indicateur VERT de Marche Minuterie
s'allumera à l'avant du téléviseur.
Tout équipement connecté par une prise péritel
devra également être mis sur veille pour
empêcher qu'il ne se mette en marche lorsque la
minuterie s'enclenche.
Une fois la fonction Marche Minuterie
programmée, le téléviseur pourra être allumé à
n'importe quel moment en appuyant sur i.
L'indicateur vert de Marche Minuterie restera
allumé jusqu'à ce que la période programmée
soit écoulée, et le téléviseur passera alors au
canal choisi. Cette fonction peut permettre d'éviter
de manquer des émissions favorites.
Pour annuler la Marche Minuterie, tapez zéro
dans chaque position, y compris la position de
programme.
Le téléviseur peut être réglé pour s'allumer ou s'éteindre
automatiquement après un certain temps.
1
2
3
4
Appuyez sur la touche MENU puis Sou Rpour
sélectionner le menu MINUTERIE.
3
Utilisez les touches Sou Rpour ajuster jusqu'à ce
que l'image soit claire.
3
Utilisez les touches Sou Rpour ajuster jusqu'à ce
que l'image soit claire.
Dans AUTRES MENUS, appuyez surQjusqu'à
ce que Réglage PC soit mis en surbrillance.
Appuyez sur OK pour sélectionner, puis sur Q
pour mettre en surbrillance période de mise
en vieille.
1
2
La période de mise en vieille adapte le signal de
l'ordinateur à l'affichage à cristaux liquides. Cet
ajustement permet d'effacer les bandes horizontales et
le flou de l'image.
Phase de l'horloge
AUTRES MENUS
Télétexte
Bloc. clavier Arrêt
Profondeur de noir 16
Côte de l’écran 0
Réglage PC OK
MENU Retour EXIT Retour TV
Dans AUTRES MENUS, appuyez surQjusqu'à ce
que Réglage PC soit mis en surbrillance.
Appuyez sur OK pour sélectionner, puis sur Q
pour mettre en surbrillance horloge.
1
2
L'ajustement de horloge permet de modifier le nombre
d'impulsions par balayage, ce qui effacera les lignes
verticales sur l'écran.
Horloge d'échantillonnage
Réglage PC
période de mise en veille 9
horloge 7
MENU Retour EXIT Retour TV
Réglage PC
période de mise en veille 7
horloge 9
MENU Retour EXIT Retour TV

Français
40
Connexions AV
Entrée EXT3 AV
Sortie EXT3 EXT1
Ampli basses Externe
Sortie Audio Fixe
MENU Retour EXIT Retour TV
La plupart des magnétoscopes et décodeurs envoient un
signal par le câble Péritel pour commuter le téléviseur sur
la prise d’Entrée correcte. Vous pouvez également
appuyer à plusieurs reprises sur la touche B(sélection
de la source externe) jusqu’à ce que l’image provenant
de l’appareil raccordé au téléviseur apparaisse.
Cette touche doit obligatoirement être utilisée pour
tout appareil raccordé via l’ENTREE VIDEO
COMPOSANT (EXT1et EXT2).
La lettre S, par ex. B3S (EXT 3S), indique que l’entrée
est configurée pour un signal S-Video.
Sélection des entrées et Connexions AV
Définition des prises ENTREE et SORTIE permettant au téléviseur de reconnaître les appareils qui lui sont
raccordés. Voir page 28 pour le schéma des connexions recommandées.
Sélectionnez Connexions AV.
Utilisez les touches Sou Rpour modifier la
Sortie EXT3 :
MONITEUR = L'image à l'écran.
TV = La dernière sélection de programme de
télévision.
EXT1 = L'image provenant de l'équipement
connecté à
B
1.
EXT2 = L'image provenant de l'équipement
connecté à
B
2.
EXT4 = L'image provenant de l'équipement
connecté à la prise péritel 4.
EXT5 = L'image provenant de l'équipement
connecté à la prise péritel 5.
EXT6 = L'image provenant de l'équipement
connecté aux prises d'entrée à l'avant.
Ceci permet la sélection de la source à faire sortir par la
prise péritel 3. Par exemple, pour enregistrer des
émissions en stéréo à partir d'un décodeur stéréo,
connectez un décodeur stéréo à la prise péritel 4 ou 5 et
un magnétoscope stéréo à la prise péritel 3, puis
sélectionnez EXT4 ou EXT5 en tant que Sortie EXT3. Le
signal reçu par la prise péritel 4 ou 5 sortira directement
par la prise péritel 3.
Appuyez sur
B
pour sélectionner B1, B2,
B
3, B4, B5, B6 (EXT1-6) ou PC.
PC représente un ordinateur connecté à l'entrée
RGB/PC sur le côté du téléviseur.
Pour repasser en mode TV, appuyez une nouvelle
fois sur la touche Bou sur l’une des touches
numériques.
Utilisez cette fonction si le téléviseur ne commute pas
automatiquement.
Sélection des entrées
Sélection du signal de SORTIE pour la
prise Péritel 3
1
Elle spécifie le type de signal allant vers les prises Péritel 3
(EXT3) à l'arrière du téléviseur. Veuillez vous référer aux
instructions des fabricants pour les équipements
raccordés.
Dans le menu RÉGLAGES, appuyez sur la touche
Q
jusqu'à ce que la fonction Connexions AV soit
en surbrillance, puis appuyez sur OK. Avec
S
ou R, sélectionnez soit AV soit S-VIDEO
comme entrée requise pour EXT3.
Si vous obtenez une image en noir et blanc,
essayez l’autre position.
Sélection du signal d’ENTREE
1
1
2
2
Connexions AV
Entrée EXT3 AV
Sortie EXT3 EXT1
Ampli basses Externe
Sortie Audio Fixe
MENU Retour EXIT Retour TV

Français
41
Télétexte – configuration,
généralités, mode Auto.
Ce téléviseur est équipé d’une mémoire Télétexte multi-pages dont le chargement nécessite un certain temps.
Il offre deux modes de visualisation du texte – Auto affichera Fastext, si celui-ci est disponible. LISTE gardera
en mémoire vos quatre pages préférées.
Si Fastext est disponible, vous verrez apparaître quatre
titres en couleur au bas de l’écran.
Pour accéder à l’une des quatre rubriques indiquées,
appuyez sur la touche de couleur de la télécommande.
Pour de plus amples informations sur votre (vos)
système(s) de texte, consultez la page d’index Télétexte
de la chaîne de télévision concernée ou demandez
conseil à votre revendeur Toshiba le plus proche.
La touche
6/7
:
Appuyez sur
6/7
pour faire apparaître l’écran
Télétexte. Appuyez une nouvelle fois sur cette touche
pour afficher Télétexte en surimpression sur une émission
de télévision normale, et une troisième fois pour repasser
à l’écran normal. Vous ne pouvez pas changer de chaîne
tant que Télétexte est actif.
La première page qui s’affiche est la page initiale.
En mode Auto., elle affiche les rubriques principales
disponibles ainsi que les numéros de pages
correspondants.
En mode LISTE, elle affiche la page actuellement
mémorisée sur la touche ROUGE.
Dans les deux modes, il est possible d’accéder
directement à une page Télétexte quelconque en entrant
le numéro à 3 chiffres de la page à l’aide des touches
numériques de la télécommande, en appuyant sur les
touches de couleur ou encore en appuyant sur la touche
Pf(P ) pour passer à la page suivante et sur la touche
P
e
(Q ) pour revenir à la page précédente.
Sous-pages
Les sous-pages éventuelles seront automatiquement
chargées en mémoire sans changer la page affichée à
l’écran.
Pour accéder aux sous-pages, appuyez sur
X(B
)puis
utilisez les touches Pet Q pour les visualiser. Une barre
contenant des chiffres apparaîtra sur le côté de l'écran.
Le numéro de la sous-page que vous visualisez
apparaîtra en surbrillance et, à mesure que le téléviseur
charge les sous-pages supplémentaires, les numéros
changeront de couleur pour indiquer que ces pages ont
bein été chargées.
Ces sous-pages resteront disponibles jusqu'à la sélection
d'une nouvelle page, ou en mode télévision normal,
jusqu'au prochain changement de chaîne.
Sélectionnez Télétexte dans le AUTRES MENUS.
A l’aide des touches Sou Rchoisissez Auto. ou
LISTE, puis appuyez sur EXIT.
Le réglage des caractères du télétexte sera sélectionné
automatiquement par la sélection de la langue dans le
menu RÉGLAGES.
Selection des Modes
Naviguer dans les pages en
mode Auto.
Informations Télétexte
1
2
AUTRES MENUS
Télétexte Auto.
Bloc. clavier Arrêt
Profondeur de noir 16
Côte de l’écran 0
Réglage PC
MENU Retour EXIT Retour TV

Français
42
Tapez le numéro de la page puis appuyez sur
8/9
:
une image normale s’affichera. Le téléviseur indiquera
que la page a été localisée en affichant le numéro de la
page en haut de l’écran. Appuyez sur
6/7
pour
visualiser cette page.
Pour afficher des flashs d’information :
Sélectionnez la page des flashs pour le service Télétexte
particulier (consultez la page d’index du service Télétexte).
Appuyez sur
8/9
.
Les flashs s’afficheront au
fur et à mesure de leur
transmission. Appuyez à
nouveau sur
8/9
pour
annuler les flashs.
Vous devez désactiver la page des flashs avant
de changer de chaîne.
Pour sélectionner une page tout en
regardant un programme de télévision :
8/9
Auto.
Appuyez sur la touche Tpour accéder aux pages
d’index. La page affichée est fonction de la chaîne de
télévision regardée.
LISTE
Appuyez sur la touche Tto return to the page currently
pour revenir à la page actuellement mémorisée sur la
touche
ROUGE.
Rappel : Vous devez
désactiver le Télétexte pour
pouvoir changer de chaîne
– appuyez deux fois sur la
touche
6
/
7
.
☛
Télétexte suite
– mode LISTE, touches de commande
Vous trouverez ci-dessous un guide des fonctions des touches Télétexte de la télécommande.
Pour afficher une page d’index/initiale :
T
Il est parfois nécessaire de figer une page de texte.
Appuyez sur la touche qpour faire apparaître le
symbole qdans le coin supérieur gauche de l’écran.
La page reste figée tant que vous ne rappuyez pas sur
cette touche.
Pour figer une page utile :
q
Appuyez sur la touche rpour découvrir les réponses
aux quiz jeux-concours et les pages de blagues.
Pour révéler du texte caché :
r
Appuyez sur la touche
6/7
pour afficher le Télétexte.
Appuyez une nouvelle fois sur cette touche pour afficher
Télétexte en surimpression sur une émission de télévision
normale, et une troisième fois pour repasser à l’écran
normal. Vous ne pouvez pas changer de chaîne tant que
Télétexte est actif.
Pour afficher une page Télétexte :
6/7
Appuyez sur la touche sune seule fois pour agrandir la
moitié supérieure de la page, appuyez une nouvelle fois
pour agrandir la moitié inférieure. Appuyez une troisième
fois pour repasser au format standard.
Pour agrandir la taille de l’affichage
Télétexte :
s
Utilisez les touches Pet Q pour visualiser les souspages éventuelles.
Pour accéder à des sous-pages :
X
Les quatre choix de couleur au bas de l’écran sont les
numéros 100, 200, 300 et 400 (programmés dans la
mémoire du téléviseur). Pour visualiser ces pages,
appuyez sur la touche de couleur correspondante.
Pour modifier ces pages mémorisées, appuyez sur la
touche de couleur souhaitée et tapez le numéro à
3 chiffres. Ce numéro apparaîtra alors dans le coin
supérieur gauche de l’écran dans la case colorée.
Appuyez sur OK pour mémoriser. Les barres au bas de
l’écran clignoteront alors en blanc. Chaque fois que
vous appuierez sur OK, les quatre numéros de
page apparaissant au bas de l’écran seront
mémorisés et remplaceront les numéros
précédents.
Si vous n’appuyez pas sur OK, la sélection sera perdue
lorsque vous désactiverez Télétexte.
Vous pouvez parfaitement visualiser d’autres pages en
tapant leurs numéros à 3 chiffres respectifs – mais
n’appuyez pas sur OK sous peine de mémoriser ces
pages.
Naviguer dans les pages en
mode LISTE

Français
43
Recherche manuelle
Accord fin manuel
1 L1 A 22 + 2 T F 1
Mémo MENU Retour EXIT Retour TV
Questions-Réponses
Vous trouverez ci-dessous les réponses aux questions les plus fréquentes.
R
Vérifiez que l’interrupteur marche/arrêt est bien
sur marche et que tous les branchements sont
corrects.
Assurez-vous que le téléviseur n’est pas en mode Veille.
Il n’y a pas d’image ni de son
Q
R
Vérifiez que le volume n’a pas été baissé ou que la
touche de coupure du son n’a pas été activée.
Il y a une image mais pas de son
Q
R
Vérifiez que la fonction de Blocage du clavier
n’est pas activée.
Pourquoi les commandes à l'avant du téléviseur
ne fonctionnent-elles pas ?
Q
R
Vérifiez le câble Péritel.
L’image vidéo est bonne, mais il n’y a pas de son
Q
R
Assurez-vous que le magnétoscope ou le lecteur
DVD sont bien raccordés au téléviseur (voir
schéma des connexions page 28), puis sélectionnez
l’entrée correcte à l’aide de la touche B.
La cassette vidéo / le DVD n’apparaissent pas
à l’écran
Q
R
Vérifiez que vous avez sélectionné la bonne
entrée – S-VIDEO ou AV (voir le chapitre
Connexions AV).
La cassette vidéo / le DVD sont en noir et blanc
Q
R
Lorsque vous utilisez une source externe, par
exemple une cassette vidéo de mauvaise qualité, il
est parfois possible d’améliorer la reproduction des
couleurs. La couleur est réglée en usine sur Auto. de
façon à ce que le téléviseur affiche automatiquement le
meilleur système de couleurs.
Pour vérifier que le meilleur système de couleurs a été
sélectionné :
Il y a bien une image, mais il y a peu ou pas
de couleur
Q
A l’aide des touches Sou R, choisissez Auto.,
PAL, SECAM, NTSC 4.43 ou 3.58.
2
En laissant la source externe en lecture, sélectionnez
Rég. manuel dans le menu RÉGLAGES.
1
R
Les parasites ou un signal faible. Essayez une
autre chaîne. Un Accord fin manuel peut
améliorer la qualité de l’image.
Quelles peuvent être les autres causes de la
mauvaise qualité de l’image ?
Q
Sélectionnez le menu Recherche manuelle.
Mettez la chaîne en surbrillance et appuyez sur
OK. Appuyez sur Rpour sélectionner Accord fin
manuel
.
Utilisez les touches Pou Q pour clarifier l’image
et le son. Appuyez sur OK puis sur EXIT pour sortir.
1
2
Rég. Manuel
Système couleur : Auto.
EXT3 AVCR
Mémo MENU Retour EXIT Retour TV
R
L'horloge peut nécessiter un ajustement.
Sélectionnez Réglage PC à partir du AUTRES
MENUS, mettez en surbrillance horloge et ajustez
jusqu'à la disparition des lignes.
Pourquoi y a-t-il des des bandes verticales sur
l'écran ?
Q
R
La période de mise en vieille peut nécessiter un
ajustement. Sélectionnez Réglage PC à partir du
AUTRES MENUS, mettez en surbrillance période de
mise en vieille et ajustez jusqu'à ce que l'image
soit claire.
Pourquoi y a-t-il des bandes horizontales et/ou
des images floues sur l'écran ?
Q

Français
44
Questions-Réponsessuite
R
Le Télétexte nécessite un signal de diffusion
puissant, normalement obtenu par une antenne
sur le toit ou dans le grenier. Vérifiez l’antenne si le texte
est illisible ou brouillé. Consultez la page d’index principal
du service Télétexte et sélectionnez le Guide de
l’utilisateur. Vous y trouverez une description plus ou
moins détaillée des principes de fonctionnement du
Télétexte. Pour de plus amples renseignements
concernant l’utilisation du Télétexte, reportez-vous au
chapitre consacré au Télétexte.
Le Télétexte ne fonctionne pas correctement
Q
R
Le service sélectionné n’en diffuse pas, ou elles
n’ont pas encore été chargées. Appuyez sur la
touche X(B)
pour y accéder. (Voir le chapitre consacré
au Télétexte).
Il n’y a pas de sous-pages Télétexte
Q
R
Connectez la source par le biais d'une prise péritel,
et mettez en lecture. Sélectionnez Reg. Manuel
dans le menu RÉGLAGES.
Il y a un problème avec la couleur lors de la
lecture d’une source NTSC
Q
Réglez la Couleur sur Auto. et quittez le menu.
Sélectionnez le menu Image et réglez la teinte.
1
2
Rég. Manuel
Système couleur : Auto.
EXT3 AVCR
Mémo MENU Retour EXIT Retour TV
R
Appuyez sur la touche CALL pour le faire
disparaître.
Un message s’affiche en permanence à l’écran
Q
R
Vérifiez que l'option Haut-parleurs dans le menu
Son est bien réglée sur Arrêt.
Pourquoi n'y a-t-il pas de son en provenance de
ma sono connectée ?
Q
R
Vérifiez que le commutateur latéral de la
télécommande est dans la position TV.
Vérifiez que les piles sont chargées et correctement
insérées.
La télécommande ne fonctionne pas
Q
Nettoyage de l'écran et du boîtier…
Après avoir débranché l'appareil, nettoyez l'écran et le boîtier à l'aide d'un chiffon sec et doux. Nous recommandons de ne pas utiliser
de produits d'entretien pour meubles ou de solvants de marque déposée sur l'écran ou le boîtier, cela pouvant endommager l'appareil.
Mise au rebut…
La lampe fluorescente à cathode froide dans l'écran à cristaux liquides contient une petite quantité de mercure. A la fin de la vie utile de
votre téléviseur, veuillez le mettre au rebut selon les réglementations gouvernementales légales ou dans un centre de recyclage.

Français
45
Caractéristiques techniques et accessoires
Systèmes de diffusion/canaux
PAL-I UHF UK21-UK69
PAL-B/G UHF E21-E69
VHF E2-E12, S1-S41
SECAM-L UHF F21-F69
VHF F1-F10, B-Q
SECAM-D/K UHF R21-R69
VHF R1-R12
Entrée vidéo PAL, SECAM, NTSC 3.58/4.43
Connexions externes
EXT1 Entrée Jacks audio Y, PB/CB, PR/C
R
Haute définition 1080i
Balayage progressif
Jacks audio A/V
EXT2 Entrée Jacks audio Y, P
B/CB
, PR/C
R
Haute définition 1080i
Balayage progressif
Jacks audio A/V
EXT3 Entrée/Sortie Péritel 21 broches A/V, S-Vidéo,
sortie sélectionnable
Entrée 4 broches S-Vidéo
Jack audio Video
Jacks audio Audio L + R
EXT4 Entrée/Sortie Péritel 21 broches RGB, A/V
EXT5 Entrée/Sortie Péritel 21 broches RGB, A/V
EXT6 Entrée (avant) 4 broches S-Vidéo
Jack audio Vidéo
Jacks audio Audio L + R
RGB/PC Entrée Mini D-sub 15 broches Signal analogue RGB
Entrée Fiche stéréo 3,5 mm Audio
Moniteur Sortie Jacks audio A/V
Sortie audio Fixe/variable Jacks audio Audio L + R
Sortie versAmpli de Basses Actif Prise phono
Positions de programme 100
Stéréo Nicam
Système à 2 porteuses
Taille visible écran 26 pouces
(approx.) 32 pouces
Format 15 : 9
Sortie son (distorsion de 10%) Principale 10 W + 10 W
Consommation 26 pouces 150 W
conformément à EN60107-1 : 1997 32 pouces 185 W
Vielle 26 pouces <1,3 W
32 pouces <1,3 W
Dimensions 26 pouces 48 cm (H) 82 cm (L) 14 cm (p)
(approx.) 32 pouces 61 cm (H) 107 cm (L) 15 cm (p)
Poids (approx.) 26 pouces 22 kg
32 pouces 33 kg
Prise casque 3,5 mm stéréo
Accessoires 1 télécommande
2 piles
(UM-4, AAA, IEC R03 – 1,5 V)
Clip
Toshiba Information Systems (U.K.) Limited
Consumer Products Division,
European Service Centre,
Admiralty Way, Camberley,
Surrey, GU15 3DT, Royaume-Uni
Caractéristiques techniques susceptibles de modifications sans préavis.
Conception : Kensa Creative Solutions, Saltash, Cornouailles.
© Toshiba Information Systems (U.K.) Limited
Tous droits réservés.
Toute reproduction, même partielle, strictement interdite sans
autorisation écrite préalable.
Imprimè sur du papier recyclè. 100 % sans chlore.

Deutsch
46
Inhalt
VORBEREITUNG ZUR INBETRIEBNAHME
Sicherheitshinweise – einige Hinweise und Regeln zur Beachtung 47
Installation und wichtige Informationen 48
Die Fernbedienung – Übersicht auf einen Blick 49
Anschließen externer Geräte – Anleitung zum Anschließen von Geräten an die rückseitigen
Anschlüsse des Fernsehers 50
Anschließen eines Computers – Anschließen eines Computers an den seitlichen Anschluss
des Fernsehers 51
Anschlüsse und Bedienelemente – Einschalten des Fernsehers, Standby-Betrieb,
Verwenden der vorderen Bedienfeldtasten, Kopfhörerbuchse, Anschluss von Geräten
an der Vorderseite des Fernsehers 52
Sendereinstellung des Fernsehgerätes mit der Schnelleinstellung – Sprache, Land,
Sendesystem 53
Sortieren der Programmplätze 53
Manuelle Sendereinstellung – eine Alternative zur Schnelleinstellung,
direkte Eingabe von Kanälen, Einstellen des Programmplatzes für einen Videorecorder 54
Überspringen von Programmplätzen 55
Automatischer Sendersuchlauf 56
BEDIENELEMENTE UND FUNKTIONEN
Allgemeine Bedienelemente – Wechseln von Programmplätzen, Uhrzeitanzeige 56
Tastensperre – Sperren der Tasten an der Vorderseite des Fernsehers 56
Klangregelung – Lautstärke, Stummschaltung, Bassverstärkung, Super Woofer,
Bass/Höhen/Balance 57
BBE
®
Soundprozessor 57
Übertragungen in Stereo und Zweikanalton – Stereo-/Mono- und Zweikanaltonsendungen 57
Anzeige im Breitbildformat 58
Bildeinstellung – Bildposition, Bildvoreinstellungen (Helligkeit, Farbe, Kontrast, Schärfe, Farbton),
Digitale Rauschunterdrückung (DNR), Schwarzwert 59
Bildeinstellung – Farbtemperatur, automatische Formatierung (Breitbild), graues Bild,
Hintergrundbeleuchtung, Einstellung der Funktion "Side Panel" 60
Der Timer – Funktion zum automatischen Ein- und Ausschalten des Fernsehgerätes 61
PC-Einstellungen – Taktphase, Abtasttakt 61
Auswahl von Eingängen und AV-Anschlüsse – Eingangs- und Ausgangsanschlüsse für
angeschlossene Geräte 62
VIDEOTEXT
Einrichtung, allgemeine Informationen, auto-Modus 63
NORMALTEXT-Modus, Steuertasten für Videotext 64
PROBLEMLÖSUNG
Fragen und Antworten – FAntworten auf häufig gestellte Fragen, beispielsweise zur
manuellen Feinabstimmung und zum Farbsystem 65
INFORMATIONEN
Spezifikationen und Zubehör – technische Daten des Fernsehgerätes und Angaben zum
mitgelieferten Zubehör 67

47
Deutsch
Sicherheitshinweise
Dieses Gerät wurde in Übereinstimmung mit internationalen Sicherheitsstandards entwickelt und hergestellt.
Wie bei jedem anderen Elektrogerät müssen Sie jedoch die gebührende Vorsicht walten lassen, um eine
optimale Funktionsweise und Sicherheit zu gewährleisten. Bitte lesen Sie zu Ihrer eigenen Sicherheit die
nachfolgenden Hinweise sorgfältig durch. Die Hinweise sind allgemeiner Natur und bieten Unterstützung bei
der Handhabung aller elektronischen Geräte, wobei einige Punkte unter Umständen auf das gerade von
Ihnen erworbene Produkt nicht zutreffen.
Lassen Sie im Umkreis des Fernsehgerätes mindestens
10 cm Abstand, um eine ausreichende Belüftung zu
ermöglichen, die Ihren Fernseher vor Überhitzung und
den daraus erwachsenden möglichen Schäden bewahrt.
Räume mit großer Staubentwicklung sollten als Standorte
ebenfalls gemieden werden.
Wenn Sie das Fernsehgerät der direkten
Sonneneinstrahlung aussetzen oder neben einem
Heizkörper aufstellen, kann es unter Umständen
beschädigt werden. Vermeiden Sie Standorte, an denen
extrem hohe Temperaturen oder eine hohe
Luftfeuchtigkeit vorherrschen bzw. Plätze, an denen die
Temperatur unter 5° C absinken kann.
Lesen Sie die Bedienungsanleitung, bevor Sie das Gerät
in Betrieb nehmen.
Überprüfen Sie, ob alle elektrischen Kabel, einschließlich
des Netzkabels, der Verlängerungskabel und der
internen Verbindungen zwischen den einzelnen
Gerätekomponenten ordnungsgemäß und entsprechend
den Richtlinien des Herstellers angeschlossen wurden.
Schalten Sie das Gerät aus, und ziehen Sie den
Netzstecker, bevor Sie neue oder zusätzliche
Komponenten anschließen.
Wenden Sie sich an Ihren Fachhändler, falls Sie Zweifel
an der korrekten Installation, Funktionsweise oder
Sicherheit des Gerätes haben.
Besondere Vorsicht ist angebracht, wenn sich Glasplatten
oder Türen in der Nähe des Gerätes befinden.
Luftzirkulation
Warnhinweise
Beschädigung durch Hitze
Stromversorgung
Empfehlungen
Die für dieses Gerät erforderliche Netzspannung beträgt
110 – 240 V bei 50/60 Hz Wechselstrom. Schließen Sie
das Gerät niemals an Gleichstrom oder eine andere
Stromquelle an. Beachten Sie stets, dass das
Fernsehgerät nicht auf dem Netzkabel stehen darf.
Trennen Sie den Netzstecker NICHT vom Kabel, da im
Stecker ein spezieller Funkentstörfilter integriert ist,
dessen Funktion anderenfalls beeinträchtigt wäre.
WENDEN SIE SICH IM ZWEIFELSFALL AN EINEN
FACHKUNDIGEN ELEKTRIKER.
Entfernen Sie KEINE fest angebauten Gehäuseteile, da
dadurch gefährliche Spannungen freigesetzt werden könnten.
Die Belüftungsschlitze des Geräts dürfen NICHT mit
Zeitungen, Tischdecken, Vorhängen oder ähnlichen Stoffen
abgedeckt werden. Durch Überhitzung können Schäden
verursacht und die Lebensdauer des Gerätes verkürzt werden.
Elektrische Geräte dürfen NICHT mit Tropf- oder Spritzwasser
in Berührung kommen. Achten Sie darauf, dass keine
Behälter mit Flüssigkeiten, beispielsweise Blumenvasen, auf
dem Gerät abgestellt werden.
Stellen Sie KEINE heißen Gegenstände oder offene
Flammen, wie zum Beispiel brennende Kerzen oder
Nachtlampen, auf dem Gerät oder in seiner Nähe ab. Hohe
Temperaturen können zum Schmelzen von Kunststoff führen
und Brände auslösen.
Verwenden Sie KEINEN behelfsmäßigen Fernsehtisch, und
befestigen Sie die Tischbeine NIEMALS mit Holzschrauben.
Montieren Sie zur Gewährleistung der optimalen Sicherheit
stets den vom Hersteller zugelassenen Fernsehtisch bzw. die
geeigneten Tischbeine entsprechend der Anleitung mit den
im Lieferumfang enthaltenen Befestigungen.
Achten Sie bei Verwendung der Kopfhörer auf eine
angemessene und NICHT zu hohe Lautstärke, da
anderenfalls Ihr Hörvermögen auf Dauer beeinträchtigt
werden kann.
Lassen Sie eingeschaltete Geräte nie unbeaufsichtigt, es sei
denn, diese sind besonders darauf ausgelegt oder haben
eine Standby-Funktion. Ziehen Sie den Netzstecker und
achten Sie darauf, dass die ganze Familie auch dazu in der
Lage ist. Für behinderte oder gebrechliche Menschen können
besondere Einrichtungen erforderlich sein.
Benutzen Sie das Gerät NICHT weiter, wenn Sie Zweifel an
der korrekten Funktionsweise haben oder das Gerät in
irgendeiner Weise beschädigt ist. Schalten Sie es ab, ziehen
Sie den Netzstecker, und wenden Sie sich an einen
Fachhändler.
Achten Sie VOR ALLEM darauf, besonders bei Kindern,
dass NIEMALS der Bildschirm Schlägen oder Stößen
ausgesetzt wird oder Gegenstände in Löcher, Schlitze
oder andere Gehäuseöffnungen gesteckt werden.
Gehen Sie NIEMALS leichtfertig mit elektrischen
Geräten jeglicher Art um – Vorsicht ist besser als
Nachsicht!
UM DAS FERNSEHGERÄT VOM NETZ ZU TRENNEN
ZIEHEN SIE DEN STECKER AUS DER STECKDOSE.

Deutsch
48
Installation und wichtige Informationen
Wahl des Standorts
Bitte beachten!
HAFTUNGSAUSSCHLUSSKLAUSEL
Toshiba haftet unter keinen Umständen für Verluste und/oder Schäden am Produkt, die durch folgende Ereignisse hervorgerufen
werden:
i) Brand;
ii) Erdbeben;
iii) Unfallschaden;
iv) absichtliche Zweckentfremdung bzw. falsche Verwendung des Produkts;
v) Nutzung des Produkts unter ungeeigneten Bedingungen;
vi) Verlust und/oder Schäden am Produkt, die auftreten, während sich das Produkt im Besitz eines Dritten befindet;
vii) jegliche Schäden oder Verluste, die durch Bedienfehler oder die Nichtbeachtung von Anweisungen aus der
Bedienungsanleitung durch den Eigentümer verursacht werden;
viii) jegliche Verluste oder Schäden, die direkt auf die missbräuchliche Verwendung oder Fehlfunktion des Produkts bei
gleichzeitiger Nutzung mit angeschlossenen Geräten zurückzuführen sind;
Weiterhin haftet Toshiba unter keinen Umständen für mittelbare Verluste und/oder Folgeschäden, einschließlich, jedoch nicht
beschränkt auf folgende Schäden: Gewinnverlust, Geschäftsunterbrechung und Verlust gespeicherter Daten, unabhängig davon,
ob dieser Datenverlust während des normalen Betriebs oder bei missbräuchlicher Nutzung des Produkts entstanden ist.
Stellen Sie das Fernsehgerät an einem Platz auf, der möglichst
nicht der direkten Sonneneinstrahlung ausgesetzt ist und sich
nicht in der Nähe starker Lichtquellen befindet. Um ein
optimales Fernseherlebnis zu gewährleisten, wird ein Ort mit
weichem indirektem Licht empfohlen. Stellen Sie das
Fernsehgerät auf einer stabilen Unterlage ab. Die Abstellfläche
muss eben und robust sein. Der Fernseher sollte zudem mit dem
an der Rückseite angebrachten Haken über eine feste
Verankerung an der Wand gesichert werden, so dass das Gerät
nicht herunterfallen kann. Ziehen Sie gegebenenfalls die
Vorhänge zu, oder schließen Sie die Jalousien, damit die Sonne
nicht direkt auf den Bildschirm scheint.
Für dieses Gerät ist ein Standfuß zur Aufstellung auf dem Boden
und ein Fernsehtisch erhältlich. Mit einer Wandhalterung, die
ebenfalls erhältlich ist, kann das Gerät auch an der Wand
montiert werden.
LCD-Bildschirme werden unter Verwendung von
Hochpräzisionstechnologie hergestellt, trotzdem können in
einigen Bildschirmbereichen zuweilen fehlende Bildpunkte oder
Leuchtflecken vorkommen. Dies ist jedoch kein Anzeichen einer
Fehlfunktion.
Stellen Sie sicher, dass das Fernsehgerät an einem Ort steht, an
dem es keinen Stößen ausgesetzt oder von anderen
Gegenständen getroffen werden kann, da der Bildschirm durch
übermäßige Druckeinwirkung zersplittern oder beschädigt
werden kann.
Wenn stehende Bilder wie Videotext, Senderkennungen, Computeranzeigen, Videospiele, Bildschirmmenüs o.ä. über eine längere
Zeit angezeigt werden, ist es empfehlenswert Kontrast und Helligkeit zu verringern.

49
Deutsch
Stummschaltun
Steuertasten für Videotext
Verlassen der Menüs
Bassverstärker/Bass
Stereo-/Zweikanaltonempfang
Zur Anzeige von
Bildschirminformationen und zum
Aufrufen der Videotext-Indexfunktion
Wahl des Eingangs für externe Quelle
Zugriff auf untergeordnete Seiten im
Videotextmodus
Zur Moduswahl
Bildschirmmenüs
Wählbare Bildvoreinstellungen
Anzeige im Breitbildformat
Zifferntasten
Umschalten zum vorherigen Programm
Ein/Standby
Zum Anzeigen von Videotext
Im VCR- oder DVD-Modus:
Drücken Sie
m
für PAUSE
Drücken Sie
w
für AUSWERFEN
Drücken Sie
l
q
für ÜBERSPRINGEN –
SCHNELLER RÜCKLAUF
Drücken Sie
s
l
für ÜBERSPRINGEN –
SCHNELLER VORLAUF
Drücken Sie
r
für WIEDERGABE
Drücken Sie
p
für STOPP
Drücken Sie
q
für SCHNELLER RÜCKLAUF
Drücken Sie
s
für SCHNELLER VORLAUF
Tasten für Programmwahl und Wechsel
der Videotextseiten
Tasten zur Lautstärkeeinstellung
Verwenden Sie die Pfeiltasten zum
Verschieben des Cursors in den
Bildschirmmenüs nach oben, unten, links
oder rechts. Bestätigen Sie Ihre Auswahl
mit OK
Im TV-Modus:
8/9
Uhrzeitanzeig
Im Videotextmodus:
r
Zum Einblenden von verborgenem
Text
q
Zum Halten einer gewünschten Seite
s
Zum Vergrößern der Videotextanzeige
8/9
Zur Auswahl einer Seite im normalen
TV-Anzeigemodus
Die Fernbedienung
UP
Nehmen Sie die Batterieabdeckung ab, so dass das Batteriefach sichtbar wird, und legen Sie die Batterien
mit der richtigen Polarität ein. Geeignete Batterietypen für diese Fernbedienung sind UM-4, AAA, IEC R03
mit jeweils 1,5 V.
In der Fernbedienung dürfen nicht gleichzeitig entladene und neue Batterien oder unterschiedliche
Batterietypen verwendet werden. Wechseln Sie verbrauchte Batterien sofort aus, anderenfalls könnte das
Batteriefach durch auslaufende Säure beschädigt werden. Geben Sie Altbatterien an einem dafür
gekennzeichneten Entsorgungsplatz ab.
Die Leistung der Fernbedienung verschlechtert sich ab einer Entfernung von 5 m bzw. außerhalb eines
Winkels von 30° zum Mittelpunkt des Fernsehgerätes.
Einlegen der Batterien und wirksame Reichweite der Fernbedienung
Eine übersichtliche Darstellung mit einer Erläuterung der einzelnen Tasten Ihrer Fernbedienung

Deutsch
50
Anschluss externer Geräte
Schalten Sie alle Netzschalter am Fernsehgerät aus, bevor Sie externe Geräte anschließen.
An der Rückseite des Fernsehgerätes können
die unterschiedlichsten Geräte angeschlossen
werden. Lesen Sie daher unbedingt für alle
Zusatzgeräte vorher die Bedienungsanleitungen
der jeweiligen Hersteller.
Wir empfehlen Ihnen, Scart 4 oder Scart 5 für einen
Decoder, und Scart 3 für einen Videorecorder.
Beim Anschluss von S-VIDEO-Geräten muss die
Einstellung INPUT für EXT3 entsprechend festgelegt
werden. Siehe Seite 62.
Wenn Ihr Fernsehgerät automatisch zur Anzeige der
angeschlossenen Zusatzgeräte umgeschaltet wird,
können Sie in den normalen TV-Modus zurückkehren,
indem Sie die Taste mit der gewünschten
Programmnummer drücken.
Um das jeweilige externe Gerät wieder aufzurufen,
drücken Sie die Taste
B
. Mit dieser Taste können Sie
zwischen EXT1
,
EXT2,EXT3,EXT4,EXT5,EXT6 oder
RGB/PC umschalten.
WIR EMPFEHLEN IHNEN, NACH MÖGLICHKEIT
AUSSER EINEM ANTENNENKABEL AUCH
SCART-KABEL ZU VERWENDEN.
Antennenkabel:
Schließen Sie das Antennenkabel an die Antennenbuchse
an der Rückseite des Fernsehgerätes an. Bei Verwendung
eines Decoders* und/oder eines Videorecorders ist zu
beachten, dass das Antennenkabel über den Decoder
und/oder den Videorecorder mit dem Fernsehgerät
verbunden werden muss.
Scart-Kabel:
Verbinden Sie die Buchse IN/OUT des Videorecorders über
ein Scart-Kabel mit dem Fernseher. Verbinden Sie die
Buchse TV des Decoders über ein Scart-Kabel mit dem
Fernseher. Verbinden Sie die Buchse SAT des
Videorecorders mit der Buchse VCR am Decoder.
Schalten Sie vor Start der Funktion Automatische
Sendersuche Ihren Decoder und Videorecorder auf
Standby.
Über die Phono-Anschlüsse neben den Buchsen
COMPONENT VIDEO INPUT (Komponenten Videoeingang)
können L- und R-Audiosignale eingespeist werden.
Ein zusätzlicher fester/variabler Audioausgang ermöglicht
den Anschluss einer passenden HiFi Anlage. Dazu muss die
Option Lautsprecher im Ton-Menü auf Aus gestellt
werden.
IN
OUT
IN
OUT
SAT
IN/OUT
VCR
TV
Geräte dürfen NICHT
gleichzeitig an Eingang 3
und Scart 3 (EXT 3)
angeschlossen sein.
!
*
Ein Decoder kann ein
digitaler Satellitenem
pfänger
oder ein anderer kom
patibler
Decoder sein.
☛
videorecorder
decoder*
Rückseite Ihres Fernsehgerätes
SCART 5 (EXT 5)
SCART 4 (EXT 4)
SCART 3 (EXT 3)
EINGANG 3 (EXT 3)
EINGANG FÜR VIDEOKOMPONENTEN (EXT 1)
EINGANG FÜR VIDEOKOMPONENTEN (EXT 2)
COMPOSITE-VIDEOEINGANG (EXT 1)
COMPOSITE-VIDEOEINGANG (EXT 2)

51
Deutsch
Anschließen eines Computers
linke Seite des Fernsehers
Computer
Audiokabel für
PC-TV-Verbindung
(nicht mitgeliefert)
Übergangsstecker, sofern
ein Adapter erforderlich ist
(nicht mitgeliefert)
RGB-PC-Kabel
(nicht mitgeliefert)
Mini-D-Sub-Stecker, 15-polig
Schalten Sie alle Netzschalter am Fernsehgerät aus, bevor Sie externe Geräte anschließen.
Verbinden Sie das PC-Kabel des Computers mit dem
RGB/PC-Anschluss an der linken Seite des
Fernsehgerätes.
Drücken Sie die Taste
B
, um den PC-Modus
auszuwählen.
Folgende Signale können auf dem Bildschirm angezeigt
werden:
VGA: 640 x 480/60 Hz (VESA 480-60)
SVGA: 800 x 600/60 Hz (VESA 600-60)
XGA: 1024 x 768/60 Hz (VESA 768-60)
HINWEIS:
Einige PC-Modelle können nicht an dieses Fernsehgerät
angeschlossen werden.
Für Computer mit einem DOS/V-kompatiblen 15-poligen
Mini-D-Sub-Anschluss wird kein Steckadapter benötigt.
An den Bildschirmrändern können unter Umständen
Streifen erscheinen, oder Teile des Bildes können unscharf
sein. Dieser Effekt ist auf die jeweilige Signalstärke
zurückzuführen und stellt keine Fehlfunktion dar.
Bei ausgewähltem PC-Modus sind einige Funktionen am
Fernsehgerät nicht verfügbar. Diese zeitweilig deaktivierten
Funktionen sind in den betreffenden Menüs grau hinterlegt
und können nicht ausgewählt werden. Wenn Sie sich nicht
im PC-Modus befinden, ist hingegen die Option
PC Einstellungen grau hinterlegt, d. h. deaktiviert.
Signaldaten für 15-poligen Mini-D-Sub-Stecker
Pinbelegung für RGB/PCAnschlussklemme
Pin-Nr. Signalname Pin-Nr. Signalname
1R9NA
2 G 10 Masse
3B11NA
4 NA (
nicht angeschlossen
)12 NA
5 NA 13 H-Sync
6 Masse 14 V-Sync
7 Masse 15 NA
8 Masse

Deutsch
52
Anschlüsse und Bedienelemente
Wenn das Kontrolllämpchen zur Anzeige der
Betriebsbereitschaft nicht leuchtet, drücken Sie die Taste
NETZTASTE unten links am Fernseher, um das Gerät
einzuschalten. Wählen Sie anschließend eine Zifferntaste auf
der Fernbedienung, um den Bildschirm anzuzeigen. Unter
Umständen dauert es einige Sekunden, bis das Bild erscheint.
Drücken Sie die Taste
i
auf der Fernbedienung, um das
Gerät in den Standby-Modus zu schalten. Um den Bildschirm
wieder einzuschalten, drücken Sie erneut
i
oder eine
beliebige Zifferntaste. Unter Umständen dauert es einige
Sekunden, bis das Bild erscheint. Das Gerät sollte nur für
kurze Zeit im Standby-Modus verbleiben.
Die Einrichtung des Fernsehgerätes muss jetzt über die
Bildschirmmenüs vorgenommen werden. Drücken Sie die
Taste MENU auf der Fernbedienung, um die Menüs
anzuzeigen.
In der Menüleiste am oberen Bildschirmrand sehen Sie fünf
verschiedene Symbole für die einzelnen Funktionsmenüs.
Wenn Sie mit Hilfe der Tasten Soder Rdie verschiedenen
Symbole auswählen, werden jeweils die entsprechenden
Optionen unterhalb der Menüleiste angezeigt.
Drücken Sie auf der Fernbedienung die Taste Q, um nach
unten durch die Menüoptionen zu blättern. Mit den Tasten
OK, Soder Rkönnen Sie anschließend die gewünschte
Option auswählen. Befolgen Sie die Bildschirmanweisungen.
Die Funktionen der einzelnen Menüs sind in dieser
Bedienungsanleitung detailliert beschrieben.
Sie können über die Eingänge an der Vorderseite des Fernsehers eine große Bandbreite an externen
Geräten anschließen.
Obwohl sich alle erforderlichen Anpassungen und Einstellungen an Ihrem Fernsehgerät mit der Fernbedienung
vornehmen lassen, können Sie für einige Funktionen auch die Tasten an der Vorderseite des Gerätes nutzen.
Drücken Sie die Taste
— j+
, um die Lautstärke
einzustellen.
Drücken Sie die Tasten
eeFff
, um das Programm zu
wechseln.
Drücken Sie die Taste MENU auf der Fernbedienung und
anschließend
S,R
bzw. Q
oder P, um die Ton- und
Bildeinstellungen anzupassen.
Drücken Sie MENU, um das Menü zu verlassen.
Beim Anschluss eines Mono-Gerätes an EXT6, muss der
Audio-Ausgang des entsprechenden Gerätes mit der
Buchse L/Mono am Fernsehgerät verbunden werden.
Drücken Sie zur Auswahl des Eingangs die Taste
B
-, bis
gemäß der Beschreibung auf Seite 62 die Einstellung EXT6
angezeigt wird. Der Signaltyp wird vom Fernsehgerät
automatisch erkannt.
Genauere Informationen entnehmen Sie bitte der
Bedienungsanleitung des anzuschließenden Gerätes.
Hinweis: Wenn Sie Kopfhörer anschließen, werden alle
Lautsprecher stummgeschaltet.
Einschalten
Verwenden der Bedienelemente
und Anschlüsse
Netzschalter
ROT – Netzbetrieb
GRÜN – Ein-Timer eingestellt
EINGANG 6
(EXT 6)
Zum Öffnen
drücken Sie auf die
Mitte der Klappe
Zum Öffnen
drücken Sie auf die
Mitte der Klappe

53
Deutsch
Press Q to highlight Language.
Quick setup
Select your language.
Language English
EXIT Watch TV Next
Schalten Sie vor dem Einschalten des Fernsehgerätes Ihren Decoder und Videorecorder in den
Standby-Modus. Nehmen Sie die Einstellung des Fernsehgerätes mit den Tasten der Fernbedienung vor, die
in der Abbildung auf Seite 49 erläutert sind.
1
2
3
5
6
7
8
9
4
Schalten Sie das Fernsehgerät über die Netztaste
ein. Der Begrüßungsbildschirm Quick setup
erscheint.
Wählen Sie Ihre Sprache mit den Tasten Soder
R
aus, und drücken Sie anschließend die Taste OK.
Wählen Sie dann mit den Tasten SoderRIhr
Land aus, und drücken Sie erneut OK.
Ihr System wurde jetzt ausgewählt. Wenn eine
Auswahl erforderlich ist, drücken SieR, um eines
der angezeigten Systeme auszuwählen.
Drücken Sie die Taste OK, um die Funktion
Autom. Einstellung zur Autom. Sendersuche
zu starten.
Jetzt wird nach allen Sendern gesucht, deren
Signale empfangen werden. Durch einen
Statusbalken wird der Fortschritt des Suchlaufs
dynamisch angezeigt.
Sie müssen erst warten, bis das Fernsehgerät
den Suchlauf abgeschlossen hat.
Nach Abschluss der Suche schaltet das
Fernsehgerät automatisch auf den ersten
Programmplatz um. Wenn das Bild undeutlich ist
oder das Empfangssignal von dem betreffenden
Sender auf diesem Programmplatz zu schwach ist,
können Sie die Reihenfolge der Sender mit der
Funktion Programme ordnen ändern, die im
Bildschirmmenü automatische Installation
angezeigt wird.
Drücken Sie die Taste OK, um die Funktion
Programme ordnen auszuwählen.
Die Senderliste wird jetzt angezeigt. Markieren Sie
mit Hilfe der Taste Q oderPden Sender, den Sie
verschieben möchten, und drücken Sie die Taste R.
Der ausgewählte Sender erscheint jetzt auf der
rechten Seite des Bildschirms.
Autom. Sendersuche
suchen
Kanal : 6 Sender :
EXIT stop
automatische Installation
Die automatische Installation
ist abgeschlossen.
Drücken sie ok um in das
Menü zur manuellen.
Sendersortierung zu gelangen.
EXIT beenden weiter
B/G – Kontinentaleuropa, I– Großbritannien
D/K – Osteuropa, L1, L2 – Frankreich
Blättern Sie wieder mit den Tasten Q oder
P
durch die Liste, bis Sie die gewünschte
Programmposition erreichen. Bei diesem Vorgang
werden die übrigen Sender entsprechend
verschoben.
Drücken Sie Szum Speichern ihres
Programmplatzes.
Wiederholen Sie den Vorgang bei Bedarf, und
drücken Sie anschließend EXIT.
Falls das Fernsehgerät nicht mit einem Scart-Kabel
an einen Videorecorder/Decoder angeschlossen
werden kann, oder falls Sie den Sender eines
anderen Systems einstellen möchten, verwenden
Sie zur Zuordnung der Programmpositionen die
Funktion zur manuelle Sendersuche, siehe
Seite 54.
Programme ordnen
Prog. Kanal Sender
1 22 ARD
2 25 ZDF
3 28 RTL
4 32 SAT 1
5 69
6 69
ordnen speichern
MENU zurück EXIT beenden
Sendereinstellung des Fernsehgerätes
mit Schnelleinstellung,
Sortieren der Programmplätze

Deutsch
54
EINSTELLUNG
Sprache Deutsch
Land Deutschland
Autom. Sendersuche OK
manuelle Sendersuche OK
Programme ordnen OK
MENU zurück EXIT beenden
manuelle Sendersuche
Prog. Sys. Kanal Sender
0 I 60 VCR
1 I 22 ARD
2 I 25 ZDF
3 I 28 RTL
4I 32SAT 1
5I 69
Auswahl
MENU zurück EXIT beenden
Drücken Sie zur Auswahl des Systems die Taste
R
und zum Wechseln der Einstellung die Tasten
P
oder Q (wenn notwendig siehe Punkt 4 auf
Seite 53).
Drücken Sie anschließend die Taste R, um die
Option Suchen auszuwählen.
Drücken Sie die Taste Poder Q , um den
Suchlauf zu starten. Während der Suche erscheint
die Meldung Suchen, und am Bildschirm werden
die jeweiligen Kanalnummern angezeigt.
Manuelle Sendereinstellung
Als Alternative zum automatischen Sendersuchlauf besteht für Ihr Fernsehgerät auch die Möglichkeit einer
manuelle Sendersuche. Beispiel: Das Fernsehgerät kann nicht per Scart-Kabel an einen Videorecorder/Decoder
angeschlossen werden, oder Sie möchten einen Sender in einem anderen System einstellen (siehe Seite 53).
Programm: Die Nummer, die auf der Fernbedienung gedrückt werden muss.
System: Betrifft nur bestimmte Regionen. Siehe Punkt 4 auf Seite 53.
Farbsystem: Fabrikeinstellung ist Auto; diese sollte nur geändert werden, wenn Probleme zu erwarten sind, wie z.B. ein
NTSC-Eingang von einem externen Gerät.
Progr. Überspr.:*Bedeutet, dass kein Sender gespeichert wurde oder die Funktion zum Überspringen des Kanals
aktiviert wurde. Siehe Seite 55.
Kanal: Die Nummer des Kanals, auf dem ein Sender übertragen wird.
Suchen: Suche nach einem Signal im Frequenzbereich.
Feineinstellung: Wird nur verwendet, wenn Störungen auftreten bzw. das Empfangssignal zu schwach ist. Siehe Seite 65.
Sender: Sendername. Verwenden Sie die Tasten
P
oder Qund SoderRzur Eingabe einer Senderbezeichnung,
die aus bis zu sieben Zeichen bestehen kann.
Markieren Sie den gewünschten Programmplatz
mit der Taste Poder Q. Für den Videorecorder
wird Prog. 0 empfohlen.
Drücken Sie die Taste MENU, und wählen Sie mit
den Tasten Soder Rdas Menü EINSTELLUNG
aus. Markieren Sie dann mit Hilfe der Taste Q die
Option manuelle Sendersuche, und drücken Sie
zur Auswahl die Taste OK.
Die Nummern
Ihrer Kanäle
können sich
von den hier
dargestellten
Nummern
unterscheiden.
Fortsetzung auf der nächsten Seite
So können Sie einem Decoder und Videorecorder im Fernsehgerät eine Programmposition zuweisen: Schalten Sie den Decoder ein, legen Sie
eine bespielte Kassette in den Videorecorder ein, und drücken Sie PLAY (Wiedergabe). Nehmen Sie dann die manuelle Feineinstellung vor.
Benutzen Sie die Tasten SundR, um sich innerhalb des Bildschirmmenüs zu bewegen und die entsprechende Option für die manuelle
Einstellung auszuwählen.
1
2
3
4
5
6
Sender
Programm System
Farbsystem
Kanal Suchen
Progr.
Überspr.
Feineinstellung
manuelle Sendersuche
Suchen
0 B/G a 60 0
speichern MENU zurück EXIT beenden
manuelle Sendersuche
System
0 B/G a 60 0 V C R
speichern MENU zurück EXIT beenden
Jedes Signal wird auf dem Fernsehgerät angezeigt.
Wenn es sich nicht um Ihren Videorecorder
handelt, drücken Sie erneut die Taste Poder Q,
um den Suchlauf neu zu starten.
7
Drücken Sie OK, zur Auswahl. Wenn es sich um
ein zu überspringendes Programm handelt, muss
die Option Programme ordnen vor dem
Speichern zurückgesetzt werden.

55
Deutsch
97
98
99
B
1
B
2DVD
B
3
B
4
B
5
0 VCR
Wenn das Signal Ihres Videorecorders gefunden
wird, drücken Sie die Taste R, um die Option
Sender aufzurufen. Geben Sie mit Hilfe der
Tasten Pund Q sowie Sund Rdie
gewünschten Zeichen ein, z. B. VCR.
Manuelle Sendereinstellung Fortsetzung
Überspringen von Programmen
Dieses Fernsehgerät verfügt über eine Funktion zur direkten
Kanaleingabe. Dazu müssen Sie die Kanalnummern kennen.
Wählen Sie dazu das Menü manuelle Sendersuche aus Schritt 3.
Geben Sie dann die gewünschte Programmnummer, das System, und
dann die Nummer des entsprechenden Kanal ein. Drücken Sie zum
Speichern der Eingabe die Taste OK.
8
Drücken Sie zum Speichern die Taste OK.
Wiederholen Sie den Vorgang für jede
Programmposition, die Sie einstellen möchten, oder
drücken Sie die Taste MENU, um zur Liste der Kanäle
zu wechseln, und wählen Sie die nächste
einzustellende Nummer.
Drücken Sie nach Abschluss des Vorgangs die Taste
EXIT.
Um einen Namen für ein extern angeschlossenes
Gerät festzulegen, z. B. DVD an EXT2, drücken Sie
zur Auswahl von EXT2 die Taste -B. Wählen Sie
dann aus dem Menü EINSTELLUNG die Option
manuelle Einstellung.
Drücken Sie R, um die Option Sendername
auszuwählen, und geben Sie dann mit Hilfe der
Tasten P, Q, Sond Rdie gewünschten Zeichen ein.
10
11
12
13
14
9
H
INWEIS
Drücken Sie die Taste MENU, und wiederholen
Sie Schritt 2, oder drücken Sie die Taste EXIT.
Jeder Programmplatz muss einzeln ausgewählt
werden. Wiederholen Sie Progr. Überspr. aus,
für jeden gewünschten Programmplatz.
Übersprungene Programmpositionen können
weder mit der Pf(P)- bzw. Pe(Q)-Taste noch
mit den Bedienelementen an der Vorderseite des
Fernsehers ausgewählt werden, Sie können aber
weiterhin mittels der Zifferntasten Ihrer
Fernbedienung auf diese zugreifen.
3
4
5
Markieren Sie mit Hilfe der Taste Poder Q die
zu sperrende Programmposition, und drücken Sie
zur Auswahl die Taste OK.
Drücken Sie die Taste R, um die Option Progr.
Überspr. auszuwählen.
Mit der P- oder der Q-Taste wird
Progr. Überspr. eingeschaltet. Drücken Sie OK.
Eine gesperrte Programmposition wird auf
dem Bildschirm durch das Symbol gekennzeichnet.
Um zu verhindern, dass bestimmte Programme gesehen
werden, können Sie das Gerät so einstellen, dass bei
weggelegter Fernbedienung die entsprechende
Programmposition übersprungen wird. Der Fernseher kann
dann über die Bedienelemente an der Vorderseite wie üblich
benutzt werden. Die übersprungene Programmposition wird
jedoch vom System nicht angezeigt.
Überspringen von Programmen
Wählen Sie aus dem Menü EINSTELLUNG die
Option manuelle Sendersuche.
1
2
manuelle Sendersuche
Prog. Sys. Kanal Sender
0 I 60 VCR
1 I 22 ARD
2 I 25 ZDF
3 I 28 RTL
4I 32SAT 1
5I 69
Auswahl
MENU zurück EXIT beenden
Durch Drücken der Taste OK kann auf dem
Bildschirm jederzeit eine Liste mit allen gespeicherten
Programmen und extern angeschlossenen Geräten
angezeigt werden. Drücken Sie zum Markieren die
TastenPund Q und zur Auswahl die Taste OK.
manuelle Sendersuche
Progr. Überspr. : ein
1 B/G a 22 0 B B C 1
speichern MENU zurück EXIT beenden
manuelle Einstellung
Sendername
EXT2 aDVD
speichern MENU zurück EXIT beenden
manuelle Sendersuche
Sender
0 B/G a 32 0 V C R
speichern MENU zurück EXIT beenden

Deutsch
56
WEIT. FUNKT
Videotext auto.
Bedienfeldsperre ein
Panelhelligkeit 16
Bedienfeld 0
PC Einstellung
MENU zurück EXIT beenden
Verwenden Sie zur Auswahl eines Programmplatzes die
Zifferntasten auf der Fernbedienung.
Geben Sie für Programmnummern unter unter 10 jeweils 0
und die gewünschte Nummer ein, z. B. 01 für Programm 1.
Programme können ebenfalls mit Hilfe der Tasten P
e
(P)
und P
e
(Q) gewählt werden.
Um wieder zum vorherigen Programm umzuschalten,
drücken Sie die Taste
^^
.
Wenn Sie Bildschirminformationen anzeigen möchten,
beispielsweise den Programmplatz, den Eingangsmodus
oder den Stereo/Mono-Signalmodus, drücken Sie die
Taste CALL.
Auswahl von Programmplätzen
Verwenden des autom. Sendersuche
1
2
3
4
Drücken Sie die Taste Q, um die Menüoption
Sprache zu markieren. Zur Auswahl verwenden Sie
die Taste SoderR.
Drücken Sie die Taste Q um die Menüoption Land
zu markieren. Wählen Sie dann mit den Tasten
S
oderReine Ländereinstellung aus.
Drücken Sie die Taste Q , um die Funktion Autom.
Sendersuche zu markieren. Drücken Sie jetzt OK.
Um die Sendereinstellung am Fernsehgerät mit der
Funktion Autom. Sendersuche vorzunehmen,
drücken Sie die Taste MENU und wählen Sie dann
mit SoderRdas Menü EINSTELLUNG aus.
Sie müssen erst warten, bis das Fernsehgerät den
Suchlauf abgeschlossen hat.
Nach Abschluss der Suche schaltet das Fernsehgerät
automatisch auf den ersten Programmplatz um. Unter
Umständen empfangen Sie von bestimmten Sendern jedoch
nur ein schwaches Bildsignal. Sie können daher die
Reihenfolge der Sender mit Hilfe der Funktion Programme
ordnen ändern. Siehe Seite 53.
B/G – Kontinentaleuropa, I– Großbritannien
D/K – Osteuropa, L1, L2 – Frankreich
5
Ihr System wurde jetzt ausgewählt. Wenn eine
weitere Auswahloption verfügbar ist, drücken Sie
S
oderR, um eines der angezeigten Systeme
auszuwählen. Drücken Sie nach Abschluss des
Vorgangs die Taste OK.
EINSTELLUNG
Sprache Deutsch
Land Deutschland
Autom. Sendersuche OK
manuelle Sendersuche OK
Programme ordnen OK
MENU zurück EXIT beenden
Autom. Sendersuche
Achtung : Bisherige Einstellungen werden
gelöscht!
beenden um alle Einstellungen
beizubehalten.
zum Starten OK drucken
System B/G
MENU zurück EXIT beenden
!
Automatischer Sendersuchlauf, Allgemeine
Bedienelemente, Uhrzeitanzeige, Tastensperre
Die Option Uhrzeitanzeige ermöglicht die Anzeige der
aktuellen (Videotext) Uhrzeit auf dem Bildschirm.
Wenn Sie während einer Fernsehsendung die Tasten
8/9
auf der Fernbedienung drücken, wird die genaue
vom Sender übertragene Uhrzeit eingeblendet. Diese
Anzeige wird nach etwa 5 Sekunden wieder ausgeblendet.
Wählen Sie aus WEIT. FUNKT. die Option
Bedienfeldsperre und anschließend mit Hilfe der
Taste SoderRdie Einstellung ein oder aus.
Die Bedienfeldsperre deaktiviert die Tasten an der
Vorderseite des Fernsehers. Alle Tasten der Fernbedienung
können nach wie vor benutzt werden.
Bedienfeldsperre
Die Uhrzeitanzeige
1
Bei aktivierter Bedienfeldsperre erscheint jedes mal ein
Erinnerungssignal, wenn eine der Tasten im vorderen
Bedienfeld gedrückt wird. Ist das System einmal
ausgeschaltet, kann der Standby-Modus NUR durch die
Benutzung der Fernbedienung verlassen werden.

57
Deutsch
Toneinstellung, BBE Soundprozessor,
Stereo- und Zweikanaltonsendungen
Lautstärke
Drücken Sie die Taste
j
— (S) oder j+ (R), um die
Lautstärke anzupassen.
Stummschaltung
Drücken Sie die Stummschaltungstaste
k
einmal, um den Ton
auszuschalten und ein zweites Mal, um den Ton wieder
einzuschalten.
Bassverstärker – für eine bessere Klangtiefe
Drücken Sie die Taste
n
und anschließend SoderR, um den
Effekt entsprechend anzupassen. Ein merklicher Unterschied ist
nur bei Musik mit starken Bässen hörbar. Drücken Sie erneut
die Taste
n
, um den Bassverstärker zu deaktivieren.
Bei Anschluss eines aktiven Super Woofer erfolgt eine Steuerung
mit der Taste
n
nur, wenn Bass Extern ausgewählt ist.
Gehen Sie dazu im Einstellung Menü auf AV-Anschluss und
mit der Taste Qauf den Eintrag Bass. Wählen Sie
anschließend mit den Tasten Sbzw.Rdie Option Extern.
Drücken Sie die Taste MENU und SoderR, um die
Option TON auszuwählen
Drücken Sie zur Auswahl der Option Bass, Höhen
oder Balance die Taste Q. Drücken Sie dann zur
Übernahme der Einstellung die Taste SoderR.
Toneinstellung
Bass-, Höhen- und Balance-Regelung
1
2
Wenn Sie ein HiFi-Gerät anschließen, müssen Sie die
Option Lautsprecher auf aus stellen. Anschließend wählen
Sie im Menü AV-Anschluss für den Audio-Ausgang die
Option fest oder variabel.
TON
Bass – 4
Höhen 0
Balance 0
Lautsprecher ein
Klangfilter ein
MENU zurück EXIT beenden
BBE®Soundprozessor
Klangfilter liefert einen natürlicheren Klang, verbessert
die Qualität der Sprachwiedergabe und erweitert den
Aussteuerungsbereich (Dynamik) von Musik.
1
Drücken Sie die Taste MENU, und wählen Sie
das Menü TON aus.
Drücken Sie Poder Q, um die Option
Klangfilter auszuwählen. Drücken Sie dann die
Taste SoderR, um ein oder aus einzustellen.
HINWEIS: Hergestellt unter Lizenz von BBE Sound, Inc.
Lizenziert von BBE Sound, Inc. gemäß USP4638258 und
4482866. BBE und das BBE-Symbol sind eingetragene
Marken von BBE Sound, Inc.
Wenn Sendungen in Stereo oder mit Zweikanalton
übertragen werden, wird für einige Sekunden die Anzeige
Stereo oder 2-Kanalton am Bildschirm eingeblendet. Diese
Anzeige erscheint kurzzeitig nach jedem Umschalten der
Programme. Falls kein Stereo-Ton gesendet wird, wird statt
dessen das Wort Mono eingeblendet.
Stereo… Drücken Sie
OI/II
zur Auswahl von Stereo
oder Mono.
Zweisprachig… Zweisprachige Sendungen (Zweikanalton)
sind relativ selten. Bei einer solchen Sendung wird die
Anzeige 2-Kanalton eingeblendet. Wählen Sie die
gewünschte Programmnummer. Wenn die Anzeige
2-Kanalton eingeblendet wird, können Sie mit der Taste
OI/II
zwischen Sprache 1, Sprache 2 oder Mono wählen.
Übertragungen in Stereo und
Zweikanalton
TON
Bass – 4
Höhen 0
Balance 0
Lautsprecher ein
Klangfilter aus
MENU zurück EXIT beenden

Deutsch
58
Anzeige im Breitbildformat
SUPER LIVE
Mit dieser Einstellung kann das
Fernsehbild an die Bildschirmgröße
angepasst werden, indem es
horizontal gestreckt wird. In der
Bildmitte werden dabei die realen
Größenverhältnisse beibehalten.
UNTERTITEL
In Abhängigkeit von der Art der jeweiligen Fernsehübertragung können Sie sich Sendungen in verschiedenen
Bildformaten anschauen. Drücken Sie bei Bedarf jeweils die Taste
{
, um zwischen den Bildformaten
Super Live, Kino, Untertitel, 14:9, Breitbild und 4:3 umzuschalten.
Hinweis: Bei jedem Drücken der Taste MENU ändert sich die jeweilige Bildformateinstellung, während die
Menüs weiterhin auf dem Bildschirm sichtbar bleiben. Dadurch wird gewährleistet, dass die Menüs nicht über
die Grenzen des sichtbaren Bildschirmbereiches hinausragen.
KINO
Wenn Sie sich Filme bzw. Videos im
Breitbildformat anschauen und schwarze
Balken am unteren und oberen Bildrand
angezeigt werden, können Sie mit Hilfe
dieser Einstellung diese Balken
verkleinern oder entfernen, indem Sie
das Bild auswählen und vergrößern,
ohne dass die Darstellung verzerrt wird.
Wenn bei einem Film im
Breitbildformat Untertitel angezeigt
werden, können Sie mit dieser
Einstellung das Bild nach oben
verschieben, um zu gewährleisten,
dass der gesamte Untertiteltext auf den
Bildschirm passt.
UNTERTITEL
14:9
Verwenden Sie diese Einstellung für
Sendungen im 14:9-Format.
Verwenden Sie diese Einstellung für
Breitwand-DVDs, Breitwand-Videos
oder gegebenenfalls bei Sendungen
im 16:9-Format. Aufgrund der
verschiedenen Breitwandformate
(16:9, 14:9, 20:9 usw.) werden unter
Umständen schwarze Balken am
oberen und unteren Rand des
Bildschirms angezeigt.
BREITBILD
Verwenden Sie diese Einstellung bei
Sendungen, die im 4:3-Format
ausgestrahlt werden.
4:3
Der Einsatz der speziellen Funktionen zur Veränderung der Größe des angezeigten Bildes
(d. h. Ändern des Verhältnisses der Bildhöhe zur Bildbreite) zum Zweck einer öffentlichen Vorführung
oder zur Erzielung eines kommerziellen Gewinns kann eine Verletzung von Urheberrechtsgesetzen darstellen.

59
Deutsch
Bildeinstellung
Verwenden Sie zur Einstellung von Kontrast,
Helligkeit, Farbe, Farbton und Shärfe die Taste
S
oderR.
Eine Einstellung des Farbtons bei NTSC-Signalen
von einem NTSC-Videorekorder oder DVD-Player
kann nur vorgenommen werden, wenn der
Farbmodus auf AUTO oder NTSC gestellt ist.
Wählen Sie das Menü BILD.
1
2
Bildposition
Die Bildposition kann individuell angepasst werden.
Teilweise ist dies bei externen Quellen hilfreich.
1
Drücken Sie OK, um die verfügbaren Optionen
für das ausgewählte Bildformat anzuzeigen.
Wählen Sie die gewünschte Option durch
Drucken der Tasten Pund Q aus, und nehmen
Sie die Einstellung jeweils mit Hilfe der Tasten
S
und Rvor.
Die angezeigten Optionen ändern sich in
Abhängigkeit vorn gewählten Breitbildformat
sowie bei der Bildanzeige über angeschlossene
Geräte.
Im Modus Kino:
2
3
BILD
Kontrast 50
Helligkeit 50
Farbe 50
Farbton 0
Schärfe 0
MENU zurück EXIT beenden
Wählen Sie das Menü EINSTELLUNG, und
drücken Sie die Taste Q, bis die Einstellung
Bildlage markiert ist.
EINSTELLUNG
manuelle Sendersuche OK
Programme ordnen OK
AV-Anschluss OK
Bildlage OK
automatische Installation OK
MENU zurück EXIT beenden
Bildlage
horiz.-Lage
vertik.-Lage
zurücksetzen OK
MENU zurück EXIT beenden
Dieses Fernsehgerät bietet die Möglichkeit, individuelle
Bildeinstellungen zu speichern. Drücken Sie
m
, um die
verfügbaren Bildmodi anzuzeigen:
Tag, Abend und Nacht sind voreingestellte Optionen.
Unter eigene Einstellung können Ihre eigenen
Einstellungen gespeichert werden:
Bildvoreinstellungen
DNR führt zu einer "weicheren" Bilddarstellung bei einem
schwachen Signal zur Reduzierung störender Effekte.
Digitale Rauschminderung (DNR)
1
Mit der Einstellung Schwarzanp. erfolgt eine
Verstärkung von dunklen Bereichen des Bildes, was die
Bildschärfe verbessert.
Schwarzwert
Wählen Sie das Menü BILD, und drücken Sie die
Taste Q, bis die Einstellung Schwarzanp.
markiert ist.
Drücken Sie die Tasten SoderR, um die
Einstellung ein oder aus auszuwählen Die Stärke
dieses Effekts ist von der jeweiligen Sendung
abhängig und am besten bei dunklen Farben
sichtbar.
1
2
Wählen Sie DNR aus dem Menü BILD und
nehmen Sie mit den Tasten Sbzw.Rdie
Einstellung vor. Die Unterschiede sind nicht immer
wahrnehmbar (die besten Ergebnisse erzielen Sie
bei niedrigen Einstellungen. Bei zu hohen
Einstellungen kann sich die Bildqualität
verschlechtern).

Deutsch
60
Wählen Sie das Menü BILD, und drücken Sie die
Taste Q, bis die Einstellung
Farbtemperatur
markiert ist.
Wählen Sie mit Hilfe der Tasten SundRje nach
Bedarf die Einstellung normal, warm oder kalt.
1
2
Durch die Einstellung Farbtemperatur kann ein Bild
"wärmer" oder "kühler" dargestellt werden, indem jeweils der
rote oder blaue Farbanteil des Bildes erhöht wird.
Farbtemperatur
Bildeinstellung Fortsetzung
Automatische Formatierung (Breitbild)
Wenn dieses Fernsehgerät ein Signal in einem echten
Breitbildformat empfängt und die Einstellung Auto-Format
aktiviert ist ein, wird die Sendung unabhängig von der
aktuellen Bildformateinstellung des Fernsehers automatisch
im Breitbildformat angezeigt.
Wählen Sie aus dem Menü BILD die Option
Auto-Format und anschließend die Einstellung
ein oder aus.
1
BILD
DNR 4
Schwarzanp. ein
Farbtemperatur normal
Auto-format aus
grauer Bildschirm aus
MENU zurück EXIT beenden
Mit der Funktion Bedienfeld können die im Format 4:3
oder 14:9 jeweils an den Bildschirmrändern sichtbaren
Streifen heller oder dunkler eingestellt werden. Dadurch
wird ein Nachleuchten des Streifenbildes vermieden und
ein entspannteres und angenehmeres Fernseherlebnis
ermöglicht, da Sie das Bild an helle oder dunkle
Lichtbedingungen anpassen können.
Drücken Sie im Menü WEIT. FUNKT. die Taste Q,
um die Option Panelhelligkeit auszuwählen.
Drücken Sie OK, um die Auswahl zu bestätigen.
Drücken Sie dann die Taste SoderR, um die
Feineinstellung vorzunehmen.
1
2
Durch Wahl der Funktion Panelhelligkeit kann an sehr
hellen Plätzen die Qualität der Bildschirmdarstellung
verbessert werden.
Hintergrundbeleuchtung
Graues Bild
Bei Auswahl der Einstellung grauer Bildschirm (graues
Bild) wird bei einem fehlenden Empfangssignal ein grauer
Bildschirm angezeigt und der Ton abgeschaltet.
Drücken Sie im Menü BILD die Taste Poder Q,
um die Option grauer Bildschirm zu markieren.
Drücken Sie dann die Taste SoderR, um die
Funktion ein oder aus zu schalten.
1
2
Drücken Sie im Menü WEIT. FUNKT. die Taste Q,
um die Option Bedienfeld auszuwählen.
Drücken Sie OK, um die Auswahl zu bestätigen.
Drücken Sie dann die Taste SoderR, um die
Feineinstellung vorzunehmen.
1
2
Einstellung Seitenrand
WEIT. FUNKT.
Videotext auto.
Bedienfeldsperre aus
Panelhelligkeit 16
Bedienfeld 0
PC Einstellung
MENU zurück EXIT beenden
WEIT. FUNKT.
Videotext auto.
Bedienfeldsperre aus
Panelhelligkeit 16
Bedienfeld 0
PC Einstellung
MENU zurück EXIT beenden

61
Deutsch
Timer, PC-Einstellungen – Taktphase,
Abtasttakt
Drücken Sie die Taste Q, um die Option Ein-
Timer oder Aus-Timer auszuwählen. Stellen Sie
die gewünschte Zeit mit den Nummerntasten ein.
Um beispielsweise den Timer so einzustellen, dass
das Fernsehgerät in anderthalb Stunden
ausgeschaltet wird, geben Sie 01:30 ein.
Drücken nach Einstellung des Aus-Timer die Taste
EXIT, um den Vorgang zu beenden. Zur Einstellung
des Ein-Timer drücken Sie die Taste Q, um die
Einschaltprogrmm auszuwählen. Geben Sie
dann die gewünschte Programmpositionsnummer
ein, und drücken Sie
i
, um das Fernsehgerät in
den Standby-Modus zu schalten. Die GRÜNE
Anzeige für den Ein-Timer an der Vorderseite des
Fernsehgerätes leuchtet jetzt.
Alle über Scart-Kabel angeschlossenen
Zusatzgeräte müssen ebenfalls in den StandbyModus geschaltet werden, damit ihr Signal nicht
auf dem Bildschirm angezeigt wird, wenn der
Timer aktiviert wird.
Nachdem der Ein-Timer eingestellt wurde, kann
das Fernsehgerät jederzeit mit der Taste
i
eingeschaltet werden. Die grüne Anzeige für den
On-Timer leuchtet so lange, bis die eingestellte
Zeitspanne abgelaufen ist und der Fernseher durch
den Timer mit dem gewählten Kanal eingeschaltet
wird. Mit dieser Funktion können Sie beispielsweise
verhindern, dass Sie Ihre Lieblingssendung
verpassen.
Um den Ein-Timer zu deaktivieren, geben Sie in
jeder Position einschließlich der Programmposition
eine Null ein.
Das Fernsehgerät kann so eingestellt werden, dass es
sich nach einer bestimmten Zeit automatisch
ein- oder ausschaltet.
Der Timer
1
2
3
4
Drücken Sie die Taste MENU und SoderR, um
das Menü TIMER auszuwählen.
TIMER
Aus-Timer 01:30
Ein-Timer 00:00
Einschaltprogramm 01
MENU zurück EXIT beenden
3
Nehmen Sie dann die weitere Einstellung mit der
Taste SoderRvor, bis die gewünschte
Bildqualität erreicht ist.
3
Drücken Sie im Menü WEIT. FUNKT. die Taste Q,
um die Option PC-Einstellung auszuwählen.
Drücken Sie OK, um die Auswahl zu bestätigen.
Drücken Sie dann Q, um die Option Clock
phase auszuwählen.
1
2
Mit der Funktion Clock phase kann das PC-Signal an die
LCD-Anzeige angeglichen werden. Durch die Einstellung
dieser Funktion können störende waagerechte Streifen und
Unschärfen im Bild beseitigt werden.
Taktphase
Drücken Sie im Menü WEIT. FUNKT. die Taste Q,
um die Option PC-Einstellung auszuwählen.
Drücken Sie OK, um die Auswahl zu bestätigen.
Drücken Sie dann Q, um die Option Sampling
clock auszuwählen.
Nehmen Sie dann die weitere Einstellung mit der
Taste SoderRvor, bis die gewünschte Bildqualität
erreicht ist.
1
2
Mit der Funktion Sampling clock kann die Anzahl der
Impulse pro Bildabtastung eingestellt werden. Dadurch
können ggf. im Bild störende senkrechte Streifen
beseitigt werden.
Abtastrate
PC Einstellung
Clock phase 9
Sampling clock 7
MENU zurück EXIT beenden
WEIT. FUNKT.
Videotext
Bedienfeldsperre aus
Panelhelligkeit 16
Bedienfeld 0
PC Einstellung OK
MENU zurück EXIT beenden

Deutsch
62
AV-Anschluss
EXT3-Eingang AV
EXT3 Ausgang EXT1
Bass Extern
Audioausgang Fest
MENU zurück EXIT beenden
Auswahl der Eingänge und AV-Anschlüsse
Einrichten der EINGÄNGE und AUSGÄNGE des Gerätes, damit an Ihrem Fernsehgerät angeschlossene Geräte
korrekt erkannt werden. Eine übersichtliche Darstellung der hinteren Anschlüsse finden Sie auf Seite 50.
Wählen Sie AV-Anschluss.
MONITOR = das auf dem Bildschirm angezeigte Bild.
TV = die letzte Programmauswahl am Fernsehgerät.
EXT1 = das Bild des an
B
1 angeschlossenen Gerätes.
EXT2 = das Bild des an
B
2 angeschlossenen Gerätes.
EXT4 = das Bild des an Scart 4 angeschlossenen Gerätes.
EXT5 = das Bild des an Scart 5 angeschlossenen Gerätes.
EXT6 = das Bild des an den vorderen Eingangsbuchsen
angeschlossenen Gerätes.
Mit Hilfe der Tasten Sund Rkönnen Sie die
Option EXT3 Ausgang folgendermaßen
einstellen:
Falls im Bild keine Farben angezeigt werden,
aktivieren Sie die jeweils andere Einstellung.
Hiermit können Sie die an Scart 3 angeschlossene
Ausgabequelle auswählen. Um beispielsweise Sendungen
in Stereo von einem Stereo-Decoder aufzunehmen,
müssen Sie den Stereo-Decoder an Scart 4 oder Scart 5
und den Stereo-Videorecorder an Scart 3 anschließen
und dann EXT4 oder EXT5 als EXT3 Ausgang
auswählen. Das über Scart 4 oder 5 empfangene Signal
wird somit direkt über Scart 3 ausgegeben.
Die meisten Videorecorder und Decoder senden über das
Scart-Kabel ein Signal an das Fernsehgerät, so dass
automatisch die richtige Eingangsbuchse aktiviert wird.
Sie können jedoch ebenfalls auf der Fernbedienung die
Taste zur Auswahl externer. Quellen
B
drücken, bis das
Bild vom angeschlossenen Gerät sichtbar ist. Diese Taste
muss zur Anzeige von Anschlussgeräten am EINGANG
FÜR VIDEOKOMPONENTEN (EXT1 und EXT2) verwendet
werden.
Ein S, wie beispielsweise in B3S (EXT 3S), bedeutet,
dass der Eingang für ein S-Video-Signal eingerichtet ist.
Drücken Sie die Taste
B
, um B1, B2, B3,
B
4, B5, B6 (EXT 1-6) oder PC auszuwählen.
PC zeigt das Signal des Computers an, der an den
Eingang RGB/PC an der Seite des Fernsehgerätes
angeschlossen ist.
Um wieder in den TV-Modus zu schalten, drücken
Sie erneut die Taste
B
oder eine der
Programmtasten auf der Fernbedienung.
Diese Funktion kann verwendet werden, wenn das
Fernsehgerät nicht automatisch umschaltet.
Auswahl des Eingangs
Auswahl des AUSGANGSsignals für
Scart 3
1
Wählen Sie das Menü EINSTELLUNG, und
drücken Sie die Taste Q, bis die Einstellung
AV-Anschluss markiert ist, denn drücken Sie die
Taste OK. Wählen Sie mit den Tasten Soder
R
die Option AV oder S-VIDEO als erforderlichen
Eingang für EXT3 aus.
1
Hiermit wird die Art des Signals bestimmt, das an Scart 3
(EXT3) an der Rückseite des Fernsehgerätes geleitet wird.
Informationen zu den angeschlossenen Geräten können
Sie der Bedienungsanleitung der jeweiligen Hersteller
entnehmen.
Auswahl des EINGANGSsignals
1
2
2
AV-Anschluss
EXT3-Eingang AV
EXT3 Ausgang EXT1
Bass Extern
Audioausgang Fest
MENU zurück EXIT beenden

63
Deutsch
Videotext – Einrichtung, allgemeine
Informationen, Auto-Modus
Falls TOPTEXT verfügbar ist, werden am unteren Rand
des Bildschirms vier farbige Titel angezeigt.
Um einen der vier Themenbereiche aufzurufen, drücken
Sie die entsprechende Farbtaste für das gewünschte
Thema auf der Fernbedienung.
Wenn Sie weitere Informationen zu Ihrem speziellen
Videotext-System benötigen, rufen Sie die VideotextIndexseite des jeweiligen Senders auf, oder wenden Sie
sich an Ihren Toshiba Fachhändler vor Ort.
Im Modus NORMALTEXT werden auf dieser Seite die
gegenwärtig unter der ROTEN Taste gespeicherten
Seitennummern angezeigt.
In beiden Modi können Sie jede Videotextseite durch
Eingabe einer dreistelligen Seitennummer über die
Zifferntasten der Fernbedienung aufrufen. Sie können zur
Seitenanwahl ebenfalls die farbigen Tasten oder die Taste
P
f
(P ) für den Sprung zur nächsten Seite bzw.
P e(Q ) zur Wahl der vorherigen Seite verwenden.
Untergeordnete Seiten
Untergeordnete Seiten werden gegebenenfalls
automatisch in den Speicher geladen, ohne dass sich die
auf dem Bildschirm angezeigte Seite ändert.
Für den Zugriff auf die Unterseiten drücken Sie die Taste
X(B
) und anschließend Poder Q für die Anzeige der
Seiten. An der Seite des Bildschirmes erscheint ein Balken
mit Ziffern.
Die momentan angezeigte Unterseite wird jeweils
markiert. Wenn durch das Fernsehgerät weitere
Unterseiten geladen werden, ändert sich die Farbe der
Nummern. Durch die neue Farbe wird angezeigt, dass
diese Seiten in den Speicher geladen wurden.
Diese Unterseiten bleiben so lange für die Anzeige
verfügbar, bis eine andere Seite gewählt wird oder im
normalen TV-Modus der Kanal gewechselt wird.
Die Taste
6/7
:
Drücken Sie die Taste
6/7
, um den Videotext
aufzurufen. Drücken Sie die Taste erneut, um die normale
Bildschirmanzeige mit dem Videotext zu überlagern.
Drücken Sie die Taste zum dritten Mal, um in den
normalen TV-Modus zurückzukehren. Ein
Programmwechsel ist erst möglich, wenn der Videotext
wieder ausgeblendet wird.
Die zuerst angezeigte Seite ist die Startseite.
Im Modus auto. werden auf dieser Seite die enthaltenen
Hauptthemen sowie die entsprechenden Seitennummern
angezeigt.
Auswahl von Seiten im Auto-Modus
Videotext-Informationen
Dieses Fernsehgerät verfügt über einen Videotext-Speicher mit einer Kapazität von mehreren Seiten. Es kann
daher einen Moment dauern, bis der Videotext geladen wird. Es sind zwei Anzeigemodi für die Textanzeige
wählbar: auto. zeigt bei entsprechender Verfügbarkeit den so genannten Toptext an. Mit Normaltext
können Sie Ihre Lieblingsseiten speichern.
Wählen Sie aus dem Menü WEIT. FUNKT. die
Option Videotext.
Wählen Sie mit den Tasten Soder Rden Modus
auto. oder NORMALTEXT, und drücken Sie
dann EXIT.
Der Zeichensatz für den Videotext wird automatisch
mit der im Menü EINSTELLUNG ausgewählten
Sprache eingestellt.
Auswahl des Anzeigemodus
1
2
WEIT. FUNKT.
Videotext auto.
Bedienfeldsperre aus
Panelhelligkeit 16
Bedienfeld 0
PC Einstellung
MENU zurück EXIT beenden

Deutsch
64
auto.
Drücken Sie zum Aufrufen der Indexseite die Taste T.
Welche Seite angezeigt wird, hängt vom gewählten
Sender ab.
NORMALTEXT
Drücken Sie die Taste T, um zu der gegenwärtig unter
der ROTEN Taste gespeicherten Seite zu wechseln.
Beachten Sie, dass der Videotext-Modus
beendet werden muss, bevor Sie zu einem
anderen Kanal umschalten können. Drücken
Sie dazu zweimal die Taste
6
/
7
.
☛
Videotext Fortsetzung
– NORMALTEXT-mode, Steuerungstasten
Auf dieser Seite finden Sie eine kurze Anleitung, wie Sie mit Hilfe der Tasten an der Fernbedienung die
Anzeige des Videotextes steuern können.
Geben Sie die gewünschte Seitennummer ein, und
drücken Sie anschließend die Tastenkombination
8/9
.
Auf dem Fernsehgerät wird dann angezeigt, dass die
Seite verfügbar ist, indem die Nummer der gesuchten
Textseite am oberen Bildschirmrand erscheint. Drücken Sie
dann
6/7
, um diese Seite anzuzeigen.
So zeigen Sie aktuelle Kurzmeldungen an:
Wählen Sie im jeweiligen Videotext-Dienst die
entsprechende Seite für diese Kurzmeldungen (siehe
Index des Videotext-Programms). Drücken Sie
anschließend die Taste
8/9
. Die aktuellen
Kurzmeldungen werden jetzt gegebenenfalls in Echtzeit
eingeblendet. Drücken Sie erneut die Taste
8/9
, um
die Anzeige der Meldungen zu beenden.
Vor einem Programmwechsel muss die Seite für
aktuelle Kurzmeldungen wieder verlassen werden.
So zeigen Sie eine Index-/Startseite an:
T
Manchmal soll eine bestimmte Videotext-Seite zur
genaueren Betrachtung länger angezeigt werden.
Drücken Sie dazu die Taste q, so dass in der oberen
linken Ecke des Bildschirms die Anzeige qerscheint. Die
Seite wird jetzt auf dem Bildschirm angezeigt, bis sie durch
einen erneuten Tastendruck wieder freigegeben wird.
So halten Sie eine gewünschte Seite:
q
Auf bestimmten Seiten werden Antworten von Quizfragen
oder Pointen von Witzen zunächst ausgeblendet. Um die
entsprechenden Lösungen anzuzeigen, drücken Sie die
Taste r.
So zeigen Sie verborgenen Text an:
r
Drücken Sie die Taste, um eine Videotext-Seite
aufzurufen. Drücken Sie diese Taste erneut, um die
normale Bildschirmanzeige mit dem Videotext zu
überlagern. Drücken Sie die Taste zum dritten Mal, um in
den normalen TV-Modus umzuschalten. Das Programm
kann nicht mit eingeblendetem Videotext, sondern nur im
normalen TV-Modus umgeschaltet werden.
So zeigen Sie eine Videotext-Seite an:
So wählen Sie eine Seite aus, während
das normale Fernsehbild angezeigt wird:
8/9
6
/
7
Drücken Sie einmal die Taste s, um die obere
Seitenhälfte zu vergrößern. Bei erneutem Drücken dieser
Taste wird die untere Hälfte der Seite vergrößert. Drücken
Sie ein drittes Mal, um wieder die normale Seitengröße
einzustellen.
So vergrößern Sie die Videotext-Anzeige:
s
Untergeordnete Seiten können gegebenenfalls mit den
Tasten Sund Raufgerufen werden.
So rufen Sie untergeordnete Seiten auf:
X
Die vier farbigen Auswahlbereiche am unteren
Bildschirmrand entsprechen den Nummern 100, 200, 300
und 400, die in den Speicher des Fernsehgerätes
einprogrammiert wurden. Zur Anzeige dieser Seiten
müssen Sie jeweils die entsprechende farbige Taste auf
der Fernbedienung drücken.
Sie können anstelle der voreingestellten auch andere
Seiten speichern. Drücken Sie dazu die jeweilige Farbtaste,
und geben Sie dann die dreistellige Nummer ein. Diese
neue Nummer erscheint in der oberen linke Ecke des
Bildschirms und in der farbigen Markierung.
Drücken Sie die Taste OK, um die Nummer zu speichern.
Die Leisten am unteren Bildschirmrand blinken weiß auf.
Sobald OK gedrückt wird, werden alle vier im
unteren Bildschirmbereich angezeigten
Seitennummern gespeichert. Alle vorherigen
Nummern werden dabei aus dem Speicher gelöscht.
Wenn die Taste OK nicht gedrückt wird, gehen die neuen
Einstellungen beim Beenden des Videotext-Modus
verloren.
Andere Seiten können durch Eingabe der dreistelligen
Seitennummer aufgerufen werden – drücken Sie jedoch
AUF KEINEN FALL die Taste OK, anderenfalls werden die
Seiten abgespeichert.
Auswahl von Seiten im
NORMALTEXT-Modus

65
Deutsch
manuelle Einstellung
Farbsystem : auto.
EXT3 aDVD
speichern MENU zurück EXIT beenden
Fragen und Antworten
Auf dieser Seite finden Sie Antworten zu einigen der häufigsten Fragen.
A
Überprüfen Sie, ob die Stromversorgung des
Gerätes eingeschaltet ist. Prüfen Sie alle
Anschlüsse.
Vergewissern Sie sich, dass das Fernsehgerät nicht auf
Standby-Betrieb umgeschaltet wurde.
Mein Fernsehgerät überträgt weder Ton noch
Bild. Warum?
F
A
Überprüfen Sie, ob vielleicht die Lautstärke
heruntergeregelt oder die Stummschaltung
aktiviert wurde.
Es wird zwar ein Bild angezeigt, jedoch ohne
Ton. Warum?
F
A
Überprüfen Sie den Anschluss der Scart-Kabel.
Warum ist die Bildqualität des Videos gut, jedoch
kein Ton hörbar?
F
A
Durch Störungen oder ein zu schwaches
Empfangssignal. Schalten Sie probehalber auf
einen anderen Fernsehsender um. Unter Umständen
lassen sich mit einer manuellen Feineinstellung
Verbesserungen erzielen.
Wodurch könnte eine schlechte Bildqualität noch
hervorgerufen werden?
F
A
Überprüfen Sie, ob der Videorecorder oder
DVD-Player ordnungsgemäß am Fernsehgerät
angeschlossen wurde (siehe Seite 50), und wählen Sie
dann den entsprechenden Eingang, indem Sie die Taste
B
drücken.
Warum wird das Bild vom Videorecorder/DVDPlayer nicht an das Fernsehgerät übertragen?
F
A
Bei der Verwendung einer externen Bildquelle,
wie zum Beispiel einer minderwertigen
Videokassette, bei der keine oder kaum Farben
angezeigt werden, können unter Umständen qualitative
Verbesserungen erzielt werden. Für das Fernsehgerät
ist werkseitig die Einstellung auto. gewählt, so dass
automatisch das jeweils optimale Farbsystem
gewählt wird.
So überprüfen Sie, ob die optimale Farbanzeige
eingestellt ist:
Es wird zwar ein Bild angezeigt, aber warum sind
nur wenige oder keine Farben sichtbar?
F
Wählen Sie beim Abspielen der externen Quelle
die Option manuelle Einstellung aus dem
Menü EINSTELLUNG.
Wählen Sie mit Hilfe der Taste SoderReine der
folgenden Einstellungen: auto., PAL, SECAM,
NTSC 4.43 oder 3.58.
1
2
Wählen Sie das Menü manuelle Sendersuche.
Markieren Sie den Sender, und drücken Sie die
Taste OK. Drücken Sie die Taste R, um die Option
Feineinstellung
auszuwählen.
Verwenden Sie die Taste Por Q, um die
Bild- und Tonqualität optimal einzustellen.
Drücken Sie OK und anschließend EXIT.
1
2
manuelle Sendersuche
Feineinstellung
1 B/G a 22 + 2 B B C 1
speichern MENU zurück EXIT beenden
A
Unter Umständen müssen Sie den Sampling
Clock anpassen, um diesen störenden Effekt zu
beseitigen. Wählen Sie im Menü WEIT. FUNKT. die
Option PC Einstellung, markieren Sie die Einstellung
Sampling Clock, and passen Sie die Einstellung an, bis
die Streifen vom Bildschirm verschwinden.
Warum sind auf dem Bildschirm senkrecht
verlaufende Streifen sichtbar?
F
A
Unter Umständen müssen Sie den Clock phase
anpassen, um diesen störenden Effekt zu
beseitigen. Wählen Sie im Menü WEIT. FUNKT. die
Option PC Einstellung, markieren Sie die Einstellung
Clock phase und passen Sie die Einstellung an, bis das
Bild wieder deutlich sichtbar ist.
Warum werden auf dem Bildschirm waagerecht
verlaufende Streifen und/oder verschwommene
Bilder angezeigt?
F

Deutsch
66
Fragen und Antworten Fortsetzung
A
Die Videotext-Qualität ist in hohem Maße von der
Stärke des Sendesignals abhängig. Dazu ist
normalerweise eine Außen- oder Hausantenne
erforderlich. Falls der Text unleserlich oder unscharf ist,
sollten Sie Ihre Antenne überprüfen. Wählen Sie die Seite
für den Hauptindex des Videotext-Dienstes, und suchen
Sie im Index die entsprechende Anleitung, in der die
grundlegende Benutzerführung detailliert erläutert ist.
Falls Sie weitere Informationen zur Nutzung der
Videotext-Funktion benötigen, lesen Sie den
entsprechenden Abschnitt zum Videotext in dieser
Anleitung.
Warum funktioniert der Videotext nicht fehlerfrei?
F
A
Es werden keine derartigen Seiten übertragen,
bzw. sie wurden nicht geladen. Drücken Sie die
Taste X(B)
, um die Seiten aufzurufen (siehe Abschnitt
zum Videotext).
Warum gibt es keine untergeordneten Seiten im
Videotext?
F
A
Schließen Sie die entsprechende Quelle über ein
Scart-Kabel an, und starten Sie die Wiedergabe.
Wählen Sie die Option manuelle Einstellung aus dem
Menü EINSTELLUNG.
Warum sind bei der Wiedergabe von einer
NTSC-Quelle die Farben verfälscht?
F
Setzen Sie die Farbsystem auf auto., und
verlassen Sie das Menü.
Wählen Sie das Menü Bild, und passen Sie die
Farbtoneinstellung an.
1
2
A
Entfernen Sie die Meldung, indem Sie die Taste
CALL drücken.
Warum wird auf dem Bildschirm ständig eine
Meldung angezeigt?
F
A
Überprüfen Sie, ob der richtige eingang gewählt
wurde: S-VIDEO oder AV. Weitere Informationen
finden Sie im Abschnitt AV-Anschluss.
Warum empfange ich nur ein Schwarzweißbild
vom Videorecorder bzw. DVD-Player?
F
manuelle Einstellung
Farbsystem : auto.
EXT3 aDVD
speichern MENU zurück EXIT beenden
A
Prüfen Sie, ob die Option Lautsprecher im
Ton-Menü auf aus gestellt ist.
Warum höre ich keinen Ton über mein
angeschlossenes Soundsystem?
F
A
Überprüfen Sie, ob der seitliche Schalter an der
Fernbedienung auf TV-Modus eingestellt ist.
Überprüfen Sie den Ladezustand und die Polarität der
Batterien, um auszuschließen, dass diese nicht verkehrt
herum eingesetzt wurden.
Warum funktioniert meine Fernbedienung nicht?
F
Reinigen des Bildschirms und des Gehäuses…
Schalten Sie die Stromzufuhr über den Netzschalter ab, und reinigen Sie den Bildschirm und das Gehäuse mit einem weichen
trockenen Tuch. Die Verwendung spezieller Putz- und Lösungsmittel zur Reinigung von Bildschirm und Gehäuse ist nicht
empfehlenswert, da durch diese Stoffe die Oberfläche angegriffen werden kann.
Entsorgung…
Die Leuchtstofflampe des LCD-Bildschirm enthält eine geringe Menge an Quecksilber. Entsorgen Sie daher das ausgediente
Fernsehgerät gemäß den in Ihrem Land geltenden Vorschriften, oder geben Sie es direkt in einer Recycling-Stelle ab.
A
Vergewissern Sie sich, dass die Bedienfeldsperre
nicht aktiviert (ein) wurde.
Warum funktionieren die Bedienelemente an der
Vorderseite des Fernsehers nicht?
F

67
DeutschDeutsch
Spezifikationen und Zubehör
Empfangssystem/-kanäle
PAL-I UHF UK21-UK69
PAL-B/G UHF E21-E69
VHF E2-E12, S1-S41
SECAM-L UHF F21-F69
VHF F1-F10, B-Q
SECAM-D/K UHF R21-R69
VHF R1-R12
Video-Eingang PAL, SECAM, NTSC 3.58/4.43
Externe Anschlüsse
EXT1 Eingang Phono-Buchsen Y, PB/CB, PR/C
R
High Definition 1080i
Vollbildabtastung
Phono-Buchsen A/V
EXT2 Eingang Phono-Buchsen Y, P
B/CB
, PR/C
R
High Definition 1080i
Vollbildabtastung
Phono-Buchsen A/V
EXT3 Eingang/Ausgang 21-poliger Scart-Anschluss A/V, S-video
Ausgabe wählbar
Eingang 4-polig S-video
Phono-Buchse Video
Phono-Buchsen Audio L + R
EXT4 Eingang/Ausgang 21-poliger Scart-Anschluss RGB/AV
EXT5 Eingang/Ausgang 21-poliger Scart-Anschluss RGB/AV
EXT6 Eingang (vorn) 4-polig S-video
Phono-Buchse Video
Phono-Buchsen Audio L + R
RGB/PC Eingang Mini D-Sub, 15-polig Analoges RGB-Signal
Eingang 3,5mm-Stereo-Klinkenstecker Audio
Monitor Ausgang Phono-Buchsen A/V
Audioausgang fest/variabel Phono-Buchsen Audio L + R
Ausgang auf Active Phono-Buchse
Super Woofer
Programmspeicherplätze 100
Stereo Nicam
Zweiträgersystem
Sichtbare Bildschirmgröße (ca.) 26 ins
32 ins
Anzeigeformat 15:9
Tonausgangsleistung Effektiv 10 W + 10 W
(bei 10 % Verzerrung)
Leistungsaufnahme 26 ins 150 W
gemäß EN60107-1: 1997 32 ins 185 W
Standby 26 ins <1,3 W
32 ins <1,3 W
Abmessungen (ca.) 26 ins 48 cm (H) 82 cm (B) 14 cm (T)
32 ins 61 cm (H) 107 cm (B) 15 cm (T)
Gewicht (ca.) 26 ins 22 kg
32 ins 33 kg
Kopfhörerbusche 3,5 mm Stereo
Zubehör Fernbedienung
2 Batterien
(UM-4, AAA, IEC R03 1,5V)
Klammer
Toshiba Information Systems (U.K.) Limited
Consumer Products Division,
European Service Centre,
Admiralty Way, Camberley,
Surrey, GU15 3DT, Großbritannien
Technische Spezifikationen können jederzeit ohne Ankündigung geändert werden.
Erstellt von Kensa Creative Solutions, Saltash, Cornwall.
© Toshiba Information Systems (U.K.) Limited
Alle Rechte vorbehalten.
Die teilweise oder vollständige Reproduktion ohne schriftliche
Genehmigung ist strengstens verboten.
Gedruckt auf Umweltpapier. 100% chlorfrei.

Español
68
Contenido
PUESTA A PUNTO
Precauciones de seguridad – algunas reglas obligatorias que debe conocer 69
Instalación e información importante 70
El mando a distancia – una guía rápida 71
Conexión de equipos externos – una guía para la conexión de equipos en la parte
trasera de la TV 72
Conexión de un ordenador – conexión de un ordenador en la parte lateral de la TV 73
Conexiones y mandos – encendido de la TV, standby (en espera), uso de los mandos frontales,
enchufe para auriculares, conexión de equipos en la parte frontal de la TV 74
Sintonización de la TV con la ayuda de Instalação rápida – idioma, país,
sistema de emisión 75
Ordenación de programas 75
Sintonización manual – una alternativa a la Instalação rápida, entrada directa de canales,
sintonización de una posición de programa para un VCR (aparato de vídeo) 76
Salto de programas 77
Sintonización automática 78
MANDOS Y FUNCIONES
Mandos generales – cambio de la posición de programa, visualización de la hora 78
Bloqueo de panel – desactivación de los botones de la TV 78
Mandos del sonido – volumen, desactivación del sonido, amplificación de graves,
super woofer, graves/agudos/balance 79
Procesador de sonido BBE
®
79
Transmisiones estéreo y bilingües – emisiones estéreo/mono o en dos idiomas 79
Pantalla panorámica 80
Mandos de la imagen – posición de la imagen, preferencias de imagen (luminosidad, color,
contraste, nitidez, matiz), reducción del ruido digital (DNR), intensificación de los
colores oscuros 81
Mandos de la imagen – temperatura del color, formato automático (pantalla panorámica),
pantalla gris, retroiluminación, ajuste del panel lateral 82
El temporizador – ajuste de la TV para que se encienda o se apague 83
Ajustes del PC – fase del reloj, reloj de muestreo 83
Selección de entradas y conexiones AV – enchufes de entrada y de salida para los
equipos conectados 84
TELETEXTO
Configuración, información general, modo Auto 85
Modo LISTA, botones de mando 86
RESOLUCION DE PROBLEMAS
Preguntas y respuestas – respuestas a algunas de las preguntas más comunes con
inclusión de sintonización fina manual y sistema de color 87
INFORMACION
Especificaciones y accesorios – - información técnica sobre la TV, accesorios suministrados 89

69
Español
Precauciones de seguridad
Este aparato ha sido diseñado y fabricado para cumplir las normas de seguridad internacionales pero, como
con cualquier aparato eléctrico, debe tenerse cuidado para obtener los mejores resultados y garantizar la
seguridad. Haga el favor de ver los puntos siguientes por su propia seguridad. Tienen carácter general y
están destinados a ayudar en relación con todos los productos electrónicos para los consumidores, y algunos
puntos pueden no ser aplicables a los artículos que acaba de adquirir.
NO retire ninguna cubierta fija, ya que esto puede
exponerle a tensiones peligrosas.
NO obstruya las aberturas de ventilación del aparato
con elementos tales como periódicos, manteles,
cortinas, etc. El sobrecalentamiento causará daños y
acortará la vida del aparato.
NO permita que los equipos eléctricos se expongan
a goteos o salpicaduras u objetos llenos de líquidos,
tales como floreros, que se coloquen sobre
el aparato.
NO sitúe objetos calientes o fuentes de llama
desnuda, como velas encendidas o lámparas de
noche sobre el aparato o cerca de él. Las altas
temperaturas pueden fundir el plástico y dar lugar
a incendios.
NO utilice soportes improvisados y NUNCA fije las
patas con tirafondos. Para garantizar una seguridad
completa, ponga siempre en el soporte aprobado del
fabricante o en las patas las fijaciones proporcionadas
de acuerdo con las instrucciones.
NO escuche con auriculares a gran volumen, ya que
esta costumbre puede dañar permanente su oído.
NO deje desatendido el equipo encendido, a menos
que se especifique que está diseñado para funcionar
sin supervisión o tiene un modo standby (en espera).
Para apagarlo, desenchúfelo y asegúrese que todos
en casa sepan cómo hacerlo. Es posible que se
tengan que tomar precauciones especiales con
respecto a personas enfermas o minusválidas.
NO siga haciendo funcionar el aparato si tiene
alguna duda de que esté funcionando normalmente,
o está dañado de alguna forma; apáguelo,
desconecte la clavija de la red y consulte al vendedor.
ANTE TODO, NUNCA deje que nadie,
especialmente los niños, empuje o golpee la
pantalla, introduzca nada en los agujeros,
ranuras o en ninguna otra abertura de la caja.
NUNCA haga suposiciones ni corra riesgos con
aparatos eléctricos de ningún tipo; más vale
prevenir que curar.
PARA DESCONECTAR LA TV Y RETÍRELO EL
ENCHUFE.
Cosas que no deben hacerse
Deje por lo menos un hueco de 10 cm alrededor del
televisor para permitir una ventilación adecuada. Esto
evitará el sobrecalentamiento y posibles daños al
televisor. También deben evitarse lugares polvorientos.
Pueden producirse daños si se deja el televisor
expuesto a la luz solar directa o cerca de un
radiador. Evite los lugares sometidos a temperaturas
o humedades sumamente altas,
o los lugares en los que sea probable que la
temperatura caiga por debajo de 5°C.
La alimentación eléctrica requerida para este equipo
es de 110-240v CA 50/60Hz. No lo conecte nunca a
una alimentación de CC ni a ninguna otra fuente de
alimentación. ASEGURESE de que el televisor no pisa
el cable de la red. NO corte la clavija de la red de
este equipo, ya que incorpora un Filtro de
Interferencias de Radio especial, cuya eliminación
perjudicará su funcionamiento.
SI TIENE ALGUNA DUDA, CONSULTE A UN
ELECTRICISTA COMPETENTE.
LEA las instrucciones de manejo antes de intentar
usar el aparato.
ASEGURESE de que todas las conexiones eléctricas
(incluyendo la clavija de la red eléctrica, los cables de
prolongación y las interconexiones entre partes del
aparato) están hechas correctamente y de acuerdo
con las instrucciones de los fabricantes. Apague el
televisor y desconecte la clavija de la red antes de
establecer o cambiar conexiones.
CONSULTE con el vendedor si tiene alguna duda
acerca de la instalación, manejo o seguridad de su
aparato.
TENGA cuidado con los paneles o puertas de cristal
del aparato.
Circulación de aire
Daños por el calor
Alimentación de la red eléctrica
Cosas que deben hacerse

Español
70
Instalación e información importante
Donde instalar el aparato
Por favor tome nota
CLÁUSULA DE EXCLUSIÓN
Toshiba no será responsable bajo ninguna circunstancia de pérdida y/o daño al producto causado por:
i) incendio;
ii) terremoto;
iii) daño accidental;
iv) mal empleo intencional del producto;
v) utilización del producto en condiciones inapropiadas;
vi) pérdida y/o daño causados al producto mientras que está en posesión de terceros;
vii) cualquier daño o pérdida causados como resultado de falta y/o negligencia por parte del propietario de seguir las
instrucciones indicadas en el manual del propietario;
viii) cualquier daño o pérdida causados directamente como resultado de mal empleo o mal funcionamiento del producto al ser
utilizado simultáneamente con equipos asociados;
Además, bajo ninguna circunstancia será responsable Toshiba de pérdida alguna y/o daño consecuente incluyendo pero no
limitado a lo siguiente, pérdida de utilidades, interrupción de actividades comerciales, pérdida de información registrada
causada ya sea durante el funcionamiento normal o por mal empleo del producto.
Sitúe la TV lejos de la luz del sol directa y de las luces
fuertes. Se recomienda una iluminación suave e indirecta
para verla de manera cómoda. Coloque la TV sobre una
plataforma sólida, la superficie de soporte debe ser plana
y firme. Fíjela entonces en la pared con un acoplamiento
sólido utilizando el gancho que se encuentra en la parte
trasera de la TV. Esto evitará que se caiga. Utilice cortinas
o persianas para evitar que la luz del sol directa caiga
sobre la pantalla.
Se encuentra disponible para esta televisión un soporte
para suelo y mesa, así como una palomilla para que la
TV pueda montarse en la pared.
Los paneles de VCL están fabricados con una tecnología
de gran precisión; sin embargo, hay veces que algunas
partes de la pantalla no tienen elementos de imagen o
presentan puntos luminosos. Esto no es un signo de mal
funcionamiento.
Asegúrese que la TV se encuentra en un lugar donde no
pueda ser empujada ni golpeada por objetos, ya que la
presión podría romper o dañar la pantalla.
Si se dejan en la pantalla de TV imágenes inmóviles generadas por teletexto, logos de identificación de canales, pantallas de
ordenador, videojuegos, menús en pantalla, etc., durante el tiempo que sea, siempre es aconsejable reducir los ajustes del brillo y
del contraste.

71
Español
Para desactivar el sonido
Botones de control del teletexto
Para salir de los Menús
Amplificación de graves/Super Woofer
Recepción estereofónica/bilingüe
Para mostrar en la pantalla
información y para la función
inicial/índice de teletexto
Para seleccionar la entrada de fuentes
externas
Para acceder a subpáginas en modo
de teletexto
Para seleccionar el modo
Menús en pantalla
Preferencias de imagen
Viendo TV en pantalla ancha
Botones de números
Para volver al programa anterior
Para el modo Conectado/Espera
Para ver el teletexto
En modo VCR o DVD:
pulse
m
para PAUSA
pulse
w
para EXPULSAR
pulse
l
q
para OMITIR/REBOBINAR
pulse
s
l
para OMITIR-AVANZAR
pulse
r
para REPRODUCIR
pulse
p
para PARAR
pulse
q
para REBOBINAR
pulse
s
para AVANCE RAPIDO
Para cambiar posiciones de programas y
páginas de teletexto
Para modificar el volumen
Cuando se utilicen menús, las flechas
mueven el cursor en la pantalla hacia
arriba, hacia abajo, a la izquierda o a la
derecha. OK para confirmar su selección
En modo TV:
8/9
Indicación de la hora
En modo Teletexto:
r
Para mostrar texto oculto
q
Para retener una página deseada
s
Para ampliar el tamaño de la
pantalla de teletexto
8/9
Para seleccionar una página
mientras está viendo una imagen
normal
El mando a distancia
Retire la tapa posterior para dejar al descubierto el compartimiento de las pilas y asegúrese de que
las pilas se colocan en la posición correcta. Los tipos de pilas correctos para este mando a distancia
son los UM-4, AAA, IEC R 03 de 1,5 V.
No utilice una pila vieja gastada junto con una nueva ni tampoco tipos de pila distintos. Retire las
pilas agotadas inmediatamente para evitar que el ácido se introduzca en el compartimiento de las
pilas. Deshágase de ellas en un punto de eliminación designado.
El funcionamiento del mando a distancia se deteriorará más allá de una distancia de cinco metros o
fuera de un ángulo de 30 grados respecto al centro del televisor.
Inserción de las pilas y alcance efectivo del mando a distancia
Descripción visual simple de su mando a distancia.

Español
72
IN
OUT
IN
OUT
Conexión de equipos externos
Antes de conectar cualquier equipo externo, desconecte todos los interruptores de alimentación de
la red.
Se puede conectar una amplia variedad de
equipos externos a la parte trasera de la TV, por
tanto deberá remitirse a los manuales de los
propietarios pertinentes para todos los equipos
adicionales.
Recomendamos el Scart 4 o Scart 5 para un
decodificador y Scart 3 para una grabadora de vídeo.
Si se conecta equipo S-VIDEO, ponga la ENTRADA
para EXT3 de acuerdo con él. Vea la página 84.
Si el televisor se conmuta automáticamente a un
equipo monitor externo, vuelva a TV normal pulsando
el botón de la posición del programa deseado.
Para volver a llamar al equipo externo, pulse
B
para
seleccionar entre EXT1, EXT2, EXT3, EXT4, EXT5,
EXT6 o RGB/PC.
RECOMENDAMOS QUE UTILICE CABLES SCART
ADEMAS DE CABLES DE ANTENA SIEMPRE QUE
SEA POSIBLE
Cables de antena:
Conecte la antena al enchufe de la parte posterior del
televisor. Si utiliza un decodificador* y/o una grabadora
de vídeo, es esencial que el cable de la antena se
conecte a través del decodificador y/o a través de la
grabadora de vídeo al televisor.
Cables Scart:
Conecte el conector hembra IN/OUT de la grabadora
de vídeo al televisor. Conecte el conector hembra TV
del decodificador al televisor. Conecte el conector
hembra SAT de la grabadora de vídeo al conector
hembra VCR del decodificador.
Antes de realizar la Sintonización automática ponga
su decodificador y grabadora de vídeo en Espera.
Los enchufes fono junto a los enchufes de ENTRADA
DE COMPONENTES DE VÍDEO aceptarán señales de
audio L y R.
Además, hay una salida audio externa fija/variable
que permite la conexión a una unidad Hi-Fi adecuada.
Asegúrese de que la opción Altavoz del menú Sonido
se encuentra en Apagado.
Parte trasera de su televisor
Grabadora de vídeo
Decodificador*
SAT
IN/OUT
VCR
TV
NO conecte
equipos a los
terminales Entrada 3
y Scart 3 (EXT3) al
mismo tiempo.
!
*
Un decodificador
podria ser de Satélite
Digital a qualquier
otro decodificador
compatible
☛
SCART 5 (EXT 5)
SCART 4 (EXT 4)
SCART 3 (EXT 3)
ENTRADA 3 (EXT 3)
ENTRADA DE VIDEO COMPONENTE (EXT 1)
ENTRADA DE VIDEO COMPONENTE (EXT 2)
ENTRADA DE VIDEO
COMPUESTA (EXT 1)
ENTRADA DE VIDEO
COMPUESTA (EXT 2)

73
Español
Conexión de un ordenador
parte lateral izquierda de la TV
Ordenador
Cable de audio para la
conexión del PC a la TV
(no suministrado)
Adaptador de conversión en
caso necesario (no suministrado)
Cable RGB PC
(no suministrado)
Conector Mini D-sub 15p
Antes de conectar cualquier equipo externo, desconecte todos los interruptores de alimentación de
la red.
Conecte el cable PC del ordenador al terminal RGB/PC
que se encuentra en la parte lateral izquierda de la
televisión.
Pulse el botón Bpara seleccionar el modo PC.
Se podrán ver las siguientes señales en pantalla:
VGA: 640 – 480/60 Hz (VESA 480-60)
SVGA: 800 – 600/60 Hz (VESA 600-60)
XGA: 1024 – 768/60 Hz (VESA 768-60)
OBSERVACION:
Ciertos modelos de PC no pueden ser conectados a
esta TV.
No es necesario un adaptador para los ordenadores
provistos de un terminal mini D-sub 15p compatible
DOS/V.
Puede que aparezca una banda en los bordes de la
pantalla o que se oscurezcan ciertas partes de la
imagen. Esto se debe a la potencia de la señal, no se
trata de mal funcionamiento.
Una vez seleccionado el modo PC, algunas de las
funciones de la TV no estarán disponibles. Estas
aparecerán sombreadas en las listas de menús y no
podrán seleccionarse. Cuando no esté seleccionado el
modo PC, la función Ajuste imagen en PC aparecerá
sombreada.
Información de señal para el conector Mini D-sub 15p
Asignación de pins
para el terminal
RGB/PC
N° de pin Nombre de señal N° de pin Nombre de señal
1R9NC
2 G 10 Tierra
3B11NC
4 NC (no conectado) 12 NC
5 NC 13 H-sync
6 Tierra 14 V-sync
7 Tierra 15 NC
8 Tierra

Español
74
Conexiones y controles
Si está apagada la luz de encendido, pulse el botón de
ENCENDIDO/APAGADO que se encuentra debajo de la
esquina inferior izquierda de la TV para encencer el
aparato. A continuación, pulse uno de los botones con
número del mando a distancia para ver la pantalla. Esto
puede tardar unos instantes.
Para poner el aparato en Espera, pulse ien el mando a
distancia. Para ver la televisión, vuelva a pulsar io
cualquiera de los botones numéricos. La imagen puede
tardar unos pocos segundos en aparecer. La Espera debe
utilizarse solamente durante períodos de tiempo cortos.
Para preparar el televisor necesitará ahora utilizar los
menús en la pantalla. Pulse el botón MENU en el
mando a distancia para ver los menús.
La barra de menús en la parte superior de las pantallas
mostrará cinco tópicos diferentes mostrados en símbolos.
Debido a que cada símbolo se selecciona pulsando el
botón So Ren el mando a distancia, sus opciones
respectivas aparecerán más abajo.
Para utilizar las opciones pulse el botón Q en el mando
a distancia para desplazarse hacia abajo por las mismas
y OK, So Rpara seleccionar la opción requerida. Siga
las instrucciones en la pantalla. Las funciones de cada
menú se describen en detalle en el manual.
Puede conectarse una gran variedad de equipos externos a través de los enchufes que se encuentran en la
parte frontal de la TV.
Aunque todos los ajustes y controles necesarios del televisor se hacen utilizando el mando a distancia, los
botones del televisor pueden utilizarse para algunas funciones.
Para modificar el volumen, pulse — j +
.
Para cambiar la posición del programa, pulse
eeFff
.
Pulse MENU y SoR, Q o P para controlar las
opciones de sonido y de imagen.
Pulse MENU para acabar.
Cuando conecte un equipo de sonido monoaural a la
EXT6, conecte la salida de audio del equipo al conector
hembra L/Mono del televisor.
Para seleccionar la Entrada pulse Bhasta que la
visualización muestre EXT6 como se describe en la
página 84. El televisor automáticamente detectará el
tipo de señal.
Consulte siempre el manual del propietario del equipo a
conectar para ver detalles completos.
Atención: la inserción de la clavija de auricular apagará
el sonido de todos los altavoces.
Encendido
Utilización de los mandos y
conexiones
Botón de alimentación
ROJO – Alimentación
conectada
VERDE – Temporizador de
encendido programado
ENTRADA 6
(EXT 6)
Presione el centro de
la tapa para abrirla
Presione el centro de
la tapa para abrirla

75
Español
Sintonización del televisor utilizando
Instalação rápida, Ordenación de programas
Antes de encender el televisor coloque el decodificador y la grabadora de vídeo en Espera. Para preparar el
televisor utilice los botones en el mando a distancia como se detalla en la página 71.
1
2
3
5
6
7
8
9
4
Press Q to highlight Language.
Pulse el botón de encendido. Aparecerá la
pantalla Quick setup.
Utilizando So Rseleccione su idioma y luego
pulse OK.
Luego pulse So Rpara seleccionar su país y
pulse OK.
Su Sistema habrá sido seleccionado, si hay una
selección, pulse Rpara seleccionar de entre los
sistemas visualizados.
Para comenzar la Sintonización auto. pulse OK.
Comenzará la búsqueda de todas las estaciones
disponibles. La barra de deslizamiento se moverá
por la línea a medida que la búsqueda progrese.
Debe permitir que el televisor termine la
búsqueda.
Cuando se haya completado la búsqueda, la TV
seleccionará automáticamente la posición de
programa 1. Puede que no sea una imagen clara
o que la sintonía sea débil y, por esa razón, se
puede cambiar el orden de cadenas utilizando
Ordenar programas que aparecerá en la
pantalla de Instalação rápida.
Pulse OK para seleccionar Ordenar
programas.
Con la lista de estaciones ahora mostrada utilice
Q o Ppara hacer resaltar la estación que
quiere mover y pulse R.
La estación seleccionada se moverá a la derecha
de la pantalla.
Quick setup
Select your language.
Language English
EXIT Watch TV Next
Sintonización auto.
Búsqueda
Canal : 6 Cadena :
EXIT Parada
Instalação rápida
Sintonización automática
realizada.
Pulse OK para acceder al
programa de Tipo de Menú
EXIT Ver TV Siguiente
B/G – Europa Continental, I– Reino Unido
D/K – Europa Oriental, L1, L2 – Francia
Utilice Q o Ppara moverse por la lista a la
posición que prefiera. Al hacer esto las otras
estaciones se moverán para dejar lugar libre.
Pulse Spara almacenar su elección.
Repita según sea necesario y luego pulse EXIT.
Si el televisor no se puede conectar a un
vídeo/decodificador con un cable Scart o si se
requiere una estación en otro sistema, utilice
Sintonización manual para asignar una
posición de programa. Vea la página 76.
Ordenar programas
Prog. Canal Cadena
1 22 TVE 1
2 25 TVE 2
3 28 ANTENA 3
4 32 TELE 5
5 69
6 69
Tipo Almacenar
MENU Volver EXIT Ver TV

Español
76
Cada señal aparecerá en el televisor, si no es su
grabadora de vídeo, vuelva a pulsar Po Q
para reiniciar la búsqueda.
7
Pulse OK to select. para seleccionar. Si se salta el
programa, Saltar programa debe eliminarse
antes de almacenar.
Pulse Rpara seleccionar Sistema y utilice Po
Q para cambiar (cambiar (en caso de ser
necesario, vea el paso 4 en la página 75).
Pulse después Rpara seleccionar Búsqueda.
Pulse Po Q para iniciar la búsqueda.
Aparecerá Búsqueda y el televisor mostrará los
números de los canales.
Sintonización manual
El televisor se podrá sintonizar a mano utilizando Sintonización manual. Por ejemplo: si el televisor no se
puede conectar a un vídeo/decodificador con un cable Scart o para sintonizar una estación en otro Sistema
(vea la página 75).
Programa: El número que debe pulsarse en el mando a distancia.
Sistema: Específico de ciertos zonas. Vea el paso 4 en la página 75.
Sistema de color: Se ha establecido en fábrica como Auto y sólo debe cambiarse si se presentan problemas, es
decir, NTSC input de una fuente externa.
Saltar programa:*significa que no se ha almacenado nada o que la facilidad de skip el canal está activada.
Vea la página 77.
Canal: El número de canal en el que una estación está emitiendo.
Búsqueda: Búsqueda hacia arriba y hacia abajo de una señal.
Sintoniz. manual precisa: Sólo se utiliza si existe una señal de interferencia/débil. Vea la página 87.
Cadena: Identificación de la estación. Utilice los botones
P
o Qy SoRpara introducir un máximo de
siete caracteres.
Utilice Po Q para resaltar la posición de
programa requerida, por ej. sugerimos Prog. 0
para un vídeo.
Pulse MENU y utilizando So Rseleccione el menú
CONFIGURACIÓN, con Q resalte Sintonización
manual, pulse OK para seleccionar.
Continúa en la página siguiente
Para asignar una posición de programa en el televisor para un decodificador y una videograbadora: encienda el decodificador,
introduzca una cinta pregrabada en el vídeo y pulse PLAY, luego sintonice a mano.
Utilice SyRpara moverse por la pantalla y seleccionar cualquiera de estas opciones de Sintonización manual.
1
2
3
4
5
6
Cadena
Programa Sistema
Sistema
de color
Canal Búsqueda
Saltar
programa
Sintoniz.
manual precisa
Sintonización manual
Prog. Sis. Canal Cadena
0 I 60 VCR
1 I 22 TVE 1
2 I 25 TVE 2
3 I 28 ANTENA 3
4 I 32 TELE 5
5I 69
Seleccionar
MENU Volver EXIT Ver TV
Sintonización manual
Búsqueda
0 B/G A 60 0
Almacenar MENU Volver EXIT Ver TV
Sintonización manual
Sistema
0 B/G A 60 0 V C R
Almacenar MENU Volver EXIT Ver TV
CONFIGURACIÓN
Idioma Español
Pais España
Sintonización auto. OK
Sintonización manual OK
Ordenar programas OK
MENU Volver EXIT Ver TV
Es posible que
aparezcan
diferentes
números de
canales

77
Español
97
98
99
B
1
B
2DVD
B
3
B
4
B
5
0 VCR
Sintonización manual continuación
Omisión de programas
Este televisor tiene entrada de canal
directa si se conocen los números de los
canales. Seleccione la pantalla Sintonización manual en el
Paso 3. Introduzca el Número de programa, el Sistema, y
luego el número del Canal. Pulse OK para almacenar.
8
Pulse OK para almacenar.
Repita para cada posición de programa que
quiera sintonizar o pulse MENU para volver a la
lista de canales y seleccionar el siguiente número
a sintonizar.
Pulse EXIT cuando haya acabado.
Para nombrar equipos externos, por ej. DVD en
EXT2, pulse Bpara seleccionar EXT2, luego
seleccione Ajuste manual del menú
CONFIGURACIÓN.
Pulse Rpara seleccionar Etiqueta y luego
utilizando P, Q, Sy Rintroduzca los
caracteres requeridos.
10
11
12
13
14
9
ADVERTENCIA
Pulse MENU y repita desde el Paso 2 o pulse
EXIT.
Cada posición de programa debe seleccionarse
individualmente. Para desactivar Saltar
programa, repita el procedimiento para cada
posición.
Las posiciones de programa saltadas no pueden
seleccionarse con Pf(P), Pe(Q) ni tampoco
con los mandos de la parte frontal de la TV, pero
sí pueden accederse a través de los botones con
número del control remoto.
3
4
5
Utilice Po Q para resaltar la posición del
programa que hay que omitir y pulse OK para
seleccionar.
Pulse Rpara seleccionar Saltar programa.
Utilice Po Q para activar Saltar programa.
Pulse OK.
en la pantalla indica una posición de
programa omitida.
Para evitar que se vean ciertos programas, se puede saltar la
posición de programa y eliminar el control remoto. La
televisión se puede ver entonces de manera normal
utilizando los mandos de la parte frontal, pero la televisión
no mostrará la posición de programa saltado.
Omisión de programas
Seleccione Sintonización manual en el menú
Configuración.
1
2
Cuando se encuentre la señal de su grabadora
de vídeo, pulse Rpara pasar a Cadena. Con P,
Q, Sy Rintroduzca los caracteres requeridos,
por ej. VCR.
Si en cualquier momento se pulsa OK aparecerá
una lista en la pantalla que muestra todos los
programas almacenados y los equipos externos.
UtilicePy Q para resaltar y OK para seleccionar.
Ajuste manual
Etiqueta
EXT2 ADVD
Almacenar MENU Volver EXIT Ver TV
Sintonización manual
Cadena
0 I A 32 0 V C R
Almacenar MENU Volver EXIT Ver TV
Sintonización manual
Prog. Sis. Canal Cadena
0 I 60 VCR
1 I 22 TVE 1
2 I 25 TVE 2
3 I 28 ANTENA 3
4 I 32 TELE 5
5I 69
Seleccionar
MENU Volver EXIT Ver TV
Sintonización manual
Saltar programa : Encendido
1IA 22 0BBC1
Almacenar MENU Volver EXIT Ver TV

Español
78
OTRAS FUNC.
Teletexto Auto.
Bloqueo panel Encendido
Luz trasera 16
Panel Lateral 0
Ajuste imagen en PC
MENU
Volver EXIT Ver TV
Sintonización automática, mandos generales,
indicación de la hora, bloqueo del panel
Utilización de la Sintonización auto.
1
2
3
4
Pulse Q para resaltar Idioma y So Rpara
seleccionar.
Utilizando Q resalte País, luego So Rpara
seleccionar. El televisor se sintonizará ahora a las
estaciones para su país.
Pulse Q para resaltar Sintonización auto. y
luego pulse OK.
Para preparar el televisor utilizando
Sintonización auto. pulse MENU y utilice So
R
para seleccionar el menú CONFIGURACIÓN.
Debe permitir que el televisor termine la búsqueda.
Una vez que la búsqueda ha terminado el televisor
automáticamente seleccionará la posición de programa 1.
Ésta podría no ser una imagen clara y se podrá
cambiar el orden de las estaciones utilizando
Ordenar programas. Vea la página 75.
B/G – Europe Continental,
I
– Reino Unido
D/K – Europe Oriental, L1, L2 – Francia
5
Su Sistema habrá sido seleccionado, si hay una
selección, pulse So Rpara seleccionar de entre
los sistemas visualizados, luego pulse OK.
CONFIGURACÓN
Idioma Español
Pais España
Sintonización auto. OK
Sintonización manual OK
Ordenar programas OK
MENU Volver EXIT Ver TV
Sintonización auto.
Se eliminan los ajustes previos.
Para no hacer cambios pulse SALIR.
Pulse OK para iniciar
Sistema B/G
MENU Volver EXIT Ver TV
!
Para seleccionar la posición de un programa, utilice los
botones numerados del mando a distancia.
Para las posiciones de programa por debajo 10, utilice 0
y el número requerido, por ej. 01 para la posición de
programa 1.
Las posiciones de los programas pueden seleccionarse
también utilizando P
f
(P) y Pe(Q).
Para volver a la posición de programa anterior pulse
^^
.
Para visualizar información en pantalla, es decir, posición
de programa, modo de entrada o señal mono/estéreo,
pulse CALL.
Selección de las posiciones de programa
La función de visualización de la hora permite ver la hora
actual (teletexto) en la pantalla de TV.
Pulse
8/9
mientras ve una emisión normal de
televisión para ver una indicación de la hora de la
emisora. Permanecerá en la pantalla durante unos
5 segundos.
En el menú OTRAS FUNC. seleccione Bloqueo
panel y elija Encendido o Apagado utilizando
So R
.
Bloqueo de panel desactiva los botones de la parte
frontal de la TV. Pueden utilizarse todos los demás botones
del control remoto.
Bloqueo del panel
Indicación de la hora
1
Cuando Bloqueo del panel esté activado, aparecerá un
recordatorio cuando se pulse cualquiera de los botones del
panel frontal. Una vez se haya apagado la televisión,
SOLO se puede salir en espera utilizando el control
remoto.

79
Español
Estéreo… Pulse OI/II para seleccionar Estéreo or
Mono.
Bilingüe… Las transmisiones bilingües son raras. Si se
transmiten, aparecerá la palabra Dual. Elija el número de
programa requerido y, si aparece la palabra Dual, pulse
OI/II para seleccionar Dual 1, Dual 2 o Mono.
Si se están transmitiendo emisiones estereofónicas o en
dos idiomas, aparecerá en la pantalla la palabra Estéreo o
Dual, cada vez que se cambian las posiciones de los
programas, desapareciendo después de unos pocos
segundos. Si la emisión no es estéreo, aparecerá la
palabra Mono.
Transmisiones estereofónicas y bilingües
Mandos de sonido, Procesador de sonido
BBE, transmisiones estereofónicas/bilingües
Volumen
Pulse j— (S)o j+ (
R
) para ajustar el volumen.
Desactivación del sonido
Pulse kuna vez para desconectar el sonido y vuelva a
pulsarlo para anularlo.
Amplificación de graves – para mejorar la
profundidad de sonido
Pulse
n
y luego SoRpara ajustar el efecto. La
diferencia sólo será apreciable en el sonido con graves
fuertes. Vuelva a pulsarnpara desactivar la
Amplificación de graves.
Cuando esté conectado un Super Woofer activo, pulsar
n
lo controlará únicamente si se ha escogido Woofer
Ext. Seleccione Conexión AV del menú CONFIGURACIÓN,
pulse Qhasta que Woofer quede seleccionado y, a
continuación, pulse SoRpara escoger Ext.
Pulse MENU y SoRpara seleccionar la opción
SONIDO.
Pulse Qpara resaltar Graves, Agudos o
Balance y SoRpara cambiar el ajuste.
Mandos del sonido
Graves, agudos y balance
1
2
Al conectar a una unidad Hi-Fi, ajuste la opción Altavoz
a Apagado. A continuación, seleccione Arreglado o
Variable para la Salida Audio del menú Conexión AV.
SONIDO
Graves – 4
Agudos 0
Balance 0
Altavoz Encendido
BBE Encendido
MENU Volver EXIT Ver TV
SONIDO
Graves – 4
Agudos 0
Balance 0
Altavoz Encendido
BBE Encendido
MENU Volver EXIT Ver TV
Procesador de sonido BBE
®
BBE proporciona un sonido más natural, mejora la
claridad de las voces y aumenta la gama dinámica
de la música.
1
Pulse MENU y seleccione el menú SONIDO.
Utilice Po Q para seleccionar BBE y, a
continuación, pulse So Rpara seleccionar
Encendido o Apagado.
OBSERVACION: Fabricado bajo licencia de BBE Sound,
Inc. Autorizado por BBE Sound, Inc. bajo USP4638258 y
4482866. BBE y el símbolo BBE son marcas registradas de
BBE Sound, Inc.

Español
80
Viendo TV en pantalla ancha
SUPER LIVE
Esta consigna agrandará la imagen
para que encaje en la pantalla
estirando la imagen horizontalmente,
conservando las proporciones
correctas en el centro de la imagen.
SUBTÍTULO
Dependiendo del tipo de transmisión que está teniendo lugar, los programas se podrán ver en varios
formatos. Pulse el botón
{
varias veces para seleccionar entre Super Live, Cine, Subtítulo, 14:9,
Panorámico y 4:3. Sírvase notar: Cuando se pulsa el botón MENU cambiará la consigna del tamaño de la
imagen mientras los menús estén ACTIVADOS en la pantalla. Esto es para asegurar que los menús no
aparezcan por encima de los bordes del área de visión.
CINE
Cuando se vean películas/cintas de
vídeo en formato "letterbox", esta
consigna eliminará o reducirá las barras
negras en la parte superior e inferior de
la pantalla haciendo uso de zoom in y
seleccionando la imagen sin distorsión.
Cuando se incluyen subtítulos en una
transmisión en formato "letterbox",
esta consigna alzará la imagen para
asegurar que se visualice todo el texto.
SUBTÍTULO
14:9
Utilice esta consigna cuando vea una
transmisión 14:9.
Utilice esta consigna cuando vea un
DVD en pantalla ancha, una cinta de
vídeo en pantalla ancha o una
transmisión 16:9 (cuando esté
disponible). Debido a la diversidad de
formatos de pantalla ancha (16:9,
14:9, 20:9, etc.) se podrán ver barras
negras en la parte superior e inferior
de la pantalla.
PANORÁMICO
Utilice esta consigna para ver una
transmisión 4:3 verdadera.
4:3
Utilizar las funciones especiales para cambiar el tamaño de la imagen visualizada (es decir, cambiar
la relación altura/ancho) con el propósito de exhibición pública o beneficio comercial puede infringir leyes de derecho de propiedad.

81
Español
Mandos de la imagen
Este televisor ofrece la opción de personalizar el estilo
de imagen. Pulse
m
para ver los diferentes
estilos disponibles.
Modo imagen-1 a 3 son opciones prefijadas y
el Modo imagen-M almacena sus propios ajustes:
El Tono sólo puede ajustarse en una señal NTSC desde un
vídeo NTSC o un reproductor de DVD cuando la televisión
está en modo AUTO o color NTSC.
Utilice SoRpara ajustar el Contraste, Brillo,
Color, Tono y la Resolución.
Seleccione el menú IMAGEN.
Preferencias de imágenes
1
2
Posición de la imagen
La posición de la imagen se puede ajustar para adecuarse
a las preferencias personales y puede resultar
especialmente útil para entradas externas.
En el menú CONFIGURACIÓN pulse Qhasta
que se resalte Posición imagen.
1
Pulse OK para ver las opciones disponibles para
el formato de imagen que se ha seleccionado.
Pulse Py Q para seleccionar una opción, luego
SoR
para ajustar las consignas.
Las opciones cambiarán dependiendo del
formato de pantalla ancha seleccionado y al ver
equipos conectados.
En Cine:
2
3
IMAGEN
Contraste 50
Brillo 50
Color 50
Tono 0
Resolución 0
MENU Volver EXIT Ver TV
CONFIGURACIÓN
Sintonización manual OK
Ordenar programas OK
Conexión AV OK
Posición imagen OK
Ajuste rápido OK
MENU Volver EXIT Ver TV
Posición imagen
Posición Horizontal
Posición Vertical
Reset OK
MENU Volver EXIT Ver TV
DNR le permite "suavizar" la representación en pantalla de
una señal débil para reducir el efecto del ruido.
DNR – Reducción de Ruido Digital
Seleccione DNR del menú IMAGEN. Utilice
SorR
para ajustar. Existe la posibilidad de que
las diferencias no sean siempre perceptibles (para
conseguir el mejor resultado utilice ajustes más
bajos, ya que la calidad de la imagen puede
perderse si el ajuste es demasiado alto).
1
Intensificación de los colores oscuros incrementa la
intensidad de las áreas oscuras de la imagen, lo que
mejora la definición.
Intensificación de los colores oscuros
En el menú IMAGEN pulse Qhasta que se
resalte Ajuste negro.
Pulse So Rpara seleccionar entre Encendido y
Apagado El efecto depende de la transmisión y
es más perceptible en colores oscuros.
1
2
IMAGEN
Color 50
Tono 0
Resolución 0
DNR 2
Ajuste negro Encendido
MENU Volver EXIT Ver TV

Español
82
Mandos de la imagen continuación
En el menú IMAGEN pulse Qhasta que se
resalte Temperatura color.
Pulse So Rpara seleccionar entre Normal,
Cálido y Suave según su preferencia.
1
2
Temperatura color incrementa la "calidez" o el "frío" de
una imagen incrementando el tono rojo o azul.
Temperatura color
Formato automático (Pantalla ancha)
Cuando este televisor recibe una imagen en pantalla ancha
verdadera y Formato auto. está Encendido, la imagen se
visualizará automáticamente en formato de pantalla
ancha, sin importar la consigna anterior del televisor.
Seleccione Formato auto. del menú IMAGEN y
luego seleccione Encendido o Apagado.
1
IMAGEN
DNR 4
Ajuste negro Encendido
Temperatura color Normal
Formato auto. Apagado
Pantalla gris Encendido
MENU Volver EXIT Ver TV
La función de Panel Lateral hace más clara u oscura la
banda de cada lado de la pantalla en formato 4:3 o 14:9.
Esto permitirá evitar una imagen posterior de la banda y
puede igualmente hacer que la visualización en
condiciones luminosas u oscuras sea más cómoda.
En el menú CONFIGURACIÓN, pulse Qhasta
que se haya seleccionado Luz trasera.
Pulse OK para seleccionar y, a continuación,
So R
para ajustar.
1
2
El ajuste de la Luz trasera puede mejorar la claridad de
la pantalla cuando se mira la TV en condiciones luminosas.
Retroiluminación
Pantalla gris
Cuando se seleccione Pantalla gris , la pantalla se
volverá gris y el sonido se desactivará cuando no se reciba
ninguna señal.
En el menú IMAGEN, pulse Po Q para
seleccionar Pantalla gris.
Pulse So Rpara seleccionar Encendido o
Apagado.
1
2
En el menú CONFIGURACIÓN, pulse Qhasta
que se haya seleccionado Panel Lateral.
Pulse OK para seleccionar y, a continuación,
So R
para ajustar.
1
2
Ajuste del panel lateral
CONFIGURACIÓN
Teletexto Auto.
Bloqueo panel Apagado
Luz trasera 16
Panel Lateral 0
Ajuste imagen en PC
MENU Volver EXIT Ver TV
CONFIGURACIÓN
Teletexto Auto.
Bloqueo panel Apagado
Luz trasera 16
Panel Lateral 0
Ajuste imagen en PC
MENU Volver EXIT Ver TV

83
Español
Temporizador, Ajustes del PC – fase del reloj,
reloj de muestreo
Pulse Qpara seleccionar Temporizador
activación o desactivación. Utilice los botones
de números para fijar el tiempo requerido. Por
ejemplo, para apagar el televisor en una hora y
media introduzca 01:30.
Si está consignando el Temporizador a
desactivación, pulse EXIT para terminar. Si está
consignando el Temporizador a activación,
pulse Qpara seleccionar la Posición
temporizador, introduzca el número de posición
del programa requerido y luego pulse ipara
poner el televisor en Espera. El indicador VERDE
de Temporizador activado en el frente del
televisor estará ahora encendido.
Cualquier equipo conectado con cables Scart
también se debe poner en Espera para impedir
que se visualicen al activarse el temporizador.
Una vez que se ha consignado el Temporizador
a activación el televisor se podrá encender en
cualquier momento pulsando
i
. El indicador
verde de Temporizador activado permanecerá
encendido hasta que haya pasado el período de
tiempo fijado cuando el televisor pasará al canal
seleccionado. Esta característica puede ayudar a
evitar que se pierdan programas favoritos.
Para cancelar Temporizador activación,
introduzca cero en cada posición, incluyendo la
posición del programa.
El televisor puede ser consignado para Activación o
Desactivación automático después de un cierto tiempo.
El temporizador
1
2
3
4
Pulse MENU y luego So Rpara seleccionar el
menú TEMPORIZADOR.
TEMPORIZADOR
Desactivación 01:30
Activación 00:00
Posición temporizador 01
MENU Volver EXIT Ver TV
3
Utilice So Rpara ajustar hasta que la imagen
sea clara.
3
Utilice So Rpara ajustar hasta que la imagen
sea clara.
En el menú OTRAS FUNC., pulse Qhasta que
se haya seleccionado Ajuste imagen en PC.
Pulse OK para seleccionar y, a continuación,
Q para seleccionar Fase de reloj.
1
2
La Fase de reloj permite adaptar la señal del PC con la
VCL. Este ajuste puede eliminar las rayas horizontales y el
contorno borroso de la imagen.
Fase del reloj
En el menú OTRAS FUNC., pulse Quntil Ajuste
imagen en PC hasta que se haya seleccionado.
Pulse OK para seleccionar y, a continuación, Q
para seleccionar Reloj de muestro.
1
2
El ajuste del Reloj de muestro permite modificar el
número de impulsos por barrido, lo que eliminará las
líneas verticales en pantalla.
Reloj de muestreo
Ajuste imagen en PC
Fase de reloj 9
Reloj de muestro 7
MENU Volver EXIT Ver TV
Ajuste imagen en PC
Fase de reloj 7
Reloj de muestro 9
MENU Volver EXIT Ver TV
OTRAS FUNC.
Teletexto
Bloqueo panel Apagado
Luz trasera 16
Panel Lateral 0
Ajuste imagen en PC
MENU Volver EXIT Ver TV

Español
84
Conexión AV
Entrada EXT3 AV
Salida EXT3 EXT1
Woofer Ext.
Salida Audio Arreglado
MENU Volver EXIT Ver TV
Conexión AV
Entrada EXT3 AV
Salida EXT3 EXT1
Woofer Ext.
Salida Audio Arreglado
MENU Volver EXIT Ver T V
Selección de entradas y conexiones AV
Definición de los conectores hembra de ENTRADA y SALIDA de modo que el televisor reconozca el equipo
conectado. Vea la página 72 para tener una visión clara de las recomendaciones de las conexiones en la
parte trasera.
Seleccione Conexión AV.
Utilice SoRpara cambiar la opción de
Salida EXT3:
MONITOR = La imagen en pantalla.
TV = La última selección de programa de
televisión.
EXT1 = La imagen del equipo conectado a
B
1.
EXT2 = La imagen del equipo conectado a
B
2.
EXT4 = La imagen del equipo conectado a
Scart 4.
EXT5 = La imagen del equipo conectado a
Scart 5.
EXT6 = La imagen del equipo conectado a los
enchufes de entrada frontales.
Esto permite que la selección de la fuente salga por
Scart 3. Por ejemplo, para grabar transmisiones en
estéreo a partir de un decodificador estéreo – conecte un
decodificador estéreo a Scart 4 o 5 y un VCR estéreo a
Scart 3, a continuación seleccione EXT4 o EXT5 como la
salida de EXT3. La señal recibida por Scart 4 o 5 saldrá
directamente por Scart 3.
La mayoría de las grabadoras de vídeo y de los
decodificadores envían una señal por el cable Scart para
conmutar el televisor al conector hembra de Entrada
correcto. Alternativamente, pulse el botón de selección de
fuente externa
B
hasta que aparezca la imagen
procedente del equipo conectado. Este botón debe ser
utilizado para ver el equipo conectado utilizando la
ENTRADA DE VIDEO COMPONENTE (EXT1 y EXT2).
Una S por ej.
B
3S (EXT 3S), indica que la entrada está
preparada para una señal S-Vídeo.
Pulse
B
para seleccionar B1, B2, B3, B4,
B
5, B6 (EXT1-6) o PC.
PC muestra un ordenador conectado a la Entrada
RGB/PC en la parte lateral de la TV.
Para volver al modo TV vuelva a pulsar Bo uno
de los botones numerados.
Utilice la Selección de entradas si el televisor no se
conmuta automáticamente.
Selección de entradas
Selección de la señal de ENTRADA
Selección de la señal de SALIDA
para Scart 3
1
1
2
2
Esto especifica el tipo de señal que entra a los Scart 3
(EXT3) en la parte trasera del televisor. Sírvase remitirse a
las instrucciones del fabricante para los equipos
conectados.
En el menú CONFIGURACIÓN pulse Qhasta
que se resalte Conexión AV, luego pulse OK.
Con Sy Rseleccione ya sea AV o S-VIDEO
como la entrada requerida para EXT3.
Si falta el color, pruebe el ajuste alternativo.
1

85
Español
Teletexto – preparación,
información general, modo Automático
Esta TV tiene una memoria de teletexto de múltiples páginas, la cual lleva algunos momentos para cargar.
Ofrece dos Modos de visualizar el texto – Auto. visualizará Fastext, si está disponible. LISTA almacenará sus
cuatro páginas favoritas.
Si está disponible Fastext, aparecerán cuatro títulos en
color en la base de la pantalla.
Para acceder a uno de los cuatro temas dados, pulse el
botón de color correspondiente del mando a distancia.
Para más información sobre su(s) sistema(s) de texto en
particular, vea la página de índice del teletexto de la
emisora o consulte con el vendedor local de Toshiba.
Subpáginas
Si hay subpáginas, se cargarán automáticamente en la
memoria sin cambiar la página de la memoria.
Para acceder a las sub-páginas, pulse X(B)
y, a
continuación, utilice Py Q para verlas. Aparecerá una
barra con números en el lateral de la pantalla.
La subpágina que esté viendo será resaltada y, a medida
que el televisor cargue subpáginas adicionales, cambiará el
color de los números indicando que se han cargado esas
páginas.
Estas subpáginas permanecerán disponibles para ser
vistas hasta que se elija otra página o, en el modo
normal del televisor, hasta que se cambie el canal.
El botón
6/7
:
Para ver el teletexto, pulse
6/7
. Vuelva a pulsarlo
para superponer el teletexto a la imagen de la emisión
normal y púlselo otra vez para volver a la imagen
normal. Los programas no pueden cambiarse hasta que
se cancele el teletexto.
La primera página de texto que se muestra será la
página inicial.
En modo Auto. ésta presenta los temas principales
disponibles y sus números de página correspondientes.
En modo LISTA ésta presenta el número de página que
esté almacenado actualmente en el botón ROJO.
En cualquier modo puede accederse a cualquier página
de teletexto introduciendo el número de página de 3
dígitos utilizando los botones numerados, pulsando los
botones de color o pulsando Pf(P ) para avanzar a la
página siguiente y P e(Q ) para volver a la página
anterior.
Navegación por las páginas
utilizando Automático
Información de teletexto
Seleccione Teletexto en el menú OTRAS FUNC.
Con So Relija Auto. o LISTA, luego pulse EXIT.
El conjunto de caracteres de teletexto será elegido de
forma automática mediante la configuración de idioma
del menú CONFIGURACIÓN.
Selección de modos
1
2
OTRAS FUNC.
Teletexto Auto.
Bloqueo panel Encendido
Luz trasera 16
Panel Lateral 0
Ajuste imagen en PC
MENU
Volver EXIT Ver TV

Español
86
Las cuatro opciones de color en la parte inferior de la
pantalla son los números 100, 200, 300 y 400, que han
sido programados en la memoria del televisor. Para ver
estas páginas, pulse los botones de color
correspondientes.
Para cambiar estas páginas almacenadas, pulse el botón
de color correspondiente e introduzca el número de 3
dígitos. Este número cambiará en la parte superior
izquierda de la pantalla y en el resalte en color.
Pulse OK para almacenarlo. Las barras de la parte
inferior de la pantalla parpadearán en blanco. Siempre
que se pulse OK se almacenarán los cuatro
números de página que aparezcan en la parte
inferior y se perderán los anteriores.
Si no pulsa OK , se olvidará la selección cuando se
cancele el teletexto.
Pueden verse otras páginas introduciendo el número de
página de 3 dígitos, pero NO pulse OK o esas páginas
quedarán almacenadas.
Navegación por las páginas
utilizando LISTA
Auto.
Pulse Tpara acceder a las páginas de índice. La que
aparezca en la pantalla depende de la emisora.
LISTA
Pulse Tpara volver a la página almacenada
actualmente en el botón ROJO.
Recuerde cancelar el teletexto
antes de cambiar de canal: pulse
dos veces el botón
6
/
7
.
☛
Teletexto continuación
– modo LISTA, botones de mando
A continuación se da una guía de las funciones de los botones de teletexto del mando a distancia.
Introduzca el número de la página y luego pulse
8/9
,
y aparecerá en la pantalla una imagen normal. El
televisor indicará cuándo está presente la página
indicando el número de página en la parte superior de la
pantalla. Pulse
6/7
para ver la página.
Para hacer aparecer noticias de última hora:
Seleccione la página de noticias de última hora para el
servicio de teletexto elegido (vea la página de índice del
servicio de teletexto). Pulse
8/9
. Las notificas de última
hora aparecerán en la pantalla a medida que se emiten.
Vuelva a pulsar
8/9
para cancelar la presentación.
La página de noticias de última hora debe
cancelarse antes de cambiar de programa.
Para ver una página de índice/inicial:
T
A veces es conveniente retener una página de texto.
Pulse qy aparecerá qen la parte superior izquierda
de la pantalla. La página se mantendrá en la pantalla
hasta que se vuelva a pulsar el botón.
Para retener una página deseada:
q
Para descubrir las soluciones de las páginas de
adivinanzas y entretenimientos, pulse el botón r.
Para revelar un texto oculto:
r
Pulse
6/7
para hacer aparecer en la pantalla el
teletexto. Vuelva a pulsarlo para superponer el teletexto
sobre una imagen de emisión normal. Vuelva a pulsarlo
para volver a la imagen de televisión normal. No pueden
cambiarse los programas hasta que vuelva a TV normal.
Para ver una página de teletexto:
Para seleccionar una página mientras
se ve una página normal:
8/9
6
/
7
Pulse una vez spara aumentar la mitad superior de la
página y vuelva a pulsarlo para aumentar la mitad
inferior de la página. Vuelva a pulsarlo para volver al
tamaño normal.
Para aumentar el tamaño de
presentación del teletexto:
s
Para utilizar con So Rpara ver las subpáginas cuando
existan.
Para acceder a las subpáginas:
X

87
Español
Preguntas y Respuestas
A continuación se dan las respuestas a algunas de las consultas más comunes.
R
Compruebe que el interruptor de la red está
conectado y compruebe todas las conexiones.
Compruebe que el televisor no está en modo de espera.
¿Por qué no hay sonido o imagen?
P
R
Compruebe que no se ha bajado el volumen ni se
ha seleccionado la desactivación del sonido.
¿Por qué hay imagen pero no hay sonido?
P
R
Compruebe que Bloqueo panel no está
Encendido.
¿Por qué no funcionan los mandos de la parte
frontal de la TV?
P
R
Compruebe la conexión del cable Scart.
¿Por qué hay una buena imagen de vídeo pero
no hay sonido?
P
R
Interferencias o una señal débil. Pruebe una
estación de TV diferente. La Sintonización
manual precisa puede ayudar.
¿Qué otra cosa puede ser la causa de una mala
imagen?
P
R
Asegúrese de que la grabadora de vídeo o el
reproductor de DVD está conectado al televisor
como se muestra en la página 72, y luego seleccione la
entrada correcta pulsando B.
¿Por qué no aparece en la pantalla el vídeo/DVD
que se está reproduciendo?
P
R
Compruebe que se ha elegido la entrada has
correcta, S-VIDEO o AV. Vea Conexión AV.
¿Por qué el vídeo/DVD está en blanco y negro?
P
Seleccione el menú Sintonización manual.
Resalte la estación y pulse OK. Utilice Rpara
seleccionar Sintoniz. manual precisa
.
Utilizando Po Q, ajuste para obtener la mejor
imagen y el mejor sonido. Pulse OK y luego EXIT.
1
2
R
Cuando se utiliza una fuente externa, por
ejemplo una cinta de vídeo de mala calidad, si
tiene poco o ningún color, pueden conseguirse mejoras
algunas veces. El color se ajusta en fábrica en Auto. para
ver automáticamente el mejor color.
Para comprobar que tiene el mejor color:
Hay imagen, pero ¿por qué tiene poco o ningún
color?
P
Con la fuente externa en funcionamiento,
seleccione Ajuste manual del menú
CONFIGURACIÓN.
Con So Relija entre Auto., PAL, SECAM, NTSC
4.43 o 3.58.
1
2
Sintonización manual
Sintoniz. manual presica
1 I A 22 + 2 T V E 1
Almacenar MENU Volver EXIT Ver TV
Ajuste manual
Sistema de Color : Auto.
EXT3 AVCR
Almacenar MENU Volver EXIT Ver TV
R
El Reloj de muestreo puede necesitar un ajuste.
Seleccione Ajuste imagen en PC a partir del
menú OTRAS FUNC., seleccione Reloj de muestreo y
ajuste hasta que desaparezcan las líneas.
¿Por qué hay rayas verticales en la pantalla?
P
R
La Fase del reloj puede necesitar un ajuste.
Seleccione Ajuste imagen en PC a partir del
menú OTRAS FUNC., seleccione Fase del reloj y ajuste
hasta que la imagen sea clara.
¿Por qué hay rayas horizontales y/o imágenes
borrosas en la pantalla?
P
R
Elimínelo pulsando CALL.
¿Por qué hay un mensaje permanentemente en
la pantalla?
P

Español
88
Preguntas y Respuestas
continuación
R
El buen funcionamiento del texto depende de una
señal de la emisora buena y fuerte. Esto exige
normalmente una antena en el tejado o en el desván. Si
el texto es ilegible o está mutilado, compruebe la antena.
Vaya a la página de índice principal principal del servicio
de teletexto y busque la Guía del Usuario. Esta explicará
el funcionamiento básico del teletexto con cierto detalle.
Si se necesita más información sobre como utilizar el
texto, vea la sección de teletexto.
¿Por qué hay problemas con el teletexto?
P
R
No se está emitiendo ninguna o no se han
cargado todavía. Pulse el botón X(B)
para
acceder a ellas. (Vea la sección de teletexto).
¿Por qué no hay subpáginas de teletexto?
P
R
Conecte la fuente por medio de un cable Scart y
haga funcionar. Seleccione Ajuste manual del
menú CONFIGURACIÓN.
¿Por qué están mal los colores cuando se
reproduce una fuente NTSC?
P
Ponga el Color en Auto. y salga.
Vaya al menú IMAGEN y ajuste el tono.
1
2
Ajuste manual
Sistema de Color : Auto.
EXT3 AVCR
Almacenar MENU Volver EXIT Ver TV
R
Compruebe que la opción Altavoz del menú
Sonido se encuentra en Apagado.
¿Por qué no suena mi equipo de sonido
conectado?
P
R
Compruebe que el conmutador lateral del mando
a distancia está en modo TV.
Compruebe que las pilas no se han agotado ni están
colocadas incorrectamente.
¿Por qué no funciona el mando a distancia?
P
El que suscribe: TOSHIBA INFORMATION SYSTEMS (U.K.) LIMITED (Nombre del fabricante)
Consumer Products Division, European Service Centre, Admiralty Way, Camberley, Surrey,
GU15 3DT England (Razón social)
declara, bajo su propia responsabilidad, que el
Equipo: TELEVISOR EN COLOR Fabricado por: TOSHIBA INFORMATION SYSTEMS (U.K.) LTD
En (Estado o zona geogràfica): UNITED KINGDOM Marca: TOSHIBA
Modelos:
26/32WL36
Objecto de esta declaración, cumple con la normativa siguiente:
Articulo 9.2 del Reglamento Tecnico del servicio de Difusion de Television, aprobado en el R.D. 1160/89.
Anexo V del Reglamento sobre perturbaciones Radioelectricas aprobado en R.D. 138/89.
Exigencias de seguridad del material electrico destinado a ser utilizado en determinados limites de tension, aprobado
en el R.D. 7/1988.
Hecho en PLYMOUTH (Lugar y fecha)
R. J. PHILLIPS QUALITY AND SAFETY MANAGER
(Nombre y apellidos) (Cargo)
DECLARACION DE CONFORMIDAD CON NORMAS, EXPEDIDO POR EL FABRICANTE
(Firma)
TOSHIBA
Limpieza de la pantalla y de
la caja…
Desconecte la alimentación, limpie la
pantalla y la caja con un paño suave y
seco. Le recomendamos que no utilice
ninguna cera o disolvente patentado en
la pantalla o la caja ya que podría
causar daños.
Eliminación…
La lámpara fluorescente de cátodo frío
en el panel de VCL contiene una
pequeña cantidad de mercurio. Cuando
el aparato llegue al final de su vida útil,
deshágase de él de acuerdo con las
Disposiciones del Gobierno Local o en un
centro de reciclaje.

89
Español
Especificaciones y accesorios
Sistemas de emisión/canales
PAL-I UHF UK21-UK69
PAL-B/G UHF E21-E69
VHF E2-E12, S1-S41
SECAM-L UHF F21-F69
VHF F1-F10, B-Q
SECAM-D/K UHF R21-R69
VHF R1-R12
Entrada de vídeo PAL, SECAM, NTSC 3.58/4.43
Conexiones externas
EXT1 Entrada Jacks Fono Y, PB/CB, PR/C
R
Alta definición 1080i
Barrido progresivo
Jacks Fono A/V
EXT2 Entrada Jacks Fono Y, P
B/CB
, PR/C
R
Alta definición 1080i
Barrido progresivo
Jacks Fono A/V
EXT3 Entrada/Salida Scart 21 patillas A/V, S-video
salida seleccionable
Entrada 4 patillas S-video
Jack Fono Video
Jacks Fono Audio L + R
EXT4 Entrada/Salida Scart 21 patillas RGB, A/V
EXT5 Entrada/Salida Scart 21 patillas RGB, A/V
EXT6 Entrada (frontal) 4 patillas S-video
Jack Fono Video
Jacks Fono Audio L + R
RGB/PC Entrada Mini D-sub 15 pins Señal analógica RGB
Entrada Jacks estéreo 3,5 mm A/V
Monitor Salida Jacks Fono A/V
Salida Audio Fija/Variable Jacks Fono Audio L + R
Salida a Super Woofer Activo Toma fono
Posiciones de programa 100
Estéreo Nicam
Sistema de 2 portadoras
Tamaño de pantalla visible 26 ins
(aprox.) 32 ins
Pantalla 15:9
Salida de sonido Principal 10 W + 10 W
(para 10% de distorsión)
Consumo de potencia 26 ins 150 W
como se especifica en 32 ins 185 W
EN60107-1:1997
Espera 26 ins <1,3 W
32 ins <1,3 W
Dimensiones 26 ins 48 cm (Al) 82 cm (An) 14 cm (Pr)
(aprox.) 32 ins 61 cm (Al) 107 cm (An) 15 cm (Pr)
Peso (aprox.) 26 ins 22 kg
32 ins 33 kg
Enchufe del auricular 3,5 mm estéreo
Accesorios Mando a distancia
2 pilas
(UM-4, AAA, IEC R03 1,5V)
Clip
Toshiba Information Systems (U.K.) Limited
Consumer Products Division,
European Service Centre,
Admiralty Way, Camberley,
Surrey, GU15 3DT, RU
La especificación está sujeta a cambio sin previo aviso.
Hecho por Kensa Creative Solutions, Saltash, Cornwall, Inglaterra.
© Toshiba Information Systems (U.K.) Limited
Quedan reservados todos los derechos
Se prohibe estrictamente la reproducción parcial o total sin permiso escrito
Impreso en papel reciclado. 100% libre de cloro.

Italiano
90
Contenuto
IMPOSTAZIONI
Precauzioni di sicurezza – Alcune cose da fare e da evitare 91
Installazione e informazioni importanti 92
Il telecomando – guida rapida 93
Connessione di apparecchiature esterne – come collegare altre apparecchiature sul retro
del televisore 94
Connessione di un computer – come collegare un computer al lato del televisore 95
Connessioni e controlli – accensione del televisore, condizione di stand-by, utilizzo dei controlli
anteriori, presa per le cuffie e collegamento di apparecchiature sul davanti del televisore 96
Sintonizzazione del televisore usando l’Impostazione rapida – lingua, paese e sistema
di trasmissione 97
Ordinamento dei programmi 97
Sintonia manuale – alternativa all’Impostazione rapida, introduzione diretta dei canali e
sintonizzazione di una posizione dei programmi per il VCR 98
Salto dei programmi 99
Sintonia automatica 100
CONTROLLI E CARATTERISTICHE
Controlli generali – cambio della posizione dei programmi e visualizzazione dell’ora 100
Blocco del pannello anteriore – come disabilitare i pulsanti del televisore 100
Controlli audio – volume, esclusione audio, esaltazione dei toni bassi, super woofer,
toni bassi/alti e balance 101
Processore audio BBE
®
101
Trasmissioni stereo e bilingui – trasmissioni stereo/mono o in due lingue 101
Visualizzazione widescreen 102
Controlli dell’immagine – posizione dell’immagine, preferenze per l’immagine (luminosità,
colore, contrasto, nitidezza, tinta), riduzione digitale del rumore (DNR) ed estensione dei neri 103
Controlli dell’immagine – temperatura di colore, formato automatico (widescreen),
schermo grigio, retroilluminazione e regolazione del pannello laterale 104
Il timer – impostazione dell’accensione e dello spegnimento del televisore 105
Impostazioni dal PC – fase dell’orologio e orologio di campionatura 105
Selezione degli ingressi e connessioni AV – prese di ingresso ed uscita per le
apparecchiature collegate 106
TELEVIDEO
Impostazioni, informazioni generali, modo Auto 107
Modo LISTA, pulsanti di controllo 108
SOLUZIONE DEI PROBLEMI
Domande e risposte – risposte ad alcune delle domande rivolte più spesso, inclusa la sintonia
fine manuale e il sistema di colore 109
INFORMAZIONI
Specifiche ed accessori – informazioni tecniche sul televisore, e accessori forniti 111

91
Italiano
Precauzioni di sicurezza
Questo apparecchio è stato progettato e fabbricato in modo da soddisfare le pertinenti normative
internazionali di sicurezza ma, come per ogni altra apparecchiatura elettrica, occorre prestare attenzione per
ottenere i migliori risultati e garantirne la sicurezza d’uso. Leggere attentamente le seguenti avvertenze
generali di sicurezza individuale applicabili a tutti gli apparecchi elettronici per uso dei consumatori, sebbene
alcune di esse possano non essere applicabili a quello appena acquistato.
La rete elettrica di alimentazione per questo apparecchio
deve essere a 110-240 V c.a., 50/60 Hz. Non collegarlo
mai ad una rete di alimentazione a corrente continua, o
a qualsiasi altra fonte di alimentazione. ASSICURARSI
che il cavo di alimentazione del televisore non resti
schiacciato sotto l’apparecchio. NON tagliare via la
spina di alimentazione dell’apparecchio, poiché
incorpora un filtro speciale di soppressione delle
interferenze radio la cui rimozione comprometterebbe il
funzionamento del televisore.
IN CASO DI DUBBIO, CONSULTARE UN ELETTRICISTA
COMPETENTE.
NON rimuovere qualsiasi coperchio fisso, poiché
potrebbero rimanere esposte tensioni pericolose.
NON ostruire le aperture di ventilazione delle
apparecchiature con articoli come giornali, tovaglie,
tendaggi, ecc. Il conseguente surriscaldamento
danneggerebbe le apparecchiature e ne ridurrebbe la
durata utile d’impiego.
NON permettere che le apparecchiature elettriche siano
esposte a sgocciolature o a schizzi, e tenere lontano ogni
oggetto che contiene liquidi, come un vaso.
NON porre oggetti caldi o fonti di fiamme scoperte,
come candele accese o luci da notte, nelle vicinanze delle
apparecchiature. Le elevate temperature potrebbero
fonderne le parti di plastica e provocare un incendio.
NON usare mezzi di sostegno improvvisati, e non fissare
MAI le gambe per mezzo di viti a legno. Per garantire
completa sicurezza, usare sempre un sostegno di tipo
approvato dal fabbricante o gambe dotate dei sistemi di
fissaggio forniti, seguendo le istruzioni.
NON ascoltare con le cuffie a volume eccessivamente
elevato, poiché si potrebbe altrimenti danneggiare
permanentemente l’udito.
NON lasciare le apparecchiature incustodite quando
sono accese, a meno che sia dichiarato specificatamente
che sono state progettate per funzionare incustodite,
oppure dispongono di modalità stand-by. Spegnere
staccando la spina, assicurandosi che il resto della
famiglia sappia come farlo. In caso di persone inferme o
affete da handicap possono essere necessarie
disposizioni speciali.
NON continuare a far funzionare le apparecchiature se
esiste alcun dubbio sul loro normale funzionamento, o
se sono in qualsiasi modo danneggiate; spegnerle in tal
caso, estrarre la spina dalla presa di corrente e
consultare il rispettivo rivenditore.
SOPRATTUTTO, non consentire MAI, specialmente
ai bambini, di spingere o colpire lo schermo,
spingere oggetti estranei nei fori, nelle fenditure o
in qualsiasi altra apertura dell’involucro.
Non tentare MAI di indovinare o rischiare con
apparecchiature elettriche di qualsiasi tipo: è
meglio eccedere nelle precauzioni di sicurezza che
subire i danni derivanti da negligenza.
PER STACCARE IL TELEVISORE ED ESTRARRE LA
SPINA.
Lasciare almeno 10 cm di spazio libero intorno al
televisore per consentire una ventilazione adeguata ed
evitare che il televisore si surriscaldi, o possa perfino
danneggiarsi. Evitare anche di installarlo in aree
polverose.
Lasciando il televisore alla luce diretta del sole, o vicino ad
un riscaldatore, potrebbe danneggiarsi. Evitare anche di
esporlo a temperature ambientali estremamente elevate o
ad eccessiva umidità, ed ogni località la cui temperatura
può cadere al di sotto di 5˚C.
LEGGER le istruzioni di funzionamento prima di tentare di
usare l’apparecchio.
ASSICURARS che tutte le connessioni elettriche (inclusa la
spina della rete di alimentazione, eventuali prolunghe ed
ogni interconnessione fra le varie apparecchiature) siano
effettuate correttamente seguendo le istruzioni dei
rispettivi fabbricanti. Spegnere l’apparecchio ed estrarre la
spina dalla presa di corrente prima di effettuare, o
cambiare, qualsiasi connessione.
CONSULTAR il proprio fornitore in caso di qualsiasi
dubbio sull’installazione, sul funzionamento o sulla
sicurezza delle apparecchiature usate.
PRESTAR particolare attenzione ai pannelli o agli sportelli
di vetro delle apparecchiature.
Circolazione dell’aria
Cose da non fare
Danni da surriscaldamento
Rete elettrica di alimentazione
Cose da fare

Italiano
92
Installazione e informazioni importanti
Dove installare il televisore
Notare bene quanto segue
CLAUSOLA DI ESCLUSIONE
Toshiba non sarà in alcun caso responsabile della perdita e/o dei danni provocati al prodotto da:
i) incendio;
ii) terremoto;
iii) danno accidentale;
iv) cattivo uso intenzionale del prodotto;
v) uso del prodotto in condizioni inadatte;
vi) perdita e/o danno provocati al prodotto durante il tempo in cui è in possesso di terzi;
vii) qualsiasi danno o perdita provocati in conseguenza della mancata e/o trascurata osservanza delle norme riportate nel
manuale di istruzioni;
viii) qualsiasi danno o perdita provocati direttamente in conseguenza del cattivo uso o del malfunzionamento del prodotto
quando viene usato contemporaneamente ad altri apparecchi ad esso collegati.
Inoltre, Toshiba non sarà in alcun caso responsabile di qualsiasi perdita e/o danno consequenziale includendo, senza limitarvisi,
perdita di profitti, interruzione di attività commerciali o perdita di dati registrati, sia che ciò sia avvenuto durante il normale
funzionamento o il cattivo uso del prodotto.
Posizionare il televisore lontano dalla luce diretta del sole e da
luci intense; per ottenere condizioni di visualizzazione
confortevoli si consiglia di usare un’illuminazione ambientale
morbida ed indiretta. Porre il televisore su una piattaforma
robusta, con superficie di montaggio piana e stabile, e fissarlo
alla parete con un tirante robusto servendosi del gancio
montato sul retro del televisore per evitare che l’apparecchio
possa cadere. Usare tendaggi o avvolgibili/ tende alla veneziana
per evitare che cada sullo schermo la luce diretta del sole.
Per questo televisore è disponibile un supporto da montare sul
pavimento o su un tavolo, oppure una staffa ad angolo che
consente di montare il televisore a parete.
I pannelli LCD di visualizzazione vengono fabbricati usando una
tecnologia di precisione estremamente alta, tuttavia in alcune
parti dello schermo può talvolta mancare qualche elemento di
formazione dell’immagine, oppure ci possono essere dei puntini
luminosi. Ciò non significa però che il pannello è difettoso.
Assicurarsi che il televisore sia installato in una posizione dove
non può essere sospinto o colpito da oggetti, poiché se soggetto
ad urti potrebbe rompersi o danneggiarsi.
Se sullo schermo del televisore vengono lasciate per un certo tempo immagini fisse di Televideo, logotipi di identificazione dei
canali, schermate di computer, videogiochi, menu su schermo, ecc., è consigliabile ridurre sempre sia la luminosità che il contrasto.

93
Italiano
Per escludere l’audio
Tasti per il controllo di Televideo
Per uscire dai menu
Aumento bassi/Woofer
Ricezione stereo/bilingue
Per visualizzare le informazioni su
schermo e per la funzione
iniziale/l’indice di Televideo
Per selezionare l’ingresso delle fonti
esterne
Per accedere alle pagine secondarie nel
modo Televideo
Per selezionare il modo
Menu su schermo
Preferenze per l'immagine
Visualizazzione widescreen
Tasti con le cifre
Per tornare al programma precedente
Per il modo Acceso/Stand-by
Per visualizzare Televideo
Nel modo VCR o DVD:
premere
m
per PAUSA
premere
w
per ESPULSIONE
premere
l
q
per SALTA RIAVVOLGIMENTO
premere
s
l
per SALTA AVANTI VELOCE
premere
r
per LETTURA
premere
p
per STOP
premere
q
per RIAVVOLGIMENTO
premere
s
per AVANTI VELOCE
Per cambiare la posizione dei
programmi e le pagine di Televideo
Per cambiare il volume
Quando vengono usati i menu, i tasti
con le frecce fanno spostare il cursore in
su e in giù, a destra e sinistra, sullo
schermo. Premere OK per confermare la
scelta fatta
Nel modo TV:
8/9
Visualizzazione dell’ora
Nel modo Televideo:
r
Per rivelare il testo nascosto
q
Per fissare le pagine desiderate
s
Per ingrandire la visualizzazione
di Televideo
8/9
Per selezionare una pagina mentre
viene visualizzata un’immagine
normale
Telecomando
Rimuovere il coperchio posteriore del telecomando per esporre lo scomparto batterie, ed assicurarsi
che le batterie siano inserite nel senso giusto. I tipi di batterie da 1,5 V adatte per questo
telecomando sono UM-4, AAA e IEC R03.
Non usare una batteria scarica o vecchia insieme ad una nuova, oppure batterie di tipo diverso.
Rimuovere immediatamente le batterie scariche per evitare che possano danneggiare lo scomparto
delle batterie in seguito alla perdita di acido. Eliminarle in un’apposita area a ciò designata.
Le prestazioni del telecomando deteriorano ad oltre cinque metri di distanza dal televisore, e con un
angolo maggiore di 30 gradi rispetto al suo centro.
Inserimento delle batterie e distanza di funzionamento del telecomando
Breve descrizione delle funzioni.

Italiano
94
Connessione delle apparecchiature esterne
Prima di collegare al televisore qualsiasi apparecchiatura esterna, spegnere tutti gli interruttori di
accensione.
Sul retro del televisore si possono collegare vari
apparecchi esterni; consultare a tal riguardo i
manuali di istruzioni di tutti gli apparecchi
connessi.
Si raccomanda di usare Scart 4 o Scart 5 per il decoder e
Scart 3 per il VCR.
Se si collegano apparecchiature S-VIDEO, impostare nel
modo corrispondente l’INGRESSO di EXT3.
Vedere pagina 106.
Se il televisore si commuta automaticamente per
monitorare le apparecchiature esterne, tornare ai
programmi televisivi normali premendo i tasti di
posizione del programma desiderato.
Per richiamare le apparecchiature esterne, premere
B
per selezionare EXT1, EXT2, EXT3, EXT4, EXT5, EXT6 o
RGB/PC.
OLTRE A QUELLI DELL’ANTENNA, SI RACCOMANDA
DI USARE CAVI SCART OGNI VOLTA CHE È
POSSIBILE.
Cavi dell’antenna:
Collegare l’antenna alla presa montata sul retro del
televisore. Se si usa un decoder* e/o un videoregistratore,
è essenziale che il cavo dell’antenna sia collegato al
televisore passando attraverso il decoder e/o il
videoregistratore.
Cavi Scart:
Collegare al televisore la presa INGRESSO/USCITA del
videoregistratore. Collegare al televisore la presa TV del
decoder. Collegare la presa SAT del videoregistratore alla
presa VCR del decoder.
Prima di eseguire la Sintonizzazione automatica
mettere in stand-by sia il decoder che il
videoregistratore.
Le prese fono montate accanto alle prese INGRESSO
COMPONENTI VIDEO servono ad accettare il segnale
audio sinistro (L) e destro (R).
È disponibile inoltre un’uscita audio fissa/variabile esterna
che consente di collegare un amplificatore hi-fi di tipo
adatto; assicurarsi però che l’opzione Diffusore del menu
Suono sia stata impostata su Spento.
IN
OUT
IN
OUT
retro del televisore
videoregistratore
decoder*
SAT
IN/OUT
VCR
TV
NON collegare
contemporaneamente
le apparecchiature ai
terminali dell’Ingresso 3
e a Scart 3 (EXT3).
!
*
Il d
ecod
er pu
ó
essere
un
ricevitore
sa
telita
re dig
ita
le o
q
ua
lsiasi altro
d
eco
d
er com
p
a
tib
le.
☛
SCART 5 (EXT 5)
SCART 4 (EXT 4)
SCART 3 (EXT 3)
INGRESSO 3 (EXT 3)
INGRESSO COMPONENTE VIDEO (EXT 1)
INGRESSO COMPONENTE VIDEO (EXT 2)
INGRESSO VIDEO
COMPOSITO (EXT 1)
INGRESSO VIDEO
COMPOSITO (EXT 2)

95
Italiano
Connessione di un computer
Lato sinistro del televisore
Computer
Cavo audio per collegare
il PC al televisore
(non fornito)
Adattatore di conversione
se necessario (non fornito)
Cavo RGB per il PC
(non fornito)
Connettore miniatura D-sub a 15 pin
Prima di collegare al televisore qualsiasi apparecchiatura esterna, spegnere tutti gli interruttori di
accensione.
Collegare il cavo per il PC dal computer al terminale
RGB/PC, sul lato sinistro del televisore.
PremereBper selezionare la modalità del PC.
Si possono visualizzare i seguenti segnali
VGA: 640 x 480, 60 Hz (VESA 480-60)
SVGA: 800 x 600, 60 Hz (VESA 600-60)
XGA: 1024 x 768, 60 Hz (VESA 768-60)
NOTA BENE
Alcuni modelli di PC non possono essere collegati a
questo televisore.
Per i computer con un terminale miniatura D-sub a 15
pin compatibile con DOS/V non è necessario un
adattatore.
Sui bordi dello schermo può apparire una fascia,
oppure alcune parti dell’immagine possono essere
oscurate. Ciò è dovuto all’intensità del segnale e non
rappresenta un malfunzionamento.
Quando viene selezionata la modalità del PC alcune
funzioni del televisore possono non essere disponibili;
appaiono in tal caso in grigio nelle liste dei menu e non
possono essere selezionate. Quando non viene
selezionata la modalità del PC le Impostazione PC
appaiono in grigio.
Informazioni sui segnali per il connettore miniatura D-sub
a 15 pin
Assegnazione dei pin
del terminale
RGB/PC
Pin N˚ Nome del segnale Pin N˚ Nome del segnale
1 Rosso 9 N. C.
2 Verde 10 Terra
3 Blu 11 N. C.
4 N. C. (
non collegato
) 12 N. C.
5 N. C. 13 Sincronizz. orizz.
6 Terra 14 Sincronizz. vert.
7 Terra 15 N. C.
8 Terra

Italiano
96
Connessioni e controlli
Se la spia luminosa di accensione è spenta, premere il
pulsante di accensione posto sotto l’angolo inferiore
sinistro del televisore per accendere l’apparecchio, poi
premere un pulsante con le cifre del telecomando per
visualizzare lo schermo acceso; ciò può richiedere
alcuni secondi.
Per porre il televisore in stand-by, premere il tasto idel
telecomando. Per visualizzare un programma televisivo,
premere nuovamente il tasto iod uno qualsiasi dei
tasti con le cifre. Possono passare alcuni secondi prima
che appaia l’immagine. Usare la modalità stand-by solo
per periodi brevi di tempo.
Per impostare il televisore bisogna ora usare i menu su
schermo. Premere il pulsante MENU del telecomando
per visualizzare i menu.
La barra dei menu in cima alle schermate mostra cinque
argomenti diversi rappresentati da simboli. Via via che
viene selezionato ciascun simbolo premendo il
pulsante So Rdel telecomando, appaiono sotto le
rispettive opzioni.
Per usare le opzioni, premere il pulsante Q del
telecomando per scorrerle dall’alto in basso e OK, So
R
per effettuare la scelta desiderata. Seguire le istruzioni su
schermo. Le funzioni di ciascun menu sono descritte
dettagliatamente nelle varie parti del manuale.
Attraverso le prese anteriori del televisore si può collegare un’ampia gamma di apparecchiature esterne.
Sebbene tutte le regolazioni e i controlli necessari per il funzionamento del televisore siano fatti usando il
telecomando, per alcune funzioni si possono usare invece i pulsanti montati sul televisore.
Per cambiare il volume, premere — j +.
Per cambiare la posizione dei programmi, premere
eeFff
.
Premere MENU e S,R, Q o P per controllare le varie
opzioni del suono e dell’immagine.
Premere MENU per finire.
Se si collegano apparecchiature audio monoaurali
all’EXT6, collegare la loro uscita audio alla presa
L/Mono del televisore.
Per selezionare l’Ingresso, premere Bfino a quando
viene visualizzato EXT6 come descritto a pagina 106. Il
televisore rileva il tipo di segnale automaticamente.
Per i particolari completi, consultare sempre il manuale
utente delle apparecchiature da collegare.
Nota: Inserendo la spina jack delle cuffie si silenzia il
suono proveniente da tutti gli altoparlanti.
Accensione Utilizzo dei controlli e connessioni
Pulsanti de
Accensione
ROSSA – Accesso
VERDE – Timer di
accensione impostato
INGRESSO 6
(EXT 6)
Premere nel centro
del pannello per aprirlo
Premere nel centro
del pannello per aprirlo

97
Italiano
Come sintonizzare il televisore usando
Impostazione rapida, e Ordinamento
dei programmi
Prima di accendere il televisore, mettere in stand-by ogni eventuale ricevitore e videoregistratore. Per
impostare il televisore usare i pulsanti del telecomando come spiegato dettagliatamente a pagina 93.
1
2
3
5
6
7
8
9
4
Press Q to highlight Language.
Premere il pulsante di accensione. Appare ora la
schermata Quick setup.
Selezionare la propria lingua usando il pulsante
So R
, poi premere OK.
Premere quindi So Rper selezionare il proprio
Paese, poi premere OK.
A questo punto dovrebbe essere stato selezionato
il proprio Sistema ma se è disponibile una scelta,
premere Rper selezionarlo fra quelli visualizzati.
Per iniziare la Sintonizzazione autom.
premere OK.
Ha inizio ora la ricerca di tutte le stazioni
disponibili. Con il progredire della ricerca la barra
orizzontale avanza lungo la riga.
Bisogna ora lasciare che il televisore
completi la ricerca.
Alla fine della ricerca il televisore seleziona
automaticamente la posizione 1 dei programmi.
L’immagine visualizzata può non essere chiara,
oppure il segnale può essere debole, per cui
l’ordine delle stazioni può essere cambiato
usando Ordinamento programmi che appare
nella schermata Impostazione veloce.
Premere OK per selezionare Ordinamento
programmi.
Mentre viene ora visualizzata la lista delle stazioni,
usare Q o Pper evidenziare la stazione che si
vuole spostare e premere R.
La stazione selezionata viene ora spostata a
destra dello schermo.
Quick setup
Select your language.
Language English
EXIT Watch TV Next
Sintonizzazione autom.
Ricerca
Canale : 6 Emittente :
EXIT Arresto
Impostazione veloce
Sinton. autom. eseguita
Premere OK per accedere
menu ord. Programmi
EXIT Guarda TV Success.
B/G – Europa Continentale, I– Regno Unito
D/K – Europa Orientale, L1, L2 –Francia
Ordinamento programmi
Prog. Canale Emittente
1 22 BBC1
2 25 ITV
3 28 BBC2
4 32 CH4
5 69
6 69
Ordinare Memorizz.
MENU Preced. EXIT Guarda TV
Usare Q o Pper passare in rassegna la lista fino
alla posizione preferita. Nel fare questo tutte le
altre stazioni si spostano per fare posto.
Premere Sper memorizzare lo spostamento fatto.
Ripetere quanto sopra come necessario, poi
premere EXIT.
Se il televisore non può essere collegato ad un
videoregistratore/ricevitore tramite un cavo Scart,
oppure se si desidera una stazione di un altro
sistema, usare la Sintonizzazione manuale per
assegnare una posizione al programma,
consultare pagina 98.

Italiano
98
Ogni segnale viene visualizzato sul televisore;
se non è il VCR, premere nuovamente Po Q
per ricominciare la ricerca.
7
Premere Rper selezionare Sistema ed usare
P
o Q cambiarlo (vedere, se necessario,
il punto 4 a pagina 97).
Premere poi Rper selezionare Ricerca.
Premere Po Q per iniziare la ricerca. Appare
allora Ricerca e il televisore visualizza il numero
dei canali.
Sintonizzazione manuale
Il televisore può essere sintonizzato manualmente usando Sintonizzazione manuale, come ad esempio se
il televisore non può essere collegato ad un videoregistratore/ricevitore tramite un cavo Scart, oppure per
sintonizzare una stazione di un altro Sistema (consultare pagina 97).
Programma: Il numero da premere sul telecomando.
Sistema: Specifico di certe aree. Vedere il punto 4 a pagina 97.
Sistema colore: È stato impostato alla fabbrica su Auto, e deve essere cambiato solo se si incontrano problemi, cioè
se viene usato un input NTSC da una fonte esterna.
Salto programma:*Significa che non è stato memorizzato niente o che la funzione di saltare il canale è ACCESA. Vedere
pagina 99.
Canale: Il numero del canale su cui trasmette l’emittente.
Ricerca: Ricerca in su e in giù di un segnale.
Sintonia fine manuale: Usata solo se ci sono interferenze/il segnale è debole. Vedere pagina 109.
Emittente: Identificazione dell’emittente. Usare i tasti Po Q e SoRper introdurre un massimo di sette caratteri.
Usare Po Q per evidenziare la posizione del
programma desiderato ad esempio per un
videoregistratore si suggerisce Prog. 0.
Premere MENU e selezionare il menu
IMPOSTAZIONI usando So R, evidenziare poi
con Q Sintonizzazione manuale e premere
OK per selezionarla.
Continua alla pagina prossima
Per assegnare al televisore la posizione di un programma per i segnali provenienti da un ricevitore e da un VCR, accendere il
ricevitore, inserire nel VCR un videonastro già registrato, premere LETTURA e sintonizzare manualmente.
Usare SeRper spostarsi lateralmente sullo schermo e selezionare una di queste opzioni di Sintonizzazione manuale.
1
2
3
4
5
6
Emittente
Programma Sistema
Sistema
colore
Canale Ricerca
Salto
programma
Sintonia fine
manuale
Sintonizzazione manuale
Prog. Sis. Canale Emittente
0 I 60 VCR
1 I 22 RAI UNO
2 I 25 RAI DUE
3 I 28 RAI TRE
4 I 32 RAI 24
5I 69
Seleziona
MENU Preced. EXIT Guarda TV
Sintonizzazione manuale
Ricerca
0 B/G A 60 0
Memorizz. MENU Preced. EXIT Guarda TV
Sintonizzazione manuale
Sistema
0 B/G A 60 0 V C R
Memorizz. MENU Preced. EXIT Guarda TV
IMPOSTAZIONI
Lingua Italiano
Paese Italia
Sintonizzazione autom. OK
Sintonizzazione manuale OK
Ordinamento programmi OK
MENU Preced. EXIT Guarda TV
Possono
essere
visualizzati
numeri
dei Canale
diversi
Premere OK per effettuare la selezione. Se il
programma è fra quelli saltati, prima di
memorizzarlo bisogna rimuovere Salto
programma.

99
Italiano
Sintonizzazione manuale
Prog. Sis. Canale Emittente
0 I 60 VCR
1 I 22 RAI UNO
2 I 25 RAI DUE
3 I 28 RAI TRE
4 I 32 RAI 24
5I 69
Seleziona
MENU Preced. EXIT Guarda TV
97
98
99
B
1
B
2DVD
B
3
B
4
B
5
0 VCR
Quando viene trovato il segnale del VCR,
premere Rper spostarsi su Emittente. Introdurre
i caratteri desiderati usando i tasti P, Q, Se
R
ad es VCR.
Sintonizzazione manuale continuazione
Salto dei programmi
Questo televisore è dotato di accesso
diretto ai canali introducendo i rispettivi
numeri, se sono noti. Selezionare nel Punto 3 la
schermata Sintonizzazione manuale. Introdurre il
Numero del programma, il Sistema e poi il numero
del Canale. Premere OK per memorizzare.
8
Premere OK per memorizzare.
Ripetere l’operazione per ciascuna posizione dei
programmi che si vuole sintonizzare, oppure
premere MENU per ritornare alla lista dei canali e
selezionare il numero successivo da sintonizzare.
Alla fine, premere EXIT.
Per assegnare un nome alle apparecchiature
esterne, ad es. DVD ad EXT2, premere Bper
selezionare EXT2, poi selezionare Impost. man.
dal menu IMPOSTAZIONI.
Premere Rper selezionare Etichetta ed introdurre
poi i caratteri desiderati usandoP, Q, Se R.
10
11
9
13
14
12
N
OTA BENE:
Premere MENU e ripetere dal Punto 2, oppure
premere EXIT.
Ciascuna posizione dei programmi deve essere
selezionata individualmente. Per impostare Salto
programma disattivato, ripetere la procedura
per ciascuna posizione.
La posizione dei programmi saltati non può
essere selezionata mediante P
f
(P) e Pe(Q)
o con i comandi anteriori del televisore, ma vi si
può tuttora accedere mediante i pulsanti numerici
del telecomando.
3
4
5
Usare Po Q per evidenziare la posizione del
programma da saltare, e premere OK per
selezionarla.
Premere Rper selezionare Salto programma.
Usare Po Q per attivare Salto programma,
poi premere OK.
Sullo schermo indica la posizione di un
programma saltato.
Per impedire di vedere certi programmi bisogna ‘saltare’ la loro
posizione e rimuovere il telecomando. I programmi televisivi
possono essere allora veduti nel modo normale utilizzando i
comandi anteriori del televisore, ma non si possono vedere
quelli delle posizioni saltate.
Salto dei programmi
Selezionare Sintonizzazione manuale dal
menu IMPOSTAZIONI.
1
2
Premendo OK in qualsiasi momento, sullo
schermo appare una lista di tutti i programmi e
tutte le apparecchiature esterne memorizzati.
UsarePe Q per evidenziare quanto desiderato,
e OK per selezionarlo.
Impost. man.
Etichetta
EXT2 ADVD
Memorizz. MENU Preced. EXIT Guarda TV
Sintonizzazione manuale
Emittente
0 B/G A 32 0 V C R
Memorizz. MENU Preced. EXIT Guarda TV
Sintonizzazione manuale
Salto programma : Acceso
1 B/G A 22 0 B B C 1
Memorizz. MENU Preced. EXIT Guarda TV

Italiano
100
MENU CARATT.
Televideo Autom.
Blocco funzioni Acceso
Livello della luminosità 16
Luminosità dello sfondo 0
Impostazione PC
MENU Preced. EXIT Guarda TV
Sintonizzazione automatica, Controlli generali,
visualizzazione dell’ora, blocco funzioni
Come usare la sintonia automatica
1
2
3
4
Premere Q per evidenziare Lingua e SoRper
selezionarla.
Usare Q per evidenziare Paese, poi SoRper
selezionare il proprio. Il televisore sintonizza ora le
stazioni del proprio Paese.
Premere Q per evidenziare Sintonizzazione
autom., poi premere OK.
Per impostare il televisore usando la
Sintonizzazione autom., premere MENU e usare
So R
per selezionare il menu IMPOSTAZIONI.
Bisogna ora lasciare che il televisore completi la ricerca.
Quando la ricerca è finita il televisore seleziona
automaticamente la posizione del programma 1. Può darsi
che l’immagine non sia ben chiara, per cui si può cambiare
l’ordine delle stazioni usando Ordinamento programmi,
consultare pagina 97.
B/G – Europa Continentale, I– Regno Unito
D/K – Europa Orientale, L1, L2 – Francia
5
A questo punto dovrebbe essere stato selezionato
il proprio Sistema, ma se è disponibile una scelta
premereSoRper selezionarlo fra quelli
visualizzati, poi premere OK.
IMPOSTAZIONI
Lingua Italiano
Paese Italia
Sintonizzazione autom. OK
Sintonizzazione manuale OK
Ordinamento programmi OK
MENU Preced. EXIT Guarda TV
Sintonizzazione autom.
Il settaggio precedente verra' cancellato!
Uscire senza effettuare cambiamenti.
Premere OK per avviare
Sistema B/G
MENU Preced. EXIT Guarda TV
!
Per selezionare la posizione dei programmi, usare i tasti
con le cifre del telecomando.
Per le posizioni dei programmi al di sotto di 10, fare
precedere da uno 0 la cifra desiderata, ad es. 01 per la
posizione del programma 1.
La posizione dei programmi può essere selezionata
anche usando Pf(P) e Pe(Q).
Per ritornare alla posizione del programma precedente,
premere ^^.
Per visualizzare le informazioni sullo schermo, ad es. la
posizione del programma, la modalità d’ingresso o il
segnale monoaurale/stereo, premere CALL.
Selezione della posizione dei programmi
La funzione di visualizzazione dell’ora consente di
visualizzare sullo schermo del televisore l’ora corrente
(di Televideo).
Premere
8/9
mentre viene vista una normale
trasmissione televisiva per vedere sovrapposta l’ora
trasmessa dall’emittente. La visualizzazione dell’ora
rimane sullo schermo per circa 5 secondi.
Selezionare Blocco funzioni dal MENU CARATT.
e scegliere Acceso o Spento usandoSo R.
Blocco funzioni disabilita i pulsanti anteriori del
televisore, ma si possono usare ancora tutti i pulsanti
del telecomando.
Blocco funzioni
Visualizzazione dell’ora
1
Quando Blocco funzioni è attivato, ogni volta che
viene premuto un pulsante del pannello anteriore del
televisore appare un messaggio di avviso. Dopo avere
spento l’apparecchio si può uscire da stand-by SOLO
usando il telecomando.
 Loading...