

Page 1

TOSHIBA
'
HIGH
Digital Stereo Colour Television
PERFORMANCE NlCAM
with
fastext
OWNER'S MANUAL
Page 2
You have bought a superb new colour television from Toshiba - one of the world's leading manufacturers of
quality home entertainment products.
If you follow the instructions in this booklet, your TV will give you many years' trouble-free enjoyment. Please
read the instructions carefully before you begin using your TV and, keep the booklet handy for future reference.
This set includes many of the latest features to bring you great pictures and sound. Do take time to read all about
them to help you get the very best from your TV.
And don't forget that Toshiba also makes a range of award winning video recorders with design and features
which perfectly complement our
The
Toshiba Corporation
TVs.
Founded in
electrical goods.
Toshiba has made more TV tubes than any other manufacturer in the world and was the first to introduce the
Flatter, Squarer Tube
the
standard TV format.
As well as its market-leading home entertainment products, the company has an amazing range of other business
interest's, from communications satellites to hydro-electric power plants. Toshiba equipment helps power Japan's
legendary Bullet Train and the company's medical division makes body scanners and other vital life-saving
equipment.
Nearly half the world's 1 mega-bit DRAM chips (the micro-chips which supply the brain power of most
computerised equipment) are made by Toshiba and the company's portable lap-top computers are the world's
number one best sellers.
It's this breadth of experience which helps keep Toshiba in the lead, and gives it's products the edge in technical
excellence, design and reliability.
1
Glossary of
QUAD!YL
BEAB:
Euro Connector:
1875,
the Toshiba Corporation is now the world's seventh largest manufacturer of electronic and
(FST). FST technology, which gives sharper pictures and improved colour, has now becomt
Terms:
:
High performance Nicam stereo giving a richer, deeper and fuller tone.
British Electrotechnical Approvals Board.
See Scart Socket.
Fastext:
FST:
Nicam:
PAL:
Programme Position:
Scart Socket:
Size of Screen:
Stand-by:
Text:
An improved text system providing easier and faster access to text pages via
coded keys on the remote control.
Flatter, Squarer Tube.
Nearly Instantaneous Companded Audio Multiplex.
A digital transmission system which gives near CD sound clarity on both stereo and
mono soundtracks when received by a Nicam TV or Nicam Video recorder. (Ensure that
your local transmitter is Nicam equipped).
Phase Alternating Line.
The numbered button assigned to a particular station or channel on the remote control.
60
Programme Positions are available on this television set.
A standard 21-pin socket which allows direct audio/visual connection - providing higher
picture and sound quality. For example, for direct connection from Video recorder or
Satellite decoder (also known as Euro connector).
Screen sizes are measured diagonally across the screen and quoted in centimetres.
Switches the set to 'Rest' mode to save power over short periods of time.
Teletext information obtained by direct page number entry.
UK
broadcast standard.
colour-
Page 3
GETTING STARTED
I
Introduction
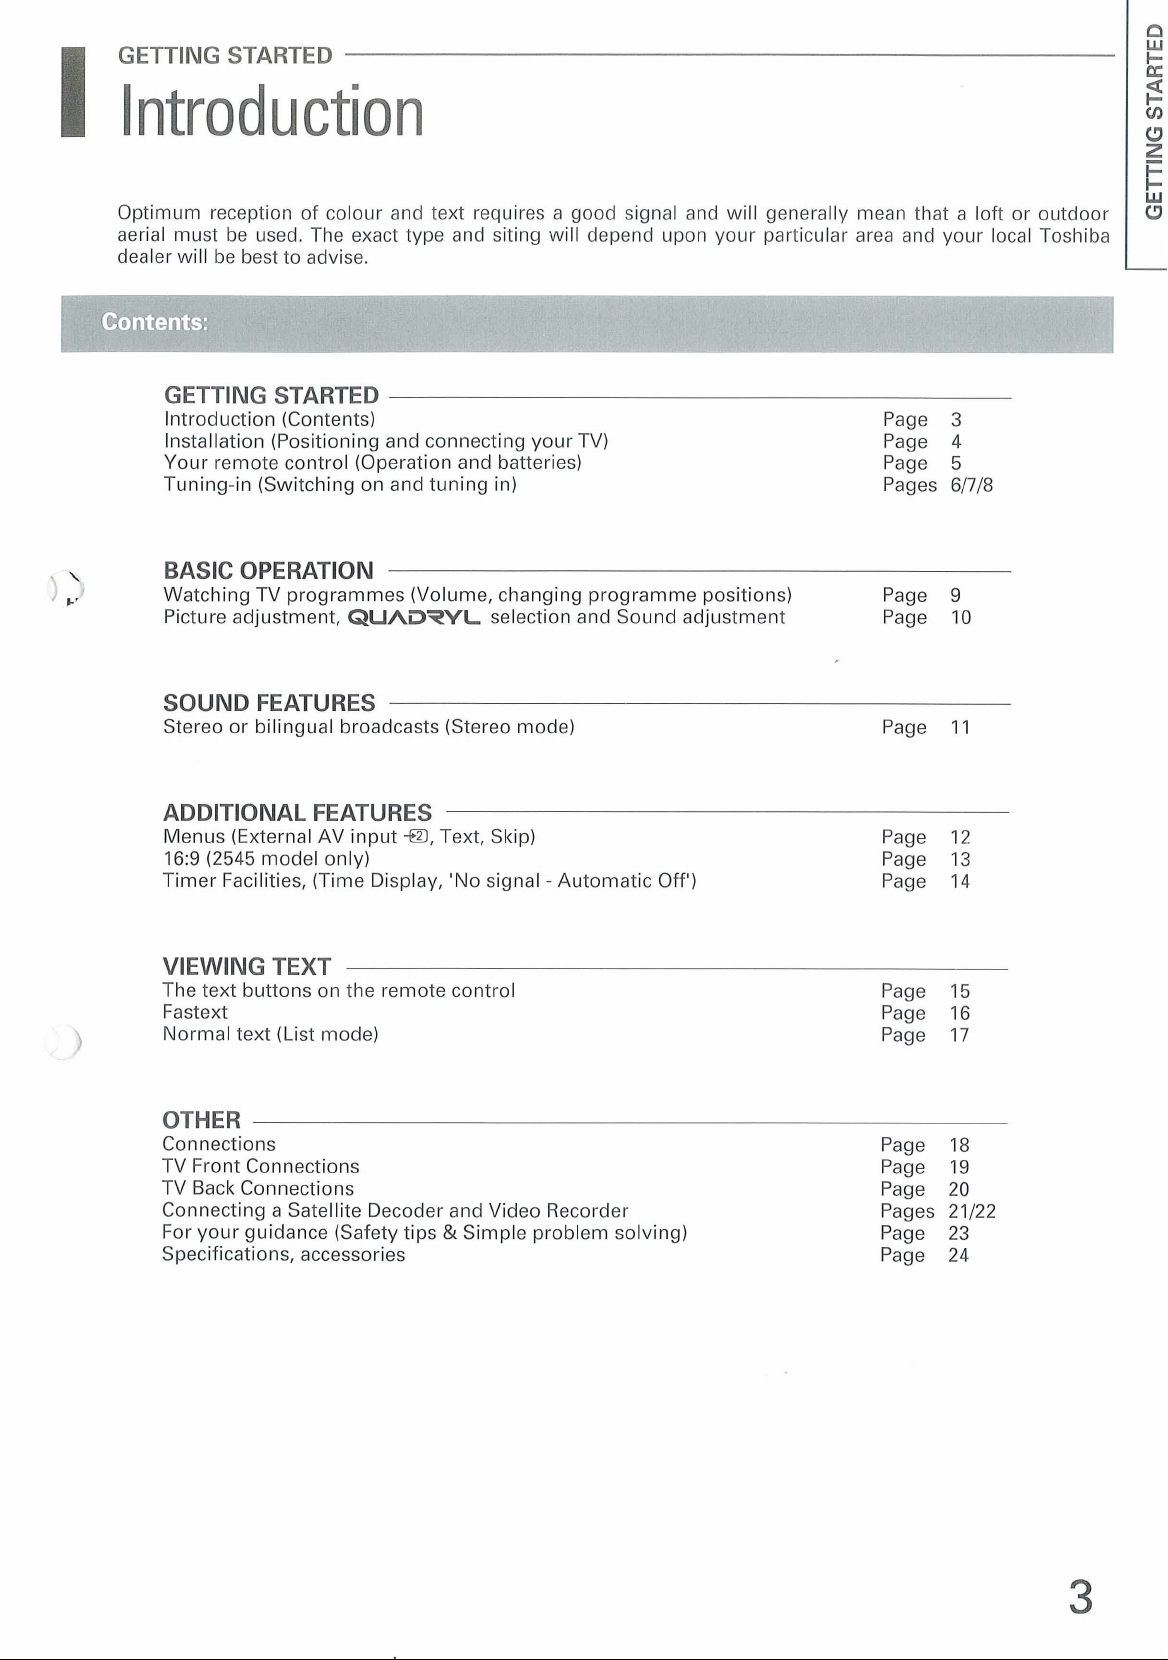
Optimum reception of colour and text requires a good signal and will generally mean that a loft or outdoor
aerial must be used. The exact type and siting will depend upon your particular area and your local Toshiba
dealer will be best to advise.
GETTING STARTED
Introduction (Contents) Page
Installation (Positioning and connecting your TV) Page 4
Your remote control (Operation and batteries) Page 5
Tuning-in (Switching on and tuning in)
Pages
3
61718
BASIC OPERATION
Watching TV programmes (Volume, changing programme positions) Page 9
Picture adjustment,
QUADqYL
selection and Sound adjustment Page 10
SOUND FEATURES
Stereo or bilingual broadcasts (Stereo mode) Page 11
ADDITIONAL FEATURES
Menus (External AV input
16:9 (2545 model only) Page 13
Timer Facilities, (Time Display,
-El,
Text, Skip) Page 12
'No
signal - Automatic Off')
Page 14
VIEWING TEXT
The text buttons on the remote control Page 15
Fastext Page 16
Normal text (List mode) Page
17
OTHER
Connections
TV Front Connections
TV Back Connections
Connecting a Satellite Decoder and Video Recorder
For your guidance (Safety tips & Simple problem solving)
Specifications, accessories
Page 18
Page 19
Page 20
Pages 21/22
Page 23
Page 24
Page 4
"
GETTING
STARTED
U
Installation
z
The following describes the initial set-up procedure in order to operate all of the features of your TV.
1
Always use a Scart lead to connect your video recorder, if
equipment see pages
The mains supply required for this equipment is 220v to 240v 50Hz. Never connect to a DC supply or any other power
source.
DO NOT cut off the mains plug from this equipment. If the plug fitted is not suitable for the power points in your home
or the cable is too short to reach a power point, then obtain an appropriate safety approved extension lead or adaptor
or consult your dealer. If nonetheless the mains plug is cut off, remove the fuse and dispose of the plug immediately,
to avoid a possible shock hazard by inadvertent connection to the mains supply.
If this product is not provided with a mains plug, or one has to be fitted, then follow the instruction given below:
IMPORTANT. DO NOT make any connection to the larger terminal which is marked with the letter
earth symbol
The wires in the mains lead on this product are coloured in accordance with the following code:
As these colours may not correspond with the coloured markings identifying the terminals in your plug proceed as follows:
I
or coloured green or green-and-yellow.
19
-
22.
BLUE: NEUTRAL BROWN:
it
has a Scart socket. For connecting additional
E
or by the safety
LIVE
I
N
The wire which is coloured blue must be connected to the terminal which is marked with the letter
The wire which is coloured brown must be connected to the terminal which is marked with the letter
When replacing the fuse only a correctly rated approved type should be used and be sure to re-fit the fuse cover.
The fuse fitted in this plug is
IF
IN DOUBT - CONSULT A COMPETENT ELECTRICIAN.
Your new Toshiba
In order to achieve the best possible performance from your new
follow these simple installation procedures:
To get the clearest picture and the best text operation we strongly advise that you use a roof top or loft mounted
aerial. Your local Toshiba dealer will be able to advise you accordingly.
Position your television so that no direct sunlight falls on the screen as this can impair the clarity of the picture.
Always ensure that there is sufficient space around the television for adequate ventilation.
Your new Toshiba
best sound performance from your
the screen. This will give you the full effects from the
QUADPYL
QUAD-
5A
and
is
approved by ASTA or BSI to BS1362.
TV is designed to give a superb sound response to a wide range of broadcasts.
QUADPVL
TV is designed to deliver a superb stereo effect both far and wide. To get the
QUADTYL
we suggest that you arrange the seating positions in front of
QUADPYL
speakers.
TV we recommend that you
or coloured black.
L
or coloured red.
Avoid excessively warm locations to prevent possible damage to the cabinet and components.
Do not expose your television to excessively moist or humid conditions.
Do not place anything on top of your
damage your
When cleaning the screen and cabinet: Always turn off the mains supply and remove the plug. Clean the screen
and cabinet with a soft, dry cloth. We recommend that you do not use any proprietary polishes or solvents on the
screen or cabinet as this may cause damage.
QUIWPYL
TV.
QUADYL
TV. The top surface is curved and any falling items could
Page 5
GETTING STARTED
Your remote control
I
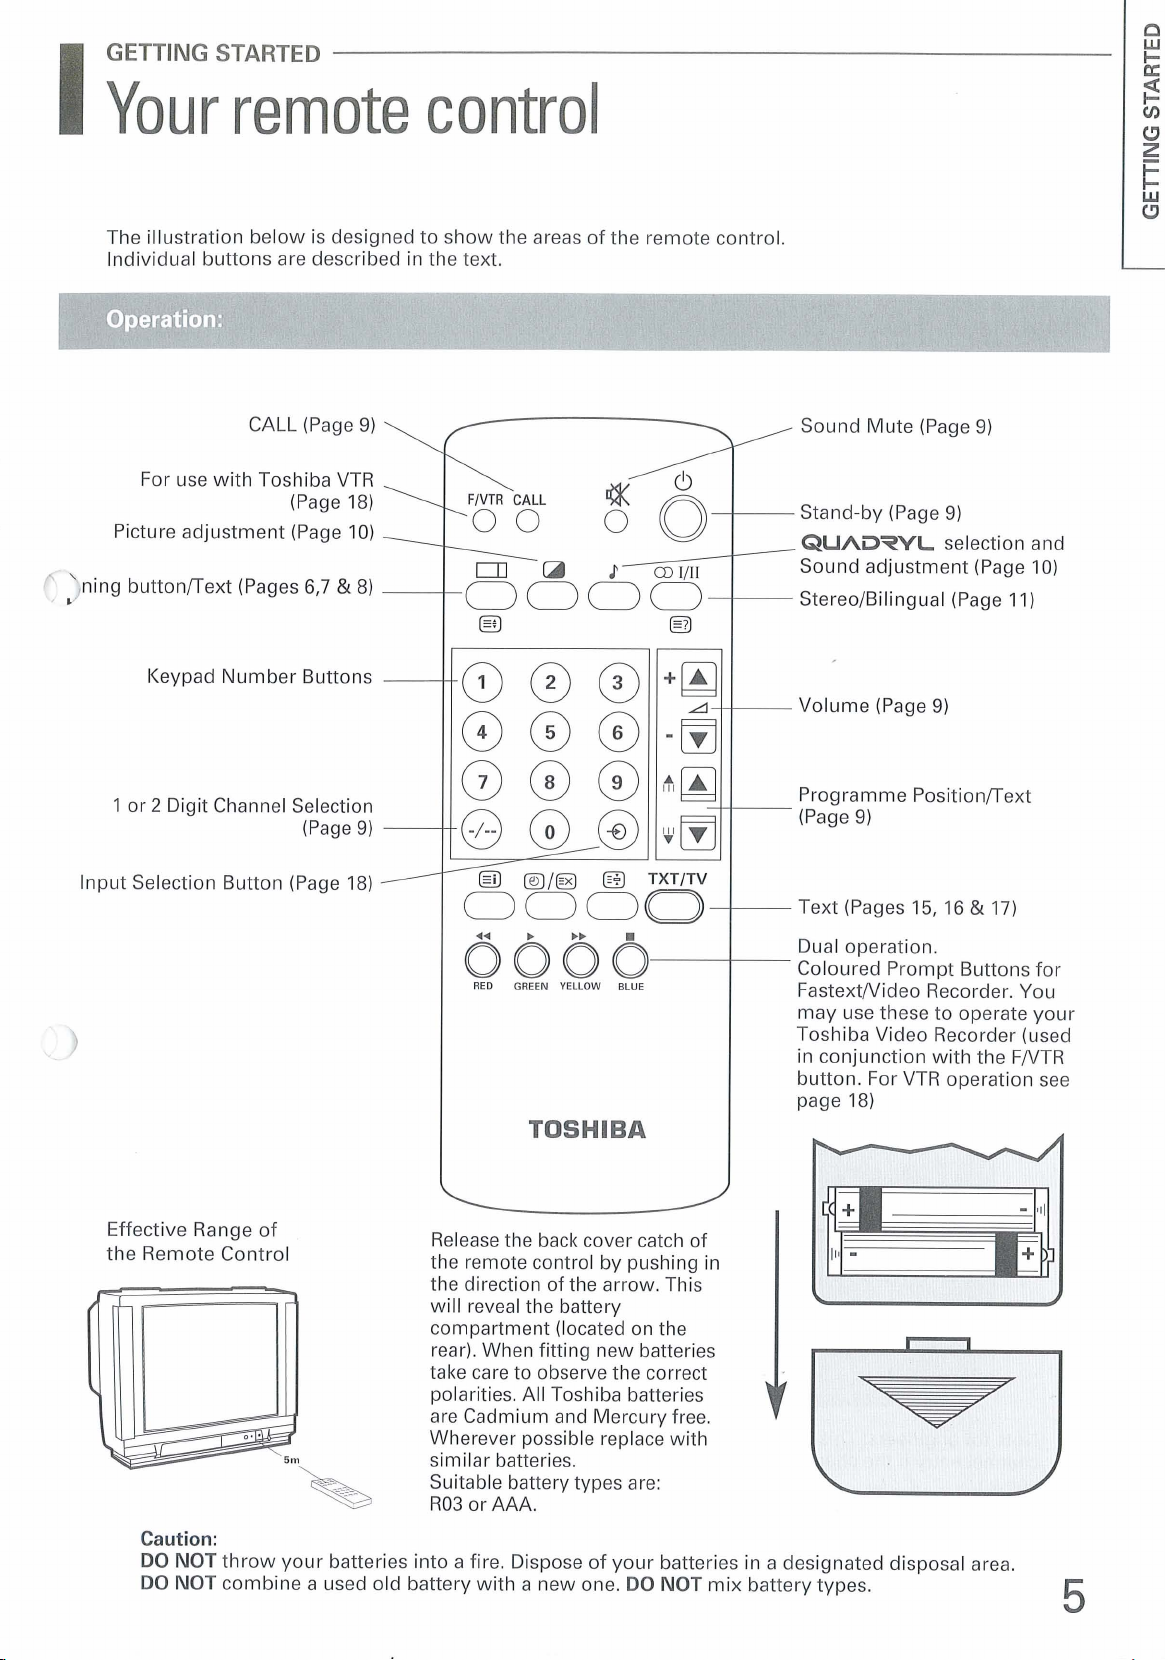
The illustration below is designed to show the areas of the remote control.
Individual buttons are described in the text.
E
CT
a
U
Z
-
Operation:
CALL (Page 9)
For use with Toshiba VTR
(Page 18)
Picture adjustment (Page 10)
Oning buttonnext (Pages 6.7
Keypad Number Buttons
1 or 2 Digit Channel Selection
(Page
Input Selection Button (Page 18)
y--=
&
8)
9)
3000
v
ll
al
Sound Mute (Page
Stand-by (Page 9)
QUADqVL
Sound adjustment (Page 10)
Stereo/Bilingual (Page 11)
Volume
Programme
(Page 9)
Text (Pages 15, 16 & 17)
(
Position/Text
9)
selection and
1
Effective Range of
the Remote Control
6066-
RED GREEN YELLOW BLUE
Release the back cover catch of
the remote control by pushing in
the direction of the arrow. This
will reveal the battery
compartment (located on the
rear). When fitting new batteries
take care to observe the correct
polarities. All Toshiba batteries
are Cadmium and Mercury free.
Wherever possible replace with
similar batteries.
Suitable battery types are:
R03 or AAA.
Dual operation.
Coloured Prompt Buttons for
FastextNideo Recorder. You
may use these to operate your
Toshiba Video Recorder (used
in conjunction with the
button. For VTR operation see
page
18)
FNTR
Caution:
DO NOT
DO NOT
throw your batteries into a fire. Dispose of your batteries in a designated disposal area.
combine a used old battery with a new one.
DO NOT
mix battery types.
5
Page 6
0
P
GETTING STARTED
2
c3
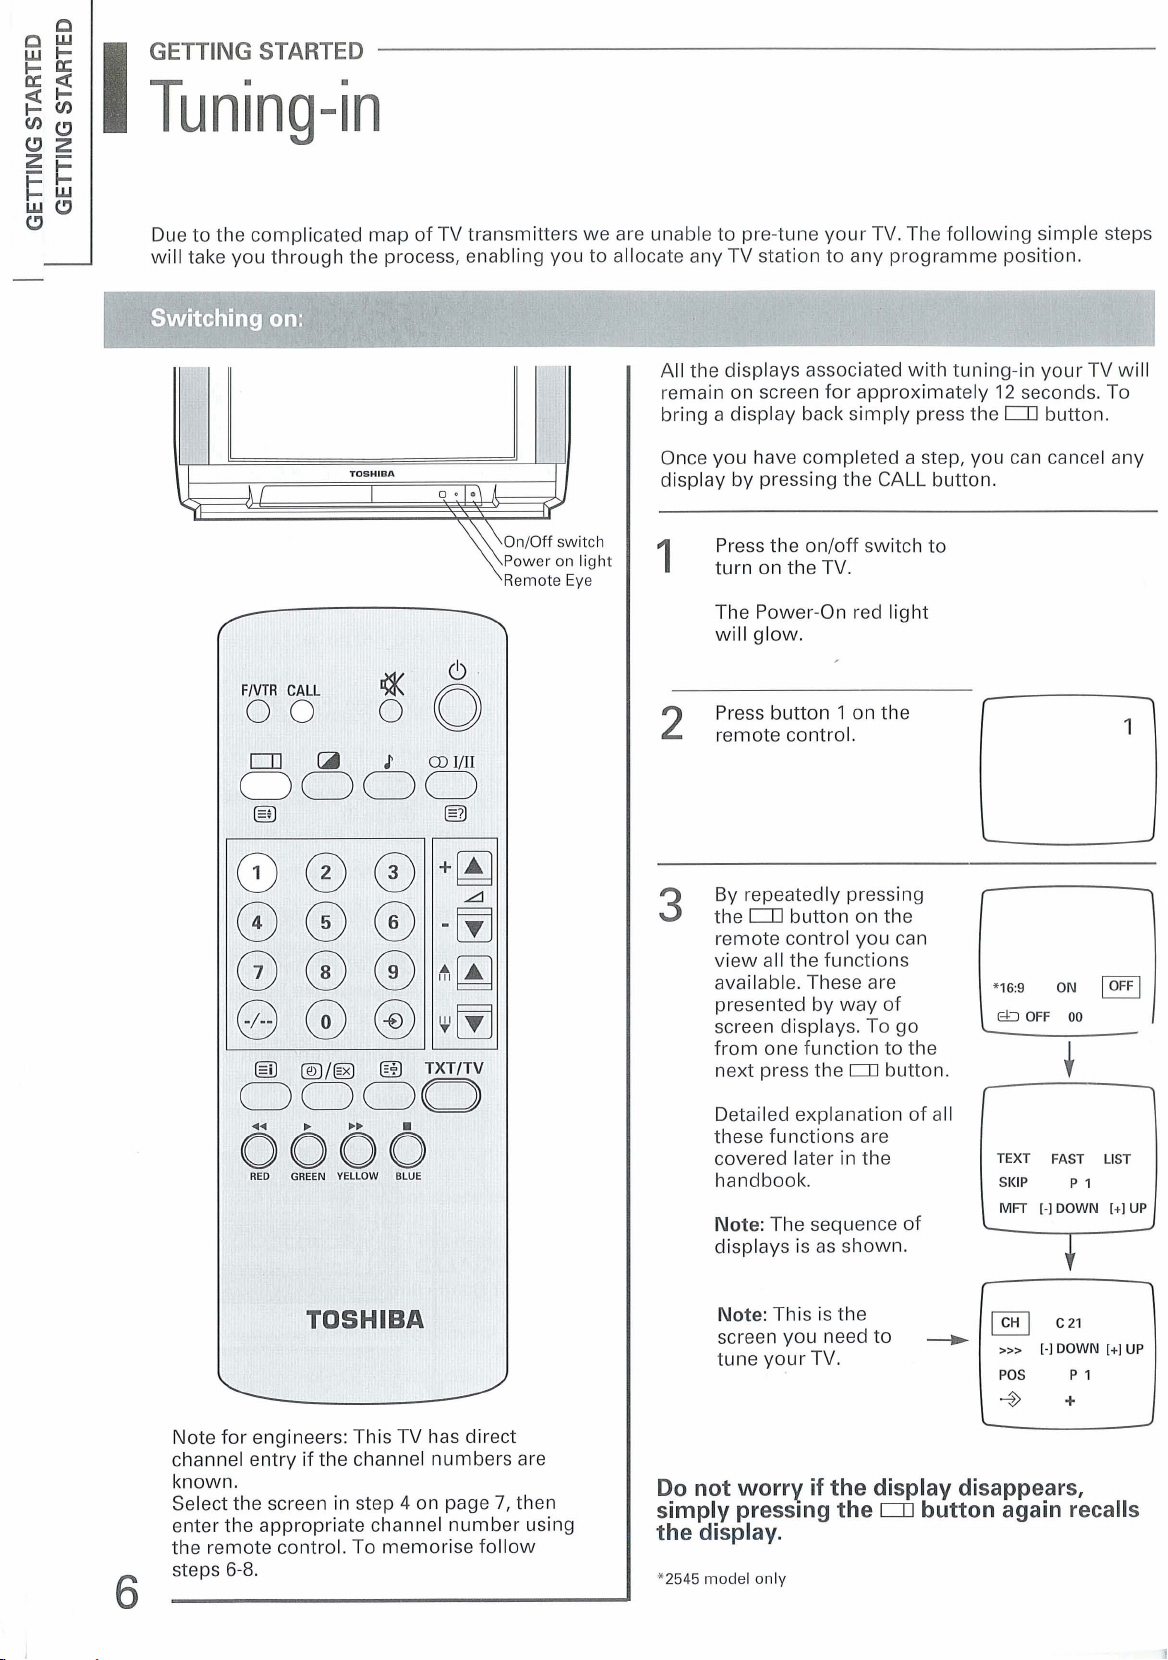
Due to the complicated map of TV transmitters we are unable to pre-tune your TV. The following simple steps
will take you through the process, enabling you to allocate any TV station to any programme position.
\0n/0ff switch
Power on light
Remote Eye
All the displays associated with tuning-in your
remain on screen for approximately
bring a display back simply press the
Once you have completed a step, you can cancel any
display by pressing the CALL button.
Press the onloff switch to
turn on the TV.
I
I
The Power-On red light
will glow.
Press button 1 on the
2
remote control.
12
seconds. To
Ul
TV
button.
will
Note for engineers: This TV has direct
channel entry if the channel numbers are
known.
Select the screen in step
enter the appropriate channel number using
the remote control. To memorise follow
steps
6-8.
4
on page
c
7,
then
By repeatedly pressing
the
remote control you can
view all the functions
available. These are
presented by way of
screen displays. To go
from one function to the
next press the
Detailed explanation of all
these functions are
covered later in the
handbook.
Note:
displays is as shown.
Note:
screen you need to
tune your TV.
Do not worry
simply
the display.
1
V545
model only
D
button on the
L:)
&l
OFF
00
D
button.
TEXT
The sequence of
This is the
B
-
POS
+
if
the display disappears,
presslng the D button again recalls
FAST
c21
[-l
DOWN
1
P
1
+
LIST
[+I
UP
Page 7
GETTING
I
Tuning-in
STARTED
NOTE:
To cancel the display press the
If the display disappears, simply press the D button to recall the display.
FlVTR
CALL
oo
66
CALL
button.
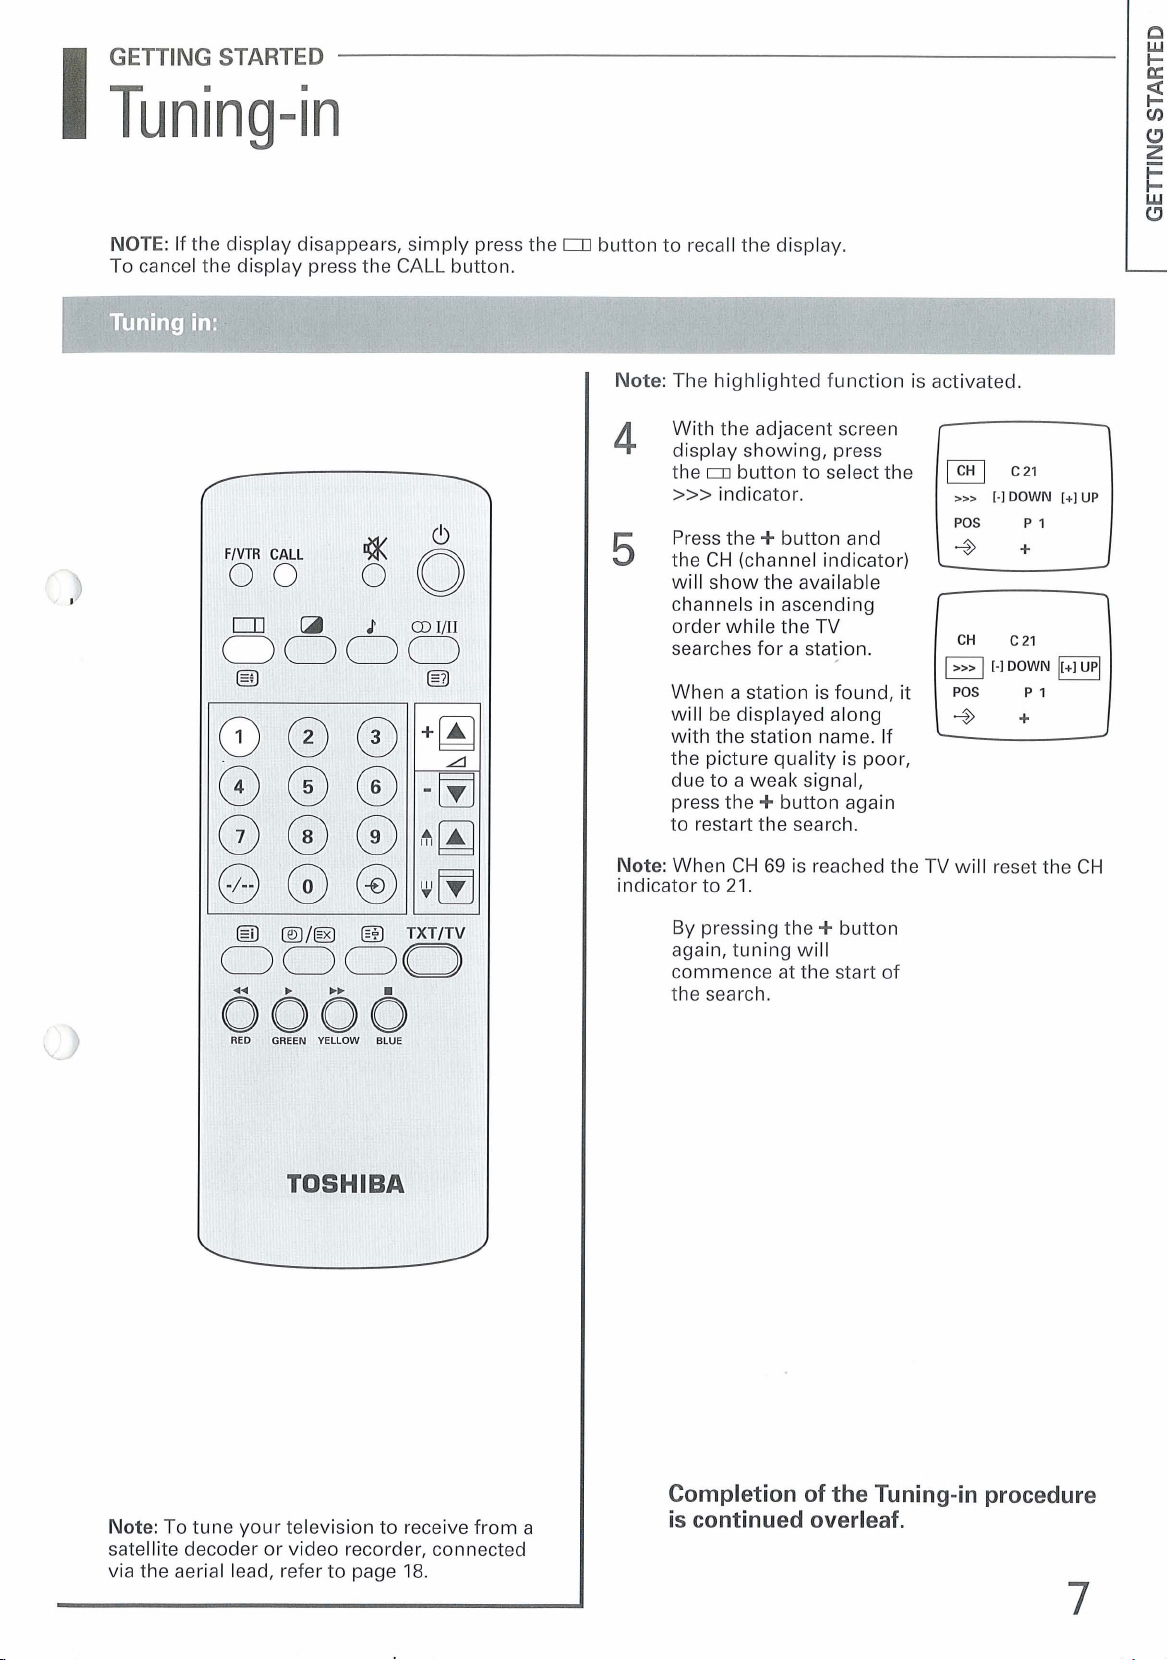
Note:
The highlighted function is activated.
With the adjacent screen
4
display showing, press
the
m
button to select the
>>>
indicator.
Press the
5
the
will show the available
channels in ascending
order while the
searches for a station.
When a station is found, it
will be displayed along
with the station name. If
the picture quality is poor,
due to a weak signal,
press the
to restart the search.
+
button and
CH
(channel indicator)
+
button again
TV
[-l
DOWN
m
K-
6666
RED 'GREEN YELLOW BLUE
Note:
When
indicator to
By pressing the + button
again, tuning will
commence at the start of
the search.
CH
21.
69
is reached the
TV
will reset the
CH
Note:
To tune your television to receive from a
satellite decoder or video recorder, connected
via the aerial lead, refer to page
18.
Completion of the Tuning-in procedure
is
continued overleaf.
Page 8
NOTE:
To cancel the display press the
If the display disappears, simply press the D button to recall the display.
FlVTR
CALL
0
0
CALL
button.
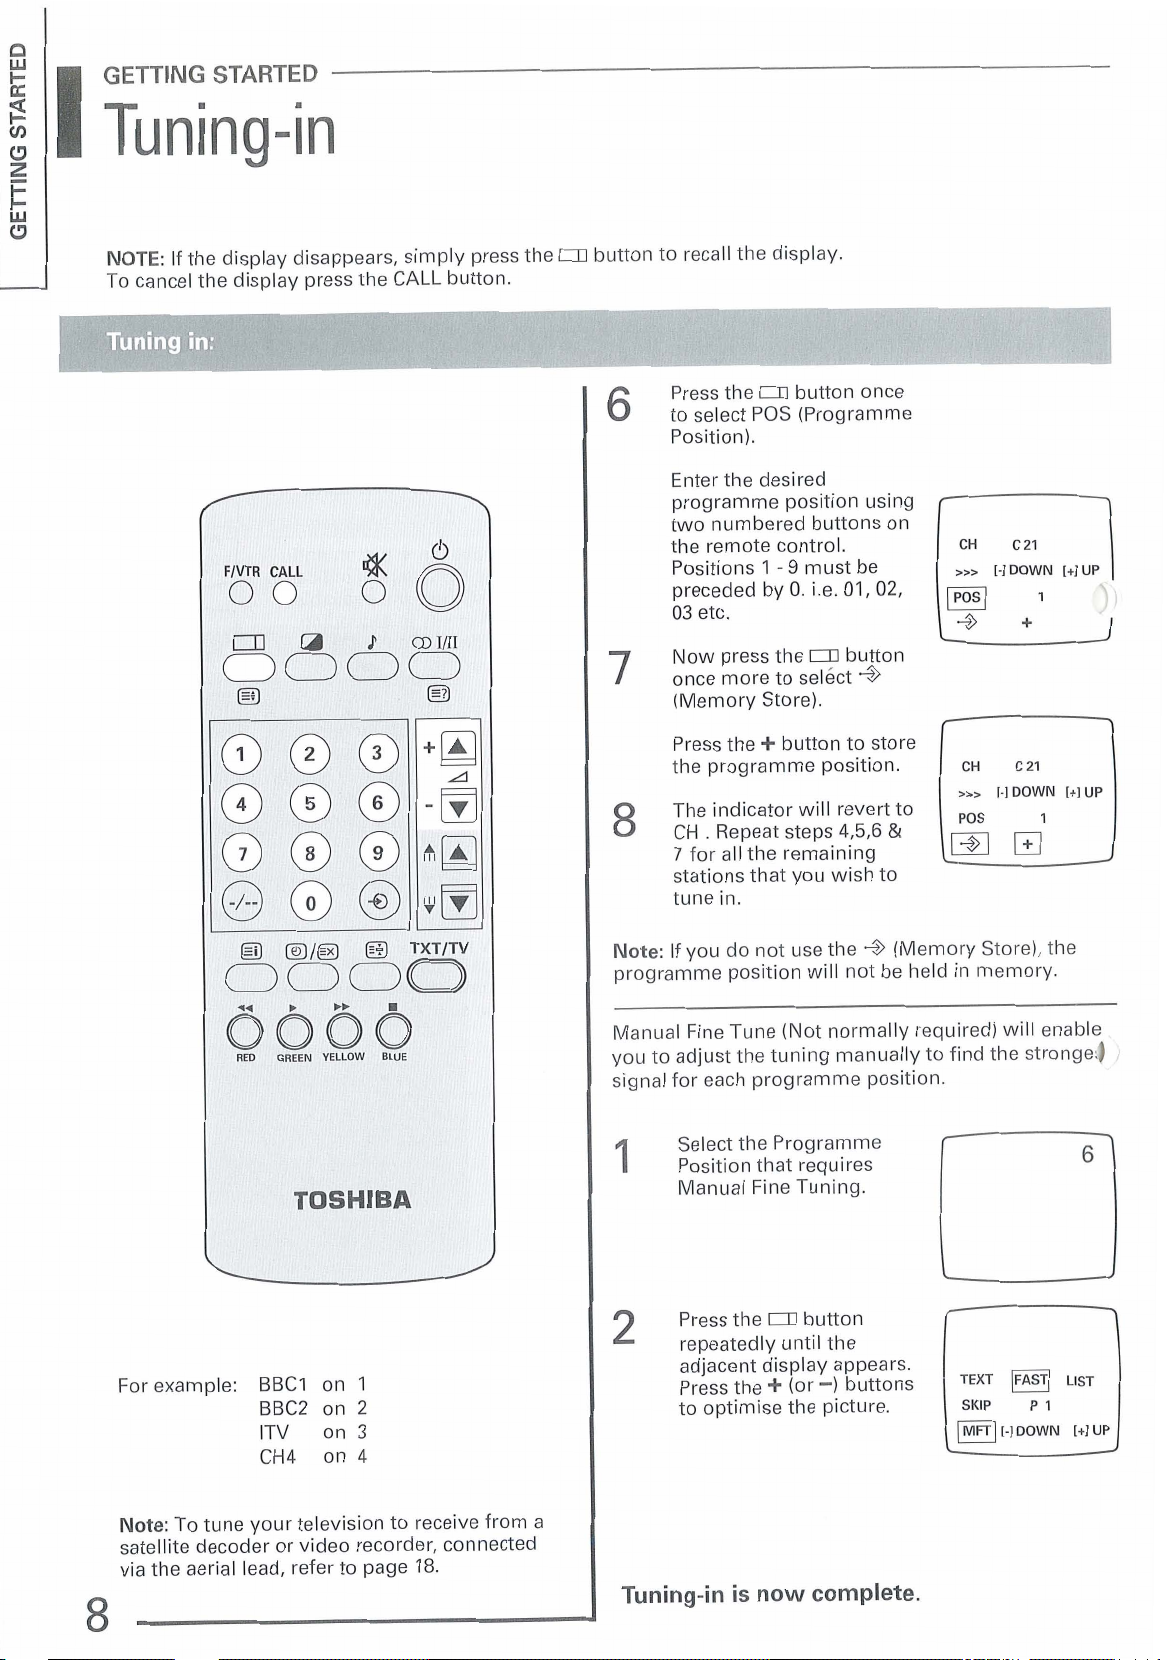
Press the D button once
6 to select POS (Programme
Position).
Enter the desired
programme position using
two numbered buttons on
the remote control.
Positions
preceded by
03
etc.
Now press the D button
once more to
(Memory Store).
Press the
the programme position.
The indicator will revert to
CH . Repeat steps
7
for all the remaining
stations that you wish to
tune in.
1
-
9 must be
0.
i.e.
01, 02,
selkct
*
+
button to store
4,5,6
&
>>>
+
CH
>>>
POS
[-l
[-l
DOWN
1
+
c21
DOWN
[+l
UP
1
)I
I
[+]
UP
1
RED GREEN
YELLOW BLUE
TOSHIBA
For example:
Note:
To tune your television to receive from a
satellite decoder or video recorder, connected
via the aerial lead, refer to page
BBC1
BBC2
ITV on3
CH4
on
on
on
1
2
4
18.
Note:
If you do not use the
programme position will not be held in memory.
Manual Fine Tune (Not normally required) will enable
you to adjust the tuning manually to find the
signal for each programme position.
Select the Programme
Position that requires
Manual Fine Tuning.
2
Press the D button
repeatedly until the
adjacent display appears.
Press the
to optimise the picture.
+
(or
-1
(Memory Store), the
buttons
TEXT
l==\
strongeJ
(FASTI
LIST
Tuning-in is now complete.
r
Page 9

BASIC OPERATION
1
Watching
Whilst all the necessary adjustments and controls for your new TV are made using the remote control,
you can alter the volume
on the front of the TV set. To open, simply press the top right of the panel.
tuned-in to enable you to use these buttons.
lV
d
and programme position
programmes
(see page 19)
using the
A
or V buttons located under the flap
Note: The set must be fully
Volume settings, changing programme positions using the remote control:
To alter the volume
To raise or lower the
1
Q
/
TXTITV
oooa
0606
RED
GREEN
YELLOW
BLUE
volume press the
or - buttons.
The display will show
the changes.
Alternatively:
The sound can be muted
2
simply by pressing the
a
button. The
symbol will appear on
the screen. To restore
the sound press the
button again.
I
To change programme position
1
TO select a programme
position press one of the
numbered buttons.
The programme position
will be displayed in the
top right corner of the
screen.
I
Alternatively:
2
YOU can change the
programme position by
using the button to
increase the programme
position by one or the
to reduce the programme
position by one.
a
d
+
a
1
Standby Buttoh
This allows you to put the set into standby
mode when leaving the TV unattended for
short periods of time. To return to TV mode
press the
buttons on the remote control.
6:
(I)
button, or any of the numbered
1
1
NOTE: To identify the current programme
For programme positions
below 10, press the
button to select
the desired programme
position number using
the numbered buttons on
the remote control.
For programme positions
above 9, press the
button to select
the desired
programme position
number (10-59).
position press the CALL button.
Press again to cancel the display.
2
digit
-.
-
-I--
Enter
-I--
-.
Enter
Page 10

BASIC OPERATION
I
Picture,
Adjustment may be made to the Contrast, Brightness and Colour by pressing the MENU button, located
under the flap on the front of your television. Pressing the MENU button repeatedly, will enable you to select
between Contrast, Brightness, Colour and NTSC tint control (video playback only). To adjust the levels press
A
A
the
or V buttons next to the menu button. (See page
QUADWL
and sound adjustment
19)
To adjust the Contrast, Brightness, Colour
1
Press the button
repeatedly to select
between the Contrast
Brightness
and NTSC tint control
(video playback only).
You can select your own
levels of Contrast,
Brightness and Colour.
Use the
increase the
-
button to decrease the
level. Any changes made
will automatically be
stored in memory when
the display disappears.
C),
+
button to
level,and the
a,
Colour
m
The top mounted
switched on or off to best suit the sound style of the
programme you are watching.
Sound
style
Best News Drama
uses Speech programmes Music
QUA33YL
QUADqYL
Off
A compact
directional
sound
(i.e., interviews) Films
speakers can be
QUADF!YL
On
Produces a fuller
more dynamic
sound stage
Sport
Note:
Input 2 Selection
(see adjacent screen)
is covered on page
To adjust the
Press the $ button
1
repeatedly to select the
adjacent display.
Qumqy~
12.
I(ii0i)ll~
E'
To switch the
System off press the
2
button. To switch on press
the
+
button again.
To adjust the Bass, Treble and Balance
1
Press the ) button
repeatedly to select
between Bass
and Balance
QUADPYL
3,
Treble
AA.
+
OFF
TO adjust the levels of
2
Bass
9:,
Treble
Balance
and - buttons.
Any changes made will automatically be stored
in memory when the display disappears.
AA
9;
and
use the
+
Page 11

SOUND FEATURES
1
Stereo or bilingual broadcasts
This
TV
set is designed to receive and automatically select all Nicam transmissions.
operation and displays which accompany stereo broadcasts.
Nicam broadcasts can be in either Stereo or Mono.
The following describes the
If Nicam broadcasts are transmitted the
symbol will appear in the upper right corner of the
screen, after a few seconds the display will
disappear. The display will reappear each time
you change programme positions, provided that
the broadcast is in Nicam.
Note:
Nicam broadcasts can be in stereo or mono.
Some common problems with Nicam reception:
1
Your local transmitter has not been upgraded
for Nicam e.g. No stereo indicator appears.
2
The original soundtrack of the film etc. was
recorded in mono. Note: Nicam indicator
appears but sound is in mono.
Note:
For Nicam information please refer to the
TV programme magazine or text pages for your
area.
FIVTR
CALL
00
0"dt
CD
To select
2
To select bilingual mode (when transmitted)
stereofmono mode
a11n
or
a1111
button
CD/I,CD/II
CD111
for
V
for
button
CD/I,CD/II
Press the
repeatedly, the
and V symbols appear
alternately in the lower
part of the screen.
Select
CD11
Nicam sound, or
mono. (Non-Nicam
signals or areas of poor
Nicam reception)
Press the
repeatedly, the
and
v
symbols appear
alternately in the lower
part of the screen.
F
F
Bilingual transmissions are rare. If bilingual
broadcasts are transmitted the
displayed.
1111
symbol will be
Select
CD111
for normal mono. (this has
the same effect as for
language
Symbol Soundtrack
CDR
a111
V
CD11
for language
for language 2 or
1).
Stereo
Stereo
Mono
v
1
Bilingual
Language
Language
Language
1,
,E
1
2
1
Page 12

ADDITIONAL FEATURES
1
MENU'S
In addition to the screen displays already discussed, the following pages cover the additional features of
your new Toshiba TV.
a2
enables the selection of the type of video
recorder to be connected to the number
socket. The [S] sets up the television for S-Video, the
FIVTR
CALL
0 0
[AV] sets the television for standard video recorders.
-
To select
1
Press the 0 button
repeatedly to bring up the
adjacent display. Press the
A
select the required input
signal for
External AV Scart
+
(or
-1
buttons to
-2.
El2
2
scart
Remember:
recorder to Scart 2.
Note:
connections.
To select TEXT system
1
2
To skip a channel
(Repeat for all programme positions to be skipped)
Only connect your S-Video
See pages 20,21 and 22 for
Press the D button
repeatedly until the
adjacent display appears.
To change between FAST
(Fastext) and LlST (Normal
text) use the
See pages 15-17 for details
of TEXT operation.
A
+
button.
PI
SKlP
m
SK~P
MFT
PI
LIST
P
1
1-1
DOWN I+]
FAST
P
I
[-]DOWN [+I
U?'
UP
The Skip feature enables you to prevent certain
programme positions from being viewed.
For example, if you are going out for the evening
and you do not wish your children to watch a
certain film etc., you can skip the programme
position and take the remote control with you.
The
TV
will function normally, using the controls
on the front of the
the skipped programme position.
TV
but the set will not show
12
To turn the SKlP function
1
on or off, use the remote
control to select the
programme.position
number to be changed.
Press the
repeatedly until the
adjacent display appears.
Press the
turn the SKlP function on
or off.
D
A
button
+
button to
TEXT
FAST
lsKlpl
MFT
1-1 DOWN [+l
TEXT FAST
ISKIP(
XPI
MFT
[-l DOWN [+l
LIST
P1
UP
LlST
UP
Page 13

ADDITIONAL FEATURES
1
1619
This feature has been added for programmes which are transmitted in the wide screen format.
(2545
model
only)
Your new Toshiba TV is capable of showing TV
broadcasts in
Screen
Most feature films are shot in wide screen
(16:9) format, which is then compressed at the
studio. With the growth of satellite broadcasts,
more and more films are broadcast in Wide
Screen format.
6
if you view a Wide Screen broadcast in Normal
(4:3) mode the aspect ratio (height compared to
width) will be incorrect.
The aspect ratio of the transmission can be
corrected by a feature known as picture
compression. When viewing a transmission in
this mode the images on the screen are
restored to their normal proportions. Black bars
will appear at the top and bottom of the screen.
NOTE:
outside the viewing area, this is normal.
There could be interference lines
(16:9).
2
formats, Normal (4:3) and Wide
To alter aspect ratio
Press the
repeatedly to bring up
the adjacent display.
Press the
select
The adjacent display
shows normal format
viewing a wide screen
transmission.
D
A
16:9.
button
+
button to
L]
Eb
OFF
00
E!3
OFF
00
FIVTR
CALL
loo
38
By pressing the
button the aspect ratio is
altered and the images
are restored to their
normal proportions.
Viewing a normal
transmission whilst in
16:9 format will result in
the images being
reduced as shown in the
adjacent display.
To revert to normal 4:3
format, simply press one
of the numbered buttons
on the remote control.
A
+
Page 14

ADDITIONAL FEATURES
Timer Facilities
I
The Timer is especially useful if you want the television to turn itself to standby after a selected period of time
30,60,90 or 120 minutes. For example: If you want the set to turn itself to standby in 30 minutes time
ie
follow the procedure below.
To select the
Press the D button to
1
bring up the adjacent
display. Press the
button to select
(Timer).
set), 30,
Note:
To return the set to TV lode after the timer
has operated press either the
numbered buttons on the remote control.
1
*2545 model only
Off
Timer
D
ELI
Press the
repeatedly to select
between 00 (no
minutes.
/1+
60,90 and 120
button
OFF
time
0
button or any of the
This sets incorporates a 'No Signal
feature which will turn the TV to standby
approximately
closes down.
15
minutes after the broadcast station
6606
RED GREEN YELLOW BLUE
-
Automatic
Off'
To select the Time Display
If you press the
button whilst watching
a normal TV broadcast,
you will see
accurate time display
appear in the top right
corner of the screen.
ie 6.25 and 52 seconds
a
very
Q/@
Page 15

VIEWING TEXT
The text buttons on the remote control
Below is a introduction to the text buttons on your remote control and their functions.
Please Note:
It
is not possible to change programme positions whilst in text mode.
4
~t
B"ldawantedrI
times
it
is convenient
/B
TXTITV
TXTITV To display a
a
page of text:
Press the
to display the initial
page. Press again to
superimpose the text
over a normal broadcast
picture. Press again to
return to normal
mode.
Q
Press the O button to
call up the index page
for the subject area you
are viewing. If you are
viewing a section index,
by pressing the
button again you will
see the general index.
=A
-v
0
Press the Q button
once to enlarge the top
half of the page, press
again to enlarge the
bottom half of the page.
Press again to revert to
the normal size.
TXT/TV
button
N
To display
an index page:
Q
To enlar e the
text disp ay size:
B
to hold a page of text.
Press the B button and
the word
appear in the top left of
the screen. Press again
to release.
Q/@
viewing a normal,
picture:
If, whilst in text mode,
the
pressed, a normal picture
selection can be entered
and the
its presence by
displaying a box with the
selected page number.
Press the
to view the page.
To display news flashes:
To view news flashes as
they are broadcast,
select the news flash
page for the particular
text service (see the
index page of text
service). Press the
button. The news flashes
will be displayed as and
when they are
broadcast. Press the
@l/@
the display. Note: It will
not be possible to
change programme
position whilst in this
mode, you will have to
press the
to cancel the text first.
Q
Some pages cover
topics such as quizzes
and jokes. To discover
the solutions press the
Q
HOLD
TO
page select whilst a
@l/@
button.
button is
N
will indicate
TXTITV
button to cancel
TXTITV
To reveal
concealed text:
will
button
Q/@
button
mi
lFaI,:
0
0
GREEN,
YELLOW,, BL~E~!'
b
'
,
.
D,='
,,
i
6;.i
X
1
,
I;;/
tlT.
,F
1)
1,;
.;l
l
l
..
Page 16

VIEWING TEXT
Fastext
Fastext is a method of viewing text pages by related subjects. The subject areas are grouped by the broadcast
studio so that different classifications are presented to you. This is done using coloured prompts. There are
many different areas covering a wide variety of topics.
When you first select text you see an index
page which briefly outlines the main subject
areas and their relevant pages.
To access any given topic press the relevant
coloured prompt button.
Alternatively, you can access any text page by
3
simply entering the appropriate
number using the numbered buttons on the
remote control.
To advance to the next page of text press the
;)i
button, to go back to the previous page of
text press
This will enable you to advance through the
pages without having to enter each
page number.
the. button.
FlVTR
CALL
digit page
3
digit
Press the
to select Text mode. The
subject areas are
displayed along the
bottom of the screen and
are printed in
GREEN,
BLUE. To select one of
the subject areas simply
press the corresponding
button on the remote
control.
If you press buttons in
quick succession there
may be a delay before the
page changes.
TXTITV
YELLOW and
button
RED,
f
SPORT
'1
m
tioobo
,
Q
RED GREEN YELLOW BLUE
Note: If when viewing text, the display is to one
side, adjustment can be made using the picture
centring control as described on page
0
CO
1/11
Q
20.
FOOTBALL CRICKET
G.
PRIX
SWIMMING
Page 17

VIEWING
TEXT
Normal text
When you first select TEXT you will see an
index page which briefly outlines the main
subject areas and their relevant page numbers.
You can access any text page by simply
3
entering the appropriate
using the numbered buttons on the remote
control.
A feature of this set is that you can programme
up to four of the most frequently used text
pages. For example: If you use teletext to see
)
'
what's on
hold these pages in memory. So each day
whenever you select TEXT, you will be able to
view these pages almost instantly.
In addition you can programme the set to
display the same page each time you switch
the-TVO~. This could be a complete index
page, a horoscope page etc.
All of these options are available for each
programme position. For example: You can
pre- select an initial page for the teletext service
on BBC
SO
on.
TV
you can programme the set to
1,
a different initial page for BBC2 and
digit page number
(LIST
mode)
Press the TXTITV button
1
to select TEXT. Enter the
required
number using the
numbered buttons on
the remote control.
2
TO programme the set
to hold
memory.
Select the
by pressing the GREEN
button on the remote
control.
Enter the first page
number and then press
the GREEN prompt
button. The page
number in the lower
right corner of the
screen will appear in
purple. Repeat for each
of the desired four
pages.
4
3
digit page
pages
in
LlST function
ROTATE
ROTATE
U
LIST
LIST
INITIAL
INITIAL
FIVTR
CALL
00
6066
RED GREEN YELLOW BLUE
66
3
TO view the selected
pages press the RED
button for ROTATE.
4
TO pre-programme an
initial page.
Select the
function
YELLOW coloured
button on the remote
control unit.
The numbers in the top
left corner of the screen
will appear as
red. Enter the required
digit page number. As
you key in the desired
initial page, for example
Page
will replace the
INITIAL
by
220,
the numbers
pressing the
P***
in
3
P***.
100
TELETEXT
DATE
100
m
ROTATE
U,-
220 TELETEXT
P***
LlST
INITIAL
TELETEXT
nL
Page 18

OTHER
Connections
I
These sets have two
enable you to connect a wide range of audio and
video equipment (see page
If your auxiliary equipment does not have a Scart
socket. Connect the video, satellite decoder etc.
to the TV via the aerial socket.
To tune your TV to a video
decoder, press the 'Power On' button and either
play a pre-recorded tape (on the video recorder)
or simply leave the satellite decoder in
Press the D button on the remote control
repeatedly until the
Press the
When the playback or satellite programme is
found, assign your chosen programme
position(s). (Full details on tuning-in are to be
found on pages
If your video recorder is made by Toshiba, you
will be able to use the Coloured prompt buttons
as follows:
Press the
following:
+
button to commence the search.
FNTR together with one of the
RED
GREEN
YELLOW
BLUE
0
21
pin Scart sockets which
20,21
recorder/satellite
>>>
symbol is highlighted.
6,7
and 8 of this handbook.)
for REWIND
for
for FAST FORWARD
for STOP
for
and 22).
P
LAY
STANDBY (Video)
standby.
Automatic Selection Via Scart
For easier opration this
1
television will
automatically select
pictures and sound from
auxiliary equipment,
when they are used,
provided that they are
-Q
butt& to
2)
scart
eiample:
-Q
-2
or
or input
-63
button
connected via a
lead, and that the
auxiliary equipment has
this feature. For
Video recorders in
playback mode.
To return to TV stations
after automatic selection
has taken place, simply
press either the
button, or the desired
programme position
button.
If the TV does not switch
over automaticallv.
press the
select between input
(Start
l),
input
-2s (Scart
a3.
Press the
to return to TV mode.
-El1
1
r
I
f
4
Page 19

OTHER
TV
I
For your convenience you can now make connection of camcorders, computer games etc. much more easily.
These are accessible through the sockets located behind the flap on the front of the TV set. To open, simply
press the top right of the panel.
Front Connections
S-Video Camcorder
Computer/games
Camcorder
----
Note:
Picture Centring Control.
If when using a computer the display is to one
side see page
20.
',,,
Whilst all the necessary adjustments and controls for
your new TV are made using the remote control, the
buttons on the front of the TV may be used as set out
below.
TO alter the volume press
1
2
A
V
the
TO alter the programme
position press the
A
buttons.
or A buttons.
8
V
or
n
U
Pressing the MENU
1
button repeatedly, will
enable you to select
between Contrast
Brightness
and NTSC tint control
only).
0,
(video playback
(3,
Colour
m
............
IIIIIIIIIII
..........
11111111111
..........
......
I..
...............
To adjust the levels press
the
A
A
2
next to the menu button.
or V buttons
19
Page 20

OTHER
W
I
The diagram below illustrates some of the possible connections for auxiliary equipment. Please refer to
pages 21/22 or the relevant handbook for further details.
Satellite receiver
Satellite decoder
Back Connections
Laser disc
Camcorder
Picture Centring Control
The picture centring control is factory set and
should need little or no adjustment, however, if
when viewing text or using a computer the
display is to one side, adjustment to a central
position can be made using this control.
Video recorder
S-Video recorder ot
2nd Video recorder
One Shot Memory
When you connect and switch on a Satellite
Decoder
you may discover that the TV automatically
switches over to give priority to auxiliary
equipment. To reset the TV simply press the
desired programme position button. To recall the
auxiliary equipment, press the
andlor Video Recorder via a scart lead,
-@.
S-Video
Camcorder
Page 21

OTHER
Connecting satellite decoder/video recorder
Shown on these two pages are some basic connections for other equipment. If your particular 'Set-up' is not
shown, please contact your local dealer, who will be able to advise you accordingly. For the best results we
recommend that you use Scart connectors whenever possible.
4
*RF
CABLE
I
\
TELEVISION
"SCART
I
"SCART
1
LEAD
LEAD
To connect a satellite decoder with
video recorder with
1
on your television.
Connect the Aerial1R.F. Cable as shown
1
opposite.
Connect the Scart leads as shown.
2
Scart sockets and then to Scart
l2
This configuration will now enable you to
3
record directly from the Satellite Decoder in
stereo (if your equipment has this facility).
1
Scart socket to a
I
"RI
CABLE
I
I
VIDEO RECORDER
*RF
CABLE
\
*
Not supplied with this television.
Full specification Scart leads are required.
SATELLITE DECODER
*SCART
TELEVISION
LEAD
1
To connect a satellite decoder with
1
a video recorder with
television.
Connect the Aerial1R.F. Cable as shown
1
opposite.
Connect the Scart leads as shown.
Scart socket to your
Scart socket and
2
This configuration will now enable you to
3
record from the Satellite Decoder but will not
give a stereo soundtrack on the recording.
Page 22

OTHER
1
Connecting satellite decoderlvideo recorder
Connecting a Satellite DecoderIVideo Recorder:
SATELLITE DECODER
'RF
CABLE
'RF
CABLE
1
I
TELEVISION
'SCART
LEAD
I'SCART
LEAD
To connect a satellite decoder with
a video recorder with
1
on your television.
Connect the
1
opposite.
Connect the Scart leads as shown.
1
Scart socket and then to Scart
Aerial1R.F. Cable as shown
2
I
This configuration will now enable you to
record directly from the Satellite Decoder in
stereo (if your equipment has this facility).
2
Scart sockets to
I
I
'RF
CABLE
I
RF
CABLE
\
*
Not supplied with this television.
Full specification Scart leads are required.
SATELLITE DECODER
VIDEO RECORDER
]
%CART
*SCART
LEAD
LEAD
To connect a satellite decoder with 1 Scart socket and
a video recorder with
your television via a switch.
Connect the
1
opposite.
Connect the Scart leads as shown.
1
Scart socket to Scart 1 on
Aerial1R.F. Cable as shown
2
This configuration will now enable you to
3
record directly from the Satellite Decoder in
stereo (if your equipment has this facility) whilst
watching a terrestrial
TV
programme.
Page 23

OTHER
1
For your guidance
SOME DO'S AND DON'TS ON THE SAFE USE OF EQUIPMENT. PLEASE READ THE FOLLOWING POINTS CAREFULLY. THEY ARE
OF A GENERAL NATURE, INTENDED TO HELP YOU
NOT APPLY TO THE GOODS YOU HAVE JUST PURCHASED.
WITH ALL YOUR ELECTRONIC CONSUMER PRODUCTS. SOME ITEMS MAY
This equipment has been designed and manufactured to meet
international safety standards, but like any electrical equipment, care
must be taken if you are to obtain the best results and safety is to be
assured.
DO
read the operating instructions before you attempt to use the
equipment.
DO
ensure that all electrical connections, including the mains plug,
extension leads and inter connections, between pieces of
*~ipment, are properly made and in accordance with the
-)
.,,anufacturers instructions. Switch off and withdraw the mains plug
when making or changing connections.
DO
be careful with glass panels or doors on equipment.
DON'T
continue to operate the equipment if you are in any doubt
about it working normally, or it is damaged in any way
withdraw the mains plug and consult your dealer.
DON'T
remove any fixed cover as this may expose dangerous
voltages.
DON'T
use equipment such as personal stereos or radios so that you
are distracted from the requirements of traffic safety. It is illegal to
watch television whilst driving.
-
switch off,
Simple problem solving:
DON'T
leave equipment switched on when it is unattended, unless it
is specifically stated that it is designed for unattended operation or
standby mode. Switch off using the switch on the equipment
has a
and make sure your family know how to do this. Special
arrangements may need to be made for infirm or handicapped
people.
DON'T
listen to headphones at high volume, as such use can
permanently damage your hearing.
DON'T
obstruct the ventilation of the equipment for example, with
curtains or soft furnishings. Overheating will cause damage and
shorten the life of the equipment.
DON'T
use makeshift stands and NEVER fix legs with wood screws
to ensure complete safety always fit the manufacturer's approved
stand or legs with the fixings
DON'T
allow electrical equipment to be exposed to rain or moisture.
ABOVE ALL- NEVER let anyone, especially children, push anything
into holes, slots or any other openings in the case -this could result
in a fatal electric shock
equipment of any kind
DON'T
place anything on the top of your TV set. The top surface is
curved and any falling items could damage your TV.
phided, according to the instructions.
-
NEVER guess or take chances with electrical
-
it is better to be safe than sorry.
-
If your TV fails to operate correctly, please follow these
simple checks. If the problem still persists, contact your
~cal Toshiba dealer for advice.
>
No Picture or Sound.
Check mains switches are on, press
known working mains socket. 'Timer off' facility has
operated.
If in doubt, contact a competent electrician.
Poor or no Picture.
Try a different TV station, check your aerial and
connections. Adjust fine tuning.
Good picture but no sound.
Press
A
A.
If
you have problems with text.
Go to the main index page of the text service and look
for the User Guide. This will explain the basic
operation of text in some detail.
6.
Plug into a
Sound not in Stereo.
Check that your local transmitter is Nicam equipped.
Remote Control does not work.
Check the batteries.
Coloured patches on screen.
Caused by magnetic field interference, turn off TV for
10 minutes, turn on again, fault of temporary nature.
VTR or Satellite picture in Black and White.
Ensure the correct input socket is being used and that
the socket is not switched to S-Video.
Cleaning the screen and cabinet.
After turning off the power, clean the screen and
cabinet with a soft, dry cloth. We recommend that you
do not use any proprietary polishes or solvents on the
screen or cabinet as this may cause damage.
Page 24

OTHER
I
Specifications, accessories
Receiving system
External
Programme Positions
AV
AV
AV input front
Sound output (at 10% distortion)
13 amp Plug 'Fitted' fuse
2145DB Visible Picture*
2545DB Visible Picture*
*
I
AudioNideo inputloutput
inlout rear
inlout rear
Dimensions
Weight
Power consumption
(at AC 220-240V
Dimensions
Weight
Power consumption
(at AC 220-240V
Measured diagonally
Accessories:
50Hz)
50Hz)
PAL I
UHF:
21-68
PALINTSC (VTR playback)
60
S?;
(Scart - 1) Full - 21 pin
-02;
(Scart - 2) S-VHS (Normal Video, Audio L-R)
-0;
(4
Pin S-VHS RCA jack) NormalJS- Video, Audio L-R
IOW + IOW rms.
Main
5 amp
51cm 90 degree deflection
608mm (W) 482mm (H) 488mm
25 Kg (approx.)
85W
59cm 110 degree deflection
676mm (W) 528mm (H) 440mm (D)
28.4 Kg (approx.)
OOW
1
(RGB,
Normal Video, Audio L-R)
(D)
1 X Remote control
2
X
(R03,
AAA)
batteries
0
Toshiba Consumer Products
All rights reserved.
Reproduction in whole or part without written permission is strictly prohibited.
Toshiba
Toshiba House, Frimley Road, Frimley, Camberley, Surrey, UK
Specification is subject to change without notice.
Originated by Kensa Illustration
Printed by Deltor Communications Ltd., Torpoint, Cornwall
&
Design, Saltash, Cornwall.
(UK)
(UK)
GU16
Ltd
Ltd
5JJ
 Loading...