

TOSHIBA
Connectior
Colour
TV
Welcome to the bright new world of Toshiba colour.
Your new precision built colour television has been
designed and engineered by one of the world's
largest manufacturer's of
I.C.'s, transistors and
diodes to give you an extremely reliable and natural
performance.
Please read this manual and retain for future
reference.
?>34
,p'
-
g3WWh
ere
to Position Your
Receive
Tt
lins supply required for this equipment is 220v
DC supply or any other power source.
DO NOT cut off the mains from this equipment. If the plug fitted is not suitable
for the power points in your home or the cable is too short to reach a power point,
then obtain an appropriate safety approval extension lead or consult your dealer.
If nonetheless the mains plug is cut off, remove the fuse and dispose of the plug
immediatly, to avoid a possible shock hazard by innadvertent connection to the
mains
swpiy.
If this product is not provided with a mains plug, or one has to be fitted, then follow
the instructions given below:
IMPORTANT.
'
marked with the letter E or by the safety earth symbol
or green-and-yellow.
'
The wires in the mains lead on this product are coloured in accordance with the
following code:
As these colours may not correspond with the coloured markings identifying the
terminals in your plug proceed as follows:
The wire which is coloured blue must be connected to the terminal which is marked
with the letter N or coloured black.
The wire which is coloured brown must be connected to the terminal which is
marked with the letter L or coloured red.
When replacing the fuse only a correctly rated approved type should be used and
be sure to re-fit the fuse cover.
IF IN DOUBT - CONSULT A COMPETANT ELECTRICIAN.
1
Carefully release back cover catch (21001210112102~~) or slide
back cover (21 00121 01121
2 batteries, taking care to observe correct polarities.
DO NOT make any connection to the larger terminal which is
BLUE: NEUTRAL BROWN:
02RB) and remove battery cover, insert
50Hz.
Never connect to a
LIVE
Choose a position where direct light from a lamp or window does
not fall on the screen. Wherever possible out of the reach of young
Make sure that there is adequate air circulation through the vents
or coloured green
Optimum reception of colour and teletext requires a good signal
and will generally mean that a loft or outdoor aerial must be used.
The exact type and siting will depend upon your particular area
and your local aerial installers will be best to advise. Where signals
permit, a set top aerial may be used by plugging into the aerial
socket and rotating to obtain the best picture.
Suitable battery types are:
R6
or
AA
or SUM-3.
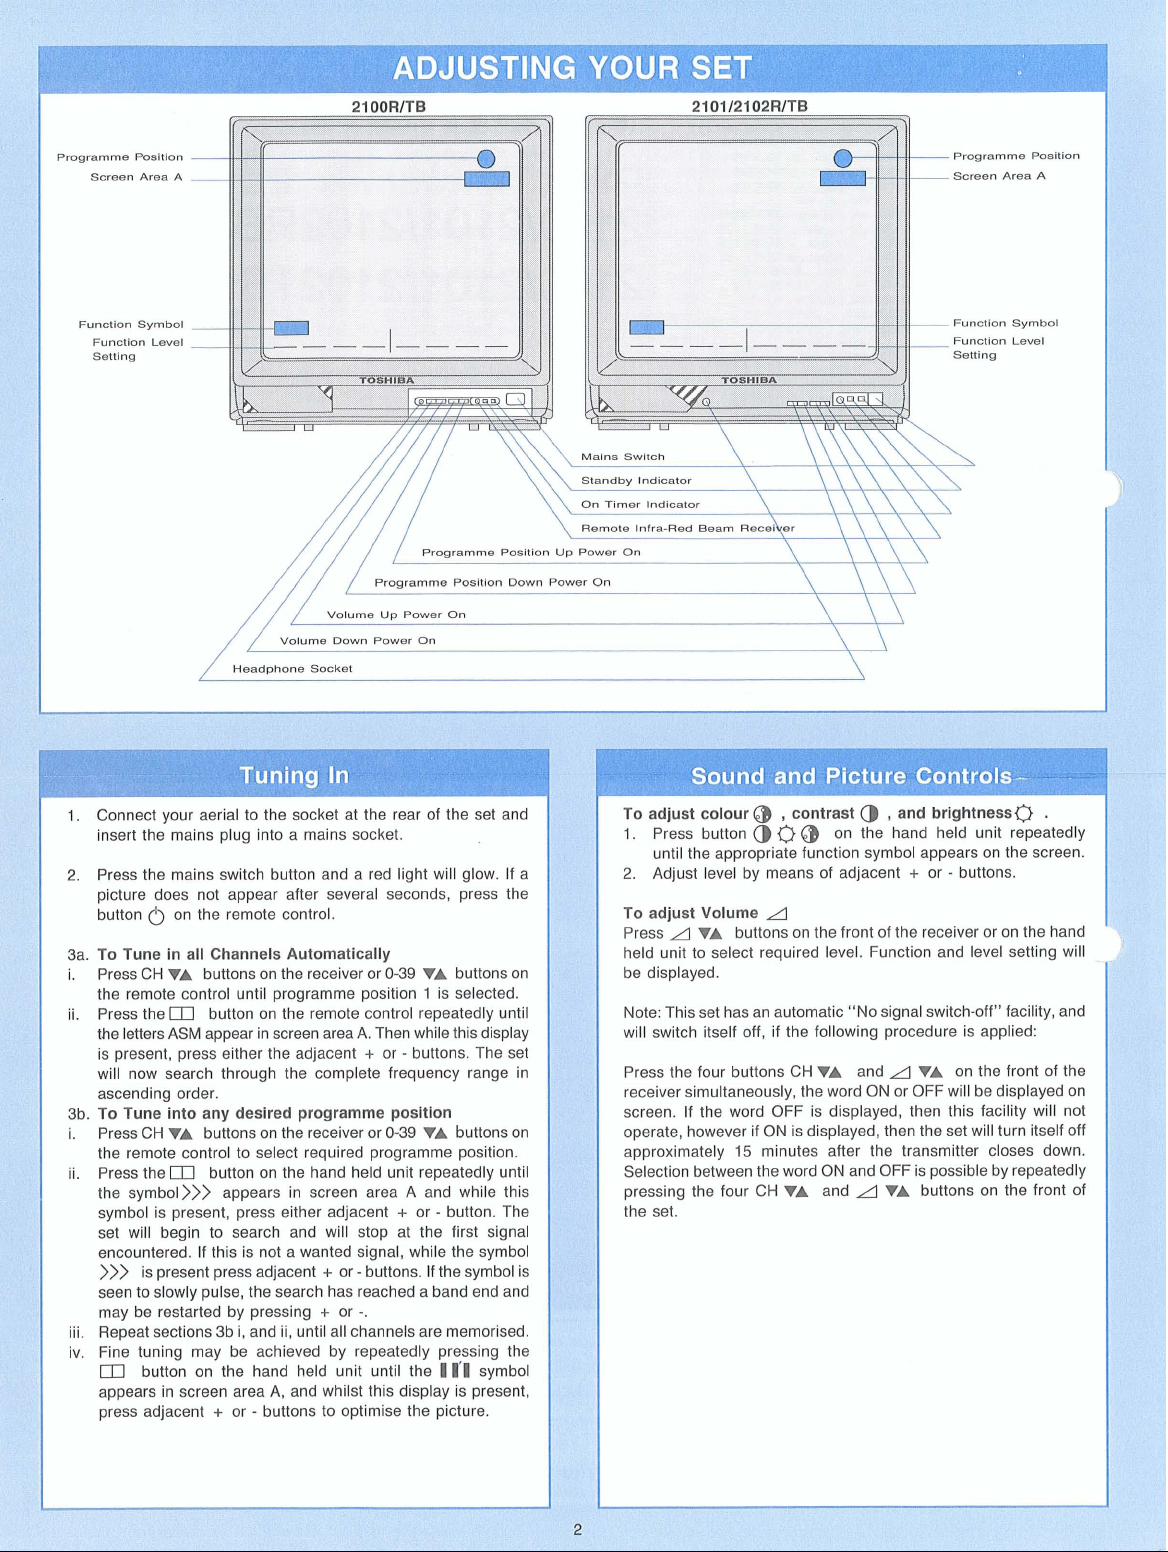
Programme Position
Screen Area A
Function Symbol
Function Level
///
/
//
/
/
Volume Down Power On
Headphone Socket
/
programme posltlon .own power on
Volume
Up
Power On
in
\
1
-
-
\
\
\
1.
Connect your aerial to the socket at the rear of the set an1
insert the mains plug into a mains socket.
Press the mains switch button and a red light will glow. If
2.
picture does not appear after several seconds, press th
0
button
3a. To Tune in all Channels Automatically
Press CH
i.
the remote control until programme position
Press the
ii.
the letters ASM appear in screen area A. Then while this display
is present, press either the adjacent
will now search through the complete frequency range in
ascending order.
3b. To Tune into any desired programme position
Press CH
i.
the remote control to select required programme position.
Press the
ii.
the symbol>>> appears in screen area A and while this
symbol is present, press either adjacent
set will begin to search and will stop at the first signal
encountered. If this is not a wanted signal, while the symbol
>>>
seen to slowly pulse, the search has reached a band end and
may be restarted by pressing
iii. Repeat sections 3b i, and ii, until all channels are memorised.
iv. Fine tuning may be achieved by repeatedly pressing the
m
appears in screen area A, and whilst this display is present,
press adjacent
on the remote control.
VA
buttons on the receiver or
E0
button on the remote control repeatedly until
VA
buttons on the receiver or
E0
button on the hand held unit repeatedly until
is present press adjacent + or - buttons. If the symbol is
+
button on the hand held unit until the
+
or - buttons to optimise the picture.
0-39
V.
1
+
or - buttons. The set
0-39
VA
+
or - button. The
or
-.
buttons on
is selected.
buttons on
111
symbol
To adjust colour
Press button
1.
until the appropriate function symbol appears on the screen.
2.
Adjust level by means of adjacent + or - buttons.
To adjust Volume
Press
A
held unit to select required level. Function and level setting will
be displayed.
Note: This set has an automatic "No signal switch-off" facility, and
will switch itself off, if the following procedure is applied:
Press the four buttons CH
receiver simultaneously, the word ON or OFF will be displayed on
screen. If the word OFF is displayed, then this facility will not
operate, however if ON is displayed, then the set will turn itself off
approximately
Selection between the word ON and OFF is possible by repeatedly
pressing the four CH
the set.
@
,
@C)
contrast
@
a
,
on the hand held unit repeatedly
and brightness0
A
VA
buttons on the front of the receiver or on the hand
and
A
VA
VA
15
minutes after the transmitter closes down.
and
A
VA
VA
on the front of the
buttons on the front of
.

REMOTE
CONTROL
QPERATlON
FOR
NORMAL
P1CTURE
lperate the control by pointing iward the infra-red receiver on
rhe set, using the buttons as
3
(Standby onloff)
standby to turn the set off for short periods of time.
Jse
(TVNideo
Button selects operational mode, see page
-I--,
]select programme 8 press
rl
screen area A then press button 8. To select programme 38,
)ress
-I--
hen press 3 followed by 8.
1 : 39
(Programme Selection)
A
Hold
programme position. Programme number is briefly displayed.
A
(Volume adjustment)
iold A or l buttons to raise or lower volume. Function and
;etting is briefly displayed.
3
0
@
'ress the button
appears on the screen and press and hold the adjacent
buttons to raise or lower the setting. Function and setting is briefly
iisplayed.
(Sound mute)
.
ress
c(
Call
'ress to retain channel display, and again to cancel channel display.
jl
s K (Selectable picture)
lperation of this button selects 3 levels of preset picture contrast
tdjustment to suit individual taste, levels selected are indicated
by the numbers
display.
1,
2, 2s mode selection)
0-9
(Programme Selection)
repeatedly until two
or l buttons to sequentially raise or lower the
and
+l-
C)
once to mute sound and again to return sound.
41
K
follows:-
5
for further details.
-I--
repeatedly until - appears
--
appear in screen area
(contrast, billiance, colour adjustment)
@
repeatedly until the required function
,42)t or43K in the function setting
A,
+
or
t
e>
(Onloff timer)
Press
a
,
button and the following will be displayed on screen:-
OFF 00
If the set is required to revert to the
period of time for example
on the hand held unit your selected time will appear on the screen,
and the set will switch to the
has expired.
Return the set to the on position by pressing
hand held unit, if the
will be displayed on screen:-
If required, the set can now be programmed to switch itself on
a given period of time on a certain programme position. For example
if the set is required to be on in 20 minutes time on programme
position 2 then press the following buttons on the hand held unit:02 (for programme position 2), then 00 20 (for 20 minutes).
N.B.
on time.
illuminate when an on time has been programmed and will remain
-
on while the set is in the
o@
Press to obtain extremely accurate time display. Display lasts for
several seconds.
VT R Function Controls
Most Toshiba
control, (your Toshiba dealer can advise). Control functions as
follows:
0
b
4
II
:
00
20
e)
button is pressed twice, then the following
The set must be left in the standby mode after programming
A
yellowCJJ light on the front of the receiver will
standby mode.
TimelTXCL (time display) 2100TB/2101TB/2102TB models only
VTR's may also be operated by use of this remote
(standby onloff)
(play)
(stop)
(fast wind)
(fast rewind)
(pause)
Please refer to your VTR owners
manual for further details.
standby mode after a given
minutes, press the buttons 00 20
standby condition after this period
0
button on the
after

Text functions are selected by use of the Remote Control. Several buttoris are dual fun~u
News Flashes
To receive news flashes whilst
To Display a Page of Text
1.
Select a TV station for the requrred text service.
buttons. If an error
To return to TV mode press
To receive a text service from a different TV station
1.
Press once to return to TV mode. subject.
2.
Select the new TV station.
3.
Press
@Q).
To display the index page
@
Press
To superimpose text on a TV picture
Press
To enlarge text display
Press
the text and to revert to normal.
and the rndex pages will be drsplayed.
@@l
@
repeatedly to enlarge the top and bottom halves of
IS
made, complete the 3 digrt sequence and
-@a.
repeatedly to superrmpose then clear.
@@
To cancel a news flash, press
Note: It is not possible to change channels whilst this mode is
selected, to change channels press
buttons on the remote control
of the
To use Fastext
Fastext is a studio linked
When viewing text, four prompts will appear at the bottom of the
page, coloured red, green, yellow and blue. These may be selected
by use of the colour matched buttons on your remote control.
and then select the
recerver.
watchlng a normal prcture, press
appropriate
e)@
unit or CH
serres of pages relevant to a particular
news flash page.
.
-@a
and erther
TA
buttons on the front
0-39
VA
To hold a wanted page
When a page
a sub-page press
~ndicated by the word HELD In the top left hand srde of the screen.
To adjust Brilliance and Contrast
Press
appears on screen, and then press the adjacent
to adjust while the on screen
To view previously selected page
Press PREV. to view the previous page selected, press again to
return to the current page selected.
To Reveal concealed text
To use the alarm
To call of the alarm
a normal TV picture, select
the appropriate alarm captron page and press
number at the top left hand srde of the screen will be replaced by
Enter the required time
normal picture. To cancel alarm press
Note: This
IS
broadcast by the appropriate TV station.
IS
divided into sub pages and it
.
Press agarn to release. A held page
() 0 @
repeatedly until the approprrate functron symbol
drsplay is present.
capt~on at a pre-determrned time whrlst viewing
aTV statron and press
i.e.
0930
and press
functron will not operate unless an alarm caption page
IS
required to hold
+
or - buttons
@a
8
.
a@
to return to
8
whilst In the text mode.
.
Select
The page
IS

Aerial
Pin
Pin
Socket
Socket
Socket
(2)
(1)
21
21
Horizontal
SVideo Soclret
Picture
Positton
Television system and
channel coverage
Supplied Accessories
Power Consumption
A
SELF-HELP GUIDE FOR SIMPLE PROBLEM SOLVING
Patches of Colouration
Switch off at the mains for 15 minutes.
No Picture or Sound
Check mains'switches are on, press 6 and
known working mains socket. "No signal off" facility has operated.
Poor or no Picture
Try a different TV station, press
connections. Adjust fine tuning.
+SF,
UHF
Pal I:
51cm 90 degree deflection
4.5W r.m.s.
51 1mm wide, 482mm high, 485mm deep
1
X
2100TB, 2101TB, 2102TB only
95W (TB) 94W (RB)
+SF.
check your aerial and
21-68
Remote Control, 2 X R6 Batteries, 1 X Stand
Plug into a
lmageslGhostinglGarbled Text
Double
Check your aerial, a more directional type might be needed for your
area. Adjust fine tuning.
Good Picture but no Sound
A
+.
Press
Blue Screen
Set senses no signal condition, check aerial connection, switch
to a transmitting signal.
Remove earphone plug, press
a
.
m

international safety standards but, like any electrical equipment,
care must be taken if you are to obtain the best results and safety
is to be assured.
DO read the operating instructions before you attempt to use the
DO ensure that all electrical connections including the mains plug,
extension leads and inter connections between pieces of equipment
are properly made and in accordance with the manufacturer's
instructions. Switch off and withdraw the mains plug when making
or changing connections.
DO consult your dealer if you are ever in doubt about the installation,
operation or safety of your equipment.
DO be careful with glass panels or doors on equipment.
DON'T continue to operate the equipment if you are in any doubt
about it working normally, or it is damaged in any way
off, withdraw the mains plug and consult your dealer.
DON'T leave equipment switched on when it is unattended unless
it is specifically stated that it is designed for unattended operation
3r
has a standby mode. Switch off using the switch on the
squipment and make sure your family know how to do this. Special
arrangements may need to be made for infirm or handicapped
r--------------------
-
switch
DON'T use equipment such as personal stereos or radios so that
you are distracted from the requirements of traffic safety. It is illegal
to watch television whilst driving.
DON'T listen to headphones at high volume, as such use
permanently damage your hearing.
DON'T obstruct the ventilation of the equipment for example
curtains or soft furnishings. Overheating will cause damage
shorten the life of the equipment.
DON'T use makeshift stands and NEVER fix legs with wood screw!
-to ensure complete safety always fit the manufacturer's approveo
stand or legs with the fixing provided according to the instructions.
DON'T allow electrical equipment to be exposed to rain or moisture.
ABOVE ALL
-
NEVER let anyone, especially children, push anything into holes,
slots or any other openings in the case
fatal electric shock.
-
NEVER guess or take chances with electrical equipment of
kind - it is better to be safe than sorry!
-
this could result in
cal
wit1
an(
a
L
 Loading...