

Page 1
OWNER'S MANUAL
LCD Colour TV
Introduction
Getting started
Basic operation
15VL56B
15VL56G
20VL56B
features
Using the TV’s
Viewing teletext
Equipment
Owner's Record
You will find the model number and serial number on
the back of the TV. Record these numbers in the spaces
provided below. Refer to them whenever you call upon
your TOSHIBA dealer regarding this product.
connections
20VL56G
#01E01_1520VL56BG 05.6.24, 0:50 PM1
Black
Model number:
Serial number:
Reference section
Toshiba 1520VL56BG (E)
Page 2
Welcome to Toshiba
Thank you for purchasing this Toshiba LCD Colour Television. This manual will help you use the exciting features of your
new TV.
Instructions in this manual are based on using the remote control.
You can also use the controls on the TV if they have the same name as those on the remote control.
Please read all the safety and operating instructions carefully, and keep the manual for future reference.
Contents
Introduction
Important Safety Instructions ................................. 3
Installation ........................................................... 3
Use ....................................................................... 5
Service ................................................................. 6
Cleaning ............................................................. 7
Important information............................................. 7
Important information ....................................... 7
Installation ................................................................ 8
Connecting an aerial ........................................ 8
Getting started
Exploring your new TV ............................................. 9
TV top/TV side..................................................... 9
TV front ................................................................ 9
TV back ...............................................................10
Learning about the remote control ......................11
Location of controls/
Installing the remote control batteries ............ 11
Watching TV programmes .....................................12
Turning the TV on or off/Volume/
Sound mute/Programme positions ..................12
Switching programme return/
On-screen information ...................................... 13
Learning about the menu system ......................... 13
Selecting a language .......................................13
Menu overview ..................................................14
Programming channel memory ............................15
System selection/Auto programme................. 15
Manual programme ..........................................16
MFT/AFT ...............................................................18
Basic operation
Picture quality adjustment ..................................... 19
Picture quality adjustment ................................19
Sound adjustment ...................................................20
Sound quality adjustment .................................20
WOW surround setting....................................... 21
Using the AVL function
(Auto Volume Leveler).......................................21
Stereo/Bilingual selection.................................. 22
Using the TV’s features
Panel lock, Input selection, Sleep Timer ...............23
Panel lock ........................................................... 23
Input selection ....................................................23
Sleep Timer ......................................................... 23
Blue screen function,
Activating the Auto off function ........................... 24
Blue screen function ..........................................24
Activating the Auto off function ......................24
Viewing teletext
Teletext – Control buttons .......................................25
To view normal text ............................................25
Teletext buttons on the remote control ........... 25
Teletext – Auto and List modes ..............................27
Using Auto mode ...............................................27
Using List mode................................................... 28
Equipment connections
Side panel connections..........................................29
Connection example ........................................29
Back panel connections ........................................30
Connection example ........................................30
Connecting a computer ........................................31
To connect a computer ....................................31
PC Setting ................................................................. 32
Picture position/Clock/Phase adjustments .....32
Auto-configure/To reset .................................... 33
Reference section
Troubleshooting ....................................................... 34
Symptom and solution ......................................34
Specifications........................................................... 35
LCD colour television specifications ................35
Exemptions
■ Toshiba is not liable for any damage caused by fires, natural disaster (such as thunder, earthquake, etc.), acts by third
parties, accidents, owner's misuse, or uses in other improper conditions.
■ Toshiba is not liable for incidental damages (such as profit loss or interruption in business, modification or erasure of
record data, etc.) caused by use or inability to use of product.
■ Toshiba is not liable for any damage caused by neglect of the instructions described in the owner's manual.
■ Toshiba is not liable for any damage caused by misuse or malfunction through simultaneous use of this product and
the connected equipment.
2
#01E02_1520VL56BG 05.6.24, 0:50 PM2
Black
Toshiba 1520VL56BG (E)
Page 3
Introduction
Important Safety Instructions
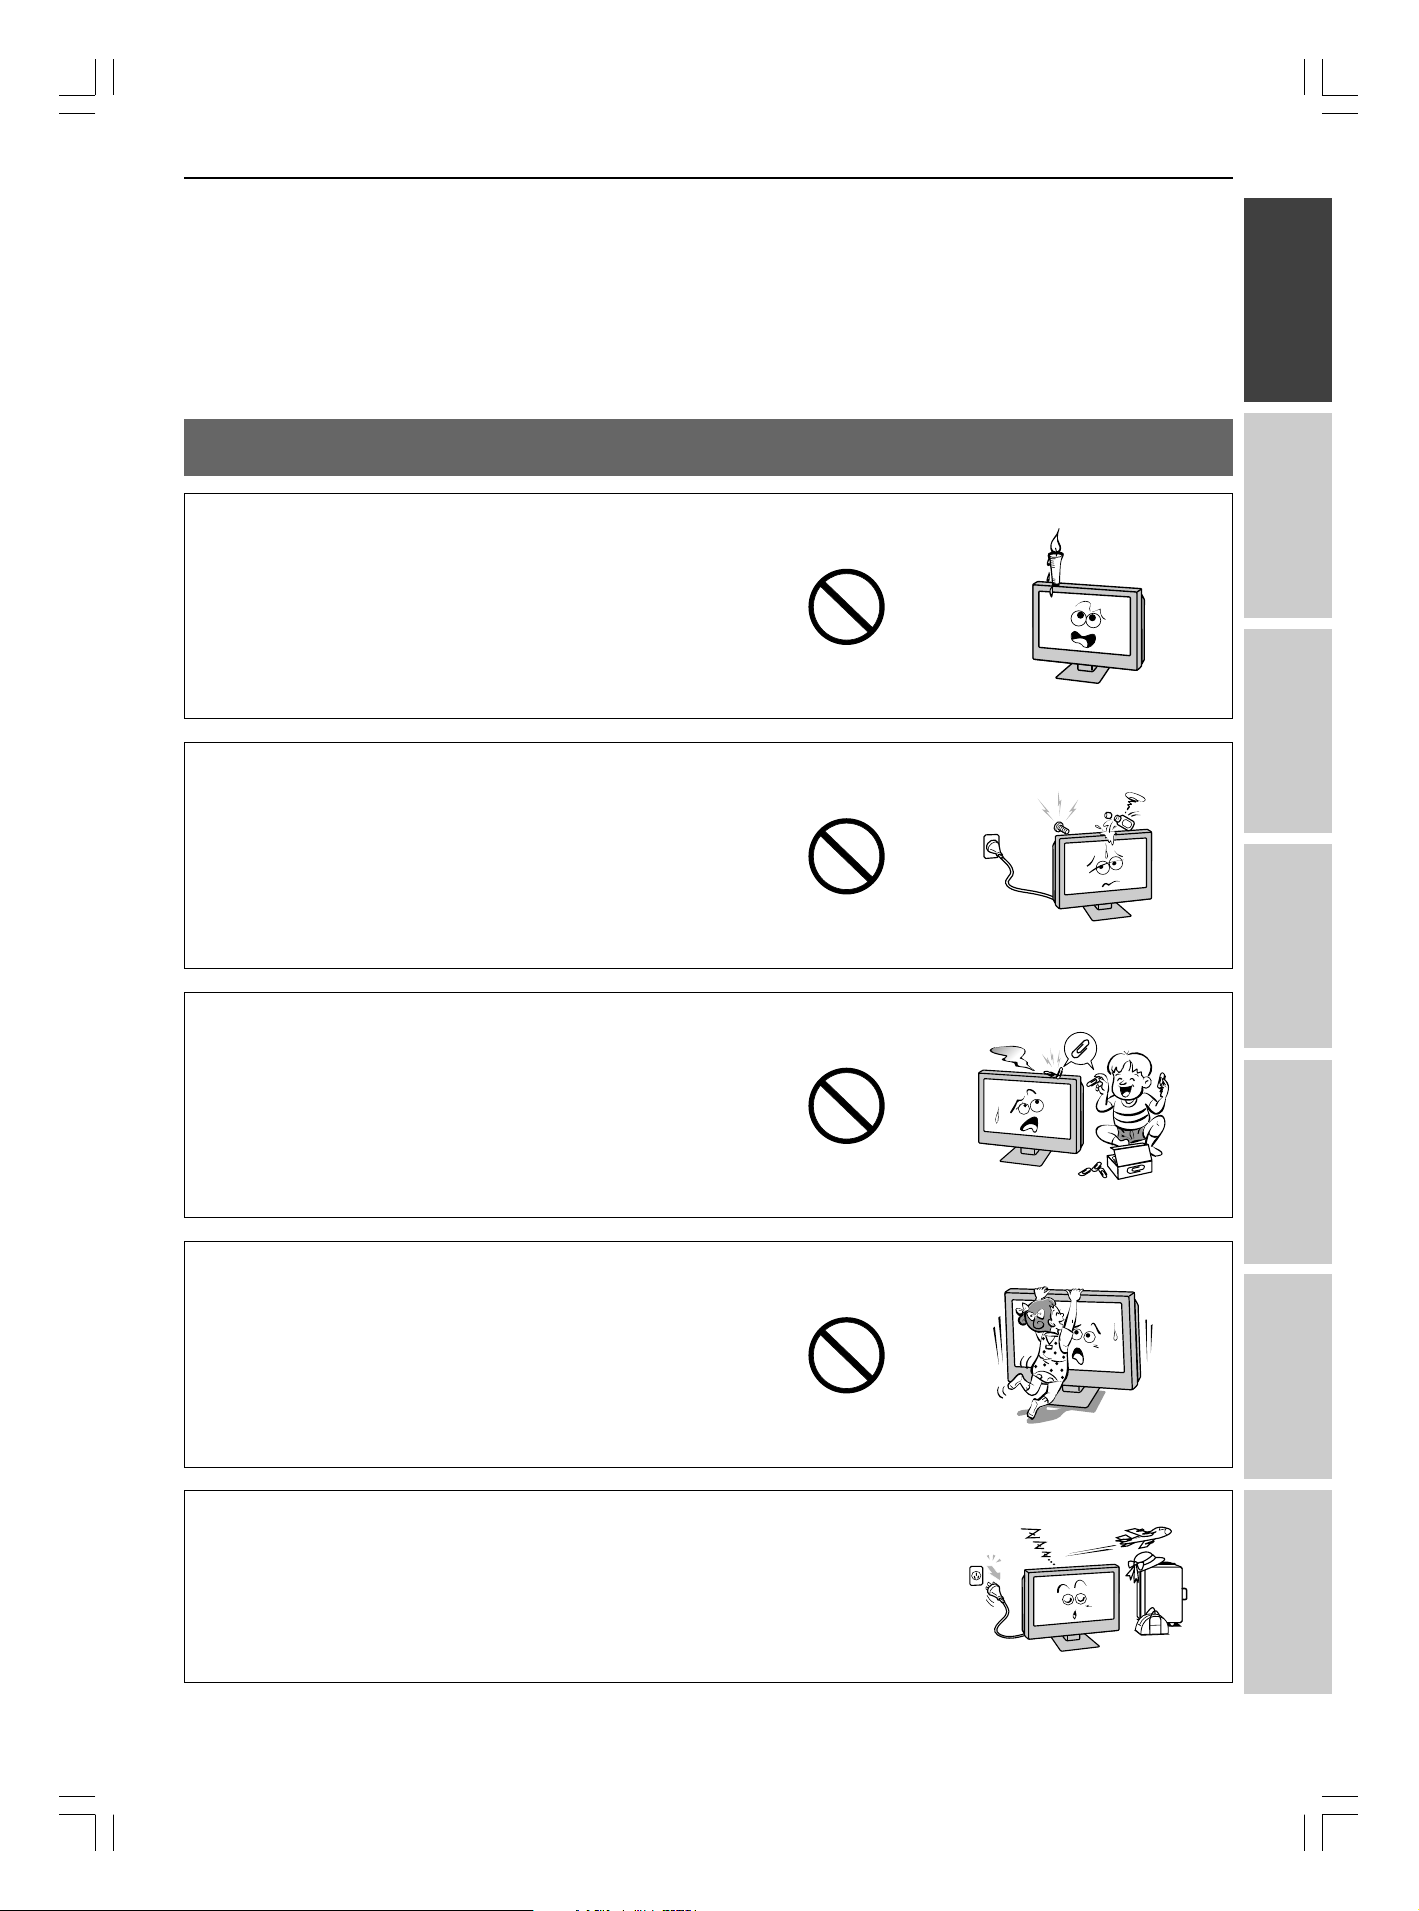
• Be sure to observe the following instructions and precautions to ensure safe use of this TV.
• The exact power cord will vary according to the country or region.
• The mains plug is used as a disconnecting device and therefore should be readily operable.
Installation
Always connect the power plug to an electrical outlet equipped with
100 – 240V AC 50/60 Hz.
Never use the TV outside the specified voltage range. It may cause a fire
or an electric shock.
Never insert or remove the power plug with wet hands.
This may cause electric shock.
Check!
About the fuse
In a three-pin plug type, the fuse fitted in
this plug is approved by ASTA or BSI to
BS1362. It should only be replaced by a
correctly rated and approved type and the
fuse cover must be refitted.
Introduction
100-240V AC
Getting started
Basic operation
Never place the TV in an unstable location, such as on a shaky table or
incline or in a location subject to vibration.
The TV may drop or fall down, which may cause injury or damage.
Never block or cover the slots and openings in the cabinet.
• Never place the TV so that it is facing upward or on its side.
• Never place the TV in a closet, bookcase or other similar area where the
ventilation is poor.
• Never drape a newspaper, tablecloth or curtain on the TV.
• When installing the TV near a wall, always keep the TV at least 10 cm
away from the wall.
• Never place the TV on a soft, unstable surface, such as carpet or a
cushion.
The inside of this TV will overheat if the ventilation holes are covered,
blocked or sealed, which may result in a fire.
Never place the TV near a heater or in direct sunlight.
The surface of the cabinet or power cord may melt and result in fire or
electric shock.
features
Using the TV’s
Viewing teletext
Equipment
connections
#01E03-08_1520VL56BG 05.7.4, 6:38 PM3
Black
Reference section
3
Toshiba 1520VL56BG (E)
Page 4
Introduction
Important Safety Instructions
Introduction
Installation (continued)
Never place the TV in an area exposed to high humidity levels, such as
in a bathroom or close to a humidifier.
This may cause a fire or an electric shock.
Never place the TV next to a stove where it will be exposed to oil,
smoke, or steam, or in a location where there is a large quantity of
dust.
This may cause a fire or an electric shock.
(continued)
Install the TV in a horizontal, stable location. Connect between the
two clips on the back of the TV and a wall, pillar, etc., with a sturdy tie
and clip of supplied accessories (see page 36).
• Use as short a tie as possible to ensure the TV is stable.
• If the TV is not installed securely, it may lean or fall over and cause an
injury.
Precautions for moving the TV
• When moving the TV, be sure to remove the power plug from the wall
outlet and disconnect the aerial cable, audio/video cables, and any ties.
Fire or electric shock may result if the power cord is damaged.
• Never carry the TV with the screen facing up or down.
Precautions for installing an outdoor aerial
An outside aerial system should not be located in the vicinity of
overhead power lines or other electric light or power circuits.
If the aerial falls down or drops, it may cause injury or electric shock.
Sturdy tie
Side view Top view
Sturdy tie
(as short as possible)
Clip
Clip
4
#01E03-08_1520VL56BG 05.6.24, 0:50 PM4
Black
Toshiba 1520VL56BG (E)
Page 5
Use
Never place hot objects or open flame sources, such as lighted candles
or nightlights, on or close to the TV.
High temperatures can melt plastic and lead to fires.
The apparatus shall not be exposed to dripping or splashing and that
no objects filled with liquids, such as vases, shall be placed on the
apparatus.
When liquids are spilled or small items are dropped inside the TV, this
may cause a fire or an electric shock. If small objects drop inside the TV,
turn off the TV and remove the power plug from the outlet immediately
and contact a service technician.
Introduction
Getting started
Basic operation
Never insert objects (metal or paper) or pour water inside the TV
through ventilation holes or other openings.
These items may cause a fire or an electric shock.
If these objects are inserted inside the TV, turn off the TV, remove the
power plug from the outlet immediately and contact a service technician.
Be especially careful that children do not insert objects in the TV.
Never stand or climb on the TV.
Be especially careful in households with children to prevent them from
climbing on top of the TV.
It may move, fall over, break, become damaged or cause an injury.
When the TV will not be used for a long period of time, such as during
vacation or travel, remove the power plug from the wall outlet for
safety.
Clip
features
Using the TV’s
Viewing teletext
Equipment
connections
#01E03-08_1520VL56BG 05.6.24, 0:50 PM5
Black
Reference section
5
Toshiba 1520VL56BG (E)
Page 6
Introduction
Important Safety Instructions
Introduction
Use (continued)
Never pull on the power cord when removing the plug from the wall
outlet.
Always hold the plug firmly when removing it. If the power cord is
yanked, the cord may become damaged and fire or electric shock may
occur.
Never cut, break, modify, twist, bunch up or bend the power cord or
apply excessive force or tension to it.
Never place heavy objects on the cord or allow it to overheat as this may
cause damage, fire or electric shock. Contact a service technician if the
power cord is damaged.
(continued)
If there is thunder or lightning, never touch the aerial cable or other
connected cables.
You may suffer an electric shock.
Service
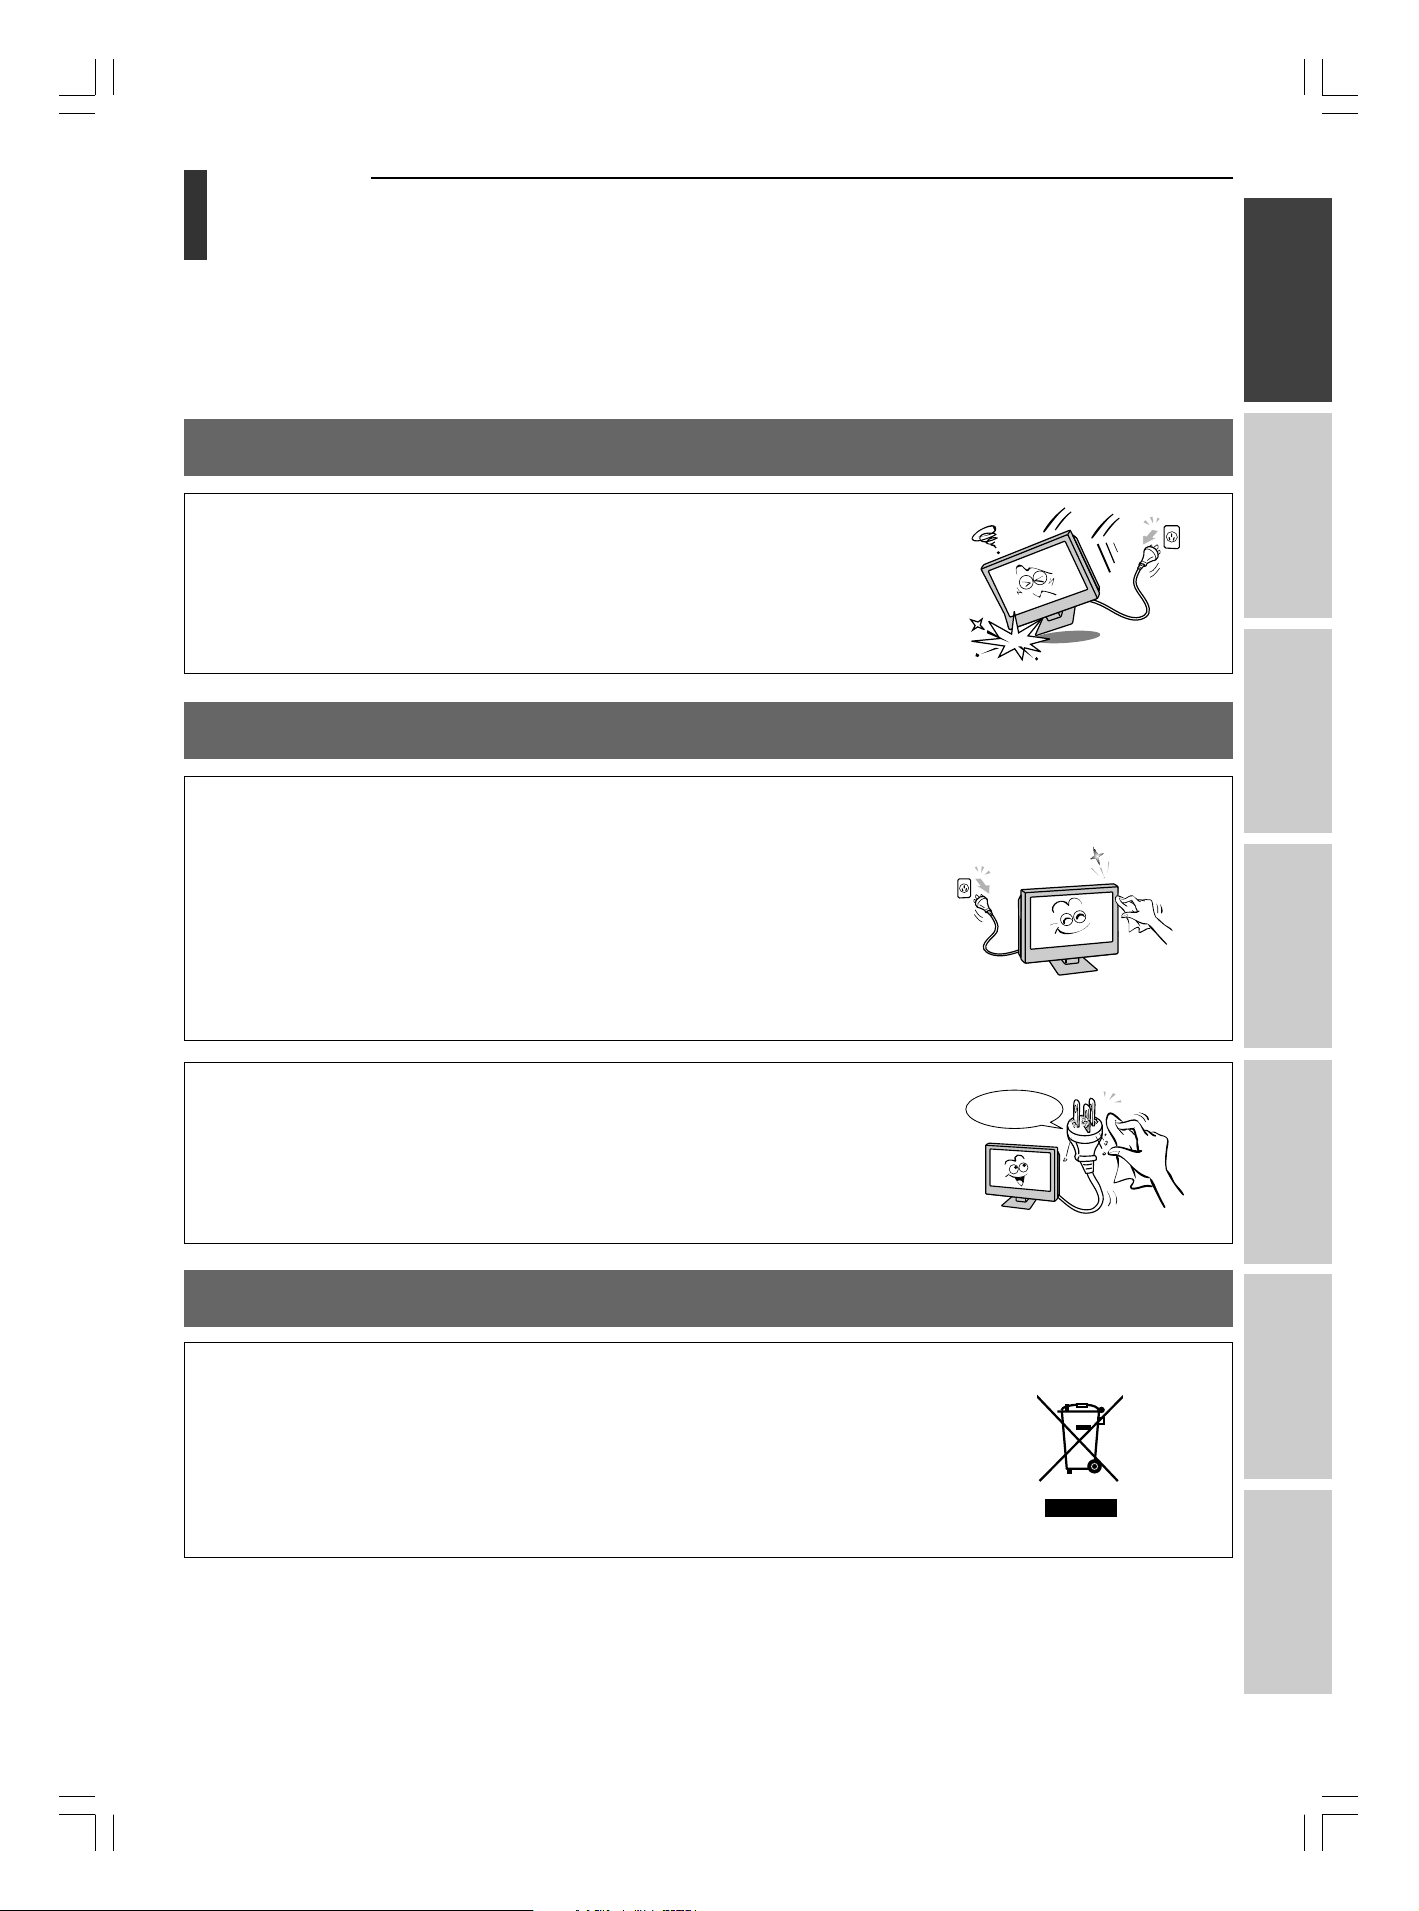
Never repair, modify or disassemble the TV by yourself.
If it may cause a fire or an electric shock. Consult a service technician for
inspection and repairs.
When a malfunction occurs, or if smoke or an unusual odor comes
from the TV, turn off the TV and remove the power plug from the
outlet immediately.
Make sure that the smoke or smell has stopped, then contact a service
technician. If the TV is still used in this condition, it may cause a fire or
an electric shock.
6
#01E03-08_1520VL56BG 05.6.24, 0:50 PM6
Black
Toshiba 1520VL56BG (E)
Page 7
Introduction
Important Safety Instructions
(continued),
Important information
Service (continued)
If the TV is dropped or the cabinet is broken, turn off the TV and
remove the power plug from the outlet immediately.
If the TV is powered on in this condition, it may cause a fire or an electric
shock or an injury. Contact a service technician for inspection.
Cleaning
Always remove the power plug before cleaning.
Never use solvents such as benzine or thinner to clean the TV.
– These solvents may warp the cabinet or damage its finish.
– If rubber or vinyl products remain in contact with the TV for a long
time, a stain may result.
If the cabinet becomes dirty, clean it with a soft, dry cloth.
When cleaning the surface of the LCD display, wipe the panel surface
gently with a soft, dry cloth.
Introduction
Getting started
Basic operation
features
Using the TV’s
Periodically disconnect the power plug from the outlet and check it. If
dust has collected on the power plug connectors, clean off the dust.
This dust may cause a fire due to reduced insulation on the plug.
Important information
Disposal...
Following information is only for EU-member states:
The use of the symbol indicates that this product may not be treated as household
waste. By ensuring this product is disposed of correctly, you will help prevent potential
negative consequences for the environment and human health, which could otherwise
be caused by inappropriate waste handling of this product. For more detailed
information about recycling of this product, please contact your local city office, your
household waste disposal service or the shop where you purchased the product.
Clean here
Viewing teletext
Equipment
connections
#01E03-08_1520VL56BG 05.6.24, 0:51 PM7
Black
Reference section
7
Toshiba 1520VL56BG (E)
Page 8
Introduction
Introduction
Important information
Installation
(continued),
Important information (continued)
About the LCD screen
• If you have the LCD screen facing to the sun, the LCD screen will be damaged. Be aware of locating the TV in
the place such as window side or outside of the room.
• Do not press the LCD screen strongly or scratch it, and do not put anything on it. These actions will damage
the LCD screen.
About the cabinet
Do not spray volatile compounds such as insecticide on the cabinet.
This may cause a discolouration or damage the cabinet.
Some pixels of the screen do not light up
The LCD display panel is manufactured using an extremely high level of precision technology, however
sometimes some pixels of the screen may be missing picture elements or have luminous spots. This is not a sign
of a malfunction.
About Interference
The LCD display may cause interference in image, sound, etc. of other electronic equipment that receives
electromagnetic waves (e.g. AM radios and video equipment).
About using the TV in low-temperature conditions
If you use the TV in a room of 0°C or less, the picture brightness may vary until the
is not a sign of a malfunction.
About after-image
If a still picture is displayed, an after-image (ghost) may remain on the screen; however, it will disappear.
This is not a sign of malfunction.
LCD
monitor warms up.
This
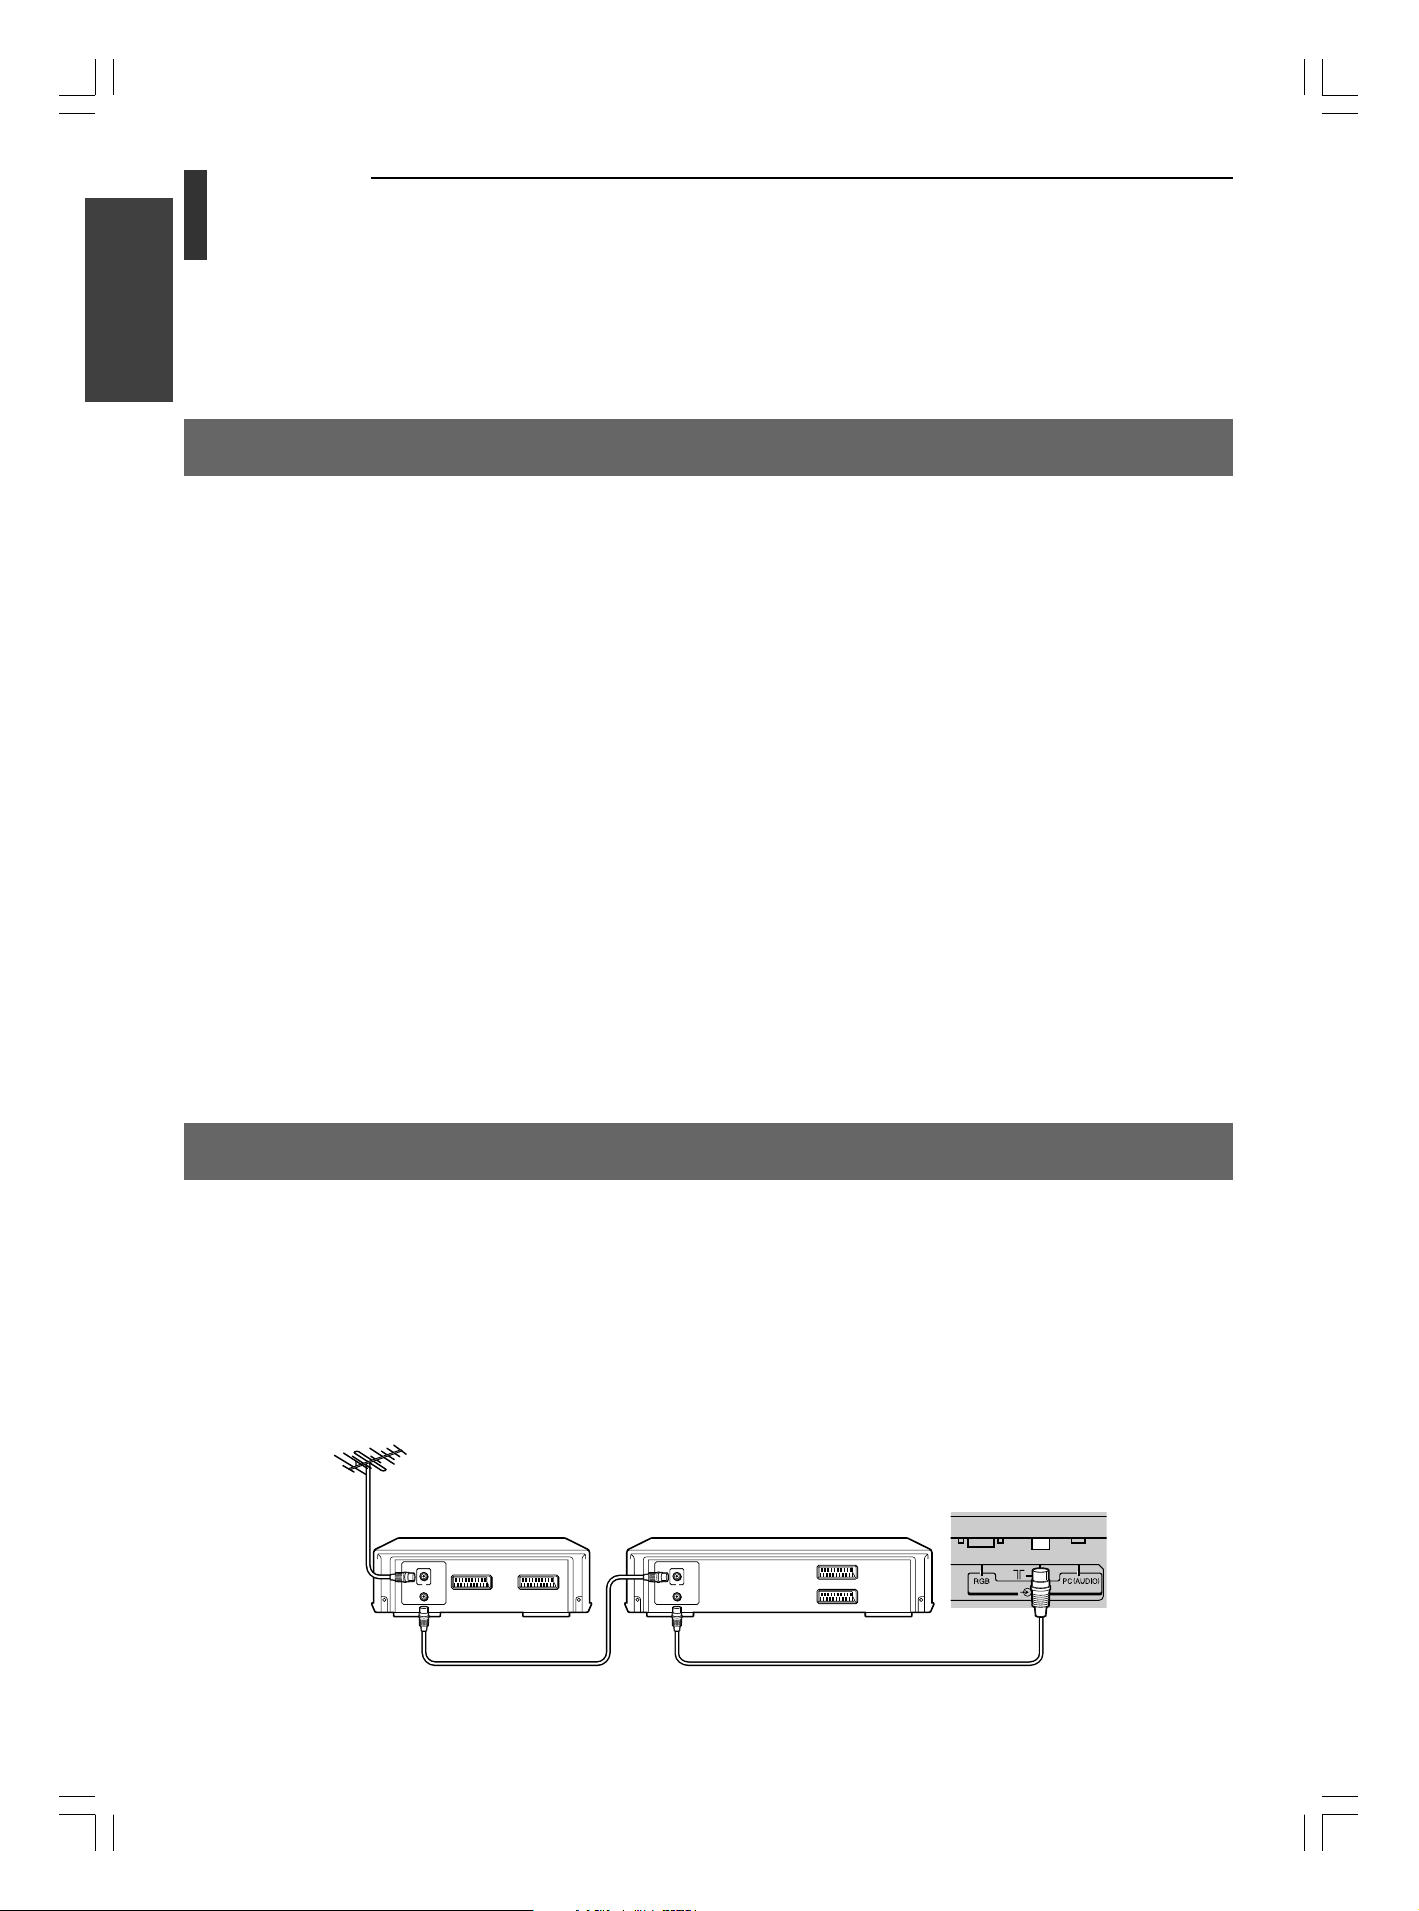
Connecting an aerial
Your new Toshiba television is designed to automatically tune in and store all available terrestrial transmissions and to
allocate a satellite position.
The following describes the initial set-up procedure in order to operate the features of your TV.
Before connecting the aerial cable, remove the back terminal cover (see page 10).
Connect the aerial cable to the socket on the rear of the TV. If you use a satellite receiver and/or a VCR, it is essential that
the aerial cable is connected through the satellite receiver and/or through the VCR to the TV.
DO NOT CONNECT SCART LEADS UNTIL THE TELEVISION IS FULLY TUNED IN.
(See page 29-31 for various equipment connections.)
Aerial
8
#01E03-08_1520VL56BG 05.6.24, 0:51 PM8
Black
Set Top Box Media Recorder
IN
OUT
IN
OUT
Aerial cable (75 ohm coaxial)
(Not supplied)
TV back view
Toshiba 1520VL56BG (E)
Page 9
Getting started
Exploring your new TV
•You can operate your TV using the buttons on the tops panel or remote control. The back and side panels provide
the terminal connections to connect other equipment to your TV. See “Equipment connections” on pages 29 - 33.
• Model 20VL56 series is used in this manual for illustration purposes.
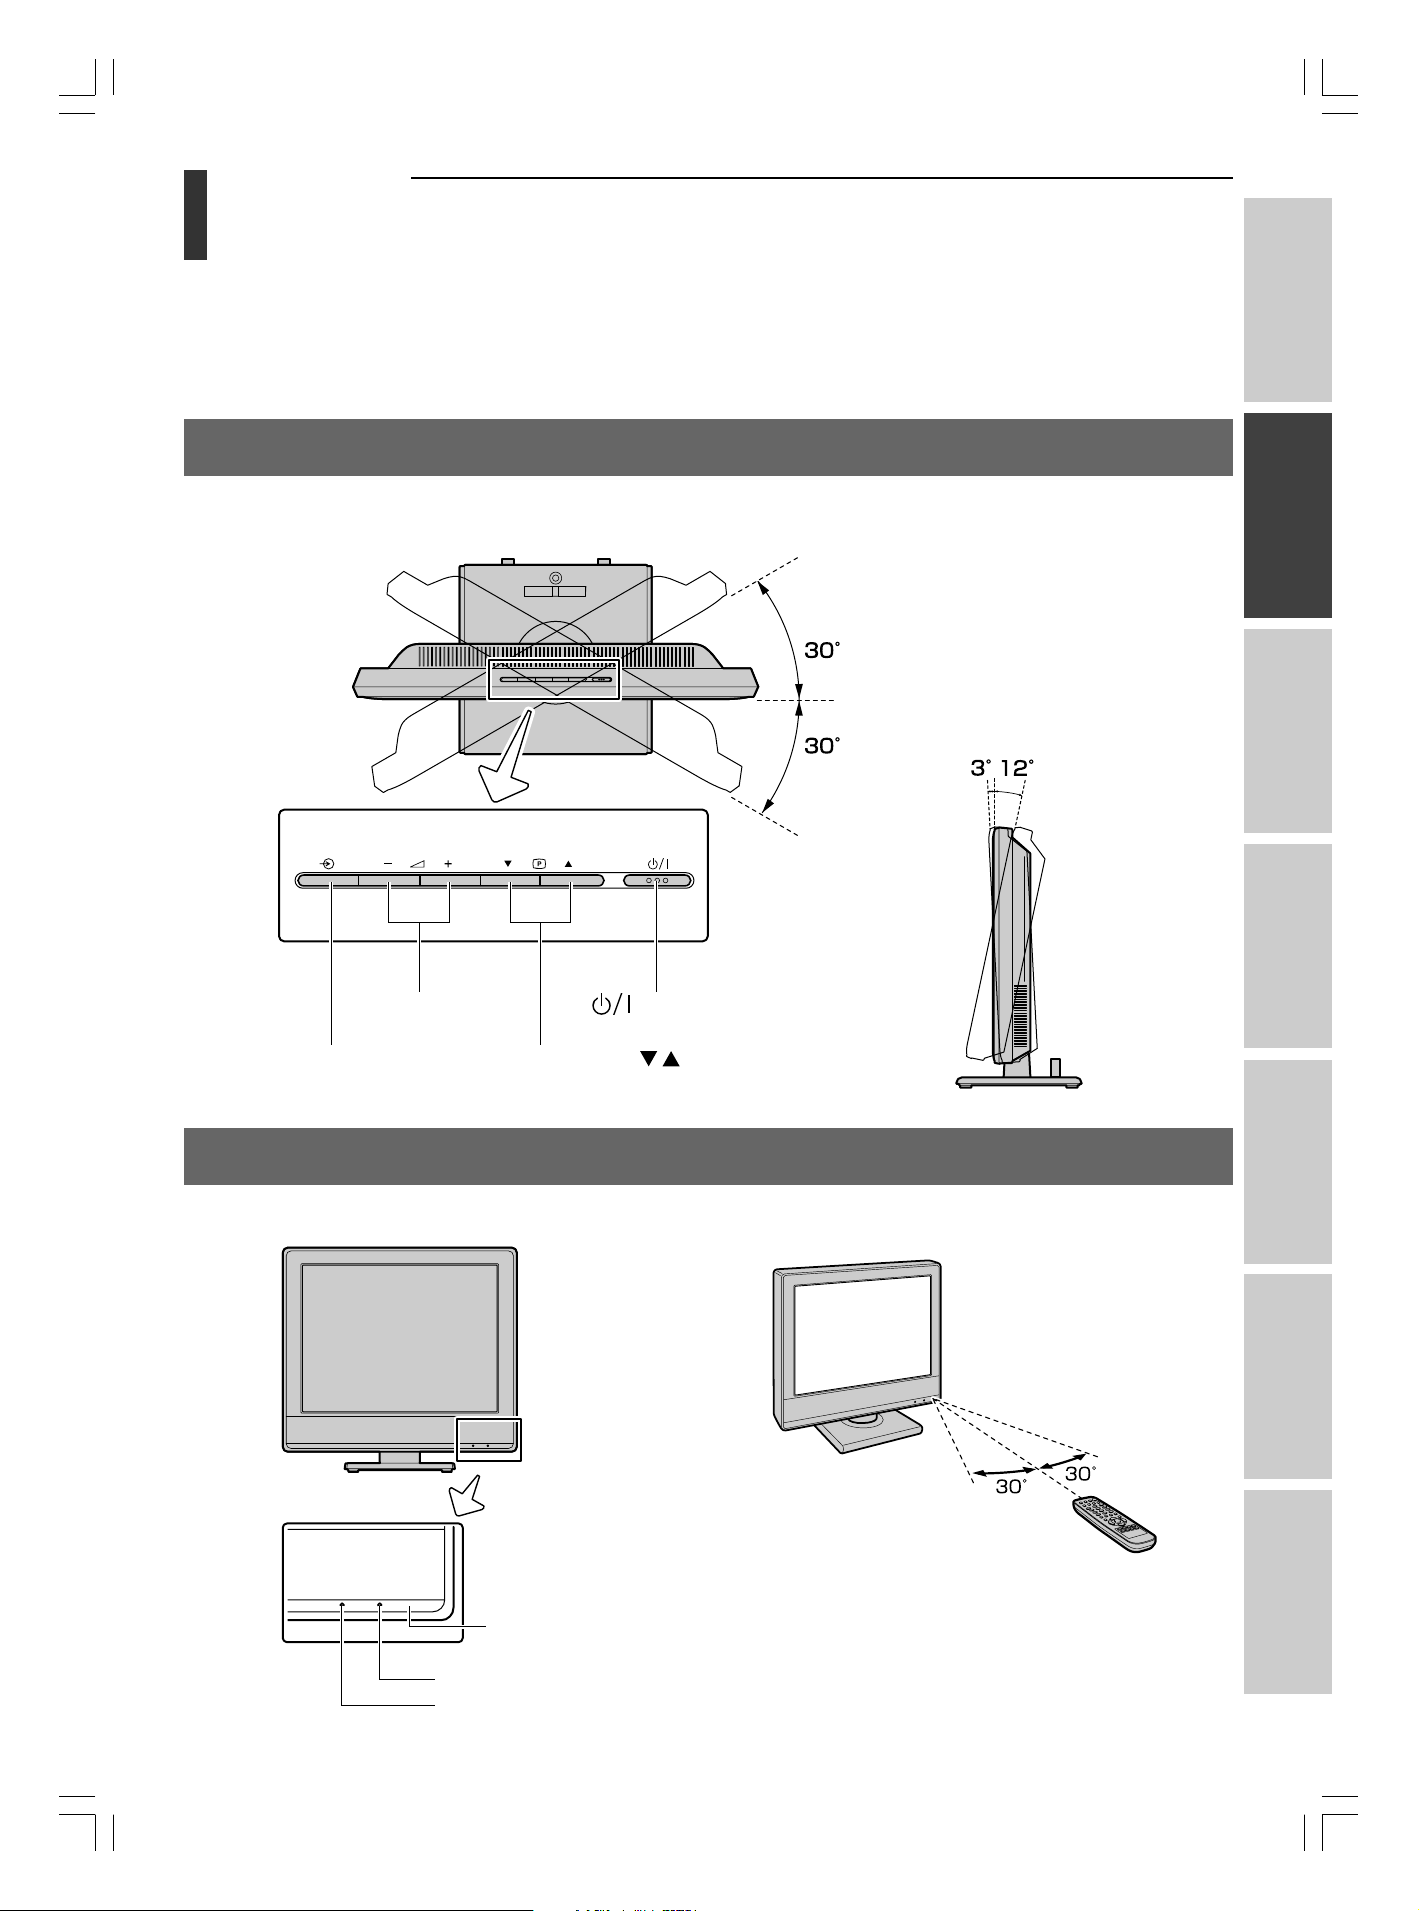
TV top/TV side
For the use of each control, see the pages in brackets.
TV top view
You can adjust the angle of the TV screen.
Swivel angle: 30 degrees to left and right.
Tilt angle: 3 degrees forward or 12
degrees backward from
vertical angle.
TV side view
Top view
Introduction
Getting started
Basic operation
Input source
selection [23]
TV front
Volume - + [12]
TV front view
Power button [12]
Programme position [12]
Effective range
within 5 m
features
Using the TV’s
Viewing teletext
Equipment
connections
#01E09-12_1520VL56BG 05.6.24, 0:51 PM9
Black
Remote sensor
Power/standby indicator
Red On : Standby mode [12]
Green On : Power on [12]
Remote control
Reference section
9
Toshiba 1520VL56BG (E)
Page 10
Getting started
Exploring your new TV
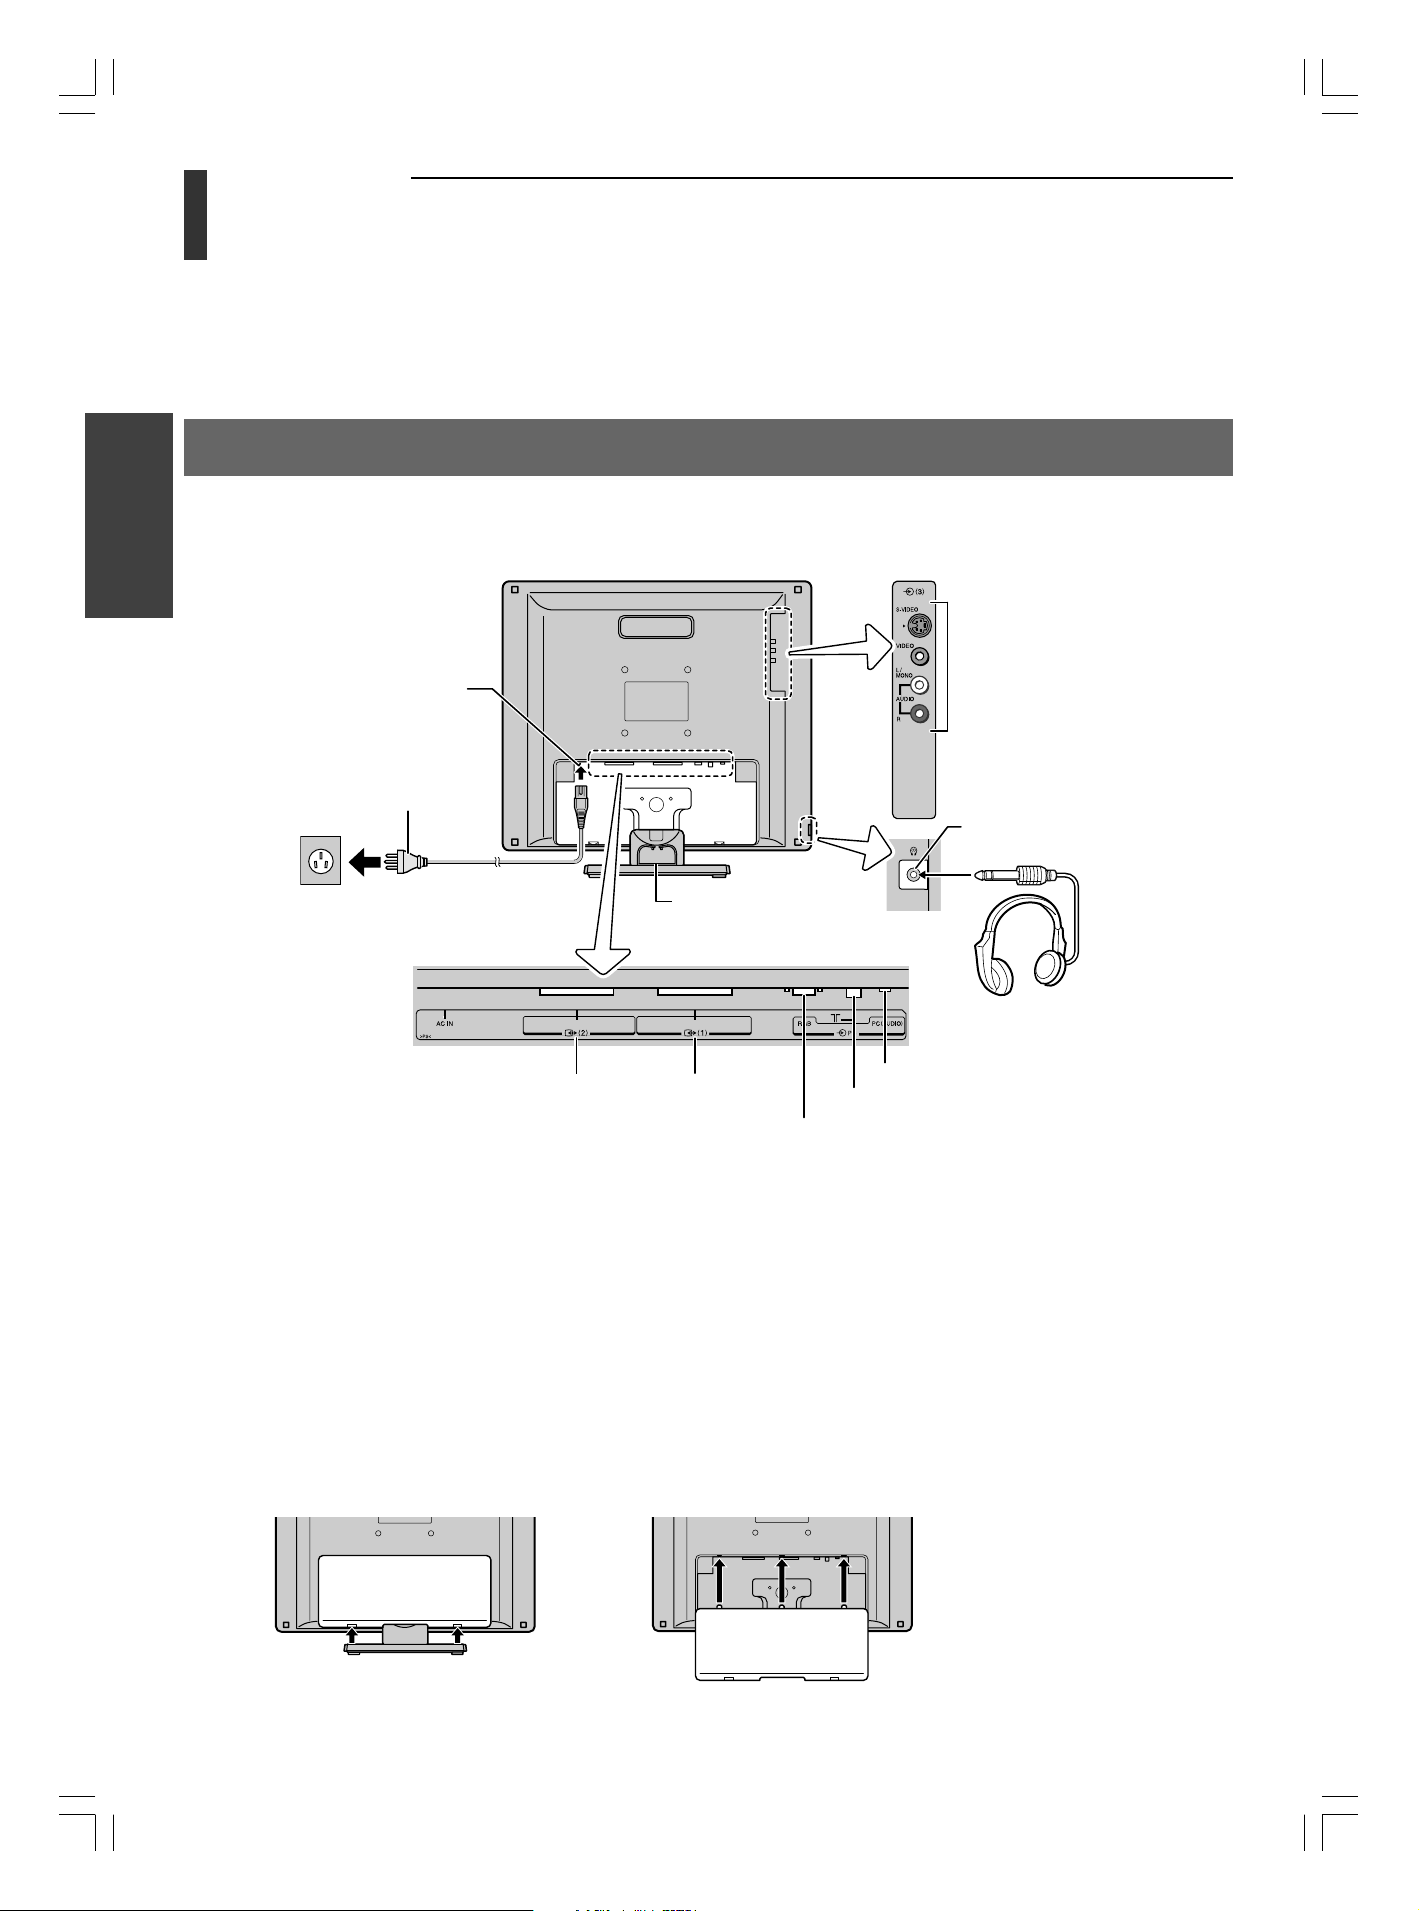
TV back
Before connecting the aerial and audio/video cables, remove the terminal panel cover (see “Rear terminal cover”
below).
Getting Started
AC IN terminal
Power cord
The exact power cord
will vary according to
the country or region.
TV back view
(continued)
Left side view
VIDEO 3
(S-VIDEO, VIDEO/AUDIO input)
[29]
Headphone jack
(3.5 mm, stereo)
When the power plug is
connected to outlet, the
power/standby indicator
lights in red.
Power cord (supplied)
Back panel
VIDEO 2
(Scart 2)
[30]
Cable holder*
VIDEO 1
(Scart 1)
[30]
Headphones
(Not supplied)
PC AUDIO input [31]
Aerial input [8]
RGB/PC input [31]
*You can use the cable holder to hold
the aerial and audio/video cables.
Never use the cable holder to carry
the TV when moving it.
Note:
Inserting a headphone plug into the Headphone jack will mute the sound from all speakers and deliver normal stereo left
and right sounds to the headphones.
Rear terminal cover
The connection panel is hidden behind the terminal cover.
1. To remove the cover, release the two catches on the bottom of the cover.
2. Connect cables as necessary.
3. To reinstall the cover, align the holes on the TV back with the three tabs on the rear terminal cover as shown
and close the cover.
10
#01E09-12_1520VL56BG 05.6.24, 0:51 PM10
Black
Toshiba 1520VL56BG (E)
Page 11
Getting started
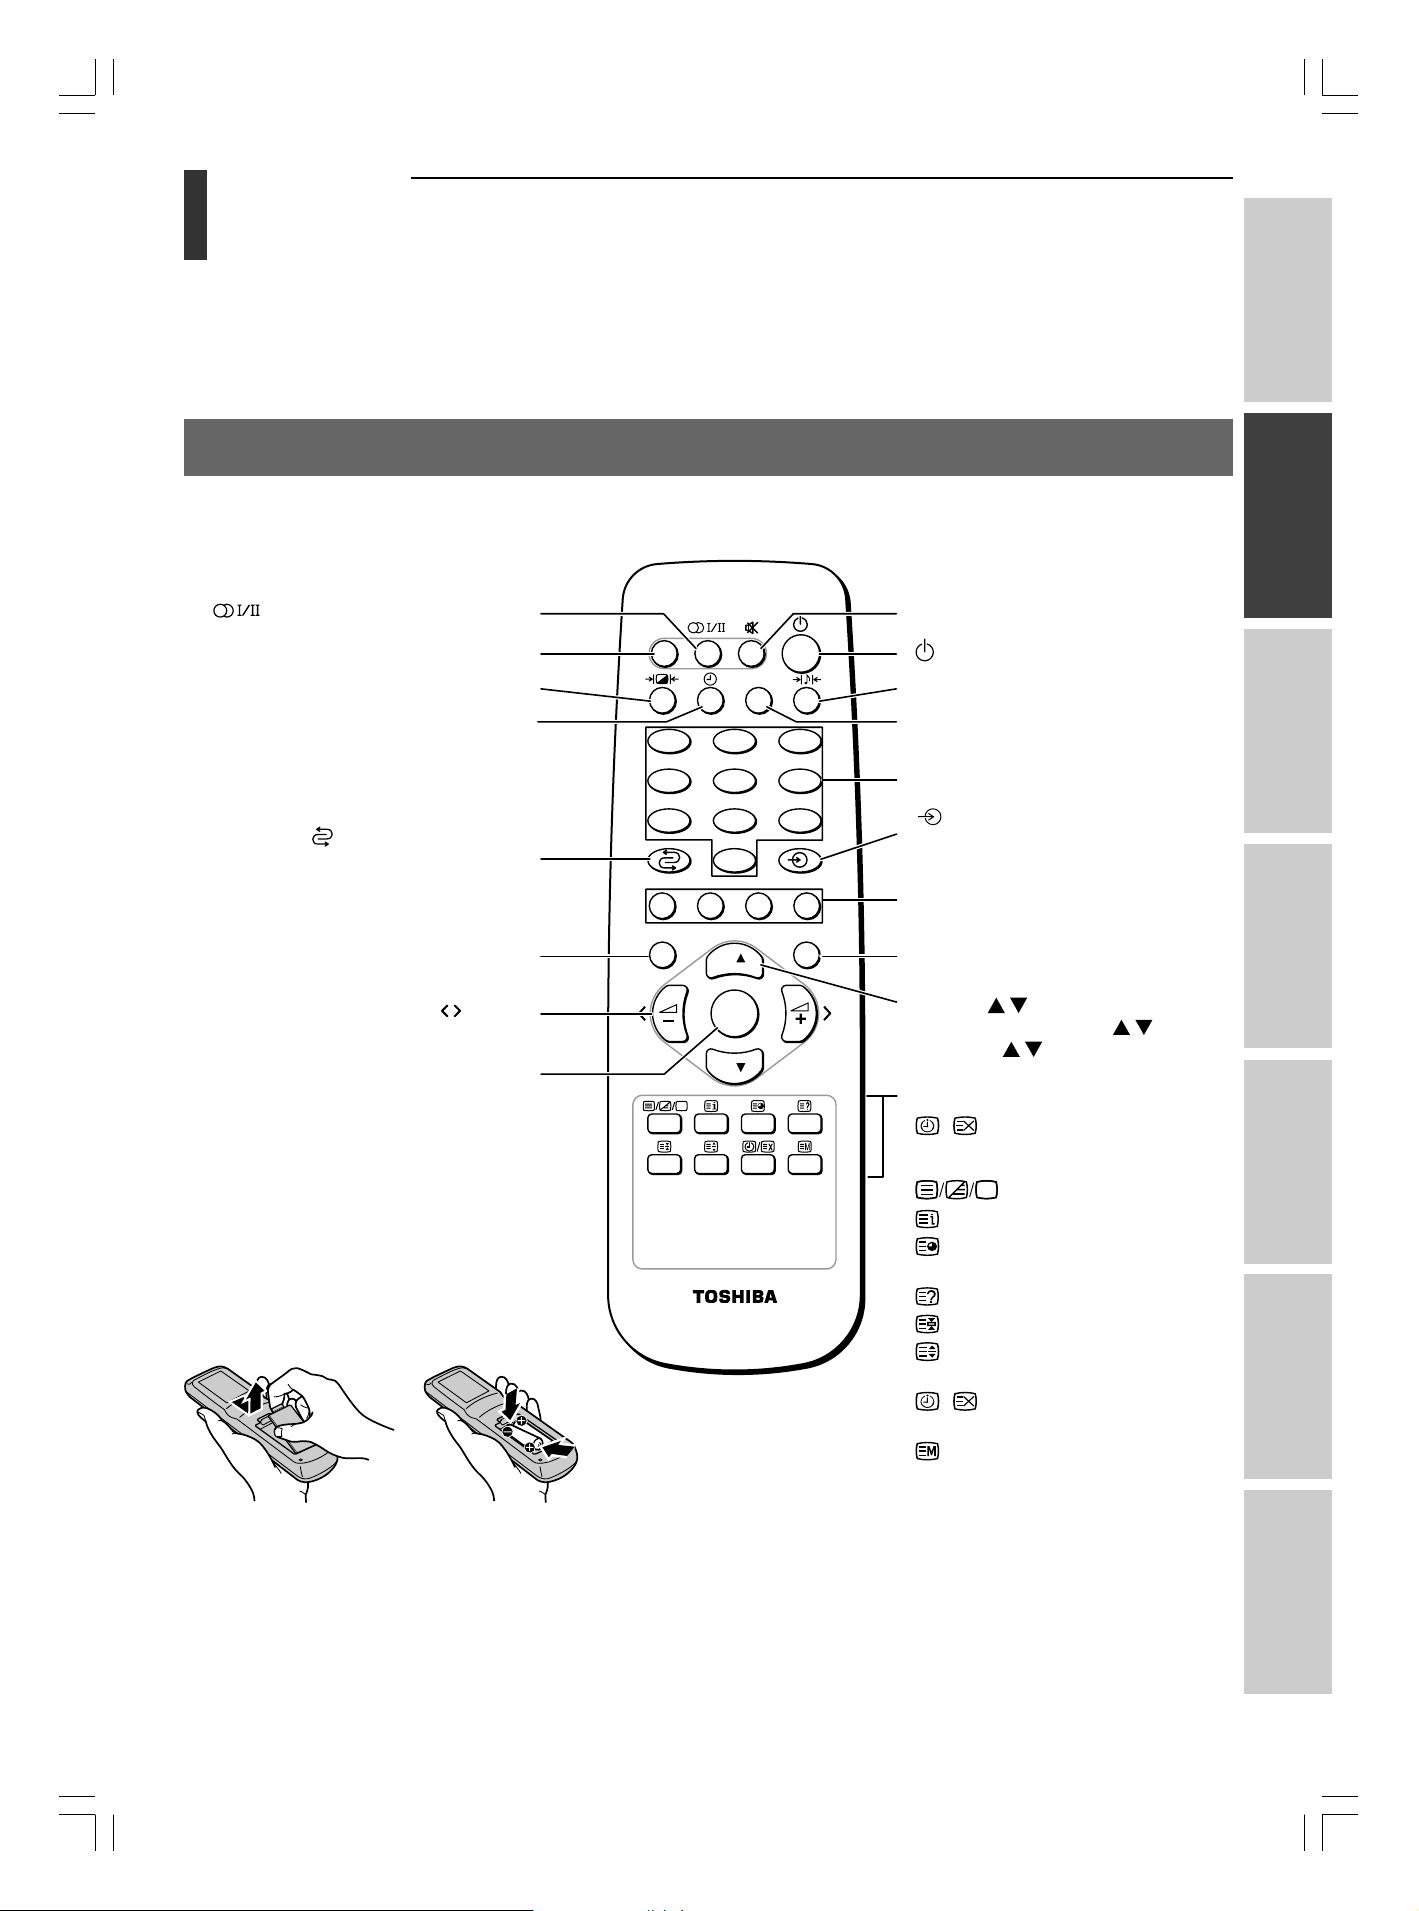
Learning about the remote control
Location of controls/Installing the remote control batteries
For the use of each control, see the pages in brackets.
Stereo/bilingual selection [22]
CALL [13, 17]
V Picture mode selection [19]
CALL
o Sound mute [12]
Power on/Standby [12]
b Sound mode selection [20]
Introduction
Getting started
Y To set Sleep Timer [23]
(Programme return)
To return to the previous
programme [13]
MENU [14]
• Menu [14]
• Volume – + [12]
OK [15, 16, 18]
Installing the remote control batteries
Remove the battery cover.
Insert two R6 (AA) batteries, matching the –/+
polarities of the battery to the –/+ marks inside
the battery compartment.
213
546
87
9
0
MENU EXIT
P
OK
P
CT-893
This button is not available for this
TV.
Number buttons (0-9) [12, 15]
Input source selection [23, 32]
(VIDEO 1, VIDEO 2, VIDEO 3, PC)
Teletext control buttons [25–28]
(Four coloured buttons: Red, Green,
Yellow, Blue)
EXIT [14]
• Menu [14]
• Programme position [12]
• Teletext [26]
When in TV mode:
/ Time display [26]
When in Teletext mode:
Teletext on/off [25]
Initial/index [25]
To access sub-pages when in
teletext [26]
To reveal concealed text [26]
To hold a desired page [26]
To enlarge teletext display size
[26]
/ To select a page while
viewing a normal picture [26]
To switch the teletext mode [26]
Basic operation
features
Using the TV’s
Viewing teletext
Equipment
connections
Cautions:
• Dispose of batteries in a designated disposal area. Do
not throw batteries into a fire.
• Attention should be drawn to the environmental
aspects of battery disposal.
• Do not mix battery types or combine a used battery
with a new one.
#01E09-12_1520VL56BG 05.6.24, 0:51 PM11
Black
Notes:
• If the remote control does not operate correctly, or
if the operating range becomes reduced, replace
both batteries with new ones.
• If the batteries are dead or if you will not use the
remote control for a long time, remove the
batteries to prevent battery acid from leaking into
the battery compartment.
11
Toshiba 1520VL56BG (E)
Reference section
Page 12

Getting started
Watching TV programmes
Plug the power cord to a wall outlet.
Turning the TV on or off/Volume/Sound mute/Programme positions
Getting Started
TV top view
TV front view
Switching on the TV:
Press the power button on the TV or press the button on the
remote control.
The power on indicator lights in green.
Switching off the TV (standby mode):
Press the power button on the TV or press the button on the
remote control.
The standby indicator lights in red.
Notes:
• When the TV is turned off but remains plugged into the electrical
outlet, a minute amount of current is still consumed.
• When the TV will not be used for a long period of time, such as
during a vacation or a travel, remove the power plug from the
electrical outlet.
• When Auto off is set to On, the TV will automatically turn itself
off after approximately 15 minutes if it is tuned to a vacant
channel or one whose station has finished its broadcasts for the
day (see page 24).
• If power is cut off while you are viewing the TV, the Last Mode
Memory feature turns on the TV automatically when power is
applied again. If power is going to be off for a long time and you
are going to be away from your TV, unplug the power cord to
prevent the TV from turning on in your absence.
CALL
213
546
879
0
MENU EXIT
P
OK
P
To adjust the volume:
Press the + or – button to
increase or decrease the volume.
Volume 30
To mute the sound:
Press the button. appears
on the screen.
Press the button again to
restore the sound.
To change programme position:
Enter the desired programme position
number using the Number buttons on
the remote control. You can also
change the programme position by
using the P or P button.
For programme positions below 10, use 0 and the required number
(e.g., for programme position 1, press 0, 1).
The position number will be displayed in the top right of the screen.
ABCD Pr. 1
12
#01E09-12_1520VL56BG 05.6.24, 0:51 PM12
Black
Toshiba 1520VL56BG (E)
Page 13

Getting started
Watching TV programmes (continued),
Learning about the menu system
Introduction
Switching Programme return/On-screen information
To switch between two programme positions:
You can switch between two programme positions without entering
CALL
213
546
87
9
0
MENU EXIT
P
OK
the actual position number each time.
Select the first programme
position you want to view.
EFGH Pr. 2
Select the second programme
position using the Number
buttons (0-9).
Press the button. The
IJKL Pr. 3
previous channel will be
displayed.
Each time you press the button, the TV will switch back and
forth between the two programme positions.
To display the on-screen information:
•Press the CALL button to display
the following on-screen
information.
The information will disappear in 4
seconds.
– Selected programme position or external input mode
–Programme skip on information
– Station name (if set)
– Mono/Stereo/Dual audio status
MNOP Pr. 4
Getting started
Basic operation
features
Using the TV’s
P
Selecting a language
Choose from seventeen different languages for the on-screen
display.
Press the MENU button, then press the or button to
display the Setup menu.
Viewing teletext
Press the OK button, then the z
or y button to select Language.
Press the OK button, then press
the z or y button to select the
desired language.
English, Deutsch, Français,
Italiano, Español, Nederlands,
Svenska, Norsk, Dansk,
Language
Auto off
Teletext
Teletext language
Panel lock
Nederlands
English
Deutsch
Français
Italiano
Español
Svenska
To set
OK MENU EXIT
Norsk
Dansk
MENU EXIT
Setup
Suomi
Português
Romaneste
Polski
Magyar
Chesky
Slovensky
Equipment
connections
Suomi, Português, Romaneste,
Polski, Magyar, Chesky,
Русский, Slovensky
Reference section
#01E13-18_1520VL56BG 05.6.24, 0:51 PM13
Black
13
Toshiba 1520VL56BG (E)
Page 14

Getting started
Learning about the menu system (continued)
To use the menu system:
Press the MENU button to open the menu system, then press the or button to select a main menu.
Press the OK button, then press the z or y button to select an item in the main menu.
Press the OK button, and then press the z or y button to select or adjust a setting in the item.
Press the OK button to display the next menu.
Menu overview
Picture menu
Getting Started
Picture
Picture mode
Contrast
Brightness
Colour
Sharpness
Tint
Sound menu
Sound mode
Bass
Treble
Balance
AVL
Channel menu
Auto programme
Manual programme
MFT
AFT
Blue screen
Sound
OK MENU EXIT
OK MENU EXIT
Channel
OK MENU EXIT
Picture
Picture mode
Contrast
Brightness
Colour
Sharpness
Tint
Sound
Sound mode
Bass
Treble
Balance
AVL
Auto programme
Manual programme
MFT
AFT
Blue screen
Contrast 85
OK MENU EXIT
Bass 0
OK MENU EXIT
Channel
To set
OK MENU EXIT
OK
OK
Contrast 85
Bass 0
Notes:
• If you do not make a selection for a while, the
menu display closes automatically.
• If you want to close the on-screen display
instantly, press the MENU button.
•To return to the previous menu, press the EXIT
button.
• In TV or video mode, the PC menu will not
appear.
• In the NTSC signal mode, you can select Tint on
the Picture menu (see page 19).
Setup menu
Language
Auto off
Teletext
Teletext language
Panel lock
Setup
OK MENU EXIT
PC menu
H-Position
V-Position
Clock
Phase
Auto-configure
Reset
OK MENU EXIT
14
#01E13-18_1520VL56BG 05.6.24, 0:51 PM14
Black
English
Language
Auto off
Teletext
Teletext language
Panel lock
PC
H-Position
V-Position
Clock
Phase
Auto-configure
Reset
Setup
To set
OK MENU EXIT
H-Position 76
OK MENU EXIT
OK
PC
Deutsch
Français
Italiano
Español
Nederlands
Svenska
Norsk
Dansk
Português
Romaneste
Slovensky
MENU EXIT
Suomi
Polski
Magyar
Chesky
Toshiba 1520VL56BG (E)
Page 15

Getting started
Programming channel memory
• First, use the Auto Programme function to preset all the active channels in your area automatically. Then, arrange
the preset channels with the Manual Programme function so that you can tune into only desired channels.
• Up to 100 TV stations can be stored by programme numbers (0 to 99). Once you have preset the stations, you will
be able to use the or buttons to scan the stations you have programmed. Stations can be tuned using automatic
or manual modes.
System selection/Auto programme
Press the MENU button, then
CALL
213
press the or button to
display the Channel menu.
Press the OK button, then press
the z or y button to select
Auto programme
Manual programme
MFT
AFT
Blue screen
Auto programme.
Press the OK button to display the Auto programme menu.
Continue to set each item following the steps described below.
Channel
To set
OK MENU EXIT
Introduction
Getting started
546
87
9
0
MENU EXIT
P
OK
P
System:
Press the z or y button to
select System, then press the
OK button.
System
Storage from
Search
Select a TV system with the z or y button on the System
menu;
B/G : PAL B/G, SECAM B/G (Europe/East Europe)
I : PAL I/II (U.K./Ireland)
D/K : PAL D/K, SECAM D/K (East Europe)
L : SECAM L/L’ (France)
M : NTSC
Press the OK button.
Auto programme
Storage from:
Press the z or y button to select Storage from, then press the
OK button.
Select the beginning programme position with the or
button or Number button. Any number under 10 is entered
with a numeric “0” in front of it, i.e. “05” for 5.
Press the OK button.
Basic operation
B/G
I
D/K
L
M
MENU EXIT
features
Using the TV’s
Viewing teletext
#01E13-18_1520VL56BG 05.6.24, 0:51 PM15
Black
Search:
Press the z or y button to select Search.
Press the OK button to begin
auto programming.
All receivable stations are
stored.
To stop auto programming,
press the MENU button.
When auto programming is completed, the Channel menu
appears on the screen automatically.
System
Storage from
Search
Toshiba 1520VL56BG (E)
Auto programme
MENU EXIT
C10 B/G
5 5 %
15
Equipment
connections
Reference section
Page 16

Getting started
Programming channel memory
Manual programme
Getting Started
CALL
213
546
87
9
(continued)
Select the programme position you want to arrange by using
the Py or Pz button or Number buttons.
Press the MENU button, then press the or button to
display the Channel menu.
Press the OK button, then press
the z or y button to select
Manual programme.
Auto programme
Manual programme
MFT
AFT
Blue screen
Press the OK button to display the Manual programme menu.
Continue to set each item following the steps described below.
Channel
To set
OK MENU EXIT
0
MENU EXIT
P
OK
P
Storage (Storing channel):
With this function, a specific channel can be stored to another
programme position of your choice.
Press the
z or y
button to select
Storage, then press the OK button.
Select the desired programme
number (0 to 99) with the or
button or Number buttons on
Storage
System
Channel
Skip
Search
Name
Manual programme
18
OK MENU EXIT
the Storage menu.
Press the OK button.
System (Selecting the Colour system):
Press the z or y button to select System, then press the OK
button.
Select a TV system with the z or y button on the System
menu;
B/G : PAL B/G, SECAM B/G (Europe/East Europe)
I : PAL I/II (U.K./Ireland)
D/K : PAL D/K, SECAM D/K (East Europe)
L : SECAM L/L’ (France)
M : NTSC
Press the OK button.
16
#01E13-18_1520VL56BG 05.6.24, 0:51 PM16
Black
Channel (Selecting channel):
Press the
button.
Press the z or y button to select VHF/UHF or Cable on the
Channel menu.
If possible, select the channel number directly with the
Number buttons.
Press the OK button.
z or y
button to select Channel, then press the
Toshiba 1520VL56BG (E)
OK
Page 17

Manual programme (continued)
CALL
213
546
87
9
0
MENU EXIT
P
OK
P
Skip (Skipping a programme position):
Press the z or y button to select Skip, then press the OK
button.
Press the z or y button to turn
the programme position’s skip
option On or Off.
The programme position will
then be skipped when you
select channels with the P or
Storage
System
Channel
Skip
Search
Name
P button.
The “ ” mark will appear beside a programme position
number when you use the Number button.
Press the OK button.
Search (Searching for a channel):
Press the z or y button to select Search, then press the OK
button.
Press the or button to begin
searching. If a station is found,
the search will stop.
Press the OK button.
Storage
System
Channel
Skip
Search
Name
Manual programme
On
Off
OK MENU EXIT
Manual programme
OK MENU EXIT
Introduction
Getting started
Basic operation
features
Using the TV’s
When a station/satellite is found, it will be displayed.
Name:
Station names appear with the programme position display each
time you turn on the TV, select a channel, or press the CALL button.
To change or create station labels:
Press the z or y button to select Name, then press the OK
button.
Press the z or y button repeatedly to select a character for
the first space, then press the button.
*(blank space)
Repeat step 2 to enter the rest of the characters. If you would
like a blank space in the label name, you must choose a blank
space from the list of characters.
Press the OK button.
Viewing teletext
Equipment
connections
Reference section
#01E13-18_1520VL56BG 05.6.24, 0:51 PM17
Black
17
Toshiba 1520VL56BG (E)
Page 18

Getting started
Programming channel memory
MFT/AFT
Getting Started
CALL
213
546
87
9
0
(continued)
MFT (Manual Fine Tuning):
The adjustments below are not necessary under normal receiving
conditions. However, in areas of inferior broadcast conditions
where adjustment is necessary for a better picture, perform the MFT
function.
Select the programme position you want to fine-tune with
the P or P button or Number buttons.
Press the MENU button, then press the or button to
display the Channel menu.
Press the OK button, then press
the z or y button to select
MFT.
Press the OK button, then press
the or button to obtain
better picture and sound.
Auto programme
Manual programme
MFT
AFT
Blue screen
Channel
OK MENU EXIT
MENU EXIT
P
OK
P
AFT (Automatic Fine Tuning):
The AFT function automatically corrects slight fluctuations when
receiving signals.
Select the programme position you want to fine-tune with
the P or P button or Number buttons.
Press the MENU button, then press the or button to
display the Channel menu.
Press the OK button, then press
the z or y button to select AFT.
Press the OK button, then press
the z or y button to select On.
Auto programme
Manual programme
MFT
AFT
Blue screen
Auto programme
Manual programme
MFT
AFT
Blue screen
Channel
On
Off
OK MENU EXIT
Channel
On
Off
MENU EXIT
Note:
When operating the MFT function, the
AFT status is automatically set to Off.
18
#01E13-18_1520VL56BG 05.6.24, 0:51 PM18
Black
Toshiba 1520VL56BG (E)
Page 19

Basic operation
Picture quality adjustment
Picture quality adjustment
To select the picture mode using the remote control:
You can select the picture quality instantly among three preset
modes and one user-set mode.
• Repeatedly press the button
CALL
213
546
87
9
to select one of the following
picture qualities:
Dynamic, Standard, Movie and
Memory (user-set).
Mode Picture quality
Dynamic bright and dynamic picture
Standard standard picture
Movie softer picture suitable for viewing movies
Memory the picture qualities you set
Introduction
Getting started
Dynamic
Basic operation
0
MENU EXIT
P
OK
P
To select the picture mode through the Picture menu:
Press the MENU button, then press the or button to
display the Picture menu.
Press the OK button, then press
the z or y button to select
Picture mode.
Press the OK button, then press
the z or y button to select the
mode you prefer.
Picture
Picture mode
Contrast
Brightness
Colour
Sharpness
Tint
Dynamic
Standard
Movie
Memory
MENU EXIT
To adjust the picture quality:
The adjusted level is stored in the picture Memory.
Press the MENU button, then
press the or button to
display the Picture menu.
Press the OK button, then press
the z or y button to select
Contrast, Brightness, Colour,
Sharpness or Tint.
Press the OK button, then press
the or button to adjust the
level.
Picture
Picture mode
Contrast
Brightness
Colour
Sharpness
Tint
Contrast 85
OK MENU EXIT
Contrast 85
features
Using the TV’s
Viewing teletext
Equipment
connections
Note:
To continue adjusting the other picture
qualities, press the z or y button in step
3.
#01E19-22_1520VL56BG 05.6.24, 0:52 PM19
Black
Selection Pressing
Contrast lower higher
Brightness darker lighter
Colour paler deeper
Sharpness softer sharper
Tint* reddish greenish
*for NTSC system only
Reference section
19
Toshiba 1520VL56BG (E)
Page 20

Basic operation
Sound adjustment
Sound quality adjustment
To select the sound mode using the remote control:
You can select the sound quality instantly among five preset modes
and one user-set mode.
• Repeatedly press the b button
CALL
to select one of the following
sound qualities:
WOW, Flat, Hall, Theater, News
and Memory (user-set).
Flat
Basic operation
213
546
87
9
0
MENU EXIT
P
OK
P
Note:
To continue adjusting the other sound
qualities, press the z or y button in step
3.
Mode Sound quality
WOW see page 21
Flat flat sound
Hall a concert hall filled with a rich, warm sound
Theater a movie theater filled with a dynamic sound
News news/dialogue
Memory the sound qualities you set
To select the sound mode through the Sound menu:
Press the MENU button, then press the or button to
display the Sound menu.
Press the OK button, then press
the z or y button to select
Sound mode.
Press the OK button, then press
the z or y button to select the
mode you prefer.
Sound mode
Bass
Treble
Balance
AVL
Sound
WOW
Flat
Hall
Theater
News
Memory
MENU EXIT
To adjust the sound quality:
The adjusted level is stored in the sound Memory.
Press the MENU button, then
press the or button to
display the Sound menu.
Press the OK button, then press
the z or y button to select
Bass, Treble or Balance.
Press the OK button, then press
the or button to adjust the
level.
Selection Pressing
Bass weaker stronger
Treble weaker stronger
Balance decreases the decreases the
right channel left channel
Sound mode
Bass
Treble
Balance
AVL
Sound
Bass 0
OK MENU EXIT
Bass 0
20
#01E19-22_1520VL56BG 05.6.24, 0:52 PM20
Black
Toshiba 1520VL56BG (E)
Page 21

WOW surround setting
CALL
213
546
87
9
0
To turn on the WOW surround:
WOW widens and deepens the audio listening field to deliver
exceptional sound from the TV’s speakers. The function uses stereo
signals from a TV broadcast or video input.
Press the MENU button, then press the or button to
display the Sound menu.
Press the OK button, then press
the z or y button to select
Sound mode.
Press the OK button, then press
the z or y button to select
WOW.
Sound mode
Bass
Treble
Balance
AVL
Sound
WOW
Flat
Hall
Theater
News
Memory
MENU EXIT
Using the AVL function (Auto Volume Leveler)
Introduction
Getting started
Basic operation
MENU EXIT
P
OK
P
AV L maintains an equal volume level automatically, even if the
channel is changed.
To activate the AVL:
Press the MENU button, then press the or button to
display the Sound menu.
Press the OK button, then press
the z or y button to select
AVL.
Press the OK button, then press
the z or y button to select On.
Sound mode
Bass
Treble
Balance
AVL
Sound
On
Off
MENU EXIT
To deactivate the AVL:
Select Off in step 3 above.
features
Using the TV’s
Viewing teletext
Equipment
connections
Notes:
• If the broadcast is monaural, the WOW
effect does not work.
• WOW, SRS and ® symbol are
trademarks of SRS Labs, Inc.
• WOW technology is incorporated under
license from SRS Labs, Inc.
#01E19-22_1520VL56BG 05.6.24, 0:52 PM21
Black
Reference section
21
Toshiba 1520VL56BG (E)
Page 22

Basic operation
Basic operation
Sound adjustment
(continued)
Stereo/Bilingual selection
To select sounds in stereo programmes:
When a stereo programme is
received, STEREO appears.
CALL
Repeatedly press the
button to toggle between stereo
and monaural modes.
213
546
87
9
0
Display Reception mode
STEREO Stereo
MONO Monaural
STEREO
MONO
MENU EXIT
P
OK
P
To select different bilingual programmes:
When a bilingual programme
is received, DUAL I appears.
Repeatedly press the button to select the sound to be
heard. The sound differs according to the transmission
system: NICAM or German stereo/bilingual broadcast.
You can toggle among DUAL I, DUAL II and DUAL I/II
modes.
Sound to be heard
Display
NICAM
DUAL I Sub I sound Main sound
DUAL II Sub II sound Sub sound
DUAL I/II Sub I + Sub II sound Main and Sub sound
MONO Main sound –
Note:
These settings are not stored in the TV memory.
German stereo/
bilingual broadcast
DUAL I
22
#01E19-22_1520VL56BG 05.6.24, 0:52 PM22
Black
Toshiba 1520VL56BG (E)
Page 23

Using the TV’s features
Panel lock, Input selection, Sleep Timer
Panel lock
Introduction
TV top view
CALL
213
546
87
9
0
MENU EXIT
P
OK
P
Panel lock allows you to disable the buttons on the top of the TV.
You can still use all of the buttons on the remote control.
To set the Panel lock on:
Press the MENU button, then press the or button to
display the Setup menu.
Press the OK button, then press
the z or y button to select
Panel lock.
Press the OK button, then press
the z or y button to select On.
Language
Auto off
Teletext
Teletext language
Panel lock
Setup
On
Off
OK MENU EXIT
If Panel lock feature is set to On, the top panel buttons on the
TV except for the Power button are disabled.
If a button is pressed, the word “Panel lock on” will appear.
Input selection
To select the input source:
Repeatedly press the button on the TV or the remote control
until you see the appropriate input indicator on the screen:
VIDEO 1 ( (1), VIDEO 1 input),
VIDEO 2 ( (2), VIDEO 2 input),
VIDEO 3 ( (3), VIDEO 3 input),
PC ( RGB/PC, PC input)
Note:
If no PC input signal is present, the
PC menu will not appear.
PC
Getting started
Basic operation
features
Using the TV’s
Viewing teletext
#01E23-24_1520VL56BG 05.6.24, 0:52 PM23
Black
Sleep Timer
To set the Sleep Timer:
You don’t have to remember to switch
the TV off before you go to sleep. The
Sleep timer automatically switches the
TV to standby after the preset time
has elapsed.
Repeatedly press the Y button to
select the period of time. “ 30” will
appear on the screen, followed by, 60,
90, 120 and Off.
The timer begins to count down from the period of minutes selected.
Notes:
•To view the remaining preset time, press the Y button once.
•To cancel the Sleep timer, repeatedly press the Y button until the
display “ Off” appears.
• When you switch the TV off, the preset Sleep timer is cancelled.
30
23
Toshiba 1520VL56BG (E)
Equipment
connections
Reference section
Page 24

Using the TV’s features
Blue screen function,
Activating the Auto off function
Blue screen function
With the Blue screen function On, if the TV does not receive a
signal, the screen will automatically turn blue and the sound will be
muted.
To turn on the Blue screen:
CALL
213
546
87
9
0
Press the MENU button, then press the or button to
display the Channel menu.
Press the OK button, then press
the z or y button to select Blue
screen.
Press the OK button, then press
the z or y button to select On.
Notes:
• If the Blue screen function does not operate properly due to
unstable signal strength or frequency, select Off in step 3.
• In the PC input mode, the blue screen function is not available.
Auto programme
Manual programme
MFT
AFT
Blue screen
Channel
On
Off
MENU EXIT
Using the TV’s
features
MENU EXIT
P
OK
P
Activating the Auto off function
With the Auto off function On, the TV automatically turns off if no
signal is received for approximately 15 minutes.
Press the MENU button, then press the or button to
display the Setup menu.
Press the OK button, then press
the z or y button to select
Auto off.
Press the OK button, then press
the z or y button to select On.
Language
Auto off
Teletext
Teletext language
Panel lock
To turn off the Blue screen or the Auto off function:
Select Off in step 3 of each instruction above.
Setup
On
Off
MENU EXIT
24
#01E23-24_1520VL56BG 05.6.24, 0:52 PM24
Black
Toshiba 1520VL56BG (E)
Page 25

Viewing teletext
Teletext – Control buttons
• The TV is capable of showing both normal text and the text information selected by Auto mode and List mode.
• The Teletext buttons on the remote control have the same function for both text information types.
• The teletext language option enables the display of different language when using Teletext.
To view normal text
To select a language for Teletext:
Press the MENU button, and
CALL
213
then press the or button to
display the Setup menu.
Press the OK button, then press
the z or y button to select
Teletext language.
Press the OK button, then press
the z or y button to select the
required language.
Language
Auto off
Teletext
Teletext language
Panel lock
Setup
1
2
3
4
5
OK MENU EXIT
546
• Language 1: English, French, Scandian, Turkish, German,
87
9
0
RGY B
MENU EXIT
P
• Language 2: Polish, French, Scandian, Czech, German,
• Language 3: English, Russian, Estonian, Czech, German,
• Language 4: English, French, Arabic, Hebrew
• Language 5: English, French, Turkish, Farsi
Spanish, Italian, Greek
Serbian, Italian, Romanian
Ukrainian, Lettish
Introduction
Getting started
Basic operation
features
Using the TV’s
OK
P
Note:
It will not be possible to change
programme position while in Teletext
mode. You will have to cancel the
teletext first by pressing the
button to return to a normal TV mode.
To display a page of text ( ):
Select a desired TV station with a text service.
Press the button to display the index page.
Enter the 3-digit page number using the Number buttons
(0 - 9). Ex. Page 100: Press 1, 0 and 0.
Press the button again to superimpose the teletext
over a normal broadcast picture.
Press the button again to return to normal TV
mode.
Teletext buttons on the remote control
To display a page of teletext:
Press the button to display teletext. Press again to
superimpose the teletext over a normal broadcast picture. Press the
button again to return to normal TV mode. You need to
return to normal viewing if you wish to change channels.
When you first press the button to access the text service,
the first page you see will be the initial page.
In Auto mode, this displays the main subjects available and their
relevant page numbers.
In List mode, you will see whichever page number is currently
stored on each coloured button.
Viewing teletext
Equipment
connections
Reference section
#01E25-28_1520VL56BG 05.6.24, 0:52 PM25
Black
25
Toshiba 1520VL56BG (E)
Page 26

Viewing teletext
Teletext – Control buttons
(continued)
Teletext buttons on the remote control (continued)
To display an index/initial page:
In Auto-mode
Press the button to display the index page of a particular
broadcaster.
CALL
213
546
87
9
0
In List-mode
Press the button to return to your page currently stored on
each coloured button.
To reveal concealed text:
Some pages cover topics such as quizzes and jokes. To discover the
solutions, press the button.
To hold a desired page:
When a page is divided into sub pages, it is convenient to hold it.
Press the button to hold the page. “ ” will appear in the top left
of the screen. Press again to release the hold mode.
Viewing teletext
RG
MENU EXIT
P
OK
P
To enlarge the teletext display size:
Press the button once to enlarge the top half of the page. Press
again to enlarge the bottom half of the page. With the third press of
the button, the page will return to normal size.
/ To select a page while viewing a normal picture:
When in teletext mode, if a page selection is made and then the
/ button is pressed, a normal picture will be displayed. The
TV will indicate when the page is present by displaying the number
of the text page at the top of the screen. Press the button
to view the page.
To switch the teletext mode:
When in teletext mode, press the button to switch between List
mode and another mode.
To select the time display (with the Teletext service only):
If you press the / button while
watching a normal TV broadcast, you
will see a time display from the
broadcaster.
To erase the display, press the /
button again.
9:56 and 25 seconds p.m.
21:56:25
Sub-pages:
If there are sub-pages, you can access the sub-pages by using the
button.
Press the button to select a sub-page number. The sub-page
number is displayed at the bottom of the screen. To change the subpage, press the R, G, y, z or Number buttons. Press the button
again to exit this function.
26
#01E25-28_1520VL56BG 05.6.24, 0:52 PM26
Black
Toshiba 1520VL56BG (E)
Page 27

Viewing teletext
Teletext – Auto and List modes
Auto mode
Auto mode is a method of viewing Teletext pages by related subjects grouped by the broadcast station. You can
access any given topic shown on the screen simply by pressing the corresponding coloured text select button on the
remote control.
Using Auto mode
To select the Auto mode (Fastext mode):
When you select the Auto mode, four coloured prompts appear at
the bottom of the screen. The colours correspond to those of the text
select buttons on the remote control. Press the corresponding
CALL
213
546
87
9
0
RGY B
MENU EXIT
P
OK
P
coloured button to go to the desired topic page instantly.
Select a TV channel with the
desired FASTEXT service.
Press the MENU button, then
press the or button to
display the Setup menu.
Press the OK button, then press
the z or y button to select
Teletext.
Press the OK button, then press
the z or y button to select
Auto (Fastext mode).
Language
Auto off
Teletext
Teletext language
Panel lock
MENU EXIT
To view Fastext:
Press the button to
select the text mode.
Four coloured prompts will
appear at the bottom of the
screen.
100 Sport 14:57:55
Setup
Auto
List
Introduction
Getting started
Basic operation
features
Using the TV’s
Prompts
Press the coloured button that
corresponds to your desired
topic.
The display will switch to the
selected page.
Repeat step 2 to switch to the
next topic you want to view.
To return to the normal TV mode:
Press the button twice.
Press the button to display an index page.
SwimmingRacingBaseballFootball
Green
Red
100 Rasing 14:57:55
Yellow
Blue
RALLYBRAZILMONACOF1
27
Viewing teletext
Equipment
connections
Reference section
#01E25-28_1520VL56BG 05.6.24, 0:52 PM27
Black
Toshiba 1520VL56BG (E)
Page 28

Viewing teletext
Teletext – Auto and List modes
(continued)
List mode
You can preset up to four of the most frequently used text pages to select these pages easily.
Using List mode
To select the List mode:
Press the MENU button, then press the or button to
display the Setup menu.
CALL
213
546
87
9
0
RGY B
MENU EXIT
P
Press the OK button, then press the z or y button to select
Teletext.
Press the OK button, then press
the z or y button to select List
(List mode).
Select a TV channel with the
normal text service.
To preset desired pages:
Press the button to select
Language
Auto off
Teletext
Teletext language
Panel lock
EX. Factory presetting
100 TEXT M00 14:58:55
the text mode.
Press the R button to select the red
page.
Setup
Auto
List
MENU EXIT
Viewing teletext
OK
P
Prompts
Press the Number buttons to
100 200 300 400
Green
Red
100 TEXT M00 14:58:59
Yellow
enter the 3-digit page number
that you want to preset the red
page.
Ex. page 120 : Press 1, 2 and 0.
The preset page is displayed on
120 200 300 400
the screen.
Press the OK button to store
your choice.
Repeat steps 2 - 4 to preset the
other three pages using the G,
Y, and B buttons.
To display a desired page:
Press the desired coloured button according to the four coloured
prompts on the screen.
Blue
28
#01E25-28_1520VL56BG 05.6.24, 0:52 PM28
Black
To display an initial page:
Press the button.
Toshiba 1520VL56BG (E)
Page 29

Equipment connections
Side panel connections
•You can connect one of a wide variety of auxiliary equipments via the inputs located on the TV’s side panel.
• The side panel connections are referred to as “VIDEO 3.”
Connection example
Always refer to the owner’s manual of the equipment for full details of its connection.
TV back view
Side panel detail
Introduction
Getting started
Basic operation
Camcorder with S-Video
•To select the side input, press the button repeatedly to select VIDEO 3 (see page 23).
• Never plug in any power cords until you have finished connecting all equipments.
• Connect either the S-VIDEO input terminal or VIDEO input terminal, whichever terminal is used.
Do not connect to both of these terminals at the same time.
• When connecting a mono sound equipment to VIDEO 3, connect the audio output of the equipment to the L/
MONO jack on the TV.
Camcorder
Video Game
features
Using the TV’s
Viewing teletext
Equipment
connections
•You can enjoy video games with this TV; however, games that involve shooting at a target on the TV screen with a
light gun may not work because of the LCD colour TV properties.
#01E29-33_1520VL56BG 05.6.24, 0:52 PM29
Black
Reference section
29
Toshiba 1520VL56BG (E)
Page 30

Equipment connections
Back panel connections
Connection example
TV back panel
Computer
VCRSet Top Box
• Do not plug in any power cords until you have finished connecting all equipments.
• Before connecting any external equipment, remove the TV back terminal panel cover (see page 10).
• The unauthorized recording of television programmes, video tapes and other materials may infringe upon the
provisions of copyright laws.
• Additional equipments and cables shown here are not supplied with this TV.
Equipment
connections
30
#01E29-33_1520VL56BG 05.6.24, 0:53 PM30
Black
Toshiba 1520VL56BG (E)
Page 31

Equipment connections
Connecting a computer
• Before connecting PC and audio cables, remove the back terminal panel cover (see page 10).
• An analogue RGB (15-pin) computer cable can be connected.
To connect a computer
TV back panel
Computer
Audio cable for PC-to-TV
connection (not supplied)
Mini D-sub
15-pin
RGB PC cable
(not supplied)
Introduction
Getting started
Basic operation
Connect a PC cable from the computer to the RGB/PC input terminal on the back of the TV.
The following signal can be displayed:
• VGA: VESA 640 x 480 @ 60 Hz (20VL56B/G)
• XGA: VESA 1024 x 768 @ 60Hz (15VL56B/G)
Other formats or non-standard signals may not be displayed correctly.
Notes:
• Some PC models cannot be connected to this TV.
• Computers with a DOS/V compatible mini D-sub 15-pin terminal do not require an adapter.
• Some input signals may cause a bar to appear in the upper, lower, right, or left side of the screen, or may obscure
parts of the picture. This is not a malfunction.
• If the edges of the picture are stretched, readjust the picture position through the PC’s menu.
• Depending on the DVD’s title and the specification of the PC on which you are playing the DVD-Video, some
scenes may be skipped or you may not be able to pause during multi-angle scenes. This is not a malfunction.
Signal names for mini D-sub 15 pin connector
Pin assignment for RGB/PC
terminal
5
10
15
1
6
11
Pin No. Signal name Pin No. Signal name
1R 9 NC
2G 10 Ground
3B 11 NC
4 NC (not connected) 12 NC
5Ground 13 H-sync
6Ground 14 V-sync
7Ground 15 NC
8Ground
features
Using the TV’s
Viewing teletext
Equipment
connections
Reference section
#01E29-33_1520VL56BG 05.6.24, 0:53 PM31
Black
31
Toshiba 1520VL56BG (E)
Page 32

Equipment connections
PC Setting
•You can adjust the horizontal/vertical picture position, clock (to minimize vertical stripes on the screen), and
phase (to remove horizontal noise and sharpen the picture).
•You can auto-configure and reset these settings.
Picture position/Clock/Phase adjustments
First press the button repeatedly to select the PC input mode
(see page 23).
Press the MENU button, then
press the or button to
CALL
display the PC menu.
H-Position
V-Position
Clock
Phase
Auto-configure
Reset
OK MENU EXIT
PC
213
546
87
9
0
MENU EXIT
P
OK
P
Press the OK button, then press
the z or y button to select the
desired item.
H-Position
V-Position
Clock
Phase
Auto-configure
Reset
H-Position 76
OK MENU EXIT
Press the OK button, then press
the or button to make
appropriate adjustments.
• H-Position / V-Position
Use this function to adjust the picture to the left/right and
up/down as you prefer.
• Clock
Use this function to minimize any vertical bars or stripes
visible on the screen background. The horizontal screen
size will also change.
• Phase
Use this function to remove any horizontal noise and
sharpen the image of characters.
PC
Equipment
connections
Note:
The optimum points of the clock and
phase adjustments will vary according to
input signals.
32
#01E29-33_1520VL56BG 05.6.24, 0:53 PM32
Black
Toshiba 1520VL56BG (E)
Page 33

• The Auto-configure function allows you to automatically adjust the screen position, clock, and phase.
• The reset function allows you to return to the picture settings programmed at the factory.
Auto-configure/To reset
To configure automatically:
Press the MENU button, then press the or button to
display the PC menu.
CALL
213
Press the OK button, then press
the z or y button to select
Auto-configure.
H-Position
V-Position
Clock
Phase
Auto-configure
Reset
Introduction
Getting started
PC
To set
OK MENU EXIT
546
87
9
0
MENU EXIT
P
OK
P
Press the OK button. The automatic adjustment will start.
Note:
The displayed image will disappear for a few seconds while Auto
configuration is in progress.
To reset the PC setting:
Press the MENU button, then press the or button to
display the PC menu.
Press the OK button, then press
the z or y button to select
Reset.
Press the OK button.
H-Position
V-Position
Clock
Phase
Auto-configure
Reset
To set
OK MENU EXIT
Basic operation
features
Using the TV’s
PC
Viewing teletext
Note:
Some graphic boards’ signals may not
display properly. If the results are
unsatisfactory, adjust your monitor’s
position, clock and phase manually.
#01E29-33_1520VL56BG 05.6.24, 0:53 PM33
Black
33
Toshiba 1520VL56BG (E)
Equipment
connections
Reference section
Page 34

Reference section
Troubleshooting
Before calling a service technician, please check the following table for a possible cause of the symptom and some
solutions.
Symptom and solution
Symptom Solution
TV will not turn on • Make sure the power cord is plugged in, then press .
• The remote control batteries may be dead. Replace the batteries.
No picture, no sound • Check the aerial connections.
No sound, picture OK • The sound may be muted. Press +, – or .
• The station may have broadcast difficulties. Try another channel.
Poor sound, picture OK • The station may have broadcast difficulties. Try another channel.
Poor picture, sound OK • Check the aerial connections.
• The station may have broadcast difficulties. Try another channel.
• Adjust the Picture menu.
Poor reception of broadcast channels • Check the aerial connections.
• The station may have broadcast difficulties. Try another channel.
Teletext problems • Check the aerial connections.
Good performance of text depends on a clear, strong broadcast signal.
Multiple images • The station may have broadcast difficulties. Try another channel.
• Aerial reception may be poor. Use a highly directional outdoor aerial.
• Check if the direction of the aerial has changed.
Poor colour or no colour • The station may have broadcast difficulties. Try another channel.
• Adjust the Tint and/or Colour in the Picture menu.
The top panel buttons do not operate • Check the Panel lock feature.
The remote control does not operate • Remove all obstructions between the remote control and the remote
control sensor in the TV.
• The remote control batteries may be dead. Replace them with new
ones.
Some pixels of the screen do not light up • The LCD display panel is manufactured with an extremely high level
of precision technology. However, some pixels of the screen may
have missing picture elements or luminous spots. This is not a sign of
a malfunction.
The picture brightness is reduced, the
screen flickers, or some parts of the
screen do not light up
The picture brightness varies when you
turn on the TV
Reference section
34
#01E34-36_1520VL56BG 05.6.24, 0:53 PM34
Black
• When you first buy and start to use this TV, the screen may flicker.
If this happens, turn off the TV, then turn it on again.
• The cold cathode fluorescent lamp used for the back light on this TV
has a limited service life. When the picture brightness fades, the
screen flickers, or some parts of the screen do not light up, the lamp
may be at the end of its useful life. Contact a service technician.
• If you turn on the TV in an area with a temperature of 0°C or lower,
wait until the display warms up.
Toshiba 1520VL56BG (E)
Page 35

Reference section
Specifications
LCD colour television specifications
• Design and specifications are subject to change without notice.
• Never service or remodel the TV by yourself. It may expose you to a fire hazard or dangerous voltages.
Introduction
Model 15VL56B/G, 20VL56B/G
Power source 100 - 240V AC, 50/60 Hz
Power consumption 15VL56B/G: 50 W, 0.8 W (standby mode)
20VL56B/G: 65 W, 0.8 W (standby mode)
Dimensions 15VL56B/G: 379 mm (W) 388 mm (H) 203 mm (D)
(Including TV stand) 20VL56B/G: 491 mm (W) 469 mm (H) 228 mm (D)
Mass (Weight) 15VL56B/G: 5.6 kg
20VL56B/G: 9.1 kg
Television system Channel coverage:
(Aerial input) PAL B/G (CCIR) VHF 2 - 12
UHF 21 - 69
CATV X - Z+2, S1 - S41
PA LI (UK) VHF -
UHF 21 - 69
CATV -
PA L D/K (CHINA) VHF 1 - 12
UHF 13 - 57
CATV Z1 - Z38
SECAM B/G (CCIR) VHF 2 - 12
UHF 21 - 69
CATV X - Z+2, S1 - S41
SECAM D/K (OIRT) VHF 1 - 12
UHF 21 - 69
CATV X1 - X19
SECAM L (FRANCE) VHF 2 - 10
UHF 21 - 69
CATV B - Q
NTSC M (US) VHF 2 - 13
UHF 14 - 69
CATV A6 - A1, A - W, AA - ZZ, AAA, BBB
NTSC M (JAPAN) VHF 1 - 12
UHF 13 - 62
CATV M1 - M10, S1 - S41
Special RF signal:
NTSC 4.43 colour system 5.5/6.0/6.5 MHz sound system
PA L 60 Hz colour system 5.5/6.0/6.5 MHz sound system
Getting started
Basic operation
features
Using the TV’s
Viewing teletext
Equipment
connections
#01E34-36_1520VL56BG 05.6.24, 0:53 PM35
Black
Reference section
35
Toshiba 1520VL56BG (E)
Page 36

LCD colour television specifications (continued)
Colour system PAL, SECAM, NTSC 3.58/4.43
Aspect ratio 4 : 3
Visible size (diagonal) 15VL56B/G: 38.0 cm
20VL56B/G: 51.0 cm
Number of pixels 15VL56B/G: 1024 (H) dots × 768 (V) dots
20VL56B/G: 640 (H) dots × 480 (V) dots
Audio power 5 W + 5 W (10% THD)
Speakers 40 × 70 mm 2pcs.
Input/Output terminals VIDEO 1 Input/Output 21 pin Scart RGB, A/V
VIDEO 2 Input/Output 21 pin Scart A/V
VIDEO 3 Input 4 pin S-video
Phono jacks A/V
PC Input Analogue RGB (Mini D-sub 15-pin)
Audio (3.5 mm stereo mini)
Headphone jack 3.5 mm stereo mini
Operating condition Temperature 0°C - 35°C
Humidity 20% - 80% (No moisture condensation)
Supplied accessories Owner’s manual (1),
Power cord (1),
Remote control (1),
Batteries (2),
Clip (1)
Reference section
36
This is used to fix the TV to a wall, pillar, etc. (see page 4)
YC/L
72742088
#01E34-36_1520VL56BG 05.6.24, 0:53 PM36
Black
Toshiba 1520VL56BG (E)
 Loading...