


1110-S153
Table of contents
 Loading...
Toshiba 1110-S153, 1115-S103, 1115-S104, 1115-S107, 1115-S123 User Manual
...
Satellite® 1110/1115 User’s Guide
If you need assistance:
❖ InT ouch
Calling within the United States (800) 457-7777
Calling from outside the United States (949) 859-4273
For more information, see “If Something Goes Wrong” on
page 165 in this guide.
®
Center
TOSHIBA
C6626-1002M2

2
Model: Satellite 1110/1115
Compact Disk-ReWritable
The computer system you purchased may include a Compact DiskReWritable (CD-RW), one of the most advanced storage technologies
available. As with any ne w techn ology, you must read and follo w all set-u p
and usage instructions in the applicable user guides and/or manuals
enclosed. If you fail to do so, this product may not function properly and
you may lose data or suffer other damage. TOSHIBA AMERICA
INFORMATION SYSTEMS (“TOSHIBA”), ITS AFFILIATES AND
SUPPLIERS DO NOT WARRANT THAT OPERATION OF THE
PRODUCT WILL BE UNINTERRUPTED OR ERROR FREE. YOU
AGREE THAT TOSHIBA, ITS AFFILIATES AND SUPPLIERS
SHALL HAVE NO RESPONSIBILITY FOR DAMAGE TO OR LOSS
OF ANY BUSINESS, PROFITS, PROGRAMS, DATA OR
REMOVABLE STORAGE MEDIA ARISING OUT OF OR
RESULTING FROM THE USE OF THE PRODUCT, EVEN IF
ADVISED OF THE POSSIBILITY THEREOF.
Protection of Stored Data
For your important data, please make periodic back-up copies of all the
data stored on the hard disk or other storage devices as a precaution against
possible failures, alteration, or loss of the data. IF YOUR DATA IS
ALTERED OR LOST DUE TO ANY TROUBLE, FAILURE OR
MALFUNCTION OF THE HARD DISK DRIVE OR OTHER
STORAG E DEVICES AND THE DATA CANNO T BE RECO VERED,
TOSHIBA SHALL NOT BE LIABLE FOR ANY D AMA GE OR LOSS
OF DATA, OR ANY OTHER DAMAGE RESULTING
THEREFROM. WHEN COPYING OR TRANSFERRING YOUR
DATA, PLEASE BE SURE TO CONFIRM WHETHER THE DATA
HAS BEEN SUCCESSFULLY COPIED OR TRANSFERRED.
TOSHIBA DISCLAIMS ANY LIABILITY FOR THE FAILURE TO
COPY OR TRANSFER THE DATA CORRECTLY.
Critical Applications
The computer you have purchased is not designed for any “critical
applications.” “Critical applications” means life support systems, medical
applications, connections to implanted medical devices, commercial
transportation, nuclear facilities or systems or any othe r applicat ions where
product failure could lead to injury to persons or loss of life or catastrophic
property damage. ACCORDINGLY, TOSHIBA, ITS AFFILIATES
AND SUPPLIERS DISCLAIM ANY AND ALL LIABILITY
ARISING OUT OF THE USE OF THE COMPUTER PRODUCTS IN

ANY CRITICAL APPLICATIONS. IF YOU USE THE COMPUTER
PRODUCTS IN A CRITICAL APPLICATION, YOU, AND NOT
TOSHIBA, ASSUME FULL RESPONSIBILITY FOR SUCH USE.
FCC Notice
This equipment has been tested and found to comply with the limits for a
Class B digi tal device, pursuant to Part 15 of the FCC rules. These limits
are designed to provide reasonable protection against harmful interference
in a residential installation.
This equipment generates, uses and can radiate radio frequency energy and,
if not installed and used in accordance with the instructions, it may cause
harmful interference to radio communications. However, there is no
guarantee that interference will not occur in a particular installation. If this
equipment does cause harmful interference to radio or television reception,
which can be determined by turning the equipment off and on, the user is
encouraged to try to correct the interference by one or more of the
following measures:
❖ Reorient or relocate the receiving antenna.
❖ Increase the separation between the equipment and receiver.
❖ Connect the equipment to an outlet on a circuit different from that to
which the receiver is connected.
❖ Consult the dealer or an experienced radio/TV technician for help.
3
NOTE: Only Peripherals complying with the FCC Class B limits may be attached
to this equipment. Operation with noncompliant peripherals or peripherals not
recommended by Toshiba is likely to result in interference to radio and TV
reception. Shielded cables must be used between the external devices and the
computer's or expansion unit's serial port, parallel port, monitor port, USB port,
®
PS/2 port
to this equipment not expressly approved by Toshiba or parties authorized by
Toshiba could void the user's authority to operate the equipment.
This device complies with Part 15 of the FCC Rules. Operation is subject to
the following two conditions:
❖ This device may not cause harmful interference.
❖ This device must accept any interference received, including
interference that may cause undesired operation.
, i.LINK® port and microphone jack. Changes or modifications made

4
Contact:
Toshiba America Information Systems, Inc.
9740 Irvine Blvd.
Irvine, CA 92618-1697
(949) 583-3000
Industry Canada Requirement
This Class B digital apparatus complies with Canadian ICES-003.
Cet appareil numérique de la classe B est conformé à la norme NMB-003
du Canada.
FCC Requirements
The following information is pursuant to FCC CFR 47, Part 68 and refers
to internal modems.
Installation
When you are ready to install or use the modem, call your local telephone
company and give them the following information:
❖ The telephone number of the line to which you will connect the
modem.
❖ The FCC registration number of the modem.
❖ The ringer equivalence number (REN) of the modem, which is 0.6B.
The modem connects to the telephone line by means of a standard jack
called the USOC RJ11C.
Type of Service
Your modem is designed to be used on standard-device telephone lines.
Connection to telephone company-provided coin service (central office
implemented systems) is prohibited. Connection to party lines service is
subject to State tariffs. If you have any questions about your telephone line,
such as how many pieces of equipment you can connect to it, the telephone
company will provide this information upon request.
Telephone Company Procedures
The goal of the telephone company is to provide you with the best service it
can. In order to do this, it may occasionally be necessary for them to make
changes in their equipment, operations or procedures. If these changes
might affect your service or the operation of your equipment, the telephone

company will give you notice, in writing, to allo w you to make any changes
necessary to maintain uninterrupted service.
If Problems Arise
If any of your telephone equipment is not operating properly, you should
immediately remove it from your telephone line, as it may cause harm to
the telephone network. If the telephone company notes a problem, they
may temporarily discontinue service. When practical, they will notify you
in advance of this disconnection. If advance notice is not feasible, you will
be notified as soon as possible. When you are notified, you will be given
the opportunity to correct the problem and informed of your right to file a
complaint with the FCC. In the event repairs are ever needed on your
modem, they should be performed by Toshiba Corporation, Toshiba
America Information Systems, Inc. or an authorized representative of
Toshiba.
Disconnection
If you should ever decide to permanently disconnect your modem from its
present line, please call the telephone company and let them know of this
change.
Fax Branding
The Telephon e Consumer Protection Act of 1991 makes it unlawful to use
a computer or other electronic device to send any message via a telephone
fax machine unless such message clearly contains in a margin at the top or
bottom of each transmitted page or on the first page of the transmission, the
date and time it is sent and an identification of the business, other entity or
individual sending the message and the telephone number of the sending
machine or such business, other entity or individual.
In order to program this information into your fax modem, you should
complete the setup for your fax software before sending a message.
5
Instructions for IC CS-03 certified equipment
1 NOTICE: The Industry Canada label identifies certified equipment.
This certification means that the equipment meets ce rtain
telecommunications network protective, operational and safety
requirements as prescribed in the appropriate Terminal Equipment
Te chnical Requirements document(s). The Department does not
guarantee the equipment will operate to the user’s satisfaction.
Before installing this equipment, users should ensure that it is
permissible to be connected to the facilities of the local
telecommunications company. The equipment must also be installed
using an acceptable method of connection. The customer should be

6
aware that compliance with the above conditions may not prevent
degradation of service in some situations.
Repairs to certified equipment should be coordinated by a
representative designated by the supplier. Any repairs or alterations
made by the user to this equipment, or equipment malfunctions, may
give the telecommunications company cause to request the user to
disconnect the equipment.
Users should ensure for their own protection that the electrical ground
connections of the power utility, telephone lines and internal metallic
water pipe system, if present, are connected together. This precaution
may be particularly important in rural areas.
Caution: Users should not attempt to make such connections
themselves, but should contact the appropriate electric inspection
authority, or electrician, as appropriate.
2 The user manual of analog equipment must contain the equipment’s
Ringer Equivalence Number (REN) and an explanation notice similar
to the following:
The Ringer Equivalence Number (REN) of this device can be found
on the label affixed to your computer.
NOTICE: The Ringer Equivalence Number (REN) assigned to each
terminal device provides an indication of the maximum number of
terminals allowed to be connected to a telephone interface. The
termination on an interface may consist of an y combination o f devic es
subject only to the requirement that the sum of the Ringer Equiva lence
Numbers of all the devices does not exceed 5.
3 The standard connecting arrangement (telephone jack type) for this
equipment is jack type(s): USOC RJ11C.
DVD-ROM Safety Instructions
The DVD-ROM drive employs a laser system. To ensure proper use of this
product, please read this instruction manual carefully and retain for future
reference. Should the unit ever require maintenance, contact an authorized
service location.
Use of controls, adjustments or the performance of procedures other than
those specified may result in hazardous radiation exposure.
To prevent direct exposure to the laser beam, do not try to open the
enclosure.
Location of the required label
(Sample shown below. Location of the label and manufacturing
information may vary.)
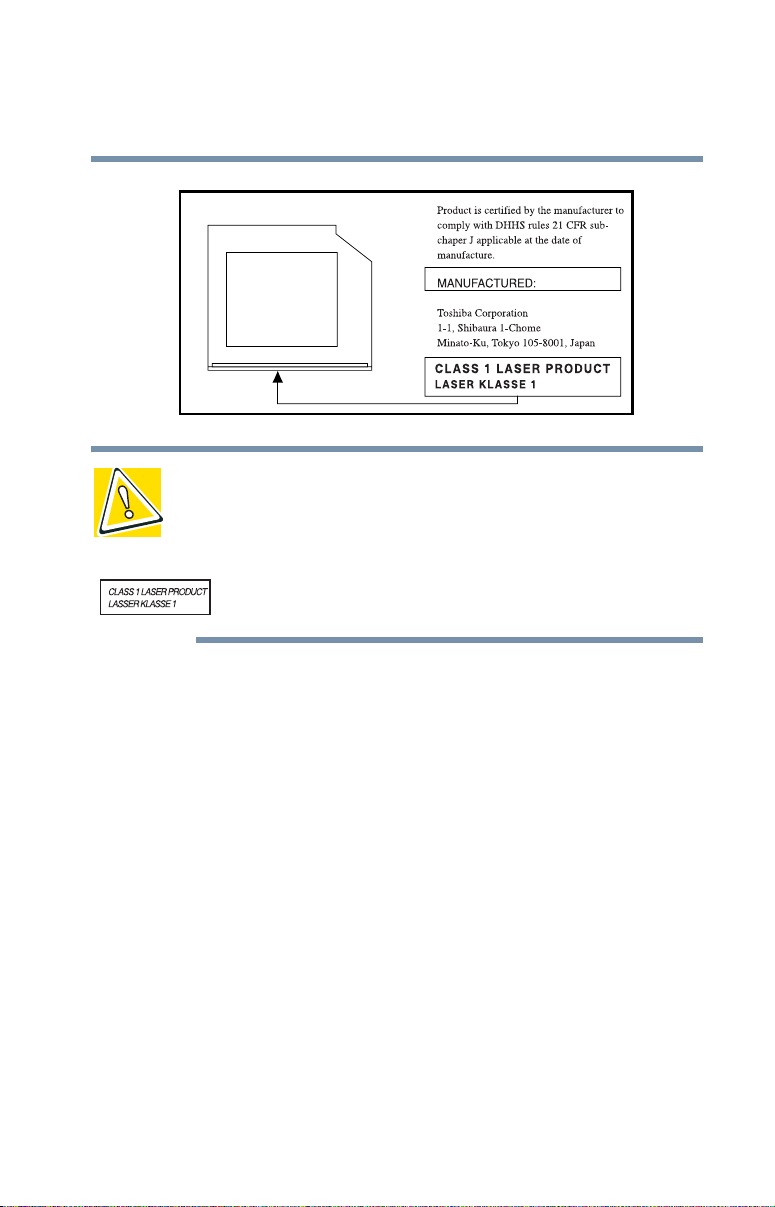
7
CAUTION : This appliance contains a laser system and is classified as a “CLASS 1
LASER PRODUCT.” To use this model properly, read the instruction manual
carefully and keep it for your future reference. In case of any trouble with this
model, please contact your nearest “AUTHORIZED service station.” To prevent
direct exposure to the laser beam, do not try to open the enclosure.
Use of controls or adjustments or performance of procedures other than those
specified in the owner’s manual may result in hazardous radiation exposure.
Copyright
This guide is copyrighted by Toshiba America Information Systems, Inc.
with all rights reserved. Under the copyright laws, this guide cannot be
reproduced in any form without the prior written permission of T oshiba. No
patent liability is assumed, however, with respect to the use of the
information contained herein.
©2002 by Toshiba America Information Systems, Inc. All rights reserved.
Export Administration Regulation
This document contains technical data that may be controlled under the
U.S. Export Administration Regulations, and may be subject to the
approval of the U.S. Department of Commerce prior to export. An y e xport,
directly or indirectly, in contra vention of the U.S. Export Administration
Regulations is prohibited.
Notice
The information contained in this manual, including but not limited to any
product specifications, is subject to change without notice.

8
TOSHIBA CORPORATION AND TOSHIBA AMERICA
INFORMATION SYSTEMS, INC. (TOSHIBA) PROVIDES NO
WARRANTY WITH REGARD TO THIS MANUAL OR ANY OTHER
INFORMATION CONTAINED HEREIN AND HEREBY EXPRESSLY
DISCLAIMS ANY IMPLIED W ARRANTIES OF MERCHANTABILITY
OR FITNESS FOR ANY P ARTICULAR PURPOSE WITH REGARD TO
ANY OF THE FOREGOING. TOSHIBA ASSUMES NO LIABILITY
FOR ANY DAMAGES INCURRED DIRECTLY OR INDIRECTLY
FROM ANY TECHNICAL OR TYPOGRAPHICAL ERRORS OR
OMISSIONS CONTAINED HEREIN OR FOR DISCREPANCIES
BETWEEN THE PRODUCT AND THE MANUAL. IN NO EVENT
SHALL TOSHIBA BE LIABLE FOR ANY INCIDENTAL,
CONSEQUENTIAL, SPECIAL, OR EXEMPLARY DAMAGES,
WHETHER BASED ON TORT, CONTRACT OR OTHERWISE,
ARISING OUT OF OR IN CONNECTION WITH THIS MANUAL OR
ANY OTHER INFORMATION CONTA I NED HEREIN OR THE USE
THEREOF.
Trademarks
Satellite, InTouch, and Noteworthy are registered trademarks, SelectServ,
FreedomWare, and SmartMedia are trademarks, of T oshiba America
Information Systems, Inc. and/or Toshiba Corporation.
Microsoft, Windows, DirectX, Active Desktop, and DirectShow are
registered trademarks, and Windows Media is a trademark of Microsoft
Corporation.
LapLink is a registered trademark of Traveling Software, Inc.
WinDVD is a trademark of InterVideo, Inc.
CompuServe is a registered trademark of America Online , Inc.
Dolby - Manufactured by Toshiba under license from Dolby Laboratories/
Dolby and the double-D symbol are trademarks of Dolby Laboratories.
TouchPad is a trademark of Synaptics, Inc.
All other brand and product names are trademarks or registered trademarks
of their respective companies.
Computer Disposal Information
This product contains mercury. Disposal of this material may be regulated
due to environmental considerations. For disposal, reuse or recycling
information, please contact your local government or the Electronic
Industries Alliance at www.eiae.org.

Contents
Introduction ..............................................................17
This guide .............................................................. 17
Safety icons ........................................................... 18
Other icons used.............................................. 19
Other documentation ............................................. 19
Service options ...................................................... 20
Chapter 1: Finding Your Way Around ........................ 21
Making sure you have everything .......................... 21
Front with the display closed ................................. 22
Back....................................................................... 23
Right side............................................................... 24
Left side ................................................................. 25
Front with the display open.................................... 26
Indicator lights................................................. 27
System indicator panel .................................... 28
Underside .............................................................. 29
9

Contents
10
Chapter 2: Getting Started ........................................ 31
Selecting a place to work ....................................... 31
Creating a computer-friendly environment....... 31
Keeping yourself comfortable .......................... 32
Precautions...................................................... 35
Setting up your computer ...................................... 37
Setting up your software.................................. 37
Registering your computer with Toshiba ......... 39
Adding external devices ................................... 39
Connecting the AC adapter..................................... 40
Charging the main battery...................................... 41
Using the computer for the first time..................... 42
Opening the display panel................................ 42
Turning on the power....................................... 42
Using the TouchPad™...................................... 43
Control buttons................................................ 44
Disabling or enabling the TouchPad................. 44
Installing additional memory (optional) ................. 45
Removing a memory module........................... 49
Connecting a mouse ........................................ 49
Connecting a printer ........................................ 50
Setting up a printer .......................................... 52
Turning off the computer ....................................... 55
Caring for your computer....................................... 56
Cleaning the computer..................................... 56
Moving the computer....................................... 56
Using a computer lock ..................................... 57
Chapter 3: Learning the Basics ................................. 59
Computing tips ...................................................... 59
Using the keyboard ................................................ 60
Character keys ................................................. 61
Ctrl, Fn, and Alt keys ........................................ 61
Function keys................................................... 61

Contents
11
Windows® special keys.................................... 62
Overlay keys..................................................... 62
Starting a program................................................. 64
Saving your work................................................... 64
Printing your work ................................................. 65
Using diskettes ...................................................... 66
Inserting and removing diskettes..................... 66
Caring for diskettes.......................................... 66
Backing up your files ............................................. 67
Using your DVD drive ............................................ 68
DVD-ROM drive components........................... 69
Inserting a disc ................................................ 70
Playing an audio CD......................................... 72
Playing a DVD .................................................. 74
Viewing the contents of a CD or DVD............... 74
Removing a disc with the computer on............ 74
Removing a disc with the computer off ........... 75
Caring for CDs and DVDs................................. 75
Setting up for communications.............................. 76
Connecting the modem to a phone line............ 76
Connecting your computer to a network.......... 76
Powering down the computer................................ 77
Using Turn Off or Shut down ................................. 78
Hibernation command ..................................... 79
Standby command........................................... 80
Turning off more quickly.................................. 81
Starting again after Turn Off............................. 82
Using Hibernation .................................................. 82
Starting again from Hibernation mode............. 83
Using Standby ....................................................... 84
Going into Standby mode more quickly ........... 85
Starting again from Standby ............................ 86
Toshiba’s online resources..................................... 86

Contents
12
Chapter 4: Mobile Computing ................................... 87
Toshiba’s energy-saver design ............................... 87
Running the computer on battery power ............... 88
Power management ......................................... 89
Charging the battery .............................................. 89
Charging the RTC battery................................. 90
Monitoring battery power ...................................... 91
Determining remaining battery power.............. 91
Conserving battery power ................................ 92
What to do when the battery runs low ............. 93
Setting battery alarms...................................... 93
Changing the main battery ..................................... 94
Removing the battery from the computer ........ 95
Taking care of your battery..................................... 95
Maximizing battery life..................................... 96
Disposing of used batteries safely ......................... 97
Traveling tips.......................................................... 98
Chapter 5: Getting to Know the Windows® XP
Operating System................................. 99
Lesson 1: Exploring the desktop.......................... 100
Finding your way around the desktop ............ 100
Windows
Lesson 2: Using the TouchPad and control
buttons together ........................................... 103
Lesson 3: Learning about the Internet ................. 106
Lesson 4: Creating a new document .................... 107
Lesson 5: Creating a new folder........................... 108
Lesson 6: Starting programs ............................... 109
Lesson 7: Resizing, repositioning, and hiding
windows ........................................................ 111
Using the taskbar........................................... 112
Minimizing and maximizing windows ............ 112
Resizing and moving windows....................... 113
®
XP file system .............................. 102

Contents
13
Lesson 8: Closing programs ............................... 115
Lesson 9: Creating shortcuts ............................... 116
Creating a shortcut to the Calculator.............. 116
Creating a shortcut to the Character Map ...... 117
Lesson 10: Changing the screen saver................. 119
Lesson 11: Setting the date and time................... 121
Lesson 12: Removing objects from the desktop.. 122
Lesson 13: Using System Restore ....................... 124
Lesson 14: If I am lost, what do I do? ................. 125
Windows® XP Help and Support Center ........ 125
Using the online tours and tutorials ............... 127
Lesson 15: Turning off your computer................. 128
Chapter 6: Exploring Your Options.......................... 129
Windows® XP special features............................. 129
Personalizing your desktop.................................. 130
Customizing the taskbar ................................ 130
Bringing the world to your desktop................ 131
Changing desktop and browsing style ........... 132
Personalizing individual windows .................. 133
Customizing window toolbars........................ 134
Displaying information about each folder ...... 135
Using your computer at the office........................ 136
Setting up for communications...................... 137
Connecting the modem to a telephone line .... 138
Setting up a dial-up connection ..................... 138
Exchanging data with another computer.............. 139
Transferring files using a parallel
port connection........................................ 139
Getting help transferring files......................... 140
Connecting to the Internet ................................... 140
An overview of using the Internet ........................ 141
The Internet ................................................... 141
The World Wide Web ..................................... 142

14
Contents
Internet Service Providers.............................. 142
Signing up with an Internet Service Provider 142
Surfing the Internet........................................ 143
Internet features............................................. 143
Uploading and downloading files on
the Internet .............................................. 144
Exploring video features ...................................... 144
Display settings hot key ................................ 145
Exploring audio features ...................................... 146
Recording sounds.......................................... 146
Using a microphone....................................... 146
Adjusting recording settings .......................... 147
Using external speakers or headphones......... 148
Connecting a monitor, keyboard and mouse........ 148
Changing the display properties setting............... 149
Using PC Cards.................................................... 150
PC Card supporting software ......................... 150
Inserting PC Cards......................................... 150
Removing PC Cards....................................... 151
Hot swapping................................................. 152
Chapter 7: WinDVD™.............................................. 153
Playing DVDs ....................................................... 153
Using the WinDVD slider bar (location) ......... 155
Using the WinDVD control panel.......................... 156
Using the control panel playback buttons ...... 157
Maximizing the video window........................ 160
Using WinDVD Advanced Features ...................... 160
Using playlists ..................................................... 161
Creating a Playlist .......................................... 162
Playing a Playlist............................................ 163
Getting Help ......................................................... 164
Exiting WinDVD ................................................... 164

Contents
15
Chapter 8: If Something Goes Wrong ..................... 165
Problems when you turn on the computer........... 168
The Windows® operating system is not working . 169
Using Startup options to fix problems ........... 169
Internet problems .......................................... 170
The Windows® XP operating system
can help you ............................................ 171
Resolving a hardware conflict.............................. 171
A plan of action.............................................. 172
Resolving hardware conflicts on your own .... 172
Fixing a problem with Device Manager .......... 174
Memory card problems.................................. 176
Power and the batteries ................................. 176
Keyboard problems........................................ 178
Display problems ........................................... 178
Disk drive problems....................................... 180
DVD-ROM drive problems ............................. 182
Sound system problems ................................ 191
PC Card problems.......................................... 191
Printer problems............................................ 194
Modem problems........................................... 195
Develop good computing habits .......................... 196
If you need further assistance.............................. 197
Before you call ............................................... 197
Contacting Toshiba ........................................ 198
Other Toshiba Internet Web sites ........................ 199
Toshiba’s worldwide offices ................................. 200

Contents
16
Appendix A: Hot Keys ............................................. 203
Instant password security.................................... 203
Without a password....................................... 203
With a password ............................................ 203
Maintaining security when the battery
isn’t fully charged .................................... 204
Sound .................................................................. 205
Display modes ..................................................... 205
Disabling or enabling the TouchPad..................... 206
Keyboard hot keys ............................................... 206
Appendix B: Power Cable Connectors..................... 207
Glossary ................................................................. 209
Index ....................................................................... 225

Introduction
W elcome to the world of po werful and portable multimedia
computers! With your ne w Toshiba notebook computer , your
access to information can accompany you wherever you go.
You will f ind your operating system, Microsoft
already installed on your computer. Your operating system offers
exciting features and easy Internet access.
This guide contains information about your operating system and
how it functions with your Toshiba computer. For specif ic
information on the software, see the Microsoft booklet that
shipped with your computer.
This guide
This guide introduces the computer’s features. You can:
❖ Read the entire guide from beginning to end.
❖ Skim through and stop when a topic interests you.
❖ Use the table of contents and the index to find specific
information.
®
Windo ws® XP
17
Introduction
18
Safety icons
If you are new to computers, or have not used a notebook
computer before, read through the first couple of chapters to
familiarize yourself with the components of the computer and how
to turn it on. After that, seek out whatever interests you most.
Safety icons
This manual contains safety instructions that must be observed in
order to avoid potential hazards that could result in personal
injuries, damage to your equipment, or loss of data. These safety
cautions have been classified according to the seriousness of the
risk, and the icons highlight these instructions as follows:
DANGER: This icon indicates the existence of a hazard that could
result in death or serious bodily injury if the safety instruction is
not observed.
WARNING: This icon indicates the existence of a hazard that could
result in bodily injury if the safety instruction is not observed.
CAUTION: This icon indicates the existence of a hazard that could
result in damage to equipment or property if the safety instruction
is not observed.
NOTE: This icon indicates information that relates to the safe
operation of the equipment or related items.
Other icons used
Additional icons highlight other helpful or educational
information:
TECHNICAL NOTE: This icon highlights technical information
about the computer.
HINT: This icon denotes helpful hints and tips.
DEFINITION: This icon indicates the definition of a term used in
the text.
Introduction
Other documentation
19
Other documentation
Your computer comes with the following documentation:
❖ This electronic user’s guide. Look for the user’ s guide icon on
your desktop or in the DOCS folder on the C: drive.
❖ Guides for other programs that may come preinstalled on
your computer or that are available for installation on your
Recovery CDs.
❖ Toshiba accessories information, which lists accessories
available from Toshiba and explains how to order them.
❖ The Microsoft
which explains the features of the operating system.
®
Windo ws® operating system documentation

Introduction
20
Service options
Service options
T oshiba of fers a full line of service options built around its
SelectServ
T oshiba’s Web site at
If you have a problem or need to contact Toshiba, see “If
Something Goes Wrong” on page 165.
TM
warranty programs. For more information, visit
toshiba.com.

Chapter 1
Finding Your Way
Around
This chapter presents a “grand tour” of your notebook
computer. It serves as a reference when you need to locate
specific parts of the computer.
Making sure you have everything
Before doing anything else, consult the Quick Start card
provided with your system to make sure you received
everything. If any items are missing or damaged, notify your
dealer immediately. For additional help, see “If you need
further assistance” on page 197.
21
Finding Your Way Around
22
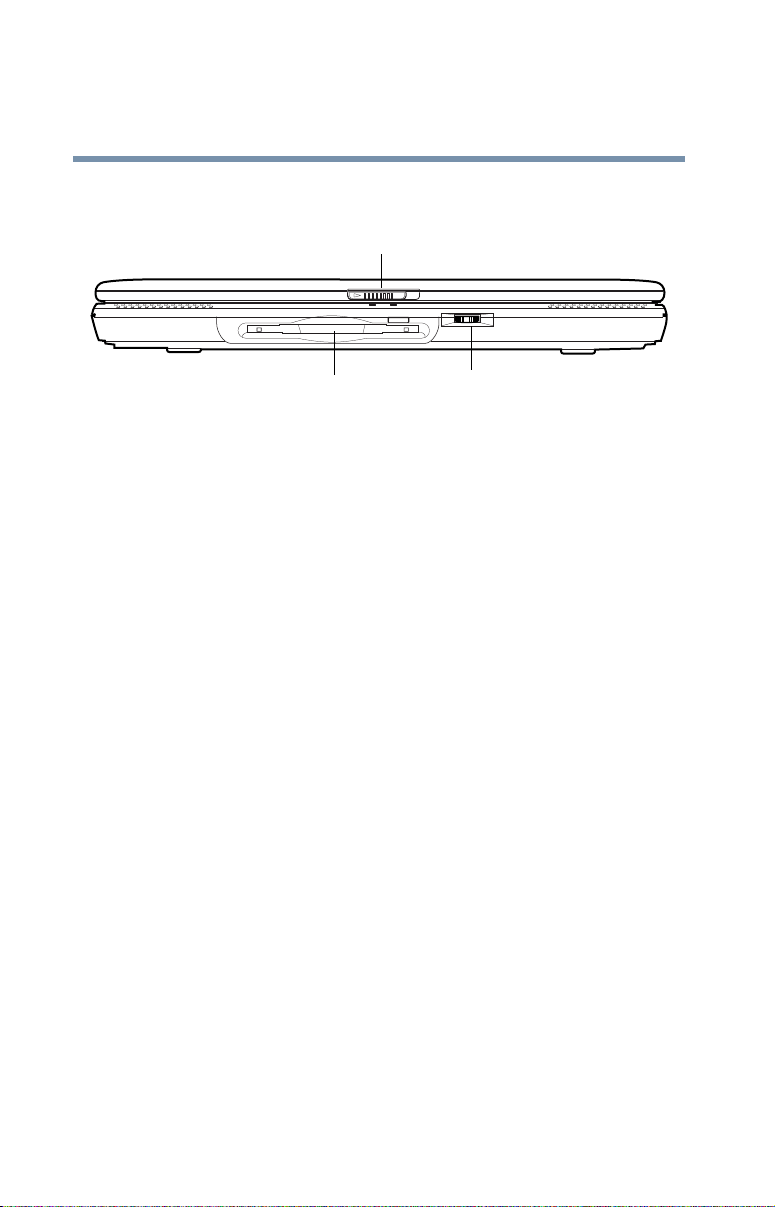
Fr ont with the display closed
Front with the display closed
Display latch
Floppy drive Volume control
The display latch keeps the display panel closed and locked.
To open the display panel, press the display latch and raise
the panel.
For those systems with a floppy drive installed, the drive
allows you to insert floppy disks into your computer.
The volume control lets you adjust how loud the sound is on
your computer. To turn the volume up, turn the dial to the
right. To turn the volume down, turn the dial to the left.
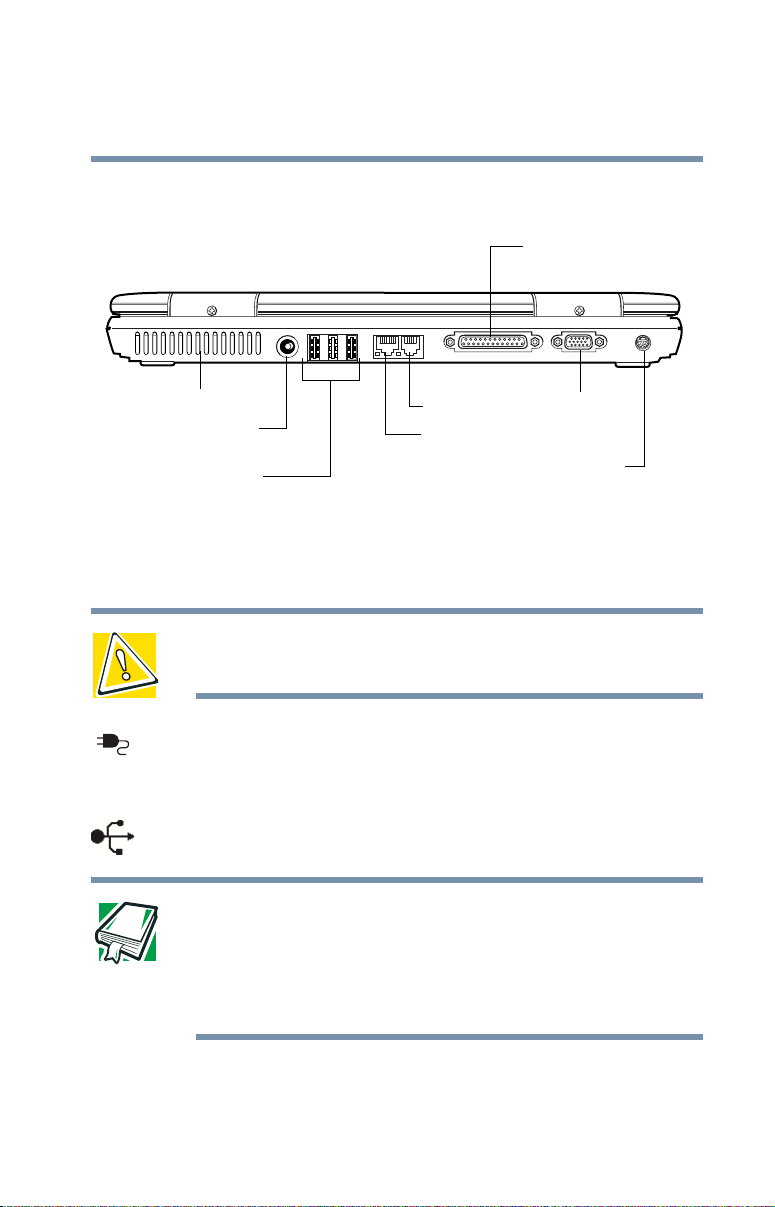
Back
Finding Your Way Around
Back
Parallel port
23
Cooling vent
DC IN
USB ports
The cooling vent prevents the computer’s central processing
unit (CPU) from overheating so that it can continue to
perform at its maximum speed.
CAUTION: To prevent possible overheating of the CPU, make sure
you don’t block the cooling vents.
The DC IN is where you plug in the AC adapter for either
operating the computer on external power or charging the
battery.
The USB (Universal Serial Bus) ports allow you to connect
USB peripherals to your computer.
DEFINITION: USB is a peripheral expansion standard that
supports a data-transfer rate of up to 12 Mbps for peripherals such
as keyboards, pointing devices, and monitors. USB peripherals
have a single standard for cabling and connectors. The USB
standard allows hot swapping of peripherals.
Modem port
Network port
RGB (monitor)
port
S-video port
Finding Your Way Around
24
Ether
Ether
Right side
The Network port (RJ45 jack) provides access to a LAN via
standard Ethernet
The modem port lets you use a standard RJ11 telephone
cable to connect the modem directly to a standard telephone
line. For more information, see “Connecting the modem to a
phone line” on page 76.
The parallel port lets you connect a parallel printer or other
parallel device, including ECP-compatible devices.
The RGB (monitor) port allows you to connect an external
monitor.
The S-video port allows you to play DVD audio and video
on a projector or TV that accepts audio/video inputs.
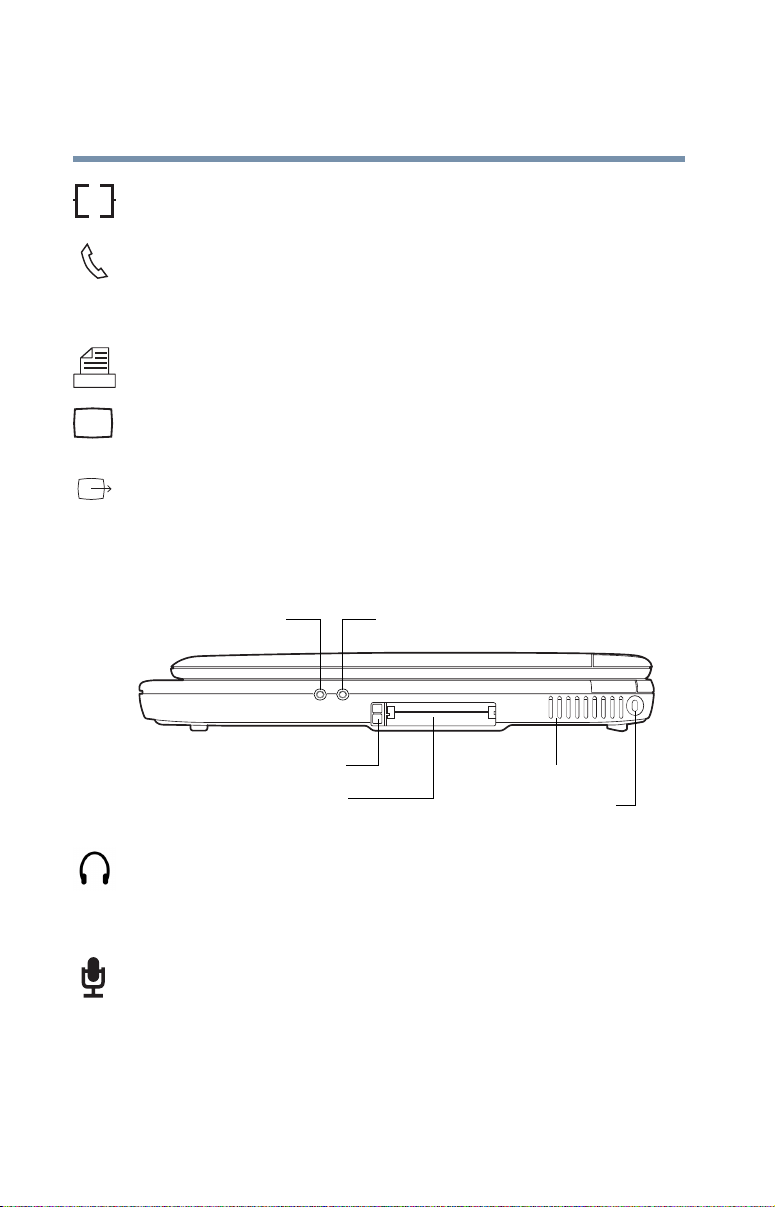
Right side
®
network cable.
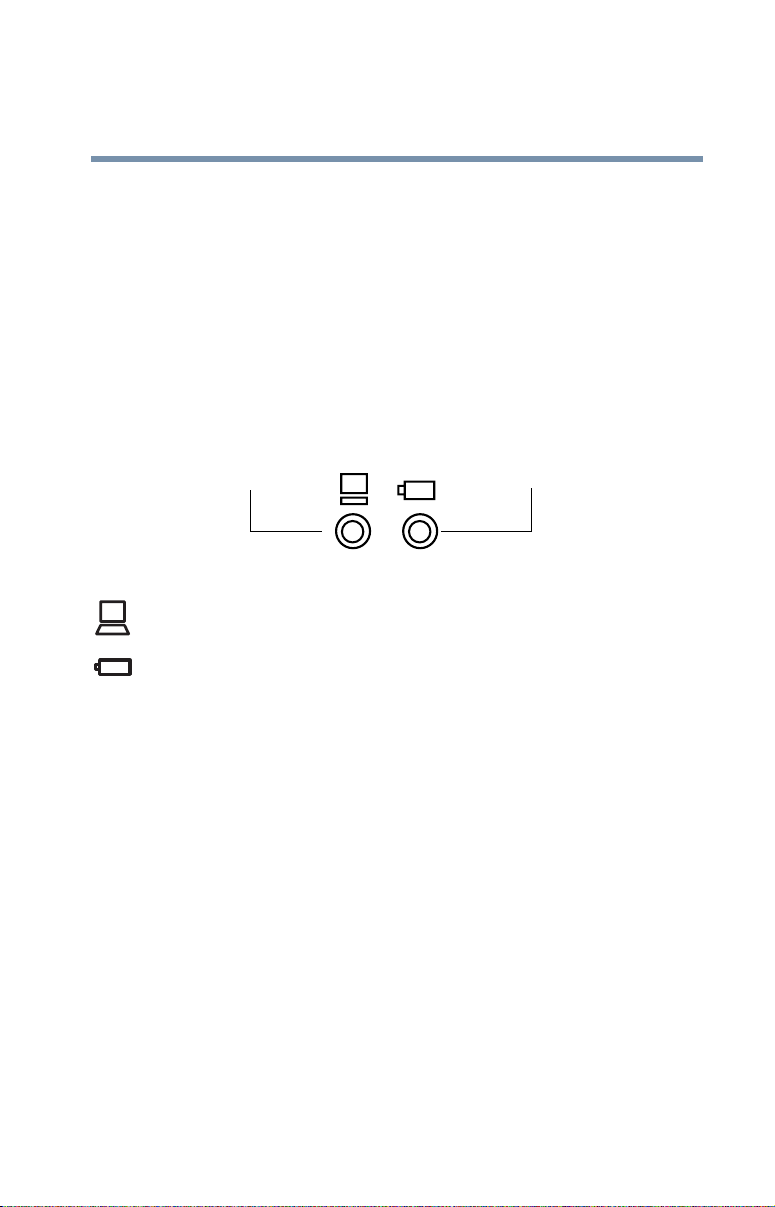
Headphone jack
PC Card ejection tabs
PC Card slots
Microphone jack
Cooling vent
Security lock slot
The 3.5 mm headphone jack lets you connect stereo
headphones or other audio-output devices, such as external
speakers. Connecting other devices automatically disables the
internal speakers.
The 3.5 mm microphone jack lets you connect an external
monaural microphone or other audio input device.
The PC Card ejection tabs release PC Cards from the
corresponding slots.
Finding Your Way Around
Left side
The two stacked PC Card slots support up to two Type I or
Type II PC Cards, or one Type III PC Card. See “Using PC
Cards” on page 150 for more information.
The cooling vent prevents the computer’s central processing
unit (CPU) from overheating so that it can continue to
perform at its maximum speed.
CAUTION: To prevent possible overheating of the CPU, make sure
you don’t block the cooling vents.
25
The security lock slot allows you to attach an optional
PORT- Noteworthy
secure it to a large, heavy object such as your desk.
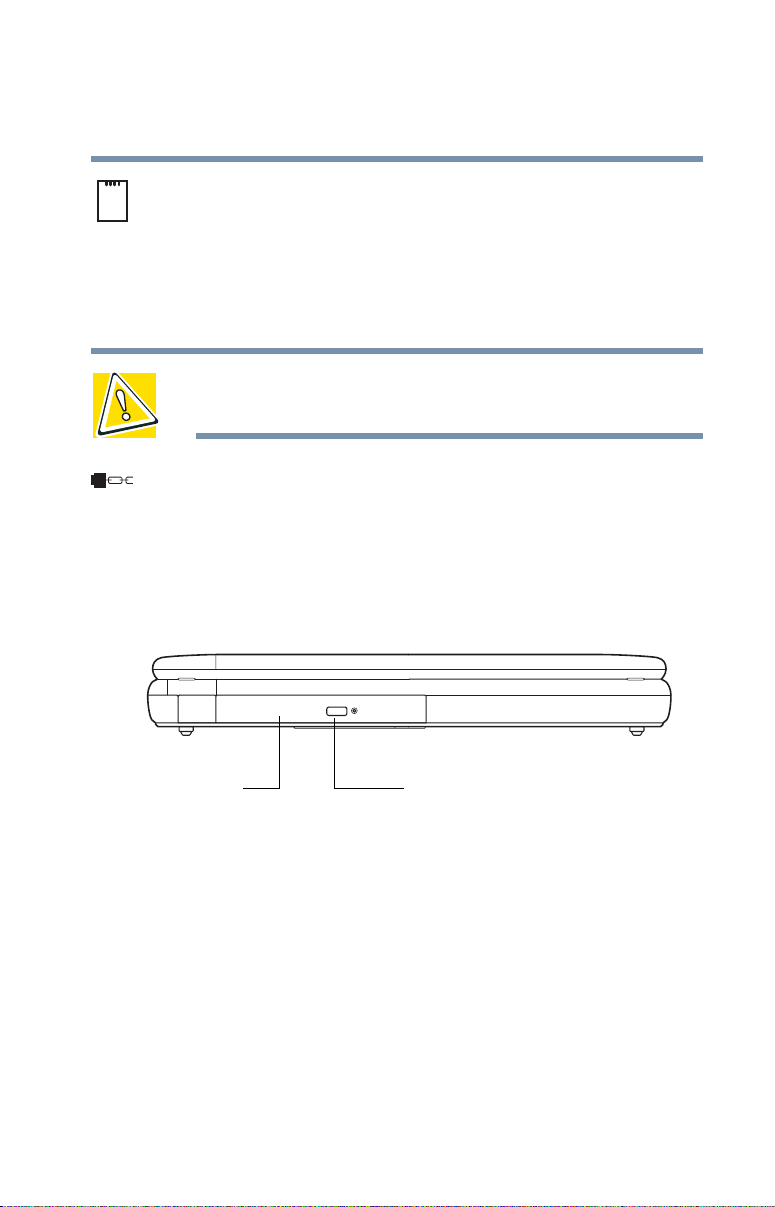
Left side
CD/DVD-ROM
The CD/DVD-ROM drive allows you to play back
prerecorded CDs and D VDs.
The CD/DVD-ROM eject button allows you to eject or
insert a CD-ROM or DVD-ROM.
®
computer lock cable to your computer to
CD/DVD-ROM eject button
Finding Your Way Around
26
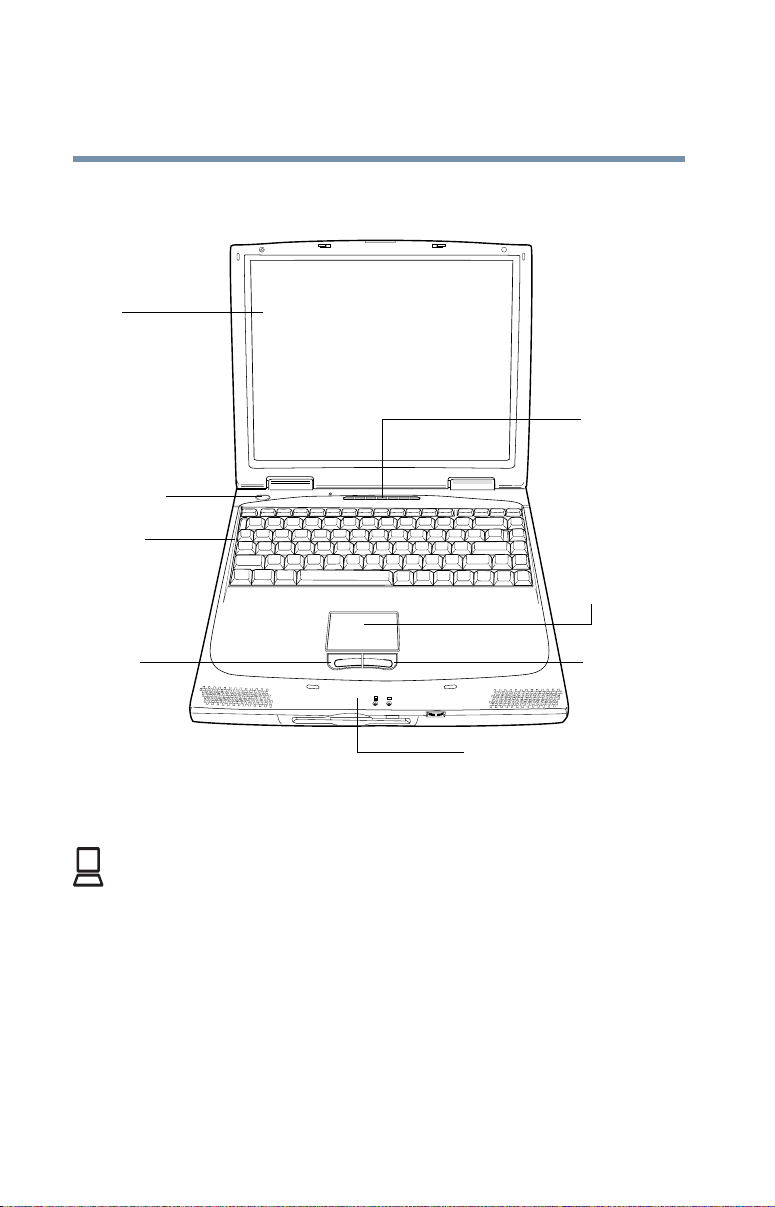
Fr ont with the display open
Front with the display open
Screen
Power button
Keyboard
System
indicator panel
To uc hP ad
Primary
button
On
Secondary
button
Palm rest
The computer’s screen is a liquid crystal display (LCD) that
provides clear, sharp images.
The power button turns the computer on and of f. If yo u hold
the power button down for four seconds, it will reset the
computer.
The 85-key keyboard provides all the functionality of a fullsize keyboard. For more information, see “Using the
keyboard” on page 60.
The system indicator panel is a series of lights that glow
when certain functions are being performed by the system.
For more information, see “System indicator panel” on
page 28.
The TouchPadTM enables you to move the cursor with the
stroke of a finger.
The primary and secondary buttons below the TouchPad
act like the buttons on a mouse, with primary and secondary
functions.
The front panel provides a palm rest to assist you in
maintaining proper posture while using the computer.
Indicator lights
Finding Your Way Around
Fr ont with the display open
27
Power indicator light
The power on light glows green when the computer is on.
On
The light blinks when the computer is in Standby mode.
The main battery light indicates the main battery’s current
charge. It glows green when the battery is fully charged. It
glows amber while the battery is being charged. It does not
glow if the external power source is disconnected or if the
battery is completely discharged. For more information on
determining remaining battery power, see “Monitoring
battery power” on page 91.
Battery indicator light
Finding Your Way Around
28
Fr ont with the display open
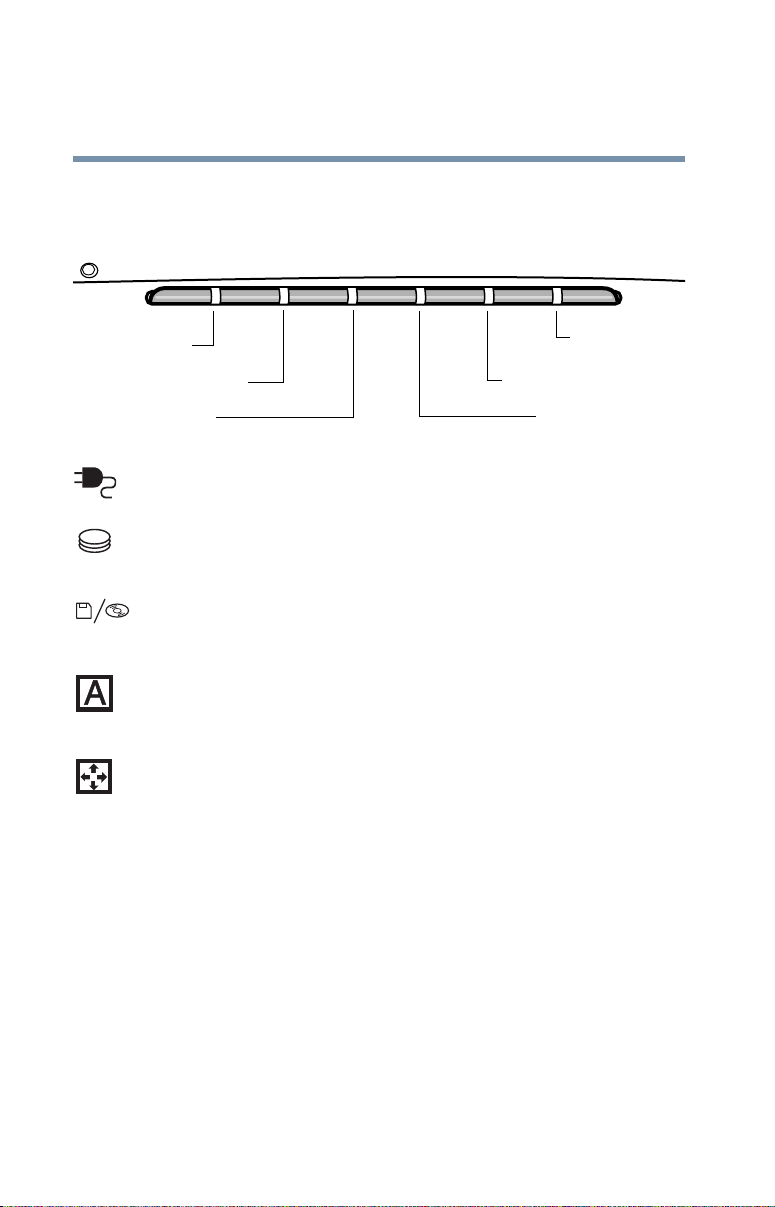
System indicator panel
DC IN indicator
Hard disk drive indicator
Disc/disk indicator
The DC IN indicator glows when the computer is connected
to an external power source.
The hard disk drive indicator flashes while the hard disk
drive is being accessed.
The disc/disk acti vity indicator flashes when the floppy disk
drive (for those systems with a floppy disk dri ve installed) or
the DVD-ROM drive is being accessed.
The caps lock light glows when you press the
When this light is on, pressing a letter key on the keyboard
produces an uppercase (capital) letter.
The cursor control mode light glows when the cursor
control overlay is on. When this light is on, pressing an
overlay key moves the cursor in the direction of the white
arrow printed on the key instead of typing the letter printed
on the top of the key. For more information, see “Using the
cursor control overlay” on page 63.
Cursor control mode light
Numeric mode light
Caps Lock key.
Caps lock light
The numeric mode light glows when the numeric overlay is
on. When this light is on, pressing an overlay key types the
white number printed on the key instead of typing the letter
printed on the top of the key. For more information, see
“Using the numeric keypad overlay” on page 63.
CAUTION: Never turn off the computer while any drive is in use.
Doing so may damage the media and result in loss of data.
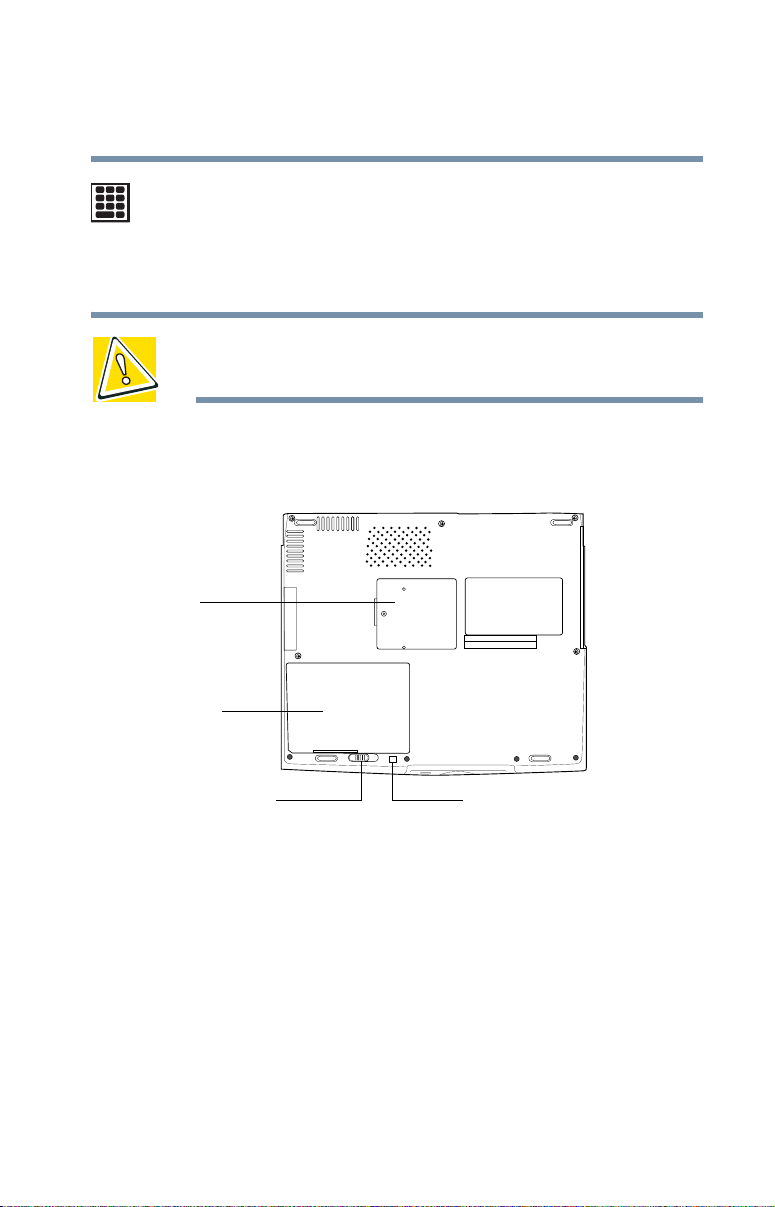
Underside
Memory slot
cover
Finding Your Way Around
Underside
29
Battery pack
Battery release latch
The expansion memory slot cover protects the two
expansion memory slots where you insert additional memory .
See “Installing additional memory (optional)” on page 45 for
detailed information.
The hard disk drive is the computer’s permanent data
storage devic e.
Battery latch lock

30
Finding Your Way Around
Underside
The battery pack contains the battery. For information about
replacing the battery, see “Changing the main battery” on
page 94.
The battery release latch secures the battery cover to the
computer, preventing the cover from dislodging from the
computer case.
Loading...