

Page 1
FormNo.3409-679RevD
MultiPro
ModelNo.41188—SerialNo.400000000andUp
®
1750TurfSprayer
Registeratwww.T oro.com.
OriginalInstructions(EN)
*3409-679*D
Page 2
TheMultiProturfsprayerisadedicatedturfspray
applicationvehicleandisintendedtobeused
byprofessional,hiredoperatorsincommercial
applications.Itisprimarilydesignedforsprayingon
well-maintainedlawnsinparks,golfcourses,sports
elds,andoncommercialgrounds.
ThisproductcomplieswithallrelevantEuropean
directives;fordetails,pleaseseetheseparateproduct
specicDeclarationofConformity(DOC)sheet.
WARNING
CALIFORNIA
Proposition65Warning
Thisproductcontainsachemical
orchemicalsknowntotheStateof
Californiatocausecancer,birthdefects,
orreproductiveharm.
Theengineexhaustfromthisproduct
containschemicalsknowntotheStateof
Californiatocausecancer,birthdefects,
orotherreproductiveharm.
Useofthisproductmaycauseexposure
tochemicalsknowntotheStateof
Californiatocausecancer,birthdefects,
orotherreproductiveharm.
Introduction
Readthismanualcarefullytolearnhowtooperate
andmaintainyourproductproperly.Theinformation
inthismanualcanhelpyouandothersavoidinjury
andproductdamage.AlthoughT orodesignsand
producessafeproducts,youareresponsiblefor
operatingtheproductproperlyandsafely .
YoumaycontactT orodirectlyatwww.Toro.com
forproductsafetyandoperationtrainingmaterials,
accessoryinformation,helpndingadealer,orto
registeryourproduct.
Wheneveryouneedservice,genuineToroparts,or
additionalinformation,contactanAuthorizedService
DealerorToroCustomerServiceandhavethemodel
andserialnumbersofyourproductready.Figure1
illustratesthelocationofthemodelandserialnumbers
ontheproduct.
ItisaviolationofCaliforniaPublicResourceCode
Section4442or4443touseoroperatetheengineon
anyforest-covered,brush-covered,orgrass-covered
landunlesstheengineisequippedwithaspark
arrester,asdenedinSection4442,maintainedin
effectiveworkingorderortheengineisconstructed,
equipped,andmaintainedforthepreventionofre.
ThissparkignitionsystemcomplieswithCanadian
ICES-002
TheenclosedEngineOwner'sManualis
suppliedforinformationregardingtheUS
EnvironmentalProtectionAgency(EPA)and
theCaliforniaEmissionControlRegulationof
emissionsystems,maintenance,andwarranty.
Replacementsmaybeorderedthroughtheengine
manufacturer.
g023031
Figure1
1.Locationofthemodelandserialnumbers
ModelNo.
SerialNo.
Thismanualidentiespotentialhazardsandhas
safetymessagesidentiedbythesafety-alertsymbol
(Figure2),whichsignalsahazardthatmaycause
seriousinjuryordeathifyoudonotfollowthe
recommendedprecautions.
g000502
Figure2
1.Safety-alertsymbol
©2018—TheToro®Company
8111LyndaleAvenueSouth
Bloomington,MN55420
Thismanualuses2wordstohighlightinformation.
Importantcallsattentiontospecialmechanical
informationandNoteemphasizesgeneralinformation
worthyofspecialattention.
2
Contactusatwww.Toro.com.
PrintedintheUSA
AllRightsReserved
Page 3

Contents
Safety.......................................................................4
GeneralSafety...................................................4
SafeOperatingPractices....................................4
ChemicalSafety.................................................5
WhileOperating..................................................5
Maintenance.......................................................7
SafetyandInstructionalDecals..........................8
Setup......................................................................14
1InstallingtheAnti-SiphonFill
Receptacle....................................................14
2CheckingtheSection-HingeSprings..............14
3LearningMoreaboutY ourProduct.................15
ProductOverview...................................................16
Controls...........................................................18
Specications..................................................22
Attachments/Accessories.................................22
Operation................................................................22
SafetyFirst.......................................................22
PreparingtoDrivetheMachine.........................22
PerformingthePre-StartingChecks.................24
OperatingtheMachine.....................................24
BreakinginaNewSprayer...............................25
PreparingtoUsetheSprayer............................26
OperatingtheSprayer......................................28
UsingtheDifferentialLock................................28
FillingtheFresh-WaterTank.............................28
FillingtheSprayTank........................................28
OperatingtheSections.....................................29
Spraying...........................................................29
SprayingTips....................................................30
CalibratingtheSprayerFlow.............................30
CalibratingtheSprayerSpeed..........................31
CalibratingtheSection-BypassValves..............31
Agitation-BypassValveKnobPosition..............32
CalibratingtheAgitation-BypassValve.............32
AdjustingtheMaster-Section-Bypass
Valve.............................................................33
LocatingtheSprayPump..................................33
HaulingtheMachine.........................................33
TransportingtheSprayer..................................33
TowingtheSprayer...........................................34
SprayFilterRecommendations........................34
Maintenance...........................................................37
RecommendedMaintenanceSchedule(s)...........37
DailyMaintenanceChecklist.............................38
NotationforAreasofConcern...........................39
Pre-MaintenanceProcedures..............................40
RaisingtheSprayer..........................................40
Lubrication..........................................................40
GreasingtheMachine.......................................40
GreasingtheSprayerPump.............................40
GreasingtheSectionHinges............................41
EngineMaintenance...........................................42
CheckingtheAir-IntakeScreen........................42
ServicingtheAirCleaner..................................42
ServicingtheEngineOil....................................43
ChangingtheSparkPlugs................................44
FuelSystemMaintenance...................................45
ReplacingtheFuelFilter...................................45
ServicingtheCarbonCanister..........................46
DrainingtheFuelT ank......................................46
ElectricalSystemMaintenance...........................47
LocatingtheFuses...........................................47
ServicingtheBattery.........................................47
DriveSystemMaintenance..................................49
InspectingtheWheelsandTires.......................49
AdjustingtheDifferential-LockCable................49
AdjustingtheFrontWheelT oe-in......................49
BrakeMaintenance.............................................50
CheckingtheBrakeFluid..................................50
InspectingtheBrakes.......................................50
AdjustingtheParkingBrake..............................51
HydraulicSystemMaintenance...........................51
CheckingtheTransaxle/Hydraulic
Fluid..............................................................51
ChangingTransaxle/HydraulicFluid.................52
ReplacingtheHydraulicFilter..........................52
CheckingtheHydraulicLinesand
Hoses............................................................53
SpraySystemMaintenance.................................53
InspectingtheHoses........................................53
ChangingtheSuctionFilter...............................54
ChangingthePressureFilter............................54
ChangingtheNozzleFilter................................55
InspectingthePump.........................................55
InspectingtheNylonPivotBushings.................55
AdjustingtheBoomstoLevel............................56
Cleaning..............................................................57
CleaningtheFlowMeter...................................57
CleaningtheSprayerV alves.............................58
Storage...................................................................67
Troubleshooting......................................................69
Schematics.............................................................72
3
Page 4

Safety
Improperuseormaintenancebytheoperatororowner
canresultininjury.T oreducethepotentialforinjury,
complywiththesesafetyinstructionsandalwayspay
attentiontothesafety-alertsymbol,whichmeans
Caution,Warning,orDanger.Failuretocomplywith
theinstructionmayresultinpersonalinjuryordeath.
Themachinewasevaluatedtotherequirementsof
SAEJ2258.
GeneralSafety
Thisproductiscapableofamputatinghandsand
feetandofthrowingobjects.Alwaysfollowallsafety
instructionstoavoidseriouspersonalinjury.
Usingthisproductforpurposesotherthanitsintended
usecouldprovedangeroustoyouandbystanders.
•Readandunderstandthecontentsofthis
Operator’sManualbeforestartingtheengine.
•Donotputyourhandsorfeetnearmoving
componentsofthemachine.
•Donotoperatethemachinewithoutallguards
andothersafetyprotectivedevicesinplaceand
workingonthemachine.
•Keepclearofanydischargeopening.Keep
bystandersandpetsasafedistanceawayfrom
themachine.
•Keepchildrenoutoftheoperatingarea.Never
allowchildrentooperatethemachine.
•Stopthemachineandshutofftheenginebefore
servicing,fueling,oruncloggingthemachine.
Improperlyusingormaintainingthismachinecan
resultininjury .Toreducethepotentialforinjury,
complywiththesesafetyinstructionsandalwayspay
attentiontothesafety-alertsymbol,whichmeans
Caution,Warning,orDanger—personalsafety
instruction.Failuretocomplywiththeseinstructions
mayresultinpersonalinjuryordeath.
Youcanndadditionalsafetyinformationwhere
neededthroughoutthisOperator’sManual.
SafeOperatingPractices
Important:Themachineisdesignedprimarily
asanoff-roadvehicleandisnotintendedfor
extensiveuseonpublicroads.Whenusing
themachineonpublicroads,followalltrafc
regulationsanduseanyadditionalaccessories
thatmayberequiredbylaw,suchaslights,turn
signals,slow-moving-vehicle(SMV)sign,and
othersasrequired.
TheMultiPro1750TurfSprayerwasdesigned
andtestedtooffersafeservicewhenoperatedand
maintainedproperly.Althoughhazardcontroland
accidentpreventionpartiallyaredependentuponthe
designandcongurationofthemachine,thesefactors
arealsodependentupontheawareness,concern,
andpropertrainingofthepersonnelinvolvedinthe
operation,maintenanceandstorageofthemachine.
Improperuseormaintenanceofthemachinecan
resultininjuryordeath.
NotalloftheattachmentsthatadapttotheMultiPro
1750TurfSprayerarecoveredinthismanual.See
thespecicoperator’smanualprovidedwitheach
attachmentforadditionalsafetyinstructions.Read
thesemanuals.
Toreducethepotentialforinjuryordeath,complywith
thefollowingsafetyinstructions:
Supervisor'sResponsibilities
•Makesurethatoperatorsarethoroughlytrained
andfamiliarwiththeOperator'sManual,engine
manual,andalllabelsonthemachine.
•Establishyourownspecialproceduresandwork
rulesforunusualoperatingconditions(e.g.,slopes
toosteepforsprayeroperation).
BeforeOperating
•Operatethemachineonlyafterreadingand
understandingthecontentsofthismanual.
•Neverallowchildrentooperatethemachine.
•Thismachineisdesignedtocarrytheoperator.
Nevercarryanypassengersonthemachine.
•Neveroperatethesprayerwhenill,tired,orunder
theinuenceofdrugsoralcohol.
•Becomefamiliarwiththecontrolsandknowhow
toshutofftheenginequickly.
•Keepallshields,safetydevices,anddecals
inplace.Ifashield,safetydevice,ordecalis
malfunctioning,illegible,ordamaged,repairor
replaceitbeforeoperatingthemachine.
•Wearappropriateclothing;includingsafety
glasses,longpants,substantialslip-resistant
footwear,gloves,andhearingprotection.Donot
wearjewelryorlooseclothing.Tiebacklonghair.
CAUTION
Thismachineproducessoundlevelsin
excessof85dBAattheoperator’searand
cancausehearinglossthroughextended
periodsofexposure.
Wearhearingprotectionwhenoperating
thismachine.
4
Page 5

•Operateonlyindaylightorgoodarticiallight.
•Neverspraywithbystanderspresent.
•Neverspraywhilepeople,especiallychildrenor
petsarenearby.
•Beforeoperatingthemachine,alwayscheckthe
designatedareasofthesprayerthatarestatedin
thePre-StartingChecksintheOperationsection.
Ifthemachinedoesnotfunctioncorrectlyoris
damagedinanyway ,donotusethesprayer.
Makesurethattheproblemiscorrectedbeforethe
sprayerorattachmentisoperated.
•Makesurethattheoperator’sareaiscleanand
freefromchemicalresidueanddebrisbuildup.
•Ensurethatalluidlineconnectorsaretightand
allhosesareingoodconditionbeforeapplying
pressuretothesystem.
Beforeworkingonasprayersystem,make
surethatthesystemhasbeentriplerinsedand
neutralizedaccordingtotherecommendationsof
thechemicalmanufacturer(s)andallofthevalves
havebeencycled3times.
Verifythereisanadequatesupplyofcleanwater
andsoapnearby,andimmediatelywashoffany
chemicalsthatcontactyou.
•Obtainpropertrainingbeforeusingorhandling
chemicals.
•Usethecorrectchemicalforthejob.
•Followthechemicalmanufacturer'sinstructionsfor
thesafeapplicationofthechemical.Donotexceed
recommendedsystemapplicationpressure.
•Donotll,calibrate,orcleantheunitwhenpeople,
especiallychildren,orpetsareinthearea.
•Handlechemicalsinawellventilatedarea.
ChemicalSafety
WARNING
•Chemicalsubstancesusedinthesprayer
systemmaybehazardousandtoxicto
you,bystanders,animals,plants,soilsor
otherproperty.
•Carefullyreadandfollowthechemical
warninglabelsandmaterialsafetydata
sheets(MSDS)forallchemicalsusedand
protectyourselfaccordingtothechemical
manufacturer'srecommendations.Ensure
thataslittleskinaspossibleisexposed
whileusingchemicals.Useappropriate
personalprotectiveequipment(PPE)
toguardagainstpersonalcontactwith
chemicals,suchas:
–safetyglasses,goggles,and/orface
shield
–respiratororltermask
–chemicalresistantgloves
•Havecleanwateravailableespeciallywhenlling
thespraytank.
•Donoteat,drink,orsmokewhileworkingwith
chemicals.
•Donotcleanspraynozzlesbyblowingthrough
themorplacinginyourmouth.
•Alwayswashyourhandsandotherexposedareas
assoonaspossibleafteryounishworkingwith
chemicals.
•Keepchemicalsintheiroriginalpackagesand
storedinasafelocation.
•Properlydisposeofunusedchemicalsand
chemicalcontainersasinstructedbythechemical
manufacturerandyourlocalcodes.
•Chemicalsandfumesaredangerous;neverenter
thetankorplaceyourheadoverorintheopening
ofatank.
•Followalllocal,state,andfederalregulationsfor
spreadingorsprayingchemicals.
WhileOperating
–rubberbootsorothersubstantial
footwear
–hearingprotection
–cleanchangeofclothes,soap,and
disposabletowels,tobekeptonhand,
intheeventofachemicalspill.
Important:Keepinmindthattheremaybemore
than1chemicalused,andinformationoneach
chemicalshouldbeassessed.
Refusetooperateorworkonthesprayerifthis
informationisnotavailable.
WARNING
Engineexhaustcontainscarbonmonoxide,
whichisanodorless,deadlypoisonthatcan
killyou.
Donotrunengineindoorsorinanenclosed
area.
•Remainseatedwheneverthesprayerisinmotion.
Keepbothhandsonthesteeringwheelwhenever
possible.Keepyourarmsandlegswithinthe
operator’scompartmentatalltimes.
5
Page 6

•Failuretooperatethemachinesafelymayresult
inanaccident,tipoverofthesprayer,andserious
injuryordeath.Drivecarefully.T opreventtipping
orlossofcontrol:
–Useextremecaution,reducespeed,and
maintainasafedistancearoundsandtraps,
ditches,creeks,ramps,unfamiliarareas,or
anyareasthathaveabruptchangesinground
conditionsorelevation.
–Watchforholesorotherhiddenhazards.
–Useextracautionwhenoperatingthemachine
onwetsurfaces,inadverseweatherconditions,
athigherspeeds,orwithafullload.Stopping
timeanddistanceincreaseswithafullload.
–Avoidsuddenstopsandstarts.Donotgo
fromreversetoforwardorforwardtoreverse
withoutrstcomingtoacompletestop.
–Slowdownbeforeturning.Donotattempt
sharpturnsorabruptmaneuversorother
unsafedrivingactionsthatmaycausealoss
ofsprayercontrol.
–Beforebackingup,looktotherearandensure
thatnooneisbehindyou.Backupslowly.
–Watchoutfortrafcwhenyouarenearor
crossingroads.Alwaysyieldtherightofwayto
pedestriansandothervehicles.Thissprayer
isnotdesignedforuseonstreetsorhighways.
Alwayssignalyourturnsorstopearlyenough
sothatotherpeopleknowwhatyouplantodo.
Obeyalltrafcrulesandregulations.
–Theelectricalandexhaustsystemsofthe
sprayercanproducesparkscapableofigniting
explosivematerials.Neveroperatethesprayer
inornearanareawherethereisdustorfumes
intheairwhichareexplosive.
–Ifyouareeverunsureaboutsafeoperation,
stopworkandaskyoursupervisor.
•Donottouchtheengineormuferwhiletheengine
isrunningorsoonafterithasshutoff.These
areasmaybehotenoughtocauseburns.
•Ifthemachineevervibratesabnormally ,stop
immediately,waitforallmotiontostop,andinspect
thesprayerfordamage.Repairalldamagebefore
resumingoperation.
•Beforegettingofftheseat:
Important:Donotparkthemachineon
anincline.
•Lightningcancausesevereinjuryordeath.If
lightningisseenorthunderisheardinthearea,do
notoperatethemachine;seekshelter.
Braking
•Slowdownbeforeyouapproachanobstacle.This
givesyouextratimetostoporturnaway.Hitting
anobstaclecandamagethemachineandits
contents.Moreimportant,itcaninjureyou.
•GrossVehicleWeight(GVW)hasamajorimpact
onyourabilitytostopand/orturn.Heavyloads
andattachmentsmakeamachinehardertostop
orturn.Theheaviertheload,thelongerittakes
tostop.
•Turfandpavementaremuchmoreslipperywhen
theyarewet.Itcantake2to4timesaslongto
stoponwetsurfacesasondrysurfaces.Ifyou
drivethroughstandingwaterdeepenoughto
getthebrakeswet,theywillnotworkwelluntil
theyaredry .Afterdrivingthroughwater,you
shouldtestthebrakestomakesurethattheywork
properly.Iftheydonot,driveslowlywhileputting
lightpressureonthebrakepedal.Thiswilldrythe
brakesout.
ROPSSafety
Note:ForeachmachinecoveredinthisOperator’s
Manual,acabinstalledbyT oroisaROPS.
•DonotremovetheROPSfromthemachine.
•Fastentheseatbeltandensurethatyoucan
releaseitquicklyinanemergency.Alwayswear
yourseatbeltwhentherollbarisuporona
machinewithacabinstalledbyToro.
•Checkcarefullyforoverheadobstructionsanddo
notcontactthem.
•KeeptheROPSinsafeoperatingconditionby
thoroughlyinspectingitperiodicallyfordamage
andkeepingallthemountingfastenerstight.
•ReplaceanydamagedROPScomponent.Donot
repairoralterit.
OperatingonHillsandRough Terrain
1.Stopthemachine.
2.PlacetherangeselectorintheNEUTRAL
positionandsettheparkingbrake.
3.TurntheignitionkeytotheOFFposition.
4.Removetheignitionkey .
Operatingthesprayeronahillmaycausetippingor
rollingofthemachine,ortheenginemaystallandyou
couldloseheadwayonthehill.Thiscouldresultin
personalinjury.
•Donotacceleratequicklyorsuddenlyapplythe
brakeswhenbackingdownahill,especiallywitha
load.
6
Page 7

•Neverdriveacrossasteephill;alwaysdrive
straightupordownorgoaroundthehill.
notsuddenlyapplythebrakes.Useextracaution
onslopes.
•Iftheenginestallsoryoubegintoloseheadway
whileclimbingahill,graduallyapplythebrakes
andslowlybackstraightdownthehill.
•Turningwhiletravelingupordownhillscanbe
dangerous.Ifyouhavetoturnwhileonahill,doit
slowlyandcautiously.Nevermakesharporfast
turns.
•Heavyloadsaffectstability .Reducetheweightof
theloadandyourspeedwhenoperatingonhills.
•Avoidstoppingonhills,especiallywithaload.
Stoppingwhilegoingdownahillwilltakelonger
thanstoppingonlevelground.Ifyoumuststop
themachine,avoidsuddenspeedchanges,which
mayinitiatetippingorrollingofthemachine.
Donotsuddenlyapplythebrakeswhenrolling
backward,asthismaycausethemachineto
overturn.
•Usetheseatbeltwhenoperatingthemachineand
becertainthatitcanbereleasedquicklyinthe
eventofanemergency.
•Donotremoveoraltertherolloverprotection
system(ROPS).
•Alwayskeepthetransmissioningearwhenyou
drivethemachinedownaslope.
•Reducespeedandloadwhenoperatingonrough
terrain,unevenground,andnearcurbs,holes,and
othersuddenchangesinterrain.Loadsmayshift,
causingthemachinetobecomeunstable.
•Beawarethatheavyloadsincreaseyourstopping
distanceandreduceyourabilitytoturnquickly
withouttippingover.
Maintenance
•Onlypermitqualiedandauthorizedpersonnelto
maintain,repair,adjust,orinspectthemachine.
•Beforeservicingormakingadjustmentstothe
machine,parkthemachineonalevelsurface,
engagetheparkingbrake,shutofftheengine,
andremovethekeytopreventsomeonefrom
accidentallystartingtheengine.
•Tomakesurethattheentiremachineisingood
condition,keepallnuts,bolts,andscrewsproperly
tightened.
•Toreducethepotentialforre,keeptheengine
areafreeofexcessivegrease,grass,leaves,and
accumulationofdirt.
•Neveruseanopenametocheckthelevelor
leakageoffuelorbatteryelectrolyte.
•Ifyoumustruntheenginetoperforma
maintenanceadjustment,keepyourhands,feet,
clothing,andanypartsofyourbodyawayfrom
theengineandanymovingparts.Keepeveryone
away.
•Donotuseopenpansoffuelorammable
cleaninguidswhencleaningparts.
WARNING
Suddenchangesinterrainmaycause
abruptsteeringwheelmovement,possibly
resultinginhandandarminjuries.
Gripthesteeringwheellooselyaroundthe
perimeter.Keepyourhandsclearofthe
steeringwheelspokes
Loading
Theweightofthecargocanchangethecenterof
gravityofthemachineandthehandlingofit.T o
avoidlossofcontrolandpersonalinjury,followthese
guidelines:
•Liquidloadscanshift.Thisshiftinghappens
mostoftenwhileturning,goingupordownhills,
suddenlychangingspeeds,orwhiledrivingover
roughsurfaces.Shiftingloadscancausethe
machinetotipover.
•Whenoperatingwithaheavyload,reduceyour
speedandallowforsufcientbrakingdistance.Do
•Donotadjustthetractioncontrolspeed.Toensure
safetyandaccuracy,haveanAuthorizedT oro
Distributorcheckthegroundspeed.
•Keepyourbodyandhandsawayfrompinhole
leaksornozzlesthatejecthigh-pressureuid.Use
cardboardorpapertondleaks.Fluidescaping
underpressurecanpenetrateskinandcause
injuryrequiringsurgerywithinafewhoursbya
qualiedsurgeon;otherwise,gangrenemayresult.
•Ifmajorrepairsareeverneededorassistanceis
required,contactanAuthorizedToroDistributor.
•Tobesureofoptimumperformanceandsafety,
alwayspurchasegenuineT ororeplacement
partsandaccessories.Replacementpartsand
accessoriesmadebyothermanufacturerscould
bedangerous.Alteringthismachineinanymanner
thatmayaffectsprayeroperation,performance,
durability,oritsuse,mayresultininjuryordeath.
Suchusecouldvoidtheproductwarranty.
7
Page 8
SafetyandInstructionalDecals
Safetydecalsandinstructionsareeasilyvisibletotheoperatorandarelocatednearanyarea
ofpotentialdanger.Replaceanydecalthatisdamagedormissing.
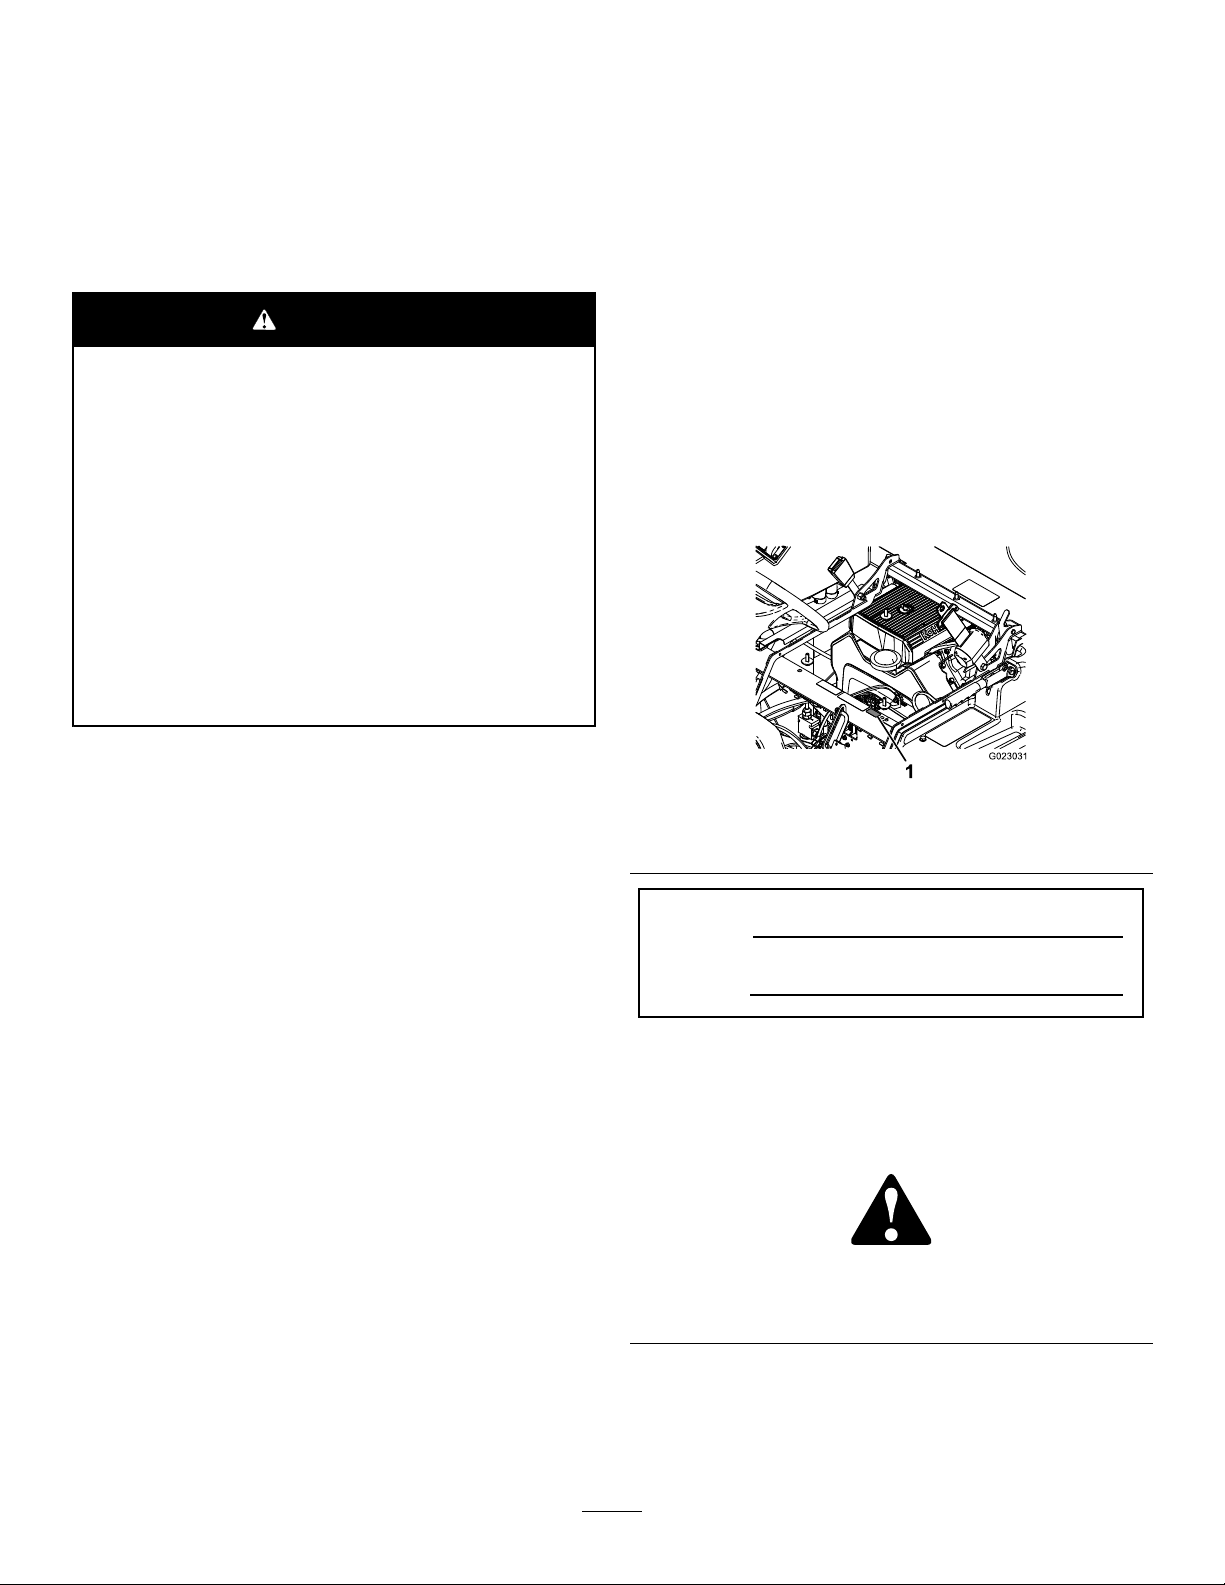
106-9206
1.Wheeltorquespecications
2.ReadtheOperator'sManual.
117–2718
120–0616
1.Warning—readtheOperator’sManual;usefresh,clean
waterforrst-aidwashing.
decal106-9206
decal120-0622
120–0622
1.Warning—readthe
Operator’sManual.
2.Warning—donotenterthe
sprayertank.
decal117-2718
decal120-0616
3.Chemicalburnhazard;
toxicgasinhalation
hazard—wearhandand
skinprotection;weareye
andrespiratoryprotection.
1.Severinghazardofhand,
pinchingpoint—keep
awayfromactuatedjoints.
decal120-0617
120–0617
2.Crushinghazard—keep
bystandersawayfromthe
machine.
1.Turnthethrottle
lock/speedlockon/off
2.Sonicboom(optional)
125–4125
3.Turnthefoammakers
on/off(optional)
decal125-4125
8
Page 9
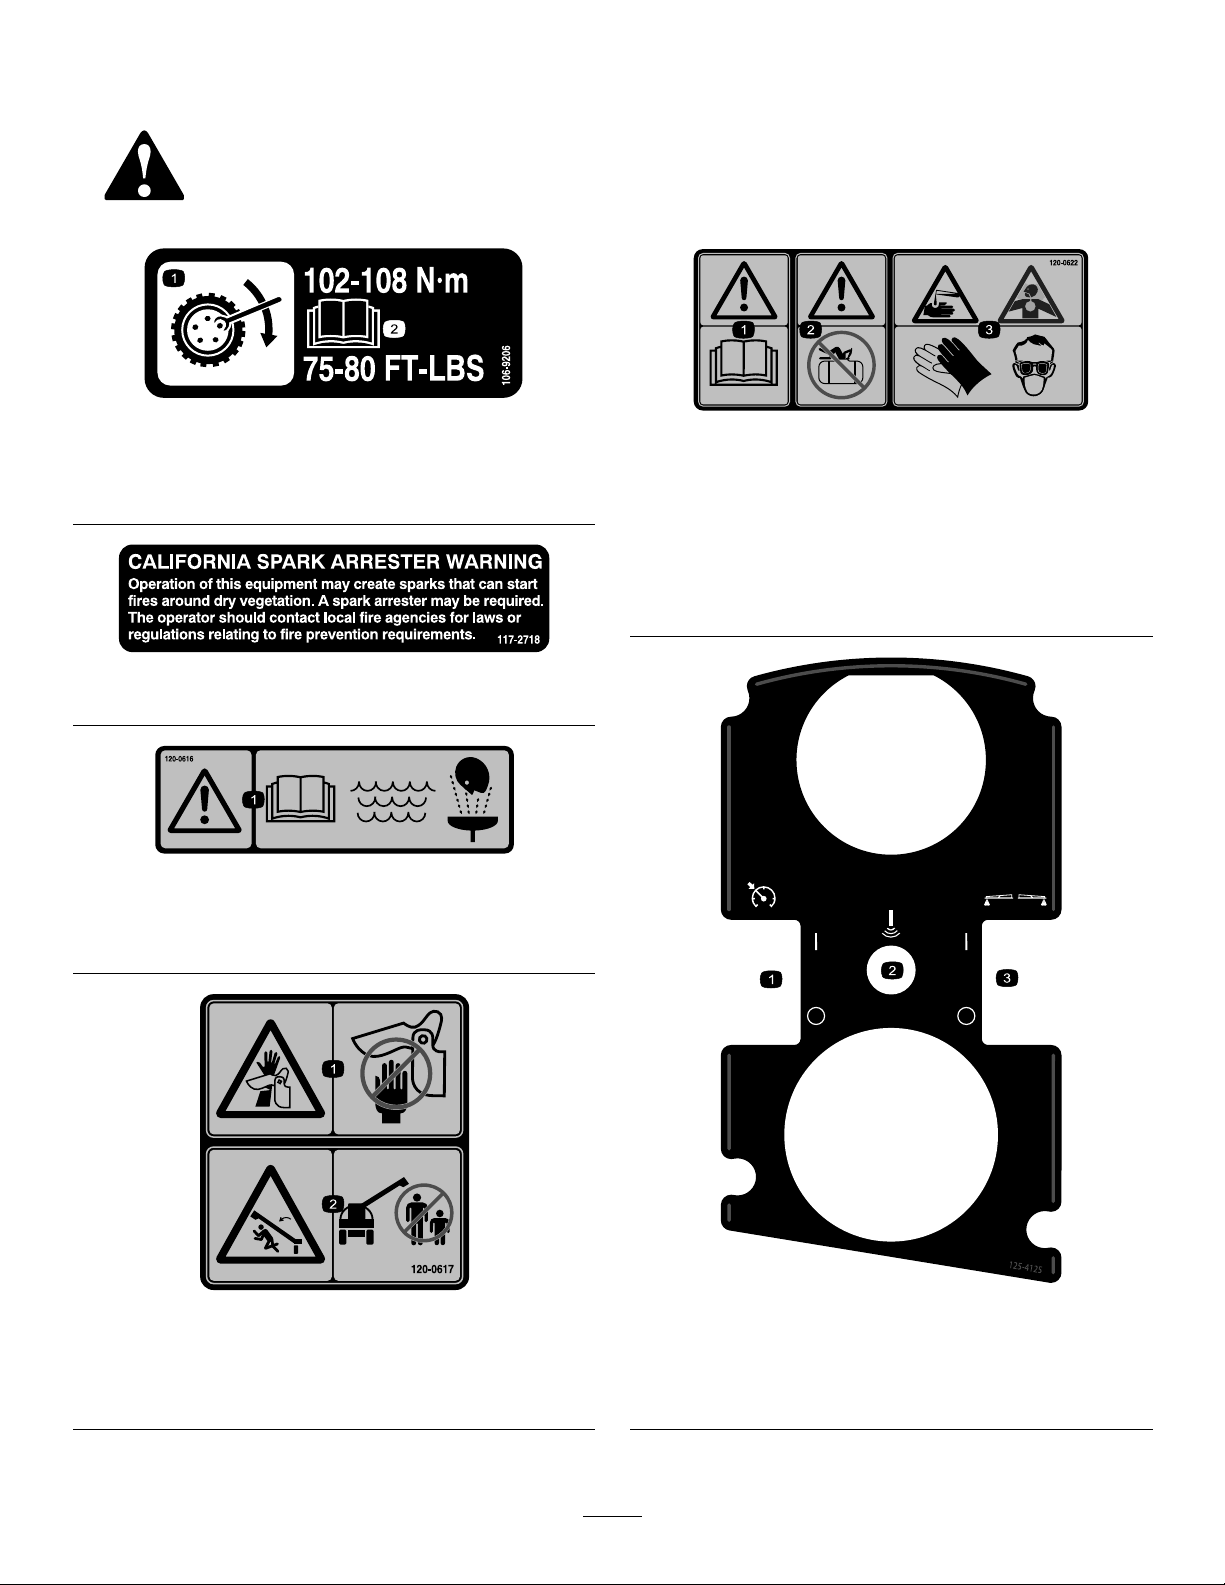
decal125-4128
125–4128
1.Raise/lowerleftsection
4.Engine—run
2.Raise/lowerrightsection5.Engine—shutoff
3.Engine—start
125–4129
1.Leftsection
2.Centersection
3.Rightsection
decal125-8113
125–8113
1.Gearselection5.Automatic(optional)
2.Lockdifferentiallock6.Manual(optional)
decal125-4129
3.Unlockdifferentiallock
4.Toggleheadlightson/off
7.Rewindhosereel
(optional)
1.Tiedownlocation
decal125-8114
125–8114
1.Ratelockout
locked/unlocked
decal125-6694
2.Togglerinsepumpon/off
125–6694
9
Page 10
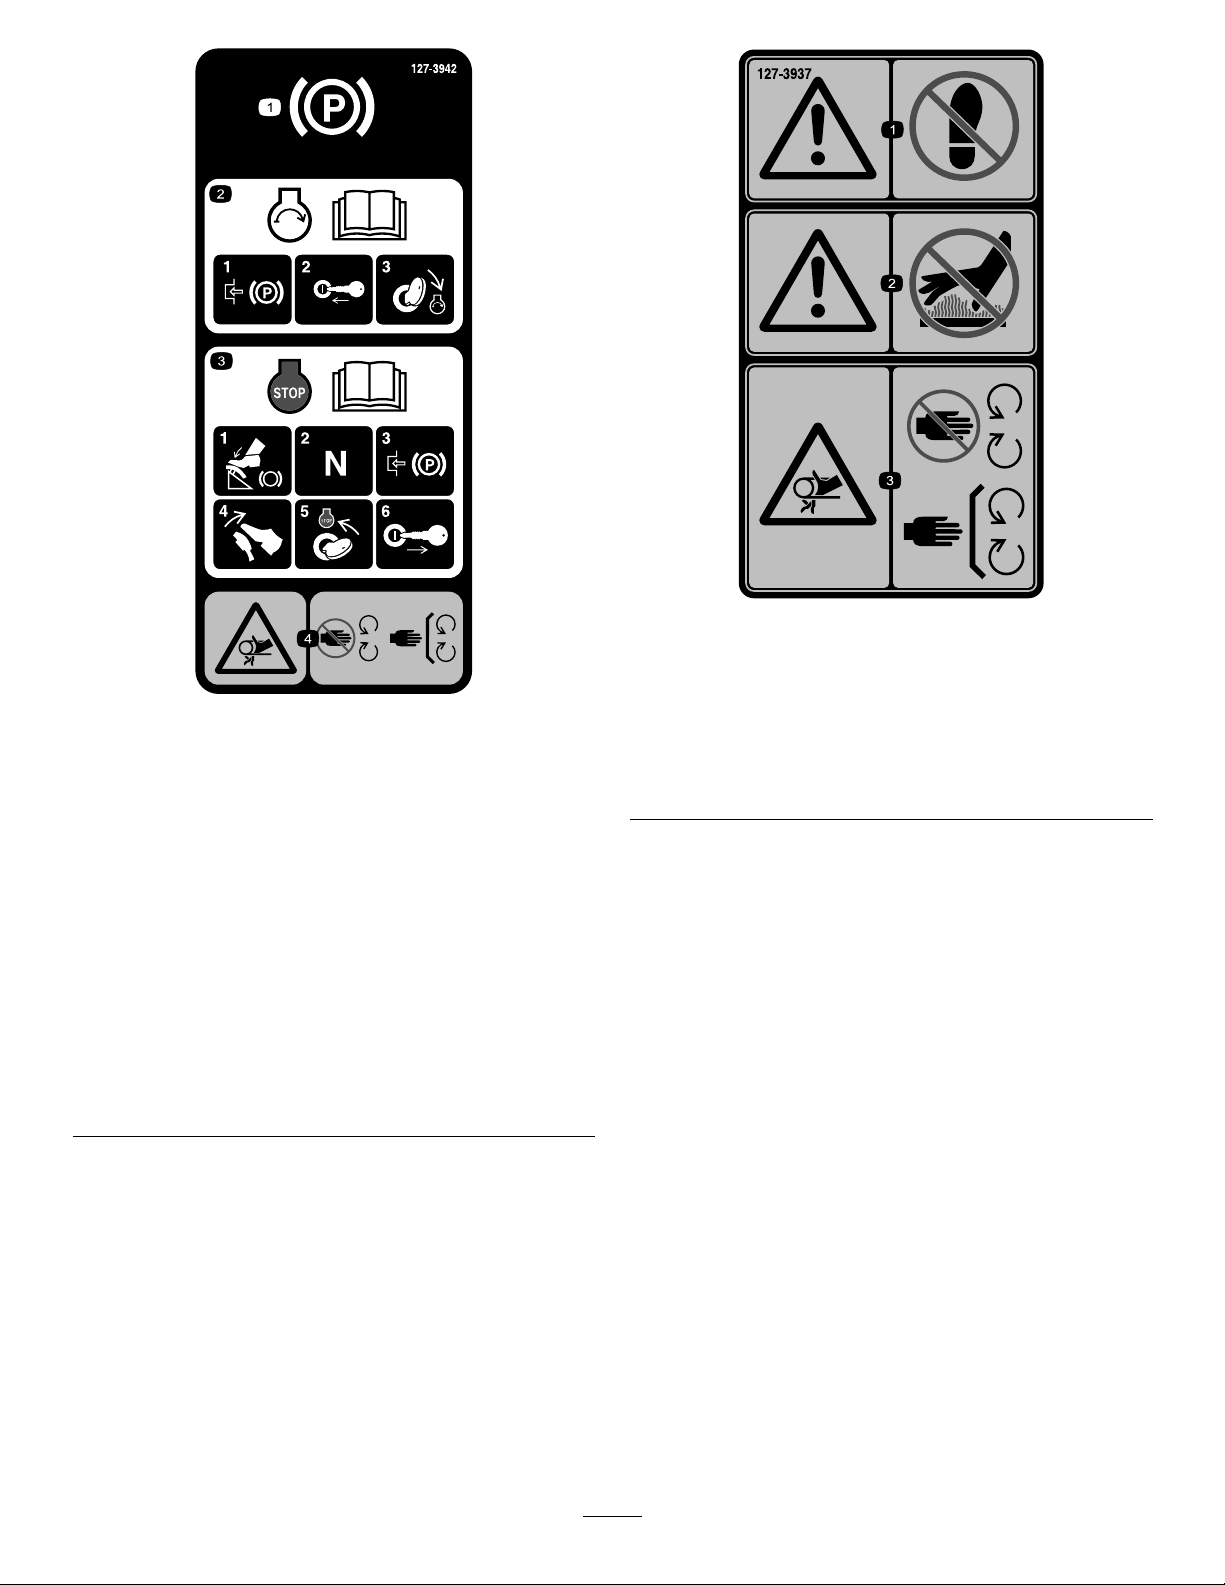
decal127-3937
127–3937
1.Parkingbrake
2.Forinformationonstarting
theengine,readthe
Operator’sManual—1)
Engagetheparkingbrake;
2)Insertthekeyintothe
ignition;3)Turnthekeyto
theenginerunposition.
127–3935
3.Forinformationonshutting
offtheengine,readthe
Operator’sManual—1)
Pressdownonthebrake
pedal;2)Setthegearto
neutral;3)Engagethe
parkingbrake;4)Release
thebrakepedal;5)Turn
theignitionkeytoSTOP
position;6)Removethe
keyfromtheignition.
4.Entanglementhazard,
belt—keepawayfrom
movingparts;keepall
guardsandshieldsin
place.
1.Warning—donotstep.3.Entanglementhazard,
belt—keepawayfrom
decal127-3935
movingparts;keepall
guardsandshieldsin
place.
2.Warning—keepawayfrom
hotsurfaces.
10
Page 11
decal127-3942
127–3942
1.ReadtheOperator’s
6.7.5A
Manualforinformationon
fuses.
2.10A—Ignition7.7.5A
3.15A—Sprayersection8.2A—TEC
4.15A—Headlights9.30A—Rinsetank
5.7.5A
127-6976
1.Decrease2.Increase
decal127-6976
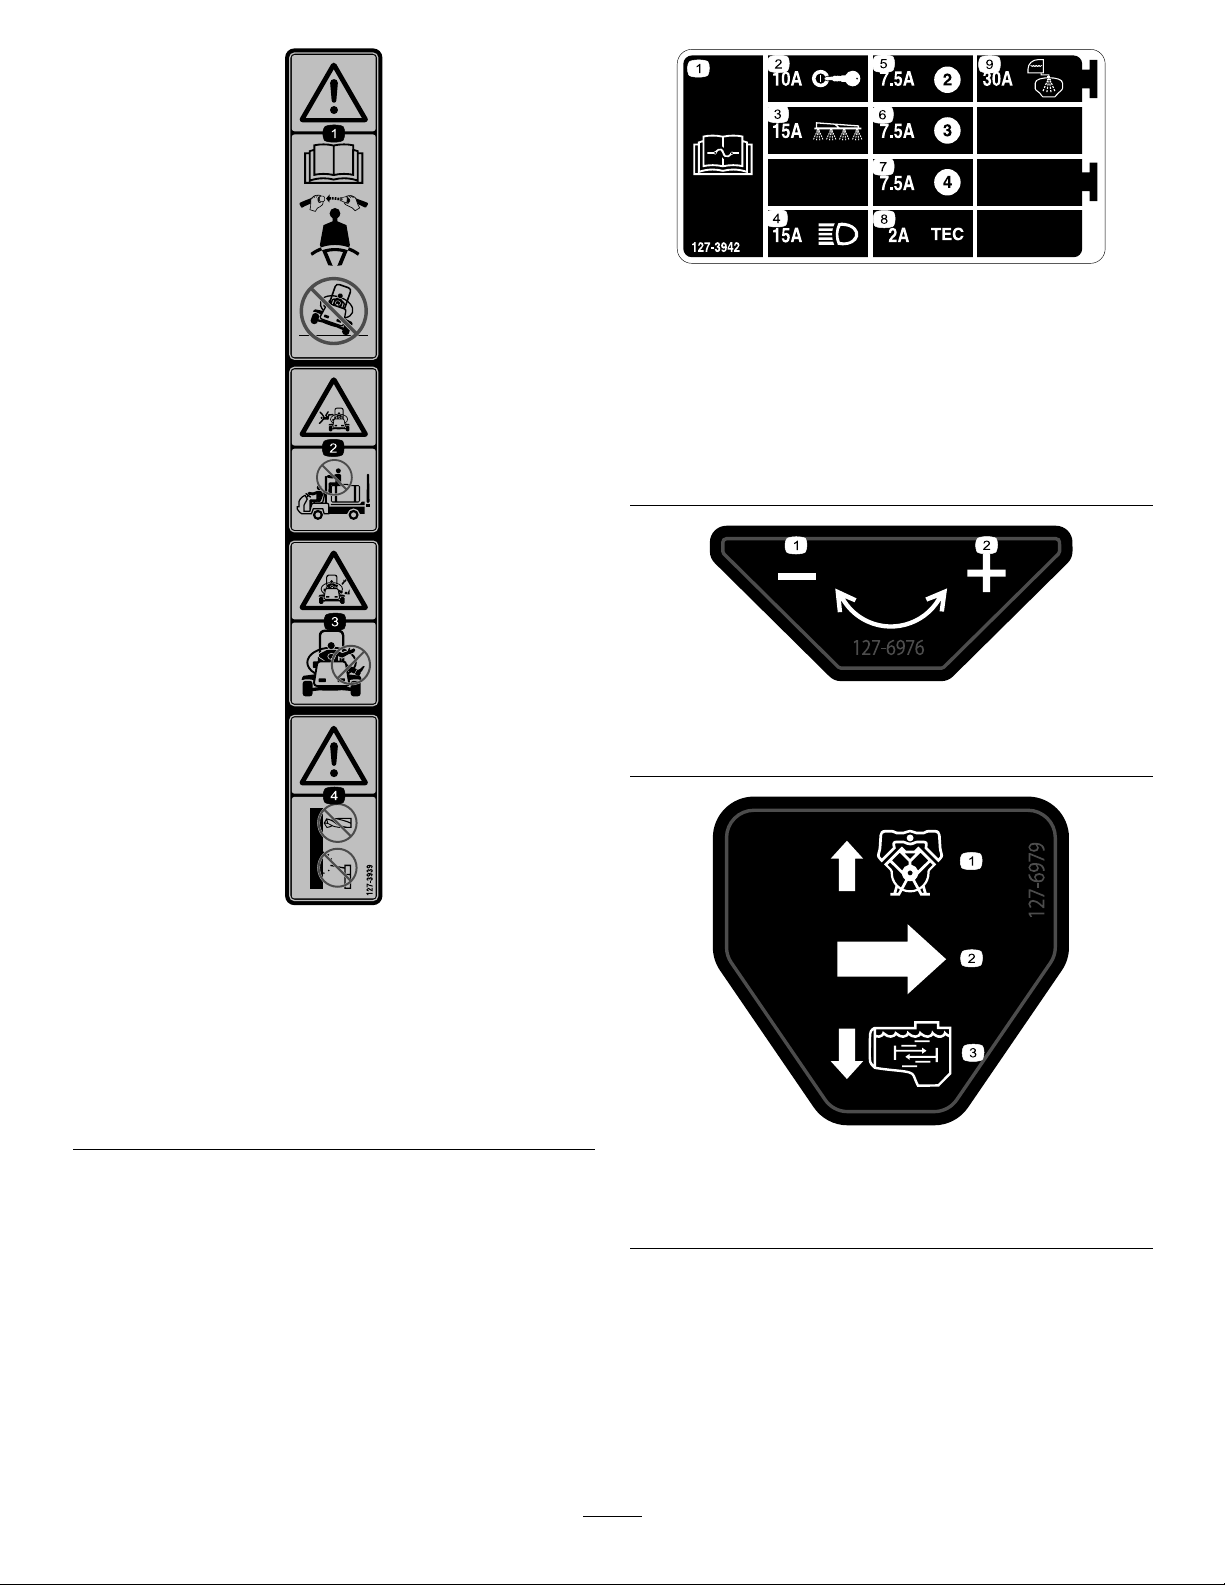
1.Warning—readthe
Operator’sManual;always
wearaseatbeltwhen
operatingthemachine;do
nottipthemachine.
2.Fallinghazard—donot
carrypassengersonthe
sprayertank.
127–3939
3.Cutting/dismemberment
4.Warning—donotdrill,
decal127-3939
hazard—keeparmsand
legsinsidethevehicleat
alltimes.
weld,oraltertheROPS
system.
decal127-6979
127-6979
1.Pump-returnow3.Agitationow
2.Flow
11
Page 12
decal130-8293
130-8293
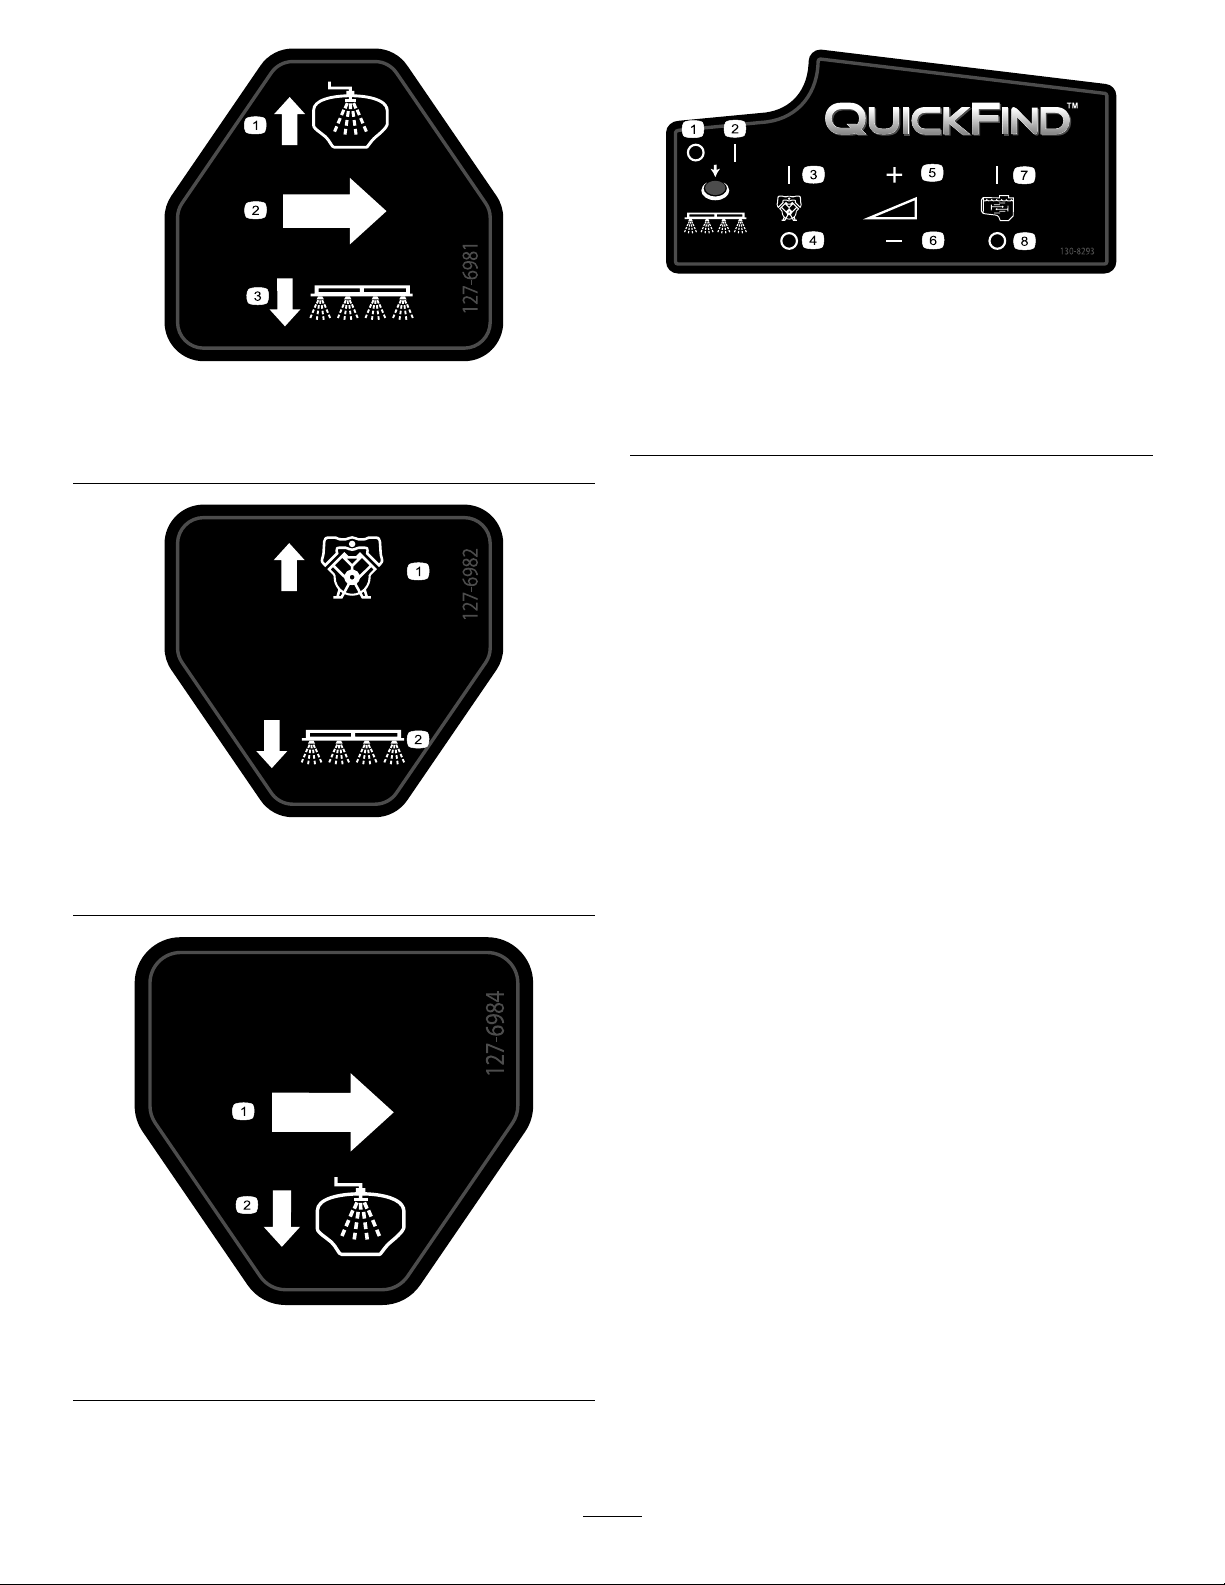
127-6981
1.Bypass-returnow3.Sectionspray
2.Flow
127-6982
1.Bypass-returnow2.Sectionspray
1.Sprayeroff
decal127-6981
2.Sprayeron
5.Increasespeed
6.Decreasespeed
3.Engineon7.Agitationon
4.Engineoff8.Agitationoff
decal127-6982
decal127-6984
127-6984
1.Flow
2.Tank-returnow
12
Page 13
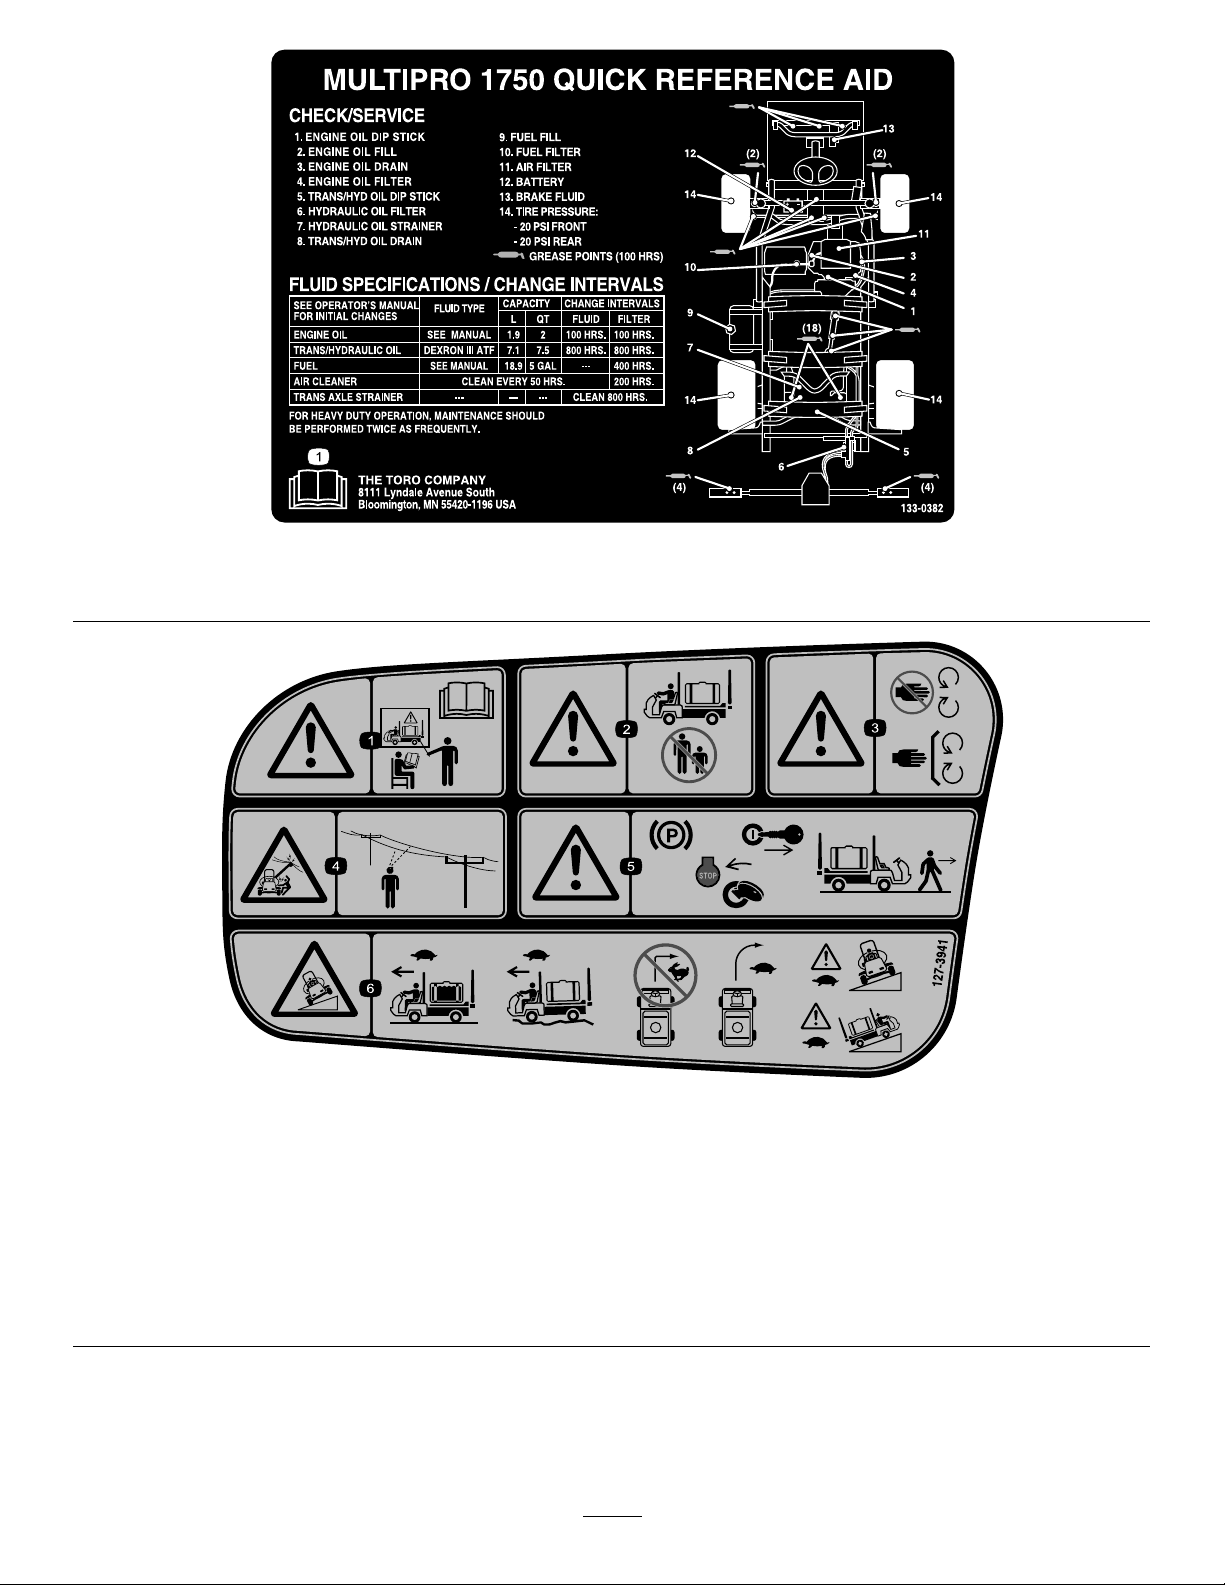
1.ReadtheOperator'sManualformoreinformationaboutmaintenance.
decal133-0382
133-0382
decal127-3941
127–3941
1.Warning—donotoperatethemachinewithoutpropertraining;
readtheOperator’sManual.
2.Warning—keepbystandersawaywhenoperatingthe
machine.
3.Warning—keepawayfrommovingparts;keepallguardsand
shieldsinplace.
4.Electricalshockhazard,overheadpowerlines—checkthe
areaforoverheadpowerlinesbeforeoperatingthemachine
inthearea.
5.Warning—Engagetheparkingbrake,shutofftheengine,and
removethekeyfromtheignitionbeforeleavingthemachine.
6.Tippinghazard—Moveslowlywhenthesprayertankisfull;
moveslowlywhendrivingoverroughterrain;donotturnat
highspeed;turnslowly;driveslowlywhendrivingacrossor
upslopes.
13
Page 14

Setup
Note:Determinetheleftandrightsidesofthe
machinefromthenormaloperatingposition.
2.Placethethreadedendofthe90°elbowtting
throughthebracketandthreadthequickcoupler
ontoit,securingittothebracket(Figure3).
Note:Installthettingwiththeopenend
pointingtowardthelargeopeninginthebracket
andtowardthetankopeningsothatthewater
arcsintothetankwhenyoullit.
1
InstallingtheAnti-Siphon FillReceptacle
Partsneededforthisprocedure:
1
90°tting
1
Quickcoupler
1Hoseadapter
1Fill-receptaclebracket
1
Flange-headbolt(5/16x3/4inch)
1Anti-siphonhose
Procedure
1.Placethell-receptaclebracketoverthe
threadedholeinthetankandsecureitwitha
ange-headbolt(5/16x3/4inch)asshownin
Figure3.
3.Installthehoseadapterintothequickcoupler
(Figure3).
4.Locktheadapterintoplacebyswingingthe
leverstowardtheadapterandthensecurethem
withthehairpincotters(Figure3).
5.Installtheanti-siphonhosethroughthelarge
openingonthebracketandontothebarbedend
ofthe90°elbowtting(Figure3).
Important:Donotlengthenthehoseto
allowcontactwiththetankuids.
2
CheckingtheSection-Hinge Springs
NoPartsRequired
Figure3
1.Fill-receptaclebracket
2.Threadedholeinthetank6.Hoseadapter
3.Flangebolt(5/16x3/4
inch)
4.90°elbowtting
5.Quickcoupler
7.Anti-siphonhose
Procedure
Important:Operatingthespraysystemwith
thesection-hingespringsundertheincorrect
compressioncoulddamagetheboomassembly.
Measurethespringsandusethejamnutto
compressthespringsto3.96cm(1.56inches)if
necessary.
Thesprayerisshippedwiththesectionextensions
swungforwardtofacilitateshippingthemachine.
Thespringsarenotfullytightenedatthetimeof
manufacturetoallowthesectionstobeinthisposition
fortransit.Beforeoperatingthemachine,thesprings
mustbeadjustedtothecorrectcompression.
g001488
1.Ifnecessary,removethepackingcomponents
thatsecuretherightandleftextensionsections
duringshipping.
2.Supportthesectionswhiletheyareextendedto
thesprayposition.
3.Atthesectionhinge,measurethecompression
oftheupperandlowerspringswhilethesections
areintheirextendedposition(Figure4).
14
Page 15

A.Allspringsmustbecompresseduntilthey
measure3.96cm(1.56inches).
B.Usethejamnuttocompressanyspring
thatmeasuregreaterthan3.96cm(1.56
inches).
Figure4
1.Section-hingespring3.Compressedspring
dimension—3.96cm(1.56
inches)
2.Jamnut
3
LearningMoreaboutYour Product
Partsneededforthisprocedure:
1Ignitionkey
1
Operator'sManual
1Engineoperator'smanual
1
PartsCatalog
1
Operatortrainingmaterial
1Registrationcard
1
Pre-deliveryInspectionSheet
Procedure
g035648
1.Readthemanuals.
2.Viewtheoperatortrainingmaterial.
3.Completetheregistrationcardandreturnitto
Toro.
4.Storethedocumentationinasafeplace.
4.Repeattheprocedureforeachspringonboth
sectionhinges.
5.Movethesectionsintothetransport‘X’position.
SeeUsingtheBoom-TransportCradle(page
29)formoreinformation.
15
Page 16
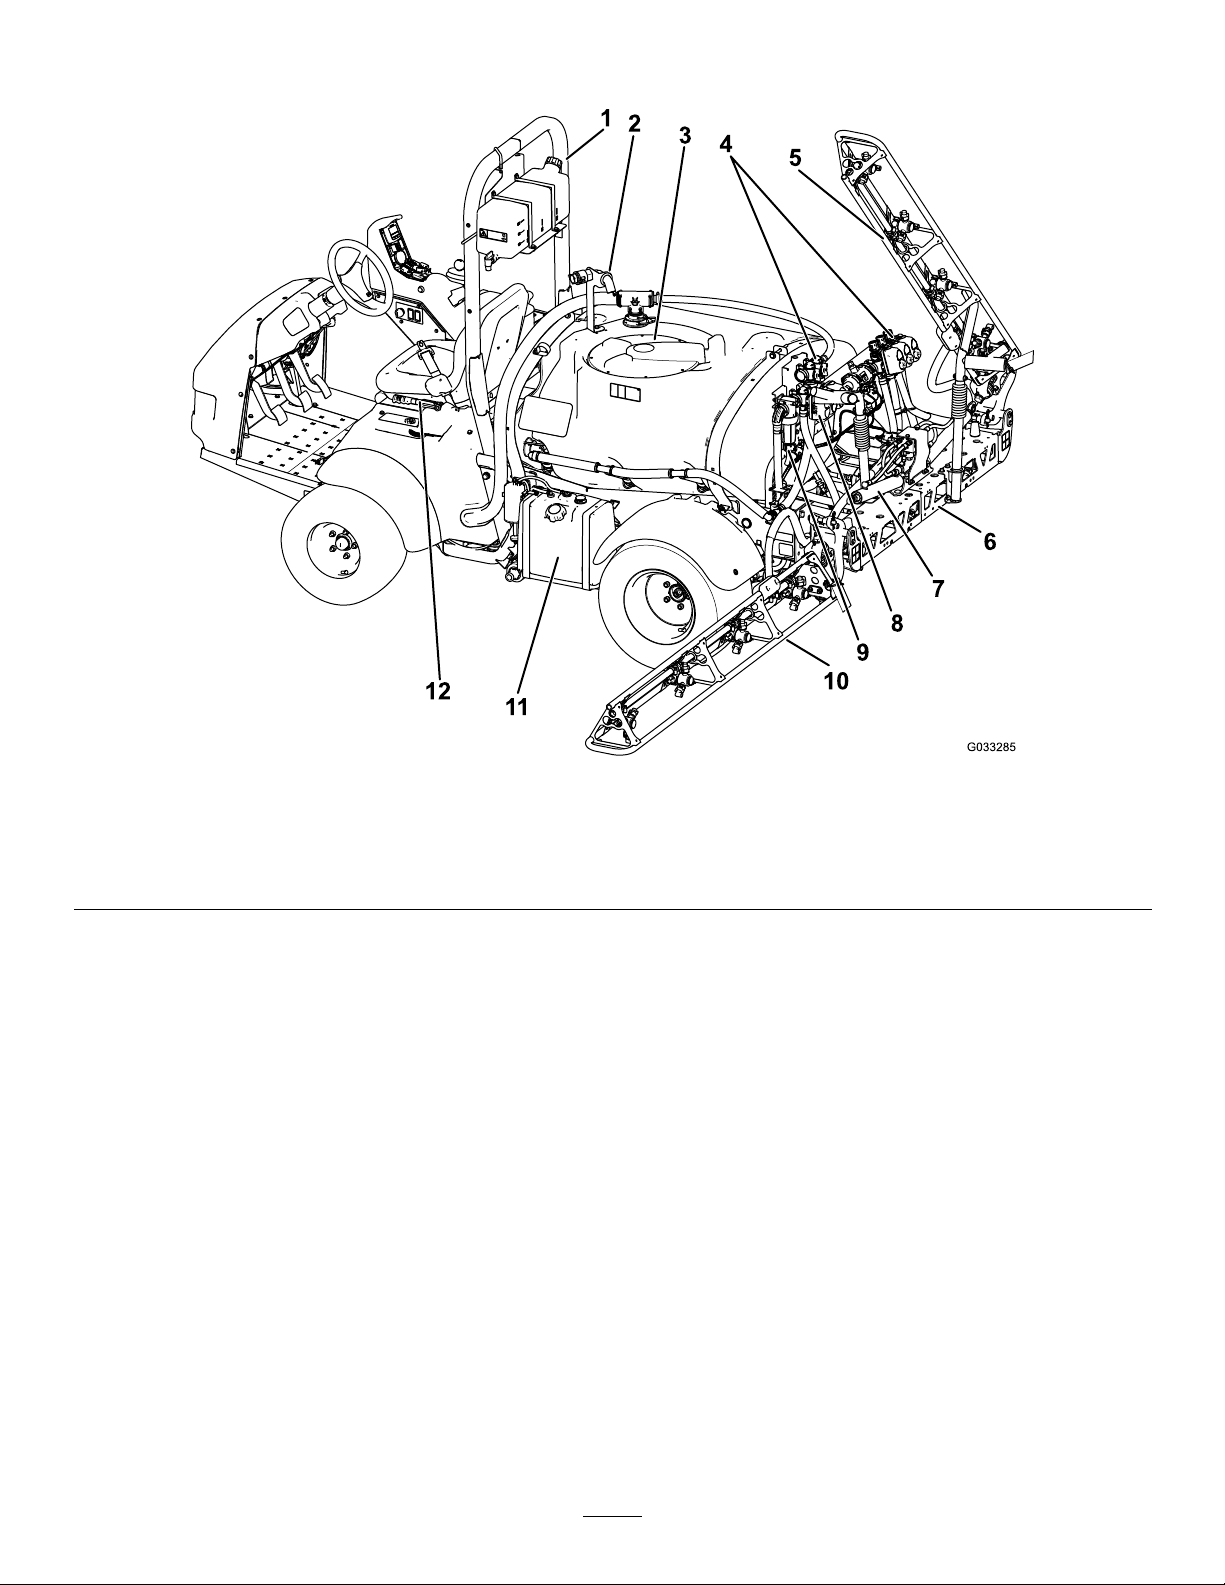
ProductOverview
Figure5
1.Rollbar
2.Anti-siphonreceptacle5.Rightsection8.Agitation-throttlevalve11.Fueltank
3.Chemical-tanklid6.Centersection9.Pressurelter
4.Valvemanifolds7.Section-controlcylinder10.Leftsection
12.Parkingbrake
g033285
16
Page 17
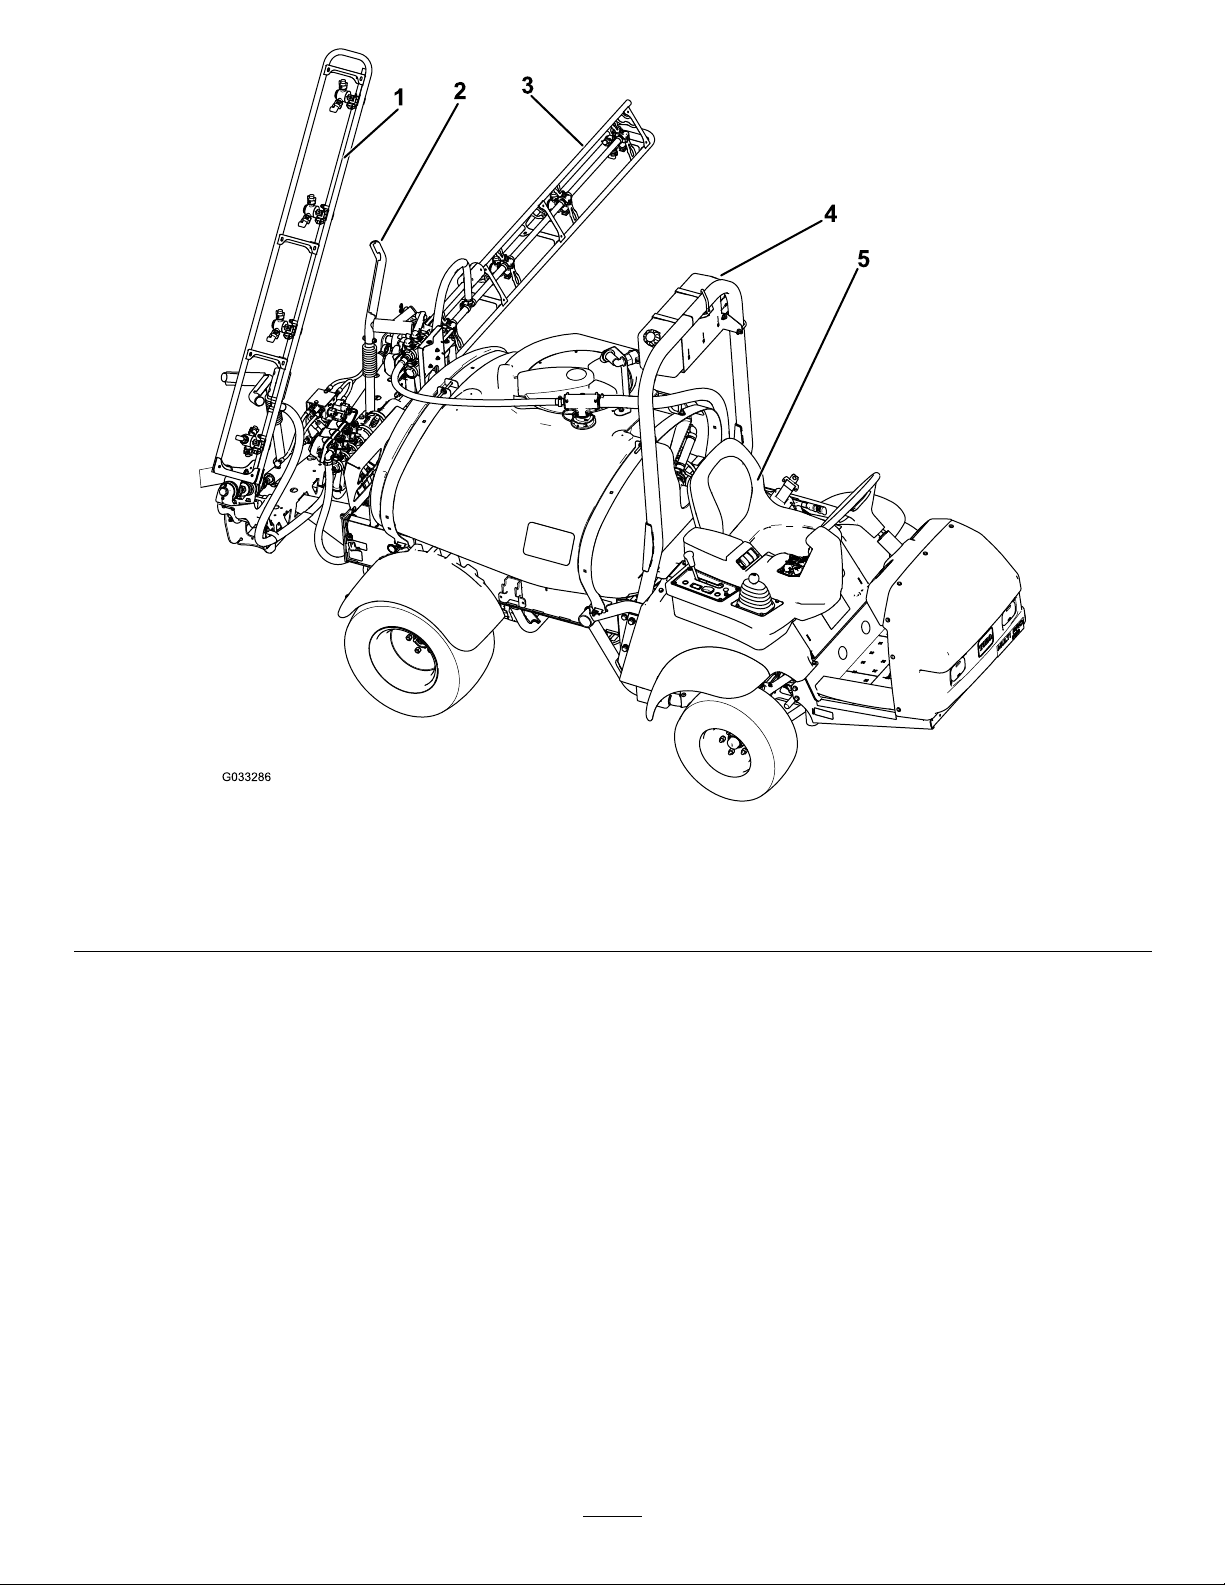
Figure6
1.Rightsection4.Fresh-watertank
2.Boom-transportcradle
3.Leftsection
5.Operator’sseat
g033286
17
Page 18

Controls
1.InfoCenter
2.Foam-markerswitch
(optional)
3.Pressuregauge8.Headlightswitch
4.Engineswitch
5.Left,center,andright
sectionswitches
6.Rangeselector11.Hose-reel-rewindbutton
7.Choke
9.Differentiallock14.Spray-pumpswitch19.Throttle/speedlockswitch
10.Sonic-boomswitch
(optional)
Figure7
16.Supervisor(rate-lockout)
(optional)
12.Agitationswitch17.Mastersectionswitch
13.Spray-pressureswitch18.Boom-sectionliftswitches
15.Rinse-tankswitch(optional)
g204239
switch
18
Page 19

AcceleratorPedal
ParkingBrake
Theacceleratorpedal(Figure8)givesyoutheability
tovarythegroundspeedofthesprayer.Pressingthe
pedalincreasesgroundspeed.Releasingthepedal
slowsthesprayerandreducestheenginespeedto
idle.
Figure8
1.Clutchpedal
2.Brakepedal
3.Acceleratorpedal
Theparkingbrakeisalargelevertotheleftofthe
seat(Figure9).Engagetheparkingbrakewhenever
youplanonleavingtheseattopreventaccidental
movementofthesprayer.T oengagetheparking
brake,pullupandbackonthelever.Todisengage,
pushitforwardanddown.Ifthesprayerisparked
onasteepgrade,applytheparkingbrakeandplace
blocksatthedownhillsideofthewheels.
g023036
g023035
1.Parking-brakelever
Figure9
ClutchPedal
Fullypresstheclutchpedal(Figure8)todisengage
theclutchwhenstartingtheengineorshifting
transmissiongears.Releasethepedalsmoothlywhen
thetransmissionisingeartopreventunnecessary
wearonthetransmissionandotherrelatedparts.
Important:Donotridetheclutchpedalduring
operation.Theclutchpedalmustbefullyoutor
theclutchwillslip,causingheatandwear.Never
holdthevehiclestoppedonahillusingtheclutch
pedal.Damagetotheclutchmayoccur.
BrakePedal
Usethebrakepedaltostoporslowthesprayer
(Figure8).
CAUTION
Brakescanbecomewornorcanbeadjusted
incorrectlyresultinginpersonalinjury.
Ifbrakepedaltravelstowithin2.5cm(1inch)
ofthesprayeroorboard,adjustorrepairthe
brakes.
HillAssist
Hillassistpreventsthesprayerfromrollingorjerking
bytemporarilyholdingthesprayeronhillyterrain
whenyoumoveyourfootfromthebrakepedaltothe
acceleratorpedal.Toengagehillassist,engagethe
clutchandpushdownonthebrakepedalrmly.When
hillassistisengaged,thehillassisticonappears
ontheInfoCenter;refertotheMultiPro1750Turf
SprayerSoftwareGuide.Hillassistholdsthemachine
for2secondsafterreleasingthebrakepedal.
Note:Thehillassistonlytemporarilyholdsthe
machine,youcannotuseitinplaceoftheparking
brake.
DifferentialLock
Thedifferentiallockallowsyoutolocktherearaxlefor
increasedtraction.Y oumayengagethedifferential
lock(Figure7)whilethesprayerisinmotion.Move
theleverforwardandtotherighttoengagethelock.
Note:Youmayneedtodrivethemachineforward
whileturningslightlytoengageordisengagethe
differentiallock.
19
Page 20

CAUTION
Turningwiththedifferentiallockoncanresult
inlossofmachinecontrol.
Donotoperatewithdifferentiallockonwhen
makingsharpturnsorathighspeeds;referto
AdjustingtheDifferential-LockCable(page
49).
ChokeControl
Thechokecontrolisasmallknobbehindtherange
selector(Figure7).T ostartacoldengine,pullthe
chokecontrolup.Aftertheenginestarts,regulate
thechoketokeeptheenginerunningsmoothly.As
soonaspossible,pushthecontroldowntotheOFF
position.Awarmenginerequireslittleornochoking.
MasterSectionSwitch
Themastersectionswitch(Figure7)islocatedonthe
sideoftheconsoleandtotherightoftheoperator.It
allowsyoutostartorstopthesprayoperation.Press
theswitchtoenableordisablethespraysystem.
Left,Center,andRightSection
Switches
Theleft,center,andrightsectionswitchesarelocated
onthecontrolpanel(Figure7).Toggleeachswitch
forwardtoturnthecorrespondingsectiononand
rearwardtoturnthemoff.Whentheswitchisturned
on,alightontheswitchilluminates.Theseswitches
affectthespraysystemonlywhenthemastersection
switchison.
RangeSelector
Therangeselector(Figure7)has5positions:3
forwardspeeds,NEUTRAL,andREVERSE.Theengine
startsonlywhentherangeselectorisintheNEUTRAL
position.
IgnitionSwitch
Theignitionswitch(Figure7),has3positions:STOP,
RUN,andSTART.Rotatethekeyclockwisetothe
STARTpositiontostarttheengineandreleaseitto
theRUNpositionwhenstarted.Rotatethekeytothe
STOPpositiontoshutofftheengine.
HeadlightSwitch
Toggletheswitchtooperatetheheadlights(Figure
7).Pushitforwardtoturnthelightsonandrearward
toturnthemoff.
Throttle/Speed-LockSwitch
WhentherangeselectorisintheNEUTRALposition,
youcanusetheacceleratorpedaltospeedupthe
engine,thenpushtheswitchbelowtheInfoCenter
forwardtosettheengineatthatspeed.This
isnecessarytorunthechemicalagitationwhile
stationaryoroperatingattachmentssuchasthehand
sprayer(Figure7).
Important:Therangeselectormustbeinthe
NEUTRALpositionandtheparkingbrakemustbe
setfortheswitchtowork.
PumpSwitch
Thepumpswitchislocatedonthecontrolpaneltothe
rightoftheseat(Figure7).Togglethisswitchforward
torunthepumporrearwardtostopthepump.
Important:Thepumpswitchwillonlyengage
whentheengineisatlowidletoavoiddamaging
thepumpdrive.
Application-RateSwitch
Theapplication-rateswitchislocatedonthecontrol
paneltotherightoftheseat(Figure7).Pressand
holdtheswitchforwardtoincreasethespraysystem
pressure,orpressandholditrearwardtodecrease
thepressure.
Supervisor(Rate-Lockout)Switch
Thesupervisorswitchislocatedonthecontrolpanel
totherightoftheseat(Figure7).Turnthekey
counterclockwisetotheLOCKpositiontodisablethe
application-rateswitch,therebykeepinganyonefrom
accidentallychangingtheapplicationrate.Turnthe
keyclockwisetotheUNLOCKEDpositiontoenablethe
application-rateswitch.
Boom-SectionLiftSwitches
Theboom-sectionliftswitchesarelocatedonthe
controlpanelandareusedtoraisetheouterboom
sections.
FuelGauge
Thefuelgaugeislocatedontopofthefueltank,on
theleftsideofthemachine,andshowstheamountof
fuelinthetank.
HourMeter
Thehourmeterindicatesthetotalnumberofhours
theenginehasrun.Thisnumberisdisplayedonthe
rstscreenoftheInfoCenter.Thehourmeterstarts
20
Page 21

tofunctionwheneverthekeyisturnedtotheRUN
position.
Foam-MarkerSwitchLocations
section.Youcanadjustthesectionbypasstoensure
thatthesectionpressureremainsconstantnomatter
howmanysectionsareon.RefertoAdjustingthe
Master-Section-BypassValve(page33).
(Optional)
IfyouinstalltheFoamMarkerkit,youwilladdswitches
tothecontrolpanelforcontrollingtheiroperation.The
sprayercomeswithplasticplugsintheselocations.
Regulating(Rate-Control)Valve
Thisvalve,locatedbehindthetank(Figure10),
controlstheamountofuidroutedtothesectionsor
theratereturntothetank.
AgitationValve
Thisvalveislocatedontherearofthetank(Figure
10).Whenagitationison,theowisdirectedthrough
theagitationnozzlesinthetank.Whenagitationisoff,
theowisdirectedthroughthepumpsuction.
PressureGauge
Thepressuregaugeislocatedonthecontrolpanel
(Figure7).Thisgaugeshowsthepressureoftheuid
inthesysteminpsiandkPa.
InfoCenterLCDDisplay
TheInfoCenterLCDdisplayshowsinformationabout
yourmachineandbatterypack,suchasthecurrent
batterycharge,thespeed,diagnosticsinformation,
andmore(Figure7).
Formoreinformation,refertotheMultiPro1750
SoftwareGuide.
Figure10
1.Regulating(rate-control)
valve
2.Agitationvalve
3.Mastersectionvalve
4.Flowmeter
5.Sectionvalves
Master-SectionValve
Themaster-sectionvalve(Figure10)controlstheow
totheowmeterandsectionvalves.
Flowmeter
Theowmetermeasurestheowrateoftheuidfor
usebytheInfoCentersystem(Figure10).
SectionBypassValves
Thesevalvesturntheright,center,andleftsections
onoroff(Figure10).
Agitation-ThrottleValve
g204247
Theagitation-throttlevalveisusedtoreducetheow
availablefortheagitationcircuit.Itprovidesadditional
owforthesections.
Section-BypassShutoffValve
Thesectionbypassshutoffvalveredirectstheuid
owforasectiontothetankwhenyouturnoffthe
21
Page 22
Specications
Note:Specicationsanddesignaresubjectto
changewithoutnotice.
Weightwithstandardspray
system,empty,without
operator
Weightwithstandardspray
system,full,withoutoperator
Maximumgrossvehicleweight
(GVW)(onlevelground)
Overalllengthwithstandard
spraysystem
Overallheightwithstandard
spraysystem
Overallheightwithstandard
spraysystemtothetopof
thesectionsstoredintheX
position
Overallwidthwithstandard
spraysystemsectionsstored
inthe‘X’position
Groundclearance14cm(5.5inches)
Wheelbase
Tankcapacity(includesthe
CE5%overow)
Attachments/Accessories
953kg(2,100lb)
1678kg(3,700lb)
1814kg(4,000lb)
343cm(135inches)
191cm(75inches)
246cm(97inches)
178cm(70inches)
155cm(61inches)
662L(175USgallons)
Operation
Note:Determinetheleftandrightsidesofthe
machinefromthenormaloperatingposition.
SafetyFirst
Pleasecarefullyreadallofthesafetyinstructionsand
decalsinthesafetysection.Knowingthisinformation
couldhelpyouorbystandersavoidinjury.
PreparingtoDrivethe Machine
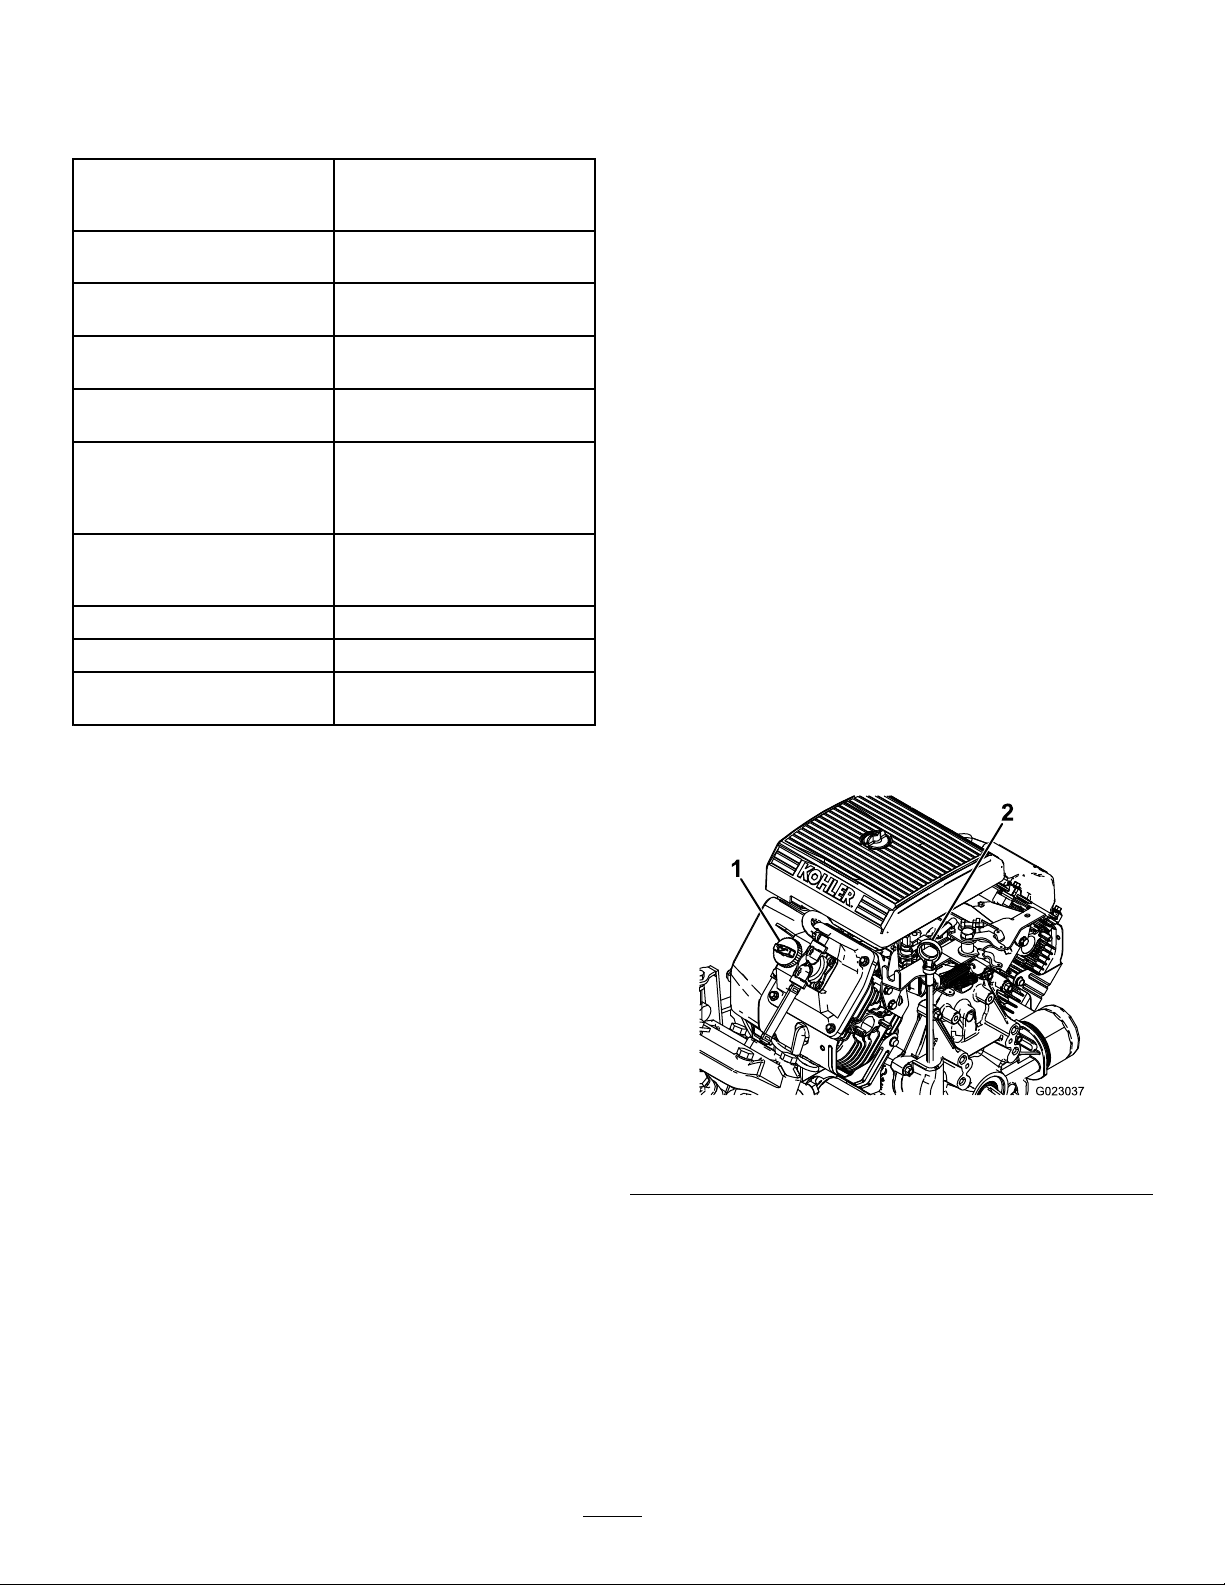
CheckingtheEngineOil
Theengineisshippedwithoilinthecrankcase;
however,thelevelofoilmustbecheckedbeforeyou
rststarttheengineandafteryouhaverunit.
1.Positionthemachineonalevelsurface.
2.Removethedipstickandwipeitwithacleanrag
(Figure11).
3.Insertthedipstickintothetubeandmakesure
thatitisseatedfully .Removethedipstickand
checktheoillevel.
AselectionofT oroapprovedattachmentsand
accessoriesisavailableforusewiththemachineto
enhanceandexpanditscapabilities.Contactyour
AuthorizedServiceDealerorDistributor.
Tobestprotectyourinvestmentandmaintainoptimal
performanceofyourToroequipment,countonT oro
genuineparts.Whenitcomestoreliability,T oro
deliversreplacementpartsdesignedtotheexact
engineeringspecicationofourequipment.Forpeace
ofmind,insistonTorogenuineparts.
g023037
Figure11
1.Fillercap2.Dipstick
4.Iftheoillevelislow,removethellercapfrom
thevalvecover(Figure11)andpouroilintothe
openinguntiltheoillevelisuptotheFULLmark
onthedipstick;refertoServicingtheEngineOil
(page43)fortheproperoiltypeandviscosity.
Note:Addtheoilslowlyandcheckthelevel
oftenduringthisprocess.Donotoverll.
5.Installthedipstickrmlyinplace.
22
Page 23

CheckingtheTirePressure
Checkthetirepressureevery8hoursordailyto
ensureproperlevels.Fillthetiresto138kPa(20psi).
Also,checkthetiresforwearordamage.
AddingFuel
DANGER
Incertainconditions,fuelisextremely
ammableandhighlyexplosive.Areor
explosionfromfuelcanburnyouandothers
andcandamageproperty.
•Fillthefueltankoutdoors,inanopenarea,
whentheengineiscold.Wipeupanyfuel
thatspills.
•Neverllthefueltankinsideanenclosed
trailer.
•Donotllthefueltankcompletelyfull.
Addfueltothefueltankuntilthelevelis6
to13mm(1/4to1/2inch)belowthebottom
ofthellerneck.Thisemptyspaceinthe
tankallowsfueltoexpand.
•Neversmokewhenhandlingfuel,andstay
awayfromanopenameorwheresparks
mayignitefuelfumes.
•Storefuelinanapprovedcontainerand
keepitoutofthereachofchildren.Never
buymorethana30-daysupplyoffuel.
•Donotoperatethemachinewithoutthe
entireexhaustsysteminplaceandin
properworkingcondition.
DANGER
Incertainconditionsduringfueling,static
electricitycanbereleasedcausingaspark
whichcanignitethefuelvapors.Areor
explosionfromfuelcanburnyouandothers
andcandamageproperty.
•Alwaysplacefuelcontainersontheground
awayfromyourvehiclebeforelling.
•Donotllfuelcontainersinsideavehicle
oronatruckortrailerbedbecauseinterior
carpetsorplastictruckbedlinersmay
insulatethecontainerandslowthelossof
anystaticcharge.
•Whenpractical,removefuel-powered
equipmentfromthetruckortrailerand
refueltheequipmentwithitswheelsonthe
ground.
•Ifthisisnotpossible,thenrefuelsuch
equipmentonatruckortrailerfroma
portablecontainerratherthanfroma
fuel-dispensernozzle.
•Ifyoumustuseafuel-dispensernozzle,
keepthenozzleincontactwiththerimof
thefueltankorcontaineropeningatall
timesuntilfuelingiscomplete.
•Forbestresults,useonlyclean,fresh(lessthan
30daysold),unleadedgasolinewithanoctane
ratingof87orhigher((R+M)/2ratingmethod).
•ETHANOL:Gasolinewithupto10%ethanol
(gasohol)or15%MTBE(methyltertiarybutyl
ether)byvolumeisacceptable.Ethanoland
MTBEarenotthesame.Gasolinewith15%
ethanol(E15)byvolumeisnotapprovedforuse.
Neverusegasolinethatcontainsmorethan10%
ethanolbyvolume,suchasE15(contains15%
ethanol),E20(contains20%ethanol),orE85
(containsupto85%ethanol).Usingunapproved
gasolinemaycauseperformanceproblemsand/or
enginedamagewhichmaynotbecoveredunder
warranty.
•Donotusegasolinecontainingmethanol.
•Donotstorefueleitherinthefueltankorfuel
containersoverthewinterunlessyouuseafuel
stabilizer.
•Donotaddoiltogasoline.
FillingtheFuelTank
Thefueltankcapacityisapproximately19L(5US
gallons).
Note:Thefuel-tankcapcontainsagaugewhich
showsthefuellevel;checkitfrequently.
23
Page 24

1.Parkthemachineonaalevelsurface,engage
theparkingbrake,shutofftheengine,and
removethekey.
2.Cleantheareaaroundthefuel-tankcap(Figure
12).
OperatingtheMachine
StartingtheEngine
1.Sitintheoperator'sseat,insertthekeyintothe
ignitionswitch,androtatethekeyclockwiseto
theRUNposition.
2.Presstheclutchandmovetherangeselectorto
theNEUTRALposition.
3.EnsurethatthepumpswitchisintheOFF
position.
Figure12
1.Fuel-tankcap2.Fuelgauge
3.Removethefuel-tankcap.
4.Fillthetanktoabout2.5cm(1inch)belowthe
topofthetank(bottomofthellerneck).
Note:Thisairspaceinthetankallowsfuelto
expand.Donotoverllthetank.
5.Installthefuel-tankcaptothetanksecurely.
6.Wipeupanyfuelthatmayhavespilled.
PerformingthePre-Starting Checks
Checkthefollowingitemseachtimeyoubeginusing
thesprayerfortheday:
•Checkthetirepressure.
Note:Thesetiresaredifferentthancartires;they
requirelesspressuretominimizeturfcompaction
anddamage.
•Checkalluidlevelsandaddtheappropriate
amountofspecieduids,ifanyarefoundtobe
low.
•Checkthebrakepedaloperation.
•Checktoseethatthelightsareworking.
•Turnthesteeringwheeltotheleftandrightto
checksteeringresponse.
•Checkforoilleaks,looseparts,andanyother
noticeablemalfunctions.Makesurethatthe
engineisoffandallmovingpartshavestopped
beforecheckingforoilleaks,looseparts,and
othermalfunctions.
Ifanyoftheaboveitemsarenotcorrect,notifyyour
mechanicorcheckwithyoursupervisorbeforetaking
thesprayeroutfortheday.Yoursupervisormaywant
youtocheckotheritemsonadailybasis,soaskwhat
yourresponsibilitiesare.
g023038
4.Iftheengineiscold,pullthechokeknobup.
Important:Donotusethechokeifthe
engineiswarm.
5.TurnthekeytotheST ARTpositionuntilthe
enginestarts.
Important:DonotholdthekeyintheSTART
positionformorethan10seconds.Ifthe
enginehasnotstartedafter10seconds,wait
1minutebeforetryingagain.Donotattempt
topushortowthesprayertostarttheengine.
6.Oncetheenginestarts,pushthechokeknob
downslowly.
DrivingtheMachine
1.Releasetheparkingbrake.
2.Fullypresstheclutchpedal.
3.Movethegearshiftlevertorstgear.
4.Releasetheclutchpedalsmoothlywhile
pressingtheacceleratorpedal.
5.Whenthevehiclegainsenoughspeed,remove
yourfootfromtheacceleratorpedal,fullypress
theclutchpedal,movethegearshiftlevertothe
nextgearandreleasetheclutchpedalwhile
pressingtheacceleratorpedal.Repeatthe
procedureuntilthedesiredspeedisattained.
Important:Alwaysstopthevehiclebefore
shiftingfromaforwardgeartoreverseor
fromreversetoaforwardgear.
Note:Avoidlongperiodsofengineidling.
Usethechartbelowtodeterminetheground
speedofanemptyvehicleat3,400rpm.
Gear
166.4:15.63.5
238.1:19.86.1
319.6:119.211.9
R80.7:14.72.9
Ratio
Speed
(km/h)
Speed(mph)
24
Page 25

Note:LeavingtheignitionswitchintheON
positionforlongperiodsoftimewithoutrunning
theenginewilldischargethebattery .
Important:Donotattempttopushortow
thevehicletogetitstarted.Damagetothe
drivetraincouldresult.
SettingtheThrottleLock
BreakinginaNewSprayer
ServiceInterval:Aftertherst100hours—Toprovide
properperformanceandlong
sprayerlife,followtheseguidelines
fortherst100operatinghours:
•Checktheengine-oilanduidlevelsregularly
andbealertforindicationsofoverheatinginany
componentofthesprayer.
Note:Youmusthavetheparkingbrakeandspray
pumponandtherangeselectorintheNEUTRAL
positiontosetthethrottlelock.
1.Pressdownontheacceleratorpedaltoobtain
thedesiredenginerpm.
2.Togglethethrottlelockswitchonthecontrol
paneltotheONposition.
3.Toreleasethethrottlelock,toggletheswitchto
theOFFposition,orpressthebrakeorclutch
pedal.
SettingtheSpeedLock
Note:Beforesettingthespeedlock,youmustsit
intheoperator’sseatwiththeparkingbrakeoff,the
pumpon,andtherangeselectoringear.
1.Pressdownontheacceleratorpedaltoobtain
thedesiredenginespeed.
2.Togglethespeedlockswitchonthecontrol
paneltotheONposition.
3.Toreleasethespeedlock,toggletheswitchto
theOFFposition,orpressthebrakeorclutch
pedal.
•Afterstartingacoldengine,letitwarmupforabout
15secondsbeforeaccelerating.
•Tooptimizethebrakesystem,burnish(breakin)
thebrakesasfollows:
1.Load454L(120USgallons)ofwaterinto
thetank.
2.Movethemachinetoanopen-levelarea.
3.Drivethemachineatfullspeed.
4.Applythebrakesrapidly .
Note:Stopthemachineinastraightline
withoutlockingupthetires.
5.Wait1minutetoallowthebrakestocool.
6.Repeatsteps3through5anadditional9
times.
•Avoidracingtheengine.
•Varythesprayerspeedduringoperation.Avoid
faststartsandquickstops.
•RefertoMaintenance(page37)foranyspecial,
low-hourchecks.
ShuttingOfftheEngine
1.Presstheclutchandapplythebraketostopthe
sprayer.
2.Pulltheparking-brakeleverupandbacktosetit.
3.Movetherangeselectoroutofgearintothe
NEUTRALposition.
4.TurntheignitionkeytotheSTOPposition.
5.Removethekeyfromtheswitchtoprevent
accidentalstarting.
25
Page 26

PreparingtoUsethe Sprayer
CleaningtheSuctionFilter
ServiceInterval:Beforeeachuseordaily—Cleanthe
suctionlter.Cleanthesuctionlter
(moreoftenwhenusingwettable
powders).
1.Parkthemachineonalevelsurface,engagethe
parkingbrake,shutoffthepump,shutoffthe
engine,andremovethekey.
2.Atthetopofthesprayertank,removethe
retainerthatsecuresthehosettingattachedto
thelargehosefromthelterhousing(Figure13).
6.Insertthesuctionlterintothelterhousinguntil
thelterisfullyseated.
7.Alignthehoseandhosettingtothelter
housingatthetopofthetank,andsecuretting
andhousingwiththeretainerthatyouremoved
instep2.
CleaningthePressureFilter
ServiceInterval:Beforeeachuseordaily—Clean
thepressurelter.Cleanthe
pressurelter(moreoftenwhen
usingwettablepowders).
1.Parkthemachineonalevelsurface,engagethe
parkingbrake,shutoffthesprayerpump,shut
offtheengine,andremovethekey.
2.Alignadrainpanunderthepressurelter
(Figure15).
Figure13
1.Suctionhose
2.Retainer
3.Removethehoseandhosettingfromthelter
housing(Figure13).
4.Pullthesuctionstraineroutofthelterhousing
inthetank(Figure14).
Figure14
1.Screenvane2.Suctionstrainer
g033577
g033293
Figure15
1.Filterhead
2.Gasket(bowl)
3.Filterelement6.Bowl
4.Gasket(drainplug)
5.Draincap
3.Rotatethedraincapcounterclockwiseand
removeitfromthebowlofthepressurelter
(Figure15).
Note:Allowthebowltodraincompletely.
4.Rotatethebowlcounterclockwiseandremove
thelterhead(Figure15).
g033578
5.Removethepressurelterelement(Figure15).
6.Cleanthepressurelterelementwithclean
water.
5.Cleanthesuctionlterwithcleanwater.
Important:Replacethelterifitisdamaged
orcannotbecleaned.
Important:Replacethelterifitisdamaged
orcannotbecleaned.
7.Checkthegasketforthedrainplug(located
insidethebowl)andthegasketforbowl(located
26
Page 27

insidethelterhead)fordamageandwear
(Figure15).
Important:Replaceanydamagedorworn
gasketsfortheplug,bowl,orboth.
8.Installthepressurelterelementintothelter
head(Figure15).
Note:Ensurethatthelterelementisrmly
seatedintothelterhead.
9.Installthebowlontothelterhead,andtighten
byhand(Figure15).
10.Assemblethedraincapontothettingatthe
bottomofthebowl,andtightenthecapbyhand
(Figure15).
CleaningtheNozzleFilter
1.Parkthemachineonalevelsurface,engagethe
parkingbrake,shutoffthesprayerpump,shut
offtheengine,andremovethekey.
2.Removethenozzlefromthesprayturret(Figure
16).
InspectingtheTankStraps
ServiceInterval:Beforeeachuseordaily—Check
thetankstraps.
Important:Overtighteningthetankstrap
fastenerscanresultindeforminganddamaging
thetankandstraps.
1.Fillthemaintankwithwater.
2.Checktoseeifthereisanymovementbetween
thetankstrapsandthetank(Figure17).
g028263
Figure17
Figure16
1.Sprayturret
2.Nozzlelter
3.Nozzle
3.Removethenozzlelter(Figure16).
4.Cleanthenozzlelterwithcleanwater.
1.Reartankstrap4.Forwardtankstrap
2.Bolt
3.Flangedlocknut
5.Frontofthemachine
3.Ifthetankstrapstloosetothetank,tightenthe
angedlocknutsandboltsatthetopofstraps
untilthestrapsareushwiththesurfaceofthe
tank(Figure17).
Note:Donotovertightenthetankstrap
hardware.
g209504
Important:Replacethelterifitisdamaged
orcannotbecleaned.
5.Installthenozzlelter(Figure16).
Note:Ensurethatthelterisfullyseated.
6.Installthenozzleontothesprayturret(Figure
16).
27
Page 28

OperatingtheSprayer
TooperatetheMultiProSprayer,rstllthespray
tank,thenapplythesolutiontotheworkarea,and
nallycleanthetank.Completeall3ofthesesteps
insequencetoavoiddamagingthesprayer.For
example,donotmixandaddchemicalsinthespray
tankatnightandthensprayinthemorning.This
wouldleadtoseparationofthechemicalsandto
possibledamagetothesprayercomponents.
Thedifferentiallockcausestherearwheelstoturnat
thesamespeed.Whenusingdifferentiallockyour
abilitytomakesharpturnsissomewhatrestrictedand
thetiresmayscufftheturf.Usethedifferentiallock
onlywhenneeded,atslowerspeedsandonlyinrst
orsecondgear.
WARNING
Tippingorrollingthesprayeronahillwill
causeseriousinjury.
CAUTION
Chemicalsarehazardousandcancause
personalinjury.
•Readthedirectionsonthechemicallabels
beforehandlingthechemicals,andfollow
allmanufacturerrecommendationsand
precautions.
•Keepchemicalsawayfromyourskin.
Shouldcontactoccur,washtheaffected
areathoroughlywithsoapandcleanwater.
•Weargogglesandanyotherprotective
equipmentrecommendedbythechemical
manufacturer.
TheMultiProSprayerhasbeenspecicallydesigned
tohavehighdurabilityinordertogiveitthelong
sprayerlifeyouneed.Differentmaterialshavebeen
chosenforspecicreasonsatdifferentlocationson
yoursprayertomeetthisgoal.Unfortunately,thereis
nosinglematerialwhichisperfectforallforeseeable
applications.
Somechemicalsaremoreaggressivethanothers,
andeachchemicalinteractsdifferentlywithvarious
materials.Someconsistencies(e.g.,wettable
powders,charcoal)aremoreabrasiveandlead
tohigher-than-normalwearrates.Ifachemicalis
availableinaformulationthatwouldprovideincreased
lifetothesprayer,usethisalternativeformulation.
•Theextratractionavailablewiththe
differentiallockcanbeenoughtogetyou
intodangeroussituationssuchasclimbing
slopesthataretoosteeptoturnaround.
Beextracarefulwhenoperatingwiththe
differentiallockon,especiallyonsteeper
slopes.
•Ifthedifferentiallockisonwhenmakinga
sharpturnatahigherspeedandtheinside
rearwheelliftsofftheground,theremay
bealossofcontrolwhichcouldcausethe
sprayertoskid.Usethedifferentiallock
onlyatslowerspeeds.
FillingtheFresh-Water Tank
Alwaysllthefresh-watertankwithcleanwaterbefore
handlingormixinganychemicals.
Thefresh-watertankislocatedontheleftsideofthe
ROPSbar.Itsuppliesasourceoffreshwaterfor
youtowashchemicalsoffyourskin,eyes,orother
surfacesinthecaseofaccidentalexposure.
Toopenthefresh-watertankspigot,turntheleveron
thespigot.
FillingtheSprayTank
Asalways,remembertocleanyoursprayerthoroughly
afterallapplications.Thiswilldothemosttoensure
thatyoursprayerhasalongandtrouble-freelife.
UsingtheDifferentialLock
Thedifferentiallockincreasesthesprayer’straction
bylockingtherearwheelssothat1wheelwillnotspin
out.Thiscanhelpwhenyouhaveheavyloadstohaul
onwetturforslipperyareas,goinguphills,andon
sandysurfaces.Itisimportanttoremember,however,
thatthisextratractionisintendedfortemporary
orlimiteduse.Itsusedoesnotreplacethesafe
operation,alreadydiscussedconcerningsteephills
andheavyloads.
InstalltheChemicalPre-MixKitforoptimalmixingand
exteriortankcleanliness.
Important:Ensurethatthechemicalsyouwill
beusingarecompatibleforusewithViton
themanufacturer'slabel;itshouldindicateifit
isnotcompatible).Usingachemicalthatisnot
compatiblewithViton
inthesprayer,causingleaks.
TM
willdegradetheO-rings
Important:Verifythattheproperapplication
ratehasbeensetpriortollingthetankwith
chemicals.
1.Stopthesprayeronalevelsurface,movethe
rangeselectortotheNEUTRALposition,shutoff
theengine,andsettheparkingbrake.
28
TM
(see
Page 29

2.Ensurethatthetankdrainvalveisclosed.
3.Determinetheamountofwaterneededtomix
theamountofchemicalyouneedasprescribed
bythechemicalmanufacturer.
4.Openthetankcoveronthespraytank.
Note:Thetankcoverislocatedinthecenterof
thetopofthetank.Toopenit,turnthefronthalf
ofthecovercounterclockwiseandswingitopen.
Youcanremovethestrainerinsideforcleaning.
Tosealthetank,closethecoverandrotatethe
fronthalfclockwise.
5.Add3/4oftherequiredwatertothespraytank
usingtheanti-siphonllreceptacle.
Important:Alwaysusefreshcleanwaterin
thespraytank.Donotpourconcentrateinto
anemptytank.
6.Starttheengineandsetthepumpswitchtothe
ONposition.
7.Presstheacceleratorpedaltotheoorandset
thethrottlelocktotheONposition.
8.SetthemastersectionswitchtotheOFF
position.
9.TurntheagitationvalvetotheONposition.
10.Addtheproperamountofchemicalconcentrate
tothetankasdirectedbythechemical
manufacturer.
boom-transportcradleformingthe‘X’transport
positionandthesectioncylindersarefully
retracted.
Important:T opreventdamagetothe
sectionactuatorcylinder,makesurethatthe
actuatorsarefullyretractedbeforetransport.
UsingtheBoom-TransportCradle
Thesprayerisequippedwithaboom-transportcradle
thathasauniquesafetyfeature.Intheeventof
accidentalsectioncontactwithalowoverheadobject
whileintheTRANSPORTposition,youcanpushthe
section(s)outofthetransportcradles.Ifthisoccurs,
thesectionswillcometorestinanearhorizontal
positiontotherearofthevehicle.Whilethesections
willnotbedamagedduetothismovement,they
shouldbeimmediatelyputbackintothetransport
cradle.
Important:Youcandamagethesectionsifyou
transporttheminanypositionotherthanthe
‘X’transportpositionusingtheboom-transport
cradle.
Toputthesectionsbackintothetransportcradle,
lowerthesections(s)totheSPRAYposition,andthen
raisethesection(s)backintotheTRANSPORTposition.
Makesurethatthesectioncylindersarefullyretracted
topreventactuatorroddamage.
Important:Ifyouareusingawettable
powderwithoutfullagitation,mixthepowder
withasmallamountofwatertoformaslurry
beforeaddingittothetank.
11.Addtheremainingwatertothetank.
OperatingtheSections
Theboom-sectionliftswitchesonthesprayercontrol
panelallowsyoutomovethesectionsbetweenthe
TRANSPORTpositionandtheSPRA Ypositionwithout
leavingtheoperator'sseat.Itisrecommendedto
changesectionpositionswhilethemachineisnot
moving.
ChangingtheSectionPosition
1.Stopthesprayeronlevelground.
2.Usetheboom-sectionliftswitchestolowerthe
sections.
Note:Waituntilthesectionsreachthefull,
extendedSPRAYposition.
3.Whenthesectionsneedtoberetracted,stop
thesprayeronlevelground.
4.Usetheboom-sectionliftswitchestoraisethe
sectionsuntiltheyhavemovedcompletelyinto
Spraying
Important:Toensurethatyoursolutionremains
wellmixed,usetheagitationfeaturewhenever
youhaveasolutioninthetank.Foragitationto
work,youmusthavethepumponandtheengine
runningaboveanidle.Ifyoustopthevehicleand
needagitation,settheparkingbrake,turnthe
pumpon,presstheacceleratorpedaltooor,and
switchthethrottlelocktotheONposition.
Note:Thisprocedureassumesthatthepumpison
fromtheOperatingtheSprayer(page28)procedure.
1.Lowerthesectionsintoposition.
2.Withthemaster-sectionswitchintheOFF
position,setthe3sectionswitchestotheON
position.
3.Drivetothelocationwhereyouwillbespraying.
4.Setthemaster-sectionswitchtotheONposition
tobeginspraying.
Note:TheInfoCentershowsthesectionswith
thesprayon.
Note:Whenthetankisnearlyempty,the
agitationmaycausefoaminginthetank.
Topreventthis,turntheagitationvalveoff.
29
Page 30

Alternatively,youcanuseananti-foamingagent
inthetank.
5.Usetherateswitchtoadjustandsetatarget.
6.Whennishedspraying,setthemaster-section
switchtotheOFFpositiontoturnoffallsections,
thensetthepumpswitchtotheOFFposition.
PerformingaCatchTest
1.Setall3sectionswitchesandthemaster-section
switchtotheONposition.
2.Turnthesupervisor(rate-lockout)switchtothe
UNLOCKposition.
3.Preparetoperformacatchtestusingthe
graduatedcontainer.
SprayingTips
•Donotoverlapareasthatyouhavepreviously
sprayed.
•Watchforpluggednozzles.Replaceallwornor
damagednozzles.
•Usethemaster-sectionswitchtostopthespray
owbeforestoppingthesprayer.Oncestopped,
placetherangeselectorintheNEUTRALposition
andusetheneutralenginespeedlocktoholdthe
enginespeeduptokeeptheagitationrunning.
•Youwillobtainbetterresultsifthesprayeris
movingwhenyouturnthesectionson.
•Watchforchangesintheapplicationratethatmay
indicatethatyourspeedhaschangedbeyondthe
rangeofthenozzlesorthereisaproblemwiththe
spraysystem.
CalibratingtheSprayer Flow
Beforeusingthesprayerforthersttime,ifyou
changethenozzles,orasneeded,calibratethe
sprayerow.
Operatorsuppliedequipment:Stopwatchcapable
ofmeasuring±1/10secondandacontainergraduated
in50ml(1oz)increments.
4.Startat2.75bar(40psi)andusethe
application-rateswitchtoadjustthespray
pressuresoacatchtestyieldstheamounts
listedinthetablebelow.
Note:Repeatthetest3timesandusethe
average.
NozzleColor
Yellow1896.4
Red37812.8
Brown47316.0
Gray
White
Blue94632.0
Green
5.Oncethecatchtesthasyieldedtheamounts
listedinthetableabove,setthesupervisorrate
lockoutswitchtotheLOCKposition.
6.Turnoffthemaster-sectionswitch.
Milliliters
collectedin15
seconds
56719.2
757
1,41948.0
PerformingtheSprayerFlow Calibration
1.OntheInfoCenter,navigatetotheCalibration
menuandselectFLOWCALasfollows:
Ouncescollected
in15seconds
25.6
PreparingtoCalibratetheSprayer Flow
1.Fillthespraytankwithcleanwater.
Note:Ensurethatthereisenoughwaterinthe
tanktocompletethecalibration.
2.Settheparkingbrakeandturntheengineon.
3.SetthepumpswitchtotheONposition,andturn
ontheagitation.
4.Pressdownontheacceleratorpedaluntilyou
reachthemaximumenginespeed,andtoggle
thethrottlelockswitchtotheONposition.
Note:SelectingtheHomeScreeniconatany
timecancelscalibrations.
A.Pressthecenterselectionbuttononthe
InfoCentertwicetoaccessthemenus.
B.Enterthecalibrationmenubypressingthe
rightselectionbuttonontheInfoCenter.
C.SelectFLOWCALbyhighlightingFLOWCAL
andpresstherightselectionbuttononthe
InfoCenter.
D.Inthenextscreen,entertheknownquantity
ofwaterthatwillbesprayedoutofthe
sectionsforthecalibrationprocedure;refer
tothechartbelow.
E.Presstherightselectionbuttononthe
InfoCenter.
30
Page 31

2.Usingtheplus(+)andminus(-)symbols,enter
theowvolumeaccordingtothetablethat
follows:
NozzleColor
Yellow4211
Red8322
Brown10628
Gray
White16744
Blue208
Green
3.Turnonthemaster-sectionswitchfor5minutes.
Liters
12533
31483
USGallons
55
Note:Asthemachinesprays,theInfoCenter
displaysthequantityofuidthatitiscounting.
4.Afterthe5minutedurationofsprayingclickthe
checkmarkbypressingthecenterbuttononthe
InfoCenter.
Note:Itisacceptableifthegallonsdisplayed
duringthecalibrationprocessdonotmatch
theknownquantityofwaterenteredintothe
InfoCenter.
5.After5minutes,turnoffthemaster-section
switchandselectthecheckmarkonthe
InfoCenter.
Note:Calibrationisnowcomplete.
6.Usingtheplus(+)andminus(-)symbols,enter
themarked-offdistanceintotheInfoCenter.
7.Shiftthemachineintorstgearanddrivethe
markeddistanceinastraightlineatfullthrottle.
8.Stopthemachineatthemarked-offdistance
andselectthecheckmarkontheInfoCenter.
Note:Slowdownandrolltoastoptoalignthe
centerofthefronttireswiththenishline,for
themostaccuratemeasurement.
Note:Calibrationisnowcomplete.
Calibratingthe Section-BypassValves
Beforeusingthesprayerforthersttime,ifyou
changethenozzles,orasneeded,calibratethe
sprayersectionbypass
Important:Selectanopenatareatoperform
thisprocedure.
PreparingtoCalibratethe Section-BypassValves
1.Fillthespraytankhalfwaywithcleanwater.
2.Lowerthesprayersections.
3.MovetherangeselectortotheNEUTRALposition
andsettheparkingbrake.
CalibratingtheSprayer Speed
Beforeusingthesprayerforthersttime,ifyou
changethenozzles,orasneeded,calibratethe
sprayerspeed.
1.Fillthetankwithfreshwater.
2.Onanopen,atarea,markoffadistance
between45to152m(150to500ft).
Note:Tororecommendsmarkingoff152m
(500ft)formoreaccurateresults.
3.Starttheengineanddrivetothestartofthe
marked-offdistance.
Note:Alignthecenterofthefronttireswiththe
startinglineforthemostaccuratemeasurement.
4.OntheInfoCenter,navigatetotheCalibration
menuandselectSPEEDCAL.
Note:SelectingtheHomeScreeniconatany
timecancelscalibrations.
4.Setthe3sectionswitchestotheONposition,
butleavethemaster-sectionswitchoff.
5.SetthepumpswitchtotheONposition,andturn
ontheagitation.
6.Pressdownontheacceleratorpedaluntilyou
reachthemaximumenginespeed,andtoggle
thethrottlelockswitchtotheONposition.
7.OntheInfoCenter,navigatetotheCalibration
menuandselectTESTSPEED.
Note:SelectingtheHomeScreeniconatany
timecancelsthecalibration.
8.Usingtheplus(+)andminus(-)symbols,enter
atestspeedof5.6km/h(3.5mph),thenselect
theHomeicon.
9.Turnthesupervisor(rate-lockout)switchtothe
UNLOCKposition,andturnthemaster-section
switchtotheONposition.
5.SelecttheNextarrow(→)ontheInfoCenter.
31
Page 32

AdjustingtheBypassValves
1.Usingtheapplication-rateswitch,adjustthe
applicationrateaccordingtothetablebelow.
NozzleColorSI(Metric)
Yellow
Red
Brown
Gray478l/ha
White
Blue
Green1,190l/ha
159l/ha
319l/ha
394l/ha
637l/ha
796l/ha
2.Turnofftheleftsectionandadjustthe
section-bypassknob(Figure18)untilthe
pressurereadingisatthepreviouslyadjusted
level(typically2.75baror40psi).
Note:Thenumberedindicatorsonthebypass
knobandneedleareforreferenceonly.
English
17gpa0.39gpk
34gpa0.78gpk
42gpa0.96gpk
51gpa1.17gpk
68gpa1.56gpk
85gpa1.95gpk
127gpa2.91gpk
Agitation-BypassValve KnobPosition
Turf
•Theagitation-bypassvalveisinthefullopen
positionasshowninFigure19A.
•Theagitation-bypassvalveisintheclosed(0)
positionasshowninFigure19B.
•Theagitation-bypassvalveisinanintermediate
(adjustedrelativetothepressuregaugeforthe
sprayersystem)positionasshowninFigure19C.
g214029
Figure19
g028047
Figure18
1.Section-bypassadjustmentknobs
3.Turnontheleftsectionandturnofftheright
section.
4.Adjusttherightsection-bypassknob(Figure18)
untilthepressurereadingisatthepreviously
adjustedlevel(typically2.75baror40psi).
5.Turnontherightsectionandturnoffthecenter
section.
6.Adjustthecentersection-bypassknob(Figure
18)untilthepressurereadingisatthepreviously
adjustedlevel(typically2.75baror40psi).
7.Turneachsectionoff.
8.Turnthepumpoff.
Note:Calibrationisnowcomplete.
1.Open
2.Closed(0)
3.Intermediateposition
Calibratingthe Agitation-BypassValve
ServiceInterval:Y early
Selectanopenatareatoperformthisprocedure.
1.Fillthespraytankwithcleanwater.
2.Verifytheagitation-controlvalveisopen.Ifithas
beenadjusted,openitcompletelyatthistime.
3.Settheparkingbrakeandstarttheengine.
4.SettherangeselectortoNEUTRAL.
5.SetthepumpswitchtotheONposition.
6.Presstheacceleratorpedaltoachievemaximum
enginespeedandsetthethrottlelock.
7.Setthe3sectionvalvestotheOFFposition.
8.Setthemaster-sectionswitchtotheONposition.
9.SetthesystempressuretoMAXIMUM.
10.PresstheagitationswitchtotheOFFposition
andreadthepressuregauge.
•Ifthereadingremainsat6.9bar(100psi)the
agitation-bypassvalveisproperlycalibrated.
•Ifthepressuregaugereadsdifferently ,
continuetothenextstep.
11.Adjusttheagitation-bypassvalve(Figure20)
onthebacksideoftheagitationvalveuntilthe
32
Page 33

pressurereadingonthegaugeis6.9bar(100
psi).
LocatingtheSprayPump
Thespraypumpislocatedundertheseat(Figure21).
Figure20
1.Agitation-bypassvalve2.Master-sectionbypass
12.PressthepumpswitchtotheOFFposition,shift
thethrottlelevertotheIDLEposition,andturn
theignitionswitchtotheOFFposition.
Adjustingthe Master-Section-Bypass Valve
Note:Adjustingthemaster-section-bypassvalve
reducesorincreasestheamountofowsenttothe
agitationnozzlesinthetankwhenthemaster-section
switchissettotheOFFposition.
1.Fillthesprayertank1/2fullwithcleanwater.
2.Movethemachinetoanopenlevelsurface.
3.Settheparkingbrake.
4.SettherangeselectortotheNEUTRALposition.
g028049
Figure21
g216323
HaulingtheMachine
•Usefull-widthrampsforloadingthemachineonto
atrailerortruck.
•Tiethemachinedownsecurely.
TransportingtheSprayer
Whenmovingthesprayerlongdistances,useatrailer.
•Securethesprayertothetrailer.
–Usethetie-downloopatthefrontoftheframe;
refertoFigure22A.
–Usethe2tie-downloopsattherearofthe
frame;refertoFigure22B.
•Ensurethattheouter-boomsectionsaretieddown
andsecure.
5.SetthepumpswitchtotheONposition.
6.SettheagitationswitchtotheONposition.
7.Setthemaster-sectionswitchtotheOFF
position.
8.Increasetheenginespeedtofullthrottleandset
thethrottlelocktotheONposition.
9.Adjustthemaster-section-bypasshandleto
controltheamountofagitationoccurringinthe
tank(Figure20).
10.Reducethethrottlespeedtoidle.
11.Settheagitationswitchandpumpswitchtothe
OFFposition.
12.Shutoffthemachine.
33
Page 34

SprayFilter Recommendations
SelectingaSuctionFilter
StandardEquipment:50meshsuctionlter(blue)
Usethesuctionltertabletoidentifythescreen
meshforthespraynozzlesyouareusingbased
onchemicalsproductsorsolutionswithaviscosity
equivalenttowater.
SuctionFilterTable
Figure22
1.Fronttie-downloop2.Reartie-downloops
TowingtheSprayer
Incaseofanemergency,youcantowthesprayer
forashortdistance.However,donotusethisasa
standardprocedure.
WARNING
Towingatexcessivespeedscouldcausea
lossofsteeringcontrol,resultinginpersonal
injury.
SprayNozzle
ColorCode(ow
rate)
Yellow(0.2gpm)
Red(0.4gpm)
Brown(0.5gpm)50(or30)Blue(orgreen)
Gray(0.6gpm)
White(0.8gpm)
g216272
Blue(1.0gpm)
Green(1.5gpm)
*Themeshsizeofthesuctionltersinthistable
arebasedonspraychemicalsorsolutionswiththe
ScreenMesh
Size*
50Blue
50Blue
30
30
30
30
viscosityequivalenttowater .
FilterColorCode
Green
Green
Green
Green
Important:Whenyouspraywithhigherviscosity
(thicker)chemicalproductsorsolutionswith
wettablepowders,youmayneedtouseancoarser
screenmeshfortheoptionalsuctionlter;refer
toFigure23.
Nevertowthesprayerfasterthan8km/h
(5mph).
Towingthesprayerisa2–personjob.Ifyoumust
movethemachineaconsiderabledistance,transport
itonatruckortrailer;refertoTransportingtheSprayer
(page33).
1.Attachatowlinetotheframe.
2.PuttherangeselectorintheNEUTRALposition
andreleasetheparkingbrake.
3.Towthesprayeratlessthan8km/h(5mph).
34
Meshsize—chemicalorsolutionviscosity
1.Higher-viscositychemicals
orsolutions
2.Lower-viscositychemicals
orsolutions
g214212
Figure23
3.Screenmeshsize
Page 35

Whenyousprayatahigherapplicationrate,consider
usingancourseroptionalsuction-ltermesh;refer
toFigure24.
PressureFilterTable(cont'd.)
Figure24
Meshsize—applicationrate
1.Higherapplicationrate
2.Lowerapplicationrate
SelectingaPressureFilter
3.Screenmeshsize
SprayNozzle
ColorCode(ow
rate)
Asrequiredforhigh
viscositychemicals
orsolutionsorhigh
applicationrates
*Themeshsizeofthepressureltersinthistable
arebasedonspraychemicalsorsolutionswiththe
ScreenMesh
Size*
16Brown
viscosityequivalenttowater .
FilterColorCode
Important:Whenyouspraywithhigherviscosity
(thicker)chemicalproductsorsolutionswith
wettablepowders,youmayneedtouseacoarser
g214214
screenmeshfortheoptionalpressure-lter;refer
toFigure25.
Availablescreensizesinclude:
StandardEquipment:50meshsuctionlter(blue)
Usethepressureltertabletoidentifythescreen
meshforthespraynozzlesyouareusingbased
onchemicalsproductsorsolutionswithaviscosity
equivalenttowater.
PressureFilterTable
SprayNozzle
ColorCode(ow
rate)
Asrequiredforlow
viscositychemicals
orsolutionsorlow
applicationrates
Yellow(0.2gpm)
Red(0.4gpm)
Brown(0.5gpm)
Gray(0.6gpm)
White(0.8gpm)
Blue(1.0gpm)
Green(1.5gpm)
Asrequiredforhigh
viscositychemicals
orsolutionsorhigh
applicationrates
ScreenMesh
Size*
100
80Yellow
50Blue
50Blue
50Blue
50Blue
50Blue
50Blue
30Red
FilterColorCode
Green
Figure25
Meshsize—chemicalorsolutionviscosity
1.Higher-viscositychemicals
orsolutions
2.Lower-viscositychemicals
orsolutions
3.Screenmeshsize
Whenyousprayatahigherapplicationrate,consider
usingancourseroptionalpressure-ltermesh;refer
toFigure26.
g214211
35
Page 36

Figure26
Meshsize—applicationrate
g214240
g214246
Figure27
Meshsize—chemicalorsolutionviscosity
1.Higherapplicationrate
2.Lowerapplicationrate
3.Screenmeshsize
SelectingaNozzle-TipFilter (Optional)
Note:Theusetheoptionalnozzle-tipltertoprotect
thespray-nozzletipandincreaseitsservicelife.
Usethenozzle-tipltertabletoidentifythescreen
meshforthespraynozzlesyouareusingbased
onchemicalsproductsorsolutionswithaviscosity
equivalenttowater.
Nozzle-TipFilterT able
SprayNozzle
ColorCode(ow
rate)
Yellow(0.2gpm)
Red(0.4gpm)
Brown(0.5gpm)
Gray(0.6gpm)
White(0.8gpm)
Blue(1.0gpm)
Green(1.5gpm)
*Themeshsizeofthenozzleltersinthistable
arebasedonspraychemicalsorsolutionswiththe
FilterMeshSize*FilterColorCode
100
50Blue
50Blue
50Blue
50Blue
50Blue
50Blue
viscosityequivalenttowater .
Green
1.Higher-viscositychemicals
orsolutions
2.Lower-viscositychemicals
orsolutions
3.Screenmeshsize
Whenyousprayatahigherapplicationrate,consider
usingancoursertip-ltermesh;refertoFigure28.
Figure28
Meshsize—applicationrate
1.Higherapplicationrate
2.Lowerapplicationrate
3.Screenmeshsize
g214245
Important:Whenyouspraywithhigherviscosity
(thicker)chemicalproductsorsolutionswith
wettablepowders,youmayneedtouseacoarser
screenmeshfortheoptionaltip-lter;referto
Figure27.
36
Page 37

Maintenance
Note:Downloadafreecopyoftheschematicbyvisitingwww.T oro.comandsearchingforyourmachine
fromtheManualslinkonthehomepage.
Foradditionalinformationaboutthesprayersystem,refertothesprayersystemschematicinSchematics
(page72).
Note:Determinetheleftandrightsidesofthemachinefromthenormaloperatingposition.
RecommendedMaintenanceSchedule(s)
MaintenanceService
Interval
Aftertherst8hours
Aftertherst50hours
Aftertherst100hours
Beforeeachuseordaily
Every50hours
Every100hours
MaintenanceProcedure
•T orquethewheel-lugnuts.
•Replacethehydrauliclter.
•Changetheengineoil.
•Checktheairlterforthecarboncanister.
•Replacethecarbon-canisterlter.
•T oprovideproperperformanceandlongsprayerlife,followtheseguidelinesfor
therst100operatinghours:
•Cleanthesuctionlter.
•Cleanthepressurelter.
•Checkthetankstraps.
•Checktheengine-rotatingscreen.
•Checktheengineoil.
•Checkthetirepressure.
•Lubricatethepump.
•Cleanandoiltheair-cleanerfoamelement(moreoftenindusty,dirtyconditions).
•Checkthebattery-cableconnections.
•Checkthebattery-electrolytelevel.
•Lubricateallgreasettings.
•Lubricatethesectionhinges.
•Cleantheengine-rotatingscreen(moreoftenindusty,dirtyconditions).
•Changetheengineoil(moreoftenwhenoperatingunderheavyloadorinhigh
temperature).
•Replacetheengine-oillter.
•Replacethefuellter.
•T orquethewheel-lugnuts.
•Inspecttheconditionandwearofthetires.
•Checkfrontwheeltoe-in.
•Inspectthebrakes.
Every200hours
•Replacetheair-cleanerpaperelement(moreoftenindusty,dirtyconditions).
•Changethesparkplugs.
•Checktheairlterforthecarboncanister.
•Replacethecarbon-canisterlter.
•Checktheadjustmentofthedifferential-lockcable.
•Checktheparkingbrake.
•Checkthetransaxle/hydraulicuid.
•Inspectallhosesandconnectionsfordamageandproperattachment.
•Cleantheowmeter(moreoftenwhenusingwettablepowders).
37
Page 38

MaintenanceService
Every400hours
Interval
MaintenanceProcedure
•Completeallyearlymaintenanceprocedurespeciedintheengineoperator's
manual.
•Inspectthefuellines.
•Drainandcleanthefueltank.
•Changethesuctionlter.
•Changethepressurelter.
•Inspectthepumpdiaphragmsandreplaceifnecessary(seeanAuthorizedToro
ServiceDistributor).
•Inspectthepumpcheckvalvesandreplaceifnecessary(seeanAuthorizedToro
ServiceDistributor).
•Inspectthenylonpivotbushings.
Every800hours
Yearly
•Changethetransaxle/hydraulicuidandcleanstrainer.
•Replacethehydrauliclter.
•Calibratetheagitation-bypassvalve.
Refertoyourengineowner’smanualforadditionalmaintenanceprocedures.
DailyMaintenanceChecklist
Duplicatethispageforroutineuse.
Fortheweekof: MaintenanceCheckItem
Mon.Tues.Wed.Thurs.Fri.
Checkthebrakeandparkingbrake
operation.
Checkthegearshift/neutraloperation.
Checkthefuellevel.
Checktheengine-oillevel.
Checkthetransaxleoillevel.
Inspecttheairlter.
Inspecttheenginecoolingns.
Checkanyunusualenginenoises.
Checkanyunusualoperatingnoises.
Checkthetirepressure.
Checkforuidleaks.
Checktheinstrumentoperation.
Checktheacceleratoroperation.
Cleanthesuctionstrainer.
Checktoe-in.
Lubricateallgreasettings.
Touchupanddamagedpaint.
1
Sat.Sun.
1
Immediatelyaftereverywashing,regardlessoftheintervallisted
38
Page 39

NotationforAreasofConcern
Inspectionperformedby:
ItemDate
1
2
3
4
5
6
7
8
9
10
11
12
CAUTION
Ifyouleavethekeyintheignitionswitch,someonecouldaccidentlystarttheengineand
seriouslyinjureyouorotherbystanders.
Information
Removethekeyfromtheignitionanddisconnectthewire(s)fromthesparkplug(s)beforeyou
performanymaintenance.Setthewire(s)asidesothatitdoesnotaccidentallycontactthe
sparkplug(s).
Figure29
decal133-0382
39
Page 40

Pre-Maintenance
Lubrication
Procedures
GreasingtheMachine
RaisingtheSprayer
Whenevertheengineisrunforroutinemaintenance
and/orenginediagnostics,therearwheelsofthe
sprayershouldbe2.5cm(1inch)offthegroundwith
therearaxlesupportedonjackstands.
DANGER
Asprayeronajackmaybeunstableandslip
offthejack,injuringanyonebeneathit.
•Donotstarttheenginewhilethesprayer
isonajack.
•Alwaysremovethekeyfromtheignition
beforegettingoffthesprayer.
•Blockthetireswhenthesprayerisona
jack.
Thejackingpointatthefrontofthesprayerisunder
thefrontcrossbar(Figure30A).Thejackingpointat
therearofthesprayerisontherearframesupport,
behindthereartie-downloops(Figure30B).
ServiceInterval:Every100hours/Yearly(whichever
comesrst)—Lubricateallgrease
ttings.
GreaseType:No.2lithiumgrease
ReferFigure31forthegrease-pointlocations.
g216476
Figure31
1.Wipethegreasettingcleansothatyoudonot
forcedirtordebrisintothebearingorbushing.
Figure30
2.Pumpgreaseintothebearingorbushing.
3.Wipeofftheexcessgrease.
GreasingtheSprayerPump
ServiceInterval:Every50hours—Lubricatethe
pump.
GreaseType:MobilXHP461
1.Raisethesprayer;refertoRaisingtheSprayer
(page40).
2.Locatethesprayerpump.
Note:Thepumpislocatedbelowtheseat;refer
toLocatingtheSprayPump(page33).
3.Wipethe2remotegreasettingsclean(Figure
32AandFigure32B).
g028108
1.Frontjackingpoint2.Reartie-downloops
40
Page 41

GreasingtheSection Hinges
ServiceInterval:Every100hours
Important:Ifthesectionhingeiswashedwith
water,clearallwateranddebrisfromthehinge
assemblyandapplyfreshgrease.
g216324
GreaseType:No.2lithiumgrease
1.Wipethegreasettingscleansothatforeign
mattercannotbeforcedintothebearingor
bushing.
2.Pumpgreaseintothebearingorbushingat
eachtting(Figure33).
Figure32
1.Greasetting(outboard
sideofthespraypump)
2.Greasetting(bottom,
rearsideofthespray
pump)
3.Frontofthemachine
4.Pumpgreaseintoeachremotegreasetting
(Figure32AandFigure32B).
5.Wipeofftheexcessgrease.
g216325
g002014
Figure33
1.Greasetting
3.Wipeoffexcessgrease.
4.Repeattheprocedureforeachsectionpivot.
41
Page 42

EngineMaintenance
CheckingtheAir-Intake
5.Carefullyslidethefoamelementoffthepaper
element(Figure34).
6.Unscrewthecovernutandremovethecover
andpaperelement(Figure34).
Screen
ServiceInterval:Beforeeachuseordaily—Check
theengine-rotatingscreen.
Every100hours—Cleantheengine-rotating
screen(moreoftenindusty,dirtyconditions).
Checkandcleanasnecessarytheair-intakescreen
onthefrontoftheenginebeforeeachuseordaily.
ServicingtheAirCleaner
ServiceInterval:Every50hours/Yearly(whichever
comesrst)(moreoftenindusty,
dirtyconditions).
Every200hours/Yearly(whichevercomesrst)
(moreoftenindusty,dirtyconditions).
RemovingtheFoamandPaper Elements
1.Settheparkingbrake,stopthepump,shutoff
theengine,andremovetheignitionkey.
2.Releasethelatchonthebackoftheseatandlift
theseatforward.
3.Cleanaroundtheaircleanertopreventdirtfrom
gettingintotheengineandcausingdamage
(Figure34).
CleaningtheFoamElement
1.Washthefoamelementinliquidsoapandwarm
water.
2.Whentheelementisclean,rinseitthoroughly.
3.Drytheelementbysqueezingitinacleancloth.
4.Put30to59ml(1to2oz)ofoilontheelement
(Figure35).
Important:Replacethefoamelementifit
istornorworn.
Figure35
1.Foamelement
5.Squeezetheelementtodistributetheoil.
2.Oil
CheckingthePaperElement
Inspectthepaperelementfortears,anoilylm,
damagetotherubberseal,excessivedirt,orother
damage(Figure36).Ifanyoftheseconditionsexist,
replacethelter.
g001981
Figure34
1.Air-cleanercover5.Foamelement
2.Knob6.Paperelement
3.Covernut
4.Cover
4.Loosentheknobontheair-cleanercoverand
removethecover(Figure34).
7.Rubberseal
8.Air-cleanerbase
Important:Donotcleanthepaperelementwith
pressurizedairorliquids,suchasasolvent,
gasoline,orkerosene.
g001980
g001982
Figure36
1.Paperelement2.Rubberseal
Important:Topreventenginedamage,always
operatetheenginewiththecompletefoamand
paperair-cleanerassemblyinstalled.
42
Page 43

InstallingtheFoamandPaper Elements
1.Carefullyslidethefoamelementontothepaper
air-cleanerelement(Figure34).
2.Slidetheair-cleanerassemblyandcoveronto
thelongrod.
3.Installthecovernutnger-tightagainstthecover
(Figure34).
Note:Ensurethattherubbersealisatagainst
theair-cleanerbaseandcover.
4.Installtheair-cleanercoverandknob(Figure
34).
5.Closeandlatchtheseat.
ServicingtheEngineOil
CrankcaseCapacityis2.0L(2.1USqt)withthelter.
Usehigh-qualityengineoilthatmeetsthefollowing
specications:
•APIclassicationLevelrequired:SJ,JK,SL,or
higher.
•Preferredoil:SAE10W30(above0°F)
•Alternateoil:SAE5W30(below32°F)
ToroPremiumEngineOilisavailablefromyour
distributorineither10W30or5W30viscosity.Seethe
PartsCatalogforpartnumbers.
g023037
Figure37
1.Fillercap2.Dipstick
3.Iftheoillevelislow,removethellercapfrom
thevalvecover(Figure37)andpouroilintothe
openinguntiltheoillevelisuptotheFULLmark
onthedipstick.Addtheoilslowlyandcheckthe
leveloftenduringthisprocess.Donotoverll.
4.Installthedipstickrmlyinplace.
ChangingtheEngineOil
ServiceInterval:Aftertherst50hours—Change
theengineoil.
Every100hours—Changetheengineoil(more
oftenwhenoperatingunderheavyloadorin
hightemperature).
1.Starttheengineandletitrunfor5minutes.This
warmstheoilsoitdrainsbetter.
CheckingtheEngineOil
ServiceInterval:Beforeeachuseordaily
Every400hours/Yearly(whichevercomesrst)
Theengineisshippedwithoilinthecrankcase;
however,youmustcheckthelevelofoilbeforeyou
rststarttheengineandafteryouhaverunit.
1.Positionthemachineonalevelsurface.
2.Removethedipstickandwipeitwithacleanrag
(Figure37).Insertthedipstickintothetubeand
makesurethatitisseatedfully.Removethe
dipstickandchecktheoillevel.
2.Positionthemachineonalevelsurface,engage
theparkingbrake,shutoffthesprayerpump,
shutofftheengine,andremovethekey .
3.Releasethelatchonthebackoftheseatandlift
theseatforward.
CAUTION
Componentsundertheseatarehotifthe
sprayerhasbeenrunning.Ifyoutouch
hotcomponents,youmaybeburned.
Allowthesprayertocoolbefore
performingmaintenanceortouching
componentsunderthehood.
4.Placeapanbelowtheoildrain.
5.Removethedrainplug(Figure38).
43
Page 44

ChangingtheSparkPlugs
ServiceInterval:Every200hours
Type:ChampionRC-12YC(orequivalent)
AirGap:0.76mm(0.030inch)
Makesurethattheairgapbetweenthecenterand
sideelectrodesiscorrectbeforeinstallingthespark
plugs.Useaspark-plugwrenchforremovingand
installingthesparkplugsandagappingtool/feeler
gaugetocheckandadjusttheairgap.
Figure38
1.Oillter2.Oil-drainplug
6.Whentheoilhasdrainedcompletely,replacethe
drainplugandtorqueitto13.6N∙m(10ft-lb).
7.Disposeoftheusedoilatacertiedrecycling
center.
8.Slowlypourapproximately80%ofthespecied
amountofoilintotheoilllertube(Figure37).
9.Checktheoillevel.
10.Slowlyaddadditionaloiltobringtheoillevelto
theFULLmarkonthedipstick.
Important:Overllingthecrankcasewithoil
maycauseenginedamage.
ChangingtheEngine-OilFilter
ServiceInterval:Every100hours
1.Draintheoilfromtheengine;refertoChanging
theEngineOil(page43),steps1through7.
g023045
RemovingtheSparkPlugs
1.Positionthemachineonalevelsurface,engage
theparkingbrake,shutoffthesprayerpump,
shutofftheengine,andremovethekey .
2.Releasethelatchonthebackoftheseatandlift
theseatforward.
3.Pullthewiresoffthesparkplugs(Figure39).
4.Cleanaroundthesparkplugstopreventdirt
fromfallingintotheengineandpotentially
causingdamage.
5.Removethesparkplugsandmetalwashers.
2.Removetheoillter(Figure38).
3.Wipethelteradaptergasketsurface.
4.Applyathincoatofnewoiltotherubbergasket
onthereplacementlter.
5.Installthereplacementoilltertothelter
adapter.Turntheoillterclockwiseuntilthe
rubbergasketcontactsthelteradapter,then
tightenthelteranadditional1/2turn(Figure
38).
6.Fillthecrankcasewiththecorrecttypeofnew
oil;refertoChangingtheEngineOil(page43),
steps8through10.
7.Disposeoftheusedoillteratacertied
recyclingcenter.
g001985
Figure39
1.Spark-plugwire2.Sparkplug
CheckingtheSparkPlugs
1.Lookatthecenterofthesparkplugs(Figure40).
Note:Ifyouseealightbrownorgraycoating
ontheinsulator,theengineisoperatingproperly.
Ablackcoatingontheinsulatorusuallymeans
thattheaircleanerisdirty .
Important:Donotcleanthesparkplugs.
Alwaysreplaceasparkplugwhenithasa
blackcoating,wornelectrodes,anoilylm,
orcracks.
44
Page 45

2.Checkthegapbetweenthecenterandside
electrodes(Figure40)andbendtheside
electrode,ifthegapisnotcorrect.
Figure40
1.Center-electrodeinsulator3.Airgap(nottoscale)
2.Sideelectrode
InstallingtheSparkPlugs
1.Installthesparkplugsandmetalwashers.
2.Tightenthesparkplugsto24.4to29.8N∙m(18
to22ft-lb).
3.Pushthewiresontothesparkplugs(Figure39).
FuelSystem
Maintenance
ReplacingtheFuelFilter
ServiceInterval:Every100hours—Replacethefuel
lter.
Every400hours/Y early(whichevercomes
rst)—Inspectthefuellines.
1.Settheparkingbrake,stopthepump,shutoff
g000533
theengine,andremovetheignitionkey.
2.Releasethelatchonthebackoftheseatandlift
theseatforward.
3.Clampoffthehoseoneithersideofthefuellter
topreventgasfrompouringoutofthehoses
whenyouremovethelter.
4.Placeadrainpanunderthelter.
5.Squeezetheendsofthehoseclampstogether
andslidethemawayfromthelter(Figure41).
6.Removethelterfromthefuellines.
4.Closeandlatchtheseat.
g001986
Figure41
1.Hoseclamp3.Filter
2.Fuelline4.Flow-directionarrow
7.Installanewlterandmovethehoseclamps
closetothelter.
Ensurethattheow-directionarrowpoints
towardtheengine.
45
Page 46

ServicingtheCarbon
DrainingtheFuelTank
Canister
CheckingtheAirFilterforthe CarbonCanister
ServiceInterval:Aftertherst50hours
Every200hours
Checktheopeningatthebottomoftheairlterforthe
carboncanistertoensurethatitiscleanandfreeof
debrisandobstructions(Figure42).
ServiceInterval:Every400hours/Yearly(whichever
comesrst)
Drainandcleanthefueltankifthefuelsystem
becomescontaminatedorifyouplantostorethe
machineforanextendedperiod.Usefresh,cleanfuel
toushoutthetank.
1.Transferthefuelfromthetankintoanapproved
fuelcontainerusingasiphonpump,orremove
thetankfromthemachineandpourthefuelout
ofthetankllspoutintothefuelcontainer.
Note:Ifyouremovethefueltank,alsoremove
thefuelandreturnhosesfromthetankbefore
removingthetank.
2.Replacethefuellter;refertoReplacingthe
FuelFilter(page45).
3.Flushthetankwithfresh,cleanfuel,ifnecessary.
4.Installthetankifyouremovedit.
5.Fillthetankwithfresh,cleanfuel.
Figure42
1.Air-lteropening4.Carboncanister
2.Carbon-canisterlter
3.Hose
5.Fueltank
ReplacingtheCarbon-Canister Filter
ServiceInterval:Aftertherst50hours
Every200hours
1.Removethebarbedttingofthecarbon-canister
lterfromthehoseatthebottomofthecarbon
canister,andremovethelter(Figure42).
Note:Discardtheoldlter.
2.Fullyinsertthebarbedttingofthenew
carbon-canisterlterintothehoseatthebottom
ofthecarboncanister.
g033149
46
Page 47

ElectricalSystem
2.Thebatteryislocatedontherightsideofthe
machinebehindthepump(Figure43).
Maintenance
LocatingtheFuses
Thereare2fuseblocksand1emptyslotinthe
electricalsystem.Theyarelocatedbeneaththeseat
(Figure43).
Figure43
1.Battery
ServicingtheBattery
2.Fuseblocks
3.Disconnectthenegative(black)groundcable
fromthebatterypost.
WARNING
Incorrectbattery-cableroutingcould
damagethesprayerandcablescausing
sparks.Sparkscancausethebattery
gassestoexplode,resultinginpersonal
injury.
•Alwaysdisconnectthenegative
(black)batterycablebefore
disconnectingthepositive(red)
cable.
•Alwaysconnectthepositive(red)
batterycablebeforeconnectingthe
negative(black)cable.
g023046
WARNING
Batteryterminalsormetaltoolscould
shortagainstmetalsprayercomponents
causingsparks.Sparkscancausethe
batterygassestoexplode,resultingin
personalinjury.
WARNING
CALIFORNIA
Proposition65Warning
Batteryposts,terminals,andrelated
accessoriescontainleadandlead
compounds,chemicalsknownto
theStateofCaliforniatocause
cancerandreproductiveharm.Wash
handsafterhandling.
Important:Donotjumpstartthesprayer.
Alwayskeepthebatterycleanandfullycharged.Use
apapertoweltocleanthebatteryandbatterybox.If
thebatteryterminalsarecorroded,cleanthemwith
asolutionof4partswaterand1partbakingsoda.
Applyalightcoatingofgreasetothebatteryterminals
topreventcorrosion.
Voltage:12Vwith280coldcrankingAat0°F
RemovingtheBattery
1.Positionthesprayeronalevelsurface,engage
theparkingbrake,shutoffthesprayerpump,
shutofftheengine,andremovethekey .
•Whenremovingorinstallingthe
battery,donotallowthebattery
terminalstotouchanymetalpartsof
thesprayer.
•Donotallowmetaltoolstoshort
betweenthebatteryterminalsand
metalpartsofthesprayer.
•Alwayskeepthebatterystrapinplace
toprotectandsecurethebattery .
4.Disconnectthepositive(red)cablefromthe
batterypost.
5.Removethebatteryretainerandfasteners
(Figure43).
6.Removethebattery.
InstallingtheBattery
ServiceInterval:Every50hours—Checkthe
battery-cableconnections.
1.Setthebatteryonthebatteryboxsothatthe
batterypostsaretowardthefrontofthesprayer.
2.Installthebatteryretainerandsecureitwiththe
fastenersyouremovedpreviously(Figure43).
47
Page 48

Important:Alwayskeepthebatteryretainer
inplacetoprotectandsecurethebattery.
ChargingtheBattery
3.Connectthepositive(red)cabletothepositive
(+)batterypostandthenegative(black)cable
tothenegative(-)batterypostusingthebolts
andwingnuts.Slidetherubberbootoverthe
positivebatterypost.
4.Installthebatterycoverandsecureitwiththe2
knobs(Figure43).
CheckingtheElectrolyteLevel
ServiceInterval:Every50hours
Note:Whenthemachineisinstoragecheckthe
battery-electrolytelevelevery30days.
1.Loosentheknobsonthesidesofthebatterybox
andremovethebatterycover(Figure43).
2.Removethellercaps.Iftheelectrolyteisnot
uptothellline,addtherequiredamountof
distilledwater;refertoAddingWatertothe
Battery(page48).
DANGER
Batteryelectrolytecontainssulfuricacid
whichisadeadlypoisonandcauses
severeburns.
•Donotdrinkelectrolyteorallowitto
contactyourskin,eyesorclothing.
Wearsafetyglassestoshieldyour
eyesandrubberglovestoprotect
yourhands.
•Fillthebatterywherecleanwateris
alwaysavailableforushingtheskin.
WARNING
Chargingthebatteryproducesgassesthat
canexplode.
Neversmokenearthebatteryandkeepsparks
andamesawayfrombattery .
Important:Alwayskeepthebatteryfullycharged
(1.260specicgravity).Thisisespecially
importanttopreventbatterydamagewhenthe
temperatureisbelow0°C(32°F).
1.Removethebatteryfromthechassis;referto
RemovingtheBattery(page47).
2.Checktheelectrolytelevel;refertoChecking
theElectrolyteLevel(page48).
3.Connecta3to4Abatterychargertothebattery
posts.Chargethebatteryatarateof3to4A
for4to8hours(12V).
Important:Donotoverchargethebattery.
4.Installthebatteryinthechassis;referto
InstallingtheBattery(page47).
StoringtheBattery
Ifthemachinewillbestoredformorethan30days,
removethebatteryandchargeitfully.Eitherstore
itontheshelforonthemachine.Leavethecables
disconnectedifitisstoredonthemachine.Store
thebatteryinacoolatmospheretoavoidquick
deteriorationofthechargeinthebattery.T oprevent
thebatteryfromfreezing,ensurethatitisfully
charged.
AddingWatertotheBattery
Thebesttimetoadddistilledwatertothebatteryis
justbeforeyouoperatethemachine.Thisletsthe
watermixthoroughlywiththeelectrolytesolution.
1.Cleanthetopofthebatterywithapapertowel.
2.Removethellercapsfromthebatteryand
slowlylleachcellwithdistilledwateruntilthe
levelisuptothellline.Replacethellercaps.
Important:Donotoverllthebattery.
Electrolytewilloverowontootherparts
ofthesprayerandseverecorrosionand
deteriorationwillresult.
48
Page 49

DriveSystem
Maintenance
InspectingtheWheelsand Tires
ServiceInterval:Beforeeachuseordaily—Check
thetirepressure.
Aftertherst8hours—T orquethewheel-lug
nuts.
Every100hours—Torquethewheel-lugnuts.
Every100hours—Inspecttheconditionand
wearofthetires.
Checkthetirepressureevery8hoursordailyto
ensureproperlevels.Fillthetiresto138kPa(20psi).
Also,checkthetiresforwearordamage.
Checkthewheelstoensurethattheyaremounted
securelyaftertherst8operatinghoursandthen
every100hoursthereafter.T orquethefrontandrear
lugnutsto102to108N∙m(75to80ft-lb).
Checkthetireconditionatleastevery100hours
ofoperation.Operatingaccidents,suchashitting
curbs,candamageatireorrimandalsodisrupt
wheelalignment,soinspectthetireconditionafter
anaccident.
Adjustingthe Differential-LockCable
ServiceInterval:Every200hours
1.Movethedifferential-locklevertotheOFF
position.
2.Loosenthejamnutssecuringthedifferential-lock
cabletothebracketonthetransaxle(Figure44).
Figure44
1.Differential-lockcable3.Spring
2.Transaxlebracket
3.Adjustthejamnutstoobtaina0.25to1.5mm
(0.01to0.06inch)gapbetweenthespringhook
andtheoutsidediameteroftheholeinthe
transaxlelever.
4.Tightenthejamnutswhennished.
4.0.25to1.5mm(0.01to
0.06inch)gap
AdjustingtheFrontWheel Toe-in
ServiceInterval:Every100hours/Yearly(whichever
comesrst)
Thetoe-inshouldbe0to6mm(0to1/4inch).
1.Fillthetankwithapproximately331L(87.5US
gallons)ofwater.
2.Checkandllalltires;refertoCheckingtheTire
Pressure(page23).
3.Drivethesprayerbackandforthafewtimesto
relaxtheA-arms,thendriveitforwardatleast
3m(10ft).
g002425
4.Measurethedistancebetweenbothofthefront
tiresattheaxleheightatboththefrontandrear
ofthefronttires(Figure45).
Note:Y ouwillneedaxtureoralignment
gaugeformeasuringtherearofthefronttiresat
axleheight.Usethesamextureoralignment
gaugetoaccuratelymeasurethefrontofthe
fronttiresataxleheight(Figure45).
Thefrontofthetiresshouldbe0to6mm(0to
1/4inch)closerthanthebacksideofthefront
tires.
49
Page 50

Figure45
1.Tirecenterline—back4.Fixture
2.Tirecenterline—front
3.Axlecenterline
5.Axle-centerlinedistance
6.15cm(6inches)ruler
5.Ifthemeasurementdoesnotfallwithinthe
speciedrange,loosenthejamnutsatboth
endsofthetierods(Figure46).
BrakeMaintenance
CheckingtheBrakeFluid
Thebrake-uidreservoirisshippedfromthefactory
lledwithDOT3brakeuid.Checkthelevelbefore
startingtheengineeachday.
g002006
g023047
Figure47
Figure46
1.Jamnut2.Tierod
6.Rotatebothtierodstomovethefrontofthetire
inwardoroutward.
Note:Thetierodsmeasurethesamelength.
7.Tightenthetierodjamnutswhentheadjustment
iscorrect.
8.Ensurethatthereisfulltravelofthesteering
wheelinbothdirections.
1.Brake-uidreservoir
1.Positionthesprayeronalevelsurface,set
theparkingbrake,stopthepump,shutoffthe
engine,andremovetheignitionkey.
2.TheuidlevelshouldbeuptotheFULLlineon
g002007
thereservoir.
3.Iftheuidlevelislow,cleantheareaaround
thereservoircap,removethecap,andllthe
reservoirtotheproperlevel.Donotoverll.
InspectingtheBrakes
ServiceInterval:Every100hours
Thebrakesareacriticalsafetycomponentofthe
sprayer.Inspectthemasfollows:
•Inspectthebrakeshoesforwearordamage.Ifthe
lining(brakepad)thicknessislessthan1.6mm
(1/16inch),replacethebrakeshoes.
•Inspectthebackingplateandothercomponents
forsignsofexcessivewearordeformation.If
anydeformationisfound,replacetheappropriate
components.
50
Page 51

AdjustingtheParking
HydraulicSystem
Brake
ServiceInterval:Every200hours—Checkthe
parkingbrake.
1.Removetheplasticgrip.
2.Loosenthesetscrewsecuringtheknobtothe
parking-brakelever(Figure48).
Figure48
1.Parking-brakelever
Maintenance
Checkingthe Transaxle/HydraulicFluid
ServiceInterval:Every200hours
1.Positionthesprayeronalevelsurface,engage
theparkingbrake,shutoffthesprayerpump,
shutofftheengine,andremovethekey .
2.Removethetransaxledipstickandwipeitwitha
cleanrag(Figure49).
g023036
3.Rotatetheknobuntilaforceof18to23kg(40
to50lb)isrequiredtoactuatelever.
4.Tightenthesetscrew.
g002002
Figure49
1.Dipstick2.Fillhole
Important:Beverycarefulnottogetdirtor
othercontaminantsintotheopeningwhen
checkingthetransmissionoil.
3.Insertthedipstickintothetubeandmakesure
thatitisseatedfully .Removethedipstickand
checktheoillevel.
4.Thetransaxleuidlevelshouldbeatthetop
oftheatportionofthedipstick.Ifitisnot,ll
thereservoirwiththeappropriateuid;referto
ChangingTransaxle/HydraulicFluid(page52).
5.Installthedipstickrmlyinplace.
51
Page 52

Changing Transaxle/HydraulicFluid
ServiceInterval:Every800hours/Yearly(whichever
comesrst)
1.Positionthesprayeronalevelsurface,set
theparkingbrake,stopthepump,shutoffthe
engine,andremovetheignitionkey.
2.Placeadrainpanunderthedrainplugofthe
reservoir.
3.Removethedrainplugfromthesideofthe
reservoir,andletthehydraulicuidowintothe
drainpan(Figure50).
8.Installthestrainerwhentheoilisdraining.
9.Installthehydraulichoseand90°ttingtothe
strainer.
10.Installandtightenthedrainplug.
11.Fillthereservoirwithapproximately7L(7.5US
qt)ofDexronIIIATF .
Important:Useonlythehydraulicuids
specied.Otheruidscouldcausesystem
damage.
12.Starttheengineanddrivethesprayertollthe
hydraulicsystem.
13.Checktheoillevelandreplenishit,ifrequired.
ReplacingtheHydraulic Filter
ServiceInterval:Aftertherst8hours
Every800hours/Yearly(whichevercomesrst)
UsetheTororeplacementlter(PartNo.54-0110).
Figure50
1.Hydraulicdipstick2.Drainplug
4.Notetheorientationofthehydraulichoseand
90°ttingconnectedtothestrainer.
5.Removethehydraulichoseand90°tting
(Figure51).
Figure51
1.Hydraulicstrainer
2.O-ring
3.90°tting
Important:Useofanyotherltermayvoidthe
warrantyonsomecomponents.
g002003
g002004
1.Positionthesprayeronalevelsurface,set
theparkingbrake,stopthepump,shutoffthe
engine,andremovetheignitionkey.
2.Cleantheareaaroundtheltermountingarea.
3.Placeadrainpanunderthelter.
4.Removethelter(Figure52).
g204330
Figure52
1.Hydrauliclter
5.Lubricatethenewltergasket.
6.Ensurethattheltermountingareaisclean.
6.Removethestrainerandcleanitbyback
ushingitwithacleandegreaser.
7.Allowthestrainertoairdry.
7.Screwthelteronuntilthegasketcontactsthe
mountingplate,thentightenthelter1/2turn.
8.Starttheengineandletitrunforabout2minutes
topurgeairfromthesystem.
52
Page 53

9.Shutofftheengineandcheckthehydraulic-oil
levelandforleaks.
SpraySystem Maintenance
CheckingtheHydraulic LinesandHoses
Inspectthehydrauliclinesandhosesdailyfor
leaks,kinkedlines,loosemountingsupports,wear,
loosettings,weatherdeterioration,andchemical
deterioration.Makeallnecessaryrepairsbefore
operating.
WARNING
Hydraulicuidescapingunderpressurecan
penetrateskinandcauseinjury .
•Ensurethatallhydraulicuidhoses
andlinesareingoodconditionandall
hydraulicconnectionsandttingsaretight
beforeapplyingpressuretothehydraulic
system.
•Keepyourbodyandhandsawayfrom
pinholeleaksornozzlesthateject
high-pressurehydraulicuid.
•Usecardboardorpapertondhydraulic
leaks.
•Safelyrelieveallpressureinthehydraulic
systembeforeperforminganyworkonthe
hydraulicsystem.
•Getimmediatemedicalhelpifuidis
injectedintotheskin.Injecteduidmust
besurgicallyremovedwithinafewhours
byadoctor.
WARNING
Chemicalsubstancesusedinthespray
systemmaybehazardousandtoxictoyou,
bystanders,animals,plants,soilsorother
property.
•Carefullyreadandfollowthechemical
warninglabelsandmaterialsafetydata
sheets(MSDS)forallchemicalsusedand
protectyourselfaccordingtothechemical
manufacturer'srecommendations.For
example,useappropriatepersonal
protectiveequipment(PPE),including
faceandeyeprotection,gloves,orother
equipmenttoguardagainstpersonal
contactwithchemicals.
•Keepinmindthattheremaybemorethan
1chemicalusedandinformationoneach
shouldbeassessed.
•Refusetooperateorworkonthesprayerif
thisinformationisnotavailable.
•Beforeworkingonaspraysystemmake
surethatthesystemhasbeentriple
rinsedandneutralizedaccordingto
therecommendationsofthechemical
manufacturer(s)andallofthevalveshave
beencycled3times.
•Verifythatthereisanadequatesupply
ofcleanwaterandsoapnearby,and
immediatelywashoffanychemicalsthat
contactyou.
InspectingtheHoses
ServiceInterval:Every200hours—Inspectallhoses
andconnectionsfordamageand
properattachment.
Examineeachhoseinthespraysystemforcracks,
leaksorotherdamage.Atthesametime,inspectthe
connectionsandttingsforsimilardamage.Replace
anywornordamagedhosesandttings.
53
Page 54

ChangingtheSuctionFilter
ServiceInterval:Every400hours
ttingandhousingwiththeretainerthatyou
removedinstep2.
Note:Determinetheappropriatesuctionltermesh
sizethatyouneedforyourjob;refertoSelectinga
SuctionFilter(page34).
1.Parkthemachineonalevelsurface,engagethe
parkingbrake,shutoffthepump,shutoffthe
engine,andremovethekey.
2.Atthetopofthesprayertank,removethe
retainerthatsecuresthehosettingattachedto
thelargehosefromthelterhousing(Figure53).
Figure53
1.Suctionhose
2.Retainer
ChangingthePressure Filter
ServiceInterval:Every400hours
1.Movethemachinetoalevelsurface,shutoffthe
sprayerpump,shutofftheengine,andremove
thekey .
2.Alignadrainpanunderthepressurelter
(Figure55).
g033577
3.Removethehoseandhosettingfromthelter
housing(Figure53).
4.Removetheoldsuctionlterfromthelter
housinginthetank(Figure54).
Note:Discardtheoldlter.
Figure54
1.Screenvane2.Suctionlter
5.Installthenewsuctionlterintothelterhousing.
Note:Ensurethatthelterisfullyseated.
g033293
Figure55
1.Filterhead4.Bowl
2.O-ring(bowl)5.O-ring(drainplug)
3.Filterelement6.Drainplug
3.Rotatethedrainplugcounterclockwiseand
removeitfromthebowlofthepressurelter
(Figure55).
Note:Allowthebowltodraincompletely.
4.Rotatethebowlcounterclockwiseandremove
fromitslterhead(Figure55).
5.Removetheoldpressurelterelement(Figure
55).
g033578
Note:Discardtheoldlter.
6.ChecktheO-ringforthedrainplug(located
insidethebowl)andtheO-ringforbowl(located
insidethelterhead)fordamageandwear
(Figure55).
Note:ReplaceanydamagedorwornO-rings
fortheplug,bowl,orboth.
6.Alignthehoseandhosettingtothelter
housingatthetopofthetank,andsecurethe
7.Installthenewpressurelterelementintothe
lterhead(Figure55).
54
Page 55

Note:Ensurethatthelterelementisrmly
seatedintothelterhead.
8.Installthebowlontothelterheadandtighten
byhand(Figure55).
9.Installtheplugintothebowlandtightenbyhand
(Figure55).
ChangingtheNozzleFilter
Note:Determinetheappropriatenozzleltermesh
sizethatyouneedforyourjob;refertoSelectinga
Nozzle-TipFilter(Optional)(page36).
1.Parkthemachineonalevelsurface,engagethe
parkingbrake,shutoffthesprayerpump,shut
offtheengine,andremovethekey.
2.Removethenozzlefromthesprayturret(Figure
56).
InspectingthePump
ServiceInterval:Every400hours/Yearly(whichever
comesrst)—Inspectthepump
diaphragmsandreplaceif
necessary(seeanAuthorized
ToroServiceDistributor).
Every400hours/Y early(whichevercomes
rst)—Inspectthepumpcheckvalvesand
replaceifnecessary(seeanAuthorizedT oro
ServiceDistributor).
Note:Thefollowingmachinecomponentsare
consideredpartssubjecttoconsumptionthroughuse
unlessfounddefectiveandarenotcoveredbythe
warrantyassociatedwiththismachine.
HaveanAuthorizedT oroServiceDistributorcheck
followinginternalpumpcomponentsfordamage:
•Pumpdiaphragms
•Pumpcheckvalvesassemblies
Replaceanycomponents,ifnecessary.
Figure56
1.Sprayturret
2.Nozzlelter
3.Removetheoldnozzlelter(Figure56).
3.Nozzle
Note:Discardtheoldlter.
4.Installthenewnozzlelter(Figure56).
Note:Ensurethatthelterisfullyseated.
InspectingtheNylonPivot Bushings
ServiceInterval:Every400hours/Yearly(whichever
comesrst)
1.Parkthemachineonalevelsurface,engagethe
parkingbrake,shutoffthepump,shutoffthe
engine,andremovethekey.
2.Extendtheouter-boomsectionstothespray
positionandsupporttheboomsusingstandsor
strapsandliftingequipment.
g209504
3.Withtheweightoftheboomsupported,remove
theboltandnutsecuringthepivotpintothe
boomassembly(Figure57).
5.Installthenozzleontothesprayturret(Figure
56).
55
Page 56

Figure57
1.Nylonbushings3.Bolt
2.Pivotpin
g022367
g013780
Figure58
4.Removetheboltandnutthatsecurethepivot
pin,andremovethepin(Figure57).
5.Removetheboomandpivotbracketassembly
fromthecenterframetoaccessthenylon
bushings.
6.Removeandinspectthenylonbushingsfrom
thefrontandbacksidesofthepivotbracket
(Figure57).
Note:Replaceanywornordamagedbushings.
7.Placeasmallamountofoilonthenylon
bushings,andinstallthemintopivotbracket
(Figure57).
8.Installtheboomandpivotbracketassemblyinto
thecenterframe,aligningtheholes(Figure57).
9.Installthepivotpinandsecureitwiththebolt
andnutremovedinstep4.
10.Repeatsteps2through9fortheother
outer-boomsection.
AdjustingtheBoomsto
1.Actuator
2.Actuatorrod5.Pin
3.Boom-pivotpinhousing
4.Cotter
3.Liftupontheboomandremovethepin(Figure
58),andslowlylowertheboomtotheground.
4.Inspectthepinforanydamageandreplaceit
ifnecessary.
5.Useawrenchontheatsidesoftheactuator
rodtoimmobilizeit,thenloosenthejamnutto
allowtheeyeletrodtobeadjusted(Figure59).
Level
Usethefollowingproceduretoadjustthelevelofthe
leftandrightboomssectionswhentheyareinthe
sprayposition.
1.Extendtheboomstothesprayposition.
2.Removethecotterpinfromthepivotpin(Figure
58).
Figure59
1.Flatontheactuatorrod5.Eyeletadjusted
2.Jamnut
3.Eyelet7.Jamnuttightenedtolock
4.Jamnutloosened
56
6.Eyeletpositionfor
assembly
newposition
g014220
Page 57

6.Turntheeyeletrodintheactuatorrodtoshorten
orlengthentheextendedactuatortothedesired
position(Figure59).
Cleaning
Note:Youmustturntheeyeletrodinhalfor
completerevolutionssothatyoucanassemble
therodtotheboom.
7.Oncethedesiredpositionhasbeenachieved,
tightenthejamnuttosecuretheactuatorand
eyeletrod.
8.Raisetheboomtoalignthepivotwiththe
actuatorrod.
9.Whileholdingtheboom,insertthepinthrough
bothboompivotandactuatorrod(Figure58).
10.Withthepininplace,releasetheboomand
securethepinwiththecotterpreviously
removed.
11.Repeattheprocedureforeachactuatorrod
bearing,ifnecessary.
CleaningtheFlowMeter
ServiceInterval:Every200hours/Yearly(whichever
comesrst)(moreoftenwhenusing
wettablepowders).
1.Thoroughlyrinseanddraintheentirespraying
system.
2.Removetheowmeterfromthesprayerand
ushitwithcleanwater.
3.Removetheretainerringontheupstreamside
(Figure60).
Figure60
1.Flange(ow-meterbody)
2.Downstreamhub(with
keywayup)
3.Retainingring9.Wire-harnessclamp
4.Downstreamarrow
(ow-meterbody)
5.Upstream
6.Rotor/magnet
7.Upstreamhubandbearing
(withkeywayup)
8.Turbinestud
10.Flange-headscrew
11.Sensorassembly
4.Cleantheturbineandtheturbinehubtoremove
metallingsandanywettablepowders.
5.Inspecttheturbinebladesforwear.
Note:Holdtheturbineinyourhandandspin
it.Itshouldspinfreelywithverylittledrag.Ifit
doesnot,replaceit.
6.Assembletheowmeter.
7.Usealowpressure(50kPaor5psi)airjetto
ensurethattheturbinespinsfreely.
g012934
Note:Iftheturbinedoesnotspinfreely,loosen
thehexstudonthebottomoftheturbinehubby
1/16ofaturnuntilitdoesspinsfreely .
57
Page 58

CleaningtheSprayer Valves
•Tocleantherate-controlvalve,refertothe
followingsections:
1.RemovingtheValveActuator(page58)
2.RemovingtheRate-Control-ManifoldValve
(page59)
3.CleaningtheManifoldValve(page62)
4.AssemblingtheManifoldValve(page63)
RemovingtheValveActuator
1.Positionthesprayeronalevelsurface,engage
theparkingbrake,shutoffthepump,shutoffthe
engine,andremovethekey.
2.Removethe3-pinconnectorofthevalve
actuatorfromthe3socketelectricalconnector
ofthesprayerharness.
3.Removetheretainerthatsecurestheaactuator
tothemanifoldvalvefortheratecontrol,
agitation,mastersection,orsectionvalve
(Figure61).
5.InstallingtheRateControlManifoldV alve
(page64)
6.InstallingtheValveActuator(page67)
•Tocleantheagitationvalve;refertothefollowing
sections:
1.RemovingtheValveActuator(page58)
2.RemovingtheAgitation-ManifoldV alve
(page59)
3.CleaningtheManifoldValve(page62)
4.AssemblingtheManifoldValve(page63)
5.InstallingtheAgitation-ManifoldValve(page
64)
6.InstallingtheValveActuator(page67)
•Tocleanthemaster-sectionvalve,refertothe
followingsections:
1.RemovingtheValveActuator(page58)
2.RemovingtheMaster-Section-Manifold
Valve(page60)
3.CleaningtheManifoldValve(page62)
4.AssemblingtheManifoldValve(page63)
Note:Squeezethe2legsoftheretainer
togetherwhilepushingitdown.
Note:Retaintheactuatorandretainerfor
installationinInstallingtheValveActuator(page
67).
g028237
Figure61
Section-ValveActuatorShown(theagitation-valveactuator
issimilar)
5.InstallingtheMaster-Section-ManifoldValve
(page65)
6.InstallingtheValveActuator(page67)
•Tocleanthe3sectionvalves;refertothefollowing
sections:
1.RemovingtheValveActuator(page58)
2.RemovingtheSection-ManifoldValve(page
61)
3.CleaningtheManifoldValve(page62)
4.AssemblingtheManifoldValve(page63)
5.InstallingtheSectionManifoldValve(page
66)
6.InstallingtheValveActuator(page67)
1.Valveactuator(section
valveshown)
2.Retainer
4.Removetheactuatorfromthemanifoldvalve.
58
3.Stemport
Page 59

Removingthe Rate-Control-ManifoldValve
1.Removetheclampsandgasketsthatsecurethe
manifoldfortherate-controlvalve(Figure62).
Note:Retaintheclamp(s)andgasket(s)for
installationinInstallingtheRateControlManifold
Valve(page64).
Figure63
1.Flanged-headbolt4.Retainer
2.Valvemount
3.Flangedlocknut
5.Socket(outlettting)
6.Manifold-valveassembly
3.Removethe2anged-headboltsand2anged
locknutsthatsecuretherate-controlvalveto
thevalvemountandremovethevalvemanifold
fromthemachine(Figure63).
g033313
Figure62
1.Flange(pressure-lter
head)
2.Manifold(rate-control
valve)
3.Flange(agitationvalve)6.3-pinconnector(valve
4.Clamp
5.Gasket
actuator—rate-control
valve)
2.Removetheretainerthatsecurestheoutlet
ttingtothemanifoldfortherate-controlvalve
(Figure63).
g033304
Note:Ifnecessary ,loosenedthemounting
hardwareforthepressure-lterheadtoease
removaloftherate-controlvalve.
RemovingtheAgitation-Manifold Valve
1.Removetheclampsandgasketsthatsecure
themanifoldfortheagitationvalve(Figure
64)totheagitation-bypassvalve,rate-control
valve,master-sectionvalve,andadaptertting
(agitation-throttlevalve).
Note:Retaintheclamp(s)andgasket(s)for
installationinInstallingtheAgitation-Manifold
Valve(page64).
2.Removetheretainerthatsecurestheoutlet
ttingtothemanifoldfortheagitationvalve
(Figure64).
59
Page 60

Figure64
Removingthe Master-Section-ManifoldValve
1.Removetheclampsandgasketsthatsecurethe
manifoldforthemaster-sectionvalve(Figure66)
tothemaster-section-bypassvalve,agitation
valve,andmaster-section-manifoldvalve(atthe
endofthehosefortheowmeter).
Note:Retaintheclamp(s)and
gasket(s)forinstallationinInstallingthe
Master-Section-ManifoldValve(page65).
2.Removetheretainerthatsecurestheoutlet
ttingtothemanifoldforthemaster-section
valve(Figure66).
g033327
1.Gasket6.3-pinconnector(valve
2.Flange(pressure-lter
head)
3.Manifold(agitationvalve)
4.Flange(bypass
valve—agitationvalve)
5.Flange(master-section
valve)
actuator—agitationvalve)
7.Socket(outlettting)
8.Retainer
9.Clamp
3.Removetheanged-headboltandanged
locknutthatsecurestheagitationvalvetothe
valvemountandremovethevalvemanifoldfrom
themachine(Figure65).
Figure66
1.Gasket5.3-pinconnector(valve
2.Flange
(bypass—master-section
valve)
3.Flange(agitationvalve)
4.Manifold(master-section
valve)
actuator—master-section
valve)
6.Socket(outlettting)
7.Retainer
8.Clamp
g033328
Figure65
1.Flanged-headbolt3.Valvemount
2.Manifold(agitationvalve)
4.Flangedlocknut
3.Removetheanged-headboltandanged
locknutthatsecuresthemaster-sectionvalveto
thevalvemountandremovethevalvemanifold
g033307
60
fromthemachine(Figure67).
Page 61

Figure67
1.Flanged-headbolt3.Valvemount
2.Manifold(master-section
valve)
RemovingtheSection-Manifold
2.Removetheretainersthatsecuretheoutlet
ttingtothesection-valvemanifoldandthevalve
manifoldtothebypasstting(Figure69).
g033309
4.Flangedlocknut
Valve
1.Removeclampsandgasketsthatsecurethe
manifoldforthesectionvalve(Figure68)tothe
adjacentsectionvalve(ifleftsectionvalve,and
thereducercoupling).
Figure69
1.Retainer
2.Socket(bypasstting)4.Manifold-valveassembly
3.Socket(outlettting)
3.Fortheleftorrightsectionvalves,removethe
anged-headboltsandangedlocknutsthat
securethesectionvalve(s)tothevalvemount
andremovethevalvemanifold(s)fromthe
machine;forthecentersectionvalve,remove
thesection-valvemanifoldfromthemachine
(Figure70).
g028238
Figure68
1.Flange(reducercoupling)4.Gasket
2.Manifold(sectionvalve)
3.Flange(adjacentsection
valve)
g028236
5.Flangeclamp
61
Page 62

Figure70
1.Bypasstting2.Section-valvemanifold
CleaningtheManifoldValve
1.Positionthevalvestemsothatitisintheclosed
position(Figure71B).
g028243
Figure72
g028239
1.Stemretainer7.BackseatingO-ring(0.676
2.Valvestem8.V alve-seatring
3.Stemport9.Manifoldbody
4.Stem-captureretainer
5.End-captting1 1.End-cap-ttingassembly
6.End-capsealO-ring
(0.796x0.139inch)
AgitationValveManifold
x0.07inch)
10.Ballvalve
Figure71
1.Valveopen2.Valveclosed
2.Removethe2end-cap-ttingassembliesfrom
eachendofthemanifoldbody(Figure72and
Figure73).
g027562
62
Page 63

Figure73
SectionValveManifold
1.Valve-stemseat
2.Valve-stemassembly
3.Stemport
4.Stemretainer10.Manifoldbody
5.OutletttingO-ring(0.737
x0.103inch)
6.Coupling(manifold)12.Couplingassembly
7.End-capO-ring(0.796x
0.139inch)
8.BackseatingO-ring(0.676
x0.07inch)
9.Ballseat
11.Ballvalve
(manifold)
AssemblingtheManifoldValve
1.Checktheconditionoftheoutlet-ttingO-rings
(section-valvemanifoldonly),end-capO-rings,
backseatingO-rings,ballseatfordamageor
wear(Figure72andFigure73).
Note:ReplaceanydamagedorwornO-rings
orseats.
2.Applygreasetothevalvestemandinsertitinto
thevalve-stemseat(Figure72andFigure73).
3.Installthevalvestemandseatintothemanifold
andsecurethestemandseatwiththestem
retainer(Figure72andFigure73).
4.EnsurethatthebackseatingO-ringandtheball
seatarealignedandseatedintotheend-cap
tting(Figure72andFigure73).
5.Installtheend-cap-ttingassemblyontothe
manifoldbodyuntiltheangeoftheend-cap
ttingtouchesthemanifoldbody(Figure72
andFigure73),thenturntheend-capttingan
g028240
additional1/8to1/4turn;torquethettingto225
to282N∙cm(20to25in-lb).
Note:Usecautionsoasnottodamagetheend
ofthetting.
6.Inserttheballintothevalvebody(Figure74).
Note:Thevalvestemshouldtinsidetheball
driveslot.Ifthevalvestemdoesnott,adjust
thepositionoftheball(Figure74).
3.Turnthevalvestemsothattheballisinthe
openposition(Figure71A).
Note:Whenthevalvestemisparallelwiththe
valveow,theballslidesout.
4.Removethestemretainerfromtheslotsinthe
stemportinthemanifold(Figure72andFigure
73).
5.Removethestemretainerandvalvestemseat
fromthemanifold(Figure72andFigure73).
6.Reachintothemanifoldbodyandremovethe
valve-stemassembly(Figure72andFigure73).
7.Cleantheinsideofthemanifoldandexterior
oftheballvalve,valve-stemassembly,stem
capture,andendttings.
g027565
Figure74
7.Turnthevalve-stemassemblysothatthevalve
isclosed(Figure71B)
8.Repeatsteps4and5fortheotherend-cap-tting
assembly.
63
Page 64

InstallingtheRateControl ManifoldValve
1.Alignagasketbetweentheangesoftherate
controlvalvemanifoldandthepressurelter
head(Figure75A).
Note:Ifneeded,loosenthemountinghardware
forthepressurelterheadasneededtoprovide
clearance.
4.Assembletheratecontrolvalvemanifold,
gasket,andagitation-valvemanifoldwitha
angeclampandtightenbyhand(Figure75A).
5.Assembletheratecontrolvalvetothevalve
mountwiththe2anged-headboltsand2
angedlocknuts(Figure75A)thatyouremoved
instep3ofRemovingtheRate-Control-Manifold
Valve(page59)andtorquethenutandboltto
10to12N∙m(90to110in-lb).
6.Assembletheoutletttingontothecoupling
ttingatthebottomofthemanifoldfortherate
controlvalve(Figure75B).
7.Securetheoutletttingcouplingttingby
insertingaretainerintothesocketoftheoutlet
tting(Figure75B).
8.Ifyouloosenedthemountinghardwareforthe
pressurelterhead,tightenthenutandboltto
10to12N∙m(90to110in-lb).
InstallingtheAgitation-Manifold Valve
1.Locknut(1/4
inch)
2.Valvemount6.Flangeclamp
3.Flange
(agitation-valve)
4.Flanged-head
bolt(1/4x3/4
inch)
5.Gasket9.Coupling
7.Flange
8.Flange(rate
1.Aligntheangeoftheagitation-valvemanifold,
1gasket,andtheangeoftheagitation-bypass
valve(Figure76A).
Note:Ifneeded,loosenthemountinghardware
forthemaster-sectionvalveasneededto
provideclearance.
g033311
Figure75
(manifold-valve)
10.Socket(outlet
tting)
11.Retainer
(pressurelter
head)
controlvalve)
2.Assembletheratecontrolvalvemanifold,
gasket,andpressurelterheadwithaange
clampandtightenbyhand(Figure75A).
3.Alignagasketbetweentheangesoftherate
controlvalveandtheagitation-valvemanifold
(Figure75A).
64
Page 65

8.Securetheend-capttingtotheoutletttingby
insertingaretainerintothesocketoftheoutlet
tting(Figure76C).
9.Assembletheagitationvalvetothevalvemount
withtheanged-headboltandangedlocknut
thatyouremovedinstep3ofRemovingthe
Agitation-ManifoldValve(page59)andtorque
thenutandboltto1017to1243N∙cm(90to
110in-lb).
10.Ifyouloosenedthemountinghardwareforthe
master-sectionvalve,tightenthenutandboltto
1978to2542N∙cm(175to225in-lb).
Installingthe Master-Section-ManifoldValve
1.Aligntheangeofthemaster-section-valve
manifold,1gasket,andtheangeofthe
master-section-bypassvalve(Figure77A).
Figure76
1.Flangeclamp7.Flangedlocknut
2.Gasket8.Flange(rate-controlvalve)
3.Manifold(agitationvalve)9.Flange(master-section
4.Flange
(manifold—agitation-bypass
valve)
5.Flanged-headbolt
6.Valvemount
valve)
10.Retainer
11.Socket(outlettting)
2.Assembletheagitation-bypassvalve,gasket,
andagitation-valvemanifoldwithaclamp
tightenedbyhand(Figure76A).
3.Alignagasketbetweentheangesofthe
rate-controlvalveandtheagitation-valve
manifold(Figure76B).
4.Assemblethegasketandagitation-valve
manifoldwithaclamptightenedbyhand(Figure
76B).
5.Alignagasketbetweentheangesofthe
agitation-valvemanifoldandthemaster-section
valve(Figure76B).
6.Assembletheagitation-valvemanifold,gasket,
andmaster-sectionvalvewithaclamptightened
byhand(Figure76B).
7.Assembletheagitation-valvemanifoldand
socketwithaclamptightenedbyhand(Figure
76C).
g033329
g033330
Figure77
1.Flangeclamp6.Valvemount
2.Gasket
3.Manifold(master-section
valve)
4.Flange
(bypass—master-section
valve)
5.Flanged-headbolt
7.Flangedlocknut
8.Flange(agitationvalve)
9.Retainer
10.Socket(outlettting)
65
Page 66

2.Assemblethemaster-section-valvemanifold,
gasket,andmaster-section-bypassvalvewitha
clamptightenedbyhand(Figure77A).
3.Aligntheangeofthemaster-section-valve
manifold,agasket,andtheagitation-valve
manifold(Figure77B).
4.Assemblethemaster-section-valvemanifold,
gasket,andagitation-valvemanifoldwitha
clamptightenedbyhand(Figure77B)
5.Aligntheangeofthemaster-section-valve
manifold,agasket,andthemaster-section
house(Figure77B).
6.Assemblethemaster-section-valvemanifold
andsocketwithaclamptightenedbyhand
(Figure77B).
7.Securetheend-capttingtotheoutletttingby
insertingaretainerintotheoutlettting(Figure
77B).
8.Assembletheagitationvalvetothevalvemount
withtheanged-headboltandangedlocknut
thatyouremovedinstep3ofRemovingthe
Master-Section-ManifoldValve(page60)and
torquethenutandboltto1017to1243N∙cm
(90to110in-lb).
Figure78
1.Flange(reducercoupling)6.Socket(outlettting)
2.Socket(bypasstting)
3.Bypasstting8.Flange(manifold—section
4.Flange(adjacent
manifold—agitationvalve)
5.End-captting(manifold
valveassembly)
7.Retainer
valve)
9.Gasket
10.Flangeclamp
g028245
InstallingtheSectionManifold Valve
1.Inserttheupperend-capttingofthemanifold
valveintothebypasstting(Figure78A).
Note:Ifneeded,loosenthemountinghardware
forthebypassttingtoprovideclearance.
2.Securetheend-capttingtothebypasstting
byinsertingaretainerintothesocketofthe
bypasstting(Figure78A).
3.Assembletheoutletttingontothelower
end-capttingofthemanifoldvalve(Figure
78A).
4.Securetheend-capttingtotheoutletttingby
insertingaretainerintothesocketoftheoutlet
tting(Figure78A).
5.Alignagasketbetweentheangesofthe
reducercouplingandthesectionvalvemanifold
(Figure78B).
6.Assemblethereducercoupling,gasket,and
sectionvalvemanifoldwithaclampandtighten
byhand(Figure78B).
7.Ifinstallingthe2leftmostsectionvalves,align
agasketbetweentheangesofthe2adjacent
sectionvalvemanifolds(Figure78B).
8.Assemblethe2adjacentsectionvalvemanifolds
andgasketwithaclampandtightenbyhand
(Figure78B).
9.Fortheleftorrightboomsectionvalves,
assemblethevalvestothevalvemountwith
theanged-headboltandangedlocknut
thatyouremovedinstep3ofRemovingthe
Section-ManifoldV alve(page61)andtorquethe
nutsandboltsto10to12N∙m(90to110in-lb).
66
Page 67

10.Ifyouloosenedthemountinghardwareforthe
bypasstting,tightenthenutandboltto10to12
N∙m(90to110in-lb).
InstallingtheValveActuator
1.Aligntheactuatortothemanifoldvalveand
(Figure61).
2.Securetheactuatorandvalvewiththeretainer
thatyouremovedinstep3ofRemovingthe
ValveActuator(page58).
3.Connectthe3-pinconnectorofthevalve-actuator
harnesstothe3-socketconnectorofthewire
harnessofthesprayer.
Storage
1.Positionthesprayeronalevelsurface,engage
theparkingbrake,shutoffthepump,shutoffthe
engine,andremovethekey.
2.Cleandirtandgrimefromtheentiremachine,
includingtheoutsideoftheenginecylinderhead
nsandblowerhousing.
Important:Youcanwashthemachine
withmilddetergentandwater.Donotuse
high-pressurewatertowashthemachine.
Pressurewashingmaydamagetheelectrical
systemorwashawaynecessarygreaseat
frictionpoints.Avoidexcessiveuseofwater,
especiallynearthecontrolpanel,lights,
engine,andthebattery.
3.Cleanthespraysystem;refertoCleaning(page
57).
4.Cleanthepistonsinthevalveassembly;referto
CleaningtheSprayerValves(page58).
5.Conditionthesprayersystemasfollows:
A.Drainthefresh-watertank.
B.Drainthespraysystemascompletelyas
possible.
C.Preparerustinhibiting,non-alcohol
based,RVantifreezesolutionperthe
manufacturer'sinstructions.
D.AddtheRVantifreezesolutiontothe
fresh-watertankandthesprayertank.
E.Runthesprayerpumpforafewminutes
tocirculatetheRVantifreezethroughout
thesprayersystemandanyinstalledspray
accessories.
F.Drainthefresh-watertankandspraysystem
ascompletelyaspossible.
6.Usetheboom-sectionliftswitchestoraise
theouter-boomsections.Raisethesections
untiltheyhavemovedcompletelyintothe
boom-transportcradle,formingthe‘X’transport
positionandthesectioncylindersarefully
retracted.
Note:Makesurethatthesectioncylindersare
fullyretractedtopreventactuatorroddamage.
7.Inspectthebrakes;refertoInspectingthe
Brakes(page50).
8.Servicetheaircleaner;refertoServicingtheAir
Cleaner(page42).
9.Greasethesprayer;refertotheLubrication
(page40).
10.Changethecrankcaseoil;refertoChangingthe
EngineOil(page43).
67
Page 68

11.Checkthetirepressure;refertoCheckingthe
TirePressure(page23).
12.Forstorageover30days,preparethefuel
systemasfollows:
A.Addapetroleumbased
stabilizer/conditionertofuelinthe
tank.
than4°C(40°F).Ifthetemperatureswillbe
above4°C(40°F),checkthewaterlevelinthe
batteryandchargeitevery30days.
18.Checkandtightenallbolts,nuts,andscrews.
Repairorreplaceanypartthatisdamaged.
19.Checktheconditionofallsprayhoses,replacing
anythataredamagedorworn.
Followmixinginstructionsfromstabilizer
manufacturer.Donotuseanalcoholbased
stabilizer(ethanolormethanol).
Note:Afuelstabilizer/conditionerismost
effectivewhenmixedwithfreshgasoline
andusedatalltimes.
B.Runtheenginetodistributeconditionedfuel
throughthefuelsystem(5minutes).
C.Shutofftheengine,allowittocool,and
drainthefueltank.
D.Starttheengineandrunituntilitstops.
E.Choketheengine.
F.Startandruntheengineuntilitdoesnot
startagain.
G.Disposeoffuelproperly.Recycleasper
localcodes.
Important:Donotstore
stabilizer/conditionedfuelover90
days.
13.Removethesparkplugsandchecktheir
condition;refertoChangingtheSparkPlugs
(page44).
20.Tightenallhosettings.
21.Paintallscratchedorbaremetalsurfaces.Paint
isavailablefromyourAuthorizedServiceDealer.
22.Storethemachineinaclean,drygarageor
storagearea.
23.Removetheignitionkeyandputitinasafe
placeoutofthereachofchildren.
24.Coverthemachinetoprotectitandkeepitclean.
14.Withthesparkplugsremovedfromtheengine,
pour2tablespoonsofengineoilintothespark
plughole.
15.Usetheelectricstartertocranktheengineand
distributetheoilinsidethecylinder.
16.Installthesparkplugsandtightento
recommendedtorque;refertoInstallingthe
SparkPlugs(page45).
Note:Donotinstallthewireonthespark
plug(s).
17.Removethebatteryfromthechassis,check
theelectrolytelevel,andchargeitfully;referto
RemovingtheBattery(page47).
Note:Donotconnectthebatterycablestothe
batterypostsduringstorage.
Important:Thebatterymustbefully
chargedtopreventitfromfreezingandbeing
damagedattemperaturesbelow0°C(32°F).
Afullychargedbatterymaintainsitscharge
forabout50daysattemperatureslower
68
Page 69

Troubleshooting
TroubleshootingtheEngineandVehicle
Problem
Thestarterdoesnotcrank.
Theenginecranksbutdoesnotstart.
PossibleCauseCorrectiveAction
1.Therangeselectorisinagearother
thanNEUTRAL.
2.Theelectricalconnectionsare
corrodedorloose.
3.Afuseisblownorloose.3.Correctorreplacefuse.
4.Thebatteryisdischarged.
5.Thesafety-interlocksystemis
malfunctioning.
6.Astarterorstartersolenoidisbroken.
7.Theinternalenginecomponentshave
seized.
1.Thefueltankisempty.1.Fillthetankwithfreshfuel.
2.Dirt,water,orstalefuelisinthefuel
system.
3.Thefuellineisclogged.3.Cleanorreplacethefuelsystem.
4.Thesparkplugleadisdisconnected.
5.Asparkplugisdamagedordirty .5.Replacethesparkplug.
6.Thekillrelayisnotenergized.
7.Theignitionisbroken.
1.Pressthebrakepedalandmovethe
rangeselectortotheNEUTRALposition.
2.Checktheelectricalconnectionsfor
goodcontact.
4.Chargeorreplacethebattery.
5.ContactyourAuthorizedService
Dealer.
6.ContactyourAuthorizedService
Dealer.
7.ContactyourAuthorizedService
Dealer.
2.Drainandushthefuelsystem;add
freshfuel.
4.Connectthesparkplug.
6.ContactyourAuthorizedService
Dealer.
7.ContactyourAuthorizedService
Dealer.
Theenginestartsbutdoesnotkeep
running.
Theenginerunsbutknocksormisses.
1.Thefueltankventisrestricted.1.Replacethefuelcap.
2.Dirtorwaterisinthefuelsystem.
3.Thefuellterisclogged.3.Replacethefuellter.
4.Afuseisblownorloose.4.Correctorreplacethefuse.
5.Thefuelpumpisbroken.
6.Thecarburetorisbroken.
7.Thereareloosewiresorpoor
connections.
8.Thecylinderheadgasketisbroken.
1.Dirt,water,orstalefuelisinthefuel
system.
2.Asparkplugleadisloose.
3.Asparkplugisbroken.3.Replacethesparkplug.
4.Thereareloosewiresorpoor
connections.
5.Theengineisoverheating.
2.Drainandushthefuelsystem;add
freshfuel.
5.ContactyourAuthorizedService
Dealer.
6.ContactyourAuthorizedService
Dealer.
7.Checkandtightenwireconnections.
8.ContactyourAuthorizedService
Dealer.
1.Drainandushthefuelsystem;add
freshfuel.
2.Connectthesparkpluglead.
4.Checkandtightenwireconnections.
5.
See“Theengineoverheats”below.
69
Page 70

Problem
PossibleCauseCorrectiveAction
Theenginedoesnotidle.
Theengineoverheats.
Theenginelosespower.
1.Thefueltankventisrestricted.1.Replacethefuelcap.
2.Dirt,water,orstalefuelisinthefuel
system.
3.Asparkplugisdamagedorbroken.3.Replacethesparkplug.
4.Carburetoridlepassagesareplugged.4.ContactyourAuthorizedService
5.Theidlespeedadjustingscrewis
incorrectlyset.
6.Thefuelpumpisbroken.6.ContactyourAuthorizedService
7.Thereislowcompression.
8.Theair-cleanerelementisdirty.
1.Thecrankcase-oillevelisincorrect.1.FillordraintotheFULLmark.
2.Thereisexcessiveloading.2.Reducetheload;uselowerground
3.Theair-intakescreensaredirty.
4.Thecoolingnsandairpassages
undertheengineblowerhousing
and/ortherotatingair-intakescreen
areplugged.
5.Thefuelmixtureislean.5.ContactyourAuthorizedService
1.Thecrankcase-oillevelisincorrect.1.FillordraintotheFULLmark.
2.Theair-cleanerelementisdirty.
3.Dirt,water,orstalefuelisinthefuel
system.
4.Theengineisoverheated.
5.Asparkplugisdamagedordirty .5.Replacethesparkplug.
6.Theventholeinthefueltankvent
ttingisplugged.
7.Thereislowcompression.
2.Drainandushthefuelsystem;add
freshfuel.
Dealer.
5.ContactyourAuthorizedService
Dealer.
Dealer.
7.ContactyourAuthorizedService
Dealer.
8.Cleanorreplacetheelement.
speed.
3.Cleanwitheveryuse.
4.Cleanwitheveryuse.
Dealer.
2.Cleanorreplace.
3.Drainandushthefuelsystem;add
freshfuel.
4.SeeTheEngineOverheats.
6.Replacethefuelcap.
7.ContactyourAuthorizedService
Dealer.
Themachinedoesnotoperateoris
sluggishineitherdirectionbecausethe
enginebogsdownorstalls.
Themachinedoesnotoperateineither
direction.
1.Theenginemountingboltsareloose.1.Tightentheenginemountingbolts. Thereisabnormalvibrationornoise.
2.Thereisaproblemwiththeengine.
1.Theparkingbrakeisset.1.Releasetheparkingbrake.
1.TherangeselectorisintheNEUTRAL
position.
2.Theparkingbrakewasnotreleasedor
theparkingbrakeisnotreleasing.
Thetransmissionisbroken.
3.
4.Thecontrollinkageneedsadjustment
orreplacement.
5.
Thedriveshaftorwheel-hubkeyhas
beendamaged.
2.ContactyourAuthorizedService
Dealer.
1.Pressthebrakeandshifttherange
selectorintoagear.
2.Releasetheparkingbrakeorcheck
thelinkage.
3.ContactyourAuthorizedService
Dealer.
4.ContactyourAuthorizedService
Dealer.
5.
ContactyourAuthorizedService
Dealer.
70
Page 71

TroubleshootingtheSpraySystem
Problem
Asectiondoesnotspray.
Asectiondoesnotturnoff.
Asectionvalveisleaking.1.Asealiswornordamaged.1.Disassemblethevalveandreplace
Apressuredropoccurswhenyouturnon
asection.
1.Theelectricalconnectiononthe
sectionvalveisdirtyordisconnected.
2.Thereisablownfuse.2.Checkthefusesandreplacethemas
3.Thereisapinchedhose.3.Repairorreplacethehose.
4.Asectionbypassisimproperly
adjusted.
5.Therearedamagedsectionvalve.
6.Theelectricalsystemisdamaged.
1.Thesectionvalveisdamaged.
1.Thesectionbypassisimproperly
adjusted.
2.Thereisanobstructioninthesection
valvebody .
3.Anozzlelterisdamagedorclogged.
PossibleCauseCorrectiveAction
1.Turnthevalveoffmanually.Disconnect
theelectricalconnectoronthevalve
andcleanallleads,thenconnectit.
necessary.
4.Adjustthesectionbypass.
5.ContactyourAuthorizedService
Dealer.
6.ContactyourAuthorizedService
Dealer.
1.Disassemblethesectionvalve;refer
tothesectionCleaningtheSprayer
Valves.Inspectallofthepartsand
replaceanythataredamaged.
thesealsusingtheValveRepair
Kit;contactyourAuthorizedService
Dealer.
1.Adjustthesectionbypass.
2.Removetheinletandoutlet
connectionstothesectionvalve
andremoveanyobstructions.
3.Removeandinspectallnozzles.
71
Page 72

Schematics
SprayerSystemSchematic(Rev.DWG125-0698RevB)
72
g028078
Page 73

Notes:
Page 74

Notes:
Page 75

EuropeanPrivacyNotice
TheInformationT oroCollects
ToroWarrantyCompany(T oro)respectsyourprivacy.Inordertoprocessyourwarrantyclaimandcontactyouintheeventofaproductrecall,weaskyou
tosharecertainpersonalinformationwithus,eitherdirectlyorthroughyourlocalT orocompanyordealer.
TheT orowarrantysystemishostedonserverslocatedwithintheUnitedStateswhereprivacylawmaynotprovidethesameprotectionasapplies
inyourcountry.
BYSHARINGYOURPERSONALINFORMATIONWITHUS,YOUARECONSENTINGTOTHEPROCESSINGOFYOURPERSONALINFORMATION
ASDESCRIBEDINTHISPRIV ACYNOTICE.
TheWayT oroUsesInformation
Toromayuseyourpersonalinformationtoprocesswarrantyclaims,tocontactyouintheeventofaproductrecallandforanyotherpurposewhichwetell
youabout.ToromayshareyourinformationwithT oro'safliates,dealersorotherbusinesspartnersinconnectionwithanyoftheseactivities.Wewillnot
sellyourpersonalinformationtoanyothercompany.Wereservetherighttodisclosepersonalinformationinordertocomplywithapplicablelawsand
withrequestsbytheappropriateauthorities,tooperateoursystemsproperlyorforourownprotectionorthatofotherusers.
RetentionofyourPersonalInformation
Wewillkeepyourpersonalinformationaslongasweneeditforthepurposesforwhichitwasoriginallycollectedorforotherlegitimatepurposes
(suchasregulatorycompliance),orasrequiredbyapplicablelaw .
Toro'sCommitmenttoSecurityofYourPersonalInformation
Wetakereasonableprecautionsinordertoprotectthesecurityofyourpersonalinformation.Wealsotakestepstomaintaintheaccuracyandcurrent
statusofpersonalinformation.
AccessandCorrectionofyourPersonalInformation
Ifyouwouldliketorevieworcorrectyourpersonalinformation,pleasecontactusbyemailatlegal@toro.com.
AustralianConsumerLaw
AustraliancustomerswillnddetailsrelatingtotheAustralianConsumerLaweitherinsidetheboxoratyourlocalToroDealer.
374-0282RevC
Page 76

TheToroWarranty
ATwo-YearLimitedWarranty
ConditionsandProductsCovered
TheToroCompanyanditsafliate,T oroWarrantyCompany ,pursuant
toanagreementbetweenthem,jointlywarrantyourT oroCommercial
product(“Product”)tobefreefromdefectsinmaterialsorworkmanship
fortwoyearsor1500operationalhours*,whicheveroccursrst.This
warrantyisapplicabletoallproductswiththeexceptionofAerators
(refertoseparatewarrantystatementsfortheseproducts).Wherea
warrantableconditionexists,wewillrepairtheProductatnocosttoyou
includingdiagnostics,labor,parts,andtransportation.Thiswarranty
beginsonthedatetheProductisdeliveredtotheoriginalretailpurchaser.
*Productequippedwithanhourmeter.
InstructionsforObtainingWarrantyService
YouareresponsiblefornotifyingtheCommercialProductsDistributoror
AuthorizedCommercialProductsDealerfromwhomyoupurchasedthe
Productassoonasyoubelieveawarrantableconditionexists.Ifyouneed
helplocatingaCommercialProductsDistributororAuthorizedDealer,or
ifyouhavequestionsregardingyourwarrantyrightsorresponsibilities,
youmaycontactusat:
ToroCommercialProductsServiceDepartment
ToroWarrantyCompany
811 1LyndaleAvenueSouth
Bloomington,MN55420-1196
952–888–8801or800–952–2740
E-mail:commercial.warranty@toro.com
OwnerResponsibilities
AstheProductowner,youareresponsibleforrequiredmaintenanceand
adjustmentsstatedinyourOperator'sManual.Failuretoperformrequired
maintenanceandadjustmentscanbegroundsfordisallowingawarranty
claim.
ItemsandConditionsNotCovered
Notallproductfailuresormalfunctionsthatoccurduringthewarranty
periodaredefectsinmaterialsorworkmanship.Thiswarrantydoesnot
coverthefollowing:
•Productfailureswhichresultfromtheuseofnon-Tororeplacement
parts,orfrominstallationanduseofadd-on,ormodiednon-Toro
brandedaccessoriesandproducts.Aseparatewarrantymaybe
providedbythemanufactureroftheseitems.
•Productfailureswhichresultfromfailuretoperformrecommended
maintenanceand/oradjustments.Failuretoproperlymaintainyour
ToroproductpertheRecommendedMaintenancelistedinthe
Operator’sManualcanresultinclaimsforwarrantybeingdenied.
•ProductfailureswhichresultfromoperatingtheProductinanabusive,
negligent,orrecklessmanner.
•Partssubjecttoconsumptionthroughuseunlessfoundtobedefective.
Examplesofpartswhichareconsumed,orusedup,duringnormal
Productoperationinclude,butarenotlimitedto,brakepadsand
linings,clutchlinings,blades,reels,rollersandbearings(sealedor
greasable),bedknives,sparkplugs,castorwheelsandbearings,tires,
lters,belts,andcertainsprayercomponentssuchasdiaphragms,
nozzles,andcheckvalves,etc.
•Failurescausedbyoutsideinuence.Conditionsconsideredtobe
outsideinuenceinclude,butarenotlimitedto,weather,storage
practices,contamination,useofunapprovedfuels,coolants,lubricants,
additives,fertilizers,water,orchemicals,etc.
•Failureorperformanceissuesduetotheuseoffuels(e.g.gasoline,
diesel,orbiodiesel)thatdonotconformtotheirrespectiveindustry
standards.
•Normalnoise,vibration,wearandtear,anddeterioration.
•Normal“wearandtear”includes,butisnotlimitedto,damagetoseats
duetowearorabrasion,wornpaintedsurfaces,scratcheddecalsor
windows,etc.
Parts
Partsscheduledforreplacementasrequiredmaintenancearewarranted
fortheperiodoftimeuptothescheduledreplacementtimeforthatpart.
Partsreplacedunderthiswarrantyarecoveredforthedurationofthe
originalproductwarrantyandbecomethepropertyofT oro.Torowillmake
thenaldecisionwhethertorepairanyexistingpartorassemblyorreplace
it.T oromayuseremanufacturedpartsforwarrantyrepairs.
DeepCycleandLithium-IonBatteryWarranty:
DeepcycleandLithium-Ionbatterieshaveaspeciedtotalnumberof
kilowatt-hourstheycandeliverduringtheirlifetime.Operating,recharging,
andmaintenancetechniquescanextendorreducetotalbatterylife.Asthe
batteriesinthisproductareconsumed,theamountofusefulworkbetween
chargingintervalswillslowlydecreaseuntilthebatteryiscompletelyworn
out.Replacementofwornoutbatteries,duetonormalconsumption,
istheresponsibilityoftheproductowner.Batteryreplacementmaybe
requiredduringthenormalproductwarrantyperiodatowner’sexpense.
Note:(Lithium-Ionbatteryonly):ALithium-Ionbatteryhasapartonly
proratedwarrantybeginningyear3throughyear5basedonthetime
inserviceandkilowatthoursused.RefertotheOperator'sManualfor
additionalinformation.
MaintenanceisatOwner’sExpense
Enginetune-up,lubrication,cleaningandpolishing,replacementoflters,
coolant,andcompletingrecommendedmaintenancearesomeofthe
normalservicesT oroproductsrequirethatareattheowner’sexpense.
GeneralConditions
RepairbyanAuthorizedToroDistributororDealerisyoursoleremedy
underthiswarranty.
NeitherTheToroCompanynorToroWarrantyCompanyisliablefor
indirect,incidentalorconsequentialdamagesinconnectionwiththe
useoftheToroProductscoveredbythiswarranty,includingany
costorexpenseofprovidingsubstituteequipmentorserviceduring
reasonableperiodsofmalfunctionornon-usependingcompletion
ofrepairsunderthiswarranty.ExceptfortheEmissionswarranty
referencedbelow,ifapplicable,thereisnootherexpresswarranty.All
impliedwarrantiesofmerchantabilityandtnessforusearelimitedto
thedurationofthisexpresswarranty.
Somestatesdonotallowexclusionsofincidentalorconsequential
damages,orlimitationsonhowlonganimpliedwarrantylasts,sotheabove
exclusionsandlimitationsmaynotapplytoyou.Thiswarrantygivesyou
speciclegalrights,andyoumayalsohaveotherrightswhichvaryfrom
statetostate.
Noteregardingenginewarranty:
TheEmissionsControlSystemonyourProductmaybecoveredby
aseparatewarrantymeetingrequirementsestablishedbytheU.S.
EnvironmentalProtectionAgency(EP A)and/ortheCaliforniaAirResources
Board(CARB).Thehourlimitationssetforthabovedonotapplytothe
EmissionsControlSystemWarranty.RefertotheEngineEmissionControl
WarrantyStatementsuppliedwithyourproductorcontainedintheengine
manufacturer’sdocumentationfordetails
CountriesOtherthantheUnitedStatesorCanada
CustomerswhohavepurchasedT oroproductsexportedfromtheUnitedStatesorCanadashouldcontacttheirT oroDistributor(Dealer)toobtain
guaranteepoliciesforyourcountry ,province,orstate.IfforanyreasonyouaredissatisedwithyourDistributor'sserviceorhavedifcultyobtaining
guaranteeinformation,contacttheT oroimporter.
374-0253RevD
 Loading...