

Toro 74955, 74959 Operator's Manual

FormNo.3411-264RevB
ZMaster
®
Commercial3000
SeriesRidingMower
with52inor72inTURBOFORCE
DischargeMower
ModelNo.74955—SerialNo.400000000andUp
ModelNo.74959—SerialNo.400000000andUp
®
Side
Registeratwww.T oro.com.
OriginalInstructions(EN)
*3411-264*B
ThissparkignitionsystemcomplieswithCanadian
ICES-002
Introduction
ItisaviolationofCaliforniaPublicResourceCode
Section4442or4443touseoroperatetheengineon
anyforest-covered,brush-covered,orgrass-covered
landunlesstheengineisequippedwithaspark
arrester,asdenedinSection4442,maintainedin
effectiveworkingorderortheengineisconstructed,
equipped,andmaintainedforthepreventionofre.
WARNING
Removingstandardoriginalequipmentparts
andaccessoriesmayalterthewarranty,
traction,andsafetyofthemachine.Failureto
useoriginalT oropartscouldcauseserious
injuryordeath.Makingunauthorizedchanges
totheengine,fuelorventingsystem,may
violateEPAandCARBregulations.
Replaceallpartsincluding,butnotlimited
to,tires,belts,blades,andfuelsystem
componentswithoriginalToroparts.
Pleaserefertotheenginemanufacturer’sinformation
includedwiththemachine.
Thisrotary-blade,ridinglawnmowerisintendedtobe
usedbyresidentialhomeownersorprofessional,hired
operators.Itisdesignedprimarilyforcuttinggrasson
well-maintainedlawnsonresidentialorcommercial
properties.Itisnotdesignedforcuttingbrushorfor
agriculturaluses.
Readthisinformationcarefullytolearnhowtooperate
andmaintainyourproductproperlyandtoavoid
injuryandproductdamage.Youareresponsiblefor
operatingtheproductproperlyandsafely .
YoumaycontactT orodirectlyatwww.Toro.com
forproductsafetyandoperationtrainingmaterials,
accessoryinformation,helpndingadealer,orto
registeryourproduct.
Wheneveryouneedservice,genuineToroparts,or
additionalinformation,contactanAuthorizedService
DealerorToroCustomerServiceandhavethemodel
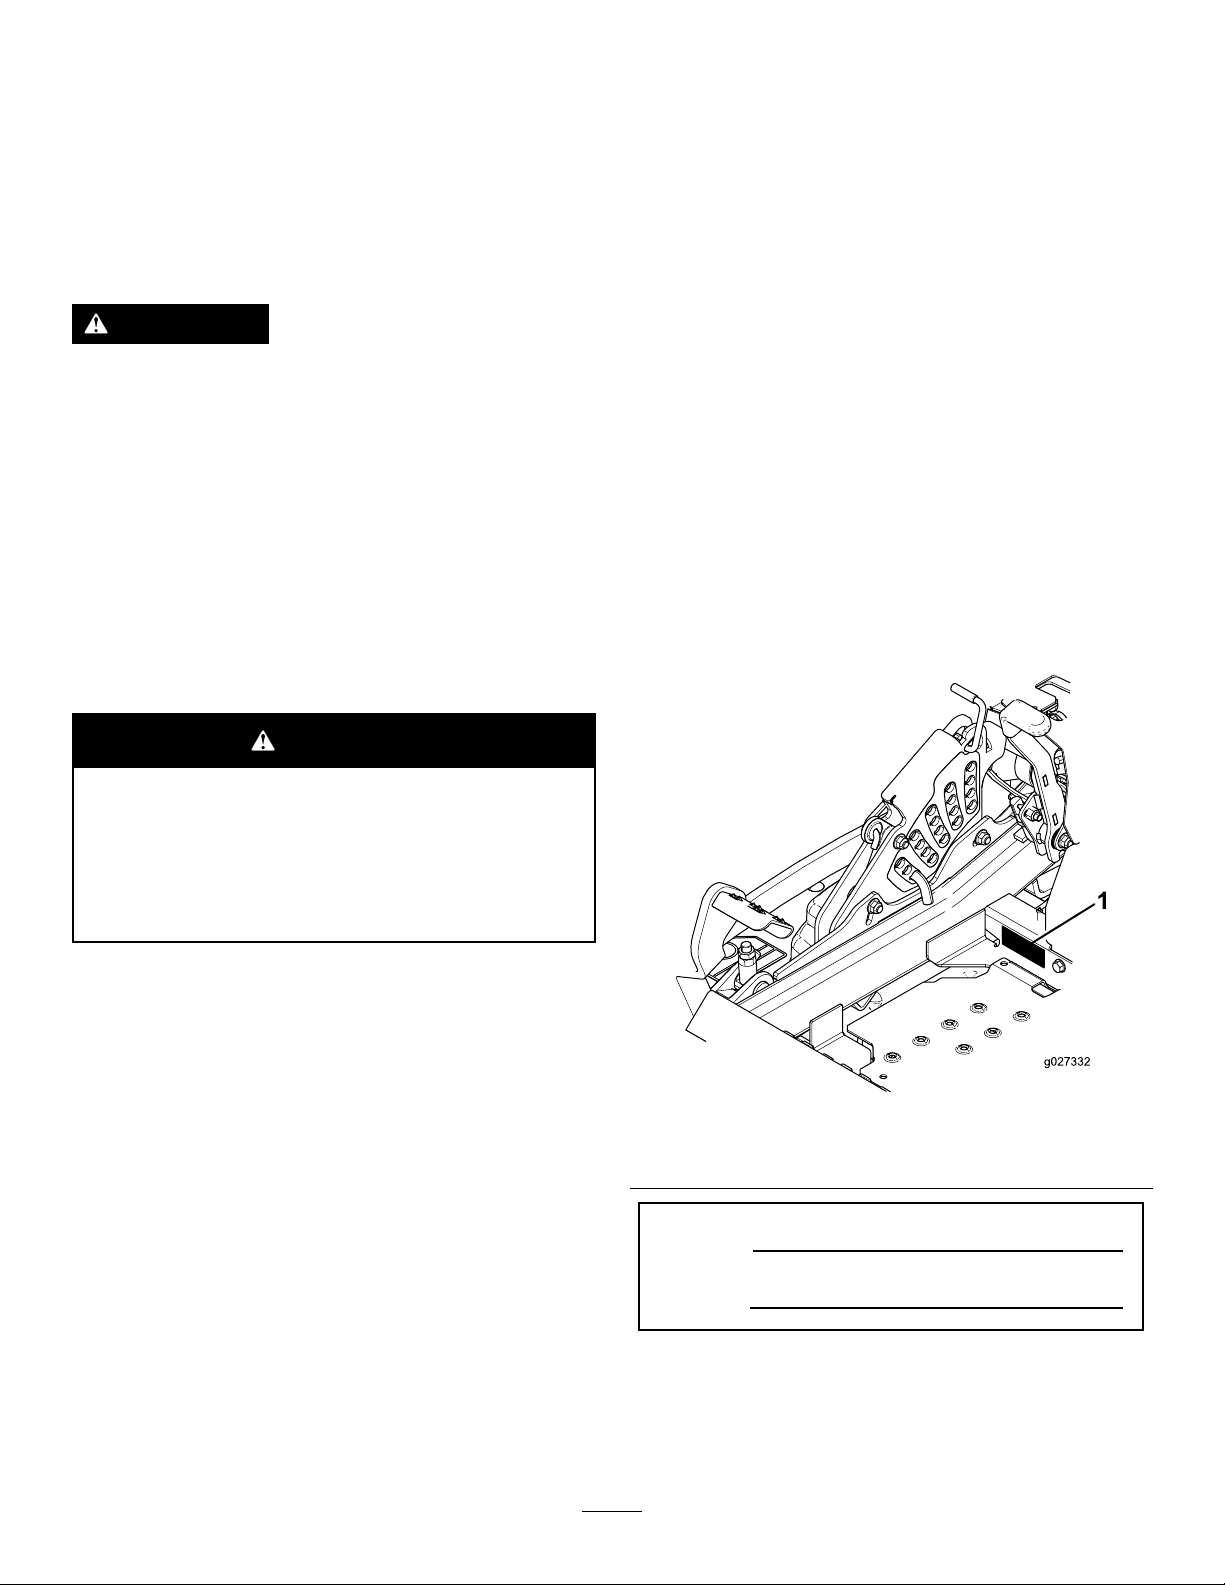
andserialnumbersofyourproductready.Figure1
identiesthelocationofthemodelandserialnumbers
ontheproduct.Writethenumbersinthespace
provided.
WARNING
CALIFORNIA
Proposition65Warning
Theengineexhaustfromthisproduct
containschemicalsknowntotheStateof
Californiatocausecancer,birthdefects,
orotherreproductiveharm.
g027332
Figure1
1.Modelandserialnumberlocation
ModelNo.
SerialNo.
©2018—TheToro®Company
8111LyndaleAvenueSouth
Bloomington,MN55420
Thismanualidentiespotentialhazardsandhas
safetymessagesidentiedbythesafety-alertsymbol
(Figure2),whichsignalsahazardthatmaycause
seriousinjuryordeathifyoudonotfollowthe
recommendedprecautions.
Contactusatwww.Toro.com.
2
PrintedintheUSA
AllRightsReserved

Contents
Figure2
1.Safety-alertsymbol
Thismanualuses2wordstohighlightinformation.
Importantcallsattentiontospecialmechanical
informationandNoteemphasizesgeneralinformation
worthyofspecialattention.
g000502
Safety.......................................................................4
GeneralSafety...................................................4
SlopeIndicator...................................................5
SafetyandInstructionalDecals..........................6
ProductOverview...................................................13
Controls...........................................................13
Specications..................................................14
BeforeOperation.................................................15
BeforeOperationSafety...................................15
RecommendedFuel.........................................15
UsingStabilizer/Conditioner.............................16
FillingtheFuelTank..........................................16
CheckingtheEngine-OilLevel..........................16
BreakinginaNewMachine..............................16
UsingtheRolloverProtectionSystem
(ROPS).........................................................17
ThinkSafetyFirst..............................................18
UsingtheSafety-InterlockSystem....................18
PositioningtheSeat..........................................19
UnlatchingtheSeat..........................................19
ChangingtheSeatSuspension.........................20
DuringOperation.................................................20
DuringOperationSafety...................................20
OperatingtheParkingBrake.............................21
OperatingtheMowerBlade-ControlSwitch
(PTO)............................................................22
OperatingtheThrottle.......................................22
OperatingtheChoke.........................................22
OperatingtheIgnitionSwitch............................23
StartingandShuttingOfftheEngine.................23
UsingtheMotion-ControlLevers.......................24
DrivingtheMachine..........................................24
StoppingtheMachine.......................................26
UsingtheSideDischarge.................................26
AdjustingtheHeightofCut...............................27
AdjustingtheAnti-ScalpRollers........................28
AdjustingtheFlowBafeCamLocks................28
PositioningtheFlowBafe................................29
OperatingTips.................................................30
AfterOperation....................................................31
AfterOperationSafety......................................31
UsingtheFuel-ShutoffValve.............................31
UsingtheDrive-Wheel-ReleaseValves............31
TransportingtheMachine.................................32
LoadingtheMachine........................................33
Maintenance...........................................................34
RecommendedMaintenanceSchedule(s)...........34
Pre-MaintenanceProcedures..............................35
MaintenanceandStorage.................................35
Lubrication..........................................................36
AddingLightOilorSprayLubrication................36
GreasingtheMower.........................................36
LubricatingtheCaster-WheelHubs..................37
EngineMaintenance...........................................38
EngineSafety...................................................38
ServicingtheAirCleaner..................................38
3

ServicingtheEngineOil....................................40
ServicingtheSparkPlug...................................43
CheckingtheSparkArrester.............................44
FuelSystemMaintenance...................................45
ReplacingtheFuelFilter...................................45
ServicingtheFuelT ank.....................................45
ElectricalSystemMaintenance...........................46
ElectricalSystemSafety...................................46
ServicingtheBattery.........................................46
ServicingtheFuses..........................................47
DriveSystemMaintenance..................................48
CheckingtheSeatBelt.....................................48
CheckingtheRolloverProtectionSystem
(ROPS)Knobs..............................................48
AdjustingtheTracking......................................48
CheckingtheTirePressure...............................49
CheckingtheWheel-LugNuts..........................49
CheckingtheWheel-HubSlottedNut................49
AdjustingtheCaster-PivotBearing...................50
UsingtheClutchShim......................................50
CoolingSystemMaintenance..............................52
CleaningtheEngineScreenandEngine-Oil
Cooler...........................................................52
CleaningtheEngine-CoolingFinsand
Shrouds........................................................52
CheckingandCleaningtheHydraulic-Unit
Shrouds........................................................53
BrakeMaintenance.............................................54
AdjustingtheParkingBrake..............................54
BeltMaintenance................................................55
InspectingtheBelts..........................................55
ReplacingtheMowerBelt.................................55
ReplacingtheHydraulicPump-Drive
Belt................................................................56
ControlsSystemMaintenance.............................57
AdjustingtheControl-HandlePosition..............57
AdjustingtheMotion-ControlLinkage...............57
AdjustingtheMotion-ControlDamper...............58
AdjustingtheMotion-ControlNeutral-Lock
Pivot..............................................................58
HydraulicSystemMaintenance...........................59
HydraulicSystemSafety...................................59
ServicingtheHydraulicSystem........................59
MowerDeckMaintenance....................................62
LevelingtheMowerDeck..................................62
ServicingtheCuttingBlades.............................64
RemovingtheMowerDeck...............................67
ReplacingtheGrassDeector..........................68
Cleaning..............................................................69
CleaningundertheMower................................69
DisposingofWaste...........................................69
Storage...................................................................70
CleaningandStorage.......................................70
Troubleshooting......................................................71
Schematics.............................................................73
Safety
Thismachinehasbeendesignedinaccordancewith
ANSIB71.4-2012.
GeneralSafety
Thisproductiscapableofamputatinghandsand
feetandofthrowingobjects.Alwaysfollowallsafety
instructionstoavoidseriouspersonalinjury.
Usingthisproductforpurposesotherthanitsintended
usecouldprovedangeroustoyouandbystanders.
•Readandunderstandthecontentsofthis
Operator’sManualbeforeyoustarttheengine.
Ensurethateveryoneusingthisproductknows
howtouseitandunderstandsthewarnings.
•Donotputyourhandsorfeetnearmoving
componentsofthemachine.
•Donotoperatethemachinewithoutallguards
andothersafetyprotectivedevicesinplaceand
workingonthemachine.
•Keepclearofanydischargeopening.Keep
bystandersasafedistanceawayfromthe
machine.
•Keepchildrenoutoftheoperatingarea.Never
allowchildrentooperatethemachine.
•Stopthemachineandshutofftheenginebefore
servicing,fueling,oruncloggingthemachine.
Improperlyusingormaintainingthismachinecan
resultininjury .Toreducethepotentialforinjury ,
complywiththesesafetyinstructionsandalwayspay
attentiontothesafety-alertsymbol,whichmeans
Caution,Warning,orDanger—personalsafety
instruction.Failuretocomplywiththeseinstructions
mayresultinpersonalinjuryordeath.
Youcanndadditionalitemsofsafetyinformationin
theirrespectivesectionsthroughoutthismanual.
4
SlopeIndicator
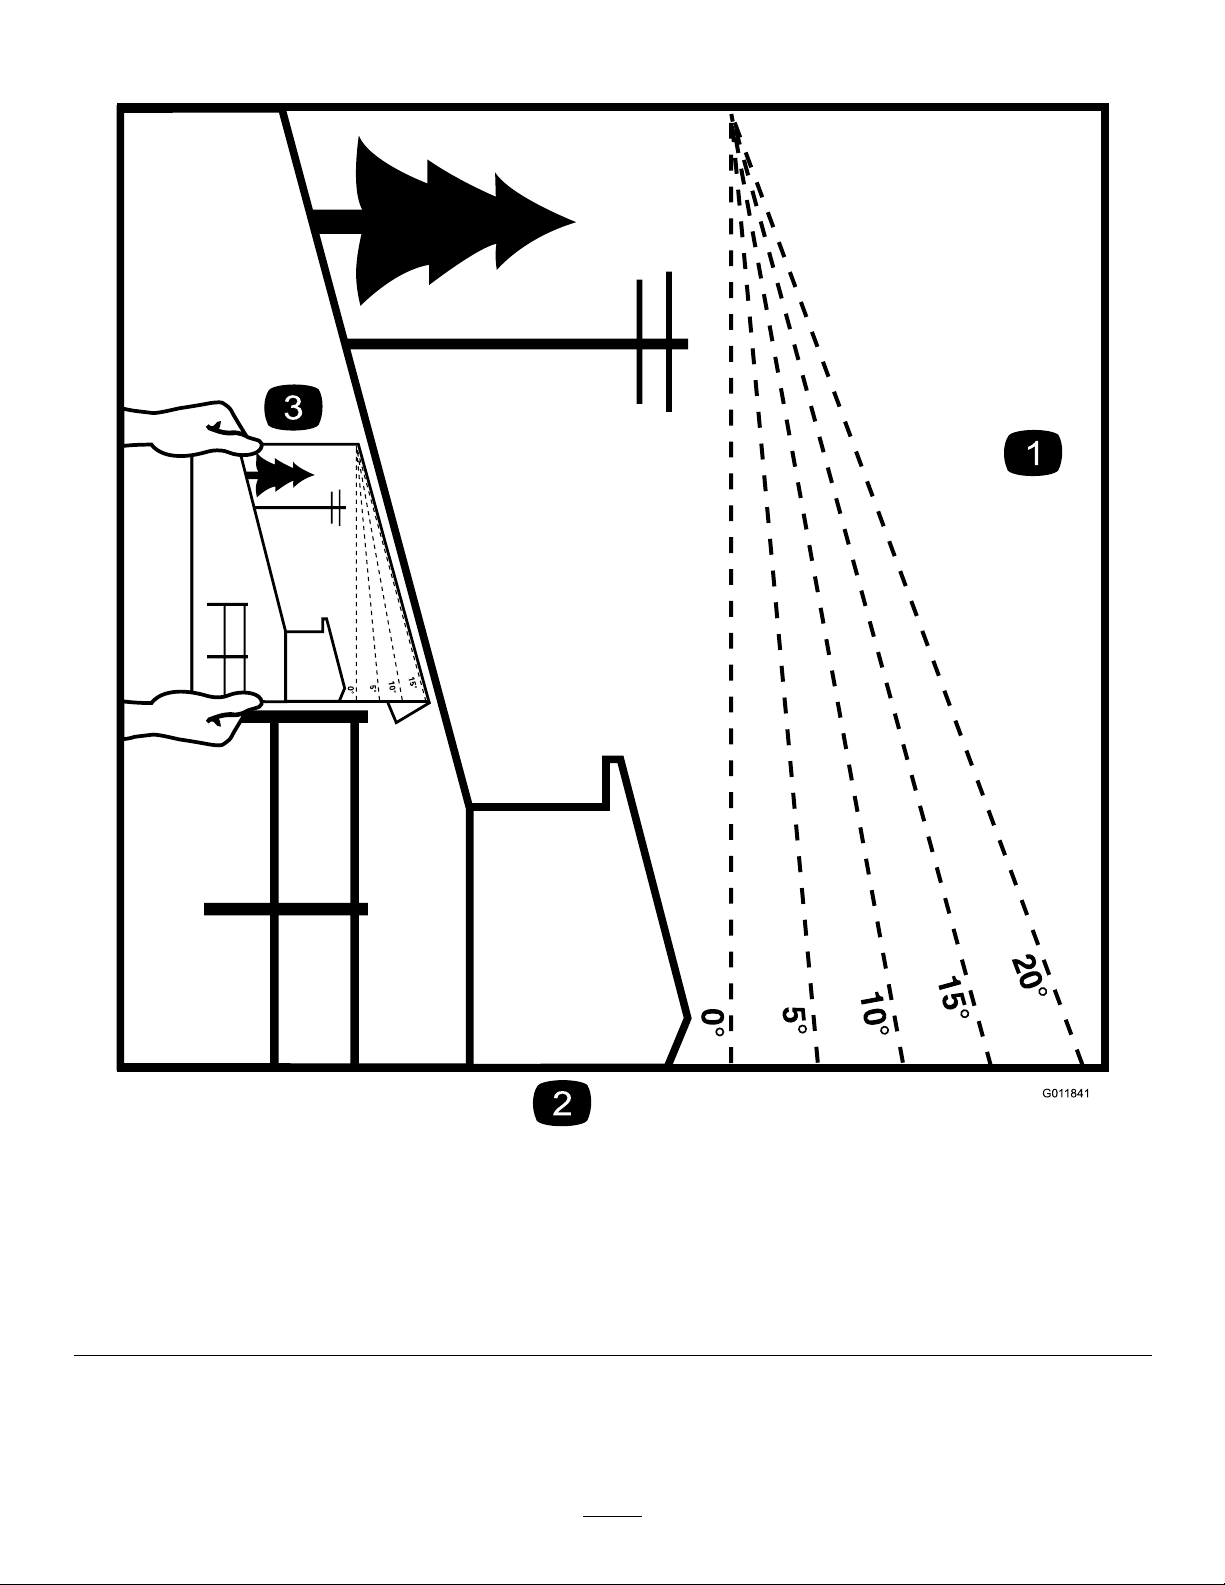
Figure3
Thispagemaybecopiedforpersonaluse.
1.Themaximumslopeyoucansafelyoperatethemachineonis15degrees.Usetheslopecharttodeterminethedegreeofslope
ofhillsbeforeoperating.Donotoperatethismachineonaslopegreaterthan15degrees.Foldalongtheappropriateline
tomatchtherecommendedslope.
2.Alignthisedgewithaverticalsurface,atree,building,fencepole,etc.
3.Exampleofhowtocompareslopewithfoldededge
5
g011841
SafetyandInstructionalDecals
Safetydecalsandinstructionsareeasilyvisibletotheoperatorandarelocatednearanyarea
ofpotentialdanger.Replaceanydecalthatisdamagedormissing.
58-6520
1.Grease
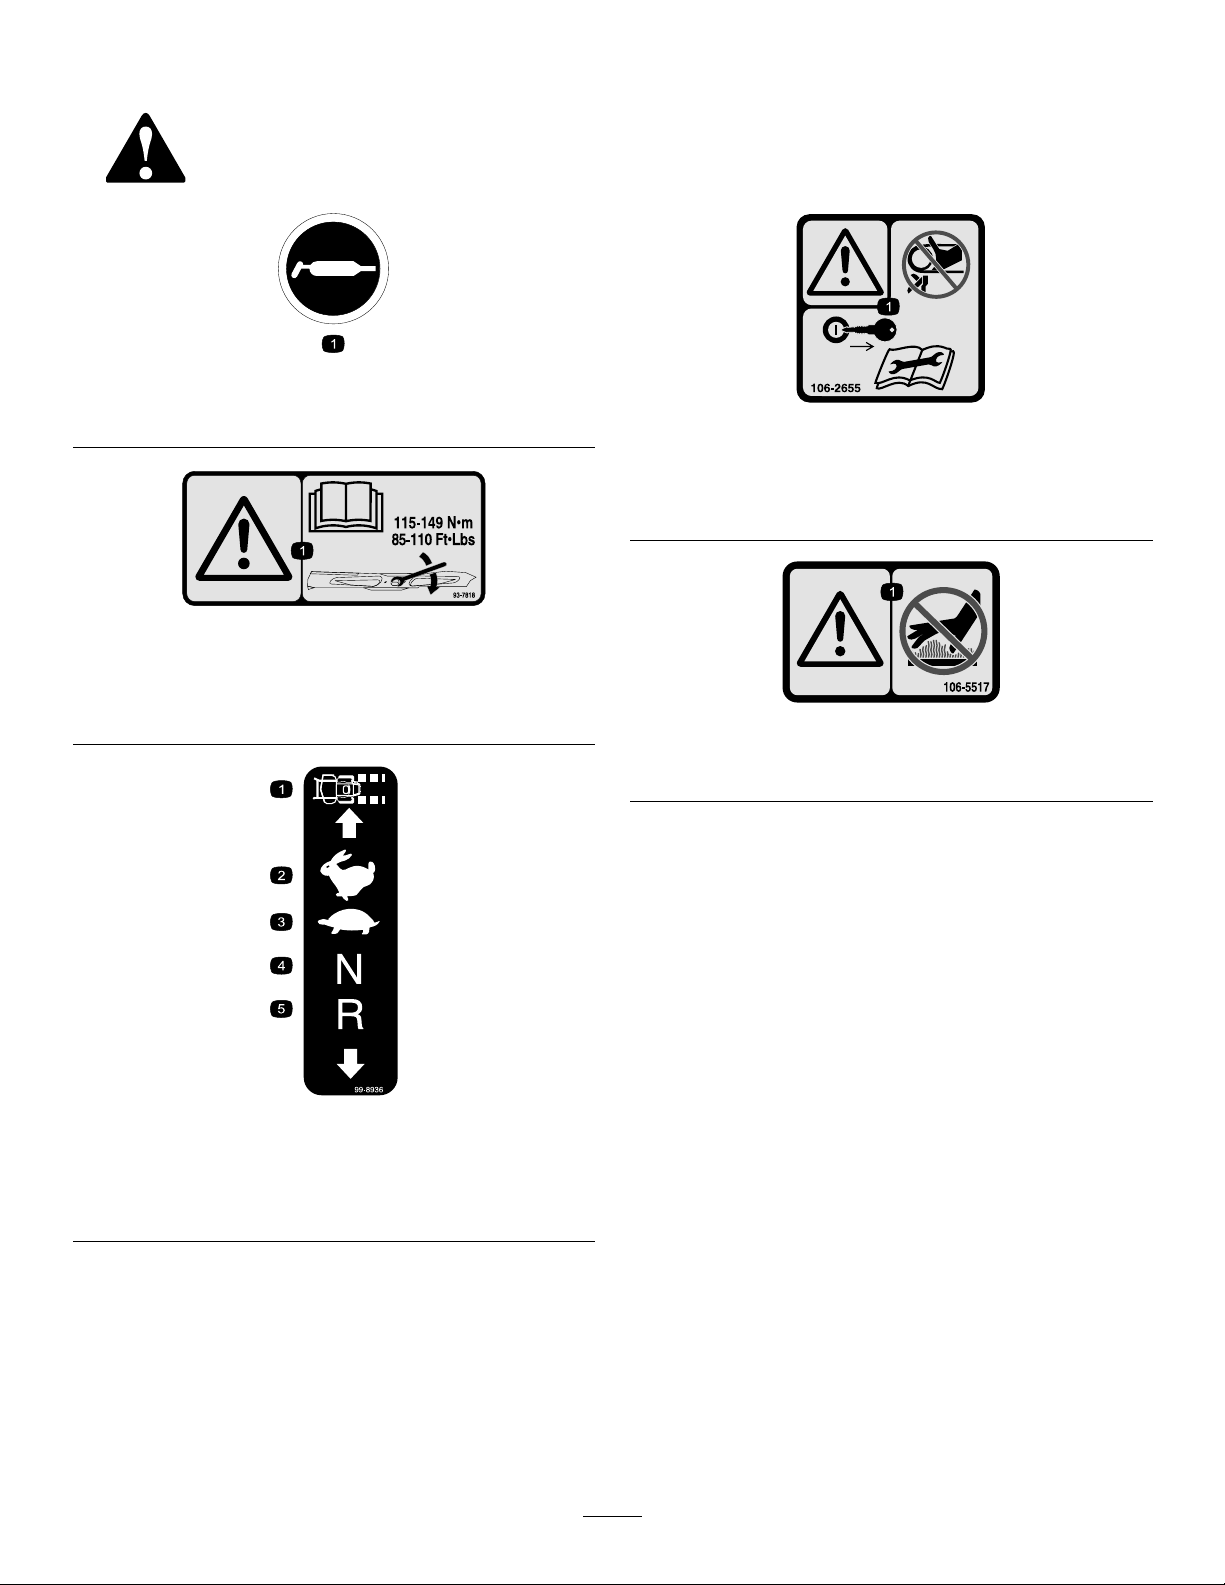
93-7818
decal58-6520
decal106-2655
106-2655
1.Warning-donottouchorapproachmovingbelts;remove
theignitionkeyandreadtheinstructionsbeforeservicing
orperformingmaintenance.
decal93-7818
1.Warning—readtheOperator'sManualforinstructionson
torquingthebladebolt/nutto1 15to149N∙m(85to1 10
ft-lb).
99-8936
1.Machinespeed4.Neutral
2.Fast5.Reverse
3.Slow
decal106-5517
106-5517
1.Warning—donottouchthehotsurface.
decal99-8936
6
decal107-3069
107-3069
1.Warning–thereisnorolloverprotectionwhentherollbaris
down.
2.Toavoidinjuryordeathfromarolloveraccident,keepthe
rollbarintheraisedandlockedpositionandweartheseat
belt.Lowertherollbaronlywhenabsolutelynecessary;do
notweartheseatbeltwhentherollbarisdown.
3.ReadtheOperator'sManual;driveslowlyandcarefully.
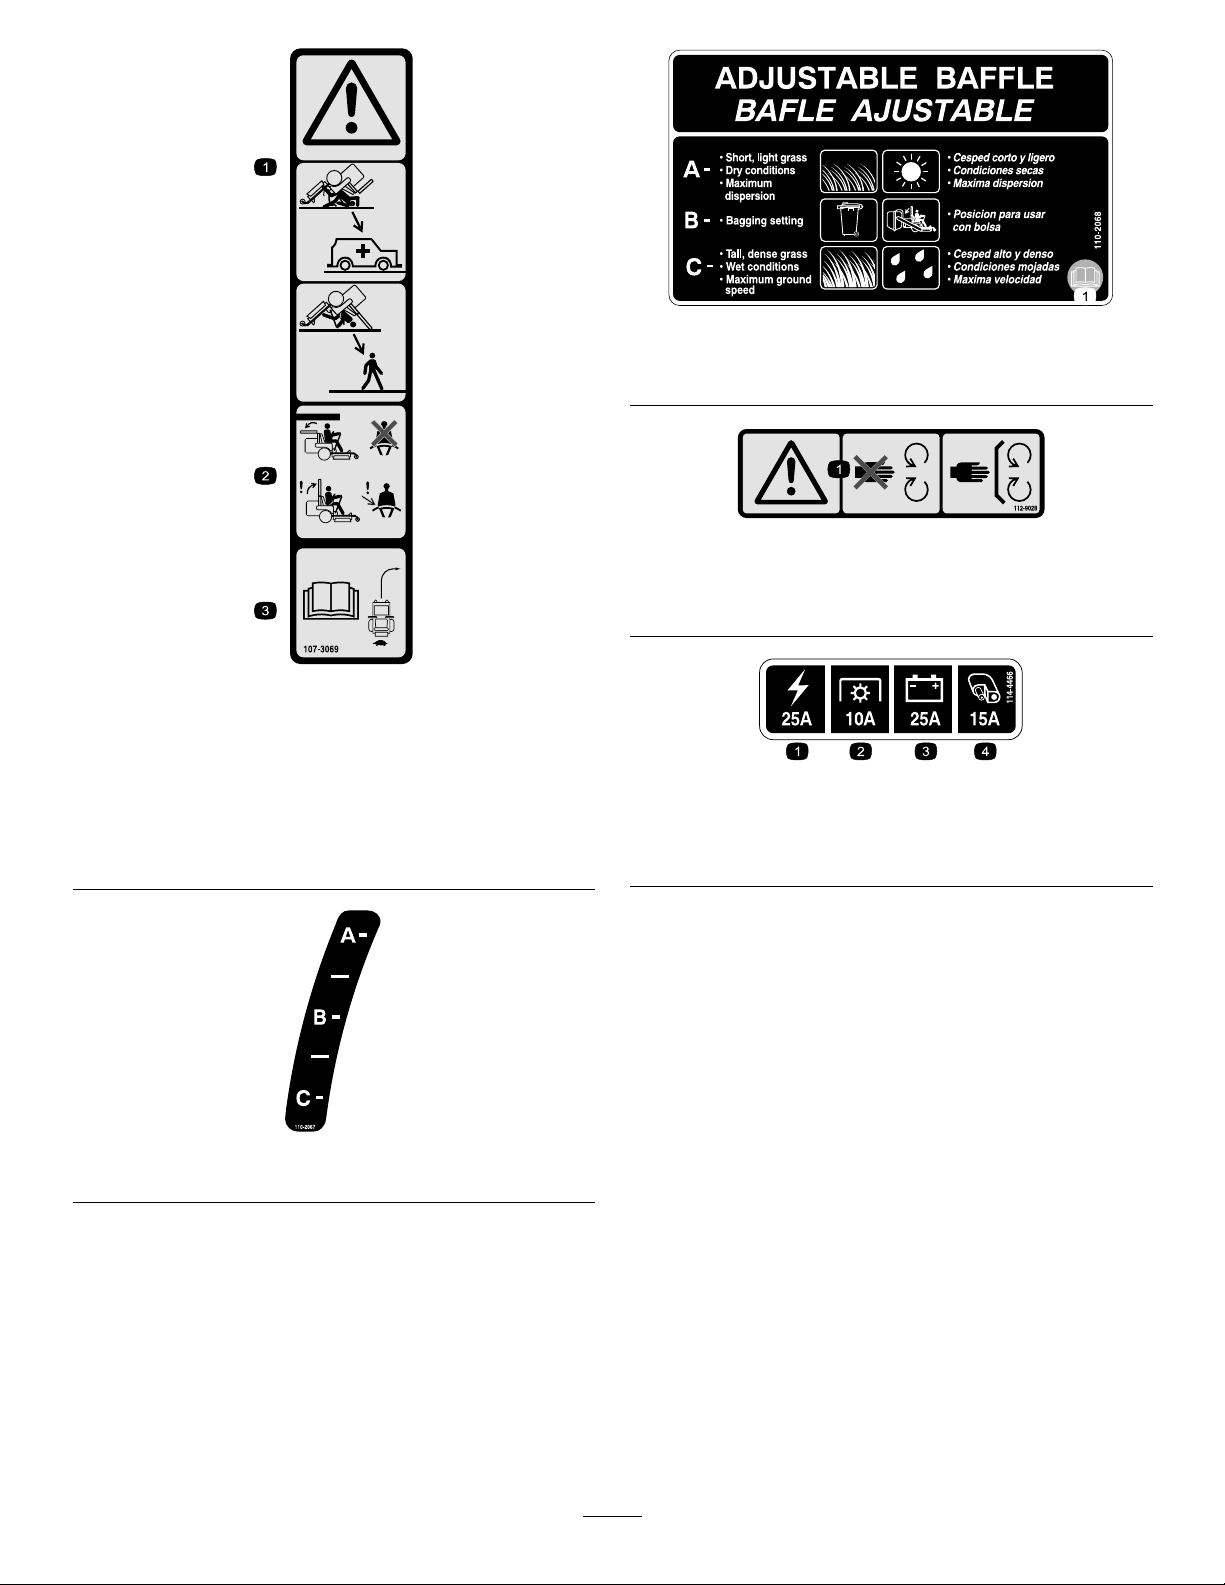
decal110-2068
110-2068
1.ReadtheOperator'sManual.
decal112-9028
112-9028
1.Warning—stayawayfrommovingparts;keepallguardsin
place.
decal114-4466
114-4466
1.Main(25A)3.Charge(25A)
2.PTO(10A)4.Auxiliary(15A)
decal110-2067
110-2067
7
decal116-5988
116-5988
1.Parkingbrake—engaged2.Parking
brake—disengaged
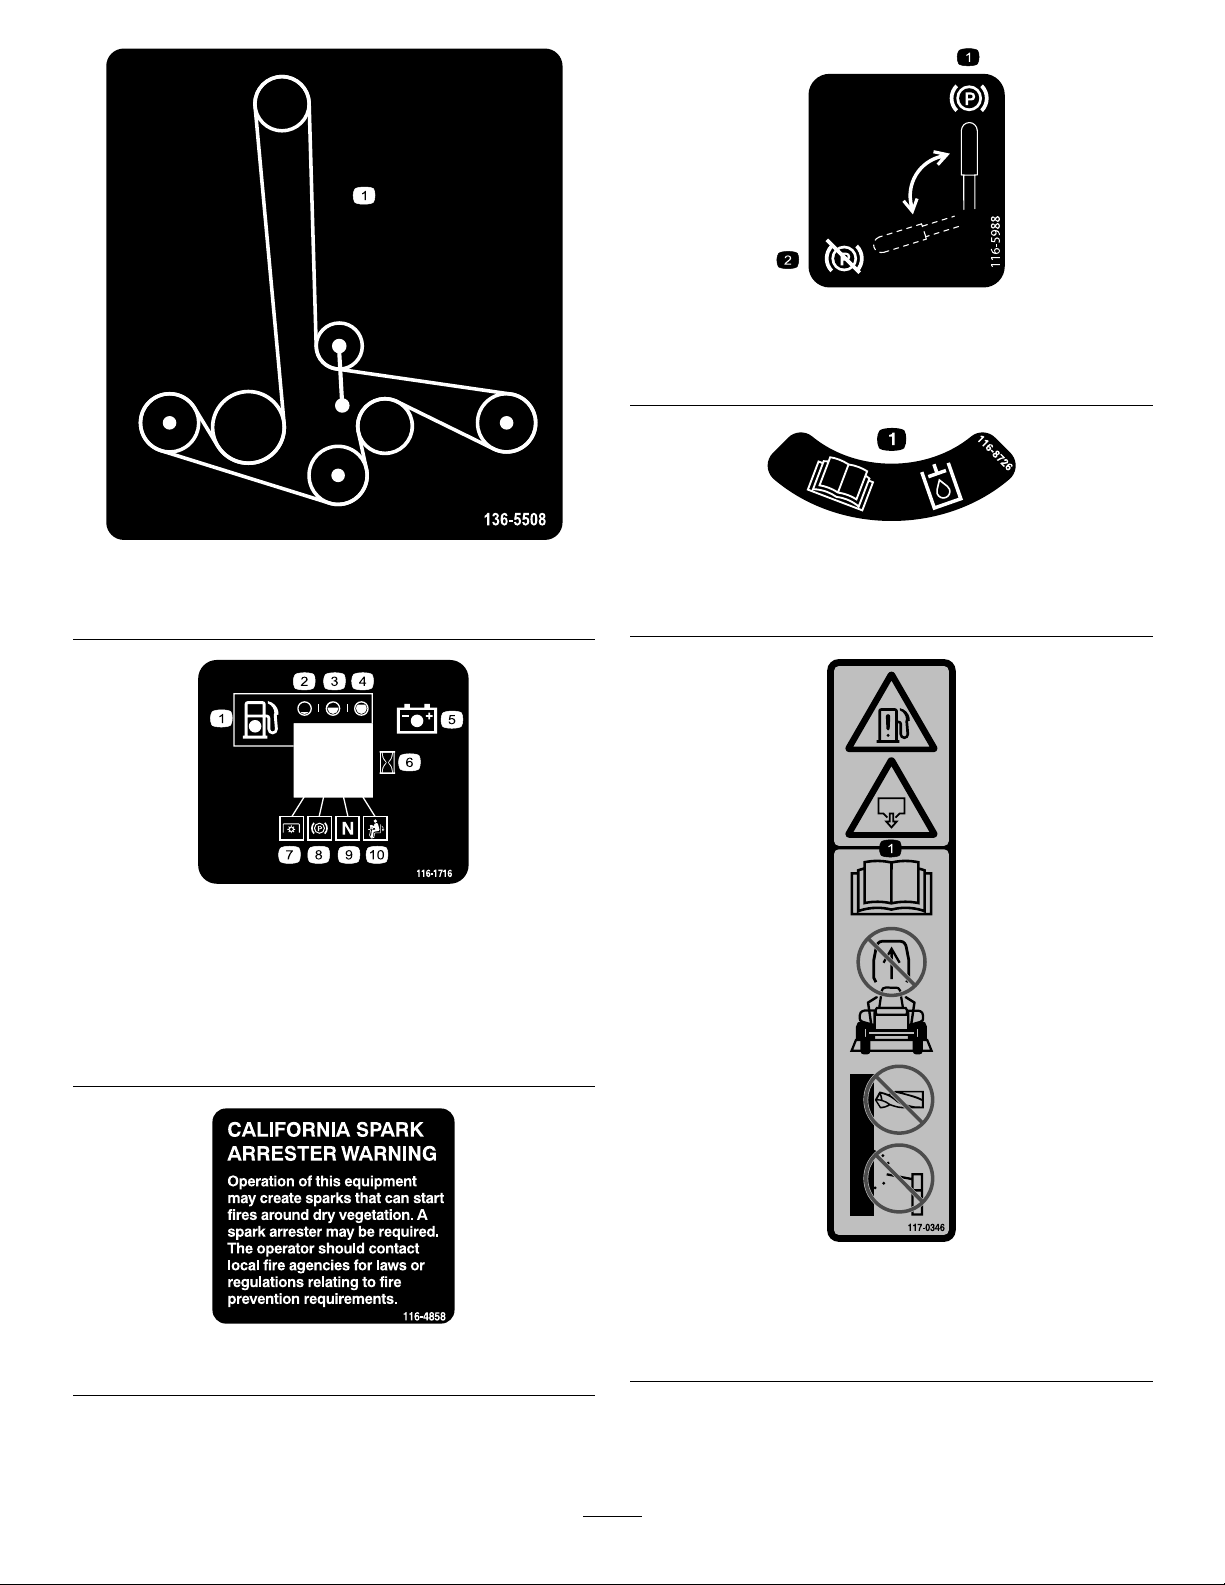
decal136-5508
116-8726
decal116-8726
136-5508
1.Beltrouting
decal116-1716
1.ReadtheOperator’sManualfortherecommendedhyraulic
uid.
116-1716
1.Fuel6.Hourmeter
2.Empty
3.Half
7.PTO
8.Parkingbrake
4.Full9.Neutral
5.Battery
10.Operator-presenceswitch
116-4858
decal117-0346
117-0346
1.Fuelleakhazard—readtheOperator'sManual;donot
decal116-4858
attempttoremovetherollbar;donotweld,drill,ormodify
therollbarinanyway.
8

117-3848
1.Thrownobjecthazard—keepbystandersasafedistance
awayfromthemachine.
2.Thrownobjecthazard,mower-donotoperatethemachine
withoutthedeector ,dischargecover,orgrasscollection
systeminplace.
3.Cutting/dismembermentofhandorfoot—stayawayfrom
movingparts;keepallguardsandshieldsinplace.
117-3864
1.ReadtheOperator’s
Manual.
2.Filltobottomofllerneck;
warning—donotoverll
thetank.
decal117-3848
decal117-3864
decal121-7551
121-7551
1.PowerTakeoff(PTO)4.Continuousvariable
setting
2.Choke5.Slow
3.Fast
126-2055
1.Wheellugnuttorque95ft-lb(129N∙m)(4x)
2.Wheelhubnuttorque235ft-lb(319N∙m)
3.ReadandunderstandtheOperator’sManualbefore
performinganymaintenance,checktorqueafterrst100
hoursthenevery500hoursthereafter.
9
decal126-2055

BatterySymbols
Someorallofthesesymbolsareonyourbattery
decalbatterysymbols
1.ReadtheOperator’s
Manual
2.Lock
1.Explosionhazard
6.Keepbystandersasafe
distanceawayfromthe
battery.
2.Nore,opename,or
smoking
7.Weareyeprotection;
explosivegasescan
causeblindnessandother
injuries.
3.Causticliquid/chemical
decal126-4398
126-4398
burnhazard
4.Weareyeprotection.9.Flusheyesimmediately
8.Batteryacidcancause
blindnessorsevereburns.
withwaterandgetmedical
3.Unlock
5.ReadtheOperator's
Manual.
helpfast.
10.Containslead;donot
discard
decaloemmarkt
Manufacturer'sMark
1.Indicatesthebladeisidentiedasapartfromtheoriginal
machinemanufacturer.
1.ReadtheOperator's
Manual.
2.Height-of-cut
1.Maximumdrawbarpull36
kg(80lb)
decal127-0326
127-0326
3.Removethekeyfrom
theignitionandreadthe
Operator'sManualbefore
performingmaintenance
orservicingthemachine.
decal131-4036
131-4036
2.ReadtheOperator's
Manual.
10
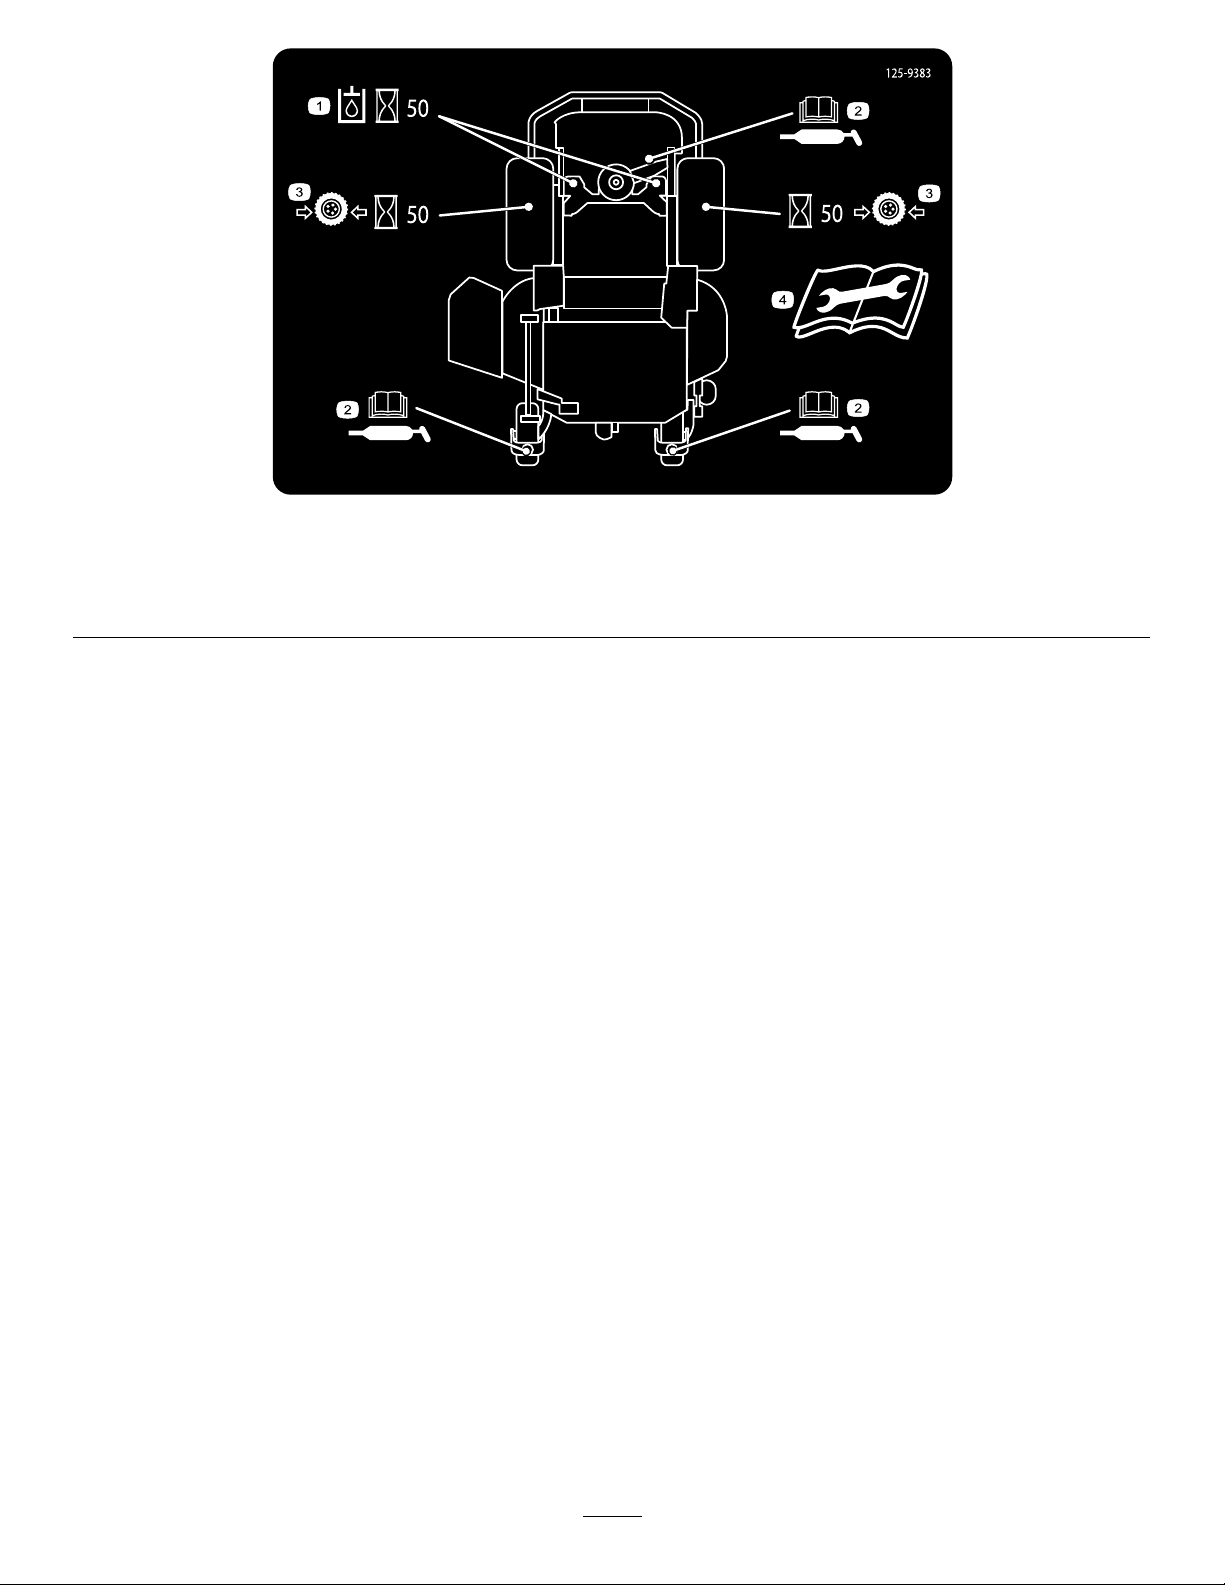
125–9383
1.Checkhydraulicuidevery50operatinghours.3.Checkthetirepressureevery50operatinghours.
2.ReadtheOperator’sManualforinformationonlubricating
themachine.
4.ReadtheOperator’sManualbeforeservicingorperforming
maintenance.
decal125-9383
11
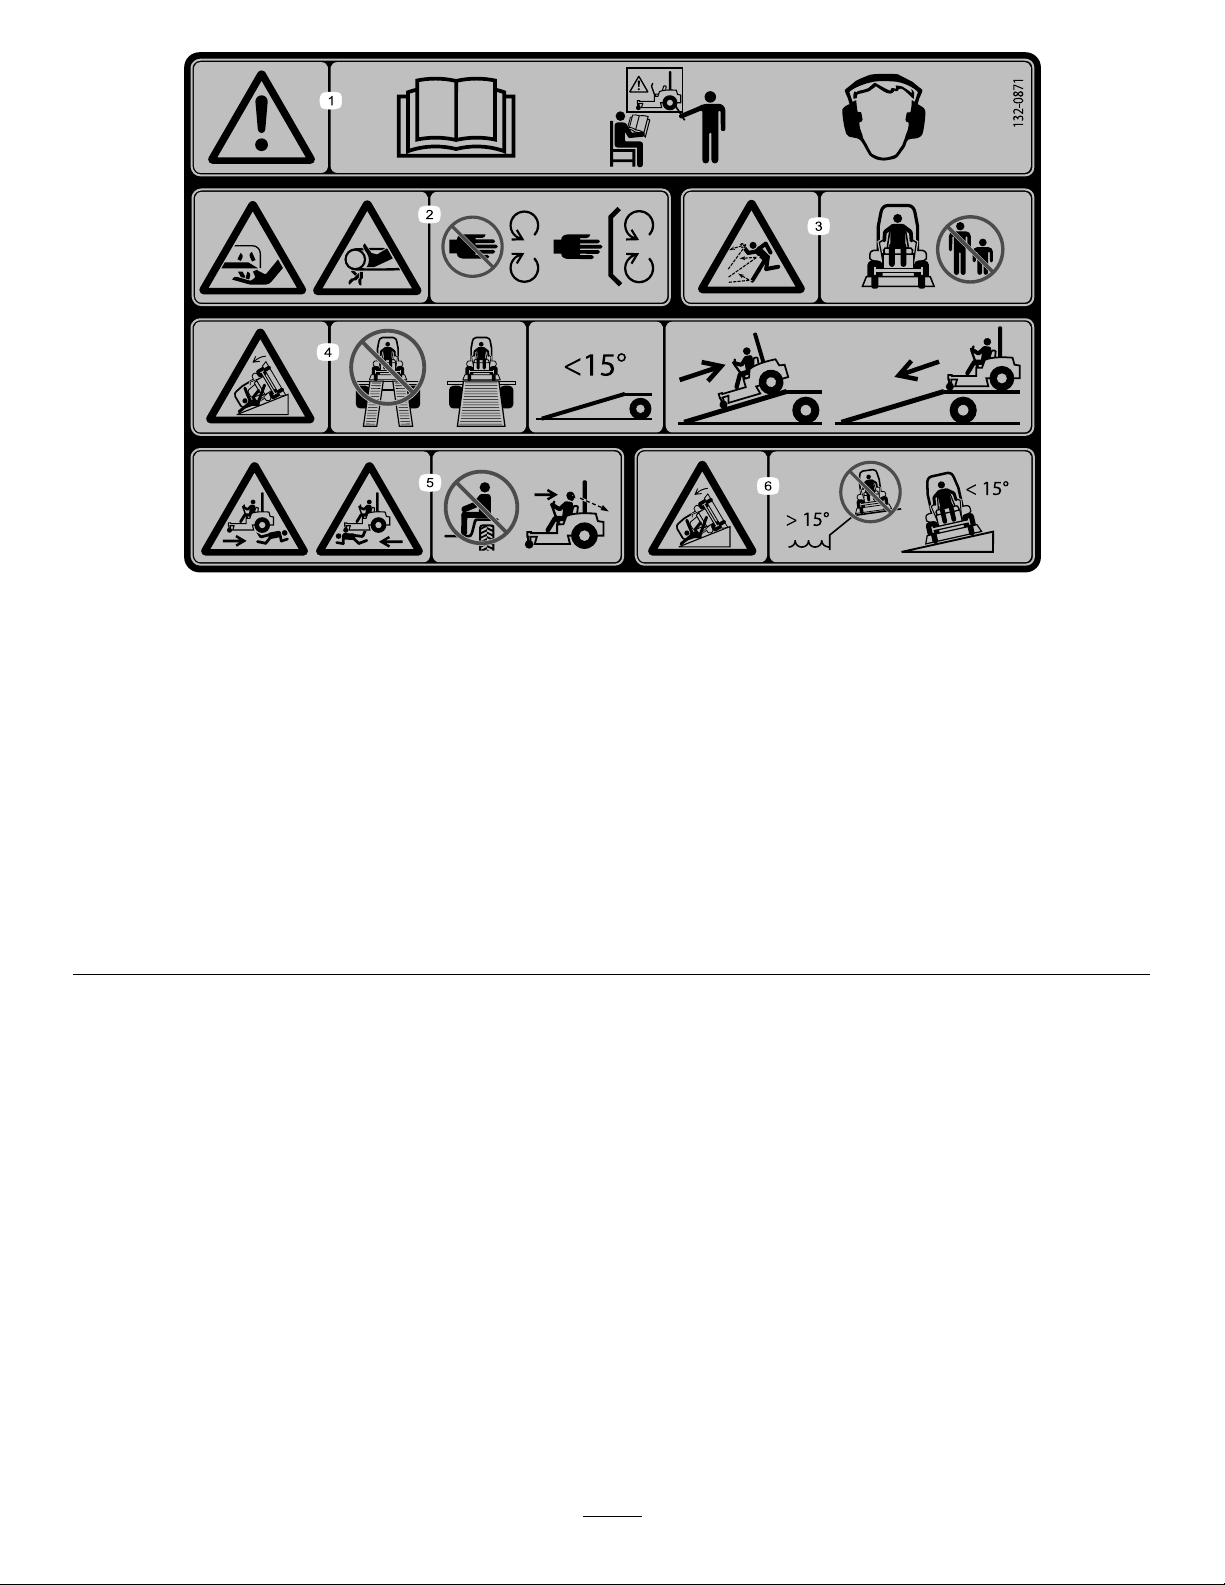
132-0871
Note:Thismachinecomplieswiththeindustrystandardstabilitytestinthestaticlateralandlongitudinaltestswiththemaximum
recommendedslopeindicatedonthedecal.ReviewtheinstructionsforoperatingthemachineonslopesintheOperator’sManualas
wellastheconditionsinwhichyouwouldoperatethemachinetodeterminewhetheryoucanoperatethemachineinthoseconditions
onthatdayandatthatsite.Changesintheterraincanresultinachangeinslopeoperationforthemachine.Ifpossible,keepthe
cuttingunitsloweredtothegroundwhileoperatingthemachineonslopes.Raisingthecuttingunitswhileoperatingonslopescan
causethemachinetobecomeunstable.
decal132-0871
1.Warning—readtheOperator’sManual;donotoperatethis
machineunlessyouaretrained;wearhearingprotection.
2.Cutting,dismembering,andentanglementhazard—keep
handsawayfrommovingparts;keepallguardsandshieldsin
place.
3.Thrownobjecthazard—keepbystandersaway.6.Tippinghazardonslopes—donotuseonslopesnearopen
4.Ramphazard—whenloadingontoatrailer,donotusedual
ramps;onlyuseasingularrampwideenoughforthemachine
andthathasaninclinelessthan15°;backuptheramp(in
reverse)anddriveforwardofftheramp.
5.Bodilyharmhazard—donotcarrypassengers;lookbehind
youwhenmowinginreverse.
water;donotuseonslopesgreaterthan15°.
12
ProductOverview
HourMeter
Thehourmeterrecordsthenumberofhoursthe
enginehasoperated.Itoperateswhentheengine
isrunning.Usethesetimesforschedulingregular
maintenance(Figure6).
FuelGauge
Thefuelgaugeislocatedwiththehourmeter,and
thebarslightupwhentheignitionswitchisintheON
position(Figure6).
Theindicatorlightappearswhenthefuellevelislow
(approximately1gallonremaininginthefueltank).
Safety-InterlockIndicators
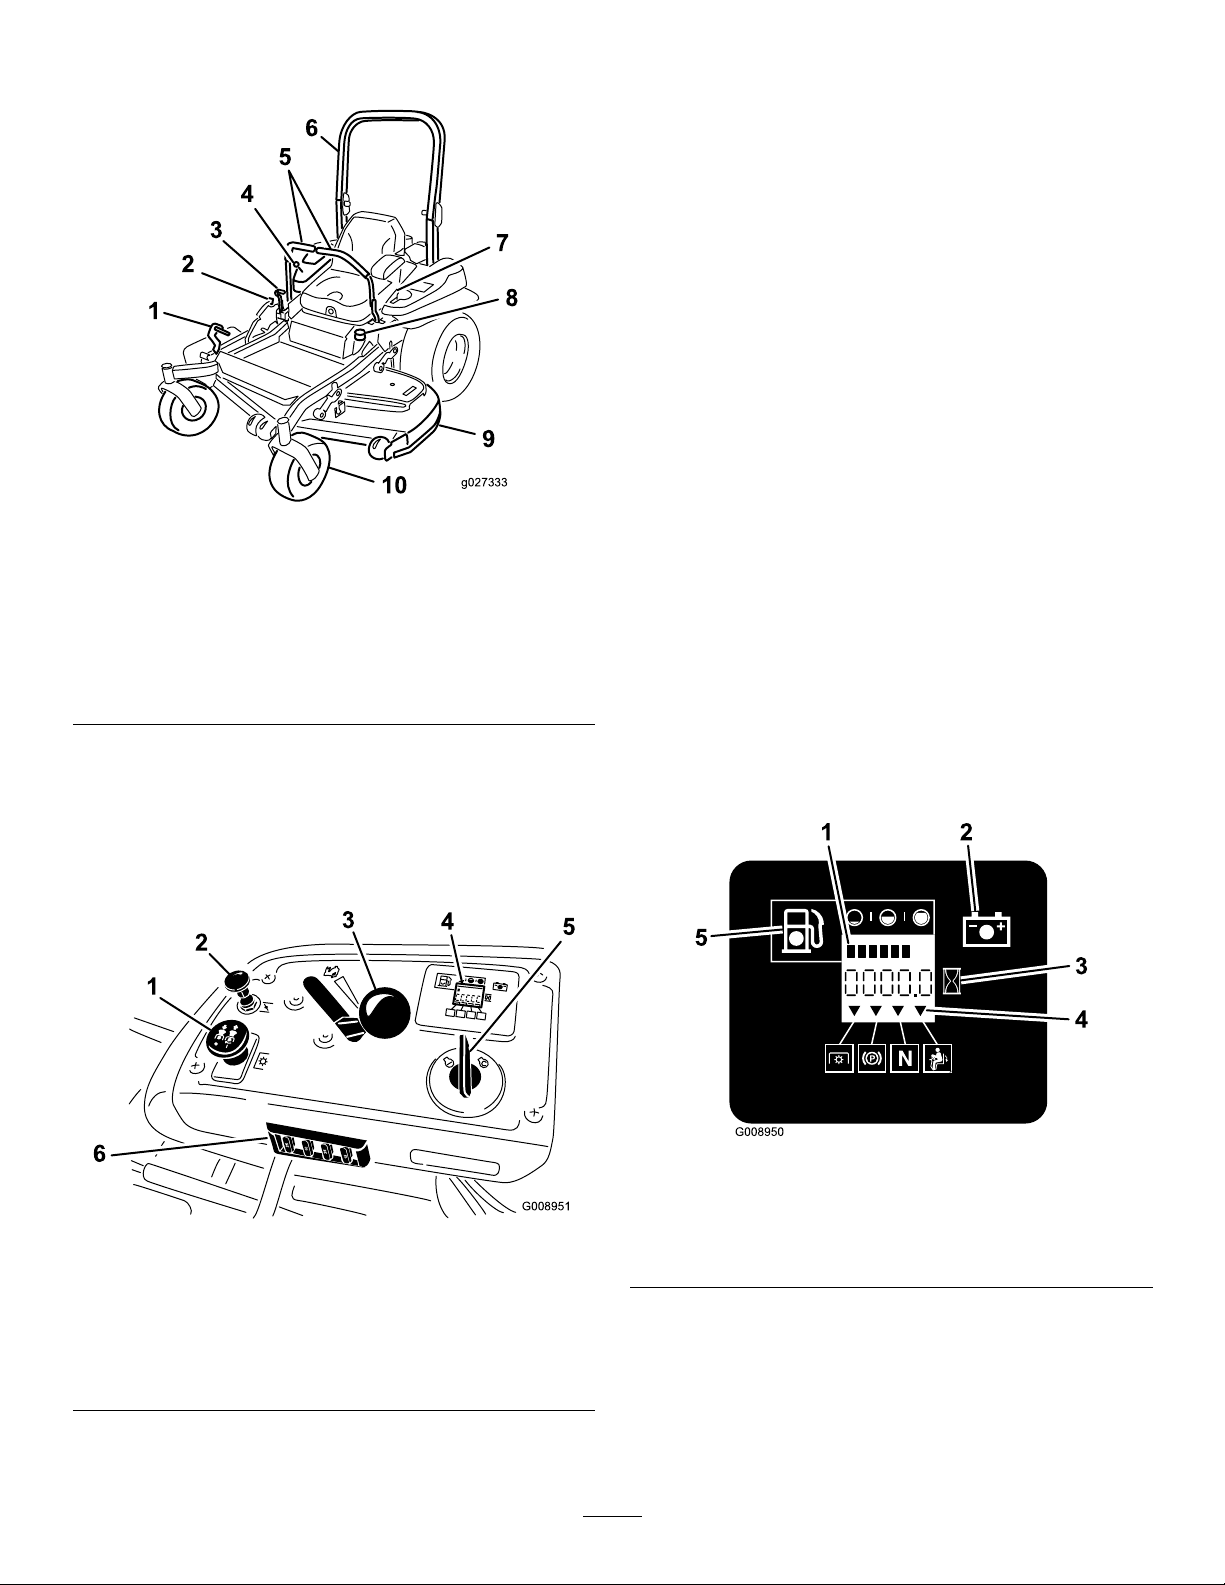
Figure4
1.Height-of-cutdeck-lift
pedal
2.Transportlock
3.Parking-brakelever8.Fuelcap
4.Controls
5.Motion-controllevers
6.Rollbar
7.Seatbelt
9.Mowerdeck
10.Casterwheel
Controls
Becomefamiliarwithallthecontrolsbeforeyoustart
theengineandoperatethemachine(Figure4and
Figure5).
g027333
Therearesymbolsonthehourmeterthatindicate
withablacktrianglethattheinterlockcomponentis
positionedcorrectly(Figure6).
Battery-IndicatorLight
IfyouturntheignitionkeytotheONpositionfora
fewseconds,thebatteryvoltagedisplaysinthearea
wherethehoursarenormallydisplayed.
Thebatterylightturnsonwhentheignitionisturned
onandwhenthechargeisbelowthecorrectoperating
level(Figure6).
Figure5
1.PTOswitch
2.Chokecontrol
3.Throttlecontrol6.Fuses
4.Hour
5.Ignitionswitch
g008950
Figure6
1.Fuelgauge(bars)4.Safety-interlocksymbols
g008951
meter/Safety-interlock
display
2.Batterylight
3.Hourmeter
5.Lowfuel-indicatorlight
ThrottleControl
Thethrottlecontrolstheenginespeed,andithasa
continuous-variablesettingfromtheSLOWtoFAST
position(Figure5).
13

ChokeControl
Specications
Usethechoketostartacoldengine.Pullthechoke
knobuptoengageit.Pushthechokeknobdownto
disengageit(Figure5).
Blade-ControlSwitch(Power
Takeoff)
Theblade-controlswitch(PTO)engagesand
disengagespowertothemowerblades(Figure5).
IgnitionSwitch
Usethisswitchtostartthemowerengine.Ithas3
positions:ST ART,RUN,andOFF.
Motion-ControlLevers
Usethemotion-controlleverstodrivethemachine
forward,reverse,andturneitherdirection.
Neutral-LockPosition
UsetheNEUTRAL-LOCKpositionwiththe
safety-interlocksystemtoengageandtodetermine
theNEUTRALposition.
Fuel-ShutoffValve
Note:Specicationsanddesignaresubjectto
changewithoutnotice.
Width
52-inchDeck72-inchDeck
Withoutthedeck
Deectorup135cm(53inches)187cm(74inches)
Deectordown172cm(67inches)222cm(88inches)
119cm(47inches)150cm(59inches)
Length
52-inchDeck72-inchDeck
Rollbarup
Rollbardown
202cm(79inches)219cm(86inches)
206cm(81inches)223cm(88inches)
Height
52-inchDeck72-inchDeck
Rollbarup
Rollbardown
178cm(70inches)179cm(71inches)
118cm(47inches)119cm(47inches)
Weight
ModelWeight
74955
74959
495kg(1,092lb)
588kg(1,296lb)
Closethefuel-shutoffvalve(undertheseat)when
transportingorstoringthemower.
Attachments/Accessories
AselectionofT oroapprovedattachmentsand
accessoriesisavailableforusewiththemachineto
enhanceandexpanditscapabilities.Contactyour
AuthorizedServiceDealerorDistributororgoto
www.T oro.comforalistofallapprovedattachments
andaccessories.
14

Operation
containersontheground,awayfromyourvehicle
beforelling.
Note:Determinetheleftandrightsidesofthe
machinefromthenormaloperatingposition.
BeforeOperation
BeforeOperationSafety
GeneralSafety
•Neverallowchildrenoruntrainedpeopleto
operateorservicethemachine.Localregulations
mayrestricttheageoftheoperator.Theowner
isresponsiblefortrainingalloperatorsand
mechanics.
•Becomefamiliarwiththesafeoperationofthe
equipment,operatorcontrols,andsafetysigns.
•Knowhowtostopthemachineandshutoffthe
enginequickly.
•Checkthatoperator-presencecontrols,safety
switches,andshieldsareattachedandfunctioning
properly.Donotoperatethemachineunlessthey
arefunctioningproperly.
•Beforemowing,alwaysinspectthemachineto
ensurethattheblades,bladebolts,andcutting
assembliesareingoodworkingcondition.
Replacewornordamagedbladesandboltsinsets
topreservebalance.
•Inspecttheareawhereyouwillusethemachine
andremoveallobjectsthatthemachinecould
throw.
•Evaluatetheterraintodeterminetheappropriate
equipmentandanyattachmentsoraccessories
requiredtooperatethemachineproperlyand
safely.
FuelSafety
•Toavoidpersonalinjuryorpropertydamage,use
extremecareinhandlingfuel.Fuelvaporsare
ammableandexplosive.
•Extinguishallcigarettes,cigars,pipes,andother
sourcesofignition.
•Useonlyanapprovedfuelcontainer.
•Donotremovethefuelcaporaddfueltothefuel
tankwhiletheengineisrunningorwhilehot.
•Donotrefuelthemachineindoors.
•Donotstorethemachineorfuelcontainerwhere
thereisanopename,spark,orpilotlight,such
asonawaterheateroronotherappliances.
•Donotllcontainersinsideavehicleoronatruck
ortrailerbedwithaplasticliner.Alwaysplace
•Removetheequipmentfromthetruckortrailer
andrefuelitwhileitisontheground.Ifthisisnot
possible,thenrefuelfromaportablecontainer
ratherthanafuel-dispensernozzle.
•Donotoperatethemachinewithouttheentire
exhaustsysteminplaceandinproperworking
condition.
•Keepthefuel-dispensernozzleincontactwith
therimofthefueltankorcontaineropeningat
alltimesuntilfuelingiscomplete.Donotusea
nozzlelock-opendevice.
•Ifyouspillfuelonyourclothing,changeyour
clothingimmediately.Wipeupanyfuelthatspills.
•Neveroverllthefueltank.Replacethefuelcap
andtightenitsecurely.
•Storefuelinanapprovedcontainerandkeepit
outofthereachofchildren.Neverbuymorethan
a30-daysupplyoffuel.
•Donotllthefueltankcompletelyfull.Addfuelto
thefueltankuntilthelevelis6to13mm(1/4to
1/2inch)belowthebottomofthellerneck.This
emptyspaceinthetankallowsfueltoexpand.
–Avoidprolongedbreathingofvapors.
–Keepyourfaceawayfromthenozzleandfuel
tankopening.
–Avoidcontactwithskin;washoffspillswith
soapandwater.
RecommendedFuel
•Forbestresults,useonlyclean,fresh(lessthan
30daysold),unleadedgasolinewithanoctane
ratingof87orhigher((R+M)/2ratingmethod).
•Ethanol:Gasolinewithupto10%ethanol
(gasohol)or15%MTBE(methyltertiarybutyl
ether)byvolumeisacceptable.Ethanoland
MTBEarenotthesame.Gasolinewith15%
ethanol(E15)byvolumeisnotapprovedforuse.
Neverusegasolinethatcontainsmorethan
10%ethanolbyvolume,suchasE15(contains
15%ethanol),E20(contains20%ethanol),orE85
(containsupto85%ethanol).Usingunapproved
gasolinemaycauseperformanceproblemsand/or
enginedamagewhichmaynotbecoveredunder
warranty.
•Donotusegasolinecontainingmethanol.
•Donotstorefueleitherinthefueltankorfuel
containersoverthewinterunlessyouuseafuel
stabilizer.
•Donotaddoiltogasoline.
15
Using Stabilizer/Conditioner
Useafuelstabilizer/conditionerinthemachineto
providethefollowingbenets:
•Keepsfuelfreshduringstorageof90daysorless
(drainthefueltankwhenstoringthemachinefor
morethan90days)
•Cleanstheenginewhileitruns
•Eliminatesgum-likevarnishbuildupinthefuel
system,whichcauseshardstarting
Important:Donotusefueladditives
containingmethanolorethanol.
Addthecorrectamountoffuelstabilizer/conditioner
tothefuel.
Note:Afuelstabilizer/conditionerismost
effectivewhenmixedwithfreshfuel.T ominimize
thechanceofvarnishdepositsinthefuelsystem,
usefuelstabilizeratalltimes.
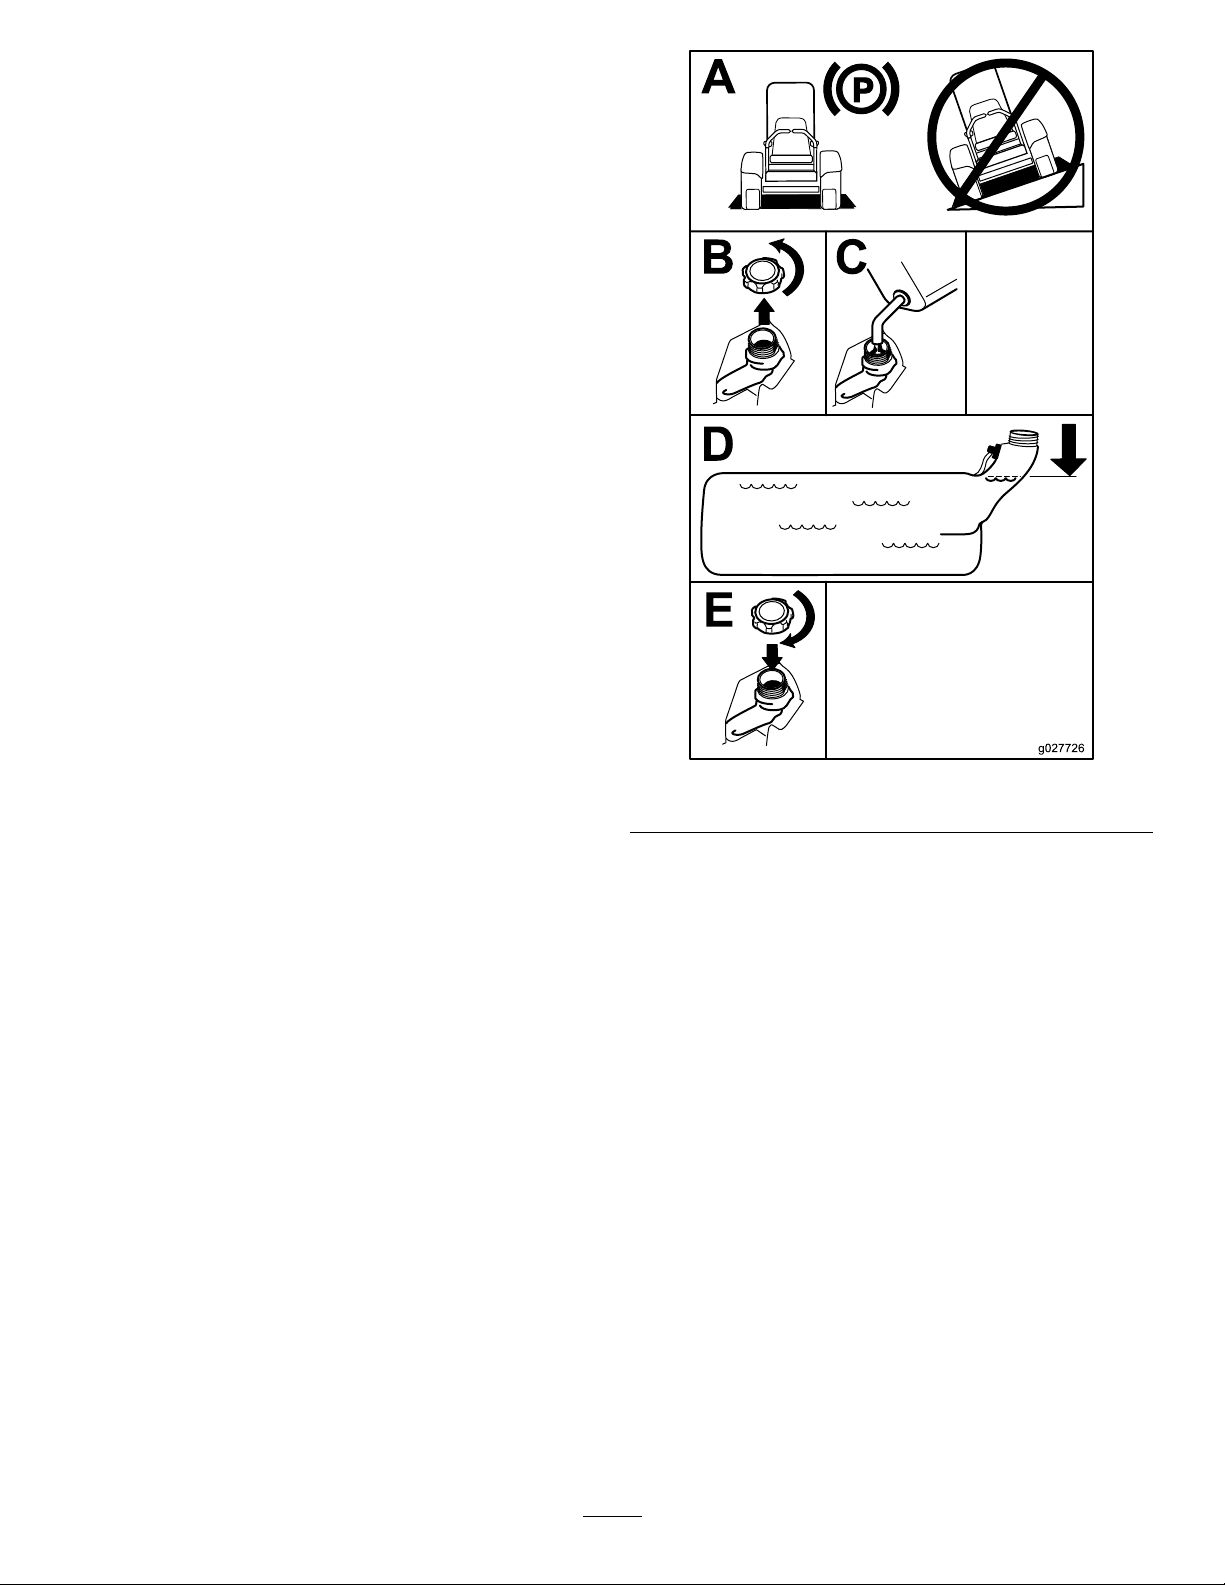
FillingtheFuelTank
1.Parkthemachineonlevelground.
2.Shutofftheengineandengagetheparking
brake.
3.Cleanaroundthefuel-tankcap.
4.Fillthefueltanktothebottomofthellerneck
(Figure7).
Note:Donotllthefueltankcompletelyfull.
Theemptyspaceinthetankallowsthegasoline
toexpand.
g027726
Figure7
CheckingtheEngine-Oil Level
Beforeyoustarttheengineandusethemachine,
checktheoillevelintheenginecrankcase;referto
CheckingtheEngine-OilLevel(page40).
BreakinginaNewMachine
Newenginestaketimetodevelopfullpower.Mower
decksanddrivesystemshavehigherfrictionwhen
new,placingadditionalloadontheengine.Allow
40to50hoursofbreak-intimefornewmachinesto
developfullpowerandbestperformance.
16
UsingtheRollover ProtectionSystem(ROPS)
WARNING
Toavoidinjuryordeathfromrollover:keep
therollbarinthefullyraisedlockedposition
andusetheseatbelt.
Ensurethattheseatissecuredtothe
machine.
WARNING
Thereisnorolloverprotectionwhentheroll
barisinthedownposition.
•Lowertherollbaronlywhenabsolutely
necessary.
•Donotweartheseatbeltwhentherollbar
isinthedownposition.
•Driveslowlyandcarefully.
•Raisetherollbarassoonasclearance
permits.
•Checkcarefullyforoverheadclearances
(i.e.,branches,doorways,electricalwires)
beforedrivingunderanyobjectsanddo
notcontactthem.
Important:Lowertherollbaronlywhen
absolutelynecessary.
Important:Ensurethattheseatissecuredto
themachine.
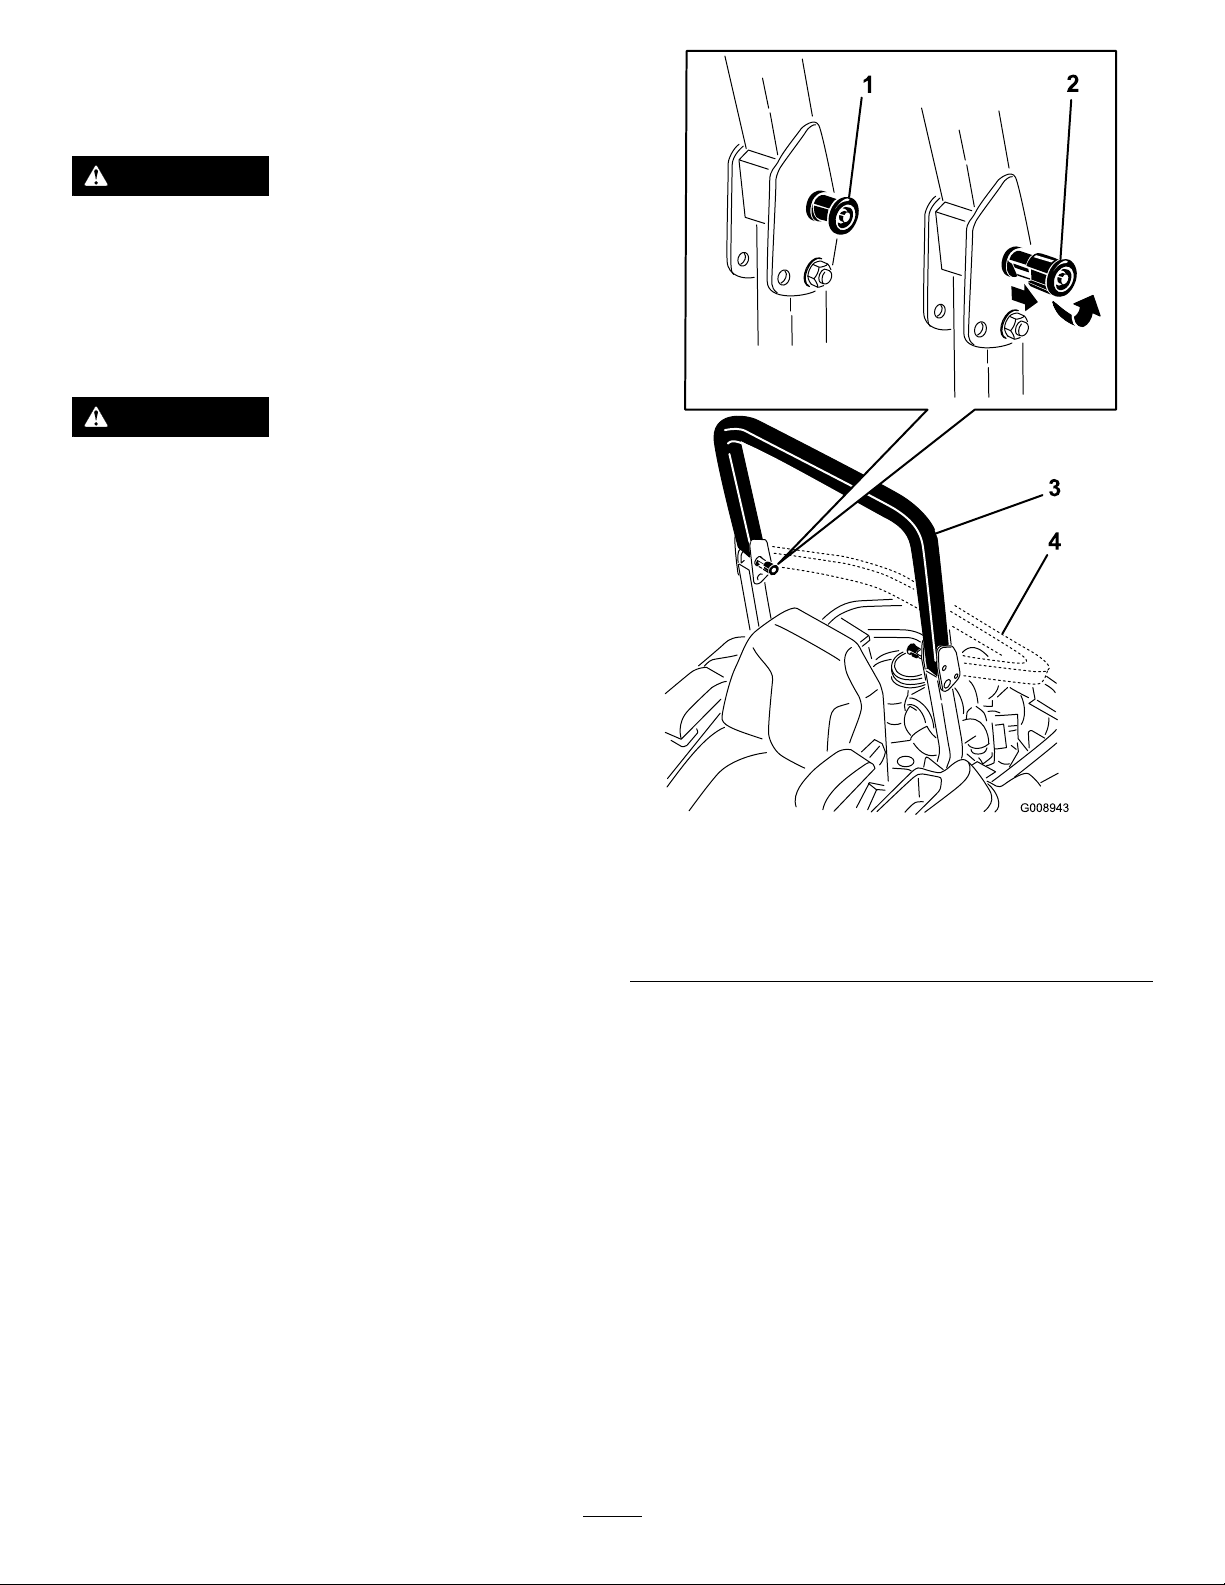
1.Tolowertherollbar,applyforwardpressureto
theupperpartoftherollbar.
2.Pullbothknobsoutandrotatethem90°sothey
arenotengaged(Figure8).
3.Lowertherollbartothedownposition(Figure
8).
Figure8
1.ROPSknob
2.PulltheROPSknobout
androtate90degrees
4.Toraisetherollbar,raisetherollbartothe
operateposition,rotatetheknobssothatthey
movepartiallyintothegrooves(Figure8).
5.Raisetherollbartothefulluprightpositionwhile
pushingontheupperrollbarandthepinssnap
intopositionwhentheholesalignwiththepins
(Figure8).
3.Rollbarintheupright
position
4.Rollbarinthefolded
position
Important:Alwaysusetheseatbeltwiththe
rollbarintheraisedposition.
6.Pushontherollbarandensurethatbothpins
areengaged.
g008943
17
ThinkSafetyFirst
CAUTION
Pleasereadallsafetyinstructionsandsymbolsinthe
safetysection.Knowingthisinformationcouldhelp
youorbystandersavoidinjury.
DANGER
Operatingthemachineonwetgrassorsteep
slopescancauseslidingandlossofcontrol.
•Donotoperateonslopesgreaterthan15
degrees.
•Reducespeedanduseextremecautionon
slopes.
•Donotoperatethemachinenearwater.
DANGER
Wheelsdroppingoveredgescancause
rollovers,whichmayresultinseriousinjury,
death,ordrowning.
Donotoperatethemachineneardrop-offs.
DANGER
Operatingthemachinewhiletherollbaris
downmayleadtoseriousinjuryordeathin
theeventofarollover.
Alwayskeeptherollbarinthefullyraisedand
lockedpositionandusetheseatbelt.
Thismachineproducessoundlevelsin
excessof85dBAattheoperator’searand
cancausehearinglossthroughextended
periodsofexposure.
Wearhearingprotectionwhenoperatingthis
machine.
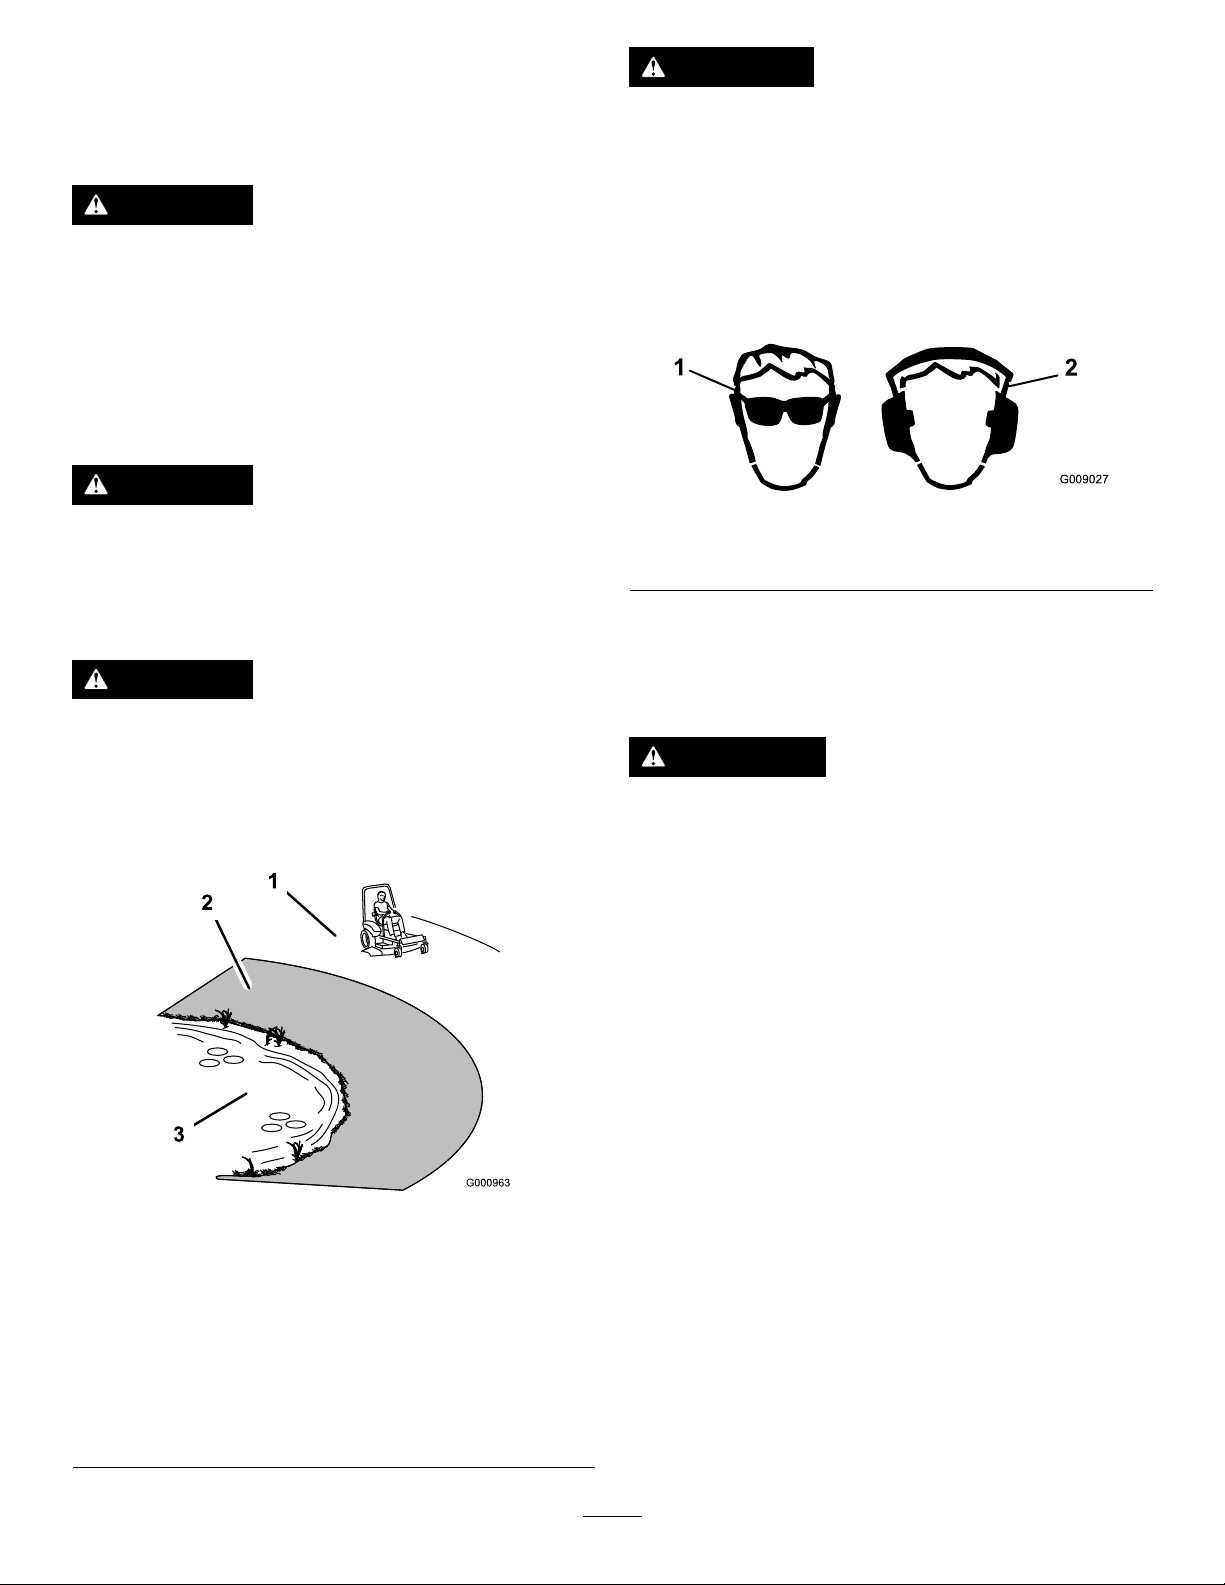
Useprotectiveequipmentforyoureyes,ears,hands,
feet,andhead.
g009027
Figure10
1.Weareyeprotection.2.Wearhearingprotection.
UsingtheSafety-Interlock System
WARNING
Ifsafety-interlockswitchesaredisconnected
ordamaged,themachinecouldoperate
unexpectedlycausingpersonalinjury.
1.SafeZone—usethe
machinehereonslopes
lessthan15degreesor
atareas.
2.DangerZone—usea
walk-behindmowerand/or
ahandtrimmeronslopes
greaterthan15degrees
andneardrop-offsor
water.
Figure9
3.Water
•Donottamperwiththeinterlockswitches.
•Checktheoperationoftheinterlock
switchesdaily,andreplaceanydamaged
switchesbeforeoperatingthemachine.
Understandingthe Safety-InterlockSystem
Thesafety-interlocksystemisdesignedtopreventthe
enginefromstartingunless:
•Theparkingbrakeisengaged.
g000963
•Theblade-controlswitch(PTO)isdisengaged.
•Themotion-controlleversareintheNEUTRAL-LOCK
position.
Thesafety-interlocksystemalsoisdesignedtoshutoff
theenginewhenthetractioncontrolsaremovedfrom
thelockedpositionwiththeparkingbrakeengagedor
ifyourisefromtheseatwhenthePTOisengaged.
Thehourmeterhassymbolstonotifytheuserwhen
theinterlockcomponentisinthecorrectposition.
Whenthecomponentisinthecorrectposition,a
trianglelightsupinthecorrespondingsquare.
18
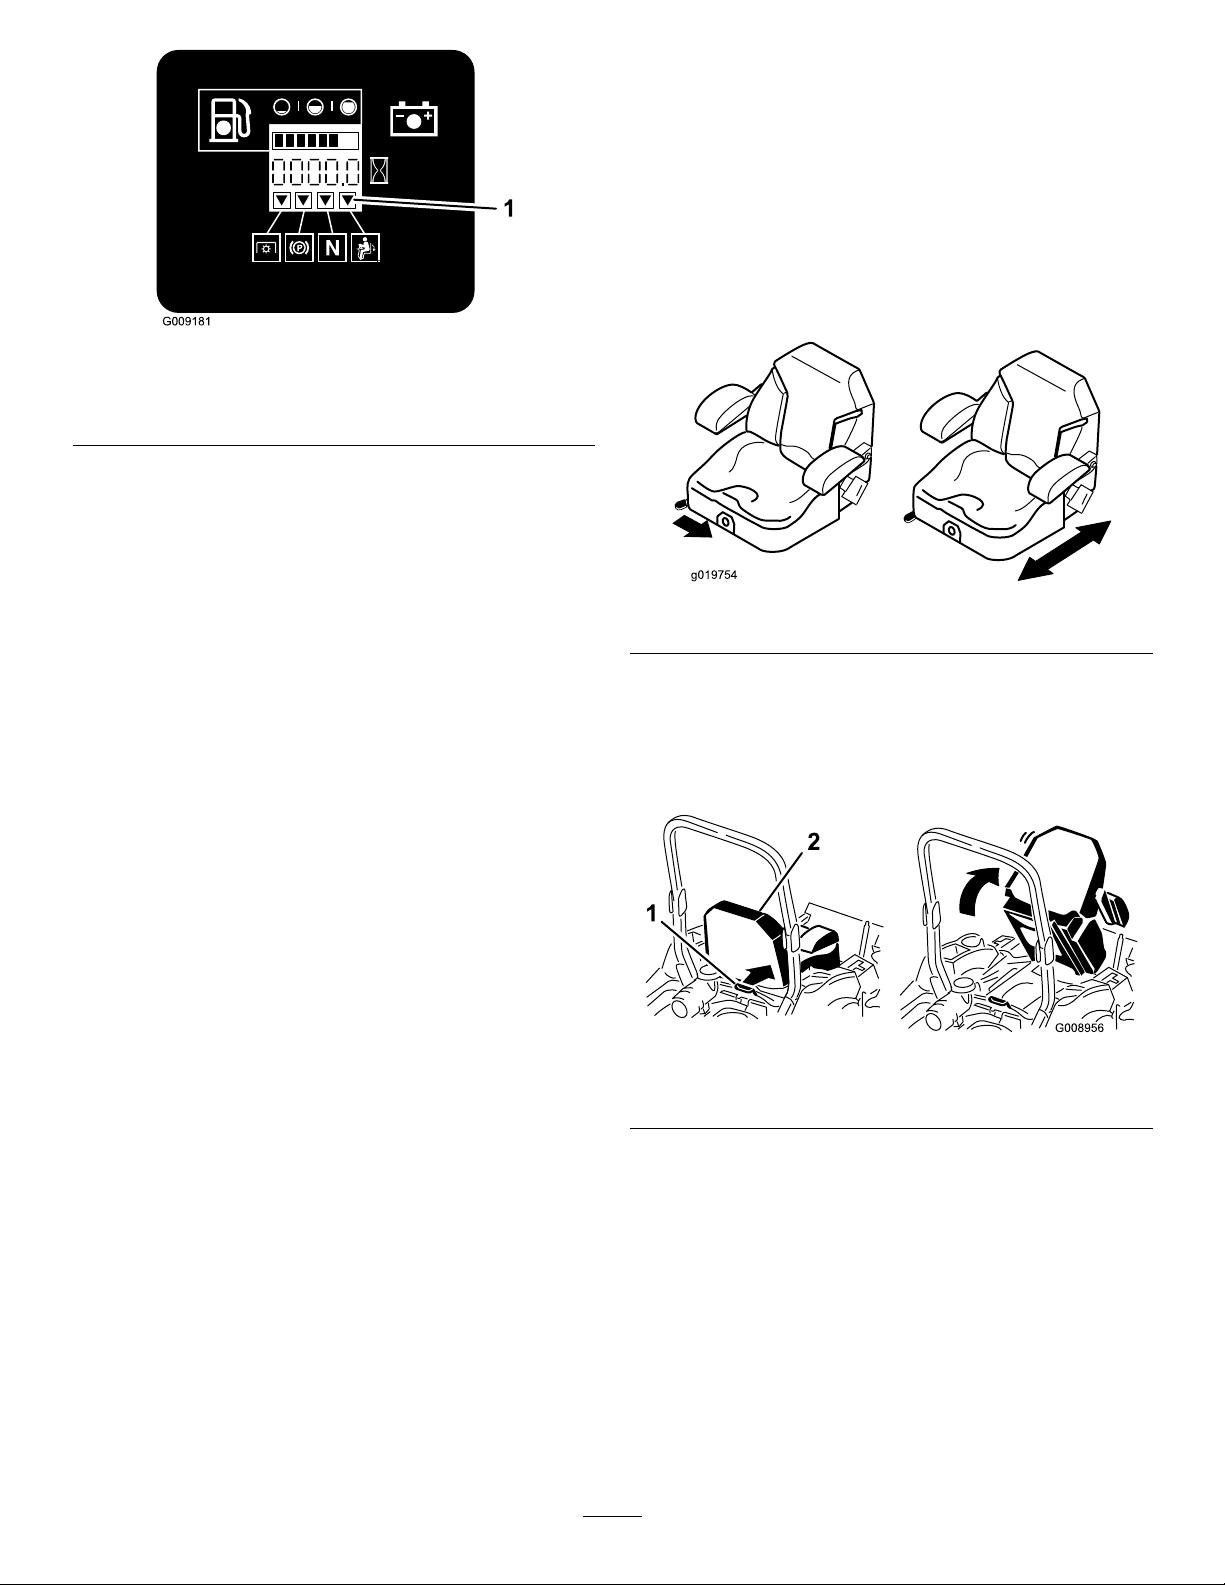
Figure11
1.Triangleslightupwhentheinterlockcomponentsareinthe
correctposition
TestingtheSafety-Interlock System
totheNEUTRAL-LOCKposition.Trystartingthe
engine;theengineshouldnotstart.
PositioningtheSeat
Theseatcanmoveforwardandbackward.Position
theseatwhereyouhavethebestcontrolofthe
machineandaremostcomfortable.
Toadjusttheseat,movetheleversidewaystounlock
theseat(Figure12).
g009181
ServiceInterval:Beforeeachuseordaily
Testthesafety-interlocksystembeforeyouusethe
machineeachtime.Ifthesafetysystemdoesnot
operateasdescribedbelow,haveanAuthorized
ServiceDealerrepairthesafetysystemimmediately .
1.Sittingontheseat,engagetheparkingbrake
andmovetheblade-controlswitch(PTO)tothe
ONposition.Trystartingtheengine;theengine
shouldnotstart.
2.Sittingontheseat,engagetheparkingbrake
andmovetheblade-controlswitch(PTO)tothe
OFFposition.Moveeithermotion-controllever
(outoftheNEUTRAL-LOCKposition).Trystarting
theengine;theengineshouldnotstart.Repeat
fortheothercontrollever.
3.Sittingontheseat,engagetheparkingbrake,
movetheblade-controlswitch(PTO)totheOFF
position,andmovethemotion-controllevers
totheNEUTRAL-LOCKposition.Nowstartthe
engine.Whiletheengineisrunning,disengage
theparkingbrake,engagetheblade-control
switch(PTO),andriseslightlyfromtheseat;the
engineshouldshutoff.
g019754
Figure12
UnlatchingtheSeat
Tounlatchtheseat,pushtheseatlatchforward
(Figure13).
g008956
Figure13
1.Seatlatch2.Seat
4.Sittingontheseat,engagetheparkingbrake,
movetheblade-controlswitch(PTO)totheOFF
position,andmovethemotion-controllevers
totheNEUTRAL-LOCKposition.Nowstartthe
engine.Whiletheengineisrunning,center
eithermotioncontrolandmove(forwardor
reverse);theengineshouldshutoff.Repeatfor
othermotioncontrol.
5.Sittingontheseat,disengagetheparkingbrake,
movetheblade-controlswitch(PTO)totheOFF
position,andmovethemotion-controllevers
19
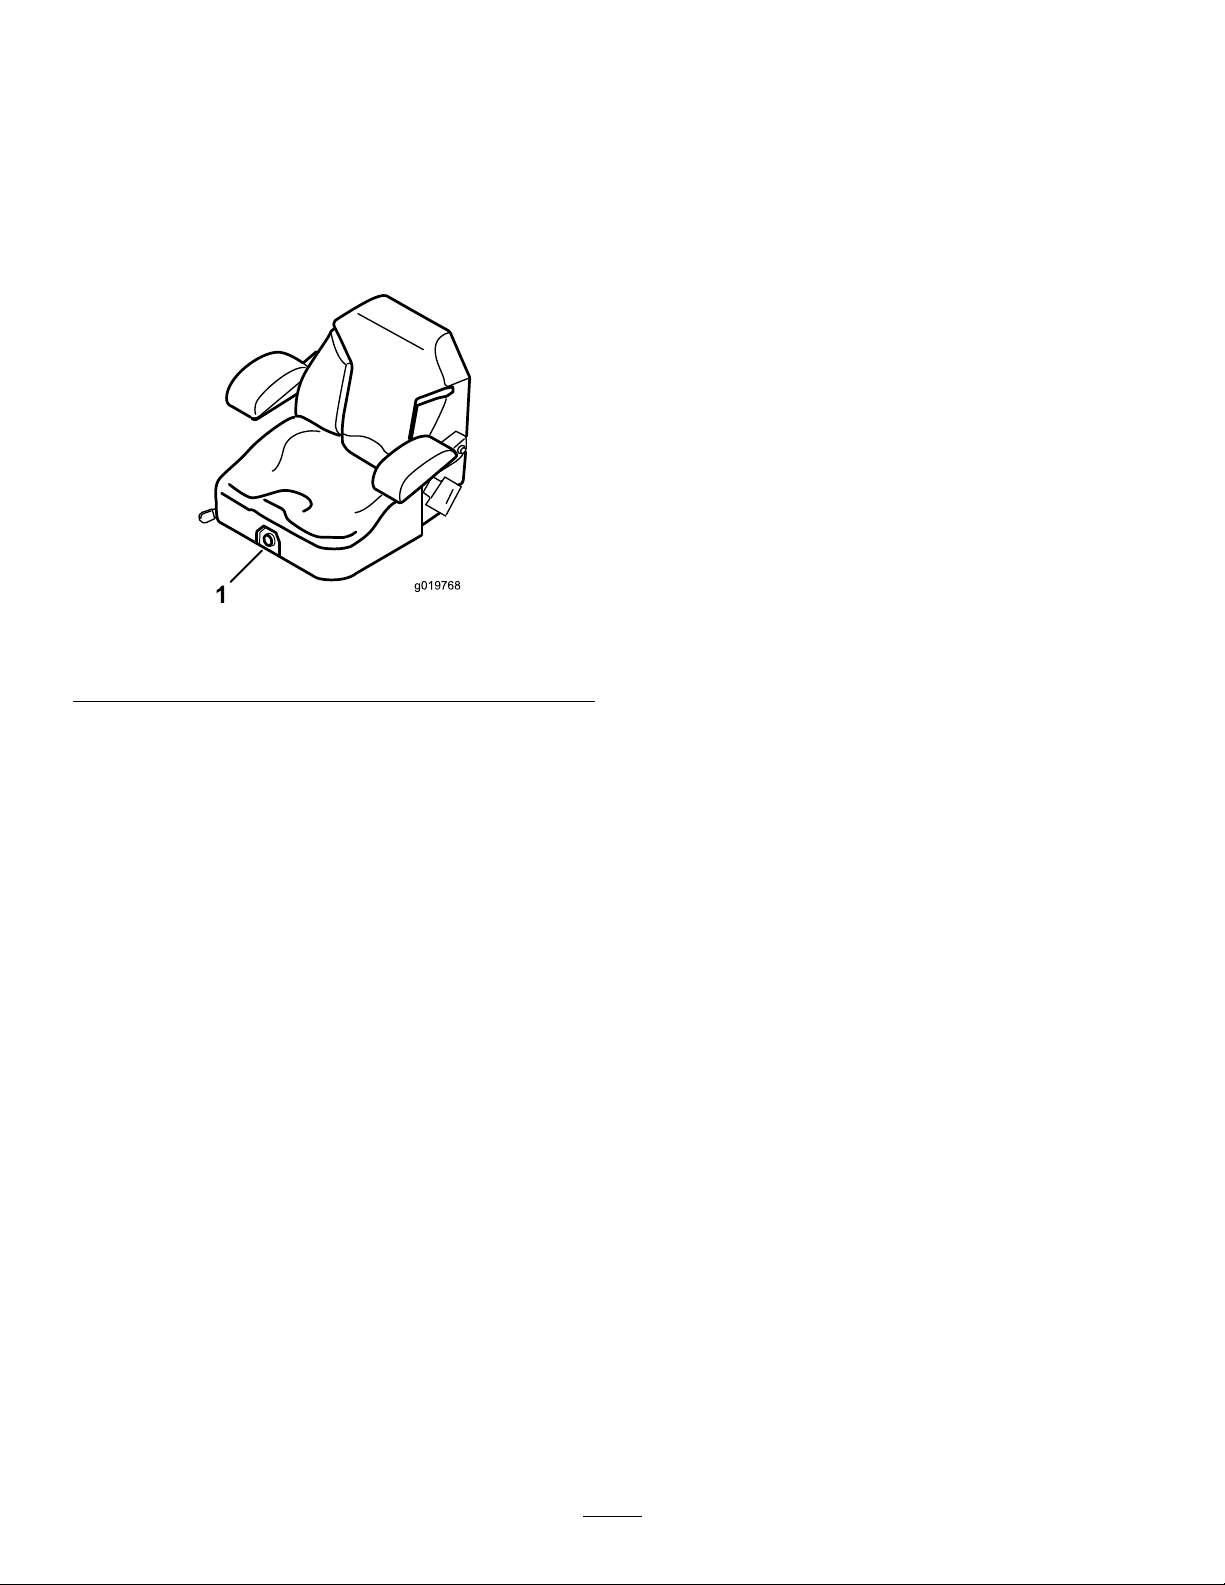
ChangingtheSeat Suspension
Theseatadjuststoprovideasmoothandcomfortable
ride.Positiontheseatwhereyouaremost
comfortable.
Toadjust,turntheknobinfronteitherdirectionto
providethebestcomfort(Figure14).
Figure14
1.Seat-suspensionknob
DuringOperation
DuringOperationSafety
GeneralSafety
•Theowner/operatorcanpreventandisresponsible
foraccidentsthatmaycausepersonalinjuryor
propertydamage.
•Wearappropriateclothing,includingeye
protection;slip-resistant,substantialfootwear;and
hearingprotection.Tiebacklonghairanddonot
wearjewelry.
•Donotoperatethemachinewhileill,tired,or
undertheinuenceofalcoholordrugs.
•Nevercarrypassengersonthemachineandkeep
bystandersandpetsawayfromthemachine
duringoperation.
•Keepyourhandsandfeetawayfromthecutting
units.Keepclearofthedischargeopeningatall
times.
•Lookbehindanddownbeforebackinguptobe
sureofaclearpath.
•Usecarewhenapproachingblindcorners,shrubs,
trees,orotherobjectsthatmayobscureyour
vision.
•Donotmowneardrop-offs,ditches,or
embankments.Themachinecouldsuddenlyroll
overifawheelgoesovertheedgeoriftheedge
givesway.
•Stopthebladeswheneveryouarenotmowing.
•Stopthemachineandinspectthebladesafter
strikinganobjectorifthereisanabnormal
vibrationinthemachine.Makeallnecessary
repairsbeforeresumingoperation.
•Slowdownandusecautionwhenmakingturns
andcrossingroadsandsidewalkswiththe
machine.Alwaysyieldtheright-of-way.
•Disengagethedrivetothecuttingunitandshut
g019768
offtheenginebeforeadjustingtheheightof
cut(unlessyoucanadjustitfromtheoperating
position).
•Neverrunanengineinanareawhereexhaust
gasesareenclosed.
•Neverleavearunningmachineunattended.
•Beforeleavingtheoperatingposition(including
toemptythecatchersortounclogthechute),do
thefollowing:
–Stopthemachineonlevelground.
–Disengagethepowertake-offandlowerthe
attachments.
–Engagetheparkingbrake.
–Shutofftheengineandremovethekey.
–Waitforallmovingpartstostop.
•Donotoperatethemachinewhenthereistherisk
oflightning.
•Donotusethemachineasatowingvehicle.
•Donotchangethegovernorspeedoroverspeed
theengine.
•Useaccessoriesandattachmentsapprovedby
Toroonly.
RolloverProtectionSystem
•Operatethemachineonlyingoodvisibilitytoavoid
holesorhiddenhazards.
•Avoidmowingonwetgrass.Reducedtraction
couldcausethemachinetoslide.
•Ensurethatalldrivesareinneutral,theparking
brakeisengaged,andyouareintheoperating
positionbeforeyoustarttheengine.
(ROPS)Safety
•Donotremovetherollbarfromthemachine.
•Ensurethattheseatbeltisattachedandthatyou
canreleaseitquicklyinanemergency.
•Alwayswearyourseatbeltwhentherollbarisup.
•Checkcarefullyforoverheadobstructionsanddo
notcontactthem.
20
•Keeptherollbarinsafeoperatingconditionby
thoroughlyinspectingitperiodicallyfordamage
andkeepingallthemountingfastenerstight.
•Replaceadamagedrollbar.Donotrepairoralter
it.
SlopeSafety
•Slowdownthemachineanduseextracareon
hillsides.Travelupanddownonhillsides.Turf
conditionscanaffectthestabilityofthemachine.
•Avoidturningthemachineonslopes.Ifyoumust
turnthemachine,turnitslowlyandgradually
downhill,ifpossible.
•Donotturnthemachinesharply.Usecarewhen
reversingthemachine.
•Useextracarewhileoperatingthemachinewith
attachments;theycanaffectthestabilityofthe
machine.
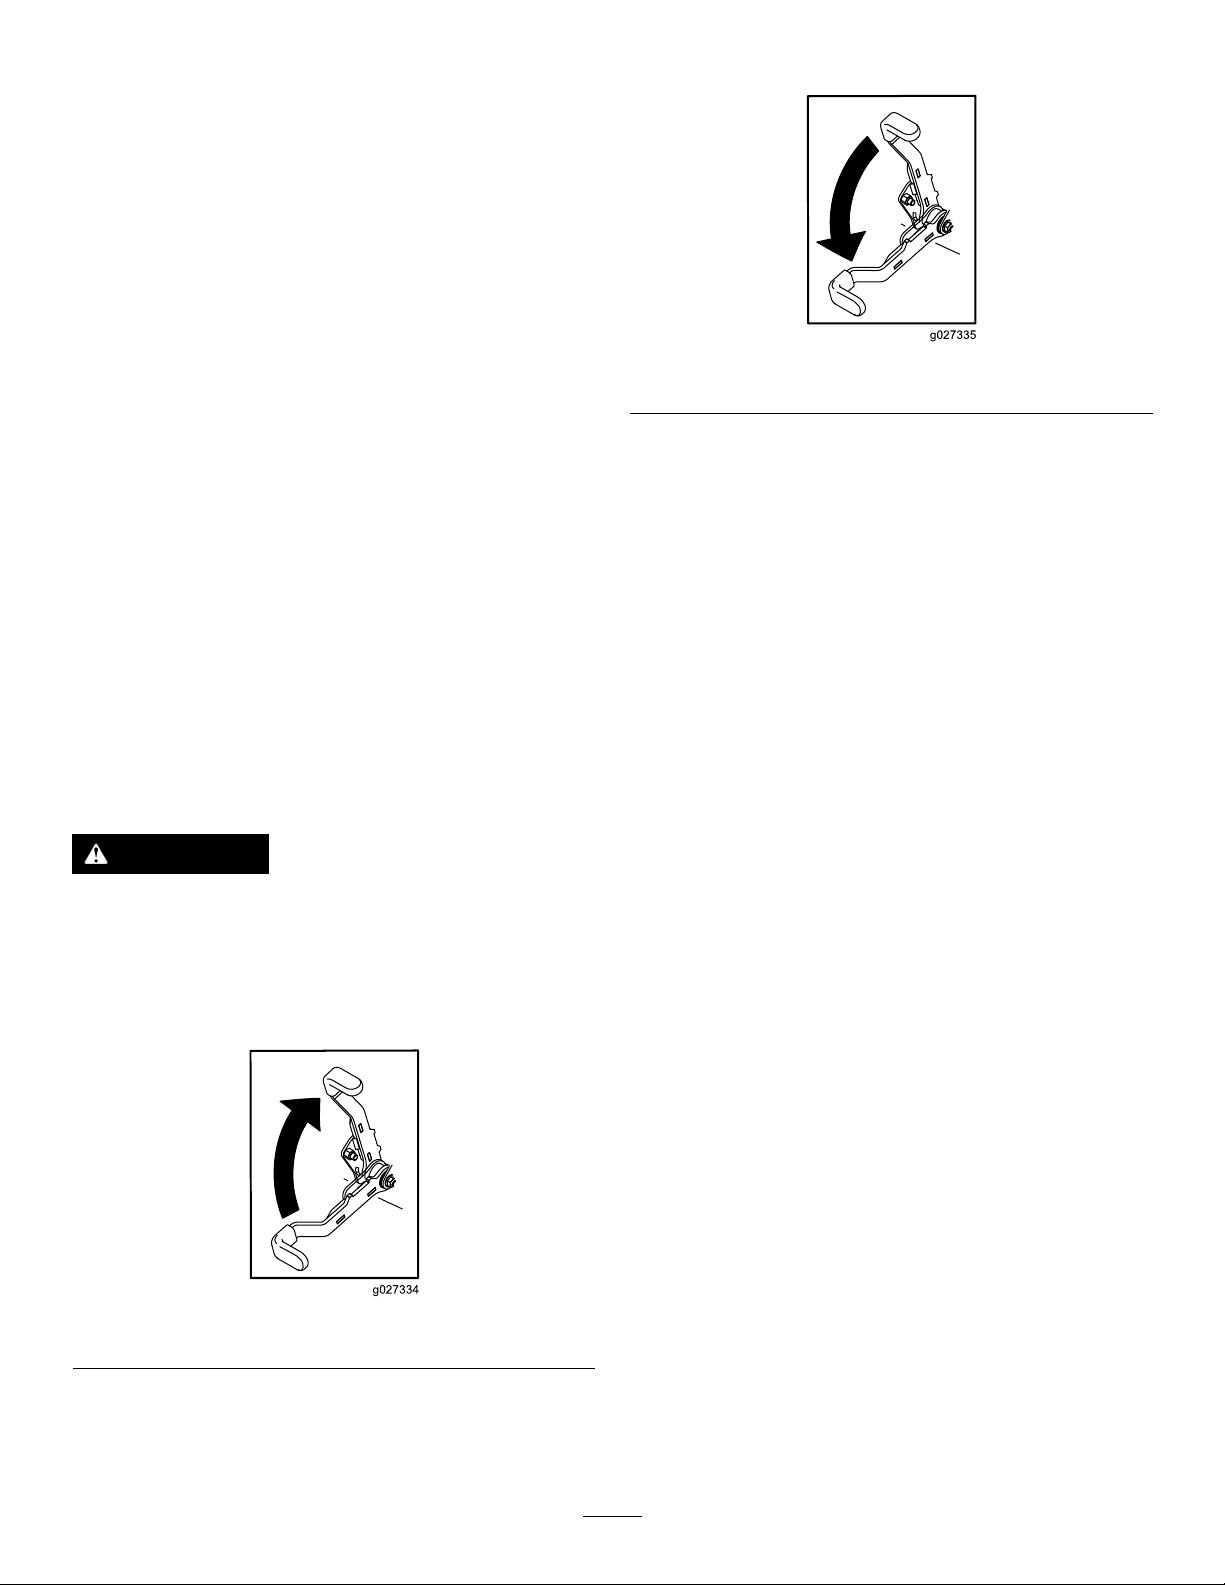
OperatingtheParking
DisengagingtheParkingBrake
g027335
Figure16
Brake
Alwaysengagetheparkingbrakewhenyoustopthe
machineorleaveitunattended.
EngagingtheParkingBrake
WARNING
Theparkingbrakemaynotholdthemachine
parkedonaslopeandcouldcausepersonal
injuryorpropertydamage.
Donotparkonslopesunlessthewheelsare
chockedorblocked.
Figure15
g027334
21
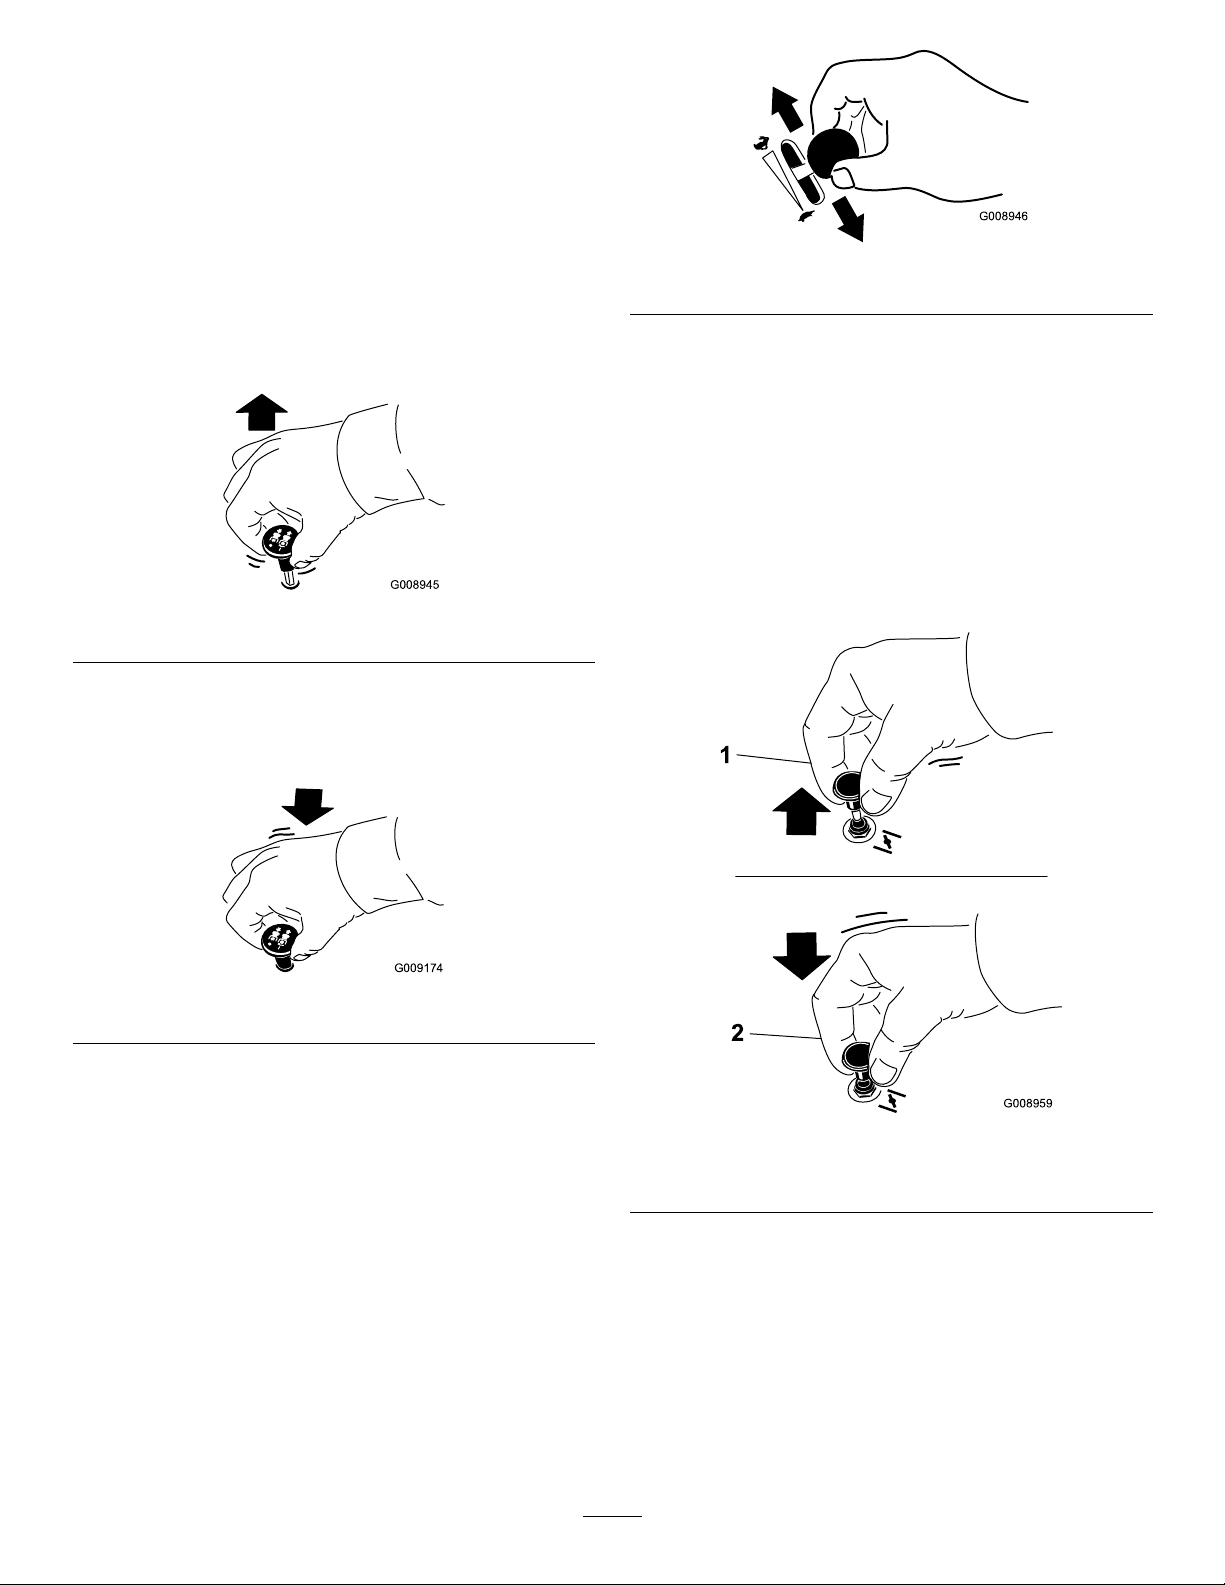
OperatingtheMower Blade-ControlSwitch(PTO)
Theblade-controlswitch(PTO)startsandstopsthe
mowerbladesandanypoweredattachments.
EngagingtheBlade-Control Switch(PTO)
Note:Engagingtheblade-controlswitch(PTO)with
thethrottlepositionathalforlesscausesexcessive
weartothedrivebelts.
Figure17
DisengagingtheBlade-Control Switch(PTO)
g008946
Figure19
OperatingtheChoke
Usethechoketostartacoldengine.
1.Iftheengineiscold,usethechoketostartthe
engine.
2.Pulluponthechokeknobtoengagethechoke
beforeusingtheignitionswitch(Figure20).
g008945
3.Pushdownonthechoketodisengagethechoke
aftertheenginehasstarted(Figure20).
Figure18
OperatingtheThrottle
YoucanmovethethrottlecontrolbetweentheFAST
andSLOWpositions(Figure19).
AlwaysusetheFASTpositionwhenturningonthe
mowerdeckwiththeblade-controlswitch(PTO).
g009174
g008959
Figure20
1.Onposition2.Offposition
22
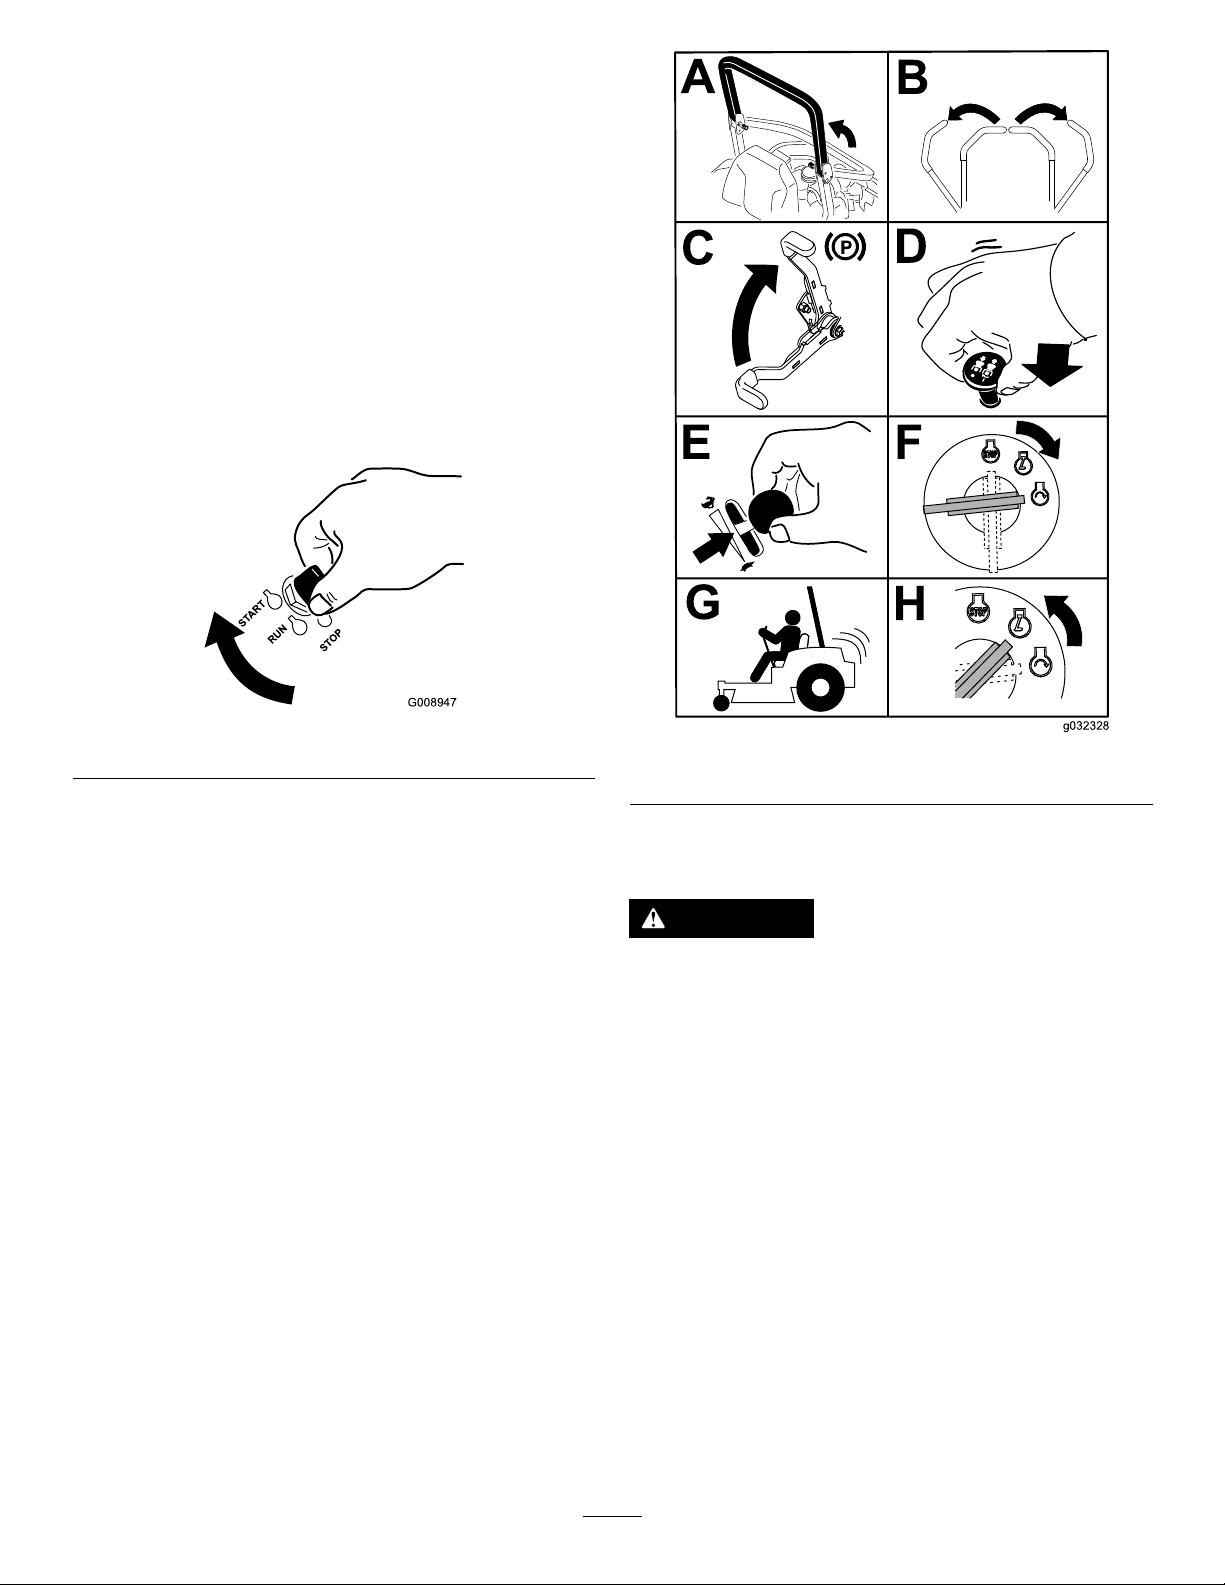
OperatingtheIgnition Switch
1.TurntheignitionkeytotheSTARTposition
(Figure21).
Note:Whentheenginesstarts,releasethekey.
Important:Donotengagestarterformore
than5secondsatatime.Iftheenginefails
tostartallowa15secondcool-downperiod
betweenattempts.Failuretofollowthese
instructionscanburnoutthestartermotor.
Note:Y oumayneedmultipleattemptstostart
theenginewhenyoustartitthersttimeafter
thefuelsystemhasbeenwithoutfuelcompletely.
g008947
Figure21
2.Turntheignitionkeytoshutofftheengine.
StartingandShuttingOff theEngine
StartingtheEngine
Important:Donotengagestarterformorethan5
secondsatatime.Iftheenginefailstostart,wait
15secondsbetweenattempts.Failuretofollow
theseinstructionscanburnoutthestartermotor.
Note:Youmayneedmultipleattemptstostartthe
enginethersttimeafteraddingfueltoanemptyfuel
system.
g032328
Figure22
ShuttingOfftheEngine
CAUTION
Childrenorbystandersmaybeinjuredifthey
moveorattempttooperatethemachinewhile
itisunattended.
Alwaysremovetheignitionkeyandengage
theparkingbrakewhenleavingthemachine
unattended,evenifjustforafewminutes.
23
 Loading...