


FormNo.3443-561RevB
Flex-ForcePowerSystem™60VPoleSaw
51847T
Flex-ForcePowerSystem™60VHochentaster
51847T
PodadoradealturaFlex-ForcePowerSystem™60V
51847T
ÉlagueusesurpercheFlex-ForcePowerSystem™de60V
51847T
SegaapalodaFlex-ForcePowerSystem™60V
51847T
Flex-ForcePowerSystem™60Vhoogsnoeier
51847T
Flex-ForcePowerSystem™60Vgrensag
51847T
PodkrzesywarkaFlex-ForcePowerSystem™60V
51847T
Flex-ForcePowerSystem™60Vstolpsåg
51847T
www.T oro.com.
*3443-561*

FormNo.3443-540RevB
Flex-ForcePowerSystem
PoleSaw
ModelNo.51847T—SerialNo.321000001andUp
™
60V
Registeratwww.T oro.com.
OriginalInstructions(EN)
*3443-540*
Forassistance,pleasesee
www.Toro.com/support
forinstructionalvideosor
contactyourAuthorized
ServiceDealerbefore
returningthisproduct.
Introduction
Thispolesawisdesignedfortrimmingsmallbranches
andlimbsupto6inches(15.2cm)indiameter.Itis
tobeusedonlybyadults.ItisdesignedtouseT oro
Flex-Forcelithium-ionbatterypackModel81820,
81825,81850,81860,or81875.Thesebatterypacks
aredesignedtobechargedonlybybatterycharger
Models81801,81101,81802,or81805.Usingthese
productsforpurposesotherthantheirintendeduse
couldprovedangeroustoyouandbystanders.
Important:Withyourmobiledevice,youcan
scantheQRcode(ifequipped)ontheserial
numberplatetoaccesswarranty,parts,andother
productinformation.
g374224
Figure1
1.Modelandserialnumberlocation.
Important:Ifyouareusingthismachinewith
batterypackModels81850,81860,or81875,you
mustinstalltheincludedquick-releaseharness
forpropersupportandbalance.
Donotuseotherharnessesormultipleharnesses
whenoperatingthemachine.
Readthisinformationcarefullytolearnhowtooperate
andmaintainyourproductproperlyandtoavoid
injuryandproductdamage.Y ouareresponsiblefor
operatingtheproductproperlyandsafely.
Visitwww.T oro.comformoreinformation,including
safetytips,trainingmaterials,accessoryinformation,
helpndingadealer,ortoregisteryourproduct.
Wheneveryouneedservice,genuineT oroparts,or
additionalinformation,contactanAuthorizedService
DealerorT oroCustomerServiceandhavethemodel
andserialnumbersofyourproductready.Figure1
identiesthelocationofthemodelandserialnumbers
ontheproduct.Writethenumbersinthespace
provided.
ModelNo.
SerialNo.
Thismanualidentiespotentialhazardsandhas
safetymessagesidentiedbythesafety-alertsymbol
(Figure2),whichsignalsahazardthatmaycause
seriousinjuryordeathifyoudonotfollowthe
recommendedprecautions.
sa-black
Figure2
Safety-alertsymbol
Thismanualuses2wordstohighlightinformation.
Importantcallsattentiontospecialmechanical
informationandNoteemphasizesgeneralinformation
worthyofspecialattention.
©2022—TheToro®Company
8111LyndaleAvenueSouth
Bloomington,MN55420
Contactusatwww.T oro.com.
2
PrintedinChina
AllRightsReserved

Contents
Safety.......................................................................3
SafetyandInstructionalDecals..........................7
Setup........................................................................8
InstallingtheBarandChain................................8
AssemblingthePoleSaw...................................9
AddingBarandChainOiltothePole
Saw...............................................................10
InstallingtheHarness........................................11
ProductOverview....................................................11
Specications..................................................12
Operation................................................................13
BeforeUsingthePoleSaw...............................13
StartingthePoleSaw.......................................13
ShuttingOffthePoleSaw.................................13
CuttingwiththePoleSaw.................................14
PruningaTree..................................................15
RemovingtheBatteryPack..............................15
Maintenance...........................................................16
RecommendedMaintenanceSchedule(s)...........16
CheckingtheOilLevelandAddingBarand
ChainOil.......................................................16
CheckingtheFlowofBarandChain
Oil.................................................................17
AdjustingtheChainT ension.............................17
ServicingtheGuideBar,Chain,andDrive
Sprocket........................................................19
InstallingtheGuideBarandChain....................20
SharpeningtheChain.......................................20
Service.............................................................20
Storage...................................................................21
Troubleshooting......................................................22
Safety
WARNING
Readallsafetywarnings,instructions,
illustrationsandspecicationsprovidedwith
thispowertool.
Failuretofollowallinstructionslistedbelow
mayresultinelectricshock,reand/or
seriousinjury.
Saveallwarningsandinstructionsforfuture
reference.
Theterm“powertool”inallthewarningsrefers
toyourmains-operated(corded)powertoolor
battery-operated(cordless)powertool.
IMPORTANTSAFETY
INSTRUCTIONS
I.Workareasafety
1.Keepworkareacleanandwelllit.Cluttered
ordarkareasinviteaccidents.
2.Donotoperatepowertoolsinexplosive
atmospheres,suchasinthepresenceof
ammableliquids,gasses,ordust.Power
toolscreatesparkswhichmayignitethedust
orfumes.
3.Keepchildrenandbystandersawaywhile
operatingapowertool.Distractionscancause
youtolosecontrol.
II.Electricalsafety
1.Powertoolplugsmustmatchtheoutlet.
Nevermodifythepluginanyway .Donotuse
anyadapterplugswithearthed(grounded)
powertools.Unmodiedplugsandmatching
outletswillreduceriskofelectricshock.
2.Avoidbodycontactwithearthedorgrounded
surfaces,suchaspipes,radiators,ranges
andrefrigerators.Thereisanincreasedrisk
ofelectricshockifyourbodyisearthedor
grounded.
3.Donotexposepowertoolstorainorwet
conditions.Waterenteringapowertoolwill
increasetheriskofelectricshock.
4.Donotabusethecord.Neverusethecord
forcarrying,pullingorunpluggingthepower
tool.Keepcordawayfromheat,oil,sharp
edgesormovingparts.Damagedorentangled
cordsincreasetheriskofelectricshock.
5.Whenoperatingapowertooloutdoors,use
anextensioncordsuitableforoutdooruse.
3

Useofacordsuitableforoutdoorusereduces
theriskofelectricshock.
6.Ifoperatingapowertoolinadamplocation
isunavoidable,usearesidualcurrentdevice
(RCD)protectedsupply .UseofanRCD
reducestheriskofelectricshock.
III.Personalsafety
1.Stayalert,watchwhatyouaredoinganduse
commonsensewhenoperatingapowertool.
Donotuseapowertoolwhileyouaretired
orundertheinuenceofdrugs,alcohol,or
medication.Amomentofinattentionwhile
operatingpowertoolsmayresultinserious
personalinjury .
2.Usepersonalprotectiveequipment.Always
weareyeprotection.Protectiveequipment
suchasdustmask,non-skidsafetyshoes,hard
hat,orhearingprotectionusedforappropriate
conditionsreducespersonalinjuries.
3.Preventunintentionalstarting.Ensure
theswitchisintheOFF-positionbefore
connectingtopowersourceand/orbattery
pack,pickinguporcarryingthetool.Carrying
powertoolswithyourngerontheswitchor
energizingpowertoolsthathavetheswitchon
invitesaccidents.
4.Removeanyadjustingkeyorwrenchbefore
turningthepowertoolon.Awrenchorakey
leftattachedtoarotatingpartofthepowertool
mayresultinpersonalinjury.
5.Donotoverreach.Keepproperfootingand
balanceatalltimes.Thisenablesbettercontrol
ofthepowertoolinunexpectedsituations.
6.Dressproperly.Donotwearlooseclothing
orjewelry.Keepyourhair,clothing,and
glovesawayfrommovingparts.Loose
clothes,jewelry ,orlonghaircanbecaughtin
movingparts.
7.Ifdevicesareprovidedfortheconnection
ofdustextractionandcollectionfacilities,
ensuretheseareconnectedandproperly
used.Useofdustcollectioncanreduce
dust-relatedhazards.
8.Donotletfamiliaritygainedfromfrequent
useoftoolsallowyoutobecomecomplacent
andignoretoolsafetyprinciples.Acareless
actioncancausesevereinjurywithinafraction
ofasecond.
9.Donotallowchildrenoruntrainedpeopleto
operateorservicethisdevice.Allowonly
peoplewhoareresponsible,trained,familiar
withtheinstructions,andphysicallycapable
tooperateorservicethedevice.
IV.Powertooluseandcare
1.Donotforcethepowertool.Usethecorrect
powertoolforyourapplication.Thecorrect
powertoolwilldothejobbetterandsaferatthe
rateforwhichitwasdesigned.
2.Donotusethepowertooliftheswitch
doesnotturnitonandoff.Anypowertool
thatcannotbecontrolledwiththeswitchis
dangerousandmustberepaired.
3.Disconnecttheplugfromthepowersource
and/orremovethebatterypack,ifdetachable,
fromthepowertoolbeforemakingany
adjustments,changingaccessories,or
storingpowertools.Suchpreventivesafety
measuresreducetheriskofstartingthepower
toolaccidentally .
4.Storeidlepowertoolsindoors,outofthe
reachofchildren,anddonotallowpersons
unfamiliarwiththepowertoolorthese
instructionstooperatethepowertool.Power
toolsaredangerousinthehandsofuntrained
users.
5.Maintainpowertoolsandaccessories.
Checkformisalignmentorbindingofmoving
parts,breakageofparts,andanyother
conditionthatmayaffectthepowertool’s
operation.Ifdamaged,havethepowertool
repairedbeforeuse.Manyaccidentsare
causedbypoorlymaintainedpowertools.
6.Keepcuttingtoolssharpandclean.Properly
maintainedcuttingtoolswithsharpcuttingedges
arelesslikelytobindandareeasiertocontrol.
7.Usethepowertool,accessories,andtoolbits
etc.inaccordancewiththeseinstructions,
takingintoaccounttheworkingconditions
andtheworktobeperformed.Useofthe
powertoolforoperationsdifferentfromthose
intendedcouldresultinahazardoussituation.
8.Keephandlesandgraspingsurfacesdry,
cleanandfreefromoilandgrease.Slippery
handlesandgraspingsurfacesdonotallow
forsafehandlingandcontrolofthetoolin
unexpectedsituations.
V.Batterytooluseandcare
1.Rechargeonlywiththechargerspeciedby
themanufacturer.Achargerthatissuitablefor
onetypeofbatterypackmaycreateariskofre
whenusedwithanotherbatterypack.
2.Usepowertoolsonlywithspecically
designatedbatterypacks.Useofanyother
batterypacksmaycreateariskofinjuryandre.
3.Whenbatterypackisnotinuse,keepitaway
fromothermetalobjects,likepaperclips,
coins,keys,nails,screwsorothersmall
metalobjects,thatcanmakeaconnection
4

fromoneterminaltoanother.Shortingthe
batteryterminalstogethermaycauseburnsor
are.
4.Underabusiveconditions,liquidmaybe
ejectedfromthebattery;avoidcontact.If
contactaccidentallyoccurs,ushwithwater.
Ifliquidcontactseyes,additionallyseek
medicalhelp.Liquidejectedfromthebattery
maycauseirritationorburns.
5.Donotuseabatterypackortoolthatis
damagedormodied.Damagedormodied
batteriesmayexhibitunpredictablebehavior
resultinginre,explosionorriskofinjury.
6.Donotexposeabatterypackortooltore
orexcessivetemperature.Exposuretoreor
temperatureabove100°C(212°F)maycause
explosion.
7.Followallcharginginstructionsanddo
notchargethebatterypackortooloutside
thetemperaturerangespeciedinthe
instructions.Chargingimproperlyorat
temperaturesoutsidethespeciedrangemay
damagethebatteryandincreasetheriskofre.
8.Donotexposeabatterypackortooltorain
orwetconditions.Waterenteringapowertool
willincreasetheriskofelectricshock.
9.CAUTION—Amistreatedbatterypackmay
presentariskofreorchemicalburn.Donot
disassemblethebatterypack.Donotheatthe
batterypackabove68°C(154°F)orincinerate
it.ReplacethebatterypackwithagenuineToro
batterypackonly;usinganothertypeofbattery
packmaycauseareorexplosion.Keep
batterypacksoutofthereachofchildrenand
intheoriginalpackaginguntilyouarereadyto
usethem.
VI.Service
1.Haveyourpowertoolservicedbya
qualiedrepairpersonusingonlyidentical
replacementparts.Thiswillensurethatthe
safetyofthepowertoolismaintained.
2.Neverservicedamagedbatterypacks.
Serviceofbatterypacksshouldonlybe
performedbythemanufacturerorauthorized
serviceproviders.
VII.Polesawsafety
1.Keepallpartsofthebodyawayfromthe
sawchain.Donotremovecutmaterialor
holdmaterialtobecutwhenthesawchain
ismoving.Makesuretheswitchisoffand
thebatterydisconnectedwhenclearing
jammedmaterial.Sawchaincontinuesto
moveaftertheswitchisturnedoff.Before
youstartthepolesaw,makesurethesaw
chainisnotcontactinganything.Amoment
ofinattentionwhileoperatingpolesawsmay
causeentanglementofyourclothingorbody
withthesawchain.
2.Carrythepolesawbythehandlewiththe
sawchainstopped.Whentransportingor
storingthepolesaw,alwaystthesawchain
devicecover.Properhandlingofthepolesaw
willreducepossiblepersonalinjuryfromthesaw
chain.
3.Holdthepowertoolbyinsulatedgripping
surfacesonly,becausethesawchainmay
contacthiddenwiring.Sawchainsorblades
contactinga″live″wiremaymakeexposed
metalpartsofthepowertool″live″andcould
givetheoperatoranelectricshock.
4.Donotusethepolesawinbadweather
conditions,especiallywhenthereisarisk
oflightning.Thisdecreasestheriskofbeing
struckbylightning.
5.Toreducetheriskofelectrocution,never
usenearanyelectricalpowerlines.Contact
withorusenearpowerlinesmaycauseserious
injuryorelectricshockresultingindeath.
6.Alwaysusetwohandswhenoperatingthe
polesaw.Holdthepolesawwithbothhands
toavoidlossofcontrol.
7.Alwaysuseheadprotectionwhenoperating
thepolesawoverhead.Fallingdebriscan
resultinseriouspersonalinjury .
8.Dressproperly—Wearappropriateclothing,
includingeyeprotection;longpants;
substantial,slip-resistantfootwear;gloves;
andhearingprotection.Tiebacklonghair
anddonotwearloosejewelrythatcanget
caughtinmovingparts.Useafacemask
industyoperatingconditions.Adequate
protectiveclothingwillreducepersonalinjuryby
yingdebrisoraccidentalcontactwiththesaw
chain.
9.Donotoperateapolesawinatree,on
aladder,fromarooftop,oranyunstable
support.Operationofapolesawinthismanner
couldresultinseriouspersonalinjury.
10.Alwayskeepproperfootingandoperate
thepolesawonlywhenstandingonxed,
secureandlevelsurface.Slipperyorunstable
surfacessuchasladdersmaycausealossof
balanceorcontrolofthepolesaw.
11.Whencuttingalimbthatisundertensionbe
alertforspringback.Whenthetensioninthe
woodbersisreleased,thespringloadedlimb
maystriketheoperatorand/orthrowthepole
sawoutofcontrol.
5

12.Useextremecautionwhencuttingbrushand
saplings.Theslendermaterialmaycatchthe
sawchainandbewhippedtowardyouorpull
youoffbalance.
13.Carrythepolesawwithbothhands,thepole
sawswitchedoffandawayfromyourbody.
Whentransportingorstoringthepolesaw,
alwaysttheguidebarcover.Properhandling
ofthepolesawwillreducethelikelihoodof
accidentalcontactwiththemovingsawchain.
14.Followinstructionsforlubricating,chain
tensioning,changingthebarandchain.
Improperlytensionedorlubricatedchainmay
eitherbreakorincreasethechanceforkickback.
15.Cutwoodonly.Donotusepolesawfor
purposesnotintended.Forexample:do
notusepolesawforcuttingmetal,plastic,
masonryornon-woodbuildingmaterials.
Useofthepolesawforoperationsdifferentthan
intendedcouldresultinahazardoussituation.
16.Keephandlesdry,clean,andfreefromoil
andgrease.Greasy ,oilyhandlesareslippery
causinglossofcontrol.
whileclearingjammedmaterialorservicingmay
resultinseriouspersonalinjury .
20.Onlyusereplacementbarsandchains
speciedbythemanufacturer.Incorrect
replacementbarsandchainsmaycausechain
breakageand/orkickback.
21.Followthemanufacturer’ssharpeningand
maintenanceinstructionsforthesawchain.
Decreasingthedepthgaugeheightcanleadto
increasedkickback..
SAVETHESE
INSTRUCTIONS
17.Avoidkickback.Kickbackmayoccurwhenthe
noseortipoftheguidebartouchesanobject,or
whenthewoodclosesinandpinchesthesaw
chaininthecut.
Tipcontactinsomecasesmaycauseasudden
reversereaction,kickingtheguidebarupand
backtowardyou.
Pinchingthesawchainalongthetopofthe
guidebarmaypushtheguidebarrapidlyback
towardyou.
Eitherofthesereactionsmaycauseyoutolose
controlofthesaw,whichcouldresultinserious
personalinjury.Donotrelyexclusivelyuponthe
safetydevicesbuiltintoyoursaw.Asapolesaw
user,youshouldtakeseveralstepstokeepyour
cuttingjobsfreefromaccidentorinjury.
Kickbackistheresultoftoolmisuseand/or
incorrectoperatingproceduresorconditionsand
canbeavoidedbytakingproperprecautionsas
givenbelow:
18.Maintainarmgrip,withthumbsandngers
encirclingthepolesawhandles,withboth
handsonthehandleandpositionyourbody
andarmtoallowyoutoresistkickback
forces.Kickbackforcescanbecontrolledby
theoperator,ifproperprecautionsaretaken.Do
notletgoofthepolesaw.
19.Whenclearingjammedmaterial,storingor
servicingthepole-mountedpruner,make
suretheswitchisoffandthebatterypackis
removed.Unexpectedactuationofthemachine
6
SafetyandInstructionalDecals
Safetydecalsandinstructionsareeasilyvisibletotheoperatorandarelocatednearanyarea
ofpotentialdanger.Replaceanydecalthatisdamagedormissing.
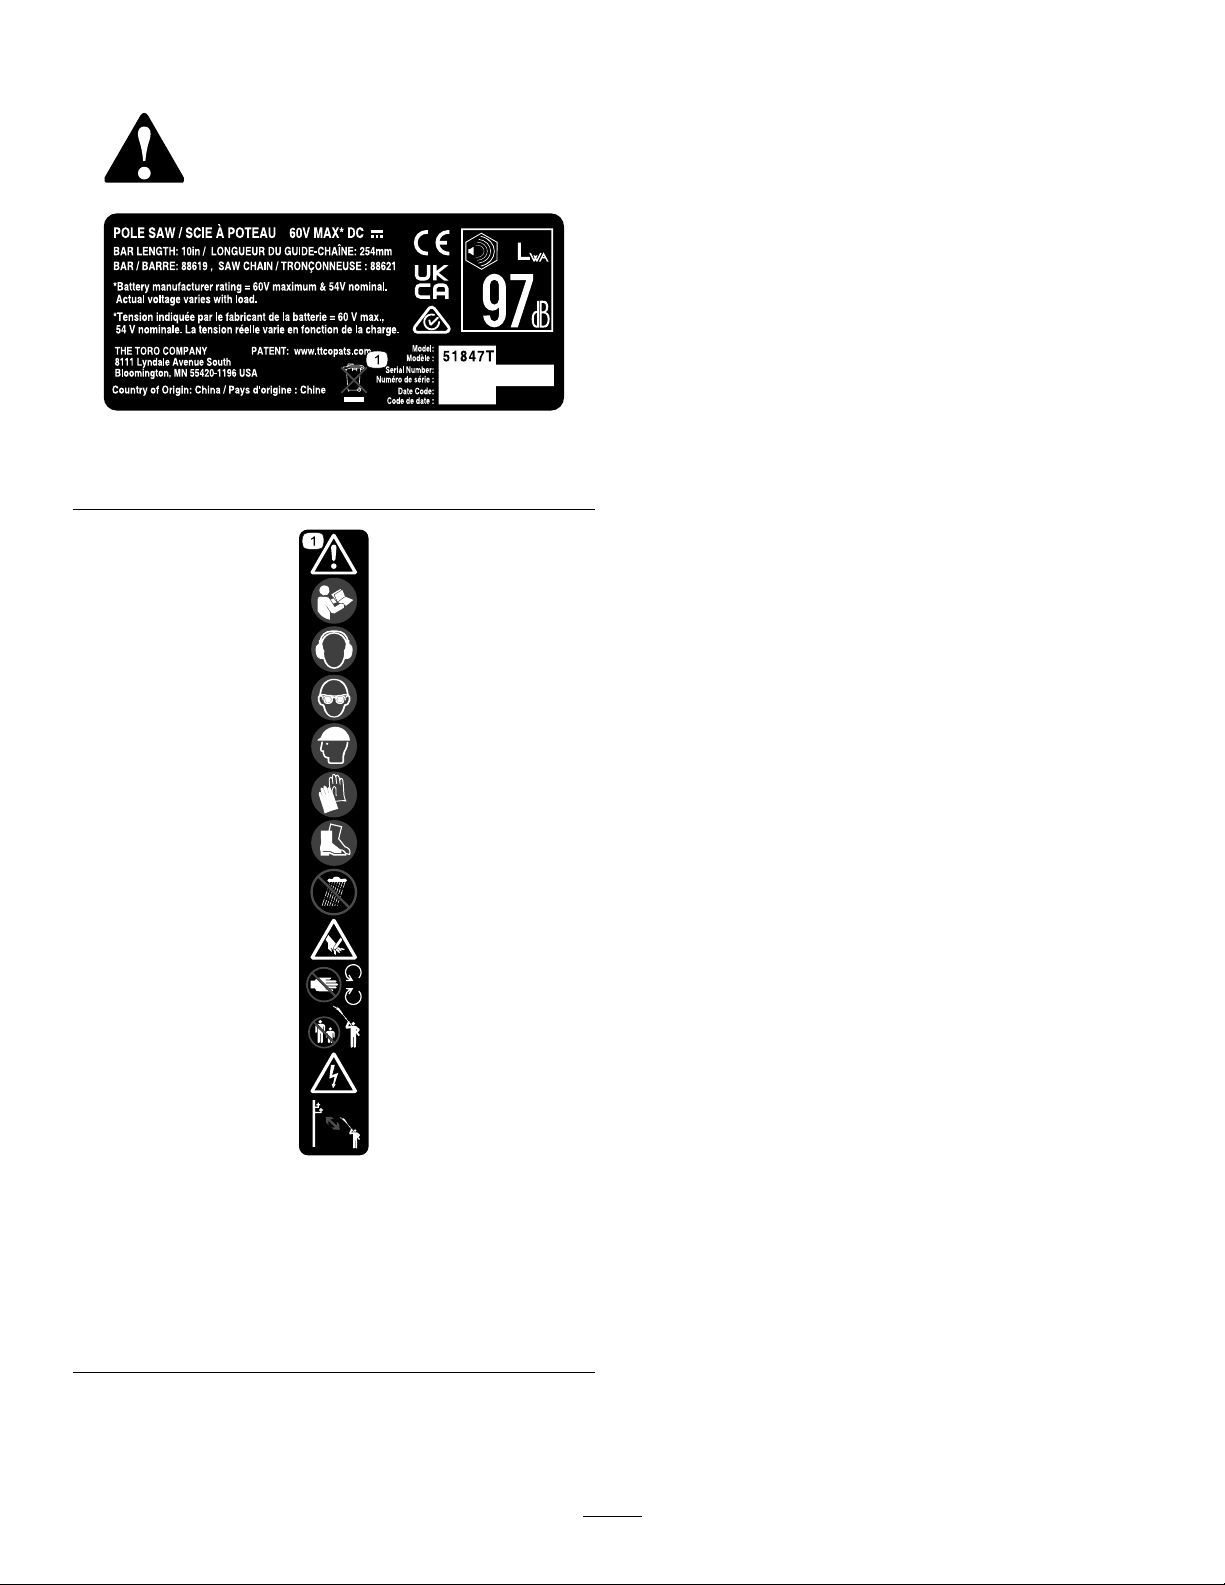
139-5348
1.Donotdisposeimproperly .
decal139-5348
139-5345
1.Warning—readtheOperator’sManual;wearhearing
protection;weareyeprotection;wearahardhat,wear
gloves,wearsubstantialslip-resistantshoes,donotexpose
torain;Caution—Cutting/dismembermenthazardofhands;
entanglementhazard—stayawayfrommovingparts;
keepbystandersawayduringoperation;Electricalshock
hazard—keepawayfrompowerlines.
decal139-5345
7
Setup
InstallingtheBarandChain
DANGER
Contactwiththepolesawteethcancauseseriouspersonalinjury.
•Removethebatterypackbeforeadjustingormaintainingthepolesaw.
•Alwaysweargloveswhenadjustingormaintainingthepolesaw.
1.Placethepolesawonaatsurfaceanddonotinstallthebatterypack.
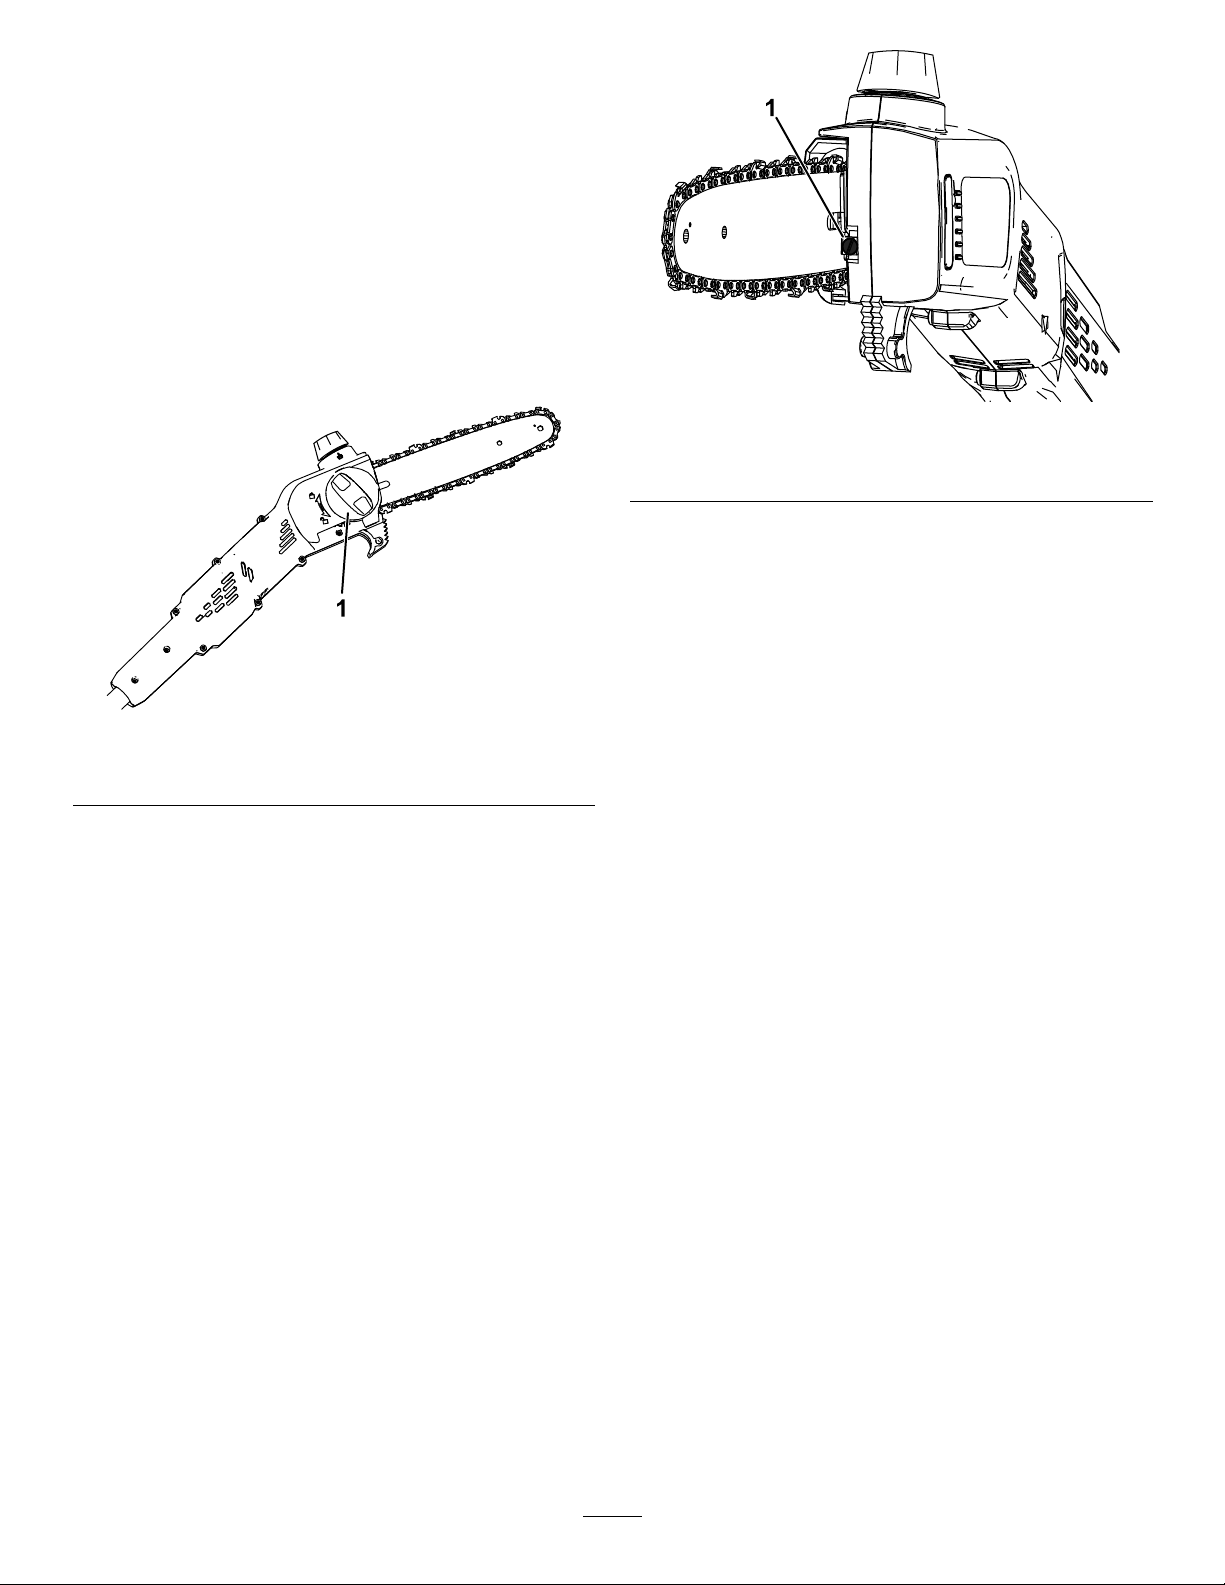
2.Removethesidecover;turnthebarcoverknobcounterclockwiseuntiltheknobisremovedandthen
removethesidecover(Figure3).
Figure3
1.Barcoverknob
2.Sidecover6.Guidebar10.Chainadjustingstud
3.Chain
4.Chainadjustingstudslot8.Guidebarstud
3.Placethechainaroundthesprocketonthefrontendoftheguidebar,withthecuttingedgeofthechain
teethonthetopofthebarfacingforwardasshowninthediagrambeneaththesidecoverofthepolesaw.
4.Continuetofeedthechainaroundtheguidebarandalignthechainintothegrooveoftheguidebar.
5.Positiontheopenloopofthechain(thesidenotontheguidebar)aroundthedrivesprocketonthepole
saw(Figure3).
5.Guidebarslot9.Oiloutlet
7.Drivesprocket
Important:Ensurethatthechainadjustingstudisinsertedintothechainadjustingstudslot
ontheguidebar(Figure3).
Youmayneedtorotatethechain-tensioningscrewtotthestudintotheslotontheguidebar
(Figure18).
6.Installthesidecoverandbarcoverknobandlooselytightenthesidecoverbyturningtheknobclockwise.
7.Adjustthechaintension;refertoAdjustingtheChainTension(page17).
g374226
8
AssemblingthePoleSaw
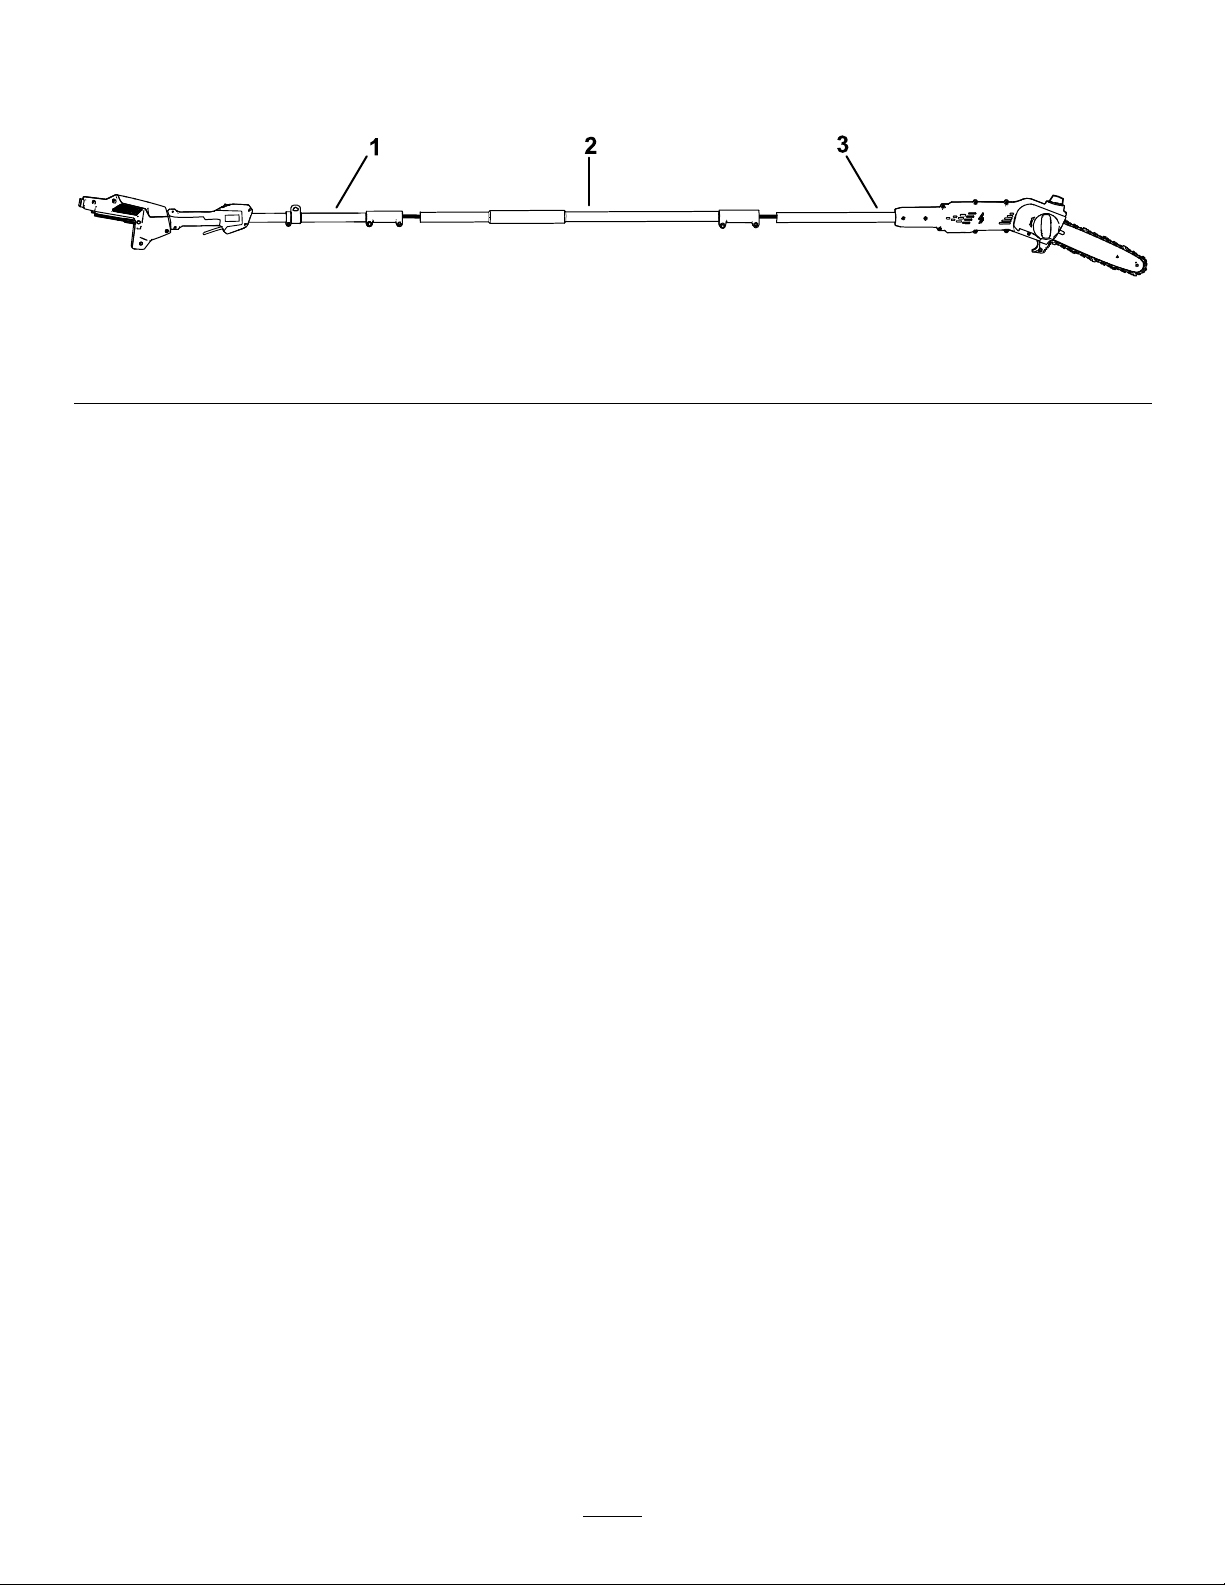
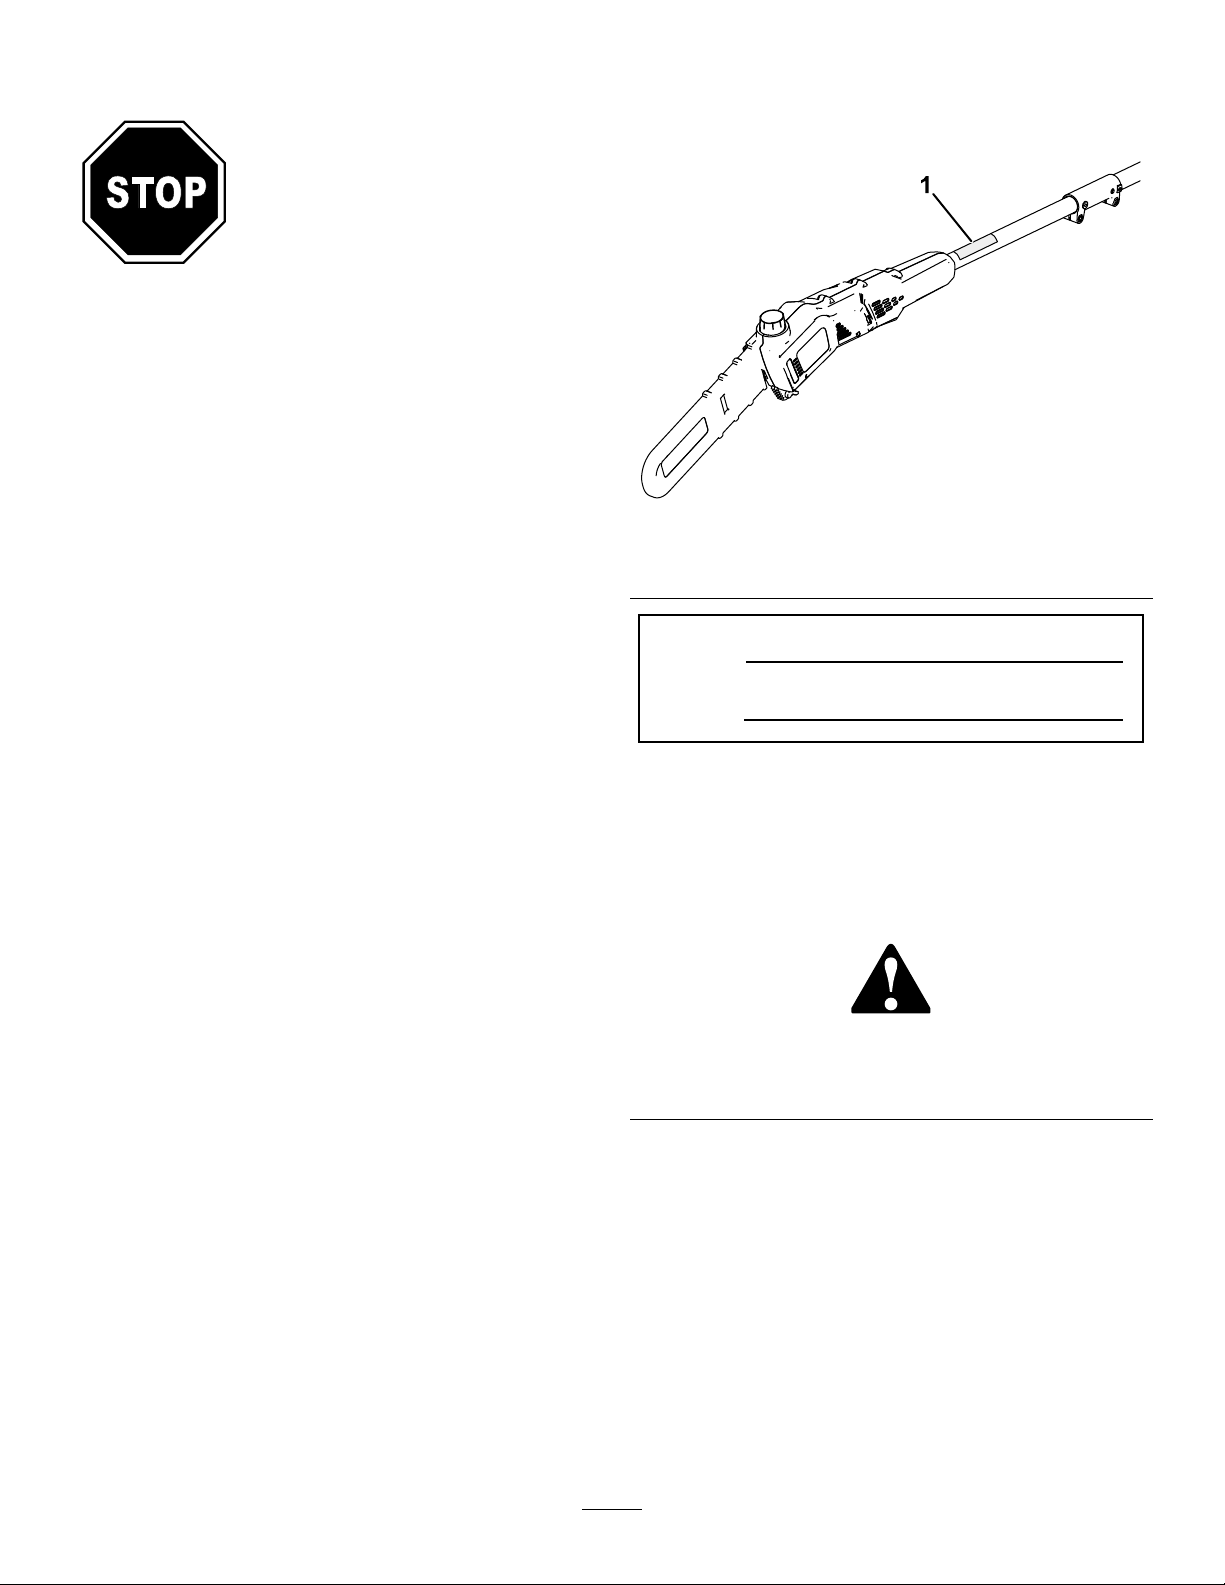
1.Unfoldthesectionsofthehandle(Figure4).
g374227
Figure4
1.Handlepolesection
2.Middlepolesection
3.Sawpolesection
2.Alignthelockingbuttononthemiddlepolesectionwiththeslottedholeattheendofthehandlepole
sectionandslidethe2shaftstogether(Figure5).
Note:Thelockingbuttonclicksintotheslottedholewhentheshaftsaresecured
3.Usetheprovidedwrenchtosecurethese2sectionsofthepoletogether(EofFigure5).
4.Repeatthisproceduretoconnectthesawpolesectiontothemiddlepolesection(Figure5).
9
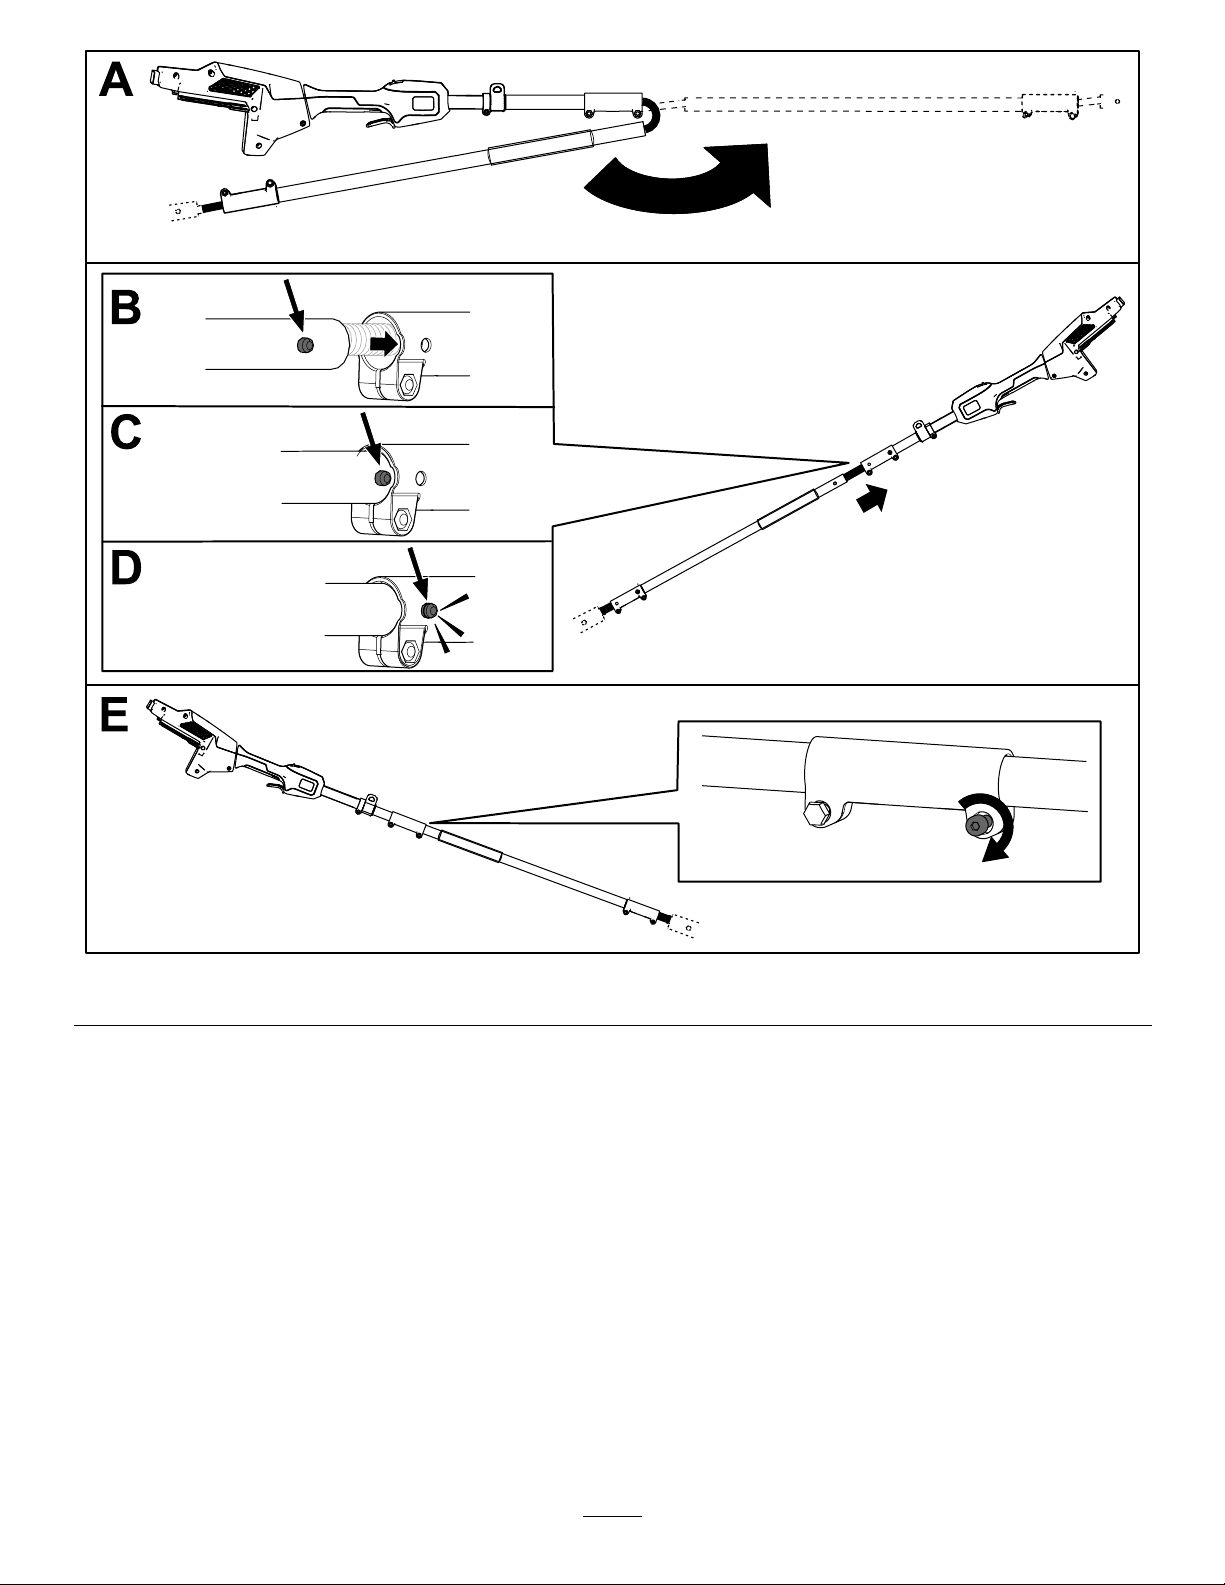
Figure5
AddingBarandChainOiltothePoleSaw
Important:Useonlybarandchainoil(soldseparately).
Fillthepolesawwithbarandchainoilbeforerstoperation;refertoCheckingtheOilLevelandAdding
BarandChainOil(page16).
10
g374228
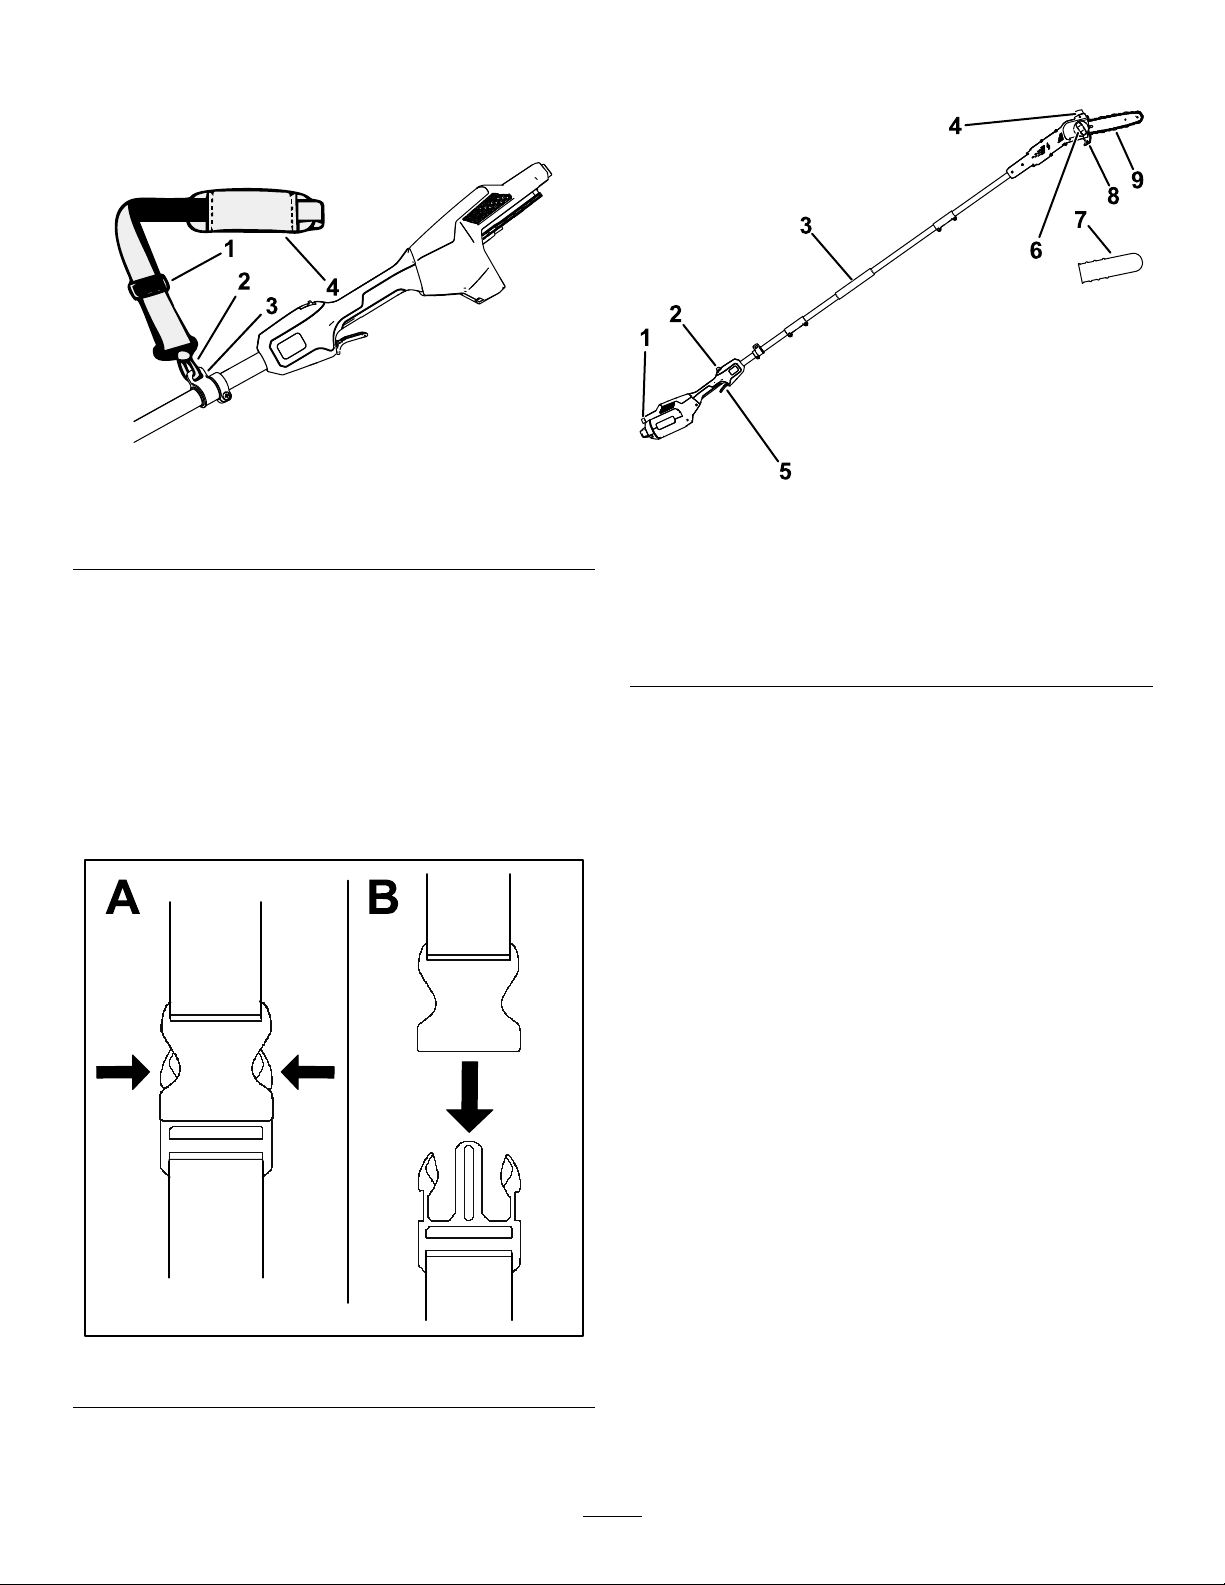
InstallingtheHarness
Connectthemetalhookontheshoulderharnessto
thestrapcollaronthepolesawhandle(Figure6).
Figure6
1.Strapadjuster3.Strapcollar
2.Metalstraphook
Thestraplengthisadjustable;slidethestrapadjuster
uptodecreasethelengthofthestrap,ordownto
increasethelengthofthestrap(Figure6).
4.Shoulderstrap
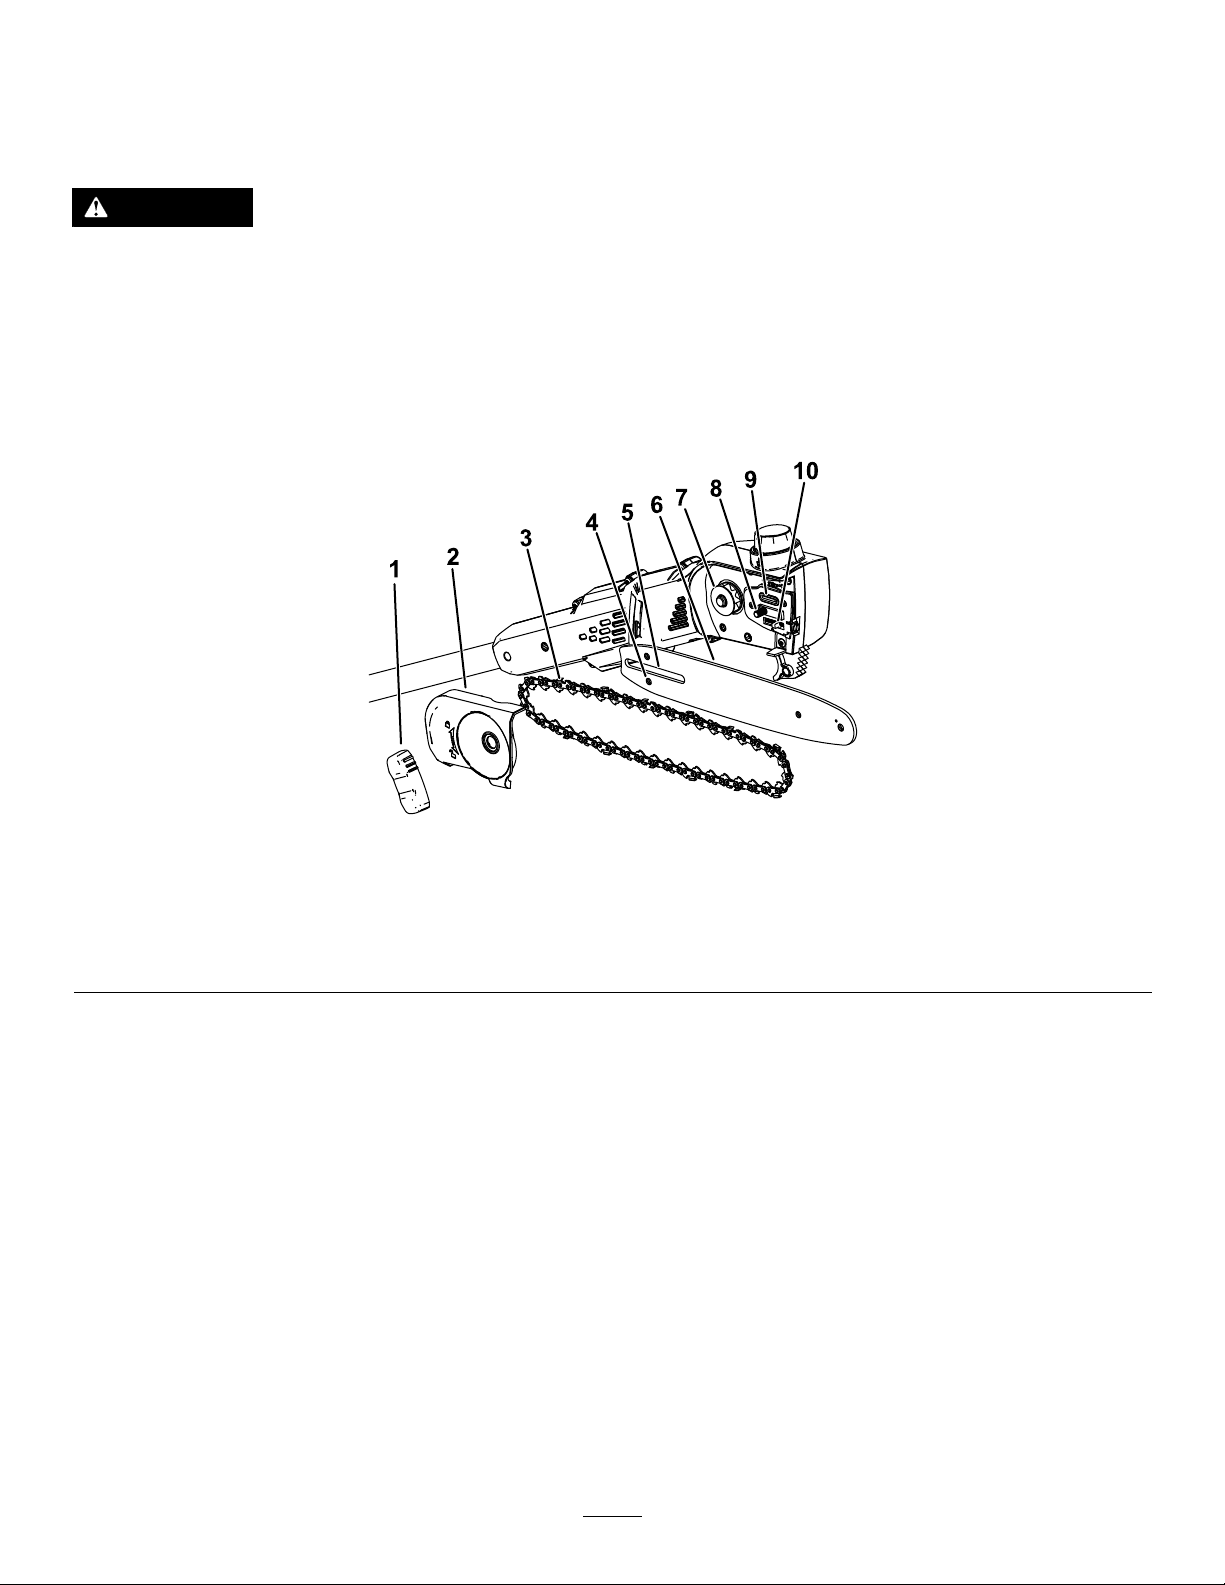
ProductOverview
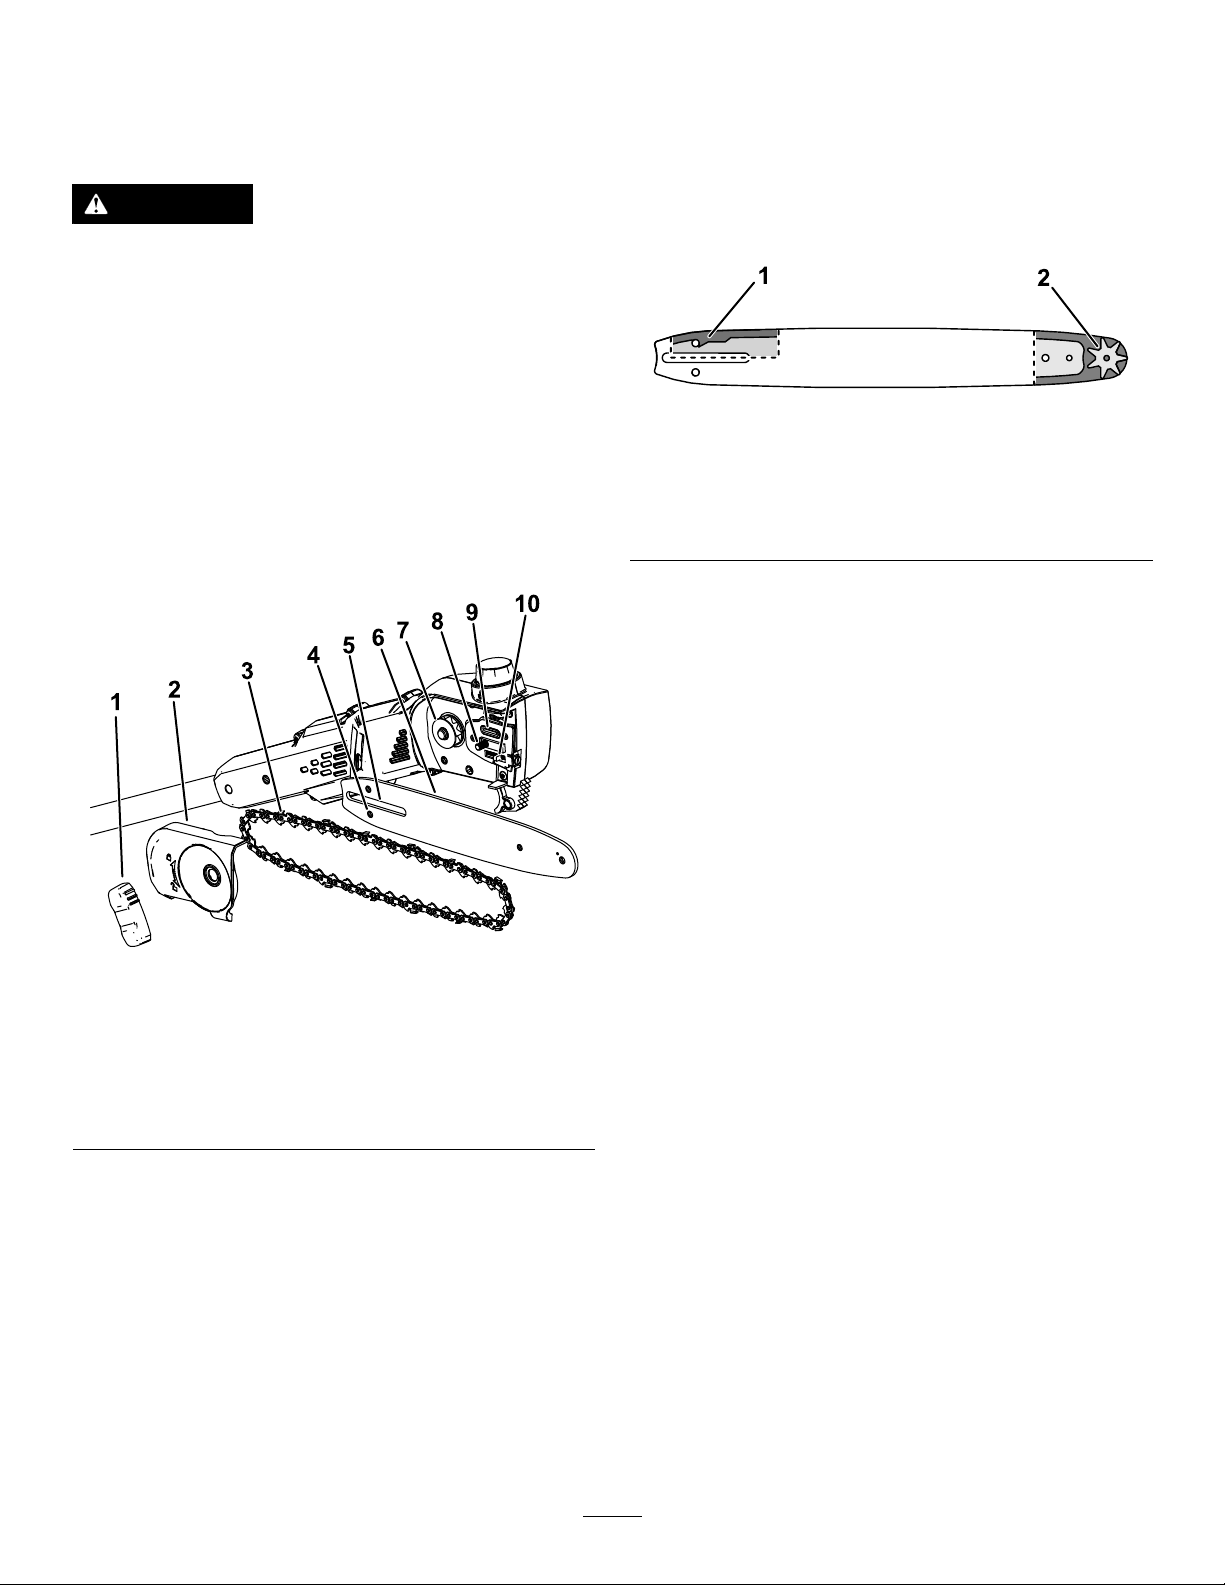
g374229
g374230
Figure8
1.Buttonlatch6.Barcoverknob
2.Triggerlock
3.Fronthandle
4.Oilcap9.Guidebarandchain
5.Trigger
7.Guidebarcover
8.Cuttingguide
Ifthereiseveranemergencyandyouneedtorapidly
removetheharness,disconnectthequick-release
buckleasfollows:
1.Pressinonthesidesofthebuckle(AofFigure
7).
2.Allowthebuckletodisconnect(BofFigure7).
Figure7
g340477
11

Specications
Model51847T
BarLength(with88619and
88621equipped)
ChainGauge(with88619
and88621equipped)
ChainPitch(with88619and
88621equipped)
ChainLength(with88619
and88621equipped)
RatedV oltage
Weight(withoutabattery)4.1kg(9lbs)
ChargerT ype
BatteryT ype81820,81825,81850,81860,
*Ifyouareusingthismachinewithbatterypack
Models81850,81860,or81875,youmustinstallthe
includedquick-releaseharness.
25.4cm(10inches)
0.050inches
1/4inch
58links
60VDCmaximum,54VDC
nominalusage
81801,81 101,81802,or
81805
or81875*
AppropriateTemperatureRanges
Charge/storethebatterypack
at
Usethebatterypackat
Usethetoolat
*Chargingtimewillincreaseifyoudonotchargethe
batterywithinthisrange.
Storethetool,batterypack,andbatterychargerinan
enclosedclean,dryarea.
5°C(41°F)to40°C(104°F)*
-30°C(-22°F)to49°C(120°F)*
0°C(32°F)to49°C(120°F)*
12
Operation
BeforeUsingthePoleSaw
Beforeusingthepolesaw,dothefollowing:
•Checkthechaintension;refertoAdjustingthe
ChainT ension(page17).
•Cleanthepolesawcomponents,inspectthemfor
excessivewearordamage,andreplacethemas
needed;refertoServicingtheGuideBar,Chain,
andDriveSprocket(page19).
•Checkthechainforsharpnessanddamage,and
sharpenorreplaceasneeded;refertoSharpening
theChain(page20).
•Checktheoillevel;refertoCheckingtheOilLevel
andAddingBarandChainOil(page16).
•Checkthepolesawfordamage,general
appearance,andperformance;ensurethatthe
switchesmovefreely,theventsandhandlesare
clean,andthebarisnotbentordamaged.
g374232
Figure10
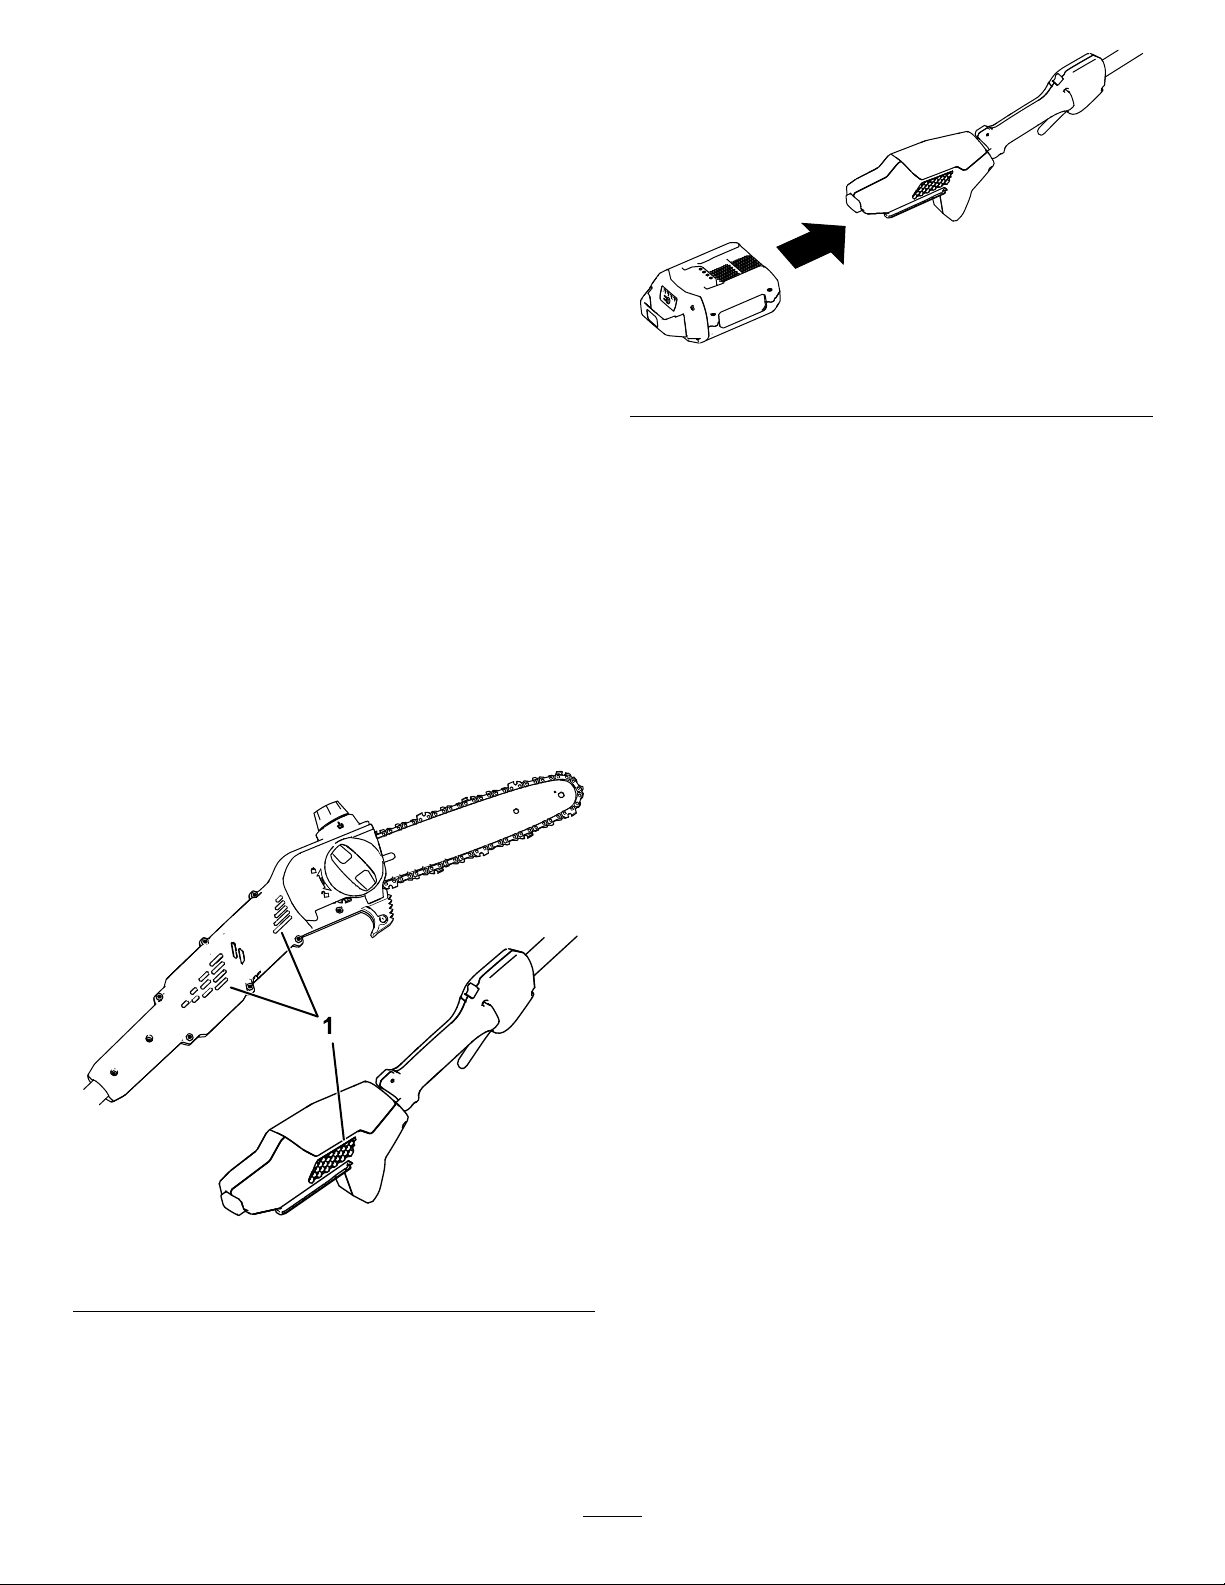
4.Pushthebatterypackintothehandleuntilthe
batterypacklocksintoplace.
5.Removetheguidebarcoverfromthechain.
6.Pressthetriggerlock,thenpressthetriggerto
startthepolesaw.
ShuttingOffthePoleSaw
StartingthePoleSaw
1.Ensurethattheventsonthepolesawarefree
fromdustanddebris(Figure9).
Figure9
Toshutoffthepolesaw,releasethetrigger.
Wheneveryouarenotusingthesaworare
transportingthesawtoorfromtheworkarearemove
thebatterypack;refertoRemovingtheBatteryPack
(page15).
g374231
1.Vents
2.Setthepolesawdownonalevelsurface.
3.Alignthecavityinthebatterypackwiththe
tongueonthehandlehousing(Figure10).
13
CuttingwiththePoleSaw
WARNING
Operatingapolesawimproperlycancause
seriouspersonalinjuryordeath.
Readandfollowalloperatinginstructions
carefullytoavoidpossiblepersonalinjury.
1.Gripthepolesawwith2hands.
2.Standonsolid,evengroundinfrontofthetreeto
betrimmedandpositionyourselfforbalanced,
stablefootingwhilecutting.
3.Ensurethatyouonlycutthewoodthatyou
intendtocut;donotallowthesawchainto
contacttheearth,otherlogs,oranyother
objectswhencutting.
4.Ensurethatthesawchainisrotatingatfull
speedbeforestartingacut.
WARNING
Donotoperatenearelectricalpowerlines;the
polesawhasnotbeendesignedtoprovide
protectionfromelectricshockintheeventof
contactwithoverheadelectriclines,
Consultlocalregulationsforsafedistances
fromoverheadelectricpowerlinesandensure
thattheoperatingpositionissafeandsecure
beforeoperatingthepolesaw.
WARNING
Kickbackcancauseseriousorfatalinjuryto
you.
Avoidtouchingobjectstobecutwiththe
noseofthepolesawguidebar.
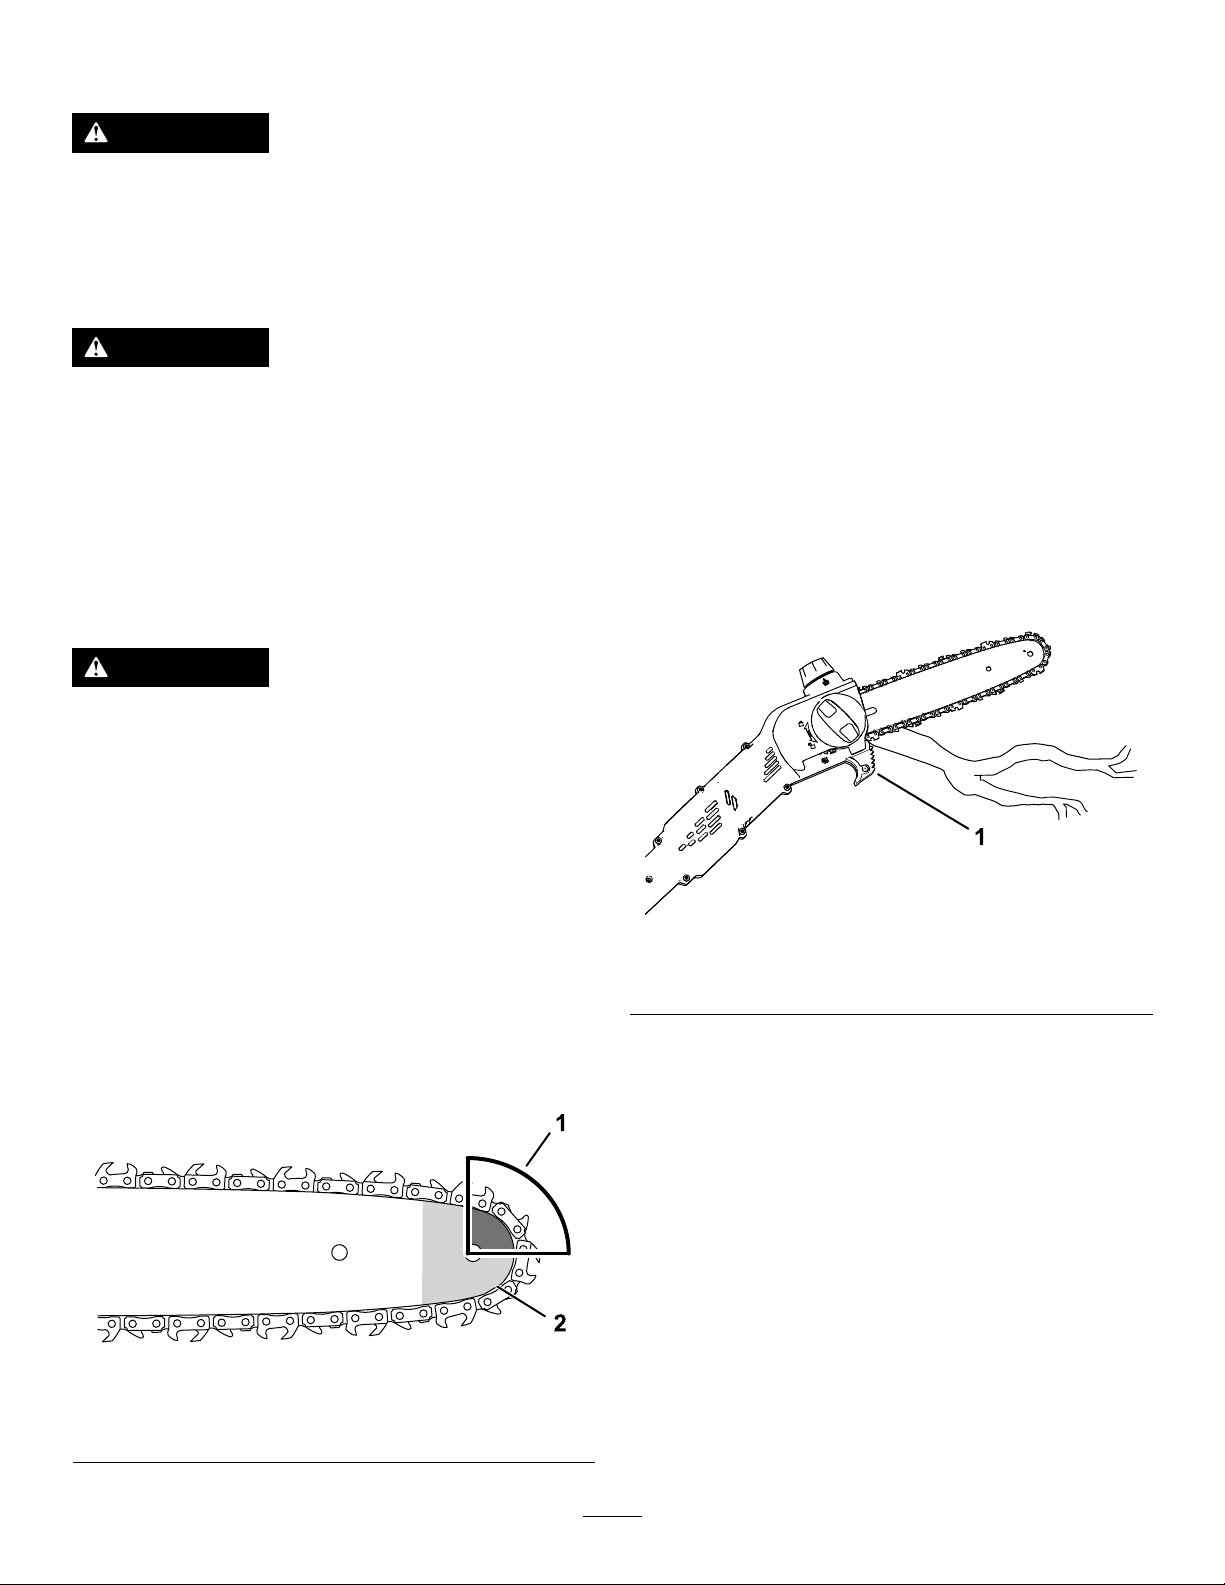
Thereare2typesofkickback:
•Afastupwardmotionofthepolesawthatresults
whenthechainatthenoseortopofthebar
contactsanobject
•Afastbackwardmotionofthepolesawthat
resultswhenthechainatthenoseortopofthebar
ispinchedbytheobjectbeingcut
Figure11showstheareaofthebartoavoidcontacting
anobjecttopreventkickback.
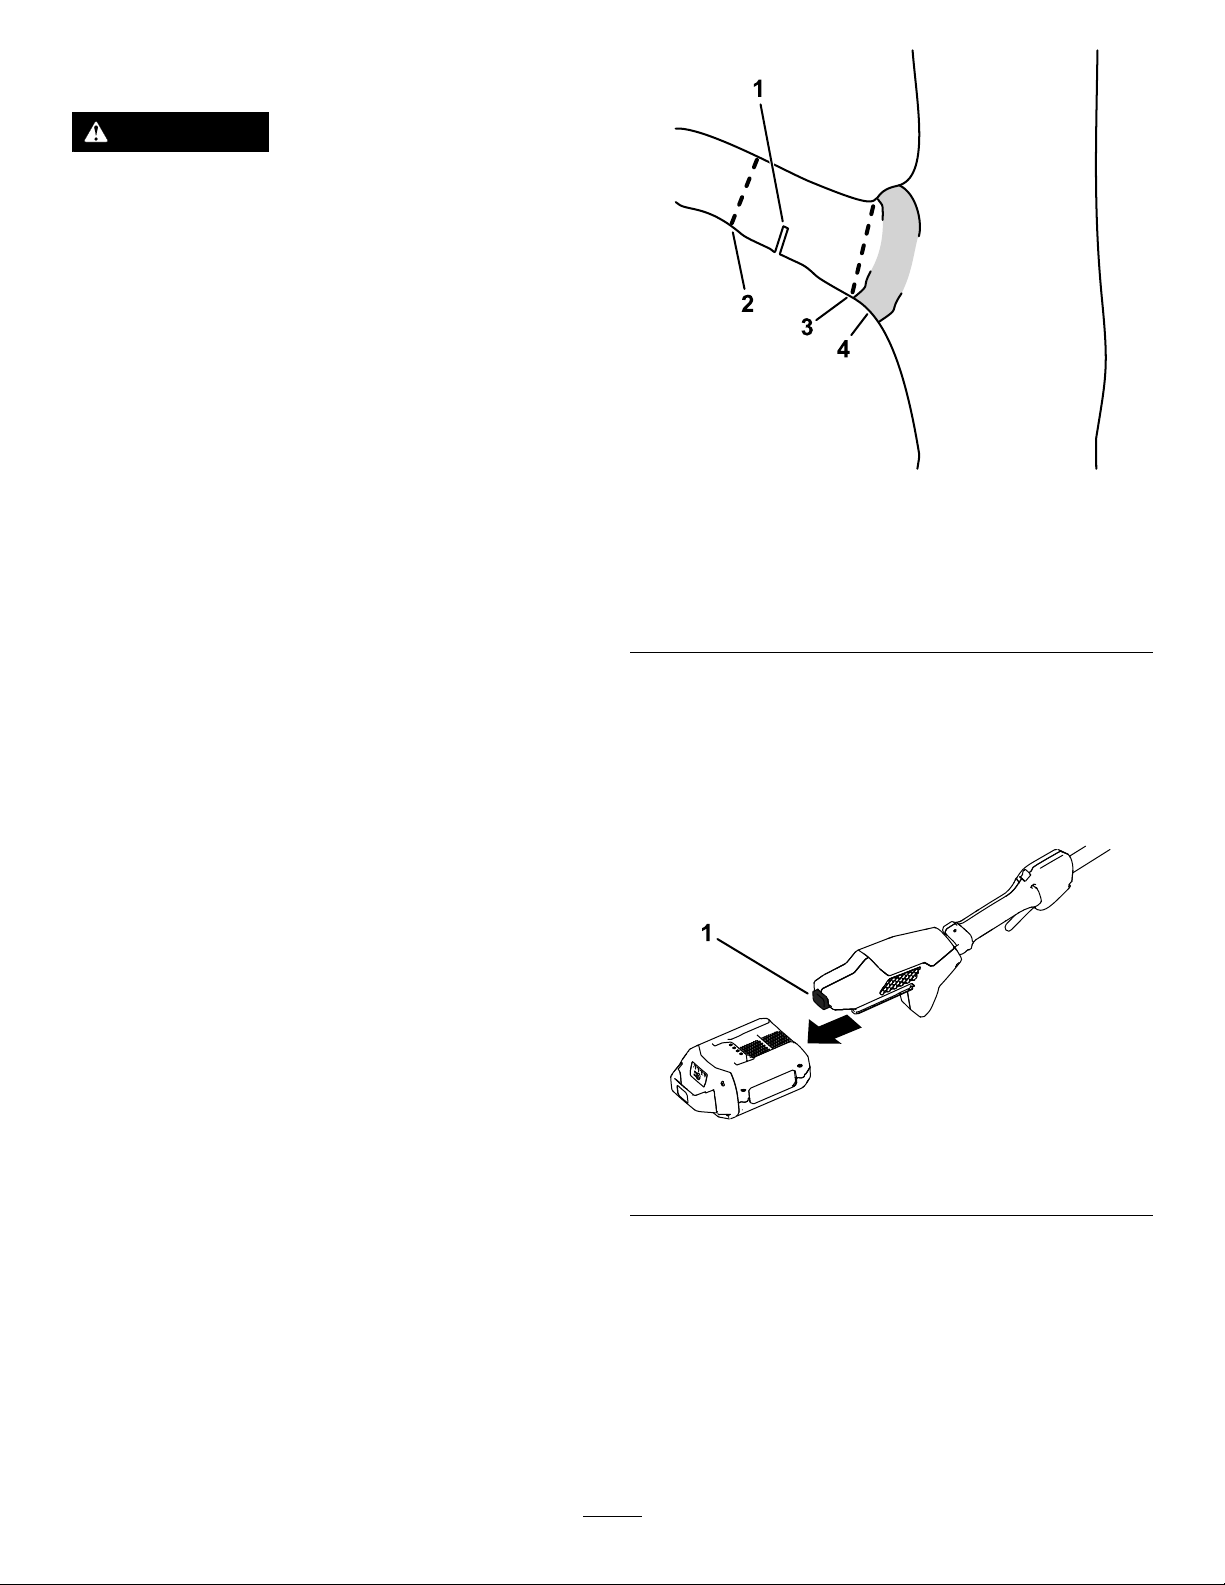
5.Cutwiththebranchneartherearoftheguide
bar,closetothecuttingguide;pressthesaw
chainlightlyagainstthewoodandallowthe
weightofthepolesawtodrivethecutting
(Figure12).
Important:Ifthechainbindsinthecut,do
notattempttofreeitbyrunningthemotor.
Shutoffthepolesaw,removethebattery,
andliftthelimbwhileholdingthesaw;this
shouldreleasethepinchandfreethepole
saw.
g374233
Figure12
1.Cuttingguide
6.Keepsteadypressureonthepolesaw,cutting
inastraightline,andreleasepressureonlynear
theendofthecut.
1.Kickbackarea(nose,top
ofthebar)
7.Releasethetriggerassoonasyoucomplete
acut.
g318677
Figure11
2.Nose
14
PruningaTree
WARNING
Cuttinghigherlimbsfromatreeofftheground
canputyouinanunstablepositionthatcould
beunsafeforyouwhilehandlingapolesaw,
resultinginpossibleseriouspersonalinjury
ordeathtoyouorbystanders.
Whencuttinglimbsfromastandingtree,use
thefollowingpractices:
•Donotclimbonlimbsorbrancheswitha
polesaw.
•Donotoverreach,andcutwithbothhands
onthepolesaw.
•Ensurethatallbystandersareawayfrom
theareawherebranchesmayfall.
1.GripthepolesawasdescribedinCuttingwith
thePoleSaw(page14).
2.Whilecuttingsmallbranches,applylight
pressuretothebranchtobecut.
Figure13
1.Firstreliefundercut
2.Secondthroughcut4.Branchcollar(wherethe
3.Finalpruningcutto
removethelimbstub
trunktransitionstothe
limb)
g316577
3.Whilecuttinglargerbranches,makeashallow
undercutandthencompletethecutfromthe
topsideofthebranch.
A.Cutfromtheundersideofthelimbabout15
cm(6inches)fromthetrunk.Cutathirdof
thewaythroughthelimb.
B.Cut5.0to10.0cm(2to4inches)farther
outonthelimbandfromabove.Cutthe
limbuntilitfalls.
C.Cutthelimbstubatthebranchcollar
(Figure13).
Important:Donotcutthelimbpastthe
collar,ushtothetrunk,orleavealarge
limbstub;thisdamagesthetree.
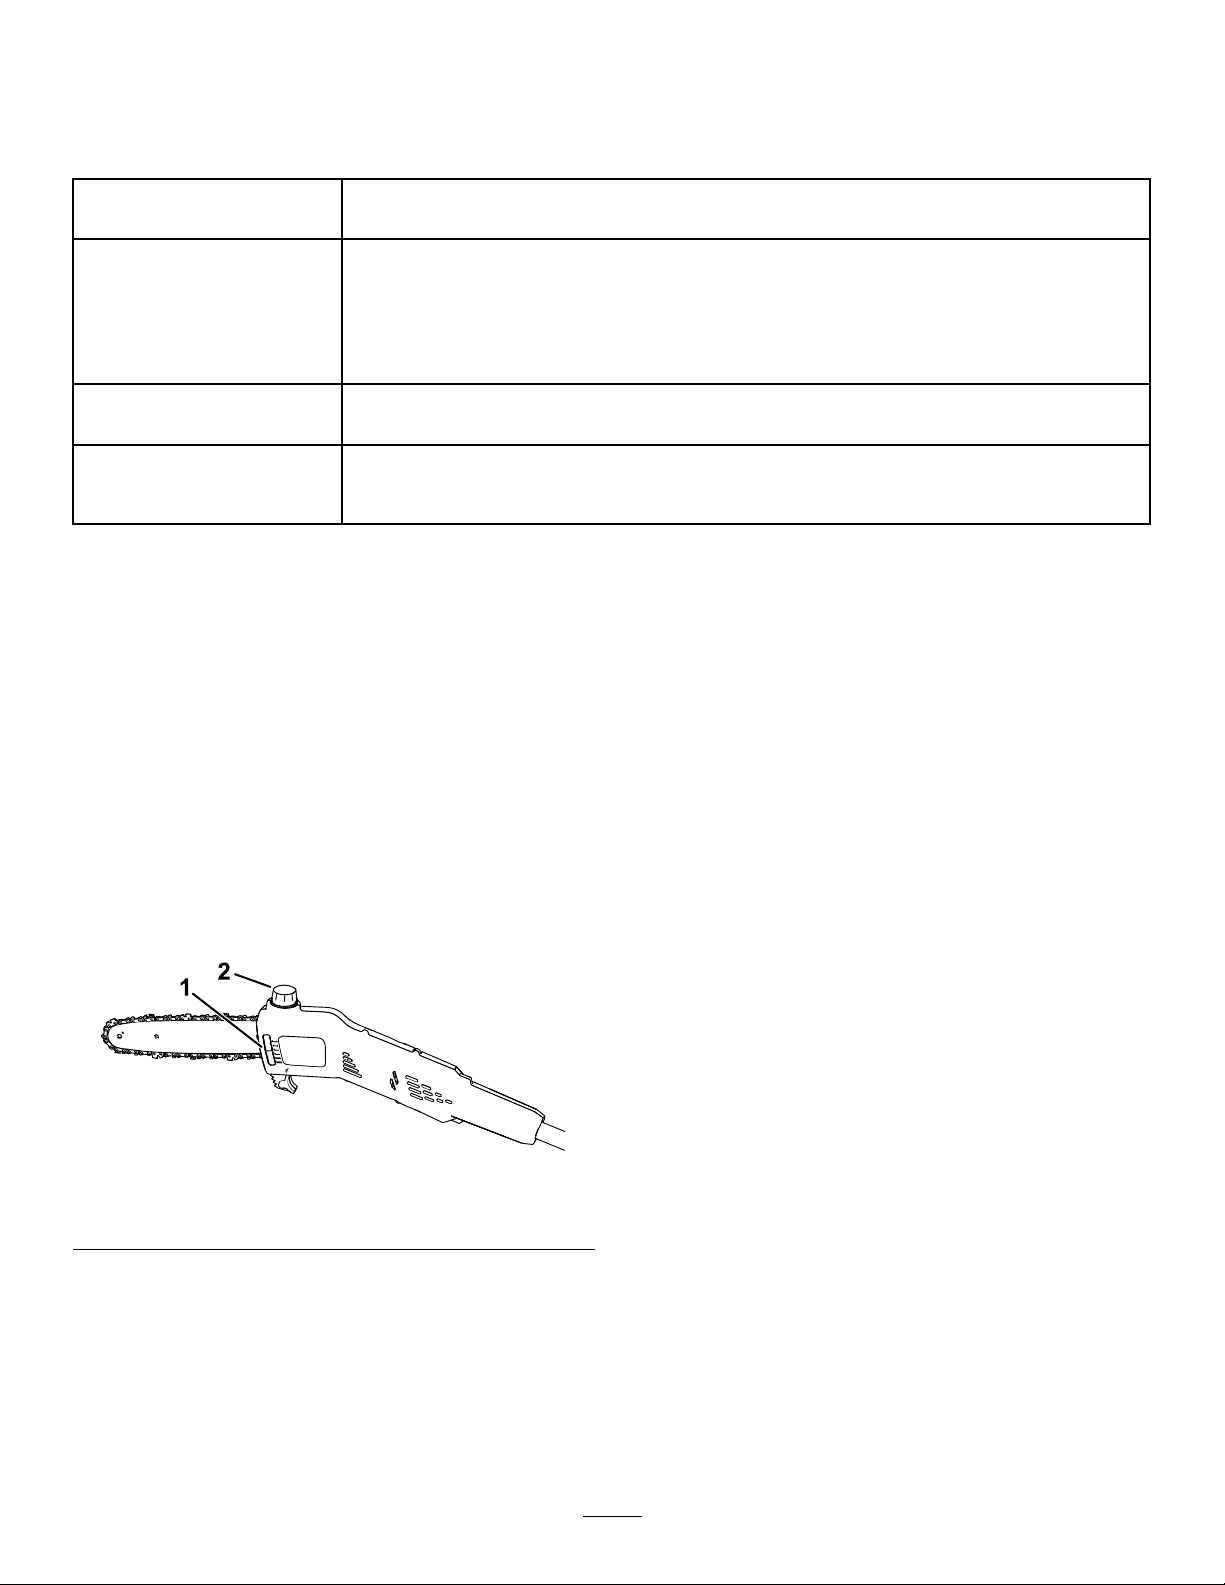
RemovingtheBatteryPack
1.Placethepolesawonaatsurface.
2.Pressdownonthelatchbuttonandremovethe
batterypackfromthehandle.
g374234
Figure14
1.Latchbutton
15
Maintenance
RecommendedMaintenanceSchedule(s)
MaintenanceService
Interval
Beforeeachuseordaily
Aftereachbatterydrain
cycle
Yearlyorbeforestorage
MaintenanceProcedure
•Checktheoillevelandaddbarandchainoilifnecessary.
•Checkthatoilisowingtothechain.
•Checkthechaintensionandadjustitifnecessary .
•Ensurethatthebarisstraightandundamaged
•Checkthechainforsharpness;contactanAuthorizedServiceDealertohavethe
chainsharpenedorreplaced.
•Checktheoillevelandaddbarandchainoilifnecessary.
•Checkthechaintensionandadjustitifnecessary .
•Servicetheguidebar,chain,anddrivesprocket.
•Checkthechainforsharpness;contactanAuthorizedServiceDealertohavethe
chainsharpenedorreplaced.
CheckingtheOilLeveland
AddingBarandChainOil
ServiceInterval:Beforeeachuseordaily
Aftereachbatterydraincycle
Important:Useonlybarandchainoil(sold
separately).
Important:Donotllthepolesawhigher
thanthebottomofthellneck.
6.Cleanupanyspilledoilandsecuretheoilcap.
7.Ensurethatoilisowingtothechain;referto
CheckingtheFlowofBarandChainOil(page
17).
1.Shutoffthepolesawandremovethebattery
pack;refertoRemovingtheBatteryPack(page
15).
2.Checktheoillevelinthewindow.Iftheoildoes
notllthewindow,addbarandchainoilas
needed(Figure15).
Figure15
1.Oilwindow2.Oilcap
3.Placethepolesawonaatsurfacewiththeoil
capfacingup.
4.Cleantheareaaroundtheoilcap(Figure15).
Note:Ensurethatyoudonotallowdebris/wood
chipstoentertheoiltank.
g374235
5.Removethecap,andpourbarandchainoilinto
thepolesawuntiltheoilllsthetank(Figure15).
16
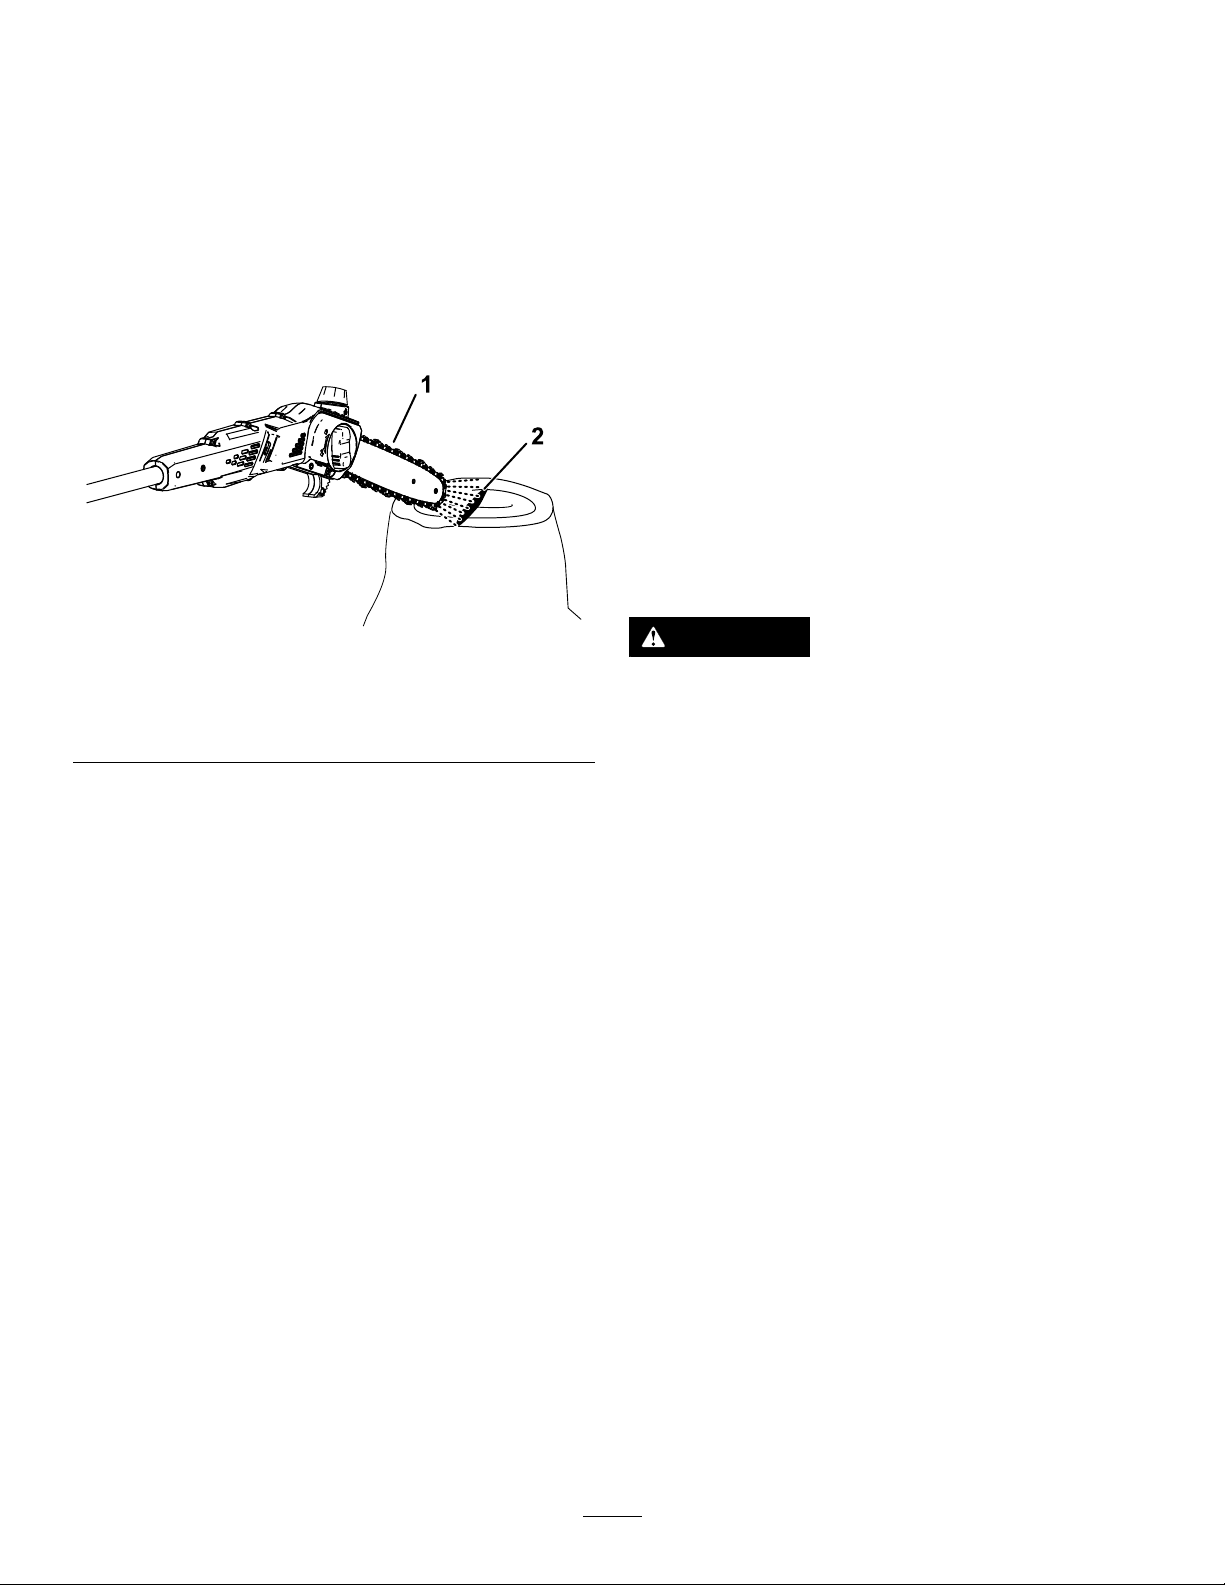
CheckingtheFlowofBar
AdjustingtheChain
andChainOil
ServiceInterval:Beforeeachuseordaily
1.Preparetousethepolesaw;refertoBefore
UsingthePoleSaw(page13).
2.T oensurethatoilisowingtothechain,point
thenoseofthepolesawafewinchesfroma
surface(e.g.paper,cardboard,astump)and
runthepolesaw;youshouldbeabletoseea
lightsprayofoilonthesurface(Figure16).
Figure16
1.Runthepolesawafew
inchesfromasurface.
3.Ifoilisnotowing,ensurethatthereisoilinthe
tankandthattheareaunderthesidecoveris
clean;refertoCheckingtheOilLevelandAdding
BarandChainOil(page16)andServicingthe
GuideBar,Chain,andDriveSprocket(page19).
2.Iftheoilisowing,itwill
sprayoffthechainand
accumulate.
Tension
ServiceInterval:Beforeeachuseordaily
Aftereachbatterydraincycle
Ensurethatthechainisproperlytensioned.
Aloosechainshortensthelifeofthedrivesprocket
andtheguidebarandmaycausethechaintofalloff.
Anovertightenedchainoverheatstheguidebarand
chain,causingrapidwear,andmayburnoutthemotor
orbreakthechain.
Thechaintensioniscorrectwhenyouareabletouse
aglovedhandtopullthechainsmoothlyaroundthe
guidebar.Thechainshouldremainincontactwith
thebottomedgeoftheguidebar.
Also,checkthechaintensionofanewchainaftera
fewcuts;anewchainusuallystretchesandrequires
adjustmentafterafewcuts.
g374236
DANGER
Contactwiththepolesawteethcancause
seriouspersonalinjury.
•Removethebatterypackbeforeadjusting
ormaintainingthepolesaw.
•Alwaysweargloveswhenadjustingor
maintainingthepolesaw.
17
1.Placethepolesawonalevelsurfaceand
removethebatterypack;refertoRemovingthe
BatteryPack(page15).
2.Allowthesawchaintocool.
Important:Donottensionahotchain;it
maycontractasitcools,resultinginan
overtightenedchain.
3.Inspecttheguidebarforbendsordamage,
replaceifnecessary.
4.Turnthebarcoverknobcounterclockwiseto
loosenthebarcover,butdonotremoveit
(Figure17).
g374238
Figure18
1.Chaintensioningscrew
Adjustthechaintensionuntilthechaintouches
thebottomedgeoftheguidebar,thenpullthe
chainawayfromthebottomedgeoftheguide
bar;aproperlyadjustedchaincanonlybepulled
3.2to6.4mm(1/8to1/4inch)awayfromthe
guidebar,andsnapsbackonrelease.
Figure17
1.Barcoverknob
5.Adjustthechaintensionusingthechain
tensioningscrew(Figure18),andthensecure
thesidecovertothepolesawbyturningthe
barcoverknobclockwisebeforecheckingthe
tension(Figure17).
•Totightenthechain,turnthechain
tensioningscrewclockwise.
•Toloosenthechain,turnthechain
tensioningscrewcounterclockwise.
Note:Whileadjustingthechaintension,liftup
g374237
thetipoftheguidebarwithaglovedhandto
ensuretheguidebardoesnotsagandaffect
chaintension.
6.Useaglovedhandtopullthechainaroundthe
guidebar.Aproperlytensionedchainshould
movesmoothlyandremainincontactwiththe
bottomedgeoftheguidebar.
7.Ifthechainisnotproperlytensioned,repeat
steps4through7.
18
ServicingtheGuideBar,
Chain,andDriveSprocket
Yearlyorbeforestorage
8.Cleantheguidebarandchain;useawireora
smallat-headscrewdrivertoremovedirtand
debrisfromthegroovealongtheedgeofthe
guidebar,startingfromthesprocketonthefront
endandmovingrearward.
DANGER
Contactwiththepolesawteethcancause
seriouspersonalinjury.
•Removethebatterypackbeforeadjusting
ormaintainingthepolesaw.
•Alwaysweargloveswhenadjustingor
maintainingthepolesaw.
1.Placethepolesawonaatsurfaceandremove
thebatterypack;refertoRemovingtheBattery
Pack(page15).
2.Removethesidecover;turnthebarcoverknob
counterclockwiseuntiltheknobisremovedand
thenremovethesidecover(Figure19).
Ensurethattheoilchannelinthebarthataligns
withtheoiloutletonthepolesawiscleanso
thatoilcanowfreelytothechain(Figure20).
Figure20
Internalsectionsoftheguidebarshown
1.Ensurethatthischannel
connectingtotheoiloutlet
isclean.
2.Ensurethatthebar
sprocketiscleanand
rotatesfreely .
9.Inspecttheguidebarandchain;ifthebar
isbent,thegroovesaredamaged,orifthe
sprocketonthefrontenddoesnotrotatefreely,
replacetheguidebar;ifthechainisexcessively
wornordamaged,replaceit.
10.Installtheguidebarandchain;refertoInstalling
theGuideBarandChain(page20).
g315856
Figure19
1.Barcoverknob
2.Sidecover
3.Chain8.Guidebarstud
4.Chainadjustingstudslot9.Oiloutlet
5.Guidebarslot10.Chainadjustingstud
6.Guidebar
7.Drivesprocket
3.Loosenthechainbyturningthechain-tightening
screwcounterclockwise(Figure18).
4.Separatethechainfromtheguidebarandset
themaside.
5.Cleananydebrisfromtheareaundertheside
cover.
6.Inspectthedrivesprocket;ifitisexcessively
wornordamaged,replaceit;contactyour
authorizedservicedealer.
11.Ensurethatoilisowingtothechain;referto
CheckingtheFlowofBarandChainOil(page
17).
g374226
7.Checktheoiloutlet(Figure19)fordebrisand
cleantheareaifnecessary.
19

InstallingtheGuideBarand
SharpeningtheChain
Chain
DANGER
Contactwiththepolesawteethcancause
seriouspersonalinjury.
•Removethebatterypackbeforeadjusting
ormaintainingthepolesaw.
•Alwaysweargloveswhenadjustingor
maintainingthepolesaw.
1.Ifthesidecoverisinstalledtothemachine,
removeit;refertoServicingtheGuideBar,
Chain,andDriveSprocket(page19).
2.Placethechainaroundthesprocketonthefront
endoftheguidebar,withthecuttingedgeof
thechainteethonthetopofthebarfacing
forwardasshowninthediagrambeneaththe
sidecoverofthepolesaw.
3.Feedthechainaroundtheguidebarandalign
thechainintothegrooveoftheguidebar.
Yearlyorbeforestorage
Asharpchainensuresbettercuttingperformanceand
longerbatterylife.
Thechainneedstobesharpenedorreplacedifyou
mustforceitontothewood,orifitproducessawdust
insteadoffullwoodchips.
ContactanAuthorizedServiceDealertohavethe
chainsharpenedorreplaced.
Service
Shouldthepolesawneedservice,takethetoolto
yourAuthorizedServiceDealer.
Note:Ifyouareinstallinganewchain,ipthe
guidebartoavoidunevenwear.
4.Positiontheopenloopofthechain(notonthe
guidebar)aroundthedrivesprocketonthepole
sawandinstalltheguidebarandattachedchain
ontothepolesaw.
Important:Ensurethatthechainadjusting
studisinsertedintothechainadjustingstud
slotontheguidebar(Figure19).Youmay
needtorotatethechain-tensioningscrewto
tthestudintotheholeintheguidebar.
5.Installthesidecover,butdonotfullytightenthe
sidecoverknob.
6.Adjustthechaintension;refertoAdjustingthe
ChainTension(page17).
20

Storage
Important:Storethemachine,batterypack,and
chargeronlyintemperaturesthatarewithinthe
appropriaterange;refertoSpecications(page
12).
Important:Ifyouarestoringthebatterypack
fortheoff-season,chargeituntil2or3LED
indicatorsturngreenonthebattery.Donotstore
afullychargedorfullydepletedbattery.When
youarereadytousethemachineagain,charge
thebatterypackuntiltheleftindicatorlightturns
greenonthechargerorall4LEDindicatorsturn
greenonthebattery.
•Disconnectthemachinefromthepowersupply
(i.e.,removethebatterypack)andcheckfor
damageafteruse.
•Cleanallforeignmaterialfromthemachine.
•Donotstorethemachinewiththebatterypack
installed.
•Storethemachine,batterypack,andbattery
chargerinawell-ventilatedplacethatis
inaccessibletochildren.
•Keepthemachine,batterypack,andbattery
chargerawayfromcorrosiveagentssuchas
gardenchemicalsandde-icingsalts.
•Toreducetheriskofseriouspersonalinjury,do
notstorethebatterypackoutsideorinvehicles.
•Storethemachine,batterypack,andbattery
chargerinanenclosedclean,dryarea.
21

Troubleshooting
Performonlythestepsdescribedintheseinstructions.Allfurtherinspection,maintenance,andrepairwork
mustbeperformedbyanauthorizedservicecenterorasimilarlyqualiedspecialistifyoucannotsolvethe
problemyourself.
Problem
Thepolesawdoesnotrunordoesnotrun
continuously.
Thepolesawruns,butthechaindoesnot
rotate.
Thepolesawdoesnotproperlycut.
PossibleCauseCorrectiveAction
1.Thebatterypackislowoncharge.
2.Thebatterypackisnotfullyseated.
3.Thebatterypackisoverorunderthe
appropriatetemperaturerange.
4.Thebatterypackhasexceededhigh
amperagelimits.
5.Thereismoistureontheleadsofthe
batterypack.
6.Thereisdebrisunderthecover.6.Removethecoverandcleanoutany
1.Thechainisnotproperlyseatedonthe
drivesprocket.
2.Thereisdebrisunderthecover.2.Removethecoverandcleanoutany
1.Thechainisnottensionedcorrectly .
2.Thechainisdullordamaged.2.Replacethechain.
3.Theguidebarisbentorthegrooves
aredamaged.
4.Thechainisinstalledbackward.4.Installthechaincorrectly.
5.Thechainisnotbeinglubricated
properly.
1.Chargethebatterypack.
2.Ensurethatthebatterypackisinserted
allthewayintothehousing.
3.Movethebatterypacktoaplace
whereitisdryandthetemperatureis
between5°C(41°F)and40°C(104°F).
4.Releasethetrigger,thenpressthe
triggerswitch.
5.Allowthebatterypacktodryorwipeit
dry.
debris.
1.Installthechainandensurethatthe
linksareproperlyseatedinthedrive
sprocket.
debris.
1.Setthepropertensiononthechain.
3.Replacetheguidebar
5.Checktheoillevelandensurethatoil
isowingtothechain.
Thechainoilisnotlubricatingproperly.
1.Theoillevelislow.
2.Theoiloutletisplugged.
3.Thereisdebrisunderthecover.3.Removethecoverandcleanoutany
4.Theoilchannelorgrooveintheguide
barisplugged.
1.Checktheoillevel.
2.Cleanoutdebrisfromtheoiloutlet.
debris.
4.Cleanoutdebrisinthebar.
22

EEA/UKPrivacyNotice
Toro’sUseofYourPersonalInformation
TheT oroCompany(“T oro”)respectsyourprivacy .Whenyoupurchaseourproducts,wemaycollectcertainpersonalinformationaboutyou,eitherdirectly
fromyouorthroughyourlocalT orocompanyordealer.T orousesthisinformationtofullcontractualobligations-suchastoregisteryourwarranty,
processyourwarrantyclaimortocontactyouintheeventofaproductrecall-andforlegitimatebusinesspurposes-suchastogaugecustomer
satisfaction,improveourproductsorprovideyouwithproductinformationwhichmaybeofinterest.Toromayshareyourinformationwithoursubsidiaries,
afliates,dealersorotherbusinesspartnersinconnectiontheseactivities.Wemayalsodisclosepersonalinformationwhenrequiredbylaworin
connectionwiththesale,purchaseormergerofabusiness.Wewillneversellyourpersonalinformationtoanyothercompanyformarketingpurposes.
RetentionofyourPersonalInformation
Torowillkeepyourpersonalinformationaslongasitisrelevantfortheabovepurposesandinaccordancewithlegalrequirements.Formoreinformation
aboutapplicableretentionperiodspleasecontactlegal@toro.com.
Toro’sCommitmenttoSecurity
YourpersonalinformationmaybeprocessedintheUSoranothercountrywhichmayhavelessstrictdataprotectionlawsthanyourcountryofresidence.
Wheneverwetransferyourinformationoutsideofyourcountryofresidence,wewilltakelegallyrequiredstepstoensurethatappropriatesafeguardsare
inplacetoprotectyourinformationandtomakesureitistreatedsecurely .
AccessandCorrection
Youmayhavetherighttocorrectorreviewyourpersonaldata,orobjecttoorrestricttheprocessingofyourdata.T odoso,pleasecontactusbyemail
atlegal@toro.com.IfyouhaveconcernsaboutthewayinwhichTorohashandledyourinformation,weencourageyoutoraisethisdirectlywithus.
PleasenotethatEuropeanresidentshavetherighttocomplaintoyourDataProtectionAuthority.
374-0282RevC
FormNo.3443-544RevB
Flex-ForcePowerSystem
Hochentaster
Modellnr.51847T—Seriennr.321000001undhöher
™
60V
RegistrierenSieIhrProduktunterwww.Toro.com.
Originaldokuments(DE)
*3443-544*
WennSieUnterstützung
benötigen,sehenSiesich
erstdieAnleitungsvideos
Wichtig:ScannenSiemitIhremMobilgerätden
QR-Code(fallsvorhanden)aufdemTypenschild,
umaufGarantie-,Ersatzteil-oderandere
Produktinformationenzuzugreifen.
aufwww.Toro.com/support
anoderwendenSie
sichanIhrenofziellen
Service-Vertragshändler,
bevorSiedasProdukt
zurückgeben.
Einführung
DieserHochentasteristfürdasBeschneiden
kleinerÄsteundZweigemiteinemDurchmesser
vonbiszu15cmausgelegt.DasGerätsollte
nurvonErwachsenenverwendetwerden.Er
istfürdieVerwendungmitdenToroFlex-Force
Lithium-Ionen-Akkupack-Modellen81820,81825,
81850,81860oder81875vorgesehen.Diese
Akkupackssindsoausgelegt,dasssienurmitdem
Akkuladegerät-Modell81801,81101,81802oder
81805geladenwerdenkönnen.Derzweckfremde
EinsatzdieserProduktekannfürSieundUnbeteiligte
gefährlichsein.
Wichtig:WennSiediesesGerätmitden
Akkupack-Modellen81850,81860oder81875
verwenden,müssenSiedenmitgelieferten
Schnellspanngurtanbringen,umdierichtige
UnterstützungundBalancezugewährleisten.
VerwendenSiebeimBetriebderMaschinekeine
anderenGurtzeugeoderMehrfachgurtzeuge.
LesenSiedieseInformationensorgfältigdurch,
umsichmitdemordnungsgemäßenEinsatzund
derWartungdesProduktsvertrautzumachenund
VerletzungenundeineBeschädigungdesProdukts
zuvermeiden.SietragendieVerantwortungfür
einenordnungsgemäßenundsicherenEinsatzdes
Produkts.
BesuchenSieT oro.comfürweitereInformationen,
einschließlichSicherheitstipps,Schulungsunterlagen,
Zubehörinformationen,StandorteinesHändlersoder
RegistrierungIhresProdukts.
g374224
Bild1
1.TypenschildmitModell-undSeriennummer.
Modellnr.
Seriennr.
IndieserAnleitungwerdenpotenzielleGefahren
angeführt,undSicherheitshinweisewerdenvom
Sicherheitswarnsymbol(Bild2)gekennzeichnet.
DiesesWarnsymbolweistaufeineGefahrhin,diezu
schwerenodertödlichenVerletzungenführenkann,
wennSiedieempfohlenenSicherheitsvorkehrungen
nichteinhalten.
sa-black
Bild2
Sicherheitswarnsymbol
IndieserAnleitungwerdenzweiBegriffezur
HervorhebungvonInformationenverwendet.Wichtig
weistaufspeziellemechanischeInformationenhin,
undHinweishebtallgemeineInformationenhervor,
dieIhrebesondereBeachtungverdienen.
WendenSiesichanIhrenT oro-Vertragshändler
oderKundendienst,wennSieeineServiceleistung,
OriginalersatzteilevonTorooderzusätzliche
Informationenbenötigen.HaltenSiehierfür
dieModell-undSeriennummernIhresProdukts
griffbereit.Bild1zeigtdiePositionderModell-und
SeriennummernamProdukt.TragenSiehierdie
Modell-undSeriennummerndesGerätsein.
©2022—TheToro®Company
8111LyndaleAvenueSouth
Bloomington,MN55420
KontaktierenSieunsunterwww.Toro.com.
2
AlleRechtevorbehalten
Druck:China

Inhalt
Sicherheit
Sicherheit..................................................................3
Sicherheits-undBedienungsschilder.................8
Einrichtung................................................................9
EinbaudesSchwertsundderSägekette.............9
ZusammenbaudesHochentasters...................10
NachfüllenvonSchwert-undKettenölfür
denHochentaster...........................................11
AnlegendesTragegurts...................................12
Produktübersicht.....................................................12
TechnischeDaten............................................13
Betrieb....................................................................14
VorderVerwendungdesHochentasters...........14
StartendesHochentasters...............................14
AbschaltendesHochentasters.........................14
ArbeitenmitdemHochentaster.........................15
ZurückschneideneinesBaums.........................16
HerausnehmendesAkkupacks........................17
Wartung..................................................................18
EmpfohlenerWartungsplan.................................18
PrüfendesÖlstandsundAuffüllenmit
Stangen-undKettenöl..................................18
KontrolledesDurchussesdesSchwert-
undKettenöls................................................19
EinstellenderKettenspannung.........................19
WartendesSägeschwerts,Sägeketteund
desAntriebsrads...........................................21
EinbaudesSägeschwertsundder
Sägekette......................................................22
SchärfenderKette............................................22
Wartung............................................................22
Einlagerung............................................................23
Fehlersucheund-behebung...................................24
WARNUNG:
LesenSiealleSicherheits-und
Warnhinweise,Anweisungen,Abbildungen
undSpezikationen,diemitdiesem
Elektrowerkzeuggeliefertwerden.
DasNichtbeachtenalleruntenaufgeführten
AnweisungenkannzuStromschlag,Brand
und/oderschwerenVerletzungenführen.
BewahrenSiealleWarnungenundAnweisungen
füreinenspäterenBezugauf.
DerBegriff„Elektrowerkzeuge“inallenWarnungen
beziehtsichaufElektrowerkzeugemitStromkabel
oderAkku.
WichtigeSicherheitsANWEISUNGEN
I.Arbeitsbereichssicherheit
1.DerArbeitsbereichsolltesauberundgut
beleuchtetsein.Unaufgeräumteoderdunkle
BereicheführenleichtzuUnfällen.
2.VerwendenSieElektrowerkzeuge
nichtinexplosivenUmgebungen,
u.a.Vorhandenseinvonbrennbaren
Flüssigkeiten,DämpfenoderStaub.
ElektrowerkzeugeerzeugenFunken,dieden
StauboderdieDämpfeentzündenkönnen.
3.HaltenSieKinderundUnbeteiligtefern,
wennSiedasElektrowerkzeugverwenden.
AblenkungenkönnenzueinemKontrollverlust
führen.
II.ElektrischeSicherheit
1.SteckerdesElektrowerkzeugsmüssenmit
derStechdoseübereinstimmen.Modizieren
SiedenSteckeraufkeinenFall.Verwenden
SiekeineAdaptersteckermitgeerdeten
Elektrowerkzeugen.NichtmodizierteStecker
undpassendeSteckdosenverringerneinen
möglichenStromschlag.
2.FassenSiekeinegeerdetenOberächen,
u.a.Rohre,Kühler,HerdeoderKühlschränke
an.DieGefahreinesStromschlagsisthöher,
wennIhrKörpergeerdetist.
3.SetzenSieElektrowerkzeugenichtRegen
odernassenBedingungenaus.Wasser,das
ineinElektrowerkzeugeindringt,erhöhtdie
GefahreinesStromschlags.
4.MissbrauchenSiedasKabelnicht.
VerwendenSiedasKabelnicht,umdas
Elektrowerkzeugzutragen,zuziehen
3

odervonderSteckdoseabzuschließen.
BringenSiedasKabelnichtmitHitze,
scharfenKantenoderbeweglichenTeilen
inVerbindung.Beschädigteoderverwickelte
KabelerhöhendieGefahreinesStromschlags.
5.WennSieeinElektrowerkzeug
außenverwenden,verwendenSie
einVerlängerungskabel,dasfürden
Außeneinsatzgeeignetist.DieVerwendung
einesfürdenAußeneinsatzgeeignetenKabels
verringertdieGefahreinesStromschlags.
6.WennSieesnichtvermeidenkönnen,ein
ElektrowerkzeuganeinemnassenOrt
einzusetzen,verwendenSieeinedurch
eineFehlerstromeinrichtunggeschützte
Stromzufuhr.DieVerwendungeiner
FehlerstromeinrichtungverringertdieGefahr
einesStromschlags.
III.PersönlicheSicherheit
1.BleibenSiewachsam,passenSieaufund
setzenSiegesundenMenschenverstandein,
wennSieeinElektrowerkzeugverwenden.
VerwendenSiekeinElektrowerkzeug,
wennSiemüdesindoderunterDrogen-,
Alkohol-oderMedikamenteneinussstehen.
EinekurzeUnaufmerksamkeitbeimEinsatz
einesElektrowerkzeugskannzuschweren
Verletzungenführen.
2.TragenSieSchutzkleidung.TragenSieimmer
eineSchutzbrille.PassendeSchutzkleidung
wieeineStaubschutzmaske,rutschfeste
Sicherheitsschuhe,einSchutzhelmoder
GehörschutzverringerndieVerletzungsgefahr.
3.VerhindernSieunabsichtlichesAnlassen.
StellenSiesicher,dassderSchalterinder
AUS-Stellungist,bevorSiedasStromkabel
oderdasAkkupackanschließen,das
Werkzeughochhebenundtragen.Das
TragenvonElektrowerkzeugenmitdem
FingeramSchalteroderdasEinschalten
vonElektrowerkzeugenmiteingeschaltetem
SchalterführenschnellzuUnfällen.
6.TragenSieentsprechendeKleidung.Tragen
SiekeineweitenKleidungsstückeoder
Schmuck.BerührenSiebeweglicheTeile
nichtmitdenHaaren,derKleidungund
denHandschuhen.LoseKleidungsstücke,
SchmuckoderlangeHaarekönnensichin
beweglichenTeilenverfangen.
7.WennGerätefürdenAnschlussvonStaubabzugs-undStaubsammlungseinrichtungen
bereitgestelltsind,stellenSiesicher,
dasssierichtigangeschlossensindund
verwendetwerden.DieVerwendungvon
StaubsammlungkannmitStaubinBeziehung
stehendeGefahrenverringern.
8.UmgehenoderignorierenSiedie
Sicherheitshinweiseund-vorkehrungen
nicht,selbstwennSieimhäugenUmgang
mitdemElektrowerkzeugvertrautsind.Eine
unvorsichtigeHandlungkanninnerhalbvon
SekundenbruchteilenzuschwerenVerletzungen
führen.
9.KinderodernichtgeschultePersonen
dürfendiesesGerätwederverwenden
nochwarten.LassenSienurPersonen,die
verantwortungsbewusst,geschult,mitden
Anweisungenvertraut,undkörperlichinder
Lagesind,dasGerätzubedienenundzu
warten.
IV.VerwendungundPegevon
Elektrowerkzeugen
1.ÜbenSiekeineGewaltaufdas
Elektrowerkzeugaus.VerwendenSie
dasrichtigeElektrowerkzeugfürdie
Arbeitsaufgabe.DasrichtigeElektrowerkzeug
funktioniertbessermitdemDurchsatz,fürden
eskonzipiertist().
2.SetzenSiedasElektrowerkzeugnicht
ein,wennesnichtmitdemSchaltereinoderausgeschaltetwerdenkann.Jedes
Elektrowerkzeug,dasnichtmitdemSchalter
gesteuertwerdenkann,istgefährlichundmuss
repariertwerden.
4.EntfernenSieEinstellschlüsseloder
Schraubenschlüssel,bevorSiedas
Elektrowerkzeugeinschalten.Ein
Schraubenschlüsselodereinaneinem
beweglichenTeildesElektrowerkzeugs
angeschlossenerSchlüsselkönnenzu
Verletzungenführen.
5.StreckenSiesichnichtzustark.Verlieren
SienichtdenHaltundbehaltenSiedas
Gleichgewicht.Siehabendanninunerwarteten
SituationeneinebessereKontrolleüberdas
Elektrowerkzeug.
3.ZiehenSiedenSteckerausderSteckdose
odernehmenSiedenAkkupackausdem
Elektrowerkzeug(sofernabnehmbar),bevor
SieEinstellungenvornehmen,Zubehör
auswechselnoderdasElektrowerkzeug
aufbewahren.Solchevorbeugenden
Sicherheitsmaßnahmenverhindern,dassdas
ElektrowerkzeugausVerseheneingeschaltet
wird.
4.LagernSienichtverwendeteElektrowerkzeugeinInnenräumenaußerhalb
derReichweitevonKindern.Personen,
4

dienichtmitdemElektrowerkzeugoder
diesenAnweisungenvertrautsind,sollten
dasElektrowerkzeugnichtverwenden.
ElektrowerkzeugesindindenHändenvonnicht
geschultenBedienerngefährlich.
5.WartungvonElektrowerkzeugen
undZubehör.PrüfenSieaufnicht
ausgeuchteteoderklemmendebewegliche
Teile,zerbrocheneTeileoder,andere
Bedingungen,diesichaufdenBetrieb
desElektrowerkzeugsauswirkenkönnen.
LassenSiedasElektrowerkzeug,wenn
esbeschädigtist,vorderVerwendung
reparieren.VieleUnfällewerdenvonschlecht
gewartetenElektrowerkzeugenverursacht.
6.HaltenSieSchneidwerkzeugescharfund
sauber.RichtiggewarteteSchneidwerkzeuge
mitscharfenSchnittkantenklemmennichtund
sindleichterzusteuern.
7.VerwendenSiedasElektrowerkzeug,das
ZubehörunddieEinsätzeusw.gemäßdieser
Anweisungen;berücksichtigenSiedie
Arbeitsbedingungenunddieauszuführende
Arbeit.DiezweckentfremdendeVerwenden
desElektrowerkzeugskönntezugefährlichen
Situationenführen.
8.HaltenSiedieGriffeundGriffoberächen
trocken,saubersowieöl-undfettfrei.
RutschigeGriffeundGriffoberächen
ermöglichenkeinesichereHandhabungund
KontrolledesElektrowerkzeugsinunerwarteten
Situationen
V.VerwendungundPegevon
akkubetriebenenWerkzeugen
1.VerwendenSienurdasvomHersteller
zugelasseneLadegerät.EinLadegerät,das
füreinenTypdesBatteriepacksgeeignetist,
kannbeieinemanderenBatteriepackzueiner
Brandgefahrführen.
2.VerwendenSieElektrowerkzeugenurmitden
angegebenenBatteriepacks.DieVerwendung
vonanderenAkkupackskannzumöglichen
VerletzungenodereinemBrandführen.
3.HaltenSieeinennichtverwendeten
AkkupackvonanderenMetallobjektenfern,
u.a.Briefklammern,Münzen,Schlüssel,
Nägel,Schraubenoderanderenkleinen
Metallobjekten,dieeinenKurzschluss
zwischendenPolenherstellenkönnen.
EinKurzschließenderAkkupolekannzu
VerbrennungenodereinemBrandführen.
4.BeiMissbrauchkannFlüssigkeitausdem
Akkuausgestoßenwerden;vermeiden
SieeinenKontakt.SpülenSiebeieinem
versehentlichenKontaktmitklarem
Wasser.FallsdieFlüssigkeitdieAugen
berührt,suchenSieeinenArztauf.Vom
AkkuausgestoßeneFlüssigkeitkannzu
HautreizungenoderVerbrennungenführen.
5.VerwendenSiekeinebeschädigtenoder
umgebautenAkkusoderWerkzeuge.
BeschädigteoderumgebauteAkkuskönnen
unvorhergesehenreagierenundBrände
sowieExplosionenverursachenodereine
Verletzungsgefahrdarstellen.
6.SetzenSieeinenAkkupackoderein
WerkzeugnichtFeueroderübermäßigen
Temperaturenaus.DasAussetzengegenüber
FeueroderTemperaturenüber100°Ckann
eineExplosionverursachen.
7.BefolgenSiealleAnweisungenzum
AuadenundladenSiedasAkkupack
oderWerkzeugnichtaußerhalbdesinder
AnweisungangegebenTemperaturbereichs.
UnsachgemäßesAuadenoderbei
Temperaturenaußerhalbdesangegebenen
BereichskanndenAkkubeschädigenunddie
Brandgefahrerhöhen.
8.SetzenSieeinenAkkupackoderein
WerkzeugkeinemRegenodernassen
Bedingungenaus.Wasser,dasinein
Elektrowerkzeugeindringt,erhöhtdieGefahr
einesStromschlags.
9.VORSICHT :BeiunsachgemäßerBehandlung
desAkkusbestehtdieGefahreinesBrandes
odereinerVerätzung.DemontierenSiedas
Akkupacknicht.ErwärmenSiedasAkkupack
nichtüber68°CundverbrennenSieesnicht.
ErsetzenSiedasAkkupacknurdurchein
OriginalakkupackvonToro.DieVerwendung
einesanderenAkkupacktypskannzueinem
BrandodereinerExplosionführen.HaltenSie
AkkupacksvonKindernfernundbewahrenSie
sieinderOriginalverpackungauf,bisSiesie
verwenden.
VI.Wartung
1.LassenSiedasElektrowerkzeugvon
einemqualiziertenMechanikerwarten
undverwendenSienuridentische
Ersatzteile.DiesgewährleistetdieSicherheit
desElektrowerkzeugs.
2.WartenSieniemalsbeschädigteAkkupacks.
DieWartungvonAkkussolltenurvomHersteller
odervonautorisiertenServiceanbietern
durchgeführtwerden
VII.SicherheitbeiHochentastern
1.HaltenSiedieSägekettevonKörperteilen
fern.NehmenSiedasgeschnittene
MaterialnichtherausundhaltenSiedaszu
5

schneidendeMaterialnichtfest,solange
sichdieSägekettebewegt.Vergewissern
Siesich,dassderSchalterausgeschaltet
unddasAkkuabgeklemmtist,wennSie
eingeklemmtesMaterialbeseitigen.Die
Sägekettebewegtsichauchnachdem
AusschaltendesSchaltersweiter.Bevor
SiedenHochentasterstarten,stellen
Siesicher,dassdieSägekettekeinen
KontaktzuGegenständenhat.EinMoment
derUnaufmerksamkeitbeimBetriebvon
Hochentasternkanndazuführen,dasssich
IhreKleidungoderIhrKörperinderSägekette
verheddert.
2.TragenSiedenHochentasteramHolm
mitangehaltenerSägekette.BringenSie
beimTransportoderderLagerungdes
HochentastersimmerdieAbdeckungder
Sägekettenvorrichtungan.Einerichtige
HandhabungdesHochentastersverringertdie
GefahrvonVerletzungendurchdieSägekette.
3.HaltenSiedasElektrowerkzeugnur
andenisoliertenGriffoberächen,dadie
KettensägeverborgeneKabelberührenkann.
Sägeketten,dieeinunterStromstehendes
Kabelberührenoderdurchtrennen,können
freiliegendeMetallteiledesElektrowerkzeugs
unterStromsetzenundSiekönneneinen
Stromschlagerleiden.
4.VerwendenSiedenHochentasternicht
beischlechtenWetterbedingungen,
insbesonderewenndieGefahreines
Blitzschlagsbesteht.Diesverringertdie
Gefahr,vomBlitzgetroffenzuwerden.
5.UmdasRisikoeinesStromschlagszu
verringern,verwendenSiedasWerkzeug
niemalsinderNähevonStromleitungen.
DerKontaktmitoderdieVerwendungin
derNähevonStromleitungenkannzu
schwerenVerletzungenoderStromschlägenmit
Todesfolgeführen.
6.VerwendenSiedenHochentasterimmermit
beidenHänden.HaltenSiedenHochentaster
mitbeidenHänden,umeinenKontrollverlustzu
vermeiden.
7.TragenSieimmereinenKopfschutz,wenn
SiedenHochentasterüberKopfführen.
HerabfallendeÄsteundSchnittgutkannzu
schwerenKörperverletzungenführen.
8.GeeigneteKleidung:TragenSie
geeigneteKleidung,u.a.eine
Schutzbrille,langeHosen,rutschfeste
Arbeitsschuhe,Schutzhandschuheund
einenGehörschutz.BindenSielanges
HaarzusammenundtragenSiekeinen
losenSchmuck,derinbeweglichen
Teilenhängenbleibenkann.Tragen
SiebeistaubigenArbeitsbedingungen
eineStaubschutzmaske.Angemessene
SchutzkleidungverringertdieGefahrvon
Verletzungendurchherausgeschleuderte
Gegenständeodereinerversehentlichen
BerührungderSägekette.
9.ArbeitenSiemitdemHochentasternichtin
einemBaum,aufeinerLeiter,voneinemDach
odereinerandereninstabilenArbeitsäche
aus.DerBetriebeinesHochentastersaufdiese
WeisekannzuschwerenVerletzungenführen.
10.AchtenSieimmereineguteStandfestigkeit
undverwendenSiedenHochentasternur
aufeinerfesten,sicherenundebenen
Oberäche.Rutschigeoderinstabile
Oberächen,u.a.Leitern,könnenzueinem
GleichgewichtsverlustodereinemKontrollverlust
überdenHochentasterführen.
11.WennSieeinenunterZugstehendenAst
schneidenkannerzurückfedern.Wenndie
SpannunginderHolzfaserwegfällt,kannSieder
zurückfederndeAsttreffenund/oderSiekönnen
dieKontrolleüberdenHochentasterverlieren.
12.PassenSiebesondersbeimSchneiden
vonUnterholzundjungenTriebenauf.Das
schlankeMaterialkannsichinderKettensäge
verfangenundinIhreRichtunggefedertwerden
oderSiekönnendasGleichgewichtverlieren.
13.TragenSiedenHochentastermitbeiden
Händen,beiausgeschaltetemHochentaster
undvomKörperweg.BringenSie
beimTransportoderderLagerungdes
HochentastersimmerdieSchutzabdeckung
desSägeschwertsan.Dierichtige
HandhabungdesHochentastersverringertdas
RisikoeinesversehentlichenKontaktsmitder
sichbewegendenSägekette.
14.BefolgenSiedieAnweisungenzum
SchmierenundSpannenderKettesowie
zumAustauschendesSägeschwertsund
derSägekette.Einefalschgespannteoder
eingefetteteKettekannbrechenoderden
Rückschlagerhöhen.
15.NurHolzsägen.VerwendenSieden
HochentasterniemalsfürandereZwecke.
ZumBeispiel:VerwendenSieden
HochentasternichtzumSchneiden
vonMetall,Kunststoff,Mauerwerkoder
anderenBaumaterialienalsHolz.Die
zweckentfremdendeVerwendungdes
HochentasterskannzugefährlichenSituationen
führen.
16.HaltenSiedieGriffetrocken,sauberund
öl-undfettfrei.FettigeoderöligeGriffesind
6

rutschigundkönnenzueinemKontrollverlust
führen.
EinVerringernderHöhederFühlerlehrekann
zueinemstärkerenRückschlagführen.
17.VermeidenSieeinenRückschlag.Ein
Rückschlagkannauftreten,wenndieNaseoder
SpitzedesSägeschwertseinObjektberührt
oderwennHolzdieKettensägebeimSchneiden
einklemmt.
DerKontaktmitderSpitzekannineinigen
FällenzueinerplötzlichenRückschlagreaktion
führen,beiderdasSägeschwertnachobenund
zurückzuIhnengeschleudertwird
WennSiedieSägeketteobenamSägeschwert
einklemmt,kanndasSägeschwertschnell
wiederzuIhnenzurückgedrücktwerden
BeibeidenReaktionenkönnenSieden
VerlustüberdieSägeverlierenundschwere
Verletzungenerleiden.VerlassenSiesich
nichtausschließlichaufdieinIhrerKettensäge
eingebautenSicherheitsvorrichtungen.Als
BenutzereinesHochentasterssolltenSie
weitereMaßnahmenunternehmen,umUnfälle
oderVerletzungenbeiSchneidearbeitenzu
verhindern.
EinRückschlagenderKettensägesinddas
ErgebniseinesfalschenGebrauchsdes
Werkzeugsund/oderfalscherBetriebsverfahren
oder-bedingungenundkönnen,durchgeeignete
Vorsichtsmaßnahmenwieuntenangegeben,
vermiedenwerden:
BEWAHRENSIEDIESE
ANWEISUNGEN
18.HaltenSiedenHochentasterfest.Ihre
DaumenundFingersolltendenHolmdes
HochentastersfestumschließenundSie
solltenbeideHändeandenGriffenhaben.
IhrKörperundIhreArmesolltenineiner
Stellungsein,inderSieeinemRückschlag
standhaltenkönnen.Rückschlagkräfte
könnenvomBedienerkontrolliertwerden,wenn
entsprechendeVorsichtsmaßnahmengetroffen
werden.LassenSiedenHochentasternichtlos.
19.VergewissernSiesich,dassderSchalter
ausgeschaltetundderAkkuentferntist,
wennSieeingeklemmtesMaterialbeseitigen,
denHochentasterlagernoderwartenwollen.
UnerwartetesBetätigenderMaschinebeim
RäumenvoneingeklemmtemMaterialoder
beiWartungsarbeitenkannzuschweren
Verletzungenführen.
20.VerwendenSienurErsatzsägeschwerterund
Sägeketten,dievomHerstellerzugelassen
sind.EinfalscherAustauschdesSägeschwerts
undSägekettekannzumBrechenderKetten
und/oderzueinemRückschlagführen.
21.FolgenSiedenAnweisungendesHerstellers
fürdasSchärfenundWartenderKettensäge.
7

Sicherheits-undBedienungsschilder
1.Bittenursachgerechtentsorgen.
DieSicherheits-undBedienungsaufklebersindgutsichtbar;siebendensichinderNähe
dermöglichenGefahrenbereiche.T auschenSiebeschädigteoderverlorengegangene
Aufkleberaus.
decal139-5348
139-5348
139-5345
1.Warnung:LesenSiedieBedienungsanleitung,tragenSie
einenGehörschutz,tragenSieeinenAugenschutz,tragen
SieeinenSchutzhelm,tragenSieSchutzhandschuhe,
tragenSiefestes,rutschfestesSchuhwerk.SetzenSie
dieMaschinenichtRegenaus.Vorsicht:Gefahrvon
Schnittverletzungen/AmputationderHände!Einzugsgefahr:
HaltenSiesichvonbeweglichenTeilenfern.HaltenSie
UnbeteiligtewährenddesBetriebsfern.Gefahreines
Stromschlags:HaltenSiesichvonStromleitungenfern.
decal139-5345
8

Einrichtung
EinbaudesSchwertsundderSägekette
GEFAHR
BerührenderKettensägenzähnedesHochentasterskannzuschwerenVerletzungenführen.
•NehmenSiedasAkkupackheraus,bevorSieEinstell-oderWartungsarbeitenam
Hochentasterdurchführen.
•TragenSiebeiEinstell-oderWartungsarbeitenamHochentasterimmerSchutzhandschuhe.
1.LegenSiedenHochentasteraufeineebeneFlächeundsetzenSiedenAkkupacknichtein.
2.EntfernenSiedieSeitenabdeckung,drehenSiedenKnopfderSchwertabdeckunggegenden
Uhrzeigersinn,bisderKnopfentferntist,undentfernenSiedanndieSeitenabdeckung(Bild3).
Bild3
1.KnopfderSchwertabdeckung5.SchlitzdesSägeschwerts
2.Seitenabdeckung6.Sägeschwert
3.Kette7.Antriebsrad
4.SchlitzfürKettenspannbolzen8.BolzendesSägeschwerts
3.LegenSiedieSägeketteumdasKettenradamvorderenEndedesSägeschwerts,wobeidie
SchneidekantederSägekettenzähneamoberenEndedesSägeschwertsnachvornezeigt,wieinder
AbbildungunterderSeitenabdeckungdesHochentastersdargestellt.
4.FührenSiedieSägeketteumdasSägeschwertunduchtenSiedieKettenzähneinderNutdes
Sägeschwertsaus.
5.LegenSiedieoffeneEndederSägekette(dieSeite,dienichtaufdemSägeschwertliegt)umdas
AntriebskettenradamHochentaster(Bild3).
9.Ölaustritt
10.Kettenspannbolzen
Wichtig:VergewissernSiesich,dassderKettenspannbolzenindenSchlitzdes
KettenspannbolzensamSägeschwerteingeführtist(Bild3).
MöglicherweisemüssenSiedieKettenspannschraubedrehen,damitderBolzenindenSchlitzam
Sägeschwertpasst(Bild18).
6.BringenSiedieSeitenabdeckungunddenKnopfderSchwertabdeckunganundziehenSiedie
SeitenabdeckungdurchDrehendesKnopfesimUhrzeigersinnlockerfest.
g374226
7.StellenSiedieKettenspannungein;sieheEinstellenderKettenspannung(Seite19).
9

ZusammenbaudesHochentasters
1.KlappenSiedieT eiledesHolmsaus(Bild4).
Bild4
1.HolmabschnittmitGriffen3.HolmabschnittmitSäge
2.MittlererHolmabschnitt
2.RichtenSiedenVerriegelungsknopfammittlerenHolmabschnittaufdasLanglochamEndedes
HolmabschnittmitGriffenausundschiebenSiediebeidenHolmabschnittezusammen(Bild5).
Hinweis:DerVerriegelungsknopfklicktindasLochein,wennbeideHolmabschnitteverbundensind.
3.VerwendenSiedenmitgeliefertenSchraubenschlüssel,umdiebeidenHolmabschnittemiteinanderzu
verschrauben(EvonBild5).
4.WiederholenSiediesenVorgang,umdenHolmabschnittmitderSägemitdemmittlerenHolmabschnitt
zuverbinden(Bild5).
g374227
10

Bild5
NachfüllenvonSchwert-undKettenölfürden
Hochentaster
Wichtig:VerwendenSienurStangen-undKettenöl(separaterhältlich).
BefüllenSiedenHochentastervordererstenVerwendungmitSchwert-undKettenöl;siehePrüfendes
ÖlstandsundAuffüllenmitStangen-undKettenöl(Seite18).
11
g374228

AnlegendesTragegurts
VerbindenSiedenMetallhakenamSchultergurtmit
demGurtbandamHolmdesHochentasters(Bild6).
Bild6
1.Gurt-Einstellvorrichtung3.Gurtband
2.Metallhaken
DieGurtlängeisteinstellbar;schiebenSiedie
Gurt-Einstellvorrichtungnachoben,umdieLängedes
Gurtszuverringern,odernachunten,umdieLänge
desGurtszuvergrößern(Bild6).
SolltejemalseinNotfalleintretenundSiedas
Gurtzeugschnellentfernenmüssen,lösenSiedie
Schnellverschlussschnallewiefolgt:
4.Schultergurt
Produktübersicht
g374229
g374230
Bild8
1.Tastenverriegelung
2.Abzugssperre
3.VordererGriff8.AnleitungzumSchneiden
4.Öldeckel
5.Abzug
6.Knopfder
Schwertabdeckung
7.Schutzabdeckungdes
Sägeschwerts
9.Kettenschwertund
Sägekette
1.BeidenSeitenderSchnellverschlussschnalle
eindrücken(AinBild7).
2.LassenSiedieSchnellverschlussschnallesich
lösen(BinBild7).
Bild7
g340477
12

TechnischeDaten
Modell51847T
Schwertlänge(mit88619
und88621ausgestattet)
Kettenabstand(mit88619
und88621ausgestattet)
Kettenneigung(mit88619
und88621ausgestattet)
Kettenlänge(mit88619und
88621ausgestattet)
Nennspannung
Gewicht(ohneAkku)
Ladegerättyp
Akkutyp81820,81825,81850,81860
*WennSiediesesGerätmitdenAkkupack-Modellen
81850,81860oder81875verwenden,müssenSie
denmitgeliefertenSchnellspanngurtanbringen.
25,4cm
0,127cm
¼"
58Glieder
60VDCmaximal,54VDC
Nennbetrieb
4,1kg
81801,81101,81802oder
81805
oder81875*
GeeigneteTemperaturbereiche
Auaden/Lagerndes
Akkupacksbei
VerwendungdesAkkupacks
bei
VerwendenSiedasWerkzeug
beiT emperaturenzwischen
*DieLadezeitwirdverlängert,wennSiedenAkku
nichtindiesemBereichauaden.
LagernSiedasWerkzeug,dasAkkupackunddas
AkkuladegerätaneinemsauberenundtrockenenOrt.
5°Cbis40°C*
-30°Cbis49°C*
0°Cbis49°C*
13

Betrieb
VorderVerwendungdes
Hochentasters
FührenSiefolgendeSchrittevorVerwendungdes
Hochentastersaus:
•PrüfenSiedieKettenspannung;sieheEinstellen
derKettenspannung(Seite19).
•ReinigenSiedieKomponentendesHochentasters,
prüfenSiesieaufübermäßigenVerschleißoder
SchädenundersetzenSiediesebeiBedarf;siehe
WartendesSägeschwerts,Sägeketteunddes
Antriebsrads(Seite21).
•ÜberprüfenSiedieSägeketteaufSchärfeund
BeschädigungenundschärfenoderersetzenSie
diesebeiBedarf;sieheSchärfenderKette(Seite
22).
•PrüfenSiedenÖlstand;siehePrüfendesÖlstands
undAuffüllenmitStangen-undKettenöl(Seite18).
•ÜberprüfenSiedenHochentasterauf
Beschädigungen,allgemeinesErscheinungsbild
undLeistung.StellenSiesicher,dasssichdie
Schalterfreibewegen,dieLüftungsöffnungenund
GriffesaubersindunddasSägeschwertnicht
verbogenoderbeschädigtist.
2.LegenSiedenHochentasteraufeineebene
Fläche.
3.FluchtenSiedasLochimAkkupackmitder
ZungeimGriffgehäuseaus(Bild10).
g374232
Bild10
4.DrückenSiedasAkkupackindenGriff,bisdas
Akkupackeinrastet.
5.NehmenSiedieSchutzabdeckungvom
Sägeschwertab.
6.DrückenSiedieAbzugssperreunddannden
Abzug,umdenHochentasterzustarten.
StartendesHochentasters
1.StellenSiesicher,dassdieLüftungsöffnungen
amHochentasterfreivonStaubund
Rückständensind(Bild9).
Abschaltendes
Hochentasters
LassenSiedenAbzuglos,umdenHochentaster
abzustellen.
WennSiedenHochentasternichtverwenden
oderihnzwischenArbeitsbereichentransportieren,
entfernenSiedasAkkupack;sieheHerausnehmen
desAkkupacks(Seite17).
1.Lüftungsöffnungen
g374231
Bild9
14

Arbeitenmitdem
Hochentaster
WARNUNG:
DieunsachgemäßeVerwendungdes
Hochentasterskannzuschweren
VerletzungenoderzumTodführen.
LesenundbefolgenSiealle
Verwendungsanweisungen,ummögliche
Verletzungenzuvermeiden.
1.Rückschlagbereich
(Nase,Oberseitedes
Sägeschwerts)
g318677
Bild11
2.Nase
WARNUNG:
ArbeitenSienichtinderNähevon
Stromleitungen!DerHochentasteristnicht
fürdenSchutzvorStromschlägenbeiKontakt
mitFreileitungenausgelegt.
InformierenSiesichüberdie
örtlichenVorschriftenbezüglichder
Sicherheitsabständezuelektrischen
FreileitungenundvergewissernSiesich,dass
dieArbeitspositionsicherist,bevorSieden
HochentasterinBetriebnehmen.
WARNUNG:
Rückschlagkannzuschwerenodertödlichen
Verletzungenführen.
VermeidenSiees,diezuschneidenden
GegenständemitderNasedesSägeschwerts
desHochentasterszuberühren.
EsgibtzweiArtendesRückschlags:
•EineschnelleBewegungdesHochentastersnach
obenentsteht,wenndieSägeketteanderNase
oderobenamSägeschwerteinObjektberührt.
•EineschnelleBewegungdesHochentastersnach
hintenentsteht,wenndieSägeketteanderNase
oderobenamSägeschwertvoneinemObjekt,das
Sieschneiden,eingeklemmtwird.
1.FassenSiedenHochentastermitbeiden
Händen.
2.StellenSiesichvordemzuschneidenden
Baumaufeinenfesten,ebenenUntergrundund
sorgenSiefüreinenausgewogenen,stabilen
StandbeimSchneiden.
3.StellenSiesicher,dassSienurdasHolz
schneiden,dasSieschneidenwollen;lassen
SiedieSägekettebeimSchneidennichtmit
demBoden,anderenStämmenoderanderen
GegenständeninBerührungkommen.
4.StellenSiesicher,dasssichdieSägekettemit
vollerGeschwindigkeitdreht,bevorSieeinen
Schnittstarten.
5.SchneidenSiemitdemAstnahederRückseite
desSägeschwerts,nahederSchnittführung;
drückenSiedieSägeketteleichtgegendas
HolzundführenSiedenSchnittmittelsdem
auiegendenGewichtsdesHochentasters
durch(Bild12).
Wichtig:WennsichdieSägeketteimSchnitt
verhakt,versuchenSienicht,siedurch
weiteresLaufenlassendesHochentasters
zubefreien.SchaltenSiedenHochentaster
ab,nehmenSiedasAkkupackherausund
hebenSiedenAstan,währendSieden
Hochentasterfesthalten;dadurchsolltesich
dieKlemmunglösenundderHochentaster
freikommen.
InBild11istderBereichderStangeabgebildet,der
keinObjektberührensollte,umeinenRückschlagzu
vermeiden.
15

Bild12
1.AnleitungzumSchneiden
6.HaltenSieeinengleichmäßigenDruckaufden
Hochentaster,sägenSieineinergeradenLinie
undnehmenSiedenDrucknuramEndedes
Schneidvorgangsweg.
7.LassenSiedenAbzuglos,sobaldSieeinen
Schnittausgeführthaben.
Zurückschneideneines
Baums
WARNUNG:
WennSiehöhereÄsteeinesfreistehenden
Baumsschneiden,könnenSieggf.in
eineinstabilePositionkommen,diefür
Siegefährlichist,währendSieeinen
Hochentasterhandhaben.Dieskannzu
g374233
schwerenoderggf.tödlichenVerletzungen
fürSieundUnbeteiligteführen.
WennSieÄsteeinesfreistehendenBaums
schneiden,verwendenSiefolgende
Vorgehensweisen:
•KletternSienichtmiteinemHochentaster
aufÄste.
•BeugenSiesichnichtzuweitnachvorne
undArbeitenSiemitbeidenHändenam
Hochentaster.
•StellenSiesicher,dasskeineUnbeteiligten
imBereichsind,indendieÄstefallen
können.
1.HaltenSiedenHochentasterso,wieinArbeiten
mitdemHochentaster(Seite15)beschrieben.
2.WendenSiebeimSchneidenkleinerÄste
leichtenDruckaufdenzuschneidendenAstan.
3.MachenSiebeimSchneidengrößererÄste
einenachenUnterschnittundschließenSie
denSchnittdannvonderOberseitedesAstes
ab.
A.SchneidenSievonderUnterseitedesAstes
ca.15cmvomBaumstamm.Schneiden
SiedenAsteinDritteldurch.
B.SchneidenSie5-10cmweiteraußenam
Astundvonoben.SchneidenSiedenAst
durch,biserfällt.
C.SchneidenSiedenAststumpfamAstkragen
ab(Bild13).
Wichtig:SchneidenSiedenAststumpf
nichtüberdenAstkragenhinausab,
nichtbündigamStammanliegendund
lassenSiekeinengroßenAststumpf
stehen;diesschadetdemBaum.
16

Bild13
g316577
1.ErsteEntlastungsunterschnitt
2.Zweiterdurchgehender
Schnitt
3.EndgültigerSchnitt
zurEntfernungdes
Aststumpfs
4.Astkragen(woderStamm
indenAststumpfübergeht)
Herausnehmendes
Akkupacks
1.LegenSiedenHochentasteraufeineebene
Fläche.
2.DrückenSieaufdenVerriegelungsknopfund
nehmenSiedenAkkupackvomHolm.
g374234
Bild14
1.Verriegelungsknopf
17

Wartung
EmpfohlenerWartungsplan
Wartungsintervall
BeijederVerwendung
odertäglich
NachjedemBatterieent-
ladung
Jährlichodervorder
Einlagerung
Wartungsmaßnahmen
•PrüfenSiedenÖlstandundfüllenSieggf.Stangen-undKettenölauf.
•KontrollierenSie,dassÖlzurSägeketteießt.
•PrüfenSiedieKettenspannungundstellenSiesieggf.ein.
•StellenSiesicher,dassdasSägeschwertgeradeundunbeschädigtist.
•PrüfenSie,obdieKettescharfist;wendenSiesichggf.aneinenofziellen
Vertragshändler,umdieKetteschärfenoderaustauschenzulassen.
•PrüfenSiedenÖlstandundfüllenSieggf.Stangen-undKettenölauf.
•PrüfenSiedieKettenspannungundstellenSiesieggf.ein.
•WartenSiedasSägeschwert,KetteunddasAntriebsrad.
•PrüfenSie,obdieKettescharfist;wendenSiesichggf.aneinenofziellen
Vertragshändler,umdieKetteschärfenoderaustauschenzulassen.
PrüfendesÖlstandsund
AuffüllenmitStangen-und
Kettenöl
Wartungsintervall:BeijederVerwendungoder
täglich
NachjedemBatterieentladung
Wichtig:VerwendenSienurStangen-und
Kettenöl(separaterhältlich).
1.SchaltenSiedenHochentasteraus
undentfernenSiedenAkkupack;siehe
HerausnehmendesAkkupacks(Seite17).
2.PrüfenSiedenÖlstandimSchauglas.Wenn
dasÖlimÖlschauglasnichtsichtbarist,füllen
SiejenachBedarfKettenölnach(Bild15).
Hinweis:AchtenSiedarauf,dannkeine
Rückständebzw.HolzspäneindenÖlbehälter
gelangen.
5.NehmenSiedenDeckelabundgießenSie
KettenölindenHochentaster,bisderÖltankvoll
ist(Bild15).
Wichtig:FüllenSiedenHochentaster
höchstensbiszurUnterkantedes
Füllstutzens.
6.WischenSieverschüttetesÖlaufundsetzen
SiedenÖldeckelauf.
7.StellenSiesicher,dassÖlzurKetteießt;siehe
KontrolledesDurchussesdesSchwert-und
Kettenöls(Seite19).
Bild15
1.Ölschauglas
3.StellenSiedenHochentastermitdemÖldeckel
nachobenaufeineacheOberäche.
4.ReinigenSiedenBereichumdenÖldeckel(Bild
15).
2.Öldeckel
g374235
18

KontrolledesDurchusses
Einstellender
desSchwert-undKettenöls
Wartungsintervall:BeijederVerwendungoder
täglich
1.BereitenSiedenEinsatzdesHochentastersvor;
sieheVorderVerwendungdesHochentasters
(Seite14).
2.Umsicherzustellen,dassÖlzurSägekette
ießt,richtenSiedieNasedesHochentasters
einigeZentimetervoneinerOberäche(z.B.
Papier,Pappe,einStumpf)wegundlassenSie
denHochentasterlaufen.Siesollteneineleichte
ÖlsprühspuraufderOberächesehenkönnen
(Bild16).
Kettenspannung
Wartungsintervall:BeijederVerwendungoder
täglich
NachjedemBatterieentladung
StellenSiesicher,dassdieKetterichtiggespanntist.
EineloseSägeketteverkürztdieLebensdauerder
AntriebsräderunddesSägeschwertsunddieKette
kannbrechenundherunterfallen.
EinezustarkgespannteSägeketteüberhitztdas
SägeschwertunddieSägekette,waszuschnellem
VerschleißführtundzumDurchbrennendesMotors
oderzumBruchderSägeketteführenkann.
DieKettenspannungistrichtig,wennSiedie
SägekettemiteinerbehandschuhtenHandumdas
Sägeschwertziehenkönnen.DieSägekettesolltedie
untereKantedesSägeschwertsimmerberühren.
ÜberprüfenSieauchdieKettenspannungeinerneuen
KettenacheinigenSchnitten;eineneueKettedehnt
sichnormalerweiseundmussnacheinigenSchnitten
nachgespanntwerden.
Bild16
1.LassenSieden
Hochentastereinige
Zentimetervoneiner
Oberächeentferntlaufen.
3.FließtkeinÖl,kontrollierenSie,dasssich
ÖlimT ankbendetunddassderBereich
unterderSeitenabdeckungsauberist;siehe
PrüfendesÖlstandsundAuffüllenmitStangenundKettenöl(Seite18)undWartendes
Sägeschwerts,SägeketteunddesAntriebsrads
(Seite21).
2.WenndasÖließt,spritzt
esvonderKetteabund
sammeltsichan.
g374236
GEFAHR
BerührenderKettensägenzähnedes
Hochentasterskannzuschweren
Verletzungenführen.
•NehmenSiedasAkkupackheraus,bevor
SieEinstell-oderWartungsarbeitenam
Hochentasterdurchführen.
•TragenSiebeiEinstell-oder
WartungsarbeitenamHochentaster
immerSchutzhandschuhe.
19

1.LegenSiedenHochentasteraufeineebene
FlächeundnehmenSiedasAkkupackheraus;
sieheHerausnehmendesAkkupacks(Seite17).
2.LassenSiedieKettensägeabkühlen.
Wichtig:SpannenSiekeineheißeSägekette
nach;siekannsichbeimAbkühlen
zusammenziehen,waszueinerübermäßigen
SpannungderSägeketteführt.
3.PrüfenSiedasSägeschwertaufVerbiegungen
oderBeschädigungenundersetzenSiesie
gegebenenfalls.
4.DrehenSiedenKnopfderSchwertabdeckung
gegendenUhrzeigersinn,umdie
Schwertabdeckungzulösen,aberentfernenSie
diesenicht(Bild17).
g374238
Bild18
1.SchraubefürKettenspannung
StellenSiedieKettenspannungein,bisdie
SägekettedieUnterkantedesSägeschwerts
berührt,dannziehenSiedieSägekettevonder
UnterkantedesSägeschwertsweg;einerichtig
eingestellteKettekannnur3,2bis6,4mm
vomSägeschwertweggezogenwerdenund
schnapptbeimLoslassenwiederein.
Bild17
1.KnopfderSchwertabdeckung
5.StellenSiedieKettenspannungmittels
Kettenspannschraube(Bild18)ein,und
befestigenSiedanndieSeitenabdeckung
amHochentaster,indemSiedenKnopfder
SchwertabdeckungimUhrzeigersinndrehen,
bevorSiedieKettenspannungüberprüfen(Bild
17).
•DrehenSiedieSpannschraubeder
Kettenspannungnachrechts,umdie
Sägekettezuspannen.
•DrehenSiedieSpannschraubeder
Kettenspannungnachlinks,umdie
SpannungderSägekettezulösen.
Hinweis:HebenSiebeimEinstellender
KettenspannungdieSpitzedesSägeschwerts
miteinerHand(Schutzhandschuheverwenden!)
g374237
an,umsicherzustellen,dassdasSägeschwert
nichtdurchhängtunddieKettenspannung
beeinträchtigt.
6.ZiehenSiedieSägekettemiteiner
behandschuhtenHandumdasSägeschwert.
EineordnungsgemäßeingestellteSägekette
solltesichreibungslosumdasSägeschwert
ziehenlassenunddieuntereKantedes
Sägeschwertsimmerberühren.
7.WenndieSägekettenichtrichtiggespanntist,
wiederholenSiedieSchritte4bis7.
20

WartendesSägeschwerts,
Sägeketteunddes
Antriebsrads
JährlichodervorderEinlagerung
5.SäubernSiedenBereichunterder
SeitenabdeckungvonjeglichemSchmutz.
6.PrüfenSiedasAntriebskettenradundtauschen
Sieesaus,wennesstarkabgenutztoder
beschädigtist.WendenSiesichhierzuanIhre
autorisierteVertragswerkstatt.
GEFAHR
BerührenderKettensägenzähnedes
Hochentasterskannzuschweren
Verletzungenführen.
•NehmenSiedasAkkupackheraus,bevor
SieEinstell-oderWartungsarbeitenam
Hochentasterdurchführen.
•TragenSiebeiEinstell-oder
WartungsarbeitenamHochentaster
immerSchutzhandschuhe.
1.LegenSiedenHochentasteraufeineebene
FlächeundnehmenSiedasAkkupackheraus;
sieheHerausnehmendesAkkupacks(Seite17).
2.EntfernenSiedieSeitenabdeckung,drehenSie
denKnopfderSchwertabdeckunggegenden
Uhrzeigersinn,bisderKnopfentferntist,und
entfernenSiedanndieSeitenabdeckung(Bild
19).
7.PrüfenSiedenÖlaustritt(Bild19)auf
RückständeundreinigenSiedenBereichggf.
8.ReinigenSiedasSägeschwertunddieKette.
EntfernenSieSchmutzundRückständeaus
derRilleentlangderKantedesSägeschwerts
miteinemDrahtodereinemachen
Schraubenzieher.BeginnenSievomKettenrad
amvorderenEndeundarbeitenSiesichnach
hintenvor.
StellenSiesicher,dassderÖlkanalim
Sägeschwert,dermitdemÖlauslassam
Hochentastersuchtet,sauberist,sodassdas
ÖlfreizurSägeketteießenkann(Bild20).
Bild20
InterneAbschnittedesSägeschwertsabgebildet
1.StellenSiesicher,dass
dieserKanal,dermitdem
Ölauslassverbundenist,
sauberist.
2.StellenSiesicher,dass
dasKettenraddes
Sägeschwertssauber
istundsichfreidreht.
g315856
Bild19
1.Knopfder
Schwertabdeckung
2.Seitenabdeckung
3.Kette
4.Schlitzfür
Kettenspannbolzen
5.SchlitzdesSägeschwerts
6.Sägeschwert
7.Antriebsrad
8.BolzendesSägeschwerts
9.Ölaustritt
10.Kettenspannbolzen
3.DrehenSiedieSchraubefürdieKettenspannung
nachlinks,umdieKettezulockern(Bild18).
4.NehmenSiedieKettevomSägeschwertabund
legensiezurSeite.
9.KontrollierenSiedasSägeschwertunddie
Sägekette;wenndasSägeschwertverbogenist,
dieRillenbeschädigtsindoderdasRitzelam
vorderenEndesichnichtfreidreht,ersetzen
SiedasSägeschwert;wenndieSägekette
übermäßigabgenutztoderbeschädigtist,
ersetzenSiesie.
10.BauenSiedasSägeschwertunddieSägekette
g374226
ein;sieheEinbaudesSägeschwertsundder
Sägekette(Seite22).
11.StellenSiesicher,dassÖlzurKetteießt;siehe
KontrolledesDurchussesdesSchwert-und
Kettenöls(Seite19).
21

EinbaudesSägeschwerts
SchärfenderKette
undderSägekette
GEFAHR
BerührenderKettensägenzähnedes
Hochentasterskannzuschweren
Verletzungenführen.
•NehmenSiedasAkkupackheraus,bevor
SieEinstell-oderWartungsarbeitenam
Hochentasterdurchführen.
•TragenSiebeiEinstell-oder
WartungsarbeitenamHochentaster
immerSchutzhandschuhe.
1.WenndieSeitenabdeckungamGerät
angebrachtist,entfernenSiediese;siehe
WartendesSägeschwerts,Sägeketteunddes
Antriebsrads(Seite21).
2.LegenSiedieKetteumdasAntriebskettenrad
amvorderenEndedesSägeschwerts,wobei
dieSchneidekantederSägekettenzähne
anderOberseitedesSägeschwertsliegen
undnachvornezeigensollte,wieaufder
AbbildungunterderSeitenabdeckungdes
Hochentasters.
JährlichodervorderEinlagerung
EinescharfeSägekettesorgtfüreinebessere
SchneidleistungundeinelängereAkkulebensdauer.
DieSägekettemussgeschärftoderersetztwerden,
wennsiemitübermäßigerKraftaufdasHolzgedrückt
werdenmuss,oderwennsieSägemehlstattvoller
Holzspäneproduziert.
WendenSiesichaneinenofziellenVertragshändler,
umdieKetteschärfenoderaustauschenzulassen.
Wartung
WennderHochentastergewartetwerdenmuss,
bringenSieihnzueinerofziellenVertragswerkstatt.
3.FührenSiedieSägeketteumdasSägeschwert
unduchtenSiedieSägekettenzähneinderNut
desSägeschwertsaus.
Hinweis:WennSieeineneueSägekette
einbauen,drehenSiedasSägeschwertum,um
ungleichmäßigeAbnutzungzuvermeiden.
4.PositionierenSiedieoffeneSchleifeder
Sägekette(nichtamSägeschwert)umdas
AntriebskettenradamHochentasterund
befestigenSiedasSägeschwertunddie
befestigteSägeketteamHochentaster.
Wichtig:VergewissernSiesich,dass
derKettenspannbolzenindenSchlitz
desKettenspannbolzensamSägeschwert
eingeführtist(Bild19).Möglicherweise
müssenSiedieKettenspannschraube
drehen,damitderBolzenindasLochim
Sägeschwertpasst.
5.BringenSiedieSeitenabdeckungan,aber
ziehenSiedenKnopfderSeitenabdeckung
nichtganzfest.
6.StellenSiedieKettenspannungein;siehe
EinstellenderKettenspannung(Seite19).
22

Einlagerung
Wichtig:LagernSiedieMaschine,denAkkupack
unddasLadegerätnurbeiTemperaturenim
angemessenenBereich;sieheTechnischeDaten
(Seite13).
Wichtig:WennSiedenAkkupackfürdie
Nebensaisonaufbewahren,ladenSieihnsoweit
auf,bis2oder3LED-AnzeigebalkenaufdemAkku
grünleuchten.LagernSieeinganzaufgeladenes
oderganzleeresAkkunichtein.WennSiedie
Maschinewiederverwendenmöchten,ladenSie
denAkkupackauf,bisdielinkeAnzeigeleuchte
amLadegerätgrünleuchtetoderallevier
LED-AnzeigenamAkkugrünleuchten.
•TrennenSiedieKettensägevonder
Stromversorgung(d.h.entfernenSiedas
Akkupack)undprüfenSieesnachder
VerwendungaufSchäden.
•EntfernenSieSchmutzundSägerückständevon
derKettensäge.
•BewahrenSiedieKettensägenichtmit
eingebautemAkkuauf.
•LagernSiedieKettensäge,dasAkkupackunddas
AkkuladegerätaneinemgutbelüftetenOrt,derfür
Kinderunzugänglichist.
•HaltenSiedieMaschine,denAkkupackunddas
AkkuladegerätfernvonätzendenMaterialien,wie
z.B.GartenchemikalienoderStreusalz.
•LagernSiedasAkkupacknichtdraußenoder
inFahrzeugen,umdieGefahrmöglicher
Verletzungenzuverringern.
•LagernSiedasGerät,denAkkupackunddas
Akkuladegerätaneinemsauberenundtrockenen
Ort.
23

Fehlersucheund-behebung
FührenSienurdieindieserAnleitungbeschriebenenSchritteaus.AlleweiterenPrüfungen,Wartungsarbeiten
undReparaturenmüssenvoneinemofziellenKundendienstzentrumodereinemähnlichqualizierten
Fachmannausgeführtwerden,wennSiedasProblemnichtselbstbehebenkönnen.
Problem
DerHochentasterläuftnichtoderläuft
nichtununterbrochen.
DerHochentasterläuft,dieSägekette
drehtsichjedochnicht.
DerHochentasterschneidetnicht
ordnungsgemäß.
MöglicheUrsacheBehebungsmaßnahme
1.DasAkkupackhateineniedrigeoder
keineLadung.
2.DasAkkupackistnichtganzeingesetzt.
3.DasAkkupackistnichtimgeeigneten
Temperaturbereich.
4.DasAkkupackhatdasLimitfürhohe
Spannungüberschritten.
5.DieLeitungendesAkkupackssind
feucht.
6.UnterderAbdeckungbendensich
Rückstände.
1.DieKettesitztnichtrichtigaufdem
Antriebsrad.
2.UnterderAbdeckungbendensich
Rückstände.
1.DieKetteistnichtrichtiggespannt.
2.DieSägeketteiststumpfoder
beschädigt.
3.DasSägeschwertistverbogenoder
dieRillensindbeschädigt.
4.DieKetteistfalschherumbefestigt.4.BefestigenSiedieKetterichtig.
5.DieSägekettewirdnichtrichtig
geschmiert.
1.LadenSiedasAkkupackauf.
2.StellenSiesicher,dassdasAkkupack
ganzindasGehäuseeingesetztist.
3.BringenSiedasAkkupackaneinen
Ort,dertrockenistundandemdie
Temperaturzwischen5°Cund40°C
liegt.
4.LassenSiedenAbzuglosunddrücken
SiedanndenAbzugsschalter.
5.LassenSiedasAkkupacktrocknen
odertrocknenSieesmiteinem
Lappen.
6.NehmenSiedieAbdeckungabund
entfernenSiedieRückstände.
1.BefestigenSiedieKetteundstellen
Siesicher,dassdieGliederrichtigim
Antriebsradsitzen.
2.NehmenSiedieAbdeckungabund
entfernenSiedieRückstände.
1.StellenSiedieSpannungderKette
richtigein.
2.T auschenSiedieKetteaus.
3.ErsetzenSiedasSägeschwert.
5.PrüfenSiedenÖlstandundstellenSie
sicher,dassÖlzurSägeketteießt.
DasKettenölfettetnichtrichtig.
1.DerÖlstandistniedrig.1.PrüfenSiedenÖlstand.
2.DerÖlauslassistverstopft.
3.UnterderAbdeckungbendensich
Rückstände.
4.DieÖlrilleimSägeschwertistverstopft.
2.EntfernenSieRückständevom
Ölauslass.
3.NehmenSiedieAbdeckungabund
entfernenSiedieRückstände.
4.EntfernenSieRückständevonder
Stange.
24

EEA/UKDatenschutzerklärung
TorosVerwendungIhrerpersönlichenInformationen
TheToroCompany(„T oro“)respektiertIhrePrivatsphäre.WennSieunsereProduktekaufen,könnenwirbestimmtepersönlicheInformationenüber
Siesammeln,entwederdirektvonIhnenoderüberIhrelokaleT oro-NiederlassungoderIhrenHändler.ToroverwendetdieseInformationen,um
vertraglicheVerpichtungenzuerfüllen–z.B.umIhreGarantiezuregistrieren,IhrenGarantieanspruchzubearbeitenoderSieimFalleeinesRückrufs
zukontaktieren–undfürlegitimeGeschäftszwecke–z.B.umdieKundenzufriedenheitzumessen,unsereProduktezuverbessernoderIhnen
ProduktinformationenzurVerfügungzustellen,diefürSievonInteresseseinkönnten.T orokanndieInformationenimRahmendieserAktivitätenan
ToroT ochtergesellschaften,HändleroderGeschäftspartnerweitergeben.WirkönnenauchpersönlicheDatenoffenlegen,wenndiesgesetzlich
vorgeschriebenistoderimZusammenhangmitdemVerkauf,KaufoderderFusioneinesUnternehmens.ToroverkauftIhrepersönlichenInformationen
niemalsananderenUnternehmen.
SpeicherungIhrerpersönlichenDaten
TorowirdIhrepersönlichenDatensolangeaufbewahren,wieesfürdieobengenanntenZweckerelevantistundinÜbereinstimmungmitden
gesetzlichenBestimmungen.FürweitereInformationenüberdiegeltendenAufbewahrungsfristenwendenSiesichbitteanlegal@toro.com.
TorosEngagementfürSicherheit
IhrepersönlichenDatenkönnenindenUSAodereinemanderenLandverarbeitetwerden,indemmöglicherweisewenigerstrengeDatenschutzgesetze
geltenalsinIhremWohnsitzland.WannimmerwirIhreDatenaußerhalbIhresWohnsitzlandesübermitteln,werdenwirdiegesetzlichvorgeschriebenen
Schritteunternehmen,umsicherzustellen,dassangemesseneSicherheitsvorkehrungenzumSchutzIhrerDatengetroffenwerdenundum
sicherzustellen,dassdiesesicherbehandeltwerden.
ZugangundKorrektur
SiehabendasRecht,IhrepersönlichenDatenzukorrigierenundzuüberprüfenoderderVerarbeitungIhrerDatenzuwidersprechenbzw.diese
einzuschränken.BittekontaktierenSieunsdazuperE-Mailunterlegal@toro.com.WennSieBedenkenhaben,wieT oromitIhrenDatenumgegangenist,
bittenwirSie,diesdirektmitunszubesprechen.BittebeachtenSie,dasseuropäischeBürgerdasRechthaben,sichbeiIhrerDatenschutzbehörde
zubeschweren.
374-0282RevC

FormNo.3443-546RevB
PodadoradealturaFlex-Force
PowerSystem
Nºdemodelo51847T—Nºdeserie321000001ysuperiores
™
60V
Registresuproductoenwww.Toro.com.
Traduccióndeloriginal(ES)
*3443-546*

Sinecesitaayuda,consulte
losvídeosinstruccionales
enwww.Toro.com/support
opóngaseencontacto
consuServicioTécnico
Autorizadoantesde
devolveresteproducto.
Introducción
Estapodadoradealturasehadiseñadoparacortar
ramasypequeñostroncosdehasta15,2cmde
diámetro.Debeserutilizadaúnicamenteporadultos.
Sehadiseñadoparautilizarbateríasdeionesdelitio
Flex-ForcedeT oro,Modelo81820,81825,81850,
81860o81875.Estasbateríassehandiseñadopara
cargarseúnicamenteconelcargadordebaterías
Modelo81801,81101,81802o81805.Elusode
estosproductosparaotrosnesdistintosalos
previstospodríaserpeligrosoparaustedyparaotras
personas.
Importante:Consudispositivomóvil,puede
escanearelcódigoQR(ensucaso)delaplaca
delnúmerodeserieparaaccederainformación
sobrelagarantía,laspiezas,yotrainformación
sobreelproducto.
g374224
Figura1
1.Ubicacióndelosnúmerosdemodeloydeserie.
Nºdemodelo
Importante:Sivaautilizarestamáquinacon
lasbateríasModelo81850,81860o81875,debe
instalarelarnésdeliberaciónrápidaincluidopara
obtenerunsoporteyunequilibrioóptimos.
Noutiliceotrosarnesesnivariosarnesesal
utilizarlamáquina.
Leaestemanualdetenidamenteparaaprendera
utilizarymantenercorrectamentesuproducto,y
paraevitarlesionesydañosalproducto.Ustedes
responsabledeutilizarelproductodeformacorrecta
ysegura.
Visitewww.Toro.comparaobtenermásinformación,
incluidosconsejosdeseguridad,materialesde
formación,informaciónsobreaccesorios,ayuda
paraencontraraundistribuidoropararegistrarsu
producto.
Cuandonecesiteasistenciatécnica,piezasgenuinas
Torooinformaciónadicional,póngaseencontacto
conunServicioTécnicoAutorizadooconAtención
alclientedeT oro,ytengaamanolosnúmerosde
modeloyseriedesuproducto.Figura1identicala
ubicacióndelosnúmerosdemodeloyserieenel
producto.Escribalosnúmerosenelespacioprovisto.
Nºdeserie
Estemanualidenticapeligrospotencialesycontiene
mensajesdeseguridadidenticadosporelsímbolo
dealertadeseguridad(Figura2),queseñalaun
peligroquepuedecausarlesionesgravesolamuerte
siustednosiguelasprecaucionesrecomendadas.
sa-black
Figura2
Símbolodealertadeseguridad
Estemanualutiliza2palabraspararesaltar
información.Importantellamalaatenciónsobre
informaciónmecánicaespecial,yNotaresalta
informacióngeneralquemereceunaatención
especial.
©2022—TheToro®Company
8111LyndaleAvenueSouth
Bloomington,MN55420
Póngaseencontactoconnosotrosenwww.Toro.com.
2
Reservadostodoslosderechos
ImpresoenChina

Contenido
Seguridad.................................................................3
Pegatinasdeseguridadeinstrucciones.............8
Montaje.....................................................................9
Instalacióndelaespadaylacadena...................9
Montajedelapodadoradealtura......................10
Añadidodeaceitedelaespadaylacadena
enlapodadoradealtura.................................11
Instalacióndelarnés.........................................12
Elproducto..............................................................12
Especicaciones..............................................13
Operación...............................................................14
Antesdeusarlapodadoradealtura..................14
Arranquedelapodadoradealtura....................14
Apagadodelapodadoradealtura....................15
Corteconlapodadoradealtura........................15
Podadeunárbol..............................................16
Cómoretirarlabatería......................................16
Mantenimiento........................................................17
Calendariorecomendadodemanteni-
miento..........................................................17
Cómocomprobarelniveldeaceiteyañadir
aceiteparacadenas......................................17
Comprobacióndelujodeaceitedela
cadena..........................................................18
Ajustedelatensióndelacadena......................18
Mantenimientodelaespada,lacadenayel
piñóndearrastre...........................................20
Instalacióndelaespadaylacadena.................21
Cómoalarlacadena.......................................21
Mantenimiento..................................................21
Almacenamiento.....................................................22
Solucióndeproblemas...........................................23
Seguridad
ADVERTENCIA
Leatodaslasinstrucciones,ilustraciones,
especicacionesyadvertenciasdeseguridad
proporcionadasconestaherramienta
eléctrica.
Elhacercasoomisodetodaslas
instruccionesenumeradasacontinuación
puededarlugaradescargaseléctricas,
incendiosy/olesionesgraves.
Guardetodaslasadvertenciaseinstrucciones
parasureferenciafutura.
Eltérmino"herramientaeléctrica"queapareceenlas
advertenciassereeresiempreaunaherramienta
accionadaporelsuministroeléctricodelared(con
cable)ounaherramientaeléctricaaccionadapor
batería(sincable).
INSTRUCCIONESDE
SEGURIDAD
INSTRUCCIONES
I.Seguridaddelazonadetrabajo
1.Mantengalazonadetrabajolimpiaybien
iluminada.Laszonasdesordenadasuoscuras
sonunainvitaciónalaccidente.
2.Noutiliceherramientaseléctricasen
atmósferasexplosivas,comoporejemplo
enpresenciadelíquidosinamables,gases
opolvo.Lasherramientaseléctricascrean
chispasquepuedeninamarelpolvoolos
vapores.
3.Mantengaalejadosaniñosyotraspersonas
mientrasutilizaunaherramientaeléctrica.
Lasdistraccionespuedenhacerquepierdael
control.
II.Seguridadeléctrica
1.Laclavijadelaherramientaeléctricadebe
serdeltipocorrectoparaelenchufe.Nunca
modiqueelenchufeenmodoalguno.
Noutiliceadaptadoresdeenchufecon
herramientaseléctricascontomadetierra.
Elusodeclavijassinmodicaryenchufes
apropiadosreduciráelriesgodedescarga
eléctrica.
2.Evitetocarsuperciesconectadasatierra,
talescomotuberías,radiadores,cocinasy
frigorícos.Hayunmayorriesgodedescarga
eléctricasisucuerpohacetierra.
3

3.Noexpongalasherramientaseléctricasa
lalluviaoacondicioneshúmedas.Sientra
aguaenunaherramientaeléctrica,elriesgode
descargaeléctricaaumenta.
4.Nomaltrateelcable.Noutiliceelcablenunca
paratransportar,arrastrarodesenchufarla
herramientaeléctrica.Mantengaelcable
alejadodelcalor,delaceite,delosbordes
cortantesydelaspiezasmóviles.Loscables
dañadosoenredadosaumentanelriesgode
descargaeléctrica.
5.Siutilizaunaherramientaeléctricaenel
exterior,utiliceuncablealargadoradecuado
paraelusoenexteriores.Elusodeuncable
apropiadoparaelusoenexterioresreduceel
riesgodedescargaeléctrica.
6.Sinoesposibleevitarelusodeuna
herramientaeléctricaenunlugarhúmedo,
utiliceunsuministroeléctricoprotegido
porundispositivodecorrienteresidual
(interruptordiferencial).Elusodeun
interruptordiferencialreduceelriesgode
descargaeléctrica.
III.Seguridadpersonal
1.Manténgasealerta,estéatentoaloqueestá
haciendoyutiliceelsentidocomúnmientras
utilizaunaherramientaeléctrica.Noutilice
unherramientaeléctricasiestácansado
obajolainuenciadedrogas,alcoholo
medicamentos.Unabrevefaltadeatención
mientrasutilizaunaherramientaeléctricapodría
provocarlesionespersonalesgraves.
2.Utiliceequiposdeprotecciónpersonal.Lleve
siempreprotecciónocular.Elusodeequipos
deprotecciónpersonalcomomascarillas,
calzadodeseguridadantideslizante,cascoy
protecciónauditivaencondicionesapropiadas
reduceelriesgodesufrirlesionespersonales.
3.Eviteelencendidoaccidental.Asegúrese
dequeelinterruptorestáenlaposiciónde
APAGADOantesdeconectarlaherramientaa
latomadecorrientey/oalabatería,yantes
delevantarotransportarlaherramienta.
Transportarlasherramientaseléctricas
coneldedosobreelinterruptoroenchufar
herramientaseléctricasconelinterruptoren
laposicióndeencendidoesunainvitaciónal
accidente.
4.Retirecualquierllavedeajusteantesde
encenderlaherramientaeléctrica.Unallave
quesedejainsertadaenunaparterotativadela
herramientaeléctricapuededarlugaralesiones
personales.
5.Nointentealcanzarzonasdemasiado
alejadas.Pisermeymantengaelequilibrio
entodomomento.Estopermiteunmayor
controldelaherramientaensituaciones
imprevistas.
6.Utilicelaropaadecuada.Nolleveropaso
joyassueltas.Mantengaelpelo,laropay
losguantesalejadosdelaspiezasmóviles.
Laropasuelta,lasjoyasyelpelolargopueden
quedaratrapadosenlaspiezasmóviles.
7.Siexistendispositivosparalaconexión
desistemasderecogidayextracciónde
polvo,asegúresedeconectarlosyusarlos
correctamente.Elusodedispositivosde
recoleccióndepolvopuedereducirlosriesgos
asociadosconelpolvo.
8.Nodejequelafamiliaridadadquiridaconel
usofrecuentedelasherramientaslehaga
conarsedemasiadoypasarporaltolos
principiosdeseguridaddelasherramientas.
Unaaccióndescuidadapuedecausarlesiones
gravesenunafraccióndeunsegundo.
9.Nodejequeutilicenomantenganeste
dispositivoniñosopersonasquenohayan
recibidolaformaciónadecuadaalrespecto.
Solopermitaqueutiliceneldispositivo
personasqueseanresponsables,que
cuentenconlaformaciónadecuada,que
esténfamiliarizadasconlasinstruccionesy
tengancapacidadfísicaparausarlo.
IV.Usoycuidadodelasherramientas
eléctricas
1.Nofuercelaherramientaeléctrica.Utilice
laherramientaeléctricaadecuadaparael
trabajoarealizar.Laherramientaeléctrica
correctarealizaráeltrabajomejoryconmayor
seguridadalavelocidadparalaquefue
diseñada.
2.Noutilicelaherramientaeléctricasiel
interruptornolaenciendeyapaga.Cualquier
herramientaeléctricaquenopuedaser
controladaconelinterruptorespeligrosaydebe
serreparada.
3.Desconectelaclavijadelsuministroeléctrico
y/oextraigalabatería,siesextraíble,de
laherramientaeléctricaantesderealizar
cualquierajuste,cambiardeaccesorioo
almacenarlaherramienta.Estasmedidasde
seguridadpreventivasreducenelriesgodeun
arranqueaccidentaldelaherramientaeléctrica.
4.Sinolasestáusando,guardelas
herramientaseléctricasfueradelalcance
delosniñosynopermitaqueutilicen
estaherramientaeléctricapersonas
nofamiliarizadasconellaoconestas
instruccionesdeuso.Lasherramientas
4

eléctricassonpeligrosasenmanosdeusuarios
inexpertos.
líquidoexpulsadodelabateríapuedecausar
irritaciónoquemaduras.
5.Mantenimientodelasherramientaseléctricas
ylosaccesorios.Compruebequelaspiezas
móvilesestáncorrectamentealineadasy
quesemuevenlibrementesinagarrotarse,
quenohaypiezasrotas,yquenohayotras
circunstanciasquepodríanafectaralusode
laherramientaeléctrica.Siexistendaños,
hagarepararlaherramientaeléctricaantes
deusarla.Muchosaccidentessedebenaun
mantenimientodecientedelasherramientas
eléctricas.
6.Mantengalasherramientasdecortealadas
ylimpias.Unaherramientadecortebien
mantenidaconlosbienaladosesmásfácilde
controlaryhaymenosprobabilidadesdeque
seagarrote.
7.Utilicelaherramientaeléctrica,los
accesorios,lasbrocas,etc.,segúnlo
indicadoenestasinstrucciones,teniendoen
cuentalascondicionesdetrabajoyeltrabajo
arealizar.Elusodelaherramientaeléctrica
paraoperacionesdiferentesdelasprevistas
podríadarlugaraunasituacióndepeligro.
8.Mantengalasasas,empuñadurasyotras
superciesdeagarresecas,limpiasylibres
deaceiteygrasa.Unasaounasupercie
deagarreresbaladizanopermitemanejary
controlarlaherramientaconseguridaden
situacionesimprevistas.
V.Usoycuidadodelasherramientasabatería
1.Recargarúnicamenteconelcargador
especicadoporelfabricante.Uncargador
diseñadoparauntipodebateríapuedecrearun
riesgodeincendiosiseutilizaconotrabatería.
2.Utilicelasherramientaseléctricas
únicamenteconlasbateríasespecícamente
indicadas.Elusodeotrabateríapuedecrearun
riesgodeincendioylesiones.
3.Cuandolabateríanoestáenuso,manténgala
alejadadeotrosobjetosmetálicos,como
porejemploclips,monedas,llaves,puntillas
uotrosobjetosmetálicospequeños,que
podríanhacerunaconexiónentreunterminal
yotro.Uncortocircuitoentrelosterminales
delabateríapuedecausarquemadurasoun
incendio.
4.Encondicionesdeusoincorrecto,puede
haberunafugadelíquidodelabatería;evite
elcontactocondicholíquido.Encasode
uncontactoaccidental,lavarconabundante
agua.Siellíquidoentraencontactocon
losojos,busquetambiénayudamédica.El
5.Noutiliceunabateríaounaherramienta
dañadaomodicada.Lasbateríasdañadaso
modicadaspodríanmostraruncomportamiento
impredeciblequepuedeprovocarincendio,
explosiónoriesgodelesiones.
6.Noexpongaunabateríaouncargador
alfuegooatemperaturasexcesivas.La
exposiciónalfuegooatemperaturassuperiores
alos100°Cpuedecausarunaexplosión.
7.Sigatodaslasinstruccionesdecargay
nocarguelabateríaolaherramientasi
latemperaturaestáfueradelintervalo
especicadoenlasinstrucciones.Cargarla
bateríaolaherramientadeformaincorrectao
atemperaturasqueesténfueradelintervalo
especicadopuededañarlabateríayaumentar
elriesgodeincendio.
8.Noexpongalabateríaolaherramientaa
lalluviaoacondicioneshúmedas.Sientra
aguaenunaherramientaeléctrica,elriesgode
descargaeléctricaaumenta.
9.PRECAUCIÓN–Unabateríautilizadade
formaincorrectapuedepresentarriesgo
deincendioodequemaduraquímica.No
desmontelabatería.Nocalientelabateríaa
másde68°Cnilaincinere.Sustituyalabatería
únicamenteconunabateríaTorogenuina;el
usodeotrotipodebateríapodríaprovocarun
incendioounaexplosión.Mantengalasbaterías
fueradelalcancedelosniñosyenelembalaje
originalhastaquevayaautilizarlas.
VI.Mantenimiento
1.Elmantenimientodesuherramienta
eléctricadebeserrealizadoporuntécnico
dereparacionesdebidamentecualicado,
utilizandoúnicamentepiezasderepuesto
idénticas.Sólodeestamanerasegarantiza
elmantenimientodelaseguridaddela
herramientaeléctrica.
2.Norealiceningúntipodemantenimiento
enunabateríadañada.Elmantenimiento
delasbateríassólodebeserrealizadoporel
fabricanteoporunserviciotécnicoautorizado.
VII.Seguridadenelusodelapodadorade
altura:
1.Mantengatodaslaspartesdelcuerpo
alejadasdelacadenadelapodadora.No
retireelmaterialcortadonisujeteelmaterial
quesevaacortarmientraslacadenadela
podadoraestéenmovimiento.Asegúresede
queelinterruptorestáapagadoylabatería
5

desconectadaantesdedespejarcualquier
obstrucción.Lacadenadelapodadora
siguemoviéndosedespuésdeapagarseel
interruptor.Antesdearrancarlapodadorade
altura,asegúresedequelacadenanoestá
tocandonada.Unabrevefaltadeatención
mientrasseutilizanpodadorasdealturapuede
provocarelenredamientodelaropaodel
cuerpoconlacadenadelapodadora.
2.Transportelapodadoradealturaporla
empuñadura,conlacadenadelapodadora
parada.Altransportaroalguardarla
podadoradealtura,coloquesiemprela
cubiertadelacadenadelapodadora.El
manejocorrectodelapodadoradealtura
reducirálasposibleslesionespersonales
producidasporlacadena.
3.Sujetelaherramientaeléctricaúnicamente
porlassuperciesdeagarreaisladas,
porquelapodadorapodríaentraren
contactoconcablesocultos.Silacadenade
lapodadoraolascuchillasentranencontacto
conuncableconcorriente,laspartesmetálicas
expuestasdelaherramientaeléctricatambién
tendráncorrienteyeloperadorpodríarecibir
unadescargaeléctrica.
4.Noutilicelapodadoradealturaen
condicionesmeteorológicasadversas,
especialmentesihayriesgoderayos.Esto
reduceelriesgodeseralcanzadoporunrayo.
5.Parareducirelriesgodeelectrocución,no
lautilicenuncajuntoacableseléctricos.
Elcontactoconcableseléctricosoeluso
juntoaellospuedeprovocarlesionesgraves
odescargaseléctricasquepuedencausarla
muerte.
6.Utilicesiemprelasdosmanosparamanejar
lapodadoradealtura.Sostengalapodadora
dealturaconambasmanosparaevitarperder
elcontrol.
7.Utilicesiempreprotecciónparalacabezaal
utilizarlapodadoradealturaporencimade
lacabeza.Lacaídaderesiduospuedeproducir
lesionespersonalesgraves.
8.Vestimentaadecuada–Lleveropaadecuada,
incluidaprotecciónocular,pantalón
largo,calzadoresistenteyantideslizante
yprotecciónauditiva.Sitieneelpelo
largo,recójaselo,ynollevejoyassueltas
quepuedanquedaratrapadasenlas
piezasmóviles.Utiliceunamascarillaen
condicionesdemuchopolvo.Unaropa
deprotecciónadecuadareducelaslesiones
personalesquepodríanprovocarlosresiduos
quesalendespedidosoelcontactoaccidental
conlalacadenadelapodadora.
9.Noutiliceunapodadoradealturasubido
aunárbol,sobreunaescalera,desdeun
tejadoodesdecualquiersoporteinestable.
Elusodeunapodadoradealturadeestemodo
podríaproducirlesionespersonalesgraves.
10.Siemprepisermeyutilicelapodadora
dealturaúnicamentecuandoestéenuna
supercieja,seguraynivelada.Las
superciesresbaladizasoinestables,tales
comoescaleras,puedenhacerleperderel
equilibriooelcontroldelapodadoradealtura.
11.Alcortarunaramaqueestébajo
tensión,tengacuidadoporsiselibera
repentinamente.Alliberarselatensióndelas
brasdelamadera,laramapuederebotary
golpearaloperadorodescontrolarlapodadora
dealtura.
12.Extremelasprecaucionesalcortarmaleza
yárbolesjóvenes.Elmaterialnopuede
engancharseenlacadenadelapodadoray
salirdespedidocomounlatigazohaciaustedo
hacerleperderelequilibrio.
13.Llevelapodadoradealturaconambas
manos,conlapodadoradealturaapagaday
alejadadelcuerpo.Altransportaroguardar
lapodadoradealtura,coloquesiempre
lacubiertadelaespadaguía.Unmanejo
correctodelapodadoradealturareducirála
posibilidaddecontactoaccidentalconlacadena
delapodadoraenmovimiento.
14.Sigalasinstruccionesdelubricación,
tensadodelacadena,cambiodelacadena
ydeespada.Unacadenatensadaolubricada
incorrectamentepuederomperseoaumentar
lasposibilidadesdequeseproduzcaun
contragolpe.
15.Corteúnicamentemadera.Noutilicela
podadoradealturaparanesdiferentes
alosprevistos.Porejemplo:noutilice
lapodadoradealturaparacortarmetal,
plástico,mamposteríaocualquierotro
materialdeconstrucciónquenosea
madera.Elusodelapodadoradealturapara
operacionesdiferentesdelasprevistaspodría
darlugaraunasituacióndepeligro.
16.Mantengalaempuñaduraseca,limpiaylibre
deaceiteygrasa.Unaempuñaduraaceitosao
grasientaesresbaladizaypuedehacerquese
pierdaelcontrol.
17.Eviteloscontragolpes.Puedenproducirse
contragolpessilapuntaoelextremodela
espadatocaunobjeto,ocuandolamadera
aprietayaprisionalacadenadelapodadora
duranteelcorte.
6

Enalgunoscasos,uncontactoconlapunta
puedecausarunareacciónrepentinahacia
atrásyhacerquesaltelaespadahaciaarribay
atrás,haciausted.
Sielbordesuperiordelaespadadelapodadora
quedaaprisionada,laespadapuedeser
empujadaconrapidezhaciaatrás,haciausted.
Cualquieradeestasdosreaccionespuede
causarunapérdidadecontroldelasierra
ylesionespersonalesgraves.Noconfíe
únicamenteenlosdispositivosdeseguridad
integradosenlasierra.Comousuariode
unapodadoradealtura,debeadoptarvarias
medidasparaevitaraccidentesolesionesen
lostrabajosdecorte.
Uncontragolpeeselresultadodelusoincorrecto
delaherramientaodeprocedimientoso
condicionesdeoperaciónincorrectosypuede
evitarsesisetomanlasprecaucionessiguientes:
18.Agarrelapodadoraconrmeza,rodeando
laempuñaduraconlospulgaresydemás
dedos,conlasdosmanossobrela
empuñaduraycoloqueelcuerpoyelbrazo
demodoquelepermitaresistirlafuerzade
loscontragolpes.Eloperadorpuedecontrolar
loscontragolpessitomalasprecauciones
adecuadas.Nosueltelapodadoradealtura.
19.Alretirarmaterialatascado,guardaro
realizartareasdemantenimientoenla
podadoradealtura,asegúresedequeel
interruptorestáapagadoylabateríaretirada.
Laactivacióninesperadadelamáquinadurante
laeliminacióndematerialatascadoodurante
elmantenimientopuedecausarlesiones
personalesgraves.
20.Utilicesolamentelasespadasycadenasde
repuestoespecicadasporelfabricante.Las
espadasycadenasderepuestoincorrectas
puedencausarlaroturadelacadenay/o
contragolpes.
21.Sigalasinstruccionesdelfabricantepara
alarymantenerlacadenadelapodadora.
Lareduccióndelaalturadellimitadorde
profundidadpuedeaumentarloscontragolpes.
GUARDEESTAS
INSTRUCCIONES
7

Pegatinasdeseguridadeinstrucciones
Laspegatinasdeseguridadeinstruccionesestánalavistadeloperadoryestánubicadas
cercadecualquierzonadepeligropotencial.Sustituyacualquierpegatinaqueestédañadao
quefalte.
139-5348
1.Nodesechardeformaincorrecta.
decal139-5348
139-5345
1.Advertencia–leaelManualdeloperador;lleveprotección
auditiva,protecciónocular,uncasco,guantes,calzadode
seguridadantideslizanteynoexpongalamáquinaala
lluvia;Precaución–Peligrodecorte/desmembramientode
lasmanos;peligrodeenredamiento–manténgasealejado
delaspiezasenmovimiento;mantengaaotraspersonas
alejadasdelamáquinadurantesufuncionamiento;Peligro
dedescargaeléctrica–aléjesedecableseléctricos.
decal139-5345
8

Montaje
Instalacióndelaespadaylacadena
PELIGRO
Cualquiercontactoconlosdientesdelapodadoradealturapuedecausarlesionespersonales
graves.
•Retirelabateríaantesderealizarcualquierajusteomantenimientodelapodadoradealtura.
•Siempreuseguantescuandorealicecualquierajusteomantenimientodelapodadora
dealtura.
1.Coloquelapodadoradealturaenunasupercieplanaynoinstalelabatería.
2.Retirelacubiertalateral:gireelpomodelacubiertadelaespadaensentidoantihorariohastaquese
retireelpomoy ,acontinuación,retirelacubiertalateral(Figura3)
Figura3
1.Pomodelacubiertadelaespada5.Ranuradeespadaguía
2.Cubiertalateral
3.Cadena
4.Ranuradeespárragodeajustedela
cadena
3.Coloquelacadenaalrededordelpiñónenelextremodelanterodelaespadaguía,conellodecortede
losdientesdelacadenadeltramosuperiordelaespadaorientadohaciaadelantecomosemuestraenel
diagramadelacubiertalateraldelapodadoradealtura.
4.Sigacolocandolacadenaalrededordelaespadaguía,alineandolosdientesdelacadenaenlaranura
delaespadaguía.
5.Coloqueelbucleabiertodelacadena(ellateralquenoestámontadoenlaespada)alrededordelpiñón
dearrastreenlapodadoradealtura(Figura3).
6.Espadaguía10.Espárragodeajustedelacadena
7.Piñóndearrastre
8.Espárragodeespadaguía
9.Salidadeaceite
Importante:Asegúresedequeelespárragodeajustedelacadenaestáinsertadoenlaranuradel
espárragodeajusteenlaespadaguía(Figura3).
Puedequetengaquegirareltornillotensordelacadenaparaajustarelespárragoenlaranurade
laespadaguía(Figura18).
6.Coloquelacubiertalateralyelpomodelacubiertadelaespadayaprieteprovisionalmentelacubierta
lateralgirandoelpomoensentidohorario.
g374226
7.Ajustelatensióndelacadena;consulteAjustedelatensióndelacadena(página18).
9

Montajedelapodadoradealtura
1.Desplieguelasseccionesdelaempuñadura(Figura4)
Figura4
1.Seccióndepostedelaempuñadura3.Seccióndelapodadora
2.Seccióndepostemedia
2.Alineeelbotóndebloqueoenlaseccióndepostemediaconeltaladroranuradoenelextremodela
seccióndelpostedelaempuñaduraydeslicelos2ejeshastaquequedenjuntos(Figura5).
Nota:Elbotóndebloqueohacecliceneltaladroranuradocuandoambosejesestánjos.
3.Utilicelallaveproporcionadaparajarestas2seccionesdelpostejuntas(EenlaFigura5).
4.Repitaesteprocedimientoparaconectarlaseccióndelapodadoraalaseccióndepostemedia(Figura5).
g374227
10

Figura5
Añadidodeaceitedelaespadaylacadenaenla
podadoradealtura
Importante:Utiliceúnicamenteaceiteparacadenasyespadas(sevendeporseparado).
Llenelapodadoraconaceiteparalaespadaylacadenaantesdeutilizarlaporprimeravez;consulteCómo
comprobarelniveldeaceiteyañadiraceiteparacadenas(página17).
11
g374228

Instalacióndelarnés
Conecteelganchometálicodelarnésalcollaríndela
empuñaduradelapodadoradealtura(Figura6).
Figura6
1.Hebilladeajustedela
correa
2.Ganchometálicodela
correa
Lalongituddelacorreaesajustable;deslicelahebilla
deajustehaciaarribaparareducirlalongituddela
correa,ohaciaabajoparaaumentarlalongitudde
lacorrea(Figura6).
3.Collaríndelacorrea
4.Correa
Elproducto
g374229
g374230
Figura8
1.Botóndecierre6.Pomodelacubiertadela
2.Segurodelgatillo7.Cubiertadelaespada
3.Empuñaduradelantera
4.Tapóndeaceite9.Espadaguíaycadena
5.Gatillo
espada
guía
8.Guíadecorte
Encasodeemergencia,paraquitarserápidamenteel
arnésdesconectelahebilladeliberaciónrápidacomo
seindicaacontinuación:
1.Presionehaciadentrolosladosdelahebilla
(Figura7,A).
2.Dejequesedesconectelahebilla(Figura7,B).
Figura7
g340477
12

Especicaciones
Modelo51847T
Longituddelaespada
(equipadacon88619y
88621)
Galgadelacadena
(equipadacon88619y
88621)
Pasodelacadena(equipada
con88619y88621)
Longituddelacadena
(equipadacon88619y
88621)
Voltajenominal
Peso(sinbatería)
Tipodecargador81801,81101,81802o81805
Tipodebatería
*SivaautilizarestamáquinaconlasbateríasModelo
81850,81860o81875,debeinstalarelarnésde
liberaciónrápidaincluido.
25,4cm
0,050pulgadas
¼"
58eslabones
Máximo60VCC,usonominal
54VCC
4,1kg
81820,81825,81850,81860
o81875*
Intervalosdetemperaturaadecuados
Cargue/guardelabateríaa5°Cy40°C*
Utilicelabateríaa
Utilicelaherramientaa
*Eltiempodecargaserámayorsilatemperaturano
estáenesteintervalodurantelacarga.
Guardelaherramienta,labateríayelcargadorenun
lugarcerrado,limpioyseco.
-30°Cy49°C*
0°Ca49°C*
13

Operación
Antesdeusarlapodadora
dealtura
Antesdeusarlapodadoradealtura,hagalosiguiente:
•Compruebelatensióndelacadena;consulte
Ajustedelatensióndelacadena(página18).
•Limpieloscomponentesdelapodadorade
altura,compruebequenoestánexcesivamente
desgastadosodañadosysustitúyalossegúnsea
necesario;consulteMantenimientodelaespada,
lacadenayelpiñóndearrastre.(página20).
•Compruebequelacadenaestáaladayqueno
estádañada,yafílelaosustitúyalasegúnsea
necesario;consulteCómoalarlacadena(página
21).
•Compruebeelniveldeaceite;consulteCómo
comprobarelniveldeaceiteyañadiraceitepara
cadenas(página17).
•Inspeccionelapodadoradealturaenbusca
dedañosycompruebesuaspectogeneraly
rendimiento;asegúresedequelosinterruptores
semuevenlibremente,losoriciosdeventilación
ylasempuñadurasestánlimpios,ydequela
espadanoestádobladaodañada.
g374231
Figura9
1.Oriciosdeventilación
2.Coloquelapodadoradealturaenunasupercie
nivelada.
3.Alineeelhuecodelabateríaconlalengüetadel
alojamientodelmango(Figura10).
Arranquedelapodadora
dealtura
1.Compruebequelosoriciosdeventilaciónde
lapodadoradealturaestánlibresdepolvoy
residuos(Figura9).
g374232
Figura10
4.Introduzcalabateríaenlaempuñadurahasta
quesebloqueeensusitio.
5.Retiredelacadenalacubiertadelaespada
guía.
6.Pulseelbloqueodelgatilloyaprieteelgatillo
paraarrancarlapodadoradealtura.
14

Apagadodelapodadorade
altura
Paraapagarlapodadoradealtura,libereelgatillo.
Cuandonoestéutilizandolapodadoraolaesté
transportandohaciaodesdeeláreadetrabajo,retire
labatería;consulteCómoretirarlabatería(página
16).
Corteconlapodadorade
altura
estácortandoaprisionalacadenaenlapuntaoen
eltramosuperiordelaespada.
LaFigura11muestralazonadelaespadaque
nodebehacercontactoconunobjetoparaevitar
contragolpes.
ADVERTENCIA
Elusoincorrectodelapodadoradealtura
puedecausarlesionespersonalesgraveso
lamuerte.
Leaatentamenteysigatodaslasinstrucciones
deusoconelndeevitarposibleslesiones
personales.
ADVERTENCIA
Nolautilicecercadecableseléctricos;
lapodadoradealturanosehadiseñado
paraofrecerprotecciónfrenteadescargas
eléctricasencasodecontactoconcables
eléctricosaéreos.
Consulteenlasnormativaslocaleslas
distanciassegurasconrespectoaloscables
eléctricosaéreosyasegúresedequela
posicióndefuncionamientoesseguraantes
deutilizarlapodadoradealtura.
Figura11
1.Zonadelcontragolpe
(punta,bordesuperiorde
laespada)
1.Agarrelapodadoradealturaconlas2manos.
2.Colóquesesobreunterrenormeyuniforme
delantedelárbolquevayaacortarysitúesede
modoquelospiesesténequilibradosyestables
mientrascorta.
3.Asegúresedecortarúnicamentelamaderaque
tieneprevistocortar;nodejequelacadenade
lapodadoratoquelatierra,otrostroncosuotros
objetosmientrascorte.
4.Asegúresedequelacadenadelapodadoragira
amáximavelocidadantesdeempezaracortar.
5.Corteconlaramacercadelapartetrasera
delaespadaguíaycercadelaguíadecorte;
presionelapodadoraligeramentecontrala
maderaydejequeelpesodelapodadoradirija
elcorte(Figura12).
2.Punta
g318677
ADVERTENCIA
Uncontragolpepuedecausarlelesiones
personalesgravesomortales.
Evitetocarlosobjetosquevaacortarconla
puntadelaespadaguíadelapodadorade
altura.
Existen2tiposdecontragolpe:
•Unmovimientorápidohaciaarribadelapodadora
queseproducecuandolacadenaenlapuntaoen
lapartesuperiordelaespadaentraencontacto
conunobjeto
•Unmovimientorápidohaciaatrásdelapodadora
dealturaqueseproducecuandoelobjetoquese
Importante:Silacadenaseatoraenel
corte,nointenteliberarlahaciendofuncionar
elmotor.Apaguelapodadora,retirela
bateríaylevantelaramamientrassostiene
lapodadora;deestemododeberíaliberarse
elaprisionamientoylapodadoradealtura.
15

Figura12
1.Guíadecorte
6.Mantengaunapresiónconstantesobrela
podadoradealtura,cortandoenlínearecta,y
dejedepresionarsolamentecercadelnaldel
corte.
7.Libereelgatilloencuantotermineelcorte.
Podadeunárbol
B.Hagaotrocortedesdearriba,alejándose
5a10cmmásdeltronco.Cortelarama
hastaquecaiga.
C.Corteelmuñóndelaramaenelcuellode
larama(Figura13).
Importante:Nocortelaramamásallá
delcuello,arasdeltronco,nidejeun
muñóngrande;estodañaríaelárbol.
g374233
ADVERTENCIA
Cortarlasramasmásaltasdeunárboldesde
elsuelopuedeponerloenunaposición
inestablequepodríaserpeligrosamientras
manipulaunapodadoradealtura,causando
posibleslesionespersonalesgravesola
muerteaustedoaotraspersonas.
Paracortarramasdeunárbolenpie,utilice
lassiguientesprácticas:
•Notrepesobrelasramasconlapodadora
dealtura.
•Noestiredemasiadolosbrazosoelcuerpo
ycorteconambasmanosenlapodadora
dealtura.
•Asegúresedequenohayanadieenlazona
enlaquepuedancaerramas.
1.Sujetelapodadoradealturacomosemuestra
enlaCorteconlapodadoradealtura(página
15).
2.Cuandocorteramaspequeñas,apliqueuna
presiónligeracontralaramaacortar.
3.Cuandocorteramasmásgrandes,hagaun
cortedepocaprofundidadenlaparteinferiory
luegocompleteelcortedesdelapartesuperior
delarama.
A.Cortedesdelaparteinferiordelaramaa
15cmaproximadamentedeltronco.Corte
unterciodelgrosordelarama.
Figura13
1.Primercorteenellado
inferior
2.Segundocortecompleto4.Cuellodelarama
3.Cortedepodanalpara
eliminarelmuñón
(transiciónentrelaramay
eltronco)
Cómoretirarlabatería
1.Coloquelapodadoradealturaenunasupercie
plana.
2.Presionehaciaabajosobreelbotóndecierrey
retirelabateríadelaempuñadura.
Figura14
1.Botóndecierre
g316577
g374234
16

Mantenimiento
Calendariorecomendadodemantenimiento
Intervalodemanteni-
mientoyservicio
Cadavezqueseutilice
odiariamente
Despuésdecadaciclode
descargadelabatería
Cadaañooantesdel
almacenamiento
Procedimientodemantenimiento
•Compruebeelniveldeaceiteyañadaaceiteparacadenasyespadasdepodadora
siesnecesario.
•Compruebequeelaceiteuyehastalacadena.
•Compruebelatensióndelacadenayajústelasiesnecesario.
•Asegúresedequelaespadaestárectaylibrededaños
•Compruebesilacadenaestáalada;póngaseencontactoconunServicioTécnico
Autorizadoparaquealenosustituyanlacadena.
•Compruebeelniveldeaceiteyañadaaceiteparacadenasyespadasdepodadora
siesnecesario.
•Compruebelatensióndelacadenayajústelasiesnecesario.
•Realiceelmantenimientodelaespada,lacadenayelpiñóndearrastre.
•Compruebesilacadenaestáalada;póngaseencontactoconunServicioTécnico
Autorizadoparaquealenosustituyanlacadena.
Cómocomprobarelnivel
deaceiteyañadiraceite
paracadenas
Intervalodemantenimiento:Cadavezqueseutilice
odiariamente
Despuésdecadaciclodedescargadela
batería
Importante:Utiliceúnicamenteaceitepara
cadenasyespadas(sevendeporseparado).
1.Apaguelapodadoradealturayretirelabatería;
consulteCómoretirarlabatería(página16).
2.Observeelniveldeaceiteenlamirilla.Siel
aceitenollenalamirilla,añadalacantidad
necesariadeaceiteparacadenas(Figura15).
Nota:Nodejequeentrenresiduosoastillasde
maderaeneldepósitodeaceite.
5.Retireeltapónyviertaaceitedeespaday
cadenaenlapodadoradealturahastaquese
llenedeaceiteeldepósito(Figura15).
Importante:Nollenelapodadoradealtura
porencimadelextremoinferiordelcuello
dellenado.
6.Limpieelaceitequesehayaderramadoy
coloquedenuevoeltapón.
7.Asegúresedequeelaceiteuyehastala
cadena;consulteComprobacióndelujode
aceitedelacadena(página18).
Figura15
1.Mirilladeaceite2.Tapóndeaceite
3.Coloquelapodadoradealturaenunasupercie
planaconeltapóndeaceitehaciaarriba.
4.Limpielazonaalrededordeltapóndeaceite
(Figura15).
g374235
17

Comprobacióndelujode
Ajustedelatensióndela
aceitedelacadena
Intervalodemantenimiento:Cadavezqueseutilice
odiariamente
1.Preparelapodadoradealturaparaeluso;
consulteAntesdeusarlapodadoradealtura
(página14).
2.Paraasegurarsedequeelaceiteuyehasta
lacadena,coloquelapuntadelapodadorade
alturaaunoscentímetrosdeunasupercie(por
ejemplo,papel,cartón,untocón)yarranque
lapodadoradealtura;debepoderveruna
pulverizaciónligeradeaceiteenlasupercie
(Figura16).
Figura16
1.Pongalapodadorade
alturaenmarchaaunos
centímetrosdeuna
supercie.
2.Sielaceiteuye,saldrá
pulverizadadelacadena
yseacumulará.
cadena
Intervalodemantenimiento:Cadavezqueseutilice
odiariamente
Despuésdecadaciclodedescargadela
batería
Asegúresedequelacadenaestácorrectamente
tensada.
Unacadenadestensadaacortalavidadelpiñónde
arrastreylaespada,ypuedehacerquelacadena
sedesprenda.
Silacadenasetensademasiado,sesobrecalientan
laespadaylacadenacausandoundesgasterápido,
ypuedequemarseelmotororomperselacadena.
Latensióndelacadenaescorrectasiustedpuede
tirardelacadenaporlaespadaconlamano
enguantada.Lacadenadebepermaneceren
contactoconelbordeinferiordelaespada.
Compruebetambiénlatensióndeunacadenanueva
despuésderealizaralgunoscortes;unacadena
nuevasueleestirarseyesnecesarioajustarla
despuésdeunoscortes.
g374236
PELIGRO
Cualquiercontactoconlosdientesdela
podadoradealturapuedecausarlesiones
personalesgraves.
3.Sielaceitenouye,asegúresedequehay
aceiteeneldepósitoyquelazonadebajode
lacubiertalateralestálimpia;consulteCómo
comprobarelniveldeaceiteyañadiraceite
paracadenas(página17)yMantenimientode
laespada,lacadenayelpiñóndearrastre.
(página20).
•Retirelabateríaantesderealizarcualquier
ajusteomantenimientodelapodadorade
altura.
•Siempreuseguantescuandorealice
cualquierajusteomantenimientodela
podadoradealtura.
18

1.Coloquelapodadoradealturaenunasupercie
niveladayretirelabatería;consulteCómo
retirarlabatería(página16).
2.Dejequelacadenadelapodadoraseenfríe.
Importante:Notenseunacadenacaliente;
puedecontraersealenfriarse,dandolugara
unacadenademasiadotensada.
3.Compruebequelaespadanoestádobladao
dañada;cámbielasiesnecesario.
4.Gireelpomodelacubiertadelaespadaen
sentidoantihorarioparaaojarlacubierta,pero
nolaretire(Figura17).
g374238
Figura18
1.Tornillotensordelacadena
Ajustelatensióndelacadenahastaquetoque
elbordeinferiordelaespada,luegotirede
lacadenaparaalejarladelbordeinferiorde
laespada;silacadenaestácorrectamente
ajustada,nopodráalejarlamásde3,2mm–
6,4mmdelaespada,yalsoltarlarecuperarásu
lugaroriginalbajotensión.
Figura17
1.Pomodelacubiertadelaespada
5.Ajustelatensióndelacadenaconeltornillo
tensordelacadena(Figura18)y,acontinuación,
jelacubiertalateralalapodadoradealtura
girandoelpomodelacubiertadelaespadaen
sentidohorarioantesdecomprobarlatensión
(Figura17).
•Paraapretarlacadena,gireeltornillo
tensordelacadenaensentidohorario.
•Paraaojarlacadena,gireeltornillotensor
delacadenaensentidoantihorario.
g374237
Nota:Mientrasajustalatensióndelatensión
delacadena,levantelapuntadelaespadaguía
conunamanoprotegidaconunguante,para
asegurarsedequelaespadaguíanocaeyno
afectaalatensióndelacadena.
6.Coloquelacadenaalrededordelaespada
conlamanoenguantada.Unacadena
correctamentetensadadebedesplazarse
librementeypermanecerencontactoconel
bordeinferiordelaespada.
7.Silacadenanoestátensadacorrectamente,
repitalospasos4a7.
19

Mantenimientodela
espada,lacadenayel
piñóndearrastre.
Cadaañooantesdelalmacenamiento
PELIGRO
5.Limpiecualquiersuciedaddedebajodela
cubiertalateral.
6.Inspeccioneelpiñóndearrastrey,siestámuy
desgastadoodañado,sustitúyalo;póngaseen
contactoconsuServicioTécnicoAutorizado.
7.Compruebequelasalidadeaceite(Figura
19)estálibrederesiduos;limpielazonasies
necesario.
Cualquiercontactoconlosdientesdela
podadoradealturapuedecausarlesiones
personalesgraves.
•Retirelabateríaantesderealizarcualquier
ajusteomantenimientodelapodadorade
altura.
•Siempreuseguantescuandorealice
cualquierajusteomantenimientodela
podadoradealtura.
1.Coloquelapodadoradealturaenunasupercie
planayretirelabatería;consulteCómoretirar
labatería(página16).
2.Retirelacubiertalateral:gireelpomodela
cubiertadelaespadaensentidoantihorario
hastaqueseretireelpomoy,acontinuación,
retirelacubiertalateral(Figura19)
8.Limpielaespadaylacadena;useunalambreo
unpequeñodestornilladordecabezaplanapara
eliminarlasuciedadylosresiduosdelaranura
delbordedelaespada,empezandoenelpiñón
delextremodelanteroytrabajandohaciaatrás.
Asegúresedequeelcanaldeaceitedela
espadaqueestáalineadoconlasalidade
aceitedelapodadoradealturaestálimpiopara
queelaceitepuedauirlibrementealacadena
(Figura20).
Figura20
Seccionesinternasdelaespadailustradas
1.Asegúresedequeeste
canalquesecomunica
conlasalidadeaceite
estálimpio.
2.Asegúresedequeelpiñón
delaespadaestálimpioy
quegiralibremente.
g315856
Figura19
1.Pomodelacubiertadela
espada
2.Cubiertalateral
3.Cadena
4.Ranuradeespárragode
ajustedelacadena
5.Ranuradeespadaguía10.Espárragodeajustedela
6.Espadaguía
7.Piñóndearrastre
8.Espárragodeespadaguía
9.Salidadeaceite
cadena
3.Aojelacadenagirandoeltornillodeaprietede
lacadenaensentidoantihorario(Figura18).
4.Separelacadenadelaespadayapártalas.
9.Inspeccionelaespadaylacadena;silaespada
estádoblada,lasranurasestándañadas,
oelpiñóndelextremodelanteronogira
libremente,cambielaespada;silacadenaestá
excesivamentedesgastadaodañada,cámbiela.
10.Instalelaespadaylacadena;consulte
Instalacióndelaespadaylacadena(página
21).
g374226
11.Asegúresedequeelaceiteuyehastala
cadena;consulteComprobacióndelujode
aceitedelacadena(página18).
20

Instalacióndelaespaday
Cómoalarlacadena
lacadena
PELIGRO
Cualquiercontactoconlosdientesdela
podadoradealturapuedecausarlesiones
personalesgraves.
•Retirelabateríaantesderealizarcualquier
ajusteomantenimientodelapodadorade
altura.
•Siempreuseguantescuandorealice
cualquierajusteomantenimientodela
podadoradealtura.
1.Siestáinstaladalacubiertalateralenla
máquina,retírela;consulteMantenimientode
laespada,lacadenayelpiñóndearrastre.
(página20).
2.Coloquelacadenaalrededordelpiñónenel
extremodelanterodelaespadaguía,conel
lodecortedelosdientesdelacadenadel
tramosuperiordelaespadaorientadohacia
adelantecomosemuestraeneldiagramadela
cubiertalateraldelapodadoradealtura.
Cadaañooantesdelalmacenamiento
Unacadenaaladaaseguraunmejorrendimientode
corteyunavidamáslargadelabatería.
Esnecesarioalarosustituirlacadenasihayque
forzarlaparaquepenetreenlamadera,osiproduce
serrínenlugardevirutasdemadera.
PóngaseencontactoconunServicioTécnico
Autorizadoparaquealenosustituyanlacadena.
Mantenimiento
Silapodadoradealturanecesitamantenimiento,
llevelaherramientaaunServicioTécnicoAutorizado.
3.V ayacolocandolacadenaalrededordela
espadaguía,alineandolosdientesdelacadena
enlaranuradelaespadaguía.
Nota:Silacadenaesnueva,inviertalaespada
paraevitarundesgastedesigual.
4.Coloqueelbucleabiertodelacadena(separado
delaespada)alrededordelpiñóndearrastrede
lapodadoradealturaeinstalelaespadaguía
conlacadenaenlapodadoradealtura.
Importante:Asegúresedequeelespárrago
deajustedelacadenaestáinsertadoenla
ranuradelespárragodeajusteenlaespada
guía(Figura19).Puedequetengaquegirar
eltornillotensordelacadenaparaajustarel
espárragoenlaranuradelaespadaguía.
5.Instalelacubiertalateral,peronoaprietedel
todoelpomodelacubiertalateral.
6.Ajustelatensióndelacadena;consulteAjuste
delatensióndelacadena(página18).
21

Almacenamiento
Importante:Almacenelamáquina,labateríayel
cargadorsoloatemperaturasqueesténdentrodel
intervaloapropiado;consulteEspecicaciones
(página13).
Importante:Sivaaalmacenarlabateríahasta
latemporadasiguiente,cárguelahastaque2o
3delosindicadoresLEDdelabateríacambien
averde.Noalmacenelabateríacompletamente
cargadanicompletamentedescargada.Antesde
volverausarlamáquina,carguelabateríahasta
quesevuelvaverdeelindicadorizquierdodel
cargador,ohastaquelos4indicadoresLEDdela
bateríasevuelvanverdes.
•Desconectelamáquinadelsuministrodeenergía
(esdecir,retirelabatería)ycompruebesihay
dañosdespuésdeluso.
•Limpiecualquiermaterialextrañodelproducto.
•Noalmacenelamáquinaconlabateríainstalada.
•Almacenelamáquina,labateríayelcargadorde
labateríaenunlugarbienventiladoquenosea
accesibleparalosniños.
•Mantengalamáquina,labateríayelcargador
delabateríaalejadosdeagentescorrosivos
comoproductostosanitariosdejardínosalpara
deshielo.
•Parareducirelriesgodelesionespersonales
graves,noalmacenelabateríaenelexterioroen
unvehículo.
•Guardelamáquina,labateríayelcargadorenun
lugarcerrado,limpioyseco.
22

Solucióndeproblemas
Realicesololospasosdescritosenestasinstrucciones.Cualquierotrotrabajodeinspección,mantenimientoo
reparacióndebeserrealizadoporunServicioTécnicoAutorizadooporunespecialistaautorizadosino
puedesolucionarelproblemaustedmismo.
ProblemaPosiblecausa
Lapodadoradealturanofunciona,o
funcionadeformaintermitente.
Lapodadoradealturafunciona,perola
cadenanogira.
Lapodadoradealturanocortabien.
Accióncorrectora
1.Labateríatienepocacarga.
2.Labateríanoestácompletamente
asentada.
3.Labateríaestáporencimaopor
debajodelintervalodetemperatura
adecuado.
4.Labateríahasuperadoloslímites
máximosdeamperaje.
5.Hayhumedadenloscablesdela
batería.
6.Haysuciedaddebajodelacubierta.6.Retirelacubiertayeliminelasuciedad.
1.Lacadenanoestácorrectamente
asentadaenelpiñóndearrastre.
2.Haysuciedaddebajodelacubierta.2.Retirelacubiertayeliminelasuciedad.
1.Lacadenanoestátensada
correctamente.
2.Lacadenaestádesaladaodañada.2.Cambielacadena.
3.Laespadaestádobladaolasranuras
estándañadas.
4.Lacadenaestáinstaladaalrevés.4.Instalelacadenacorrectamente.
5.Lacadenanoselubricacorrectamente.
1.Carguelabatería.
2.Asegúresedequelabateríase
haintroducidoporcompletoenel
alojamiento.
3.Trasladelabateríaaunlugarseco
cuyatemperaturaseadeentre5°Cy
40°C.
4.Suelteelgatilloyluegopresioneel
interruptordelgatillo.
5.Dejequelabateríasesequeoséquela
conunpaño.
1.Instalelacadenayasegúresedeque
loseslabonesestáncorrectamente
asentadosenelpiñóndearrastre.
1.Ajustelacadenaconlatensión
correcta.
3.Cambielaespada
5.Compruebeelniveldeaceitey
asegúresedequeelaceiteuyehasta
lacadena.
Elaceitedelacadenanolubrica
correctamente.
1.Elniveldelaceiteesbajo.
2.Lasalidadeaceiteestáobstruida.2.Limpielasuciedaddelasalidadel
3.Haysuciedaddebajodelacubierta.3.Retirelacubiertayeliminelasuciedad.
4.Elcanaldeaceiteolaranuradela
espadaestáobstruida.
1.Compruebeelniveldeaceite.
aceite.
4.Limpielasuciedadquehayaenla
espada.
23

AvisosobreprivacidadenelEEE/ReinoUnido
UsodesusdatospersonalesporpartedeToro
TheT oroCompany(“T oro”)respetasuprivacidad.Aladquirirnuestrosproductos,podemosrecopilarciertosdatospersonalessobreusted,yasea
deformadirectaatravésdeustedodenuestraempresaonuestrorepresentantelocaldeT oro.T oroutilizaestosdatosparacumplirobligaciones
contractuales,comoregistrarsugarantía,procesarunareclamacióndegarantíaoponerseencontactoconustedencasodelaretiradadeunproducto,
asícomoparanescomercialeslegítimos,comovalorarlasatisfaccióndelosclientes,mejorarnuestrosproductosuofrecerleinformacióndeproductos
quepuedanserdesuinterés.Toropuedecompartirsusdatosconliales,concesionariosuotrossocioscomercialesdeToroenrelaciónconcualquiera
delasactividadesantesmencionadas.T ambiénpodemosrevelarsusdatospersonalescuandoserequieraporleyoenrelaciónconlaventa,la
adquisiciónolafusióndeunaempresa.Novenderemossusdatospersonalesaningunaotraempresaconnesdemarketing.
Retencióndesusdatospersonales
Toroconservarásusdatospersonaleshastaqueseanrelevantesparalasnalidadesindicadasanteriormenteysegúnlosrequisitoslegales.Para
obtenermásinformaciónsobrelosperiodosderetenciónaplicables,póngaseencontactoconlegal@toro.com.
CompromisodeToroconlaseguridad
SusdatospersonalessepuedenprocesarenEstadosUnidosoenotropaísqueapliqueleyesdeproteccióndedatosmenosestrictasquelasdesupaís
deresidencia.Cuandotransramossusdatospersonalesfueradesupaísderesidencia,daremoslospasoslegalmentepertinentesparagarantizarque
seaplicanlasmedidasadecuadasparaprotegersuinformaciónyparagarantizarquesetrataconseguridad.
Accesoycorrección
Puedetenerderechoacorregirorevisarsusdatospersonales,obienanegarsealprocesamientodesusdatosorestringirlo.Paraello,póngase
encontactoconnosotrosenladirecciónlegal@toro.com.SitienealgunapreocupaciónacercadecómohagestionadoT orosuinformación,le
instamosaquesepongaencontactoconnosotrosdirectamente.Recuerdequelosresidenteseuropeostienenderechoapresentarquejasantela
autoridadresponsabledelaproteccióndedatos.
374-0282RevC

FormNo.3443-548RevB
ÉlagueusesurpercheFlex-Force
PowerSystem
N°demodèle51847T—N°desérie321000001etsuivants
™
de60V
Enregistrezvotreproduitàwww.Toro.com.
Traductiondutexted'origine(FR)
*3443-548*

Sivousavezbesoin
d'aide,visionnezles
vidéosd'instructionsur
www.Toro.com/support
oucontactezvotre
concessionnaireréparateuragrééavant
derenvoyerceproduit.
Introduction
Cetteélagueusesurpercheestconçuepourtailler
lespetitesbranchesetbranchagesmesurantjusqu'à
15cmdediamètre.Ellenedoitêtreutiliséequepar
despersonnesadultes.Ilestconçupourfonctionner
avecunebatterieion-lithiumToroFlex-Forcemodèle
81820,81825,81850,81860ou81875.Cesbatteries
sontconçuespourêtrechargéesaveclechargeur
modèle81801,81101,81802ou81805seulement.
L'utilisationdecesproduitsàd'autresnsquecelle
prévuepeutêtredangereusepourvousettoute
personneàproximité.
Important:Sivousutilisezcettemachineavec
labatteriemodèles81850,81860ou81875,vous
devezinstallerlasangleàxationrapideincluse
pourassurerunsoutienetunéquilibrecorrects.
N'utilisezpasd'autrestypessanglesouplusieurs
sanglesàlafois.
Important:Avecvotreappareilmobile,vous
pouvezscannerlecodeQR(selonl'équipement)
surlaplaquedunumérodesériepouraccéder
auxrenseignementssurlagarantie,lespièceset
autresinformationsproduit.
g374224
Figure1
1.Emplacementdesnumérosdemodèleetdesérie.
N°demodèle
N°desérie
Lesmisesengardedecemanuelsoulignentdes
dangerspotentielsetsontsignaléesparlesymbole
desécurité(Figure2),quiindiqueundangerpouvant
entraînerdesblessuresgravesoumortellessiles
précautionsrecommandéesnesontpasrespectées.
Lisezattentivementcettenoticepourapprendre
commentutiliseretentretenircorrectementvotre
produit,etéviterainsidel'endommageroudevous
blesser.Vousêtesresponsabledel'utilisationsûreet
correcteduproduit.
Pourplusd'informations,ycomprisdesconseils
desécurité,desdocumentsdeformation,des
renseignementsconcernantunaccessoire,
pourobtenirl'adressed'unconcessionnaireou
pourenregistrervotreproduit,rendez-voussur
www.T oro.com.
Pourobtenirdesprestationsdeservice,des
piècesd'origineTorooudesrenseignements
complémentaires,munissez-vousdesnuméros
demodèleetdesérieduproduitetcontactezun
concessionnaire-réparateuragrééouleserviceclient
Toro.LaFigure1indiquel'emplacementdesnuméros
demodèleetdesérieduproduit.Inscrivezles
numérosdansl'espaceréservéàceteffet.
©2022—TheToro®Company
8111LyndaleAvenueSouth
Bloomington,MN55420
Figure2
Symboledesécurité
Cemanuelutilisedeuxtermespourfairepasserdes
renseignementsessentiels.Important,pourattirer
l'attentionsuruneinformationd'ordremécanique
spécique,etRemarque,poursoulignerune
informationd'ordregénéralméritantuneattention
particulière.
Contactez-noussurwww.Toro.com.
2
Tousdroitsréservés
sa-black
ImpriméenChine

Tabledesmatières
Sécurité
Sécurité....................................................................3
Autocollantsdesécuritéetd'instruction..............8
Miseenservice.........................................................9
Installationduguide-chaîneetdela
chaîne.............................................................9
Assemblagedel'élagueusesurperche.............10
Ajoutd'huilepourguide-chaîneetchaîne
dansl'élagueuse............................................11
Installationdelasangle....................................12
Vued'ensembleduproduit......................................12
Caractéristiquestechniques............................13
Utilisation................................................................14
Avantd'utiliserl'élagueusesurperche..............14
Démarragedel'élagueusesurperche...............14
Arrêtdel'élagueusesurperche.........................14
Couperavecl'élagueusesurperche.................15
Élagaged'unarbre...........................................16
Retraitdelabatterie.........................................16
Entretien.................................................................17
Programmed'entretienrecommandé..................17
Contrôleduniveaud'huileetappointd'huile
pourguide-chaîneetchaîne..........................17
Contrôledudébitd'huilepourguideet
chaîne...........................................................18
Réglagedelatensiondelachaîne....................18
Entretienduguide-chaîne,delachaîneetdu
pignond'entraînement..................................20
Installationduguideetdelachaîne..................21
Affûtagedelachaîne........................................21
Entretien...........................................................21
Remisage...............................................................22
Dépistagedesdéfauts............................................23
ATTENTION
Prenezconnaissancedetouteslesconsignes
desécurité,instructions,illustrationset
spécicationsquiaccompagnentcetoutil
électrique.
Lenonrespectdetouteslesinstructions
énoncéesci-aprèspeutentraînerdeschocs
électriques,unincendieet/oudesblessures
graves.
Conservezprécieusementtouteslesmisesen
gardeetconsignesdesécuritéàtitrederéférence.
Leterme«outilélectrique»utilisédanstoutesles
misesengarderenvoieàtoutoutilélectriquebranché
surlesecteur(câblé)oualimentéparbatterie(sans
l).
IMPORTANTES
CONSIGNES
DESÉCURITÉ
I.Sécuritésurlazonedetravail
1.Lazonedetravaildoitêtrepropreetbien
éclairée.Lesendroitssombresetencombrés
sontpropicesauxaccidents.
2.N'utilisezjamaisd'outilsélectriquesdans
desatmosphèresexplosives,enprésencede
liquides,gazoupoussièresinammablespar
exemple.Lesoutilsélectriquesproduisentdes
étincellesquipeuventenammerlapoussière
oulesvapeurs/émanations.
3.Tenezenfantsetadultesàdistancependant
l'utilisationd'unoutilélectrique.Les
distractionspeuvententraînerlapertede
contrôledel'outil.
II.Consignesdesécuritéélectrique
1.Leschesdesoutilsélectriquesdoivent
correspondreautypedeprise.Nemodiez
jamaislacheélectrique.N'utilisezpas
d'adaptateursavecdesoutilsélectriques
reliésàlaterre.Leschesetprises
correspondantesnonmodiéesréduisentle
risquedechocélectrique.
2.Éviteztoutcontactducorpsavecdes
surfacesreliéesàlaterre/masse,par
exempletuyaux,radiateurs,cuisinièreset
réfrigérateurs.Lerisquedechocélectrique
augmentesivotrecorpsestreliéàlaterre.
3.N'exposezpaslesoutilsélectriquesàla
pluieouàl'humidité.L'inltrationd'eaudans
3

unoutilélectriqueaugmentelerisquedechoc
électrique.
perdrel'équilibre.Vouspourrezainsigarderle
contrôledel'outilencasd'événementinattendu.
4.Nemaltraitezpaslecordond'alimentation.
Nevousservezjamaisducordonpour
transporter,tireroudébrancherl'outil
électrique.Éloignezlecordondessurfaces
chaudes,delagraisse,desarêtesvivesou
despiècesmobiles.Lescordonsendommagés
ouemmêlésaugmententlerisquedechoc
électrique.
5.Sivousutilisezunoutilélectriqueà
l'extérieur,utiliseztoujoursunerallonge
adaptéeàl'usageextérieur.L'utilisationd'une
rallongeprévuepourl'usageextérieurréduitle
risquedechocélectrique.
6.Sil'utilisationd'unoutilélectriquedansun
endroithumidenepeutêtreévitée,utilisez
unealimentationprotégéeparundisjoncteur
différentiel(RCD).L'utilisationd'undisjoncteur
différentielréduitlerisquedechocélectrique.
III.Sécuritépersonnelle
1.Restezalerte,concentrez-voussurvotre
tâcheetfaitespreuvedebonsenslorsque
vousutilisezunoutilélectrique.N'utilisez
pasunoutilélectriquesivousêtesfatigué(e)
ousousl'emprisedel'alcool,dedroguesou
demédicaments.Unseulmomentd'inattention
pendantl'utilisationpeutentraînerdegraves
blessures.
2.Utilisezdeséquipementsdeprotection
individuelle.Porteztoujoursuneprotection
oculaire.Leséquipementsdeprotection
commelesmasquesantipoussière,les
chaussuresdesécuritéàsemelleantidérapante,
lescasquesetlesprotectionsantibruitutilisés
demanièrepertinenteréduisentlesrisquesde
blessures.
3.Éviteztoutdémarrageaccidentel.
Assurez-vousquel'interrupteurMarche/Arrêt
estenpositionARRÊTavantdeconnecter
l'outilàunesourced'alimentationet/ouà
labatterie,deleprendreenmainoudele
transporter.Desaccidentspeuventseproduire
sivoustransportezunoutilélectriqueengardant
ledoigtsurl'interrupteurd'alimentationousi
vouslemettezsoustensionsansavoirplacé
l'interrupteurenpositionarrêt.
4.Retireztoutecléderéglageouautreavant
demettrel'outilenmarche.Unecléoubliée
surunepiècerotativedel'outilélectriquerisque
devousblesser.
5.Nevouspenchezpastropenavantlorsque
voustravaillez.Gardeztoujourslespieds
bienposésàterreetfaitesensortedenepas
6.Portezdesvêtementsadéquats.Neportez
pasdevêtementsamplesnidebijoux
pendants.N'approchezpaslescheveux,les
vêtementsetlesgantsdespiècesmobiles.
Lesvêtementsamples,lesbijouxpendantsou
lescheveuxlongspeuventseprendredansles
piècesmobiles.
7.Sidesdispositifssontfournispour
leraccordementd'équipementsde
dépoussiérageetderamassage,
assurez-vousqu'ilssontbranchéset
utiliséscorrectement.L'utilisationd'un
dispositifderécupérationdespoussièrespeut
réduirelesrisquesassociésauxpoussières.
8.Mêmesivousavezl'habituded'utiliser
lesoutils,nerelâchezpasvotreattention
etn'ignorezpaslesprincipesdesécurité
desoutils.Uneimprudencepeutcauserdes
blessuresgravesenunefractiondeseconde.
9.Neconezpasl'utilisationoul'entretien
decetappareilàdesenfantsouàdes
personnesnonqualiées.Seulesles
personnesresponsables,forméesà
l'utilisationdel'appareil,ayantluetcompris
lesinstructionsetphysiquementaptessont
autoriséesàutiliserl'appareilouàenfaire
l'entretien.
IV.Utilisationetentretiendesoutils
électriques
1.Nefaitespasforcerl'outilélectrique.Utilisez
l'outilélectriquecorrectpourlatâcheà
accomplir.L'outilélectriquecorrectdonnerade
meilleursrésultatsetseraplussûrs'ilestutilisé
dansleslimitesprévues.
2.Nevousservezpasdel'outilélectrique
sil'interrupteurd'alimentationnepermet
pasdelemettreenmarcheetdel'arrêter
correctement.Unoutilélectriquequine
peutpasêtrecommandéparl'interrupteur
d'alimentationestdangereuxetdoitêtreréparé.
3.Débranchezl'outildelasourced'alimentation
et/ouenlevezlabatteriedel'outil,sielleest
amovible,avantd'effectuerdesréglages,de
changerd'accessoireouderangerl'outil.
Cesmesuresdesécuritépréventivesréduisent
lerisquededémarrageaccidenteldel'outil.
4.Rangezlesoutilsélectriquesnonutilisésà
l'intérieur,horsdeportéedesenfants,etne
conezleurutilisationqu'àdespersonnes
enconnaissantlemaniementetayant
lucesinstructions.Lesoutilsélectriques
sontdangereuxs'ilssontmisentrelesmains
d'utilisateursnovices.
4

5.Effectuezl'entretiendesoutilsetdes
accessoires.Vériezqu'aucunepiècen'est
désalignée,grippée,casséeouprésentetout
autredéfautsusceptibled'affecterlebon
fonctionnementdel'outilélectrique.S'ilest
endommagé,faitesréparerl'outilélectrique
avantdel'utiliser.Denombreuxaccidentssont
causéspardesoutilsélectriquesenmauvais
état.
6.Gardezlesoutilsdecoupepropreset
bienaffûtés.Desoutilsdecoupeentretenus
correctementetbienaffûtéssontmoins
susceptiblesdecoinceretsontplusfacilesà
contrôler.
7.Utilisezl'outilélectrique,lesaccessoires,
lesoutilsrapportés,etc.,enconformité
aveccesinstructions,entenantcompte
desconditionsdetravailetdelatâcheà
réaliser.L'utilisationdel'outilélectriquepour
desopérationsautresquecellesprévuespeut
engendrerunesituationdangereuse.
8.Gardezlespoignéesetsurfacesde
préhensionsèches,propresetexemptes
d'huileetdegraisse.Lespoignéesetles
surfacesdepréhensionglissantesnepermettent
pasdemanipuleretdecontrôlerl'outilentoute
sécuritédansdessituationsimprévues.
V.Utilisationetentretiendesoutilsàbatterie
1.Nelesrechargezqu'aveclechargeurspécié
parlefabricant.Unchargeurconvenantàun
typedebatteriespéciquepeutcréerunrisque
d'incendies'ilestutiliséavecuneautrebatterie.
2.Utilisezlesoutilsélectriquesuniquement
aveclesbatteriesspéciquementprévues.
L'utilisationd'autresbatteriespeutcréerun
risquedeblessureetd'incendie.
6.N'exposezpaslabatterieoul'outilaufeuou
àunetempératureexcessive.L'expositionau
feuouàunetempératuresupérieureà100°C
peutprovoqueruneexplosion.
7.Suiveztouteslesinstructionsdechargeet
nechargezpaslabatterieoul'outilendehors
delaplagedetempératurespéciéedansles
instructions.Unechargeincorrecteouàdes
températuresendehorsdelaplagespéciée
peutendommagerlabatterieetaugmenterle
risqued'incendie.
8.N'exposezpaslabatterieoul'outilàlapluie
ouàl'humidité.L'inltrationd'eaudansun
outilélectriqueaugmentelerisquedechoc
électrique.
9.PRUDENCE–Labatteriepeutprésenterun
risqued'incendieoudebrûlurechimique
encasdemauvaistraitement.Nedémontez
paslabatterie.N'exposezpaslabatterieàune
températuresupérieureà68°Cetnel'incinérez
pas.Remplaceztoujourslabatterieparune
batterieTorod'origine;l'utilisationdetoutautre
typedebatteriepeutentraînerunincendieou
uneexplosion.Conservezlesbatterieshorsde
laportéedesenfantsetdansleuremballage
d'originejusqu'aumomentdelesutiliser.
VI.Entretien
1.Conezl'entretiendevotreoutilélectriqueà
unréparateurqualiéutilisantexclusivement
despiècesderechangeidentiques.La
sécuritédevotreoutilélectriqueseraainsi
maintenue.
2.Nefaitesjamaisl'entretiendesbatteries
endommagées.L'entretiendesbatteriesne
doitêtreeffectuéqueparlefabricantoudes
prestatairesdeservicesautorisés.
3.Lorsquelabatterienesertpas,rangez-la
àdistanced'objetsmétalliquestelsque
trombones,piècesdemonnaie,clés,clous,
visouautrepetitobjetmétalliquequipourrait
relierlesbornesentreelles.Uncourt-circuit
auxbornesdelabatteriepeutcauserdes
brûluresouunincendie.
4.Uneutilisationabusivepeutcauserla
projectiondeliquidehorsdelabatterie;
éviteztoutcontact.Encasdecontact
accidentel,rincezàl'eau.Encasdecontact
duliquideaveclesyeux,consultezenplus
unmédecin.Leliquideéjectédelabatterie
peutcauserdesirritationsoudesbrûlures.
5.N'utilisezpasunebatterieouunoutilquiest
endommagé(e)oumodié(e).Lesbatteries
endommagéesoumodiéespeuventavoir
uncomportementimprévisibleetcauserun
incendie,uneexplosionoudesblessures.
VII.Consignesdesécuritépourl'élagueuse
surperche
1.N'approchezaucunepartieducorpsdela
chaînedel'élagueuse.Neretirezpasle
matériaucoupéetnetenezpaslematériau
àcouperpendantlefonctionnementdela
chaînedel'élagueuse.Vérieztoujours
quel'interrupteurestenpositionhors
tensionetquelabatterieestdébranchée
avantd'enleverlesobstructions.Lachaîne
continuedetourneraprèslamisehors
tensiondel'élagueuse.Avantdedémarrer
l'élagueusesurperche,vériezquelachaîne
netoucherien.Eneffet,ilsuftd'unseul
momentd'inattentionpendantl'utilisationde
l'élagueusesurperchepourquelachaîne
happelesvêtementsouunepartieducorps.
2.Porteztoujoursl'élagueusesurperchepar
lapoignéeaprèsavoirattendul'arrêtde
5

lachaîne.Metteztoujourslecouverclede
protectionsurlachaînepourtransporterou
rangerl'élagueusesurperche.Lesrisquesde
blessuresinigéesparlachaîneserontréduits
sil'élagueuseestmanipuléecorrectement.
11.Lorsquevouscoupezunebranchesoumiseà
unetension,méez-vousdel'effetderetour.
Lorsquelesbresdeboissedétendent,la
branchepeutvenirvousheurteret/ouvousfaire
perdrelecontrôledel'élagueusesurperche.
3.Tenezl'outiluniquementparlessurfacesde
maintienisolées,carlachaînepeuttoucher
descâblesinvisibles.Silachaîneoulalame
delatronçonneuseentreencontactavecun
câble«soustension»,lespiècesmétalliques
exposéespeuventégalementêtremises«sous
tension»etcauserunchocélectriquepour
l'utilisateur.
4.N'utilisezpasl'élagueusesurperchepar
mauvaistemps,surtouts'ilexisteunrisque
defoudre.Celaréduitlerisqued'êtrefrappé
parlafoudre.
5.Pourréduirelerisqued'électrocution,
n'utilisezjamaisl'outilàproximitédelignes
électriques.Sivoustouchezdeslignes
électriquesousivoustravaillezàproximité,
vouspouvezsubirdegravesblessuresouun
chocélectriquepouvantentraînerlamort.
6.Teneztoujoursl'élagueusesurperchedes
deuxmainspendantl'utilisation.Tenez
l'élagueusesurperchedesdeuxmainspour
éviterd'enperdrelecontrôle.
7.Protégez-voustoujourslatêtequandvous
utilisezl'élagueuseenhauteur.Lachutede
débrispeutentraînerdegravesblessures.
8.Portezdesvêtementsadéquats–Portezune
tenueadaptée,ycomprisuneprotection
oculaire,unpantalon,deschaussures
solidesàsemelleantidérapante,desgants
etdesprotecteursd'oreilles.Sivoscheveux
sontlongs,attachez-lesetneportezpas
debijouxpendantsquipourraientse
prendredanslespiècesmobiles.Portez
unmasqueantipoussièresil'atmosphère
estpoussiéreuse.Leportdevêtements
deprotectionadaptésréduitlesrisquesde
blessuresoccasionnéesparlaprojectionde
débrisouuncontactaccidentelaveclachaîne
delatronçonneuse.
12.Faitespreuved'uneextrêmeprudence
quandvouscoupezdesbroussaillesetdes
arbustes.Lesmatériauxtrèsmincespeuvent
secoincerdanslatronçonneuseetvousfouetter
parretourouvousdéséquilibrer.
13.Transportezl'élagueusesurpercheaprès
l'avoirarrêtéeenlatenantàdeuxmainset
enl'éloignantdevous.Enleztoujoursl'étui
surleguide-chaîneavantdetransporterou
rangerl'élagueusesurperche.Lemaniement
correctdel'élagueusesurpercheréduitlerisque
decontactaccidentelaveclachaîneenmarche.
14.Suivezlesinstructionsdegraissage,de
réglagedetensiondelachaîne,etde
remplacementduguide-chaîneetdela
chaîne.Unechaînemaltendueoumalgraissée
peutsecasserouaugmenterlerisquede
rebond.
15.Necoupezquedubois.N'utilisezpas
l'élagueuseàd'autresnsquecelleprévue.
Parexemple:n'utilisezpasl'élagueusepour
couperdumétal,duplastique,desmatériaux
demaçonnerieoudesmatériauxde
constructionautresquelebois.L'utilisation
del'élagueusepourdesopérationsautresque
cellesprévuespeutengendrerunesituation
dangereuse.
16.Gardezlespoignéessèchesetpropres,et
exemptesd'huileetdegraisse.L'huileet
lagraisserendentlespoignéesglissanteset
peuventfaireperdrelecontrôledelamachine.
17.Pouréviterlerebond.Unrebondpeutse
produirelorsquelenezoul'extrémitéavantdu
guide-chaînerencontreunobjet,oulorsque
leboisserefermeetcoincelachaînedela
tronçonneuse.
Lecontactdel'extrémitéavantpeutcauser
uneréactioninversesubitequivapropulserle
guide-chaîneverslehautetdansvotredirection.
9.N'utilisezpasl'élagueusesurperchelorsque
voustrouvezdansunarbre,suruneéchelle,
suruntoitousurunsupportinstable.
L'utilisationd'uneélagueusesurperchedecette
manièrepeutentraînerdegravesblessures.
10.Tenez-voustoujoursbiend'aplombsurune
surfacestable,fermeetdeniveauquand
vousutilisezl'élagueusesurperche.Les
surfacesglissantesouinstables,tellesles
échelles,peuventvousfaireperdrel'équilibreou
lecontrôledel'élagueuse.
Silachaînesecoinceausommetdu
guide-chaîne,celui-cipeutêtrerepoussé
rapidementdansvotredirection.
Chacunedecesréactionspeutvousfaire
perdrelecontrôledelatronçonneuseet
causerdegravesblessures.Nevousez
pasexclusivementauxdispositifsdesécurité
intégrésàlatronçonneuse.L'utilisateurde
l'élagueusesurperchedoitprendreunesériede
mesurespouréviterlesaccidentsoublessures
lorsdelacoupe.
6

Lerebondestcauséparunemauvaise
utilisationdel'outilet/oudesméthodesou
desconditionsd'utilisationincorrectes;ce
phénomènepeutêtreévitéenprenantles
précautionsappropriéesindiquéesci-après:
18.Tenezfermementlespoignéesdel'élagueuse
enlesentourantaveclepouceetlesdoigts
desdeuxmains,etpositionnezlecorpset
lesbrasdemanièreàpouvoirrésisteraux
forcesderebond.Lesforcesderebondpeuvent
êtrecontrôléesparl'utilisateurs'iladopteles
précautionsvoulues.Nelâchezpasl'élagueuse.
19.Avantdedégagerdesobstructions,de
rangeroudefairel'entretiendel'élagueuse
surperche,assurez-vousquel'interrupteur
d'alimentationestàlapositionarrêtetque
labatterieestretirée.Lamiseenmarche
inopinéedelamachinependantledégagement
d'uneobstructionoul'entretienpeutentraîner
desblessuresgraves.
20.Utilisezuniquementlesguidesetles
chaînesderechangespéciésparle
fabricant.L'utilisationdeguidesetdechaînes
derechangeincorrectspeutcauserlarupturede
lachaîneet/oufairerebondirlatronçonneuse.
21.Suivezlesinstructionsdufabricant
concernantl'affûtageetl'entretiendela
chaînedelatronçonneuse.Lefaitderéduire
lahauteurdelajaugedeprofondeurpeut
accroîtrelephénomènederebond.
CONSERVEZCES
INSTRUCTIONS
7

Autocollantsdesécuritéetd'instruction
Desautocollantsdesécuritéetdesinstructionsbienvisiblesparl'opérateursontplacésprès
detouslesendroitspotentiellementdangereux.Remplaceztoutautocollantendommagé
oumanquant.
139-5348
1.Mettreaurebutenrespectantl'environnement.
decal139-5348
139-5345
1.Attention–lisezleManueldel'utilisateur;portezdes
protège-oreilles;portezdeslunettesdeprotection;
portezuncasque,desgantsetdeschaussuressolides
àsemelleantidérapante;n'exposezpasl'appareilàla
pluie;Prudence–Risquedecoupure/mutilationdes
mains;risquedecoincement–nevousapprochezpasdes
piècesmobiles;teneztoutlemondeàdistancependant
l'utilisationdel'appareil;Risquedechocélectrique–ne
vousapprochezpasdeslignesélectriques.
decal139-5345
8

Miseenservice
Installationduguide-chaîneetdelachaîne
DANGER
Toutcontactaveclesdentsdel'élagueusesurperchepeutcauserdegravesblessures.
•Retirezlabatterieavanttoutréglageouentretiendel'élagueusesurperche.
•Porteztoujoursdesgantspourrégleroufairel'entretiendel'élagueusesurperche.
1.Placezl'élagueusesurperchesurunesurfaceplaneethorizontale,etn'installezpaslabatterie.
2.Pourretirerlecouverclelatéral,tournezleboutonducouvercleduguide-chaînedanslesensantihoraire
jusqu'àcequ'ilsoitpossiblederetirerlebouton,puisretirezlecouverclelatéral(Figure3).
Figure3
1.Boutonducouverclelatéraldu
guide-chaîne
2.Couverclelatéral6.Guide-chaîne10.Goujonderéglagedelachaîne
3.Chaîne
4.Fentedugoujonderéglagedela
chaîne
3.Placezlachaîneautourdupignonàl'extrémitéavantduguide,endirigeantversl'avantlebordcoupant
desdentsausommetduguide,commemontrésurleschémagurantsouslecouverclelatéralde
l'élagueusesurperche.
4.Continuezd'engagerlachaîneautourduguideenalignantlachaînedanslagorgeduguide.
5.Placezlaboucleouvertedelachaîne(lecôtéquin'estpassurleguide)autourdupignond'entraînement
del'élagueuse(Figure3).
5.Fenteduguide-chaîne
7.Pignond'entraînement
8.Goujonduguide-chaîne
9.Sortied'huile
Important:Vériezquelegoujonderéglagedelachaîneestbieninsérédanslafente
correspondantesurleguide-chaîne(Figure3).
Vousdevrezéventuellementtournerlavisderéglagedetensiondelachaînepourpouvoirpasser
legoujondanslafenteduguide(Figure18).
6.Reposezlecouverclelatéralduguide-chaîneetsonbouton,puistournezleboutondanslesenshoraire
pourserrerlégèrementlecouverclelatéral.
g374226
7.Réglezlatensiondelachaîne;voirRéglagedelatensiondelachaîne(page18).
9

Assemblagedel'élagueusesurperche
1.Dépliezlessectionsdelaperche(Figure4).
Figure4
1.Sectioncôtépoignéedelaperche3.Sectioncôtéélagueusedelaperche
2.Sectioncentraledelaperche
2.Alignezleboutondeverrouillagedelasectioncentraledelaperchesurletrouàl'extrémitédelasection
côtépoignée,etemboîtezles2sectionsensemble(Figure5).
Remarque:Leboutondeverrouillages'enclenchedansletrouquandlesdeuxsectionssont
correctementemboîtées.
3.Utilisezlacléfourniepourxerles2sectionsdelapercheensemble(EdeFigure5).
4.Répétezcetteprocédurepourrelierlasectioncôtéélagueuseàlasectioncentraledelaperche(Figure5).
g374227
10

Figure5
Ajoutd'huilepourguide-chaîneetchaînedans
l'élagueuse
Important:Utilisezuniquementdel'huilepourguide-chaîneetchaîne(vendueséparément).
Remplissezl'élagueused'huilepourguide-chaîneetchaîneavantlapremièreutilisation;voirContrôledu
niveaud'huileetappointd'huilepourguide-chaîneetchaîne(page17).
11
g374228

Installationdelasangle
Accrochezlecrochetenmétaldelasangleaucollier
surlasectioncôtépoignéedelaperche(Figure6).
Figure6
Vued'ensembledu
produit
g374229
1.Dispositifderéglagede
sangle
2.Crochetenmétal4.Sangle
3.Collierdesangle
Lalongueurdelasangleestréglable;faitescoulisser
ledispositifderéglageverslehautpourraccourcirla
sangleouverslebaspourl'allonger(Figure6).
Encasd'urgence,sivousdevezretirerrapidementla
sangle,détachezlaboucleàxationrapidecomme
suit:
1.Appuyezdechaquecôtédelaboucle(Ade
Figure7).
2.Labouclesedétachetouteseule(BdeFigure
7).
Figure8
1.Verroudubouton6.Boutonducouvercle
2.Verroudegâchette
3.Poignéeavant
4.Bouchonderemplissage
d'huile
5.Gâchette
7.Étuiduguide-chaîne
8.Guidedecoupe
9.Guide-chaîneetchaîne
g374230
latéralduguide-chaîne
Figure7
g340477
12

Caractéristiques
techniques
Modèle
Longueurduguide(avec
88619et88621)
Jaugedechaîne(avec
88619et88621)
Pasdechaîne(avec88619
et88621)
Longueurdechaîne(avec
88619et88621)
Tensionnominale60Vc.c.maximum,54Vc.c.
Poids(sansbatterie)
Typedechargeur81801,81101,81802ou
Typedebatterie81820,81825,81850,81860
51847T
25,4cm
0,127cm
0,635cm
58maillons
utilisationnominale
4,1kg
81805
ou81875*
*Sivousutilisezcettemachineaveclabatterie
modèle81850,81860ou81875,vousdevezinstaller
lasangleàxationrapideincluse.
Plagesdetempératuresadéquates
Charger/rangerlabatterie
entre
Utiliserlabatterieentre
Utiliserl'outilentre
5°Cet40°C*
-30°Cet49°C*
0°Cet49°C*
*Letempsdechargeserapluslongendehorsde
cetteplagedetempérature.
Rangezl'outil,labatterieetlechargeurdansunlieu
fermé,propreetsec.
13

Utilisation
Avantd'utiliserl'élagueuse
surperche
Avantd'utiliserl'élagueusesurperche,effectuezla
procéduresuivante:
•Contrôlezlatensiondelachaîne;voirRéglagede
latensiondelachaîne(page18).
•Nettoyezlescomposantsdel'élagueuse,vériez
qu'ilsnesontpasexcessivementusésou
endommagés,etremplacez-lesaubesoin;voir
Entretienduguide-chaîne,delachaîneetdu
pignond'entraînement(page20).
•Vériezsilachaîneestémousséeou
endommagée,etaiguisezouremplacez-laau
besoin;voirAffûtagedelachaîne(page21).
•Contrôlezleniveaud'huile;voirContrôledu
niveaud'huileetappointd'huilepourguide-chaîne
etchaîne(page17).
•Vériezl'état,l'aspectgénéraletlefonctionnement
del'élagueuse;assurez-vousquelescommandes
bougentlibrement,queleséventsetlespoignées
sontpropres,etqueleguide-chaînen'estpas
fausséouendommagé.
2.Placezl'élagueusesurunesurfaceplane.
3.Alignezlecreuxdelabatteriesurlalanguette
ducorpsdumanche(Figure10).
g374232
Figure10
4.Insérezlabatteriedanslapoignéejusqu'àce
qu'elles'enclencheenplace.
5.Retirezl'étuiduguide-chaîne.
6.Appuyezsurleverroudelagâchette,puissurla
gâchettepourdémarrerl'élagueuse.
Arrêtdel'élagueusesur
Démarragedel'élagueuse
surperche
1.Assurez-vousqueleséventsdel'élagueusesont
exemptsdepoussièreetdedébris(Figure9).
perche
Pourarrêterl'élagueuse,relâchezlagâchette.
Retireztoujourslabatteriequandvousn'utilisezpas
l'élagueuseoupourlatransporterdansouhorsdela
zonedetravail;voirRetraitdelabatterie(page16)
g374231
Figure9
1.Évents
14

Couperavecl'élagueuse
surperche
ATTENTION
L'élagueusesurperchepeutcauserdes
blessuresgraves,voiremortellessivousne
l'utilisezpascorrectement.
Lisezattentivementetrespecteztoutesles
instructionsd'utilisationpouréviterdevous
blesser.
1.Zonederebond(nez,haut
duguide-chaîne)
g318677
Figure11
2.Nez
ATTENTION
N'utilisezpasl'élagueusesurpercheprès
delignesélectriques;ellen'estpasconçue
pouroffriruneprotectioncontreleschocs
électriquesencasdecontactavecdeslignes
électriquesaériennes.
Consultezlaréglementationlocaleconcernant
lesdistancesdesécuritéparrapportaux
lignesélectriquesaériennes,etassurez-vous
quelapositiond'utilisationestsûreet
sécuriséeavantd'utiliserl'élagueusesur
perche.
ATTENTION
Lerebondpeutvousblessergravementou
mortellement.
Évitezdetoucherlapiècedeboisque
vousvoulezcouperavecl'extrémitédu
guide-chaîne.
1.T enezfermementl'élagueusedes2mains.
2.T enezvoussurunesurfacestableetdeniveau,
devantl'arbrequevousvoulezélaguer,et
calez-vousbiensurlespiedsdemanièreàne
pasperdrel'équilibrependantquevouscoupez.
3.Assurez-vousdenecouperquelapiècedebois
prévue;lachaînenedoitpastoucherlesol,
d'autresbillesoutoutautreobjetpendantque
voussciez.
4.Vériezquelachaînetourneàlavitesse
maximaleavantdecommenceràcouper.
5.Coupezlabrancheversl'arrièreduguide-chaîne,
prèsduguidedecoupe;appuyezlachaîne
légèrementcontrelapiècedeboisetlaissezagir
lepoidsdel'élagueusepourcouper(Figure12).
Important:Silachaînesecoincedans
l'entaille,n'essayezpasdeladégager
enfaisanttournerlemoteur.Arrêtez
l'élagueuse,retirezlabatterieetsoulevez
labranchetoutenmaintenantl'élagueuse;
celadevraitpermettred'ouvrirl'entailleetde
libérerlachaîne.
Ilexiste2typesderebond:
•Undéplacementrapideverslehautde
l'élagueuse,quiseproduitquandl'extrémitéou
lehautduguide-chaîneentreencontactavecun
objet.
•Undéplacementrapideversl'arrièrede
l'élagueuse,quiseproduitquandl'extrémitéou
lehautduguide-chaîneestpincéparl'objetque
vouscoupez.
LaFigure11montrelapartieduguide-chaînequine
doitpasentreravecuncontactavecunobjetpour
éviterunrebond.
g374233
Figure12
1.Guidedecoupe
6.Maintenezunepressionrégulièresur
l'élagueuse,etcoupezenlignedroiteenne
relâchantlapressionqueverslandelacoupe.
15

7.Relâchezlagâchettedèsquelacoupeest
terminée.
Élagaged'unarbre
ATTENTION
L'élagagedesbrancheshautesd'unarbre
peutvousplacerdansunepositioninstable
etpotentiellementdangereusependantle
maniementd'uneélagueusesurperche,ce
quipeutentraînerdesblessuresgravesou
mortellespourvousmêmeoutoutepersonne
àproximité.
Lorsquevousélaguezunarbredebout,
utilisezlespratiquessuivantes:
•Negrimpezpassurlesbranchesentenant
uneélagueusesurperche.
•Nevouspenchezpastropenavantet
coupezentenantl'élagueuseàdeuxmains.
•Veillezàéloignertouteslespersonnesde
lazonedechutedesbranches.
1.T enezfermementl'élagueusecommedécrità
lasectionCouperavecl'élagueusesurperche
(page15).
2.Pourscierlespetitesbranches,exercezune
légèrepressiondessus.
3.Pourlesbranchesdeplusgrosdiamètre,
pratiquezuneentaillepeuprofondepuis
terminezlacoupeparledessusdelabranche.
A.Coupezparledessousdelabrancheà
15cmenvirondutronc.Coupezuntiersde
l'épaisseurdelabranche.
Figure13
1.Premièreincisionsousla
branche
2.Deuxièmecoupecomplète
3.Coupenalede
suppressionduchicot
4.Collet(pointdetransition
entreletroncetla
branche)
Retraitdelabatterie
1.Placezl'élagueusesurperchesurunesurface
plane.
2.Appuyezsurleboutondeverrouillageetretirez
labatteriedelapoignée.
g316577
B.Coupezde5à10cmplusloinetsurle
dessusdelabranche.Sciezlabranche
jusqu'àcequ'elletombe.
C.Coupezlechicotauniveauducolletdela
branche(Figure13).
Important:Necoupezpaslabranche
au-delàducollet,aurasdutronc,oune
laissezpasunchicottropimportant;
celaendommagel'arbre.
g374234
Figure14
1.Boutondeverrouillage
16

Entretien
Programmed'entretienrecommandé
Périodicitéd'entretienProcédured'entretien
Àchaqueutilisationou
unefoisparjour
•Contrôlezleniveaud'huileetfaitesl'appointavecdel'huilepourguide-chaîneet
chaîneaubesoin.
•Vériezquel'huilearrivejusqu'àlachaîne.
•Contrôlezlatensiondelachaîneetajustez-laaubesoin.
•Vériezqueleguideestdroitetenbonétat.
•Contrôlezletranchantdesdentsdelachaîne;demandezàun
concessionnaire-réparateuragrééd'affûterouderemplacerlachaîne.
Aprèschaquecyclede
déchargedelabatterie
Unefoisparanouavant
leremisage
•Contrôlezleniveaud'huileetfaitesl'appointavecdel'huilepourguide-chaîneet
chaîneaubesoin.
•Contrôlezlatensiondelachaîneetajustez-laaubesoin.
•Faitesl'entretienduguide-chaîne,delachaîneetdupignond'entraînement.
•Contrôlezletranchantdesdentsdelachaîne;demandezàun
concessionnaire-réparateuragrééd'affûterouderemplacerlachaîne.
Contrôleduniveaud'huile
etappointd'huilepour
guide-chaîneetchaîne
Périodicitédesentretiens:Àchaqueutilisationou
unefoisparjour
Aprèschaquecyclededéchargedelabatterie
Important:Utilisezuniquementdel'huilepour
guide-chaîneetchaîne(vendueséparément).
1.Arrêtezl'élagueuseetretirezlabatterie;voir
Retraitdelabatterie(page16).
2.Contrôlezleniveaud'huileparleregard.Si
l'huilenerecouvrepasleregard,faitesl'appoint
d'huilepourguide-chaîneetchaîneselonles
besoins(Figure15).
Remarque:Veillezànepasfairetomberde
débris/copeauxdeboisdansleréservoird'huile.
5.Retirezlebouchonetversezdel'huilepour
guide-chaîneetchaînedansl'élagueusesur
perchejusqu'àcequeleréservoirsoitplein
(Figure15).
Important:Leniveaud'huilenedoitpas
dépasserlabasedugoulotderemplissage.
6.Nettoyezlescouléesd'huileéventuelleset
revissezsolidementlebouchonenplace.
7.Vériezquel'huilearrivejusqu'àlachaîne;voir
Contrôledudébitd'huilepourguideetchaîne
(page18).
Figure15
1.Regarddeniveau2.Bouchonderemplissage
d'huile
3.Placezl'élagueusesurunesurfaceplane,avec
lebouchonderemplissaged'huileenhaut.
4.Nettoyezlasurfaceautourdubouchonde
remplissaged'huile(Figure15).
g374235
17

Contrôledudébitd'huile
Réglagedelatensiondela
pourguideetchaîne
Périodicitédesentretiens:Àchaqueutilisationou
unefoisparjour
1.Préparez-vousàutiliserl'élagueusesurperche;
voirAvantd'utiliserl'élagueusesurperche(page
14).
2.Pourvérierquel'huilearrivejusqu'àlachaîne,
dirigezl'extrémitédel'élagueuseàquelques
centimètresau-dessusd'unesurface(papier,
carton,souche,etc.)etdémarrezl'élagueuse;
unpeud'huiledevraitêtrepulvérisésurla
surface(Figure16).
Figure16
1.Fairefonctionner
l'élagueuseàquelques
centimètresd'unesurface.
3.Sil'huilenecirculepas,vériezqueleréservoir
n'estpasvideetquelazonesouslecouvercle
latéralestpropre;voirContrôleduniveaud'huile
etappointd'huilepourguide-chaîneetchaîne
(page17)etEntretienduguide-chaîne,dela
chaîneetdupignond'entraînement(page20).
2.Sil'huilecircule
correctement,elleest
pulvériséeets'accumule
surlasurface.
chaîne
Périodicitédesentretiens:Àchaqueutilisationou
unefoisparjour
Aprèschaquecyclededéchargedelabatterie
Vériezquelachaîneesttenduecorrectement.
Unechaînedétendueréduitlavieutiledupignon
d'entraînementetduguide-chaîne,etrisquedese
rompre.
Unechaînetroptenduesurchauffeetfaitsurchauffer
leguide,cequicauseuneusurerapideetpeutfaire
grillerlemoteuroucasserlachaîne.
Latensiondelachaîneestcorrectequandvous
pouvezlafairetournersansforcerautourdu
guide-chaîneàl'aidedevotremaingantée.La
chaînedoitresterencontactaveclebordinférieur
duguide-chaîne.
Vériezaussilatensiond'unechaîneneuveaprès
lespremièrescoupes;unechaîneneuveatendance
às'étireretdoitdoncêtreajustéeaprèsquelques
coupes.
g374236
DANGER
Toutcontactaveclesdentsdel'élagueusesur
perchepeutcauserdegravesblessures.
•Retirezlabatterieavanttoutréglageou
entretiendel'élagueusesurperche.
•Porteztoujoursdesgantspourréglerou
fairel'entretiendel'élagueusesurperche.
18

1.Placezl'élagueusesurunesurfaceplaneet
horizontale,etretirezlabatterie;voirRetraitde
labatterie(page16).
2.Laissezrefroidirlachaînedelatronçonneuse.
Important:Netendezpaslachaînequand
elleestchaude,carellepeutsecontracteren
refroidissantetdeviendraalorstroptendue.
3.Vériezsileguide-chaîneestfausséou
endommagé,etremplacez-lesinécessaire.
4.Dévissezleboutonducouverclelatéraldu
guide-chaînepourdesserrerlecouvercle,mais
laissez-leenplace(Figure17).
g374238
Figure18
1.Visderéglagedetensiondelachaîne
Réglezlatensionjusqu'àcequelachaîne
touchelebordinférieurduguide,puisécartez
lachaînedubordinférieur;silachaîneest
correctementréglée,vousnepourrezl'écarter
duguidequede3,2à6,4mm,etellereviendra
enplacequandvouslarelâcherez.
Figure17
1.Boutonducouverclelatéralduguide-chaîne
5.Ajustezlatensiondelachaîneàl'aidedela
visderéglagedetension(Figure18),puis
xezlecouverclelatéralduguide-chaînesur
l'élagueuseentournantleboutonducouvercle
danslesenshoraire;vériezensuitelatension
(Figure17).
•Pourtendrelachaîne,tournezlavisde
réglagedetensiondanslesenshoraire.
•Pourdétendrelachaîne,tournezlavisde
réglagedetensiondanslesensantihoraire.
Remarque:Quandvousréglezlatensionde
g374237
lachaîne,soulevezl'extrémitéduguide-chaîne
d'unemain(gantée)etvériezquele
guide-chaînenes'affaissepasetn'affectepas
latensiondelachaîne.
6.Enlezungantpourtirerlachaîneautourdu
guide.Unechaînecorrectementtenduedoit
tournerfacilementetresterencontactavecle
bordinférieurduguide.
7.Silachaînen'estpascorrectementtendue,
répétezlesopérations4à7.
19

Entretienduguide-chaîne,
delachaîneetdupignon
d'entraînement
Unefoisparanouavantleremisage
DANGER
Toutcontactaveclesdentsdel'élagueusesur
perchepeutcauserdegravesblessures.
•Retirezlabatterieavanttoutréglageou
entretiendel'élagueusesurperche.
•Porteztoujoursdesgantspourréglerou
fairel'entretiendel'élagueusesurperche.
1.Placezl'élagueusesurunesurfaceplaneet
horizontale,etretirezlabatterie;voirRetraitde
labatterie(page16).
2.Pourretirerlecouverclelatéral,tournezle
boutonducouvercleduguide-chaînedansle
sensantihorairejusqu'àcequ'ilsoitpossiblede
retirerlebouton,puisretirezlecouverclelatéral
(Figure19).
6.Examinezlepignond'entraînementet
remplacez-les'ilestexcessivementusé
ouendommagé;adressez-vousàvotre
concessionnaire-réparateuragréé.
7.Contrôlezlasortied'huile(Figure19)etenlevez
lesdébriséventuellementprésents.
8.Nettoyezleguide-chaîneetlachaîne;utilisez
duldeferouunpetittournevisàlameplate
pourenleverlasaletéetlesdébrisaccumulés
danslarainure,lelongdubordduguide-chaîne,
encommençantparlepignonavanteten
continuantversl'arrière.
Vériezlapropretédupassaged'huileduguide,
quialignésurlasortied'huile,anquel'huile
puisses'écoulerlibrementverslachaîne(Figure
20).
g315856
Figure20
Sectionsinternesduguide-chaînemontrées
Figure19
1.Boutonducouvercle
latéralduguide-chaîne
2.Couverclelatéral
3.Chaîne8.Goujonduguide-chaîne
4.Fentedugoujonde
réglagedelachaîne
5.Fenteduguide-chaîne
6.Guide-chaîne
7.Pignond'entraînement
9.Sortied'huile
10.Goujonderéglagedela
chaîne
1.Vérierlapropretédece
passagereliéàlasortie
d'huile
2.Vérierquelepignondu
guideestpropreettourne
librement
9.Examinezleguideetlachaîne;sileguide
estfaussé,lesgorgessontendommagées
oulepignonavantnetournepaslibrement,
remplacezleguide;remplacezlachaînesielle
estexcessivementuséeouendommagée.
10.Installezleguideetlachaîne;voirInstallation
duguideetdelachaîne(page21).
11.Vériezquel'huilearrivejusqu'àlachaîne;voir
Contrôledudébitd'huilepourguideetchaîne
g374226
(page18).
3.Détendezlachaîneentournantlavisdetension
danslesensantihoraire(Figure18).
4.Séparezlachaîneduguide-chaîneetmettez-les
decôté.
5.Enlevezlesdébrissouslecouverclelatéral.
20

Installationduguideetde
Affûtagedelachaîne
lachaîne
DANGER
Toutcontactaveclesdentsdel'élagueusesur
perchepeutcauserdegravesblessures.
•Retirezlabatterieavanttoutréglageou
entretiendel'élagueusesurperche.
•Porteztoujoursdesgantspourréglerou
fairel'entretiendel'élagueusesurperche.
1.Silecouverclelatéralestinstallé,déposez-le;
voirEntretienduguide-chaîne,delachaîneet
dupignond'entraînement(page20).
2.Placezlachaîneautourdupignonàl'extrémité
avantduguide,endirigeantversl'avantle
bordcoupantdesdentsausommetduguide,
commemontrésurleschémagurantsousle
couverclelatéraldel'élagueuse.
3.Continuezd'engagerlachaîneautourduguide
enalignantlachainedanslagorgeduguide.
Unefoisparanouavantleremisage
Unechaînebienaffûtéeproduitunecoupede
meilleurequalitéetprolongelaviedelabatterie.
Lachaînedoitêtreaffûtéeouremplacées'ilest
nécessairedeforcerpourqu'ellemordedanslebois,
ousielleproduitdelasciureplutôtquedescopeaux.
Demandezàunconcessionnaire-réparateuragréé
d'affûterouderemplacerlachaîne.
Entretien
Sil'élagueusenécessiteunentretien,conez-laàun
concessionnaire-réparateuragréé.
Remarque:Sivousinstallezunechaîne
neuve,retournezleguidepouréviteruneusure
irrégulière.
4.Placezlaboucleouvertedelachaîne(qui
n'estpassurleguide)autourdupignon
d'entraînementdel'élagueuse,puismontezle
guideetlachaînexéeenplacesurl'élagueuse.
Important:Vériezquelegoujonderéglage
delachaîneestbieninsérédanslafente
correspondantesurleguide-chaîne(Figure
19).Ilfaudraéventuellementtournerlavisde
réglagedetensiondelachaînepourpouvoir
passerlegoujondanslafenteduguide.
5.Posezlecouverclelatéral,maisn'enserrezpas
complètementlebouton.
6.Réglezlatensiondelachaîne;voirRéglagede
latensiondelachaîne(page18).
21

Remisage
Important:Remisezlamachine,labatterieet
lechargeuruniquementàdestempératures
comprisesdanslaplageadéquate;voir
Caractéristiquestechniques(page13).
Important:Sivousremisezlabatterieàlan
delasaison,chargez-lajusqu'àceque2ou3de
sesdiodesdeviennentvertes.Neremisezpas
unebatterieàpleinechargeoucomplètement
déchargée.Avantderemettrelamachineen
service,chargezlabatteriejusqu'àcequele
voyantgaucheduchargeurdeviennevert,ouque
les4diodesdelabatteriedeviennentvertes.
•Débranchezlamachinedel'alimentation
(autrementdit,retirezlabatterie)etrecherchez
toutdommageéventuelaprèsutilisation.
•Débarrassezlamachinedetoutcorpsétranger.
•Nerangezpaslamachineenlaissantlabatterie
dessus.
•Rangezlamachine,labatterieetlechargeurdans
unendroitbienaéré,horsdelaportéedesenfants.
•N'approchezpaslamachine,labatterieetle
chargeurdesagentscorrosifs,telslesproduits
chimiquesdejardinageetlesselsdedégivrage.
•Pourréduirelesrisquesdeblessuresgraves,ne
rangezpaslabatterieàl'extérieuroudansun
véhicule.
•Rangezlamachine,labatterieetlechargeurdans
unlieufermé,propreetsec.
22

Dépistagedesdéfauts
N'effectuezquelesopérationsdécritesdanscesinstructions.T outautretravaild'inspection,d'entretienou
deréparationdoitêtreréaliséparuncentred'entretienagrééouautrespécialistequaliésivousn'arrivez
pasàrésoudreleproblèmevous-même.
ProblèmeCausepossible
L'élagueusesurperchenefonctionnepas
ououfonctionneparintermittence.
L'élagueusefonctionne,maislachaînene
tournepas.
L'élagueusenecoupepascorrectement.
Mesurecorrective
1.Lachargedelabatterieestfaible.
2.Labatterien'estpascomplètement
insérée.
3.Latempératuredelabatterieest
supérieureouinférieureàlaplagede
températureappropriée.
4.Labatterieadépasséleslimites
supérieuresd'intensité.
5.Ilyadel'humiditésurleslsdela
batterie.
6.Desdébrissontaggloméréssousle
couvercle.
1.Lachaînen'estpasengagée
correctementsurlepignon
d'entraînement.
2.Desdébrissontaggloméréssousle
couvercle.
1.Lachaînen'estpastendue
correctement.
2.Lachaîneestémousséeou
endommagée.
3.Leguide-chaîneestfausséoules
gorgessontendommagées.
4.Lachaîneestmontéeàl'envers.4.Remontezlachaînedanslebonsens.
5.Lachaînen'estpaslubriée
correctement.
1.Rechargezlabatterie.
2.Insérezlabatterietoutaufonddeson
logement.
3.Placezlabatteriedansunendroitsec,
oùlatempératureestcompriseentre
5et40°C.
4.Relâchezlagâchette,puisappuyezà
nouveaudessus.
5.Laissezsécherlabatterieou
essuyez-la.
6.Enlevezlecouvercleetnettoyezles
débris.
1.Réinstallezlachaîneenprenantsoin
debienengagerlesmaillonssurle
pignond'entraînement.
2.Enlevezlecouvercleetnettoyezles
débris.
1.Corrigezlatensiondelachaîne.
2.Remplacezlachaîne.
3.Remplacezleguide-chaîne.
5.Contrôlezleniveaud'huileetvériez
quel'huilearrivejusqu'àlachaîne.
L'huilenelubriepaslachaîne
correctement.
1.Leniveaud'huileesttropbas.
2.Lasortied'huileestbouchée.2.Débouchezlasortied'huile.
3.Desdébrissontaggloméréssousle
couvercle.
4.Lepassaged'huileoulagorgedu
guide-chaîneestbouché(e).
1.Contrôlezleniveaud'huile.
3.Enlevezlecouvercleetnettoyezles
débris.
4.Nettoyezleguide-chaîne.
23

DéclarationdecondentialitéEEE/R-U
UtilisationdevosdonnéespersonnellesparToro
LasociétéTheToroCompany(«Toro»)respectevotrevieprivée.Lorsquevousacheteznosproduits,nouspouvonsrecueillircertainesdonnées
personnellesvousconcernant,soitdirectementsoitparl'intermédiairedevotresociétéouconcessionnaireTorolocal(e).T oroutilisecesdonnéespour
s'acquitterd'obligationscontractuelles,parexemplepourenregistrervotregarantie,traiteruneréclamationautitredelagarantieouvouscontacterdans
l'éventualitéd'unrappeldeproduit,maisaussiàdesnscommercialeslégitimes,parexemplepourmesurerlasatisfactiondesclients,améliorernos
produitsouvoustransmettredesinformationssurlesproduitssusceptiblesdevousintéresser.Toropourrapartagerlesdonnéespersonnellesque
vousluiaurezcommuniquéesavecsesliales,concessionnairesouautrespartenairescommerciauxdanslecadredecesactivités.Nouspourrons
aussiêtreamenésàdivulguerdesdonnéespersonnellessilaloil'exigeoudanslecadredelacession,del'acquisitionoudelafusiond'unesociété.
Nousnevendronsjamaisvosdonnéespersonnellesàaucuneautresociétéauxnsdemarketing.
Conservationdevosdonnéespersonnelles
Toroconserveravosdonnéespersonnellesaussilongtempsquenécessairepourrépondreauxnssusmentionnéesetconformémentauxdispositions
légalesapplicables.Pourplusd'informationsconcernantlesduréesdeconservationapplicables,veuillezcontacterlegal@toro.com.
L'engagementdeT oroenmatièredesécurité
VosdonnéespersonnellespourrontêtretraitéesauxÉtats-Unisoudanstoutautrepaysoùlalégislationconcernantlaprotectiondesdonnéespeutêtre
moinsrigoureusequecelledevotreproprepaysderésidence.Chaquefoisquenoustransféreronsvosdonnéespersonnelleshorsdevotrepays
derésidence,nousprendronstouteslesdispositionslégalesrequisespourmettreenplacetouteslesgarantiesnécessairesvisantàlaprotectionet
autraitementsécurisédevosdonnées.
Droitsd'accèsetderectication
Vouspouvezêtreendroitdecorrigeroudeconsultervosdonnéespersonnelles,ouencoredevousopposeràleurtraitement,oud'enlimiterla
portée.Pourcefaire,veuilleznouscontacterparcourrielàlegal@toro.com.SivousavezlamoindreinquiétudeconcernantlamanièredontT oroa
traitévosdonnéespersonnelles,nousvousencourageonsànousenfairepartdirectement.Veuilleznoterquelesrésidentseuropéensontledroit
deporterplainteauprèsdeleurAutoritédeprotectiondesdonnées.
374-0282RevC

FormNo.3443-550RevB
SegaapalodaFlex-ForcePower
System
Nºdelmodello51847T—Nºdiserie321000001esuperiori
™
60V
Registrateilvostroprodottopressowww.Toro.com.
Traduzionedell'originale(IT)
*3443-550*

Perassistenza,
consultatelapagina
www.Toro.com/support
perlmatidiistruzionio
contattateilvostroCentro
assistenzaautorizzato
primadirestituirequesto
prodotto.
Introduzione
Questasegaapaloèpensataperlapotaturadi
piccoliramietronchinoa15,2cmdidiametro.Ilsuo
usoèconsentitosoltantoagliadulti.Èprogettataper
utilizzarepacchibatteriaT oroFlex-Forceagliionidi
litiomodello81820,81825,81850,81860o81875.
Questipacchibatteriasonoprogettatiperessere
ricaricatisolodacaricabatteriemodelli81801,81101,
81802o81805.L'utilizzodiquestiprodottiperscopi
nonconformiallefunzionipercuisonostaticoncepiti
puòesserepericolosopervoiegliastanti.
Importante:Conilvostrodispositivomobile
potetescansionareilcodiceQR(sepresente)
sullatargacheriportailnumerodiserieper
accedereallagaranzia,airicambieadaltre
informazionisuiprodotti.
g374224
Figura1
1.Posizionedelnumerodimodelloedelnumerodiserie.
Nºdelmodello
Importante:Incasodiutilizzodiquestamacchina
conpacchibatteriamodelli81850,81860o81875,
ènecessariomontarel’imbracaturaasgancio
rapidoinclusaperunadeguatosupportoe
bilanciamento.
Nonutilizzatealtreimbracatureopiùimbracature
durantel’usodellamacchina.
Leggeteattentamentequesteinformazioniper
impararecomeutilizzareemantenereilvostro
prodottoinmodoidoneoedevitarelesionipersonali
edannialprodotto.Sieteresponsabilidell'utilizzo
consonoesicurodelprodotto.
Visitateilsitowww.Toro.compermaggiori
informazioni,compresisuggerimentisullasicurezza,
materialidiformazione,informazionisugliaccessori,
assistenzanellalocalizzazionediunrivenditoreoper
registrareilvostroprodotto.
Perassistenza,ricambioriginaliTorooulteriori
informazioni,rivolgeteviaunDistributoreToro
autorizzatooadunCentroAssistenzaT oroedabbiate
sempreaportatadimanoilnumerodelmodelloedil
numerodiseriedelprodotto.Figura1identicala
posizionedeinumeridimodelloediseriesulprodotto.
Scriveteinumerinellospaziofornito.
Nºdiserie
Questomanualeidenticapotenzialipericolie
presentamessaggidisicurezzaidenticatidalsimbolo
diavvertenza(Figura2),cheindicaunpericolo
chepotrebbeprovocareserielesioniolamorte
qualoranondovesseroessereseguiteleprecauzioni
raccomandate.
sa-black
Figura2
Simbolodiavvertenza
Questomanualeutilizza2parolepermetterein
evidenzaleinformazioni.Importanterichiama
l’attenzionesuinformazionimeccanichespeciali,
eNotaponeinrisaltoinformazionigeneraliche
meritanoun’attenzionespeciale.
©2022—TheToro®Company
8111LyndaleAvenueSouth
Bloomington,MN55420
Contattateciawww.T oro.com.
2
Tuttiidirittisonoriservati
StampatoinCina
 Loading...