

Page 1
FormNo.3383-389RevA
18inTurfSeeder
ModelNo.23511—SerialNo.314000001andUp
ModelNo.33511—SerialNo.314000001andUp
Registeratwww.T oro.com.
OriginalInstructions(EN)
*3383-389*A
Page 2
WARNING
CALIFORNIA
Proposition65Warning
Thisproductcontainsachemicalorchemicals
knowntotheStateofCaliforniatocausecancer,
birthdefects,orreproductiveharm.
Theengineexhaustfromthisproduct
containschemicalsknowntotheStateof
Californiatocausecancer,birthdefects,
orotherreproductiveharm.
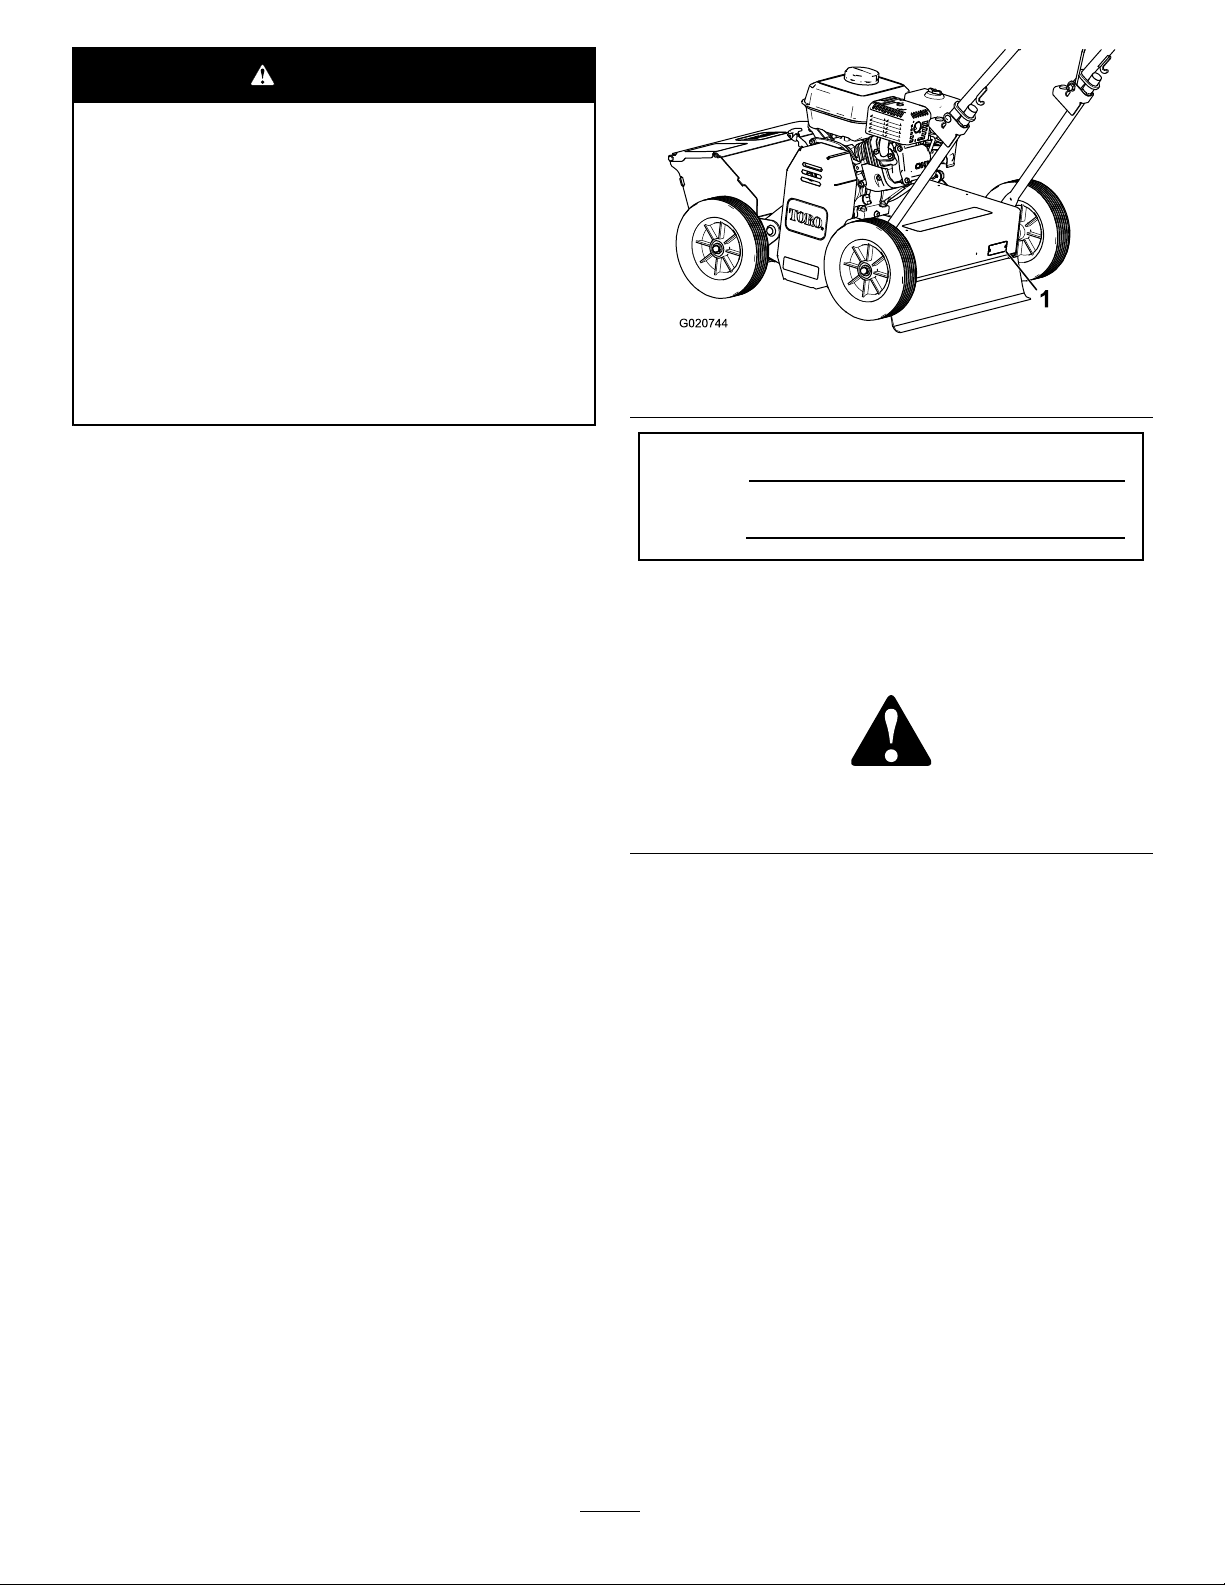
Figure1
1.Locationofthemodelandserialnumbers
ThissparkignitionsystemcomplieswithCanadianICES-002.
Important:Thisengineisnotequippedwithaspark
arrestermufer.ItisaviolationofCaliforniaPublic
ResourceCodeSection4442touseoroperatetheengine
onanyforest-covered,brush-covered,orgrass-covered
land.Otherstatesorfederalareasmayhavesimilarlaws.
Introduction
Thismachineseedsturf.Itisintendedforsmall-to
medium-sizedlawnapplicationsinresidentialandcommercial
properties.
Readthisinformationcarefullytolearnhowtooperateand
maintainyourproductproperlyandtoavoidinjuryand
productdamage.Youareresponsibleforoperatingthe
productproperlyandsafely.
YoumaycontactTorodirectlyatwww .Toro.comforproduct
andaccessoryinformation,helpndingadealer,ortoregister
yourproduct.
ModelNo.
SerialNo.
Thismanualidentiespotentialhazardsandhassafety
messagesidentiedbythesafetyalertsymbol(Figure2),
whichsignalsahazardthatmaycauseseriousinjuryordeath
ifyoudonotfollowtherecommendedprecautions.
Figure2
1.Safetyalertsymbol
Thismanualuses2wordstohighlightinformation.
Importantcallsattentiontospecialmechanicalinformation
andNoteemphasizesgeneralinformationworthyofspecial
attention.
Wheneveryouneedservice,genuineT oroparts,oradditional
information,contactanAuthorizedServiceDealerorToro
CustomerServiceandhavethemodelandserialnumbersof
yourproductready.
Figure1illustratesthelocationofthe
modelandserialnumbersontheproduct.Writethenumbers
inthespaceprovided.
©2014—TheToro®Company
8111LyndaleAvenueSouth
Bloomington,MN55420
Contactusatwww.Toro.com.
2
PrintedintheUSA
AllRightsReserved
Page 3

Contents
Safety
Introduction..................................................................2
Safety...........................................................................3
SafeOperatingPractices...........................................3
SlopeIndicator.......................................................5
SafetyandInstructionalDecals.................................6
Setup............................................................................9
UnfoldingtheHandle..............................................9
CheckingtheEngine-OilLevel..................................9
ProductOverview..........................................................9
Controls...............................................................10
Specications........................................................12
Attachments/Accessories........................................12
Operation....................................................................13
CheckingtheEngine-OilLevel.................................13
CleaningDebrisfromtheMachine............................13
RecommendedFuel................................................13
StartingandStoppingtheEngine..............................14
OperatingtheMachine............................................15
OperatingTips......................................................15
Maintenance.................................................................16
RecommendedMaintenanceSchedule(s)......................16
PremaintenanceProcedures........................................16
DisconnectingtheSpark-PlugWire...........................16
EngineMaintenance..................................................17
ServicingtheAirCleaner.........................................17
ChangingtheEngineOil.........................................17
CleaningtheSedimentCup......................................18
ServicingtheSparkPlug..........................................18
BeltMaintenance......................................................19
CheckingtheBeltTension.......................................19
AdjustingtheBeltTension.......................................20
MaintainingtheCuttingBlades....................................20
InspectingtheCuttingBlades...................................20
ReplacingW ornCuttingBlades................................20
Storage........................................................................22
RemovingtheMachinefromStorage.........................22
Improperuseormaintenancebytheoperatoror
ownercanresultininjury.Toreducethepotential
forinjury,complywiththesesafetyinstructionsand
alwayspayattentiontothesafetyalertsymbol,which
means
instruction.Failuretocomplywiththeinstructionmay
resultinpersonalinjuryordeath.
Caution
,
W ar ning
,or
Danger
—personalsafety
SafeOperatingPractices
Training
•ReadtheOperator’ sManualandothertrainingmaterial.If
theoperator(s)ormechanic(s)cannotreadEnglishitis
theowner’sresponsibilitytoexplainthismaterialtothem.
•Becomefamiliarwiththesafeoperationoftheequipment,
operatorcontrols,andsafetysigns.
•Alloperatorsandmechanicsshouldbetrained.The
ownerisresponsiblefortrainingtheusers.
•Neverletchildrenoruntrainedpeopleoperateorservice
theequipment.Localregulationsmayrestricttheageof
theoperator.
•Theowner/usercanpreventandisresponsiblefor
accidentsorinjuriesoccurringtopeople,ordamageto
property.
Preparation
•Evaluatetheterraintodeterminewhataccessoriesand
attachmentsareneededtoproperlyandsafelyperform
thejob.Useonlyaccessoriesandattachmentsapproved
bythemanufacturer.
•Wearappropriateclothingincludingsafetyglassesand
hearingprotection.Longhair,looseclothing,orjewelry
maygettangledinmovingparts.
•Inspecttheareawheretheequipmentistobeusedand
removeallobjectssuchasrocks,toys,andwire,whichcan
becontactedbythemachine.
•Useextracarewhenhandlinggasolineandotherfuels.
Theyareammableandvaporsareexplosive.
–Useonlyanapprovedcontainer.
–Neverremovethegascaporaddfuelwiththeengine
running.
–Allowtheenginetocoolbeforerefueling.
–Donotsmoke.
–Neverrefuelordrainthemachineindoors.
•Checkthattheoperatorpresencecontrols,safetyswitches,
andshieldsareattachedandfunctioningproperly .Donot
operatethemachineunlessitisfunctioningproperly.
3
Page 4

Operation
•Neverrunanengineinanenclosedarea.
•Onlyoperateingoodlight,keepingawayfromholesand
hiddenhazards.
•Starttheengineonlyfromtheoperator’sposition.
•Neveroperatewithouttheshields,covers,orotherguards
securelyinplace.Besureallinterlocksarefunctioning
properly.
•Watchforditches,holes,rocks,dips,andrisesthatchange
theoperatingangle,asroughterraincouldoverturnthe
machine.
•Alwaysavoidsuddenstartingorstoppingonaslope.
Iftireslosetraction,disengagethecuttingbladesand
proceedslowlyofftheslope.
•Followtherecommendationsforwheelweightsor
counterweightstoimprovestability.
•Donotchangetheenginegovernorsettingoroverspeed
theengine.
•Raisethecuttingblades,stopthemachine,andstopthe
enginebeforeleavingtheoperator’spositionforany
reason.
•Stoptheequipmentandinspectthecuttingbladesafter
strikinganobjectorifanabnormalvibrationoccurs.
Makenecessaryrepairsbeforeresumingoperation.
•Keephandsandfeetawayfromthecuttingbladearea.
•Nevercarrypassengers,andkeeppetsandbystanders
away.
•Bealert,slowdown,andusecautionwhenmakingturns.
Lookbehindandtothesidebeforechangingdirections.
•Slowdownandusecautionwhencrossingroadsand
sidewalks.
•Donotoperatethemachinewhileundertheinuence
ofalcoholordrugs.
•Lightningcancausesevereinjuryordeath.Iflightning
isseenorthunderisheardinthearea,donotoperate
themachine;seekshelter.
•Useextremecarewhenloadingorunloadingthemachine
intoatrailerortruck.
MaintenanceandStorage
•Waitforallmovementtostopbeforeadjusting,cleaning,
orrepairing.Raisethecuttingblades,stopthemachine,
stoptheengine,anddisconnectthespark-plugwire.
•Cleangrassanddebrisfromtheblades,drives,mufers,
andenginetohelppreventres.Cleanupoilorfuelspills.
•Lettheenginecoolbeforestoring,anddonotstorethe
machinenearaame.
•Shutoffthefuelwhilestoringortransportingthemachine
ontrailers.Donotstorefuelnearamesordrainindoors.
•Parkthemachineonlevel,hardground.Neverallow
untrainedpersonneltoserviceit.
•Usejackstandsorsafetylatchestosupportcomponents
whenrequired.
•Carefullyreleasepressurefromcomponentswithstored
energy.
•Removethespark-plugwirebeforemakinganyrepairs.
•Keephandsandfeetawayfrommovingparts.Ifpossible,
donotmakeadjustmentswiththeenginerunning.
•Keepallpartsingoodworkingconditionandallhardware
tightened.Replaceallwornordamageddecals.
•Usecarewhenapproachingblindcorners,shrubs,trees,
orotherobjectsthatmayobscurevision.
•Alwaysbeawareofobstaclesthatmaybeinthearea
ofoperation.Planyourpathtoavoidcontactwithany
obstaclebyyouorthemachine.
SlopeOperation
•Donotoperateneardrop-offs,ditches,steepbanks,or
water.Wheelsdroppingoveredgescancauserollovers,
whichmayresultinseriousinjuryordeath.
•Donotoperateonslopeswhengrassiswet.Slippery
conditionsreducetractionandcouldcauseslidingand
lossofcontrol.
•Donotmakesuddenturnsorrapidspeedchanges.
•Reducespeedanduseextremecautiononslopes.
•Donotoperateonaslopegreaterthan20degrees.
•Removeormarkobstaclessuchasrocks,treelimbs,etc.
fromtheoperatingarea.Tallgrasscanhideobstacles.
•Tobestprotectyourinvestmentandmaintainoptimal
performanceofyourToroequipment,countonToro
genuineparts.Whenitcomestoreliability,Torodelivers
replacementpartsdesignedtotheexactengineering
specicationsofourequipment.Forpeaceofmind,insist
onTorogenuineparts.
4
Page 5
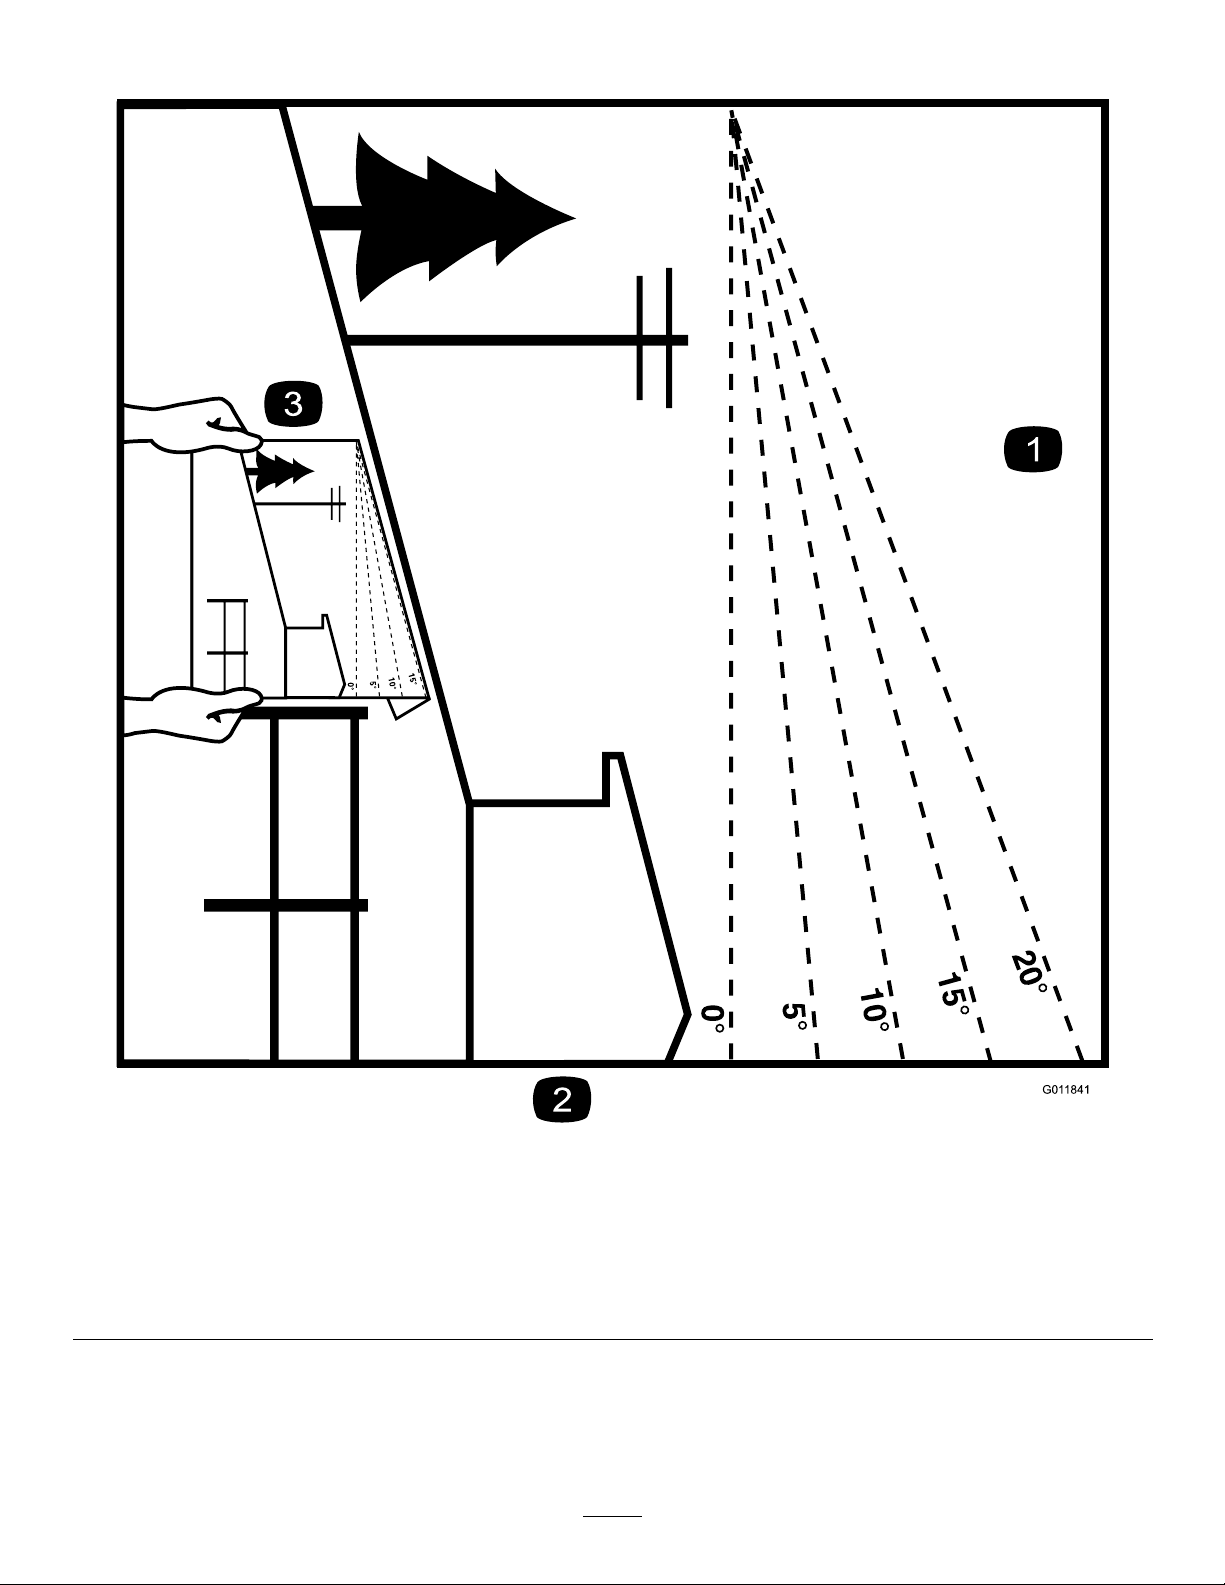
SlopeIndicator
G011841
Figure3
Thispagemaybecopiedforpersonaluse.
1.Themaximumslopeyoucansafelyoperatethemachineonis20degrees.Usetheslopecharttodeterminethedegreeofslope
ofhillsbeforeoperating.Donotoperatethismachineonaslopegreaterthan20degrees.Foldalongtheappropriateline
tomatchtherecommendedslope.
2.Alignthisedgewithaverticalsurface,atree,building,fencepole,etc.
3.Exampleofhowtocompareslopewithfoldededge.
5
Page 6
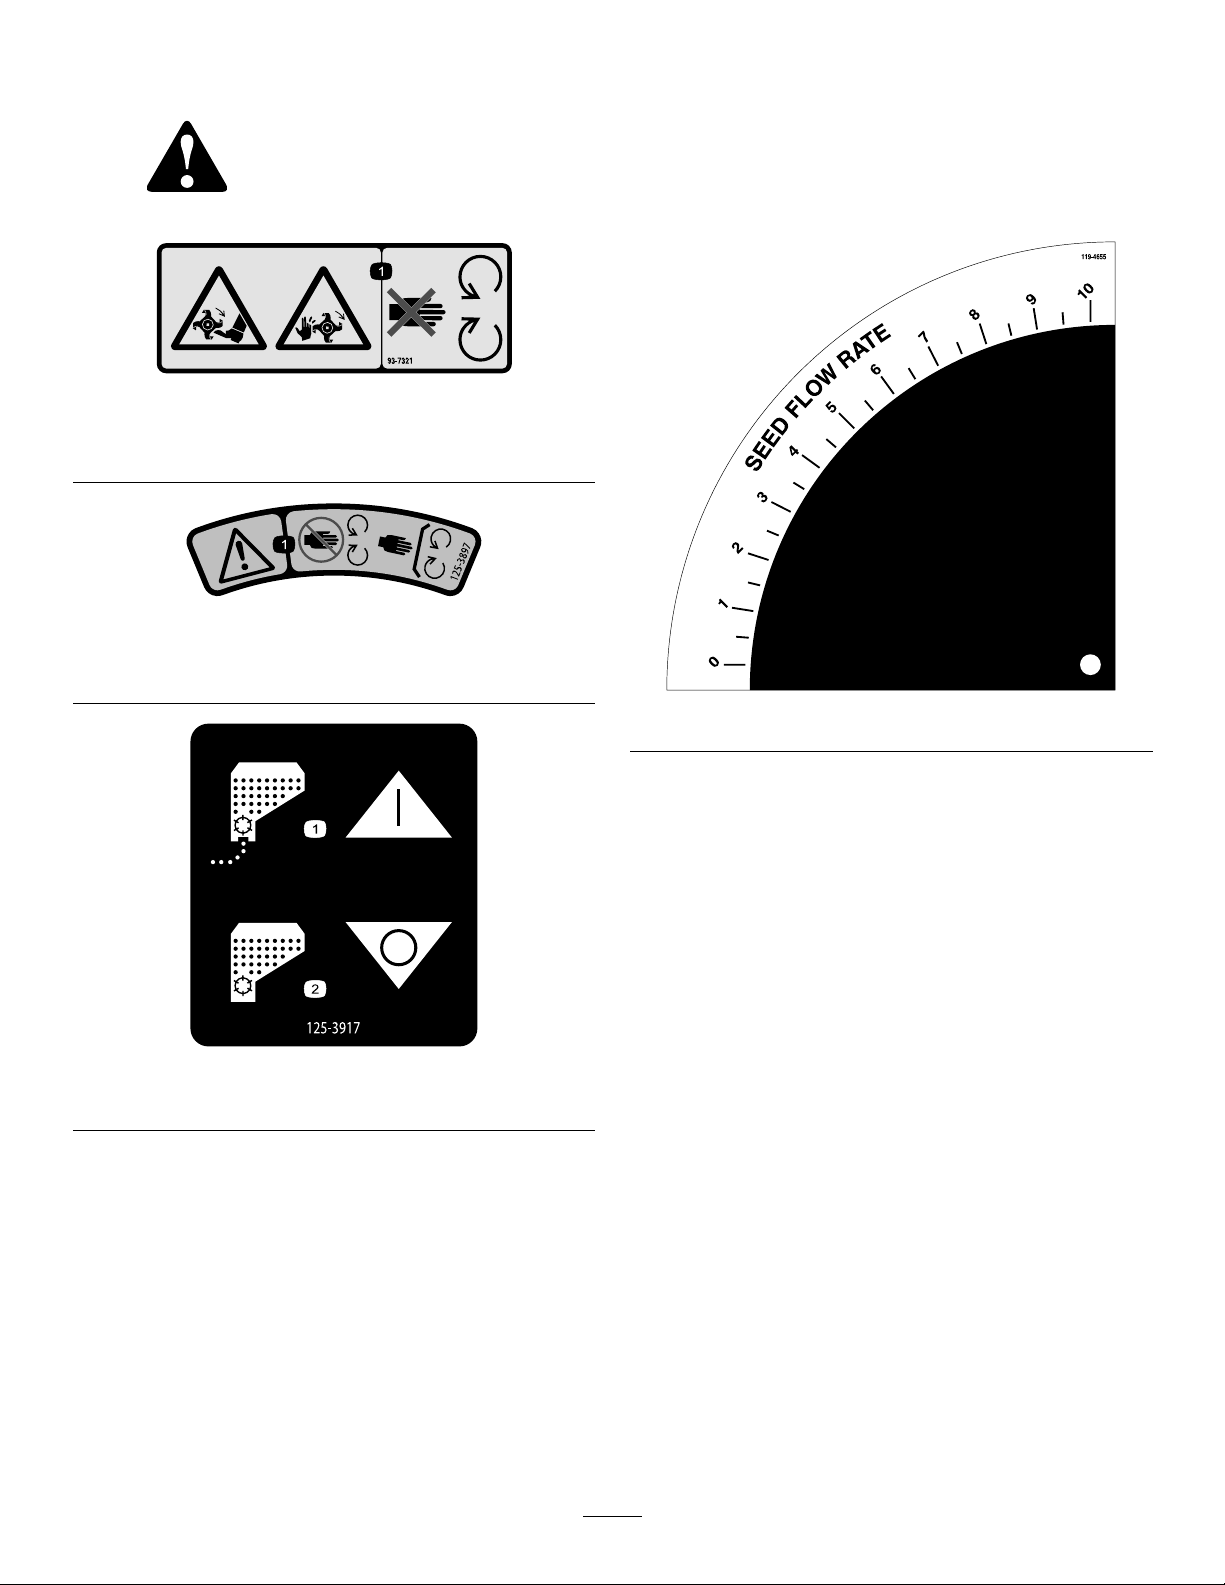
SafetyandInstructionalDecals
Safetydecalsandinstructionsareeasilyvisibletotheoperatorandarelocatednearanyareaof
potentialdanger.Replaceanydecalthatisdamagedorlost.
93–7321
1.Warning—stayawayfrommovingparts;keepallguardsin
place.
125–3897
1.Warning-stayawayfrommovingparts;keepallguardsand
shieldsinplace.
125–3917
1.SeederOn2.SeederOff
119-4655
6
Page 7
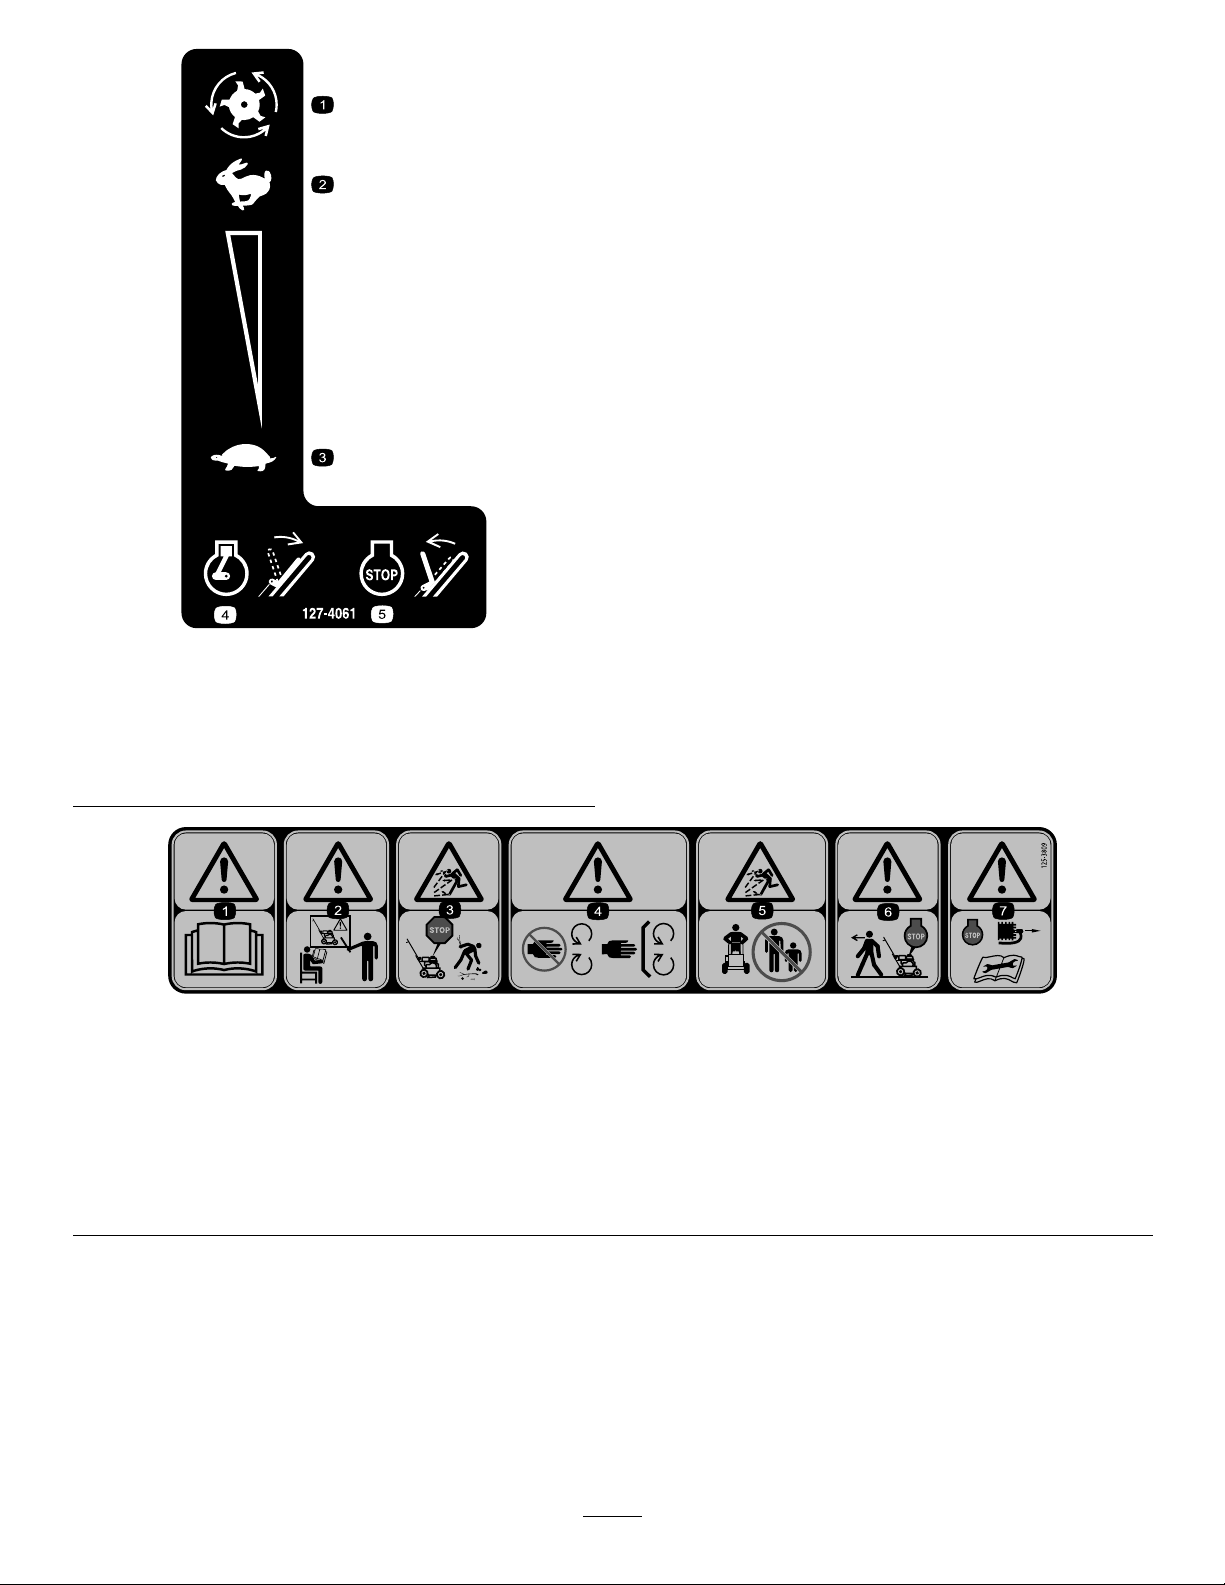
127–4061
1.Cuttingblades
2.Fast5.Releasethehandletostop
3.Slow
4.Holdthehandletostart
theengine.
theengine.
125–3809
1.Warning—readtheOperator’sManual.5.Thrownobjecthazard—keepbystandersawayfromthe
2.Warning—donotoperatethismachineunlessyouaretrained.
3.Thrownobjecthazard—stoptheengineandremoveany
debrisfromyourpath.
4.Warning—stayawayfrommovingparts;keepallguardsin
place.
machine.
6.Warning—stoptheenginebeforewalkingawayfromthe
machine.
7.Warning—stoptheengineanddisconnectthesparkplugwire
beforeperformingmaintenanceonthemachine.
7
Page 8
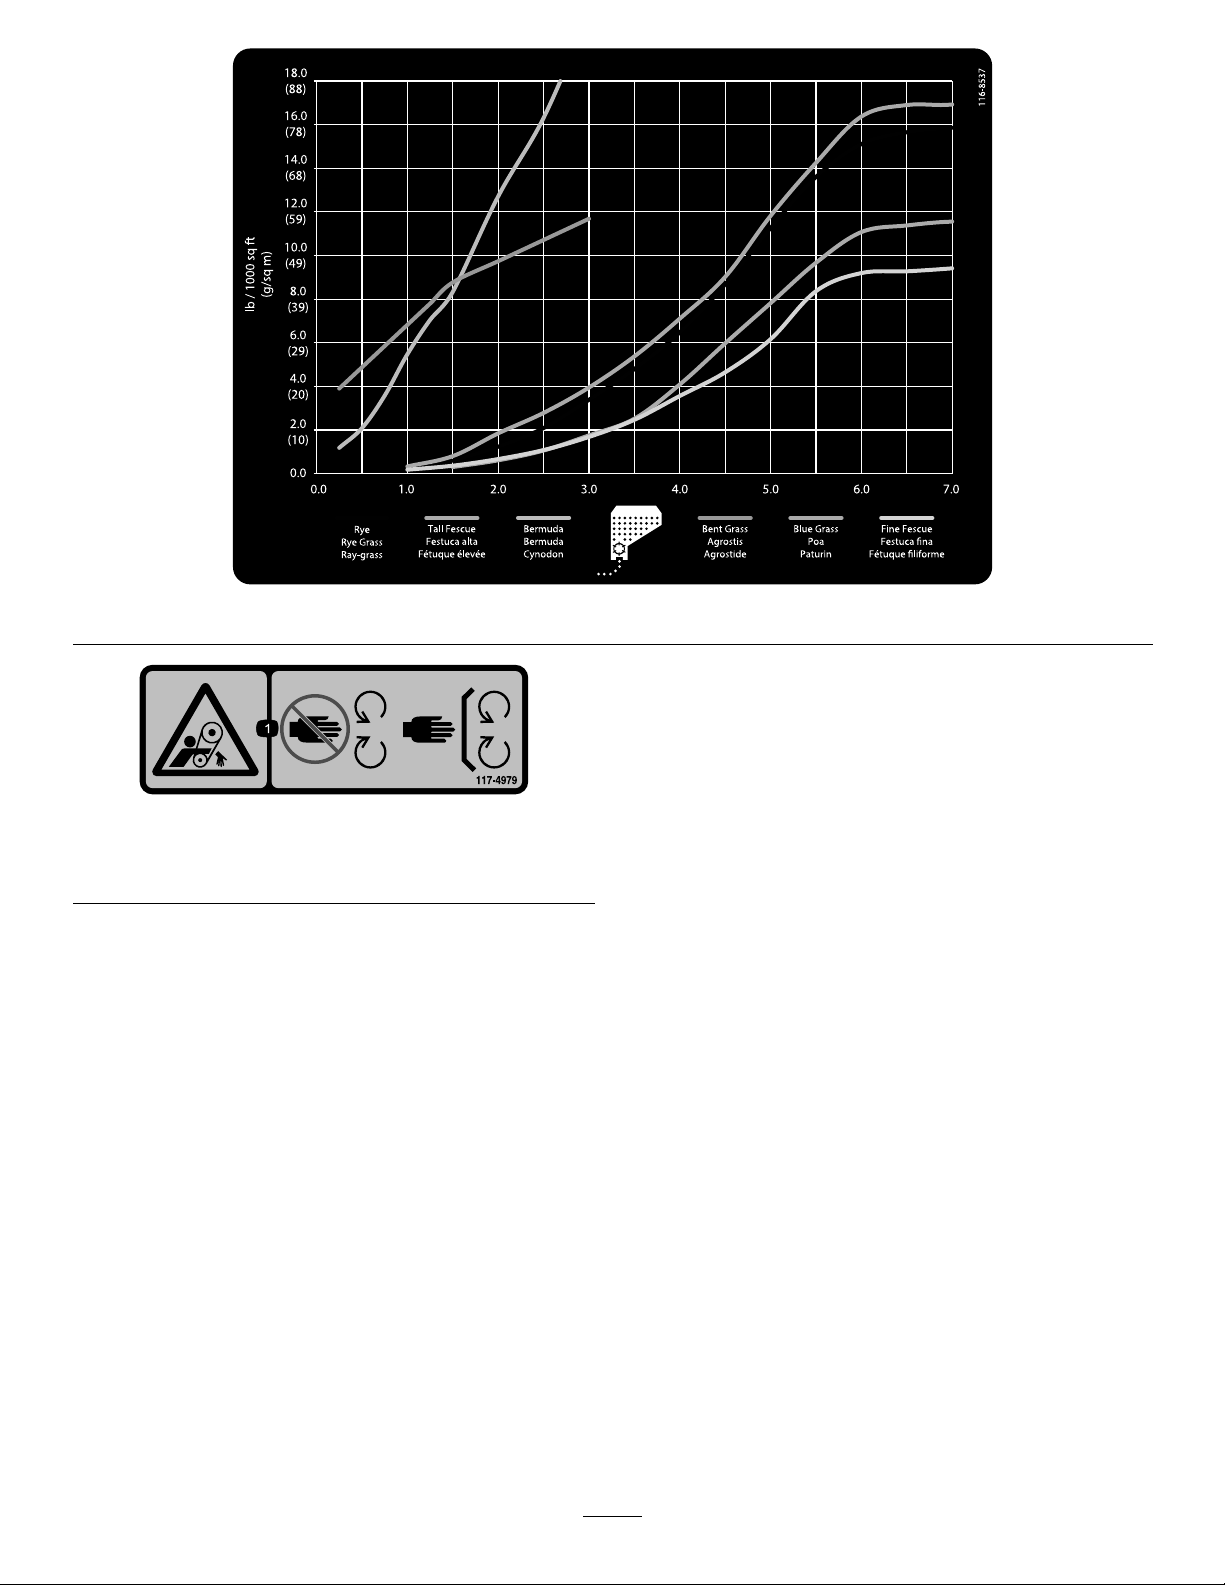
117–4979
1.Entanglementhazard,belt—keepawayfrommovingparts;
keepallguardsandshieldsinplace.
116–8537
8
Page 9

Setup
g023004
1
1
2
3
4
5
6
7
8
g023003
UnfoldingtheHandle
1.Raisethehandletotheoperatingposition(Figure4).
ProductOverview
Figure5
1.Operatorpresencebail
2.Handlebar
3.Throttlecontrollever7.Depthcontrollever
4.Seedgatecontrollever
5.Fueltank
6.Seedingrategauge
8.Recoil-starterrope
Figure4
2.Slidetheovallockingringsdowneachsideoftheupper
handleoverthelowerhandle(
handlesectionstogether.
Figure4),lockingthe
CheckingtheEngine-OilLevel
Themachinecomesfromthefactorywithoilintheengine
crankcase;however,youmayneedtoaddoil.Referto
ChangingtheEngineOil(page17).Addonlyenoughoilto
raisetheleveltotheFullmarkonthedipstick.
9
Page 10

Controls
G023178
Figure6
1.Recoil-starterhandle
2.Sedimentcup
3.Fuel-shutoffvalve
4.Chokelever
5.Throttlelever
Recoil-Starter
Pulltherecoil-starterhandletostartengine(Figure6).
Fuel-ShutoffValve
Closethefuel-shutoffvalvewhentransportingorstoringthe
machine(Figure6).
ChokeLever
Beforestartingacoldengine,movethechokeleverforward.
Aftertheenginestarts,regulatethechoketokeeptheengine
runningsmoothly.Assoonaspossible,movethechokelever
allthewayrearward.
Note:Awarmenginerequireslittleornochoking.
Figure7
1.Throttlelever
Operator-PresenceBail
Theoperator-presencebailallowsthemachinetostartand
run.
•Tostartthemachine,holddowntheoperator-presence
bail(Figure8).Continuetoholddownthe
operator-presencebailtoallowthemachinetorun.
ThrottleLever
Movethecontrolforwardtoincreasetheenginespeedand
rearwardtodecreasespeed;refertoFigure7.
10
Page 11

Depth-ControlLever
1
2
3
4
g019441
Thedepth-controlleverallowsyoutosetthedepthofthe
cuttingbladesin10cuttingpositionsalongwith1position
fortransportation.Toadjustthedepth,removethehairpin
cotter,pullthelockingpinout,andmovetheleverforwardor
rearwardtothedesireddepthsetting(Figure9).
Important:Donotpulltheleversidetosideasthis
willbendit.
Figure8
1.Operator-presencebail
•Tostopthecuttingblades,releasetheoperator-presence
bail.
Figure9
1.Depth-controllever3.Hairpincotter
2.Transport-positionhole4.Lockingpin
Seeding-RateGauge
Usetheseeding-rategaugetosettheseedowrate.Itis
calibratedwiththemachinespeedtogiveyouanevenseeding
rateatanyspeed.Tochangetheseedingrate,loosenthe
knobonthegaugeandmovethegaugepointertothedesired
position,thentightentheknobtoholditinplace.
11
Page 12

Specications
Note:Specicationsanddesignaresubjecttochange
withoutnotice.
Figure10
Refertotheseedinggraphlocatedonthemachineto
determinethecorrectgaugesettingforthetypeofgrassyou
areplantingandthethicknessinwhichyouwanttoplantit.
Seed-Gate-ControlLever
Pushtheseed-gate-controllever(Figure11)forwardtostart
theseedow ,andpullitrearwardtostoptheseedow .
Note:Themachineisdesignedsothattheseedowslows
and/orstopswhenyoustopthemachineorslowforaturn.
Toreduceseedloss,raisethefrontwheelsasthemachineis
turned.Thereisnoneedtoturntheseedowonandoff
foreachturn.
Width
Length(operating)130cm(51inches)
Length(withhandlestored)96.5cm(38inches)
Height(operating)94cm(37inches)
Height(withhandlestored)63.5cm(25inches)
Weight
70cm(27.5inches)
77kg(170lbs)
Attachments/Accessories
Approvedattachmentsandaccessoriesareavailableforuse
withthemachinetoenhanceandexpanditscapabilities.
ContactanAuthorizedServiceDealerorDistributororgo
towww .Toro.comforalistofallapprovedattachmentsand
accessories.
1.Seed-gate-controllever
Figure11
12
Page 13

Operation
1
2
3
4
g019686
5
Note:Determinetheleftandrightsidesofthemachine
fromthenormaloperatingposition.
CheckingtheEngine-OilLevel
ServiceInterval:Beforeeachuseordaily
1.Stopthemachineonalevelsurface.
Note:Toensureamoreaccuratemeasurement,adjust
thedepthcontrolleveruntiltheengineisalsolevel.
2.Disengagethecuttingblades,stoptheengine,waitfor
allmovingpartstostop,andturnofftheengineswitch.
3.Cleanaroundthedipstick(Figure12)sothatdirt
cannotfallintothellerholeanddamagetheengine.
Figure13
1.Fillertube4.Lowerlimit
2.Dipstick
3.Upperlimit
5.Oil-drainbolt
Figure12
1.Dipstick
4.Unscrewthedipstickandwipetheendclean(Figure
12).
5.Insertthedipstickfullyontothellertube.Donot
screwin.(Figure12).
6.Removethedipstickagainandlookattheend.Ifthe
engineoillevelislow,slowlypouronlyenoughoilinto
thellertubetoraisetheleveltothemiddleofthe
dipstick(Figure13).
Important:Donotoverllthecrankcasewith
engineoilandruntheengine;enginedamage
mayresult.
CleaningDebrisfromthe Machine
ServiceInterval:Beforeeachuseordaily
1.Disengagethecuttingblades,stoptheengine,waitfor
allmovingpartstostop,andturnofftheengineswitch.
2.Brushdirtanddebrisawayfromtheaircleanerand
engineopenings.
RecommendedFuel
•Forbestresults,useonlyclean,fresh(lessthan30days
old),unleadedgasolinewithanoctaneratingof87or
higher((R+M)/2ratingmethod).
•Ethanol:Gasolinewithupto10%ethanol(gasohol)
or15%MTBE(methyltertiarybutylether)byvolume
isacceptable.EthanolandMTBEarenotthesame.
Gasolinewith15%ethanol(E15)byvolumeisnot
approvedforuse.Neverusegasolinethatcontainsmore
than10%ethanolbyvolume,suchasE15(contains15%
ethanol),E20(contains20%ethanol),orE85(contains
85%ethanol).Usingunapprovedgasolinemaycause
performanceproblemsand/orenginedamagewhichmay
notbecoveredunderwarranty.
•Donotusegasolinecontainingmethanol.
13
Page 14

•Donotstorefueleitherinthefueltankorfuelcontainers
g013315
overthewinterunlessafuelstabilizerisused.
•Donotaddoiltogasoline.
DANGER
Incertainconditions,gasolineisextremely
ammableandhighlyexplosive.Areorexplosion
fromgasolinecanburnyouandothersandcan
damageproperty.
•Fillthefueltankoutdoors,inanopenarea,
whentheengineiscold.Wipeupanygasoline
thatspills.
•Neverllthefueltankinsideanenclosedtrailer.
•Donotllthefueltankcompletelyfull.Add
gasolinetothefueltankuntilthelevelis1/4to
1/2inch(6to13mm)belowthebottomofthe
llerneck.Thisemptyspaceinthetankallows
gasolinetoexpand.
•Neversmokewhenhandlinggasoline,andstay
awayfromanopenameorwheregasoline
fumesmaybeignitedbyaspark.
•Storegasolineinanapprovedcontainerand
keepitoutofthereachofchildren.Neverbuy
morethana30-daysupplyofgasoline.
•Donotoperatewithouttheentireexhaust
systeminplaceandinproperworkingcondition.
UsingStabilizer/Conditioner
Useafuelstabilizer/conditionerinthetractionunittokeep
gasolinefreshduringstorageof90daysorless.Forlonger
storagedrainthefueltank.
Important:Donotusefueladditivescontaining
methanolorethanol.
Addthecorrectamountofgasstabilizer/conditionertothe
gas.
Note:Afuelstabilizer/conditionerismosteffectivewhen
mixedwithfreshgasoline.Tominimizevarnishdepositsin
thefuelsystem,usefuelstabilizeratalltimes.
FillingtheFuelTank
1.Disengagethecuttingblades,stoptheengine,waitfor
allmovingpartstostop,andturnofftheengineswitch.
2.Allowtheenginetocool.
3.Cleanaroundthefueltankcapandremoveit(Figure
14).
Note:Thecapistetheredtothefueltank.
DANGER
Incertainconditionsduringfueling,static
electricitycanbereleased,causingasparkwhich
canignitethegasolinevapors.Areorexplosion
fromgasolinecanburnyouandothersandcan
damageproperty.
•Alwaysplacegasolinecontainersontheground
awayfromyourvehiclebeforelling.
•Donotllgasolinecontainersinsideavehicleor
onatruckortrailerbed,becauseinteriorcarpets
orplastictruckbedlinersmayinsulatethe
containerandslowthelossofanystaticcharge.
•Whenpractical,removegas-poweredequipment
fromthetruckortrailer,andrefuelthe
equipmentwithitswheelsontheground.
•Ifthisisnotpossible,thenrefuelsuch
equipmentonatruckortrailerfromaportable
containerratherthanfromagasolinedispenser
nozzle.
•Ifagasolinedispensernozzlemustbeused,
keepthenozzleincontactwiththerimofthe
fueltankorcontaineropeningatalltimesuntil
fuelingiscomplete.
Figure14
4.Addunleadedgasolinetothefueltankuntilthelevel
isjustinsidethemeshlterbasket.
Important:Thisspaceinthetankallowsgasoline
toexpand.Donotllthefueltankcompletelyfull.
5.Installthefueltankcapsecurely.
6.Wipeupanyspilledgasoline.
StartingandStoppingthe Engine
StartingtheEngine
1.Movethechokelevertotheleftifyouarestartinga
coldengine.
2.MovethethrottlelevermidwaybetweentheSlow
(turtle)andFast(rabbit)positions.
14
Page 15

Note:Awarmorhotenginemaynotrequirechoking.
3.Holddowntheoperatorpresencebailwithonehand.
4.Pulltherecoilhandlesharplytostarttheengine.
5.Aftertheenginestarts,graduallymovethechoketo
theright.
Note:Iftheenginestallsorhesitates,movethechoke
leftagainuntiltheenginewarmsup.
6.Movethethrottlelevertothedesiredsetting.
StoppingtheEngine
1.Releasetheoperator-presencebail.
OperatingtheMachine
1.Movethedepthcontrollevertothedesiredsetting.
2.Starttheengine.
3.Pushdownonthehandletoraisethefrontwheelsoff
theground.
4.Pullthecutting-blade-controllevertothehandle,and
slowlylowerthefrontwheelstotheground,allowing
thebladestograduallyworkintothegrassandsoil.
5.Whennished,releasethecutting-blade-controllever,
stoptheengine,andraisethecuttingbladestothe
transportsetting.
2.Closethefuelvalve.
3.Waitforallmovingpartstostop.
OperatingTips
•Asseedowvariesgreatlybetweendifferentseedtypes,
llthehopperwithaminimalamountofseed,andrun
atrialportionoftheyardtoensureyouhavethedesired
seedoutput.
•Foroptimalcoverage,reducetheseedowto1/2the
desiredamountandseedtheentireyardin1direction,
thencompleteasecondcoverageperpendiculartothe
rst.
PowerSeeding
•Setthecuttingblades3to6mm(1/8to1/4inch)into
theearth(belowthezeroposition).
•Mowtheyardshorterthannormalmowinglengthbefore
seeding.
•Seedalawnbeforeprimegrassgrowingseason.
•Givelawnextrawateringafterseeding.
PowerRaking/Renovating
Tobreaknewgroundortillanexistinglawn,setthecutting
blades6to12mm(1/4to1/2inch)intotheearth(below
thezeroposition).Allowthemachinetomoveatitsown
pacethroughthesoil,goingforwardandbackwardoverthe
areatobeleveled,ormakingmultiplepassesfromdifferent
directions.
15
Page 16
Maintenance
G019426
RecommendedMaintenanceSchedule(s)
MaintenanceService
Interval
Aftertherst25hours
Beforeeachuseordaily
Every50hours
Every100hours
Every200hours
Every300hours
Yearlyorbeforestorage
MaintenanceProcedure
•Changetheengineoil.
•Checktheengine-oillevel.
•Cleandebrisformthemachine.
•Inspecttheaircleanerelements.
•Checkthebelttension.Iftheengineisworkingbutthecuttingbladesseem
underpowered,checkthebelttension.
•Checkthecuttingbladesforwearordamage.
•Checkthebladesforwearordamage.
•Checkforloosefasteners.
•Cleantheairlterelements.Cleanthemmorefrequentlyindustyoperating
conditions.
•Changetheengineoil.
•Cleanthesedimentcup.
•Inspect,clean,andadjustthesparkplug;replaceitifnecessary.
•Replacethesparkplug.
•Replacethepaperaircleanerelement.Replaceitmorefrequentlyindustyoperating
conditions.
•T ouchupchippedpaint.
Premaintenance
Procedures
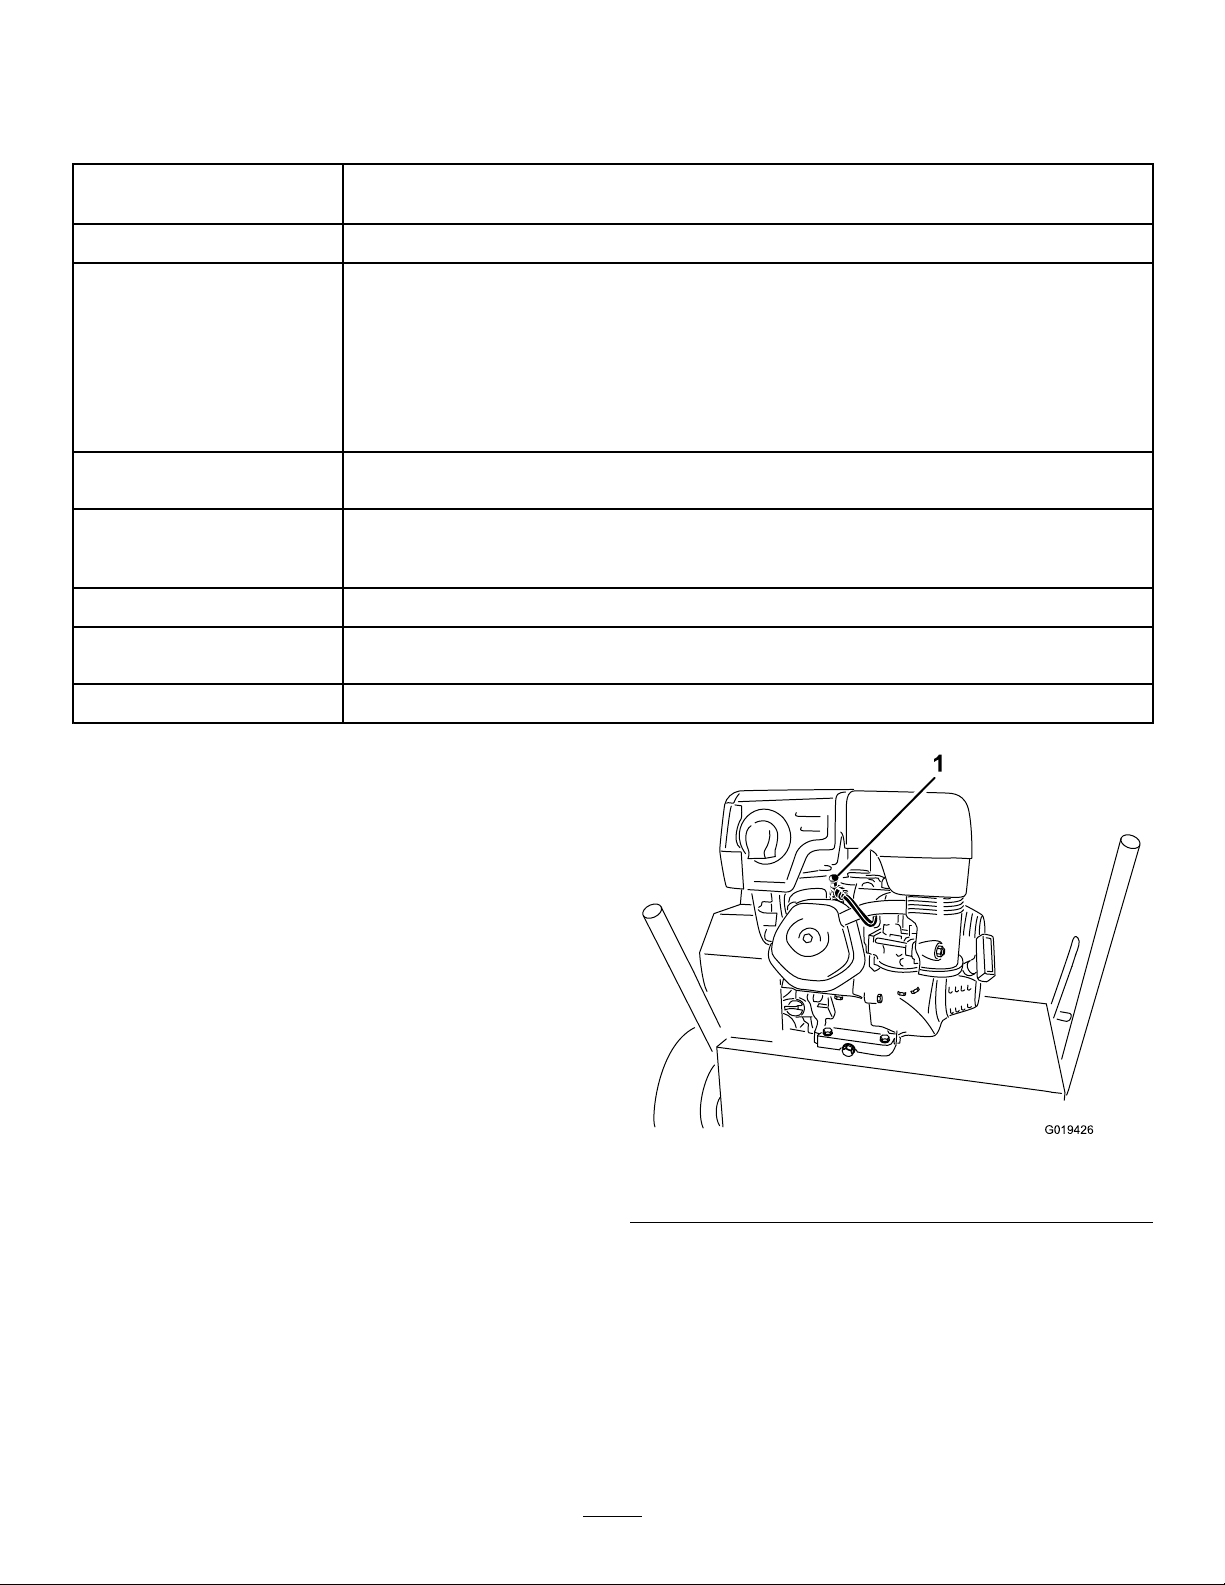
DisconnectingtheSpark-Plug Wire
Beforeperforminganymaintenanceontheengine,belts,or
cuttingblades,disconnectthespark-plugwirefromthespark
plug(Figure15).
Figure15
1.Spark-plugwire
16
Page 17

EngineMaintenance
G019427
g013375
0 20 40 60 80 100 F
-20 -10 0 10 20 30 40 C
o
o
30
5W - 30 / 10W - 30
10.Cleanthefoamelementinwarm,soapywaterorina
nonammablesolvent.
ServicingtheAirCleaner
ServiceInterval:Beforeeachuseordaily—Inspecttheair
cleanerelements.
Every50hours—Cleantheairlterelements.Clean
themmorefrequentlyindustyoperatingconditions.
Every300hours/Yearly(whichevercomes
rst)—Replacethepaperaircleanerelement.Replace
itmorefrequentlyindustyoperatingconditions.
Important:Donotoperatetheenginewithouttheair
lterassembly;extremeenginedamagewilloccur.
1.Stoptheengineandwaitforallmovingpartstostop.
2.Disconnectthewirefromthesparkplug.
3.Removethenutthatsecuresthecover(
Figure16).
Note:Donotusegasolinetocleanthefoamelement
becauseitcouldcreateariskofreorexplosion.
11.Rinseanddrythefoamelementthoroughly.
12.Dipthefoamelementincleanengineoil,thensqueeze
outtheexcessoil.
Note:Excessoilinthefoamelementrestrictstheair
owthroughtheelementandmayreachthepaper
lterandclogit.
13.Wipedirtfromthebaseandthecoverwithamoistrag.
Note:Becarefultopreventdirtanddebrisfrom
enteringtheairductleadingtothecarburetor.
14.Installtheaircleanerelementsandensurethattheyare
properlypositioned.
15.Securetheaircleanerelementswiththepreviously
removednut.
16.Securelyinstallthecoverwiththepreviouslyremoved
nut.
ChangingtheEngineOil
ServiceInterval:Aftertherst25hours
Every100hours
Figure16
1.Nut3.Paperelement
2.Cover
4.Removethecover.
Note:Becarefultopreventdirtanddebrisfrom
fallingintothebase.
5.Removethenutrestrainingairlterassembly.
6.Removethefoamandpaperelementsfromthebase
(
Figure16).
7.Removethefoamelementfromthepaperelement
(Figure16).
8.Inspectthefoamandpaperelements,andreplacethem
iftheyaredamagedorexcessivelydirty.
9.Ifthepaperelementisexcessivelydirty,replaceit.
Note:Nevertrytobrushdirtoffthepaperelement;
brushingforcesthedirtintothebers.
4.Foamelement
WARNING
Oilmaybehotaftertheenginehasbeenrun,and
contactwithhotoilcancauseseverepersonalinjury.
Avoidcontactingthehotengineoilwhenyoudrain
it.
OilType:Detergentoil(APIserviceSJorhigher)
CrankcaseCapacity:1.1l(37oz)
Viscosity:Seetablebelow
Figure17
1.Disengagethecuttingblades,stoptheengineby
releasingtheoperatorpresencebail,andwaitforall
movingpartstostop.
17
Page 18
2.Disconnectthewirefromthesparkplug.
G019428
1
2
g020282
2.Disconnectthewirefromthesparkplug.
3.Raisethefrontwheelsafewinchesofftheground,and
placeapanunderthedrainplugtocatchtheoil.
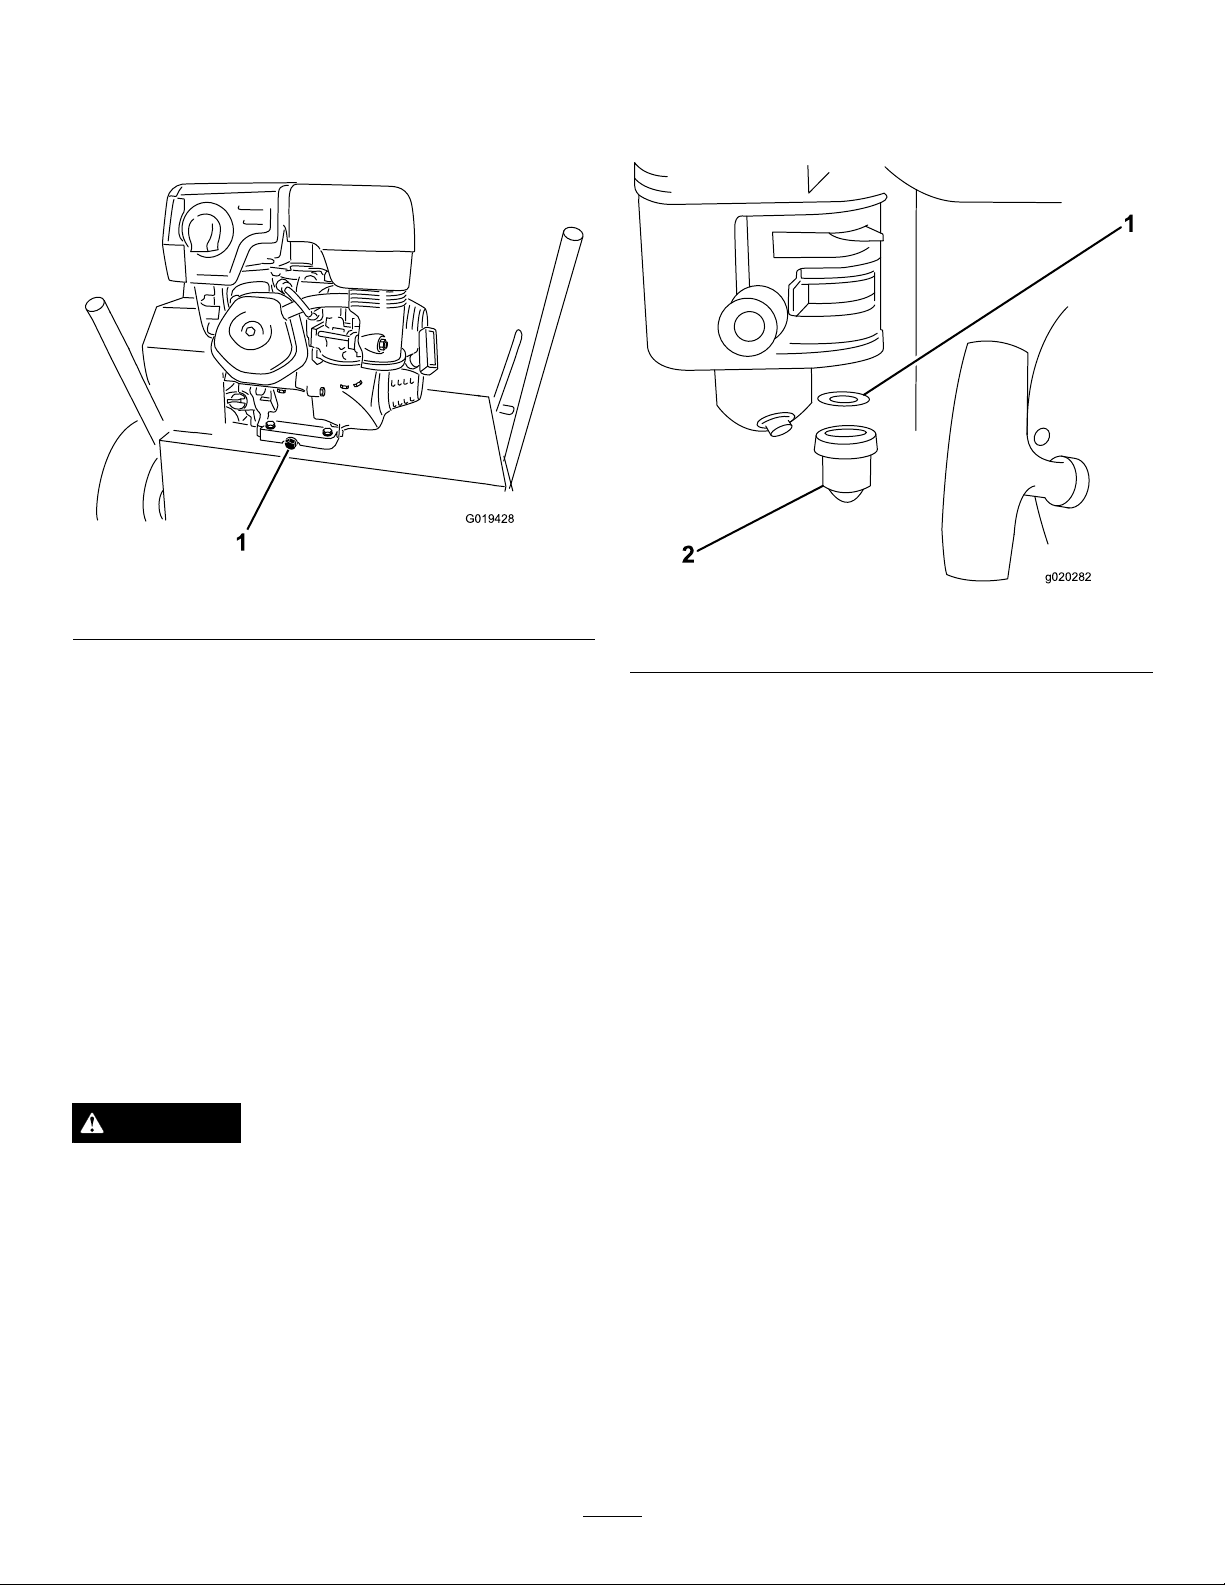
4.Removethedrainplug(Figure18).
Figure18
1.Drainplug
5.Whentheoilhasdrainedcompletely,lowerthefront
wheelstotheground,replacethedrainplug,and
torqueto17n-m(13ft-lb).
Note:Disposeoftheusedoilatacertiedrecycling
center.
6.Removethedipstickandslowlypouroilintotheller
holeuntiltheoillevelreachesthemiddleofthedipstick
Figure13).
(
7.Replaceandsecurethedipstick.
3.MovethefuelshutoffvalvetotheOffposition.
4.RemovethesedimentcupandO-ring(Figure19).
Figure19
1.O-ring2.Sedimentcup
5.Washthesedimentcupinanonammablesolventand
dryitthoroughly .
6.PlacetheO-ringinthefuelvalveandinstallthe
sedimentcup,tighteningitsecurely.
7.MovethefuelshutofflevertotheOnposition.
Ifanyfuelleaks,repeatthisprocedureandreplacethe
O-ring.
8.Wipeupanyspilledoil.
9.Connectthewiretothesparkplug.
CleaningtheSedimentCup
ServiceInterval:Every100hours
DANGER
Incertainconditions,gasolineisextremely
ammableandhighlyexplosive.Areorexplosion
fromgasolinecanburnyouandothersandcan
damageproperty.
•Stoptheengineandkeepheat,sparks,and
ameaway .
•Handlefuelonlyoutdoors.
•Wipeupspillsimmediately.
•Donotsmokewhilehandlingfuel.
1.Stoptheengineandwaitforallmovingpartstostop.
ServicingtheSparkPlug
ServiceInterval:Every100hours—Inspect,clean,and
adjustthesparkplug;replaceitif
necessary.
Every200hours—Replacethesparkplug.
UseanNGKBPR6ESsparkplugorequivalent.
1.Stoptheengineandwaitforallmovingpartstostop.
2.Disconnectthewirefromthesparkplug.
3.Cleanaroundthesparkplug.
4.Removethesparkplugfromthecylinderhead.
Important:Replaceacracked,fouled,ordirty
sparkplug.Donotcleantheelectrodesbecause
gritenteringthecylindercandamagetheengine.
5.Setthegapontheplugto0.76mm(0.030inch)(
20
).
Figure
18
Page 19

BeltMaintenance
CheckingtheBeltTension
ServiceInterval:Beforeeachuseordaily—Checkthebelt
tension.Iftheengineisworkingbut
thecuttingbladesseemunderpowered,
checkthebelttension.
Figure20
1.Centerelectrodeinsulator
2.Sideelectrode
3.Airgap(nottoscale)
6.Carefullyinstallthesparkplugbyhand(toavoidcross
threading)untilitishandtight.
7.Tightenthesparkpluganadditional1/2turnifitis
new;otherwise,tightenitanadditional1/8to1/4turn.
Important:Aloosesparkplugcanbecomevery
hotandcandamagetheengine;overtighteninga
sparkplugmaydamagethethreadsinthecylinder
head.
8.Connectthewiretothesparkplug.
1.Stopthemachineonalevelsurface,stoptheengine
byreleasingtheoperatorpresencebail,disconnectthe
spark-plugwire,andraisethecuttingbladestothe
transportposition.
2.Removethe4boltssecuringthebeltcovertotheleft
sideofthemachineandremovethecover(Figure21).
Figure21
1.Belt3.Bolts
2.Cover
3.Checkthetensionofthebelt(Figure21).
Note:Thebeltshouldnotexmorethana12mm
(1/2inch)withmoderatengerpressureappliedtothe
spanjustabovethemachineframe.
4.Ifthebelttensionisloose,refertoAdjustingtheBelt
Tension(page20).
5.Installthebeltcoverbeforeoperatingthemachine.
19
Page 20

AdjustingtheBeltTension
1
g019740
1.Totightenthebelt,loosenthe4mountingnuts
securingtheenginetotheframe.
MaintainingtheCutting Blades
InspectingtheCuttingBlades
ServiceInterval:Beforeeachuseordaily—Checkthe
cuttingbladesforwearordamage.
Whenthecuttingbladesareworndownandarenolonger
functioningproperly;refertoReplacingWornCuttingBlades
(page20).
Important:Performthisprocedurewhenthefueltank
isemptyornearlyempty.Tiptheunitforwardtokeep
airlterup
ReplacingWornCutting Blades
ServiceInterval:Beforeeachuseordaily—Checktheblades
forwearordamage.
Figure22
1.Mountingnuts
2.Movetheenginetotightenthebelttotheproper
tension.
3.Securethe4mountingnutsandbolts.
Note:Torquetheboltsthatsecuretheenginetothe
frame271N-m(200in-lb).
Whenthecuttingbladesareworndownandnolonger
functioningproperly ,replacethem,asfollows:
Important:Performthisprocedurewhenthefueltank
isemptyornearlyempty .
1.Stopthemachineonalevelsurface,stoptheengine
byreleasingtheoperator-presencebail,disconnectthe
spark-plugwire,andraisethecuttingbladestothe
transportposition.
2.Removethe4boltsand4nutssecuringthebeltcover
totheleftsideofthemachine,andremovethecover.
3.Removethecuttingbladesdrivebeltfromthemachine.
4.Tiltthemachineforwardontoitsnose,restingona
blockofwood.
Note:Itwilltake2peopletotipthemachineforward
safely.
5.Lowerthecuttingbladestothelowestposition.
6.Spinthecuttingbladeassemblymanually.
Note:Thebladeassemblyshouldspinfreely.Ifit
makesagrindingnoiseandishalting,thebearingsare
worn;replacethemwhenyoureplacetheblades.
7.Removethe4boltsandlocknutssecuringthecutting
20
bladeassembly(Figure23),andremoveitfromthe
machine.
Page 21

Figure23
1.Bolt
2.Bearing
3.Washer7.Nut
4.Blade
8.Loosenandremovethenutandwasherfromtheshaft
(Figure23).
9.Slidethespacerofftheshaft(
Figure23).
10.Carefullyslidethebladesoffoftheshaft(Figure23)
andreplacethemasnecessary.
11.Reversethisproceduretoinstalltheassembly.
5.Spacer
6.Shaft
21
Page 22

Storage
5.Checktheengineoillevel;refertoCheckingthe
Engine-OilLevel(page13).
1.Raisethecuttingblades,stopthemachine,stopthe
engine,anddisconnectthesparkplugwire.
2.Removedirtandgrimefromtheentiremachine.
Important:Youcanwashthemachinewithmild
detergentandwater.Donotpressurewashthe
machine.Avoidexcessiveuseofwater,especially
neartheengine.
3.Servicetheaircleaner;referto
Cleaner(page17).
4.Changetheengineoil;refertoChangingtheEngine
Oil(page17).
5.Forstorageover30days,preparethetractionunitas
follows:
A.Addapetroleumbasedstabilizer/conditionerto
fuelinthetank.Followmixinginstructionsfrom
stabilizermanufacturer(1ozpergallon).Donot
useanalcoholbasedstabilizer(ethanolor
methanol).
Note:Afuelstabilizer/conditionerismost
effectivewhenmixedwithfreshgasolineandused
atalltimes.
ServicingtheAir
6.Fillthefueltankwithfreshgasoline;refertoFilling
theFuelTank(page14).
7.Connectthewiretothesparkplug.
B.Runtheengineuntilitstopsfromrunningout
offuel.
C.Choketheengine.
D.Startandruntheengineuntilitwillnotstartagain.
E.Disposeoffuelproperly.Recyclethefuel
accordingtolocalcodes.
Important:Donotstorestabilizer/conditioned
gasolineover90days.
6.Checkandtightenallbolts,nuts,andscrews.Repairor
replaceanypartthatisdamaged.
7.Paintallscratchedorbaremetalsurfaceswithpaint
fromanAuthorizedServiceDealer.
8.Storethemachineinaclean,drygarageorstoragearea.
9.Coverthemachinetoprotectitandkeepitclean.
RemovingtheMachinefrom Storage
1.Checkandtightenallfasteners.
2.Inspectthesparkplugandreplaceitifitisdirty,worn,
orcracked;refertotheengineowner’smanual.
3.Installthesparkpluguntilitishand-tight,thenan
additional1/2turnifitisnew,otherwise,tightenitan
additional1/8to1/4turn.
4.Performanyneededmaintenanceprocedures;referto
Maintenance(page16).
22
Page 23

Notes:
23
Page 24

Alimitedwarranty(seewarrantyperiodsbelow)
TheToroWarranty
SWS
TurfRenovation
and
TreeCare
ConditionsandProductsCovered
TheT oroCompanyanditsafliate,T oroWarrantyCompany ,pursuantto
anagreementbetweenthem,jointlywarrantyourToroProductslisted
belowtobefreefromdefectsinmaterialsorworkmanship.
Thiswarrantycoversthecostofpartsandlabor,butyoumustpay
transportationcosts.
Thefollowingtimeperiodsapplyfromthedateofpurchase:
ProductsWarrantyPeriod
TurfRenovation
Walk-BehindAerator1year
•Engine2years
Stand-OnAerator
•Battery90daysPartsandLabor
•Engine2years
Dethatcher1year
•Engine2years
TurfSeeder
•Engine2years
TreeCare
LogSplitter
•Battery90daysPartsandLabor
•Engine2years
StumpGrinder
•Engine2years
BrushChipper
•Battery90daysPartsandLabor
•Engine3years
Walk-BehindRotaryBroom1year
•Engine2years
Whereawarrantableconditionexists,wewillrepairtheProductatnocost
toyouincludingdiagnosis,labor,andparts.
1year
1yearPartsOnly
1year
1year
1yearPartsOnly
1year
1year
1yearPartsOnly
InstructionsforObtainingWarrantyService
IfyouthinkthatyourT oroProductcontainsadefectinmaterialsor
workmanship,followthisprocedure
1.ContactanyAuthorizedServicingOutlettoarrangeserviceattheir
dealership.T olocateoneconvenienttoyou,accessourwebsiteat
www.T oro.com.Select“WheretoBuy”andselect“Contractor”under
producttype.Y oumayalsocallourtollfreenumberbelow.
2.Bringtheproductandyourproofofpurchase(salesreceipt)tothem.
3.IfforanyreasonyouaredissatisedwiththeServiceOutlet’s
analysisorwiththeassistanceprovided,contactusat:
SWSCustomerCareDepartment
ToroWarrantyCompany
811 1LyndaleAvenueSouth
Bloomington,MN55420-1196
TollFree:888-384-9940
**
ToroAuthorizedRentalCustomerswhohavepurchasedproductsdirectlyfromToroandhave
signedtheToroRentalCustomerAgreementhavetheabilitytoperformtheirownwarrantywork.
PleasevisitToro’ sRentalPortalforelectronicwarrantyclamlingproceduresorcallthetollfree
numberabove.
**
:
OwnerResponsibilities
YoumustmaintainyourT oroProductbyfollowingthemaintenance
proceduresdescribedintheOperator’sManual.Suchroutine
maintenance,whetherperformedbyadealerorbyyou,isatyourexpense.
Partsscheduledforreplacementasrequiredmaintenance(“Maintenance
Parts”),arewarrantedfortheperiodoftimeuptothescheduled
replacementtimeforthatpart.Failuretoperformrequiredmaintenance
andadjustmentscanbegroundsfordisallowingawarrantyclaim.
ItemsandConditionsNotCovered
Notallproductfailuresormalfunctionsthatoccurduringthewarranty
periodaredefectsinmaterialsorworkmanship.Thisexpresswarranty
doesnotcoverthefollowing:
•Productfailureswhichresultfrominstallationanduseofadd-on,
modied,orunapprovedaccessories
•Failuretoperformrequiredmaintenanceand/oradjustments
•Repairsnecessaryduetofailuretofollowrecommendedfuel
procedure(consultOperator'sManualformoredetails)
–Removingcontaminantsfromthefuelsystemisnotcovered
–Useofoldfuel(morethanonemonthold)orfuelwhichcontains
morethan10%ethanolormorethat15%MTBE
–Failuretodrainthefuelsystempriortoanyperiodofnon-use
overonemonth
•Productfailureswhichresultfromoperatingtheproductinanabusive,
negligentorrecklessmanner
•Partssubjecttoconsumptionthroughuseunlessfoundtobe
defective.Examplesofpartswhichareconsumed,include,belts,
cutters,blades,teeth,sparkplugs,tires,lters,etc.
•Failurescausedbyoutsideinuenceinclude,weather,storage,
contamination,lubricants,additives,orchemicals,etc.
•Normal“wearandtear”itemsincudespaintedsurfacesandscratched
decals,etc.
•Anycomponentcoveredbyaseparatemanufacturer’swarranty
•Pickupanddeliverycharges
GeneralConditions
RepairbyanAuthorizedServicingOutletorSelf-ServiceasanAuthorized
RentalCustomerisyoursoleremedyunderthewarranty.
NeitherTheToroCompanynorT oroWarrantyCompanyisliablefor
indirect,incidentalorconsequentialdamagesinconnectionwith
theuseoftheToroProductscoveredbythiswarranty ,including
anycostorexpenseofprovidingsubstituteequipmentorservice
duringreasonableperiodsofmalfunctionornon-usepending
completionofrepairsunderthiswarranty.Allimpliedwarranties
ofmerchantabilityandtnessforusearelimitedtotheduration
ofthisexpresswarranty.Somestatesdonotallowexclusionsof
incidentalorconsequentialdamages,orlimitationsonhowlong
animpliedwarrantylasts,sotheaboveexclusionsandlimitations
maynotapplytoyou.
Thiswarrantygivesyouspeciclegalrights,andyoumayalsohaveother
rightswhichvaryfromstatetostate.
ExceptfortheenginewarrantycoverageandtheEmissionswarranty
referencedbelow,ifapplicable,thereisnootherexpresswarranty .The
EmissionsControlSystemonyourProductmaybecoveredbyaseparate
warrantymeetingrequirementsestablishedbytheU.S.Environmental
ProtectionAgency(EPA)ortheCaliforniaAirResourcesBoard(CARB).
RefertotheCaliforniaEmissionControlWarrantyStatementsuppliedwith
yourProductorcontainedintheenginemanufacturer’sdocumentationfor
details.
CountriesOtherthantheUnitedStatesorCanada
CustomerswhohavepurchasedT oroproductsoutsidetheUnitedStatesorCanadashouldcontacttheirT oroDistributor(Dealer)toobtainguarantee
policiesforyourcountry,province,orstate.IfforanyreasonyouaredissatisedwithyourDistributor'sserviceorhavedifcultyobtainingguarantee
information,contacttheT oroimporter .Ifallotherremediesfail,youmaycontactusatToroWarrantyCompany .
AustralianConsumerLaw:AustraliancustomerswillnddetailsrelatingtotheAustralianConsumerLaweitherinsidetheboxoratyourlocalT oro
Dealer.
374-0289RevC
 Loading...