

Page 1
FormNo.3380-986RevA
48cmSuperBaggerLawnMowerand48cmSuper
RecyclerLawnMower
ModelNo.20835—SerialNo.314000001andUp
ModelNo.20836—SerialNo.314000001andUp
Operator'sManual
Introduction
Thisrotary-blade,walk-behindlawnmowerisintended
tobeusedbyresidentialhomeowners.Itisdesigned
primarilyforcuttinggrassonwell-maintainedlawns
onresidentialproperties.Itisnotdesignedforcutting
brushorforagriculturaluses.
Readthisinformationcarefullytolearnhowtooperateand
maintainyourproductproperlyandtoavoidinjuryand
productdamage.Y ouareresponsibleforoperatingthe
productproperlyandsafely.
YoumaycontactTorodirectlyatwww .Toro.comforproduct
andaccessoryinformation,helpndingadealer,ortoregister
yourproduct.
Wheneveryouneedservice,genuineToroparts,oradditional
information,contactanAuthorizedServiceDealerorToro
CustomerServiceandhavethemodelandserialnumbersof
yourproductready.
modelandserialnumbersontheproduct.
Figure1identiesthelocationofthe
Thismanualidentiespotentialhazardsandhassafety
messagesidentiedbythesafetyalertsymbol(Figure2),
whichsignalsahazardthatmaycauseseriousinjuryordeath
ifyoudonotfollowtherecommendedprecautions.
Figure2
1.Safetyalertsymbol
Thismanualuses2wordstohighlightinformation.
Importantcallsattentiontospecialmechanicalinformation
andNoteemphasizesgeneralinformationworthyofspecial
attention.
ThisproductcomplieswithallrelevantEuropeandirectives.
Fordetails,seetheseparateproductspecicDeclarationof
Conformity(DOC)sheet.
Formodelswithstatedenginehorsepower,thegross
horsepoweroftheenginewaslaboratoryratedbytheengine
manufacturerinaccordancewithSAEJ1940.Ascongured
tomeetsafety,emission,andoperatingrequirements,the
actualenginehorsepoweronthisclassoflawnmowerwill
besignicantlylower.
Figure1
1.Modelandserialnumberplate
Writetheproductmodelandserialnumbersinthespace
below:
ModelNo.
SerialNo.
©2013—TheToro®Company
8111LyndaleAvenueSouth
Bloomington,MN55420
Registeratwww.T oro.com.
Donottamperwiththeenginecontrolsoralterthegovernor
speed;doingsomaycreateanunsafeconditionresultingin
personalinjury.
Contents
Introduction..................................................................1
GeneralLawnMowerSafety.....................................2
SoundPressure......................................................3
SoundPower..........................................................3
Hand-ArmVibration...............................................3
SafetyandInstructionalDecals.................................4
Setup............................................................................5
1UnfoldingtheHandle............................................5
2InstallingtheRecoil-starterRopeintheRope
Guide.................................................................5
3FillingtheEnginewithOil......................................6
ProductOverview..........................................................7
Specications.........................................................7
OriginalInstructions(EN)
PrintedintheCzechRepublic
AllRightsReserved
*3380-986*A
Page 2

Operation.....................................................................7
FillingtheFuelTank................................................7
CheckingtheEngineOilLevel..................................8
AdjustingtheCuttingHeight....................................8
AdjustingtheHandleHeight.....................................9
StartingtheEngine.................................................10
UsingtheSelf-propelDrive......................................10
StoppingtheEngine...............................................10
RecyclingtheClippings...........................................11
BaggingtheClippings.............................................11
Rear-dischargingtheClippings.................................11
OperatingTips......................................................12
Maintenance.................................................................13
RecommendedMaintenanceSchedule(s)......................13
PreparingforMaintenance.......................................13
ServicingtheAirCleaner.........................................14
ChangingtheEngineOil.........................................14
ServicingtheSparkPlug..........................................15
ReplacingtheBlade................................................15
CleaningundertheMachineHousing........................16
Storage........................................................................17
PreparingtheMachineforStorage............................17
FoldingtheHandle.................................................17
RemovingtheMachinefromStorage.........................17
Safety
Improperlyusingormaintainingthislawnmowercan
resultininjury.Toreducethepotentialforinjury,
complywiththesesafetyinstructions.
•Neverallowchildrenorpeopleunfamiliarwiththese
instructionstousethemower.Localregulationscan
restricttheageoftheoperator.
•Keepinmindthattheoperatororuserisresponsiblefor
accidentsorhazardsoccurringtootherpeopleortheir
property.
•Understandexplanationsforallpictogramsusedonthe
mowerorintheinstructions.
Gasoline
WARNING
Gasolineishighlyammable.T akethefollowing
precautions.
•Storefuelincontainersspecicallydesignedfor
thispurpose.
•Refueloutdoorsonlyanddonotsmokewhile
refueling.
•Addfuelbeforestartingtheengine.Never
removethecapofthefueltankoraddgasoline
whiletheengineisrunningorwhentheengine
ishot.
•Ifgasolineisspilled,donotattempttostartthe
enginebutmovethemachineawayfromthe
areaofspillageandavoidcreatinganysourceof
ignitionuntilgasolinevaporshavedissipated.
•Replaceallfueltankandcontainercapssecurely.
Torodesignedandtestedthislawnmowertoofferreasonably
safeservice;however,failuretocomplywiththefollowing
instructionsmayresultinpersonalinjury.
Toensuremaximumsafetyandbestperformance,and
togainknowledgeoftheproduct,itisessentialthat
youandanyotheroperatorofthelawnmowerread
andunderstandthecontentsofthismanualbeforethe
engineiseverstarted.Payparticularattentiontothe
safetyalertsymbol(
Warning,orDanger—“personalsafetyinstruction.”
Readandunderstandtheinstructionbecauseithasto
dowithsafety.Failuretocomplywiththeinstruction
mayresultinpersonalinjury.
Figure2)whichmeansCaution,
GeneralLawnMowerSafety
ThefollowinginstructionshavebeenadaptedfromEN836.
Thiscuttingmachineiscapableofamputatinghandsandfeet
andthrowingobjects.Failuretoobservethefollowingsafety
instructionscouldresultinseriousinjuryordeath.
Training
•Readtheinstructionscarefully .Befamiliarwiththe
controlsandtheproperuseoftheequipment.
Preparation
•Whilemowing,alwayswearsubstantialfootwearandlong
trousers.Donotoperatethemachinewhenbarefootor
wearingopensandals.
•Thoroughlyinspecttheareawherethemachineistobe
used,andremoveallstones,sticks,wires,bones,and
otherforeignobjects.
•Beforeusing,alwaysvisuallyinspecttoseethatguardsand
safetydevices,suchasdeectorsand/orgrasscatchers,
areinplaceandworkingcorrectly.
•Beforeusing,alwaysvisuallyinspecttoseethatthe
blades,bladebolts,andcutterassemblyarenotwornor
damaged.Replacewornordamagedbladesandboltsin
setstopreservebalance.
Starting
Starttheenginecarefully,accordingtoinstructionsandwith
feetwellawayfromtheblade(s)andnotinfrontofthe
dischargechute.
Operation
•Nevermowwhilepeople,especiallychildren,orpetsare
nearby.
•Mowonlyindaylightoringoodarticiallight.
2
Page 3

•Stayalertforholesintheterrainandotherhiddenhazards.
•Donotputhandsorfeetnearorunderrotatingparts.
Keepclearofthedischargeopeningatalltimes.
•Neverpickuporcarrythemachinewhiletheengineis
running.
•Useextremecautionwhenreversingorpullingthemower
towardsyou.
•Walk;neverrun.
•Slopes:
•Neverstorethemachinewithgasolineinthetankand
insideabuildingwherefumescanreachanopename
orspark.
•Allowtheenginetocoolbeforestoringinanyenclosure.
•Toreducetheriskofre,keeptheengine,silencer,
batterycompartment,andgasolinestorageareafreeof
grass,leaves,orexcessivegrease.
•Checkgrasscatchercomponentsandthedischargeguard
frequentlyandreplacewithmanufacturer'srecommended
parts,whennecessary.
–Donotmowonexcessivelysteepslopes.
–Exerciseextremecautionwhenonslopes.
–Mowacrossthefaceofslopes,neverupanddown,
andexerciseextremecautionwhenchangingdirection
onslopes.
–Alwaysbesureofyourfootingonslopes.
•Reducespeedonslopesandinsharpturnstoprevent
overturningorlossofcontrol.
•Stopthebladeifthemachinehastobetiltedfor
transportationwhencrossingsurfacesotherthangrass
andwhentransportingthemachine.
•Donotoperatetheengineinaconnedspacewhere
dangerouscarbonmonoxidefumescancollect.
•Stoptheengine
–wheneveryouleavethemachine.
–beforerefueling.
–beforeremovingthegrasscatcher.
–beforemakingheightadjustmentunlessadjustment
canbemadefromtheoperator'sposition.
•Replacewornordamagedpartsforsafety.
•Replacefaultysilencers.
•Ifthefueltankhastobedrained,dothisoutdoors.
•Donotchangetheenginegovernorsettingsoroverspeed
theengine.Operatinganengineatexcessivespeedcan
increasethehazardofpersonalinjury.
•Becarefulduringadjustmentofthemowertoprevent
entrapmentofthengersbetweenmovingbladesand
xedpartsofthemower.
•Toensurethebestperformanceandsafety,
purchaseonlygenuineT ororeplacementpartsand
accessories.Donotuse
theymaycauseasafetyhazard.
will t
partsandaccessories;
SoundPressure
Thisunithasasoundpressurelevelattheoperator’searof
86dBA,whichincludesanUncertaintyValue(K)of1dBA.
Thesoundpressurelevelwasdeterminedaccordingtothe
proceduresoutlinedinEN836.
•Stoptheengineanddisconnectthesparkplugwire
–beforeclearingblockagesoruncloggingchute.
–beforechecking,cleaning,orservicingthemachine.
–afterstrikingaforeignobject;inspectthemachine
fordamageandmakerepairsbeforerestartingand
operatingthemachine.
–ifthemachinestartstovibrateabnormally(check
immediately).
•Lightningcancausesevereinjuryordeath.Ifyousee
lightningorhearthunderinthearea,donotoperatethe
machine;seekshelter.
•Watchoutfortrafcwhencrossingornearroadways.
MaintenanceandStorage
•Keepallnuts,bolts,andscrewstighttobesurethe
machineisinsafeworkingcondition.
•Donotusepressurecleaningequipmentonthemachine.
SoundPower
Thisunithasaguaranteedsoundpowerlevelof96dBA,
whichincludesanUncertaintyValue(K)of1dBA.Thesound
powerlevelwasdeterminedaccordingtotheprocedures
outlinedinISO11094.
Hand-ArmVibration
Measuredvibrationlevelforthelefthand=4.8m/s
Measuredvibrationlevelfortherighthand=5.5m/s
UncertaintyValue(K)=2.2m/s
Themeasuredvaluesweredeterminedaccordingtothe
proceduresoutlinedinEN836.
2
2
2
3
Page 4
SafetyandInstructionalDecals
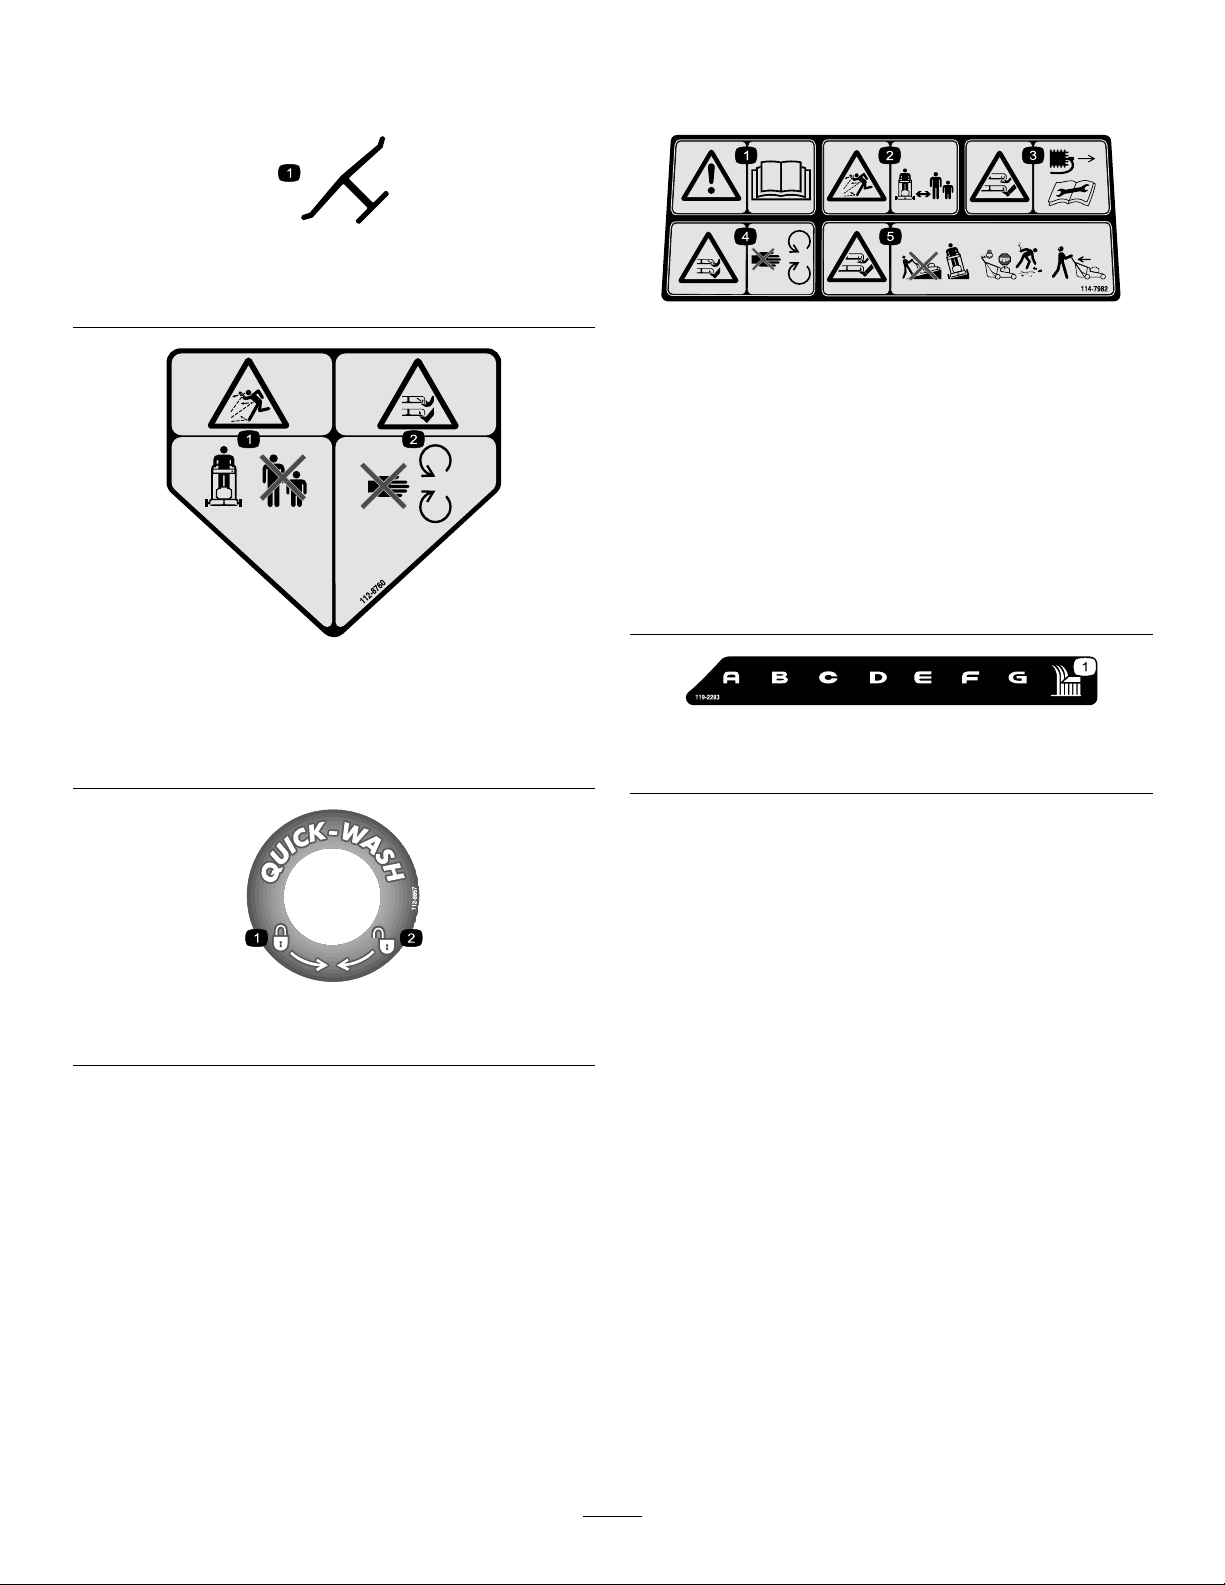
Important:Safetyandinstructiondecalsarelocatednearareasofpotentialdanger.Replacedamageddecals.
Manufacturer'sMark
1.Indicatesthebladeisidentiedasapartfromtheoriginal
machinemanufacturer.
114-7982
1.Warning—readtheOperator'sManual.
2.Thrownobjecthazard—keepbystandersasafedistance
fromthemachine.
3.Cutting/dismembermenthazardofhandorfoot,mower
blade—removetheignitionkeyandreadtheinstructions
beforeservicingorperformingmaintenance.
4.Cutting/dismembermenthazardofhandorfoot,mower
blade—stayawayfrommovingparts.
5.Cutting/dismembermenthazardofhandorfoot,mower
blade—donotoperateupanddownslopes;operatesideto
sideonslopes;stoptheenginebeforeleavingtheoperating
position;andlookbehindyouwhenbackingup.
112-8760
1.Thrownobjecthazard—keepbystandersasafedistance
fromthemachine.
2.Cutting/dismembermentofhandorfoot—stayawayfrom
movingparts.
112-8867
1.Lock2.Unlock
119–2283
1.Height-of-cutsettings
4
Page 5
Setup
G020721
G020722
1
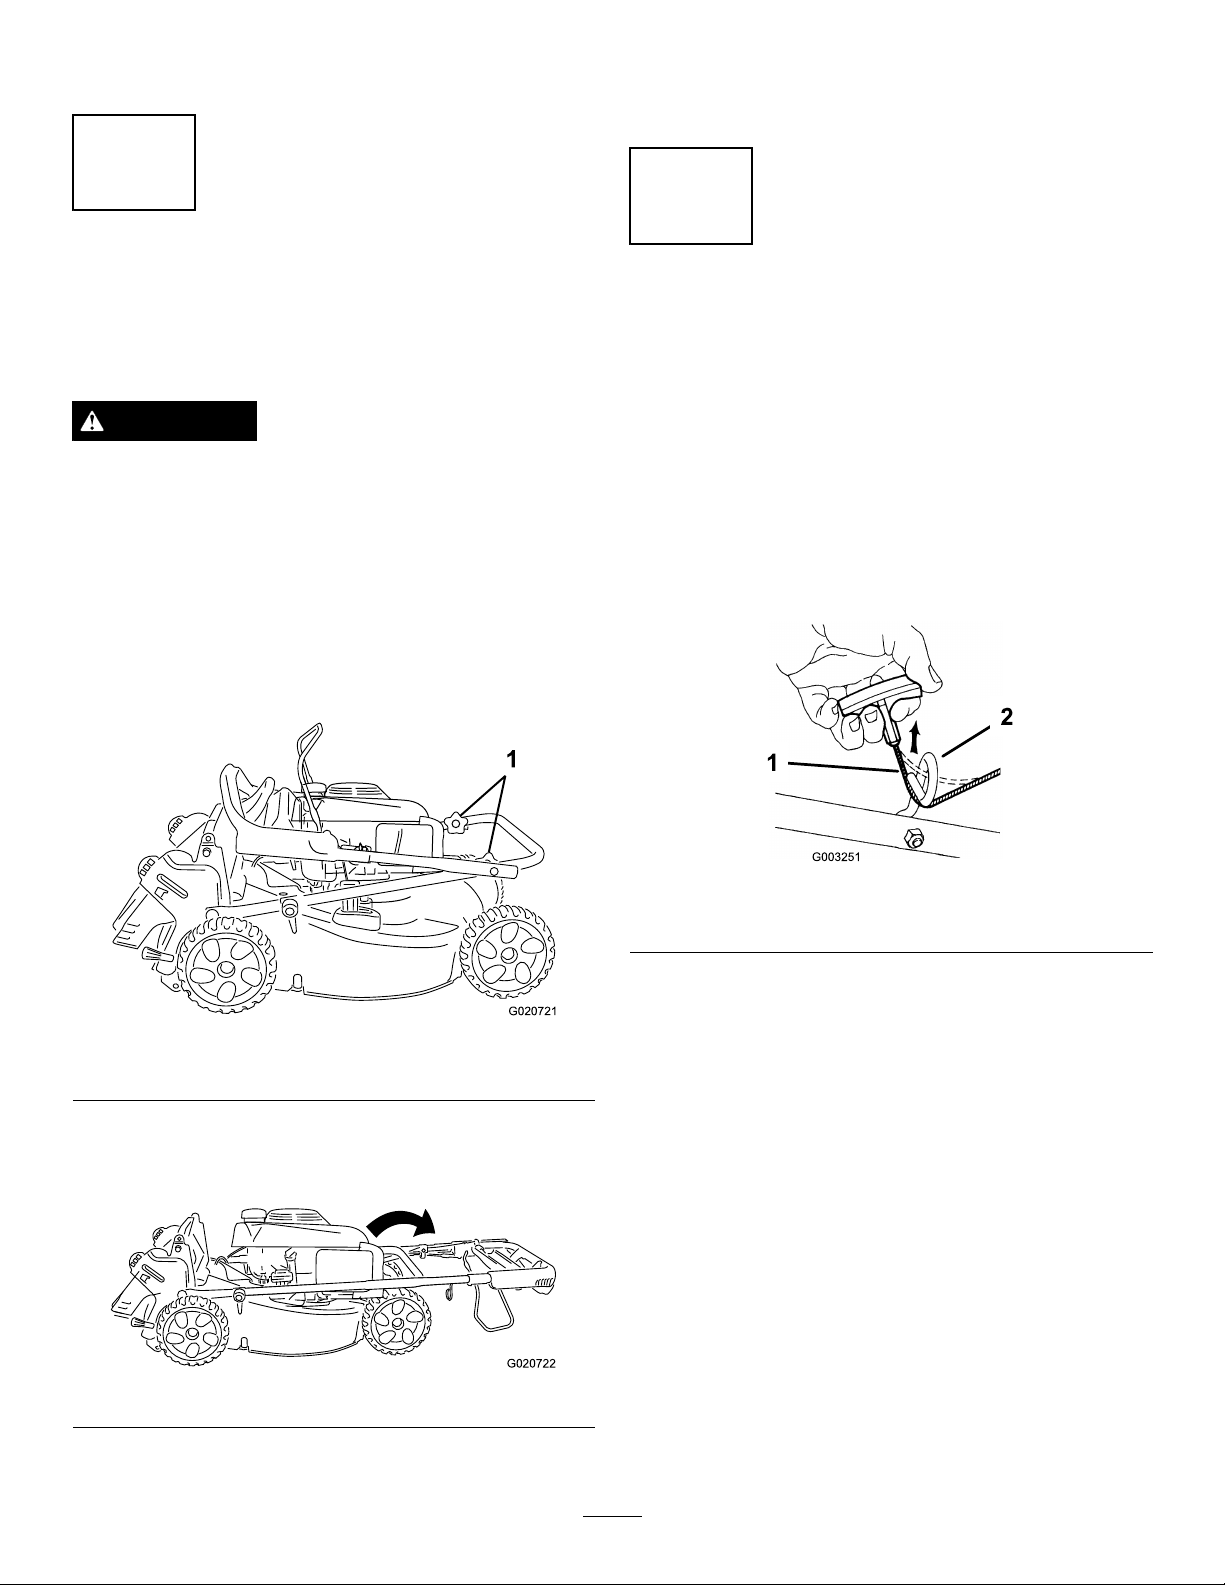
UnfoldingtheHandle
NoPartsRequired
4.Rotatethehandlerearwardtotheoperatingposition,
andlockthehandleatyourdesiredheight.Referto
AdjustingtheHandleHeight(page9).
2
InstallingtheRecoil-starter RopeintheRopeGuide
Procedure
WARNING
Foldingorunfoldingthehandleimproperlycan
damagethecables,causinganunsafeoperating
condition.
•Donotdamagethecableswhenfoldingor
unfoldingthehandle.
•Ifacableisdamaged,contactanAuthorized
ServiceDealer.
1.Loosenthehandleknobs(Figure3).
NoPartsRequired
Procedure
Important:Y oumustinstalltherecoil-starterropein
theropeguide.
Holdtheblade-controlbartotheupperhandleandpullthe
recoil-starterropethroughtheropeguideonthehandle
(Figure5).
Figure5
1.Recoil-starterrope2.Ropeguide
Figure3
1.Handleknobs
2.Carefullymovetheupperhandleforwarduntilthe
handlehalvesareinlineandnesttogetherasshown
inFigure4.
Figure4
3.Tightenthehandleknobsrmlybyhand.
5
Page 6
steps
through5untiltheoillevelonthedipstickis
correct.
3
FillingtheEnginewithOil
NoPartsRequired
Procedure
Important:Themachinedoesnotcomewithoilinthe
engine.Beforestartingtheengine,lltheenginewith
oil.
1.Movethemachinetoalevelsurface.
2.Removethedipstick(
thecrankcasecapacityofoilintotheoil-lltube.
Note:Max.ll:0.59l(20oz),type:SAE30orSAE
10W-30detergentoilwithanAPIserviceclassication
ofSF,SG,SH,SJ,SL,orhigher.
Figure6)andpourabout3/4of
•Iftheoillevelistoohigh,draintheexcessoiluntil
theoillevelonthedipstickiscorrect.Todrainthe
excessoil,refertoChangingtheEngineOil(page
14).
Important:Iftheoillevelinthecrankcaseis
toolowortoohighandyouruntheengine,
youmaydamagetheengine.
6.Installthedipsticksecurely.
Important:
operating hour s
toChangingtheEngineOil(page14).
Change the engine oil after the r st 5
;changeityearlythereafter.Refer
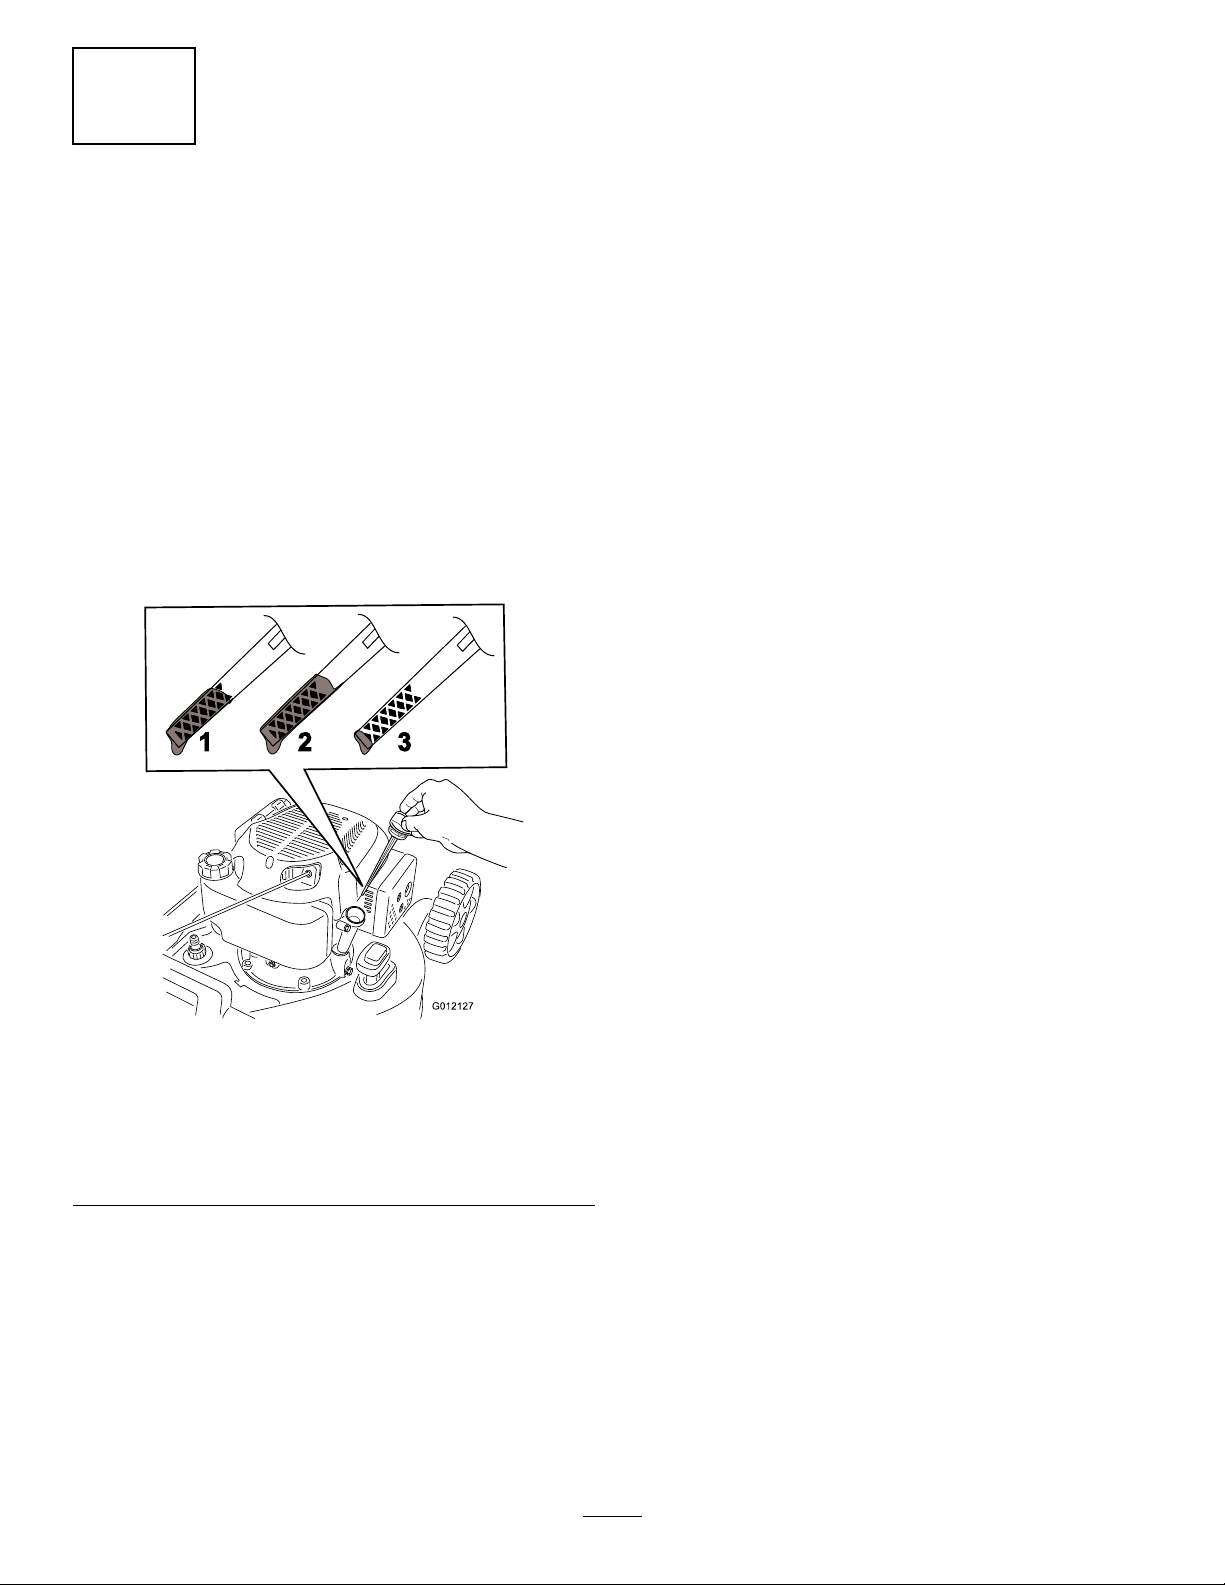
Figure6
1.Theoillevelisatits
maximum.
2.Theoillevelistoo
high—removeoilfrom
thecrankcase.
3.Wipeoffthedipstickendwithacleancloth.
4.Insertthedipstickintotheoil-lltube,butdonot
screwitin.
5.Removethedipstickandreadtheoillevelonthe
dipstick(Figure6).
3.Theoillevelistoo
low—addoiltothe
crankcase.
•Iftheoillevelistoolow,addasmallamount
ofoilslowlytotheoil-lltube,andthenrepeat
6
Page 7
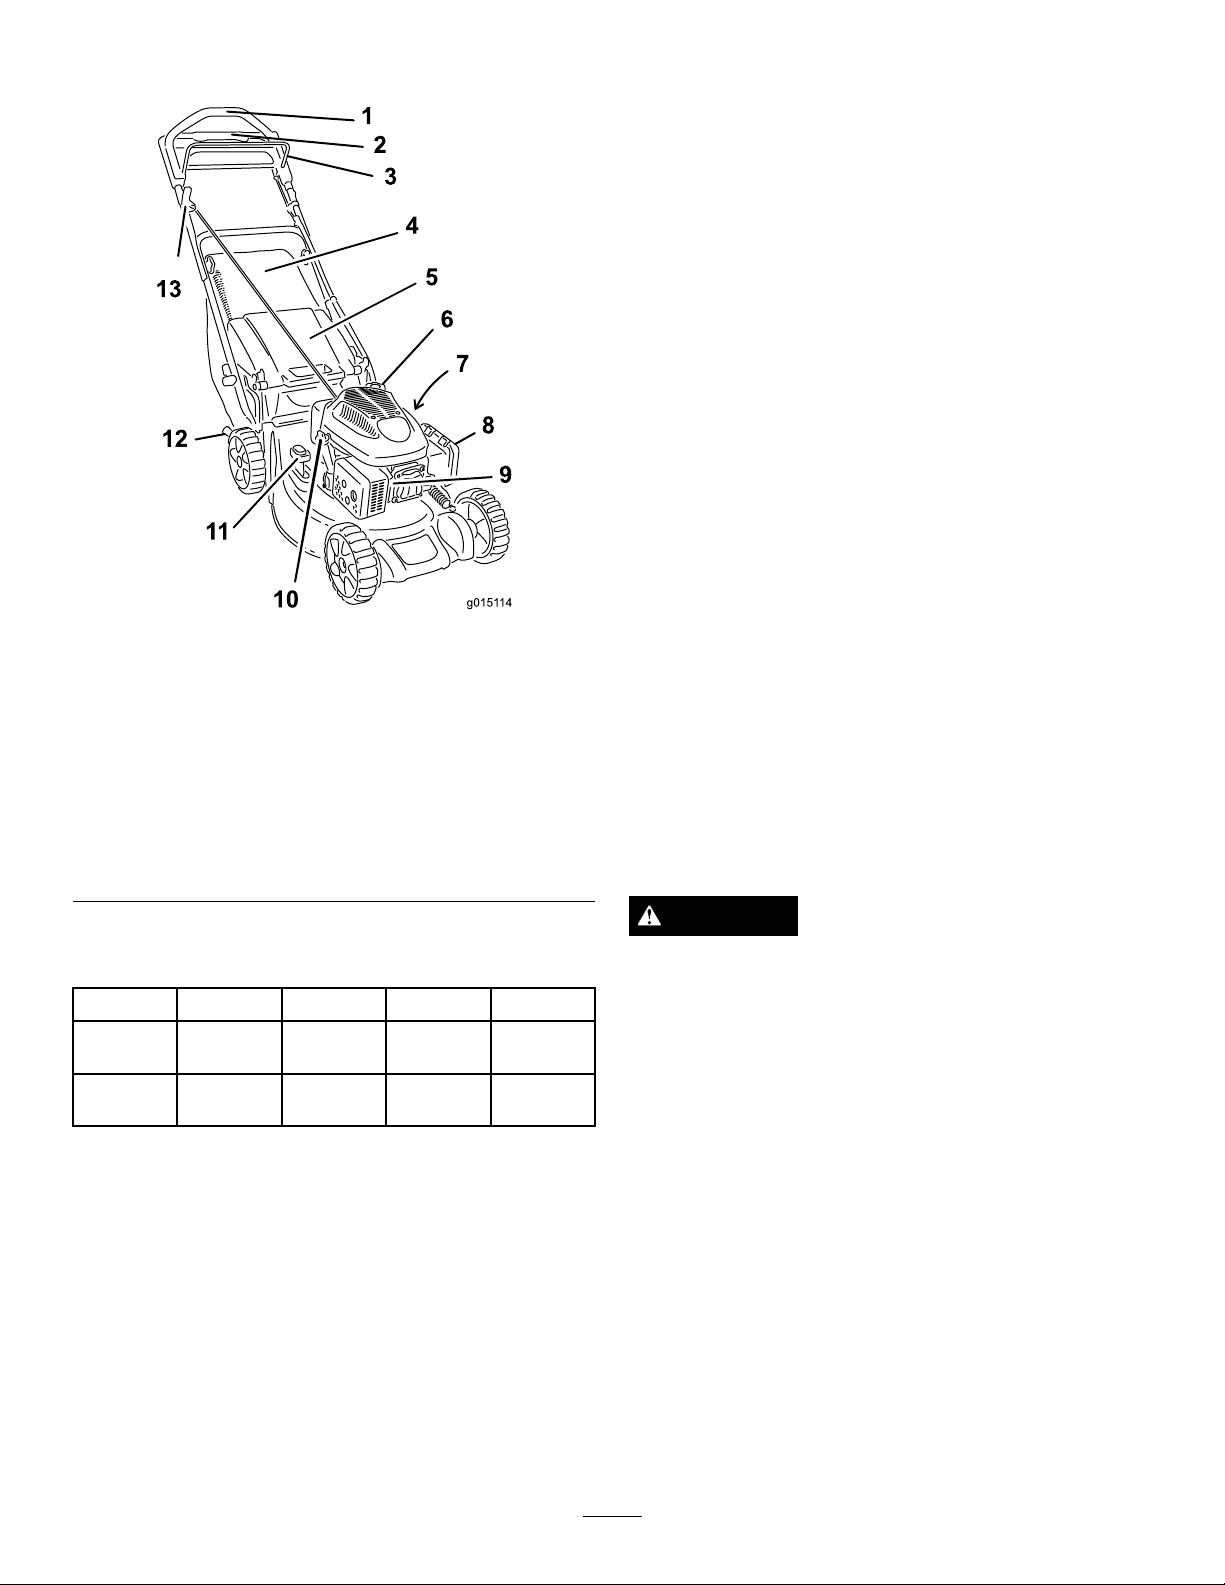
ProductOverview
Figure7
1.Upperhandle
2.Traction-assisthandle
3.Blade-controlbar
4.Grassbag
5.Rear-deectordoor12.Cutting-heightlever(2)
6.Fuel-tankcap13.Recoil-starthandle
7.Washoutport(notshown;
model20836only)
8.Airlter
9.Sparkplug
10.Oil-lltube/dipstick
11.Bag-on-demandlever
(model20836only)
Operation
FillingtheFuelTank
RecommendedFuel:
•Forbestresults,useonlyclean,fresh(lessthan30days
old),unleadedgasolinewithanoctaneratingof87or
higher((R+M)/2ratingmethod).
•Ethanol:Gasolinewithupto10%ethanol(gasohol)
or15%MTBE(methyltertiarybutylether)byvolume
isacceptable.EthanolandMTBEarenotthesame.
Gasolinewith15%ethanol(E15)byvolumeisnot
approvedforuse.Neverusegasolinethatcontains
morethan10%ethanolbyvolume,suchasE15
(contains15%ethanol),E20(contains20%ethanol),or
E85(containsupto85%ethanol).Usingunapproved
gasolinemaycauseperformanceproblemsand/orengine
damagewhichmaynotbecoveredunderwarranty.
•Donotusegasolinecontainingmethanol.
•Donotstorefueleitherinthefueltankorfuelcontainers
overthewinterunlessafuelstabilizerisused.
•Donotaddoiltogasoline.
Important:Toreducestartingproblems,addfuel
stabilizertothefuelallseason,mixingitwithgasoline
lessthan30daysold;runthemachinedrybeforestoring
itformorethan30days.
Donotusefueladditivesotherthanafuel
stabilizer/conditioner.Donotusefuelstabilizers
withanalcoholbasesuchasethanol,methanol,or
isopropanol.
Specications
ModelWeightLengthWidthHeight
2083538kg
(84lb)
2083639kg
(86lb)
152cm
(60in)
152cm
(60in)
DANGER
Gasolineisextremelyammableandexplosive.A
reorexplosionfromgasolinecanburnyouand
others.
53cm
(21in)
53cm
(21in)
109cm
(43in)
109cm
(43in)
•Topreventastaticchargefromignitingthe
gasoline,placethecontainerand/ormachine
directlyonthegroundbeforelling,notina
vehicleoronanobject.
•Fillthetankoutdoorswhentheengineiscold.
Wipeupspills.
•Donothandlegasolinewhensmokingoraround
anopenameorsparks.
•Storegasolineinanapprovedfuelcontainer,out
ofthereachofchildren.
1.Cleanaroundthefuel-tankcap,andremovethecap
fromthetank(Figure8).
7
Page 8
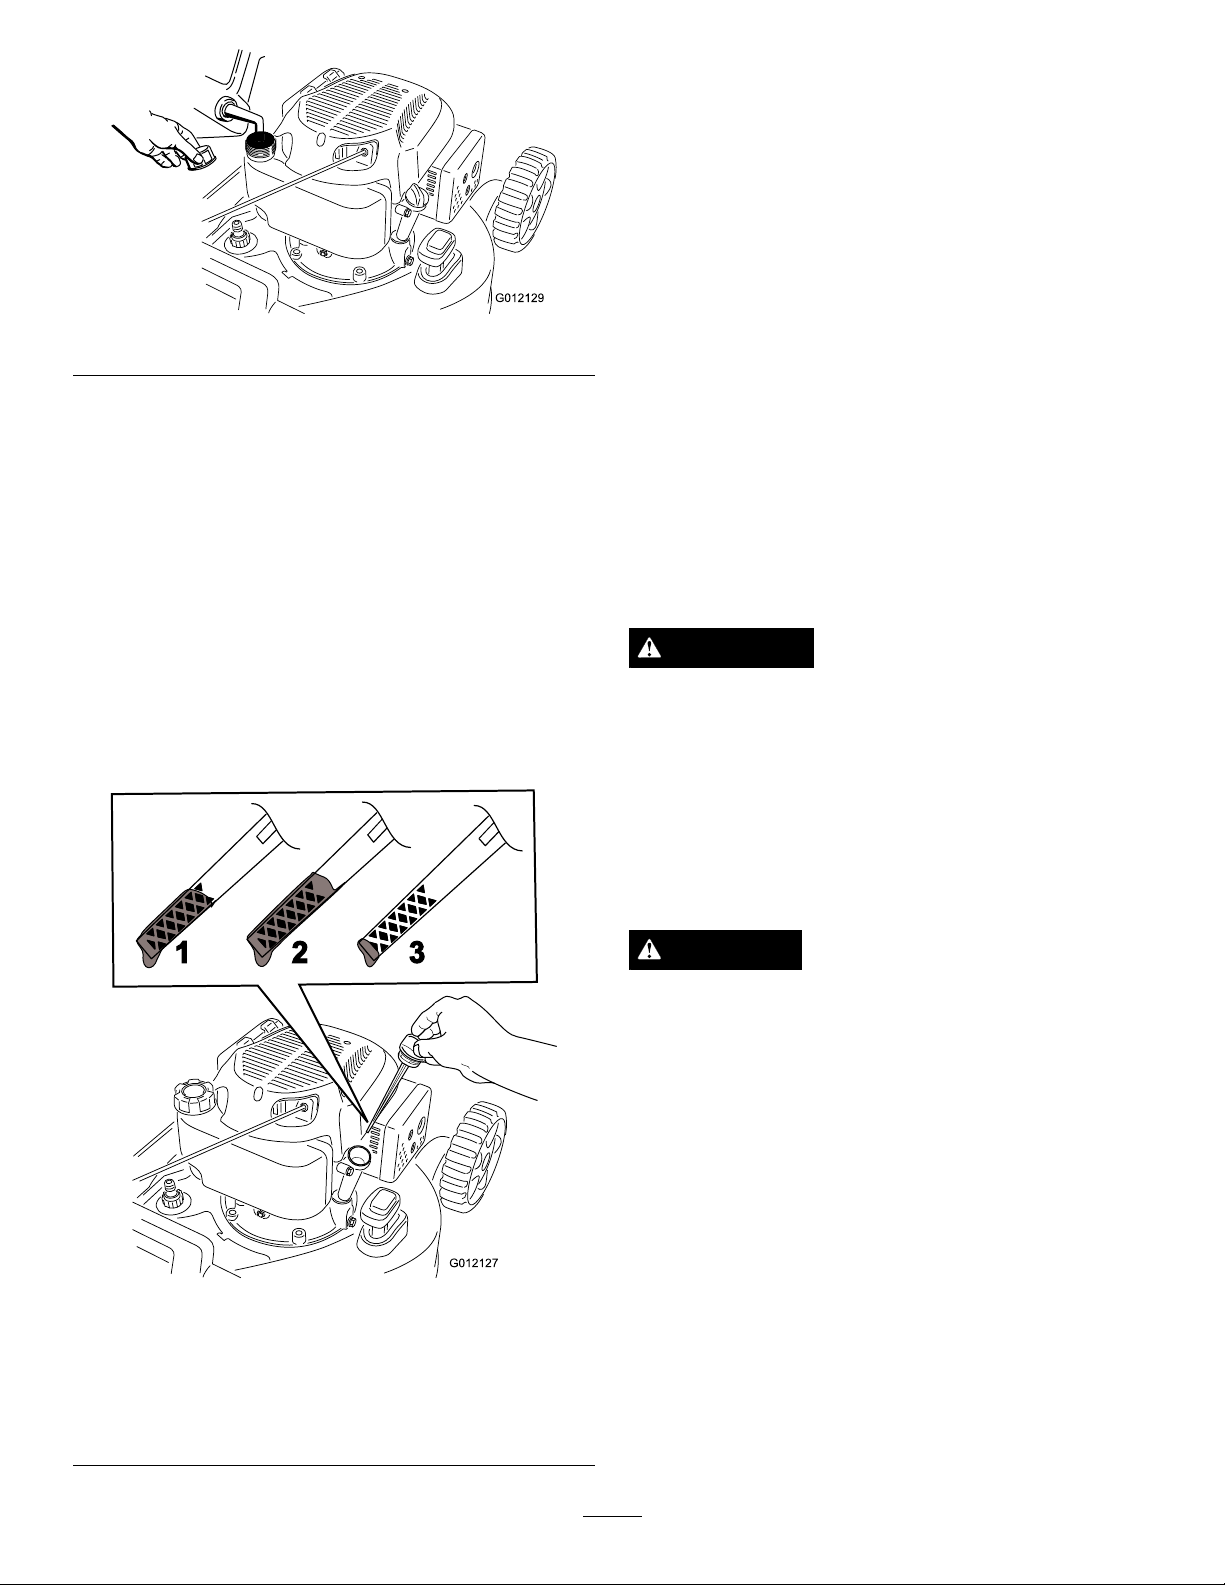
3.Wipeoffthedipstickendwithacleancloth.
4.Insertthedipstickintotheoil-lltube,butdonot
screwitin.
5.Removethedipstickandreadtheoillevelonthe
dipstick(Figure9).
•Iftheoillevelistoolow ,addasmallamountof
oilslowlytotheoil-lltube,andthenrepeatsteps
3through5untiltheoillevelonthedipstickis
correct.
Figure8
2.Fillthefueltank,leavingatleast1cm(1/2inch)from
thebottomoftheneckemptytoallowthegasoline
roomtoexpand.
3.Installthefueltankcapandtightenitsecurelybyhand.
CheckingtheEngineOilLevel
ServiceInterval:Beforeeachuseordaily—Checktheengine
oillevel.
Note:Max.ll:0.59l(20oz),type:SAE30orSAE10W -30
detergentoilwithanAPIserviceclassicationofSF ,SG,SH,
SJ,SL,orhigher.
1.Movethemachinetoalevelsurface.
2.Removethedipstick(Figure9).
•Iftheoillevelistoohigh,draintheexcessoiluntil
theoillevelonthedipstickiscorrect.Todrainthe
excessoil,refertoChangingtheEngineOil(page
14).
Important:Iftheoillevelinthecrankcaseis
toolowortoohighandyouruntheengine,
youmaydamagetheengine.
6.Installthedipsticksecurely.
AdjustingtheCuttingHeight
WARNING
Adjustingthecuttingheightmaybringyouinto
contactwiththemovingblade,causingserious
injury.
•Stoptheengineandwaitforallmovingparts
tostop.
•Donotputyourngersunderthehousingwhen
adjustingthecuttingheight.
1.Theoillevelisatits
maximum.
2.Theoillevelistoo
high—removeoilfrom
thecrankcase.
CAUTION
Iftheenginehasbeenrunning,themuferwillbe
hotandcanseverelyburnyou.Keepawayfromthe
hotmufer.
Adjustthecuttingheightasdesired.
Note:Toraisethemachine,movebothcutting-heightlevers
forward;tolowerthemachine,movethemrearward(Figure
10).
Figure9
3.Theoillevelistoo
low—addoiltothe
crankcase.
8
Page 9
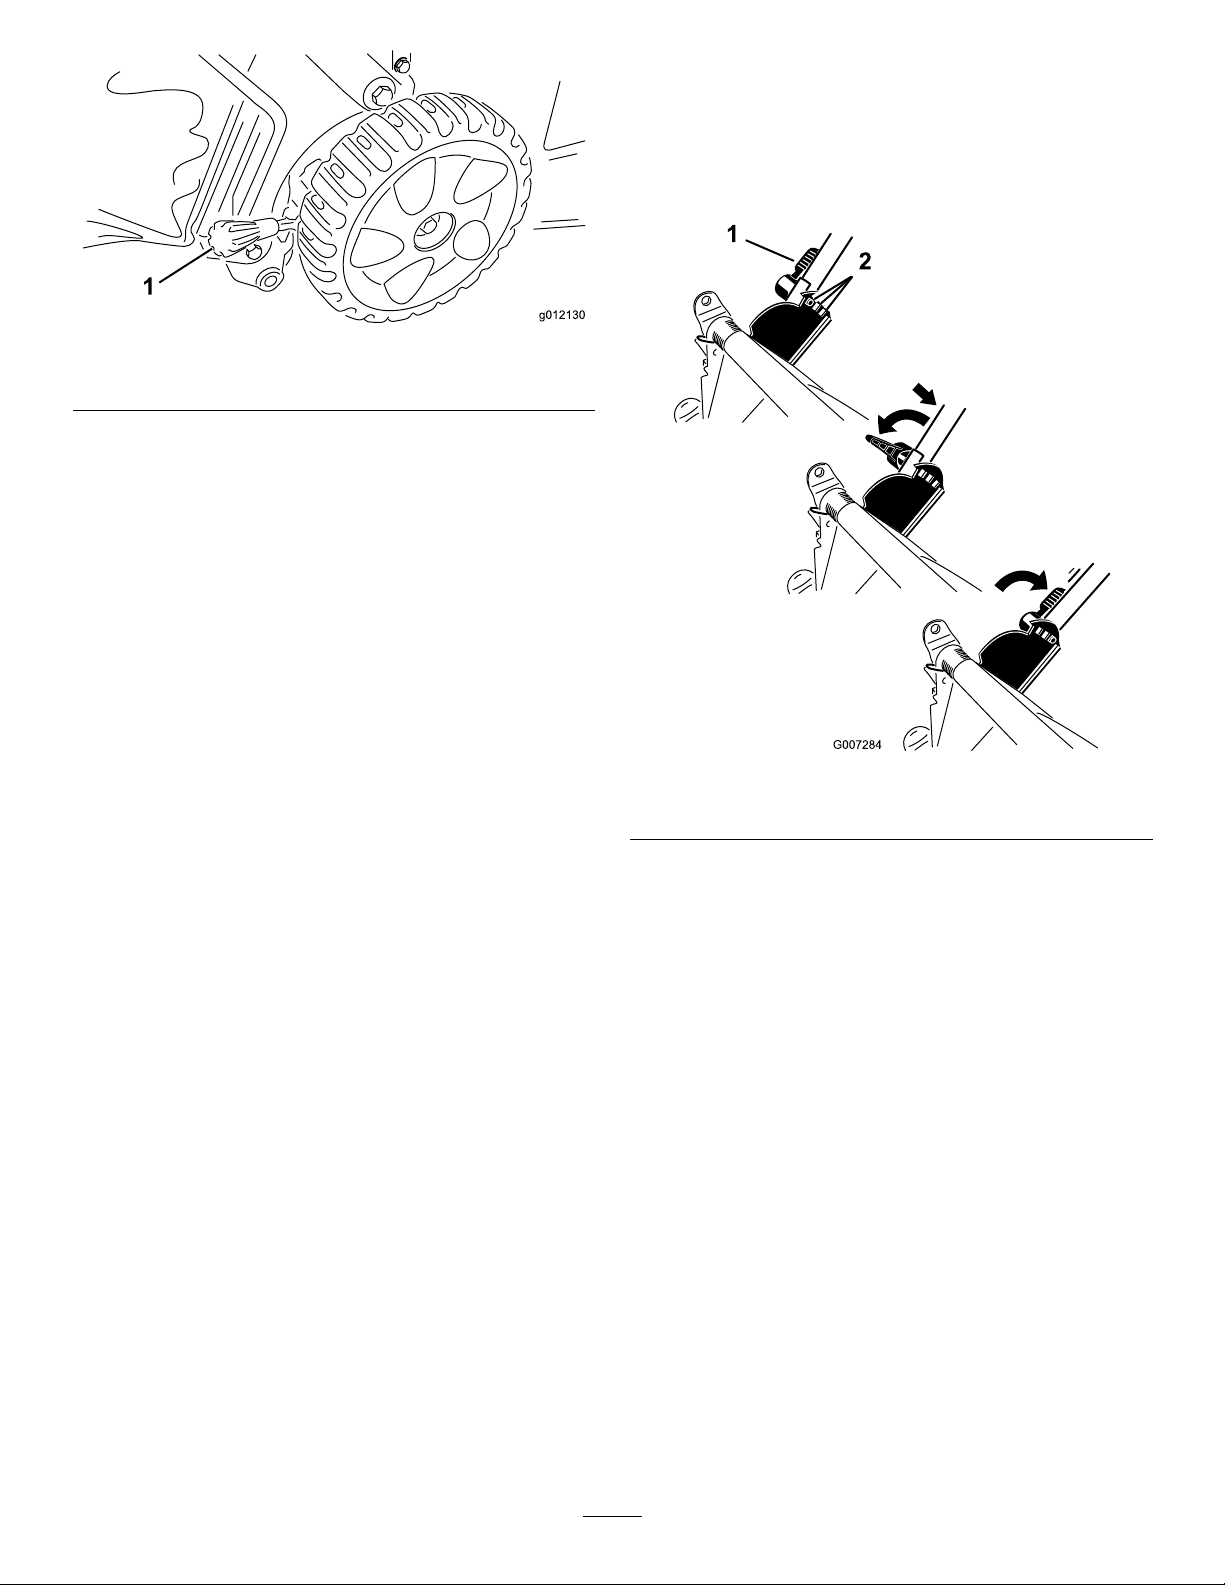
Figure10
1.Cutting-heightlever
Note:TheapproximatecuttingheightsettingsareA=25
mm(1inch);B=38mm(1-1/2inch);C=51mm(2inches);
D=64mm(2-1/2inches);E=83mm(3-1/4inches);F=95
mm(3-3/4inches);andG=108mm(4-1/4inches).
AdjustingtheHandleHeight
Youmayraiseorlowertheupperhandletoaposition
comfortableforyou.
Rotatethehandlelock,movethehandleto1of3positions,
andlockthehandleintoposition(Figure11).
Figure11
1.Handlelock2.Handlepositions
9
Page 10
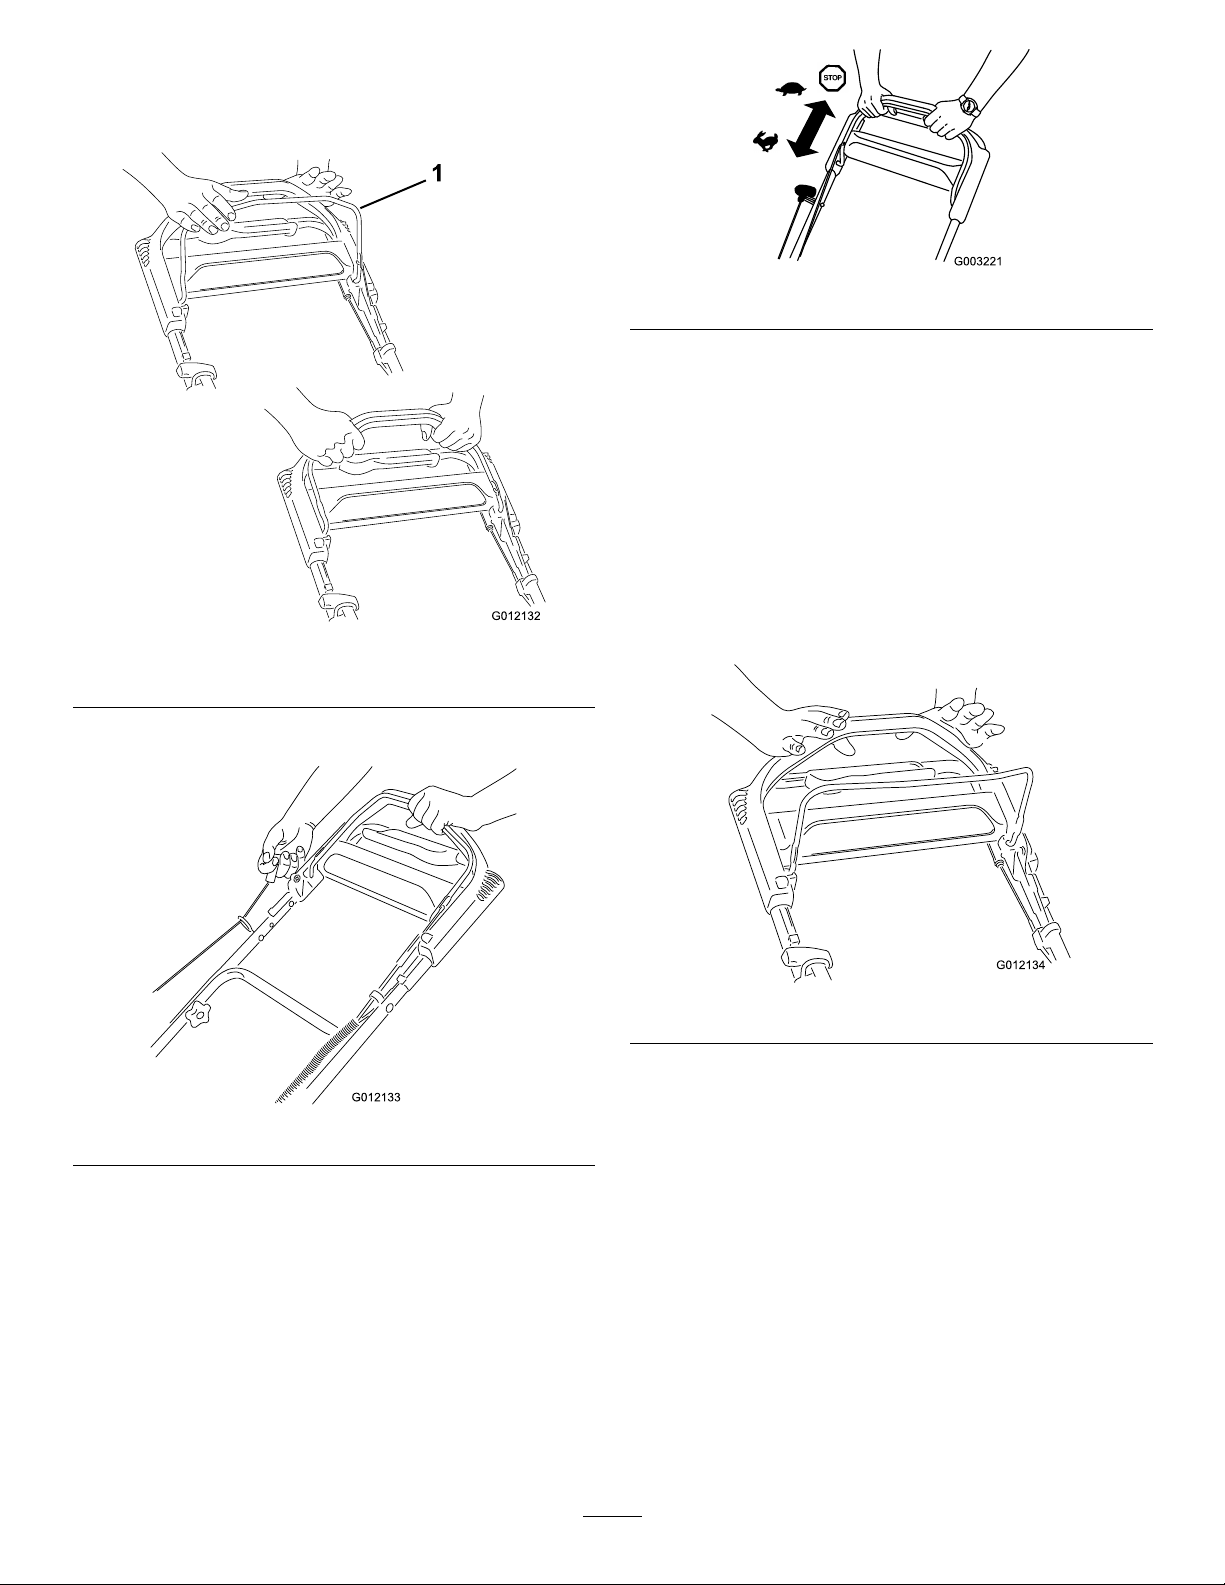
StartingtheEngine
1.Holdtheblade-controlbar(Figure12)againstthe
handle.
Figure12
Figure14
StoppingtheEngine
ServiceInterval:Beforeeachuseordaily—Ensurethat
theenginestopswithin3secondsafter
releasingthebladecontrolbar.
Tostoptheengine,releasetheblade-controlbar(Figure15).
Important:Whenyoureleasetheblade-controlbar,
boththeengineandbladeshouldstopwithin3seconds.
Iftheydonotstopproperly,stopusingyourmachine
immediatelyandcontactanAuthorizedServiceDealer.
1.Blade-controlbar
2.Pulltherecoil-starthandle(Figure13).
Figure13
Note:Ifthemachinedoesnotstartafterseveral
attempts,contactanAuthorizedServiceDealer.
Figure15
UsingtheSelf-propelDrive
Tooperatetheself-propeldrive,simplywalkwithyourhands
ontheupperhandleandyourelbowsatyoursides,andthe
machinewillautomaticallykeeppacewithyou(Figure14).
10
Page 11
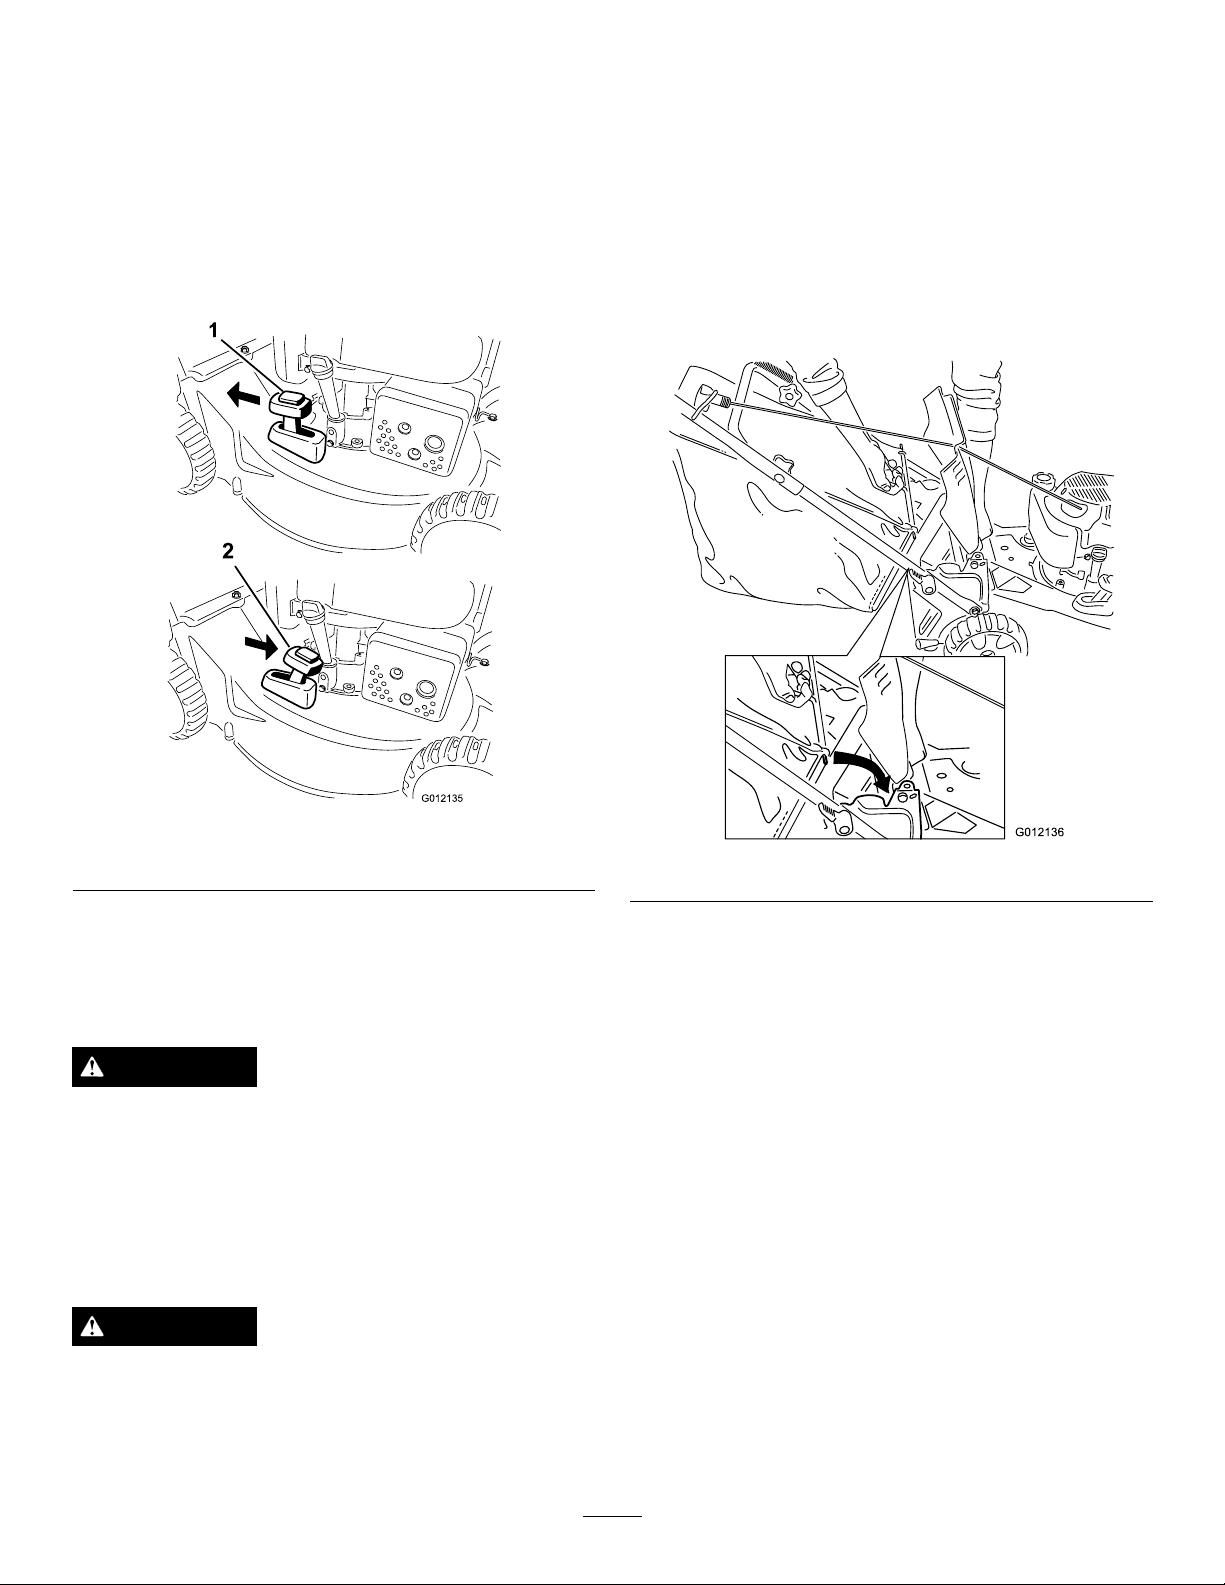
RecyclingtheClippings
Model20836only
Yourmachinecomesfromthefactoryreadytorecyclethe
grassandleafclippingsbackintothelawn.
Note:Thegrassbagmayremainonthemachinewhileyou
arerecyclingtheclippings.
1.Stoptheengineandwaitforallmovingpartstostop.
2.Installthegrassbag;refertoRemovingtheGrassBag
(page11)andmovethebag-on-demandlevertothe
baggingmode(model20836only)asshowninFigure
16.
InstallingtheGrassBag
Torecycletheclippings,movethebag-on-demandleverto
therecyclingmode(
Figure16).
Figure16
1.Stoptheengineandwaitforallmovingpartstostop.
2.Raiseandholdupthereardoor,installthebaginthe
notches,andlowerthereardoor(Figure17).
1.Recyclingmode2.Baggingmode
BaggingtheClippings
Usethegrassbagwhenyouwanttocollectgrassandleaf
clippingsfromthelawn.
WARNING
Aworngrassbagcouldallowsmallstonesandother
similardebristobethrowntowardtheoperatoror
abystanderandresultinseriouspersonalinjuryor
death.
Checkthegrassbagfrequently.Ifitisdamaged,
installanewTororeplacementbag.
WARNING
Thebladeissharp;contactingthebladecanresult
inseriouspersonalinjury.
Stoptheengineandwaitforallmovingpartstostop
beforeleavingtheoperatingposition.
Figure17
RemovingtheGrassBag
1.Stoptheengineandwaitforallmovingpartstostop.
2.Liftupthegrassbagupandawayfromthehandle.
Note:Tiltthegrassbagslightlybackwardtoprevent
thecollectedgrassclippingsfromfallingout.
Rear-dischargingthe Clippings
Usethereardischargeforcuttingverytallgrass.
Note:Ifthegrassbagisonthemachine,removeitbefore
rear-dischargingtheclippings;refertoRemovingtheGrass
Bag(page11).Thebag-on-demandlevershouldbeinthe
baggingmode(model20836only)asshowninFigure16.
11
Page 12

WARNING
Thebladeissharp;contactingthebladecanresult
inseriouspersonalinjury.
Stoptheengineandwaitforallmovingpartstostop
beforeleavingtheoperatingposition.
OperatingTips
–Setthecuttingheightonthefrontwheelsonenotch
lowerthantherearwheels.Forexample,setthefront
wheelsat51mm(2inches)andtherearwheelsat64
mm(2-1/2inches).
CuttingLeaves
•Aftercuttingthelawn,ensurethathalfofthelawnshows
throughthecutleafcover.Youmayneedtomakemore
thanonepassovertheleaves.
GeneralMowingTips
•Cleartheareaofsticks,stones,wire,branches,andother
debristhatthebladecouldhit.
•Avoidstrikingsolidobjectswiththeblade.Never
deliberatelymowoveranyobject.
•Ifthemachinestrikesanobjectorstartstovibrate,
immediatelystoptheengine,disconnectthewirefrom
thesparkplug,andexaminethemachinefordamage.
•Forbestperformance,installanewbladebeforethe
cuttingseasonbegins.
•ReplacethebladewhennecessarywithaToro
replacementblade.
CuttingGrass
•Cutonlyaboutathirdofthegrassbladeatatime.Donot
cutbelowthe51mm(2inch)settingunlessthegrassis
sparseoritislatefallwhengrassgrowthbeginstoslow
down.RefertoAdjustingtheCuttingHeight(page8).
•Whencuttinggrassover15cm(6inches)tall,mowatthe
highestcuttingheightsettingandwalkslower;thenmow
againatalowersettingforthebestlawnappearance.If
thegrassistoolong,themachinemaybecomeclogged
andcausetheenginetostall.
•Mowonlydrygrassorleaves.Wetgrassandleavestend
toclumpontheyardandcancausethemachineto
becomecloggedortheenginetostall.
•Iftherearemorethan13cm(5inches)ofleavesonthe
lawn,setthefrontcuttingheight1or2notcheshigher
thantherearcuttingheight.
•Slowdownyourmowingspeedifthemachinedoesnot
cuttheleavesnelyenough.
WARNING
Wetgrassorleavescancauseseriousinjuryif
youslipandcontacttheblade.Mowonlyindry
conditions.
•Alternatethemowingdirection.Thishelpsdispersethe
clippingsoverthelawnforevenfertilization.
•Ifthenishedlawnappearanceisunsatisfactory,tryone
ormoreofthefollowing:
–Replacethebladeorhaveitsharpened.
–Walkataslowerpacewhilemowing.
–Raisethecuttingheightonthemachine.
–Cutthegrassmorefrequently.
–Overlapcuttingswathsinsteadofcuttingafullswath
witheachpass.
12
Page 13
Maintenance
Note:Determinetheleftandrightsidesofthemachinefromthenormaloperatingposition.
RecommendedMaintenanceSchedule(s)
MaintenanceService
Interval
Aftertherst5hours
Beforeeachuseordaily
Aftereachuse
Every100hours
Beforestorage
Yearly
MaintenanceProcedure
•Changetheengineoil.
•Checktheengineoillevel.
•Ensurethattheenginestopswithin3secondsafterreleasingthebladecontrolbar.
•Cleanunderthemachinehousing.
•Servicethesparkplug.
•Emptythefueltankbeforerepairsasdirectedandbeforeannualstorage.
•Cleantheairlter(morefrequentlyindustyoperatingconditions).
•Changetheengineoil.
•Replacethebladeorhaveitsharpened(morefrequentlyiftheedgedullsquickly).
•RefertoyourEngineOperator'sManualforanyadditionalyearlymaintenance
procedures.
PreparingforMaintenance
1.Stoptheengineandwaitforallmovingpartstostop.
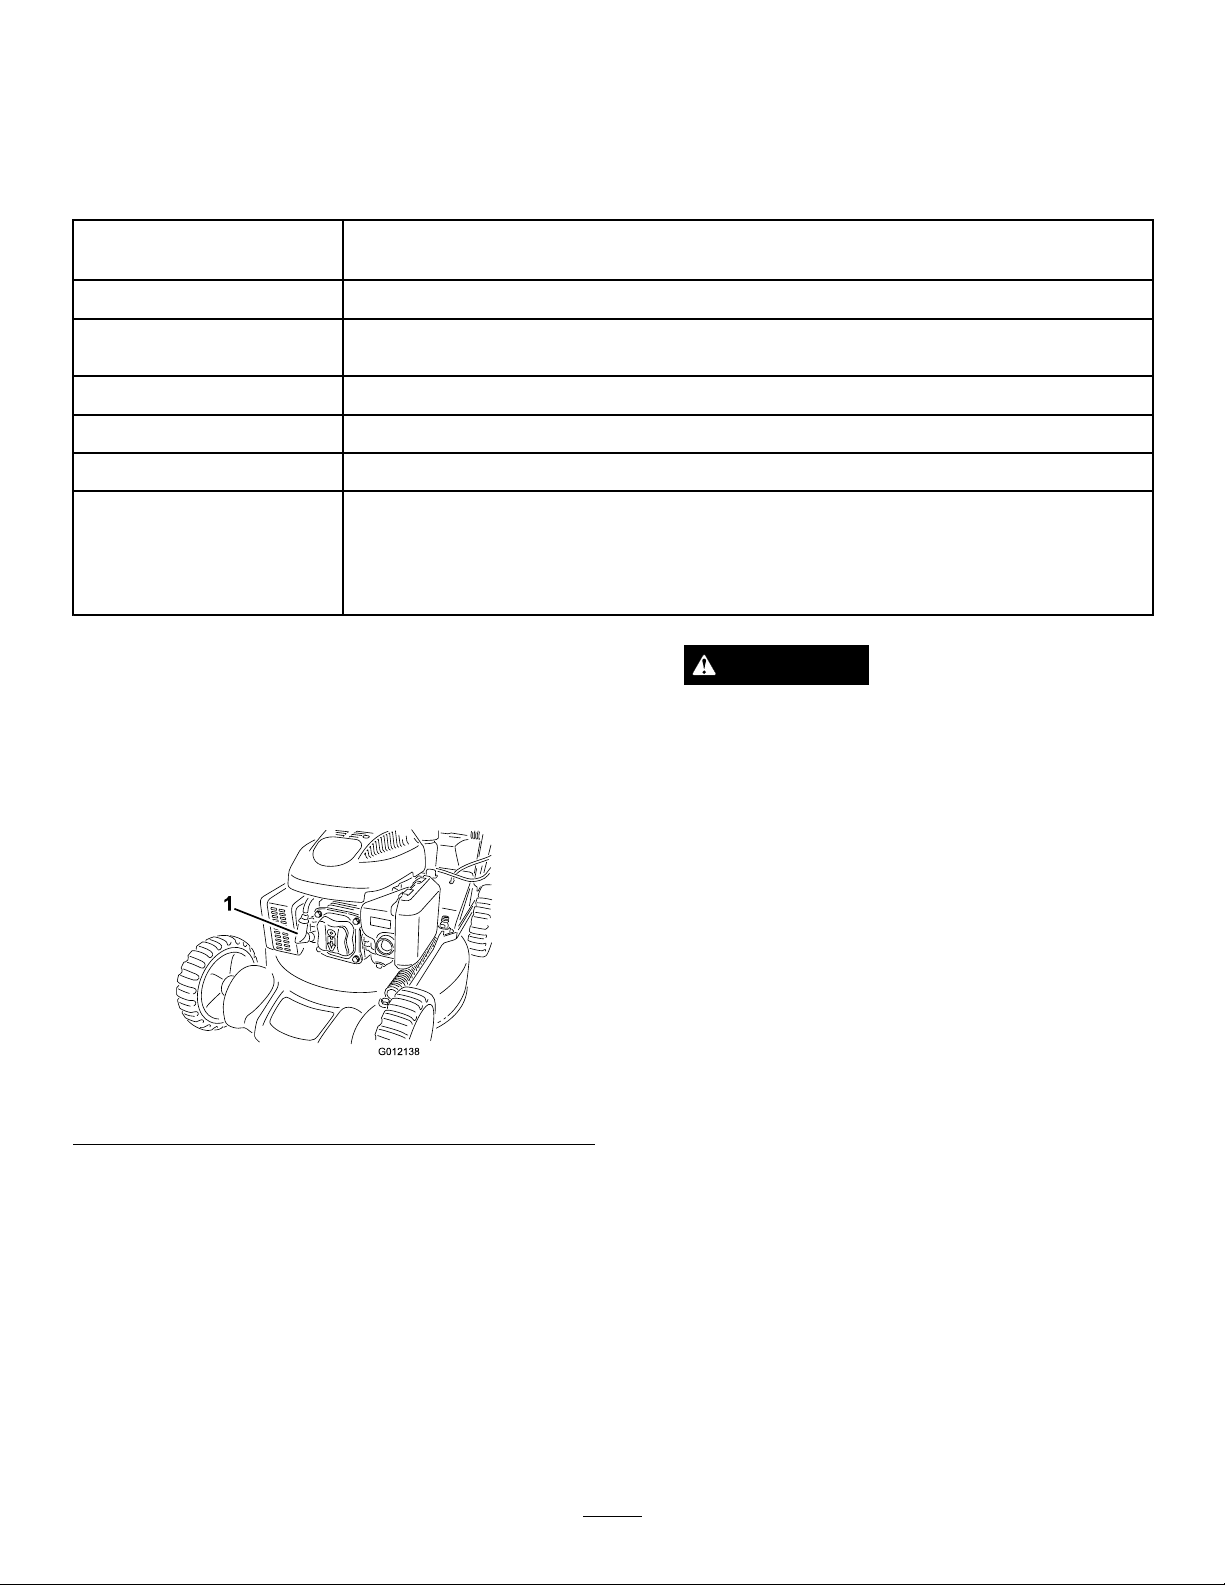
2.Disconnectthespark-plugwirefromthesparkplug
(Figure18)beforeperforminganymaintenance
procedure.
WARNING
Tippingthemachinemaycausethefuelto
leak.Gasolineisammableandexplosive,
andcancausepersonalinjury.
Runtheenginedryorremovethegasoline
withahandpump;neversiphon.
Figure18
1.Spark-plugwire
3.Afterperformingthemaintenanceprocedure(s),
connectthespark-plugwiretothesparkplug.
Important:Beforetippingthemachinetochange
theoilorreplacetheblade,allowthefueltankto
rundrythroughnormalusage.Ifyoumusttip
themachinepriortorunningoutoffuel,usea
handfuelpumptoremovethefuel.Alwaystipthe
machineontoitssidewiththedipstickdown.
13
Page 14
ServicingtheAirCleaner
ChangingtheEngineOil
ServiceInterval:Yearly
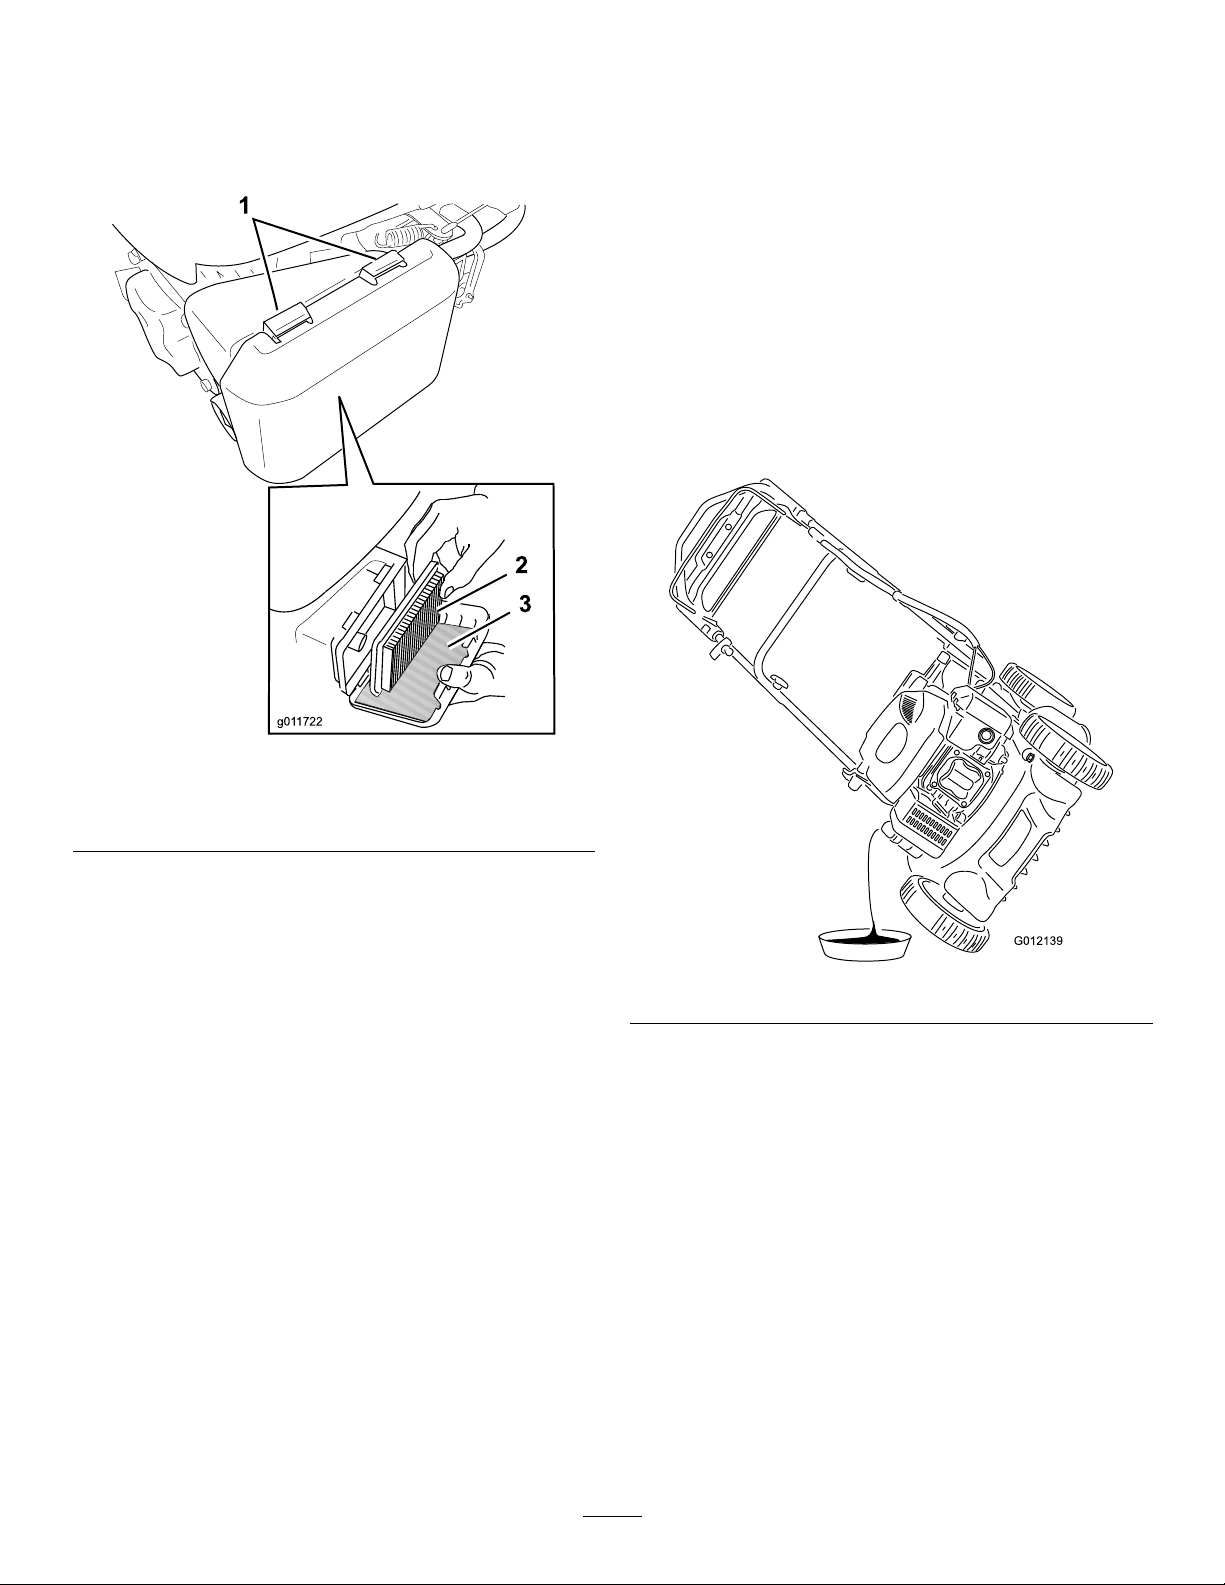
1.Pressdownonthelatchtabsontopoftheair-cleaner
Figure19).
cover(
ServiceInterval:Aftertherst5hours
Yearly
1.Movethemachinetoalevelsurface.
2.Runtheengineafewminutesbeforechangingtheoil
towarmit.
Note:Warmoilowsbetterandcarriesmore
contaminants.
3.Disconnectthespark-plugwirefromthesparkplug;
referto
4.Tipthemachineontoitsside,withthedipstickdown,
todraintheusedoiloutthroughtheoil-lltubeinto
anoildrainpan(Figure20).
PreparingforMaintenance(page13).
Figure19
1.Latchtabs
2.Paperairlter
2.Openthecover.
3.Removethepaperairlterandthefoampre-lter
(Figure19).
4.Inspectthefoampre-lter,andreplaceitifitis
damagedorexcessivelydirty.
5.Inspectthepaperairlter.
A.Ifthepaperairlterisdamagedoriswetwithoil
orfuel,replaceit.
B.Ifthepaperairlterisdirty,tapitonahard
surfaceseveraltimesorblowcompressedairless
than30psi(207kPa)throughthesideofthelter
thatfacestheengine.
Note:Donotbrushthedirtoffthelter;
brushingforcesdirtintothebers.
6.Removedirtfromtheaircleanerbodyandcoverusing
amoistrag.Donotwipedirtintotheairduct.
7.Insertthefoampre-lterandthepaperairlterinto
theaircleaner.
3.Foampre-lter
Figure20
5.Afterdrainingtheusedoil,returnthemachinetothe
operatingposition.
6.Pourabout3/4ofthecrankcasecapacityofoilinto
theoil-lltube.
Note:Max.ll:0.59l(20oz),type:SAE30orSAE
10W-30detergentoilwithanAPIserviceclassication
ofSF,SG,SH,SJ,SL,orhigher.
7.Wipeoffthedipstickendwithacleancloth.
8.Insertthedipstickintotheoil-lltube,butdonot
screwitin.
9.Removethedipstickandreadtheoillevelonthe
dipstick(Figure21).
8.Installthecover.
14
Page 15
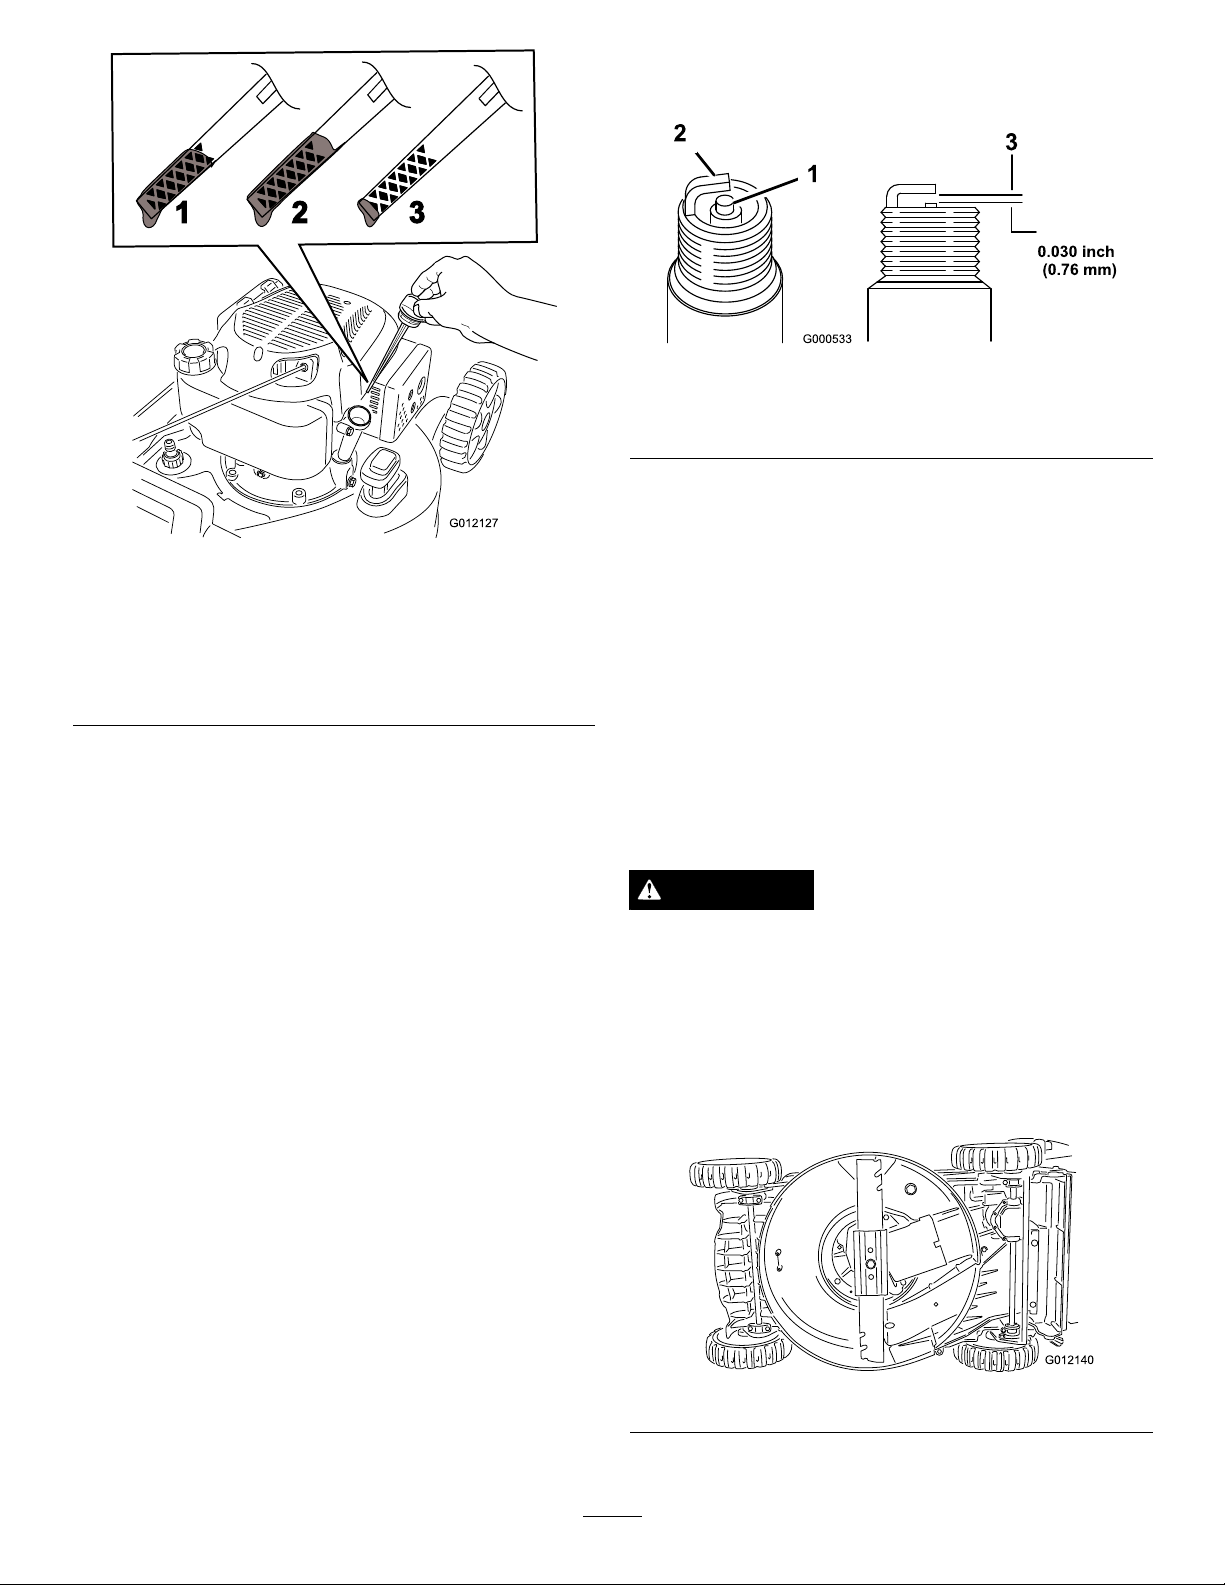
Figure21
5.Setthegapontheplugto0.76mm(0.030in)asshown
inFigure22.
Figure22
1.Centerelectrodeinsulator3.Airgap(nottoscale)
2.Sideelectrode
6.Installthesparkplugandthegasketseal.
7.Torquetheplugto15ft-lb(20N-m).
8.Connectthewiretothesparkplug.
1.Theoillevelisatits
maximum.
2.Theoillevelistoo
high—removeoilfrom
thecrankcase.
3.Theoillevelistoo
low—addoiltothe
crankcase.
•Iftheoillevelistoolow,addasmallamount
ofoilslowlytotheoil-lltube,andthenrepeat
stepsthrough9untiltheoillevelonthedipstickis
correct.
•Iftheoillevelistoohigh,draintheexcessoiluntil
theoillevelonthedipstickiscorrect.Todrainthe
excessoil,refertoChangingtheEngineOil(page
14).
Important:Iftheoillevelinthecrankcaseis
toolowortoohighandyouruntheengine,
youmaydamagetheengine.
10.Installthedipsticksecurely.
11.Recycletheusedoilproperly.
ServicingtheSparkPlug
ReplacingtheBlade
ServiceInterval:Yearly
Important:
blade pr oper l y
areuncomfortableperformingthisprocedure,contact
anAuthorizedServiceDealer.
Examinethebladewheneveryourunoutofgasoline.Ifthe
bladeisdamagedorcracked,replaceitimmediately.Ifthe
bladeedgeisdullornicked,haveitsharpenedorreplaceit.
WARNING
Thebladeissharp;contactingthebladecanresult
inseriouspersonalinjury.
Weargloveswhenservicingtheblade.
1.Disconnectthespark-plugwirefromthesparkplug;
refertoPreparingforMaintenance(page13).
2.Tipthemachineontoitsside(Figure23),withthe
dipstickdown.
Y ou will need a torque wr ench to install the
.Ifyoudonothaveatorquewrenchor
ServiceInterval:Every100hours
UseanChampionRN9YCsparkplugorequivalent.
1.Stoptheengineandwaitforallmovingpartstostop.
2.Disconnectthewirefromthesparkplug(Figure18).
3.Cleanaroundthesparkplug.
4.Removethesparkplugfromthecylinderhead.
Important:Replaceacracked,fouled,ordirty
sparkplug.Donotcleantheelectrodesbecause
gritenteringthecylindercandamagetheengine.
Figure23
3.Useablockofwoodtoholdthebladesteady .
15
Page 16
4.Removethebladebyturningthebladebolt
counterclockwise.
Note:Saveallthemountinghardware.
5.Installthenewbladeusingthemountinghardwarethat
youremovedinstep4.
6.Useatorquewrenchtotightenthebladeboltto
82N-m(60ft-lb).
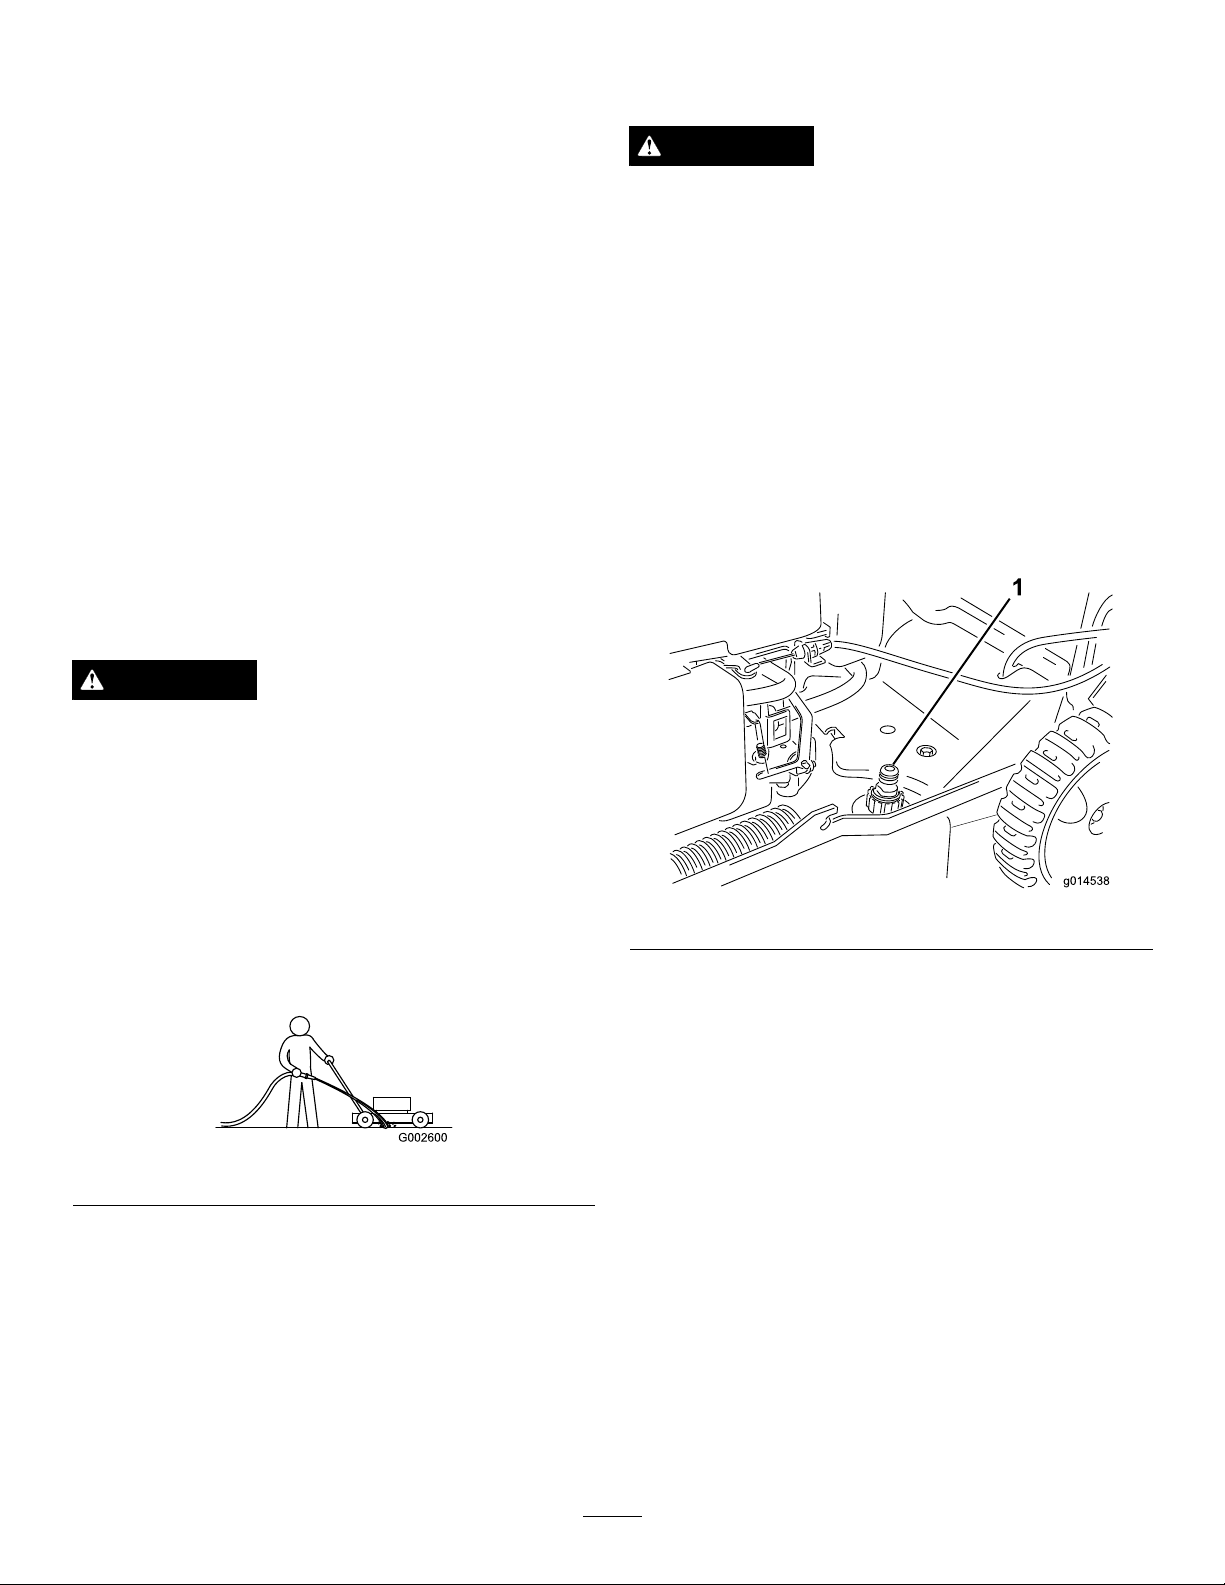
CleaningundertheHousingwitha
WashoutPort(Model20836only)
WARNING
Themachinemaydislodgematerialfromunderthe
machinehousing.
•Weareyeprotection.
Important:Abolttorquedto82N-m(60ft-lb)is
verytight.Whileholdingthebladewithablock
ofwood,putyourweightbehindtheratchetor
wrenchandtightentheboltsecurely.Thisboltis
verydifculttoovertighten.
CleaningundertheMachine Housing
ServiceInterval:Aftereachuse
CleaningundertheHousingwithouta
WashoutPort(Model20835only)
WARNING
Themachinemaydislodgematerialfromunderthe
machinehousing.
•Weareyeprotection.
•Stayintheoperatingposition(behindthe
handle)whentheengineisrunning.
•Stayintheoperatingposition(behindthe
handle)whentheengineisrunning.
•Donotallowbystandersinthearea.
1.Lowerthemachinetoitslowestcuttingheightsetting;
refertoAdjustingtheCuttingHeight(page8).
2.Movethemachineontoaatpavedsurface.
3.Attachagardenhosethatisconnectedtoawater
supplytothewashoutportonthemachinehousing
(Figure25).
•Donotallowbystandersinthearea.
1.Withtheenginerunningonaatpavedsurface,spraya
streamofwaterinfrontoftherightrearwheel(Figure
24).
Figure24
Note:Thewaterwillsplashintothepathoftheblade,
cleaningouttheclippings.
2.Whennomoreclippingscomeout,stopthewaterand
movethemachinetoadryarea.
3.Runtheengineforafewminutestodrythemachine
housing.
Figure25
4.Turnthewateron.
5.Starttheengineandrunituntilnomoreclippings
comeoutfromunderthemachinehousing.
6.Stoptheengine.
7.Shutoffthewateranddisconnectthegardenhose
fromthemachine.
8.Starttheengineandrunitforafewminutestodry
thehousing.
16
Page 17

Storage
5.Checktheengineoillevel;refertoCheckingtheEngine
OilLevel(page8).
Storethemachineinacool,clean,dryplace.
PreparingtheMachinefor Storage
WARNING
Gasolinevaporscanexplode.
•Donotstoregasolinemorethan30days.
•Donotstorethemachineinanenclosurenear
anopename.
•Allowtheenginetocoolbeforestoringit.
1.Onthelastrefuelingoftheyear,addfuelstabilizerto
thefuelasdirectedbytheenginemanufacturer.
2.Runthemachineuntiltheenginestopsfromrunning
outoffuel.
3.Startitagain.
4.Allowtheenginetorununtilitstops.Whenyoucan
nolongerstarttheengine,itissufcientlydry.
6.Fillthefueltankwithfreshgasoline;refertoFillingthe
FuelTank(page7).
7.Connectthewiretothesparkplug.
5.Disconnectthewirefromthesparkplug.
6.Removethesparkplug,add30mlofoilthrough
thesparkplughole,andpullthestarterropeslowly
severaltimestodistributeoilthroughoutthecylinder
topreventcylindercorrosionduringtheoff-season.
7.Looselyinstallthesparkplug.
8.Tightenallnuts,bolts,andscrews.
FoldingtheHandle
1.Rotatethehandleforward(Figure26).
Important:Routethecablestotheoutsideofthe
handleknobsasyoufoldtheupperhandle.
2.Tounfoldthehandle,referto1UnfoldingtheHandle
(page5).
RemovingtheMachinefrom Storage
1.Checkandtightenallfasteners.
2.Removethesparkplugandspintheenginerapidlyto
blowexcessoilfromthecylinder.
3.Installthesparkplugandtightenitwithatorque
wrenchto20N-m(15ft-lb).
4.Performanyneededmaintenanceprocedures;referto
PreparingforMaintenance(page13).
17
Page 18

Notes:
18
Page 19

InternationalDistributorList
Distributor:
AgrolancKft
BalamaPrimaEngineeringEquip.HongKong85221552163
B-RayCorporation
CascoSalesCompany
CeresS.A.CostaRica
CSSCTurfEquipment(pvt)Ltd.SriLanka
CyrilJohnston&Co.
CyrilJohnston&Co.RepublicofIreland
EquiverMexico525553995444ParklandProductsLtd.NewZealand6433493760
FemcoS.A.Guatemala
ForGarderOU
G.Y .K.CompanyLtd.
GeomechanikiofAthensGreece
GolfinternationalTurizm
GuandongGoldenStarChina
HakoGroundandGardenSweden
HakoGroundandGarden
HayterLimited(U.K.)
HydroturfInt.CoDubai
HydroturfEgyptLLC
IrrimacPortugal351212388260T oroEuropeNVBelgium3214562960
IrrigationProductsInt'lPvtLtd.India00914424494387ValtechMorocco212537663636
JeanHeybroekb.v .Netherlands31306394611VictusEmakPoland48618238369
Country:
Hungary3627539640
Korea82325512076
PuertoRico7877888383
NorthernIreland442890813121
Estonia3723846060
Japan81726325861
Turkey902163365993Riversa
Norway4722907760
UnitedKingdom441279723444
UnitedArabEmirates97143479479T-MarktLogisticsLtd.Hungary3626525500
Egypt2025194308ToroAustraliaAustralia61395807355
PhoneNumber:Distributor:
5062391138
94112746100
442890813121
5024423277
30109350054
862087651338
4635100000
MaquiverS.A.Colombia
MaruyamaMfg.Co.Inc.
Mountelda.s.CzechRepublic
Mountelda.s.Slovakia
MunditolS.A.
NormaGarden
OslingerTurfEquipmentSA
OyHakoGroundandGardenAb
Perfetto
PratoverdeSRL.
Prochaska&Cie
RTCohen2004Ltd.
LelyTurfcare
SolvertS.A.S.
SpyprosStavrinidesLimitedCyprus
SurgeSystemsIndiaLimited
Country:
Japan81332522285
Argentina541148219999
Russia74954116120
Ecuador59342396970
Finland35898700733
Poland48618208416
Italy390499128128
Austria4312785100
Israel97298617979
Spain
Denmark4566109200
France33130817700
India911292299901
PhoneNumber:
5712364079
420255704220
420255704220
34952837500
35722434131
EuropeanPrivacyNotice
TheInformationT oroCollects
ToroWarrantyCompany(T oro)respectsyourprivacy .Inordertoprocessyourwarrantyclaimandcontactyouintheeventofaproductrecall,weaskyou
tosharecertainpersonalinformationwithus,eitherdirectlyorthroughyourlocalT orocompanyordealer.
TheTorowarrantysystemishostedonserverslocatedwithintheUnitedStateswhereprivacylawmaynotprovidethesameprotectionasapplies
inyourcountry.
BYSHARINGYOURPERSONALINFORMA TIONWITHUS,YOUARECONSENTINGTOTHEPROCESSINGOFYOURPERSONALINFORMATION
ASDESCRIBEDINTHISPRIV ACYNOTICE.
TheW ayToroUsesInformation
Toromayuseyourpersonalinformationtoprocesswarrantyclaims,tocontactyouintheeventofaproductrecallandforanyotherpurposewhichwetell
youabout.T oromayshareyourinformationwithT oro'safliates,dealersorotherbusinesspartnersinconnectionwithanyoftheseactivities.Wewillnot
sellyourpersonalinformationtoanyothercompany .Wereservetherighttodisclosepersonalinformationinordertocomplywithapplicablelawsand
withrequestsbytheappropriateauthorities,tooperateoursystemsproperlyorforourownprotectionorthatofotherusers.
RetentionofyourPersonalInformation
Wewillkeepyourpersonalinformationaslongasweneeditforthepurposesforwhichitwasoriginallycollectedorforotherlegitimatepurposes
(suchasregulatorycompliance),orasrequiredbyapplicablelaw.
Toro'sCommitmenttoSecurityofY ourPersonalInformation
Wetakereasonableprecautionsinordertoprotectthesecurityofyourpersonalinformation.Wealsotakestepstomaintaintheaccuracyandcurrent
statusofpersonalinformation.
AccessandCorrectionofyourPersonalInformation
Ifyouwouldliketorevieworcorrectyourpersonalinformation,[email protected].
AustralianConsumerLaw
AustraliancustomerswillnddetailsrelatingtotheAustralianConsumerLaweitherinsidetheboxoratyourlocalT oroDealer.
374-0269RevH
Page 20

TheToroWarranty
TheToroGTSStartingGuarantee
ResidentialProducts
and
ConditionsandProductsCovered
TheT oroCompanyanditsafliate,T oroW arrantyCompany,pursuant
toanagreementbetweenthem,jointlypromisetorepairfortheoriginal
purchaser
workmanshiporiftheT oroGTS(GuaranteedtoStart)enginewillnotstart
ontherstorsecondpull,providedtheroutinemaintenancerequiredin
theOperator'sManualhavebeenperformed.
Thefollowingtimeperiodsapplyfromthedateofpurchase:
ProductsWarrantyPeriod
WalkPowerMowers
•CastDeck
•Engine
•Battery2years
•SteelDeck
•Engine
TimeMasterMowers3yearsResidentialUse
•Engine
•Battery2years
ElectricHandHeldProducts2yearsResidentialUse
Snowthrowers
•SingleStage
•Engine
•TwoStage
•Chute,chutedeectorand
impellerhousingcover
ElectricSnowthrowers
AllRide-OnUnitsBelow
•Engine
•Battery2yearsResidentialUse
•Attachments2yearsResidentialUse
DHLawn&GardenTractors
XLSLawn&GardenTractors
TimeCutter
TITANMowers3yearsor240hours
•Frame
1
OriginalPurchasermeansthepersonwhooriginallypurchasedtheT oroProduct.
2
Residentialusemeansuseoftheproductonthesamelotasyourhome.Useatmorethanone
locationisconsideredcommercialuseandthecommercialusewarrantywouldapply .
3
TheToroGTSStartingGuaranteedoesnotapplywhentheproductisusedcommercially .
4
SomeenginesusedonT oroProductsarewarrantedbytheenginemanufacturer.
5
Whicheveroccursrst.
6
LifetimeFrameW arranty-Ifthemainframe,consistingofthepartsweldedtogethertoformthe
tractorstructurethatothercomponentssuchastheenginearesecuredto,cracksorbreaksin
normaluse,itwillberepairedorreplaced,atT oro'soption,underwarrantyatnocostforparts
andlabor .Framefailureduetomisuseorabuseandfailureorrepairrequiredduetorustor
corrosionarenotcovered.
Warrantymaybedeniedifthehourmeterisdisconnected,altered,or
showssignsofbeingtamperedwith.
1
theT oroProductlistedbelowifdefectiveinmaterialsor
5yearsResidentialUse
90DaysCommercialUse
5yearsGTSGuarantee,
ResidentialUse
3
2yearsResidentialUse
30DaysCommercialUse
2yearsGTSGuarantee,
ResidentialUse
3
90DaysCommercialUse
3yearsGTSGuarantee,
ResidentialUse
3
NoWarrantyforCommercialUse
2yearsResidentialUse
45DaysCommercialUse
2yearsGTSGuarantee,
ResidentialUse
3
3yearsResidentialUse
45DaysCommercialUse
Lifetime(originalowneronly)
2yearsResidentialUse
NoWarrantyforCommercialUse
Seeenginemanufacturer'swarranty
2yearsResidentialUse
30DaysCommercialUse
3yearsResidentialUse
30DaysCommercialUse
3yearsResidentialUse
30DaysCommercialUse
5
Lifetime(originalowneronly)
2
2
2
2
2
2
2
2
2
2
2
2
OwnerResponsibilities
YoumustmaintainyourT oroProductbyfollowingthemaintenance
proceduresdescribedintheOperator'sManual.Suchroutine
maintenance,whetherperformedbyadealerorbyyou,isatyourexpense.
InstructionsforObtainingWarrantyService
IfyouthinkthatyourT oroProductcontainsadefectinmaterialsor
workmanship,followthisprocedure:
1.Contactyoursellertoarrangeserviceoftheproduct.Ifforany
reasonitisimpossibleforyoutocontactyourseller,youmaycontact
anyT oroAuthorizedDistributortoarrangeservice.Seeattached
DistributorList.
2.Bringtheproductandyourproofofpurchase(salesreceipt)to
theservicingoutlet.Ifforanyreasonyouaredissatisedwiththe
servicingoutlet’sanalysisorwiththeassistanceprovided,contact
usat:
ToroCustomerCareDepartment,RLCDivision
ToroWarrantyCompany
811 1LyndaleAvenueSouth
Bloomington,MN55420-1196
001–952–948–4707
ItemsandConditionsNotCovered
Thereisnootherexpresswarrantyexceptforspecialemissionsystem
coverageandenginewarrantycoverageonsomeproducts.Thisexpress
warrantydoesnotcoverthefollowing:
•Costofregularmaintenanceserviceorparts,suchaslters,fuel,
lubricants,oilchanges,sparkplugs,airltersbladesharpening
orwornblades,cable/linkageadjustments,orbrakeandclutch
adjustments
•Componentsfailingduetonormalwear
5
•Anyproductorpartwhichhasbeenalteredormisusedorneglected
andrequiresreplacementorrepairduetoaccidentsorlackofproper
maintenance
•Pickupanddeliverycharges
•RepairsorattemptedrepairsbyanyoneotherthananAuthorized
4
ToroServiceDealer
•Repairsnecessaryduetofailuretofollowrecommendedfuel
procedure(consultOperator'sManualformoredetails)
–Removingcontaminantsfromthefuelsystemisnotcovered
–Useofoldfuel(morethanonemonthold)orfuelwhichcontains
morethan10%ethanolormorethat15%MTBE
–Failuretodrainthefuelsystempriortoanyperiodofnon-use
overonemonth
•Repairsoradjustmentstocorrectstartingdifcultiesduetothe
following:
–Failuretofollowpropermaintenanceproceduresor
6
recommendedfuelprocedure
–Rotarymowerbladestrikinganobject
•Specialoperationalconditionswherestartingmayrequiremorethan
twopulls:
–Firsttimestartsafterextendedperiodofnon-useoverthree
monthsorseasonalstorage
–Cooltemperaturestartssuchasthosefoundinearlyspringand
lateautumn
–Improperstartingprocedures-ifyouarehavingdifcultystarting
yourunit,pleasechecktheOperator'sManualtoensurethat
youareusingthecorrectstartingprocedures.Thiscansavean
unnecessaryvisittoanAuthorizedT oroServiceDealer.
GeneralConditions
Thepurchaseriscoveredbythenationallawsofeachcountry .Therights
towhichthepurchaserisentitledwiththesupportoftheselawsarenot
restrictedbythiswarranty.
374-0268RevF
 Loading...