

Page 1
22inRecycler
G017301
ModelNo.20370—SerialNo.313000001andUp
ModelNo.20371—SerialNo.313000001andUp
ModelNo.20377—SerialNo.313000001andUp
ModelNo.20378—SerialNo.313000001andUp
ReplacementpartsareavailablefromanAuthorizedServiceDealeroratwww.shoptoro.com.
®
LawnMower
Introduction
FormNo.3375-431RevB
Operator'sManual
Readthisinformationcarefullytolearnhowtooperateand
maintainyourproductproperlyandtoavoidinjuryand
productdamage.Youareresponsibleforoperatingthe
productproperlyandsafely.
YoumaycontactT orodirectlyatwww.Toro.comforproduct
andaccessoryinformation,helpndingadealer,ortoregister
yourproduct.
Wheneveryouneedservice,genuineToroparts,oradditional
information,contactanAuthorizedServiceDealerorToro
CustomerServiceandhavethemodelandserialnumbersof
yourproductready.Figure1identiesthelocationofthe
modelandserialnumbersontheproduct.
Figure1
1.Modelandserialnumberplate
Figure2
1.Safetyalertsymbol
Thismanualuses2wordstohighlightinformation.
Importantcallsattentiontospecialmechanicalinformation
andNoteemphasizesgeneralinformationworthyofspecial
attention.
WARNING
CALIFORNIA
Proposition65Warning
Theengineexhaustfromthisproduct
containschemicalsknowntotheStateof
Californiatocausecancer,birthdefects,
orotherreproductiveharm.
Important:Thisengineisnotequippedwithaspark
arrestermufer.ItisaviolationofCaliforniaPublic
ResourceCodeSection4442touseoroperatetheengine
onanyforest-covered,brush-covered,orgrass-covered
land.Otherstatesorfederalareasmayhavesimilarlaws.
Writetheproductmodelandserialnumbersinthespace
below:
ModelNo.
SerialNo.
Thismanualidentiespotentialhazardsandhassafety
messagesidentiedbythesafetyalertsymbol(Figure2),
whichsignalsahazardthatmaycauseseriousinjuryordeath
ifyoudonotfollowtherecommendedprecautions.
©2016—TheToro®Company
8111LyndaleAvenueSouth
Bloomington,MN55420
Registeratwww.Toro.com.
ThissparkignitionsystemcomplieswithCanadianICES-002.
Theenclosed
Engine Owner's Man ual
issuppliedfor
informationregardingtheUSEnvironmentalProtection
Agency(EPA)andtheCaliforniaEmissionControl
Regulationofemissionsystems,maintenance,and
warranty.Replacementsmaybeorderedthroughthe
enginemanufacturer.
Formodelswithstatedenginehorsepower,thegross
horsepoweroftheenginewaslaboratoryratedbytheengine
manufacturerinaccordancewithSAEJ1940.Ascongured
tomeetsafety,emission,andoperatingrequirements,the
actualenginehorsepoweronthisclassoflawnmowerwill
besignicantlylower.
OriginalInstructions(EN)
PrintedintheUSA
AllRightsReserved
*3375-431*B
Page 2

Contents
Introduction..................................................................1
Safety...........................................................................2
GeneralOperation..................................................2
SlopeOperation......................................................2
Children.................................................................3
Service...................................................................3
SafetyandInstructionalDecals.................................4
Setup............................................................................4
1InstallingtheHandle.............................................4
2InstallingtheRecoil-starterRopeintheRope
Guide.................................................................4
3FillingtheEnginewithOil......................................5
ProductOverview..........................................................6
Operation.....................................................................6
FillingtheFuelTank................................................6
CheckingtheEngineOilLevel..................................7
AdjustingtheCuttingHeight....................................7
StartingtheEngine..................................................7
UsingtheSelf-propelDrive.......................................8
StoppingtheEngine................................................8
RecyclingtheClippings............................................8
BaggingtheClippings..............................................8
Side-dischargingtheClippings...................................9
OperatingTips......................................................10
Maintenance.................................................................11
RecommendedMaintenanceSchedule(s)......................11
PreparingforMaintenance.......................................11
ServicingtheAirCleaner.........................................12
ChangingtheEngineOil.........................................12
ReplacingtheBlade................................................13
AdjustingtheSelf-propelDriveCable........................13
CleaningundertheMachine.....................................14
Storage........................................................................15
PreparingtheMachineforStorage............................15
FoldingtheHandle.................................................15
RemovingtheMachinefromStorage.........................15
Safety
ThislawnmowermeetsorexceedstheCPSCbladesafety
requirementsforwalk-behindrotarylawnmowersandthe
B71.1specicationsoftheAmericanNationalStandards
Instituteineffectatthetimeofproduction.
Readandunderstandthecontentsofthismanualbefore
youstarttheengine.
Thesafetyalertsymbol(Figure2)isusedtoalertyouto
potentialpersonalinjuryhazards.Obeyallsafetymessages
thatfollowthissymboltoavoidpossibleinjuryordeath.
Improperlyusingormaintainingthismowercouldresultin
injuryordeath.T oreducethispotential,complywiththe
followingsafetyinstructions.
Thefollowinginstructionshavebeenadaptedfromthe
ANSI/OPEIstandardB71.1-2003.
Thiscuttingmachinecanamputatehandsandfeetand
throwobjects.Failuretoobservethefollowingsafety
instructionscouldresultinseriousinjuryordeath.
GeneralOperation
•Read,understand,andfollowallinstructionsonthe
machineandinthemanual(s)beforestarting.
•Donotputhandsorfeetnearorunderthemachine.
Keepclearofthedischargeopeningatalltimes.
•Onlyallowresponsibleadults,whoarefamiliarwiththe
instructions,tooperatethismachine.
•Cleartheareaofobjectssuchasrocks,wire,toys,etc.,
whichcouldbethrownbytheblade.Staybehindthe
handlewhentheengineisrunning.
•Besuretheareaisclearofbystandersbeforeoperating.
Stopmachineifanyoneentersthearea.
•Wearappropriateclothing,includingsubstantialfootwear
andeyeprotection.Tiebacklonghair.Donotwear
jewelry.
•Donotpullmachinebackwardunlessabsolutely
necessary.Alwayslookdownandbehindbeforeand
whilemovingbackward.
•Neverdirectdischargedmaterialtowardanyone.Avoid
dischargingmaterialagainstawallorobstruction.
Materialmayricochetbacktowardtheoperator.Stopthe
bladewhencrossinggravelsurfaces.
•Donotoperatemachinewithouttheentiregrasscatcher,
dischargeguard,rearguard,orothersafetyprotective
devicesinplaceandworking.
•Neverleavearunningmachineunattended.
•Stoptheengineandwaituntilthebladecomestoa
completestopbeforecleaningthemachine,removing
grasscatcher,oruncloggingthedischargeguard.
•Operatemachineonlyindaylightorgoodarticiallight.
•Donotoperatemachinewhileill,tired,orunderthe
inuenceofalcoholordrugs.
•Neveroperatemowerinwetgrass.Alwaysbesureof
yourfooting;walk;neverrun.
•Disengagethedrivesystem,ifsoequipped,before
startingtheengine.
•Ifthemachineshouldstarttovibrateabnormally,stop
theengineandcheckforthecauseimmediately.Vibration
isgenerallyawarningoftrouble.
•Seemanufacturer'sinstructionsforproperoperationand
installationofaccessories.Onlyuseaccessoriesapproved
bythemanufacturer.
SlopeOperation
Slopesareamajorfactorrelatedtoslipandfallaccidents,
whichcanresultinsevereinjury.Operationonallslopes
requireextracaution.Ifyoufeeluneasyonaslope,donot
mowit.
2
Page 3

•Mowacrossthefaceofslopes;neverupanddown.
Exerciseextremecautionwhenchangingdirectionon
slopes.
•Watchforholes,ruts,bumps,rocks,orotherhidden
objects.Uneventerraincouldcauseaslipandfall
accident.Tallgrasscanhideobstacles.
•Donotmowonwetgrassorexcessivelysteepslopes.
Poorfootingcouldcauseaslipandfallaccident.
•Donotmowneardrop-offs,ditches,orembankments.
Youcouldloseyourfootingorbalance.
•Iffuelisspilledonclothing,changeclothingimmediately.
•Neveroverllfueltank.Replacegascapandtighten
securely.
WARNING
Exhaustcontainscarbonmonoxide,anodorless,
deadlypoisonthatcankillyou.
Donotruntheengineindoorsorinanenclosed
area.
Children
Tragicaccidentscanoccuriftheoperatorisnotalerttothe
presenceofchildren.Childrenareoftenattractedtothe
machineandthemowingactivity.Neverassumethatchildren
willremainwhereyoulastsawthem.
•Keepchildrenoutofthemowingareaandunderthe
watchfulcareofaresponsibleadultotherthanthe
operator.
•Bealertandturnmoweroffifachildentersthearea.
•Neverallowchildrentooperatethemachine.
•Useextracarewhenapproachingblindcorners,shrubs,
trees,orotherobjectsthatmayblockyourviewofachild.
Service
SafeHandlingofGasoline
Toavoidpersonalinjuryorpropertydamage,use
extremecareinhandlinggasoline.Gasolineisextremely
ammableandthevaporsareexplosive.
•Extinguishallcigarettes,cigars,pipes,andothersources
ofignition.
•Useonlyanapprovedgasolinecontainer.
•Neverremovegascaporaddfuelwiththeengine
running.Allowenginetocoolbeforerefueling.
GeneralService
•Neveroperatemachineinaclosedarea.
•Keepallnutsandboltstighttobesuretheequipmentis
insafeworkingcondition.
•Nevertamperwithsafetydevices.Checktheirproper
operationregularly.
•Keepmachinefreeofgrass,leaves,orotherdebris
build-up.Cleanupoilorfuelspillageandremoveany
fuel-soakeddebris.Allowmachinetocoolbeforestoring.
•Ifyoustrikeaforeignobject,stopandinspectthe
machine.Repair,ifnecessary,beforestarting.
•Nevermakeanyadjustmentsorrepairswiththeengine
running.Disconnectthesparkplugwireandground
againstenginetopreventunintendedstarting.
•Checkgrasscatchercomponentsandthedischargeguard
frequentlyandreplacewithmanufacturer'srecommended
parts,whennecessary.
•Mowerbladesaresharp.Wrapthebladeorweargloves,
anduseextracautionwhenservicingthem.
•Donotchangetheenginegovernorsettingoroverspeed
theengine.
•Maintainorreplacesafetyandinstructionlabels,as
necessary.
•Neverrefuelthemachineindoors.
•Neverstorethemachineorfuelcontainerwherethereis
anopename,spark,orpilotlightsuchasonawater
heateroronotherappliances.
•Neverllcontainersinsideavehicleoronatruckor
trailerbedwithaplasticliner.Alwaysplacecontainerson
thegroundawayfromyourvehiclebeforelling.
•Removegas-poweredequipmentfromthetruckortrailer
andrefuelitontheground.Ifthisisnotpossible,then
refuelsuchequipmentwithaportablecontainer,rather
thanfromagasolinedispensernozzle.
•Keepthenozzleincontactwiththerimofthefueltank
orcontaineropeningatalltimesuntilfuelingiscomplete.
Donotuseanozzlelock-opendevice.
3
Page 4
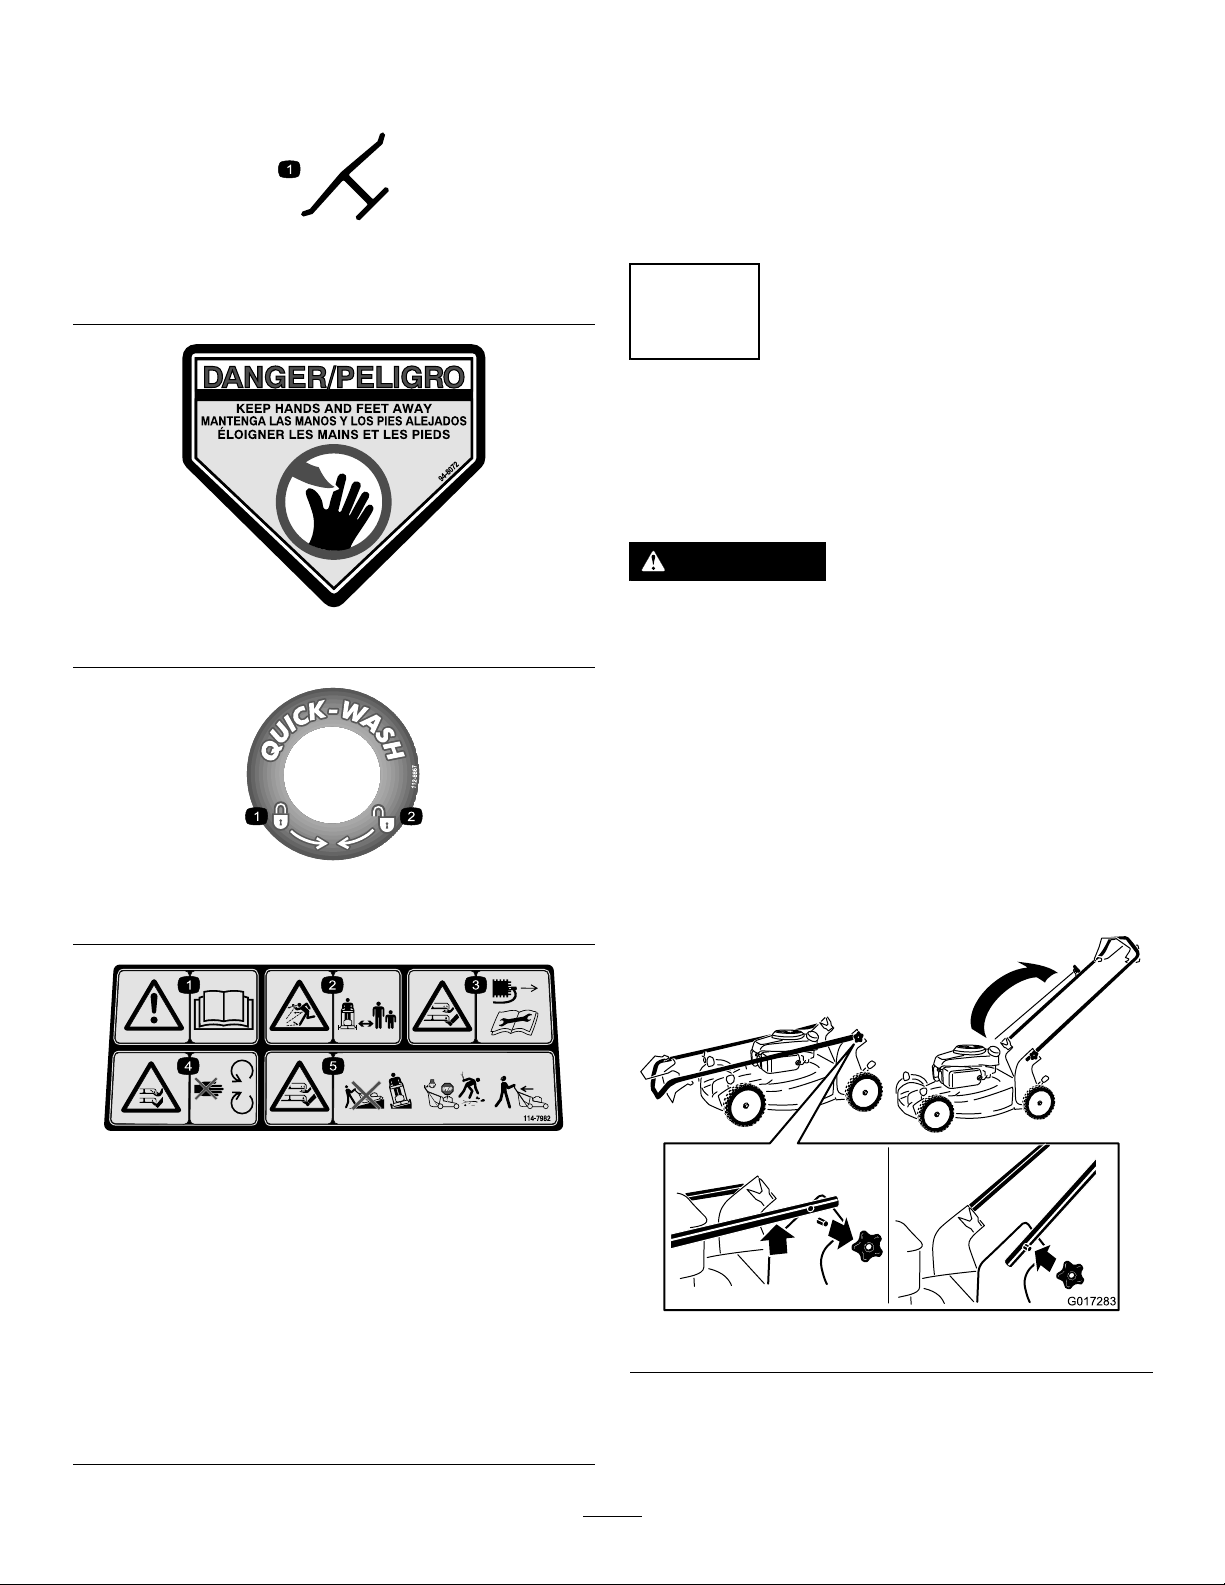
SafetyandInstructionalDecals
G017283
Important:Safetyandinstructiondecalsarelocatednearareasofpotentialdanger.Replacedamageddecals.
Setup
Important:Removeanddiscardtheprotectiveplastic
Manufacturer'sMark
1.Indicatesthebladeisidentiedasapartfromtheoriginal
machinemanufacturer.
sheetthatcoverstheengine.
1
InstallingtheHandle
NoPartsRequired
Procedure
WARNING
Foldingorunfoldingthehandleimproperlycan
94-8072
damagethecables,causinganunsafeoperating
condition.
112-8867
1.Lock2.Unlock
114-7982
1.Warning—readtheOperator'sManual.
2.Thrownobjecthazard—keepbystandersasafedistance
fromthemachine.
3.Cutting/dismembermenthazardofhandorfoot,mower
blade—removetheignitionkeyandreadtheinstructions
beforeservicingorperformingmaintenance.
4.Cutting/dismembermenthazardofhandorfoot,mower
blade—stayawayfrommovingparts.
5.Cutting/dismembermenthazardofhandorfoot,mower
blade—donotoperateupanddownslopes;operatesideto
sideonslopes;stoptheenginebeforeleavingtheoperating
position;andlookbehindyouwhenbackingup.
•Donotdamagethecableswhenfoldingor
unfoldingthehandle.
•Ifacableisdamaged,contactanAuthorized
ServiceDealer.
1.Removethehandleknobsfromthemachinehousing
(Figure3).
Important:Routethecablestotheoutsideofthe
handleknobsasyouinstallthehandle.
Figure3
2.Movethehandletotheoperatingposition.
3.Installandtightenthehandleknobsthatyouremoved
instep1(Figure3).
4
Page 5
2
G020008
3
InstallingtheRecoil-starter
RopeintheRopeGuide
NoPartsRequired
Procedure
Important:Tostarttheenginesafelyandeasily
wheneveryouusethemachine,installtherecoil-starter
ropeintheropeguide.
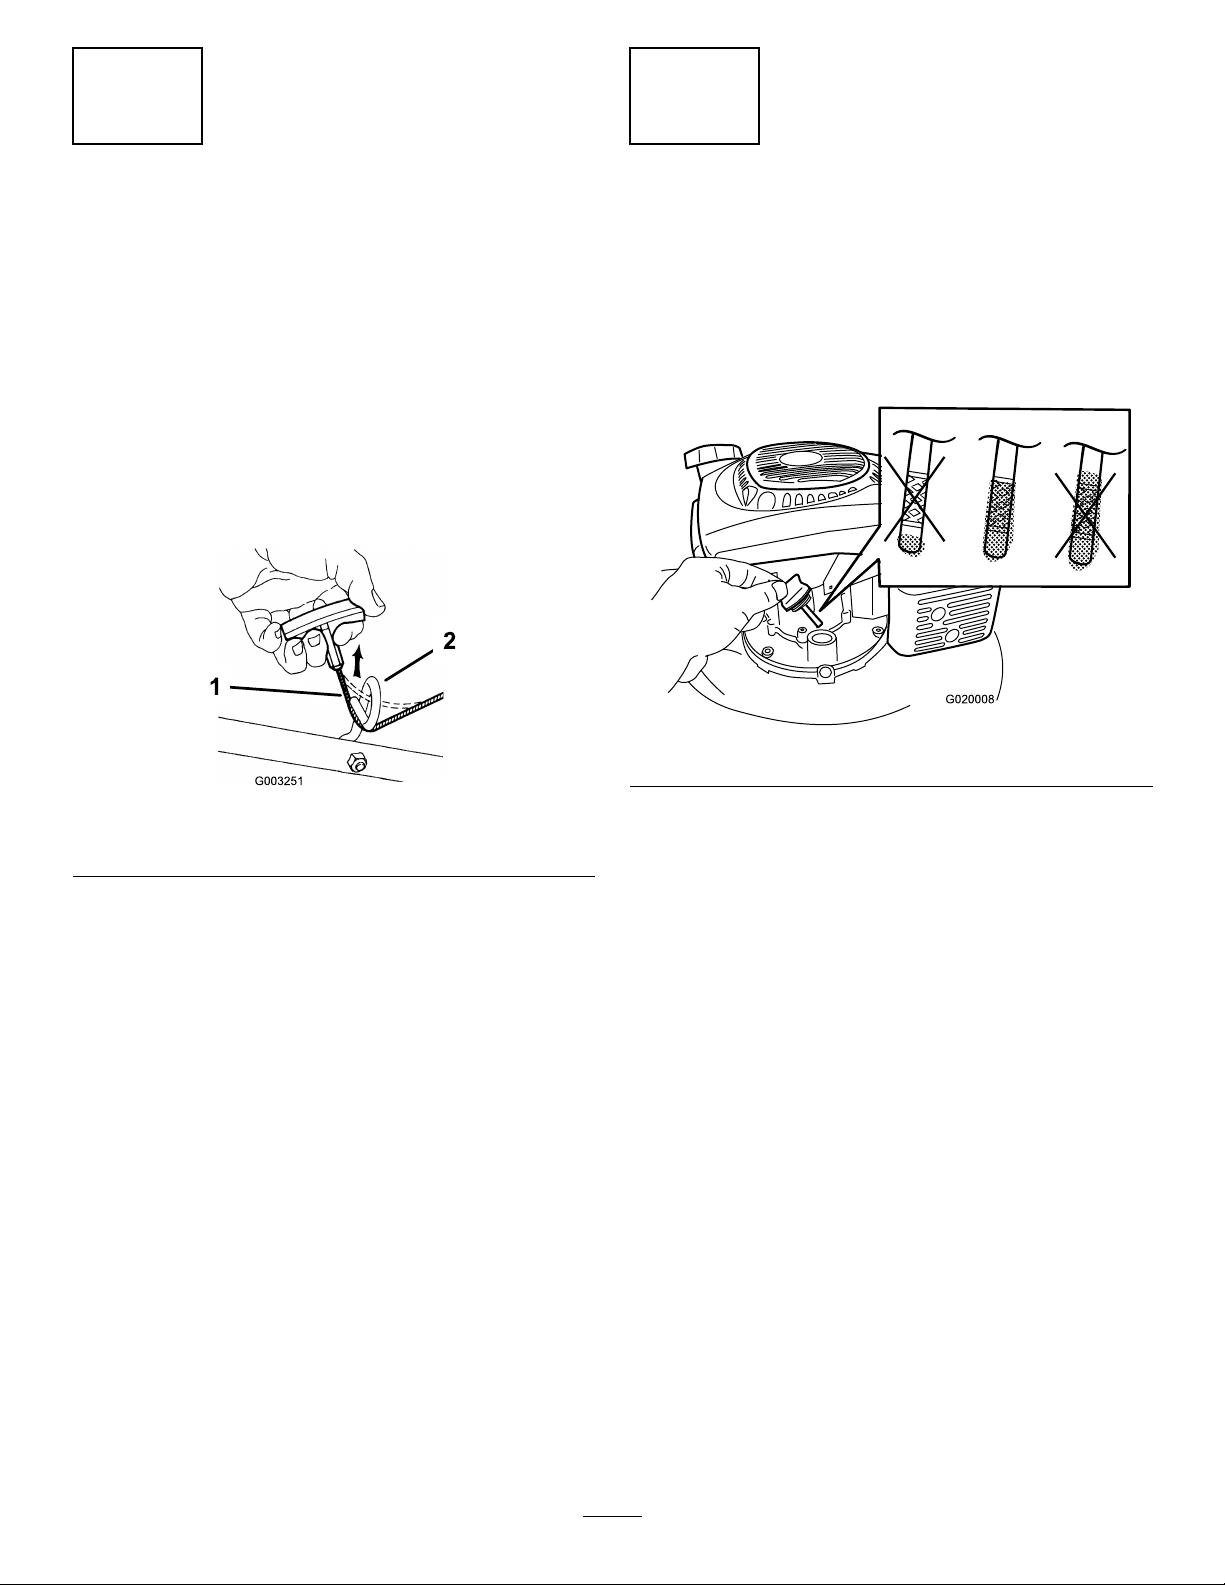
Holdtheblade-controlbartotheupperhandleandpullthe
recoil-starterropethroughtheropeguideonthehandle
(Figure4).
FillingtheEnginewithOil
NoPartsRequired
Procedure
Yourmachinedoesnotcomewithoilintheengine.
1.Removethedipstick(Figure5).
Figure5
Figure4
1.Recoil-starterrope2.Ropeguide
2.Slowlypouroilintotheoil-lltubeuntiltheoillevel
reachestheFulllineonthedipstick(Figure5).Donot
overll.(Max.ll:22oz.(0.65l),type:10W-30or
SAE30detergentoilwithanAPIserviceclassication
ofSJorhigher.)
Note:Eachtimeyouchecktheoillevel,removethe
dipstickandwipeitclean,insertitintotheoilller
neck(butdonotscrewitin),thenremoveitagainand
checkthelevel(Figure5).
Note:Ifyouoverlltheengine,poursomeoiloutof
it;refertoChangingtheEngineOil(page12).
3.Installthedipsticksecurely.
Important:
operating hour s
toChangingtheEngineOil(page12).
Change the engine oil after the r st 5
;changeityearlythereafter.Refer
5
Page 6
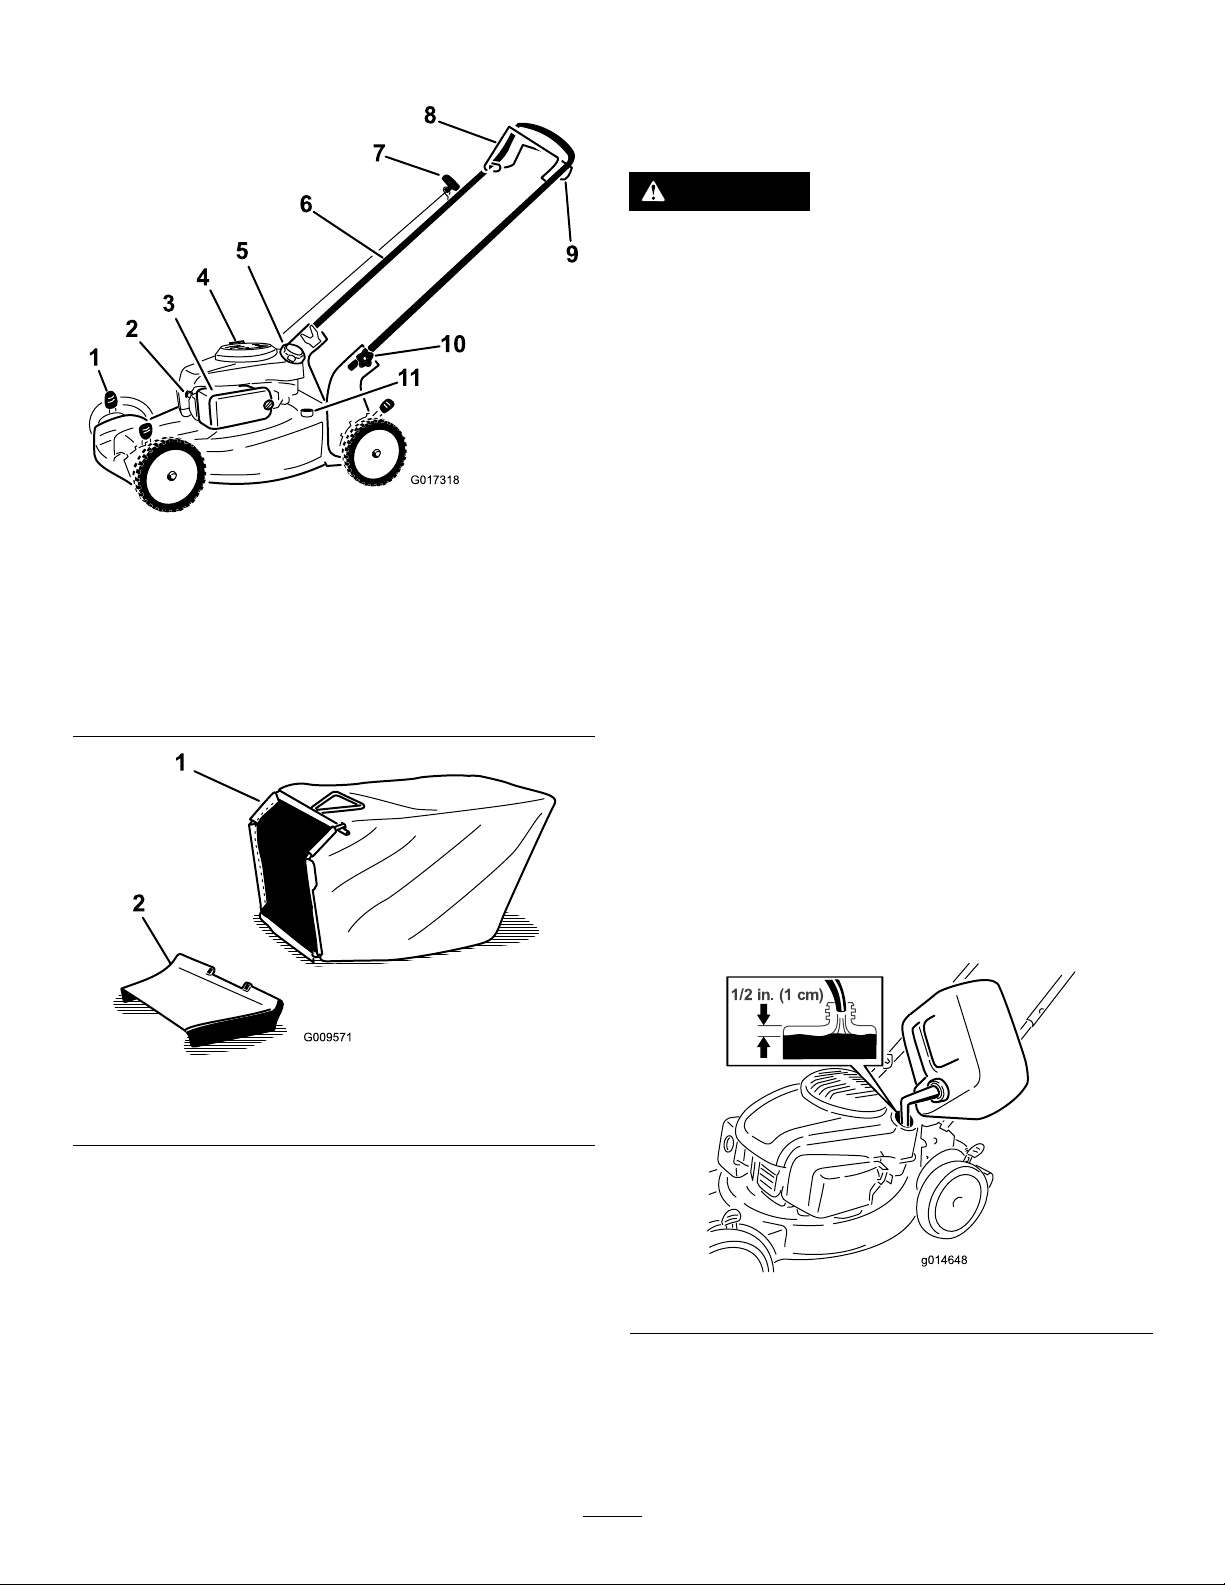
ProductOverview
G017318
Operation
FillingtheFuelTank
DANGER
Gasolineisextremelyammableandexplosive.A
reorexplosionfromgasolinecanburnyouand
others.
•Topreventastaticchargefromignitingthe
gasoline,placethecontainerand/ormachine
directlyonthegroundbeforelling,notina
vehicleoronanobject.
•Fillthetankoutdoorswhentheengineiscold.
Wipeupspills.
•Donothandlegasolinewhensmokingoraround
Figure6
anopenameorsparks.
1.Cuttingheightlever(4)
2.Sparkplug
3.Airlter(notshown)9.Self-propeldrivebar
4.Oilll/dipstick10.Handleknob(2)
5.Fueltankcap11.Washoutport
6.Handle
1.Grassbag2.Sidedischargechute
7.Recoilstarthandle
8.Bladecontrolbar
Figure7
•Storegasolineinanapprovedfuelcontainer,out
ofthereachofchildren.
Fillthefueltankwithfreshunleadedregulargasolinefroma
majorname-brandservicestation(Figure8).
Useunleadedregulargasolinesuitableforautomotiveuse
(87pumpoctaneminimum).Leadedregulargasolinemaybe
usedifunleadedregularisnotavailable.
Note:Neverusemethanol,gasolinecontainingmethanol,or
gasoholcontainingmorethan10%ethanolbecausethefuel
systemcouldbedamaged.Donotmixoilwithgasoline.
Important:Toreducestartingproblems,addfuel
stabilizertothefuelallseason,mixingitwithgasoline
lessthan30daysold.
Figure8
6
Page 7
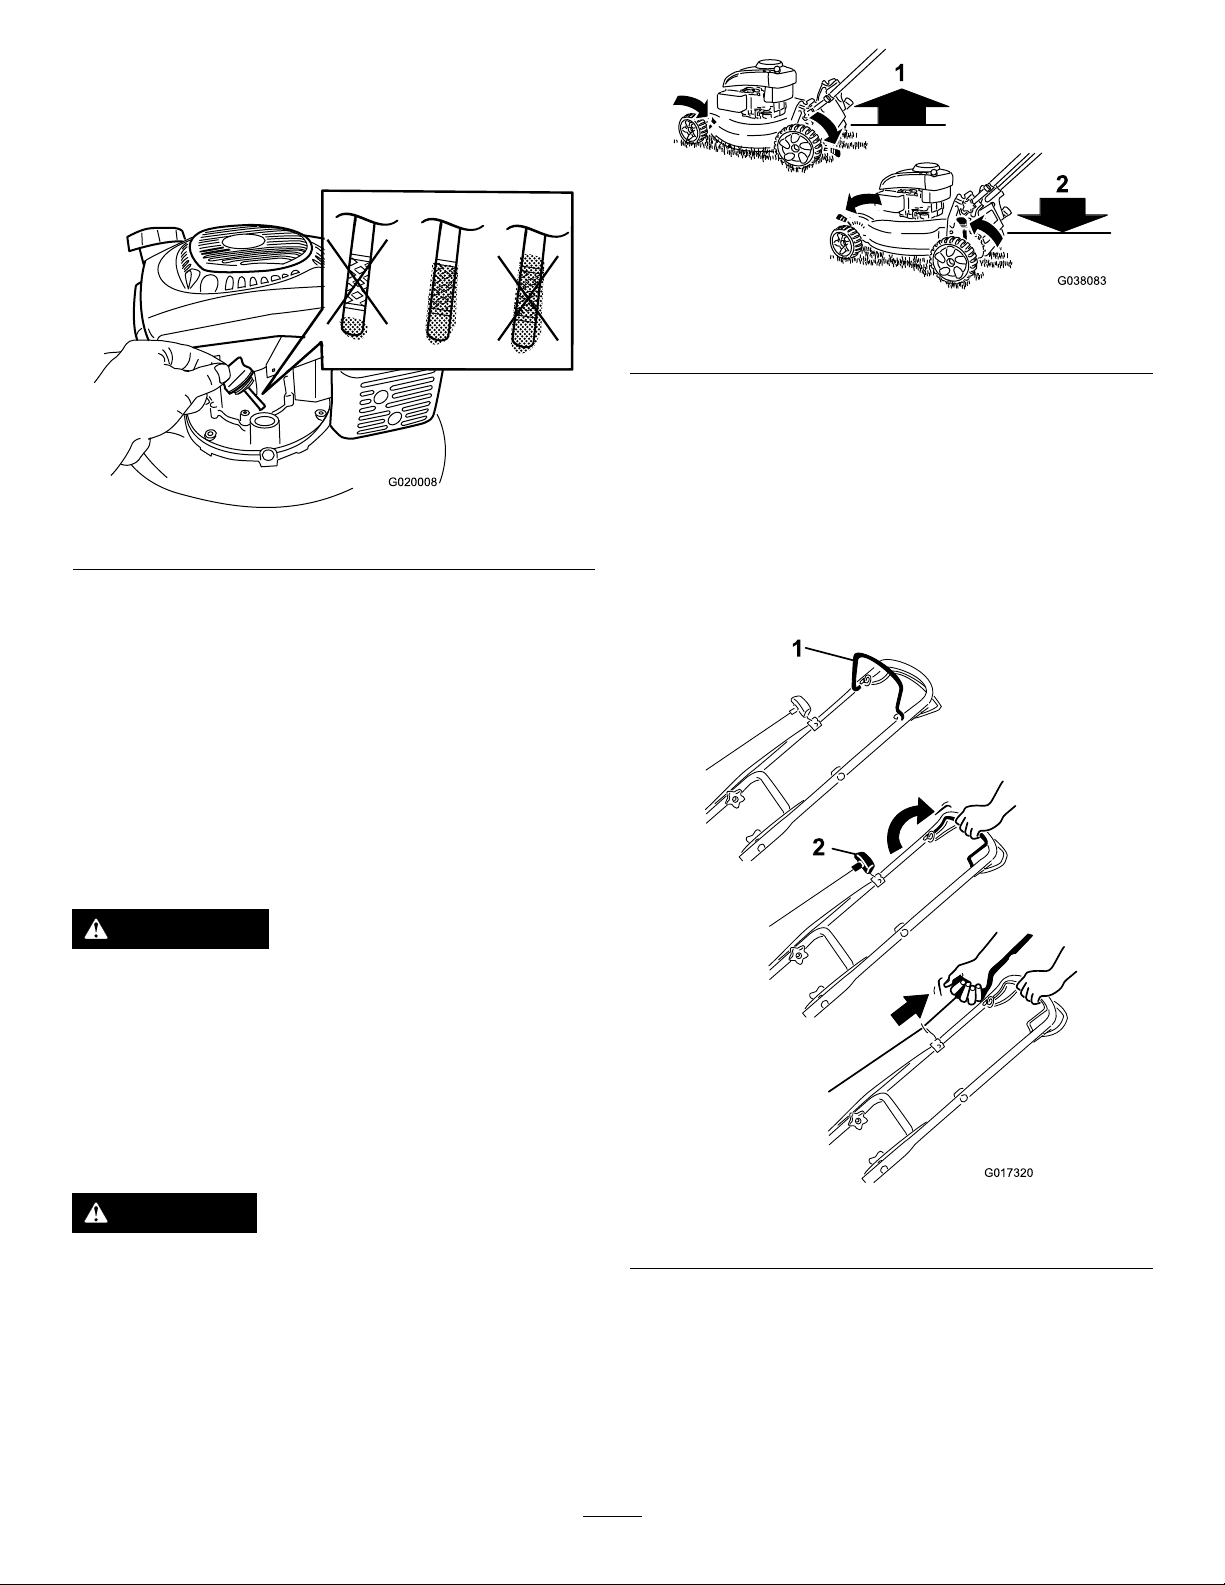
CheckingtheEngineOilLevel
G020008
G017320
ServiceInterval:Beforeeachuseordaily
1.Removethedipstick,wipeitclean,andinsertitintothe
oilllerneck,butdonotscrewitin(Figure9).
Figure9
Figure10
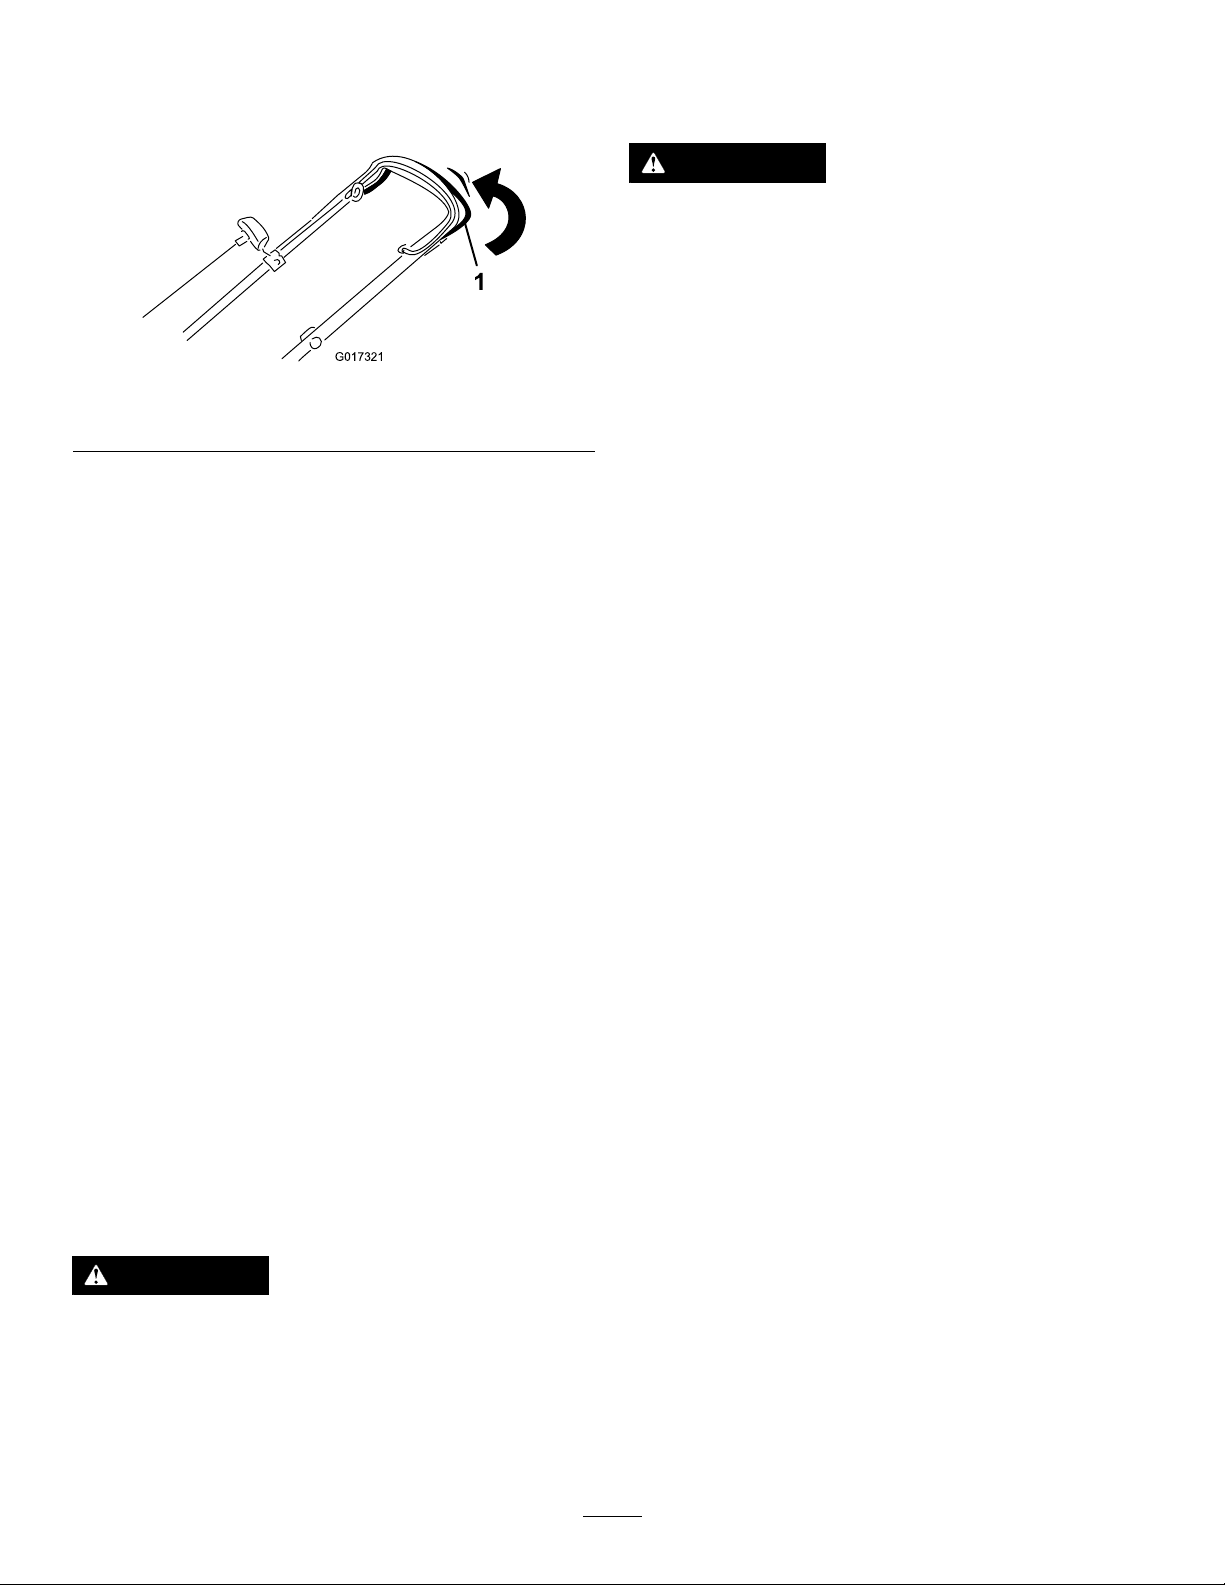
1.Raisethemachine2.Lowerthemachine
Note:Thecuttingheightsettingsare1inch(25mm);1-3/8
inches(35mm);1-3/4inches(44mm);2-1/8inches(54mm);
2-1/2inches(64mm);2-7/8inches(73mm);3-1/4inches
(83mm);3-5/8inches(92mm);and4inches(102mm).
StartingtheEngine
2.Removethedipstickandchecktheoillevel(Figure9).
IftheoillevelisbelowtheAddmarkonthedipstick,
slowlypouroilintotheoil-lltubetoraisetheoillevel
totheFullmarkonthedipstick.Donotoverll.(Max.
ll:22oz.(0.65l),type:10W -30orSAE30detergent
oilwithanAPIserviceclassicationofSJorhigher.)
Note:Ifyouoverlltheengine,poursomeoiloutof
itasdirectedinChangingtheEngineOil.
3.Installthedipsticksecurely.
AdjustingtheCuttingHeight
WARNING
Adjustingthecuttingheightmaybringyouinto
contactwiththemovingblade,causingserious
injury.
•Stoptheengineandwaitforallmovingparts
tostop.
•Donotputyourngersunderthehousingwhen
adjustingthecuttingheight.
1.Holdthebladecontrolbaragainstthehandle(Figure
11).
CAUTION
Iftheenginehasbeenrunning,themuferwillbe
hotandcanseverelyburnyou.Keepawayfromthe
hotmufer.
Adjustthecuttingheightasdesired.Setthefrontwheelsto
thesameheightastherearwheels.
Note:T oraisethemachine,moveallthecuttingheight
leversrearward.Tolowerthemachine,moveallthecutting
heightleversforward(Figure10).
Figure11
1.Bladecontrolbar2.Recoilstarthandle
2.Pulltherecoilstarthandlelightlyuntilyoufeel
resistance,thenpullitsharply .Allowtheropetoreturn
tothehandleslowly(Figure11).
Note:Ifthemachinedoesnotstartafterseveral
attempts,contactanAuthorizedServiceDealer.
7
Page 8
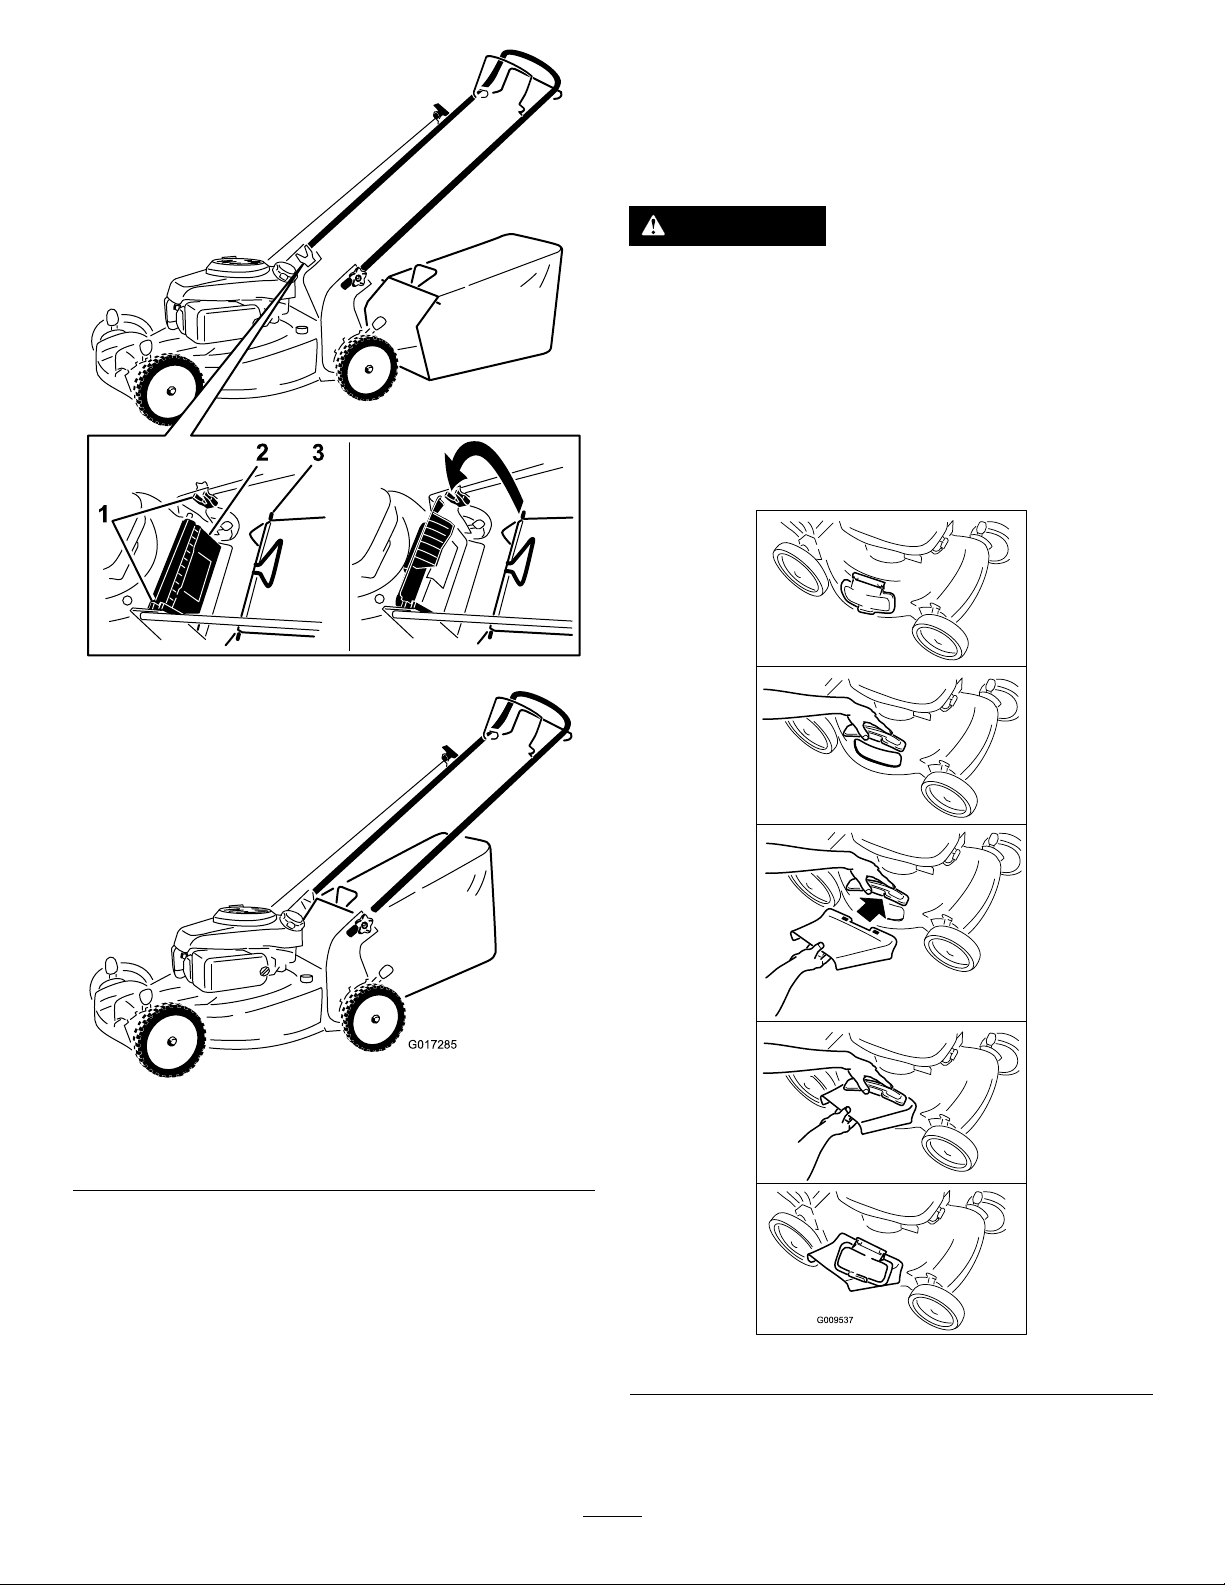
UsingtheSelf-propelDrive
G017321
Tooperatetheself-propeldrive,squeezetheself-propeldrive
bar(Figure12)towardthehandleandholdit.
Figure12
1.Self-propeldrivebar
Todisengagetheself-propeldrive,releasetheself-propel
drivebar.
Note:Themaximumself-propelgroundspeedisxed.To
reducethegroundspeed,increasethespacebetweenthe
self-propeldrivebarandthehandle.
Ifthesidedischargechuteisonthemachine,removeit(refer
toRemovingtheSideDischargeChute)beforebaggingthe
clippings.
WARNING
Thebladeissharp;contactingthebladecanresult
inseriouspersonalinjury.
Stoptheengineandwaitforallmovingpartstostop
beforeleavingtheoperatingposition.
InstallingtheGrassBag
Note:Ensurethebagisseatedinthecorrectposition.
1.Raiseandholdupthereardeector(Figure13).
StoppingtheEngine
Tostoptheengine,releasethebladecontrolbar.
Important:Whenyoureleasethebladecontrolbar,
boththeengineandbladeshouldstopwithin3seconds.
Iftheydonotstopproperly,stopusingyourmachine
immediatelyandcontactanAuthorizedServiceDealer.
RecyclingtheClippings
Yourmachinecomesfromthefactoryreadytorecyclethe
grassandleafclippingsbackintothelawn.
Ifthegrassbagisonthemachine,removeit(referto
RemovingtheGrassBag)beforerecyclingtheclippings.If
thesidedischargechuteisonthemachine,removeit(refer
toRemovingtheSideDischargeChute)beforerecyclingthe
clippings.
BaggingtheClippings
Usethegrassbagwhenyouwanttocollectgrassandleaf
clippingsfromthelawn.
Note:Ensurethebagisseatedinthecorrectposition.
WARNING
Aworngrassbagcouldallowsmallstonesand
othersimilardebristobethrownintheoperator'sor
bystander'sdirectionandresultinseriouspersonal
injuryordeathtotheoperatororbystanders.
Checkthegrassbagfrequently.Ifitisdamaged,
installanewTororeplacementbag.
8
Page 9
G017285
Side-dischargingtheClippings
Usethesidedischargeforcuttingverytallgrass.
Ifthebagisonthemachine,removeitbeforeside-discharging
theclippings.
WARNING
Thebladeissharp;contactingthebladecanresult
inseriouspersonalinjury.
Stoptheengineandwaitforallmovingpartstostop
beforeleavingtheoperatingposition.
InstallingtheSideDischargeChute
Liftupthesidedeectorandinstallthesidedischargechute
(Figure14).
Figure13
1.Notches
2.Reardeector
2.Installthegrassbag,ensuringthatthepinsonthebag
restinthenotchesonthehandle(Figure13).
3.Lowerthereardeector.
3.Grassbagpin(2)
RemovingtheGrassBag
Toremovethebag,reversethestepsabove.
Figure14
9
Page 10

RemovingtheSideDischargeChute
–Cutthegrassmorefrequently .
Toremovethesidedischargechute,liftupthesidedeector,
removethesidedischargechute,andlowerthesidedischarge
deector.
OperatingTips
GeneralMowingTips
•Cleartheareaofsticks,stones,wire,branches,andother
debristhatthebladecouldhit.
•Avoidstrikingsolidobjectswiththeblade.Never
deliberatelymowoveranyobject.
•Ifthemachinestrikesanobjectorstartstovibrate,
immediatelystoptheengine,disconnectthewirefrom
thesparkplug,andexaminethemachinefordamage.
•Forbestperformance,installanewbladebeforethe
cuttingseasonbegins.
•ReplacethebladewhennecessarywithaToro
replacementblade.
CuttingGrass
–Overlapcuttingswathsinsteadofcuttingafullswath
witheachpass.
–Setthecuttingheightonthefrontwheelsonenotch
lowerthantherearwheels.Forexample,setthefront
wheelsat2-1/8-inch(54mm)andtherearwheels
at2-1/2inches(64mm).
CuttingLeaves
•Aftercuttingthelawn,ensurethathalfofthelawnshows
throughthecutleafcover.Y oumayneedtomakemore
thanonepassovertheleaves.
•Iftherearemorethan5inches(13cm)ofleavesonthe
lawn,setthefrontcuttingheight1or2notcheshigher
thantherearcuttingheight.
•Slowdownyourmowingspeedifthemachinedoesnot
cuttheleavesnelyenough.
•Cutonlyaboutathirdofthegrassbladeatatime.Donot
cutbelowthe2-1/8-inch(54mm)settingunlessthegrass
issparseoritislatefallwhengrassgrowthbeginstoslow
down.RefertoAdjustingtheCuttingHeight.
•Whencuttinggrassover6inches(15cm)tall,mowatthe
highestcuttingheightsettingandwalkslower;thenmow
againatalowersettingforthebestlawnappearance.If
thegrassistoolong,themachinemayplugandcause
theenginetostall.
•Mowonlydrygrassorleaves.Wetgrassandleavestend
toclumpontheyardandcancausethemachinetoplug
ortheenginetostall.
WARNING
Wetgrassorleavescancauseseriousinjuryif
youslipandcontacttheblade.Mowonlyindry
conditions.
•Beawareofapotentialrehazardinverydryconditions,
followalllocalrewarnings,andkeepthemachinefree
ofdrygrassandleafdebris.
•Alternatethemowingdirection.Thishelpsdispersethe
clippingsoverthelawnforevenfertilization.
•Ifthenishedlawnappearanceisunsatisfactory,tryone
ormoreofthefollowing:
–Replacethebladeorhaveitsharpened.
–Walkataslowerpacewhilemowing.
–Raisethecuttingheightonyourmachine.
10
Page 11
Maintenance
Note:Determinetheleftandrightsidesofthemachinefromthenormaloperatingposition.
RecommendedMaintenanceSchedule(s)
MaintenanceService
Interval
Aftertherst5hours
Beforeeachuseordaily
Every25hours
Every50hours
Every100hours
Beforestorage
Yearly
Important:Refertoyourengineoperator'smanualforadditionalmaintenanceprocedures.
Note:ReplacementpartsareavailablefromanAuthorizedServiceDealer(gotowww.toro.comtondthenearestdealer)
oratwww.shoptoro.com.
MaintenanceProcedure
•Changetheengineoil.
•Checktheengineoillevel.
•Ensurethattheenginestopswithin3secondsafterreleasingthebladecontrolbar.
•Cleangrassclippingsanddirtfromunderthemachine.
•Checktheaircleanerfordirty,loose,ordamagedparts,andcleanorreplacethem
ifnecessary.
•Changetheengineoil.
•Replacetheaircleanerelement(morefrequentlywhenoperatingthemachine
industyordirtyoperatingconditions).
•Emptythefueltankbeforerepairsasdirectedandbeforeannualstorage.
•Replacethebladeorhaveitsharpened;replaceorsharpenitmorefrequentlyif
theedgedullsquickly .
•Cleantheaircoolingsystem;cleanitmorefrequentlyindustyoperatingconditions.
Refertoyourengineoperator'smanual.
•Refertoyourengineoperator'smanualforanyadditionalyearlymaintenance
procedures.
PreparingforMaintenance
1.Stoptheengineandwaitforallmovingpartstostop.
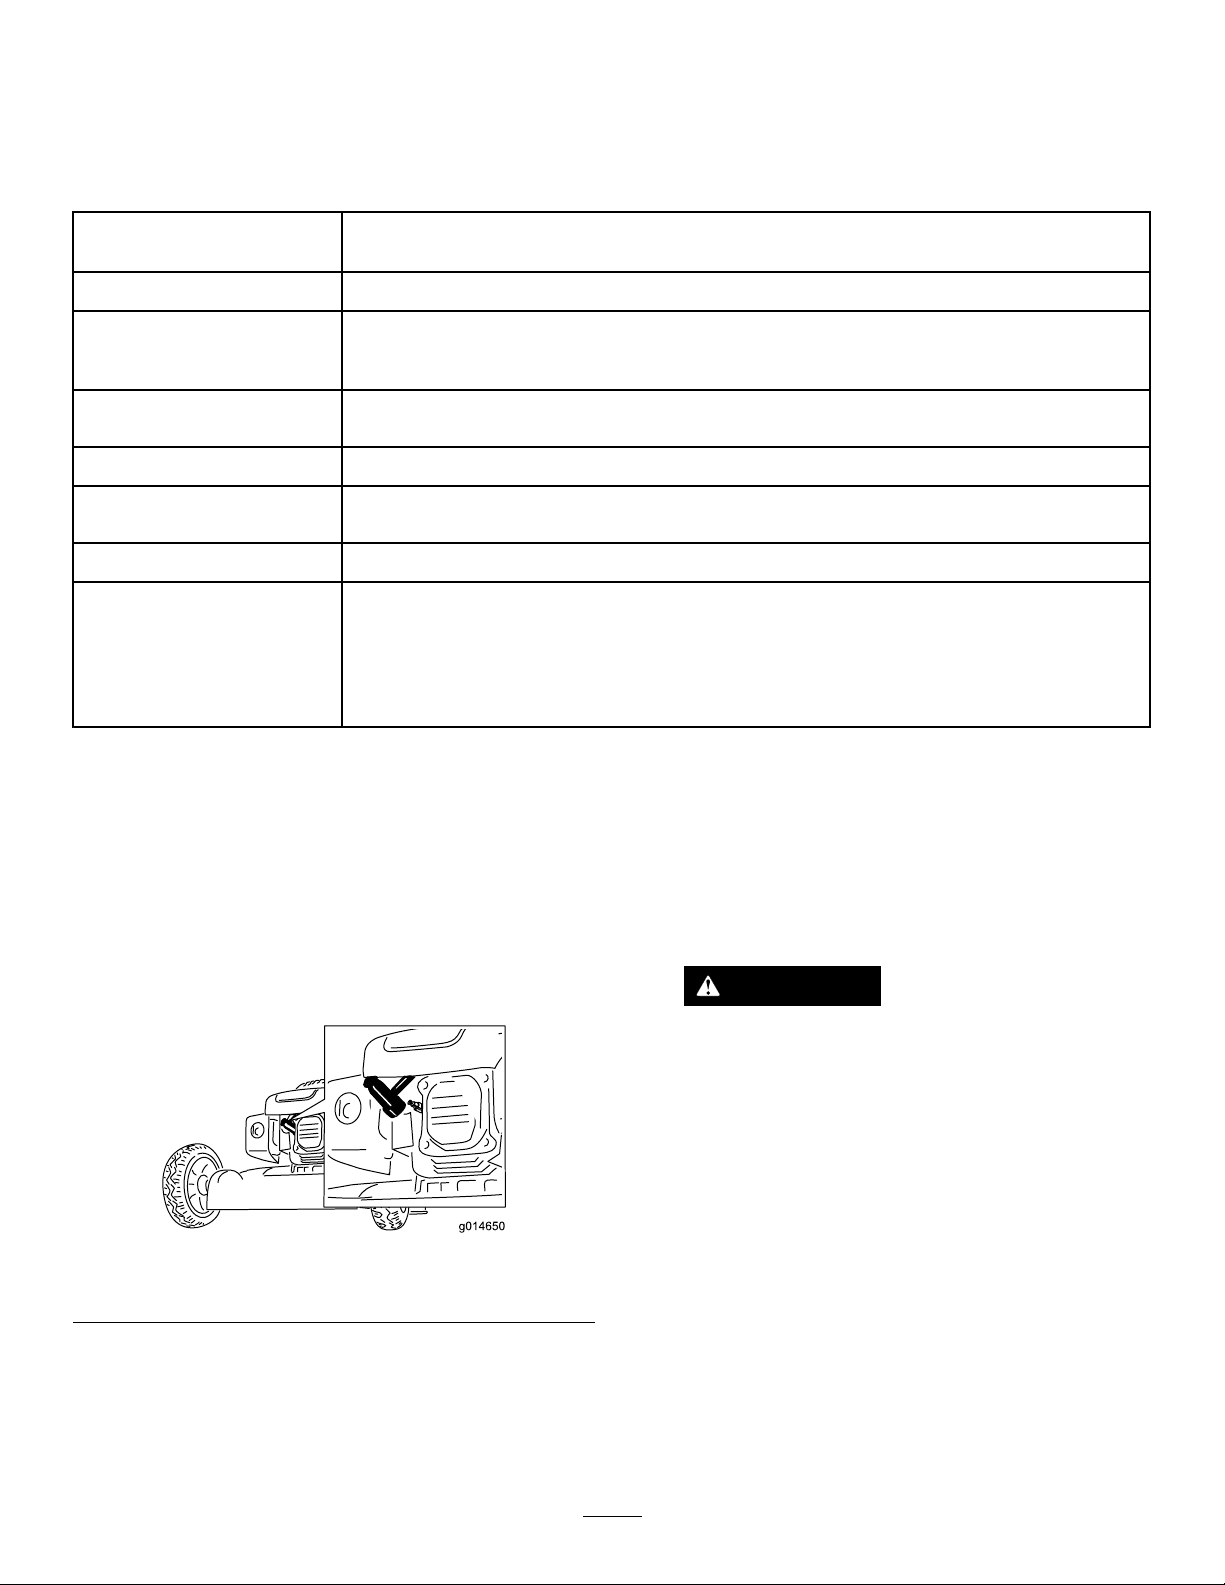
2.Disconnectthespark-plugwirefromthesparkplug
(Figure15)beforeperforminganymaintenance
procedure.
Figure15
1.Sparkplugwire
3.Afterperformingthemaintenanceprocedure(s),
connectthespark-plugwiretothesparkplug.
Important:Beforetippingthemachinetochange
theoilorreplacetheblade,allowthefueltankto
rundrythroughnormalusage.Ifyoumusttip
themachinepriortorunningoutoffuel,usea
handfuelpumptoremovethefuel.Alwaystipthe
machineontoitssidewiththedipstickdown.
WARNING
Tippingthemachinemaycausethefuelto
leak.Gasolineisammable,explosiveand
cancausepersonalinjury.
Runtheenginedryorremovethegasoline
withahandpump;neversiphon.
11
Page 12
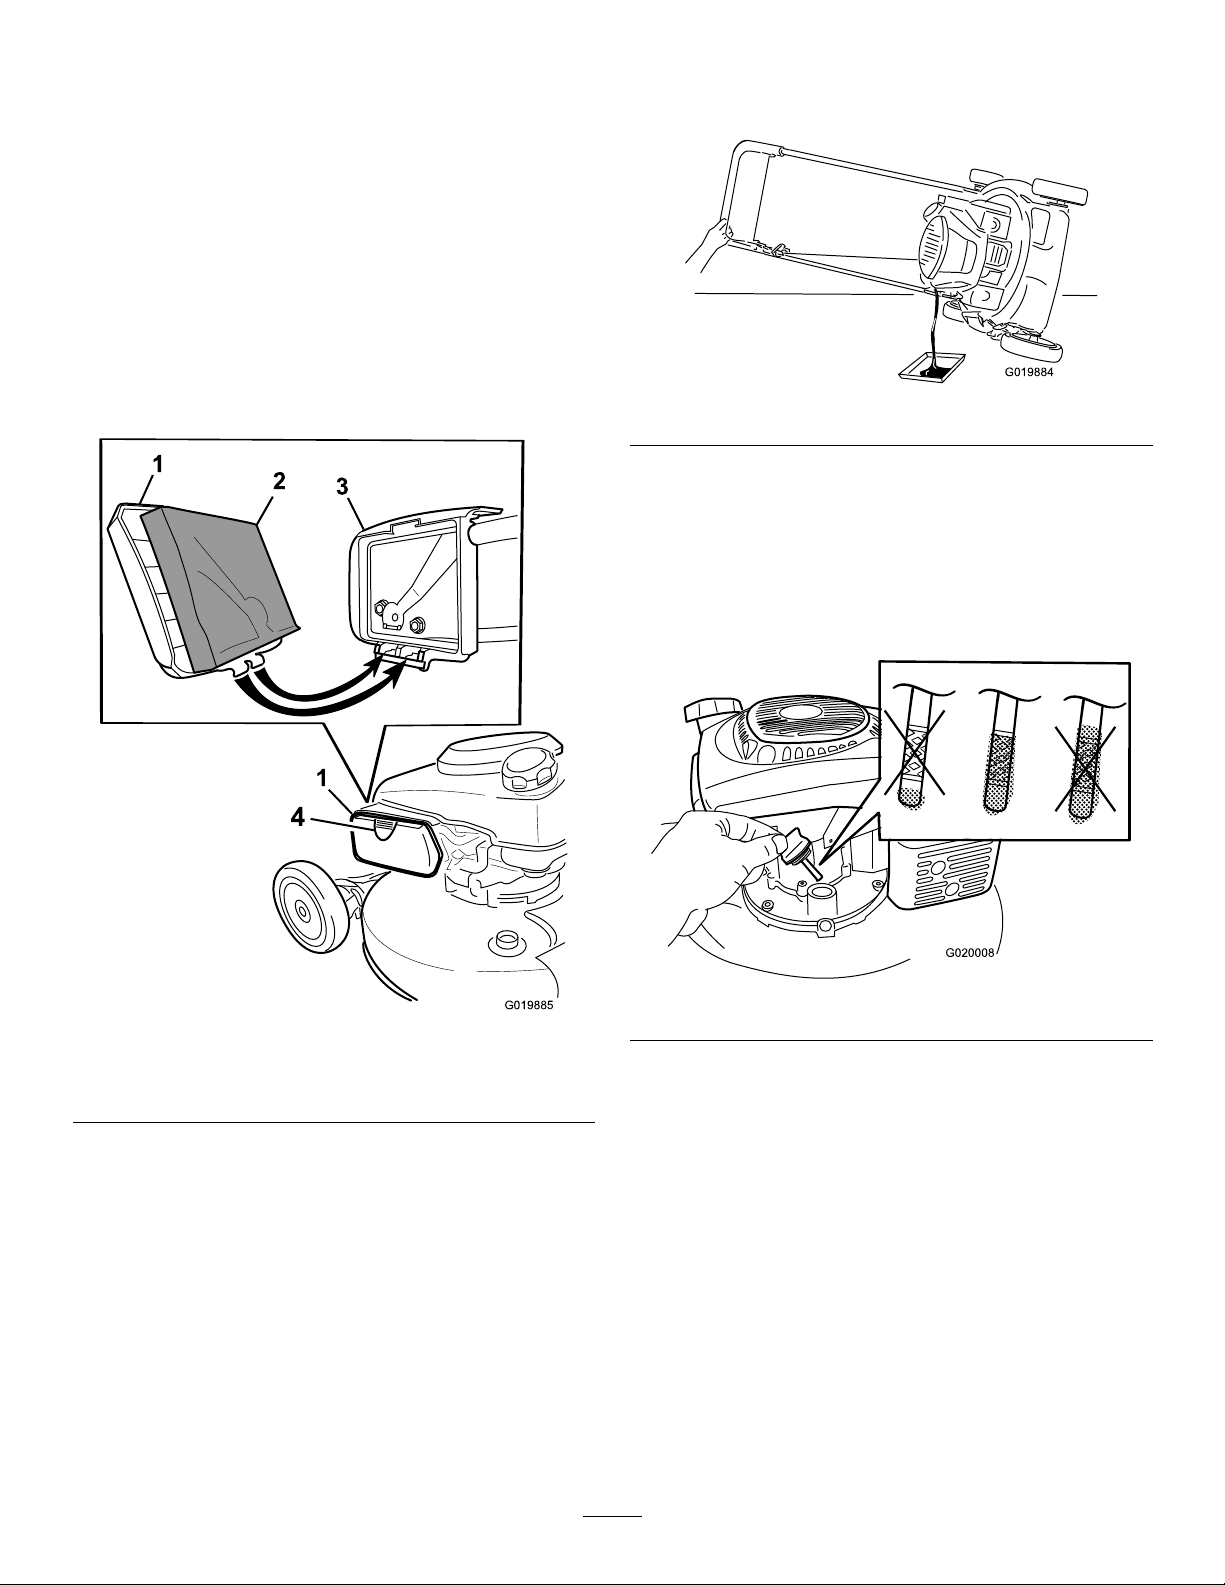
ServicingtheAirCleaner
1
2
3
4
G019885
1
G019884
G020008
ServiceInterval:Every25hours/Yearly(whichevercomes
rst)—Checktheaircleanerfordirty,
loose,ordamagedparts,andcleanor
replacethemifnecessary.
Every100hours/Y early(whichevercomes
rst)—Replacetheaircleanerelement(more
frequentlywhenoperatingthemachineindustyor
dirtyoperatingconditions).
1.Performthepre-maintenanceprocedures;referto
PreparingforMaintenance(page11).
2.Tipthemachineontoitsside,withtheairlterup,then
removethedipsticktodraintheusedoiloutthrough
theoil-lltube(Figure17).
2.Pressthebuttonontheaircleanercover(Figure16)
andopenthecover.
Figure17
3.Afterdrainingtheusedoil,returnthemachinetothe
normaloperatingposition.
4.Slowlypouroilintotheoil-lltubeuntiltheoillevel
reachestheFulllineonthedipstick(Figure18).Do
notoverll.(Max.ll:22oz.(0.65l),type:10W-30or
SAE30detergentoilwithanAPIserviceclassication
ofSJorhigher.)
1.Aircleanercover3.Aircleanerhousing
2.Aircleanerfoamelement
Figure16
4.Button
3.Replacetheaircleanerelement.
4.Installtheaircleanercover.
ChangingtheEngineOil
ServiceInterval:Aftertherst5hours
Every50hours/Yearly(whichevercomesrst)
Runtheengineafewminutesbeforechangingtheoiltowarm
it.Warmoilowsbetterandcarriesmorecontaminants.
1.Performthepre-maintenanceprocedures;referto
PreparingforMaintenance(page11).
Figure18
Note:Eachtimeyouchecktheoillevel,removethe
dipstickandwipeitclean,insertitintotheoilller
neck(butdonotscrewitin),thenremoveitagainand
checkthelevelofthedipstick.
Note:Ifyouoverlltheengine,drainsomeoftheoil
outoftheenginecrankcase.
5.Installthedipsticksecurely.
6.Disposeoftheusedoilproperlyatalocalrecycling
center.
12
Page 13
ReplacingtheBlade
ServiceInterval:Yearly
Important:
blade pr oper l y
areuncomfortableperformingthisprocedure,contact
anAuthorizedServiceDealer.
Examinethebladewheneveryourunoutofgasoline.Ifthe
bladeisdamagedorcracked,replaceitimmediately.Ifthe
bladeedgeisdullornicked,haveitsharpenedandbalanced,
orreplaceit.
Y ou will need a torque wr ench to install the
.Ifyoudonothaveatorquewrenchor
WARNING
Thebladeissharp;contactingthebladecanresult
inseriouspersonalinjury.
Weargloveswhenservicingtheblade.
1.RefertoPreparingforMaintenance(page11).
2.Tipthemachineontoitssidewiththeairlterup.
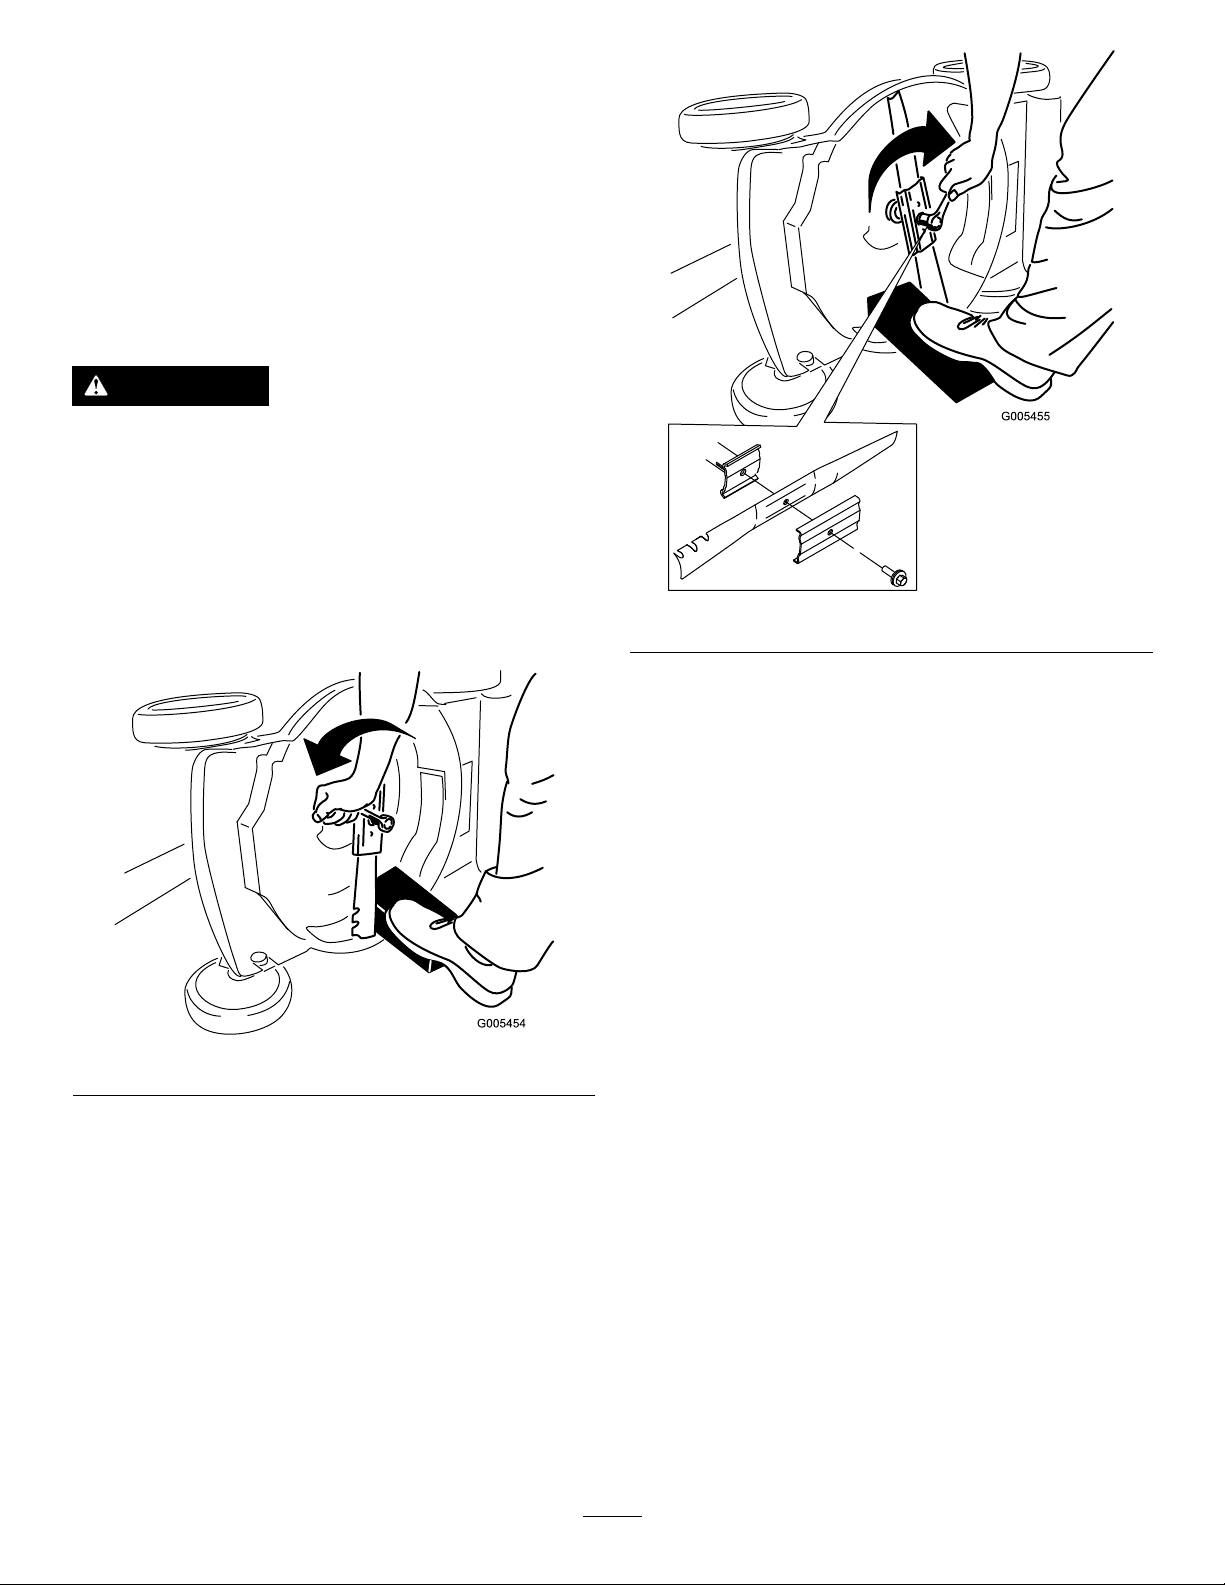
3.Useablockofwoodtoholdthebladesteady(Figure
19).
Figure20
Important:Positionthecurvedendsoftheblade
topointtowardthemachinehousing.
Figure19
4.Removetheblade,savingallmountinghardware
(Figure19).
5.Installthenewbladeandallmountinghardware
(Figure20).
6.Useatorquewrenchtotightenthebladeboltto
60ft-lb(82N-m).
Important:Abolttorquedto60ft-lb(82N-m)is
verytight.Whileholdingthebladewithablock
ofwood,putyourweightbehindtheratchetor
wrenchandtightentheboltsecurely.Thisboltis
verydifculttoovertighten.
AdjustingtheSelf-propelDrive Cable
Wheneveryouinstallanewself-propelcableorifthe
self-propeldriveisoutofadjustment,adjusttheself-propel
drivecable.
1.Loosenthecablesupportnut(Figure21).
13
Page 14
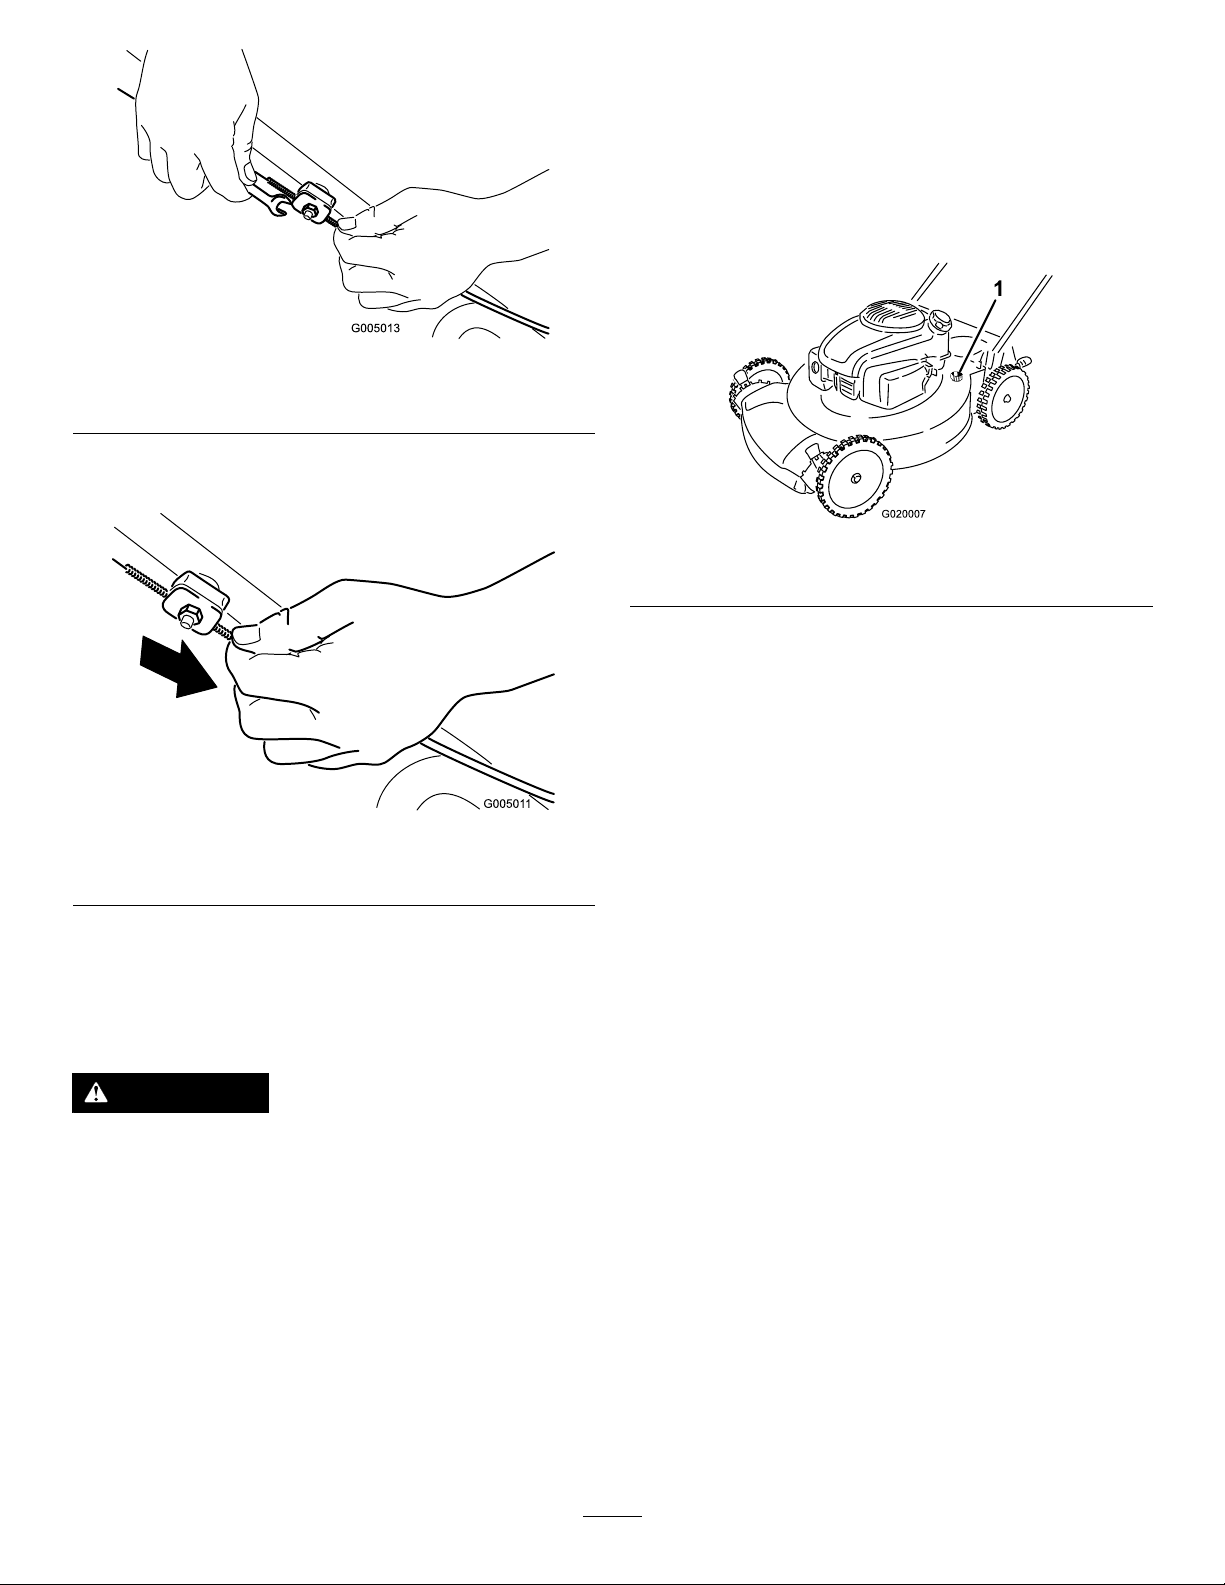
Figure21
G020007
1
Thisgureissimpliedforthepurposeofclarity.
2.Pulldownthecablejacket(towardthemachine)until
thereisnoslackinthecable(Figure22).
3.Washouttheareaunderthereardeectorwherethe
clippingsgofromthehousingtothegrassbag.
Note:Washouttheareawiththebag-on-demandin
boththefullyforwardandfullyrearwardpositions.
4.Attachagardenhosethatisconnectedtoawater
supplytothewashoutportonthemachinehousing
(Figure23).
Figure23
1.Washoutport
5.Turnthewateron.
Figure22
Thisgureissimpliedforthepurposeofclarity.
3.Tightenthenutonthecablesupport.
CleaningundertheMachine
ServiceInterval:Beforeeachuseordaily
WARNING
Themachinemaydislodgematerialfromunderthe
machinehousing.
•Weareyeprotection.
•Stayintheoperatingposition(behindthe
handle)whentheengineisrunning.
6.Starttheengineandrunituntiltherearenomore
clippingsthatcomeoutfromunderthemachine
housing.
7.Stoptheengine.
8.Shutoffthewateranddisconnectthegardenhose
fromthemachine.
9.Starttheengineandrunitforafewminutestodrythe
housingtopreventitfromrusting.
10.Allowtheenginetocoolbeforestoringthemachine
inanenclosedarea.
•Donotallowbystandersinthearea.
Forbestresults,cleanthemachinesoonafteryouhave
completedmowing.
1.Lowerthemachinetoitslowestcuttingheightsetting.
RefertoAdjustingtheCuttingHeight(page7).
2.Movethemachineontoaatpavedsurface.
14
Page 15
Storage
G017287
Storethemachineinacool,clean,dryplace.
PreparingtheMachinefor Storage
WARNING
Gasolinevaporscanexplode.
•Donotstoregasolinemorethan30days.
•Donotstorethemachineinanenclosurenear
anopename.
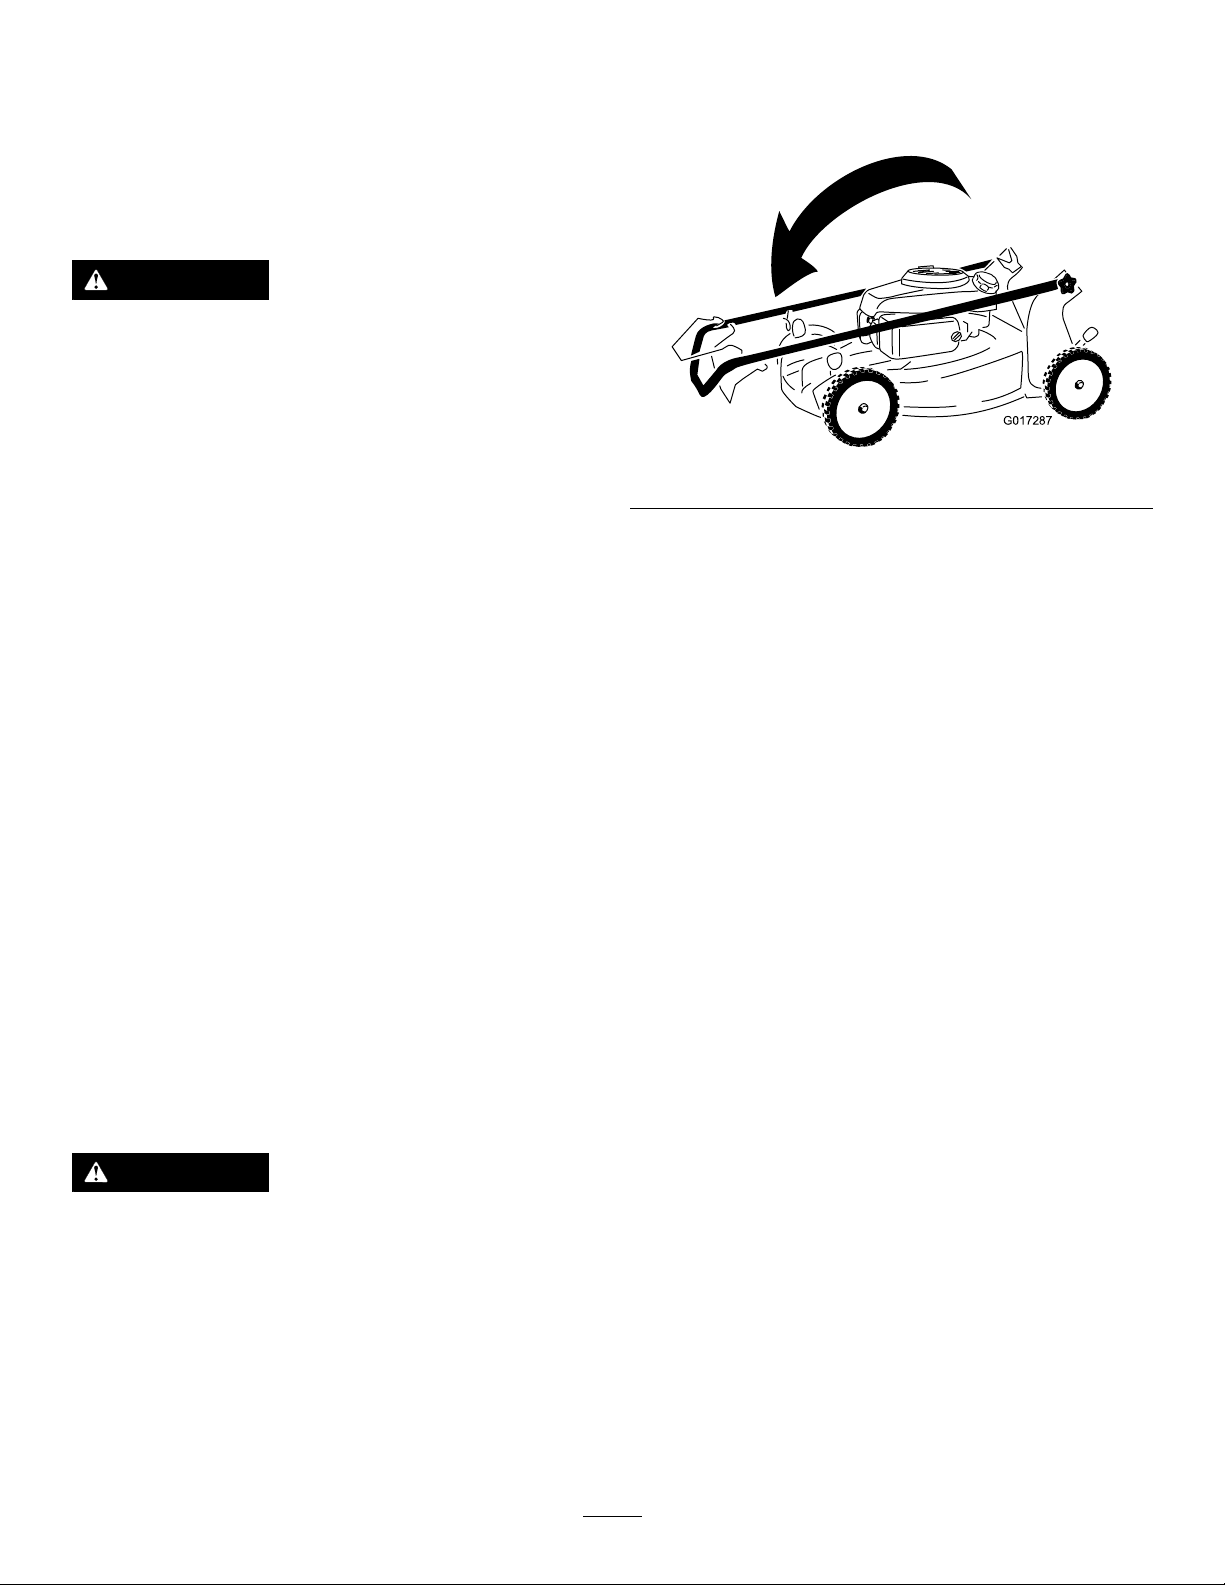
2.FoldtheupperhandleforwardasshowninFigure24.
Important:Routethecablestotheoutsideofthe
handleknobsasyoufoldthehandle.
•Allowtheenginetocoolbeforestoringit.
1.Onthelastrefuelingoftheyear,addfuelstabilizerto
thefuelasdirectedbytheenginemanufacturer.
2.Disposeofanyunusedfuelproperly.Recycleit
accordingtolocalcodes,oruseitinyourautomobile.
Note:Oldfuelinthefueltankistheleadingcauseof
hardstarting.Donotstorefuelwithoutstabilizermore
than30days,anddonotstorestabilizedfuelmorethan
90days.
3.Runthemachineuntiltheenginestopsfromrunning
outoffuel.
4.Starttheengineagain.
5.Allowtheenginetorununtilitstops.Whenyoucan
nolongerstarttheengine,itissufcientlydry.
6.Disconnectthewirefromthesparkplug.
7.Removethesparkplug,add1oz.(30ml)ofoilthrough
thesparkplughole,andpullthestarterropeslowly
severaltimestodistributeoilthroughoutthecylinder
topreventcylindercorrosionduringtheoff-season.
8.Looselyinstallthesparkplug.
Figure24
3.Tounfoldthehandle,reversethestepsabove.
RemovingtheMachinefrom Storage
1.Removethesparkplugandspintheenginerapidlyby
pullingtherecoilstarthandletoblowtheexcessoil
fromthecylinder.
2.Installthesparkplugandtightenitwithatorque
wrenchto15ft-lb(20N-m).
3.Connectthewiretothesparkplug.
9.Tightenallnuts,bolts,andscrews.
FoldingtheHandle
WARNING
Foldingorunfoldingthehandleimproperlycan
damagethecables,causinganunsafeoperating
condition.
•Donotdamagethecableswhenfoldingor
unfoldingthehandle.
•Ifacableisdamaged,contactanAuthorized
ServiceDealer.
1.Loosenthehandleknobsuntilyoucanmovetheupper
handlefreely.
15
Page 16

TheToroTotalCoverageGuarantee
A2-Y earFullWarranty(45DayLimitedWarrantyforCommercialUse)20inMulcher/Bagger
22inRecycler
®
TheToroGTSStartingGuarantee
A3-YearFullWarranty(NotApplicableforCommercialUse)
ConditionsandProductsCovered
TheToroCompanyanditsafliate,T oroWarrantyCompany,pursuantto
anagreementbetweenthem,jointlypromisetorepairtheToroProduct
listedbelowifusedforresidentialpurposes*;ifitisdefectiveinmaterials
orworkmanshiporifitstopsfunctioningduetothefailureofacomponent;
oriftheToroGTS(GuaranteedtoStart)enginewillnotstartontherstor
secondpull,providedtheroutinemaintenancerequiredintheOperator's
Manualhavebeenperformed.
Thiswarrantycoversthecostofpartsandlabor,butyoumustpay
transportationcosts.
Thefollowingtimeperiodsapplyfromthedateofpurchase:
ProductsWarrantyPeriod
22inRecyclerand20in
Mulcher/BaggerandAttachments
GTS(GuaranteedtoStart)3-yearfullwarranty
Engine
Battery
LimitedWarrantyforCommercialUse*
Gas-poweredT oroProductsusedforcommercial,institutional,orrental
use,arewarrantedfor45daysagainstdefectsinmaterialsorworkmanship.
Componentsfailingduetonormalweararenotcoveredbythiswarranty.
TheT oroGTS(GuaranteedtoStart)StartingGuaranteedoesnotapply
whentheproductisusedcommercially*.
InstructionsforObtainingWarrantyService
IfyouthinkthatyourToroProductcontainsadefectinmaterialsor
workmanship,orifanormal,able-bodiedadultcannolongerstartyour
product'sengineinoneortwopulls,followthisprocedure:
1.ContactanyAuthorizedToroServiceDealertoarrangeserviceattheir
dealership.Tolocateadealerconvenienttoyou,refertotheYellow
Pagesofyourtelephonedirectory(lookunder“LawnMowers”)or
accessourwebsiteatwww.T oro.com.Y oumayalsocallthenumbers
listedinitem#3tousethe24-hourToroDealerlocatorsystem.
2.Bringtheproductandyourproofofpurchase(salesreceipt)tothe
ServiceDealer.Thedealerwilldiagnosetheproblemanddetermineif
itiscoveredunderwarranty.
3.IfforanyreasonyouaredissatisedwiththeServiceDealer’s
analysisorwiththeassistanceprovided,contactusat:
CustomerCareDepartment,RLCDivision
TheT oroCompany
811 1LyndaleAvenueSouth
Bloomington,MN55420-1196
Tollfreeat866-214-9807(U.S.customers)
Tollfreeat866-214-9808(Canadiancustomers)
OwnerResponsibilities
YoumustmaintainyourT oroProductbyfollowingthemaintenance
proceduresdescribedintheOperator'sManual.Suchroutinemaintenance,
whetherperformedbyadealerorbyyou,isatyourexpense.
2-yearfullwarranty
3-yearfullwarranty
1-yearfullwarranty
WalkPowerMowers
ItemsandConditionsNotCovered
Thereisnootherexpresswarrantyexceptforspecialemissionsystem
coverageandenginewarrantycoverageonsomeproducts.Thisexpress
warrantydoesnotcoverthefollowing:
•Costofregularmaintenanceserviceorparts,suchaslters,fuel,
lubricants,oilchanges,sparkplugs,airltersbladesharpeningorworn
blades,cable/linkageadjustments,orbrakeandclutchadjustments
•Anyproductorpartwhichhasbeenalteredormisusedandrequires
replacementorrepairduetoaccidentsorlackofpropermaintenance
•Repairsnecessaryduetofailuretousefreshfuel(lessthanone
monthold),orfailuretoproperlypreparetheunitpriortoanyperiodof
non-useoveronemonth
•Pickupanddeliverycharges
•Operationalmisuse,neglect,oraccidents
•RepairsorattemptedrepairsbyanyoneotherthananAuthorizedT oro
ServiceDealer
•Repairsoradjustmentstocorrectstartingdifcultiesduetothe
following:
–failuretofollowpropermaintenanceprocedures
–rotarymowerbladestrikinganobject
–contaminantsinthefuelsystem
–improperfuel(consultyourOperator'sManualifindoubt)
–failuretodrainthefuelsystempriortoanyperiodofnon-useover
onemonth
•Specialoperationalconditionswherestartingmayrequiremorethan
twopulls:
–rsttimestartsafterextendedperiodofnon-useoverthree
monthsorseasonalstorage
–cooltemperaturestartssuchasthosefoundinearlyspringand
lateautumn
–improperstartingprocedures-ifyouarehavingdifcultystarting
yourunit,pleasechecktheOperator'sManualtoensurethat
youareusingthecorrectstartingprocedures.Thiscansavean
unnecessaryvisittoanAuthorizedT oroServiceDealer.
GeneralConditions
AllrepairscoveredbythesewarrantiesmustbeperformedbyanAuthorized
ToroServiceDealerusingToro-approvedreplacementparts.Repairbyan
AuthorizedToroServiceDealerisyoursoleremedyunderthiswarranty.
NeitherTheToroCompanynorToroWarrantyCompanyisliablefor
indirect,incidental,orconsequentialdamagesinconnectionwiththe
useoftheToroProductscoveredbythesewarranties,includingany
costorexpenseofprovidingsubstituteequipmentorserviceduring
reasonableperiodsofmalfunctionornon-usependingcompletionof
repairsunderthesewarranties.
Somestatesdonotallowexclusionsofincidentalorconsequential
damages,sotheaboveexclusionsmaynotapplytoyou.
Thiswarrantygivesyouspeciclegalrights,andyoumayalsohaveother
rightswhichvaryfromstatetostate.
CountriesOtherthantheUnitedStatesorCanada
CustomerswhohavepurchasedT oroproductsexportedfromtheUnitedStatesorCanadashouldcontacttheirToroDistributor(Dealer)toobtain
guaranteepoliciesforyourcountry ,province,orstate.IfforanyreasonyouaredissatisedwithyourDistributor'sserviceorhavedifcultyobtaining
guaranteeinformation,contacttheToroimporter.Ifallotherremediesfail,youmaycontactusatToroWarrantyCompany .
*Residentialpurposesmeansuseoftheproductonthesamelotasyourhome.Useatmorethanonelocation,orinstitutionalorrentaluse,isconsidered
commercialuse,andthecommercialusewarrantywouldapply.
374-0254RevC
 Loading...