

Page 1

22inRecycler
ModelNo.20340—SerialNo.404330000andUp
ModelNo.20355—SerialNo.404330000andUp
Introduction
Thisrotary-blade,walk-behindlawnmowerisintended
tobeusedbyresidentialhomeowners.Itisdesigned
primarilyforcuttinggrassonwell-maintainedlawns
onresidentialproperties.
®
LawnMowerwithSmartStow
FormNo.3423-297RevA
®
Operator'sManual
g000502
Figure2
Safety-alertsymbol
Readthisinformationcarefullytolearnhowtooperate
andmaintainyourproductproperlyandtoavoid
injuryandproductdamage.Youareresponsiblefor
operatingtheproductproperlyandsafely.
Visitwww.T oro.comformoreinformation,including
safetytips,trainingmaterials,accessoryinformation,
helpndingadealer,ortoregisteryourproduct.
Wheneveryouneedservice,genuineToroparts,or
additionalinformation,contactanAuthorizedService
DealerorToroCustomerServiceandhavethemodel
andserialnumbersofyourproductready .Figure1
identiesthelocationofthemodelandserialnumbers
ontheproduct.Writethenumbersinthespace
provided.
Important:Withyourmobiledevice,youcan
scantheQRcodeontheserialnumberdecal(if
equipped)toaccesswarranty,parts,andother
productinformation.
Figure1
1.Modelandserialnumberlocation
Thismanualuses2wordstohighlightinformation.
Importantcallsattentiontospecialmechanical
informationandNoteemphasizesgeneralinformation
worthyofspecialattention.
ItisaviolationofCaliforniaPublicResourceCode
Section4442or4443touseoroperatetheengineon
anyforest-covered,brush-covered,orgrass-covered
landunlesstheengineisequippedwithaspark
arrester,asdenedinSection4442,maintainedin
effectiveworkingorderortheengineisconstructed,
equipped,andmaintainedforthepreventionofre.
Theenclosedengineowner'smanualissupplied
forinformationregardingtheUSEnvironmental
ProtectionAgency(EPA)andtheCaliforniaEmission
ControlRegulationofemissionsystems,maintenance,
andwarranty.Replacementsmaybeorderedthrough
theenginemanufacturer.
GrossorNetTorque:Thegrossornettorque
ofthisenginewaslaboratoryratedbytheengine
manufacturerinaccordancewiththeSocietyof
AutomotiveEngineers(SAE)J1940orJ2723.As
conguredtomeetsafety,emission,andoperating
requirements,theactualenginetorqueonthisclass
ofmowerwillbesignicantlylower.Pleasereferto
g226621
theenginemanufacturer’sinformationincludedwith
themachine.
ModelNo.
SerialNo.
Thismanualidentiespotentialhazardsandhas
safetymessagesidentiedbythesafety-alertsymbol
(Figure2),whichsignalsahazardthatmaycause
seriousinjuryordeathifyoudonotfollowthe
recommendedprecautions.
©2018—TheT oro®Company
8111L yndaleAvenueSouth
Bloomington,MN55420
Registeratwww.Toro.com.
OriginalInstructions(EN)
PrintedinMexico
AllRightsReserved
*3423-297*A
Page 2

WARNING
CALIFORNIA
Proposition65Warning
Theengineexhaustfromthisproduct
containschemicalsknowntotheStateof
Californiatocausecancer,birthdefects,
orotherreproductiveharm.
Useofthisproductmaycauseexposure
tochemicalsknowntotheStateof
Californiatocausecancer,birthdefects,
orotherreproductiveharm.
Contents
Introduction...............................................................1
Safety.......................................................................3
GeneralSafety...................................................3
SafetyandInstructionalDecals..........................4
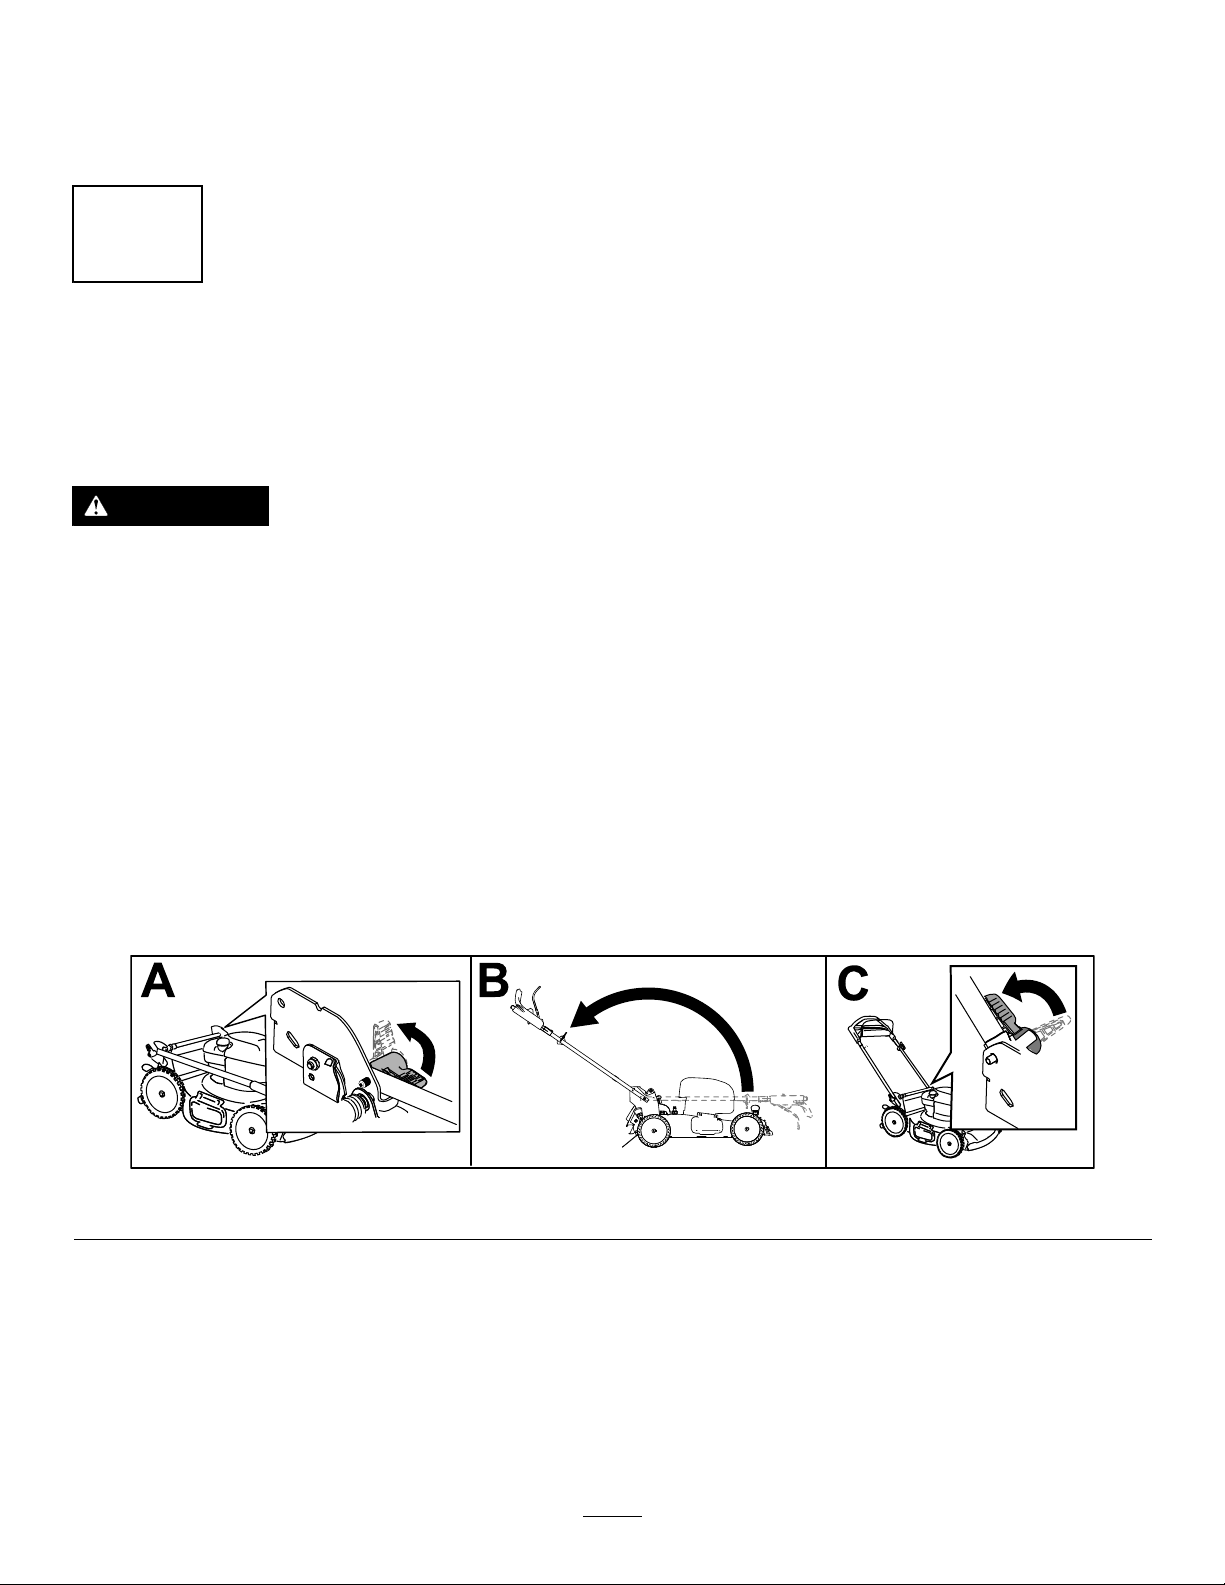
Setup........................................................................6
1UnfoldingtheHandle.......................................6
2InstallingtheRecoil-StarterRopeinthe
RopeGuide.....................................................7
3FillingtheEnginewithOil.................................8
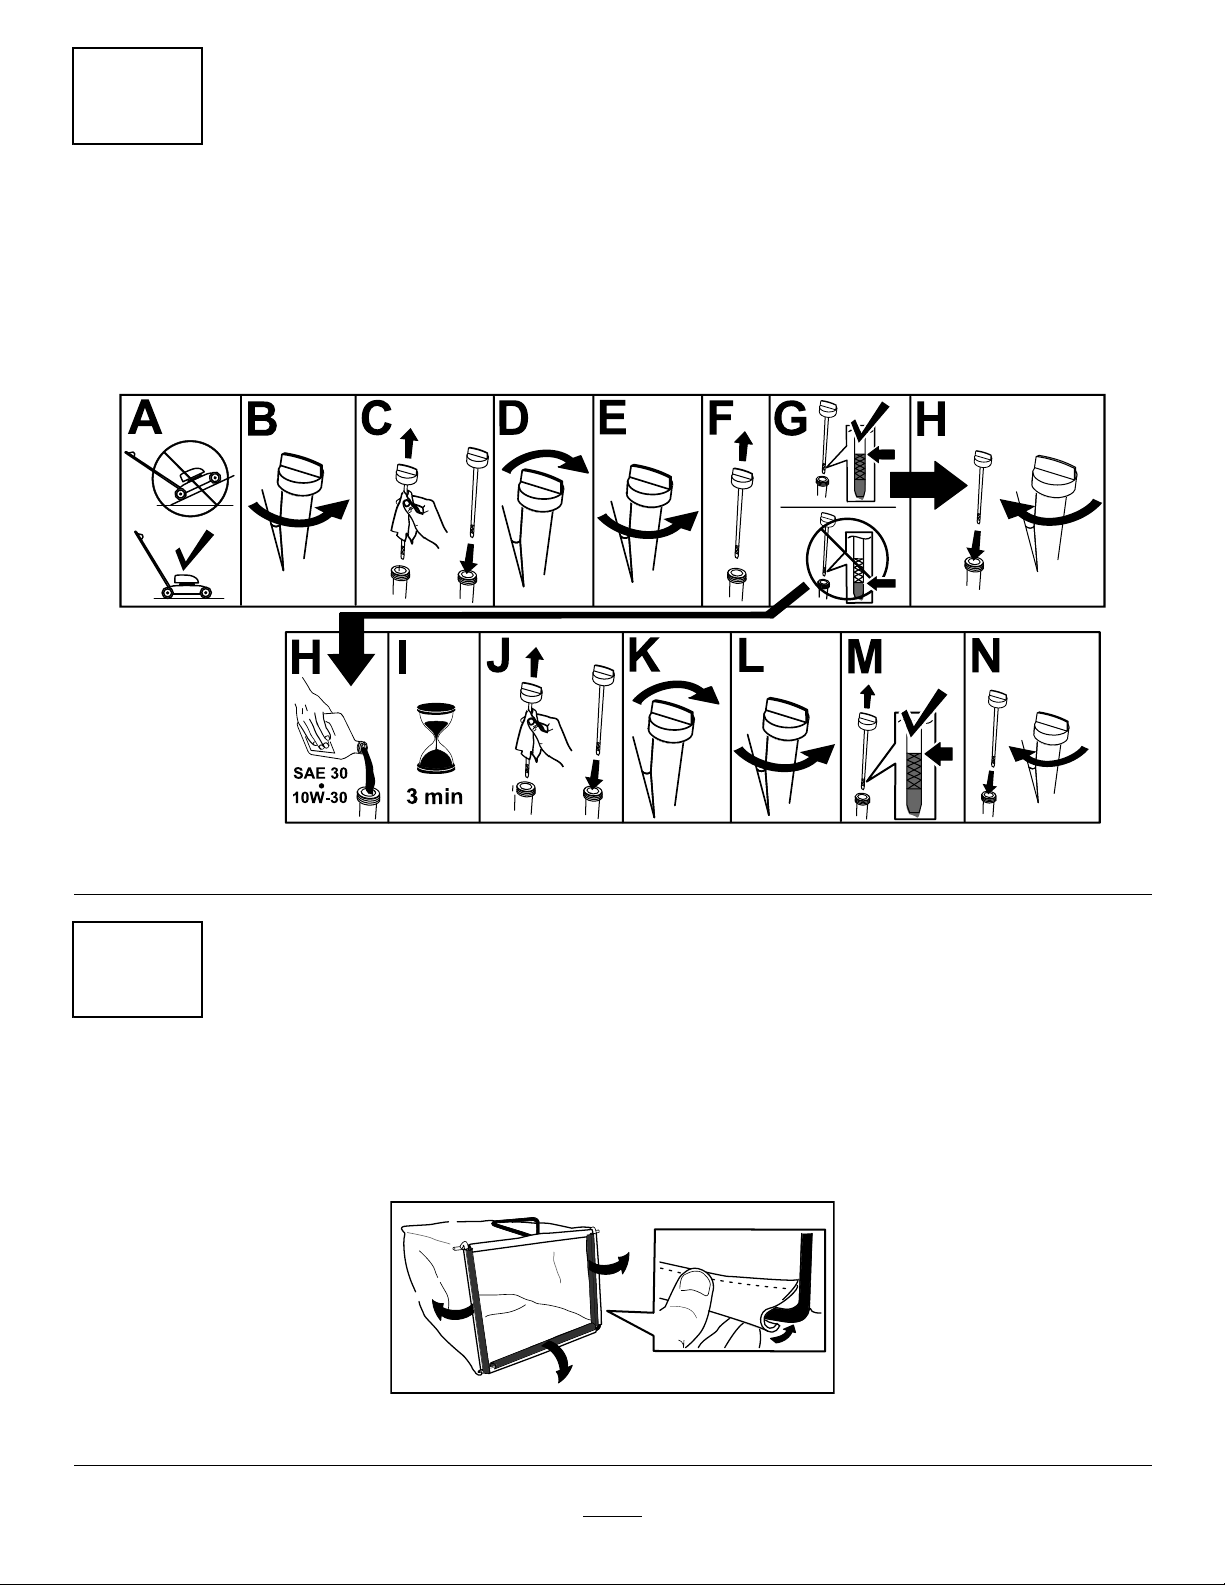
4AssemblingtheGrassBag...............................8
ProductOverview.....................................................9
Operation..................................................................9
BeforeOperation...................................................9
BeforeOperationSafety.....................................9
FillingtheFuelTank..........................................10
CheckingtheEngine-OilLevel..........................10
AdjustingtheHandleHeight..............................11
AdjustingtheCuttingHeight.............................12
DuringOperation.................................................13
DuringOperationSafety...................................13
UsingtheSelf-PropelDrive...............................13
ShuttingOfftheEngine.....................................14
RecyclingtheClippings....................................14
BaggingtheClippings.......................................14
OperatingtheBag-on-DemandLever...............15
Side-DischargingtheClippings.........................15
OperatingTips.................................................16
AfterOperation....................................................17
AfterOperationSafety......................................17
CleaningundertheMachine.............................17
FoldingtheHandle...........................................18
StoringtheMachineintheVertical-Stow
Position.........................................................18
Maintenance...........................................................20
RecommendedMaintenanceSchedule(s)...........20
MaintenanceSafety..........................................20
PreparingforMaintenance...............................20
ServicingtheAirFilter.......................................21
ChangingtheEngineOil...................................21
ReplacingtheBlade..........................................22
AdjustingtheSelf-PropelDrive.........................23
Storage...................................................................23
StorageSafety..................................................23
PreparingtheMachineforStorage...................23
RemovingtheMachinefromStorage................23
2
Page 3

Safety
Thismachinehasbeendesignedinaccordancewith
ANSIB71.1-2017.
GeneralSafety
Thisproductiscapableofamputatinghandsand
feetandofthrowingobjects.Alwaysfollowallsafety
instructionstoavoidseriouspersonalinjury .
Usingthisproductforpurposesotherthanitsintended
usecouldprovedangeroustoyouandbystanders.
•Read,understand,andfollowtheinstructions
andwarningsinthisOperator’sManualandon
themachineandattachmentsbeforestartingthe
engine.
•Donotputyourhandsorfeetnearmovingpartsof
orunderthemachine.Keepclearofanydischarge
opening.
•Donotoperatethemachinewithoutallguards
andothersafetyprotectivedevicesinplaceand
functioningproperlyonthemachine.
•Keepbystandersandchildrenoutoftheoperating
area.Donotallowchildrentooperatethemachine.
Allowonlypeoplewhoareresponsible,trained,
familiarwiththeinstructions,andphysically
capabletooperatethemachine.
•Stopthemachine,shutofftheengine,andwaitfor
allmovingpartstostopbeforeservicing,fueling,
oruncloggingthemachine.
Improperlyusingormaintainingthismachinecan
resultininjury.T oreducethepotentialforinjury,
complywiththesesafetyinstructionsandalways
payattentiontothesafety-alertsymbol
meansCaution,Warning,orDanger—personalsafety
instruction.Failuretocomplywiththeseinstructions
mayresultinpersonalinjuryordeath.
,which
3
Page 4
SafetyandInstructionalDecals
Safetydecalsandinstructionsareeasilyvisibletotheoperatorandarelocatednearanyarea
ofpotentialdanger.Replaceanydecalthatisdamagedormissing.
Manufacturer'sMark
1.Thismarkindicatesthatthebladeisidentiedasapart
fromtheoriginalmachinemanufacturer .
decaloemmarkt
decal94-8072
94-8072
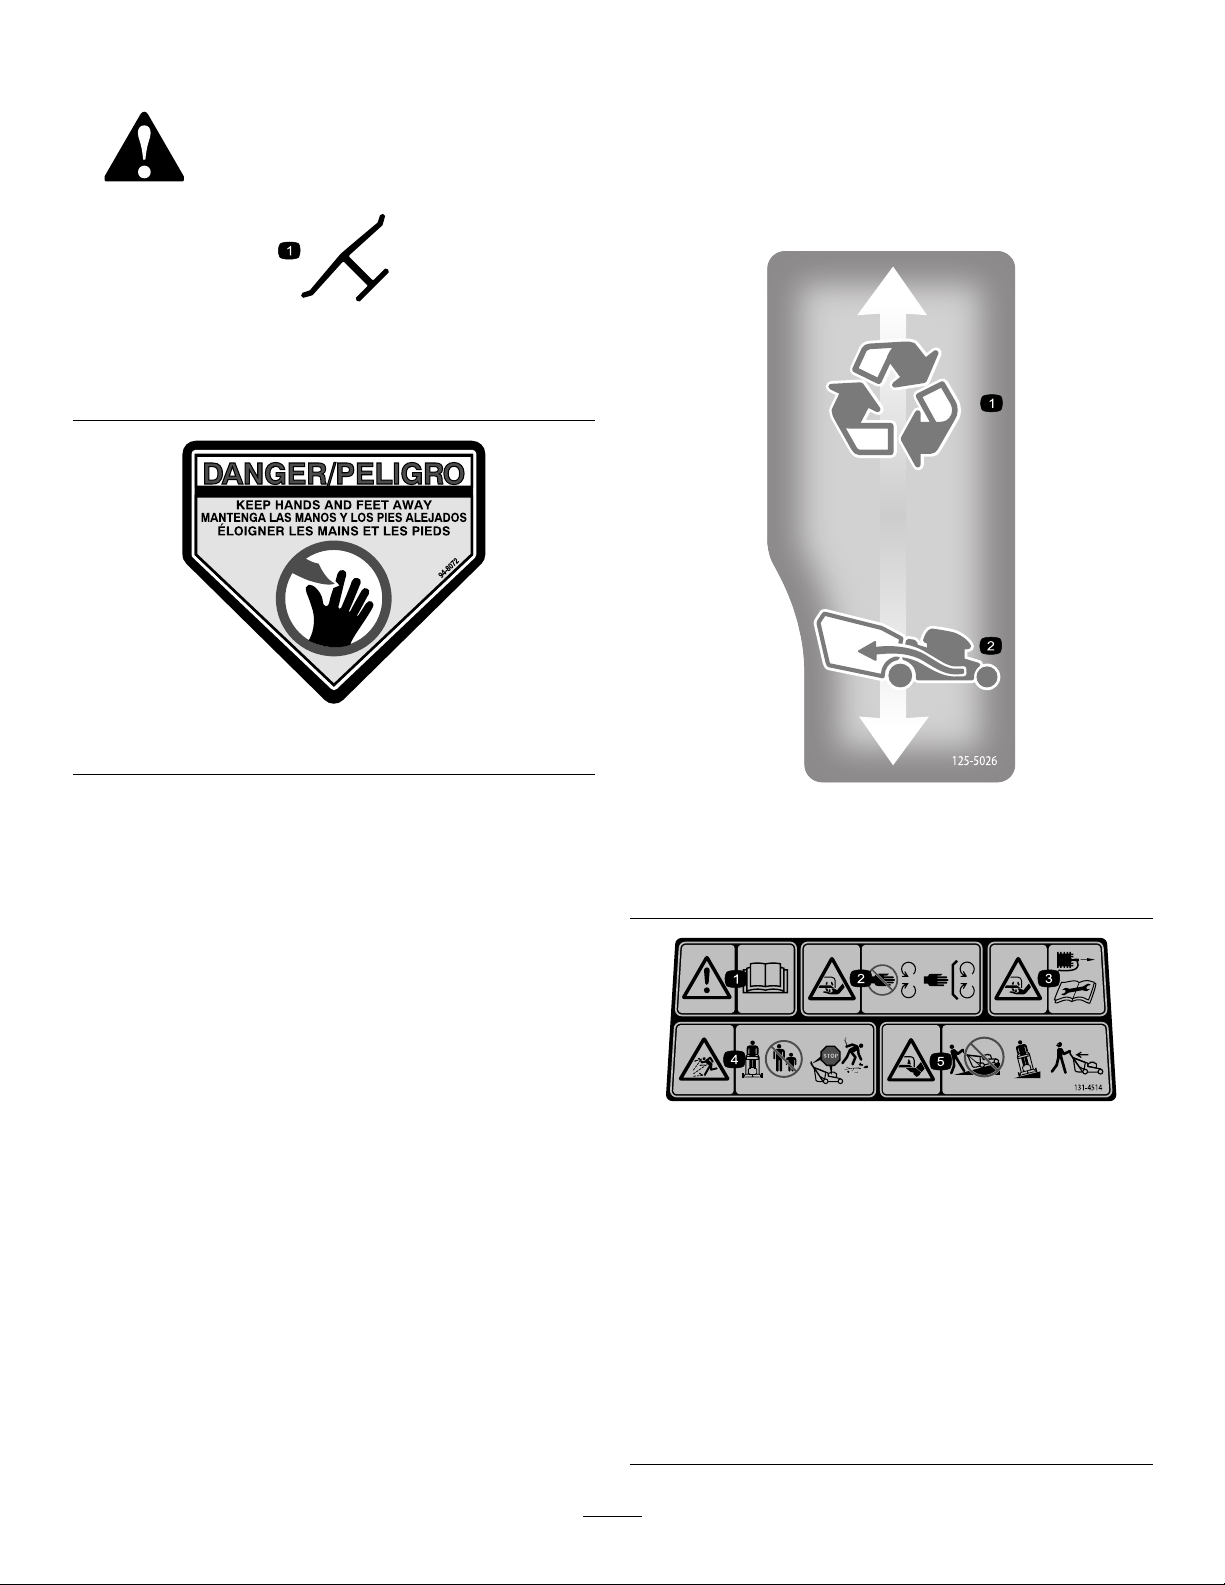
decal125-5026
125-5026
1.Recyclingmode2.Baggingmode
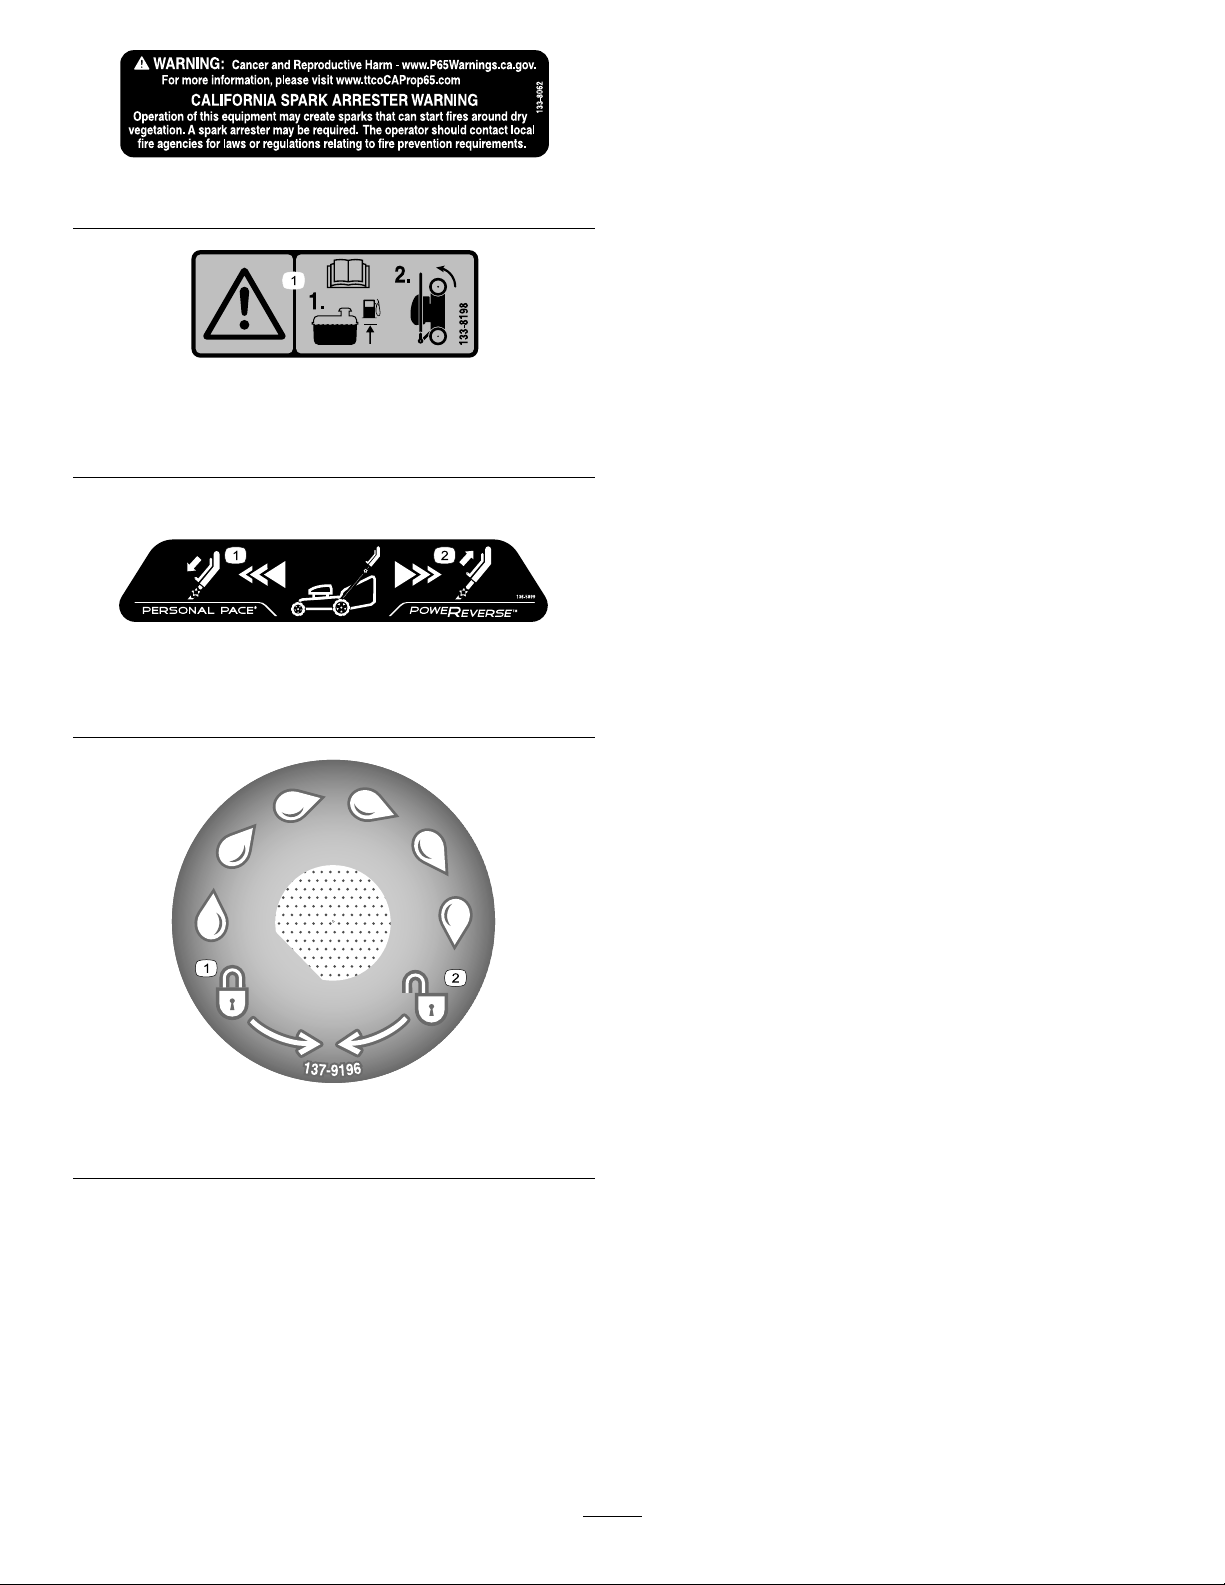
decal131-4514b
131-4514
1.Warning—readtheOperator'sManual.
2.Cutting/dismembermenthazardofhand,mower
blade—stayawayfrommovingparts;keepallguardsand
shieldsinplace.
3.Cutting/dismembermenthazardofhand,mower
blade—disconnectthespark-plugwirebeforeperforming
maintenance.
4.Thrownobjecthazard—keepbystandersaway.
5.Cutting/dismembermenthazardoffoot,mowerblade—do
notoperateupanddownslopes;operatesidetosideon
slopes;shutofftheenginebeforeleavingthemachine;
pickupanydebrisbeforemowing;lookbehindyouwhen
movinginreverse.
4
Page 5
133-8062
133-8198
1.Warning—readtheOperator'sManual;1)Addfueluptothe
indicatedlevel.2)Tipthemachineforwardforstorage.
decal133-8062
decal133-8198
Decal136-5899isforPoweReverse
1.Pushthehandledownto
moveforward.
136-5899
2.Pullthehandleuptomove
®
models.
decal136-5899
backward.
137-9196
1.Lock2.Unlock
decal137-9196
5
Page 6
Setup
Important:Removeanddiscardtheprotectiveplasticsheetthatcoverstheengineandanyother
plasticorwrappingonthemachine.
1
UnfoldingtheHandle
NoPartsRequired
Procedure
WARNING
Unfoldingthehandleimproperlycandamagethecables,causinganunsafeoperating
condition.
•Donotdamagethecable(s)whenfoldingorunfoldingthehandle.
•Ensurethatthecable(s)areroutedtotheoutsideofthehandle.
•Ifacableisdamaged,contactanAuthorizedServiceDealer.
Important:Removeanddiscardtheprotectiveplasticsheetthatcoverstheengineandanyother
plasticorwrappingonthemachine.
1.Unlockthehandle(AofFigure3).
2.Movethehandlerearwardtotheoperatingposition(BofFigure3).
3.Holdthehandlewhileengagingthehandlelockstoavoidpinchingyourhands.
4.Engagethehandlelockuntilthepinclicksinplacetolockthehandleintotheoperatingposition(Cof
Figure3).
Figure3
g232815
6
Page 7
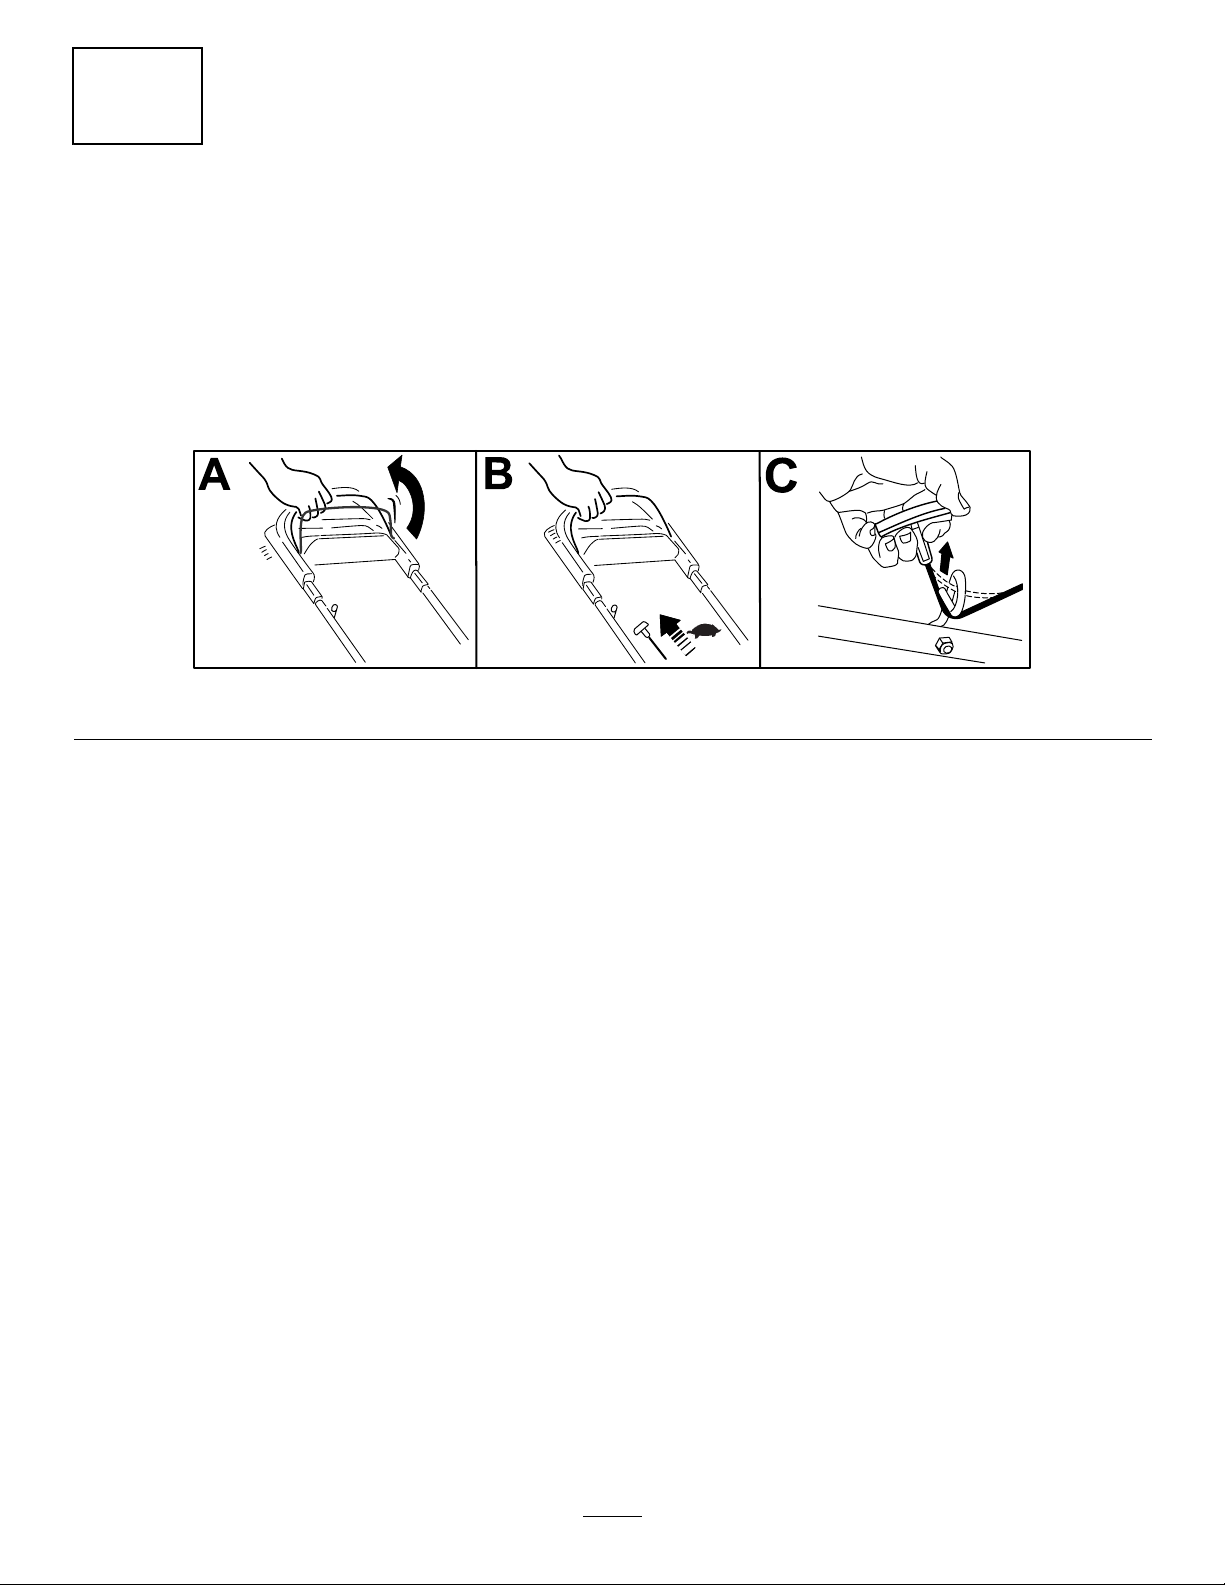
2
InstallingtheRecoil-Starter RopeintheRopeGuide
NoPartsRequired
Procedure
Important:Tostarttheenginesafelyandeasilywheneveryouusethemachine,installtherecoil-starter
ropeintheropeguide.
Figure4
g230719
7
Page 8
3
FillingtheEnginewithOil
NoPartsRequired
Procedure
Important:Yourmachinedoesnotcomewithoilintheengine.Beforestartingtheengine,llthe
enginewithoil.
4
AssemblingtheGrassBag
NoPartsRequired
Procedure
g222533
Figure5
g230447
Figure6
8
Page 9
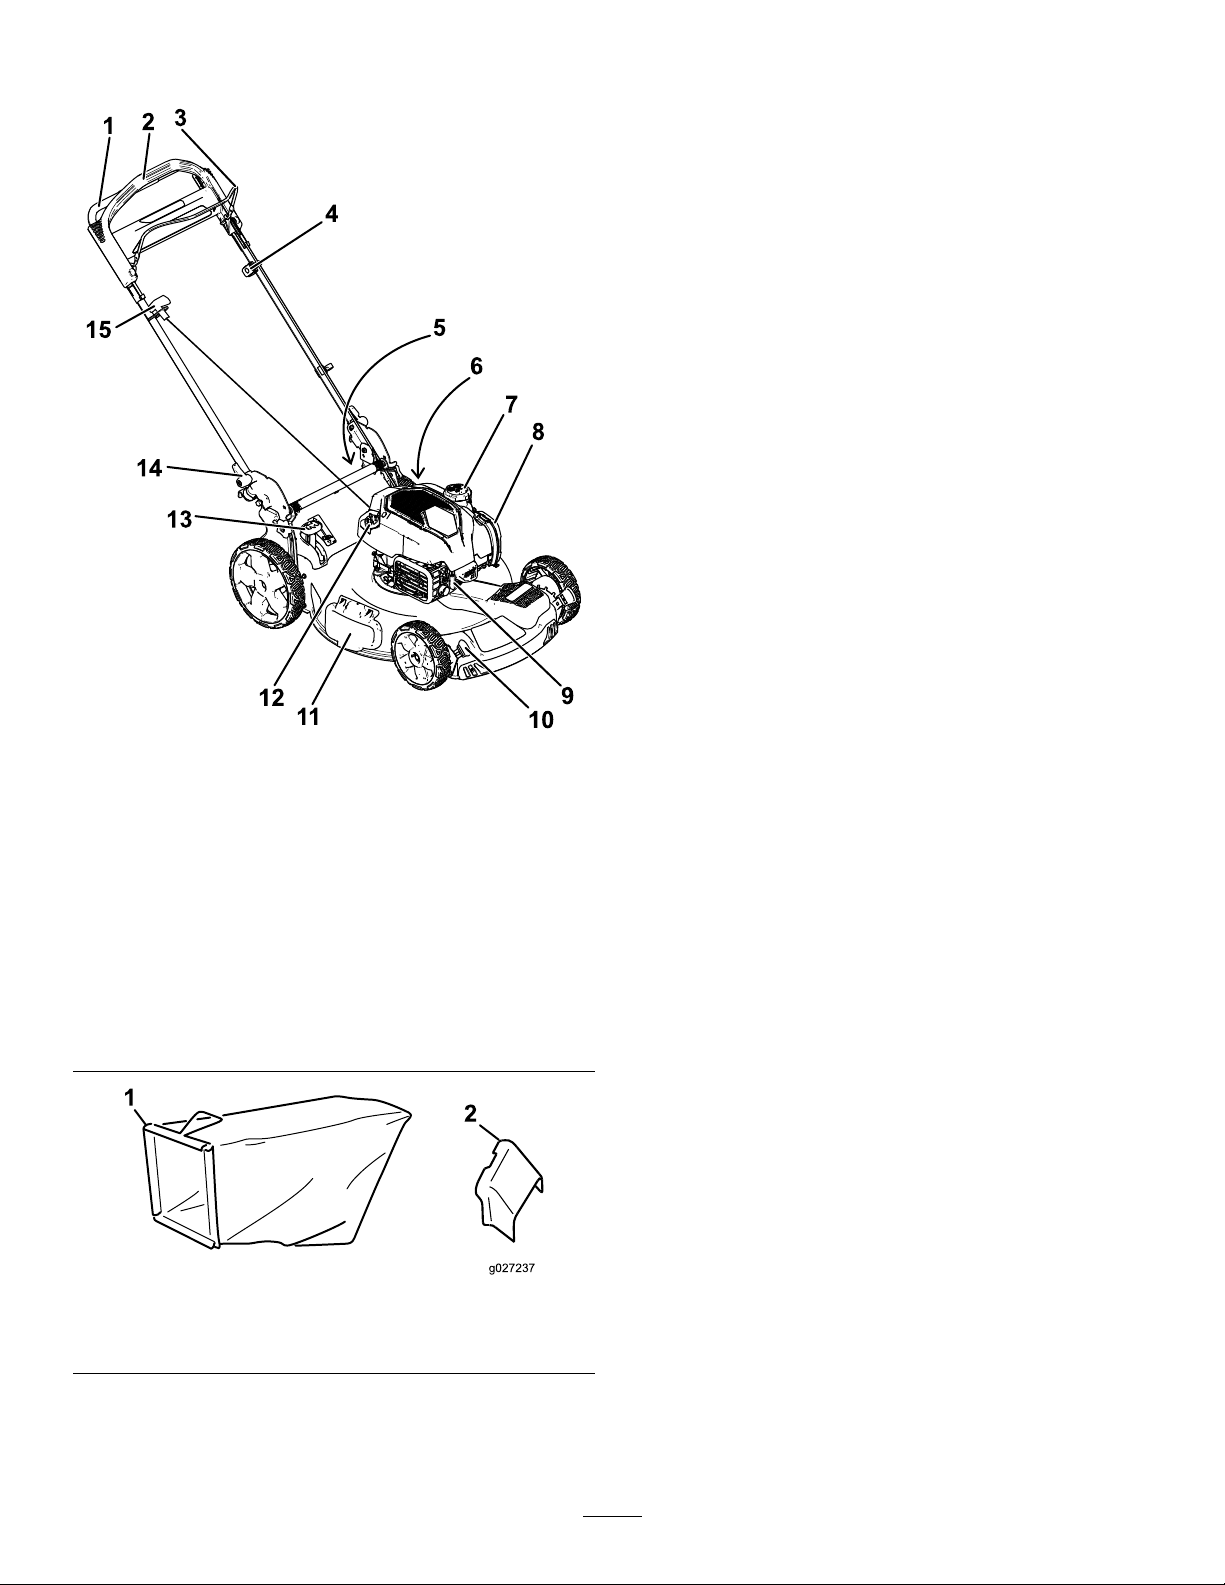
ProductOverview
Figure7
Model20355shown
1.Handle
2.Self-propelbar10.Cutting-heightlever(4)
3.Blade-controlbar
4.Adjustmentforthe
self-propeldrive
5.Reardeector(notshown)
6.Washoutport(notshown)14.Handlelock(2)
7.Fuel-tankcap15.Recoil-starthandle
8.Airlter
1.Grassbag2.Side-dischargechute
9.Spark-plugwire
11.Side-dischargedeector
12.Oilll/dipstick
13.Bag-on-demandlever
Figure8
Operation
Note:Determinetheleftandrightsidesofthe
machinefromthenormaloperatingposition.
BeforeOperation
BeforeOperationSafety
GeneralSafety
•Alwaysshutoffthemachine,waitforallmoving
partstostop,andallowthemachinetocoolbefore
adjusting,servicing,cleaning,orstoringit.
•Becomefamiliarwiththesafeoperationofthe
equipment,operatorcontrols,andsafetysigns.
•Checkthatallguardsandsafetydevices,suchas
deectorsand/orgrasscatcher,areinplaceand
functioningproperly.
•Alwaysinspectthemachinetoensurethatthe
bladesandbladeboltsarenotwornordamaged.
•Inspecttheareawhereyouwillusethemachine,
andremoveallobjectsthatcouldinterferewith
theoperationofthemachineorthatthemachine
g270020
g027237
couldthrow.
•Contactwiththemovingbladewillcauseserious
injury.Donotputyourngersunderthehousing
whenadjustingthecuttingheight.
FuelSafety
•Fuelisextremelyammableandhighlyexplosive.
Areorexplosionfromfuelcanburnyouand
othersandcandamageproperty.
–Topreventastaticchargefromignitingthefuel,
placethecontainerand/ormachinedirectlyon
thegroundbeforelling,notinavehicleoron
anobject.
–Fillthefueltankoutdoors,inanopenarea,
whentheengineiscold.Wipeupanyfuelthat
spills.
–Donothandlefuelwhensmokingoraroundan
openameorsparks.
–Donotremovethefuelcaporaddfueltothe
tankwhiletheengineisrunningorhot.
–Ifyouspillfuel,donotattempttostartthe
engine.Avoidcreatingasourceofignitionuntil
thefuelvaporshavedissipated.
–Storefuelinanapprovedcontainerandkeep
itoutofthereachofchildren.
•Fuelisharmfulorfatalifswallowed.Long-term
exposuretovaporscancauseseriousinjuryand
illness.
9
Page 10

–Avoidprolongedbreathingofvapors.
–Keepyourhandsandfaceawayfromthe
nozzleandthefuel-tankopening.
–Keepfuelawayfromyoureyesandskin.
Fillthefueltankwithfreshunleadedregulargasoline
fromamajorname-brandservicestation(Figure9).
Important:T oreducestartingproblems,addfuel
stabilizer/conditionertofreshfuelasdirectedby
thefuel-stabilizermanufacturer.
FillingtheFuelTank
•Forbestresults,useonlyclean,fresh,unleaded
gasolinewithanoctaneratingof87orhigher
((R+M)/2ratingmethod).
•Oxygenatedfuelwithupto10%ethanolor15%
MTBEbyvolumeisacceptable.
•Donotuseethanolblendsofgasoline,such
asE15orE85,withmorethan10%ethanolby
volume.Performanceproblemsand/orengine
damagemayresult,whichmaynotbecovered
underwarranty.
•Donotusegasolinecontainingmethanol.
•Donotstorefueleitherinthefueltankorinfuel
containersoverthewinterunlessfuelstabilizer
hasbeenaddedtothefuel.
•Donotaddoiltogasoline.
CheckingtheEngine-OilLevel
ServiceInterval:Beforeeachuseordaily
Refertoyourengineowner’smanualforadditional
information.
g230458
Figure9
Important:Iftheoillevelinthecrankcaseistoolowortoohighandyouruntheengine,youmay
damagetheengine.
Figure10
g222533
10
Page 11

AdjustingtheHandleHeight
Model20355Only
Youcanraiseorlowerthehandlein1of3positionsthatismorecomfortableforyou(Figure11).
Figure11
1.Removebothhandleknobs.
2.Movethehandletothedesiredheightposition.
3.Securethehandlewiththepreviouslyremovedhandleknobs.
g238410
Model20340Only
Youmayraiseorlowerthehandletoapositioncomfortableforyou.
Rotatethehandlelock,movethehandleto1of2positions,andlockthehandleintoposition(Figure12).
Figure12
g271093
11
Page 12

AdjustingtheCuttingHeight
CAUTION
Iftheenginehasbeenrunning,themuferwillbehotandcanseverelyburnyou.
Keepawayfromthehotmufer.
Adjustthecuttingheightasdesired.Setallwheelstothesamecuttingheight(Figure13).
Figure13
g254131
12
Page 13

DuringOperation
DuringOperationSafety
GeneralSafety
•Wearappropriateclothing,includingeye
protection;longpants;substantial,slip-resistant
footwear;andhearingprotection.Tiebacklong
hairanddonotwearlooseclothingorloose
jewelry.
•Useyourfullattentionwhileoperatingthe
machine.Donotengageinanyactivitythat
causesdistractions;otherwise,injuryorproperty
damagemayoccur.
•Donotoperatethemachinewhileill,tired,or
undertheinuenceofalcoholordrugs.
•Thebladeissharp;contactingthebladecanresult
inseriouspersonalinjury.Shutofftheengineand
waitforallmovingpartstostopbeforeleavingthe
operatingposition.
•Whenyoureleasetheblade-controlbar,the
engineshouldshutoffandthebladeshouldstop
within3seconds.Ifnot,stopusingyourmachine
immediatelyandcontactanAuthorizedService
Dealer.
•Keepbystandersoutoftheoperatingarea.Keep
smallchildrenoutoftheoperatingareaandunder
thewatchfulcareofaresponsibleadultwhois
notoperatingthemachine.Stopthemachineif
anyoneentersthearea.
•Alwayslookdownandbehindyoubeforemoving
themachineinreverse.
•Operatethemachineonlyingoodvisibilityand
appropriateweatherconditions.Donotoperate
themachinewhenthereistheriskoflightning.
•Wetgrassorleavescancauseseriousinjuryif
youslipandcontacttheblade.Avoidmowingin
wetconditions.
•Useextremecarewhenapproachingblind
corners,shrubs,trees,orotherobjectsthatmay
blockyourview.
•Donotdirectthedischargematerialtoward
anyone.Avoiddischargingmaterialagainstawall
orobstruction;materialmayricochettowardyou.
Stoptheblade(s)whencrossinggravelsurfaces.
•Watchforholes,ruts,bumps,rocks,orother
hiddenobjects.Uneventerraincouldcauseyou
toloseyourbalanceorfooting.
•Ifthemachinestrikesanobjectorstartsto
vibrate,immediatelyshutofftheengine,waitfor
allmovingpartstostop,anddisconnectthewire
fromthesparkplugbeforeexaminingthemachine
fordamage.Makeallnecessaryrepairsbefore
resumingoperation.
•Beforeleavingtheoperatingposition,shutoffthe
engineandwaitforallmovingpartstostop.
•Iftheenginehasbeenrunning,itwillbehotand
canseverelyburnyou.Keepawayfromthehot
engine.
•Operatetheengineonlyinwell-ventilatedareas.
Exhaustgasescontaincarbonmonoxide,which
islethalifinhaled.
•Checkthegrasscatchercomponentsandthe
dischargechutefrequentlyforanywearor
deteriorationandreplacethemwithgenuineT oro
partswhennecessary.
UsingtheSelf-PropelDrive
UsingtheSelf-PropelDrive
ForModelsWithoutPoweReverse
Tooperatetheself-propeldrive,simplywalkwithyour
handsontheupperhandleandyourelbowsatyour
sides,andthemachinewillautomaticallykeeppace
withyou(Figure14).
Figure14
Note:Ifthemachinedoesnotfreelyrollbackward
afterself-propelling,stopwalking,holdyourhands
inplace,andallowthemachinetorollacoupleof
centimeters(inches)forwardtodisengagethewheel
drive.Y oucanalsotryreachingjustundertheupper
handletothemetalhandleandpushingthemachine
forwardacoupleofcentimeters(inches).Ifthe
machinestilldoesnotrollbackwardeasily,contactan
AuthorizedServiceDealer.
UsingtheSelf-PropelDrive
ForModelsWithPoweReverse
Tooperatetheself-propeldrive,simplywalkforward
orbackwardwithyourhandsontheupperhandle
®
®
g233423
13
Page 14

andyourelbowsatyoursides,andthemachinewill
automaticallykeeppacewithyou(Figure15).
Figure15
Note:Ifthemachinedoesnotfreelyrollforward
orbackwardafterusingtheself-propeldrive,stop
walking,holdyourhandsinplace,andallowthe
machinetorollacoupleofcentimeters(inches)
forwardtodisengagethewheeldrive.Y oucanalso
tryreachingjustundertheupperhandletothemetal
handleandpushingthemachineforwardacouple
ofcentimeters(inches).Ifyouarehavingissues
propellinginreverse,slightlyliftthehandle.Ifthe
machinestilldoesnotrollbackwardeasily,youmay
needtoadjusttheself-propeldrive;refertoAdjusting
theSelf-PropelDrive(page23).Otherwise,contact
anAuthorizedServiceDealer.
ShuttingOfftheEngine
ServiceInterval:Beforeeachuseordaily
Toshutofftheengine,releasetheblade-controlbar.
Important:Whenyoureleasetheblade-control
bar,boththeengineandbladeshouldstopwithin
3seconds.Iftheydonotstopproperly ,stop
usingyourmachineimmediatelyandcontactan
g038503
AuthorizedServiceDealer.
RecyclingtheClippings
Yourmachinecomesfromthefactoryreadytorecycle
thegrassandleafclippingsbackintothelawn.
Ifthegrassbagisonthemachineandthe
bag-on-demandleverisinthebaggingposition,
movethelevertotherecyclingposition;referto
OperatingtheBag-on-DemandLever(page15).If
theside-dischargechuteisonthemachine,remove
it;refertoRemovingtheSide-DischargeChute(page
16).
BaggingtheClippings
Usethegrassbagwhenyouwanttocollectgrassandleafclippingsfromthelawn.
Iftheside-dischargechuteisonthemachine,removeit;refertoRemovingtheSide-DischargeChute(page
16).Ifthebag-on-demandleverisintherecyclingposition,moveittothebaggingposition;refertoOperating
theBag-on-DemandLever(page15).
InstallingtheGrassBag
1.Raiseandholdupthereardeector(AofFigure16).
2.Installthegrassbag,ensuringthatthepinsonthebagrestinthenotchesonthehandle(BofFigure16).
3.Lowerthereardeector.
Figure16
g233434
RemovingtheGrassBag
Toremovethebag,reversethestepsinInstallingtheGrassBag(page14).
14
Page 15

Operatingthe Bag-on-DemandLever
Thebag-on-demandfeatureallowsyoutoeither
collectorrecyclegrassandleafclippingswhilethe
grassbagisattachedtothemachine.
•Tobagthegrassandleafclippings,pressthe
buttononthebag-on-demandleverandmovethe
leverforwarduntilthebuttonontheleverpopsup
(Figure17).
Important:Forproperoperation,shutoff
theengine,waitforallmovingpartstostop,
andthenremoveanygrassclippingsand
debrisfromthebag-on-demanddoorandthe
surroundingopening(Figure18)beforeyou
movethebag-on-demandleverfrom1position
toanother.
g234643
Figure18
1.Cleanhere
g234642
Figure17
1.Bag-on-demandlever(inthebaggingposition)
•Torecycleorside-dischargethegrassand
leafclippings,pressthebuttonontheleverand
movetheleverrearwarduntilthebuttononthe
leverpopsup.
Side-DischargingtheClippings
Usethesidedischargeforcuttingverytallgrass.
Ifthegrassbagisonthemachineandthebag-on-demandleverisintheBaggingposition,movetheleverto
theRecyclingposition;refertoOperatingtheBag-on-DemandLever(page15).
InstallingtheSide-DischargeChute
Liftupthesidedeectorandinstalltheside-dischargechute(AandBofFigure19).
Figure19
g233435
15
Page 16

RemovingtheSide-DischargeChute
Toremovetheside-dischargechute,liftupthesidedeector,removetheside-dischargechute,andlowerthe
side-dischargedeector.
OperatingTips
GeneralMowingTips
•Inspecttheareawhereyouwillusethemachine
andremoveallobjectsthatthemachinecould
throw.
•Avoidstrikingsolidobjectswiththeblade.Never
deliberatelymowoveranyobject.
•Ifthemachinestrikesanobjectorstartstovibrate,
immediatelyshutofftheengine,removethekey
(ifequipped),disconnectthewirefromthespark
plug,andexaminethemachinefordamage.
•Forbestperformance,installanewbladebefore
thecuttingseasonbegins.
•ReplacethebladewhennecessarywithaToro
replacementblade.
CuttingGrass
•Cutonlyaboutathirdofthegrassbladeatatime.
Donotcutbelow51mm(2inches)unlessthe
grassissparseoritislatefallwhengrassgrowth
beginstoslowdown.
CuttingLeaves
•Aftercuttingthelawn,ensurethathalfofthelawn
showsthroughthecutleafcover.Y oumayneed
tomakemorethanasinglepassovertheleaves.
•Iftherearemorethan13cm(5inches)ofleaves
onthelawn,mowatahighercuttingheightand
thenagainatthedesiredcuttingheight.
•Slowdownyourmowingspeedifthemachine
doesnotcuttheleavesnelyenough.
•Whencuttinggrassover15cm(6inches)tall,
mowatthehighestcuttingheightsettingandwalk
slower;thenmowagainatalowersettingforthe
bestlawnappearance.Ifthegrassistoolong,the
machinemayplugandcausetheenginetostall.
•Wetgrassandleavestendtoclumpontheyard
andcancausethemachinetoplugortheengine
tostall.Avoidmowinginwetconditions.
•Beawareofapotentialrehazardinverydry
conditions,followalllocalrewarnings,andkeep
themachinefreeofdrygrassandleafdebris.
•Alternatethemowingdirection.Thishelps
dispersetheclippingsoverthelawnforeven
fertilization.
•Ifthenishedlawnappearanceisunsatisfactory,
try1ormoreofthefollowing:
–Replacethebladeorhaveitsharpened.
–Walkataslowerpacewhilemowing.
–Raisethecuttingheightonyourmachine.
–Cutthegrassmorefrequently.
–Overlapcuttingswathsinsteadofcuttingafull
swathwitheachpass.
16
Page 17

AfterOperation
AfterOperationSafety
GeneralSafety
•Alwaysshutoffthemachine,waitforallmoving
partstostop,andallowthemachinetocoolbefore
adjusting,servicing,cleaning,orstoringit.
•Cleangrassanddebrisfromthemachinetohelp
preventres.Cleanupoilorfuelspills.
g009501
Figure20
1.Washoutport
•Neverstorethemachineorfuelcontainerwhere
thereisanopename,spark,orpilotlight,such
asonawaterheateroronotherappliances.
HaulingSafety
•Usecarewhenloadingorunloadingthemachine.
•Securethemachinefromrolling.
CleaningundertheMachine
ServiceInterval:Beforeeachuseordaily
CleaningundertheMachineUsing theWashoutPort
Forbestresults,cleanthemachinesoonafteryou
havecompletedmowing.
1.Movethemachineontoaatpavedsurface.
2.Shutofftheengineandwaitforallmovingparts
tostopbeforeleavingtheoperatingposition.
6.Turnthewateron.
7.Starttheengineandrunituntiltheclippingsno
longercomeoutfromunderthemachine.
8.Shutofftheengine.
9.Shutoffthewateranddisconnectthegarden
hosefromthemachine.
10.Starttheengineandrunitforafewminutesto
drytheundersideofthemachinetopreventit
fromrusting.
11.Shutofftheengineandallowittocoolbefore
storingthemachineinanenclosedarea.
CleaningundertheMachineinthe Vertical-stowPosition
1.Setthemachineinthevertical-stowposition;
refertoStoringtheMachineintheVertical-Stow
Position(page18).
2.Washouttheclippingsfromunderthemachine.
3.Lowerthemachinetoitslowestcutting-height
setting.RefertoAdjustingtheCuttingHeight
(page12).
4.Washouttheareaunderthereardoorwherethe
clippingsgofromtheundersideofthemachine
tothegrassbag.
Note:Washouttheareawiththe
bag-on-demand(ifequipped)inboththefully
forwardandfullyrearwardpositions.
5.Attachagardenhosethatisconnectedtoa
watersupplytothewashoutport(Figure20).
17
Page 18

FoldingtheHandle
WARNING
Foldingorunfoldingthehandleimproperly
candamagethecables,causinganunsafe
operatingcondition.
•Donotdamagethecableswhenfoldingor
unfoldingthehandle.
•Ifacableisdamaged,contactan
AuthorizedServiceDealer.
1.Holdthehandlewhiledisengagingthehandle
lockstoavoidpinchingyourhands.
2.Disengagethehandlelocksuntilyoucanmove
theupperhandlefreely.
3.Foldthehandleforwardeithertothevertical
positionorthefullyforwardpositionasshown
inFigure21.
Important:Routethecablestotheoutside
ofthehandlelocksasyoufoldthehandle.
StoringtheMachineinthe Vertical-StowPosition
Duringthemowingseasonorintheoff-season,you
canstoreyourmachineintheverticalpositionto
minimizestoragespace.
DANGER
Fuelisextremelyammableandexplosive.A
reorexplosionfromfuelcanburnyouand
others.
•Storingthemachineintheverticalposition
whenthereistoomuchfuelinthefueltank
maycausefueltoleakfromthefueltank.
Fuelisextremelyammableandexplosive.
Areorexplosionfromfuelcanburnyou
andothers.
•Storethemachineintheverticalposition
onlywhentheleveloffuelinthefueltank
isnohigherthanwhatisrecommendedin
thisOperator’sManual.
•Donotstorethemachineinaposition
thatisbeyondthevertical(90°)position;
otherwise,fuelmayescapefromthefuel
tank.
•Donottransportthemachineinthe
vertical-stowposition.
•Donotattempttostartthemachineinthe
vertical-stowposition.
•Donotattempttostoreanymachinewith
fuelandoilinthevertical-stowposition
thatisnotdesignedforthatpurpose.
Figure21
4.Tounfoldthehandle,referto1Unfoldingthe
Handle(page6).
WARNING
Foldingorunfoldingthehandleimproperly
candamagethecables,causinganunsafe
operatingcondition.
•Donotdamagethecableswhenfoldingor
unfoldingthehandle.
•Ifacableisdamaged,contactan
g186137
18
AuthorizedServiceDealer.
1.Ensurethattheleveloffuelinthefueltankisno
higherthanwhatisrecommendedbytheengine
manufacturer;refertotheenginemanufacturer’s
decalontheengine(Figure22).
Note:Ifthereistheleveloffuelinthefuel
tankistoohigh,drainthefuelfromthefueltank
intoanapprovedfuelcontaineruntilitisator
belowthelevelrecommendedbytheengine
manufacturer.
Page 19

Figure22
2.Ensurethatthecutting-heightsettingonthe
machineis92mm(3-5/8inches)orlower.If
itisnot,lowerit;refertoAdjustingtheCutting
Height(page12).
3.Disengagethehandlelocks(Figure23).
decal133-8198
g186013
Figure24
Figure23
1.Handlelockdisengaged
positions
2.Handlelockengaged
position
4.Foldthehandlefullyforward(Figure23).
Important:Routethecablestotheoutside
ofthehandleknobsasyoufoldthehandle.
5.Engagethehandlelocks.
6.Liftthefrontofthemachinebythehandleand
moveitintoastoragespace(Figure24).
g186012
19
Page 20

Maintenance
RecommendedMaintenanceSchedule(s)
MaintenanceService
Interval
Beforeeachuseordaily
Yearly
Yearlyorbeforestorage
MaintenanceProcedure
•Checktheengine-oillevel.
•Ensurethattheengineshutsoffwithin3secondsafterreleasingtheblade-control
bar.
•Cleangrassclippingsanddirtfromunderthemachine.
•Servicetheairlter;serviceitmorefrequentlyindustyoperatingconditions.
•Changetheengineoil(ifdesired).
•Replacethebladeorhaveitsharpened(morefrequentlyiftheedgedullsquickly).
•Cleantheenginebyremovingdirtanddebrisfromitstopandsides;cleanitmore
frequentlyindustyoperatingconditions.
•Emptythefueltankbeforerepairsasdirectedandbeforeyearlystorage.
Important:Refertoyourengineowner’smanualforadditionalmaintenanceprocedures.
MaintenanceSafety
•Disconnectthespark-plugwirefromthesparkplug
beforeperforminganymaintenanceprocedure.
•Wearglovesandeyeprotectionwhenservicing
themachine.
•Thebladeissharp;contactingthebladecanresult
inseriouspersonalinjury .Weargloveswhen
servicingtheblade.Donotrepairoralterthe
blade(s).
•Nevertamperwithsafetydevices.Checktheir
properoperationregularly .
•Tippingthemachinemaycausethefueltoleak.
Fuelisammableandexplosive,andcancause
personalinjury.Runtheenginedryorremovethe
fuelwithahandpump;neversiphonthefuel.
•Toensureoptimumperformanceofthemachine,
useonlygenuineTororeplacementpartsand
accessories.Replacementpartsandaccessories
madebyothermanufacturerscouldbedangerous,
andsuchusecouldvoidtheproductwarranty.
PreparingforMaintenance
1.Shutofftheengineandwaitforallmovingparts
tostop.
2.Disconnectthespark-plugwirefromthespark
plug(Figure25).
g206312
Figure25
1.Spark-plugwire
3.Afterperformingthemaintenanceprocedure(s),
connectthespark-plugwiretothesparkplug.
Important:Beforetippingthemachineto
changetheoilorreplacetheblade,allowthe
fueltanktorundrythroughnormalusage.If
youmusttipthemachinepriortorunning
outoffuel,useahandfuelpumptoremove
thefuel.Alwaystipthemachineontoits
side,withthedipstickdown.
20
Page 21

ServicingtheAirFilter
ServiceInterval:Y early
1.Unclipthetopoftheair-ltercover(Figure26).
Figure26
1.Clip
2.Air-ltercover
3.Airlter
2.RefertoPreparingforMaintenance(page20).
3.Removethedipstickbyrotatingthecap
counterclockwiseandpullingitout(Figure27).
g187518
Figure27
1.Dipstick3.Full
2.Add
g027456
4.Tipthemachineontoitsside(sothattheair
lterisup)todraintheusedoilfromtheoil-ll
tube(Figure28).
2.Removetheairlter(Figure26).
3.Inspecttheairlter.
Note:Iftheairlterisexcessivelydirty,replace
itwithanewlter.Otherwise,gentlytaptheair
lteronahardsurfacetoloosendebris.
4.Installtheairlter.
5.Usethecliptoinstalltheair-ltercover.
ChangingtheEngineOil
ServiceInterval:Y early
Changingtheengineoilisnotrequired,butif
youwanttochangetheoil,usethefollowing
procedure.
Note:Runtheengineafewminutesbeforechanging
theoiltowarmit.Warmoilowsbetterandcarries
morecontaminants.
EngineOilSpecications
Engineoilcapacity
OilviscositySAE30orSAE10W-30
APIserviceclassicationSJorhigher
1.Movethemachinetoalevelsurface.
0.44L(15oz)
detergentoil
g027457
Figure28
5.Afterdrainingtheusedoil,returnthemachineto
theoperatingposition.
6.Carefullypourabout3/4oftheenginecapacity
ofoilintotheoil-lltube.
7.Wait3minutesfortheoiltosettleintheengine.
8.Wipethedipstickcleanwithacleancloth.
9.Insertthedipstickintotheoil-lltube,then
removethedipstick.
10.Readtheoillevelonthedipstick(Figure27).
•Iftheoillevelonthedipstickistoolow,
carefullypourasmallamountofoilintothe
oil-lltube,wait3minutes,andrepeatsteps
21
Page 22

8through10untiltheoillevelonthedipstick
iscorrect.
4.Removetheblade,savingallmountinghardware
(Figure29).
•Iftheoillevelonthedipstickistoohigh,
draintheexcessoiluntiltheoillevelonthe
dipstickiscorrect.
Important:Iftheoillevelintheengineistoo
lowortoohighandyouruntheengine,you
maydamagetheengine.
11.Installthedipstickintotheoil-lltubesecurely.
12.Recycletheusedoilproperly.
ReplacingtheBlade
ServiceInterval:Y early
Important:Youwillneedatorquewrenchto
installthebladeproperly.Ifyoudonothavea
torquewrenchorareuncomfortableperforming
thisprocedure,contactanAuthorizedService
Dealer.
Examinethebladewheneveryourunoutoffuel.Ifthe
bladeisdamagedorcracked,replaceitimmediately.
Ifthebladeedgeisdullornicked,haveitsharpened
andbalanced,orreplaceit.
WARNING
5.Installthenewbladeandallmountinghardware
(Figure30).
g231390
Figure30
Thebladeissharp;contactingthebladecan
resultinseriouspersonalinjury.
Weargloveswhenservicingtheblade.
1.RefertoMaintenance(page20).
2.Tipthemachineontoitssidewiththeairlterup.
3.Useablockofwoodtoholdthebladesteady
(Figure29).
Important:Positionthecurvedendsofthe
bladetopointtowardthemachinehousing.
6.Useatorquewrenchtotightenthebladebolt
to82N∙m(60ft-lb).
Important:Abolttorquedto82N∙m(60
ft-lb)isverytight.Whileholdingtheblade
withablockofwood,putyourweight
behindtheratchetorwrenchandtightenthe
boltsecurely.Thisboltisverydifcultto
overtighten.
Figure29
g231389
22
Page 23

AdjustingtheSelf-Propel
Storage
Drive
ForSelf-Propel-DriveModelsOnly
Wheneveryouinstallanewself-propelcableorif
theself-propeldriveisoutofadjustment,adjustthe
self-propeldrive.
1.Turntheadjustmentnutcounterclockwiseto
loosenthecableadjustment(Figure31).
Figure31
1.Handle(leftside)
2.Adjustmentnut5.Turnthenut
3.Self-propel-drivecable
2.Adjustthetensiononthecable(Figure31)by
pullingitbackorpushingitforwardandholding
thatposition.
Note:Pushthecabletowardtheengineto
increasethetraction;pullthecableawayfrom
theenginetodecreasethetraction.
3.Turntheadjustmentnutclockwisetotightenthe
cableadjustment.
Note:Tightenthenutrmlywithasocketor
wrench.
4.Turnthenutclockwiseto
tightentheadjustment.
counterclockwiseto
loosentheadjustment.
Storethemachineinacool,clean,dryplace.
StorageSafety
Alwaysshutoffthemachine,waitforallmoving
partstostop,andallowthemachinetocoolbefore
adjusting,servicing,cleaning,orstoringit.
PreparingtheMachinefor Storage
1.Onthelastrefuelingoftheyear,addfuel
stabilizer(suchasToroPremiumFuel
Treatment)tothefuelasdirectedonthelabel.
2.Disposeofanyunusedfuelproperly .Recycle
itaccordingtolocalcodesoruseitinyour
automobile.
Important:Oldfuelinthefueltankisthe
leadingcauseofhardstarting.Donotstore
g269307
thefuelwithoutfuelstabilizermorethan
30days,anddonotstorestabilizedfuel
beyondthedurationrecommendedbythe
fuel-stabilizermanufacturer.
3.Runthemachineuntiltheengineshutsofffrom
runningoutoffuel.
4.Starttheengineagainandallowittorununtil
itshutsoff.Whenyoucannolongerstartthe
engine,itissufcientlydry.
5.Disconnectthewirefromthesparkplugand
connectthewiretotheretainingpost(if
equipped).
6.Removethesparkplug,add30ml(1oz)of
engineoilthroughthespark-plughole,andpull
thestarterropeslowlyseveraltimestodistribute
oilthroughoutthecylindertopreventcylinder
corrosionduringtheoff-season.
7.Looselyinstallthesparkplug.
8.Tightenallnuts,bolts,andscrews.
RemovingtheMachine fromStorage
1.Checkandtightenallfasteners.
2.Removethesparkplugandspintheengine
rapidlybypullingtherecoil-starthandletoblow
theexcessoilfromthecylinder.
3.Installthesparkplugandtightenitwithatorque
wrenchto20N∙m(15ft-lb).
4.Performanymaintenanceprocedures;referto
Maintenance(page20).
23
Page 24

5.Checktheengine-oillevel;refertoCheckingthe
Engine-OilLevel(page10).
6.Fillthefueltankwithfreshfuel;refertoFilling
theFuelT ank(page10).
7.Connectthewiretothesparkplug.
24
Page 25

Notes:
Page 26

Notes:
Page 27

CaliforniaProposition65WarningInformation
Whatisthiswarning?
Youmayseeaproductforsalethathasawarninglabellikethefollowing:
WARNING:CancerandReproductiveHarm—www.p65Warnings.ca.gov.
WhatisProp65?
Prop65appliestoanycompanyoperatinginCalifornia,sellingproductsinCalifornia,ormanufacturingproductsthatmaybesoldinorbroughtinto
California.ItmandatesthattheGovernorofCaliforniamaintainandpublishalistofchemicalsknowntocausecancer,birthdefects,and/orother
reproductiveharm.Thelist,whichisupdatedannually,includeshundredsofchemicalsfoundinmanyeverydayitems.ThepurposeofProp65isto
informthepublicaboutexposuretothesechemicals.
Prop65doesnotbanthesaleofproductscontainingthesechemicalsbutinsteadrequireswarningsonanyproduct,productpackaging,orliteraturewith
theproduct.Moreover,aProp65warningdoesnotmeanthataproductisinviolationofanyproductsafetystandardsorrequirements.Infact,the
CaliforniagovernmenthasclariedthataProp65warning“isnotthesameasaregulatorydecisionthataproductis‘safe’or‘unsafe.’”Manyofthese
chemicalshavebeenusedineverydayproductsforyearswithoutdocumentedharm.Formoreinformation,gotohttps://oag.ca.gov/prop65/faqs-view-all
AProp65warningmeansthatacompanyhaseither(1)evaluatedtheexposureandhasconcludedthatitexceedsthe“nosignicantrisklevel”;or(2)
haschosentoprovideawarningbasedonitsunderstandingaboutthepresenceofalistedchemicalwithoutattemptingtoevaluatetheexposure.
Doesthislawapplyeverywhere?
Prop65warningsarerequiredunderCalifornialawonly.ThesewarningsareseenthroughoutCaliforniainawiderangeofsettings,includingbutnot
limitedtorestaurants,grocerystores,hotels,schools,andhospitals,andonawidevarietyofproducts.Additionally,someonlineandmailorder
retailersprovideProp65warningsontheirwebsitesorincatalogs.
.
HowdotheCaliforniawarningscomparetofederallimits?
Prop65standardsareoftenmorestringentthanfederalandinternationalstandards.TherearevarioussubstancesthatrequireaProp65warning
atlevelsthatarefarlowerthanfederalactionlimits.Forexample,theProp65standardforwarningsforleadis0.5μg/day,whichiswellbelow
thefederalandinternationalstandards.
Whydon’tallsimilarproductscarrythewarning?
•ProductssoldinCaliforniarequireProp65labellingwhilesimilarproductssoldelsewheredonot.
•AcompanyinvolvedinaProp65lawsuitreachingasettlementmayberequiredtouseProp65warningsforitsproducts,butothercompanies
makingsimilarproductsmayhavenosuchrequirement.
•TheenforcementofProp65isinconsistent.
•CompaniesmayelectnottoprovidewarningsbecausetheyconcludethattheyarenotrequiredtodosounderProp65;alackofwarningsfora
productdoesnotmeanthattheproductisfreeoflistedchemicalsatsimilarlevels.
WhydoesToroincludethiswarning?
Torohaschosentoprovideconsumerswithasmuchinformationaspossiblesothattheycanmakeinformeddecisionsabouttheproductstheybuyand
use.Toroprovideswarningsincertaincasesbasedonitsknowledgeofthepresenceofoneormorelistedchemicalswithoutevaluatingthelevelof
exposure,asnotallthelistedchemicalsprovideexposurelimitrequirements.WhiletheexposurefromT oroproductsmaybenegligibleorwellwithinthe
“nosignicantrisk”range,outofanabundanceofcaution,TorohaselectedtoprovidetheProp65warnings.Moreover,ifT orodoesnotprovidethese
warnings,itcouldbesuedbytheStateofCaliforniaorbyprivatepartiesseekingtoenforceProp65andsubjecttosubstantialpenalties.
RevA
Page 28

 Loading...