

Page 1
22inRecycler
ModelNo.20332—SerialNo.312000001andUp
ModelNo.20334—SerialNo.312000001andUp
ModelNo.20352—SerialNo.312000001andUp
ReplacementpartsareavailablefromanAuthorizedServiceDealeroratwww.shoptoro.com.
®
LawnMower
FormNo.3371-667RevA
Operator'sManual
Introduction
Thisrotary-blade,walk-behindlawnmowerisintended
tobeusedbyresidentialhomeowners.Itisdesigned
primarilyforcuttinggrassonwell-maintainedlawns
onresidentialproperties.Itisnotdesignedforcutting
brushorforagriculturaluses.
Readthisinformationcarefullytolearnhowtooperate
andmaintainyourproductproperlyandtoavoidinjury
andproductdamage.Youareresponsibleforoperating
theproductproperlyandsafely.
YoumaycontactTorodirectlyatwww .Toro.comfor
productandaccessoryinformation,helpndingadealer,
ortoregisteryourproduct.
Wheneveryouneedservice,genuineToroparts,
oradditionalinformation,contactanAuthorized
ServiceDealerorToroCustomerServiceandhave
themodelandserialnumbersofyourproductready.
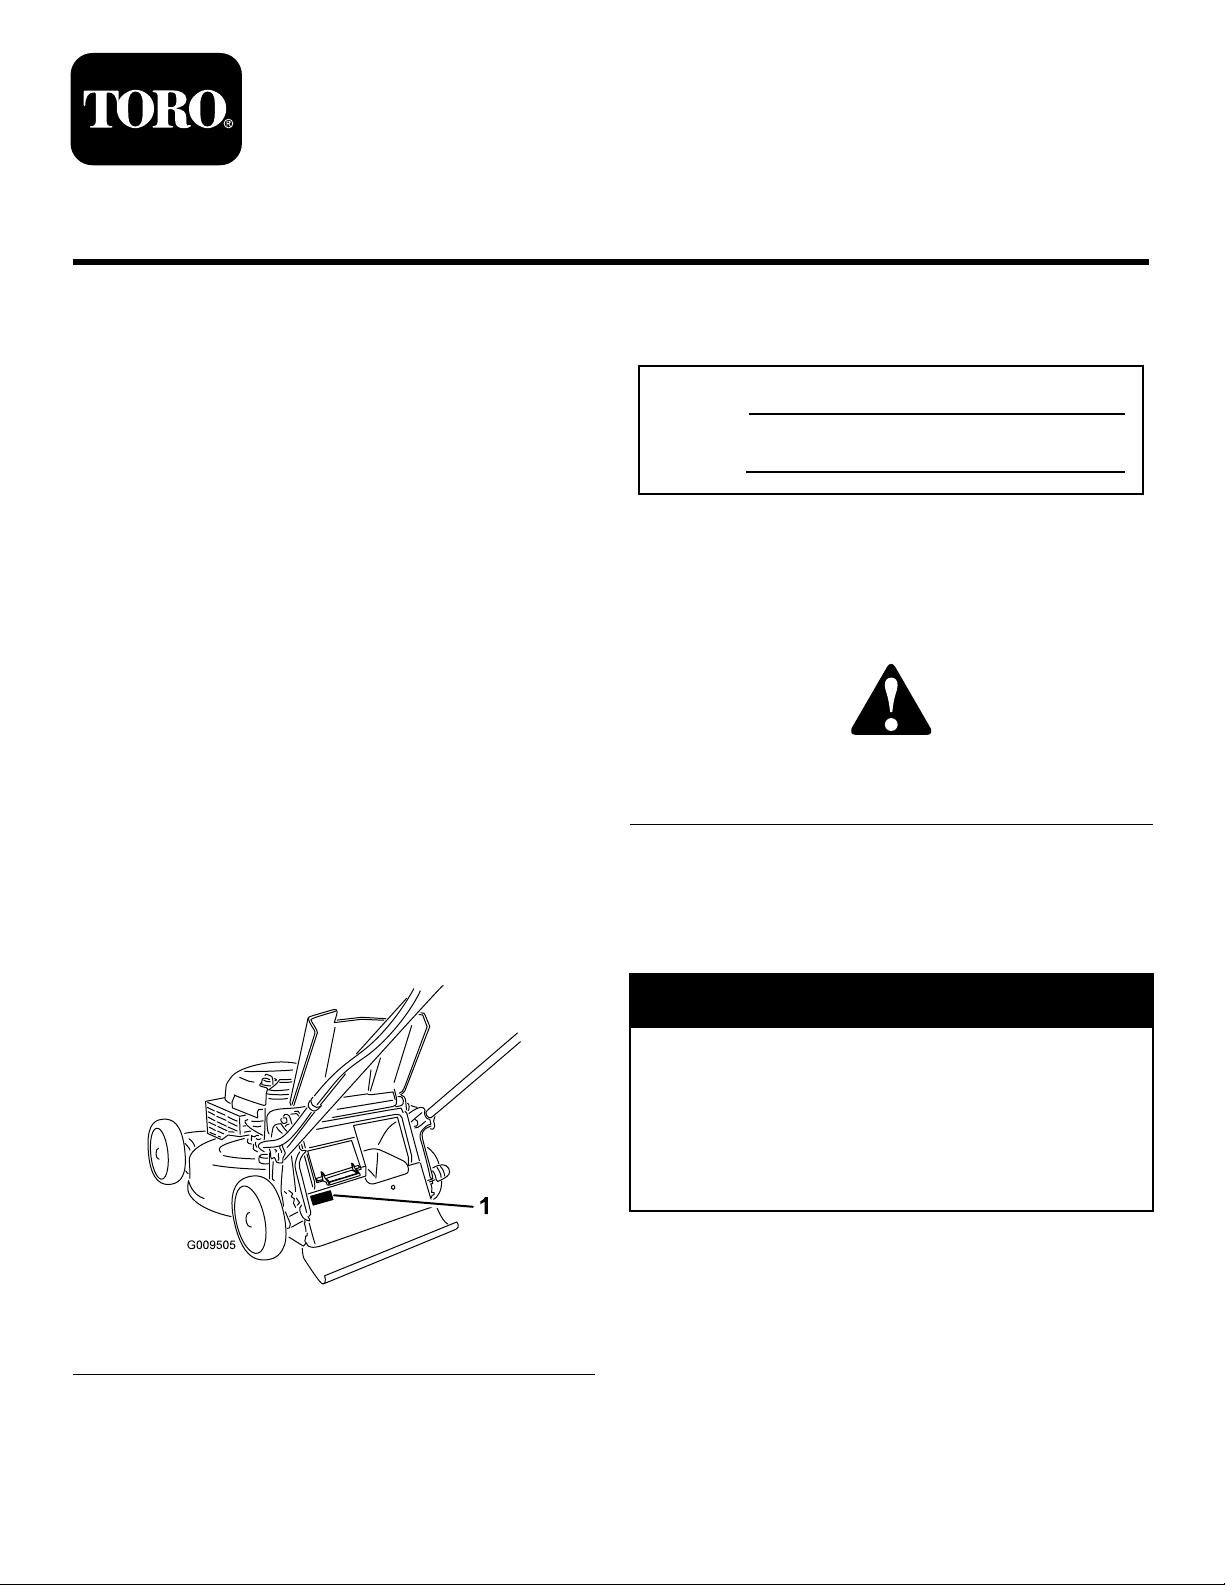
Figure1identiesthelocationofthemodelandserial
numbersontheproduct.
ModelNo.
SerialNo.
Thismanualidentiespotentialhazardsandhassafety
messagesidentiedbythesafetyalertsymbol(Figure2),
whichsignalsahazardthatmaycauseseriousinjury
ordeathifyoudonotfollowtherecommended
precautions.
Figure2
1.Safetyalertsymbol
Thismanualuses2wordstohighlightinformation.
Importantcallsattentiontospecialmechanical
informationandNoteemphasizesgeneralinformation
worthyofspecialattention.
Figure1
1.Modelandserialnumberplate
Writetheproductmodelandserialnumbersinthespace
below:
©2011—TheToro®Company
8111LyndaleAvenueSouth
Bloomington,MN55420
Registeratwww.Toro.com.
WARNING
CALIFORNIA
Proposition65Warning
Theengineexhaustfromthisproduct
containschemicalsknowntotheStateof
Californiatocausecancer,birthdefects,
orotherreproductiveharm.
Important:Thisengineisnotequippedwitha
sparkarrestermufer.ItisaviolationofCalifornia
PublicResourceCodeSection4442touseoroperate
theengineonanyforest-covered,brush-covered,or
grass-coveredland.Otherstatesorfederalareas
mayhavesimilarlaws.
ThissparkignitionsystemcomplieswithCanadian
ICES-002.
OriginalInstructions(EN)
PrintedintheUSA
AllRightsReserved
Page 2

Theenclosed
forinformationregardingtheUSEnvironmental
ProtectionAgency(EPA)andtheCalifornia
EmissionControlRegulationofemissionsystems,
maintenance,andwarranty.Replacementsmaybe
orderedthroughtheenginemanufacturer.
Formodelswithstatedenginehorsepower,thegross
horsepoweroftheenginewaslaboratoryratedbythe
enginemanufacturerinaccordancewithSAEJ1940.
Asconguredtomeetsafety,emission,andoperating
requirements,theactualenginehorsepoweronthisclass
oflawnmowerwillbesignicantlylower.
Engine Owner's Man ual
issupplied
Safety
ThislawnmowermeetsorexceedstheCPSCblade
safetyrequirementsforwalk-behindrotarylawnmowers
andtheB71.1specicationsoftheAmericanNational
StandardsInstituteineffectatthetimeofproduction.
Readandunderstandthecontentsofthismanual
beforeyoustarttheengine.
Thesafetyalertsymbol(
topotentialpersonalinjuryhazards.Obeyallsafety
messagesthatfollowthissymboltoavoidpossibleinjury
ordeath.Improperlyusingormaintainingthismower
couldresultininjuryordeath.Toreducethispotential,
complywiththefollowingsafetyinstructions.
Thefollowinginstructionshavebeenadaptedfromthe
ANSI/OPEIstandardB71.1-2003.
Thiscuttingmachinecanamputatehandsandfeet
andthrowobjects.Failuretoobservethefollowing
safetyinstructionscouldresultinseriousinjuryor
death.
Figure2)isusedtoalertyou
•Donotpullmachinebackwardunlessabsolutely
necessary.Alwayslookdownandbehindbeforeand
whilemovingbackward.
•Neverdirectdischargedmaterialtowardanyone.
Avoiddischargingmaterialagainstawallor
obstruction.Materialmayricochetbacktoward
theoperator.Stopthebladewhencrossinggravel
surfaces.
•Donotoperatemachinewithouttheentiregrass
catcher,dischargeguard,rearguard,orothersafety
protectivedevicesinplaceandworking.
•Neverleavearunningmachineunattended.
•Stoptheengineandwaituntilthebladecomes
toacompletestopbeforecleaningthemachine,
removinggrasscatcher,oruncloggingthedischarge
guard.
•Operatemachineonlyindaylightorgoodarticial
light.
•Donotoperatemachinewhileundertheinuence
ofalcoholordrugs.
•Neveroperatemowerinwetgrass.Alwaysbesure
ofyourfooting;walk;neverrun.
•Disengagethedrivesystem,ifsoequipped,before
startingtheengine.
•Ifthemachineshouldstarttovibrateabnormally,
stoptheengineandcheckforthecauseimmediately.
Vibrationisgenerallyawarningoftrouble.
•Alwaysweareyeprotectionwhenoperatingmachine.
•Seemanufacturer'sinstructionsforproperoperation
andinstallationofaccessories.Onlyuseaccessories
approvedbythemanufacturer.
SlopeOperation
GeneralOperation
•Read,understand,andfollowallinstructionsonthe
machineandinthemanual(s)beforestarting.
•Donotputhandsorfeetnearorunderthemachine.
Keepclearofthedischargeopeningatalltimes.
•Onlyallowresponsibleadults,whoarefamiliarwith
theinstructions,tooperatethismachine.
•Cleartheareaofobjectssuchasrocks,wire,toys,
etc.,whichcouldbethrownbytheblade.Staybehind
thehandlewhentheengineisrunning.
•Besuretheareaisclearofbystandersbefore
operating.Stopmachineifanyoneentersthearea.
•Donotoperatemachinebarefootedorwhilewearing
sandals.Alwayswearsubstantialfootwear.
Slopesareamajorfactorrelatedtoslipandfallaccidents,
whichcanresultinsevereinjury.Operationonallslopes
requireextracaution.Ifyoufeeluneasyonaslope,do
notmowit.
•Mowacrossthefaceofslopes;neverupanddown.
Exerciseextremecautionwhenchangingdirection
onslopes.
•Watchforholes,ruts,bumps,rocks,orotherhidden
objects.Uneventerraincouldcauseaslipandfall
accident.Tallgrasscanhideobstacles.
•Donotmowonwetgrassorexcessivelysteepslopes.
Poorfootingcouldcauseaslipandfallaccident.
•Donotmowneardrop-offs,ditches,or
embankments.Youcouldloseyourfootingor
balance.
2
Page 3

Children
WARNING
Tragicaccidentscanoccuriftheoperatorisnotalertto
thepresenceofchildren.Childrenareoftenattractedto
themachineandthemowingactivity.Neverassume
thatchildrenwillremainwhereyoulastsawthem.
•Keepchildrenoutofthemowingareaandunderthe
watchfulcareofaresponsibleadultotherthanthe
operator.
•Bealertandturnmoweroffifachildentersthearea.
•Neverallowchildrentooperatethemachine.
•Useextracarewhenapproachingblindcorners,
shrubs,trees,orotherobjectsthatmayblockyour
viewofachild.
Service
SafeHandlingofGasoline
Toavoidpersonalinjuryorpropertydamage,use
extremecareinhandlinggasoline.Gasolineis
extremelyammableandthevaporsareexplosive.
•Extinguishallcigarettes,cigars,pipes,andother
sourcesofignition.
•Useonlyanapprovedgasolinecontainer.
•Neverremovegascaporaddfuelwiththeengine
running.Allowenginetocoolbeforerefueling.
•Neverrefuelthemachineindoors.
•Neverstorethemachineorfuelcontainerwhere
thereisanopename,spark,orpilotlightsuchas
onawaterheateroronotherappliances.
•Neverllcontainersinsideavehicleoronatruck
ortrailerbedwithaplasticliner.Alwaysplace
containersonthegroundawayfromyourvehicle
beforelling.
Exhaustcontainscarbonmonoxide,anodorless,
deadlypoisonthatcankillyou.
Donotruntheengineindoorsorinanenclosed
area.
GeneralService
•Neveroperatemachineinaclosedarea.
•Keepallnutsandboltstighttobesuretheequipment
isinsafeworkingcondition.
•Nevertamperwithsafetydevices.Checktheir
properoperationregularly .
•Keepmachinefreeofgrass,leaves,orotherdebris
build-up.Cleanupoilorfuelspillageandremove
anyfuel-soakeddebris.Allowmachinetocool
beforestoring.
•Ifyoustrikeaforeignobject,stopandinspectthe
machine.Repair,ifnecessary,beforestarting.
•Nevermakeanyadjustmentsorrepairswiththe
enginerunning.Disconnectthesparkplugwireand
groundagainstenginetopreventunintendedstarting.
•Checkgrasscatchercomponentsandthedischarge
guardfrequentlyandreplacewithmanufacturer's
recommendedparts,whennecessary.
•Mowerbladesaresharp.Wrapthebladeorwear
gloves,anduseextracautionwhenservicingthem.
•Donotchangetheenginegovernorsettingor
overspeedtheengine.
•Maintainorreplacesafetyandinstructionlabels,as
necessary.
•Removegas-poweredequipmentfromthetruck
ortrailerandrefuelitontheground.Ifthisisnot
possible,thenrefuelsuchequipmentwithaportable
container,ratherthanfromagasolinedispenser
nozzle.
•Keepthenozzleincontactwiththerimofthefuel
tankorcontaineropeningatalltimesuntilfuelingis
complete.Donotuseanozzlelock-opendevice.
•Iffuelisspilledonclothing,changeclothing
immediately.
•Neveroverllfueltank.Replacegascapandtighten
securely.
3
Page 4
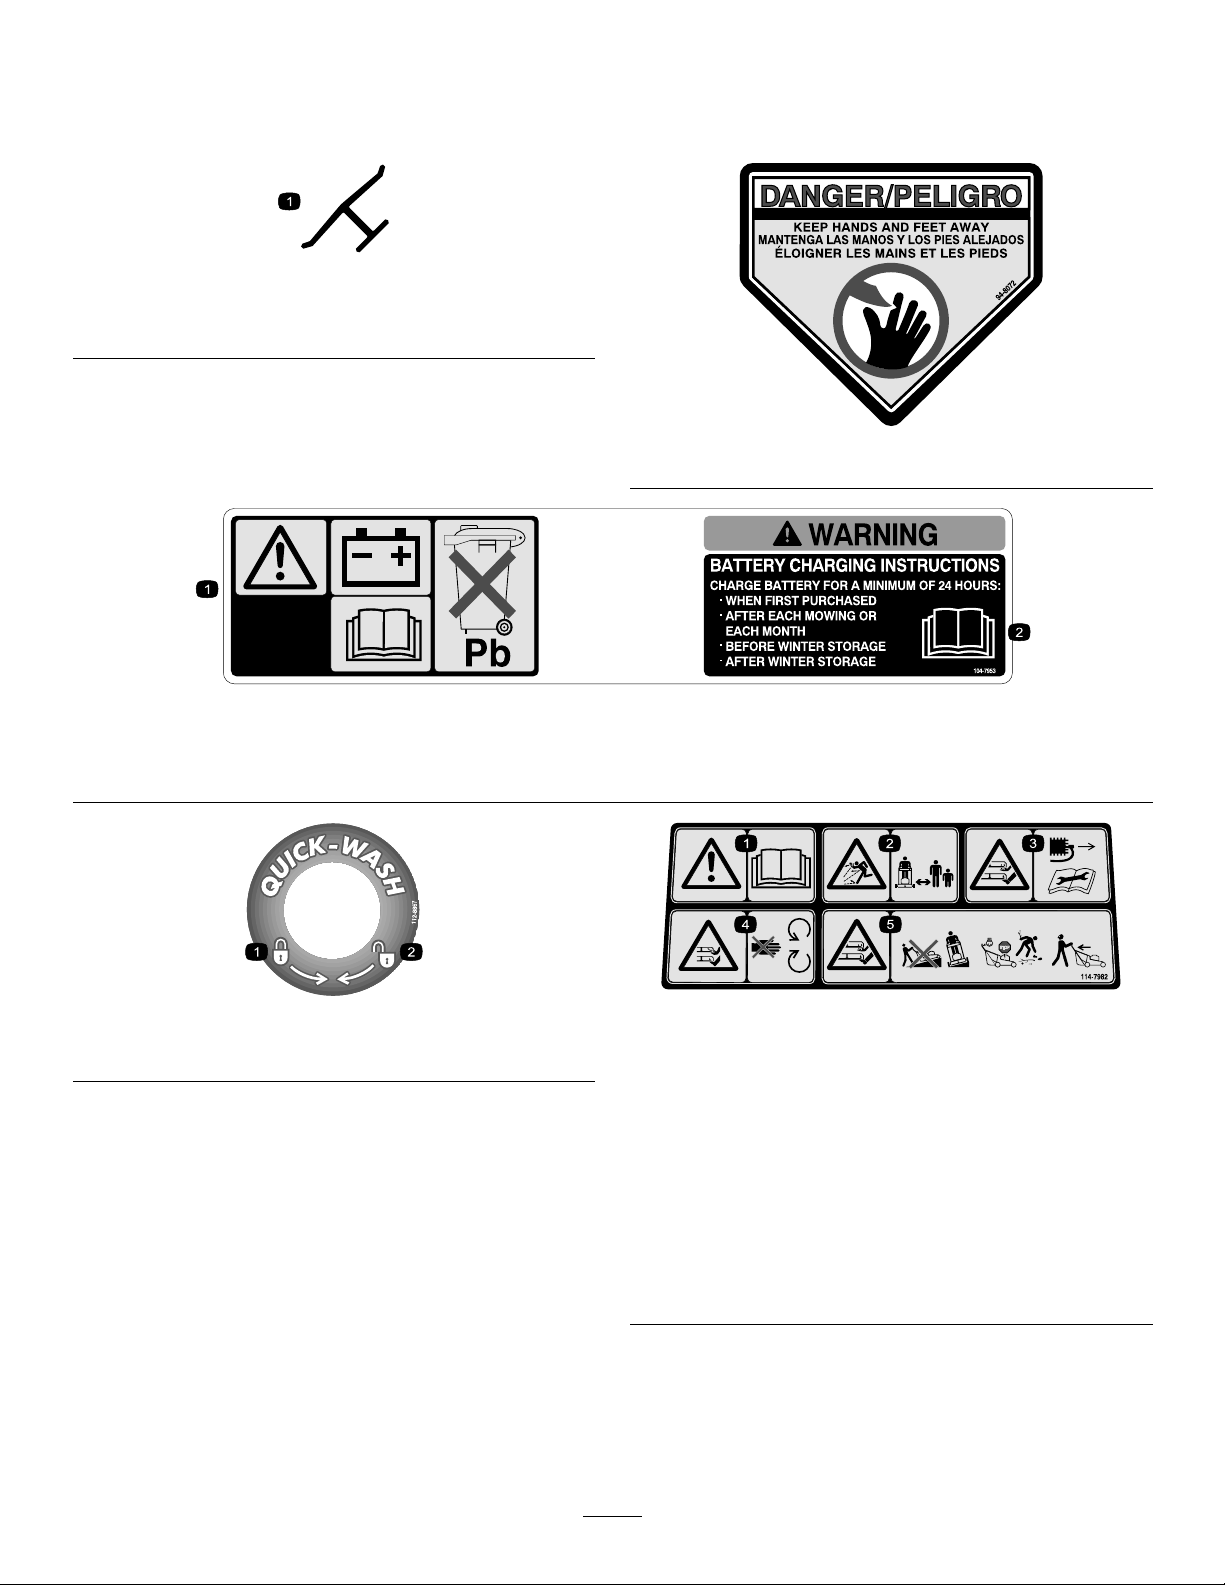
SafetyandInstructionalDecals
Important:Safetyandinstructiondecalsarelocatednearareasofpotentialdanger.Replacedamaged
decals.
Manufacturer'sMark
1.Indicatesthebladeisidentiedasapartfromtheoriginal
machinemanufacturer.
94-8072
104-7953
1.Warning—readtheOperator'sManualforinformationonchargingthebattery;containslead;donotdiscard.
2.ReadtheOperator'sManual.
112-8867
1.Lock2.Unlock
1.Warning—readtheOperator'sManual.
2.Thrownobjecthazard—keepbystandersasafedistance
fromthemachine.
3.Cutting/dismembermenthazardofhandorfoot,mower
blade—removetheignitionkeyandreadtheinstructions
beforeservicingorperformingmaintenance.
4.Cutting/dismembermenthazardofhandorfoot,mower
blade—stayawayfrommovingparts.
5.Cutting/dismembermenthazardofhandorfoot,mower
blade—donotoperateupanddownslopes;operatesideto
sideonslopes;stoptheenginebeforeleavingtheoperating
position;andlookbehindyouwhenbackingup.
114-7982
4
Page 5
Setup
Important:Removeanddiscardtheprotective
plasticsheetthatcoverstheengine.
1
InstallingtheHandle
NoPartsRequired
Procedure
WARNING
Foldingorunfoldingthehandleimproperlycan
damagethecables,causinganunsafeoperating
condition.
•Donotdamagethecableswhenfoldingor
unfoldingthehandle.
•Ifacableisdamaged,contactanAuthorized
ServiceDealer.
2
FillingtheEnginewithOil
NoPartsRequired
Procedure
Important:Yourmowerdoesnotcomewithoilin
theengine,butitdoescomewithabottleofoil.
Beforestartingtheengine,lltheenginewithoil.
Max.ll:20oz.(0.59l),type:SAE30detergentoil
withanAPIserviceclassicationofSF ,SG,SH,SJ,SL,
orhigher.
Note:Whenthecrankcaseisempty,pourabout3/4of
thecrankcasecapacityofoilinthecrankcase,thendo
thefollowing:
1.Movethemowertoalevelsurface.
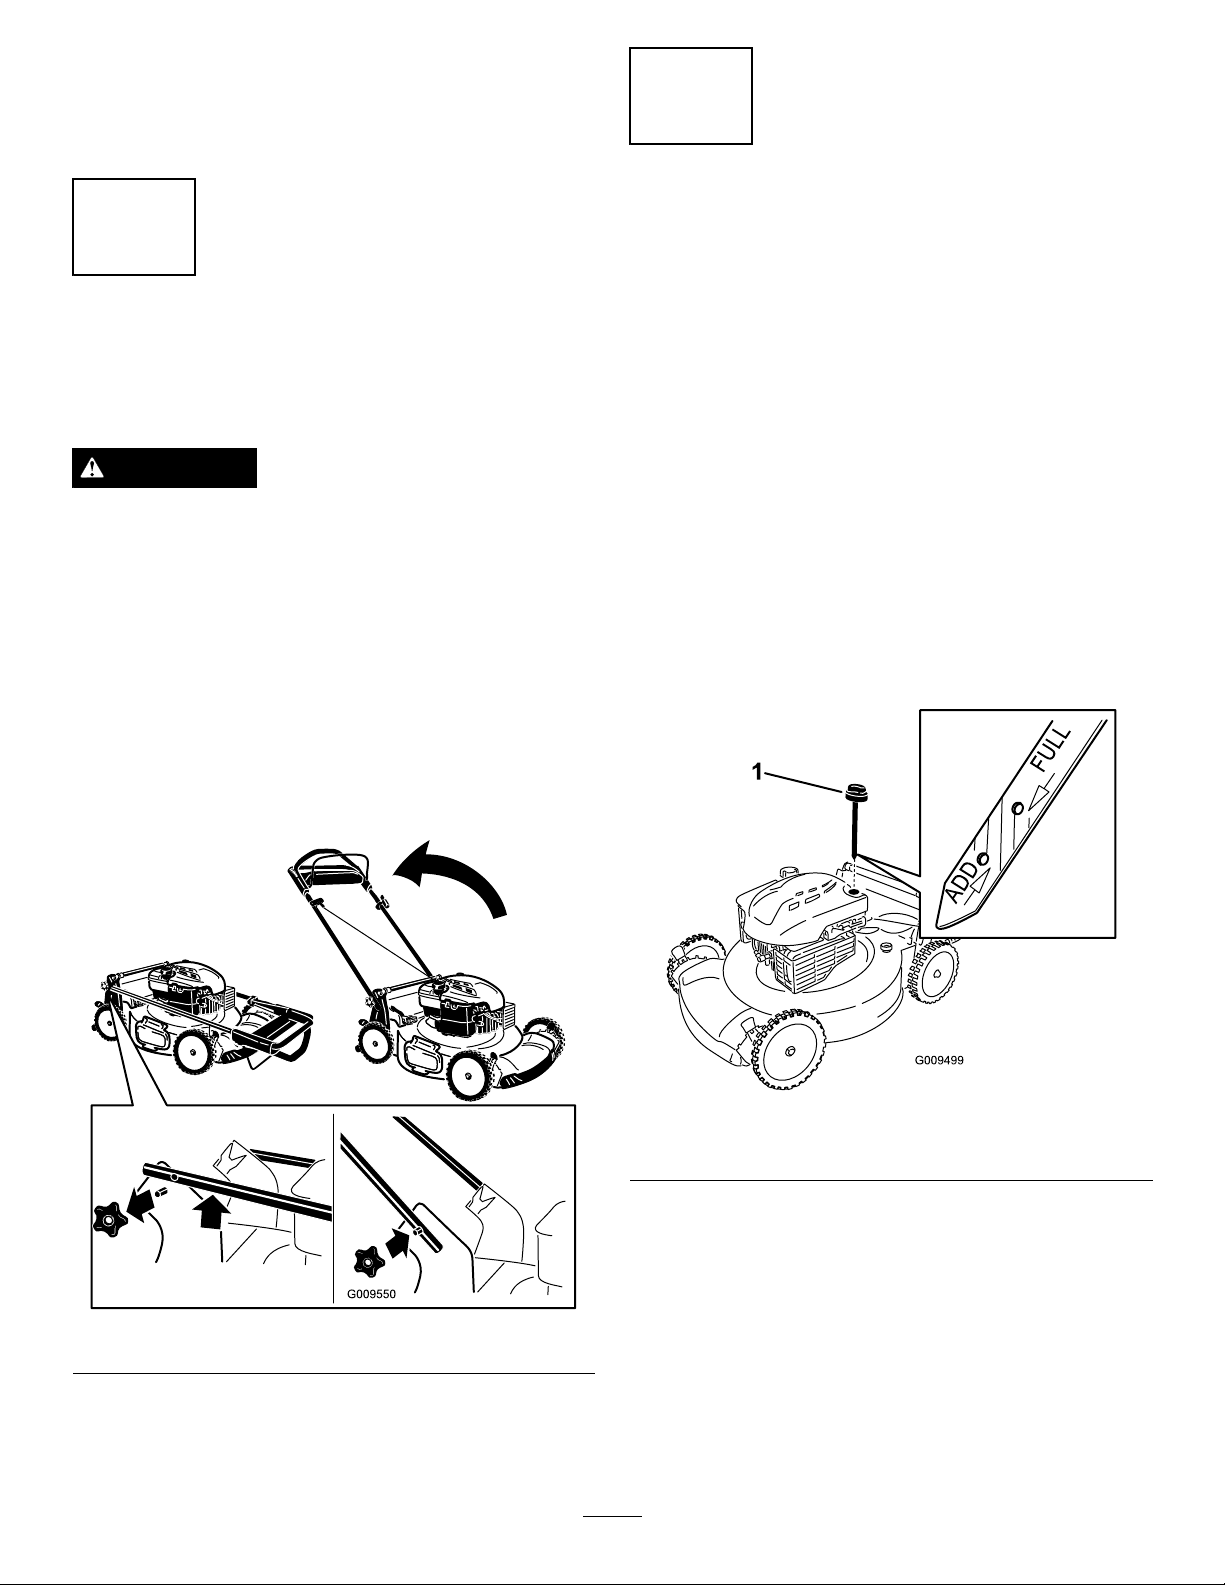
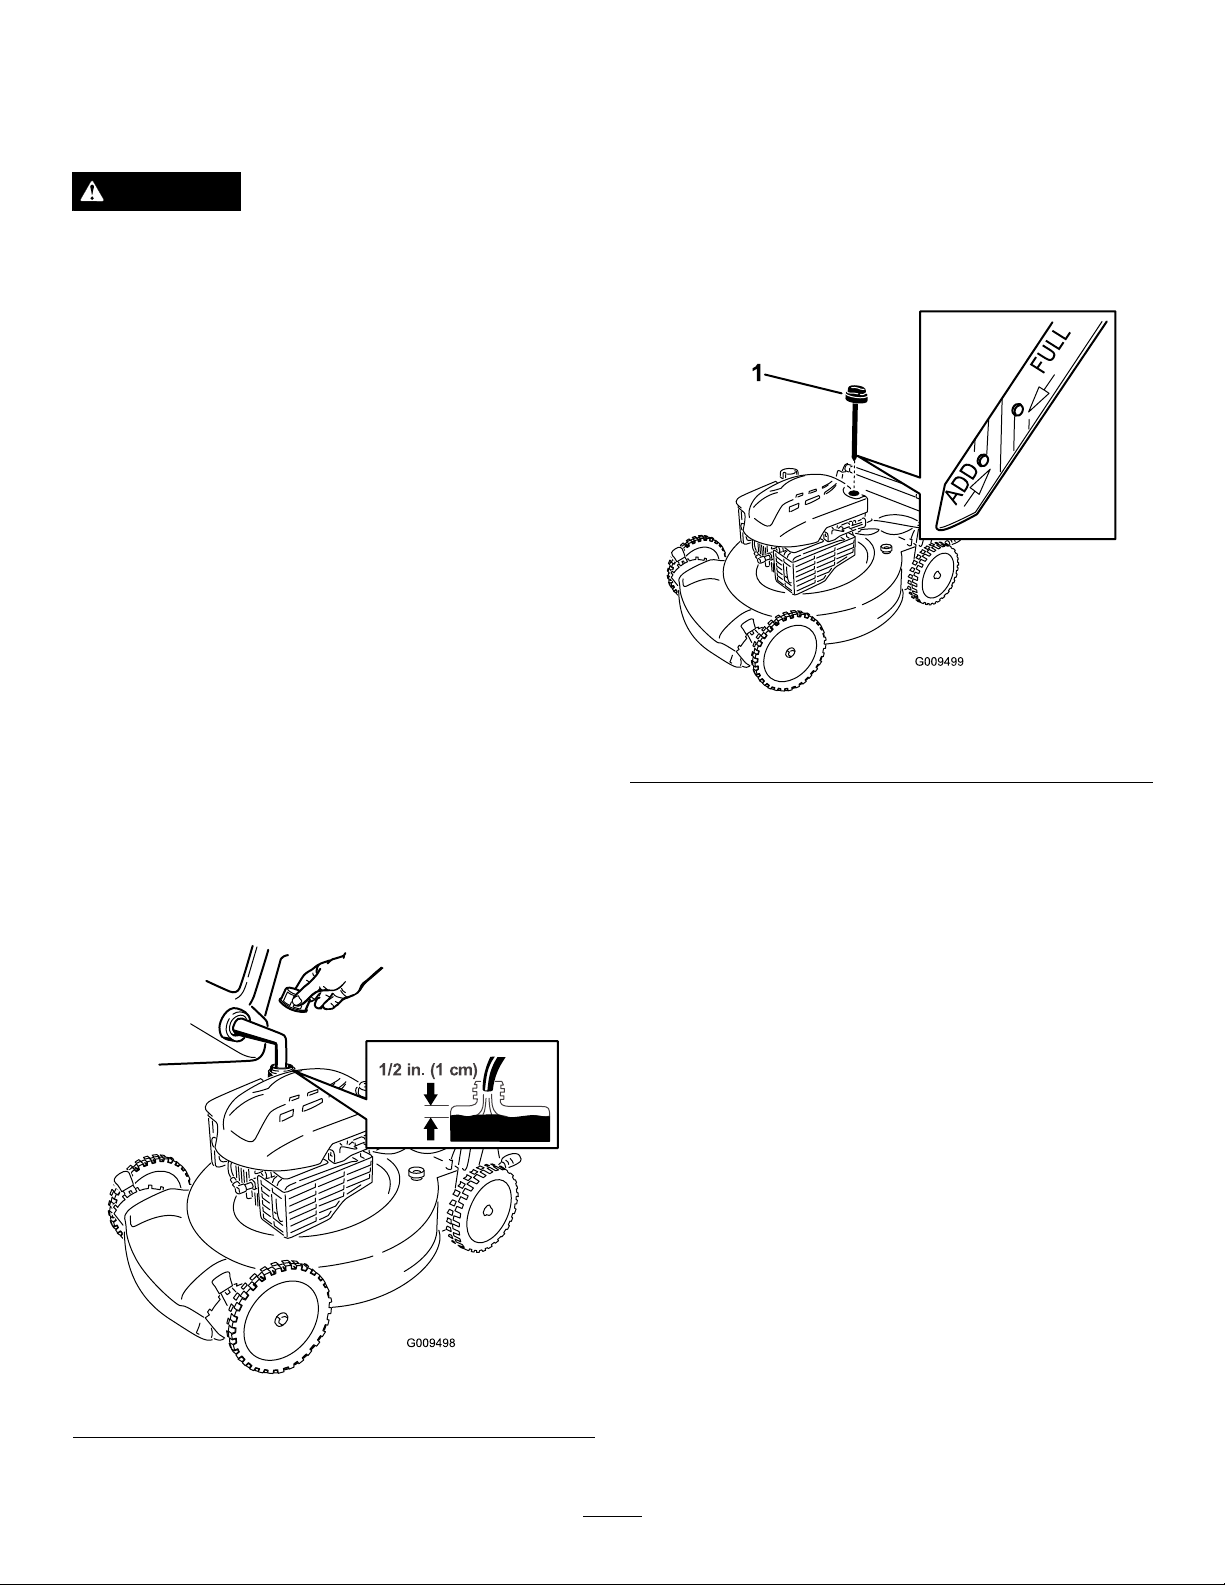
2.Removethedipstickbyrotatingthecap
counterclockwiseandpullingitout(Figure4).
1.Removethehandleknobsfromthemowerhousing
(Figure3).
Important:Routethecablestotheoutsideof
thehandleknobsasyouinstallthehandle.
Figure4
1.Dipstick
3.Wipethedipstickcleanwithacleancloth.
4.Insertthedipstickfullyintotheoillltube,then
removethedipstick.
Figure3
2.Movethehandletotheoperatingposition.
3.Installandtightenthehandleknobsthatyou
removedinstep1.
5.Readtheoillevelonthedipstick.
Note:IftheoillevelisbelowtheAddmarkon
thedipstick,slowlypourasmallamountofoilinto
theoillltube,wait3minutes,andrepeatsteps3
through5untiltheoillevelisattheFullmarkonthe
dipstick(Figure4).
5
Page 6
Important:Donotoverllthecrankcasewith
oilandruntheengine.Draintheexcessoiluntil
theoillevelonthedipstickreadsFull.
6.Installthedipstickintotheoillltubesecurely.
ProductOverview
Important:
5 operating hour s
RefertoChangingtheEngineOil.
Change the engine oil after the r st
;changeityearlythereafter.
3
ChargingtheBattery
NoPartsRequired
Procedure
Electric-startmodelsonly
RefertoChargingtheBatteryintheMaintenance
section.
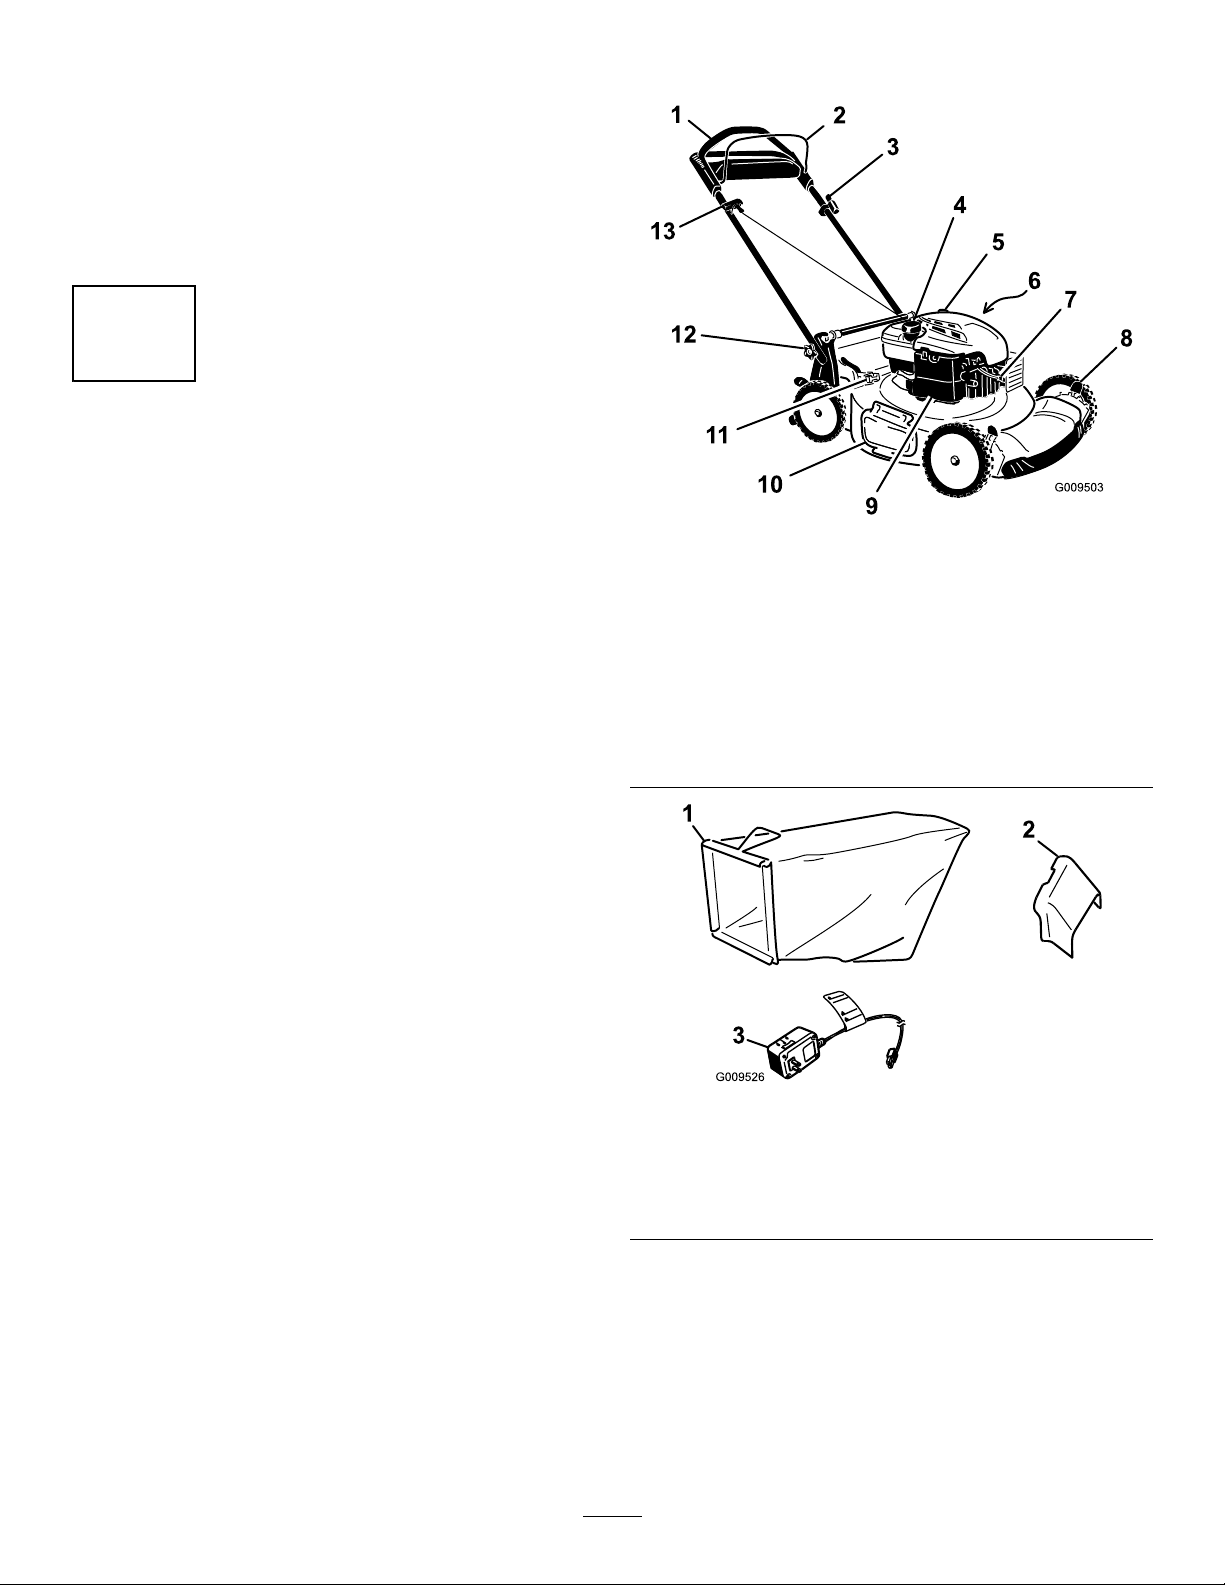
Figure5
1.Handle
2.Bladecontrolbar
3.Ignitionkey(electric-start
modelsonly)
4.Fueltankcap11.Bag-on-demandlever
5.Oilll/dipstick12.Handleknob(2)
6.Washoutport(notshown)
7.Sparkplug
8.Cuttingheightlever(4)
9.Airlter
10.Side-dischargedeector
13.Recoilstarthandle
1.Grassbag
2.Sidedischargechute
6
Figure6
3.Batterycharger
(electric-startmodels
only)
Page 7
Operation
FillingtheFuelTank
DANGER
Gasolineisextremelyammableandexplosive.A
reorexplosionfromgasolinecanburnyouand
others.
•Topreventastaticchargefromignitingthe
gasoline,placethecontainerand/ormower
directlyonthegroundbeforelling,notina
vehicleoronanobject.
•Fillthetankoutdoorswhentheengineiscold.
Wipeupspills.
•Donothandlegasolinewhensmokingoraround
anopenameorsparks.
•Storegasolineinanapprovedfuelcontainer,out
ofthereachofchildren.
Fillthefueltankwithfreshunleadedregulargasoline
(havinganoctaneratingof87orhigher)fromamajor
name-brandservicestation(Figure7).
CheckingtheEngineOilLevel
ServiceInterval:Beforeeachuseordaily
Note:Max.ll:20oz.(0.59l),type:SAE30detergent
oilwithanAPIserviceclassicationofSF,SG,SH,SJ,
SL,orhigher.
1.Movethemowertoalevelsurface.
2.Removethedipstick(
Figure8).
Figure8
Note:Neverusemethanol,gasolinecontaining
methanol,orgasolinecontainingmorethan10%ethanol
becausethefuelsystemcouldbedamaged.Donotmix
oilwithgasoline.
Important:T oreducestartingproblems,add
fuelstabilizertothefuelallseason,mixingitwith
gasolinelessthan30daysold.
1.Dipstick
3.Wipethedipstickcleanwithacleancloth.
4.Insertthedipstickfullyintotheoillltube,then
removethedipstick.
5.Readtheoillevelonthedipstick.
Note:IftheoillevelisbelowtheAddmarkon
thedipstick,slowlypourasmallamountofoilinto
theoillltube,wait3minutes,andrepeatsteps
through5untiltheoillevelisattheFullmarkonthe
dipstick(Figure8).
Important:Donotoverllthecrankcasewith
oilandruntheengine.Draintheexcessoiluntil
theoillevelonthedipstickreadsFull.
6.Installthedipstickintotheoillltubesecurely.
3
Figure7
7
Page 8
AdjustingtheCuttingHeight
StartingtheEngine
WARNING
Adjustingthecuttingheightmaybringyouinto
contactwiththemovingblade,causingserious
injury.
•Stoptheengineandwaitforallmovingparts
tostop.
•Donotputyourngersunderthehousingwhen
adjustingthecuttingheight.
CAUTION
Iftheenginehasbeenrunning,themuferwillbe
hotandcanseverelyburnyou.Keepawayfromthe
hotmufer.
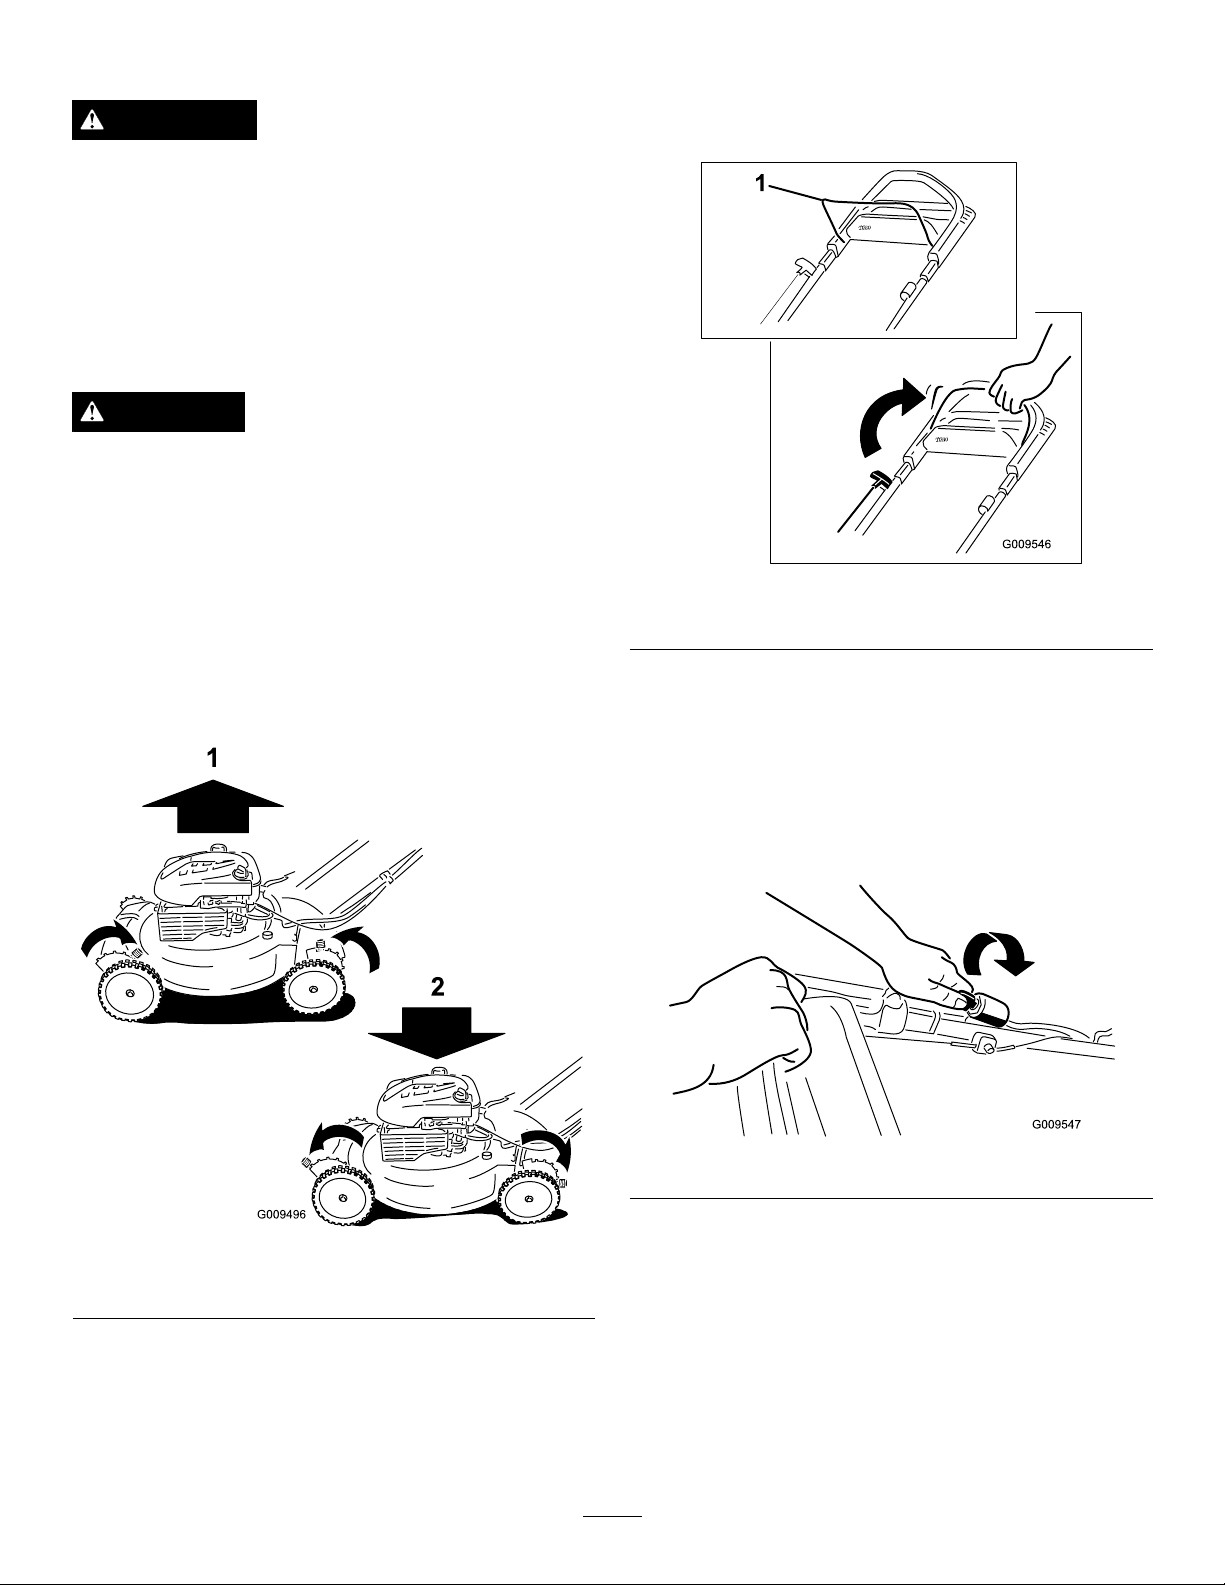
Adjustthecuttingheightasdesired.Setthefrontwheels
tothesameheightastherearwheels(
Note:T oraisethemower,movethefrontcutting
heightleversrearwardandtherearcuttingheightlevers
forward.Tolowerthemower,movethefrontcutting
heightleversforwardandtherearcuttingheightlevers
rearward.
Figure9).
1.Holdthebladecontrolbaragainstthehandle
(Figure10).
Figure10
1.Bladecontrolbar
2.Turntheignitionkey(Figure11)(electric-start
modelsonly)orpulltherecoilstarthandle
Figure12).
(
Figure9
1.Raisethemower2.Lowerthemower
Note:Thecuttingheightsettingsare1inch(25mm);
1-3/8inches(35mm);1-3/4inches(44mm);2-1/8
inches(54mm);2-1/2inches(64mm);2-7/8inches(73
mm);3-1/4inches(83mm);3-5/8inches(92mm);and
4inches(102mm).
Note:Whenyoupulltherecoilstarthandle,pullit
lightlyuntilyoufeelresistance,thenpullitsharply
(Figure12).Allowtheropetoreturntothehandle
slowly.
Figure11
8
Page 9
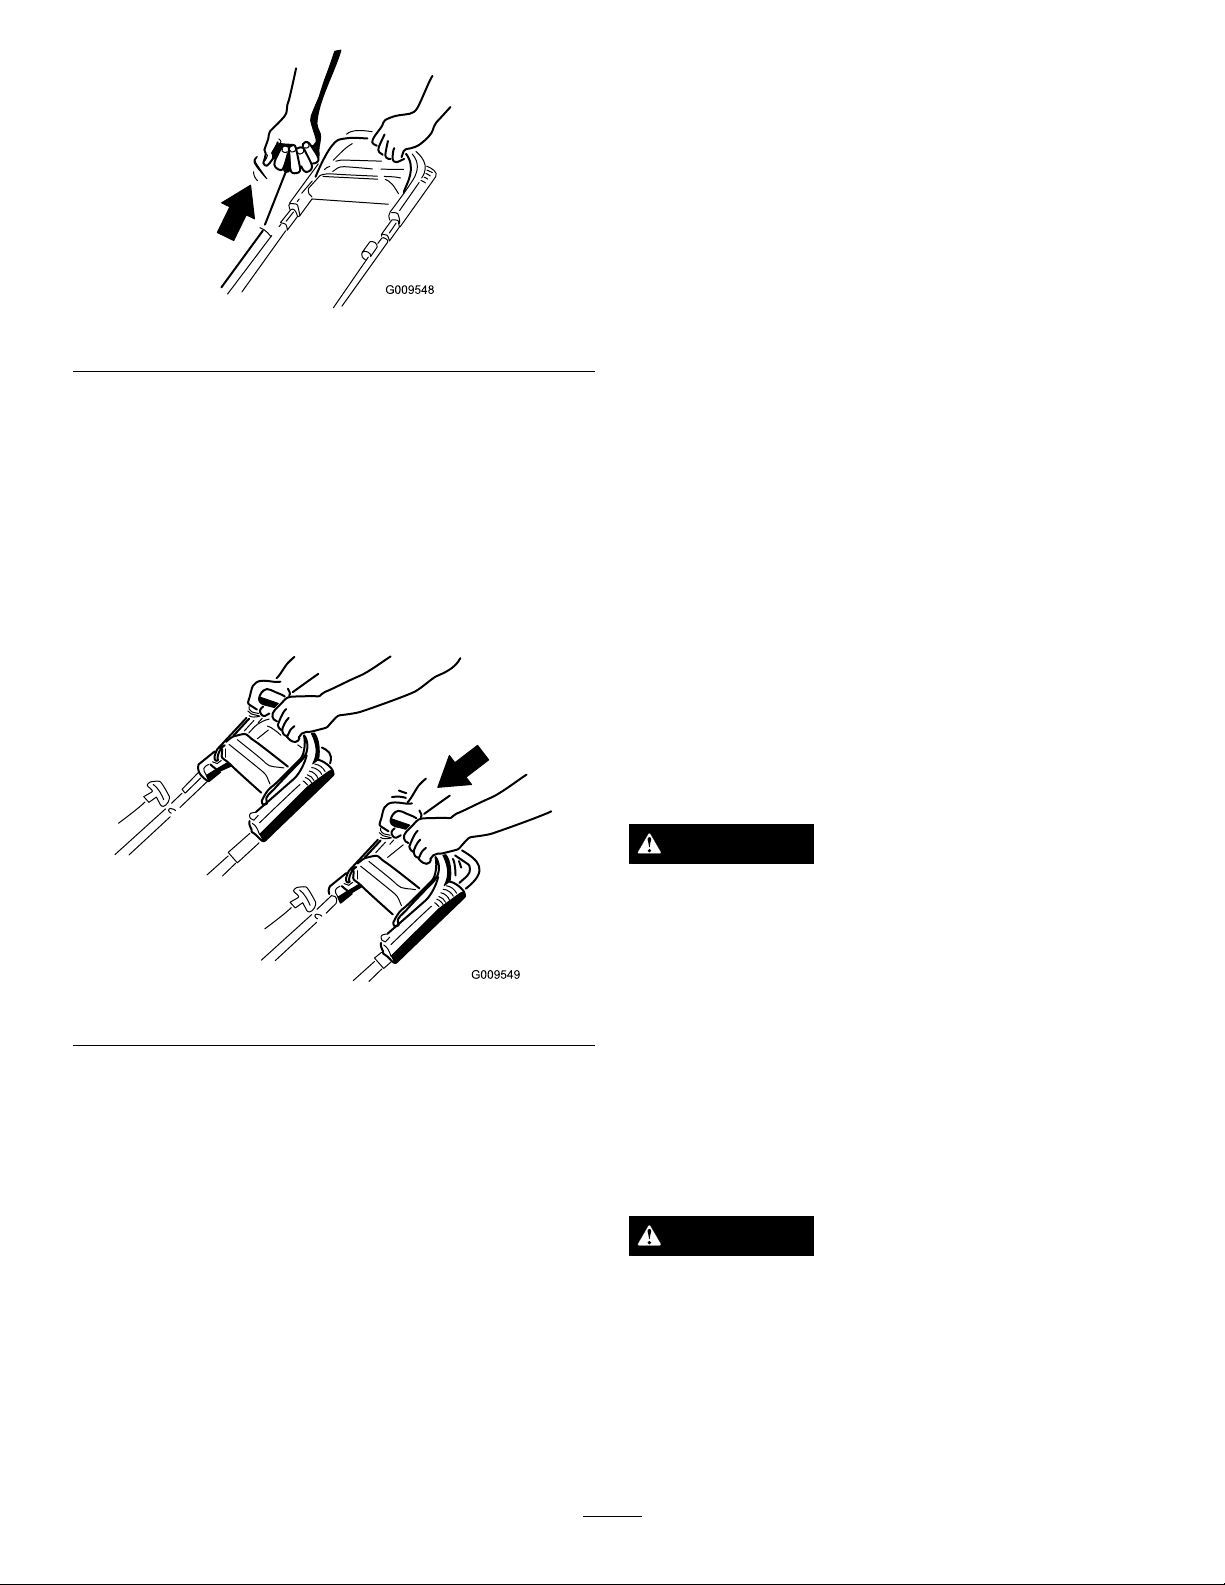
Figure12
StoppingtheEngine
Tostoptheengine,releasethebladecontrolbar.
Note:Removetheignitionkeywhenyouleavethe
mower(electric-startmodelsonly).
Important:Whenyoureleasethebladecontrol
bar,boththeengineandbladeshouldstopwithin
3seconds.Iftheydonotstopproperly,stopusing
yourmowerimmediatelyandcontactanAuthorized
ServiceDealer.
Note:Ifthemowerdoesnotstartafterseveral
attempts,contactanAuthorizedServiceDealer.
UsingtheSelf-propelDrive
Tooperatetheself-propeldrive,simplywalkwithyour
handsontheupperhandleandyourelbowsatyour
sides,andthemowerwillautomaticallykeeppacewith
Figure13).
you(
RecyclingtheClippings
Yourmowercomesfromthefactoryreadytorecyclethe
grassandleafclippingsbackintothelawn.
Ifthegrassbagisonthemowerandthebag-on-demand
leverisinthebaggingposition,movethelever
totherecyclingposition(refertoOperatingthe
Bag-on-DemandLever)beforerecyclingtheclippings.
Iftheside-dischargechuteisonthemower,removeit
(refertoRemovingtheSideDischargeChute)before
recyclingtheclippings.
BaggingtheClippings
Usethegrassbagwhenyouwanttocollectgrassand
leafclippingsfromthelawn.
WARNING
Aworngrassbagcouldallowsmallstonesand
othersimilardebristobethrownintheoperator'sor
bystander'sdirectionandresultinseriouspersonal
injuryordeathtotheoperatororbystanders.
Figure13
Note:Ifthemowerdoesnotfreelyrollbackward
afterself-propelling,stopwalking,holdyourhandsin
place,andallowthemowertorollacoupleofinches
(centimeters)forwardtodisengagethewheeldrive.You
canalsotryreachingjustunderthepersonalpacehandle
tothemetalhandleandpushthemowerforwarda
coupleofinches(centimeters).Ifthemowerstilldoes
notrollbackwardeasily,contactanAuthorizedService
Dealer.
Checkthegrassbagfrequently.Ifitisdamaged,
installanewTororeplacementbag.
Ifthesidedischargechuteisonthemower,removeit
(refertoRemovingtheSideDischargeChute)before
baggingtheclippings.Ifthebag-on-demandleverisin
therecyclingposition,moveittothebaggingposition
(refertoOperatingtheBag-on-DemandLever).
WARNING
Thebladeissharp;contactingthebladecanresult
inseriouspersonalinjury.
Stoptheengineandwaitforallmovingpartstostop
beforeleavingtheoperatingposition.
InstallingtheGrassBag
1.Raiseandholdupthereardeector(Figure14).
9
Page 10
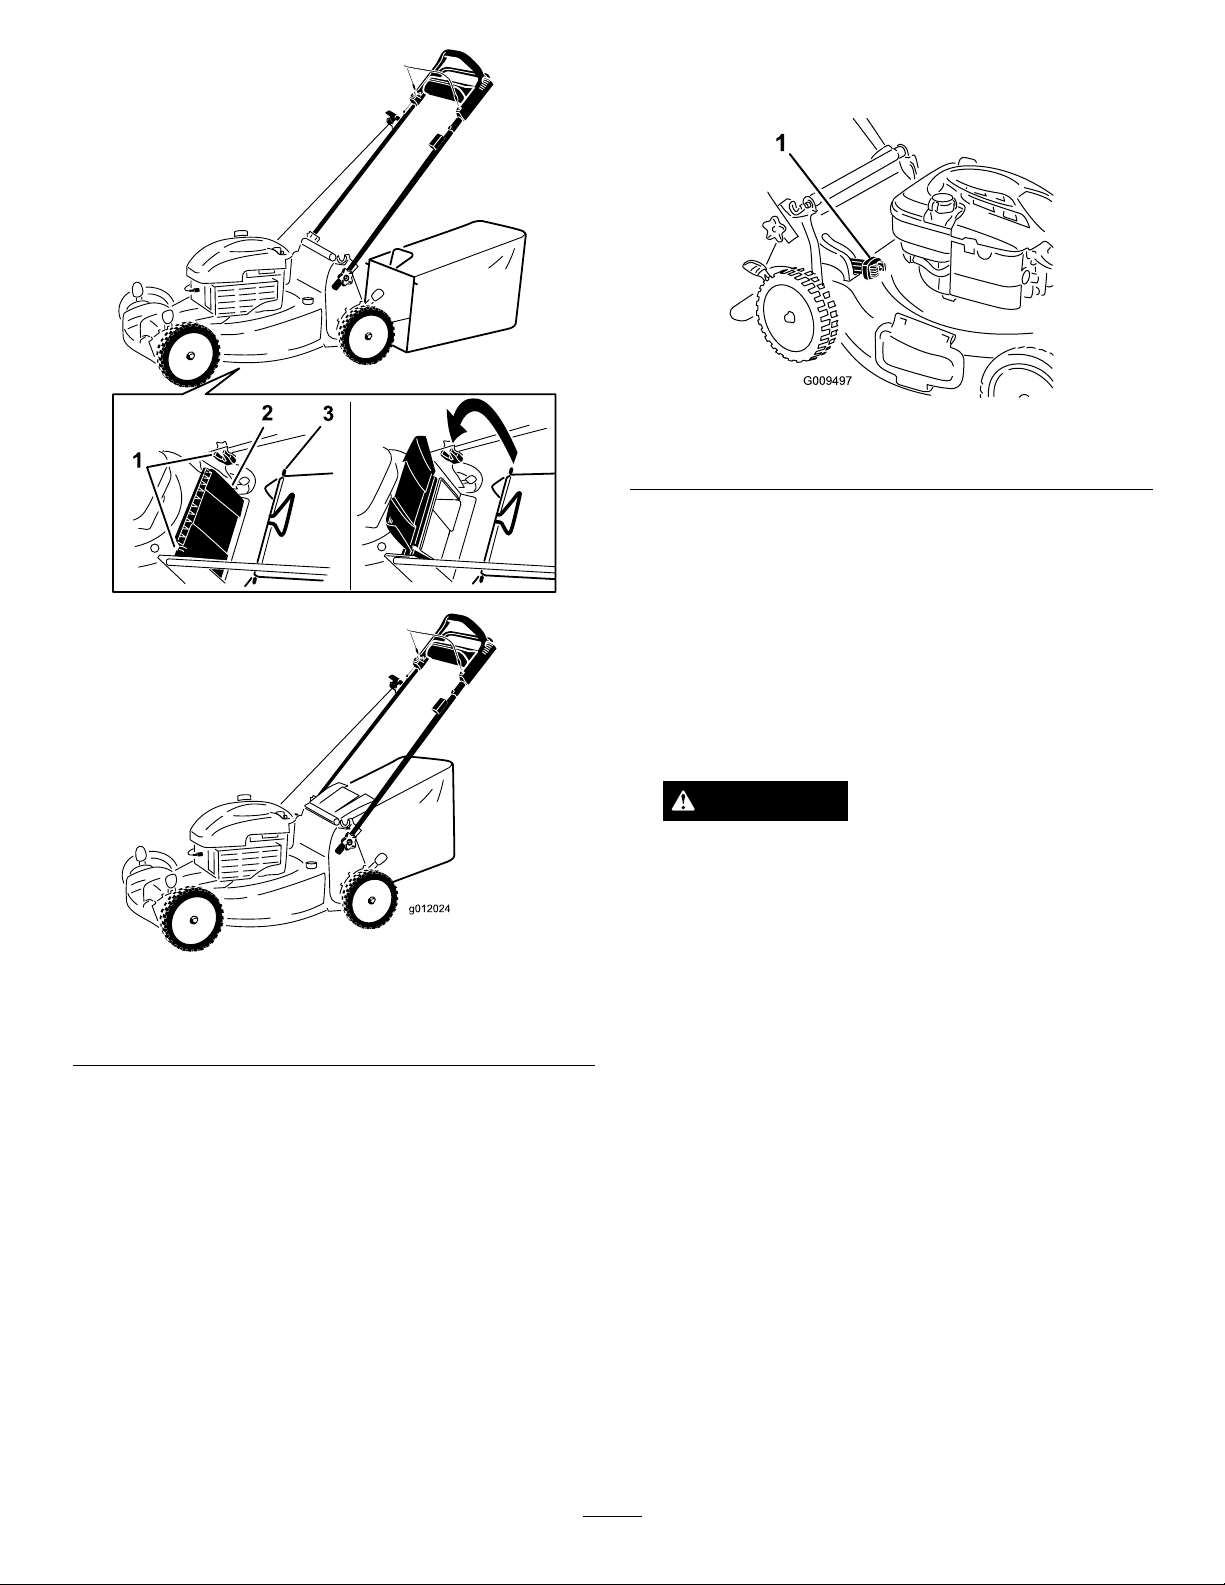
leverforwarduntilthebuttonontheleverpopsup
(Figure15)
Figure15
1.Bag-on-demandlever(inbaggingposition)
•Forrecyclingthegrassandleafclippings,pressthe
buttonontheleverandmovetheleverrearward
untilthebuttonontheleverpopsup.
Important:Forproperoperation,remove
anygrassclippingsanddebrisfromthe
bag-on-demanddoorandthesurrounding
opening(
Figure16)beforeyoumovethe
bag-on-demandleverfromonepositionto
another.
Figure14
1.Notches
2.Reardeector
3.Grassbagpin(2)
2.Installthegrassbag,ensuringthatthepinsonthe
bagrestinthenotchesonthehandle(
Figure14).
3.Lowerthereardeector.
RemovingtheGrassBag
Toremovethebag,reversethestepsabove.
OperatingtheBag-on-DemandLever
Thebag-on-demandfeatureallowsyoutoeithercollect
orrecyclegrassandleafclippingswhilethegrassbag
isattachedtothemower.
•Forbaggingthegrassandleafclippings,pressthe
buttononthebag-on-demandleverandmovethe
WARNING
Thebladeissharp;contactingthebladecan
resultinseriouspersonalinjury.Also,anopen
reardischargeareacouldallowsmallstones
andothersimilardebristobethrowninthe
operator'sorbystander'sdirectionandresultin
seriouspersonalinjuryordeathtotheoperator
orbystanders.
Stoptheengineandwaitforallmovingpartsto
stopbeforecleaningthebag-on-demanddoor
andthesurroundingopening.
10
Page 11
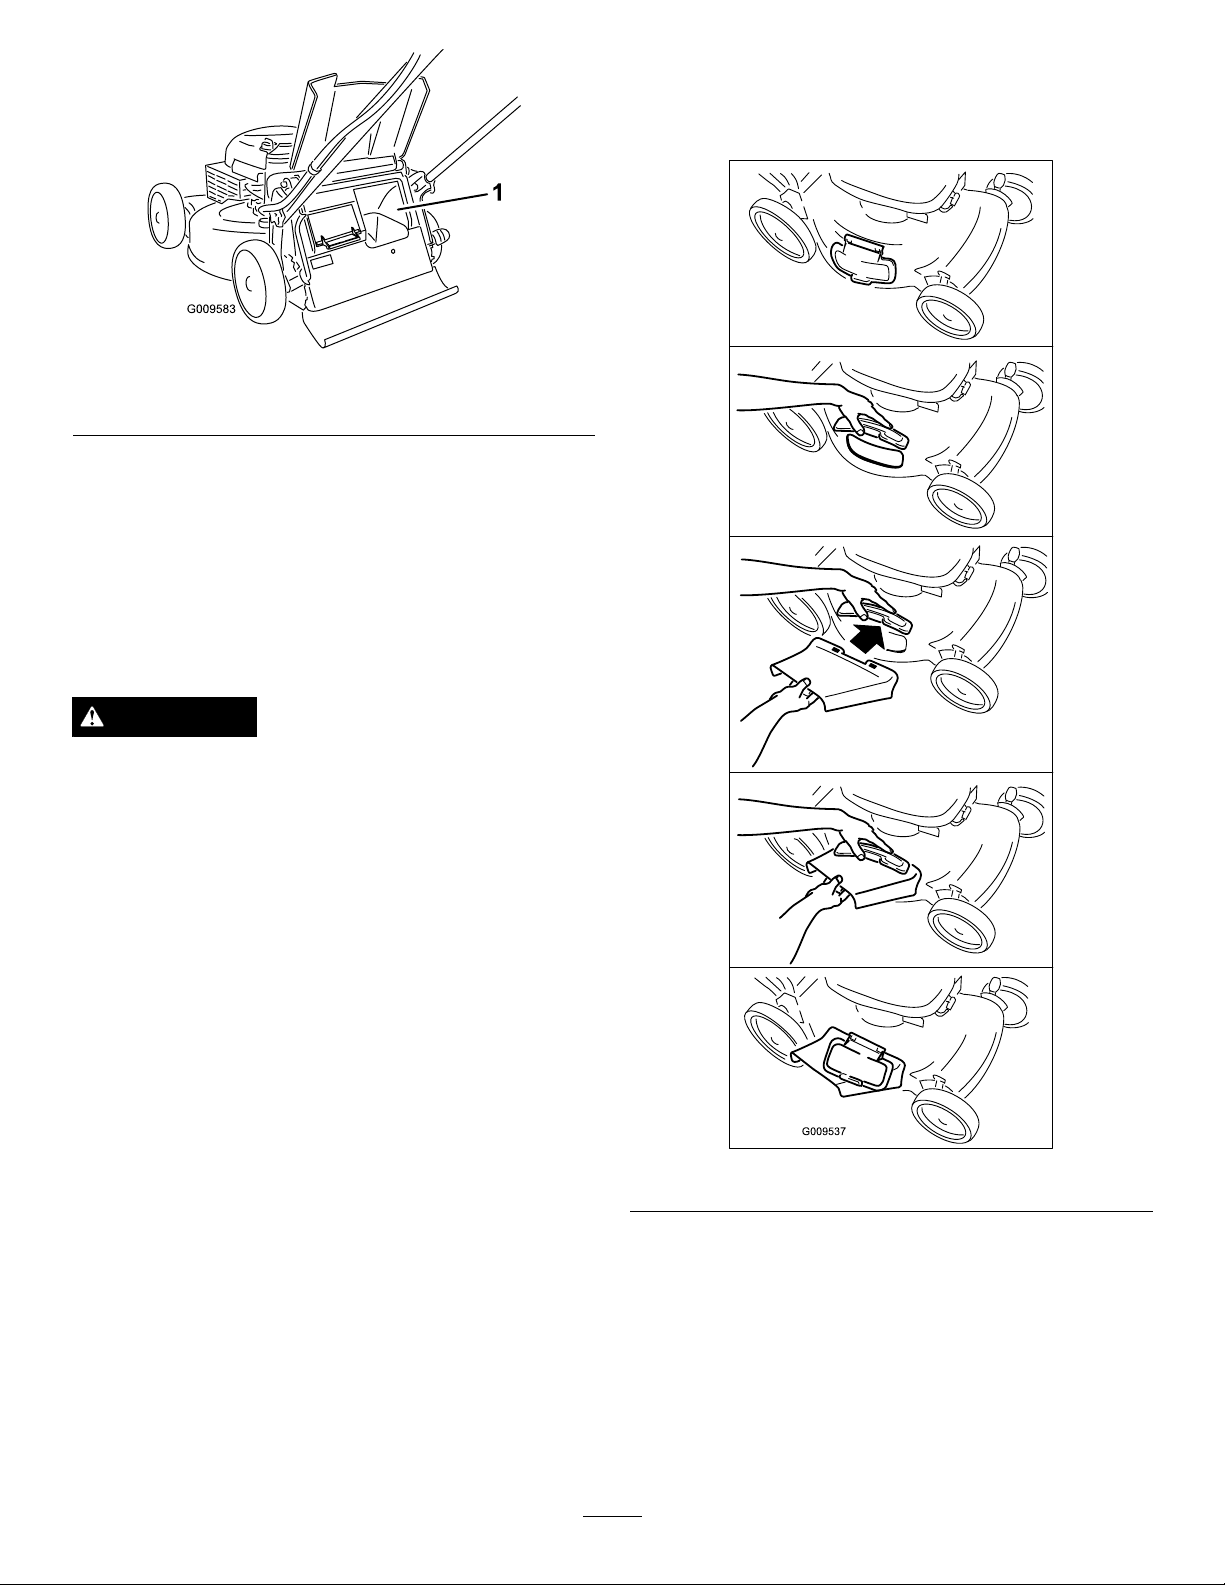
Figure16
1.Cleanhere
Side-dischargingtheClippings
Usethesidedischargeforcuttingverytallgrass.
Ifthegrassbagisonthemowerandthebag-on-demand
leverisinthebaggingposition,movethelever
totherecyclingposition(refertoOperatingthe
Bag-on-DemandLever).
InstallingtheSideDischargeChute
Liftupthesidedeectorandinstallthesidedischarge
chute(Figure17).
WARNING
Thebladeissharp;contactingthebladecanresult
inseriouspersonalinjury.
Stoptheengineandwaitforallmovingpartstostop
beforeleavingtheoperatingposition.
Figure17
RemovingtheSideDischargeChute
Toremovethesidedischargechute,liftuptheside
deector,removethesidedischargechute,andlower
thesidedischargedeector.
11
Page 12

OperatingTips
–Overlapcuttingswathsinsteadofcuttingafull
swathwitheachpass.
GeneralMowingTips
•Cleartheareaofsticks,stones,wire,branches,and
otherdebristhatthebladecouldhit.
•Avoidstrikingsolidobjectswiththeblade.Never
deliberatelymowoveranyobject.
•Ifthemowerstrikesanobjectorstartstovibrate,
immediatelystoptheengine,disconnectthewire
fromthesparkplug,andexaminethemowerfor
damage.
•Forbestperformance,installanewbladebeforethe
cuttingseasonbegins.
•ReplacethebladewhennecessarywithaToro
replacementblade.
CuttingGrass
•Cutonlyaboutathirdofthegrassbladeatatime.
Donotcutbelowthe2-1/8-inch(54mm)setting
unlessthegrassissparseoritislatefallwhengrass
growthbeginstoslowdown.RefertoAdjustingthe
CuttingHeight.
–Setthecuttingheightonthefrontwheelsone
notchlowerthantherearwheels.Forexample,
setthefrontwheelsat2-1/8-inch(54mm)and
therearwheelsat2-1/2inches(64mm).
CuttingLeaves
•Aftercuttingthelawn,ensurethathalfofthelawn
showsthroughthecutleafcover.Youmayneedto
makemorethanonepassovertheleaves.
•Iftherearemorethan5inches(13cm)ofleaves
onthelawn,setthefrontcuttingheightoneortwo
notcheshigherthantherearcuttingheight.
•Slowdownyourmowingspeedifthemowerdoes
notcuttheleavesnelyenough.
•Whencuttinggrassover6inches(15cm)tall,mow
atthehighestcuttingheightsettingandwalkslower;
thenmowagainatalowersettingforthebestlawn
appearance.Ifthegrassistoolong,themowermay
plugandcausetheenginetostall.
•Mowonlydrygrassorleaves.Wetgrassandleaves
tendtoclumpontheyardandcancausethemower
toplugortheenginetostall.
WARNING
Wetgrassorleavescancauseseriousinjuryif
youslipandcontacttheblade.Mowonlyindry
conditions.
•Beawareofapotentialrehazardinverydry
conditions,followalllocalrewarnings,andkeep
themowerfreeofdrygrassandleafdebris.
•Alternatethemowingdirection.Thishelpsdisperse
theclippingsoverthelawnforevenfertilization.
•Ifthenishedlawnappearanceisunsatisfactory,try
oneormoreofthefollowing:
–Replacethebladeorhaveitsharpened.
–Walkataslowerpacewhilemowing.
–Raisethecuttingheightonyourmower.
–Cutthegrassmorefrequently.
12
Page 13
Maintenance
Note:Determinetheleftandrightsidesofthemachinefromthenormaloperatingposition.
RecommendedMaintenanceSchedule(s)
MaintenanceService
Interval
Aftertherst5hours
Beforeeachuseordaily
Every25hours
Beforestorage
Yearly
MaintenanceProcedure
•Changetheengineoil.
•Checktheengineoillevel.
•Ensurethattheenginestopswithin3secondsafterreleasingthebladecontrolbar.
•Cleangrassclippingsanddirtfromunderthemower.
•Replacetheairlter;replaceitmorefrequentlyindustyoperatingconditions.
•Chargethebatteryfor24hours(electric-startmodelsonly).
•Emptythefueltankbeforerepairsasdirectedandbeforeannualstorage.
•Changetheengineoil.
•Replacethebladeorhaveitsharpened(morefrequentlyiftheedgedullsquickly).
•Cleantheaircoolingsystem;cleanitmorefrequentlyindustyoperatingconditions.
Refertoyourengineoperator'smanual.
•Refertoyourengineoperator'smanualforanyadditionalyearlymaintenance
procedures.
Important:Refertoyourengineoperator'smanualforadditionalmaintenanceprocedures.
Note:ReplacementpartsareavailablefromanAuthorizedServiceDealer(gotowww.toro.comtondthenearest
dealer)oratwww.shoptoro.com.
PreparingforMaintenance
1.Stoptheengineandwaitforallmovingpartstostop.
tipthemowerpriortorunningoutoffuel,usea
handfuelpumptoremovethefuel.Alwaystip
themowerontoitsside,withtheairlterup.
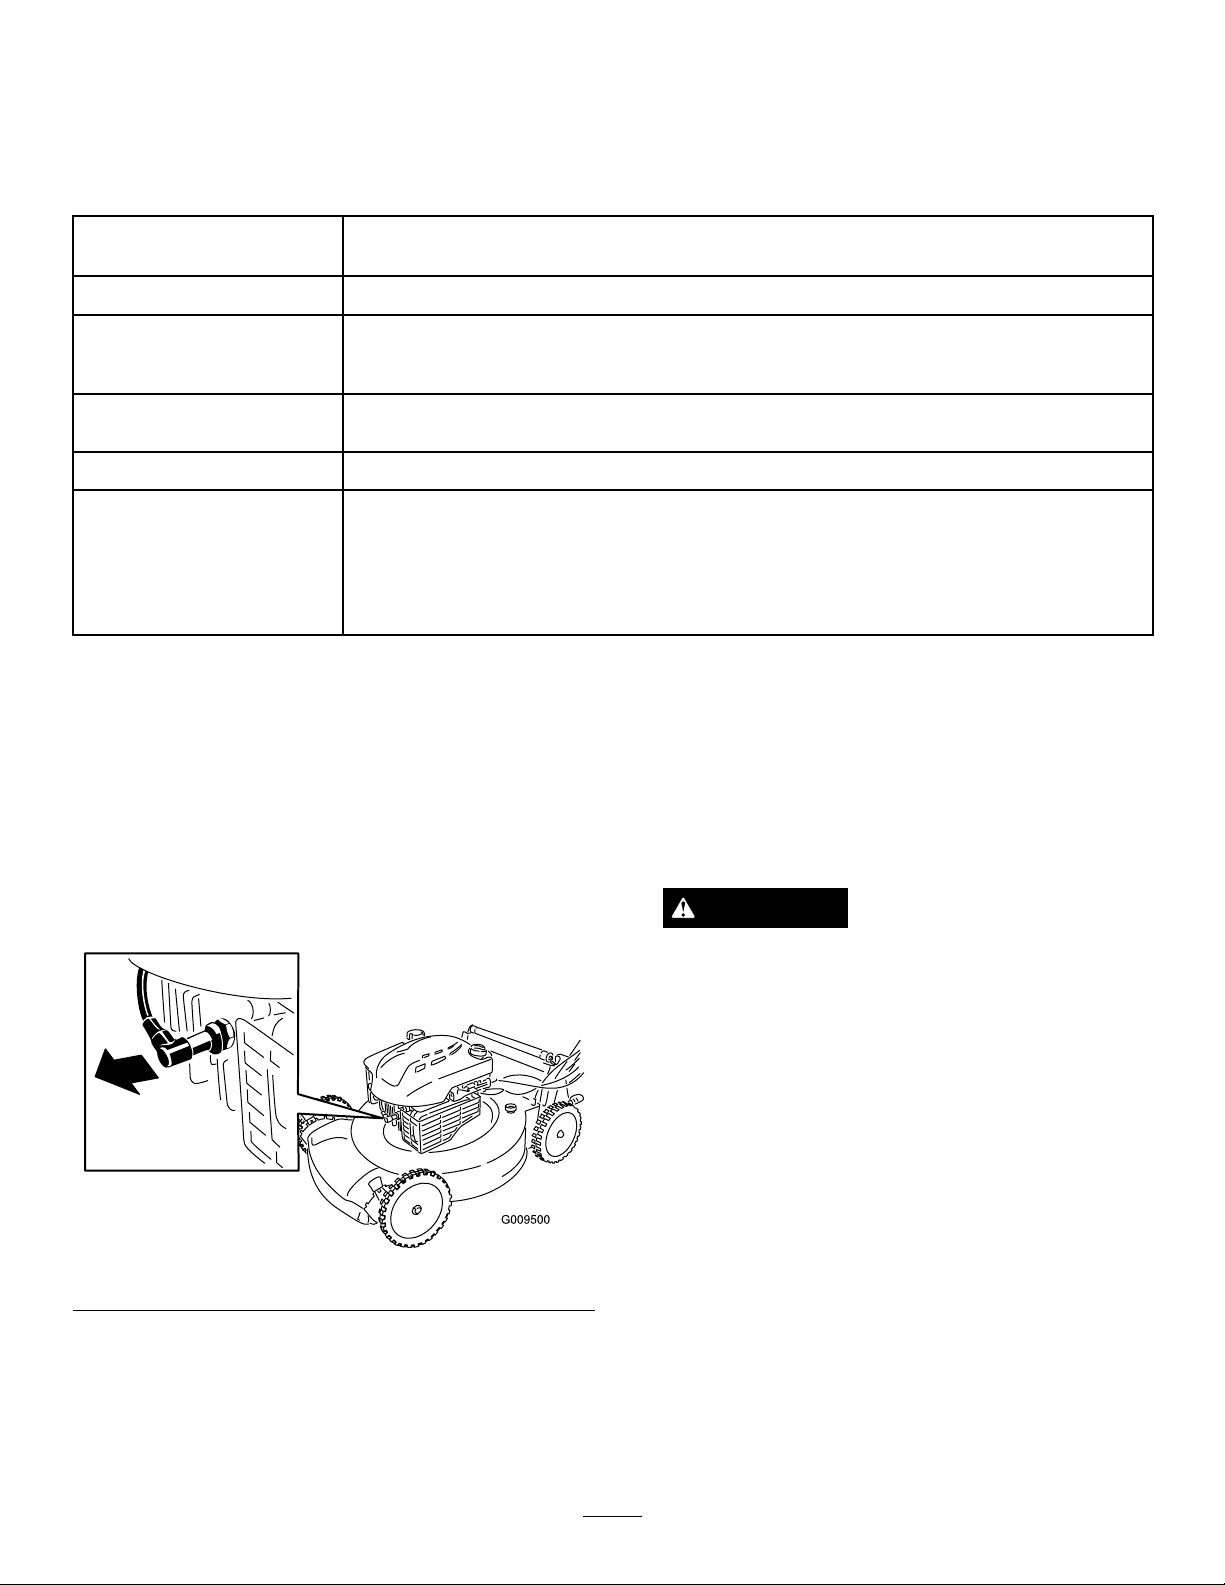
2.Disconnectthesparkplugwirefromthesparkplug
(Figure18)beforeperforminganymaintenance
procedure.
WARNING
Tippingthemowermaycausethefueltoleak.
Gasolineisammable,explosiveandcancause
personalinjury.
Figure18
3.Afterperformingthemaintenanceprocedure(s),
connectthesparkplugwiretothesparkplug.
Important:Beforetippingthemowertochange
theoilorreplacetheblade,allowthefueltank
torundrythroughnormalusage.Ifyoumust
Runtheenginedryorremovethegasolinewith
ahandpump;neversiphon.
13
Page 14
ReplacingtheAirFilter
ServiceInterval:Every25hours
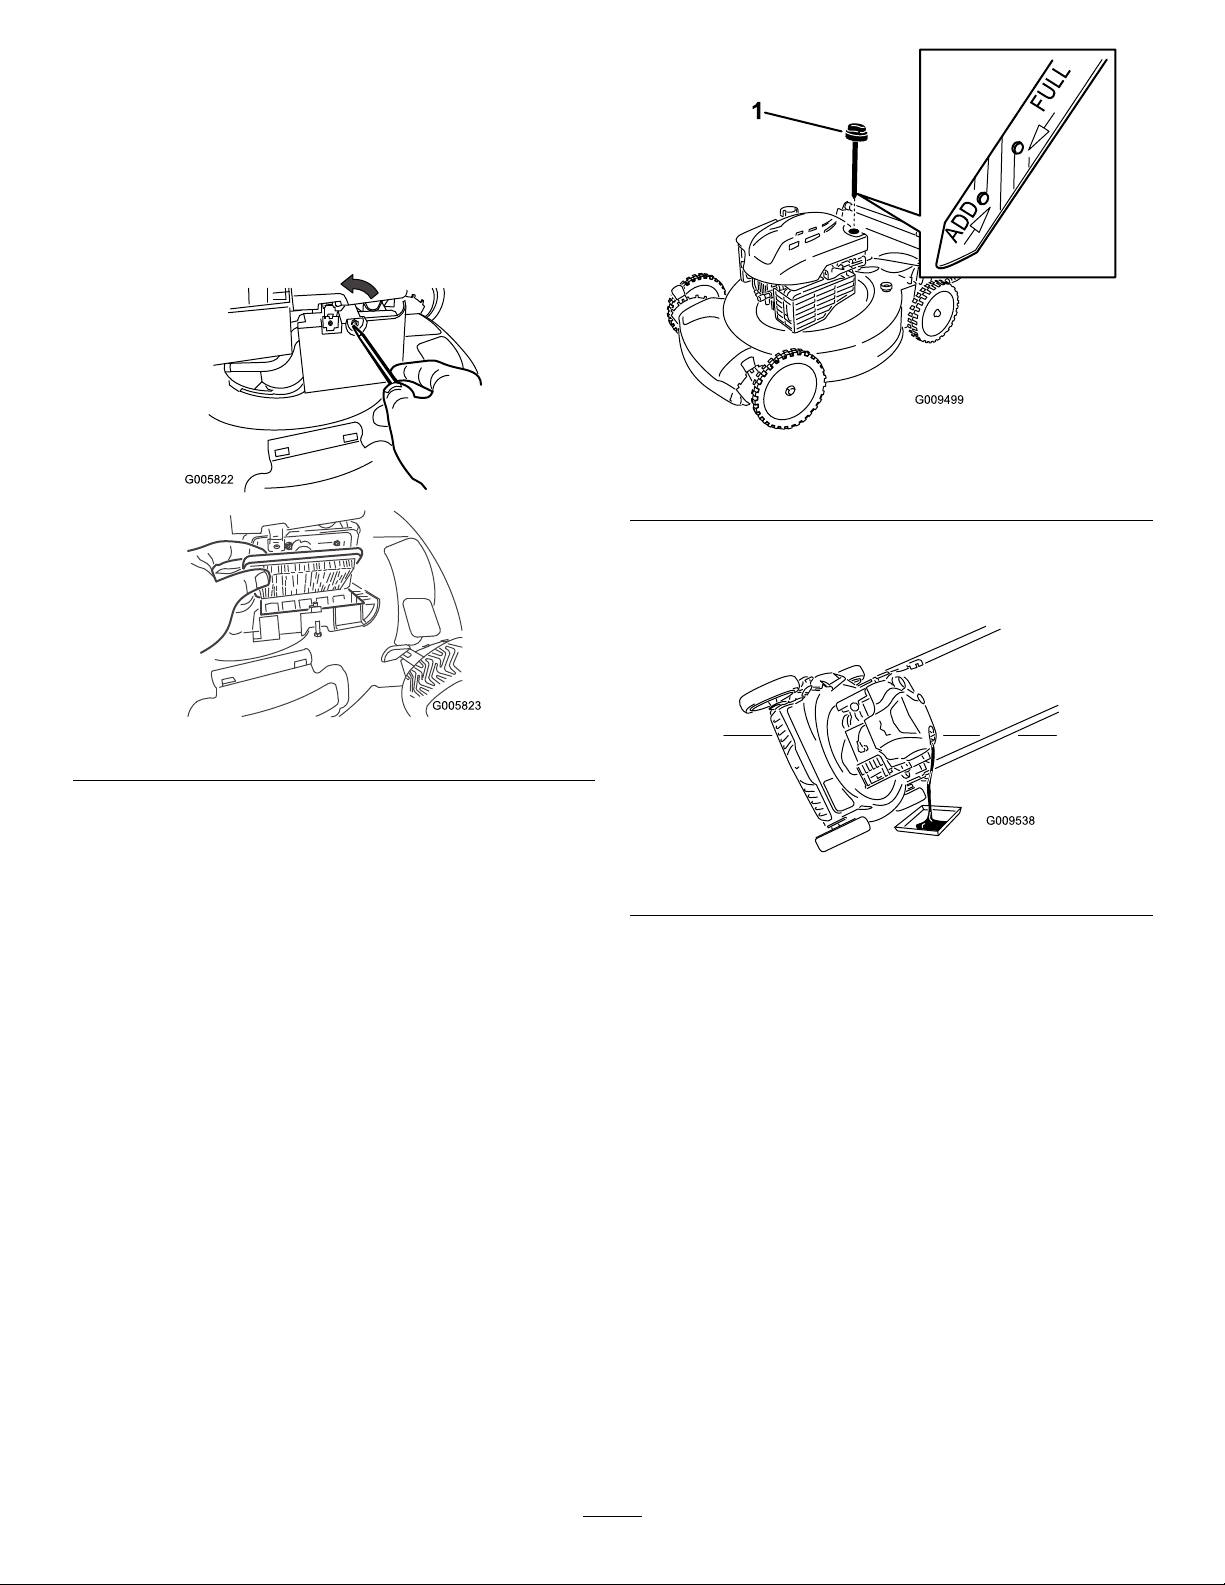
1.Useascrewdrivertoopentheairltercover
(Figure19).
2.Replacetheairlter(
3.Installthecover.
Figure19).
Figure20
1.Dipstick
4.Tipthemowerontoitssidewiththeairlterup
todraintheusedoiloutthroughtheoillltube
(Figure21).
Figure19
ChangingtheEngineOil
ServiceInterval:Aftertherst5hours
Yearly
Runtheengineafewminutesbeforechangingtheoil
towarmit.Warmoilowsbetterandcarriesmore
contaminants.
1.Movethemowertoalevelsurface.
2.RefertoPreparingforMaintenance.
3.Removethedipstick(
Figure20).
Figure21
5.Returnthemowertotheoperatingposition.
6.Pourabout3/4ofthecrankcasecapacityofoilin
thecrankcase.
7.Wait3minutesfortheoiltosettle.
8.Wipethedipstickcleanwithacleancloth.
9.Insertthedipstickfullyintotheoillltube,then
removethedipstick.
10.Readtheoillevelonthedipstick.
Note:IftheoillevelisbelowtheAddmarkonthe
dipstick,slowlypourasmallamountofoilintothe
oillltubeandrepeatsteps8through10untiltheoil
levelisattheFullmarkonthedipstick(Figure20).
Important:Donotoverllthecrankcasewith
oilandruntheengine.Draintheexcessoiluntil
theoillevelonthedipstickreadsFull.
11.Installthedipstickintotheoillltubesecurely.
12.Disposeoftheusedoilproperlyatalocalrecycling
center.
14
Page 15
ChargingtheBattery
ServiceInterval:Every25hours
•Agreenlightindicatesthatthechargerisfully
chargedorthechargerisdisconnectedfromthe
battery.
Electric-startmodelsonly
WARNING
CALIFORNIA
Proposition65Warning
Batteryposts,terminals,andrelated
accessoriescontainleadandleadcompounds,
chemicalsknowntotheStateofCalifornia
tocausecancerandreproductiveharm.
Washhandsafterhandling.
Chargethebatteryfor24hoursinitially,thenmonthly
(every25starts)orasneeded.Alwaysusethecharger
inashelteredareaandchargethebatteryatroom
temperature(70°or22°C)wheneverpossible.
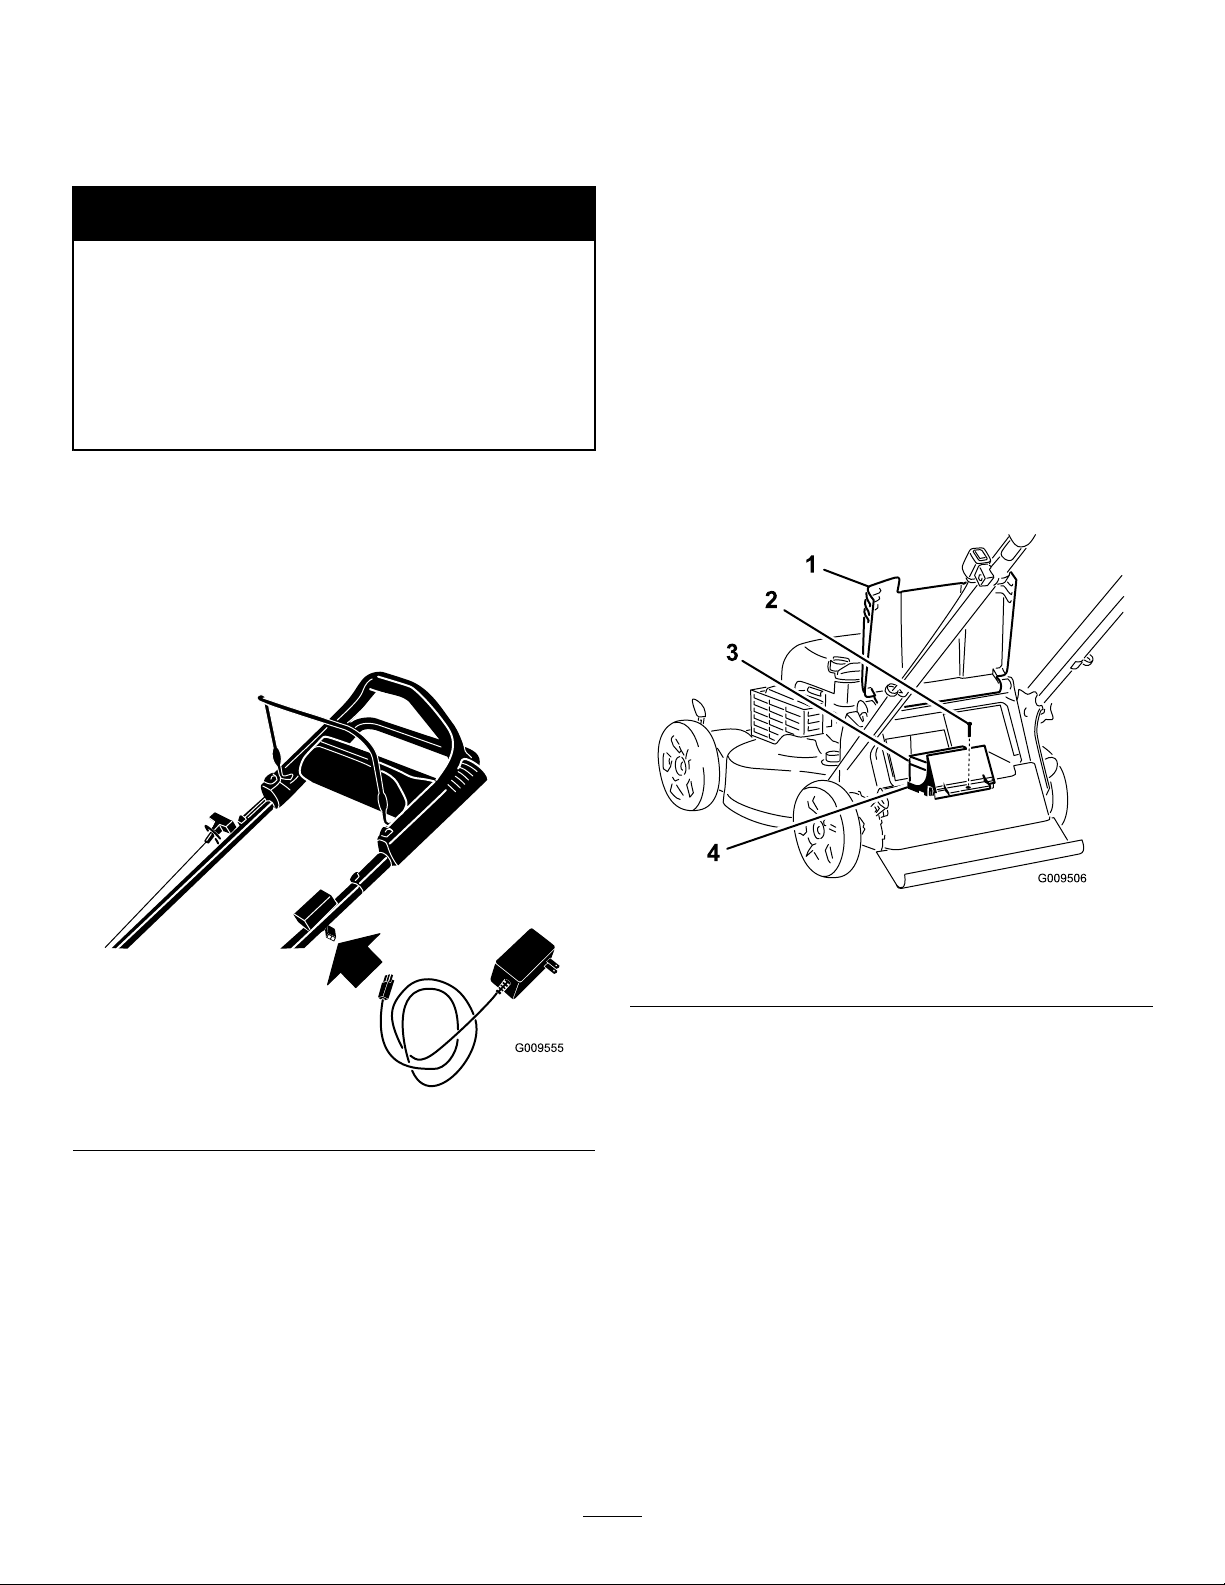
1.Connectthechargertothemowerwireharness
locatedbelowtheignitionkey(
Figure22).
•Aashinglightthatalternatesbetweenredandgreen
indicatesthatthebatteryisnearlyfullycharged.This
statelastsonlyafewminutesuntilthebatteryisfully
charged.
ReplacingtheFuse
Electric-startmodelsonly
Ifthebatterydoesnotchargeortheenginedoesnotrun
withtheelectricstarter,thefusemaybeblown.Replace
itwitha40-ampplug-intypefuse.
1.Raisethereardeectorandlocatethebattery
compartment(
Figure23).
Figure22
2.Plugthechargerintoawalloutlet.
Note:Whenthebatterynolongerholdsacharge,
recycleordisposeofthelead-acidbatteryaccording
tolocalcodes.
Note:Yourbatterychargermayhaveatwo-colorLED
displaythatindicatesthefollowingstatesofcharging:
•Aredlightindicatesthatthechargerischargingthe
battery.
Figure23
1.Reardeector
2.Screw
3.Battery
4.Batterycompartment
2.Wipeawayanydebrisinthebatterycompartment
area.
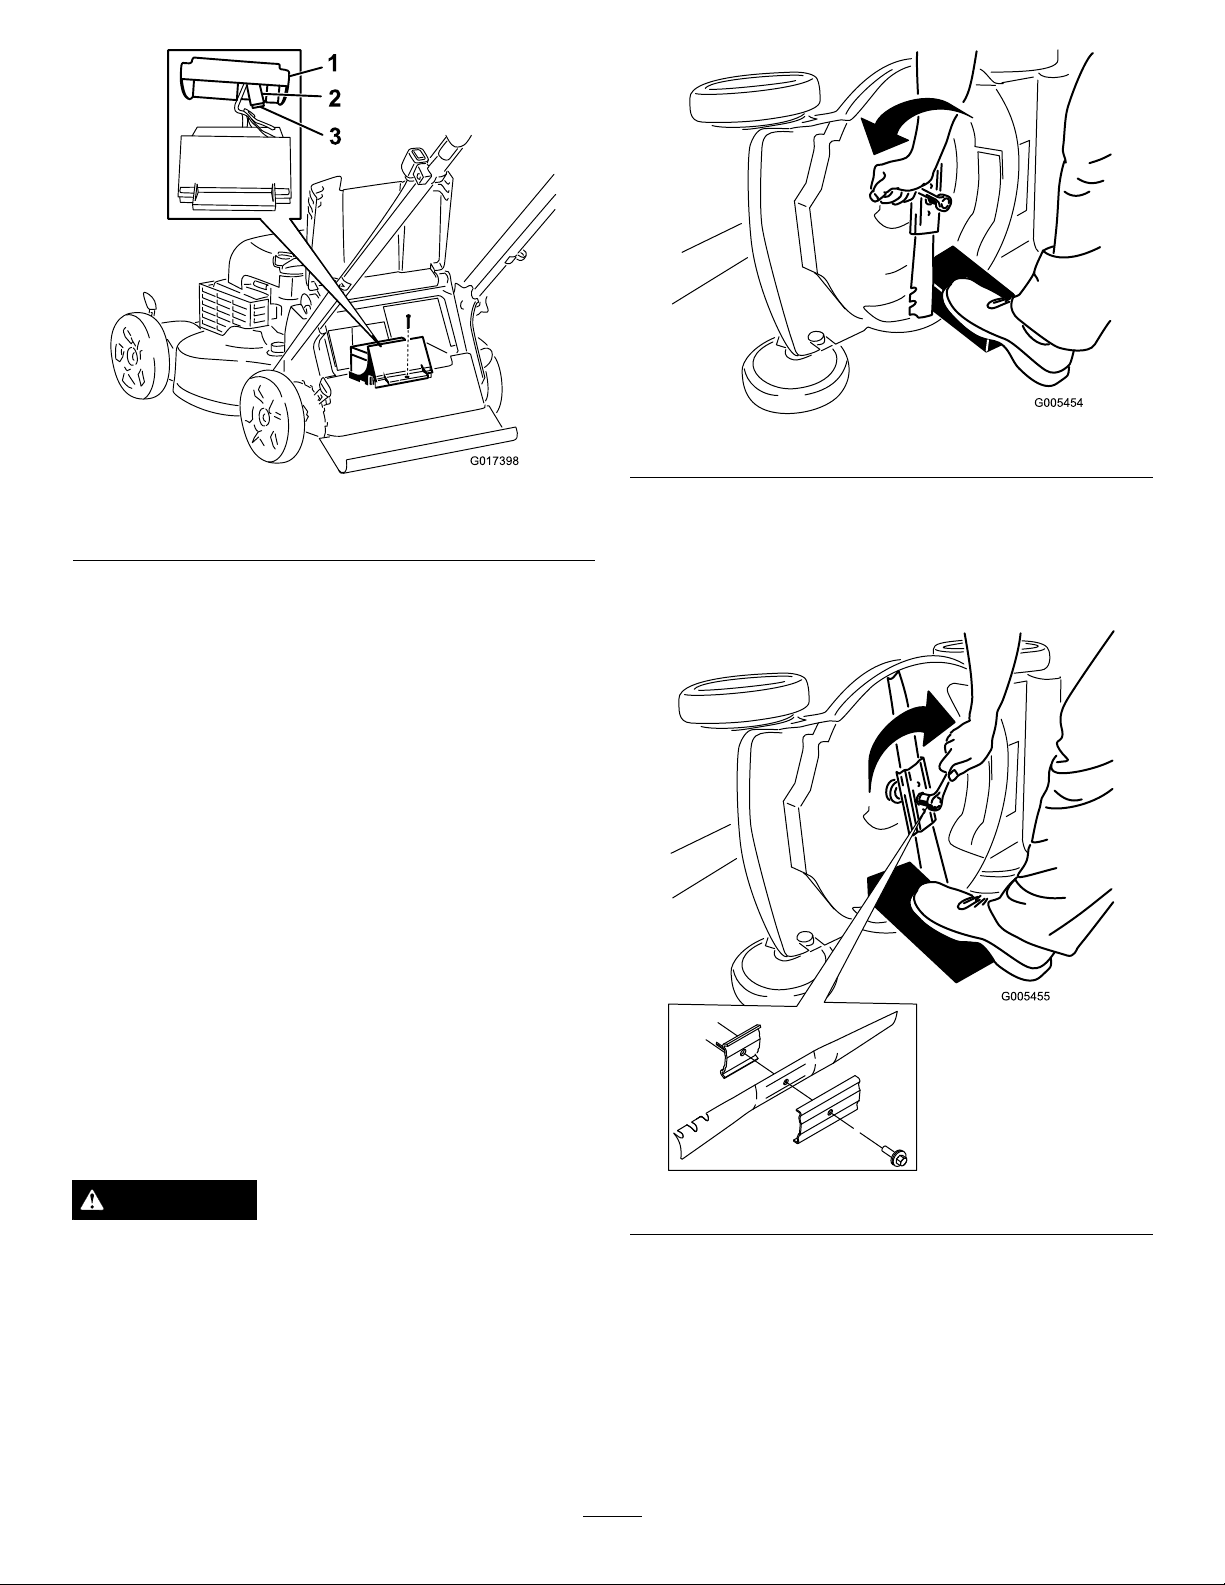
3.Removethescrewthatsecuresthebattery
compartment,pulloutthebattery,andlocatethe
Figure24.
fuse(
15
Page 16
1
2
3
G017398
Figure25
Figure24
1.Fuse2.Fuseholder
4.Replacethefuseinthefuseholder(Figure24).
Note:Y ourmowercomeswithasparefuseinthe
batterycompartment.
5.Installthebatterycompartmentwiththescrewthat
youremovedinstep
3.
6.Installthecoveringoverthebatterycompartment.
7.Lowerthereardeector.
ReplacingtheBlade
ServiceInterval:Yearly
Important:
the blade pr oper l y
wrenchorareuncomfortableperformingthis
procedure,contactanAuthorizedServiceDealer.
Examinethebladewheneveryourunoutofgasoline.If
thebladeisdamagedorcracked,replaceitimmediately.
Ifthebladeedgeisdullornicked,haveitsharpenedand
balanced,orreplaceit.
WARNING
Thebladeissharp;contactingthebladecanresult
inseriouspersonalinjury.
Weargloveswhenservicingtheblade.
1.RefertoPreparingforMaintenance.
Y ou will need a torque wr ench to install
.Ifyoudonothaveatorque
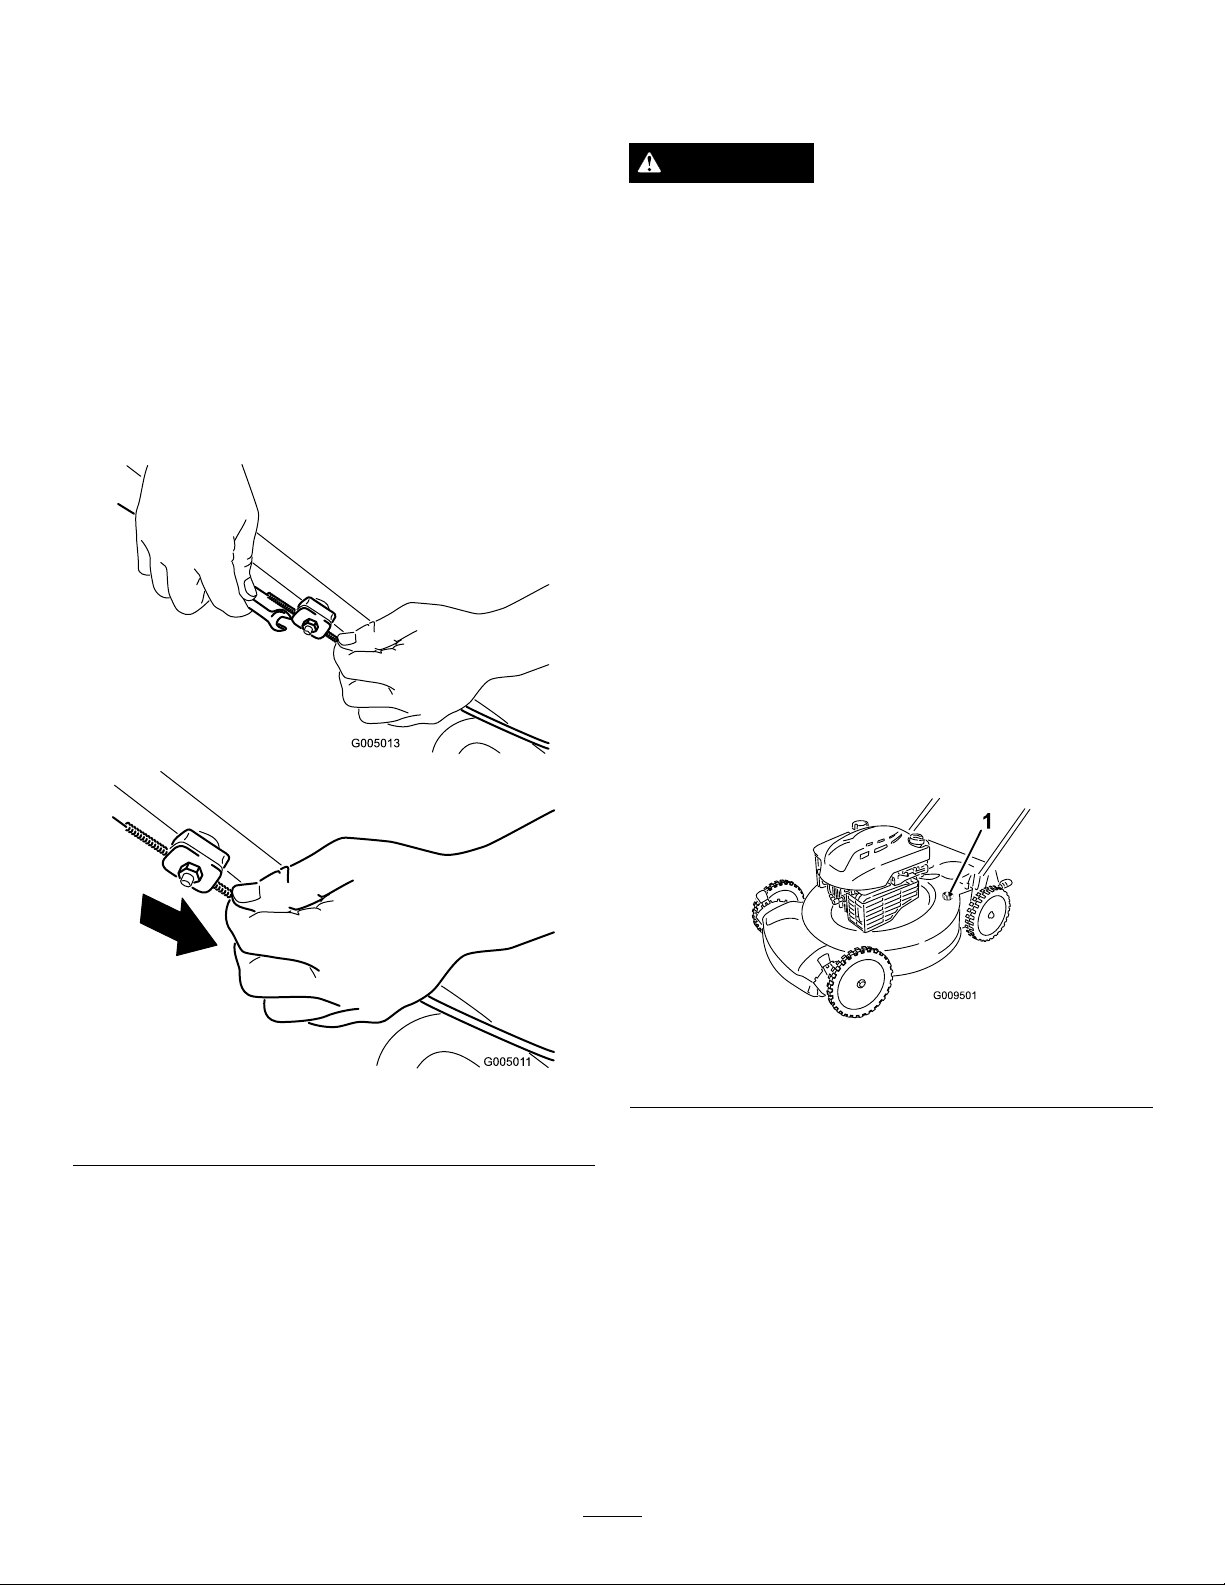
4.Removetheblade,savingallmountinghardware
(Figure25).
5.Installthenewbladeandallmountinghardware
(Figure26).
Figure26
Important:Positionthecurvedendsofthe
bladetopointtowardthemowerhousing.
6.Useatorquewrenchtotightenthebladeboltto
60ft-lb(82N-m).
2.Tipthemowerontoitssidewiththeairlterup.
3.Useablockofwoodtoholdthebladesteady
(Figure25).
Important:Abolttorquedto60ft-lb(82N-m)
isverytight.Whileholdingthebladewitha
blockofwood,putyourweightbehindthe
16
Page 17
ratchetorwrenchandtightentheboltsecurely.
Thisboltisverydifculttoovertighten.
CleaningtheMower
ServiceInterval:Beforeeachuseordaily
AdjustingtheSelf-propelDrive
Cable
Wheneveryouinstallanewself-propelcableorif
theself-propeldriveisoutofadjustment,adjustthe
self-propeldrivecable.
1.Loosenthecablesupportnut(Figure27).
2.Pulldownthecablejacket(towardthemower)until
thereisnoslackinthecable(
3.Tightenthenutonthecablesupport.
Figure27).
WARNING
Themowermaydislodgematerialfromunderthe
mowerhousing.
•Weareyeprotection.
•Stayintheoperatingposition(behindthe
handle)whentheengineisrunning.
•Donotallowbystandersinthearea.
Forbestresults,cleanthemowersoonafteryouhave
completedmowing.
1.Lowerthemowertoitslowestcuttingheightsetting.
RefertoAdjustingtheCuttingHeight.
2.Movethemowerontoaatpavedsurface.
3.Washouttheareaunderthereardeectorwherethe
clippingsgofromthehousingtothegrassbag.
Note:Washouttheareawiththebag-on-demandin
boththefullyforwardandfullyrearwardpositions.
4.Attachagardenhosethatisconnectedtoawater
supplytothewashoutportonthemowerhousing
Figure28).
(
Figure27
Thisgureissimpliedforthepurposeofclarity .
Figure28
1.Washoutport
5.Turnthewateron.
6.Starttheengineandrunituntiltherearenomore
clippingsthatcomeoutfromunderthemower
housing.
7.Stoptheengine.
8.Shutoffthewateranddisconnectthegardenhose
fromthemower.
9.Starttheengineandrunitforafewminutestodry
thehousingtopreventitfromrusting.
10.Allowtheenginetocoolbeforestoringthemower
inanenclosedarea.
17
Page 18
Storage
FoldingtheHandle
Storethemowerinacool,clean,dryplace.
PreparingtheMowerfor
Storage
WARNING
Gasolinevaporscanexplode.
•Donotstoregasolinemorethan30days.
•Donotstorethemowerinanenclosurenearan
opename.
•Allowtheenginetocoolbeforestoringit.
1.Onthelastrefuelingoftheyear,addfuelstabilizer
tothefuelasdirectedbytheenginemanufacturer.
2.Disposeofanyunusedfuelproperly.Recycleit
accordingtolocalcodes,oruseitinyourautomobile.
Note:Oldfuelinthefueltankistheleadingcause
ofhardstarting.Donotstorefuelwithoutstabilizer
morethan30days,anddonotstorestabilizedfuel
morethan90days.
WARNING
Foldingorunfoldingthehandleimproperlycan
damagethecables,causinganunsafeoperating
condition.
•Donotdamagethecableswhenfoldingor
unfoldingthehandle.
•Ifacableisdamaged,contactanAuthorized
ServiceDealer.
1.Removetheignitionkey(electric-startmodelonly).
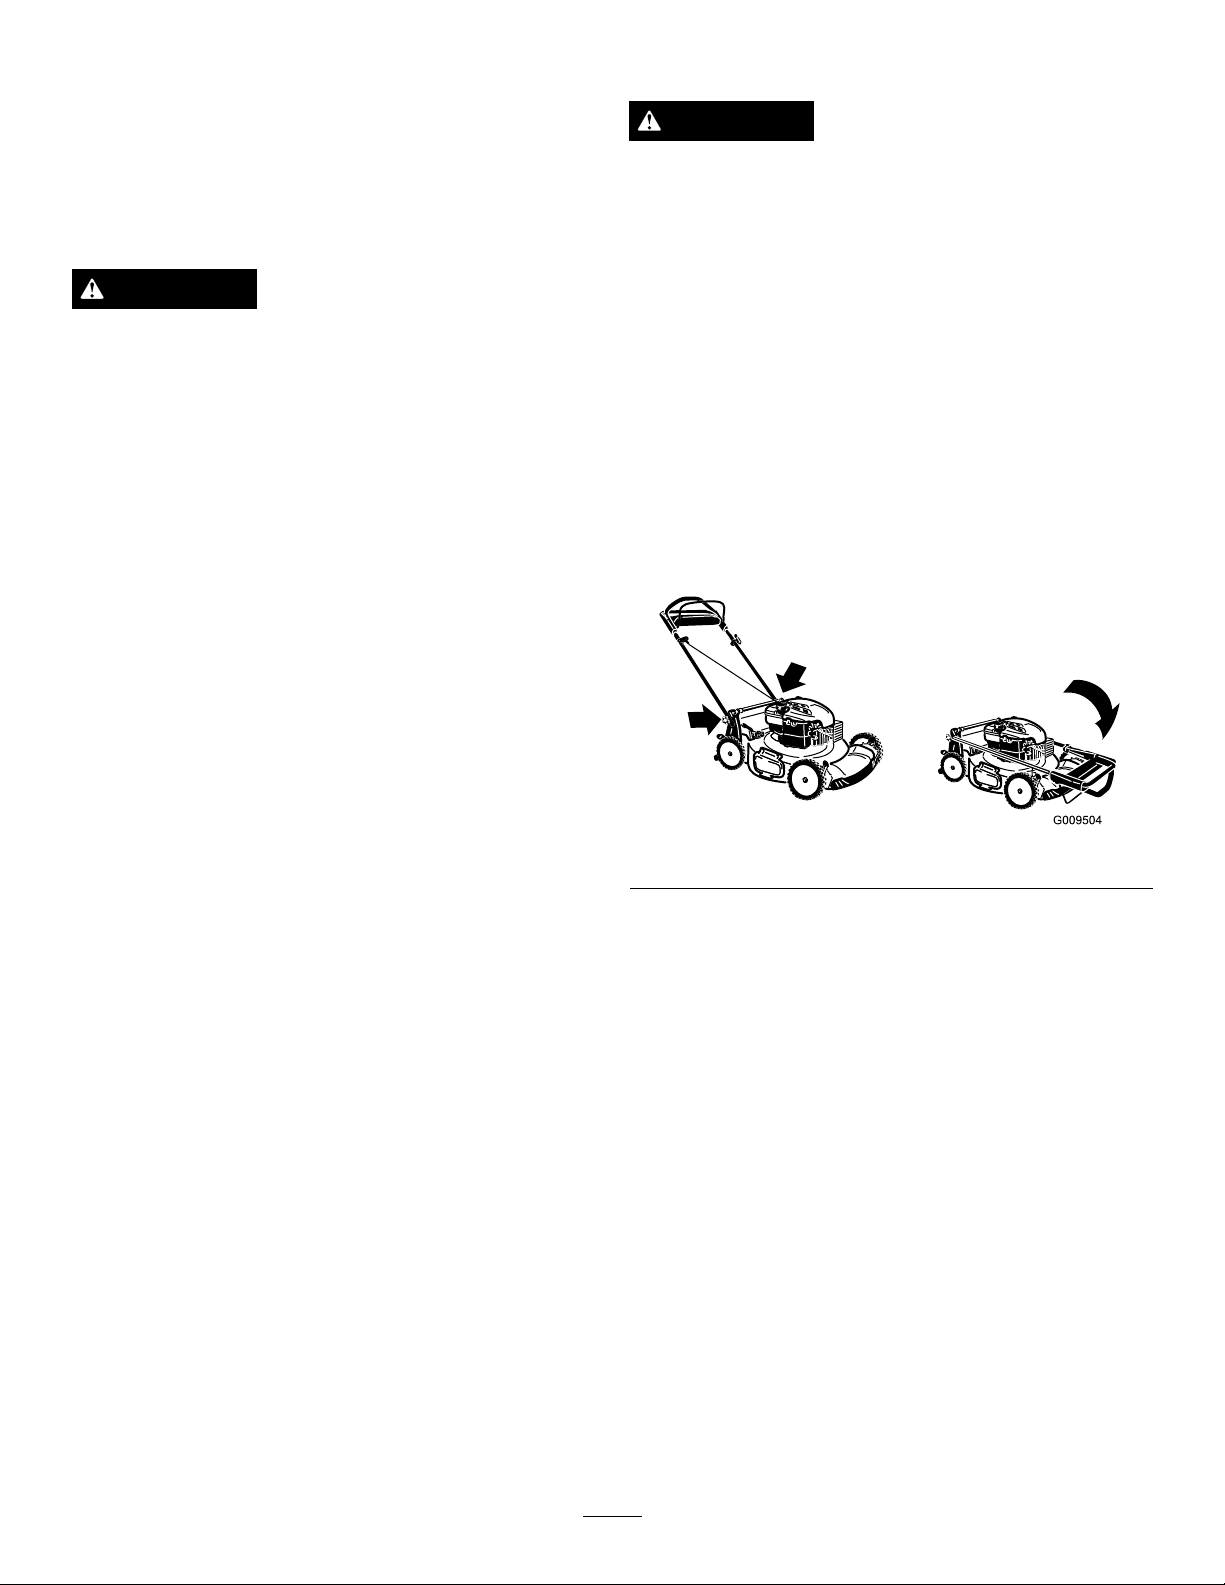
2.Loosenthehandleknobsuntilyoucanmovethe
upperhandlefreely.
3.Foldtheupperhandleforwardasshownin
Important:Routethecablestotheoutsideof
thehandleknobsasyoufoldthehandle.
Figure29.
3.Runthemoweruntiltheenginestopsfromrunning
outoffuel.
4.Starttheengineagain.
5.Allowtheenginetorununtilitstops.Whenyoucan
nolongerstarttheengine,itissufcientlydry.
6.Disconnectthewirefromthesparkplug.
7.Removethesparkplug,add1oz.(30ml)ofoil
throughthesparkplughole,andpullthestarterrope
slowlyseveraltimestodistributeoilthroughoutthe
cylindertopreventcylindercorrosionduringthe
off-season.
8.Looselyinstallthesparkplug.
9.Tightenallnuts,bolts,andscrews.
10.Chargethebatteryfor24hours,thenunplugthe
batterychargeranstorethemowerinanunheated
area.Ifyoumuststorethemowerinaheated
area,youmustchargethebatteryevery90days
(electric-startmodelsonly).
Figure29
4.Tounfoldthehandle,reversethestepsabove.
RemovingtheMowerfrom
Storage
1.Chargethebatteryfor24hours(electric-startmodels
only).
2.Connectthewiretothesparkplug.
18
Page 19

Notes:
19
Page 20

TheToroTotalCoverageGuarantee
A2-Y earFullWarranty(45DayLimitedWarrantyforCommercialUse)20inMulcher/Bagger
22inRecycler
®
TheToroGTSStartingGuarantee
A3-YearFullWarranty(NotApplicableforCommercialUse)
ConditionsandProductsCovered
TheToroCompanyanditsafliate,T oroWarrantyCompany,pursuantto
anagreementbetweenthem,jointlypromisetorepairtheToroProduct
listedbelowifusedforresidentialpurposes*;ifitisdefectiveinmaterials
orworkmanshiporifitstopsfunctioningduetothefailureofacomponent;
oriftheT oroGTS(GuaranteedtoStart)enginewillnotstartontherstor
secondpull,providedtheroutinemaintenancerequiredintheOperator's
Manualhavebeenperformed.
Thiswarrantycoversthecostofpartsandlabor ,butyoumustpay
transportationcosts.
Thefollowingtimeperiodsapplyfromthedateofpurchase:
ProductsWarrantyPeriod
22inRecyclerand20in
Mulcher/BaggerandAttachments
GTS(GuaranteedtoStart)3-yearfullwarranty
Engine
Battery
LimitedWarrantyforCommercialUse*
Gas-poweredT oroProductsusedforcommercial,institutional,or
rentaluse,arewarrantedfor45daysagainstdefectsinmaterialsor
workmanship.Componentsfailingduetonormalweararenotcovered
bythiswarranty.
TheToroGTS(GuaranteedtoStart)StartingGuaranteedoesnotapply
whentheproductisusedcommercially*.
InstructionsforObtainingWarrantyService
IfyouthinkthatyourT oroProductcontainsadefectinmaterialsor
workmanship,orifanormal,able-bodiedadultcannolongerstartyour
product'sengineinoneortwopulls,followthisprocedure:
1.ContactanyAuthorizedT oroServiceDealertoarrangeserviceattheir
dealership.Tolocateadealerconvenienttoyou,refertotheYellow
Pagesofyourtelephonedirectory(lookunder“LawnMowers”)or
accessourwebsiteatwww.T oro.com.Youmayalsocallthenumbers
listedinitem#3tousethe24-hourT oroDealerlocatorsystem.
2.Bringtheproductandyourproofofpurchase(salesreceipt)tothe
ServiceDealer.Thedealerwilldiagnosetheproblemanddetermine
ifitiscoveredunderwarranty.
3.IfforanyreasonyouaredissatisedwiththeServiceDealer’s
analysisorwiththeassistanceprovided,contactusat:
CustomerCareDepartment,RLCDivision
TheT oroCompany
811 1LyndaleAvenueSouth
Bloomington,MN55420-1196
Tollfreeat866-214-9807(U.S.customers)
Tollfreeat866-214-9808(Canadiancustomers)
OwnerResponsibilities
YoumustmaintainyourT oroProductbyfollowingthemaintenance
proceduresdescribedintheOperator'sManual.Suchroutine
maintenance,whetherperformedbyadealerorbyyou,isatyourexpense.
2-yearfullwarranty
3-yearfullwarranty
1-yearfullwarranty
WalkPowerMowers
ItemsandConditionsNotCovered
Thereisnootherexpresswarrantyexceptforspecialemissionsystem
coverageandenginewarrantycoverageonsomeproducts.Thisexpress
warrantydoesnotcoverthefollowing:
•Costofregularmaintenanceserviceorparts,suchaslters,fuel,
lubricants,oilchanges,sparkplugs,airltersbladesharpening
orwornblades,cable/linkageadjustments,orbrakeandclutch
adjustments
•Anyproductorpartwhichhasbeenalteredormisusedandrequires
replacementorrepairduetoaccidentsorlackofpropermaintenance
•Repairsnecessaryduetofailuretousefreshfuel(lessthanone
monthold),orfailuretoproperlypreparetheunitpriortoanyperiod
ofnon-useoveronemonth
•Pickupanddeliverycharges
•Operationalmisuse,neglect,oraccidents
•RepairsorattemptedrepairsbyanyoneotherthananAuthorized
ToroServiceDealer
•Repairsoradjustmentstocorrectstartingdifcultiesduetothe
following:
–failuretofollowpropermaintenanceprocedures
–rotarymowerbladestrikinganobject
–contaminantsinthefuelsystem
–improperfuel(consultyourOperator'sManualifindoubt)
–failuretodrainthefuelsystempriortoanyperiodofnon-use
overonemonth
•Specialoperationalconditionswherestartingmayrequiremorethan
twopulls:
–rsttimestartsafterextendedperiodofnon-useoverthree
monthsorseasonalstorage
–cooltemperaturestartssuchasthosefoundinearlyspringand
lateautumn
–improperstartingprocedures-ifyouarehavingdifcultystarting
yourunit,pleasechecktheOperator'sManualtoensurethat
youareusingthecorrectstartingprocedures.Thiscansavean
unnecessaryvisittoanAuthorizedToroServiceDealer.
GeneralConditions
Allrepairscoveredbythesewarrantiesmustbeperformedbyan
AuthorizedToroServiceDealerusingT oro-approvedreplacementparts.
RepairbyanAuthorizedToroServiceDealerisyoursoleremedyunder
thiswarranty .
NeitherTheT oroCompanynorT oroWarrantyCompanyisliablefor
indirect,incidental,orconsequentialdamagesinconnectionwiththe
useoftheT oroProductscoveredbythesewarranties,includingany
costorexpenseofprovidingsubstituteequipmentorserviceduring
reasonableperiodsofmalfunctionornon-usependingcompletionof
repairsunderthesewarranties.
Somestatesdonotallowexclusionsofincidentalorconsequential
damages,sotheaboveexclusionsmaynotapplytoyou.
Thiswarrantygivesyouspeciclegalrights,andyoumayalsohaveother
rightswhichvaryfromstatetostate.
CountriesOtherthantheUnitedStatesorCanada
CustomerswhohavepurchasedT oroproductsexportedfromtheUnitedStatesorCanadashouldcontacttheirT oroDistributor(Dealer)toobtain
guaranteepoliciesforyourcountry,province,orstate.IfforanyreasonyouaredissatisedwithyourDistributor'sserviceorhavedifcultyobtaining
guaranteeinformation,contacttheToroimporter .Ifallotherremediesfail,youmaycontactusatT oroWarrantyCompany.
*Residentialpurposesmeansuseoftheproductonthesamelotasyourhome.Useatmorethanonelocation,orinstitutionalorrentaluse,isconsidered
commercialuse,andthecommercialusewarrantywouldapply .
374-0254RevC
 Loading...