

Page 1

FormNo.3408-832RevA
22inRecycler®LawnMower
withSmartStow®
20339
CortacéspedRecycler®de56
cm(22")conSmartStow®
20339
TondeuseRecycler®de56cm
(22po)avecSmartStow®
20339
www.T oro.com.
*3408-832*A
Page 2

Page 3
22inRecycler
ModelNo.20339—SerialNo.400000000andUp
®
LawnMowerwithSmartStow
FormNo.3408-829RevA
®
Operator'sManual
Introduction
Thisrotary-blade,walk-behindlawnmowerisintendedto
beusedbyresidentialhomeowners.Itisdesignedprimarily
forcuttinggrassonwell-maintainedlawnsonresidential
properties.Itisnotdesignedforcuttingbrushorfor
agriculturaluses.
Readthisinformationcarefullytolearnhowtooperateand
maintainyourproductproperlyandtoavoidinjuryand
productdamage.Youareresponsibleforoperatingthe
productproperlyandsafely.
YoumaycontactTorodirectlyatwww .Toro.comforproduct
andaccessoryinformation,helpndingadealer,ortoregister
yourproduct.
Wheneveryouneedservice,genuineToroparts,oradditional
information,contactanAuthorizedServiceDealerorToro
CustomerServiceandhavethemodelandserialnumbersof
yourproductready.Figure1identiesthelocationofthe
modelandserialnumbersontheproduct.
whichsignalsahazardthatmaycauseseriousinjuryordeath
ifyoudonotfollowtherecommendedprecautions.
g000502
Figure2
1.Safety-alertsymbol
Thismanualuses2wordstohighlightinformation.
Importantcallsattentiontospecialmechanicalinformation
andNoteemphasizesgeneralinformationworthyofspecial
attention.
WARNING
CALIFORNIA
Proposition65Warning
Thisproductcontainsachemicalorchemicals
knowntotheStateofCaliforniatocausecancer,
birthdefects,orreproductiveharm.
Theengineexhaustfromthisproduct
containschemicalsknowntotheStateof
Californiatocausecancer,birthdefects,
orotherreproductiveharm.
Figure1
1.Modelandserialnumberplate
Writetheproductmodelandserialnumbersinthespace
below:
ModelNo.
SerialNo.
Thismanualidentiespotentialhazardsandhassafety
messagesidentiedbythesafety-alertsymbol(Figure2),
©2016—TheToro®Company
8111LyndaleAvenueSouth
Bloomington,MN55420
Registeratwww.T oro.com.
CV
ItisaviolationofCaliforniaPublicResourceCode
Section4442or4443touseoroperatetheengineonany
forest-covered,brush-covered,orgrass-coveredlandunless
theengineisequippedwithasparkarrester,asdenedin
Section4442,maintainedineffectiveworkingorderorthe
engineisconstructed,equipped,andmaintainedforthe
g189172
preventionofre.
ThissparkignitionsystemcomplieswithCanadianICES-002.
Theenclosed
Engine Owner's Man ual
issuppliedfor
informationregardingtheUSEnvironmentalProtection
Agency(EPA)andtheCaliforniaEmissionControl
Regulationofemissionsystems,maintenance,and
warranty.Replacementsmaybeorderedthroughthe
enginemanufacturer.
NetTorque:Thegrossornettorqueofthisenginewas
laboratoryratedbytheenginemanufacturerinaccordance
withtheSocietyofAutomotiveEngineers(SAE)J1940.
Asconguredtomeetsafety,emission,andoperating
requirements,theactualenginetorqueonthisclassofmower
OriginalInstructions(EN)
PrintedintheUSA
AllRightsReserved
*3408-829*A
Page 4

willbesignicantlylower.Gotowww .Toro.comtoview
specicationsonyourmowermodel.
Contents
Safety
ThismachinehasbeendesignedinaccordancewithANSI
B71.1-2012.
Introduction..................................................................1
Safety...........................................................................2
GeneralSafety.........................................................2
SafetyandInstructionalDecals.................................3
Setup............................................................................4
1UnfoldingtheHandle............................................4
2InstallingtheRecoil-starterRopeintheRope
Guide.................................................................5
3FillingtheEnginewithOil......................................5
4AssemblingtheGrassBag......................................6
ProductOverview..........................................................7
Operation.....................................................................7
BeforeOperation.......................................................7
BeforeOperationSafety...........................................7
FillingtheFuelTank................................................8
CheckingtheEngine-OilLevel..................................8
AdjustingtheCuttingHeight....................................8
DuringOperation......................................................9
DuringOperatingSafety...........................................9
StartingtheEngine..................................................9
UsingtheSelf-PropelDrive.....................................10
ShuttingOfftheEngine..........................................10
RecyclingtheClippings...........................................10
BaggingtheClippings.............................................10
Side-DischargingtheClippings.................................11
StoringtheMachineintheVertical-Stow
Position.............................................................11
OperatingTips......................................................12
AfterOperation........................................................13
AfterOperatingSafety............................................13
CleaningundertheMachine.....................................13
FoldingtheHandle.................................................14
Maintenance.................................................................15
RecommendedMaintenanceSchedule(s)......................15
MaintenanceSafety.................................................15
PreparingforMaintenance.......................................15
ServicingtheAirFilter............................................16
ChangingtheEngineOil.........................................16
ReplacingtheBlade................................................17
AdjustingtheSelf-PropelDrive................................18
Storage........................................................................19
PreparingtheMachineforStorage............................19
RemovingtheMachinefromStorage.........................19
GeneralSafety
Thisproductiscapableofamputatinghandsandfeetand
ofthrowingobjects.Alwaysfollowallsafetyinstructionsto
avoidseriouspersonalinjury.
Usingthisproductforpurposesotherthanitsintendeduse
couldprovedangeroustoyouandbystanders.
•ReadandunderstandthecontentsofthisOperator’ sManual
beforestartingtheengine.
•Donotputyourhandsorfeetnearmovingcomponents
ofthemachine.
•Donotoperatethemachinewithoutallguardsandother
safetyprotectivedevicesinplaceandworkingonthe
machine.
•Keepclearofanydischargeopening.Keepbystandersa
safedistanceawayfromthemachine.
•Keepchildrenoutoftheoperatingarea.Neverallow
childrentooperatethemachine.
•Stopthemachineandshutofftheenginebeforeservicing,
fueling,oruncloggingthemachine.
Improperlyusingormaintainingthismachinecanresult
ininjury.Toreducethepotentialforinjury,complywith
thesesafetyinstructionsandalwayspayattentiontothe
safety-alertsymbol,whichmeansCaution,Warning,or
Danger—personalsafetyinstruction.Failuretocomplywith
theseinstructionsmayresultinpersonalinjuryordeath.
Youcanndadditionalitemsofsafetyinformationintheir
respectivesectionsthroughoutthismanual.
2
Page 5
SafetyandInstructionalDecals
Safetydecalsandinstructionsareeasilyvisibletotheoperatorandarelocatednearanyareaof
potentialdanger.Replaceanydecalthatisdamagedormissing .
Manufacturer'sMark
decaloemmarkt
1.Indicatesthebladeisidentiedasapartfromtheoriginal
machinemanufacturer.
94-8072
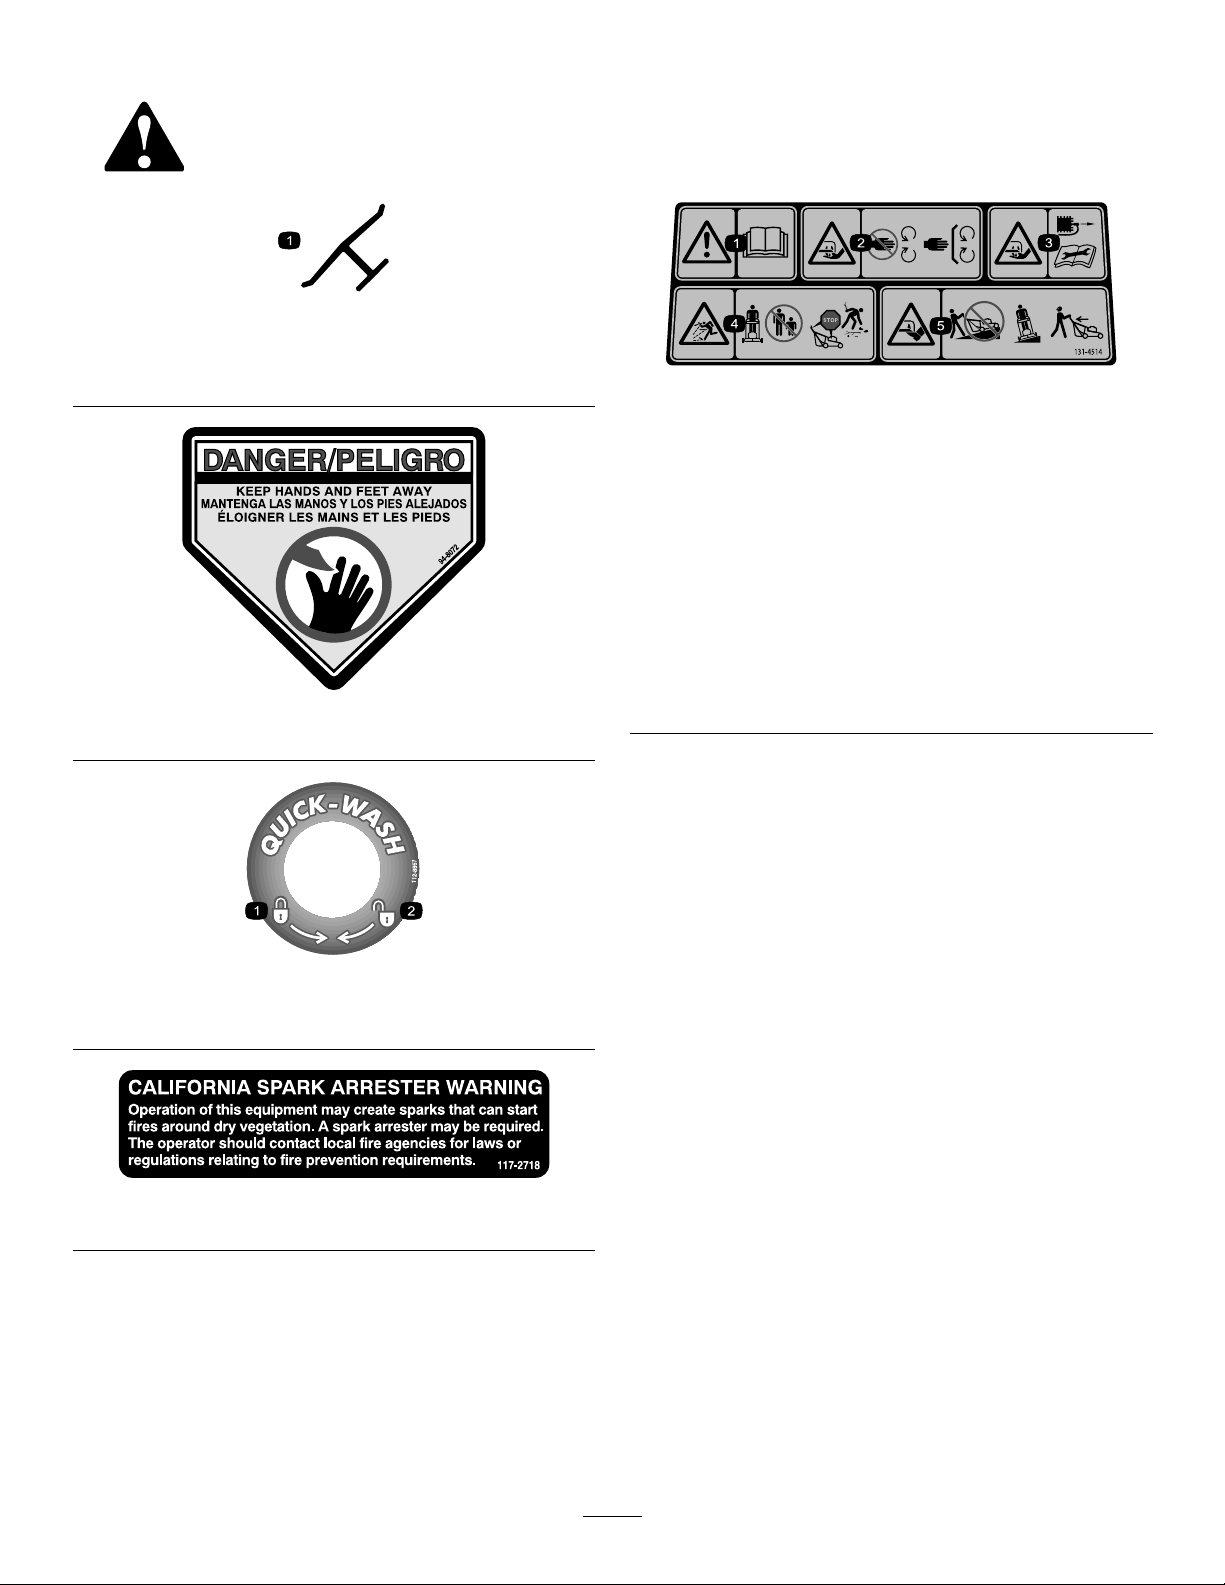
decal131-4514b
131-4514
1.Warning—readtheOperator'sManual.
2.Cutting/dismembermenthazardofhandorfoot,mower
blade—stayawayfrommovingparts;keepallguardsand
shieldsinplace.
3.Cutting/dismembermenthazardofhandorfoot,mower
blade—disconnectthespark-plugwireandreadthe
instructionsbeforeservicingorperformingmaintenance.
4.Thrownobjecthazard—keepbystandersasafedistance
fromthemachine;stoptheenginebeforeleavingthe
operatingposition;pickupanydebrisbeforemowing.
5.Cutting/dismembermenthazardofhandorfoot,mower
decal94-8072
blade—donotoperateupanddownslopes;operatesideto
sideonslopes;lookbehindyouwhenbackingup.
112-8867
1.Lock2.Unlock
117-2718
decal112-8867
decal117-2718
3
Page 6
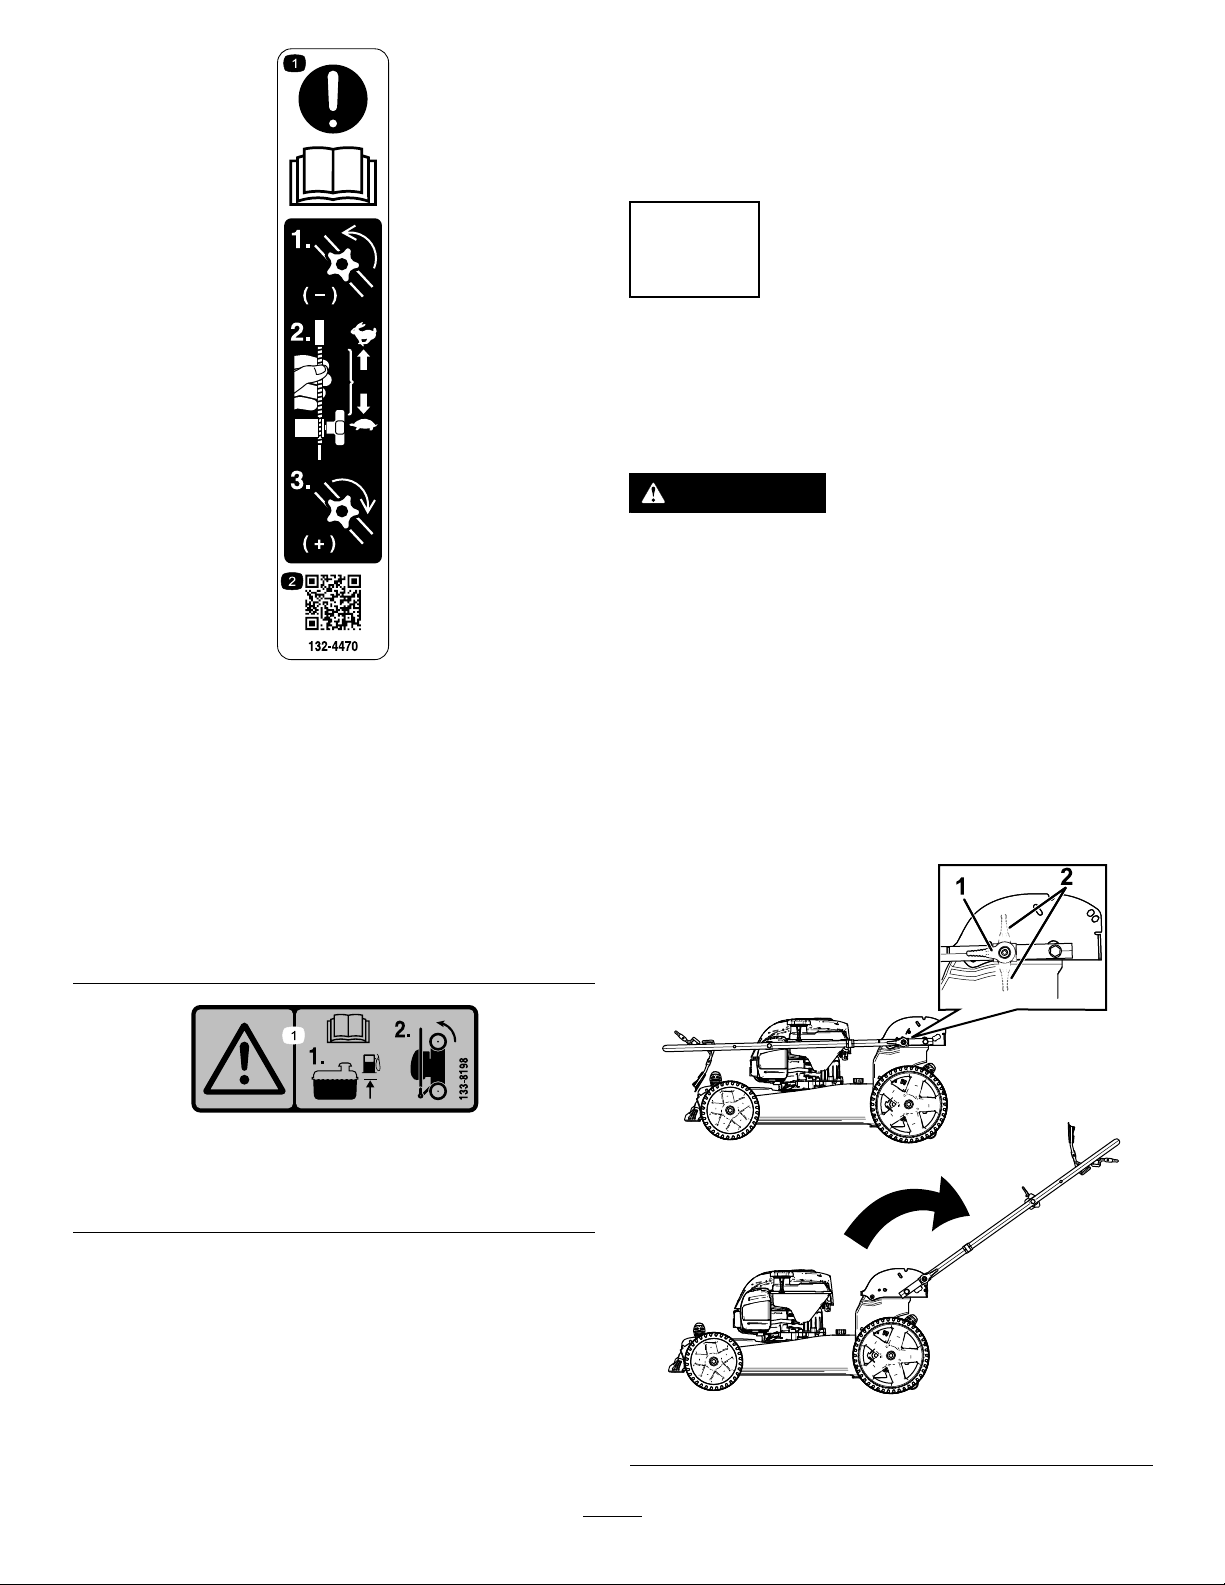
1.Attention;readthe
Operator'sManual—1)
Loosentheknobbyturning
itcounterclockwise;2)Pull
thecable(s)awayfrom
theenginetodecrease
thetraction,orpushthe
cable(s)towardtheengine
toincreasethetraction;
3)Tightentheknobby
turningitclockwise.
Setup
Important:Removeanddiscardtheprotectiveplastic
sheetthatcoverstheengineandanyotherplasticor
wrappingonthemachine.
1
UnfoldingtheHandle
NoPartsRequired
Procedure
WARNING
Unfoldingthehandleimproperlycandamagethe
cables,causinganunsafeoperatingcondition.
•Donotdamagethecable(s)whenfoldingor
unfoldingthehandle.
decal132-4470
132-4470
TractionAdjustment
2.ScantheQRcodefor
moreinformationon
tractionadjustment.
•Ensurethatthecable(s)areroutedtotheoutside
ofthehandle.
•Ifacableisdamaged,contactanAuthorized
ServiceDealer.
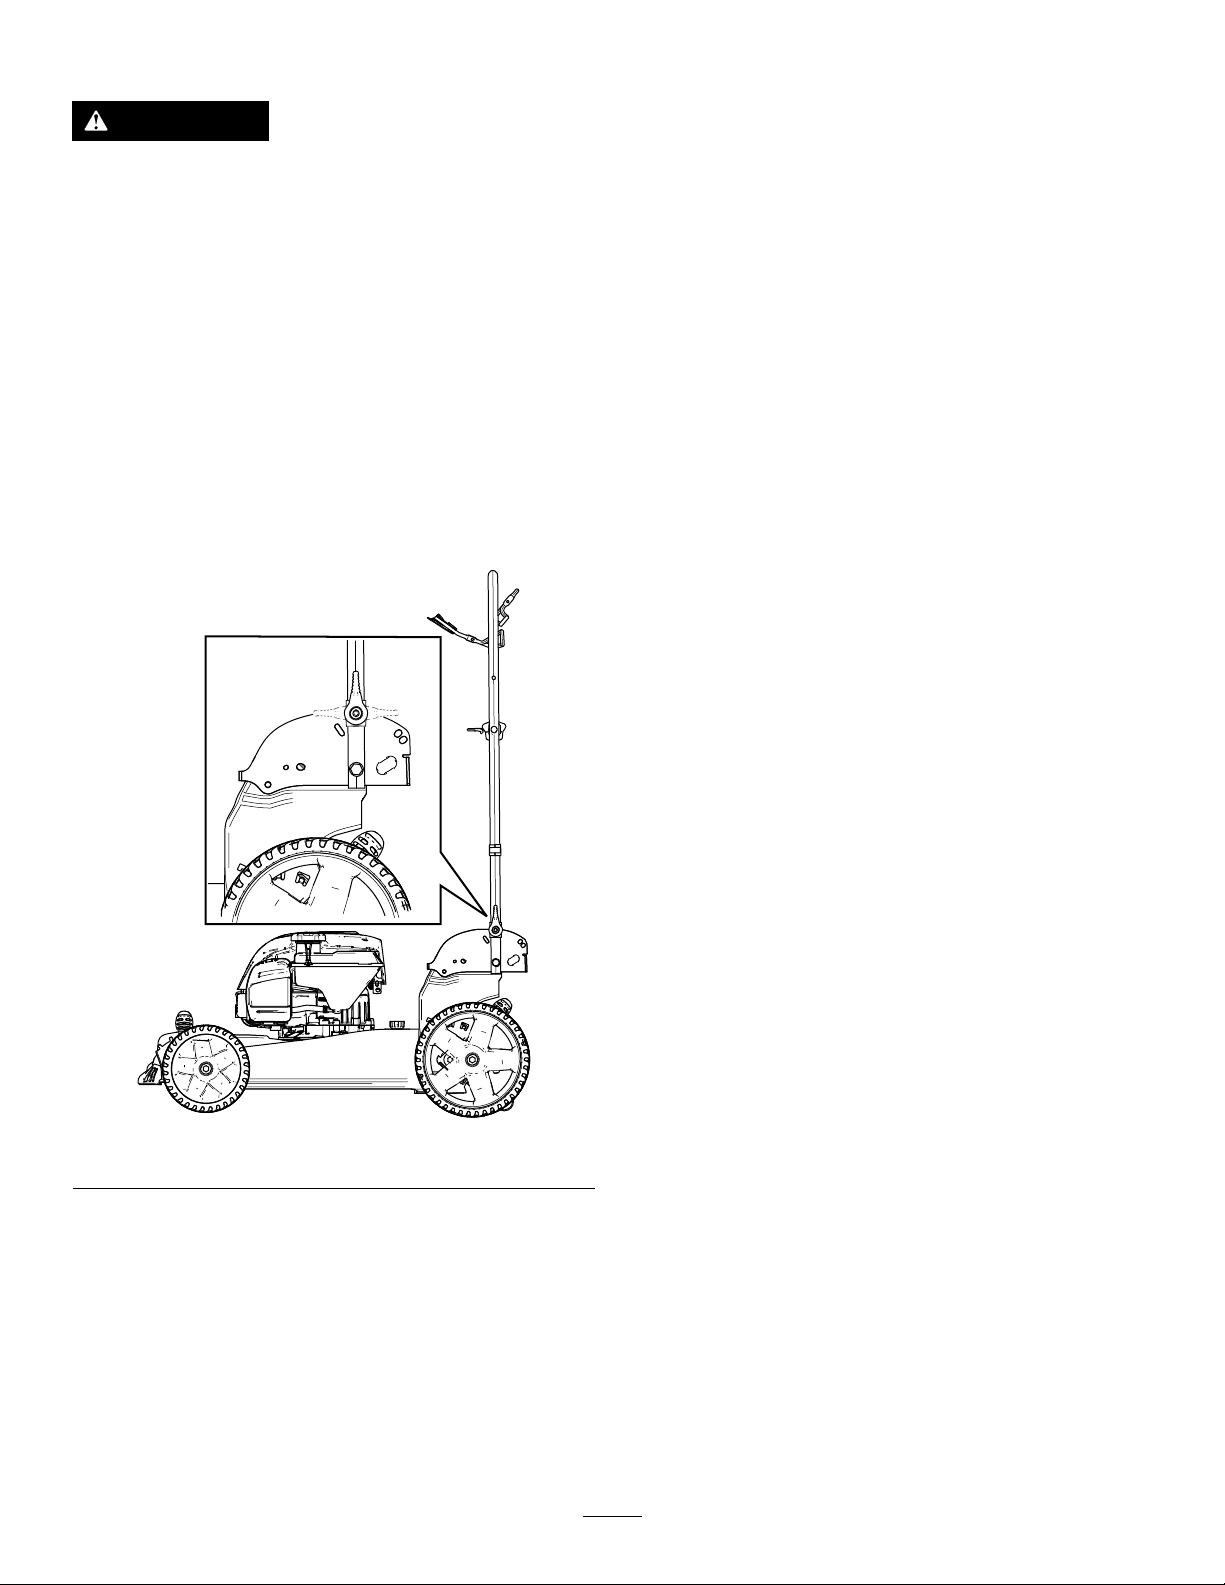
1.Disengagethehandlelocks(Figure3).
2.Movethehandlerearwardtotheoperatingposition
(Figure3).
133-8198
1.Warning—readtheOperator'sManual;1)Addfueluptothe
indicatedlevel.2)Tipthemowerforwardforstorage.
decal133-8198
g189174
Figure3
4
Page 7
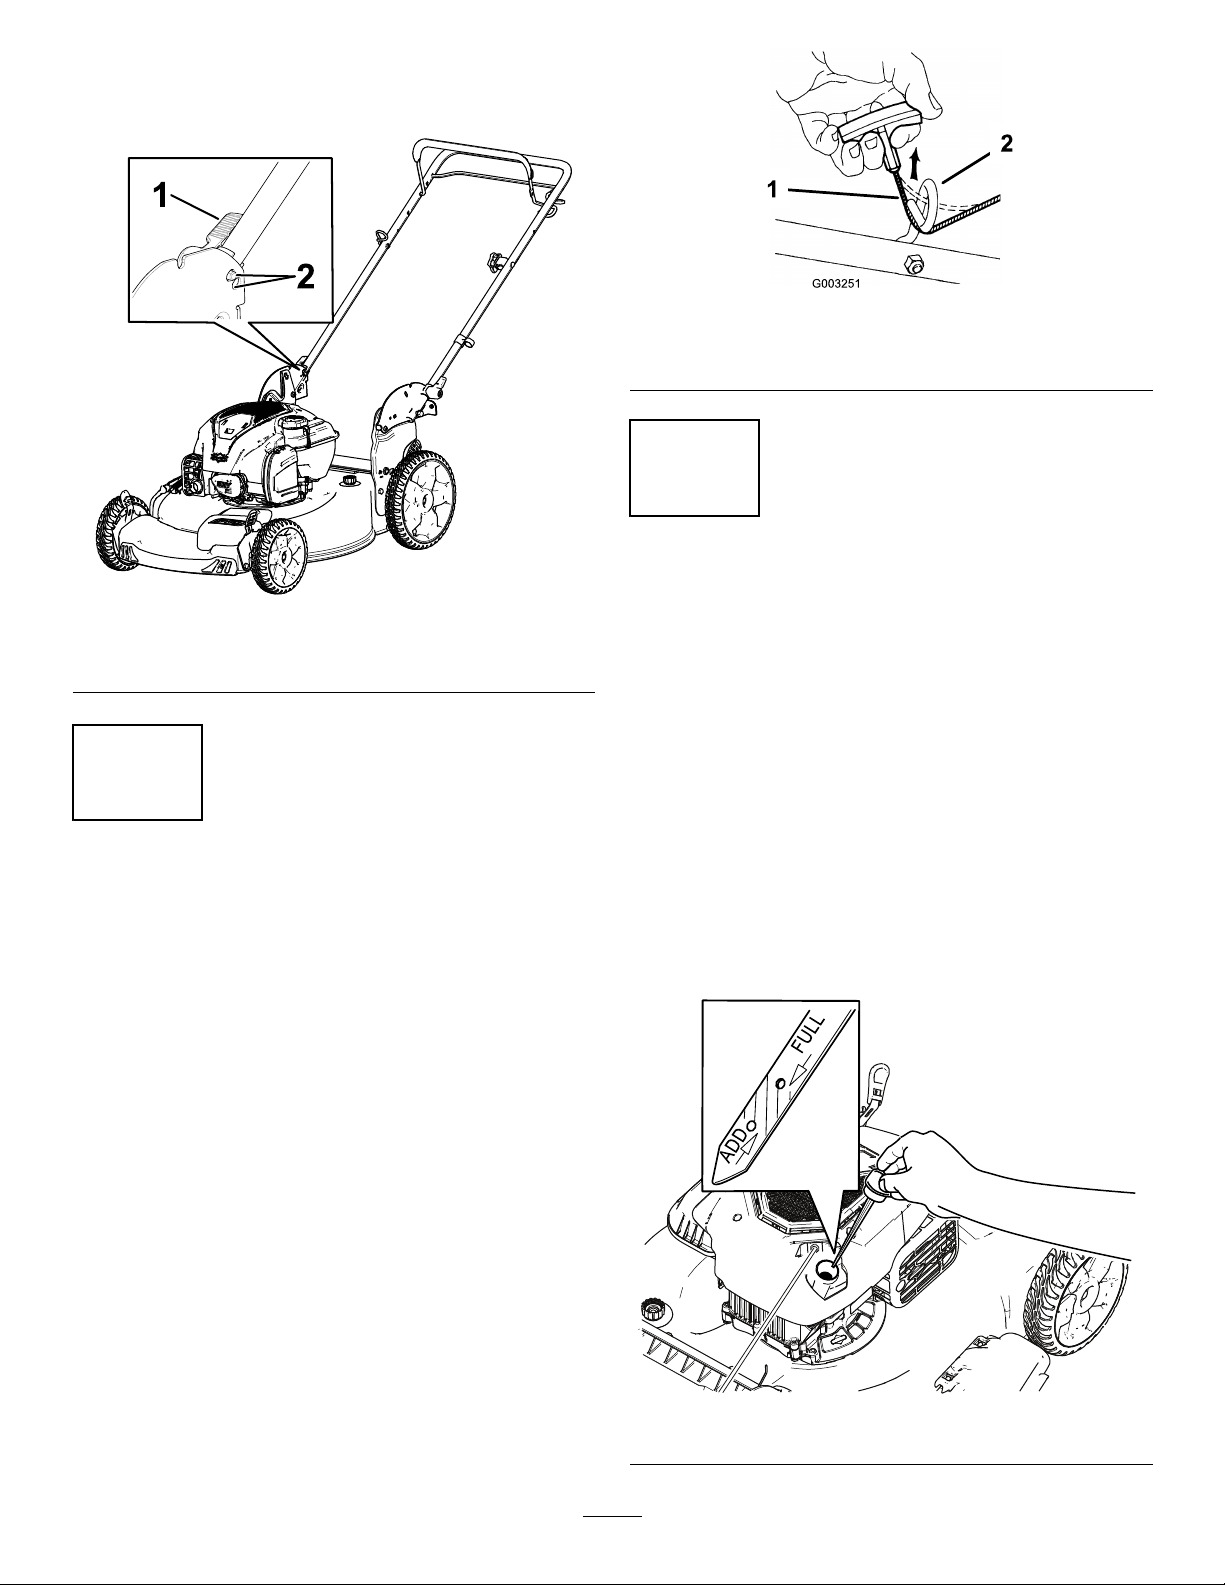
3.Setthehandlelockinoneofthetwopositions(Figure
4)untilthepinclicksinplacetolockthehandleinto
theoperatingposition.
g003251
Figure5
1.Recoil-starterrope2.Ropeguide
3
FillingtheEnginewithOil
Figure4
1.Handlelock2.Pinpositions
2
InstallingtheRecoil-starter RopeintheRopeGuide
NoPartsRequired
Procedure
Important:Tostarttheenginesafelyandeasily
wheneveryouusethemachine,installtherecoil-starter
ropeintheropeguide.
Holdtheblade-controlbartotheupperhandleandpullthe
recoil-starterropethroughtheropeguideonthehandle
(Figure5).
g189175
NoPartsRequired
Procedure
Important:Yourmachinedoesnotcomewithoilin
theengine,butitdoescomewithabottleofoil.Before
startingtheengine,lltheenginewithoil.
Engineoilcapacity:0.47L(16oz)
Oilviscosity:SAE30orSAE10W-30detergentoil
APIserviceclassication:SJorhigher
1.Movethemachinetoalevelsurface.
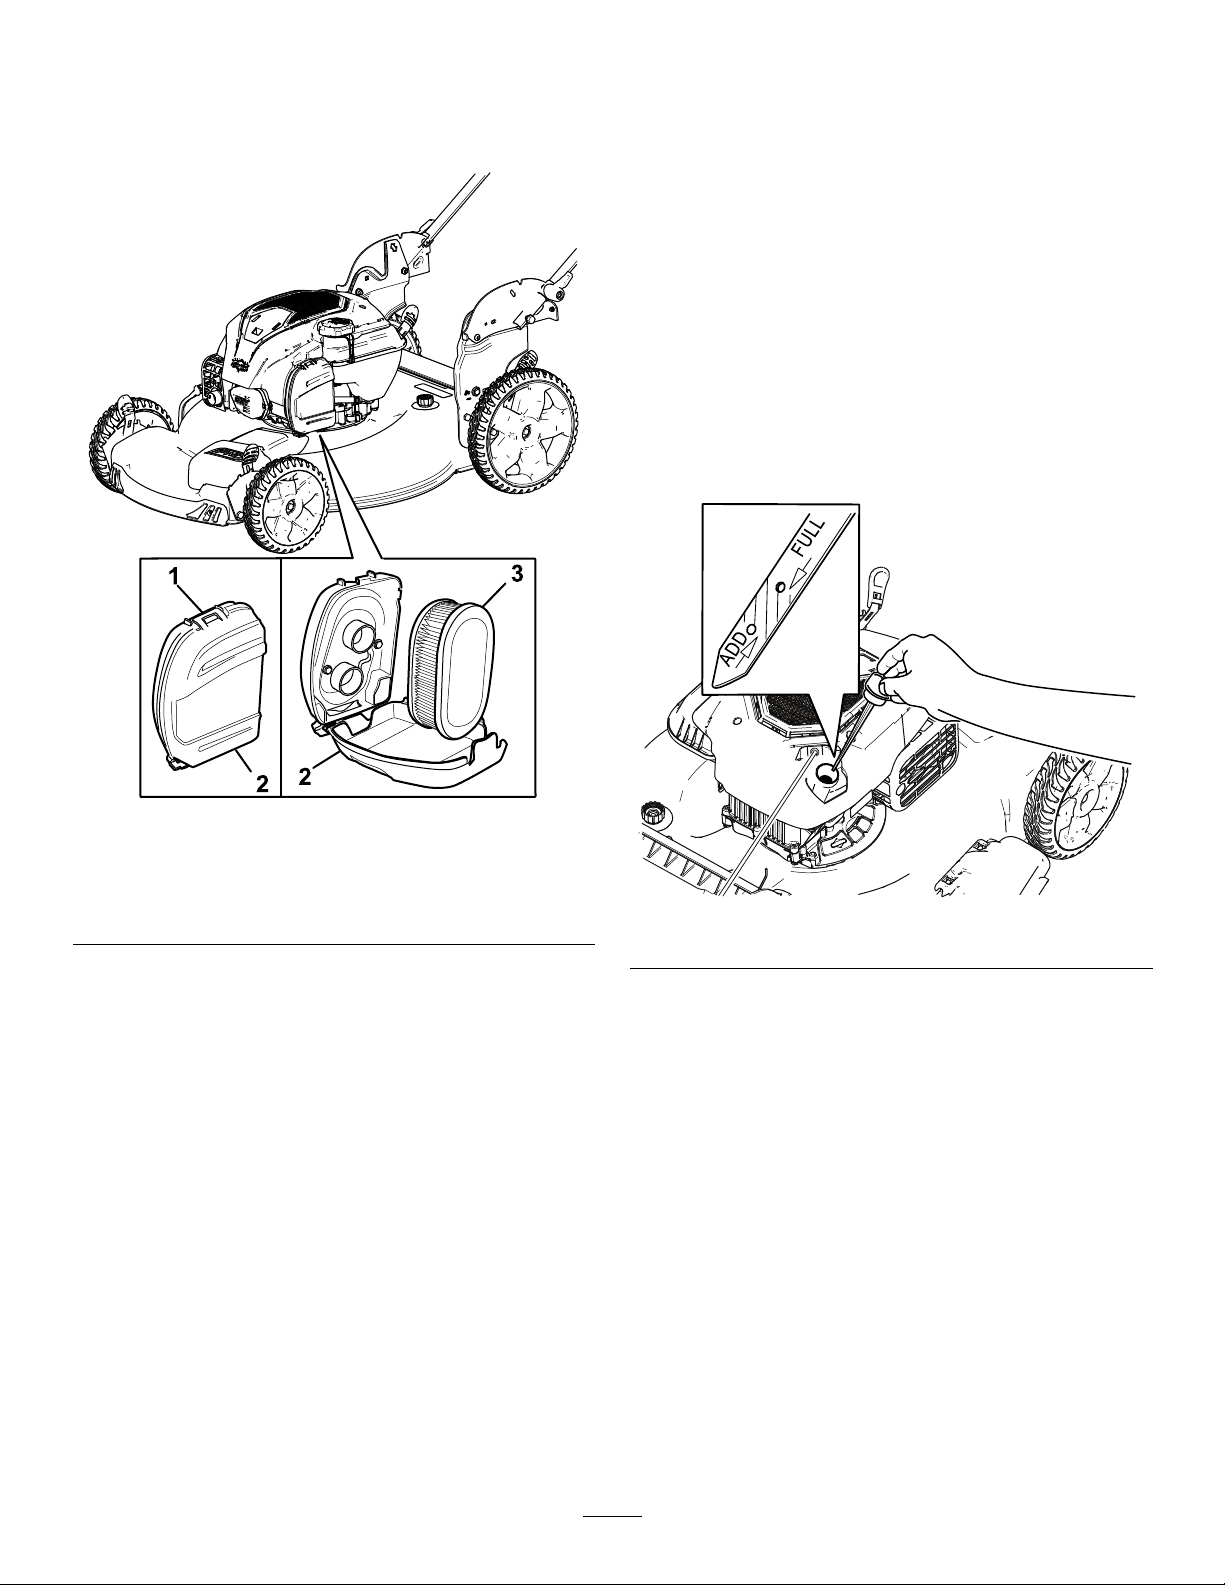
2.Removethedipstickbyrotatingthecap
counterclockwiseandpullingitout(Figure6).
g186245
Figure6
5
Page 8
3.Carefullypourabout3/4oftheenginecapacityofoil
1
2
3
g027120
g027121
intotheoil-lltube.
4.Wipethedipstickcleanwithacleancloth.
5.Insertthedipstickintotheoil-lltube,thenremove
thedipstick.
6.Readtheoillevelonthedipstick(Figure6).
•IftheoillevelisbelowtheAddmarkonthe
dipstick,carefullypourasmallamountofoilinto
theoil-lltube,wait3minutes,andrepeatsteps3
through5untiltheoillevelisattheFullmarkon
thedipstick.
•IftheoillevelisabovetheFullmarkonthe
dipstick,draintheexcessoiluntiltheoillevelisat
theFullmarkonthedipstick;refertoChanging
theEngineOil(page16).
Important:Iftheoillevelinthecrankcaseis
toolowortoohighandyouruntheengine,
youmaydamagetheengine.
7.Installthedipsticksecurely.
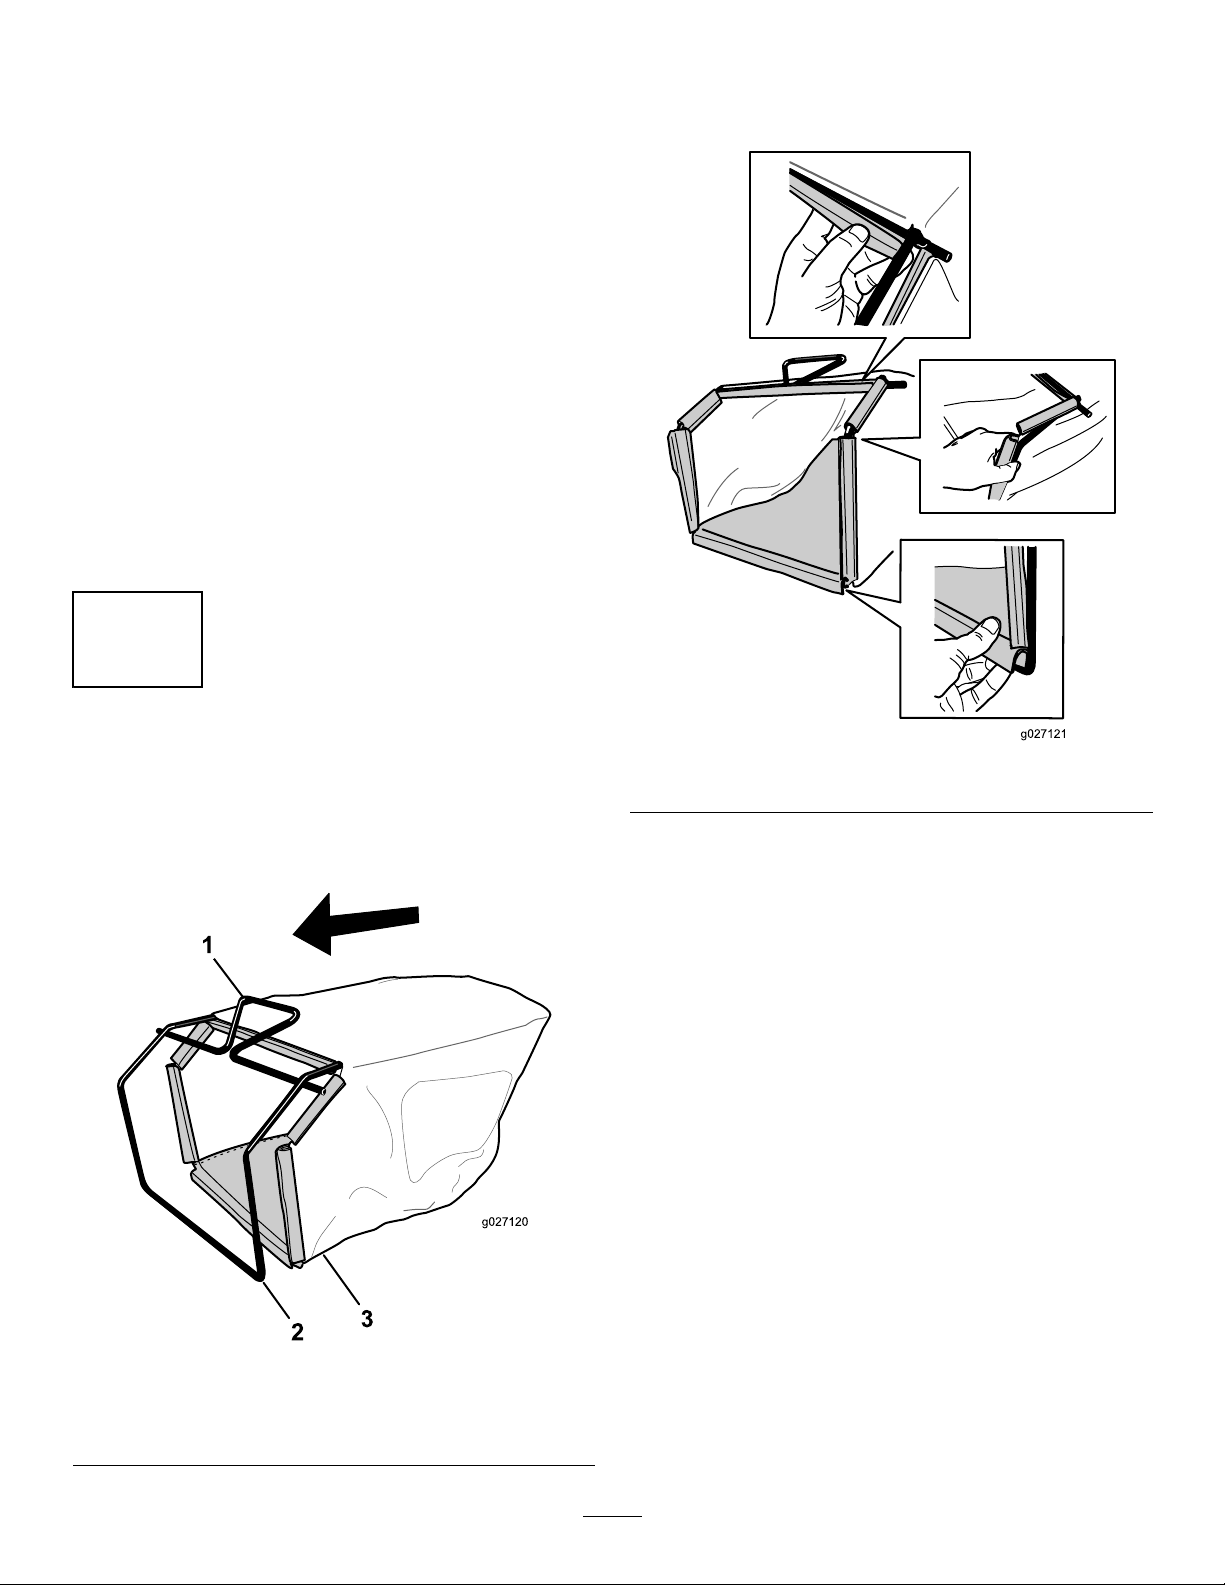
Note:Donotslipthebagoverthehandle(Figure7).
2.Hookthebottomchannelofthebagontothebottom
oftheframe(Figure8).
4
AssemblingtheGrassBag
NoPartsRequired
Procedure
1.SlipthegrassbagovertheframeasshowninFigure7.
g027121
Figure8
3.Hookthetopandsidechannelsofthebagontothetop
andsidesoftheframe,respectively(Figure8).
g027120
Figure7
1.Handle
2.Frame
3.Grassbag
6
Page 9
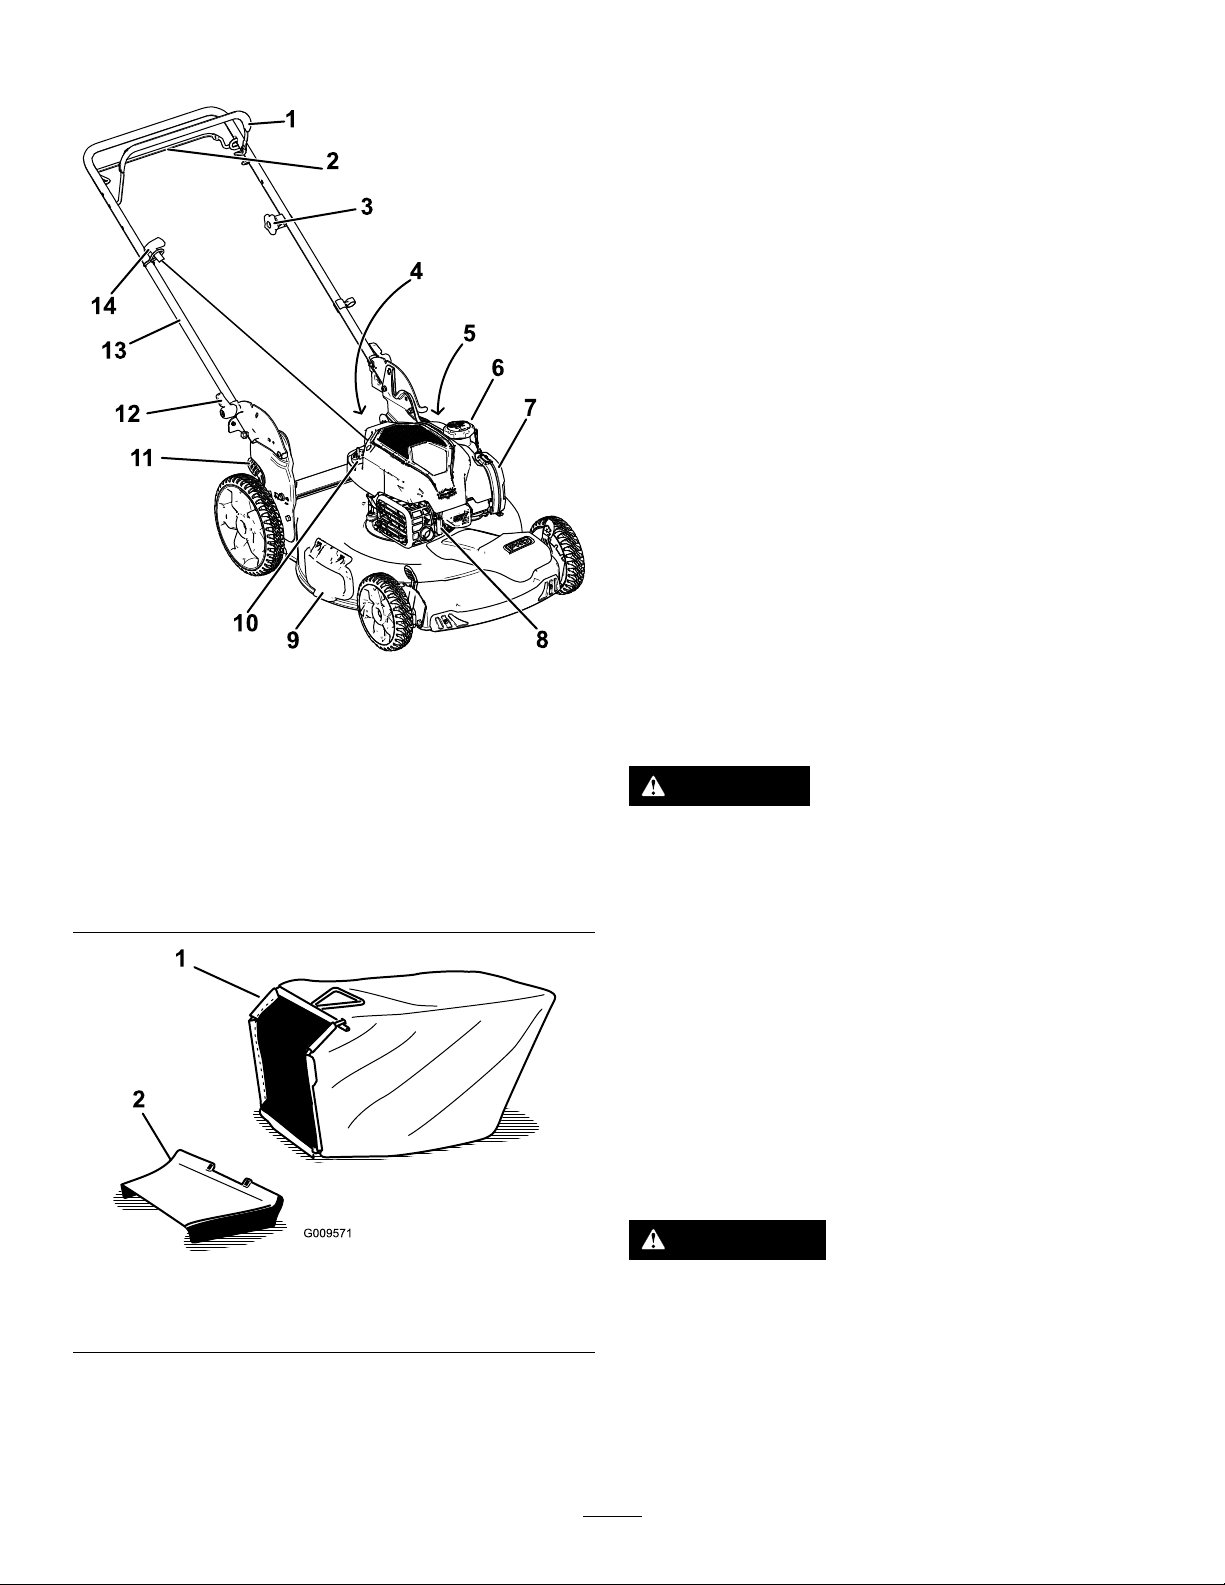
ProductOverview
Operation
BeforeOperation
BeforeOperationSafety
GeneralSafety
•Becomefamiliarwiththesafeoperationoftheequipment,
operatorcontrols,andsafetysigns.
•Checkthatallguardsandsafetydevices,suchasdoors
and/orgrasscatchers,areinplaceandworkingproperly.
•Alwaysinspectthemachinetoensurethattheblades,
bladebolts,andcuttingassemblyarenotwornor
damaged.
•Inspecttheareawhereyouwillusethemachineand
removeallobjectsthatthemachinecouldthrow .
•Adjustingthecuttingheightmaybringyouintocontact
withthemovingblade,causingseriousinjury.
–Shutofftheengineandwaitforallmovingpartsto
stop.
g188888
Figure9
–Donotputyourngersunderthehousingwhen
adjustingthecuttingheight.
1.Blade-controlbar
2.Self-propelbar9.Side-dischargedoor
3.Adjustmentknobforthe
self-propeldrive
4.Reardoor(notshown)11.Cutting-heightlever(4)
5.Washoutport(notshown)12.Handlelock(2)
6.Fuel-tankcap13.Handle
7.Airlter
1.Grassbag2.Side-dischargechute
8.Sparkplug
10.Oilll/dipstick
14.Recoil-starthandle
Figure10
FuelSafety
DANGER
Fuelisextremelyammableandhighlyexplosive.
Areorexplosionfromfuelcanburnyouand
othersandcandamageproperty.
•Topreventastaticchargefromignitingthefuel,
placethecontainerand/ormachinedirectlyon
thegroundbeforelling,notinavehicleoron
anobject.
•Fillthefueltankoutdoors,inanopenarea,when
theengineiscold.Wipeupanyfuelthatspills.
•Donothandlefuelwhensmokingoraroundan
openameorsparks.
•Storefuelinanapprovedcontainerandkeepit
outofthereachofchildren.
g009571
WARNING
Fuelisharmfulorfatalifswallowed.Long-term
exposuretovaporscancauseseriousinjuryand
illness.
•Avoidprolongedbreathingofvapors.
•Keepyourhandsandfaceawayfromthenozzle
andthefuel-tankopening.
•Keepfuelawayfromyoureyesandskin.
7
Page 10
FillingtheFuelTank
•Forbestresults,useonlyclean,fresh,unleadedgasoline
withanoctaneratingof87orhigher((R+M)/2rating
method).
•ETHANOL:Gasolinewithupto10%ethanol(gasohol)
or15%MTBE(methyltertiarybutylether)byvolume
isacceptable.EthanolandMTBEarenotthesame.
Gasolinewith15%ethanol(E15)byvolumeisnot
approvedforuse.Neverusegasolinethatcontainsmore
than10%ethanolbyvolume,suchasE15(contains15%
ethanol),E20(contains20%ethanol),orE85(contains
upto85%ethanol).Usingunapprovedgasolinemay
causeperformanceproblemsand/orenginedamage
whichmaynotbecoveredunderwarranty.
•Donotusegasolinecontainingmethanol.
•Donotstorefueleitherinthefueltankorinfuel
containersoverthewinterunlessfuelstabilizerhasbeen
addedtothefuel.
•Donotaddoiltogasoline.
Important:T oreducestartingproblems,addfuel
stabilizertothefuelallseason,mixingitwithgasoline
lessthan30daysold.
Refertoyourenginemanualforadditionalinformation.
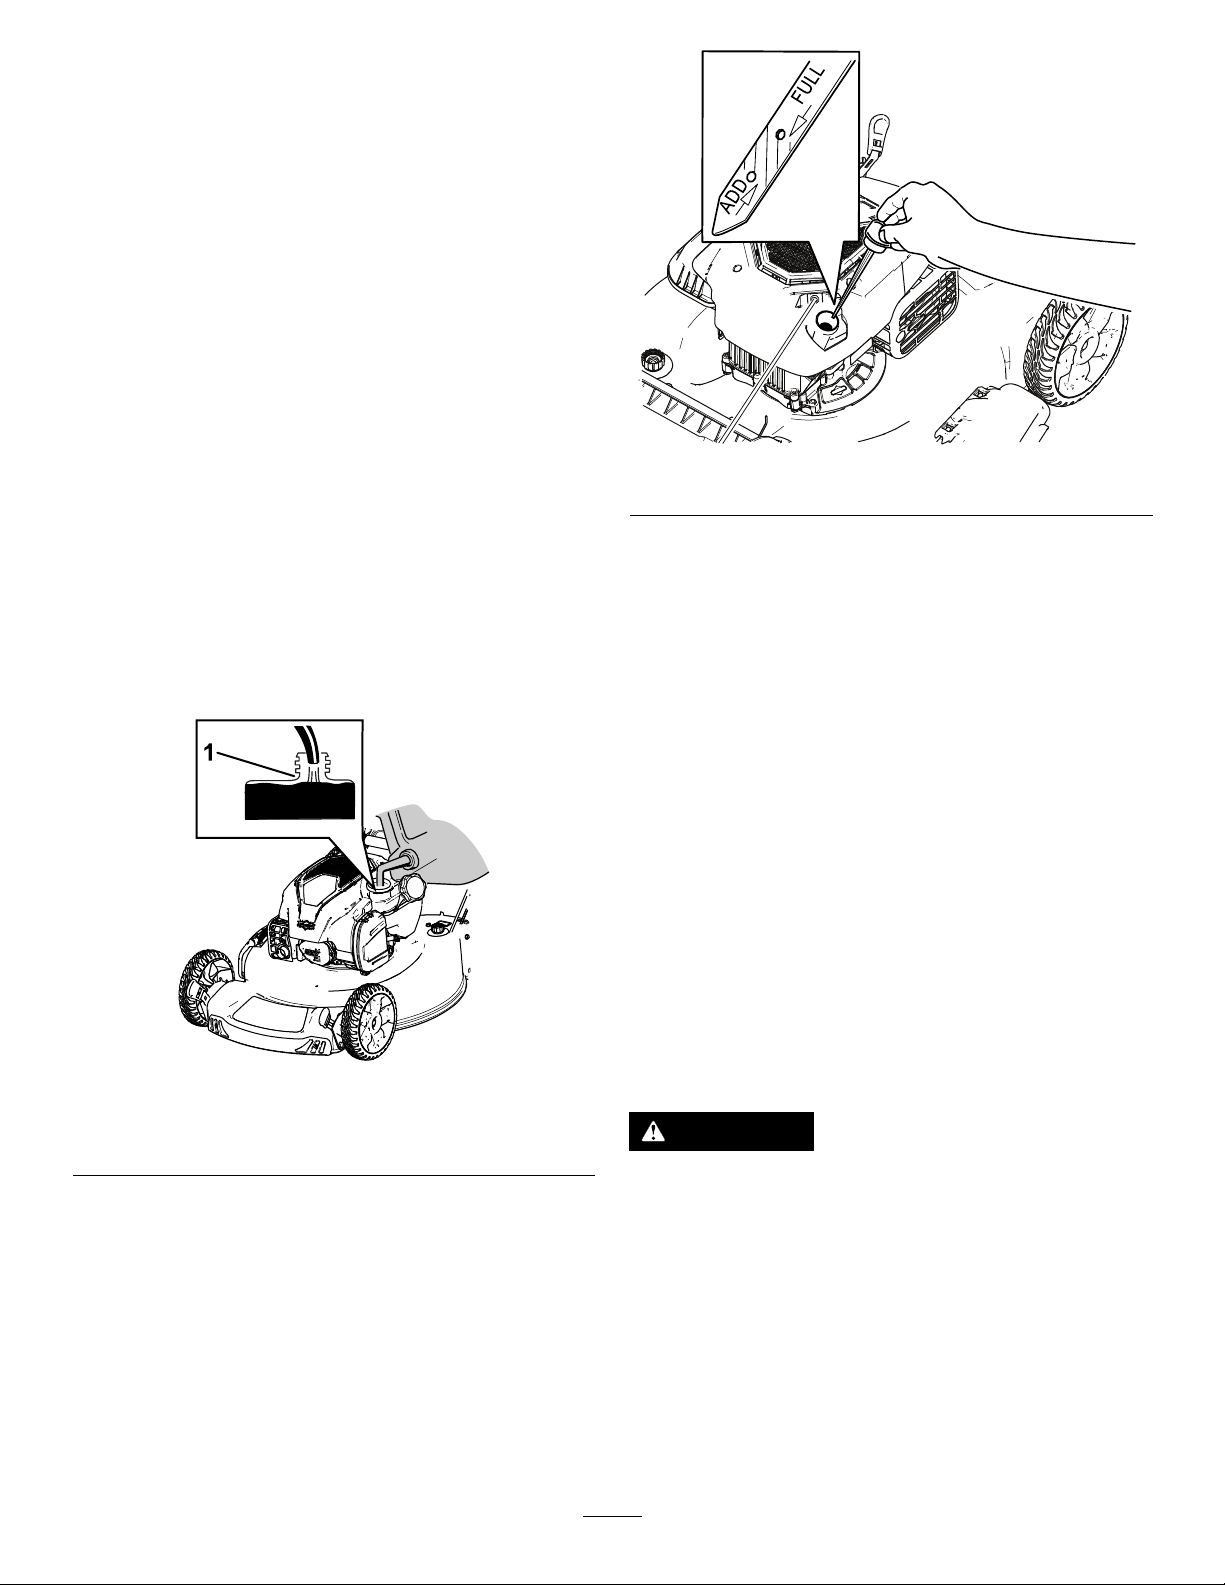
g186245
Figure12
3.Wipethedipstickcleanwithacleancloth.
4.Insertthedipstickintotheoil-lltube,thenremove
thedipstick.
5.Readtheoillevelonthedipstick(Figure12).
•IftheoilisbelowtheAddmarkonthedipstick,
slowlypourasmallamountofoilintotheoil-ll
tube,wait3minutes,andthenrepeatsteps3
through5untiltheoillevelisattheFullmarkon
thedipstick.
•IftheoilisabovetheFullmarkonthedipstick,
draintheexcessoiluntiltheoillevelisattheFull
markonthedipstick.Todraintheexcessoil,refer
toChangingtheEngineOil(page16).
Important:Iftheoillevelinthecrankcaseistoo
lowortoohighandyouruntheengine,youmay
damagetheengine.
6.Installthedipstickintotheoil-lltubesecurely .
Figure11
1.Donotllthefueltankabovethebottomofthefueltank
neck.
CheckingtheEngine-OilLevel
ServiceInterval:Beforeeachuseordaily
1.Movethemachinetoalevelsurface.
2.Removethedipstickbyrotatingthecap
counterclockwiseandpullingitout(Figure12).
g188892
AdjustingtheCuttingHeight
CAUTION
Iftheenginehasbeenrunning,themuferwillbe
hotandcanseverelyburnyou.
Keepawayfromthehotmufer.
Adjustthecuttingheightasdesired.Setallthecutting-height
leverstothesameheight.Toraiseandlowerthemachine,
refertoFigure13.
8
Page 11
•Iftheenginehasbeenrunningthemuferwillbehotand
canseverelyburnyou.Keepawayfromthehotmufer.
•Checkthegrasscatchercomponentsandthedischarge
guardfrequentlyandreplacethemwiththemanufacturer’ s
recommendedpartswhennecessary.
•UseaccessoriesandattachmentsapprovedbytheThe
Toro®Companyonly.
g189036
Figure13
1.Raisethemachine2.Lowerthemachine
Note:Thecutting-heightsettingsare25mm(1inch);35
mm(1-3/8inches);44mm(1-3/4inches);54mm(2-1/8
inches);64mm(2-1/2inches);73mm(2-7/8inches);83mm
(3-1/4inches);92mm(3-5/8inches);and102mm(4inches).
DuringOperation
DuringOperatingSafety
GeneralSafety
•Wearappropriateclothing,includingeyeprotection;
slip-resistant,substantialfootwear;andhearing
protection.Tiebacklonghair,securelooseclothing,and
donotwearjewelry.
•Donotoperatethemachinewhileill,tired,orunderthe
inuenceofalcoholordrugs.
•Thebladeissharp;contactingthebladecanresultin
seriouspersonalinjury.Shutofftheengineandwaitfor
allmovingpartstostopbeforeleavingtheoperating
position.
•Whenyoureleasetheblade-controlbar,theengineshould
shutoffandthebladeshouldstopwithin3seconds.If
not,stopusingyourmachineimmediatelyandcontactan
AuthorizedServiceDealer.
•Operatethemachineonlyingoodvisibilityand
appropriateweatherconditions.Donotoperatethe
machinewhenthereistheriskoflightning.
•Wetgrassorleavescancauseseriousinjuryifyouslipand
contacttheblade.Avoidmowinginwetconditions.
•Useextremecarewhenapproachingblindcorners,
shrubs,trees,orotherobjectsthatmayblockyourview .
•Watchforholes,ruts,bumps,rocks,orotherhidden
objects.Uneventerraincouldcauseaslip-and-fall
accident.
•Stopthemachineandinspectthebladesafterstrikingan
objectorifthereisanabnormalvibrationinthemachine.
Makeallnecessaryrepairsbeforeresumingoperation.
•Beforeleavingtheoperatingposition,shutofftheengine,
andwaitforallmovingpartstostop.
SlopeSafety
•Mowacrossthefaceofslopes;neverupanddown.Use
extremecautionwhenchangingdirectiononslopes.
•Donotmowonexcessivelysteepslopes.Poorfooting
couldcauseaslip-and-fallaccident.
•Mowwithcautionneardrop-offs,ditches,or
embankments.
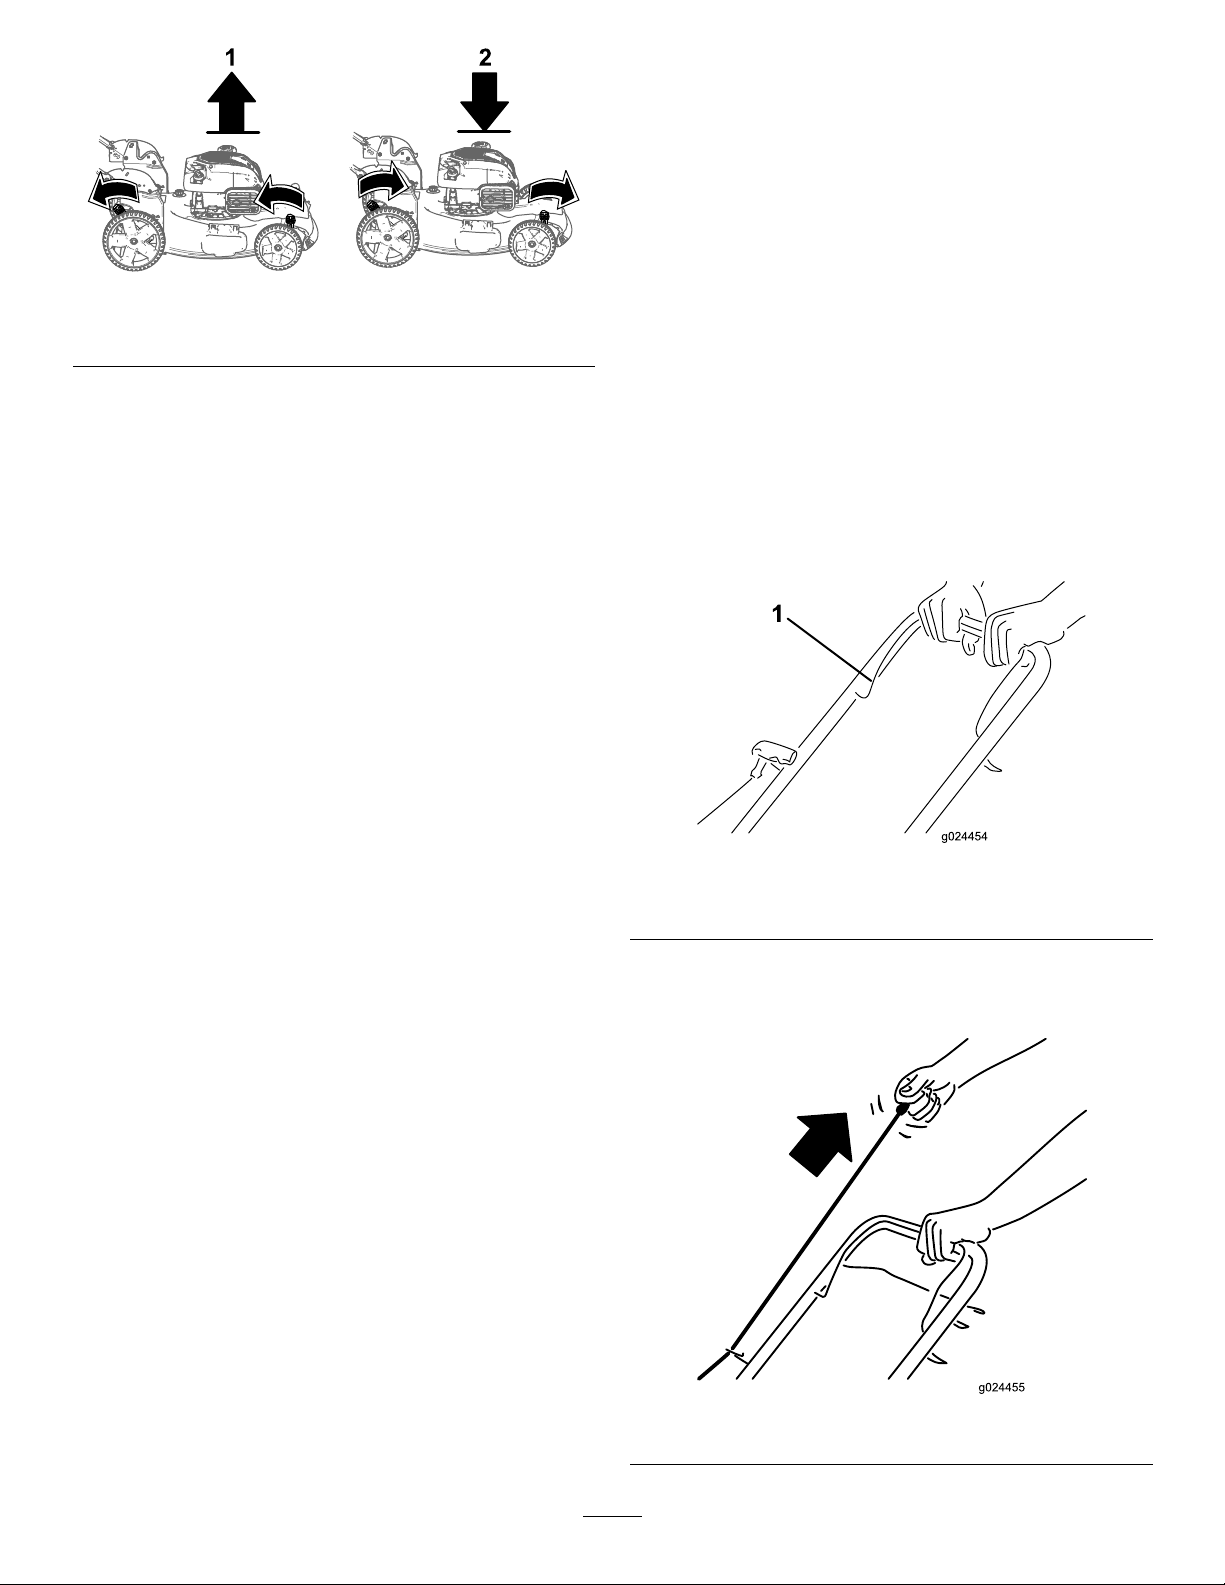
StartingtheEngine
1.Holdtheblade-controlbaragainstthehandle(Figure
14).
g024454
Figure14
1.Blade-controlbar
2.Pulltherecoil-starthandle(Figure15)lightlyuntil
youfeelresistance,thenpullitsharply ,andallowitto
returntotheropeguideonthehandleslowly.
g024455
Figure15
9
Page 12
Note:Ifthemachinedoesnotstartafterseveral
attempts,contactanAuthorizedServiceDealer.
UsingtheSelf-PropelDrive
•Toengagetheself-propeldrive:Squeezethe
self-propel-drivebaragainstthehandleandholdit
(Figure16).
Ifthegrassbagisonthemachine,removeit;referto
RemovingtheGrassBag(page10)beforerecyclingthe
clippings.Iftheside-dischargechuteisonthemachine,
removeit;refertoRemovingtheSide-DischargeChute(page
11)beforerecyclingtheclippings.
BaggingtheClippings
Usethegrassbagwhenyouwanttocollectgrassandleaf
clippingsfromthelawn.
Iftheside-dischargechuteisonthemachine,removeit;refer
toRemovingtheGrassBag(page10).
InstallingtheGrassBag
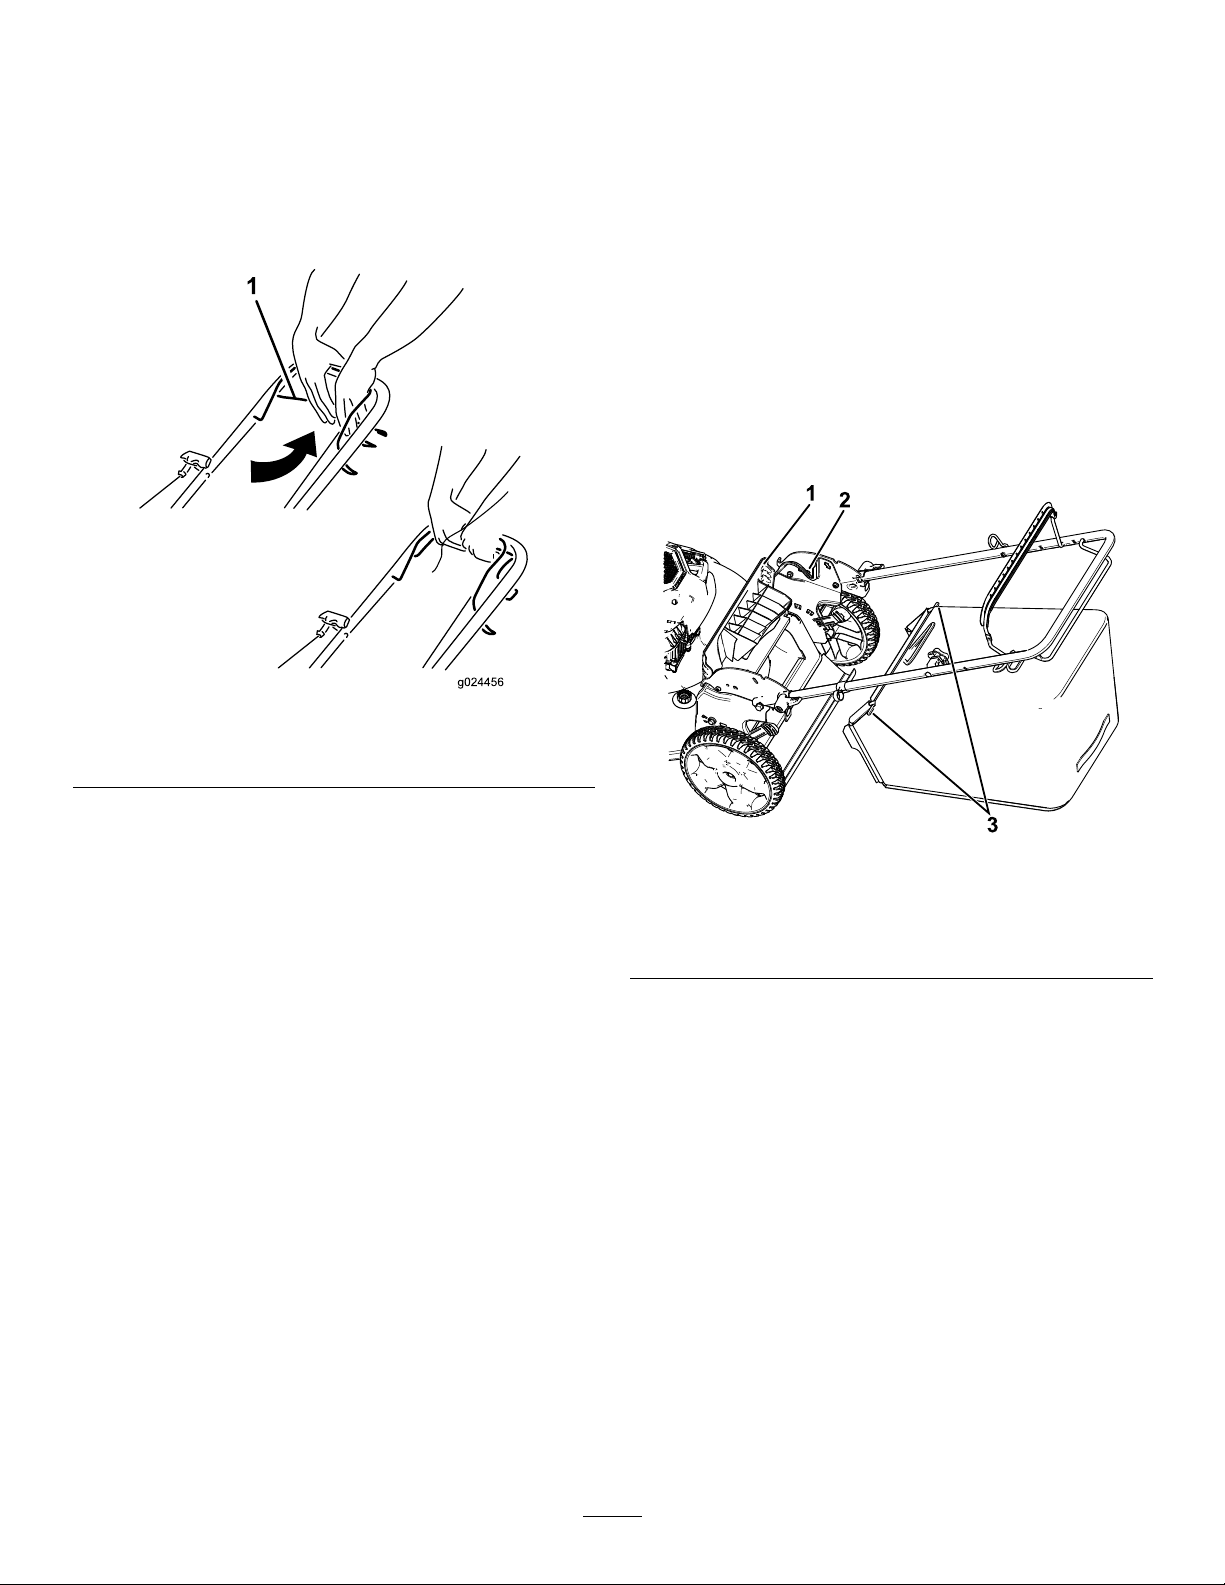
1.Raiseandholdupthereardeector(Figure17).
Figure16
1.Self-propel-drivebar
Note:Themaximumself-propel-drivespeedisxed.
Toreducethespeed,increasethespacebetweenthe
self-propel-drivebarandthehandle.
•Todisengagetheself-propel-drive:releasethe
self-propel-drivebar.
Note:Themachinecomeswithfreewheelingclutches
thatmakeiteasiertopullthemachinerearward.To
disengagetheclutches,youmayneedtopushthemachine
forwardabout2.5cm(1inch)ormoreafteryourelease
theself-propel-drivebar.
ShuttingOfftheEngine
ServiceInterval:Beforeeachuseordaily
Toshutofftheengine,releasetheblade-controlbar.
Important:Whenyoureleasetheblade-controlbar,
boththeengineandbladeshouldstopwithin3seconds.
Iftheydonotstopproperly,stopusingyourmachine
immediatelyandcontactanAuthorizedServiceDealer.
g024456
g189040
Figure17
1.Reardeector3.Grassbagpin(2)
2.Notch(leftsidenotchnot
shown)
2.Installthegrassbag,ensuringthatthepinsonthebag
restinthenotchesonthehandle(Figure17).
3.Lowerthereardeector.
RemovingtheGrassBag
Toremovethebag,reversethestepsabove.
RecyclingtheClippings
Yourmachinecomesfromthefactoryreadytorecyclethe
grassandleafclippingsbackintothelawn.
10
Page 13
Side-Dischargingthe
DANGER
Clippings
Usesidedischargingforcuttingverytallgrass.
Ifthegrassbagisonthemachine,removeit;referto
RemovingtheGrassBag(page10).
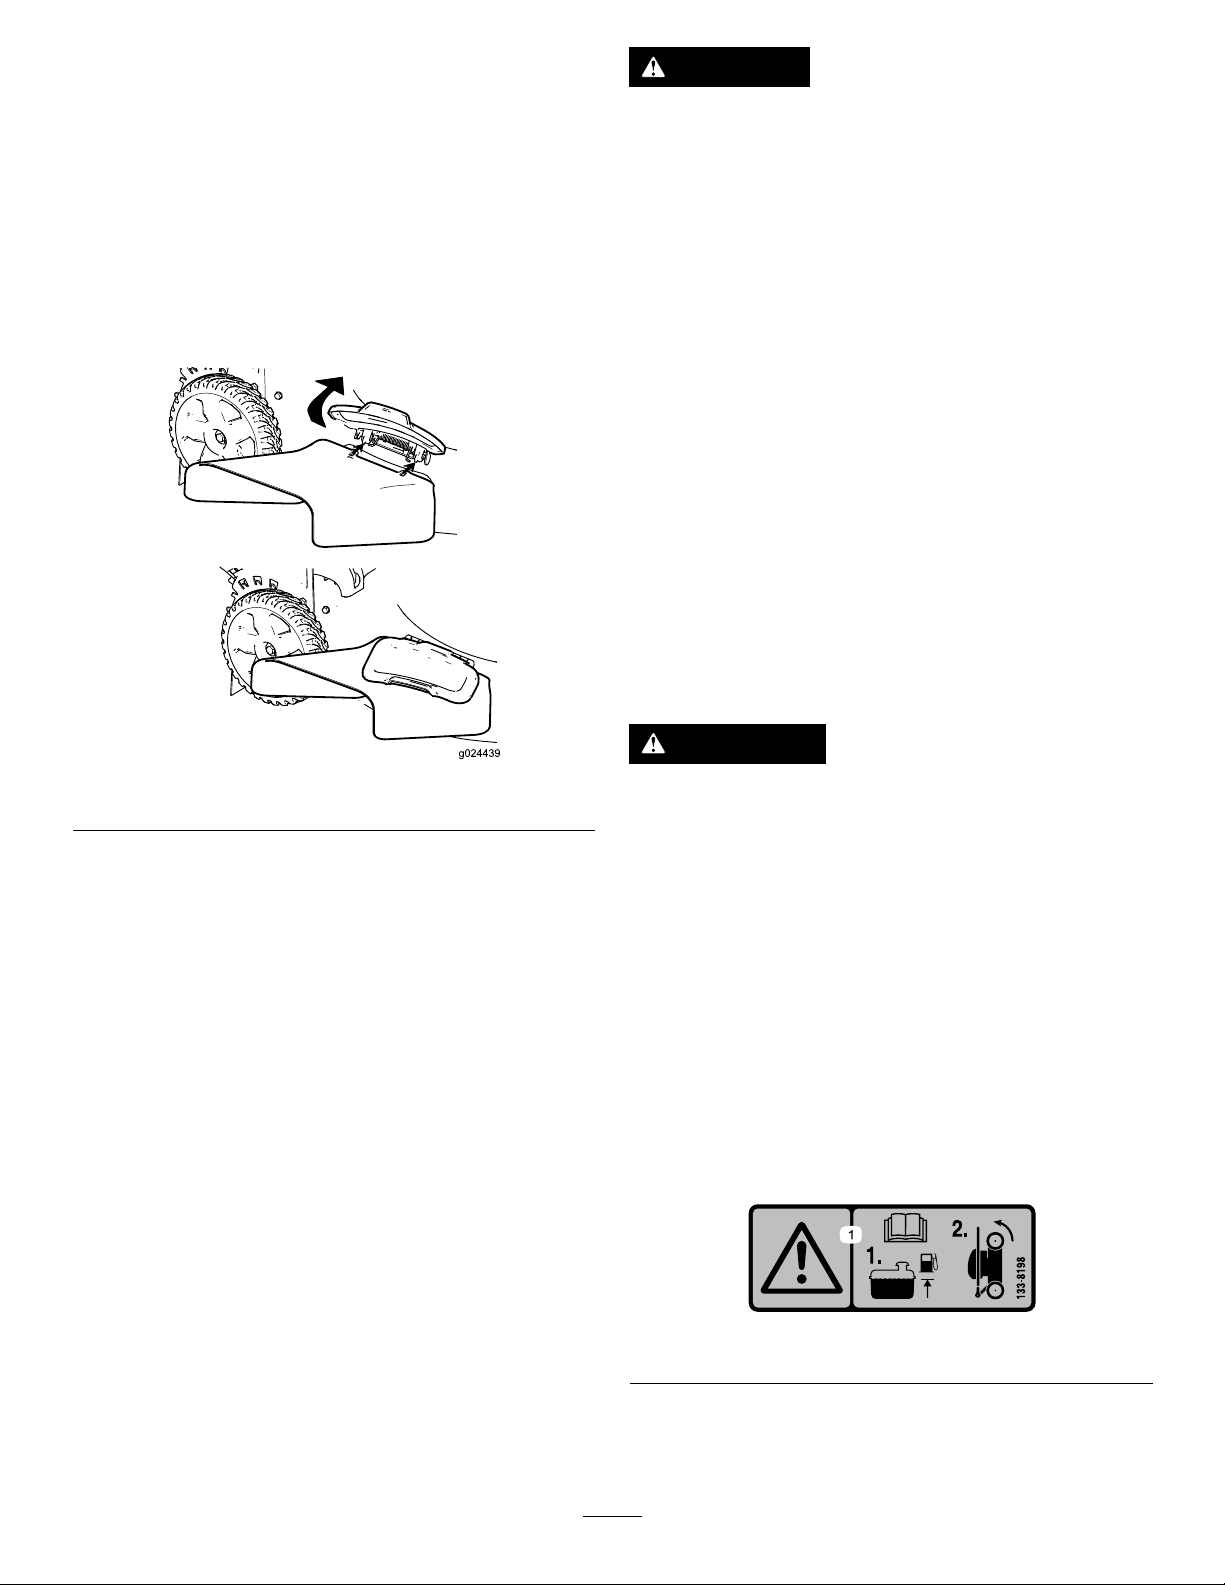
InstallingtheSide-DischargeChute
Liftupthesidedeectorandinstalltheside-dischargechute
(Figure18).
Fuelisextremelyammableandexplosive.Are
orexplosionfromfuelcanburnyouandothers.
•Storingthemachineintheverticalposition
whenthereistoomuchfuelinthefueltank
maycausefueltoleakfromthefueltank.Fuel
isextremelyammableandexplosive.Areor
explosionfromfuelcanburnyouandothers.
•Storethemachineintheverticalpositiononly
whentheleveloffuelinthefueltankisnohigher
thanwhatisrecommendedinthis
Man ual
.
Operator’ s
•Donotstorethemachineinapositionthatis
beyondthevertical(90°)position;otherwise,
fuelmayescapefromthefueltank.
•Donottransportthemachineinthevertical-stow
position.
•Donotattempttostartthemachineinthe
vertical-stowposition.
•Donotattempttostoreanymachinewithfuel
andoilinthevertical-stowpositionthatisnot
designedforthatpurpose.
g024439
Figure18
RemovingtheSide-DischargeChute
Toremovetheside-dischargechute,liftupthesidedeector,
removetheside-dischargechute,andlowertheside-discharge
deector.
StoringtheMachineinthe Vertical-StowPosition
Duringthemowingseasonorintheoff-season,youcanstore
yourmachineintheverticalpositiontominimizestorage
space.
WARNING
Foldingorunfoldingthehandleimproperlycan
damagethecables,causinganunsafeoperating
condition.
•Donotdamagethecableswhenfoldingor
unfoldingthehandle.
•Ifacableisdamaged,contactanAuthorized
ServiceDealer.
1.Ensurethattheleveloffuelinthefueltankisnohigher
thanwhatisrecommendedbytheenginemanufacturer;
refertotheenginemanufacturer’sdecalontheengine
(Figure19).
Note:Ifthereistheleveloffuelinthefueltankis
toohigh,drainthegasolinefromthefueltankintoan
approvedfuelcontaineruntilitisatorbelowthelevel
recommendedbytheenginemanufacturer.
decal133-8198
Figure19
2.Ensurethatthecutting-heightsettingonthemachine
is92mm(3-5/8inches)orlower;ifitisnot,lowerit;
refertoAdjustingtheCuttingHeight(page8).
11
Page 14
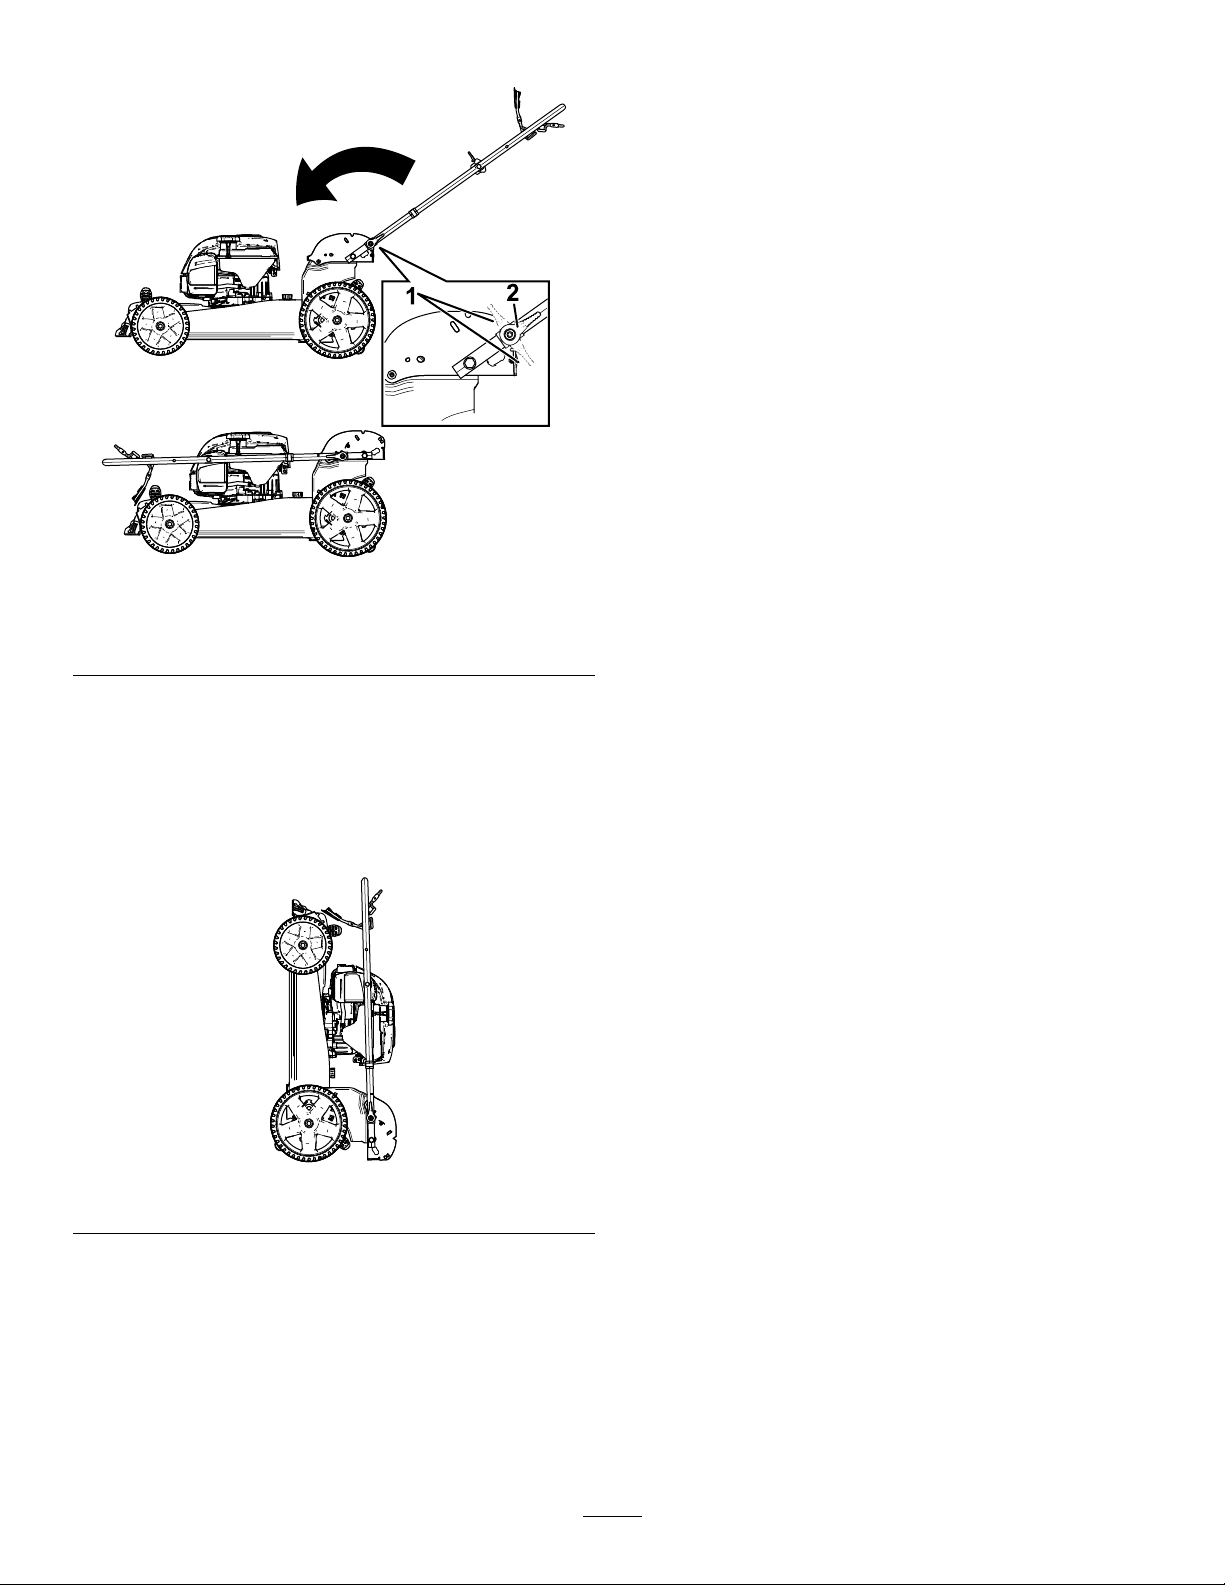
3.Disengagethehandlelocks(Figure20).
Figure20
1.Handlelockdisengaged
positions
4.Foldthehandlefullyforward(Figure20).
2.Handlelockengaged
position
•Ifthemachinestrikesanobjectorstartstovibrate,
immediatelyshutofftheengine,disconnectthewirefrom
thesparkplug,andexaminethemachinefordamage.
•Forbestperformance,installanewbladebeforethe
cuttingseasonbegins.
•ReplacethebladewhennecessarywithaToro
replacementblade.
CuttingGrass
•Cutonlyaboutathirdofthegrassbladeatatime.Donot
cutbelowthe54mm(2-1/8inch)settingunlessthegrass
issparseoritislatefallwhengrassgrowthbeginstoslow
down.RefertoAdjustingtheCuttingHeight(page8).
•Whencuttinggrassover15cm(6inches)tall,mowatthe
highestcuttingheightsettingandwalkslower;thenmow
againatalowersettingforthebestlawnappearance.If
thegrassistoolong,themachinemayplugandcause
theenginetostall.
g189218
•Wetgrassandleavestendtoclumpontheyardandcan
causethemachinetoplugortheenginetostall.Avoid
mowinginwetconditions.
•Beawareofapotentialrehazardinverydryconditions,
followalllocalrewarnings,andkeepthemachinefree
ofdrygrassandleafdebris.
Important:Routethecablestotheoutsideofthe
handleknobsasyoufoldthehandle.
5.Engagethehandlelocks.
6.Liftthefrontofthemachinebythehandleandmove
itintoastoragespace(Figure21).
Figure21
OperatingTips
GeneralMowingTips
•Inspecttheareawhereyouwillusethemachineand
removeallobjectsthatthemachinecouldthrow .
•Avoidstrikingsolidobjectswiththeblade.Never
deliberatelymowoveranyobject.
•Alternatethemowingdirection.Thishelpsdispersethe
clippingsoverthelawnforevenfertilization.
•Ifthenishedlawnappearanceisunsatisfactory,try1
ormoreofthefollowing:
–Replacethebladeorhaveitsharpened.
–Walkataslowerpacewhilemowing.
–Raisethecuttingheightonyourmachine.
–Cutthegrassmorefrequently.
–Overlapcuttingswathsinsteadofcuttingafullswath
witheachpass.
CuttingLeaves
•Aftercuttingthelawn,ensurethathalfofthelawnshows
g189217
throughthecutleafcover.Youmayneedtomakemore
thanasinglepassovertheleaves.
•Iftherearemorethan13cm(5inches)ofleavesonthe
lawn,setthefrontcuttingheight1or2notcheshigher
thantherearcuttingheight.
•Slowdownyourmowingspeedifthemachinedoesnot
cuttheleavesnelyenough.
12
Page 15
AfterOperation
AfterOperatingSafety
6.Turnthewateron.
7.Starttheengineandrunituntiltherearenomore
clippingsthatcomeoutfromunderthemachine.
8.Shutofftheengine.
GeneralSafety
•Cleangrassanddebrisfromthemachinetohelpprevent
res.Cleanupoilorfuelspills.
•Allowtheenginetocoolbeforestoringthemachinein
anyenclosure.
•Neverstorethemachineorfuelcontainerwherethereis
anopename,spark,orpilotlight,suchasonawater
heateroronotherappliances.
HaulingSafety
•Usecarewhenloadingorunloadingthemachine.
•Securethemachinefromrolling.
CleaningundertheMachine
ServiceInterval:Beforeeachuseordaily
CleaningundertheMachineUsingthe
WashoutPort
Forbestresults,cleanthemachinesoonafteryouhave
completedmowing.
1.Movethemachineontoaatpavedsurface.
2.Shutofftheengineandwaitforallmovingpartsto
stopbeforeleavingtheoperatingposition.
3.Lowerthemachinetoitslowestcutting-heightsetting.
RefertoAdjustingtheCuttingHeight(page8).
4.Washouttheareaunderthereardeectorwherethe
clippingsgofromtheundersideofthemachinetothe
grassbag.
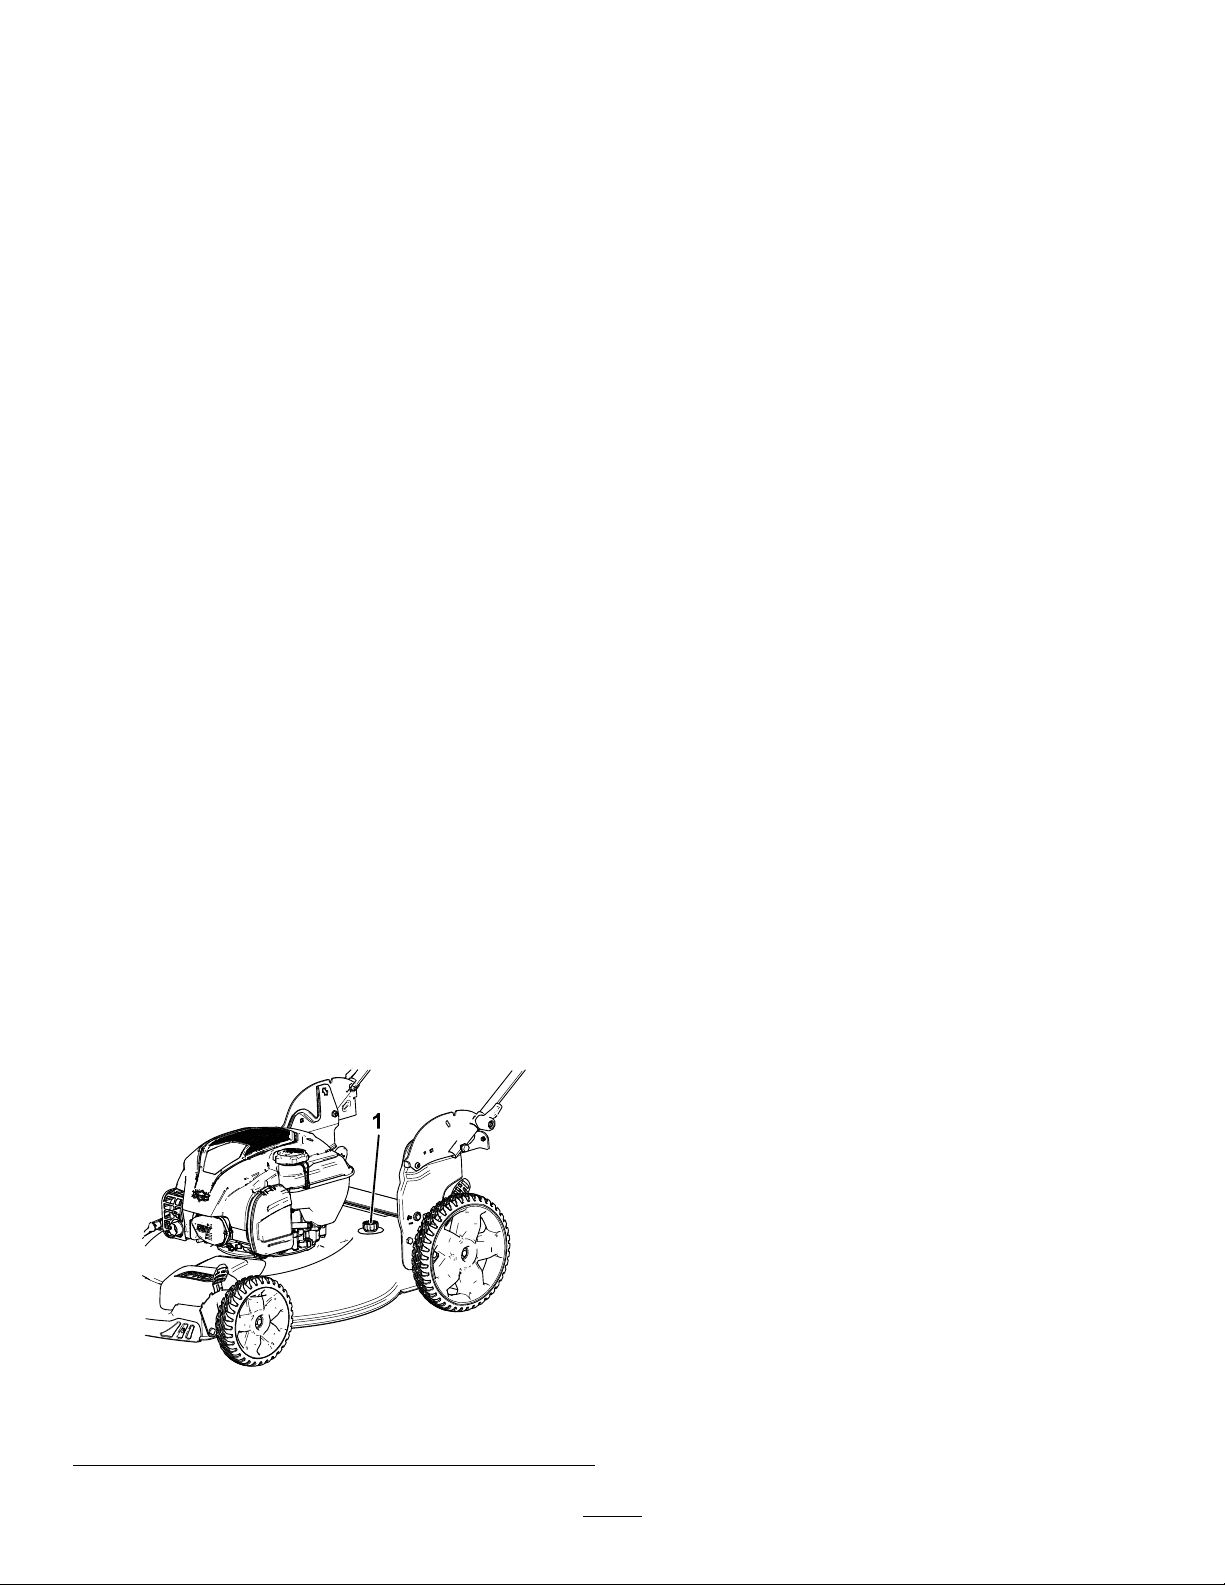
5.Attachagardenhosethatisconnectedtoawater
supplytothewashoutport(Figure22).
9.Shutoffthewateranddisconnectthegardenhose
fromthemachine.
10.Starttheengineandrunitforafewminutestodrythe
undersideofthemachinetopreventitfromrusting.
11.Shutofftheengineandallowittocoolbeforestoring
themachineinanenclosedarea.
CleaningundertheMachineinthe
Vertical-stowPosition
1.Setthemachineinthevertical-stowposition;referto
StoringtheMachineintheVertical-StowPosition(page
11).
2.Washouttheclippingsfromunderthemachine.
1.Washoutport
g189173
Figure22
13
Page 16
FoldingtheHandle
WARNING
Foldingorunfoldingthehandleimproperlycan
damagethecables,causinganunsafeoperating
condition.
•Donotdamagethecableswhenfoldingor
unfoldingthehandle.
•Ifacableisdamaged,contactanAuthorized
ServiceDealer.
1.Disengagethehandlelocksuntilyoucanmovethe
upperhandlefreely.
2.Foldthehandleforwardeithertotheverticalposition
orthefullyforwardpositionasshowninFigure23.
Important:Routethecablestotheoutsideofthe
handlelocksasyoufoldthehandle.
Figure23
3.Tounfoldthehandle,referto1UnfoldingtheHandle
(page4).
g189219
14
Page 17

Maintenance
Note:Determinetheleftandrightsidesofthemachinefromthenormaloperatingposition.
ReplacementpartsareavailablefromanAuthorizedServiceDealeroratwww .torodealer.com(UScustomersonly).
RecommendedMaintenanceSchedule(s)
MaintenanceService
Interval
Beforeeachuseordaily
Yearly
Yearlyorbeforestorage
Important:Refertoyourenginemanualforadditionalmaintenanceprocedures.
MaintenanceProcedure
•Checktheengine-oillevel.
•Ensurethattheenginestopswithin3secondsafterreleasingtheblade-controlbar.
•Cleangrassclippingsanddirtfromunderthemachine.
•Cleantheair-coolingsystem;cleanitmorefrequentlyindustyoperatingconditions.
Refertoyourenginemanual.
•Servicetheairlter;serviceitmorefrequentlyindustyoperatingconditions.
•Replacethebladeorhaveitsharpened(morefrequentlyiftheedgedullsquickly).
•Cleantheair-coolingsystem;cleanitmorefrequentlyindustyoperatingconditions.
Refertoyourenginemanual.
•Emptythefueltankbeforerepairsasdirectedandbeforeyearlystorage.
MaintenanceSafety
•Disconnectthespark-plugwirefromthesparkplugand
removetheelectric-startbuttonbeforeperformingany
maintenanceprocedure.
•Wearglovesandeyeprotectionwhenservicingthe
machine.
•Thebladeissharp;contactingthebladecanresultin
seriouspersonalinjury.Weargloveswhenservicingthe
blade.
•Nevertamperwithsafetydevices.Checktheirproper
operationregularly.
•Tippingthemachinemaycausethefueltoleak.Fuelis
ammableandexplosive,andcancausepersonalinjury.
Runtheenginedrytoremovethefuelwithahandpump;
neversiphonthefuel.
PreparingforMaintenance
1.Shutofftheengineandwaitforallmovingpartsto
stop.
2.Disconnectthespark-plugwirefromthesparkplug
(Figure24).
g189230
Figure24
1.Spark-plugwire
3.Afterperformingthemaintenanceprocedure(s),
connectthespark-plugwiretothesparkplug.
Important:Beforetippingthemachinetochange
theoilorreplacetheblade,allowthefueltankto
rundrythroughnormalusage.Ifyoumusttip
themachinepriortorunningoutoffuel,usea
handfuelpumptoremovethefuel.Alwaystipthe
machineontoitsside,withthedipstickdown.
15
Page 18
ServicingtheAirFilter
ChangingtheEngineOil
ServiceInterval:Yearly
1.Unclipthetopoftheair-ltercover(Figure25).
Changingtheengineoilisnotrequired,butifyoudesire
tochangetheoil,usethefollowingprocedure.
Note:Runtheengineafewminutesbeforechangingthe
oiltowarmit.Warmoilowsbetterandcarriesmore
contaminants.
Engineoilcapacity:0.47L(16oz)
Oilviscosity:SAE30orSAE10W-30detergentoil
APIserviceclassication:SJorhigher
1.Movethemachinetoalevelsurface.
2.RefertoPreparingforMaintenance(page15).
3.Removethedipstickbyrotatingthecap
counterclockwiseandpullingitout(Figure26).
Figure25
1.Clip
2.Air-ltercover
3.Airlter
2.Removetheairlter(Figure25).
3.Inspecttheairlter.
Note:Iftheairlterisexcessivelydirty,replaceitwith
anewlter.Otherwise,gentlytaptheairlterona
hardsurfacetoloosendebris.
4.Installtheairlter.
5.Usethecliptoinstalltheair-ltercover.
g189231
g186245
Figure26
4.Tipthemachineontoitsside(sothattheairlterisup)
todraintheusedoilfromtheoil-lltube(Figure27)
orsetthemachineinthevertical-stowposition(Figure
28).RefertoStoringtheMachineintheVertical-Stow
Position(page11)todraintheusedoilfromtheoil-ll
tube.
16
Page 19
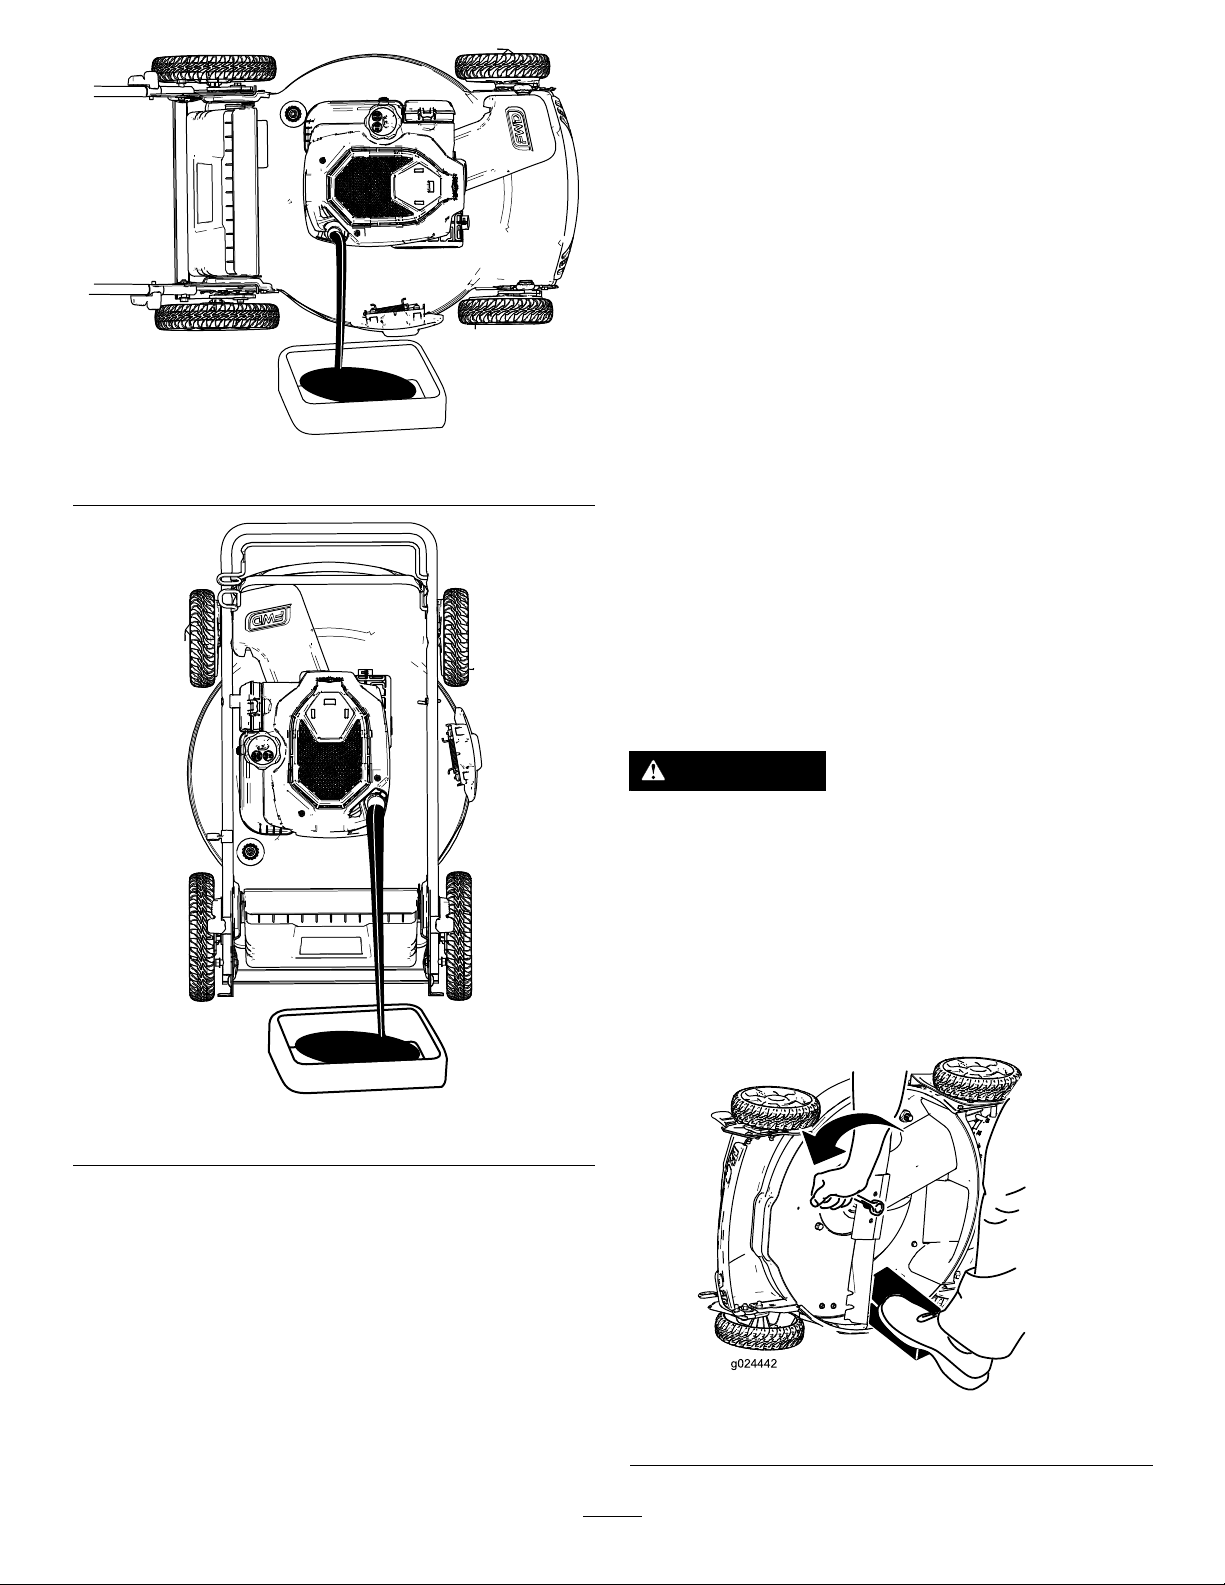
Figure27
•IftheoillevelisbelowtheAddmarkonthe
dipstick,carefullypourasmallamountofoilinto
theoil-lltube,wait3minutes,andrepeatsteps
8through10untiltheoillevelisattheFullmark
onthedipstick.
•IftheoillevelisabovetheFullmarkonthe
dipstick,draintheexcessoiluntiltheoillevelisat
theFullmarkonthedipstick.
Important:Iftheoillevelintheengineistoo
lowortoohighandyouruntheengine,you
maydamagetheengine.
11.Installthedipsticksecurely.
12.Recycletheusedoilproperly.
g189232
ReplacingtheBlade
ServiceInterval:Yearly
Figure28
Important:
blade pr oper l y
Y ou will need a torque wr ench to install the
.Ifyoudonothaveatorquewrenchor
areuncomfortableperformingthisprocedure,contact
anAuthorizedServiceDealer.
Examinethebladewheneveryourunoutoffuel.Iftheblade
isdamagedorcracked,replaceitimmediately.Iftheblade
edgeisdullornicked,haveitsharpenedandbalanced,or
replaceit.
WARNING
Thebladeissharp;contactingthebladecanresult
inseriouspersonalinjury.
Weargloveswhenservicingtheblade.
1.RefertoPreparingforMaintenance(page15).
2.Tipthemachineontoitssidewiththeairlterup.
3.Useablockofwoodtoholdthebladesteady(Figure
29).
g189236
5.Afterdrainingtheusedoil,returnthemachinetothe
operatingposition.
6.Carefullypourabout3/4oftheenginecapacityofoil
intotheoil-lltube.
7.Waitabout3minutesfortheoiltosettleintheengine.
8.Wipethedipstickcleanwithacleancloth.
9.Insertthedipstickintotheoil-lltube,thenremove
thedipstick.
10.Readtheoillevelonthedipstick(Figure26).
g024442
Figure29
17
Page 20
4.Removetheblade,savingallmountinghardware
(Figure29).
5.Installthenewbladeandallmountinghardware
(Figure30).
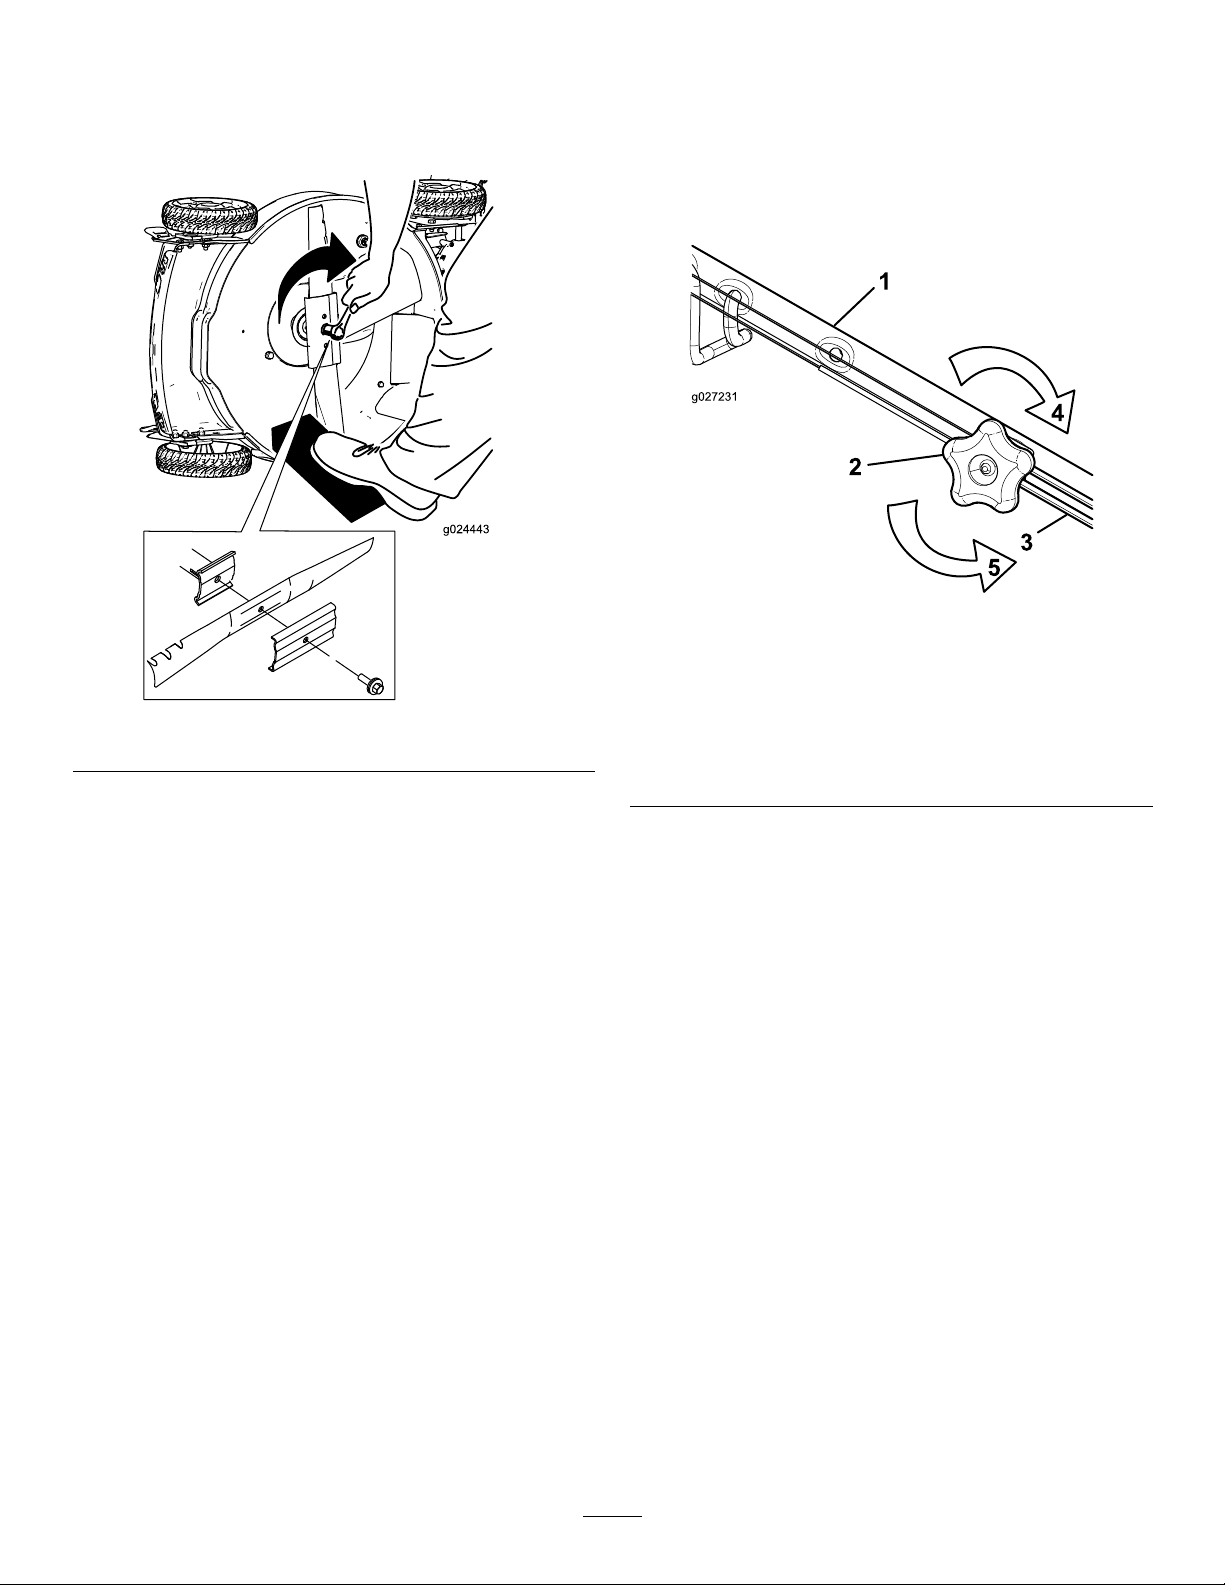
AdjustingtheSelf-PropelDrive
Wheneveryouinstallanewself-propelcableorifthe
self-propeldriveisoutofadjustment,adjusttheself-propel
drive.
1.Turntheadjustmentknobcounterclockwisetoloosen
thecableadjustment(Figure31).
g027231
Figure31
Figure30
Important:Positionthecurvedendsoftheblade
topointtowardthemachinehousing.
6.Useatorquewrenchtotightenthebladeboltto
82N∙m(60ft-lb).
Important:Abolttorquedto82N∙m(60ft-lb)is
verytight.Whileholdingthebladewithablock
ofwood,putyourweightbehindtheratchetor
wrenchandtightentheboltsecurely.Thisboltis
verydifculttoovertighten.
1.Handle(leftside)
g024443
2.Adjustmentknob5.Turntheknob
3.Self-propel-drivecable
4.Turntheknobclockwiseto
tightentheadjustment.
counterclockwiseto
loosentheadjustment.
2.Adjustthetensiononthecable(Figure31)bypullingit
backorpushingitforwardandholdingthatposition.
Note:Pushthecabletowardtheenginetoincrease
thetraction;pullthecableawayfromtheengineto
decreasethetraction.
3.Turntheadjustmentknobclockwisetotightenthe
cableadjustment.
Note:Tightentheknobrmlybyhand.
18
Page 21

Storage
Storethemachineinacool,clean,dryplace.
PreparingtheMachinefor Storage
1.Onthelastrefuelingoftheyear,addfuelstabilizer
(suchasToroPremiumFuelTreatment)tothefuel.
2.Disposeofanyunusedfuelproperly.Recycleit
accordingtolocalcodes,oruseitinyourautomobile.
Note:Oldfuelinthefueltankistheleadingcauseof
hardstarting.Donotstorefuelwithoutstabilizermore
than30days,anddonotstorestabilizedfuelmorethan
90days.
3.Runthemachineuntiltheengineshutsofffrom
runningoutoffuel.
4.Starttheengineagain.
5.Allowtheenginetorununtilitshutsoff.Whenyou
cannolongerstarttheengine,itissufcientlydry.
6.Disconnectthewirefromthesparkplug.
7.Removethesparkplug,add30mlofengineoilthrough
thespark-plughole,andpullthestarterropeslowly
severaltimestodistributeoilthroughoutthecylinder
topreventcylindercorrosionduringtheoff-season.
8.Looselyinstallthesparkplug.
9.Tightenallnuts,bolts,andscrews.
RemovingtheMachinefrom Storage
1.Checkandtightenallfasteners.
2.Removethesparkplugandspintheenginerapidlyby
pullingtherecoil-starthandletoblowtheexcessoil
fromthecylinder.
3.Installthesparkplugandtightenitwithatorque
wrenchto20N∙m(15ft-lb).
4.Performanymaintenanceprocedures;referto
Maintenance(page15).
5.Checktheengine-oillevel;refertoCheckingthe
Engine-OilLevel(page8).
6.Fillthefueltankwithfreshfuel;refertoFillingthe
FuelTank(page8).
7.Connectthewiretothesparkplug.
19
Page 22

TheToroWarranty
A2-Y earFullWarranty(45DayLimitedWarrantyforCommercialUse)20inMulcher/Bagger
20inand22in
Recycler
®
TheToroGTSStartingGuarantee
A3-YearFullWarranty(NotApplicableforCommercialUse)
ConditionsandProductsCovered
TheToroCompanyanditsafliate,T oroWarrantyCompany,pursuantto
anagreementbetweenthem,jointlypromisetorepairtheT oroProduct
listedbelowifusedforresidentialpurposes*;ifitisdefectiveinmaterials
orworkmanshiporifitstopsfunctioningduetothefailureofacomponent;
oriftheT oroGTS(GuaranteedtoStart)enginewillnotstartontherstor
secondpull,providedtheroutinemaintenancerequiredintheOperator's
Manualhavebeenperformed.
Thiswarrantycoversthecostofpartsandlabor,butyoumustpay
transportationcosts.
Thefollowingtimeperiodsapplyfromtheoriginaldateofpurchase:
ProductsWarrantyPeriod
20inand22inRecyclerand20in
Mulcher/Bagger
Attachments
GTS(GuaranteedtoStart)3-yearfullwarranty
1
Engine
1
Engine
Battery
1
SomeenginesusedonT oroProductsarewarrantedbytheenginemanufacturer.
-CommercialUse
LimitedWarrantyforCommercialUse*
Gas-poweredT oroProductsusedforcommercial,institutional,orrental
use,arewarrantedfor45daysagainstdefectsinmaterialsorworkmanship.
Componentsfailingduetonormalweararenotcoveredbythiswarranty.
Fortheenginewarrantyperiods,seethetableabove.
TheT oroGTS(GuaranteedtoStart)StartingGuaranteedoesnotapply
whentheproductisusedcommercially*.
InstructionsforObtainingWarrantyService
IfyouthinkthatyourT oroProductcontainsadefectinmaterialsor
workmanship,orifanormal,able-bodiedadultcannolongerstartyour
product'sengineinoneortwopulls,followthisprocedure:
1.ContactanyAuthorizedToroServiceDealertoarrangeserviceat
theirdealership.T olocateadealerconvenienttoyou,accessourweb
siteatwww.T oro.com.Y oumayalsocallthenumberslistedinitem#3
tousethe24-hourT oroDealerlocatorsystem.
2.Bringtheproductandyourproofofpurchase(salesreceipt)tothe
ServiceDealer.Thedealerwilldiagnosetheproblemanddetermineif
itiscoveredunderwarranty.
3.IfforanyreasonyouaredissatisedwiththeServiceDealer’s
analysisorwiththeassistanceprovided,contactusat:
ToroWarrantyCompany
CustomerCareDepartment,RLCDivision
811 1LyndaleAvenueSouth
Bloomington,MN55420-1 196
Tollfreeat866-214-9807(U.S.customers)
Tollfreeat866-214-9808(Canadiancustomers)
OwnerResponsibilities
YoumustmaintainyourT oroProductbyfollowingthemaintenance
proceduresdescribedintheOperator'sManual.Suchroutinemaintenance,
whetherperformedbyadealerorbyyou,isatyourexpense.
2-yearfullwarranty
2-yearfullwarranty
3-yearfullwarranty
Toro-45Days
Otherengines-90days
1-yearfullwarranty
WalkPowerMowers
SteelDecks
ItemsandConditionsNotCovered
Thereisnootherexpresswarrantyexceptforspecialemissionsystem
coverageandenginewarrantycoverageonsomeproducts.Thisexpress
warrantydoesnotcoverthefollowing:
•Costofregularmaintenanceserviceorparts,suchaslters,fuel,
lubricants,oilchanges,sparkplugs,airlters,bladesharpening
orwornblades,cable/linkageadjustments,orbrakeandclutch
adjustments
•Anyproductorpartwhichhasbeenaltered,misused,neglected,or
requiresreplacementorrepairduetoaccidentsorlackofproper
maintenance
•Pickupanddeliverycharges
•RepairsorattemptedrepairsbyanyoneotherthananAuthorizedT oro
ServiceDealer
•Repairsnecessaryduetofailuretofollowrecommendedfuel
procedure(consulttheOperator'sManualformoredetails)
–Removingcontaminantsfromthefuelsystemisnotcovered
–Useofoldfuel(morethanonemonthold)orfuelwhichcontains
morethan10%ethanolormorethat15%MTBE
–Failuretodrainthefuelsystempriortoanyperiodofnon-use
overonemonth
•Repairsoradjustmentstocorrectstartingdifcultiesduetothe
following:
–Failuretofollowpropermaintenanceproceduresorrecommended
fuelprocedures
–Rotarymowerbladestrikinganobject
•Specialoperationalconditionswherestartingmayrequiremorethan
twopulls:
–Firsttimestartsafterextendedperiodofnon-useoverthree
monthsorseasonalstorage
–Cooltemperaturestartssuchasthosefoundinearlyspringand
lateautumn
–Improperstartingprocedures-ifyouarehavingdifcultystarting
yourunit,pleasechecktheOperator'sManualtoensurethat
youareusingthecorrectstartingprocedures.Thiscansavean
unnecessaryvisittoanAuthorizedT oroServiceDealer.
GeneralConditions
AllrepairscoveredbythesewarrantiesmustbeperformedbyanAuthorized
ToroServiceDealerusingT oro-approvedreplacementparts.Repairbyan
AuthorizedT oroServiceDealerisyoursoleremedyunderthiswarranty.
NeitherTheToroCompanynorT oroWarrantyCompanyisliablefor
indirect,incidental,orconsequentialdamagesinconnectionwiththe
useoftheToroProductscoveredbythesewarranties,includingany
costorexpenseofprovidingsubstituteequipmentorserviceduring
reasonableperiodsofmalfunctionornon-usependingcompletionof
repairsunderthesewarranties.
Somestatesdonotallowexclusionsofincidentalorconsequential
damages,sotheaboveexclusionsmaynotapplytoyou.
Thiswarrantygivesyouspeciclegalrights,andyoumayalsohaveother
rightswhichvaryfromstatetostate.
CountriesOtherthantheUnitedStatesorCanada
ThiswarrantyisnotvalidinMexico.CustomerswhohavepurchasedT oroproductsexportedfromtheUnitedStatesorCanadashouldcontacttheirT oro
Distributor(Dealer)toobtainguaranteepoliciesforyourcountry ,province,orstate.IfforanyreasonyouaredissatisedwithyourDistributor'sserviceor
havedifcultyobtainingguaranteeinformation,contacttheT oroimporter .Ifallotherremediesfail,youmaycontactusatT oroW arrantyCompany .
AustralianConsumerLaw:AustraliancustomerswillnddetailsrelatingtotheAustralianConsumerLaweitherinsidetheboxoratyourlocalT oro
Dealer.
*Residentialpurposesmeansuseoftheproductonthesamelotasyourhome.Useatmorethanonelocation,orinstitutionalorrentaluse,isconsidered
commercialuse,andthecommercialusewarrantywouldapply.
374-0254RevG
Page 23

CortacéspedRecycler
SmartStow
Nºdemodelo20339—Nºdeserie400000000ysuperiores
®
®
de56cm(22")con
FormNo.3408-830RevA
Manualdeloperador
Introducción
Estecortacéspeddirigidodecuchillasrotativasestádiseñado
paraserusadoporusuariosdomésticos.Estádiseñado
principalmenteparasegarcéspedbienmantenidoenzonas
verdesresidenciales.Noestádiseñadoparacortarmaleza
oparaaplicacionesagrícolas.
Leaestemanualdetenidamenteparaaprenderautilizary
mantenercorrectamentesuproducto,yparaevitarlesiones
ydañosalproducto.Ustedeselresponsabledeutilizarel
productodeformacorrectaysegura.
UstedpuedeponerseencontactodirectamenteconToroen
www.T oro.comsideseaobtenerinformaciónsobreproductos
yaccesorios,osinecesitalocalizarundistribuidororegistrar
suproducto.
Cuandonecesiteasistenciatécnica,piezasgenuinasToroo
informaciónadicional,póngaseencontactoconunServicio
TécnicoAutorizadooconAsistenciaalClienteT oro,ytenga
amanolosnúmerosdemodeloyseriedesuproducto.Figura
1identicalaubicacióndelosnúmerosdemodeloyserie
enelproducto.
Nºdemodelo
Nºdeserie
Estemanualidenticapeligrospotencialesycontiene
mensajesdeseguridadidenticadosporelsímbolodealerta
deseguridad(Figura2),queseñalaunpeligroquepuede
causarlesionesgravesolamuertesiustednosiguelas
precaucionesrecomendadas.
g000502
Figura2
1.Símbolodealertadeseguridad
Estemanualutiliza2palabraspararesaltarinformación.
Importantellamalaatenciónsobreinformaciónmecánica
especial,yNotaresaltainformacióngeneralquemereceuna
atenciónespecial.
ADVERTENCIA
Figura1
1.Placaconlosnúmerosdemodeloydeserie
Anoteacontinuaciónlosnúmerosdemodeloydeseriede
suproducto:
CALIFORNIA
AdvertenciadelaPropuesta65
Esteproductocontieneunaomássustancias
químicasqueelEstadodeCaliforniaconsidera
causantesdecáncer,defectoscongénitoso
trastornosdelsistemareproductor.
Losgasesdeescapedeesteproductocontienen
productosquímicosqueelEstadodeCalifornia
sabequecausancáncer,defectoscongénitos
uotrospeligrosparalareproducción.
g189172
Elusoolaoperacióndelmotorencualquierterrenoforestal,
demonteocubiertodehierbaamenosqueelmotoresté
equipadoconparachispas(conformealadeniciónde
lasección4442)mantenidoenbuenascondicionesde
funcionamiento,oqueelmotorhayasidofabricado,equipado
ymantenidoparalaprevencióndeincendios,constituyeuna
infraccióndelalegislacióndeCalifornia(CaliforniaPublic
ResourceCodeSection4442o4443).
Estesistemadeencendidoporchispacumplelanorma
canadienseICES-002.
©2016—TheToro®Company
8111LyndaleAvenueSouth
Bloomington,MN55420
CV
Registresuproductoenwww.T oro.com.
Traduccióndeloriginal(ES)
Reservadostodoslosderechos
ImpresoenEE.UU.
*3408-830*A
Page 24

El
Man ual del pr opietario del motor
informaciónsobrelasnormasdelaAgenciade
protecciónambientaldeEE.UU .(U.S.Environmental
ProtectionAgency/EPA)ydelaNormadecontrol
deemisionesdeCalifornia(CaliforniaEmission
ControlRegulation)sobresistemasdeemisiones,
mantenimientoygarantía.Puedesolicitarseunmanual
nuevoalfabricantedelmotor.
Parneto:Elparbrutoonetodeestemotorfuedeterminado
enellaboratorioporelfabricantedelmotorconarregloala
normaJ1940delaSocietyofAutomotiveEngineers(SAE).
Debidoaqueelmotorestáconguradoparacumplirlos
requisitosdeseguridad,emisionesyoperación,supotencia
realenestetipodecortacéspedserásignicativamentemenor.
Vayaawww.T oro.comparaverlasespecicacionesdesu
modelodecortacésped.
adjuntoofrece
Contenido
Introducción.................................................................1
Seguridad......................................................................2
Seguridadengeneral................................................2
Pegatinasdeseguridadeinstrucciones.......................3
Montaje........................................................................4
1Cómodesplegarelmanillar.....................................4
2Instalacióndelacuerdadearranqueenlaguíade
lacuerda.............................................................5
3Llenadodelcárterdeaceite.....................................5
4Ensamblajedelabolsaderecogida..........................6
Elproducto...................................................................7
Operación.....................................................................8
Antesdelfuncionamiento............................................8
Seguridadantesdeluso............................................8
Cómollenareldepósitodecombustible......................9
Comprobacióndelniveldeaceitedelmotor.................9
Ajustedelaalturadecorte.......................................10
Duranteelfuncionamiento.........................................10
Seguridadduranteeluso..........................................10
Arranquedelmotor................................................11
Usodelatransmisiónautopropulsada........................11
Paradadelmotor...................................................11
Recicladodelosrecortes..........................................12
Ensacadodelosrecortes.........................................12
Descargalateraldelosrecortes.................................12
Almacenamientodelamáquinaenposición
vertical..............................................................12
Consejosdeoperación............................................14
Despuésdelfuncionamiento.......................................15
Seguridaddespuésdeluso........................................15
Limpiezadelosbajosdelamáquina..........................15
Cómoplegarelmanillar...........................................16
Mantenimiento.............................................................17
Calendariorecomendadodemantenimiento..................17
Seguridadenelmantenimiento.................................17
Preparaciónparaelmantenimiento...........................17
Mantenimientodelltrodeaire................................18
Cómocambiarelaceitedelmotor.............................18
Cómocambiarlacuchilla.........................................19
Ajustedelatransmisiónautopropulsada....................20
Almacenamiento...........................................................21
Preparacióndelamáquinaparael
almacenamiento.................................................21
Despuésdelalmacenamiento...................................21
Seguridad
Estamáquinahasidodiseñadaconarregloaloestipuladoen
lanormaANSIB71.1–2012.
Seguridadengeneral
Esteproductoescapazdeamputarmanosypiesydelanzar
objetosalaire.Sigasiempretodaslasinstruccionesde
seguridadconelndeevitarlesionespersonalesgraves.
Elusodeesteproductoparaotrospropósitosquelos
previstospodríaserpeligrosoparaustedyparaotraspersonas.
•LeaycomprendaelcontenidodeesteManualdeloperador
antesdearrancarelmotor.
•Nopongalasmanosolospiescercadeloscomponentes
móvilesdelamáquina.
•Nohagafuncionarlamáquinasinoestáncolocados
yfuncionandotodoslosprotectoresydispositivosde
seguridad.
•Noseacerquealosoriciosdedescarga.Mantengaa
otraspersonasaunadistanciaprudencialdelamáquina.
•Mantengaalosniñosalejadosdelazonadetrabajo.
Nuncapermitaalosniñosutilizarlamáquina.
•Parelamáquinaypareelmotorantesderealizartareas
demantenimientoorepostaje,yantesdeeliminar
obstruccionesenlamáquina.
Elusoomantenimientoincorrectodeestamáquinapuede
causarlesiones.Parareducirelpeligrodelesiones,cumpla
estasinstruccionesdeseguridadypresteatenciónsiempre
alsímbolodealertadeseguridad,quesignicaCuidado,
AdvertenciaoPeligro–instrucciónrelativaalaseguridad
personal.Elincumplimientodeestasinstruccionespuededar
lugaralesionespersonalesolamuerte.
Puedeencontrarinformacióndeseguridadadicionalentodo
estemanual,enlasseccionescorrespondientes.
2
Page 25

Pegatinasdeseguridadeinstrucciones
Laspegatinasdeseguridadeinstruccionesestánalavistadeloperadoryestánubicadascercade
cualquierzonadepeligropotencial.Sustituyacualquierpegatinaqueestédañadaoquefalte.
Marcadelfabricante
decaloemmarkt
1.Indicaquelacuchillahasidoidenticadacomopiezadel
fabricanteoriginaldelamáquina.
94-8072
decal131-4514b
131-4514
1.Advertencia–leaelManualdeloperador.
2.Peligrodecorte/desmembramientodemanoopieporla
cuchilladelcortacésped–noseacerquealaspiezasen
movimiento;mantengacolocadostodoslosprotectores.
3.Peligrodecorte/desmembramientodemanoopie,cuchilla
delcortacésped–desconecteelcabledelabujíaylea
lasinstruccionesantesderealizarcualquiertareade
mantenimiento.
4.Peligrodeobjetosarrojados–mantengaaotraspersonasa
unadistanciaprudencialdelamáquina;pareelmotorantes
deabandonarelpuestodeloperador;recojacualquier
residuoantesdesegar.
decal94-8072
5.Peligrodecorte/desmembramientodemanoopie,
cuchilladelcortacésped–nosieguelaspendienteshacia
arriba/abajo;sieguelaspendientesdetravés;pareelmotor
antesdeabandonarelpuestodeloperador;mirehacia
atrásmientrasconduceenmarchaatrás.
1.Bloquear2.Desbloquear
decal112-8867
112-8867
decal117-2718
117-2718
3
Page 26

Montaje
Importante:Retireydesechelahojaprotectorade
plásticoquecubreelmotor,ycualquierotroplásticoo
envolturadelamáquina.
1
Cómodesplegarelmanillar
Nosenecesitanpiezas
Procedimiento
ADVERTENCIA
Sipliegaodespliegaelmanillardeforma
incorrecta,puedendañarseloscables,creandounas
condicionesdeoperacióninseguras.
132-4470
Ajustedelatracción
1.Atención:leaelManual
deloperador–1)Aojeel
pomogirándoloensentido
antihorario;2)Tiredel/de
loscable(s)delmotor
parareducirlatracción,
oempujeel/loscable(s)
haciaelmotorpara
aumentarlatracción;3)
Aprieteelpomogirándolo
ensentidohorario.
1.Advertencia—leaelManualdeloperador;1)Añada
combustiblehastaelnivelindicado.2)Vuelqueel
cortacéspedhaciaadelanteparaalmacenarlo.
2.Escaneeelcódigo
QRparaobtenermás
informaciónsobreel
ajustedelatracción.
133-8198
decal132-4470
decal133-8198
•Nodañeel/loscable(s)alplegarodesplegar
elmanillar.
•Asegúresedecolocarel/loscable(s)enel
exteriordelmanillar.
•Siuncableestádañado,póngaseencontacto
conelServicioTécnicoAutorizado.
1.Abralaspalancasdebloqueodelmanillar(Figura3).
2.Muevaelmanillarhaciaatrásalaposicióndeoperación
(Figura3).
4
Page 27

Figura3
3.Muevalapalancadebloqueodelmanillaraunade
lasdosposiciones(Figura4)hastaqueelpasadorse
engancheensusitioparabloquearelmanillarenla
posicióndeoperación.
2
Instalacióndelacuerdade arranqueenlaguíadela cuerda
Nosenecesitanpiezas
Procedimiento
Importante:Paraarrancarelmotordeformaseguray
fácilcadavezqueutilicelamáquina,instalelacuerda
dearranqueenlaguíadelacuerda.
Sujetelabarradecontroldelascuchillascontraelmanillar
superiorypaselacuerdadearranqueatravésdelaguíadel
manillar(Figura5).
g189174
1.Palancadebloqueodel
manillar
Figura4
2.Posicionesdelpasador
g003251
Figura5
1.Cuerdadearranque2.Guíadelacuerda
3
Llenadodelcárterdeaceite
Nosenecesitanpiezas
Procedimiento
g189175
Importante:Lamáquinasesuministrasinaceiteen
elmotor,peroincluyeunabotelladeaceite.Antesde
arrancarelmotor,lleneelmotordeaceite.
Capacidaddeaceitedelmotor:0.47litros(16oz)
Viscosidaddelaceite:AceitedetergenteSAE30oSAE
10W-30
ClasicaciónAPI:SJosuperior
1.Llevelamáquinaaunasupercienivelada.
5
Page 28

2.Retirelavarillagirandoeltapónenelsentidocontrario
1
2
3
g027120
alasagujasdelrelojytirandodelmismo(Figura6).
Figura6
3.Concuidado,viertatrescuartaspartes
aproximadamentedelacapacidadtotalde
aceitedelmotoreneltubodellenado.
4
Ensamblajedelabolsade recogida
Nosenecesitanpiezas
Procedimiento
1.Coloquelabolsaderecogidasobreelbastidor,según
semuestraenlaFigura7.
g186245
4.Limpielavarillaconunpañolimpio.
5.Introduzcalavarillaeneltubodellenadodeaceite,
luegoretírela.
6.Observeelniveldeaceiteenlavarilla(Figura6).
•SielniveldeaceiteestápordebajodelamarcaAdd
(Añadir)delavarilla,viertaunapequeñacantidad
deaceitelentamenteeneltubodellenado,espere
3minutos,yrepitalospasos3a5hastaqueelnivel
lleguealamarcaFull(Lleno)delavarilla.
•Sielniveldeaceiteestáporencimadelamarca
Llenodelavarilla,dreneelexcesodeaceitehasta
queelnivellleguealamarcaLlenodelavarilla;
consulteCómocambiarelaceitedelmotor(página
18).
Importante:Sielniveldeaceitedelmotor
esdemasiadobajoodemasiadoaltoyusted
arrancaelmotor,puededañarelmotor.
7.Instalelavarillarmemente.
g027120
Figura7
1.Manillar3.Bolsaderecogida
2.Bastidor
Nota:Nocoloquelabolsasobreelmanillar(Figura7).
2.Engancheelcanalinferiordelabolsaenlaparte
inferiordelbastidor(Figura8).
6
Page 29

g027121
Figura8
Elproducto
g027121
g188888
Figura9
3.Engancheloscanalessuperiorylateralesdelabolsa
enlapartesuperioryenloslateralesdelbastidor,
respectivamente(Figura8).
1.Barradecontroldelas
cuchillas
2.Barradecontrol
delatransmisión
autopropulsada
3.Pomodeajuste
delatransmisión
autopropulsada
4.Puertatrasera(no
ilustrada)
5.Conectordelavado(no
ilustrado)
6.Tapóndeldepósitode
combustible
7.Filtrodeaire14.Arrancador
8.Bujía
9.Puertadedescargalateral
10.Varilla/tapóndellenadode
aceite
11.Palancadealturadecorte
(4)
12.Palancadebloqueodel
manillar(2)
13.Manillar
7
Page 30

1.Bolsaderecogida
Figura10
2.Conductodedescarga
lateral
Operación
Antesdel
funcionamiento
Seguridadantesdeluso
Seguridadengeneral
g009571
•Familiaríceseconlaoperaciónseguradelequipo,los
controlesdeloperadorylasseñalesdeseguridad.
•Compruebequetodoslosprotectoresydispositivosde
seguridad,comoporejemplopuertasy/orecogedores,
estáncolocadosyquefuncionancorrectamente.
•Inspeccionesiemprelamáquinaparaasegurarsedeque
lascuchillas,lospernosdelascuchillasyelconjuntode
cortenoestándesgastadosodañados.
•Inspeccionelazonaenlaquevaautilizarlamáquina
yretirecualquierobjetoquepudieraserarrojadoporla
máquina.
•Alajustarlaalturadecorte,ustedpodríatocarlacuchilla
enmovimiento,loquepodríacausarlegraveslesiones.
–Pareelmotoryespereaquesedetengantodaslas
piezasenmovimiento.
–Nopongalosdedosdebajodelacarcasaalajustarla
alturadecorte.
Seguridad–Combustible
PELIGRO
Elcombustibleesextremadamenteinamabley
altamenteexplosivo.Unincendioounaexplosión
provocadosporelcombustiblepuedecausarle
quemadurasaustedyaotraspersonasasícomo
dañosmateriales.
•Paraevitarqueunacargaestáticaincendie
elcombustible,coloqueelrecipientey/ola
máquinadirectamentesobreelsueloantesde
repostar,noenunvehículoosobreotroobjeto.
•Lleneeldepósitodecombustibleenelexterior,
enunazonaabiertayconelmotorfrío.Limpie
cualquiercombustiblederramado.
•Nomanejecombustiblesiestáfumando,ni
cercadeunallamadesnudaochispas.
•Almaceneelcombustibleenunrecipiente
homologadoymanténgalofueradelalcancede
losniños.
8
Page 31

ADVERTENCIA
Elcombustibleesdañinoomortalsiesingerido.
Laexposiciónalargoplazoalosvaporespuede
causarlesionesyenfermedadesgraves.
•Evitelarespiraciónprolongadadelosvapores.
•Mantengalasmanosylacaraalejadasde
laboquillaydelaaberturadeldepósitode
combustible.
•Mantengaalejadoelcombustibledelosojosy
lapiel.
Cómollenareldepósitode
g188892
Figura11
combustible
•Paraobtenerlosmejoresresultados,utilicesolamente
gasolinafresca,sinplomo,de87omásoctanos(método
decálculo(R+M)/2).
•ETANOL:Esaceptableelusodegasolinaconhasta
el10%deetanol(gasohol)oel15%deMTBE(éter
metiltert-butílico)porvolumen.EletanolyelMTBE
nosonlomismo.Noestáautorizadoelusodegasolina
conel15%deetanol(E15)porvolumen.Noutilice
nuncagasolinaquecontengamásdel10%deetanol
porvolumen,comoporejemplolaE15(contieneel
15%deetanol),laE20(contieneel20%deetanol)
olaE85(contienehastael85%deetanol).Eluso
degasolinanoautorizadapuedecausarproblemasde
rendimientoodañosenelmotorquepuedennoestar
cubiertosbajolagarantía.
•Noutilicegasolinaquecontengametanol.
•Noguardecombustiblenieneldepósitodecombustible
nienlosrecipientesdecombustibleduranteelinvierno,a
menosquehayaañadidounestabilizadoralcombustible.
•Noañadaaceitealagasolina.
1.Nolleneeldepósitodecombustibleporencimadelborde
inferiordelcuellodeldepósito.
Comprobacióndelnivelde aceitedelmotor
Intervalodemantenimiento:Cadavezqueseutiliceo
diariamente
1.Llevelamáquinaaunasupercienivelada.
2.Retirelavarillagirandoeltapónenelsentidocontrario
alasagujasdelrelojytirandodelmismo(Figura12).
Importante:Parareducirlosproblemasdearranque,
añadaestabilizadordecombustiblealcombustible
durantetodalatemporada,mezclándolocongasolina
compradohacemenosde30días.
Paraobtenerinformaciónadicional,consulteelmanualdel
motor.
g186245
Figura12
3.Limpielavarillaconunpañolimpio.
4.Introduzcalavarillaeneltubodellenadodeaceite,
luegoretírela.
5.Observeelniveldeaceiteenlavarilla(Figura12).
•SielaceiteestápordebajodelamarcaAñadirde
lavarilla,viertaunapequeñacantidaddeaceite
lentamenteeneltubodellenado,espere3minutos,
9
Page 32

yrepitalospasos3a5hastaqueelnivelllegueala
marcaLlenodelavarilla.
Duranteel
•SielaceiteestáporencimadelamarcaLlenodela
varilla,dreneelexcesodeaceitehastaqueelnivel
lleguealamarcaLlenodelavarilla.Paravaciarel
excesodeaceite,consulteCómocambiarelaceite
delmotor(página18).
Importante:Sielniveldeaceitedelmotores
demasiadobajoodemasiadoaltoyustedarranca
elmotor,puededañarelmotor.
6.Instalelavarillarmementeeneltubodellenadode
aceite.
Ajustedelaalturadecorte
CUIDADO
Sielmotorhaestadoenmarcha,elsilenciador
estarámuycalienteypuedecausarlequemaduras
graves.
Manténgasealejadodelsilenciadorsiésteestá
caliente.
Ajustelaalturadecortesegúndesee.Ajustetodaslaspalanca
dealturadecortealamismaaltura.Paraelevarybajarla
máquina,consulteFigura13.
funcionamiento
Seguridadduranteeluso
Seguridadengeneral
•Lleveropaadecuada,incluyendoprotecciónocular,
calzadoresistenteyantideslizante,yprotecciónauditiva.
Sitieneelpelolargo,recójaselo,remetalaropasueltayno
lleveprendasojoyassueltas.
•Noutilicelamáquinasiestáenfermo,cansado,obajola
inuenciadealcoholodrogas.
•Lacuchillaestámuyalada;cualquiercontactoconla
cuchillapuedecausarlesionespersonalesgraves.Pare
elmotoryespereaquesedetengantodaslaspiezasen
movimientoantesdeabandonarelpuestodeloperador.
•Cuandosueltalabarradecontroldelacuchilla,elmotor
debepararseylacuchilladebedetenerseen3segundoso
menos.Sino,dejedeusarlamáquinainmediatamentey
póngaseencontactoconunServicioTécnicoAutorizado.
•Utilicelamáquinaúnicamenteconbuenavisibilidady
encondicionesmeteorológicasapropiadas.Nousela
máquinacuandohayriesgoderayos.
•Lahierbamojadaolashojasmojadaspuedencausarle
graveslesionessiustedresbalaytocalacuchilla.Evite
segarencondicioneshúmedas.
Figura13
1.Elevarlamáquina2.Bajarlamáquina
Nota:Losajustesdealturadecorteson:25mm(1po),
35mm(1⅜po),44mm(1¾po),54mm(2⅛po),64mm
(2½po),73mm(2⅞po),83mm(3¼po),92mm(3⅝po)
y102mm(4po).
•Extremelaprecauciónalacercarseaesquinasciegas,
arbustos,árbolesuotrosobjetosquepuedantaparlela
vista.
•Estéalertaaagujeros,surcos,montículos,rocasuotros
objetosocultos.Losterrenosdesigualespuedencausar
caídasyresbalones.
g189036
•Parelamáquinaeinspeccionelascuchillasdespuésde
golpearunobjetoosiseproduceunavibraciónanormal
enlamáquina.Hagatodaslasreparacionesnecesarias
antesdevolverautilizarlamáquina.
•Antesdeabandonarelpuestodeloperador,apagueel
motoryespereaquesedetengantodaslaspiezasen
movimiento.
•Sielmotorhaestadoenmarcha,elsilenciadorestarámuy
calienteypuedecausarlequemadurasgraves.Manténgase
alejadodelsilenciadorsiésteestácaliente.
•Compruebefrecuentementeloscomponentesdel
recogedoryelprotectordedescargaysustitúyalos
porpiezasrecomendadasporelfabricantecuandosea
necesario.
•Utiliceúnicamenteaccesoriosyaperoshomologadospor
TheToro®Company .
10
Page 33

Seguridadenlaspendientes
•Sieguedetravéslascuestasypendientes,nuncahacia
arribaohaciaabajo.Extremelasprecaucionesalcambiar
dedirecciónencuestasopendientes.
•Nosieguependientesycuestasexcesivamenteempinadas.
Sinopisarme,puederesbalarycaerse.
•Extremelasprecaucionesalsegarcercadeterraplenes,
fosasotaludes.
Arranquedelmotor
1.Sujetelabarradecontroldelascuchillascontrael
manillar(Figura14).
Usodelatransmisión autopropulsada
•Paraactivarlaautopropulsión:Aprietelabarrade
autopropulsióncontraelmanillarymanténgalaallí
(Figura16).
Figura14
1.Barradecontroldelacuchilla
2.Tiresuavementedelarrancadorderetroceso(Figura
15)hastaquenoteresistencia,luegotireconfuerza
ydejequevuelvalentamentealaguíadecuerdadel
manillar.
g024456
Figura16
g024454
1.Barradeautopropulsión
Nota:Lavelocidadmáximadelatransmisión
autopropulsadaesja.Parareducirlavelocidad,aumente
elespacioentrelabarradeautopropulsiónyelmanillar.
•Paradesengranarlaautopropulsión:sueltelabarrade
autopropulsión.
Nota:Lamáquinaestáequipadaconembraguesde
ruedalibrequefacilitaneltirarhaciaatrásdelamáquina.
Paradesengranarlosembragues,puedesernecesario
empujarlamáquinahaciaadelanteunos2.5cm(1")omás
despuésdesoltarlabarradeautopropulsión.
Paradadelmotor
Intervalodemantenimiento:Cadavezqueseutiliceo
diariamente
Parapararelmotor,sueltelabarradecontroldelacuchilla.
Figura15
Nota:Silamáquinanoarrancadespuésdevarios
intentos,póngaseencontactoconelServicioTécnico
Autorizado.
Importante:Cuandoustedsueltelabarradecontrol
g024455
delacuchilla,elmotorylacuchilladeberándetenerse
en3segundosomenos.Sinoseparancorrectamente,
dejedeusarlamáquinainmediatamenteypóngaseen
contactoconunServicioTécnicoAutorizado.
11
Page 34

Recicladodelosrecortes
Descargalateraldelos
Sumáquinavienepreparadadefábricaparareciclarlos
recortesdehierbayhojasydevolverlosalcésped.
Silabolsaderecogidaestáinstaladaenlamáquina,retírela;
consulteCómoretirarlabolsaderecogida(página12)antesde
reciclarlosrecortes.Sielconductodedescargaestáinstalado
enlamáquina,retírelo;consulteCómoretirarelconductode
descargalateral(página12)antesdereciclarlosrecortes.
Ensacadodelosrecortes
Utilicelabolsaderecogidasidesearecogerlosrecortesde
hierbayhojasdelcésped.
Sielconductodedescargaestáinstaladoenlamáquina,
retírelo;consulteCómoretirarlabolsaderecogida(página
12).
Instalacióndelabolsaderecogida
1.Levanteysujeteeldeectortrasero(Figura17).
recortes
Utiliceladescargalateralparacortarhierbamuyalta.
Silabolsaderecogidaestáinstaladaenlamáquina,retírela;
consulteCómoretirarlabolsaderecogida(página12).
Instalacióndelconductodedescarga
lateral
Levanteeldeectorlateraleinstaleelconductodedescarga
lateral(Figura18).
g189040
Figura17
1.Deectortrasero
2.Muesca(muescadellado
izquierdonoilustrado)
2.Instalelabolsaderecogida,asegurándosedequelos
pasadoresdelabolsadescansanenlasmuescasdel
manillar(Figura17).
3.Bajeeldeectortrasero.
3.Pasadordelabolsade
recogida(2)
Cómoretirarlabolsaderecogida
Pararetirarlabolsa,sigalosmismospasosensentidoinverso.
g024439
Figura18
Cómoretirarelconductodedescarga
lateral
Pararetirarelconductodedescargalateral,levanteeldeector
lateral,retireelconductodedescargalateralybajeeldeector
delconductodedescargalateral.
Almacenamientodela máquinaenposiciónvertical
Durantelatemporadadesiega,oenlatemporadade
inactividad,puedealmacenarlamáquinaenposiciónvertical
paraminimizarelespacioocupado.
12
Page 35

PELIGRO
Elcombustibleesaltamenteinamableyexplosivo.
Unaexplosiónounincendioprovocadoporel
combustiblepuedecausarlequemadurasausted
yaotraspersonas.
•Siseguardalamáquinaenposiciónverticalcon
demasiadocombustibleeneldepósito,puede
provocarfugasdecombustibledeldepósito.El
combustibleesaltamenteinamableyexplosivo.
Unaexplosiónounincendioprovocadoporel
combustiblepuedecausarlequemadurasausted
yaotraspersonas.
•Noguardelamáquinaenposiciónvertical
sielniveldecombustibledeldepósitode
combustiblesobrepasalorecomendadoeneste
Man ual del operador
•Noguardelamáquinaenunaposiciónmásallá
delavertical(90°);silohace,puedehaberfugas
decombustibledeldepósitodecombustible.
•Notransportelamáquinaenlaposiciónde
almacenamientovertical.
.
decal133-8198
Figura19
2.Asegúresedequeelajustedealturadecortedela
máquinaesde92mmomenos;sino,bájelo;consulte
Ajustedelaalturadecorte(página10).
3.Abralaspalancasdebloqueodelmanillar(Figura20).
•Nointentearrancarlamáquinaenlaposición
dealmacenamientovertical.
•Nointenteguardarningunamáquinacon
combustibleyaceiteenlaposiciónde
almacenamientoverticalsinohasidodiseñada
paraello.
ADVERTENCIA
Sipliegaodespliegaelmanillardeforma
incorrecta,puedendañarseloscables,creandounas
condicionesdeoperacióninseguras.
•Nodañeloscablesalplegarodesplegarel
manillar.
•Siuncableestádañado,póngaseencontacto
conelServicioTécnicoAutorizado.
1.Asegúresedequeelniveldecombustibledeldepósito
decombustiblenosobrepasalorecomendadoporel
fabricantedelmotor;consultelapegatinadelfabricante
delmotor,situadaenelmotor(Figura19).
Figura20
1.Posicionesdemanillar
desbloqueado
4.Pliegueelmanillarcompletamentehaciaadelante
(Figura20).
Importante:Asegúresedequeloscablesquedan
porfueradelospomosdelmanillaralplegarla
secciónsuperior.
5.Cierrelaspalancasdebloqueodelmanillar.
6.Levantelapartedelanteradelamáquinaconelmanillar
yllévelaallugardealmacenamiento(Figura21).
2.Posicióndemanillar
bloqueado
g189218
Nota:Sielniveldecombustibledeldepósitode
combustibleesdemasiadoalto,drenelagasolina
deldepósitodecombustibleenunrecipientede
combustiblehomologadohastaqueestéenopor
debajodelnivelrecomendadoporelfabricantedel
motor.
13
Page 36

Figura21
Consejosdeoperación
Consejosgeneralesdesiega
•Inspeccionelazonaenlaquevaautilizarlamáquina
yretirecualquierobjetoquepudieraserarrojadoporla
máquina.
•Evitegolpearobjetossólidosconlacuchilla.Nosiegue
nuncaporencimadeobjetoalguno.
•Silamáquinagolpeaunobjetooempiezaavibrar,pare
inmediatamenteelmotor,desconecteelcabledelabujíae
inspeccionelamáquinaenbuscadedaños.
•Alterneladireccióndecorte.Estoayudaadispersarlos
recortesentodoelcésped,dandounafertilizaciónmás
homogénea.
•Sielaspectonaldelcéspednoessatisfactorio,pruebe
conunaomásdelastécnicassiguientes:
–Cambiarlacuchillaomandarlaaalar.
–Caminarmásdespaciomientrassiega.
–Elevarlaalturadecortedelamáquina.
–Cortarelcéspedconmásfrecuencia.
g189217
–Solaparlospasillosdecorteenlugardecortarun
pasillocompletoencadapasada.
Cómocortarhojas
•Despuésdesegarelcésped,asegúresedequelamitaddel
céspedseveatravésdelacoberturadehojascortadas.
Esposiblequetengaquehacermásdeunapasadapor
encimadelashojas.
•Sihaymásde13cm(5po)dehojasenelcésped,ajustela
alturadecortedelasruedasdelanterasunamuescaodos
másaltaqueladelasruedastraseras.
•Sieguemásdespaciosilamáquinanocortalashojas
sucientementenas.
•Paraobtenerelmejorrendimiento,instaleunacuchilla
nuevaantesdequeempiecelatemporadadesiega.
•Sustituyalacuchillacuandoseaprecisoporunacuchilla
derepuestoToro.
Cómocortarlahierba
•Cortesolamenteunterciodelahojadehierbacadavez.
Nocorteconunajusteinferiora54mm(2⅛po)amenos
quelahierbaseaescasa,oanalesdelotoñocuando
elritmodecrecimientodelahierbaempiezaadecaer.
ConsulteAjustedelaalturadecorte(página10).
•Cuandocortehierbademásde15cm(6po)dealto,
siegueprimerousandolaalturadecortemásaltaycamine
despacio,luegosieguedenuevoaunaalturamenorpara
obtenerelmejoraspectodelcésped.Silahierbaes
demasiadolarga,puedeatascarlamáquinayhacerque
secaleelmotor.
•Lahierbamojadaylashojasmojadastiendenapegarseal
suelo,ypuedenatascarlamáquinaohacerquesecaleel
motor.Evitesegarencondicioneshúmedas.
•Estéatentoalposibleriesgodeincendioencondiciones
muysecas,sigatodaslasadvertenciaslocalesparacasos
deincendioymantengalamáquinalibredehierbaseca
yresiduosdehojas.
14
Page 37

Despuésdel
funcionamiento
Seguridaddespuésdeluso
Seguridadengeneral
•Limpielosrecortesdehierbaylosresiduosdelamáquina
paraayudaraprevenirincendios.Limpiecualquieraceite
ocombustiblederramado.
•Espereaqueseenfríeelmotorantesdeguardarla
máquinaenunrecintocerrado.
•Noguardenuncalamáquinaounrecipientede
combustiblecercadeunallamadesnuda,chispaollama
piloto,porejemploenuncalentadordeaguauotro
electrodoméstico.
g189173
Figura22
1.Oriciodelavado
6.Abraelgrifodelamanguera.
7.Arranqueelmotoryhágalofuncionarhastaqueno
salganmásrecortesdedebajodelamáquina.
Seguridadduranteeltransporte
•Tengacuidadoalcargarodescargarlamáquina.
•Evitequelamáquinaruede.
Limpiezadelosbajosdela máquina
Intervalodemantenimiento:Cadavezqueseutiliceo
diariamente
Limpiezadelosbajoslamáquinacon
elconectordelavado
Paraobtenerresultadosóptimos,limpielamáquina
inmediatamentedespuésdeterminarlasiega.
1.Llevelamáquinaaunasupercieplanapavimentada.
2.Pareelmotoryespereaquesedetengantodaslas
piezasenmovimientoantesdeabandonarelpuesto
deloperador.
3.Bajelamáquinaalaalturadecortemásbaja.Consulte
Ajustedelaalturadecorte(página10).
8.Pareelmotor.
9.Cierreelgrifoydesconectelamangueradelamáquina.
10.Arranqueelmotoryhágalofuncionarduranteunos
minutosparaquesesequelaparteinferiordela
máquinayevitarqueseoxide.
11.Apagueelmotoryespereaqueseenfríeantesde
guardarlamáquinaenunlugarcerrado.
Limpiezadelosbajosdelamáquinaen
laposicióndealmacenamientovertical
1.Pongalamáquinaenlaposicióndealmacenamiento
vertical;consulteAlmacenamientodelamáquinaen
posiciónvertical(página12).
2.Eliminelosrecortesdehierbadedebajodelamáquina
conagua.
4.Lavelazonaqueestádebajodeldeectortrasero,por
dondepasanlosrecortesensucaminodesdelaparte
inferiordelamáquinahastalabolsaderecogida.
5.Conecteunamangueradejardínqueestéconectadaa
ungrifoaloriciodelavado(Figura22).
15
Page 38

Cómoplegarelmanillar
ADVERTENCIA
Sipliegaodespliegaelmanillardeforma
incorrecta,puedendañarseloscables,creandounas
condicionesdeoperacióninseguras.
•Nodañeloscablesalplegarodesplegarel
manillar.
•Siuncableestádañado,póngaseencontacto
conelServicioTécnicoAutorizado.
1.Abralaspalancasdebloqueodelmanillarhasta
quepuedamoverlibrementelasecciónsuperiordel
manillar.
2.Pliegueelmanillarhaciaadelante,alaposiciónvertical
oalaposicióndeplegadocompleto,segúnseindica
enFigura23.
Importante:Asegúresedequeloscablesquedan
porfueradelaspalancasdebloqueodelmanillar
alplegarlasecciónsuperior.
Figura23
3.Paradesplegarelmanillar,consulte1Cómodesplegar
elmanillar(página4).
g189219
16
Page 39

Mantenimiento
Nota:Losladosderechoeizquierdodelamáquinasedeterminandesdelaposiciónnormaldeloperador.
PuedeadquirirpiezasderepuestoenunServicioTécnicoAutorizadooenwww .torodealer.com(clientesdeEE.UU .solamente).
Calendariorecomendadodemantenimiento
Intervalodemanteni-
mientoyservicio
Cadavezqueseutilice
odiariamente
Cadaaño
Cadaañooantesdel
almacenamiento
Importante:Consultelosprocedimientosadicionalesdemantenimientoenelmanualdelmotor.
Procedimientodemantenimiento
•Comprobacióndelniveldeaceitedelmotor.
•Asegúresedequeelmotorseparaenelplazode3segundosdespuésdesoltarla
barradecontroldelacuchilla.
•Limpielosrecortesdehierbaylasuciedaddedebajodelamáquina.
•Limpieelsistemadelimpiezadeaire;límpieloconmásfrecuenciaencondiciones
demuchopolvo.Consulteelmanualdesumotor.
•Reviseelltrodeaire;revíseloconmásfrecuenciaencondicionesdemuchopolvo.
•Cambielacuchillaohagaquelaalen(másamenudosisedesalarápidamente).
•Limpieelsistemadelimpiezadeaire;límpieloconmásfrecuenciaencondiciones
demuchopolvo.Consulteelmanualdesumotor.
•Vacíeeldepósitodecombustibleantesdeefectuarreparaciones,segúnlas
instrucciones,yantesdelalmacenamientoanual.
Seguridadenelmantenimiento
•Desconecteelcabledelabujíayretireelbotón
dearranqueeléctricoantesderealizarcualquier
procedimientodemantenimiento.
•Lleveguantesyprotecciónocularalrealizarel
mantenimientodelamáquina.
•Lacuchillaestámuyalada;cualquiercontactoconla
cuchillapuedecausarlesionespersonalesgraves.Lleve
guantesalrealizarelmantenimientodelacuchilla.
•Nomanipulenuncalosdispositivosdeseguridad.
Comprueberegularmentequefuncionancorrectamente.
•Alvolcarlamáquina,puedehaberfugasdecombustible.
Elcombustibleesinamableyexplosivo,ypuedecausar
lesionespersonales.Dejefuncionarelmotorhastaqueno
quedecombustible,oretirelagasolinaconunabombade
mano;nuncautiliceunsifón.
Preparaciónparael mantenimiento
1.Pareelmotoryespereaquesedetengantodaslas
piezasenmovimiento.
2.Desconecteelcabledelabujía(Figura24).
g189230
Figura24
1.Cabledelabujía
3.Despuésderealizarlosprocedimientosde
mantenimiento,conecteelcabledelabujíaalabujía.
Importante:Antesdeinclinarlamáquinapara
cambiarelaceiteosustituirlacuchilla,dejeque
sevacíeeldepósitodecombustibleconeluso
normal.Siesimprescindibleinclinarlamáquina
antesdequeseacabeelcombustible,utilice
unabombamanualpararetirarelcombustible.
Siemprecoloquelamáquinadeladoconlavarilla
deaceitehaciaabajo.
17
Page 40

Mantenimientodelltrodeaire
Cómocambiarelaceitedel
Intervalodemantenimiento:Cadaaño
1.Abraloscierresdelapartesuperiordelatapadelltro
deaire(Figura25).
motor
Noesnecesariocambiarelaceitedelmotor,perosi
deseacambiarlo,sigaesteprocedimiento.
Nota:Hagafuncionarelmotorduranteunosminutosantes
decambiarelaceiteparacalentarelaceite.Elaceitecaliente
uyemejorytransportamáscontaminantes.
Capacidaddeaceitedelmotor:0.47litros(16oz)
Viscosidaddelaceite:AceitedetergenteSAE30oSAE
10W-30
ClasicaciónAPI:SJosuperior
1.Llevelamáquinaaunasupercienivelada.
2.ConsultePreparaciónparaelmantenimiento(página
17).
3.Retirelavarillagirandoeltapónenelsentidocontrario
alasagujasdelrelojytirandodelmismo(Figura26).
Figura25
1.Cierre
2.Tapadelltrodeaire
3.Filtrodeaire
2.Retireelltrodeaire(Figura25).
3.Inspeccioneelltrodeaire.
Nota:Sielltrodeaireestáexcesivamentesucio,
cámbieloporunltronuevo.Sino,golpeesuavemente
elltrodeaireenunasupercieduraparaaojarlos
residuos.
4.Instaleelltrodeaire.
5.Utiliceelclipparainstalarlatapadelltrodeaire.
g189231
g186245
Figura26
4.Coloquelamáquinadelado(conelltrodeairehacia
arriba)paradrenarelaceitedeltubodellenadode
aceite(Figura27)opongalamáquinaenlaposición
verticaldealmacenamiento(Figura28).Consulte
Almacenamientodelamáquinaenposiciónvertical
(página12)paradrenarelaceiteusadodeltubode
llenadodeaceite.
18
Page 41

10.Observeelniveldeaceiteenlavarilla(Figura26).
•SielniveldeaceiteestápordebajodelamarcaAdd
(Añadir)delavarilla,viertaunapequeñacantidad
deaceitelentamenteeneltubodellenado,espere
3minutos,yrepitalospasos8a10hastaqueel
nivellleguealamarcaFull(Lleno)delavarilla.
•Sielniveldeaceiteestáporencimadelamarca
Llenodelavarilla,dreneelexcesodeaceitehasta
queelnivellleguealamarcaLlenodelavarilla.
Importante:Sielniveldeaceitedelmotor
esdemasiadobajoodemasiadoaltoyusted
arrancaelmotor,puededañarelmotor.
11.Instalelavarillarmemente.
Figura27
g189232
12.Reciclecorrectamenteelaceiteusado.
Cómocambiarlacuchilla
Intervalodemantenimiento:Cadaaño
Importante:
para instalar la cuchilla cor r ectamente
deunallavedinamométricaopreerenorealizareste
procedimiento,póngaseencontactoconelServicio
TécnicoAutorizado.
Examinelacuchillacadavezqueseacabeelcombustible.Sila
cuchillaestádañadaoagrietada,sustitúyalainmediatamente.
Siellodelacuchillaestáromoomellado,mandeaalar
lacuchillaocámbiela.
ADVERTENCIA
Lacuchillaestámuyalada;cualquiercontactocon
lacuchillapuedecausarlesionespersonalesgraves.
Lleveguantesalrealizarelmantenimientodela
cuchilla.
Usted necesitará una lla v e dinamométrica
.Sinodispone
Figura28
5.Despuésdedrenarelaceiteusado,pongalamáquina
ensuposicióndeuso.
6.Concuidado,viertatrescuartaspartes
aproximadamentedelacapacidadtotalde
aceitedelmotoreneltubodellenado.
7.Espereunos3minutosparaqueelaceiteseasiente
enelmotor.
8.Limpielavarillaconunpañolimpio.
9.Introduzcalavarillaeneltubodellenadodeaceite,
luegoretírela.
1.ConsultePreparaciónparaelmantenimiento(página
17).
g189236
2.Coloquelamáquinadeladoconelltrodeairehacia
arriba.
3.Utiliceunbloquedemaderaparainmovilizarlacuchilla
(Figura29).
19
Page 42

Figura29
4.Retirelacuchilla,conservandotodoslosherrajesde
montaje(Figura29).
5.Instalelacuchillanuevaytodoslosherrajesdemontaje
(Figura30).
Ajustedelatransmisión autopropulsada
Cadavezqueinstaleunnuevodelatransmisión
autopropulsadaosilatransmisiónautopropulsadaestámal
ajustada,ajusteelcabledelatransmisiónautopropulsada.
1.Gireelpomodeajusteensentidoantihorariopara
aojarelcable(Figura31).
g024442
g027231
Figura31
Figura30
Importante:Coloquelacuchillaconlosextremos
curvosorientadoshacialacarcasadelamáquina.
1.Manillar(ladoizquierdo)4.Gireelpomoensentido
2.Pomodeajuste
3.Cabledelatransmisión
autopropulsada
horarioparaapretarel
ajuste.
5.Gireelpomoensentido
antihorarioparaaojarel
ajuste.
2.Ajustelatensióndelcable(Figura31)tirandodel
mismohaciaatrásoempujándolohaciaadelante,y
sujételoenesaposición.
Nota:Empujeelcablehaciaelmotorparaaumentar
latracción;tiredelcableparareducirlatracción.
3.Gireelpomoensentidohorarioparaapretarelajuste
delcable.
g024443
Nota:Aprieteelpomormementeamano.
6.Utiliceunallavedinamométricaparaapretarel
pernodelacuchillaa82N·m(60pies-libra).
Importante:Unpernoapretadoa82N·m
(60pies-libra)quedamuyrme.Mientrassujeta
lacuchillaconunbloquedemadera,apliquetoda
sufuerzaalallaveyaprieteelpernormemente.
Serámuydifícilapretarestepernodemasiado.
20
Page 43

Almacenamiento
Almacenelamáquinaenunlugarfresco,limpioyseco.
Preparacióndelamáquina paraelalmacenamiento
1.Enelúltimorepostajedelaño,añadaestabilizador(por
ejemplo,elTratamientodeCombustiblePremiumde
Toro)alcombustible.
2.Desecheadecuadamentecualquiercombustible
sobrante.Recíclelosegúnlanormativalocal,outilícelo
ensuautomóvil.
Nota:Lapresenciadecombustibleviejoeneldepósito
decombustibleeslaprincipalcausadedicultadesen
elarranque.Noguardecombustiblesinestabilizador
durantemásde30días,ynoalmacenecombustible
estabilizadodurantemásde90días.
3.Hagafuncionarlamáquinahastaqueelmotorsepare
porhabersequedadosingasolina.
4.Arranqueelmotordenuevo.
5.Dejequefuncioneelmotorhastaquesepare.Cuando
yanosepuedearrancarelmotor,estásucientemente
seco.
6.Desconecteelcabledelabujía.
7.Retirelabujía,añada30ml(1onza)deaceitedemotor
atravésdeloriciodelabujía,ytiredelacuerdade
arranquelentamentevariasvecesparaquesedistribuya
elaceiteporelcilindro,conelndeevitarlacorrosión
duranteelperiododeinactividad.
8.Instalelabujíasinapretarla.
9.Aprietetodoslospernos,tuercasytornillos.
Despuésdelalmacenamiento
1.Compruebeyaprietetodosloscierres.
2.Retirelabujíayhagagirarelmotorrápidamenteusando
elarrancadorderetrocesoparaeliminarelexcesode
aceitedelcilindro.
3.Instalelabujíayapriételaconunallavedinamométrica
a20N·m(15pies-libra).
4.Lleveacabocualquierprocedimientode
mantenimiento;consulteMantenimiento(página17).
5.Compruebeelniveldeaceitedelmotor;consulte
Comprobacióndelniveldeaceitedelmotor(página9).
6.Lleneeldepósitodecombustibleconcombustible
fresco;consulteCómollenareldepósitode
combustible(página9).
7.Conecteelcabledelabujía.
21
Page 44

Notas:
Page 45

Notas:
Page 46

®
Recycler
LaGarantíaToro
Unagarantíacompletade2años(Garantíalimitadade45díasparaelusocomercial)Picador/Ensacadorde51cm(20")
LaGarantíadeArranqueGTSdeToro
Unagarantíacompletade3años(noaplicablealusocomercial)
de20"y22"
Cortacéspedesdirigidos
Carcasasdeacero
Condicionesyproductoscubiertos
TheT oroCompanyysualiado,T oroWarrantyCompany,bajounacuerdoentresí,prometen
conjuntamenterepararelproductoT oronombradoacontinuaciónquehayasidousadocon
propósitosresidenciales*,sitienedefectosdematerialesomanodeobraosidejadefuncionar
debidoalafalladeuncomponente,osielmotorT oroGTS(GuaranteedtoStart–Garantía
deArranque)noarrancaenelprimerosegundointento,siemprequesehayarealizadotodoel
mantenimientorutinarioindicadoenelManualdeloperador.
Estagarantíacubreelcostodepiezasymanodeobra,perousteddebepagarloscostosde
transporte.
Lossiguientesplazossonaplicablesdesdelafechadelacompraoriginal:
Productos
Recyclerde20"y22"yPicador/Ensacadorde
20"
Accesorios
GTS(GuaranteedtoStart)Garantíacompletade3años
1
Motor
1
Motor
–UsocomercialToro-45días
Batería
1
AlgunosmotoresutilizadosenlosproductosT oroestángarantizadosporelfabricantedelmotor.
Periododegarantía
Garantíacompletade2años
Garantíacompletade2años
Garantíacompletade3años
Otrosmotores–90días
Garantíacompletade1año
Garantíalimitadaparaelusocomercial*
LosproductosdegasolinaT oroutilizadosconpropósitoscomerciales,institucionalesode
alquilerestángarantizadosdurante45díascontradefectosenmaterialesomanodeobra.Los
componentesquefallandebidoalusoydesgastenormalesnoestáncubiertosporestagarantía.
Periodosdegarantíadelmotor:consultelatablaanterior.
LaGarantíadearranqueT oroGTSnoesaplicablecuandoelproductoesusadoconnes
comerciales*.
Instruccionesparaobtenerasistenciabajolagarantía
SiustedcreequesuProductoT orotieneundefectodematerialesomanodeobra,osiunadulto
decapacidadnormalyanopuedearrancarelmotordesuproductoconunoodosintentos,siga
esteprocedimiento:
1.PóngaseencontactoconcualquierDistribuidorAutorizadoT oroparaconcertarel
mantenimientoensusinstalaciones.Paralocalizarundistribuidorcercano,visitenuestra
páginaweb:www.T oro.com.T ambiénpuedellamaralosnúmerosqueaparecenenel
apartado3parausarelsistemadelocalizacióndeDistribuidoresT orolas24horasaldía.
2.Lleveelproductoysupruebadecompra(reciboofacturadeventa)alDistribuidor.El
distribuidordiagnosticaráelproblemaydeterminarásiestácubiertoporlagarantía.
3.SiporalgunarazónustednoestásatisfechoconelanálisisdelDistribuidoroconlaasistencia
recibida,póngaseencontactoconnosotrosenladirecciónsiguiente:
ToroWarrantyCompany
CustomerCareDepartment,RLCDivision
811 1L yndaleA venueSouth
Bloomington,MN55420-1196
Teléfonogratuito:866-214-9807(clientesdeEE.UU.)
Teléfonogratuito:866-214-9808(clientesdeCanadá)
Elementosycondicionesnocubiertos
Nohayotragarantíaexpresasalvolacoberturaespecialdesistemasdeemisiónylagarantíasobre
motoresenalgunosproductos.Estagarantíaexpresanocubre:
•Elcostedemantenimientoregular ,servicioopiezas,comoporejemploltros,combustible,
lubricantes,cambiosdeaceite,bujías,ltrosdeaire,aladodecuchillasocuchillas
desgastadas,ajustesdecables/acoplamientosoajustesdefrenosyembragues
•Cualquierproductoopiezaquehayasufridomodicaciones,abusosonegligencia,oque
necesitesersustituidooreparadodebidoaaccidenteofaltademantenimientoadecuado
•Costosderecogidayentrega
•ReparacionesointentosdereparaciónporpartedepersonasnopertenecientesaunServicio
TécnicoT oroAutorizado
•Reparacionesnecesariaspornohaberseguidoelprocedimientorecomendadorespectoal
combustible(consulteelManualdeloperadorparaobtenermásdetalles)
–Laeliminacióndecontaminantesdelsistemadecombustiblenoestácubierta
–Elusodecombustibleviejo(demásdeunmesdeedad)ocombustiblequecontenga
másdel10%deetanoloel15%deMTBE
–Elnodrenarelsistemadecombustibleantesdeunperiododeinactividaddemás
deunmes
•Reparacionesoajustesparacorregirproblemasdearranquedebidosalosiguiente:
–Nosehanseguidolosprocedimientoscorrectosdemantenimientoolosprocedimientos
recomendadosrespectoalcombustible
–Unacuchilladelcortacéspedrotativohagolpeadounobjeto
•Condicionesdeoperaciónespecialesquepuedenrequerirmásdedosintentosdearranque:
–Primerarranquedespuésdeunperiodoextendidodeinactividadsuperioratresmeses
odealmacenamientoestacional
–Arranqueabajatemperatura,porejemploaliniciodelaprimaveraoalnaldelotoño
–Procedimientosdearranqueincorrectos–sitienedicultadalarrancarsuunidad,revise
elManualdeloperadorparaasegurarsedequeestásiguiendolosprocedimientosde
arranquecorrectos.EstopuedeahorrarleunavisitainnecesariaalServicioTécnico
AutorizadoT oro.
Condicionesgenerales
TodaslasreparacionescubiertasporestasgarantíasdebenserrealizadasporunServicioTécnico
ToroAutorizadousandopiezasderepuestoaprobadosporT oro.LareparaciónporunDistribuidor
AutorizadoT oroessuúnicoremediobajoestagarantía.
NiTheT oroCompanyniT oroWarrantyCompanysonresponsablesdedañosindirectos,
incidentalesoconsecuentesrespectoalusodelosproductosT orocubiertosporestas
garantías,incluyendocualquiercostoogastoporlaprovisióndeequiposdesustitución
oservicioduranteperiodosrazonablesdemalfuncionamientoonoutilizaciónhastala
terminacióndereparacionesbajoestasgarantías.
Algunosestadosnopermitenexclusionesdedañosincidentalesoconsecuentes,demaneraque
lasexclusionesarribacitadaspuedennoseraplicablesausted.
Estagarantíaleotorgaaustedderechoslegalesespecícos;esposiblequeustedtengaotros
derechosquevaríandeunestadoaotro.
ResponsabilidadesdelPropietario
UsteddebemantenersuProductoT orosiguiendolosprocedimientosdemantenimientodescritos
enelManualdeloperador.Dichomantenimientorutinario,searealizadoporundistribuidoropor
ustedmismo,esporcuentadeusted.
PaísesfueradeEstadosUnidosoCanadá
EstagarantíanoesválidaenMéxico.LosclientesquecompraronproductosT oroexportadosdelosEstadosUnidosoCanadádebenponerseencontactoconsuDistribuidor(Concesionario)T oropara
obtenerpólizasdegarantíaparasupaís,provinciaoestado.Siporcualquierrazónustednoestásatisfechoconelservicioofrecidoporsudistribuidor,ositienedicultadenobtenerinformaciónsobrela
garantía,póngaseencontactoconelimportadorT oro.Sifallantodoslosdemásrecursos,puedeponerseencontactoconnosotrosenT oroWarrantyCompany .
LeydeConsumodeAustralia:LosclientesaustralianosencontraráninformaciónsobrelaLeydeConsumodeAustraliadentrodelacajaoatravésdesudistribuidorT orolocal.
*“Propósitoresidencial”signicaelusodelproductoenlamismaparcelaenqueseencuentrasuvivienda.Elusoenmásdeunlugar ,oelusoinstitucionaloalquiler ,seconsideracomouso
comercialyseríaaplicablelagarantíadeusocomercial.
374-0254RevG
Page 47

TondeuseRecycler
SmartStow
N°demodèle20339—N°desérie400000000etsuivants
®
®
FormNo.3408-831RevA
de56cm(22po)avec
Manueldel'utilisateur
Introduction
Cettetondeuseàlamerotativeautotractéeestdestinéeau
grandpublic.Elleestprincipalementconçuepourtondreles
pelousesentretenuesrégulièrementdanslesterrainsprivés.
Ellen'estpasconçuepourcouperlesbroussaillesnipour
unusageagricole.
Lisezattentivementcettenoticepourapprendrecomment
utiliseretentretenircorrectementvotreproduit,etéviterde
l'endommageroudevousblesser.Vousêtesresponsablede
l'utilisationsûreetcorrecteduproduit.
VouspouvezcontacterTorodirectementsurwww .Toro.com
pourtoutrenseignementconcernantunproduitouun
accessoire,pourobtenirl'adressedesdépositairesoupour
enregistrervotreproduit.
Pourobtenirdesprestationsdeservice,despièces
Torod'origineoudesrenseignementscomplémentaires,
munissez-vousdesnumérosdemodèleetdesérieduproduit
etcontactezundépositaire-réparateurouleserviceclient
Toroagréé.LaFigure1indiquel'emplacementdesnuméros
demodèleetdesérieduproduit.
N°demodèle
N°desérie
Lesmisesengardedecemanuelsoulignentdesdangers
potentielsetsontsignaléesparlesymboledesécurité(Figure
2),quiindiqueundangerpouvantentraînerdesblessures
gravesoumortellessilesprécautionsrecommandéesnesont
pasrespectées.
g000502
Figure2
1.Symboledesécurité
Cemanuelutilisedeuxtermespourfairepasserdes
renseignementsessentiels.Important,pourattirerl'attention
surdesrenseignementsmécaniquesspéciquesetRemarque,
pourinsistersurdesrenseignementsd'ordregénéralméritant
uneattentionparticulière.
Figure1
1.Plaquedesnumérosdemodèleetdesérie
Notezlesnumérosdemodèleetdesérieduproduitdans
l'espaceci-dessous:
ATTENTION
CALIFORNIE
Proposition65-Avertissement
Ceproduitcontientuneoudessubstances
chimiquesconsidéréesparl'étatdeCalifornie
commecapablesdeprovoquerdescancers,
desanomaliescongénitalesoud'autres
troublesdelareproduction.
Lesgazd'échappementdeceproduit
contiennentdessubstanceschimiques
considéréesparl'étatdeCaliforniecomme
g189172
Vouscommettezuneinfractionàlasection4442ou4443
duCodedesressourcespubliquesdeCaliforniesivous
utilisezcettemachinedansunezoneboisée,broussailleuseou
recouverted'herbe,àmoinsdel'équiperd'unpare-étincelles
enbonétat,telquedénidanslasection4442,ousansque
lemoteursoitconstruit,équipéetentretenucorrectement
pourprévenirlesincendies.
susceptiblesdeprovoquerdescancers,
desmalformationscongénitalesetautres
troublesdelareproduction.
©2016—TheToro®Company
8111LyndaleAvenueSouth
Bloomington,MN55420
Enregistrezvotreproduitàwww.T oro.com.
Traductiondutexted'origine(FR)
ImpriméauxÉtats-Unis
Tousdroitsréservés
*3408-831*A
Page 48

Cesystèmed'allumageparétincelleestconformeàlanorme
canadienneICES-002.
Le
Man uel du pr opriétair e du moteur
titreinformatifconcernantlaréglementationdel'Agence
américainepourlaprotectiondel'environnement(EPA)
etlaréglementationantipollutiondel'étatdeCalifornie
relativeauxsystèmesantipollution,àleurentretienetà
leurgarantie.Vouspouvezvousenprocurerunnouvel
exemplaireenvousadressantauconstructeurdumoteur.
ci-jointestfournià
Vidangedel'huilemoteur........................................18
Remplacementdelalame........................................19
Réglagedel'autopropulsion.....................................20
Remisage.....................................................................21
Préparationdelamachineauremisage.......................21
Remiseenserviceaprèsremisage..............................21
Sécurité
Couplenet:Lecouplebrutounetdecemoteuraétécalculé
enlaboratoireparleconstructeurdumoteurselonlanorme
SAEJ1940delaSocietyofAutomotiveEngineers.Étant
congurépoursatisfaireauxnormesdesécurité,antipollution
etd'exploitation,lemoteurmontésurcetteclassedetondeuse
aurauncoupleeffectifnettementinférieur.Rendez-vous
surlesitewww .Toro.compourvérierlesspécicationsde
votremodèle.
Tabledesmatières
Introduction..................................................................1
Sécurité........................................................................2
Sécuritégénérale.....................................................2
Autocollantsdesécuritéetd'instruction.....................3
Miseenservice..............................................................4
1Dépliageduguidon...............................................4
2Montageducâbledulanceurdansle
guide..................................................................5
3Pleind'huilemoteur..............................................5
4Montagedubacàherbe.........................................6
Vued'ensembleduproduit..............................................7
Utilisation.....................................................................8
Avantl'utilisation........................................................8
Sécuritéavantl'utilisation..........................................8
Remplissageduréservoirdecarburant........................8
Contrôleduniveaud'huilemoteur.............................9
Réglagedelahauteurdecoupe..................................9
Pendantl'utilisation...................................................10
Sécuritépendantl'utilisation.....................................10
Démarragedumoteur.............................................10
Utilisationdel'autopropulsion..................................11
Arrêtdumoteur.....................................................11
Recyclagedel'herbecoupée.....................................11
Ramassagedel'herbecoupée....................................11
Éjectionlatéraledel'herbecoupée............................12
Remisagedelamachineenpositionverticale...............12
Conseilsd'utilisation..............................................14
Aprèsl'utilisation......................................................15
Sécuritéaprèsl'utilisation.........................................15
Nettoyagedudessousdelamachine..........................15
Pliageduguidon.....................................................16
Entretien.....................................................................17
Programmed'entretienrecommandé...........................17
Consignesdesécuritépendantl'entretien...................17
Préparationàl'entretien...........................................17
Entretiendultreàair............................................18
CettemachineestconçueenconformitéaveclanormeANSI
B71.1–2012.
Sécuritégénérale
Ceproduitpeutsectionnerlesmainsoulespiedsetprojeter
desobjets.Respecteztoujourstouteslesconsignesdesécurité
pouréviterdesblessuresgraves.
L'utilisationdeceproduitàd'autresnsquecellequiest
prévuepeutêtredangereusepourl'utilisateuretlespersonnes
àproximité.
•VousdevezlireetcomprendrelecontenudeceManuelde
l'utilisateuravantdedémarrerlemoteur.
•N'approchezpaslesmainsoulespiedsdescomposants
mobilesdelamachine.
•N'utilisezpaslamachinesitouslescapotsetautres
dispositifsdeprotectionappropriésnesontpasenplace
etenbonétatdemarche.
•Nevoustenezpasdevantl'ouvertured'éjection.Tenez
toutlemondeàunedistancesufsantedelamachine.
•N'admettezpaslesenfantsdanslazonedetravail.
N'autorisezjamaisunenfantàutiliserlamachine.
•Arrêtezlamachineetcoupezlemoteuravantdefaire
l'entretien,defairelepleindecarburantoudedéboucher
lamachine.
L'usageoul'entretienincorrectdecettemachinepeut
occasionnerdesaccidents.Pourréduirelesrisquesd'accidents
etdeblessures,respectezlesconsignesdesécuritéquisuivent.
Teneztoujourscomptedesmisesengardesignaléesparle
symboledesécuritéetlamentionPrudence,Attentionou
Danger.Nepasrespectercesinstructions,c'estrisquerde
vousblesser,parfoismortellement.
Voustrouverezd'autresconsignesdesécuritédanslesdiverses
sectionsdecemanuel.
2
Page 49

Autocollantsdesécuritéetd'instruction
Desautocollantsdesécuritéetdesinstructionsbienvisiblesparl'opérateursontplacésprèsdetous
lesendroitspotentiellementdangereux.Remplaceztoutautocollantendommagéoumanquant.
Marquedufabricant
decaloemmarkt
1.Identielalamecommepièced'origine.
decal131-4514b
131-4514
1.Attention–lisezleManueldel'utilisateur.
2.Risquedecoupure/mutilationdesmainsoudespiedspar
lalamedutablierdecoupe–nevousapprochezpasdes
piècesmobilesetgardeztouteslesprotectionsenplace.
3.Risquedecoupure/mutilationdesmainsoudespiedspar
lalamedutablierdecoupe–débranchezleldelabougie
etlisezlesinstructionsavantd'entreprendreunentretien
ouunerévision.
4.Risquedeprojectiond'objets–tenezlesspectateursà
bonnedistancedelamachine;coupezlemoteuravant
dequitterlapositiond'utilisation;ramassezlesdébris
decal94-8072
94-8072
éventuellementprésentsavantdetondre.
5.Risquedecoupure/mutilationdesmainsoudespiedspar
lalamedelatondeuse–netravaillezpasdanslesensde
lapente,maistransversalement;regardezderrièrevous
avantdefairemarchearrière.
1.Verrouillage2.Déverrouillage
decal112-8867
112-8867
decal117-2718
117-2718
3
Page 50

1.Attention–lisezle
Manueldel'utilisateur
–1)Desserrezlebouton
enletournantdanslesens
antihoraire;2)Éloignez
le(s)câble(s)dumoteur
pourréduirelatraction,
ourapprochez-lesdu
moteurpouraugmenter
latraction;3)Serrezle
boutonenletournantdans
lesenshoraire.
Réglagedelatraction
132-4470
2.ScannezlecodeQRpour
plusderenseignements
surleréglagedela
traction.
decal132-4470
Miseenservice
Important:Retirezetmettezaurebutlapellicule
deplastiquequiprotègelemoteurainsiquetout
autreemballageouélémentenplastiqueutilisésurla
machine.
1
Dépliageduguidon
Aucunepiècerequise
Procédure
ATTENTION
Vousrisquezd'endommagerlescâblesetderendre
l'utilisationdelamachinedangereusesivousne
dépliezpasleguidoncorrectement.
•Veillezànepasendommagerle(s)câble(s)en
pliantoudépliantleguidon.
•Vériezquele(s)câble(s)passe(nt)bienà
l'extérieurduguidon.
•Siuncâbleestendommagé,adressez-vousàun
dépositaire-réparateuragréé.
1.Déverrouillezleguidon(Figure3).
2.Ramenezleguidonenarrièreàlapositiond'utilisation
(Figure3).
133-8198
1.Attention–lisezleManueldel'utilisateur;1)Ajoutezdu
carburantjusqu'auniveauindiqué.2)Basculezlatondeuse
enavantpourlaremiser.
decal133-8198
4
Page 51

Figure3
3.Placezledispositifdeverrouillageduguidondansl'une
desdeuxpositions(Figure4)jusqu'àcequelagoupille
s'enclencheenplaceetverrouilleleguidonàlaposition
d'utilisation.
2
Montageducâbledulanceur dansleguide
Aucunepiècerequise
Procédure
Important:Pourdémarrerlemoteurfacilementeten
toutesécuritéchaquefoisquevousutilisezlamachine,
installezlecâbledulanceurdansleguide.
Maintenezlabarredecommandedelalamecontrelapartie
supérieureduguidonettirezlecâbleàtraversleguidesurle
guidon(Figure5).
g189174
g003251
Figure5
1.Dispositifdeverrouillage
1.Câbledulanceur2.Guidedulanceur
3
Pleind'huilemoteur
Aucunepiècerequise
Procédure
Important:Àlalivraisondelamachine,lecarter
moteurestvide,maisunbidond'huilemoteurest
fourni.Avantdemettrelemoteurenmarche,faitesle
g189175
Figure4
2.Positionsdelagoupille
duguidon
pleind'huilemoteur.
Capacitéd'huilemoteur:0,47L(16oz)
Viscositédel'huile:huiledétergenteSAE30ouSAE
10W-30
ClassedeserviceAPI:SJousupérieure
1.Amenezlamachinesurunsolplatethorizontal.
2.Tournezlebouchondanslesensantihoraireetsortez
lajauge(Figure6).
5
Page 52

Figure6
1
2
3
g027120
3.Versezlentementenviron3/4delacapacitéd'huile
moteurdansletubederemplissaged'huile.
4.Essuyezlajaugesurunchiffonpropre.
5.Insérezlajaugeaufonddugoulotderemplissage,puis
ressortez-la.
6.Vériezleniveaud'huileindiquéparlajauge(Figure6).
4
Montagedubacàherbe
Aucunepiècerequise
Procédure
1.Glissezlebacsurl'armature,commemontréàlaFigure
7.
g186245
•Sileniveaun'atteintpaslerepèreminimumsurla
jauge,versezlentementunepetitequantitéd'huile
dansletubederemplissage,patientez3minuteset
répétezlesopérations3à5jusqu'àcequeleniveau
atteignelerepèremaximum.
•Sileniveaud'huiledépasselerepèremaximumsur
lajauge,vidangezl'excédentd'huilejusqu'àceque
leniveausoitredescenduaurepèremaximum;voir
Vidangedel'huilemoteur(page18).
Important:Sivousfaitestournerlemoteur
alorsqueleniveaud'huiledanslecarter
esttropbasoutropélevé,vousrisquez
d'endommagerlemoteur.
7.Revissezlajaugefermementenplace.
g027120
Figure7
1.Poignée3.Bacàherbe
2.Armature
Remarque:Nepassezpaslebacpardessusla
poignée(Figure7).
2.Accrochezlaglissièreinférieuredubacaubasde
l'armature(Figure8).
6
Page 53

g027121
Figure8
Vued'ensembledu
produit
g027121
3.Accrochezlaglissièresupérieureetlesglissières
latéralesdubacausommetetsurlescôtésdel'armature
respectivement(Figure8).
Figure9
1.Barredecommandedela
lame
2.Barred'autopropulsion9.Voletd'éjectionlatérale
3.Boutonderéglagede
l'autopropulsion
4.Voletarrière(non
représenté)
5.Raccorddelavage(non
représenté)
6.Bouchonduréservoirde
carburant
7.Filtreàair14.Poignéedulanceur
8.Bougie
10.Bouchonde
remplissage-jauge
11.Levierdehauteurde
coupe(4)
12.Dispositifdeverrouillage
duguidon(2)
13.Poignée
g188888
7
Page 54

1.Bacàherbe
Utilisation
Avantl'utilisation
Sécuritéavantl'utilisation
Figure10
2.Goulotted'éjectionlatérale
Sécuritérelativeaucarburant
DANGER
Lecarburantestextrêmementinammableet
hautementexplosif.Unincendieouuneexplosion
causé(e)parducarburantpeutvousbrûler,ainsi
quelespersonnessetenantàproximité,etcauser
desdommagesmatériels.
•Pouréviterquel'électricitéstatiquen'enamme
lecarburant,posezlerécipientet/oulamachine
g009571
directementsurlesol,pasdansunvéhiculeou
surunsupportquelconque,avantderemplirle
réservoir.
•Faiteslepleinduréservoirdecarburantà
l'extérieur,dansunendroitbiendégagé,lorsque
lemoteurestfroid.Essuyeztoutcarburant
répandu.
•Nefumezpaslorsquevousmanipulezdu
carburantettenez-vousàl'écartdesammes
nuesousourcesd'étincelles.
•Conservezlecarburantdansunrécipient
homologuéethorsdelaportéedesenfants.
Sécuritégénérale
•Familiarisez-vousaveclemaniementcorrectdumatériel,
lescommandesetlessymbolesdesécurité.
•Vérieztoujoursquelescapotsetdispositifsdesécurité,
commelesvoletset/oulesbacsàherbe,sontenplaceet
fonctionnentcorrectement.
•Vérieztoujourssileslames,lesboulonsdelameet
l'ensembledecoupenesontpasusésouendommagés.
•Inspectezlazonedetravailetenleveztoutobjetpouvant
êtreprojetéparlamachine.
•Pendantleréglagedelahauteurdecoupe,vousrisquez
detoucherlalameenmouvementetdevousblesser
gravement.
–Coupezlemoteuretattendezl'arrêtcompletde
touteslespiècesmobiles.
–Nemettezpaslesdoigtssouslecarterdutablierde
coupequandvousréglezlahauteurdecoupe.
ATTENTION
Lecarburantesttoxique,voiremortelencas
d'ingestion.L'expositionprolongéeauxvapeursde
carburantpeutcauserdesblessuresetdesmaladies
graves.
•Évitezderespirerlesvapeursdecarburantde
façonprolongée.
•N'approchezpaslevisageoulesmainsdu
pistoletnidel'ouvertureduréservoirde
carburant.
•N'approchezpaslecarburantdesyeuxetdela
peau.
Remplissageduréservoirde carburant
•Pourassurerlefonctionnementoptimaldelamachine,
utilisezuniquementdel'essencesansplombpropreet
fraîcheavecunindiced'octanede87ouplus(méthode
decalcul[R+M]/2).
•Éthanol:Del'essencecontenantjusqu'à10%
d'éthanol(essence-alcool)ou15%deMTBE(éther
méthyltertiobutylique)parvolumepeutêtreutilisée.
L'éthanoletleMTBEsontdeuxproduitsdifférents.
L'utilisationd'essencecontenant15%d'éthanol(E15)
parvolumen'estpasagréée.N'utilisezjamaisd'essence
contenantplusde10%d'éthanolparvolume,par
exempleE15(quicontient15%d'éthanol),E20(qui
contient20%d'éthanol)ouE85(quicontientjusqu'à
8
Page 55

85%d'éthanol).L'utilisationd'essencenonagrééepeut
entraînerdesproblèmesdeperformanceset/oudes
dommagesaumoteurquipeuventnepasêtrecouverts
parlagarantie.
•N'utilisezpasd'essencecontenantduméthanol.
•Nestockezpaslecarburantdansleréservoiroudansdes
bidonsdecarburantpendantl'hiveràmoinsd'ajouterun
stabilisateuraucarburant.
•N'ajoutezpasd'huileàl'essence.
Important:Pourréduirelesproblèmesdedémarrage,
ajoutezunstabilisateuràchaquepleinetutilisezde
l'essencestockéedepuismoinsd'unmois.
Reportez-vousaumanueldumoteurpourplusde
renseignements.
g186245
Figure12
3.Essuyezlajaugesurunchiffonpropre.
4.Insérezlajaugeaufonddugoulotderemplissage,puis
ressortez-la.
5.Vériezleniveaud'huileindiquéparlajauge(Figure
12).
Figure11
1.Neremplissezpasleréservoirdecarburantau-dessusdu
basdugoulotduréservoir.
Contrôleduniveaud'huile moteur
Périodicitédesentretiens:Àchaqueutilisationouunefois
parjour
1.Amenezlamachinesurunsolplatethorizontal.
2.Tournezlebouchondanslesensantihoraireetsortez
lajauge(Figure12).
•Sileniveaud'huilen'atteintpaslerepèreminimum
surlajauge,versezlentementunepetitequantité
d'huiledansletubederemplissage,patientez
3minutesetrépétezlesopérations3à5jusqu'àce
queleniveauatteignelerepèremaximum.
g188892
•Sileniveaudépasselerepèremaximumsurla
jauge,vidangezl'excédentd'huilejusqu'àcequele
niveausoitredescenduaurepèremaximum.Pour
vidangerl'excédentd'huile,voirVidangedel'huile
moteur(page18).
Important:Sivousfaitestournerlemoteuralors
queleniveaud'huiledanslecarteresttropbasou
tropélevé,vousrisquezd'endommagerlemoteur.
6.Insérezetvissezsolidementlajaugedansletubede
remplissage.
Réglagedelahauteurde coupe
PRUDENCE
Silemoteurvientdetourner,lesilencieuxesttrès
chaudetpeutvousbrûlergravement.
Nevousapprochezpasdusilencieuxencorechaud.
Choisissezlahauteurdecoupevoulue.Régleztouslesleviers
dehauteurdecoupeàlamêmehauteur.Pouréleverou
abaisserlamachine,voirFigure13.
9
Page 56

Figure13
1.Éleverlamachine
Remarque:Leshauteursdecoupesuivantessont
disponibles:25mm(1po),35mm(1-3/8po),44mm
(1-3/4po),54mm(2-1/8po),64mm(2-1/2po),73mm
(2-7/8po),83mm(3-1/4po),92mm(3-5/8po)et102mm
(4po).
2.Abaisserlamachine
Pendantl'utilisation
Sécuritépendantl'utilisation
Sécuritégénérale
•Portezdesvêtementsappropriés,ycomprisune
protectionoculaire,deschaussuressolidesàsemelle
antidérapanteetdesprotecteursd'oreilles.Attachezles
cheveuxlongsetlesvêtementsamples,etneportezpas
debijoux.
•N'utilisezpaslamachinesivousêtesmaladeoufatigué,ni
sousl'emprisedel'alcool,dedroguesoudemédicaments.
•Lalameesttranchanteetvouspouvezvousblesser
gravementàsoncontact.Coupezlemoteuretattendez
l'arrêtcompletdetouteslespiècesmobilesavantde
quitterlapositiond'utilisation.
•Lorsquevousrelâchezlabarredecommandedela
lame,lemoteuretlalamedoivents'arrêterenmoinsde
3secondes.Sicen'estpaslecas,cessezimmédiatement
d'utiliserlamachineetcontactezundépositaire-réparateur
agréé.
•N'utilisezlamachinequesilavisibilitéestsufsanteet
dansdebonnesconditionsmétéorologiques.N'utilisez
paslamachinesilafoudremenace.
•Entravaillantsurl'herbeoulesfeuilleshumides,vous
risquezdeglisseretdevousblessergravementsivous
touchezlalameentombant.Évitezdetondrequand
l'herbeesthumide.
•Soyezparticulièrementprudentàl'approchedetournants
sansvisibilité,debuissons,d'arbresoud'autresobjets
susceptiblesdemasquerlavue.
•Méez-vousdestrous,ornières,bosses,rochersouautres
obstaclescachés.Lesirrégularitésdeterrainpeuventvous
fairedéraperetprovoquervotrechute.
•Arrêtezlamachineetvériezl'étatdeslamessivous
heurtezunobstacleousilamachinevibredemanière
inhabituelle.Effectueztouteslesréparationsnécessaires
avantderéutiliserlamachine.
•Avantdequitterlapositiond'utilisation,coupezlemoteur
etattendezl'arrêtdetouteslespiècesmobiles.
•Silemoteurvientdetourner,lesilencieuxesttrèschaud
etpeutvousbrûlergravement.Nevousapprochezpas
g189036
dusilencieuxencorechaud.
•Vériezfréquemmentl'étatdescomposantsdubacà
herbeetdudéecteurd'éjection,etremplacezlespièces
quienontbesoinpardespiècesrecommandéesparle
constructeur.
•Utilisezuniquementlesaccessoiresetéquipementsagréés
parTheToro®Company .
Consignesdesécuritépourl'utilisation
surdespentes
•Travailleztransversalementàlapente,jamaisverslehaut
ouverslebas.Soyezextrêmementprudentlorsquevous
changezdedirectionsurunterrainenpente.
•Netondezpasdepentestropraides.Vouspourriez
glisseretvousblesserentombant.
•Tondeztoujoursavecprudenceàproximitéde
dénivellations,fossésouberges.
Démarragedumoteur
1.Maintenezlabarredecommandedelalamecontrele
guidon(Figure14).
g024454
Figure14
1.Barredecommandedelalame
2.Tirezlégèrementlapoignéedulanceur(Figure15)
jusqu'àcequevoussentiezunerésistance,puistirez
vigoureusementetlaissezlecâbleserétracterlentement
jusqu'auguidesurleguidon.
10
Page 57

Figure15
éventuellementpousserlamachineenavantsurenviron
2,5cm(1po)ouplusaprèsavoirrelâchélabarrede
commanded'autopropulsion.
Arrêtdumoteur
Périodicitédesentretiens:Àchaqueutilisationouunefois
parjour
Pourarrêterlemoteur,relâchezlabarredecommandede
lalame.
Important:Lorsquevousrelâchezlabarrede
commandedelalame,lemoteuretlalamedoivent
g024455
s'arrêterenmoinsde3secondes.Sicen'estpasle
cas,cessezimmédiatementd'utiliserlamachineet
adressez-vousàundépositaire-réparateuragréé.
Remarque:Silemoteurnedémarrepasaprès
plusieurstentatives,contactezundépositaire-réparateur
agréé.
Utilisationdel'autopropulsion
•Pourengagerl'autopropulsion:serrezetmaintenezla
barred'autopropulsioncontreleguidon(Figure16).
Recyclagedel'herbecoupée
Àlalivraison,votremachineestprêteàrecyclerl'herbeetles
feuillescoupéespournourrirvotrepelouse.
Silebacàherbeestmontésurlamachine,enlevez-leavantde
procéderaurecyclagedel'herbe;voirRetraitdubacàherbe
(page12).Silagoulottelatéraleestmontée,déposez-laavant
deprocéderaurecyclagedel'herbe;voirRetraitdelagoulotte
d'éjectionlatérale(page12).
Ramassagedel'herbecoupée
Utilisezlebacàherbepourrecueillirl'herbeetlesfeuilles
coupéesàlasurfacedelapelouse.
Silagoulotted'éjectionlatéraleestinstallée,déposez-la;voir
Retraitdubacàherbe(page12).
Montagedubacàherbe
1.Soulevezledéecteurarrièreetmaintenez-ledanscette
position(Figure17).
Figure16
1.Barred'autopropulsion
Remarque:Lavitessed'autopropulsionmaximaleest
xe.Pourralentir,éloignezlabarred'autopropulsiondu
guidon.
•Pourdésengagerl'autopropulsion:relâchezlabarre
decommanded'autopropulsion.
Remarque:Lamachineestéquipéed'embrayages
àrouelibrequipermettentdelatirerenarrièreplus
facilement.Pourdésengagerlesembrayages,ilfaudra
g024456
11
Page 58

Figure17
1.Déecteurarrière3.Ergotdebacàherbe(2)
2.Cran(lecrangauchen'est
pasreprésenté)
2.Montezlebacàherbeenveillantàplacerlesergots
danslescransduguidon(Figure17).
3.Abaissezledéecteurarrière.
Éjectionlatéraledel'herbe coupée
Utilisezl'éjectionlatéralequandvoustondezdel'herbetrès
haute.
Silebacàherbeestinstallé,déposez-le;voirRetraitdubacà
herbe(page12).
Montagedelagoulotted'éjection
latérale
Soulevezledéecteurlatéraletmontezlagoulotted'éjection
g189040
latérale(Figure18).
Retraitdubacàherbe
Pourretirerlebacàherbe,inversezlaprocéduredemontage
décriteplushaut.
g024439
Figure18
Retraitdelagoulotted'éjectionlatérale
Pourenleverlagoulotted'éjectionlatérale,soulevezle
déecteurlatéral,enlevezlagoulotteetabaissezledéecteur.
Remisagedelamachineen positionverticale
Pendantlasaisondetonteouhorssaison,vouspouvez
remiserlamachineenpositionverticalepourminimiser
l'espaceoccupé.
12
Page 59

DANGER
Lecarburantestextrêmementinammableet
explosif.Unincendieouuneexplosioncausé(e)par
ducarburantpeutvousbrûler,ainsiqued'autres
personnes.
•Sileréservoirdecarburantesttropplein,du
carburantpeuts'enéchappersivousremisez
lamachineenpositionverticale.Lecarburant
estextrêmementinammableetexplosif.Un
incendieouuneexplosioncausé(e)pardu
carburantpeutvousbrûler,ainsiqued'autres
personnes.
•Neremisezlamachineenpositionverticale
quesileniveaudecarburantdansleréservoir
nedépassepaslalimiterecommandéedansce
Man uel de l'utilisateur
•Neremisezpaslamachineau-delàdelaposition
verticale(90°),carducarburantpourrait
s'échapperduréservoir.
•Netransportezpaslamachineenposition
verticale.
.
decal133-8198
Figure19
2.Vériezquelahauteurdecoupedelamachineest
régléeà92mm(3-5/8po)oumoins;sicen'estpas
lecas,ajustez-la;voirRéglagedelahauteurdecoupe
(page9).
3.Déverrouillezleguidon(Figure20).
•Netentezpasdedémarrerlamachineen
positionverticale.
•Lesmachinesnonconçuespourcelane
doiventpasêtreremiséesenpositionverticale
lorsqu'ellescontiennentdel'huileetdu
carburant.
ATTENTION
Vousrisquezd'endommagerlescâblesetderendre
l'utilisationdelamachinedangereusesivousne
pliezounedépliezpasleguidoncorrectement.
•Veillezànepasendommagerlescâblesenpliant
oudépliantleguidon.
•Siuncâbleestendommagé,adressez-vousàun
dépositaire-réparateuragréé.
1.Vériezqueleniveaudecarburantdansleréservoirne
dépassepaslalimiterecommandéeparleconstructeur
dumoteur;voirl'autocollantduconstructeurapposé
surlemoteur(Figure19).
g189218
Figure20
1.Guidondéverrouillé2.Guidonverrouillé
4.Pliezleguidoncomplètementenavant(Figure20).
Important:Faitespasserlescâblesàl'extérieur
desboutonsquandvouspliezleguidon.
5.Verrouillezleguidon.
6.Levezl'avantdelamachineparleguidonetamenez-la
dansunlieuderemisage(Figure21).
Remarque:Sileniveaudecarburantesttropélevé
dansleréservoirdecarburant,vidangezunepartiedu
réservoirdansunrécipientappropriéjusqu'àcequele
niveausoitégalouinférieuràlalimiterecommandée
parleconstructeurdumoteur.
13
Page 60

–Remplacezlalameoufaites-laaiguiser.
–Tondezenavançantpluslentement.
–Augmentezlahauteurdecoupe.
–Tondezplussouvent.
–Empiétezsurlespassagesprécédentspourtondre
unelargeurdebanderéduite.
Hachagedefeuilles
g189217
Figure21
Conseilsd'utilisation
Conseilsdetontegénéraux
•Inspectezlazonedetravailetenleveztoutobjetpouvant
êtreprojetéparlamachine.
•Évitezdeheurterdesobstaclesaveclalame.Nepassez
jamaisintentionnellementsurunobjetquelqu'ilsoit.
•Silamachineaheurtéunobstacleoucommenceàvibrer,
coupezimmédiatementlemoteur,débranchezleldela
bougieetvériezsilamachinen'estpasendommagée.
•Pourobtenirdesrésultatsoptimaux,remplacezlalameau
débutdelasaisondetonte.
•RemplacezlalamedèsquenécessaireparunelameToro.
Latonte
•Netondezl'herbequesuruntiersdesahauteuràchaque
fois.N'utilisezpasunehauteurdecoupeinférieureà
54mm(2-1/8po),saufsil'herbeestclairseméeouàlan
del'automnequandlapoussecommenceàralentir.Voir
Réglagedelahauteurdecoupe(page9).
•Sil'herbefaitplusde15cm(6po),effectuezd'abordun
premierpassageàvitesseréduiteàlahauteurdecoupe
laplushaute.Effectuezensuiteundeuxièmepassageà
unehauteurdecoupeinférieurepourobtenirunecoupe
plusesthétique.L'herbetrophauterisqued'obstruerla
machineetdefairecalerlemoteur.
•L'herbeetlesfeuilleshumidesonttendanceàs'agglomérer
surlapelouseetpeuventobstruerlamachineetfairecaler
lemoteur.Évitezdetondrequandl'herbeesthumide.
•Soyezconscientdesrisquesd'incendiepartempstrès
sec,respecteztouslesavertissementslocauxrelatifsaux
incendies,etnelaissezpasl'herbeetlesfeuillessèches
s'accumulersurlamachine.
•Alternezladirectiondelatonte.Celapermetde
disperserlesdéchetsplusuniformémentetd'obtenirune
fertilisationplushomogène.
•Sil'aspectdelapelousetonduen'estpassatisfaisant,
essayezuneouplusieursdessolutionssuivantes:
•Aprèslatonte,50%delapelousedoitêtrevisiblesous
lacouchedefeuilleshachées.Àceteffet,vousdevrez
peut-êtrerepasserplusieursfoissurlesfeuilles.
•Silacouchedefeuillesfaitplusde13cm(5po)
d'épaisseur,réglezlesrouesavant1ou2cransplushaut
quelesrouesarrière.
•Ralentissezlavitessededéplacementsilesfeuillesnesont
pashachéesassezmenues.
14
Page 61

Aprèsl'utilisation
Sécuritéaprèsl'utilisation
Sécuritégénérale
•Pouréviterlesrisquesd'incendie,enlevezlesbrinsd'herbe
etautresdébrisquisontaggloméréssurlamachine.
Nettoyezlescouléeséventuellesd'huileoudecarburant.
•Laissezrefroidirlemoteuravantderangerlamachine
dansunlocalfermé.
•Nejamaisremisezpaslamachinenilesbidonsde
carburantàproximitéd'uneammenue,d'unesource
d'étincellesoud'uneveilleuse,tellecelled'unchauffe-eau
oud'autresappareils.
g189173
Figure22
1.Raccorddelavage
6.Ouvrezl'arrivéed'eau.
Sécuritérelativeautransport
•Procédezavecprudencepourchargeroudéchargerla
machine.
•Empêchezlamachinederouler.
Nettoyagedudessousdela machine
Périodicitédesentretiens:Àchaqueutilisationouunefois
parjour
Nettoyagedudessousdelamachine
aumoyendel'oricedelavage
Pourobtenirdesrésultatsoptimaux,nettoyezrapidementla
machineaprèslatonte.
1.Placezlamachinesurunesurfaceplaneetrevêtue.
2.Coupezlemoteuretattendezl'arrêtcompletde
touteslespiècesmobilesavantdequitterlaposition
d'utilisation.
7.Mettezlemoteurenmarcheetlaissez-letournerjusqu'à
cequ'ilneresteplusd'herbesouslamachine.
8.Coupezlemoteur.
9.Coupezl'eauetdébranchezletuyaud'arrosagedela
machine.
10.Mettezlemoteurenmarcheetlaissez-letourner
quelquesminutespoursécherladessousdelamachine
etl'empêcherderouiller.
11.Coupezlemoteuretlaissez-lerefroidiravantderemiser
lamachinedansunlocalfermé.
Nettoyagedudessousdelamachine
enpositionverticale
1.Placezlamachineenpositionverticale;voirRemisage
delamachineenpositionverticale(page12).
2.Lavezledessousdelamachinepouréliminerlesdébris
d'herbe.
3.Abaissezlamachineàlahauteurdecoupelaplusbasse.
VoirRéglagedelahauteurdecoupe(page9).
4.Lavezledessousdudéecteurarrièreaupointoù
l'herbecoupéepassedelafaceinférieuredelamachine
aubacderamassage.
5.Branchezuntuyaud'arrosage,reliéàunearrivéed'eau,
auraccorddelavage(Figure22).
15
Page 62

Pliageduguidon
ATTENTION
Vousrisquezd'endommagerlescâblesetderendre
l'utilisationdelamachinedangereusesivousne
pliezounedépliezpasleguidoncorrectement.
•Veillezànepasendommagerlescâblesenpliant
oudépliantleguidon.
•Siuncâbleestendommagé,adressez-vousàun
dépositaire-réparateuragréé.
1.Déverrouillezleguidonjusqu'àcequelamoitié
supérieurebougelibrement.
2.Pliezleguidonversl'avantàlapositionverticaleou
complètementenavant,commemontréàlaFigure23.
Important:Faitespasserlescâblesàl'extérieur
desdispositifsdeverrouillagequandvouspliez
leguidon.
Figure23
3.Pourdéplierleguidon;voir1Dépliageduguidon(page
4).
g189219
16
Page 63

Entretien
Remarque:Lescôtésgaucheetdroitdelamachinesontdéterminésd'aprèslapositiond'utilisationnormale.
Vouspouvezvousprocurerdespiècesderechangechezn'importequeldépositaireagrééousurlesitewww.torodealer.com
(clientsaméricainsuniquement).
Programmed'entretienrecommandé
Périodicitéd'entretienProcédured'entretien
•Contrôlezleniveaud'huilemoteur.
Àchaqueutilisationou
unefoisparjour
Unefoisparan
•Vériezquelemoteurs'arrêtedansles3secondessuivantlerelâchementdela
barredecommandedelalame.
•Enlevezl'herbecoupéeetautresdébrisaccumuléssouslamachine.
•Nettoyezlesystèmederefroidissement;nettoyez-leplussouventsivoustravaillez
dansuneatmosphèrepoussiéreuse.Reportez-vousaumanueldumoteur.
•Effectuezl'entretiendultreàair;faites-leplusfréquemmentsil'atmosphèreest
trèspoussiéreuse.
•Remplacezlalameoufaites-laaiguiser(plussouventsielles'émousserapidement).
•Nettoyezlesystèmederefroidissement;nettoyez-leplussouventsivoustravaillez
dansuneatmosphèrepoussiéreuse.Reportez-vousaumanueldumoteur.
Unefoisparanouavant
leremisage
Important:Reportez-vousaumanueldumoteurpourtoutesprocéduresd'entretiensupplémentaires.
•Vidangezleréservoirdecarburantavantleremisageannueletavantlesréparations
quilenécessitent.
Consignesdesécuritépendant l'entretien
•Débranchezleldelabougieetretirezleboutonde
démarrageélectriqueavantd'entreprendretoutentretien.
•Portezdesgantsetuneprotectionoculairepourfaire
l'entretiendelamachine.
•Lalameesttranchanteetvouspouvezvousblesser
gravementàsoncontact.Portezdesgantspoureffectuer
l'entretiendelalame.
•N'enlevezetnemodiezjamaislesdispositifsdesécurité.
Vériezrégulièrementqu'ilsfonctionnentcorrectement.
•Ducarburantpeuts'échapperlorsquelamachineest
basculéesurlecôté.Lecarburantestinammableet
explosif,etpeutcauserdesblessures.Laisseztourner
lemoteurjusqu'àcequ'ils'arrêtefautedecarburantou
vidangezlerestedecarburantavecunepompemanuelle;
nesiphonnezjamaislecarburant.
Préparationàl'entretien
1.Coupezlemoteuretattendezl'arrêtcompletdetoutes
lespiècesmobiles.
2.Débranchezleldelabougie(Figure24).
1.Fildebougie
3.Rebranchezlelsurlabougieunefoisl'entretien
terminé.
Important:Avantdebasculerlamachinepour
vidangerl'huileouremplacerlalame,laissezle
moteurenmarchejusqu'àcequ'ils'arrêtefaute
decarburant.Sivousnepouvezpasattendre
quelemoteurs'arrêteparmanquedecarburant,
utilisezunepompemanuellepourviderlereste
decarburant.Basculeztoujourslamachinesurle
côté,aveclajaugeenbas.
Figure24
g189230
17
Page 64

Entretiendultreàair
Vidangedel'huilemoteur
Périodicitédesentretiens:Unefoisparan
1.Déclipsezlehautducouvercledultreàair(Figure25).
Iln'estpasnécessairedevidangerl'huilemoteur,mais
sivoussouhaitezlefaire,procédezcommesuit.
Remarque:Faitestournerlemoteurpendantquelques
minutesavantlavidangepourréchaufferl'huile.L'huile
chaudes'écouleplusfacilementetentraîneplusd'impuretés.
Capacitéd'huilemoteur:0,47L(16oz)
Viscositédel'huile:huiledétergenteSAE30ouSAE
10W-30
ClassedeserviceAPI:SJousupérieure
1.Amenezlamachinesurunsolplatethorizontal.
2.VoirPréparationàl'entretien(page17).
3.Tournezlebouchondanslesensantihoraireetsortez
lajauge(Figure26).
Figure25
1.Clip
2.Couvercledultreàair
3.Filtreàair
2.Déposezleltreàair(Figure25).
3.Examinezleltreàair.
Remarque:Sileltreàairestexcessivement
encrassé,remplacez-leparunneuf.Sinon,tapotezle
ltresurunesurfacedurepourdélogerlesdébris.
4.Mettezleltreàairenplace.
5.Fixerlecouvercledultreàairavecleclip.
g189231
g186245
Figure26
4.Basculezlamachinesurlecôté(ltreàairenhaut)pour
vidangerl'huileusagéeparlegoulotderemplissage
(Figure27)ouplacezlamachineenpositionde
rangementàlaverticale(Figure28).Reportez-vousà
lasectionRemisagedelamachineenpositionverticale
(page12)pourvidangerl'huileusagéeparletubede
remplissage.
18
Page 65

•Sileniveaun'atteintpaslerepèreminimumsurla
jauge,versezlentementunepetitequantitéd'huile
dansletubederemplissage,patientez3minutes
etrépétezlesopérations8à10jusqu'àcequele
niveauatteignelerepèremaximum.
•Sileniveaud'huiledépasselerepèremaximumsur
lajauge,vidangezl'excédentd'huilejusqu'àceque
leniveausoitredescenduaurepèremaximum.
Important:Sivousfaitestournerlemoteur
alorsqueleniveaud'huilemoteuresttropbas
outropélevé,vousrisquezd'endommagerle
moteur.
11.Revissezlajaugefermementenplace.
Figure27
g189232
12.Recyclezl'huileusagéecorrectement.
Remplacementdelalame
Périodicitédesentretiens:Unefoisparan
Important:
dynamométrique pour monter la lame cor r ectement
vousn'enpossédezpasousivousnevoussentezpas
capabled'effectuercetteprocédure,adressez-vousàun
dépositaire-réparateuragréé.
Examinezl'étatdelalamechaquefoisqueleréservoirde
carburantestvide.Silalameestendommagéeoufêlée,
remplacez-laimmédiatement.Silalameestémousséeou
ébréchée,faites-laaiguiseretéquilibrerouremplacez-la.
ATTENTION
Lalameesttranchanteetvouspouvezvousblesser
gravementàsoncontact.
Portezdesgantspoureffectuerl'entretiendela
lame.
V ous aur ez besoin d'une clé
.Si
Figure28
5.Redressezlamachineaprèsavoirvidangél'huileusagée.
6.Versezlentementenviron3/4delacapacitéd'huile
moteurdansletubederemplissaged'huile.
7.Attendezenviron3minutesquel'huilesestabilisedans
lemoteur.
8.Essuyezlajaugesurunchiffonpropre.
9.Insérezlajaugeaufonddugoulotderemplissage,puis
ressortez-la.
10.Vériezleniveaud'huileindiquéparlajauge(Figure
26).
1.VoirPréparationàl'entretien(page17).
2.Basculezlamachinesurlecôté(ltreàairenhaut).
g189236
3.Immobilisezlalameavecunmorceaudebois(Figure
29).
19
Page 66

Figure29
4.Déposezlalamemaisnejetezpaslesxations(Figure
29).
5.Montezlanouvellelameettouteslesxations(Figure
30).
Réglagedel'autopropulsion
Lorsquevousremplacezuncâbledecommande
d'autopropulsionouquel'autopropulsionestdéréglée,vous
devezréglerl'autopropulsion.
1.Tournezleboutonderéglagedanslesensantihoraire
pourdesserrerleréglageducâble(Figure31).
g024442
g027231
Figure31
Figure30
1.Guidon(côtégauche)
2.Boutonderéglage5.Tournezleboutondans
3.Câbled'autopropulsion
4.Tournezleboutondansle
senshorairepourserrerle
réglage.
lesensantihorairepour
desserrerleréglage.
2.Ajustezlatensionducâble(Figure31)enletiranten
arrièreouenlepoussantenavantpuisenlemaintenant
àcetteposition.
Remarque:Poussezlecâbleverslemoteurpour
accroîtrelatractionetéloignez-ledumoteurpour
réduirelatraction.
3.Tournezleboutonderéglagedanslesenshorairepour
serrerleréglage.
Remarque:Serrezfermementleboutonàlamain.
g024443
Important:Lesextrémitésrelevéesdelalame
doiventêtredirigéesverslamachine.
6.Àl'aided'uneclédynamométrique,serrezle
boulondelalameà82N·m(60pi-lb).
Important:Unboulonvisséà82N·m(60pi-lb)
esttrèsserré.Bloquezlalameavecunecaleen
bois,appuyezdetoutvotrepoidssurlerochet
oulaclé,etserrezleboulonsolidement.Ilest
pratiquementimpossibledetropserrerceboulon.
20
Page 67

Remisage
Remisezlamachinedansunlocalfrais,propreetsec.
Préparationdelamachineau remisage
1.Lorsdudernierpleindelasaison,ajoutezun
stabilisateuraucarburant(tell'additifdetraitementde
carburanthautequalitéToro).
2.Débarrassez-vouscorrectementducarburantinutilisé.
Recyclez-leconformémentàlaréglementationlocale
ouutilisez-ledansunevoiture.
Remarque:Laprésencedecarburanttropvieux
dansleréservoirestlaprincipalecausedesproblèmes
dedémarrage.Neconservezpaslecarburantnontraité
plusde30joursetlecarburanttraitéplusde90jours.
3.Laisseztournerlemoteurdelamachinejusqu'àcequ'il
s'arrêtefautedecarburant.
4.Remettezlemoteurenmarche.
5.Laissezlemoteurtournerjusqu'àcequ'ils'arrêtede
nouveau.Lemoteurestsufsammentseclorsqu'iln'y
aplusmoyendelefairedémarrer.
6.Débranchezleldelabougie.
7.Retirezlabougieetversez30mld'huiledansl'ouverture
laisséeparlabougie.Tirezensuitelapoignéedulanceur
lentementàplusieursreprisespourbienrépartirl'huile
àl'intérieurducylindreetempêchercelui-ciderouiller
pendantleremisagedelamachine.
8.Remettezlabougieenplacesanslaserrer.
9.Serreztouslesécrous,boulonsetvis.
Remiseenserviceaprès remisage
1.Contrôlezetresserreztouteslesxations.
2.Retirezlabougieetfaitestournerlemoteurrapidement
entirantlapoignéedulanceurpouréliminerl'excédent
d'huiledanslecylindre.
3.Reposezetserrezlabougieà20N·m(15pi-lb)àl'aide
d'uneclédynamométrique.
4.Effectuezlesentretiensrequis;voirEntretien(page17).
5.Contrôlezleniveaud'huilemoteur;voirContrôledu
niveaud'huilemoteur(page9).
6.Remplissezleréservoirdecarburantd'essenceneuve;
voirRemplissageduréservoirdecarburant(page8).
7.Branchezleldelabougie.
21
Page 68

LagarantieToro
Unegarantieintégralede2ans(garantielimitéede45jourspourusagecommercial)
Lagarantiededémarrage(GTS)Toro
Unegarantieintégralede3ans(nes'appliquepasàl'usagecommercial)
®
Recycler
de51et56cm(20et22po)
Déchiqueteur/systèmederamassagede
51cm(20po)
Tondeusesautotractées
Tabliersenacier
Conditionsetproduitscouverts
TheT oroCompanyetsalialeT oroWarrantyCompany,envertud'unaccordmutuel,s'engagent
conjointementàréparerleproduitT oroci-dessouss'ilestemployépourunusagerésidentiel*,
s'ilprésenteundéfautdematériauxoudefabricationous'ilcessedefonctionnerparsuitedela
défaillanced'uncomposant;ousilemoteurToroGTS(GuaranteedtoStart–Démarragegaranti)ne
démarrepasàlapremièreouàladeuxièmetentativeaulanceur,àconditionquel'entretiencourant
requisdansleManueldel'utilisateuraitétéeffectué.
Cettegarantiecouvrelecoûtdespiècesetdelamain-d'œuvre,maisletransportestàvotrecharge.
Duréesdelagarantieàpartirdeladated'achatd'origine:
Produits
Recyclerde51cm(20po)et56cm(22po)et
déchiqueteur/systèmederamassagede51cm
(20po)
Accessoires
GTS(GuaranteedtoStart–démarragegaranti)Garantieintégralede3ans
1
Moteur
1
Moteur
–UsagecommercialToro–45jours
Batterie
1
CertainsmoteursutiliséssurlesproduitsTorosontcouvertsparlagarantieconstructeurdumoteur.
Périodedegarantie
Garantieintégralede2ans
Garantieintégralede2ans
Garantieintégralede3ans
Autresmoteurs–90jours
Garantieintégralede1ans
Garantielimitéepourusagecommercial*
LesproduitsT oroàmoteuràessenceutilisésàdesnscommerciales,pardesinstitutionsoudonnés
enlocationsontcouvertscontretoutdéfautdefabricationoudematériaupendantunepériodede
45jours.Lesdéfaillancesdecomposantsduesàuneusurenormalenesontpascouvertesparcette
garantie.Pourlespériodesdegarantiemoteur,reportez-vousautableauci-dessus.
LagarantiededémarrageT oroGTSnes'appliquepassileproduitestutiliséàdesns
commerciales.*
Commentfaireintervenirlagarantie
SivouspensezquevotreproduitT oroprésenteundéfautdefabricationdematériau,ous'ilne
démarreplusaprèsunoudeuxessaiseffectuésparn'importequeladultephysiquementapte,
suivezlaprocédureci-dessous:
1.Demandezàundépositaire-réparateurT oroagréédeprendreenchargevotreproduit.Pour
trouverledépositaireleplusproche,consulteznotresitewebàwww.Toro.com.Vouspouvez
aussiappelerlesnumérosindiquésaupoint3pourconsulternotresystèmepermanentde
localisationdesdépositairesToro.
2.Lorsquevousvousrendezchezledépositaire-réparateur,apportezleproduitetunepreuve
d'achat(reçu).Ledépositaire-réparateurdiagnostiqueraleproblèmeetdétermineras'ilest
couvertparlagarantie.
3.Si,pouruneraisonquelconque,vousn'êtespassatisfaitdudiagnosticdevotre
dépositaire-réparateuroudesconseilsprodigués,n'hésitezpasànouscontacteràl'adresse
suivante:
ToroWarrantyCompany
CustomerCareDepartment,RLCDivision
811 1L yndaleAvenueSouth
Bloomington,MN55420-1196,États-Unis
Numérovert:866-214-9807(auxÉtats-Unis)
Numérovert:866-214-9808(auCanada)
Cequelagarantienecouvrepas
Iln'existeaucuneautregarantieexpresse,àpartlagarantiespécialedusystèmeantipollutionetdu
moteurpourcertainsproduits.Cettegarantieexpressenecouvrepas:
•Lesfraisnormauxd'entretienetderemplacementdepièces,tellesquelesltres,lecarburant,
leslubriants,lesvidangesd'huile,lesbougies,lesltresàair,l'affûtagedeslames,leslames
usées,leréglagedescâbles/delatringlerieouleréglagedesfreinsetdel'embrayage.
•Lesproduitsoupiècesayantfaitl'objetdemodications,d'unusageabusifoudenégligence,
ounécessitantunremplacementouuneréparationenraisond'unaccidentoud'undéfaut
d'entretien.
•Lesfraisdepriseàdomicileetdelivraison.
•Lesréparationsoutentativesderéparationparquiconqueautrequ'undépositaire-réparateur
Toroagréé.
•Lesréparationsrequisesenraisondunonrespectdelaprocédurerecommandéerelativeau
carburant(consultezleManueldel'utilisateurpourplusdedétails).
–Ladécontaminationdusystèmed'alimentationn'estpascouverte.
–L'utilisationdecarburanttropancien(vieuxdeplusd'unmois)oudecarburant
contenantplusde10%d'éthanolouplusde15%deMTBE
–L'omissiondelavidangedusystèmed'alimentationavanttoutepériodedenon
utilisationdeplusd'unmois.
•Lesréparationsouréglagesnécessairespourcorrigerlesproblèmesdedémarragecausés
par:
–Lenonrespectdesprocéduresd'entretiencorrectesoudesprocéduresrecommandées
relativesaucarburant
–Lesdommagessubisparlalamedelatondeusequiheurteunobstacle.
•Certainesconditionsdedémarrageexigentunouplusieursessais,notamment:
–Lepremierdémarrageaprèsunepériodedenonutilisationdeplusdetroismoisou
aprèsleremisagesaisonnier
–Lesdémarragespartempsfroid,parexempleaudébutduprintempsetàlande
l'automne.
–Desméthodesdedémarrageincorrectes–sivousavezdesdifcultésàdémarrerle
moteur,vériezdansleManueldel'utilisateurquevoussuivezbienlesprocédures
dedémarragecorrectes.Vouséviterezpeut-êtreainsiunevisiteinutilechezun
dépositaire-réparateurT oroagréé.
Conditionsgénérales
Touteslesréparationscouvertesparlesprésentesgarantiesdoiventêtreeffectuéesparun
dépositaire-réparateurT oroagréé,àl'aidedepiècesderechangeagrééesparT oro.Laréparation
parundépositaire-réparateurT oroagrééestleseuldédommagementauquelcettegarantiedonne
droit.
TheT oroCompanyetT oroWarrantyCompanydéclinenttouteresponsabilitéencasde
dommagessecondairesouindirectsliésàl'utilisationdesproduitsTorocouvertspar
cesgaranties,notammentquantauxcoûtsetdépensesencouruspourseprocurerun
équipementouunservicedesubstitutiondurantunepérioderaisonnablepourcausede
défaillanceoud'indisponibilitéenattendantlaréparationsousgarantie.
L'exclusiondelagarantiedesdommagessecondairesouindirectsn'estpasautoriséedanscertains
étatsoupays,etpeutdoncnepass'appliquerdansvotrecas.
Cettegarantievousaccordedesdroitsspéciques,auxquelspeuvents'ajouterd'autresdroits
quivarientselonlesétats.
Responsabilitésdupropriétaire
L'entretiendevotreproduitTorodoitêtreconformeauxprocéduresdécritesdansleManuelde
l'utilisateur.Cetentretiencourantestàvosfrais,qu'ilsoiteffectuéparvous-mêmeouparun
dépositaire-réparateur.
PaysautresquelesÉtats-UnisetleCanada
Cettegarantien'estpasvalideauMexique.PourlesproduitsToroexportésdesÉtats-UnisouduCanada,demandezàvotredistributeur(dépositaire)T orolapolicedegarantieapplicabledansvotre
pays,régionouétat.Si,pouruneraisonquelconque,vousn'êtespassatisfaitdesservicesdevotredistributeur ,ousivousavezdumalàvousprocurerdesrenseignementsconcernantlagarantie,
adressez-vousàl'importateurT oro.Endernierrecours,adressez-vousàT oroWarrantyCompany.
Droitaustraliendelaconsommation:LesclientsaustralienstrouverontdesrenseignementsconcernantleDroitaustraliendelaconsommationàl'intérieurducartonouauprèsdeleurdépositaire
Torolocal.
*L'usagerésidentielnormaldésignel'utilisationduproduitsurleterrainoùsetrouvevotredomicile.L'utilisationdansplusieurslieuxoupardesinstitutionsoulalocationestconsidéréecommeun
usagecommercial,couvertparlagarantiecommerciale.
374-0254RevG
 Loading...