


Instruction Manual:
DRX-4

Instruction Manual – DRX-4 Pharmacy Balance
Table of Contents
TableofContents
Chapter 1: Cautionary Notes and Warnings .................................................................................................... 2
Chapter 2: Specifications ................................................................................................................................... 4
Chapter 3: Parts Description .............................................................................................................................. 5
Chapter 4: Keys and Display Indicators ............................................................................................................ 7
Chapter 5: Unpacking the Scale and Getting Started ...................................................................................... 8
Chapter 6: Main Menu ..................................................................................................................................... 10
Chapter 7: Users ................................................................................................................................................. 11
Chapter 8: Calibration ...................................................................................................................................... 12
Chapter 9: Print .................................................................................................................................................. 14
9.1 Print Method ............................................................................................................................................................. 14
9.2 Print Configuration ...................................................................................................................................................
Chapter 10: Ports ............................................................................................................................................................. 16
10.1 Baud Rate .................................................................................................................................................................
10.2 Bits ............................................................................................................................................................................
10.3 Parity ........................................................................................................................................................................
10.4 Data Transmission and Exchange Protocol ..........................................................................................................
Chapter 11: Date and Time............................................................................................................................................ 20
Chapter 12: Sound ........................................................................................................................................................... 22
Chapter 13: Firmware .................................................................................................................................................... 23
Chapter 14: Restoring Default Settings ...................................................................................................................... 24
Chapter 15: Weighing ........................................................................................................................................ 25
15.1 Zeroing the Scale .........................................................................................................................................25
15.2 Taring the Scale ...........................................................................................................................................26
15.3 Clearing the Tare .........................................................................................................................................27
Chapter 16: Sealing the Calibration Switch .................................................................................................... 28
Chapter 17: Maintenance .................................................................................................................................. 29
Chapter 18: Accessories ................................................................................................................................... 29
Chapter 19: Replacement Parts ........................................................................................................................ 29
Chapter 20: Limited Warranty ....................................................................................................................... 30
15
16
17
17
18
- 1 -

Instruction Manual – DRX-4 Pharmacy Balance
Chapter 1: Cautionary Notes and Warnings
Important handling Cautions and Warnings
Always handle your scale with care.
Damage caused by improper handling is not covered under the scale’s warranty.
Never drop or throw any
articles onto the scale’s pan
or onto any other parts of the
unit!
DO NOT let the scale fall or
drop from its tabletop
surface!
When moving the scale do
not press or apply force onto
the scales pan!
DO NOT pass or handle
liquids directly over the
scale to avoid spillage and
liquid damage!
- 2 -

Instruction Manual – DRX-4 Pharmacy Balance
CAUTIONARY NOTES AND PRECAUTIONS
Always handle your scale with care. The correct location and proper environment makes an important
contribution to the accuracy of the weighing results of TORBAL precision scales.
The optimum location for your scale:
• Stable, vibration-free base as horizontal as possible
• Away from direct sunlight
• Not exposed to high temperature variations
• Away from direct drafts
• The best location is on a stable bench away from direct drafts,
doors, windows, radiators and air conditioner vents.
CAUTION:
WARNING:
• The scale is designed for indoor use only.
• Do not operate the scale in hazardous areas or under dangerous conditions.
• Do not use the scale in locations subject to high humidity or dust.
• Do not connect cables in ways other than those mentioned in this manual.
• Set the scale on a firm, stable, horizontal surface.
• Never stand on or lean on this product. Equipment may fall or collapse,
causing breakage and possible injury.
• Before moving the product, unplug it and unplug all cables connected to it.
• When storing, transporting or returning the scale for service, always use the
original packaging.
• Never attempt to repair, disassemble or modify the scale. Tampering with the
scale may result in injury and cause greater damage to the equipment.
• Be sure to use the specified power source.
• Do not allow foreign matter to fall onto the scale.
• If water or other liquid spills onto the scale, unplug the power cord
immediately and contact technical support.
- 3 -

Instruction Manual – DRX-4 Pharmacy Balance
Chapter 2: Specifications
Model
Capacity (Max)
Minimum load (Min)
Reading unit (d)
Verification unit (e)
Tare range
Accuracy class
Temperature range
Weighing time
Certificate of Conformance
DRX-4
100g
0.02g
0.001g
0.01g
100g
II
+15C to +30C
<3s
NTEP Approved
Certificate Number: 04-061
Pan Dimensions
Scale Dimensions
Power Supply
Scale weight
Calibrating weight
Input: 120VDC 60Hz 9.5W
Output: 12VDC 500mA
116mm
235 x 245 x 80mm
5kg
100g
- 4 -

Instruction Manual – DRX-4 Pharmacy Balance
Chapter 3: Part Specifications
Front Side Rear
Pan Pan Support Draft Ring
AC Adapter Leveling Feet Bubble Level Indicator
AC Adapter Socket | Service Switch Access | RS232 Port | USB Port (Select models)
- 5 -

Instruction Manual – DRX-4 Pharmacy Balance
- 6 -

Instruction Manual – DRX-4 Pharmacy Balance
Chapter 4: Keys and Display Indicators
Key Primary Function
ÅÆT
Æ0Å
MENU
Display Indicator
Power On and Power Off
Tare – used to tare the weighing pan / Enter – Used to accept commands
Zero – used to zero the scale (Legal for Trade models only)
Menu – used to access the main menu
Data Transfer – used to print data or transfer data to a PC via the RS232/USB
communication ports
Description
Stability Indicator - The weighing result has stabilized and an accurate reading may be
taken.
Zero - The scale is maintaining a “center of zero” condition. (Legal for Trade models only)
MODE Mode – The scale is in pill counting mode
NET
AUT
A tare was taken and the scale subtracted the tare weight from the gross weight to obtain the
net weight.
AZSM - Auto-zeroing Setting Mechanism is enabled (Always enabled in Legal for Trade
Scales)
- 7 -
Instruction Manual – DRX-4 Pharmacy Balance
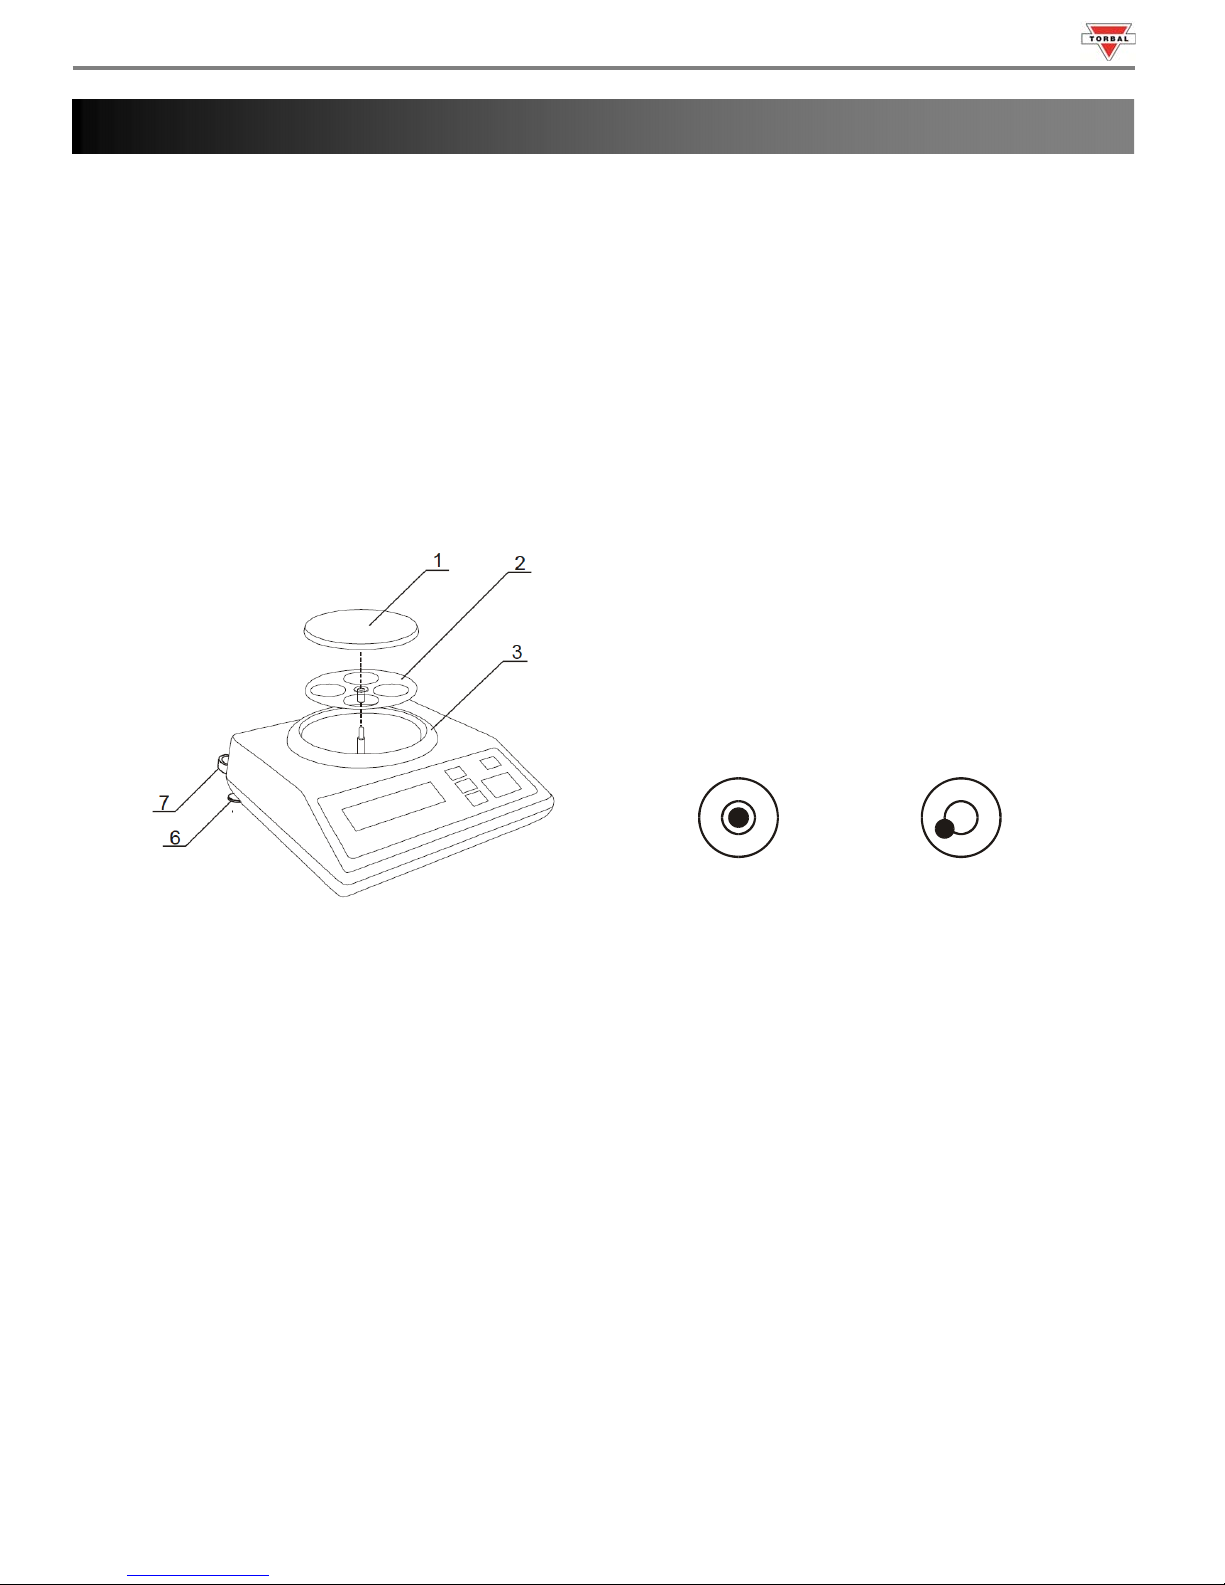
Chapter 5: Unpacking the Scale and Getting Started
1. Carefully remove the scale, pan, and all of its components out of the packaging. Place them on a stable
surface where the scale will not be affected by any mechanical vibrations or high air movements.
2. After removing the pan base and the pan from their packaging, carefully install the pan base (2) onto the
scale by seating it on the pan support located in the middle of the scale. Once the pan base has been
installed, carefully place the pan (1) on the base.
3. Once the pan has been installed, level the scale by adjusting the front feet (6) until the level indicator (7)
shows the “air bubble” is in the center position of the sight glass. The level indicator is located on the rear
left side of the scale.
1 – pan
2 – pan support (under pan)
3 – draft ring
6 – rotating legs
7 – level indicators
Correct Incorrect
- 8 -

Instruction Manual – DRX-4 Pharmacy Balance
4. After leveling the scale, plug the AC adaptor to the AC adaptor socket located in the rear of the scale.
5. When the AC adaptor is plugged into the wall outlet, the scale will automatically turn on, and go through its
initialization process. If the scale is equipped with automatic internal calibration it will calibrate itself. The
calibration process will initialize automatically whenever the scale is turned on. The scale will also calibrate
whenever the temperature changes by 1 degree Celsius and at two-hour intervals. Calibration will initialize
only if the scale has been stable and idle for 60 seconds, in order not to interrupt weighing operations. The
scale will display “WWAIT” when calibrating.
WWAIT
Note – Automatic Internal Calibration Models: When the AC adapter is plugged into the wall outlet for
the first time, the scale will automatically and frequently initialize temperature calibration as the internal
parts of the scale heat up. The scale will display “WWAIT” when calibrating. Once the internal
temperature stabilizes, the scale will calibrate whenever the temperature changes by 1 degree Celsius and
at two-hour intervals.
Note: The scale will always start up in the mode that was enabled when it was turned off.
6. To put the scale into standby mode, leave the AC adaptor plugged into both the scale and the wall outlet and
press the Power “OFF” button. The “OFF” indicator will light up in the upper left corner of the display
signaling the scale is in standby mode.
- 9 -
 Loading...