

Page 1

Torbal Printers
PRP-058C
THERMAL RECEIPT PRINTER
Specifications subjects to
change without notice
Page 2

1. Safety Notice:
* Don't touch the printer head with anything.
* Don't touch the cutter blade.
* Don't bend the power cord excessively or place any heavy objects onto it.
* Don't use the printer when it is out of order. This can cause a fire or an electrocution.
* When connecting or disconnecting the plug, always hold the plug but not the cord.
* Use only approved accessories and do not try to disassemble, repair or remodel it by yourself.
* Install the printer on the stable surface. Choose firm, level surface where avoid vibration.
* Don't let water or other foreign objects into the printer.
* Don't connect a telephone line into the peripheral drive connector.
* We recommend that you unplug the printer from the power outlet if no use it for a long period.
2. Applications:
* POS system receipts
* EFT POS system receipts
* Gym, post, hospital, civil aviation system receipts
* Inquiry, service system receipts
* Instrument test receipts
* Tax, Tab receipts
3. Unpacking
After unpacking the unit, check that all the necessary accessories are included in the package.
User's Manual 1 PCS
Printer 1 PCS
Data Cable 1 PCS
Power Adapter (include power cord) 1 SET
---------------------------Thermal Receipt Printer---------------------------1
Page 3
4. Main Features:
* Command protocal is based on ESC/POS standard.
* Low-noise thermal printing.
* Various layouts are possible by using page mode.
* Repeated operation and copy printing are possible.
* Character font size optional.
* Easy paper-roll installation.
* Easy paper jam clearance.
* Easy maintenance for tasks such as head cleaning.
* Built-in interface provides control capability for cash drawer.
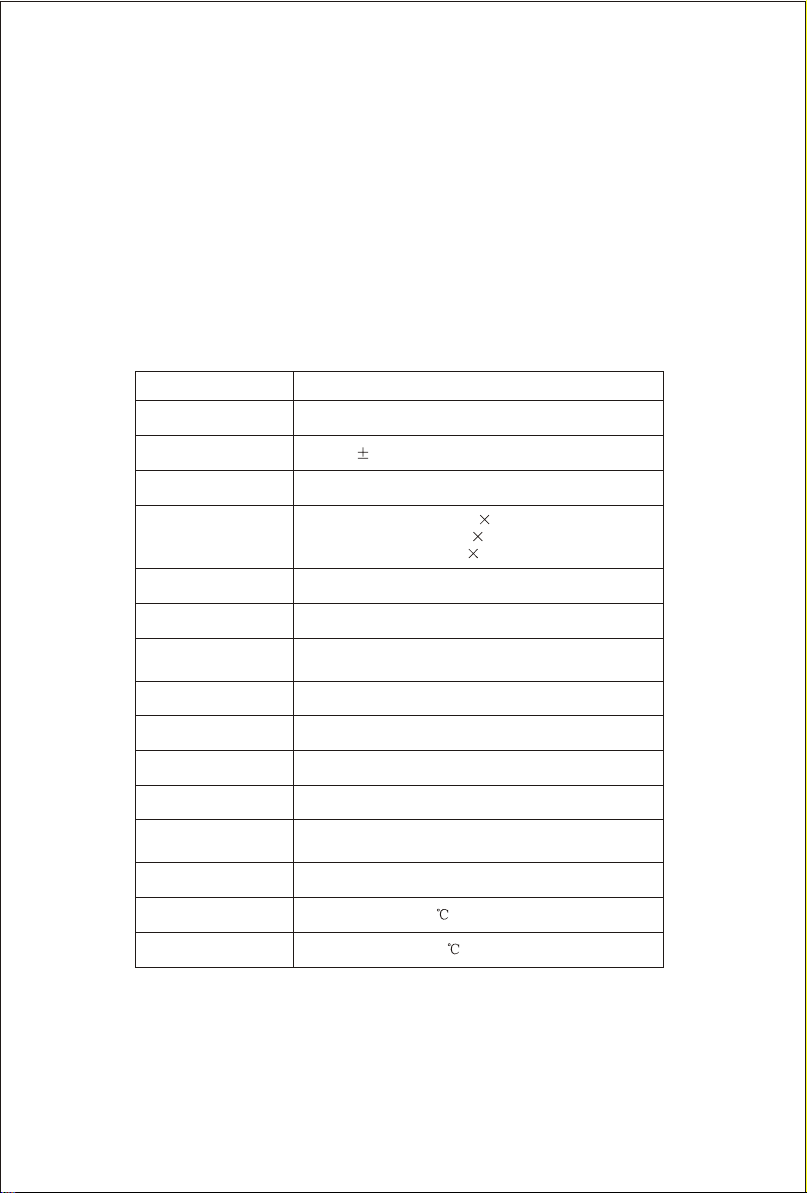
5. Technique Spec.
Print method
Print speed
Paper width
Print columns
Character
Print command
Interface
Barcode mode
Reliability print
Paper thickness
Adaptor power input
Power supply
Power adapter
Cash drawer
Operation
Storage
Thermal line printing
120 mm/sec.
57.5 0.5mm
384 dots/line
ANK Character: Font A: 12 24dots
Font B: 9 7dots
Simplified/Traditional: 24 24dots
Compatible with ESC/POS
Parallel/Serial+USB/Ethernet
UPC-A/UPC-E/JAN13(EAN13)/JAN8(EAN8)/
CODABAR/CODE39/CODE93/CODE128
100Km
0.06~0.08mm
AC 110V/220V
DC 24V/2.5A
Input: AC 110V/220V, 50 60HZ
Output: DC 24V/2.5A
DC 24V/1A
Temperature: 0~45 Humidity: 10~80%,
Temperature: Humidity: -10~60 , 10~90%
, 50~60Hz
~
---------------------------Thermal Receipt Printer---------------------------
2
Page 4
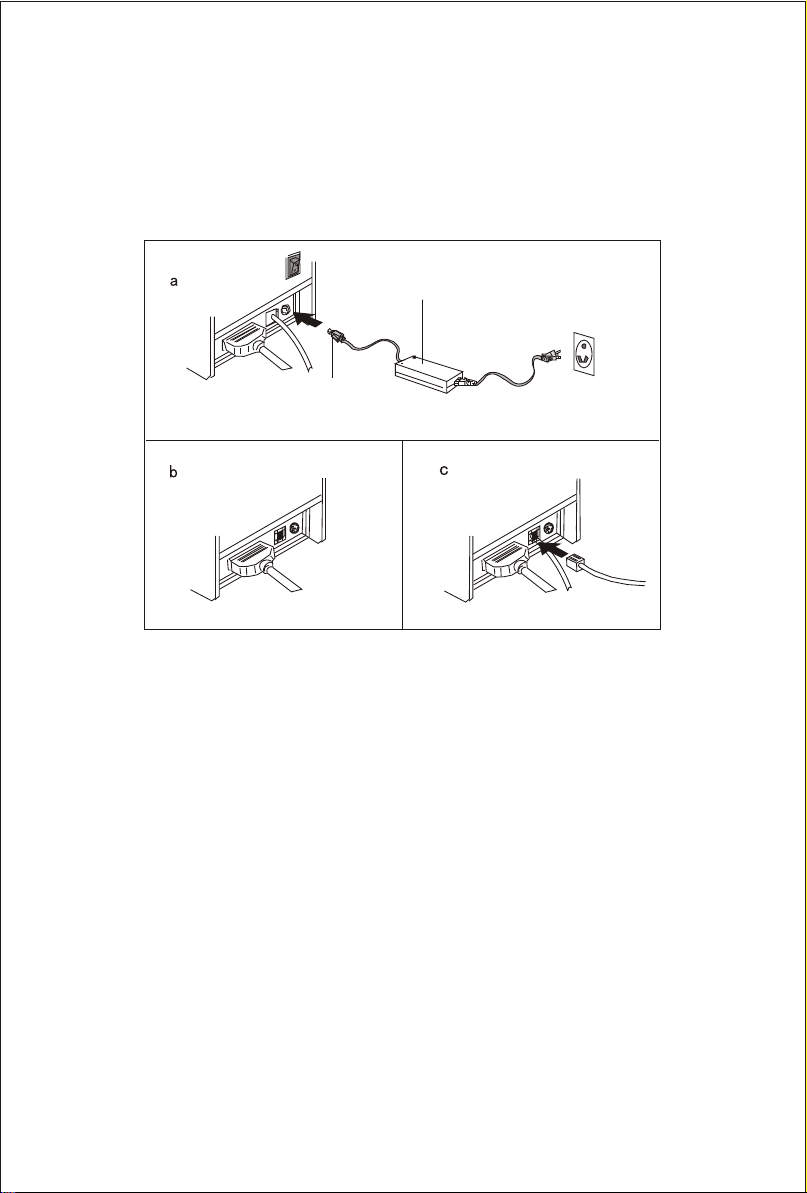
6. Connection
a. Connect the adapter cable to power connector of the printer.
b. Connect the interface cable to the connector on the rear panel of the printer.
c. Connect the cash drawer's RJ-11 phone jack to the connector on the rear panel.
Power adapter
Adapter cable
7. Paper Roll Installation
a. Open the top cover, install the paper roll as the picture showing direction.
b. Set the paper roll into the hollow, and pull on the leading edge of the paper
towards you as shown.
c. Press the center of printer cover firmly to prevent paper miss loading.
d. Tear off the paper outside the cover as shown.
3
---------------------------Thermal Receipt Printer---------------------------
Page 5
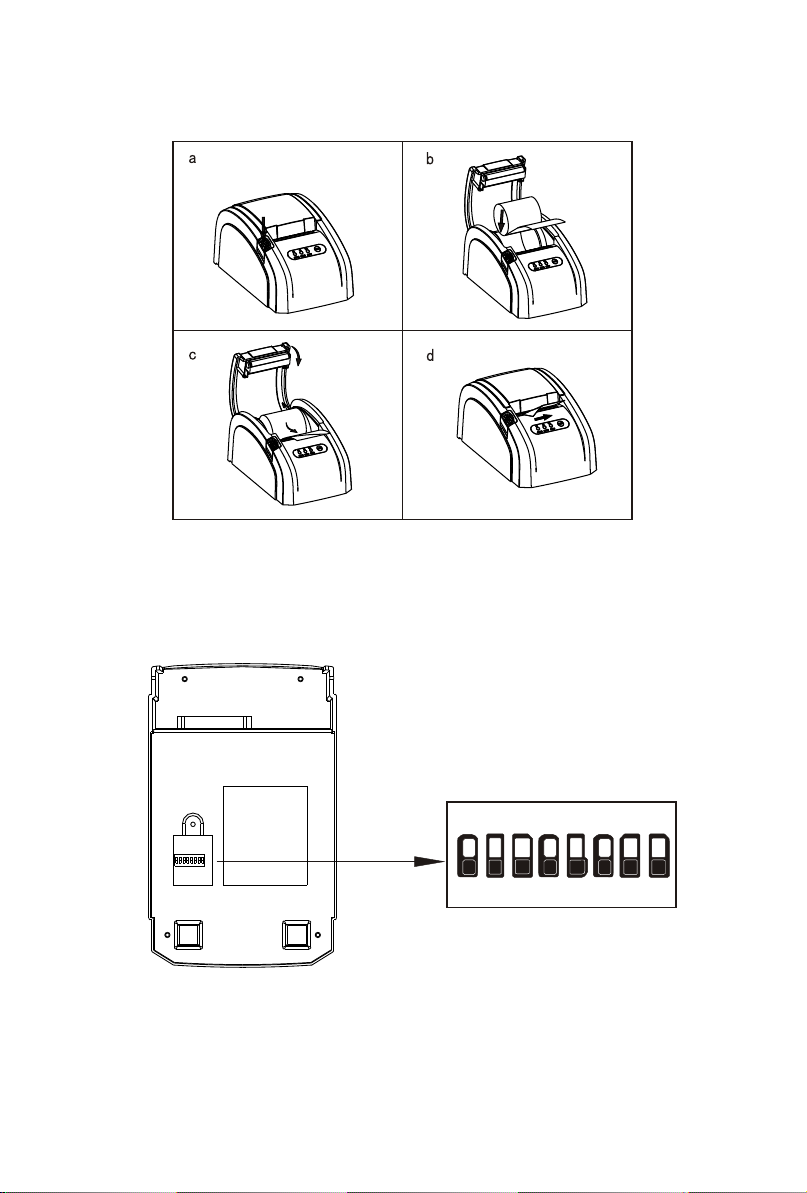
Press to open the top cover
and drop the paper roll
8. Setting the Printing Mode (DIP switches)
The DIP switches are used to set the printer to perform various functions, such as cutter mode,
character set, speed, beeper, print density and etc.
DIP SWITCH SETTINGS
BAUDRATE SETTINGS
1 2 3 4 5 6 7 8
---------------------------Thermal Receipt Printer---------------------------
4
Page 6

Dip Switches Function:
Interface
Serial
Parallel&
Ethernet
DIP-8
SW-1
SW-2
SW-3
SW-4
SW-5
SW-6
SW-7
SW-8
Baud rate
SW-8
Print mode
Function
Select cutter
Select beeper
Select print density
Two-byte character code
Character per line
DK(RJ11) port output signal
ON
ON
38400 115200
Driver mode
OFF
ON
ON OFF
ON OFF
No
Yes
Light
Dark
No
42
Yes
OFF
ON
OFF
OFF
9600
19200
Normal mode
Yes
No
Yes
48
No
9. Driver Installation
a. Insert the bundled CD disk into the CD-ROM drive, in the CD-Rom menu, click
DRV58EN V5.0G file to begin driver installation .
5
---------------------------Thermal Receipt Printer---------------------------
Page 7

b. Please choose the OS that matches with your computer system and press next.
c. Please select PRP-058C Series for Install module.
---------------------------Thermal Receipt Printer---------------------------
6
Page 8

 Loading...