

Page 1

Instruction Manual - TORBAL AGCN Series Torbal Analytical Balances
Table of Contents
Chapter 1.Cautionary Notes and precaution......................................................................................................................3
Chapter 2.Specifications....................................................................................................................................................4
Chapter 3.Keys and display indicators.............................................................................................................................. 5
Chapter 4.Commands and Abbreviations..........................................................................................................................6
Chapter 5.Parts Description...............................................................................................................................................7
Chapter 6.Unpacking the balance and Getting Started......................................................................................................8
Chapter 7.Weighing.........................................................................................................................................................10
7.1.1.Taring ........................................................................................................................................................... 10
7.1.2.Clearing a Tare..............................................................................................................................................11
Chapter 8.Calibration...................................................................................................................................................... 12
8.1.1.Initializing Automatic Calibration................................................................................................................ 12
8.1.2.Calibration Adjustment................................................................................................................................. 13
8.1.3.Calibration Time........................................................................................................................................... 15
8.1.4.Calibration Temperature............................................................................................................................... 16
8.1.5.Calibration Report.........................................................................................................................................17
Chapter 9.Automatic Zero Setting Mechanism (AZSM)................................................................................................ 18
9.1.1.1.AZSM – Enable / Disable..................................................................................................................... 18
9.1.2.Configuration................................................................................................................................................ 20
Chapter 10.Units of Measure...........................................................................................................................................22
Chapter 11.Parts Counting...............................................................................................................................................23
11.1.1.Using Default Sample Size Settings........................................................................................................... 23
11.1.2.Using Custom Sample Size.........................................................................................................................25
11.1.3.Counting based on a known Individual Piece Weight (No Sample Size Required)................................... 27
Chapter 12.Percent Weighing..........................................................................................................................................29
Chapter 13.Recipe Making and Totalizing......................................................................................................................31
Chapter 14.Density Calculation.......................................................................................................................................34
14.1.1.Solid............................................................................................................................................................ 35
14.1.2.Liquid.......................................................................................................................................................... 38
Chapter 15.Printing and RS232 Communication Port Configuration............................................................................. 42
15.1.1.Torbal Printer Configuration (RXP-4)........................................................................................................42
15.1.2.Baud............................................................................................................................................................ 43
15.1.3.Parity........................................................................................................................................................... 44
15.1.4.Bits.............................................................................................................................................................. 45
Chapter 16.Date and Time...............................................................................................................................................47
16.1.1.Time............................................................................................................................................................ 47
16.1.2.Date............................................................................................................................................................. 49
Chapter 17.Menu Customization.....................................................................................................................................51
Chapter 18.Common Errors and Troubleshooting.......................................................................................................... 52
Chapter 19.Maintenance..................................................................................................................................................53
Chapter 20.Accessories .................................................................................................................................................. 53
Chapter 21.Replacement Parts ........................................................................................................................................53
Chapter 22.Limited Warranty..........................................................................................................................................54
2
Page 2

Page 3

Instruction Manual - TORBAL AGCN Series
Chapter 1.
CAUTIONARY NOTES AND PRECAUTION
The TORBAL Precision scale is a sensitive and a delicate instrument. Always handle your scale with care.
The correct location and proper environment affect the accuracy of your TORBAL Precision Scale.
The best location for your scale:
• Stable, horizontal, vibration-free surface
• Away from direct sunlight
• Not exposed to high temperature variations
• Away from direct drafts
• The best location is on a stable bench away from drafts, doors, windows, radiators
and air conditioner vents.
CAUTION:
WARNING:
o The scale is designed for indoor use only.
o Do not operate the scale in hazardous areas or under dangerous conditions.
o Do not use the scale in locations subject to high humidity or dust levels.
o Do not connect cables in ways other than those mentioned in this manual.
o Set the scale on a firm, stable, horizontal surface.
o Never stand on or lean on this product. Equipment may fall or collapse,
causing breakage and possible injury.
o Before moving the product, unplug it and unplug all cables connected to it.
o When storing, transporting or returning the scale for service, use the original
packaging.
o Never attempt to repair, disassemble or modify the scale. Tampering with the
scale may result in injury and cause greater damage to the equipment.
o Be sure to use the specified power source.
o Do not allow foreign matter to fall into the scale.
o If water or other liquids spill into the scale, unplug the power cord immediately
and contact technical support
3
Page 4

Chapter 2.
SPECIFICATIONS
Capacity
Readability (d)
Repeatability (Standard
Divination)
Linearity
Stabilization time
(typical)
Tare Range
Accuracy Class
Automatic Internal
Calibration
Time Configuration
Temperature
Configuration
Automatic Calibration
Adjustment Masses (g)
Pan Dimension
Instruction Manual - TORBAL AGCN Series
Model
AGCN100 AGCN200
100g 200g
0.0001
0.0001g
+/- 0.0002g
Approx. 3 sec
-100g -200g
I
YES
1h, 2,h, 3h, 4h, 5h, 6h
0.5°C, 1.0°C, 1.5°C, 2.0°C
20,50, 100 50, 100, 200
90mm
Draft Chamber
Scale Dimension
Operating Temperature
RS232 Port
Power Supply
Display Type
Display Size
Application Modes
Weighing Units
Scale’s Net Weight
(lb/kg)
Parts
Counting
Percent
Weighing
Sample Size
%
Resolution
Displayed
(Reference
Weight)
Standard
216 x 345 x 347 mm
+15°C to +30°C
Bidirectional
Input: 120VAC 60Hz 15W Output: 12VDC 500mA
Seven Segment LCD with backlight
30mm x 100mm
Weighing, Parts Counting, Percent Weighing, Totalizing, Density Calculation
Grams, Carats, Pounds
6.5kg/14.5lbs
5, 10, 20, 50, 100, 200, 500, Custom, Known Piece Weight
0.1% (10mg to 700mg), 0.01% (700mg to 7g)
0.001% (> 7g)
4
Page 5
Instruction Manual - TORBAL AGCN Series
Chapter 3.
KEYS AND DISPLAY INDICATORS
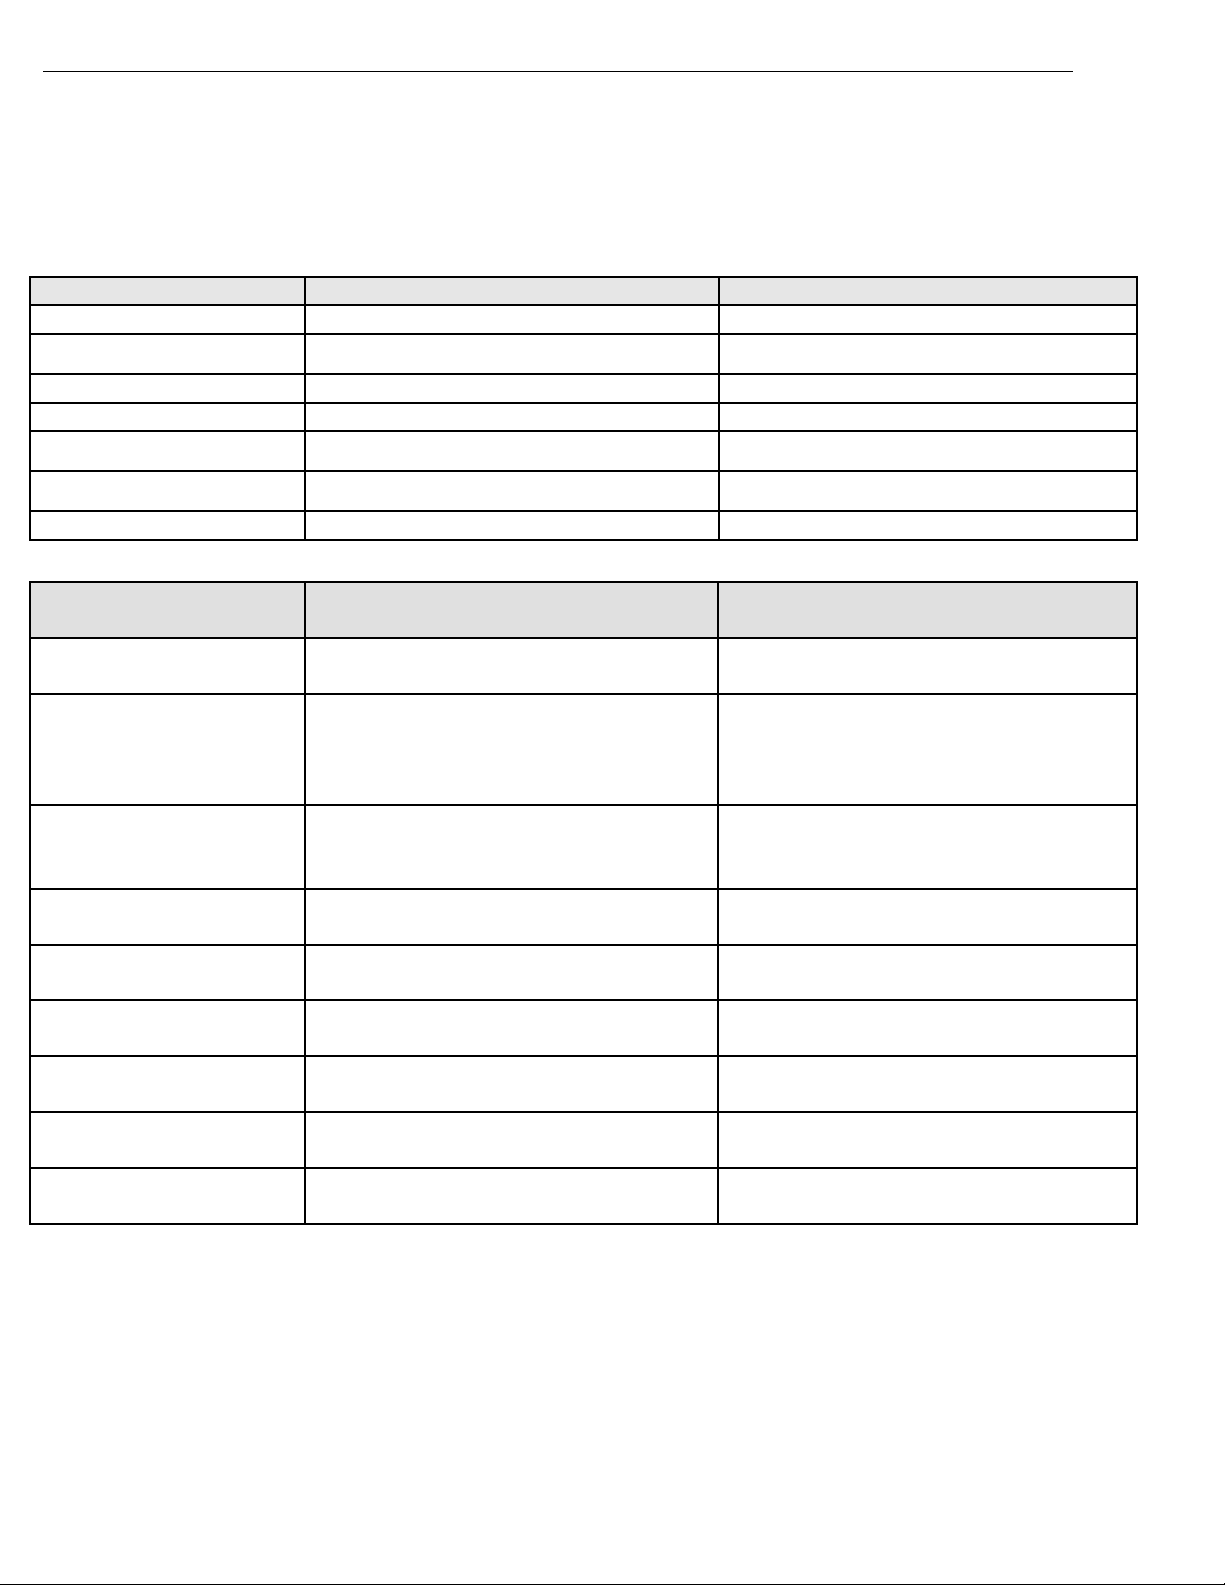
Key Primary Function Secondary Function
Ø
T (YES)
0 (NO)
MENU
FUNCTION
P
C
Display Indicator Description Explanation
Power On and Power Off -
Tare – used to tare the weighing pan
- Toggle and scroll menu options
Menu – used to access the main menu -
-
Print – used to initiate printing
Calibration -
Enter and YES (Accept) – used to enter or
accept commands
Recall Total– In Totalizing this key is used to
check the total weight of ingredients.
Decimal – used for entering a decimal when
assigning limit values in check-weighing
OFF Power Off
The scale is turned OFF and in standby
mode.
AZSM (Automatic Zero Setting
AUT
AZSM (Automatic Zero Setting
Mechanism)
Mechanism) is active and the scale
maintains a “center of zero” condition
within +/- 2d
A tare was taken and the scale subtracted
NET Net Result
the tare weight from the gross weight to
obtain the net weight.
0 - -
O
Current setting Indicates enabled functions or settings.
MODE Main Menu Indicates Main Menu functions
▲▲ Stability Indicator
Pcs Pieces
% Percent
The weighing result has stabilized and
an accurate reading may be taken.
In parts count this indicator shows that
the result is a piece count
In percent weighing this indicator shows
that the result is a percentage
5
Page 6

Instruction Manual - TORBAL AGCN Series
Chapter 4.
COMMANDS AND ABBREVIATIONS
Command or Abbreviation Description
- - - - - CAL
TARING
CAL ON
CAL
LOAD XXX g
UNLOAD
WAIT
PRESS AGAIN
CAL PRN
AUTOTAR
PCS SET
PCS UM
PRINT
ACTIV
The scale is in the calibration mode.
The scale is taring before the calibration process or a tare is requiered
Calibration adjustment in progress
Indicates to lad a calibration weight on the pan in order to begin calibration
Press Again in order to initiate manual calibration.
Configure Automatic Zero Setting Mechanism
Custom Sample Size selection (Parts Counting)
Known Individual Piece Weight (Parts Counting)
Main Menu customization command
Taring in progress
Calibration has been initiated
Remove the calibration weight
Wait for calibration to finish
Start Calibration Report printout
Printing in Progress
6
Page 7

Instruction Manual - TORBAL AGCN Series
Chapter 5.
PARTS DESCRIPTION
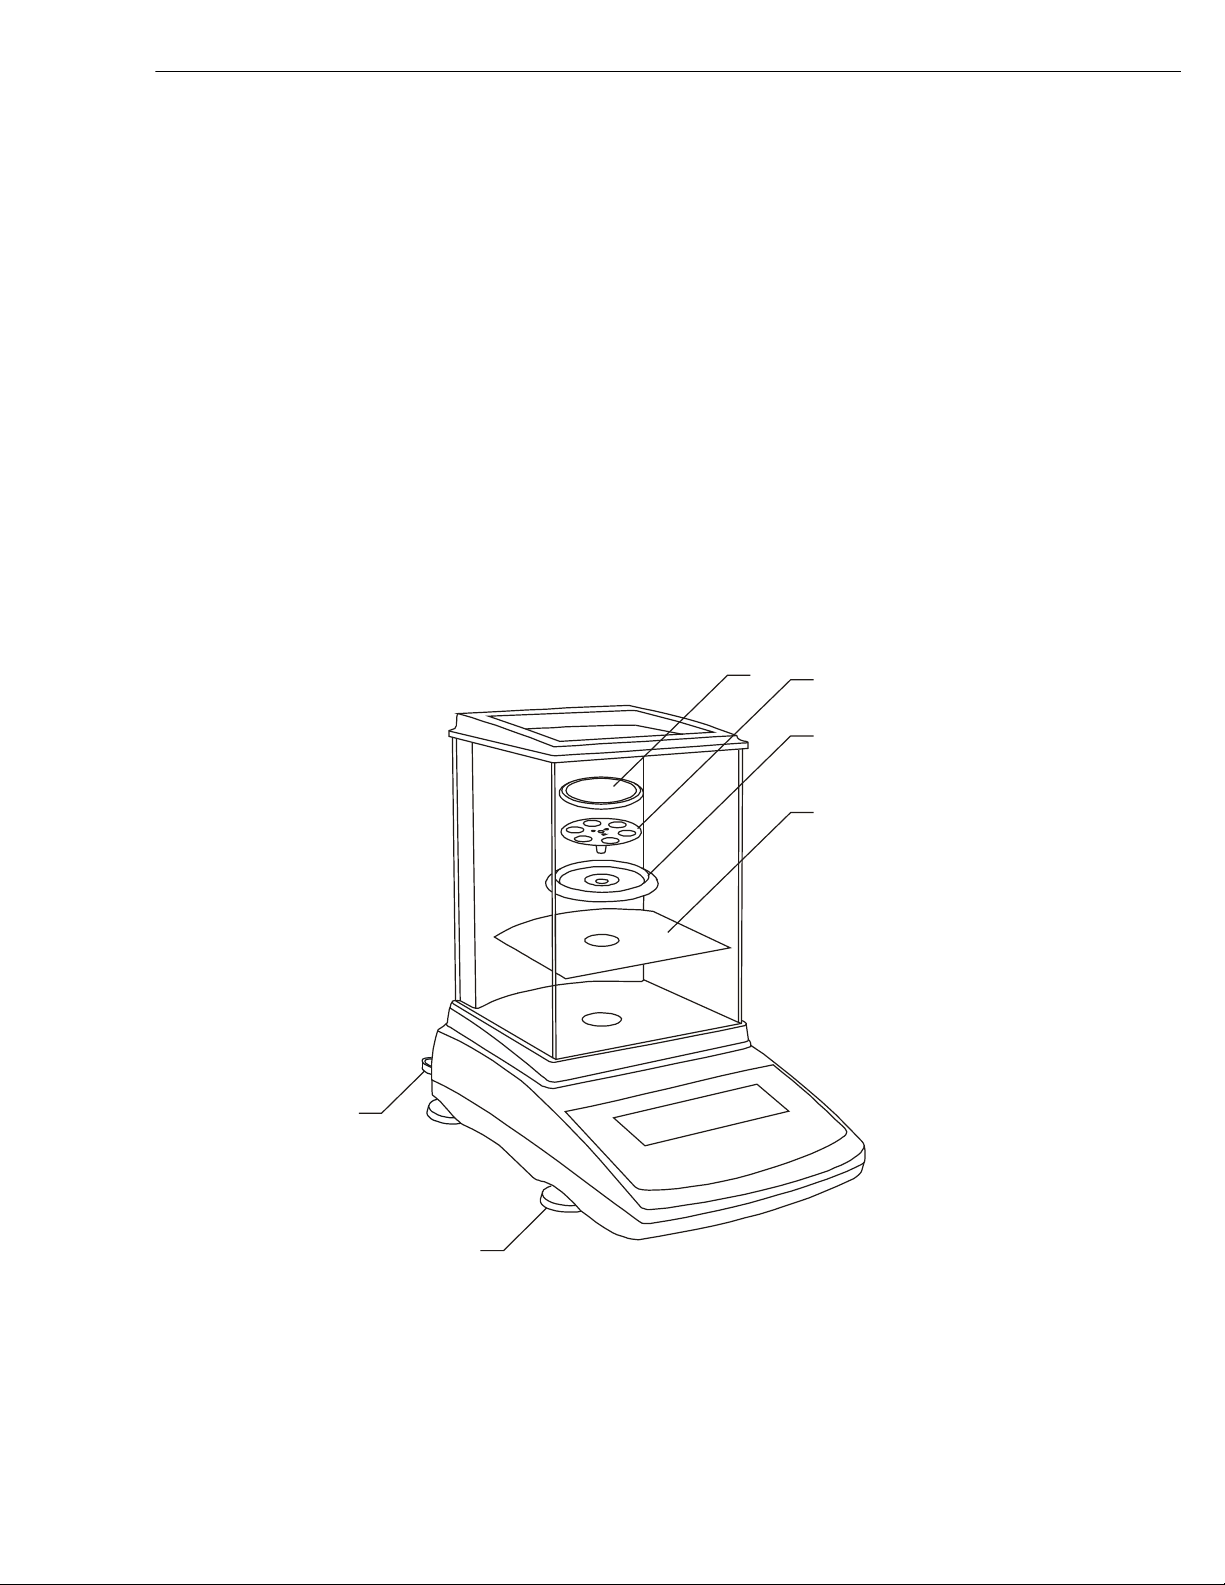
1 Pan
2 Pan Base
3 Draft Ring
4 Weighing Chamber Base
5 Keypad
6 Adjustable Legs
7 Level Indicator
8 LCD Display
9 Weighing Camber
10 AC Adapter Socket
11 Service Switch
12 RS232 Serial Port
7
Page 8
Instruction Manual - TORBAL AGCN Series
7
6
1
2
3
4
Chapter 6.
UNPACKING THE BALANCE AND GETTING STARTED
1. Carefully remove the scale, pan, and all of its components out of the packaging and place them on a stable
base where the scale will not be affected by any mechanical vibrations or air movements.
2. After removing the chamber base (4), draft ring (3), pan base (2), and the pan (1) from their packaging,
carefully install the chamber base (4) on the case of the balance as shown below. Once the chamber base is in
place, install the draft ring (3). Once components 4 and 3 are in place install the pan base onto the scale by
placing it on the pan support located in the middle of the scale. Once the pan base has been installed, carefully
place the pan on the base as shown below.
8
Page 9

Instruction Manual - TORBAL AGCN Series
3. Once the pan has been installed, level the scale by adjusting the rear feet until the level indicator shows the
“air bubble” is in the center position of the sight glass. The level indicator is located in the rear left side of the
scale.
4. After leveling the scale, you may plug the AC adaptor to the AC adaptor socket located in the rear of the scale.
5. When the AC adapter is plugged into the wall outlet, the scale will turn “ON” automatically, initialize itself,
perform automatic internal calibration and enter weighing mode.
6. To put the scale into standby mode, leave the AC adaptor plugged into both the scale and the wall outlet and
press the Power “OFF” button ( ). The “OFF” indicator will light up in the upper left corner of the
display signaling the scale is in standby mode.
9
Page 10

Instruction Manual - TORBAL AGCN Series
Chapter 7.
WEIGHING
1. To begin weighing, press the power button ( ) to turn the scale ON. The scale will go through its
initialization procedure and automatically enter Weighing Mode. The scale is ready to begin weighing as soon
as the stabilization ( ) indicator appears on the display.
2. When weighing, always place the mass in the middle of the pan. The weighed result may be taken when the
stabilization indicator appears on the display.
7.1.1.Taring
1. If a container is used for weighing, it may be tared. In taring the container, the scale subtracts the weight of the
container from the gross weight to obtain the net weight.
2. To tare the weighing container, place it in the middle of the pan. The container’s weight will be shown on the
display.
10
Page 11

Instruction Manual - TORBAL AGCN Series
3. Once the stabilization indicator appears on the display, the container is ready to be tared. To tare the container,
press the “T” button. The display will show a dotted line which indicates the scale has begun the taring
process,
4. When finished taring, the balance will return to Weighing Mode. The display will indicate 0.0000, and the
NET indicator will be shown on the display signaling the next weight taken is a NET result.
7.1.2.Clearing a Tare
1. To clear the tare, remove the tared object along with the NET weight from the pan. The scale will then display
a negative NET tare result.
2. To clear the tare, press the T button.
3. The display will show dashed lines indicating the tare is clearing.
4. When finished clearing the tare, the scale will return to Weighing Mode.
11
Page 12

Instruction Manual - TORBAL AGCN Series
Chapter 8.
CALIBRATION
When the scale is initially installed, it will automatically calibrate at start up to ensure the accuracy of
weighing results. You can also configure the scale to calibrate automatically with time and temperature variations.
8.1.1.Initializing Automatic Calibration
To calibrate the scale at any time, follow these steps:
1. Press the calibration key located on the scales front panel.
2. Command “PRESS AGAIN” will be displayed sequentially for approximately 5 seconds.
3. While the command “PRESS AGAIN” is displayed, press the calibration key once more.
12
Page 13

Instruction Manual - TORBAL AGCN Series
4. The scale will display “WAIT”, indicating that automatic calibration has begun.
5. Calibration can last from 30 to 50 seconds. When it is finished, the scale will automatically return to the
weighing mode.
8.1.2.Calibration Adjustment
The calibration adjustment function allows the internal calibration mass value to be adjusted with an external
calibration weight that has a traceable class certification. To perform calibration adjustment, follow these steps:
1. Enter the main menu by pressing the MENU key.
2. Enter the calibration set up by pressing the T Key when “CALIBR” is displayed.
3. Press the T Key again when “CAL ON” is displayed.
13
Page 14

Instruction Manual - TORBAL AGCN Series
4. Calibration mass value settings which can be used for calibration adjustment will be displayed sequentially.
Press the T Key when the desired external calibration mass value is displayed.
5. The scale will display “CAL”, indicating the calibration adjustment has been entered.
6. Before calibration adjustment can begin, the scale will perform automatic tare. Dashed lines “- - - - - - -” will
be displayed during auto tare.
7. Once the scale has been tared, the command “LOAD” will be displayed. At any time during the “LOAD”
command, place the single calibration weight in the middle of the pan.
8. Command “CAL” will be displayed, indicating that the scale is recording a new calibration mass value.
14
Page 15

Instruction Manual - TORBAL AGCN Series
9. Once the new calibration value is stored, the command “UNLOAD” will be displayed, indicating that this
calibration weight should be removed from the pan.
10. Once the weight is removed, the scale will continue with calibration adjustment. “WAIT” will be displayed
during the remainder of the adjustment process. Once finished, the scale will automatically return to the
weighing mode.
8.1.3.Calibration Time
Internal calibration can be configured to calibrate automatically after a set interval of time. To set a calibration time
interval, follow these steps:
1. Enter the main menu by pressing the MENU key.
2. Enter calibration set-up by pressing the T Key when “CALIBR” is displayed.
15
Page 16

Instruction Manual - TORBAL AGCN Series
3. Press the T Key again when “CAL TM” is displayed.
4. Time interval settings will begin to display sequentially. The current time interval setting will be marked with
“o” located in the lower left corner of the display.
5. Automatic calibration can be set to calibrate between 1, 2, 3, 4, 5, and 6 hours (i.e., if set to 3, calibration will
be performed at least once every three hours).
6. To select a time interval, press the T Key when the desired setting is displayed.
To disable the time interval calibration, press the T Key when OFF is displayed.
8.1.4.Calibration Temperature
Internal calibration can be configured to calibrate automatically within a change of temperature. To set a calibration
temperature interval, follow these steps:
1. Enter the main menu by pressing the MENU key.
2. Enter the calibration set-up by pressing the T Key when “CALIBR” is displayed.
16
Page 17

Instruction Manual - TORBAL AGCN Series
3. Press the T Key again when “CAL °C” is displayed.
4. Temperature interval settings will begin to display sequentially. The current temperature interval setting will
be marked with “o” located in the lower left corner of the display.
5. Automatic calibration can be set to 0.5°C, 1.0°C, 1.5°C, and 2.0°C (i.e., if set to 2.0°C, calibration will be
performed every time the temperature changes by 2.0°C).
6. To select a temperature interval, press the T Key when the desired setting is displayed.
To disable temperature calibration, press the T Key when OFF is displayed.
8.1.5.Calibration Report
After calibration set-up and adjustment have been completed, a calibration report can be printed. The
calibration report includes calibration data such as the current as well as factory internal and external weights. To
print the calibration report, follow these steps:
1. Press MENU to enter the main menu.
2. When command “CALIBR” is displayed, press the T key.
17
Page 18

Instruction Manual - TORBAL AGCN Series
3. Press the T key again when command “CAL PRN” is displayed.
4. Command “PRINT” will be displayed indicating that data has been sent to an external printer or a PC via the
RS232 communication port. For more on printing set-up and configuration, please turn to chapter xx.
Chapter 9.
AUTOMATIC ZERO SETTING MECHANISM (AZSM)
All AGCN scales are equipped with AZSM, the “Auto Zero Setting Mechanism.” AZSM automatically
maintains a “center of zero” condition within +/- 2d.
9.1.1.1.AZSM – Enable / Disable
To enable or disable AZSM, follow these steps:
1. Enter the main menu by pressing the MENU key.
18
Page 19

Instruction Manual - TORBAL AGCN Series
2. When command “AUTOTAR” is displayed, press the T key.
3. Commands “AUT ON”,” AUT OFF”, and “AUT SET” will be displayed sequentially.
4. To enable AZSM, press the T key when AUT ON is displayed.
5. To disable AZSM, press the T key when AUT OFF is displayed.
Note: AZSM is automatically enabled for 10 minutes after the scale is turned ON, regardless of its ON/OFF
configuration.
19
Page 20

Instruction Manual - TORBAL AGCN Series
9.1.2.Configuration
The AZSM range can be configured to work between 0.1d and 5d. To change the AZSM range, follow
these steps:
1. Enter the main menu by pressing the MENU key.
2. When command “AUTOTAR” is displayed, press the T key.
3. Commands “AUT ON”, “AUT OFF”, and “AUT SET” will be displayed sequentially.
4. Press the T key when command “AUT SET” is displayed.
5. Default AZSM setting will be displayed followed by the “OUT” command. To exit AZSM configuration,
press the T key when “OUT” is displayed. To change AZSM range, press the T key when the current AZSM
value is displayed (i.e., 2.0).
20
To Exit
`
To Change
Page 21

Instruction Manual - TORBAL AGCN Series
6. After the T key is pressed, in order to set a new AZSM range a dash will be displayed indicating a new AZSM
value between 0.1d and 5d should be entered.
7. To enter a new AZSM value, use the following keys: the C key to increment a digit, the T key to accept and
go to the next digit, the P key to insert a decimal, and MENU to accept the entire setting.
21
Page 22

Instruction Manual - TORBAL AGCN Series
Chapter 10.
UNITS OF MEASURE
The AGCN Series Scales can operate in three different units of measure: Grams (g), Carats (ct), and
Pounds (lb). By factory default, the scale is set to weigh in grams (g). To select a different unit of measure,
follow the steps below.
1. Enter the main menu by pressing the MENU key.
2. When command “UNITS” is displayed, press the T key.
3. The scale will display available units of measure sequentially.
4. When the desired unit is displayed, press the T key to make the selection.
5. Once the selection is made, the scale will automatically return to the weighing mode.
22
Page 23

Instruction Manual - TORBAL AGCN Series
Chapter 11.
PARTS COUNTING
11.1.1.Using Default Sample Size Settings
1. Place a container on the scale’s pan and press the T key to tare.
2. After taring the container manually, count out the sample that you wish to be used for calculating the average
piece weight of your counting transaction. Use one of the following sample sizes: 5, 10, 20, 50, 100, 200, and
500.
3. Place the sample in the container.
4. The weight of the sample will be displayed as it is placed on the pan. Once the weight of the sample
stabilizes and the stability indicator appears on the display, press the MENU key to enter the main menu.
23
Page 24

Instruction Manual - TORBAL AGCN Series
5. When “PCS” is displayed, press the T key.
6. Commands “PCS OFF” and “PCS ON” will be displayed sequentially. To proceed with parts counting, press
the T key when command “PCS ON” is displayed.
7. The sample size selections will begin to scroll on the display. Press the T key when the sample size is
displayed that is equal to the number of the pieces in the container (i.e., if you have placed 10 pieces as the
sample for your counting transaction, press the T key when “PCS 10” is displayed).
8. After the sample size has been selected, the scale will display the count of the sample. At any time you can
proceed with the count.
9. Once an accurate count has been taken, the container and its contents may be removed from the scale.
To exit parts counting and return to basic weighing, select “PCS OFF” from the parts counting menu.
24
Page 25

Instruction Manual - TORBAL AGCN Series
11.1.2.Using Custom Sample Size
1. Place a container on the scale’s pan and press the T key to tare. After taring the container manually, count out
the sample that you wish to be used for calculating the average piece weight of your counting transaction.
2. Place the sample in the container.
3. The weight of the sample will be displayed as it is placed on the pan. Once the weight of the sample
stabilizes and the stability indicator appears on the display, press the MENU key to enter the main menu.
4. When “PCS” is displayed, press the T key.
25
Page 26

Instruction Manual - TORBAL AGCN Series
5. Commands “PCS OFF” and “PCS ON” will be displayed sequentially. To proceed with parts counting, press
the T key when command “PCS ON” is displayed. The sample size selected will begin to scroll on the
display.
6. Press the T key when PCS SET is displayed.
7. A dashed line will be displayed indicating to manually enter the value for your sample size in the container.
To do so, use the following keys: the C key to increment a digit, the T key to accept and go to the next digit,
and MENU to accept the entire setting.
26
Page 27

Instruction Manual - TORBAL AGCN Series
8. Once your custom sample size value has been entered and the MENU key pressed, the scale will display the
count of the sample. At any time you can proceed with the count.
9. Once an accurate count has been taken, the container and its contents may be removed from the scale.
11.1.3.Counting based on a known Individual Piece Weight (No Sample Size
Required).
1. Place a container on the scale’s pan and press the T key to tare.
2. Press the MENU key to enter the main menu.
3. When PCS is displayed, press the T key.
27
Page 28

Instruction Manual - TORBAL AGCN Series
4. Commands “PCS OFF” and “PCS ON” will be displayed sequentially. To proceed with parts counting, press
the T key when the command “PCS ON” is displayed.
5. Press the T key when command “PCS UM” is displayed.
6. A dashed line will be displayed indicating to manually enter the exact individual piece weight of the counted
parts. To manually enter the individual piece weight, use the following keys: the C key to increment a digit,
the T key to accept and go to the next digit, the P key to insert a period, and the MENU key to accept the
entire setting.
28
Page 29

Instruction Manual - TORBAL AGCN Series
7. Once the individual piece weight is entered and the MENU key pressed, the scale will display “0pcs”. At any
time proceed with the count.
8. Once an accurate count has been taken, the container and its contents may be removed from the scale.
To exit parts counting and return to basic weighing, select “PCS OFF” from the parts counting menu.
Chapter 12.
PERCENT WEIGHING
Percent weighing is used to express the weight of an object as a percentage of a stored sample weight. To use
percent weighing, follow these steps:
1. Place container on the pan and press the T key to tare.
29
Page 30

Instruction Manual - TORBAL AGCN Series
2. Once the scale has been tared, place the sample reference weight on the pan.
- A Reference Weight
3. The weight of the sample will be displayed as it is placed on the pan. Once the weight of the sample
stabilizes and the stability indicator appears on the display, press the MENU key to enter the main menu.
4. When “PERCENT” is displayed, press the T key.
5. Commands “PER OFF” and “PER ON” will be displayed sequentially. To proceed with percent weighing
and set the reference sample weight, press the T key when command “PER ON” is displayed.
6. Once the reference sample weight is set, the scale will express the weight as a percentage.
30
Page 31

Instruction Manual - TORBAL AGCN Series
7. Remove the sample and place an object in the container. The scale will express the weight of that object as a
percentage of the stored sample.
To exit percent weighing and return to basic weighing, select “PER OFF” from the percent menu.
Chapter 13.
RECIPE MAKING AND TOTALIZING
To engage in recipe making and totalizing, follow these steps:
1. Place a container on the scale’s pan and press the T key to tare.
2. Press the MENU key to enter the main menu.
31
Page 32

Instruction Manual - TORBAL AGCN Series
3. When “RECIPE” is displayed, press the T key.
4. Commands “REC OFF” and “REC ON” will be displayed sequentially. To proceed with recipe making and
totalizing, press the T key when command “REC ON” is displayed.
5. Once totalizing is enabled, the scale will return to the weighing mode and “o” will appear in the lower left
corner of the display indicating that totalizing may begin.
6. Place the first ingredient in the container.
7. Once the weight of the ingredient stabilizes and the stability indicator appears on the display, press the T key.
The weight of the ingredient will be tared and stored in the scale’s internal memory.
8. The scale will read zero indicating it is ready to receive the next ingredient.
32
Page 33

Instruction Manual - TORBAL AGCN Series
9. Place a second ingredient in the container, wait until the weight stabilizes, and press the T key to tare. The
weight of the second ingredient will be added to the grand total and stored in the scale’s internal memory.
10. To check the total weight of the ingredients at any time, press the FUNCTION key. The SUM indicator and
the total weight of the ingredients in the container will appear on the display. To clear the total, press the T
key when the SUM indicator is displayed. To return to totalizing and add more ingredients, press the
FUNCTION key once again.
11. To add more ingredients, repeat steps 6 through 9. To exit totalizing, select “REC OFF” from the recipe
function menu.
33
Page 34

Instruction Manual - TORBAL AGCN Series
Chapter 14.
DENSITY CALCULATION
The density calculation feature is used to assist in calculation of density in solids and liquids. To perform
density calculation, a Density Kit (part no. AGC9171) is required.
To calculate density of a solid the following formula is used:
m 1 – mass calculation in air
m 2 – mass calculation in liquid
To calculate density in liquid the following formula is used:
m 1 – mass of the plunger in air
m 2 – mass of the plunger in liquid
V – Volume of the plunger
34
Page 35

Instruction Manual - TORBAL AGCN Series
14.1.1.Solid
To calculate the density of a solid, follow these steps:
1. Press the M key to enter the main menu.
2. When command “DENSITY” is displayed, press the T key.
3. Commands “DEN ON” and “DEN OFF” will be displayed sequentially.
4. To proceed with density calculation, press the T key when “DEN ON” is displayed.
5. Press the T key when command SOLID is displayed.
35
Page 36

Instruction Manual - TORBAL AGCN Series
6. Commands H2O (distilled water), ETHANOL, and OTHER will scroll sequentially. Select the liquid that
will be used in this density calculation by pressing the T key when the corresponding command is displayed.
NOTE:
If you are using a liquid other than H2O (distilled water) or ETHANOL, select OTHER by pressing the T
key and key in the density value of the liquid that will be used. To key in the density value of the liquid, use the
following keys: the C key to increment a digit, the T key to accept and go to the next digit, and MENU to accept
the setting.
7. Once the liquid for your density calculation has been selected, command t °C will be displayed indicating to
key in the temperature of the liquid. Key in the temperature of the liquid with a precision to 0.5 (half a degree
Celsius). To key in the temperature of the liquid, use the following keys: the C key to increment a digit, the T
key to accept and go to the next digit, the P key to insert a decimal, and MENU to accept the setting.
36
Page 37

Instruction Manual - TORBAL AGCN Series
8. Once the temperature has been entered and accepted, command “PRESS TARE” will be displayed indicating
to tare the scale.
9. Once the scale has been tared, place the solid object on the upper pan of the density kit to perform a weighing
in the air.
10. Once the weight of the object stabilizes, press the P key. Command “M1” will be displayed indicating that the
weight of the object in air has been stored in the formula.
11. Remove the object from the upper pan of the density kit and place it on the lower pan of the density kit to
perform a weighing in liquid.
37
Page 38

Instruction Manual - TORBAL AGCN Series
12. Once the weight of the object stabilizes, press the P key. Command “M2” followed by command “RESULT”
will be displayed, indicating that the weight of the solid in the liquid has been stored in the formula and the
density calculation has been performed.
13. The density of the object will be displayed and locked on the LCD.
14. If a printer or a computer is connected to the scale, you may print detailed results of the performed density
calculation by pressing the P key.
14.1.2.Liquid
To calculate the density of a liquid, follow these steps.
1. Press the M key to enter the main menu.
38
Page 39

Instruction Manual - TORBAL AGCN Series
2. When command “DENSITY” is displayed, press the T key.
3. Command “DEN ON” and “DEN OFF” will be displayed sequentially.
4. To proceed with the density calculation, press the T key when “DEN ON” is displayed.
5. Press the T key when command “LIQUID” is displayed.
6. Once LIQUID is selected, command “PLUNGER” will be displayed, indicating to enter the volume of the
plunger used in the density kit, which can be found on the plunger hook included with the density kit.
39
Page 40

Instruction Manual - TORBAL AGCN Series
7. To key in the volume of the plunger, use the following keys: the C key to increment a digit, the T key to
accept and go to the next digit, the P key to insert a decimal, and MENU to accept the setting.
8. Once the volume of the plunger has been entered, command “PRESS TARE” will be displayed indicating to
tare the scale.
9. Once the scale has been tared, hang the plunger on the wire support frame of the density apparatus.
10. The weight of the plunger will be displayed. Once the weight is stable, press the P key. Command “M1” will
be displayed, indicating that the weight of the plunger has been stored in the formula.
40
Page 41

Instruction Manual - TORBAL AGCN Series
11. Submerge the plunger, by placing the beaker with the liquid on the base of the density apparatus.
12. As the plunger displaces the liquid in which it is submerged, the weight will decrease. Once the new weight
stabilizes, press the P key.
13. Command “M2” followed by command “RESULT” will be displayed indicating that the new weight of the
plunger has been stored in the formula and the density calculation has been performed.
14. The density of the liquid will be displayed and locked on the LCD.
15. If a printer or a computer is connected to the scale, you may print detailed results of the performed density
calculation by pressing the P key.
41
Page 42

Instruction Manual - TORBAL AGCN Series
Chapter 15.
PRINTING AND RS232 COMMUNICATION PORT CONFIGURATION
After a weighing transaction is completed, a result data receipt can be printed. To initiate printing, wait for the
weighing result to stabilize and press the P key.
15.1.1.Torbal Printer Configuration (RXP-4)
The printing function is used to print data via the RS232 port. Data may be printed via the printer or sent to a PC via
the Torbal Communication Software.
To connect the AGCN Scale to a Torbal (RXP-4) printer, use the following settings:
Scale settings:
Baud rate: 9600
Parity: none
Data bits: 8
Printer settings (follow the steps detailed in the RXP-4 instruction manual):
Baud rate: 9600
Data: 8 bits
Parity: none/ignore
Column printing: 40
RS232 Communication Port Configuration
42
Page 43

Instruction Manual - TORBAL AGCN Series
15.1.2.Baud
1. Enter the main menu by pressing the MENU key.
2. When “RS-232” is displayed, press the T key.
3. Commands “BAUD”, “BITS”, and “PARITY” will begin to scroll sequentially.
4. Press the T key when “BAUD” is displayed.
43
Page 44

Instruction Manual - TORBAL AGCN Series
5. The scale will begin to display available baud rates: 1200, 2400, 4800, 9600, 19200, 38400, 57600, 115200.
To make a selection, press the T key when the desired setting is displayed.
15.1.3.Parity
1. Enter the main menu by pressing the MENU key.
2. When “RS-232” is displayed, press the T key.
3. Commands “BAUD”, “BITS”, and “PARITY” will begin to scroll sequentially.
44
Page 45

Instruction Manual - TORBAL AGCN Series
4. Press the T key when “PARITY” is displayed.
5. The scale will display available “PARITY” settings: “NONE”, “ODD”, and “EVEN”.
6. To make a selection, press the T key when the desired setting is displayed.
15.1.4.Bits
1. Enter the main menu by pressing the MENU key.
2. When “RS-232” is displayed, press the T key.
45
Page 46

Instruction Manual - TORBAL AGCN Series
3. Commands “BAUD”, “BITS”, and “PARITY” will begin to scroll sequentially.
4. Press the T key when “BITS” is displayed.
5. The scale will display available BITS settings: “7-BIT”, “8-BIT”.
6. To make a selection, press the T key when the desired setting is displayed.
46
Page 47

Instruction Manual - TORBAL AGCN Series
Chapter 16.
DATE AND TIME
To set the current time and date, follow these steps.
1. Enter the main menu by pressing the MENU key.
2. When command “DATE” is displayed, press the T key.
3. Commands “TIME” and “DATE” will scroll sequentially.
16.1.1.Time
1. To set the current time, press the T key when “TIME” is displayed.
47
Page 48

Instruction Manual - TORBAL AGCN Series
2. The current time setting and the command “OUT” will scroll sequentially. To adjust the time, press T when
the time is displayed. To exit, press the T key when command “OUT” is displayed.
3. After the T key is pressed, when the current time is displayed, command “HOUR” will be displayed followed
by a dashed line.
4. Use the following keys to enter the current hour setting: the C key to increment a digit, the T key to accept and
go to the next digit, and MENU to accept the hour setting.
5. Once the hour is set, command “MINUTE” will be displayed followed by a dashed line.
6. Use the following keys to enter the current minute setting: the C key to increment a digit, the T key to accept
and go to the next digit, and MENU to accept the minute setting.
7. Once the minute setting is saved, the scale will save the current time setting and return to the date and time
menu.
48
Page 49

Instruction Manual - TORBAL AGCN Series
16.1.2.Date
1. To set the date, press T when “DATE” is displayed.
2. The current date setting and the command “OUT” will scroll sequentially. To set a new date, press T when
the date is displayed. To exit, press T when command “OUT” is displayed.
3. After T is pressed, when the current date is displayed, command “YEAR” will be displayed followed by a
dashed line.
4. Use the following keys to enter the current year setting: the C key to increment a digit, the T key to accept and
go to the next digit, and MENU to accept the year setting. Use a four-digit year configuration (i.e., 2007).
5. Once the year is set, command “MONTH” will be displayed followed by a dashed line.
49
Page 50

Instruction Manual - TORBAL AGCN Series
6. Use the following keys to enter the current month setting: the C key to increment a digit, the T key to accept
and go to the next digit, and MENU to accept the month setting.
7. Once the month setting is set, command “DAY” will be displayed followed by a dashed line.
8. Use the following keys to enter the current day setting: the C key to increment a digit, the T key to accept and
go to the next digit, and MENU to accept the day setting.
9. Once the day setting is saved, the scale will save the current date setting and return to the date and time menu.
10. To exit the date and time menu, press the T key when command “OUT” is displayed.
50
Page 51

Instruction Manual - TORBAL AGCN Series
Chapter 17.
MENU CUSTOMIZATION
The main menu can be customized to deactivate commands and functions that are not in use (i.e., if the
RS232 configuration function is seldom used, you may wish to remove it from the main menu to speed up
access to other functions used more often). To customize the main menu, follow these steps:
1. Press the main MENU key to enter the main menu.
2. Press the T key when the command “ACTIV” is displayed.
3. All main menu functions and commands will begin to scroll. Enabled functions will have the symbol
“o” displayed in the lower left corner of the display.
4. To deactivate a function, press the T key when it appears on the display.
5. Commands “ON” and “OFF” will begin to scroll sequentially. To deactivate the function from the
main menu, press the T key when “OFF” is displayed. To activate the function for the main menu,
press the T key when “ON” is displayed.
51
Page 52
Instruction Manual - TORBAL AGCN Series
Chapter 18.
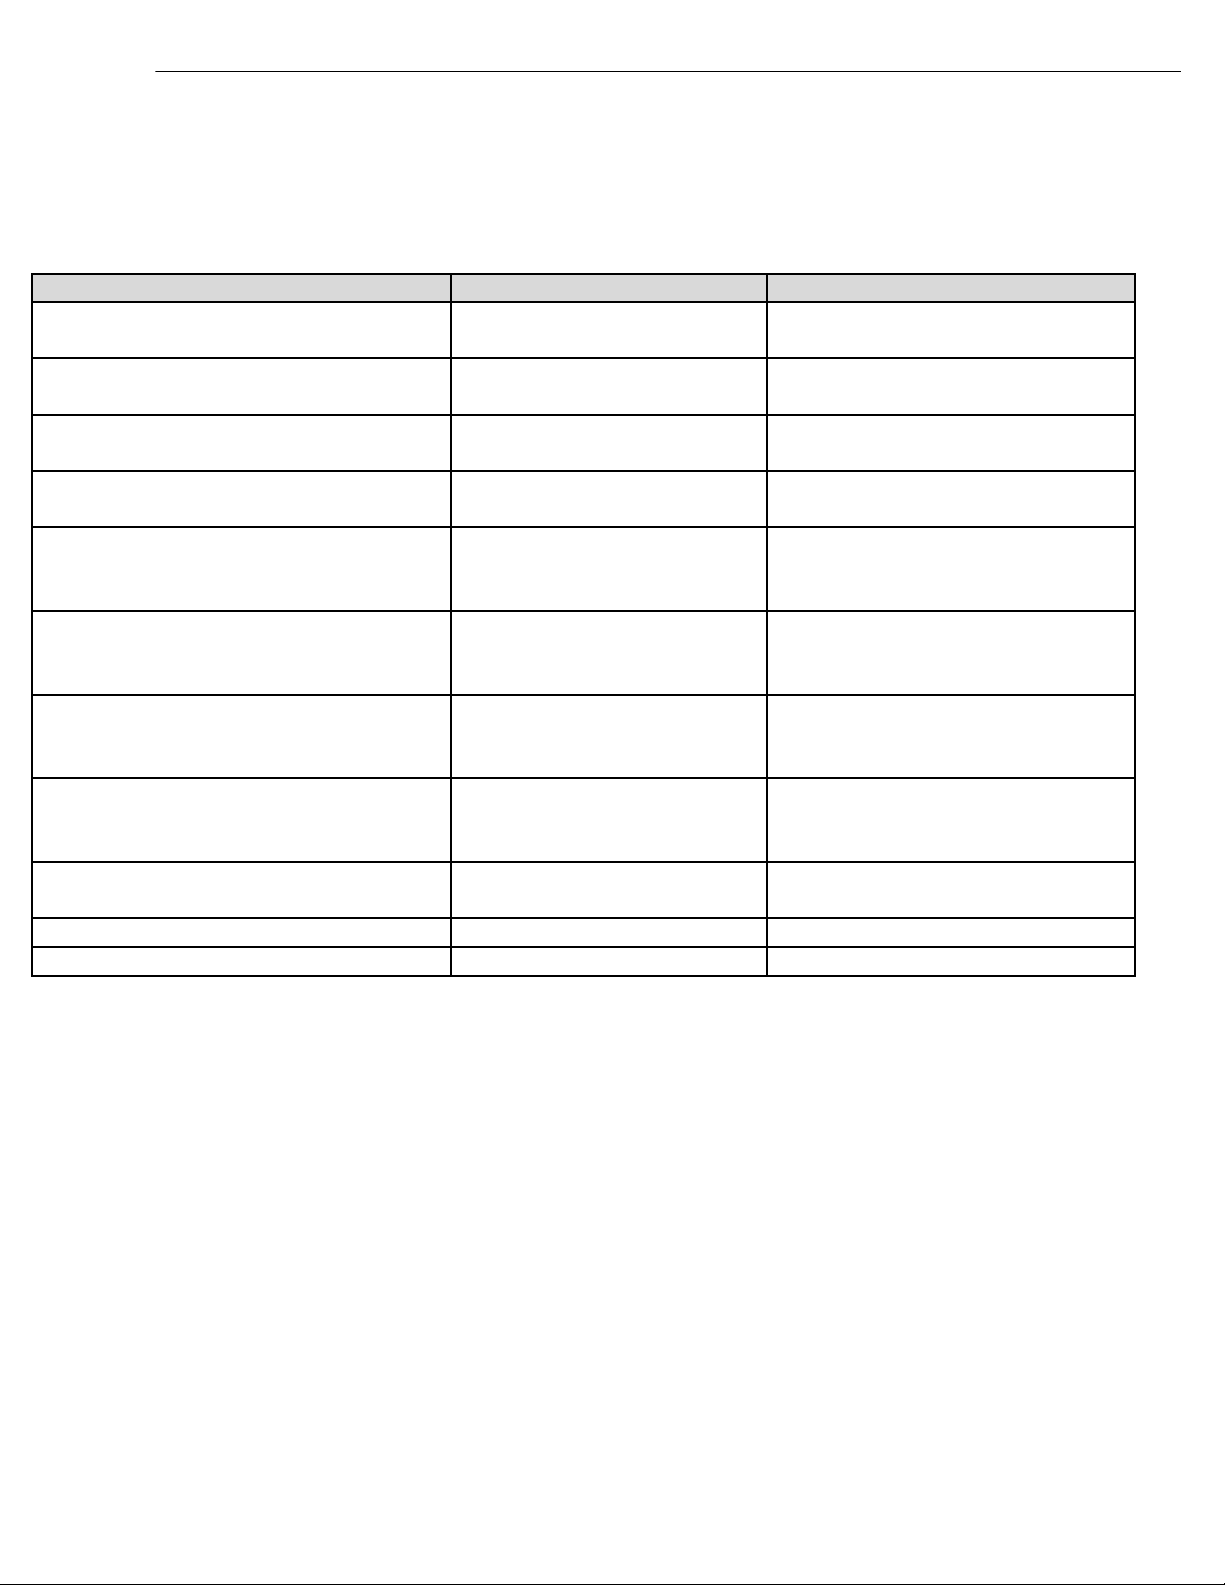
COMMON ERRORS AND TROUBLESHOOTING
Error or Indicator Cause Explanation / Solution
- - - - Below zero Re-zero the scale by pressing the
0 key.
- - Taring is not allowed Place a weight on the pan before
taking a tare.
- - Re-zeroing is not allowed Remove weight from pan and clear
stored tare values
L Pan error Make sure that pan is properly
seated on the pan support
.H Exceeded capacity The scale has exceeded its
weighing capacity. Reduce the
weight.
Err – b Pan not cleared on power-up The pan was not empty while the
scale was initiating at startup. Clear
the pan and restart the scale.
Sapl LO (Parts Counting) Average piece weight is too
low
Sapl LO (Percent Weighing) Sample Reference weight is
too low
The scale will not turn on Possible power failure Check the power AC adapter
Weighing results are not accurate Inaccurate calibration Calibrate the scale
Weighing result will not stabilize Irregular environment Eliminate drafts or vibrations
The average piece weight is lower
than 3e. Be sure that individual
piece weight is greater than 3e.
The sample reference weight is
lower than 100d. Increase the
sample weight.
connection
52
Page 53

Instruction Manual - TORBAL AGCN Series
Chapter 19.
MAINTENANCE
Cleaning and maintaining your AGCN Precision Scale:
• Before cleaning the scale always unplug the A/C adapter from the electrical outlet.
• Use a soft, slightly damp cloth to clean the exterior housing of your scale,.
• Wipe the scale gently. Do not allow any liquid to enter into the scale.
• Do not apply extensive pressure to the LCD display.
• Do not use chemicals or benzene when cleaning the surface. Corrosive chemicals may damage the finish.
• Alcohol may be used only to clean the scale’s stainless steel pan or the draft ring.
Chapter 20.
ACCESSORIES
Chapter 21.
REPLACEMENT PARTS
53
Page 54

Instruction Manual - TORBAL AGCN Series
Chapter 22.
LIMITED WARRANTY
PURCHASER’S 24-MONTH WARRANTY
Warranty is valid only if the attached warranty registration card is completed and returned within 30 days.
This product is a precision device made to exacting standards of scientific accuracy. It is guaranteed to have
been adjusted and inspected for proper workmanship and performance, and certified for its currently advertised
specifications before shipment.
Fulcrum Products are warranted against defects in material and workmanship under normal use and service.
This warranty is extended only to the first purchaser. This limited warranty will not apply if, upon inspection, it
is found that the product was tampered with, misused, overloaded, or abused. mishandled, placed in an
improper environment, improperly installed or adjusted, used for a purpose other than that for which it was
designed, or repaired by unauthorized personnel.
Fulcrum’s liability under this warranty is limited to furnishing labor and parts necessary to remedy the defect
covered by this warranty and restore the product to normal operating condition. Purchasers may be charged a
minimum repair fee for in-warranty products returned for repair if those products are determined to be problemfree.
To make a claim under this limited warranty, obtain an RMA number from Fulcrum and return the
product, carefully packed in its original packaging, shipping prepaid, with the RMA number written on the
return package.
54
 Loading...