

Page 1

The User’s Manual
Personal Video Recorder
Please read this User s Manual carefully.
The menu structure and specification can be changed without noti
ce.
-Personal Video Recorder
-Embedded Conax
TF4000PVR
-Personal Video Recorder
TF4000PVR CoCI
TM
Page 2

This symbol indicates “dangerous voltage”
inside the product that presents a risk of
electric shock or personal injury.
This symbol indicates
important instructions
accompanying the product.
CAUUTTION
RISK ELECTRIC SHOCK
Do NOT OPEN
FA
FE
FE
CI
CIP
FAP
FEP
FA
FE
FE
CI
CIP
FAP
FEP
FE
FE
CI
CIP
FAP
FEP
FE
FE
CI
CIP
FAP
FEP
CAUTION: TO REDUCE THE RISK OF FIRE OR ELECTRIC SHOCK,
DO NOT EXPOSE THIS APPLIANCE TO RAIN OR MOISTURE
INTRODUCTION
4
CONTENTS
4
FEATURES
4
FRONT/ REAR PANELS
1) FRONT PANEL
6
2) REAR PANEL
6
REMOTE CONTROL UNIT
(RCU)
7
GETTING STARTED
13
FUNCTION GUIDE
14
MENU OPERATIONS
1) SYSTEM SETTING
17
2) ORGANIZING CHANNEL
27
3) ORGANIZING FAVORITES
29
4) RECORDING
30
5) HDD SERVICE
33
6) INSTALLATION
34
7) INFORMATION
45
8) COMMON INTERFACE
46
9) GAME
47
HOW TO RECORD AND PLAYBACK THE PVR
1) TIME SHIFTING
49
2)
RECORDING WHILE TIME SHIFTING
49
3) RECORDING, CHECKING AND CANCELING
50
4) PLAYBACK A RECORDED SERVICE
52
5) STOP
52
6) PAUSING
53
7)
SLOW MOTION PLAYBACK
53
8)
FAST MOTION PLAYBACK
54
9) FAST FORWARDING AND REWINDING
54
10) REVERSE PLAYBACK
54
11) BOOKMARK
55
12)
RECORDING THE DESCRAMBLED LIVE SERVICE
55
13)
DESCRAMBLING SERVICE
56
14)
COPYING FROM RECORDED SERVICE
56
15)
CUT OUT SELECTED REGION
57
16)
TIME SHIFTING WHILE RECORDING
57
17)
ZAPPING WHILE RECORDING
58
18)
REPEAT MODE
58
TROUBLE SHOOTING(Q & A)
59
SPECIFICATIONS
60
TABLE OF CONTENTS
Warning!
Please do not insert metal or alien substance into the slots
for the Modules and Cards.
In doing so can cause damage to the PVR and reduce its life span.
Page 3

3
Please read the following recommended safety precautions carefully for your safety.
MAINS SUPPLY
: 90-250V AC 50/60 Hz.
OVERLOADING
: Do not overload wall outlets, extension cords or adapters
as these can result in fire or electrical shock.
LIQUIDS
: Keep liquids away from the PVR.
The apparatus shall not be exposed to dripping or splashing and that no
objects filled with liquids, such as vases, shall be placed on the apparatus.
SMALL OBJECTS
: Coins or other small objects must be kept away from the PVR as
they can fall through the ventilation slots of the PVR and cause
serious damage.
CLEANING
: Disconnect the PVR from the wall socket before cleaning it.
Use a dry cloth lightly dampened(no solvents) to clean
the exterior of the PVR.
VENTILATION
: Do not block the decoder’s ventilation slots.
Ensure that a free airflow is maintained around the PVR.
Never
stand the PVR on soft furnishings or carpets.
Do not use or store the PVR where it is exposed to direct
sunlight or near a heater.
Never
stack other electronic
equipment on top of the PVR.
ATTACHMENTS
: Do not use any attachments that are not recommended as these
may cause hazards or damage the equipment .
CONNECTION TO THE SATELLITE DISH LNB
:
Disconnect the PVR from the mains before connecting or
disconnecting the cable from the satellite dish.
Failure to do so can damage the LNB.
SERVICING
: Do not attempt to service this product by yourself.
Refer all serving to qualified service agents.
LIGHTNING
: It is recommended that the PVR should remain connected at all
times to the mains supply and satellite dish (except when
working on the LNB). However, the manufacturer’s
instructions for safeguarding other equipment connected to the
PVR, i, e, TV set, must be followed during lightning storms.
LNB and the modem telephone line are essential.
EARTHING
: The LNB cable
must be earthed
to the system earth for
the satellite dish.
LOCATION
: Locate the PVR indoor place properly to prevent lightening,
raining and direct sunlight.
WARNING Warning WARNING Warning WARNING
Page 4

4
INTRODUCTION
Thank you for purchasing the Personal Video Recorder (PVR).
This PVR is fully compliant with the international DVB standard and thus transmits digital
images, sounds, information guides and teletext directly to your TV through the satellite.
Now you can comfortably see and receive digitally transmitted music, news, movie and sports
satellite broadcasts in your office or at your home. The PVR records and playback satellite
broadcasts. You can enjoy interesting games embedded in PVR.
In the Channel Search section, both the automatic channel search method and the
manual search mode are provided. Also it supports DiSEqC 1.2, enabling you to move your
antenna in order to focus preferred satellite. You can save up to 3500 TV and 1500 Radio
channels and work around with the Favorite, Lock, Delete, Move and Sort functions.
The Menu is very modern and supports different languages. All functions can be carried out
using the remote control and some of the functions can also be carried out using the front panel.
The PVR is easy to use and adaptable for future advances. Please be aware that new
software may change the functions of the PVR.
If you have any difficulties concerning the operation of your PVR, please refer to the
relevant section of this manual, including the ‘Troubleshooting’. This Manual will provide you
with useful information on using the PVR.
Fully Compliant to DVB.
Common Interface for Viaccess,Irdeto,Cryptoworks,Nagravision,Conax and Mediaguard.
Please ensure that the following items are included with the PVR.
1) Remote control unit
2) Batteries (size AAA)
3) User’s Guide (this document)
CONTENTS
FEATURES
Page 5

5
Antenna/LNB control
- 22KHz mode On/Off
- 0/12V mode selection
- Automatic FEC Detection
- DiSEqC 1.0 & 1.2 compatible
Satellite/Channel support
- 3500 TV channels, 1500 Radio channels storable
Video/Audio
- Automatic PAL/NTSC selection
- Multi-lingual Audio support
- Automatic channel search
OSD (On Screen Display) support
- 256 color support.
- Multi-lingual menu text support.
- GMT and Time Offset support
- 10 favorite channel groups support
- Page Up/Page Down available on your channel list
- PIG ( Picture In Graphic ) support
Recording and playback
- Time shifting playback
- Recording by EPG
- Delayed Recording
- Fast and Slow Playback
- Bookmark
- Repeated Playback for selected interval
- Capable of editing recorded services
- About 12-25 hours recording capacity with a 40GB HDD
2 Tuners
- 2 Tuners for zapping while recording.
- 2 LNB inputs
- 2 RF signal loop through
- Independent LNB control
Teletext
- Software emulation mode with always VBI insertion mode on.
Games are embedded.
Embedded Conax
(Embedded Conax model only)
S/PDIF output (Digital Audio Output)
Page 6

6
1) Front Panel
2)Rear Panel
FRONT / REAR PANELS
The power button of STB (ON / Stand by)
- LED
TV / SAT
REMOTE
STAND BY
- DISPLAY
During the STANDBY mode, the current time is displayed.
When the power is ON, the current status is displayed (TV/ Radio/ Menu).
- CHANNEL
The channel buttons are to change channels.
VIDEO OUTPUT
Video output (YELLOW)
LNB 1 OUT
Use it to connect to
another PVR or LNB 2 IN.
LNB 2 OUT
Use it to connect to
another STB.
RF IN
Connects the TV.
RF OUT
Connects the TV RF IN (ANT IN).
VCR SCART
Connects the VCR SCART
AUDIO-LEFT OUTPUT
Audio output.(WHITE)
RS232
Upgrades the PVR Program &
software
S/PDIF
Optical output for Digital
Audio
Connects the satellite antenna cable.
LNB 1 IN
Connects the satellite antenna cable.
TV SCART
Connects the TV SCART
AUDIO-RIGHT OUTPUT
Audio output.(RED)
0/12V OUTPUT
Chooses the LNB on the antenna.
- POWER
LNB 2 IN
Page 7

7
REMOTE CONTROL UNIT (RCU)
POWER Button ( )
Switches the PVR between Operation and Standby mode.
MUTE Button ( )
Enables/ Disables the Audio.
UHF Button ( )
Displays and alters the UHF setting in menu.
TV/SAT Button ( )
Changes the terrestrial TV and Satellite mode.
SLEEP Button ( )
Displays sleep time. When sleep time,
the power automatically turns to the OFF
mode and the PVR to the STANDBY mode.
Numeric Buttons ( 0~9 )
Selects the TV or Radio service channels
and individual menu options.
RECALL Button ( )
Selects the previously viewed channel.
INFO Button ( )
Displays the program information box on
the screen and removes it.
GUIDE Button ( )
Displays the EPG (Electronic Program Guide)
on screen only when available.
TV/ Radio Button ( )
Selects the TV/Radio mode.
MENU Button ( )
Displays the Menu on screen or returns to
previous menu from submenu.
SOUND Button ( )
Selects LEFT/RIGHT/MONO/STEREO
sound function.
Page 8

8
Button
Pause.
Button Button Button
The each function for above buttons is not
defined yet. According to the future upgrade
for the software, the buttons will be used
and its function will be defined, which will
be notified through our website or addendum
in manual.
Button Button Button Button
Above buttons are a kind of function key. So,
the fixed function in each OSD Screen can be
referred in each instruction message in help
window.
Button
Display recorded service list.
Button
Select the period for repeated playback.
V+/V- Buttons ( )
Adjusts the volume (Increase/Decrease).
P+/P- Buttons ( )
Tunes to the next or previous service.
Services up or down through the available
services.
OK Button ( )
Displays Channel List on screen.
Selects an item in the menu.
FAV Button ( )
Displays the favorite channel list.
SUBTITLE Button ( )
Selects the subtitle language list for the
current service.
EXIT Button ( )
Returns to the previous menu and the screen.
TELETEXT Button ( )
Enables the teletext with software
emulation.
Button
Display the progress bar of time shifting or
playback when no progress bar is displayed.
Fast rewind when the progress bar is displayed.
Button
Playback with normal speed.
Button
Fast forward or fast motion playback.
Button
Slow motion playback.
Button
Stop playback or recording.
Button
Start recording.
Page 9

9
First, connect both the satellite antenna and the TV line to the PVR and switch the
power on.
In this manual there are some of the most common ways to connect the equipment:
TV, VCR and PVR.
There are several ways of connecting the PVR to the existing Audio/TV system.
We recommend one of the following setups.
If you have problems with your connections and need help, contact your dealer or
service provider.
1. Connection to TV, VCR and Hi-Fi
1-2) Connection to the VCR with the SCART Cable.
Connect one end of the SCART cable to the
VCR SCART socket on the PVR and the other
end to a SCART socket on the VCR.
INSTALLATION (Connection)
1-1) Connection to the TV with the SCART Cable.
Connect one end of the SCART cable to the
TV SCART socket on the PVR and the other
end to a SCART socket on the TV.
Page 10

10
1-3) Connection to the TV with the CINCH Cable.
Connect one end (3 connectors) of the CINCH
cable to the AUDIO-RIGHT (red),
AUDIO-LEFT (white) and the VIDEO
output (yellow) socket on the PVR.
Connect the other end (3 connectors) to the
AUDIO-RIGHT (red), AUDIO-LEFT
(white) and the VIDEO input
(yellow) socket on the TV or Hi-Fi.
1-4) Connection to the TV using the RF cable.
Connect a terrestrial antenna to RF IN socket
on the PVR.
Connect one end of the RF cable to the RF
OUT socket on the PVR.
Connect the other end to the ANT IN socket
on the TV.
2.Connection to the Antenna.
We recommend one of the following installation diagrams because of the LNB
specifications for selecting RF signal band by DC voltage and 22Khz tone.
If the PVR is installed with separated connection type, there is no restriction for
zapping while recording.
Page 11

11
2-1) Installing the PVR with two separated Antennas.
Installing the PVR with two separated Antennas.
The
Connection Type
in
LNB setting
menu
should be set to
Separated
.
2-2) Installing the PVR with one Antenna.
The
Connection Type
in
LNB setting
menu
should be set to
Loop Through
.
Tuner 1 and 2 can receive the RF signal of
the same polarity and the same band.
2-3) Installing the PVR with one dual LNB Antenna.
The
Connection Type
in
LNB setting
menu should be set to
Separated
.
Page 12

12
3.Connection to the other Satellite Receiver.
Connect the satellite cable to the LNB IN socket
on the PVR. With other connector, connect the
LNB OUT socket on the PVR and the LNB IN
socket of the other PVR or STB.
2-4) Installing the PVR with two separated dual LNB
Antennas and DiSEqC switches.
The
Connection Type
in
LNB setting
menu should be set to
Separated
.
Page 13

13
GETTING STARTED
Press the
Power
button to operate the PVR from the STANDBY mode. Now, the
Info Box will appear for a given time and disappear. By pressing the button, the Info
Box will remain on the screen. The display time of the Info Box is adjustable under the
Installation
menu of the
Main
menu.
If the current broadcast has EPG (Electronic Program Guide) with it, press the
button to see not only the current channel’s but also other channel’s EPG without
any time constraints. Also, press button to reserve and save the current service
and to watch the broadcast automatically when it starts.
IMPORTANT: Before taking charge of your new PVR, some important technical
settings are essential.
- First, press the
MENU
button on the RCU to make the
Main
Menu appear.
- Go to the
LNB Setting
menu under the
Channel Search
item of the
Installation
menu and press button.
- The default PIN CODE is
0000
.
- Choose the right parameters for Satellite Name, LNB Frequency, 22KHz, 12 V,
DiSEqC 1.0, and Motorized System according to your LNB and satellite settings.
If the right Satellite Name and LNB Frequency were not found in the list, call the
dealer for satellite information.
- Then, press the
MENU
button and go back to the
Channel Search
menu.
- Set the
Search Mode
to the
Auto
mode. (A
Manual
or
Advanced Search
can always be performed later on)
- Select the
Start Search...
item and press button.
- The search procedure will take a while. Press button when the searching
process is over (100%) to confirm and save the new channel list.
- For further information, please refer to the
LNB Setting
item of the MENU
OPERATIONS on this manual.
Page 14

14
Press button on the RCU to see the program
information. The Information box displays as follows:
.
Channel Number
.
Channel Name
.
Detailed Program Information
.
Signal Level & Quality
.
Satellite Information
.
Information of subtitle and / or teletext
Information Box
EPG (Electronic Program Guide)
Function Guide
To use currently showing TV, and Radio services
as well as to use next program schedules,
press button on the remote control unit.
If EPG is available on programs, you will see
the detailed description of the programs, start/end
time and programs schedules etc. , and
, buttons will be used to move program and
to see next program schedules. The
button makes the reservation for the next program.
button shows extended information of the current program.
button will change the contents of EPG between TV and Radio services.
By using , buttons, you can see the EPG of next event. To change volume level in this
mode, press , buttons without no interval.
Press button once more, you can see the extended infomation of the current program.
To remove info box, press button once more.
Page 15

15
FA
FE
FE
CI
CIP
FAP
FEP
FE
FE
CI
CIP
FAP
FEP
You can choose a language of subtitle using button
on the RCU.
If a broadcaster provides subtitles, you can see
symbol in the Information Box.
Subtitle
You can choose a language of soundtrack using
button on the RCU when a broadcaster supports
various languages of soundtrack.
Also, it is possible to choose a mode among
Stereo
,
Mono, Left
and
Right
using the , buttons
on the RCU.
Soundtrack
If a broadcaster supports teletext, you can see symbol in the Information Box.
There are VBI insertion mode and software emulation mode in teletext.
In the VBI insertion mode, which is always on, you can watch the teletext with your TV
using the RCU of your TV. To watch teletext with VBI insertion, your TV must support
teletext.
In the software emulation mode, you can watch the teletext even though your TV does
not support teletext. You can watch the teletext using the RCU of PVR.
Press
Teletext
button to watch the teletext with software emulation mode.
Press
Teletext
button or
EXIT
button to escape from teletext.
Teletext
AUTO
Track 01
Track 02
Track 03
Track 04
Track 05
Track 06
Track 07
Track 08
Sound Track
Sound Mode
Mono
Page 16

16
Now this chapter assumes that the PVR system has been installed correctly,
meaning:
* The satellite dish for the PVR has been installed, connected to the PVR and
correctly adjusted to the proper satellite.
* The PVR is connected to the TV.
* The RCU has batteries and ready to control the PVR.
If the PVR has not been installed or connected properly, please refer to the
INSTALLATION
(connection) menu on this manual.
Many of the functions of the PVR are available from the
Main
Menu. Press the
button to open it.
MENU OPERATIONS
Page 17

17
I. SYSTEM SETTING
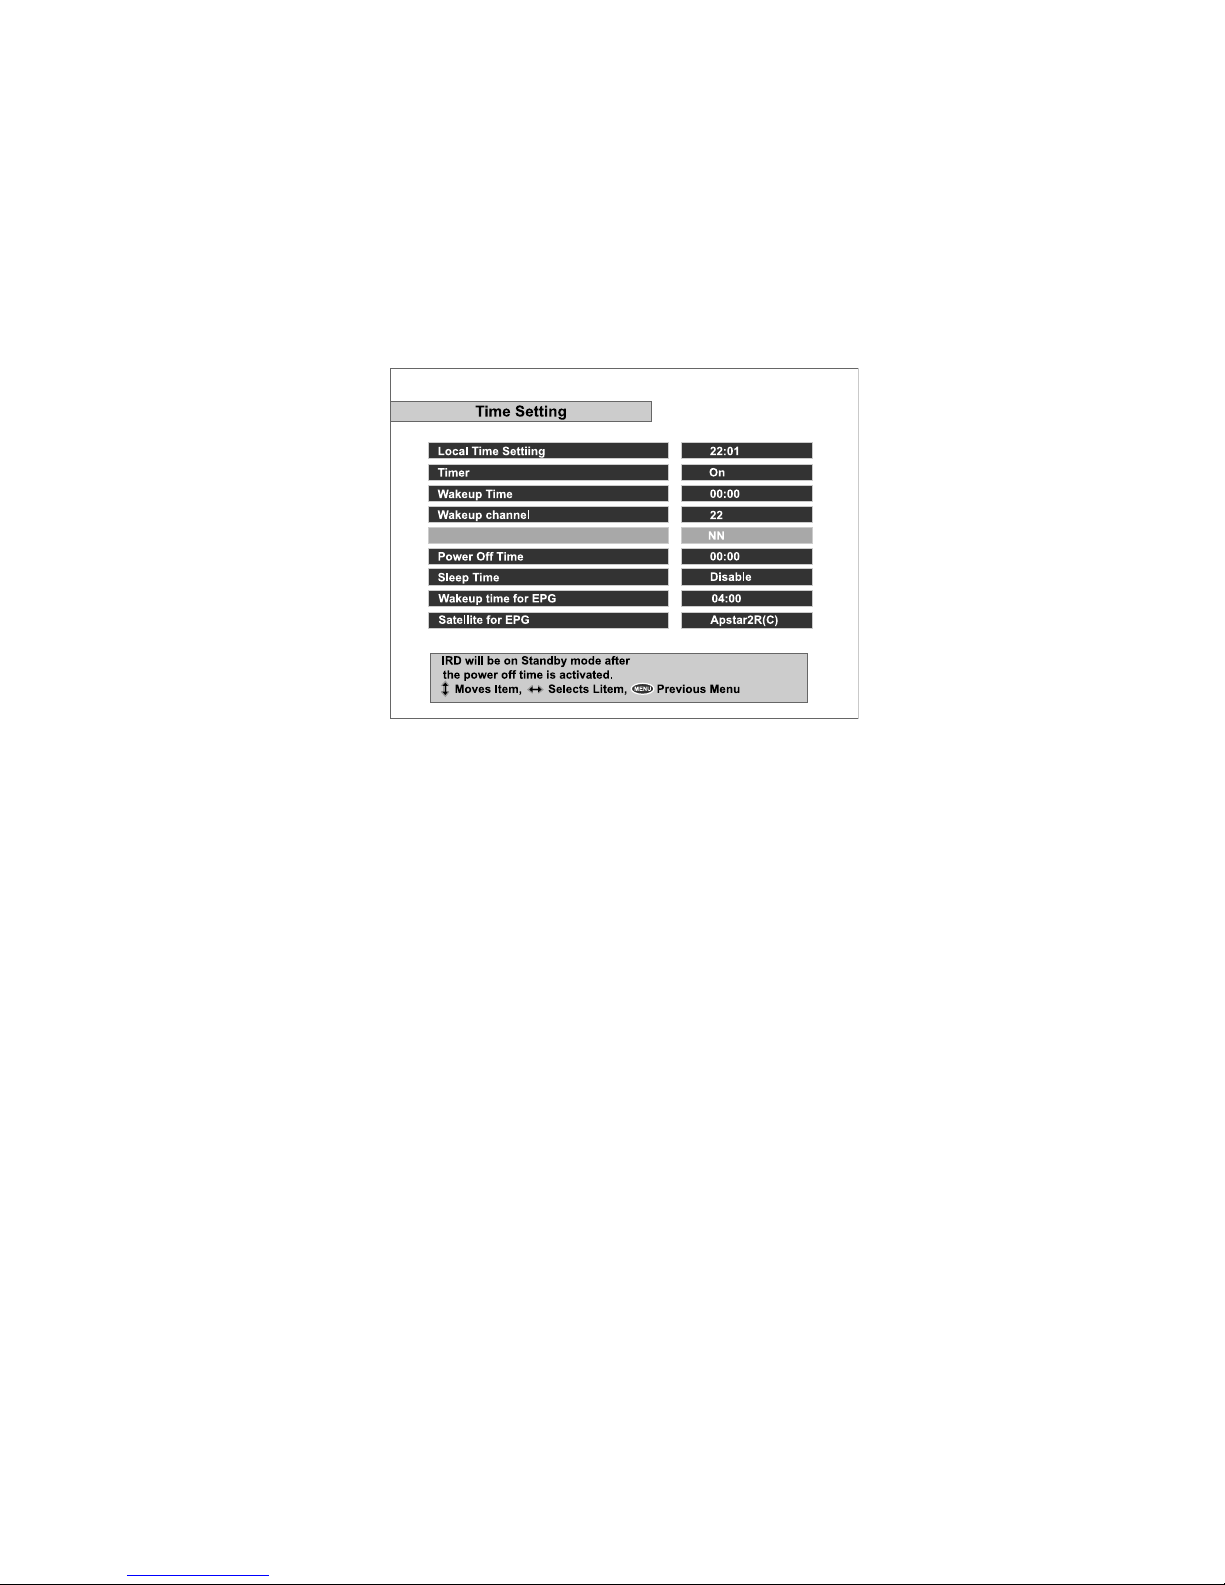
Various time modes can be set, such as the current local time, the Power
On/Off time and the Sleep Time. The exact local present time can be adjusted
by using the
GMT
, the
Time Offset
and the
Mode
sub menus.
PLEASE NOTE: Configure the
Local Time
before adjusting the
Wakeup
Time,Power Off Time
or the
Sleep Time
.
I-1 TIME SETTING
Page 18

18
Press button at
Local Time Setting
item in the
Time Setting
menu to open the
Local Time Setting
menu. Inside the
Local Time Setting
menu, there are 4 sub
menus:
Mode, Local Time, GMT
and
Time Offset
.
Mode
By using the , buttons,you can control the
Auto/Manual
mode. The
Auto
mode automatically updates the time settings by adding the GMT received from the
satellite and the
Time Offset
value you have inserted. The
Auto
mode is recommended.
Local Time
The
Local Time
is adjustable only when the
Mode
is on the
Manual
mode.
Adjust the current time, if necessary, by using the numeric buttons and the ,
buttons.
GMT
GMT is referred to the standard time of Greenwich. This cannot be changed.
Time Offset
The current time of the local area can be inserted. In another words, insert the
time difference of the local time zone from the GMT. For example, if the local area is
Seoul (the time difference from the GMT being 9), insert
9:00
. The time is
adjustable by using the , buttons,15 minutes at a time.
A. Local Time Setting
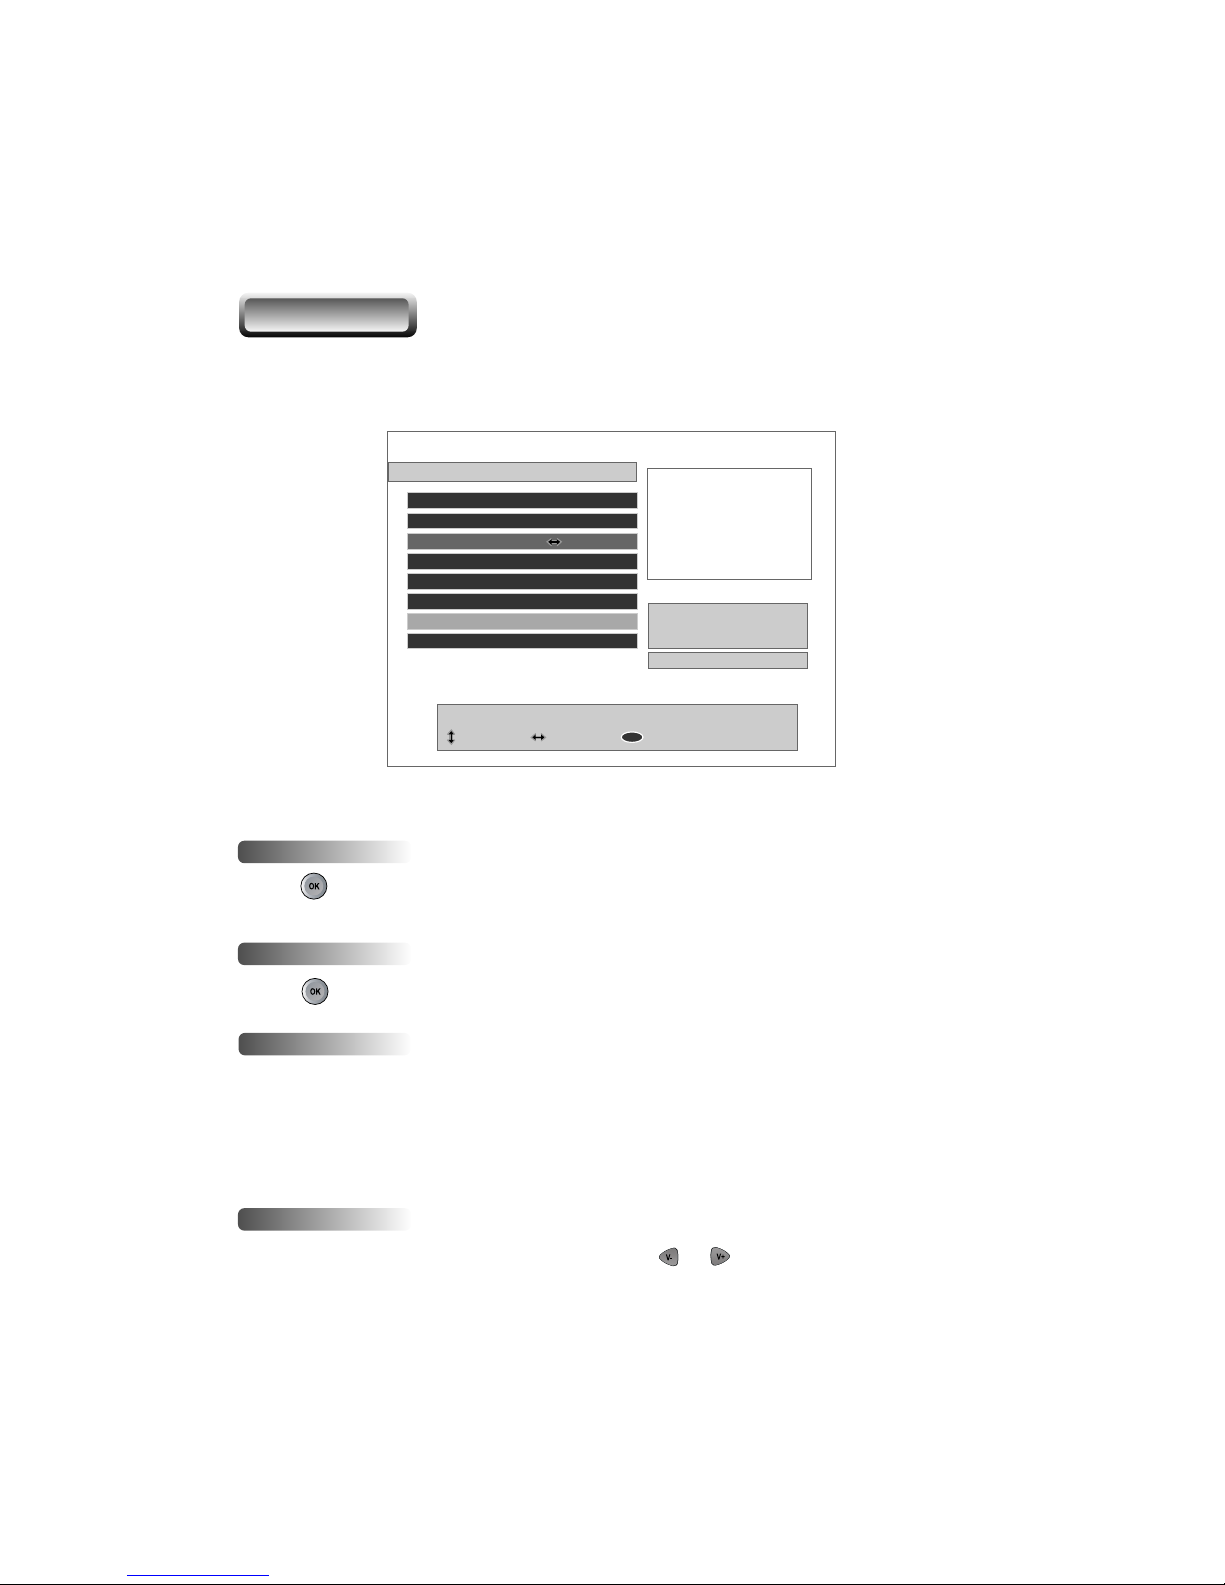
Local Time Setting
Mode
Local Time
GMT
Time Offset
Changes the time setting mode.
In order to change the local time, set it to manual mode.
Moves Item, Selects Item, Previous Menu
MENU
Auto
08:19
08:19
00:00
Page 19

19
Use the , buttons to select the
On/Off
mode. If the
Timer
item
is set to On, the
Wakeup Time
item, the
Wakeup Channel
item and the
Power Off Time
item becomes adjustable.
The
Wakeup Time
item sets up the time the PVR automatically turns
on. Insert the preferable
Wakeup Time
by using the numeric buttons and the
, buttons on the RCU. To disable the wakeup funtion, make the
Timer
item
Off
.
The
Wakeup Channel
item automatically turns the PVR to the preset
channel when it automatically turns on by the
Wakeup
function.
B. Timer
C. Wakeup Time
D. Wakeup Channel
Page 20
20
E. Power Off Time
F. Sleep Time
G. Wakeup time for EPG
The
Power Off Time
menu sets the time of the PVR automatically turns off.
The
Sleep Time
item is similar to the
Power Off
menu. The
Sleep
Time
function turns off after the adjusted sleep time.
The
Wakeup time for EPG
menu automatically turns the PVR on if this
menu is enabled. The PVR will record EPG data to HDD from the desired time.
H. Satellite for EPG
If wakeup time for EPG menu is enabled, you have to select the desired Satellite
you want to record EPG data to HDD.
Page 21
21
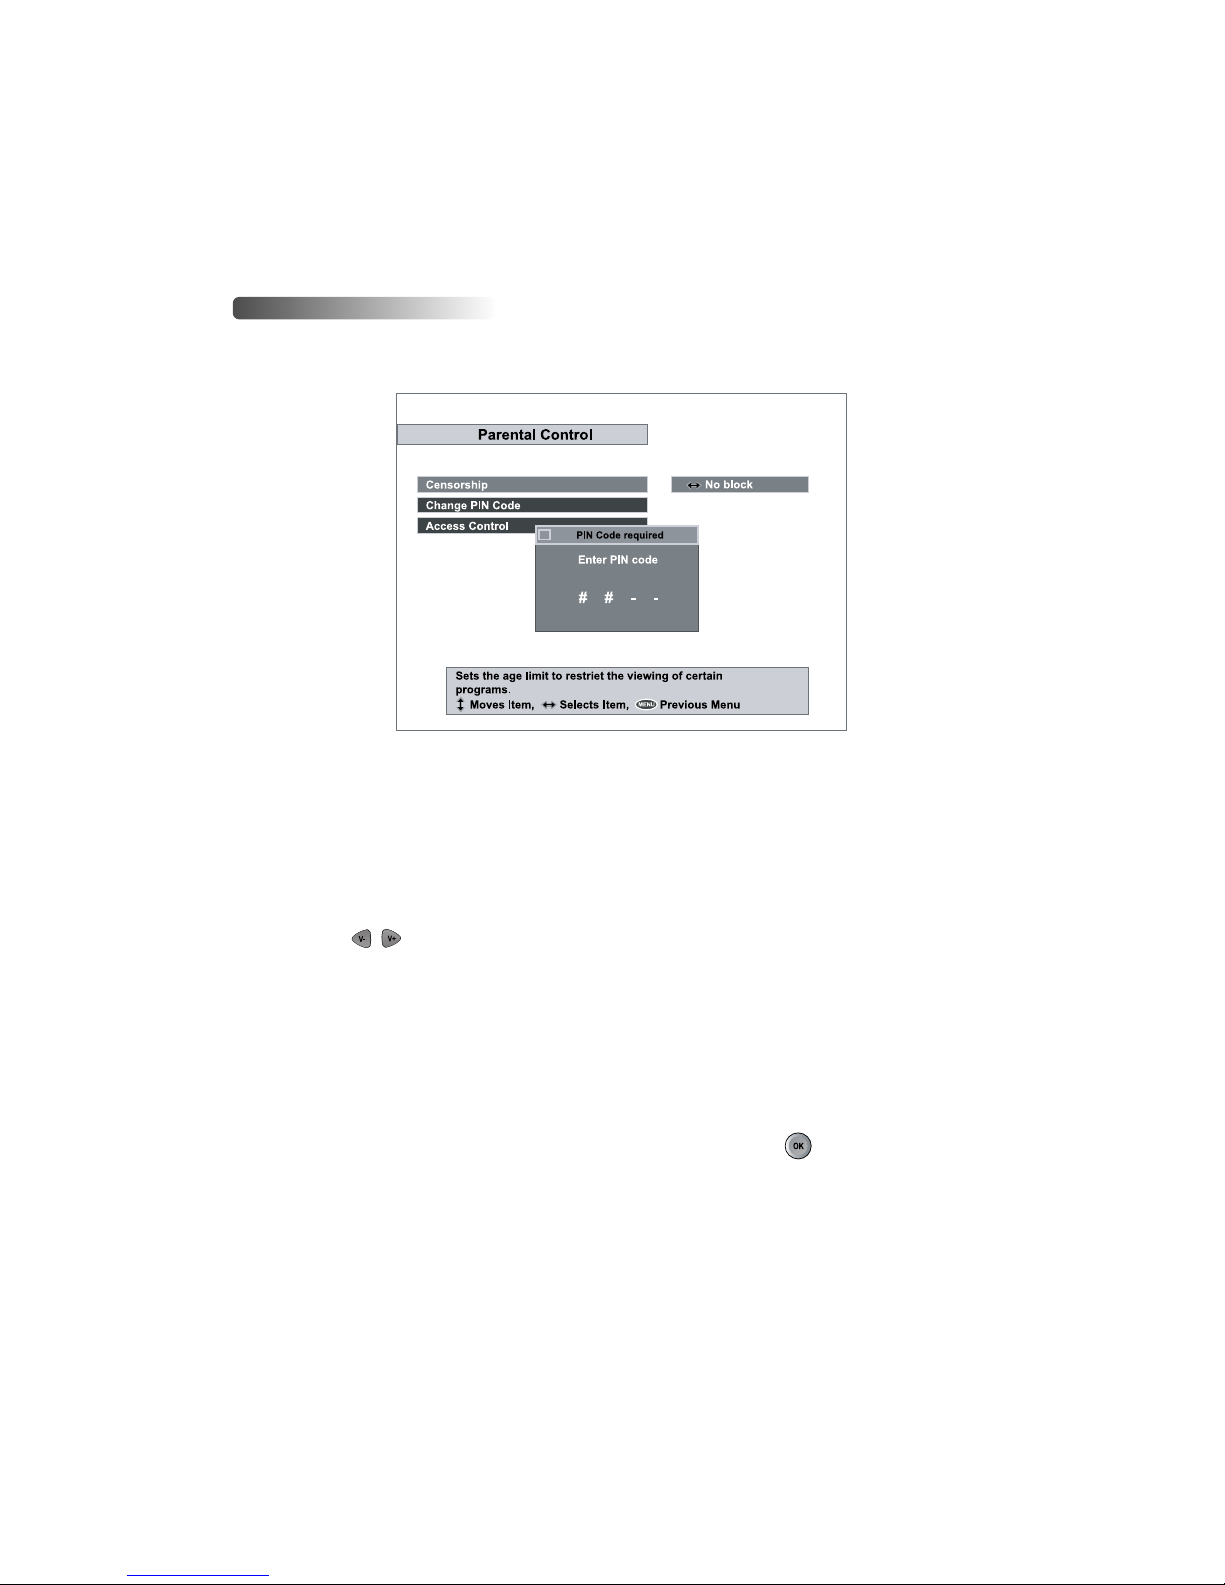
The age rating control, the PIN(Personal Identification Number) Code and the
passwords to various menus can be configured. The PIN Code box will
automatically appear when this menu is selected. The default PIN Code is 0000.
The Censorship item blocks programs according to each specific setting.
Use the , buttons to select the items below.
No Block: Access to everyone.
4~18(age): Inaccessible for viewers within each minimum age limit.
Total Block: Access to no one.
If the channel is limitation free, the block function will not work.
Go to the PIN Code item to configure new PIN Code. Press button, and a
box will appear on the screen. Enter the PIN code by using the numeric buttons on your
RCU.
I-2. PARENTAL CONTROL
A. Censorshi
p
B. Change PIN Code
Page 22
22
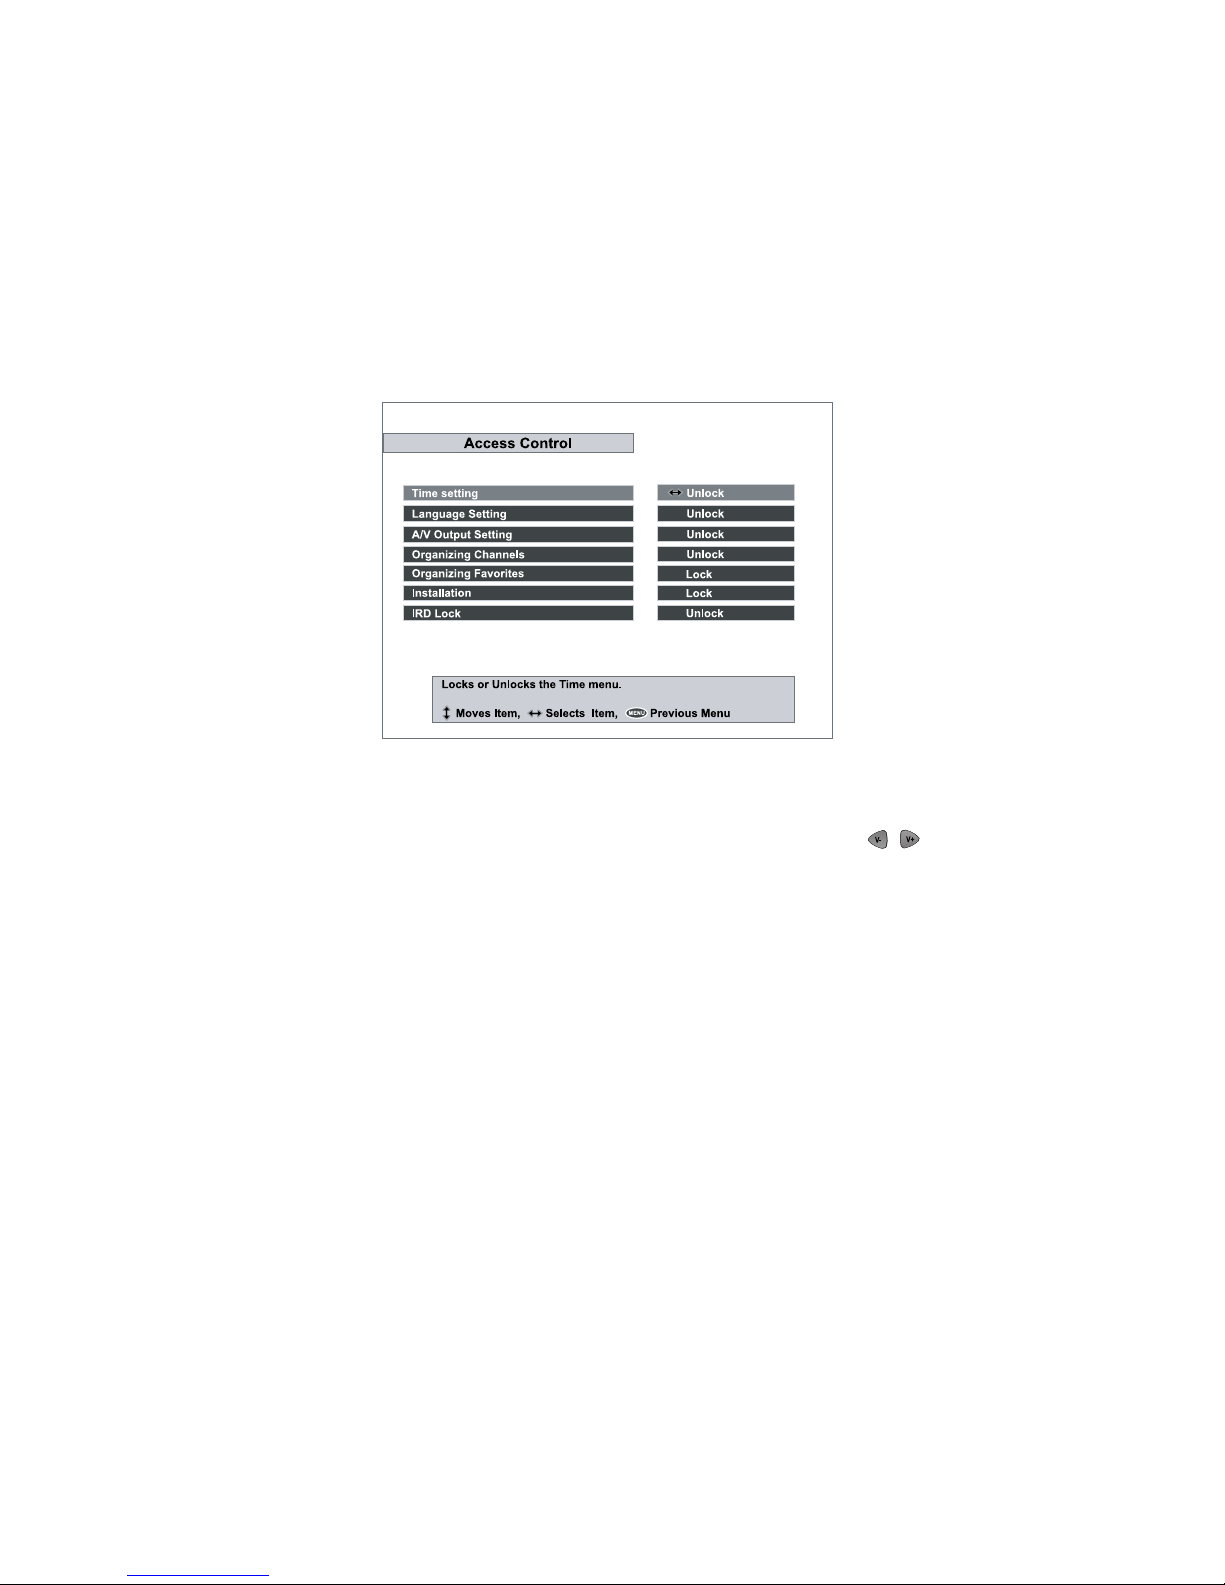
The
Access Control
menu controls access to 7 items:
Time Setting
,
Language Setting, A/V Output Setting, Organizing Channels
,
Organizing Favorites, Installation
and
IRD Lock
. Press the ,
buttons to
Lock/Unlock
the access.
Locking
means controlling the access to
specific menus with the PIN Code system. The default PIN Code is
0000
.
C. Access Control
Page 23
23
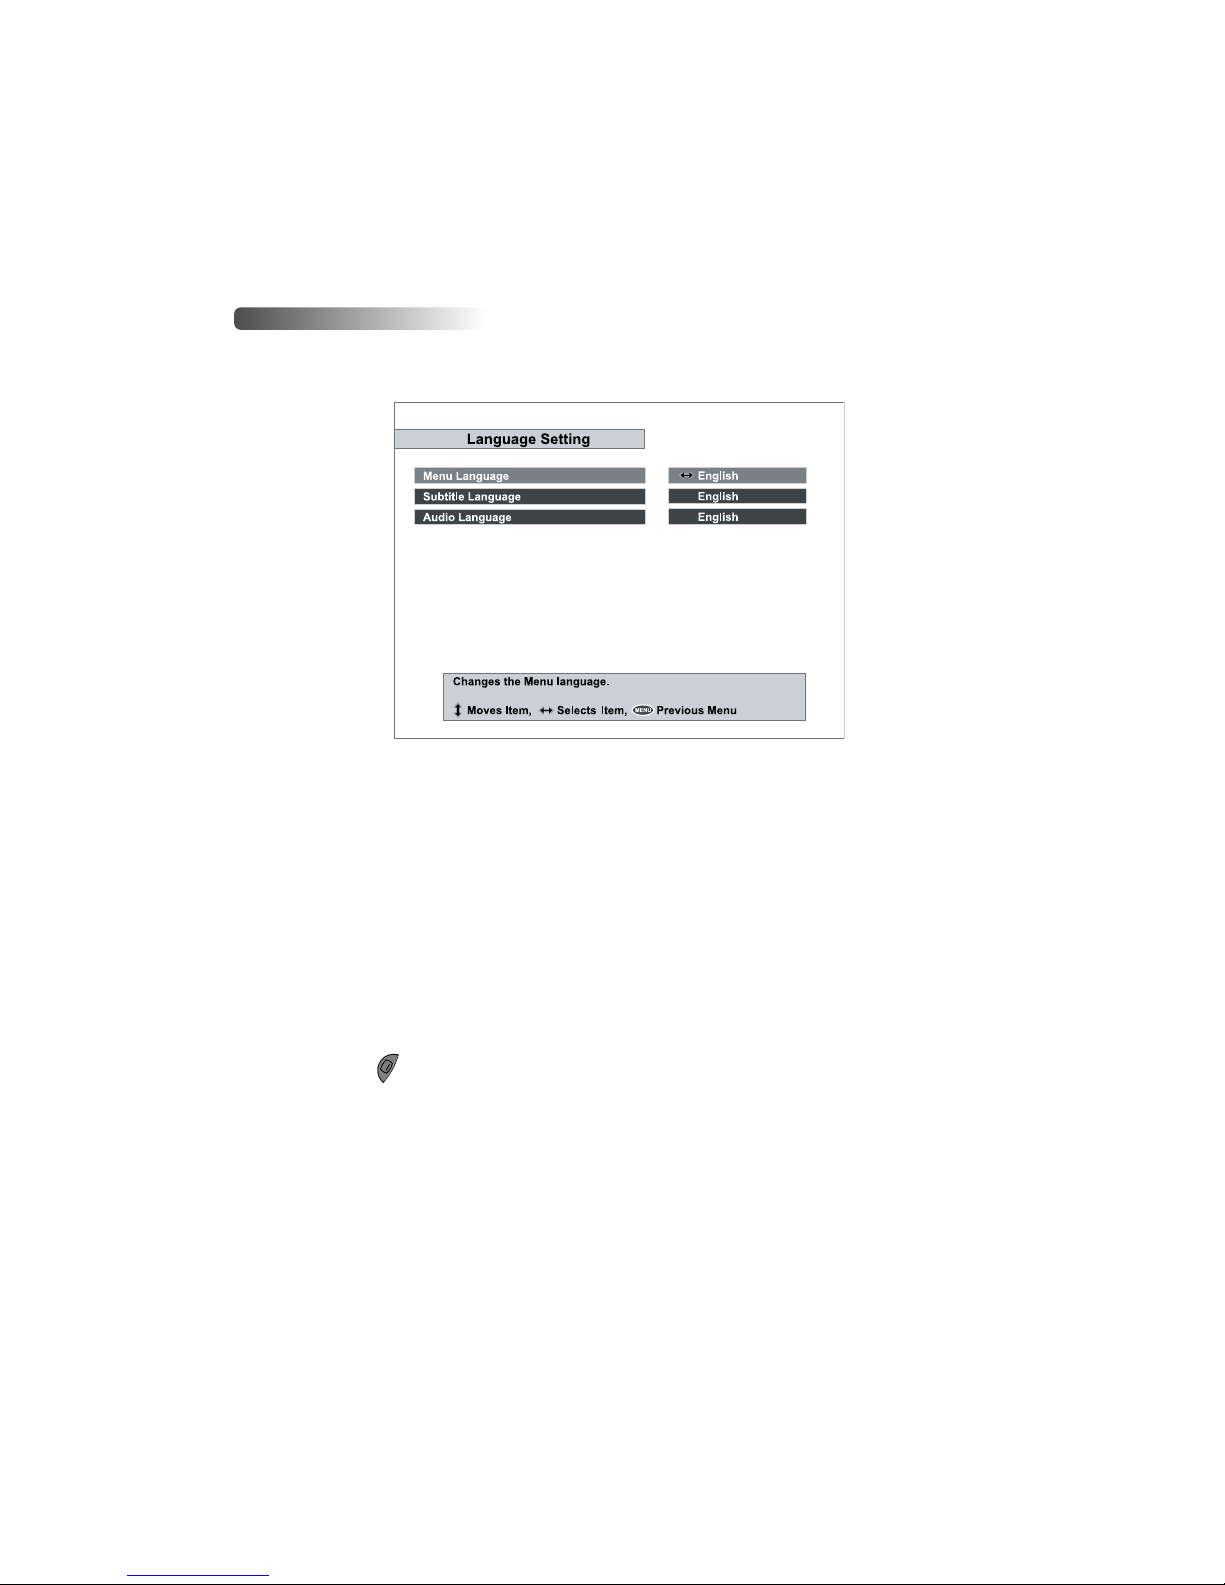
There are many languages available for the menu. The default language is
English.
A. Menu Language
It is an item for changing the language of the
Main
menu.
Select the language which the menus will be shown in.
[English / French / German / Italian / Spanish / Arabic / Greek / Turkish /
Danish / Swedish / Norwegian / Dutch / Russian]
B. Subtitle Language
It is an item for changing the language of the subtitle.
As long as the services support, the subtitle language is changeable by
pressing button on your RCU.
[English / French / German / Italian / Spanish / Arabic / Greek / Turkish /
Danish / Swedish / Norwegian / Dutch / Russian]
I-3. LANGUAGE SETTING
Page 24
24
C. Audio Language
It is an item for changing the language of the Audio.
The first audio language is set to English. If more than one audio language is
transmitted, you may select one language among several languages transmitted
by pressing button.
[English / French / German / Italian / Spanish / Arabic / Greek / Turkish /
Danish / Swedish / Norwegian / Dutch / Russian]
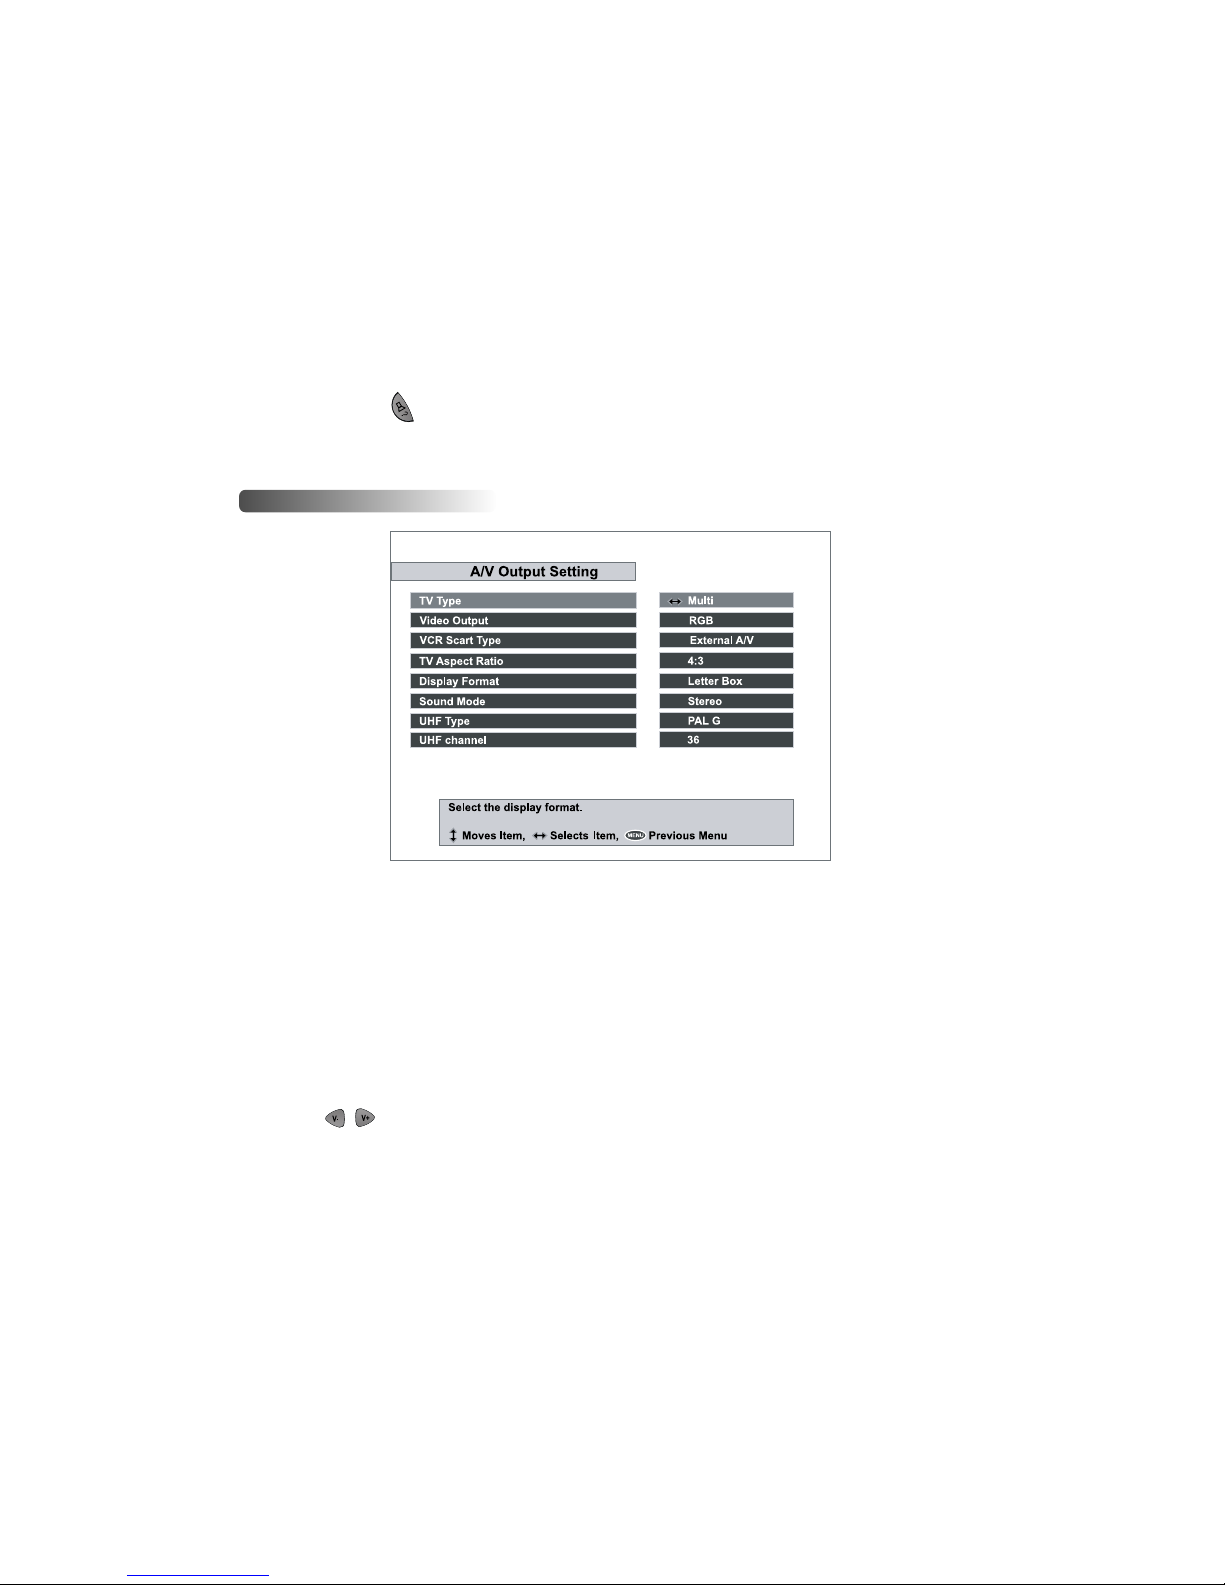
The PVR has many A/V Outputs. Control this menu properly according to external
components connected to the PVR. Configurations concerning Audio and Video can be
made here.
A. TV Type
Enables the setting of the TV standard. For automatic PAL/NTSC selection, set to
Multi
.
B. Video Output
Select the mode of Video output among RGB and CVBS on TV Scart by using
, buttons.
C. VCR Scart Type
Select the VCR scart type either Standard or External A/V. In case of“External A/V”,
TV Video Output will be switched to VCR input automatically by pressing “TV/Sat”
button on the RCU.
I-4. A/V OUTPUT SETTING
Page 25
25
I-5. OSD Transparency
D. TV Aspect Ratio
Enables the setting of the screen format of the TV. Select 4:3 or 16:9 mode by
using , buttons.
E. Display Format
Enables the setting of the screen format of the TV. Select the
Letter Box
or
Center extract
mode of 4:3 pictures by using , buttons.
F. Sound Mode
Allows you to configure the sound mode. Select the
Stereo, Mono, Left
and
Right
modes by using the , buttons. The Sound mode is configurable later
on by using the button on your RCU.
G. UHF Type
Allows you to change the UHF Type. Select the
PAL G, PAL I, PAL K
modes
by using the , buttons.
H. UHF Channel
Choose the UHF Channel by using the , buttons. The default UHF channel
is CH36.
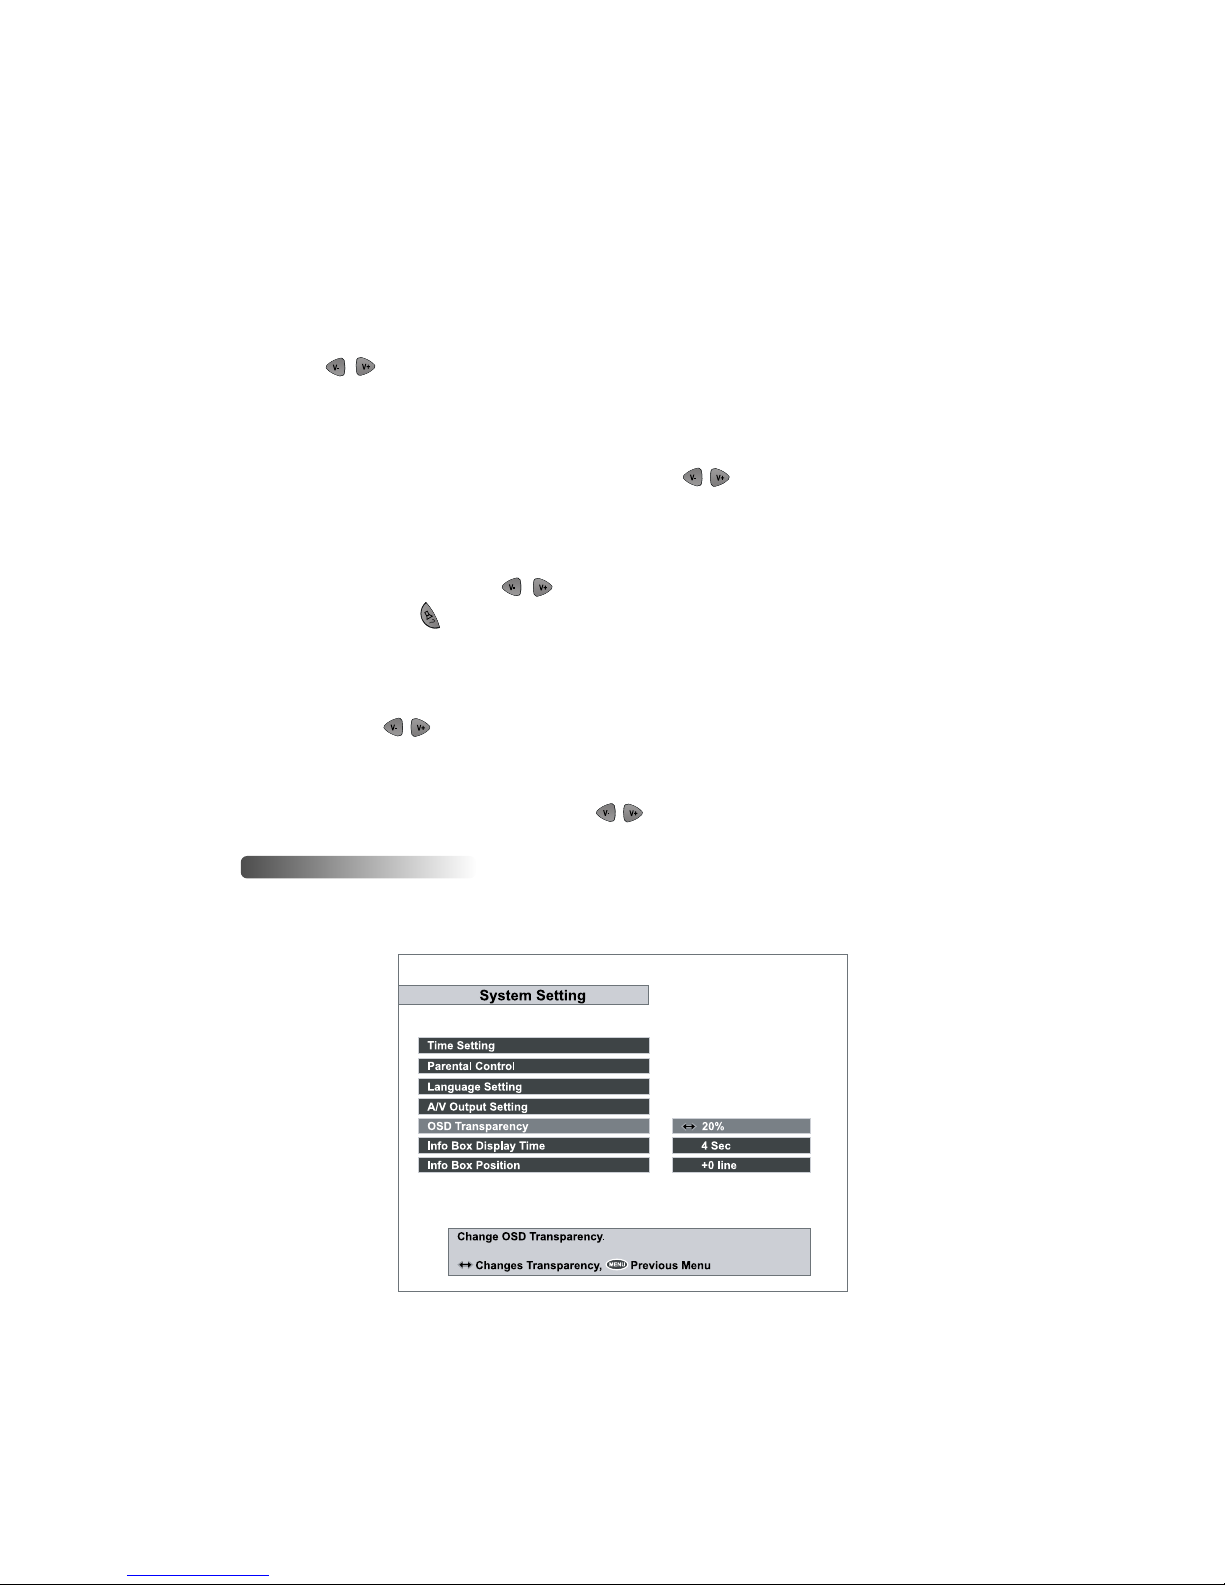
Adjusts the OSD transparency level of all kinds of menus. The available levels
are ranging from 0% to 50%.
Page 26
26
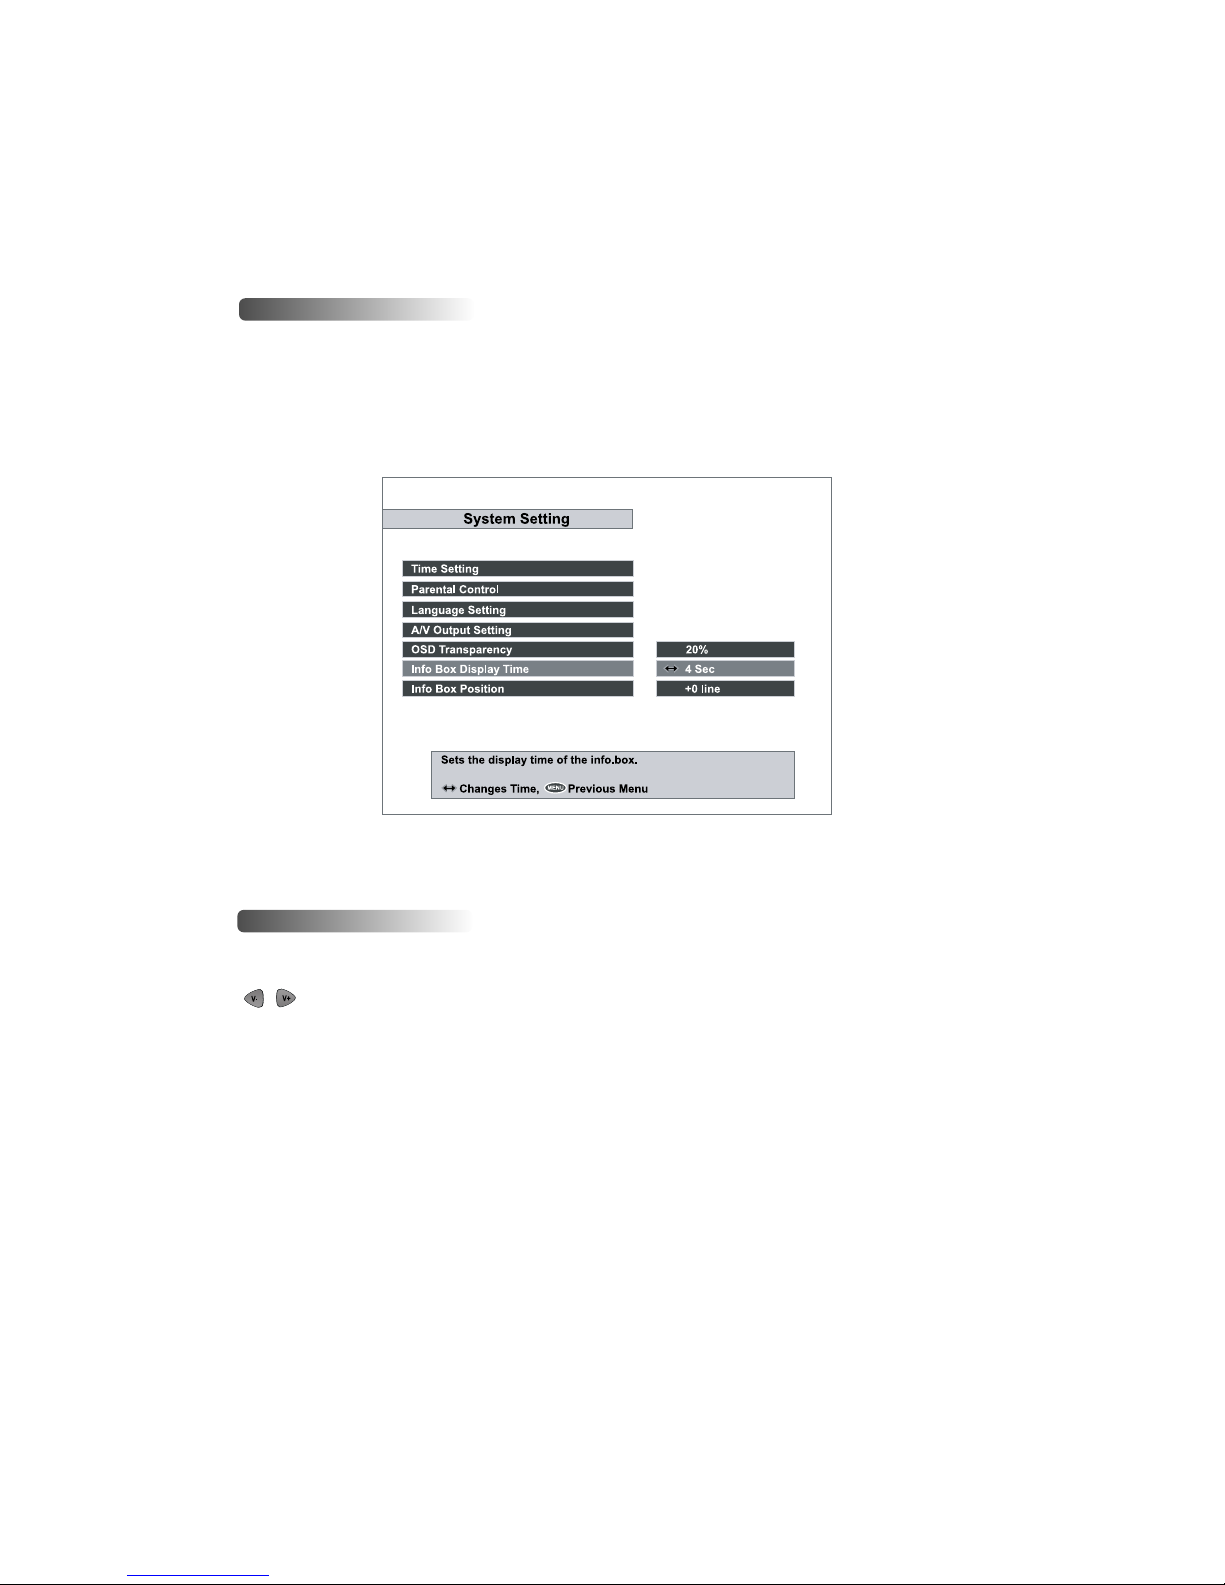
I-6. Info Box Display Time
Adjusts the time-out of the Info Box. Sets the period of time the Info Box is displayed on screen.
The adjustable time is from 0 to 30 seconds.
I-7. Info Box Position
Adjusts the position of the Info Box. Allows you to change the position by using the
, buttons.
Page 27
27
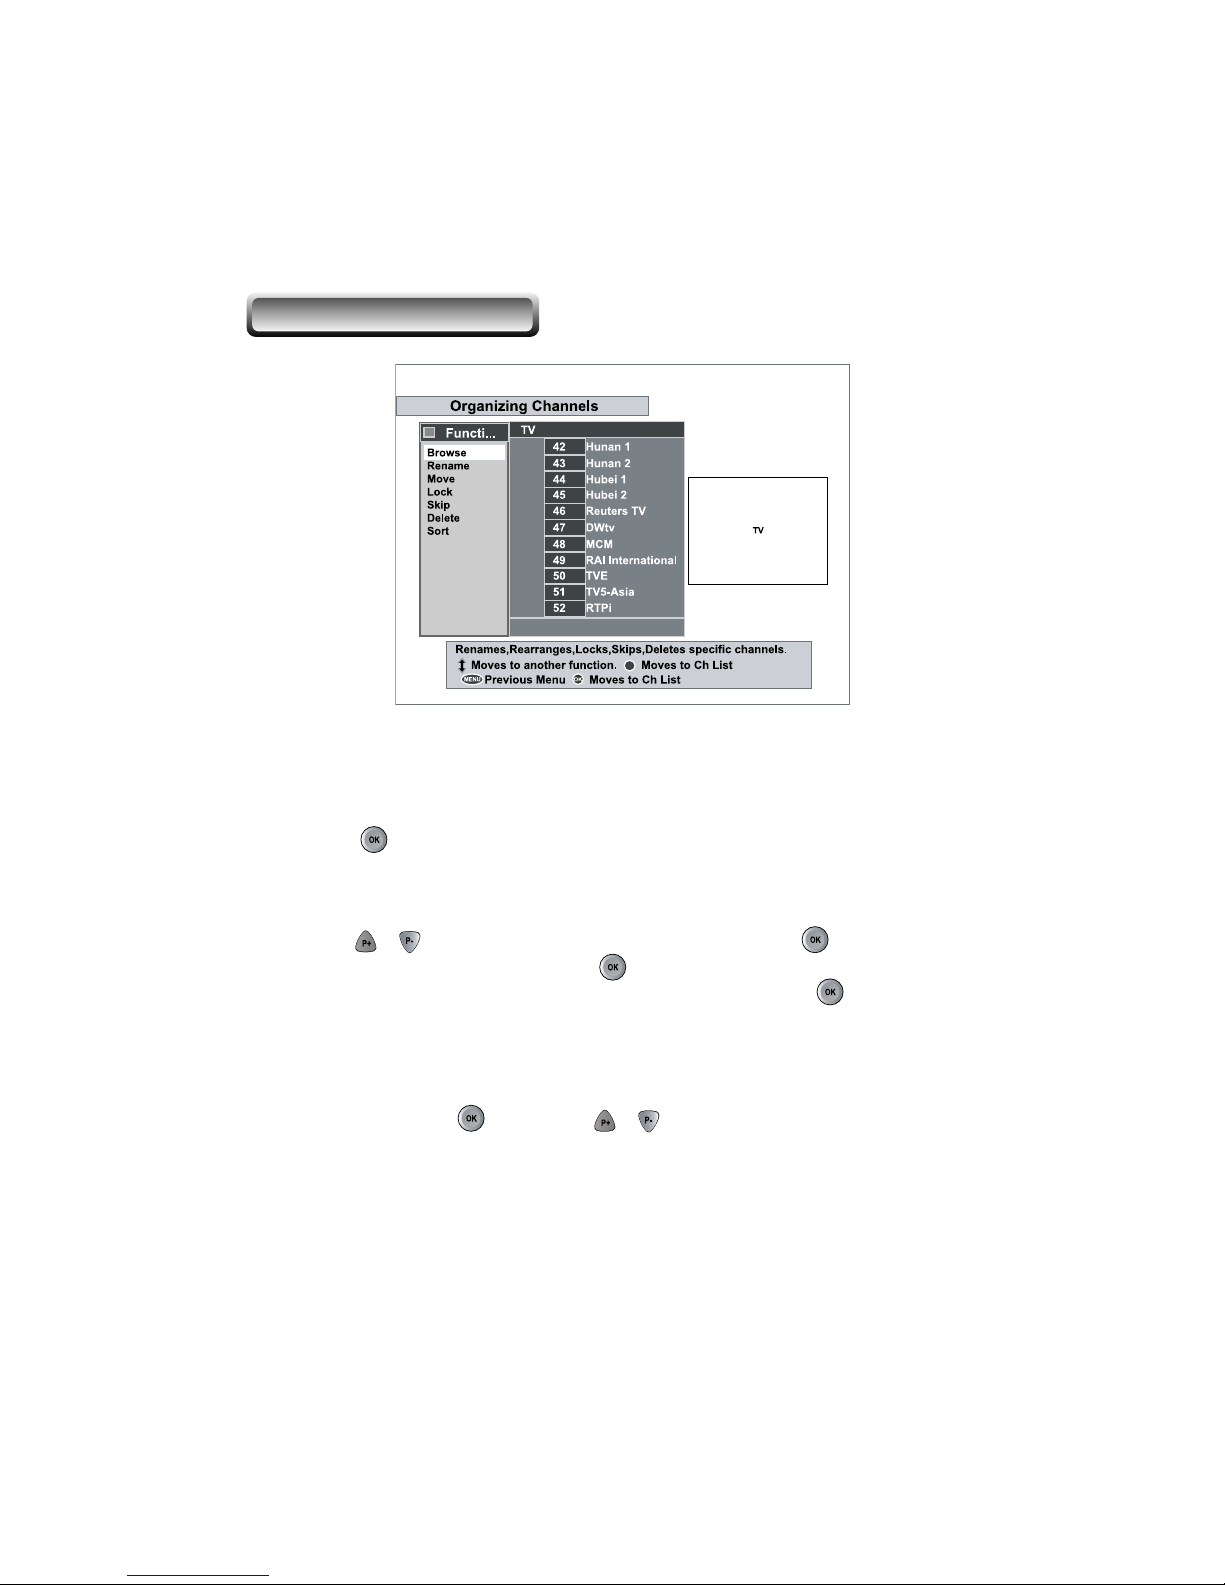
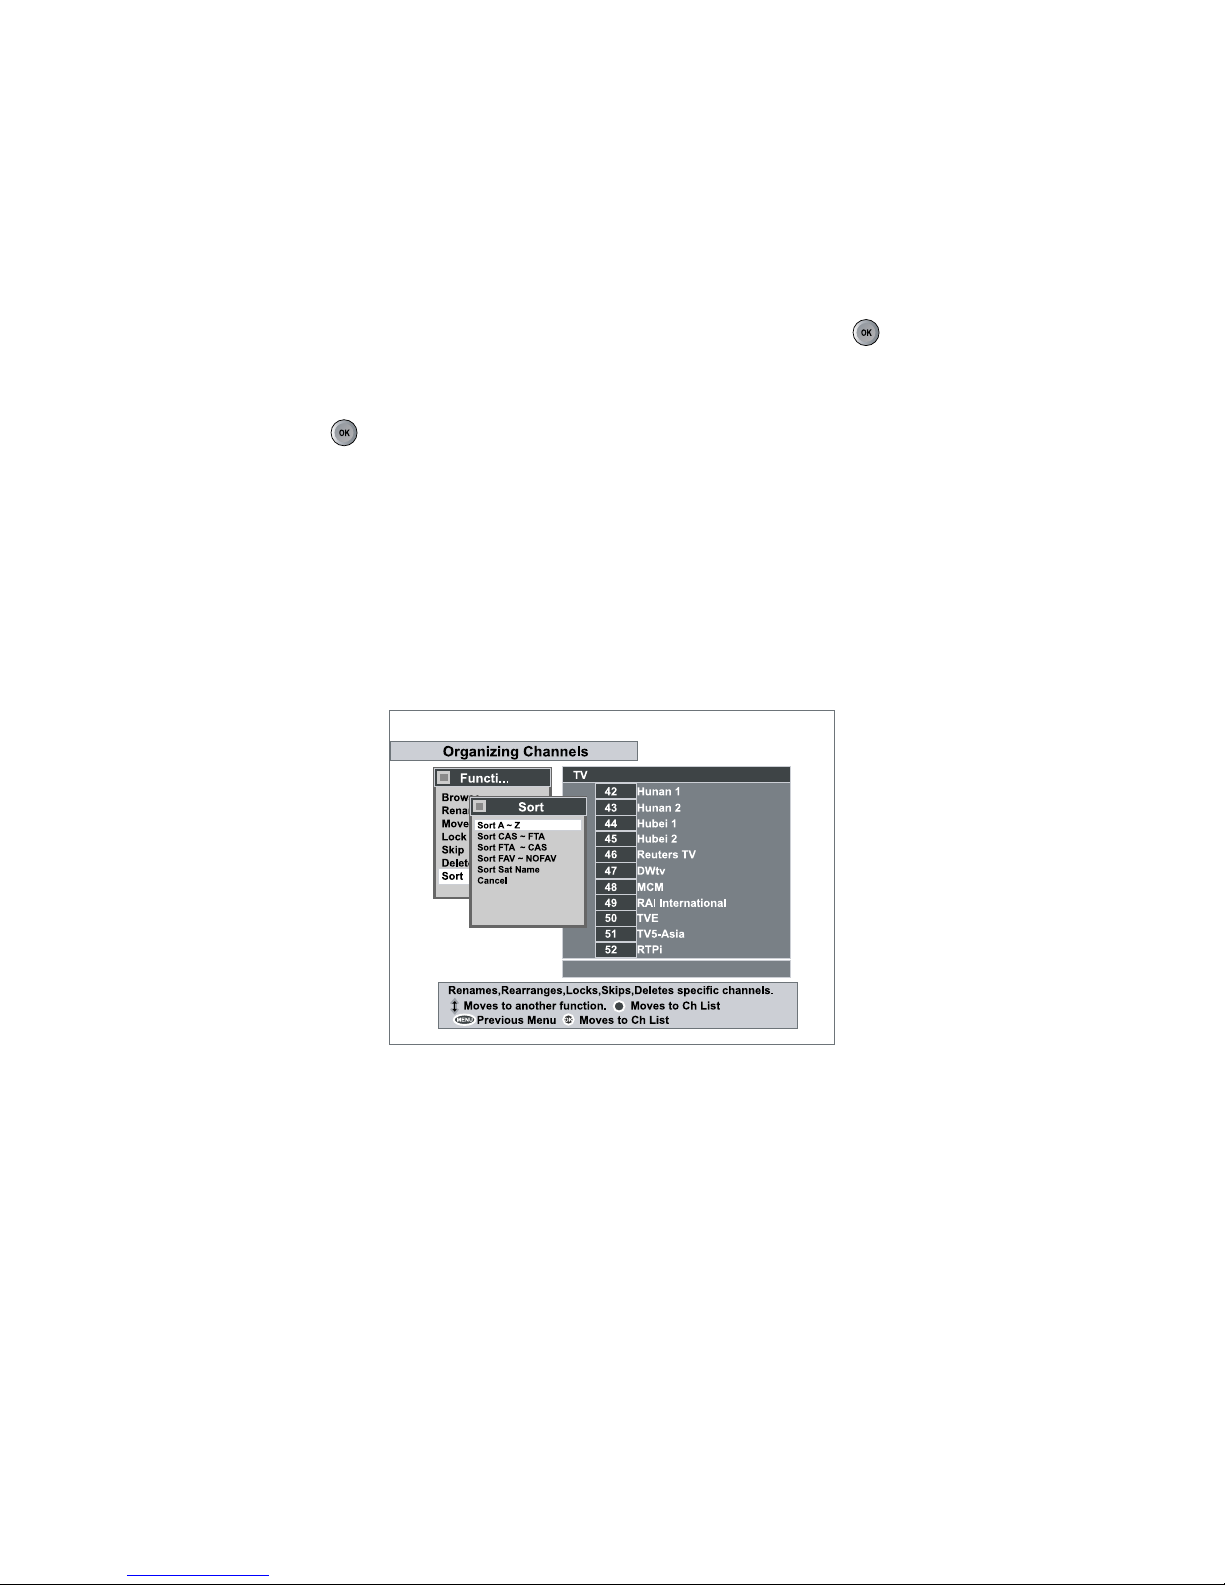
This mode can be used to rename, reorder, lock, hide and delete TV Services.
A. Browse
Press button. Now, browsing through the
Organizing Channels
is possible.
Press assigned buttons on the help message.
B. Rename
Use , buttons to select
Rename
item and press the button to move
the cursor to the Channel List. Press button to display keyboard, and rename
the channel. After renaming it, be sure to save it by pressing the button at
Save
item.
C. Move
You can reorder and move the service to the preferred position. Mark the desired channel
to move and press button. Use , buttons to choose the
Move
mode.
D. Lock
You can restrain and lock the services. From here, locking (and later unlocking)
channels in any of the lists is possible e.g. in order to prevent children from watching
it. If a locked service is selected, enter the PIN code in order to enjoy it.
II. ORGANIZING CHANNELS
Page 28
28
E. Skip
You can hide and skip the services. In order to unlock the skip function, press button
on the skipped channel. The skipped channels will not be visible on channel list.
F. Delete
Press button to delete channels. The delete function differs from the skip
function as it deletes the channel completely. Whereas, the skip function just makes
the channel invisible.
NOTE: Deleted channels are permanently deleted. The only way to reobtain
is to perform a new channel search.
G. Sort
You can sort and rearrange the sequence for the services.
Page 29
29
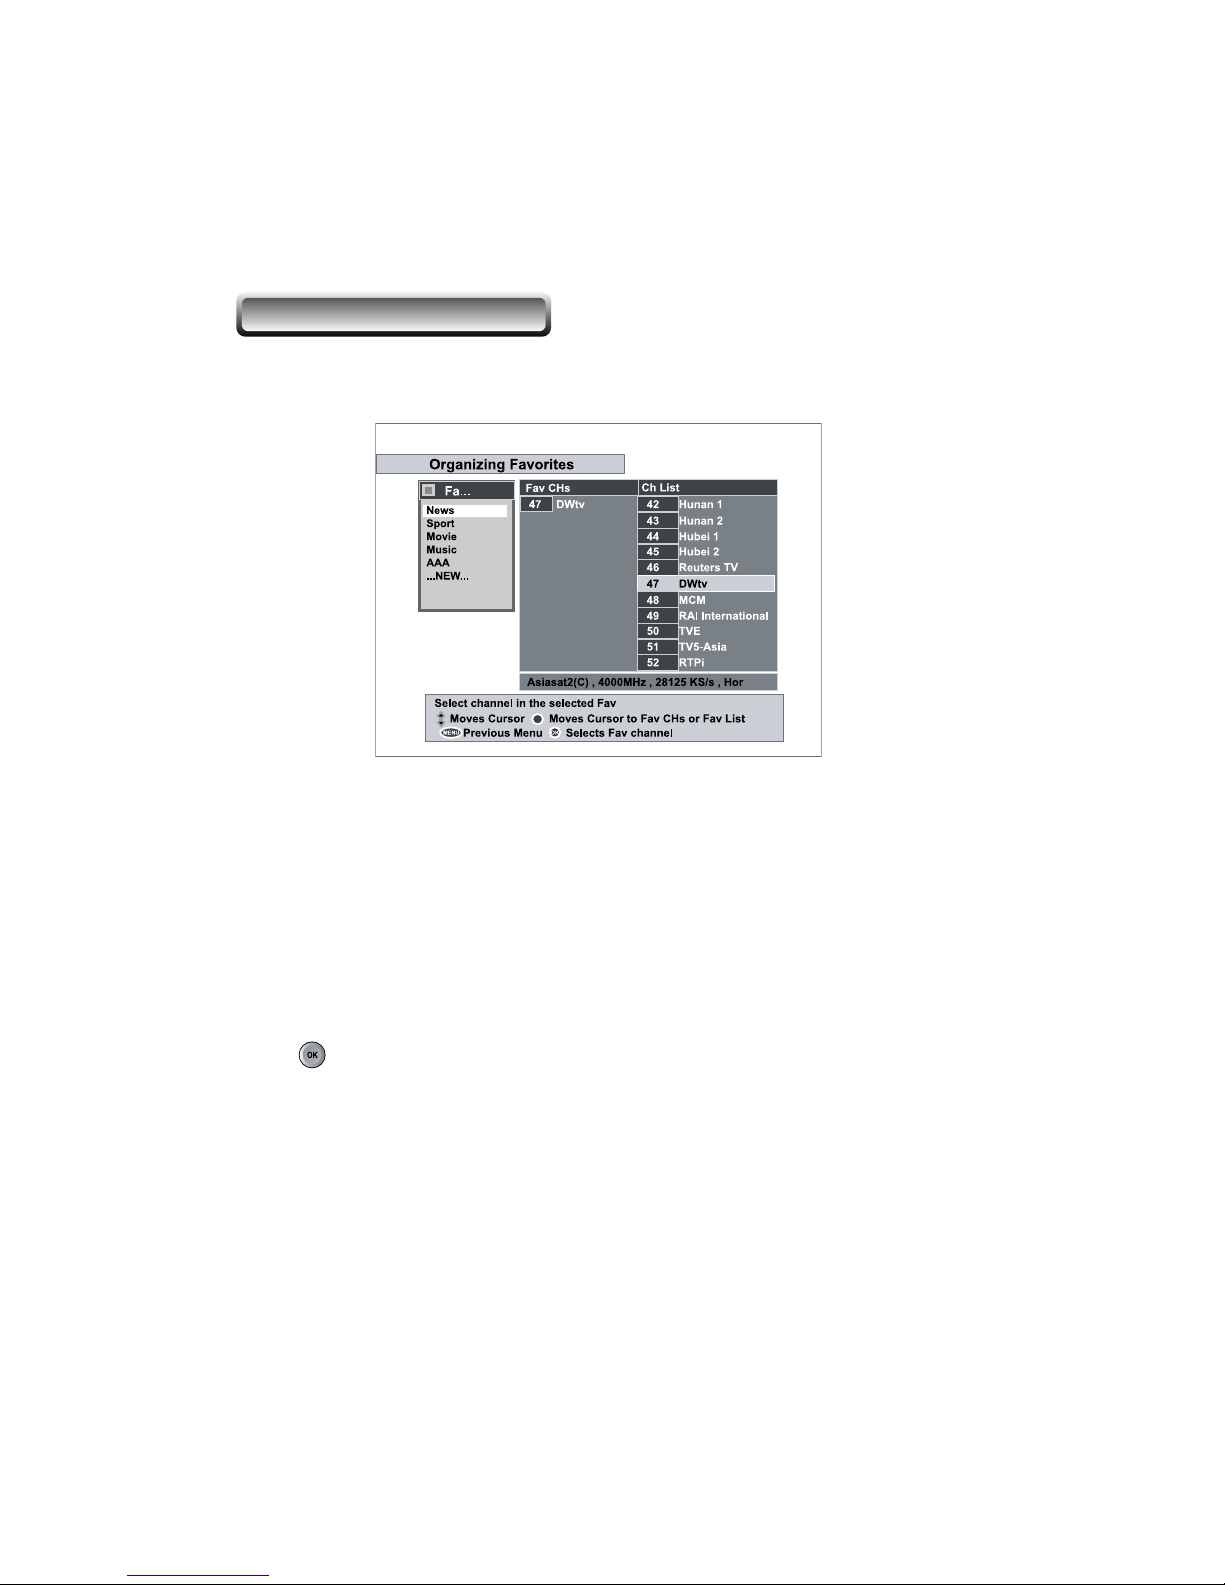
This mode is helpful in adding and deleting services to and from the favorite
group.
Under the menu
Organizing Favorites
, there are three different modes:
Fav List , Fav CHs
and
Ch List
. On the
Fav List
mode, four standard lists are
selected as the default menus:
News, Sports, Movie
and
Music
. Up to 10 lists
including these lists can be added and renamed.
When deleting a service, select a service in the
Fav CHs
section and press the
assigned button on the help message.
To add services into Favorites, locate the cursor to the desired service and press
button.
Even in the Favorite CHs, you will see basic satellite & Channel information.
III. ORGANIZING FAVORITES
Page 30
30
IV. Recording
This menu shows some options for recording.
Press button to display the satellite list. Select a satellite that includes the channel to
be recorded.
IV-1. Satellite
Press button to display the channel list. Select a channel to be recorded.
IV-2. Channel
IV-3 Mode
There are two recording modes.
To record the selected service immediately, select the
Quick
mode.
To record current event including the data of the time shifting buffer, select
Current Event
mode. The
Current Event
mode is valid only when the event information of the channel
exists.
To change the duration of the recording time, press or button.
IV-4. Duration
Recording
TV
S
atellite
Channel
Mode
Duration
File Name
O
ther
5 3sat
Quick
2 Hour 0 Min
3sat-1
Start
Stop
Delayed Recording
Select the record mode.
Moves Item, Selects Item, Exit
M
ENU
N
o recording
1
8706 MB Free
Page 31

31
To change the file name of the service to be recorded, press button at this item.
IV-5. File Name
To start recording, press button at this item.
IV-6. Start
To stop recording, press button at this item.
IV-7. Stop
In this menu you can reserve delayed recording.
IV-8. Delayed Recording
A. Satellite
Press button to display the satellite list. Select a satellite that includes the
channel to be recorded.
B. Channel
Press button to display the channel list. Select a channel to be recorded.
C. Mode
There are 5 different modes.
Select
One Time
to record the channel only once.
Select
Every Day
to record the same channel at the same time of every day.
Select
Weekly
to record the same channel at the same time on the same weekday.
Select
Every Weekend
to record the same channel at the same time on every
weekend. This menu is enabled when the
Date
menu is set to Saturday or Sunday.
Select
Every Weekday
to record the same channel at the same time on every
weekday. This menu is enabled when the
Date
menu is set from Monday to Friday.
Delayed Recording
6 KiKa 19/08-Sun 00:46 30Min OT
Next/Prev entry. Edit entry.
Insert new entry. Delete the selected entry.
OK
01
02
03
04
05
5
12
6
6
Entry Information
Mode
Date
Start Time
Duration
OK
File NAME
One Time
1/01/2001-Mon
09:51
30 min
Type
TV
Satellite
Other
Channel
B. KiKa
Tuner select
Tuner 2
OK
OK
Recording
TV
Satellite
Channel
Mode
Duration
File Name
Other
5 3sat
Quick
2 Hour 0 Min
3sat-1
Start
Stop
Delayed Recording
Select the record mode.
Moves Item, Selects Item, Exit
MENU
No recording
18706 MB Free
Page 32
32
D. Date
To change the recording start date, press or button.
E. Start Time
To change the recording start time, press or button or enter the time using the
numeric buttons
F. Duration
To change the recording duration, press or button.
G. OK
To confirm the setting for the delayed recording, press button.
Be sure to confirm it if you want to register the current setting for delayed recording.
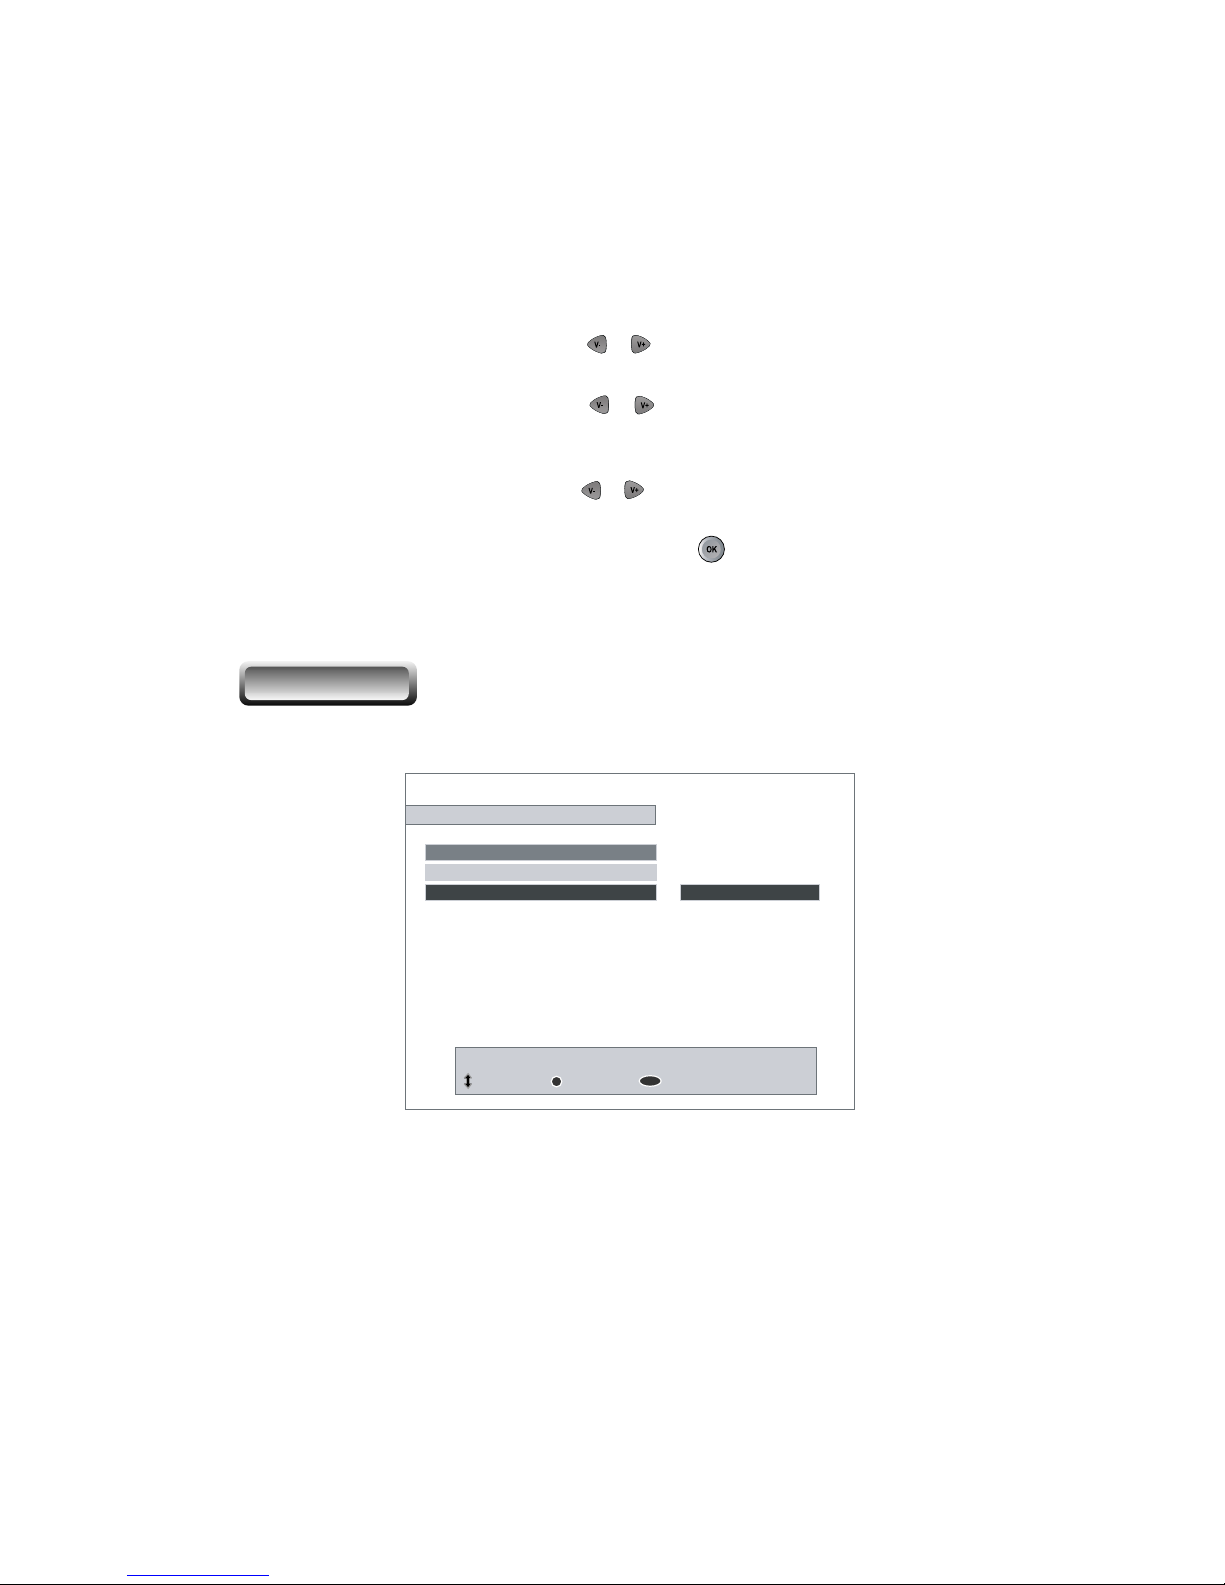
V. HDD Service
You can use this menu to manage the HDD and the functions related to the HDD
Edit Reservation
TV
List
Channel
Date
Mode
Start Time
Duration
Save
Cancel
Recording
Select the reserved name in the delayed recording List
Moves Item, Selects Item, Exit
OK
MENU
1 DWtv
73 DWtv
- / -- / ---- (---)
00:37
30 min
HDD Service
Delayed Recording
Format Hard Disk
Time Shifting Enable
Select to enter delayed Recording menu
Moves Item, Selects Item, Exit
OK
MENU
Delayed Recording
6 KiKa 19/08-Sun 00:46 30Min OT
Next/Prev entry. Edit entry.
Insert new entry. Delete the selected entry.
OK
01
0
2
0
3
04
05
5
1
2
6
6
Entry Information
Mode
Date
Start Time
D
uration
OK
File NAME
One Time
1/01/2001-Mon
09:51
30 min
Type
TV
Satellite
Other
Channel
B. KiKa
T
uner select
T
uner 2
OK
OK
Re
cording
TV
S
atellite
Ch
annel
M
ode
D
uration
File Name
O
ther
5
3sat
Q
uick
2
Hour 0 Min
3sat-1
Start
Stop
Delayed Recording
Select the record mode.
M
oves Item, Selects Item, Exit
MENU
No recording
1
8706 MB Free
Page 33
33
Refer to IV-8. Delayed Recording.
V-1. Delayed Recording
To format the HDD in PVR, press button at this item.
Format Hard Disk
will delete all the data and the files in HDD permanently.
If a new HDD is installed, it should be formatted by this PVR. The file structure of the
PVR is different from that of PC.
You cannot use the Time shifting, Recording and Playback functions with an
unformatted HDD.
V-2. Format Hard Disk
V-3. Time Shifting
To enable time shifting function, select
Enable
.
If the
Time Shifting
is enabled, this PVR records the current channel in normal play.
And, you can take advantage of the time shifting function.
To disable time shifting function, select
Disable
. If you don’t want to use time shifting
function, disable the time shifting to reduce the power consumption.
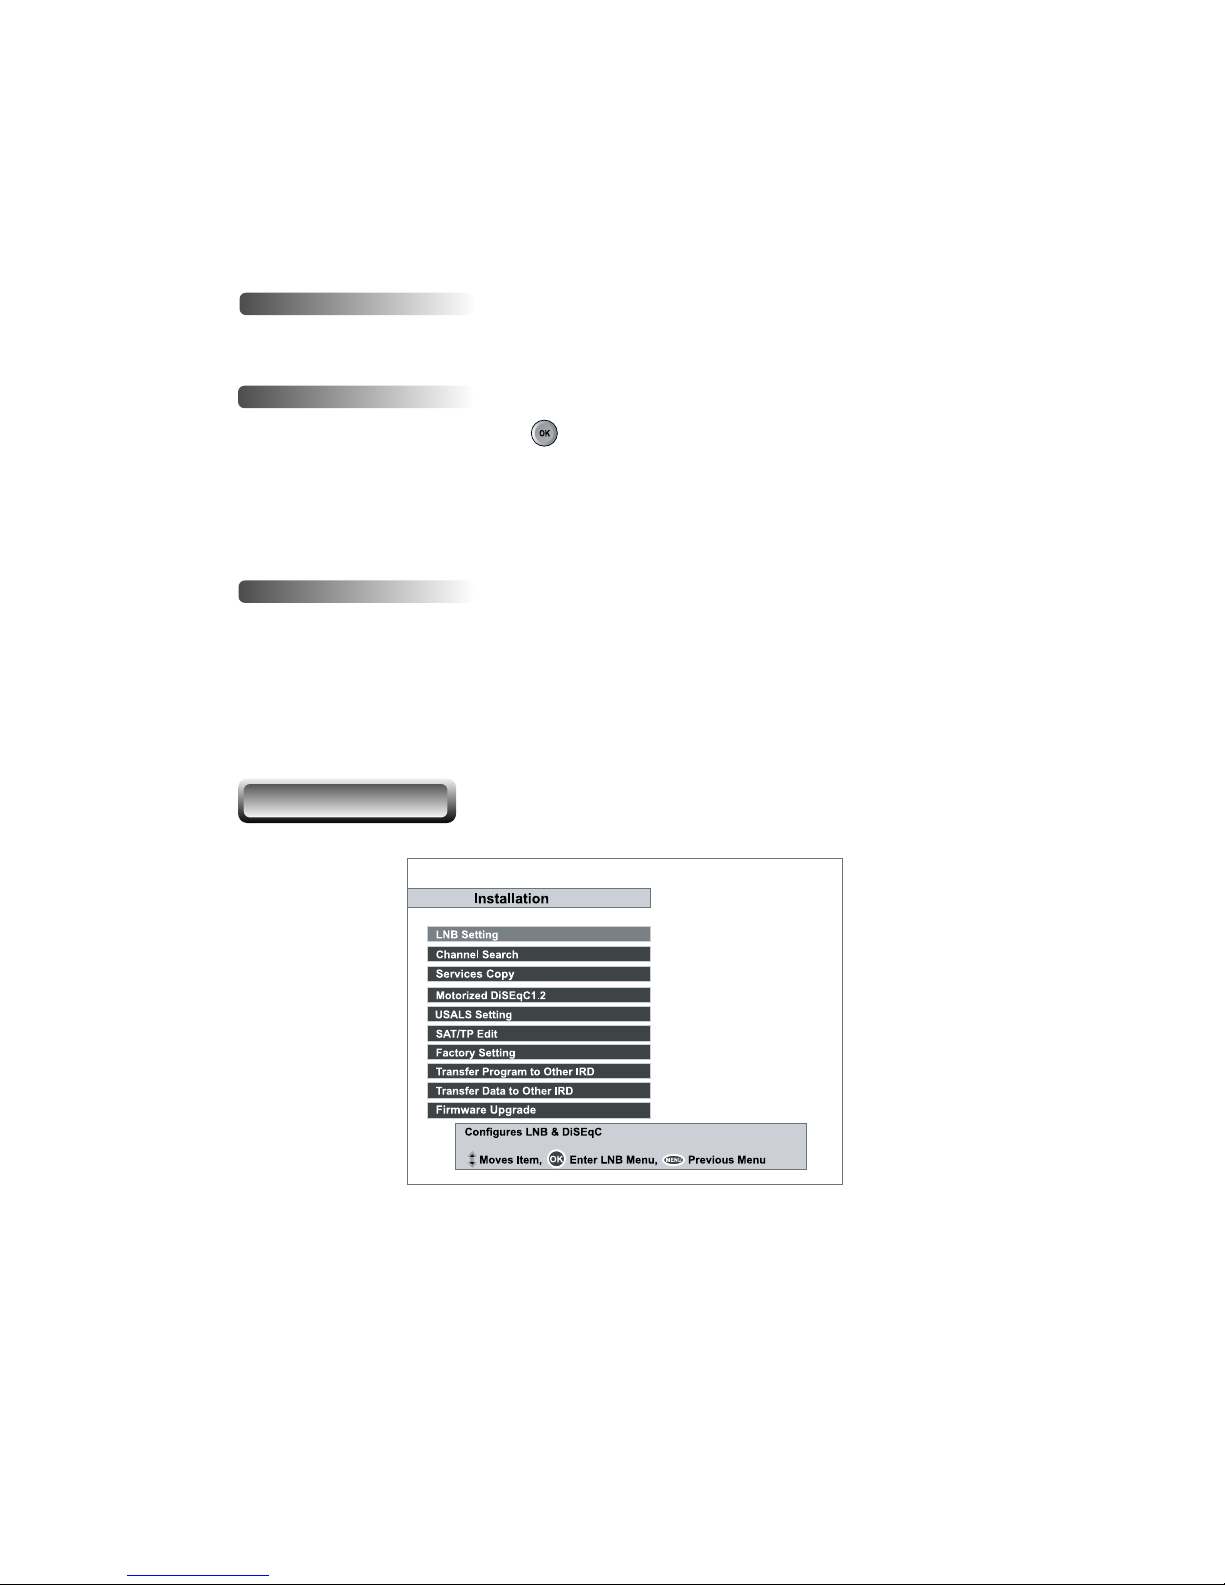
VI. INSTALLATION
Page 34
34
The Low Noise Blockdown Converter (LNB) amplifies the signal received by
the satellite dish and lowers the frequency of the signal. The signal is then fed from
the LNB at the dish via cable to the PVR.
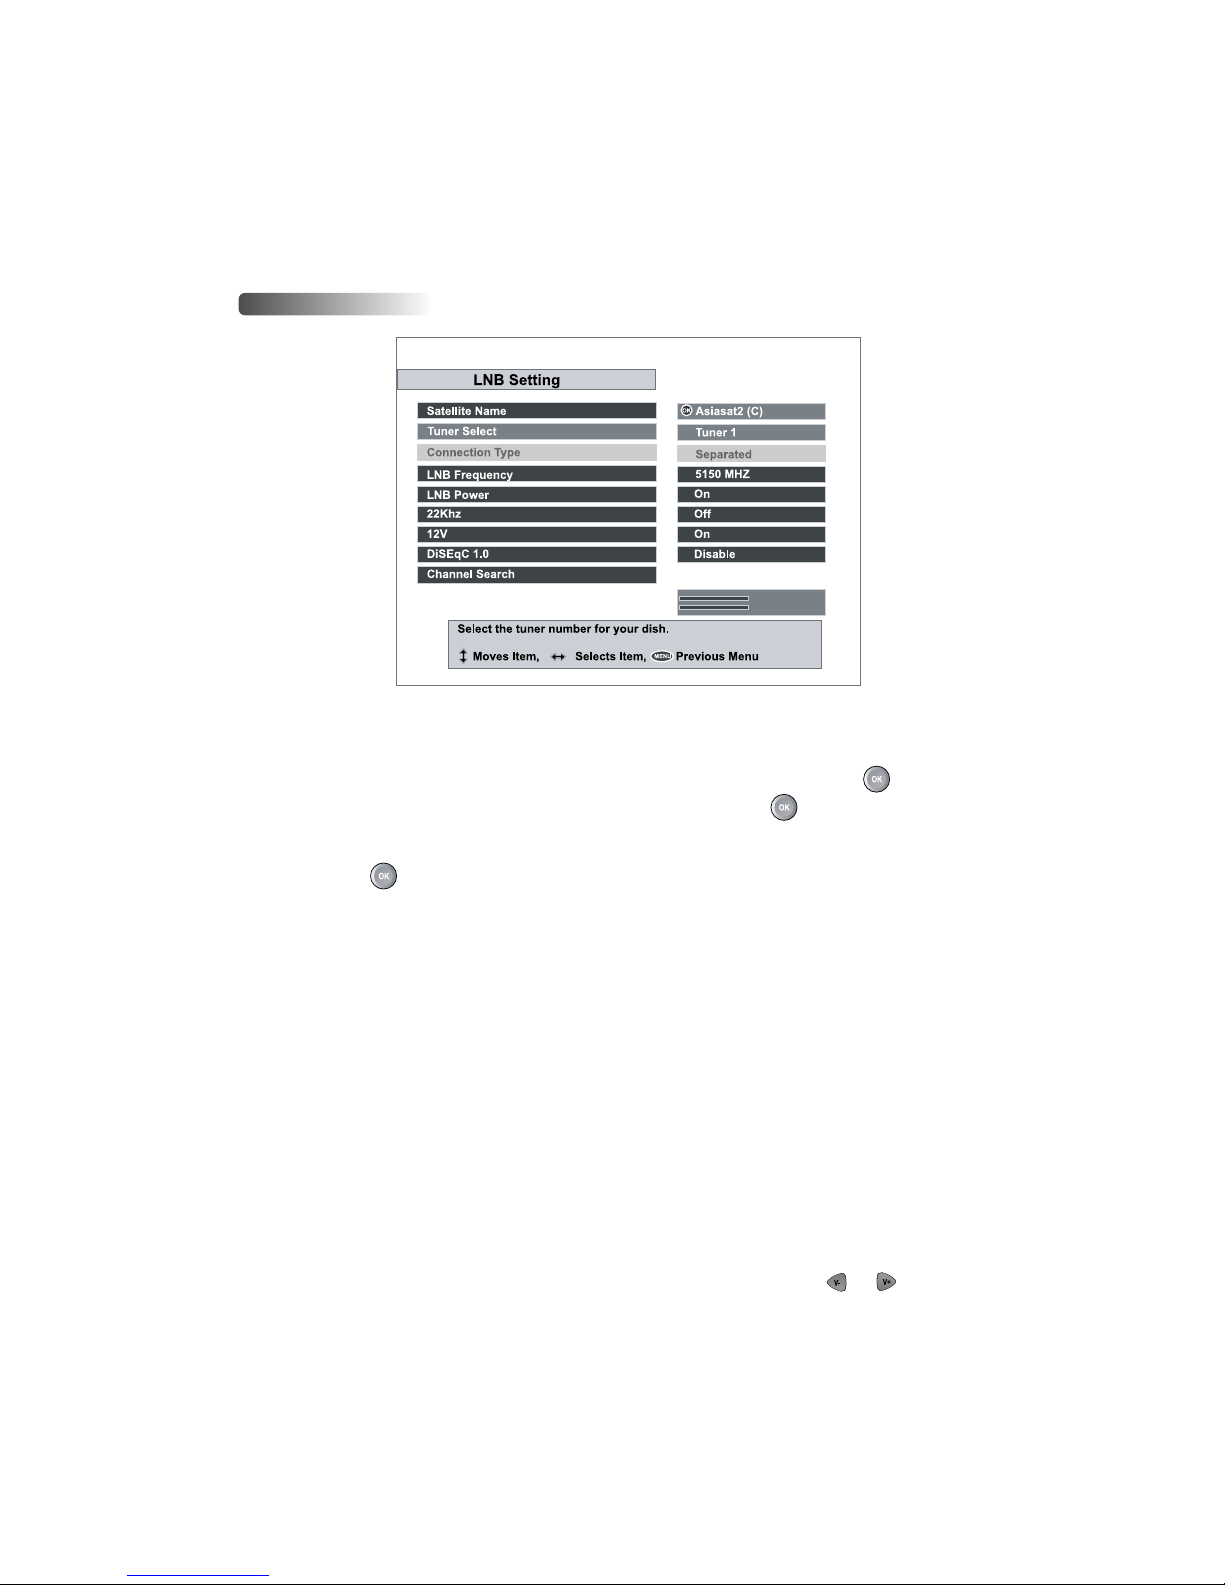
VI-1. LNB Setting
For the LNB Settings, move the cursor to
Installation
item and press button.
Then, move the cursor to the
LNB Setting
item and press button.
A. Satellite Name
Press the button to display the Satellite List. The Satellite name list is put in
alphabetical order. Select one of the preprogrammed satellites that correspond to the
value of the antenna. If the desired satellite name is not in the list, then select
Others
.
B. Tuner Select
Select a tuner for channel searching from the selected satellite.
C. Connection Type
If two tuners share one LNB as the diagram 2-2) on page 12, select
Loop Through
.
If a service is being recoded, the other tuner can receive only the signal of the same band
and polarity as being recorded in this configuration.
If the tuners are connected to separated LNBs (or Dual LNB), select
Separated
.
There is no restriction as in the
Loop Through
configuration.
D. LNB Frequency
Select the L.O. Frequency set to antenna. The LNB Frequency of 5150, 9750,
10600, 10750, 11475 MHz or Universal can be selected by using the or button.
00% Level
00% Quality
Page 35
35
NOTE: If the Universal LNB is selected, both 9750 and 10600 MHz are
supported at the same time, and therefore the 22 KHz tone setting
is not required.
E. LNB Power
Select LNB power ‘ On’ for internal and ‘
Off
’ for external.
F. 22 KHz
If you are using a 22 KHz tone switch box, make 22 KHz tone switch enable or disable
to select LNB or antenna.
G. 12V
Use it if the switch box is controlled by 12V DC.
H. DiSEqC 1.0
The PVR is designed to be DiSEqC 1.0 compatible. This allows multiple antennas to be
connected to the PVR at the same time. If you are using two or more fixed antennas or
LNBs, then it is recommended to use a DiSEqC 1.0 switch.
Select from
1 of DiSEqC
to
4 of DiSEqC, Mini A,Mini B
or
Disable
according to the option or the configuration of DiSEqC switch box or antenna.
I. Channel Search
To go to
Channel Search
menu directly from
LNB Setting
menu, press
button at this item.
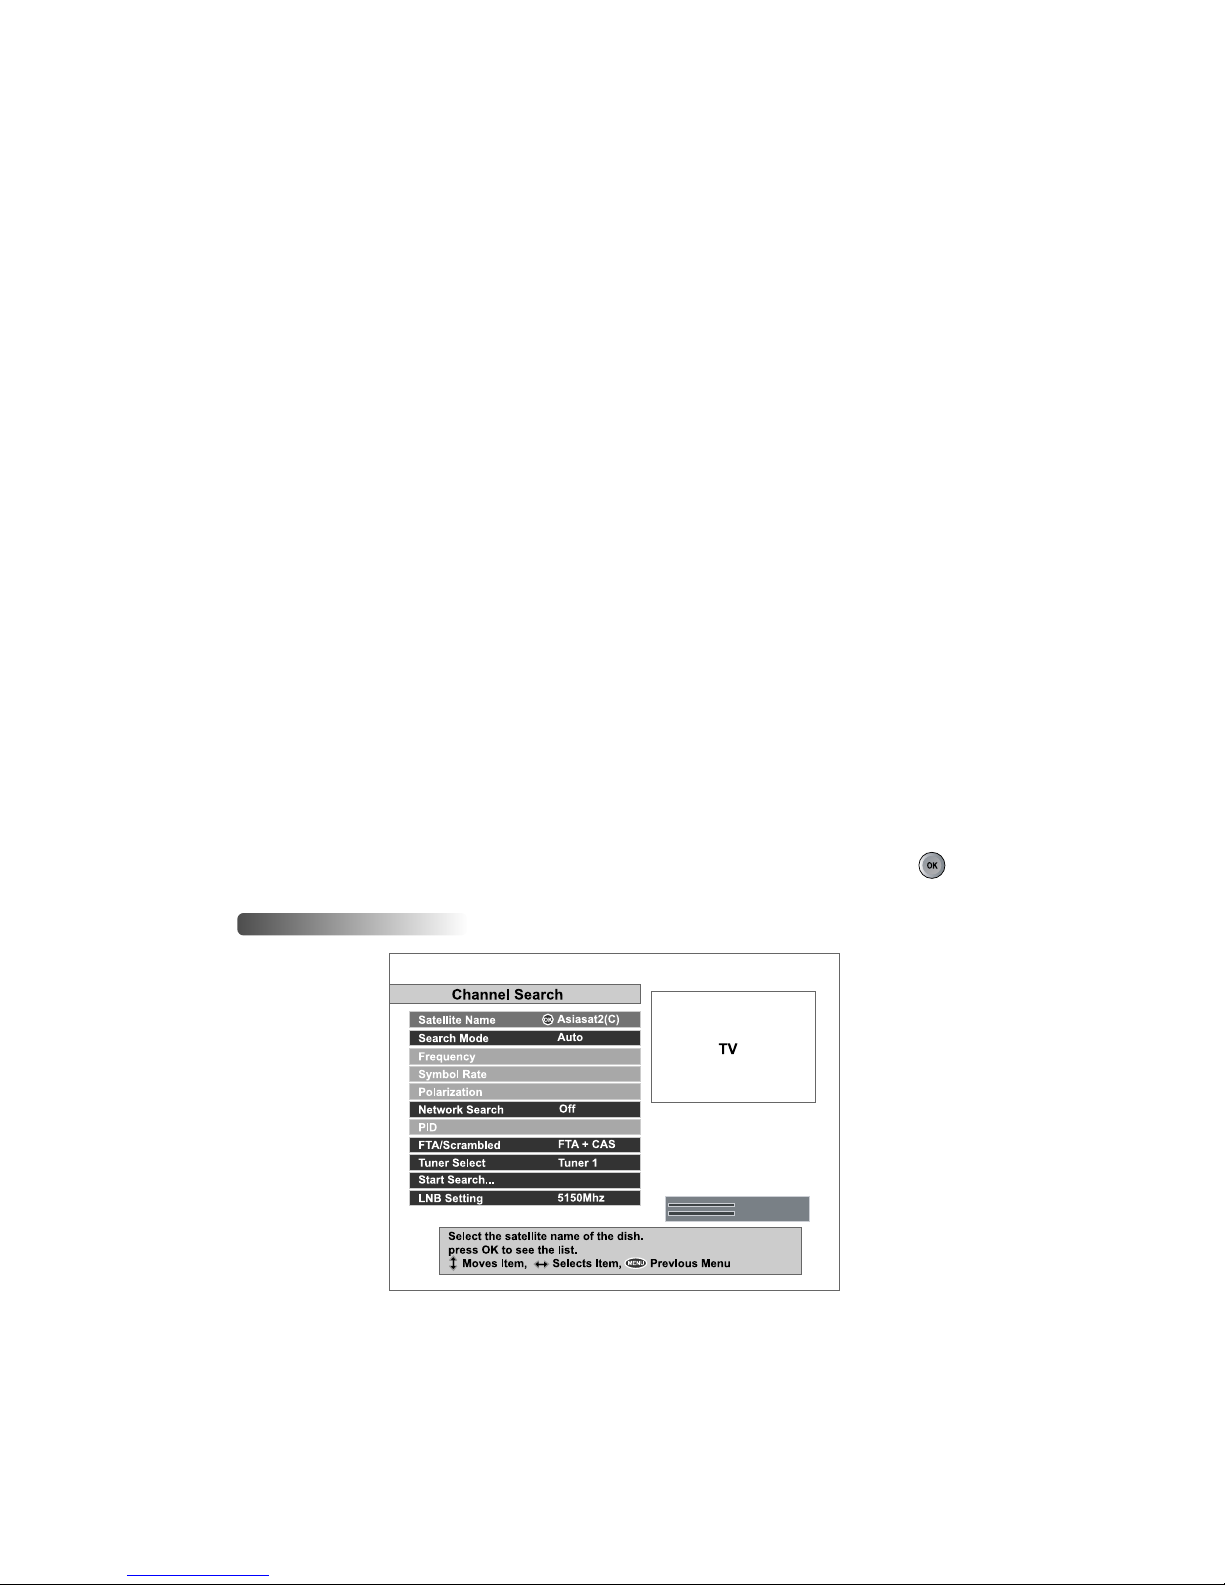
VI-2. Channel Search
00% Level
00% Quality
Page 36

36
Press the button to display the Satellite List Box. The Satellite name list is put in
alphabetical order. Select one of the preprogrammed satellites that correspond to the value
of the antenna. If the desired satellite name is not in the list, then select
Others
.
A. Satellite Name
There are 4 search modes,
Auto, Manual, Advanced
and
SMATV
. The
Auto
mode enables to search using the information the PVR has. On the other hand, there
will be a need to know in advance the frequencies and the symbol rates before using the
Manual
mode. On the
Advanced
mode, enter the Audio PID, Video PID or the PCR
PID. The
SMATV
mode is used to special purposes on satellite master antenna TV
system.
Enter the Transponder’s Frequency by using the numeric buttons on your RCU.
Enter the Transponder’s Symbol Rate by using the numeric buttons on your RCU.
Choose the type of polarization, either the
Horizontal
or the
Vertical
.
This
Network Search
item can be used if the
Search mode
is set to the
Manual
or
Auto
mode. If the
Network Search
item is set to Onand the NIT
(Network Information Table) is available, the Transponder’s information can be found.
Press button to enter Video,Audio and PCR PID’s.
1) Video PID
Insert the Video PID by using the numeric buttons on your RCU.
2) Audio PID
Insert the Audio PID by using the numeric buttons on your RCU.
C. Frequency
D. Symbol Rate
E. Polarization
F. Network Search
B. Search Mode
G. PID
Page 37
J. Start Search...
37
3) PCR PID
Insert the PCR PID by using the numeric buttons on your RCU.
4) SAVE
To ensure the above Video,Audio and PCR PID change, press button at this item.
Choose your favorable channels among
FTA only, CAS only
and
FTA+CAS
.
Select a tuner for channel searching from the selected satellite.
H. FTA/ Scrambled
I. Tuner Select
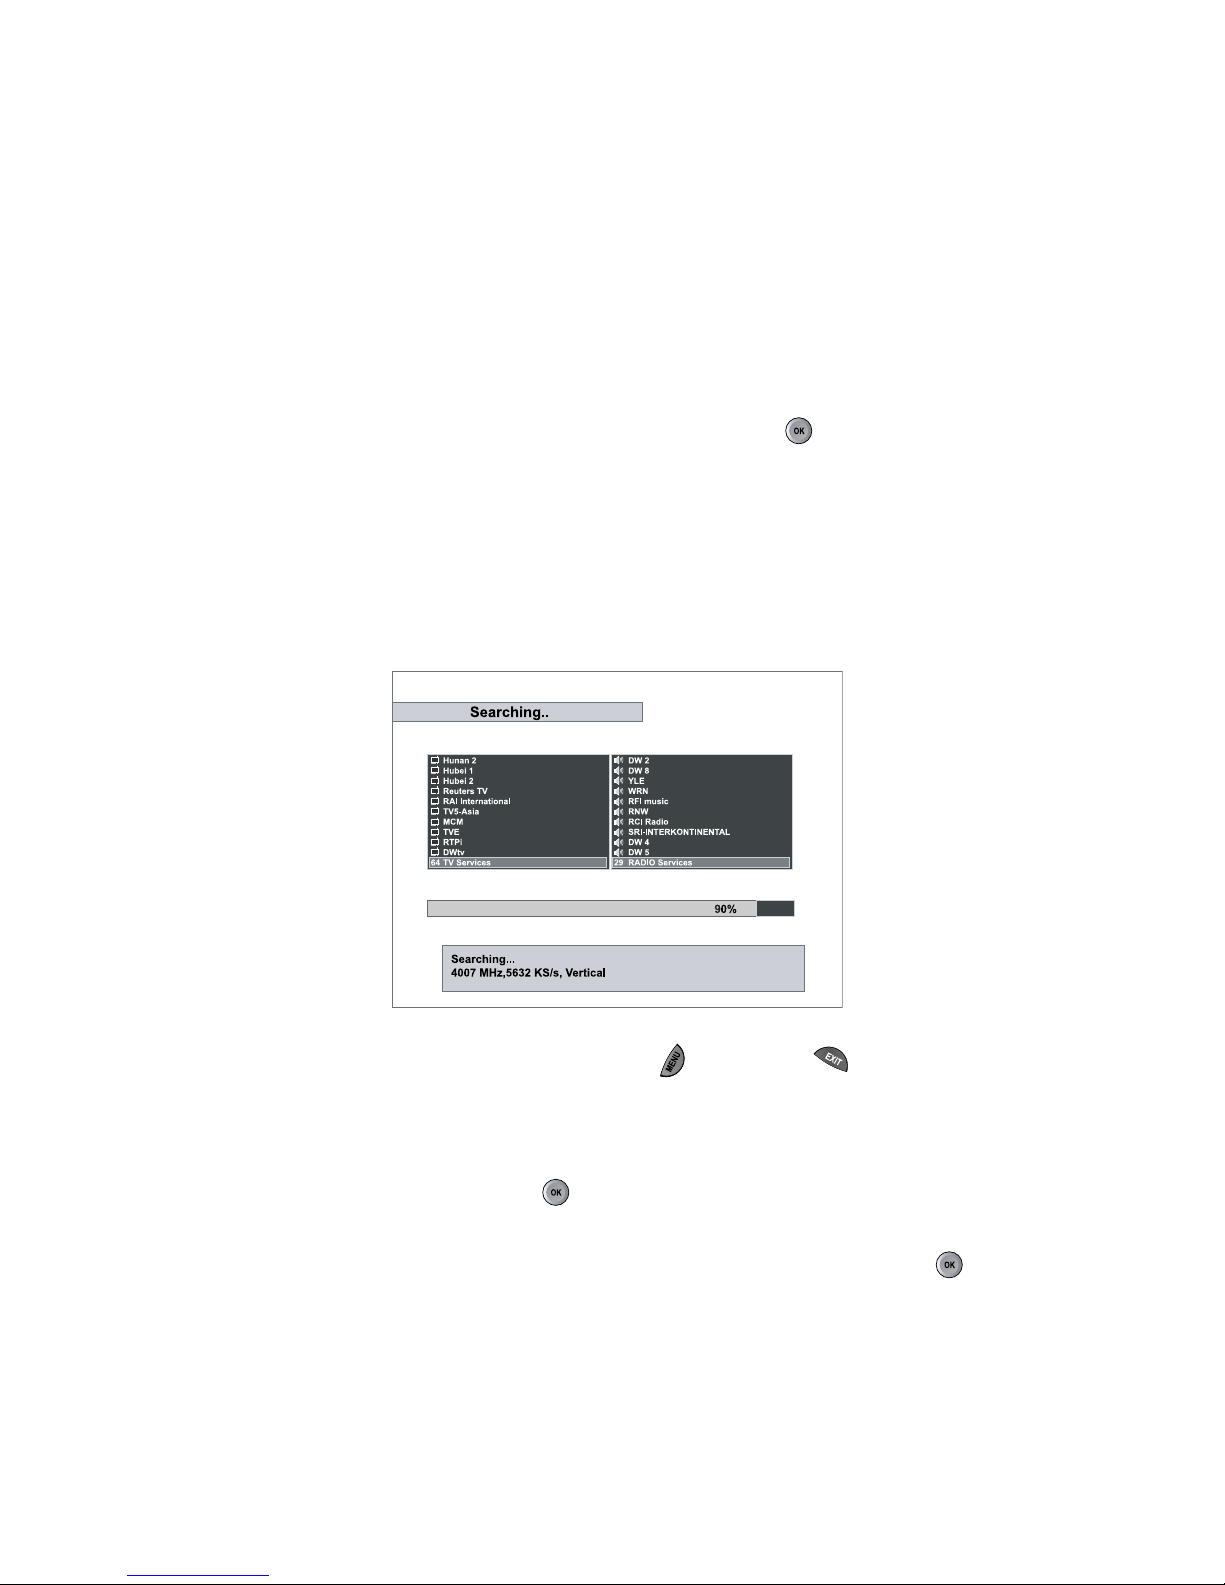
Searches for digital channels after the configuration of the LNB is over. To stop the
searching process on the way, press either the button or the button.
This menu will be shown as long as the PVR is searching for channels. All channels
found will be listed in two columns on the screen; with TV channels in one column and
Radio channels in the other. Please note that the search procedure may take a few minutes.
When the search procedure is completed, the screen will show how many TV and Radio
channels have been found. Press button to save the channels.
To go to
LNB Setting
menu directly from
Channel Search
menu, press
button at this item.
K. LNB Setting
Page 38
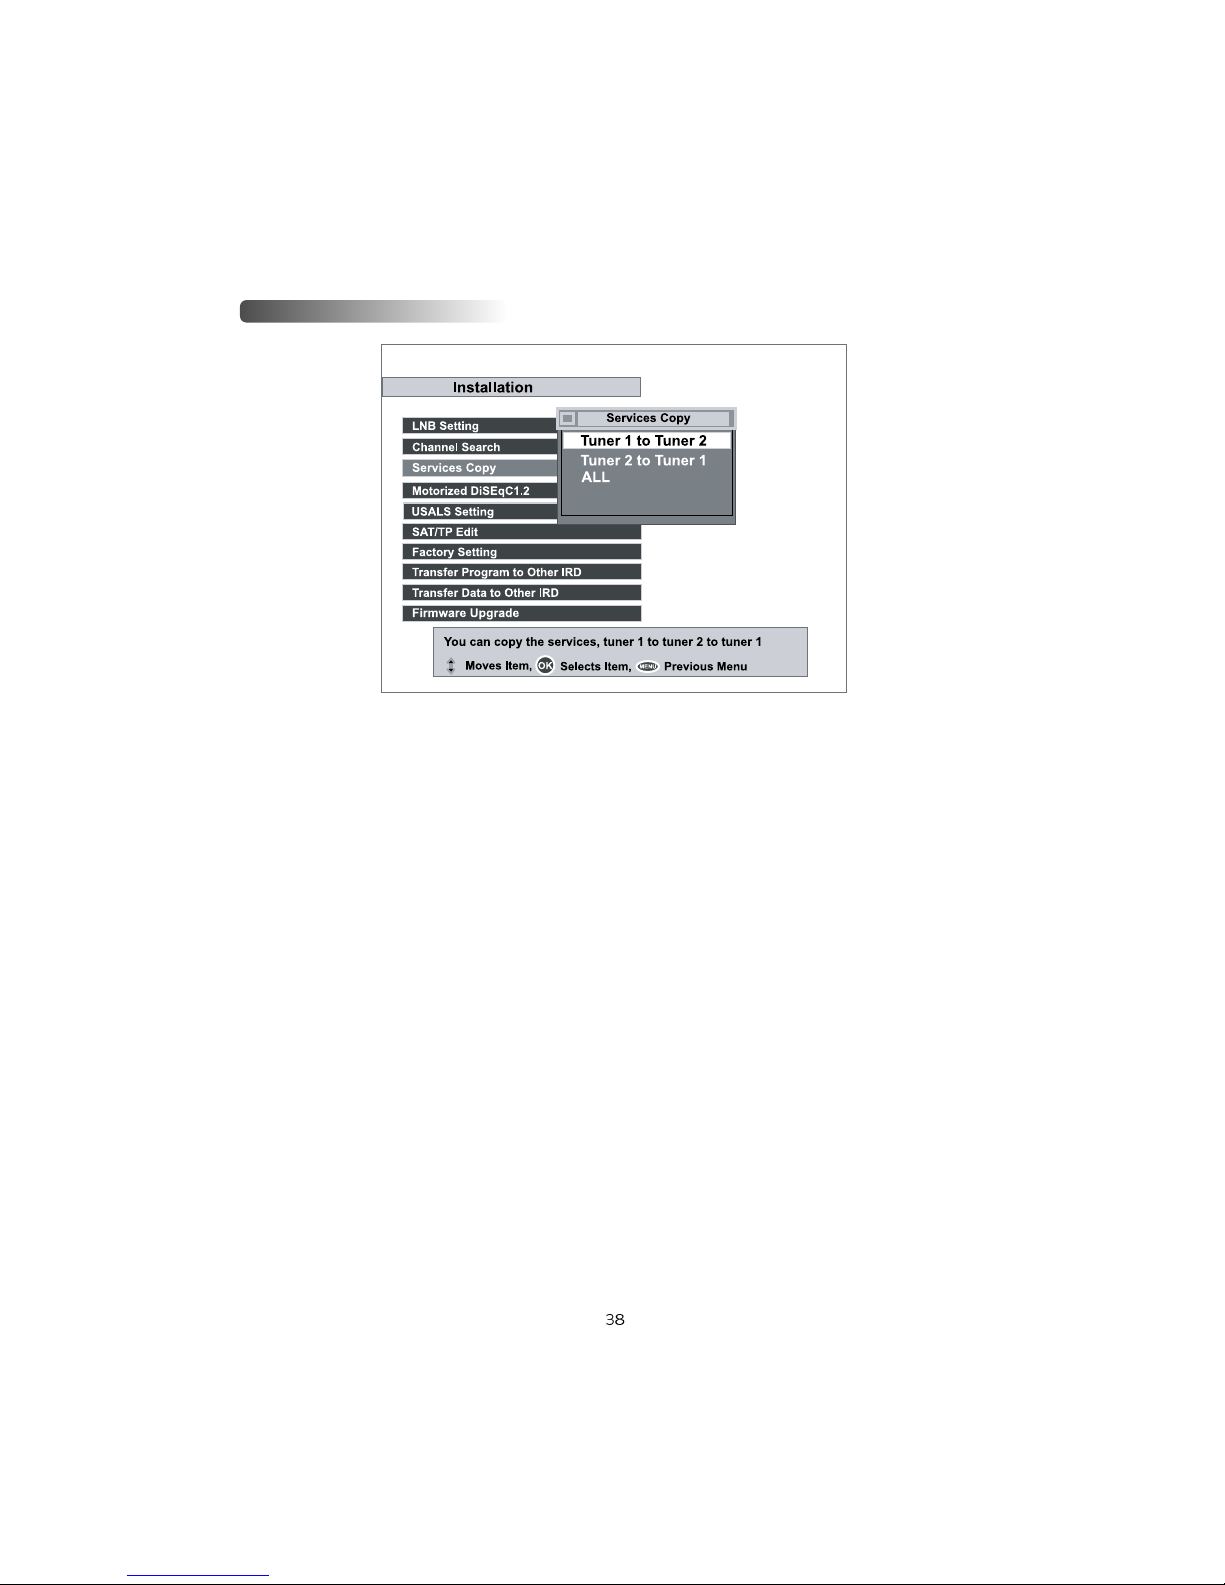
VI-3 . Service Copy
In this menu, you can copy the existed channel. Between Tuner 1 and Tuner 2.
A. Tuner 1 to Tuner 2
Copy the service list of Tuner 1 to that of Tuner 2.
B. Tuner 2 to Tuner 1
Copy the service list of Tuner 2 to that of Tuner 1.
C. All
Add the service list of Tuner 1 and Tuner 2 and save it to that of Tuner 1 and Tuner 2.
Page 39
39
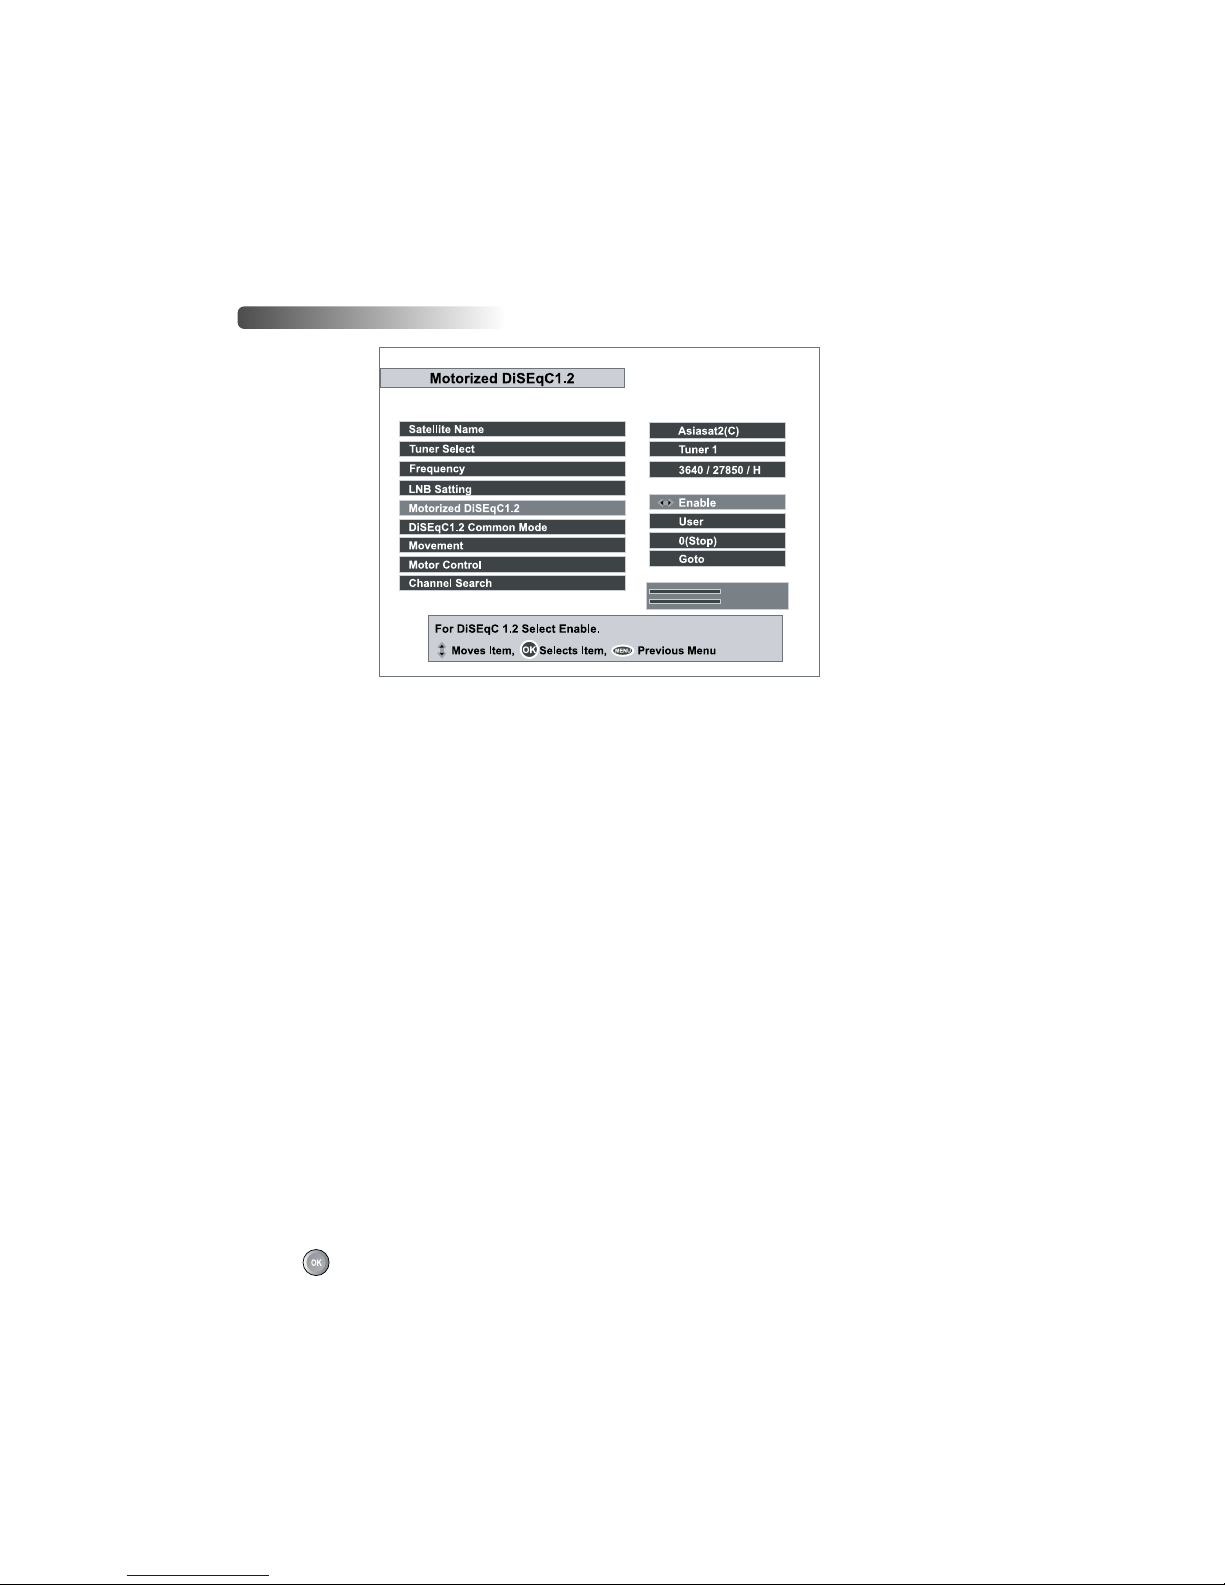
VI-4 . Motorized DiSEqC 1.2
If you have DiSEqC 1.2 motorized system, then you can use the DiSEqC 1.2 functions.
. Satellite Name
A selection of satellite names that will be used to identify a motor position.
. Tuner Select
: Select a tuner, connected with DiSEqC 1.2 system.
. Frequency
: Selects the frequency to catch the strong signal.
. DiSEqC Command Mode
: Change the current mode between
User
and
Installer
modes.
-
User
: This mode is used to fine-tune the position of the motor for better reception.
-
Installer
: This mode is used to search for the position of a satellite manually.
. Movement
: In case of
User
mode, the movement is adjustable by fine-tuning.
In case of
Installer
mode, the movement is adjustable by
East , West
going
command.
00% Level
00% Quality
. Motor Control
-
Goto
: Moves the motor to the stored position of the selected satellite.
-
Store
: Stores the current position of the motor for the selected satellite.
-
Reset
: Resets all stored position of the motor relative to the “0” position (
Installer
mode only).
-
Recalculate
: Recalculates the position of the Stab Rotor motor.
-
Limit E , Limit W
: Limits east and west position.
-
Limit Off
: Removes the limitation.
-
Goto Ref
: Goes to reference.
. Channel Search
: After saving the DiSEqC configuration at the highest signal quality,
press button to start channel searching of the selected satellite.
Page 40
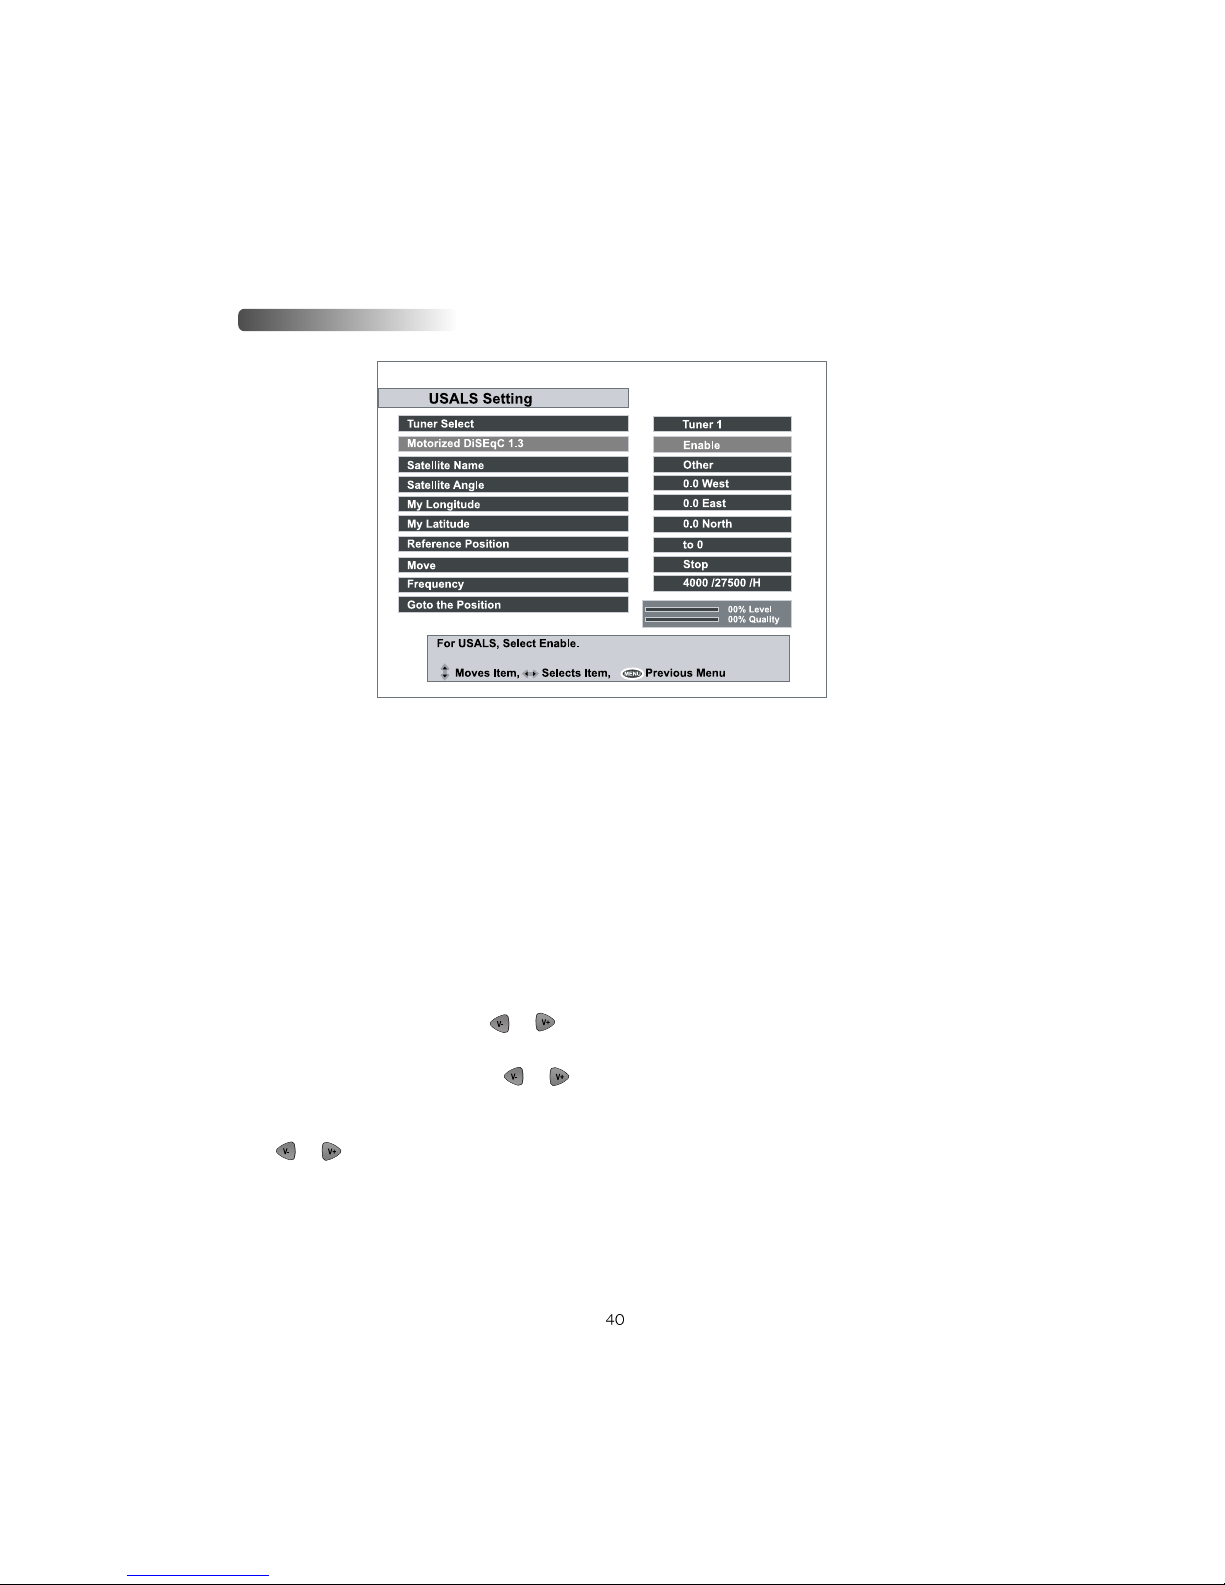
VI-5. USALS Setting
USALS is very convenient motorized DiSEqC System that support DiSEqC 1.3 command
and also can get the satellite position automatically if you know geographical location.
Basically,the listed satellites have the Longitude saved and therefore the angle of the satellite
can be calculated without problem.
If you have USALS motorized system, then you can use the USALS as followings.
. Tuner Select
: Select a tuner, connected with USALS system.
. Satellite Name
: Select a satellite that will be used to identify a motor system.
. Satellite Angle
: It is the Longitude of the selected satellite and it can be set automatically
in case of selecting a satellite name.
. My Longitude:
: It means the angle of Longitude and you can select the direction of EAST
and WEST by Numeric or , button.
. My Latitude
: It means the angle of Latitude and you can select the direction of SOUTH
and NORTH by Numeric or , button.
. Reference Position
: Goes to Reference position (O˚)
. Move
: After selecting “goto the position” menu, it is adjustable by fine-tuning and
, button moves to anti-clockwise and clok-wise respectively.
. Frequency
: Selects the frequency to catch the strong signal.
. Goto the position
: After setting the Longitude, Latitude and the longitude of the selected
satellite, this menu is used when you want to move the desired direction (position)of the
dish, saved before. Its moving limit is ±65˚.
Page 41
41
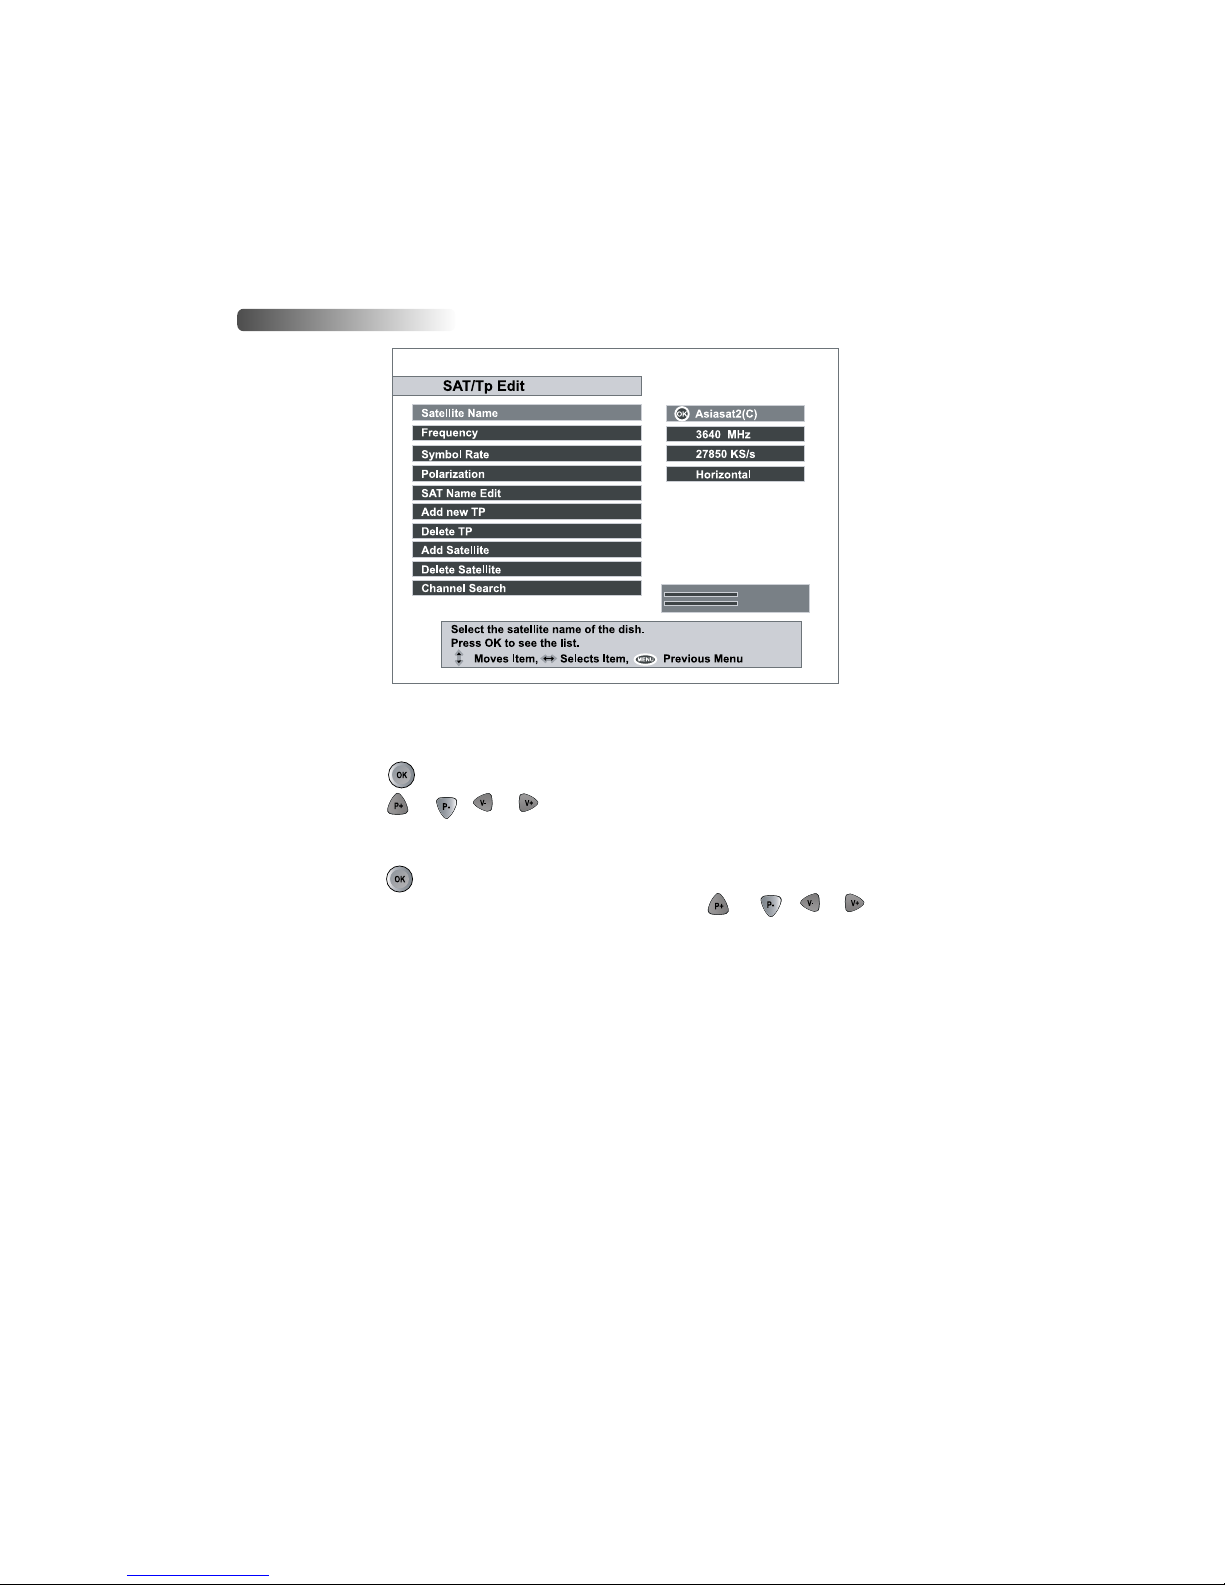
VI-6. SAT/Tp Edit
By pressing button, you can see the listed satellite names.
Then, using , , or buttons, you can select satellite.
By pressing button, you can see the all frequencies of transponders of a satellite,
and also you can select a frequency. Or, by pressing , , or buttons,
you can select and view a frequency one by one.
You can see the symbol rate of the specified satellite on the right side of the menu.
C. Symbol Rate
A. Satellite Name
B. Frequency
00% Level
00% Quality
00% Level
00% Quality
You can select the polarization from
Horizontal
and
Vertical
.
D. Polarization
Page 42

42
E. SAT Name Edit
You can change the name of the satellite by this menu.
Press button to display a keyboard. There are several items such as
Other, Save
and
Space
in the keyboard.
By selecting
Other
item, you can see a new alphabet character sets. The
Space
item
means a space between two characters. And the
Save
item is used to confirm the new
name of the satellite.
Notes
: You can move the cursor in the satellite name row by or and column
by or button.
F. Add New TP
In case of new transponder information is added by broadcaster, you can add new
TP(transponder) information and enjoy new services.
Before adding new TP information, you should know the frequency, symbol rate and
polarization types.
After adding new information, you should confirm the new information by pressing
button at
OK
item.
G. Delete TP
By selecting this item, you can delete the selected TP (Transponder) information.
H. Add Satellite
Using this menu, you can add new satellite name by keyboard, then it will be added in
the Satellite Name menu.
I. Delete Satellite
By selecting this item, you can delete the selected satellite information.
J. Channel Search
It is used to go to
Channel Search
menu directly from
SAT/Tp Edit
menu.
Page 43
43
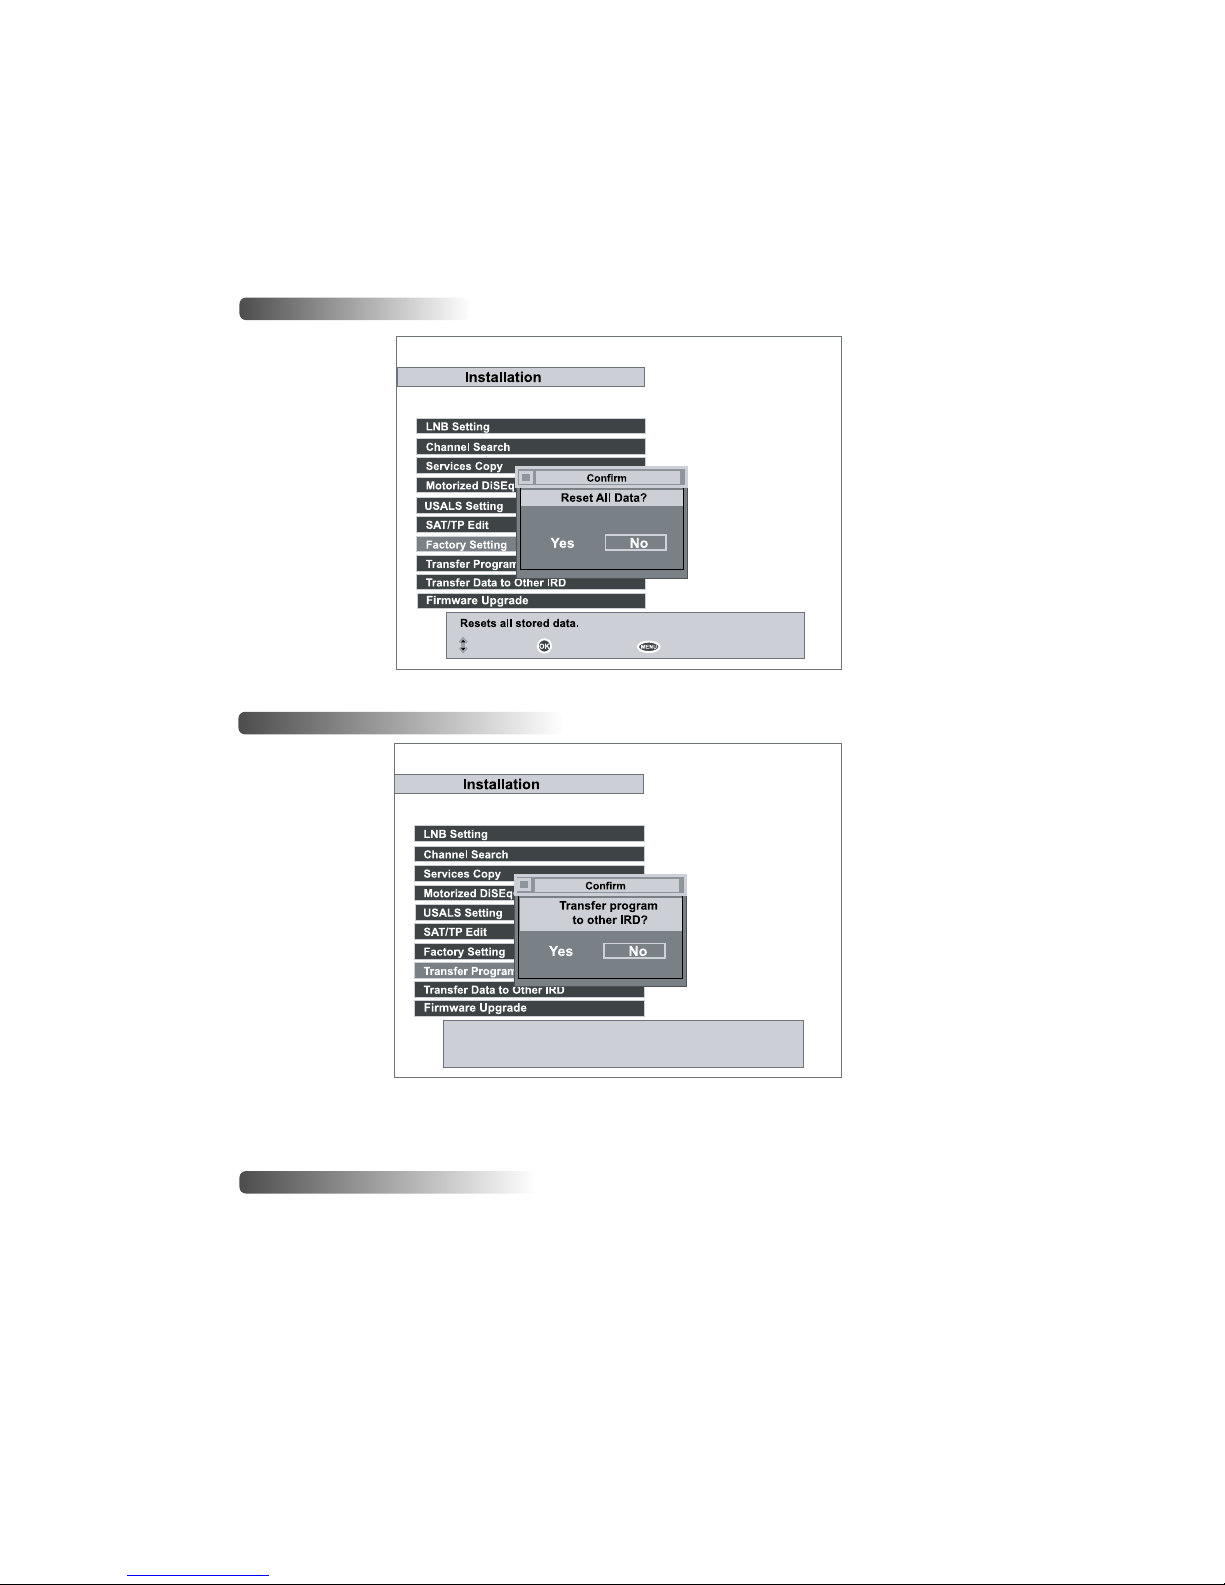
VI-7. Factory Setting
All the stored data can be reset just like it was manufactured.
VI-8.Transfer Program to Other PVR
It is used to transfer PVR program to other PVR for upgrading the PVR.
Notes: Please proceed this menu with connecting the PVR of same model and
same specification.
VI-9.Transfer Data to Other PVR
It is used to transfer PVR Data such as satellite/TP information to other PVR for
upgrading the PVR.
Notes: Please proceed this menu with connecting the PVR of same model and
same specification.
00% Level
00% Quality
00% Level
00% Quality
Moves Item, Reset all data, Previous Menu
00% Level
00% Quality
Page 44
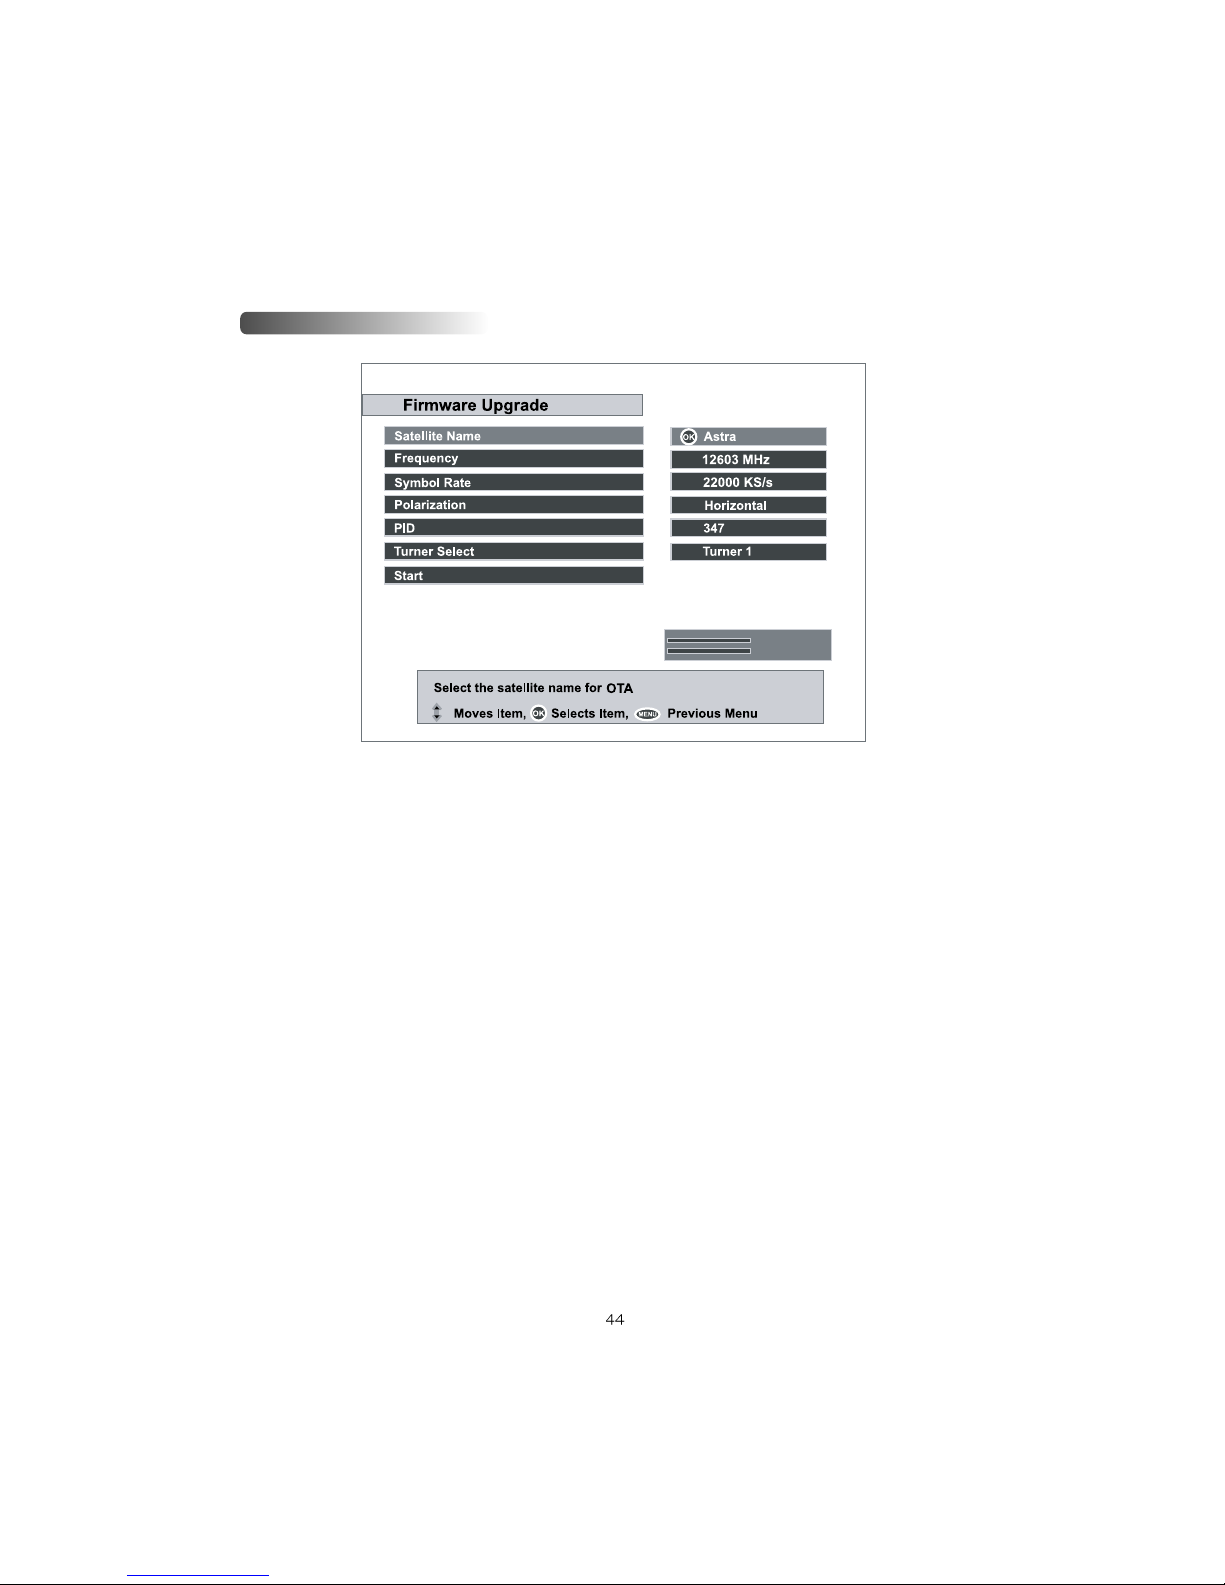
VI-10. Firmware Upgrade
At this menu, you can download the latest PVR software from the Astra Satellite.
The TP details are as bellows.
. FREQ : 12603 MHz
. S / R : 22000 KS/s
. Polarity : Horizontal
. PID : 347
For OTA( Over - The - Air ), it takes around 10minutes to download software
from the Satellite.
00% Level
00% Quality
Page 45
45
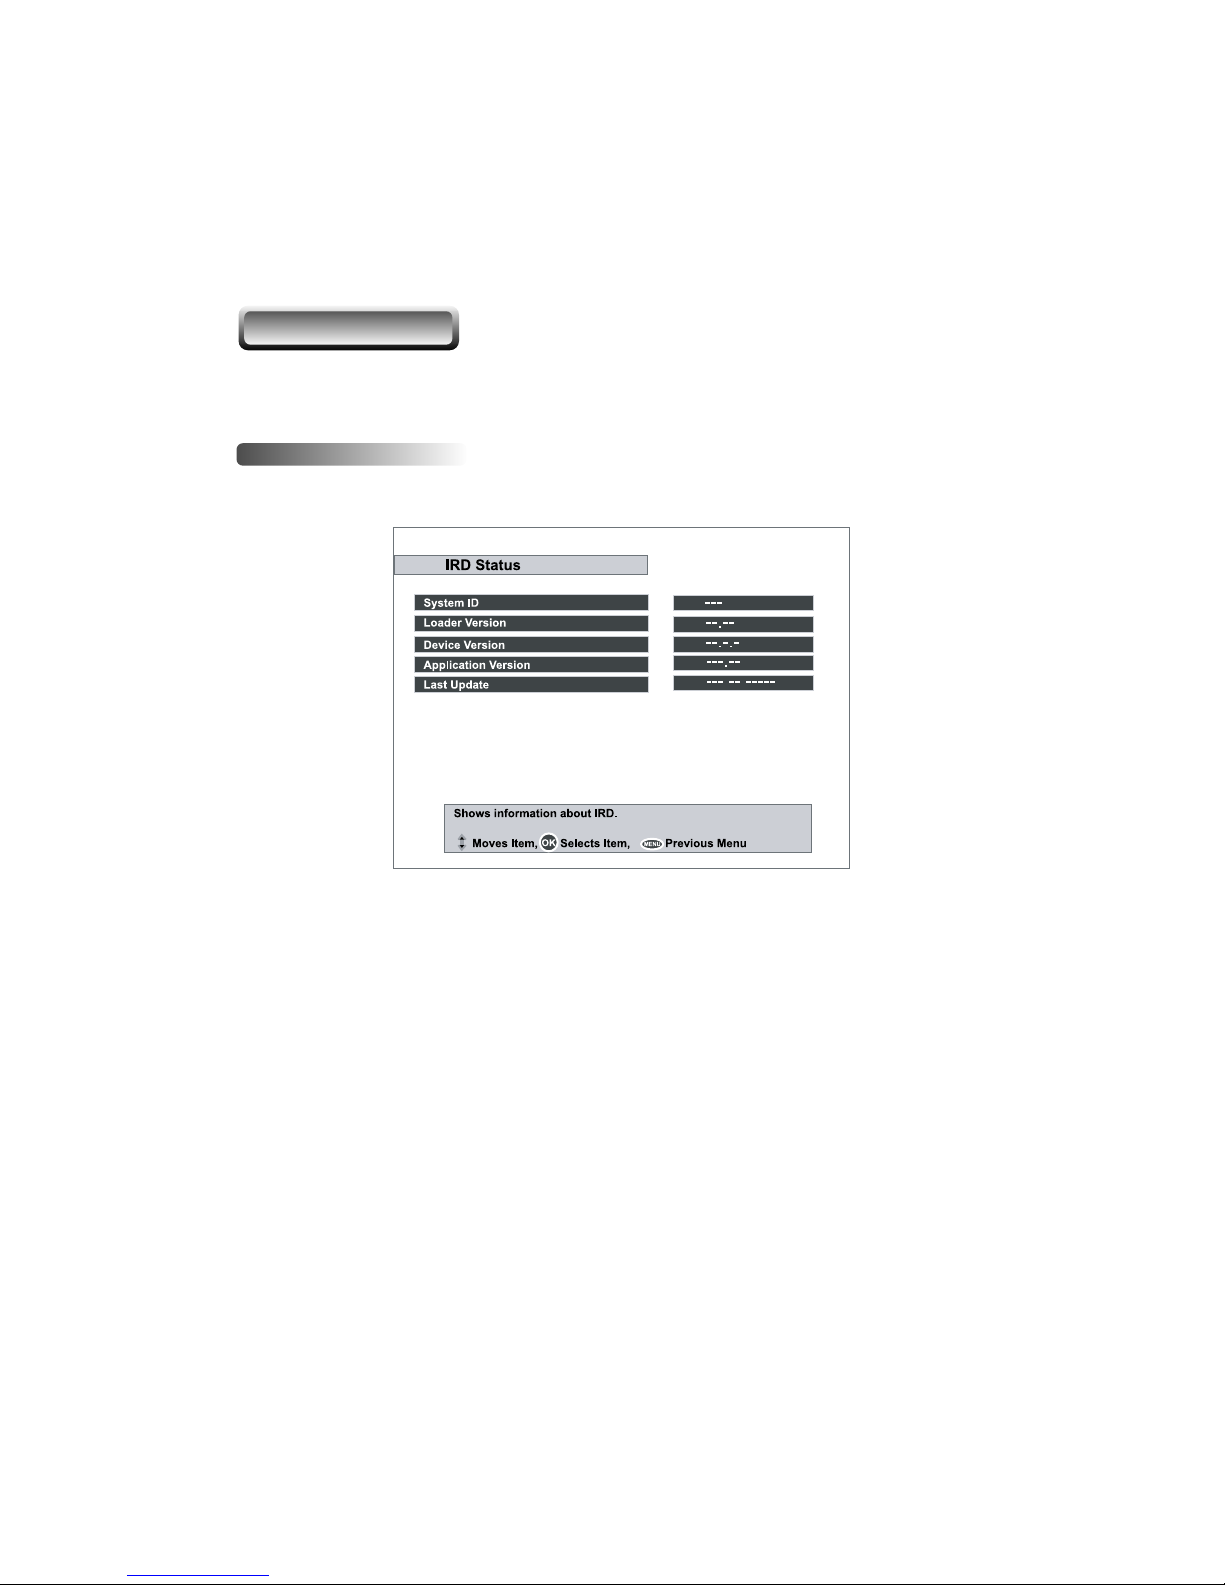
Check the PVR’s system information. It shows the PVR’s:
v
System ID
v
Loader Version
v
Device Version
v
Application Version
v
Last Update
VII-1. PVR STATUS
You can check the PVR version and refer the calendar.
VII. INFORAMTION
00% Level
00% Quality
00% Level
00% Quality
Moves Item, Reset all data, Previous Menu
Page 46
46
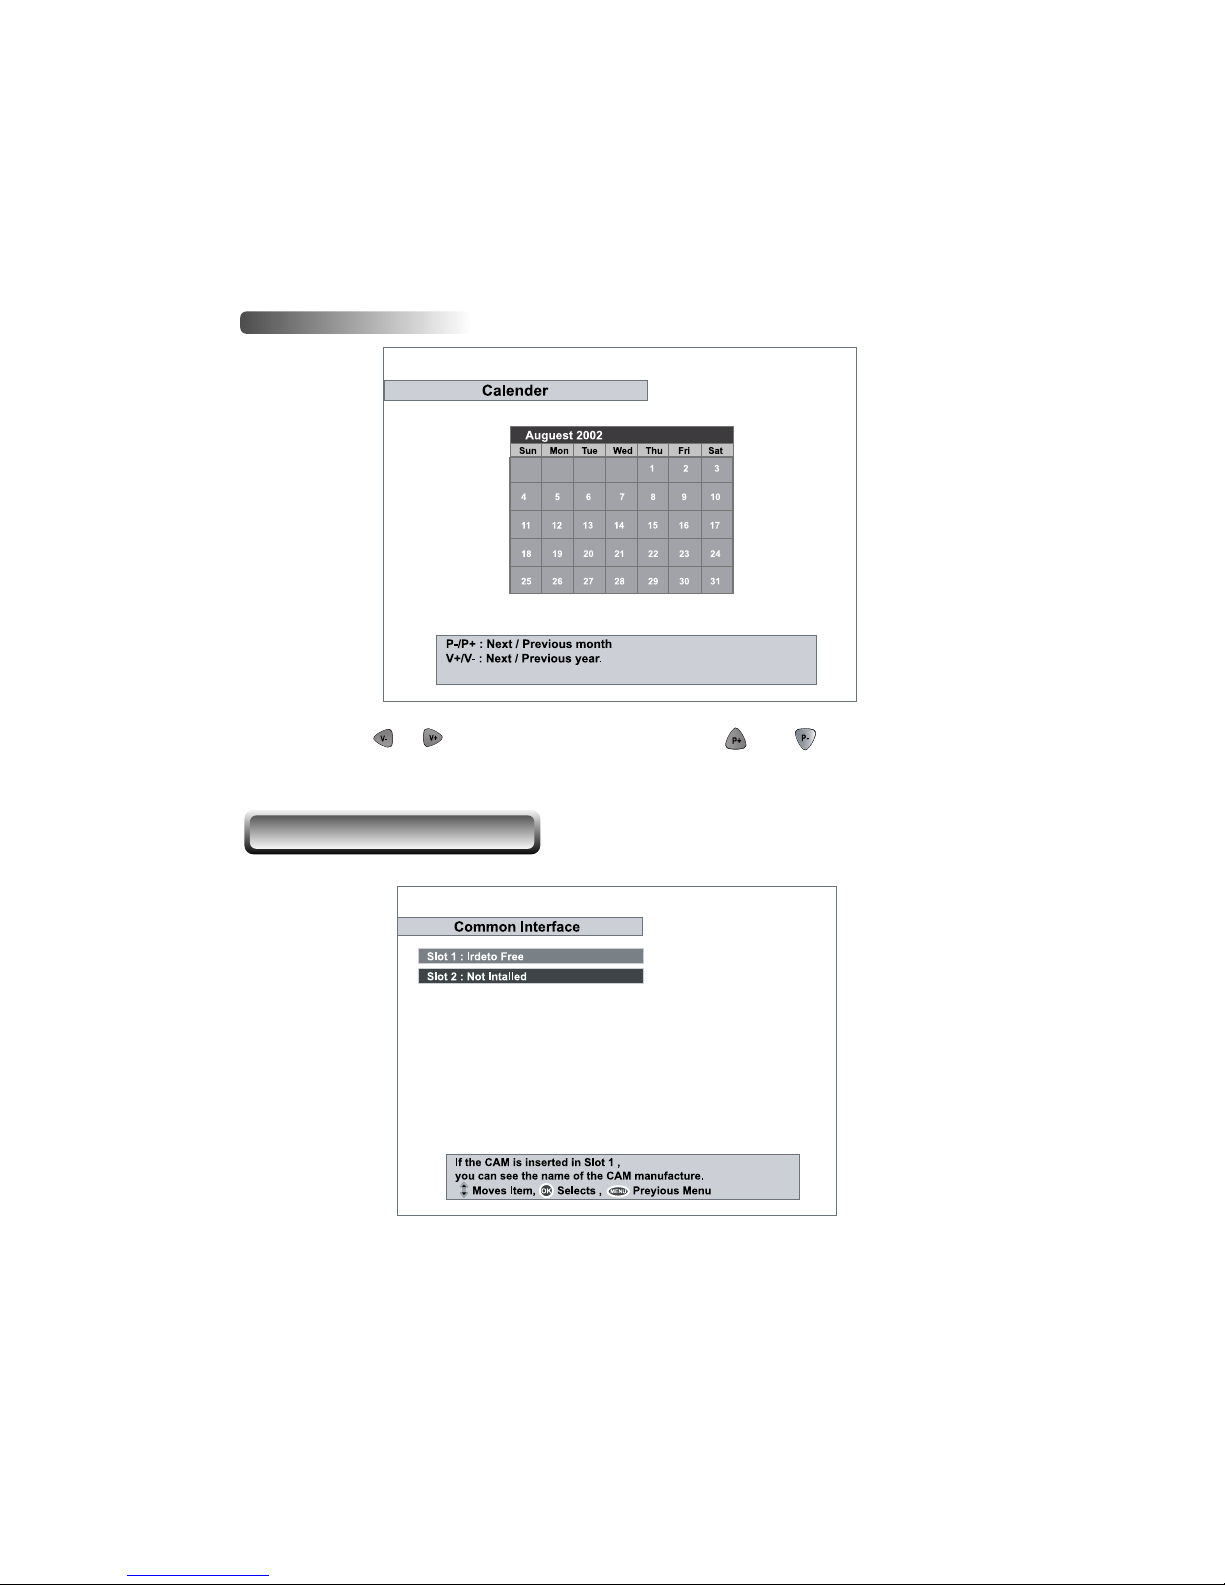
Press the or button to select the year. Press the or button to select
the month.
VII-2. CALENDAR
The menu differs according to each inserted CAM. If the module has not been
installed yet, the phrase ‘Not Installed’ will be accordingly indicated.
VIII. COMMON INTERFACE
Page 47
47
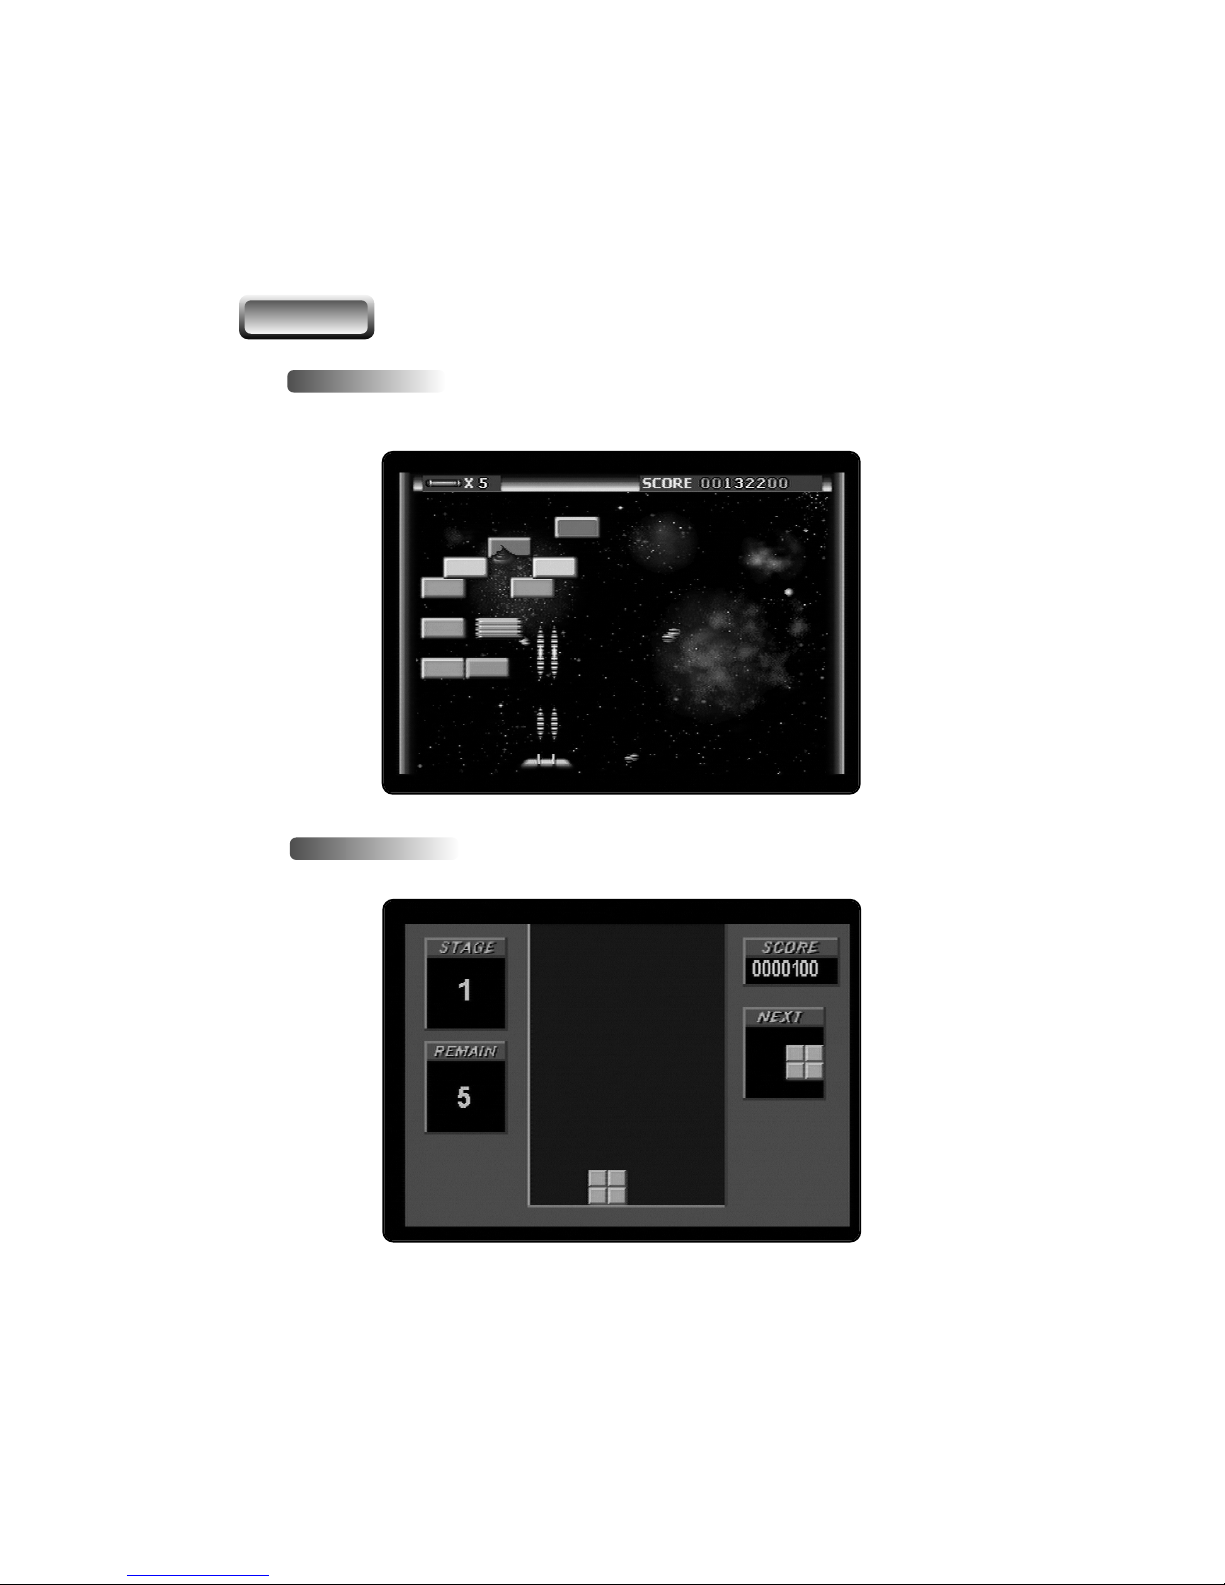
IX
-1. ExBlock
IX.GAME
IX
-2. Bricks Lay
Page 48
48
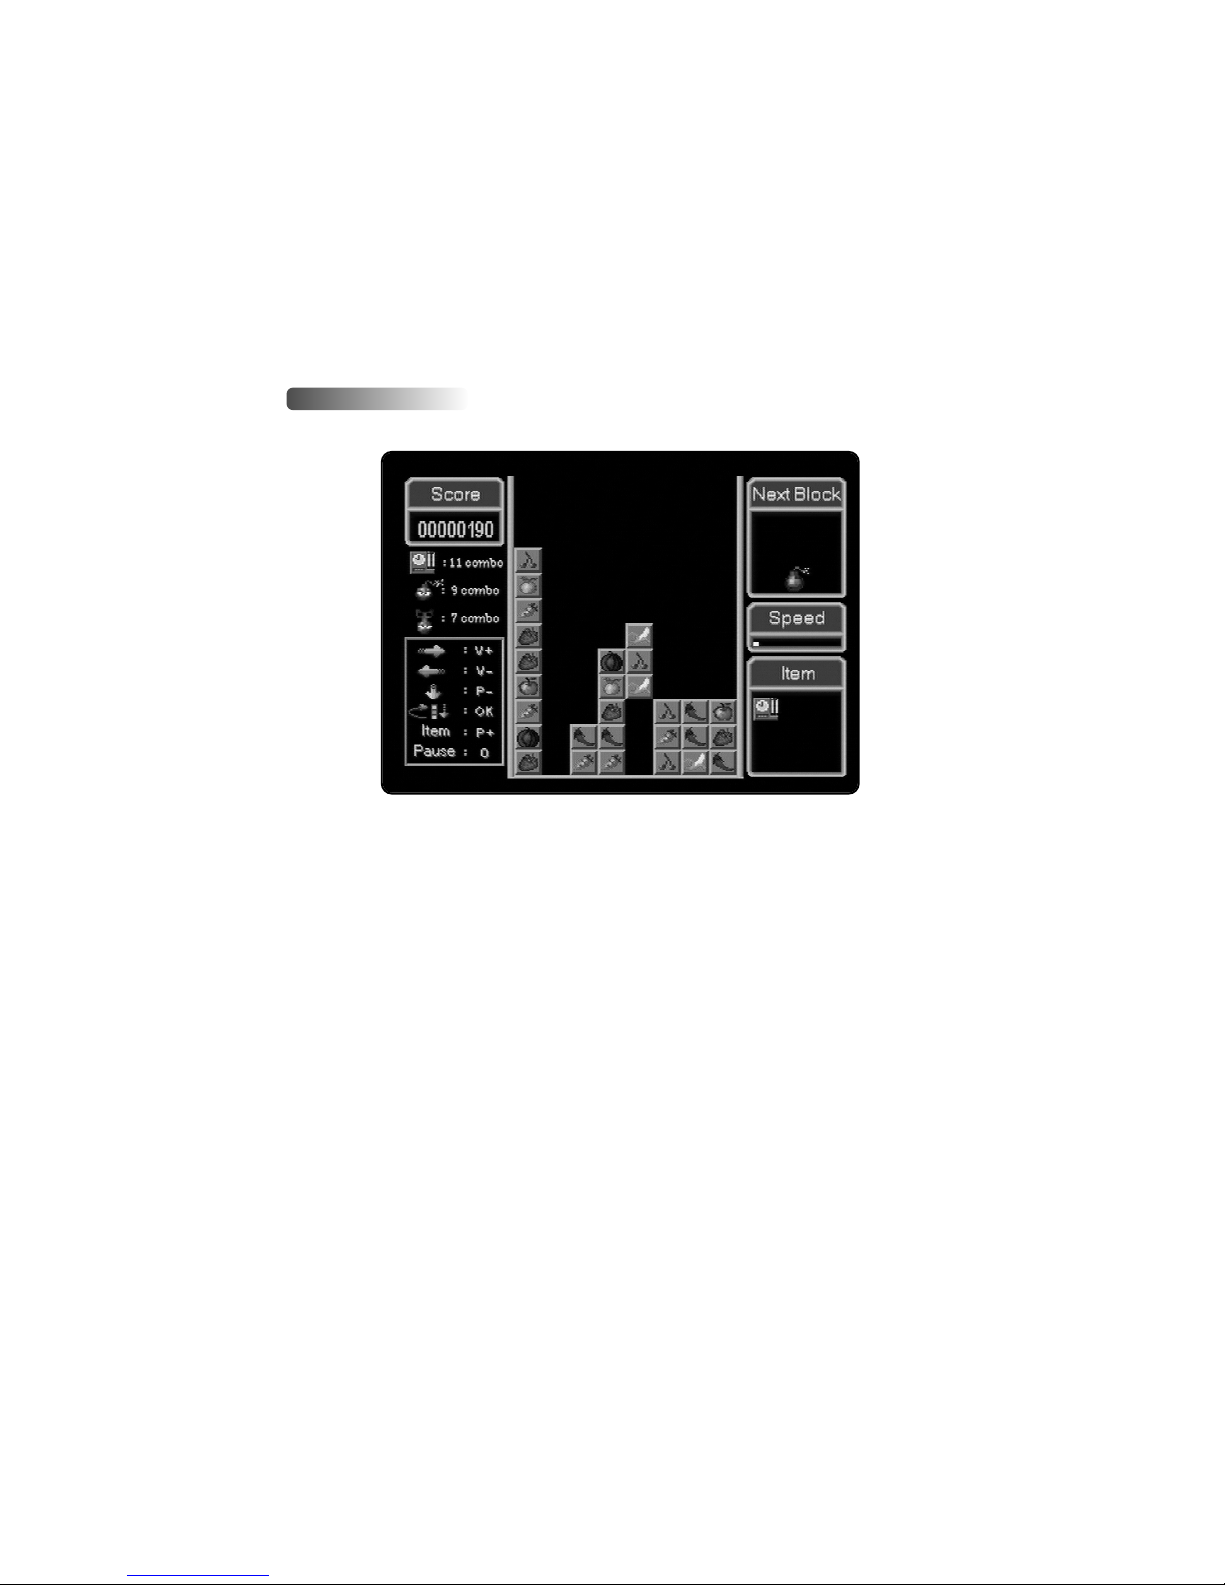
IX
-3. Bomb Hexa
Page 49
49
HOW TO RECORD AND PLAYBACK THE PVR
Time Shifting
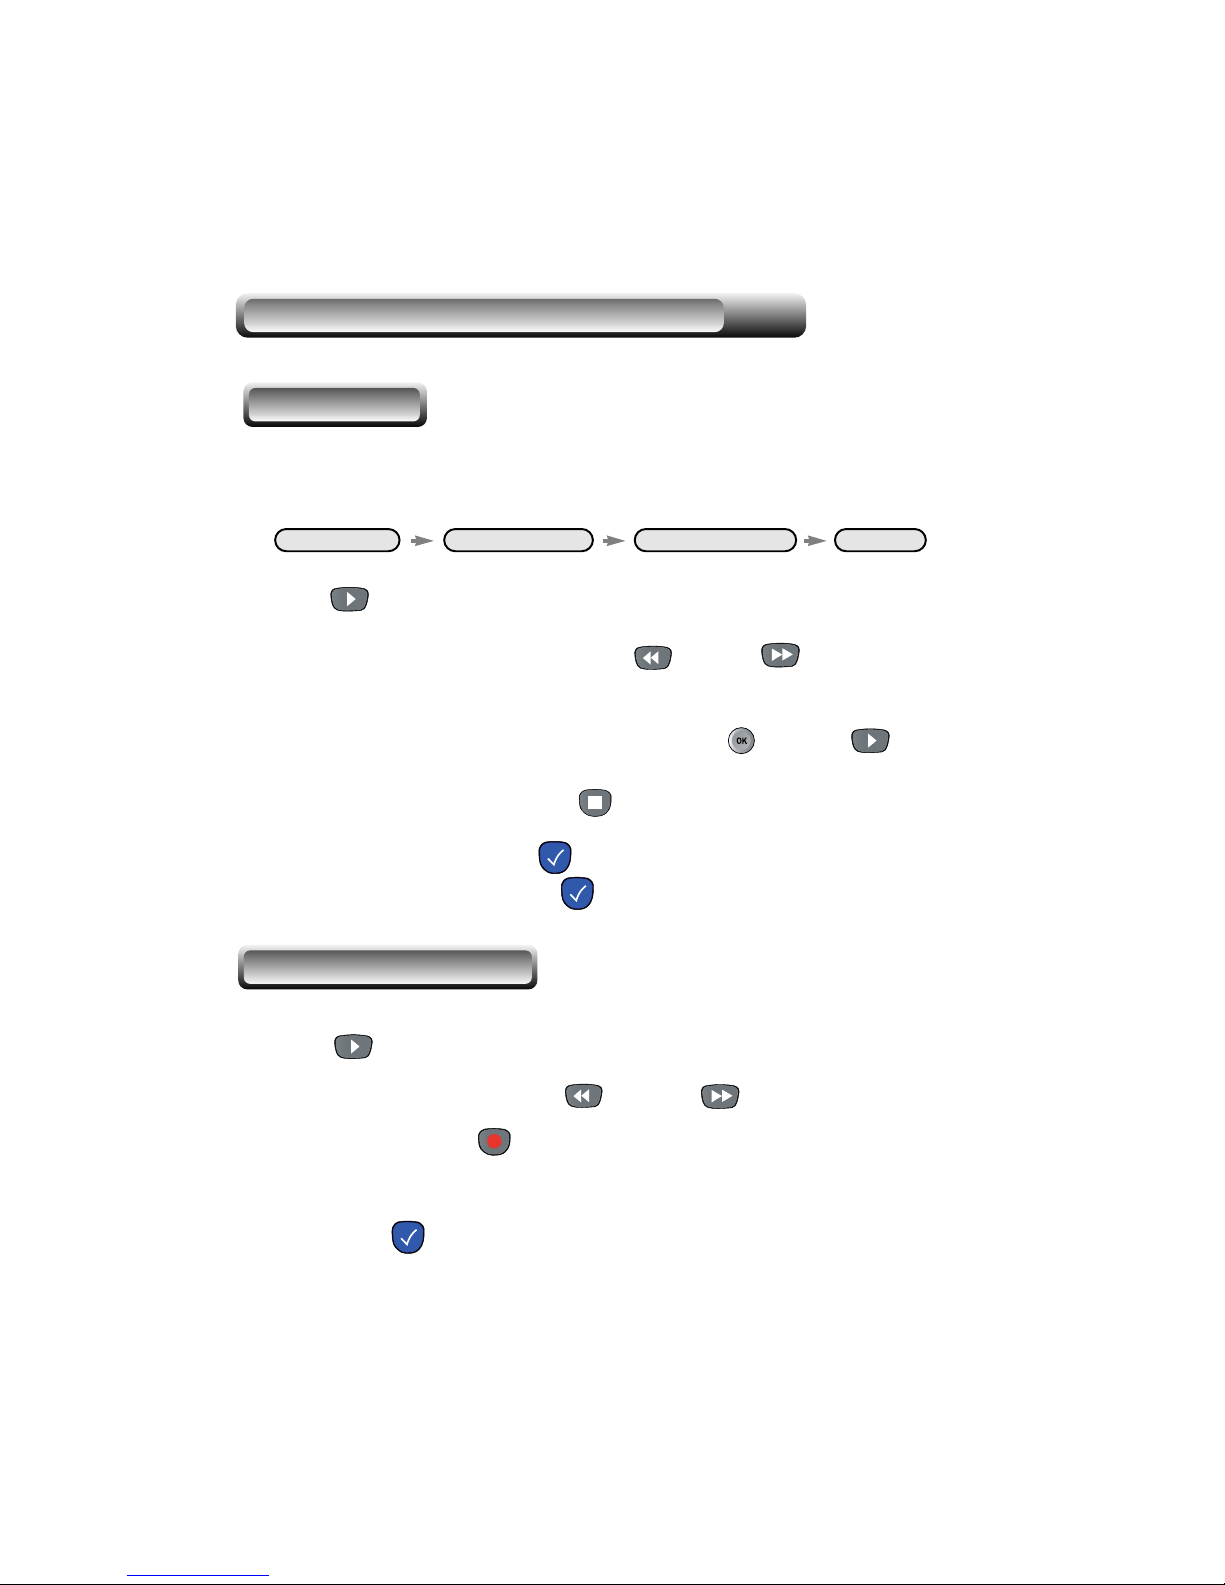
1. To enable Time Shifting, the
Time Shifting
option should be enabled.
To find the
Time Shifting
option menu, follow the steps below.
Main Menu HDD Service Time Shifting Enable
2. Press button to display
Time Shifting
progress bar.
3. To go to the desired playback position, press button or button. This function
is valid while the Time Shifting progress bar is displayed.
4. To remove the Time Shifting progress bar at once, press or
PLAY
button.
5. To play the live video, press
STOP
button.
6. To start Instant Playback, press button. The start position of the playback goes 10
seconds back per each pressing of button.
1. Press button to display
Time Shifting
progress bar.
2. To go to the desired position, press button or button.
3. Press
RECORDING
button to start recording.
4. The recording will be started from the selected position.
5. Press
STOP
button to stop Time Shifting.
Recording while Time Shifting
Page 50
50
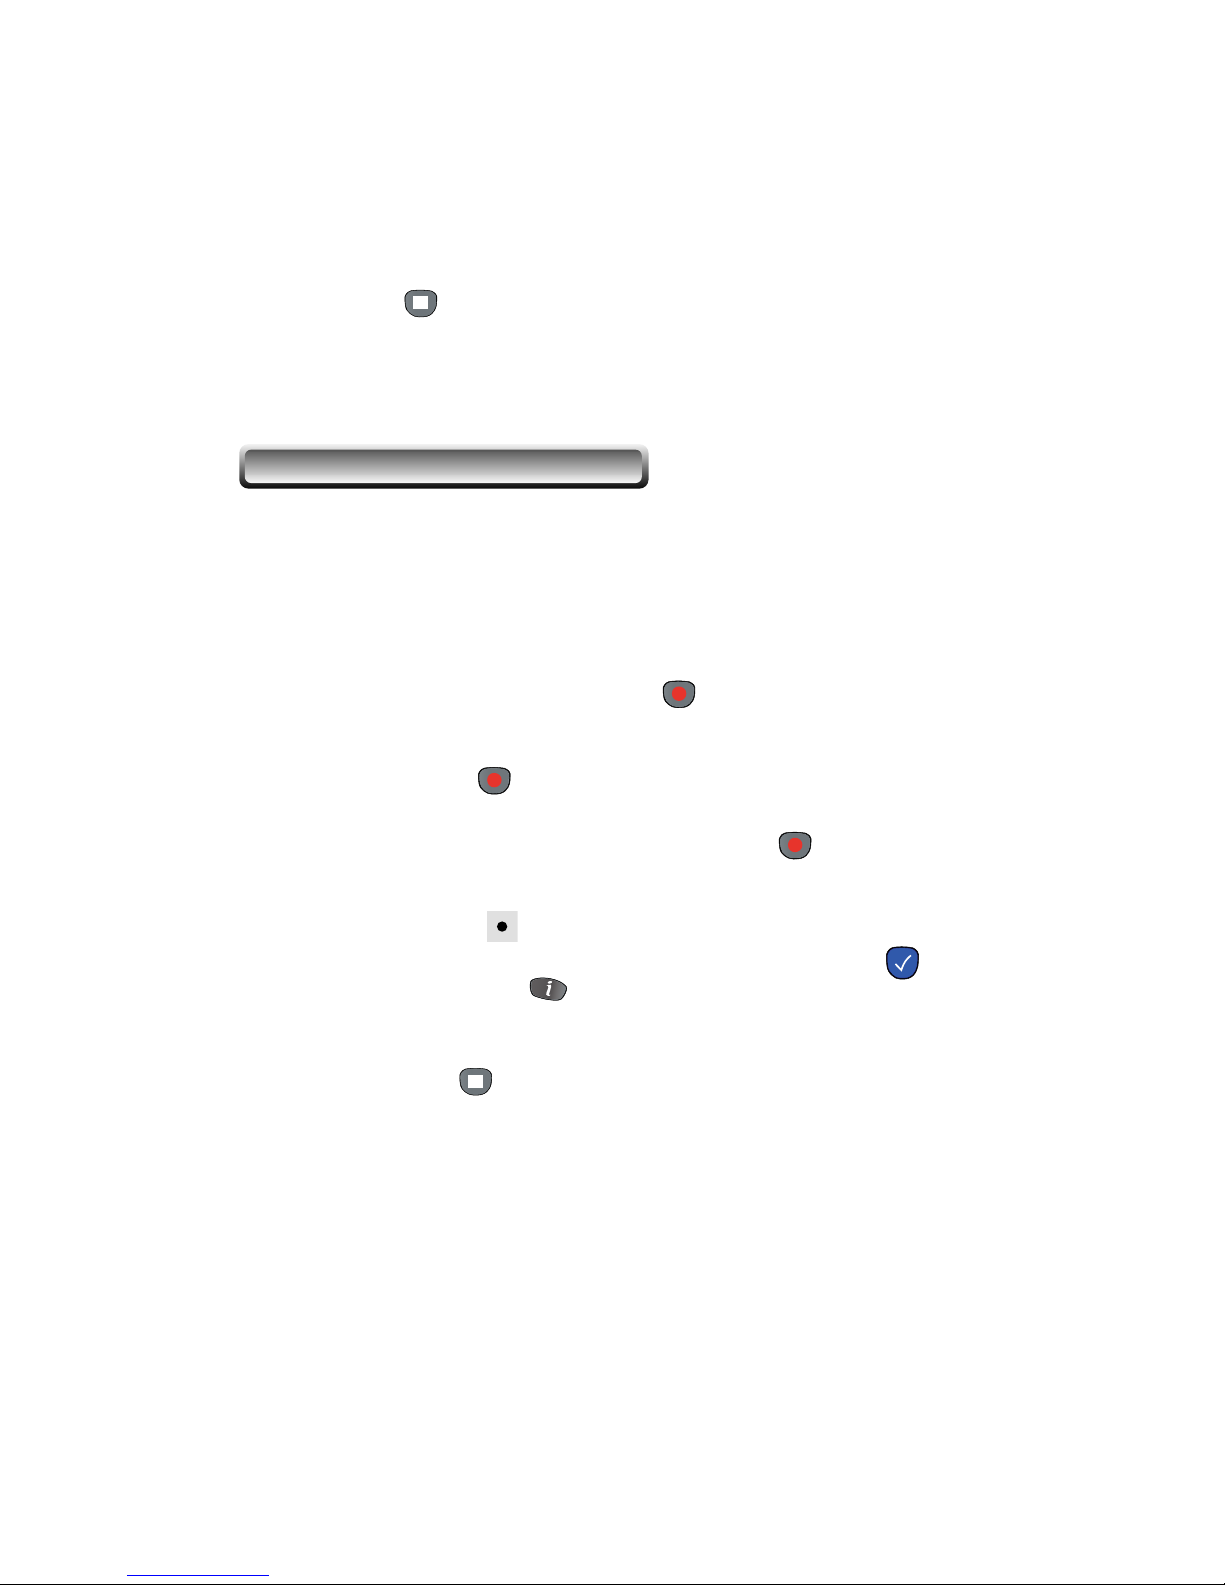
b. Checking
A
Recording Icon
will be displayed on the upper rightmost of the TV screen
if the recording is in progress. For more information, press
CHECK
button
or
INFORMATION
button.
c. Stop
Press
STOP
button and select
Yes
to confirm the immediate stop.
Recording, Checking and Editing reserving
To record services, refer to the following steps. There are four kinds of recording references.
Caution
: If the recording time is less than about 1 minute, recording will not be done
successfully.
1.Immediate Recording by
RECORDING
button
a. Recording
Press
RECORD
button to record the channel you are watching.
To specify the stop time, go to
Recording
menu and modify
Duration
item.
To go to the
Recording
menu, press
RECORDING
button once more.
6. Press
STOP
button again to stop recording.
Caution
: If the recording time is less than about 1 minute, recording will not be done
successfully.
Page 51
For detailed information, refer to the explanation of
Recording
menu in
Menu
operations
.
b. Checking
To check the reserved recordings, go to
Edit Reservation
menu of
Recording
menu.
c. Canceling
To cancel the reserved recording, go to
Edit Reservation
menu of
Recording
menu. Press button at
Cancel
item.
51
2.Immediate Recording by Menu Selection
a. Recording
To go to
Recording
menu, press button and select
Recording
item by
pressing button.
Select the options that you want to record with. Select
Start
item and press button.
For detailed information, refer to the explanation of
Recording
menu in
Menu
operations
.
b. Checking and modification
A
Recording Icon
will be displayed on the upper rightmost of the TV screen if the
recording is in progress. For more information, press
INFORMATION
button or
CHECK
button.
To check and modify the recording options, go to
Recording
menu.
c. Stop
Press
STOP
button and select
Yes
to confirm the immediate stop.
Otherwise, go to
Recording
menu and press button at
Stop
item.
3. Delayed Recording
a. Recording
Go to
Recording
menu and press button at the
Delayed Recording
item.
Set the options that you want to record with. Press button at
OK
item.
Page 52
52
1.Press the red button to display the recorded service list.
2.Select a recorded service at the list.
3.Press button to start playback.
Playback a Recorded Service
1.To stop playback, press
STOP
button.
2.This function is available for playback.
Stop
two times pressing of button is valid for delayed recording.
The
Recording mark
will be displayed.
b. Checking
Press
GUIDE
button to display EPG. The reserved services for delayed
recording will be marked with a
Recording mark
.
c. Canceling
Press
GUIDE
button to display EPG.
To cancel a reservation of delayed recording, select the service you want to cancel and
press
RECORDING
button again. Instead of
RECORDING
button, button is valid. The
Recording mark
will disappear.
4. Recording by EPG
a. Recording
Press
GUIDE
button to display EPG. Select a service that you want to record,
and press
RECORDING
button. Instead of
RECORDING
button,
Page 53

53
1. To playback in slow motion(without sound), press the
SLOW
button.
2. Slow motion speed can be adjusted by pressing the
SLOW
button
repeatedly.
3. There are 7 steps in slow motion playback.
4. Press
PLAY
button to resume playback with normal speed.
5. The slow motion function is available for the playback and the time-shifted playback.
Slow Motion Playback
To pause the picture or playback, press
PAUSE
button.
Press
PAUSE
button or
PLAY
button to quit pausing.
1. Pausing from live video
If the PAUSING is kept more than 5 seconds with enabled
Time Shifting
mode, the
play mode is changed to time-shifted playback. The video continues from the paused
image when resumed from PAUSING.
2.Pausing from Time Shifting
The video continues from the paused image when resumed from PAUSING.
3. Pausing from Playback
The video continues from the paused image when resumed from PAUSING.
Pausing
Page 54
54
1. Press button to display Time Shifting or Playback progress bar.
2. To go to the desired playback position, press button or button. This function
is valid while the progress bar is displayed.
3. To remove the progress bar at once, press button.
Fast Forwarding and Rewinding
1. If there is a
Time Shifting
or
Playback
progress bar, remove the progress bar by
pressing
PLAY
( ) button.
2. Press button for fast motion playback. To change the playback speed, press
button repeatedly.
3. There are 4 steps in fast motion playback.
4. Press
PLAY
( ) button to resume playback with normal speed.
5. The slow motion function is available for the playback and the time-shifted playback.
Fast Motion Playback
Reverse Playback
1. Press button to display the Time Shifting or Playback progress bar.
2. To rewind with motion, press button without the progress bar.
The reverse motion is not so much smooth as fast motion playback because of the
limitation of the characteristics of MPEG signal.
Sometimes you may encounter the message
The service is not running..
on the
reverse playback of scrambled data. The message will be disappeared in a few
seconds.
Page 55
55
You can jump to a position directly by bookmark function in playback and time-shifted
playback.
To search positions very quickly and easily, use bookmarks.
1. Adding a bookmark
To add a bookmark, press
BOOKMARK
button at the position you want to
add it.
2. Going to a bookmark
Press
GO TO BOOKMARK
button to jump to the previous bookmark.
Then, the PVR plays from the book marked position.
3. Deleting a bookmark
To remove a bookmark, select the bookmarked position by
GO TO BOOKMARK
button and press
BOOKMARK
button.
4. 30 sencods forward
If there is no bookmark, the PVR plays every 30 seconds forward by pressing
BOOKMARK
button.
1. Select the live video you want to record. Descramble the service with a proper
CAM and smart card. The live service should play well with the proper CAM
and smart card.
2. Start recording according to the recording procedure.
3. During recording, don’t change the channel neither try the time shifting function.
Caution
: If there is any disturbance such as channel changing or time shifting during
recording, scrambled service will be recorded.
If the recording time is less than about 1 minute, recording will not be done
successfully.
Recording The Descrambled Live Service
Bookmark
Page 56
56
1. Select and play back a service you want to descramble. Descramble the service with a
proper CAM and smart card. The live service should play well with the proper CAM and
smart card.
2. Press button to display
Playback
progress bar.
3. To go to the desired position, press button or button.
4. Start playback. The video should be descrambled with a proper CAM and smart card.
The fast/slow motion descrambling is possible by fast/slow motion playback.
5. Start recording by
RECORDING
Button.
6. The video displayed on TV will be recorded.
7. Press
STOP
button to stop recording.
8. Press
STOP
button again to stop playback
Caution
: If the descrambling time is less than about 1 minute, descrambling will not be
done successfully.
1. Select and play back a service to copy it.
2. Press button to display
Playback
progress bar.
3. To go to the desired position, press button or button.
Descrambling Services
Copying from Recorded Service
Page 57
1. Start playback a recorded service.
2. Press button to display
Playback progress
bar.
3. To specify one end of region, press the button with the progress bar.
4. Move the cursor by pressing (or ) or (or ) button.
5. To cut out selected region, press the button once more.
57
4. Start playback the recorded video you want to copy.
The fast/slow motion copying is possible by fast/slow motion playback.
5. Start copying by
RECORDING
Button.
6. The video displayed on TV will be copied.
7. Press
STOP
button to stop copying.
8. Press
STOP
button again to stop playback
Caution
: If the copying time is less than about 1 minute, copying will not be done
successfully.
During recording, Time Shifting is possible only in the recorded channel.
Time Shifting while Recording
Cut Out Selected Region
Page 58
58
Repeat mode
The repeat mode works only in playback mode. It does not work in time shifting mode.
There are two repeat modes.
1. Repeating the whole selected service.
a. Start playback a recorded service.
b. Press button without the progress bar to repeat the whole selected service.
c. Press button once more to cancel the repeating playback.
2 Repeating the selected region.
a. Start playback a recorded service.
b. Press button to display
Playback progress
bar.
c. To specify one end of region, press the button with the progress bar.
d. Move the cursor by pressing (or ) or (or ) button.
e. To specify the other end of region, press the button once more.
f. Press button once more to cancel the repeating playback.
1. With
Separated
mode in
LNB setting
menu.
For the tuner being recorded with, all the channels in the same TP can be selected.
For the other tuner, all the scanned channels can be selected.
2. With
Loop Through
mode in
LNB setting
menu.
For the tuner being recorded with, all the channels in the same TP can be selected.
For the other tuner, all the channels of the same polarity and the same band as being
recorded channel can be selected.
Zapping while Recording
Page 59
59
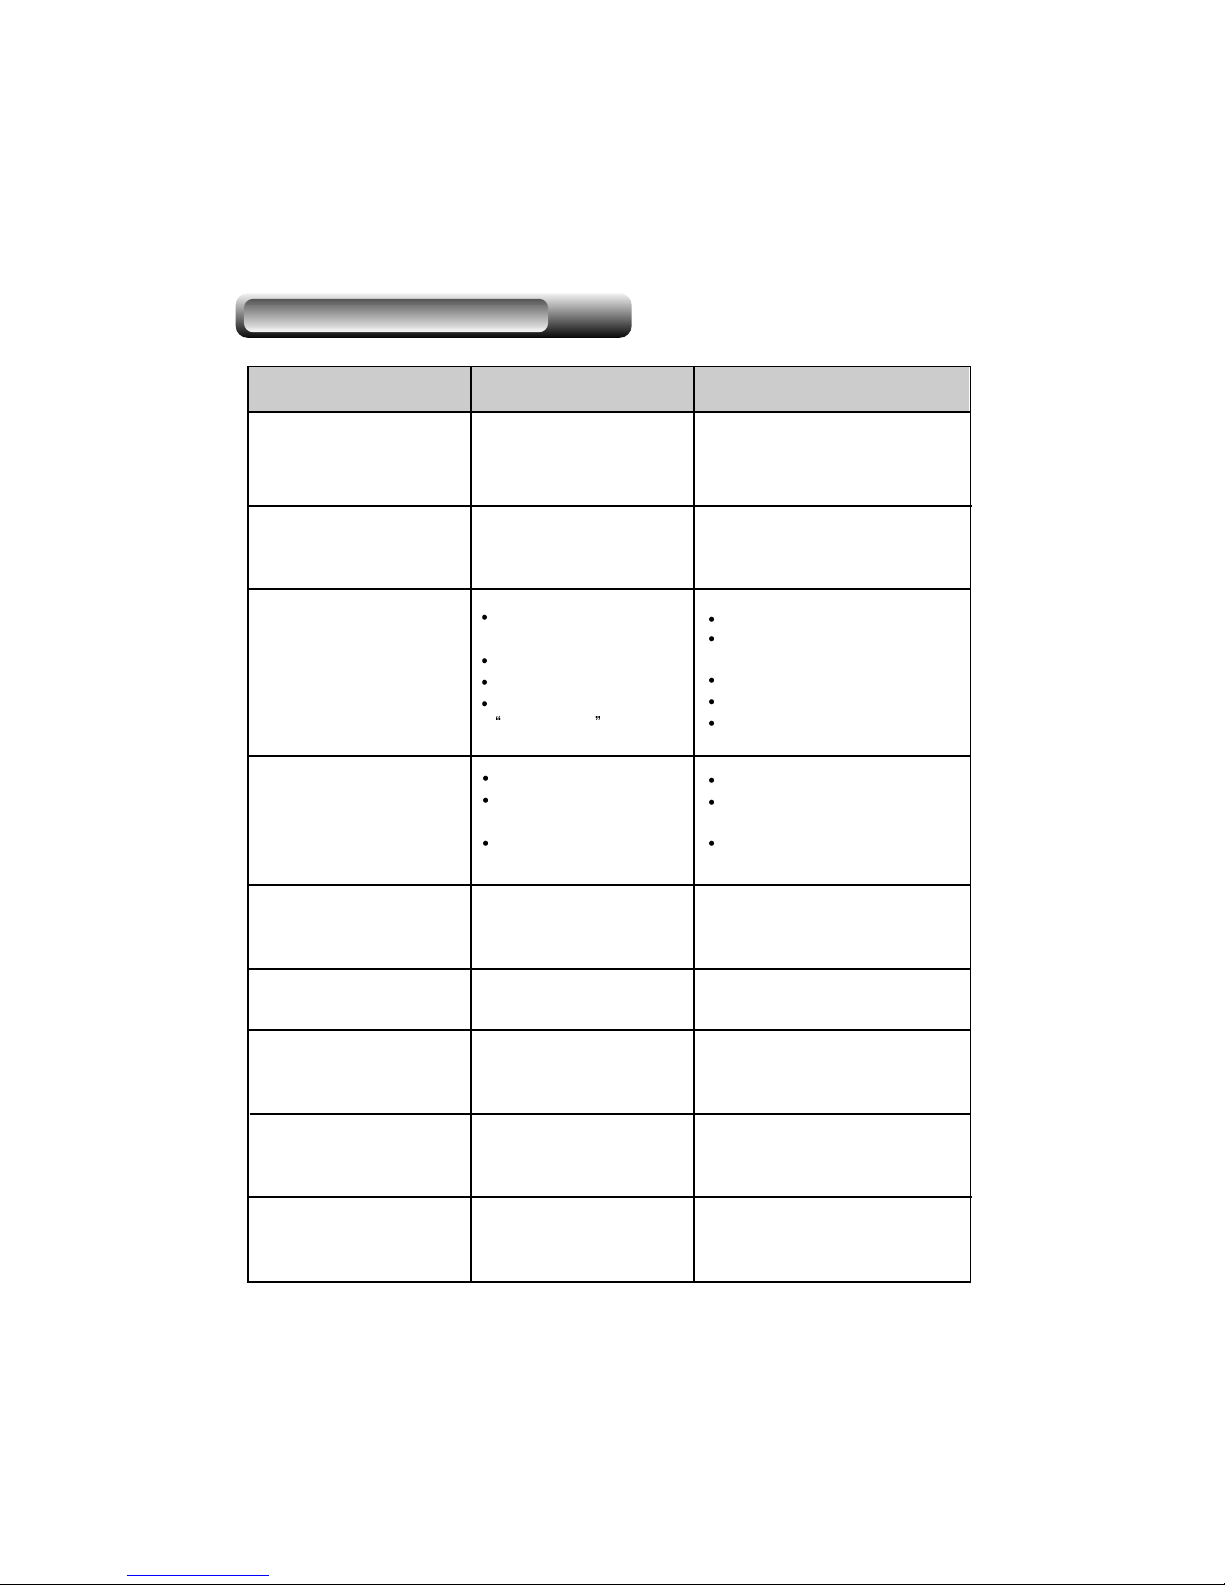
TROUBLESHOOTING (Q & A)
Problem Possible Causes What to do
Nothing appears on the
Front Panel.
No sound or picture, but
the front panel shows the
time or -- : --
No Picture, No Sound.
The Remote Control Unit
(RCU) is not working.
Time Setting is wrong.
2 broadcasts overlap.
The CAM is not working.
Black Screen.
The main power cable
is not connected.
PVR is in standby mode.
The satellite dish is not
pointing at the satellite.
No Signal or Weak Signal.
LNB is faulty.
The UHF Button is
pushed down
.
No Batteries.
The RCU is incorrectly
aimed.
The PVR is in standby
mode.
The Time is not set properly.
The channels are not
configured properly on the
RF mode.
The CAM is not installed
properly.
Check that the main power
cable is plugged into the power
socket.
Turn the power ON.
Adjust the dish.
Check the settings in one of
the channel search submenus.
Check the cable connections.
Replace the LNB.
Get out of the UHF mode.
Change the batteries (both).
Aim the RCU properly to
the PVR.
Change the mode to the
normal mode.
Adjust the Time on the Menu.
You have forgotten your
secret PIN Code.
Contact your Service Provider.
Set the channels in the RF mode
under the A/V setting of the
Menu between 21 to 69 on the TV.
Check that the CAM has been
correctly inserted.
The CAM is not working
correctly
.
Eject the CAM and reinsert
it again.
Page 60
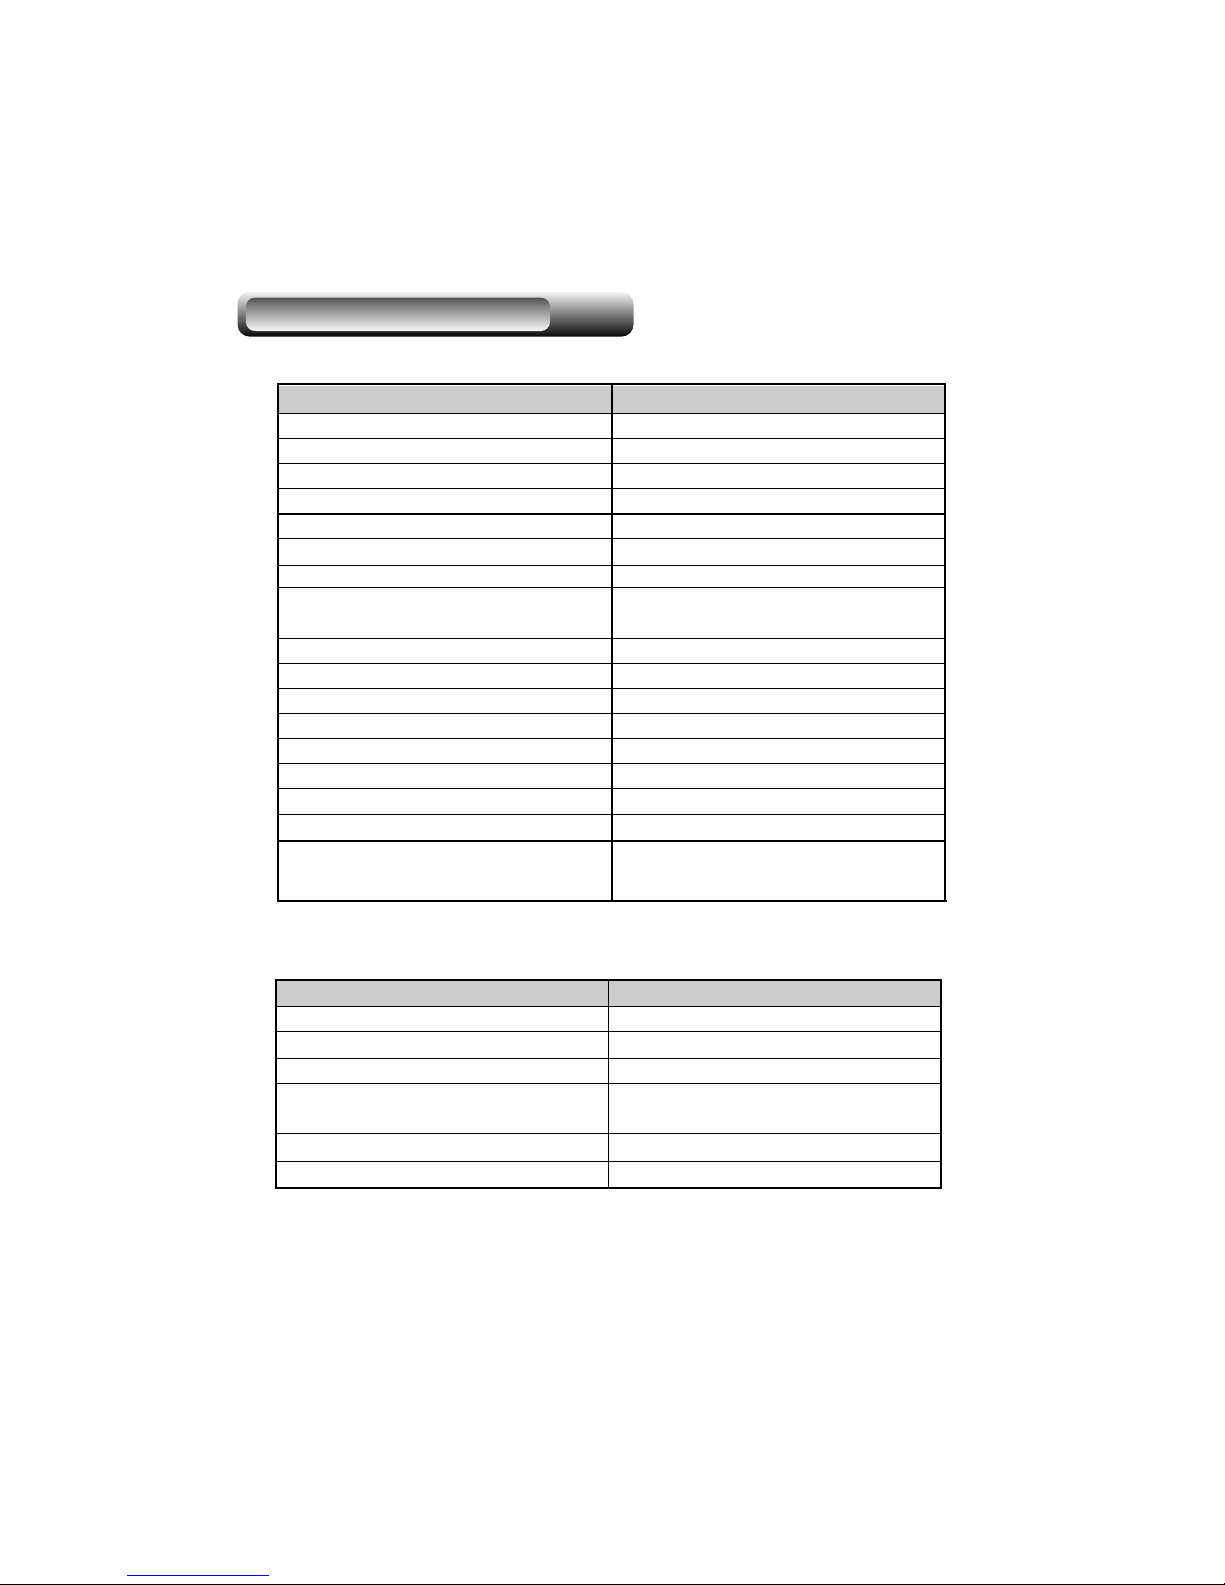
60
I.
PVR SPECIFICATIONS
SPECIFICATIONS
Item Specification
Power
90 - 250VAC, 50 / 60Hz
Input Frequency
950 - 2150 MHz
1 RS - 232C, 115kbpsDATA Service
SCART
A/V OUT
2 SCARTs : 1 VCR, 1 TV
1Video / 2 Audio (left and right)
SPDIF
Digital Audio Out
Convertible 13.5/18V (500mA max)
LNB Power
Modulation / FEC Type
QPSK / Multiple convolution coding
(DVB Compliant)
DiSEqC
Tone Switching
DiSEqC 1.0 / 1.2 compatible
22 KHz
RF Modulator UHF Ch. 21-69 with PAL I/G/K
Specification MPEG - 2/DVB Compliant SI
Video Compression MP@ML in MPEG-2
Aspect Ratio
On-Screen Display
EPG
Common Interface
4:3 or 16:9
256 colors with full resolution
Supported
Viaccess , Irdeto , Cryptoworks , Conax,
Nagravision , Mediaguard
II.
CHANNEL PROCESSING
Item Specification
Input Frequency Range
950 - 2150 MHz
Number of Channels
3500 TV Cannels and 1500 Radio Channels
QPSK (DVB Specification)Modulation
Rates: 1/2, 2/3, 3/4, 5/6, 7/8
(DVB Specification)
Inner FEC
Input Symbol Rate
2 to 45 Ms/s
Connector Type
F Type ( IEC 169 - 24 female)
Page 61
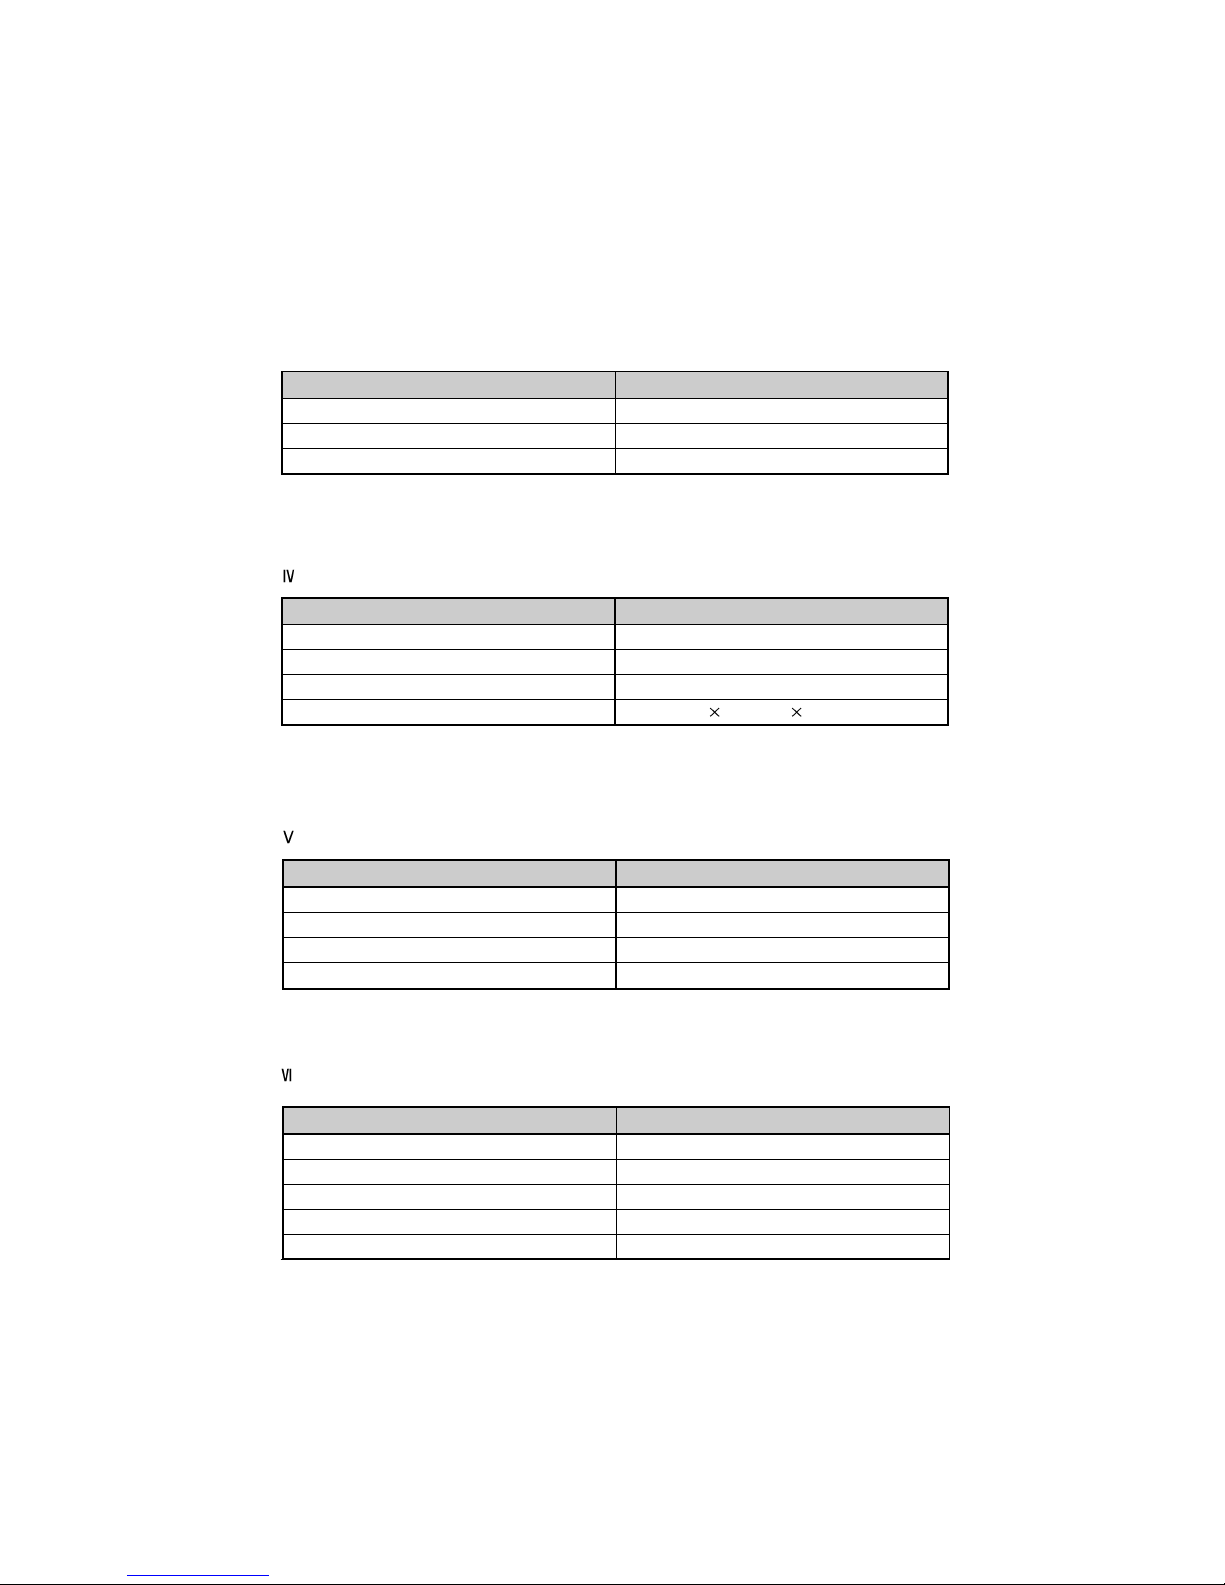
61
III.
MPEG AUDIO
Item Specification
Operation Mode Mono , Left , Right and Stereo
Sampling Rates 32, 44.1 and 48 kHz
Resolution 18 bit digital to analogue Converters
.
VIDEO SPECIFICATIONS
Item Specification
Specification
Meets ETR 154 amended in ALM-95-021
PAL I ,G,K
ISO / IEC 13818-2, MP@ML
TV System
Video Decoding
Video Resolution
720 pixels
576 lines
25 frames per sec.
.
RF MODULATOR
Item Specification
Features
Input RF bypass Supported.
IEC Coaxial female 9.5 mm.(IEC 168-2)
CCIR UHF E 21-69 adjustable
Channel 36 (or TBD)
Connector
Channel Range
Pre-Set Channel
. POWER SUPPLY
Item Specification
Input Voltage
90 - 250VAC, 50 / 60Hz
Type
SMPS
Power Consumption
Max.55Watt
Standby Power
10Watt
Protection Separate internal fuse
 Loading...