

Page 1
HB 10M00
USER GUIDE
HANDLEIDING
MANUEL D’UTILISATEUR
V 1.0, 11/08
Page 2

UK The CE symbol indicates that the unit complies with the essential
requirements of the directive 89/336/EEC.
NL Het toestel voldoet aan de basiseisen van de richtlijn 89/336/EEC. Dit wordt
bevestigd door de CE-markering.
F La conformité de l’appareil avec les exigences fondamentales de la directive
européenne 89/336/EEC relative aux terminaux, est confirmée par
le label CE.
UK The features described in this manual are published with reservation to
modifications.
NL De in deze handleiding beschreven mogelijkheden worden gepubliceerd
onder voorbehoud van wijzigingen.
F Les possibilités décrites dans ce manuel sont publiées sous réserve de
modifications.
This product is in compliance with the essential requirements and other relevant provisions of the R&TTE directive 89/336/EEC.
The Declaration of conformity can be found on :
http://www.topcom.be/cedeclarations.asp
Page 3
TOPCOM HB 10M00
ENGLISH
1 INTRODUCTION
Congratulations on your purchase of the HB 10M00. This system is
designed for fitness and Sport training. We hope that you will enjoy using
the Heart Meter/ GPS pod and the benefits of the wireless transmission to
send/receive data to/from the controller or to PC. In exercise or sports, your
heart naturally speeds up in pumping blood to the body in accordance with
the increased energy level. The Heart Meter can calculate this increase
expressed as the number of beats per minute (bpm) to determine a target
heart rate safe for each individual.
More information about the target heart rate zone, maximum
heart rate etc... can be found on:
www.topcom.net/sports/heartbeat.asp
With the GPS tracking ability this system can be used for outdoor activities
like hiking, biking, etc. On the other hand, functions for indoor exercise like
chronograph, timer, heart rate monitor in combination with the pedometer
are also suitable with this system.
With the data stored on your PC, you can transfer it to programs like Google
Earth, SportTracks, Perfect Session, ...to analyze it or to track it back later.
2 SAFETY NOTES
Using a Heart Monitor is NOT a substitute for professional medical
attention. If you suffer from heart disorder, illness or have recently taken up
fitness training, it is advisable that you seek a doctor or talk to your trainer
and work out a fitness plan that suits you.
The watch should only be used as a guide in maintaining a safe heart beat
rate for exercises. It should NOT be relied upon as a medical heart rate
monitor. If you are uncertain about how your exercise program will impact
on your heart, please consult a physician.
3 CARE AND MAINTENANCE
DO NOT expose the watch to extreme weather conditions or cleaning
agents and solvents. Avoid dropping or rough handling of the watch. Avoid
fastening the strap too tightly. Clean the watch with a dry soft cloth or a soft
cloth moistened with water and mild detergent. Store the watch in a dry
place when not in use.
3
Page 4
TOPCOM HB 10M00
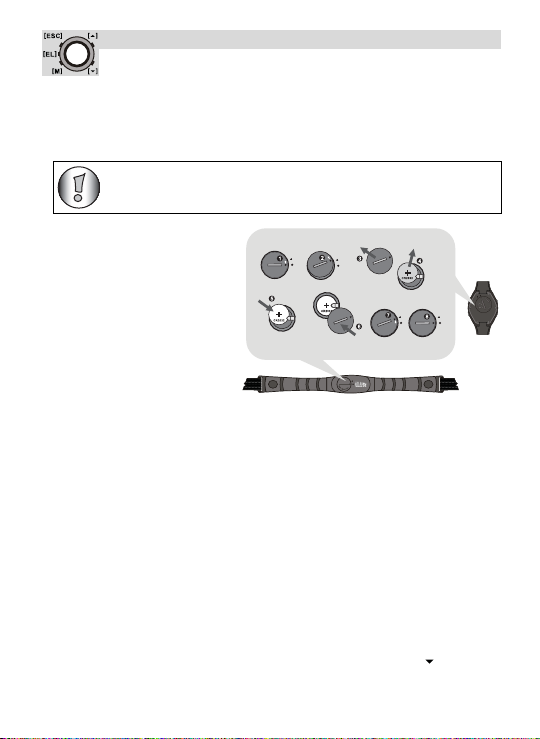
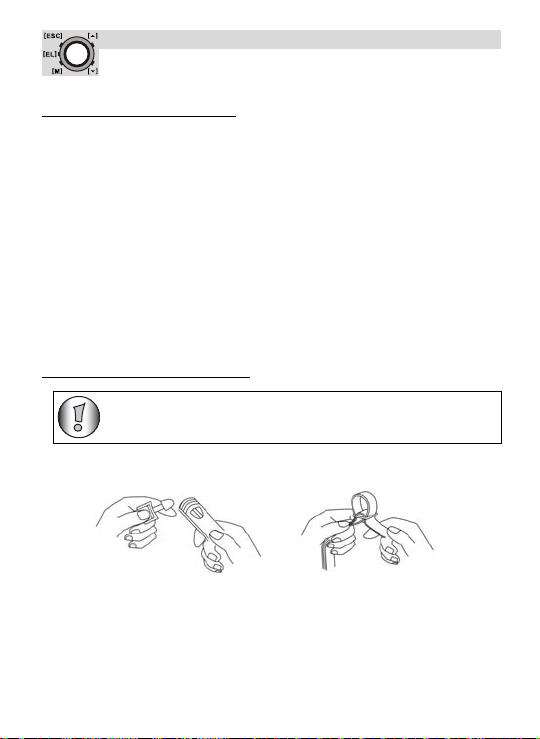
4 CHANGING THE BATTERY
If you are not confident with electronics, let the battery be changed by a
professional. Do not open the watch yourself.
4.1 WATCH & CHEST BELT
THE WATCH AND CHEST BELT HAVE ALREADY A
BATTERY INSIDE, so no need to place this battery when you
just bought it. To turn the watch on see “5 Power save mode”.
1.Turn the battery cover with
a coin counterclockwise
until the arrow is pointing to
the arrow.
2.Turn the cover gently further
to pop it out.
3.Put the battery cover aside.
4.Remove the empty battery.
5.Insert a new CR2032 bat-
tery, the (+) side of the battery must touch the ‘L’shaped metal contact.
6.Make sure the sealing rubber O-ring is placed correctly in its slot before
the battery cover is closed.
7.Put the battery cover back with the arrow on the cover pointing to the
arrow, and then press the cover down gently until it is on the same level
as the surface.
8.Turn the cover with a coin clockwise until the arrow is pointing to the dot.
4.2 GPS POD
The GPS pod has a build-in battery which can’t be removed/replaced
unless you send it out for repair. Please follow the repair instructions if the
battery of your GPS pod doesn’t work anymore.
5 POWER SAVE MODE
This watch is sold with a power save function so that the battery can last
longer. To turn this watch (display) on, press any key.
To activate the power save mode press the LAP/RESET key [ ] for
5 seconds in time mode.
4
Page 5
TOPCOM HB 10M00
ENGLISH
[ESC]
[M]
[]
[]
[EL]
6 BUTTONS
Mode Button [M] (MODE/SET)
• To select the current function or menu.
• Hold down to select setting mode. In
setting mode: To select among the setting
items.
Escape Button [ESC] (LIGHT/ESC)
• To select between timekeeping and sensor
mode.
• To exit from setting mode.
• To go back to previous screen or function
level.
Up Button [ ] (ST./STP.)
• To scroll the menu upward.
• To activate the 'start' or 'stop' function
under chronograph, timer, pacer mode.
• To increase the setting value during
setting.
Down Button [ ] (LAP/RESET)
• To scroll the menu downward.
• To activate the lap function during
chronograph mode and reset function
during chronograph (hold down), timer
and pacer (hold down) mode.
• To decrease the setting value during
setting.
Light button [EL]
• To turn on the backlight for a few seconds.
6.1 MASTER RESET
Press and hold [M], [] and [] simultaneously to reset the watch.
All set information will be lost, also the time!
6.2 BACK LIGHT
Press the [EL] key to active the back light of the display for 3 seconds.
5
Page 6
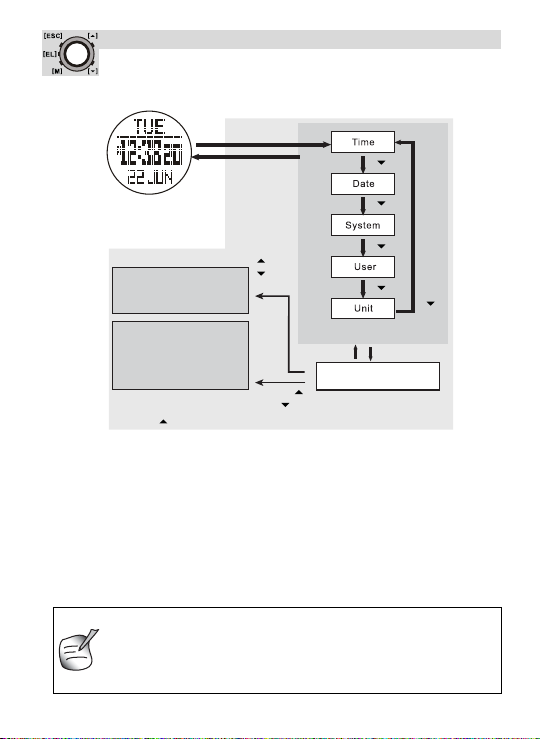
7 TO SET THE GENERAL ITEMS
hold [M]
[ESC]
Current time mode
TOPCOM HB 10M00
[]*
[]*
Setting menu
[ESC]
Setting display
[]*
[]*
[M]
[]*
[] or
Change the setting
value
Change the setting
value faster (for some
settings)
* Press [] to move selection in the reverse direction.
- Time: setting the Second, Minute, Hour and Hour Format.
- Date: setting the Year, Month and Day.
- System: setting the LCD (contrast), Sound (key tone and chime),
Light (normal and night), Pair (pair the chest strap and GPS pod with
the watch, see “7.1 To pair the watch with the chest belt and GPS
pod”).
- User: setting the Gender, Birthday, Height, Weight and Stride (walk
and run).
- Unit: setting the Speed (Km/h, mi/h and knot) and others (Metric and
Imperial) units.
• When Light is set to night mode, every key press will turn
on the backlight.
• The Stride can easily be measured by walking or running
100 m (= 10000 cm) and counting the steps. Divide 10000
by the amount of steps and you get the stride in cm.
6
[]
hold [ ]
or [ ]
Page 7
TOPCOM HB 10M00
ENGLISH
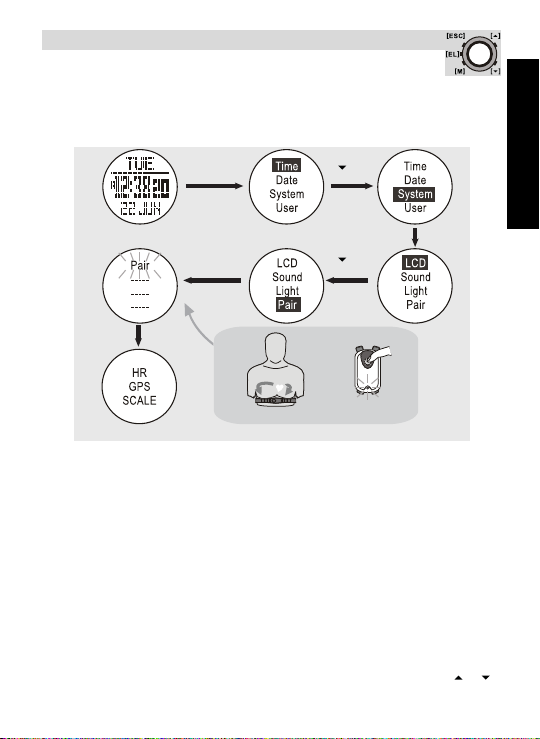
7.1 TO PAIR THE WATCH WITH THE CHEST BELT
AND GPS POD
The chest belt and GPS pod is normally paired with the watch when bought.
If battery is replaced or after a reset the chest belt/GPS pod has to be paired
again.
hold [M]
[]
Current time mode
[M]
Pairing completed
During the pairing:
• The heart rate chest strap must be worn on the chest or press the two
contacts (i.e. heart rate signal is sampling).
chest strap
[]
GPS pod
[M]
• The GPS pod must be turned on (see “10.4.1 Turning it on/off”).
Note:
• The product has been paired before the shipment.
• For some instance, the chest strap and GPS pod can be paired with the
watch again by the steps mentioned above.
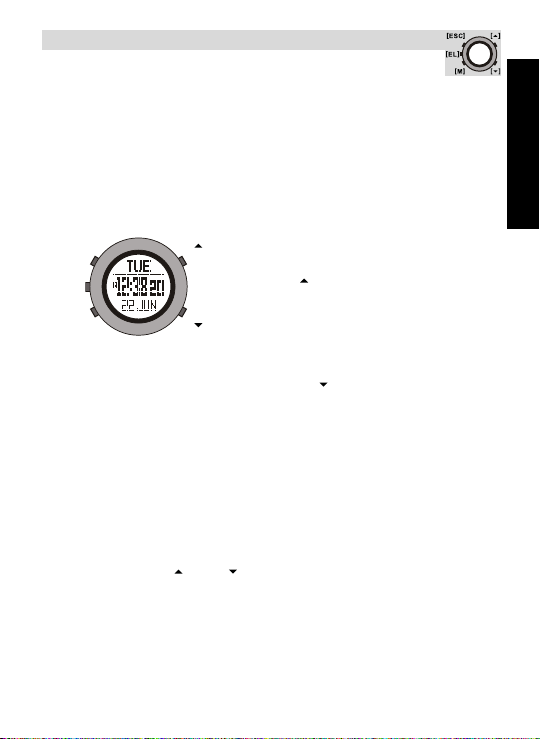
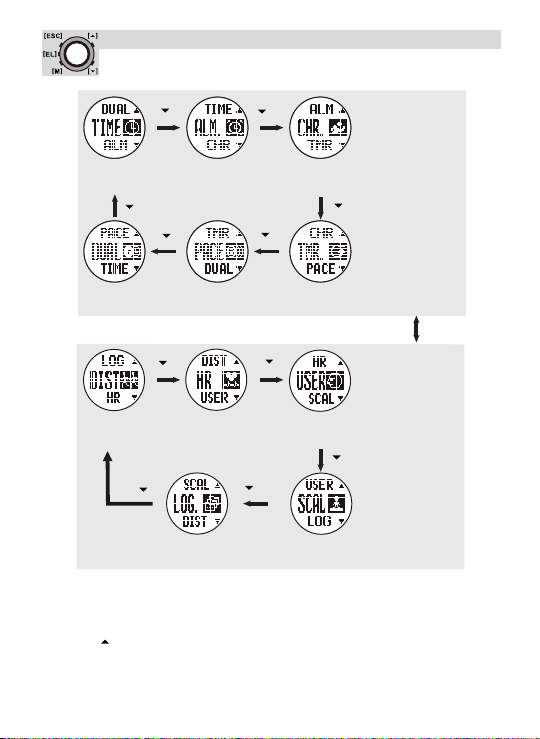
8 TIMEKEEPING - SENSOR MODE MAIN MENU
There are 2 menu’s you can enter by briefly pressing the [ESC] key:
timekeeping menu and sensor menu. To scroll between both menu’s press
the [ESC] key.
Once you are in the selected menu you can scroll with the up/down []/[]
keys between the other modes.
7
Page 8
TOPCOM HB 10M00
Current time
mode
front page
Daily alarm mode
front page
Chronograph
mode
front page
Timer mode
front page
Pacer mode
front page
Dual time mode
page
Timekeeping
function
mode
Sensor
function
mode
[ESC]
[]
[]
Distance mode
[]
front page
[]
[]
Heart rate mode
Logbook mode
front page
front page
[]
[]
[]
[]
[]
User mode
front page
[]
Scale mode
front page
Note:
• The corresponding operation mode will show after 3 seconds or press
[M] to show the operation mode immediately.
• Press [] to move the selection in the reverse direction.
8
Page 9
TOPCOM HB 10M00
ENGLISH
[]
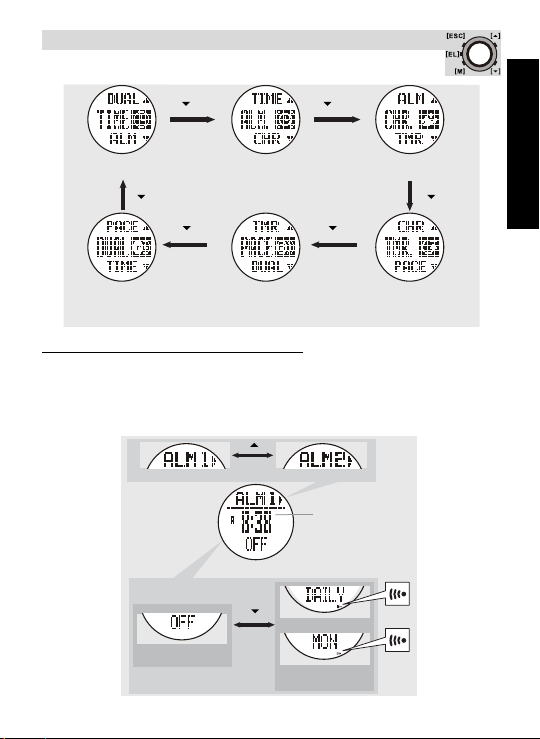
8.1 TIMEKEEPING MENU ITEMS
[]
Current time mode
front page
[]
Dual time mode
front page
Daily alarm mode
front page
[][]
Pacer mode
front page
Timekeeping function mode
Chronograph mode
front page
[]
Timer mode
front page
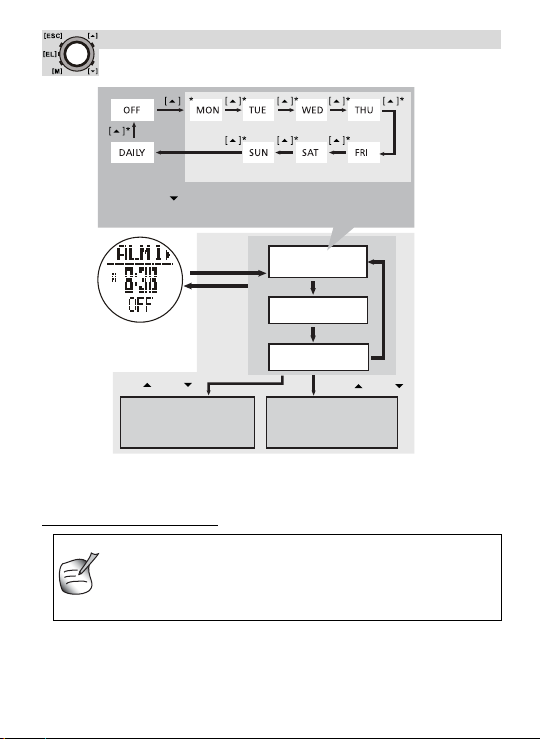
8.1.1 Daily or weekly alarm mode on/off
This watch includes 2 alarms for home time.
When the daily alarm is on, the watch will beep for 30s at the alarm time
every day. When the weekly alarm is on, the watch will beep for 30s at the
alarm time on the set day. When the alarm beeps, press any button to stop
the alarm.
[]
Alarm 1 Alarm 2
Daily alarm mode
[]
Alarm off
Alarm time
Daily alarm
Weekly alarm
Alarm on
9
Page 10
Daily alarm
mode
daily/weekly
alarm
hour
minute
Daily alarm
* Press the [] button to move the selection by reverse
order.
hold [M]
TOPCOM HB 10M00
Weekly alarm
[ESC]
[] or []
Change the setting
value
Note:
Set the alarm 2 with the above similar process.
8.1.2 Use the chronograph
• The chronograph counts up to 99 hours, 59 minutes and 59
seconds and has a memory of 50 laps.
• Chronograph logs, e.g. lap time, maximum/average/minimum
10
lap time, etc can be uploaded to PC for review.
See “11.3.1 Download /analyse from watch” for more details.
[M]
hold [ ] or [ ]
Change the setting
value faster (for some
settings)
[M]
Page 11
TOPCOM HB 10M00
ENGLISH
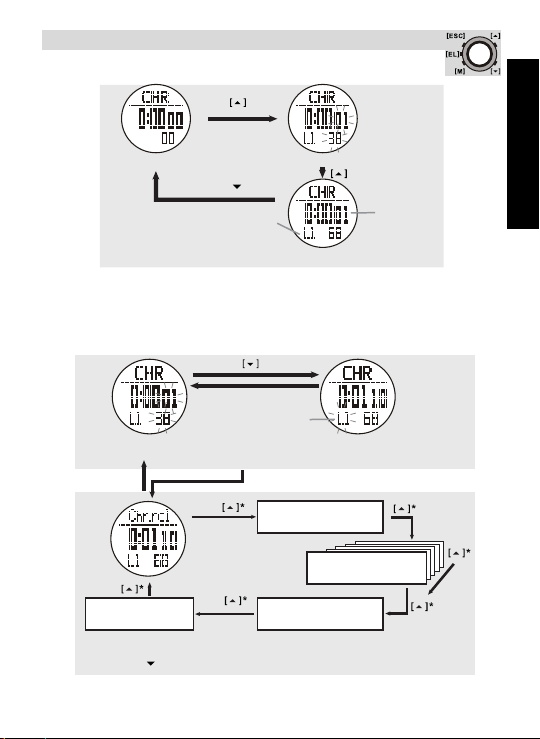
Counting Lap time display
Chronograph mode
The lap time
will freeze for
10 seconds
lap no.
10 seconds
The 2nd lap record
The next lap record
The last lap record
Total elapsed time
To start and stop the chronograph
Reset display
hold [ ]
lap no.
Chronograph mode
Counting
Stop counting
Note:
Reset the chronograph will clear the lap time memory too.
To take and recall lap times
[ESC]
* Press the [] button to move the selection by reverse order.
Lap times recall sequence
hold [M]
elapsed
time
11
Page 12
TOPCOM HB 10M00
Quick set value
User preset value
(e.g. 30 minutes)
Target time setting
current time
target time
Timer mode
45 min
3 min 5 min 10 min
15 min
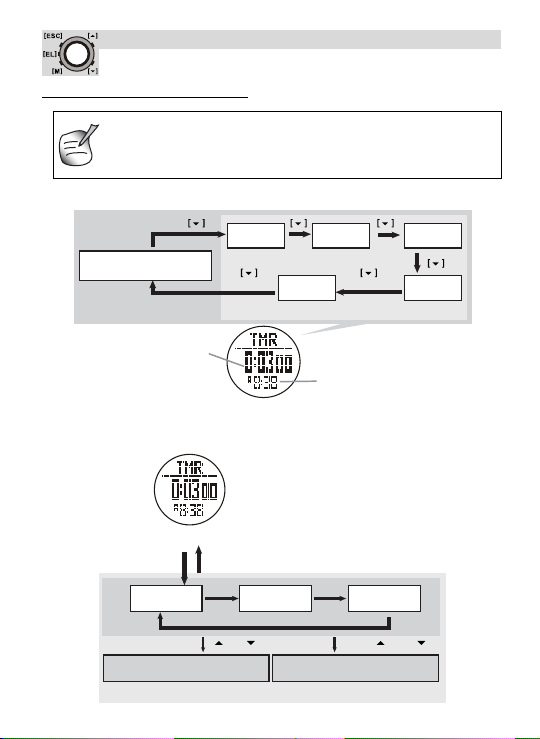
8.1.3 Use the count down timer
The maximum counting down time is 99 hours, 59 and minutes
59 seconds. You can set your own count down time (max.
99:59:59) or use one of the preset values (3, 5, 10, 15 or 45
minutes).
To set and use the preset values (3, 5, 10, 15 or 45 minutes)
To set your own count down time
Timer mode
[M]
hour minute second
Setting sequence
[M]
Change setting value faster
(for some settings)
hold [ ] or [ ][] / []
Change setting value
12
hold [M] [ESC]
Page 13
TOPCOM HB 10M00
ENGLISH
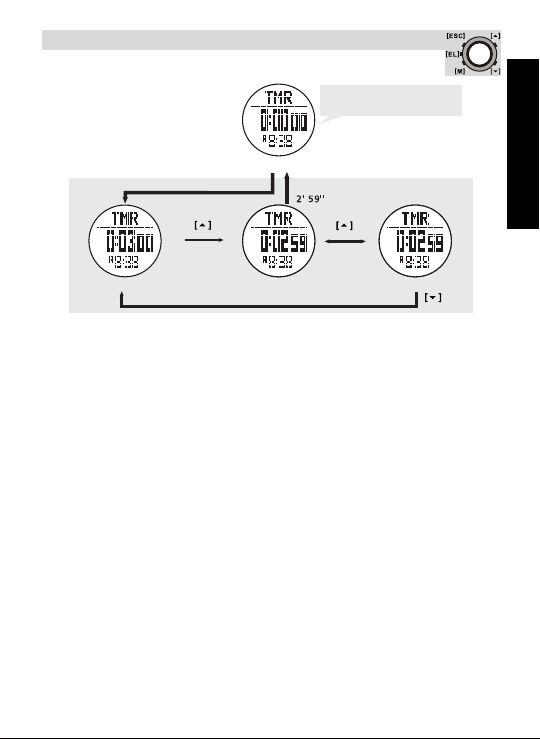
To start/stop the count down timer
Beep for
30 seconds
Beep finish
Target time display Counting Stop counting
Note:
During the counting, the timer will generate beeps to prompt the user about
the elapsed of time at various time:
• The last 10 minutes: it beeps once for every minute (i.e. 10’00’’,
9’00’’...1’00’’)
• The last 1 minute: it beeps once for every 10 seconds (i.e.
0’50’’,0’40’’,...0’10’’)
• The last 5 seconds: it beeps for every second (i.e. 5,4,3,2,1second(s)).
• When the target time is reached, a beep sound will beep for 30 seconds.
Pressing any button in this period will terminate the beep sound
‘Zero’ display
prematurely.
13
Page 14
TOPCOM HB 10M00
Change setting value
Change setting
value faster (for
some settings)
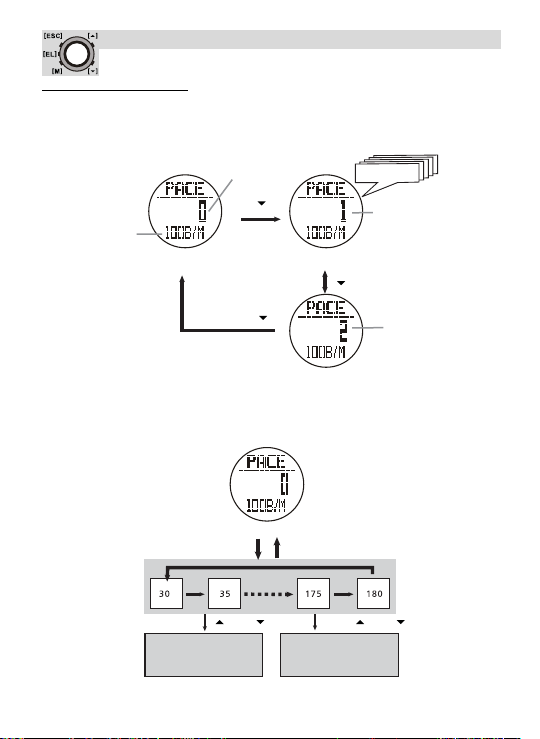
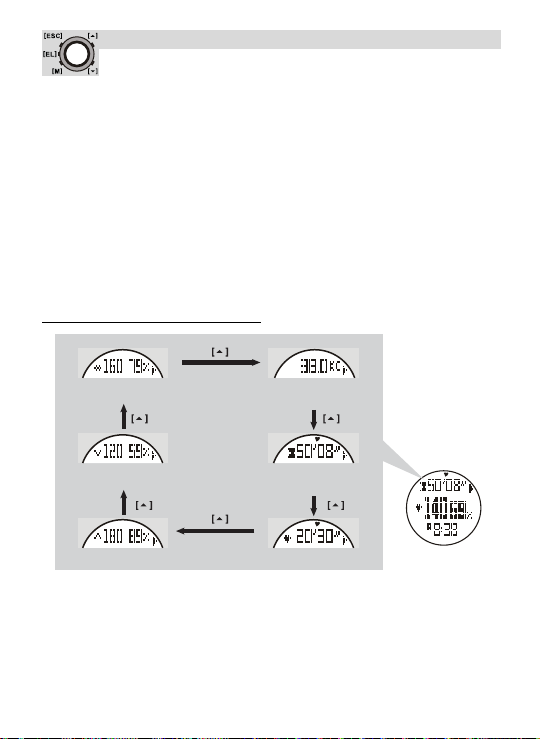
8.1.4 To use the pacer
A pacer is a kind of metronome that can be used to give a certain rhythm
when you exercise. It can be set in beeps per minute (B/M). You can also
see the counter of the beeps on the screen:
beep rate
Pacer mode
Stop beeping
step counter
[]
hold [ ]
Pacer mode
Beeping
Pacer mode
Stop beeping
beep
counting
[]
stop counting
To set the pacer
The pacer can be set in steps of 5 beeps per minute (30,35,...):
Pacer mode
hold [M] [ESC]
hold [ ] or [ ][] or []
14
Pacer setting sequence
Page 15
TOPCOM HB 10M00
ENGLISH
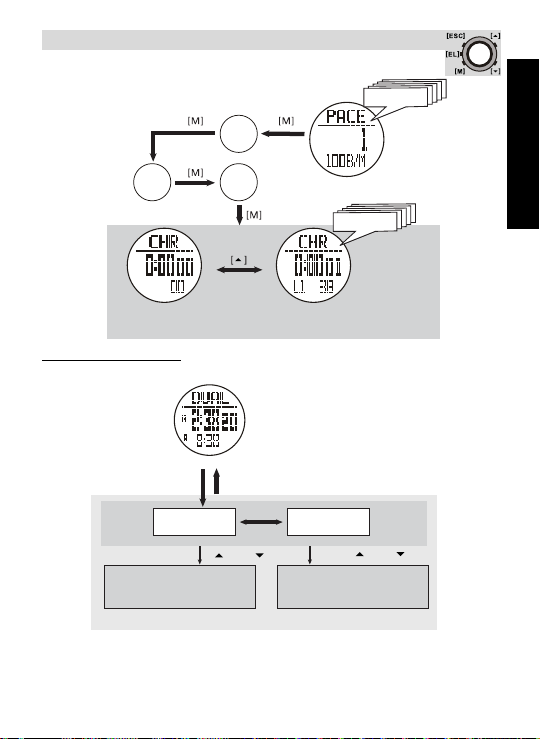
The pacer can also be used in chronograph mode:
Pacer mode activated
beep
beep
Stop counting
Chronograph mode
Counting
8.1.5 Dual time mode
When you need to keep track of the time elsewhere in the world.
Dual time mode
[ESC]hold [M]
hour minute
change setting value
Dual time setting sequence
Note:
The seconds cannot be set, it is synchronized with the current time mode.
[M]
[] or []
hold [ ] or [ ]
change setting value faster
(for some settings)
15
Page 16
TOPCOM HB 10M00
8.2 SENSOR MODE OVERVIEW
8.2.1 Heartbeat measurement
See “8 Timekeeping - Sensor mode main menu” how to enter the heart beat
measurement menu (HR).
PRECAUTIONS
• Avoid fastening the strap too tight.
• Do not bend or fold the chest belt for preventing damage.
• Wetting the skin, where there is contact with the conductive area of
the chest belt, will improve the conduction and get a more stable signal.
• The physical condition of an individual might effect the intensity of
measured signal.
• Avoid using the heart rate monitor close to a trolley car, a tram stop,
transformer, electric substation and high-tension distribution lines etc.
The radio signal will be affected under influence of the environment
from high voltage and strong electromagnetic fields.
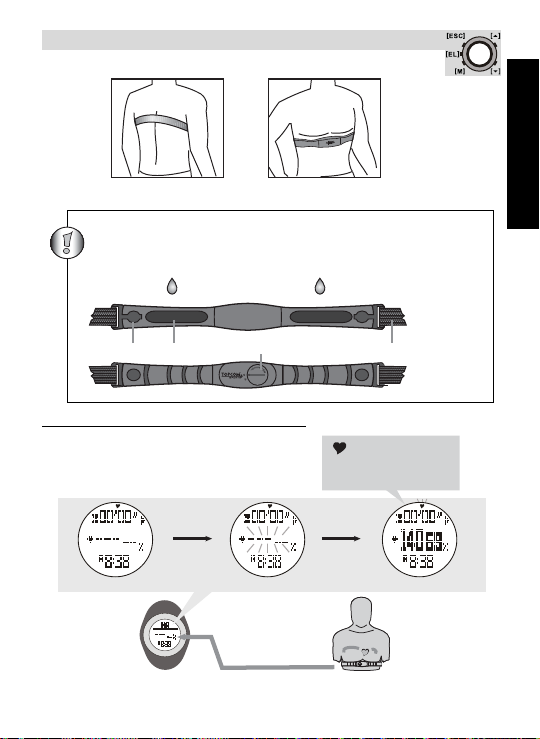
8.2.2 Using the transmitter belt.
The chest strap must be paired with the watch. See “7.1 To pair
the watch with the chest belt and GPS pod” for detailed pairing
operation!
Fasten the fastener at one end. Try the chest belt on your chest and loosen
the stretch band if necessary.
Adjust the length of the stretch band until it feels conformable. The stretch
band must cling to the chest. Fasten the fastener at the other end. Adjust
the sensor to the center of your chest and be sure the backside of the
sensor clings to your chest and touches the skin.
16
Page 17
TOPCOM HB 10M00
ENGLISH
Moisten the chest belt conductive pads with saliva of ECG-gel
(available at you local pharmacy) in order to ensure good contact
with the skin at all time.
sensor activated
Heart rate
measurement
activated
heart rate captured
watch
radio frequency
signal
heart beat signal
5
seconds
5 to 8
seconds
The chest belt has to be worn while using the heart rate function.
BACK
contactconnector elastic band
battery door
8.2.3 To get the heart rate measurement
FRONT
17
Page 18
TOPCOM HB 10M00
Average heart rate
Minimum heart rate
Maximum heart rate
Calorie expenditure
Total exercise time
In-zone time
Heart rate mode function display
Total exercise time
Note:
• When entering the heart rate mode, the heart rate function (sensor) will
be activated automatically after 5 seconds. Which can be activated
manually too, see “8.2.8 To start/stop the sensor, timer and logbook” for
the detailed operations.
• When the heart rate function (sensor) is activated, the watch will
aggregate the readings of the exercise into the current ‘session’.
• The data of the current session can be saved (into the ‘daily record’) /
reviewed by the heart rate mode function menu, see “8.2.10 Heart rate
mode function menu” under “Menu 1: Save” for the detailed operations.
• The daily record can be reviewed by the heart rate mode function menu
too. The watch can store up to 10 daily records.
• See “8.2.8 To start/stop the sensor, timer and logbook” to reset the
current session.
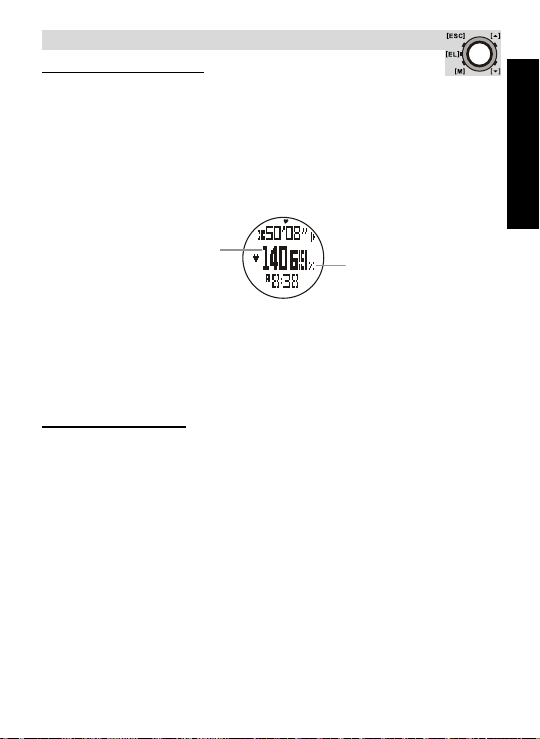
8.2.4 Heart rate function displays
Note:
• The exercise timer is counting independently. Switching off the sensor or
changing the screen to another mode will not affect the counting.
• The calorie expenditure is calculated by heart rate, changing the screen
to another mode will not affect the calculation unless the sensor is
switched off.
18
Page 19
TOPCOM HB 10M00
ENGLISH
beats per minute
(= 140 bpm)
percentage of Estimated
Maximum Heart Rate
(= 69%EMHR)
8.2.5 EMHR and %EMHR
Estimated Maximum Heart Rate (EMHR)
EMHR = 220 - age of the user
Percentage of Estimated Maximum Heart Rate (%EMHR)
%EMHR = acquired heart rate / EMHR x 100%
An example of %EMHR:
Estimated Maximum Heart Rate (EMHR)
EMHR = 220 - 30 (user’s age) = 190 bpm
Percentage of Estimated Maximum Heart Rate (%EMHR)
acquired heart rate = 131 (by measurement)
%EMHR = 131 / 190 x 100% = 69%
8.2.6 Heart rate zones
Exercise zones are established by setting the Upper and Lower Heart Rate
Limits. You can use the fitness (preset limits = 65% and 85% of the EMHR)
or your own customized limits.
Use the following Heart Rate Zone Chart to select the zone you wish to
exercise in.
You should consult a medical professional when selecting a training
19
Page 20
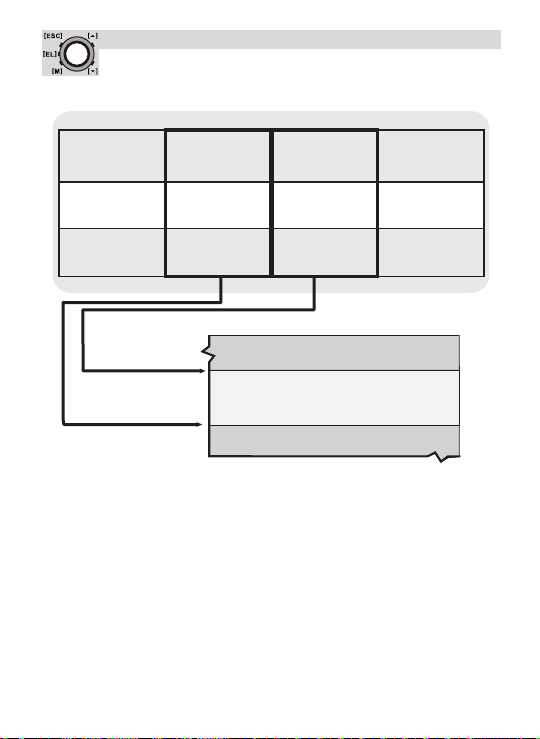
zone, especially if you have a heart condition.
Fitness
Zone Alert Setting
General
application
Lower limit
Upper limit
65%EMHR
85%EMHR
cannot be
changed by user
Custom
40-239 bpm
41-240 bpm
can be changed
by user
Remarks
bpm or %EMHR
Heart Rate Zone
upper limit
lower limit
The above zone
The in zone
(the target heart rate zone for one
particular application)
The below zone
TOPCOM HB 10M00
Note:
To set the zone upper or lower limits see “8.2.10 Heart rate mode function
menu” under “Menu 4: Zone”.
20
Page 21
TOPCOM HB 10M00
ENGLISH
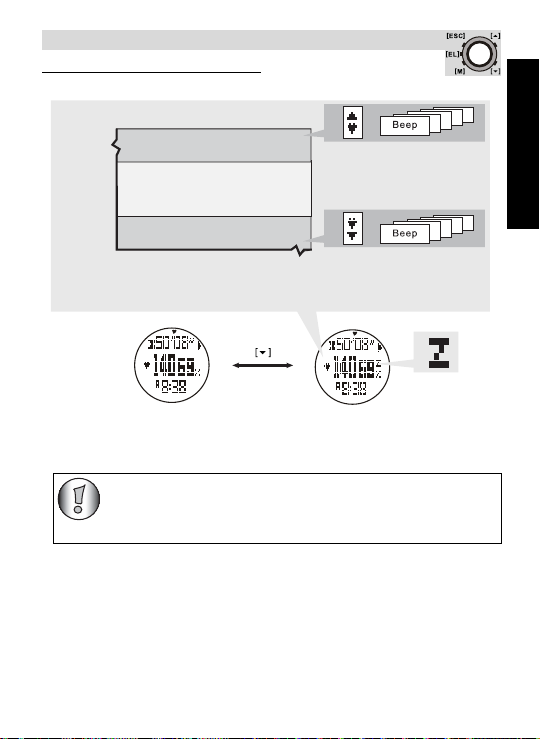
Heart rate zone
upper
limit
Zone alert onZone alert off
lower
limit
The above zone
The in zone
(the target heart rate zone for one
particular application)
The below zone
Beep sounds and an icon
displays if the acquired heart
rate is above the upper limit
Beep sounds and an icon
displays if the acquired heart
rate is below the lower limit
bpm or %EMHR
zone alert icon
8.2.7 To turn on/off the zone alert
• When the zone alert is on, it will also be activated in distance and user mode.
• When you are in distance and user mode, you have to go
to heart rate mode to turn the zone alert on/off.
21
Page 22
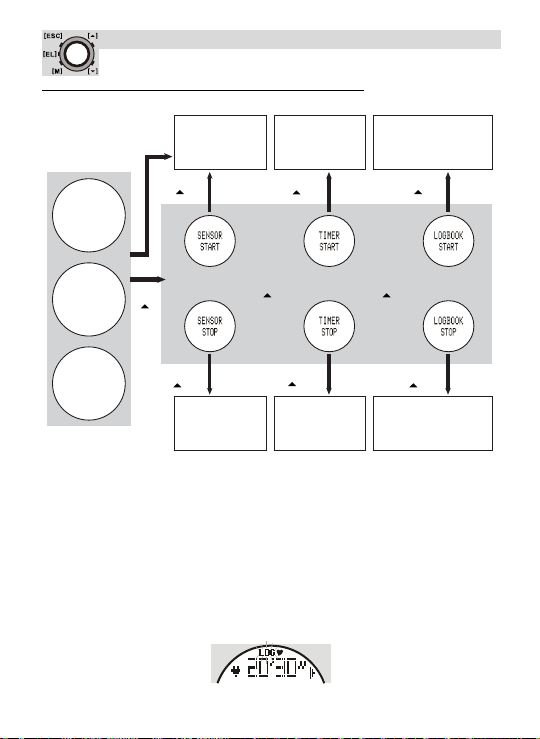
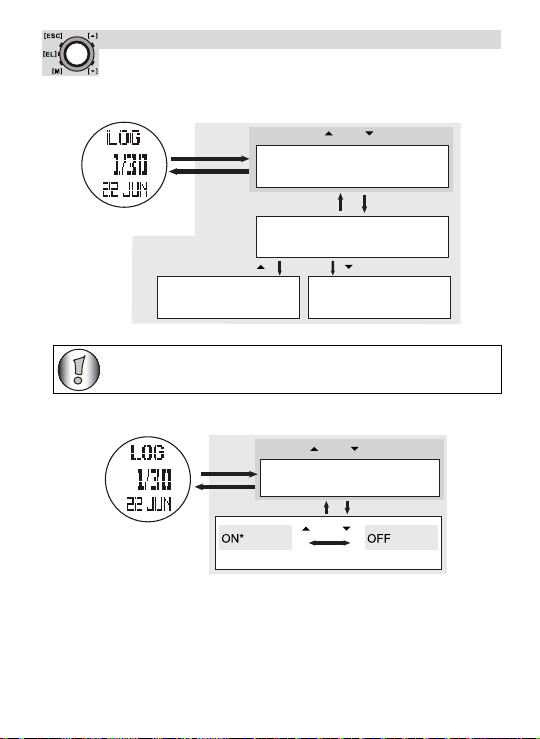
8.2.8 To start/stop the sensor, timer and logbook
Sensor function
activated
Timer starts to
count
Logbook starts to log
(sensor function
activated too)
Logbook stops to log
(sensor function
inactivated too)
Timer
inactivated
Sensor function
inactivated
release
[]
or or or
release
[]
5 seconds
release
Heart rate
mode
[]
TOPCOM HB 10M00
release
[]
keep
User
mode
hold
[]
mode
Distance
• When enter the heart rate, user or distance mode, the sensor function
will be activated automatically after 5 seconds.
• The watch includes a count-up timer for timing the accumulative exercise
time. If the timer is started, it will count-up continuously until it is
stopped.
• When the sensor function is activated, the logbook will be started too if
the ‘AUTO’ feature is set ‘ON’. (See “8.2.11 Logbook functions menu”
under “Menu 5: Auto” for details.)
• While the ‘LOG’ function is started, a ‘LOG’ indicator starts flashing on
holding
[]
release
[]
keep
holding
[]
release
[]
the screen.
22
Page 23
TOPCOM HB 10M00
ENGLISH
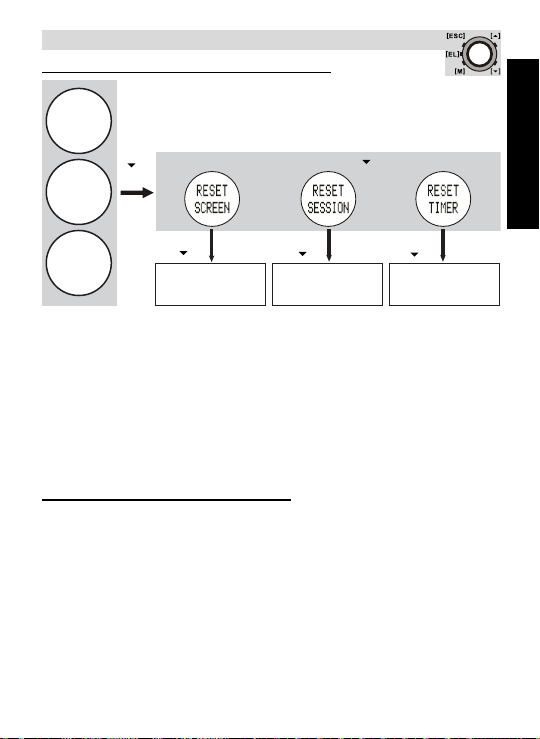
Reset the timer
keep holding [ ]
User
mode
Distance
mode
Heart rate
mode
Reset the current
session
Reset the current
screen
8.2.9 To reset the screen, session and timer
hold
[]
release
[]
Note:
• When enter the heart rate, user or distance mode, the sensor function
will be activated automatically after 5 seconds.
• The watch includes a count-up timer for timing the accumulative exercise
time under heart rate, user and distance mode. If the timer is started, it
will count-up continuously until it is stopped.
• When the sensor function is activated, the logbook will start
automatically if the ‘AUTO’ feature is selected at logbook function menu.
• While the log function is started, a ‘LOG’ indicator starts flashing on the
release
[]
release
[]
screen.
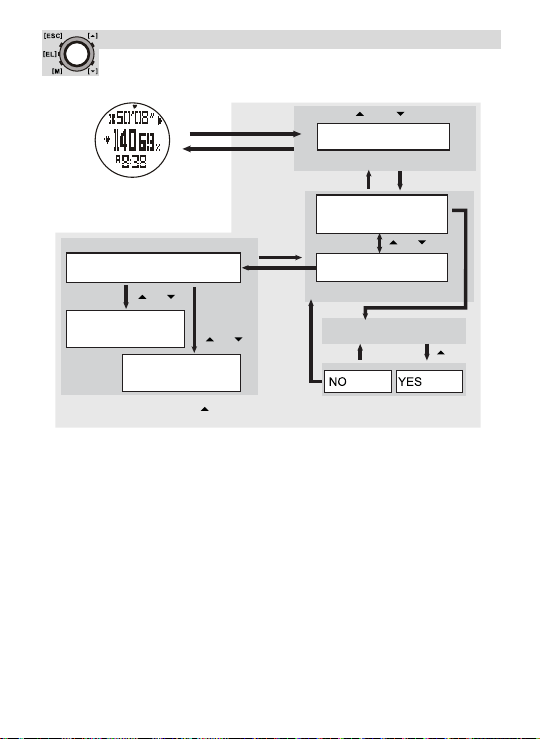
8.2.10 Heart rate mode function menu
During heart rate measurement you can enter the heart rate mode function
menu to:
• Menu 1: ‘Save’ To save the current session into today’s record.
• Menu 2: ‘Session’ To review the statical data of the current session.
• Menu 3: ‘Daily records’ To review the daily records for the last 10 days.
• Menu 4: ‘Zone’ To set upper and lower limits for the Zone Alert.
To enter the hear rate mode function menu press and hold [M]:
23
Page 24
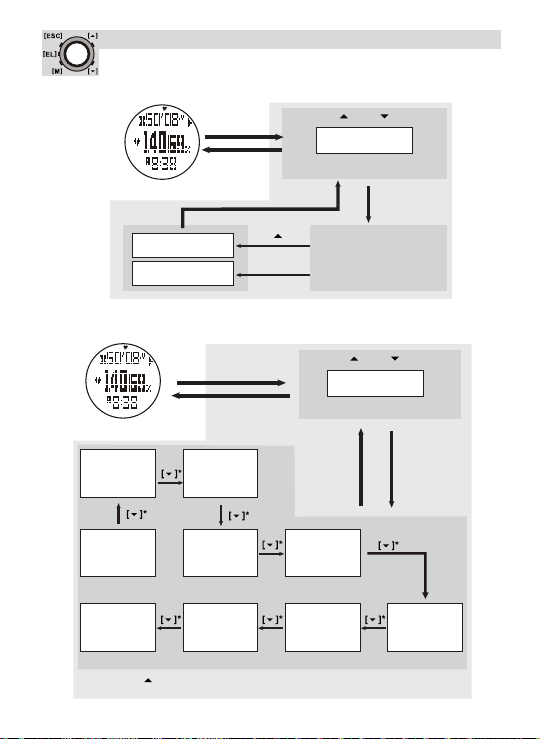
Menu 1: Save
Heart rate mode
hold [M]
[ESC]
TOPCOM HB 10M00
[] or []
‘Save’
Function menu 1
YES
NO
[]
[ESC]
Save today’s data?
Menu 2: Session
hold [M]
[ESC]
Heart rate mode
duration
start time moving time
calorie
expenditure
* Press the [] button to move selection in the reverse direction.
24
in-zone
exercise
time
average/
max./min.
heart rate
average/min.
pace
Function menu
Function menu 2
[ESC]
average/max.
speed
[] or []
‘Session’
[M]
distance /
step
Page 25
TOPCOM HB 10M00
ENGLISH
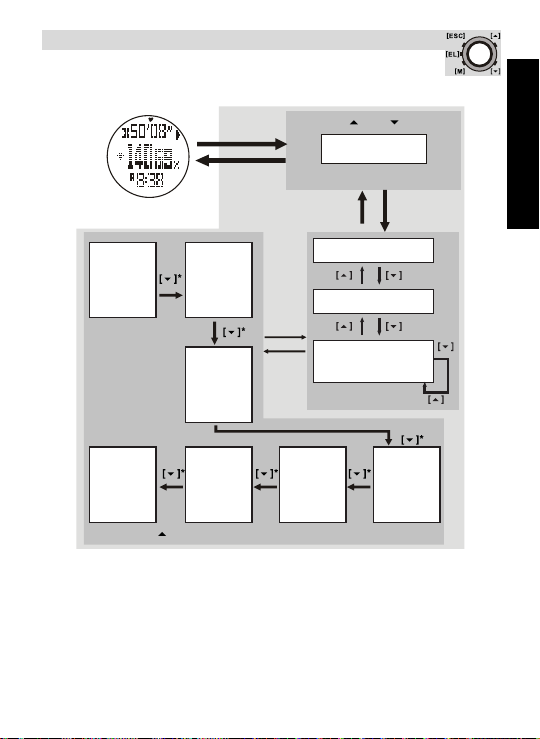
Menu 3: Daily Rd
hold [M]
[] or []
‘Daily Rd’
[M]
average/
maximum
speed
Function menu 3
Day 1
Day 2
day
[M]
distance/
step
[ESC]
the next available
Function menu
[ESC]
Heart rate mode
in-zone
exercise
time
calorie
expendi-
ture
* Press the [] button to move selection in the reverse direction.
average/
max./min.
heart rate
moving
time
average/
minimum
pace
[ESC]
25
Page 26
Menu 4: Zone
Function menu 4
hold [M]
* Press [M] and then the [] button to confirm the setting.
[ESC]
[M]
[M]
Heart rate mode
Function menu
Change setting
value
(setting value)
[] /[]
Change setting
value faster
hold
[ ] /[ ]
[ESC]
TOPCOM HB 10M00
[] or []
‘Zone’
[ESC]
Fitness*
(65 - 85%EMHR)
custom
Function menu
Fitness zone
[ESC] [ ]
[M]
[ ] /[ ]
26
Page 27
TOPCOM HB 10M00
ENGLISH
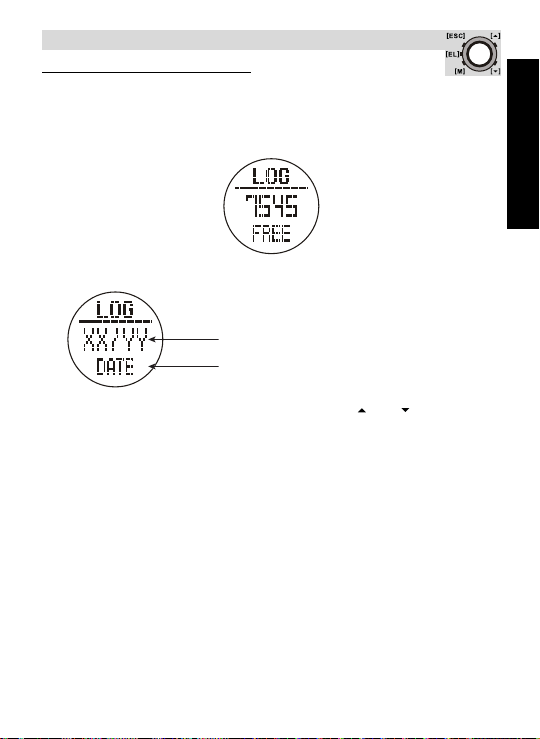
Session XX from YY in total
Date of session XX
8.2.11 Logbook functions menu
To enter the log menu (LOG) the watch has to be in sensor mode. See “8.1
Timekeeping menu items” how to enter this mode.
If no session is stored in the logbook, the amount of free memory will be
displayed.
If YY sessions are stored in the logbook, the display will show:
To scroll through the session list (1-YY) press the [] or [] button.
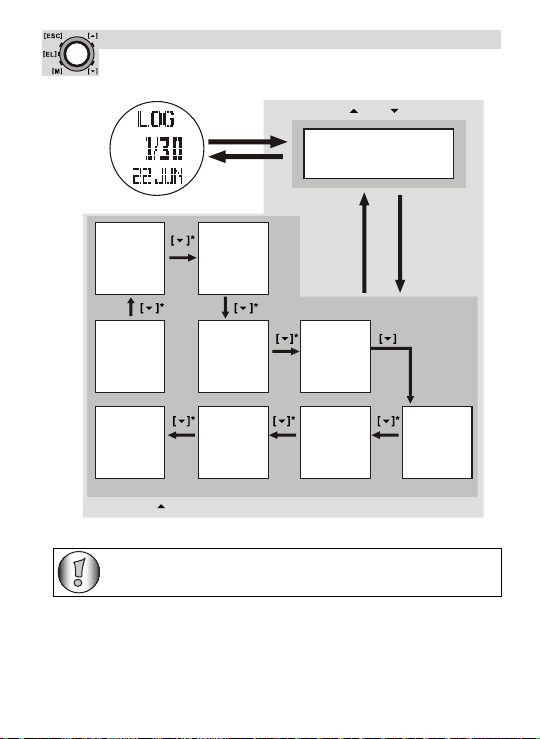
Press and hold the [M] key to enter the LOG menu:
• Menu 1: ‘View’ To recall the details of the logged session.
• Menu 2: ‘start/Stop’ To start or stop the data logging function.
• Menu 3: ‘PC link’ To pair the watch with the ‘Wireless Data Manager’
program and to upload data from the watch to PC. See “11.2 Pairing the
watch, chest and GPS pod with the dongle” and “11.3 Download/analyse
and save data from watch, chest strap and GPS pod”.
• Menu 4: ‘Log rate’ To set the sampling rate for the data logging.
• Menu 5: ‘Auto’ To set the auto-start log function.
• Menu 6: ‘Erase’ To erase the logged session.
• Menu 7: ‘Mem.’ To view the free memory capacity.
27
Page 28
Menu 1: View
Logbook mode
[ESC]
[] or []
TOPCOM HB 10M00
hold [M]
[ESC]
duration
start time
calorie
expenditure
* Press the [] button to move selection in the reverse direction.
in-zone
exercise
time
average/
max./min.
heart rate
average/
minimum
pace
Function menu
view session
moving time
average/
maximum
speed
If a log is started, the session cannot be viewed.
‘View’
[M]
distance/
step
28
Page 29
TOPCOM HB 10M00
ENGLISH
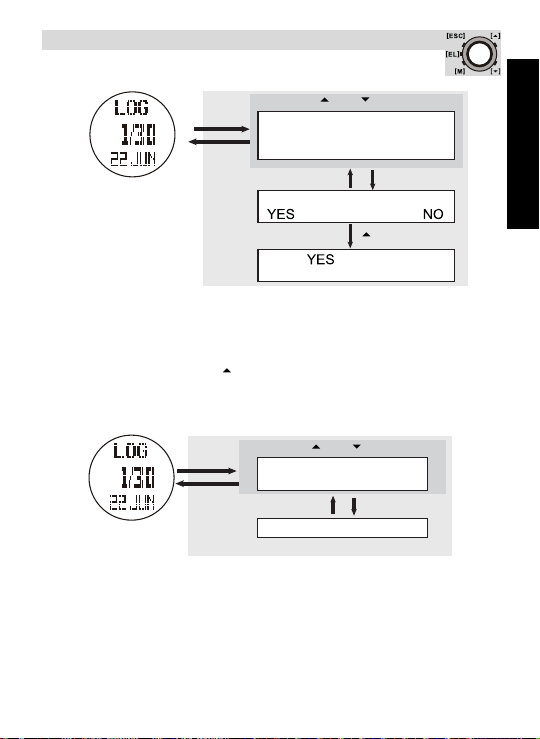
Menu 2: start/stop (start/stop the logbook)
hold [M]
[ESC]
Logbook mode
• During the log function is started, a ‘LOG’ indicator start to flash on the
screen, the watch will create a new log session and log the readings into
a record at the predefined log rate. See “Menu 4: Log rate” below.
• This Log function can be started or stopped at heart rate, distance and
user mode by holding the [ ], see
and logbook”
.
[] or []
‘start’ / ‘stop’
Start or stop the logging
[ESC]
Function menu
Start or stop the log
[M]
yes or no
[]
“8.2.8 To start/stop the sensor, timer
Menu 3: PC link
hold [M]
[ESC]
Logbook mode
See also “11.3.1 Download /analyse from watch”.
[] or []
‘PC link’
Upload record
[ESC]
Sending
Function menu
[M]
29
Page 30
Menu 4: Log rate
‘Auto’
TOPCOM HB 10M00
Logbook mode
If a log is started, the log rate cannot be changed.
Menu 5: Auto
Logbook mode
hold [M]
[ESC]
Change the rate by
forward scrolling
[] or []
‘Log rate’
Set log rate
[ESC]
Function menu
(sampling rate)
Change the rate by
backward scrolling
[] or []
Auto start a log
[ESC]
[] or []
Function menu
[M]
[][]
[M]
30
Page 31

TOPCOM HB 10M00
ENGLISH
[ESC]
[] or []
Menu 6: Erase (Erase one/all session(s))
hold [M]
[ESC]
Logbook mode
[ESC]
Menu 7: Mem. (View free memory)
hold [M]
[ESC]
Logbook mode
[ESC]
[] or []
[ESC] [M]
Session XX (e.g. 1) erased
View free memory
(free memory reading)
[] or []
‘Erase’
Erase session
[M]
Function menu
Function menu
yes or no
[]
Function menu
‘Mem.’
[M]
Function menu
31
Page 32

TOPCOM HB 10M00
5
seconds
sensor activated reading captured
Flashing:
Pedometer
sensor is
activated.
Steady:
Satellites
are fixed.
Rolling:
Searching
satellite.
GPS
signal
radio
frequency
signal
watch
8.2.12 Distance mode menu
This mode works with the GPS pod and the built-in pedometer. See also
“10 GPS pod” for the GPS pod and make sure the stride is set correctly, see
“7 To set the general items”.
In distance mode you can see:
Current speed:
The measurement of the
walking/running speed.
Average speed:
The measurement of the
average walking/running
speed.
Distance:
The calculation of total
walking/running distance.
Calorie expenditure:
The calculation of calorie
expenditure.
Distance mode function
Current pace:
The measurement of time
which needs to accomplish
one kilometer/mile by the
current speed.
Maximum speed:
The measurement of the
maximum walking/running
speed.
Movement time:
The measurement of time that
the user is in motion.
Step:
The calculation of total
walking/running steps.
To get the measurement:
32
Page 33

TOPCOM HB 10M00
ENGLISH
Steps
pace exercise time
maximum speed
calorie expenditure
average speed
current speed
moving time
Current speed
Distance mode function display
•
When entering the distance mode, the distance function (sensor)
will be activated automatically after 5 seconds. Which can be activated
manually too, see “8.2.8 To start/stop the sensor, timer and logbook” for
detailed operations.
• When the distance function (sensor) is activated, the watch will
aggregate the readings of the exercise into the current session.
• The date of the current session can be saved (into the daily record) or
reviewed by the distance mode function menu.
• The daily record can be reviewed by the distance mode function menu
too. The watch can store up to 10 daily records.
• See “8.2.9 To reset the screen, session and timer” to reset the current
session.
Display function display:
When you are not using the GPS pod or when the satellite
reception is bad, the watch will use the build-in pedometer to
measure the distance and speed.
33
Page 34

TOPCOM HB 10M00
Save Today’s Data ?
‘Save’
Note:
• The exercise timer is counting independently. Switching off the sensor or
changing the screen to other mode will not affect the counting. i.e. the
same set of exercise time can be checked from either the heart rate
mode, distance mode or user mode.
• The calorie expenditure is calculated by heart rate and pedometer,
changing the screen to anther mode will not affect the calculation unless
the sensor is switched off. i.e. The same set of calorie expenditure can
be checked from either the heart rate mode, distance mode or user
mode.
Distance mode function menu:
During distance measurement you can enter the distance mode function
menu (Press and hold the [M] key) to:
• Function menu 1: ‘Save’ To save the current session into today’s record.
• Function menu 2: ‘Session’ To review the statical data of the current
session.
• Function menu 3: ‘Daily Rd’ To review the daily records for the last 10
days.
• Function menu 4: ‘Sleep’ To set the auto-sleep time for the pedometer.
• Function menu 5: ‘Sense’ To set the sensitivity of the Pedometer.
• Function menu 6: ‘Trk. Del’ To delete all tracks from the GPS pod.
Function menu 1: Save
hold [M]
[ESC]
Logbook mode
(yes)
(no)
Note:
If the last session has NOT been saved, the watch will auto save that
session into the today’s record at midnight.
34
[] or []
Function menu 1
[ESC]
[M]
Page 35

TOPCOM HB 10M00
ENGLISH
Function menu 2: Session
hold [M]
[] or []
‘Session’
[ESC]
Distance mode
duration
start time
calorie
expenditure
* Press the [] button to move selection in the reverse direction.
in-zone
exercise
time
average/
max./min.
heart rate
average/
minimum
pace
Function menu
Function menu 2
[ESC]
moving time
average/
maximum
speed
[M]
distance/
step
35
Page 36

Function menu 3: Daily Rd
Distance mode
Function menu
Change setting value faster
Function menu
(setting value)
hold [M]
[ESC]
[] or []
TOPCOM HB 10M00
Distance mode
in-zone exercise time
(of the selected day)
Function menu 4: Sleep
Change setting value
36
hold [M]
[ESC]
[] / []
hold
[ ] / [ ]
[] or []
‘Daily Rd’
Function menu 3
[ESC]
the next available day
Function menu
[M]
‘Sleep’
Function menu 4
[ESC]
[M]
Page 37

TOPCOM HB 10M00
ENGLISH
‘Sense’
Function menu 5: Sense
hold [M]
[] or []
[ESC]
Distance mode
Change setting value
Change setting value faster
[ ] / [ ]
hold
[ ] / [ ]
Function menu 5
[ESC]
Function menu
(setting value)
Function menu
Function menu 6: Trk. Del (track delete)
hold [M]
[ESC]
Distance mode
[] or []
‘Trk. Del’
Function menu 6
[ESC]
no or yes
All tracks erased
Any key
Track log erased
Function menu
Note:
To erase all tracks from the GPS pod, the pod must be turned on!
[M]
[M]
[]
37
Page 38

TOPCOM HB 10M00
current speed average speed maximum speed
step distance odometer
moving time pace
average heart rate
minimum heart
rate
maximum heart
rate
current heart rate
in-zone exercise
time
altitude heading course
real time
calorie
expenditure
exercise time
User mode function list
8.2.13 User mode menu
This mode works with the GPS or the built-in pedometer and chest strap.
See also “10 GPS pod” for the GPS pod.
In user mode you can see the following 18 functions on the top, middle or
bottom row of the display. Each function can be set according to user’s
option:
38
Page 39

TOPCOM HB 10M00
ENGLISH
5
seconds
sensor activated
reading captured
GPS
signal
radio
frequency
signal
watch
radio
frequency
signal
heart
beat
signal
Note:
• When enter user mode, the user function (sensor) will be activated
automatically after 5 seconds. Which can be activated manually too, see
“8.2.8 To start/stop the sensor, timer and logbook”.
• When the user function (sensor) is activated, the watch will aggregate
the readings of the exercise into the current session.
• The data of the current session can be saved (into the ‘daily record’) or
reviewed by the user mode function menu.
• The ‘daily record’ can be reviewed by the user mode function menu too.
The watch can store up to 10 daily records.
• See “8.2.9 To reset the screen, session and timer” to reset the current
session.
See chapter “10.3 Wearing the GPS pod” for lacing the GPS pod
on your shoe and the precautions of using GPS pod before the
measurement. See “Function menu 4: View” below for the
details about function selection.
39
Page 40

How to change the displayed functions:
change the middle row
change the display function (select
one from the 18 functions)
TOPCOM HB 10M00
User mode
Note:
• See “Function menu 4: View” for more detail about changing the display
change the bottom row
function for the top row.
During user mode you can enter the user mode function menu to (Press and
hold the [M] key):
• Function menu 1: ‘Save’ To save the current session into today’s record.
• Function menu 2: ‘Session’ To review the statical data of the current
session.
• Function menu 3: ‘Daily Rd’ To review the daily records for the last 10
days.
• Function menu 4: ‘View’ To set one of the 17 display functions on the
upper, middle or lower row of the display.
• Function menu 5: ‘Pos.FM’ To set the position format i.e. longitude and
latitude display format.
40
Page 41

TOPCOM HB 10M00
ENGLISH
Function menu 1: Save
hold [M]
[] or []
‘Save’
[ESC]
User mode
(yes)
(no)
Function menu 1
[ESC]
[M]
Save Today’s Data ?
Note:
• If the last session has NOT been saved, the watch will auto save that
session into the today’s record at midnight.
41
Page 42

Function menu 2: Session
* Press the [] button to move selection in the reverse direction.
duration
Function menu
in-zone
exercise time
start time
calorie
expenditure
average/
minimum pace
average/
maximum
speed
distance/step
average/max./
min. heart rate
moving time
Function menu 2
[M]
hold [M]
[ESC]
User mode
TOPCOM HB 10M00
[] or []
‘Session’
[ESC]
42
Page 43

TOPCOM HB 10M00
ENGLISH
User mode
[ESC]
[] or []
Function menu 3: Daily Rd
hold [M]
[ESC]
‘Daily Rd’
Function menu 3
[M]
in-zone exercise time
(of the selected day)
[ESC]
[M]
the next available day
Function mode
43
Page 44

Function menu 4: View
17 user mode function list
(top and bottom row)
18 user mode function list
(middle row)
Function menu 4
[M]
hold [M]
[ESC]
bottom row
Function mode
top row
middle row
[M]
[M]
[M]
[]
or
[]
TOPCOM HB 10M00
[] or []
‘View’
User mode
44
[ESC]
Page 45

TOPCOM HB 10M00
ENGLISH
confirm the setting
Function menu 4
[M]
hold [M]
[ESC]
HD.M.S’
Function mode
HD.D
HD.M.M’
[ESC]
[ESC]
* Press the [] button to move selection in the reverse direction.
Function menu 5: Pos. FM (position format)
User mode
Note:
• HD.D: degrees
• HD.M’: degrees and minutes
• HD.M.S’: degrees, minutes and seconds
[] or []
‘Pos. FM’
9 BATTERY LOW INDICATION
See “4 Changing the battery”.
45
Page 46

10 GPS POD
10.1 ACCESSORIES OF THE GPS POD
GPS pod charger
USB charger cable
arm band
TOPCOM HB 10M00
GPS pod
GPS pod bracket
46
Page 47

TOPCOM HB 10M00
ENGLISH
1. Insert the smaller end of the USB cable
into the charger. Insert the opposite end
of the USB cable into the PC.
2. Lower the button end to the charger
first and then the LED end. A click will be
heard.
3. The LED will turn on continuously
when the GPS pod is charging. It turns
off when the GPS pod is fully charged.
4. Insert your fingers into the gap at
the hollow marks on the charger.
5. Pull the GPS pod from the charger.
10.2 CHARGING THE GPS
10.2.1 By PC
5
Note:
• The PC must be turned on during the charging.
• The GPS pod can be functioned normally during charging.
47
Page 48

TOPCOM HB 10M00
1. Push the battery door
outward in compliance
with the arrows marked
on the door.
2. Insert 4 ‘AAA’ or UM-4,
battery (alkaline battery
recommended, not included)
into the charger in compliance
with the polarity marked on the
case.
3. Put the battery door
back. Push the battery
door backward until a
‘click’ is heard.
1. Thread the GPS pod
bracket through the lace
with the handle upward.
2. Ensure the bracket is flat
and smoothly bedded
down on the shoe’s
tongue.
3. Lodge the GPS pod in
the bracket with the button
upward (to maximize the
exposure of the GPS
antenna to the sky). A click
will be heard.
Velcro
Velcro
10.2.2 By batteries
Note:
• Remove the batteries from the charger when the charger will not be used
for a long time.
• If both batteries and USB are supplies, USB will be selected
automatically as the power source.
10.3 WEARING THE GPS POD
On running shoe:
48
Page 49

TOPCOM HB 10M00
ENGLISH
1. Place the GPS pod
bracket on a flat table with
the handle upward.
2. Place the arm band over
the bracket with the Velcro
upward.
3. Lodge the GPS pod on
the bracket with the LED
end upward. A click will be
heard.
4. Simply thread the tip of the arm band
(Velcro upward) through the gap between
the pod and the bracket.
5. Further thread the band and
make sure that the band is
smooth and flat.
Velcro
Velcro
6. Thread the tip of the
arm band through the
connector. Flip the tip
back and form a loose
loop by Velcro temporary.
7. Wear the arm band on the
forearm with the LED upward
(to maximize the exposure of the
GPS antenna to the sky).
8. Fit the loop with your
arm until the GPS pod
is securely fit on the
forearm.
• Do not cover the GPS pod with clothing which will shelter the
satellite signal.
• Lace up your shoes firmly, otherwise the GPS pod can fall
from the shoe during an intensive exercise.
On arm band:
67
4
5
8
5
49
Page 50

TOPCOM HB 10M00
The arm strap is adjusted
too tightly
The arm strap is adjusted
too loose
The arm strap is adjusted
rightly
blood circulation
is blocked
unsteady
fit
• Fasten the GPS pod to the forearm with the LED facing
outside upward and see the sky most of the time.
• Do not cover the GPS pod with clothing which will shelter the
satellite signal.
• Do not adjust the arm band too tight, it will block the blood
circulation.
• Wear the GPS pod on the same arm as the watch.
50
OK not OK
Page 51

TOPCOM HB 10M00
ENGLISH
10.4 TO USE THE GPS POD
10.4.1 Turning it on/off
Off
Flashing at a slow pace
Flashing at a fast pace
Flashing at the faster pace
Flashing at the fastest pace
LED indication during operation
The GPS pod is off or the GPS pod is running
at calm mode.
The GPS pod found enough satellites. Data is
available
The GPS pod is searching satellite signal.
The GPS pos is uploading data to PC via the
PC pod.
Battery low. Charge the GPS pod
immediately.
Hold down the button to
turn on the GPS pod.
Press the button once. To turn on or off the calm mode.
To turn on or off the GPS pod.
Note: Turn on the GPS pod consuming
battery, turn it off when not in use.
When the GPS pod is on, the LED indication
can be turned on or off by pressing the button
once.
Button operations
51
Page 52

TOPCOM HB 10M00
No signal
Inside a building or
under shelter
No signal
On a street with tall
buildings on both
side
Good signal
In an open area
(with a clear view of
the sky)
Fair signal Good signal
Good signal
Fair signal
On a street with tall
buildings on one
side
The GPS pod will be turned off automatically if no satellites are
found for 15 minutes (e.g. inside a building or under shelter).
10.4.2 GPS accuracy
The amount of satellites seen by the GPS determine the accuracy.
52
Page 53

TOPCOM HB 10M00
ENGLISH
10.4.3 Automatic track logging function
1.Start the GPS pod at the trail head.
2.The GPS pod logs the track automatically during the travel.
3.Stop the GPS pod at the end of trail.
4.The GPS pod stores the track into a
session.
Note:
This track can be uploaded to PC via
Automatic track logging
the PC pod (see below).
10.4.4 To send real time GPS data to PC
offline track
log data
PC pod
Download track log to PC
1. Insert the PC pod into the USB port of the PC.
2. Run the ‘Wireless Data Manager’ (see “11 Wireless data manager”)
program and click the ‘Download from GPS pod’ button from the GPS
pod page.
3. Start the GPS pod to upload the track (LED flashing at the fastest
pace) to PC.
4. The stored track sessions will be shown on the monitor.
5. Save the track or analyse the track with a mapping program.
PC
Note:
This feature functions with the PC pod, read “11.3.4 Analyse/Save RealTime Data from GPS pod” in advance before the operation.
53
Page 54

TOPCOM HB 10M00
11 WIRELESS DATA MANAGER
With the wireless data manager program you can download the daily record
and session data from the watch to the PC. Or from the chest belt and GPS
pod directly to the PC. With the data stored on the PC, you can transfer it to
programs like SportTracks, Perfect Session, ...for further analysing.
11.1 INSTALLING THE SOFTWARE
1. Insert the bundled CD into the CD drive of
the target PC. The menu will show automatically. If not, open the CD folder and
dubble click ‘CD_start.exe’.
PC
2. Click the ‘Install Software’ button from
the side menu.
PC
3. Follow the instructions to install the program into the target PC.
PC
54
Page 55

TOPCOM HB 10M00
ENGLISH
PC
USB dongle
PC
USB dongle
4. Reboot your PC after installation and plug-in the USB dongle into a free USB port.
5. After rebooting, Windows will
install the proper USB device for the USB dongle.
11.2
PAIRING THE WATCH, CHEST AND GPS POD WITH
THE DONGLE
Note:
• The watch MUST be switched to ‘PC-Link’ display of the logbook mode,
and activate the PC-link function. (See “8.2.11 Logbook functions menu”
under “Menu 3: PC link”.)
• The chest strap MUST be worn on the chest or press the two contacts.
• The GPS pod must be turned on.
1. When the installation is completed. Execute the ‘Wireless Data Manager’ program from the Windows program menu bar.
2. The wizard will guide you to pair the watch, chest strap and GPS pod
with the program.
3. When the pairing is done the ID of the watch, chest strap and GPS will
be saved into the program.
For some instance, the watch and the chest strap can be paired
with the program again under the ‘Option’ top menu and the
‘Setting’ option.
55
Page 56

TOPCOM HB 10M00
USB
dongle
PC
watch
GPS pod
11.3 DOWNLOAD/ANALYSE AND SAVE DATA FROM
WATCH, CHEST STRAP AND GPS POD
The watch and chest belt must be within 4 meter from the
dongle, otherwise the PC dongle may not receive data from the
device.
11.3.1 Download /analyse from watch
Watch
HR Strap
GPS Pod
Note:
The watch MUST be switched to ‘PC-Link’ display of the logbook mode,
and activate the PC-link function. (See “8.2.11 Logbook functions menu”).
1. Click the ‘Watch’ icon from the side menu to pop the watch page.
2. Select the ‘Chronograph’, ‘Logbook’ or ‘Daily Stat’ page from the
top menu.
3. Click ‘Download’ button to download the data from the watch through
the corresponding page. The respective data will be shown on the
screen after a while.
4. Analyze the data on the PC by the options provided by the program.
Save the data into PC for further analysis.
56
Page 57

TOPCOM HB 10M00
ENGLISH
USB dongle
PC
chest strap
11.3.2 Real-time data from the chest strap
Watch
HR Strap
GPS Pod
Note:
• This is functioned with the chest strap.
• The heart rate chest strap MUST be worn on the chest (i.e. heart rate
signal is sampling).
1. Click the ‘HR Strap’ icon from the side menu to pop the ‘Chest Strap’
page.
2. The real-time heart rate readings will be shown on that page.
3. Analyze the data on the PC by the options provided by the program.
4. Save the data into PC for further analysis.
57
Page 58

11.3.3 Download/Analyse/Save data from GPS pod
PC
PC pod
PC pod
Notebook
computer
PC pod
PC pod
GPS signal
Watch
HR Strap
GPS Pod
11.3.4 Analyse/Save Real-Time Data from GPS pod
TOPCOM HB 10M00
58
Watch
HR Strap
GPS Pod
Page 59

TOPCOM HB 10M00
ENGLISH
12 SPECIFICATIONS
12.1 WATCH
Time
- Normal Time with month, day, day of week, hour, minute and second
display
- 12/24 hour format selectable
- Calendar range: 2000 to 2099
- Hourly Chime
Alarm
- Two independent alarms with daily and weekly selection.
- 30 seconds alarm duration
Chronograph
- Up to 99H59M59.99S, 1/100s resolution
- 50 laps with recall function
Count Down Timer
- Count down timer up to 99H59M59S, 1 second resolution
- Five pre-defined value (3/5/10/15/45 min)
- One user-defined value from 00:00:00 to 99:59:59
Pacer
- Range: 30 to 180 bpm (beep per minute)
- 5 bpm per step
- Maximum count up to 999999
2.4 GHz Wireless Communication
- Wireless communication using 2.4 GHz ISM band
- Carrier: 2.45 GHz
- Modulation: FSK
- Comply with EN300440, EN301489 and FCC Part 15
- Communication Distance: > 4 meters in open area, direct line of sight
2.4 GHz Heart Rate Measurement
- Measuring Range: 40 to 240 BPM
- Heart rate alert
- Heart Rate In-zone timer 00:00:00 to 23:59:59
- 1 Exercise Timer
- 2 Heart rate zone limit selection
- Calorie Expenditure range: 0-99999 kcal
59
Page 60

TOPCOM HB 10M00
Daily Records and Logbook
- 10 statistical daily records
- Logbook up to 100 sessions, +/- 7000 records
Others
- Full matrix (~ 32 x 46 dot) LCD
- LCD level adjustable: 16 contrast level adjustments
- Electro-Luminescent (EL) back light
System requirement PC
- Pentium II 300MHz or higher
- 128MB free memory
- 20MB hard disk space or more
- Window XP/Vista operation system
- CD-ROM drive
- USB port
12.2 GPS POD
2.4 GHz Wireless Communication
- Wireless communication using 2.4 GHz ISM band
- Carrier: 2.45 GHz
- Modulation: FSK
- Comply with EN300440, EN301489 and FCC Part 15
- Communication Distance: > 4 meters in open area, direct line of sight
GPS receiver
- Internal GPS data update rate: 1 sec
- Real-time data transmission rate: 2 sec
- Track log up to 20000 track points
- Configurable track log period: 1 - 3600 sec.
- GPS pod charging time: 1h
- SiRFstarIII chipset (-15dBm tracking sensitivity, 20 channels)
- Cold start: 40 sec. typical, warm start: 30 sec. typical, hot start 2 sec.
typical.
60
Page 61

TOPCOM HB 10M00
ENGLISH
13 TOPCOM WARRANTY
13.1 WARRANTY PERIOD
The Topcom units have a 24-month warranty period. The warranty period
starts on the day the new unit is purchased. There is no warranty on
standard or rechargeable batteries (AA/AAA type).
Consumables or defects causing a negligible effect on operation or value of
the equipment are not covered. The warranty has to be proven by
presentation of the original or copy of the purchase receipt, on which the
date of purchase and the unit-model are indicated.
13.2 WARRANTY HANDLING
A faulty unit needs to be returned to a Topcom service centre including a
valid purchase note and a filled in service return card.
If the unit develops a fault during the warranty period, Topcom or its officially
appointed service center will repair any defects caused by material or
manufacturing faults free of charge, by either repairing or exchanging the
faulty units or parts of the faulty units. In case of replacement, colour and
model can be different from the original purchased unit.
The initial purchase date shall determine the start of the warranty period.
The warranty period is not extended if the unit is exchanged or repaired by
Topcom or its appointed service centre.
13.3 WARRANTY EXCLUSIONS
Damage or defects caused by incorrect treatment or operation and damage
resulting from use of non-original parts or accessories are not covered by
the warranty. The warranty does not cover damage caused by outside
factors, such as lightning, water and fire, nor any damage caused during
transportation. No warranty can be claimed if the serial number on the units
has been changed, removed or rendered illegible. Any warranty claims will
be invalid if the unit has been repaired, altered or modified by the buyer.
61
Page 62

TOPCOM HB 10M00
1 INLEIDING
Gefeliciteerd met uw aankoop van de HB 10M00. Dit systeem is ontworpen
voor fitness en andere sportactiviteiten. We hopen dat deze hartslagmeter/
GPS pod en de voordelen van de draadloze functie voor het verzenden/
ontvangen van gegevens naar/van de controller of een computer u goede
diensten zullen bewijzen. Als u sport beoefent of traint, pompt uw hart het
bloed automatisch sneller door uw lichaam in overeenstemming met het
hogere energieniveau. De hartslagmeter kan deze verhoging, uitgedrukt in
aantal hartslagen per minuut (hpm), berekenen om zo voor elk individu een
streefhartslag te bepalen.
Meer informatie over de doelzone van de hartslag, maximale
hartslag enz. kunt u vinden op:
www.topcom.net/sports/heartbeat.asp
Dankzij de GPS-functie kan dit systeem worden gebruikt voor
outdooractiviteiten zoals wandelen, fietsen, enz. Anderzijds zijn functies
voor indooractiviteiten, zoals de stopwatch, timer, hartslagmeter in
combinatie met de pedometer, ook beschikbaar met dit systeem.
Via de gegevens op uw computer kunt u alles overzetten naar programma's
als Google Earth, SportTracks, Perfect Session, ... om het te analyseren of
later opnieuw te bekijken.
2 VEILIGHEIDSVOORSCHRIFTEN
Deze hartslagmeter is GEEN vervanging voor professionele medische
hulp. Als u lijdt aan een hartkwaal, als u ziek bent of nog maar pas
begonnen bent met fitness, raden wij u aan om een arts te raadplegen of te
overleggen met uw begeleider en te vragen of hij een fitnessprogramma
voor u wil uitwerken.
Het horloge mag alleen gebruikt worden als hulpmiddel om een veilige
hartslag te behouden tijdens het trainen. Het mag NIET gebruikt worden als
een medische hartslagmeter. Als u onzeker bent over de invloed die uw
oefenprogramma heeft op uw hart, dient u uw huisarts te raadplegen.
3 VERZORGING EN ONDERHOUD
Stel het horloge NIET bloot aan extreme weersomstandigheden,
reinigingsmiddelen en oplosmiddelen. Laat het horloge niet vallen en
behandel het met zachtheid. Bevestig de band niet te strak. Reinig het
horloge met een droge zachte doek of met een zachte doek die lichtjes
bevochtigd werd met water en een mild reinigingsmiddel. Bewaar het
horloge op een droge plaats wanneer u het niet gebruikt.
62
Page 63

TOPCOM HB 10M00
NEDERLANDS
4 BATTERIJ VERVANGEN
Als u niet vertrouwd bent met elektronica kunt u de batterij beter laten
vervangen door een vakman. Maak het horloge niet zelf open.
4.1 HORLOGE & BORSTRIEM
IN HET HORLOGE EN DE BORSTRIEM ZIT AL EEN
BATTERIJ, u hoeft dus geen batterij te plaatsen als u dit horloge
pas gekocht hebt. Zie voor het inschakelen van het horloge "5
Stroombesparingsmodus".
1.Draai het batterijdeksel met
een muntstuk tegen de
wijzers van de klok in tot de
pijl naar de pijl wijst.
2.Draai het deksel voorzichtig
verder totdat het loskomt.
3.Leg het batterijdeksel aan
de kant.
4.Verwijder de lege batterij.
5.Plaats een nieuwe CR2032-
batterij. De (+)-pool van de
batterij moet het ‘L’-vormige
metalen contactpunt raken.
6.Zorg ervoor dat de rubberen O-ring correct in de sleuf past voordat u het
batterijdeksel weer bevestigt.
7.Plaats het batterijdeksel zo terug dat de pijl op het deksel naar de pijl
wijst en druk vervolgens het deksel zachtjes naar beneden totdat het
gelijk met het oppervlak komt.
8.Draai het deksel met een muntstuk met de wijzers van de klok mee tot
de pijl naar de stip wijst.
4.2 GPS POD
De GPS pod is voorzien van een ingebouwde batterij die niet kan worden
verwijderd/vervangen, tenzij u hem voor herstelling binnenbrengt. Volg de
herstellingsinstructies als de batterij van uw GPS pod niet meer werkt.
63
Page 64

TOPCOM HB 10M00
[ESC]
[M]
[]
[]
[EL]
5 STROOMBESPARINGSMODUS
Dit horloge wordt verkocht met een stroombesparingsfunctie zodat de
batterij langer meegaat. Druk op een willekeurige toets om het horloge
(display) aan te zetten.
Druk op de toets LAP/RESET [ ] gedurende 5 seconden in de tijdmodus
om de stroombesparingsmodus in te schakelen.
6 TOETSEN
Mode Button (Modustoets) [M] (MODE/
SET)
• De huidige functie of menu selecteren.
• Ingedrukt houden om de instelmodus te
selecteren. In instelmodus: De
verschillende opties voor de instellingen
selecteren.
Escape Button [ESC] (LIGHT/ESC)
• De horloge- of sensorfunctie selecteren.
• De instelmodus afsluiten.
• Terug naar het vorige scherm of het vorige
functieniveau.
Up Button [ ] (ST./STP.)
• Omhoog in het menu bladeren.
• De functie 'start' of 'stop' in de stopwatch-,
timer- of pacermodus activeren.
• De instelwaarde tijdens het instellen
verhogen.
Down Button [ ] (LAP/RESET)
• Omlaag in het menu bladeren.
64
• De rondetijdfunctie in de stopwatchmodus
activeren en resetfunctie bij stopwatch(ingedrukt houden), timer- en pacermodus
(ingedrukt houden).
• De instelwaarde tijdens het instellen
verlagen.
Light button [EL]
• De achtergrondverlichting enkele
seconden inschakelen.
Page 65

TOPCOM HB 10M00
NEDERLANDS
6.1 MASTER RESET
Houd [M],[]en [][ tegelijkertijd ingedrukt om het horloge te resetten.
Alle ingestelde waarden gaan verloren, ook de tijdsmelding!
6.2 BACK LIGHT (ACHTERGRONDVERLICHTING)
Druk de toets [EL] in om de achtergrondverlichting van de display
3 seconden te laten branden.
7 DE ALGEMENE OPTIES INSTELLEN
[M] ingedrukt
houden
[ESC]
[]*
Huidige tijdmodus
[] of
De instelwaarde
wijzigen
De instelwaarde sneller
wijzigen (voor sommige
instellingen)
* Druk op [] om de keuze in de andere richting te bewegen.
- Time (tijd): de Second (seconden), Minute (minuten), Hour (uren) en
het Hour Format (tijdnotatie) instellen.
- Date (datum): Year (jaar), Month (maand) en Day (dag) instellen.
- System (systeem): LCD (LCD) contrast, Sound (geluid) toetstoon en
geluidssignaal, Light (licht) normaal en nacht, Pair (verbinden)
verbind de borstband en GPS pod met het horloge, zie "7.1 Het
horloge met de borstband en GPS pod verbinden".
[]
[] of []
ingedrukt houden
Instellingsmenu
[ESC]
Display instellen
[]*
[]*
[]*
[M]
[]*
65
Page 66

TOPCOM HB 10M00
- User (gebruiker): Gender (geslacht), Birthday (verjaardag), Height
(lengte), Weight (gewicht) en Stride (paslengte) wandelen en lopen
instellen.
- Unit (eenheid): snelheid (km/h, mi/h en knoop) en andere
(metrische en Engelse) eenheden instellen.
• Als Light (licht) is ingesteld op nachtmodus, wordt de
achtergrondverlichting ingeschakeld als er op een
willekeurige toets wordt gedrukt.
• De Stride (paslengte) kan gemakkelijk worden gemeten door
100 m (= 10.000 cm) te wandelen of te lopen en de stappen
te tellen. Deel 10.000 door het aantal stappen en u hebt de
paslengte in cm.
7.1 HET HORLOGE MET DE BORSTBAND EN GPS POD
VERBINDEN
De borstband en GPS pod zijn meestal met de horloge verbonden bij
aankoop. Als de batterij wordt vervangen of na een reset, moet de
borstband/GPS pod opnieuw worden verbonden.
[M] ingedrukt
houden
[]
Huidige tijdmodus
Verbinding voltooid
66
[M]
borstband
[M]
[]
GPS pod
Page 67

TOPCOM HB 10M00
NEDERLANDS
Tijdens het verbinden:
• De borstband voor de hartslagregistratie moet op de borst worden
gedragen of druk op de twee contactpunten (dus een voorbeeld van een
hartslagsignaal).
• De GPS pod moet worden ingeschakeld (zie "10.4.1 In-/uitschakelen").
Opmerking:
• Het product werd vóór de verzending verbonden.
• In sommige gevallen kunnen de borstband en GPS pod opnieuw met het
horloge worden verbonden door de bovenstaande stappen te volgen.
8 HOOFDMENU HORLOGEFUNCTIE -
SENSORFUNCTIE
Er zijn 2 menu’s die u kunt openen door kort op de toets [ESC] te drukken:
het menu voor de horlogefunctie en het menu voor de sensorfunctie. Druk
op de toets [ESC] om door beide menu's te bladeren.
Als u in het geselecteerde menu bent, kunt u met de toetsen omhoog/
omlaag []/[] tussen de andere modi bladeren.
67
Page 68

TOPCOM HB 10M00
Huidige
tijdmodus
voorpagina
Dagelijks
alarmmodus
voorpagina
Stopwatchmodus
voorpagina
Timermodus
voorpagina
Pacermodus
voorpagina
Dubbele
tijdmeting
pagina
stopwatch-
functiemodus
sensorfunctie-
modus
[ESC]
[]
Afstandsmodus
voorpagina
[]
[]
[]
[]
Hartslagmodus
voorpagina
Logboekmodus
voorpagina
[]
[]
[]
Gebruiksmodus
voorpagina
[]
Weegschaalmodus
voorpagina
[]
[]
Opmerking:
• De bijbehorende modus wordt na 3 seconden getoond of druk op [M] om
de modus meteen weer te geven.
• Druk op [] om de keuze in de andere richting te bewegen.
68
Page 69

TOPCOM HB 10M00
NEDERLANDS
8.1 MENUOPTIES VOOR DE STOPWATCH
[][]
Huidige tijdmodus
voorpagina
[]
Dubbele tijdmeting
voorpagina
8.1.1 Dagelijkse of wekelijkse alarmmodus aan/uit
Dit horloge beschikt over 2 alarmen voor de lokale tijd.
Als het dagelijks alarm aan staat, piept het horloge elke dag 30 seconden
op de alarmtijd. Als het wekelijks alarm aan staat, piept het horloge elke dag
30 seconden lang op de alarmtijd op de ingestelde tijd. Als het alarm piept,
drukt u op een willekeurige toets om het alarm te stoppen.
Dagelijks alarmmodus
voorpagina
Pacermodus
voorpagina
Stopwatchfunctiemodus
[]
Alarm 1 Alarm 2
Alarmtijd
Dagelijks alarmmodus
[]
Dagelijks alarm
Alarm uit
Wekelijks alarm
Aalarm aan
Stopwatchmodus
[][]
voorpagina
[]
Timermodus
voorpagina
69
Page 70

Dagelijks
alarmmodus
dagelijks/
wekelijks alarm
uur
minuten
Dagelijks alarm
* Druk op de toets [] om de selectie in de omgekeerde
volgorde te bewegen.
[M] ingedrukt
houden)
[ESC]
TOPCOM HB 10M00
Wekelijks alarm
[M]
[M]
[] or []
De instelwaarde
wijzigen
Opmerking:
Stel alarm 2 op dezelfde manier in.
hold [ ] or [ ]
De instelwaarde sneller
wijzigen (voor
sommige instellingen)
8.1.2 De stopwatch gebruiken
70
• De stopwatch telt op tot 99 uur, 59 minuten en 59 seconden
en heeft een geheugen van 50 rondes.
• Logboeken van de stopwatch, bijvoorbeeld rondetijd en
maximale/minimale rondetijd, kunnen naar de computer
worden geüpload en worden bekeken.
Zie "11.3.1 Downloaden /analyseren vanaf het horloge" voor
meer informatie.
Page 71

TOPCOM HB 10M00
NEDERLANDS
[M] ingedrukt houden
[ESC]
Rondetijdoproepvolgorde
* Druk op de toets [] om de selectie in de omgekeerde volgorde te bewegen.
Tellen Weergave rondetijd
Stopwatchmodus
De rondetijd
blijft 10
seconden
staan
rondenr.
10 seconden
De recordtijd van de
2e ronde
De recordtijd van de
volgende ronde
De recordtijd van de
laatste ronde
Totale verstreken
tijd
De stopwatch starten en stoppen
Display resetten
hold [ ]
rondenr.
Stopwatchmodus
Opmerking:
Door de stopwatch te resetten, wist u ook alle opgeslagen rondetijden.
Tellen
Stoppen met tellen
verstreken
tijd
Rondetijden opnemen en oproepen
71
Page 72

TOPCOM HB 10M00
Timermodus)
Instelvolgorde
Instelwaarde wijzigen
De instelwaarde sneller wijzigen
(voor sommige instellingen)
uur minuten seconden
[M] ingedrukt
houden
[ESC]
[M]
[M]
[] of []
ingedrukt houden
8.1.3 De timer voor aftellen gebruiken
De maximale afteltijd is 99 uur, 59 minuten en 59 seconden. U
kunt uw eigen afteltijd (max. 99:59:59) instellen of een van de
geprogrammeerde waarden gebruiken (3, 5, 10, 15 of 45
minuten).
De geprogrammeerde waarden instellen en gebruiken (3, 5, 10, 15 of
45 minuten)
3 min 5 min 10 min
Door de gebruiker
ingestelde waarde
Instelling doeltijd
streeftijd
Timermodus
45 min
Snelle instelwaarde
huidige tijd
15 min
Uw eigen afteltijd instellen
72
[] / []
Page 73

TOPCOM HB 10M00
NEDERLANDS
De timer voor aftellen starten/stoppen
Pieptoon gedurende
30 seconden
Einde pieptoon
Weergave doeltijd Tellen Stoppen met tellen
Opmerking:
Tijdens het tellen produceert de timer pieptonen om de gebruiker op
verschillende tijdstippen aan de verstreken tijd te herinneren:
• De laatste 10 minuten: hij piept elke minuut een keer (i.e. 10’00”,
9’00”...1’00”)
• De laatste minuut: hij piept elke 10 seconden (i.e. 0’50”,0’40”,...0’10”)
• De laatste 5 seconden: hij piept elke seconden (i.e. 5, 4, 3, 2, 1
seconde(n)).
• Wanneer de doeltijd is bereikt, weerklinkt gedurende 30 seconden een
pieptoon. Wanneer u in tussentijd op een willekeurige toets drukt, stopt
de pieptoon meteen.
Nulscherm
73
Page 74

TOPCOM HB 10M00
pieptoon
Pacermodus)
Stoppen met piepen
Pacermodus
Piepen
Pacermodus
Stoppen met piepen
stappenteller
piepsnelheid
tellen
stoppen met tellen
[ ] ingedrukt
houden
Pacermodus
Instelvolgorde pacer
[M] ingedrukt houden [ESC]
[ ] of [ ] ingedrukt houden
8.1.4 De pacer gebruiken
Een pacer is een soort metronoom die een bepaald ritme kan geven tijdens
uw oefeningen. Deze kan in piepen per minuut (P/M) worden ingesteld. U
kunt de teller voor de piepen ook op het scherm zien:
[]
[]
De pacer instellen
De pacer kan worden ingesteld in stappen van 5 piepen per minuut
(30, 35, ...):
Instelwaarde
wijzigen
74
[] of []
De instelwaarde
sneller wijzigen (voor
sommige instellingen)
Page 75

TOPCOM HB 10M00
NEDERLANDS
Volgorde voor instellen van dubbele tijd
uur minuten
Dubbele tijdmeting
[ESC][M] ingedrukt houden
instelwaarde wijzigen
de instelwaarde sneller
wijzigen (voor sommige
instellingen)
[M]
[ ] of [ ] ingedrukt houden
[] of []
De pacer kan ook in de stopwatchmodus worden gebruikt:
pieptoon
Pacermodus geactiveerd
pieptoon
Stoppen met tellen
Stopwatchmodus
Tellen
8.1.5 Dubbele tijdmeting
Als u de tijd elders in de wereld bij wilt houden.
Opmerking:
De seconden kunnen niet worden ingesteld, ze vallen samen met de
huidige tijdmodus.
75
Page 76

TOPCOM HB 10M00
8.2 OVERZICHT SENSORFUNCTIE
8.2.1 Hartslagmeting
Zie "8 Hoofdmenu horlogefunctie - sensorfunctie" voor het openen van het
menu voor de hartslagmeting (HR).
VOORZORGSMAATREGELEN
• Bevestig de band niet te strak.
• Buig of vouw de borstriem niet om schade te voorkomen.
• De huid natmaken op de plaats waar de huid in contact staat met het
geleidende gedeelde van de borstriem verbetert de geleiding en zorgt
voor een stabieler signaal.
• De fysieke conditie van een persoon kan de intensiteit van het
gemeten signaal beïnvloeden.
• Gebruik de hartslagmeter niet te dicht in de buurt van een tram, een
tramhalte, elektrische onderstations en hoogspanningsleidingen enz.
Het radiosignaal wordt ook beïnvloed door hoogspanning en sterke
elektromagnetische velden in de omgeving.
8.2.2 De zendriem gebruiken
De borstband moet door het horloge gedetecteerd worden. Zie
"7.1 Het horloge met de borstband en GPS pod verbinden" voor
gedetailleerde informatie hierover!
Maak de gesp aan één kant vast. Probeer of de borstriem rond uw borst
past en maak de elastische band iets losser indien nodig.
Pas de lengte van de elastische band aan tot hij comfortabel zit. De
elastische band moet vast tegen de borst gedrukt zitten. Maak de gesp aan
de andere kant vast. Schuif de sensor naar het midden van uw borst en
zorg ervoor dat de achterkant van de sensor stevig tegen uw borst gedrukt
zit en uw huid raakt.
76
Page 77

TOPCOM HB 10M00
NEDERLANDS
Bevochtig de geleidende kussentjes van de borstriem met
speeksel of ECG-gel (verkrijgbaar bij de plaatselijke apotheek)
om ervoor te zorgen dat de kussentjes op elk moment goed
contact maken met de huid.
batterijdeksel
VOORKANT
ACHTERKANT
contactstekker elastiek
sensor geactiveerd
Hartslagmeting
geactiveerd
hartslag vastgelegd
horloge
radiofrequentie-
signaal
hartslagsignaal
5
seconden
5 tot 8
seconden
De borstriem moet gedragen worden wanneer u de hartslagfunctie
gebruikt.
8.2.3 Voor de hartslagmeting
77
Page 78

TOPCOM HB 10M00
Gemiddelde hartslag
Minimale hartslag
Maximale hartslag
Calorieverbruik
Totale trainingstijd
In-zonetijd
Display van de hartslagfunctie
Totale trainingstijd
Opmerking:
• In de hartslagmodus wordt de hartslagfunctie (sensor) automatisch na 5
seconden geactiveerd. Deze kan ook handmatig worden geactiveerd,
zie "8.2.8 De sensor, timer en logboek starten/stoppen" voor uitleg.
• Als de hartslagfunctie (sensor) is geactiveerd, verzamelt het horloge de
waarden van de oefeningen in de huidige 'sessie'.
• De gegevens van de huidige sessie kunnen worden opgeslagen (in het
'dagrecord') / bekeken via het menu voor de hartslagmodusfunctie, zie
"8.2.10 Menu voor de hartslagfunctie" onder "Menu 1: Save" voor meer
informatie.
• Het 'dagrecord' kan ook via het menu voor de hartslagmodusfunctie
worden bekeken. Het horloge kan maximaal 10 dagrecords opslaan.
• Zie "8.2.8 De sensor, timer en logboek starten/stoppen" om de huidige
sessie te resetten.
8.2.4 Displays van de hartslagfunctie
Opmerking:
• De trainingstimer telt onafhankelijk. Het uitschakelen van de sensor of
overschakelen naar een ander scherm heeft geen invloed op het tellen.
• Het calorieverbruik wordt berekend op basis van de hartslag; als u
overschakelt naar een andere modus heeft dit geen invloed op de
berekening, tenzij de sensor wordt uitgeschakeld.
78
Page 79

TOPCOM HB 10M00
NEDERLANDS
8.2.5 EMHR en %EMHR
Estimated Maximum Heart Rate (geschatte maximale hartslag)
(EMHR)
EMHR = 220 - leeftijd van de gebruiker
Percentage of Estimated Maximum Heart Rate (percentage van de
geschatte maximale hartslag) (%EMHR)
%EMHR = gemeten hartslag / EMHR x 100%
Een voorbeeld van %EMHR:
slagen per minuut
(= 140 bpm)
Estimated Maximum Heart Rate (geschatte maximale hartslag)
(EMHR)
EMHR = 220 - 30 (leeftijd gebruiker) = 190 bpm (hartslagen per
minuut)
Percentage of Estimated Maximum Heart Rate (percentage van de
geschatte maximale hartslag) (%EMHR)
gemeten hartslag = 131 (via meting)
%EMHR = 131 / 190 x 100% = 69%
8.2.6 Hartslagzones
Trainingszones worden vastgelegd door het instellen van de bovenste en
onderste hartslaglimieten. U kunt de fitnessgrenzen (ingestelde
grenswaarden = 65% en 85% van de EMHR) of uw eigen aangepaste
grenzen gebruiken.
Gebruik het volgende schema met hartslagzones om de zone te selecteren
waarin u wilt trainen.
Raadpleeg een medisch specialist bij het kiezen van een
trainingszone, vooral als u hartproblemen hebt.
percentage van de
geschatte maximale
hartslag
(= 69%EMHR)
79
Page 80

TOPCOM HB 10M00
Fitness
Alarminstelling zones
Algemene
toepassing
Onderste
grenswaarde
Bovenste
grenswaarde
65%EMHR
85%EMHR
kan niet door de
gebruiker
worden
Aangepast
40-239 bpm
41-240 bpm
kan wel door de
gebruiker
worden
Opmerkingen
bpm of %EMHR
Hartslagzone
bovenste
onderste
De bovenzone
De in-zone
(de doelhartslagzone voor een
specifieke toepassing)
De onderzone
Opmerking:
Zie voor het instellen van de bovenste of onderste grenswaarde van de
zone "8.2.10 Menu voor de hartslagfunctie" onder "Menu 4: Zone".
80
Page 81

TOPCOM HB 10M00
NEDERLANDS
Hartslagzone
bovenste
grens-
waarde
Zonealarm aanZonealarm uit
onderste
grens-
waarde
De bovenzone
De in-zone
(de doelhartslagzone voor een
specifieke toepassing)
De onderzone
U hoort een pieptoon en er
wordt een pictogram
weergegeven als de gemeten
hartslag hoger is dan de
bovenste grenswaarde
U hoort een pieptoon en er
wordt een pictogram
weergegeven als de gemeten
hartslag lager is dan de
onderste grenswaarde
bpm of %EMHR
pictogram
zonealarm
8.2.7 Het zonealarm in-/uitschakelen
• Wanneer het zonealarm aan staat, wordt het ook geactiveerd
in de afstands- en gebruiksmodus.
• Wanneer u zich in de afstands- en gebruiksmodus bevindt,
moet u naar de hartslagmodus gaan om het zonealarm in/uit
te schakelen.
81
Page 82

8.2.8 De sensor, timer en logboek starten/stoppen
Sensorfunctie
geactiveerd
Timer begint
met tellen
Logboek begint met
opslaan
(sensorfunctie ook
geactiveerd)
Logboek stopt met
opslaan
(sensorfunctie ook
gedeactiveerd)
Timer
gedeactiveerd
Sensorfunctie
gedeactiveerd
[]
loslaten
[]
vasthouden
5 seconden
Hartslag-
modus
Gebruiks-
modus
[]
ingedrukt
houden
[]
loslaten
of of of
loslaten
[]
vasthouden
[]
TOPCOM HB 10M00
[]
loslaten
Afstands-
modus
[]
loslaten
• Wanneer u de hartslag-, gebruiks- of afstandsmodus selecteert, wordt de
sensorfunctie automatisch na 5 seconden geactiveerd.
• Het horloge heeft een optelfunctie voor het tellen van de totale
trainingstijd. Als de timer wordt gestart, telt de timer continu op totdat hij
wordt gestopt.
• Als de sensorfunctie is geactiveerd, begint het logboek ook als de functie
‘AUTO’ is ingesteld op ‘ON’ (aan). (Zie "8.2.11 Functiemenu voor het
logboek" onder "Menu 5: Auto" voor meer informatie.)
• Als de functie ‘LOG’ wordt gestart, begint het lampje voor ‘LOG’ op het
scherm te knipperen.
82
[]
loslaten
Page 83

TOPCOM HB 10M00
NEDERLANDS
De timer resetten
[ ] vasthouden
Gebruiks-
modus
Afstands-
modus
Hartslag-
modus
De huidige sessie
resetten
Het huidige scherm
resetten
8.2.9 Het scherm, de sessie en de timer resetten
[]
inge-
drukt
houden
[]
loslaten
[]
loslaten
[]
loslaten
Opmerking:
• Wanneer u de hartslag-, gebruiks- of afstandsmodus selecteert, wordt de
sensorfunctie automatisch na 5 seconden geactiveerd.
• Het horloge heeft een optelfunctie voor het tellen van de totale
trainingstijd onder de hartslag-, gebruiks- en afstandsmodus. Als de
timer wordt gestart, telt de timer continu op totdat hij wordt gestopt.
• Als de sensorfunctie is geactiveerd, begint het logboek automatisch als
de functie ‘AUTO’ in het functiemenu voor het logboek is geselecteerd.
• Als de logfunctie wordt gestart, begint het lampje voor ‘LOG’ op het
scherm te knipperen.
8.2.10 Menu voor de hartslagfunctie
Tijdens de hartslagmeting kunt u het menu voor de hartslagmodusfunctie
openen om:
• Menu 1: ‘Save’ De huidige sessie opslaan in het record van vandaag.
• Menu 2: ‘Session (sessie)’ De statistieke gegevens van de huidige
sessie bekijken.
• Menu 3: ‘Daily records (dagrecords)’ De dagrecords voor de laatste 10
dagen bekijken.
• Menu 4: ‘Zone’ De bovenste en onderste grenswaarden voor het
zonealarm instellen.
83
Page 84

TOPCOM HB 10M00
‘Save’
‘Session’
U kunt het menu voor de hartslagmodusfunctie openen door [M] ingedrukt
te houden:
Menu 1: Save
[M]
[] of []
Hartslagmodus
YES (ja)
NO (nee)
[ESC]
[ESC]
[]
Functiemenu 1
Save today’s data?
Gegevens van
vandaag opslaan?
Menu 2: Session (sessie)
[M] ingedrukt
houden
[ESC]
Hartslagmodus
duur
begintijd beweegtijd
calorie-
verbruik
* Druk op de toets [] om de selectie in de andere richting te bewegen.
84
trainingstijd
in zone
gemiddelde/
max./min.
hartslag
gemiddelde/
min. tred
Functiemenu
[] of []
Functiemenu 2
[ESC]
gemiddelde/
max. snelheid
[M]
afstand / stap
Page 85

TOPCOM HB 10M00
NEDERLANDS
Functiemenu 3
[M] ingedrukt
houden
* Druk op de toets [] om de selectie in de andere richting te bewegen.
Menu 3: Daily Rd (dagrecord)
Hartslagmodus
[ESC]
[] of []
‘Daily Rd’
[ESC]
[M]
trainings-
tijd in zone
calorie-
verbruik
gemiddel-
de/max./
min.
hartslag
beweegtijd
gemiddel-
de/
minimale
tred
[ESC]
[M]
gemiddelde
/maximale
snelheid
Dag 1
Dag 2
de volgende
beschikbare dag
Functiemenu
afstand /
stap
85
Page 86

TOPCOM HB 10M00
Functiemenu 4
[M] ingedrukt
houden
* Druk op [M] en daarna op de toets [] om de instelling te bevestigen.
[ESC]
[M]
[M]
Menu 4: Zone
[] of []
‘Zone’
Hartslagmodus
Functiemenu
(instelwaarde)
[] /[]
Instelwaarde
wijzigen
Instelwaarde sneller
[ ] /[ ]
ingedrukt
houden
wijzigen
[ESC]
[ESC]
Fitness*
(65 - 85%EMHR)
[ ] /[ ]
aangepast
Functiemenu
Fitnesszone
[ESC] [ ]
[M]
8.2.11 Functiemenu voor het logboek
U kunt het logboekmenu (LOG) alleen openen als het horloge in de
sensormodus staat. Zie "8.1 Menuopties voor de stopwatch" over het
openen van de modus.
Als er in het logboek geen sessie werd opgeslagen, wordt het beschikbare
geheugen weergegeven.
86
Page 87

TOPCOM HB 10M00
NEDERLANDS
Als er YY sessies in het logboek zijn opgeslagen, toont het display:
Sessie XX van YY in totaal
Datum van sessie XX
Om de sessielijst (1-YY) te doorlopen, drukt u op toets [] of [].
Houd de toets [M] ingedrukt om het menu LOG te openen:
• Menu 1: ‘View’ De gegevens van de opgeslagen sessie oproepen.
• Menu 2: ‘Start/Stop’ De gegevensopslagfunctie starten of stoppen.
• Menu 3: ‘PC-link’ Het horloge verbinden met het programma ‘Wireless
Data Manager’ en gegevens vanaf het horlogen naar de computer
uploaden. Zie "11.2 Het horloge, de borstband en GPS pod met de
dongle verbinden" en "11.3 Gegevens van het horloge, de borstriem en
GPS pod downloaden/analyseren.".
• Menu 4: ‘Log rate (snelheid gegevensopslag)’ De proefsnelheid voor
gegevensopslag.
• Menu 5: ‘Auto’ De logfunctie met automatische start instellen.
• Menu 6: ‘Erase (wissen)’ De opgeslagen sessie wissen.
• Menu 7: ‘Mem. (geheugen)’ De hoeveelheid beschikbaar geheugen
bekijken.
87
Page 88

Menu 1: View (bekijken)
[M]
ingedrukt
houden
* Druk op de toets [] om de selectie in de andere richting te bewegen.
[ESC]
duur
Functiemenu
trainingstijd
in zone
begintijd
calorieverbr
uik
gemiddelde/
minimale
tred
gemiddelde/
maximale
snelheid
afstand /
stap
gemiddelde/
max./min.
hartslag
beweegtijd
sessie bekijken
[M]
Logboekmodus
TOPCOM HB 10M00
[] of []
‘View’
[ESC]
88
Als het opslaan werd gestart, kan de sessie niet worden
bekeken.
Page 89

TOPCOM HB 10M00
NEDERLANDS
Menu 2: start/stop (start/stop het logboek)
[M]
ingedrukt
houden
[ESC]
Logboekmodus
• Wanneer de logfunctie wordt gestart, begint het lampje voor ‘LOG’ op
het scherm te knipperen, de horloge creëert een nieuwe logsessie en
slaat de gegevens tegen de vooraf bepaalde logsnelheid op. Zie "Menu
4: Log rate (snelheid gegevensopslag)" hieronder.
• Deze logfunctie kan in de hartslag-, afstands- en gebruiksmodus worden
gestart en gestopt door [ ] ingedrukt te houden, zie "8.2.8 De sensor,
timer en logboek starten/stoppen"
[] of []
‘start’ / ‘stop’
Het opslaan starten of stoppen
[ESC]
Functiemenu
Het opslaan starten of stoppen
.
[M]
ja of nee
[]
Menu 3: PC-link
Logboekmodus
[M]
ingedrukt
houden
[ESC]
[] of []
‘PC link’
Record uploaden
[ESC]
[M]
Verzenden
Functiemenu
Zie ook "11.3.1 Downloaden /analyseren vanaf het horloge".
89
Page 90

Menu 4: Log rate (snelheid gegevensopslag)
[M]
ingedrukt
houden
[ESC]
[M]
Logsnelheid instellen
Functiemenu
(voorbeeldsnelheid)
De snelheid wijzigen door
vooruit te bladeren
De snelheid wijzigen door
achteruit te bladeren
[]
‘Auto’
[] of []
‘Log rate’
TOPCOM HB 10M00
Logboekmodus
Als het opslaan werd gestart, kan de logsnelheid niet worden
veranderd.
Menu 5: Auto
Logboekmodus
90
[ESC]
[]
[] of []
Automatisch een logboek
[ESC]
[] of []
aan uit
Functiemenu
[M]
Page 91

TOPCOM HB 10M00
NEDERLANDS
[M]
Sessie wissen
Functiemenu
Logboekmodus
[ESC] [M]
[]
Menu 6: Erase (Erase one/all session(s))
(Eén/alle sessie(s) wissen)
[M]
ingedrukt
houden
[ESC]
[ESC]
één alle
[] of []
‘Erase’
[] of []
Functiemenu
ja of nee
[ESC]
Sessie XX (bijvoorbeeld 1) gewist
ja
Functiemenu
Menu 7: Mem. (View free memory) (beschikbaar geheugen bekijken)
[M]
ingedrukt
houden
Logboekmodus
8.2.12 Afstandsmodusmenu
Deze modus werkt met de GPS pod en ingebouwde pedometer. Zie ook
"10 GPS pod" voor de GPS pod en zorg ervoor dat de paslengte correct is
ingesteld, zie "7 De algemene opties instellen".
[ESC]
[] of []
Beschikbaar geheugen bekijken
‘Mem.’
[ESC]
(lezen beschikbaar geheugen)
[M]
Functiemenu
91
Page 92

TOPCOM HB 10M00
5
seconden
sensor geactiveerd meting vastgelegd
Knipperen:
Pedometer-
sensor is
geactiveerd.
Stabiel:
Satellieten
zijn bepaald.
Rollen:
Satelliet
wordt
gezocht.
GPS-
signaal
radiofrequentie
signaal
horloge
In de afstandsmodus ziet u:
Current speed: (huidige
snelheid)
Meting van de wandel-/
loopsnelheid.
Average speed: (gemiddelde
snelheid)
Meting van de gemiddelde
wandel-/loopsnelheid.
Distance: (afstand)
Berekening van de totale
wandel-/loopafstand.
Calorie expenditure:
(calorieverbruik)
Berekening van het
calorieverbruik.
Afstandsmodusfunctie
Current pace: (huidige tred)
Meting van de vereiste tijd om
met de huidige snelheid één
kilometer/mijl af te leggen.
Maximum speed: (maximale
snelheid)
Meting van de maximale
wandel-/loopsnelheid.
Movement time:
(beweegtijd)
Meting van de tijd die de
gebruiker in beweging is.
Step: (stap)
Berekening van het totale
aantal gewandelde/gelopen
stappen.
Om de meting te bekijken:
In de afstandsmodus wordt de afstandsfunctie (sensor)
•
seconden geactiveerd. Deze kan ook handmatig worden geactiveerd,
zie "8.2.8 De sensor, timer en logboek starten/stoppen" voor uitleg.
92
automatisch na 5
Page 93

TOPCOM HB 10M00
NEDERLANDS
Stappen
tred trainingstijd
maximale snelheid
calorieverbruik
gemiddelde snelheid
huidige snelheid
beweegtijd
Huidige snelheid
Display afstandsmodusfunctie
• Als de afstandsfunctie (sensor) is geactiveerd, verzamelt
het horloge de waarden van de oefeningen in de huidige sessie.
• De gegevens van de huidige sessie kunnen worden opgeslagen (in het
dagrecord) of via het menu van de afstandsmodusfunctie worden
bekeken.
• Het dagrecord kan ook via het menu voor de afstandsmodusfunctie
worden bekeken. Het horloge kan maximaal 10 dagrecords opslaan.
• Zie "8.2.9 Het scherm, de sessie en de timer resetten" om de huidige
sessie te resetten.
Weergave displayfunctie:
Opmerking:
• De trainingstimer telt onafhankelijk. Het uitschakelen van de sensor of
Wanneer u de GPS pod niet gebruikt of wanneer de
satellietontvangst slecht is, gebruikt het horloge de ingebouwde
pedometer om de afstand en snelheid te meten.
overschakelen naar een ander scherm heeft geen invloed op het tellen,
93
Page 94

TOPCOM HB 10M00
[M]
(ja)
Logboekmodus
[M]
ingedrukt
houden
[ESC]
(nee)
Functiemenu 1
Gegevens van vandaag
opslaan?
i.e. dezelfde trainingstijd kan vanuit de hartslag-, afstands- of
gebruiksmodus worden gecontroleerd.
• Het calorieverbruik wordt berekend op basis van de hartslag en
pedometer; als u overschakelt naar een andere modus heeft dit geen
invloed op de berekening, tenzij de sensor wordt uitgeschakeld, i.e.
hetzelfde calorieverbruik kan vanuit de hartslag-, afstands- of
gebruiksmodus worden gecontroleerd.
Menu van de afstandsmodusfunctie:
Wanneer de afstand wordt gemeten, kunt u het menu van de
afstandsmodusfunctie openen (hou de [M]-toets ingedrukt) op:
• Functiemenu 1: ‘Save’ De huidige sessie opslaan in het record van
vandaag.
• Functiemenu 2: ‘Session (sessie)’ De statistieke gegevens van de
huidige sessie bekijken.
• Functiemenu 3: ‘Daily Rd (dagrecords)’ De dagrecords voor de laatste
10 dagen bekijken.
• Functiemenu 4: ‘Sleep (slaap)’ De automatische slaaptijd voor de
pedomater instellen.
• Functiemenu 5: ‘Sense’ De gevoeligheid van de pedometer instellen.
• Functiemenu 6: ‘Trk. Del’ Alle tracks op de GPS pod wissen.
Functiemenu 1: Save
[] of []
‘Save’
Opmerking:
Als de laatste sessie NIET werd opgeslagen, slaat het horloge die sessie
om middernacht automatisch in het dagelijkse record op.
94
[ESC]
Save Today’s Data ?
Page 95

TOPCOM HB 10M00
NEDERLANDS
[M]
ingedrukt
houden
* Druk op de toets [] om de selectie in de andere richting te bewegen.
Functiemenu 2: Session
Afstandsmodus
[ESC]
[] of []
‘Session’
Functiemenu 2
trainingstijd
in zone
gemiddelde/
max./min.
hartslag
gemiddelde/
minimale
tred
Functiemenu
duur
begintijd
calorie-
verbruik
[ESC]
beweegtijd
gemiddelde/
maximale
snelheid
[M]
afstand /
stap
95
Page 96

Functiemenu 3: Daily Rd (dagrecord)
Afstandsmodus
Functiemenu
Instelwaarde sneller wijzigen
Functiemenu
(instelwaarde)
[M]
ingedrukt
houden
[ESC]
[] of []
Functiemenu 4
[] / []
ingedrukt
houden
[M]
ingedrukt
houden
[ESC]
Afstandsmodus
TOPCOM HB 10M00
[] of []
‘Daily Rd’
Functiemenu 3
[ESC]
[M]
trainingstijd in zone
(van de geselecteerde dag)
Functiemenu 4: Sleep (slaap)
Instelwaarde wijzigen
96
[] / []
de volgende
beschikbare dag
Functiemenu
‘Sleep’
[ESC]
[M]
Page 97

TOPCOM HB 10M00
NEDERLANDS
‘Sense’
Functiemenu 5: Sense
[M]
ingedrukt
houden
[] of []
[ESC]
Afstandsmodus
Instelwaarde wijzigen
Instelwaarde sneller wijzigen
[ ] / [ ]
[] / []
ingedrukt
Functiemenu 6: Trk. Del (track wissen)
[M]
ingedrukt
houden
[ESC]
Afstandsmodus
Willekeurige toets
houden
Opgeslagen GPS track gewist
Functiemenu 5
[ESC]
Functiemenu
(instelwaarde)
Functiemenu
[] of []
‘Trk. Del’
Functiemenu 6
[ESC]
nee of ja
Alle tracks gewist
ja
Functiemenu
[M]
[M]
[]
97
Page 98

TOPCOM HB 10M00
current speed
(huidige snelheid)
average speed
(gemiddelde
snelheid)
(maximum speed)
maximale
snelheid
step (stap) distance (afstand) podometer
moving time
(beweegtijd)
pace (tred)
average heart rate
(gemiddelde
hartslag)
minimum heart
rate (minimale
hartslag)
maximum heart
rate (maximale
hartslag)
current heart rate
(huidige hartslag)
in-zone exercise
time (trainingstijd
in zone)
altitude (hoogte)
heading course
(koersrichting)
real time (actuele
tijd)
calorie
expenditure
(calorieverbruik)
exercise time
(trainingstijd)
Lijst met gebruiksmodusfuncties
8.2.13 Gebruiksmodusmenu
Deze modus werkt met de GPS of ingebouwde pedometer en borstriem.
Zie ook "10 GPS pod" voor de GPS pod.
In de gebruiksmodus kunt u de volgende 18 functies op de bovenste,
middelste of onderste rij van het display zien. Elke functie kan
overeenkomstig de gebruikersoptie worden ingesteld:
98
Page 99

TOPCOM HB 10M00
NEDERLANDS
5
seconden
sensor geactiveerd
meting vastgelegd
GPS-
signaal
radiofrequentie
signaal
horloge
radiofrequentie
signaal
hartslag-
signaal
Opmerking:
• In de gebruiksmodus wordt de gebruiksfunctie (sensor) automatisch na 5
seconden geactiveerd. Deze kan ook handmatig worden geactiveerd,
zie "8.2.8 De sensor, timer en logboek starten/stoppen".
• Als de gebruiksfunctie (sensor) is geactiveerd, verzamelt het horloge de
waarden van de oefeningen in de huidige sessie.
• De gegevens van de huidige sessie kunnen worden opgeslagen (in het
dagrecord) of via het menu van de afstandsmodusfunctie worden
bekeken.
• Het dagrecord kan ook via het menu voor de gebruiksmodusfunctie
worden bekeken. Het horloge kan maximaal 10 dagrecords opslaan.
• Zie "8.2.9 Het scherm, de sessie en de timer resetten" om de huidige
sessie te resetten.
Zie hoofdstuk "10.3 De GPS pod dragen" om de GPS pod aan
uw schoen vast te maken en voor de voorzorgsmaatregelen om
de GPS pod te gebruiken voor de meting. Zie "Functiemenu 4:
Bekijken" hieronder voor meer informatie over de
functieselectie.
99
Page 100

Hoe de weergegeven functies veranderen:
verander de middelste rij
verander de displayfunctie (kies een
van de 18 functies)
TOPCOM HB 10M00
Gebruiksmodus
Opmerking:
• Zie "Functiemenu 4: Bekijken" voor meer informatie om de displayfunctie
voor de bovenste rij te veranderen.
In de gebruiksmodus kunt u het menu van de gebruiksmodusfunctie
openen (hou de [M]-toets ingedrukt):
• Functiemenu 1: ‘Save’ De huidige sessie opslaan in het record van
vandaag.
• Functiemenu 2: ‘Session (sessie)’ De statistieke gegevens van de
huidige sessie bekijken.
• Functiemenu 3: ‘Daily Rd (dagrecords)’ De dagrecords voor de laatste
10 dagen bekijken.
• Functiemenu 4: ‘View’ Een van de 17 displayfuncties op de bovenste,
middelste of onderste rij van het display instellen.
• Functiemenu 5: ‘Pos.FM’ Het positieformaat instellen i.e displayformaat
voor lengte en breedte instellen.
100
verander de onderste rij
 Loading...