

Page 1
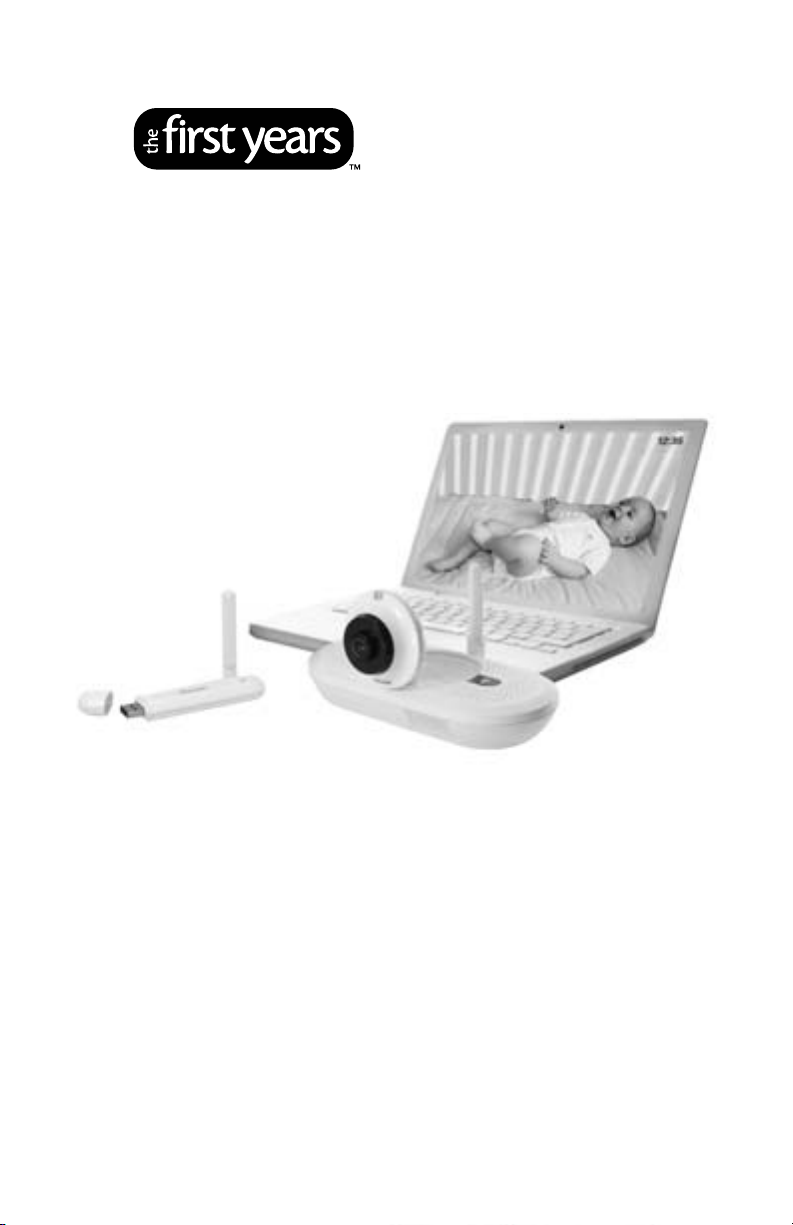
Home & Away
™
Computer-Connect
Digital Video Monitor
Before returning this product to the store for any reason, please
contact our Parent Service Center at
1-800-704-8697 or cs@learningcurve.com
Often, we can provide helpful tips and instructions to resolve your
problem quickly over the phone or by e-mail.
Y74 00
get ready for thefirstyears.com
™
Page 2
Home & Away Computer-Connect™ Digital Video Monitor
SAFETY INSTRUCTIONS
This symbol is intended to warn the user of potential safety hazards.
This symbol is intended to alert the user to a potential risk of
electric shock and other electrical safety issues.
WARNING:
• To prevent electric shock or strangling by the cord, KEEP OUT OF
CHILD’S REACH. Never place monitor or cord within 3 feet of child or
attach to a crib or playpen.
• Never place these units within a child’s reach.
• This product is not a toy; do not allow children to play with it.
• The product is designed to assist in the monitoring of children, not as a
prevention for injury to or loss of a child.
• This product is not a substitute for proper adult supervision. All children
should be supervised at all times by responsible adults.
WARNING
Toreducetheriskofreorelectricalshock,donotopenthisproductor
expose the product to:
• Water and Moisture: This product should not be used near water,
for example, near a bathtub or sink, in a wet basement or near a
swimming pool.
• Heat: This product should be situated away from heat sources such as
radiators, heat registers, stoves, or other appliances that produce heat.
IMPORTANT
• The user should not attempt to service this product. Read all safety and
operating instructions before operating this product.
• Retain these instructions for future reference.
English
• Observe all warnings.
• Follow all operating instructions.
• Do not tamper with the plug under any circumstances.
• Power Source – This product should be connected only to the power
supply provided.
• Cleaning —Before cleaning, be sure to unplug. Clean only as
recommended in these instructions.
• Object and Liquid Entry—Care should be taken so that objects do not
fall and liquids are not spilled into the enclosure through the openings.
• Damage or Malfunction—Please contact our Parent Service Center at
800-704-8697 or cs@learningcurve.com if:
a. The power supply cord or plug has been damaged
b. Objects have fallen or liquid has been spilled into it
c. The product has been exposed to rain
d. The product does not appear to operate normally or exhibits a
marked change in its performance
e. The product has been dropped or the enclosure damaged.
Wall Mounting—The Child Unit should be mounted to a wall only as
recommended in these instructions.
WARNING
Do not mount the Child Unit in a location where the unit or the adapter cord
is within the child’s reach. Never place monitor or cord within 3 feet of child
or attach to a crib or playpen.
To prevent injury, this apparatus must be securely attached to the wall in
accordance with the installation instructions.
2 get ready for thefirstyears.com
™
get ready for thefirstyears.com™ 3
Page 3
Home & Away Computer-Connect™ Digital Video Monitor
English
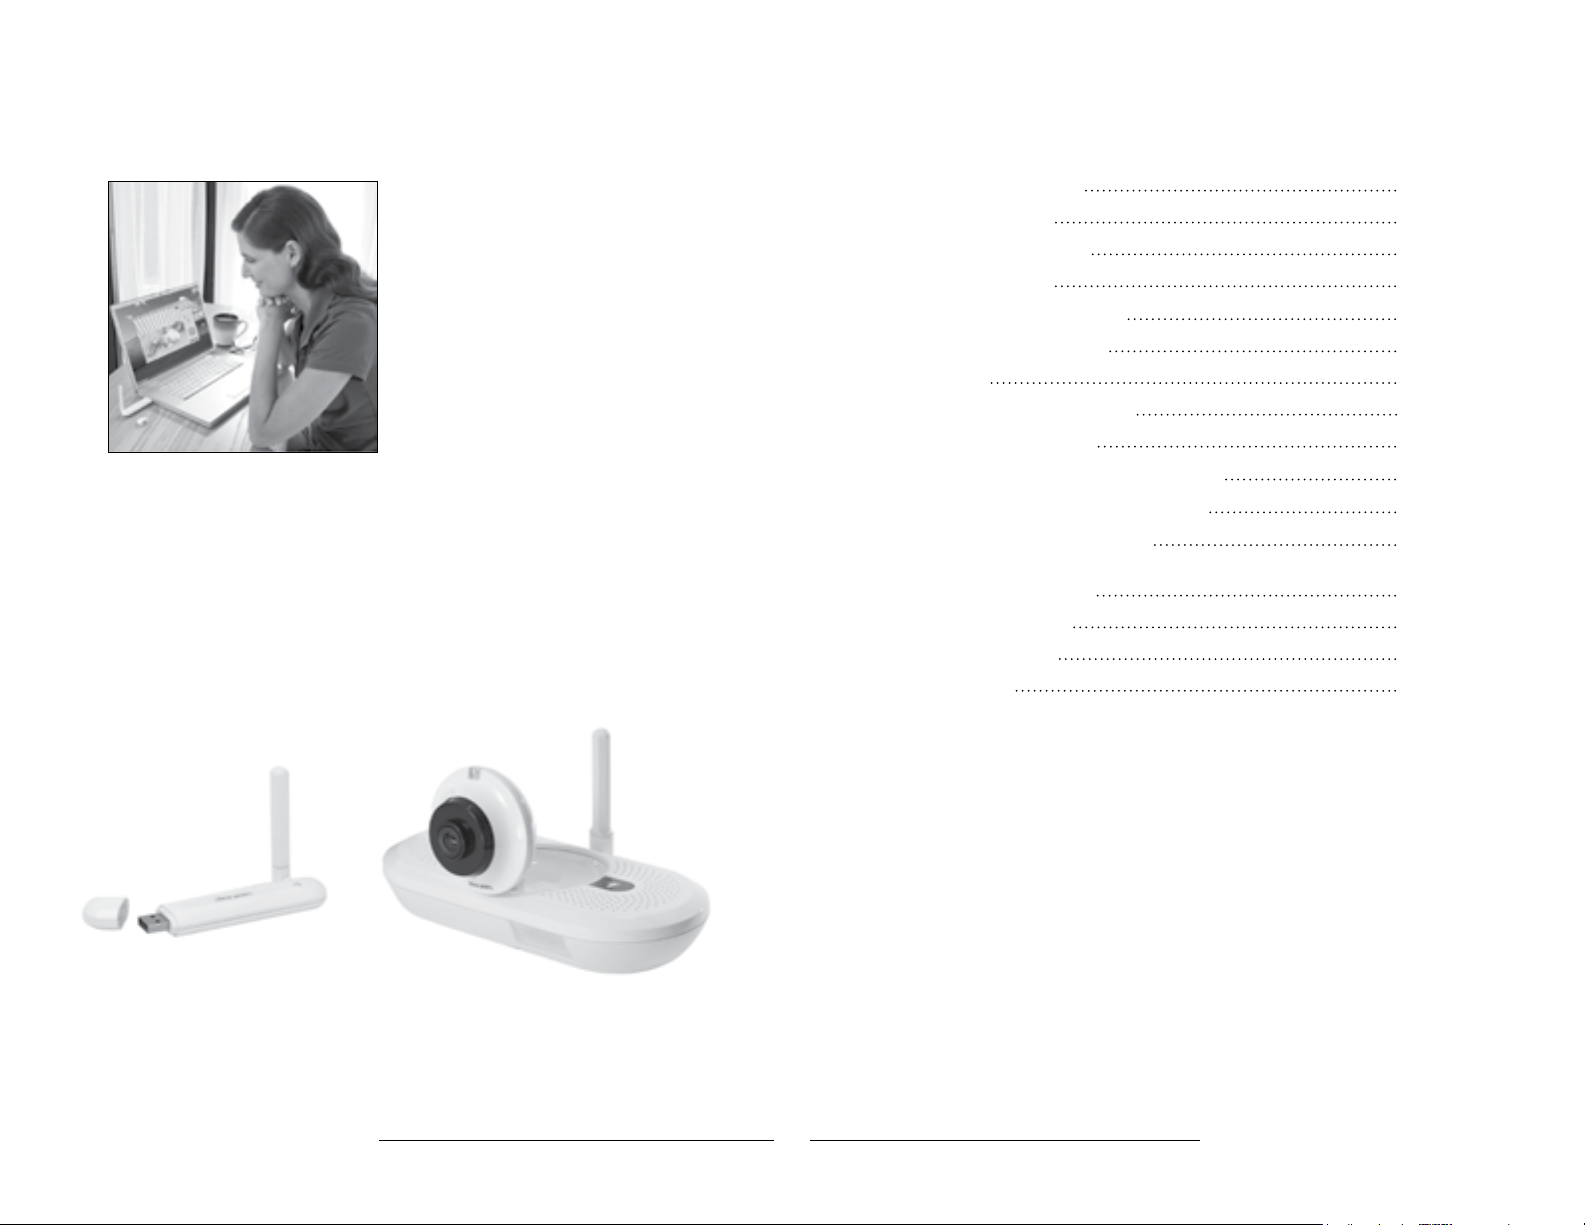
The First Years Home and Away
Computer-Connect™ Video Monitor
With The First Years® Home & Away
Computer-Connect
home computer into your video monitor.
The USB connector creates a wireless
connection bet ween your computer and
the camera in baby’s room. With the
supplied soft ware you can easily see,
hear and even talk to your baby right from
the computer. You can also take quick
snapshots or long videos and store them
to your hard drive.
Also, when your computer is connected
to the internet you open a world of
connectivity to your video monitor. You can use free programs such as Skype
Google™ Chat to tap into your monitor from anywhere in the world. This is a great
way to check in from work and travel or let the grandparents check in on the little
one. Of course you get complete control over this and it works like any Skype call or
phone call.
With the Home & Away Computer-Connect Video Monitor you will always have a
simple way of connecting your family!
™
you can turn your
®
or
Contents
Safety Instructions
Parts Diagram
USB Connector
Child Unit
Quick Start Instructions
To Set Up—Child Unit
To U se
Baby Viewer Software
Setup and Usage
Child Unit Indicators and Controls
Recharging/Replacing Batteries
Care (To Clean/Storage)
Using Your Home and Away Baby Video
Monitor with Sk ype
Troubleshooting
FCC Statement
Warranty
2
6
6
6
7
8
10
10
11
17
18
19
20
22
24
25
4 get ready for thefirstyears.com
™
get ready for thefirstyears.com™ 5
Page 4
Home & Away Computer-Connect™ Digital Video Monitor
Parts Diagram Quick Start Instructions
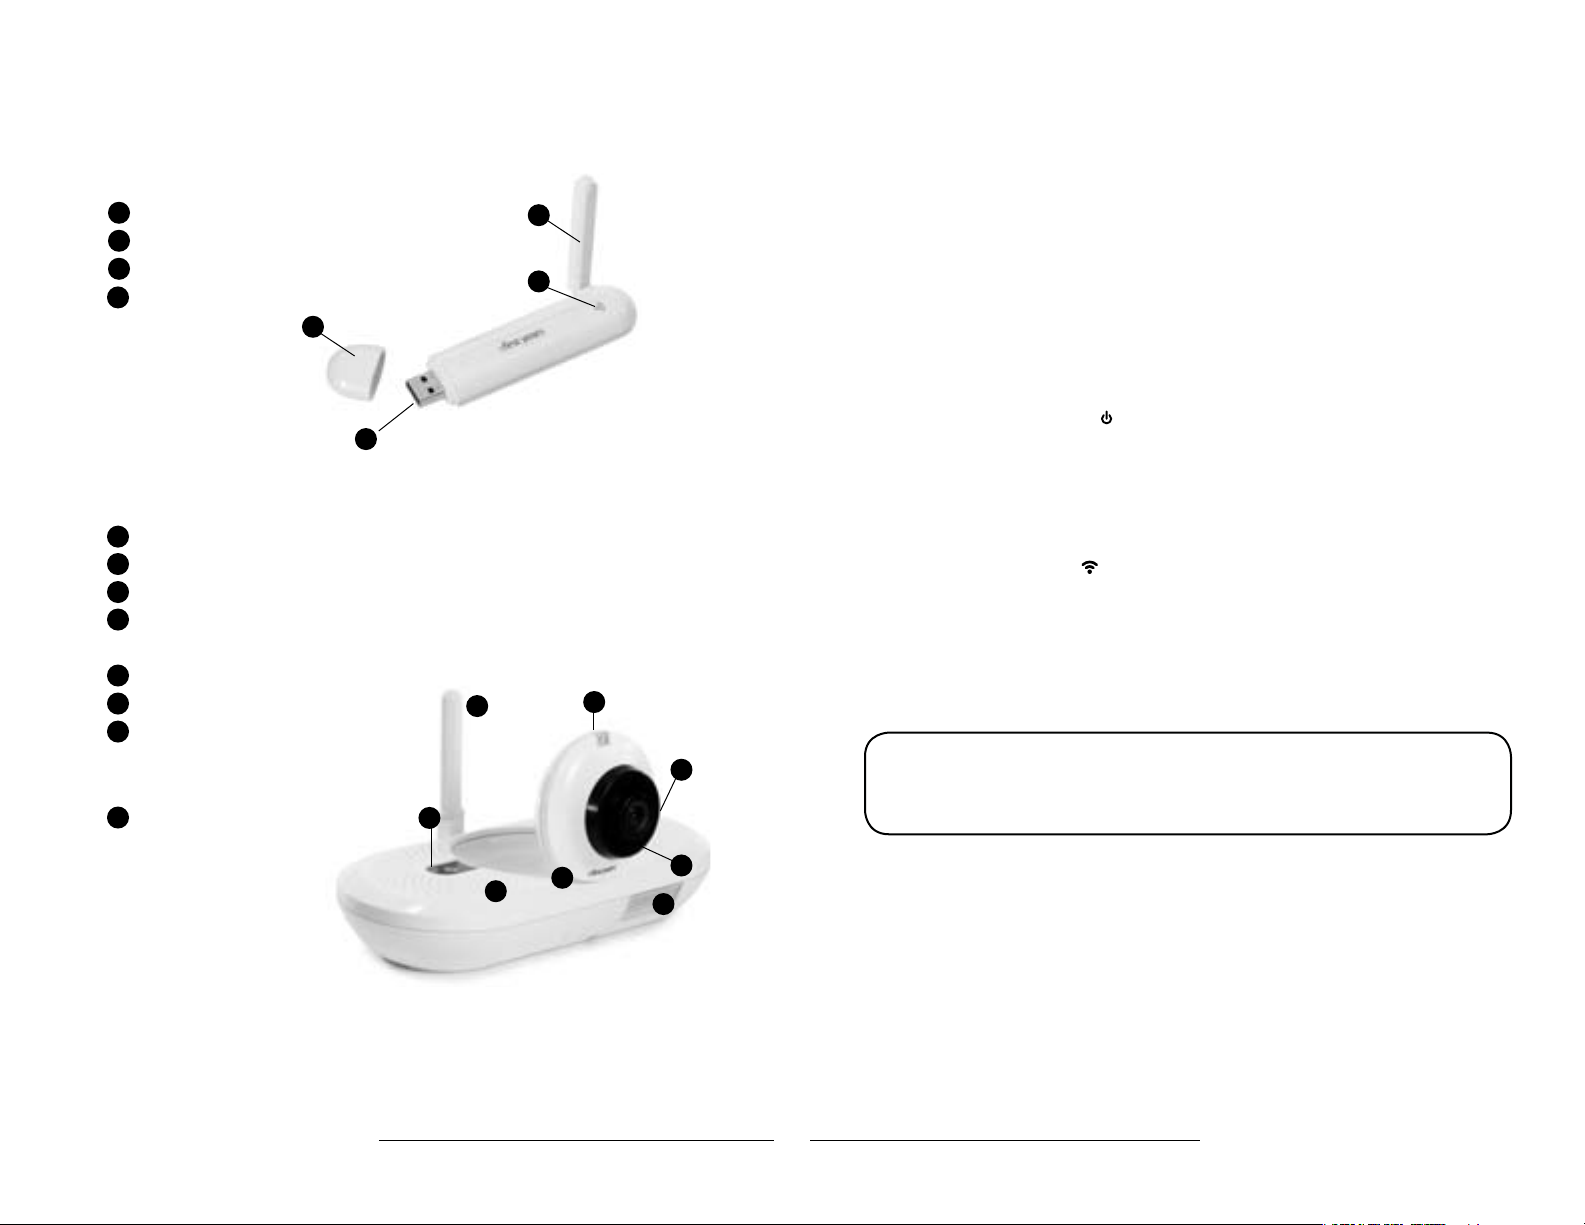
USB Connector
1
Cap
2
Antenna
3
Connection Indicator
4
USB Plug
1
4
Child Unit
Antenna
1
2
Microphone
3
Power button
4
Nightlight button
Talkback volume switch (not pictured)
5
Connection indicator
6
Camera
7
Adjustable-angle camera base
Wall mount slots (not pictured)
Cord channel (not pictured)
Nightlight
8
Battery cover (not pictured)
Power jack (not pictured)
Also Included
AC adapter (1) (not pictured)
Software disk (not pictured)
1
3
2
English
You’ll find detailed instructions on the pages that follow.
Please read the Safety Instructions on pages 2–3.
2
3
Set up the Computer
Install baby viewer sof tware from included CD into your computer. See detailed
instructions on page 10 if needed.
Set up the Child Unit
• Place unit 4 to 6 feet from child’s crib or play area.
• Connect remaining AC adapter to unit and plug into wall outlet.
To u se
1. Hold down power button on Child Unit until connection indicator lights up
and blinks to turn it on .
2. Move antenna to full upright position.
3. Lift camera to upright position.
4. Insert USB connector into computer with sof tware installed.
5. Connection indicators on both units should glow blue indicating they are
connected.
6. Launch Baby Viewer software.
7. Adjust camera position to ensure desired view is displayed.
5
4
7
6
8
8. Use computer volume controls to adjust volume.
Before returning this product to the store for any reason, please contact our
Parent Service Center at 800 -704-8697 or cs@learningcurve.com.
Often, we can provide helpful tips and instructions to resolve your problem
quickly over the phone or by email.
6 get ready for thefirstyears.com
™
get ready for thefirstyears.com™ 7
Page 5
Home & Away Computer-Connect™ Digital Video Monitor
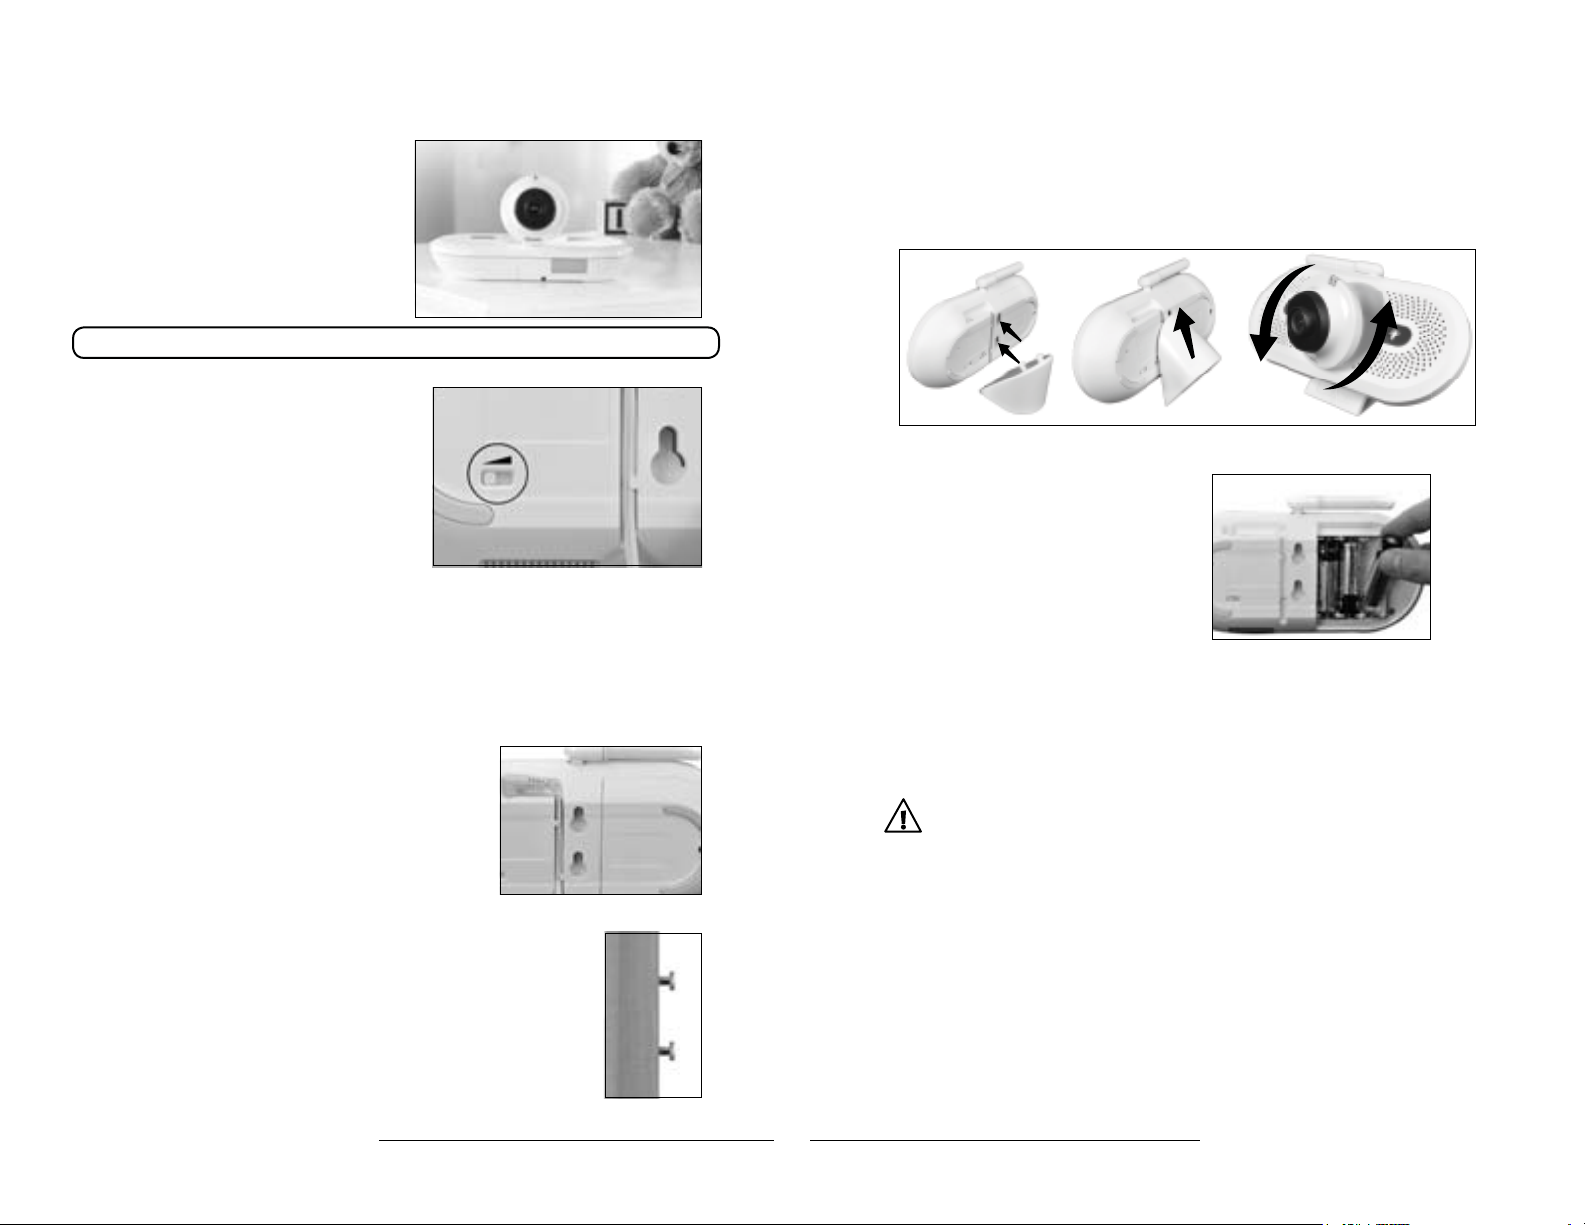
To Set Up —Child Unit
English
1. Position the Child unit 4 to 6 feet from
your child’s crib or the area you wish
to view. NEVER position the unit
within a child’s reach.
2. Insert the connector on the AC
adapter into the jack on the back of
the unit, then plug the adapter into
an electrical outlet.
Note: Use attached hook & loop strip to gather and secure any excess cord.
3. Lift the antenna to its full upright position.
4. Rotate the camera out from the base
and swivel it to the angle you think will
give you your best view.
5. Use the Talkback Volume Switch on the
back of the Child Unit to choose your
preferred setting:
Low for quietest, or High for loudest.
Talkback volum e switch on Child Unit
Additional cameras
You can position up to three additional cameras in your home to monitor
dierent locations. To find out where you can purchase additional cameras for
your Monitor, please contact our Parent Service Center at 800-704-8697 or
purchase directly at thefirstyears.com.
For wall mounting (recommended)
1. Press the adapter cord into the grooved channel
on the back of the unit, making certain to slide it
under the two holding clips.
2. Securely fasten two #8 “pan” head screws to the
wall, one above the other, exactly 1 inch apart,
leaving the screw heads protruding by at
least ¼ inch. For best results use a 3/4-inch
long screw; mount in a solid wood panel, or
use screw anchors.
3. Fit the round openings on the wall mount slots
over the screw heads, then slide the unit down
until it is seated firmly.
4. To test that unit is securely mounted, press on
its top and side edges.
cord in grooved channel
Optional Stand For Child Unit
An optional stand has been included with the Home and Away™ Digital Video
Monitor. This stand allows you to better view your baby from tough angles.
To Install:
For temporary/battery-powered operation
Loosen the screw to release the batter y
compartment cover, then slide and
lift it o. Insert three AA batteries,
positioning them so the + and – symbols
on the batteries are aligned with the
corresponding symbols in the battery
compartment. Replace the cover and
secure it by tightening the screw.
IMPORTANT
Use of batteries to power the Child Unit is
intended only for temporary Use dUring a power
oUtage or when a plUg-in eleCtriCal oUtlet is
Unavailable. CheCk the low battery indiCator
often, and replaCe batteries as neCessary.
Install batteries in compartment
WARNING
• KEEP OUT OF CHILD’S REACH.
• Do not place Child Unit in crib or attach to crib or playpen.
• Never place monitor or cord within 3 feet of child or attach
to a crib or playpen.
• Do not mount the Child Unit in a location where the unit or
the adapter cord is within the child’s reach.
8 get ready for thefirstyears.com
Slots in unit slide
™
over screws
get ready for thefirstyears.com™ 9
Page 6

Home & Away Computer-Connect™ Digital Video Monitor
To Use
Baby Viewer Software
This software will allow you to use your personal computer as a parent unit, while
also giving you the ability to take still pictures and record video of your child.
About the Software
Software is compatible with current Windows PC operating systems.
Note: If this software is lost, it can be downloaded from our Website.
English
Installation Requirements
PC:
Windows® XP (SP2 or higher), Vista® or Windows® 7 (32-bit or 64-bit)
• 1 GHz (1.6 GHz recommended)
• 512 MB RAM or more
• 200 MB hard drive space
• CD-ROM drive
• OS-compatible sound card and speakers
• 1.1 USB port (2.0 recommended)
Installing Software
Insert the provided CD into the CD drive on your computer and install the
software following on-screen directions.
Note: Software will search the Internet every time it opens to look for updates.
You can determine if you want the software to update.
Setup & Usage
1. Turn on Child Unit.
2. Connect the USB connector to your computer.
3. Open the on-screen display by double clicking on the Icon located on
your desktop.
4. You are now ready to use your computer as your video monitor. Please review
the following descriptions of the On Screen Display to understand all of the
features of this software.
Sample display on computer screen
On Screen Display
The indicators, controls, and video display you’ll see on your computer screen
will be quite similar to those on the Parent Unit itself, with two significant
additions. Home and Away Computer-Connect Digital Video Monitor software
allows you to capture and save both still images and record video.
Instant Help
Use your mouse to hover over any button; an explanation of that button’s
function will be displayed in a pop-up window.
Talkback Feature
1. Click on the Talkback Button, and hold your mouse button depressed
while speaking.
2. Your child will be able to hear your voice. An on-screen display in red tells
you that you are transmitting your voice.
• While the Talkback button is depressed, you will not hear any sounds being
transmitted by the Child Unit.
• When using more than one camera, the talk feature will link to the camera in
the location you are currently viewing.
Note: For this feature to work, your computer must be equipped with a
microphone.
10 get ready for thefirstyears.com
™
get ready for thefirstyears.com™ 11
Page 7

Home & Away Computer-Connect™ Digital Video Monitor
English
Zoom Feature
• Click on the Zoom Button to zoom in and out.
• Click once to zoom the display image.
• Press again to revert to original size.
Pan Feature
Use directional pad to view dierent areas of the image once it is zoomed.
Camera Identification/Selection
Add/Remove Cameras
(If you have linked additional cameras to your Monitor)
Select file from the menu and then choose “Add/Remove Camera.” Follow on
screen instructions to add or remove cameras.
The system identifies cameras by number 1, 2, 3, 4 assigned when they were
added. If you have not added any cameras to your system, the camera icon will
be greyed out and the Camera Selection button will not respond when you try to
click on it.
Click the camera button to switch the display to the next camera in the
numerical sequence.Click through the cameras in sequence until you reach the
one you want to view. The number of the camera currently transmitting will be
highlighted on the Control Panel.
If you have multiple cameras installed and active, the sof tware can display each
of these cameras in a scan mode. This scanning feature can be turned on by
going into the Video tab in the Preferences in the File menu.
Still Image Capture
Click on the camera icon . You will hear a shutter sound.
The image file will automatically be saved to the default location. File location
will be displayed in the lower left corner of the window. You can click on this file
location to see the picture you took.
The file location can be changed in Preferences in File menu.
Video Capture
1. Click on the Video icon to start recording. You will hear a sound at the
start of the recording.
2. Video will be recorded until you click on the Video icon again.
A flashing on-screen display in red tells you that the image on your display is
being recorded.
Note: Maximum recording time is 20 minutes. Recording will stop automatically,
even if you have not clicked the Video button again.
The video file will automatically be saved to the default location. File location
will be displayed in the lower left corner of the window. You can click on this file
location to watch the video you just made.
This location can be changed in Preferences in File menu.
Mini Mode
Use the Mini Mode display screen to maximize space on your desktop: This
mini display screen will remain on top of any other active application windows
on your computer screen, so you can watch your child while working on your
computer.
Click on the to create the mini display screen. This screen can be moved to
any location on your computer desktop.
Note: When the mini display screen is being used, only the video image being
captured by the Child Unit is displayed. You must restore the display to full size
for access to the control buttons.
To restore the Control Panel display to full size: Click on the .
12 get ready for thefirstyears.com
™
get ready for thefirstyears.com™ 13
Page 8

Home & Away Computer-Connect™ Digital Video Monitor
English
File Menu Options:
Change Language — allows you to chose between English (default), Spanish
and French. Once selection is made the language used in the software will
change.
Preferences — opens the Preferences Screen with the following topics:
Still Image – allows you to change the location that your still images are
stored and the naming convention for these images.
Video — allows you to change the location that your video recordings are
stored and the naming convention for these images.
Camera — allows you to turn on or disable the display scan mode for multiple
cameras, as well as open a Wizard to allow you to add & remove cameras from
your video monitor system.
Keyboard Shortcuts
S = Still photo
Z = Zoom
C = Camera Select
V = Video
M = Mini Display Screen - toggle
Spacebar = Talkback (hold while talking)
= Pan image up
= Pan image down
= Pan image left
= Pan image right
Note: Keyboard shortcuts can be used in Mini Mode.
14 get ready for thefirstyears.com
™
get ready for thefirstyears.com™ 15
Page 9

Home & Away Computer-Connect™ Digital Video Monitor
Child Unit USB Connector
1. Hold down the power button on the Child Unit until connection indicator
lights up. The connection indicator will blink to indicate it is searching for
the USB Connector.
2. Insert USB connector into computer with Baby Viewer software installed.
3. Launch Baby Viewer software. Once the two units are connected, and
software opened, live video will be displayed, you will hear sounds from your
child’s room (or wherever you have placed the Child Unit), and connection
indicators, on both units will glow blue.
4. Use computer volume controls to adjust volume.
To turn the Child Unit o
Hold down the power button until the power light goes out.
This takes a few seconds.
IMPORTANT
the power indiCators on the Child Unit will glow red when
battery power is low. batteries in the Child Unit shoUld be
replaCed. (see “reCharging/replaCing batteries.” on p. 24)
Range
The distance you can separate the units and still maintain a connection will
vary based on the layout and construction of your home. To test the Monitor’s
workable range, walk though your house and yard to check for the volume of
sounds being transmitted and the clarity of images being displayed.
English
Child Unit Indicators and Controls
Power button
• Hold down to turn unit on or o.
• Blue glow indicates full power.
• Red glow indicates battery power is low. Replace batteries as soon as possible.
• No light indicates no power. Unit will not work until turned on, connected to AC
adapter or powered by good batteries.
Nightlight button
• Press to turn the nightlight on or o.
Note: When Child Unit is being powered by batteries, nightlight will turn o
automatically after 60 seconds.
Connection Indicator
• Glows blue when connected to Parent Unit
• Blinks blue when not connected
Talkback Volume Switch
• Allows you to choose your preferred setting for talkback volume to the Child
Unit. Three settings are provided: Low, Medium, and High.
Night Vision
The Home and Away Computer-Connect Digital Video Monitor is equipped with
night vision technology that enables the transmission of video images even
when your child’s room is dark. In low light situations, the display will appear as a
black-and-white image.
16 get ready for thefirstyears.com
™
get ready for thefirstyears.com™ 17
Page 10

Home & Away Computer-Connect™ Digital Video Monitor
Recharging/Replacing Batteries
English
Child Unit
IM P ORTA NT:
remember that the Child Unit Can be operated on batteries for
only a limited time; onCe the batteries rUn down, the Unit will
not work. battery Use is intended only dUring power oUtages
or in temporary sitUations where eleCtriCity is not available.
if yoU are operating the Child Unit on batteries, CheCk the
power light freqUently, and replaCe batteries onCe power
bUtton glows red.
Tip: Use alkaline batteries for longer battery life.
WARNING
Keep batteries away from children. Parents are urged to exercise
care in the storage, use and disposal of all batteries. Do not dispose
ofbatteriesinare.Theymayexplode.
To avoid battery leakage:
• Do not use rechargeable batteries;
• Batteries must be removed and inserted under adult supervision;
• Non-rechargeable batteries are not to be recharged;
• Batteries are to be inserted with the correct polarity;
• Exhausted batteries are to be removed from the unit and disposed properly;
• Supply terminals are not to be short-circuited;
• Dierent types of batteries (e.g. alkaline, standard carbon-zinc or
rechargeable) or new and used batteries are not to be mixed;
• Do not dispose of batteries in re, may explode or leak.
• Never use a screwdriver or any other tool to pry batteries from the
compartment, as the supply terminals could be short-circuited.
• Do not leave batteries in the Monitor for long periods of non-use.
Failure to follow these instructions may cause batteries to make popping sounds
and leak battery acid, which could result in personal injury, as well as damage to
the Monitor. If battery leakage occurs, avoid all contact with battery acid, being
especially careful to keep it away from eyes and mouth. Should contact occur,
wash any aected skin and clothing thoroughly.
IM P ORTA NT:
• If batterIes are Installed In ChIld UnIt, CheCk for sIgns of
battery leakage at least every six months.
• always dIspose of Used batterIes In an envIronmentally
friendly manner.
Alkaline batteries and Nickel Metal Hydride batteries (Ni-Li or Ni-Hydride),
are classied as non-hazardous waste (except in California) and can be either
disposed of in the trash or e recycled at a local recycling center. In order to
find a center near you, go to www.ehso.com; using the search function, type
in “Batteries” and select the Battery Disposal Guide for Households. This will
provide a link to nearby centers based on zip code.
Care
To Clean
Do not immerse the USB Connector and Child Unit in water. Do not use cleaning
spray or liquid cleaners.
1. Disconnect Child Unit from adapter (if connected) and unplug adapter from
electrical outlets if it is plugged in.
2. Wipe units and adapter with a damp cloth.
3. Make sure all components are dry before reconnecting them.
Storage
When you are not going to use your Home and Away Computer-Connect Digital
Video Monitor for some time, remove the batteries from the Child Unit. Store in
a clean, dry place.
18 get ready for thefirstyears.com
™
get ready for thefirstyears.com™ 19
Page 11

Home & Away Computer-Connect™ Digital Video Monitor
Using your Home and Away
Baby Video Monitor with Skype
Your Home and Away Computer-Connect Digital Video Monitor comes ready
to use with Skype. Skype is a free program that allows you to make video and
voice calls over the internet to anywhere in the world. With this feature you can
check into your nursery camera and even talk to your baby from any computer
with internet access. Check out skype.com for more information and enjoy this
wicked cool way to keep your family even closer!
For maintaining privacy for your Home and Away Computer-Connect Digital
Video Monitor, we recommend that you setup a new Skype account for use with
this system. Having this new Skype account will allow you to only include people
that you trust to view your child as contacts. To setup your Skype account, go to
skype.com and follow instructions.
1. With your Video Monitor system on, connect the USB Connector to your
home computer.
2. Open Skype and sign in to your account by entering your Skype name and
password.
3. Select “Options” from the “Tools” Menu.
4. From the list of Options, choose “Audio Settings.”
5. In the Microphone Dialog Box, highlight “Wireless Audio Device.” This
designates the Child Unit of your Home and Away Computer-Connect Digital
Video Monitor as your new microphone, so that you can hear your baby.
6. Set microphone Volume using the Volume Selector Bar or click on the
“Automatically adjust microphone settings” check box, as you would when
using Skype.
7. In the Speakers Dialog Box, highlight “Wireless Audio Device.” This
designates the Child Unit of your Home and Away Computer-Connect Digital
Video Monitor as your new speaker, so your baby will be able to hear you.
8. Set speaker Volume using the Volume Selector Bar or click on the
“Automatically adjust speaker settings” check box, as you would when
using Skype.
9. Click the “Save” button.
English
10. Again, select “Options” from the Tools menu.
11. From the list of Options, choose “Video Settings.”
12. In the Webcam Dialog Box, select “USB Video Device.” This designates the
Child Unit of your Home and Away Computer-Connect Digital Video Monitor
as your new video camera.
13. Click the “Save” button.
14. Once again, select “Options” from the Tools menu.
15. Choose the “Calls” option, then click on “Call setting.”
16. Select “people in my Contact list only.” This setting protects your privacy.
17. Click in the “Answer incoming calls automatically” check box. This setting
enables Skype to receive transmissions from your Home and Away
Computer-Connect Digital Video Monitor automatically.
18. Click on the “Save” button.
These settings will enable you to receive audio and video transmissions from
your Home and Away Computer-Connect Digital Video Monitor, and to speak to
your child, remotely, just as you would if using your home computer with its USB
connection to the Parent Unit.
Note: These instructions were developed for Skype Version 4.0.32.227. If these
instructions do not match your Skype interf ace, please follow latest Skype
setup instructions or check Skype.com. You can also contact our Parent Service
Center at 1-800-704-8697 to obtain further help.
20 get ready for thefirstyears.com
™
get ready for thefirstyears.com™ 21
Page 12

Home & Away Computer-Connect™ Digital Video Monitor
English
Troubleshooting
Problem Possible Cause Solution
USB Connector
No power
(No lights on unit)
No connection
Connection indicator on
USB connector is flashing
• Unit is not plugged in.
Child Unit
• Unit is not turned on.
• Adapter not plugged in.
• Adapter is plugged into
outlet that is turned o.
• USB Connector is too far
from Child Unit (out of
range).
• Child Unit is turned o.
• Plug into USB port.
• Press and hold power
button.
• Plug in adapter.
• If outlet is controlled by
a wall switch, be sure
switch is turned on.
• Move USB Connector
closer to Child Unit.
• Turn on the Child Unit.
Connection indicator on
both units should stop
blinking and glow blue.
Troubleshooting
Problem Possible Cause Solution
Nightlight on Child Unit
does not turn on or o
Nightlight on Child Unit
does not stay on
Skype instructions are
dierent than actual Skype
• Unit is not turned on.
• No power to Unit.
• Unit is running on
battery power.
• Skype has updated their
software.
• Press power button.
• Make sure adapter is
plugged in and outlet is
receiving power. If outlet
is controlled by a wall
switch, be sure switch
is turned on. If running
on battery power, the
batteries are dead.
Replace the batteries.
• While under battery
power the nightlight will
shut o after 60 seconds.
• Refer to Skype.com for
setup instructions.
• USB Connector has
temporarily lost
connection to Child Unit.
• Units are no longer
digitally paired.
22 get ready for thefirstyears.com
• Reset system by
turning o Child Unit
and unplugging USB
connector. Turn Child Unit
on. Plug in USB connector.
Relaunch software.
• Follow add camera
instructions on page 8
and add as camera 1.
™
get ready for thefirstyears.com™ 23
Page 13

Home & Away Computer-Connect™ Digital Video Monitor
English
Warranty
Note: This equipment has been tested and found to comply with the limits
for a Class B digital device, pursuant to Part 15 of the FCC Rules. These limits
are designed to provide reasonable protection against harmful interference
in a residential installation. This equipment generates, uses and can radiate
radio frequency energy and, if not installed and used in accordance with the
instructions, may cause harmful interference to radio communications.
However, there is no guarantee that interference will not occur in a particular
installation. If this equipment does cause harmful interference to radio or television
reception, which can be determined by turning the equipment o and on, the user
is encouraged to try to correct the interference by one or more of the following
measures:
• Reorient or relocate the receiving antenna.
• Increase the separation between the equipment and receiver.
• Connect the equipment into an outlet on a circuit dierent from that to which
the receiver is connected.
• Consult the dealer or an experienced radio/T V technician for help.
This device complies with Part 15 of the FCC Rules. Operation is subject to the
following two conditions: (1) this device may not cause harmful interference, and
(2) this device must accept any interference received, including interference that
may cause undesired operation.
These devices comply with FCC and Industry Canada RF radiation exposure limits
set forth for the general population. They must not be operated when co-located
with any other antenna or transmitter.
Caution: To maintain the compliance with the FCC’s and Industry Canada’s RF
exposure guideline, place the child unit at least 20 cm (8 inches) from nearby
persons.
This Class B digital apparatus complies with Canadian ICES-003.
This device complies with RSS-310 of Industry Canada. Operation is subject
to the condition that this device does not cause harmful interference.
WARNING
Changesormodicationstothisunitnotexpresslyapprovedby
Learning Curve Brands, Inc. could void the user’s authority to operate
the equipment.
Our Limited Warranty and Warranty Period
When we use the terms “we,” “us,” and “our,” we are referring to Learning Curve Brands, Inc.,
and when we use the terms “you and “your,” we mean the original end-user customer. Our
product s are guaranteed to be free from defects in material and workmanship under normal
and intended use for a period of 9 0 days from the date of your purchase.
Repair/Replacement
If your product fails to meet our limited warrant y during the warranty period, we will, at our
option, repair or replace the produc t free of charge.
What Our Limited Warranty Does Not Cover:
We oer this limited w arranty only when the product is used by the original end-user
customer. We oer no other warranty. Additionally, while our warranty is excellent, there are
other limits to it. We o er NO WARRANT Y in cases of damage in transit, inadequate care,
abuse, abnormal use, misuse, accident, normal wear and tear, damage due to environmental
or natural elements, failure to f ollow product instructions, immersion in water (except for
product s specifically indentifie d by us in writing as intended for water use), battery leakage or
improper stor age or maintenance of the products.
Disclaimer of Other Warranties:
THE EXPRESS WARR ANTIES IN THE PRECEDING SECTION ARE E XCLUSIVE AND IN LIEU OF
ALL OTHER WARRANTIES. However, to the extent applicable law does not permit disclaimers
of certain implied warranties, such warranties are limited to the w arranty period identified
above. Some states and countries do not allow limitations on how long an implied warranty
lasts, so the above limitations may not apply to you.
Limitation on Damages:
IN NO EVENT SHALL WE BE LIABLE FOR INDICDENTAL, COMPENSATORY, PUNITIVE,
CONSEQUENITAL, INDIRECT, SPECIAL, OR OTHER DAMAGES. OUR AGGREGATE LIABILIT Y
WITH RESPECT TO DEFECTIVE PRODUCTS IS LIMITED TO THE MONIES PAID TO US FOR
THE DEFECTIVE GOOD. Some states and countries do not allow the exclusion or limitation
of incidental, consequential or other damages, so the above limitations or exclusion may not
apply to you.
State Variations:
This warrant y gives you specific legal rights, and you may also have other rights which v ary
based on state, province, or countr y.
Contact Us:
If you have a warrant y claim or request, or any customer care questions, pleas e contact us
at cs@learningcurve.com or call us at 800 -70 4-8697.
© 2011 Learning Curve Brands, Inc.
Oak Brook, IL 60523, U.S. A.
All rights reserved.
Made in China.
Y74 0 0
24 get ready for thefirstyears.com
Skype i s a registered t rademark of S kype Limite d.
Windows a nd Windows Vis ta are a regist ered tradem arks of Micros oft Corpor ation in the Unit ed States and oth er countries .
Google i s a trademark of G oogle, Inc.
™
get ready for thefirstyears.com™ 25
Page 14

 Loading...