


TE/M6C RP 12/10
Ref. No. 71497 Made in China Fabriqué en Chine
Digital VideoSRV400
Baby Monitor • Écoute-bébé • Babyfoon • Babyphone Monitor para Bebés • Baby Monitor • Видеоняня
 • Συσκευή παρακολούθησης μωρού •
Instructions • Notice d’emploi Gebruiksaanwijzing • Bedienungsanleitung Manual de Instrucciones • Manuale d’uso
Инструкция по эксплуатации •  Εγχειρίδιο οδηγιών •
GB
• GETTING TO KNOW YOUR MONITOR
PARENT UNIT |
Sound Level Lights Display |
|
Quick View Key (Top) |
|
Power Indication Light |
Speaker |
LCD Display |
Power ON/OFF Button |
 Navigation Key
 Mode/Enter Key
Belt Clip/Battery
Compartment Cover
AC Adaptor Jack/
Mini USB Jack
LCD DISPLAY
Battery Level Indicator |
Timer Icon |
Temperature Indicator
Sound Activated Monitoring Icon
Timer Display
Volume Indicator
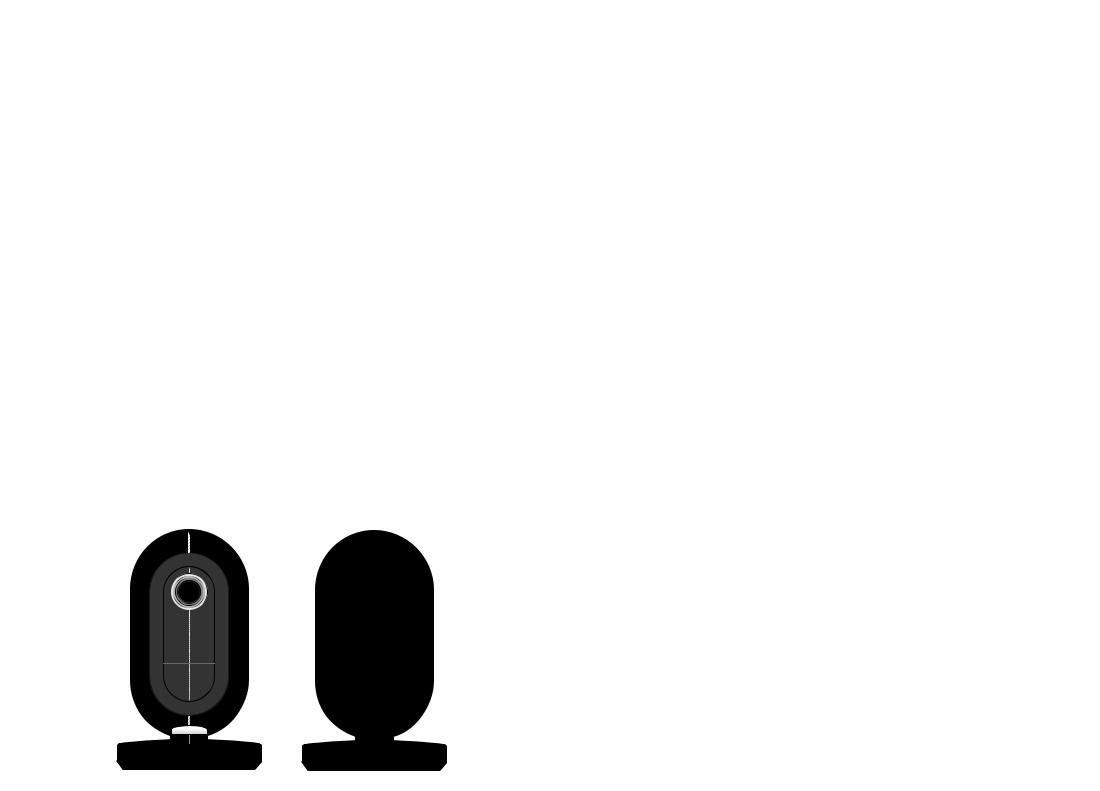
BABY UNIT
Camera Lens
Power Indication Light 
Power ON/OFF Button 
AC Adaptor Jack
Microphone
GB
• PARENT UNIT – BATTERY INSERTION & CHARGING
Unscrew the battery compartment cover from the back of the unit (N.B: this may already be supplied loose). Next, link the plug on the end of the battery pack connector to the socket inside the unit, pushing the plug firmly into the socket until it clicks. Place the battery pack into the compartment and screw the cover back into position. See Figure 1.
Connect the power adaptor with the mini USB-style plug to the Parent Unit. |
|
|
See Figure 2. Connect the unit into the mains supply and charge for a full |
Fig.1 |
Fig.2 |
7 hours. You can use your monitor while it is charging by following the ‘SET |
UP’ guide below.
Important! Your Parent Unit will not function without first inserting the battery pack.
• BABY UNIT – MAINS CONNECTION
Connect the power adaptor with the jack head to the back of the Baby Unit. See Figure 3. Connect the unit to a suitably located mains supply.
Important! Position the Baby Unit at least 1 metre but no more than 3 metres away from your baby for best performance, ensuring all parts are kept out of reach. Under no circumstances should you place any parts of the monitor in or on a cot. Keep cot sides and ends at least 40cm from surrounding bedroom furniture.
The Baby Unit Camera should be positioned to give a complete view of your baby. It may be placed |
|
upright on a flat surface pointing towards your baby, or wall mounted above the cot. See ‘Wall |
|
Mounting’ section. |
Fig.3 |
|
• SET UP
Make sure both Parent and Baby Units are plugged into the mains and/or the Parent Unit is adequately charged. The units should stand at least 1 metre apart.
Press and hold the ON/OFF Button on each unit until the green Power Indication Light illuminates.
• ALARM MODES
Identify the cause of an audible alarm by using the following table; should you be unable to identify or rectify the cause of the problem, please refer to the Simple Solution Guide in these instructions.
Alarm tone on |
Alarm Meaning |
|
Indications on the Parent Unit |
|
Parent Unit |
|
|||
|
|
|
|
|
|
|
|
|
|
•••••••• |
Out of range |
|
|
This icon will appear on the |
|
|
|||
|
|
|
|
|
(Continuous) |
|
|
|
LCD display. |
|
|
|
|
|
|
|
|
|
|
|
|
|
|
|
••• |
Low Battery on the Parent Unit |
Power Indication Light will start to flash. |
||
|
|
|
||
|
The battery icon on the LCD screen will |
|||
3 beeps |
|
appear empty with a red border. |
||
|
|
|
|
|
• MAIN MENU
Press the Mode/Enter Key to enter the Parent Unit’s Main Menu screen. Using the four-directional Navigation Keys, select one of the menus and press the Mode/Enter Key to confirm your choice. Select the Return icon on the screen to go back to the previous screen
Timer
Sound Activated
Monitoring 
Power Saving Mode 
Brightness
RETURN
(to previous screen)
Add/Remove Baby Unit(s)
2 |
|
3 |

GB
• POWER SAVING MODE
To conserve battery life, your monitor has a power saving feature that will automatically make the video screen go blank and transmit sounds only if no buttons have been pressed on the Parent Unit for 5 minutes (you can change this interval to 60 or 30 seconds if you prefer). To reactivate the screen at any time, press the Quick View
Key on top of the Parent Unit.
To disable Power Saving mode and ensure constant video monitoring, connect the Parent Unit to the mains or a PC.
• SOUND ACTIVATED MONITORING 
For those quiet moments or when your baby is a little older, you may not want to hear every sound in your baby’s room. Your Baby Monitor has a Sound Activated Monitoring mode, a feature that only captures sounds above a pre-set threshold, for example a cry rather than a gurgle.
When Sound Activated Monitoring is selected from the Main Menu, the Parent Unit (and its video display) will go into sleep mode 10 seconds after your baby settles. Every time your baby’s sounds rise above the threshold, this feature will be interrupted instantly and normal sound and video monitoring will continue until your baby settles again. The Sound Activated Monitoring Icon  will show on the Parent Unit’s LCD Display.
• TIMER
Use the Timer on the Parent Unit’s LCD Display to keep track of the interval between feeds, doses of medication, how long your child has been asleep and so on. Select the Timer from the Main Menu and then select the Start and Stop icons when ready, using the Navigation Keys and the Mode/Enter Key. For the first minute, the Timer will count in seconds. After that, it will count in minutes. To check the Timer when Sound Activated Monitoring is on or when in Power Saving Mode, simply press the Quick View Key.
• SOUND LEVEL LIGHTS DISPLAY
The Sound Level Lights Display on your Parent Unit reacts to the sounds of your baby. The louder your baby, the more lights illuminate on the display. You can lower the volume of the Parent Unit while still watching out for baby, ideal for when you’re relaxing or entertaining.
• QUICK VIEW
Press the Quick View Key on top of the Parent Unit whenever you want to reactivate the video on the LCD Display. If you are using more than one Baby Unit, you can toggle between pictures by pressing the Quick View Key repeatedly.
• ZOOM
Press the Navigation Key’s up and down arrows on the Parent Unit to zoom in and out.
• PAGING 
Locate a lost Parent Unit by pressing the ON/OFF Button on the Baby Unit 3 times in quick succession and the Parent Unit will sound a 3-minute long alarm. To silence the alarm, press any button on the Parent Unit. Please note that the paging feature will only work when both units are switched ON and monitoring as normal.
• USING MULTIPLE BABY UNITS
You can add up to 3 additional Baby Units and monitor their audio and video, all from one and the same Parent Unit. Additional Baby Units with instructions on pairing up and using them are available from www.tomy.eu
GB
• PC CONNECTION
You can connect the Parent Unit to your Personal Computer (PC) to monitor your baby, or to record and replay video. Start by downloading and installing the Tomy PC Viewer software from our website: www.tomy.co.uk/srmonitors
Once installed, open the Tomy PC Viewer programme and, using the USB cable supplied, connect the Parent Unit to your PC. Video monitoring will divert to your PC’s screen. Sound monitoring will continue through the Parent Unit. Its LCD screen will go into standby but all alarm functions will continue as normal.
Your PC should have one of the following Operating Systems: Windows XP (Service Pack 3), Windows Vista (Service Pack 2) or Windows 7, with the following recommended system requirements: 2.8 GHz dual core processor or faster; 2 GB of RAM; 10GB of available disk space; 65k colour or higher display card and support DirectX 9.
Timer Display
VIEWING AREA
|
|
|
|
|
|
|
Sound Activated |
|
|
|
|
|
|
|
Monitoring |
Active Baby Unit |
|
|
|
|
|
|
Temperature |
|
|
|
|||||
|
|
|
|
|
|||
Indicator |
|
|
Indicator |
||||
|
|
|
|
|
|
|
CONTROL AREA |
|
|
|
|
|
|
|
|
• CONTROL AREA BUTTONS
Baby Unit selector – Use your PC’s cursor to select the Baby Unit to be displayed on screen.
Zoom / Pan control – Click repeatedly on the blue button to zoom in (normal size —>X2 —> X3 —> X4 —> normal size...). Use the arrow buttons around the outside to pan around the picture.
Full screen – Click once to enlarge the picture to full screen with the Control Area showing at the bottom of the screen. Press again to make the Control Area disappear. Press your PC’s Esc key to return to small screen without the Control Area panel and again to restore to its default setting.
Viewing Area icons on/off – Press repeatedly to show or hide the on-screen icons.
View video library – Click to select and playback pictures in your video library (see below).
Record – Click to start recording. Pictures will be stored in your video library (see below). Click again to stop recording.
4 |
|
5 |
GB
• CREATING A VIDEO LIBRARY
When your Tomy PC Viewer starts up, it will default to monitoring live video from any selected Baby Unit. If no pictures appear on the screen, see our PC Troubleshooting guide below or use the on-screen help section.
Click on the Record button to store treasured footage of your baby. Showing or hiding the screen icons will not affect your recording. If left unattended, recording will continue for one hour and then stop automatically. While recording is in progress, you cannot use the Baby Unit selector to choose another camera.
Any recorded video will be saved to your PC’s hard disk, in a location and format of your choice. NOTE: no sound will be recorded to your PC.
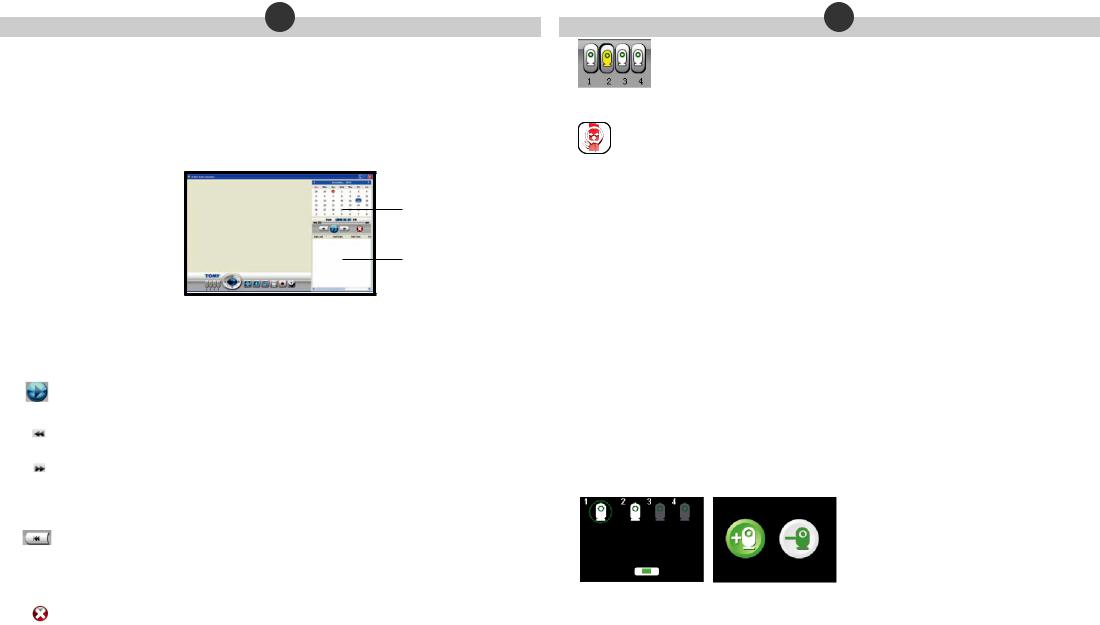
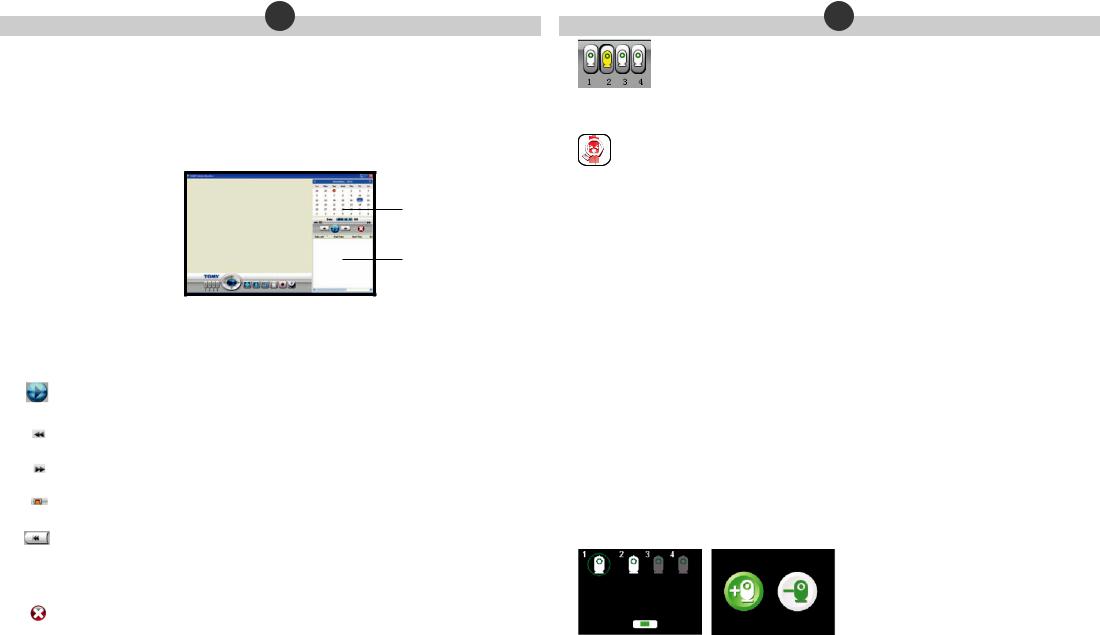
 Click on the View video library button to playback the recorded video. The following screen will appear:
Calendar View
Recorded Video List
Calendar View The current date is highlighted in blue. If a recording has been made on a given date, it will be highlighted in orange. Click on that date to play the recorded video.
Recorded Video List This panel shows the list of recorded video files shot on the selected date.
Play/Pause – Click to playback or pause the selected video. Alternatively, double-click a title in the Recorded Video List.
Slow motion – Click to toggle in and out of slow motion.
Fast forward – Click to toggle in and out of accelerated view.
 Progress Bar – Shows how much video has elapsed/is left to run.
Restart/ previous – Click to restart video (if currently selected file is first in the list) or to skip to the previous file listed in the Recorded Video List.
 Next – Click to skip to the next file listed in the Recorded Video List.
Delete – To delete a file from the Recorded Video List, first select it from the list with your cursor and then click on the Delete button.
GB
• USING MULTIPLE BABY UNITS WITH THE PC VIEWER
Full instructions on how to connect additional Baby Units are supplied when purchasing the units from www.tomy.eu
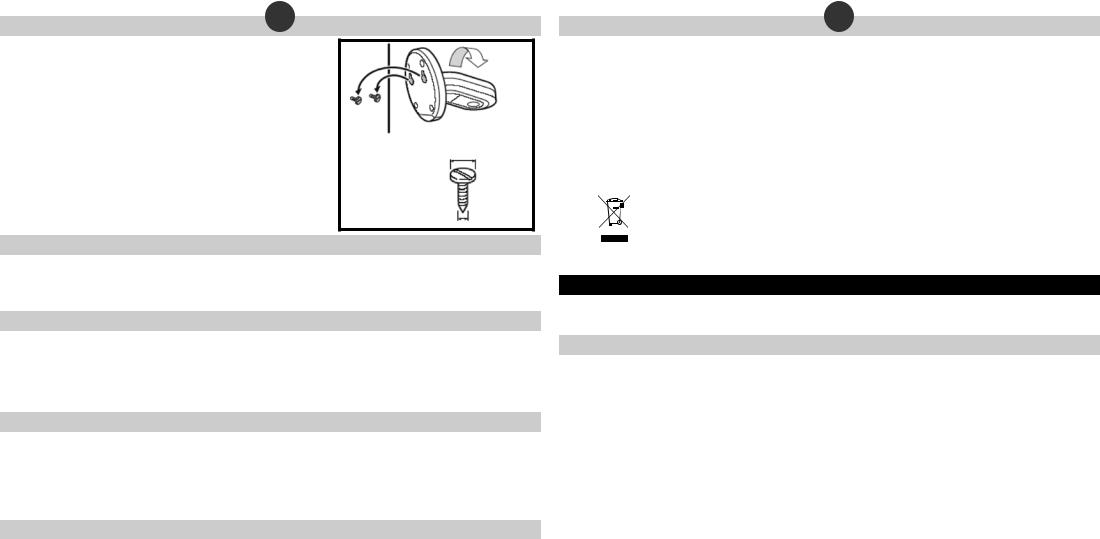
With up to 4 Baby Units connected to a single Parent Unit, you can manually toggle between video feeds on your PC screen by clicking on the matching numbered icon on the Baby Unit selector.
Switching between video feeds automatically
When you select Sound Activated Monitoring from the Parent Unit’s Main Menu and you have more than one Baby Unit connected, the video feed to your PC will automatically come from whichever Baby Unit detects sound above the preset threshold.
•If only one Baby Unit is detecting sound above the threshold, video pictures will continue to be transmitted from that unit until that baby settles or until another Baby Unit picks up sound above the preset threshold.
•If more than one Baby Unit detects sound above the threshold, the two video feeds (or more) will toggle at 3-second intervals between those Baby Units. For example, if Baby Units #2 and #4 pick up sound above the preset threshold, the video feed will toggle between these two cameras. Pictures from Baby Units #1 and #3 will not appear unless they in turn pick up sound above the threshold.
•If all the babies being monitored are quiet (with their sound levels below the preset threshold) for a period longer than 10 seconds, the video pictures on your PC will simply toggle between ALL connected Baby Units at regular intervals until one or more of the babies stirs and trips Sound Activated Monitoring.
•IMPORTANT! If you choose to record video while in Sound Activated Monitoring mode, the automatic switching between Baby Units described above will affect what is recorded.
Losing a connection |
|
|
If a connection is lost with one or more Baby Units, the video feed on your PC will be replaced with |
|
|
|
||
the ‘Loss of Link’ icon opposite, together with a number indicating which Baby Unit is affected. See |
|
|
Figure 4. |
2 |
|
To avoid the Loss of Link icon appearing on your PC screen when you turn off one of the Baby |
||
Units, be sure to remove it from the Parent Unit’s Main Menu (see below) so that the other |
|
|
Baby Units can go on monitoring without interruption. |
|
|
Fig. 4 |
||
|
||
Removing a Baby Unit |
|
Select the Add/Remove Baby Unit(s) option from the Parent Unit’s Main Menu. Next, choose the number Baby Unit you want to stop monitoring by moving the green circle using the Navigation Keys. Press the Mode/Enter Key and then select the ‘Remove’ icon with the minus symbol. See Figure 5.
Fig. 5
6 |
|
7 |
GB
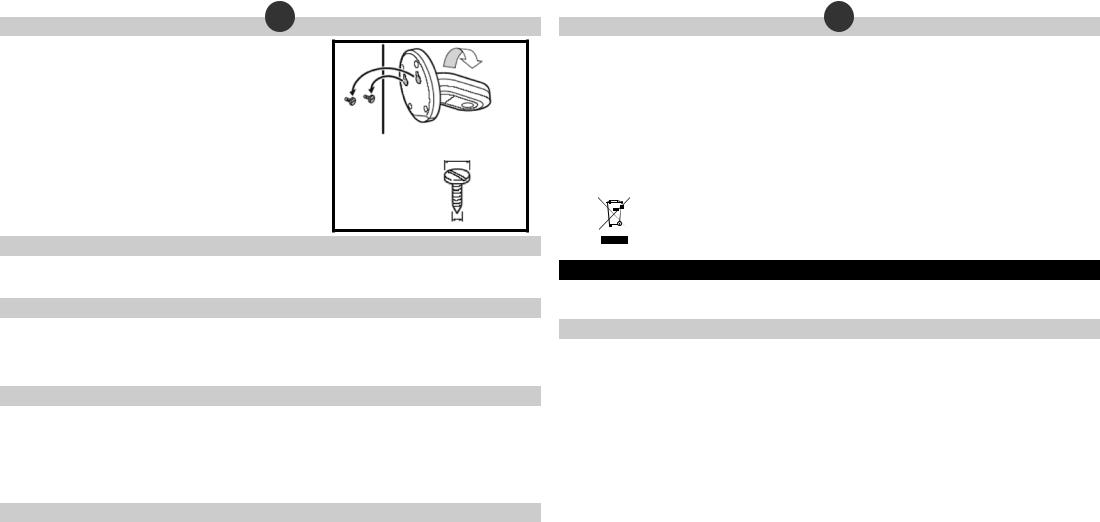
• WALL MOUNTING
The Baby Unit can be placed on any sturdy, level surface that will provide a good view of your baby. It can also be wall mounted as follows: drill two holes in the wall 32mm apart and fix the screws, using wall plugs as necessary, leaving 6mm of each screw proud of the wall. Next, with the AC Adaptor Jack connected, slide the back of the Baby Unit down onto the screws until it is secured to the wall. If necessary, remove the Unit and adjust the screws in or out. Plug the adaptor into the mains supply.
Twist the camera on the Baby Unit 180 degrees so the camera is facing the floor when the base is mounted on the wall. Once fixed, adjust the angle of the camera to get the best view of your baby.
• CARING FOR YOUR MONITOR
32mm
Recommended screw size
Head width: 3.5 - 5.0mm
Shank width:
Less than 2.5mm
Do not immerse any parts in liquid. Do not place in direct sunlight. Periodically examine product for signs of damage to electrical parts and do not use until damage has been properly repaired.
• GUARANTEE
We guarantee your monitor against manufacturing defects for 2 years from the date of purchase on production of a valid receipt. In the first instance of a manufacturing defect, we recommend that you return your monitor to its place of purchase. If this does not satisfactorily resolve your problem, please visit our website for further advice. Full terms and conditions can be also found on our website: www.tomy.eu
• TECHNICAL SPECIFICATIONS
-Batteries: Parent Unit - Rechargeable 1800mAh 2.4V Ni-MH battery (included).
-Power Supply: Mains adaptor rating: PRI: 100-240V~50/60Hz SEC: 5V 1000mA
-Operating Range: 250m in optimum ‘open field’ conditions.
-Operating Temperature: 0 - 50ºC.
-Frequencies: 2410~2470MHz.
• SAFETY INFORMATION
IMPORTANT! This monitor is restricted for indoor use only! The Tomy Baby Monitor is designed to help you monitor your child and is not a substitute for adult supervision. This product is not a toy. Always keep electrically operated items and their cables out of reach of babies and younger children. Under no circumstances should you place any part of your monitor in or on a cot. Ensure all wiring is positioned safely so that children cannot become entangled and that no trip hazard is created. Under no circumstances should the adaptors supplied with this monitor be used with any other equipment. No other adaptors than those supplied should be used with your monitor. Be careful not to position the adaptor where a child is likely to use it as a step. Putting weight on the adaptor while it is plugged in could damage the
unit or cause injury to your child. It is normal for chargers to become hot during use – take care when handling, allow heat to disperse. DO NOT COVER. Disconnect charger if the product will not be used for several days. To prevent a shock hazard, please disconnect from power supply before cleaning. The rechargeable battery within the Parent Unit should be recycled. Do not dispose in normal waste. Do not attempt to dismantle any part of this product.
GB
• BATTERY SAFETY
Charging, removal and replacement of battery pack should be carried out by an adult or under adult supervision. Unplug the adaptor cord before replacing batteries. Use only the supplied battery pack or replacement battery pack available by contacting Tomy Webcare. Please note that the guarantee becomes void if you use any other battery pack. Clean all contact surfaces before installing the supplied battery pack. Take special care to ensure battery pack is inserted correctly, observing (+) and (-) polarity marks on battery and product. Do not short circuit the contacts in the battery compartment or the battery pack terminals. Remove the battery pack and unplug the pigtail of the battery pack when storing the product for a long period of time or when the battery is dead. Dispose of exhausted battery packs safely, and never dispose of batteries in a fire. Remove exhausted batteries from product. Do not mix old (used) and new batteries or batteries of different types, e.g. rechargeable and alkaline or batteries of different makes/brands. Remove batteries from product after use or if storing for long periods. Only use batteries of the same or equivalent type to those recommended. Removal and recharging of rechargeable batteries should be carried out by an adult or under adult supervision. Do not attempt to recharge non-rechargeable batteries.
Help the environment by disposing of your product and packaging responsibly. The wheelie bin symbols indicate the product and batteries must not be disposed of in the domestic waste as they contain substances which can be damaging to the environment and health. Please use designated collection points or recycling facilities when disposing of the item or batteries.
• SIMPLE SOLUTION GUIDE
Should your monitor not be operating as expected, the information listed below should be adequate to resolve your problems.
• FREQUENTLY ASKED QUESTIONS
Q.Does my Parent Unit need to be switched on or off whilst charging?
A.Either. Your Parent Unit will charge while switched ON or OFF. However, charging the unit when switched ON will allow you to monitor your baby while charging.
Q.I have measured the temperature of my baby’s room using another device and I get a different reading than that on my monitor – why?
A.The temperature measuring device within your Tomy monitor is designed to give you an indication of the baby’s room temperature to within a small tolerance of + 1°C or - 1°C. Other devices will also have a similar tolerance.
Q.Can I use my monitor abroad?
A.You can use your monitor in the country it was purchased and anywhere in the EU. Although your monitor may function correctly in other countries, its operating frequency may affect (or be affected by) other devices and could be illegal. Tomy cannot accept any liability for use outside of the country in which you purchased your monitor or the EU.
Q.Will I hear the out-of-range and low battery alarms even when the volume on my monitor is set to zero (mute)?
A.Yes, alarms are unaffected by the volume controls.
Q.Can my monitor coexist with WI-FI and other 2.4GHz devices?
A.Your Tomy SR Monitor operates on a 2.4GHz frequency using Direct-Sequence Spread Spectrum (DSSS) technology designed to coexist with WI-FI and similar wireless digital equipment. However, if multiple 2.4GHz devices are operating in close proximity, some interference is inevitable. Should you experience reduced performance in either your monitor or wireless devices, select another channel by pressing the Mode/Enter Key for 3 seconds, repeating as necessary until you find a vacant channel.
8 |
|
9 |
• FAULT FINDING |
GB |
|
|
|
|
|
|
|
|
||
|
|
|
|
|
|
|
PROBLEM |
POSSIBLE CAUSE |
SOLUTION |
PAGE |
|
|
My Parent Unit will not |
The rechargeable battery supplied has |
Insert the battery as instructed within this booklet or the |
|
|
|
switch ON. |
not been installed correctly. |
Quick Start Guide. Once installed, place the Parent Unit on |
|
|
|
|
|
charge and leave for several minutes before switching ON. |
3 |
|
|
|
|
|
|
|
|
|
The rechargeable battery may be below the |
Place the Parent Unit on charge and leave for several |
|
|
|
|
critical voltage to activate your monitor. |
minutes before switching ON. |
|
|
|
|
|
|
|
|
|
|
Mains power is not connected correctly. |
Check the power cable connections (including wall socket). |
|
|
|
|
|
|
|
|
|
My Baby Unit will not |
Mains power is not connected |
Check the power cable connections (including wall socket). |
|
|
|
switch ON. |
correctly. |
|
3 |
|
|
|
|
|
|
|
|
|
The Power ON/OFF Button is not being |
Press and hold the Baby Unit’s Power ON/OFF Button |
|
|
|
|
|
|
||
|
|
held long enough. |
until the Power Indication Light illuminates. |
|
|
|
|
|
|
|
|
|
There is a continuous |
Loss of contact alarm. |
Make sure that the Baby Unit is switched ON. |
|
|
|
beeping noise from the |
|
|
3 |
|
|
|
Make sure the Parent Unit is adequately powered |
|
||
|
Parent Unit. |
|
|
||
|
|
and move it nearer to the Baby Unit. |
|
|
|
|
|
|
|
|
|
|
|
|
|
|
|
|
An alarm beeps 3 times |
Low battery in the Parent Unit. |
Place the Parent Unit on charge. |
3 |
|
|
every minute from the |
|
|
|
|
|
Parent Unit. |
|
|
|
|
|
I cannot hear anything |
Volume on Parent Unit is set too low. |
Increase Parent Unit volume. |
|
|
|
through my Parent Unit. |
|
|
4 |
|
|
Units are set to Sound Activated |
Refer to the Sound Activated Monitoring section. |
|
||
|
And/or its sound is only |
|
|||
|
|
|
|
||
|
intermittent. |
Monitoring mode. |
|
|
|
|
|
|
|
|
|
|
Parent Unit’s LCD display |
Power Saving mode is switched on. |
When Power Saving function is activated, the LCD |
4 |
|
|
keeps turning off. |
|
display will switch off after a set time to conserve |
|
|
|
|
|
battery life. See Power Saving section. |
|
|
|
|
|
|
|
|
|
Parent Unit’s LCD screen |
Sound Activated Monitoring is on. If baby |
Switch off Sound Activated Monitoring, or leave on |
4 |
|
|
turns off every 10 seconds. |
is quiet, sound and video automatically |
and leave the unit to switch on if your baby makes |
|
|
|
|
go into sleep mode after 10 seconds. |
a louder noise. |
|
|
|
|
|
|
|
|
|
Parent Unit is switched |
Units are set to Sound Activated |
Refer to the Sound Activated Monitoring section. |
|
|
|
on, but the LCD display, |
Monitoring mode. |
|
4 |
|
|
sound level lights and |
|
|
|
|
|
audio are all off. |
|
|
|
|
|
|
|
|
|
|
|
I hear a high-pitched noise. |
Units are too close together. |
Move units apart. |
3 |
|
|
|
|
|
|
|
|
|
Volume is too high. |
Decrease volume. |
|
|
|
|
|
|
||
|
|
|
|
|
|
|
Power Indication Light |
Low battery. |
Place the Parent Unit on charge. |
3 |
|
|
on the Parent Unit is |
|
|
|
|
|
blinking. |
|
|
|
|
|
|
|
|
|
|
|
Parent Unit loses video |
This is normal. |
Continue monitoring pictures through your PC screen and |
5 |
|
|
when I connect it to |
|
sounds through your Parent Unit. Alarms will still sound |
|
|
|
my PC. |
|
from the Parent Unit when appropriate. |
|
|
|
|
|
|
|
|
|
I think my Baby Monitor |
The monitor may have chosen a band |
Press the Mode/Enter Key for 3 seconds. This will |
|
|
|
may be having an effect |
similar to your electronic device. |
prompt the monitor to seek a different band. Repeat |
9 |
|
|
on another electronic |
|
as necessary. |
|
|
|
|
|
|
||
|
device in my home. |
|
|
|
|
|
|
|
|
|
|
|
Battery life after charging |
As with any rechargeable battery, it has |
Please visit our website for replacement parts. |
9 |
|
|
is becoming shorter. |
|
www.tomy.eu |
|
|
|
|
|
|
|
|
|
I cannot hear the baby’s |
Radio waves from other devices may be |
This product has Auto-Channel Selection feature. If you |
|
|
|
sound clearly because |
affecting your monitor. |
experience static sound, place the Parent Unit closer to |
3 |
|
|
of static. |
|
the Baby Unit. If this does not solve the problem, move |
|
|
|
|
|
your Parent Unit away from other 2.4GHz devices such as |
|
|
|
|
|
microwave ovens, wireless phones or a wireless access point. |
|
|
|
|
|
|
|
|
• PC TROUBLESHOOTING |
GB |
|
|
|
|
|
|
|
|
||
|
|
|
|
|
|
|
PROBLEM |
POSSIBLE CAUSE |
SOLUTION |
PAGE |
|
|
I cannot start the |
Your PC may not have the required |
|
5 |
|
|
Programme. |
minimum hardware. |
reinstalling the programme. |
|
|
|
|
|
|||
|
|
|
|
|
|
|
After disconnection from |
Parent Unit may be in USB mode. |
When you unplug the Parent Unit, press the Quick View |
|
|
|
my PC, there are no |
|
Button to exit USB mode. Video pictures should now |
5 |
|
|
pictures on my Parent |
|
appear on the Parent Unit. |
|
|
|
|
|
|
||
|
Unit’s LCD screen. |
|
|
|
|
|
|
|
|
|
|
|
I have connected the |
Problem with the USB connection. |
Disconnect the Parent Unit’s USB cable from the PC, press |
|
|
|
Parent Unit to my PC |
|
the Quick View Button to check you can see pictures on |
|
|
|
but there’s no video on |
|
your Parent Unit. Reconnect USB of Parent Unit to PC. |
|
|
|
my PC screen. |
|
|
5 |
|
|
Video is slow when |
|
|
|
|
|
viewed on the PC. |
|
|
|
|
|
|
|
|
|
|
|
There is no sound |
This is normal. |
Connecting the Parent Unit to your PC lets you view |
|
|
|
monitoring on my PC. |
|
pictures of your Baby. Sound Monitoring remains with |
5 |
|
|
|
|
the Parent Unit and cannot be recorded or transmitted |
|
|
|
|
|
|
|
|
|
|
|
through a PC. |
|
|
|
|
|
|
|
|
• LIMITED WARRANTY & LICENSEE INFORMATION
1.BECAUSE THE PROGRAMME IS LICENSED FREE OF CHARGE, THERE IS NO WARRANTY FOR THE PROGRAMME, TO THE EXTENT PERMITTED BY APPLICABLE LAW. EXCEPT WHEN OTHERWISE STATED IN WRITING THE COPYRIGHT HOLDERS AND/ OR OTHER PARTIES PROVIDE THE PROGRAMME “AS IS” WITHOUT WARRANTY OF ANY KIND, EITHER EXPRESSED OR IMPLIED, INCLUDING, BUT NOT LIMITED TO, THE IMPLIED WARRANTIES OF MERCHANTABILITY AND FITNESS FOR A PARTICULAR PURPOSE. THE ENTIRE RISK AS TO THE QUALITY AND PERFORMANCE OF THE PROGRAMME IS WITH YOU. SHOULD THE PROGRAMME PROVE DEFECTIVE, YOU ASSUME THE COST OF ALL NECESSARY SERVICING, REPAIR OR CORRECTION.
2.IN NO EVENT UNLESS REQUIRED BY APPLICABLE LAW OR AGREED TO IN WRITING WILL ANY COPYRIGHT HOLDER, OR ANY OTHER PARTY WHO MAY MODIFY AND/OR REDISTRIBUTE THE PROGRAMME AS PERMITTED ABOVE, BE LIABLE TO YOU FOR DAMAGES, INCLUDING ANY GENERAL, SPECIAL, INCIDENTAL OR CONSEQUENTIAL DAMAGES ARISING OUT OF THE USE OR INABILITY TO USE THE PROGRAMME (INCLUDING BUT NOT LIMITED TO LOSS OF DATA OR DATA BEING RENDERED INACCURATE OR LOSSES SUSTAINED BY YOU OR THIRD PARTIES OR A FAILURE OF THE PROGRAMME TO OPERATE WITH ANY
OTHER PROGRAMMES), EVEN IF SUCH HOLDER OR OTHER PARTY HAS BEEN ADVISED OF THE POSSIBILITY OF SUCH DAMAGES.
3.THIS PRODUCT IS LICENSED UNDER THE AVC PATENT PORTFOLIO LICENSE FOR THE PERSONAL AND
NON-COMMERCIAL USE OF A CONSUMER TO (i) ENCODE VIDEO IN COMPLIANCE WITH THE AVC STANDARD (“AVC VIDEO”) AND/OR (ii) DECODE AVC VIDEO THAT WAS ENCODED BY A CONSUMER ENGAGED IN A PERSONAL AND NON-COMMERCIAL ACTIVITY AND/OR WAS OBTAINED FROM A VIDEO PROVIDER LICENSED TO PROVIDE AVC VIDEO. NO LICENSE IS GRANTED OR SHALL BE IMPLIED FOR ANY OTHER USE.
ADDITIONAL INFORMATION MAY BE OBTAINED FROM MPEG LA, L.L.C., SEE HTTP://WWW.MPEGLA.COM
10 |
|
11 |

• FAMILIARISEZ-VOUS AVEC VOTRE ECOUTE-BEBE F
UNITÉ PARENT |
Affichage lumineux du niveau sonore |
LED d’indication Marche/Arrêt |
|
Haut-parleur |
|
Ecran LCD |
|
Bouton MARCHE/ARRET |
Touche Quick View (dessus)
 Touches directionnelles

 Touche Mode/Entrée
Clip ceinture/Couvercle du compartiment de l’accumulateur

 Entrée d’alimentation du cordon secteur/Port mini USB
AFFICHAGE LCD
Indicateur de batterie |
Icône minuteur |
Affichage de la température
Icône Surveillance avec activation au son
Affichage du minuteur
Indicateur de volume
UNITÉ BÉBÉ
Objectif de la caméra
LED d’indication
Marche/Arrêt
Bouton MARCHE/ARRET 
|
|
|
|
Entrée d’alimentation |
Microphone |
|
|
|
du cordon secteur |
|
|
|||
|
|
|
|
• UNITÉ PARENT – INSÉRER ET CHARGER L’ACCUMULATEUR F |
|
|
Enlevez le couvercle du compartiment situé à l’arrière de l’appareil (N.B. : celui-ci |
|
|
peut déjà être ouvert) et insérez l’accumulateur fourni en branchant correctement |
|
|
la fiche de l’accumulateur à la prise située dans le compartiment de l’appareil. |
|
|
Veillez à bien enfoncer la fiche dans la prise jusqu’à ce que vous entendiez un clic. |
|
|
Remettez en place le couvercle et vissez-le fermement. Référez-vous à l’image 1. |
|
|
Assurez-vous que le câble d’alimentation avec la prise de type mini USB est |
|
|
correctement branché. Référez-vous à l’image 2. Branchez l’Unité Parent à la prise de |
Image 1 |
Image 2 |
courant et laissez-la recharger pendant 7 heures. Vous pouvez utiliser votre récepteur |
pendant la charge en suivant les étapes d’INSTALLATION détaillées ci-dessous.
Important! L’Unité Parent ne fonctionne que si son accumulateur a bien été installé.
• UNITÉ BÉBÉ – BRANCHEMENT AU SECTEUR
Branchez l’adaptateur secteur en connectant la fiche à l’arrière de l’Unité Bébé. Voir l’image 3. Branchez l’unité à une prise secteur convenablement située.
Important ! Pour des performances optimales, l’Unité Bébé doit être placée à 1 mètre minimum de votre enfant (maximum 3 mètres). Assurez-vous que tous les éléments sont hors de portée. En aucun cas vous ne devez mettre les appareils de surveillance sur ou dans le lit de bébé. Gardez les côtés et extrémités du lit à au moins 40 cm des meubles de la chambre.
La caméra de l’Unité Bébé doit être positionnée de façon à avoir une vue complète de votre enfant. |
|
Elle doit être placée sur une surface plate, debout et dirigée vers lui, ou bien fixée au-dessus du lit. |
|
Voir ci-dessous la section « Montage au mur ». |
Image 3 |
|
• INSTALLATION
Veillez à ce que l’Unité Parent et l’Unité Bébé soient branchées sur le secteur et/ou que l’Unité Parent soit chargée convenablement. Les unités doivent être séparées d’au moins 1 mètre.
Maintenez le bouton MARCHE/ARRÊT de chaque unité enfoncé jusqu’à ce que la LED d’indication Marche/Arrêt s’allume.
• ALARMES
Vous pouvez identifier les causes d’une alarme sonore en vous référant au tableau suivant ; cependant, si vous ne réussissez pas à identifier ou corriger un problème, consultez le chapitre Guide de Résolution des Problèmes de cette notice.
Tonalité de l’alarme |
Signification |
|
Indication sur l’Unité Parent |
|
sur l’Unité Parent |
|
|||
|
|
|
|
|
|
|
|
|
|
•••••••• |
Perte de contact |
|
|
Cette icône apparaît sur |
|
|
|||
|
|
|
l’écran LCD. |
|
(sonnerie continue) |
|
|
|
|
|
|
|
|
|
|
|
|
|
|
|
|
|
|
|
••• |
Accumulateur déchargé – Unité Parent |
|
• La LED d’indication Marche/Arrêt va |
|
|
commencer à clignoter |
|||
|
|
|||
3 bips |
|
|
• L’icône Batterie affichée sur l’écran LCD |
|
|
|
|
sera « vide » avec une bordure rouge. |
|
|
|
|
|
|
• MENU PRINCIPAL
Appuyez sur la touche Mode/Entrée pour accéder à l’écran du menu principal de l’Unité Parent. À l’aide des touches directionnelles, sélectionnez l’un des menus et appuyez sur la touche Mode/ Entrée pour confirmer votre choix. Sélectionnez l’icône Retour sur l’écran pour revenir à l’écran précédent.
Minuteur
Surveillance avec activation au son 
Mode Economiseur
d’écran
Luminosité
RETOUR
(à l’écran précédent)
Ajouter/Retirer une/des Unité(s) Bébé
12 |
|
13 |

F
• ECONOMISEUR D’ECRAN
Pour prolonger la durée de vie de l’accumulateur, la fonction Economiseur d’écran met automatiquement en veille l’écran de votre écoute-bébé, pour ne transmettre que le son. Cette fonction s’active si aucun bouton de l’Unité Parent n’est activé
pendant 5 minutes. Pour que la mise en veille s’active plus tôt (au bout de 30 ou 60 secondes), allez dans la rubrique Economiseur d’écran du menu principal. Pour réactiver l’écran à tout moment, appuyez sur la touche Quick View.
Pour désactiver la fonction Economiseur d’écran et laisser l’écran allumé en permanence, branchez l’Unité Parent sur secteur ou connectez-la à votre ordinateur.
• SURVEILLANCE AVEC ACTIVATION AU SON 
Cette fonction vous permet de ne pas entendre en continu tous les sons émis par votre bébé. Cela s’avère pratique lorsque votre enfant est plus grand ou pour apprécier des moments de calme. Votre écoute-bébé
possède ce mode de surveillance qui capte uniquement les sons au dessus d’un niveau sonore prédéfini, c’est- à-dire uniquement les pleurs de votre enfant et pas ses gazouillis par exemple.
Lorsque la Surveillance avec activation au son est sélectionnée depuis le menu principal, l’Unité Parent (et l’écran vidéo) entrera en mode veille 10 secondes après que votre bébé se soit calmé. À chaque fois que les bruits émis par votre bébé dépassent ce seuil, cette fonctionnalité s’interrompra instantanément et la surveillance normale par le son et la vidéo continuent jusqu’à ce que votre bébé se calme à nouveau. L’icône de Surveillance avec activation au son apparaîtra sur l’affichage LCD de l’Unité Parent.
• MINUTEUR
Utilisez le minuteur sur l’affichage LCD de l’Unité Parent pour suivre les intervalles entre les repas ou entre les doses de médicaments de votre enfant, pour suivre la durée du sommeil de votre enfant, et ainsi de suite.
Choisissez le Minuteur à partir du menu principal, et sélectionnez les icônes Départ et Arrêt lorsque vous êtes prêt, en utilisant les touches directionnelles et la touche Mode/Entrée. Pendant la première minute, le minuteur compte en secondes. Après cela, il compte en minutes. Pour vérifier le minuteur lorsque la Surveillance avec activation au son est activée, ou lorsque l’économiseur d’écran est activé, appuyez simplement sur la touche Quick View.
• AFFICHAGE LUMINEUX DU NIVEAU SONORE
L’affichage lumineux du niveau sonore de l’Unité Parent réagit aux sons émis par votre enfant. Plus les sons émis sont puissants, plus le nombre de témoins lumineux augmente. Vous pouvez baisser le volume de l’Unité Parent tout en continuant de surveiller le bébé, ce qui est idéal pour les moments où vous désirez vous détendre ou vous divertir.
• QUICK VIEW
Appuyez sur la touche Quick View située sur le dessus de l’Unité Parent lorsque vous voulez réactiver la vidéo sur l’écran LCD. Si vous utilisez plus d’une Unité Bébé, vous pouvez basculer entre les émissions vidéo en appuyant de façon répétée sur la touche Quick View.
• ZOOM
Appuyez sur les touches directionnelles haut et bas de l’Unité Parent pour faire un zoom en avant ou en arrière.
• BIPEUR DE LOCALISATION 
Pour localiser l’Unité Parent si vous l’avez égarée, appuyez rapidement 3 fois sur le bouton MARCHE/ARRÊT de l’Unité Bébé  : l’Unité Parent émettra alors une sonnerie pendant 3 minutes. Appuyez sur n’importe quel bouton de l’Unité Parent pour arrêter la sonnerie. Veuillez noter que le bipeur ne fonctionne que lorsque les deux unités sont en MARCHE et effectuent une surveillance normale.
• UTILISER PLUSIEURS UNITES BEBE
Vous pouvez ajouter jusqu’à 3 Unités Bébé supplémentaires et surveiller leurs émissions audio et vidéo avec la même Unité Parent. Les Unités Bébé supplémentaires, ainsi que les instructions de connexion et d’utilisation sont disponibles sur www.tomy.eu
F
• CONNEXION À UN ORDINATEUR
Vous pouvez connecter l’Unité Parent à votre ordinateur pour surveiller votre bébé, ou enregistrer et revisionner les vidéos. Pour cela, téléchargez et installez le logiciel Tomy PC Viewer disponible sur notre site Internet : www.tomy.co.uk/smonitors
Une fois installé, lancez le programme Tomy PC Viewer puis, à l’aide du câble USB fourni, connectez l’Unité Parent à votre ordinateur. Il est ainsi possible de transférer la surveillance à votre écran d’ordinateur. La surveillance sonore s’effectue toujours via l’Unité Parent. Son écran LCD se mettra en veille mais toutes les fonctions d’alarme continueront de fonctionner normalement.
Votre ordinateur devra répondre aux exigences suivantes si vous désirez utiliser le logiciel Tomy PC Viewer : Windows XP (Service Pack 3), Windows Vista (Service Pack 2) ou Windows 7, avec le système recommandé suivant : Un processeur Dual Core 2,8 GHz ou supérieur ; 2 Go de RAM ; 10 Go d’espace libre sur le disque ; Carte graphique couleurs 65k (ou plus), avec prise en charge de DirectX 9.
 Affichage du minuteur
ZONE DE
VISUALISATION
|
|
|
|
|
|
Icône Surveillance |
L’indicateur |
|
|
|
|
|
avec activation au son |
|
|
|
|
|
Affichage de la |
|
|
|
|
|
|
||
d’Unité Bébé |
|
|
température |
|||
|
|
|||||
active |
|
|
|
|||
|
|
|
|
|
|
ZONE DE CONTRÔLE |
|
|
|
|
|
|
|
• BOUTONS DE LA ZONE DE CONTRÔLE
 Sélecteur d’Unité Bébé – utilisez le curseur de votre ordinateur pour sélectionner l’Unité Bébé à afficher sur l’écran.
Zoom / Panorama – cliquez plusieurs fois sur le bouton bleu pour zoomer en avant (taille normale —>x2 —> x3 —> x4 —> taille normale…). Utilisez les boutons fléchés situés autour pour effectuer un panorama autour de l’image.
Plein écran – cliquez une fois pour agrandir l’image en plein écran avec la Zone de contrôle qui apparaît en bas de l’écran. Appuyez encore une fois pour faire disparaître la Zone de contrôle. Sur le clavier de votre ordinateur, appuyez sur la touche Esc (Échap) pour revenir au petit écran sans le panneau de la Zone de commande puis encore une fois pour rétablir son réglage par défaut.
Icônes de la Zone d’affichage visibles/invisibles – appuyez plusieurs fois pour montrer ou cacher les icônes de l’écran.
Voir la vidéothèque – cliquez pour sélectionner et lire des images dans votre vidéothèque (voir ci-dessous)
Enregistrer – cliquez pour démarrer l’enregistrement. Les images seront stockées dans votre vidéothèque (voir ci-dessous). Cliquez à nouveau pour arrêter l’enregistrement.
14 |
|
15 |
F
• CRÉATION D’UNE VIDÉOTHÈQUE
Lorsque le logiciel Tomy PC Viewer démarre, il effectue par défaut la surveillance vidéo à partir de toute Unité Bébé sélectionnée. Si aucune image n’apparaît à l’écran, référez-vous au Guide de dépannage ci-dessous ou utilisez la section d’aide à l’écran.
Cliquez sur le bouton Enregistrer pour stocker les scènes précieuses de votre bébé. Le fait que les icônes de l’écran soient, ou non, cachées n’affectera pas l’enregistrement. Si l’enregistrement n’est pas arrêté, il continuera pendant une heure puis s’arrêtera automatiquement. Pendant l’enregistrement, il est impossible d’utiliser le sélecteur d’Unités Bébé pour choisir une autre caméra.
Les vidéos enregistrées seront sauvegardées sur le disque dur de votre ordinateur, à l’emplacement et au format de votre choix. REMARQUE : les sons ne peuvent pas être enregistrés.
 Cliquez sur le bouton Vidéothèque pour lire la vidéo enregistrée. L’écran suivant apparaîtra:
Vue Calendrier
Liste des vidéos enregistrées
Vue calendrier La date du jour est surlignée en bleu. Si un enregistrement a été effectué à une date donnée, cette date sera surlignée en orange. Cliquez sur cette date pour lire la vidéo enregistrée.
Liste des vidéos enregistrées Ce panneau montre la liste des fichiers vidéo enregistrés, réalisés à une date donnée.
Lecture/Pause – Cliquez pour lire ou mettre en pause la vidéo sélectionnée. Vous pouvez également doublecliquer sur un titre de la Liste des vidéos enregistrées.
Ralenti – Cliquez pour passer au ralenti puis pour reprendre la lecture en vitesse normale.
Avance rapide – Cliquez pour passer en vitesse accélérée puis pour reprendre la lecture en vitesse normale.
Barre de progression – Indique la durée écoulée / la durée restante de la vidéo.
Recommencer / Précédent – Cliquez pour redémarrer la vidéo (si le fichier actuellement sélectionné est le premier de la liste) ou pour voir la vidéo précédente dans la Liste des vidéos enregistrées.
 Suivant – Cliquez pour passer au fichier suivant de la Liste des vidéos enregistrées.
Supprimer – Pour supprimer un fichier de la Liste des vidéos enregistrées, sélectionnez-le d’abord dans la liste à l’aide de votre curseur, puis cliquez sur le bouton Supprimer.
• UTILISER PLUSIEURS UNITÉS BÉBÉ AVEC LE LOGICIEL PC VIEWER |
F |
Des instructions complètes sur la façon de connecter les Unités Bébé supplémentaires sont fournies lors de l’achat en ligne des unités sur le site www.tomy.eu
Jusqu’à 4 Unités Bébé peuvent être connectées à l’Unité Parent et vous pouvez basculer manuellement d’une émission vidéo à l’autre sur votre écran d’ordinateur en cliquant sur l’icône correspondant à l’Unité Bébé souhaitée.
Passer automatiquement d’une émission vidéo à l’autre
Si vous sélectionnez la fonction Surveillance avec activation au son dans le menu principal de l’Unité Parent et que plusieurs Unités Bébé sont connectées, l’émission vidéo apparaît alors sur votre ordinateur à partir de n’importe quelle Unité Bébé ayant capté des sons émis au-dessus du niveau sonore prédéfini.
•Si une seule Unité Bébé détecte des sons dépassant le niveau sonore prédéfini, alors cette unité continuera de transmettre les images vidéo jusqu’à ce que le bébé se calme, ou jusqu’à ce qu’une autre Unité Bébé capte des sons dépassant le seuil prédéfini.
•Si plus d’une Unité Bébé détecte des sons dépassant le niveau sonore prédéfini, les deux (ou plus) émissions vidéos basculeront de l’une à l’autre toutes les 3 secondes. Par exemple, si les Unités Bébé n°2 et n°4 captent un son dépassant le seuil prédéfini, l’affichage passera d’une caméra à l’autre. Les images des Unités Bébé n°1 et n°3 n’apparaîtront pas, sauf si elles captent à leur tour des sons dépassant le niveau sonore prédéfini.
•Si tous les bébés surveillés sont calmes (c’est-à-dire. que le niveau sonore émis par chacun d’entre eux ne dépasse pas le niveau sonore prédéfini) sur une période supérieure à 10 secondes, les images vidéos émises par CHACUNE des Unités Bébé connectées seront simplement affichées, tour à tour, sur l’écran de votre ordinateur à intervalles réguliers jusqu’à ce que l’un au moins des bébés s’agite et déclenche la Surveillance avec activation au son.
•IMPORTANT ! Si vous décidez d’enregistrer une vidéo pendant que la Surveillance avec activation au son est activée, le basculement automatique d’une Unité Bébé à l’autre décrit précédemment affectera ce qui est enregistré.
Perte de connexion |
|
|
Si la connexion avec au moins une Unité Bébé est perdue, le flux vidéo affiché sur votre PC sera |
|
|
|
||
remplacé par l’icône « Perte de contact » ci-dessous, accompagnée du numéro de l’Unité Bébé |
|
|
concernée. Voir l’image 4 |
2 |
|
Pour éviter de voir apparaître l’icône « Perte de contact » sur l’écran de votre ordinateur |
||
|
||
lorsque vous mettez hors tension l’une des Unités Bébé, veillez à la déconnecter depuis |
|
|
le menu principal de l’Unité Parent (voir ci-dessous), de sorte que les autres Unités Bébé |
|
|
Image 4 |
||
puissent continuer la surveillance sans être interrompues. |
||
|
Déconnecter une Unité Bébé
Sélectionnez l’option Ajouter/Retirer une/des Unité(s) Bébé dans le menu principal de l’Unité Parent. Ensuite, choisissez le numéro de l’Unité Bébé dont vous souhaitez arrêter la surveillance, en déplaçant le cercle vert à l’aide des touches directionnelles. Appuyez sur la touche Mode/Entrée puis sélectionnez l’icône « Retirer » (touche symbole « moins »). Voir l’image 5.
Image 5
16 |
|
17 |
F
• MONTAGE AU MUR
L’Unité Bébé peut être placée sur n’importe quelle surface plane et robuste, susceptible de fournir une bonne vision sur votre bébé. L’Unité peut également être accrochée au mur de la façon suivante : percez deux trous dans le mur à 32 mm d’écart et fixez les vis à l’aide de chevilles si nécessaire, en laissant chaque vis dépasser de 6 mm du mur. Ensuite, une fois l’adaptateur secteur branché, placez l’arrière de l’Unité Bébé en insérant les vis et vérifier qu’elle est correctement fixée au mur. Si nécessaire, retirez l’Unité et ajustez la position des vis. Branchez l’adaptateur au secteur.
Faites tourner la caméra de l’Unité Bébé à 180° de sorte à ce que la caméra fasse face au sol lorsque la base est montée au mur. Une fois fixée, ajustez l’angle de la caméra pour obtenir la meilleure vue possible de votre bébé.
• ENTRETIEN DE VOTRE ECOUTE-BEBE
32mm
Taille de vis recommandée
Largeur de la tête :3,5 – 5,0mm
Largeur de la vis :
Inférieure à 2,5 mm
Aucun élément ne doit être immergé dans un liquide. Ne pas exposer à la lumière directe des rayons du soleil. Inspectez régulièrement l’article pour déceler tout signe de dommage des composants électroniques. En cas de dommage, l’article ne peut être utilisé de nouveau qu’une fois réparé.
• GARANTIE
Votre écoute-bébé est garanti contre tout défaut de fabrication pendant 2 ans à partir de la date d’achat et sur présentation du ticket de caisse. Si vous décelez un défaut de fabrication lors de la première utilisation, nous vous conseillons de rapporter votre écoute-bébé où vous l’avez acheté. Si votre problème n’est pas résolu de façon
satisfaisante, vous pouvez nous contacter sur notre site Tomy Webcare www.tomy.eu pour obtenir plus de conseils et consulter les Termes et Conditions Générales.
• CARACTERISTIQUES TECHNIQUES
-Accumulateur : Unité Parent – accumulateur rechargeable Ni-MH 1800 mAh 2,4 V (fourni).
-Alimentation secteur : caractéristiques de l’adaptateur secteur : PRI : 100-240V~50/60Hz SEC : 5 V 1000 mA
-Portée : 250m en champ libre et dans des conditions optimales.
-Température de fonctionnement : 0 à 50 °C.
-Fréquences : 2410~2470MHz.
• CONSIGNES DE SECURITE
IMPORTANT ! Cet écoute-bébé est destiné à un usage intérieur exclusivement ! Il est conçu pour vous aider à surveiller votre enfant, mais ne doit en aucun cas se substituer à la surveillance d’un adulte. Cet article n’est pas un jouet. Les éléments électriques et leurs câbles doivent toujours être placés hors de portée des bébés et des jeunes enfants. Vous ne devez en aucun cas placer des éléments de l’écoute-bébé dans ou sur un lit pour enfant. Assurez-vous que tous les câbles sont installés en toute sécurité, sans risque de trébucher ni de s’enchevêtrer. En aucun cas les adaptateurs fournis avec cet écoute-bébé ne doivent être utilisés avec un autre matériel. Seuls les adaptateurs fournis avec cet écoute-bébé doivent être utilisés. L’adaptateur doit être placé dans un endroit sûr pour éviter tout risque qu’un enfant ne s’en serve comme marche. Tout poids appliqué sur l’adaptateur pendant qu’il est branché peut entraîner un risque de dommages pour l’unité ou de blessures pour votre enfant. Le chargeur chauffe pendant son utilisation, ceci est normal. Prenez soin de ne pas vous brûler en le manipulant et laissez la chaleur se disperser. NE PAS RECOUVRIR. Débranchez le chargeur si vous n’utilisez pas l’article pendant plusieurs jours. Afin d’éviter tout risque d’électrocution, débranchez le chargeur de l’alimentation avant de le nettoyer. L’accumulateur rechargeable de l’Unité Parent doit être recyclé. Ne pas jeter avec les déchets domestiques, recycler dans un conteneur prévu à cet effet. Ne pas essayer de démonter les pièces de cet article.
F
• MANIPULATION DE L’ACCUMULATEUR
La recharge, la mise en place et le remplacement de l’accumulateur doivent être effectués par un adulte ou sous la surveillance d’un adulte. Débranchez le câble de l’adaptateur avant de remettre en place l’accumulateur. N’utilisez que l’accumulateur fourni ou un accumulateur de remplacement disponible en contactant Tomy Webcare. Remarque :
la garantie ne sera plus valable si vous utilisez un autre type d’accumulateur. Nettoyez toutes les surfaces de contact avant de mettre en place l’accumulateur fourni. Assurez-vous tout spécialement qu’il est correctement branché et mis en place, en respectant les signes de polarité (+) et (-) de l’accumulateur et du produit. Ne pas court-circuiter les contacts du logement de l’accumulateur ou ceux de ses bornes. Retirez l’accumulateur et débranchez son fil lorsque vous n’utilisez pas l’appareil pendant une longue période ou lorsque l’accumulateur est hors service. Retirez l’accumulateur usé de l’appareil et jetez-le sans risque, et jamais dans le feu. Ne mélangez pas une pile usagée avec une pile neuve ou de modèle différent, par exemple, rechargeables et piles alcalines ou des accumulateurs de fabrication/marques différentes. Utilisez toujours des accumulateurs de modèle identique ou équivalents à ceux recommandés. Ne pas recharger des piles non rechargeables.
Préservez l’environnement en jetant de manière responsable votre produit et son emballage. Les symboles de recyclage indiquent que le produit et les accumulateurs ne doivent pas être jetés avec les déchets ménagers car ils contiennent des substances qui pourraient nuire à l’environnement et à la santé. Utilisez des poubelles spécialisées ou allez dans un centre de tris des ordures lorsque vous vous débarrassez de l’appareil ou de ses accumulateurs.
• GUIDE DE RÉSOLUTION DES PROBLÈMES
Si votre écoute-bébé ne fonctionne pas correctement, les informations fournies ci-dessous devraient vous aider à résoudre vos problèmes.
• QUESTIONS FRÉQENTES
Q.Est-ce que l’Unité Parent doit être hors tension ou sous tension lors de la recharge ?
R.Les deux sont possibles. L’Unité Parent peut être rechargée pendant qu’elle est sous tension ou non. Si l’unité est sous tension pendant la recharge, cela vous permet de surveiller votre enfant en même temps.
Q.J’ai pris la température de la chambre de mon enfant avec un autre appareil de mesure de température, le résultat est différent de celui affiché par l’écoute-bébé. Pourquoi?
R.Le dispositif de mesure de la température de votre écoute-bébé Tomy est prévu pour vous donner une indication
de la température de la chambre de bébé avec une petite marge d’erreur de +1°C ou -1°C. Les autres dispositifs de mesure de la température ont également leur propre marge d’erreur, ce qui explique donc une légère différence.
Q.Puis-je me servir de mon écoute-bébé à l’étranger ?
R.Vous pouvez utilisez votre écoute-bébé dans le pays où vous l’avez acheté ainsi que dans toute l’Union Européenne. Votre écoute-bébé devrait fonctionner normalement dans les autres pays ; toutefois, sa fréquence de fonctionnement pourrait affecter (ou être affectée par) d’autres appareils et pourrait être illégale. Tomy décline toute responsabilité en cas d’utilisation de l’écoute-bébé dans un autre pays que celui du pays d’achat ou en dehors de l’Union Européenne.
Q.Si le volume de mon écoute-bébé est à zéro (muet), est-ce que les alertes sonores de niveau de charge faible et les alertes m’avertissant de la perte de connexion sont toujours actives ?
R.Oui, les alarmes ne sont pas affectées par les commandes de volume sonore.
Q.Mon écoute-bébé peut-il être utilisé en même temps que du Wi-Fi ou tout autre appareil fonctionnant sur fréquence 2,4 GHz ?
R.Votre écoute-bébé fonctionne sur une fréquence de 2,4 GHz et utilise la technologie DSSS (Etalement de spectre à séquence directe) qui est spécialement conçue pour cohabiter avec les équipements fonctionnant en Wi-Fi ou avec d’autres technologies digitales non filaires. Néanmoins, si de nombreux appareils en 2,4 GHz fonctionnent en même temps à proximité de votre écoute-bébé, il se peut que des interférences se produisent. Si vous observez une réduction des performances de votre écoute-bébé ou de dispositifs sans fils, sélectionnez un autre canal en appuyant sur la touche Mode/Entrer pendant 3 secondes et répétez cette opération autant de fois que nécessaire, jusqu’à ce que vous trouviez un canal disponible.
18 |
|
19 |
• RÉSOLUTION DES PROBLÈMES |
F |
|
|
|
|||
|
|
|
|
||||
|
|
|
|
|
|
|
|
|
|
PROBLÈME |
CAUSE POSSIBLE |
|
SOLUTION |
PAGE |
|
|
|
L’Unité Parent ne |
L’accumulateur rechargeable fourni |
Branchez l’accumulateur en suivant les instructions de ce livret ou du |
|
|
|
|
|
s’allume pas. |
n’est pas installé correctement. |
|
Guide de Démarrage Rapide. Une fois l’accumulateur installé, rechargez |
|
|
|
|
|
|
|
l’Unité Parent et attendez plusieurs minutes avant de la mettre en marche. |
13 |
|
|
|
|
|
|
|
|
|
|
|
|
L’accumulateur rechargeable est peut-être sous le seuil |
Rechargez l’Unité Parent et attendez plusieurs minutes |
|
||
|
|
|
|
|
|||
|
|
|
critique de voltage pour pouvoir activer l’écoute-bébé. |
avant de la mettre en marche. |
|
|
|
|
|
|
|
|
|
|
|
|
|
|
L’alimentation secteur n’est pas établie correctement. |
Vérifiez le branchement du câble d’alimentation (y compris la prise murale). |
|
|
|
|
|
|
|
|
|
|
|
|
|
L’Unité Bébé ne s’allume |
L’alimentation secteur n’est pas établie correctement. |
Vérifiez le branchement du câble d’alimentation (y compris la prise murale). |
|
|
|
|
|
pas. |
|
|
|
13 |
|
|
|
La pression sur le bouton MARCHE/ARRÊT |
Maintenez appuyé le bouton MARCHE/ARRÊT de l’Unité Bébé |
|
|||
|
|
|
|
||||
|
|
|
n’est pas maintenue assez longtemps. |
jusqu’à ce que la LED d’indication Marche/Arrêt s’allume. |
|
|
|
|
|
|
|
|
|
|
|
|
|
L’Unité Parent émet un |
Perte du signal de contact. |
|
Assurez-vous que l’Unité Bébé est allumée. |
|
|
|
|
bip continu. |
|
|
|
13 |
|
|
|
|
|
Assurez-vous que l’Unité Parent est alimentée |
|
||
|
|
|
|
|
|
||
|
|
|
|
|
convenablement et rapprochez-la de l’Unité Bébé. |
|
|
|
|
|
|
|
|
|
|
|
|
L’Unité Parent émet un bip |
L’accumulateur de l’Unité Parent est |
Rechargez l’Unité Parent. |
13 |
|
|
|
|
de signal 3 fois par minute. |
faible. |
|
|
|
|
|
|
|
|
|
|
|
|
|
|
L’Unité Parent n’émet |
Le volume de l’Unité Parent est trop faible. |
Augmentez le volume. |
|
|
|
|
|
aucun son et/ou le son |
|
|
|
14 |
|
|
|
L’appareil est en mode de Surveillance |
Consultez le paragraphe sur le mode de Surveillance avec |
|
|||
|
|
émis est intermittent. |
|
||||
|
|
|
avec Activation au Son. |
|
Activation au Son. |
|
|
|
|
|
|
|
|
|
|
|
|
L’affichage LCD de |
L’ Economiseur d’écran est actif |
|
Lorsque la fonction Economiseur d’écran est activée, |
|
|
|
|
l’Unité Parent s’éteint en |
|
|
l’affichage LCD s’éteindra après une durée déterminée afin |
14 |
|
|
|
permanence. |
|
|
de prolonger la durée de vie de la batterie. Voir la section |
|
|
|
|
|
|
|
Economiseur d’écran. |
|
|
|
|
|
|
|
|
|
|
|
|
L’écran de l’Unité Parent |
La Surveillance avec Activation au son est |
Désactivez la Surveillance avec Activation au son, ou |
|
|
|
|
|
s’éteint toutes les 10 |
active. Si le bébé est calme, le son et l’image |
laissez-la active et laissez l’unité s’allumer si votre bébé |
14 |
|
|
|
|
secondes. |
se mettent en mode veille après 10 secondes. |
émet un bruit plus fort. |
|
|
|
|
|
|
|
|
|
|
|
|
|
L’Unité Parent est allumée mais |
L’appareil est en mode de Surveillance |
Consultez le paragraphe sur le mode de Surveillance avec |
|
|
|
|
|
l’affichage LCD, les lumières du niveau |
avec Activation au Son. |
|
Activation au Son. |
14 |
|
|
|
sonore et le son sont tous désactivés. |
|
|
|
|
|
|
|
|
|
|
|
|
|
|
|
|
|
|
|
|
|
|
|
J’entends un bruit très aigu. |
Les deux unités sont trop proches l’une de l’autre. |
Eloignez les unités l’une de l’autre. |
13 |
|
|
|
|
|
|
|
|
|
|
|
|
|
Le volume est trop élevé. |
|
Baissez le volume. |
|
|
|
|
|
|
|
|
||
|
|
|
|
|
|
|
|
|
|
La LED d’alimentation de |
Accumulateur faible. |
|
Rechargez l’Unité Parent. |
13 |
|
|
|
l’Unité Parent clignote. |
|
|
|
|
|
|
|
|
|
|
|
|
|
|
|
L’Unité Parent perd la |
C’est normal. |
|
La surveillance vidéo se fait avec votre ordinateur et le son |
|
|
|
|
connexion vidéo lorsque je la |
|
|
avec votre Unité Parent. Les alarmes sonneront toujours |
15 |
|
|
|
connecte à mon ordinateur. |
|
|
depuis l’Unité Parent au moment opportun. |
|
|
|
|
|
|
|
|
|
|
|
|
Je pense que mon |
L’écoute-bébé pourrait bien avoir |
|
Maintenez la touche Mode/Entrée enfoncée pendant 3 |
|
|
|
|
écoute-bébé a un |
choisit une bande proche de celle de |
secondes. Ceci incitera votre écoute-bébé à chercher une |
19 |
|
|
|
|
impact sur un autre |
votre produit électronique. |
|
autre bande. Répétez cette opération si nécessaire. |
|
|
|
|
dispositif électronique de |
|
|
|
|
|
|
|
mon domicile. |
|
|
|
|
|
|
|
|
|
|
|
|
|
|
|
L’autonomie de |
L’accumulateur a une certaine durée |
Consultez notre site Tomy Webcare pour obtenir plus de |
|
|
|
|
|
l’accumulateur devient |
de vie et a sans doute besoin d’être |
|
détails sur les pièces de remplacement : www. tomy.eu |
19 |
|
|
|
plus courte après |
remplacé. |
|
|
|
|
|
|
chaque recharge. |
|
|
|
|
|
|
|
|
|
|
|
|
|
|
|
Je n’entends pas |
Des ondes radio provenant d’autres |
Cet appareil possède une fonction de sélection |
|
|
|
|
|
correctement les sons |
appareils ont peut-être une incidence |
automatique de canal. Si jamais il y a des interférences, |
|
|
|
|
|
émis par le bébé à cause |
sur votre écoute-bébé. |
|
rapprochez l’Unité Parent de l’Unité Bébé. Si cela ne résout |
13 |
|
|
|
d’interférences. |
|
|
pas le problème, éloignez votre Unité Parent d’autres |
|
|
|
|
|
|
|
appareils à 2,4 GHz comme un four à micro-ondes, un |
|
|
|
|
|
|
|
téléphone portable ou un appareil-émetteur sans fil. |
|
|
|
|
|
|
|
|
|
|
• RÉSOLUTION DES PROBLÈMES - ORDINATEUR |
F |
|
|
|
||
|
|
|
|
|||
|
|
|
|
|
|
|
|
PROBLÈME |
CAUSE POSSIBLE |
|
SOLUTION |
PAGE |
|
|
Je n’arrive pas à lancer le |
Il se peut que votre ordinateur ne |
|
Vérifiez la configuration de votre ordinateur. Si le problème |
15 |
|
|
programme Tomy PC Viewer. |
dispose pas de la configuration requise. |
persiste, réinstallez le programme. |
|
|
|
|
Après l’avoir déconnecté |
L’Unité Parent est peut-être en |
|
Lorsque vous débranchez l’Unité Parent, appuyez sur le |
|
|
|
de mon ordinateur, il n’y a |
mode USB. |
|
bouton Quick View pour quitter le mode USB. Les images |
15 |
|
|
aucune image sur l’écran |
|
|
vidéo devraient à présent apparaître sur l’Unité Parent. |
|
|
|
LCD de mon Unité Parent. |
|
|
|
|
|
|
|
|
|
|
|
|
|
J’ai connecté l’Unité Parent |
Problème de connexion USB. |
|
Déconnectez le câble USB de l’Unité Parent de votre |
|
|
|
à mon ordinateur mais |
|
|
ordinateur, appuyez sur le bouton Quick View pour |
|
|
|
il n’y a aucune vidéo sur |
|
|
vérifier que vous voyez bien les images sur votre Unité |
|
|
|
l’écran de mon ordinateur. |
|
|
Parent. Reconnectez le câble USB de l’Unité Parent à |
15 |
|
|
|
|
|
votre ordinateur. |
|
|
|
La vidéo est lente |
|
|
|
|
|
|
|
|
|
|
|
|
|
lorsque je la regarde sur |
|
|
|
|
|
|
mon ordinateur. |
|
|
|
|
|
|
|
|
|
|
|
|
|
Le son ne parvient pas à |
C’est normal. |
|
La connexion de l’Unité Parent à votre ordinateur vous |
|
|
|
mon ordinateur. |
|
|
permet de voir les images de votre bébé. La surveillance |
15 |
|
|
|
|
|
sonore continue de s’effectuer par l’Unité Parent et ne peut |
|
|
|
|
|
|
être enregistrée ou transmise sur votre ordinateur. |
|
|
|
|
|
|
|
|
|
• GARANTIE LIMITEE
1.PARCE QUE LE LOGICIEL FOURNI EST LIBRE DE DROITS, IL NE BENEFICIE D’AUCUNE GARANTIE, DANS LA LIMITE DE CE QUI EST PERMIS PAR LA LOI EN APPLICATION. SAUF SI SPECIFIE PAR ECRIT, LES DETENTEURS DES DROITS ET AUTRES PARTIES FOURNISSENT LE LOGICIEL “EN L’ETAT”, SANS GARANTIES D’AUCUNE SORTE, QU’ELLES SOIENT EXPRIMEES OU IMPLICITES, CECI INCLUANT, SANS Y ETRE LIMITE, LES GARANTIES IMPLICITES DE VALEUR COMMERCIALE OU DE COMPATIBILITE DANS UN BUT SPECIFIQUE. LE RISQUE EN TERMES DE QUALITE ET DE PERFORMANCE DU LOGICIEL EST SOUS VOTRE ENTIERE RESPONSABILITE. DANS LE CAS D’UN DYSFONCTIONNEMENT DU LOGICIEL, VOUS DEVREZ EN ASSUMER LE COUT ET LES CONSEQUENCES DU POINT DE VUE DE L’ENTRETIEN, DE LA REPARATION OU DE LA MODIFICATION.
2.EN AUCUN CAS, SAUF SI BIEN SUR REQUIS PAR LA LOI EN APPLICATION, ET SI CELA EST VALIDE PAR ECRIT, LE DETENTEUR DES DROITS OU TOUT AUTRE TIERS CHARGE DE MODIFIER ET/OU DISTRIBUER LE LOGICIEL COMME AUTORISE CI-DESSUS, NE SERONT REDEVABLES ENVERS VOUS POUR QUELQUES DOMMAGES QUE CE SOIT ; CECI INCLUANT TOUT DOMMAGE GENERAL, SPECIFIQUE, ACCIDENTEL OU CONSEQUENTIEL, SURVENANT DANS L’UTILISATION OU L’IMPOSSIBILITE D’UTILISATION DU LOGICIEL (INCLUANT EGALEMENT, MAIS PAS SEULEMENT, LA PERTE DE DONNEES, OU LA PERTE SUBIE PAR VOUS-MEME OU UN TIERS, OU ENCORE L’INCAPACITE DU LOGICIEL A FONCTIONNER AVEC D’AUTRES PROGRAMMES). CECI MEME SI VOUS OU TOUTE AUTRE PARTIE AVEZ ETE INFORME(E) DE LA POSSIBILITE DE TELS DOMMAGES.
20 |
|
21 |

NL
• KENNISMAKING MET UW BABYFOON
OUDER-UNIT |
Weergavelampjes geluidsniveau |
|
Quick View-toets (bovenaan) |
|
Led (aanduiding in-/uitschakeling) |
Luidspreker |
Lcd-scherm |
AAN/UIT-knop |
 Navigatietoets


 Toets modus/enter
Riemclip/Batterijruimtedeksel
AC-adapteraansluiting/Mini-

 USB-aansluiting
LCD-scherm
Aanduiding batterijniveau |
Timerpictogram |
Temperatuur-weergave
Pictogram geluidsgeactiveerd toezicht
Timerweergave
Volume-indicator
BABY-UNIT
Cameralens
Led (aanduiding in-/
uitschakeling)
AAN/UIT-knop
AC-adapteraansluiting
Microfoon
NL
• OUDER-UNIT –PLAATSEN EN LADEN VAN BATTERIJEN
Verwijder het deksel van het batterijcompartiment aan de achterzijde van de unit (NB: dit kan bij levering al los zitten). Steek vervolgens de stekker aan het uiteinde van het snoer van de batterijset in het contact binnenin het toestel
– duw de stekker stevig in het contact tot u een klik hoort. Plaats de batterijset in het compartiment en schroef het deksel weer vast. Zie Figuur 1.
Verbind de stroomadapter met de mini-USB-plug op de Ouder-unit. Zie |
|
|
Figuur 2. Verbind de unit met het elektriciteitsnet en laat gedurende een |
Fig. 1 |
Fig. 2 |
volle 7 uur laden. U kunt uw Babyfoon gebruiken terwijl hij aan het laden is. |
Volg hiervoor het hoofdstuk ‘INSTELLEN’ hieronder.
Belangrijk! Uw Ouder-unit zal niet werken zonder dat de batterijset werd geïnstalleerd.
• BABY-UNIT – AANSLUITING OP NETSTROOM
Sluit de stroomadapter met de stekkerkop aan op de achterzijde van de baby-unit. Zie Figuur 3. Sluit het toestel aan op een stopcontact op een geschikte locatie.
Belangrijk! Voor de beste prestaties plaatst u de Baby-unit op een afstand van minstens 1 meter en hoogstens 3 meter van uw baby. Hou alle onderdelen buiten het bereik van de baby. Plaats in geen enkel geval delen van de Babyfoon in of op een wieg. Houd de zijkanten en uiteinden van de wieg op minstens 40 cm van ander slaapkamermeubilair.
De camera van de Baby-unit moet zo geplaatst zijn, dat uw baby volledig in beeld is. Ze kan |
|
|
|
|
|
||
rechtop op een vlak oppervlak geplaatst worden, op uw baby gericht, of op de muur gemonteerd |
|
|
|
Fig. 3 |
|||
worden boven de wieg. Zie het hoofdstuk ‘Muurmontage’ hieronder. |
|||
|
|
||
• INSTELLEN
Zorg ervoor dat de Ouderen Baby-unit aangesloten zijn op het elektriciteitsnet en/of dat de Ouder-unit correct geladen is. De units moeten minstens 1 meter van elkaar staan.
Houd de AAN/UIT-knop op elke unit ingedrukt tot de groene led voor aanduiding van de in-/uitschakeling gaat branden.
• ALARMMODI
Identificeer de oorzaak van het geluidsalarm met behulp van de volgende tabel; als u de oorzaak van het probleem niet kunt identificeren of corrigeren, dan raadpleegt u het hoofdstuk ‘Eenvoudige Oplossingen’ in deze instructies.
Alarmsignaal op de |
Betekenis alarm |
|
|
Aanduiding op Ouder-unit |
Ouder-unit |
|
|
||
|
|
|
|
|
|
|
|
|
|
•••••••• |
Buiten bereik |
|
|
Dit pictogram verschijnt op het |
|
|
|||
(Continu) |
|
|
|
lcd-scherm. |
|
|
|
|
|
••• |
Batterijspanning op Ouder-unit te laag |
|
• De stroom-led zal gaan knipperen. |
|
|
|
|
||
|
|
• Het batterijpictogram op het lcd-scherm zal |
||
3 beeps |
|
|
leeg met een rode rand worden weergegeven. |
|
|
|
|
|
|
• HOOFDMENU
Druk op de toets Mode/Enter om het scherm met het hoofdmenu op de Ouder-unit te openen. Met de vier navigatieknoppen kiest u één van de menu’s; druk op de toets Mode/Enter om uw keuze te bevestigen. Kies de knop Terug op het scherm om terug te keren naar het vorige scherm.
Timer
Geluidsgeactiveerd
toezicht
Spaarstand 
Helderheid
TERUG
(naar vorig scherm)
Baby-unit(s) toevoegen/verwijderen
22 |
|
23 |
NL
• SPAARSTAND
Om de batterijen te sparen, heeft uw Babyfoon een spaarstand die het videoscherm automatisch leeg maakt. Hij geeft dan alleen nog geluiden door. De Ouder-unit zal naar de spaarstand gaan als gedurende 5 minuten geen knoppen werden
ingedrukt (u kunt deze interval wijzigen in 60 of 30 seconden, als u dat wil, door op de knop Spaarstand in het hoofdmenu te drukken). Om het scherm weer in te schakelen, drukt u op gelijk welk ogenblik op de toets Quick View bovenop de Ouder-unit.
Om de spaarstand uit te schakelen en een continu videotoezicht te verzekeren, sluit u de Ouder-unit aan op het elektriciteitsnet of een pc.
• GELUIDSGEACTIVEERD TOEZICHT 
Voor wat rust, of wanneer uw baby wat ouder is, wilt u misschien niet elk geluid in de kamer van uw baby horen. Uw Babyfoon beschikt over de modus Geluidsgeactiveerd toezicht, een functie die alleen geluiden doorgeeft boven een vooraf ingestelde drempel, bijvoorbeeld een schreeuw in plaats van gekir.
Wanneer u in het hoofdmenu het Geluidsgeactiveerde toezicht selecteert, zal de Ouder-unit (en het videoscherm ervan) naar de slaapstand gaan, 10 seconden nadat uw baby tot rust is gekomen. Telkens als de geluiden van uw baby de drempelwaarde overschrijden, wordt deze functie onmiddellijk onderbroken en gaat het normale geluidsen videotoezicht door tot uw baby weer rustig is. Het pictogram voor het Geluidsgeactiveerde toezicht zal op het lcdscherm van de Ouder-unit weergegeven worden.
• TIMER
Gebruik de timer op het lcd-scherm van de Ouder-unit om de intervallen bij te houden tussen voedingen of geneesmiddelendoses, om te controleren hoe lang uw kind slaapt, enz. Kies de Timer in het hoofdmenu en selecteer dan de Starten Stoppictogrammen met de navigatietoetsen en de toets Modus/Enter. De eerste minuut zal de Timer in seconden aftellen, daarna in minuten. Om de timer te controleren wanneer het Geluidsgeactiveerde toezicht ingeschakeld is of wanneer het toestel in de spaarstand staat, drukt u gewoon op de toets Quick View.
• WEERGAVELAMPJES GELUIDSNIVEAU
De weergavelampjes voor het geluidsniveau op de Ouder-unit reageren op het geluid van uw baby. Hoe luider uw baby is, hoe meer lampjes gaan branden. U kunt het volume van de Ouder-unit lager instellen terwijl u nog steeds uw baby in het oog houdt, ideaal wanneer u aan het relaxen bent of gasten hebt.
• QUICK VIEW
Druk op de toets Quick View aan de bovenzijde van de Ouder-unit wanneer u de video op het lcd-scherm wilt heractiveren. Als u meer dan één Baby-unit gebruikt, kunt u tussen de verschillende beelden schakelen door herhaaldelijk op de toets Quick View te drukken.
• ZOOM
Druk op de Ouder-unit op de navigatietoets hoger en lager om in en uit te zoomen.
• OPROEPEN 
Zoek een verloren Ouder-unit door 3 keer snel na elkaar op de AAN/UIT-knop op de Baby-unit te drukken. De Ouderunit zal gedurende 3 minuten een alarm laten weerklinken. Om het alarm uit te schakelen drukt u op gelijk welke knop op de Ouder-unit. De oproepfunctie werkt alleen wanneer beide units ingeschakeld zijn en normaal toezicht aan het houden zijn.
• VERSCHILLENDE BABY-UNITS GEBRUIKEN
U kunt tot drie bijkomende Baby-units toevoegen en toezicht houden, met audio en video, vanaf één en dezelfde Ouder-unit. Bijkomende Baby-units zijn beschikbaar op www.tomy.eu, samen met instructies om ze op elkaar af te stemmen en te gebruiken.
NL
• AANSLUITEN OP EEN PC
U kunt de Ouder-unit op uw pc aansluiten, om toezicht te houden op uw baby of om video op te nemen en af te spelen. Start met het downloaden en installeren van de software Tomy PC Viewer vanaf onze website: www. tomy.co.uk/srmonitors.
Eens geïnstalleerd, opent u het programma Tomy PC Viewer en sluit u de Ouder-unit aan op uw pc met de meegeleverde USB-kabel. Het videotoezicht zal afgeleid worden naar het scherm van uw pc. Geluidstoezicht zal via de Ouder-unit blijven gaan. Het lcd-scherm zal in stand-by gaan, maar alle alarmfuncties blijven werken, zoals normaal.
Uw pc moet een van de volgende besturingssystemen hebben: Windows XP (Service Pack 3), Windows Vista (Service Pack 2) of Windows 7, met de volgende aanbevolen systeemvereisten: Dual core processor van 2,8 GHz of sneller; 2 GB RAM; 10 GB vrije schijfruimte; videokaart voor 65k kleuren of meer en ondersteuning voor DirectX 9.
Timerweergave
KIJKZONE
|
|
|
|
|
|
|
Pictogram |
|
|
|
|
|
|
|
geluidsgeactiveerd |
|
|
|
|
|
|
|
|
Indicator |
|
|
|
|
|
|
toezicht |
|
|
|
|
Temperatuur- |
|||
|
|
|
|||||
voor actieve |
|
|
|||||
|
|
||||||
|
|
weergave |
|||||
Baby-unit |
|
|
|||||
|
|
|
|||||
|
|
|
|
|
|
|
BEDIENINGSZONE |
|
|
|
|
|
|
|
|
• KNOPPEN BEDIENINGSZONE
 Baby-unitkiezer – gebruik de cursor van uw pc om te selecteren welke Baby-unit op het scherm weergegeven moet worden.
Zoom / Panorama – klik herhaaldelijk op de blauwe knop om in te zoomen (normaal formaat—> X2—> X3 —>X4 —> normaal formaat ...). Gebruik de pijltjes rond de buitenzijde om een panoramisch beeld te krijgen.
Volledig scherm – één keer klikken om het beeld te vergroten tot het volledige scherm, terwijl de bedieningszone onderaan het scherm wordt weergegeven. Nogmaals drukken om de bedieningszone te doen verdwijnen. Druk op de Esc-toets van uw pc om naar het kleine scherm terug te keren, zonder het bedieningspaneel, en nogmaals om de standaardinstelling te herstellen.
Pictogrammen Kijkzone AAN/UIT – druk herhaaldelijk om de pictogrammen op het scherm weer te geven of te verbergen.
Videobibliotheek bekijken – klikken om beelden in uw videobibliotheek te selecteren en af te spelen (zie hieronder).
Opname - klikken om de opname te starten. De beelden zullen opgeslagen worden in uw videobibliotheek (zie hieronder). Nogmaals klikken om de opname te stoppen.
24 |
|
25 |
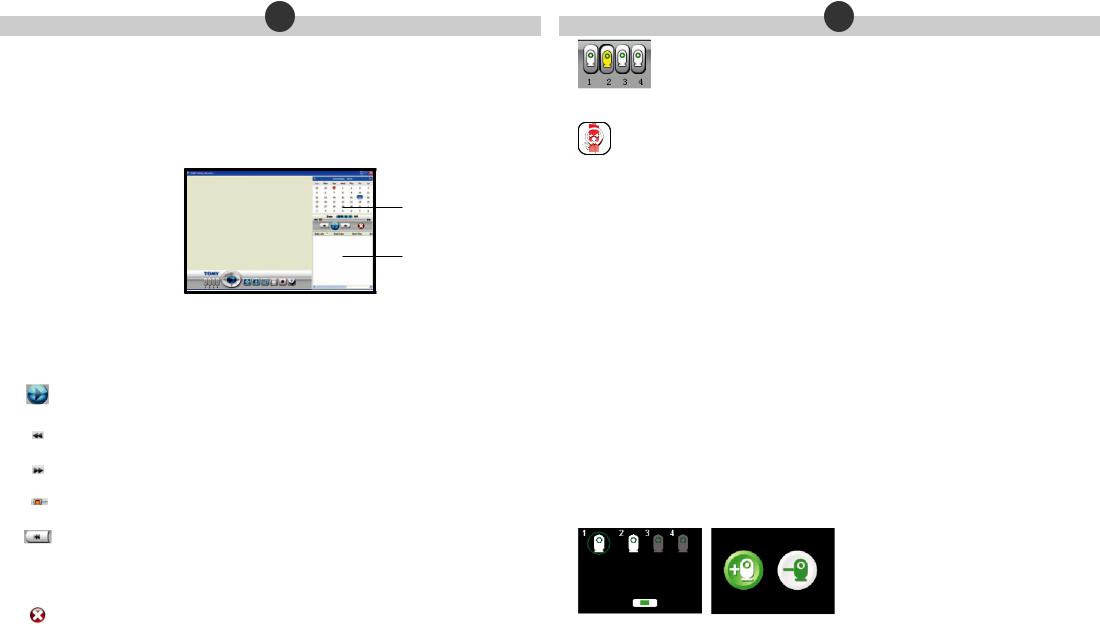
NL
• EEN VIDEOBIBLIOTHEEK CREËREN
Wanneer uw Tomy PC Viewer opstart, dan zal hij standaard starten met het weergeven van live videobeelden van de geselecteerde Baby-units. Als geen beelden op het scherm weergegeven worden, dan raadpleegt u onze gids pc-problemen oplossen hieronder of gebruikt u de on-screen help.
Klik op de opnameknop om gekoesterde opnames van uw baby op te slaan. Het weergeven of verbergen van de pictogrammen op het scherm heeft geen invloed op uw opname. Indien u niets doet, dan gaat de opname een uur lang door en stopt ze automatisch. Tijdens de opname kunt u de keuzeknop voor de Baby-unit gebruiken om een andere camera te kiezen.
Opgenomen video wordt opgeslagen op de harde schijf van uw pc, op een locatie en in het formaat van uw keuze. OPMERKING: op uw pc wordt geen geluid opgenomen.
 Klik op de knop Videobibliotheek bekijken om de opgenomen video weer te geven. Het volgende scherm verschijnt:
Kalender-weergave
Lijst van opgenomen video’s
Kalenderweegave De huidige datum wordt in het blauw weergegeven. Als op een bepaalde datum een opname werd gemaakt, dan wordt die datum in het oranje weergegeven. Klik op die datum om de opgenomen video af te spelen.
Lijst van opgenomen video Dit scherm toont de lijst van de opgenomen videobestanden die op de geselecteerde datum werden gemaakt.
Afspelen / Pauze - klikken om de geselecteerde video af te spelen of te pauzeren. Alternatief dubbelklikt u op een titel in de lijst van opgenomen video.
Trage weergave – hier klikken om slow motion in en uit te schakelen.
Snel vooruitspoelen – hier klikken om de versnelde weergave in en uit te schakelen.
Vorderingsbalk – toont hoeveel video werd afgespeeld/nog afgespeeld moet worden.
Herstarten / vorige - klikken om de video te herstarten (als het huidige geselecteerde bestand het eerste in de lijst is) of om naar het vorige bestand in de lijst van opgenomen video te gaan.
 Volgende - klikken om naar het volgende bestand in de lijst van opgenomen video te gaan.
Wissen - om een bestand uit de lijst van opgenomen video te wissen, gebruikt u eerst de cursor om het in de lijst te selecteren en klikt u vervolgens op de knop Wissen
• VERSCHILLENDE BABY-UNITS GEBRUIKEN MET DE PC |
NL |
De volledige instructies over het aansluiten van bijkomende Baby-units worden geleverd wanneer u de units aankoopt op www.tomy.eu
Met maximaal 4 Baby-units die verbonden zijn op één enkele Ouder-unit, kunt u manueel schakelen tussen de videobeelden op uw pc-scherm, door te klikken op het nummer van de gewenste Baby-unit.
Automatisch schakelen tussen videobeelden
Wanneer u het Geluidsgeactiveerde toezicht van het hoofdmenu van de Ouder-unit selecteert en u meer dan één Baby-unit aangesloten hebt, dan zullen de videobeelden op uw pc automatisch afkomstig zijn van de Baby-unit die een geluid detecteert boven de vooraf ingestelde drempel.
•Als slechts één Baby-unit geluid boven een drempel detecteert, zullen de videobeelden vanaf deze unit doorgestuurd blijven worden tot die baby rustig wordt of tot een andere Baby-unit geluid boven de vooraf ingestelde drempel detecteert.
•Als meer dan één Baby-unit geluid boven de ingestelde drempel detecteert, dan zullen de twee videobeelden (of meer) met een interval van 3 seconden schakelen tussen de betreffende Baby-units. Als de Baby-units 2 en 4 geluid registreren boven de vooraf ingestelde drempel, dan zullen de videobeelden schakelen tussen deze twee
camera’s. De beelden van Baby-units 1 en 3 zullen niet weergegeven worden, tenzij ze op hun beurt geluid boven de drempelwaarde registreren.
•Als alle baby’s onder toezicht langer dan 10 seconden rustig zijn (met een geluidsniveau onder de vooraf ingestelde drempel), dan zullen de videobeelden op uw pc gewoonweg met een regelmatige interval schakelen tussen alle aangesloten Baby-units tot één of meer van de baby’s zich roert en het Geluidsgeactiveerde toezicht in werking stelt.
•BELANGRIJK! Als u ervoor kiest om video op te nemen in de stand voor Geluidsgeactiveerd Toezicht, dan zal het automatische schakelen tussen de Baby-units, zoals hierboven beschreven, een invloed hebben op wat opgenomen wordt.
Verlies van de verbinding |
|
|
Als de verbinding met één of meer Baby-units verbroken wordt, dan zullen de videobeelden op |
|
|
|
||
uw pc vervangen worden door het pictogram ‘verbinding verbroken’ hieronder, samen met een |
|
|
nummer dat aangeeft over welke Baby-unit het gaat. Zie Figuur 4. |
2 |
|
Om te vermijden dat het pictogram voor een verbroken verbinding op uw pc-scherm |
||
|
||
verschijnt wanneer u één van de Baby-units uitschakelt, zorgt u ervoor dat u hem |
|
|
verwijdert vanaf het hoofdmenu van de Ouder-unit (zie hieronder,) zodat de andere Baby- |
|
|
Fig. 4 |
||
units zonder onderbreking toezicht kunnen blijven houden. |
||
|
Een Baby-unit verwijderen
Selecteer de optie Baby-unit(s) toevoegen/verwijderen in het hoofdmenu van de ouder-unit. Vervolgens kiest u de Baby-unit die u wilt uitschakelen door de groene cirkel te bewegen met behulp van de navigatietoetsen. Druk op de toets Modus/Enter en kies het pictogram ‘Verwijderen’ (met het minteken). Zie Figuur 5.
Fig. 5
26 |
|
27 |
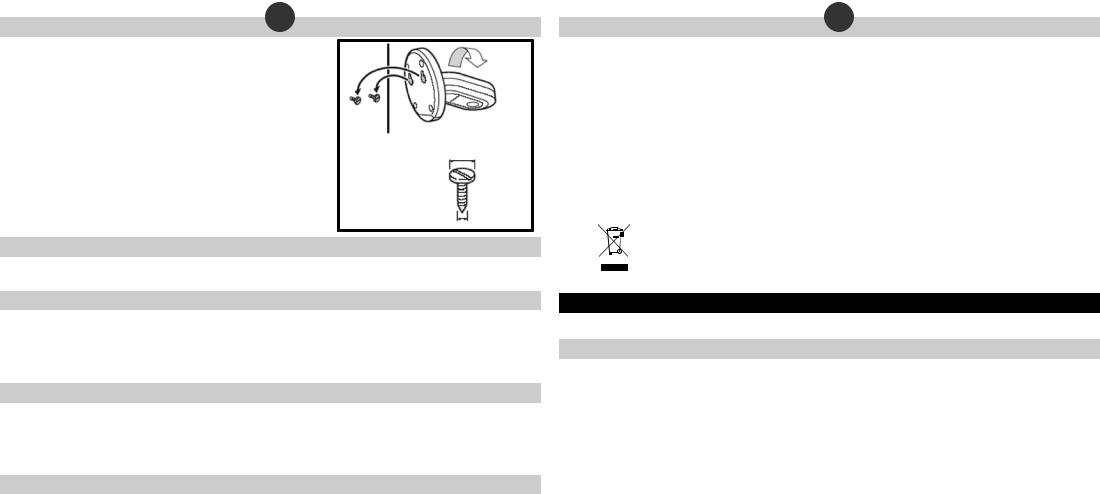
NL
• MUURMONTAGE
De Baby-unit kan op gelijk welk stevig, vlak oppervlak geplaatst worden dat een goed zicht op uw baby geeft. Hij kan ook als volgt op de muur gemonteerd worden: boor twee gaten in de muur, op een onderlinge afstand van 32 mm, en draai de schroeven vast, met muurpluggen zoals nodig, en laat 6 mm van elke schroef uit de muur steken. Vervolgens, met aangesloten AC-adapterstekker, schuift u de achterzijde van de Baby-unit op de schroeven tot
hij vast aan de muur hangt. Indien nodig verwijdert u de unit en past u de positie van de schroeven aan (meer of minder uitstekend). Sluit de adapter aan op het elektriciteitsnet.
Draai de camera op de Baby-unit 180 graden zodat de camera naar de vloer gericht is wanneer de basis op de muur gemonteerd is. Eens hij is vastgemaakt, past u de hoek van de camera aan om het beste zicht op uw baby te krijgen.
• VERZORGING VAN UW BABYFOON
32mm
Aanbevolen schroefformaat
Kop:
3,5 – 5,0 mm
Steelbreedte: minder dan 2,5 mm
Dompel geen onderdelen onder in vloeistof. Niet rechtstreeks blootstellen aan zonlicht. Controleer het product regelmatig op tekenen van schade aan de elektrische onderdelen. Niet gebruiken tot de schade correct werd hersteld.
• GARANTIE
We garanderen uw babyfoon tegen productiefouten gedurende 2 jaar vanaf de datum van aankoop, mits voorlegging van een geldig aankoopbewijs. Bij het eerste voorkomen van een productiedefect, bevelen we aan dat u uw babyfoon terugbrengt naar de plaats waar u hem hebt gekocht. Als uw probleem hiermee niet tot uw tevredenheid werd opgelost, bezoekt u onze website voor meer advies. Alle bepalingen en voorwaarden kunnen ook op onze website worden teruggevonden: www.tomy.eu
• TECHNISCHE SPECIFICATIES
-Batterijen: Ouder-unit – oplaadbare 1800 mAh 2,4 V Ni-MH-batterij (bijgeleverd).
-Stroombron: netstroomadapter: PRI: 100-240 V~50/60 Hz SEC: 5 V 1000 mA
-Werkbereik: 250 m in optimale omstandigheden in ‘open ruimte’
-Bedrijfstemperatuur: 0 - 50 ºC.
-Frequenties: 2410~2470MHz.
• VEILIGHEIDSINFORMATIE
BELANGRIJK! Deze Babyfoon is uitsluitend bestemd om binnenshuis te gebruiken! De Tomy Babyfoon is ontworpen als hulp bij het toezicht op uw kind en vervangt het toezicht door een volwassene niet. Dit product is geen speelgoed. Houd
elektrische toestellen en hun netsnoeren altijd buiten bereik van baby’s en jonge kinderen. Belangrijk: plaats nooit een of ander onderdeel van uw Babyfoon in of op het bedje. Zorg ervoor dat bedrading veilig weggewerkt is zodat kinderen er niet in verstrikt geraken of erover kunnen struikelen. De adapters die met deze Babyfoon worden meegeleverd, mogen nooit met andere toestellen gebruikt worden. Gebruik voor deze Babyfoon nooit andere dan de meegeleverde adapters. Plaats de adapter nergens waar een kleuter hem als opstapje zou kunnen gebruiken. Gewicht op een ingeplugde adapter kan de unit beschadigen maar kan ook verwondingen veroorzaken. Het is normaal dat laders heet worden tijdens het gebruik. Wees voorzichtig; geef hitte de kans zich te verspreiden. NIET AFDEKKEN! Ontkoppel de lader indien het product enkele dagen niet gebruikt wordt. Voorkom elektrische schokken: haal de stekker uit het stopcontact vóór het schoonmaken. De oplaadbare batterij in de Ouder-unit moet gerecycleerd worden. Niet weggooien met gewoon afval. Probeer geen onderdelen uit elkaar te halen.
NL
• BATTERIJVEILIGHEID
Het laden, verwijderen en vervangen van de batterijset moet door een volwassene of onder het toezicht van een volwassene worden uitgevoerd. Koppel het adaptersnoer los voordat u de batterijen vervangt. Gebruik alleen de meegeleverde batterijset of de vervangende batterijset die beschikbaar is bij Tomy Webcare. De garantie vervalt als u een andere batterijset gebruikt. Maak alle contactoppervlakken schoon voordat u de meegeleverde batterijset installeert. Zorg er in het bijzonder voor dat de batterijset correct wordt geïnstalleerd. Let op de polariteitstekens
(+) en (-) op de batterij en op het product. Zorg dat u geen kortsluiting veroorzaakt op de contacten in het batterijcompartiment of de klemmen van de batterijset. Verwijder het batterijpak en koppel de opgerolde draad van de batterijset los wanneer u het product langdurig opbergt of wanneer de batterij opgebruikt is. Werp uitgeputte batterijsets veilig weg, en gooi batterijen nooit in een vuur. Verwijder uitgeputte batterijen uit het product. Meng geen oude (gebruikte) batterijen met nieuwe of batterijen van verschillende types, bv. oplaadbare batterijen en alkalinebatterijen of batterijen van verschillende merken. Verwijder batterijen uit het product na gebruik of wanneer u het langdurig opbergt. Gebruik alleen batterijen van hetzelfde of van een gelijkwaardig type als deze die worden aanbevolen. Het verwijderen en opladen van oplaadbare batterijen moet door een volwassene of onder het toezicht van een volwassene worden uitgevoerd. Probeer nooit niet-oplaadbare batterijen op te laden.
Help het milieu door uw product en de verpakking op een verantwoorde wijze weg te gooien. Het symbool van een vuilnisbak op wielen geeft aan dat het product en de batterijen niet mogen worden weggegooid bij het huisafval, aangezien ze stoffen bevatten die schadelijk kunnen zijn voor het milieu en de gezondheid. Gebruik de vaste ophaalof recyclingpunten wanneer u het voorwerp of de batterijen weggooit.
• EENVOUDIGE OPLOSSINGEN
Als uw Babyfoon niet zou werken zoals verwacht, dan moet de onderstaande informatie volstaan om die problemen op te lossen.
• VAAK GESTELDE VRAGEN
V. Moet mijn Ouder-unit inof uitgeschakeld zijn tijdens het laden?
A. Beide zijn mogelijk. Uw Ouder-unit wordt zowel wanneer hij inof uitgeschakeld is, geladen. Wanneer de unit geladen wordt wanneer hij ingeschakeld is, dan zult u echter wel toezicht kunnen houden op uw baby tijdens het laden.
V. Ik heb met een ander toestel de temperatuur in de kamer van mijn baby gemeten en krijg een andere waarde dan op mijn Babyfoon. Waarom?
A. Het toestel om de temperatuur te meten dat in uw Tomy Babyfoon zit, werd ontworpen om u een indicatie te geven van de temperatuur in de kamer van uw baby, met een kleine tolerantie van + 1 °C of -1 °C. Andere toestellen zullen eveneens een gelijkaardige tolerantie hebben.
V. Kan ik mijn Babyfoon in het buitenland gebruiken?
A. U kunt uw Babyfoon gebruiken in het land waar u hem gekocht hebt, en overal in de EU. Hoewel uw Babyfoon in andere landen correct kan werken, kan de bedrijfsfrequentie ervan een invloed hebben op (of beïnvloed worden door) andere toestellen en illegaal zijn. Tomy kan niet aansprakelijk worden gesteld voor gebruik buiten het land waarin u uw Babyfoon gekocht hebt, of buiten de EU.
V. Zal ik de alarmen ‘buiten bereik’ en ‘batterij bijna leeg’ horen, zelfs als het volume op mijn Babyfoon op nul ingesteld is (mute)?
A. Ja, alarmen worden niet beïnvloed door de volumeregeling.
V. Kan mijn Babyfoon samen met WiFi en andere 2,4 GHz-toestellen gebruikt worden?
A. Uw Tomy SR Babyfoon werkt bij een frequentie van 2,4 GHz en gebruikt hierbij de technologie Direct-Sequence Spread Spectrum (DSSS), ontworpen om samen met WiFi en gelijkaardige draadloze digitale uitrusting gebruikt te worden. Als in de dichte nabijheid verschillende 2,4 GHz-toestellen werken, is enige interferentie onvermijdelijk. Als u vaststelt dat uw Babyfoon of andere draadloze toestellen minder goed functioneren, dan kiest u een ander kanaal door gedurende 3 seconden op de toets Modus/Enter te drukken. Herhaal deze handeling zo veel als nodig is, tot u een vrij kanaal vindt.
28 |
|
29 |
• FOUTOPLOSSING |
NL |
|
|
|
||
|
|
|
|
|||
|
|
|
|
|
|
|
|
|
PROBLEEM |
MOGELIJKE OORZAAK |
OPLOSSING |
PAGINA |
|
|
|
Mijn Ouder-unit kan niet |
De meegeleverde oplaadbare batterij |
Plaats de batterij zoals beschreven in dit boekje of in de |
|
|
|
|
ingeschakeld worden. |
werd niet correct geïnstalleerd. |
Snelstartgids. Eens de batterij geïnstalleerd is, laat u de |
|
|
|
|
|
|
Ouder-unit enkele minuten opladen voordat u hem inschakelt. |
|
|
|
|
|
|
|
23 |
|
|
|
|
De oplaadbare batterij kan onder de kritieke |
Laat de Ouder-unit enkele minuten opladen voordat |
|
|
|
|
|
spanning zijn om uw Babyfoon te activeren. |
u hem inschakelt. |
|
|
|
|
|
|
|
|
|
|
|
|
Het toestel is niet correct aangesloten |
Controleer de aansluitingen van het stroomsnoer |
|
|
|
|
|
op de netspanning. |
(met inbegrip van het stopcontact) |
|
|
|
|
|
|
|
|
|
|
|
Mijn Baby-unit kan niet |
Het toestel is niet correct aangesloten |
Controleer de aansluitingen van het stroomsnoer |
|
|
|
|
ingeschakeld worden. |
op de netspanning. |
(met inbegrip van het stopcontact) |
23 |
|
|
|
|
|
|
|
|
|
|
|
Een AAN/UIT-knop wordt niet lang |
Druk de AAN/UIT-knop van de Baby-unit in tot de led |
|
|
|
|
|
genoeg ingedrukt. |
voor aanduiding in-/uitschakeling gaat branden. |
|
|
|
|
|
|
|
|
|
|
|
Er is een continu |
Alarm voor verbroken contact. |
Controleer of de Baby-unit ingeschakeld is. |
|
|
|
|
piepgeluid te horen in |
|
|
23 |
|
|
|
|
Zorg ervoor dat de Ouder-unit correct ingeschakeld |
|
||
|
|
de Ouder-unit |
|
|
||
|
|
|
is en plaats hem dichter bij de Baby-unit. |
|
|
|
|
|
|
|
|
|
|
|
|
|
|
|
|
|
|
|
Uit de Ouder-unit weerklinkt elke |
Batterijspanning in de Ouder-unit te |
Laat de Ouder-unit opladen. |
23 |
|
|
|
minuut 3 keer een alarmsignaal. |
laag. |
|
|
|
|
|
|
|
|
||
|
|
|
|
|
|
|
|
|
Ik kan niets horen door mijn Ouder- |
Het volume op de Ouder-unit is te laag ingesteld. |
Stel het volume op de Ouder-unit hoger in |
|
|
|
|
unit en/of het geluid wordt slechts |
|
|
24 |
|
|
|
De units zijn ingesteld op het |
Raadpleeg het hoofdstuk Geluidsgeactiveerd toezicht. |
|
||
|
|
met tussenpozen weergegeven |
Geluidsgeactiveerd toezicht. |
|
|
|
|
|
|
|
|
|
|
|
|
|
|
|
|
|
|
|
Het lcd-scherm van de |
De spaarstand is ingeschakeld. |
Wanneer de spaarstand ingeschakeld is, zal het lcd-scherm |
|
|
|
|
ouderunit wordt altijd |
|
na een bepaalde tijd uitgeschakeld worden om de levensduur |
24 |
|
|
|
uitgeschakeld. |
|
van de batterij te behouden. Zie hoofdstuk Spaarstand. |
|
|
|
|
|
|
|
|
|
|
|
Het lcd-scherm van |
Het Geluidsgeactiveerd toezicht is |
Schakel het Geluidsgeactiveerde toezicht uit, of laat |
|
|
|
|
de ouder-unit wordt |
ingeschakeld. Als de baby stil is, gaan |
het aan staan zodat de unit wordt ingeschakeld |
24 |
|
|
|
om de 10 seconden |
het geluid en de video na 10 seconden |
wanneer uw baby luider geluid maakt. |
|
|
|
|
uitgeschakeld. |
automatisch naar de slaapstand. |
|
|
|
|
|
|
|
|
|
|
|
|
De Ouder-unit is ingeschakeld, |
De units zijn ingesteld op het |
Raadpleeg het hoofdstuk Geluidsgeactiveerd toezicht. |
|
|
|
|
maar het lcd-scherm, de |
Geluidsgeactiveerd toezicht. |
|
24 |
|
|
|
weergavelampjes voor het |
|
|
|
|
|
|
geluidsniveau en de audio zijn uit. |
|
|
|
|
|
|
|
|
|
|
|
|
|
Ik hoor een geluid met |
De units staan te dicht bij elkaar. |
Zet de units verder uit elkaar. |
23 |
|
|
|
hoge toon. |
|
|
|
|
|
|
Het volume is te hoog ingesteld. |
Stel het volume lager in. |
|
||
|
|
|
|
|
||
|
|
|
|
|
|
|
|
|
Het led voor |
Batterij bijna leeg. |
Laat de Ouder-unit opladen. |
23 |
|
|
|
stroomaanduiding op |
|
|
|
|
|
|
de Ouder-unit knippert. |
|
|
|
|
|
|
|
|
|
|
|
|
|
De video op de Ouder- |
Dit is normaal. |
Blijf de beelden bekijken via het scherm van uw pc, en hou |
25 |
|
|
|
unit verdwijnt wanneer ik |
|
geluidstoezicht via uw Ouder-unit. Indien nodig, zullen nog |
|
|
|
|
hem op mijn pc aansluit. |
|
alarmsignalen door de Ouder-unit worden weergegeven. |
|
|
|
|
|
|
|
|
|
|
|
Ik denk dat mijn Babyfoon |
De monitor heeft misschien een |
Druk de toets Modus/enter gedurende 3 seconden in. |
29 |
|
|
|
een effect heeft op een ander |
frequentieband gekozen die gelijk is |
Hierdoor zal de monitor een andere frequentieband |
|
|
|
|
elektronisch toestel in mijn huis. |
aan die van uw elektronische toestel. |
kiezen. Herhaal indien nodig. |
|
|
|
|
|
|
|
|
|
|
|
De levensduur van de |
Zoals bij elke oplaadbare batterij, |
Bezoek onze website voor vervangingsonderdelen. |
|
|
|
|
batterij wordt korter na |
is de levensduur eindig en moet hij |
www.tomy.eu |
29 |
|
|
|
elke oplaadbeurt. |
misschien vervangen worden. |
|
|
|
|
|
|
|
|
||
|
|
|
|
|
|
|
|
|
Ik kan het geluid van |
Radiogolven van andere toestellen |
Dit product heeft een functie voor automatische kanaalkeuze. Als u een |
|
|
|
|
de baby niet duidelijk |
kunnen uw Babyfoon beïnvloeden. |
ruis hoort, plaatst u de Ouder-unit dichter bij de Baby-unit. Als dit het |
23 |
|
|
|
horen door ruis. |
|
probleem niet oplost, verplaatst u uw Ouder-unit weg van andere 2,4 GHz- |
|
|
|
|
|
|
toestellen zoals magnetrons, draadloze telefoons of een draadloze router. |
|
|
|
|
|
|
|
|
|
• PC-PROBLEMEN OPLOSSEN |
NL |
|
|
|
||
|
|
|
|
|||
|
|
|
|
|
|
|
|
PROBLEEM |
MOGELIJKE OORZAAK |
|
OPLOSSING |
PAGINA |
|
|
Ik kan het programma niet |
Uw pc beschikt mogelijk niet over de |
Controleer de specificaties van uw pc. Als het probleem blijft |
25 |
|
|
|
starten. |
minimaal vereiste hardware. |
|
bestaan, probeert u het programma opnieuw te installeren. |
|
|
|
Na loskoppeling van mijn pc |
De Ouder-unit staat misschien in USB- |
Wanneer u de Ouder-unit loskoppelt, drukt u op de knop |
|
|
|
|
zijn er geen beelden te zien |
modus. |
|
Quick View om de USB-modus af te sluiten. U moet nu |
25 |
|
|
op het lcd-scherm van mijn |
|
|
videobeelden op de Ouder-unit zien. |
|
|
|
Ouder-unit. |
|
|
|
|
|
|
|
|
|
|
|
|
|
Ik heb de Ouder-unit |
Probleem met de USB-aansluiting |
|
Koppel de USB-kabel van de Ouder-unit los van de pc, druk |
|
|
|
aangesloten op mijn pc, |
|
|
op de knop Quick View om te controleren of u beelden kunt |
|
|
|
maar er verschijnt geen |
|
|
bekijken op uw Ouder-unit. Sluit de USB van de Ouder-unit |
|
|
|
video op mijn pc-scherm. |
|
|
weer aan op de pc. |
25 |
|
|
De video op de pc wordt |
|
|
|
|
|
|
traag weergegeven |
|
|
|
|
|
|
|
|
|
|
|
|
|
Er is geen geluidstoezicht op |
Dit is normaal. |
|
Wanneer u de Ouder-unit op uw pc aansluit, kunt u |
|
|
|
mijn pc. |
|
|
beelden van uw baby bekijken. Het geluidstoezicht |
25 |
|
|
|
|
|
wordt voortgezet op de Ouder-unit en kan niet worden |
|
|
|
|
|
|
opgenomen of weergegeven op een pc. |
|
|
|
|
|
|
|
|
|
|
|
|
|
|
|
|
• BEPERKTE GARANTIE
1.AANGEZIEN VOOR DIT PROGRAMMA EEN GRATIS LICENTIE WORDT VERLEEND, IS ER GEEN GARANTIE VOOR HET PROGRAMMA, IN DE MATE WAARIN DIT WORDT TOEGELATEN DOOR DE TOEPASSELIJKE WETGEVING. BEHALVE WANNEER ANDERS SCHRIFTELIJK VERMELD, LEVEREN DE COPYRIGHTEIGENAARS EN/OF ANDERE PARTIJEN HET PROGRAMMA “AS IS”, ZONDER ENIGE GARANTIE, EXPLICIET OF IMPLICIET, MET INBEGRIP VAN MAAR NIET BEPERKT TOT DE GEÏMPLICEERDE WAARBORGEN VAN VERHANDELBAARHEID EN GESCHIKTHEID VOOR EEN BEPAALD DOEL. HET VOLLEDIGE RISICO
MET BETREKKING TOT DE KWALITEIT EN DE PRESTATIES VAN HET PROGRAMMA, WORDT DOOR U GEDRAGEN. ALS HET PROGRAMMA DEFECT ZOU BLIJKEN, ZIJN ALLE KOSTEN VOOR DE NOODZAKELIJKE INGREPEN, REPARATIES OF CORRECTIES TE UWEN LASTE
2.IN GEEN GEVAL, TENZIJ VEREIST DOOR DE TOEPASSELIJKE WETGEVING OF SCHRIFTELIJK OVEREENGEKOMEN, KAN GEEN ENKELE COPYRIGHTEIGENAAR OF ENIGE ANDERE PARTIJ DIE HET PROGRAMMA KAN WIJZIGEN EN/OF VERDELEN, ZOALS HOGER TOEGELATEN, AANSPRAKELIJK GESTELD WORDEN VOOR UW SCHADE, MET INBEGRIP VAN ALGEMENE, BIJZONDERE, INCIDENTELE OF RESULTERENDE SCHADE VOORTVLOEIEND UIT HET GEBRUIK VAN HET PROGRAMMA (MET INBEGRIP VAN MAAR NIET BEPERKT TOT GEGEVENSVERLIES OF GEGEVENS DIE ONJUIST WORDEN WEERGEGEVEN, VERLIEZEN OPGELOPEN DOOR U OF DERDEN, HET NIET COMPATIBEL ZIJN VAN HET PROGRAMMA MET ANDERE PROGRAMMA’S), ZELFS ALS DIE EIGENAAR OF ANDERE PARTIJ GEÏNFORMEERD WERD OVER DE MOGELIJKHEID VAN DERGELIJKE SCHADE.
30 |
|
31 |
 Loading...