

Page 1
Remote Bottle Warmer – Instructions (rev 8)
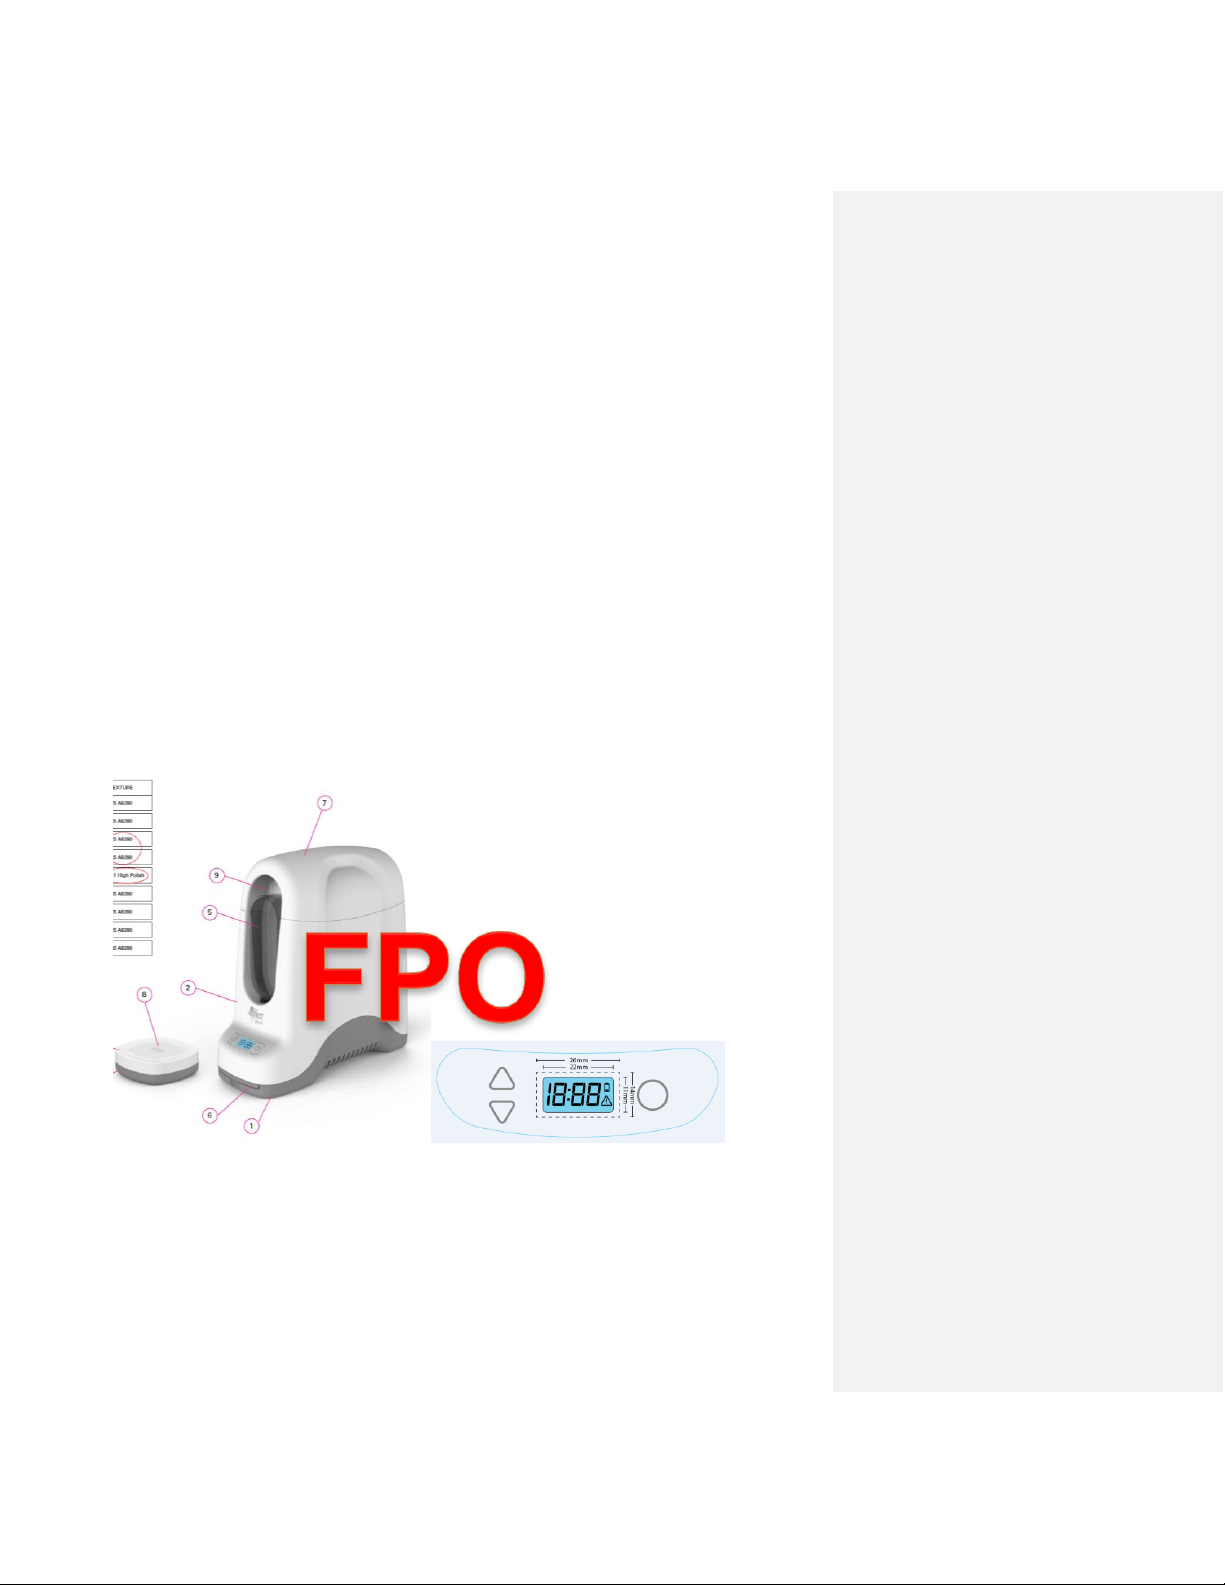
Section 1: Cover:
o TFY Logo (top left)
o Remote Bottle Warmer (top right)
o Instruction Manual
o Line Drawing/Exploded View of pieces (labeled)
Base unit
Cover
Water reservoir
Lift-out basket
Freezer bottles (2)
Control panel
Warming time reference drawer
Remote button
o “Questions? Let’s talk!
help@thefirstyears.com
USA & Canada 800-704-8697
(Reference image from the CMF…CMF lists extra parts and unneeded info…use list
above)
Exploded view of the control panel with callouts pointing to:
Up arrow button
Down arrow button
LCD Screen
Low battery indicator
Error indicator
Power button
Page 1 of 9
Page 2

Section 2: Safeguards
IMPORTANT SAFEGUARDS
1. Read all instructions before using.
2. Always use the included lift out basket to warm or sterilize
3. Do not place your hands in or around the warming chamber during heating.
4. Allow steam to disperse from the base unit (after removing lid) before removing
warming chamber basket.
5. To prevent injury, always swirl bottle contents and test temperature of contents
before giving bottle to your child. If heating baby food, always test temperature
before feeding your child.
6. To protect against electric shock, do not immerse cord in water or any other
liquid.
7. Close supervision is necessary when any appliance is used near children.
8. Do not operate this unit with a damaged cord or plug or after the appliance
malfunctions or has been damaged in any manner.
9. Do not let cord hang over edge of table or counter, or touch hot surfaces.
10. Do not use with an extension cord.
11. TOMY does not make, offer or recommend any accessory attachments for this
unit. The use of any kind of accessory attachments may cause injury. NOTE:
additional freezer bottles can be purchased at thefirstyears.com
12. For household use only. Do not use outdoors.
13. Do not place on or near a hot gas or electric burner.
14. Do not move unit when hot or contains hot liquids.
15. Do not use this unit for anything other than its intended use outlined in this
manual.
16. This appliance has a polarized plug (one blade is wider than the other). To
reduce the risk of electric shock, this plug is intended to fit into a polarized outlet
only one way. If it does not fit, contact a qualified electrician. Do not attempt to
modify the plug in any way.
17. This product does not require preheating.
18. The user should not attempt to service or repair the unit.
19. No serviceable parts inside.
20. Unplug from the outlet when not in use, before putting on or taking off parts, and
before cleaning.
21. Unit will automatically shut off when no water is available to be heated
22. Wait 10 minutes before heating a second bottle to avoid overheating.
23. Save these instructions for future use.
Page 2 of 9
Page 3

Section 3: To Clean
Thank you for purchasing this Remote Bottle Warmer. We hope you enjoy using it.
While we have designed this to be easy to use, it does take a little explaining and we
want to best prepare you to successfully and safely use this item. After reading through
the instruction booklet, we hope that you understand how easy it really is. Of course,
should you have any questions, please just ask us! We are here to help you. Please
contact us via website www.thefirstyears.com, by email at: help@thefirstyears.com or
call us at 1-800-704-8697.
TO CLEAN
Water reservoir, lift-out basket, freezer bottle:
Dishwasher safe (top rack only).
Bottle warmer unit: ALWAYS TURN OFF, LET THE UNIT COOL AND UNPLUG
BEFORE CLEANING. Wipe surface of unit as well as inside warming chamber with a
damp cloth or sponge using mild liquid soap. Wipe with clean water. Air dry. DO NOT
IMMERSE BOTTLE WARMER IN WATER. Do not use scouring pads, solvents or
abrasive cleaners as they could damage the unit. Remove the pop out divider behind
water reservoir for better access.
Warming chamber: Mineral deposits (usually white in color) may form on the inner
surfaces of the warming chamber and can cause damage to the unit.
To remove mineral deposits:
1. Unplug the unit.
2. Remove the basket, and wash separately as indicated above.
3. Pour 2 oz. distilled white vinegar into the warming chamber and let it stand for
an hour or two (longer if necessary).
4. Pour out the vinegar and rinse the chamber two or three times with 3 or 4 oz.
of clear tap water.
WARNING
ALWAYS turn unit off, let the unit cool and unplug to clean.
DO NOT immerse unit in water.
DO NOT use scouring pads, solvents or abrasive cleaners to clean unit.
Page 3 of 9
Page 4

Section 4: To Use
TO USE
FREEZING THE FREEZER BOTTLES (2)
1. Remove/Unscrew the cap
2. Fill with clean water to the fill line. Do not overfill.
3. Replace/Screw on the cap
4. Place in freezer until frozen solid (allowing at least 6 hours for water to
freeze)
Line drawing showing water going into the freezer bottle pointing to/calling out the fill
line
(Reference image from the CMF fill line is circled in orange oval)
FILLING THE WATER RESERVOIR
1. Remove the reservoir from the base unit
2. Remove/Unscrew the cap
3. Fill with clean water to the fill line
4. Replace/Screw on the cap
5. Place the reservoir into the base unit
NOTE: The unit will automatically dispense enough water needed for the set
warming time
Line drawing showing water going into the reservoir
Line drawing showing how to insert into the base unit
(Reference image from the CMF fill line is circled in orange oval)
Page 4 of 9
Page 5

PREPARING THE REMOTE
1. Remove battery door, using a phillips screw driver
2. Insert 4 AAA batteries (ref image)
3. Replace battery door
Line drawing of the bottom of the remote showing a screwdriver unscrewing the door
Line drawing of the inside of where the batteries go (showing positive and negative
outlines for clarity)
PAIRING THE REMOTE TO THE BASE UNIT
Pairing creates a coded signal so that only the remote’s signal can remotely activate the
warmer. On occasion, the remote and base unit may need to be paired.
The base unit and remote are already paired coming out of the package. However,
should the connection between the base unit and remote be broken, it will need to be
paired again.
To pair the remote to the base unit:
1. Plug in the base unit and make sure there are charged batteries in the remote
2. With the base unit OFF, press and hold UP and DOWN button for 5 seconds
3. LCD will display ”-P-” (when “-P” appears, release the UP/DOWN buttons)
4. Press the remote button
5. If pairing is successful, the blue and orange LED lights will flash 3 times on the
remote and the warmer will return to OFF state
NOTE: If no remote is paired in 1 min, the warmer goes back into OFF state.
The remote will have no lights. Repeat steps to attempt to pair.
TIP: Batteries may not installed correctly, no longer have a charge or are missing
Page 5 of 9
Page 6

PREPARING THE UNIT FOR STAND-BY MODE
1. Place the unit on a flat surface and plug into AC outlet.
2. Remove the lid from the base unit.
3. Place the 2 freezer bottles and the lift-out basket into the unit.
4. Make sure the water level is above the fill line on the water reservoir.
5. Place the prepared bottle into the lift-out basket
NOTE: Be sure to remove the bottle’s hood or baby food jar’s lid first.
Recommended max chill time is 8 hours. Do not remove lid during
warming cycle as it will/may result in inaccurate warming. It is not
recommended to warm/thaw frozen breastmilk in the warmer. Product is
not designed to warm bagged breastmilk…only in a bottle.
Do not place bottle/jar directly onto heating element.
Always use the lift-out basket when warming or sterilizing.
6. Replace lid onto the base unit. Lid must remain securely on the base unit
during use.
Line drawing showing proper placement of the freezer bottles and lift-out basket
Line drawing of a hand putting the lid on showing the front cut out lining up with the
water reservoir
Line drawing of the unit with water reservoir with a callout to the fill line
SETTING THE UNIT IN STANDBY MODE:
1. Turn the unit ON by pressing the power button down for 2 seconds
2. Using the up/down buttons, set the desired warming time
a. Use the provided chart to determine the recommended warming time
NOTE: The recommended warming times are not exact durations. Adjust
the warming times as desired.
b. For initial use, the LCD screen will read: 0:00. After using the unit for a
warming cycle, the unit will display the warming time used last. The
warming time can be adjusted up/down as desired (up to a max of 15
minutes).
NOTE: In the On state, the unit is programed to alert you to potential
issues by displaying and the remote will alert you by flashing alternate
blue/orange lights
The battery icon will flash if the remote battery level is low
An error message “H2O” will appear on the LCD screen if the water
reservoir needs to be filled
3. After 5 seconds from the last button pushed, the LCD screen will show two
circulating zeros 5 times, then will show set warming time, indicating that the
unit is in standby mode
NOTE: The remote will pulse a soft blue light indicating the warmer is in
standby mode.
***Insert** warming times here for Bottles with ice packs/Bottles without ice packs/Baby
food/Sterilize/silicone
Line drawing showing where the warming time chart is (showing it being half way
pulled out)
Line drawing showing the LCD panel calling out up/down buttons AND the power
button
Page 6 of 9
Page 7

ACTIVATING THE WARMING CYCLE
Remote battery level low
LCD Screen - flashing battery icon
Remote - When pushed to activate warming cycle, the warming cycle will
start and the remote will flashes orange/blue lights for 10 seconds then to
pulsing orange (then solid orange when warming is complete). While the
unit is in standby mode, the remote will flash orange every 10 minutes
No water in water reservoir
Remote – will flash alternating blue and orange lights
Remote is out of range from the base unit
LCD Screen - normal setting allowed into standby
Remote - no lights when button is pushed
The base unit is not in standby mode
LCD Screen - blank
Remote - no lights when button is pushed
Expired Batteries
LCD Screen - flashing low battery icon
Base unit and remote are not paired
LCD Screen - normal setting allowed into standby
From remote
Press and hold the remote button down for 2 seconds to activate warming to the preset
warming time
NOTE:
o While the unit is warming, the remote will pulse a soft orange glow so you know it
is warming.
o When warming cycle is complete, the remote will glow orange for 10 minutes
and the base unit LCD screen will display “00” and will be back lit in soft orange
To shut off the lights (LCD screen and remote) prior to the auto shut off
time, press the power button for 2 seconds.
NOTE: After attempting to activate the warming cycle by remote, the remote is
programed to alert you to potential issues. If you get such a response from the remote,
go to the base unit for problem solving. Potential solutions:
LCD Screen - shows H2O
Remote - no lights when button is pushed
Remote - no lights when button is pushed
From base unit
Press the power button once to activate warming to the preset warming time
NOTE:
The LCD screen on the base unit will show time remaining in the warming cycle.
The screen will pulse a soft glow during warming cycle.
When complete the LCD screen will be a soft solid glow for 10 minutes
WARNING
ALWAYS swirl bottle contents/stir food well and test temperature of
contents before giving bottle to child.
ALWAYS use the lift-out basket when warming or sterilizing.
When warming cycle has completed, the base unit will contain steam:
o Use caution when removing lid and/or removing bottle from the warmer.
o The lid may contain condensation, use caution removing/placing lid on
furniture
To cancel warming cycle:
Push down on the power button for 3 seconds to cancel warming. It is not
recommended to reheat formula or breastmilk - either serve or dispose of bottle
contents after canceling warming cycle.
Page 7 of 9
Page 8

SECTION 5: Warranty
Our Limited Warranty and Warranty Period
When we use the terms “we,” “us” and “our,” we are referring to TOMY, and when we
use the terms “you” and “your” we mean the original end-user customer. Our products
are guaranteed to be free from defects in material and workmanship under normal and
intended use for a period of 90 days from the date of your purchase.
Repair/Replacement
If our product fails to meet our limited warranty during the warranty period, we will, at
our option, repair or replace the product free of charge.
What Our Limited Warranty Does Not Cover
We offer this limited warranty only when the product is used by the original end-user
customer. We offer no other warranty. Additionally, while our warranty is excellent,
there are other limits to it. We offer NO WARRANTY in cases of damage in transit,
inadequate care, abuse, abnormal use, misuse, accidents, normal wear and tear,
damage due to environmental or natural elements, failure to follow product instructions,
immersion in water (except for products specifically identified by us in writing as
intended for water use), battery leakage or improper storage or maintenance of the
products.
Disclaimer of Other Warranties
THE EXPRESS WARRANTIES IN THE PRECEDING SECTION ARE EXCLUSIVE
AND IN LIEU OF ALL OTHER WARRANTIES. However, to the extent applicable law
does not permit disclaimers of certain implied warranties, such warranties are limited to
the warranty period identified above. Some states and countries do not allow limitations
on how long an implied warranty lasts, so the above limitations may not apply to you.
Limitation on Damages
IN NO EVENT SHALL WE BE LIABLE FOR INCIDENTAL, COMPENSATORY,
PUNITIVE, CONSEQUENTIAL, INDIRECT, SPECIAL OR OTHER DAMAGES. OUR
AGGREGATE LIABIITY WITH RESPECT TO DEFECTIVE PRODUCTS IS LIMITED
TO THE MONIES PAID TO US FOR THE DEFECTIVE GOOD. Some states and
countries do not allow the exclusion or limitation of incidental, consequential or other
damages, so the above limitation or exclusion may not apply to you.
State Variations
This warranty gives you specific legal rights, and you may also have other rights which
vary based on state, province or country.
Contact Us
If you have a warranty claim or request, any customer care questions, please contact us
via website www.thefirstyears.com or call us at 1-800-704-8697.
© TOMY
OAK BROOK, IL 60523, U.S.A.
All rights reserved.
Made in China.
Page 8 of 9
Page 9

SECTION 5: FCC Statement
Note: This equipment has been tested and found to comply with the limits for a Class B
digital device, pursuant to Part 15 of the FCC Rules. These limits are designed to
provide reasonable protection against harmful interference in a residential installation.
This equipment generates, uses and can radiate radio frequency energy and, if not
installed and used in accordance with the instructions, may cause harmful interference
to radio communications.
However, there is no guarantee that interference will not occur in a particular
installation. If this equipment does cause harmful interference to radio or television
reception, which can be determined by turning the equipment off and on, the user is
encouraged to try to correct the interference by one or more of the following measures:
• Reorient or relocate the receiving antenna.
• Increase the separation between the equipment and receiver.
• Connect the equipment into an outlet on a circuit different from that to which the
receiver is connected.
• Consult the dealer or an experienced radio/TV technician for help.
This device complies with Part 15 of the FCC Rules. Operation is subject to the
following two conditions: (1) this device may not cause harmful interference, and (2) this
device must accept any interference received, including interference that may cause
undesired operation.
Changes or modifications not expressly approved by the party responsible for compliance could
void the user’s authority to operate the equipment.
IC Statement
This device complies with Industry Canada license-exempt RSS standard(s).
Operation is subject to the following two conditions: (1) this device may not cause interference,
and (2) this device must accept any interference, including interference that may cause undesired operation of the device.
Le présent appareil est conforme aux CNR d'Industrie Canada applicables aux appareils
radio exempts de licence. Son fonctionnement est soumis aux deux conditions suivantes :
(1)l’appareil ne doit pas produire de brouillage, et
(2)l’utilisateur de l’appareildoit accepter tout brouillageradioélectrique subi, mêmesi le
brouillage est susceptible d’en compromettre le fonctionnement.
CAN ICES-3(B)/NMB-3(B)
Page 9 of 9
 Loading...