

Page 1
TE/M6C RP
09/09
Ref. No. 71028
Made in China
Fabriqué en Chine
Digital
Baby Monitor • Écoute-bébé • Baby-Monitor • Babyphone
Monitor para Bebés • Baby Monitor • Радионяня
•
Gebruiksaanwijzing • Bedienungsanleitung
Manual de Instrucciones • Manuale d’uso
Инструкция по эксплуатации
Εγχειρίδιο οδηγιών
Συσκευή παρακολούθησης μωρού
•
Instructions • Notice d’emploi
•
•
Page 2
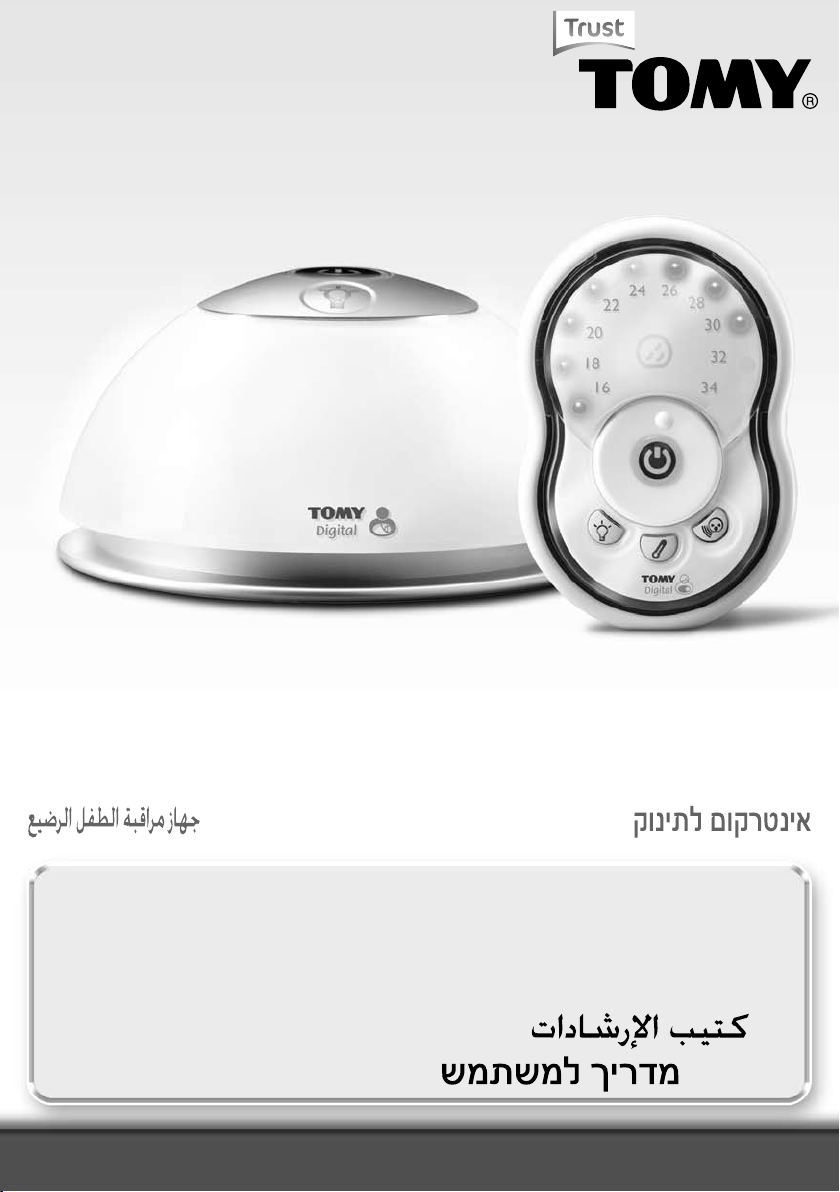
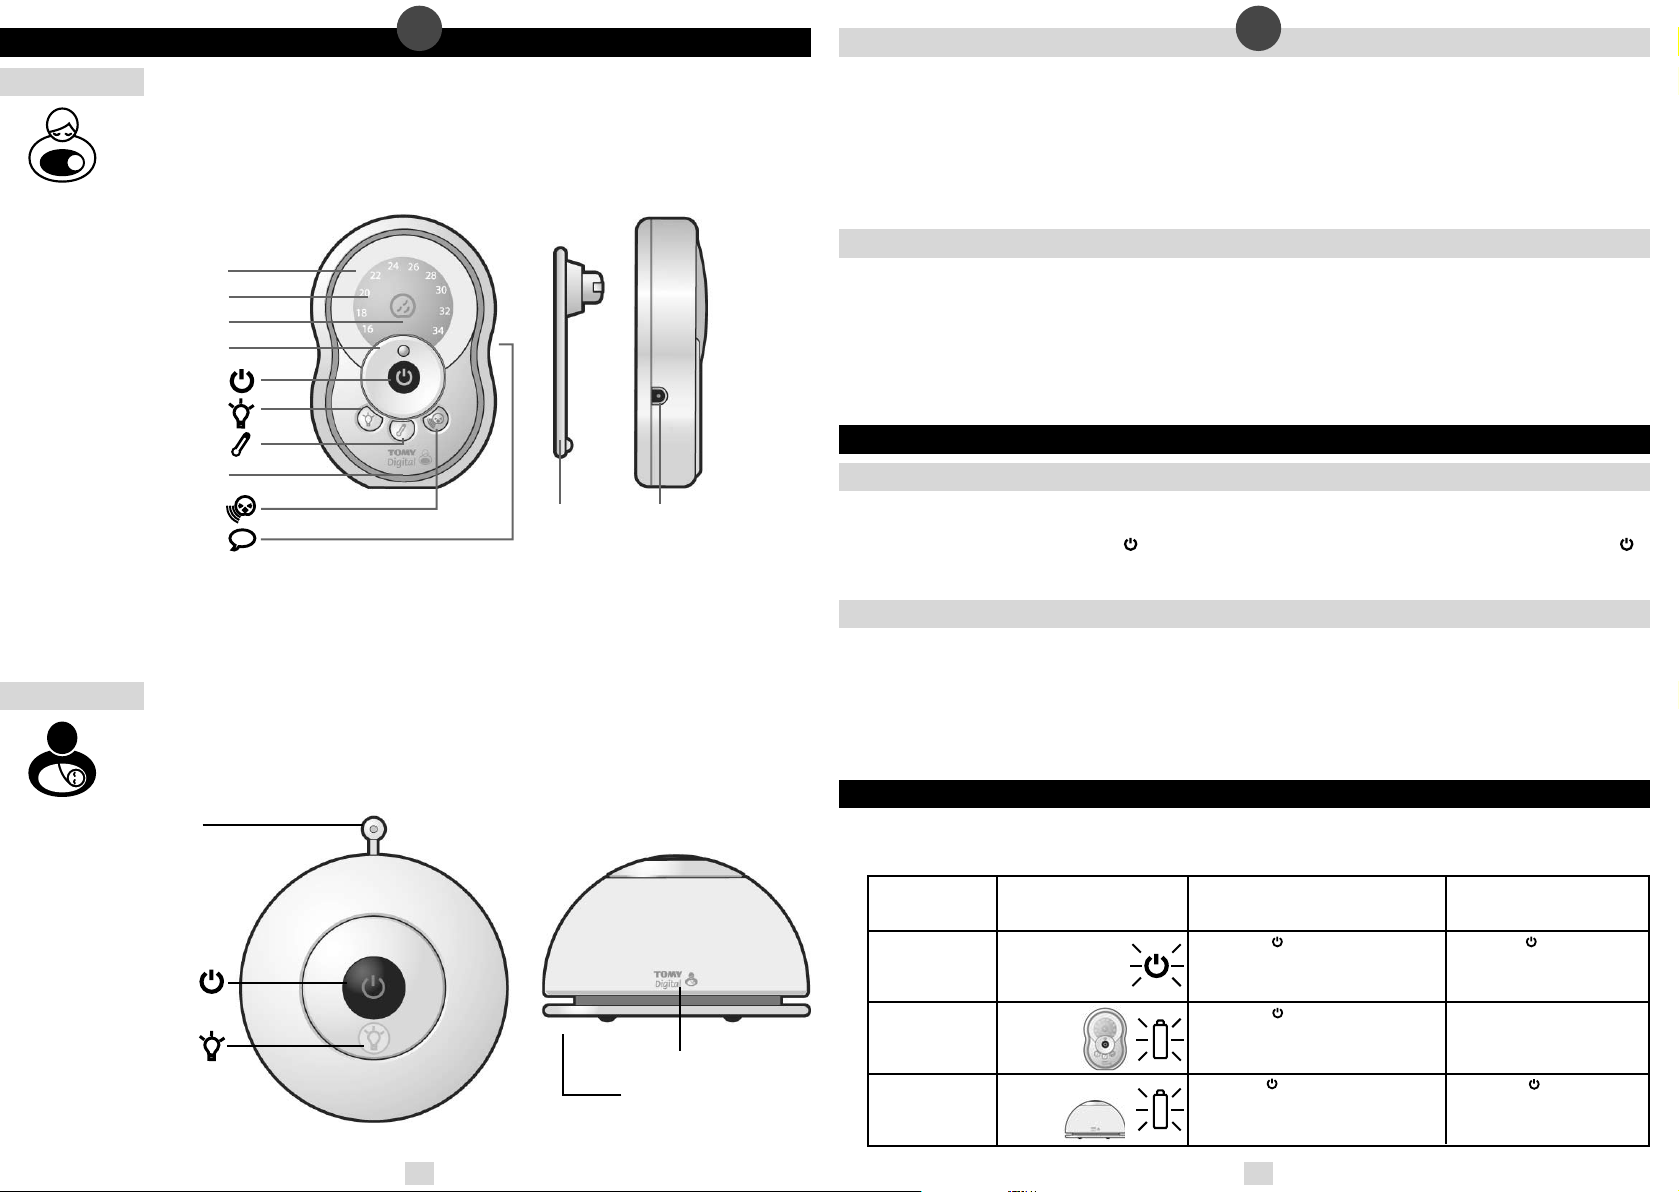
• GETTING TO KNOW YOUR MONITOR
PARENT UNIT
Sound Level Lights Display
Temperature Display
Movement Sensor Pad Display*
Volume Control Wheel
On/Off Button
Nightlight On/Off Button
Temperature Gauge
Microphone
Sound Activation Button
2-Way Talkback Button
* See ‘Accessories’ section.
BABY UNIT
GB GB
• PARENT UNIT
Remove the battery compartment cover from the back of unit (N.B: this may already be supplied loose) and insert
the battery pack (supplied) correctly, connecting the plug with the socket. Replace the cover and screw rmly into
position, referring to the Quick Start Guide for pictorial reference.
Ensuring the power cable is correctly connected, plug your Parent Unit into the mains supply and charge for a full 6
hours. You can use your monitor while it is charging by following the ‘Set Up’ guide below.
Important! Your Parent Unit will not function without rst inserting the battery.
• BABY UNIT
For best performance we recommend that the Baby Unit is powered by your domestic mains supply using the power
adaptor supplied. Alternatively, you can use 4 x AA/LR6 batteries (not supplied) to make it fully portable. To insert the
batteries, unscrew the battery compartment cover on the underside of the unit using a at-head screwdriver. Insert the
batteries, making sure you match the ‘+’ and ‘-’ polarity symbols. Replace the cover and screw rmly into position.
Position the Baby Unit at least 1 metre away from your baby ensuring all parts are kept out of reach. Under no
circumstance should you place any parts of the monitor in or on a cot. For best performance we recommend that
the monitor is placed no further away than 3 metres from your baby.
• SET UP
• POWER ON
Belt Clip
Attachment
AC/Mains
Power Input
Make sure both the Baby and Parent Units are plugged into the mains and/or have their batteries installed (see
above). The units should stand at least 1 metre apart.
Press and hold the
button on each unit for at least 2 seconds. Once activated, the buttons will glow.
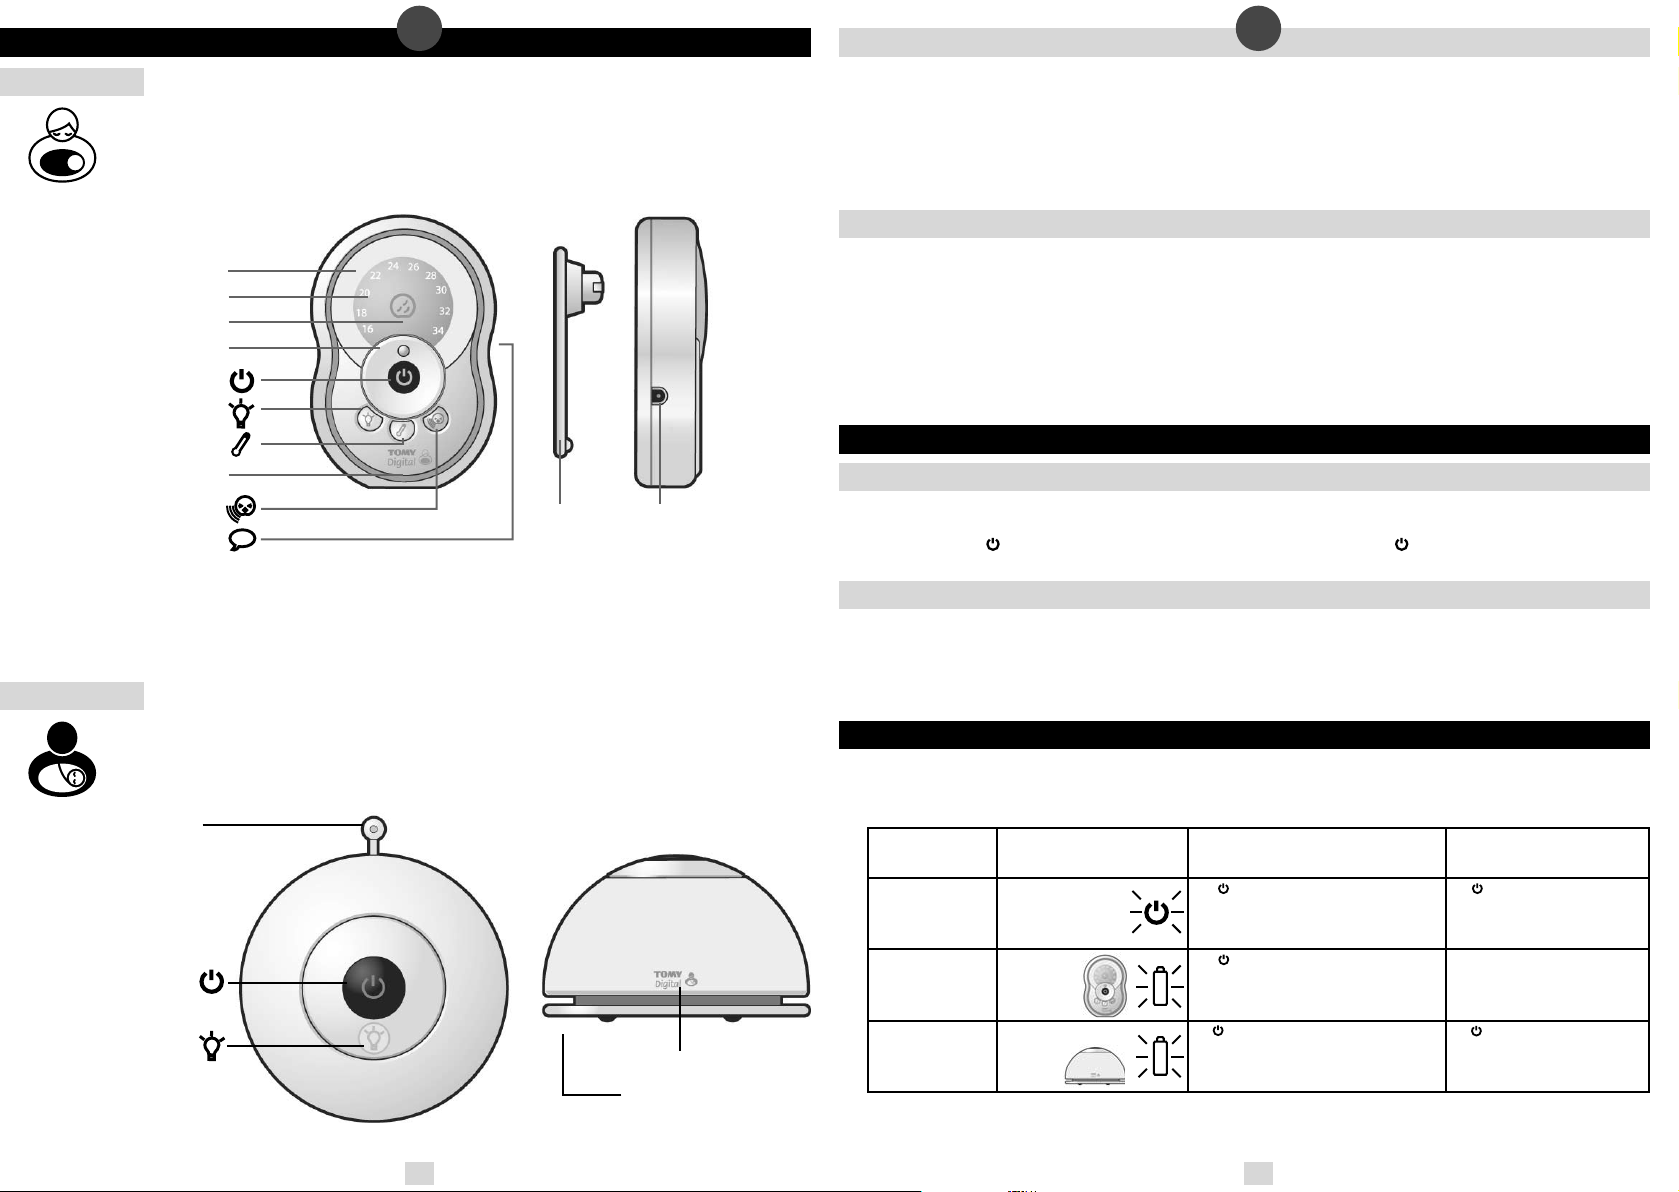
• BABY AND PARENT UNIT CONNECTION
As each unit activates, watch for the Sound Level Lights Display on the Parent Unit as it scrolls from left to right and
right to left as the Parent and Baby Units auto-search and link to each other.
Once a connection is made between Baby and Parent Units, normal monitoring will start. The Sound Level Lights
Display reacts to sound: the louder the sound, the more lights illuminate.
Temperature Sensor
ON/OFF (& Pager) Button
Nightlight On/Off Button
• ALARM MODES
Identify the cause of audible alarm by using the following table; should you be unable to identify or rectify the cause
of the problem, please refer to the Simple Solution Guide within this booklet.
Microphone
Alarm tone on
Parent Unit
••••••••
(Continuous)
•••
3 beeps
••
2 beeps
Alarm Meaning
Loss of contact.
Flashing
Green & Red
Low Battery –
Parent Unit
Low Battery –
Baby Unit
Indications on the Parent Unit
Button will change from solid
•
green to alternating ashing green
and red.
Button will change from green
•
to ashing red.
• Button will change from green to
ashing red.
Mains Cable Tidy
2 3
Indications on the
Baby Unit
• Button will change from
solid green to alternating
ashing green and red.
•
Button will change
from green to ashing red.
Page 3
• FEATURES AND FUNCTIONS
• VOLUME CONTROL
Adjust the volume from zero (mute) to level 10 (max) by moving the thumb wheel clockwise to increase or anti-
clockwise to decrease.
GBGB
• PAGING
Locate a lost Parent Unit by pressing the
will sound a 1-minute long alarm. To silence the alarm, press any button on the Parent Unit. Please note that the
paging feature will only work when both units are switched ON and monitoring as normal.
button on the Baby Unit 3 times in quick succession and the Parent Unit
• SOUND LEVEL LIGHTS DISPLAY
The Sound Level Lights Display on your Parent Unit reacts to the sounds of your baby. The louder your baby, the more
lights illuminate on the display. You can lower the volume of the Parent Unit whilst still watching out for baby, ideal
for when you’re relaxing or entertaining.
• SOUND ACTIVATED MONITORING
For those quiet moments or when your baby is a little older you may not want to hear every sound in your baby’s
room. Your Baby Monitor has a Sound Activated Monitoring mode, a feature that only captures sounds above a preset threshold, for example a cry rather than a gurgle.
Select Sound Activated Monitoring by pressing the
15 seconds after your baby settles. Every time your baby’s sounds rise above the threshold this feature will be
interrupted instantly and normal sound monitoring will continue until your baby settles again.
• 2-WAY TALKBACK
For that little extra reassurance and convenience, your monitor has a 2-Way Talkback feature that allows you
to speak to your baby. Press and hold down the
to your baby.
• TEMPERATURE GAUGE
To check the ambient temperature of your baby’s room simply press and hold the button on your Parent Unit. The Sound
Sensitive Light Display shall be temporarily suspended and replaced with the ambient temperature in your baby’s room.
Please note the temperature gauge is marked in 2°C intervals. Should the ambient temperature fall in-between
intervals then the lights above and below will illuminate (e.g for 27°C the 26°C and 28°C lights will illuminate).
• NIGHTLIGHT
Your Baby Unit has a soft glow Nightlight that can be activated by pressing the
remotely from your Parent Unit.
To extend the Baby Unit’s battery life the Nightlight will only operate for 5 minutes at a time. For unlimited use
switch to mains power using the adaptor provided.
To switch off the Nightlight, press the
To use the Nightlight without monitoring, please refer to the ‘Independent Nightlight’ section within this booklet.
button on the Parent Unit. The Parent Unit will mute
button on the side of the Parent Unit to activate and speak
button on your Baby Unit or
button on your Baby Unit or on the Parent Unit.
• BELT CLIP
Locate the rubber cover on the back of the Parent Unit and the belt
clip attachment supplied. Remove and carefully store the rubber cover,
then line up the belt clip’s guiding pins (image 1), insert the
clip in Position and turn 90 degrees in a clockwise direction
to position . Alternatively, the belt clip can be orientated
so that you can wall mount or hang your Parent Unit.
In which case, line up the belt clip’s guiding pins (image 2),
insert the clip in position and turn 90 degrees in a clockwise
direction to position .
1. Belt Clip
• INDEPENDENT NIGHTLIGHT
As your baby grows older you can use the Nightlight without monitoring and without the need for the Parent Unit.
With the Baby Unit switched OFF, press and hold the
red (instead of the usual green), indicating that the monitor is not switched ON. Press the
• ACCESSORIES; TOMY’S MOVEMENT SENSOR PAD MONITOR AND ADDITIONAL PARENT UNITS
For extra reassurance Tomy’s Movement Sensor Pad Monitor and/or an additional Parent Unit from either the Tomy
Digital or Digital Plus models can be added to your Monitor. For further details please visit our website: www.tomy.eu
button and the Nightlight will illuminate. The button will glow
button again to switch off.
2. Wall Mount
• CARING FOR YOUR MONITOR
Do not immerse any parts in liquids. Do not place in direct sunlight.
to electrical parts and do not use until damage has been properly repaired.
using the mains adaptor for long periods of time.
• GUARANTEE
We guarantee your monitor against manufacturing defects for 2 years from the date of purchase on production of
a valid receipt. In the rst instance of a manufacturing defect, we recommend that you return your monitor to its
place of purchase. If this does not satisfactorily resolve your problem, please refer to www.tomy.eu for further advice.
Full terms and conditions can be found on our website: www.tomy.eu
• TECHNICAL SPECIFICATIONS
- Power Supply: Mains adaptor rating: PRI: 230V~50Hz SEC: 6V
- Batteries: Parent Unit - Rechargeable 850mAh 2.4V Ni-MH battery (included).
Baby Unit - Requires 4 x 1.5V AA (LR6) batteries.
- Operating Range: 350m in optimum ‘open eld’ conditions.
- Operating Temperature: 0 - 50ºc.
- Frequencies: 1880~1900MHz.
Periodically examine product for signs of damage
Always remove batteries from the Baby Unit if
300mA.
4 5
Page 4

• SAFETY INFORMATION
GB GB
The Tomy Baby Monitor is designed to help you monitor your child and is not a substitute for adult supervision.
This product is not a toy. Always keep electrically operated items and their cables out of reach of babies and younger
children. Under no circumstances should you place any part of your monitor in or on a cot.
Ensure all wiring is positioned safely so that children cannot become entangled and that no trip hazard is created.
Under no circumstances should the adaptors supplied with this monitor be used with any other equipment. No
other adaptors than those supplied should be used with your monitor. Be careful not to position the adaptor where
a child is likely to use it as a step. Putting weight on the adaptor while it is plugged in could damage the unit or
cause injury to your child. It is normal for chargers to become hot during use – take care when handling, allow
heat to disperse. DO NOT COVER. Disconnect charger if the product will not be used for several days. To prevent a
shock hazard, please disconnect from power supply before cleaning. The rechargeable battery within the Parent Unit
should be recycled. Do not dispose in normal waste. Do not attempt to dismantle any part of this product.
• BATTERY SAFETY
Removal and replacement of batteries should be carried out by an adult or under adult supervision. Take special
care to ensure batteries are inserted correctly, observing (+) and (-) polarity marks on battery and product. Do not
short circuit the contacts in the battery compartment or the battery terminals. Remove exhausted batteries from
product. Do not mix old (used) and new batteries or batteries of different types, e.g. rechargeable and alkaline or
batteries of different makes/brands. Dispose of exhausted batteries safely, and never dispose of batteries in a re.
Remove batteries from product after use or if storing for long periods. Only use batteries of the same or equivalent
type to those recommended.
Removal and recharging of rechargeable batteries should be carried out by an adult or under adult supervision.
If you are using rechargeable batteries within the Baby Unit, they must be removed from the monitor before
recharging. Do not attempt to recharge non-rechargeable batteries.
Help the environment by disposing of your product and packaging responsibly. The wheelie
bin symbols indicate the product and batteries must not be disposed of in the domestic waste
as they contain substances which can be damaging to the environment and health. Please
use designated collection points or recycling facilities when disposing of the item or batteries.
• SIMPLE SOLUTION GUIDE
Should your monitor not be operating as expected, the information listed below should be adequate to resolve your
problems; alternatively a more comprehensive guide can be found on our website: www.tomy.com.eu
• FREQUENTLY ASKED QUESTIONS
Q. Does my Parent Unit need to be switched on or off whilst charging?
A. Either, your Parent Unit will charge whilst switched on or off, however charging the unit whilst switched on will
allow you to monitor your baby whilst charging.
Q. I have measured the temperature of my baby’s room using another device and I get a different reading
than that of my monitor- why?
A.
The temperature measuring device within your Tomy monitor is designed to give you an indication of the baby’s
room temperature to within a small tolerance of + 1°C or - 1°C. Other devices will also have a similar tolerance.
Q. Can I use my monitor abroad?
A. You can use your monitor in the country it was purchased and anywhere in the EU. Although your monitor may
function correctly in other countries, its operating frequency may affect (or be affected by) other devices and could
be illegal. Tomy cannot accept any liability for use outside of the country in which you purchased your monitor or
the EU.
• FAULT FINDING
PROBLEM
My Parent Unit will not
switch ON.
My Baby Unit will not
switch ON?
The Nightlight is active
but I cannot connect
with the Parent Unit.
There is a continuous
beeping noise.
There is a 2 x beep
alarm every minute.
There is a 3 x beep
alarm every minute.
I cannot hear anything
through my Parent Unit.
And/or:
It’s only intermittent.
My Parent Unit makes a
continuous beeping noise.
My Parent Unit makes a
random beep-beep every
minute or so.
High pitched noise.
Nightlight keeps
switching off.
Battery life after
charging is becoming
shorter.
POSSIBLE CAUSE
The rechargeable battery (supplied)
has not been installed correctly.
The rechargeable battery maybe below the
critical voltage to activate your monitor.
Mains power is not connected correctly.
Mains power is not connected correctly.
Battery insertion and/or battery life
issues.
button is not being held long
enough.
The Nightlight is being operated
independently of the Baby Unit’s
monitoring function (which is an
intended feature).
Loss of contact alarm.
Low battery in Baby Unit.
Low battery in Parent Unit.
Volume on Parent Unit is set too low.
Units are out of range.
Units are set to Sound Activated mode.
Units are not connecting.
One or both of the Units are running
low on battery power.
Units are too close together.
Volume too high.
The Nightlight is designed to switch
off automatically after 5 minutes to
conserve battery life.
As with any rechargeable battery
it has a nite life and may need
replacing.
SOLUTION
Insert the battery as instructed within this booklet or the
Quick Start Guide. Once installed place the Parent Unit on
charge and leave for several minutes before switching ON.
Place the Parent Unit on charge and leave for several
minutes before switching ON.
Check the power cable connections
Check the power cable connections
Check the batteries have adequate charge and are
correctly installed.
Press and hold the Baby Unit’s
illuminates.
Switch the Nightlight OFF by pressing the
then reactivate the Baby Unit’s main function by
pressing and holding the button.
Ensure both units are adequately powered.
Bring both units closer together and repeat the
‘Set-Up’ instructions.
Replace batteries.
Or. Switch to mains (AC) using the adaptor supplied.
Recharge batteries.
Increase Parent Unit volume.
Move units closer.
Refer to Sound Activated Monitoring within this
instruction booklet.
Ensure both units are adequately powered and then
follow the ‘Set-Up’ guide within this booklet.
Identify the low battery condition and either
recharge/replace batteries or switch to mains power.
Move units apart.
Decrease volume.
For continual use please switch to mains power.
Please visit our website for replacement parts:
www.tomy.eu
(including wall socket).
(including wall socket).
button until it
button
PAGE
3
3
4
3
3
3
4
3
3
4
4
5
6 7
Page 5
• PRÉSENTATION DE VOTRE ÉCOUTE-BÉBÉ
UNITÉ PARENT
Afchage température
Afchage du niveau sonore par diodes
Détecteur de Mouvement*
Molette de réglage du volume
Marche/Arrêt
Marche/Arrêt de la veilleuse
Afchage température
Microphone
Activation au son
Fonction talkie-walkie
F F
• UNITÉ PARENT
Enlevez le cache du compartiment de l’accumulateur rechargeable au dos de l’unité (N.B: celui-ci est peut-être
fourni déjà enlevé) et insérez de façon adéquate l’accumulateur (fourni) en branchant la che dans la prise.
Remettez le cache en place et vissez fermement. Reportez-vous aux illustrations du Guide de démarrage.
Assurez-vous que le câble d’alimentation est correctement branché, puis branchez votre unité parent sur
l’alimentation secteur pour le charger pendant 6 heures complètes. Vous pouvez utiliser votre écoute-bébé pendant
qu’il est en charge, en suivant les instructions d’Installation fournies ci-après.
Important ! Vous devez au préalable insérer l’accumulateur pour faire fonctionner votre unité parent.
• UNITÉ BÉBÉ
An d’optimiser le fonctionnement de l’unité, nous vous conseillons de brancher l’unité bébé sur l’alimentation secteur
à l’aide de l’adaptateur fourni. Vous pouvez également utiliser 4 piles AA/LR6 (non fournies) pour utiliser l’unité
en mode portable. Pour insérer les piles, dévissez le cache du compartiment à piles au dos de l’unité à l’aide d’un
tournevis plat. Insérez les piles selon les symboles « + » et « - ». Remettez le cache en place et revissez fermement.
Placez l’unité bébé à 1 mètre minimum de votre bébé, en vous assurant que tous les éléments sont hors de sa portée.
Vous ne devez en aucun cas placer des éléments de l’écoute-bébé dans ou sur un berceau ou un lit pour enfant. Pour
optimiser les performances de l’unité, il est conseillé de ne pas placer l’unité bébé à plus de 3 mètres de votre bébé.
• INSTALLATION
• MISE EN MARCHE
Fixation clip
ceinture
Entrée
alimentation
secteur CA
Assurez-vous que les unités parent et bébé sont branchées sur secteur et/ou que leurs piles ou accumulateur ont été insérées
(voir ci-dessus). Les unités doivent être placées à 1 mètre minimum l’une de l’autre.
Appuyez et maintenez enfoncé le bouton
de chaque unité pendant 2 secondes minimum. Une fois activés, les boutons
s’allument.
*Voir paragraphe “Accessoires”
UNITÉ BÉBÉ
Capteur de température
MARCHE/ARRÊT
(& localisation)
Marche/Arrêt de la
veilleuse
• CONNEXION ENTRE L’UNITÉ BÉBÉ ET L’UNITÉ PARENT
Alors que chaque unité est en cours d’activation, vous remarquerez que l’afchage du niveau sonore sur l’unité
parent déle de gauche à droite et de droite à gauche pendant que la recherche automatique de connexion des
unités parent et bébé s’effectue.
Une fois que la connexion est établie entre l’unité bébé et l’unité parent, la surveillance normale commence.
L’Afchage du niveau sonore réagit aux sons émis : plus les sons sont élevés, plus le nombre de témoins lumineux
afchés augmente.
• ALARMES
Identiez la cause d’une alarme sonore en vous reportant au tableau suivant. Si vous ne parvenez pas à identier ou
à corriger un problème, veuillez vous reporter au « Guide de résolution rapide des problèmes » de cette notice.
Tonalité de
Microphone
Rangement du
cordon
l’alarme sur
l’unité parent
••••••••
(Continue)
•••
3 bips
••
2 bips
Signication Indications sur l’unité parent
Perte de contact
Témoins vert et
rouge clignotants
Accumulateur
déchargé –
Unité parent
Piles faibles –
Unité bébé
• Le bouton
rouge clignotant.
• Le bouton
rouge clignotant.
• Le bouton passe du vert au rouge
clignotant.
8 9
passe du vert au vert et
passe du vert au
Indications sur
l’unité bébé
• Le bouton passe du vert au
vert et rouge clignotant.
• Le bouton
rouge clignotant.
passe du vert au
Page 6

• CARACTÉRISTIQUES ET FONCTIONS
• RÉGLAGE DU VOLUME
Le volume se règle (silencieux à volume maximum) en tournant la molette dans le sens des aiguilles d’une montre
pour augmenter le volume ou dans le sens contraire des aiguilles d’une montre pour le diminuer.
• AFFICHAGE DU NIVEAU SONORE
Les diodes lumineuses de votre unité parent réagissent aux sons qu’émet votre bébé. Plus les sons sont élevés, plus le
nombre de témoins lumineux afchés augmente. L’afchage du niveau sonore vous prévient du moindre bruit émis
par bébé même lorsque le son est coupé.
• ACTIVATION AU SON
Cette fonction, qui permet de ne pas entendre tous les sons émis dans la chambre de bébé, est très pratique quand
bébé est plus grand ou pour apprécier les moments calmes. Votre écoute-bébé est équipé d’une fonction « Activation
au son », qui capte uniquement les sons d’un niveau sonore supérieur à un seuil prédéni. Quand cette fonction est
activée, l’unité bébé réagit aux pleurs et aux cris mais pas à de simples gazouillis.
Sélectionnez l’Activation au son en appuyant sur le bouton
dépassent le seuil prédéni, l’activation se déclenche et la surveillance normale se poursuit jusqu’à ce que bébé se
soit apaisé. L’activation de l’unité parent s’arrête 15 secondes après que bébé se soit apaisé.
• FONCTION TALKIE-WALKIE
Cette fonction très pratique vous permet de parler à bébé pour le rassurer. Appuyez et maintenez enfoncé le bouton
sur le côté de l’unité parent pour activer la fonction et parler à bébé.
• AFFICHAGE TEMPÉRATURE
Pour vérier la température de la chambre de bébé, il suft d’appuyer et de maintenir enfoncé le bouton de votre
unité parent. L’Afchage des diodes sensibles au son est temporairement interrompu et remplacé par l’afchage de la
température de la chambre de votre enfant.
Veuillez noter que le relevé de température s’effectue par intervalles de 2°C. Si la température de la pièce se situe dans
un intervalle, les voyants du chiffre supérieur et du chiffre inférieur correspondant à cet intervalle s’allument (par ex. si la
température s’élève à 27°C, les voyants 26°C et 28°C s’allument).
• VEILLEUSE
Votre unité bébé est équipée d’une veilleuse à lueur douce que vous pouvez activer en appuyant sur le bouton
l’unité bébé ou bien à distance depuis l’unité parent.
Si l’unité bébé n’est pas branchée sur secteur, pour préserver l’autonomie des piles, la veilleuse ne fonctionne
que 5 minutes puis se met en veille. Pour toute utilisation prolongée, passez sur l’alimentation secteur à l’aide de
l’adaptateur fourni.
Pour désactiver la veilleuse, appuyez sur le bouton
Pour utiliser la veilleuse sans le mode de surveillance, veuillez vous reporter à la section « Fonctionnement
indépendant de la veilleuse » de cette notice.
de l’unité parent. Aussitôt que les sons émis par bébé
de
de l’unité bébé ou de l’unité parent.
10 11
FF
• BIPEUR DE LOCALISATION
Pour localiser l’unité parent si vous l’avez égarée, appuyez rapidement 3 fois de suite sur le bouton
bébé, l’unité parent émet alors une alarme sonore pendant 1 minute. Pour désactiver l’alarme, appuyez sur
n’importe quel bouton de l’unité parent. Veuillez noter que la fonction de localisation fonctionne uniquement quand
les deux unités sont sous tension et en mode de surveillance normale.
• CLIP CEINTURE
Localisez le cache en caoutchouc situé au dos de l’unité
parent et le clip ceinture fourni. Enlevez le cache en
caoutchouc et rangez-le soigneusement, puis alignez
le goujon du clip ceinture sur l’orice au dos de l’unité
parent (image 1), insérez le clip en position puis faitesle tourner à 90 degrés dans le sens des aiguilles d’une
montre en position . Vous pouvez également orienter
le clip ceinture pour xer l’unité au mur ou la suspendre.
Dans ce cas, alignez le goujon du clip ceinture sur l’orice
au dos de l’unité (image 2), insérez le clip en position
et faites tourner à 90 degrés dans le sens des aiguilles
d’une montre en position .
• FONCTIONNEMENT INDÉPENDANT DE LA VEILLEUSE
Quand votre enfant aura grandi, vous pourrez utiliser la fonction de veilleuse sans activer la surveillance et sans avoir
besoin de l’unité parent.
Sur l’unité bébé éteinte, appuyez et maintenez enfoncé le bouton
rouge (au lieu du vert habituel) pour indiquer que l’écoute-bébé n’est pas allumé. Appuyez de nouveau sur le bouton
pour désactiver la fonction.
• ACCESSOIRES
Tomy propose d’ajouter certains accessoires à ses modèles d’écoute-bébés Digital et Digital Plus. Pour plus de détails, visitez
notre site internet : www.tomy.eu
• ENTRETIEN DE VOTRE ÉCOUTE-BÉBÉ
Aucune pièce ni aucun élément ne doivent être immergés dans un liquide. Ne pas exposer à la lumière directe du soleil.
Inspecter régulièrement l’article pour déceler tout signe de dommage des composants électriques. En cas de
dommage, l’article ne peut être utilisé de nouveau qu’une fois réparé. Il convient d’enlever les piles de l’unité bébé si
vous utilisez l’adaptateur pendant une période prolongée.
• GARANTIE
Votre écoute-bébé est garanti contre tout défaut de fabrication pendant 2 ans à partir de la date d’achat sur
présentation du ticket de caisse. Si vous décelez un défaut de fabrication pour la première fois, nous vous conseillons
de rapporter votre écoute-bébé où vous l’avez acheté. Si votre problème n’est pas résolu de façon satisfaisante,
veuillez vous rendre sur le site www.tomy.eu pour obtenir plus de conseils. Vous pouvez consulter les Termes et
Conditions Générales sur le site Internet www.tomy.eu
• CARACTÉRISTIQUES TECHNIQUES
- Alimentation : Caractéristiques nominales adaptateur : Accès PRI : 230V~50Hz SEC : 6V
- Piles : Unité parent – accumulateur rechargeable 850mAh 2.4V Ni-MH (fourni).
Unité bébé – nécessite 4 piles 1,5V AA (LR6).
- Portée : 350m en champ libre et dans des conditions optimales.
- Température de fonctionnement : 0 - 50ºc.
- Fréquences : 1880~1900MHz.
et la veilleuse s’allume. Le bouton s’allume en
1. Position
Clip ceinture
300mA.
de l’unité
2. Position
Attache murale
Page 7
• CONSIGNES DE SÉCURITÉ
F F
Cet écoute-bébé Tomy est conçu pour vous aider à surveiller votre enfant mais ne doit en aucun cas se substituer à
la surveillance d’un adulte. Cet article n’est pas un jouet. Les articles électriques et leurs câbles doivent toujours être
placés hors de portée des bébés et des jeunes enfants. Vous ne devez en aucun cas placer des éléments de l’écoutebébé dans ou sur un lit pour enfant. Assurez-vous que tous les câbles sont installés en toute sécurité, sans risque de
trébucher ni de s’enchevêtrer. En aucun cas les adaptateurs fournis avec cet écoute-bébé ne doivent être utilisés avec
tout autre matériel. Seuls les adaptateurs fournis avec cet écoute-bébé doivent être utilisés. L’adaptateur doit être
placé à un endroit sûr pour éviter tout risque qu’un enfant ne s’en serve comme marche. Tout poids appliqué sur
l’adaptateur pendant qu’il est branché peut entraîner un risque de dommages pour l’unité ou de blessures pour
votre enfant. Le chargeur chauffe pendant son utilisation, ceci est normal. Prenez soin de ne pas vous brûler en le
manipulant et laissez la chaleur se disperser. NE PAS RECOUVRIR. Débranchez le chargeur si vous n’utilisez pas l’article
pendant plusieurs jours. An d’éviter tout risque d’électrocution, débranchez le chargeur de l’alimentation avant de
le nettoyer. L’accumulateur rechargeable de l’unité parent doit être recyclé. Ne pas jeter avec les déchets domestiques,
recycler dans un conteneur prévu à cet effet. Ne pas essayer de démonter les pièces de cet article.
• MANIPULATION DES PILES
Le retrait ou le remplacement des piles doit être réalisé par un adulte. Les piles doivent être insérées de façon
adéquate en suivant les symboles (+) et (-) sur les piles et l’article. Ne pas court-circuiter les contacts dans le
logement des piles ou les bornes des piles. Enlever les piles usées de l’article. Ne pas mélanger les piles usées et les
piles neuves ou des types de piles différents, par exemple des piles rechargeables et des piles alcalines ou des piles de
marques différentes. Éliminer les piles usées en toute sécurité, ne jamais jeter les piles dans un feu.
Le retrait et le rechargement des piles/accumulateurs doivent être réalisé par un adulte. Enlever les piles de l’article
après utilisation ou en cas de périodes d’inutilisation prolongées. Utiliser uniquement des piles de type identique ou
équivalent à celles qui sont recommandées. Si vous utilisez des piles rechargeables dans l’unité bébé, vous devez les
enlever de l’écoute-bébé pour les recharger. Ne pas essayez de recharger des piles non-rechargeables.
Respectez l’environnement en éliminant votre article et son emballage de façon responsable.
Le symbole de la poubelle barrée indique que l’article et les piles ne doivent pas être jetés
avec les déchets domestiques car ils contiennent des substances pouvant endommager
l’environnement et nuire à la santé. Veuillez jeter l’article ou les piles aux points de recyclage
prévus à cet effet.
• GUIDE DE RÉSOLUTION RAPIDE DES PROBLÈMES
Si votre écoute-bébé ne fonctionne pas de manière adéquate, les informations fournies ci-dessous devraient vous
aider à résoudre vos problèmes ; pour des informations plus détaillées, visitez notre site Internet www.tomy.eu
• QUESTIONS FRÉQUENTES
Q. Est-ce que mon unité parent doit être hors tension ou sous tension pendant la recharge ?
R. Les deux sont possibles. Votre unité parent peut être rechargée pendant qu’elle est sous tension ou hors tension. Si
l’unité est sous tension pendant la recharge cela vous permet de surveiller votre enfant en même temps.
Q. J’ai relevé la température de la chambre de mon bébé avec un autre appareil et j’obtiens un résultat
différent de celui afché par mon écoute-bébé, pourquoi ?
R. Le dispositif de mesure de la température de votre écoute-bébé Tomy est conçu pour vous fournir une indication de la
température de la chambre de bébé avec une tolérance de + 1°C ou - 1°C. D’autres appareils sont également équipés de ce
système avec une tolérance similaire.
Q. Puis-je utiliser mon écoute-bébé à l’étranger ?
R. Vous pouvez utiliser votre écoute-bébé dans le pays où vous l’avez acheté ainsi que dans toute l’UE. Votre écoutebébé devrait fonctionner normalement dans les autres pays, toutefois, sa fréquence de fonctionnement pourrait
affecter (ou être affectée par) d’autres appareils et pourrait être illégale. Tomy décline toute responsabilité en cas
d’utilisation de l’écoute-bébé dans un autre pays que celui du pays d’achat ou en dehors de l’UE.
• RÉSOLUTION DES PROBLÈMES
PROBLÈME
Je n’arrive pas à mettre
sous tension mon unité
parent.
Je n’arrive pas à mettre
sous tension mon unité
bébé.
La veilleuse de l’unité bébé
est active, mais je n’arrive
pas à me connecter avec
l’unité parent.
Émet un bip sonore en
continu.
Émet un double bip
sonore toutes les
minutes.
CAUSE POSSIBLE
L’accumulateur rechargeable fourni
n’a pas été inséré correctement.
L’accumulateur rechargeable est
trop faible.
L’alimentation secteur n’est pas établie
correctement.
L’alimentation secteur n’est pas établie
correctement.
Les piles n’ont pas été insérées
correctement ou sont faibles.
Maintenez la pression sur Le bouton
MARCHE/ARRÊT plus longtemps.
L’écoute-bébé propose un mode de
fonctionnement indépendant de La
veilleuse.
Alarme hors de portée.
Les piles de l’unité bébé sont faibles.
Émet un triple bip sonore
toutes les minutes.
Aucun son n’est émis
par l’unité parent.
Et/ou
L’unité parent émet les
sons uniquement par
intermittence.
Mon unité parent émet un
bip sonore en continu.
Mon unité parent émet un
bip-bip sonore aléatoire
environ toutes les minutes.
Émet un son aigu.
La veilleuse ne reste pas
allumée.
L’autonomie de
l’accumulateur devient plus
courte après chaque recharge.
L’accumulateur de l’unité parent
est faible.
Le volume de l’unité parent est trop bas.
Les unités sont hors de portée.
Les unités sont en mode Activation
au son.
Les unités ne sont pas connectées l’une
avec l’autre.
Les piles de l’unité bébé et/ou
l’accumulateur de l’unité parent sont
faibles.
Les unités sont trop rapprochées.
Volume trop élevé.
La veilleuse est conçue pour s’éteindre
automatiquement au bout de 5 minutes
pour préserver l’autonomie des piles.
L’accumulateur a une certaine
durée de vie et a peut-être besoin
d’être remplacé.
SOLUTION
Insérez l’accumulateur en suivant les instructions
fournies dans cette notice. Une fois l’accumulateur
installé, mettez l’unité parent en charge pendant
plusieurs minutes avant de la mettre en marche.
Placez l’unité parent en charge pendant plusieurs
minutes avant de la mettre en marche.
Vériez le branchement du câble d’alimentation
(y compris la prise murale).
Vériez le branchement du câble d’alimentation
(y compris la prise murale).
Vériez que les piles sont sufsamment chargées et
correctement insérées.
Appuyez et maintenez enfoncé le bouton MARCHE/
ARRÊT de l’unité bébé jusqu’à ce qu’il s’allume.
Mettez hors tension la veilleuse en appuyant sur
le bouton
principale de l’unité bébé en appuyant et en
maintenant enfoncé le bouton .
Assurez-vous que les deux unités sont correctement
branchées.
Rapprochez les deux unités et renouvelez les
opérations d’Installation.
Remplacez les piles.
Ou Passez sur l’alimentation secteur (CA) à l’aide
de l’adaptateur fourni.
Rechargez l’unité parent.
Augmentez le volume de l’unité parent.
Rapprochez les unités.
Reportez-vous à la section « Activation au son » de
cette notice.
Assurez-vous que les deux unités sont branchées
correctement puis suivez les instructions
d’Installation de cette notice.
Identiez l’état de charge des piles et de l’accumulateur et
rechargez l’accumulateur de l’unité parent ou remplacez les
piles de l’unité bébé, ou bien passez sur l’alimentation secteur.
Éloignez les unités l’une de l’autre.
Diminuez le volume.
Pour une utilisation continue, passez sur
l’alimentation secteur.
Visitez notre site Internet pour obtenir plus de détails
sur les pièces de remplacement : www.tomy.eu
, puis activez de nouveau la fonction
PAGE
9
9
10
9
9
9
10
9
9
10
10
11
12 13
Page 8

• KENNISMAKEN MET UW BABY-MONITOR
OUDER-UNIT
Temperatuurindicatie
Geluidssterkte-Lichtindicatie
Bewegingsensormat-display*
Volumecontrolewieltje
Aan/Uit-knop
Aan/Uit-knop Nachtlampje
Temperatuurindicatie
Microfoon
Geluidsactiveringsknop
Zend- en Ontvangstknop
NL NL
• OUDER-UNIT
Verwijder het deksel van het batterijvakje op de achterkant (NB: dit kan bij levering al los zijn) en voer de
(meegeleverde) batterij correct in, door de juiste polen op elkaar aan te sluiten. Plaats het deksel en schroef het
stevig op zijn plaats. Raadpleeg hiervoor de tekening in de Quick Start Gids.
Sluit het netsnoer correct aan, sluit uw Ouder-unit aan op de netvoeding en laat het toestel gedurende 6 uur
opladen. U kunt de monitor gebruiken tijdens het laden. Raadpleeg de ‘Installatie’-gids hieronder.
Belangrijk! Uw Ouder-unit werkt niet zonder eerst de batterij te installeren.
• BABY-UNIT
Voor optimale prestaties raden we aan de Baby-unit aan te sluiten op de netvoeding. Gebruik hiervoor de meegeleverde
adapter. U kunt ook 4 (niet meegeleverde) AA/LR6 batterijen gebruiken om de unit volledig draagbaar te maken.
Installatie van de batterijen: schroef met een vlakke schroevendraaier het deksel van het batterijvak op de onderzijde los.
Voer de batterijen in. Respecteer hierbij de ‘+’ en ‘-’ polariteitsymbolen. Breng het deksel aan en schroef dit stevig vast.
Plaats de Baby-unit op minstens 1 meter van uw baby. Zorg ervoor dat alle onderdelen buiten zijn bereik zijn.
Belangrijk: geen enkel onderdeel van het toestel mag in of op het bedje staan. Voor optimale prestaties adviseren we
om de monitor niet verder dan 3 meter van uw baby te plaatsen.
• INSTALLATIE
• INSCHAKELEN
Controleer of Baby- en Ouder-unit aangesloten zijn op de netvoeding en/of hun batterijen geïnstalleerd zijn (cf. hierboven). De
units moeten minstens 1 meter van elkaar staan.
Riemclipbevestiging
AC/Netvoeding
Houd de
knop van elke unit minstens 2 seconden ingedrukt. Zodra ze geactiveerd zijn, zullen de knoppen gloeien.
*Cf. ‘Accessoires’-gedeelte
BABY-UNIT
Temperatuursensor
AAN/UIT-knop (& Pager)
Aan/Uit-knop
Nachtlampje
• VERBINDING TUSSEN BABY- EN OUDER-UNIT
Terwijl beide units activeren ziet u de Geluidssterkte-Lichtindicatie op de Ouder-unit van links naar rechts en terug
rollen terwijl Ouder- en Baby-unit elkaar zoeken en vinden.
Zodra er verbinding is tussen Baby- en Ouder-unit, start de gewone monitoring. De Geluidssterkte-Lichtindicatie
reageert op geluid: hoe luider het geluid, hoe meer lichtjes opgloeien.
• ALARM-MODI
Identiceer met de volgende tabel de oorzaak van geluidsalarm; indien u de oorzaak van het probleem niet kunt
vinden of verhelpen, raadpleegt u het gedeelte ‘Eenvoudige Oplossingen’ in dit boekje.
Microfoon
Alarmtoon op
Ouder-unit
••••••••
(ononderbroken)
•••
3 bieps
••
2 bieps
Betekenis alarm Indicaties op Ouder-unit
Contact verbroken
Groen en Rood
knipperend
Batterij
Ouder-unit
bijna leeg
Batterij Babyunit bijna
leeg
Knop verandert van ononderbroken
•
groen naar afwisselend groen en rood
knipperen.
•
Knop verandert van groen naar
rood knipperen.
• Knop verandert van groen naar
rood knipperen.
Bergvak Stroomkabel
14 15
Indicaties op
Baby-unit
• Knop verandert van
ononderbroken groen naar
afwisselend (continu) groen en
rood knipperen.
•
Knop verandert van groen
naar rood knipperen.
Page 9

• EIGENSCHAPPEN EN FUNCTIES
NLNL
• VOLUMECONTROLE
Stel het volume in van 0 (stil) tot 10 (luid) door het wieltje in wijzerzin (luider) of in tegenwijzerzin (stiller) te draaien.
• GELUIDSSTERKTE-LICHTINDICATIE
De Geluidssterkte-Lichtindicatie op uw Ouder-unit reageert op de geluiden van uw baby. Hoe meer geluid baby
produceert, hoe meer lichtjes branden op de display. U kunt het geluidsvolume van de Ouder-unit verlagen en
evengoed op uw baby letten: ideaal tijdens ontspanning of een feestje.
• MONITORING DOOR GELUIDSACTIVERING
Tijdens rustgevende momenten, of als uw baby al wat ouder wordt, wil u wellicht niet elk geluidje uit de babykamer
horen. Uw Baby-monitor kan werken met ‘Monitoring door Geluidsactivering’: hij reageert als het geluid de vooraf
ingestelde drempel overschrijdt, bv. schreeuwen, geen gemurmel.
Druk op de
seconden nadat uw baby weer stil is, weer verstommen. Zodra het geluid van uw baby boven de drempel uitstijgt,
wordt de functie meteen uitgeschakeld en blijft de normale geluidsmonitoring werken tot uw baby weer kalmeert.
• ZEND- EN ONTVANGSTFUNCTIE
Uw monitor biedt u meer geruststelling en gemak dankzij een Zend- en Ontvangstfunctie zodat u uw baby iets kunt
zeggen. Houd de
• TEMPERATUURINDICATIE
Houd de button op uw Ouder-unit ingedrukt om de omgevingstemperatuur in de babykamer te controleren. De
Geluidssterkte-Lichtindicatie wordt even uitgeschakeld en vervangen door de omgevingstemperatuur in de babykamer.
Merk op dat de temperatuurindicatie werkt met intervallen van 2°C. Als de omgevingstemperatuur tussen 2 indicaties valt,
branden de lampjes erboven en eronder. (Bv.: bij 27°C branden de lampjes van 26°C en 28°C.)
knop op de Ouder-unit om ‘Monitoring door Geluidsactivering’ te selecteren. De Ouder-unit zal 15
knop opzij van de Ouder-unit ingedrukt om de functie te activeren en uw baby iets te zeggen.
• PAGING
Spoor de zoekgeraakte Ouder-unit op door 3 keer kort na elkaar op de knop van de Baby-unit te drukken. De Ouder-
unit stoot nu een alarmsignaal uit (1 minuut lang). Schakel dit alarm uit door op eender welke knop van de Ouderunit te drukken. Merk op dat deze pagerfunctie alleen werkt indien beide units op AAN staan en normaal functioneren.
• RIEMCLIP
Zoek de rubberdop op de achterzijde van de Ouder-unit en
neem ook de meegeleverde riemclip. Verwijder (en bewaar
zorgvuldig) de rubberdop en richt de invoegpinnetjes van
de riemclip op de opening (afbeelding 1). Breng de clip
aan in Stand
Stand . U kunt deze riemclip ook andersom draaien
om de Ouder-unit bv. tegen de muur te hangen. Richt in
dat geval de invoegpinnetjes van de riemclip (beeld 2),
breng de clip aan in Stand
wijzerzin naar Stand
• ONAFHANKELIJK NACHTLAMPJE
Als uw baby opgroeit, kunt u het Nachtlampje blijven gebruiken zonder monitoring en zonder de Ouder-unit.
Schakel de Baby-unit UIT en houd de
vertrouwde groen) om aan te geven dat de monitor niet AAN staat. Druk opnieuw op om uit te schakelen.
• TOEBEHOREN
Tomy stelt voor om sommige accessoires toe te voegen aan zijn Baby-Monitor-modellen Digital en Digital Plus. Meer
details vindt u op onze website: www.tomy.eu
• ONDERHOUD VAN UW MONITOR
Dompel geen onderdelen onder in vloeistof. Niet in direct zonlicht plaatsen.
Controleer het product af en toe op schade aan elektrische delen. Gebruik het alleen als alles correct gerepareerd is.
Verwijder altijd de batterijen uit de Baby-unit als u gedurende langere tijd met de netadapter werkt.
en draai hem 90 graden in wijzerzin naar
en draai hem 90 graden in
.
knop ingedrukt: het Nachtlampje brandt. De knop gloeit rood (in plaats van het
1. Riemclip
2. Muurophanging
• NACHTLAMPJE
Uw Baby-unit is uitgerust met een zacht gloeiend Nachtlampje. U activeert dit met de
afstand met uw Ouder-unit.
Om de batterij van de Baby-unit te sparen brandt dit Nachtlampje slechts 5 minuten lang. Voor onbeperkt gebruik
schakelt u met de adapter over naar netvoeding.
Schakel het Nachtlampje uit met de
U kunt dit Nachtlampje gebruiken zonder monitoring. Raadpleeg hiervoor het gedeelte ‘Onafhankelijk Nachtlampje’
in dit boekje.
knop op de Baby-unit of via de Ouder-unit.
knop op de Baby-unit of op
16 17
• GARANTIE
Uw monitor geniet een waarborg tegen fabricagefouten tot 2 jaar na aankoopdatum, op voorlegging van een
geldig aankoopbewijs. Wij raden u aan de monitor bij de eerste vaststelling van een productiefout in te leveren op
de plaats van aankoop. Indien uw probleem niet naar wens opgelost geraakt, vindt u meer tips op onze website,
www.tomy.eu. Alle voorwaarden zijn te vinden op onze website: www.tomy.eu
• TECHNISCHE SPECIFICATIES
- Voeding: Netadapter: PRI: 230V~50Hz SEC: 6V
- Batterijen: Ouder-unit - Herlaadbare 850mAh 2.4V Ni-MH batterij (inclusief).
Baby-unit - Vraagt 4 x 1.5V AA (LR6) batterijen.
- Bereik: 350m in optimale ‘open terrein’-situatie.
- Werkingstemperatuur: 0 - 50ºC
- Frequenties: 1880~1900MHz.
300mA.
Page 10
• VEILIGHEIDSINFORMATIE
NL NL
De Tomy Baby-Monitor is ontworpen als hulp bij het toezicht op uw kind en vervangt het toezicht door een
volwassene niet. Dit product is geen speelgoed. Houd elektrische toestellen en hun netsnoeren altijd buiten bereik
van baby’s en jonge kinderen. Belangrijk: plaats nooit eender welk onderdeel van uw monitor in of op het bedje.
Zorg voor een veilige plaatsing van de bedrading zodat kinderen er niet in verstrikt geraken of erover kunnen
struikelen. De adapters die met deze monitor worden meegeleverd, mogen nooit met andere toestellen gebruikt
worden. Gebruik voor deze monitor nooit andere dan de meegeleverde adapters. Plaats de adapter nergens waar
een kleuter hem als opstapje zou kunnen gebruiken. Gewicht op een ingeplugde adapter kan de unit beschadigen
maar kan ook verwondingen veroorzaken. Het is normaal dat laders heet worden tijdens gebruik. Wees voorzichtig;
geef hitte de kans zich te verspreiden. NIET AFDEKKEN! Ontkoppel de lader indien het product enkele dagen niet
gebruikt wordt. Voorkom elektrische schokken: haal de stekker uit het stopcontact vóór het schoonmaken. De
oplaadbare batterij in de Ouder-unit moet gerecycleerd worden. Niet weggooien met gewoon afval. Probeer geen
onderdelen uit elkaar te halen.
• BATTERIJVEILIGHEID
Verwijderen en vervangen van batterijen moet door een volwassene of onder diens toezicht worden uitgevoerd. Let
er vooral op dat batterijen correct worden ingevoerd: let op de (+) en (-) polariteitmerktekens op batterij en toestel.
Maak geen kortsluiting met de contactpunten in het batterijvak of met de uiteinden van de batterijen. Verwijder
lege batterijen uit het toestel. Vermeng geen oude (versleten) en nieuwe batterijen, of batterijen van ander type (bv.
oplaadbare en alkaline), model of merk. Versleten batterijen zijn geen gewoon afval! Werp batterijen nooit in vuur.
Verwijder batterijen uit het toestel na gebruik of als u het lange tijd niet gebruikt. Gebruik uitsluitend batterijen van
hetzelfde of gelijkwaardige type als aangeraden.
Verwijderen en herladen van herlaadbare batterijen moet door een volwassene of onder diens toezicht worden
uitgevoerd. Als u herlaadbare batterijen gebruikt voor de Baby-unit, moeten deze uit de monitor gehaald worden
om ze te laden. Probeer nooit niet-herlaadbare batterijen te laden.
Bescherm het leefmilieu door product en verpakking verantwoordelijk op te ruimen. Het
minicontainer-symbool geeft aan dat product en batterijen niet bij het huishoudelijk afval horen.
Ze bevatten namelijk stoffen die schadelijk kunnen zijn voor leefmilieu en gezondheid. Gebruik
aangewezen inzamelings- of recyclagepunten om dit product of batterijen op te ruimen.
• EENVOUDIGE OPLOSSINGEN
Werkt uw babyfoon niet zoals verwacht? Met de volgende informatie zou u uw problemen moeten kunnen oplossen,
en anders vindt u een volledigere handleiding op onze website: www.tomy.com.eu
• VEELGESTELDE VRAGEN
V. Moet mijn Ouder-unit Aan- of Uitgeschakeld zijn tijdens het laden?
A. Om het even. Uw Ouder-unit laadt in beide gevallen op, Aan én Uit. Maar als u de unit oplaadt terwijl hij ‘Aan’
staat, kunt u tijdens het laden ook op uw baby letten.
V. Ik heb de temperatuur van de babykamer met een ander toestel gemeten, en ik krijg een andere waarde
dan met de monitor. Waarom?
A. De temperatuurmeting van uw Tomy-monitor is bedoeld om u een indicatie te geven van de temperatuur in de
babykamer. Een kleine afwijking met +1°C of -1°C is best mogelijk. Andere toestellen hebben vergelijkbare afwijkingen.
V. Kan ik mijn monitor in het buitenland gebruiken?
A. U kunt uw monitor gebruiken in het land waar hij werd gekocht en in de hele EU. Hoewel uw monitor correct
kan werken in andere landen, is het mogelijk dat zijn werkfrequentie andere toestellen stoort (of dat hij zélf wordt
gestoord) en illegaal is. Tomy kan niet aansprakelijk gesteld worden voor gebruik buiten het land waar u uw
monitor hebt gekocht, of de EU.
• STORINGEN OPSPOREN
PROBLEEM
Mijn Ouder-unit schakelt
niet AAN.
Mijn Baby-unit schakelt
niet AAN.
Het Nachtlampje van de Babyunit brandt, maar ik heb geen
verbinding met de Ouder-unit.
Er klinkt een continu
biepgeluid.
Elke minuut klinken 2
bieps.
Elke minuut klinken 3 bieps.
Ik hoor niets via mijn
Ouder-unit.
En/of:
Het werkt slechts met
tussenpozen.
Mijn Ouder-unit maakt
een ononderbroken
biepend geluid.
Mijn Ouder-unit doet
ongeveer om de minuut
zomaar biep-biep.
Schril geluid.
Nachtlampje schakelt
telkens weer uit.
Na herlading gaat de
batterij minder lang
mee.
MOGELIJKE OORZAAK
De (meegeleverde) oplaadbare batterij
werd niet correct geïnstalleerd.
De oplaadbare batterij kan te laag
geladen zijn en niet genoeg stroom leveren
voor activering van monitor.
Niet goed aangesloten op
elektriciteitsnet.
Niet goed aangesloten op
elektriciteitsnet.
Probleem met batterijen: correcte
invoer of toestand.
AAN/UIT-knop niet lang genoeg
ingedrukt.
Het Nachtlampje werkt onafhankelijk
van de monitorfunctie van de Babyunit. (Dit is een bewuste eigenschap.)
Waarschuwing verbroken contact.
Batterij Baby-unit bijna leeg.
Batterij Ouder-unit bijna leeg.
Volume op Ouder-unit is te laag
ingesteld.
Units bereiken elkaar niet.
Units zijn ingesteld op ‘Monitoring
door Geluidsactivering’.
De units hebben geen contact met
elkaar.
Eén of beide units heeft te weinig
batterijvermogen.
Units staan te dicht bij elkaar.
Volume staat te hoog.
Het Nachtlampje is ontworpen om na 5
minuten automatisch uit te schakelen
om de batterij te sparen.
Zoals elke herlaadbare batterij is de
levensduur niet onbeperkt. Vervanging
kan nodig zijn.
OPLOSSING
Installeer de batterij volgens de instructies in dit boekje.
Sluit de Ouder-unit daarna aan op het voedingsnet om te
laden. Wacht enkele minuten om het toestel in te schakelen.
Laat de Ouder-unit via het voedingsnet opladen.
Wacht enkele minuten om het toestel in te schakelen.
Controleer de aansluiting van de voedingskabel (ook
het stopcontact).
Controleer de aansluiting van de voedingskabel (ook
het stopcontact).
Controleer of batterijen correct werden ingevoerd en
de juiste lading hebben.
Houd de AAN/UIT-knop van de Baby-unit ingedrukt
tot hij opgloeit.
Schakel het Nachtlampje UIT door op de
te drukken. Heractiveer nu de hoofdfunctie van de
Baby-unit door de knop ingedrukt te houden.
Controleer of beide units correct gevoed zijn.
Breng beide units dichter bij elkaar en voer de
installatie-instructies opnieuw uit.
Vervang de batterijen.
Of Schakel over naar netvoeding (AC) via de
meegeleverde adapter.
Laad de batterijen opnieuw op.
Verhoog het volume van de Ouder-unit.
Breng de units dichter bij elkaar.
Lees ‘Monitoring door Geluidsactivering’ in dit
instructieboekje.
Controleer of beide units wel degelijk stroom krijgen
en volg daarna de ‘Installatie’ in dit boekje.
Controleer de staat van de batterijen en herlaad/
vervang de batterijen of schakel over op netvoeding.
Plaats de units verder van elkaar.
Verminder het volume.
Voor continu gebruik schakelt u over naar
netvoeding.
Raadpleeg onze website voor vervangingsonderdelen:
www.tomy.eu
knop
BLZ.
15
15
16
15
15
15
16
15
15
16
16
17
18 19
Page 11

• LERNEN SIE IHR BABYPHONE KENNEN
ELTERNEINHEIT
Geräuschpegel-Lichtanzeige
Temperaturanzeige
Anzeige der Bewegungssensormatte*
Lautstärkeregler
Ein- und Aus-Schalter
Ein- und Aus-Schalter für das Nachtlicht
Temperaturanzeige
Mikrofon
Schalter für die Geräuschaktivierung
Gegensprechschalter
* Siehe Abschnitt „Zubehör”.
D D
• ELTERNEINHEIT
Entfernen Sie die Abdeckung des Batteriefaches auf der Rückseite des Gerätes (Anmerkung: Sie wird eventuell schon
lose geliefert.), legen Sie den Akku (mitgeliefert) korrekt ein, und verbinden Sie den Anschluss. Setzen Sie die Abdeckung
wieder ein und schrauben Sie sie gut fest, dabei können Sie sich nach den Illustrationen im Schnelleinstieg richten.
Überprüfen Sie, ob das Netzkabel richtig eingesteckt ist, stecken Sie den Stecker in die Steckdose und lassen Sie das
Babyphone ganze 6 Stunden lang auaden. Während der Ladezeit können Sie Ihr Babyphone verwenden, folgen Sie
dafür den Anweisungen unter „Einstellungen“.
Wichtig! Ihre Elterneinheit funktioniert nicht ohne eingelegten Akku.
• BABYEINHEIT
Die höchste Leistungsfähigkeit hat die Babyeinheit, wenn Sie sie am häuslichen Stromnetz mit dem mitgelieferten Netzstecker
verwenden. Aber Sie können es auch völlig mobil verwenden, wenn Sie 4 AA / LR6-Batterien (nicht im Lieferumfang enthalten)
einlegen. Entfernen Sie dafür die Abdeckung des Batteriefaches auf der Unterseite des Gerätes mit einem Schlitzschraubendreher.
Legen Sie die Batterien ein und achten Sie darauf, dass die Plus- und Minuspole korrekt zugeordnet werden. Setzen Sie die
Abdeckung wieder ein und schrauben Sie sie gut fest.
Stellen Sie die Babyeinheit mindestens 1 Meter vom Baby entfernt auf und achten Sie darauf, dass alle Teile des Gerätes
außerhalb der Reichweite des Kindes sind. Auf keinen Fall dürfen sich Teile des Gerätes im oder am Kinderbett benden. Damit
das Babyphone optimal funktioniert, sollte es nicht weiter als 3 Meter vom Baby entfernt sein.
• EINSTELLUNGEN
Befestigungspunkt
für den Gürtelclip
Eingang für das
Netzteil
• EINSCHALTEN
Überprüfen Sie, ob beide Geräte mit einer Steckdose verbunden sind oder Batterien eingelegt wurden (siehe oben). Die Geräte
sollten mindestens 1 Meter voneinander entfernt stehen.
Halten Sie bei jedem Gerät den Knopf
mindestens 2 Sekunden gedrückt. Wenn die Geräte eingeschaltet sind, werden die
Knöpfe leuchten.
BABYEINHEIT
Temperatursensor
Ein- und Aus-
(& Suchfunktion-) Schalter
Ein- und Aus-
Schalter für das Nachtlicht
• VERBINDUNG VON BABY- UND ELTERNGERÄT
Während sich beide Geräte einschalten, können Sie beobachten, wie die Geräuschpegel-Lichtanzeige auf der Elterneinheit
von links nach rechts und rechts nach links aueuchtet: Die Geräte suchen einander und bauen eine Verbindung auf.
Wenn die Verbindung steht, beginnt die normale Überwachungsfunktion. Die Geräuschpegel-Lichtanzeige reagiert
auf Geräusche: je lauter das Geräusch, desto mehr Lämpchen leuchten.
• ALARMARTEN
Die Ursachen der verschiedenen akustischen Warnungen nden Sie in der folgenden Tabelle. Wenn Sie die
Ursache nicht herausnden oder das Problem nicht lösen können, dann schauen Sie bitte im Abschnitt „Schnelle
Problemlösungen“ in der vorliegenden Broschüre nach.
Mikrofon
Aufwicklung für
Stromkabel
Warnton der
Elterneinheit
••••••••
(durchgehend)
•••
3 x Piepen
••
2 x Piepen
Bedeutung
Kontaktverlust
Grün und rot
blinkend
Batterien der
Elterneinheit
sind schwach
Batterien der
Babyeinheit
sind
schwach
Anzeige auf der Elterneinheit
• Knopf
Grün zu einem zwischen Grün und Rot
wechselndem Blinken.
• Knopf
blinkendes Rot.
• Knopf
des Rot.
20 21
wechselt vom ständigen
wechselt von Grün auf
wechselt von Grün auf blinken-
Anzeige auf der
Babyeinheit
•
Knopf wechselt vom
ständigen Grün zu einem
zwischen Grün und Rot
wechselndem Blinken.
• Knopf wechselt von Grün
auf blinkendes Rot
Page 12

• EIGENSCHAFTEN UND FUNKTIONEN
DD
• LAUTSTÄRKEREGELUNG
Die Wiedergabelautstärke kann von Null (stumm) bis Stufe 10 (Maximum) eingestellt werden. Zur Erhöhung drehen
Sie das Rädchen im Uhrzeigersinn, zum Verringern der Lautstärke entgegen dem Uhrzeigersinn.
• GERÄUSCHPEGEL-LICHTANZEIGE
Die Lautstärkeanzeige auf Ihrer Babyeinheit reagiert auf die Geräusche, die Ihr Baby macht. Je lauter Ihr Baby
ist, desto mehr Lämpchen leuchten auf der Anzeige auf. So können Sie die Wiedergabelautstärke verringern und
trotzdem Ihr Kind überwachen – ideal, wenn Sie sich entspannen möchten oder Gäste haben.
• GERÄUSCHAKTIVIERTE ÜBERWACHUNG
Wenn Sie sich einmal ausruhen möchten oder wenn Ihr Baby schon ein wenig älter ist, wollen Sie vielleicht nicht
jedes Geräusch aus dem Kinderzimmer hören. Dafür hat Ihr Babyphone die geräuschaktivierte Überwachung, eine
Einstellung, in der es nur solche Geräusche überträgt, die eine vorher gewählte Lautstärke übersteigen, zum Beispiel
wenn das Baby schreit und nicht nur gluckst.
Wählen Sie die Geräuschaktivierte Überwachung, indem Sie den Knopf
Ihr Baby sich beruhigt hat, startet der Modus in 15 Sekunden. Jedes Mal, wenn die Geräusche des Babys den
eingestellten Grenzwert übertreffen, springt das Babyphone sofort auf die ständige Übertragung um, bis sich das
Baby wieder beruhigt.
• GEGENSPRECHFUNKTION
Noch mehr Sicherheit und Komfort bietet Ihnen die Gegensprechfunktion, die es Ihnen ermöglicht, mit Ihrem Kind
zu sprechen. Halten Sie die Taste
aktivieren und mit Ihrem Baby zu sprechen.
• TEMPERATURANZEIGE
Um die Raumtemperatur im Kinderzimmer zu überprüfen, drücken Sie einfach den Knopf auf der Elterneinheit. Die
Geräuschaktivierte Lichtanzeige wird vorübergehend ausgeschaltet und statt dessen wird die Raumtemperatur im
Kinderzimmer angezeigt.
Bitte beachten Sie, dass die Temperaturanzeige in Stufen von 2 ˚C erfolgt. Sollte die Temperatur dazwischen liegen, dann
leuchten die beiden benachbarten Zahlen (z. B. für 27 ˚C leuchten 26 ˚C und 28 ˚C auf).
an Ihrer Elterneinheit drücken. Wenn
gedrückt, die sich an der Seite der Elterneinheit bendet, um die Funktion zu
• SUCHFUNKTION
Um eine verlegte Elterneinheit zu nden, drücken Sie schnell 3 mal hintereinander den Knopf
dann wird die Elterneinheit eine Minute lang einen Warnton abgeben. Um den Warnton zu beenden, drücken Sie
einen beliebigen Knopf auf der Elterneinheit. Bitte beachten Sie, dass die Suchfunktion nur dann funktioniert, wenn
beide Geräte eingeschaltet sind und im Überwachungsmodus sind.
• GÜRTELCLIP
Auf der Rückseite der Elterneinheit nden Sie eine
Gummiabdeckung für die Befestigung des mitgelieferten
Gürtelclips. Nehmen Sie die Abdeckung ab und bewahren
Sie sie gut auf, dann drehen Sie den Gürtelclip entsprechend
der Position der Führungsstifte zurecht (Bild 1),
Sie den Gürtelclip in Position und drehen Sie ihn
um 90 Grad im Uhrzeigersinn auf die Position . Oder
aber Sie drehen den Gürtelclip so zurecht, dass Sie die
Elterneinheit an der Wand anbringen oder aufhängen
können. Dafür drehen Sie die Führungsstifte in die
richtige Position (Bild 2), stecken den Gürtelclip in
Position und drehen ihn 90 Grad im Uhrzeigersinn
auf Position .
• EIGENSTÄNDIGES NACHTLICHT
Wenn Ihr Baby größer wird, können Sie auch das Nachtlicht ohne Überwachungsfunktion verwenden und benötigen
dafür auch die Elterneinheit nicht. Drücken und halten Sie Knopf an der auf AUS geschalteten Babyeinheit, und
das Nachtlicht geht an. Der Knopf wird rot leuchten (anstelle des gewohnten Grüns), und zeigt damit an, dass die
Überwachungsfunktion nicht EIN geschaltet ist. Um das Nachtlicht auszuschalten, drücken Sie wieder auf den Knopf .
• ZUBEHÖR: TOMY’S BEWEGUNGSSENSORMATTE UND ZUSÄTZLICHE ELTERNGERÄTE
Für besonders viel Sicherheit können eine Bewegungssensormatte von Tomy und/oder eine zusätzliche Elterneinheit
mit Ihrem Babyphone verbunden werden. Bei den Elterneinheiten haben Sie die Wahl zwischen Tomy Digital und
Tomy Digital Plus. Weitere Informationen dazu gibt es auf unserer Website: www.tomy.eu
• SO BLEIBT IHR BABYPHONE IN GUTEM ZUSTAND
Kein Teil des Gerätes darf in Flüssigkeiten eingetaucht werden. Nicht dem direkten Sonnenlicht aussetzen. Überprüfen
Sie das Produkt regelmäßig auf Schäden an den elektrischen Teilen und verwenden Sie es nicht, bis etwaige Schäden
vollständig repariert wurden. Nehmen Sie immer die Batterien aus der Babyeinheit heraus, wenn Sie für eine längere
Zeit das Netzteil benutzen.
stecken
1. Gürtelclip
der Babyeinheit und
2. Aufhängen
• NACHTLICHT
Ihr Babyphone hat ein sanftes Nachtlicht, das mit dem Knopf
Elterneinheit aktiviert werden kann.
Um die Batterien der Babyeinheit zu schonen, ist das Nachtlicht jeweils nur maximal 5 Minuten an. Um das
Nachtlicht länger leuchten zu lassen, benutzen Sie die Babyeinheit bitte mit dem Netzstecker.
Um das Nachtlicht auszuschalten, drücken Sie auf den Knopf
Im Abschnitt „Eigenständiges Nachtlicht“ erfahren Sie, wie Sie sie das Babyphone als Nachtlicht ohne
Überwachungsfunktion verwenden können.
an der Babyeinheit oder per Fernbedienung an der
an der Babyeinheit oder Elterneinheit.
22 23
• GARANTIE
Wir gewähren eine zweijährige Garantie gegen Herstellungsmängel ab dem Verkaufsdatum, wenn ein gültiger
Kaufbeleg vorgelegt wird. Falls ein Herstellungsmangel erstmals auftritt, empfehlen wir, dass Sie Ihr Babyphone dem
Verkäufer zurückbringen. Sollte er Ihr Problem nicht zufriedenstellend lösen können, dann nden Sie auf unserer
Website www.tomy.eu zusätzliche Informationen.
Die vollständigen Geschäftsbedingungen nden Sie auf unserer Website: www.tomy.eu
• TECHNISCHE DATEN
- Stromversorgung: Anschlusswerte des Netzteils: PRI: 230 V~50 Hz SEC: 6 V
- Batterien: Elterneinheit – 1 NiMH-Akku mit 850 mAh, 2,4 V (enthalten).
Babyeinheit: 4 AA / LR6-Batterien (1,5 V) erforderlich.
- Reichweite: 350 m unter optimalen Bedingungen auf „offenem Feld“.
- Betriebstemperatur: 0 – 50 ºC.
- Frequenzen: 1880~1900 MHz.
300 mA.
Page 13

• SICHERHEITSHINWEISE
D D
Das Tomy Babyphone soll Ihnen bei der Überwachung Ihres Kindes helfen und ist kein Ersatz für die Aufsicht durch
Erwachsene. Dieses Produkt ist kein Spielzeug. Bewahren Sie elektrische Geräte und die dazugehörigen Kabel immer
außerhalb der Reichweite von Babys und kleinen Kindern auf. Stellen Sie das Babyphone oder sein Zubehör auf
keinen Fall auf oder in das Kinderbett. Stellen Sie sicher, dass alle Kabel gesichert sind, so dass Kinder sich daran
nicht verwickeln können und man auch nicht darüber stolpern kann. Auf keinen Fall dürfen Sie die mit diesem
Babyphone mitgelieferten Netzadapter mit anderen Geräten verwenden. Verwenden Sie nur die mitgelieferten
Netzadapter mit Ihrem Babyphone. Achten Sie darauf, das Netzgerät nicht so zu installieren, dass Ihr Kind es als
Stufe benutzen kann. Wenn der in der Steckdose bendliche Adapter mit einem Gewicht belastet wird, kann die
Einheit beschädigt werden oder Ihr Kind kann verletzt werden. Die Netzadapter können während des Gebrauchs heiß
werden – fassen Sie sie vorsichtig an und lassen Sie sie abkühlen. DECKEN SIE DIE ADAPTER NICHT AB. Ziehen Sie den
Stecker, wenn das Produkt einige Tage nicht verwendet wird. Um Stromschläge zu vermeiden, sollten Sie das Gerät
vor dem Reinigen vom Netz trennen. Der Akku aus der Elterneinheit sollte recycelt werden. Das Produkt darf nicht im
Hausmüll entsorgt werden. Versuchen Sie nicht, Teile dieses Produktes auseinander zu bauen.
• BATTERIESICHERHEIT
Das Entnehmen und Austauschen der Batterien sollte nur durch einen Erwachsenen oder unter Aufsicht eines
Erwachsenen erfolgen. Geben Sie besonders darauf Acht, dass die Batterien korrekt eingelegt werden, entsprechend
den Symbolen (+) und (-) auf der Batterie und dem Produkt. Schließen Sie die Kontakte im Batteriefach oder die
Batteriekontakte nicht kurz. Entfernen Sie leere Batterien aus dem Produkt. Kombinieren Sie nicht alte (benutzte) und
neue Batterien oder Batterien verschiedenen Typs, z. B. auadbare und Alkalibatterien oder Batterien eines anderen
Herstellers oder einer anderen Marke. Entsorgen Sie leere Batterien sicher und verbrennen Sie sie nicht.
Entfernen Sie Batterien aus dem Produkt nach der Verwendung oder während einer längeren Aufbewahrungszeit.
Verwenden Sie nur Batterien des empfohlenen oder eines gleichwertigen Typs.
Das Entnehmen und Wiederauaden von Akkus sollte nur durch einen Erwachsenen oder unter Aufsicht eines
Erwachsenen erfolgen. Wenn Sie in der Babyeinheit auadbare Akkus verwenden, müssen sie vor dem Auaden aus
dem Babyfon entfernt werden. Versuchen Sie nicht, nicht wiederauadbare Batterien aufzuladen.
Schützen Sie unsere Umwelt, indem Sie das Produkt und die Verpackung
verantwortungsbewusst entsorgen. Das Mülltonnen-Symbol bedeutet, dass das Produkt und
die Batterien nicht im Hausmüll entsorgt werden dürfen. Denn sie enthalten Substanzen,
die umwelt- und gesundheitsschädlich sein können. Bitte entsorgen Sie das Produkt und die
Batterien nur in dafür vorgesehenen Sammelbehältern oder Wiederverwertungsstellen.
• SCHNELLE PROBLEMLÖSUNGEN
Wenn Ihr Babyphone nicht wie erwartet funktioniert, sollten die unten aufgeführten Informationen Ihnen helfen, das
Problem zu lösen. Falls nicht, nden Sie eine ausführlichere Anleitung auf unserer Website: www.tomy.eu
• HÄUFIG GESTELLTE FRAGEN
Q. Muss ich beim Ladevorgang die Elterneinheit ein- oder ausschalten?
A. Das ist egal, die Elterneinheit lädt sich ein- oder ausgeschaltet auf. Wenn Sie das Gerät beim Laden eingeschaltet
haben, können Sie es gleichzeitig auch zur Überwachung des Babys verwenden.
Q. Ich habe die Temperatur im Kinderzimmer mit einem anderen Thermometer gemessen und erhalte ein
anderes Ergebnis als die Babyeinheit – warum?
A. Die Temperaturmessung an Ihrem Tomy Babyphone zeigt Ihnen die ungefähre Temperatur mit einer Genauigkeit von ca.
±1 ˚C. Andere Geräte haben ähnliche Abweichungen.
Q. Kann ich mein Babyphone auch im Ausland verwenden?
A. Sie können das Babyphone in dem Land verwenden, in dem Sie es gekauft haben und in jedem anderen EU-Land.
Es ist möglich, dass Ihr Babyphone auch in weiteren Ländern korrekt funktioniert, aber seine Arbeitsfrequenz könnte
andere Geräte beeinussen, von ihnen beeinusst werden oder illegal sein. Tomy haftet nicht für die Verwendung des
Babyphones außerhalb des Landes, in dem es gekauft wurde, oder außerhalb der EU.
• FEHLERSUCHE
PROBLEM
Meine Elterneinheit lässt
sich nicht EIN schalten.
Meine Babyeinheit geht
nicht AN.
Das Nachtlicht ist
an, aber ich habe
keine Verbindung zur
Elterneinheit.
Es gibt einen
durchgehenden Piepton.
Es gibt jede Minute einen
doppelten Piepton.
Es gibt jede Minute einen
dreifachen Piepton.
Ich kann an der
Elterneinheit nichts hören.
Und/oder es gibt nur ab
und zu Geräusche.
Meine Elterneinheit gibt
einen durchgehenden
Piepton von sich.
Meine Elterneinheit gibt
ein unregelmäßiges
Piep-Piep von sich, ca.
jede Minute.
Ein schrilles Geräusch.
Das Nachtlicht geht
ständig aus.
Der Akku entlädt sich
immer schneller.
MÖGLICHE URSACHE
Der (mitgelieferte) Akku wurde nicht
richtig eingelegt.
Der Akku ist zu schwach geladen, um das
Gerät einzuschalten.
Das Netzteil ist nicht richtig angeschlossen.
Das Netzteil ist nicht richtig angeschlossen.
Fehler beim Einlegen der Batterien oder
zu schwache Batterien.
Der EIN/AUS-Schalter wird nicht lange
genug gedrückt.
Das Babyphone wird ohne
Überwachung als Nachtlicht verwendet
(das ist eine beabsichtigte Funktion).
Warnung vor unterbrochener
Verbindung.
Batterien der Babyeinheit sind
schwach.
Akku der Elterneinheit ist schwach.
Die Lautstärke der Elterneinheit ist zu
niedrig eingestellt.
Die Reichweite wurde überschritten.
Die Geräte sind auf Geräuschaktivierte
Überwachung eingestellt.
Die Geräte haben keine Verbindung.
Die Batterien bzw. der Akku in beiden
oder einem der beiden Geräte werden
zu schwach.
Eltern- und Babyeinheit stehen zu dicht
beieinander.
Die Lautstärke ist zu hoch.
Um die Batterien zu schonen, geht
das Nachtlicht automatisch nach 5
Minuten aus.
Jeder Akku hat eine begrenzte
Lebensdauer und muss schließlich
ersetzt werden.
LÖSUNG
Legen Sie den Akku wie in der vorliegenden Anleitung oder im
Schnelleinstieg beschrieben ein. Danach beginnen Sie den Ladevorgang
der Elterneinheit und warten Sie einige Minuten, bevor Sie sie EIN schalten.
Beginnen Sie den Ladevorgang der Elterneinheit und
warten Sie einige Minuten, bevor Sie sie EIN schalten.
Überprüfen Sie, ob das Kabel richtig eingesteckt ist
(auch ob der Stecker in der Steckdose ist).
Überprüfen Sie, ob das Kabel richtig eingesteckt ist
(auch ob der Stecker in der Steckdose ist).
Prüfen Sie, ob die Batterien noch ausreichend
geladen sind und ob sie richtig eingelegt wurden.
Halten Sie den EIN/AUS-Schalter der Babyeinheit
gedrückt, bis er aueuchtet.
Schalten Sie das Nachtlicht AUS, indem Sie den Knopf
drücken und dann schalten Sie die Hauptfunktion
der Babyeinheit wieder ein, indem Sie den Knopf
drücken und halten.
Überprüfen Sie, ob beide Geräte Strom haben.
Bringen Sie beide Geräte näher zusammen und folgen
Sie noch einmal der Anleitung zu den Einstellungen.
Ersetzen Sie die Batterien.
Oder: Schließen Sie das Gerät per Netzstecker an die
Stromleitung an.
Laden Sie den Akku auf.
Erhöhen Sie die Lautstärke der Elterneinheit.
Bringen Sie die Geräte näher zusammen.
Lesen Sie den Abschnitt „Geräuschaktivierte Überwachung”
in der vorliegenden Bedienungsanleitung.
Überprüfen Sie, ob beide Geräte Strom haben
und folgen Sie noch einmal der Anleitung zu den
Einstellungen.
Finden Sie die schwache Batterie, ersetzen Sie sie
oder laden Sie den Akku auf, oder benutzen Sie den
Netzstecker.
Stellen Sie die Geräte weiter auseinander.
Verringern Sie die Lautstärke.
Um das Nachtlicht dauerhaft anzuschalten, müssen
Sie das Gerät per Netzstecker betreiben.
Auf unserer Website www.tomy.eu erfahren Sie,
woher Sie Ersatzteile bekommen.
SEITE
21
21
22
21
21
21
22
21
21
22
22
23
24 25
Page 14

• CONOZCA SU MONITOR
UNIDAD DE PADRES
Pantalla de Temperatura
Pantalla Luminosa del Nivel de Sonido
Sensor de Movimiento*
Control de Volumen
Encendido / Apagado
Encendido Luz Nocturna
Indicador de Temperatura
Micrófono
Activación de Sonido
Intercomunicador Bidireccional
E E
• UNIDAD DE PADRES
Quite la tapa del compartimento de las pilas de la parte posterior de la unidad (N.B: ésta también puede
suministrarse suelta) e inserte la batería (incluida) correctamente, enchufando la clavija a la toma. Vuelva a
colocar la cubierta y atorníllela rmemente. Ver imágenes en la Guía de Inicio Rápido.
Una vez se haya asegurado de que el cable de corriente está conectado correctamente, conecte su Unidad de
Padres a la red eléctrica y cárguela por espacio de 6 horas. Puede usar su monitor mientras se está cargando,
siguiendo los pasos del apartado ‘Conguración’ que aparece más adelante.
¡Importante! Su Unidad de Padres no funcionará si no inserta primero las pilas.
• UNIDAD DEL BEBÉ
Para un mejor funcionamiento, recomendamos que la Unidad del Bebé funcione con la red eléctrica de su casa,
usando el adaptador de corriente que le proporcionamos. También puede usar 4 pilas x AA/LR6 (no incluidas) para
hacerla portátil. Para insertar las pilas, desatornille la cubierta del compartimento situado en la parte inferior de la
unidad mediante un destornillador. Inserte las pilas, asegurándose de que las coloca adecuadamente de acuerdo
con los símbolos de polaridad ‘+’ y ‘-’. Coloque de nuevo la cubierta y atorníllela rmemente en la posición correcta.
Coloque la Unidad del Bebé por lo menos a un metro de distancia del bebé, asegurándose de que todas las piezas
estén fuera del alcance de éste. Bajo ninguna circunstancia debe colocar ninguna parte del monitor dentro o sobre la
cuna. Para un correcto funcionamiento, recomendamos que el monitor no se sitúe a más de 3 metros de distancia de
su bebé.
• CONFIGURACIÓN
Accesorio Clip
de Cinturón
Entrada
corriente AC
• ENCENDIDO
Asegúrese de que las Unidades del Bebé y de los Padres estén conectadas a la red eléctrica y/o tengan instaladas
las baterías (ver instrucciones anteriores). Las unidades deben estar separadas al menos un metro una de otra.
Pulse y mantenga presionado el botón de cada unidad al menos 2 segundos. Una vez activados, los botones se iluminarán.
*Véase la sección “Accesorios”
UNIDAD DEL BEBÉ
Sensor de Temperatura
Encendido (& Buscador)
Encendido Luz Nocturna
• CONEXIÓN DE LA UNIDAD DE PADRES CON LA DEL BEBÉ
Según se activa cada unidad, observe la Pantalla Luminosa del Nivel de Sonido mientras se desplaza de izquierda a derecha
y de derecha a izquierda a medida que la Unidad de Padres y la del Bebé se buscan para conectarse una con otra.
Una vez establecida la conexión entre ambas, comenzará la monitorización. La Pantalla Luminosa del Nivel de
Sonido reacciona al sonido: mientras más alto sea éste, más luces se iluminarán.
• MODOS DE ALARMA
Identique la causa de la alarma sonora usando la siguiente tabla; si no puede identicar o recticar la causa del
problema, vaya a la sección “Guía de Soluciones Simples” de este manual.
Tono alarma en
Micrófono
la Unidad de
Padres
••••••••
(Continuo)
•••
3 pitidos
••
2 pitidos
Signicado de la Alarma Señales en la Unidad de Padres
Pérdida de Contacto
Verde y rojo
parpadeante
Batería baja –
Unidad de
Padres
Batería baja –
Unidad del
Bebé
El interruptor cambiará de solo
•
verde a un parpadeo rojo y verde.
• El interruptor cambiará de
verde a rojo parpadeante.
• El interruptor cambiará de
verde a rojo parpadeante.
Recogecable
26 27
Señales en la Unidad
del Bebé
• El interruptor cambiará
de solo verde a un par padeo
(continuo) verde y rojo.
•
El interruptor cambiará
de verde a rojo parpadeante.
Page 15

• CARACTERÍSTICAS Y FUNCIONES
EE
• CONTROL DE VOLUMEN
Ajuste el volumen desde cero (mute) al nivel 10 (max) moviendo la rueda selectora en la dirección de las agujas
del reloj para subirlo, y en sentido contrario para bajarlo.
• PANTALLA LUMINOSA DEL NIVEL DE SONIDO
La Pantalla Luminosa del Nivel de Sonido de la Unidad de Padres reacciona ante los sonidos de su bebé. Mientras
más ruido haga su bebé, más se iluminarán las luces en la pantalla. Puede bajar el volumen en la Unidad de
Padres mientras sigue cuidando a su bebé, lo cual es ideal cuando usted está descansando o disfrutando de un
rato de ocio.
• MONITORIZACIÓN POR ACTIVACIÓN DE SONIDO
En esos momentos tranquilos o cuando su bebé ya sea un poco mayor, puede que usted no desee escuchar cada
sonido de la habitación de su bebé. El monitor de su bebé tiene un modo de Monitorización por Activación de
Sonido, un dispositivo que solo captura los sonidos que superen el umbral predeterminado, por ejemplo, un grito
y no un gorjeo.
Seleccione la Monitorización por Activación de Sonido pulsando el botón
Padres se desactivará 15 segundos después de que el bebé se haya calmado. Cada vez que los sonidos de su bebé
se eleven sobre el umbral predeterminado, esta función será interrumpida instantáneamente y la monitorización
normal del sonido continuará hasta que su bebé se vuelva a calmar.
• INTERCOMUNICADOR BIDIRECCIONAL
Para su tranquilidad y comodidad, su monitor tiene un Intercomunicador Bidireccional que le permite hablar con
su bebé. Para activarlo, pulse y mantenga presionado el botón
con su bebé.
de la Unidad de Padres. La unidad de
en el costado de la Unidad de Padres y hable
• BÚSQUEDA
Para localizar la Unidad de Padres que se ha perdido, pulsar el botón
y la Unidad de Padres emitirá una alarma continua durante 1 minuto. Para silenciar la alarma, pulse cualquier
botón de la Unidad de Padres. Fíjese que la función de búsqueda solo entrará en funcionamiento cuando ambas
unidades estén ENCENDIDAS y monitorizando normalmente.
• CLIP DE CINTURÓN
Localice la cubierta de goma en la parte de atrás de la
Unidad de Padres y el clip de cinturón que se incluye.
Quítela y guarde con cuidado la cubierta de goma, alinee
los pines guía del clip de cinturón (imagen 1), inserte el
clip en la posición y gire 90 grados en la dirección de
las manecillas del reloj hasta la posición . El clip de
cinturón también puede orientarse de forma que pueda
jarlo a la pared o colgar su Unidad de Padres. En este
caso, alinee los pines guía del clip de cinturón (imagen
2), inserte el clip en la posición y gire 90 grados en
dirección de las manecillas del reloj hasta la posición .
• LUZ NOCTURNA INDEPENDIENTE
A medida que el niño crezca, puede usar la Luz Nocturna sin tener que monitorizar y sin necesidad de la Unidad de Padres.
Con la Unidad del Bebé APAGADA, pulse y mantenga presionado el botón y la Luz Nocturna se iluminará. El botón
resplandecerá en rojo (en lugar del verde acostumbrado), indicando que el monitor no está ENCENDIDO. Vuelva a
pulsar el botón para apagar.
• ACCESORIOS; SENSOR DE MOVIMIENTO Y UNIDADES ADICIONALES TOMY PARA PADRES
Para mayor tranquilidad, el Sensor de Movimiento y/o una Unidad de Padres Tomy adicional de los modelos Tomy
Digital o Digital Plus, pueden agregarse a su Monitor. Para más información, visite nuestro sitio web: www.tomy.eu
en la Unidad del Bebé tres veces seguidas
1. Clip de
Cinturón
2. Soporte
de Pared
• INDICADOR DE TEMPERATURA
Para comprobar la temperatura ambiente de la habitación de su bebé, simplemente pulse y mantenga presionado
el botón de su Unidad de Padres. La Pantalla Luminosa Sensible al Sonido se interrumpirá temporalmente y será
reemplazada con la temperatura ambiente de la habitación de su bebé.
Observe que el Indicador de Temperatura marca intervalos de 2°C. Si la temperatura ambiente se marca entre
dos intervalos, entonces las luces de arriba y abajo se encenderán (por ejemplo, para 27°C se iluminarán las
luces de 26°C y 28°C).
• LUZ NOCTURNA
Su Unidad del Bebé tiene una suave Luz Nocturna que puede ser activada pulsando el botón
Bebé o a distancia desde su Unidad de Padres.
Para ampliar la duración de la batería de su Unidad del Bebé, la Luz Nocturna solo funcionará 5 minutos cada
vez. Para uso ilimitado conectar a la red eléctrica con el adaptador que le suministramos.
Para apagar la Luz Nocturna, pulse el botón
Para usar la Luz Nocturna sin monitorización, consulte la sección ‘Luz Nocturna Independiente’ de este manual.
en la Unidad del Bebé o en la de Padres.
en su Unidad del
28 29
• CUIDADO DE SU MONITOR
No introduzca ninguno de sus componentes en líquidos. No lo exponga directamente al sol.
Examine periódicamente el producto por si hay daños en los componentes eléctricos y en tal caso, no vuelva a
utilizarlo hasta que hayan sido convenientemente reparados. Quite siempre las pilas de la Unidad del Bebé si se
utiliza el adaptador de la red eléctrica por largos períodos de tiempo.
• ESPECIFICACIONES TÉCNICAS
Garantizamos su monitor contra defectos de fabricación durante 2 años desde la fecha de compra, mediante la
presentación de un recibo válido. En caso de un defecto de fabricación, recomendamos que devuelva el monitor
al lugar donde se compró. Si esto no resuelve satisfactoriamente el problema, visite www.tomy.eu para más
información. Los términos y condiciones pueden verse en nuestro sitio web: www.tomy.eu
• TECHNICAL SPECIFICATIONS
- Fuente de alimentación: Especicaciones del adaptador de corriente: PRI: 230V~50Hz SEC: 6V
- Baterías: Unidad de Padres - Batería recargable de 850mAh 2.4V Ni-MH (incluida).
Unidad del Bebé - Necesita 4 pilas de 1.5V AA (LR6).
- Alcance: 350m en condiciones óptimas en ‘campo abierto’.
- Temperatura de funcionamiento: 0 - 50ºc.
- Frecuencias: 1880~1900MHz.
300mA.
Page 16

• INFORMACIÓN DE SEGURIDAD
E E
El Monitor para Bebés de Tomy está diseñado para ayudarle a vigilar a su niño y no sustituye la supervisión
de un adulto. Este producto no es un juguete. Mantenga siempre los artículos eléctricos y sus cables fuera del
alcance de los bebés y niños pequeños. Bajo ninguna circunstancia debe colocar ninguna pieza de su monitor
en o sobre la cuna. Asegúrese de que todos los cables estén colocados correctamente, de forma que los niños
no se enreden en ellos y no haya peligro de tropiezos. Los adaptadores que vienen con el monitor no deben ser
usados con ningún otro equipo bajo ninguna circunstancia. No debe utilizarse ningún otro adaptador con el
monitor. Tenga cuidado de no colocar el adaptador en un lugar donde el niño pueda subirse a él. Poner peso
sobre el adaptador mientras está conectado puede dañar la unidad o causar lesiones a su niño. Es normal que
los cargadores se calienten al usarse - tenga cuidado al manipular su cargador, espere a que se enfríe. NO LO
CUBRA. Desconecte el cargador si el producto no va a usarse durante algunos días. Para evitar riesgo de descarga
eléctrica, desconéctelo de la electricidad antes de limpiarlo. La batería recargable dentro de la Unidad de Padres
debe reciclarse. No tirar junto con los residuos domésticos. No intente desmontar ninguna pieza de este producto.
• SEGURIDAD DE LAS PILAS
Quitar o colocar las pilas debe hacerse por un adulto o bajo su supervisión. Ponga especial atención en que
sean colocadas correctamente, siguiendo los símbolos de polaridad (+) y (-) en las pilas y en el producto. No
poner en corto circuito los contactos en el compartimento de las pilas o en los terminales de éstas. Quite del
producto las pilas agotadas. No mezcle pilas viejas (usadas) y nuevas, o pilas de tipos diferentes, como por
ejemplo: recargables y alcalinas o de diferentes marcas. Deseche con seguridad las pilas agotadas y nunca
las tire al fuego. Después de usar el producto o si va a almacenarlo por largos períodos, quítele las pilas. Solo
utilice pilas del tipo recomendado o similares.
La eliminación o recarga de las pilas recargables debe hacerse por un adulto o bajo su supervisión. Si está
utilizando pilas recargables en la Unidad del Bebé, éstas deben quitarse del monitor antes de recargarlas. No
intente recargar pilas no recargables.
Ayude al medioambiente desechando y empaquetando su producto responsablemente. Los
símbolos de contenedores con ruedas indican que el producto y las pilas no deben tirarse junto
con los residuos domésticos, ya que contienen sustancias que pueden dañar la salud y el medio
ambiente. Por favor, utilice los puntos de recogida o reciclaje cuando deseche el artículo o las pilas.
• GUÍA DE SOLUCIONES SIMPLES
Si el monitor no funciona adecuadamente, la información que aparece más abajo puede ayudarle a resolver el
problema. También puede encontrar una guía más amplia en nuestro sitio web: www.tomy.com.eu
• PREGUNTAS FRECUENTES
P. ¿Mi Unidad de Padres necesita encenderse o apagarse mientras se está cargando?
R. Su Unidad de Padres se cargará mientras esté encendida o apagada; sin embargo, cargarla mientras esté
encendida le permitirá vigilar a su niño mientras se carga.
P. He medido la temperatura de la habitación de mi bebé con otro dispositivo y obtengo una lectura
diferente a la de mi monitor, ¿por qué?
R. El dispositivo para medir la temperatura de su monitor Tomy está diseñado para indicarle la temperatura de la
habitación de su bebé dentro de una pequeña tolerancia de + 1°C o - 1°C. Otros dispositivos también tienen una
tolerancia similar.
P. ¿Puedo usar mi monitor en el extranjero?
R. Puede usar su monitor en el país donde lo compró y en cualquier parte de la UE. Aunque su monitor puede
funcionar correctamente en otros países, su frecuencia de operación puede afectar o ser afectada por otros
dispositivos y puede constituir una violación de la normativa vigente en esos países. Tomy no puede aceptar
ninguna responsabilidad por el uso de su monitor fuera del país donde lo compró o fuera de la UE.
• SOLUCIÓN DE PROBLEMAS-
PROBLEMA
Mi Unidad de Padres NO
se enciende.
Mi Unidad del Bebé no se
ENCIENDE
La Luz Nocturna está
activada, pero no puedo
conectar con la Unidad
de Padres.
Hay un pitido continuo.
Hay una alarma de 2
pitidos cada minuto.
POSIBLE CAUSA
La batería recargable (incluida) no se
ha instalado correctamente.
Quizás la pila recargable está descargada.
El cable eléctrico no está conectado
correctamente.
El cable eléctrico no está conectado
correctamente.
Mala colocación de las pilas y /o pilas
agotadas.
El botón de Encendido y Apagado no
permanece pulsado el tiempo suciente.
La Luz Nocturna está funcionando
independientemente de la función de
monitorización de la Unidad del Bebé
(lo cual está previsto).
Alarma de pérdida de contacto.
Batería baja en la Unidad del Bebé.
Hay una alarma de 3
pitidos cada minuto.
No puedo oír nada en
mi Unidad de Padres
y/o
Escucho intermitentemente.
Mi Unidad de Padres tiene
un pitido continuo
Mi Unidad de Padres
emite un pitido
aleatorio cada minuto
aproximadamente.
Ruido agudo.
La Luz Nocturna se
apaga constantemente.
Después de recargarlas,
las baterías duran
menos.
Batería baja en la Unidad de Padres.
El volumen de la Unidad de Padres
está muy bajo
Las unidades están fuera de cobertura.
Las unidades están en el modo
Monitorización por Activación de Sonido.
Las unidades no se comunican.
Una o las dos unidades están bajas de
baterías.
Las unidades están demasiado cerca.
Volumen demasiado alto.
La Luz Nocturna está diseñada para
apagarse automáticamente después
de transcurridos 5 minutos, para
alargar la duración de la batería.
Igual que cualquier otra batería
recargable, tiene vida limitada y puede
ser necesario que la cambie.
SOLUCIÓN
Inserte la pila como se indica en este Manual. Una vez
instalada, ponga a cargar la Unidad de Padres y espere
unos minutos antes de ENCENDERLA.
Ponga a cargar la Unidad de Padres y espere unos
minutos antes de ENCENDERLA.
Compruebe el cable eléctrico (incluyendo el enchufe
de pared).
Compruebe el cable eléctrico (incluyendo el enchufe
de pared).
Compruebe que las pilas tengan la carga adecuada
y que están instaladas correctamente.
Pulse y mantenga presionado el botón de Encendido y
Apagado de la Unidad del Bebé hasta que se ilumine.
APAGUE la Luz Nocturna pulsando el botón ,
entonces reinicie la Unidad del Bebé pulsando y
manteniendo presionado el botón .
Asegúrese de que ambas unidades estén encendidas.
Acerque las dos unidades y repita las instrucciones
de ‘Conguración’.
Cambie las pilas.
O conecte a la red eléctrica (AC) usando el
adaptador incluido.
Recargue las baterías.
Suba el volumen de la Unidad de Padres.
Acerque más las unidades.
Vaya a Monitorización por Activación de Sonido en
este manual de instrucciones.
Asegúrese de que ambas unidades estén encendidas y
siga los pasos de la guía ‘Conguración’ de este manual.
Compruebe las baterías y recargue o sustituya las
mismas, o conecte con la red eléctrica.
Separe las unidades.
Baje el volumen.
Para que funcione continuamente, conéctese a la
red eléctrica.
Para piezas de repuesto, visite nuestro sitio web:
www.tomy.eu
PÁGINA
27
27
28
27
27
27
28
27
27
28
28
29
30 31
Page 17

• IMPARARE A CONOSCERE IL MONITOR
UNITÀ GENITORE
Schermo Temperatura
Visualizzazione Luci Livello Sonoro
Icona cuscinetto sensore di movimento*
Rotella Controllo Volume
Tasto Accensione
Tasto Accensione Luce Notturna
Misuratore Temperatura
Microfono
Tasto Attivazione Sonora
Tasto per Conversazione Bidirezionale
*Vedi sessione Accessori.
UNITÀ BEBÈ
I I
• UNITÀ GENITORE
Rimuovere il coperchio del vano batteria dal retro dell’unità (N.B.: il coperchio potrebbe già essere sollevato) ed
inserire il pacchetto batteria (in dotazione) correttamente, collegando la spina alla presa. Riporre il coperchio e
avvitare fermamente in posizione, si rimanda alla Guida rapida per le immagini.
Assicurandosi che il cavo d’alimentazione sia collegato correttamente, collocare l’Unità Genitore alla presa
elettrica e caricare per 6 ore. Potete usare il monitor durante la carica seguendo la seguente guida ‘Installazione’.
Importante! L’unità Genitore non funziona senza inserire prima la batteria.
• UNITÀ BEBÈ
Per performance ottimali, consigliamo di alimentare l’Unità Bebè con le prese di casa, usando il cavo
d’alimentazione in dotazione. Oppure, potete usare 4 pile di tipo AA/LR6 (non in dotazione) per renderla
completamente portatile. Per inserire le pile, svitare il coperchio del vano batteria nella parte inferiore dell’unità
con un cacciavite a testa piatta. Inserire le pile, assicurandosi che rispettino i simboli di polarità ‘+’ e ‘-’. Riporre il
coperchio e riavvitare fermamente.
Collocare l’Unità bebè ad almeno 1 metro dal bebè, assicurandosi che tutte le parti siano fuori dalla sua portata.
Nessuna parte del monitor deve essere messa in nessun caso sopra o dentro il lettino. Per ottenere una performance
ottimale, consigliamo di collocare il monitor a non più di 3 metri dal bebè.
• INSTALLAZIONE
• ACCENSIONE
Aggancio per
cintura
Entrata
alimentazione
elettrica
Assicurarsi che l’Unità Genitore e l’unità Bebè siano collegate alle prese e/o contengano pile cariche (vedere
sopra). Le unità devono essere ad almeno 1 metro di distanza.
Premere il tasto
di ogni unità e tenerlo premuto per almeno 2 secondi. Una volta attivati, i tasti s’illuminano.
• CONNESSIONE UNITÀ GENITORE E BEBÈ
Dopo aver acceso entrambe le unità, osservare lo Schermo delle Luci del Livello Sonoro sull’Unità Genitore che passa da
sinistra a destra e da destra a sinistra mentre l’Unità Genitore ricerca automaticamente l’Unità Bebè e vi si collega.
Dopo aver stabilito una connessione tra le due unità, può iniziare il monitoraggio. Lo Schermo delle Luci di Livello
Sonoro reagisce ai suoni: più forte è il suono e più luci s’illuminano.
Sensore Temperatura
Tasto ON/OFF
(& Cercapersone)
Tasto Accensione
Luce Notturna
• MODALITÀ ALLARME
Identicare la causa di un allarme sonoro usando la seguente tabella; qualora non fosse possibile identicare o
retticare la causa, si rimanda alla ‘Guida rapida di risoluzione’ del presente libretto.
Tono d’allarme
Microfono
Scatola Cavi
sull’Unità
Genitore
••••••••
(Continua)
•••
3 “bip”
••
2 “bip”
Signicato dell’Allarme
Perdita di contatto
Lampeggiante
verde e rosso
Batteria
scarica
nell’Unità
Genitore
Batteria
scarica
nell’Unità
Bebè
Indicazioni sull’Unità Genitore
• Il tasto
ssa ad una luce lampeggiante rossa
e verde a intermittenza.
• Il tasto
ad una luce lampeggiante rossa.
• Il tasto passa da una luce verde ad
una luce lampeggiante rossa.
32 33
passa da una luce verde
passa da una luce verde
Indicazioni
Unità Bebè
• Il tasto passa da una luce
verde ssa ad una luce
alternante (continua) rossa e
verde lampeggiante.
• Il tasto
luce verde ad una luce
lampeggiante rossa.
passa da una
Page 18

• CARATTERISTICHE E FUNZIONI
II
• CONTROLLO DEL VOLUME
Regolare il volume da zero (silenzioso) a 10 (livello massimo) scorrendo il pollice sulla rotella in senso orario per
aumentare il volume o antiorario per diminuirlo.
• SCHERMO CON LUCI PER LIVELLO SONORO
Lo schermo con Luci del Livello Sonoro sull’Unità Genitore reagisce ai suoni emessi dal bebè. Più alti saranno i
suoni emessi e più intensa sarà la luce che illumina lo schermo. È possibile abbassare il volume dell’Unità Genitore
e continuare a controllare il bebè.
• CONTROLLO ATTIVAZIONE SONORA
Nei momenti tranquilli o quando il bebè è più grandicello, potrebbe non essere necessario sentire ogni suono
proveniente dalla stanza del bebè. Il baby monitor dispone di una modalità “Controllo Attivazione Sonora”,
funzione che cattura solo i suoni al di sopra di una soglia predenita, ad esempio un pianto e non un gorgoglio.
Scegliere il Controllo Attivazione Sonora premendo il tasto sull’Unità Genitore. Inizierà 15 secondi dopo che il bebè
si sarà calmato. Ogni volta che il volume dei rumori emessi dal bebè supera la soglia, questa funzione sarà interrotta
immediatamente e sarà ripristinato il normale controllo sonoro no a quando il bebè sarà nuovamente tranquillo.
• CONVERSAZIONE BIDIREZIONALE
Per maggiore sicurezza e comodità, il monitor è anche dotato di una funzione di Conversazione Bidirezionale che
consente di parlare con il bebè. Premere il tasto
funzione e parlare con il bebè.
• INDICATORE DI TEMPERATURA
Per controllare la temperatura dell’ambiente della stanza del vostro bebè, premere il tasto sull’Unità Genitore e
tenerlo premuto. Lo Schermo Luminoso Sensibile al Suono sarà temporaneamente disattivato e sostituito dalla lettura
della temperatura ambiente della stanza del bebè.
Si noti che l’indicatore di temperatura è tarato a intervalli di 2°C. Qualora la temperatura dell’ambiente dovesse
trovarsi in intervalli intermedi, le luci sopra e sotto s’illumineranno (es. per i 27°C s’illuminano la luce 26°C e 28°C).
sul lato dell’Unità Genitore e tenerlo premuto per attivare la
• CERCAPERSONE
Per trovare un’Unità Genitore smarrita, premere il tasto
farà risuonare un allarme di 1 minuto. Per fermare l’allarme, premere qualsiasi tasto sull’Unità Genitore. Si noti
che la funzione cercapersone funziona solo quando entrambe le unità sono accese e in funzione.
• CLIP CINTURA
Individuare il coperchio di gomma sul retro dell’Unità
Genitore e la clip per cintura in dotazione. Rimuovere e
conservare con cura il coperchio di gomma, poi allineare
le spille di guida della clip (immagine 1), inserire la clip
nella posizione e ruotare di 90 gradi in senso orario
verso la posizione . Oppure, la clip da cintura può essere
orientata in modo da montare a parete o appendere
l’Unità Genitore. In tal caso, allineare gli agganci della clip
per cintura (immagine 2), inserire la clip nella posizione
e girare di 90 gradi in senso orario verso la posizione .
• LUCE NOTTURNA INDIPENDENTE
Mano a mano che il bebè si fa più grandicello, potrete usare la Luce Notturna senza monitorare e senza bisogno
dell’Unità Genitore.
Lasciando spenta l’Unità Bebè, premere il tasto e tenerlo premuto per illuminare la Luce Notturna. Il tasto s’illumina
di rosso (invece del solito verde), ad indicare che il monitor è acceso. Premere ancora una volta il tasto the per spegnere.
• ACCESSORI: CUSCINETTO SENSORE DI MOVIMENTO TOMY E ULTERIORI UNITÀ GENITORE
Per maggiore sicurezza, potete aggiungere il Cuscinetto Tomy con Sensore di Movimento e/o un’ulteriore
Unità Genitore dai modelli Tomy Digital o Tomy Digital Plus. Per ulteriori informazioni, visitate il nostro sito
Web: www.tomy.eu
• CURA DEL MONITOR
Non immergere nessuna parte in liquidi. Non esporre alla luce diretta del sole.
Esaminare periodicamente il prodotto e cercare eventuali segnali di danni alle parti elettriche e non usare
ntanto che il danno non sia correttamente riparato. Rimuovere sempre le pile dall’Unità Bebè se si usa
l’alimentazione elettrica per un lungo periodo di tempo.
dell’Unità Bebè 3 volte velocemente e l’Unità Genitore
1. CLIP
CINTURA
2. AGGANGIO
A PARETE
• LUCE NOTTURNA
L’Unità Bebè dispone di una leggera Luce Notturna che può essere attivata premendo il tasto
in remoto dall’Unità Genitore.
Per allungare la durata della batteria dell’Unità Bebè, la Luce Notturna funzionerà solo per 5 minuti alla volta.
Per un uso illimitato, passare all’alimentazione elettrica con l’adattatore in dotazione.
Per spegnere la Luce Notturna, premere il tasto
Per usare la Luce Notturna senza monitoraggio, si rimanda alla sezione ‘Luce Notturna Indipendente’ all’interno
di questo libretto.
sull’Unità Bebè o sull’Unità Genitore.
sull’Unità Bebè o
34 35
• GARANZIA
Garantiamo il vostro monitor contro difetti di fabbricazione per 2 anni dalla data d’acquisto su presentazione di
uno scontrino valido. Al primo caso di difetto di fabbricazione, consigliamo di far sostituire il monitor a chi ve l’ha
venduto. Se ciò non dovesse risolvere il problema, si rimanda a: www.tomy.eu per ottenere assistenza. Condizioni
generali reperibili sul nostro sito Web: www.tomy.eu
• SPECIFICHE TECNICHE
- Alimentazione: Classicazione adattatore elettrico: PRI: 230V~50Hz SEC: 6V
- Pile: Unità Genitore – Batteria ricaricabile 850mAh 2,4V Ni-MH (inclusa).
Unità Bebè - Necessita 4 pile da 1,5V AA (LR6).
- Campo operativo: 350m in condizioni ottimali di ‘campo aperto’.
- Temperatura operativa: 0 - 50ºc.
- Frequenze: 1880~1900MHz
300mA.
Page 19

• INFORMAZIONI DI SICUREZZA
I I
Il Baby Monitor Tomy è progettato per aiutarvi a controllare il vostro bambino e non sostituisce la supervisione
di un adulto. Non è un giocattolo. Mantenere sempre i dispositivi elettrici ed i loro cavi lontano dalla portata di
neonati e bambini. Nessuna parte del monitor deve essere messa in nessun caso sopra o dentro il lettino.
Assicurarsi che tutti i cavi siano ben collocati in modo che il bambino non vi s’impigli e che non vi sia il rischio
d’inciampare. Gli adattatori in dotazione con questo monitor non devono mai in nessun caso essere utilizzati
con altri apparecchi. Mai usare il monitor con adattatori diversi da quelli forniti in dotazione. Attenzione a non
collocare l’adattatore in un punto che un bimbo potrebbe utilizzare come gradino. Mettendo peso sull’adattatore
quando è collegato si potrebbe danneggiare l’unità o provocare danni al bambino. È normale che i caricatori
si riscaldino durante l’uso, fare quindi attenzione nel maneggiarli e lasciare disperdere il calore. NON COPRIRE.
Sconnettere il caricatore se il prodotto non viene utilizzato per più giorni. Per evitare rischi di scossa elettrica,
sconnettere dalla presa prima di pulire. Si consiglia di riciclare la batteria ricaricabile contenuta nell’Unità
Genitore. Non gettare con i riuti domestici. Non tentare si smantellare le parti di questo prodotto.
• SICUREZZA DELLE PILE
La rimozione e la sostituzione delle pile devono essere effettuate da un adulto o sotto la sua supervisione. Fare
particolare attenzione a garantire che le pile siano inserite correttamente, rispettando i segnali di polarità (+) e
(-) sulle pile e sul prodotto. Non mandare in corto circuito i contatti del compartimento delle pile o i terminali.
Rimuovere dal prodotto le pile scariche. Non mescolare pile vecchie (usate) con pile nuove o pile di diverso tipo,
ovvero pile ricaricabili e alcaline o pile di diversi marchi. Eliminare in modo sicuro le pile scariche e non gettarle
mai nel fuoco. Rimuovere le pile dal prodotto dopo l’uso o se si pensa di non usare il prodotto per un periodo di
tempo prolungato. Usare solo pile dello stesso tipo di quelle raccomandate.
La rimozione e la ricarica delle batterie ricaricabili devono essere effettuate da un adulto o sotto la sua
supervisione. Se si usano pile ricaricabili nell’Unità Bebè, queste devono essere tolte dal monitor prima di
ricaricarle. Non cercare di ricaricare pile non ricaricabili.
Proteggete l’ambiente, eliminate il prodotto e l’imballaggio in maniera responsabile. I simboli
dei cassonetti a ruote indicano che il prodotto e le pile non devono essere gettate come riuti
domestici, poiché contengono sostanze che potrebbero danneggiare l’ambiente e causare danni
alla salute. Si prega di usare i punti di raccolta differenziata per eliminare prodotto o batterie.
• GUIDA RAPIDA DI RISOLUZIONE
Qualora il monitor non funzioni come previsto, le seguenti informazioni dovrebbero servire a risolvere ogni
problema. Oppure, una guida più completa è reperibile sul nostro sito: www.tomy.eu
• DOMANDE FREQUENTI
D. L’Unità Genitore deve essere spenta durante la ricarica della batteria?
R. Non necessariamente. L’Unità Genitore può essere ricaricata da accesa o da spenta, ma caricandola da accesa
potete continuare a monitorare il vostro bebè.
D. Ho preso la temperatura della stanza del mio bebè con un altro strumento ed ho una lettura diversa da
quella del monitor – perché?
R. Lo strumento di misura della temperatura del monitor Tomy è pensato per dare un’indicazione della temperatura
della stanza del bebè con una piccola tolleranza di + 1°C/- 1°C. Anche gli altri strumenti hanno un simile grado di
tolleranza.
D. Posso usare il monitor all’estero?
A. Il monitor può essere usato nel paese d’acquisto e in qualsiasi paese all’interno dell’UE. Anche se il monitor
potrebbe funzionare correttamente in altri paesi, il suo campo di frequenza potrebbe inuenzare (o essere
inuenzato da) altri dispositivi e per questo essere considerato illegale. Tomy non si assume nessuna responsabilità
per l’uso al di fuori del paese in cui il monitor è stato acquistato, o fuori dall’UE.
• REPERIRE I GUASTI
PROBLEMA
L’Unità Genitore non si
accende.
L’Unità Bebè non si
accende.
La Luce Notturna è
attivata ma non riesco
a connettere con l’Unità
Genitore
Si sente un “bip”
costante.
Ogni minuto suona un
allarme con 2 “bip”.
Ogni minuto suona un
allarme con 3 “bip”.
Non sento niente
dall’Unità Genitore.
E/o.
Sento solo a
intermittenza.
La mia Unità Genitore
emette un “bip” continuo.
La mia Unità Genitore
emette un “bip bip”
ogni minuto circa.
Rumore acuto forte.
La luce notturna
continua a spegnersi.
La durata della batteria
ricaricabile si fa sempre
più corta.
POSSIBILE CAUSA
La batteria ricaricabile in dotazione
non è installata correttamente.
Il livello di carica della batteria ricaricabile
potrebbe essere al di sotto del minimo
necessario per attivare il monitor.
La spina elettrica non è collegata
correttamente.
La spina elettrica non è collegata
correttamente.
Problemi d’inserimento delle pile o
della loro durata
Il tasto di accensione non è stato
premuto abbastanza.
La Luce Notturna funziona
indipendentemente dalla funzione di
controllo dell’Unità Bebè (funzione
applicata volontariamente).
Allarme di perdita contatto.
Batteria scarica nell’Unità Bebè
Batteria scarica nell’Unità Genitore.
Il volume dell’Unità Genitore è troppo basso.
Le Unità sono fuori dal campo operativo.
Le Unità sono impostate in modalità
Controllo Attivazione Sonora.
Le unità non sono collegate.
Una o entrambe le Unità hanno la
batteria o le pile scariche.
Le unità sono troppo vicine una all’altra.
Il volume è troppo alto.
La Luce Notturna è progettata per
spegnersi automaticamente dopo 5 minuti
per preservare la durata della batteria.
Come per qualsiasi batteria
ricaricabile, la durata non è innita e
potrebbe essere necessario sostituirla.
SOLUZIONE
Inserire la batteria seguendo le istruzioni del presente
libretto. Dopo averla installata, mettere l’Unità Genitore
in carica per qualche minuto prima di riaccendere.
Mettere l’Unità Genitore in carica per qualche
minuto prima di riaccendere.
Vericare le connessioni del cavo d’alimentazione
(compresa la spina).
Vericare le connessioni del cavo d’alimentazione
(compresa la spina).
Vericare che le pile siano abbastanza cariche e
correttamente installate.
Premere il tasto di accensione dell’Unità Bebè e
tenerlo premuto nché non s’illumina.
Spegnere la Luce Notturna premendo il tasto
poi riattivare la funzione principale dell’Unità Bebè
premendo il tasto e tenendolo premuto.
Assicurarsi che entrambe le unità siano
correttamente alimentate.
Avvicinare le unità e ripetere le istruzioni di
‘installazione’.
Sostituire le pile.
O Passare all’alimentazione elettrica con
l’adattatore in dotazione.
Ricaricare le batterie.
Aumentare il volume dell’Unità Genitore.
Avvicinare le unità.
Si rimanda al capitolo di Controllo Attivazione
Sonora in questo libretto.
Assicurarsi che entrambe le unità siano
correttamente alimentate e seguire la guida di
“Installazione” di questo libretto.
Capire le condizioni della batteria e ricaricare/
sostituire le pile o passare all’alimentazione elettrica.
Allontanare le unità.
Abbassare il volume.
Per un uso continuo, passare all’alimentazione
elettrica.
Si rimanda al nostro sito Web per le parti di
ricambio: www.tomy.eu
,
PAGINA
33
33
34
33
33
33
34
33
33
34
34
35
36 37
Page 20

• ЗНАКОМСТВО С РАДИОНЯНЕЙ
РОДИТЕЛЬСКИЙ БЛОК
Термометр
Световой индикатор уровня звука
Индикатор сенсорной панели датчика движения
Регулятор громкости
Кнопка включения/выключения
Кнопка включения/выключения ночника
Индикатор температуры
Микрофон
Кнопка включения звука
Кнопка двусторонней связи
RU RU
• РОДИТЕЛЬСКИЙ БЛОК
Снимите крышку аккумуляторного отсека в задней части блока (обратите внимание: она может поставляться в
снятом виде) и правильно вставьте аккумуляторный блок (в комплекте), соединив штекер с гнездом. Установите
крышку и надежно зафиксируйте ее на месте, см. рисунок в КРАТКОМ РУКОВОДСТВЕ ПОЛЬЗОВАТЕЛЯ.
Убедившись, что шнур питания подсоединен правильно, подключите родительский блок к электросети
и заряжайте его в течение 6 часов. Вы можете пользоваться радионяней во время зарядки, для этого
выполните приведенную ниже инструкцию по настройке.
Важно! Ваш родительский блок не заработает, если сначала не вставить аккумулятор.
• ДЕТСКИЙ БЛОК
Для достижения наилучших характеристик рекомендуем подключать детский блок к домашней электросети
через блок питания поставляется в комплекте. А чтобы сделать блок полностью переносным, вы можете
использовать 4 батарейки типа AA/LR6 (не поставляются). Чтобы вставить батарейки, отвинтите крышку
аккумуляторного отсека в нижней части блока при помощи отвертки (винт с плоской головкой). Вставьте
батарейки, соблюдая полярность. Установите на место и надежно завинтите крышку.
Располагайте детский блок на расстоянии как минимум 1 м от ребенка, убедившись, что все детали находятся
вне его досягаемости. Ни при каких обстоятельствах не помещайте никакие части радионяни на/в кроватку. Для
достижения наилучших характеристик рекомендуем размещать радионяню не далее 3 метров от ребенка.
• НАСТРОЙКА
Клипса для
пояса
Ввод питания
от сети
переменного
тока
• ВКЛЮЧЕНИЕ
Убедитесь, что родительский и детский блок включены в сеть и/или питаются от батарей (см. выше). Блоки
должны стоять на расстоянии как минимум 1 м друг от друга.
Нажмите и удерживайте кнопку
на каждом блоке в течение 2 секунд минимум. После активации кнопка
начнет светиться.
ДЕТСКИЙ БЛОК
Датчик температуры
Кнопка включения/
выключения и пейджера
Кнопка включения/
выключения ночника
• СОЕДИНЕНИЕ РОДИТЕЛЬСКОГО И ДЕТСКОГО БЛОКОВ
После включения обоих блоков огни СВЕТОВОГО ИНДИКАТОРА ЗВУКА родительского блока будут бегать слева
направо и справа налево, пока родительский и детский блок ведут автопоиск и подключаются друг к другу.
Когда родительский и детский блок свяжутся друг с другом, радионяня начнет функционировать.
СВЕТОВОЙ ИНДИКАТОР ЗВУКА реагирует на звук: чем громче звук, тем больше лампочек загорится.
• РЕЖИМЫ СИГНАЛИЗАЦИИ
Причину звукового сигнала можно определить по приведенной ниже таблице; если вы не можете определить
или устранить причину проблемы, пожалуйста, см. раздел «Простые решения» в этом буклете.
Звуковой
Микрофон
Шнур питания
сигнал на
родительском
блоке
••••••••
(непрерывный)
•••
3 сигнала
••
2 сигнала
Причина
сигнала
Потеря связи
Мигающий
зеленый и красный
Низкий заряд
батарей
родительского
блока.
Низкий заряд
батарей
детского
блока.
родительском блоке
• Кнопка
постоянного зеленого на мигающий
зеленый.
• Кнопка сменит цвет с
зеленого на мигающий красный.
• Кнопка сменит цвет с зеленого
на мигающий красный.
38 39
Индикация на
изменит цвет с
Индикация на
детском блоке
• Кнопка изменит
цвет с постоянного
зеленого на мигающий
зеленый.
• Кнопка
сменит
цвет с зеленого на
мигающий красный.
Page 21

• ФУНКЦИИ
RURU
• РЕГУЛИРОВКА ГРОМКОСТИ
Регулятор громкости от нуля (нет звука) до 10 (максимальная громкость) – по часовой стрелке (громче) и
против часовой стрелки (тише).
• СВЕТОВОЙ ИНДИКАТОР ЗВУКА
СВЕТОВОЙ ИНДИКАТОР ЗВУКА родительского блока реагирует на звуки, которые издает ваш малыш. Чем
более шумно ведет себя ребенок, тем больше лампочек загорится на дисплее. Вы можете уменьшить
громкость родительского блока, не теряя связи с ребенком – идеально для отдыха или приема гостей.
• АКТИВАЦИЯ КОНТРОЛЯ ПО ЗВУКУ
Когда ребенок ведет себя тихо или если он уже подрос, вам может быть не нужно слышать каждый звук в
детской. В радионяне имеется режим АКТИВАЦИИ КОНТРОЛЯ ПО ЗВУКУ, т.е. передаются только звуки громче
определенного уровня - например, плач, но не гуканье.
АКТИВАЦИЯ КОНТРОЛЯ ПО ЗВУКУ включается нажатием кнопки
через 15 секунд после того, как ваш ребенок успокоится. Каждый раз, когда издаваемые малышом звуки
превышают определенный уровень шума, эта функция немедленно прерывается и начинается обычный
режим контроля, пока ребенок не успокоится снова.
• ДВУСТОРОННЯЯ СВЯЗЬ
Для вашего удобства и спокойствия радионяня снабжена ДВУСТОРОННЕЙ СВЯЗЬЮ, которая позволяет
поговорить с малышом. Чтобы активировать эту функцию, нажмите и удерживайте кнопку
• ТЕРМОМЕТР
Чтобы проверить температуру воздуха в детской, просто нажмите и удерживайте кнопку на родительском
блоке. СВЕТОВОЙ ИНДИКАТОР УРОВНЯ ЗВУКА временно выключится, вместо него вы увидите температуру
воздуха в детской.
Обратите внимание, что деление шкалы термометра равно 2°C. Если температура воздуха попадает в
промежуток между делениями, загорятся лампы выше и ниже нужной температуры (например, температуру
27°C покажут лампы на 26°C и 28°C).
на родительском блоке. Режим включится
сбоку радионяни.
• РАДИОПОИСК
Чтобы найти потерянный родительский блок, 3 раза быстро нажмите кнопку
родительский блок издаст сигнал длительностью 1 мин. Чтобы отключить сигнал, нажмите любую кнопку на
родительском блоке. Обратите внимание, что функция радиопоиска работает, только если оба блока включены
и работают в нормальном режиме контроля.
• КЛИПСА ДЛЯ ПОЯСА
Найдите резиновую крышку сзади родительского
блока и клипсу для пояса в комплекте поставки.
Снимите и сохраните резиновую крышку, затем,
совместив направляющие штифты клипсы (рис. 1),
вставьте клипсу в положение
градусов по часовой стрелке
можете сориентировать клипсу так, чтобы повесить
родительский блок на стену или крючок. Для этого
совместите направляющие штифты клипсы (рис. 2),
вставьте клипсу в положение
градусов по часовой стрелке в положение
• НЕЗАВИСИМЫЙ НОЧНИК
По мере взросления вашего малыша вы сможете пользоваться НОЧНИКОМ без функции присмотра за ребенком и
без необходимости использования родительского блока.
Чтобы включить НОЧНИК, нажмите и удерживайте кнопку
красным цветом (вместо обычного зеленого), показывая, что контроль отключен. Чтобы выключить, еще раз нажмите
кнопку .
• АКСЕССУАРЫ; СЕНСОРНАЯ ПАНЕЛЬ ДАТЧИКА ДВИЖЕНИЯ TOMY И ДОПОЛНИТЕЛЬНЫЕ РОДИТЕЛЬСКИЕ БЛОКИ
Для подстраховки к вашей радионяне можно добавить сенсорную панель датчика движения и/или
дополнительный родительский блок от моделей Tomy Digital или Digital Plus. Подробнее об этом можно узнать
на нашем сайте: www.tomymonitors.ru
• УХОД ЗА РАДИОНЯНЕЙ
Не погружайте блоки в жидкость. Берегите от прямых солнечных лучей.
Периодически осматривайте изделие на предмет повреждения электрических деталей и не пользуйтесь
прибором, пока повреждения не будут надлежащим образом исправлены. Всегда вынимайте батарейки из
детского блока, если длительное время пользуетесь блоком питания.
и поверните на 90
положение В. Вы также
и поверните ее на 90
.
при выключенном детском блоке. Кнопка засветится
на детском блоке, и
1. Клипса
2. Крепление для
подвешивания
• НОЧНИК
В детском блоке есть мягко светящийся НОЧНИК, который можно включить нажатием кнопки
блоке, или дистанционно с родительского блока.
Чтобы продлить время работы от батарей детского блока, НОЧНИК работает только 5 минут. Чтобы
пользоваться неограниченно, подключите радионяню к сети через блок питания из комплекта поставки.
Чтобы отключить НОЧНИК, нажмите кнопку
Чтобы пользоваться НОЧНИКОМ без контроля за ребенком, см. раздел «Независимый ночник» в этом
буклете.
на детском
на детском или на родительском блоке.
40 41
• ГАРАНТИЯ
Мы даем гарантию от производственного брака на 1 год со дня покупки, при условии предоставления
кассового чека и правильно оформленного гарантийного талона. При первом обнаружении
производственного брака рекомендуем вернуть радионяню продавцу. Если проблему не удается решить,
обратитесь за дальнейшими рекомендациями на сайт www.tomymonitors.ru
• ТЕХНИЧЕСКИЕ ХАРАКТЕРИСТИКИ
- Питание: Блок питания: ВХОД: 230В~50Гц ВЫХОД: 6В
- Батареи: Родительский блок - аккумуляторы 850мАч 2,4 В Ni-MH (в комплекте).
Детский блок - батарейки 1,5В AA (LR6), 4 шт. (в комплект не входят).
- Радиус действия: 350 м в оптимальных условиях (открытое пространство)
- Рабочая температура: 0 - 50ºС.
- Частота: 1880~1900 МГц.
300мА.
Page 22

• ТЕХНИКА БЕЗОПАСНОСТИ
RU RU
Радионяня Tomy предназначена, чтобы помочь вам следить за ребенком и не заменяет собой присмотр
взрослых. Это изделие не предназначено для игр. Всегда держите электрические компоненты и их
кабели вне досягаемости маленьких детей. Ни при каких обстоятельствах не помещайте никакие части
радионяни на или в кроватку. Убедитесь, что все провода расположены безопасно, так что дети не смогут
запутаться и нет опасности отключения. Ни при каких обстоятельствах не используйте блоки питания от
радионяни с любым другим оборудованием. Не используйте с радионяней другие блоки питания, кроме
блоков питания из комплекта поставки. Если надавить на подключенный блок питания, блок может быть
поврежден или ребенок может получить телесные повреждения. Зарядные устройства при использовании
могут нагреваться – обращайтесь с ними осторожно, дайте остыть. НЕ НАКРЫВАТЬ. Отключите зарядное
устройство, если не собираетесь пользоваться изделием несколько дней. Во избежание поражения
электрическим током отключайте изделие от блока питания перед уборкой. Аккумуляторы родительского
блока подлежат переработке. Не выбрасывайте их с обычным мусором. Не пытайтесь демонтировать
какие-либо части изделия.
• БАТАРЕИ: ТЕХНИКА БЕЗОПАСНОСТИ
Снимать и заменять батареи должны взрослые или дети под присмотром взрослых. Тщательно проверьте,
что батареи вставлены правильно с соблюдением полярности (знаки (+) и (–) на батарее и на изделии). Не
замыкайте контакты аккумуляторного отсека или батареи. Вынимайте севшие батареи из изделия. Не ставьте
старые (использованные) батареи вместе с новыми или с батареями другого типа – например, аккумуляторы
вместе со щелочными батареями, или батареи разных производителей/марок. Утилизируйте севшие
батареи безопасным способом, никогда не бросайте батареи в огонь. Вынимайте батареи из изделия после
использования или перед долговременным хранением. Используйте только батареи того же или аналогичного
типа, что и рекомендованные батареи.
Снимать и заряжать аккумуляторы должны взрослые или дети под присмотром взрослых. Если вы используете
аккумуляторы с детским блоком, перед зарядкой их необходимо вынуть. Не пытайтесь заряжать не
перезаряжаемые батареи.
Помогите охране окружающей среды, ответственно подходя к утилизации изделия
и упаковки. Символ передвижного мусорного контейнера показывает, что изделие и
батареи нельзя выбрасывать вместе с домашним мусором, так как они содержат вещества,
которые могут нанести вред окружающей среде и здоровью. Пожалуйста, воспользуйтесь
специальными пунктами приема или переработки для утилизации изделия или батарей.
• ПРОСТЫЕ РЕШЕНИЯ
Если ваша радионяня не работает как полагается, приведенной ниже информации должно быть достаточно для
решения проблем;
• ЧАСТО ЗАДАВАЕМЫЕ ВОПРОСЫ
ВОПРОС: Нужно ли включать или отключать родительский блок во время зарядки?
ОТВЕТ: Родительский блок можно заряжать как во включенном, так и выключенном состоянии, однако, заряжая
его во включенном состоянии, вы сможете одновременно следить за вашим ребенком.
ВОПРОС: Я измерил температуру в детской другим устройством, и оно показало не то значение что
радионяня – почему?
ОТВЕТ: Термометр в радионяне Tomy показывает температуру в детской с небольшой погрешностью ± 1°C. Другие
устройства так же могут иметь погрешность.
ВОПРОС: Можно ли пользоваться радионяней за границей?
ОТВЕТ: Вы можете пользоваться радионяней в той стране, где приобрели ее и в любой из стран ЕС. Хотя
радионяня может правильно работать и в других странах, ее рабочая частота может повлиять на работу других
устройств (или подвергнуться их влиянию) и может быть не разрешена законом. Компания Tomy не может взять
на себя ответственность за эксплуатацию радионяни за пределами ЕС и страны, где вы ее приобрели.
• ПОИСК НЕИСПРАВНОСТЕЙ
ПРОБЛЕМА
Родительский блок не
включается.
Детский блок не включается.
Ночник работает на детском
блоке, но нельзя связаться с
родительским блоком.
Непрерывный
звуковой сигнал.
Двукратный звуковой
сигнал каждую минуту.
ВОЗМОЖНАЯ ПРИЧИНА
Неправильно установлен
аккумулятор (в комплекте).
Заряд аккумулятора может быть ниже
критического уровня напряжения для
активации радионяни
Неправильно подключено питание от сети.
Недостаточно долго удерживали
кнопку включения/выключения.
Неправильно подключено питание от сети.
Батарея неправильно вставлена и/или села
Ночник работает независимо от
функции контроля детского блока
(предусмотренная функция).
Потеря связи.
Низкий заряд батарей детского
блока.
Трехкратный звуковой
сигнал каждую минуту.
Ничего не слышно с
родительского блока.
и/или
Звук прерывается.
Родительский блок
издает непрерывный
звуковой сигнал.
Родительский блок издает
двойной сигнал примерно
каждую минуту.
Высокочастотный шум.
Ночник постоянно
отключается.
После зарядки
уменьшилось время
работы аккумулятора.
Низкий заряд батарей родительского
блока.
Слишком низкая громкость в
родительском блоке.
Блоки слишком далеко друг от друга.
Блоки находятся в режиме активации
контроля по звуку.
Блоки не связаны друг с другом.
Недостаточное питание от батареи
одного или двух блоков.
Блоки расположены слишком близко друг к другу.
Слишком высокий уровень громкости.
Ночник должен автоматически
отключаться через 5 минут, чтобы
сохранить заряд батареи.
Как и любой аккумулятор, он имеет
ограниченный срок службы, может
потребоваться его замена.
РЕШЕНИЕ
Вставьте аккумулятор согласно инструкции в буклете.
После установки поставьте родительский блок на зарядку
и подождите несколько минут, прежде чем включить его.
Поставьте родительский блок на зарядку и
подождите несколько минут, прежде чем
включить его.
Проверьте подключение шнура питания (включая розетку).
Нажмите и удерживайте кнопку включения/
выключения детского блока, пока она не засветится.
Проверьте подключение шнура питания (включая розетку).
Проверьте заряд и правильность установки батареи.
Отключите ночник нажатием кнопки
включите основную функцию детского блока, для
чего нажмите и удерживайте кнопку .
Убедитесь в наличии питания обоих блоков.
Поднесите оба блока ближе друг к другу и повторите
действия, описанные в разделе «Настройка».
Замените батареи.
или подключите устройство к сети переменного
тока при помощи блока питания.
Зарядите аккумуляторы.
Увеличьте громкость на родительском блоке.
Поднесите блоки ближе друг к другу.
См. раздел «АКТИВАЦИЯ КОНТРОЛЯ ПО ЗВУКУ» в
этом буклете.
Убедитесь в наличии питания обоих блоков,
затем выполните действия, описанные в разделе
“Настройка” этого буклета.
Определите севшую батарею и зарядите или замените
батареи или подключите прибор к электросети.
Разнесите блоки друг от друга.
Уменьшите громкость.
Чтобы пользоваться ночником непрерывно,
подключите прибор к электросети.
Чтобы узнать о запасных деталях, посетите наш
сайт: www.tomymonitors.ru
, затем
С Т Р.
39
39
40
39
39
39
40
39
39
40
40
41
42 43
Page 23

48
48
47
48
48
48
47
A
A
48
48
47
47
46
44 45
Page 24

A A
46 47
Page 25

AA
4948
Page 26

•
ΓΝΩΡΙΣΤΕ ΤΗ ΣΥΣΚΕΥΗ ΣΑΣ ΠΑΡΑΚΟΛΟΥΘΗΣΗΣ
ΜΟΝΑΔΑ ΓΟΝΕΑ
Οθόνη θερμοκρασίας
Οθόνη φωτισμού επιπέδου ήχου Συσκευή παρακολούθησης
Οθόνη Παρακολούθησης με αισθητήρα pad*
Τροχίσκος ελέγχου έντασης
Κουμπί On/O
Κουμπί On/O φωτισμού νύχτας
Μετρητής θερμοκρασίας
Μικρόφωνο
Κουμπί ενεργοποίησης ήχου
Κουμπί προφορικής επικοινωνίας διπλής κατεύθυνσης
* Βλέπε στο Τμήμα των Αξεσουάρ.
ΜΟΝΑΔΑ ΜΩΡΟΥ
GK GK
• ΜΟΝΑΔΑ ΓΟΝΕΑ
Αφαιρέστε το καπάκι του χώρου για μπαταρίες στο πίσω μέρος της μονάδας (Σημείωση: αυτό μπορεί ήδη να έχει διατεθεί
ξεχωριστά) και εισχωρήστε το σετ μπαταριών (παρέχεται) σωστά, συνδέοντας το φις με την πρίζα. Επανατοποθετήστε το
καπάκι και βιδώστε σταθερά στη θέση του, ανατρέχοντας στον Οδηγό Ταχείας Έναρξης για εικονογραφημένη αναφορά.
Βεβαιούμενοι ότι το ηλεκτρικό καλώδιο έχει συνδεθεί σωστά, τοποθετήστε τη Μονάδα Γονέα σας στην κεντρική παροχή
ρεύματος και φορτίστε για 6 πλήρεις ώρες. Μπορείτε να χρησιμοποιήσετε τη συσκευή σας παρακολούθησης ενώ φορτίζει
ακολουθώντας τον οδηγό «Συναρμολόγηση» κατωτέρω.
Σημαντικό! Η μονάδα Γονέα σας δεν θα λειτουργήσει αν δεν έχετε πρώτα τοποθετήσει την μπαταρία.
• ΜΟΝΑΔΑ ΜΩΡΟΥ
Για την καλύτερη δυνατή απόδοση, συστήνουμε η Μονάδα Μωρού να τροφοδοτείται από την κεντρική ηλεκτρική παροχή στο σπίτι σας
χρησιμοποιώντας τον παρεχόμενο προσαρμοστικό ρευματολήπτη. Εναλλακτικά, μπορείτε να χρησιμοποιήσετε 4 μπαταρίες χ AA/LR6 (δεν
παρέχονται) για να καταστήσετε τη μονάδα πλήρως φορητή. Για να τοποθετήσετε τις μπαταρίες, ξεβιδώστε το καπάκι του χώρου μπαταριών
στην κάτω πλευρά της μονάδας χρησιμοποιώντας ένα κατσαβίδι επίπεδης κεφαλής. Εισχωρήστε τις μπαταρίες, βεβαιούμενοι ότι συνταιριάζετε
τα σύμβολα πολικότητας «+» και «-». Επανατοποθετήστε το καπάκι και τη βίδα σταθερά στη θέση τους.
Τοποθετήστε τη Μονάδα Μωρού σε τουλάχιστον 1 μέτρο απόσταση από το μωρό σας βεβαιούμενοι ότι όλα τα τμήματα είναι μακριά από
πρόσβαση. Σε καμία περίπτωση δεν θα έπρεπε να τοποθετήσετε οποιαδήποτε μέρη της συσκευής παρακολούθησης μέσα ή πάνω στην κούνια.
Για την καλύτερη απόδοση συστήνουμε η συσκευή παρακολούθησης να τοποθετείται όχι μακρύτερα από 3 μέτρα απόσταση από το μωρό σας.
• ΣΥΝΑΡΜΟΛΟΓΗΣΗ
• ΣΕ ΛΕΙΤΟΥΡΓΙΑ
Εξάρτημα κλιπ
ζώνης
Είσοδος ρεύματος
(AC/Mains)
Βεβαιωθείτε ότι οι Μονάδες Μωρού και Γονέα είναι συνδεμένες με την κεντρική ηλεκτρική παροχή ή/και έχουν εγκατεστημένες
τις μπαταρίες τους (δείτε ανωτέρω). Οι μονάδες πρέπει να βρίσκονται σε απόσταση τουλάχιστον 1 μέτρου μεταξύ τους.
Πατήστε και κρατήστε πατημένο το κουμπί σε κάθε μονάδα για τουλάχιστον 2 δευτερόλεπτα. Μόλις
ενεργοποιηθούν, τα κουμπιά θα ανάψουν.
• ΣΥΝΔΕΣΗ ΜΟΝΑΔΩΝ ΜΩΡΟΥ ΚΑΙ ΓΟΝΕΑ
Δεδομένου ότι κάθε μονάδα ενεργοποιεί, ρολόι για την επίδειξη φω’των υγιών επιπέδων στη μονάδα γονέα όπως τυλίγει από το αριστερό
στο δικαίωμα και το δικαίωμα στο αριστερό ως αυτόματος-αναζήτηση μονάδων γονέα και μωρών και τη σύνδεση η μια με την άλλη.
Καθώς ενεργοποιείται κάθε μονάδα, παρακολουθήστε την Οθόνη Φωτισμού Επιπέδου Ήχου στη Μονάδα Γονέα καθώς κάνει κύλιση από
τα αριστερά προς τα δεξιά ενώ οι μονάδες Μωρού και Γονέα πραγματοποιούν αυτόματη αναζήτηση και συνδέονται μεταξύ τους. Μόλις
γίνει η σύνδεση μεταξύ των Μονάδων Μωρού και Γονέα, θα ξεκινήσει η κανονική παρακολούθηση. Η Οθόνη Φωτισμού Επιπέδου Ήχου
αντιδρά στον ήχο· όσο δυνατότερος ο ήχος, τόσο δυνατότερος γίνεται ο φωτισμός.
Αισθητήρας θερμοκρασίας
Κουμπί ON/OFF
(& Μπίπερ)
Κουμπί φωτισμού
νύχτας On/O
• ΛΕΙΤΟΥΡΓΙΕΣ ΣΥΝΑΓΕΡΜΩΝ
Προσδιορίστε την αιτία του ευδιάκριτου συναγερμού με τη χρησιμοποίηση του ακόλουθου · εάν δεν είστε σε θέση να προσδιορίσετε
ή να διορθώσετε την αιτία του προβλήματός σας, παρακαλούμε ανατρέξατε στον «Οδηγό Απλών Λύσεων» σε αυτό εδώ το εγχειρίδιο.
Τόνος
συναγερμού σε
Μονάδα γονέα
••••••••
(Συνεχής)
•••
Μικρόφωνο
Tidy καλωδίου
ρεύματος
3 ηχητικά
σήματα (μπιπ)
••
2 ηχητικά
σήματα (μπιπ)
Κατάσταση συναγερμού
Απώλεια επαφής
Αναβοσβήνον
πράσινο και κόκκινο
Πεσμένη
μπαταρία
- Μονάδα
γονέα
Πεσμένη
μπαταρία
- Μονάδα
μωρού
Ενδείξεις στη Μονάδα Γονέα
Ο διακόπτης θα αλλάξει από
•
καθαρό πράσινο σε εναλλασσόμενο
αναβοσβήνον πράσινο και κόκκινο.
• Ο διακόπτης θα αλλάξει από
πράσινο σε αναβοσβήνον κόκκινο.
• Ο διακόπτης θα αλλάξει από πράσινο σε
αναβοσβήνον κόκκινο.
• Ο διακόπτης θα αλλάξει από
καθαρό πράσινο σε εναλλασσόμενο
(συνεχές) αναβοσβήνον πράσινο
και κόκκινο.
•
από πράσινο σε αναβοσβήνον
κόκκινο.
Ενδείξεις
Μονάδα Μωρού
Ο διακόπτης θα αλλάξει
50 51
Page 27

• ΧΑΡΑΚΤΗΡΙΣΤΙΚΑ ΚΑΙ ΛΕΙΤΟΥΡΓΙΕΣ
GKGK
• ΕΛΕΓΧΟΣ ΕΝΤΑΣΗΣ
Ρυθμίστε την ένταση ήχου από μηδέν (βουβό) στο επίπεδο 10 (ανώτατο) με κίνηση του τροχίσκου με τον αντίχειρα για
να αυξηθεί δεξιόστροφα ή για μειωθεί αριστερόστροφα.
• ΟΘΟΝΗ ΦΩΤΙΣΜΟΥ ΕΠΙΠΕΔΟΥ ΗΧΟΥ
Η Οθόνη Φωτισμού Επιπέδου Ήχου στη Μονάδα Γονέα αντιδρά στους ήχους του μωρού σας. Όσο δυνατότερους
ήχους παράγει το μωρό σας, τόσο περισσότερα φωτάκια ανάβουν στην οθόνη. Μπορείτε να χαμηλώσετε την ένταση
ήχου της Μονάδας Γονέα ενώ ταυτόχρονα εξακολουθείτε να παρακολουθείτε το μωρό, είναι ιδανική λύση όταν
χαλαρώνετε ή διασκεδάζετε.
• ΠΑΡΑΚΟΛΟΥΘΗΣΗ ΜΕ ΕΝΕΡΓΟΠΟΙΗΣΗ ΗΧΟΥ
Για εκείνες τις ήρεμες στιγμές ή όταν το μωρό σας είναι λίγο μεγαλύτερο μπορεί να μην επιθυμείτε να ακούτε
κάθε ήχο που παράγεται στο δωμάτιο του μωρού σας. Η συσκευή παρακολούθησης του μωρού σας διαθέτει μια
λειτουργία Παρακολούθησης με Ενεργοποίηση Ήχου, μια ιδιότητα που συλλαμβάνει μόνο τους ήχους πάνω από ένα
προκαθορισμένο όριο, για παράδειγμα μια κραυγή και όχι ένα γουργουρητό.
Επιλέξτε την Παρακολούθηση με Ενεργοποίηση Ήχου πατώντας το κουμπί στo Μονάδα Γονέα. Η μονάδα του γονέα θα
σιγάσει 15 δευτερόλεπτα από το μωρό σας ησυχάσει. Κάθε φορά που οι ήχοι του μωρού σας αυξάνονται πάνω από το όριο
αυτό το χαρακτηριστικό θα διακοπεί αμέσως και ο κανονικός έλεγχος θα συνεχιστεί έως ότου ησυχάσει πάλι το μωρό σας.
• ΠΡΟΦΟΡΙΚΗ ΕΠΙΚΟΙΝΩΝΙΑ ΔΙΠΛΗΣ ΚΑΤΕΥΘΥΝΣΗΣ
Για αυτή την επί πλέον ασφάλεια και ευκολία, η συσκευή σας παρακολούθησης διαθέτει μια ιδιότητα Προφορικής
Επικοινωνίας Διπλής Κατεύθυνσης που σας επιτρέπει να μιλάτε στο μωρό σας. Πατήστε και κρατήστε πατημένο το
κουμπί
• ΜΕΤΡΗΤΗΣ ΘΕΡΜΟΚΡΑΣΙΑΣ
Για να ελέγχετε την θερμοκρασία περιβάλλοντος του δωματίου του μωρού σας απλά πατήστε και κρατήστε πατημένο το
κουμπί
την θερμοκρασία περιβάλλοντος στο δωμάτιο του μωρού σας.
Παρακαλούμε σημειώστε ότι ο μετρητής θερμοκρασίας είναι διαβαθμισμένος σε διαστήματα ανά 2°C. Σε περίπτωση που η
θερμοκρασία περιβάλλοντος βρίσκεται στα ενδιάμεσα διαστήματα θα ανάψουν τα φωτάκια πάνω και κάτω (π.χ. για 27°C θα
ανάψουν τα φώτα 26°C και 28°C).
στην μια πλευρά της Μονάδας Γονέα για να την ενεργοποιήσετε και να μιλήσετε στο μωρό σας.
στη Mονάδα Γονέα. Η ευαίσθητη στον ήχο Οθόνη Φωτισμού θα ανασταλεί προσωρινά και θα αντικατασταθεί με
• ΜΠΙΠΕΡ
Εντοπίστε μια χαμένη Μονάδα Γονέα με το πάτημα του κουμπιού
διαδοχή και η Μονάδα Γονέα θα εκπέμψει ένα παρατεταμένο ηχητικό συναγερμό επί 1 λεπτό. Για να σταματήσετε το
συναγερμό, πατήστε οποιοδήποτε κουμπί στη Μονάδα Γονέα. Παρακαλούμε σημειώστε ότι το χαρακτηριστικό του
μπίπερ θα λειτουργήσει μόνο όταν και οι δύο μονάδες έχουν τεθεί σε λειτουργία (ΟΝ) και παρακολουθούν κανονικά.
• ΚΛΙΠ ΖΩΝΗΣ
Βρείτε το ελαστικό κάλυμμα στο πίσω μέρος του Μονάδα
Γονέα και το εξάρτημα του κλιπ ζώνης που παρέχεται.
Αφαιρέστε και αποθηκεύστε προσεκτικά το ελαστικό
κάλυμμα, κατόπιν βάλτε στη σειρά τις βελόνες-οδηγούς
του κλιπ ζώνης (εικόνα 1), εισχωρήστε το κλιπ στη Θέση
και στρέψτε 90 μοίρες σε δεξιόστροφη κατεύθυνση
στη θέση . Εναλλακτικά, το κλιπ ζώνης μπορεί να έχει
τέτοιο προσανατολισμό ώστε να μπορείτε να στερεώνετε
τη Μονάδα Γονέα σας στον τοίχο ή να την κρεμάτε. Σε
μια τέτοια περίπτωση, παρατάξτε στη σειρά τις βελόνεςοδηγούς του κλιπ ζώνης (εικόνα 2), εισχωρήστε το κλιπ στη
θέση και στρέψτε 90 μοίρες σε δεξιόστροφη κατεύθυνση
στη θέση .
• ΑΝΕΞΑΡΤΗΤΟΣ ΦΩΤΙΣΜΟΣ ΝΥΧΤΑΣ
Καθώς το μωρό σας μεγαλώνει μπορείτε να χρησιμοποιήσετε το Φωτισμό Νύχτας, χωρίς παρακολούθηση και χωρίς την
ανάγκη της Μονάδας Γονέα. Με τη Μονάδα Μωρού σβηστή (OFF), πατήστε το κουμπί και ο Φωτισμός Νύχτας θα ανάψει.
Το κουμπί θα γίνει κόκκινο (αντί του συνηθισμένου πράσινου), δείχνοντας ότι τη συσκευή παρακολούθησης δεν είναι
αναμμένη (ΟΝ). Πατήστε πάλι το κουμπί για να κλείσει η συσκευή για να κλείσει η συσκευή.
•
ΕΞΑΡΤΗΜΑΤΑ: ΣΥΣΚΕΥΗ ΠΑΡΑΚΟΛΟΥΘΗΣΗΣ ΤΗΣ ΚΙΝΗΣΗΣ PAD ΑΙΣΘΗΤΗΡΩΝ της TOMY ΚΑΙ ΠΡΌΣΘΕΤΕΣ ΜΟΝΑΔΕΣ ΓΟΝΕΑ
Για πρόσθετη ασφάλεια, η Συσκευή παρακολούθησης της Κίνησης Pad Aισθητήρων της Tomy ή/και μια πρόσθετη
Μονάδα Γονέα είτε από τα μοντέλα Tomy Digital είτε Digital Plus της Tomy μπορούν να προστεθούν στη συσκευή
παρακολούθησης σας. Για περαιτέρω λεπτομέρειες παρακαλούμε επισκεφτείτε τον ιστοχώρο μας: www.tomy.eu
• ΦΡΟΝΤΙΔΑ ΤΗΣ ΣΥΣΚΕΥΗΣ ΣΑΣ ΠΑΡΑΚΟΛΟΥΘΗΣΗΣ
Μην βυθίζετε οποιαδήποτε μέρη της συσκευής σε υγρό. Μην την τοποθετείτε σε μέρος όπου εκτίθεται απευθείας στον ήλιο.
Περιοδικά εξετάζετε το προϊόν για ενδείξεις βλάβης στα ηλεκτρικά του εξαρτήματα και μην χρησιμοποιείτε έως ότου
έχει αποκατασταθεί σωστά η βλάβη. Πάντα να αφαιρείτε τις μπαταρίες από τη Μονάδα Μωρού εάν χρησιμοποιείτε
προσαρμοστικό ρευματολήπτη για μεγάλες χρονικές περιόδους.
στη Μονάδα Μωρού 3 φορές σε γρήγορη
1.
ΚΛΙΠ ΖΩΝΗΣ
2. ΒΆΣΗ
ΤΟΊΧΟΥ
• ΦΩΤΙΣΜΟΣ ΝΥΧΤΑΣ
Η Μονάδα Μωρού σας έχει έναν απαλό φωτισμό νύχτας που μπορεί να ενεργοποιηθεί πατώντας το κουμπί
Mονάδα Μωρού σας ή με τηλεκατεύθυνση από τη Μονάδα Γονέα.
Για να αυξάνει η διάρκεια ζωής των μπαταριών της Μονάδα Μωρού, ο Φωτισμός Νύχτας θα λειτουργήσει μόνο για 5
λεπτά κάθε φορά. Για απεριόριστη χρήση, συνδέστε με κεντρική παροχή ρεύματος χρησιμοποιώντας τον παρεχόμενο
προσαρμοστικό ρευματολήπτη.
Για να σβήσετε το Φωτισμό Νύχτας, πατήστετο κουμπί
Για να χρησιμοποιήσετε το Φωτισμό Νύχτας χωρίς παρακολούθηση, παρακαλούμε ανατρέξατε στο
κεφάλαιο«Ανεξάρτητος Φωτισμός, Χρονόμετρο και Οθόνη Θερμοκρασίας» σε αυτό το εγχειρίδιο.
στη Mονάδα Μωρού ή στη Μονάδα Γονέα.
στη
52 53
• ΕΓΓΥΗΣΗ
Εγγυώμαστε το όργανο ελέγχου σας ενάντια στις ατέλειες κατασκευής για 2 έτη από την ημερομηνία της αγοράς
στην παραγωγή μιας έγκυρης παραλαβής. Κατά πρώτο λόγο μιας ατέλειας κατασκευής, συστήνουμε ότι επιστρέφετε
το όργανο ελέγχου σας στη θέση αγοράς της. Εάν αυτό δεν επιλύει ικανοποιητικά το πρόβλημά σας, παρακαλώ
αναφερθείτε www.tomy.eu για τις περαιτέρω συμβουλές. Οι πλήρεις όροι και οι διατάξεις μπορούν να βρεθούν στον
ιστοχώρο μας: www.tomy.eu
• ΤΕΧΝΙΚΕΣ ΠΡΟΔΙΑΓΡΑΦΕΣ
-
Παροχή ηλεκτρικού ρεύματος: Διαβάθμιση προσαρμοστικού ρευματολήπτη κεντρικής παροχής: PRI: 230V~50Hz SEC: 6V 300mA.
- Μπαταρίες: Μονάδα Γονέα - επαναφορτιζόμενη μπαταρία 850mAh 2.4V Νι-MH (συμπεριλαμβανόμενη).
Μονάδα Μωρού - απαιτούνται 4 μπαταρίες Χ 1.5V AA (LR6).
- Φάσμα λειτουργίας: 350m σε βέλτιστες συνθήκες «ανοικτού πεδίου».
- Θερμοκρασία λειτουργίας: 0 - 50ºc.
- Συχνότητες: 1880~1900MHz.
Page 28

• ΠΛΗΡΟΦΟΡΙΕΣ ΑΣΦΑΛΕΙΑΣ
GK GK
Η συσκευή παρακολούθησης Μωρού της Tomy είναι έτσι σχεδιασμένη ώστε να σας βοηθά να παρακολουθείτε το παιδί σας και δεν είναι
υποκατάστατο της επίβλεψης από έναν ενήλικο. Το προϊόν αυτό δεν είναι ένα παιχνίδι. Να κρατάτε πάντα τις ηλεκτρικές συσκευές και τα καλώδιά
τους μακριά από βρέφη και μικρά παιδιά. Σε καμία περίσταση δε θα πρέπει να τοποθετήσετε οποιοδήποτε τμήμα της συσκευής παρακολούθησης
σας μέσα ή πάνω σε μια κούνια. Βεβαιωθείτε ότι όλα τα καλώδια είναι τοποθετημένα με ασφάλεια έτσι ώστε τα παιδιά να μην μπορούν να
μπερδευτούν σε αυτά και ότι δεν προκαλείται κίνδυνος στραβοπατήματος. Σε καμία περίσταση δεν πρέπει οι προσαρμοστικοί ρευματολήπτες που
παρέχονται να χρησιμοποιηθούν με οποιοδήποτε άλλο εξοπλισμό. Κανένας άλλος προσαρμοστικός ρευματολήπτης πλην εκείνων που παρέχονται
δεν πρέπει να χρησιμοποιηθεί με τη συσκευή παρακολούθησης σας. Προσέξτε να μην τοποθετήσετε τον προσαρμοστικό ρευματολήπτη εκεί όπου
ένα παιδί είναι πιθανό να τον χρησιμοποιήσει ως σκαλοπάτι. Η τοποθέτηση βάρους στον προσαρμοστικό ρευματολήπτη ενώ είναι στη πρίζα θα
μπορούσε να βλάψει τη μονάδα ή να προκαλέσει τραυματισμό στο παιδί σας. Είναι σύνηθες για τους φορτιστές να θερμαίνονται κατά τη διάρκεια
της χρήσης – προσέξτε όταν τους χρησιμοποιείτε, αφήστε τη θερμότητα για να διασκορπιστεί. ΜΗΝ ΚΑΛΥΠΤΕΤΕ. Αποσυνδέστε το φορτιστή εάν το
προϊόν δεν θα χρησιμοποιηθεί για αρκετές ημέρες. Για να αποτρέψετε τον κίνδυνο ηλεκτροπληξίας, παρακαλούμε αποσυνδέστε από την παροχή
ηλεκτρικού ρεύματος πριν καθαρίσετε τη συσκευή. Η επαναφορτιζόμενη μπαταρία στή Μονάδα Γονέα πρέπει να ανακυκλωθεί. Μην απορρίπτετε
στα συνήθη απόβλητα. Μην προσπαθήστε να αποσυναρμολογήσετε οποιοδήποτε μέρος αυτού του προϊόντος.
• ΑΣΦΑΛΕΙΑ ΜΠΑΤΑΡΙΩΝ
Η αφαίρεση και η αντικατάσταση των μπαταριών πρέπει να πραγματοποιηθεί από έναν ενήλικο ή κάτω από επίβλεψη ενηλίκου
Δώστε ιδιαίτερη προσοχή για να εξασφαλίσετε ότι οι μπαταρίες τοποθετούνται σωστά, παρατηρώντας τις ενδείξεις πολικότητας
(+) και (-) στην μπαταρία και το προϊόν. Μην βραχυκυκλώνετε τις επαφές στο χώρο μπαταριών ή τους ακροδέκτες μπαταριών.
Αφαιρέστε τις εξαντλημένες μπαταρίες από το προϊόν. Μην αναμιγνύετε παλαιές (χρησιμοποιημένες) με καινούργιες μπαταρίες
ή μπαταρίες διαφορετικών τύπων π.χ. επαναφορτιζόμενες και αλκαλικές ή μπαταρίες διαφορετικής κατασκευής/μάρκας.
Απορρίπτετε τις εξαντλημένες μπαταρίες με ασφάλεια, και μην απορρίπτετε ποτέ τις μπαταρίες σε φωτιά. Αφαιρέστε τις μπαταρίες
από το προϊόν μετά από τη χρήση ή εάν έχουν αποθηκευτεί για μεγάλες χρονικές περιόδους. Χρησιμοποιείτε μόνον μπαταρίες του
ίδιου ή ισοδύναμου τύπου με εκείνον που συνιστάται.
Η αφαίρεση και η επαναφόρτιση επαναφορτιζόμενων μπαταριών πρέπει να πραγματοποιείται από έναν ενήλικο ή κάτω από την
επίβλεψη ενός ενηλίκου. Εάν χρησιμοποιείτε επαναφορτιζόμενες μπαταρίες στη Μονάδα Μωρού, πρέπει να αφαιρεθούν από τη
συσκευή παρακολούθησης πριν επαναφορτιστούν. Μην προσπαθήσετε να επαναφορτίσετε τις μη επαναφορτιζόμενες μπαταρίες.
Βοηθήστε το περιβάλλον απορρίπτοντας το προϊόν σας και συσκευάζοντάς το υπεύθυνα. Τα σύμβολα κάδων wheelie
bin δείχνουν ότι το προϊόν και οι μπαταρίες δεν πρέπει να απορριφθούν στα οικιακά απόβλητα δεδομένου ότι
περιέχουν ουσίες που μπορούν να είναι βλαβερές για το περιβάλλον και την υγεία. Παρακαλούμε χρησιμοποιήστε τα
οριζόμενα σημεία συλλογής ή τις εγκαταστάσεις ανακύκλωσης για την απόρριψη της συσκευής ή των μπαταριών.
• ΑΠΛΟΣ ΟΔΗΓΟΣ ΛΥΣΕΩΝ
Εάν η συσκευή παρακολούθησης σας δεν λειτουργεί όπως πρέπει, οι πληροφορίες που απαριθμούνται κατωτέρω
πρέπει να είναι επαρκείς για να επιλύσουν τα προβλήματά σας· εναλλακτικά μπορείτε να βρείτε έναν περιεκτικότερο
οδηγό στον ιστοχώρο μας: www.tomy.com.eu
• ΣΥΧΝΕΣ ΕΡΩΤΗΣΕΙΣ
Ερ. Χρειάζεται να θέσω σε λειτουργία ή να σταματήσω τη Μονάδα Γονέα μου ενώ αυτή φορτίζεται;
Α. Είτε το ένα είτε το άλλο, ή Μονάδα Γονέα σας θα φορτίσει είτε είναι σε λειτουργία είτε όχι, ωστόσο η φόρτισή της
ενώ βρίσκεται σε λειτουργία θα σας επιτρέψει να παρακολουθείτε ταυτόχρονα το παιδί σας ενώ γίνεται η φόρτιση.
Ερ. Έχω μετρήσει τη θερμοκρασία του δωματίου του μωρού μου χρησιμοποιώντας μια άλλη συσκευή και
παίρνω μια διαφορετική μέτρηση από αυτή της συσκευής παρακολούθησης -γιατί;
Α. Η συσκευή μέτρησης θερμοκρασίας μέσα στη συσκευή παρακολούθησης Tomy σχεδιάζεται για να σας δώσει μια ένδειξη της
θερμοκρασίας δωματίου του μωρού με μια μικρή ανοχή + 1°C ή - 1°C. Άλλες συσκευές θα έχουν επίσης μια παρόμοια ανοχή.
Ερ. Μπορώ να χρησιμοποιήσω τη συσκευή παρακολούθησης μου στο εξωτερικό;
Α. Μπορείτε να χρησιμοποιήσετε τη συσκευή παρακολούθησης σας στη χώρα που αγοράστηκε και οπουδήποτε
στην ΕΕ. Αν και η συσκευή σας παρακολούθησης μπορεί να λειτουργήσει σωστά σε άλλες χώρες, η λειτουργική της
συχνότητά μπορεί να επηρεάσει (ή να επηρεαστεί από) άλλες συσκευές και θα μπορούσε να μην είναι νόμιμη. Η Tomy
δεν μπορεί να αποδεχτεί οποιαδήποτε ευθύνη για τη χρήση εκτός της χώρας στην οποία αγοράσατε τη συσκευή
παρακολούθησης σας ή εκτός της ΕΕ.
54 55
• ΕΥΡΕΣΗ ΠΡΟΒΛΗΜΑΤΩΝ
ΠΡΟΒΛΗΜΑ
Η Μονάδα Γονέα
μου δεν τίθεται σε
λειτουργία (ΟΝ).
Η Μονάδα Μωρού μου δεν
τίθεται σε λειτουργία (ΟΝ);
Ο Φωτισμός Νύχτας είναι
ενεργοποιημένος, αλλά δεν
μπορώ να τον συνδέσω με
τη Μονάδα Γονέα.
Υπάρχει ένας συνεχής
θόρυβος μπιπ.
Υπάρχει ένας
συναγερμός ηχητικών
σημάτων 2 Χ κάθε λεπτό.
Υπάρχει ένας
συναγερμός ηχητικών
σημάτων 3 Χ κάθε λεπτό.
Δεν μπορώ να ακούσω
τίποτα μέσω της Μονάδα
Γονέα μου;
Ή/και.
Είναι μόνο
διακοπτόμενος ήχος;
Η Μονάδα Γονέα μου κάνει
έναν συνεχή να θόρυβο
μπιπ;
Η Μονάδα Γονέα μου κάνει
ένα τυχαίο μπιπ-μπιπ κάθε
περίπου ένα λεπτό;
Θόρυβος υψηλής έντασης.
Ο Φωτισμός Νύχτας
σβήνει συνεχώς.
Η διάρκεια ζωής των
μπαταριών γίνεται όλο και πιο
σύντομη μετά τη φόρτιση.
ΠΙΘΑΝΗ ΑΙΤΙΑ
Η επαναφορτιζόμενη μπαταρία
(παρέχεται) δεν έχει εγκατασταθεί σωστά.
Η επαναφορτιζόμενη μπαταρία ίσως είναι κάτω
από την κρίσιμη τάση για να ενεργοποιήσει τη
συσκευή παρακολούθησης σας.
Το καλώδιο ρεύματος δεν συνδέεται σωστά.
Το καλώδιο ρεύματος δεν συνδέεται
σωστά.
Τοποθέτηση μπαταριών ή/και
ζητήματα διάρκειας ζωής μπαταριών.
Το κουμπί ON/OFF δεν έχει πατηθεί για
αρκετή ώρα.
Ο Φωτισμός Νύχτας λειτουργεί ανεξάρτητα
από τη λειτουργία παρακολούθησης
της Μονάδας Μωρού (και είναι ένα
σχεδιασμένο επί τούτου χαρακτηριστικό.
Απώλεια επαφής συναγερμού.
Πεσμένη μπαταρία στη Μονάδα
Μωρού.
Πεσμένη μπαταρία στη Μονάδα Γονέα .
Η ένταση ήχου στη Μονάδα Γονέα είναι
ρυθμισμένη πάρα πολύ χαμηλά.
Οι μονάδες είναι εκτός εμβέλειας.
Οι μονάδες είναι ρυθμισμένες στη λειτουργία
Παρακολούθησης Ενεργοποίησης Ήχου.
Οι μονάδες δεν επικοινωνούν.
Στη μια ή και στις δύο μονάδες
τελειώνουν οι μπαταρίες.
Οι μονάδες είναι υπερβολικά κοντά μεταξύ τους.
Η ένταση ήχου είναι υπερβολικά υψηλή.
Ο Φωτισμός Νύχτας έχει σχεδιαστεί να
σβήσει αυτόματα μετά από 5 λεπτά για να
συντηρήσει τη διάρκεια ζωής των μπαταριών.
Όπως με οποιαδήποτε επαναφορτιζόμενη
μπαταρία έχει πεπερασμένη διάρκεια ζωής
και μπορεί να χρειαστεί αντικατάσταση.
ΛΥΣΗ
Εισχωρήστε την μπαταρία σύμφωνα με τις οδηγίες σε αυτό το
εγχειρίδιο. Μόλις τις εγκαταστήσετε, βάλτε τη Μονάδα Γονέα
να φορτίσει για αρκετά λεπτά πριν την ενεργοποιήσετε.
Βάλτε τη Μονάδα Γονέα να φορτίσει και αφήστε τη
για αρκετά λεπτά πριν την ενεργοποιήσετε.
Ελέγξτε τις συνδέσεις καλωδίων ρεύματος
(συμπεριλαμβανομένης της πρίζας του τοίχου).
Ελέγξτε τις συνδέσεις καλωδίων ρεύματος
(συμπεριλαμβανομένης της πρίζας του τοίχου).
Ελέγξτε ότι οι μπαταρίες έχουν την επαρκή φόρτιση
και ότι έχουν τοποθετηθεί σωστά.
Πατήστε και κρατήστε πατημένο το κουμπί ON/OFF
ώσπου να φωτιστεί.
Σβήστε το Φωτισμό Νύχτας πατώντας το κουμπί μετά
ενεργοποιήστε εκ νέου την κύρια λειτουργία της Μονάδας
Μωρού πατώντας και κρατώντας πατημένο το κουμπί .
Βεβαιωθείτε ότι και στις δυο μονάδες υπάρχει
επαρκής τροφοδοσία με ρεύμα.
Φέρτε και τις δύο μονάδες πιο κοντά και
επαναλάβατε τις οδηγίες της «Συναρμολόγησης».
Αντικαταστήστε τις μπαταρίες.
Ή αλλάξτε και συνδέστε με κεντρική παροχή
ρεύματος (εναλλασσόμενο ρεύμα) χρησιμοποιώντας
τον παρεχόμενο προσαρμοστικό ρευματολήπτη.
Επαναφορτίστε τις μπαταρίες.
Αυξήστε την ένταση ήχου της Μονάδας Γονέα.
Μετακινήστε τις μονάδες πιο κοντά μεταξύ τους.
Ανατρέξατε στην Παρακολούθηση με Ενεργοποίηση
Ήχου σε αυτό το εγχειρίδιο οδηγιών.
Βεβαιωθείτε ότι και οι δύο μονάδες τροφοδοτούνται
επαρκώς με ρεύμα και μετά ακολουθείστε τον οδηγό
της «Συναρμολόγησης» σε αυτό το εγχειρίδιο.
Διαπιστώστε την κατάσταση Πεσμένης μπαταρίας
και είτε επαναφορτίζετε/αντικαθιστάτε τις μπαταρίες
είτε συνδέετε με κεντρική παροχή ρεύματος.
Μετακινήστε τις μονάδες μακριά η μια από την άλλη
Μειώστε την ένταση.
Για συνεχή χρήση, παρακαλούμε συνδέστε με
κεντρική παροχή ρεύματος.
Παρακαλούμε επισκεφτείτε τον ιστοχώρο μας για
εξαρτήματα αντικατάστασης: www.tomy.eu
ΣΕΛΙΔΑ
51
51
52
51
51
51
52
51
51
52
52
53
Page 29

60
60
59
60
60
60
59
HE HE
60
60
59
59
58
56 57
Page 30

HE HE
58 59
Page 31

HEHE
6160
Page 32

62 63
Page 33

TE/M6C
09/09
Ref. No. 71028
Made in China
Fabriqué en Chine
Tomy UK Ltd., Totton,
Hants. SO40 3SA,
England.
GB
F
NL
D
Abweichungen in Farbe oder Details möglich.
E
I
RU
A
GR
HE
GB
Important Notice: This Tomy Baby Monitor is designed to help you monitor your child and is not intended as a substitute for adult supervision.
F
Avis important : Cet écoute-bébé de Tomy est conçu pour vous aider à surveiller votre enfant mais ne doit en aucun cas se substituer à la
surveillance d’un adulte.
NL
Belangrijke mededeling: Deze Tomy Baby Monitor is ontworpen om u te helpen toezicht te houden op uw kind en is niet bedoeld om te
worden gebruikt in plaats van toezicht door een volwassene.
D
Wichtiger Hinweis: Dieses Tomy Babyphone soll Ihnen helfen, Ihr Kind zu überwachen und ist nicht als Ersatz für die Beaufsichtigung durch
Erwachsene gedacht.
E
Aviso Importante: Este Monitor de Bebé Tomy está diseñado para ayudar a supervisar a su niño y no es un substituto de la supervisión adulta.
I
AVVERTENZA IMPORTANTE: questo monitor Tomy è progettato per aiutarti a supervisionare il tuo bambino ma non si può sostituire alla
supervisione di un adulto.
RU
Важная информация: Радионяня Tomy предназначена для того, чтобы помочь вам следить за ребенком и не заменяет собой
присмотр взрослых.
A
GR
Σημαντική Ειδοποίηση: Αυτή η συσκευή Παρακολούθησης Μωρού της Tomy είναι σχεδιασμένη για να σας βοηθήσει να παρακολουθείτε το
παιδί σας και δεν προορίζεται ως υποκατάστατο της επίβλεψης από ενήλικο.
HE
GB
F
NL
D
E
I
RU
A
GR
HE
 Loading...