

Page 1

TomTom Rider
User Manual
16.1
Page 2

Contents
Welcome to navigation with TomTom 7
What's new 8
New in this release ................................................................................................ 8
TomTom videos .................................................................................................... 8
Using your Rider 10
Mounting on a motorcycle ...................................................................................... 10
Using the anti-theft solution ................................................................................... 11
Installing in your car ............................................................................................ 13
Bluetooth Connections .......................................................................................... 14
Renaming your device ....................................................................................... 15
Connecting a headset ....................................................................................... 15
Connecting and disconnecting a phone .................................................................. 16
Hands-free calling ............................................................................................... 17
Navigation buttons............................................................................................... 18
The glove-friendly keyboard ................................................................................... 20
Planning a thrilling route ....................................................................................... 21
Planning a thrilling round trip route using stops ....................................................... 22
Planning a thrilling ride to a destination ................................................................ 23
Looking at trip statistics ........................................................................................ 24
Using quick settings ............................................................................................. 25
Installing Tyre Pro ............................................................................................... 26
Settings ............................................................................................................ 27
Bluetooth Connections ...................................................................................... 27
Locking device orientation ................................................................................. 27
Map colour .................................................................................................... 27
Get going 28
Positioning the device .......................................................................................... 28
Switching on and off ............................................................................................ 28
Safety Notice ..................................................................................................... 28
Setting up ......................................................................................................... 29
GPS reception .................................................................................................... 29
Sending information to TomTom .............................................................................. 29
Memory card slot ................................................................................................ 29
Device not starting .............................................................................................. 30
Charging your device ............................................................................................ 30
Caring for your Rider ............................................................................................ 30
Connecting to TomTom services 31
About TomTom services ........................................................................................ 31
Smartphone connected devices ............................................................................... 31
Personal Area Networks .................................................................................... 31
Connect to TomTom services using your smartphone ................................................. 32
Reconnecting your smartphone ........................................................................... 32
Connect to TomTom services using a different smartphone ......................................... 33
Deleting phones .............................................................................................. 33
Unable to get a connection ................................................................................ 33
2
Page 3

What's on the screen 34
The map view..................................................................................................... 34
The guidance view ............................................................................................... 35
The route bar ..................................................................................................... 37
Distances and the route bar ............................................................................... 38
The quick menu .................................................................................................. 38
Main Menu smaller buttons and symbols ..................................................................... 38
Volume control ................................................................................................... 40
Using gestures .................................................................................................... 40
Reordering the Main Menu buttons ........................................................................... 41
Traffic 42
About TomTom Traffic .......................................................................................... 42
The route bar ..................................................................................................... 42
Looking at traffic on the map ................................................................................. 43
Looking at traffic on your route ............................................................................... 44
Traffic incidents ................................................................................................. 45
Approaching a traffic jam warning ........................................................................... 46
Avoiding a traffic jam on your route ......................................................................... 46
Advanced Lane Guidance ....................................................................................... 47
Time-dependent speed limits ................................................................................. 47
Syncing using TomTom MyDrive 48
About TomTom MyDrive ........................................................................................ 48
Logging in to MyDrive ........................................................................................... 48
Setting a destination using MyDrive .......................................................................... 49
Planning a route with stops using MyDrive .................................................................. 49
Showing a planned destination in MyDrive .................................................................. 50
Clearing a MyDrive destination ................................................................................ 50
Deleting a MyDrive destination from My Places ............................................................ 50
Set a phone contact as your destination using the MyDrive app ........................................ 50
Finding and syncing locations using MyDrive ................................................................ 51
Syncing My Places locations with MyDrive ................................................................... 51
Importing a community POI list ............................................................................... 51
Deleting a community POI list ................................................................................. 51
Importing a track GPX file...................................................................................... 52
Deleting a track GPX file ....................................................................................... 52
Saving and restoring your personal navigation information .............................................. 53
Using Quick Search 54
About search ...................................................................................................... 54
Planning a route to a POI using search ....................................................................... 54
Planning a route to a POI using online search .............................................................. 56
Entering search terms ........................................................................................... 58
Working with search results ................................................................................... 59
About postcodes ................................................................................................. 61
About mapcodes ................................................................................................. 61
List of POI type icons ............................................................................................ 61
Planning a route 66
Using suggested destinations .................................................................................. 66
Planning a route to an address using search ................................................................ 66
Planning a route to a city centre ............................................................................. 68
3
Page 4

Planning a route to a POI using search ....................................................................... 70
Planning a route to a POI using online search .............................................................. 72
Planning a route using the map ............................................................................... 74
Planning a route using My Places ............................................................................. 75
Planning a route using coordinates ........................................................................... 76
Planning a route using a mapcode ............................................................................ 77
Finding an alternative route ................................................................................... 78
Planning a route in advance ................................................................................... 79
Finding a car park ............................................................................................... 81
Finding a petrol station ......................................................................................... 83
Changing your route 85
The Current Route menu ....................................................................................... 85
Avoiding a blocked road ........................................................................................ 87
Avoiding part of a route ........................................................................................ 87
Types of route .................................................................................................... 88
Route features ................................................................................................... 88
Avoiding a route feature on your route ...................................................................... 89
Adding a stop to your route from the current route menu ............................................... 89
Adding a stop to your route using the map ................................................................. 89
Deleting a stop from your route ............................................................................... 90
Skipping the next stop on your route ........................................................................ 90
Reordering stops on a route ................................................................................... 90
My Routes 91
About My Routes ................................................................................................. 91
About GPX and ITN files ........................................................................................ 91
Saving a route .................................................................................................... 92
Navigating using a saved route ................................................................................ 93
Navigating to a stop on a saved route ....................................................................... 93
Adding a stop to a saved route using the map .............................................................. 95
Recording a track ................................................................................................ 96
Navigating using a track ........................................................................................ 96
Deleting a route or a track from My Routes ................................................................. 97
Exporting tracks to a memory card ........................................................................... 97
Importing routes and tracks from a memory card ......................................................... 98
Exporting tracks using Bluetooth .............................................................................. 98
Importing routes and tracks using Bluetooth ............................................................... 99
Importing routes from your computer using USB ........................................................... 99
My Places 101
About My Places ................................................................................................. 101
Setting your home and work locations ...................................................................... 101
Changing your home location ................................................................................. 102
Adding a location from My Places ............................................................................ 103
Add a location to My Places from the map ................................................................. 103
Adding a location to My Places using search ............................................................... 104
Adding a location to My Places by marking ................................................................ 104
Deleting a recent destination from My Places ............................................................. 104
Deleting a location from My Places .......................................................................... 104
Map Share 105
About Map Share ................................................................................................ 105
Creating a map correction report ............................................................................ 105
4
Page 5

Creating a map change report from a marked location .................................................. 106
Types of map change ........................................................................................... 107
Speed Cameras 109
About speed cameras .......................................................................................... 109
Crossing into another area or country ...................................................................... 109
Speed camera warnings ........................................................................................ 109
Changing the way you are warned ........................................................................... 111
Reporting a new speed camera .............................................................................. 111
Confirm or remove a mobile speed camera ................................................................ 112
Updating locations for cameras and hazards .............................................................. 112
Danger Zones 113
About danger zones and risk zones .......................................................................... 113
Crossing into another area or country ...................................................................... 113
Danger zone and risk zone warnings ........................................................................ 113
Changing the way you are warned ........................................................................... 114
Reporting a risk zone ........................................................................................... 114
Updating locations for danger zones and risk zones ...................................................... 115
Settings 116
Appearance ...................................................................................................... 116
Display ........................................................................................................ 116
Route Bar ..................................................................................................... 117
Guidance view ............................................................................................... 118
Automatic Zoom............................................................................................. 119
Voices ............................................................................................................. 119
Maps ............................................................................................................... 120
Route Planning .................................................................................................. 120
Sounds and Warnings ........................................................................................... 121
Warning type ................................................................................................ 121
Speed camera warnings .................................................................................... 121
Cameras ...................................................................................................... 122
Hazards ....................................................................................................... 122
Screen touch sounds ........................................................................................ 122
Language and Units ............................................................................................. 123
System ............................................................................................................ 123
Help ............................................................................................................... 124
Getting Help 125
Help ............................................................................................................... 125
Product certification 126
Finding product certification information on your device ............................................... 126
Updating using MyDrive Connect 127
About MyDrive Connect ........................................................................................ 127
TomTom account ............................................................................................... 127
Setting up MyDrive Connect ................................................................................... 127
5
Page 6

Addendum 129
Copyright notices 134
6
Page 7

This Reference Guide explains all you need to know about your new TomTom Rider.
Welcome to navigation with TomTom
If you want a quick read of the essentials, we recommend that you read the Using your Rider
chapter. This covers installation, planning a thrilling ride and all the main features of your device.
Get going covers switching on, setting up and charging.
After that, you will probably want to connect to TomTom services and you can read all about that in
the Connecting to TomTom services chapter. To help you avoid traffic delays and get to your
destination quicker, you can use TomTom services even on the routes you ride every day.
Tip: There are also frequently asked questions (FAQs) at tomtom.com/support. Select your
product model from the list or enter a search term.
We hope you enjoy reading about and, most importantly, using your new Rider!
Note: You can use your device on your bike or in your car.
7
Page 8

New in this release
What's new
Version 16.1
Rider 40, Rider 400, Rider 410
Make and receive calls hands-free
As well as receiving incoming calls, you can now make calls to contacts in your smartphone's
contacts list and to recent contacts from your TomTom Rider. When you connect your phone to your
Rider using Bluetooth, your contacts are shown on your Rider.
To learn more go to Connecting and disconnecting a phone and Hands-free calling in this guide.
Other bug fixes and improvements
Various performance improvements and bug fixes have been implemented.
TomTom videos
You can find many videos on our YouTube channel to help you learn about your new TomTom Rider
and other TomTom products. Visit www.youtube.com/user/TomTomOfficial/videos to find out
more!
Here are links to some videos that you might find interesting:
Tip: Look on the TomTom YouTube Channel for videos in your own language.
The TomTom Rider
Get inspiration for your Rider:
www.youtube.com/watch?v=kbHfzuflTF0
https://www.youtube.com/playlist?list=PLSoQAVympWk4HbxQ-kv83xqcC-KDSbEl5
See how to mount your Rider without the anti-theft solution:
www.youtube.com/watch?v=w0UHEIlJ060
See how to mount your Rider with the anti-theft solution: www.youtube.com/watch?v=5SE8zUasp2I
See how to get TomTom Traffic via your iPhone: www.youtube.com/watch?v=HIwYh5nYAok
See how to get TomTom Traffic via your Android Smartphone:
www.youtube.com/watch?v=Wc3jkI-OeSM
The TomTom GO
Your Rider uses all of the features on the TomTom GO. Learn more about the GO here:
tomtom.dist.sdlmedia.com/Distributions/?o=5197E8C4-1943-40F0-A4E8-98A562AFAFCE
www.youtube.com/watch?v=sSBSeYtGpuY
8
Page 9

Using MyDrive
UK English:
www.youtube.com/watch?v=PIs5tGFhQIA
French (France):
www.youtube.com/watch?v=lYpPDxxXSwk
Spanish (Spain):
www.youtube.com/watch?v=HkZqdD5MkHI
German:
www.youtube.com/watch?v=Skg6PWMbRxI
Italian:
www.youtube.com/watch?v=AybGRzpgu1s
USA ONLY - Getting traffic on a smartphone-connected device
us.support.tomtom.com/app/content/name/Connect/page/3
New products
TomTom Bandit (English): www.youtube.com/watch?v=U2DXXwRcWyI
9
Page 10
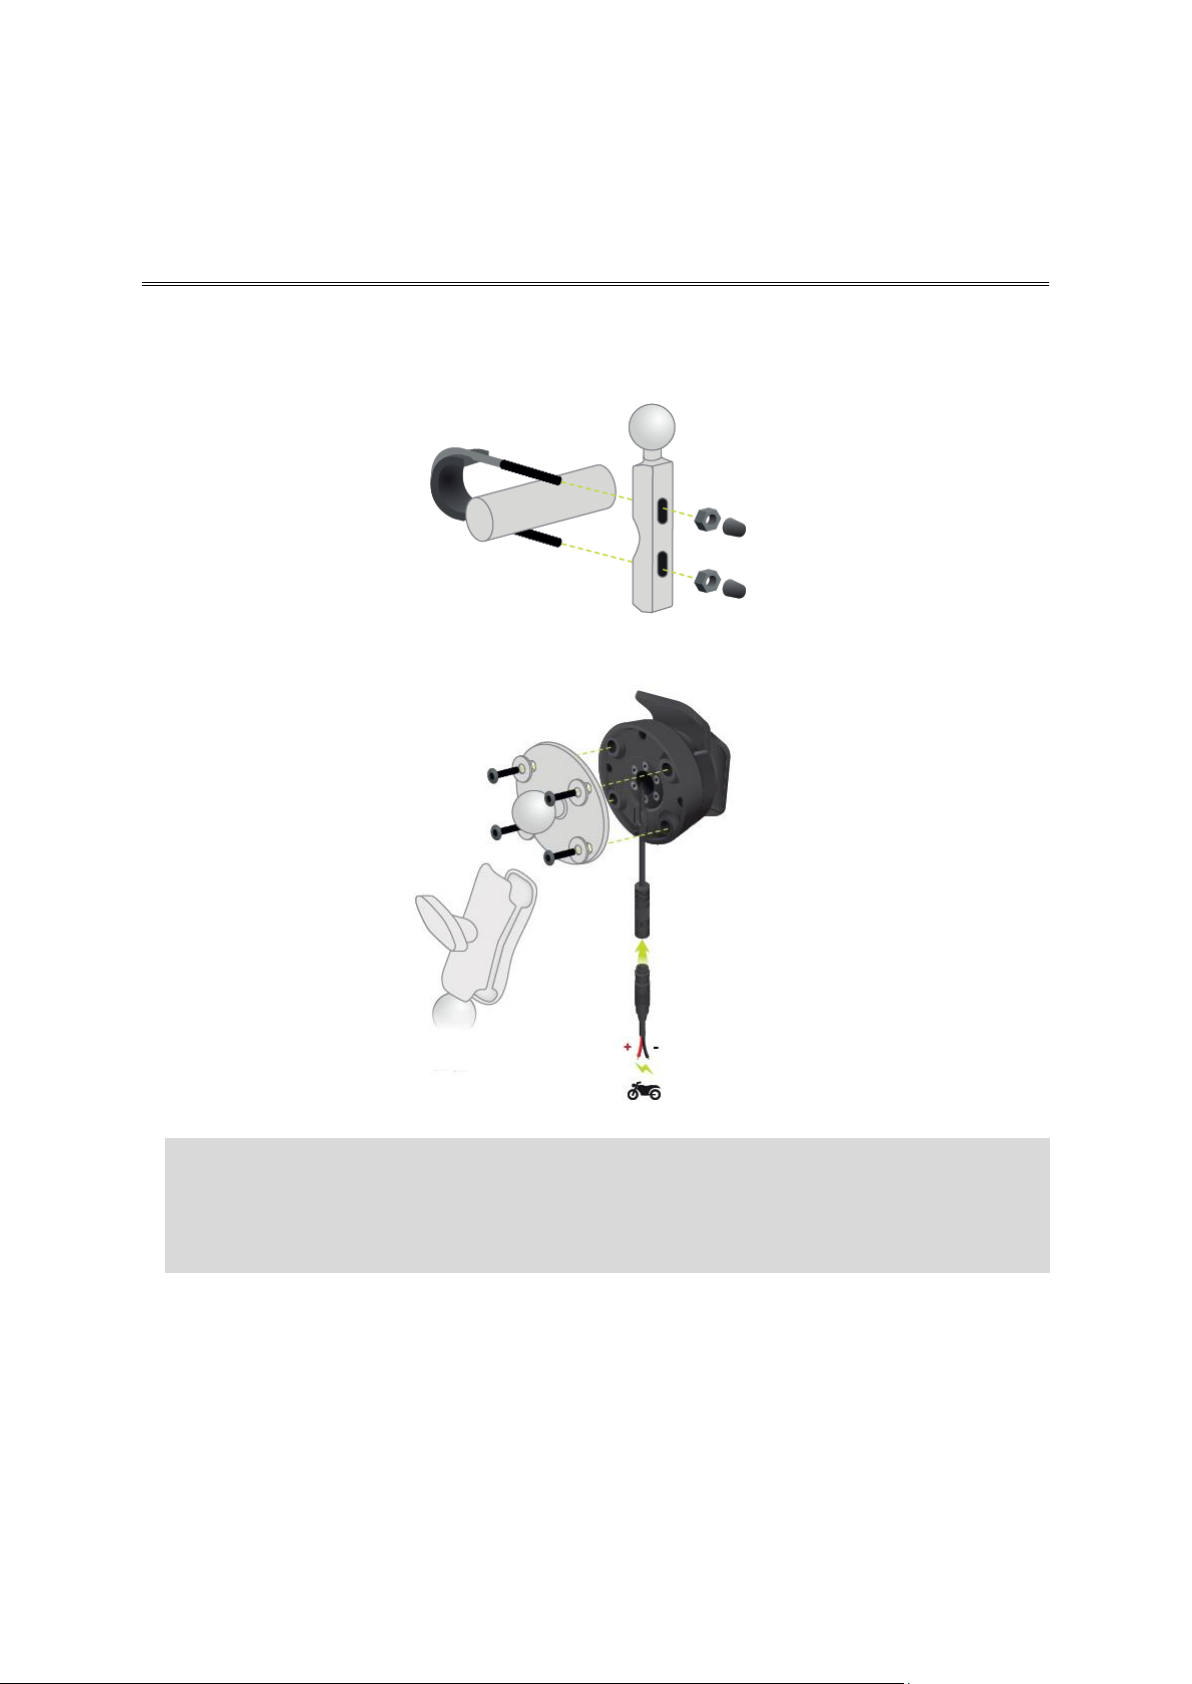
Mounting on a motorcycle
Using your Rider
1. Attach the RAM™ mount kit to your motorcycle.
2. Fix the holder to the mount and connect the wires to your motorcycle's wiring system.
Important: The red POS (+) contact needs to be connected to the motorcycle's wiring loom at
a point between the ignition and the +12V battery supply. The black NEG (-) wire needs to be
connected to the motorcycle's wiring loom at a point between the ignition and the -(GND)
battery supply. Attach to a 12V point that can be switched off by the ignition such as the light
circuit.
When you are attaching the mount kit to your motorcycle, follow these guidelines:
If you are unsure about attaching the mount kit yourself, ask a professional to fit it for you.
If you choose to attach the mount kit yourself, note that the Active Dock has a built-in fuse.
This means that you don’t need to add a fuse between the device and the motorcycle battery.
Make sure that the mount kit does not interfere with any of the controls on the motorcycle.
Always use the correct tools. If you use unsuitable tools, you may damage or break the
mount kit.
10
Page 11
Do not overtighten nuts and screws. You may crack parts of the mount kit or damage your
handlebars if you overtighten nuts or screws.
If you are using the u-bolt, don’t forget to put the rubber caps provided over the exposed
threads.
Important: Damage due to modifications, improper installation, road hazards or accident, are
not covered. Neither RAM nor TomTom shall be liable for any injury, loss, or damage, direct or
con-sequential, arising out of improper installation, or inability to use product. Before use, the
user shall determine the suitability of the product for its intended use. The user assumes all
risk and liability, whatsoever, in connection with the mount.
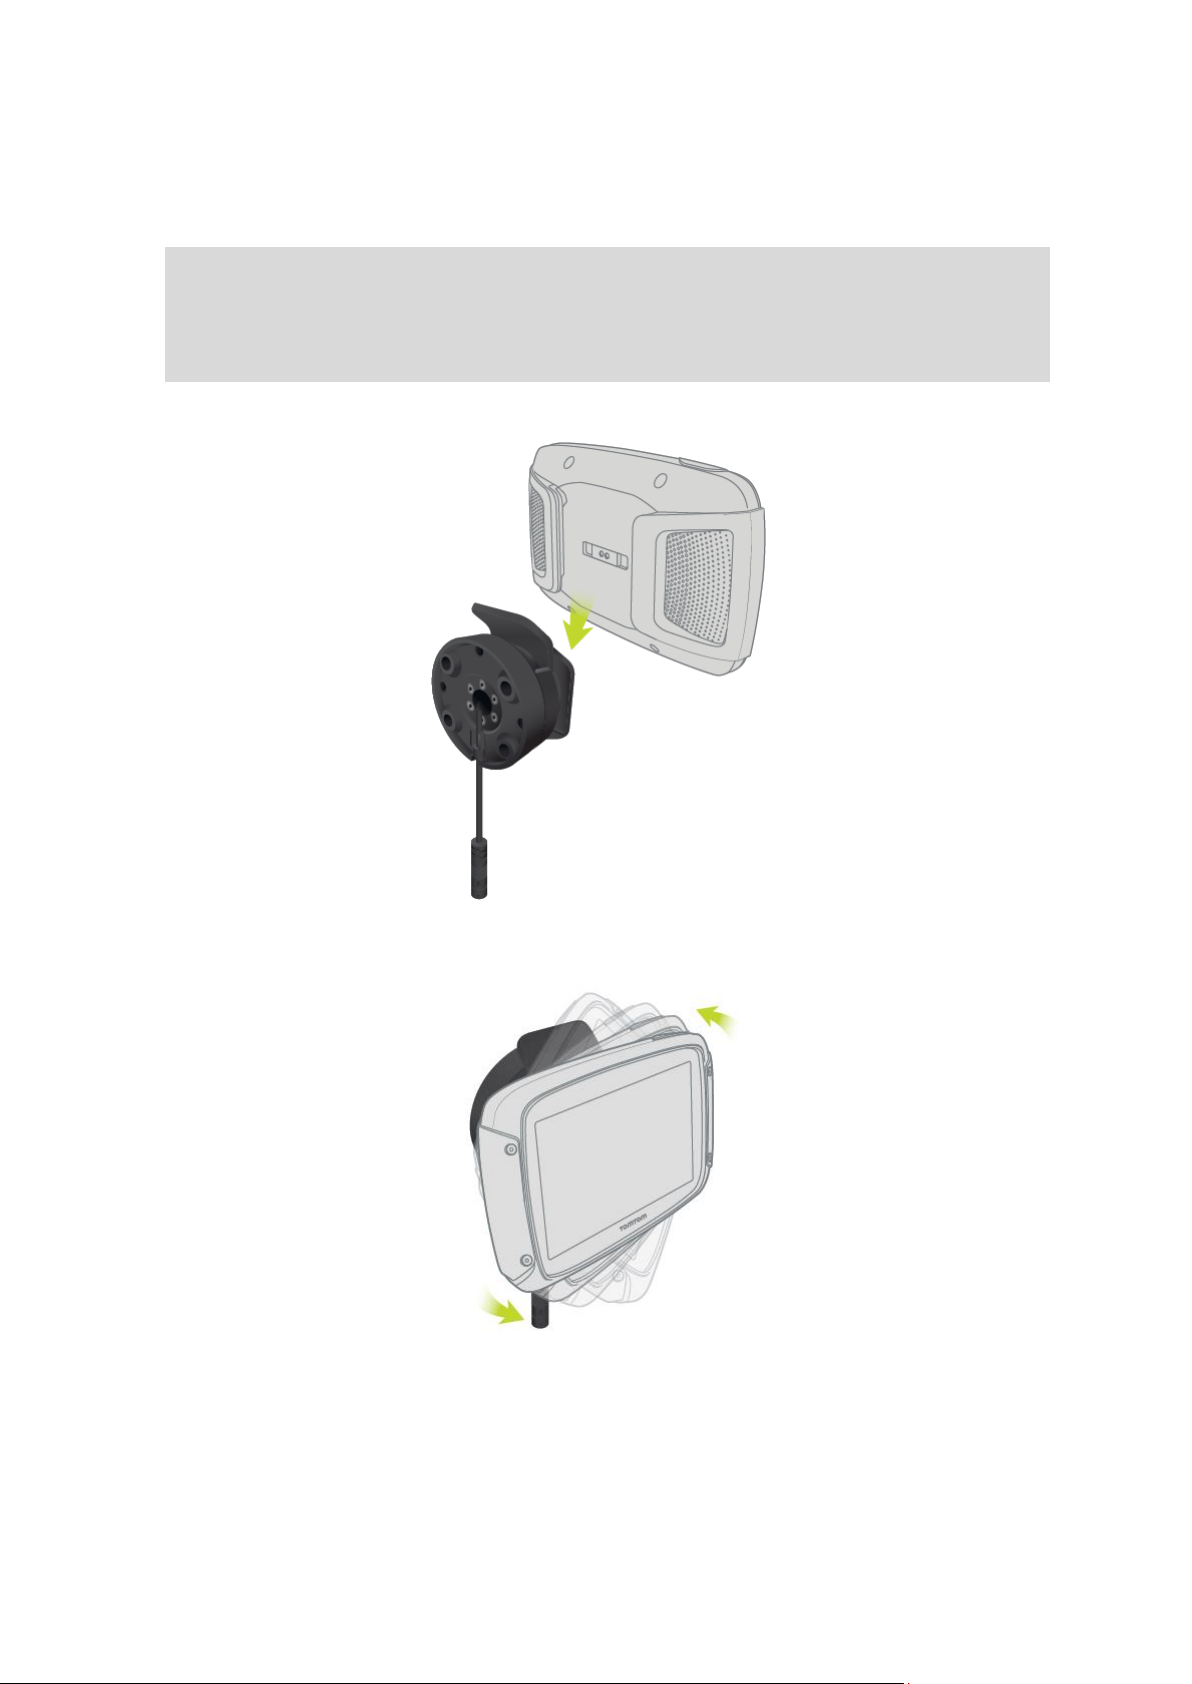
3. Place your TomTom Rider in the holder.
4. You can rotate your device by ninety degrees to get your preferred view.
Using the anti-theft solution
If your box includes an anti-theft solution, it is supplied in two parts:
11
Page 12

A RAM lock for the mount.
This lock prevents the unscrewing of the RAM arm from the motorcycle.
A lock for the TomTom Rider itself.
This lock prevents the disconnection of the TomTom Rider from the dock.
Important: Both locks have keys so you need to make sure that you keep these two extra keys with
you at all times!
To use the anti-theft solution, do the following:
1. Lock the RAM mount to your motorcycle as shown below.
Note: Make sure you use the longer screws provided with your Rider lock.
12
Page 13

2. Lock your TomTom Rider to prevent removal from the mount. Unscrew the wingnut from the
RAM arm and attach the RAM lock.
Installing in your car
If your box contains a car mount, use the supplied mount to install your TomTom Rider in your
vehicle. Read the instructions about positioning your device before you install your Rider.
If your box contains a car mount, install your Rider by doing the following:
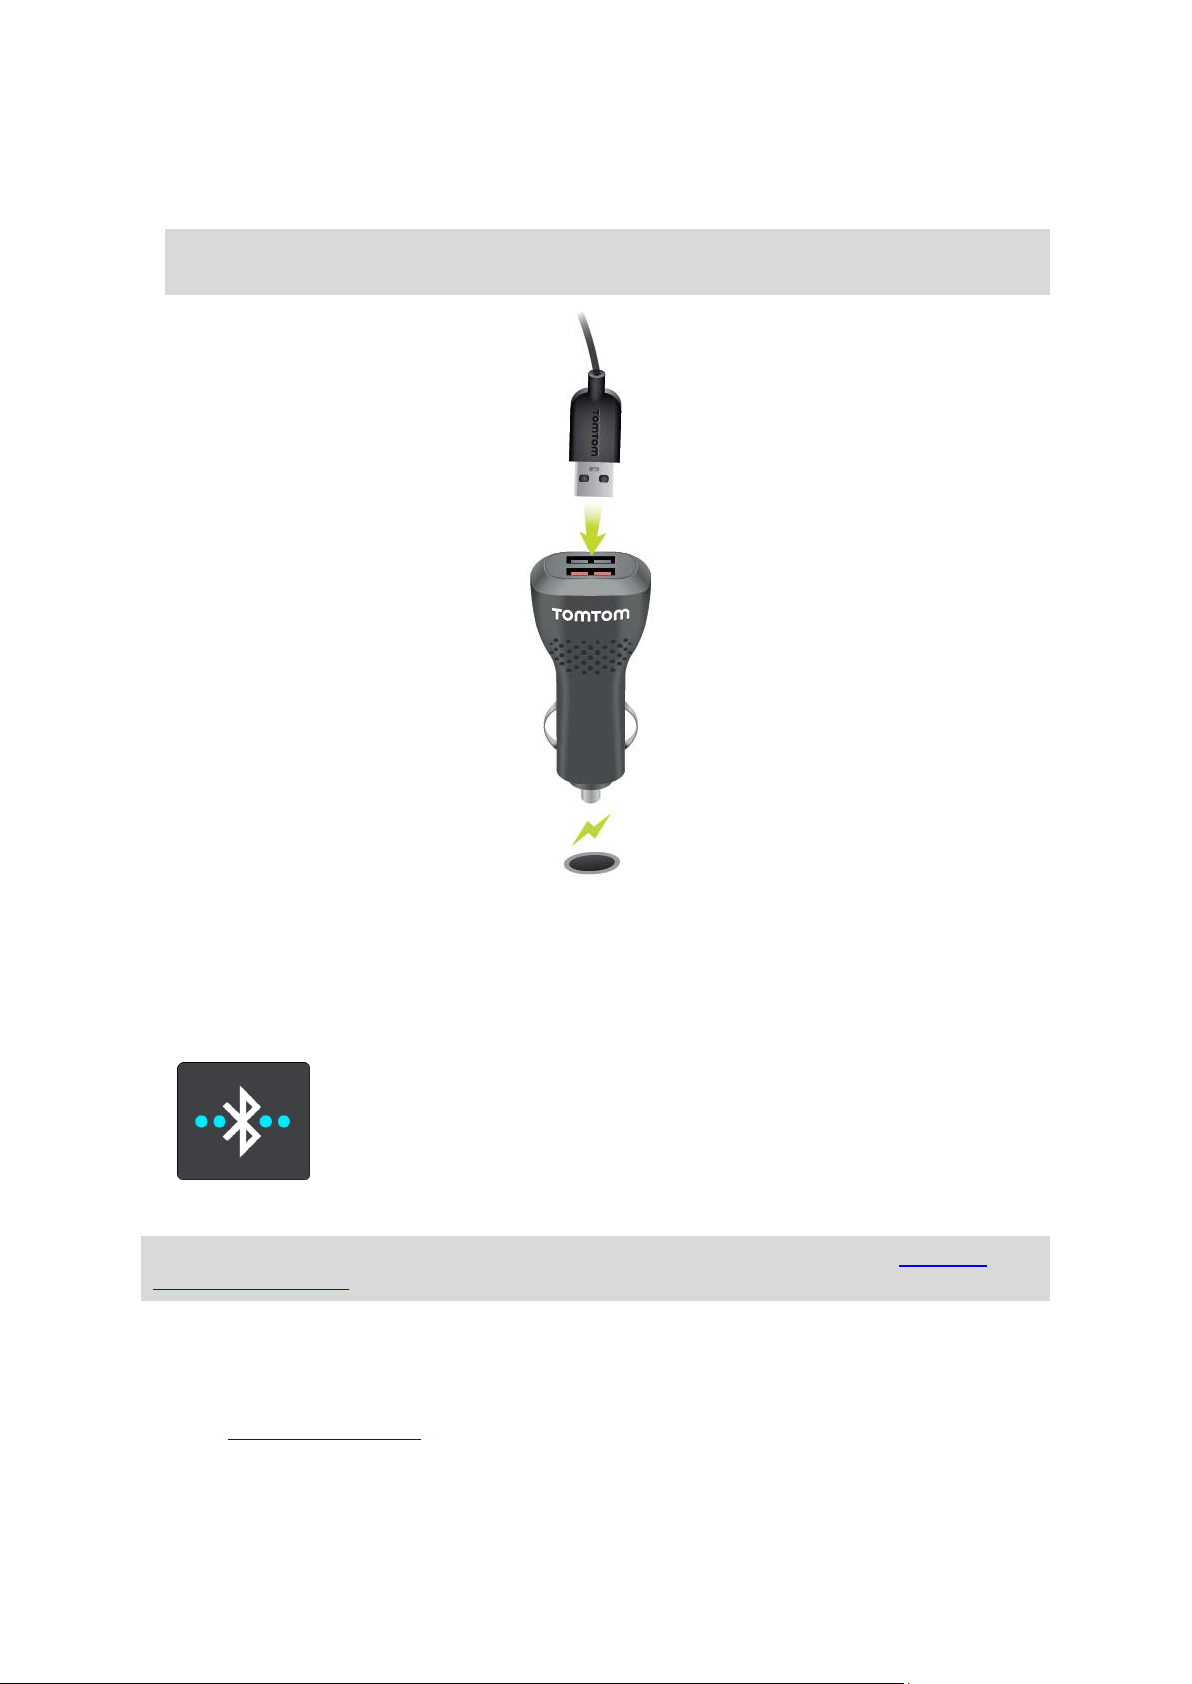
1. Connect the supplied USB cable to the mount.
Note: Use ONLY the USB cable supplied with your Rider. Other USB cables may not work.
2. Connect the USB cable to any of the USB sockets on the USB dual charger and plug this into the
power supply on your dashboard.
3. Choose the best smooth location, on your windshield or side window, to mount your TomTom
Rider.
4. Make sure that both the suction cup on the mount and your windscreen are clean and dry.
13
Page 14
5. Press the suction cup of the mount firmly against your windscreen.
6. Turn the grip near the base of the mount in a clockwise direction until you feel it lock.
7. Place your Rider in the mount, making sure that it clicks into place.
Tip: With the High-Speed Dual Charger you can charge your TomTom Rider and smartphone at
the same time.
Bluetooth Connections
Your TomTom Rider use Bluetooth to connect to your smartphone and headset.
Select Settings in the Main Menu, then select Bluetooth Connections.
You can select the following Bluetooth connections:
Tip: To make your device easier to find when connecting using Bluetooth, you can give your
device a unique name.
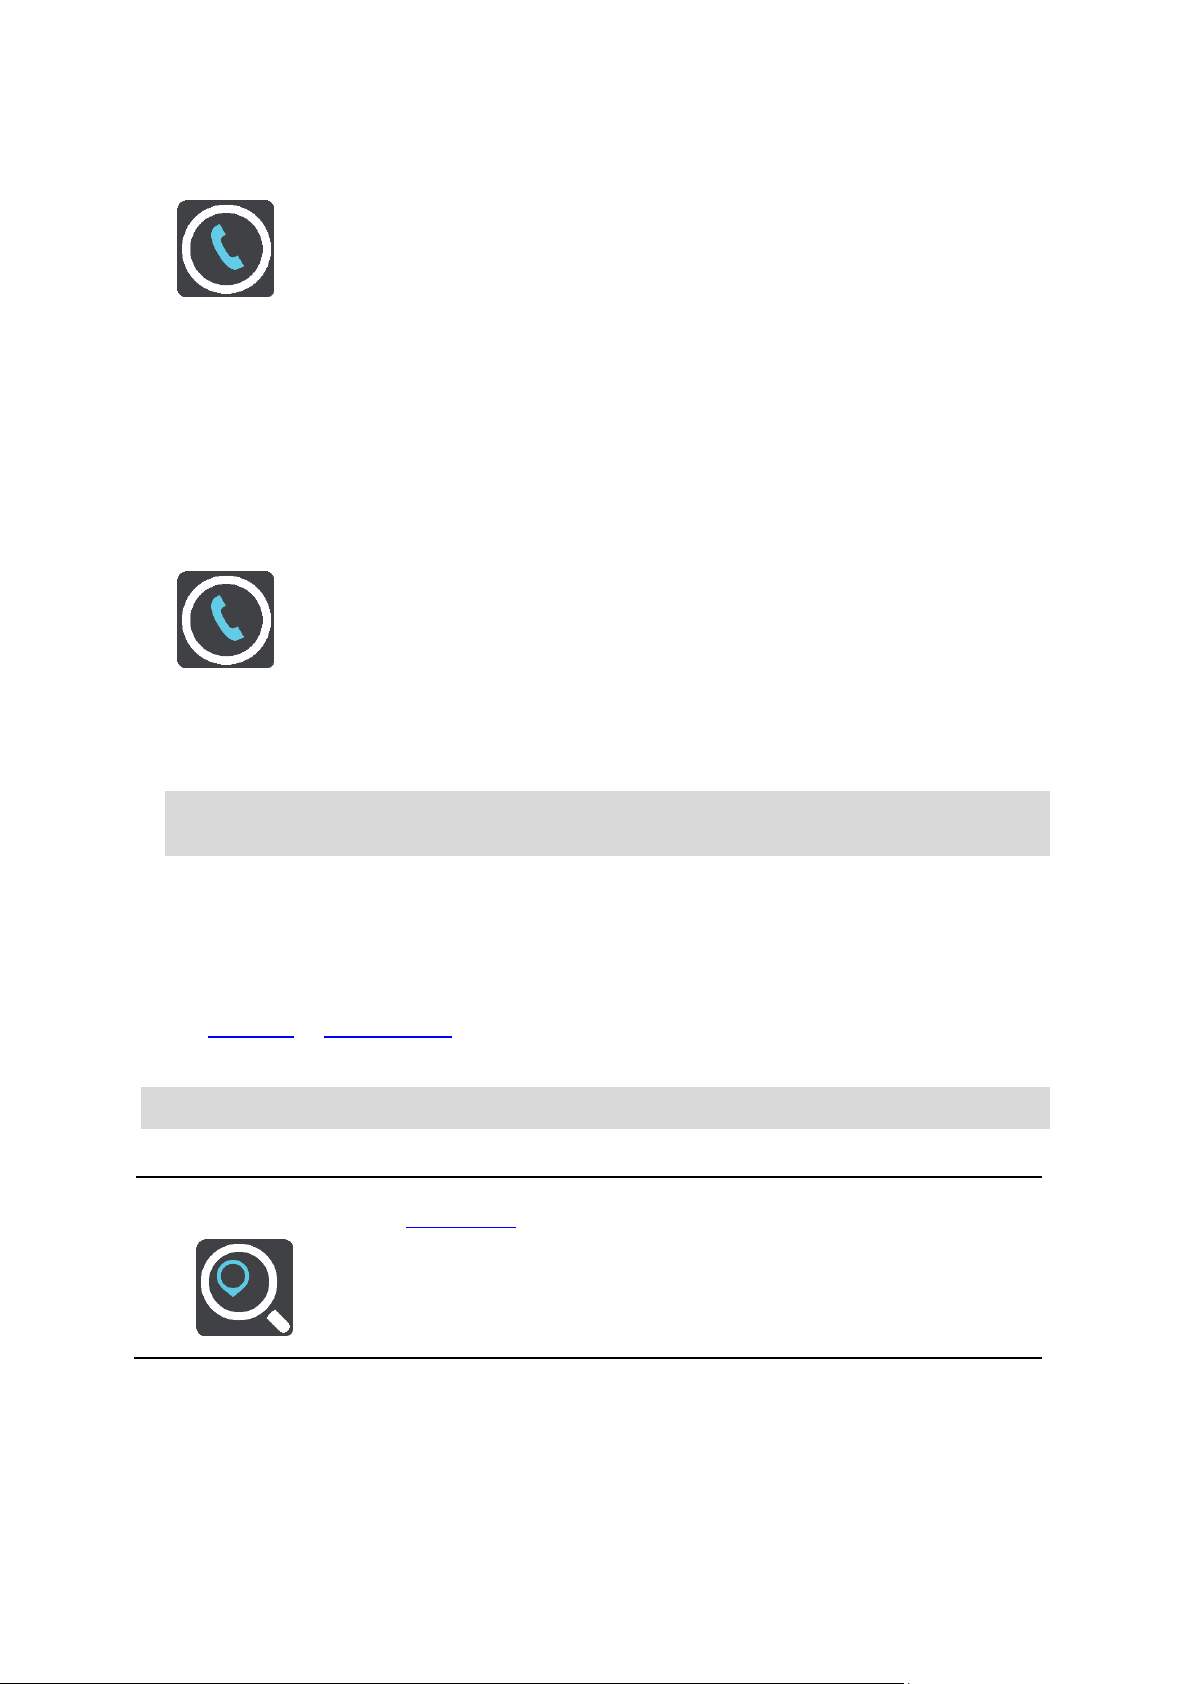
Headset
Headset lets you connect a bluetooth headset to your device. Select Headset, then select Search
for headset and follow the instructions.
See also: Connecting a headset.
14
Page 15

Hands-free calling
Use hands-free calling to receive incoming calls using your device. Select Hands-free calling, then
select Search for phone and follow the instructions.
See also: Receiving hands-free calls.
Network
Connect your device to TomTom services using a Bluetooth connection on your smartphone. Select
Network, then select a phone or search for a phone and follow the instructions.
See also: Connecting to TomTom services.
Renaming your device
You can give your device a unique Bluetooth name so that you can find it easily when connecting to
your smartphone via Bluetooth. You can change the Bluetooth name in the following ways:
Using the Settings menu
1. From the Main Menu, select Settings.
2. Select Bluetooth Connections.
3. Select the pop-up menu button.
4. Select Rename this device.
The keyboard is shown on the screen.
5. Enter the new name for your device.
6. Select Rename to save the new name.
When sharing a track or sending a track via Bluetooth
When you want to share a track or send a track via Bluetooth, your device's Bluetooth name is
displayed. Select the Bluetooth name to show the keyboard on the screen. Enter the new name for
your device, then select Rename to save the new name.
Connecting a headset
We recommend using a headset with your TomTom Rider to hear spoken instructions, and hear
warning sounds on your Rider. You can also use your headset for hands-free calling. This makes
riding with your Rider as safe as possible. For more information and a full list of compatible
headsets, go to Headset Compatibility.
Note: If you want to use hands-free calling, you must first connect a headset.
The instructions below describe how to connect a Bluetooth® headset:
1. Make sure your headset is fully charged using the charger supplied with your headset.
2. Switch on the the headset and make it discoverable by following the user instructions supplied
with your headset.
15
Page 16
3. From the Main Menu, select Settings.
4. Select Bluetooth Connections.
5. Select Headset, then select Search for Headset and follow the instructions to establish the
connection.
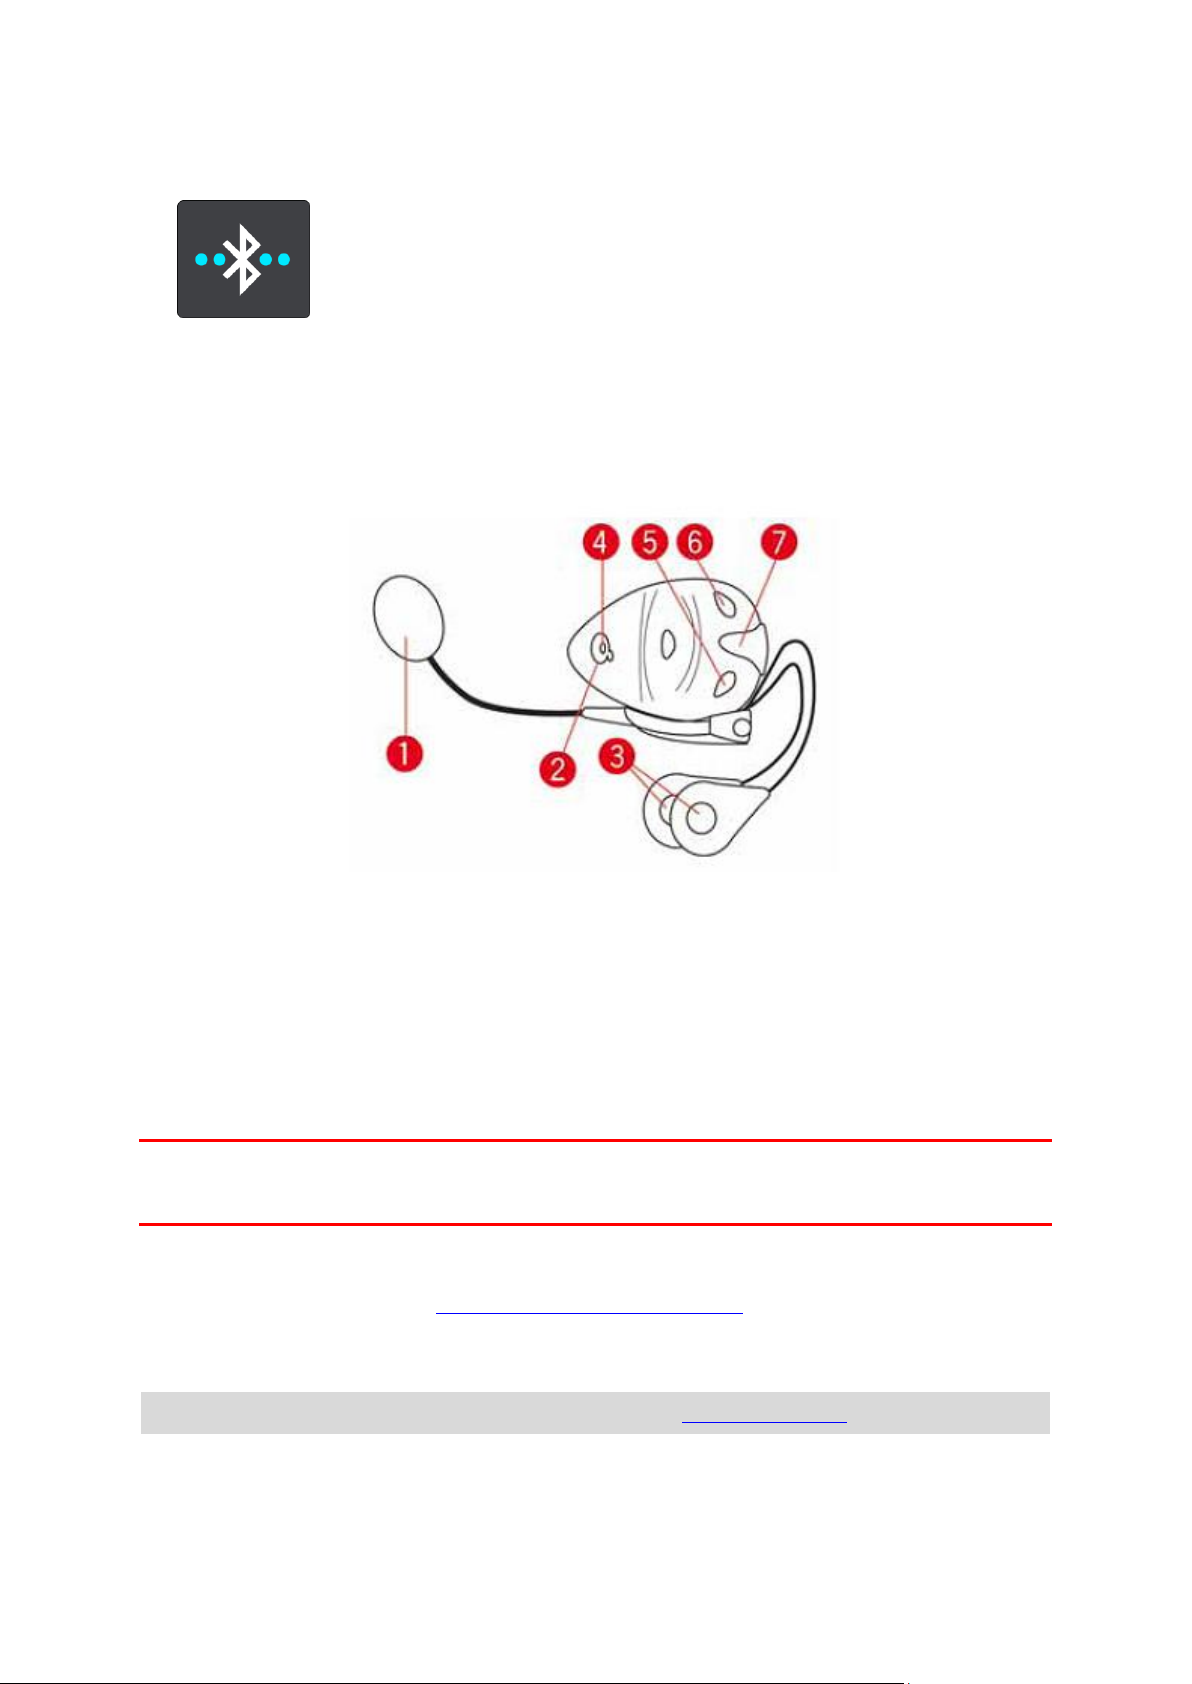
6. Attach your headset to your helmet.
Make sure you position the microphone correctly. For best results, don’t position the microphone directly in front of your mouth, position it just to the side of your mouth.
An image of the parts of a typical headset is shown below:
1. Microphone
2. On/off button
3. Speakers
4. LED
5. Volume down
6. Volume up
7. Charging connector
Important: When using a headset, the volume control may not be available because your headset
doesn't support remote volume control. If this is the case, use the volume control button on the
headset itself to change the volume.
Connecting and disconnecting a phone
You can use your smartphone to make and receive hands-free calls from your TomTom Rider. This
makes riding with your Rider as safe as possible.
Connecting your phone for the first time using Bluetooth
Note: If you want to use hands-free calling, you must first connect a headset.
1. Switch on Bluetooth on your phone, and make sure your phone is discoverable.
2. From the Main Menu, select Settings.
16
Page 17

3. Select Bluetooth Connections.
4. Select Hands-free calling.
5. If you have not yet connected a headset, select Search for Headset and follow the instructions
to establish the connection.
6. Select Search for Phone and follow the instructions to establish the connection.
When your phone is connected, your Rider imports your call history and phone contacts.
Disconnecting your phone
You can disconnect your phone in the following ways:
Switch off Bluetooth on your phone.
Switch off or reset your Rider.
Select Bluetooth Connections in the Settings menu. Select Hands-free calling then select your
phone. Select Disconnect to disconnect your device from your phone.
Your contacts and call history are temporarily stored on your Rider and are automatically removed
10 minutes after you disconnect your phone. When you switch off or reset your Rider your contacts
and call history are removed immediately.
Reconnecting your phone
Your phone will automatically connect when you switch on your Rider and switch on Bluetooth on
your phone. Your Rider imports your call history and phone contacts again, including all updates.
Hands-free calling
You can receive incoming calls and make calls to contacts in your phone's contacts list and to your
recent contacts. When you connect your phone to your TomTom Rider your contacts are shown on
your Rider.
To make hands-free calls, you must first connect your headset and your phone to your Rider.
Accepting an incoming call
On the screen, select the green button to accept a call.
Tip: It takes a short while to sync all your phone contacts so if you receive a call immediately
after setup you may not see the caller ID.
Ending or rejecting an incoming call
On the screen, select the red button to end or reject a call.
17
Page 18
Making a hands-free call to a recent contact
Search
Select this button to search for an address, a place or a Point of Interest,
then plan a route to that location.
1. In the Main Menu select Phone.
Your recent contacts list is shown on your Rider.
2. Select a recent contact from the list.
Your contact and the phone number are shown on your Rider.
3. Select the telephone button to call your contact.
4. Select the red button to end the call.
Making a hands-free call to a contact
1. In the Main Menu select Phone.
Your phone contacts list is shown on your Rider.
2. Select Tap here to search contacts at the top of the recent contacts list.
Your contacts list is shown on your Rider.
3. Select a contact from the list, or select Enter a contact name to search for a contact.
Note: A search only finds the first part of a word or name, for example "smith" will find
"smithson" but not "locksmith".
Your contact and the phone number are shown on your Rider.
4. Select the telephone button to call your contact.
5. Select the red button to end the call.
Navigation buttons
On the map view or guidance view, select the Main Menu button to open the Main Menu.
The following navigation buttons are available in the Main Menu:
Note: Not all features are supported on all devices.
18
Page 19
Plan a Thrill
Select this button to plan a thrilling ride for a roundtrip or to a
destination.
My Routes
Select this button to show your saved routes, recorded routes and
imported routes.
Add Home
Ride Home
Select this button to ride to your home location. If this button is not
included in your main menu, go to My Places to set up your home location.
Add Work
Ride to Work
Select this button to ride to your work location. If this button is not
included in your main menu, go to My Places to set up your work location.
Current Route /
Current Track
Select this button to clear or change your planned route or track.
Phone
Select this button to make hands-free calls using your phone and headset.
If your phone and headset are not connected, your are asked to connect
them.
19
Page 20

Start Recording
Select this button to start or stop recording a track.
My Places
Select this button to show your saved places.
Parking
Select this button to find car parks.
Petrol Station
Select this button to find petrol stations.
Connected Services
Select this button to see the status of your connection to the internet.
Trip Statistics
Select this button to see trip statistics about how far you've been riding,
how long you've been riding, and also at what speed.
The glove-friendly keyboard
Switching to the glove-friendly keyboard
The glove-friendly keyboard has large buttons so that you can make selections more easily while
wearing motorcycle gloves.
See Entering search terms for instructions on how to select different keyboard layouts.
Using the glove-friendly keyboard
Taking the "pqrs" key as our example, do the following:
20
Page 21
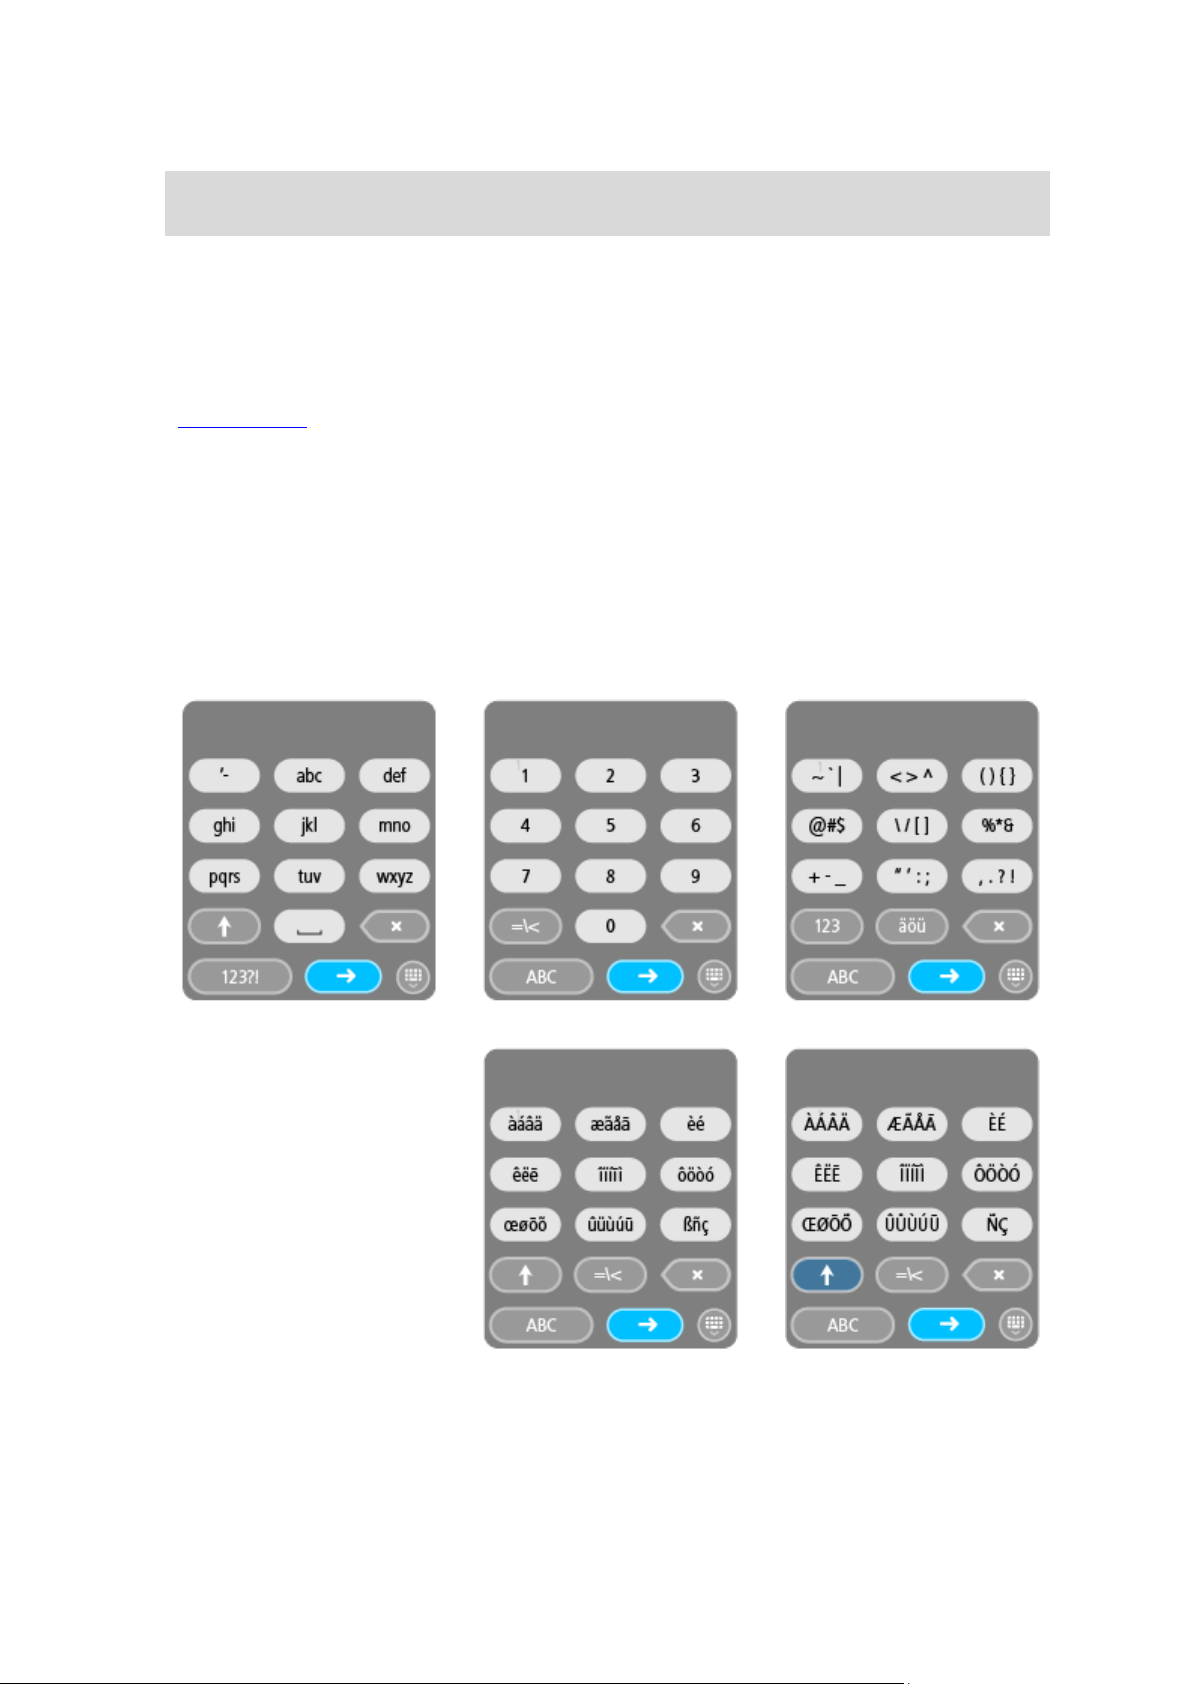
1. To select the first letter "p", tap the "pqrs" key once.
Tip: To select another letter from the same key, for example, "p" followed by "r", you need to
wait for half a second in between selecting letters.
2. To select the second letter, for example "q", tap the "pqrs" key twice in rapid succession.
3. To select the third letter, for example, "r", tap the "pqrs" key three times in rapid succession.
4. To select the fourth letter "s", tap the "pqrs" key four times in rapid succession.
If your gloves still make it difficult to select letters, you can do the following:
1. Press and hold the key, for example "def".
After touching the key the first character appears, in this case "d".
2. Wait for the pop-up to appear.
3. Select your chosen desired character from the pop-up, for example "f".
4. Your chosen character "f" replaces the "d" character that first appeared.
Available keys
The keys shown below are available when using your TomTom Traffic in either portrait or landscape
orientation.
Planning a thrilling route
You can use the Plan a Thrill button to create interesting rides on the spot. This is especially useful
for a day when you have some spare time and just need a simple way to create a thrilling ride.
21
Page 22

A thrilling route is a trip that includes interesting or challenging roads and uses as few motorways as
possible. You can choose the level of turns included in your ride, and also the degree of hilliness.
Tip: As Plan a Thrill is for creating instant routes, thrilling routes cannot be saved in My Routes.
Tip: Thrilling routes are round trips by default but you can plan a route to a destination if you
choose.
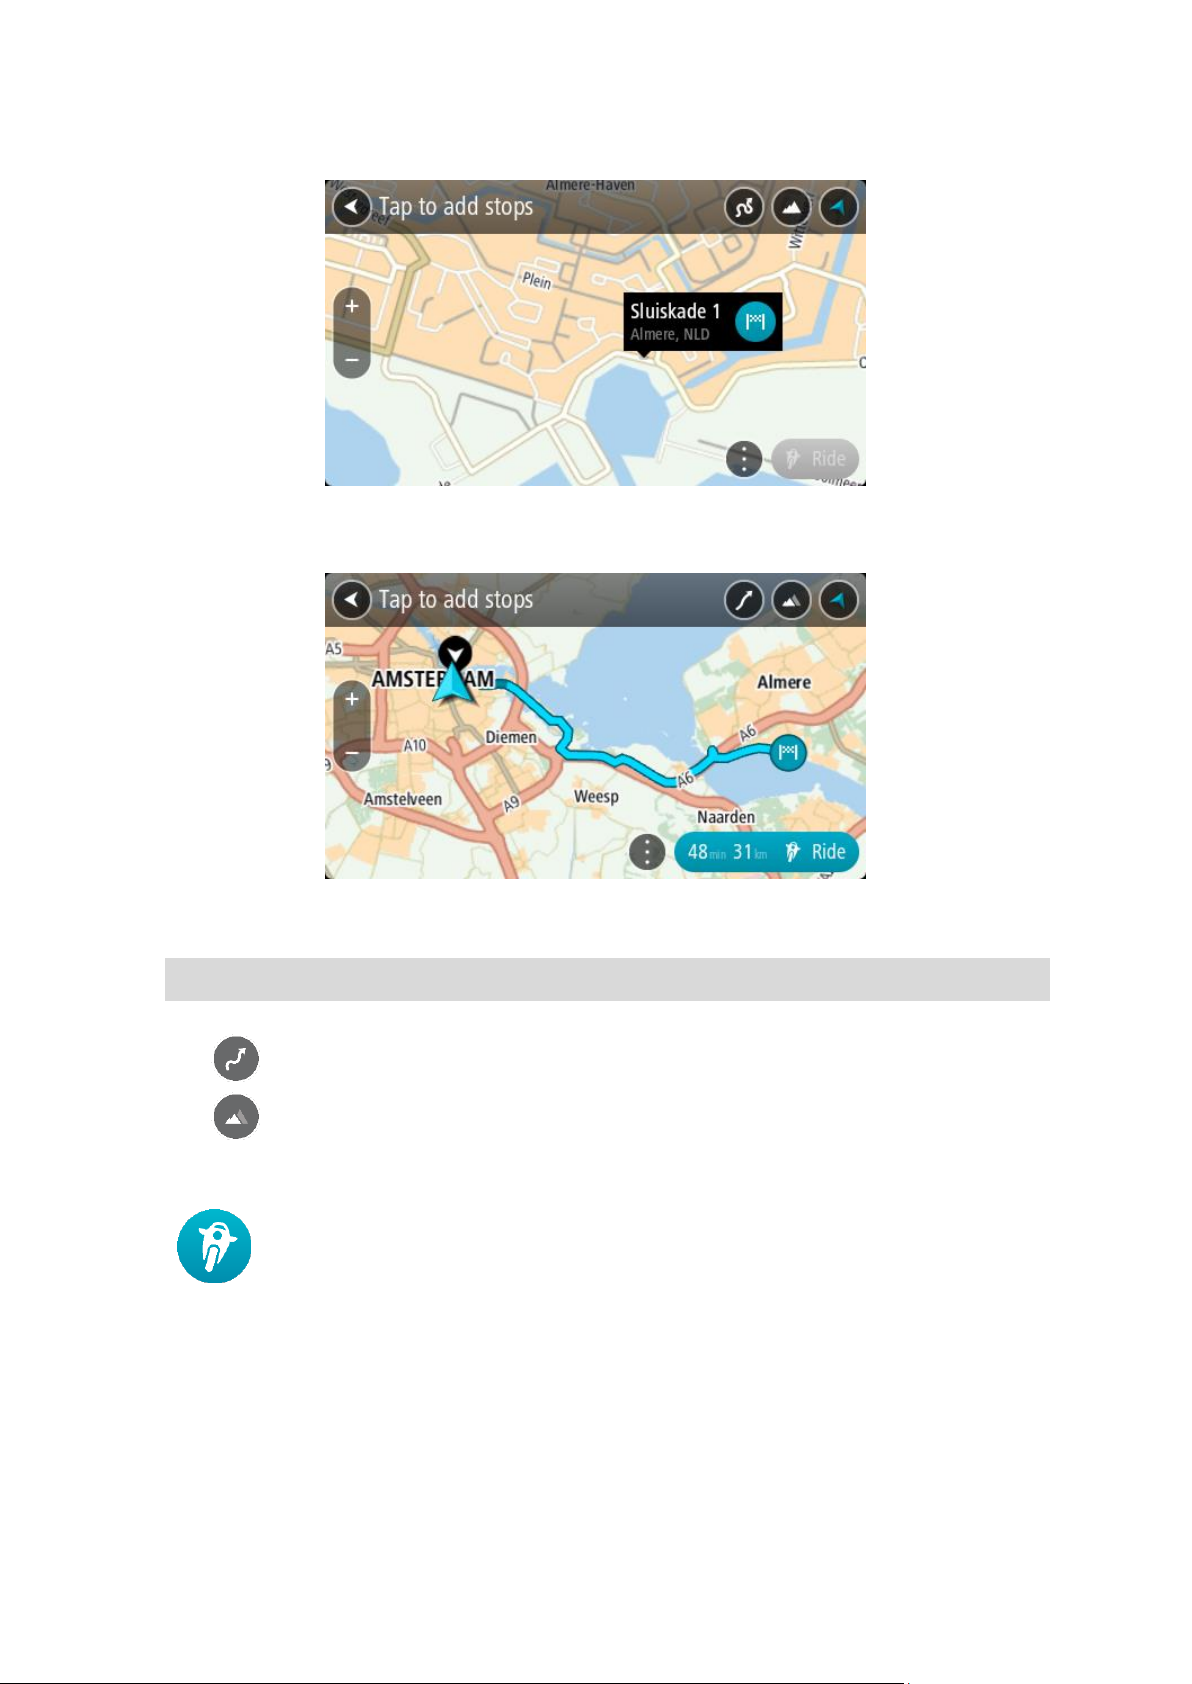
Planning a thrilling round trip route using stops
If you just need to go out for a ride, Plan a Thrill lets you plan a round trip along the most
interesting roads from your current location via the stops you choose. You must choose at least one
stop to create a thrilling route.
1. Select the Main Menu button to open the Main Menu.
2. Select Plan a Thrill.
The map view opens.
3. Move the map and zoom in until you can see the place you want to ride through.
4. Create a stop by quickly tapping the map.
Your Rider plans a thrilling round trip through your chosen stop.
Tip: The direction of the round trip is random. If you have at least 2 stops on your route, you
can change the direction of travel by reordering the stops. Arrows on the planned route show
the direction of travel.
5. If you want to add more stops to your route, move the map and select more stops.
22
Page 23
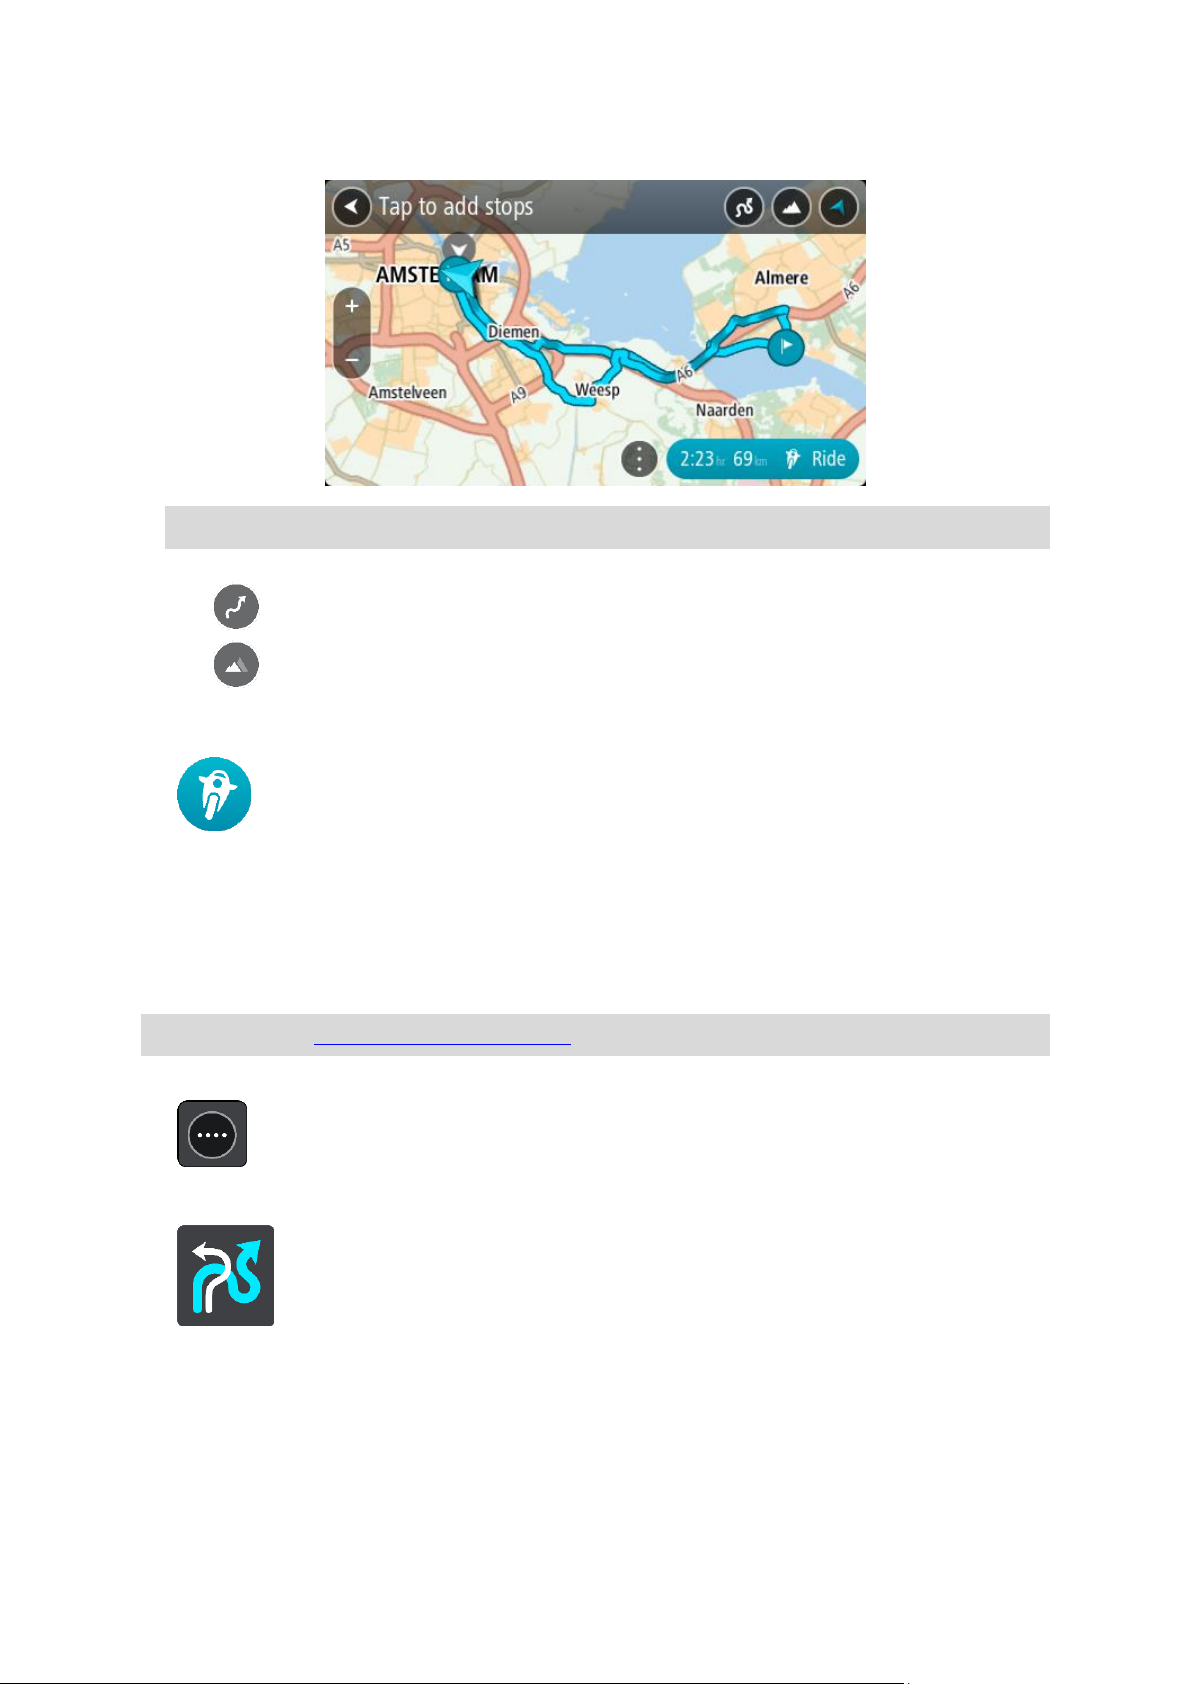
Your Rider plans a thrilling round trip route through your chosen stops.
Tip: Select the pop-up menu button to reorder your stops.
6. Select the level of turns and the degree of hilliness for your thrilling route.
Select this button to choose one of three settings for turns.
Select this button to choose one of three settings for hilliness.
Your Rider plans a thrilling round trip route with turns and hills through your chosen stops.
7. When you have planned your thrilling route, select Ride.
Your route is shown on the map view, then guidance along your route begins. As soon as you
start riding, the guidance view is shown automatically.
Planning a thrilling ride to a destination
You can plan a route to a destination using the map. The route to your destination will be along the
most interesting roads from your current location.
Tip: You can also plan a route to a destination then choose Winding route as the route type.
1. Select the Main Menu button to open the Main Menu.
2. Select Plan a Thrill.
The map view opens.
23
Page 24
3. Select a location by pressing and holding the screen for about one second.
4. Select the destination button.
Your Rider plans a thrilling route to your chosen destination.
5. If you want to add more stops to your route, move the map and select more stops.
Your Rider plans a thrilling route through your chosen stops to your destination.
Tip: Select the pop-up menu button to reorder your stops.
6. Select the level of turns and the degree of hilliness for your thrilling route.
Select this button to choose one of three settings for turns.
Select this button to chose one of three settings for hilliness.
Your Rider plans a thrilling route with turns and hills to your chosen destination.
7. When you have planned your thrilling route, select Ride.
Your route is shown on the map view, then guidance along your route begins. As soon as you
start riding, the guidance view is shown automatically.
Looking at trip statistics
Your Rider can show you how far you've been riding, how long you've been riding, and also at what
speed.
To see trip statistics, select Trip Statistics in the Main Menu.
24
Page 25
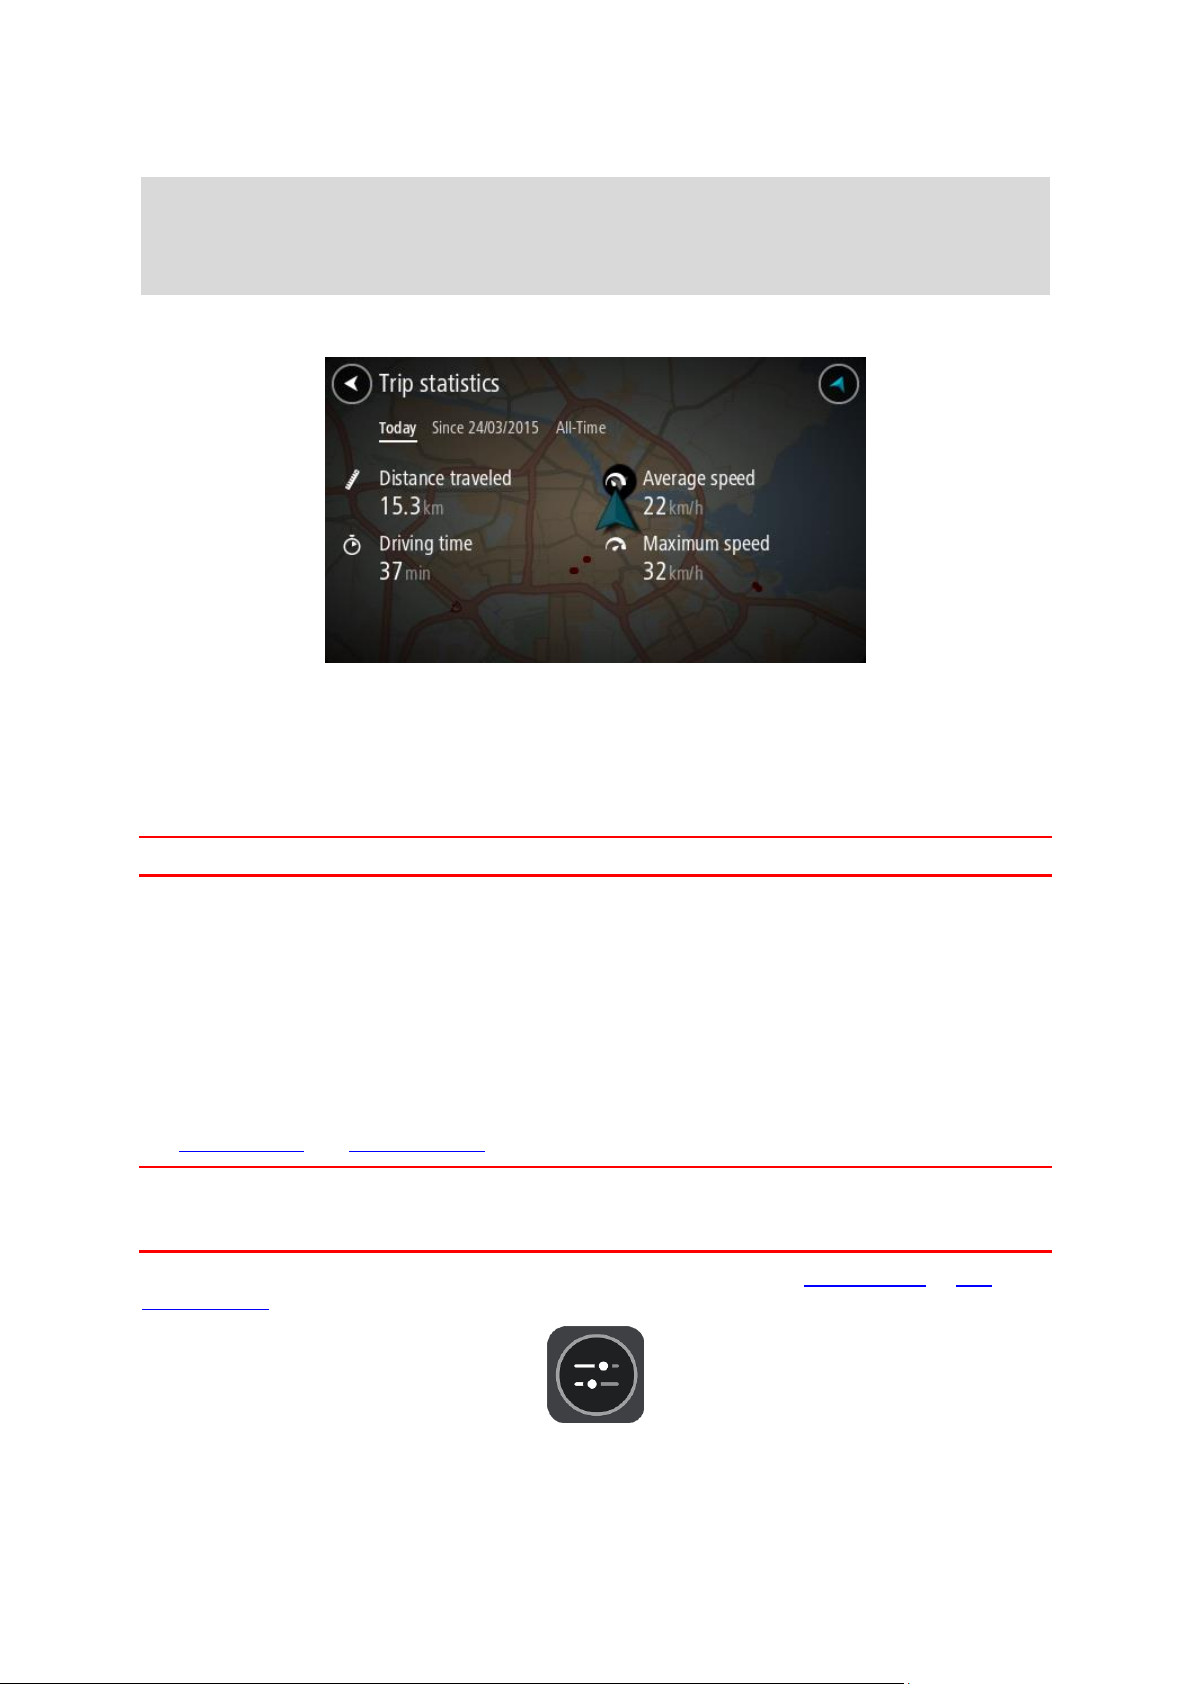
Select one of the three tabs to see statistics for today's riding, for your current trip and for all-time.
Tip: All-Time are the statistics that have been collected since the device was purchased and first
switched on.
Tip: A dot is included in large distances, for example, 20047,64 kilometres is shown as 20.047,6
km.
Statistics for your current trip
To see statistics for the trip you are riding now, select the Since --/--/-- tab.
To start a new trip, select the Clear trip button, just like resetting an odometer in a car.
After stopping your bike, if you don't press the Clear trip button, the statistics just carry on
incrementing when you start moving again. This means you get accurate statistics for trips that span
several days or several rides within a day.
Important: If you do a factory reset, the all-time tab is reset back to zero values!
Using quick settings
Quick settings make it easier for you to use a range of settings when wearing gloves.
Using quick settings you can do the following:
Switch voice instructions on or off.
Mute the volume.
Switch between lighter and darker colours.
Change the volume of instructions.
See Other buttons and Volume control for more details.
Important: When using a headset, the volume control may not be available because your headset
doesn't support remote volume control. If this is the case, use the volume control button on the
headset itself to change the volume.
To use quick settings, select the quick settings button in the main menu, the map view or the
guidance view.
25
Page 26
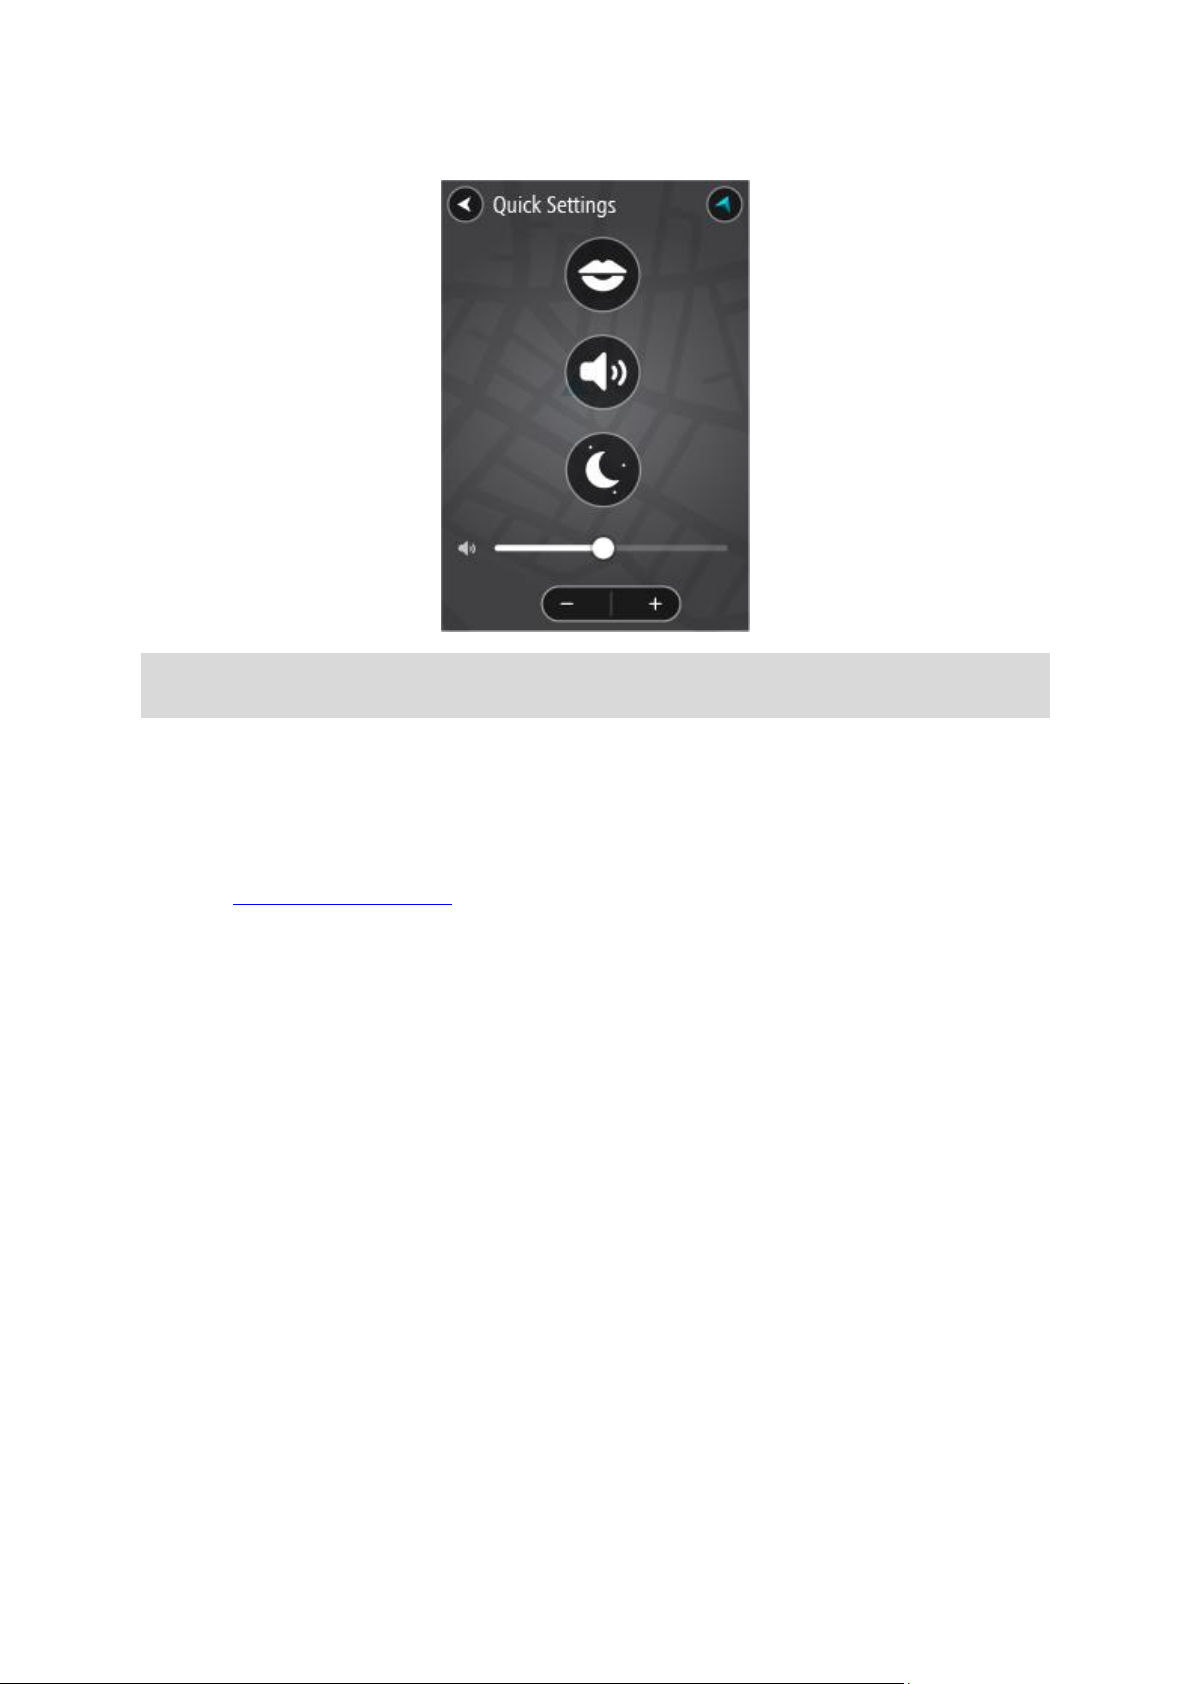
You see the screen shown below with large buttons and a volume control:
Tip: When wearing gloves, select the plus (+) and minus (-) buttons underneath the volume slider
to change the volume, instead of trying to move the slider with gloves on.
Installing Tyre Pro
You can use Tyre Pro® to search, create and edit routes on your computer before you upload them
to your TomTom Rider.
To get free access to Tyre Pro®, follow the steps below:
1. Go to tomtom.com/getstarted and select your country.
2. Connect your Rider to your computer to link your device to your account and register with us.
3. Within 24 hours you will receive an email with a unique Tyre code and URL. Use this code and
URL to activate and download your Tyre Pro® software.
26
Page 27
Settings
Bluetooth Connections
Select Settings in the Main Menu, then select Bluetooth Connections.
Your Rider can use the following Bluetooth connections:
Headset - Connect a Bluetooth headset to hear spoken instructions and warning sounds, and for
hands-free calling.
Hands-free calling - Connect a Bluetooth headset and your smartphone so you make hands-free
calls using your phone.
Network - Connect your Rider to your smartphone's internet connection so you can get TomTom
Services.
Locking device orientation
Select Settings in the Main Menu, then select Appearance.
Select Display.
Orientation Lock
Select Orientation Lock to prevent the rotation of your screen when you rotate your device.
When switched OFF (default), if you rotate your device between landscape and portrait positions,
the screen orientation changes too.
To lock the screen in either landscape or portrait, rotate the device then switch this setting ON to
lock the screen in that position.
Map colour
Select Settings in the Main Menu, then select Appearance.
Select Display.
Map colour
Select Map colour to change the contrast of the colours used in the map so that the map is easier to
see in bright light.
27
Page 28

Positioning the device
Get going
Be careful where you install your Rider. The Rider shouldn't block or interfere with any of the
following:
Your view of the road.
The controls in your vehicle.
Your rear-view mirrors.
The airbags.
You should be able to reach your Rider easily without leaning or stretching. In a car, you can attach
your Rider to the windscreen or side window or you can use a Dashboard Mount Disk to attach the
mount to your dashboard.
Switching on and off
Switching your device on
Press the On/Off button until your device starts. If the device was off you see the map view. If your
device was sleeping you see the last screen you were looking at.
Sending your device to sleep
To send your navigation device to sleep, press the On/Off button and then release it.
You can also press the On/Off button for more than 2 seconds until you see the Sleep and Turn Off
buttons. Select Sleep to make the device sleep.
Tip: To send your navigation device to sleep when the USB cable is unplugged or whenever it is
removed from the mount, go to Battery settings in the Settings menu.
Switching your device off completely
To switch off your navigation device completely, you can do one of the following:
Press and hold the On/Off button for more than 2 seconds until you see the Sleep and Turn Off
buttons. Select Turn Off to switch off the device. Select the "back" button if you don't want to
switch your device off.
Press and hold the On/Off button for more than 5 seconds until the device switches off.
Safety Notice
Some navigation devices contain a GSM/GPRS module which can interfere with electrical devices
such as cardiac pacemakers, hearing aids and aviation equipment.
Interference with these devices may endanger the health or life of you or others.
If your device includes a GSM/GPRS module, do not use it near unprotected electrical units or in
areas where the use of mobile telephones is prohibited, such as hospitals and aircraft.
28
Page 29

Setting up
Note: The language you choose will be used for all text on the screen. You can always change the
language later in Language and Units in the Settings menu.
When you first switch on your TomTom Rider, you have to answer a few questions to set it up.
Answer the questions by touching the screen.
GPS reception
When you first start your TomTom Rider, it may need a few minutes to determine your position. In
future, your position will be found much faster.
To ensure good satellite reception, use your Rider outdoors and keep it upright. Large objects such
as tall buildings can sometimes interfere with reception.
Important: QuickGPSfix contains information about satellite positions which helps your Rider find
your position faster. QuickGPSfix information is sent to Always Connected devices in real time and
to Smartphone Connected devices when connected to TomTom services using your smartphone. You
can also update QuickGPSfix using MyDrive.
Sending information to TomTom
When you first start navigating or you have reset your Rider, your Rider asks for permission to
collect some information about your use of the navigation device. The information is stored on your
Rider until we retrieve it. We use it anonymously to improve our products and services. If you use
our services, we will also use your location information to deliver the services to you.
You can change whether you send this information with us at any time by doing the following:
1. In the Main Menu, select the Settings button.
2. Select System.
3. Select Your information.
4. Select the button to turn sending of information on or off.
Note: If you choose not to send location information to us, you will no longer receive our
services. This is because services need to send the location of your device to TomTom in order to
receive the traffic information related to where you are. The end date of your subscription
remains the same, even if you do not send this information to us.
Additional information
If you think that your information is not being used for the purpose for which you have provided it
to TomTom, contact us at tomtom.com/support.
You can find current and more detailed information at tomtom.com/privacy.
Memory card slot
Some TomTom navigation devices have a memory card slot that is located on the side or bottom of
the device.
Before you use the memory card slot, make sure that you have the latest version of the application
installed on your navigation device by connecting to MyDrive using a computer.
When your Rider is up-to-date, you can use a memory card as extra storage space to add extra
maps, tracks or routes to your device. Maps can be purchased from tomtom.com.
29
Page 30

Device not starting
In rare cases, your TomTom Rider may not start correctly or may stop responding to your taps.
First, check that the battery is charged. To charge the battery, connect your Rider to the car
charger. It can take 3 - 5 hours to fully charge the battery depending on the type of device.
If this does not solve the problem, you can perform a reset. To do this, press and hold the On/Off
button until your Rider begins to restart.
Charging your device
The battery in your TomTom Rider charges when you connect it to the car charger, to your
computer or to a USB Home Charger.
You are warned when the battery level is low or critical. You lose your connection to some TomTom
services when the battery level is low or critical. When the battery is empty, your Rider goes into
sleep mode.
Note: Use ONLY the USB cable supplied with your Rider. Other USB cables may not work.
Caring for your Rider
It is important to take care of your device:
Do not open the casing of your device under any circumstances. Doing so may be dangerous and
will invalidate the warranty.
Wipe or dry the screen of your device using a soft cloth. Do not use any liquid cleaners.
30
Page 31

About TomTom services
Connecting to TomTom services
TomTom services give you real-time information about traffic and speed cameras on your route.
Smartphone Connected devices use your existing smartphone data plan to access TomTom Traffic as
well as other services like TomTom Speed Cameras by connecting to your smartphone using
Bluetooth®. Check tomtom.com/connect for more information.
To get TomTom services on your Rider, you need the following items:
Any Rider.
A smartphone with a data plan from a mobile services provider.
A TomTom account.
Using TomTom services means that data is sent and received by your phone using your mobile
services provider.
Important: You might have additional costs when you use the internet on your phone, especially if
you are outside the area covered by your data plan. Check with your mobile services provider for
more information.
Note: TomTom services are not available in all countries or regions, and not all services are
available in all countries or regions. For more information on available services in each region, go
to tomtom.com/services.
Smartphone connected devices
Some TomTom navigation devices use your phone to connect to TomTom services so that you can
receive real-time TomTom Traffic and safety warnings. Your phone needs to be compatible with the
navigation device, and you must have a data plan from a mobile services provider. Go to
tomtom.com/connect for more information.
Using TomTom services means that data is sent and received by your phone using your mobile
services provider.
Important: You might have additional costs when you use the internet on your phone, especially if
you are outside the area covered by your data plan. Check with your mobile services provider for
more information.
Personal Area Networks
Your phone shares its internet connection by using the phone's Bluetooth and Personal Area Network
(PAN) functions.
Depending on your phone's Operating System, this network, or PAN, might be called one of the
following names:
Personal Hotspot
Tethering or Bluetooth Tethering
Tether or Bluetooth Tether
The PAN function is probably already in your phone's Operating System, or you can download an app
to create a PAN.
31
Page 32

Note: Some mobile service providers don't allow their users to use a PAN. If your phone doesn't
Bluetooth not connected.
Bluetooth connecting. Your device is trying to automatically connect to
your phone.
have the PAN function, you should contact your service provider for more information.
Please check the user guide for your phone if you are having trouble finding the settings.
For more help, go to tomtom.com/connect.
Connect to TomTom services using your smartphone
To connect your Rider to your phone, do the following:
1. Select TomTom Services in the Main Menu.
2. Select Network status.
3. If you are prompted, select Yes to agree to send information to TomTom.
Note: You cannot use TomTom services unless you agree to send information to TomTom.
4. Follow the instructions on your navigation device about switching on a Personal Area Network on
your smartphone.
5. Switch on Bluetooth on your phone, and make sure your phone is discoverable.
6. Switch on Personal Area Network (PAN) on your phone.
7. Select the next screen arrow on your navigation device.
Your device searches for your phone.
Tip: If your device cannot find your phone, make sure your phone is still 'discoverable' or
'visible' for other Bluetooth devices. Select Search for Phones from the pop-up menu to search
for your phone again.
8. Select your phone from the list on your navigation device.
Your navigation device connects to TomTom services using your phone's internet connection.
9. Create a new TomTom account or log in to your existing TomTom account.
Tip: If you already own a TomTom navigation device, we recommend that you open a new
TomTom account for your Rider using a different email address.
TomTom services are now active.
Tip: You can also connect to services by selecting TomTom Services in the Main Menu, followed
by Traffic & Speed Cameras or Traffic & Danger Zones.
Reconnecting your smartphone
You do not need to do anything to reconnect your Rider to your phone.
Your Rider will remember your phone and will find it automatically when you have Personal Area
Network (PAN) and Bluetooth switched on and you are in range of your navigation device.
The Bluetooth symbol at the top of the Main Menu screen shows the status of the Bluetooth
connection:
32
Page 33

Bluetooth connected. Your device is connected to your phone.
If you want to connect using another phone, you must turn on Personal Area Network (PAN) and
Bluetooth on that phone, then let your device search for the phone.
Connect to TomTom services using a different smartphone
1. Follow the instructions on your device about switching on a Personal Area Network on your
phone.
2. Switch on Bluetooth on your phone.
3. Select Bluetooth Connections in the Settings Menu.
4. Select Network.
5. Select the pop-up menu button then select Search.
Your navigation device searches for your phone.
Tip: If your device cannot find your phone, make sure your phone is still 'discoverable' or
'visible' for other Bluetooth devices.
6. Select your smartphone from the list of phones on your device.
Your navigation device connects to TomTom services using your phone's internet connection.
7. Login to your existing TomTom account.
TomTom services are now active.
Deleting phones
1. Select Bluetooth Connections in the Settings Menu.
2. Select Network.
3. Select the pop-up menu button then select Delete.
4. Select the phone that you want to delete.
5. Select Delete.
Your phone is deleted.
Tip: If you delete all your connected phones, you will no longer be able to use TomTom
services.
Unable to get a connection
To check your connection status to the internet, select Bluetooth Settings in the Settings Menu. If
your network connection status is shown as Connecting or Not connected, select Network and
follow the instructions.
If your Rider cannot connect to your phone, or you have no internet connection, also check the
following:
Your phone is shown on your Rider.
Your phone's Bluetooth is switched on.
Your phone's Personal Area Network (PAN), which is also known as Personal Hotspot, Tethering,
or Bluetooth Tethering, is switched on.
Your data plan with your mobile services provider is active, and you can access the internet on
your phone.
33
Page 34

The map view
What's on the screen
The map view is shown when you have no planned route. Your actual location is shown as soon as
your Rider has found your GPS location.
You can use map view in the same way as you might look at a traditional paper map. You can move
around the map using gestures, and zoom using the zoom buttons.
Important: Everything on the map is interactive including the route and the map symbols - try
selecting something and see what it does!
Tip: To open a pop-up menu for an item on the map, for example a route or a POI, select the
item to open the menu. To select a location on the map, select and hold the location until the
pop-up menu opens.
The map shows your current location and many other locations such as your My Places locations.
If you have not planned a route the map is zoomed out to show the area around your location.
If you have planned a route, your complete route is shown on the map. You can add stops to your
route directly from the map. When you start to drive, the guidance view is shown.
34
Page 35

1. Back button. This button returns the map to an overview of your whole route or, if no route is
Your destination.
Your home location. You can set your home location in My Places.
Your work location. You can set your work location in My Places.
A stop on your route.
A location saved in My Places.
When a search for POIs near destination is done and the results are
shown on the map, less important POIs are shown as black pins with
white crosses.
planned, moves the map to put your current location at the centre.
2. Switch view button. Select the switch view button to change between the map view and the
guidance view. When in map view, if you are driving, the small arrow rotates to indicate your
direction of travel relative to north, with north being up.
3. Zoom buttons. Select the zoom buttons to zoom in and out.
4. Current location. This symbol shows your current location. Select it to add it to My Places or
search near your current location.
Note: If your Rider cannot find your location the symbol appears grey.
5. Selected location. Press and hold to select a location on the map. Select the pop-up menu
button to show options for the location, or select the Drive/Ride button to plan a route to the
location.
6. Main Menu button. Select the button to open the Main Menu.
7. Map symbols. Symbols are used on the map to show your destination and your saved places:
Select a map symbol to open the pop-up menu, then select the menu button to see a list of
actions you can take.
8. Traffic information. Select the traffic incident to display information about the traffic delay.
Note: Traffic information is only available if your TomTom Rider has TomTom Traffic.
9. Your route, if you have planned a route. Select the route to clear it, change the route type, add
a stop or save changes to your route.
10. Speed cameras on your route. Select a speed camera to display information about that camera.
11. Route bar. The route bar is shown when you have planned a route.
The guidance view
The guidance view is used to guide you along the route to your destination. The guidance view is
shown when you start driving. You see your current location and details along your route, including
3D buildings in some cities.
Note: 3D buildings in guidance view are not available on all devices.
35
Page 36

The guidance view is normally in 3D. To show a 2D map with the map moving in your direction of
travel, change the 2D and 3D default settings.
Tip: When you have planned a route and the 3D guidance view is shown, select the switch view
button to change to the map view and use the interactive features.
When your Rider starts after sleeping and you have a route planned, you are shown the guidance
view with your current location.
1. Switch view button. Select the switch view button to change between the map view and the
guidance view. When in guidance view, if you are driving, the small arrow rotates to indicate
your direction of travel relative to north, with north being up.
2. Zoom buttons. Select the zoom buttons to zoom in and out.
Tip: On some devices you can also pinch to zoom in and out.
3. Instruction panel. This panel shows the following information:
The direction of your next turn.
The distance to your next turn.
The name of the next road on your route.
Lane guidance at some junctions.
Note: Select the instruction panel to see a list of turn-by-turn text instructions for your
planned route.
4. Route symbols. Symbols are used on your route to show your starting location, your stops, and
your destination.
5. Main Menu button. Select the button to show the Main Menu.
36
Page 37

6. Speed panel. This panel shows the following information:
The arrival information panel shows the following information:
The estimated time that you will arrive at your destination.
The length of time to drive to the destination from your current
location.
A parking button is shown near the destination flag when parking is
available near your destination.
Tip: If your destination is in a different time zone, you see a plus
(+) or a minus (-) sign and the time difference in hours and half
hours in the arrival information panel. The estimated time of arrival
is the local time at your destination.
If you have stops on your route, select this panel to change between
information about the next stop and your final destination.
You can choose the information you see on the arrival information panel.
Traffic status - if your Rider isn't receiving any traffic information, a
symbol showing traffic with a cross appears underneath the arrival
information panel.
The bar uses symbols to show the following information:
The next two stops on your route.
Tip: To quickly remove a stop, select it in the route bar and use the
menu.
Petrol stations that are directly on your route.
TomTom Traffic including heavy rain or snow.
TomTom Speed Cameras and Danger Zones.
Rest stops directly on your route.
You can choose the information you see on your route.
The symbols are in the order that they occur on your route. For traffic
incidents, the symbol for each incident alternates between showing the
The speed limit at your location.
Your current speed. If you drive more than 5 km/h or 3 mph over the speed limit the speed
panel turns red. If you drive less than 5 km/h or 3 mph over the speed limit the speed panel
turns orange.
The name of the street you are driving on.
7. Current location. This symbol shows your current location. Select the symbol or the speed panel
to open the quick menu.
Note: If your Rider cannot find your location the symbol appears grey.
8. Route bar. The route bar is shown when you have planned a route.
Important: To see a wider route bar showing additional route information, change the setting
for Route Information.
The route bar
The route bar is shown when you have planned a route. It has an arrival information panel at the
top, and a bar with symbols underneath.
Important: To see a wider route bar showing additional route information, change the setting for
Route Information.
Note: The distance ahead shown by the route bar depends on the overall length of your route.
37
Page 38

type of incident and the delay in minutes. Select a symbol to see more
information about a stop, an incident or a speed camera. If a symbol is
shown on top of another symbol, selecting the symbols zooms in on the
route bar to show each symbol separately. You can then select a symbol.
The total time delay due to traffic jams, weather, and other incidents on
your route, including information provided by IQ Routes, is shown above
the symbols.
For a complete list of incident types, see Traffic incidents.
The bottom of the route bar represents your current location and shows
the distance to the next incident on your route. In addition, you can
choose to see the current time if you switch the setting on.
Note: To make the route bar more readable some incidents may not be shown. These incidents
will always be of minor importance and only cause short delays.
The route bar also shows status messages, for example Finding fastest route or Playing route
preview.
Distances and the route bar
The distance ahead shown on the route bar depends on the length of your route, or the distance
remaining on your route.
For remaining distances longer than 50 km (31 miles), only the next 50 km (31 miles) is shown.
The destination icon is not shown.
Tip: You can scroll the route bar to see your whole route.
For remaining distances between 10 km (6 miles) and 50 km (31 miles), the complete distance is
shown. The destination icon is shown fixed at the top of the route bar.
For remaining distances of less than 10 km (6 miles) the complete distance is shown. The
destination icon moves down towards the chevron symbol as you get nearer to your destination.
The top half of the route bar shows twice the distance of the bottom half, as shown in the following
examples:
A remaining distance of 50 km on the route bar is split into 34 km (21 miles) at the top and 16
km (9 miles) at the bottom.
A remaining distance of 10 km on the route bar is split into 6.6 km (4 miles) at the top and 3.3
km (2 miles) at the bottom.
The route bar is constantly updated as you drive.
The quick menu
To open the quick menu, select the current location symbol or the speed panel in the guidance
view.
You can then do any of the following:
Mark a location
Report a new speed camera
Change a speed limit
Avoid a blocked road
See your current location or your latitude/longitude if not on a named road.
Main Menu smaller buttons and symbols
On the map view or guidance view, select the Main Menu button to open the Main Menu.
38
Page 39

The following buttons and symbols are available in the Main Menu screen, in addition to the
Select this button to open the Settings Menu.
Select this button to open the Help Menu. The Help Menu contains help
about using your Rider, together with other information about your
device, for example, map version, device serial number and legal
information.
Select this button to reorder the buttons in the Main Menu.
Select this button to return to the previous screen.
Select this button to return to the map view or guidance view.
This symbol shows the status of the Bluetooth connection when you use a
smartphone to connect to TomTom services.
This symbol shows the power level of the battery in your Rider.
This symbol shows that your Rider is connected to TomTom services.
This symbol shows that your Rider is not connected to TomTom services.
This symbol shows that your Rider is connected to MyDrive.
This symbol shows that your Rider is not connected to MyDrive.
This button shows that you will hear voice instructions. Select the button
to switch off voice instructions. You will no longer hear spoken route
instructions but you will still hear information such as traffic information
and warning sounds.
Tip: You can select the types of instructions you want to hear. Select
Voices in the Settings Menu and select the instructions you want to
hear.
navigation buttons:
39
Page 40

This button shows that you will not hear voice instructions. Select this
button to switch on voice instructions.
This button shows that the display is using day colours. Select the button
to reduce the brightness of the screen and display the map in darker
colours.
When driving at night or when driving through a dark tunnel, it is easier to
view the screen and less distracting for the driver if the brightness of the
screen is dimmed.
Tip: Your device automatically switches between day and night colours
depending on the time of day. To switch off this feature, select
Appearance, then Display in the Settings menu and switch off Switch to
night colours when dark.
This button shows that the display is using night colours. Select the button
to increase the brightness of the screen and display the map in brighter
colours.
Select this button to refresh your screen.
Double tap
Touch one finger on the screen twice in rapid succession.
Example of when to use this: Zooming in on the map.
Drag
Put one finger on the screen and move it across the screen.
Example of when to use this: Scrolling around in the map.
Volume control
On the map or guidance view, select the Main Menu button to open the Main Menu.
Select and slide the volume control to change the volume of voice instructions and warnings. If the
voice instructions are switched off, the volume control will still change the volume of the warnings.
Using gestures
You use gestures to control your Rider.
This Reference Guide explains which gestures to use throughout the guide but here is a complete
list of all the gestures you can use.
40
Page 41

Flick
Flick the tip of a single finger across the screen.
Example of when to use this: Scrolling a big distance on the map.
Tip: Flick isn't available on all devices.
Press and hold
Put one finger on the screen for more than 0.5 second.
Example of when to use this: Opening the pop-up menu for a place on the
map.
Pinch to zoom
Touch the screen with your thumb and a finger. Move them apart to zoom
in or move them together to zoom out.
Example of when to use this: Zooming in and out on the map.
Tip: Pinch to zoom isn't available on all devices. If pinch to zoom isn't
available on your Rider, use the zoom buttons to zoom in and out.
Tap or select
Tap a single finger on the screen.
Example of when to use this: Selecting an item in the Main Menu.
Tip: To open a pop-up menu for an item on the map, select and hold
the item until the menu opens.
Reordering the Main Menu buttons
To reorder the buttons in the Main Menu to suit your preference, do the following:
1. Select the Main Menu button to open the Main Menu.
2. Press and hold the button you want to move for two seconds.
Tip: Alternatively, select the Edit button on the far right of the Main Menu.
The menu button is shown with left and right arrows.
3. Press the left or right arrow on the menu button to move the button to a new position in the
menu.
4. Select and move other buttons to the order you want.
5. Select Done.
41
Page 42

About TomTom Traffic
The arrival information panel shows the following information:
The estimated time that you will arrive at your destination.
The length of time to drive to the destination from your current
location.
A parking button is shown near the destination flag when parking is
available near your destination.
Tip: If your destination is in a different time zone, you see a plus
(+) or a minus (-) sign and the time difference in hours and half
hours in the arrival information panel. The estimated time of arrival
is the local time at your destination.
If you have stops on your route, select this panel to change between
information about the next stop and your final destination.
You can choose the information you see on the arrival information panel.
Traffic status - if your Rider isn't receiving any traffic information, a
symbol showing traffic with a cross appears underneath the arrival
information panel.
The bar uses symbols to show the following information:
The next two stops on your route.
Traffic
TomTom Traffic is a TomTom service providing real-time traffic information.
In combination with IQ Routes, TomTom Traffic helps you plan the optimum route to your
destination taking into account the current local traffic conditions and the weather.
Your TomTom Rider regularly receives information about the changing traffic conditions. If traffic
jams, heavy rain, snow or other incidents are found on your current route, your Rider will offer to
replan your route to try and avoid any delays.
Important: When you approach a faster alternative route, you get a warning in the route bar and
you can see the alternative route in both the guidance view and the map view. To accept a faster
route, just steer towards the alternative route as you approach it and your device will select it.
To get TomTom services on your Rider, you must be connected to TomTom services and logged in to
a TomTom account.
Note: TomTom services are not available on all devices.
Note: Some TomTom services might not be available in your current location.
The route bar
The route bar is shown when you have planned a route. It has an arrival information panel at the
top, and a bar with symbols underneath.
Important: To see a wider route bar showing additional route information, change the setting for
Route Information.
Note: The distance ahead shown by the route bar depends on the overall length of your route.
42
Page 43

Tip: To quickly remove a stop, select it in the route bar and use the
menu.
Petrol stations that are directly on your route.
TomTom Traffic including heavy rain or snow.
TomTom Speed Cameras and Danger Zones.
Rest stops directly on your route.
You can choose the information you see on your route.
The symbols are in the order that they occur on your route. For traffic
incidents, the symbol for each incident alternates between showing the
type of incident and the delay in minutes. Select a symbol to see more
information about a stop, an incident or a speed camera. If a symbol is
shown on top of another symbol, selecting the symbols zooms in on the
route bar to show each symbol separately. You can then select a symbol.
The total time delay due to traffic jams, weather, and other incidents on
your route, including information provided by IQ Routes, is shown above
the symbols.
For a complete list of incident types, see Traffic incidents.
The bottom of the route bar represents your current location and shows
the distance to the next incident on your route. In addition, you can
choose to see the current time if you switch the setting on.
Note: To make the route bar more readable some incidents may not be shown. These incidents
will always be of minor importance and only cause short delays.
The route bar also shows status messages, for example Finding fastest route or Playing route
preview.
Looking at traffic on the map
Traffic incidents are shown on the map. If several traffic incidents overlap the highest priority
incident is shown - for example, a road closure is higher priority than road works or a closed lane.
43
Page 44

Tip: Select an incident on the map to see more detailed information.
1. Traffic incident that affects your route in your direction of travel.
A symbol or number at the start of the incident shows the type of incident or the delay in
minutes, for example 5 minutes.
The colour of the incident indicates the speed of traffic relative to the maximum allowed speed
at that location, with red being the slowest. The stripes on the traffic jam are also animated to
show the speed of the traffic, where appropriate.
For a complete list of incident types, see Traffic incidents.
Tip: You see weather symbols on the map if there is bad weather such as heavy rain or snow.
2. Traffic incident on your route but in the opposite direction of travel.
3. Traffic incidents on roads that are not visible at your current zoom level.
Looking at traffic on your route
Information about traffic incidents on your route is shown in the route bar on the right-hand side of
the map.
The route bar tells you about traffic delays while you are driving, using symbols to show you where
each traffic incident is located on your route.
Note: If your Rider isn't receiving any traffic information, a symbol showing traffic with a cross
appears underneath the arrival information panel.
Note: To make the route bar more readable some incidents may not be shown. These incidents
will always be of minor importance and only cause short delays.
44
Page 45

To get more information about an incident, select an incident in the route bar. The map opens
Stationary traffic
Queuing traffic
Slow traffic
Unknown accident
Unknown incident
Roadworks
Lane closure
Road closure
zoomed in on the incident and an information panel opens showing detailed information about the
traffic incident.
The information shown includes:
The type of traffic incident - general, accident, road works, lane closure or weather such as
heavy rain or snow.
The severity of the incident - slow traffic, queuing traffic or stationary traffic.
The delay time.
The length of the incident.
For a complete list of incident types, see Traffic incidents.
Select the back button to go back to the guidance view.
Traffic incidents
Traffic incidents and weather warnings are shown in the map view and in the route bar.
Traffic incident symbols:
45
Page 46

Weather symbols:
Wind
Rain
Fog Snow
Ice
A warning symbol is shown in the route bar.
The route bar zooms in to the start of the traffic jam.
Your distance to the start of the traffic jam is shown in the route bar.
The colour of the road on the route bar changes to orange or red,
depending on the severity of the traffic jam.
The background colour of the route bar background changes to red if
you are driving too fast towards the traffic jam.
You hear a warning sound.
Approaching a traffic jam warning
A warning is given as you approach a traffic jam. You are warned in several ways:
To change the way you are warned, select Sounds & Warnings in the Settings menu.
Avoiding a traffic jam on your route
You can avoid a traffic jam that is on your route.
Note: Sometimes the quickest route is still the route that has the traffic jam.
Note: It may not be possible to find an alternative route around the traffic jam if none exists.
Avoiding a traffic jam using the route bar
1. In the route bar, select the symbol for the traffic jam you want to avoid.
The traffic jam is shown on the map.
2. Select the pop-up menu button.
3. Select Avoid in the pop-up menu.
46
Page 47

A new route is found that avoids the traffic jam.
Avoiding a traffic jam using the map
1. On the map view, zoom in and select the traffic jam that is on your route.
The traffic jam with an information panel is shown on the map.
2. Select the pop-up menu button.
3. Select Avoid.
A new route is found that avoids the traffic jam.
Advanced Lane Guidance
Note: Lane guidance is not available for all junctions or in all countries.
Advanced Lane Guidance helps you prepare for motorway exits and junctions by showing the correct
driving lane for your planned route.
As you approach an exit or junction, the lane you need is shown on the screen and in the instruction
panel.
Tip: To close the lane image, select anywhere on the screen.
To turn lane images off, select the Settings button in the Main Menu, then select Appearance.
Switch off the Show previews of motorway exits setting.
Time-dependent speed limits
Some speed limits change depending on the time of day. For example, you may see the speed limit
near schools decrease to 40 km/h or 25 mph in the morning between 08.00 - 09.00 and in the
afternoon between 15.00 - 16.00. Where possible, the speed limit shown in the speed panel changes
to show these variable speed limits.
Some speed limits change depending on driving conditions. For example, the speed limit will
decrease if there is heavy traffic, or the weather conditions are bad. These variable speed limits are
not shown in the speed panel. The speed shown in the speed panel is the maximum speed limit
allowed in good driving conditions.
Important: The speed limit shown in the speed panel is only an indication. You must always obey
the actual speed limit for the road you are on and the conditions you are driving in.
47
Page 48

About TomTom MyDrive
Syncing using TomTom MyDrive
TomTom MyDrive is the easy way to set a destination, share locations and favourites, and save your
personal navigation information. MyDrive synchronises your TomTom Rider using your TomTom
account. You can use MyDrive in a web browser on a computer or as a mobile app on a smartphone
or tablet.
Important: To use TomTom MyDrive you need a compatible navigation device.
Use TomTom MyDrive to do the following:
Find a destination on the MyDrive map and send it to your Rider. You can drive to the
destination and it is also saved in My Places and in Recent Destinations in the Main Menu.
Plan a route with stops on the MyDrive map and send it to your Rider.
Sync community POI list files from the MyDrive map to your Rider. The POI lists are stored in My
Places and the locations are shown on the map.
Find a POI in MyDrive and sync it with your Rider.
Continually save all your locations in My Places to MyDrive. You can see all your My Places
locations on the MyDrive map.
Automatically restore your My Places locations and POIs from MyDrive to your Rider after a
reset.
To activate MyDrive on your Rider, you must be connected to TomTom services.
Logging in to MyDrive
You must log in to MyDrive to sync to your TomTom account. When you log in to your account from
your navigation device, web browser or the MyDrive app, syncing with your TomTom account
happens automatically.
Logging in to MyDrive on your Rider
1. In the Main Menu, select TomTom Services.
2. Select MyDrive.
3. Enter the email address and password you use for your TomTom account.
4. Select Log In.
Your Rider connects to your TomTom account.
5. Return to the map view.
Your Rider automatically saves your personal navigation information to your TomTom account.
Logging in to MyDrive using a web browser or the MyDrive app
Log in using your TomTom account email address and password. When you are logged in, you can
see your personal navigation information from your navigation devices, and you can select
destinations and create Places to sync with your navigation devices.
48
Page 49

Setting a destination using MyDrive
When you are logged in to MyDrive using a web browser or the MyDrive app, you can select your
destination on the map and send it to your navigation device. When your navigation device is logged
in to your TomTom account, your device syncs with MyDrive and receives the destination.
1. In a web browser or using the MyDrive app, log in to your TomTom account.
2. On the map, select a destination.
Tip: You can search for a destination or you can move the map and select a destination. You
can also select a destination from Recent Destinations in the Main Menu or your My Places list.
3. Click on the location, then open the pop-up menu and select Send to device.
The destination is sent to your TomTom account.
4. Log in to MyDrive on your Rider.
Your Rider syncs with your TomTom account and receives the new MyDrive destination.
The message You have received a new destination is shown. A route is automatically planned
to the MyDrive destination.
Tip: All MyDrive destinations are saved in Recent Destinations in the Main Menu and in My
Places.
Planning a route with stops using MyDrive
When you are logged in to MyDrive using a web browser, you can create a route with stops and send
it to your navigation device. When your navigation device is logged in to your TomTom account,
your device syncs with MyDrive and receives the destination.
Creating a route with stops
1. In a web browser, log in to your TomTom account.
2. On the map, select a destination.
Tip: You can search for a destination or you can move the map and select a destination on the
map. You can also select a destination from Recent Destinations in the Main Menu or your My
Places list.
3. On the map, select a stop in the same way as you selected your destination, then select Add
Stop.
The stop is added to your route.
Your route is selected and the pop-up menu shows Send Route to device.
4. Add more stops to your route if you want to.
5. In the pop-up menu, select Send Route to device.
The destination and the stops are sent to your TomTom account.
6. Log in to MyDrive on your Rider.
Your Rider syncs with your TomTom account and receives the new MyDrive destination and the
stops.
The message You have received a new route is shown. A route is automatically planned to the
MyDrive destination and the stops.
Tip: All MyDrive destinations are saved in Recent Destinations in the Main Menu and in My
Places.
Tip: You can save the route with stops in My Routes.
Reordering the stops on a route
1. In Plan a Route in the My Drive Main Menu, put your mouse cursor over a stop or the destina-
tion.
49
Page 50

2. Move your cursor left until it changes into a hand symbol.
3. Click and drag each stop or the destination to the order you want to drive them.
Each time move a stop or destination, your route is recalculated with the stops in the changed
order.
The last stop on the list becomes your destination.
Showing a planned destination in MyDrive
When you plan a route on your Rider, the destination is synced with your TomTom account. You can
see the destination when you are logged in to MyDrive in a web browser or when using the MyDrive
app.
Clearing a MyDrive destination
1. Make sure you are logged in to MyDrive on your Rider.
2. Select Current Route in the Main Menu to open the Current Route Menu.
3. Select Clear Route to clear the currently planned route.
Your device returns to the map view. Your route has been cleared from your Rider and your
TomTom account.
Tip: All MyDrive destinations are saved in Recent Destinations in the Main Menu and also in in
My Places.
Deleting a MyDrive destination from My Places
1. In the Main Menu, select Recent Destinations.
Tip: Alternatively select My Places, followed by Recent Destinations.
2. Select Edit List.
3. Select the locations you want to delete.
4. Select Delete.
Set a phone contact as your destination using the MyDrive app
When you are logged in to the MyDrive app, you can select a contact in your phone's contacts list to
set as your destination. Your contact must have a full address which is in the correct order. The
destination is shown on the map and you can send it to your navigation device. When your
navigation device is logged in to your TomTom account, your device syncs with MyDrive and receives
the destination.
1. Using the MyDrive app, log in to your TomTom account.
2. In the MyDrive app menu, select Contacts.
3. Select the contact that you want as your destination.
The location of your contact is shown on the map.
4. Click on the location, then open the pop-up menu and select Send to device.
The destination is sent to your TomTom account.
5. Log in to MyDrive on your Rider.
Your Rider syncs with your TomTom account and receives the new MyDrive destination.
The message You have received a new destination is shown. A route is automatically planned
to the MyDrive destination.
Tip: All MyDrive destinations are saved in Recent Destinations in the Main Menu and in My
Places.
50
Page 51

Finding and syncing locations using MyDrive
When you are logged in to TomTom MyDrive, you can find locations in MyDrive and sync them with
your Rider My Places locations.
1. In a web browser or using the MyDrive app, log in to your TomTom account.
2. On the map, select a destination.
Tip: You can search for a destination or you can move the map and select a destination. You
can also select a destination from your My Places list.
3. Click on the location, then open the pop-up menu and select Add to My Places.
The location is shown in the Favourites list in the MyDrive My Places menu.
4. Log in to MyDrive on your Rider.
Your Rider syncs with your TomTom account and receives the new Favourites location. The
location is stored in My Places.
Syncing My Places locations with MyDrive
When you are logged in to MyDrive on your Rider, the locations you have added to My Places are
automatically synced with your TomTom account. You can see your My Places locations and the POI
place lists when you are logged in to MyDrive in a web browser or when using the MyDrive app.
Importing a community POI list
You can find collections of community POIs on the Internet and upload them to My Places using
MyDrive in a web browser. A POI collection might contain, for example, campsites or restaurants for
the area you are travelling in, and provides an easy way to select a location without the need to
search for the location each time.
Your Rider uses .OV2 files for POI collections.
Note: Your Rider needs at least 400 MB free space before it can import .OV2 and .GPX files. If you
see the message You need more space, make space available by deleting unwanted .OV2 or .GPX
files using MyDrive, or delete device content using MyDrive Connect.
To upload an .OV2 file to your Rider, do the following:
1. In a web browser, log in to your TomTom account.
2. Select POI Files in the My Places menu.
3. Select Import POI File and browse to your .OV2 file.
Tip: The name of the places list in My Places will be the same as the name of the .OV2 file.
Edit the name of the file so that you can easily recognise it in My Places.
4. Make sure you are logged in to MyDrive on your Rider.
Your Rider syncs with your TomTom account and receives the new POI file.
Note: Some .OV2 files are large and can take a long time to upload. Make sure that you sync
your Rider before you start driving.
5. Select My Places in the Main Menu.
Your new POI list is shown in the Places list.
6. Select your new POI list.
Your new POI list opens showing all the POIs in the list. Select the map view to see the POIs on
the map.
Deleting a community POI list
You can only delete an uploaded POI list from your Rider using MyDrive in a web browser.
51
Page 52

To delete a POI list, do the following:
1. In a web browser, log in to your TomTom account.
2. In the My Places menu, select POI Files .
3. Select the POI file you want to delete, then select Delete.
4. Make sure you are logged in to MyDrive on your Rider.
The POI list is removed from your My Places list.
Importing a track GPX file
GPX files (GPS exchange format)
GPX files contain a very detailed recording of a route, including any off-road locations. A GPX file
might contain, for example, a tourist route or a preferred fixed route. You can find collections of
.GPX files on the Internet and upload them to My Routes using MyDrive in a web browser. GPX files
become tracks after import.
Tracks have a beginning and an end but no stops, and there's a fixed map-dependent route between
these points. Your device follows this fixed route as closely as possible. You can edit tracks using
tools such as Tyre Pro.
Using GPX files
You use MyDrive on your computer to import .GPX track files to your TomTom device. The tracks are
saved in the My Routes menu. Your device will navigate along the GPX track exactly and will not
offer to replan your route, even if a faster route is available.
Importing a track GPX file
Note: Your Rider needs at least 400 MB free space before it can import .OV2 and .GPX files. If you
see the message You need more space, make space available by deleting unwanted .OV2 or .GPX
files using MyDrive, or delete device content using MyDrive Connect.
To import a .GPX file using MyDrive, do the following:
1. Connect your Rider to your computer using MyDrive Connect.
2. In MyDrive, select My Routes.
3. Select Import a GPX File and browse to your .GPX track file.
Tip: The name of the track file in My Routes will be the same as the name of the .GPX file.
Edit the name of the file so that you can easily recognise it in My Routes.
Your new track is shown in the My Routes list.
4. Wait for the track file to upload to your Rider.
5. Open My Routes.
Your imported track is shown in your My Routes list.
Deleting a track GPX file
You can only delete an uploaded track GPX file when your Rider is connected to your computer
using MyDrive Connect.
To delete a POI list, do the following:
1. Connect your Rider to your computer using MyDrive Connect.
2. In MyDrive, select My Routes.
3. Select the track file you want to delete, then select Delete.
The track is removed from your My Routes list.
52
Page 53

Saving and restoring your personal navigation information
When you are logged in to MyDrive on your Rider, your personal navigation information is
continuously and automatically saved to your TomTom account.
If you reset your Rider, or log in to MyDrive on a different device, your saved personal navigation
information is restored to your Rider or the different device.
The following personal navigation information is saved to your TomTom account:
MyDrive destinations.
All saved locations in My Places.
All imported POI place lists.
All imported tracks.
Tip: MyDrive also syncs your locations in My Places with your TomTom account. You can see your
My Places locations and the POI place lists you have imported in MyDrive on a web browser or on
the MyDrive app.
Make sure that there is at least 400 MB of free space on your device before syncing your device with
MyDrive. If there is not enough space, your MyDrive information will not be synced. You can check
the amount of available space by going to About in the Help menu on your device.
Note: Syncing a lot of information to your device may take some time.
53
Page 54

About search
Using Quick Search
You use search to find a wide range of places and then navigate to them. You can search for the
following:
A specific address, for example, type in 123 Oxford Street, London.
A partial address, for example, type in Oxford st Lon.
A type of place, for example, type in petrol station or restaurant.
A place by name, for example, type in Starbucks.
A postcode, for example, type in W1D 1LL for Oxford Street, London.
A city to navigate to a city centre, for example, type in London.
A POI (Point of Interest) near your current location, for example, type in restaurant near me.
A mapcode, for example, type in WH6SL.TR10
Latitude and longitude coordinates, for example, type in:
N 51°30′31″ W 0°08′34″.
Tip: To search for a specific street in the United Kingdom or the Netherlands, type in a postcode,
then leave a space and then type in the house number. For example, 1017CT 35. For other
countries, postcodes are area-based and will give you a list of matching cities, towns and streets
in your search results.
Planning a route to a POI using search
Important: In the interest of safety and to avoid distractions while you are driving, you should
always plan a route before you start driving.
To plan a route to a POI type or a specific POI using search, do the following:
1. Select the Main Menu button to open the Main Menu.
2. Select Search.
The search screen opens with the keyboard showing.
3. Use the keyboard to enter the name of the place you want to plan a route to.
54
Page 55

Tip: If you press and hold a letter key on the keyboard, you get access to extra characters if
they are available. For example, press and hold the letter "e" to access characters 3 e è é ê ë
and more.
You can search for a POI (Point of Interest) type, such as a restaurant or tourist attraction.
Alternatively, you can search for a specific POI, for example "Rosie's Pizzeria".
Note: When searching, the whole map is searched. If you want to change how the search is
done, select the button to the right of the search box. You can then change where the search
is done, for example along the route or in a city.
4. As you type, suggestions based on what you have entered are shown in columns. You can
continue typing or select a suggestion.
Tip: To see more results, hide the keyboard or scroll down the results list.
Tip: You can switch between seeing the results on the map or in a list by selecting the
list/map button:
5. Select a POI type or an individual POI. If you selected a POI type, select a POI.
The location is shown on the map.
55
Page 56

6. To see more information about the POI, select the POI on the map and then select the pop-up
menu button. Select More Information on the pop-up menu.
You see more information about the POI such as the phone number, full address and email.
7. To plan a route to this destination, select Drive/Ride depending on which device you are using.
A route is planned and then guidance to your destination begins. As soon as you start driving,
the guidance view is shown automatically.
Tip: If your destination is in a different time zone, you see a plus (+) or a minus (-) sign and
the time difference in hours and half hours in the arrival information panel. The estimated
time of arrival is the local time at your destination.
Tip: You can add a stop to a route that you have already planned.
Tip: You can save a route using My Routes.
Planning a route to a POI using online search
Important: In the interest of safety and to avoid distractions while you are driving, you should
always plan a route before you start driving.
Note: Searching online is only available on connected devices. To search online on your Rider,
you must be connected to TomTom services.
If you did a POI search but could not find the POI you were looking for, you can search TomTom
Places online. To find POIs by searching online, do the following:
1. Search for a POI using Search in the Main Menu.
The search results are shown in two columns.
2. Select Search Places Online.
56
Page 57

3. Use the keyboard to enter the name of the POI you want to find, then press the Search button
on the keyboard.
Tip: If you press and hold a letter key on the keyboard, you get access to extra characters if
they are available. For example, press and hold the letter "e" to access characters 3 e è é ê ë
and more.
You can search for a POI (Point of Interest) type, such as a restaurant or tourist attraction.
Alternatively, you can search for a specific POI, for example "Rosie's Pizzeria".
Note: When searching, you can search near your current location, in a town or city, or near
your destination. If you want to change how the search is done, select the button to the right
of the search box.
The search results are shown in a column.
Tip: To see more results, hide the keyboard or scroll down the results list.
Tip: You can switch between seeing the results on the map or in a list by selecting the
list/map button:
4. Select an individual POI from the list.
The location is shown on the map.
5. To see more information about the POI, select the POI on the map and then select the pop-up
menu button. Select More Information on the pop-up menu.
You see more information about the POI such as the phone number, full address and email.
6. To plan a route to this destination, select Drive/Ride depending on which device you are using.
57
Page 58

A route is planned and then guidance to your destination begins. As soon as you start driving,
the guidance view is shown automatically.
Tip: If your destination is in a different time zone, you see a plus (+) or a minus (-) sign and
the time difference in hours and half hours in the arrival information panel. The estimated
time of arrival is the local time at your destination.
Tip: You can add a add a stop to a route that you have already planned.
Tip: You can save a route using My Routes.
Entering search terms
Select Search in the Main Menu to start searching for addresses and POIs. The search screen opens
showing the keyboard and the following buttons:
1. Back button.
Select this button to go back to the previous screen.
2. Search input box.
Enter your search term here. As you type, matching addresses and POIs are shown.
Tip: If you press and hold a letter key on the keyboard, you get access to extra characters if
they are available. For example, press and hold the letter "e" to access characters 3 e è é ê ë
and more.
Tip: To edit, select a word you have already typed to place the cursor. You can then insert or
delete characters.
3. Type of search.
You can search the whole of the current map, or a specific area such as a town or city, or near
your destination. Select this button to change the type of search to any of the following:
58
Page 59

Whole map
Select this option to search the whole of your current map with no
limit to the search radius. Your current location is the centre of the
search. The results are ranked by exact match.
Near me
Select this option to search with your current GPS location as the
search centre. The results are ranked by distance.
In town or city
Select this option to use a town or city as the centre for your search.
You need to enter the town or city name using the keyboard. When
you have selected the town or city from the results list, you can
search for an address or POI in that city.
Along route
When a route has been planned, you can select this option to search
along your route for a specific type of location, for example, petrol
stations. When prompted, enter the type of location and then select it
in the right-hand column to carry out the search.
Near destination
When a route has been planned, you can select this option to use your
destination as the centre for your search.
Latitude Longitude
Select this option to enter a pair of latitude longitude coordinates.
4. View button.
Select this button to return to the map view or guidance view.
5. 123?! button.
Select this button to use numbers and symbols on your keyboard. Select the =\< button to
toggle between the numbers and more symbols. Select the ABC button to go back to the general
keyboard.
6. Keyboard layout button.
Select this button to change your keyboard layout to another language. You can choose up to
four layouts from the list. If you have more than one layout selected, selecting the keyboard
layout button opens a pop-up so you can quickly swap between your selected keyboard layouts.
Press and hold this button to go directly to the list of all the layouts.
7. List/map button.
Select this button to switch between showing the results in a list or showing the results on the
map.
8. Show/hide keyboard.
Select this button to show or hide the keyboard.
Tip: Select the Shift key once to make the next letter you type upper case. Double tap the Shift
key to use Caps-Lock where all the letters you type are upper case. Select the Shift key once to
quit Caps-Lock.
Tip: To cancel a search, select the map/guidance view button in the top right-hand corner of the
screen.
Working with search results
Your search results are shown in two columns.
Address and city matches are shown in the left-hand column, and POIs, types of POIs and Places are
shown in the right-hand column. Recent destinations and saved places are also shown in your search
results.
59
Page 60

Tip: To see more results, hide the keyboard or scroll down the results list.
Tip: You can switch between seeing the results on the map or in a list by selecting the
list/map button:
When you select an address from the list of search results, you can choose to show it on the map,
add a crossroad or plan a route to that chosen location. To get an exact address you can add the
house number.
If you show the result on the map, you can use the pop-up menu to add the location to My Places. If
a route is already planned, you can add the location to your current route.
60
Page 61

Note: The best search results are shown on the map. When you zoom in, the lower ranked search
Legal and financial services
results are gradually shown.
About postcodes
When searching using a postcode, your results depend on the type of postcode used in the country
that you are searching in.
The following types of postcodes are used:
Postcodes that navigate you to a street or part of a street.
Postcodes that navigate you to an area comprising, for example, a single town, several villages
in a rural area or a district in a large city.
Postcodes for streets
Countries such as the Netherlands and the United Kingdom use this type of postcode. When you
search using this type of postcode, enter the postcode, then leave a space and then optionally enter
the house number. For example, "1017CT 35". Your device then plans a route to a specific house or
building on a specific street.
Postcodes for areas
Countries such as Germany, France and Belgium use this type of postcode. If you search using a
postcode for an area, your results include all the streets in a city district, the whole town, or the
villages within that postcode.
You may get results from multiple countries if you enter a postcode for an area.
Note: If you search using a postcode for an area, you will not get a specific address in your
results.
This type of postcode is still very useful in reducing the number of search results. For example, a
search for Neustadt in Germany returns a long list of possible results. Adding a space followed by
the postcode for an area narrows the results down to the Neustadt that you are looking for.
As another example, if you want to search in a city, enter a postcode for an area and select the city
centre you are searching for from the results.
About mapcodes
In countries where roads and houses have no names or addresses, you can use a mapcode instead. A
mapcode represents a location.
Every location on Earth, including those in the sea like islands and oil rigs, can be represented by a
mapcode. Mapcodes are short, and easy to recognise, remember and communicate. They are
precise to a few metres, which is good enough for every-day use.
Go to mapcode.com for instructions on how to find the mapcode for a location.
Mapcodes are more precise and more flexible than the address on a business card. You can choose a
location that you want to associate with your address, for example, the main entrance or the
entrance to a car park.
List of POI type icons
61
Page 62

Court house
Cash dispenser
Legal - Solicitors
Financial institution
Legal - other services
Food services
Convenience store
Fast food restaurant
Restaurant
Chinese restaurant
Accommodation
Hotel or motel
Luxury hotel
Camping ground
Economy chain hotel
Emergency services
Hospital or polyclinic
Dentist
Police station
Veterinarian
Doctor
Fire station
Car-related services
Outside parking
Petrol station
Parking garage
Car wash
Car dealer
Vehicle inspection centre
62
Page 63

Rental car facility
Electrical car charging
point(s)
Rental car parking
Car repair facility
Other services
Embassy
Pet services
Government office
Telecommunication
Company
Community service
Post office
Pharmacy
Shopping centre
Beauty services
Tourist information office
Shop
Education
College or university
School
Library
Convention centre
Leisure
Casino
Winery
Theatre
Tourist attraction
Cinema
Zoo
63
Page 64

Concert hall
Amusement park
Museum
Exhibition centre
Opera
Cultural centre
Nightlife
Leisure centre
Children's Farm
Sport
Playing field
Swimming pool
Mountain peak
Water sports
Beach
Tennis court
Park or recreation area
Ice skating rink
Yacht basin or marina
Sports centre
Stadium
Golf course
Religion
Church
Place of worship
Travel
Railway station
Mountain pass
64
Page 65

Airport
Scenic or panoramic view
Ferry terminal
Postcode
Note: Not used in all
countries.
Border crossing
Residential area
Bus station
City centre
Toll gate
Electrical car charging
stations
Rest area
Truck stop
65
Page 66

Using suggested destinations
Planning a route
What are suggested destinations?
Your TomTom Rider can learn your daily driving habits to saved favourite Places and it can also
suggest destinations when you start the device from sleep mode, for example, when driving to Work
in the morning.
Getting ready for suggested destinations
Before you get your first suggested destination, your device needs some time to learn about your
habits. The more regularly you drive with your TomTom Rider, the faster you will get suggestions
and the more accurate the suggested destinations will be.
To receive suggested destinations, you need to do the following:
In Settings > System > Your information and privacy, switch on Keep journey history on this
device for optional features.
Make sure no route is planned.
If your device has voice control, switch voice control ON. Make sure that your volume is not
muted and is set higher than 20%.
Do some driving for a few days, planning routes to your favourite My Places destinations.
Using suggested destinations
Important: If your device has voice control, you can say Yes or No or select the Yes or No button. If
your device doesn't have voice control, select the Yes or No button.
If your device prompts "Going to X?", where X is a destination, you have 12 seconds to respond yes or
no.
Tip: If you don't respond yes or no, your Rider assumes a yes.
If you respond yes, your device plans a route to your destination. If you respond no, you can select
from a list of saved Places and recent destinations instead.
Alternatively, if your device prompts "Where do you want to go?", you can choose immediately from
a list of saved Places and recent destinations.
Switching suggested destinations on or off
You can turn suggested destinations on or off at any time. See Route planning and Voice Control (if
your device has voice control) for information on how to switch this feature on or off.
Planning a route to an address using search
Important: In the interest of safety and to avoid distractions while you are driving, you should
always plan a route before you start driving.
To plan a route to an address using search, do the following:
66
Page 67

1. Select the Main Menu button to open the Main Menu.
2. Select Search.
The search screen opens with the keyboard showing.
3. Use the keyboard to enter the name of the place you want to plan a route to.
Tip: If you press and hold a letter key on the keyboard, you get access to extra characters if
they are available. For example, press and hold the letter "e" to access characters 3 e è é ê ë
and more.
You can search for an address, town, city, postcode or mapcode.
Tip: To search for a specific street in the United Kingdom or the Netherlands, type in a postcode, then leave a space and then type in the house number. For example, 1017CT 35. For
other countries, postcodes are area-based and will give you a list of matching cities, towns and
streets in your search results.
Note: When searching, the whole map is searched. If you want to change how the search is
done, select the button to the right of the search box. You can then change where the search
is done, for example, to being along the route or in a city.
4. As you type the address, suggestions based on what you have entered are shown in columns. You
can continue typing or select a suggestion.
Tip: To see more results, hide the keyboard or scroll down the results list.
Tip: You can switch between seeing the results on the map or in a list by selecting the
list/map button:
67
Page 68

5. Select an address suggestion.
6. Enter the house number if you have one and haven't entered it already.
Tip: If you enter a house number that is not found, then the number appears red. The nearest
house number that is found is shown in the Drive button. You can enter a new house number,
or you can select Drive/Ride to drive to the nearest house number.
7. Select Drive/Ride depending on which device you are using.
A route is planned and then guidance to your destination begins. As soon as you start driving,
the guidance view is shown automatically.
Tip: If your destination is in a different time zone, you see a plus (+) or a minus (-) sign and
the time difference in hours and half hours in the arrival information panel. The estimated
time of arrival is the local time at your destination.
Tip: You can add a stop to a route that you have already planned.
Tip: You can save a route using My Routes.
Planning a route to a city centre
Important: In the interest of safety and to avoid distractions while you are driving, you should
always plan a route before you start driving.
To plan a route to a city centre using search, do the following:
1. Select the Main Menu button to open the Main Menu.
68
Page 69

2. Select Search.
The search screen opens with the keyboard showing.
3. Use the keyboard to enter the name of the city or town you want to plan a route to.
You can search for a town, city, or postcode.
Tip: To search for a specific city you can use the city's postcode or the country. For example,
searching for Essen will return many results. If you search for Essen 2910 or Essen Belgium then
that city will be at the top of the results. You can then search in the city.
Tip: When searching, the whole map is searched. If you want to change how the search is
done, select the button to the right of the search box. You can then change where the search
is done, for example, to being along the route or in a city.
4. As you type the address, suggestions based on what you have entered are shown in columns. You
can continue typing or select a suggestion.
Tip: To see more results, hide the keyboard or scroll down the results list.
Tip: You can switch between seeing the results on the map or in a list by selecting the
list/map button:
5. Select the city in the left-hand column.
The city name is shown in the right side of the search input box, and the city centre POI is
shown below in the right-hand column.
69
Page 70

6. Select the city centre POI.
The city centre location is shown on the map.
7. Select Drive/Ride depending on which device you are using.
A route is planned and then guidance to your destination begins. As soon as you start driving,
the guidance view is shown automatically.
Tip: If your destination is in a different time zone, you see a plus (+) or a minus (-) sign and
the time difference in hours and half hours in the arrival information panel. The estimated
time of arrival is the local time at your destination.
Tip: You can add a stop to a route that you have already planned.
Tip: You can save a route using My Routes.
Planning a route to a POI using search
Important: In the interest of safety and to avoid distractions while you are driving, you should
always plan a route before you start driving.
To plan a route to a POI type or a specific POI using search, do the following:
1. Select the Main Menu button to open the Main Menu.
2. Select Search.
The search screen opens with the keyboard showing.
3. Use the keyboard to enter the name of the place you want to plan a route to.
70
Page 71

Tip: If you press and hold a letter key on the keyboard, you get access to extra characters if
they are available. For example, press and hold the letter "e" to access characters 3 e è é ê ë
and more.
You can search for a POI (Point of Interest) type, such as a restaurant or tourist attraction.
Alternatively, you can search for a specific POI, for example "Rosie's Pizzeria".
Note: When searching, the whole map is searched. If you want to change how the search is
done, select the button to the right of the search box. You can then change where the search
is done, for example along the route or in a city.
4. As you type, suggestions based on what you have entered are shown in columns. You can
continue typing or select a suggestion.
Tip: To see more results, hide the keyboard or scroll down the results list.
Tip: You can switch between seeing the results on the map or in a list by selecting the
list/map button:
5. Select a POI type or an individual POI. If you selected a POI type, select a POI.
The location is shown on the map.
71
Page 72

6. To see more information about the POI, select the POI on the map and then select the pop-up
menu button. Select More Information on the pop-up menu.
You see more information about the POI such as the phone number, full address and email.
7. To plan a route to this destination, select Drive/Ride depending on which device you are using.
A route is planned and then guidance to your destination begins. As soon as you start driving,
the guidance view is shown automatically.
Tip: If your destination is in a different time zone, you see a plus (+) or a minus (-) sign and
the time difference in hours and half hours in the arrival information panel. The estimated
time of arrival is the local time at your destination.
Tip: You can add a stop to a route that you have already planned.
Tip: You can save a route using My Routes.
Planning a route to a POI using online search
Important: In the interest of safety and to avoid distractions while you are driving, you should
always plan a route before you start driving.
Note: Searching online is only available on connected devices. To search online on your Rider,
you must be connected to TomTom services.
If you did a POI search but could not find the POI you were looking for, you can search TomTom
Places online. To find POIs by searching online, do the following:
1. Search for a POI using Search in the Main Menu.
The search results are shown in two columns.
2. Select Search Places Online.
72
Page 73

3. Use the keyboard to enter the name of the POI you want to find, then press the Search button
on the keyboard.
Tip: If you press and hold a letter key on the keyboard, you get access to extra characters if
they are available. For example, press and hold the letter "e" to access characters 3 e è é ê ë
and more.
You can search for a POI (Point of Interest) type, such as a restaurant or tourist attraction.
Alternatively, you can search for a specific POI, for example "Rosie's Pizzeria".
Note: When searching, you can search near your current location, in a town or city, or near
your destination. If you want to change how the search is done, select the button to the right
of the search box.
The search results are shown in a column.
Tip: To see more results, hide the keyboard or scroll down the results list.
Tip: You can switch between seeing the results on the map or in a list by selecting the
list/map button:
4. Select an individual POI from the list.
The location is shown on the map.
5. To see more information about the POI, select the POI on the map and then select the pop-up
menu button. Select More Information on the pop-up menu.
You see more information about the POI such as the phone number, full address and email.
6. To plan a route to this destination, select Drive/Ride depending on which device you are using.
73
Page 74

A route is planned and then guidance to your destination begins. As soon as you start driving,
the guidance view is shown automatically.
Tip: If your destination is in a different time zone, you see a plus (+) or a minus (-) sign and
the time difference in hours and half hours in the arrival information panel. The estimated
time of arrival is the local time at your destination.
Tip: You can add a add a stop to a route that you have already planned.
Tip: You can save a route using My Routes.
Planning a route using the map
Important: In the interest of safety and to avoid distractions while you are driving, you should
always plan a route before you start driving.
To plan a route using the map, do the following:
1. Move the map and zoom in until you can see the destination that you want to navigate to.
Tip: You can also select a map symbol to open the pop-up menu, then select the Drive/Ride
button to plan a route to that location.
2. When you have found your destination on the map, select it by pressing and holding the screen
for about one second.
A pop-up menu shows the nearest address.
3. To plan a route to this destination, select Drive/Ride depending on which device you are using.
A route is planned and then guidance to your destination begins. As soon as you start driving,
the guidance view is shown automatically.
74
Page 75

Tip: You can use the location you selected in other ways, such as adding it to My Places, by
selecting the pop-up menu button.
Tip: If your destination is in a different time zone, you see a plus (+) or a minus (-) sign and
the time difference in hours and half hours in the arrival information panel. The estimated
time of arrival is the local time at your destination.
Tip: You can add a stop to a route that you have already planned.
Tip: You can save a route using My Routes.
Planning a route using My Places
To navigate to one of My Places from your current location, do the following:
1. Select the Main Menu button to open the Main Menu.
2. Select My Places.
A list of all your Places opens.
3. Select the Place you want to navigate to, for example Home.
75
Page 76

Your chosen Place is shown on the map with a pop-up menu.
4. To plan a route to this destination, select Drive/Ride depending on which device you are using.
A route is planned and then guidance to your destination begins. As soon as you start driving,
the guidance view is shown automatically.
Tip: If your destination is in a different time zone, you see a plus (+) or a minus (-) sign and
the time difference in hours and half hours in the arrival information panel. The estimated
time of arrival is the local time at your destination.
Tip: You can add a stop to a route that you have already planned.
Tip: You can save a route using My Routes.
Planning a route using coordinates
Important: In the interest of safety and to avoid distractions while you are driving, you should
always plan a route before you start driving.
To plan a route using a pair of coordinates, do the following:
1. Select the Main Menu button to open the Main Menu.
2. Select Search.
The search screen opens with the keyboard showing.
3. Select the type of search button to the right of the search box.
4. Select Latitude Longitude.
5. Type in your pair of coordinates. You can enter any of these coordinate types:
Decimal values, for example:
N 51.51000 W 0.13454
51.51000 -0.13454
76
Page 77

Tip: For decimal values you don't have to use a letter to indicate the latitude and longitude. For locations west of the 0 meridian and locations south of the equator, use a minus
sign (-) before the coordinate.
Degrees, minutes and seconds, for example:
N 51°30′31″ W 0°08′34″
GPS standard coordinates, for example:
N 51 30.525 W 0 08.569
Note: The bar below the coordinates goes red if you enter coordinates that are not recognised
by your Rider.
6. As you type in the coordinates, suggestions are shown based on what you have entered. You can
continue typing or select a suggestion.
Towns and roads are shown on the left, POIs are shown on the right.
Tip: To see more results, hide the keyboard or scroll down the results list.
Tip: You can switch between seeing the results on the map or in a list by selecting the
list/map button:
7. Select a suggestion for your destination.
The location is shown on the map.
8. To plan a route to this destination, select Drive/Ride depending on which device you are using.
A route is planned and then guidance to your destination begins. As soon as you start driving,
the guidance view is shown automatically.
Tip: If your destination is in a different time zone, you see a plus (+) or a minus (-) sign and
the time difference in hours and half hours in the arrival information panel. The estimated
time of arrival is the local time at your destination.
Tip: You can add a stop to a route that you have already planned.
Tip: You can save a route using My Routes.
Planning a route using a mapcode
Important: In the interest of safety and to avoid distractions while you are driving, you should
always plan a route before you start driving.
To plan a route using a mapcode, do the following:
1. Select the Main Menu button to open the Main Menu.
2. Select Search.
The search screen opens with the keyboard showing.
3. Type in your mapcode. You can enter any of these mapcode types:
77
Page 78

International, for example, WH6SL.TR10.
Country-specific, for example, GBR 8MH.51.
Alternative country-specific, for example, GBR 28.Y6VH or GBR LDGZ.VXR.
Tip: All the mapcodes in this example are for the same location - Edinburgh Castle in the UK.
See About mapcodes for information on how to get a mapcode for a location.
4. As you type in the mapcode, suggestions are shown based on what you have entered. You can
continue typing or select a suggestion.
Towns and roads are shown on the left, POIs are shown on the right.
Tip: To see more results, hide the keyboard or scroll down the results list.
Tip: You can switch between seeing the results on the map or in a list by selecting the
list/map button:
5. Select a suggestion for your destination.
6. To plan a route to this destination, select Drive/Ride depending on which device you are using.
A route is planned and then guidance to your destination begins. As soon as you start driving,
the guidance view is shown automatically.
Tip: If your destination is in a different time zone, you see a plus (+) or a minus (-) sign and
the time difference in hours and half hours in the arrival information panel. The estimated
time of arrival is the local time at your destination.
Tip: You can add a stop to a route that you have already planned.
Tip: You can save a route using My Routes.
Finding an alternative route
Important: In the interest of safety and to avoid distractions while you are driving, you should
always plan a route before you start driving.
To find an alternative route, do the following:
1. Plan a route as usual.
2. On the map view, select the route itself.
3. Select the pop-up menu button to open the menu.
4. Select Alternative Route and then select Find alternative.
Up to three alternative routes are shown on the map view. Each alternative route shows the
difference in travel time in a balloon.
78
Page 79

Tip: Information from the Lifetime Traffic service is used when calculating alternative routes.
Any route that is 50% longer in time than the original route is not shown.
5. Select your chosen route by tapping on the time balloon.
Guidance to your destination begins. As soon as you start driving, the guidance view is shown
automatically.
Note: There are two other ways of finding alternative routes:
1. Select Current Route in the Main Menu, followed by Find Alternative.
2. If your device has voice control, say "Find alternative".
Planning a route in advance
You can plan a route in advance before you drive it. You can save the route as part of your My
Routes list.
To plan a route in advance, do the following:
1. Select the Main Menu button to open the Main Menu.
2. Select Search.
The search screen opens with the keyboard showing.
Tip: If you don't want to use search to choose your starting point and destination, go to the
map view and press and hold to select a location.
3. Use the keyboard to enter the name of the location you want to use as a starting point.
4. Select an address or POI suggestion.
5. Select Show on Map.
6. Select the pop-up menu button.
79
Page 80

A pop-up menu shows a list of options.
7. Select Use as Starting Point.
8. Repeat the search steps to choose your destination, and then select Drive/Ride in the pop-up
menu.
Your route is planned using your chosen starting point and destination. The estimated journey
time is shown at the top of the route bar.
Tip: Stops, POIs, Places and the destination can all be selected as starting points using their
pop-up menus.
Tip: You can save the route in My Routes.
9. To drive to the starting point, select Drive/Ride at the top of the screen.
The starting point of the route is converted to your first stop and then the route is planned.
Guidance to your destination begins from your current location. As soon as you start driving, the
guidance view is shown automatically.
Changing the starting point to be your current location
1. Select the starting point of the route in the map view.
2. Select the pop-up menu button.
A pop-up menu shows a list of options.
3. Select Remove Starting Point.
Your route is replanned with your current location as the starting point. The original starting
point is removed from your route.
Changing the starting point into a stop
1. Select the starting point on the route in the map view.
2. Select the pop-up menu button.
80
Page 81

A pop-up menu shows a list of options.
3. Select Change to a Stop.
Your route is replanned with the starting point changed into a stop.
Finding a car park
Important: In the interest of safety and to avoid distractions while you are driving, you should
always plan a route before you start driving.
To find a car park, do the following:
1. Select the Main Menu button to open the Main Menu.
2. Select Parking.
The map opens showing the locations of car parks.
If a route is planned, the map shows car parks near your destination. If a route isn't planned,
the map shows car parks near your current location.
81
Page 82

You can change the screen to show a list of car parks by pressing this button:
You can select a car park from the list to locate it on the map.
Tip: You can scroll down the list of results using the scroll bar on the right side of the screen.
If you want to change how the search is done, select the button to the right of the search box.
You can then change where the search is carried out, for example, to search near you or the
whole map.
3. Select a car park from the map or the list.
A pop-up menu opens on the map showing the name of the car park.
4. Select Drive/Ride depending on which device you are using.
82
Page 83

A route is planned and then guidance to your destination begins. As soon as you start driving,
the guidance view is shown automatically.
Tip: You can add a car park as a stop on your route by using the pop-up menu.
Finding a petrol station
Important: In the interest of safety and to avoid distractions while you are driving, you should
always plan a route before you start driving.
To find a petrol station, do the following:
1. Select the Main Menu button to open the Main Menu.
2. Select Petrol Station.
The map opens showing the locations of petrol stations.
If a route is planned, the map shows petrol stations along your route. If a route isn't planned,
the map shows petrol stations near your current location.
You can change the screen to show a list of petrol stations by pressing this button:
You can select a petrol station from the list to locate it on the map.
83
Page 84

Tip: You can scroll down the list of results using the scroll bar on the right side of the screen.
If you want to change how the search is done, select the button to the right of the search box.
You can then change where the search is carried out, for example, to search near you or the
whole map.
3. Select a petrol station from the map or the list.
A pop-up menu opens on the map showing the name of the petrol station.
4. Select Drive/Ride depending on which device you are using.
A route is planned and then guidance to your destination begins. As soon as you start driving,
the guidance view is shown automatically.
Tip: You can add a petrol station as a stop on your route by using the pop-up menu. A petrol
station that is a stop on your route has a blue icon.
84
Page 85

The Current Route menu
Clear Route / Clear
Track
Select this button to clear the currently planned route or track.
The Current Route Menu closes and you return to the map view.
Skip Next Stop
Select this button to skip the next stop on your route.
Find Alternative
You see this button when you have planned a route. Select this button to
show up to three alternative routes on the map view.
Avoid Blocked Road
Select this button to avoid an unexpected obstacle that is blocking the
road on your route.
Avoid Part of Route
Select this button to avoid part of a route.
Avoid Toll Roads
and More
Select this button to avoid some types of route features that are on your
currently planned route. These include ferries, toll roads and unpaved
roads.
You can also avoid route features using the route bar.
Changing your route
When you have planned a route or track, select the Current Route or Current Track button in the
Main Menu to open the Current Route or Current Track Menu.
The following buttons are available in the menu:
85
Page 86

Show Instructions
Select this button to see a list of turn-by-turn text instructions for your
planned route.
The instructions include the following:
Your current location.
Street names.
Up to two road numbers shown in road shields whenever available.
An instruction arrow.
An instruction description.
The distance between two consecutive instructions.
Exit number.
The full addresses of stops on your route.
Tip: Select an instruction to see a preview of that section of the route
in the map view.
You can also select the instruction panel in the guidance view to see
turn-by-turn text instructions.
Add Stop to Route
Select this button to add a stop to your currently planned route. You can
also add a stop to your route directly from the map.
Add to My Routes
If you plan a new route that has not already been saved, you see this
button. Select this button to save this route as part of your My Routes list.
Save Changes to
Route
If you make a change to a My Route, you see this button. Select this
button to save the changes.
Change Route Type
Select this button to change the type of route used to plan your route.
Your route will be recalculated using the new route type.
Reorder Stops
Select this button to see the lists of stops for your current route. You can
then change the order of the stops on your route.
For a route without stops, you can also select this button to reverse your
route.
86
Page 87

Drive to Route or
Track
Select Drive to Route to plan a route from your current location to the
starting point of a My Route. The starting point is converted to a stop.
Drive to Track plans a route to the nearest point of the track from your
current position.
Drive to Starting
Point
On the Current Track menu, select this button to plan a route to the
starting point of the track. The starting point is converted to a stop. For
more information, see Navigating using a track.
Play Route or
Track Preview
Select this button to watch a preview of your planned route or track.
Stop Route or
Track Preview
Select this button to stop the preview of your planned route or track.
Avoiding a blocked road
If there is a blocked road on your route you can change your route to avoid it.
1. In the guidance view, select the current location symbol or the speed panel.
Tip: The speed panel is only shown when you have started driving on your route.
2. Select Avoid Blocked Road.
A new route is found that avoids the blocked road. You may get shown up to two alternatives
depending on the road network between you and your destination.
The new route is shown on the map view with the difference in travel time in a balloon.
Note: It may not be possible to find an alternative route around the blocked road if none
exists.
3. Select the new route by selecting the time balloon.
Guidance to your destination resumes avoiding the blocked road. As soon as you start driving,
the guidance view is shown automatically.
Avoiding part of a route
If part of a road is blocked or you wish to avoid part of a route, you can select a specific section of
a route to avoid.
87
Page 88

1. Select the Main Menu button to open the Main Menu.
2. Select Current Route.
3. Select Avoid Part of Route.
A screen opens showing a list of the sections that comprise your current route.
4. Select the section of the route that you want to avoid.
A preview shows you the section you have chosen on the map.
5. Select Avoid.
A new route is found that avoids your chosen route section. The new route is shown on the map
view.
Note: It may not be possible to find an alternative route around the route section if none
exists.
Guidance to your destination resumes avoiding your chosen route section. As soon as you start
driving, the guidance view is shown automatically.
Types of route
Select Change Route Type to change the type of route planned to your current destination. Your
route is recalculated using the new route type.
You can select the following types of route:
Fastest route - the fastest route to your destination. Your route is constantly checked taking
into account the traffic conditions.
Shortest route - the shortest route to your destination. This may take much longer than the
fastest route.
Most eco-friendly route - the most fuel-efficient route.
Avoid motorways - this type of route avoids all motorways.
Winding route - the route with the most turns.
Note: Winding routes are only available for TomTom Rider navigation devices.
Walking route - this type of route is optimised for walking.
Bicycle route - this type of route is optimised for bicycles.
You can set the default route type in the Settings Menu.
Route features
You can choose to avoid some features that are on your currently planned route. You can avoid the
following route features:
Toll Roads
88
Page 89

Ferries and car shuttle trains
Carpool Lanes
Unpaved Roads
Note: Carpool lanes are sometimes known as High Occupancy Vehicle Lanes (HOV lanes) and are
not present in every country. To travel on these lanes, you may need to have more than one
person in the car, for example, or the car may need to use environmentally-friendly fuel.
If you choose to avoid a route feature, a new route is planned.
In Route Planning in the Settings Menu, you can set how each route feature is handled when a new
route is planned.
Avoiding a route feature on your route
You can avoid a route feature that is on your route.
Note: It may not be possible to find an alternative route around the route feature if none exists.
1. In the route bar, select the symbol for the route feature you want to avoid.
The route feature is shown on the map.
2. Select the pop-up menu button.
3. Select Avoid in the pop-up menu.
A new route is found that avoids the route feature.
Adding a stop to your route from the current route menu
1. In the Main Menu, select Current Route.
2. Select Add Stop to Route.
The map view is shown.
3. To select a stop, do one of the following steps:
Zoom in on the map, then press and hold to select a location. In the pop-up menu, select
Add to Current Route.
Select Search and search for a location. When you have found a location, select the Add
Stop to Route button.
Your route is recalculated to include your stop.
Adding a stop to your route using the map
1. Press the switch view button to show the map.
Your complete route is shown on the map.
2. Zoom in on the map, then press and hold to select a location.
3. Select the pop-up menu button.
4. Select Use in Route.
5. Select Add to Current Route.
89
Page 90

Your route is recalculated to include your stop.
Deleting a stop from your route
1. Press the switch view button to show the map.
Your complete route is shown on the map.
2. In the route bar, press the stop you want to delete.
The map zooms in to the stop and shows a pop-up menu.
Tip: If you select the wrong stop press the back button to return to the map.
3. Select Delete This Stop.
The stop is deleted and your route is recalculated.
Skipping the next stop on your route
Tip: To make it easy to quickly skip a stop, move the button Skip Next Stop to the first screen of
the Main Menu.
1. In the Main Menu, select Current Route.
2. Select Skip Next Stop.
The map view is shown. The next stop on your route is deleted and your route is recalculated.
Reordering stops on a route
1. In the Main Menu, select Current Route.
2. Select Reorder Stops.
The map view is shown with the route cleared. The starting point, destination and all the stops
are shown.
3. Select the stops one by one in the order you wish to drive them.
The symbols change to a flag as you select each stop. The last stop you select becomes your
destination.
Your route is recalculated with the stops in the changed order.
90
Page 91

About My Routes
My Routes
My Routes provides an easy way to save and retrieve routes and tracks.
You may want to use My Routes in one or more of the following situations:
While working - Your job involves driving several routes with multiple stops on a daily basis.
Your routes can change and you need to be flexible and be able to change the order of your
stops or change the planned route.
While on holiday - You are going on holiday and want to plan and save a route. Your route
includes scenic roads, stops at various hotels, and other places like tourist attractions.
While touring - You want to follow a tour you have downloaded from the Internet, or drive a
route another user has shared with you.
While commuting to work - You want to add one or two regular stops between home and work.
Your route back home in the evening is the reverse of your route to work in the morning.
Routes can be created and saved on your Rider or in MyDrive. You can also use a tool such as Tyre
Pro to create and edit routes and tracks.
About routes and tracks
The term "route" includes two types of route from one place to another:
Routes have a starting point and a destination, and perhaps some stops. Your device calculates
your preferred type of route between all these points, for example, the fastest or most economical. You can edit a route by, for example, adding stops or moving the starting point. Routes
can be imported but cannot be exported from your device.
Tracks also have a starting point and a destination, but have no stops. Your route follows the
track as closely as possible, ignoring your preferred type of route and traffic conditions. You can
only edit tracks using tools such as Tyre Pro. Tracks can be imported and exported from your
device.
Tip: Tracks have a dotted arrow!
About GPX and ITN files
GPX files (GPS exchange format)
GPX files contain a very detailed recording of where you have been on your track, including any
off-road locations. GPX files become tracks after import.
Using GPX files
There are several things you can do with your GPX file:
91
Page 92

Use a tool such as Tyre Pro to view your track file.
Export to a memory card or directly to your computer, then use your computer to view the file
using software such as Google Earth.
Note: While viewing your recording, you may notice that the recorded GPS locations do not
always correspond with the roads. This can happen for several reasons. Firstly, your device
tries to keep the files small and this can cause a slight loss of data precision. Secondly, your
device records the actual data from the GPS chip for an accurate representation of where
you’ve been, rather than what you see on your screen. Thirdly, the software with which you
view the recording may have the maps misaligned.
Share the file with friends by exporting it.
Note: Tracks can be imported and exported.
ITN files (TomTom's own Itinerary file format)
An ITN file contains less detail than a GPX file. An ITN file can contain a maximum of 255 locations
which is enough to recreate a route accurately. ITN files become routes after import.
Using ITN files
There are several things you can do with your ITN file:
You can import an ITN file onto your TomTom Rider so you can travel that same route again and
get navigation instructions.
Use tools such as Tyre Pro to view your route.
Note: Routes can be imported but cannot exported.
Saving a route
1. Plan a route in advance.
Tip: If you cannot see your planned route on the map view, select the back button to show
your route.
2. Select the route.
3. Select the pop-up menu button to open the menu.
4. Select Manage Route.
5. Select Add to My Routes.
The name of the route is shown in the edit screen.
6. Edit the name of the route so that you can easily recognise it.
92
Page 93

7. Select Add to save your route in the My Routes list.
Tip: You can also save a route using the Add to My Routes button in the Current Route menu.
Navigating using a saved route
To navigate using a previously saved route, do the following:
1. In the Main Menu, select My Routes.
2. Select a route from your list.
The route is shown on the map view.
3. To navigate to the start of the saved route, select Drive/Ride depending on which device you
are using.
The starting point of the saved route is converted to your first stop and then the route is
planned. Guidance to your destination begins from your current location. As soon as you start
driving, the guidance view is shown automatically.
Tip: There are two other ways to navigate using a saved route:
Select the starting point of the route. When the pop-up menu opens, select Change to a Stop.
Alternatively, select Drive to Route or Ride to Route in the Current Route menu.
Navigating to a stop on a saved route
You can navigate from your current location to a stop on your saved route instead of to the start of
the saved route. The stop is changed to the start of your route. Your new starting point might be
one closer to your current location, or you might just want to make your route shorter.
Note: The route from the original starting point up to the new starting point is removed from the
route.
93
Page 94

Note: Your original route in My Routes is not changed. If you want to see the whole route, select
the route again in My Routes.
1. In the Main Menu, select My Routes.
2. Select a route from your list.
The route is shown on the map view.
3. Select the stop that you want to use as your starting point, then select the pop-up menu button
to open the menu.
4. Select Start Route From Here.
Your route is calculated from the new starting point.
5. Select Drive/Ride.
94
Page 95

The starting point of your route is converted to your first stop and then the route is planned
from your current location. Guidance to your destination begins. As soon as you start driving,
the guidance view is shown automatically.
Tip: There are two other ways to navigate using a saved route:
Select the starting point of the route. When the pop-up menu opens, select Change to a Stop.
Alternatively, select Drive to Route or Ride to Route in the Current Route menu.
Adding a stop to a saved route using the map
Note: You can also press and hold a location on the map and select Add to Current Route from
the pop-up menu.
1. Press the switch view button to show the map.
Your complete route is shown on the map.
2. Select the route.
3. Select the pop-menu button to open the menu.
4. Select Manage Stops.
5. Select Add Stop to Route.
6. Select your new stop on the map.
Tip: If you know the name of your new stop, you can use Search to select your stop instead of
using the map.
7. Select the Add Stop button to add this location as a stop.
Your route is recalculated to include your stop.
95
Page 96

Tip: To update the saved route in your My Routes list with the changes, select the route om
the map then select Save Changes to Route in the pop-up menu.
Recording a track
You can record a track while you drive, with or without a route planned. After recording, you can
then export your track so that you can share it with others or view it using tools such as Tyre Pro.
To record a track, do the following:
1. In the Main Menu, select Start Recording.
A red dot appears in the lower right-hand corner of the screen and initially flashes 3 times to
show that you are now recording. The dot remains on the screen until you stop recording.
2. To stop recording, select Stop Recording in the Main Menu.
3. Enter a name for your track or you can leave it at the suggested date-time combination.
4. Select Add or Finished, depending on the device you are using.
5. Your track is saved in My Routes.
Note: You can export tracks as GPX files and save them on a memory card for sharing with
others.
Navigating using a track
You can import tracks on to your Rider using MyDrive. To navigate using an imported track, do the
following:
1. In the Main Menu, select My Routes.
2. Select a track from your list.
The track route is shown on the map view.
96
Page 97

3. Select the track, then select the pop-up menu.
4. Select Drive to Starting Point.
The starting point of the track is converted to your first stop and then the route is planned.
Guidance to your destination begins from your current location. As soon as you start driving, the
guidance view is shown automatically.
Note: You see two different colours on the map for your route and track. You see one colour
for the route from your current location to the starting point, and another second colour for
the track.
Tip: There are two other ways to navigate using a saved route:
Select the starting point of the route. When the pop-up menu opens, select Drive to Starting
Point.
Alternatively, select Drive to Starting Point or Ride to Route in the Current Track menu.
Deleting a route or a track from My Routes
1. In the Main Menu, select My Routes.
2. Select Edit List.
3. Select the routes you want to delete.
4. Select Delete.
Exporting tracks to a memory card
You can export tracks as GPX files and save them on a memory card for sharing with other users.
Note: Currently, you can export only tracks from your Rider.
To export one or more tracks, do the following:
1. In the Main Menu, select My Routes.
2. Select Share Tracks.
Tip: Alternatively, when in map view, select a track and select Share Track from the pop-up
menu.
3. Select one or more tracks from your list for export.
Tip: To select or deselect all routes for export, select the pop-up menu button.
4. Select Share then select Export to Memory Card.
You see the message Saving.
Tip: If there is not enough space on your memory card or your card is not formatted correctly,
you get on-screen help to fix the problem.
97
Page 98

5. When you see a message that your tracks have been exported successfully, remove your memory
card to share your tracks with other users.
Note: Each exported route is saved as a GPX file in the TomTom Routes folder on your
memory card.
Importing routes and tracks from a memory card
You can import two types of files from a memory card:
GPX files - these become tracks after import.
ITN files - these become routes after import.
ITN files are TomTom itinerary files. Other users can record itinerary files and and share them with
you, or you can download both ITN and GPX files tools such as Tyre Pro.
To import one or more routes and tracks from a memory card, do the following:
1. Insert a memory card into the card slot on your TomTom Rider.
If routes are found on your memory card, a message confirms this.
2. Select Import Routes.
3. Select one or more routes from the list on your memory card for import.
4. Select Import.
You see the message Importing tracks. Your routes are imported onto your device.
5. When you see a message that your routes have been imported successfully, remove your
memory card.
6. To view your imported routes and tracks, select My Routes in the Main Menu.
Exporting tracks using Bluetooth
You can export tracks as GPX files to a Bluetooth enabled device for sharing with other users.
To export one or more tracks, do the following:
1. Enable Bluetooth on the device you want to export the tracks to. Make sure the device is
discoverable.
2. In the Main Menu, select My Routes.
Bluetooth is enabled on your Rider.
3. Select the pop-up menu button and then select Share Tracks.
Tip: Alternatively, when in map view and a track is shown, select the track and select Share
Track from the pop-up menu.
4. Select one or more tracks from your list for export.
Note: Currently, you can export only tracks from your Rider.
Tip: To select or deselect all routes for export, select the pop-up menu button.
5. Select Share then select Send via Bluetooth.
6. From the list of devices, select the device you want to export the tracks to.
7. Select Send.
8. On the receiving device, select Accept.
You see a message Sending tracks while the tracks are being exported.
Tip: If there is not enough space on the receiving device, you get on-screen help to fix the
problem.
9. When you see a message that your routes have been exported successfully, the tracks on the
receiving device can be shared with other bikers.
98
Page 99

Note: Each exported route is saved as a GPX file in the Bluetooth folder on the receiving
device.
Importing routes and tracks using Bluetooth
You can import two types of files from a Bluetooth-enabled device to your TomTom Rider:
GPX files - these become tracks after import.
ITN files - these become routes after import.
Tip: ITN files are TomTom itinerary files. Friends may share itinerary files with you or you can
download both ITN and GPX files from Tyre Pro.
To import one or more routes and tracks, do the following:
1. In the Main Menu, select My Routes.
Bluetooth is enabled on your Rider.
2. Enable Bluetooth on the device you want to import the tracks from.
3. On the device, use a file manager app to find the track or route files.
4. Select the file or files you want to send, then share the files using Bluetooth.
Note: The procedure to share files can be different on each device.
Note: Some Android devices don’t support Bluetooth file sharing of GPX or ITN files without
using a Bluetooth file-sharing app. These apps are available in Google Play Store.
5. Select your TomTom Rider from the list of available devices.
6. On your Rider, select Accept to accept the tracks via Bluetooth.
The tracks are received and imported.
7. Select OK.
Your imported routes and tracks are shown in My Routes.
Importing routes from your computer using USB
You can import two types of files to your Rider from your computer using USB:
GPX files - these become tracks after import.
ITN files - these become routes after import.
Tip: ITN files are TomTom itinerary files. Friends may share itinerary files with you or you can
download both ITN and GPX files from Tyre Pro.
To import routes using USB, do the following:
1. Connect your Rider to your computer using the USB cable supplied, then switch your Rider on.
The Connected to your computer screen is shown.
Note: Use ONLY the USB cable supplied with your Rider. Other USB cables may not work.
Note: You should plug the USB cable directly into a USB port on your computer and not into a
USB hub or USB port on a keyboard or monitor.
Tip: If you exit the Connected to your computer screen but you still want to import routes,
disconnect the USB cable from your computer then connect it again.
2. On your Rider, select Import Routes.
3. Open a file browser on your computer.
Tip: Your Rider is shown as a computer drive.
4. In the file browser, copy the route or routes you want to import then paste them on to your
Rider.
99
Page 100

Tip: You can paste your routes into the root directory or the Internal Storage folder. If you
have a memory card in your Rider, you can also copy your routes to the SD Card folder.
5. On your Rider, select Done.
Your Rider shows the routes you copied.
6. Select one or more routes to import, then select Import.
You see the message Importing routes.
7. When you see the message Import Completed, select OK then disconnect your Rider.
8. To view your imported routes and tracks, select My Routes in the Main Menu.
100
 Loading...