

Page 1

Remote LINK
Working Time
Connected Navigation
Part. n o. 6KG0.002.01
User Guide
Page 2

Borna_WorkingTime.book Page 3 Thursday, January 21, 2010 9:54 AM
Preparing your Remote LINK
Inserting the batteries
1. Hold the sides of the Remote LINK and press the latch on
the back of the device to open the battery compartment.
2. Insert the batteries (2 x AAA/LR3) in the Remote LINK.
Make sure you insert the batteries in the correct way, as
shown inside the battery compartment.
3. Replace the battery cover.
Establishing a paired connection
The following instructions only apply if your Remote LINK has
not been connected to a TomTom LINK 300/310. Press any key
to turn on your Remote LINK and see “Understanding your
Remote LINK” to check the status of the device.
If the device is not paired with a LINK 300/310, then do the
following.
1. Make sure the LINK 300/310 is properly installed in the
vehicle.
2. Turn on the ignition.
3. Make sure there are no other vehicles installed with a LINK
300/310 located within a distance of 30 metres.
4. Press any key on your Remote LINK to switch it on.
If the LEDs on all three buttons are flashing, then the device
is not paired and you need to continue with the next step.
5. Press any two buttons at the same time until you hear a
sound.
3
EN
Preparing
your
Remote
LINK
Page 3
Borna_WorkingTime.book Page 4 Thursday, January 21, 2010 9:54 AM
EN
Preparing your Remote LINK
Remote LINK starts searching for your LINK 300/310 and
the Connection LED begins to flash rapidly. Searching may
take about one minute before a connection is established.
Note: To check if a connection has been established press any
key. If a connection has been established, the Connection LED
will be on. If you do not use your Remote LINK for more than
10 seconds it will turn off.
If no connection was established the LED will switch off.
To establish a connection, repeat steps 1 to 4 or visit
www.tomtomwork.com/connect-remotelink for alternative
connection methods.
Reset your Remote LINK
If your Remote LINK is already paired but does not work
correctly or it is paired with the wrong device, you can reset
the Remote LINK to the default factory settings.
1. Press any key to switch on the device.
2. Press any two buttons at the same time until you hear a
sound.
Your Remote LINK switches off. To pair the device with the
LINK 300/310, read and follow the instructions under
'Establishing a paired connection'.
4
Page 4
Borna_WorkingTime.book Page 5 Thursday, January 21, 2010 9:54 AM
Preparing your Remote LINK
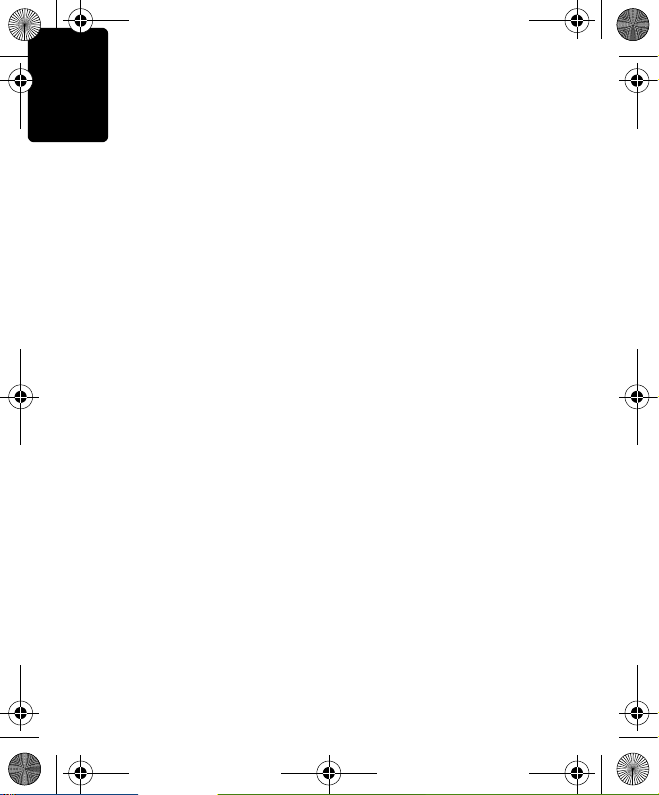
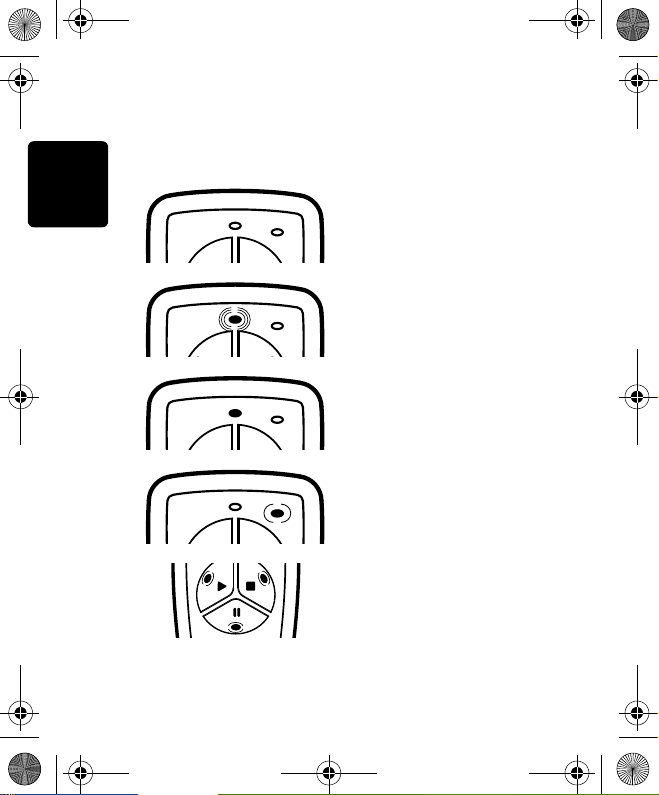
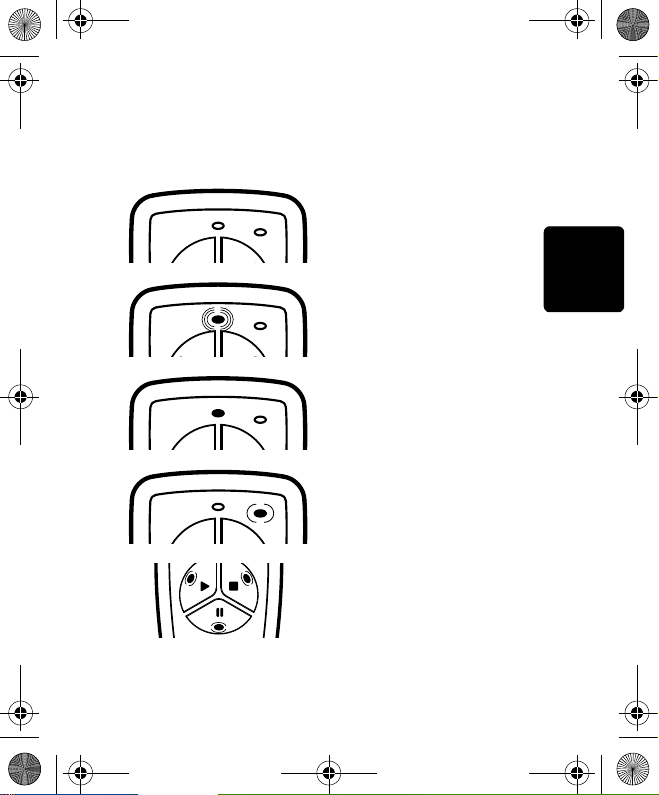
Understand your Remote LINK
No light - Remote LINK is off.
Connection LED is flashing -
Remote LINK is searching for
a LINK 300/310.
Connection LED is on Remote LINK is connected to
a LINK 300/310.
Low Battery warning LED is
flashing - The battery power
is low and the batteries need
be replaced.
All the button LEDs are
flashing - Remote LINK is not
paired with a LINK 300/310.
EN
5
Page 5
Borna_WorkingTime.book Page 6 Thursday, January 21, 2010 9:54 AM
EN
Preparing your Remote LINK
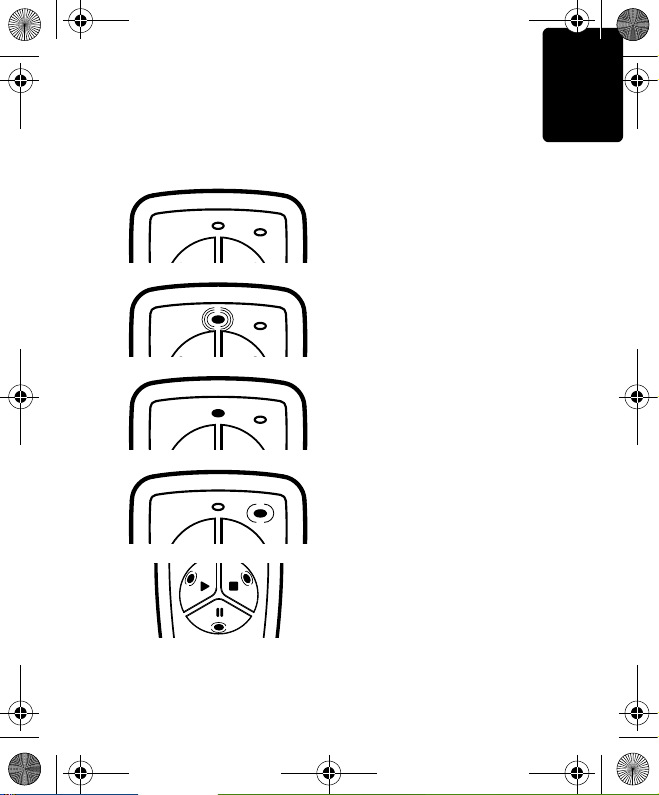
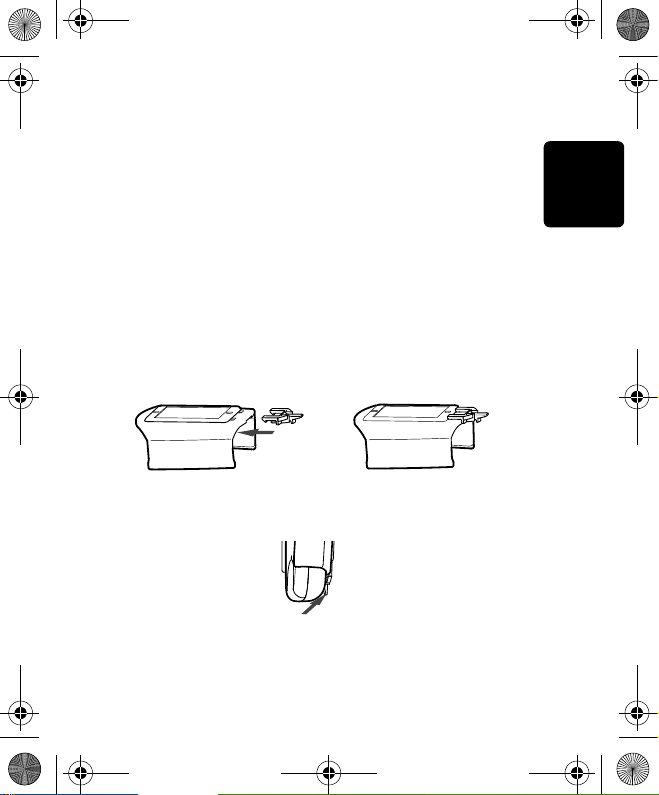
Installing your Remote LINK
To install your Remote LINK in your vehicle, first use the
adhesive pad to secure the mount to the dashboard or another
suitable surface which does not interfere with the driver's view
of the road.
Important: Do not mount the Remote LINK in the inflation area
of airbags or in the impact area of the head or knees. Search
carefully for a location that will avoid interference with
displays, safety equipment and controls.
1. To create a permanent installation, first attach the securing
lock to the mount.
Note: To remove your Remote LINK from the mount,
gently press the latch at the back of the securing lock and
then remove the device.
2. Attach the mount to a clean and flat surface using the
adhesive pad.
6
Page 6
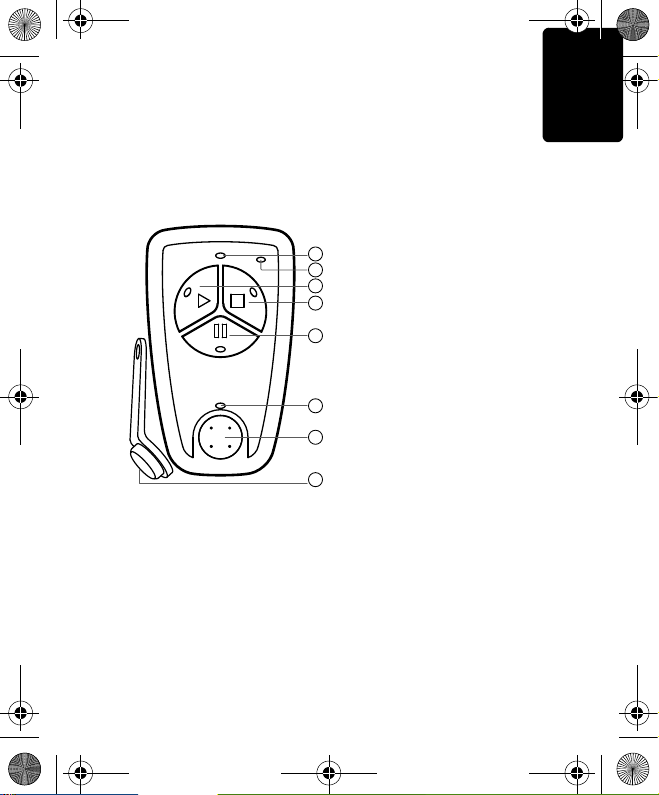
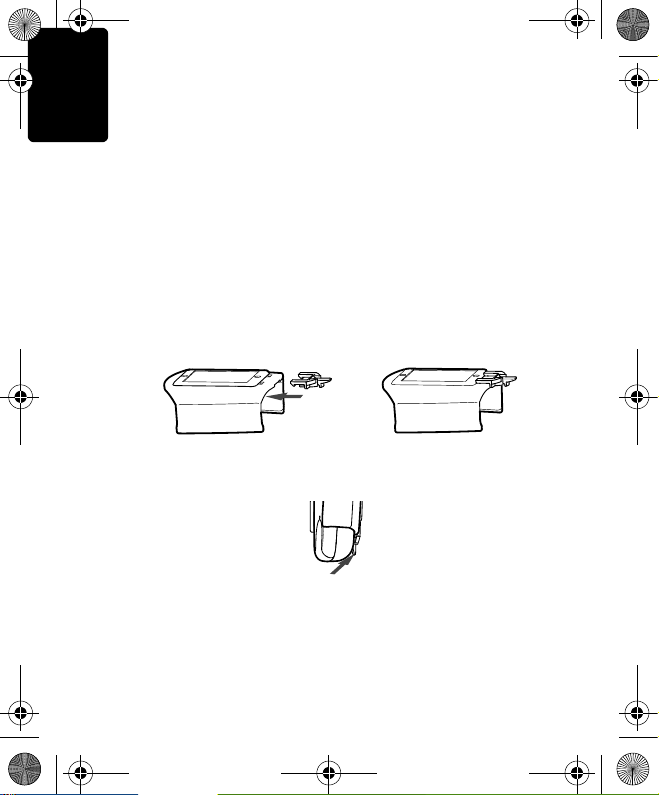
A
D
E
F
G
H
C
B
Borna_WorkingTime.book Page 7 Thursday, January 21, 2010 9:54 AM
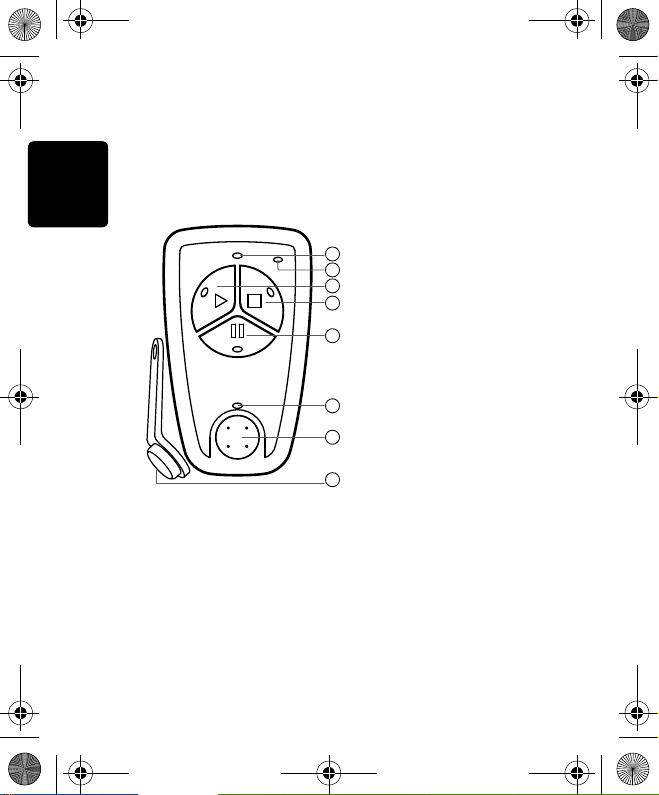
Using your Remote LINK
Your Remote LINK allows working time reporting for multiple
employees. Reporting is only possible when your Remote
LINK is connected to the LINK 300/310.
A Connection LED
B Low battery warning
LED
C Work (start work/
end break)
D Finish (finish work/
finish break without
starting work)
E Break
F ID key LED
G ID key reader
H ID key
1. Press any button to switch on and connect your Remote
LINK.
2. Wait until the Connection LED is on.
3. Press the button for the work status that you want to report.
4. Place the first person’s ID key on the ID key reader. A
The button LED and the ID key reader LED turn on.
successful report is confirmed with a sound. For each
additional person, repeat steps 3 and 4.
EN
Using
your
Remote
LINK
7
Page 7

Borna_WorkingTime.book Page 8 Thursday, January 21, 2010 9:54 AM
Vorbereitung Ihres Remote LINK
Vorbereitung
Ihres
Batterien einlegen
Remote
DE
LINK
1. Halten Sie den Remote LINK an den Seiten fest und
drücken Sie auf den Verschluss auf der Rückseite des
Geräts, um das Batteriefach zu öffnen.
2. Setzen Sie die Batterien (2 x AAA/LR3) in den Remote LINK
ein. Achten Sie beim Einsetzen der Batterien auf die
richtige Polarität laut Darstellung im Inneren des
Batteriefachs.
3. Setzen Sie den Batteriefachdeckel wieder auf.
Pairing - Geräte koppeln
Die folgenden Anweisungen gelten nur, wenn Sie Ihren
Remote LINK nicht mit einem TomTom LINK 300/310
verbunden haben. Drücken Sie eine beliebige Taste auf Ihrem
Remote LINK und beachten Sie die Hinweise unter »Ihr
Remote LINK verstehen«, um den Status des Geräts zu
überprüfen.
Wenn Ihr Remote LINK nicht mit einem TomTom LINK 300/310
verbunden ist, gehen Sie folgendermaßen vor:
1. Stellen Sie sicher, dass der LINK 300/310 ordnungsgemäß
im Fahrzeug installiert ist.
2. Schalten Sie die Zündung ein.
3. Stellen Sie sicher, dass sich im Umkreis von 30 m keine
weiteren Fahrzeuge mit installiertem LINK 300/310
befinden.
4. Drücken Sie eine beliebige Taste auf Ihrem Remote LINK,
um ihn einzuschalten.
Wenn alle drei Tasten-LEDs blinken, ist das Gerät nicht
gekoppelt, und Sie müssen mit dem nächsten Schritt
fortfahren.
8
Page 8
Borna_WorkingTime.book Page 9 Thursday, January 21, 2010 9:54 AM
Vorbereitung Ihres Remote LINK
5. Drücken Sie zwei beliebige Tasten gleichzeitig, bis Sie
einen Ton hören.
Der Remote LINK beginnt, nach Ihrem LINK 300/310 zu
suchen während die Verbindungs-LED schnell blinkt. Der
erfolgreiche Aufbau der Verbindung kann ca. eine Minute
dauern.
Hinweis: Um zu überprüfen, ob eine Verbindung hergestellt
wurde, drücken Sie eine beliebige Taste. Wenn eine
Verbindung hergestellt wurde, leuchtet die Verbindungs-LED.
Falls Sie Ihren Remote LINK für mehr als 10 Sekunden nicht
benutzen, schaltet er sich ab.
Wenn keine Verbindung hergestellt werden konnte, erlischt
die LED.
Um eine Verbindung herzustellen, wiederholen Sie die
Schritte 1 bis 4 oder besuchen Sie www.tomtomwork.com/
connect-remotelink, um sich über andere
Verbindungsmöglichkeiten zu informieren.
Zurücksetzen Ihres Remote LINK
Falls Ihr Remote LINK bereits gekoppelt ist, aber nicht richtig
funktioniert oder mit dem falschen Gerät gekoppelt wurde,
können Sie ihn auf Werkseinstellungen zurücksetzen.
1. Drücken Sie eine beliebige Taste, um das Gerät
einzuschalten.
2. Drücken Sie zwei beliebige Tasten gleichzeitig, bis Sie
einen Ton hören.
Ihr Remote LINK schaltet sich aus. Um das Gerät mit dem
LINK 300/310 zu koppeln, lesen und befolgen Sie die
Anweisungen unter Pairing - Geräte koppeln.
DE
9
Page 9
Borna_WorkingTime.book Page 10 Thursday, January 21, 2010 9:54 AM
Vorbereitung Ihres Remote LINK
Ihr Remote LINK verstehen
DE
Keine LED leuchtet/blinkt: Ihr
Remote LINK ist
ausgeschaltet.
Die Verbindungs-LED blinkt :
Ihr Remote LINK sucht nach
einem LINK 300/310.
Die Verbindungs-LED
leuchtet dauerhaft: Ihr
Remote LINK ist mit einem
LINK 300/310 verbunden.
Die LED für schwache
Batterien blinkt: Die Batterien
sind schwach und müssen
ersetzt werden.
Alle Tasten-LEDs blinken: Ihr
Remote LINK ist nicht mit
einem LINK 300/310
gekoppelt.
10
Page 10
Borna_WorkingTime.book Page 11 Thursday, January 21, 2010 9:54 AM
Vorbereitung Ihres Remote LINK
Installation Ihres Remote LINK
Um Ihren Remote LINK in Ihrem Fahrzeug zu installieren,
verwenden Sie zuerst die selbstklebende Befestigungsplatte,
um die Halterung am Armaturenbrett oder auf einer anderen
geeigneten Oberfläche sicher zu befestigen, ohne die Sicht
des Fahrers auf die Straße zu behindern.
Wichtig: Befestigen Sie den Remote LINK nicht im
Entfaltungsbereich von Airbags oder im Aufprallbereich für
Kopf und Knie. Wählen Sie sorgfältig eine Position aus, die das
Ablesen der Anzeigen, die Nutzung der
Sicherheitsausstattung und den Zugriff auf die
Bedienelemente nicht behindert.
1. Zur dauerhaften Installation befestigen Sie zunächst die
Sicherungsarretierung an der Halterung.
Hinweis: Um Ihren Remote LINK aus der Halterung zu
entnehmen, drücken Sie vorsichtig auf die Verriegelung
auf der Rückseite der Sicherungsarretierung und
entnehmen Sie dann das Gerät.
DE
2. Befestigen Sie die Halterung mit der selbstklebenden
Befestigungsplatte auf einer sauberen und ebenen
Oberfläche.
11
Page 11
A
D
E
F
G
H
C
B
Borna_WorkingTime.book Page 12 Thursday, January 21, 2010 9:54 AM
Verwendung Ihres Remote LINK
Verwend
ung
Ihres
Ihr Remote LINK ermöglicht die Arbeitszeiterfassung für
Remote
LINK
DE
mehrere Mitarbeiter. Eine Erfassung ist nur möglich, wenn Ihr
Remote LINK mit dem LINK 300/310 verbunden ist.
A Verbindungs-LED
B LED für schwache
Batterien
C Arbeiten
(Arbeitsbeginn/
Pausenende)
D Ende (Arbeitsende/
Pausenende ohne
Arbeitsbeginn)
E Pause
F ID-Key-LED
G ID-Key-Reader
H ID-Key
1. Drücken Sie eine beliebige Taste, um Ihren Remote LINK
einzuschalten und eine Verbindung herzustellen.
2. Warten Sie, bis die Verbindungs-LED leuchtet.
3. Drücken Sie die Taste für den Arbeitsstatus, den Sie
erfassen möchten. Die LED dieser Taste leuchtet auf und
die LED für den ID-Key-Reader blinkt.
4. Halten Sie den ID-Key der ersten Person auf den ID-KeyReader. Die erfolgreiche Erfassung wird mit einem Ton
bestätigt. Für jede weitere Person wiederholen Sie die
Schritte 3 und 4.
12
Page 12
Borna_WorkingTime.book Page 13 Thursday, January 21, 2010 9:54 AM
Préparer votre Remote LINK
Prépa
rer
votre
Mise en place des piles
1. Tenez le Remote LINK par les côtés et appuyez sur l'arrière
de l'appareil pour ouvrir le compartiment de la batterie.
2. Insérez les piles (2 x AAA/LR3) dans le Remote LINK. Veillez
à insérer les piles dans le bon sens, comme indiqué à
l'intérieur du compartiment des piles.
3. Replacez le couvercle des piles.
Établir une connexion
Les instructions suivantes s'appliquent uniquement si votre
Remote LINK n'a jamais été connecté à un TomTom LINK 300/
310. Appuyez sur n'importe quelle touche de votre Remote
LINK et consultez « Découvrir le Remote LINK » pour vérifier
l'état de l'appareil.
Si l'appareil n'est pas déjà appairé avec un LINK 300/310,
procédez comme suit.
1. Vérifiez que le LINK 300/310 est correctement installé dans
le véhicule.
2. Mettez le contact.
3. Veuillez-vous assurer qu’aucun autre véhicule équipé d’un
LINK 300/310 ne se trouve à moins de 30 mètres.
4. Appuyez sur n'importe quel bouton de votre Remote LINK
pour l'allumer.
Si les voyants des trois boutons clignotent, l'appareil n'est
pas appairé et veuillez passer à l'étape suivante.
Remote
LINK
FR
13
Page 13
Borna_WorkingTime.book Page 14 Thursday, January 21, 2010 9:54 AM
Préparer votre Remote LINK
5. Appuyez simultanément sur deux boutons jusqu'à ce que
vous entendiez un bip.
Le Remote LINK commence à rechercher le LINK 300/310
et le voyant Connexion se met à clignoter rapidement. La
recherche peut prendre jusqu'à une minute avant
l'établissement de la connexion.
FR
Remarque : pour vérifier si une connexion a été établie,
appuyez sur une des touches. Lorsque le pairage a été établi,
le voyant de Connexion reste allumé. Si le Remote LINK n'est
pas utilisé pendant plus de 10 secondes, le voyant s'éteint
automatiquement.
Si aucune connexion n'est établie, le voyant s'éteint.
Pour établir une connexion, répétez les étapes 1 à 4 ou rendezvous sur www.tomtomwork.com/connect-remotelink pour
prendre connaissance des autres méthodes de connexion.
Réinitialiser votre Remote LINK
Si votre Remote LINK est déjà connecté, mais qu'il ne
fonctionne pas correctement ou qu'il n'est pas connecté au
bon appareil, vous avez la possibilité de ré-établir les
paramètres d'usine par défaut du Remote LINK.
1. Appuyez sur une touche pour allumer l'appareil.
2. Appuyez simultanément sur deux boutons jusqu'à ce que
vous entendiez un bip.
Votre Remote LINK s'éteint. Pour connecter votre appareil
au LINK 300/310, suivez les instructions de la section
Établir une connexion.
14
Page 14
Borna_WorkingTime.book Page 15 Thursday, January 21, 2010 9:54 AM
Préparer votre Remote LINK
Découvrir le Remote LINK
Voyants éteints : le Remote
LINK est éteint.
Le voyant Connexion
clignote : le Remote LINK
recherche un LINK 300/310.
Le voyant Connexion est
allumé : le Remote LINK est
connecté à un LINK 300/310.
Le voyant d'avertissement du
niveau de charge des piles
clignote : les piles sont faibles
et doivent être remplacées.
Tous les voyants de bouton
clignotent : le Remote LINK
n'est pas connecté à un LINK
300/310.
15
FR
Page 15

Borna_WorkingTime.book Page 16 Thursday, January 21, 2010 9:54 AM
Préparer votre Remote LINK
Installer votre Remote LINK
Pour installer votre Remote LINK dans votre véhicule, veuillez
d'abord placer la fixation sur le tableau de bord ou une autre
surface adaptée à l'aide du disque adhésif sans qu'elle gêne la
visibilité du conducteur.
FR
Important : ne fixez pas le Remote LINK dans la zone de
gonflage des airbags ni dans la zone d'impact de la tête ou des
genoux. Sélectionnez soigneusement un emplacement
empêchant toute interférence avec les écrans, les
équipements de sécurité et les commandes.
1. Pour une installation permanente, commencez par fixer le
dispositif de blocage sur le support.
Remarque : pour enlever votre Remote LINK de la fixation,
appuyez doucement sur le dispositif de blocage de
sécurité, puis enlevez l'appareil.
2. Installez la fixation sur une surface propre et plane à l'aide
du disque adhésif.
16
Page 16

Borna_WorkingTime.book Page 17 Thursday, January 21, 2010 9:54 AM
Utilisation du Remote LINK
Utilisation
Votre Remote LINK permet à plusieurs employés d'indiquer les
différents statuts de leurs temps de travail. Cette fonctionnalité
de rapports des temps de travail est possible uniquement
lorsque le Remote LINK est connecté au LINK 300/310.
A Voyant de
A
B
C
D
E
connexion
B Voyant de niveau de
charge des piles
C Travail (début de
travail / fin de pause)
D Fin (fin de travail/ fin de
pause sans
commencer le travail)
E Pause
F
F Voyant de clé
G
H
1. Appuyez sur un bouton pour allumer et connecter le
Remote LINK.
d'identification
G Lecteur de clé
d'identification
H Clé d'identification
2. Attendez que le voyant de connexion s'allume.
3. Appuyez sur le bouton correspondant au statut de travail à
indiquer. Le voyant du bouton et c elui du lecteur de clé s'allument.
4. Placez la clé d'identification de la première personne sur
l'emplacement de lecture. La prise en compte des informations
indiquées dans la rapport des temps de travail est confirmée par un
bip. Répétez les étapes 3 et 4 pour chaque personne supplémentaire.
du
Remote
LINK
FR
17
Page 17
Borna_WorkingTime.book Page 18 Thursday, January 21, 2010 9:54 AM
Voorbereiding van je Remote LINK
Voorbereiding
van je
Batterijen plaatsen
Remote
LINK
1. Houd de zijkanten van de Remote LINK v ast en druk op het
klepje aan de achterkant van het apparaat om het
batterijvakje te openen.
2. Plaats de batterijen (2 x AAA/LR3) in de Remote LINK. Zorg
dat de batterijen op de juiste manier worden geplaatst,
zoals aangegeven aan de binnenkant van het batterijvakje.
3. Plaats het klepje van het batterijvakje terug.
Verbinding maken
NL
De volgende instructies zijn alleen van toepassing als er nog
geen verbinding is gemaakt tussen je Remote LINK en een
TomTom LINK 300/310. Druk op een willekeurige toets om je
Remote LINK in te scha kelen en g a naa r "Hoe werkt je Remote
LINK" om de status van het apparaat te bekijken.
Als het apparaat geen verbinding heeft met een LINK 300/310,
voer je deze stappen uit.
1. Controleer of de LINK 300/310 op de juiste manier in het
voertuig is geïnstalleerd.
2. Schakel het contact in.
3. Zorg ervoor dat zich geen andere voertuigen met een LINK
300/310 in een straal van 30 meter bevinden.
4. Druk op een willekeurige knop op je Remote LINK om deze
in te schakelen.
Als de LED-lampjes op alle drie de knoppen knipperen,
heeft het apparaat geen verbinding en ga je verder met de
volgende stap.
18
Page 18

Borna_WorkingTime.book Page 19 Thursday, January 21, 2010 9:54 AM
Voorbereiding van je Remote LINK
5. Druk gelijktijdig op twee willekeurige knoppen tot je een
geluid hoort.
De Remote LINK gaat nu op zoek naar je LINK 300/310 en
de LED-lampjes voor verbinding gaan nu snel knipperen.
Het zoeken kan ongeveer een minuut duren voordat de
verbinding tot stand wordt gebracht.
Opmerking: om te controleren of er een verbinding is, druk je
op een willekeurige toets. Zodra er verbinding is gemaakt,
licht het LED-lampje op. De Remote LINK schakelt zichzelf uit,
zodra er langer dan 10 seconden geen gebruik van wordt
gemaakt.
Als er geen verbinding tot stand is gebracht, gaat het LEDlampje uit.
Om een verbinding tot stand te brengen, herhaal je stap 1 tot
4 of ga je naar www.tomtomwork.com/connect-remotelink
voor alternatieve verbindingsmethoden.
Resetten van je Remote LINK
Als je Remote LINK verbinding heeft maar niet naar behoren
functioneert, of verbinding heeft met het verkeerde apparaat,
dan kun je de Remote LINK naar de standaard
fabrieksinstellingen terugzetten.
1. Druk op een willekeurige toets om het apparaat in te
schakelen.
2. Druk gelijktijdig op twee willekeurige knoppen tot je een
geluid hoort.
Je Remote LINK wordt nu uitgeschakeld. Om verbinding te
maken tussen het apparaat en de LINK 300/310 lees en volg
je de instructies onder \qVerbinding maken\q.
NL
19
Page 19

Borna_WorkingTime.book Page 20 Thursday, January 21, 2010 9:54 AM
Voorbereiding van je Remote LINK
Hoe werkt je Remote LINK
Geen brandend lampje - de
Remote LINK is uitgeschakeld.
Het LED-lampje voor
verbinding knippert - de
Remote LINK is op zoek naar
een LINK 300/310.
NL
Het LED-lampje voor
verbinding brandt - de
Remote LINK heeft verbinding
met een LINK 300/310.
Het LED-lampje 'batterij bijna
leeg' knippert - de batterijen
zijn bijna leeg en moeten
worden vervangen.
De LED-lampjes van alle
knoppen knipperen - de
Remote LINK heeft geen
verbinding met een LINK 300/
310.
20
Page 20

Borna_WorkingTime.book Page 21 Thursday, January 21, 2010 9:54 AM
Voorbereiding van je Remote LINK
Installatie van je Remote LINK
Om je Remote LINK in je voertuig te installeren, moet je eerst de
zelfklevende schijf gebruiken om de houder op het dashboard of
een ander geschikt oppervlak te bevestigen, waarbij het zicht van
de bestuurder op de weg niet wordt belemmerd.
Belangrijk: monteer de Remote LINK niet op een plek waar
zich airbags bevinden of op een plek waar hoofd of knieën mee
in aanraking zouden komen in het geval van een botsing. Zoek
zorgvuldig een plek uit waar de Remote LINK geen
belemmering vormt voor beeldschermen,
veiligheidsapparatuur en bedieningsknoppen.
1. Voor permanente installatie bevestig je eerst het
veiligheidsslot aan de houder.
Opmerking: om je Remote LINK uit de houder te
verwijderen, druk je zachtjes op het klepje aan de
achterkant van het veiligheidsslot en verwijder je het
apparaat.
NL
2. Bevestig de houder met de zelfklevende schijf op een
schoon en vlak oppervlak.
21
Page 21

Borna_WorkingTime.book Page 22 Thursday, January 21, 2010 9:54 AM
Gebruik van je Remote LINK
Gebruik
van je
Re-
Met je Remote LINK kunnen werktijdrapportages voor
mote
LINK
meerdere werknemers worden uitgevoerd. Rapportage is
alleen mogelijk wanneer je Remote LINK verbinding heeft met
de LINK 300/310.
A LED-lampje voor
verbinding
B LED-lampje 'batterij
bijna leeg'
C Werk (start werk/
einde pauze)
D Einde (einde werk/
einde pauze zonder
werk te hervatten)
E Pauze
F LED-lampje ID-
sleutel
G ID-sleutellezer
H ID-sleutel
NL
A
B
C
D
E
F
G
H
1. Druk op een willekeurige knop om je Remote LINK in te
schakelen en verbinding te laten maken.
2. Wacht tot het LED-lampje voor verbinding aan is.
3. Druk de knop in voor de werkstatus waarin je wilt
rapporteren. Het LED op de knop licht op en het LED van
de ID key lezer knippert.
4. Plaats de ID-sleutel van de eerste persoon op de ID-sleutellezer.
Een succesvol rapport wordt bevestigd door middel van een
geluid. Voor alle volgende personen herhaal je stap 3 en 4.
22
Page 22

Borna_WorkingTime.book Page 23 Thursday, January 21, 2010 9:54 AM
Preparazione di Remote LINK
Preparazi
one di
Inserimento delle batterie
1. Afferra Remote LINK ai lati e premi la linguetta sul retro del
dispositivo per aprire il vano batterie.
2. Inserisci le batterie (2 x AAA/LR3) nel Remote LINK. Verifica
che le batterie siano inserite nel modo corretto, come
indicato all'interno del vano.
3. Riposiziona il coperchio batterie.
Impostazione di una connessione accoppiata
Le seguenti istruzioni si applicano solamente se Remote LINK
non è stato connesso ad un TomTom LINK 300/310. Premi un
tasto qualsiasi per accendere Remote LINK e consulta la
sezione “Descrizione di Remote LINK” per controllare lo stato
del dispositivo.
Se il dispositivo non è accoppiato con un LINK 300/310,
procedi come segue.
1. Verifica che LINK 300/310 sia installato correttamente nel
veicolo.
2. Accendi il motore.
3. Verifica che non vi siano altri veicoli con un LINK 300/310
installato entro una distanza di 30 metri.
4. Premi un pulsante qualsiasi su Remote LINK per
accenderlo.
Se i LED su tutti i tre pulsanti lampeggiano, il dispositivo
non è accoppiato; pertanto, devi continuare con la fase
successiva.
Remote
LINK
IT
23
Page 23

Borna_WorkingTime.book Page 24 Thursday, January 21, 2010 9:54 AM
Preparazione di Remote LINK
5. Premi contemporaneamente due pulsanti qualsiasi finché
non avverti un segnale acustico.
Remote LINK inizia a cercare LINK 300/310 e il LED di
connessione inizia a lampeggiare velocemente. La ricerca
può impiegare circa un minuto prima che venga stabilita
una connessione.
Nota: per controllare se è stata stabilita una connessione,
premi un tasto qualsiasi. Se è stata stabilita una connessione,
il LED Connessione si accende. Se resta inattivo per più di 10
secondi, il Remote LINK si spegne.
Se non è stata stabilita alcuna connessione, il LED si spegne.
Per stabilire una connessione, ripeti le fasi 1-4 oppure visita il
sito www.tomtomwork.com/connect-remotelink per metodi di
connessione alternativi.
Ripristino di Remote LINK
IT
Se Remote LINK è già stato accoppiato ma non funziona
correttamente oppure è accoppiato con il dispositivo
sbagliato, puoi ripristinare Remote LINK con le impostazioni
predefinite di fabbrica.
1. Premi un tasto qualsiasi per accendere il dispositivo.
2. Premi contemporaneamente due pulsanti qualsiasi finché
non avverti un segnale acustico.
Remote LINK si spegne. Per accoppiare il dispositivo con
LINK 300/310, leggi e segui le istruzioni indicate nella
sezione Impostazione di una connessione accoppiata.
24
Page 24

Borna_WorkingTime.book Page 25 Thursday, January 21, 2010 9:54 AM
Preparazione di Remote LINK
Descrizione di Remote LINK
Luce spenta - Remote LINK è
spento.
Il LED di connessione
lampeggia - Remote LINK sta
cercando un LINK 300/310.
Il LED di connessione è
acceso - Remote LINK è
connesso ad un LINK 300/310.
Il LED di avvertenza batteria
in esaurimento lampeggia -
La batteria sta per esaurirsi e
sarà necessario sostituirla.
Tutti i LED dei pulsanti
lampeggiano - Remote LINK
non è accoppiato con un LINK
300/310.
IT
25
Page 25

Borna_WorkingTime.book Page 26 Thursday, January 21, 2010 9:54 AM
Preparazione di Remote LINK
Installazione di Remote LINK
Per installare Remote LINK nel veicolo, utilizza prima il
cuscinetto adesivo per fissare il supporto al cruscotto o su altra
superficie adeguata che non interferisca con la visualizzazione
di guida.
Importante: non montare Remote LINK nell'area di gonfiaggio
airbag o nell'area di impatto della testa o delle ginocchia.
Cerca attentamente una posizione che non interferisca con i
display, l'apparecchiatura di sicurezza e i comandi.
1. Per creare un'installazione permanente, fissa prima il
blocco di fissaggio al supporto.
IT
Nota: per rimuovere Remote LINK dal supporto, premi
delicatamente la linguetta sul retro del blocco di fissaggio,
quindi rimuovi il dispositivo.
2. Fissa il supporto su una superficie pulita e piana usando il
cuscinetto adesivo.
26
Page 26

A
D
E
F
G
H
C
B
Borna_WorkingTime.book Page 27 Thursday, January 21, 2010 9:54 AM
Utilizzo di Remote LINK
Utilizzo di
Re-
Remote LINK consente di generare rapporti sull'orario di
lavoro per più dipendenti. I rapporti sono possibili solamente
quando Remote LINK è connesso a LINK 300/310.
A LED di connessione
B LED di avvertenza
batteria in
esaurimento
C Lavoro (inizio
lavoro/fine pausa)
D Fine (fine lavoro/fine
pausa senza inizio
lavoro)
E Pausa
F LED codice ID
G Lettore codice ID
H Codice ID
1. Premi un pulsante qualsiasi per accendere Remote LINK e
connetterti ad esso.
2. Attendi finché il LED di connessione non si accende.
3. Premi il pulsante per lo stato lavoro che desideri segnalare.
4. Posiziona il codice ID della prima persona sul lettore codice ID. La
Il pulsante LED si accende e il LED del lettore codice ID
comincia a lampeggiare.
generazione corretta di un rapporto viene confermata con un
segnale acustico. Per ogni persona aggiuntiva, ripeti le fasi 3 e 4.
mote
LINK
IT
27
Page 27

Borna_WorkingTime.book Page 28 Thursday, January 21, 2010 9:54 AM
Cómo preparar su Remote LINK
Cómo
preparar
Insertar las pilas
su Remote
LINK
1. Para abrir el compartimento de las pilas, sostenga los
laterales de Remote LINK y presione el seguro de la parte
posterior.
2. Introduzca las pilas (2 x AAA/LR3) en Remote LINK.
Asegúrese de que introduce las pilas correctamente, tal y
como se muestra en el interior del compartimento.
3. Coloque nuevamente la cubierta de la pila.
Cómo establecer una conexión asociada
Las siguientes instrucciones solo son aplicables si Remote
LINK no se ha conectado a un TomTom LINK 300/310. Pulse
cualquier tecla para encender Remote LINK y consulte "Cómo
interpretar las luces de Remote LINK" para comprobar el
estado del dispositivo.
Si el dispositivo no está asociado a un LINK 300/310, haga lo
siguiente.
1. Asegúrese de que el LINK 300/310 se ha instalado
correctamente en el vehículo.
ES
2. Dé el contacto.
3. Asegúrese de que no haya otros vehículos con un
LINK300/310 instalado en un radio de 30 metros de
distancia.
4. Pulse cualquier tecla de Remote LINK para encenderlo.
Si los LED de los tres botones parpadean, el dispositivo no
estará asociado y deberá continuar con el siguiente paso.
28
Page 28

Borna_WorkingTime.book Page 29 Thursday, January 21, 2010 9:54 AM
Cómo preparar su Remote LINK
5. Pulse dos botones a la vez (cualquiera) hasta que escuche
un sonido.
Remote LINK comenzará a buscar su LINK 300/310 y el LED
de conexión comenzará a parpadear rápidamente. La
búsqueda puede tardar aproximadamente un minuto antes
de que se establezca una conexión.
Nota: Para comprobar si se ha establecido una conexión,
pulse cualquier tecla. Si se ha establecido conexion, el LED de
Conexion se encendera. Si no utiliza su Remote LINK durante
mas de 10 segundos se apagara.
Si no se establece ninguna conexión, el LED se apagará.
Para establecer una conexión, repita los pasos del 1 al 4 o
visite www.tomtomwork.com/connect-remotelink para
obtener información sobre otros métodos de conexión.
Reinicie su Remote LINK
Si su Remote LINK ya está asociado pero no funciona
correctamente o si está asociado con el dispositivo
equivocado, puede reajustar Remote LINK a la configuración
de fábrica predeterminada.
1. Pulse cualquier tecla para encender el dispositivo.
2. Pulse otros dos botones a la vez hasta que escuche un
sonido.
Su Remote LINK se apagará. Para asociar el dispositivo con
el LINK 300/310, lea las instrucciones siguientes que
encontrará en Cómo establecer una conexión asociada.
ES
29
Page 29

Borna_WorkingTime.book Page 30 Thursday, January 21, 2010 9:54 AM
Cómo preparar su Remote LINK
Cómo interpretar las luces de Remote LINK
No hay ninguna luz - Remote
LINK está apagado.
El LED de conexión parpadea
- Remote LINK está buscando
un LINK 300/310.
El LED de conexión está
encendido - Remote LINK está
conectado a un LINK 300/310.
El LED de aviso de batería
baja parpadea - El nivel de
carga de la batería es bajo y
ES
debe sustituir las pilas.
Todos los LED de los botones
parpadean - Remote LINK no
está asociado a un LINK 300/
310.
30
Page 30

Borna_WorkingTime.book Page 31 Thursday, January 21, 2010 9:54 AM
Cómo preparar su Remote LINK
Cómo instalar Remote LINK
Para instalar Remote LINK en su vehículo, en primer lugar
utilice la almohadilla adhesiva para fijar la montura en el
salpicadero o en otra superficie adecuada que no interfiera con
la visión de la carretera del conductor.
Importante: No monte Remote LINK en la zona de inflado de
los airbag o en la zona de impacto de la cabeza o las rodillas.
Trate de encontrar una posición en la que no se interfiera con
pantallas, equipo de seguridad y controles.
1. Si desea instalar el dispositivo de manera permanente,
acople el bloqueo de seguridad en la montura.
Nota: Para retirar Remote LINK de la montura, presione
suavemente el seguro de la parte posterior del bloqueo de
seguridad y retire el dispositivo.
2. Coloque la montura en una superficie limpia y llana con la
ayuda de una almohadilla adhesiva.
ES
31
Page 31

A
D
E
F
G
H
C
B
Borna_WorkingTime.book Page 32 Thursday, January 21, 2010 9:54 AM
Uso de Remote LINK
Uso
de
Remote
El Remote LINK le permite obtener informes de tiempo de
LINK
trabajo de varios empleados. La obtención de informes solo es
posible cuando Remote LINK está conectado al LINK 300/310.
A LED de conexión
B LED de aviso de
batería baja
C Trabajo (comenzar
trabajo/finalizar
descanso)
D Finalizar (finalizar
trabajo/finalizar
descanso sin
reanudar el trabajo)
E Descanso
F LED de tarjeta de
identificación
G Lector de tarjetas de
identificación
H Tarjeta de
ES
1. Pulse cualquier botón para encender y conectar Remote LINK.
2. Espere hasta que se encienda el LED de conexión.
3. Pulse el botón del estado del trabajo del que desee
informar. El botón LED se enciende y el lector de
identificación LED comienza a parpadear.
4. Coloque la tarjeta de identificación de la primera persona en el
lector de tarjetas de identificación. Se emite un aviso acústico para
confirmar que se ha generado correctamente un informe. Para
cada persona adicional, repita los pasos 3 y 4.
32
identificación
Page 32

Borna_WorkingTime.book Page 33 Thursday, January 21, 2010 9:54 AM
Preparar o seu Remote LINK
Preparar
o seu
Inserir as pilhas
1. Segure os lados do Remote LINK e prima a patilha de
encaixe na parte posterior do equipamento para abrir o
compartimento das pilhas.
2. Coloque as pilhas (2 x AAA/LR3) no Remote LINK.
Certifique-se de que coloca as pilhas com a polaridade
correcta, tal como se indica no interior do compartimento
das pilhas.
3. Volte a colocar a tampa do compartimento das pilhas.
Estabelecer uma ligação de emparelhamento
As instruções que se seguem só se aplicam caso o seu
Remote LINK não tenha sido ligado a um TomTom LINK 300/
310. Prima qualquer botão para ligar o seu Remote LINK e
consulte "Compreender o seu Remote LINK" para verificar o
estado do seu equipamento.
Se o equipamento não estiver emparelhado com um LINK 300/
310, faça então o seguinte.
1. Certifique-se de que o LINK 300/310 está devidamente
instalado na viatura.
2. Ligue a ignição.
3. Verifique que não há nenhum outro veículo com LINK 300/
310 instalado dentro de 30 metros.
4. Prima uma tecla qualquer no seu Remote LINK para ligá-lo.
Se os LEDs dos três botões estiverem a piscar, então o
equipamento não se encontra emparelhado e tem de
prosseguir para o passo seguinte.
Remote
LINK
PT
33
Page 33

Borna_WorkingTime.book Page 34 Thursday, January 21, 2010 9:54 AM
Preparar o seu Remote LINK
5. Prima quaisquer dois botões em simultâneo até ouvir um
som.
O Remote LINK começa a procurar o seu LINK 300/310 e o
LED indicador de ligação começa a piscar rapidamente.
Esta busca poderá demorar cerca de um minuto antes de
ser estabelecida uma ligação.
Nota: para verificar se foi estabelecida uma ligação, prima
uma tecla qualquer. Se uma conexão for estabelecida, o LED
de conexão estará ligada. Se não usar o Remote LINK durante
mais de 10 segundos, desligará.
Se não tiver sido estabelecida qualquer ligação, o LED apagarse-á.
Para estabelecer uma ligação, repita os passos 1 a 4 ou vá a
www.tomtomwork.com/connect-remotelink para obter
métodos alternativos de ligação.
Reiniciar o seu Remote LINK
Se o seu Remote LINK já se encontra emparelhado mas não
funciona correctamente, ou se está emparelhado com o
equipamento errado, pode repor as predefinições de fábrica
no Remote LINK.
1. Prima uma tecla qualquer para ligar o equipamento.
2. Prima quaisquer dois botões em simultâneo até ouvir um
som.
O seu Remote LINK desliga-se. Para emparelhar o
equipamento ao LINK 300/310, leia e siga as instruções
descritas em \qEstabelecer uma ligação de
PT
emparelhamento\q.
34
Page 34

Borna_WorkingTime.book Page 35 Thursday, January 21, 2010 9:54 AM
Preparar o seu Remote LINK
Compreender o seu Remote LINK
Indicadores apagados - o
Remote LINK está desligado.
LED indicador de ligação a
piscar - o Remote LINK está a
procurar um LINK 300/310.
LED indicador de ligação
aceso - o Remote LINK está
ligado a um LINK 300/310.
LED indicador de pilhas
fracas a piscar - as pilhas
estão fracas e é necessário
substitui-las.
LEDs de todos os botões a
piscarem - o Remote LINK
não está emparelhado com
um LINK 300/310.
PT
35
Page 35

Borna_WorkingTime.book Page 36 Thursday, January 21, 2010 9:54 AM
Preparar o seu Remote LINK
Instalar o seu Remote LINK
Para instalar o Remote LINK na sua viatura, utilize primeiro um
disco adesivo para fixar o suporte no tablier ou noutra
superfície adequada que não interfira com a visão do condutor
da estrada.
Importante: não monte o Remote LINK na zona de insuflação
dos airbags ou na de impacto da cabeça ou dos joelhos.
Procure cuidadosamente uma localização que não interfira
com ecrãs, equipamentos de segurança ou comandos.
1. Para criar uma instalação permanente, fixe primeiro o
bloqueio de segurança ao suporte.
Nota: para retirar o seu Remote LINK do suporte, prima
cuidadosamente a patilha de encaixe na parte posterior do
bloqueio de segurança e depois retire o equipamento.
2. Fixe o suporte numa superfície limpa e plana, utilizando o
PT
disco adesivo.
36
Page 36

A
D
E
F
G
H
C
B
Borna_WorkingTime.book Page 37 Thursday, January 21, 2010 9:54 AM
Utilizar o seu Remote LINK
Utilizar o
seu
O seu Remote LINK permite comunicar os tempos de trabalho
de vários funcionários. A comunicação só é possível quando o
seu Remote LINK está ligado ao LINK 300/310.
A LED indicador de
ligação
B LED indicador de
pilhas fracas
C Trabalho (iniciar
trabalho/terminar
pausa)
D Terminar (terminar
trabalho/terminar pausa
sem iniciar trabalho)
E Pausa
F LED do identificador RFID
G Leitor de
identificadores RFID
H Identificador RFID
1. Prima qualquer botão para iniciar e ligar o seu Remote
LINK.
2. Aguarde até o LED indicador de ligação acender.
3. Prima o botão correspondente ao estado do trabalho que
4. Coloque o identificador RFID do primeiro funcionário no
pretende comunicar. O botão LED se liga e o LED da chave
de identificação começa a piscar.
leitor de identificadores RFID. Se a comunicação for bem
sucedida, é confirmada através de um som. Repita os
passos 3 e 4 para cada funcionário.
37
Remote
LINK
PT
Page 37

Borna_WorkingTime.book Page 38 Thursday, January 21, 2010 9:54 AM
Addendum
Adden-
dum Important Safety Notices and Warnings
This TomTom WORK product is Bluetooth
environments such as hospitals or airplanes.
CE Marking
here: www.tomtom.com/legal.
WEEE directive
This symbol on the product or its packaging indicates that this product shall not be
treated as household waste. In line with EU Directive 2002/96/EC for waste electrical and
electronic equipment (WEEE), this electrical product must not be disposed of as
unsorted municipal waste. Please dispose of this product by returning it to the point of
sale or to your local municipal collection point for recycling.
This Document
Great care was taken in preparing this manual. Constant product development may
mean that some information is not entirely up to date. The information in this document
is subject to change without notice.
TomTom shall not be liable for technical or editorial errors or omissions contained
herein; nor for incidental or consequential damages resulting from the performance or
use of this material. This document contains information protected by copyright. No
part of this document may be photocopied or reproduced in any form without prior
written consent from TomTom N.V.
FCC Information for the User
manual - may cause interference to radio communications and television reception.
This device has been tested and found to comply with the limits for a Class B digital
device, pursuant to Part 15 of the FCC Rules. These limits are designed to provide
reasonable protection against harmful interference in a residential installation. This
equipment generates, uses and can radiated radio frequency energy and, if not installed
and used in accordance with the instructions, may cause harmful interference to radio
communications. However, there is no guarantee that interference will not occur in a
particular installation. If this equipment does cause harmful interference to radio or
This equipment complies with the requirements for CE marking when
used in a residential, commercial, vehicular or light industrial
environment.
R&TTE directive
Hereby, TomTom declares that this device is in compliance with the
essential requirements and other relevant provisions of the EU
Directive 1999/5/EC. The declaration of conformity can be found
This product contains a transmitter which must not be co-located or
simultaneously operated in conjunction with any other transmitter.
Radio and Television Interference
This equipment radiates radio frequency energy and if not used
properly - that is, in strict accordance with the instructions in this
TM
enabled. Do not use this product in certain
38
Page 38

Borna_WorkingTime.book Page 39 Thursday, January 21, 2010 9:54 AM
Addendum
television reception, which can be determined by turning the equipment off and on, the
user is encouraged to try to correct the interference by one or more of the following
measures:
• Reorient or relocate the receiving antenna.
• Increase the separation distance between the equipment and the receiver.
• Connect the equipment into an outlet on a circuit different from that to which the
receiver is connected.
• Consult an experienced radio/TV technican for help.
Changes or modifications not expressly approved by the party responsible for
compliance could void the user‘s authority to operate the equipment.
Important
If the user modifies the equipment or its peripherals in any way, and these modifications
are not approved by TomTom, the FCC may withdraw the user’s right to operate the
equipment. For customers in the USA, the following booklet prepared by the Federal
Communications Commission may be of help: “How to Identify and Resolve Radio-TV
Interference Problems”. This booklet is available from the US Government Printing
Office, Washington, DC 20402. Stock No 004-000-00345-4.
FCC Declaration of Conformity
Tested to Comply with FCC Standards for Home or Office Use
FCC ID: S4L-REMOTE
This device complies with part 15 of the FCC Rules. Operation is subject to the following
two conditions:
1. This device may not cause harmful interference.
2. This device must accept any interference received, including interference that may
cause undesired operation.
To reduce potential radio interference to other users, the antenna type and its gain
should be so chosen that the equivalent isotropically radiated power (e.i.r.p.) is not
more than that permitted for successful communication.
Responsible party in North America
TomTom, Inc., 150 Baker Avenue Extension, Concord, MA 01742
Tel: 1-866-459-3499
39
Page 39

Borna_WorkingTime.book Page 40 Thursday, January 21, 2010 9:54 AM
Anhang
Anhang
Wichtige Sicherheitshinweise und -warnungen
Dieses TomTom WORK-Produkt ist Bluetooth
Umgebungen wie Krankenhäusern oder Flugzeugen nicht benutzt werden.
CE-Kennzeichnung
hier: www.tomtom.com/legal.
EEAG-Richtlinie
Dieses Symbol auf dem Produkt oder der Produktverpackung zeigt an, dass das Produkt
nicht als Haushaltsabfall zu entsorgen ist. In Übereinstimmung mit EU-Richtlinie 2002/
96/EG über Elektro- und Elektronik-Altgeräte (EEAG) darf dieses Elektrogerät nicht als
unsortierter Siedlungsabfall entsorgt werden. Entsorgen Sie dieses Produkt bitte, indem
Sie es dort zurückgeben, wo Sie es erworben haben, oder bei einer kommunalen
Recycling-Sammelstelle in Ihrer Nähe.
Dieses Dokument
Dieses Handbuch wurde mit größtmöglicher Sorgfalt erstellt. Durch die fortlaufende
Produktentwicklung kann es jedoch vorkommen, dass einige darin enthaltene
Informationen nicht mehr vollständig dem neuesten Entwicklungsstand entsprechen.
Die in diesem Dokument enthaltenen Informationen können jederzeit ohne
Vorankündigung geändert werden.
TomTom haftet nicht für technische oder redaktionelle Fehler und Auslassungen sowie
für Neben- oder Folgeschäden, die durch die Nutzung bzw. Verwendung dieses
Dokuments entstehen. Die in diesem Dokument enthaltenen Informationen sind
urheberrechtlich geschützt. Kein Teil dieses Dokuments darf ohne vorherige schriftliche
Genehmigung von TomTom N.V. fotokopiert oder anderweitig reproduziert werden.
Dieses Gerät entspricht den Anforderungen der CE-Kennzeichnung,
wenn es in Wohn-, Gewerbe-, Fahrzeug- oder
Leichtindustrieumgebungen eingesetzt wird.
R&TTE-Direktive
Hiermit erklärt TomTom, dass dieses Gerät die grundlegenden
Anforderungen und anderen relevanten Bestimmungen der EURichtlinie 1999/5/EG erfüllt. Die Konformitätserklärung finden Sie
TM
-fähig. Deshalb darf es in bestimmten
40
Page 40

Borna_WorkingTime.book Page 41 Thursday, January 21, 2010 9:54 AM
Addendum
Adden-
TM
Ce produit TomTom WORK est compatible Bluetooth
produit dans certains environnements, tels que les hôpitaux ou les avions.
Marque CE
Directive DEEE
Ce symbole sur le produit ou son emballage indique que ce produit ne doit pas être
traité comme un déchet domestique. Conformément à la directive européenne 2002/96/
CE relative aux déchets d'équipements électriques et électroniques (DEEE), ce produit
électrique ne doit en aucun cas être mis au rebut sous forme de déchet municipal non
trié. Veuillez vous débarrasser de ce produit en le renvoyant à son point de vente ou au
point de ramassage local dans votre municipalité, à des fins de recyclage.
À propos de ce document
Le plus grand soin a été apporté à la préparation de ce manuel. Cependant, en raison
du développement continuel du produit, certaines informations peuvent ne pas être
tout à fait à jour. Les informations publiées dans ce document sont susceptibles d'être
modifiées sans préavis.
TomTom décline toute responsabilité en cas d'omissions ou d'erreurs techniques ou
d'édition dans le présent manuel, ainsi qu'en cas de dommages accidentels ou indirects
résultant du contenu ou de l'utilisation de ce document. Ce document contient des
informations protégées par droits d'auteur. Toute photocopie ou reproduction, sous
quelque forme que ce soit, de tout ou partie de ce document est soumise à l'autorisation
écrite préalable de TomTom N.V.
Ce produit répond aux exigences de la marque CE dans le cadre d'un
environnement résidentiel, commercial ou d'industrie légère.
Directive R&TTE
Par la présente, TomTom déclare que cet appareil est conforme aux
principales exigences et autres dispositions applicables de la
directive UE 1999/5/CE. La déclaration de conformité est disponible
ici : www.tomtom.com/legal.
. Il est interdit d'utiliser ce
dumImportant : avis de sécurité et avertissements
41
Page 41

Borna_WorkingTime.book Page 42 Thursday, January 21, 2010 9:54 AM
Addendum
Adden-
dum Belangrijke veiligheidsmededelingen en -waarschuwingen
Dit TomTom WORK-product is voorzien van Bluetooth
van dit product is in bepaalde ruimten niet toegestaan, zoals in ziekenhuis of vliegtuigen.
CE-markering
AEEA-richtlijn
Met dit symbool op het product of de bijbehorende verpakking wordt aangegeven dat
dit product niet mag worden verwerkt als huishoudelijk afval. Conform de EU-richtlijn
2002/96/EC voor afgedankte elektrische en elektronische apparatuur (AEEA), mag dit
elektrische product niet worden afgevoerd als ongesorteerd gemeentelijk afval. Voor
een correcte afvalverwerking moet dit product worden teruggebracht naar het
verkooppunt of naar het lokale gemeentelijke inzamelpunt voor recycling.
Dit document
Deze handleiding is met de grootste zorg samengesteld. Het kan zijn dat door de
continue productontwikkeling bepaalde informatie niet meer helemaal actueel is. De
informatie in dit document kan zonder voorafgaande kennisgeving worden gewijzigd.
TomTom aanvaardt geen aansprakelijkheid voor technische of redactionele fouten of
omissies in dit document, noch voor incidentele schade of gevolgschade voortvloeiend
uit de prestaties of het gebruik van dit materiaal. Dit document bevat informatie die
wordt beschermd door copyright. Niets uit dit document mag op welke wijze dan ook
worden gefotokopieerd of gereproduceerd zonder voorafgaande schriftelijk
toestemming van TomTom N.V.
Dit apparaat voldoet aan de gestelde eisen van de CE-markering bij
gebruik in een woonomgeving, commerciële of licht industriële
omgeving of in een voertuig.
R&TTE-richtlijn
TomTom verklaart hierbij dat dit apparaat voldoet aan alle essentiële
vereisten en overige relevante bepalingen in EU-richtlijn 1999/5/EC.
De conformiteitsverklaring vind je hier: www.tomtom.com/legal.
TM
-functionaliteit. Het gebruik
42
Page 42

Borna_WorkingTime.book Page 43 Thursday, January 21, 2010 9:54 AM
Appendice
Appen-
TM
Questo prodotto TomTom WORK è abilitato Bluetooth
prodotto in determinati ambienti quali ospedali o aeroplani.
Marchio CE
Direttiva RAEE
Questo simbolo presente sul prodotto o sulla sua confezione indica che il prodotto non
deve essere smaltito fra i rifiuti domestici. Conformemente alla direttiva europea 2002/
96/EC per i rifiuti di apparecchiature elettriche ed elettroniche (RAEE), questo prodotto
elettrico non deve essere smaltito fra i rifiuti di raccolta indifferenziata. Questo prodotto
deve essere smaltito tramite restituzione al punto vendita o al punto di raccolta locale
per il riciclaggio.
Questo documento
Nella preparazione di questo manuale è stata posta estrema attenzione. A causa del
continuo sviluppo dei prodotti, alcune informazioni potrebbero non essere del tutto
aggiornate. Le informazioni di questo documento sono soggette a modifica senza
previa notifica.
TomTom non si assume alcuna responsabilità in merito a errori editoriali od omissioni
ivi contenute, né per danni incidentali o conseguenti derivanti dal contenuto o dall'uso
di questo materiale. Questo documento contiene informazioni protette da copyright. È
vietato fotocopiare o riprodurre qualsiasi parte del presente documento in qualsiasi
forma senza il previo consenso scritto di TomTom N.V.
Questo dispositivo è conforme ai requisiti del marchio CE per utilizzi
in zone residenziali, commerciali, veicolari o industriali leggere.
Direttiva R&TTE
Con la presente, TomTom dichiara che questo dispositivo è
conforme ai requisiti essenziali e alle clausole pertinenti della
Direttiva 1999/5/EC dell'UE. La dichiarazione di conformità può essere
reperita qui: www.tomtom.com/legal.
. Non utilizzare questo
diceInformativa di sicurezza e avvisi importanti
43
Page 43

Borna_WorkingTime.book Page 44 Thursday, January 21, 2010 9:54 AM
Apéndice
Apéndice
Importante: Avisos y advertencias de seguridad
Este producto de TomTom WORK está equipado con Bluetooth
producto en determinados lugares, como, por ejemplo, hospitales o aviones.
Distintivo CE
conformidad puede consultarse aquí: www.tomtom.com/legal.
Directiva WEEE
El símbolo en el producto o su paquete indica que este producto no puede tratarse
como residuo doméstico. Conforme a la Directiva UE 2002/96/CE para residuos de
dispositivos eléctricos y electrónicos (WEEE), este producto eléctrico no debe
eliminarse como residuo municipal común. Para deshacerse de este producto
devuélvalo al punto de venta o a su punto de recogida municipal local para reciclaje.
Este documento
Se han tomado muchas precauciones al redactar este manual. Debido al constante
desarrollo del producto, es posible que algunos detalles no estén totalmente
actualizados. La información incluida en este documento está sujeta a cambios sin
previo aviso.
TomTom no se responsabiliza de los errores técnicos o editoriales ni de las omisiones
del presente documento o los daños accidentales o derivados del desarrollo o del uso
de este material. Este documento contiene información protegida por copyright.
Ninguna parte de este documento podrá ser fotocopiada ni reproducida en forma
alguna sin el consentimiento previo de TomTom N.V.
Este equipo cumple las exigencias del distintivo CE cuando se utiliza
en entornos residenciales, comerciales, vehiculares o industriales
ligeros.
Directiva RTTE
Por la presente, TomTom declara que este dispositivo se ha fabricado
en conformidad con los requisitos esenciales y otras provisiones
relevantes de la Directiva de la UE 1999/5/CE. La declaración de
TM
. No utilice este
44
Page 44

Borna_WorkingTime.book Page 45 Thursday, January 21, 2010 9:54 AM
Adenda
Aden-
Avisos e informações de segurança importantes
Este produto TomTom WORK está equipado com Bluetooth
em determinados locais, tais como hospitais ou aeronaves.
Marca CE
(em inglês) está disponível em: www.tomtom.com/legal.
Directiva REEE
A presença deste símbolo no produto ou na respectiva embalagem indica que este
produto não deve ser tratado como um resíduo doméstico. Em conformidade com a
Directiva da UE 2002/96/CE sobre os resíduos de equipamentos eléctricos e
electrónicos (REEE), este produto eléctrico não deve ser eliminado junto com os
resíduos indiferenciados. No final da vida do produto, entregue-o no ponto de venda ou
nos pontos próprios de recolha municipal para ser reciclado.
Este documento
Foi empregue um grande cuidado na preparação deste manual. No entanto, o
desenvolvimento contínuo dos produtos poderá significar que algumas informações
estejam ligeiramente desactualizadas. As informações incluídas neste documento estão
sujeitas a alteração sem aviso prévio.
A TomTom não se responsabiliza por erros técnicos ou editoriais, nem por quaisquer
omissões contidas neste documento, bem como por quaisquer danos acidentais ou
consequentes resultantes do desempenho ou da utilização deste material. Este
documento contém informações protegidas por direitos de autor. Nenhuma parte deste
documento poderá ser fotocopiada ou reproduzida, seja de que forma for, sem a
autorização prévia por escrito da TomTom N.V.
Este equipamento encontra-se em conformidade com os requisitos
da marcação CE para utilização num ambiente residencial, comercial,
veicular ou industrial ligeiro.
Directiva ETRT
A TomTom declara por este meio que este equipamento está em
conformidade com os requisitos fundamentais e outras cláusulas
relevantes da Directiva UE 1999/5/CE. A declaração de conformidade
TM
. Não utilize este produto
da
45
Page 45

Borna_WorkingTime.book Page 46 Thursday, January 21, 2010 9:54 AM
Copyright notices
Copyright
notic-
© 2010 TomTom International BV, The Netherlands. TomTom™ and the "two hands"
es
logo are among the trademarks, applications or registered trademarks owned by
TomTom International B.V. Our limited warranty and end user license agreement for
embedded software apply to this product; you can review both at
www.tomtomwork.com/legal
© 2010 TomTom International BV, Niederlande. TomTom™ und das Logo mit den »zwei
Händen« gehören zu den Warenzeich en, Anwendungen oder registrierten
Markenzeichen von TomTom International B.V. Für dieses Produkt gelten unsere
eingeschränkte Garantie und unsere Endnutzerlizenzvereinbarung für integrierte
Software, die Sie beide auf www.tomtomwork.com/legal einsehen und nachlesen
können.
© 2010 TomTom International BV, The Netherlands. TomTom™ et le logo TomTom
("deux mains") comptent parmi les marques commerciales, les applications ou les
marques déposées de TomTom International B.V. L'utilisation de ce produit est régie
par notre garantie limitée et le contrat de licence utilisateur final relatif aux logiciels
embarqués ; vous pouvez consulter ces deux documents à l'adresse suivante :
www.tomtomwork.com/legal
© 2010 TomTom International BV, Nederland. TomTom™ en het "twee-handenlogo"
maken onderdeel uit van de handelsme rken, applicaties of geregistreerde
handelsmerken in eigendom van TomTom International B.V. Op dit product zijn onze
beperkte garantie en licentieovereenkomst voor de eindgebruiker van toepassing;
beide zijn te vinden op www.tomtomwork.com/legal
© 2010 TomTom International BV, The Netherlands. TomTom™ e il logo delle "due
mani" fanno parte dei marchi, delle applicazioni e dei marchi registrati di proprietà di
TomTom International B.V. La nostra garanzia limitata e il contratto di licenza per
l'utente finale vengono applicati a questo prodotto, è possibile consultarli entrambi
all'indirizzo www.tomtomwork.com/legal
© 2010 TomTom International BV, Países Bajos. TomTom™ y el logotipo "dos manos"
son marcas comerciales, aplicaciones o marcas registradas de TomTom International
B.V. Nuestra garantía limitada y nuestro acuerdo de licencia de usuario final para el
software integrado son de aplicación para este producto; puede consultar ambos en
www.tomtomwork.com/legal
© 2010 TomTom International BV, Países Baixos. TomTom™ e o logótipo das "duas
mãos" fazem parte das marcas comerciais, aplicações ou marcas comerciais registadas
cuja proprietária é a TomTom International B.V. A nossa garantia limitada e contrato de
licença de utilizador final relativas ao software incorporado dizem respeito a este
produto; pode consultar ambos em www.tomtomwork.com/legal
46
Page 46

EN
FR
IT
PT
DE
NL
ES
EN
DE
FR
NL
IT
ES
PT
FCC ID: S4L-REMOTE
product. You can review it at www.tomtom.com/legal
, The
logo, among others, are Trademarks owned by
®
®
TomTom N.V. or one of its subsidiaries. Our End User License Agreement and limited warranty apply to this
©2010 TomTom N.V., The Netherlands. TomTom
Made in Germany
Art.#: 9KG0.002.01 Part #: 5KG0.001.02
Content:
Remote LINK Working Time
Two AAA/LR03 Batteries
One ID key
Mount for fixed installation
User Guide
Inhalt:
Remote LINK Working Time
Zwei Batterien Typ AAA/LR03
Ein ID-Key
Halterung zur Festmontage
Benutzerhandbuch
Remote LINK
Working Time
LINK 300
Sommaire:
Remote LINK Working Time
Deux piles AAA/LR03
Une clé d‘identification
Fixation pour installation fixe
Guide d‘utilisation
Inhoud:
Remote LINK Working Time
Twee AAA/LR03-batterijen
Eén ID-sleutel
Houder voor perm. installatie
Gebruikershandleiding
LINK 310
Contenuto:
Remote LINK Working Time
Due batterie AAA/LR03
Un codice ID
Supporto per installazione fissa
Guida utente
Contenido:
Remote LINK Working Time
Dos pilas AAA/LR03
Una tarjeta de identificación
Montura para una instalación fija
Guía del usuario
Conteúdo:
Remote LINK Working Time
Duas pilhas AAA/LR03
Um identificador RFID
Suporte para instalação fixa
Manual do utilizador
através do TomTom LINK 300/310 instalado na sua viatura.
colaboradores registarem os seus tempos de trabalho
O Remote LINK Working Time permite a diversos
LINK 300/310 instalado en sus vehículos.
dos podrán registrar sus horas de trabajo en el TomTom
Gracias a Remote LINK Working Time varios emplea-
300/310 installato nel veicolo.
sono registrare i propri orari di lavoro tramite TomTom LINK
Con Remote LINK Working Time, più dipendenti pos-
300/310 die in hun voertuig is geïnstalleerd.
werknemers hun werktijden registreren via de TomTom LINK
Met de Remote LINK Working Time kunnen meerdere
LINK 300/310 installé dans leur véhicule.
ployés d’enregistrer leurs temps de travail via le TomTom
Remote LINK Working Time permet à plusieurs em-
installierten TomTom LINK 300/310 erfassen.
Mitarbeiter ihre Arbeitszeiten über den in ihrem Fahrzeug
Mit Remote LINK Working Time können mehrere
LINK 300/310 installed in their vehicle.
are able to register their working times via the TomTom
With Remote LINK Working Time multiple employees
 Loading...