

Page 1

Page 2
Page 3
Part
nr.:
6CHO.OOO.OO
Page 4

User
Gufa
Guide
del
usuario
Guide
d'utilisation
Page 5

You are currently reading the Quick StartGuide. For information on
howtoview
the full manual see Using TomTom HOME on page
20.
Esta leyendolaGuia rapida de inicio.Sidesea
sobre
HOME
como
verelmanual completo, consulte
enlapagina
38.
obtener
informacion
UsodeTomTom
Vous lisez actuellement Ie Guide d'initiation rapide. Pour savoir
comment
Utiliser TomTom HOME en page
accederaumanuel complet, veuillez consulterlapartie
56.
Page 6
TomTom GO Quick Start Guide
@
@
@
English
Espanol 22
Fran9ais 40
Addendum
Warranty
outside the
for
purchases made
US
and Canada
58
62
4
TO
mTOrrf
Page 7
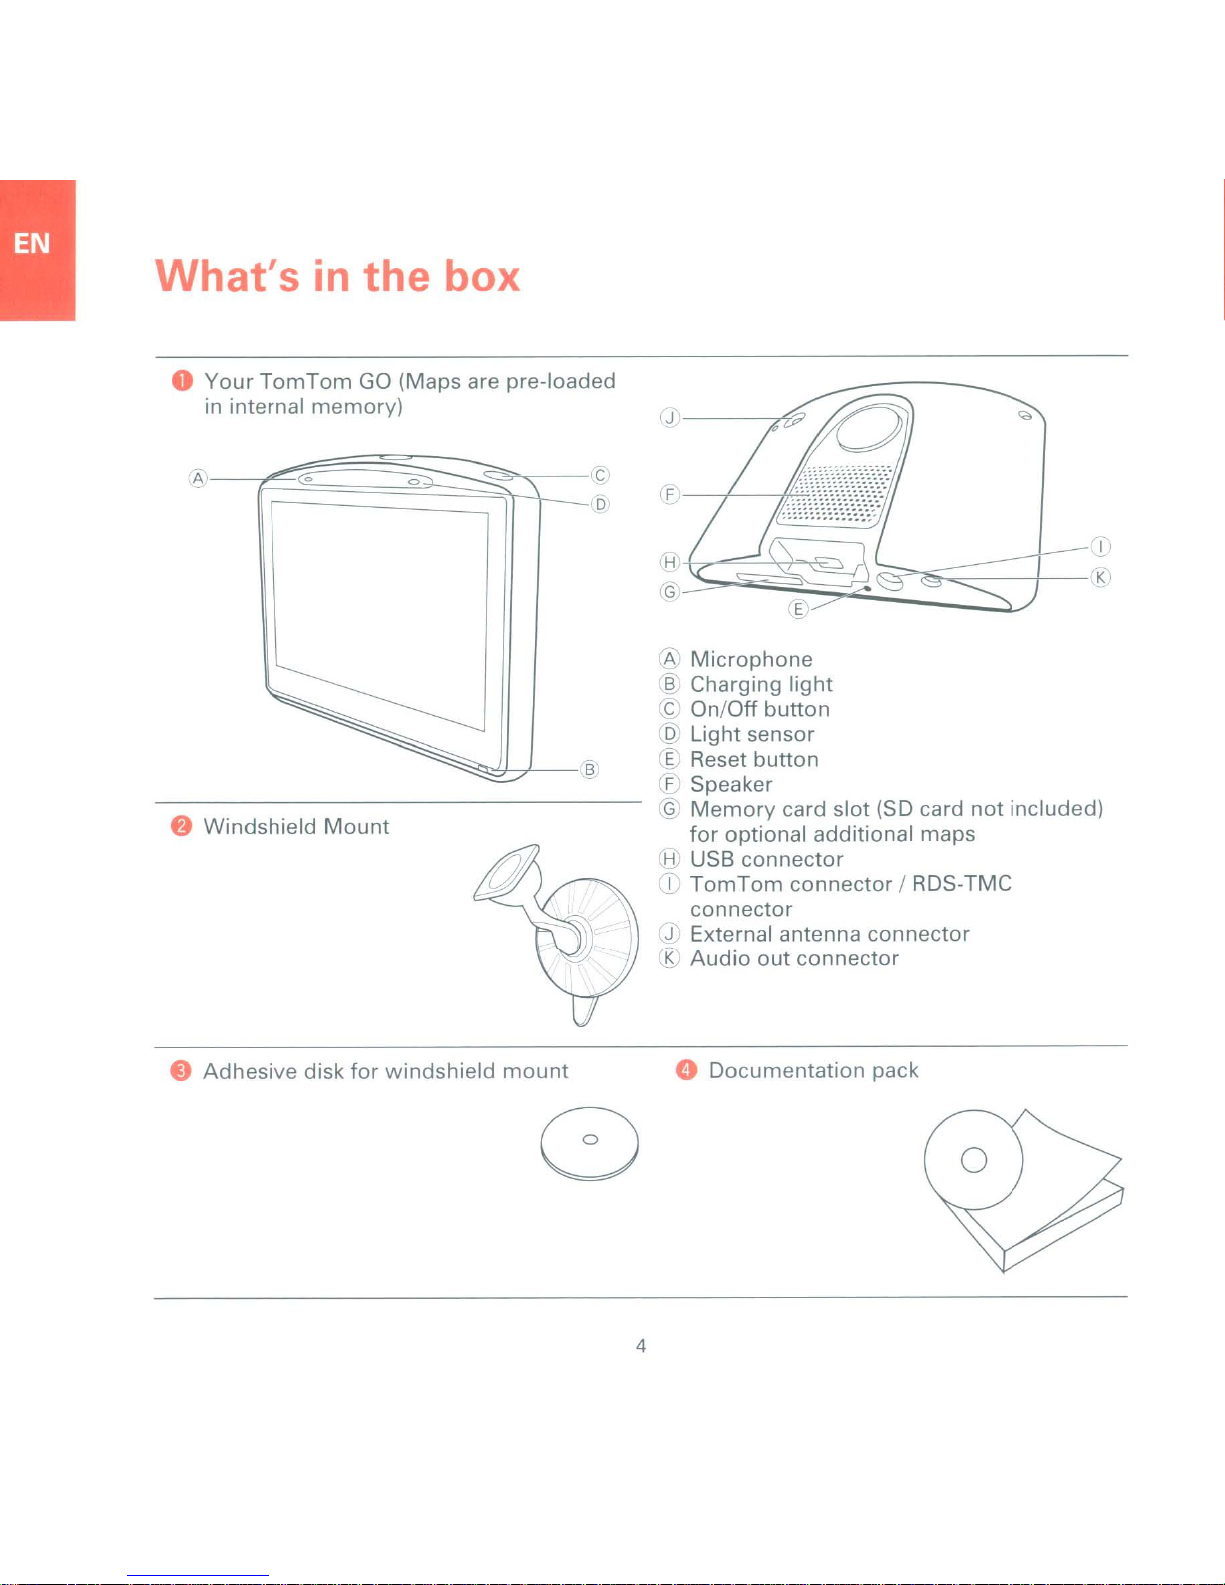
What's
o
Your
TomTom
in internal
in
the box
GO
(Maps are pre-loaded
memory)
J---~,?
A
o
Windshield
Mount
C
D
F
8
G
®
Microphone
B Charging
et
On/Off
K
IE'
light
button
@ Light sensor
r Reset
£;
Speaker
Q
Memory
for
tJ
USB
I
TomTom
connector
,! External antenna
J<
Audio
button
card
slot
(SO
card
optional additional maps
connector
connector
out
connector
/ RDS-TMC
connector
not
included)
«»
Adhesive
disk
for
windshield
mount
o
Documentation
4
pack
Page 8
What's
in
the box
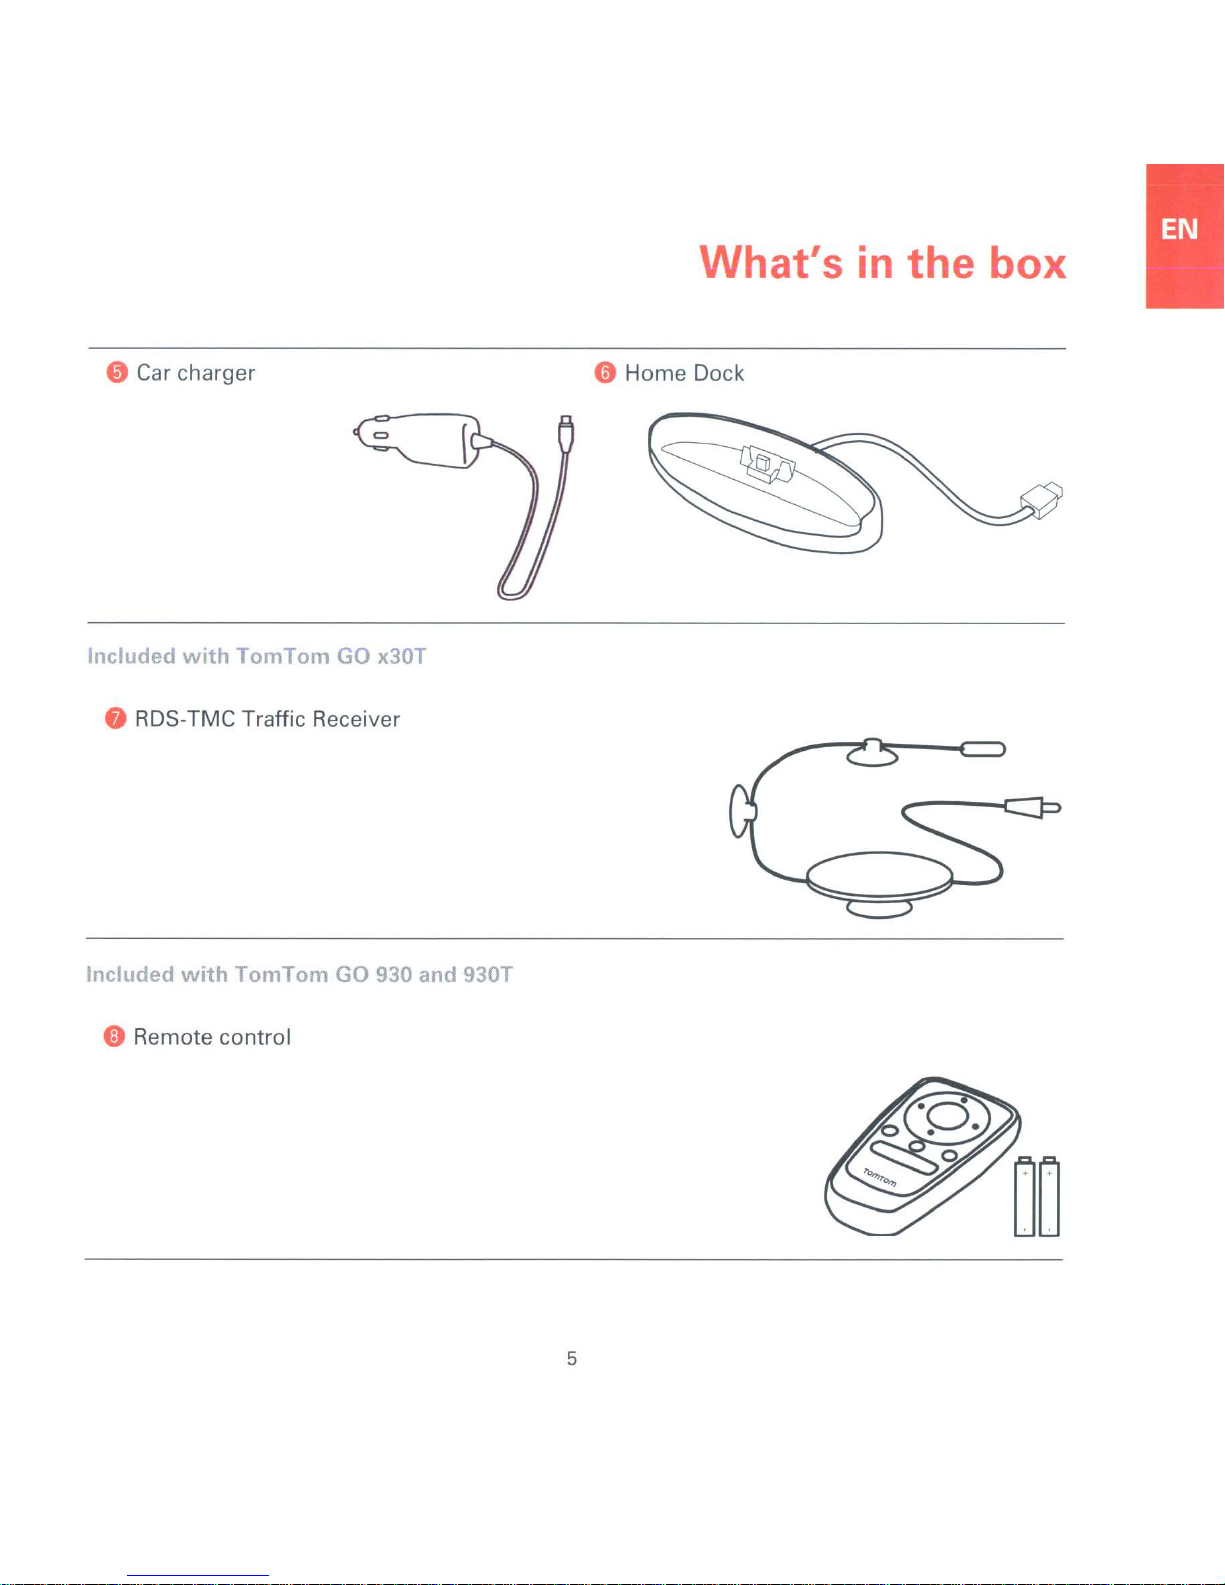
o Car charger
Included
with
TomTom
GO x30T
o RDS-TMC Traffic Receiver
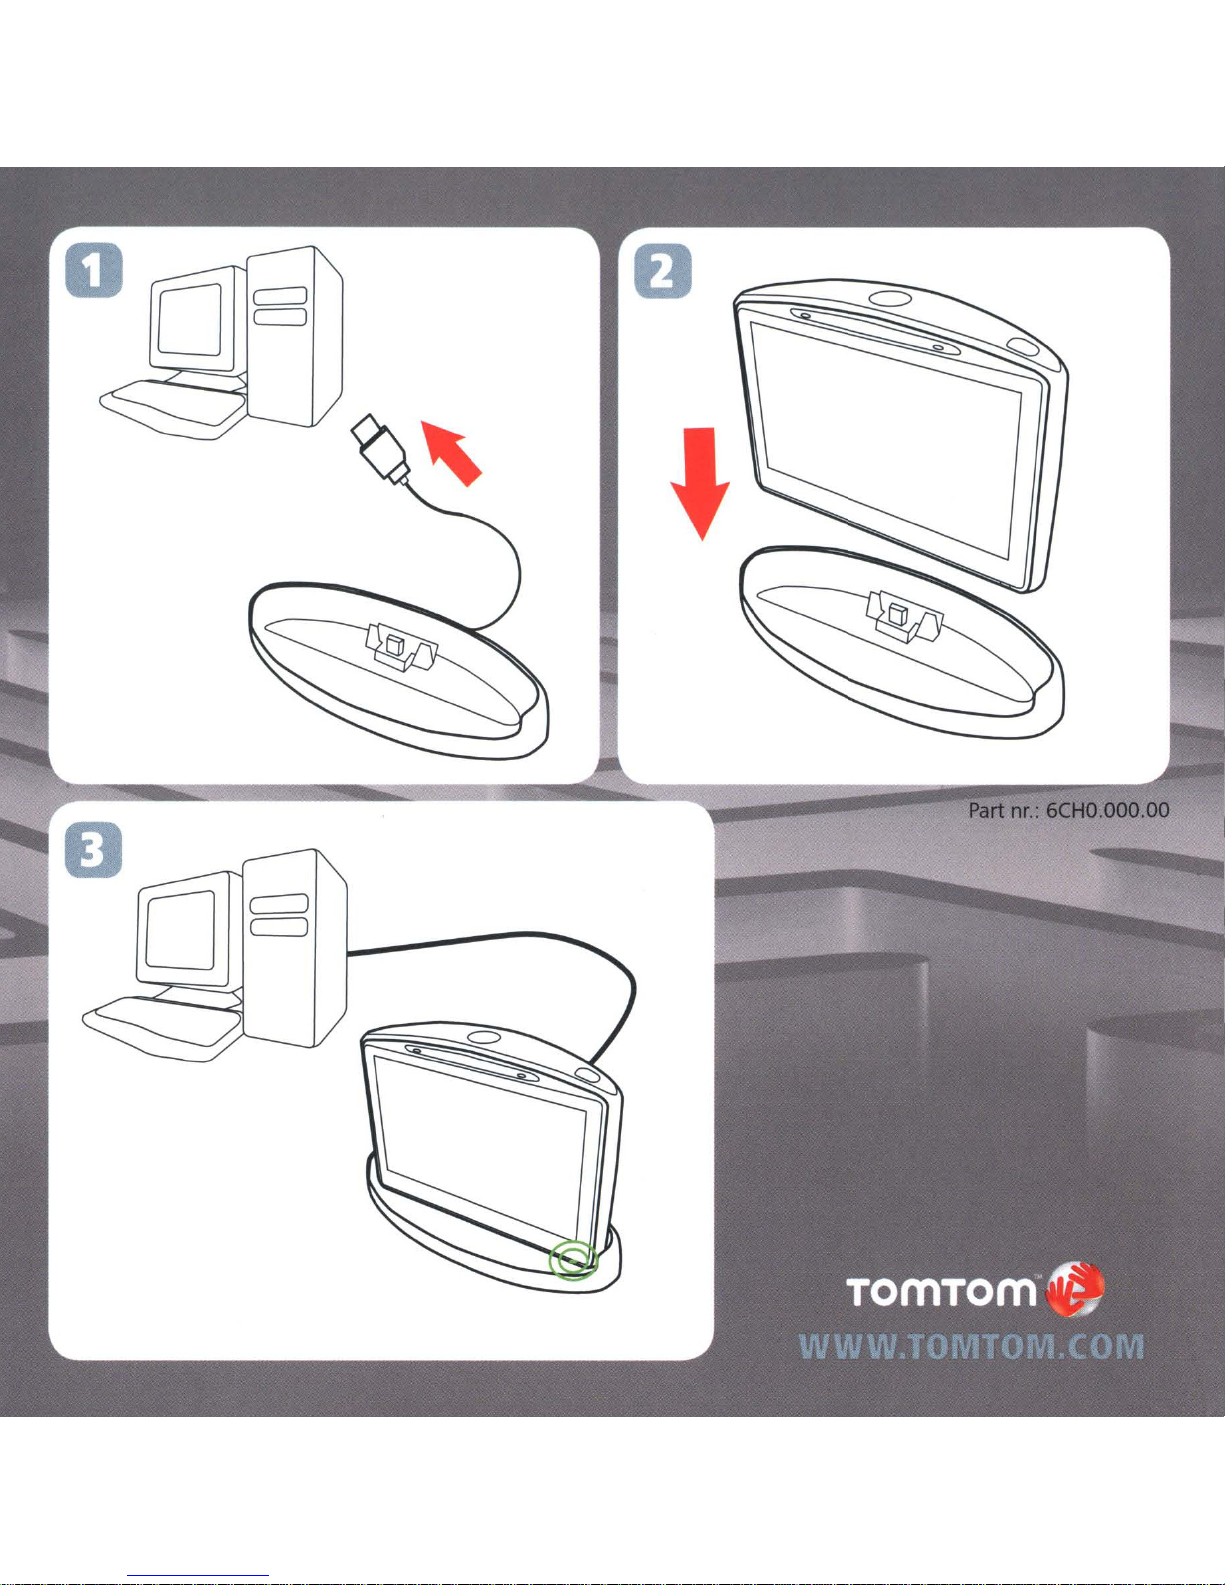
o Home Dock
Included
with
TomTom
o Remote control
GO 930 and 930T
5
Page 9
Before You
Start
...
Important:
You are currently reading the
Quick Start Guide. There is afull version
manual available
Switching
To
switch
and
hold
first
time
while
Note:
If
this happens, press the reset button, then
on the device again.
Setting
To
setupyour
on and
your
the
you
for
your
In rare cases,
up
answerafew
Important:
Take caretoselect the
language, since the language
be used
for
all
asaPDF
fileonthe
off
TomTom
On/Off
switch on, it
button
GO
onoroff, press
for
2 seconds. The
may
take a
devicetostart.
yourGOmay
TomTom
GO
not
you
questionsbytapping
you
menus
and
written
start
need
the
correct
choose will
instructions.
of
the
CD.
short
correctly.
switch
to
screen.
Battery
We
TomTom
to the
charge
When
you
computer.
switch
notes
recommend
that
GO the first
home
you
dock. It takesupto
the
battery
place
your
are askedifyou
If you select
offifyoudonot
you
fully
charge
time
that
you
connect
2 hours
completely.
GO in the
Home
wishtoconnecttothe
No,
the device
tap the screen
for
your
to
Dock,
will
three
minutes. This happens so that the battery can
recharge at a faster rate.
information
For
on connectingtoa
computer,
refer to the installation poster.
Note:
Your TomTom GO uses a
battery
shown
If
of
the default
will
powertoremember
when the device is
you do
time, the
not
charge your GO
next
starting
still
be maintained.
time
screen.
you
small
the last screen
switched
foraprolonged
start
All
off.
your GOitwill
other
device settings
amount
being
of
period
show
it
See
the
Installation Poster
installing
your
TomTom
GOinyour
for
information
on
car.
6
Page 10
Before You Start...
Improving
If
your
minutes
sure that the device
from
When you connect
computer, you can use
download information
positions during the next 7 days. This helps
your
GOtofind
Important:
shielding in the windscreen. This may prevent
your
GO
The
TomTom
for
purchaseasan
improve reception.
Windshield
reception
TomTom
to
tall objects suchasbuildings or trees.
from
GO
takes longer than 5
find
your
current position, make
isinan
your
your
position faster.
Some vehicles have heatreflective
locating
External Antenna Kit (available
accessory) can help
mount
open space away
TomTom
TomTom
about
your
GPS
current position.
GOtoyour
HOME
satellite
to
to
Take careofyour
Never leave
in
view
become
You can set a password
which
your
GO. For
TomTom
It is
importanttotake careofyour
• Your
temperatures and any such exposure may
cause permanent damage.
• Do
• Wipe or
not
any circumstances. Doing so may be
dangerous and will invalidate the warranty.
soft cloth.
your
when you leave the carorthey
an
easy target
must
be entered every
HOME
GOisnot
open the casingofyour
dry
TomTom
TomTom
more
information, see Using
on page
designed
the screenofyour
Do
not
use any liquid cleaners.
GO
GOoraccessories
for
thieves.
for
yourTomTom
20.
for
time
you
GO.
use in extreme
GO
GO
may
GO
start
under
using a
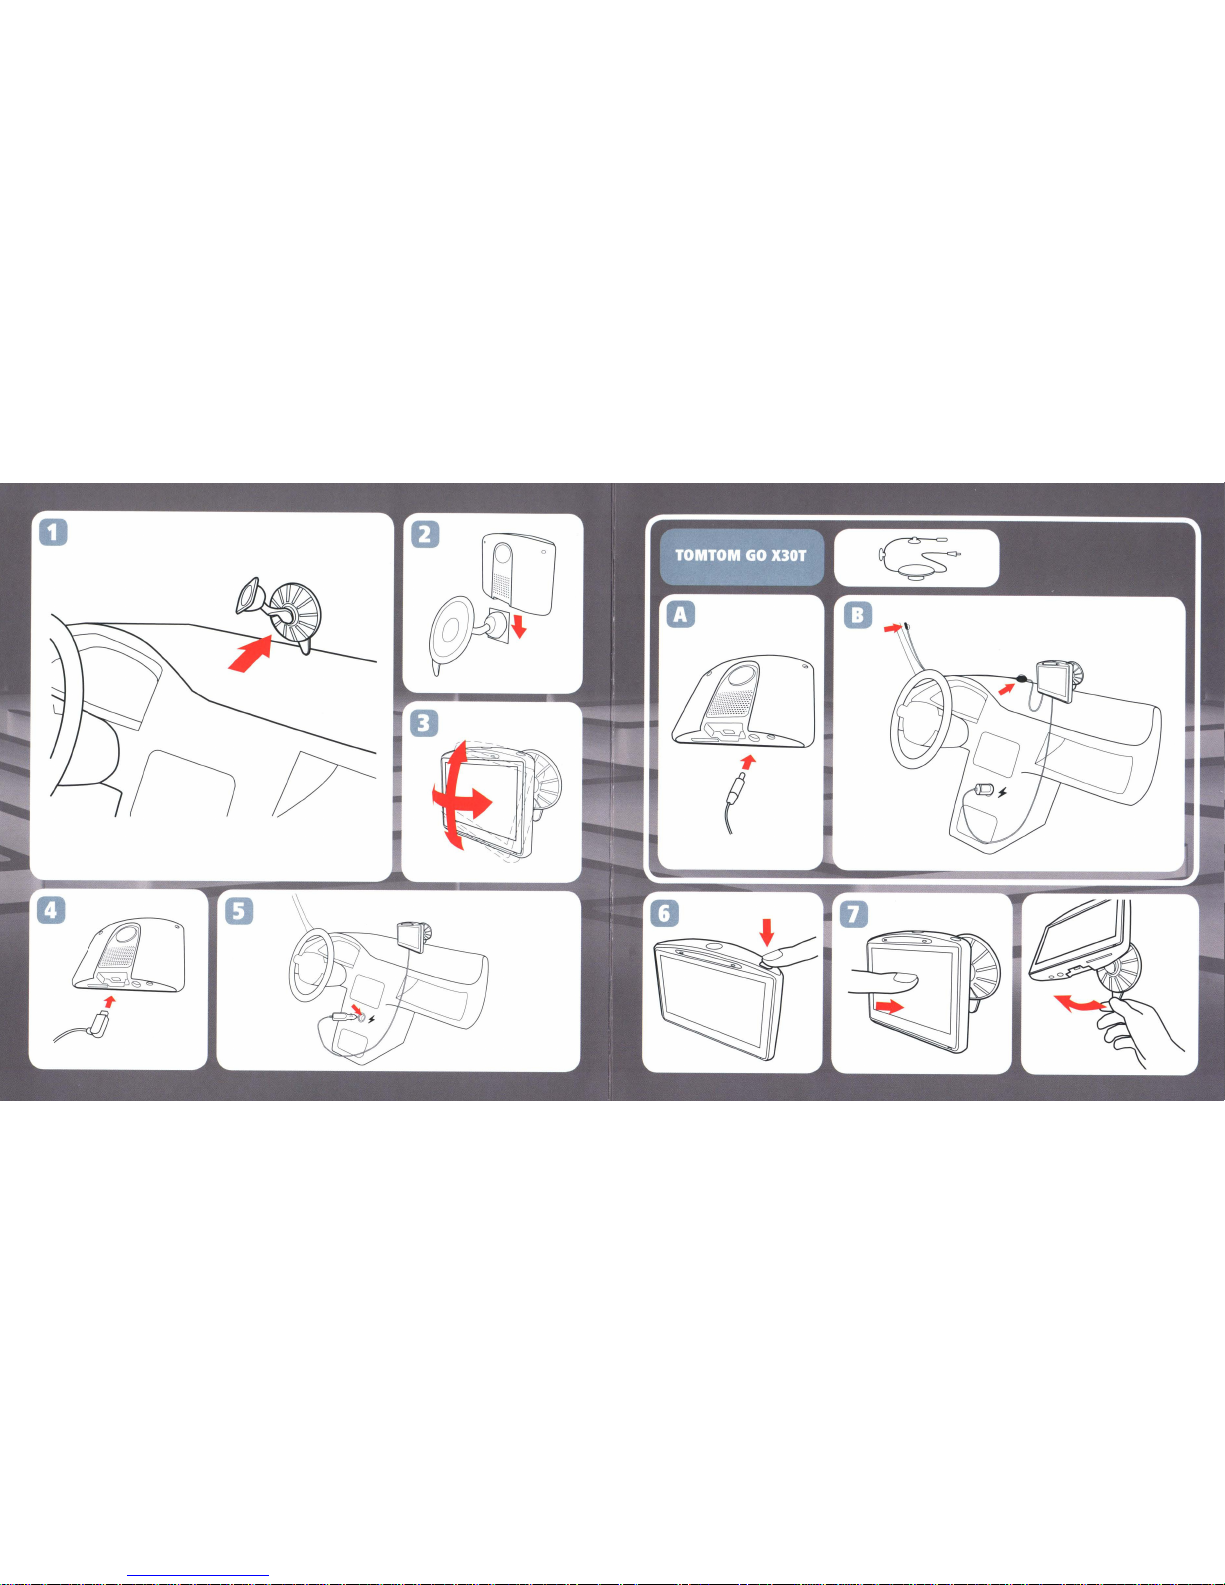
Use the windshield
TomTom
To attach the mount, press the suction cup
firmlytothe windshield in
of
the windshield where the glassisflat.
Make sure that both the
windshield are clean and
the mount. Place the
interfere with
GO inside
your
mounttoinstall
your
car.
your
car,inan
mount
dry
mount
viewofthe road.
and
before you attach
so that it does not
your
your
area
7
Page 11
Driving
When
shown
information
Tap the center
open the Main Menu.
Note: The Driving View is
until your
your
the Driving
GO locates your current position.
View
TomTom
View
about
your
of
the screen at any
GO
along
current
shown
starts,
in black
you
are
with
detailed
location.
time
and
to
white
6-
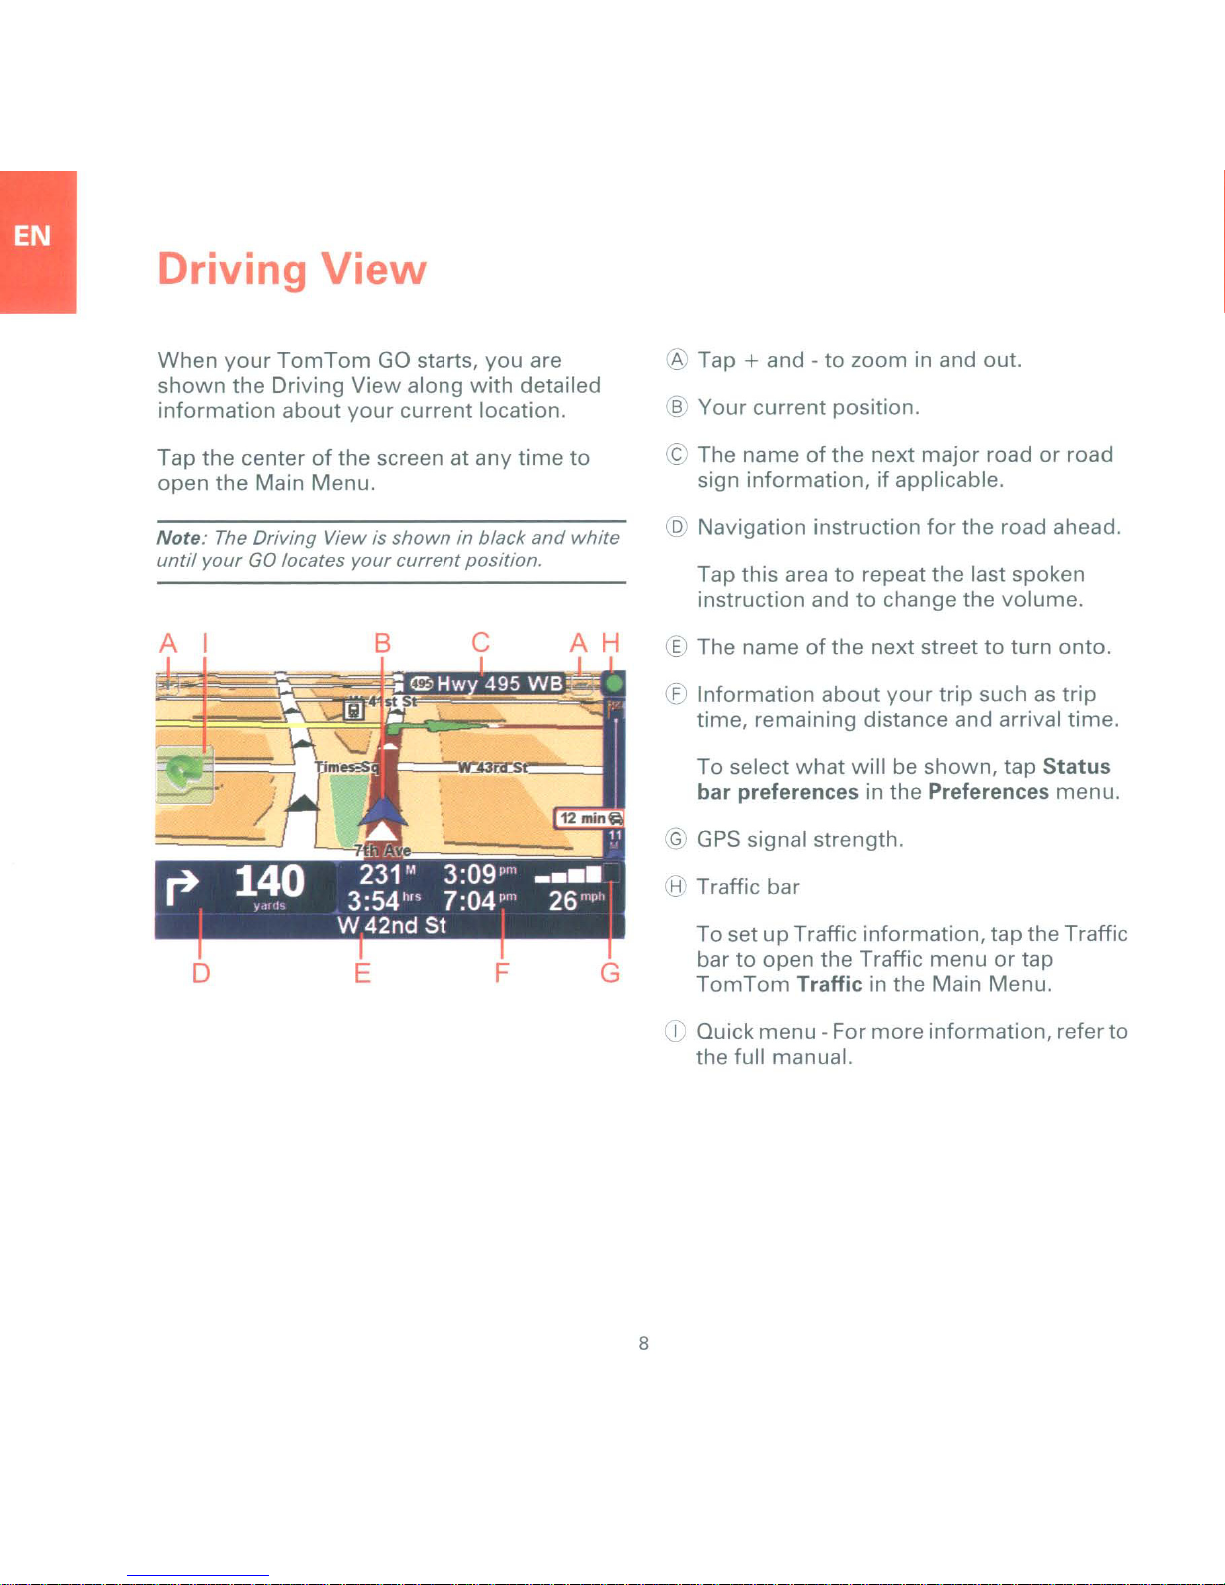
Tap + and -tozoom in and out.
§
Your
current position.
~
The nameofthe
sign information, if applicable.
,Q,
Navigation instruction
Tap this area
instruction and
next
major roadorroad
for
to
repeat the last spoken
to
change the volume.
the road ahead.
A
D
E
B
c
AH
F
G
® The name
if
Information
time, remaining distance and arrival time.
To
select
bar preferences
~
GPS
"=l
Traffic bar
To
setupTraffic information, tap the Traffic
bar
to
TomTom
-l
Quick menu - For
the full manual.
of
the next streettoturn onto.
about
what
signal strength.
open the Traffic menuortap
Traffic in the Main Menu.
your
trip
suchastrip
will be shown, tap Status
in the Preferences menu.
more
information, refer to
8
Page 12
Enhanced Positioning Technology
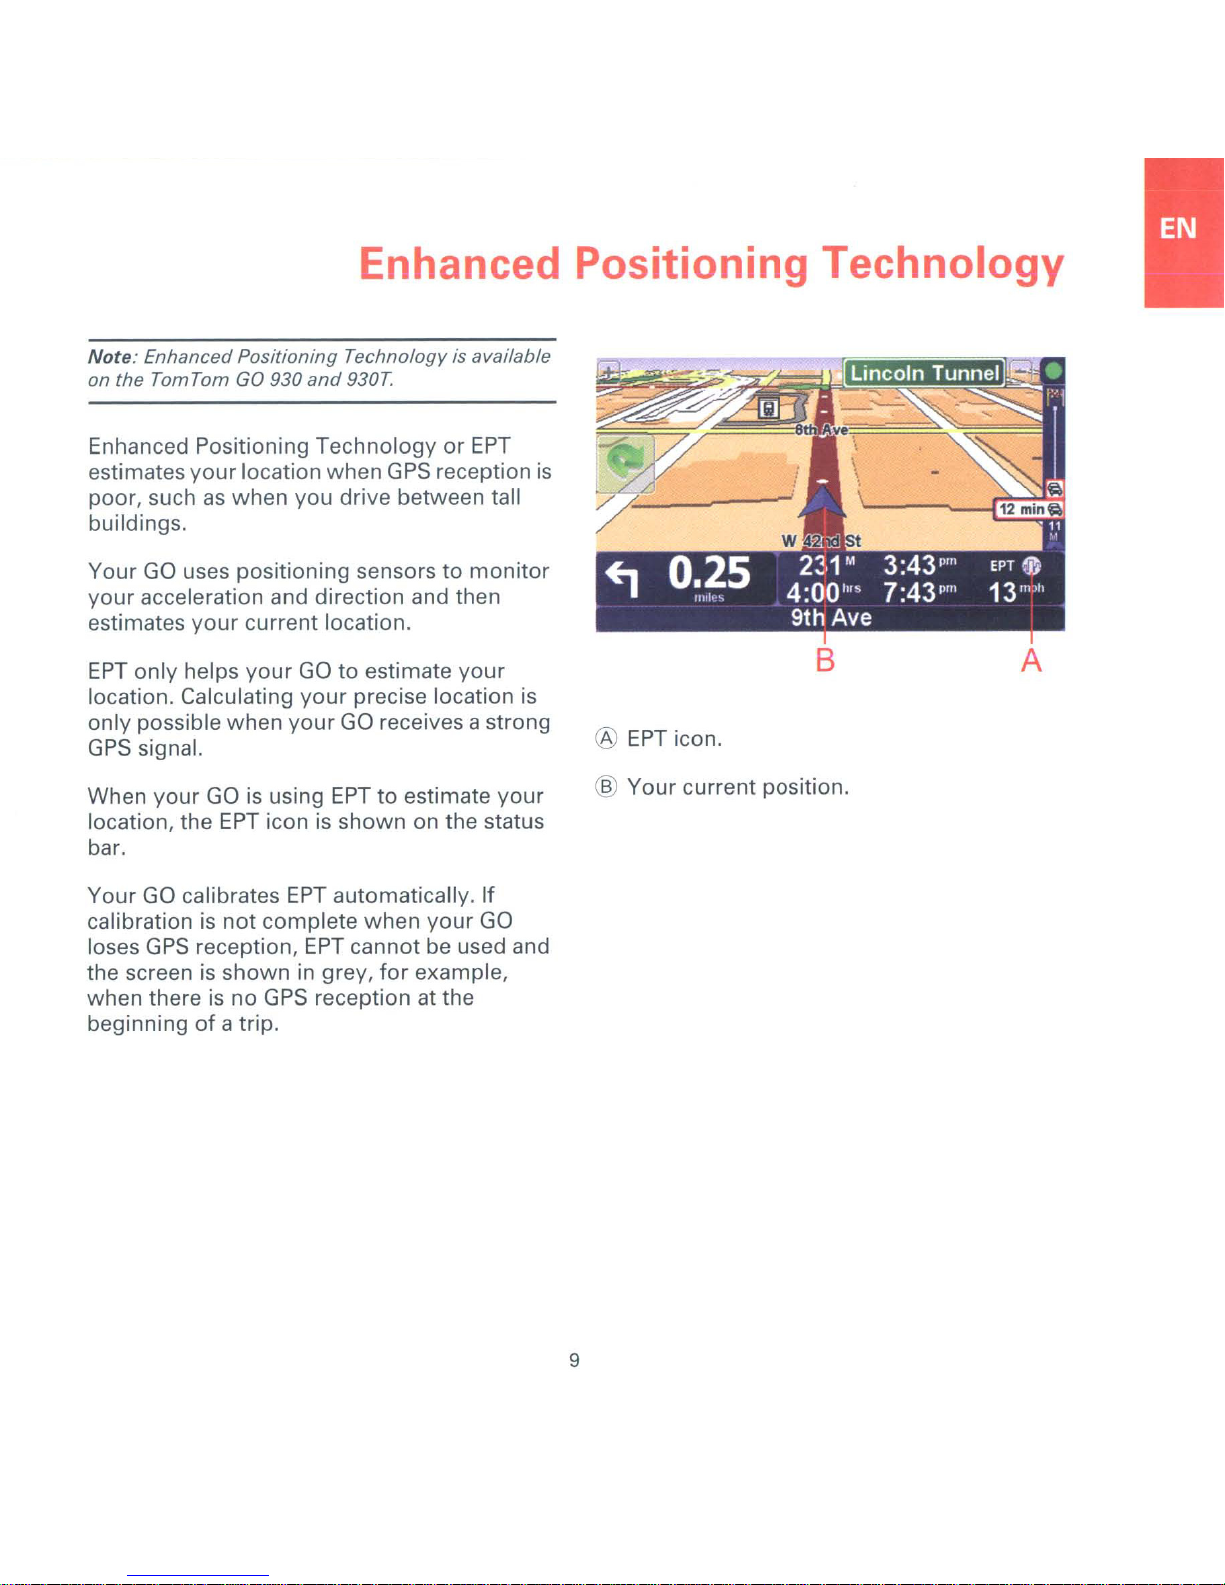
Note:
Enhanced Positioning Technology is available
on the
Tom Tom
GO
930
and
930T.
Lincoln Tunnel
Enhanced Positioning Technology or
estimates
poor, suchaswhen you drive between tall
buildings.
Your
your
estimates
EPT
location. Calculating
only possible when
GPS
When
location, the
bar.
Your
calibration
loses
the screen
when there
beginning
your
location when
GO
uses positioning sensors to
acceleration and direction and then
your
current location.
only helps
signal.
your
GO
calibrates
GPS
your
GOtoestimate
your
your
GO
is using
EPT
iconisshown on the status
EPT
is
not
complete when
reception,
is
showningrey,
is
no
GPS
of
a trip.
EPT
reception at the
GPS
precise location
GO
receives a strong
EPT
to estimate
automatically. If
cannot be used and
for
EPT
reception
monitor
your
your
GO
example,
your
is
B
is
®
EPT
icon.
A
® Your current position.
9
Page 13
Making your first trip
M.inM
...... 1at3
Mobile
phone
N.vill!te10...
Home
Recent
destination
Navill"le10...
___
preferences
-:-
Find
alternative
Change
J-
Favorite
Point
Interest
of
=-_,8:06.m
Help
me!
Done
Back
Planning a route
easy. To plan
with
your
your
TomTom
first route,
follow
GO
is
the steps
below.
Important:
journey
dangerous
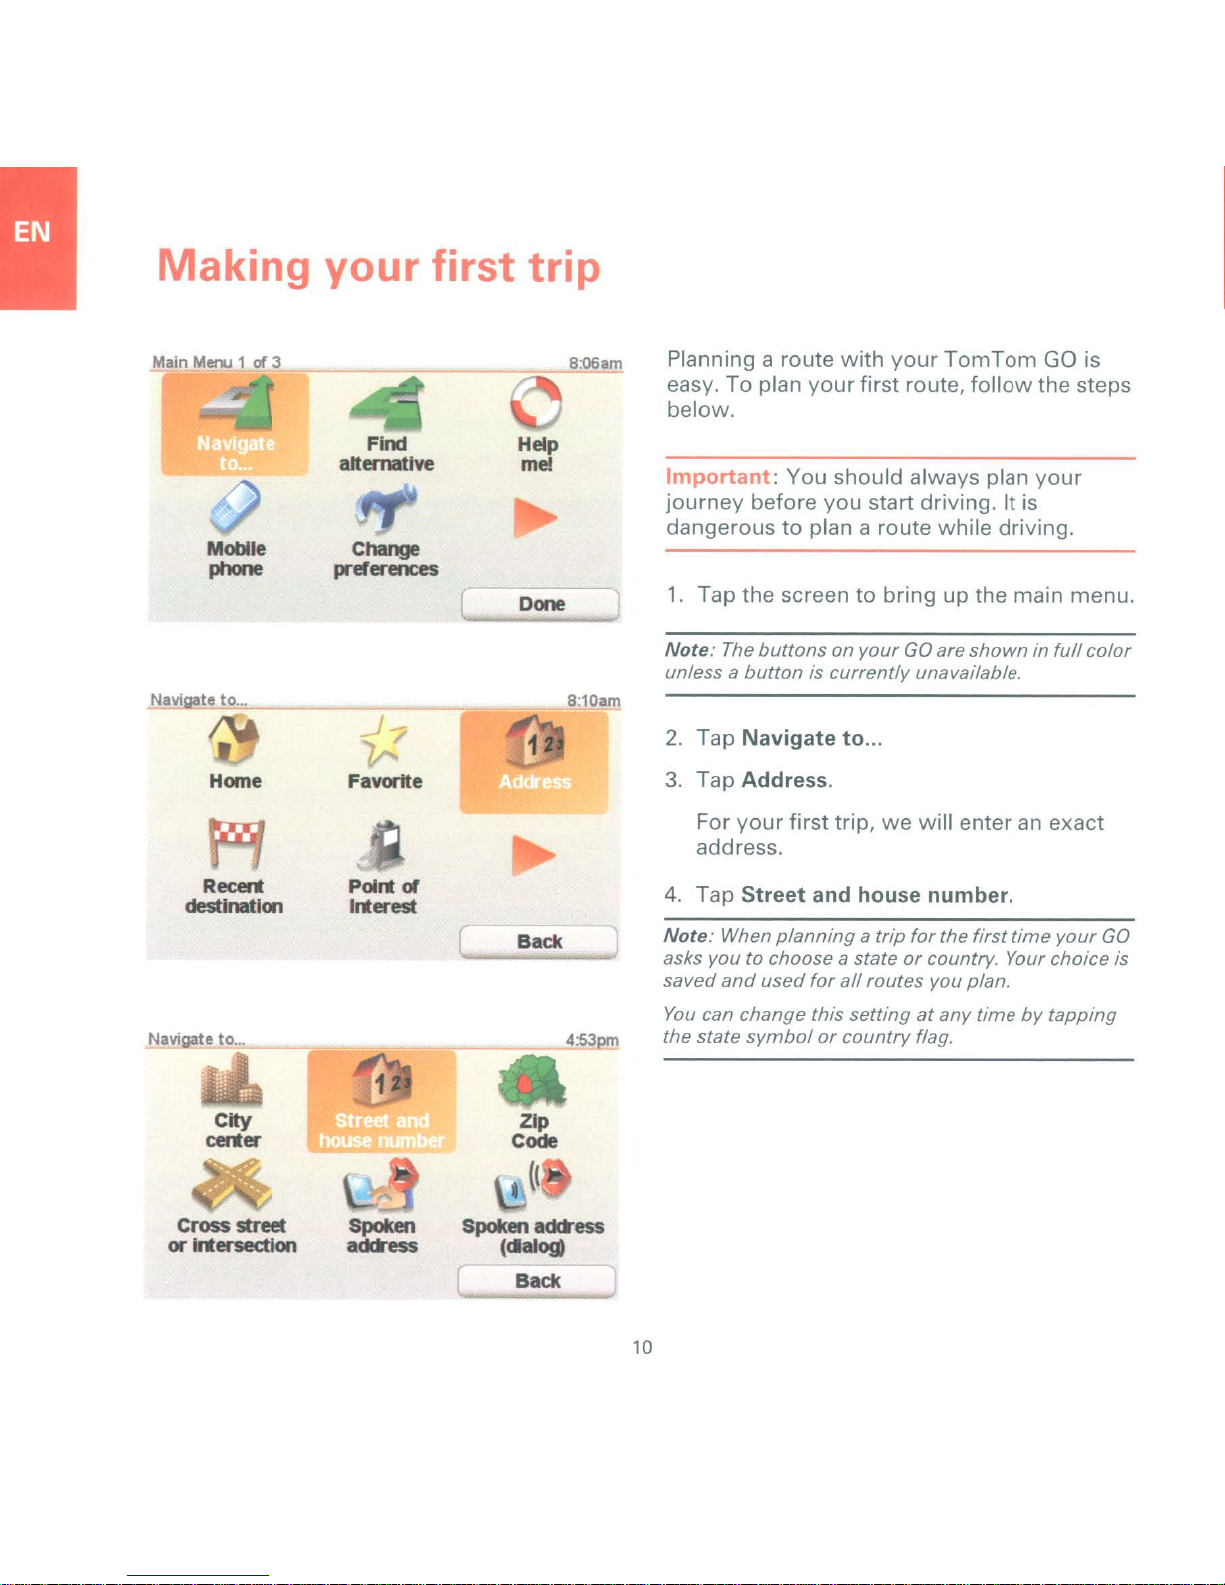
1.
Tap the screentobring up the main
Note: The buttons on your GO are
unless
2.
Tap
3.
Tap
For
You should always plan
before you start driving. It is
to
plan a route while driving.
showninfull color
a button is currently unavailable.
Navigateto...
Address.
your
first trip,
we
will enteranexact
your
menu.
address.
4.
Tap
Street
Note: When planning a trip
and
house
number.
for
the first time your GO
asks you to choose a state or country. Your choice is
saved
and
used
for
all routes you plan.
You
can change this setting at any timebytapping
the state
symbol
or country
flag.
City
center
Cross
or
street
Intersection
Spoken
address
Code
Spoken
(ctalog)
Zip
address
Back
10
Page 14

5.
Starttotype
want
you
shown
For
more
information, refertothe chapter
Spoken address
6.
Starttotype
select it
7.
Now
enter the house
destination and then tap Done.
the nameofthe
to go. Tap the name
in the list.
Tip: Instead
name, tap this
address by speakingtoyour
GO.
in
the full manual.
the nameofthe street and
when
it is shown.
numberofyour
town
when
of
typing
buttontosay
where
it is
the
the
Making your first trip
~
"'"
A B
I J K L M N
Q R
y
z
House
number:
C
5
D E F
T
V W x
U
10
G
0
I
--..J
H
p
8.
Your
GO
asksifyou needtoarrive at a
particular time. For this exercise, tap
The routeiscalculatedbyyour
Routes™ is usedtoplan the best possible
route, using historical information
traffic speed on the roads.
9.
When the route has been calculated, tap
Done.
Your
GO
will
immediately
to
your
destination, using both spoken
instructions and on-screen directions.
begintoguide
GO.
NO.
IQ
about
you
11
1
6
2
7
3
8
4
9
5
o
Page 15
Traffic information
You can obtain traffic
informationintwo
• Traffic Message Channel (TMC)
TomTom
•
The
Traffic
TMC transmits traffic
Traffic
Message
Channel
(TMC)
informationasa radio
signal and is available free-of-charge in
countries.
TMC is
when
Receiver. The
Receiver is included
available
Note:
or
TMC is
tomtom.com/rds-tmc
your
Setting
notaTomTom
using the
TomTom
as
an accessory
TomTom is
qualityoftraffic
not
available in
countryorregion.
up
TMC
Service,
TomTom
with
not
responsible
information
all
countriesorregions. Go to
to check
butisavailable
RDS-TMC Traffic
RDS-TMC Traffic
some
products
for
others.
for
the availability
providedbyTMC.
for
availability in
ways:
many
and
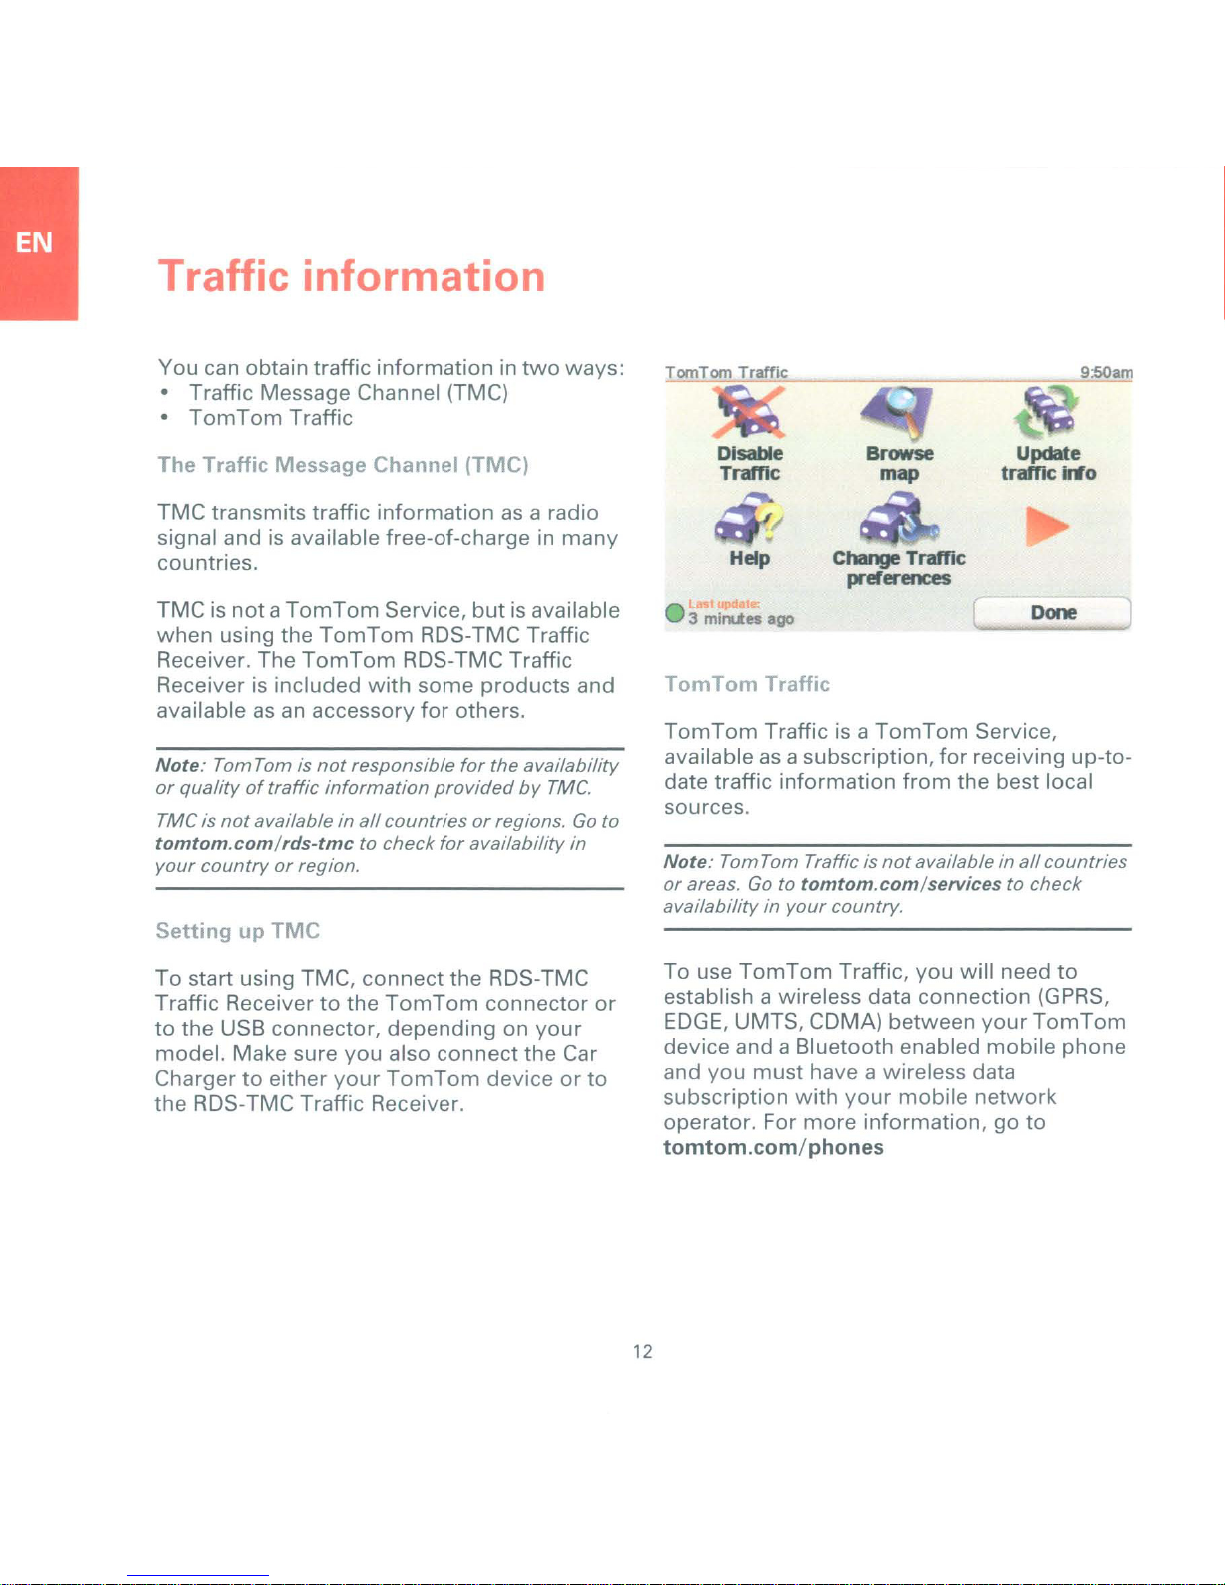
TomTom Traffic
Disable
Traffic
..-
Help
TomTom
TomTom
available
date traffic
sources.
Note:
or
areas. Go to
availability in
Traffic
Trafficisa
as
TomTom Traffic is
Browse Update
map traffic Info
/
Change
Traffic
preferences
Tom
a subscription,
information
tomtom.com/services
your
country.
from
not
available in
Tom
Service,
for
receiving up-to-
the best local
to check
Done
all
countries
9:50am
To start using TMC, connect the RDS-TMC
Traffic Receiver
to
the USB connector,
model. Make sure
to
Charger
either
TomTom
depending
you
also connect the Car
your
TomTom
connector
on
your
deviceorto
to
the
the RDS-TMC Traffic Receiver.
or
To use
TomTom
Traffic, you will need
establish a wireless data connection (GPRS,
EDGE,
device and a Bluetooth enabled
and
subscription with
operator. For
UMTS, COMA) between
you
must have a wireless data
your
mobile
more
information,goto
yourTomTom
mobile
network
tomtom.com/phones
12
to
phone
Page 16

Traffic information
To use
1.
2.
Using
TomTom
Tap
TomTom
You will be
data connection with
and then to enter
account details.
Tap Enable Traffic.
traffic
promptedtoset up a wireless
information
•
F"=1
l.
.~
~
~
I
I
9.0
M
I
!~
Traffic,dothe
Traffic in the Main Menu.
your
your
As soonasyou start
receiving traffic
information, the traffic
sidebar
the right side
Driving View. The
traffic sidebar warns
you about any traffic
incidents on
route.
following:
mobile phone,
MyTomTom
is
shown on
of
your
the
Your device looks
your
destination.
It
is
possible that the new route
include traffic delays, or
same route
route
to
will take longer than the quickest route
already shown.
3.
Tap Done.
Automatically
You can set
any delays automaticallywhenever
information becomes available. To minimize
delays automatically,
1.
Tap
TomTom
2.
Tap Change Traffic preferences.
3.
Select
after
every
4.
Tap Done.
as
avoid all delays, butthis
minimize
your
Automatically
traffic
for
the quickest route
may
also
may
even be the
before. You can re-plan the
new
route
delays
TomTom
Traffic
update.
GO
to minimize
do
the
following:
in the Main Menu.
minimize
delays
new
traffic
to
to
To find the quickest route
do
the
following:
1.
Tap the sidebar.
2.
Tap
Minimize
traffic
your
delays.
destination,
13
Page 17
Remote control
Important:
enabled. Please
environments,
you
are requiredtoswitch
This
TomTom
note
suchashospitalsorairplanes,
electronic devices.
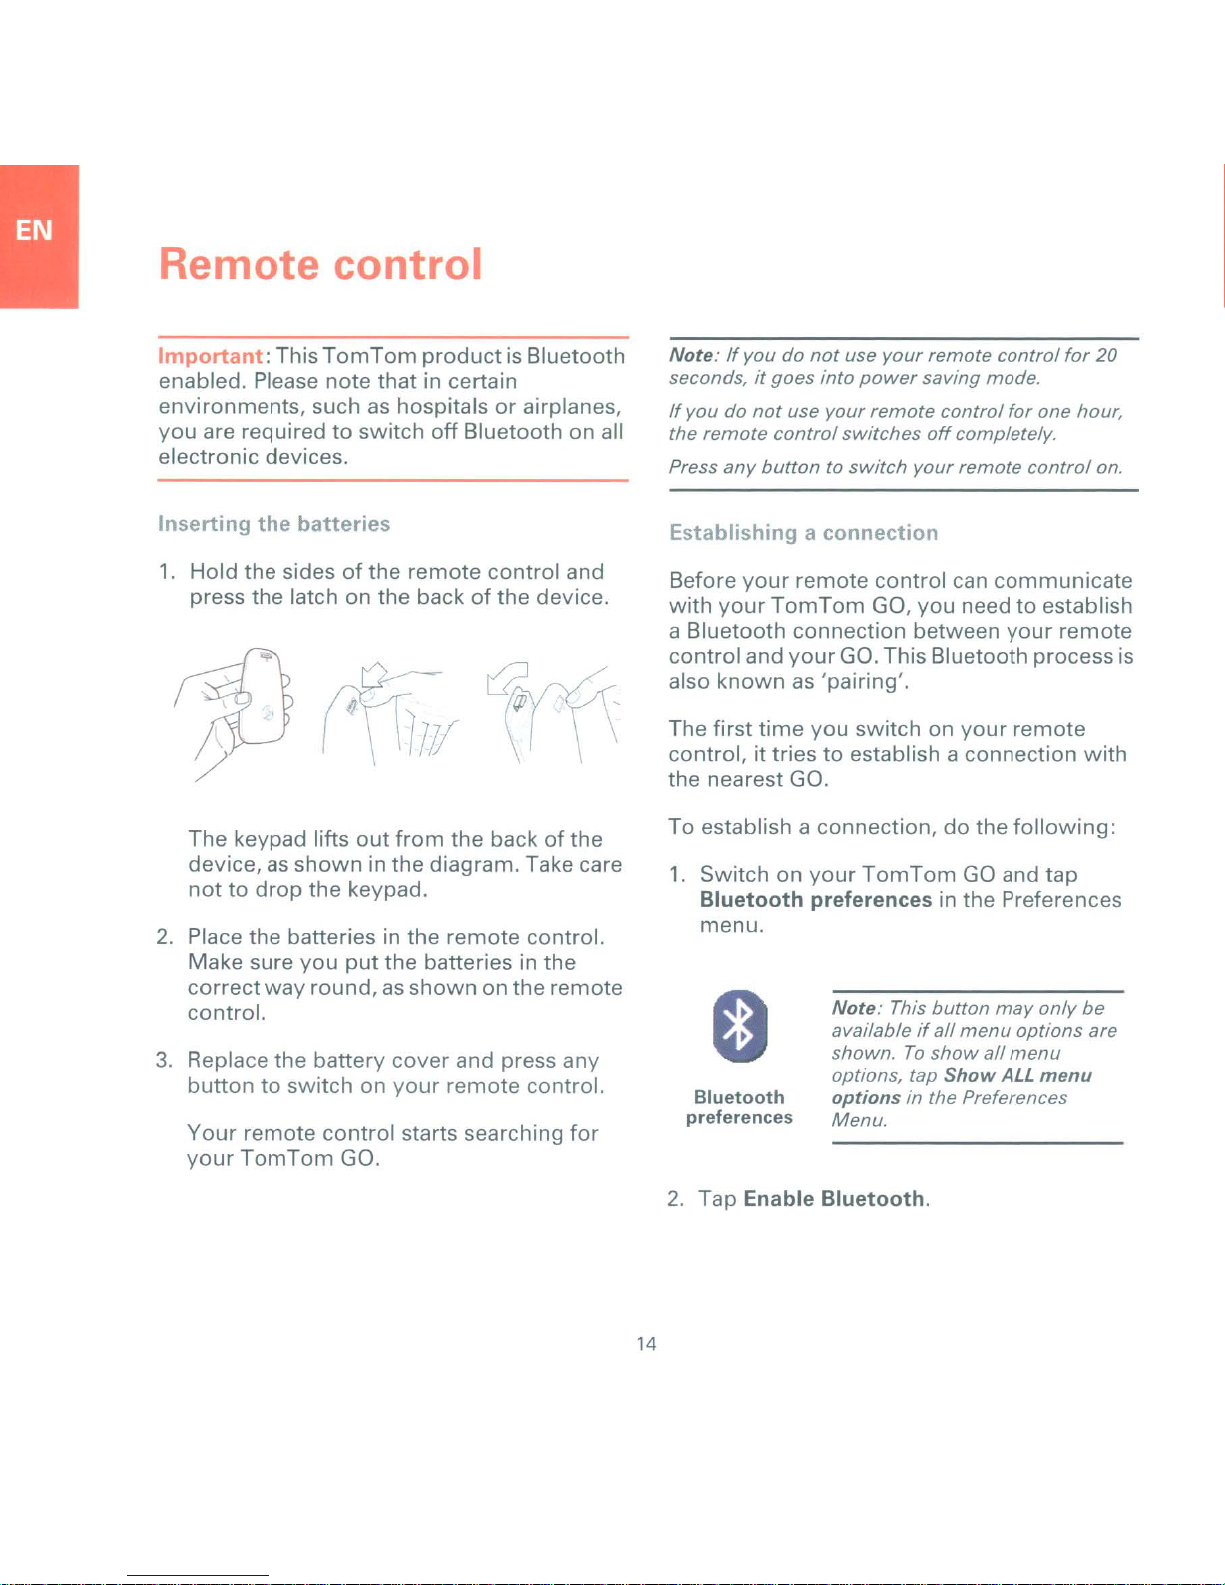
Inserting
1.
Hold
the
batteries
the
sidesofthe
press the latch on
The keypad lifts
device,
as
shown
nottodrop
2.
Place the batteries in the
Make sure
correct
way
out
the keypad.
you
put
round,asshownonthe
control.
3.
Replace the battery
buttontoswitch on
Your
your
remote
TomTom
control
GO.
product
that
in certain
off
remote
the
backofthe device.
from
is Bluetooth
Bluetooth on all
control
and
the backofthe
in the diagram. Take care
remote
the
batteries in the
control.
remote
cover
your
and press any
remote
control.
starts searching
for
Note:Ifyou do
seconds,
If
you do
the
remote
any
Press
not
use
it
goes
into
power
not
use
your
remote
control
buttontoswitch
switches
your
remote
saving mode.
control
off
your
control
for
one hour,
completely.
remote
control
Establishingaconnection
Before
with
a Bluetooth connection between
control
also
The first
your
your
and
remote
TomTom
your
control
GO, you need to establish
GO.
This Bluetooth process is
knownas'pairing'.
time
you
switch
on
can
communicate
your
your
remote
control, it triestoestablish a connection
the nearest GO.
To
establish a connection,dothe
1.
Switch
Bluetooth
on
your
TomTom
preferences in the Preferences
GO
following:
and tap
menu.
o
Bluetooth
preferences
Note:
availableifall
shown.Toshow
options, tap
optionsinthe Preferences
Menu.
This
button
menu
Show
may
all
options
menu
ALL
only
menu
for
20
on.
remote
with
be
are
14
2.
Tap Enable
Bluetooth.
Page 18

3.
Press any
switch it on.
buttononyour
remote control
to
Remote control
Lights
Your remote control
your
GO
and
you
accept the connection.
4.
Tap Yestoaccept the connection.
The next
it looks
time
for
you
your
communicates
are askedifyou
use
your
GO.
with
want
to
remote control,
No light control
power
Flashing blue
remote control is
searching
Solid blue light remote control
connectedtoyour
Red light - battery
low. Replace the batteries
as
soonaspossible.
your
remote
is
switched
saving mode.
light-your
for
your
your
is
power
offorin
GO.
GO.
is
15
Page 19
Remote control
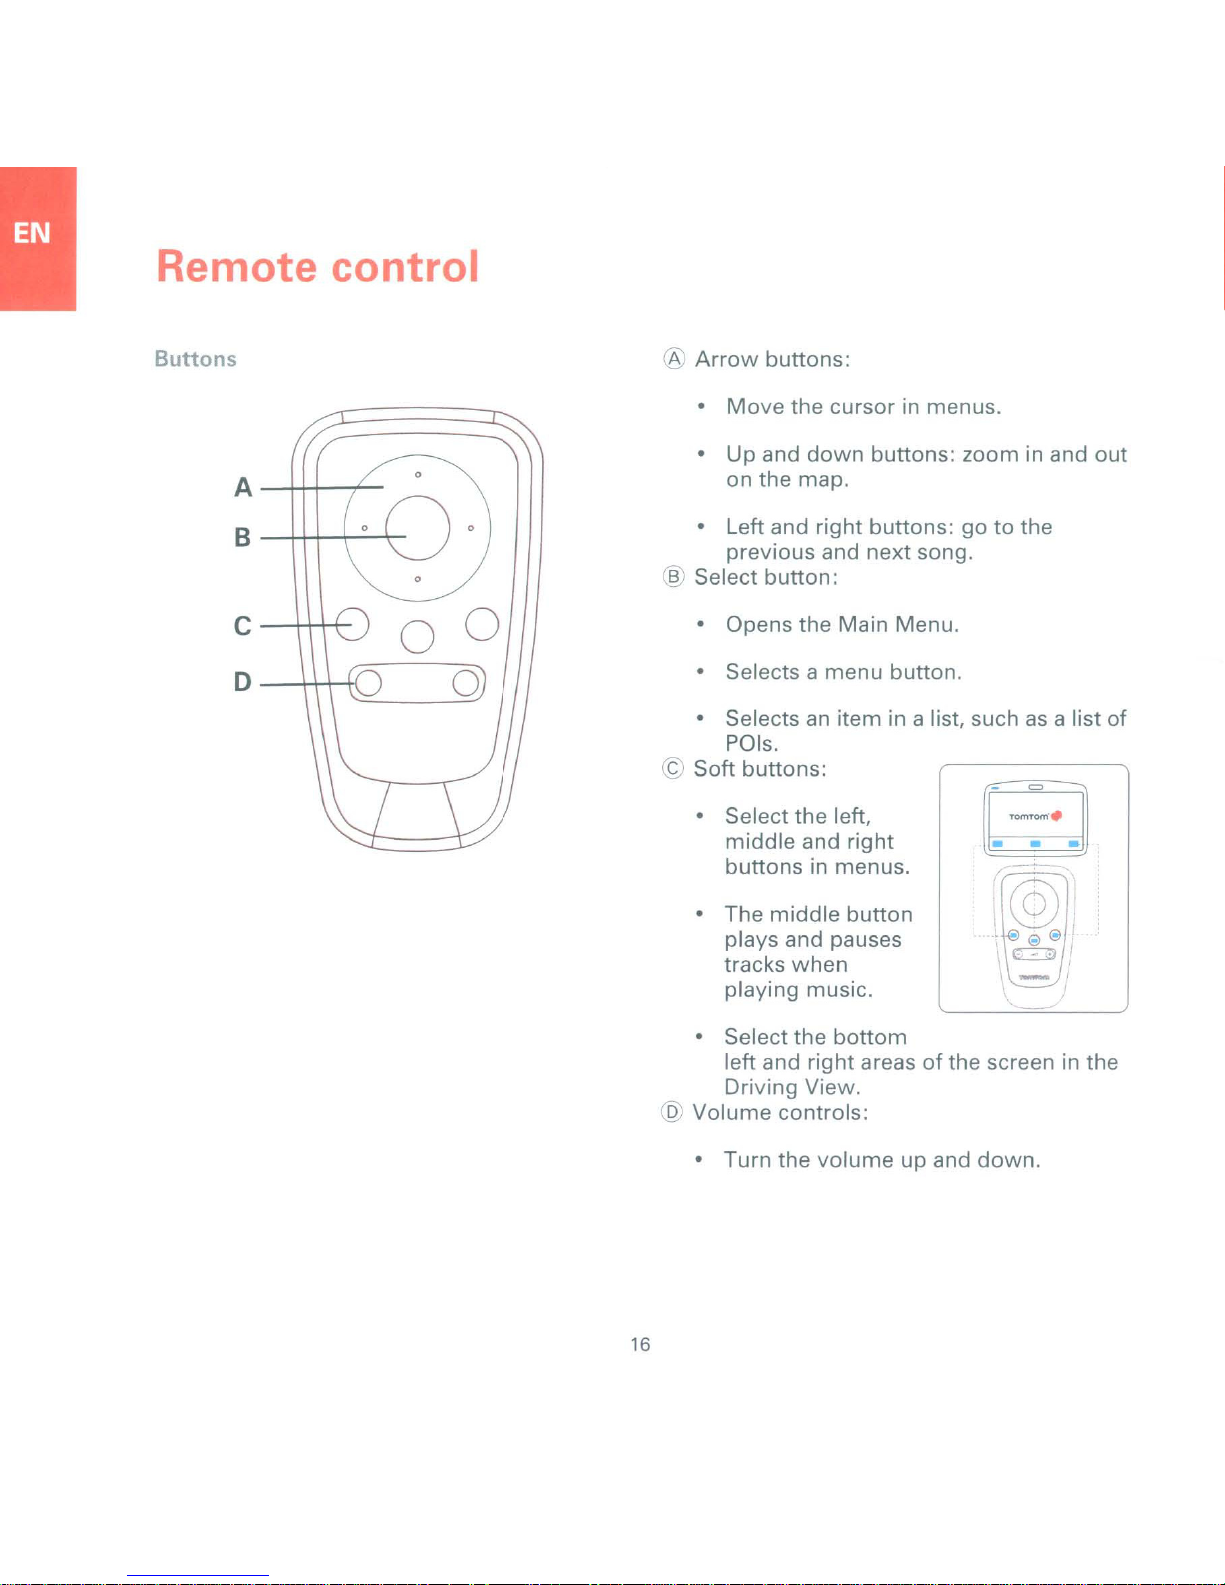
Buttons ®
A~++----+
B
--+++-+-,-O-+-
o
§) Select
C-H+t-
o
--+++-H
©
Arrow
•
• Up and
• Left and
• Opens
• Selects a
• Selects
Soft
• Select the left,
• The
buttons:
Move
on
previous
POls.
middle
buttons
plays and pauses
tracks
playing music.
the
down
the
map.
button;
the
an
buttons:
and
middle
when
cursor
right
and
Main Menu.
menu
item in a list, suchasa list
right
in menus.
button
in menus.
buttons:
buttons: gotothe
next
button.
song.
zoom
in and out
of
16
• Select the
left and
Driving View.
@
Volume
• Turn the
bottom
right
controls:
volume
areasofthe screen in the
up and
down.
Page 20
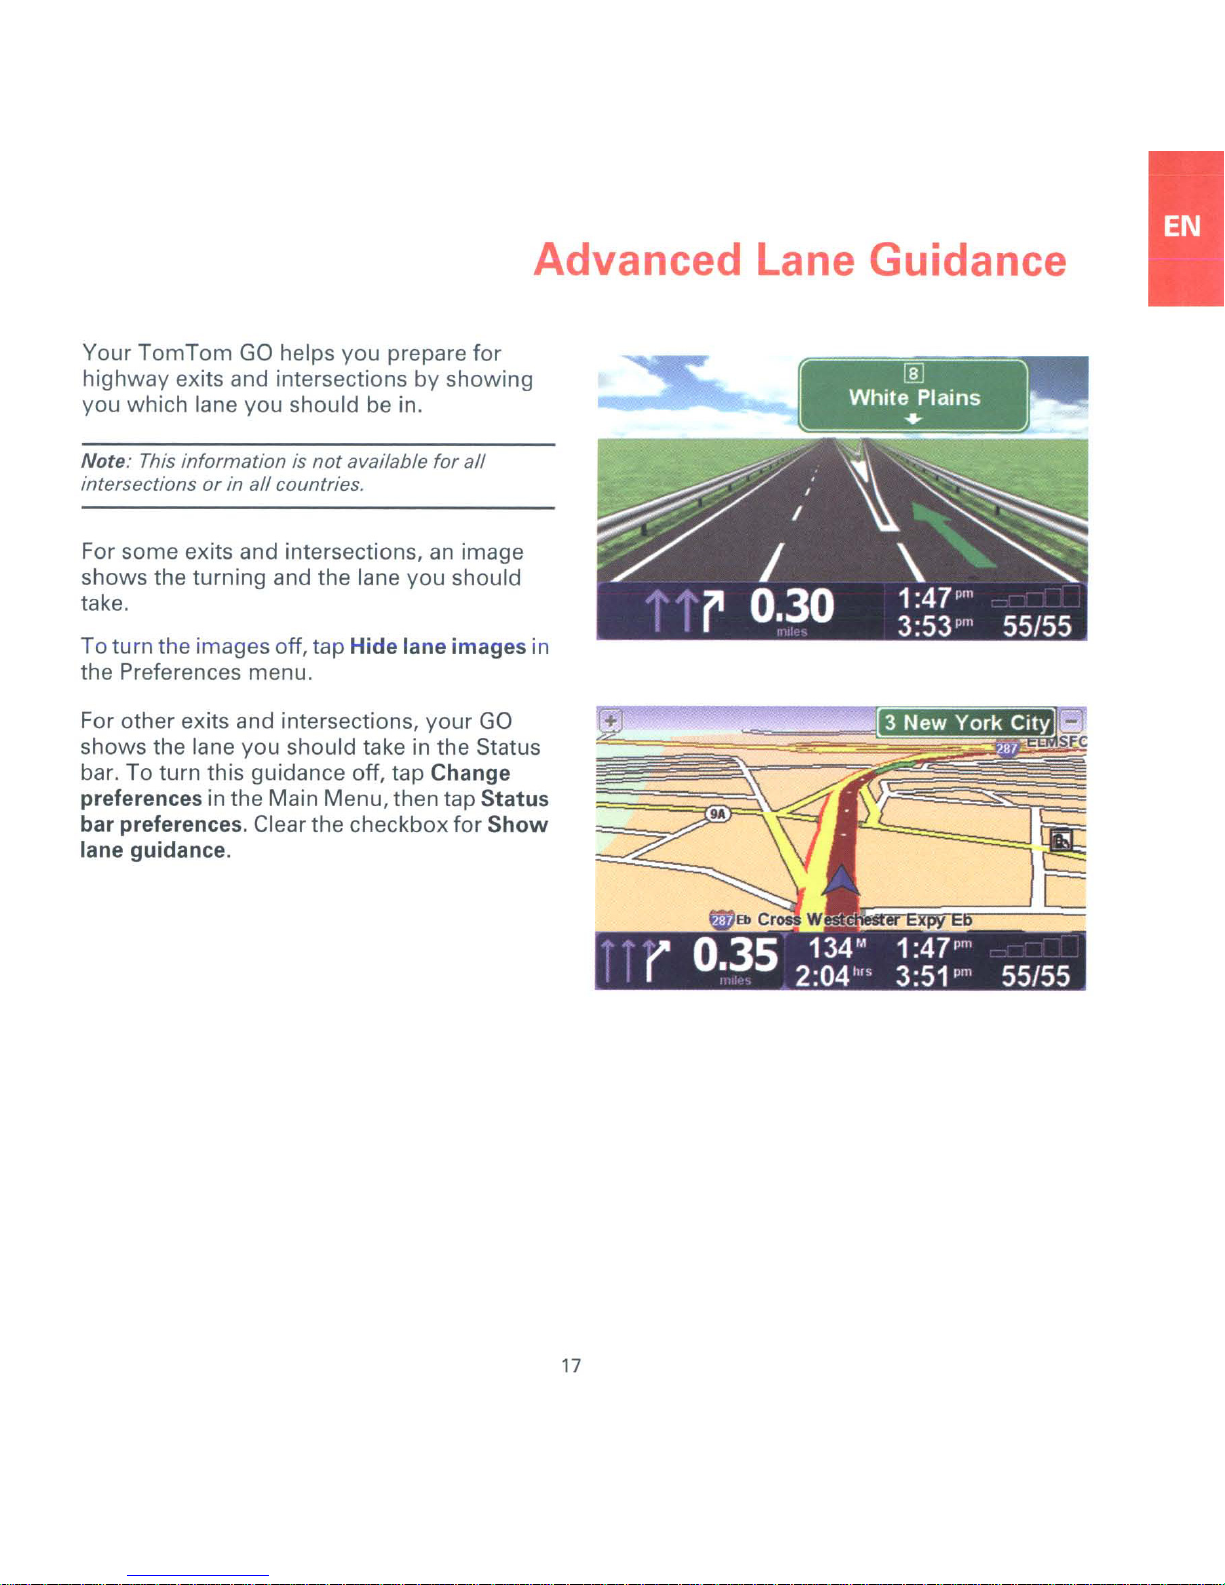
Your
TomTom
GO
helps you prepare for
highway exits and intersections by showing
you which lane you should be in.
Note:
This
information is
intersections or in all countries,
not
available
for
all
Advanced Lane Guidance
For some exits and intersections,
an
image
shows the turning and the lane you should
take.
To turn the images off, tap
Hide lane images in
the Preferences menu.
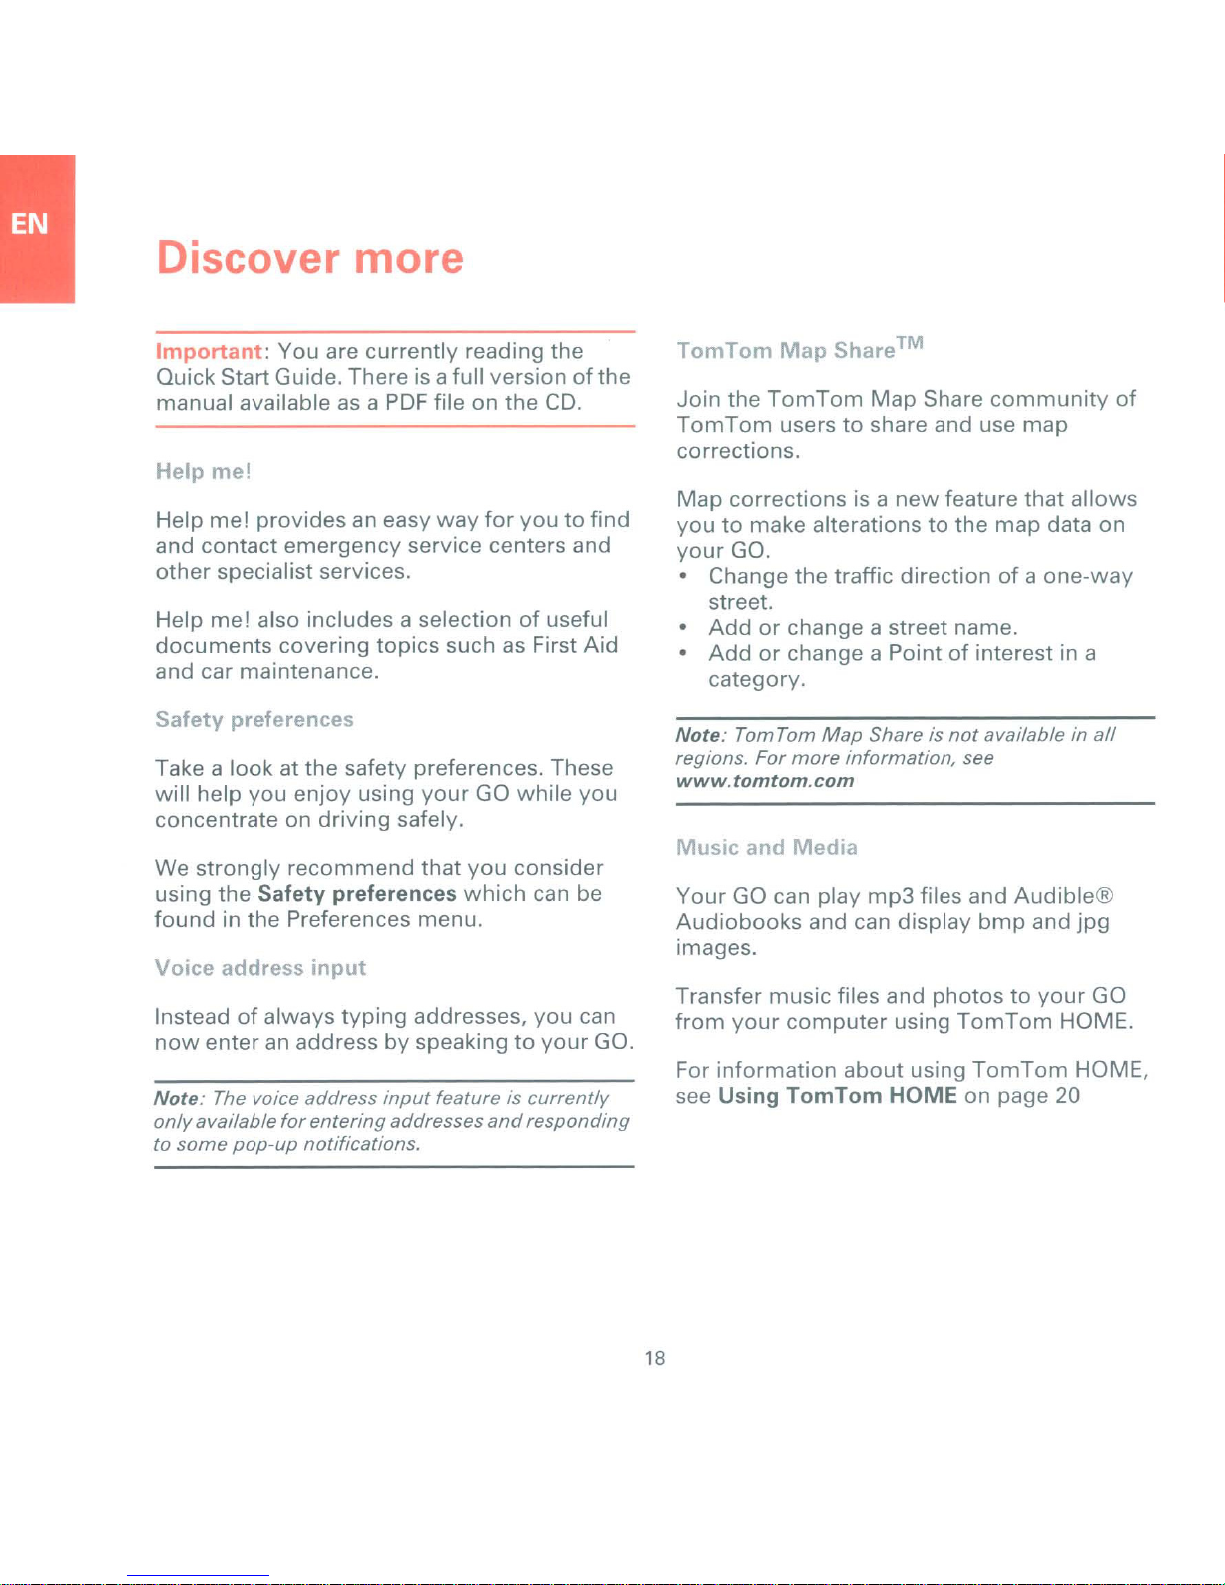
For other exits and intersections, your
GO
shows the lane you should take in the Status
bar. To turn this guidance off, tap
preferences
bar preferences.
lane guidance.
in the Main Menu, then tap Status
Clear the checkbox for
Change
Show
17
Page 21
Discover more
Important:
You are
currently
reading
Quick Start Guide. There is afull
manual available as a
Help
mel
Help
me!
providesaneasy
and
other
contact
specialist services.
emergency
PDF
file
on
way
for
service centers and
Help me! also includes a selection
documents
covering
topics
suchasFirst Aid
and car maintenance.
Safety
Take a
will
concentrate on
We
using the
foundinthe
Voice
Insteadofalways
now
Note:
only
to
preferences
lookatthe
help
you
strongly
Safety
safety preferences. These
enjoy
recommend
using
driving
safely.
preferences
your
that
GO
you
which
Preferences menu.
address
mput
typing
addresses,
enteranaddressbyspeakingtoyour
The voice address
available
some
for
pop-up
entering
notifications.
input
feature is
addresses
and
the
versionofthe
the
CD.
youtofind
of
useful
while
you
consider
can be
you
can
GO.
currently
responding
TomTom
Join
TomTom
Map
Share™
the
TomTom
Map
userstoshare and use
Share
community
corrections.
Map
corrections
youtomake alterationstothe
your
GO.
• Change
is a
new
the
traffic directionofa
feature
map
street.
Addorchange a street name.
•
Addorchange a Pointofinterest in a
•
category.
Note:
regions.
Audiobooks
TomTom
For
www.tomtom.com
Music
Your
and
GO can play
Map
more
Media
and can
Share is
information,
mp3
files and
display
not
available in
see
bmp
images.
Transfer
from
For
see
music
your
computer
information
Using
TomTom
files and
using
about
using
HOME on page
photostoyour
TomTom
TomTom
map
that
allows
data
one-way
Audible®
and
jpg
GO
HOME.
HOME,
20
of
on
all
18
Page 22

Discover more
Handsfree calling
If you have a cell phone with Bluetooth, you
can use your
and receive messages.
To establish a connection between
phone and
Tap
Mobile
follow
You
your
There
mobile phones.
For a list
website at
the instructions on the screen.
only
GO
is
GO
to make phone calls and send
your
GO:
phone in the Main Menu, then
needtodo
will remember
now
support
of
supported phones, refer to the
www.TomTom.com/phones
this once, after which
your
phone details.
forawider
range
your
cell
of
FM
transmitter
Thereisan
works like a radio station. This means you can
hear the instructions made
play
your
speakers.
Getting
•
In
the Main Menu tap Change preferences,
then tap Speaker preferences.
• Switch on
• Tune
not
• Tap Change and set the frequency on
GO
radio.
If you drive into
station transmits on the same frequency
you are using
may have
FM
Transmitter inside
by
mp3
songs through
started
your
car radio.
your
car radiotoa frequency that
being used by a radio station.
to the same frequencyasyour
an
area where a radio
for
the
FM
to
use another frequency.
your
your
GO
your
car radio
Transmitter, you
GO
car
that
and
is
your
19
Page 23
Using TomTom HOME
TomTom
your
• Manage maps, voices, POls and more.
• Transfer music and photos to
TomTom.
• Buy
subscriptions.
• Update your
software and services automatically.
• Make and restore backups.
• Set a password
Read
•
Installing
To install
do the
1.
Connect the
using the USB cable.
2.
Make sure
the internet.
HOME is a free software program
computer
TomTom
the full versionofthe user manual.
TomTom
following:
that
TomTom
TomTom
Home
your
enables
services and manage
to
restrict access.
HOME
HOME on
Docktoyour
computerisconnected to
you
with
to:
your
the latest
your
computer,
computer
your
for
HOME Help Topics
In the
find all kinds
TomTom
MyTomTom
In
TomTom
MyTomTom
to
create an account when
TomTom
TomTom
HOME.
ordertobuy
HOME
buy
the content for. You will be asked
HOME.
HOME Help topics you can
of
tips and tricks on
Account
content and services through
you
will have to set up a
account
for
how
the device you
you
start using
to use
want
to
3.
Place
your
TomTom
Dock and switch it on.
The latest version
downloaded
You can also install
CD
supplied or
website. For
tomtom
Once installed,
automatically
TomTom
and installed.
downloaditfrom
more
.com/home
TomTom
when
devicetoyour
device in the Home
of
TomTom
TomTom
information,
you connect
HOME
HOME starts
computer.
HOME
the
go
to
your
is
from
the
TomTom
20
Page 24
TomTom Limited Warranty
WARRANTOR
U.S. and Canadian Purchases: If
the United States
and this LimitationofLiability is stipulated for the benefit
TomTom
Massachusetts 01742 (United States
WHAT THIS WARRANTY COVERS
1)
TomTom
("you")
of
included ("Hardware") that theHardwarewill be free
workmanship and materials under
of
period
purchased
the Hardware
("Limited Warranty")
labour. This Limited Warranty covers the replacementofthe
Hardware only. Ifthe Hardware is repaired after the Warranty Period
has expired, the Warranty Period
months
after the dateofrepair.
WHAT
THIS WARRANTY DOES
2)
The Limited Warranty does not apply to normal wear and tear,
not
does
someone not authorizedbyTomTom
replacement
moisture, liquids,
abuse, non-compliance
Hardware, neglect
not
Limited Warranty does
or be installed on the Hardware. The Limited Warranty does
cover the installation, removalormaintenanceofthe Hardware or
any costs related herewith.
HOW TO MAKE A WARRANTY CLAIM
3)Inorder
during
www.tomtom.com
number
return the Hardware during the Warranty Period, along with
explanationofthe Defect, to the address provided to you
TomTom.
Warranty is received
eighty (180) days
charge you
connection
must
TomTom,
YOUR LEGAL RIGHTS
4)
may
jurisdiction to jurisdiction.
5)
unenforceable, the remainderofthe Limited Warranty shall
nonetheless remain in full force and effect.
apply
cover physical damage to the surfaceofthe Hardware. This
the Warranty Period at: 1-978-287-9555 or per email via
(Return Materials Authorization)ifnecessary. You
comply
This Limited Warranty gives you specific legal rights, and you
also have
If any partofthis Limited Warranty is held to be invalid
or
Canada, this Limited Warranty is granted
Inc., 150 Baker Avenue Extension, Concord
Inc.
("TomTom")
the hardware with
one
(1)
year
by
of
to make a claimofa Defect, you must contact
If a defect arises and a valid claim under this Limited
for
with
with
if any.
from
you ("Warranty Period"). During the Warranty Period
will
be repairedorreplaced at
without
when
the Hardware is opened or repaired
any Hardwareorpart
proximity
with
or
misapplication, The Limited Warranty does
not
to explain the Defect and to obtain an RMA
by
TomTom
of
the Warranty Period.
any reasonable shipping and handling costs
the repairorreplacementofthe Hardware. You
any
other
other
rights which vary
you
have made
of
America).
warrants to the original purchaser
which
this Limited Warranty is
normal
the date that the Hardware was first
chargetoyou for either parts
for
the repair will expire six
NOT
COVER
and does
or exposure to heat and accident,
coverany software that may
return procedures stipulated by
thereof
the instructions supplied
after the first one hundred and
from
your
purchase in
of
from
use ("Defects") for a
TomTom's
not
damaged by: misuse,
TomTomisentitled to
state to state and
defects in
choice
by
cover repair or
with
accompany
TomTom
must
by
made
or
by
or
(6)
the
not
an
6)
This Limited Warranty is the
and is provided in lieu
obligations (if any) created
packaging, or other communications.
7)
Except for the Limited Warranty andtothe
by
permitted
Hardware "ASISAND WITH ALL FAULTS", and hereby disclaim all
other
statutory, including,
warranties, duties or conditions of: merchantability, noninfringement,
quality, fitness
accuracy or completeness
effort, lack
to the Hardware, and the provision
or
other
through
Hardware.This exclusion does not apply to
astotitle and
description. If applicable
respect to the Hardware, all such warranties are limited in duration
to ninety (90) days, Some states and/orjurisdictions
limitations on
not
apply
8)
This Limited Warranty cannot be transferred to
LIMITATION
9)
Neither
third party for any indirect, incidental, consequential. special
exemplary damages (including in each case, but
damages for the inability to use the
of
data, lossofbusiness,lossofprofits, business interruptionorthe
like) arising out
TomTom
10)
Notwithstanding any damages that you
reason whatsoever (including,
referenced herein and all direct
anything else), the entire liabilityofTomTom
suppliers shall be limited to the
Hardware.
11)
Notwithstanding
personal injury resulting
Some
12)
in
limitationofincidentalorconsequential damages, so the above
limitations or exclusions
applicable law,
warranties and conditions,
of
services, information, software, and related content
the Hardware or otherwise arising outofthe useofthe
to you.
TomTom
has been advisedofthe possibilityofsuch damages.
states and/or jurisdictionsdonot
but
quiet
enjoyment, system integration, satisfactory
for
a particular purpose, reliabilityoravailability,
viruses, and reasonable care and skill, all with regard
(ii)
any
implied
how
longanimplied
OF
LIABILITY
nor
of
the useofor
the above, neither party's liability
only
of
any other express warrantiesorsimilar
by
not limited to, any (if any) implied
of
law
its suppliers shall be liable to you or to any
from
may
express warranty made to you
any advertising, documentation,
TomTom
whether
responses, results, workmanlike
of
warrantyasto
requires any implied warranties
warranty lasts, so the above
equipmentoraccess data, loss
inability to use the Hardware even
without
or
general damages in contract
amount
its
own
not
apply to you.
maximum
and its suppliers provide
express, implied or
or failure to provide
(i)
any implied condition
conformity
might
limitation, all damages
and anyofits
actually paidbyyou for the
negligence shall be limited.
allow
extent
support
with
do
not
any
other person.
not
limited to,
incur
for
any
for
death
the exclusion
with
allow
may
or
the
if
or
or
or
21
Page 25
Addendum
Important
Global Positioning System
The Global Positioning System
based system that provides location and timing
information around the globe.
controlled under the sole responsibility
Government
responsible
changes in
environmental conditions, may impactthe operation
of
your
any liability
Use
with
Use
ofaTomTom
that you need to drive with due care and attention.
Aircraft
Use
of
aircraft, in
locations. A
these environments.
Battery
This product uses a Lithium-Polymer battery.Donot
it
use
not
Do
heat source, in a high temperature location, in strong
direct sunlight, in a microwave oven
pressurized container, and do
temperatures over 60 C (140
these guidelines may cause the Lithium-Polymer
battery to leak acid, become hot, explode
and cause injury and/or damage. Do not pierce, open
or
disassemble the battery. Ifthe battery leaks and
you
come into contact
thoroughly
immediately. For safety reasons, and to prolong the
lifetime
(below 0 C/32F)or
temperatures.
Temperatures: Standard operation: -10 C
+55C(131
Safety Notices and Warnings
(GPS)isa satellite-
GPS
is operated and
of
other
or
in a
occur at
F)
the
not
follow
or
(14F)to
(-4F)to
of
the United StatesofAmerica
for
its availability and accuracy.
GPS
availability and accuracy,orin
TomTom
Care
and Hospitals
devices withanantenna is prohibited on
many
in a humid,
put, storeorleave
of
the battery, charging will
device. TomTom does
for
the availability and accuracyofGPS.
device for navigation still means
hospitals and in
TomTom
with water and seek medical attention
F);
short period storage: ·20 C
device
wet
and/or corrosive environment.
your
with
high (over45C/113
many
must
notbeused in
productinor
not
exposeitto
F).
Failure to
the leaked fluids, rinse
not
which
Any
accept
most
near a
ignite
low
60
C (140
+25C(77
g
is
BATTERY CHARGING.
To recycle
approved Tom Tom service center.
SPECIAL NOTE REGARDING DRIVING IN
CALIFORNIA AND MINNESOTA
California Vehicle Code Section 26708
provides that
vehicle
installed, affixed
sideorrear
not
rear
Note: this sectionofthe California Vehicle Code
applies to anyone driving in California,
California residents.
Minnesota State Legislature Statutes Section 169.71,
subdivision
not drive
between the driver and thewindshield otherthan sun
visors and rearview mirrors and electronic toll
collection devices."
Note: this Minnesota Stature applies to anyone
driving in Minnesota,
TomTom
penalties
disregarding this notice. While driving in any state
with
recommends the useofthe supplied Adhesive
Mounting Disk
includes multiple options
devices on the dashboard and using the air vents.
+
See
this mounting option.
F);
long period storage: -20 C (-4F)to
F).
THE
LITHIUM-POLYMER BATTERY
CONTAINEDINTHE
RECYCLEDORDISPOSED
PROPERLY.
. WITH
(CAR
AC
ADAPTER (HOME
your
TomTom
"No
withanobjectormaterial placed, displayed,
or
use a suction
windows.
windshield mounting restrictions,
www.tomtom.com
windows."
1,
section 2 provides that"Aperson shall
or
operate
Inc. bears no responsibility
or
damage that may be incurred
or
USE
THE
SUPPLIEDDCPOWER
CHARGER/BATTERY CABLE) AND
persons shall drive any
applied upon the windshield
Drivers in California should
mount
its Alternative
on their windshield, side
with
any objects suspended
not
just
for
PRODUCT MUSTBE
OF
YOUR
unit please see
for
mounting
more information about
TomTom
CHARGER)
your
(a) (1)
motor
not
Minnesota residents.
for
any fines,
TomTom
Mounting
Kit, which
TomTom
ONLY
LEAD
FOR
local
or
or
just
by
58
Page 26
Addendum
FCC
Information
.,.".. which must not be co-located
~
~
Exposure
This device complies
limits set
ordertoavoid the possibilityofexceeding the
radio frequency exposure limits, human
the antenna shall
during normal operation.
Radio and Television Interference
This
if
not used properly
the instructions in this manual - may cause
interference to radio communications and television
reception.
This device has been tested and
with
Part15of
provide reasonable protection against harmful
interference in a residential installation. This
equipment
frequency energy and,
accordance
interference
there
in a particular installation If this
cause harmful interference
reception, which can be determined
equipment
to
correct the interference by one or moreofthe
following
Reorient or relocate the receiving antenna.
Increase the separation distance between the
equipment
Connect the
different
connected.
Consult
help.
to
forth
equipment
the limits for a Class B digital device, pursuant
the
isnoguarantee that interference will not occur
measures:
for
the
User
This product contains a transmitter
proximity
by
turning the
or
FCC
with
does
is
simultaneously operated in conjunction
with
any other transmitter.
Radio Frequency Radiation
with
FCC
for an uncontrolled environment.
not
be less than 20cm(8inches)
radiates radio frequency energy and
-that
FCC
Rules. These limits are designed
generates, uses and can radiated radio
with
to
radio communications. However,
off
and on, the userisencouragedtotry
and the receiver.
equipment
from
an
experienced radio!TV technician for
if
the instructions, may cause harmful
thattowhich the receiver
radiation exposure
is, in strict accordance
foundtocomply
not installed and used in
equipment
to
radio or television
intoanoutlet on a circuit
In
to
to
to
Changesormodifications not expressly approved by
the party responsible for compliance could void the
user's authority to operate the equipment.
Important
This
equipment
under conditions that included the use
cables and connectors between it and the
peripherals. It
cable and connectors
causing radio and television interference. Shielded
cables, suitable
obtained
modifies the
and these modifications are not approved
TomTom,
operate the equipment. For customers in the USA,
the following booklet prepared by the Federal
Communications Commission may be
to
Identify and Resolve Radio-TV Interference
Problems". This booklet
Government Printing Office, Washington,
Stock No 004-000-00345-4.
FCC
TestedtoComply
Office Use
FCC
IC:
This device complies
Operation
1.
2.
Responsible
TomTom,
Concord,
Tel: 866486-6866 option 1 (1-866-4-TomTom)
fromanauthorised dealer. Ifthe user
DeclarationofConformity
10:
S4LG0520
5767A-G0530
This device may not cause harmful interference.
This device must accept any interference
received, including interference that may cause
undesired operation.
was tested for
is
important that you use shielded
to
for
the
product
equipment
the
FCC
is
subjecttothe following
partyinNorth
Inc., 150 Baker Avenue Extension,
MA
01742
or its peripherals in any way,
may
withdraw
with
FCC
with
FCC
compliance
of
reduce the possibility
range, can be
the user's right
of
help:
is
available
Standards
part15of the
America
from
for
two
the
FCC
conditions:
shielded
of
by
"How
US
DC
20402.
Home or
Rules.
to
59
Page 27
Addendum
Emissions
This Class B digital apparatus complies
Canadian ICES-003. Cet appareil numerique de
c1asse
Canada.
Operation is subject
(1)
this device
and
including interference that may cause undesired
operation
This category
complies
Ce
dispositif de radiocommunication de categorie
respectelanorme
C-tick
c
A-tick
'"
V
~
Warning
The user needstoswitch
exposed
atmospheres such
storage depots and blasting operations.
Best
(2)
this device
of
with
for
to
information
conformeala
may
the device.
II
radiocommunication device
Industry Canada Standard RSS-310.
N14644
This
product
complies
New
Zealand regulations.
N14644
This
showitcomplies
Australian and
regulations.
Austra
areas
for
Canada
with
norme
to
the
following
not
cause harmful interference
must
accept any interference,
CNR-310 d'industrie Canda.
displays the C-tick to
with
all relevant Australian and
product
fa
with
as
displays the A-tick to
off
potentially explosive
petrol stations, chemical
NMB-003
two
with
New
the device when
all relevant
Zealand
du
conditions:
show
This Do umen
la
II
Great care was taken in preparing this manual.
Constant
information is not entirely up-to-date. The
information in this
without
TomTom
errors
incidentalorconsequential damages resulting
the performanceoruseofthis material. This
document
copyright. No part
photocopied
written consent
Part
TomTom
4CH7.000.00,4CH9.000.00
it
product
notice.
shall not be liable
or
omissions contained herein;
contains information protected by
numbers
GO: 4CH5.000.00, 4CH5.000.01,
development
document
of
this
document
or
reproduced in any
from
TomTom
is subjecttochange
for
may mean that
technicaloreditorial
International
may
form
nor
for
be
without
some
from
prior
B.V.
60
Page 28
:t)
2008 Tom
~two
trademarks
and
product;
2008 TomTom
dos
de
TomTom
acuerdodelicenCla de usuaflO
aplicacltin
www.tomtom.comllegal
'~2008
TomTom ("deux
applications
L'utilisationdece
de
licence utiJisateur
consulter
www.tomtom.comllegal
Data Source
© 1984 -
PortIOns
Malesty
Resource Canada. PomtofInterest databyInfo
Tom
hands'
logo
ownedbyTomTom
end
user
license
you can
manos'
son
International
para
TomTom
ou
ces deux
2008
of
Canadian
the Queen m
International
are
among
agreement
review
International
marcas
este
producto;
International
mams~)
les
marques
prodwt
fmal
documents
Tele
Alias
map
RightofCanada With permiSSion
BV,
The
the trademarks, applicationsorregistered
International
for
bothatwww.tomtom.com!J8gal
comerclales, aplicaclOnes 0 marcas reglstradas
8.
comptent
est regIe
relatt!
embedded
Sv, Palses Sa/os. TomTom •
V.
Nuestra garantla IImitada y
fmal
paraelsoftware
puede
consultar
BV,
The
parmi
deposees de Tom Tom
par
aux loglclels
afadresse suivante :
North
America. Inc.
data are
reproduced
Netherlands.
Netherlands.
les
notre
TomTom'"
B.V.Our
limited
software
mtegrado
ambos
TomTom"·
marques
garanlle
commerClales, les
International
Imlltee etIecontrat
embarques..vous pouvez
All
fights
under
license from
USA
Copyright 2008.
apply
yel
nuestro
en
reserved.
from
Natural
and
warranty
to this
logotlpo
son de
etIe logo
B.V.
Her
the
Copyright notices
SoundClear'"
Technologies Inc.
MPEG Layer-3 audio codmg technology
Thomson.
Supplyofthis
d,stflbute
broadcast
channels),
networks),
demand
digital
and
the
please
Some
The
purposeofNASA's
publication
Imagery
The focus is
earthobservatory.nasa.gov!
acoustic echo cancellation
licensed
product
does
not
content
created
systems (terrestrial, satellite. cable
streaming
other
applications
versatile
like).Anmdependent
VIS,t
mp3licensmg.com
Images are taken from NASA's Earth Observatory,
on the
and
applications
content
and
diSCS,
Internet
SCientific
on
Earth's climate
semiconductor
information
conveya license
with
chiS
productinrevenue-generatmg
(Via
license
the
about
and
envrronmental
Internet, mtranets
phySICal
ChiPS,
for
public
d,strtbutlon systems (pay-audiooraudio-on·
the like)oron
Earth ObservatoryISto
where
software©Acoustic
from
Fraunhofer
nor
Imply
andlor
other
medIa
hard
such useISreqUired. For detmls,
provide
can
our
home
(compact discs,
drives,
a freely-accessible
obtain
new
planet.
change'
any
right
d,stnbutlon
and/or
memory
satellite
liS
other
cards
and
to
Data Source
Wherels'S.
Corporation
Text to Speech technology,
LoquendoISa
Appleffand
the
Audible!!.,
trademarksofAudible, Inc. When
you
Notices
2008
USO
limited,
registered
iPod'R are trademarksofApple
U.S.and
other
AudibleUstener"
needtoagree to
www.audlble.com.
11_
used
countries.
the
and
Sensls!!.- are trademarksofTelstra!!.
under
© 2008
trademark.
and
terms
license.
Loquendo
www./oquendo.com
Audiblemanager
purchasmg
and
conditionsaspostedmthe
ITS.
Computer, Inc.,
it are
and
usmg
All
fights
reserved.
registered
registered
Audible
m
content
Legal
61
Page 29
TomTom limited warranty
WARRANTOR
year
without
with
your
from
the
the
or
TomTom
to
after the
of
Non-U.S. and non-Canadian purchases: If you have made
purchase outside the United States and Canada, this Limited
Warranty
for
1017
WHAT THIS WARRANTY COVERS
1)
Hardware will
under normal use ("Defects") for a period
date that the Hardware was first purchased
Period"). During the Warranty Period the Hardware will be repaired
or
charge to you
covers the replacement
repaired after the Warranty Period has expired, the Warranty Period
for the repair will expire six
WHAT THIS WARRANTY
2)
does not apply when the Hardware is opened or repaired by
someone not authorized by
replacementofany Hardwareorpart thereof damaged by: misuse,
moisture, liquids,
abuse. non·compliance
Hardware, neglect
not
Limited Warranty does not cover any software that may accompany
orbeinstalled on the Hardware. The Limited Warranty does not
cover the installation, removal
any costs related herewith.
HOW TO MAKE A WARRANTY CLAIM
3)Inorder to make a claim of a Defect. you must contact
by
explain the Defect and to obtain
Authorization) if necessary. You must return the Hardware during
the Warranty Period, along
address provided to
claim under this Limited Warranty is received
first one hundred and eighty (180) days
TomTom
handling costs made in connection
of
procedures stipulated
YOUR LEGAL RIGHTS
4)
damages. If any partofthis Limited Warranty is held to be invalid
unenforceable, the remainderofthe Limited Warranty shall
nonetheless remain in full force and effect.
5)
and is provided in lieu
obligations (if any) created
packaging,
is
the benefitofTomTom
TomTom
replaced at
The Limited Warranty does not apply to normal wear and tear,
email during the Warranty Period via
the Hardware. You
Some countries may
This Limited Warranty is the only express warranty madetoyou
grantedbyand this LimitationofLiability is stipulated
CT
Amsterdam (The Netherlands).
International
be
free
TomTom's
for
either parts or labour. This Limited Warranty
proximity
cover physical damage to the surlaceofthe Hardware. This
is entitled to charge you for any reasonable shipping and
or
or
other communications.
International B.V.•Rembrandtplein 35,
B.V.
("TomTom") warrantstoyou that the
from
defects in workmanship and materials
choice ("Limited Warranty")
of
the Hardware only. If the Hardware is
(6)
months after the dateofrepair,
DOES
NOT COVER
TomTom
or exposure to heat and accident.
with
the instructions supplied
misapplication. The Limited Warranty does
or
maintenanceofthe Hardware
an
withanexplanationofthe Defect, to the
youbyTomTom. If a defect arises and a valid
must
comply
by
TomTom,ifany.
not
allow the exclusionorlimitation
of
any other express warrantiesorsimilar
by
any advertising, documentation.
of
one
(1)
by
you ("Warranty
and does not cover repair
www.tomtom.com
RMA
number
of
with
the repairorreplacement
with
any other return
(Return Materials
by
TomTom
the Warranty Period,
6)
Except for the Limited Warranty and to the
permitted
Hardware "AS
other warranties and conditions. whether express, implied
statutory. including, but not limited to. any (if any) implied
warranties. duties or conditions
a particular purpose,ofreliabilityoravailability.ofaccuracy
completenessofresponses,ofresults.ofworkmanlike effort.oflack
of
Hardware, and the provision
services. information, software. and related content through the
Hardware
there is
possession.
exclusion does not apply to
Iii) any implied warranty
7)
applicable national legislation governing the sale
goods.
8)
LIMITATION
or
or
9)
third party for any damages either direct. indirect. incidental.
consequential
to. damages
loss
or
even if
damages.
10)
reason whatsoever (including.
referenced herein and all direct or general damages in contract or
anything else), the entire liability
suppliers shall be limited to the amount actually paid
Hardware.
111
employees and/or agents;
on the part
12)
personal injury resulting
by
applicable law.
IS
AND WITH ALL FAULTS", and hereby disclaim all
viruses. andofreasonable care and skill. all
or
otherwise arising
no
warrantyorconditionofquiet
or
non·infringement
This Limited Warranty does not affect any legal rights under
This Limited Warranty cannot be transferred to any other person,
OF
LIABILITY
Neither
TomTom
of
data, lossofbusiness, lossofprofits, business interruption
the like) arising outofthe useofor
TomTom
Notwithstanding any damages that you
TomTom
of
Notwithstanding the above, neither party's liability for death or
nor
or
otherwise (including in each case.
for
the inability to use the equipmentoraccess data,
has been advisedofthe possibilityofsuch
shall not be liable for
its employees and/or agents.
TomTom
of
satisfactory quality,offitness
oforfailure to
outofthe useofthe Hardware. Also.
with
(i) any implied condition
astoconformity
its suppliers shall be liable to youorto any
without
of
TomTom
or
from
(i)
(ii) any fraudulent misrepresentation
its own negligence shall be limited.
maximum
and its suppliers provide the
with
provide
enjoyment, quiet
regard to the Hardware. This
with
description.
inability to use the Hardware
might
limitation. all damages
and anyofits
any fraud on the partofits
extent
or
or
regard to the
supportorother
as
to title and
of
consumer
but
not limited
incur for any
by
you
for
for
the
62
Page 30

Page 31

Services&Accessories
ServiciosyAccesorios
ServicesetAccessoi
res
Page 32

CONTENTS
4
6
8
10
12
TomTom"
14
Page 33

WELCOME
TO
THE
WORLD
TomTom's
mean
driving
Wherever
To
get
thingstoknow
award-winning
ground
breaking
experience.
life
takes
the
most
outofyour
before
you,
you
OF
software
new
technology
your
TomTomGOis
TomTom
go.
TOMTOM
and
innovative
for
device,
the
ultimate
your
here
features
guide.
areafew
Page 34

Page 35

GEIT.
G
STAHlE
Stay
current
Stayupto
software.
your
computer
cable.
software
services,
and
Access
more:
E
date
with
Connect
updates,
convenient
using
the
your
latest
extra
free
TomTom
TomTomGOto
the
enclosed
map
and
products
trip
planning
HOME
USB
and
Receive
Subscribetoor
and
Manage
your
Personalize
Download
galleryorcreate
Share
TomTom
Download
from
to
movie
Gototomtom.com/hometolearn
more
and
automatic
services
content
your
community
gas
stations
theaters
download
software
buy
TomTom
your
device
and
your
device
content
content
PointsofInterest
from
your
own
with
and
ATM
and
museums
TomTom
back-up
our
the
machines
HOME
updates
content
online
entire
(POI),
WWW.TOMTOM.COM
5
Page 36

MAPS
TomTomGOuses
road.
Get
where
maps
and
updates
We
use
the
most
accurate
leading
TomTomGOcomes
maps
is
purchase,
freeofcharge
with
maps
providers.
pre-installed.
released
you
our
latest
from
within30days
can
from
map
the
most
you're
available.
recent
and
the
world's
Your
new
with
the
If a
new
download
TomTom
guarantee.
reliable
going
latest
map
of
it
HOME
mapstosave
quickly
and
efficiently
t'u
Updating
Purchase
onlineorvia
are
maps
and
available
you
timeonthe
with
r
has
download
TomTom
quarterly.
never
new
HOME.
the
been
latest
easier.
maps
New
maps
6
Page 37

TOMTOM
Your
MAP
TomTomGOcomes
SHARfT
with
M
TomTom's
unique
find
-like
Map
Share
changesinthe
blocked
directionornew
can
note
them
device.
own
Map
to
them
You
to
the
Not
only
changes,
Share
community,
send
and
receive
with
the
can
specify
accept
all
reported
ones
verifiedbyTomTom.
monthsoffree
with
the
purchaseofa
oranew
map.
technology.Ifyou
road
network
roads,
reversed
street
names-you
instantlyonyour
can
you
make
but
you
can
also
enabling
changes,
entire
community.
your
leveloftrust
fixesoronly
Get
Map
Share™
updates
TomTom
T T
traffic
your
join
you
sharing
12
device
the
WWW.TOMTOM.COM
7
Page 38

T
Your
the
By
subscribingtoTomTom
receive
numberofproviders
mobile
on
receives
Informationtocalculate
and
FFIC
timeisvaluable.
picture.
your
suggest
Your
trustworthy
phone*.
device,itautomatically
the
most
information
Every
up-to-date
alternative
TomTom
via
time
Knowing
Traffic,
your
Bluetooth
you
traffic
your
trip
routes.
knows
you
from
switch
time
the
routetotakeisonly
the
routestoavoid,
With
TomTom
your
a
TomTom
and
points
grade,
Select
take
TomTom
TomTomGOdevices
your
you
price
there
HOME)
daily
finds
youtoit.
and
station
station
(available
half
too.
fuel
price
the
lowest
Searchbyfuel
proximity.
and
let
TomTom
via
can
also
updates,
price
receive
This
technology
updatesatregular
TomTom
receiver
asaTMC
device
will
update
your
new
alternative
8
WW
delivers
Intervalstoyour
GO.
Just
plug
the
Into
your
device
updateisreceived,
automatically
Into
your
routing,
tliP
time
and
routes.
TOMTOM
COM
standard
RDS-TMC
andassoon
your
add
the
calculate
suggest
TMC
TomTom
over-the-air.*
Fuel
Price
updates
Page 39

Page 40

SAFETY
Independent
tive
impactondriving
features
on
time.
TomTom
your
stationary.
recommends
device
SAFETY
Audio
and
speed
alerts,
breaks
approach
worship.
and
AUTOMATIC
When
new
available,
automatically
there'snoneedtore-program
device
while
research
that
help
when
your
WARNINGS
visual
warnings
recommended
warnings
school
when
zones
RE-ROUTING
road
information
your
TomTom
recalculates
driving.
take
you
only
vehicle
and
GO
the
proves
safety.
include
you
places
youtoyour
driving
that
No
operate
is
of
becomes
route,
your
usingaTomTom
surprise
destination
t1ELPMEEMERGENCYMEU
The
Help
local
emergency
call
police,
The
''WhereAmI?"
your
exact
emergency
WEATHER
Your
TomTomGOlets
weather
can
modify
requires
TomTom
can
so
downloadadetailed
or
S-day
device
when
you
safely,
Mel
menu
services.
fire
stations
locationtoprovide
providers.
conditionsinadvancesoyou
your
travel
it.
Each
time
HOME,orover
forecast
for
hasaposi-
consider
relaxed
provides
Drive,
and
feature
pinpoints
you
monitor
plansifsafety
you
connect
the
weather
your
destination.
many
and
access
hospitals.
to
air*,
walk
via
you
report
to
or
10
WWW.TOMTOM.COM
Page 41

Always
when
take
you
your
are
notinyour
TomTom
car.
with
you
PIN
code
protection
accessing
prevents
the
personal
TomTom.
A rTY
CAMERA
Subscribetoreceive
alertsofsafety
With
this
dangerous
by
red
light
updates
and
Canada.Goto
a
listofcoverage
camerasonyour
service
you'll
intersections
cameras.
for
selected
andtoreceive
updates.
others
from
dataonyour
SERV
audio
and
know
are
Receive
citiesinthe
TomTom
CES
visual
route.
which
monitored
weekly
U.S.
HOME
for
weekly
WWW.TOMTOM.COM
11
Page 42

ACCESSORIES
Personalize
your
TomTomGOwith
accessories.
C
RR
CASE
Compact
an
cases,
TomTom
Hard,
removable
TomTomGOand
PF.MOTE
Safe,
control
outarangeoffunctionsatthe
ofabutton.
and
durable,
assortmentofcloth
all
madetofit
GO.
AVEL
CASE
protective
travel
storage
accessories.
pockets
CONTRO
easy
and
smart,
works
via
Bluetoothtocarry
choose
and
and
case
the
leather
protect
with
for
remote
from
your
your
touch
our
rangeofoptional
ADDITIONAL
C
ARG
R
Transferring
and
simple
including
AL
F.RN
Mountonthe
to
attachtothe
adhesive
VENT
Keep
removable
your
vent.
withasecond
car
...
disc.
MOUTKIT
your
windshield
mount
TomTom
MOUNT
from
cartocarisquick
charger.
IVE
windshieldorchoose
dashboard
allows
devicetoyour
OUN
clear.
KIT&CAR
mount
with
This
youtoattach
car's
kit,
an
easily
air
12
WW.TOMTOM.COM
Page 43

PROCLIP
MOUNT
ProClip
makes
- TAILOR-MADE
rG
SOLUTIONS
robust,
premium
EXTERNAL
Poor
GPS
ANTENNA
reception
heat-reflecting
can
occur
with
windshieldorbuilt-in
mounting
manufactured
TomTom
solutions
for
GO.
specifically
your
vehicle
Gototomtom-proclip.com
USB
CAR
CHARGER
Plugs
intoacigarette
charge
Keep
oneinevery
FAST
CHARGER
The
quickest
orinthe
two
hours.
your
device
waytorechargeathome
office.
Includes
lighter
while
car.
Fully
readytogoinjust
worldwide
plugs.
IPOD'
Control
CONNECT
your
iPod®
CABLE
from
your
socket
your
and
your
to
drive.
adapter
TomTom
windshield
external
antenna
Partofa
300
smart
connect
office
for
and
communication.
heaters.
solves
fleet?
The
business
your
TomTomGOto
easy
fleet
Our
waterproof
this
problem.
TomTom
solution
LINK
can
the
management
screen
and
speakers.
play
tunes
through
your
car
WWW.TOMTOM.COM13
Page 44

PERSONALIZE
NAVTONES
Takearide
Customize
voice
from
like
Mr.T,Burt
Hopper,
at
tomtom.comornavtones.com
RECORD
And
now
-
record
your
someone
on
your
TomTomGOallows
create
your
AUDIO
Choose
spoken
narrators
magazines
BOOKS
from
entertainment.
VOICES
withacelebrity
your
TomTom
Navtones®
Reynolds,
and
more.
Find
YOUR
you
you
read
OWN
can
own
love.
own
audio
over
40,000
the
and
newspapers.
have
voiceorthat
The
latest
withanovelty
including
novelty
VOICE
even
easy
prompts.
Well-known
bestsellers,
guide
Dennis
more
of
interface
you
titles
You
voices
voices
fun
to
of
can
UDDIES
Keep
trackoffriends
TomTom
can
send
mobile
navigatetothem
button.
Please
phone
required.
MAP
Personalize
with
rangeofcolorful
night
GO.
see
whoisin
instant
phone,
The
note
and
COLORS
your
favorite
views
With
messages
serviceiscompletely
thatacompatible
wireless
your
and
who
also
TomTom
the
share
with
data
TomTomGOscreen
colors.
schemes,
black
Buddies,
neighborhood,
viaacompatible
locations
the
and
and
touchofa
mobile
connection
Choose
including
white.
have
free.
from
a
you
are
a
even
brushuponaforeign
while
you're
heading
14
WWW.TOMTOM.COM
for
language
the
border.
Page 45

Page 46

Page 47

TomTom GO
Page 48

What’s in the box1.
What’s in the box
a Your TomTom GO (Maps are
pre-loaded in internal memory)
A
J
C
F
D
H
G
E
A Microphone
B Charging light
C On/Off button
D Light sensor
B
E Reset button
F Speaker
G Memory card slot (SD card not
included) for optional additional
maps
H USB connector
I TomTom connector / RDS-TMC
connector
J External antenna connector
K Audio out connector
b Windshield Holder c Documentation pack
I
K
d Car charger e Home Dock
2
Page 49

Included with TomTom GO x30T
f RDS-TMC Traffic Receiver
Included with TomTom GO 930 and 930T
g Remote control
3
Page 50

Before You Start...2.
Before You Start...
Switching on and off
To switch your TomTom GO on or off, press and hold the On/Off button for 2
seconds. The first time you switch on, it may take a short while for your device
to start.
Note: In rare cases, your GO may not start correctly. If this happens, press the
reset button, then switch on the device again.
Setting up
To set up your TomTom GO you need to answer a few questions by tapping
the screen.
Important: Take care to select the correct language, since the language you
choose will be used for all menus and written instructions.
Battery notes
We recommend that you fully charge your TomTom GO the first time that you
connect it to the home dock. It takes up to 2 hours to charge the battery
completely.
When you place your GO in the Home Dock, you are asked if you wish to
connect to the computer. If you select No, the device will switch off if you do
not tap the screen for three minutes. This happens so that the battery can
recharge at a faster rate.
For information on connecting your computer, see Using TomTom HOME on
page 94.
Note: Your TomTom GO uses a small amount of battery power to remember
the last screen being shown when the device is switched off.
If you do not charge your GO for a prolonged period of time, the next time you
start your GO it will show the default starting screen. All other device settings
will still be maintained.
Improving reception
If your TomTom GO takes longer than 5 minutes to find your current position,
make sure that the device is in an open space away from tall objects such as
buildings or trees.
4
Page 51

When you connect your TomTom GO to your computer, you can use
TomTom HOME to download information about GPS satellite positions during
the next 7 days. This helps your GO to find your position faster.
Important: Some vehicles have heat reflective shielding in the windscreen.
This may prevent your GO from locating your current position.
The TomTom External Antenna Kit (available for purchase as an accessory)
can help to improve reception.
Windshield Holder
Use the windshield holder to install your TomTom GO inside your car.
To attach the holder, press the suction cup firmly to the windshield in your car,
in an area of the windshield where the glass is flat.
Make sure that both the holder and your windshield are clean and dry before
you attach the holder. Place the holder so that it does not interfere with your
view of the road.
Home Dock
The home dock is used for charging your TomTom GO when it is not in the car
and for connecting your GO to your computer.
When connected to your computer, you can use TomTom HOME to manage
your GO. For information about TomTom HOME, see Using TomTom HOME
on page 94.
Take care of your TomTom GO
Never leave your TomTom GO or accessories in view when you leave the car
or they may become an easy target for thieves.
You can set a password for your TomTom GO which must be entered every
time you start your GO. For more information, see Using TomTom HOME on
page 94.
It is important to take care of your GO.
• Your GO is not designed for use in extreme temperatures and any such
exposure may cause permanent damage.
• Do not open the casing of your GO under any circumstances. Doing so may
be dangerous and will invalidate the warranty.
• Wipe or dry the screen of your GO using a soft cloth. Do not use any liquid
cleaners.
5
Page 52

Driving View3.
Driving View
When your TomTom GO starts, you are shown the Driving View along with
detailed information about your current location.
Tap the center of the screen at any time to open the Main Menu.
Note: The Driving View is shown in black and white until your GO locates your
current position.
A Tap + and - to zoom in and out.
B Your current position.
C The name of the next major road or road sign information, if applicable.
D Navigation instruction for the road ahead.
Tap this area to repeat the last spoken instruction and to change the
volume.
E The name of the next street to turn onto.
F Information about your trip such as trip time, remaining distance and arrival
time.
To select what will be shown, tap Status bar preferences in the Preferences
menu.
G GPS signal strength.
H Traffic bar
To set up Traffic information, tap the Traffic bar to open the Traffic menu or
tap TomTom Traffic in the Main Menu.
I Quick menu - For more information, refer to the full manual.
6
Page 53

Enhanced Positioning Technology4.
Enhanced Positioning Technology
Note: Enhanced Positioning Technology is available on the TomTom GO 930
and 930T.
Enhanced Positioning Technology or EPT estimates your location when GPS
reception is poor, such as when you drive between tall buildings.
Your GO uses positioning sensors to monitor your acceleration and direction
and then estimates your current location.
EPT only helps your GO to estimate your location. Calculating your precise
location is only possible when your GO receives a strong GPS signal.
When your GO is using EPT to estimate your location, the EPT icon is shown
on the status bar.
Your GO calibrates EPT automatically. If calibration is not complete when your
GO loses GPS reception, EPT cannot be used and the screen is shown in grey,
for example, when there is no GPS reception at the beginning of a trip.
A EPT icon.
B Your current position.
Calibration
Calibration is done automatically and requires no interaction from you.
However, it is useful to have a basic understanding of the calibration
procedure.
Your TomTom GO resets the positioning sensors each time the device is
switched on. To help improve accuracy in estimating your location, your GO
calibrates the sensors throughout your trip.
The following conditions are required for successful calibration:
• Your GO is receiving a strong GPS signal.
• The car has been stationary for at least 5 seconds and then travels along a
straight and level section of road for at least one minute.
7
Page 54

Making your first trip5.
Making your first trip
Planning a route with your TomTom GO is easy. To plan your first route, follow
the steps below.
Important: You should always plan your journey before you start driving. It is
dangerous to plan a route while driving.
1. Tap the screen to bring up the main menu.
Note: The buttons on your GO are shown in full color unless a button is
currently unavailable. For example, the button named Find alternative... in
the Main Menu is not available until you have planned a route.
2. Tap Navigate to...
3. Tap Address.
When you enter an address, you can choose from the following options:
• City center - tap this button to set your destination as the center of a city
or town.
• Street and house number - tap this button to set an exact address as your
destination.
• ZIP code - tap this button to enter a ZIP code as your destination.
• Cross street or intersection - tap this button to set your destination as the
point where two streets meet.
• Spoken address - tap this button to set your destination by announcing
the address to your GO. For more information, see Voice address input
on page 21.
8
Page 55

Note: Spoken address entry is supported on TomTom GO 920 and 920T.
For your first trip, we will enter an exact address.
4. Tap Street and house number.
Note: When planning a trip for the first time your GO asks you to choose a
state or country. Your choice is saved and used for all routes you plan.
You can change this setting at any time by tapping the state symbol or country
flag.
5. Start to type the name of the town where you want to go.
As you type, the names of the towns that match what you have typed are
shown. When your destination appears in the list, tap the name of the town
to set the destination.
Tip: Instead of typing the name, tap this button to say the address
by speaking to your GO.
For more information, see Voice address input on page 21
Spoken address entry is supported on TomTom GO 930 and 930T.
6. Start to type the name of the street and select it when it is shown.
As with the name of the town, the names of the streets that match what you
have typed are shown. When your destination appears in the list, tap the
name of the street to set the destination.
7. Now enter the house number of your destination and then tap Done.
9
Page 56

Arrival times
8. Your GO asks if you need to arrive at a particular time. For this exercise, tap
NO.
The route is calculated by your GO. IQ Routes
TM
is used to plan the best
possible route, using historical information about traffic speed on the roads.
9. When the route has been calculated, tap Done.
Your GO will immediately begin to guide you to your destination, using both
spoken instructions and on-screen directions.
When you plan a route, your TomTom GO asks you if you need to arrive at a
particular time.
Tap YES to enter a preferred arrival time.
Your GO calculates your arrival time and shows you whether you will arrive
on time.
Status bar
preferences
You can also use this information to work out when you need to leave. If your
GO shows that you will arrive 30 minutes early, you can wait and leave in 30
minutes time, rather than arrive early.
Your arrival time is constantly recalculated during your trip. The status bar
shows whether you will arrive on time or if you are going to be late, as shown
below:
You will arrive 55 minutes before the arrival time you entered.
If the estimated arrival time is more than five minutes before
the time you entered, it is shown in green.
You will arrive 3 minutes before the arrival time you entered.
If the estimated arrival time is less than 5 minutes before the
time you entered, it is shown in yellow.
You will arrive 19 minutes late.
If the estimated arrival time is later than the time you entered,
it is shown in red.
Ta p Status bar preferences in the Preferences menu, to enable or disable
arrival time notifications.
Select the required options on the first menu screen and then tap Done.
To enable arrival time notifications, select Show leeway to arrival time.
To disable arrival time notifications, unselect Show leeway to arrival time.
10
Page 57

What are the other navigation options?
2
3
1
2
When you tap Navigate to..., you can set your destination in many ways, not
just by entering the address. The other options are listed below:
Tap this button to navigate to your Home location.
You will probably use this button more than any other.
Home
Favorite
Address
Recent
destination
Point of
Interest
For information about setting your Home location, see Change Home
location on page 51.
Tap this button to select a Favorite as your destination.
For more information about Favorites, see Favorites on page 31.
Tap this button to enter an address as your destination.
Tap this button to select your destination from a list of places you have
recently used as destinations.
Tap this button to navigate to a Point of Interest (POI).
For more information about POIs and navigating to a POI, see Points of
Interest on page 37.
Tap this button to select your GPS position, as your destination.
My location
Point on map
Latitude
Longitude
TomTom
Buddy
For more information about GPS, see Global Positioning System (GPS) on
page 93.
Tap this button to select a point on the map as your destination using the
map browser.
For more information about the map browser, see Driving View on page 6.
Tap this button to enter a destination using latitude and longitude values.
Tap this button to navigate to the current position of a TomTom Buddy.
Don’t forget that the Buddy may move before you reach him.
For more information about TomTom Buddies, see TomTom Services on
page 65.
11
Page 58

Tap this button to select your last recorded position, as your destination.
For more information about the GPS, see Global Positioning System (GPS)
Position of
last stop
on page 93.
Spoken address
Note: Spoken address entry is available for TomTom GO 920 and 920T.
Instead of typing addresses, you can now enter an address by speaking to
your GO.
Note: The speech recognition feature is currently only available for entering
addresses and for responding to special notifications.
In the Main menu tap Navigate to..., then tap Address, then tap Spoken
address or Spoken address (dialog) and speak when prompted.
Spoken
address
(dialog)
Spoken
address
For more information, see Voice address input on page 21
Planning a route in advance
You can also use your GO to plan trips in advance by selecting both your
starting point and your destination. You could, for example, do the following:
• Find out how long a trip is going to take before you start.
• Check the route of a trip you are planning.
• Check a route for someone who is coming to visit you so you can explain
the route to them.
To plan a route in advance, follow these steps:
1. Tap the screen to bring up the main menu.
2. Tap the arrow button to move to the next menu screen and tap Prepare
route.
Prepare route
3. Select the starting point for your trip in the same way that you would select
your destination.
4. Set the destination for your trip.
5. Choose the type of route that should be planned.
• Fastest route - the route which takes the least time.
12
Page 59

• Shortest route - the shortest distance between the locations you set. This
may not be the quickest route, especially if the shortest route is through
a town or city.
• Avoid freeways - a route which avoids freeways.
• Walking route - a route designed for making the trip on foot.
• Bicycle route - a route designed for making the trip on a bicycle.
• Limited speed - a route for a vehicle which can only be driven at a limited
speed. You have to specify the maximum speed.
6. Your TomTom GO plans the route between the two locations you selected.
More information about a route
You can access these options for the route you last planned, by tapping View
route in the Main Menu.
To find out about your route in detail, tap the Details button on the route
summary screen.
You can then select from the following options:
Tap this button for a list of all the turn instructions on the route.
This is very useful if you need to explain a route to someone else.
Browse as
text
Tap this button to see each turn in the trip. Tap the right and left arrows to
move forwards and backwards through the trip.
Browse as
images
Browse map
of route
Show route
demo
Show route
summary
Tap the screen to turn off the 3D display and view the map from above.
Tap this button to see an overview of the route using the map browser.
For more information about the map browser, see Driving View on page 6.
Tap this button to watch a demo of the trip. You can interrupt the demo at
any time by tapping the screen.
Tap this button to open the route summary screen.
13
Page 60

Finding alternative routes6.
Finding alternative routes
Once you have planned a route, you may want to change something about the
route, without changing your destination.
Why change the route?
Maybe for one of these reasons:
• You can see a roadblock or a line of traffic ahead.
• You want to travel via a particular location, to pick someone up, stop for
lunch or fill up with gas.
• You want to avoid a difficult intersection or a road you don’t like.
Ta p Find alternative... in the Main Menu to change the route that is
currently planned.
Find alterna-
tive...
Calculate
alternative
Then tap one of the options below.
Tap this button to calculate an alternative to the route already planned.
Your GO will look for another route from your current location to your
destination.
If you decide you would prefer to use the original route after all, tap
Recalculate original.
Avoid
roadblock
Why would I need to do this?
Apart from the roads near your position and near your destination, the new
route will use totally different roads to reach your destination. This is an
easy way of calculating a totally different route.
Tap this button if you can see a roadblock or a line of traffic ahead. You then
have to choose how much of the route ahead you want to avoid.
Choose from the different options: 100m, 500m, 2000m, 5000m. Your GO
will recalculate your route avoiding the section of the route for the distance
you selected.
Don’t forget that once a new route is calculated, you may have to turn off
the road you are on very soon.
If the roadblock suddenly clears, tap Recalculate original to return to your
original route.
14
Page 61

Tap this button to change your route so that it passes a particular location,
perhaps to pick someone up on the way.
Travel via...
Recalculate
original
Avoid part of
route
Minimize
traffic delays
You choose the location you want to pass in the same way as you choose a
destination. So you can select from all the same options: for example,
Address, Favorite, Point of Interest and Point on map.
Your GO will calculate a new route to your destination that passes the
location you chose.
Using this button, you can only travel via one location. If you want to pass
more than one, use an Itinerary. For more information, see Itinerary
planning on page 42.
Tap this button to return to the original route without deviations to avoid
roadblocks or traveling via particular locations.
Tap this button to avoid a part of the route. Use this button if you see that
your route includes a road or junction you don’t like, or which is wellknown for traffic problems.
You then choose the road you want to avoid from a list of the roads on your
route.
Tap this button to recalculate your route so that it avoids traffic problems as
much as possible. Your GO will check if there are any traffic problems on
your route and work out the best route to avoid the problems.
For more information about using TomTom Traffic, see TomTom Traffic on
page 74.
15
Page 62

Sounds and voices7.
Sounds and voices
The sound on your TomTom GO is used for features such as:
• Spoken instructions
• Hands-free calls
• Warnings
•Music
For information on making hands-free calls on your GO, see Hands-free
calling on page 45.
For information on playing music on your GO, see Music and Media on page
25
How do I change the volume level?
You can change the volume in three ways:
• Tap the bottom left hand area of the Driving View. The last spoken
instruction is repeated and the volume level is shown.
Move the volume slider to adjust the volume.
• In the Main Menu, tap Change preferences, then tap Volume preferences.
Tap Test to check your changes.
• You can set your GO to change the volume automatically depending on
how noisy it is in the car.
Changing the volume automatically
Your TomTom GO can change the volume automatically.
1. In the Main Menu, tap Change preferences.
Volume
preferences
2. Tap Volume preferences.
3. Select Link volume to noise level.
4. Tap Done.
16
Page 63

Selecting a voice
To change the voice being used by your TomTom GO, tap Voice
preferences in the Preferences menu, then tap Change voice. Select a voice
from the list.
Voice
preferences
Your TomTom GO has two different kinds of voices:
• Computer voices
These are generated by your GO. They provide spoken instructions
while you are driving and can pronounce street names and announce
messages, traffic reports, weather reports, tips and tutorials.
•Human voices
These are recorded by an actor.
Note: Human voices only provide spoken instructions.
How do computer voices work?
Your TomTom GO makes use of text-to-speech technology to generate
computer voices. A text-to-speech program converts written text, for example
an instruction like “Turn right”, into the sound of a human voice.
The text-to-speech program looks at the whole sentence to make sure that the
sound you hear is as close to the real thing as possible. The program is also
able to recognize and quite accurately pronounce foreign place and street
names. For example, the English voice can read French street names.
Note: If you select a Human voice, this will only be able to announce
commands, but not street names. If you would like street names to be
announced, you will need to select a computer voice.
Internal and external speakers
Your TomTom GO contains a high quality speaker. This is used to play all the
sounds on your GO unless you connect to external speakers.
You can connect external speakers to your GO in the following ways:
• Using an audio cable.
Note: If your car stereo has a line-in connector, you can play sound from your
GO through your car speakers.
• Connecting a Bluetooth® Hi-Fi headset or speakers.
• Tuning the FM Transmitter in your GO to use your car radio speakers.
FM transmitter
There is an FM Transmitter inside your GO that works like a radio station. This
means you can hear the instructions made by your GO and play your mp3
songs through your car radio speakers.
Setting up
• In the Main Menu tap Change preferences, then tap Speaker preferences.
17
Page 64

• Switch on your car radio.
• Tune your car radio to a frequency that is not being used by a radio station.
• Tap Change and set the frequency on your GO to the same frequency as
your car radio.
If you drive into an area where a radio station transmits on the same
frequency you are using for the FM Transmitter, you may have to use
another frequency.
Using more than one speaker
You can select different speakers to be used for specific events, such as using
the internal speaker for TomTom GO instructions and external speakers for
hearing handsfree phone calls and listening to music.
• Internal speaker
• Bluetooth Hi-Fi device
• Line-out (audio cable)
• FM to your car radio
Is it difficult to hear spoken instructions when music is playing?
When you choose to use a Bluetooth® Hi-Fi device for music and spoken
instructions, you are asked if you want to pause music when spoken
instructions are announced. By default, music is always paused for spoken
instructions.
When you receive a hands-free phonecall, music is always paused and spoken
instructions are not given.
For information about making hands-free calls on your GO, see Hands-free
calling on page 45.
Using the audio cable
To play sound through your car stereo or other external speaker using an
audio cable, do the following:
1. Plug the audio cable into the audio out connector on your GO.
2. Plug the audio cable into the line-in connector on your car stereo or other
external speaker.
Note: Not all car stereos have a line in connector. Check the manual for your
car stereo for specific information.
3. If you are using your car stereo, select line-in connector on your car stereo
as the input source.
4. On your GO, tap Speaker preferences in the Preferences menu.
Tap this button to change the speaker settings.
Speaker
preferences
5. Select the speaker you want your GO to use for announcing instructions.
• Internal speaker
18
Page 65

• Bluetooth Hi-Fi device
• Line-out (audio cable)
• FM to your car radio
6. Select the speaker you want your GO to use for playing music.
• Internal speaker
• Bluetooth Hi-Fi device
• Line-out (audio cable)
• FM to your car radio
7. Tap Done.
8. Your GO asks you whether you want to use an external Bluetooth® Hi-Fi
speaker. Tap NO.
Your GO will confirm that when the device is connected, the sound you have
selected will be played through the audio cable.
Note: You cannot listen to your car stereo and use the audio cable to play
sound from your GO on the car stereo at the same time.
For information about listening to music using your GO, see Music and Media
on page 25.
Using Bluetooth® Hi-Fi speakers
Your GO can play sound through Bluetooth® Hi-Fi speakers, such as a
Bluetooth® Hi-Fi headset, or a car stereo which uses Bluetooth®.
Speaker
preferences
To play sound over Bluetooth® Hi-Fi speakers, do the following:
1. Tap Speaker preferences in the Preferences menu.
Tap this button to change the speaker settings.
2. Select the speaker you want your GO to use for announcing instructions.
• Internal speaker
• Bluetooth Hi-Fi device
• Line-out (audio cable)
• FM to your car radio
3. Select the speaker you want your GO to use for playing music.
• Internal speaker
• Bluetooth Hi-Fi device
• Line-out (audio cable)
• FM to your car radio
4. Tap Done.
5. Your GO asks you to confirm that you want to use an external Bluetooth®
Hi-Fi speaker. Tap YES.
Your GO will start searching for Bluetooth® Hi-Fi devices.
6. Select your Bluetooth® Hi-Fi device from the list of devices found by your
GO.
Your GO will try to establish a Bluetooth® connection with your device.
19
Page 66

Your device may require you to enter a password on your GO before a
Bluetooth® connection can be established. See the documentation for your
Bluetooth® Hi-Fi device for more information.
Once connected, sound will be played through the external Bluetooth® Hi-Fi
device.
If your GO cannot establish a Bluetooth® connection then all sound will be
played through the internal speaker or through the audio cable if it is
connected to an external audio device with speakers.
20
Page 67

Voice address input8.
Voice address input
Spoken
address
(dialog)
Spoken
address
Important: You should always plan your journey before you start driving. It is
dangerous to plan a route while driving.
When you plan a trip with your TomTom GO, instead of tapping the screen to
type in an address, you can use voice address input to say the address.
Tap this button to enter an address using only speech. Using this option,
your GO can recognize the following:
• Commands: Yes, No, Back, Done, OK, Crossing.
• Street names.
•Place names.
• Numbers: Numbers should be pronounced as individual numerals. For
example, to say the number 35, say "Three" and then say "Five."
Using Spoken address (dialog), you can enter information without tapping
the screen.
Tap this button to enter an address using both speech and by tapping the
screen. Using this option your GO can recognize the following:
• Street names.
•Place names.
Using Spoken address is typically faster than using Spoken address
(dialog).
When this button is shown on the keyboard, you can enter information by
speaking instead of typing. Tap this button to enter information using voice
address input.
Tip: When this button is shown in grey, you cannot use speech to enter an
address.
Your GO recognizes place and street names spoken using the local language
and pronunciation.
It is not possible to use voice address input to say place and street names in
all countries.
21
Page 68

Planning a trip using voice address input
Important: You should always plan your journey before you start driving. It is
dangerous to plan a route while driving.
To plan a route using speech, do the following:
1. Tap Navigate to... in the Main menu.
2. Tap Address.
For this example, we will navigate to an address using only speech to enter
the address.
3. Tap Spoken address (dialog).
4. Say the city name.
When you say the city name, you are then shown a list of six names that
match what you said.
22
Page 69

Your GO tells you the name at the top of the list. If the name you hear is
correct, then say, "Done" or "OK" or "Yes" or "One" or tap on the name.
If the city name you hear is not correct, but the name appears in the list, then
say the number next to the correct name or tap on the correct name.
For example, if the correct name is Rotterdam and this name is number two
in the list, you could say, "Two" or tap on the name, Rotterdam.
If the city name is not shown in the list, then say "Back" or "No" or tap the
Back button to return to the previous screen. Then say the city name again.
Note: You need to say numbers in the same language that is used for menu
buttons.
5. Say the street name.
As with the city name, you are then shown a list of six names that closely
match what you said.
Your GO tells you the name at the top of the list. If the name you hear is
correct, then say, "Done" or "OK" or "Yes" or "One" or tap on the name.
Note: Different locations may have similar names, such as a road that has
multiple postcode locations. In such cases, all of these locations are shown in
the list and you need to look at the screen and select the correct location.
If the street name you hear is not correct, but the name appears in the list,
then say the number next to the correct name or tap on the name.
For example, if the correct name is Rembrandtplein and this name is
number three in the list, you could say, "Three" or tap on the name,
Rembrandtplein.
For example, looking at the list shown here, if the correct name is
Rembrandtplein, you could say, "Two" or tap on the name, Rembrandtplein.
If the street name is not shown in the list, then say "Back" or "No" or tap the
Back button to return to the previous screen. Then say the street name
again.
6. Say the house number.
Numbers should be pronounced normally. For example, you would say the
number 357 as one continuous sentence, "Three hundred and fifty seven."
If the number is shown incorrectly, say, "Back" or "No" or tap the Backspace
key. Then say the number again.
Tip: If you say, "Back" when there are no numbers shown on the screen, then
your GO will return you to the previous screen.
23
Page 70

When the number is shown correctly say, "Done" or "OK." Alternatively,
enter the number by tapping the screen.
To select a crossroads as the location, say "Crossing".
Note: You need to say numbers in the same language that is used for menu
buttons.
7. Your GO asks if you need to arrive at a particular time. For this exercise, tap
NO.
The route is calculated by your GO.
8. When the route has been calculated, tap Done.
More ways to speak to your TomTom GO
There are various ways to enter an address using speech.
To see the options available, Tap Navigate to... in the Main menu and then tap
Address.
Note: Postcode address entry is not possible using speech.
• City center - to say the centerf a city or town, tap this button and then tap
the speech button at the bottom of the keyboard on the next screen.
• Street and house number - to say an address, tap this button and then tap
the speech button at the bottom of the keyboard on the next screen.
• Cross street or intersection - to say the point where two streets meet, tap
this button and then tap the speech button at the bottom of the keyboard
on the next screen.
• Spoken address - tap this button to enter an address using speech and by
tapping the screen.
• Spoken address (dialog) - tap this button to enter an address only using
speech. You can still tap the screen for entering certain details if you prefer.
24
Page 71

Music and Media9.
Music and Media
Important: Only select music and media when you are stationary. It is
dangerous to select songs and make adjustments while you are driving.
Your TomTom GO can play mp3 audio files and Audible® Audiobooks and
display HTML and text documents and photos.
Putting Music and Photos on Your GO
Transfer music files and photos to your TomTom GO from your computer
using TomTom HOME.
For information about using TomTom HOME, see Using TomTom HOME on
page 94
Playing Music and Audiobooks
1. Tap Music and media in the Main Menu.
2. Tap TomTom Jukebox to start the Jukebox.
Note: You can create playlists using a third-party application like iTunes,
Musicmatch or Winamp.
• Playlist - tap this button to select a playlist.
• Artist - tap this button to select a song by a particular singer or group.
Now Playing
• Album - tap this button to select from a list of all the albums on your GO.
• Song - tap this button to select from all the songs on your GO.
• Genre - tap this button to select a particular type of music.
• Audiobooks - tap this button to select an Audiobook.
Note: Not all mp3 files contain information about the song, such as the artist
or genre. If the file contains no information, the file name is used as the song
title.
As soon as you choose a song or Audiobook, your TomTom GO starts playing
that song, followed by the rest of the songs in the list.
25
Page 72

A Information about the song.
B Volume - change the volume by moving the slider.
C The Options button. You can, for example, choose to repeat a song and
D Go to the previous or next song.
E Play or Pause the selected song.
F Tap the Back button to go back to the TomTom Jukebox player. The music
When you listen to Audiobooks, you will see buttons for going to the next and
previous chapter. When you stop listening to an Audiobook, your GO
remembers where you stopped.
To find out more about Audiobooks, go to the shop area in TomTom HOME.
FM transmitter
shuffle the songs. You can change these options:
• Shuffle songs - the next song is selected randomly.
• Repeat song - repeat the current song.
• Reduce brightness - brightness is only reduced on the playing screen.
• Show music button in Driving View - enables fast access to your music.
• Automatically switch to Driving view - when a song begins playing, the
Driving View is shown.
• Slideshow - your photos are shown while your music is playing..
will continue to play unless you tap the button Playing... in the Jukebox to
stop the music.
There is an FM Transmitter inside your GO that works like a radio station. This
means you can hear the instructions made by your GO and play your mp3
songs through your car radio speakers.
Getting started
• In the Main Menu tap Change preferences, then tap Speaker preferences.
• Switch on your car radio.
• Tune your car radio to a frequency that is not being used by a radio station.
• Tap Change and set the frequency on your GO to the same frequency as
your car radio.
If you drive into an area where a radio station transmits on the same
frequency you are using for the FM Transmitter, you may have to use
another frequency.
Using your iPod® with your TomTom GO
You can connect your iPod to your GO with the TomTom iPod Connect Cable,
which is available as an accessory.
26
Page 73

You can then control your iPod from your GO. Sound from your iPod will be
played over the internal speaker in your GO, or an external speaker if selected.
For more information about using different speakers, see Internal and
external speakers on page 17.
To use your iPod with your GO, do the following:
1. Plug the iPod Connect Cable into your iPod and into the windshield dock.
2. In the Main Menu, tap Music and Media and then iPod control.
3. Follow the instructions on the screen to finish the connection.
You can now control your iPod through your GO. You select songs using the
same buttons shown above in Playing Music and Audiobooks.
Looking at Photos
1. Tap Music and media in the Main Menu.
2. Tap Photo gallery.
The Photo gallery starts, showing small versions (thumbnails) of all the
photos on your GO.
Tap the arrows to move up and down the page of thumbnails.
Tap Slideshow to start a slideshow.
Tap the thumbnail of a photo to view a large version of that photo.
A Buttons to zoom in and zoom out on the photo.
B Buttons to move to the next and the previous photo.
C Tap Slideshow to start a slideshow.
D Tap Delete to delete a photo.
27
Page 74

Help me!10.
Help me!
Help me! provides an easy way to navigate to emergency services centers and
other specialist services and contact them by phone.
For example, if you are involved in a car accident, you could use Help me! to
call the nearest hospital and tell them your exact location.
Tip: If you do not see the Help me! button in the Main Menu, tap Show ALL
menu options in the Preferences menu.
How do I use Help me! to call a local service?
You can use Help me! to find and make contact with a service center.
When you select a service center, your current location and the phone number
of the POI are shown.
If your phone is connected to your GO, your current location and the service
center phone number are shown, and your TomTom GO automatically
prepares for making a phone call. The phone call will only be dialed, when you
tap Dial.
If your phone is not connected, your current location and the service center
phone number are shown, but your TomTom GO does not prepare for making
a phone call.
To use Help me! to locate a service center, contact the center by phone and
navigate from your current location to the center, do the following:
1. Tap the screen to bring up the main menu.
2. Tap Help me!
3. Tap Phone for help.
4. Select the type of service you require, for example, Nearest hospital.
5. Select a center from the list; the nearest is shown at the top of the list.
Your GO shows the location of the service center on the map and the
contact details.
6. To navigate your way to the center on foot, tap Walk there.
Your GO starts guiding you to your destination.
28
Page 75

Options
Phone for help
Use your TomTom GO to find the location of a service and the contact
details.
• Emergency services
• Emergency breakdown services
• Nearest police station
• Nearest doctor
• Nearest hospital
• Nearest public transport
• Nearest car repair services
• Nearest dentist
• Nearest pharmacy
• Nearest vet
Note: In some countries, information may not be available for all services.
Use your TomTom GO to navigate your way by road to a service center.
• Nearest car repair services
Drive to help
Walk to help
• Nearest hospital
• Nearest doctor
• Nearest police station
• Nearest pharmacy
• Nearest dentist
Note: In some countries, information may not be available for all services.
Use your TomTom GO to navigate your way on foot to a service center.
• Nearest gas station
• Nearest public transport
• Nearest police station
• Nearest pharmacy
• Home
• Nearest doctor
Note: In some countries, information may not be available for all services.
Your TomTom GO shows your current location.
You can then tap Phone for help to select the type of service you want to
contact.
Where am I?
29
Page 76

First Aid
Guide
Other guides
Tap this button to read the British Red Cross First Aid guide.
Tap this button to read a selection of useful guides.
30
Page 77

Favorites11.
Favorites
What are Favorites?
Favorites are places that you often visit. You can create Favorites so that you
don’t have to enter the address every time you want to navigate there.
They don’t have to be places you especially like, just useful addresses.
How can I create a Favorite?
From the Main Menu, tap Add Favorite.
Note: The button Add Favorite may not be shown on the first page of the Main
Menu. Tap the arrow to open other pages in the Main Menu.
You can then select the location of the Favorite from the list below.
Give your Favorite a name that is easy to remember. Your GO will always
suggest a name, usually the address of the Favorite. To enter the name, just
start typing. You don’t have to delete the suggested name.
Home
Favorite
2
2
1
Address
You can set your Home location as a Favorite.
You cannot create a Favorite from another Favorite. This option will always
be unavailable in this menu.
To rename a Favorite, tap Manage Favorites in the Preferences menu.
For more information, see Manage Favorites on page 51.
You can specify an address to be a Favorite. When you enter an address,
you can choose from four options.
3
• City center
• Street and house number
• ZIP code
• Crossing or intersection
31
Page 78

Recent
destination
Select a Favorite location from a list of places you have recently used as
destinations.
You can add a Point of Interest (POI) as a Favorite.
Does it make sense to do this?
Point of
Interest
If you visit a POI you particularly like, for example a restaurant, you can add
it as a Favorite.
To add a POI as a Favorite, tap this button, then do the following:
1. Narrow your choice of POIs by selecting the area where the POI is.
You can select one of these options:
• POI near you - to search from a list of POIs near your current position.
• POI in city - to choose a POI in a particular town or city. You have to
specify a town or city.
• POI near Home - to search from a list of POIs near your Home
location.
If you are currently navigating to a destination, you can also select from
a list of POIs which are on your route or near your destination. Choose
one of these options:
• POI along route
• POI near destination
2. Select the category of POI.
Tap the category of POI if it is shown or tap the arrow to choose from
the complete list.
Tap Any POI category to search for a POI by name.
My location
Point on map
Latitude
Longitude
For more information about POIs, see Points of Interest on page 37.
Tap this button to add your current position as a Favorite.
For example, if you stop somewhere interesting, while you are there you
can tap this button to create the Favorite.
Tap this button to create a Favorite using the map browser.
Select the location of the Favorite using the cursor, then tap Done.
For more information about the map browser, see Browse map on page 35.
Tap this button to create a Favorite by entering latitude and longitude
values.
32
Page 79

Tap this button to make a Favorite of the current position of a TomTom
Buddy.
For more information about TomTom Buddies, see TomTom Services on
TomTom
Buddy
Position of
last stop
page 65.
Tap this button to select your last recorded position as your destination.
For more information about the GPS, see Global Positioning System (GPS)
on page 93.
How can I use a Favorite?
You will normally use a Favorite as a way of navigating to a place without
having to enter the address. To navigate to a Favorite, do the following:
1. Tap the screen to bring up the main menu.
2. Tap Navigate to...
3. Tap Favorite.
4. Select a Favorite from the list.
Your GO calculates the route for you.
5. When the route is calculated, tap Done.
Your GO will immediately start guiding you to your destination with spoken
instructions and visual instructions on the screen.
How many Favorites can I create?
You can create up to 48 Favorites. If you want to add more than 48, we suggest
that you make some POI categories and add some of your Favorites as POIs.
For more information about POIs, see Points of Interest on page 37.
How can I delete a Favorite?
1. Tap the screen to bring up the main menu.
2. Tap Change preferences to open the Preferences menu.
3. Tap Manage Favourites.
Tip: Tap the arrow to move to the next page.
4. Tap the Favorite you want to delete.
5. Tap Delete.
How can I change the name of a Favorite?
1. Tap the screen to bring up the main menu.
2. Tap Change preferences to open the Preferences menu.
3. Tap Manage Favorites.
Tip: Tap the arrow to move to the next page of buttons.
4. Tap the Favorite you want to rename.
33
Page 80

5. Tap Rename.
34
Page 81

Browse map12.
Browse map
To look at the map in the same way as you might look at a traditional paper
map, tap Browse map in the Main Menu.
You can move the map by touching the screen and moving your finger across
the screen.
A The scale bar
B Your current position.
C GPS button
Tap this button to center the map on your current position.
D Options
Cursor button
E The cursor
F The Find button
Tap this button to find specific addresses.
G The Cursor button
Tap this button to navigate to the cursor position, make a Favorite of the
cursor position, or find a Point of Interest near the cursor position.
H The zoom bar
Zoom in and out by moving the slider.
You can use the map to find addresses and Points of Interest (POIs), for
example, restaurants, train stations and gas stations.
35
Page 82

Navigate
there
Find POI
nearby
Center on
map
Tap the cursor button then tap one of the following buttons:
Tap this button to navigate to the cursor position. Your GO will calculate the
route.
Tap this button to find a POI near the cursor position. For example, if you
have found a restaurant to go to, you can search for a parking garage
nearby.
Tap this button to bring the location currently highlighted by the cursor to
the center of the screen when looking at the map.
Tap this button to call the location at the cursor position. This button is only
available if your GO has the phone number for the location.
Call...
Add as
Favorite
Add as POI
Correct
location
The phone numbers of many POIs are stored in your GO. If you enter
phone numbers for POIs that you create, you can also call them.
For more information about hands-free calling, see Hands-free calling on
page 45.
Tap this button to create a Favorite at the cursor position.
For more information about Favorites, see Favorites on page 31.
Tap this button to create a POI at the cursor position.
For more information about POIs, see Points of Interest on page 37.
Tap this button to correct the location shown at the cursor position.
36
Page 83

Points of Interest13.
Points of Interest
Points of Interest or POIs are useful places on the map. Here are some
examples:
• Restaurants
•Hotels
•Museums
• Parking garages
• Gas stations
Showing POIs on the map
1. Tap Show POIs on map in the Preferences menu.
Show POI on
map
2. Select the POI categories to display on the map.
Tap Find to search for a POI by name.
3. Tap Done.
The POIs you have selected are shown as symbols on the map.
Calling a POI
Your TomTom GO knows the phone numbers for many POIs. You can, for
example, call a restaurant to book a table.
For information about using your TomTom GO for hands-free calling, see
Hands-free calling on page 45.
Navigating to a POI
You can use a POI as your destination. For example, if you are traveling to an
unfamiliar city, you could choose a POI to help find a parking garage.
1. Tap the screen to bring up the main menu.
2. Tap Navigate to... in the Main Menu.
3. Tap Point of Interest.
4. Tap POI in city.
5. Narrow your choice of POIs by selecting the area where the POI is located.
37
Page 84

You can select one of these options:
• POI near you - to choose from a list of POIs near to your current location.
• POI in city - to find a POI in a particular town or city.
• POI near Home - to choose from a list of POIs near to your Home location.
You can select from a list of POIs which are along your route or close to your
destination. Choose from one of these options:
• POI along route
• POI near destination
6. Type the name of the town you want to visit and select the town when it
appears in the list.
7. Tap Parking garage.
8. Select the category of POI:
Tap Any POI category to search for a POI by name.
Tap the category of POI, if it is shown.
Tap the arrow to choose from the complete list of categories. Select the
category from the list or start to type the name of the category and select it
when it appears in the list.
9. Select a parking garage. The distance listed next to each POI is the distance
from the city center.
10.From the list of POIs shown, select the POI you want to navigate to.
The table below explains the distances listed next to each POI.
POI near you Distance from your current location
POI in city Distance from the city center
POI near Home Distance from your Home location
POI along
Distance from your current location
route
POI near
Distance from your destination
destination
Last POI Distance to the last POI you visited
If you know the name of the POI, tap Find and type the name. Select it from
the list when it is shown.
11.Select a parking garage. The distance listed next to each POI is the distance
from the city center.
Once you have selected a POI, the route to the POI is calculated by your
TomTom GO.
The route to the POI is then calculated by your TomTom GO.
38
Page 85

Managing POIs
Manage POIs
Ta p Manage POIs from the Preferences menu.
Note: The Manage POIs button is only available when all menu buttons are
shown. To show all menu buttons, tap Show ALL menu options in the
Preferences menu.
You can, for example, do the following:
• Create your own POI categories and add POIs to them.
• Set warnings when you get close to POIs.
Why would I want to create my own POIs?
A POI acts like a shortcut - once you have saved a location as a POI you never
have to type the address of that POI again. But when you create a POI you can
save more than just the location.
• Phone number - when you create a POI, you can save a phone number with
it.
• Categories - when you create a POI you have to put it in a category.
For example, you could create a category of POIs called ‘Favourite
restaurants’. With each POI, save the phone number so that you can call them
from your GO to reserve a table.
How can I create my own POIs?
1. Tap the screen to bring up the main menu.
2. Tap Change preferences.
3. Tap Manage POIs.
4. Before you can add a POI, you have to create at least one POI category.
Every POI is assigned to a POI category. You can only add POIs to POI
categories you have created yourself.
Ta p Add POI category.
Add POI
category
5. Enter a name for your POI category, for example, ‘Friends’ or ‘Favourite
restaurants’. Then select a marker for your POI category.
6. Tap Add POI.
Tap this button to add a POI.
Add POI
7. Select the POI category in which you want to add the POI.
39
Page 86

Home
Favorite
2
2
1
Address
8. Select the location of your POI from the list below.
You can set your Home location as a POI.
If you want to change your Home location, you can create a POI of the
Home location before you change it.
You can create a POI from a Favorite.
You can only create a limited number of Favorites. If you want to create
more Favorites you have to delete some Favorites first. Before you delete
a Favorite, make it into a POI so that you don’t lose the address.
You can specify an address to be a POI. When you enter an address, you
can choose from four options.
3
• City center
• Street and house number
• ZIP code
• Crossing or intersection
Select a POI location from a list of places you have recently used as
destinations.
Recent
destination
Point of
Interest
My location
Point on map
Latitude
Longitude
You can add a Point of Interest (POI) as a POI. For example, if you are
creating a category of POIs for your favourite restaurants, use this option
instead of entering the addresses of the restaurants.
Tap this button to add your current position as a POI.
For example, if you stop somewhere you like, while you are there you
can tap this button to create the POI.
Tap this button to create a POI using the map browser.
Select the location of the POI using the cursor, then tap Done.
For more information about the map browser, see Driving View on page
6 and How can I create my own POIs? on page 39
Tap this button to create a POI by entering latitude and longitude values.
Tap this button to make a POI of the current position of a TomTom Buddy.
For more information about TomTom Buddies, see TomTom Services on
page 65.
TomTom
Buddy
40
Page 87

Tap this button to select your last recorded position as your destination.
This may be useful if your GO is unable to maintain a strong GPS signal,
Position of
last stop
for example, when you drive through a long tunnel.
For more information about the GPS, see Global Positioning System
(GPS) on page 93.
How can I set warnings for POIs?
1. Tap the screen to bring up the main menu.
2. Tap Change preferences.
3. Tap Manage POIs.
Note: The Manage POIs button is only available when all menu buttons are
shown. To show all menu buttons, tap Show ALL menu options in the
Preferences menu.
4. Tap Warn when near POI.
Tap this button to receive a warning when you travel near to the location
of a POI.
Warn when
near POI
5. Select the category of POI you want to be warned about.
Select the category from the list or start to type the name of the category
and select it when it is shown in the list.
6. Set how close the POI should be when you receive a warning.
7. Choose the warning sound for the category of POI you selected.
41
Page 88

Itinerary planning14.
Itinerary planning
What is an Itinerary?
An Itinerary is a plan for a trip including more locations than your final
destination.
An Itinerary can include the following items:
• Destination - a location on your trip where you want to stop.
• Waypoint - a location on your trip you want to travel through without
stopping.
Here’s an example of an Itinerary:
Destinations are shown using this symbol.
Waypoints are shown using this symbol.
When would I use an Itinerary?
You could use an Itinerary for trips such as:
• A road trip through a country with lots of stops.
• A two day car trip with an overnight stop.
• A short drive which passes by Points of Interest.
In all these examples you could tap Navigate to... for each place. However, if
you use an Itinerary, you can save time by planning everything in advance.
Creating an Itinerary
1. Tap the screen to bring up the main menu.
2. Tap Itinerary planning.
42
Page 89

The Itinerary planning screen opens. At first, there are no items on the
Itinerary.
Itinerary
planning
Note: This button may only be available if all menu options are shown. To
show all menu options, tap Show ALL menu options.
For more information, see Hidden buttons and features on page 48.
3. Tap Add and select a location.
Tip: You can add items to your Itinerary in any order and rearrange the order
later.
Start Using an Itinerary
Tap Options, then tap Start navigation.
To save an Itinerary, tap Save Itinerary.
To load a saved Itinerary, tap Load Itinerary.
To create a new Itinerary, tap New Itinerary and to delete one, tap Delete
Itinerary.
Following an Itinerary
When you use an Itinerary to navigate, the route will be calculated to the first
destination on the Itinerary. Your TomTom GO calculates the remaining
distance and time to the first destination and not for the whole Itinerary.
As soon as you start to use an Itinerary, the route is calculated from your
current position. You do not need to set a departure point.
When you have passed a waypoint or reached a destination, it is marked as
visited.
Waypoints are shown on the map. Your GO will not warn you when you are
approaching a waypoint or when you arrive at a waypoint.
Managing an Itinerary
Tap an item on your Itinerary to open a menu of buttons for editing the item.
The buttons shown below are available.
You can change a destination into a waypoint using this button.
Waypoints are locations you want to pass through on your way to your
Mark as
waypoint
chosen destination(s).
Destinations are locations where you want to stop.
This button is only shown if the item you tapped is a destination.
43
Page 90

Mark as
destination
You can change a waypoint into a destination using this button.
Waypoints are locations you want to pass through on your way to your
chosen destination(s).
Destinations are locations where you want to stop.
This button is only shown if the item you tapped is a waypoint.
Tap this button to miss out part of your Itinerary. Your GO will ignore this
item and all the items before it in the Itinerary.
Mark ‘visited’
Mark ‘to visit’
Move item up
Move item
down
Show on map
It will navigate you to the next item in the Itinerary.
This button is only shown if you are still due to visit this item.
Tap this button to repeat part of your Itinerary. Your GO will navigate you to
this item followed by the rest of the items in the Itinerary.
This button is only shown if you have already visited this item.
Tap this button to move the item up the Itinerary.
This button is unavailable if the item is at the top of the Itinerary.
Tap this button to move the item down the Itinerary.
This button is unavailable if the item is at the bottom of the Itinerary.
Tap this button to see the location of the item on the map.
For more information about the map browser, see Driving View on page 6.
Tap this button to delete the item from the Itinerary.
Delete item
44
Page 91

Hands-free calling15.
Hands-free calling
Hands-free calling
If you have a mobile phone with Bluetooth®, you can use your TomTom GO
to make phone calls and send and receive messages.
Note: Not all phones are supported or compatible with all features. For more
information, visit www.TomTom.com/phones
Connecting to Your Phone
First you must establish a connection between your mobile phone and your
TomTom GO.
Tap Mobile phone in the Main Menu and then follow the instructions on the
screen.
You only need to do this once, after which your TomTom GO will remember
your phone.
Setting up TomTom Services
When you have established a connection with your phone, you can set up a
wireless data connection for TomTom Services.
For information about TomTom Services, see TomTom Services on page 65.
Tips
• Make sure that you switch on Bluetooth® on your phone.
• Make sure that your phone is set to "discoverable" or "visible to all".
• You may have to enter the password ‘0000’ on your phone in order to
• Make your TomTom GO a trusted device on your phone. Otherwise you will
See your phone’s user guide for information about Bluetooth® settings.
Your Phone Book
You can copy your phonebook from your mobile phone to your TomTom GO
so that you can make calls with just a few taps on the screen.
This is the safest way to make hands-free calls.
connect to your TomTom GO.
have to enter ‘0000’ every time.
45
Page 92

Making a Call
Note: You can copy your phonebook to your TomTom GO at any time. From
the Mobile phone menu, tap Get numbers from phone.
Not all phones can transfer their phonebook to your GO. For more
information, visit www.TomTom.com/phones
Once you have established a connection with your phone, you can start
making calls.
1. Tap Mobile phone in the Main Menu.
2. Tap Call.
Note: Make sure that your phone is currently selected. The current phone is
shown at the bottom of the screen.
3. Tap Number to enter a number to call.
4. Do one of the following:
•Tap Home to call your Home location. If you have not entered a number
for your Home location this button is unavailable. To enter a number, tap
Change Home number in the Phone preferences menu.
•Tap Number to enter a number to call.
•Tap Point of Interest to choose a Point of Interest (POI) to call. If your GO
knows the phone number of a POI, this is shown next to the POI.
•Tap Phonebook entry to select a contact from your phonebook.
Note: If you have not copied your phonebook to your TomTom GO, the button
Phonebook entry is unavailable.
•Tap Recently dialed to select from a list of people or numbers you have
called recently using your GO.
•Tap Recent caller to select from a list of people or numbers who called
you recently. Only calls you have received on your GO are saved in this
list.
For information about POIs, see Points of Interest on page 37.
Receiving a Call
If someone calls you while you are driving, accept or reject the call by tapping
the screen.
Auto-Answer
You can tell your TomTom GO to answer every call automatically after a
certain time. Tap Phone preferences in the mobile phone menu, then tap
Auto-answer preferences.
Select when your TomTom GO will automatically answer your calls.
Sharing your TomTom GO
To add more phones, do the following. You can establish connections for up
to 5 mobile phones.
1. Tap Mobile phone in the Main Menu.
2. Tap Connect to your phone.
46
Page 93

REDIAL
Read/Write
message
Phone
preferences
3. Tap Find other phone... and follow the instructions on the screen.
To switch between phones, tap Connect to your phone and then select your
phone from the list.
The available buttons are listed below:
Tap this button to redial a telephone number using your mobile phone.
Tap this button to read or write a message.
Tap this button to configre how your TomTom GO communicates with your
mobile phone.
Tap this button to dial a telephone number using your mobile phone.
Call...
Get phone
numbers
from phone
Manage
phones
Tap this button to load the contacts and phone numbers from your mobile
phone onto your TomTom GO.
Tap this button to manage the mobile phones that will be connected to
your TomTom GO. You can add a profile for up to five different mobile
phones.
47
Page 94

Preferences16.
Preferences
You can change the way your TomTom GO looks and behaves.
Tap Change preferences in the Main Menu.
Hidden buttons and features
When you first start using your TomTom GO, all the buttons are shown in the
menu.
The buttons for the more advanced features can be hidden. This is a useful
option because you are unlikely to use certain features very often.
Tap this button in the Preferences menu, to reduce the number of buttons
that are shown.
You might want to do this so that only frequently used buttons are shown.
Show fewer
menu options
Show ALL
menu options
When you need to use the buttons that are hidden, you can press Show
ALL menu options in the Preferences menu to show all buttons.
Tap this button in the Preferences menu, to show all the buttons available
on your TomTom GO.
Use night colors / Use day colors
Tap this button to reduce the brightness of the screen and show darker
colors on the map.
When should I use this?
Use night
colors
Use day colors
When it’s dark, it is easier to see the screen if the display on your GO is not
brightly lit.
To change back to a brighter screen showing brighter colors on the map,
tap Use day colors.
Can my GO make this change automatically?
Yes. Your GO has a light sensor to tell when it is getting dark.
To change to night and day colors automatically, tap Brightness preferences
in the Preferences menu. Then select Switch to night view when dark.
48
Page 95

Show POI on map
Tap this button to set which categories for the Points of Interest (POIs)
should be shown on the map.
Select the POIs that you want to see on the map from the list.
Show POI on
map
When you select a POI, it is shown on the map using the symbol you can
see next to each category in the list.
To find a POI category quickly, tap Find, then start to type the name of the
POI category. As soon as the category is shown in the list, you can select it.
For more information about POIs, see Points of Interest on page 37.
Safety preferences
Tap this button to set the following safety preferences:
• Hide most menu options while driving
Safety
preferences
• Suggest driving breaks
• Show safety reminders
• Warn when near places of worship or schools
• Warn when driving faster than allowed
• Warn when driving faster than a set speed
• Warn not to leave the device in the car
If you select one or more of the warnings, you will also be asked to select a
sound to be played whenever a warning is displayed.
Select whether or not your TomTom GO should warn you about which side
of the road you should be driving on.
Decide if you want the map display to be turned off in special
circumstances and press Done.
What happens when I use the Turn off map display option?
When you turn off the map display, instead of seeing your position on a map
in the Driving View, you will only see information about the next instruction.
Tap the button and select an option for when the map should be turned off.
These are the options:
• Always - The map will not be shown and you will only see information
about the next instruction and arrows showing direction.
• Above a certain speed - you set the speed at which point the map will be
turned off. This option is useful for situations when the map might be
distracting, such as when you are driving fast.
• Never - the map is never turned off.
49
Page 96

Voice preferences
Ta p Voice preferences to manage your TomTom voices. The following
options are available:
• Change voice - tap this button to change the voice that gives you
Voice
preferences
• Disable voice - tap this button to disable the use of voices. To enable
• Speech preferences - tap this button to set the situations when your
• Record voice - tap this button to record your own voice for use by your
• Disable recorded voice
• Enable recorded voice
instructions.
A wide range of recorded human voices and computer voices are
available.
For more information on choosing a voice and the differences between
human and computer voices, see Selecting a voice on page 17.
voices, tap Enable.
TomTom will read instructions or warnings aloud.
TomTom. The procedure takes about fifteen minutes, during which time
you will say all the commands that are used by your TomTom GO.
In the Preferences menu, tap Voice preferences, then tap Record voice
and follow the instructions for recording your voice.
• Download voice - tap this button to download new voices from
TomTom Services and transfer them to your TomTom.
Turn off sound / Turn on sound
Tap this button to turn off spoken instructions.
The button changes to Turn on sound. If you turn off the sound, warnings
for upcoming POIs are also turned off.
Turn off sound
Tips
To change the volume, tap Volume preferences in the Preferences menu.
For more information, see Volume preferences on page 51.
To change the volume quickly while you are driving, tap the bottom lefthand section of the Driving View and move the slider.
You can still listen to music even if you have turned off voice instructions.
For more information, see Selecting a voice on page 17.
Can I still use my GO to make hands-free calls when the sound is turned off?
Yes. Turning the sound off does not affect hands-free calling, meaning that
you will still be able to talk to and hear the caller.
50
Page 97

Volume preferences
Tap this button to change the volume for spoken instructions.
This setting does not change the volume of the radio, CDs, or music played
Volume
preferences
from an iPod® or USB storage device.
Can my GO change the volume depending on how noisy it is in the car?
Select Link volume to noise level and your GO will change the volume
according to the background noise. The noise level is constantly monitored by
the microphone on your GO. If there is a lot of noise in the car, your GO will
automatically increase the volume.
For example, if you are driving on the motorway, which is often very noisy, the
volume level on your GO will be increased. When you are driving more slowly
again, the volume level will be lowered by your GO.
Manage Favorites
Tap this button to rename or delete Favorites.
To find a Favorite quickly, tap Find, then start to type the name of the
Favorite. As soon as the Favorite is shown in the list, you can select it.
Manage
Favorites
For more information about Favorites, see Favorites on page 31.
Change Home location
Tap this button to set or change your Home location.
Change Home
location
Do I need to use my actual home address for the Home location?
No. Your Home location can be a place you go often, for example, your office.
It can be your actual home address, but it can also be any address you like.
Why should I set a Home location?
Having a Home location means that you have a quick and easy way to navigate
there, by tapping the Home button in the Navigate to... menu
Manage maps
This button may only be available if all menu options are shown. To show all
menu options, tap Show ALL menu options.
For more information, see Hidden buttons and features on page 48.
51
Page 98

Tap this button to do the following:
• Download a map - you can buy new maps using TomTom HOME.
Manage maps
Manage POIs
For more information, see Using TomTom HOME on page 94.
• Switch map - tap this button to change the map you are using.
• Delete a map - tap this button to delete a map. This might be necessary
to create more space on your GO, for example when you want to load a
different map.
Note: Don’t delete a map unless you have already made a backup of the
map. If you delete a map before you make a backup, you will no longer be
able to load the map on your GO.
For more information about making a backup, see Using TomTom HOME
on page 94.
You can also download, add and delete maps using TomTom HOME.
This button may only be available if all menu options are shown. To show all
menu options, tap Show ALL menu options.
For more information, see Hidden buttons and features on page 48.
Tap this button to do the following:
• Set alerts for when you are near POIs.
Manage POIs
For example, your GO can tell you when there is a gas station nearby.
• Create your own POI categories and add POIs to them.
For example, you could create a category of POIs called “Friends”, and
add all your friends’ addresses as POIs in the category. You can even add
your friends’ phone numbers with their address so you can call them
from your GO.
For more information about POIs, see Points of Interest on page 37.
Change car symbol
This button may only be available if all menu options are shown. To show all
menu options, tap Show ALL menu options.
For more information, see Hidden buttons and features on page 48.
Tap this button to select a car symbol that will be used to show your current
position in the Driving view.
Change car
symbol
52
Page 99

Change 2D/3D display / Turn on 2D display
Ta p Turn on 2D display to change the perspective for viewing the map.
For example, the 2D view shows a two dimensional view of the map as
though viewed from above.
Turn on 2D
display
To switch the view to a three dimensional perspective, tap Change 2D/3D
display and select a view from the list.
Change 2D/3D
display
When should I use this?
In some situations, it is easier to see the map from above. Perhaps if the road
network is complicated or for times when you are walking while using your GO
to navigate.
Show/Hide lane images
This button may only be available if all menu options are shown. To show all
menu options, tap Show ALL menu options.
For more information, see Hidden buttons and features on page 48.
Tap this button to show or hide the arrows that warn you which lane you
need to be in to navigate an approaching road exit or intersection.
For more information on lane guidance images, see Advanced Lane
Show lane
images
Guidance on page 1
Compass preferences
This button may only be available if all menu options are shown. To show all
menu options, tap Show ALL menu options.
For more information, see Hidden buttons and features on page 48.
53
Page 100

Tap this button to configure the compass. The following options are
available:
• None - the compass is not shown.
Compass
preferences
• One with arrow pointing north - the arrow always points towards north
and the direction you are moving is shown at the top of the compass.
• One with arrow showing your heading - the arrow always shows the
direction you are moving.
If you select one of these options, you then need to select the features
that are shown in the middle of the arrow:
• Direction - your direction is shown as a compass point, displayed in
• Degrees - your direction is shown as compass degrees, displayed in
• Nothing
• One with arrow pointing to your destination - the arrow always points
towards your destination. The distance to your destination is displayed
in the compass arrow.
Change map colors
This button may only be available if all menu options are shown. To show all
menu options, tap Show ALL menu options.
For more information, see Hidden buttons and features on page 48.
the center of the compass arrow.
the center of the compass arrow.
Tap this button to select the color schemes for day and night map colors.
You can also download more color schemes from TomTom Services.
Change map
colors
Brightness preferences
This button may only be available if all menu options are shown. To show all
menu options, tap Show ALL menu options.
For more information, see Hidden buttons and features on page 48.
54
 Loading...