

Page 1

TomTom EASE
Page 2
Getting started1.
1
2
3
4
Getting started
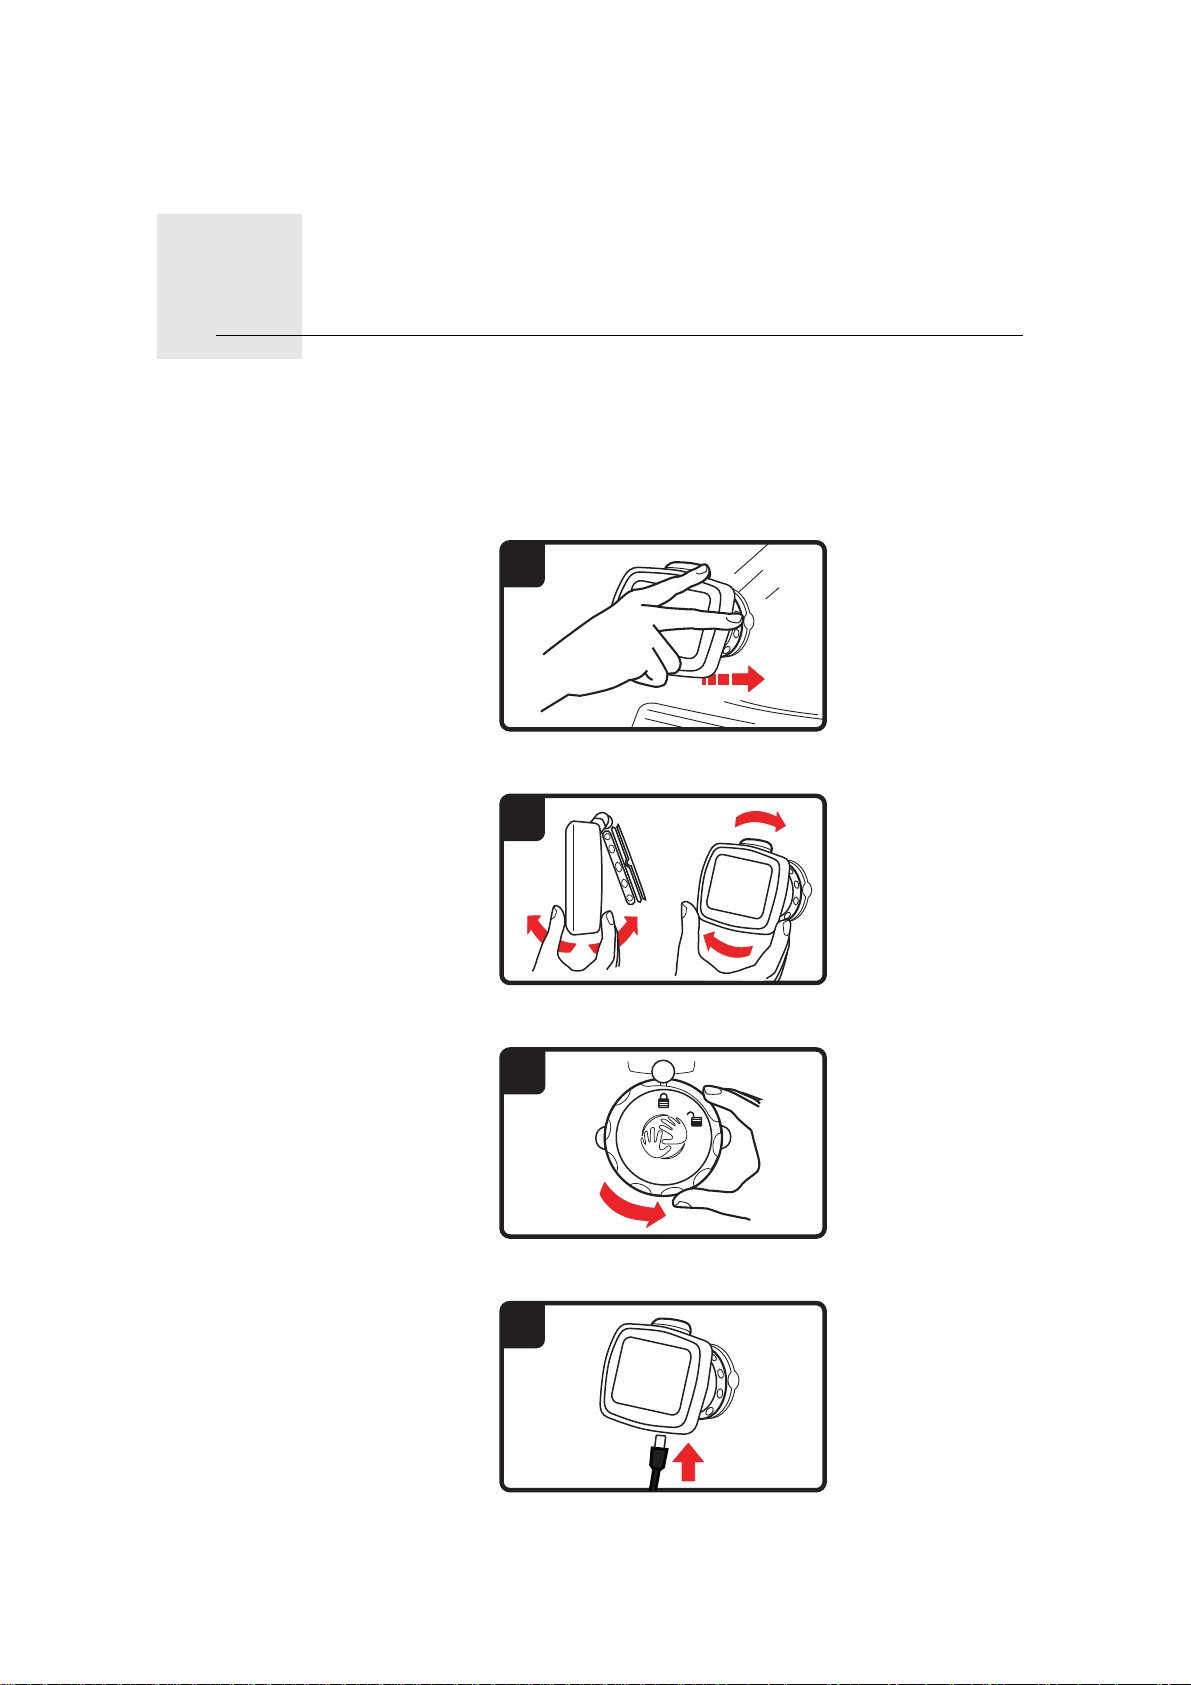
Mounting your navigation device
1. Push the EasyPort™ Mount on your TomTom EASE against the windshield
in your car.
2. Adjust the angle of your device.
3. Lock the EasyPort Mount by twisting the base.
4. Insert the Car Charger into your device.
2
Page 3
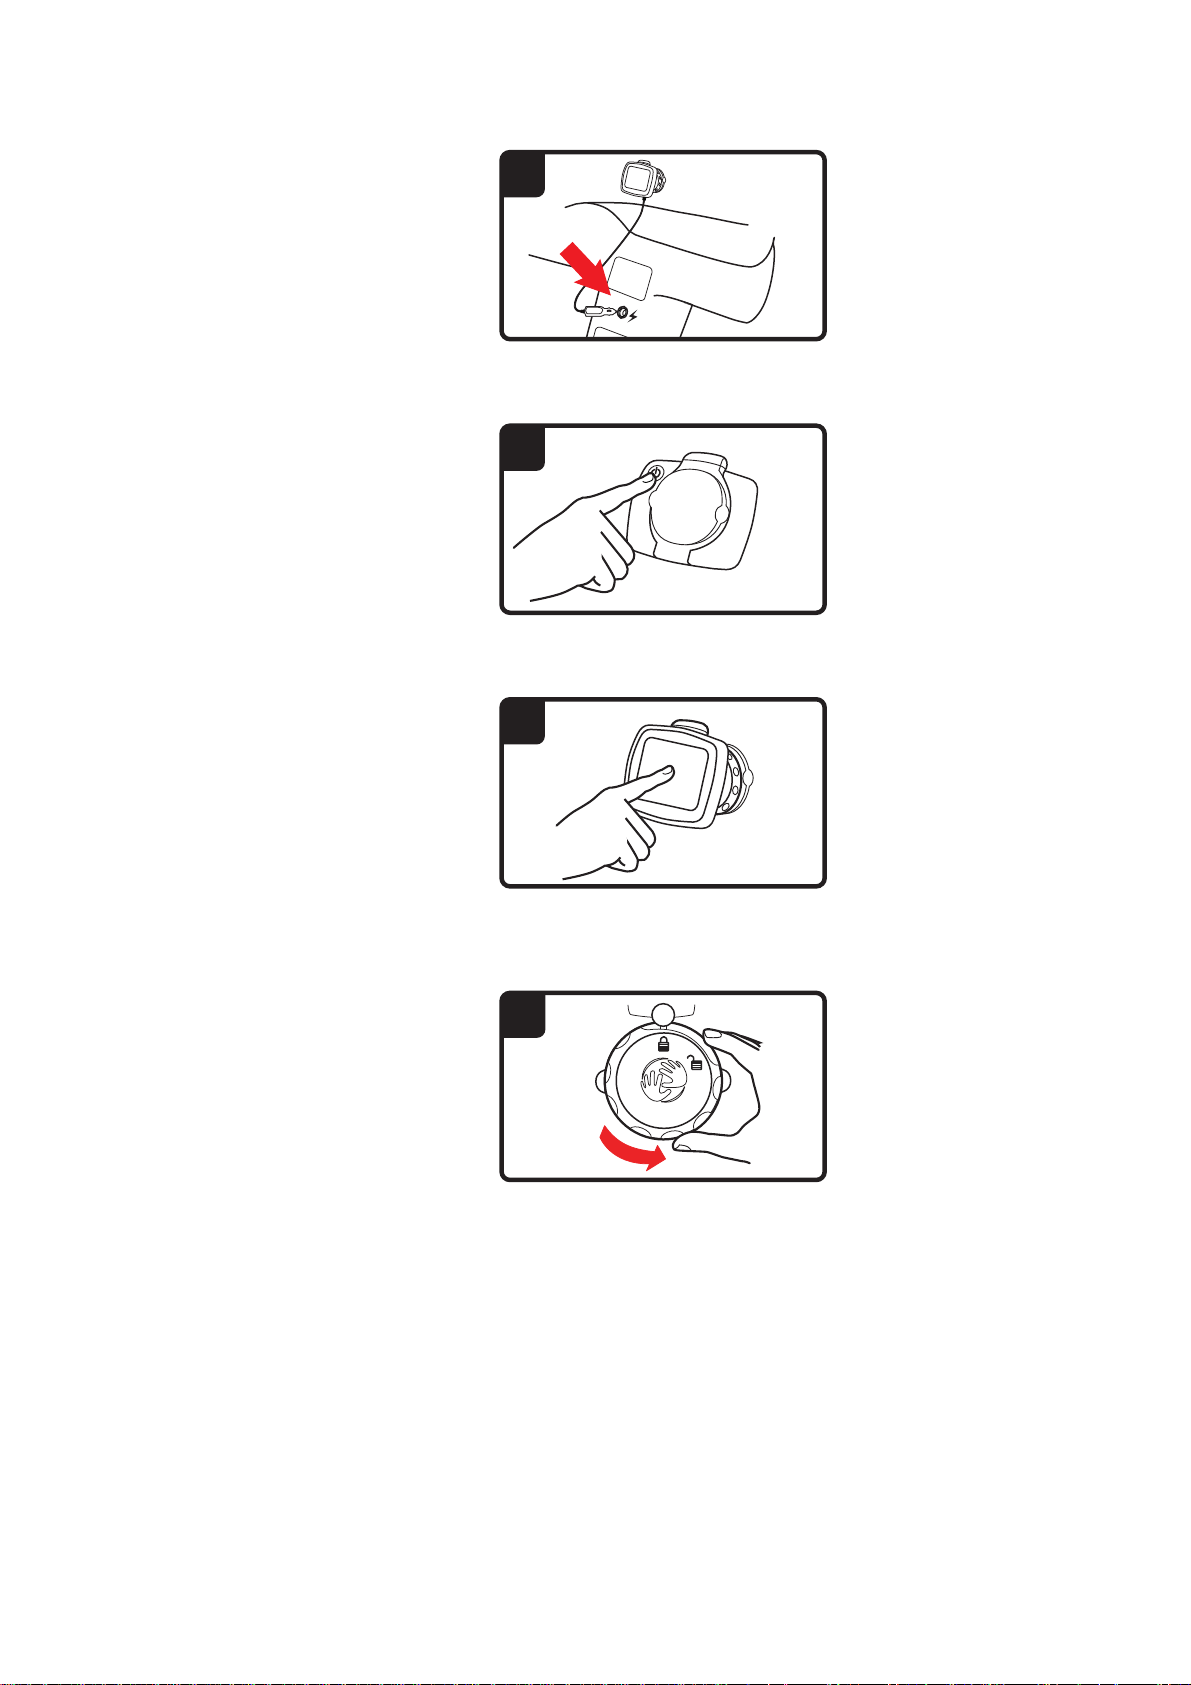
5. Insert the Car Charger into the cigarette lighter in your car.
5
6
7
8
6. Switch your device on by pressing the On/Off button on the back of your
device.
7. You now have to answer some questions to set up your device. Tap the
screen to answer the questions.
8. To remove the Mount from your windshield, first unlock the EasyPort
Mount, then gently pull one of the tabs. The Mount comes off of the windshield.
GPS reception
When you first start your TomTom EASE navigation device, the device may
need a few minutes to determine your GPS position and show your current
position on the map. In the future, your position will be found much faster,
usually within a few seconds.
To ensure good GPS reception, you should use your device outdoors. Large
objects such as tall buildings can sometimes interfere with rece ptio n.
Changeable covers
You can personalize your TomTom EASE from a selection of protective covers.
3
Page 4
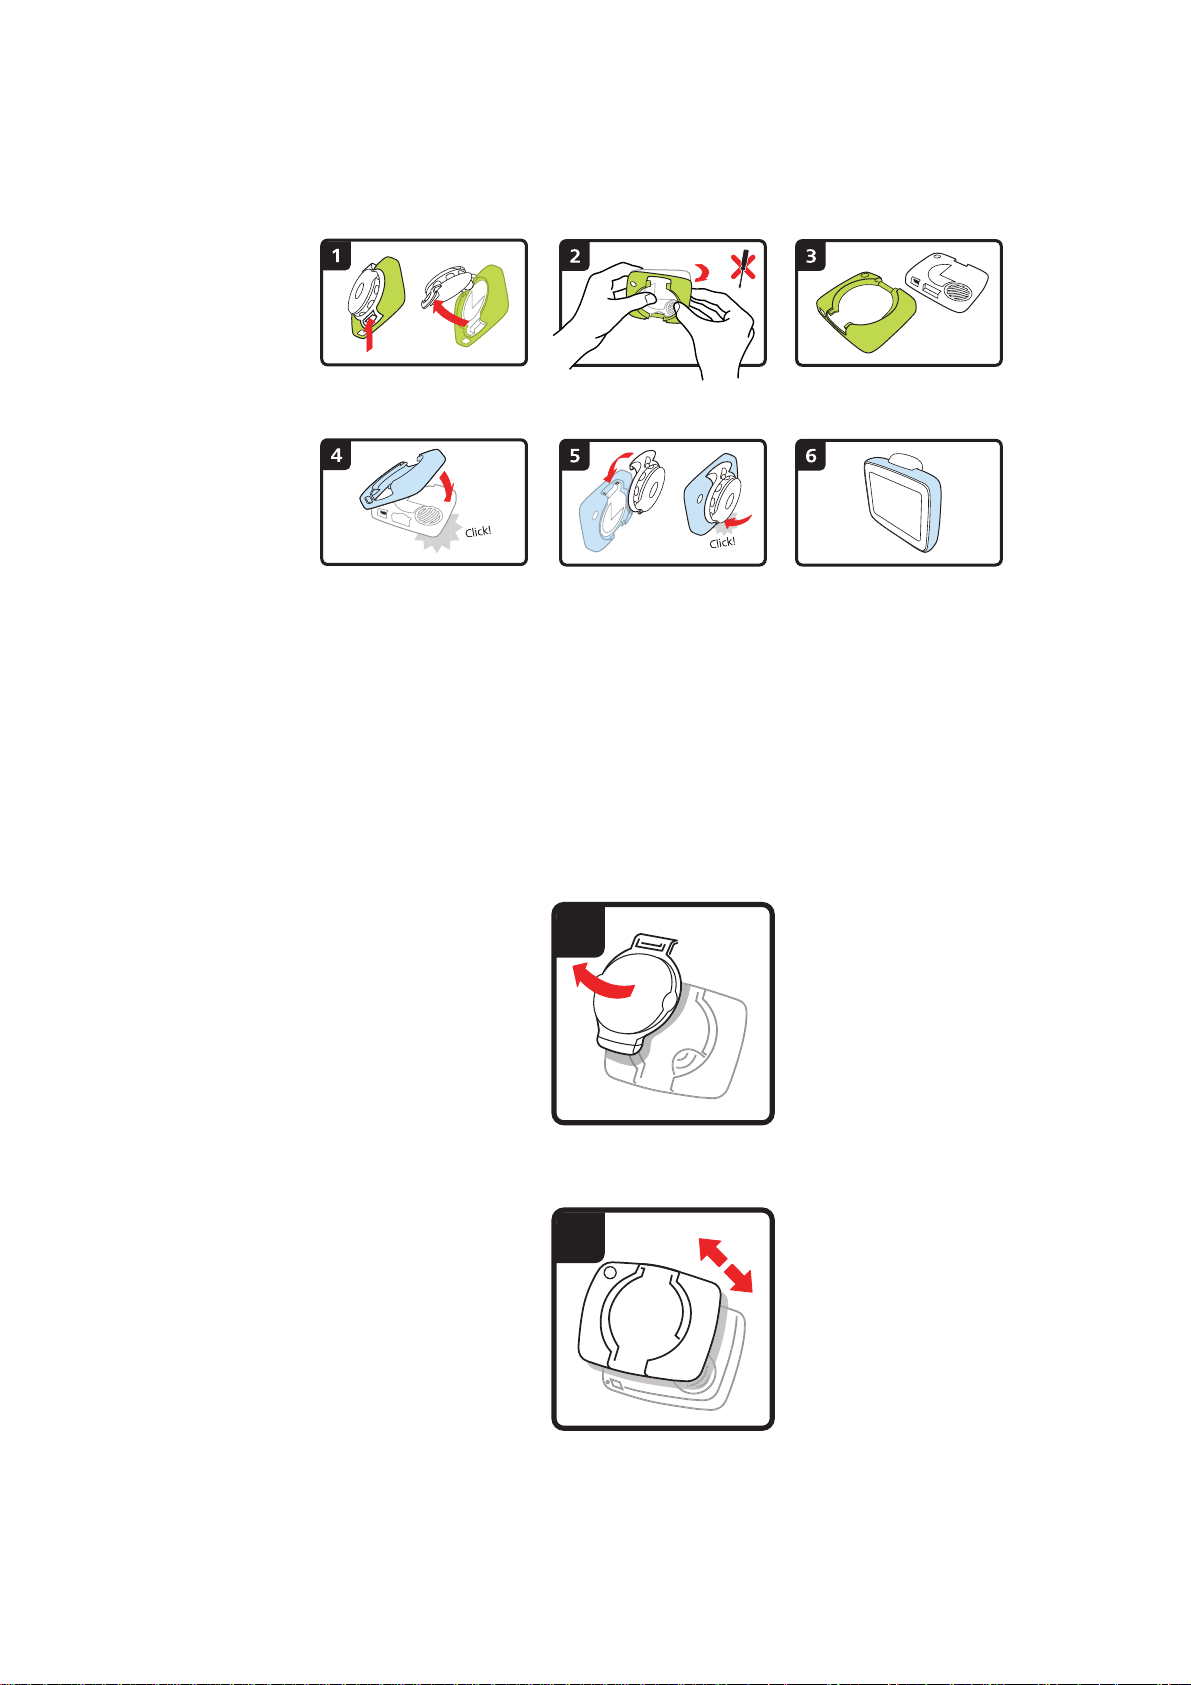
To remove the cover from the device, first remove the mount. Then hold either
1
2
side of the cover and push through the center of the cover to detach the device
from the cover as shown in the diagram. To attach the new cover, push it gently into place as shown.
Troubleshooting
In rare cases, your TomTom EASE navigation device may not start correctly
or may stop responding to your taps.
First, check that the battery is properly charged. To charge the battery, connect your device to the car charger.
If this does not solve the problem, you can reset the device. To do this, do the
following.
1. Remove the Mount from the device by pressing the release button on the
Mount.
2. Pull the back cover off the device by holding either side of the cover and
pushing the device through the center of the cover.
3. Use a straightened paper clip, or something similar, to push the reset button. The reset button is on the bottom of your device.
4
Page 5

3
5
Page 6
Driving View2.
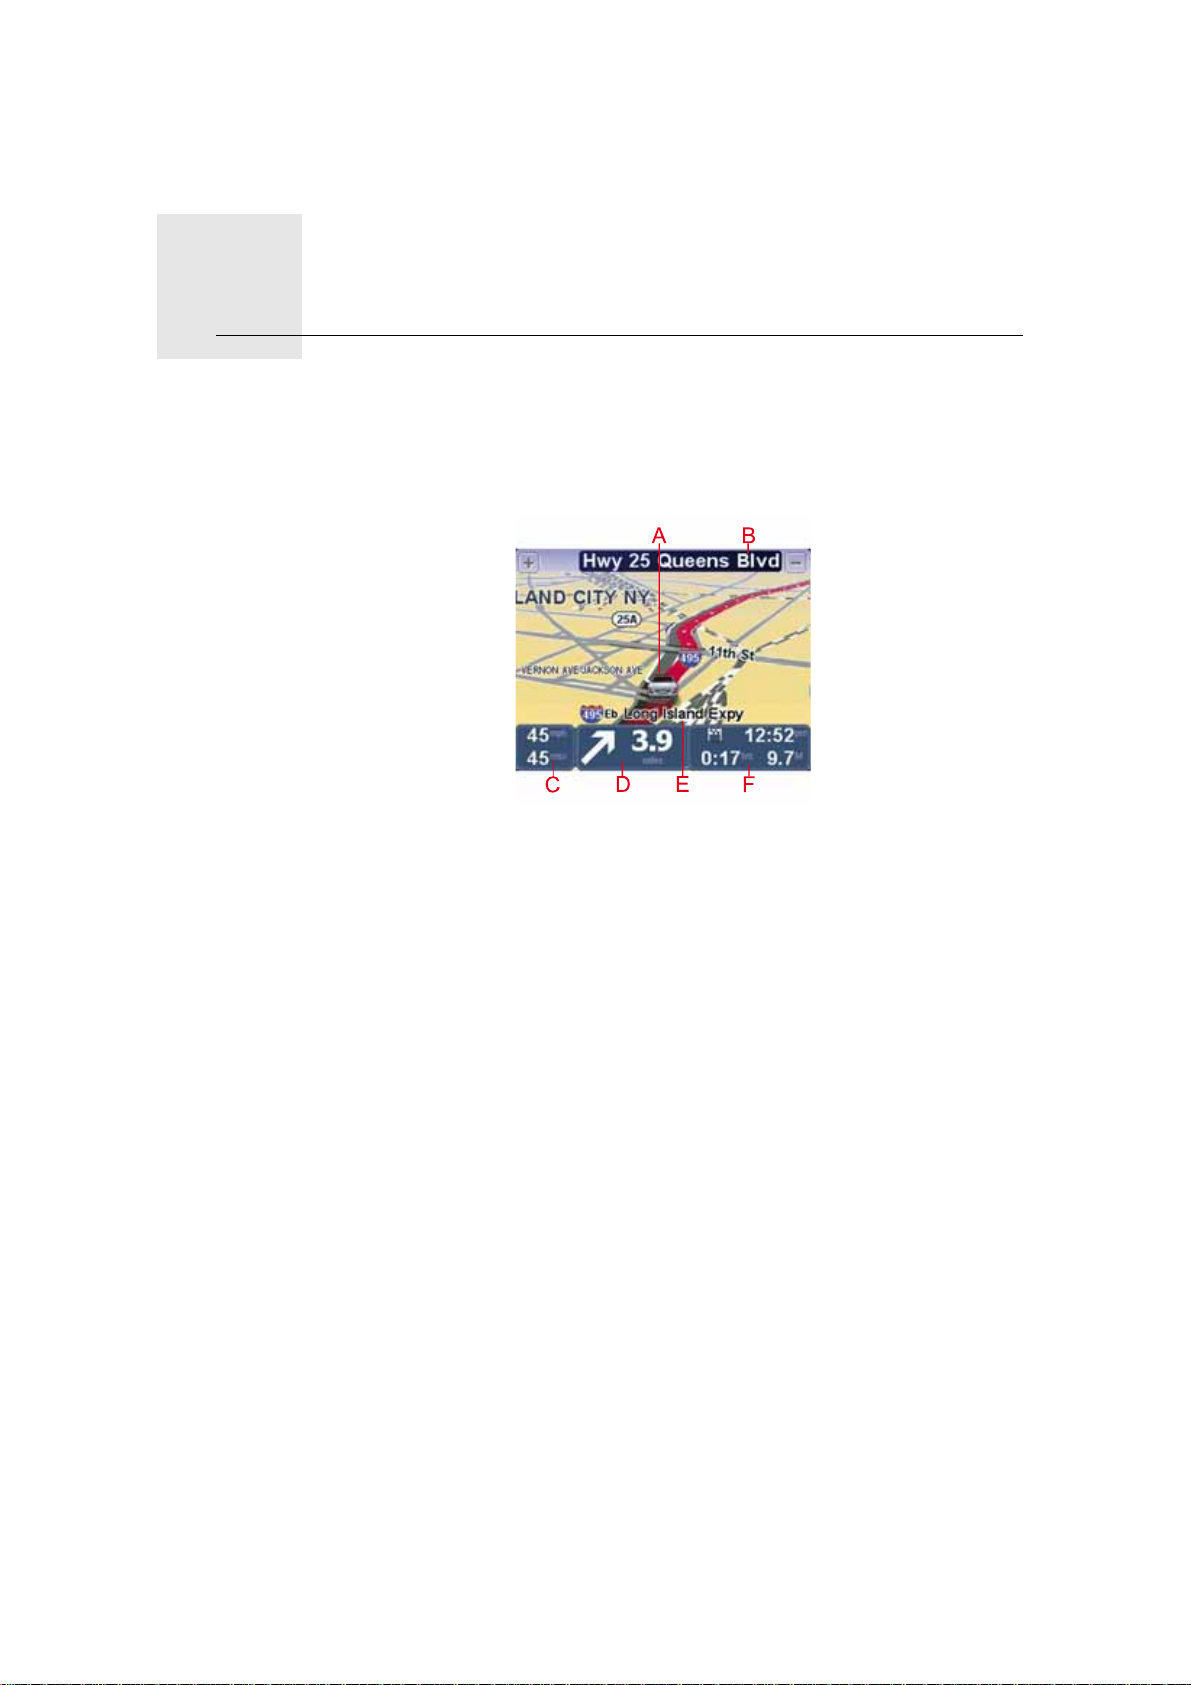
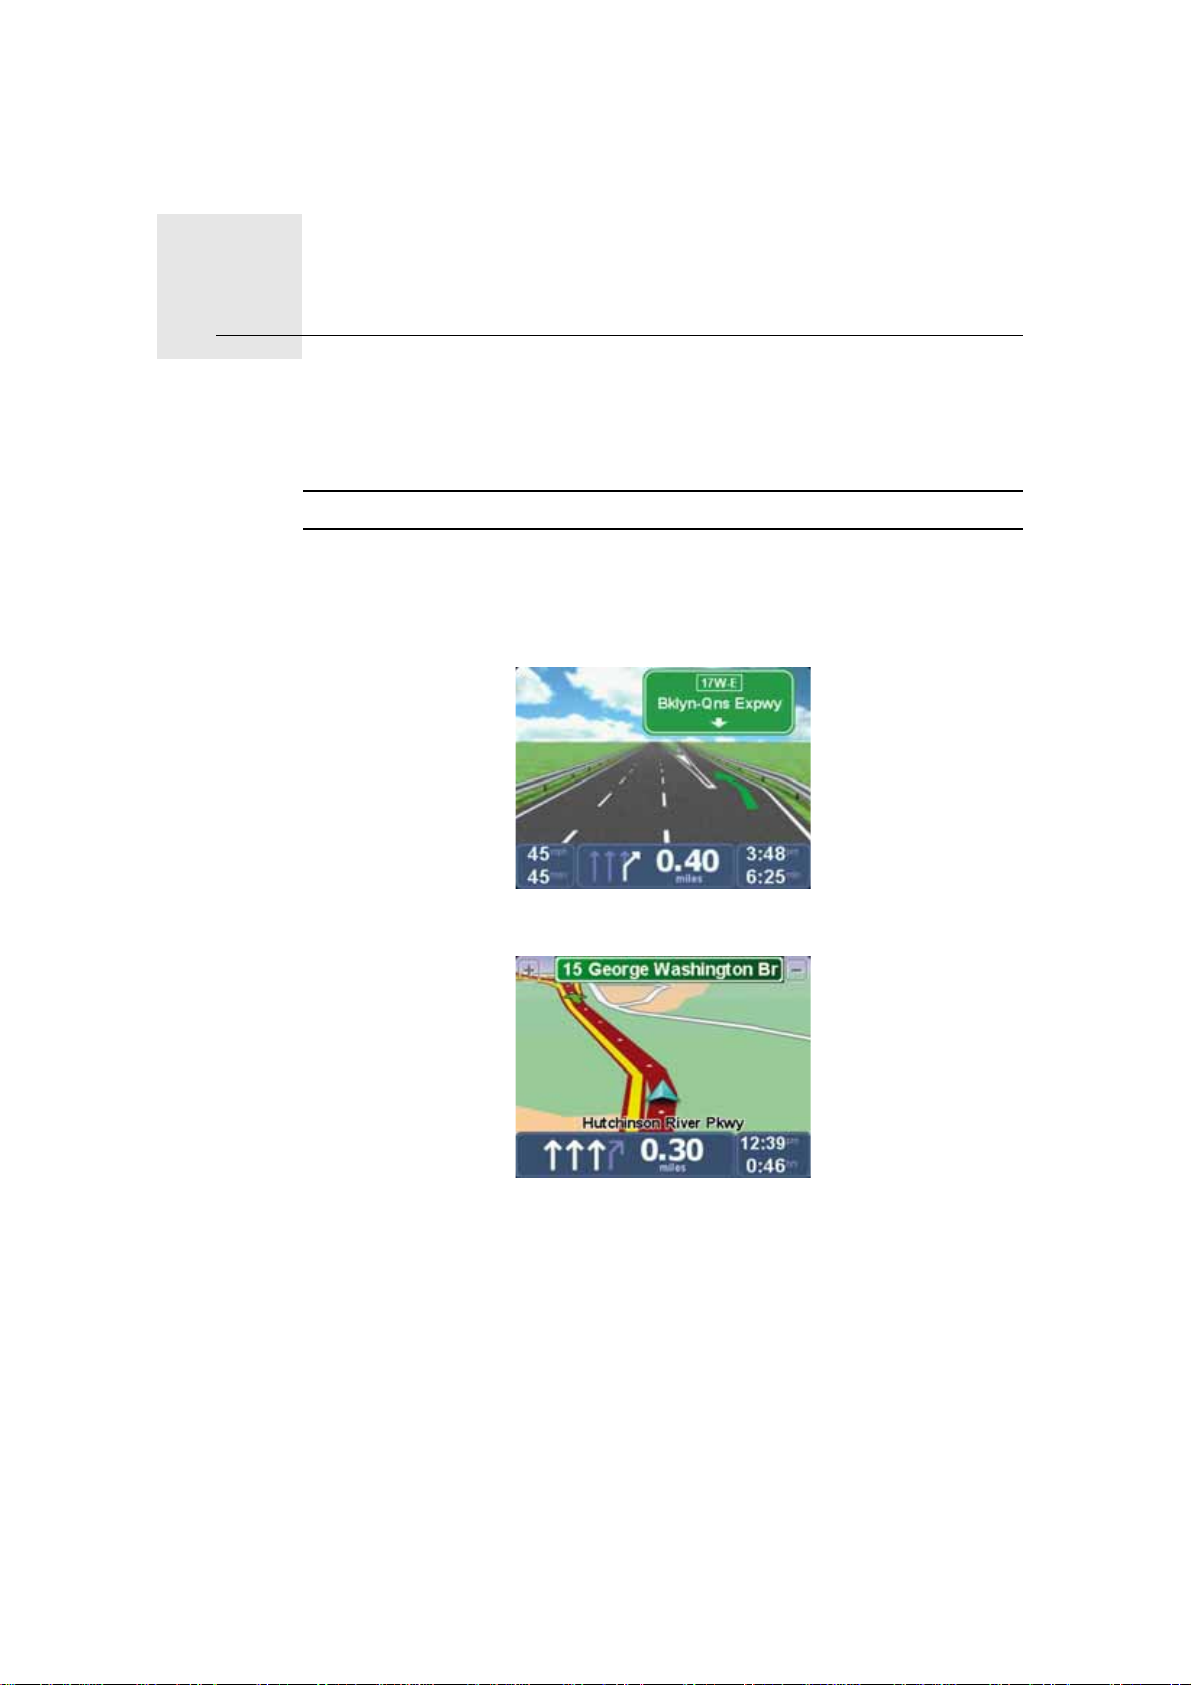
Driving View
The Driving View shows your current location on the map together with
detailed information such as current speed and route instructions.
Tap the center of the screen at any time to open the Main Menu.
AYour current position.
BThe name of the next street or street sign information.
CYour speed and the speed limit, if known.
Tap this panel on the status bar to adjust the volume and to repeat the next
instruction.
DNext route instruction.
Tap this panel on the status bar to switch between 2D and 3D views of the
Driving View.
EThe name of the street you are on.
FInformation about your trip: trip time, remaining distance and arrival time.
Tap this panel on the status bar to see a route summary.
6
Page 7
Advanced Lane Guidance3.
Advanced Lane Guidance
Advanced Lane Guidance
Note: Lane guidance is not available for all junctions or in all countries.
Your TomTom EASE helps you prepare for highway exits and junctions by
showing the correct driving lane for your planned route.
As you approach an exit or junction, the lane you need is shown on the screen.
For some exits and junctions, the lane you need is shown in the status bar.
7
Page 8
Main Menu4.
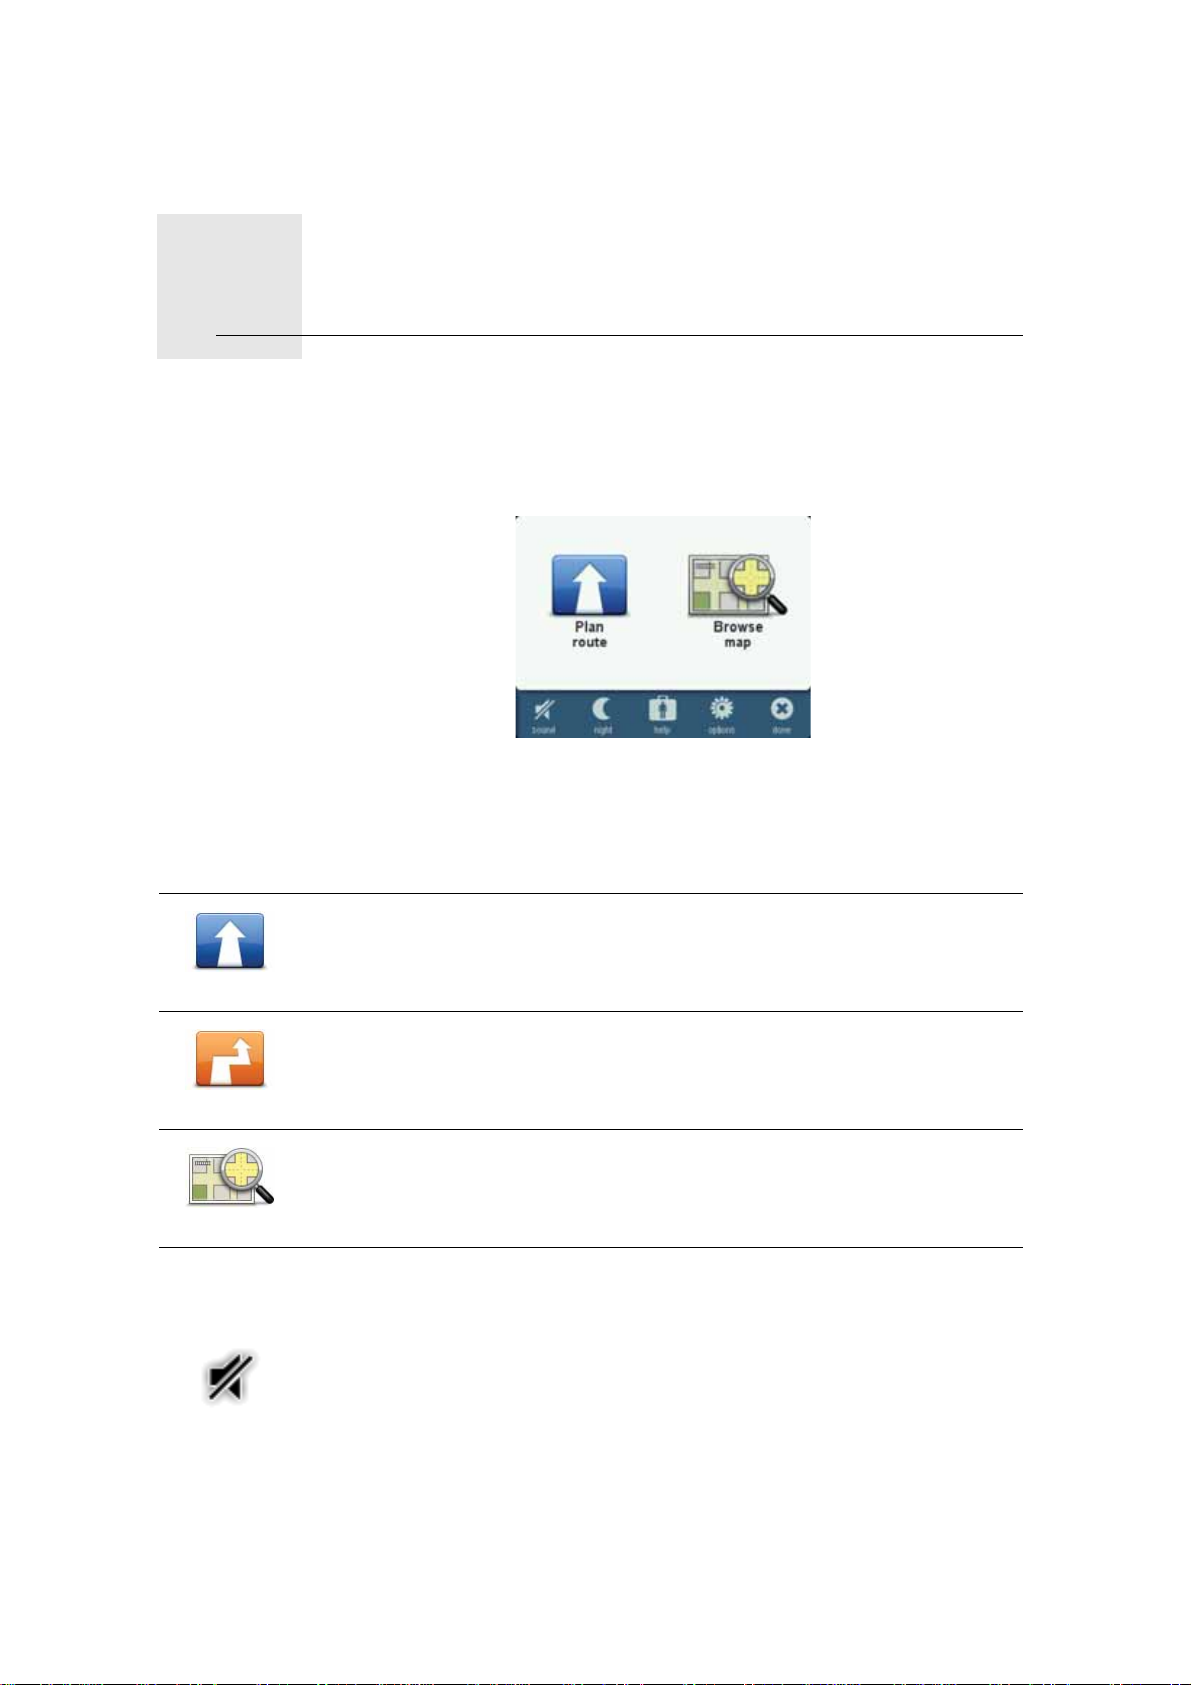
Main Menu
The Main Menu is the starting point for planning a route, looking at a map or
changing your device settings.
To open the Main Menu from the Driving View, tap the center of the screen.
To return to the Driving View from the Main Menu, tap done.
Main Menu buttons
The following buttons are shown on the Main Menu.
Tap this button to plan a new route.
This button is shown when you have not planned a route.
Plan route
Change route
Browse map
Sound
sound
Tap this button to change the existing route or to plan a new route.
This button is shown when you have planned a route.
Tap this button to look at the map.
Tap this button to turn the sound off.
8
Page 9

sound
Night /Day
night
day
Options
Tap this button to turn the sound on.
Tap this button to set t he night color scheme, which reduces the brightness
of the screen and shows the map using dark colors.
This is useful when driving at night or in dark environments such as long
tunnels.
Tap this button to set the day color scheme, which increases the brightness
of the screen and shows the map using bright colors.
Tap this button to adjust the settings for your device.
Help
options
help
For more information, see the chapter Options.
Tap this button to see contact details for local emergency services and
other special services, such as veterinary clinics. You can then plan a route
to your chosen service center.
For more information, see the chapter Help.
9
Page 10

Browse map5.
Browse map
To look at the map in the same way as you might look at a traditional paper
map, tap Browse map in the Main Menu.
You can move the map by touching the screen and sliding your finger across
the screen.
AThe scale bar
BMarker
Markers point to your current location, your home location and your destination. The marker shows the distance to the location.
Tap a marker to center the map on the location pointed to by the marker.
CGPS button
Tap this button to center the map on your current position.
DThe POI button
Tap this button to select which POIs are shown.
EThe cursor
FThe Find button
Tap this button to find specific addresses.
GThe Cursor button
Tap this button to plan a route to the cursor position, create a Favorite at the
cursor position or find a Point of Interest near to the cursor position.
HThe zoom bar
Zoom in and out by moving the slider.
10
Page 11

Planning a route6.
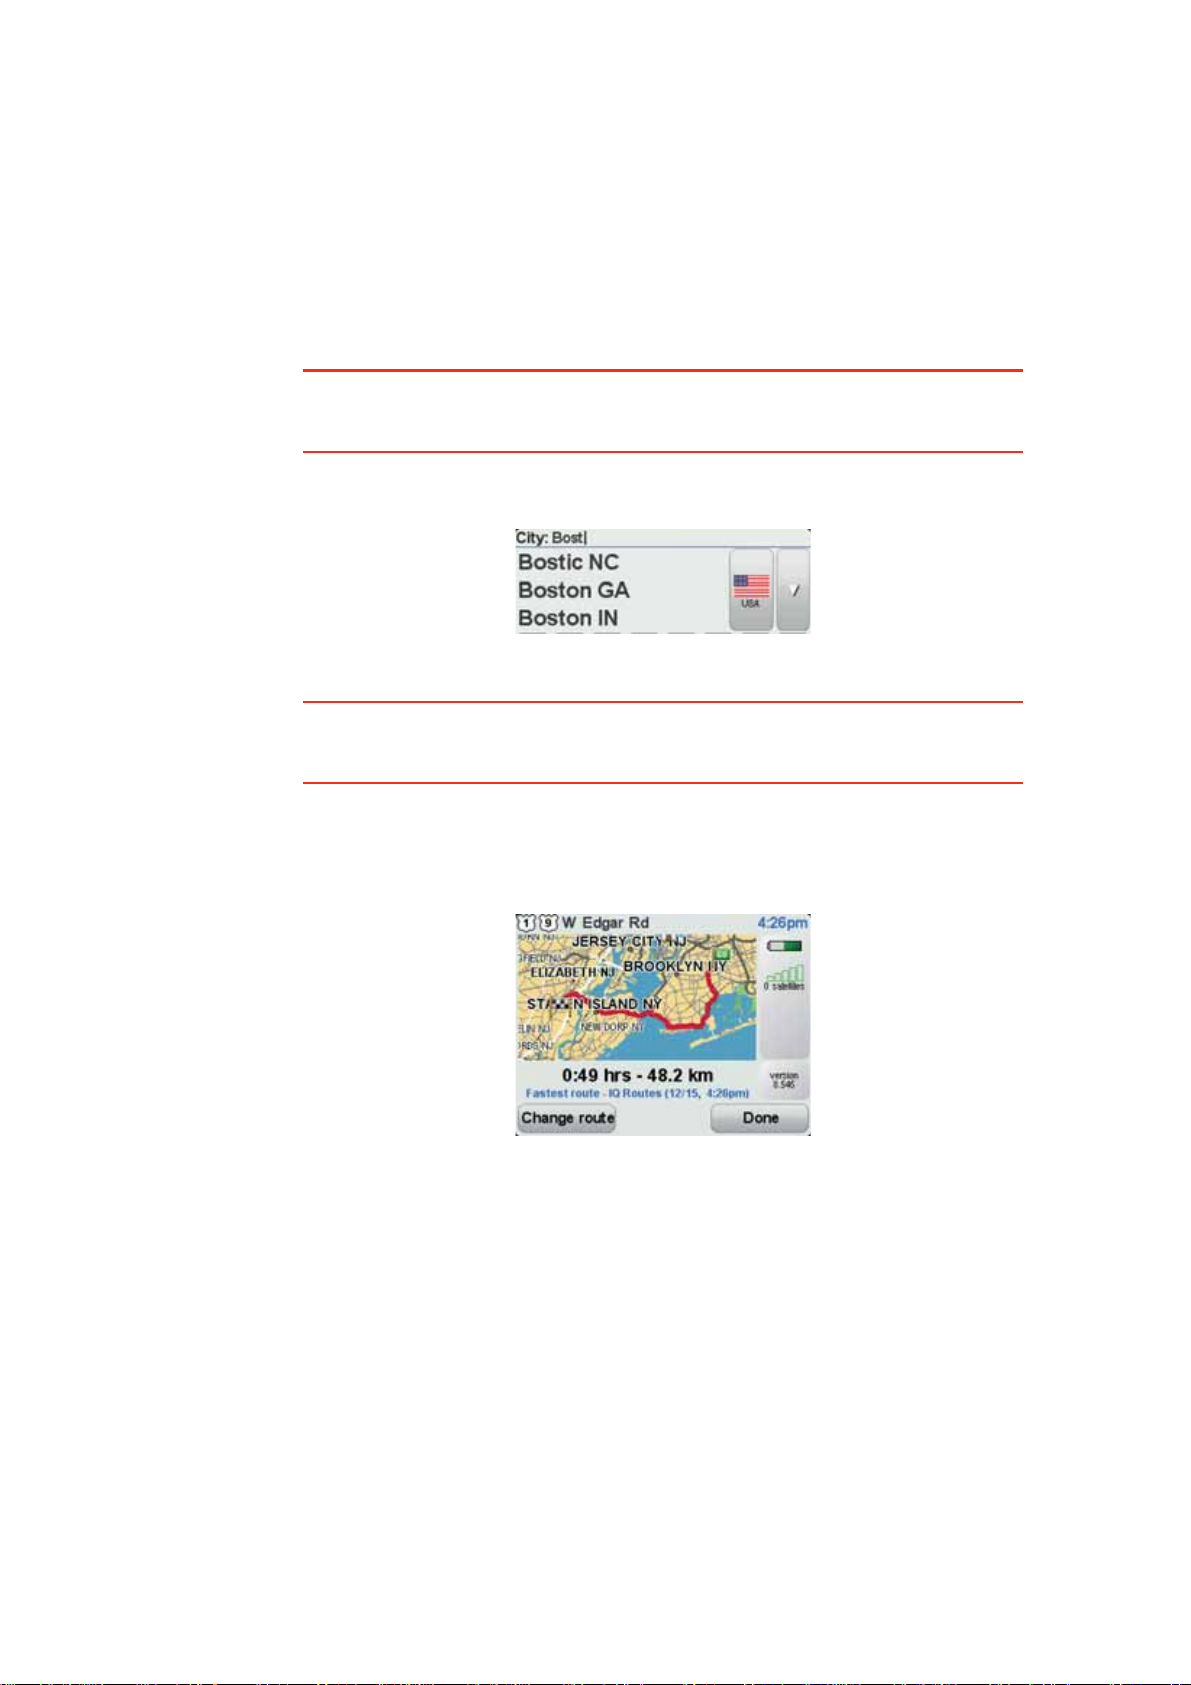
Planning a route
1. Tap the screen to open the Main Menu.
2. Tap Plan route.
You can enter an address in various ways, but we will ente r the full address.
3. Tap Address.
4. Start to type the name of the town where your trip will begin and tap on the
name when it appears in the list.
Tip: When you plan a route for the first time you are asked to select the coun-
try or state. Your choice is saved and used for all future routes. You can
change this setting by tapping on the flag and selecting a new country or state.
5. Enter the street name and the house number, then tap Done.
Tip: Before you start to enter a street name, City center is shown at th e top of
the list. This is useful if you do not have an address and only need general
directions.
6. Tap Done.
The route is planned and a summary of the route is shown.
7. Tap Done.
Your navigation device is ready to guide you to your destination.
Planning a route with a new starting point
To plan a route in advance of traveling or to use a new starting point, do the
following:
11
Page 12
1. Tap the screen to open the Main Menu.
2. Tap Plan route.
3. Tap Depart from.
You can enter an address in various ways, but we will ente r the full address.
4. Tap Address.
Start to type the name of the town where your trip will begin and tap on the
name when it appears in the list.
Tip: When you plan a route for the first time you are asked to select the coun-
try or state. Your choice is saved and used for all future routes. You can
change this setting by tapping on the flag and selecting a new country or state.
5. Enter the street name and the house number, then tap Done.
Tip: Before you start to enter a street name, City center is shown at th e top of
the list. This is useful if you do not have an address and only need general
directions.
6. Enter the destination address, then select Now when asked for the departure time and then tap Done.
The route is planned and a summary of the route is shown.
7. Tap Done.
Your navigation device is ready to guide you to your destination.
12
Page 13
Finding alternative routes7.
Finding alternative routes
Once you have planned a route, you may want to change something about the
route, without changing your destination.
Why change the route?
Maybe for one of these reasons:
• You can see a roadblock or a line of traffic ahead.
• You want to travel via a particular location, to pick someone up, stop for
lunch or fill up with gas.
• You want to avoid a difficult intersection or a road you don’t like.
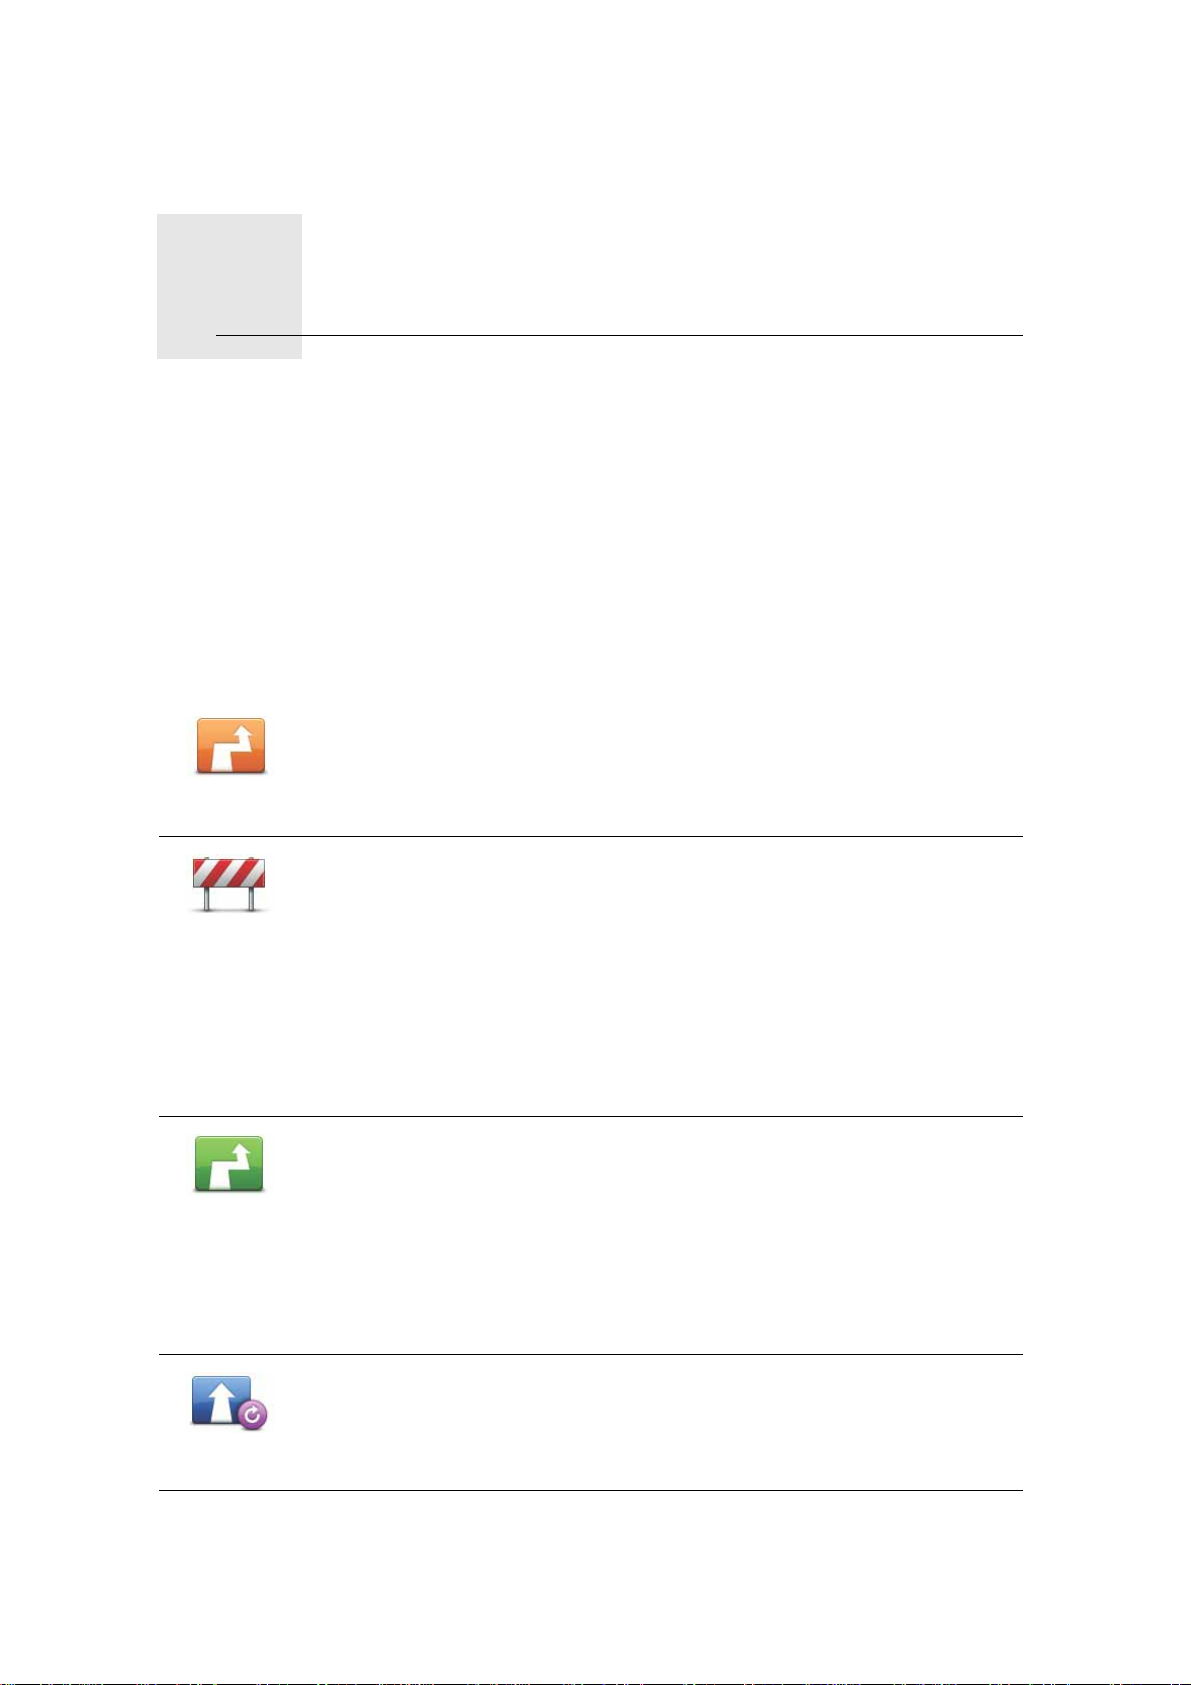
Tap this button in the Main Menu to change the currently planned route.
Change route
Tap this button if you can see a roadblock or a line of traffic ahead. You then
have to choose how much of the route ahead you want to avoid.
Avoid
roadblock
Choose from the different options. Your EASE recalculates your route
avoiding the section of the route for the distance you selected.
Don’t forget that once a new route is calculated, you may have to turn off
the road you are on very soon.
Calculate
alternative
Recalculate
original
If the roadblock disappears while you are traveling, you can tap Recalculate
original to recalculate your original route. After you tap Calculate alterna-
tive, the button name changes to Recalculate original.
Tap this button to calculate an alternative to the route already planned. Your
EASE calculates another route, starting from your current location.
After you tap Calculate alternative, the button name changes to Recalcu-
late original. If you later decide you want to travel along the original route,
tap Recalculate original.
Apart from the roads near your position and near your destination, the new
route uses totally different roads to reach your destination. This is an easy
way of calculating a totally different route.
Tap this button to replan your original route.
This button is shown when you have changed your route by calculating an
alternative.
13
Page 14
Travel via...
Plan route
Clear route
Tap this button to change your route so that it passes a particular location,
perhaps to pick someone up on the way. When you do this, a marker is
shown on the map for the location you choose to travel via.
You choose the location you want to pass in the same way as you choose a
destination. So you can select from all the same options, for example:
Address, Favorite, Point of Interest and Point on map.
Your EASE calculates a new route to your destination that passes the location you chose. Unlike your final destination, your EASE does not inform
you when you pass by this location.
Tap this button to plan a new route. When you plan a new route, the old
one is deleted.
Tap this button to delete the current route.
14
Page 15

Options8.
Options
Change voice
Change voice
Set clock
Set clock
You can change the way your TomTom EASE looks and behaves.
Tap options in the Main Menu.
Your navigation device gives spoken warnings and instructions using
voices which have been recorded by actors.
To select a different voice on your device, tap Change voice in the Options
menu or in the Voices and images menu. Then select a voice from the list.
You can add and remove voices using TomTom HOME.
Tap this button to select the time format and to set the time.
The easiest way to set the time is by tapping the Sync button. Your EASE
will then take the time from GPS information.
Note: You can only use Sync if you have GPS reception, so you cannot set
the clock in this way when you are indoors.
After using Sync to set the time, you may have to adjust the hours depending on your time zone. Your EASE works out your time zone and always
keeps the time correct using GPS information.
Change language
Tap this button to change the language used for all the buttons and messages you see on your EASE.
Change
language
You can choose from a wide range of languages. When you change the language, you are also given the opportunity to change the voice.
Home and Favorites
Tap this button to manage your Home and Favorite locations.
For more information, see the chapter Favorites.
Home and
Favorites
15
Page 16

Voices and images
Tap this button to change your settings for voices and images.
For more information, see the chapter Voices and images.
Voices and
images
Map corrections
Tap this button to make a correction to your map.
Map
corrections
Advanced settings
To change the advanced settings on your TomTom EASE, tap the Advanced
button in the Options menu.
Set units
Tap this button to set the units used for the following measurements:
•Distance
Set units
•Time
• Latitude and longitude
Operate left-handed / Operate right-handed
Tap this button to move important buttons, for example, the Done and Cancel buttons as well as the zoom bar, to the left hand side of the screen.
Operate left-
handed
To move the buttons back to the right hand side of the screen, tap Operate
right-handed.
Keyboard preferences
You use the keyboard to enter your destination or to find an item in a list,
such as a POI.
Keyboard
preferences
Tap this button to select the size of the keys on the keyboard and the keyboard layout. You can select from two sizes:
• Large keyboard
• Small keyboard
Several keyboard layouts are available:
• ABCD keyboard
• QWERTY keyboard
• AZERTY keyboard
16
Page 17

Enable/Disable Safety Alerts
Tap this button to enable or disable TomTom Safety Alerts.
Enable/
Disable Safety
Alerts
TomTom Safety Alerts
The TomTom Safety Alerts service warns you about fixed safety camera locations.
Important: If you have a subscription to this service, regularly connect your
navigation device to TomTom HOME to update the list of locations for all types
of safety alerts.
When a safety camera location is shown on the map, a warning sound is
played to warn you that you are approaching an area where a safety camera
is located.
Switch map
Tap this button to change the map you are using.
Switch map
Reset factory settings
Tap this button to restore the factory settings to your TomTom EASE.
All your settings, including your Home location and any Favorites, are
Reset factory
settings
deleted.
17
Page 18

Favorites9.
Favorites
What are Favorites?
Favorites are places that you often visit. You can create Favorites so that you
don’t have to enter the address every time you plan a route.
They don’t have to be places you especially like, just useful addresses.
How can I create a Favorite?
From the Main Menu, tap options followed by Home and Favorites and then
tap Add Favorite.
You can then select the location of the Favorite from the list below.
You can type your own name for the Favorite when the keyboard is shown. To
enter the name, there’s no need to delete the suggested name, just start typing.
You can set your Home location as a Favorite.
Home
Favorite
Address
Recent
destination
You cannot create a Favorite from another Favorite. This option will always
be unavailable in this menu.
To rename a Favorite, tap Home and Favorites then Manage Favorites in
the Options menu.
You can specify an address to be a Favorite.
Select a Favorite location from a list of places you have recently used as
destinations.
18
Page 19

Point of
Interest
You can add a Point of Interest (POI) as a Favorite.
Does it make sense to do this?
If you visit a POI you particularly like, for example a restaurant, you can add
it as a Favorite.
To add a POI as a Favorite, tap this button, then do the following:
1. Narrow your choice of POIs by selecting the area where the POI is.
You can select one of these options:
• POI near you - to search from a list of POIs near your current position.
• POI in city - to choose a POI in a particular town or city. You have to
specify a town or city.
• POI near Home - to search from a list of POIs near your Home loca-
tion.
If you are currently navigating to a destination, you can also select from
a list of POIs which are on your route or near your destination. Choose
one of these options:
• POI along route
• POI near destination
2. Select the category of POI.
Tap the category of POI if it is shown or tap the arrow to choose from
the complete list.
Tap Any POI category to search for a POI by name.
Tap this button to create a Favorite using the map browser.
Select the location of the Favorite using the cursor, then tap Done.
Point on map
How can I use a Favorite?
You will normally use a Favorite to plan a route somewhere without havin g to
enter the address. To plan a route to a Favorite location, do the following:
1. Tap the screen to open the Main Menu.
2. Tap Plan route or Change route.
3. Tap Favorite.
4. Select a Favorite from the list. This will be your destination.
5. Select Now.
6. If your current location is unknown you are asked if you want to wait until
the location is known or if you want to plan a route using your last known
position. For this example select Plan using last known position, then tap
Done.
The route is planned and a summary of the route is shown.
7. Tap Done.
Your navigation device is ready to guide you to your destination.
19
Page 20

How can I change the name of a Favorite?
1. Tap the screen to bring up the main menu.
2. Tap options to open the Options menu.
3. Tap Home and Favorites.
4. Tap Manage Favorites.
5. Tap the Favorite you want to rename.
6. Tap Rename.
How can I delete a Favorite?
1. Tap the screen to bring up the main menu.
2. Tap options to open the Options menu.
3. Tap Home and Favorites.
4. Tap Manage Favorites.
5. Tap the Favorite you want to delete.
6. Tap Delete.
20
Page 21

Points of Interest10.
Points of Interest
Points of Interest or POIs are useful places on the map. Here are some examples:
• Restaurants
•Hotels
•Museums
• Parking garages
• Gas stations
Note: Tap Map corrections in the Options menu to report missing POIs or edit
existing POIs.
Navigating to a POI
You can use a POI as your destination. For example, if you are traveling to an
unfamiliar city, you could choose a parking garage POI as your destination.
1. Tap the screen to bring up the Main Menu.
2. Tap Plan route in the Main Menu.
3. Tap Point of Interest.
4. Narrow your choice of POIs by selecting the area where the POI is located.
You can select one of these options:
• POI near you - to choose from a list of POIs near to your current location.
• POI in city - to find a POI in a particular town or city.
• POI near Home - to choose from a list of POIs near to your Home location.
You can select from a list of POIs which are along your route or close to your
destination. Choose from one of these options:
• POI along route
• POI near destination
Tip: The last POI you searched for is also shown as a button i n the POI menu.
5. Type the name of the town you want to visit and select the town when it
appears in the list.
6. Select the category of POI or if you selected to POI in city then type the
name of the city.
Tap the category of POI.
21
Page 22

Tap the arrow to choose from the complete list of categories. Select the category from the list or start to type the name of the category and select it
when it appears in the list.
7. Tap Parking garage.
8. From the list of POIs shown, select the POI you want to navigate to.
The table below explains the distances listed next to each POI.
POI near you Distance from your current location
POI in city Distance from the city center
POI near Home Distance from your Home location
POI along
Distance from a location on your route
route
POI near desti-
Distance from your destination
nation
If you know the name of the POI, tap Find and type the name. Select it from
the list when it is shown.
The next screen shows more detailed information including the location of
the POI on the map and the phone number of the POI, if available.
Tap Select to confirm you want to plan a route to this POI.
Once you have selected a POI, the route to the POI is calculated by your
TomTom EASE.
22
Page 23

Voices and images11.
Voices and images
Voices
Your navigation device has different voices which have been recorded by
actors. These voices are used for spoken instructions.
Sound and volume control
To adjust the volume level, tap the left-hand section of the status bar in the
Driving View.
The last spoken instruction is repeated and the volume level is shown.
Move the volume slider to adjust the volume.
To turn the sound on or off, tap sound in the Main Menu.
Set day color scheme
Tap day in the Main Menu to increase the brightness of the screen and
show lighter colors on the map.
Set day color
scheme
You can download additional color schemes using TomTom HOME.
Set night color scheme
Tap night in the Main Menu to reduce the brightness of the screen and
show darker colors on the map.
Set night color
scheme
You can download additional color schemes using TomTom HOME.
Change car symbol
Tap this button to select the car symbol that shows your current position in
the Driving View.
Change car
symbol
You can download additional car symbols using TomTom HOME.
23
Page 24

Change voice
Your navigation device gives spoken warnings and instructions using
voices which have been recorded by actors.
Change voice
To select a different voice on your device, tap Change voice in the Options
menu or in the Voices and images menu. Then select a voice from the list.
You can add and remove voices using TomTom HOME.
Change start-up image
Tap this button to select the start-up image which is shown every time you
switch on the device.
Change start-
up image
You can download additional start-up images using TomTom HOME.
Change shutdown image
Tap this button to select the shutdown image which is shown every time
you switch off the device.
Change
shutdown
image
You can download additional shutdown images using TomTom HOME.
24
Page 25

TomTom Map Share™12.
TomTom Map Share™
With TomTom Map Share, you can correct errors on your map and share
those corrections with other people in the TomTom Map Share community,
as well as receiving corrections made by others.
If you find a street that has recently been blocked to traffic which was open
before, you can use Map Share to correct your map and then share the correction with other Map Share users.
You can use Map Share to send and receive map corrections during the first
year after the map’s release date. This means that one year after the release
date, you will no longer be able to send or receive map corrections for that version of the map. You will still be able to make corrections to your own map for
use on your own device.
Note: TomTom Map Share is not available in all regions. For more information, go to tomtom.com/mapshare.
Map corrections
There are two types of map corrections:
• Corrections that are immediately shown on the map. These include, changing the traffic flow of a street, blocking or renaming a street and adding or
editing POIs.
This type of change is immediately shown on your own map.
• Corrections that are reported to TomTom but not shown immediately on
your map. These include, missing streets, errors in highway entrances and
exits and missing rotaries.
This type of correction is investigated by TomTom and, once verified, is
included in the next map release. These corrections are therefore not
shared with the Map Share community.
25
Page 26

Making a map correction
Important: For safety reasons, you should only mark a location when you are
driving. Do not enter the full details of an error while you are driving.
1. Tap options in the Main Menu then tap Map corrections.
2. Tap Correct a map error.
Correct a map
error
A list of possible map corrections is shown.
3. Select the type of correction you want to report.
Note: If you tap Add missing POI or Report other error you will be asked for
some additional information before the next step.
4. Select the method you want to use for selecting the location of the correction.
5. When you have found the location, tap Done.
6. Enter correction or confirmation of correction now.
Receiving the latest map updates
When you connect your TomTom EASE to your computer, TomTom HOME
automatically downloads any available map corrections and sends the Map
Share community any changes you have made.
Marking a map error while on the move
Important: For safety reasons, you should only mark a location when you are
driving. Do not enter the full details of an error while you are driving.
If you notice an item on your map that needs attention, you can mark the location using the Report button and then enter the details when you are no longer
driving.
To show the Report button in the Driving View, do the following:
1. Tap options in the Main Menu, then tap Map corrections.
2. Tap Correction preferences.
3. Tap Next, then tap Continue, then tap Done.
4. Select Show report button, then tap Done.
The Report button is shown on the left-hand side of the Driving View. After
you mark a location, you can add more information about the change when
you open the Map corrections menu.
For example, you are driving to a friendqs house and you notice that the name
of the street you are on is different from the one on your map. To report the
change, tap the Report button and your EASE will save your current location.
You can then send the correction to TomTom Map Share when you have finished your trip.
TomTom Map Share community
To join the Map Share community, do the following:
1. Tap options in the Main Menu then tap Map corrections.
26
Page 27

2. Tap Download corrections made by others.
3. Tap Join.
When you connect your EASE to your computer, TomTom HOME downloads
new corrections and sends your corrections to the Map Share community.
Important: Connect your device to your computer regularly and use TomTom
HOME to check for new updates.
Correction preferences
The correction preferences set the way TomTom Map Share works on your
device.
You can set the following preferences:
• Use the trust level slider to choose the types of corrections from the Map
Share community you want to use on your maps.
• Decide if you want to share your corrections with others.
• Show or hide the report button in the Driving View.
To set your preferences, tap options in the Main Menu then tap Map correc-
tions.
Accepting map corrections
You can set the type of map corrections you want to receive from the Map
Share community to improve your maps.
To do this, tap options in the Main Menu. Then tap Correction preferences
and move the slider to select the type of corrections you want.
There are four types of map correction:
• TomTom - only accept changes made by TomTom.
• Trusted sources - accept changes made by TomTom and by trusted users
who have been verified by TomTom.
• Many users - accept changes made by TomTom, by trusted users who have
been verified by TomTom and changes made by a high number of Map
Share community members.
• Some users - accept changes made by TomTom, by trusted users who
have been verified by TomTom and all changes that have been made by
Map Share community members.
Types of map correction
There are several types of correction that you can make to a map.
27
Page 28

To make a correction to your map, tap Map corrections in the Options menu
then tap Correct a map error. The following types of corrections are shown.
Tap this button to block or unblock a street. You can block or unblock the
street in one or both directions.
(Un)block
street
For example, to correct a street near to your current location, do th e following:
1. Tap (Un)block street.
2. Tap Near you to select a street near your current location. You can select
a street by name, a street near your Home location or a street on the
map.
3. Select the street or section of a street you want to correct by tapping it
on the map.
The street you select is highlighted and the cursor shows the name of
the street.
4. Tap Done.
Your device shows the street and whether the traffic is blocked or
allowed in each direction.
Reverse traffic
direction
5. Tap one of the direction buttons to block or unblock the flow of traffic in
that direction.
6. Tap Done.
The next time you connect your device to TomTom HOME, your correc-
tions are shared with the TomTom Map Share community.
Tap this button to correct the traffic direction of a one-way street, where the
direction of traffic is different to the direction shown on your map.
Note: Reverse traffic direction only works for one-way streets. If you select
a two-way street you will be given the chance to block/unblock the street
rather than changing the direction.
28
Page 29

Edit street
name
Change turn
restrictions
Tap this button to change the name of a street on your map.
For example, to rename a street near to your current location:
1. Tap Edit street name.
2. Tap Near you.
3. Select the street or section of a street you want to correct by tapping it
on the map.
The street you select is highlighted and the cursor shows the name of
the street.
4. Tap Done.
5. Type the correct street name.
6. Tap Done.
Tap this button to change and report incorrect road turn directions.
Tap this button to change and report an incorrect road speed limit.
Change road
speed
Add missing
POI
Tap this button to add a new Point of Interest (POI).
For example to add a new restaurant near to your current location:
1. Tap Add missing POI.
2. Tap Restaurant in the list of POI categories.
3. Tap Near you.
4. Select the location of the missing restaurant.
You can select the location by entering the address or by selecting the
location on the map. Select Near you or Near home to open the map at
your current location or at your Home location.
5. Tap Done.
6. Type the name of the restaurant then tap OK.
7. If you know the telephone number of the restaurant you can type it, then
tap OK.
If you don’t know the number, just tap OK without typing a number.
29
Page 30

Edit POI
Report other
error
Tap this button to edit an existing POI.
You can use this button to make the following changes to a POI:
• Delete the POI.
• Rename the POI.
• Change the telephone number of the POI.
• Change the category that a POI belongs to.
• Move the POI on the map.
Tap this button to report other types of corrections.
These corrections are not immediately applied to your map. Your
TomTom EASE sends a special report to TomTom Map Share.
You can report missing streets, errors in freeway entrances and exits and
missing rotaries. If the correction you want to report is not covered by any
of these report types, enter a general description then tap Other.
30
Page 31

Help13.
Help
Help provides an easy way to contact and plan a route to locations that provide emergency services, such as a hospital or to other specialized services.
For example, if you are involved in a car accident, you could use Help to call
the nearest hospital and tell them your exact location.
Note: Information may not be available for all services in all countries.
How do I use Help to phone a local service?
You can use Help to plan a route to local services, make contact by phone and
inform the service about the precise details of your current location.
When you search for a service center, you are shown a list of the nearest services. Select one of the services in the list to view their address and phone
number and to see your current location on the map.
To use Help to locate an emergency service, contact them by phone and plan
a route to the emergency service location, do the following:
1. Tap the screen to bring up the Main Menu.
2. Tap help.
3. Tap Call for help.
Options
Call for help
Drive to help
4. Select the type of service you require. For this example, tap Nearest hospital.
5. Select a service from the list. The nearest service is shown at the top of the
list. For this example, tap the one at the top of the list.
Your current location is shown on the map together with the phone number
of the service. This helps you to explain where you are when you call the
service for help.
6. To plan a route from your current location to the service location, tap Nav-
igate there.
Your navigation device starts guiding you to your destination.
Tap this button to view the location and contact details for a service.
Tap this button to plan a route by car to a service.
31
Page 32

Using TomTom HOME14.
1
2
3
Using TomTom HOME
TomTom HOME is a free application for your computer that you can use to
update your device, read the Reference Guide, download extras and update
your maps. To use TomTom HOME with your device, do the following:
1. Remove the EasyPort™ Mount from the back of your device by pushing t he
release button on the Mount. Turn the Mount around.
2. Reattach the Mount to your device. Push your device against the ball joint
end of the Mount first. Then push the device into the other end of the
Mount.
3. Open the Mount up so you can stand it on a table.
4. Connect the USB cable to your device and to your computer.
32
Page 33

Switch your device on. Your device asks you if you want to connect to the
4
computer. Tap YES. If TomTom HOME is not installed on your computer, it
starts to install. Your computer needs to be connected to the internet.
Note: You can also download TomTom HOME from tomtom.com/home.
33
Page 34

Traffic information using RDS-TMC15.
Traffic information using RDS-TMC
The Traffic Message Channel (TMC)
Note: The TomTom RDS-TMC Traffic Receiver is included with some products
and is also available as an accessory for other products. For more information,
visit tomtom.com.
Your TomTom navigation device uses TMC traffic information to warn you
about traffic delays along your route and how you can avoid them.
You can receive traffic information on your TomTom EASE using the TomTom
RDS-TMC Traffic Receiver.
TMC traffic information, also known as RDS-TMC, is transmitted on FM radio.
The signal is broadcast by radio stations in several countries on the same frequency as their normal radio programs.
Important:TMC is not available in all country regions. The Traffic Message
Channel is not a TomTom Service and TomTom is not responsible for the
availability or quality of traffic information provided by TM C. To che ck if TMC
is available in your country region, visit tomtom.com.
Using traffic information
To start using TMC, connect the TomTom RDS-TMC Traffic Receiver to the
USB connector on your device.
As soon as you start receiving traffic information, the traffic sidebar
is shown on the right side of the Driving View. The traffic sidebar
warns you about any traffic incidents on your route.
In this example, there is a traffic jam on your route 9 miles ahead that
will cause an expected delay of 38 minutes.
These symbols are shown at the top of the traffic sidebar:
Your EASE has the latest RDS-TMC traffic information.
Your EASE is waiting to download the latest RDS-TMC traffic information
as soon as it is available.
Your EASE is searching for a radio station that carries RDS-TMC traffic
information.
To find the quickest route to your destination, do the following:
1. Tap the Traffic sidebar.
34
Page 35

2. Tap Minimize traffic delays.
Your device looks for the quickest route to your destination.
The new route may also include traffic delays, or may even be the same
route as before.
3. Tap Done.
Changing traffic preferences
Use the Change Traffic preferences button to choose how traffic information works on your device.
Change Traffic
preferences
1. Tap the TomTom Traffic button in the Main Menu on your device.
2. Tap Change Traffic preferences.
You can change the following preferences:
• Beep when traffic situation on route changes - if you select this option
your device beeps when a new traffic incident occurs on your current
route.
• Tune manually by entering a frequ ency - if you select this option, the but-
ton Tune manually is shown in the Traffic menu. Tap Tune manually to
enter the frequency of a particular radio station you want to use for RDSTMC traffic information.
3. Select or clear the check box next to each preference you want to change.
4. Tap Done.
5. Select what should happen if the traffic situation changes when you are
6. Tap Done.
Traffic incidents
Traffic incidents are displayed both on the Drivin g View and also on the Traffic
sidebar as small symbols. There are two type of symbols:
• Symbols shown in a red square are traffic incidents. Your navigation de vice
• Symbols shown in a red rectangle are weather related. Your device does
Traffic incident symbols and their meaning are shown below:
driving and a faster route is found. You can choose from these options:
• Always switch to that route - your route will automatically be updated to
the faster route.
• Ask me if I want that route - you are asked if you want to stay on your
current route or switch to the faster route.
• Never change my route - your route is not changed and you are not
asked if you want to change your route.
can replan to avoid them.
not replan to avoid these warnings.
Accident
Road works
35
Page 36

One or more lanes
closed
Road closed
Traffic incident
Traffic jam
Weather related symbols and their meaning are shown below:
Fog
Rain
Wind
Ice
Snow
Note: The incident avoided symbol is shown for any traffic incident that you avoid using TomTom Traffic.
Setting the radio frequency for RDS-TMC information
If you know the frequency of a particular radio station you want to use for
RDS-TMC traffic information, do the following to set the frequency manu-
Tune manually
ally:
To activate this feature, you must first enable manual tuning. To do this, tap
the Traffic bar in the Driving View, then tap Change Traffic preferences.
Select Tune manually by entering a frequency and then tap Done.
1. Tap the Traffic sidebar in the Driving View.
2. Tap Tune Manually.
3. Enter the frequency of the radio station.
4. Tap Done.
Your TomTom device looks for your radio station. If it doesn't find a radio station at the frequency you set, it automatically continues to search for the next
available station.
36
Page 37

Making commuting to work easier
The Home to work and Work to home buttons in the Traffic menu let you
check your route to and from work with one tap of a button. When you use
either of these buttons, your device checks the route for possible delays, and
if it finds any, provides you with the possibility to avoid them.
The first time you use Home to work, you must set your home and work locations for this feature by doing the following:
1. Tap the TomTom Traffic button in the Main Menu on your device.
2. Tap Show home-work traffic.
3. Tap Change home-work
Change home-
work
4. Set your home location
5. Set your work location.
Note: The home location you set here is not the same as your Home location
that you set in the Preferences menu and is shown in the Navigate to menu.
You can now use the Home to work and Work to home buttons of the Show
home-work traffic menu.
For example, to check for delays on your route home, do the following:
1. Tap TomTom Traffic in the Main Menu on your device.
2. Tap Show home-work traffic.
3. Tap Work to home.
The Driving view is shown.
To see if there is a quicker way home, tap Find alternative and then tap Mini-
mize delays.
Show traffic on route
To check for delays on your route, tap Show traffic on route in the Traffic
menu. Your navigation device shows a summary of the traffic delays on your
route.
The total includes any delays due to traffic incidents and those due to busy
roads, with information provided by IQ Routes.
Tap Minimize delays to check if you can reduce the delay.
Checking traffic incidents in your area
Get an overview of the traffic situation in your area, using the map. To find
local incidents and their details, do the following:
Browse map
1. Tap the TomTom Traffic button in the Main Menu on your device.
2. Tap Browse map.
The map browser screen is shown.
3. Tap the blue compass image in the top right of the screen.
The map centers itself on your current location, and any traffic incidents in
the area are shown as small symbols.
37
Page 38

Traffic menu
Minimize
delays
Show home-
work traffic
4. Tap on any traffic incident to get more information.
A second screen is shown that gives you detailed information about the
incident you chose. To display information about surrounding incidents use
the left and right arrows at the bottom of this second screen.
Tap the Traffic sidebar in the Driving View to open the Traffic menu. The following buttons are available:
Replans your route based on the latest traffic information.
Checks the traffic along your Home to Work route.
Tap this button to show areas of traffic congestion along your current
route.
Show traffic on
route
Browse map
Change Traffic
preferences
Shows an overview of traffic incidents on the map.
Changes the settings for Traffic services.
38
Page 39

Addendum16.
Addendum
Important Safety Notices and Warnings
Global Positioning System
The Global Positioning System (GPS) is a satellite-based system that provides
location and timing information around the globe. GPS is operated and controlled under the sole responsibility of the Government of the United States of
America, which is responsible for its availability and accuracy. Any changes in
GPS availability and accuracy, or in environmental conditions, may impact the
operation of your TomTom device. TomTom does not accept any liability for
the availability and accuracy of GPS.
Use with Care
Use of a TomTom device for navigation still means that you need to drive with
due care and attention.
Aircraft and Hospitals
Use of devices with an antenna is prohibited on most aircraft, in many hospitals and in many other locations. A TomTom device must not be used in these
environments.
Taking care of your TomTom device
Do not leave your TomTom device or TomTom accessories in view when you
leave your car. They may become an easy target for thieves.
We recommend that you use the safety preferences on your TomTom device,
where available. The safety preferences are available in the Preferences menu.
Take care of your TomTom device and clean it correctly.
• Use a soft cloth to wipe the screen of your device; do not use any liquid
cleaners.
• If your device gets wet, dry it with a soft cloth.
• Do not open the casing of your device under any circumstances. Doing so
may be dangerous and will invalidate your warranty.
• If your device includes a memory card, do not use the memory card with
any device other than a TomTom device. Other devices may damage the
memory card.
• Do not expose your device to high or low temperatures, which can cause
permanent damage. For example, don’t leave it in the car on hot summer
days or during cold winter nights.
39
Page 40

Battery
This product uses a Lithium-Ion battery. Do not use it in a humid, wet and/or
corrosive environment. Do not put, store or leave your product in or near a
heat source, in a high temperature location, in strong direct sunlight, in a
microwave oven or in a pressurized container, and do not expose it to temperatures over 60 C (140 F). Failure to follow these guidelines may cause the Lithium-Ion battery to leak acid, become hot, explode or ignite and cause injury
and/or damage. Do not pierce, open or disassemble the battery. If the battery
leaks and you come into contact with the leaked fluids, rinse thoroughly with
water and seek medical attention immediately. For safety reasons, and to prolong the lifetime of the battery, charging will not occur at low (below 0 C/32 F)
or high (over 45 C/113 F) temperatures.
Temperatures: Standard operation: -10 C (14 F) to +55 C (131 F); short-term
storage: -20 C (-4 F) to + 60 C (140 F); long-term storage: -20 C (-4 F) to +25 C
(77 F).
Caution: risk of explosion if battery is replaced with an incorrect type.
Do not remove or attempt to remove the non-user-replaceable battery. If you
have a problem with the battery, please contact TomTom customer support.
THE LITHIUM-ION BATTERY CONTAINED IN THE PRODUCT MUST
BE RECYCLED OR DISPOSED OF PROPERLY. USE YOUR TOMTOM
ONLY WITH THE SUPPLIED DC POWER LEAD (CAR CHARGER/BATTERY CABLE) AND AC ADAPTER (HOME CHARGER) FOR BATTERY
CHARGING.
Please use this device with the charger provided.
For replacement chargers, go to tomtom.com for information about approved
chargers for your device.
To recycle your TomTom unit please see your local approved TomTom ser-
vice center.
The stated battery life is a maximum possible battery life. The maximum bat-
tery life will only be achieved under specific atmospheric conditions. The estimated maximum battery life is based on an average usage profile.
For tips on extending the battery life, go to the FAQ listed below for your country:
AU: www.tomtom.com/8703
CZ: www.tomtom.com/7509
DE: www.tomtom.com/7508
DK: www.tomtom.com/9298
ES: www.tomtom.com/7507
FI: www.tomtom.com/9299
FR: www.tomtom.com/7506
HU: www.tomtom.com/10251
IT: www.tomtom.com/7505
NL: www.tomtom.com/7504
PL: www.tomtom.com/7503
PT: www.tomtom.com/8029
RU: www.tomtom.com/10250
SE: www.tomtom.com/8704
UK: www.tomtom.com/7502
US: www.tomtom.com/7510
SPECIAL NOTE REGARDING DRIVING IN CALIFORNIA AND MINNESOTA
California Vehicle Code Section 26708 (a) (1) provides that “No persons shall
drive any motor vehicle with an object or material placed, di splayed, installed,
40
Page 41

affixed or applied upon the windshield or side or rear windows.” Drivers in
California should not use a suction mount on their windshield, side or rear windows.
Note: this section of the California Vehicle Code applies to anyone driving in
California, not just California residents.
Minnesota State Legislature Statutes Section 169.71, subdivision 1, section 2
provides that “A person shall not drive or operate with any objects suspended
between the driver and the windshield other than sun visors and rearview mirrors and electronic toll collection devices.”
Note: this Minnesota Stature applies to anyone driving in Minnesota, not just
Minnesota residents.
TomTom Inc. bears no responsibility for any fines, penalties or damage that
may be incurred by disregarding this notice. While driving in any state with
windshield mounting restrictions, TomTom recommends the use of the supplied Adhesive Mounting Disk or its Alternative Mounting Kit, which includes
multiple options for mounting TomTom devices on the dashboard and using
the air vents. See tomtom.com for more information about this mounting
option.
FCC Information for the User
This product contains a transmitter which must not be co-located or
simultaneously operated in conjunction with any other transmitter.
Exposure to Radio Frequency Radiation
This device complies with FCC radiation exposure limits set forth for an uncontrolled environment. In order to avoid the possibility of exceeding the FCC
radio frequency exposure limits, human proximity to the antenna shall not be
less than 8 inches (20 cm) during normal operation.
Radio and Television Interference
This equipment radiates radio frequency energy and if not used properly - that
is, in strict accordance with the instructions in this manual - may cause interference to radio communications and television reception.
This device has been tested and found to comply with the limits for a Class B
digital device, pursuant to Part 15 of the FCC Rules. These limits are designed
to provide reasonable protection against harmful interference in a residential
installation. This equipment generates, uses and can radiate radio frequency
energy and, if not installed and used in accordance with the instructions, may
cause harmful interference to radio communications. However, there is no
guarantee that interference will not occur in a particular installation. If this
equipment does cause harmful interference to radio or television reception,
which can be determined by turning the equipment off and on, the user is
encouraged to try to correct the interference by one or more of the following
measures:
• Reorient or relocate the receiving antenna.
• Increase the separation distance between the equipment and the receiver.
• Connect the equipment into an outlet on a circuit different from that to
which the receiver is connected.
• Consult an experienced radio/TV technician for help.
Changes or modifications not expressly appr oved by the party responsible for
compliance could void the user‘s authority to operate the equipment.
Important
This equipment was tested for FCC compliance under conditions that included
the use of shielded cables and connectors between it and the peripherals. It is
41
Page 42

important that you use shielded cables and connectors to reduce the possibility of causing radio and television interference. Shielded cables suitable for
the product range can be obtained from an authorised dealer. If the user modifies the equipment or its peripherals in any way, and these modifications are
not approved by TomTom, the FCC may withdraw the user’s right to operate
the equipment. For customers in the USA, the following booklet prepared by
the Federal Communications Commission may be of help: “How to Identify
and Resolve Radio-TV Interference Problems”. This booklet is available from
the US Government Printing Office, Washington, DC 20402. Stock No 004-00000345-4.
FCC Declaration of Conformity
Tested to comply with FCC Standards for Home or Office Use
This device complies with part 15 of the FCC Rules. Operation is subject to the
following two conditions:
1. This device may not cause harmful interference.
2. This device must accept any interference received, including interference
that may cause undesired operation.
Responsible party in North America
TomTom, Inc., 150 Baker Avenue Extension, Concord, MA 01742
Tel: 866 486-6866 option 1 (1-866-4-TomTom)
This Document
Great care was taken in preparing this manual. Constant product development
may mean that some information is not entirely up to date. The information in
this document is subject to change without notice.
TomTom shall not be liable for technical or editorial errors or omissions contained herein; nor for incidental or consequential damages resulting from the
performance or use of this material. This document con tai ns informat ion protected by copyright. No part of this document may be photocopied or reproduced in any form without prior written consent from TomTom N.V.
42
Page 43

Copyright notices17.
Copyright notices
© 2009 TomTom N.V., The Netherlands. TomTom®, and the "two hands" logo,
among others, are Trademarks owned by TomTom N.V. or one of its subsidiaries. Please see www.tomtom.com/legal for warranties and end user
licence agreements applying to this product.
© 2009 TomTom N.V., Pays-Bas. TomTom® et le logo composé de « deux
mains », entre autres, font partie des marques commerciales appartenant à
TomTom N.V. ou l'une de ses filiales. L'utilisation de ce produit est régie par
notre garantie limitée et le contrat de licence utilisateur final, que vous pouvez
consulter à l'adresse suivante : www.tomtom.com/legal
© 2009 TomTom NV, Países Bajos. TomTom™ y el logotipo "dos manos" son
marcas comerciales, aplicaciones o marcas registradas de TomTom NV.
Nuestra garantía limitada y nuestro acuerdo de licencia de usuario final para
el software integrado son de aplicación para este producto; puede consultar
ambos en www.tomtom.com/legal.
Data Source
© 2009 Tele Atlas North America. Inc. All rights reserved.
SoundClear™ acoustic echo cancellation software © Acoustic Technologies
Inc.
Apple® and iPod® are trademarks of Apple Computer, Inc., registered in the
U.S. and other countries.
Audible®, AudibleListener® and Audiblemanager® are registered trademarks of Audible, Inc. When purchasing and using Audible content you need
to agree to the terms and conditions as posted in the Legal Notices www.audible.com.
Text to Speech technology, © 2009 Loquendo TTS. All rights reserved. Loquendo is a registered trademark. www.loquendo.com
MPEG Layer-3 audio coding technology licensed from Fraunhofer IIS and
Thomson.
43
Page 44

Supply of this product does not convey a license nor imply any right to distribute content created with this product in revenue-generating broadcast systems (terrestrial, satellite, cable and/or other distribution channels),
streaming applications (via Internet, intranets and/or other networks), other
content distribution systems (pay-audio or audio-on-demand applications and
the like) or on physical media (compact discs, digital versatile discs, semiconductor chips, hard drives, memory cards and the like). An independent license
for such use is required. For details, please visit mp3licensing.com
Some images are taken from NASA’s Earth Observatory.
The purpose of NASA’s Earth Observatory is to provide a freely-accessible
publication on the Internet where the public can obtain new satellite imagery
and scientific information about our home planet.
The focus is on Earth’s climate and environmental change: earthobservatory.nasa.gov/
44
 Loading...