

Page 1

̱³Ì±³ÙÑ
Page 2
ɸ¿¬Ž- ·² ¬¸» ¾±¨ïò
Ý
Ü
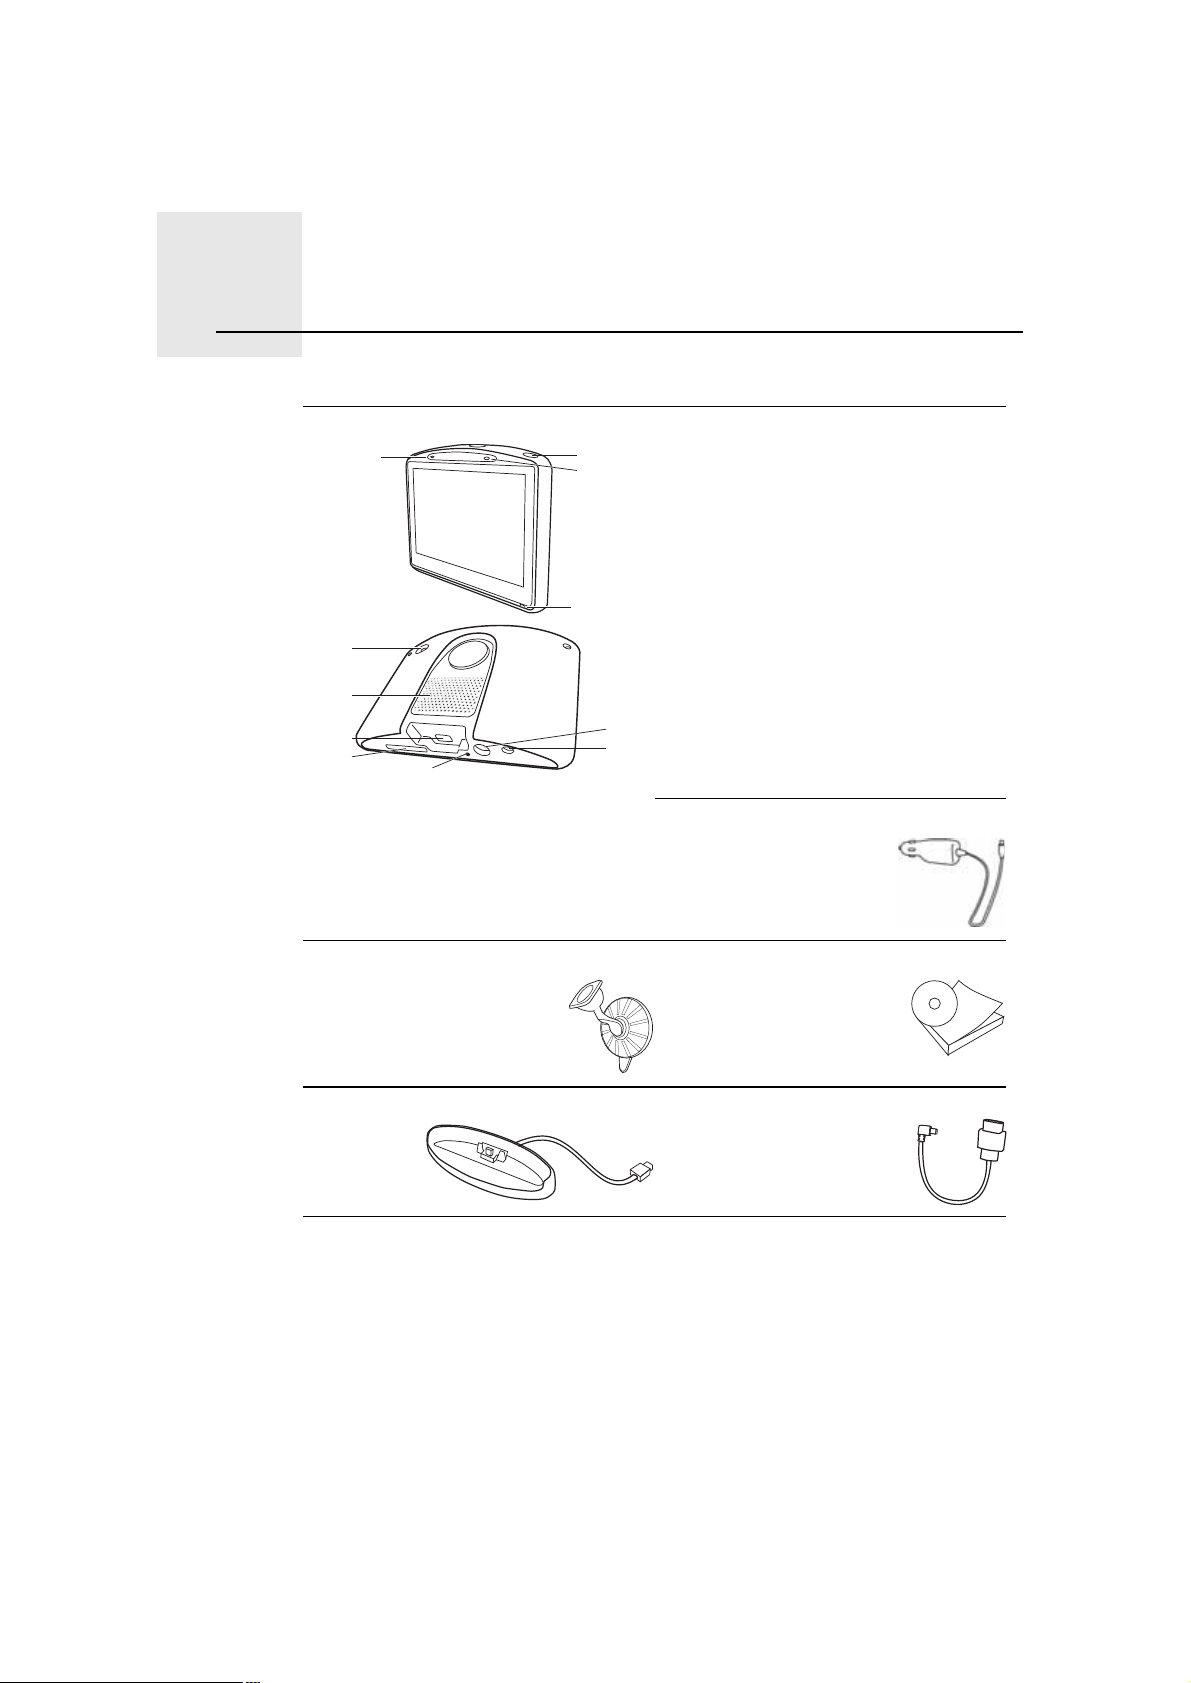
What s in the box
¿ Your TomTomGO
ß
ß Microphone
Þ Charging light
Ý On/off button
Ü Light sensor
Û Reset button
Þ
Ö
Ú Speaker
Ù Memory card slot (SD card not
included) for optional
additional maps
Ú
Ø
Ù
Û
×
Õ
Ø USB connector
× TomTom connector / RDS-TMC
connector
Ö External antenna connector
Õ Audio out connector
¾ Car charger*
½ Windscreen holder ¼ Documentation pack
» Home dock (GO 530, 730, 930) º USB cable (GO 630)
* In the TomTom GO x30 HD Traffic, this is replaced by the TomTom HD
Traffic Receiver.
2
Page 3

ײ½´«¼»¼ ©·¬¸ ̱³Ì±³ÙÑ ¨íðÌ
¹ RDS-TMC Traffic Receiver
ײ½´«¼»¼ ©·¬¸ ̱³Ì±³ÙÑ çíð ¿²¼ çíðÌ
¸ Remote control
ײ½´«¼»¼ ©·¬¸ ̱³Ì±³ÙÑ ¨íð ØÜÌ®¿ºº·½
· TomTom HD Traffic Receiver
ß Power indicator - Red light
Þ HD Traffic Receiver indicator - Blue light
ß
Þ
3
Page 4

Þ»º±®» §±« -¬¿®¬òòòîò
Before you start...
Í©·¬½¸·²¹ ±² ¿²¼ ±ºº
To switch your TomTomGO on or off, press and hold the On/Off button for 2
seconds. The first time you switch on, it may take a short while for your device
to start.
Ò±¬»æ ײ ®¿®» ½¿-»-ô §±«® ÙÑ ³¿§ ²±¬ -¬¿®¬ ½±®®»½¬´§ò ׺ ¬¸·- ¸¿°°»²-ô °®»-- ¬¸»
®»-»¬ ¾«¬¬±²ô ¬¸»² -©·¬½¸ ±² ¬¸» ¼»ª·½» ¿¹¿·²ò
Í»¬¬·²¹ «°
To set up your TomTomGO you need to answer a few questions by tapping
the screen.
׳°±®¬¿²¬: Take care to select the correct language, since the language you
choose will be used for all menus and written instructions.
Þ¿¬¬»®§ ²±¬»-
We recommend that you fully charge your TomTomGO the first time that you
connect it to your computer. It takes up to 2 hours to charge the battery
completely.
When you place your GO in the Home Dock or use the USB cable to connect
to your computer, you are asked if you wish to connect to the computer. If you
select Ò±, the device will switch off if you do not tap the screen for three
minutes. This happens so that the battery can recharge at a faster rate.
For information on connecting to your computer, see Ë-·²¹ ̱³Ì±³ ØÑÓÛ
on page 101.
Ò±¬»æ DZ«® ̱³Ì±³ÙÑ «-»- ¿ -³¿´´ ¿³±«²¬ ±º ¾¿¬¬»®§ °±©»® ¬± ®»³»³¾»®
¬¸» ´¿-¬ -½®»»² ¾»·²¹ -¸±©² ©¸»² ¬¸» ¼»ª·½» ·- -©·¬½¸»¼ ±ººò
׺ §±« ¼± ²±¬ ½¸¿®¹» §±«® ÙÑ º±® ¿ °®±´±²¹»¼ °»®·±¼ ±º ¬·³»ô ¬¸» ²»¨¬ ¬·³» §±«
-¬¿®¬ §±«® ÙÑ ·¬ ©·´´ -¸±© ¬¸» ¼»º¿«´¬ -¬¿®¬·²¹ -½®»»²ò ß´´ ±¬¸»® ¼»ª·½» -»¬¬·²¹©·´´ -¬·´´ ¾» ³¿·²¬¿·²»¼ò
׳°®±ª·²¹ ®»½»°¬·±²
If your TomTomGO takes longer than 5 minutes to find your current position,
make sure that the device is in an open space away from tall objects, such as
buildings or trees.
4
Page 5

When you connect your TomTomGO to your computer, you can use
TomTom HOME to download information about GPS satellite positions during
the next 7 days. This helps your GO to find your position faster.
׳°±®¬¿²¬: Some vehicles have heat reflective shielding in the windscreen.
This may prevent your GO from locating your current position.
The TomTom External Antenna Kit (available for purchase as an accessory)
can help to improve reception.
É·²¼-½®»»² ¸±´¼»®
Use the windscreen holder to install your TomTomGO inside your car.
To attach the holder, press the suction cup firmly to the windscreen in your
car, in an area of the windscreen where the glass is flat.
Make sure that both the holder and your windscreen are clean and dry before
you attach the holder. Place the holder so that it does not interfere with your
view of the road.
ر³» ¼±½µ ñ ËÍÞ ½¿¾´»
The Home Dock or USB cable is used for charging your TomTomGO when it
is not in the car and for connecting your GO to your computer.
When connected to your computer, you can use TomTom HOME to manage
your GO. For information about TomTom HOME, see Ë-·²¹ ̱³Ì±³ ØÑÓÛ
on page 101.
Ì¿µ» ½¿®» ±º §±«® ̱³Ì±³ÙÑ
Never leave your TomTomGO or accessories on view when you leave the car
or they may become an easy target for thieves.
You can set a password for your TomTomGO which must be entered every
time you start your GO. For more information, see Ë-·²¹ ̱³Ì±³ ØÑÓÛ on
page 101.
It is important to take care of your GO.
! Your GO is not designed for use in extreme temperatures and any such
exposure may cause permanent damage.
! Do not open the casing of your GO under any circumstances. Doing so may
be dangerous and will invalidate the warranty.
! Wipe or dry the screen of your GO using a soft cloth. Do not use any liquid
cleaners.
5
Page 6

Ü®·ª·²¹ Ê·»©íò
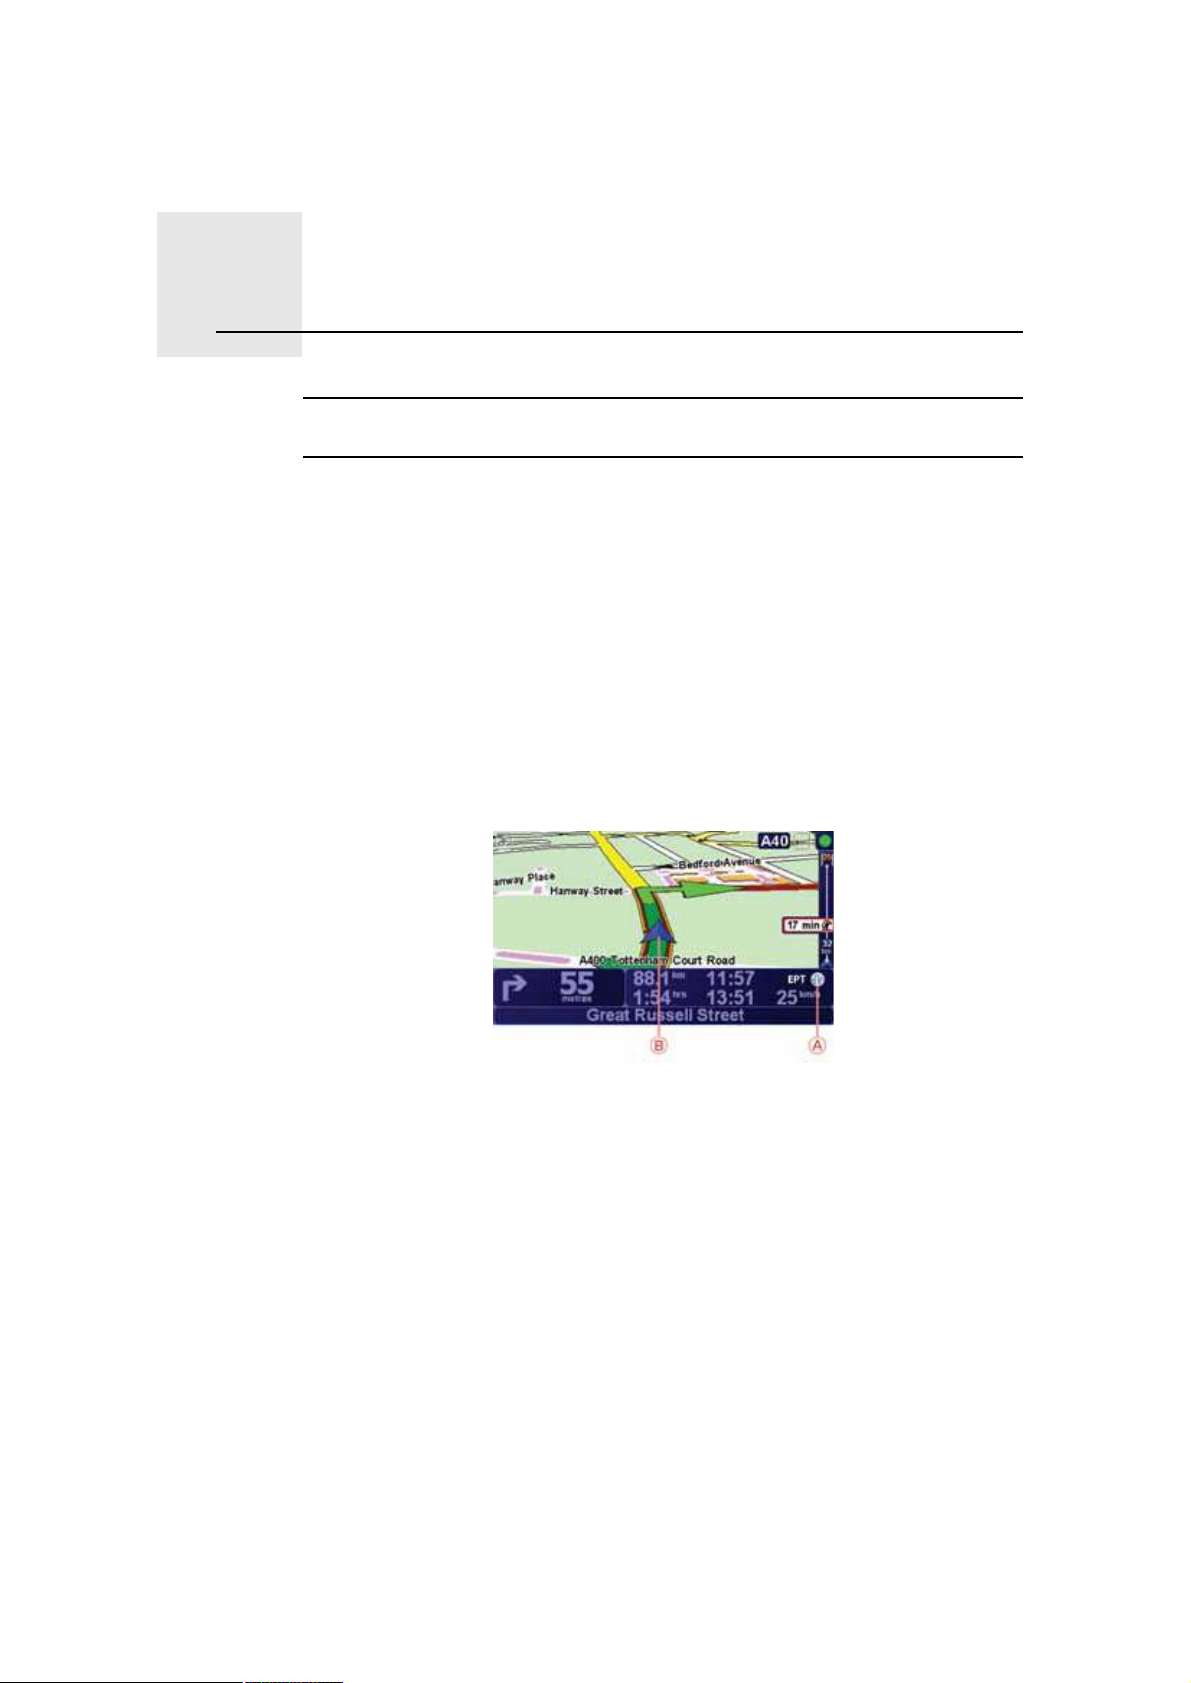
Driving View
When your TomTomGO starts, you are shown the Driving View along with
detailed information about your current location.
Tap the centre of the screen at any time to open the Main Menu.
Ò±¬»æ ̸» Ü®·ª·²¹ Ê·»© ·- -¸±©² ·² ¾´¿½µ ¿²¼ ©¸·¬» «²¬·´ §±«® ÙÑ ´±½¿¬»- §±«®
½«®®»²¬ °±-·¬·±²ò
ß Tap + and - to zoom in and out.
Þ Your current position.
Ý The name of the next major road or road sign information, if applicable.
Ü Navigation instruction for the road ahead.
Tap this area to repeat the last spoken instruction and to change the
volume.
Û The name of the next street to turn onto.
Ú Information about your journey such as journey time, remaining distance
and arrival time.
To select what will be shown, tap ͬ¿¬«- ¾¿® °®»º»®»²½»- in the Ю»º»®»²½»-
menu.
Ù GPS signal strength.
Ø Traffic bar
To set up Traffic information, tap the Traffic bar to open the Traffic menu or
tap TomTom Ì®¿ºº·½ in the Main Menu.
× Quick menu - For more information, refer to the full manual.
6
Page 7
Û²¸¿²½»¼ б-·¬·±²·²¹ Ì»½¸²±´±¹§ìò
Enhanced Positioning Technology
Ò±¬»ж Ы²¸¿²½»¼ Р±-·¬·±²·²¹ М»½¸²±´±¹§ ·- ¿ª¿·´¿¾´» ±² ¬¸» М±³М±³ЩС знр
¿²¼ знрМт
Enhanced Positioning Technology or EPT estimates your location when GPS
reception is poor, such as when you drive between tall buildings.
Your GO uses positioning sensors to monitor your acceleration and direction
and then estimates your current location.
EPT only helps your GO to estimate your location. Calculating your precise
location is only possible when your GO receives a strong GPS signal.
When your GO is using EPT to estimate your location, the EPT icon is shown
on the status bar.
Your GO calibrates EPT automatically. If calibration is not complete when your
GO loses GPS reception, EPT cannot be used and the screen is shown in grey,
for example, when there is no GPS reception at the beginning of a journey.
Ý¿´·¾®¿¬·±²
ß EPT icon.
Þ Your current position.
Calibration is done automatically and requires no interaction from you.
However, it is useful to have basic understanding of the calibration procedure.
Your TomTomGO resets the positioning sensors each time the device is
switched on. To help improve accuracy in estimating your location, your GO
calibrates the sensors throughout your journey.
The following conditions are required for successful calibration:
! Your GO is receiving a strong GPS signal.
! The car has been stationary for at least 5 seconds and then travels along a
straight and level section of road for at least one minute.
7
Page 8
Ó¿µ·²¹ §±«® º·®-¬ ¶±«®²»§ëò
Making your first journey
Planning a route with your TomTomGO is easy. To plan your first route, follow
the steps below.
׳°±®¬¿²¬: You should always plan your journey before you start driving. It is
dangerous to plan a route while driving.
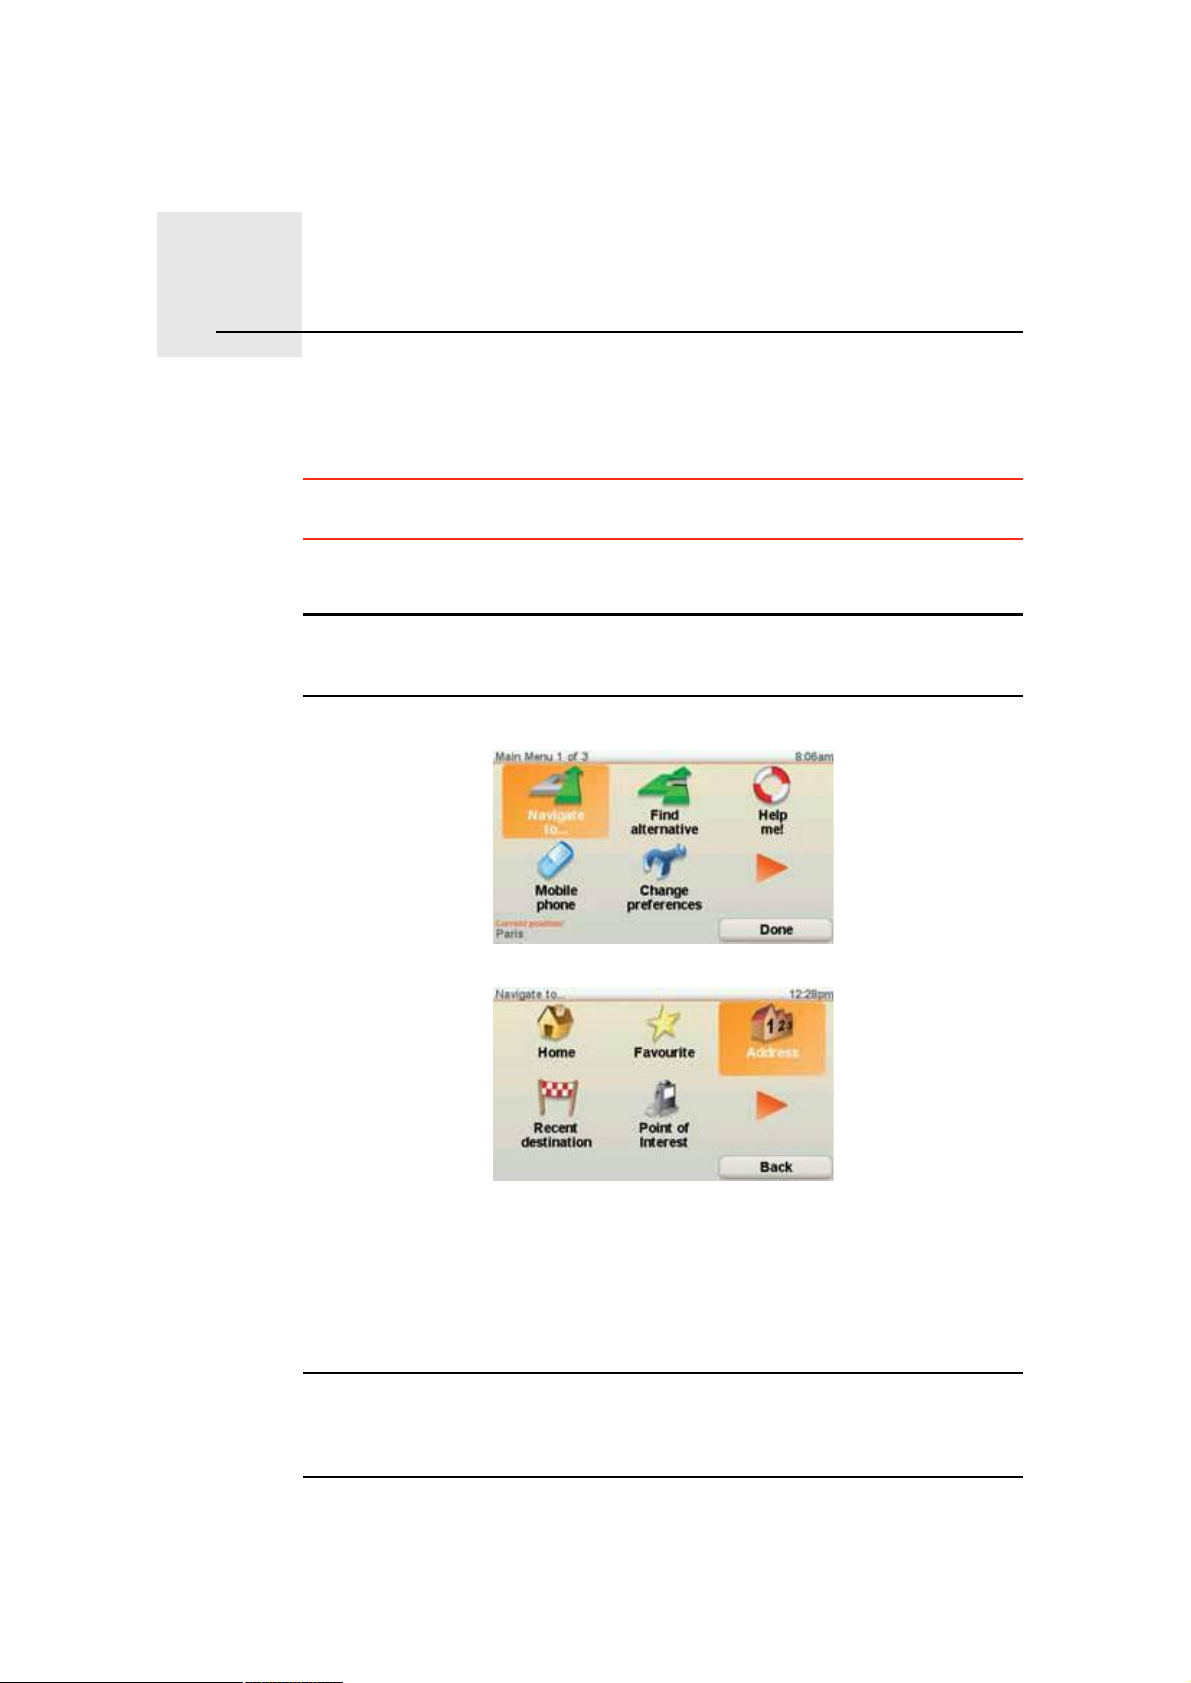
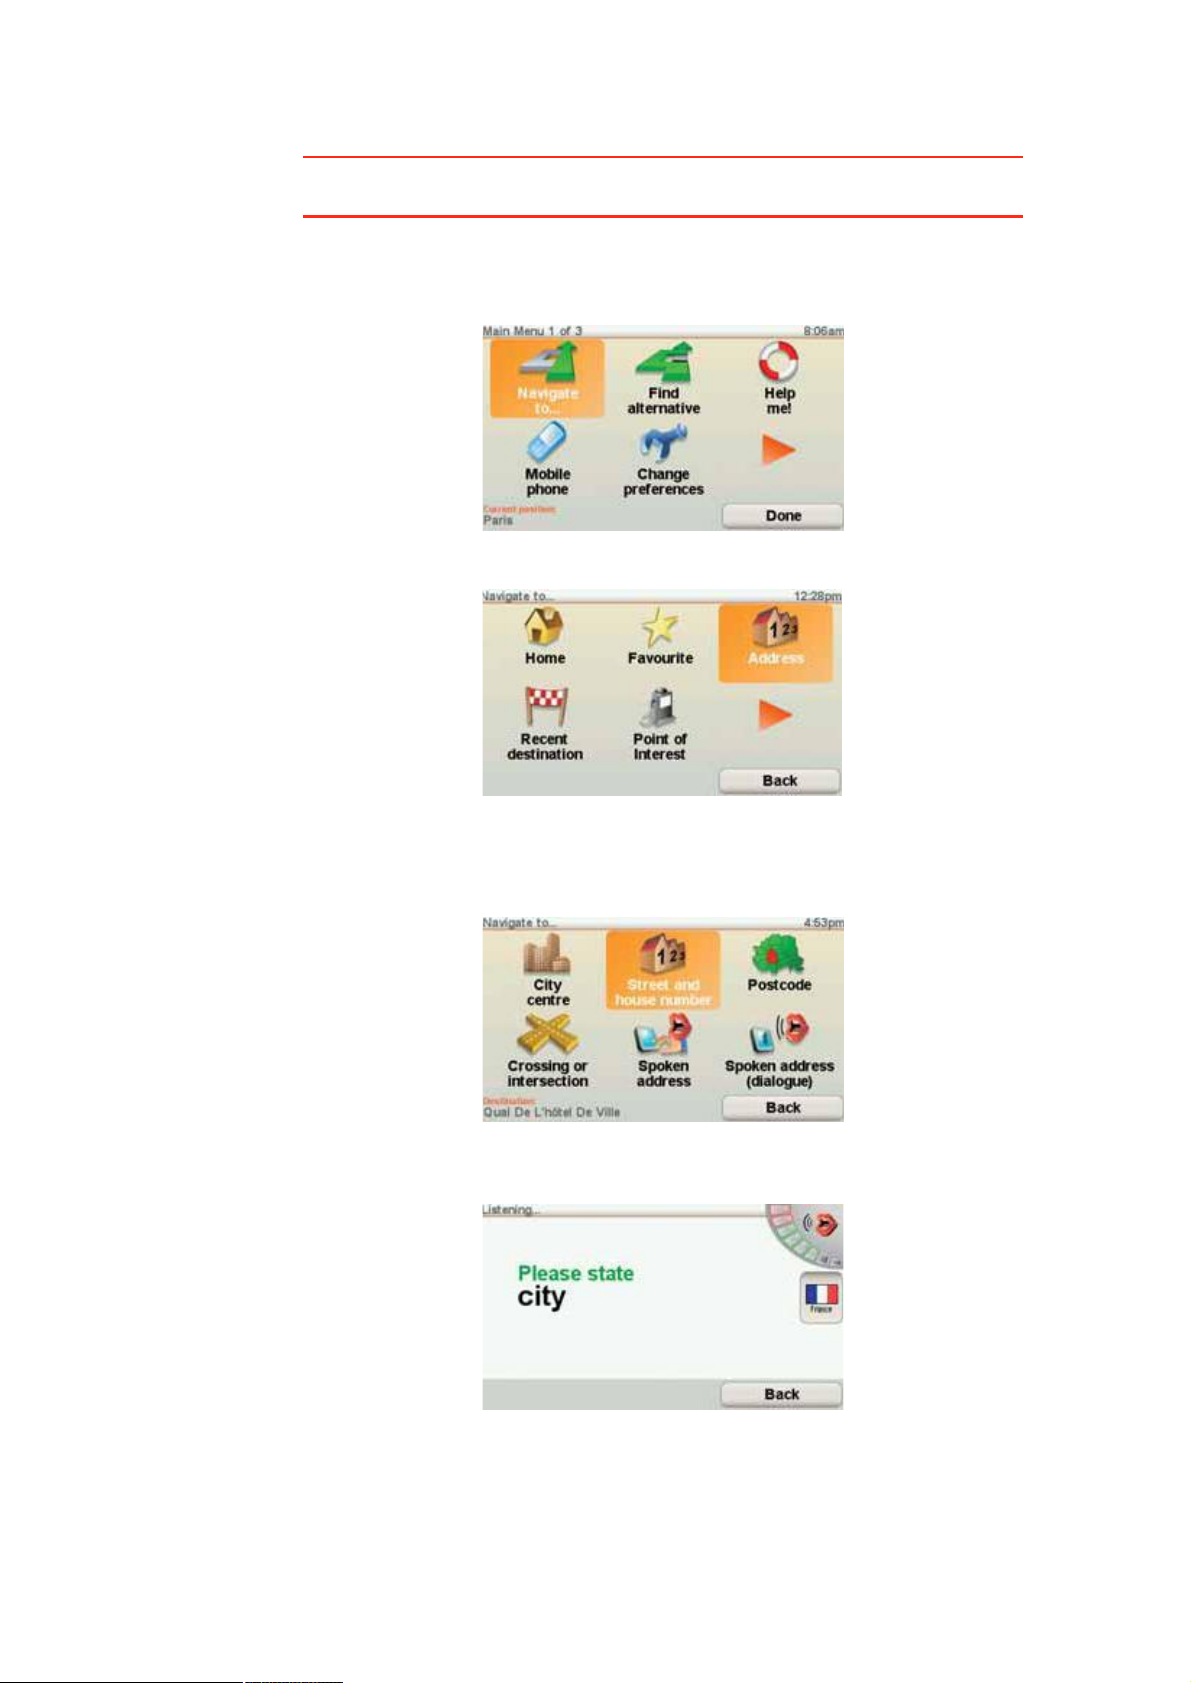
1.Tap the screen to bring up the Main Menu.
Ò±¬»æ ̸» ¾«¬¬±²- ±² §±«® ÙÑ ¿®» -¸±©² ·² º«´´ ½±´±«® «²´»-- ¿ ¾«¬¬±² ·½«®®»²¬´§ «²¿ª¿·´¿¾´»ò Ú±® »¨¿³°´»ô ¬¸» ¾«¬¬±² ²¿³»¼ Ú·²¼ ¿´¬»®²¿¬·ª»òòò ·²
¬¸» Ó¿·² Ó»²« ·- ²±¬ ¿ª¿·´¿¾´» «²¬·´ §±« ¸¿ª» °´¿²²»¼ ¿ ®±«¬»ò
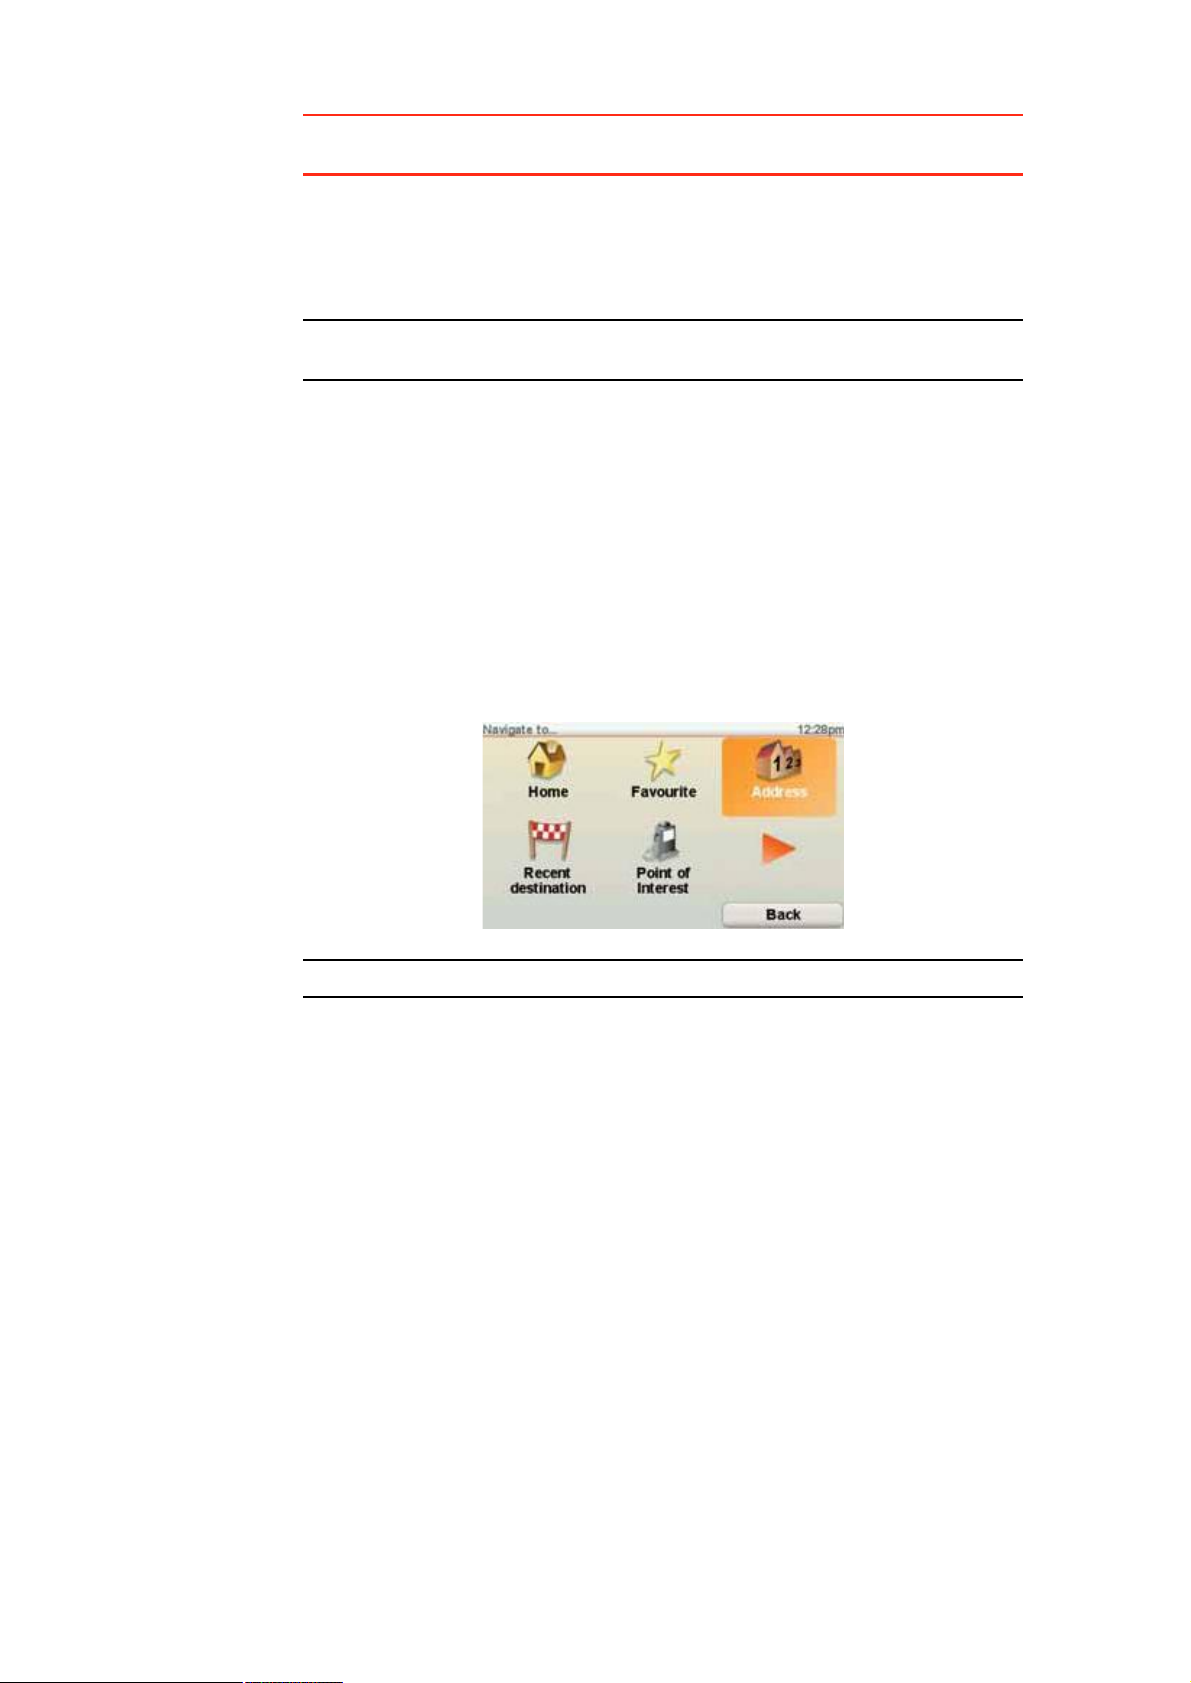
2.Tap Ò¿ª·¹¿¬» ¬±òòò
3.Tap ß¼¼®»--.
When you enter an address, you can choose from the following options:
! Ý·¬§ ½»²¬®» - tap this button to set your destination as the centre of a city
or town.
! ͬ®»»¬ ¿²¼ ¸±«-» ²«³¾»® - tap this button to set an exact address as your
destination.
! б-¬½±¼» - tap this button to enter a postcode as your destination.
Ò±¬»æ DZ« ½¿² »²¬»® ¿ °±-¬½±¼» º±® ¿²§ ½±«²¬®§ò ײ ¬¸» ËÕ ¿²¼ ¬¸»
Ò»¬¸»®´¿²¼-ô °±-¬½±¼»- ¿®» ¼»¬¿·´»¼ »²±«¹¸ ¬± ·¼»²¬·º§ ¿ ¸±«-» ±² ¬¸»·® ±©²ò
ײ ±¬¸»® ½±«²¬®·»- §±« ½¿² »²¬»® ¿ °±-¬½±¼» ¬± ·¼»²¬·º§ ¿ ¬±©² ±® ¿®»¿ò DZ« ©·´´
¬¸»² ¸¿ª» ¬± »²¬»® ¿ -¬®»»¬ ¿²¼ ¸±«-» ²«³¾»®ò
8
Page 9
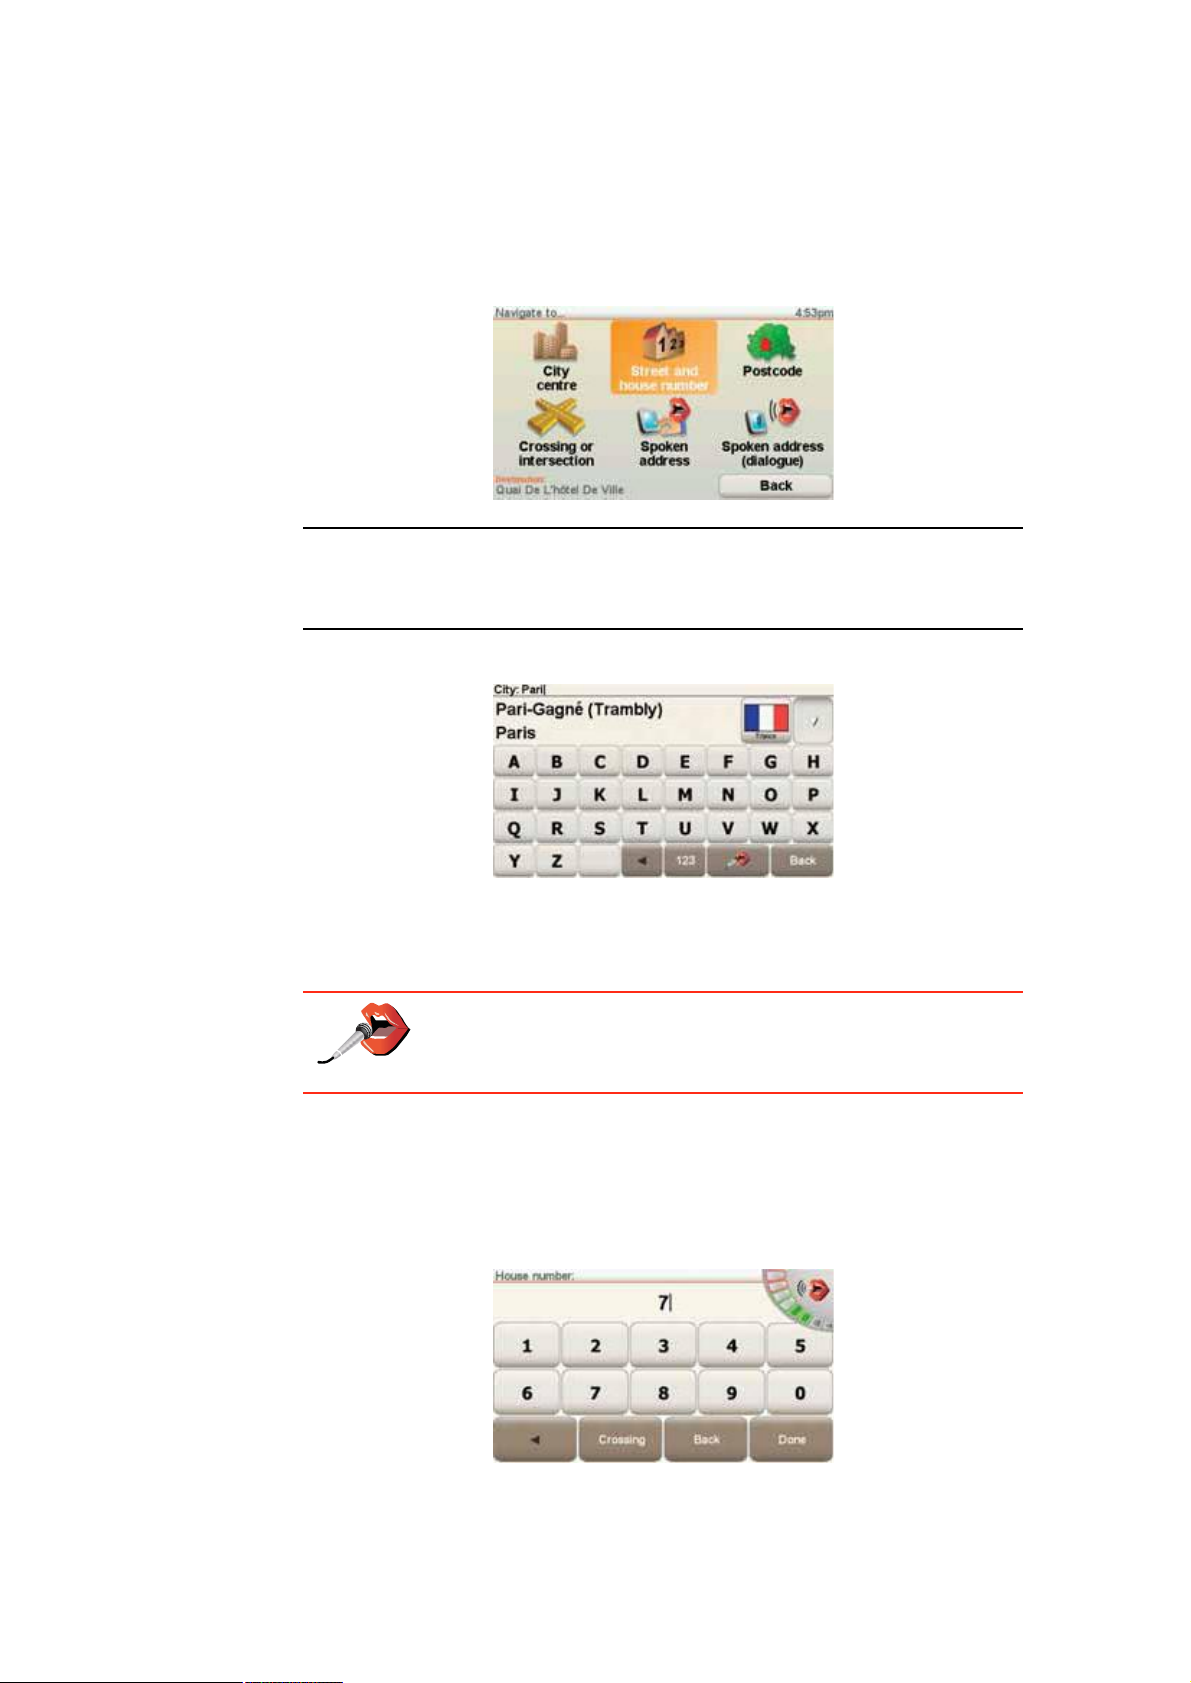
! Ý®±--·²¹ ±® ·²¬»®-»½¬·±² - tap this button to set your destination as the
point where two streets meet.
! Í°±µ»² ¿¼¼®»-- - tap this button to set your destination by announcing
the address to your GO. For more information, see ʱ·½» ¿¼¼®»-- ·²°«¬
on page 21.
For your first journey, we will enter an exact address.
4.Tap ͬ®»»¬ ¿²¼ ¸±«-» ²«³¾»®ò
Ò±¬»æ ɸ»² °´¿²²·²¹ ¿ ¬®·° º±® ¬¸» º·®-¬ ¬·³» §±«® ÙÑ ¿-µ- §±« ¬± ½¸±±-» ¿
½±«²¬®§ò DZ«® ½¸±·½» ·- -¿ª»¼ ¿²¼ «-»¼ º±® ¿´´ ®±«¬»- §±« °´¿²ò
DZ« ½¿² ½¸¿²¹» ¬¸·- -»¬¬·²¹ ¿¬ ¿²§ ¬·³» ¾§ ¬¿°°·²¹ ¬¸» ½±«²¬®§ º´¿¹ò
5.Start to type the name of the town where you want to go.
As you type, the names of the towns that match what you have typed are
shown. When your destination appears in the list, tap the name of the town
to set the destination.
Ì·°: Instead of typing the name, tap this button to say the address
by speaking to your GO.
For more information, see ʱ·½» ¿¼¼®»-- ·²°«¬ on page 21
6.Start to type the name of the street and select it when it is shown.
As with the name of the town, the names of the streets that match what you
have typed are shown. When your destination appears in the list, tap the
name of the street to set the destination.
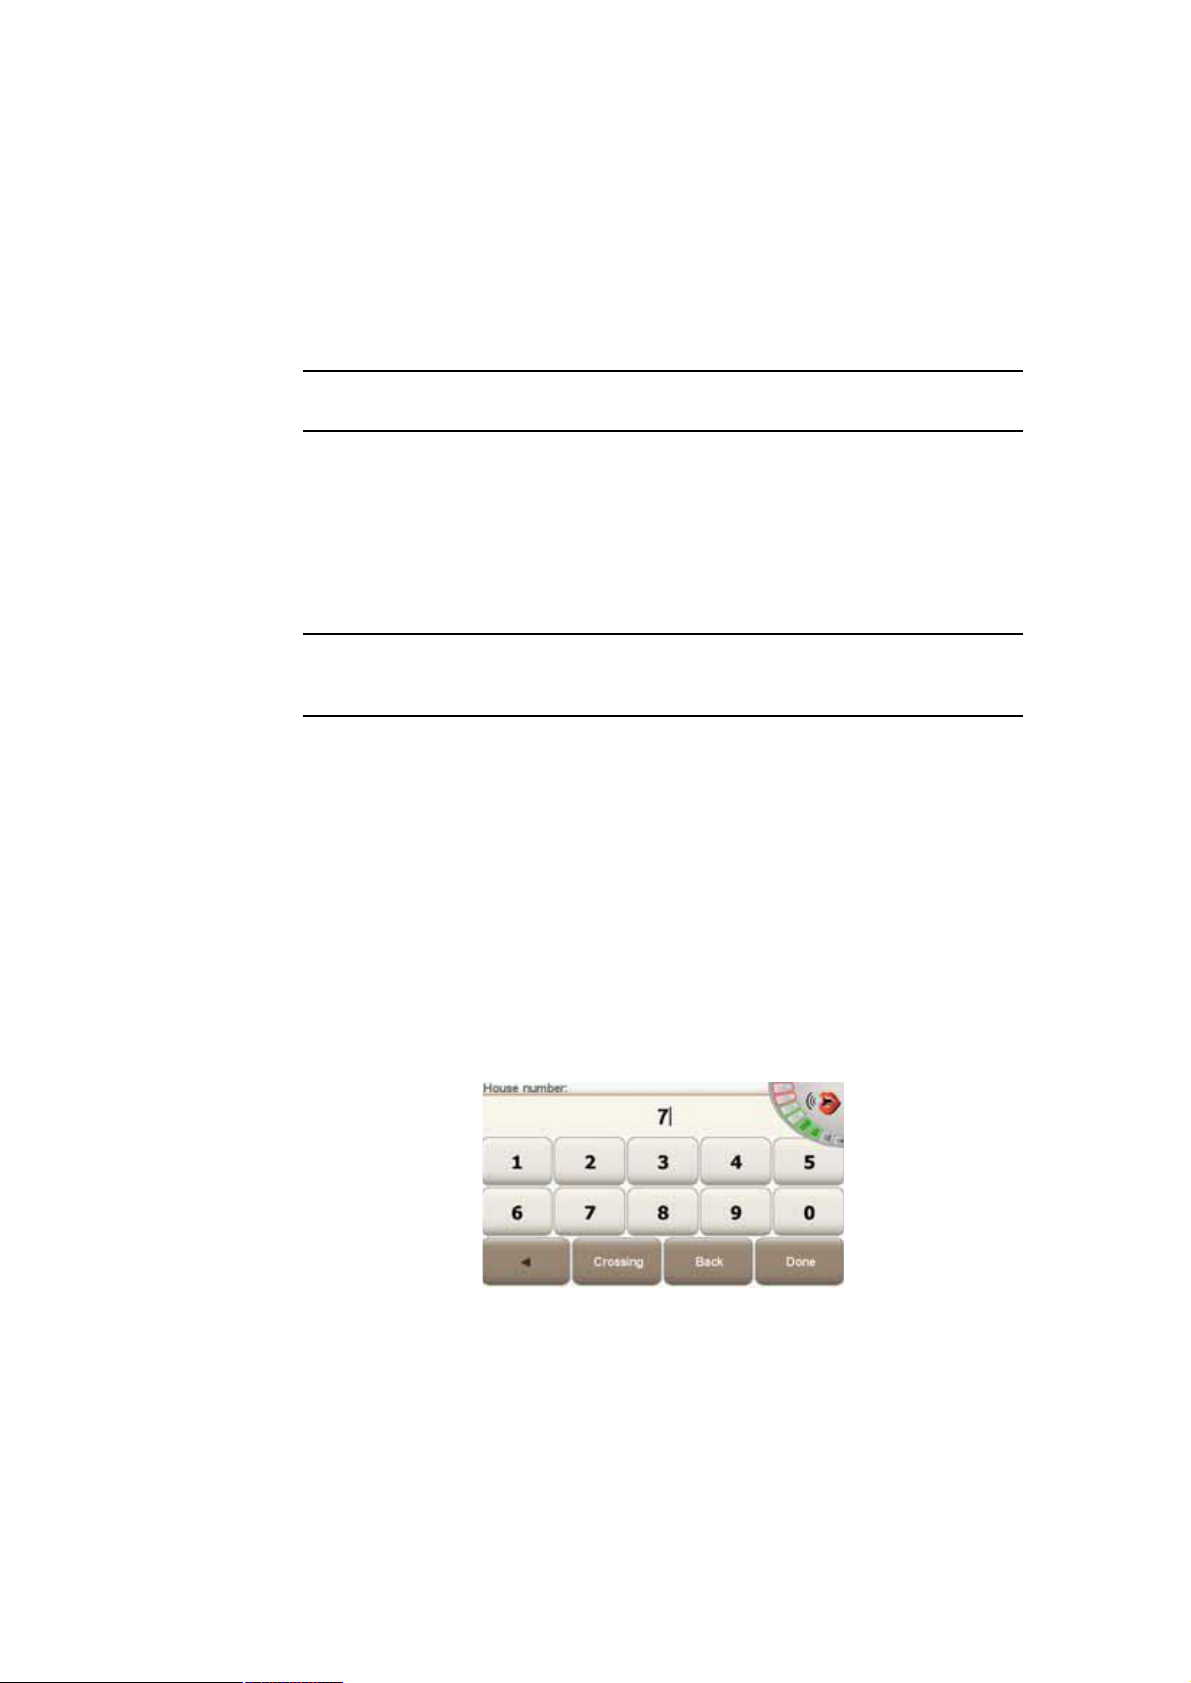
7.Now enter the house number of your destination and then tap ܱ²».
8.Your GO asks if you need to arrive at a particular time. For this exercise, tap
ÒÑ.
9
Page 10
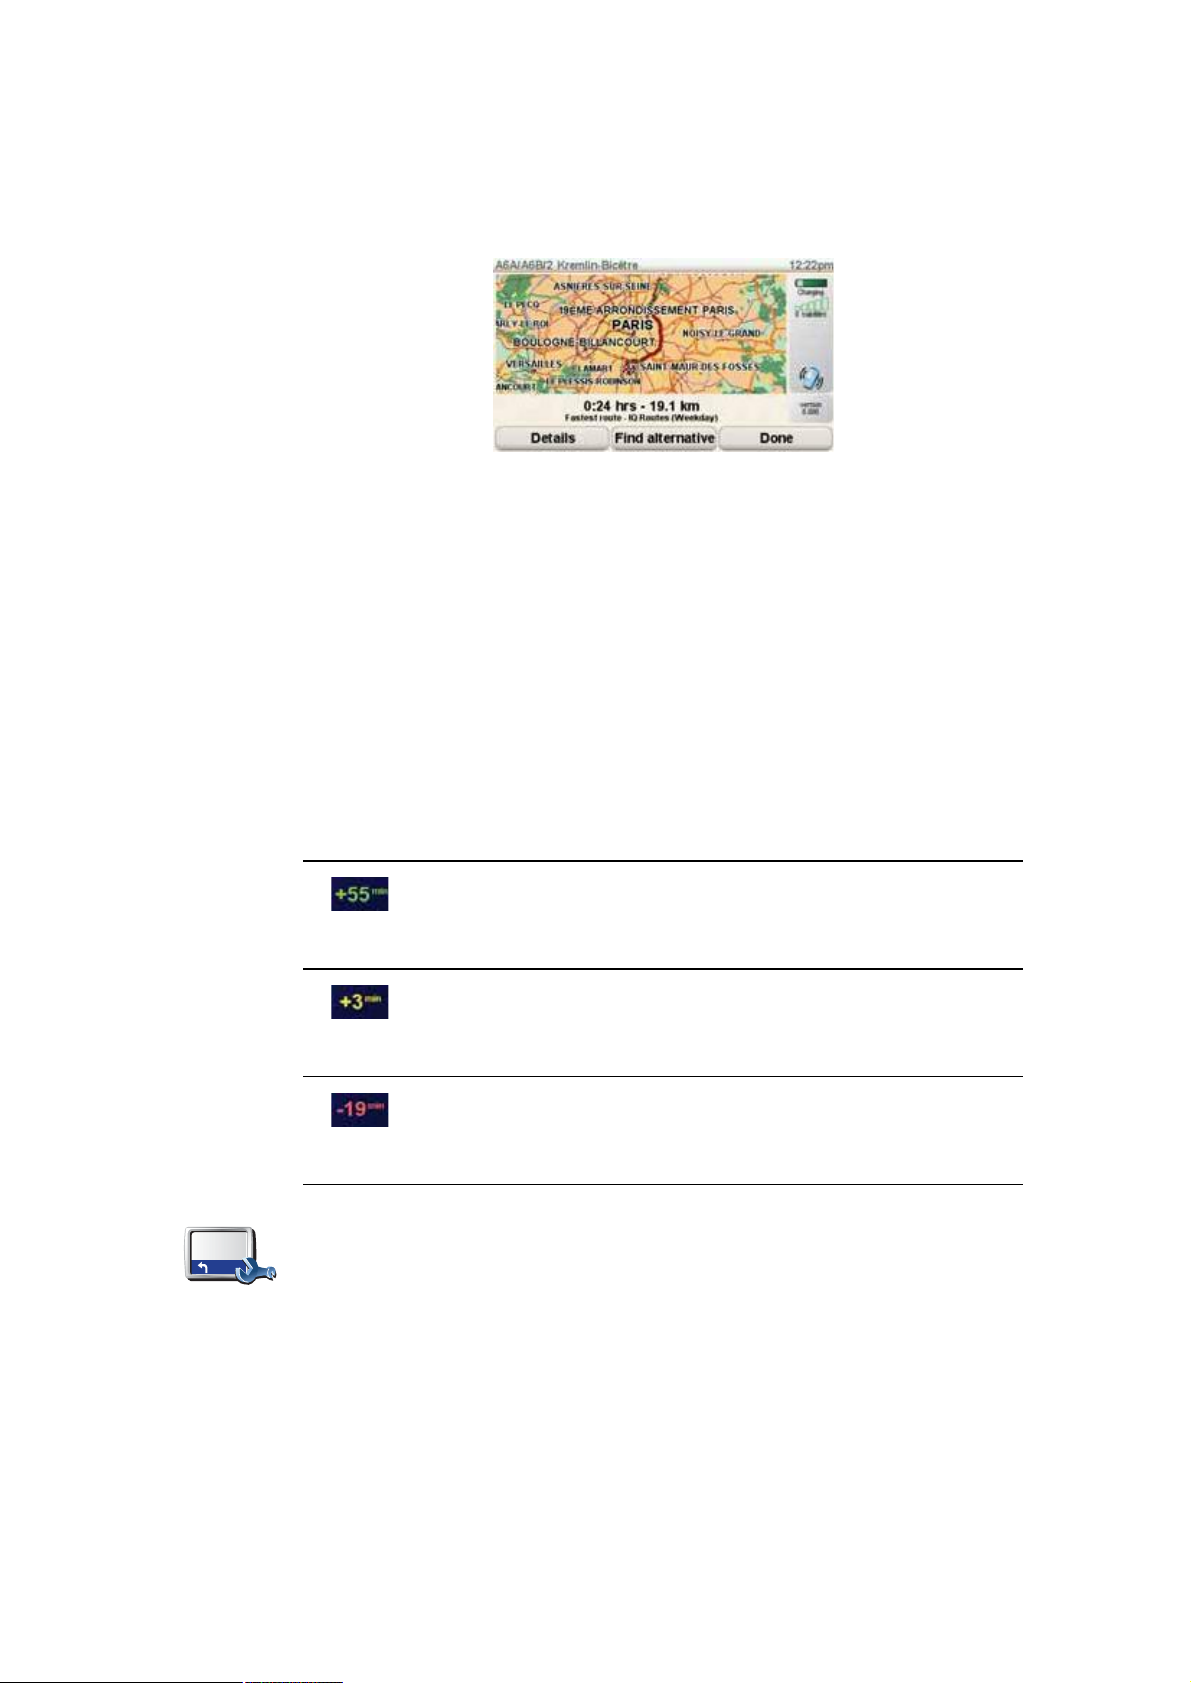
ß®®·ª¿´ ¬·³»-
The route is calculated by your GO. IQ RoutesTM is used to plan the best
possible route, using historical information about traffic speed on the roads.
9.When the route has been calculated, tap ܱ²».
Your GO will immediately begin to guide you to your destination, using both
spoken instructions and on-screen directions.
When you plan a route, your TomTomGO asks you if you need to arrive at a
particular time.
Tap ÇÛÍ to enter a preferred arrival time.
Your GO calculates your arrival time and shows you whether you will arrive
on time.
You can also use this information to work out when you need to leave. If your
GO shows that you will arrive 30 minutes early, you can wait and leave in 30
minutes time, rather than arrive early.
Your arrival time is constantly recalculated during your journey. The status bar
shows whether you will arrive on time or if you are going to be late, as shown
below:
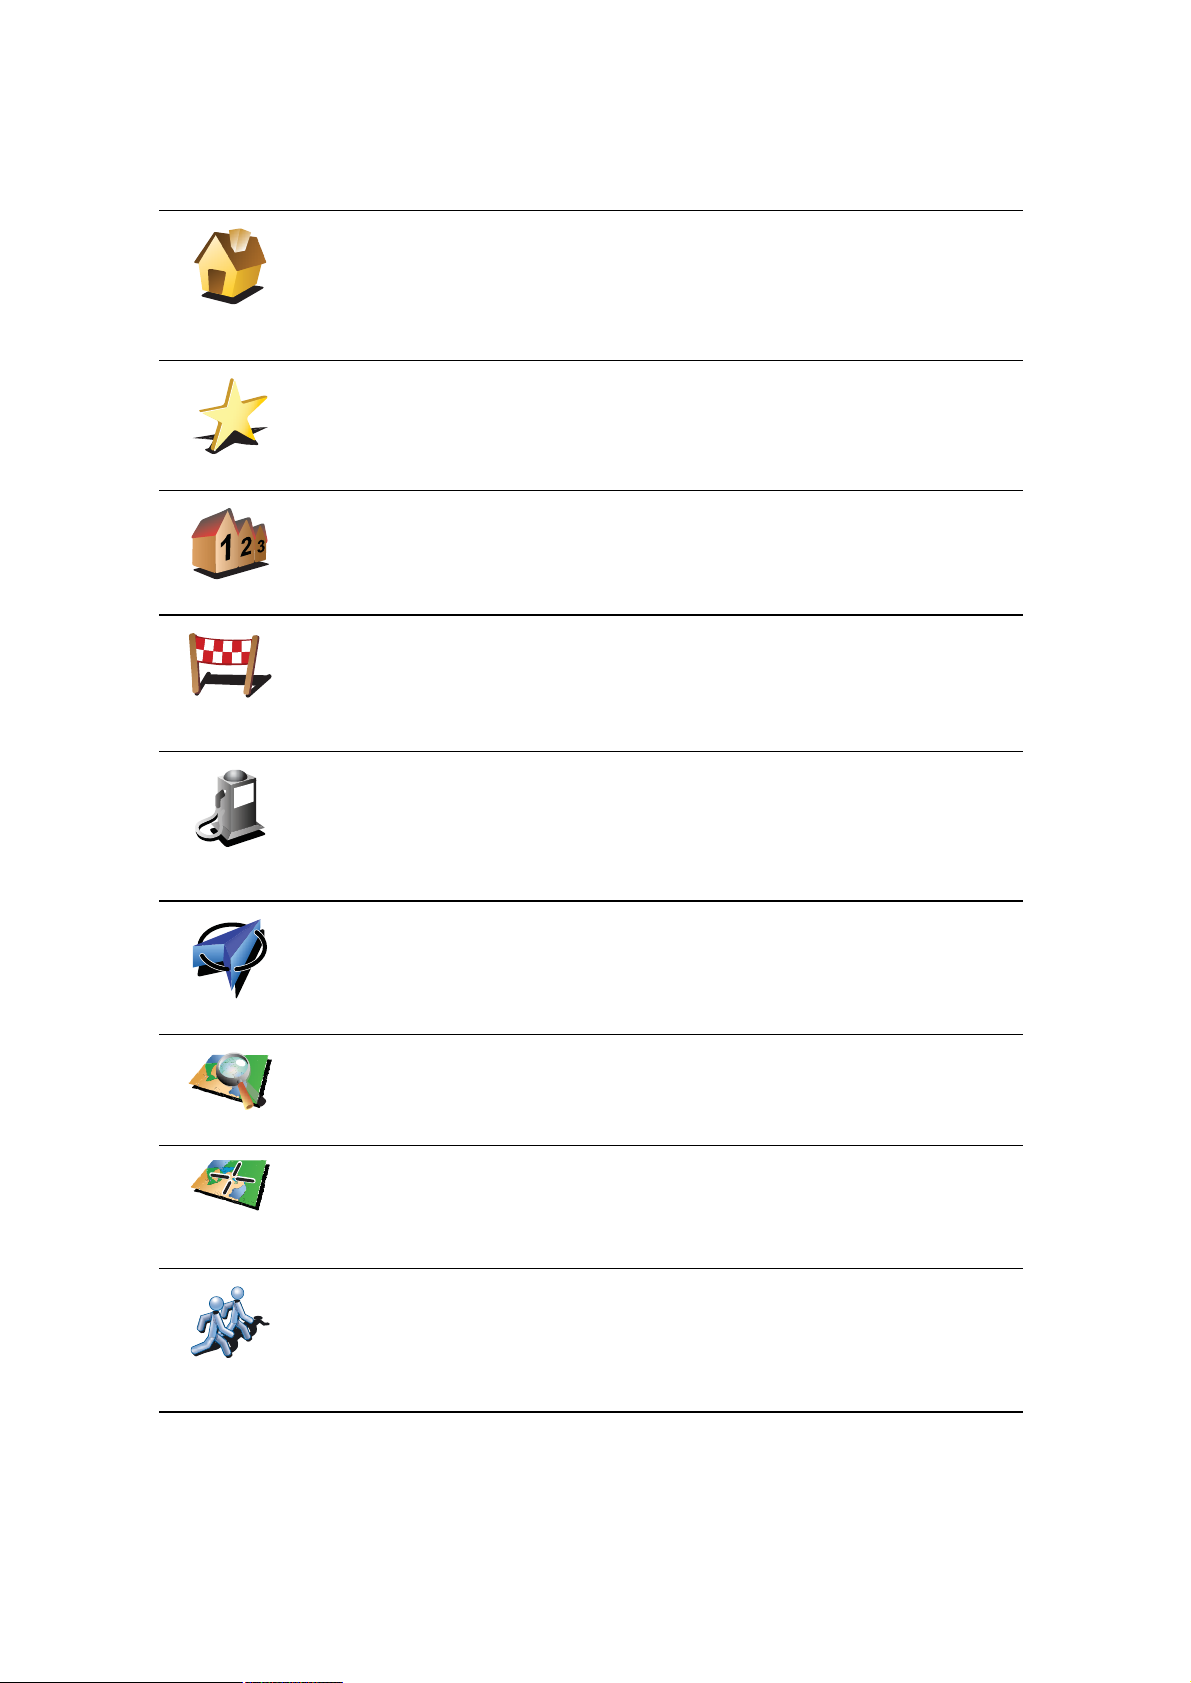
You will arrive 55 minutes before the arrival time you entered.
If the estimated arrival time is more than five minutes before
the time you entered, it is shown in green.
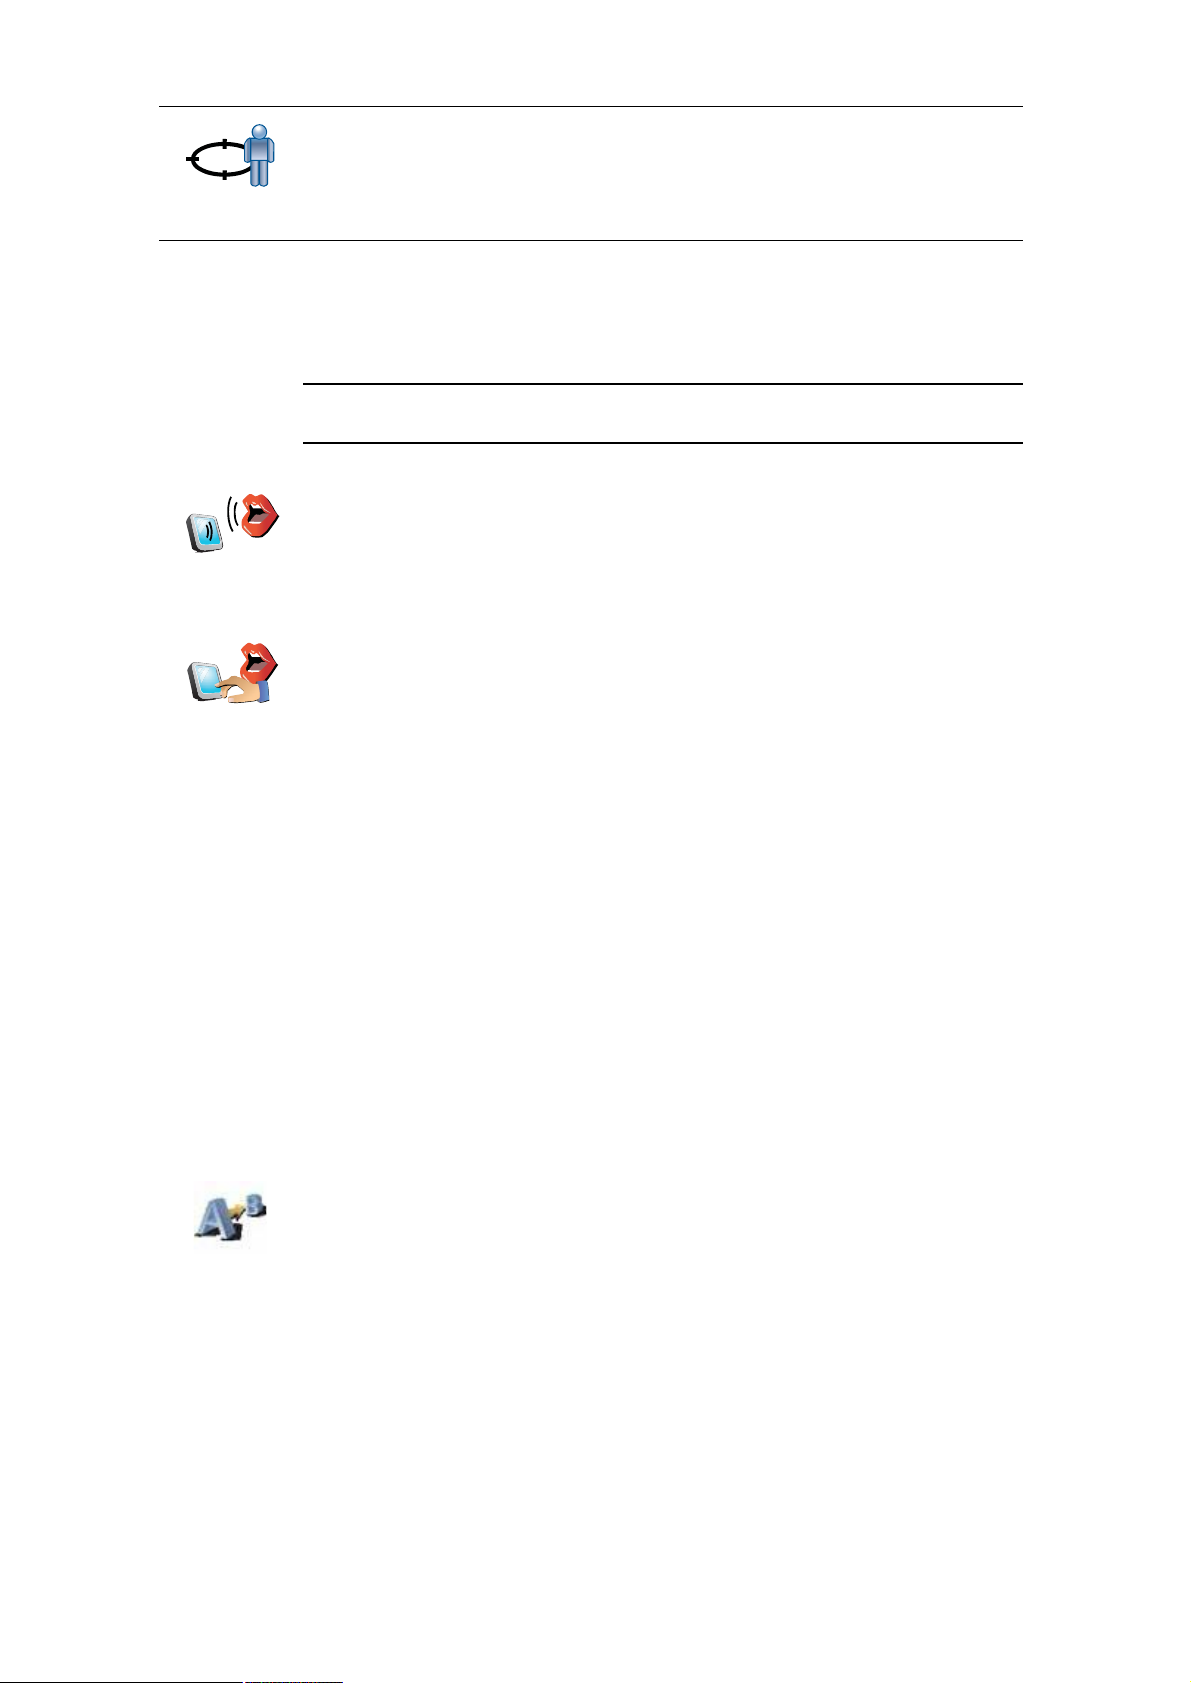
You will arrive 3 minutes before the arrival time you entered.
If the estimated arrival time is less than 5 minutes before the
time you entered, it is shown in yellow.
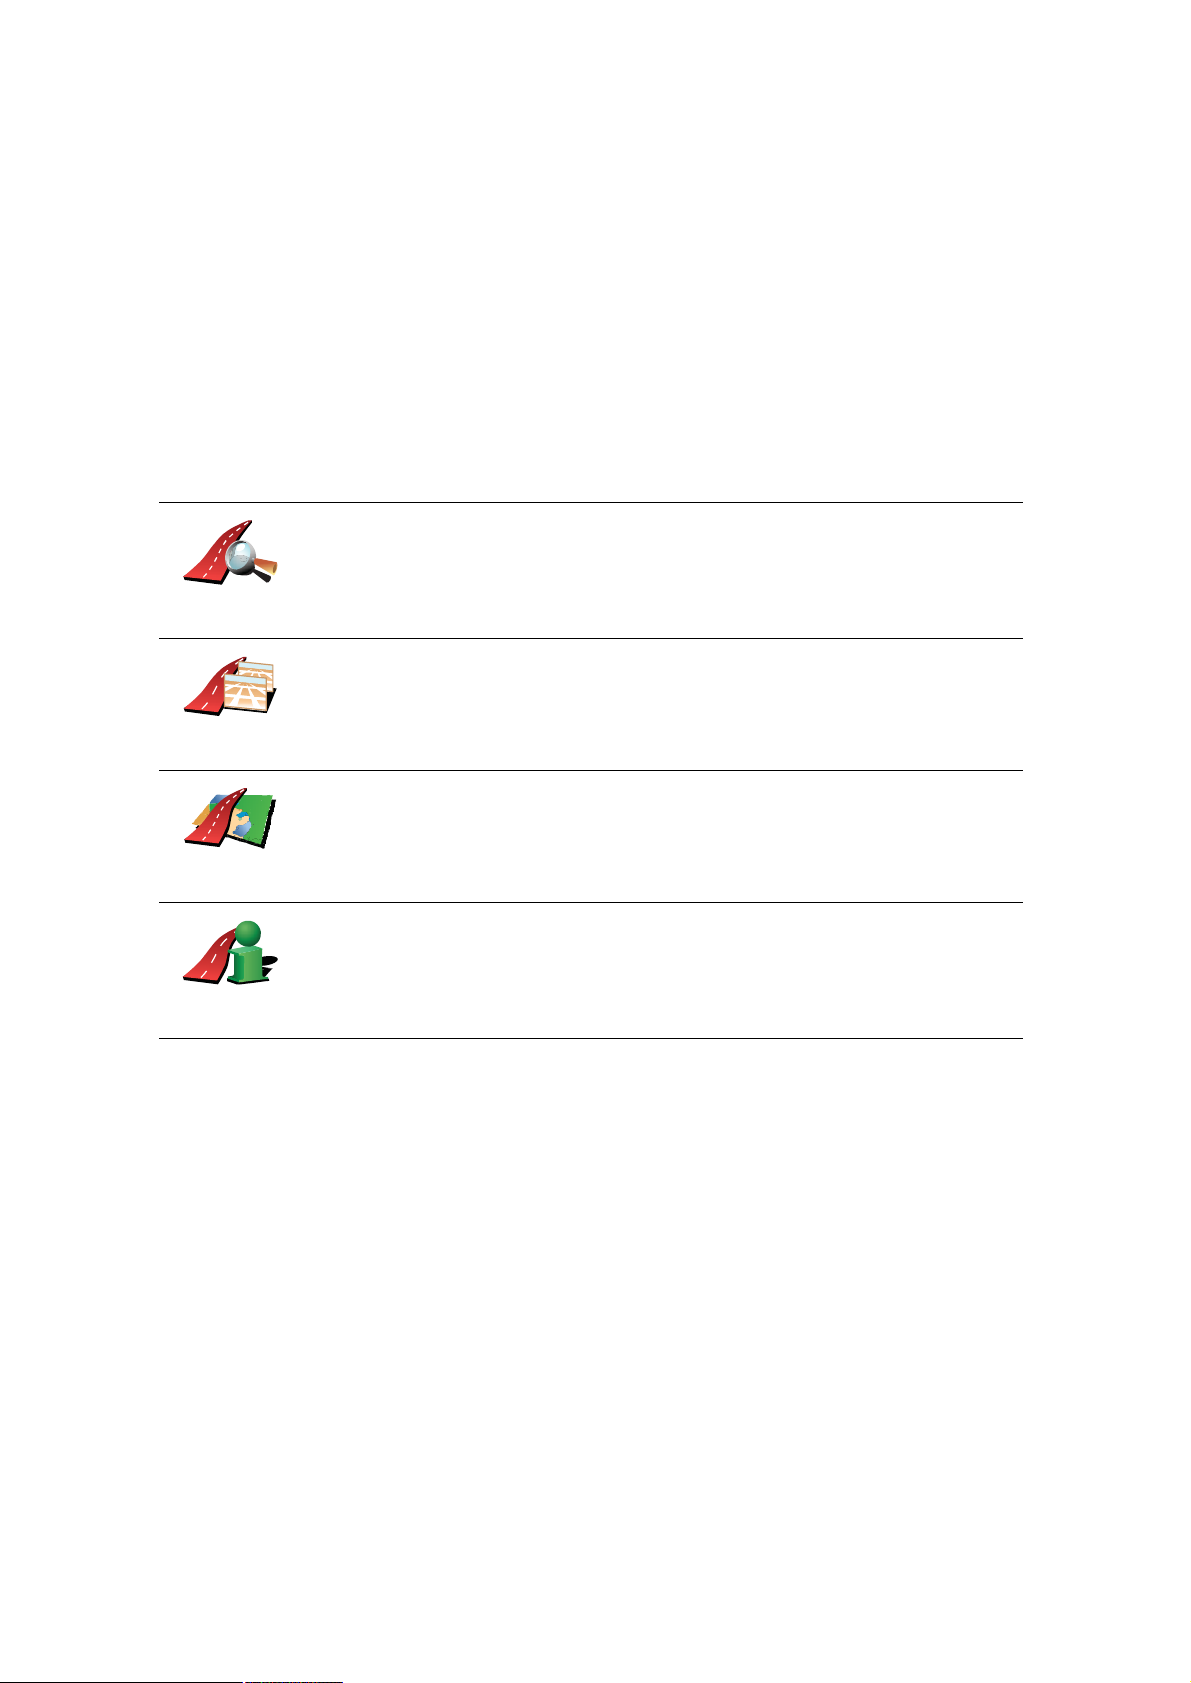
You will arrive 19 minutes late.
If the estimated arrival time is later than the time you entered,
it is shown in red.
Tap ͬ¿¬«- ¾¿® °®»º»®»²½»- in the Preferences menu, to enable or disable
arrival time notifications.
ͬ¿¬«- ¾¿®
°®»º»®»²½»-
Select the required options on the first menu screen and then tap ܱ²».
To enable arrival time notifications, select ͸±© ´»»©¿§ ¬± ¿®®·ª¿´ ¬·³».
To disable arrival time notifications, unselect ͸±© ´»»©¿§ ¬± ¿®®·ª¿´ ¬·³».
10
Page 11
ɸ¿¬ ¿®» ¬¸» ±¬¸»® ²¿ª·¹¿¬·±² ±°¬·±²-á
When you tap Ò¿ª·¹¿¬» ¬±òòò, you can set your destination in many ways, not
just by entering the address. The other options are listed below:
Tap this button to navigate to your Home location.
You will probably use this button more than any other.
ر³»
Ú¿ª±«®·¬»
ß¼¼®»--
λ½»²¬
¼»-¬·²¿¬·±²
б·²¬ ±º
ײ¬»®»-¬
For information about setting your Home location, see ݸ¿²¹» ر³»
´±½¿¬·±² on page 51.
Tap this button to select a Favourite as your destination.
For more information about Favourites, see Ú¿ª±«®·¬»- on page 31.
Tap this button to enter an address as your destination.
Tap this button to select your destination from a list of places you have
recently used as destinations.
Tap this button to navigate to a Point of Interest (POI).
For more information about POIs and navigating to a POI, see б·²¬- ±º
ײ¬»®»-¬ on page 37.
Ó§ ´±½¿¬·±²
б·²¬ ±² ³¿°
Ô¿¬·¬«¼»
Ô±²¹·¬«¼»
̱³Ì±³
Þ«¼¼§
Tap this button to select your GPS position, as your destination.
For more information about GPS, see Щ´±¾¿´ Р±-·¬·±²·²¹ Н§-¬»³ шЩРНч on
page 100.
Tap this button to select a point on the map as your destination using the
map browser.
For more information about the map browser, see Ü®·ª·²¹ Ê·»© on page 6.
Tap this button to enter a destination using latitude and longitude values.
Tap this button to navigate to the current position of a TomTom Buddy.
Don t forget that the Buddy may move before you reach him.
For more information about TomTom Buddies, see ̱³Ì±³ Í»®ª·½»- on
page 65.
11
Page 12
Tap this button to select your last recorded position, as your destination.
For more information about the GPS, see Щ´±¾¿´ Р±-·¬·±²·²¹ Н§-¬»³ шЩРНч
б-·¬·±² ±º
´¿-¬ -¬±°
on page 100.
Í°±µ»² ¿¼¼®»--
Instead of typing addresses, you can now enter an address by speaking to
your GO.
Ò±¬»æ ̸» -°»»½¸ ®»½±¹²·¬·±² º»¿¬«®» ·- ½«®®»²¬´§ ±²´§ ¿ª¿·´¿¾´» º±® »²¬»®·²¹
¿¼¼®»--»- ¿²¼ º±® ®»-°±²¼·²¹ ¬± -°»½·¿´ ²±¬·º·½¿¬·±²-ò
In the Main menu tap Ò¿ª·¹¿¬» ¬±òòò, then tap ß¼¼®»--, then tap Í°±µ»²
¿¼¼®»-- or Í°±µ»² ¿¼¼®»-- ø¼·¿´±¹«»÷ and speak when prompted.
Í°±µ»²
¿¼¼®»--
ø¼·¿´±¹«»÷
Í°±µ»²
¿¼¼®»--
For more information, see ʱ·½» ¿¼¼®»-- ·²°«¬ on page 21
д¿²²·²¹ ¿ ®±«¬» ·² ¿¼ª¿²½»
You can also use your GO to plan journeys in advance by selecting both your
starting point and your destination. You could, for example, do the following:
! Find out how long a journey is going to take before you start.
! Check the route of a journey you are planning.
! Check a route for someone who is coming to visit you, so that you can
explain the route to them.
To plan a route in advance, follow these steps:
1.Tap the screen to bring up the main menu.
2.Tap the arrow button to move to the next menu screen and tap Ю»°¿®»
®±«¬».
Ю»°¿®» ®±«¬»
3.Select the starting point for your journey in the same way that you would
select your destination.
4.Set the destination for your journey.
5.Choose the type of route that should be planned.
! Ú¿-¬»-¬ ®±«¬» - the route which takes the least time.
! ͸±®¬»-¬ ®±«¬» - the shortest distance between the locations you set. This
may not be the quickest route, especially if the shortest route is through
a town or city.
12
Page 13
! ߪ±·¼ ³±¬±®©¿§- - a route which avoids motorways.
! É¿´µ·²¹ ®±«¬» - a route designed for making the journey on foot.
! Þ·½§½´» ®±«¬» - a route designed for making the journey on a bicycle.
! Ô·³·¬»¼ -°»»¼ - a route for a vehicle which can only be driven at a limited
speed. You have to specify the maximum speed.
6.Your TomTomGO plans the route between the two locations you selected.
Ó±®» ·²º±®³¿¬·±² ¿¾±«¬ ¿ ®±«¬»
You can access these options for the route you last planned, by tapping Ê·»©
®±«¬» in the Main Menu.
To find out about your route in detail, tap the Ü»¬¿·´- button on the route
summary screen.
You can then select from the following options:
Tap this button for a list of all the turn instructions on the route.
This is very useful if you need to explain a route to someone else.
Þ®±©-» ¿-
¬»¨¬
Tap this button to see each turn in the journey. Tap the right and left arrows
to move forwards and backwards through the journey.
Þ®±©-» ¿-
·³¿¹»-
Þ®±©-» ³¿°
±º ®±«¬»
͸±© ®±«¬»
-«³³¿®§
Tap the screen to turn off the 3D display and view the map from above.
Tap this button to see an overview of the route using the map browser.
For more information about the map browser, see Ü®·ª·²¹ Ê·»© on page 6.
Tap this button to open the route summary screen.
13
Page 14
Ú·²¼·²¹ ¿´¬»®²¿¬·ª» ®±«¬»-êò
Finding alternative routes
Once you have planned a route, you may want to change something about the
route, without changing your destination.
ɸ§ ½¸¿²¹» ¬¸» ®±«¬»á
Maybe for one of these reasons:
! You can see a roadblock or a line of traffic ahead.
! You want to travel via a particular location, to pick someone up, stop for
lunch or fill up with petrol.
! You want to avoid a difficult junction or a road you don t like.
Tap Ú·²¼ ¿´¬»®²¿¬·ª»òòò in the Main Menu to change the route that is
currently planned.
Ú·²¼ ¿´¬»®²¿ó
¬·ª»òòò
Ý¿´½«´¿¬»
¿´¬»®²¿¬·ª»
Then tap one of the options below.
Tap this button to calculate an alternative to the route already planned.
Your GO will look for another route from your current location to your
destination.
If you decide you would prefer to use the original route after all, tap
λ½¿´½«´¿¬» ±®·¹·²¿´.
ߪ±·¼
®±¿¼¾´±½µ
ɸ§ ©±«´¼ × ²»»¼ ¬± ¼± ¬¸·-á
Apart from the roads near your position and near your destination, the new
route will use totally different roads to reach your destination. This is an
easy way of calculating a totally different route.
Tap this button if you can see a roadblock or a line of traffic ahead. You then
have to choose how much of the route ahead you want to avoid.
Choose from the different options: 100m, 500m, 2000m, 5000m. Your GO
will recalculate your route avoiding the section of the route for the distance
you selected.
Don t forget that once a new route is calculated, you may have to turn off
the road you are on very soon.
If the roadblock suddenly clears, tap λ½¿´½«´¿¬» ±®·¹·²¿´ to return to your
original route.
14
Page 15
Tap this button to change your route so that it passes a particular location,
perhaps to pick someone up on the way.
Ì®¿ª»´ ª·¿òòò
λ½¿´½«´¿¬»
±®·¹·²¿´
ߪ±·¼ °¿®¬ ±º
®±«¬»
You choose the location you want to pass in the same way as you choose a
destination. So you can select from all the same options: for example,
ß¼¼®»--, Ú¿ª±«®·¬», б·²¬ ±º ײ¬»®»-¬ and б·²¬ ±² ³¿°.
Your GO will calculate a new route to your destination that passes the
location you chose.
Using this button, you can only travel via one location. If you want to pass
more than one, use an Itinerary. For more information, see ׬·²»®¿®§
°´¿²²·²¹ on page 42.
Tap this button to return to the original route without deviations to avoid
roadblocks or travelling via particular locations.
Tap this button to avoid a part of the route. Use this button if you see that
your route includes a road or junction you don t like, or which is wellknown for traffic problems.
You then choose the road you want to avoid from a list of the roads on your
route.
Tap this button to recalculate your route so that it avoids traffic problems as
much as possible. Your GO will check if there are any traffic problems on
your route and work out the best route to avoid the problems.
Ó·²·³·-»
¬®¿ºº·½ ¼»´¿§-
For more information about using TomTom Traffic, see ̱³Ì±³ Ì®¿ºº·½ on
page 75.
15
Page 16

ͱ«²¼- ¿²¼ ª±·½»-éò
Sounds and voices
The sound on your TomTomGO is used for features such as:
! Spoken instructions
! Hands-free calls
! Warnings
! Music
For information on making hands-free calls on your GO, see Ø¿²¼-󺮻»
½¿´´·²¹ on page 45.
For information on playing music on your GO, see Ó«-·½ ¿²¼ ³»¼·¿ on page
25
ر© ¼± × ½¸¿²¹» ¬¸» ª±´«³» ´»ª»´á
You can change the volume in three ways:
! Tap the bottom left hand area of the Driving View. The last spoken
instruction is repeated and the volume level is shown.
Move the volume slider to adjust the volume.
! In the Main Menu, tap ݸ¿²¹» °®»º»®»²½»-, then tap ʱ´«³» °®»º»®»²½»-.
Tap Ì»-¬ to check your changes.
! You can set your GO to change the volume automatically depending on
how noisy it is in the car.
ݸ¿²¹·²¹ ¬¸» ª±´«³» ¿«¬±³¿¬·½¿´´§
Your TomTomGO can change the volume automatically.
1.In the Main Menu, tap ݸ¿²¹» °®»º»®»²½»-.
ʱ´«³»
°®»º»®»²½»-
2.Tap ʱ´«³» °®»º»®»²½»-.
3.Select Ô·²µ ª±´«³» ¬± ²±·-» ´»ª»´.
4.Tap ܱ²».
16
Page 17

Í»´»½¬·²¹ ¿ ª±·½»
To change the voice being used by your TomTomGO, tap ʱ·½»
°®»º»®»²½»- in the Preferences menu, then tap ݸ¿²¹» ª±·½». Select a voice
from the list.
ʱ·½»
°®»º»®»²½»-
Your TomTomGO has two different kinds of voices:
! Computer voices
These are generated by your GO. They provide spoken instructions
while you are driving and can pronounce street names and announce
messages, traffic reports, weather reports, tips and tutorials.
! Human voices
These are recorded by an actor.
Ò±¬»æ Ø«³¿² ª±·½»- ±²´§ °®±ª·¼» -°±µ»² ·²-¬®«½¬·±²-ò
ر© ¼± ½±³°«¬»® ª±·½»- ©±®µá
Your TomTomGO makes use of text-to-speech technology to generate
computer voices. A text-to-speech program converts written text, for example
an instruction like "Turn right#, into the sound of a human voice.
The text-to-speech program looks at the whole sentence to make sure that the
sound you hear is as close to the real thing as possible. The program is also
able to recognise and quite accurately pronounce foreign place and street
names. For example, the English voice can read French street names.
Ò±¬»æ ׺ §±« -»´»½¬ ¿ Ø«³¿² ª±·½»ô ¬¸·- ©·´´ ±²´§ ¾» ¿¾´» ¬± ¿²²±«²½»
½±³³¿²¼-ô ¾«¬ ²±¬ -¬®»»¬ ²¿³»-ò ׺ §±« ©±«´¼ ´·µ» -¬®»»¬ ²¿³»- ¬± ¾»
¿²²±«²½»¼ô §±« ©·´´ ²»»¼ ¬± -»´»½¬ ¿ ½±³°«¬»® ª±·½»ò
ײ¬»®²¿´ ¿²¼ »¨¬»®²¿´ -°»¿µ»®-
Your TomTomGO contains a high quality speaker. This is used to play all the
sounds on your GO unless you connect to external speakers.
You can connect external speakers to your GO in the following ways:
! Using an audio cable.
Ò±¬»æ ׺ §±«® ½¿® -¬»®»± ¸¿- ¿ ´·²»ó·² ½±²²»½¬±®ô §±« ½¿² °´¿§ -±«²¼ º®±³ §±«®
ÙÑ ¬¸®±«¹¸ §±«® ½¿® -°»¿µ»®-ò
! Connecting a Bluetooth® Hi-Fi headset or speakers.
! Tuning the FM Transmitter in your GO to use your car radio speakers.
Ò±¬»æ ̸» ÚÓ Ì®¿²-³·¬¬»® ·- ¿ª¿·´¿¾´» ·² ¬¸» ÙÑ ëíðô éíð ¿²¼ çíðò
ÚÓ ¬®¿²-³·¬¬»®
There is an FM Transmitter inside the GO 530, 730, 930 that works like a radio
station. This means you can hear the instructions made by your GO and play
your mp3 songs through your car radio speakers.
17
Page 18

Í»¬¬·²¹ «°
! In the Main Menu tap ݸ¿²¹» °®»º»®»²½»-, then tap Í°»¿µ»® °®»º»®»²½»-.
! Switch on your car radio.
! Tune your car radio to a frequency that is not being used by a radio station.
! Tap Change and set the frequency on your GO to use the same frequency
as your car radio.
If you drive into an area where a radio station transmits on the same
frequency you are using for the FM Transmitter, you may have to use
another frequency.
Ò±¬»æ ̸» ÚÓ Ì®¿²-³·¬¬»® ·- ¿ª¿·´¿¾´» ·² ¬¸» ÙÑ ëíðô éíð ¿²¼ çíðò
Ë-·²¹ ³±®» ¬¸¿² ±²» -°»¿µ»®
You can select different speakers to be used for specific events, such as using
the internal speaker for TomTomGO instructions and external speakers for
hearing handsfree phone calls and listening to music.
! Internal speaker
! Bluetooth Hi-Fi device
! Line-out (audio cable)
! FM to your car radio
Ò±¬»æ ̸» ÚÓ Ì®¿²-³·¬¬»® ·- ¿ª¿·´¿¾´» ·² ¬¸» ÙÑ ëíðô éíð ¿²¼ çíðò
×- ·¬ ¼·ºº·½«´¬ ¬± ¸»¿® -°±µ»² ·²-¬®«½¬·±²- ©¸»² ³«-·½ ·- °´¿§·²¹á
When you choose to use a Bluetooth® Hi-Fi device for music and spoken
instructions, you are asked if you want to pause music when spoken
instructions are announced. By default, music is always paused for spoken
instructions.
When you receive a hands-free phonecall, music is always paused and spoken
instructions are not given.
For information about making hands-free calls on your GO, see Ø¿²¼-󺮻»
½¿´´·²¹ on page 45.
Ë-·²¹ ¬¸» ¿«¼·± ½¿¾´»
To play sound through your car stereo or other external speaker using an
audio cable, do the following:
1.Plug the audio cable into the audio out connector on your GO.
2.Plug the audio cable into the line in connector on your car stereo or other
external speaker.
Ò±¬»æ Ò±¬ ¿´´ ½¿® -¬»®»±- ¸¿ª» ¿ ´·²» ·² ½±²²»½¬±®ò ݸ»½µ ¬¸» ³¿²«¿´ º±® §±«®
½¿® -¬»®»± º±® -°»½·º·½ ·²º±®³¿¬·±²ò
3.If you are using your car stereo, select line in connector on your car stereo
as the input source.
4.On your GO, tap Í°»¿µ»® °®»º»®»²½»- in the Preferences menu.
18
Page 19

Í°»¿µ»®
°®»º»®»²½»-
Tap this button to change the speaker settings.
5.Select the speaker you want your GO to use for announcing instructions.
! ײ¬»®²¿´ -°»¿µ»®
! Þ´«»¬±±¬¸ Ø·óÚ· ¼»ª·½»
! Ô·²»ó±«¬ ø¿«¼·± ½¿¾´»÷
! ÚÓ ¬± §±«® ½¿® ®¿¼·±
6.Select the speaker you want your GO to use for playing music.
! ײ¬»®²¿´ -°»¿µ»®
! Þ´«»¬±±¬¸ Ø·óÚ· ¼»ª·½»
! Ô·²»ó±«¬ ø¿«¼·± ½¿¾´»÷
! ÚÓ ¬± §±«® ½¿® ®¿¼·±
Ò±¬»æ ̸» ÚÓ Ì®¿²-³·¬¬»® ·- ¿ª¿·´¿¾´» ·² ¬¸» ÙÑ ëíðô éíð ¿²¼ çíðò
7.Tap ܱ²».
8.Your GO asks you whether you want to use an external Bluetooth® Hi-Fi
speaker. Tap ÒÑ.
Your GO will confirm that when the device is connected, the sound you have
selected will be played through the audio cable.
Ò±¬»æ DZ« ½¿²²±¬ ´·-¬»² ¬± §±«® ½¿® -¬»®»± ¿²¼ «-» ¬¸» ¿«¼·± ½¿¾´» ¬± °´¿§
-±«²¼ º®±³ §±«® ÙÑ ±² ¬¸» ½¿® -¬»®»± ¿¬ ¬¸» -¿³» ¬·³»ò
For information about listening to music using your GO, see Ó«-·½ ¿²¼ ³»¼·¿
on page 25.
Ë-·²¹ Þ´«»¬±±¬¸r Ø·óÚ· -°»¿µ»®-
Your GO can play sound through Bluetooth® Hi-Fi speakers, such as a
Bluetooth® Hi-Fi headset, or a car stereo which uses Bluetooth®.
To play sound over Bluetooth® Hi-Fi speakers, do the following:
1.Tap Í°»¿µ»® °®»º»®»²½»- in the Preferences menu.
Tap this button to change the speaker settings.
Í°»¿µ»®
°®»º»®»²½»-
2.Select the speaker you want your GO to use for announcing instructions.
! Internal speaker
! Þ´«»¬±±¬¸ Ø·óÚ· ¼»ª·½»
! Ô·²»ó±«¬ ø¿«¼·± ½¿¾´»÷
! ÚÓ ¬± §±«® ½¿® ®¿¼·±
3.Select the speaker you want your GO to use for playing music.
! ײ¬»®²¿´ -°»¿µ»®
19
Page 20

! Þ´«»¬±±¬¸ Ø·óÚ· ¼»ª·½»
! Ô·²»ó±«¬ ø¿«¼·± ½¿¾´»÷
! ÚÓ ¬± §±«® ½¿® ®¿¼·±
Ò±¬»æ ̸» ÚÓ Ì®¿²-³·¬¬»® ·- ¿ª¿·´¿¾´» ·² ¬¸» ÙÑ ëíðô éíð ¿²¼ çíðò
4.Tap ܱ²».
5.Your GO asks you to confirm that you want to use an external Bluetooth®
Hi-Fi speaker. Tap ÇÛÍ.
Your GO will start searching for Bluetooth® Hi-Fi devices.
6.Select your Bluetooth® Hi-Fi device from the list of devices found by your
GO.
Your GO will try to establish a Bluetooth® connection with your device.
Your device may require you to enter a password on your GO before a
Bluetooth® connection can be established. See the documentation for your
Bluetooth® Hi-Fi device for more information.
Once connected, sound will be played through the external Bluetooth® Hi-Fi
device.
If your GO cannot establish a Bluetooth® connection then all sound will be
played through the internal speaker or through the audio cable if it is
connected to an external audio device with speakers.
20
Page 21
ʱ·½» ¿¼¼®»-- ·²°«¬èò
Voice address input
Í°±µ»²
¿¼¼®»--
ø¼·¿´±¹«»÷
Í°±µ»²
¿¼¼®»--
׳°±®¬¿²¬: You should always plan your journey before you start driving. It is
dangerous to plan a route while driving.
When you plan a journey with your TomTomGO, instead of tapping the
screen to type in an address, you can use voice address input to say the
address.
Tap this button to enter an address using only speech. Using this option,
your GO can recognise the following:
! Commands: Ç»-, Ò±, Þ¿½µ, ܱ²», ÑÕ, Ý®±--·²¹.
! Street names.
! Place names.
! Numbers: Numbers should be pronounced as individual numerals. For
example, to say the number 35, say, "Three" and then say, "Five."
Using Í°±µ»² ¿¼¼®»-- ø¼·¿´±¹«»÷, you can enter information without
tapping the screen.
Tap this button to enter an address using both speech and by tapping the
screen. Using this option your GO can recognise the following:
! Street names.
! Place names.
Using Í°±µ»² ¿¼¼®»-- is typically faster than using Í°±µ»² ¿¼¼®»-ø¼·¿´±¹«»÷.
When this button is shown on the keyboard you can enter information by
speaking instead of typing. Tap this button to enter information using voice
address input.
Ì·°: When this button is shown in grey, you cannot use speech to enter an
address.
Your GO recognises place and street names spoken using the local language
and pronunciation.
It is not possible to use voice address input to say place and street names in
all countries.
21
Page 22
д¿²²·²¹ ¿ ¶±«®²»§ «-·²¹ ª±·½» ¿¼¼®»-- ·²°«¬
׳°±®¬¿²¬: You should always plan your journey before you start driving. It is
dangerous to plan a route while driving.
To plan a route using speech, do the following:
1.Tap Ò¿ª·¹¿¬» ¬±òòò in the Main menu.
2.Tap ß¼¼®»--.
For this example, we will navigate to an address using only speech to enter
the address.
3.Tap Í°±µ»² ¿¼¼®»-- ø¼·¿´±¹«»÷.
4.Say the city name.
When you say the city name, you are then shown a list of six names that
match what you said.
22
Page 23
Your GO tells you the name at the top of the list. If the name you hear is
correct, then say, "Done" or "OK" or "Yes" or "One" or tap on the name.
If the city name you hear is not correct, but the name appears in the list, then
say the number next to the correct name or tap on the correct name.
For example, if the correct name is Rotterdam and this name is number two
in the list, you could say, "Two" or tap on the name, Rotterdam.
If the city name is not shown in the list, then say "Back" or "No" or tap the
Þ¿½µ button to return to the previous screen. Then say the city name again.
Ò±¬»æ DZ« ²»»¼ ¬± -¿§ ²«³¾»®- ·² ¬¸» -¿³» ´¿²¹«¿¹» ¬¸¿¬ ·- «-»¼ º±® ³»²«
¾«¬¬±²-ò
5.Say the street name.
As with city name, you are then shown a list of six names that closely match
what you said.
Your GO tells you the name at the top of the list. If the name you hear is
correct, then say, "Done" or "OK" or "Yes" or "One" or tap on the name.
Ò±¬»æ Ü·ºº»®»²¬ ´±½¿¬·±²- ³¿§ ¸¿ª» -·³·´¿® ²¿³»-ô -«½¸ ¿- ¿ ®±¿¼ ¬¸¿¬ ¸¿³«´¬·°´» °±-¬½±¼» ´±½¿¬·±²-ò ײ -«½¸ ½¿-»-ô ¿´´ ±º ¬¸»-» ´±½¿¬·±²- ¿®» -¸±©² ·²
¬¸» ´·-¬ ¿²¼ §±« ²»»¼ ¬± ´±±µ ¿¬ ¬¸» -½®»»² ¿²¼ -»´»½¬ ¬¸» ½±®®»½¬ ´±½¿¬·±²ò
If the street name you hear is not correct, but the name appears in the list,
then say the number next to the correct name or tap on the name.
For example, if the correct name is Rembrandtplein and this name is
number three in the list, you could say, "Three" or tap on the name,
Rembrandtplein.
For example, looking at the list shown here, if the correct name is
Rembrandtplein, you could say, "Two" or tap on the name, Rembrandtplein.
If the street name is not shown in the list, then say "Back" or "No" or tap the
Þ¿½µ button to return to the previous screen. Then say the street name
again.
6.Say the house number.
Numbers should be pronounced normally. For example, you would say the
number 357 as one continuous sentence, "Three hundred and fifty seven."
If the number is shown incorrectly, say, "Back" or "No" or tap the Backspace
key. Then say the number again.
23
Page 24
Ì·°: If you say, "Back" when there are no numbers shown on the screen, then
your GO will return you to the previous screen.
When the number is shown correctly say, "Done" or "OK." Alternatively,
enter the number by tapping the screen.
To select a crossroads as the location, say, "Crossing".
Ò±¬»æ DZ« ²»»¼ ¬± -¿§ ²«³¾»®- ·² ¬¸» -¿³» ´¿²¹«¿¹» ¬¸¿¬ ·- «-»¼ º±® ³»²«
¾«¬¬±²-ò
7.Your GO asks if you need to arrive at a particular time. For this exercise, tap
ÒÑ.
The route is calculated by your GO.
8.When the route has been calculated, tap ܱ²».
Ó±®» ©¿§- ¬± -°»¿µ ¬± §±«® ̱³Ì±³ÙÑ
There are various ways to enter an address using speech.
To see the options available, Tap Navigate to... in the Main menu and then tap
ß¼¼®»--.
Ò±¬»æ б-¬½±¼» ¿¼¼®»-- »²¬®§ ·- ²±¬ °±--·¾´» «-·²¹ -°»»½¸ò
! Ý·¬§ ½»²¬®» - to say the centre of a city or town, tap this button and then tap
the speech button at the bottom of the keyboard on the next screen.
! ͬ®»»¬ ¿²¼ ¸±«-» ²«³¾»® - to say an address, tap this button and then tap
the speech button at the bottom of the keyboard on the next screen.
! Ý®±--·²¹ ±® ·²¬»®-»½¬·±² - to say the point where two streets meet, tap this
button and then tap the speech button at the bottom of the keyboard on the
next screen.
! Í°±µ»² ¿¼¼®»-- - tap this button to enter an address using speech and by
tapping the screen.
! Í°±µ»² ¿¼¼®»-- ø¼·¿´±¹«»÷ - tap this button to enter an address only using
speech. You can still tap the screen for entering certain details if you prefer.
24
Page 25

Ó«-·½ ¿²¼ ³»¼·¿çò
Music and media
׳°±®¬¿²¬: Only select music and media when you are stationary. It is
dangerous to select songs and make adjustments while you are driving.
Your TomTomGO can play mp3 audio files and Audible® Audiobooks and
display HTML and text documents and photos.
Ò±¬»æ ³°í º·´»- ¿²¼ ß«¼·±¾±±µ- ½¿² ¾» -¬±®»¼ ¿²¼ °´¿§»¼ ±² ¬¸» ÙÑ ëíðô éíð
¿²¼ çíðò
Ы¬¬·²¹ ³«-·½ ¿²¼ °¸±¬±- ±² §±«® ÙÑ
Transfer music files and photos to your TomTomGO from your computer
using TomTom HOME.
For information about using TomTom HOME, Ë-·²¹ ̱³Ì±³ ØÑÓÛ on page
101
д¿§·²¹ ³«-·½ ¿²¼ ¿«¼·±¾±±µ-
1.Tap Ó«-·½ ¿²¼ ³»¼·¿ in the Main Menu.
2.Tap TomTom Ö«µ»¾±¨ to start the Jukebox.
Ò±¬»æ DZ« ½¿² ½®»¿¬» °´¿§´·-¬- «-·²¹ ¿ ¬¸·®¼ó°¿®¬§ ¿°°´·½¿¬·±² ´·µ» ·Ì«²»-ô
Ó«-·½³¿¬½¸ ±® É·²¿³°ò
Ò±© °´¿§·²¹
! д¿§´·-¬ - tap this button to select a playlist.
! ß®¬·-¬ - tap this button to select a song by a particular singer or group.
! ß´¾«³ - tap this button to select from a list of all the albums on your GO.
! ͱ²¹ - tap this button to select from all the songs on your GO.
! Ù»²®» - tap this button to select a particular type of music.
! ß«¼·±¾±±µ- - tap this button to select an Audiobook.
Ò±¬»æ Ò±¬ ¿´´ ³°í º·´»- ½±²¬¿·² ·²º±®³¿¬·±² ¿¾±«¬ ¬¸» -±²¹ô -«½¸ ¿- ¬¸» ¿®¬·-¬
±® ¹»²®»ò ׺ ¬¸» º·´» ½±²¬¿·²- ²± ·²º±®³¿¬·±²ô ¬¸» º·´» ²¿³» ·- «-»¼ ¿- ¬¸» -±²¹
¬·¬´»ò
As soon as you choose a song or Audiobook, your TomTomGO starts playing
that song, followed by the rest of the songs on the list.
25
Page 26
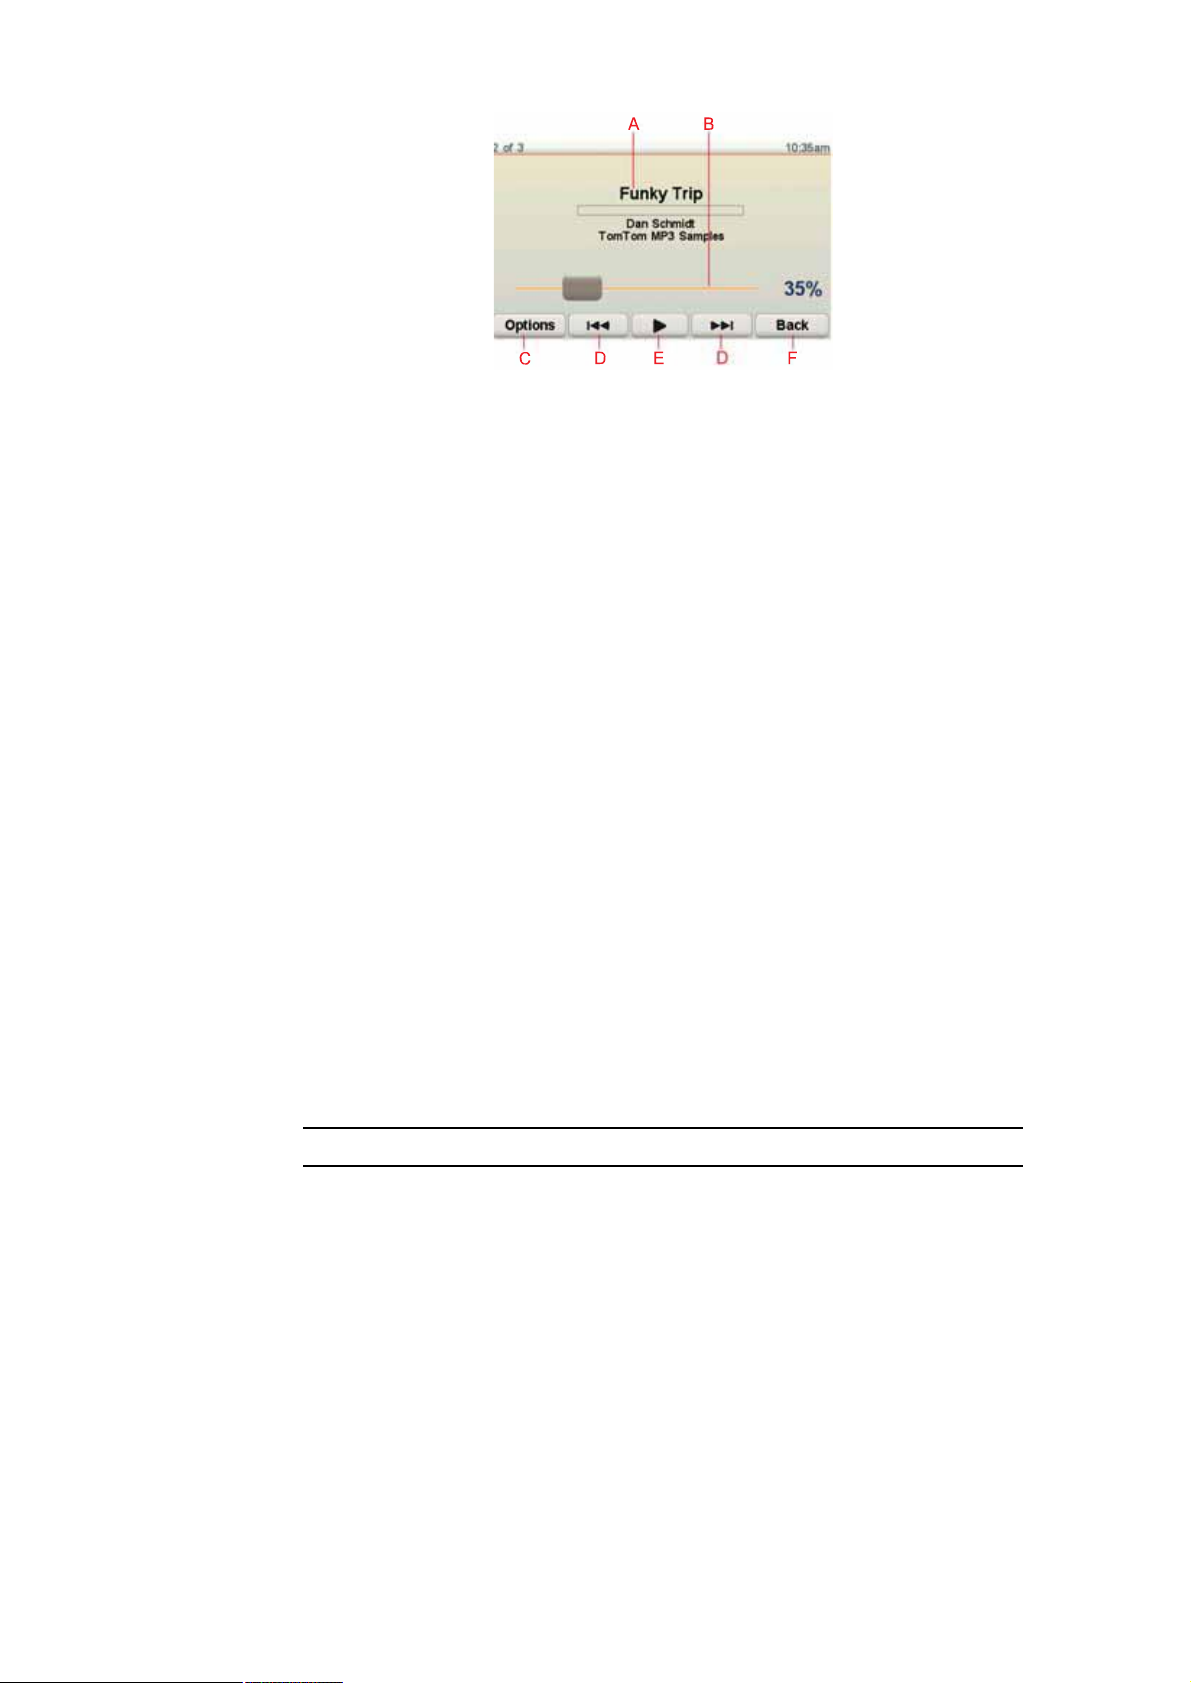
ß Information about the song.
Þ Volume - change the volume by moving the slider.
Ý The Ñ°¬·±²- button. You can, for example, choose to repeat a song and
shuffle the songs. You can change these options:
! ͸«ºº´» -±²¹- - the next song is selected randomly.
! λ°»¿¬ -±²¹ - repeat the current song.
! λ¼«½» ¾®·¹¸¬²»-- - brightness is only reduced on the playing screen.
! ͸±© ³«-·½ ¾«¬¬±² ·² Ü®·ª·²¹ Ê·»© - enables fast access to your music.
! ß«¬±³¿¬·½¿´´§ -©·¬½¸ ¬± Ü®·ª·²¹ ª·»© - when a song begins playing, the
Driving View is shown.
! Í´·¼»-¸±© - your photos are shown while your music is playing..
Ü Go to the previous or next song.
Û Play or Pause the selected song.
Ú Tap the Þ¿½µ button to go back to the TomTom Jukebox player. The music
will continue to play unless you tap the button д¿§·²¹òòò in the Jukebox to
stop the music.
When you listen to Audiobooks, there are also buttons for going to the next
and previous chapter. When you stop listening to an Audiobook, your GO
remembers where you stopped.
To find out more about Audiobooks, go to the shop area in TomTom HOME.
ÚÓ ¬®¿²-³·¬¬»®
There is an FM Transmitter inside your GO that works like a radio station. This
means you can hear the instructions made by your GO and play your mp3
songs through your car radio speakers.
Ò±¬»æ ̸» ÚÓ Ì®¿²-³·¬¬»® ·- ¿ª¿·´¿¾´» ·² ¬¸» ÙÑ ëíðô éíð ¿²¼ çíðò
Ù»¬¬·²¹ -¬¿®¬»¼
! In the Main Menu tap ݸ¿²¹» °®»º»®»²½»-, then tap Í°»¿µ»® °®»º»®»²½»-.
! Switch on your car radio.
! Tune your car radio to a frequency that is not being used by a radio station.
! Tap Change and set the frequency on your GO to use the same frequency
as your car radio.
If you drive into an area where a radio station transmits on the same
frequency you are using for the FM Transmitter, you may have to use
another frequency.
26
Page 27
Ë-·²¹ §±«® ·Ð±¼r ©·¬¸ §±«® ̱³Ì±³ÙÑ
You can connect your iPod to your GO with the TomTom iPod Connect Cable,
which is available as an accessory.
You can then control your iPod from your GO. Sound from your iPod will be
played over the internal speaker in your GO, or an external speaker if selected.
For more information about using different speakers, see ײ¬»®²¿´ ¿²¼
»¨¬»®²¿´ -°»¿µ»®- on page 17.
To use your iPod with your GO, do the following:
1.Plug the iPod Connect Cable into your iPod and into the windscreen dock.
2.In the Main Menu, tap Ó«-·½ ¿²¼ Ó»¼·¿ and then ·Ð±¼ ½±²¬®±´.
3.Follow the instructions on the screen to finish the connection.
You can now control your iPod through your GO. You select songs using the
same buttons shown above in Playing music and audiobooks.
Ô±±µ·²¹ ¿¬ °¸±¬±-
1.Tap Ó«-·½ ¿²¼ ³»¼·¿ in the Main Menu.
2.Tap 豬± ¹¿´´»®§.
The Photo gallery starts, showing small versions (thumbnails) of all the
photos on your GO.
Tap the arrows to move up and down the page of thumbnails.
Tap Í´·¼»-¸±© to start a slideshow.
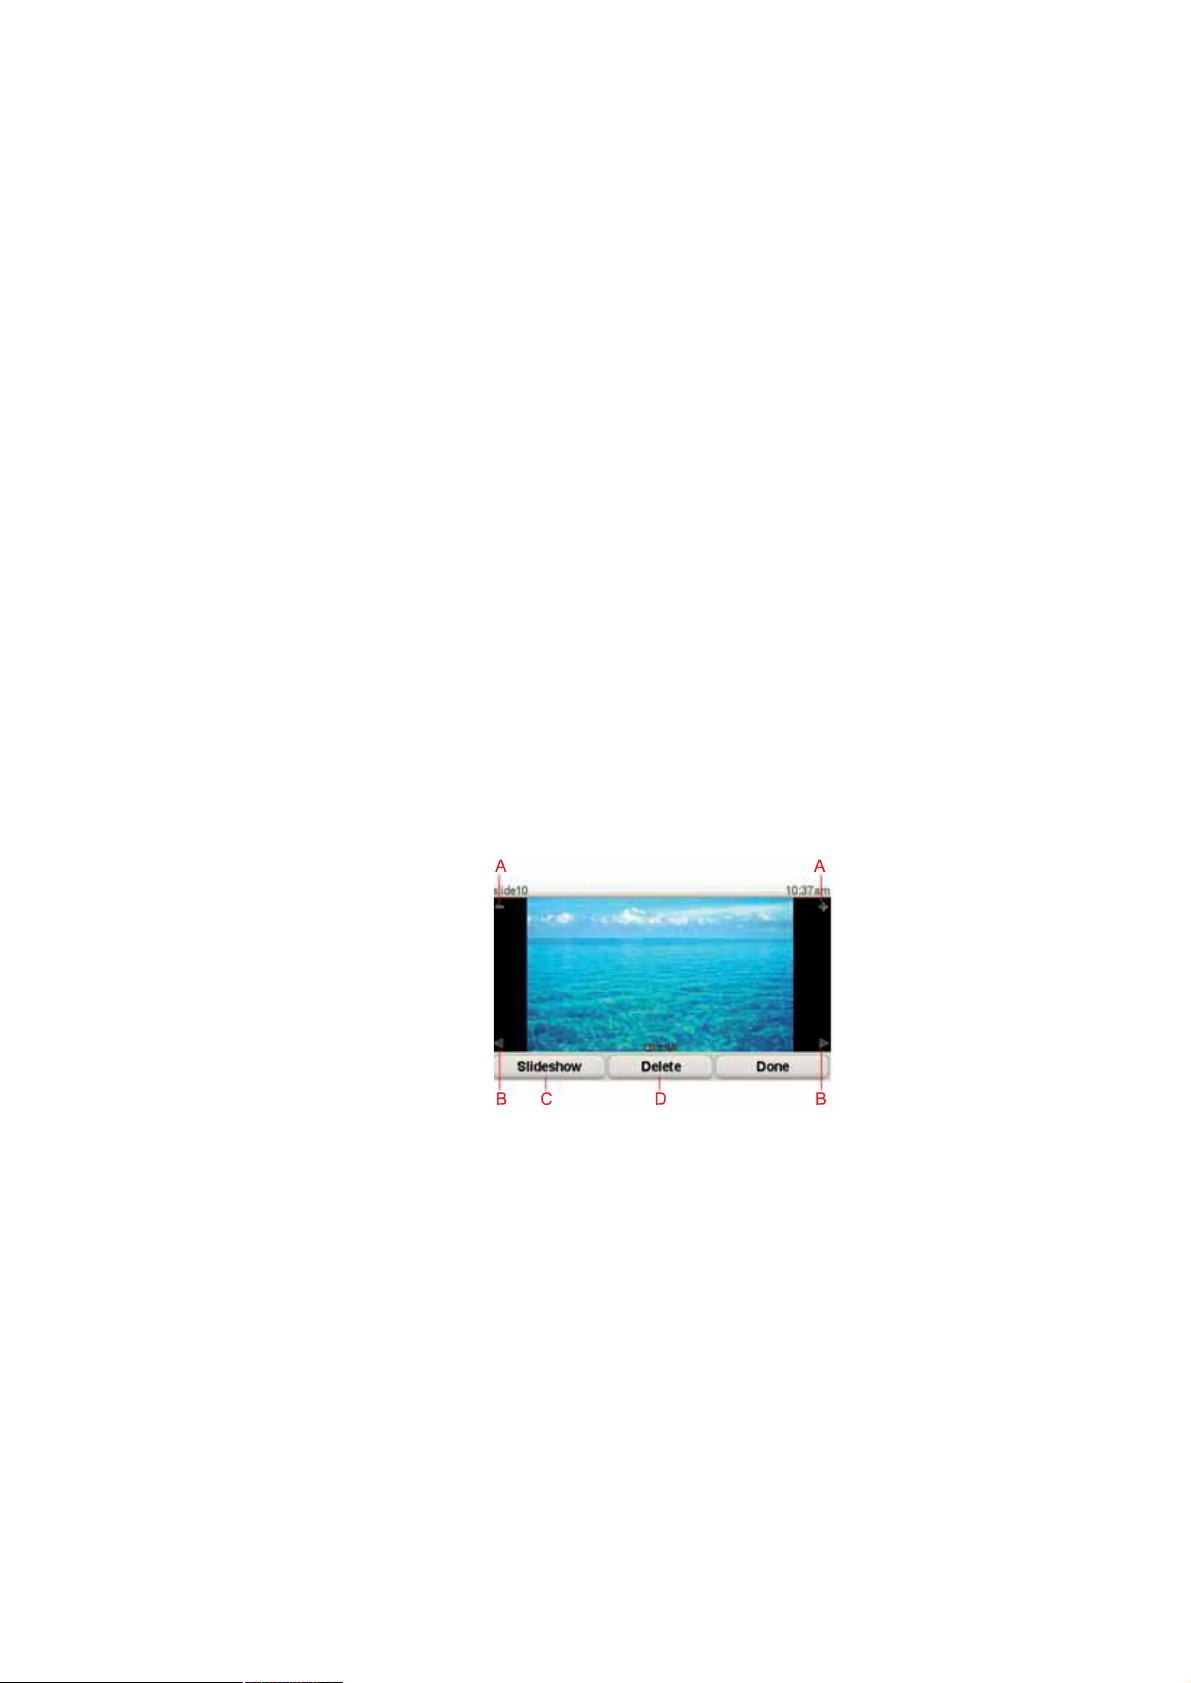
Tap the thumbnail of a photo to view a large version of that photo.
ß Buttons to zoom in and zoom out on the photo.
Þ Buttons to move to the next and the previous photo.
Ý Tap Í´·¼»-¸±© to start a slideshow.
Ü Tap Ü»´»¬» to delete a photo.
27
Page 28

Ø»´° ³»ÿïðò
Help me!
Help me! provides an easy way to navigate to emergency services centres and
other specialist services and contact them by phone.
For example, if you are involved in a car accident, you could use Help me! to
call the nearest hospital and tell them your exact location.
Ì·°: If you do not see the Ø»´° ³»ÿ button in the Main Menu, tap ͸±© ßÔÔ
³»²« ±°¬·±²- in the Preferences menu.
ر© ¼± × «-» Ø»´° ³»ÿ ¬± °¸±²» ¿ ´±½¿´ -»®ª·½»á
You can use Help me! to find and make contact with a service centre.
When you select a service centre, your current location and the phone number
of the POI are shown.
If your phone is connected to your GO, your current location and the service
centre phone number are shown, and your TomTomGO automatically
prepares for making a phone call. The phone call will only be dialled, when you
tap Ü·¿´.
If your phone is not connected, your current location and the service centre
phone number are shown, but your TomTomGO does not prepare for making
a phone call.
To use Help me! to locate a service centre, contact the centre by phone and
navigate from your current location to the centre, do the following:
1.Tap the screen to bring up the Main Menu.
2.Tap Ø»´° ³»ÿ
3.Tap и±²» º±® ¸»´°.
4.Select the type of service you require, for example, Nearest hospital.
5.Select a centre from the list, the nearest is shown at the top of the list.
Your GO shows the location of the service centre on the map and the
contact details.
6.To navigate your way to the centre on foot, tap É¿´µ ¬¸»®».
Your GO starts guiding you to your destination.
28
Page 29
Ñ°¬·±²-
и±²» º±® ¸»´°
Use your TomTomGO to find the location of a service, and the contact
details.
! Û³»®¹»²½§ -»®ª·½»-
! Û³»®¹»²½§ ¾®»¿µ¼±©² -»®ª·½»-
! Ò»¿®»-¬ °±´·½» -¬¿¬·±²
! Ò»¿®»-¬ ¼±½¬±®
! Ò»¿®»-¬ ¸±-°·¬¿´
! Ò»¿®»-¬ °«¾´·½ ¬®¿²-°±®¬
! Ò»¿®»-¬ ½¿® ®»°¿·® -»®ª·½»-
! Ò»¿®»-¬ ¼»²¬·-¬
! Ò»¿®»-¬ °¸¿®³¿½§
! Ò»¿®»-¬ ª»¬
Ò±¬»æ ײ -±³» ½±«²¬®·»-ô ·²º±®³¿¬·±² ³¿§ ²±¬ ¾» ¿ª¿·´¿¾´» º±® ¿´´ -»®ª·½»-ò
Use your TomTomGO to navigate your way by road to a service centre.
Ü®·ª» ¬± ¸»´°
É¿´µ ¬± ¸»´°
! Ò»¿®»-¬ ½¿® ®»°¿·® -»®ª·½»-
! Ò»¿®»-¬ ¸±-°·¬¿´
! Ò»¿®»-¬ ¼±½¬±®
! Ò»¿®»-¬ °±´·½» -¬¿¬·±²
! Ò»¿®»-¬ °¸¿®³¿½§
! Ò»¿®»-¬ ¼»²¬·-¬
Ò±¬»æ ײ -±³» ½±«²¬®·»-ô ·²º±®³¿¬·±² ³¿§ ²±¬ ¾» ¿ª¿·´¿¾´» º±® ¿´´ -»®ª·½»-ò
Use your TomTomGO to navigate your way on foot to a service centre.
! Ò»¿®»-¬ °»¬®±´ -¬¿¬·±²
! Ò»¿®»-¬ °«¾´·½ ¬®¿²-°±®¬
! Ò»¿®»-¬ °±´·½» -¬¿¬·±²
! Ò»¿®»-¬ °¸¿®³¿½§
! ر³»
! Ò»¿®»-¬ ¼±½¬±®
ɸ»®» ¿³ ×á
Ò±¬»æ ײ -±³» ½±«²¬®·»-ô ·²º±®³¿¬·±² ³¿§ ²±¬ ¾» ¿ª¿·´¿¾´» º±® ¿´´ -»®ª·½»-ò
Your TomTomGO shows your current location.
You can then tap и±²» º±® ¸»´° to select the type of service you want to
contact.
29
Page 30
Ú·®-¬ ß·¼ ¹«·¼»
Ѭ¸»® ¹«·¼»-
Tap this button to read the British Red Cross First Aid guide.
Tap this button to read a selection of useful guides.
30
Page 31

Ú¿ª±«®·¬»-ïïò
Favourites
ɸ¿¬ ¿®» Ú¿ª±«®·¬»-á
Favourites are places that you often visit. You can create Favourites so that
you don t have to enter the address every time you want to navigate there.
They don t have to be places you especially like, just useful addresses.
ر© ½¿² × ½®»¿¬» ¿ Ú¿ª±«®·¬»á
From the Main Menu, tap ß¼¼ Ú¿ª±«®·¬».
Ò±¬»æ ̸» ¾«¬¬±² ß¼¼ Ú¿ª±«®·¬» ³¿§ ²±¬ ¾» -¸±©² ±² ¬¸» º·®-¬ °¿¹» ±º ¬¸»
Ó¿·² Ó»²«ò Ì¿° ¬¸» ¿®®±© ¬± ±°»² ±¬¸»® °¿¹»- ·² ¬¸» Ó¿·² Ó»²«ò
You can then select the location of the Favourite from the list below.
Give your Favourite a name that is easy to remember. Your GO will always
suggest a name, usually the address of the Favourite. To enter the name, just
start typing. You don t have to delete the suggested name.
ر³»
Ú¿ª±«®·¬»
ß¼¼®»--
You can set your Home location as a Favourite.
You cannot create a Favourite from another Favourite. This option will
always be unavailable in this menu.
To rename a Favourite, tap Ó¿²¿¹» Ú¿ª±«®·¬»- in the Preferences menu.
For more information, see Ó¿²¿¹» Ú¿ª±«®·¬»- on page 51.
You can specify an address to be a Favourite. When you enter an address,
you can choose from four options.
! Ý·¬§ ½»²¬®»
! ͬ®»»¬ ¿²¼ ¸±«-» ²«³¾»®
! б-¬½±¼»
! Ý®±--·²¹ ±® ·²¬»®-»½¬·±²
31
Page 32

λ½»²¬
¼»-¬·²¿¬·±²
Select a Favourite location from a list of places you have recently used as
destinations.
You can add a Point of Interest (POI) as a Favourite.
ܱ»- ·¬ ³¿µ» -»²-» ¬± ¼± ¬¸·-á
б·²¬ ±º
ײ¬»®»-¬
If you visit a POI you particularly like, for example a restaurant, you can add
it as a Favourite.
To add a POI as a Favourite, tap this button, then do the following:
1.Narrow your choice of POIs by selecting the area where the POI is.
You can select one of these options:
! ÐÑ× ²»¿® §±« - to search from a list of POIs near your current position.
! ÐÑ× ·² ½·¬§ - to choose a POI in a particular town or city. You have to
specify a town or city.
! ÐÑ× ²»¿® ر³» - to search from a list of POIs near your Home
location.
If you are currently navigating to a destination, you can also select from
a list of POIs which are on your route or near your destination. Choose
one of these options:
! ÐÑ× ¿´±²¹ ®±«¬»
! ÐÑ× ²»¿® ¼»-¬·²¿¬·±²
2.Select the category of POI.
Tap the category of POI if it is shown or tap the arrow to choose from
the complete list.
Ó§ ´±½¿¬·±²
б·²¬ ±² ³¿°
Ô¿¬·¬«¼»
Ô±²¹·¬«¼»
Tap ß²§ ÐÑ× ½¿¬»¹±®§ to search for a POI by name.
For more information about POIs, see б·²¬- ±º ײ¬»®»-¬ on page 37.
Tap this button to add your current position as a Favourite.
For example, if you stop somewhere interesting, while you are there you
can tap this button to create the Favourite.
Tap this button to create a Favourite using the map browser.
Select the location of the Favourite using the cursor, then tap ܱ²».
For more information about the map browser, see Þ®±©-» Ó¿° on page 35.
Tap this button to create a Favourite by entering latitude and longitude
values.
32
Page 33

Tap this button to make a Favourite of the current position of a TomTom
Buddy.
For more information about TomTom Buddies, see ̱³Ì±³ Í»®ª·½»- on
̱³Ì±³
Þ«¼¼§
б-·¬·±² ±º
´¿-¬ -¬±°
page 65.
Tap this button to select your last recorded position as your destination.
For more information about the GPS, see Щ´±¾¿´ Р±-·¬·±²·²¹ Н§-¬»³ шЩРНч
on page 100.
ر© ½¿² × «-» ¿ Ú¿ª±«®·¬»á
You will normally use a Favourite as a way of navigating to a place without
having to enter the address. To navigate to a Favourite, do the following:
1.Tap the screen to bring up the Main Menu.
2.Tap Ò¿ª·¹¿¬» ¬±òòò
3.Tap Ú¿ª±«®·¬».
4.Select a Favourite from the list.
Your GO calculates the route for you.
5.When the route is calculated, tap ܱ²».
Your GO will immediately start guiding you to your destination with spoken
instructions and visual instructions on the screen.
ر© ³¿²§ Ú¿ª±«®·¬»- ½¿² × ½®»¿¬»á
You can create up to 48 Favourites. If you want to add more than 48, we
suggest that you make some POI categories and add some of your Favourites
as POIs.
For more information about POIs, see б·²¬- ±º ײ¬»®»-¬ on page 37.
ر© ½¿² × ¼»´»¬» ¿ Ú¿ª±«®·¬»á
1.Tap the screen to bring up the Main Menu.
2.Tap ݸ¿²¹» °®»º»®»²½»- to open the Preferences menu.
3.Tap Ó¿²¿¹» Ú¿ª±«®·¬»-.
Ì·°: Tap the arrow to move to the next page.
4.Tap the Favourite you want to delete.
5.Tap Ü»´»¬».
ر© ½¿² × ½¸¿²¹» ¬¸» ²¿³» ±º ¿ Ú¿ª±«®·¬»á
1.Tap the screen to bring up the Main Menu.
2.Tap ݸ¿²¹» °®»º»®»²½»- to open the Preferences menu.
3.Tap Ó¿²¿¹» Ú¿ª±«®·¬»-.
33
Page 34

Ì·°: Tap the arrow to move to the next page of buttons.
4.Tap the Favourite you want to rename.
5.Tap λ²¿³».
34
Page 35

Þ®±©-» Ó¿°ïîò
Browse Map
To look at the map in the same way as you might look at a traditional paper
map, tap Þ®±©-» ³¿° in the Main Menu.
You can move the map by touching the screen and moving your finger across
the screen.
ß The scale bar
Þ Your current position.
Ý GPS button
Tap this button to centre the map on your current position.
Ü Options
Ý«®-±® ¾«¬¬±²
Û The cursor
Ú The Find button
Tap this button to find specific addresses.
Ù The Cursor button
Tap this button to navigate to the cursor position, make a Favourite of the
cursor position, or find a Point of Interest near the cursor position.
Ø The zoom bar
Zoom in and out by moving the slider.
You can use the map to find addresses and Points of Interest (POIs), for
example, restaurants, train stations and petrol stations.
35
Page 36

Ò¿ª·¹¿¬»
¬¸»®»
Ú·²¼ ÐÑ×
²»¿®¾§
Tap the cursor button then tap one of the following buttons:
Tap this button to navigate to the cursor position. Your GO will calculate the
route.
Tap this button to find a POI near the cursor position. For example, if you
have found a restaurant to go to, you can search for a parking garage
nearby.
Tap this button to call the location at the cursor position. This button is only
available if your GO has the phone number for the location.
Ý¿´´òòò
ß¼¼ ¿-
Ú¿ª±«®·¬»
ß¼¼ ¿- ÐÑ×
ݱ®®»½¬
´±½¿¬·±²
The phone numbers of many POIs are stored in your GO. If you enter
phone numbers for POIs that you create, you can also call them.
For more information about hands-free calling, see Ø¿²¼-󺮻» ½¿´´·²¹ on
page 45.
Tap this button to create a Favourite at the cursor position.
For more information about Favourites, see Ú¿ª±«®·¬»- on page 31.
Tap this button to create a POI at the cursor position.
For more information about POIs, see б·²¬- ±º ײ¬»®»-¬ on page 37.
Tap this button to correct the location shown at the cursor position.
36
Page 37

б·²¬- ±º ײ¬»®»-¬ïíò
Points of Interest
Points of Interest or POIs are useful places on the map. Here are some
examples:
! Restaurants
! Hotels
! Museums
! Parking garages
! Petrol stations
͸±©·²¹ ÐÑ×- ±² ¬¸» ³¿°
1.Tap ͸±© ÐÑ×- ±² ³¿° in the Preferences menu.
͸±© ÐÑ× ±²
³¿°
2.Select the POI categories to display on the map.
Tap Ú·²¼ to search for a POI by name.
3.Tap ܱ²».
The POIs you have selected are shown as symbols on the map.
Ý¿´´·²¹ ¿ ÐÑ×
Your TomTomGO knows the phone numbers for many POIs. You can, for
example, call a restaurant to book a table.
For information about using your TomTomGO for hands-free calling, see
Ø¿²¼-󺮻» ½¿´´·²¹ on page 45.
Ò¿ª·¹¿¬·²¹ ¬± ¿ ÐÑ×
You can use a POI as your destination. For example, if you are travelling to an
unfamiliar city, you could choose a POI to help find a parking garage.
1.Tap the screen to bring up the Main Menu.
2.Tap Ò¿ª·¹¿¬» ¬±òòò in the Main Menu.
3.Tap б·²¬ ±º ײ¬»®»-¬.
4.Tap ÐÑ× ·² ½·¬§.
5.Narrow your choice of POIs by selecting the area where the POI is located.
37
Page 38

You can select one of these options:
! ÐÑ× ²»¿® §±« - to choose from a list of POIs near to your current location.
! ÐÑ× ·² ½·¬§ - to find a POI in a particular town or city.
! ÐÑ× ²»¿® ر³» - to choose from a list of POIs near to your Home location.
You can select from a list of POIs which are along your route or close to your
destination. Choose from one of these options:
! ÐÑ× ¿´±²¹ ®±«¬»
! ÐÑ× ²»¿® ¼»-¬·²¿¬·±²
6.Type the name of the town you want to visit and select the town when it
appears in the list.
7.Tap п®µ·²¹ ¹¿®¿¹».
8.Select the category of POI:
Tap ß²§ ÐÑ× ½¿¬»¹±®§ to search for a POI by name.
Tap the category of POI, if it is shown.
Tap the arrow to choose from the complete list of categories. Select the
category from the list or start to type the name of the category and select it
when it appears in the list.
9.Select a parking garage. The distance listed next to each POI is the distance
from the city centre.
10.From the list of POIs shown, select the POI you want to navigate to.
The table below explains the distances listed next to each POI.
POI near youDistance from your current location
POI in cityDistance from the city centre
POI near HomeDistance from your Home location
POI along
Distance from your current location
route
POI near
Distance from your destination
destination
Last POIDistance to the last POI you visited
If you know the name of the POI, tap Ú·²¼ and type the name. Select it from
the list when it is shown.
11.Select a parking garage. The distance listed next to each POI is the distance
from the city centre.
Once you have selected a POI, the route to the POI is calculated by your
TomTomGO.
The route to the POI is then calculated by your TomTomGO.
38
Page 39

Ó¿²¿¹·²¹ ÐÑ×-
Tap Ó¿²¿¹» ÐÑ×- from the Preferences menu.
Ó¿²¿¹» ÐÑ×-
Ò±¬»æ ̸» Ó¿²¿¹» ÐÑ×- ¾«¬¬±² ·- ±²´§ ¿ª¿·´¿¾´» ©¸»² ¿´´ ³»²« ¾«¬¬±²- ¿®»
-¸±©²ò ̱ -¸±© ¿´´ ³»²« ¾«¬¬±²-ô ¬¿° ͸±© ßÔÔ ³»²« ±°¬·±²- ·² ¬¸»
Ю»º»®»²½»- ³»²«ò
You can, for example, do the following:
! Create your own POI categories and add POIs to them.
! Set warnings when you get close to POIs.
ɸ§ ©±«´¼ × ©¿²¬ ¬± ½®»¿¬» ³§ ±©² ÐÑ×-á
A POI acts like a shortcut - once you have saved a location as a POI you never
have to type the address of that POI again. But when you create a POI you can
save more than just the location.
! Phone number - when you create a POI, you can save a phone number with
it.
! Categories - when you create a POI you have to put it in a category.
For example, you could create a category of POIs called %Favourite
restaurants . With each POI, save their phone number so that you can call
them from your GO to reserve a table.
ر© ½¿² × ½®»¿¬» ³§ ±©² ÐÑ×-á
1.Tap the screen to bring up the Main Menu.
2.Tap ݸ¿²¹» °®»º»®»²½»-.
3.Tap Ó¿²¿¹» ÐÑ×-.
4.Before you can add a POI, you have to create at least one POI category.
Every POI is assigned to a POI category. You can only add POIs to POI
categories you have created yourself.
Tap ß¼¼ ÐÑ× ½¿¬»¹±®§.
ß¼¼ ÐÑ×
½¿¬»¹±®§
5.Enter a name for your POI category, for example, %Friends or %Favourite
restaurants . Then select a marker for your POI category.
6.Tap ß¼¼ ÐÑ×.
ß¼¼ ÐÑ×
Tap this button to add a POI.
7.Select the POI category in which you want to add the POI.
39
Page 40

ر³»
Ú¿ª±«®·¬»
ß¼¼®»--
8.Select the location of your POI from the list below.
You can set your Home location as a POI.
If you want to change your Home location, you can create a POI of the
Home location before you change it.
You can create a POI from a Favourite.
You can only create a limited number of Favourites. If you want to create
more Favourites you have to delete some Favourites first. Before you
delete a Favourite, make it into a POI so that you don t lose the address.
You can specify an address to be a POI. When you enter an address, you
can choose from four options.
! Ý·¬§ ½»²¬®»
! ͬ®»»¬ ¿²¼ ¸±«-» ²«³¾»®
! б-¬½±¼»
! Ý®±--·²¹ ±® ·²¬»®-»½¬·±²
Select a POI location from a list of places you have recently used as
destinations.
λ½»²¬
¼»-¬·²¿¬·±²
б·²¬ ±º
ײ¬»®»-¬
Ó§ ´±½¿¬·±²
б·²¬ ±² ³¿°
Ô¿¬·¬«¼»
Ô±²¹·¬«¼»
You can add a Point of Interest (POI) as a POI. For example, if you are
creating a category of POIs for your favourite restaurants, use this option
instead of entering the addresses of the restaurants.
Tap this button to add your current position as a POI.
For example, if you stop somewhere you like, while you are there you
can tap this button to create the POI.
Tap this button to create a POI using the map browser.
Select the location of the POI using the cursor, then tap ܱ²».
For more information about the map browser, see Ü®·ª·²¹ Ê·»© on page
6 and ر© ½¿² × ½®»¿¬» ³§ ±©² ÐÑ×-á on page 39
Tap this button to create a POI by entering latitude and longitude values.
̱³Ì±³
Þ«¼¼§
Tap this button to make a POI of the current position of a TomTom Buddy.
For more information about TomTom Buddies, see ̱³Ì±³ Í»®ª·½»- on
page 65.
40
Page 41

Tap this button to select your last recorded position as your destination.
This may be useful if your GO is unable to maintain a strong GPS signal,
б-·¬·±² ±º
´¿-¬ -¬±°
for example, when you drive through a long tunnel.
For more information about the GPS, see Ù´±¾¿´ б-·¬·±²·²¹ ͧ-¬»³
шЩРНч on page 100.
ر© ½¿² × -»¬ ©¿®²·²¹- º±® ÐÑ×-á
1.Tap the screen to bring up the main menu.
2.Tap ݸ¿²¹» °®»º»®»²½»-.
3.Tap Ó¿²¿¹» ÐÑ×-.
Ò±¬»æ ̸» Ó¿²¿¹» ÐÑ×- ¾«¬¬±² ·- ±²´§ ¿ª¿·´¿¾´» ©¸»² ¿´´ ³»²« ¾«¬¬±²- ¿®»
-¸±©²ò ̱ -¸±© ¿´´ ³»²« ¾«¬¬±²-ô ¬¿° ͸±© ßÔÔ ³»²« ±°¬·±²- ·² ¬¸»
Ю»º»®»²½»- ³»²«ò
4.Tap É¿®² ©¸»² ²»¿® ÐÑ×.
Tap this button to receive a warning when you travel near to the location
of a POI.
É¿®² ©¸»²
²»¿® ÐÑ×
5.Select the category of POI you want to be warned about.
Select the category from the list or start to type the name of the category
and select it when it is shown in the list.
6.Set how close the POI should be when you receive a warning.
7.Choose the warning sound for the category of POI you selected.
41
Page 42

׬·²»®¿®§ °´¿²²·²¹ïìò
Itinerary planning
ɸ¿¬ ·- ¿² ׬·²»®¿®§á
An Itinerary is a plan for a journey including more locations than your final
destination.
An Itinerary can include the following items:
! Destination - a location on your journey where you want to stop.
! Waypoint - a location on your journey where you want to travel through
without stopping.
Here s an example of an Itinerary:
Destinations are shown using this symbol.
Waypoints are shown using this symbol.
ɸ»² ©±«´¼ × «-» ¿² ׬·²»®¿®§á
You could use an Itinerary for trips such as:
! A driving holiday through a country with lots of stops.
! A two day car journey with an overnight stop.
! A short drive which passes by Points of Interest.
In all these examples you could tap Ò¿ª·¹¿¬» ¬±òòò for each place. However, if
you use an Itinerary, you can save time by planning everything in advance.
Ý®»¿¬·²¹ ¿² ׬·²»®¿®§
1.Tap the screen to bring up the Main Menu.
2.Tap ׬·²»®¿®§ °´¿²²·²¹.
42
Page 43

The Itinerary planning screen opens. At first, there are no items on the
Itinerary.
׬·²»®¿®§
°´¿²²·²¹
Ò±¬»æ ̸·- ¾«¬¬±² ³¿§ ±²´§ ¾» ¿ª¿·´¿¾´» ·º ¿´´ ³»²« ±°¬·±²- ¿®» -¸±©²ò ̱
-¸±© ¿´´ ³»²« ±°¬·±²-ô ¬¿° ͸±© ßÔÔ ³»²« ±°¬·±²-ò
Ú±® ³±®» ·²º±®³¿¬·±²ô -»» Ø·¼¼»² ¾«¬¬±²- ¿²¼ º»¿¬«®»- ±² °¿¹» ìèò
3.Tap ß¼¼ and select a location.
Ì·°æ You can add items to your Itinerary in any order and rearrange the order
later.
ͬ¿®¬ «-·²¹ ¿² ׬·²»®¿®§
Tap Ñ°¬·±²-, then tap ͬ¿®¬ ²¿ª·¹¿¬·±².
To save an Itinerary, tap Í¿ª» ׬·²»®¿®§.
To load a saved Itinerary, tap Ô±¿¼ ׬·²»®¿®§.
To create a new Itinerary, tap Ò»© ׬·²»®¿®§ and to delete one, tap Ü»´»¬»
׬·²»®¿®§.
Ú±´´±©·²¹ ¿² ׬·²»®¿®§
When you use an Itinerary to navigate, the route will be calculated to the first
destination on the Itinerary. Your TomTomGO calculates the remaining
distance and time to the first destination and not for the whole Itinerary.
As soon as you start to use an Itinerary, the route is calculated from your
current position. You do not need to set a departure point.
When you have passed a waypoint or reached a destination, it is marked as
visited.
Waypoints are shown on the map. Your GO will not warn you, when you are
approaching a waypoint or when you arrive at a waypoint.
Ó¿²¿¹·²¹ ¿² ׬·²»®¿®§
Tap an item on your Itinerary to open a menu of buttons for editing the item.
The buttons shown below are available.
You can change a destination into a waypoint using this button.
Waypoints are locations where you want to pass through on your way to
Ó¿®µ ¿-
©¿§°±·²¬
your chosen destination(s).
Destinations are locations where you want to stop.
This button is only shown if the item you tapped is a destination.
43
Page 44

Ó¿®µ ¿-
¼»-¬·²¿¬·±²
You can change a waypoint into a destination using this button.
Waypoints are locations where you want to pass through on your way to
your chosen destination(s).
Destinations are locations where you want to stop.
This button is only shown if the item you tapped is a waypoint.
Tap this button to miss out part of your Itinerary. Your GO will ignore this
item and all the items before it in the Itinerary.
Ó¿®µ •ª·-·¬»¼Ž
Ó¿®µ •¬± ª·-·¬Ž
Ó±ª» ·¬»³ «°
Ó±ª» ·¬»³
¼±©²
͸±© ±² ³¿°
It will navigate you to the next item in the Itinerary.
This button is only shown if you are still due to visit this item.
Tap this button to repeat part of your Itinerary. Your GO will navigate you to
this item followed by the rest of the items in the Itinerary.
This button is only shown if you have already visited this item.
Tap this button to move the item up the Itinerary.
This button is unavailable if the item is at the top of the Itinerary.
Tap this button to move the item down the Itinerary.
This button is unavailable if the item is at the bottom of the Itinerary.
Tap this button to see the location of the item on the map.
For more information about the map browser, see Ü®·ª·²¹ Ê·»© on page 6.
Ü»´»¬» ·¬»³
Tap this button to delete the item from the Itinerary.
44
Page 45

Ø¿²¼-󺮻» ½¿´´·²¹ïëò
Hands-free calling
Ø¿²¼-󺮻» ½¿´´·²¹
If you have a mobile phone with Bluetooth®, you can use your TomTomGO
to make phone calls and send and receive messages.
Ò±¬»æ Ò±¬ ¿´´ °¸±²»- ¿®» -«°°±®¬»¼ ±® ½±³°¿¬·¾´» ©·¬¸ ¿´´ º»¿¬«®»-ò Ú±® ³±®»
·²º±®³¿¬·±²ô ª·-·¬ ©©©ò̱³Ì±³ò½±³ñ°¸±²»-
ݱ²²»½¬·²¹ ¬± §±«® °¸±²»
First you must establish a connection between your mobile phone and your
TomTomGO.
Tap Ó±¾·´» °¸±²» in the Ó¿·² Ó»²« and then follow the instructions on the
screen.
You only need to do this once, after which your TomTomGO will remember
your phone.
Í»¬¬·²¹ «° ̱³Ì±³ Í»®ª·½»-
When you have established a connection with your phone, you can set up a
wireless data connection for TomTom Services.
For information about TomTom Services, see ̱³Ì±³ Í»®ª·½»- on page 65.
Ì·°-
! Make sure that you switch on Bluetooth® on your phone.
! Make sure that your phone is set to %discoverable or %visible to all .
! You may have to enter the password %0000 on your phone in order to
connect to your TomTomGO.
! Make your TomTomGO a trusted device on your phone. Otherwise you
have to enter %0000 every time.
See your phone s user guide for information about Bluetooth® settings.
DZ«® °¸±²»¾±±µ
You can copy your phonebook from your mobile phone to your TomTomGO
so that you can make calls with just a few taps on the screen.
This is the safest way to make hands-free calls.
45
Page 46

Ó¿µ·²¹ ¿ ½¿´´
Ò±¬»æ DZ« ½¿² ½±°§ §±«® °¸±²»¾±±µ ¬± §±«® ̱³Ì±³ÙÑ ¿¬ ¿²§ ¬·³»ò Ú®±³
¬¸» Ó±¾·´» °¸±²» ³»²«ô ¬¿° Ù»¬ ²«³¾»®- º®±³ °¸±²»ò
Ò±¬ ¿´´ °¸±²»- ½¿² ¬®¿²-º»® ¬¸»·® °¸±²»¾±±µ ¬± §±«® ÙÑò Ú±® ³±®»
·²º±®³¿¬·±²ô ª·-·¬ ©©©ò̱³Ì±³ò½±³ñ°¸±²»-
Once you have established a connection with your phone, you can start
making calls.
1.Tap Ó±¾·´» °¸±²» in the Main Menu.
2.Tap Ý¿´´.
Ò±¬»æ Ó¿µ» -«®» ¬¸¿¬ §±«® °¸±²» ·- ½«®®»²¬´§ -»´»½¬»¼ò ̸» ½«®®»²¬ °¸±²» ·-
-¸±©² ¿¬ ¬¸» ¾±¬¬±³ ±º ¬¸» -½®»»²ò
3.Tap Ò«³¾»® to enter a number to call.
4.Do one of the following:
! Tap ر³» to call your Home location. If you have not entered a number
for your Home location this button is unavailable. To enter a number, tap
ݸ¿²¹» ر³» ²«³¾»® in the и±²» °®»º»®»²½»- menu.
! Tap Ò«³¾»® to enter a number to call.
! Tap б·²¬ ±º ײ¬»®»-¬ to choose a Point of Interest (POI) to call. If your GO
knows the phone number of a POI, this is shown next to the POI.
! Tap и±²»¾±±µ »²¬®§ to select a contact from your phonebook.
Ò±¬»æ ׺ §±« ¸¿ª» ²±¬ ½±°·»¼ §±«® °¸±²»¾±±µ ¬± §±«® ̱³Ì±³ÙÑô ¬¸» ¾«¬¬±²
и±²»¾±±µ »²¬®§ ·- «²¿ª¿·´¿¾´»ò
! Tap λ½»²¬´§ ¼·¿´»¼ to select from a list of people or numbers you have
called recently using your GO.
! Tap λ½»²¬ ½¿´´»® to select from a list of people or numbers who called
you recently. Only calls you have received on your GO are saved in this
list.
For information about POIs, see б·²¬- ±º ײ¬»®»-¬ on page 37.
λ½»·ª·²¹ ¿ ½¿´´
If someone calls you while you are driving, accept or reject the call by tapping
the screen.
ß«¬±ó¿²-©»®
You can tell your TomTomGO to answer every call automatically after a
certain time. Tap и±²» °®»º»®»²½»- in the mobile phone menu, then tap
ß«¬±ó¿²-©»® °®»º»®»²½»-.
Select when your TomTomGO will automatically answer your calls.
͸¿®·²¹ §±«® ̱³Ì±³ÙÑ
To add more phones, do the following. You can establish connections for up
to 5 mobile phones.
1.Tap Ó±¾·´» °¸±²» in the Main Menu.
2.Tap ݱ²²»½¬ ¬± §±«® °¸±²».
46
Page 47

λ¼·¿´
λ¿¼ñÉ®·¬»
³»--¿¹»
и±²»
Ю»º»®»²½»-
3.Tap Ú·²¼ ±¬¸»® °¸±²»òòò and follow the instructions on the screen.
To switch between phones, tap ݱ²²»½¬ ¬± §±«® °¸±²» and then select your
phone from the list.
The available buttons are listed below:
Tap this button to redial a telephone number using your mobile phone.
Tap this button to read or write a message.
Tap this button to configre how your TomTomGO communicates with your
mobile phone.
Ý¿´´òòò
Ù»¬ °¸±²»ó
²«³¾»®-
º®±³ °¸±²»
Ó¿²¿¹»
°¸±²»-
Tap this button to dial a telephone number using your mobile phone.
Tap this button to load the contacts and phone numbers from your mobile
phone onto your TomTomGO.
Tap this button to manage the mobile phones that will be connected to
your TomTomGO. You can add a profile for up to five different mobile
phones.
47
Page 48

Ю»º»®»²½»-ïêò
Preferences
You can change the way your TomTomGO looks and behaves.
Tap ݸ¿²¹» °®»º»®»²½»- in the Main Menu.
Ø·¼¼»² ¾«¬¬±²- ¿²¼ º»¿¬«®»-
When you first start using your TomTomGO, all the buttons are shown in the
menu.
The buttons for the more advanced features can be hidden. This is a useful
option because you are unlikely to use certain features very often.
Tap this button in the Preferences menu, to reduce the number of buttons
that are shown.
You might want to do this so that only frequently used buttons are shown.
͸±© º»©»®
³»²« ±°¬·±²-
͸±© ßÔÔ
³»²« ±°¬·±²-
When you need to use the buttons that are hidden, you can press ͸±©
ßÔÔ ³»²« ±°¬·±²- in the Preferences menu to show all buttons.
Tap this button in the Preferences menu, to show all the buttons available
on your TomTomGO.
Ë-» ²·¹¸¬ ½±´±«®- ñ Ë-» ¼¿§ ½±´±«®-
Tap this button to reduce the brightness of the screen and show darker
colours on the map.
ɸ»² -¸±«´¼ × «-» ¬¸·-á
Ë-» Ò·¹¸¬
½±´±«®-
Ë-» ¼¿§
½±´±«®-
When it s dark, it is easier to see the screen if the display on your GO is not
brightly lit.
To change back to a brighter screen showing brighter colours on the map,
tap Ë-» ¼¿§ ½±´±«®-.
Ý¿² ³§ ÙÑ ³¿µ» ¬¸·- ½¸¿²¹» ¿«¬±³¿¬·½¿´´§á
Yes. Your GO has a light sensor to tell when it is getting dark.
48
Page 49

To change to night and day colours automatically, tap Þ®·¹¸¬²»-- °®»º»®»²½»-
in the Preferences menu. Then select Í©·¬½¸ ¬± ²·¹¸¬ ª·»© ©¸»² ¼¿®µ.
͸±© ÐÑ× ±² ³¿°
Tap this button to set which categories for the Points of Interest (POIs)
should be shown on the map.
Select the POIs that you want to see on the map from the list.
͸±© ÐÑ× ±²
³¿°
When you select a POI, it is shown on the map using the symbol you can
see next to each category in the list.
To find a POI category quickly, tap Ú·²¼, then start to type the name of the
POI category. As soon as the category is shown in the list, you can select it.
For more information about POIs, see б·²¬- ±º ײ¬»®»-¬ on page 37.
Í¿º»¬§ °®»º»®»²½»-
Tap this button to set the following safety preferences:
! Ø·¼» ³±-¬ ³»²« ±°¬·±²- ©¸·´» ¼®·ª·²¹
Í¿º»¬§
°®»º»®»²½»-
! Í«¹¹»-¬ ¼®·ª·²¹ ¾®»¿µ-
! ͸±© -¿º»¬§ ®»³·²¼»®-
! É¿®² ©¸»² ²»¿® °´¿½»- ±º ©±®-¸·° ±® -½¸±±´-
! É¿®² ©¸»² ¼®·ª·²¹ º¿-¬»® ¬¸¿² ¿´´±©»¼
! É¿®² ©¸»² ¼®·ª·²¹ º¿-¬»® ¬¸¿² ¿ -»¬ -°»»¼
! É¿®² ²±¬ ¬± ´»¿ª» ¬¸» ¼»ª·½» ·² ¬¸» ½¿®
If you select one or more of the warnings, you will also be asked to select a
sound to be played whenever a warning is displayed.
Select whether or not your TomTomGO should warn you about which side
of the road you should be driving on.
Decide if you want the map display to be turned off in special
circumstances and press ܱ²».
ɸ¿¬ ¸¿°°»²- ©¸»² × «-» ¬¸» Ì«®² ±ºº ³¿° ¼·-°´¿§ ±°¬·±²á
When you turn off the map display, instead of seeing your position on a map
in the Driving View, you will only see information about the next instruction.
Tap the button and select an option for when the map should be turned off.
These are the options:
! ß´©¿§- - The map will not be shown and you will only see information
about the next instruction and arrows showing direction.
! ß¾±ª» ¿ ½»®¬¿·² -°»»¼ - you set the speed at which point the map will be
turned off. This option is useful for situations when the map might be
distracting, such as when you are driving fast.
! Ò»ª»® - the map is never turned off.
49
Page 50

ʱ·½» °®»º»®»²½»-
Tap ʱ·½» °®»º»®»²½»- to manage your TomTom voices. The following
options are available:
! ݸ¿²¹» ª±·½» - tap this button to change the voice that gives you
ʱ·½»
°®»º»®»²½»-
! Ü·-¿¾´» ª±·½» - tap this button to disable the use of voices. To enable
! Í°»»½¸ °®»º»®»²½»- - tap this button to set the situations when your
! λ½±®¼ ª±·½» - tap this button to record your own voice for use by your
! Ü·-¿¾´» ®»½±®¼»¼ ª±·½»
instructions.
A wide range of recorded human voices and computer voices are
available.
For more information on choosing a voice and the differences between
human and computer voices, see Í»´»½¬·²¹ ¿ ª±·½» on page 17.
voices, tap Û²¿¾´».
TomTom will read instructions or warnings aloud.
TomTom. The procedure takes about fifteen minutes, during which time
you will say all the commands that are used by your TomTomGO.
In the Preferences menu, tap ʱ·½» °®»º»®»²½»-, then tap λ½±®¼ ª±·½»
and follow the instructions for recording your voice.
! Û²¿¾´» ®»½±®¼»¼ ª±·½»
! ܱ©²´±¿¼ ª±·½» - tap this button to download new voices from
TomTom Services and transfer them to your TomTom.
Ì«®² ±ºº -±«²¼ ñ Ì«®² ±² -±«²¼
Tap this button to turn off spoken instructions.
The button changes to Ì«®² ±² -±«²¼. If you turn off the sound, warnings
for upcoming POIs are also turned off.
Ì«®² ±ºº -±«²¼
Ì·°-
To change the volume, tap ʱ´«³» °®»º»®»²½»- in the Preferences menu.
For more information, see ʱ´«³» °®»º»®»²½»- on page 51.
To change the volume quickly while you are driving, tap the bottom lefthand section of the Driving View and move the slider.
You can still listen to music even if you have turned off voice instructions.
For more information, see Í»´»½¬·²¹ ¿ ª±·½» on page 17.
Ý¿² × -¬·´´ «-» ³§ ÙÑ ¬± ³¿µ» ¸¿²¼-󺮻» ½¿´´- ©¸»² ¬¸» -±«²¼ ·- ¬«®²»¼ ±ººá
Yes. Turning the sound off does not affect hands-free calling, meaning that
you will still be able to talk to and hear the caller.
50
Page 51

ʱ´«³» °®»º»®»²½»-
Tap this button to change the volume for spoken instructions.
This setting does not change the volume of the radio, CDs, or music played
from an iPod® or USB storage device.
ʱ´«³»
°®»º»®»²½»-
Ý¿² ³§ ÙÑ ½¸¿²¹» ¬¸» ª±´«³» ¼»°»²¼·²¹ ±² ¸±© ²±·-§ ·¬ ·- ·² ¬¸» ½¿®á
Select Ô·²µ ª±´«³» ¬± ²±·-» ´»ª»´ and your GO will change the volume
according to the background noise. The noise level is constantly monitored by
the microphone on your GO. If there is a lot of noise in the car, your GO will
automatically increase the volume.
For example, if you are driving on the motorway, which is often very noisy, the
volume level on your GO will be increased. When you are driving more slowly
again, the volume level will be lowered by your GO.
Ó¿²¿¹» Ú¿ª±«®·¬»-
Tap this button to rename or delete Favourites.
To find a Favourite quickly, tap Ú·²¼, then start to type the name of the
Favourite. As soon as the Favourite is shown in the list, you can select it.
Ó¿²¿¹»
Ú¿ª±«®·¬»-
For more information about Favourites, see Ú¿ª±«®·¬»- on page 31.
ݸ¿²¹» ر³» ´±½¿¬·±²
Tap this button to set or change your Home location.
ݸ¿²¹» ر³»
´±½¿¬·±²
ܱ × ²»»¼ ¬± «-» ³§ ¿½¬«¿´ ¸±³» ¿¼¼®»-- º±® ¬¸» ر³» ´±½¿¬·±²á
No. Your Home location can be a place you go often, for example, your office.
It can be your actual home address, but it can be any address you like.
ɸ§ -¸±«´¼ × -»¬ ¿ ر³» ´±½¿¬·±²á
Having a Home location means that you have a quick and easy way to navigate
there, by tapping the Home button in the Ò¿ª·¹¿¬» ¬±òòò menu
51
Page 52

Ó¿²¿¹» ³¿°-
This button may only be available if all menu options are shown. To show all
menu options, tap ͸±© ßÔÔ ³»²« ±°¬·±²-.
For more information, see Ø·¼¼»² ¾«¬¬±²- ¿²¼ º»¿¬«®»- on page 48.
Tap this button to do the following:
! ܱ©²´±¿¼ ¿ ³¿° - you can buy new maps using TomTom HOME.
Ó¿²¿¹» ³¿°-
Ó¿²¿¹» ÐÑ×-
For more information, see Ë-·²¹ ̱³Ì±³ ØÑÓÛ on page 101.
! Í©·¬½¸ ³¿° - tap this button to change the map you are using.
! Ü»´»¬» ¿ ³¿° - tap this button to delete a map. This might be necessary
to create more space on your GO, for example when you want to load a
different map.
Ò±¬»æ ܱ²Ž¬ ¼»´»¬» ¿ ³¿° «²´»-- §±« ¸¿ª» ¿´®»¿¼§ ³¿¼» ¿ ¾¿½µ«° ±º ¬¸»
³¿°ò ׺ §±« ¼»´»¬» ¿ ³¿° ¾»º±®» §±« ³¿µ» ¿ ¾¿½µ«°ô §±« ©·´´ ²± ´±²¹»® ¾»
¿¾´» ¬± ´±¿¼ ¬¸» ³¿° ±² §±«® ÙÑò
For more information about making a backup, see Ë-·²¹ ̱³Ì±³ ØÑÓÛ
on page 101.
You can also download, add and delete maps using TomTom HOME.
This button may only be available if all menu options are shown. To show all
menu options, tap ͸±© ßÔÔ ³»²« ±°¬·±²-.
For more information, see Ø·¼¼»² ¾«¬¬±²- ¿²¼ º»¿¬«®»- on page 48.
Ó¿²¿¹» ÐÑ×-
Tap this button to do the following:
! Set alerts for when you are near POIs.
For example, your GO can tell you when there is a petrol station nearby.
! Create your own POI categories and add POIs to them.
For example, you could create a category of POIs called "Friends#, and
add all your friends addresses as POIs in the category. You can even add
your friends phone numbers with their address so you can call them
from your GO.
For more information about POIs, see б·²¬- ±º ײ¬»®»-¬ on page 37.
52
Page 53

ݸ¿²¹» ½¿® -§³¾±´
This button may only be available if all menu options are shown. To show all
menu options, tap ͸±© ßÔÔ ³»²« ±°¬·±²-.
For more information, see Ø·¼¼»² ¾«¬¬±²- ¿²¼ º»¿¬«®»- on page 48.
Tap this button to select a car symbol that will be used to show your current
position in the Driving view.
ݸ¿²¹» ½¿®
-§³¾±´
Э¸¿²¹» оЬснЬ ¼·-°´¿§ с М«®² ±² оЬ ¼·-°´¿§
Tap Ì«®² ±² îÜ ¼·-°´¿§ to change the perspective for viewing the map.
For example, the 2D view shows a two dimensional view of the map as
though viewed from above.
Ì«®² ±² îÜ
¼·-°´¿§
To switch the view to a three dimensional perspective, tap Э¸¿²¹» оЬснЬ
¼·-°´¿§ and select a view from the list.
Э¸¿²¹» оЬснЬ
¼·-°´¿§
ɸ»² -¸±«´¼ × «-» ¬¸·-á
In some situations, it is easier to see the map from above. Perhaps if the road
network is complicated or for times when you are walking while using your GO
to navigate.
͸±©ñØ·¼» ´¿²» ·³¿¹»-
This button may only be available if all menu options are shown. To show all
menu options, tap ͸±© ßÔÔ ³»²« ±°¬·±²-.
For more information, see Ø·¼¼»² ¾«¬¬±²- ¿²¼ º»¿¬«®»- on page 48.
Tap this button to show or hide the arrows that warn you which lane you
need to be in to navigate an approaching road exit or junction.
For more information on lane guidance images, see ß¼ª¿²½»¼ Ô¿²»
͸±© ´¿²»
·³¿¹»-
Ù«·¼¿²½» on page 99
53
Page 54

ݸ¿²¹» ³¿° ½±´±«®-
This button may only be available if all menu options are shown. To show all
menu options, tap ͸±© ßÔÔ ³»²« ±°¬·±²-.
For more information, see Ø·¼¼»² ¾«¬¬±²- ¿²¼ º»¿¬«®»- on page 48.
Tap this button to select the colour schemes for day and night map colours.
You can also download more colour schemes from TomTom Services.
ݸ¿²¹» ³¿°
½±´±«®-
Þ®·¹¸¬²»-- °®»º»®»²½»-
This button may only be available if all menu options are shown. To show all
menu options, tap ͸±© ßÔÔ ³»²« ±°¬·±²-.
For more information, see Ø·¼¼»² ¾«¬¬±²- ¿²¼ º»¿¬«®»- on page 48.
Tap this button to set the brightness of the screen.
Þ®·¹¸¬²»--
°®»º»®»²½»-
You can set the brightness separately for day map colours and for night
map colours.
You can also set these options:
! Ì«®² ¾®·¹¸¬²»-- ¼±©² ©¸»² ¼¿®µ - your GO uses a light sensor to detect
the background light level. If this option is selected, as it gets darker,
your GO reduces the brightness of the screen so that it is not distracting.
! Í©·¬½¸ ¬± ²·¹¸¬ ª·»© ©¸»² ¼¿®µ - your GO uses a light sensor to detect
the background light level. If this option is selected, when it gets dark,
your GO uses night colours for the Driving View.
You can set the map colour scheme by tapping ݸ¿²¹» ³¿° ½±´±«®-. For
more information, see ݸ¿²¹» ³¿° ½±´±«®- on page 54.
54
Page 55

ͬ¿¬«- ¾¿® °®»º»®»²½»-
This button may only be available if all menu options are shown. To show all
menu options, tap ͸±© ßÔÔ ³»²« ±°¬·±²-.
For more information, see Ø·¼¼»² ¾«¬¬±²- ¿²¼ º»¿¬«®»- on page 48.
Tap this button to select the information shown on the status bar:
! λ³¿·²·²¹ ¬·³» - the estimated time left until you reach your destination.
ͬ¿¬«- ¾¿®
°®»º»®»²½»-
! λ³¿·²·²¹ ¼·-¬¿²½» - the distance left until you reach your destination.
! Ý«®®»²¬ ¬·³»
! ß®®·ª¿´ ¬·³» - your estimated arrival time.
! Í°»»¼
! Ü·®»½¬·±²
! ͸±© ²»¨¬ -¬®»»¬ ²¿³» - the name of the next street on your journey.
! ͸±© ½«®®»²¬ -¬®»»¬ ²¿³»
! ͸±© ´»»©¿§ ¬± ¿®®·ª¿´ ¬·³» - your GO shows how late or early you will
be compared with the preferred arrival time that is set during the
planning of a route.
! ͸±© ³¿¨ -°»»¼ ²»¨¬ ¬± -°»»¼ - only available when speed (above) is
also selected.
! ͸±© ½±³°¿--
! ر© -¸±«´¼ ¬¸» -¬¿¬«- ¾¿® ¾» ¼·-°´¿§»¼á
ر®·¦±²¬¿´ - If you choose this option, the status bar will be shown at the
bottom of the Driving view.
Ê»®¬·½¿´ - If you choose this option, the status bar will be shown at the
right-hand side of the Driving view.
Ò±¬»æ ׺ ¬¸» -°»»¼ ´·³·¬ º±® ¬¸» ®±¿¼ §±« ¿®» ±² ·- ¿ª¿·´¿¾´»ô ·¬ ·- -¸±©² ²»¨¬
¬± §±«® -°»»¼ò
׺ §±« ¼®·ª» º¿-¬»® ¬¸¿² ¬¸» -°»»¼ ´·³·¬ô §±«® -°»»¼ ·- -¸±©² ·² ®»¼ò
ß«¬±³¿¬·½ ¦±±³·²¹
This button may only be available if all menu options are shown. To show all
menu options, tap ͸±© ßÔÔ ³»²« ±°¬·±²-.
For more information, see Ø·¼¼»² ¾«¬¬±²- ¿²¼ º»¿¬«®»- on page 48.
Tap this button to enable or disable automatic zooming in the Driving View.
ß«¬±³¿¬·½
¦±±³·²¹
55
Page 56

Ï«·½µ ³»²« °®»º»®»²½»-
This button may only be available if all menu options are shown. To show all
menu options, tap ͸±© ßÔÔ ³»²« ±°¬·±²-.
For more information, see Ø·¼¼»² ¾«¬¬±²- ¿²¼ º»¿¬«®»- on page 48.
Tap this button to choose up to six buttons to be used in the Quick menu.
The Quick menu button enables easy access for your most commonly used
buttons.
Ï«·½µ ³»²«
°®»º»®»²½»-
The buttons you assign for use with the Quick menu, are shown in the
Driving View.
Ù«·¼»¼ ¬±«®-
This button may only be available if all menu options are shown. To show all
menu options, tap ͸±© ßÔÔ ³»²« ±°¬·±²-.
For more information, see Ø·¼¼»² ¾«¬¬±²- ¿²¼ º»¿¬«®»- on page 48.
Tap this button to show one of the Guided tours on how to use your
TomTomGO.
Ù«·¼»¼ ¬±«®-
Ò¿³» °®»º»®»²½»-
This button may only be available if all menu options are shown. To show all
menu options, tap ͸±© ßÔÔ ³»²« ±°¬·±²-.
For more information, see Ø·¼¼»² ¾«¬¬±²- ¿²¼ º»¿¬«®»- on page 48.
Tap this button to set the information that is shown on the map in the
Driving View. The following options are available:
! ͸±© ¸±«-» ²«³¾»®- ¾»º±®» -¬®»»¬ ²¿³»-
Ò¿³»
°®»º»®»²½»-
! ͸±© -¬®»»¬ ²¿³»- - if you are using a computer voice for spoken
! ͸±© ²»¨¬ ³±¬±®©¿§ ñ -·¹²°±-¬ - when this option is selected, the next
! ͸±© ½«®®»²¬ -¬®»»¬ ²¿³» ±² ³¿°
instructions and have selected that street names should be read aloud,
you do not need to select this option, since the street names will be read
aloud even though this option is not selected.
major road on your route is shown at the top of the screen in the Driving
View.
56
Page 57

Í»¬ «²·¬-
This button may only be available if all menu options are shown. To show all
menu options, tap ͸±© ßÔÔ ³»²« ±°¬·±²-.
For more information, see Ø·¼¼»² ¾«¬¬±²- ¿²¼ º»¿¬«®»- on page 48.
Tap this button to set the type of units that will be shown for the following:
! Distance
! Time
Í»¬ «²·¬-
! Latitude and longitude
! Temperature
! Air pressure
Ñ°»®¿¬» ´»º¬ó¸¿²¼»¼ ñ Ñ°»®¿¬» ®·¹¸¬ ¸¿²¼»¼
This button may only be available if all menu options are shown. To show all
menu options, tap ͸±© ßÔÔ ³»²« ±°¬·±²-.
For more information, see Ø·¼¼»² ¾«¬¬±²- ¿²¼ º»¿¬«®»- on page 48.
Tap this button to move important buttons, for example, the ܱ²» and
Ý¿²½»´ buttons as well as the zoom bar, to the left hand side of the screen.
This makes it easier to tap the buttons with your left hand without blocking
the screen.
Ñ°»®¿¬» ´»º¬ó
¸¿²¼»¼
To move the buttons back to the right hand side of the screen, tap Ñ°»®¿¬»
®·¹¸¬ó¸¿²¼»¼.
Õ»§¾±¿®¼ °®»º»®»²½»-
You use the keyboard to enter your destination or to find an item in a list,
such as a POI.
Tap this button to select the size of the keys on the keyboard and the
Õ»§¾±¿®¼
°®»º»®»²½»-
keyboard layout. You can select from two sizes:
! Ô¿®¹» µ»§¾±¿®¼
! ͳ¿´´ µ»§¾±¿®¼
Three keyboard layouts are available:
! ßÞÝÜ µ»§¾±¿®¼
! ПЙЫОМЗ µ»§¾±¿®¼
! ЯЖЫОМЗ µ»§¾±¿®¼
Ò±¬»æ ̸» µ»§¾±¿®¼ ¼±»- ²±¬ ·²½´«¼» ¿½½»²¬- ±º ¿²§ µ·²¼ º±® ¿²§ ´¿²¹«¿¹»
-± §±« ¼±²Ž¬ ¸¿ª» ¬± ©±®®§ ¿¾±«¬ »²¬»®·²¹ ´»¬¬»®- ©·¬¸ ¿½½»²¬-ò Í·³°´§ ¬§°»
¬¸» ´»¬¬»® ©·¬¸±«¬ ¬¸» ¿½½»²¬ ¿²¼ §±«® ÙÑ ©·´´ ®»½±¹²·-» ¬¸» ©±®¼ò
57
Page 58

д¿²²·²¹ °®»º»®»²½»-
This button may only be available if all menu options are shown. To show all
menu options, tap ͸±© ßÔÔ ³»²« ±°¬·±²-.
For more information, see Ø·¼¼»² ¾«¬¬±²- ¿²¼ º»¿¬«®»- on page 48.
Tap this button to set the kind of route planned when you select a
destination.
The following options are available:
д¿²²·²¹
°®»º»®»²½»-
! ß-µ ³» »ª»®§ ¬·³» × °´¿²
! ß´©¿§- °´¿² º¿-¬»-¬ ®±«¬»-
! ß´©¿§- °´¿² -¸±®¬»-¬ ®±«¬»-
! ß´©¿§- ¿ª±·¼ ³±¬±®©¿§-
! ß´©¿§- °´¿² ©¿´µ·²¹ ®±«¬»-
! ß´©¿§- °´¿² ¾·½§½´» ®±«¬»-
! ß´©¿§- °´¿² º±® ´·³·¬»¼ -°»»¼
Then answer the following question:
ܱ §±« ©¿²¬ ¬¸» ®±«¬» -«³³¿®§ -½®»»² ¬± ½´±-» ¿«¬±³¿¬·½¿´´§ ¿º¬»® ïð
-»½±²¼-á
̱´´ ®±¿¼ °®»º»®»²½»-
This button may only be available if all menu options are shown. To show all
menu options, tap ͸±© ßÔÔ ³»²« ±°¬·±²-.
For more information, see Ø·¼¼»² ¾«¬¬±²- ¿²¼ º»¿¬«®»- on page 48.
̱´´ ®±¿¼
°®»º»®»²½»-
Tap this button to set how your GO handles toll roads if they are on the
route to a destination you set. You can choose from the following options:
! ß-µ ³» ©¸»² ¬¸»®» ¿®» ¬±´´ ®±¿¼- ±² ³§ ®±«¬» - you are asked if you
want to avoid a toll road whenever you plan a route.
! ß´©¿§- ¿ª±·¼ ¬±´´ ®±¿¼-
! Ò»ª»® ¬± ¿ª±·¼ ¬±´´ ®±¿¼-
58
Page 59

Í»¬ ±©²»®
This button may only be available if all menu options are shown. To show all
menu options, tap ͸±© ßÔÔ ³»²« ±°¬·±²-.
For more information, see Ø·¼¼»² ¾«¬¬±²- ¿²¼ º»¿¬«®»- on page 48.
Tap this button to enter your name and address as the owner of your GO
and to change or delete a 4-digit password for your GO.
Í»¬ ±©²»®
Ò±¬»æ DZ« ½¿² ±²´§ ½¸¿²¹» ±® ¼»´»¬» ¿ ìó¼·¹·¬ °¿--©±®¼ ±² §±«®
̱³Ì±³ÙÑò
You can create a 4-digit password for your GO using TomTom HOME:
1.Connect your GO to your computer and turn on your GO and your
computer.
TomTom HOME starts automatically.
For information about installing TomTom HOME on your computer, see
Ë-·²¹ ̱³Ì±³ ØÑÓÛ on page 101.
2.From the Options menu in TomTom HOME, click My GO.
3.Click the ON/OFF button on the picture of your GO to start the application
on your computer.
4.From the Main Menu, click ݸ¿²¹» °®»º»®»²½»-.
5.Click Í»¬ Ñ©²»®. You can now set a 4-digit password for your GO.
You can only create a 4-digit password using TomTom HOME.
Í°»¿µ»® °®»º»®»²½»-
This button may only be available if all menu options are shown. To show all
menu options, tap ͸±© ßÔÔ ³»²« ±°¬·±²-.
Í°»¿µ»®
°®»º»®»²½»-
For more information, see Ø·¼¼»² ¾«¬¬±²- ¿²¼ º»¿¬«®»- on page 48.
Tap this button to select which speakers are used by your GO for playing
music and spoken instructions.
For more information, see ײ¬»®²¿´ ¿²¼ »¨¬»®²¿´ -°»¿µ»®- on page 17.
The following options are available:
! ײ¬»®²¿´ -°»¿µ»®
! Þ´«»¬±±¬¸ Ø·óÚ· ¼»ª·½»
! Ô·²»ó±«¬ ø¿«¼·± ½¿¾´»÷
! ÚÓ ¬± §±«® ½¿® ®¿¼·±
Ò±¬»æ ̸» ÚÓ Ì®¿²-³·¬¬»® ·- ¿ª¿·´¿¾´» ·² ¬¸» ÙÑ ëíðô éíð ¿²¼ çíðò
59
Page 60

Ý¿® °®»º»®»²½»-
This button may only be available if all menu options are shown. To show all
menu options, tap ͸±© ßÔÔ ³»²« ±°¬·±²-.
For more information, see Ø·¼¼»² ¾«¬¬±²- ¿²¼ º»¿¬«®»- on page 48.
Tap this button to change the way your GO responds to events in your car.
! Ô·²µ ²·¹¸¬ ª·»© ¬± ¸»¿¼´·¹¸¬-
Ý¿®
Ю»º»®»²½»-
Ó«-·½ °®»º»®»²½»-
This button may only be available if all menu options are shown. To show all
menu options, tap ͸±© ßÔÔ ³»²« ±°¬·±²-.
For more information, see Ø·¼¼»² ¾«¬¬±²- ¿²¼ º»¿¬«®»- on page 48.
Tap this button to change the way your GO behaves when playing music.
! ͸«ºº´» -±²¹-
! λ°»¿¬ -±²¹-
! ײ-¬®«½¬·±²- ³«¬» ½¿® ®¿¼·±
Ó«-·½
Ю»º»®»²½»-
! λ¼«½» ¾®·¹¸¬²»--
! ͸±© ³«-·½ ¾«¬¬±² ·² Ü®·ª·²¹ Ê·»©
! ß«¬±³¿¬·½¿´´§ -©·¬½¸ ¬± Ü®·ª·²¹ Ê·»©
! Í´·¼»-¸±©
Ò±¬»æ ̸» ÚÓ Ì®¿²-³·¬¬»® ·- ¿ª¿·´¿¾´» ·² ¬¸» ÙÑ ëíðô éíð ¿²¼ çíðò
60
Page 61

ͬ¿®¬ó«° °®»º»®»²½»-
This button may only be available if all menu options are shown. To show all
menu options, tap ͸±© ßÔÔ ³»²« ±°¬·±²-.
For more information, see Ø·¼¼»² ¾«¬¬±²- ¿²¼ º»¿¬«®»- on page 48.
Tap this button to select how your GO will behave when you turn on the
device. The following options are available:
! ݱ²¬·²«» ©¸»®» × ´»º¬ ±ºº - your GO starts and shows the last screen that
ͬ¿®¬ó«°
°®»º»®»²½»-
was shown when you turned off the device.
! ß-µ º±® ¿ ¼»-¬·²¿¬·±² - your GO starts with Ò¿ª·¹¿¬» ¬±òòò menu. You can
enter a destination immediately.
! ͸±© ¬¸» Ó¿·² Ó»²« - your GO starts with the Main Menu.
! ͬ¿®¬ TomTom Ö«µ»¾±¨ - your GO starts by opening the TomTom
Jukebox.
! ͬ¿®¬ Í´·¼»-¸±© - your GO starts by showing a slideshow of the images
stored there. To interrupt the slideshow, tap the screen.
You are then asked if you want to change the picture that is shown
whenever you start your GO.
Tap Ò± to finish or tap Ç»- to see the photos stored on your GO and tap on
a photo to select that photo for use as your start-up picture.
Þ´«»¬±±¬¸ °®»º»®»²½»-
This button may only be available if all menu options are shown. To show all
menu options, tap ͸±© ßÔÔ ³»²« ±°¬·±²-.
For more information, see Ø·¼¼»² ¾«¬¬±²- ¿²¼ º»¿¬«®»- on page 48.
Tap this button to disable or enable Bluetooth functionality on your GO.
Tap ß¼ª¿²½»¼ to set how the Bluetooth connection with your phone wil be
used.
Þ´«»¬±±¬¸
°®»º»®»²½»-
You can select any of the following options:
! Û²¿¾´» ©·®»´»-- ¼¿¬¿
! Û²¿¾´» ¸¿²¼-󺮻» ½¿´´·²¹
In some places, such as hospitals and aeroplanes, you are required to turn
Bluetooth off on all electronic devices.
61
Page 62

Ü·-¿¾´» ©·®»´»-- ¼¿¬¿ ñ Û²¿¾´» ©·®»´»-- ¼¿¬¿
This button may only be available if all menu options are shown. To show all
menu options, tap ͸±© ßÔÔ ³»²« ±°¬·±²-.
For more information, see Ø·¼¼»² ¾«¬¬±²- ¿²¼ º»¿¬«®»- on page 48.
Tap this button to block the reception of wireless data. You will still be
connected to your mobile phone via Bluetooth and will still be able to
receive and make hands-free calls. You will not be able to receive any data
that uses a wireless data connection, such as TomTom Traffic.
Ü·-¿¾´»
©·®»´»-- ¼¿¬¿
To turn wireless data on again, tap Û²¿¾´» ©·®»´»-- ¼¿¬¿.
Í»²¼ñλ½»·ª» º·´»-
This button may only be available if all menu options are shown. To show all
menu options, tap ͸±© ßÔÔ ³»²« ±°¬·±²-.
For more information, see Ø·¼¼»² ¾«¬¬±²- ¿²¼ º»¿¬«®»- on page 48.
Tap this button to send or receive files, such as itineraries and voices, using
your GO with other Bluetooth devices.
Í»²¼ñλ½»·ª»
º·´»-
Û¼·¬ ̱³Ì±³ Í»®ª·½»- ¿½½±«²¬
This button may only be available if all menu options are shown. To show all
menu options, tap ͸±© ßÔÔ ³»²« ±°¬·±²-.
For more information, see Ø·¼¼»² ¾«¬¬±²- ¿²¼ º»¿¬«®»- on page 48.
Tap this button to log in to your TomTom account.
If you have more than one TomTom account or if several people are sharing
Û¼·¬ ̱³Ì±³
¿½½±«²¬
the same TomTomGO, you can create another TomTom account using a
different email address.
62
Page 63

Þ¿¬¬»®§ -¿ª·²¹ °®»º»®»²½»-
This button may only be available if all menu options are shown. To show all
menu options, tap ͸±© ßÔÔ ³»²« ±°¬·±²-.
For more information, see Ø·¼¼»² ¾«¬¬±²- ¿²¼ º»¿¬«®»- on page 48.
Tap this button to configure your GO to conserve power when possible. The
following options are available:
! Ò»ª»® ¬«®² ±ºº -½®»»²
Þ¿¬¬»®§ -¿ª·²¹
°®»º»®»²½»-
! Ì«®² ±ºº -½®»»² ¾»¬©»»² ·²-¬®«½¬·±²-
! ß´©¿§- ¬«®² ±ºº -½®»»²
Then select whether or not you want to Í©·¬½¸ ±ºº ©¸»² »¨¬»®²¿´ °±©»® ·´±-¬.
ݸ¿²¹» ´¿²¹«¿¹»
Tap this button to change the language used for all the buttons and
messages you see on your GO.
You can choose from a wide range of languages. When you change the
ݸ¿²¹»
´¿²¹«¿¹»
language, you are also given the opportunity to change the voice.
Í»¬ ½´±½µ
Tap this button to select the type of clock that is shown and set the time.
The easiest way to set the time is by tapping the ͧ²½ button. Your GO will
then take the time from GPS information.
Í»¬ ½´±½µ
For more information about GPS, see Щ´±¾¿´ Р±-·¬·±²·²¹ Н§-¬»³ шЩРНч on
page 100.
Ò±¬»æ ߺ¬»® «-·²¹ ͧ²½ ¬± -»¬ ¬¸» ¬·³»ô §±« ³¿§ ¸¿ª» ¬± ¿¼¶«-¬ ¬¸» ¸±«®¼»°»²¼·²¹ ±² §±«® ¬·³» ¦±²»ò DZ«® ÙÑ ©±®µ- ±«¬ §±«® ¬·³» ¦±²» ¿²¼
¿´©¿§- µ»»°- ¬¸» ¬·³» ½±®®»½¬ «-·²¹ ÙÐÍ ·²º±®³¿¬·±²ò
DZ« ½¿² ±²´§ «-» ͧ²½ ·º §±« ¸¿ª» ÙÐÍ ®»½»°¬·±²ô -± §±« ½¿²²±¬ -»¬ ¬¸»
½´±½µ ·² ¬¸·- ©¿§ ©¸»² §±« ¿®» ·²¼±±®-ò
Ø·¼¼»² ¾«¬¬±²- ¿²¼ º»¿¬«®»-
When you first start using your TomTomGO, all the buttons are shown in the
menu.
63
Page 64

The buttons for the more advanced features can be hidden. This is a useful
option because you are unlikely to use certain features very often.
Tap this button in the Preferences menu, to reduce the number of buttons
that are shown.
You might want to do this so that only frequently used buttons are shown.
͸±© º»©»®
³»²« ±°¬·±²-
When you need to use the buttons that are hidden, you can press ͸±©
ßÔÔ ³»²« ±°¬·±²- in the Preferences menu to show all buttons.
Tap this button in the Preferences menu, to show all the buttons available
on your TomTomGO.
͸±© ßÔÔ
³»²« ±°¬·±²-
Ø·¼» ¬·°- ñ ͸±© ¬·°-
This button may only be available if all menu options are shown. To show all
menu options, tap ͸±© ßÔÔ ³»²« ±°¬·±²-.
For more information, see Ø·¼¼»² ¾«¬¬±²- ¿²¼ º»¿¬«®»- on page 48.
Tap this button to stop your GO from showing tips.
To turn tips on again, tap ͸±© ¬·°-.
Ø·¼» ¬·°-
λ-»¬ º¿½¬±®§ -»¬¬·²¹-
This button may only be available if all menu options are shown. To show all
menu options, tap ͸±© ßÔÔ ³»²« ±°¬·±²-.
For more information, see Ø·¼¼»² ¾«¬¬±²- ¿²¼ º»¿¬«®»- on page 48.
Tap this button to restore the factory settings to your TomTomGO.
All your settings, including Favourites, your Home location, warnings for
POIs and any Itineraries you have created, as well as recent destinations
λ-»¬ º¿½¬±®§
-»¬¬·²¹-
and recent calls and callers, will be deleted.
64
Page 65

̱³Ì±³ Í»®ª·½»-ïéò
TomTom Services
TomTom Services keep you informed and entertained while you re on the
road.
You can subscribe to a range of extras and download them either directly to
your GO, or to your computer from where you can transfer them to your GO.
Ì·°-
! New services are being added regularly. Use TomTom HOME or visit
©©©ò¬±³¬±³ò½±³ñ-»®ª·½»- to find out what s available.
! To download TomTom services to your GO, you need a mobile phone with
Bluetooth and a wireless data connection (GPRS, EDGE, UMTS or CDMA).
Your mobile operator may charge you for using a wireless data connection.
Don t forget that you can download many TomTom services to your
computer without needing to set up a wireless data connection.
! Not all services are available in all countries. For more information, visit
©©©ò¬±³¬±³ò½±³ñ-»®ª·½»-
65
Page 66

̱³Ì±³Ó¿° ͸¿®»ïèò
TomTomMap Share
TomTomMap ShareTM is a free technology that lets you make updates to
your map and if you want to, share those updates with other members of the
TomTomMap Share community.
If you find a street that has recently been blocked to traffic which was open
before, you can use Map Share to update your map and then share the update
with other Map Share members.
You can use Map Shareto send and receive map updates during the first year
after the map s release date. This means that one year after the release date,
you will no longer be able to send or receive map updates for that version of
the map - You will still be able to make updates to your own map for use on
your own device.
When you join the TomTomMap Share community you can keep your maps
up-to-date with the latest updates made by other Map Share community
members.
You choose the type of updates you want and each time you connect your
TomTomGO to TomTom HOME, the map is automatically updated.
̱³Ì±³Ó¿° ͸¿®» ½±³³«²·¬§
To join the Map Share community, do the following:
1.Tap Ó¿° ½±®®»½¬·±²- in the Main Menu.
Ó¿° «°¼¿¬»-
Ì·°: If you cannot see the Ó¿° ½±®®»½¬·±²- button in the Main Menu, tap ͸±©
ßÔÔ ³»²« ±°¬·±²- in the Preferences menu.
2.Tap ܱ©²´±¿¼ ½±®®»½¬·±²- ³¿¼» ¾§ ±¬¸»®-.
3.Tap Ö±·².
When you connect your TomTomGO to computer, TomTom HOME
automatically downloads any available map updates and sends any changes
you have made, to the Map Share community.
There are two types of map update:
! Updates that are immediately shown on the map. These include, changing
the traffic flow of a street, blocking or renaming a street and adding or
editing POIs.
This type of change is immediately shown on your own map. You can hide
these updates at any time in the Map Share preferences menu.
66
Page 67

For more information on showing and hiding updates, see ݸ¿²¹·²¹ ³§
°®»º»®»²½»- º±® ³¿° «°¼¿¬»- on page 68.
! Updates that are reported to TomTom but not shown immediately on your
map. These include, missing streets, errors in motorway entrances and
exits and missing roundabouts.
This type of update is investigated by TomTom and once verified, is included
in the next map release. These updates are therefore not shared with the Map
Share community.
Ì·°: If you cannot see the Ó¿° ½±®®»½¬·±²- button in the Main Menu, tap ͸±©
ßÔÔ ³»²« ±°¬·±²- in the Preferences menu.
Ó¿µ·²¹ ¿ ³¿° «°¼¿¬»
1.Tap Ó¿° ½±®®»½¬·±²- in the Main Menu.
2.Tap ݱ®®»½¬ ¿ ³¿° »®®±®.
ݱ®®»½¬ ¿ ³¿°
»®®±®
A list of possible map updates is shown.
3.Select the type of update you want to report.
Ò±¬»æ ׺ §±« ¬¿° ß¼¼ ³·--·²¹ ÐÑ× ±® λ°±®¬ ±¬¸»® »®®±® §±« ©·´´ ¾» ¿-µ»¼ º±®
-±³» ¿¼¼·¬·±²¿´ ·²º±®³¿¬·±² ¾»º±®» ¬¸» ²»¨¬ -¬»°ò
4.Select the method you want to use for selecting the location of the
update.
5.When you have found the location, tap ܱ²».
6.Enter update or confirmation of update now.
For more information on the different types of updates you can make, see
Ó¿° «°¼¿¬» ½¿¬»¹±®·»- on page 68.
Ó¿®µ·²¹ ¿ ³¿° »®®±® ©¸·´» ±² ¬¸» ³±ª»
If you notice an item on your map that needs attention, you can mark the
location using the λ°±®¬ button and then enter the details when you are no
longer driving.
To show the λ°±®¬ button in the Driving View, do the following:
1.Tap Ó¿° ½±®®»½¬·±²- in the Main Menu.
Ì·°: If you cannot see the Ó¿° ½±®®»½¬·±²- button in the Main Menu, tap ͸±©
ßÔÔ ³»²« ±°¬·±²- in the Preferences menu.
2.Tap ݱ®®»½¬·±² °®»º»®»²½»-.
3.Tap ܱ²» and then tap ܱ²» again.
4.Select ͸±© ®»°±®¬ ¾«¬¬±², then tap ܱ²».
The λ°±®¬ button is shown on the left-hand side of the Driving View. After
you mark a location, you can add more information about the change when
you open the Ó¿° ½±®®»½¬·±²- menu.
For example, you are driving to a friend's house and you notice that the name
of the street you are on is different from the one on your map. To report the
67
Page 68

change, tap the λ°±®¬ button and your GO will save your current location.
You can then send the update to TomTomMap Share when you have finished
your journey.
For more information see ݸ¿²¹·²¹ ³§ °®»º»®»²½»- º±® ³¿° «°¼¿¬»- on page
68.
λ½»·ª·²¹ ¬¸» ´¿¬»-¬ ³¿° «°¼¿¬»-
When you connect your TomTomGO to your computer, TomTom HOME
automatically downloads any available map updates and sends any changes
you have made, to the Map Share community.
There are several types of updates which can be set in the Correction
preferences menu.
For information about how to do this, see ݸ¿²¹·²¹ ³§ °®»º»®»²½»- º±® ³¿°
«°¼¿¬»- on page 68.
ݸ¿²¹·²¹ ³§ °®»º»®»²½»- º±® ³¿° «°¼¿¬»-
Correction preferences is used to set the way TomTomMap Share runs on
your device.
You can set the following preferences:
! Choose what types of updates you want to use on your maps.
! Decide if you want to share your updates with others.
! Show or hide the λ°±®¬ button in the Driving View.
To set your preferences, do the following:
1.Tap Ó¿° ½±®®»½¬·±²- in the Main Menu.
2.Tap ݱ®®»½¬·±² °®»º»®»²½»-.
A list of update types is shown.
3.Tick the box next to each update type you want use.
4.Tap ܱ²».
5.Choose how you want to share your map updates with the Map Share
community, then tap ܱ²».
6.Choose if you want to see the λ°±®¬ button in the Driving View.
7.Tap ܱ²».
Ì·°: If you later decide you want to remove updates from the map, clear the
checkbox next to the types of update you want to remove. If you clear all the
checkboxes, your map returns to the original state before the first update.
For more information on how to use the λ°±®¬ button, see Ó¿®µ·²¹ ¿ ³¿°
»®®±® ©¸·´» ±² ¬¸» ³±ª» on page 67.
Ó¿° «°¼¿¬» ½¿¬»¹±®·»-
There are several types of update that you can make to a map.
68
Page 69

ø˲÷¾´±½µ
-¬®»»¬
To make an update to your map, tap Ó¿° ½±®®»½¬·±²- in the Main Menu then
tap ݱ®®»½¬ ¿ ³¿° »®®±®. The following types of updates are shown.
Tap this button to block or unblock a street. You can block or unblock the
street in one or both directions.
For example, to correct a street near to your current location, do the
following:
1.Tap ø˲÷¾´±½µ -¬®»»¬.
2.Tap Ò»¿® §±« to select a street near your current location. You can select
a street by name, a street near your Home location or a street on the
map.
3.Select the street or section of a street you want to correct by tapping it
on the map.
The street you select is highlighted and the cursor shows the name of
the street.
4.Tap ܱ²».
Your device shows the street and whether the traffic is blocked or
allowed in each direction:
못®-» ¬®¿ºº·½
¼·®»½¬·±²
5.Tap one of the direction buttons to block or unblock the flow of traffic in
that direction.
6.Tap ܱ²».
The next time you connect your device to TomTom HOME, your updates
are shared with the TomTomMap Share community.
Tap this button to correct the traffic direction of a one-way street, where the
direction of traffic is different to the direction shown on your map.
Ò±¬»æ 못®-» ¬®¿ºº·½ ¼·®»½¬·±² ±²´§ ©±®µ- º±® ±²»ó©¿§ -¬®»»¬-ò ׺ §±« -»´»½¬
¿ ¬©±ó©¿§ -¬®»»¬ §±« ©·´´ ¾» ¹·ª»² ¬¸» ½¸¿²½» ¬± ¾´±½µñ«²¾´±½µ ¬¸» -¬®»»¬
®¿¬¸»® ¬¸¿² ½¸¿²¹·²¹ ¬¸» ¼·®»½¬·±²ò
69
Page 70

²
¼
-
½
µ
½
¾
¿
ª
µ
ª
-
µ
¾
º
ª
¶
¼
-
Tap this button to change the name of a street on your map.
For example, to rename a street near to your current location:
Û¼·¬ -¬®»»¬
²¿³»
ݸ¿²¹» ¬«®²
¼·®»½¬·±²-
ݸ¿²¹» ®±¿¼
-°»»¼
1.Tap Û¼·¬ -¬®»»¬ ²¿³»ò
2.Tap Ò»¿® §±«.
3.Select the street or section of a street you want to correct by tapping it
on the map.
The street you select is highlighted and the cursor shows the name of
the street.
4.Tap ܱ²».
5.Type the correct street name.
6.Tap ܱ²».
Tap this button to change and report incorrect road turn directions.
Tap this button to change and report road speed limit.
ß¼¼ ³·--·²¹
ÐÑ×
Tap this button to add a new Point of Interest (POI).
For example to add a new restaurant near to your current location:
1.Tap ß¼¼ ³·--·²¹ ÐÑ×.
2.Tap λ-¬¿«®¿²¬ in the list of POI categories.
3.Tap Ò»¿® §±«.
4.Select the location of the missing restaurant.
You can select the location by entering the address or by selecting the
location on the map. Select Ò»¿® §±« or Ò»¿® ¸±³» to open the map at
your current location or at your Home location.
5.Tap ܱ²».
6.Type the name of the restaurant then tap ÑÕ.
7.If you know the telephone number of the restaurant you can type it, then
tap ÑÕ.
If you don t know the number, just tap ÑÕ without typing a number.
70
Page 71

Tap this button to edit an existing POI.
You can use this button to make the following changes to a POI:
Û¼·¬ ÐÑ×
λ°±®¬ ±¬¸»®
»®®±®
! Delete the POI.
! Rename the POI.
! Change the telephone number of the POI.
! Change the category that a POI belongs to.
! Move the POI on the map.
Tap this button to report other types of update.
These updates are not immediately corrected on your map. Your
TomTomGO sends a special update report to TomTomMap Share.
You can report missing streets, errors in motorway entrances and exits and
missing roundabouts. If the update you want to report is not covered by
any of these report types, enter a general description then tap Ѭ¸»®.
71
Page 72

Ì®¿ºº·½ ·²º±®³¿¬·±²ïçò
Traffic information
You can obtain traffic information in three ways:
! TomTom HD Traffic
! TomTom Traffic
! Traffic Message Channel (TMC)
׳°±®¬¿²¬: Reliable TMC Traffic reception is highly dependent upon optimal
antenna placement, vehicle features such as windscreen reflective shielding,
the surrounding environment such as mountains and high buildings and RDSTMC Radio station transmission signal strength.
Some vehicles have a heat reflective shield embedded in the windscreen
which might prevent a navigation device from locating your current position.
If this is a problem in your vehicle, use the TomTom External Antenna Kit
(available as an accessory).
̱³Ì±³ ØÜ Ì®¿ºº·½
TomTom HD Traffic is a unique TomTom service for receiving up-to-date
traffic information. It helps you plan the smartest route possible to your
destination.
To use TomTom HD Traffic you need a TomTom HD Traffic Receiver.
Ò±¬»ж М¸» ШЬ М®¿ºº·½ О»½»·ª»® ·- ·²½´«¼»¼ ©·¬¸ М±³М±³ЩС лнрсйнрсзнр
ШЬМ®¿ºº·½т К·-·¬ ©©©ò¬±³¬±³ò½±³ ¬± º·²¼ ±«¬ ·º ¬¸» ØÜ Ì®¿ºº·½ λ½»·ª»® ·¿ª¿·´¿¾´» ¿- ¿² ¿½½»--±®§ ·² §±«® ®»¹·±²ò
For more information about HDTraffic, see ̱³Ì±³ ØÜ Ì®¿ºº·½ ·²º±®³¿¬·±²
on page 90.
Í»¬¬·²¹ «° ̱³Ì±³ ØÜ Ì®¿ºº·½
To start using TomTom HD Traffic, you need to connect your TomTom HD
Traffic Receiver to your TomTom navigation device:
1.Insert the HD Traffic Receiver into your car s cigarette lighter.
The red Power indicator turns on.
2.Insert the USB cable into your navigation device.
72
Page 73

You can now begin using your HD Traffic Receiver.
Í¿º»¬§ Ò±¬·½»
A TomTom HD Traffic Receiver contains a GSM module which can interfere
with electrical devices such as cardiac pacemakers, hearing aids and aviation
equipment.
Interference with these devices may endanger the health or life of others.
Do not use near unprotected electrical units nor in areas where the use of
mobile telephones is prohibited, such as hospitals and airplanes.
̱³Ì±³ Ì®¿ºº·½
TomTom Traffic is a TomTom Service, available as a subscription, for
receiving up-to-date traffic information from the best local sources.
Ò±¬»æ ̱³Ì±³ Ì®¿ºº·½ ·- ²±¬ ¿ª¿·´¿¾´» ·² ¿´´ ½±«²¬®·»- ±® ¿®»¿-ò Ù± ¬±
¬±³¬±³ò½±³ñ-»®ª·½»- ¬± ½¸»½µ ¿ª¿·´¿¾·´·¬§ ·² §±«® ½±«²¬®§ò
The blue HD Traffic Receiver indicator flashes while your HD Traffic
Receiver attempts to connect to the TomTom HD Traffic Receiver service.
When the connection is made, the HD Traffic Receiver indicator stops
flashing and stays lit.
To use TomTom Traffic, you will need to establish a wireless data connection
(GPRS, EDGE, UMTS, CDMA) between your TomTom device and a Bluetooth
enabled mobile phone and you must have a wireless data subscription with
your mobile network operator. For more information, go to ¬±³¬±³ò½±³ñ
°¸±²»-
To use TomTom Traffic, do the following:
1.Tap TomTom Ì®¿ºº·½ in the Main Menu.
You will be prompted to set up a wireless data connection with your mobile
phone, and then to enter your MyTomTom account details.
2.Tap Û²¿¾´» Ì®¿ºº·½.
For more information, see ̱³Ì±³ Ì®¿ºº·½ on page 75.
73
Page 74

М¸» М®¿ºº·½ У»--¿¹» Э¸¿²²»´ шМУЭч
TMC transmits traffic information as a radio signal and is available free-ofcharge in many countries.
TMC is not a TomTom Service, but is available when using the TomTom RDSTMC Traffic Receiver. The TomTom RDS-TMC Traffic Receiver is included
with some products and available as an accessory for others.
Ò±¬»æ ̱³Ì±³ ·- ²±¬ ®»-°±²-·¾´» º±® ¬¸» ¿ª¿·´¿¾·´·¬§ ±® ¯«¿´·¬§ ±º ¬®¿ºº·½
·²º±®³¿¬·±² °®±ª·¼»¼ ¾§ ÌÓÝò
ÌÓÝ ·- ²±¬ ¿ª¿·´¿¾´» ·² ¿´´ ½±«²¬®·»- ±® ®»¹·±²-ò Ù± ¬± ¬±³¬±³ò½±³ñ®¼-󬳽
¬± ½¸»½µ º±® ¿ª¿·´¿¾·´·¬§ ·² §±«® ½±«²¬®§ ±® ®»¹·±²ò
For more information, see М®¿ºº·½ ·²º±®³¿¬·±² «-·²¹ ОЬНуМУЭ on page 82.
74
Page 75

̱³Ì±³ Ì®¿ºº·½îðò
TomTom Traffic
TomTom Traffic is a TomTom Service for receiving up-to-date traffic
information. TomTom Traffic requires a Bluetooth enabled mobile phone and
a wireless data connection (GPRS, EDGE, UMTS, CDMA).
TomTom Traffic uses the most up-to-date information from the best local
sources. For more information about subscribing see ¬±³¬±³ò½±³ñ-»®ª·½»-
Í»¬¬·²¹ «° ̱³Ì±³ Ì®¿ºº·½
To use TomTom Traffic, you need to establish a connection between your
mobile phone and your TomTom device. If you have not already done so, tap
Ó±¾·´» °¸±²» in the Ó¿·² Ó»²« to establish this connection and then do the
following:
1.Tap TomTom Ì®¿ºº·½ in the Main Menu.
2.Tap Û²¿¾´» Ì®¿ºº·½.
Ò±¬»æ ̱³Ì±³ Ì®¿ºº·½ ®»¬®·»ª»- ¬®¿ºº·½ ·²º±®³¿¬·±² «-·²¹ ¿ ©·®»´»-- ¼¿¬¿
½±²²»½¬·±² ±² §±«® ³±¾·´» °¸±²»ò DZ« ³«-¬ »-¬¿¾´·-¸ ¿ Þ´«»¬±±¬¸ ½±²²»½¬·±²
¾»¬©»»² §±«® °¸±²» ¿²¼ §±«® ¼»ª·½» ¿²¼ §±« ³«-¬ ¿´-± ¸¿ª» ¿ ©·®»´»-- ¼¿¬¿
-«¾-½®·°¬·±² ©·¬¸ §±«® ³±¾·´» ²»¬©±®µ ±°»®¿¬±®ò
3.Enter your username and password.
The Traffic sidebar is shown on the right-hand side of the Driving View and
your device retrieves the latest traffic information from TomTom.
The following symbols are shown at the top of the Traffic sidebar:
Your device is busy retrieving traffic information.
Traffic information is up to date.
75
Page 76

Traffic information has not been updated for at least 15 minutes.
Traffic information has not been updated for at least 30 minutes.
Traffic information has not been updated for at least 45 minutes.
Traffic information has not been updated for at least one hour.
No connection is available between your TomTom device and
your mobile.
Ì·°: Providing you have a connection between your device and mobile phone,
You can retrieve the latest traffic information straight away by tapping the
Ë°¼¿¬» ¬®¿ºº·½ ·²º± button in the Traffic menu.
Ë-·²¹ ̱³Ì±³ Ì®¿ºº·½
If you have a route planned on your device and there are any incidents on
that route, the Traffic sidebar on the right side of the Driving View warns
you. An example of a Traffic sidebar with a traffic warning is shown on the
left. For information on the Traffic sidebar, see ̸» Ì®¿ºº·½ -·¼»¾¿® on page
77.
In the example on the left there is a traffic jam on your route that will cause
íè ³·²
an expected delay of 38 minutes, 20 km ahead of you. To find the quickest
route to your destination, do the following:
1.Tap the Traffic sidebar.
Ì·°: If you have trouble tapping the Traffic sidebar and the Main Menu is
being displayed instead of the traffic menu, try tapping your finger half on
the Traffic sidebar and half off the screen.
2.Tap Ó·²·³·-» ¬®¿ºº·½ ¼»´¿§-.
Your device looks for the quickest route to your destination.
It is possible that the new route may also include traffic delays, or may
even be the same route as before. You can re-plan the route to avoid all
delays, but this new route will take longer than the quickest route already
shown.
3.Tap ܱ²».
Ì·°: You can let your TomTom device automatically minimise traffic delays
for you. To do this, see ݸ¿²¹·²¹ ¬®¿ºº·½ °®»º»®»²½»- on page 77.
76
Page 77

ݸ¿²¹·²¹ ¬®¿ºº·½ °®»º»®»²½»-
Use the ݸ¿²¹» Ì®¿ºº·½ °®»º»®»²½»- button to choose how traffic information
works on your device.
To change your traffic preferences, do the following:
1.Tap the TomTom Ì®¿ºº·½ button in the Main Menu on your device.
ݸ¿²¹» Ì®¿ºº·½
°®»º»®»²½»-
2.Tap ݸ¿²¹» Ì®¿ºº·½ °®»º»®»²½»-.
You can change the following preferences:
! ß«¬±³¿¬·½¿´´§ ³·²·³·-» ¼»´¿§- ¿º¬»® »ª»®§ ¬®¿ºº·½ «°¼¿¬» - if you select
this option, your device automatically recalculates your route when new
delays occur on your route.
! ß«¬±³¿¬·½¿´´§ «°¼¿¬» ¬®¿ºº·½ ·²º± ©¸·´» ±² ®±«¬» - if you select this
option, your device automatically updates traffic information whenever
you have a route planned.
! Þ»»° ©¸»² ¬®¿ºº·½ -·¬«¿¬·±² ±² ®±«¬» ½¸¿²¹»- - if you select this option
your device beeps when a new traffic incident occurs on your current
route.
! ß-µ º±® ¬®¿ºº·½ «°¼¿¬»- ©¸»² °®»°¿®·²¹ ¿ ®±«¬» - if you select this
option, your device asks if you want to update traffic information before
looking for any delays on routes that you plan.
3.Select or clear the check box next to each preference you want to change.
4.Tap ܱ²».
5.If you chose to automatically update traffic information while on route (one
of the options shown above), you are asked if you want to limit how often
that information is updated.
Tap Ò± to use the default interval of 4 minutes.
Tap Ç»- if you want to change the frequency of your automatic traffic
updates.
6.Tap ܱ²».
̸» Ì®¿ºº·½ -·¼»¾¿®
The Traffic sidebar shows you the traffic incidents on your route. It shows the
following information:
! A symbol for each traffic incident in the order they occur along your
planned route.
! The estimated delay of the next traffic incident on your route.
! The distance from your current location to the first incident on the Traffic
sidebar.
An example of a Traffic sidebar is shown below.
77
Page 78

In the example, the Traffic sidebar shows you that there are two incidents
ahead. Both incidents are traffic jams, the first is 15km ahead and is expected
to delay you by at least 51 minutes.
To re-plan your route to avoid these incidents, tap the Traffic sidebar to open
the TomTom ¬®¿ºº·½ menu, then tap Ó·²·³·-» ¬®¿ºº·½ ¼»´¿§-. For more
information see Ë-·²¹ ̱³Ì±³ Ì®¿ºº·½ on page 76.
Ó¿µ·²¹ ½±³³«¬·²¹ ¬± ©±®µ »¿-·»®
The ر³» ¬± ©±®µ or ɱ®µ ¬± ¸±³» buttons in the Traffic menu lets you
check your route to and from work with one tap of a button. When you use
either of these buttons, your device checks the route for possible delays, and
if it finds any, provides you with the possibility to avoid them.
The first time you use ر³» ¬± ©±®µ, you must set your traffic home and work
locations, do the following:
1.Tap the TomTom Ì®¿ºº·½ button in the Main Menu on your device.
2.Tap ͸±© ¸±³»ó©±®µ ¬®¿ºº·½.
ݸ¿²¹» ¸±³»ó
©±®µ
3.Tap ݸ¿²¹» ¸±³»ó©±®µ
4.Set your home location
5.Set your work location.
You can now use the ر³» ¬± ©±®µ and ɱ®µ ¬± ¸±³» buttons of the Show
home-work traffic menu.
Ò±¬»æ ̸» ¸±³» ´±½¿¬·±² §±« -»¬ ¸»®» ·- ²±¬ ¬¸» -¿³» ¿- ¬¸» ¸±³» ´±½¿¬·±²
§±« ½¿² -»¬ ·² ¬¸» Ю»º»®»²½»- Ó»²«ò ײ ¿¼¼·¬·±²ô ¬¸» ´±½¿¬·±²- §±« «-» ¸»®»
¼± ²±¬ ¸¿ª» ¬± ¾» §±«® ¿½¬«¿´ ¸±³» ¿²¼ ©±®µ ´±½¿¬·±²-ò ׺ ¬¸»®» ·- ¿²±¬¸»®
®±«¬» ¬¸¿¬ §±« ±º¬»² ¬®¿ª»´ô §±« ½¿² -»¬ ɱ®µñر³» ¬± «-» ¬¸»-» ´±½¿¬·±²-
·²-¬»¿¼ò
For example, to check for delays on your route home, do the following:
1.Tap the TomTom Ì®¿ºº·½ button in the Main Menu on your device.
2.Tap ͸±© ¸±³»ó©±®µ ¬®¿ºº·½.
3.Tap ɱ®µ ¬± ¸±³».
The route summary screen is shown. In this example, you can see that there
are some traffic incidents on your route that could mean a delay of up to 25
minutes.
78
Page 79

To see if there is a quicker way home, you could now tap the Ú·²¼ ¿´¬»®²¿¬·ª»
button and then tap Ó·²·³·-» ¬®¿ºº·½ ¼»´¿§-.
Ì·°æ You can let your device automatically look for alternative routes by
selecting ß«¬±³¿¬·½¿´´§ ³·²·³·-» ¼»´¿§- ¿º¬»® »ª»®§ ¬®¿ºº·½ «°¼¿¬» in your
Traffic preferences. For more information, see ݸ¿²¹·²¹ ¬®¿ºº·½ °®»º»®»²½»-
on page 77.
Ò±¬»æ ׬ ·- °±--·¾´» ¬¸¿¬ ¬¸» ¿´¬»®²¿¬·ª» ®±«¬» ½±«´¼ ¾» ´±²¹»® ¬¸¿² §±«® ±®·¹·²¿´
±²» ø»ª»² ©·¬¸ ·¬- ¼»´¿§-÷ò ׺ ¬¸·- ·- ¬¸» ½¿-»ô §±« ½±«´¼ ¿´©¿§- ¬®§ «-·²¹ ¬¸»
Ú·²¼ ¿´¬»®²¿¬·ª» ¾«¬¬±² ¿¹¿·²ò
ݸ»½µ·²¹ ¬®¿ºº·½ ·²½·¼»²¬- ·² §±«® ¿®»¿
Get an overview of the traffic situation in your area, using the map. To find
local incidents and their details, do the following:
1.Tap the TomTom Ì®¿ºº·½ button in the Main Menu on your device.
2.Tap Þ®±©-» ³¿°.
Þ®±©-» ³¿°
Ì®¿ºº·½ ·²½·¼»²¬-
Traffic incidents are displayed both on the Driving View and also on the Traffic
sidebar as small symbols. There are two type of symbols:
The map browser screen is shown.
3.Tap the blue compass image in the top right of the screen.
The map centres itself on you current location, and any traffic incidents in
the area are shown as small symbols. These symbols are described in,
Ì®¿ºº·½ ·²½·¼»²¬- on page 79.
4.Tap on any traffic incident to get more information.
A second screen is shown that gives you detailed information about the
incident you chose. To display information about surrounding incidents
use the left and right arrows at the bottom of this second screen.
! Symbols shown in a red square are incidents that Traffic can help you avoid.
79
Page 80

! Symbols shown in a red rectangle are weather related, because of their
nature, you cannot use Traffic to avoid them.
Traffic incident symbols and their meaning are shown below:
ß½½·¼»²¬Î±¿¼ ½´±-»¼
α¿¼ ©±®µ-Ì®¿ºº·½ ·²½·¼»²¬
Ì®¿ºº·½ ³»²«
Ѳ» ±® ³±®» ´¿²»½´±-»¼
Ì®¿ºº·½ ¶¿³
Weather related symbols and their meaning are shown below:
Ú±¹×½»
ο·²Í²±©
É·²¼
Ò±¬»æ ̸» ·²½·¼»²¬ ¿ª±·¼»¼ -§³¾±´ ·- -¸±©² º±® ¿²§ ¬®¿ºº·½ ·²½·¼»²¬ ¬¸¿¬
§±« ¿ª±·¼ «-·²¹ ̱³Ì±³ Ì®¿ºº·½ò
Either, tap the Traffic sidebar in the Driving View or tap TomTom Ì®¿ºº·½ in the
Main Menu to open the Traffic menu. The following buttons are available:
Ó·²·³·-»
¬®¿ºº·½ ¼»´¿§-
͸±© ¬®¿ºº·½ ±²
®±«¬»
͸±© ¸±³»ó
©±®µ ¬®¿ºº·½
Tap this button to re-plan your route based on the latest traffic
information.
Tap this button to see an overview of all traffic incidents on your route.
You can use the left and right buttons on the resulting screen to see more
detailed information about each of these incidents.
Tap this button to calculate and show the quickest route from your home
location to your place of work and back.
See Ó¿µ·²¹ ½±³³«¬·²¹ ¬± ©±®µ »¿-·»® on page 78.
80
Page 81

λ¿¼ ¿´±«¼
¬®¿ºº·½ ·²º±
Tap this button to read aloud all traffic incidents along your route.
Tap this button to get the latest traffic information straight away rather
than waiting for an automatic update.
Ë°¼¿¬» ¬®¿ºº·½
·²º±
Ü·-¿¾´» Ì®¿ºº·½
Ø»´°
Þ®±©-» ³¿°
ݸ¿²¹» Ì®¿ºº·½
°®»º»®»²½»-
For more information on automatic traffic updates, see ݸ¿²¹·²¹ ¬®¿ºº·½
°®»º»®»²½»- on page 77.
Tap this button to disable TomTom Ì®¿ºº·½.
Tap this button to view the guided tour on how to use TomTom Ì®¿ºº·½.
Tap this button to browse the map and see the traffic information
displayed on the map.
See ݸ»½µ·²¹ ¬®¿ºº·½ ·²½·¼»²¬- ·² §±«® ¿®»¿ on page 79.
Tap this button to change your preferences for how TomTom Ì®¿ºº·½
works on your device.
See ݸ¿²¹·²¹ ¬®¿ºº·½ °®»º»®»²½»- on page 77.
81
Page 82

М®¿ºº·½ ·²º±®³¿¬·±² «-·²¹ ОЬНуМУЭîïò
Traffic information using RDS-TMC
М¸» М®¿ºº·½ У»--¿¹» Э¸¿²²»´ шМУЭч
The Traffic Message Channel (TMC) is not a TomTom Service. FM radio
stations in several countries broadcast TMC information as part of their
programming. TMC is also known as RDS-TMC traffic information.
Your TomTom navigation device uses this information to warn you about
traffic delays along your route and how you can avoid them.
To use TMC traffic information, you need the TomTom RDS-TMC Traffic
Receiver that comes with selected TomTom navigation devices or is available
as an accessory. For more information on which TomTom devices support
RDS-TMC receivers, visit ©©©ò¬±³¬±³ò½±³.
Ò±¬»æ ̱³Ì±³ ·- ²±¬ ®»-°±²-·¾´» º±® ¬¸» ¿ª¿·´¿¾·´·¬§ ±® ¯«¿´·¬§ ±º ¬®¿ºº·½
·²º±®³¿¬·±² °®±ª·¼»¼ ¾§ ÌÓÝò
ÌÓÝ ·- ²±¬ ¿ª¿·´¿¾´» ·² ¿´´ ½±«²¬®·»- ±® ®»¹·±²-ò Ê·-·¬ ©©©ò¬±³¬±³ò½±³ ¬±
½¸»½µ ·º ·¬ ·- ¿ª¿·´¿¾´» ·² §±«® ½±«²¬®§ ±® ®»¹·±²ò
Í»¬¬·²¹ «° ÌÓÝ
To start using TMC all you need to do is connect the RDS-TMC Traffic Receiver
to your TomTom navigation device.
׳°±®¬¿²¬: When you install your navigation device in your car, don t block
the driver s view of the road.
1.Connect the RDS-TMC Traffic Receiver to your navigation device.
2.Connect the Car Charger to the RDS-TMC Traffic Receiver and then plug the
Ò±¬»ж М¸» ОЬНуМУЭ ®»½»·ª»® ¼±»- ²±¬ ©±®µ ·º ¬¸» Э¿® Э¸¿®¹»® ·- ²±¬
½±²²»½¬»¼т
3.Place the transparent suction cup at the tip of the antenna firmly against the
Car Charger into your car s cigarette lighter socket.
upper left of your car windscreen.
82
Page 83

4.Then place the remaining suction cups along the edge of the windscreen,
as shown, and keep the cable straight.
5.Switch on your navigation device.
The Traffic bar is shown in the Driving View and your navigation device
searches for a radio station that carries RDS-TMC information.
The following symbols are shown at the top of the Traffic sidebar:
Your navigation device is searching for a radio station that carries
RDS-TMC on that radio frequency.
Your navigation device is tuned to a radio station that carries RDSTMC on that radio frequency and has the latest RDS-TMC traffic
information.
Your navigation device is waiting to download the latest RDS-TMC
traffic information as soon as it is available.
83
Page 84

Л-·²¹ ОЬНуМУЭ ¬®¿ºº·½ ·²º±®³¿¬·±²
Your device receives traffic information when it is broadcasted.
If there are any incidents on your route the Traffic sidebar on the right side
of the Driving View warns you. An example of a Traffic sidebar with a traffic
warning is shown to the left. For information on the Traffic sidebar, see ̸»
Ì®¿ºº·½ -·¼»¾¿® on page 87.
íè ³·²
In the example on the left there is a traffic jam on your route with an
expected delay of 38 minutes, 20 km ahead of you. To find the quickest
route to your destination, do the following:
1.Tap the Traffic sidebar.
Ì·°: If you have trouble tapping the Traffic sidebar and the Main Menu is
being displayed instead of the traffic menu, try tapping your finger half on
the Traffic sidebar and half off the screen.
2.Tap Ó·²·³·-» ¬®¿ºº·½ ¼»´¿§-.
Your device looks for the quickest route to your destination.
It is possible that the new route may also include traffic delays, or may
even be the same route as before. You can re-plan the route to avoid all
delays, but this new route will take longer than the quickest route already
shown.
3.Tap ܱ²».
Ì·°: It is possible to let your TomTom device automatically minimise traffic
delays for you, to do this, see ݸ¿²¹·²¹ ¬®¿ºº·½ °®»º»®»²½»- on page 84.
ݸ¿²¹·²¹ ¬®¿ºº·½ °®»º»®»²½»-
Use the ݸ¿²¹» Ì®¿ºº·½ °®»º»®»²½»- button to choose how traffic information
works on your device.
To change your traffic preferences, do the following:
1.Tap the TomTom Ì®¿ºº·½ button in the Main Menu on your device.
ݸ¿²¹»
Ì®¿ºº·½
°®»º»®»²½»-
2.Tap ݸ¿²¹» Ì®¿ºº·½ °®»º»®»²½»-.
You can change the following preferences:
! ß«¬±³¿¬·½¿´´§ ³·²·³·-» ¼»´¿§- ¿º¬»® »ª»®§ ¬®¿ºº·½ «°¼¿¬» - if you select
this option, your device automatically recalculates when new delays
occur on your route.
! Þ»»° ©¸»² ¬®¿ºº·½ -·¬«¿¬·±² ±² ®±«¬» ½¸¿²¹»- - if you select this option
your device beeps when a new traffic incident occurs on your current
route.
! ß-µ º±® ¬®¿ºº·½ «°¼¿¬»- ©¸»² °®»°¿®·²¹ ¿ ®±«¬» - this option has no
effect in RDS traffic.
84
Page 85

3.Select or clear the check box next to each preference you want to change.
4.Tap ܱ²».
Your device lists the countries that have radio stations providing RDSTMC traffic information that you can currently receive. Normally you can
leave this set to ß²§ ½±«²¬®§ ø-¬®±²¹»-¬ -·¹²¿´÷. For more information
about this country setting, see ݸ±±-·²¹ ¬¸» ½±®®»½¬ ½±«²¬®§ º±® ÎÜÍó
ÌÓÝ ®»½»°¬·±² on page 87.
5.Tap ܱ²».
Ó¿µ·²¹ ½±³³«¬·²¹ ¬± ©±®µ »¿-·»®
The ر³» ¬± ©±®µ or ɱ®µ ¬± ¸±³» buttons in the Traffic menu lets you
check your route to and from work with one tap of a button. When you use
either of these buttons, your device checks the route for possible delays, and
if it finds any, provides you with the possibility to avoid them.
The first time you use ر³» ¬± ©±®µ, you must set your traffic home and work
locations, do the following:
1.Tap the TomTom Ì®¿ºº·½ button in the Main Menu on your device.
2.Tap ͸±© ¸±³»ó©±®µ ¬®¿ºº·½.
ݸ¿²¹» ¸±³»ó
©±®µ
3.Tap ݸ¿²¹» ¸±³»ó©±®µ
4.Set your home location
5.Set your work location.
You can now use the ر³» ¬± ©±®µ and ɱ®µ ¬± ¸±³» buttons of the Show
home-work traffic menu.
For example, to check for delays on your route home, do the following:
1.Tap the TomTom Ì®¿ºº·½ button in the Main Menu on your device.
2.Tap ͸±© ¸±³»ó©±®µ ¬®¿ºº·½.
3.Tap ɱ®µ ¬± ¸±³».
The route summary screen is shown. In this example, you can see that there
is a single incident on your route that could mean a delay of up to 25 minutes.
85
Page 86

To see if there is a quicker way home, you could now tap the Ú·²¼ ¿´¬»®²¿¬·ª»
button and then tap Ó·²·³·-» ¬®¿ºº·½ ¼»´¿§-.
Ì·°æ You can let your device automatically look for alternative routes by
selecting ß«¬±³¿¬·½¿´´§ ³·²·³·-» ¼»´¿§- ¿º¬»® »ª»®§ ¬®¿ºº·½ «°¼¿¬» in your
Traffic preferences. For more information, see ݸ¿²¹·²¹ ¬®¿ºº·½ °®»º»®»²½»-
on page 84.
Ò±¬»æ ׬ ·- °±--·¾´» ¬¸¿¬ ¬¸» ¿´¬»®²¿¬·ª» ®±«¬» ½±«´¼ ¾» ´±²¹»® ¬¸¿² §±«® ±®·¹·²¿´
±²» ø»ª»² ©·¬¸ ·¬- ¼»´¿§-÷ò ׺ ¬¸·- ·- ¬¸» ½¿-»ô §±« ½±«´¼ ¿´©¿§- ¬®§ «-·²¹ ¬¸»
Ú·²¼ ¿´¬»®²¿¬·ª» ¾«¬¬±² ¿¹¿·²ò
ݸ»½µ·²¹ ¬®¿ºº·½ ·²½·¼»²¬- ·² §±«® ¿®»¿
Get an overview of the traffic situation in your area, using the map. To find
local incidents and their details, do the following:
1.Tap the TomTom Ì®¿ºº·½ button in the Main Menu on your device.
2.Tap Þ®±©-» ³¿°.
Þ®±©-» ³¿°
The map browser screen is shown.
3.Tap the blue compass image in the top right of the screen.
The map centres itself on you current location, and any traffic incidents in
the area are shown as small symbols. These symbols are described in,
Ì®¿ºº·½ ·²½·¼»²¬- on page 88.
4.Tap on any traffic incident to get more information.
A second screen is shown that gives you detailed information about the
incident you chose. To display information about surrounding incidents
use the left and right arrows at the bottom of this second screen.
86
Page 87

Н»¬¬·²¹ ¬¸» ®¿¼·± º®»¯«»²½§ º±® ОЬНуМУЭ ·²º±®³¿¬·±²
If you know the frequency of a particular radio station you want to use for RDSTMC traffic information, do the following to set the frequency manually:
To activate this feature, you must first enable manual tuning. To do this, tap
the Traffic bar in the Driving View, then tap ݸ¿²¹» Ì®¿ºº·½ °®»º»®»²½»-. Select
Ì«²» ³¿²«¿´´§ ¾§ »²¬»®·²¹ ¿ º®»¯«»²½§ and then tap ܱ²».
1.Tap the Traffic sidebar in the Driving View.
2.Tap Ì«²» Ó¿²«¿´´§.
Ì«²» ³¿²«¿´´§
3.Enter the frequency of the radio station.
4.Tap ܱ²»ò
Your TomTom device looks for your radio station. If it doesn't find a radio
station at the frequency you set, it automatically continues to search for the
next available station.
Э¸±±-·²¹ ¬¸» ½±®®»½¬ ½±«²¬®§ º±® ОЬНуМУЭ ®»½»°¬·±²
If you are driving close to a country border, your device may tune to a radio
station from a neigbouring country. If this happens you will only receive RDSTMC traffic information for that country. To set the country you want to receive
traffic information for, do the following:
1.Tap the Traffic sidebar in the Driving View.
2.Tap ݸ¿²¹» Ì®¿ºº·½ °®»º»®»²½»-.
A list of preferences you can choose is shown, these preferences are
described in ݸ¿²¹·²¹ ¬®¿ºº·½ °®»º»®»²½»- on page 84.
3.Tap ܱ²».
A list of neigbouring countries is shown.
4.Tap on the country that you want to receive traffic reports for.
Your TomTom device then searches for a radio station in the country you have
chosen.
̸» Ì®¿ºº·½ -·¼»¾¿®
The Traffic sidebar is shown on the right side of the Driving View when
TomTom Ì®¿ºº·½ is switched on. The Traffic sidebar shows you the traffic
incidents on your route. It shows the following information:
! A symbol for each traffic incident in the order they occur along your
planned route.
! The estimated delay to the next traffic incident on your route.
! The distance from your current location to the next incident on your route.
An example of a Traffic sidebar is shown below.
87
Page 88

In the example, the Traffic sidebar shows you that there are two incidents
ahead. Both incidents are traffic jams, the first is 15km ahead and is expected
to delay you by at least 51 minutes.
To re-plan your route to avoid these incidents, tap the Traffic sidebar to open
the TomTom ¬®¿ºº·½ menu, then use Ó·²·³·-» ¬®¿ºº·½ ¼»´¿§-. For more
information see Л-·²¹ ОЬНуМУЭ ¬®¿ºº·½ ·²º±®³¿¬·±² on page 84.
Ì®¿ºº·½ ·²½·¼»²¬-
Traffic incidents are displayed both on the Driving View and also on the Traffic
sidebar as small symbols. There are two type of symbols:
! Symbols shown in a red square are incidents that Traffic can help you avoid.
! Symbols shown in a red rectangle are weather related, because of their
Traffic incident symbols and their meaning are shown below:
nature, you cannot use Traffic to avoid them.
ß½½·¼»²¬Î±¿¼ ½´±-»¼
α¿¼ ©±®µ-Ì®¿ºº·½ ·²½·¼»²¬
Ѳ» ±® ³±®» ´¿²»½´±-»¼
Weather related symbols and their meaning are shown below:
Ú±¹×½»
ο·²Í²±©
Wind
Ò±¬»æ ̸» ·²½·¼»²¬ ¿ª±·¼»¼ -§³¾±´ ·- -¸±©² º±® ¿²§ ¬®¿ºº·½ ·²½·¼»²¬ ¬¸¿¬
§±« ¿ª±·¼ «-·²¹ ̱³Ì±³ Ì®¿ºº·½ò
Ì®¿ºº·½ ¶¿³
88
Page 89

Ì®¿ºº·½ ³»²«
Ó·²·³·-»
¬®¿ºº·½ ¼»´¿§-
͸±© ¸±³»ó
©±®µ ¬®¿ºº·½
͸±© ¬®¿ºº·½ ±²
®±«¬»
Tap the Traffic sidebar in the Driving View to open the Traffic menu. The
following buttons are available:
Ó·²·³·-» ¬®¿ºº·½ ¼»´¿§-
Replans your route based on the latest traffic information.
Checks the traffic along your Home to Work route.
See Ó¿µ·²¹ ½±³³«¬·²¹ ¬± ©±®µ »¿-·»® on page 85.
Tap this button to show areas of traffic congestion along your current
route.
Shows an overview of traffic incidents on the map.
Þ®±©-» ³¿°
ݸ¿²¹» Ì®¿ºº·½
°®»º»®»²½»-
λ¿¼ ¿´±«¼
¬®¿ºº·½ ·²º±
See ݸ»½µ·²¹ ¬®¿ºº·½ ·²½·¼»²¬- ·² §±«® ¿®»¿ on page 86.
Changes the settings for Traffic services.
See ݸ¿²¹·²¹ ¬®¿ºº·½ °®»º»®»²½»- on page 84.
Tap this button to read aloud all traffic incidents along your route.
89
Page 90

̱³Ì±³ ØÜ Ì®¿ºº·½ ·²º±®³¿¬·±²îîò
TomTom HD Traffic information
TomTom HD Traffic is a unique TomTom service for receiving up-to-date
traffic information. It helps you plan the smartest route possible to your
destination.
Your device automatically receives updated traffic information. When you
plan a journey, your route is calculated by taking into account the current local
traffic conditions. If any delays are found on your route, you are given the
chance to re-plan a faster route avoiding one or more incidents.
Ë-·²¹ ̱³Ì±³ ØÜ Ì®¿ºº·½
The HDTraffic sidebar on the right side of the Driving View, warns you
about any traffic incidents on your route.
In the example shown here, the sidebar warns of a traffic jam on your route
that is 9 kms ahead and will cause an expected delay of 38 minutes. The
total delay over your route is 44minutes (including other additional
incidents further along your route).
For more information about the sidebar, see ̸» ØÜÌ®¿ºº·½ -·¼»¾¿® on
page 91.
To find the quickest route to your destination, do the following:
1.Tap the sidebar.
Ì·°: If you have trouble tapping the sidebar and the Main Menu is being
displayed instead of the traffic menu, try tapping your finger half on the
sidebar and half off the screen.
2.Tap Ó·²·³·-» ¬®¿ºº·½ ¼»´¿§-.
Your device looks for the quickest route to your destination.
It is possible that the new route may also include traffic delays, or may even
be the same route as before. You can re-plan the route to avoid all delays,
but this new route will take longer than the quickest route already shown.
3.Tap ܱ²».
90
Page 91

Ì·°: You can let your TomTom device automatically minimise traffic delays for
you, to do this, see ݸ¿²¹·²¹ ØÜÌ®¿ºº·½ °®»º»®»²½»- on page 91.
ß«¬±³¿¬·½¿´´§ ³·²·³·-» ¼»´¿§-
You can set HDTraffic to automatically minimise any delays for you whenever
new traffic information becomes available. To set HDTraffic to automatically
minimise delays, do the following:
1.Tap TomTom Ì®¿ºº·½ in the Main Menu.
2.Tap ݸ¿²¹» Ì®¿ºº·½ °®»º»®»²½»-.
3.Select ß«¬±³¿¬·½¿´´§ ³·²·³·-» ¼»´¿§- ¿º¬»® »ª»®§ ¬®¿ºº·½ «°¼¿¬».
4.Tap ܱ²».
ݸ¿²¹·²¹ ØÜÌ®¿ºº·½ °®»º»®»²½»-
Use the ݸ¿²¹» Ì®¿ºº·½ °®»º»®»²½»- button to choose how HDTraffic works on
your device.
To change your traffic preferences, do the following:
1.Tap TomTom Ì®¿ºº·½ in the Main Menu.
ݸ¿²¹» Ì®¿ºº·½
°®»º»®»²½»-
2.Tap ݸ¿²¹» Ì®¿ºº·½ °®»º»®»²½»-.
You can change the following preferences:
! ß«¬±³¿¬·½¿´´§ ³·²·³·-» ¼»´¿§- ¿º¬»® »ª»®§ ¬®¿ºº·½ «°¼¿¬» - your
device automatically recalculates your route when new delays occur
on your route.
! Þ»»° ©¸»² ¬®¿ºº·½ -·¬«¿¬·±² ±² ®±«¬» ½¸¿²¹»- - your device beeps
when a new traffic incident occurs on your current route.
! ͸±© ¬·³» ¹¿·² -¬¿¬·-¬·½- ±² ¼»ª·½» -¸«¬ ¼±©² - your device will
show you a summary of how much time you have saved using
HDTraffic when you reach your destination (providing it is more than
5 minutes) and also whenever you turn off your device.
3.Select or clear the check box next to each preference you want to
change.
4.Tap ܱ²».
̸» ØÜÌ®¿ºº·½ -·¼»¾¿®
The HDTraffic sidebar shows you traffic incidents on your route, displaying
the following information:
! A symbol for each traffic incident in the order they occur along your
planned route.
! The estimated delay of the next traffic incident on your route.
! The estimated delay for all incidents on your route.
! The distance from your current location to the next incident on the
HDTraffic sidebar.
Ò±¬»æ ̸» ½±´±«® ±º ¬¸» -·¼»¾¿® ½¸¿²¹»- ½±´±«® ¼»°»²¼·²¹ ±² ¸±© ±´¼ ¬¸»
¬®¿ºº·½ ·²º±®³¿¬·±² ·- ±² §±«® ¼»ª·½»ò Ú±® ³±®» ·²º±®³¿¬·±² ±² ©¸¿¬ ¬¸»-»
½±´±«®- ³»¿²ô -»» ØÜÌ®¿ºº·½ -·¼»¾¿® ½±´±«®- ±² °¿¹» çíò
91
Page 92

An example of an HDTraffic sidebar is shown below.
In the example, the sidebar shows you that there are two incidents ahead.
Both incidents are traffic jams, the first is 9km ahead and is expected to delay
you by at least 38 minutes.
To re-plan your route to avoid these incidents, tap the sidebar to open the
TomTom ¬®¿ºº·½ menu, then tap Ó·²·³·-» ¬®¿ºº·½ ¼»´¿§-.
Ò±¬»æ ̱ ³¿µ» ¬¸» Ì®¿ºº·½ -·¼»¾¿® ³±®» ®»¿¼¿¾´» -±³» ·²½·¼»²¬- ³¿§ ²±¬ ¾»
-¸±©²ò ̸»-» ·²½·¼»²¬- ©·´´ ¿´©¿§- ¾» ±º ³·²±® ·³°±®¬¿²½» ¿²¼ ±²´§ ½¿«-»
-¸±®¬ ¼»´¿§-ò
For more information see Ë-·²¹ ̱³Ì±³ ØÜ Ì®¿ºº·½ on page 90.
Ó¿µ·²¹ ½±³³«¬·²¹ ¬± ©±®µ »¿-·»®
The ر³» ¬± ©±®µ or ɱ®µ ¬± ¸±³» buttons in the Traffic menu lets you
check your route to and from work with one tap of a button. When you use
either of these buttons, your device checks the route for possible delays and
if it finds any, provides you with the possibility to avoid them.
The first time you use ر³» ¬± ©±®µ, you must set your traffic home and work
locations, do the following:
1.Tap TomTom Ì®¿ºº·½ in the Main Menu.
2.Tap ͸±© ¸±³»ó©±®µ ¬®¿ºº·½.
ݸ¿²¹»
¸±³»ó©±®µ
3.Tap ݸ¿²¹» ¸±³»ó©±®µ
4.Set your home location
5.Set your work location.
You can now use the ر³» ¬± ©±®µ and ɱ®µ ¬± ¸±³» buttons of the Show
home-work traffic menu.
Ò±¬»æ ̸» ¸±³» ´±½¿¬·±² §±« -»¬ ¸»®» ·- ²±¬ ¬¸» -¿³» ¿- ¬¸» ¸±³» ´±½¿¬·±²
§±« ½¿² -»¬ ·² ¬¸» Ю»º»®»²½»- Ó»²«ò ײ ¿¼¼·¬·±²ô ¬¸» ´±½¿¬·±²- §±« «-» ¸»®»
¼± ²±¬ ¸¿ª» ¬± ¾» §±«® ¿½¬«¿´ ¸±³» ¿²¼ ©±®µ ´±½¿¬·±²-ò ׺ ¬¸»®» ·- ¿²±¬¸»®
®±«¬» ¬¸¿¬ §±« ±º¬»² ¬®¿ª»´ô §±« ½¿² -»¬ ɱ®µñر³» ¬± «-» ¬¸»-» ´±½¿¬·±²-
·²-¬»¿¼ò
92
Page 93

For example, to check for delays on your route home, do the following:
1.Tap TomTom Ì®¿ºº·½ in the Main Menu.
2.Tap ͸±© ¸±³»ó©±®µ ¬®¿ºº·½.
3.Tap ɱ®µ ¬± ¸±³».
The driving view is shown. If the Traffic sidebar shows any delays on your
route, tap the Traffic sidebar and then Ó·²·³·-» ¬®¿ºº·½ ¼»´¿§- to see your
fastest route to home.
ݸ»½µ·²¹ ¬®¿ºº·½ ·²½·¼»²¬- ·² §±«® ¿®»¿
Get an overview of the traffic situation in your area, using the map. To find
local incidents and their details, do the following:
1.Tap TomTom Ì®¿ºº·½ in the Main Menu.
2.Tap Þ®±©-» ³¿°.
Þ®±©-» ³¿°
The map browser screen is shown.
3.Tap the blue compass image in the top right of the screen.
The map centres itself on you current location and any traffic incidents in
the area are shown. The symbols used to show traffic incident are
described in Ì®¿ºº·½ ·²½·¼»²¬- on page 94.
4.Tap on any traffic incident to get more information.
A screen is shown that gives you detailed information about the incident
you chose. To display information about surrounding incidents use the
left and right arrows at the bottom of this screen.
ØÜÌ®¿ºº·½ -·¼»¾¿® ½±´±«®-
The HDTraffic sidebar changes colours depending on how old the traffic
information is on your device. The sidebar colours are:
Ü¿®µ ¾´«» - The traffic information on your device is up to date.
Ô·´¿½ - The traffic information on your device has not been
updated for at least 10 minutes. HDTraffic still warns you about
traffic incidents, but the information is at least ten minutes old.
Ù®»§ - The traffic information on your device has not been
updated for at least 15 minutes. HDTraffic will only warn you
about traffic incidents once it has been able to update this
information.
Ò±¬»æ ̸» ¬®¿ºº·½ ·²º±®³¿¬·±² ±² §±«® ¼»ª·½» ·- «°¼¿¬»¼ ¿«¬±³¿¬·½¿´´§ ¿²¼ ¬¸»
ØÜÌ®¿ºº·½ -·¼»¾¿® ©·´´ ²±®³¿´´§ ®»³¿·² ¼¿®µ ¾´«»ò ر©»ª»®ô ·¬ ·- °±--·¾´» ¬¸¿¬
¼»ª·½» ³·¹¸¬ ²±¬ «°¼¿¬» ¬®¿ºº·½ ·²º±®³¿¬·±²ô ·º º±® »¨¿³°´» ¬¸»®» ·- ²± ±® °±±®
93
Page 94

²»¬©±®µ ½±ª»®¿¹» ·² §±«® ¿®»¿ô ±® §±« ¿®» ¼®·ª·²¹ ·² ¿ ½±«²¬®§ ±¬¸»® ¬¸¿² ¬¸»
±²» º±® ©¸·½¸ §±« °«®½¸¿-»¼ ̱³Ì±³ ØÜ Ì®¿ºº·½ò
Ì®¿ºº·½ ·²½·¼»²¬-
Traffic incidents are displayed as small symbols on the Driving View and the
HDTraffic sidebar. There are two type of symbols:
! Symbols shown in a red square are incidents that HDTraffic can help you
! Symbols shown in a red triangle are weather related and are for information
Traffic incident symbols:
to avoid.
only. You cannot use HDTraffic to avoid them.
ß½½·¼»²¬Î±¿¼ ½´±-»¼
α¿¼ ©±®µ-Ì®¿ºº·½ ·²½·¼»²¬
Ѳ» ±® ³±®» ´¿²»- ½´±-»¼Ì®¿ºº·½ ¶¿³
Ì®¿ºº·½ ³»²«
Weather related symbols:
Ú±¹×½»
ο·²Í²±©
É·²¼
Ò±¬»æ ̸» ·²½·¼»²¬ ¿ª±·¼»¼ -§³¾±´ ·- -¸±©² º±® ¿²§ ¬®¿ºº·½ ·²½·¼»²¬ ¬¸¿¬
§±« ¿ª±·¼ «-·²¹ ̱³Ì±³ ØÜ Ì®¿ºº·½ò
To open the Traffic menu, tap the HDTraffic sidebar in the Driving View or tap
TomTom Ì®¿ºº·½ in the Main Menu. The following buttons are available:
Tap this button to re-plan your route based on the latest traffic information.
Ó·²·³·-»
¬®¿ºº·½ ¼»´¿§-
͸±© ¬®¿ºº·½
±² ®±«¬»
Tap this button to get an overview of any traffic incidents along your route.
Use the left and right buttons of the overview screen to see more detailed
information about each incident. You can also use the λ°´¿² button of the
overview screen to replan your route avoiding the traffic incidents.
94
Page 95

͸±© ¸±³»ó
©±®µ ¬®¿ºº·½
Tap this button to calculate and show the quickest route from your home
location to your place of work and back.
See Ó¿µ·²¹ ½±³³«¬·²¹ ¬± ©±®µ »¿-·»® on page 92.
Tap this button to browse the map and see the traffic information displayed
on the map.
Þ®±©-» ³¿°
ݸ¿²¹»
Ì®¿ºº·½
°®»º»®»²½»-
ß½½±«²¬ ײº±
See ݸ»½µ·²¹ ¬®¿ºº·½ ·²½·¼»²¬- ·² §±«® ¿®»¿ on page 93.
Tap this button to change your preferences for how TomTom HD Traffic
works on your device.
See ݸ¿²¹·²¹ ØÜÌ®¿ºº·½ °®»º»®»²½»- on page 91.
In addition to the above buttons, there are a further two buttons that relate to
TomTom HD Traffic. The first is the ß½½±«²¬ ײº± button, that can be found in
the Main Menu.
Tap this button to see information about your HDTraffic subscription. A
screen is shown that tells you when your subscription started and how
long it is before it ends.
The second additional button can be found in the Ù«·¼»¼ ¬±«®- menu. To
open the Ù«·¼»¼ ¬±«®- menu, tap the HDTraffic sidebar in the Driving View or
tap TomTom Ì®¿ºº·½ in the Main Menu. The following button relates to
HDTraffic.
̱³Ì±³
Ì®¿ºº·½
Tap this button to see a short guided tour of how to use TomTom HD
Traffic.
95
Page 96

λ³±¬» ½±²¬®±´îíò
Remote control
׳°±®¬¿²¬: This TomTom product is Bluetooth enabled. Please note that in
certain environments such as hospitals or airplanes, you are required to
switch off Bluetooth, on all electronic devices.
ײ-»®¬·²¹ ¬¸» ¾¿¬¬»®·»-
1.Hold the sides of the remote control and press the latch on the back of the
device.
The keypad lifts out from the back of the device, as shown in the diagram.
Take care not to drop the keypad.
2.Place the batteries in the remote control. Make sure you put the batteries in
the correct way round, as shown on the remote control.
3.Replace the battery cover and press any button to switch on your remote
control.
Your remote control starts searching for your TomTomGO.
Ò±¬»æ ׺ §±« ¼± ²±¬ «-» §±«® ®»³±¬» ½±²¬®±´ º±® îð -»½±²¼-ô ·¬ ¹±»- ·²¬± °±©»®
-¿ª·²¹ ³±¼»ò
׺ §±« ¼± ²±¬ «-» §±«® ®»³±¬» ½±²¬®±´ º±® ±²» ¸±«®ô ¬¸» ®»³±¬» ½±²¬®±´
-©·¬½¸»- ±ºº ½±³°´»¬»´§ò
Ю»-- ¿²§ ¾«¬¬±² ¬± -©·¬½¸ §±«® ®»³±¬» ½±²¬®±´ ±²ò
96
Page 97

Û-¬¿¾´·-¸·²¹ ¿ ½±²²»½¬·±²
Before your remote control can communicate with your TomTomGO, you
need to establish a Bluetooth connection between your remote control and
your GO. This Bluetooth process is also known as %pairing .
The first time you switch on your remote control, it tries to establish a
connection with the nearest GO.
To establish a connection, do the following:
1.Switch on your TomTomGO and tap Þ´«»¬±±¬¸ °®»º»®»²½»- in the
Preferences menu.
Þ´«»¬±±¬¸
°®»º»®»²½»-
2.Tap Û²¿¾´» Þ´«»¬±±¬¸.
3.Press any button on your remote control to switch it on.
Your remote control communicates with your GO and you are asked if you
want to accept the connection.
4.Tap Ç»- to accept the connection.
Ò±¬»æ ̸·- ¾«¬¬±² ³¿§ ±²´§ ¾» ¿ª¿·´¿¾´» ·º ¿´´ ³»²«
±°¬·±²- ¿®» -¸±©²ò ̱ -¸±© ¿´´ ³»²« ±°¬·±²-ô ¬¿°
͸±© ßÔÔ ³»²« ±°¬·±²- ·² ¬¸» Ю»º»®»²½»- Ó»²«ò
Ô·¹¸¬-
The next time you use your remote control, it looks for your GO. If your GO
is switched off or is not within range, the remote control searches for
another GO.
No light - your remote control is switched off or in
power saving mode.
Flashing blue light - your remote control is searching
for your GO.
Solid blue light - your remote control is connected to
your GO.
Red light - battery power is low. Replace the batteries
as soon as possible.
97
Page 98

Þ«¬¬±²-
Þ
Ý
Ü
ß Arrow buttons:
! Move the cursor in menus.
! Up and down buttons: zoom in and out on the map.
! Left and right buttons: go to the previous and next song.
Þ Select button:
! Opens the Main Menu.
! Selects a menu button.
! Selects an item in a list, such as a list of POIs.
Ý Soft buttons:
! Select the left, middle and right buttons in menus.
! The middle button plays and pauses tracks when
playing music.
! Select the bottom left and right areas of the screen in the
Driving View.
Ü Volume controls:
! Turn the volume up and down.
98
Page 99

ß¼ª¿²½»¼ Ô¿²» Ù«·¼¿²½»îìò
Advanced Lane Guidance
Your TomTomGO helps you prepare for motorway exits and junctions by
showing you which lane you should be in.
Ò±¬»æ ̸·- ·²º±®³¿¬·±² ·- ²±¬ ¿ª¿·´¿¾´» º±® ¿´´ ¶«²½¬·±²- ±® ·² ¿´´ ½±«²¬®·»-ò
For some exits and junctions, an image shows the turning and the lane you
should take.
To turn the images off, tap Ø·¼» ´¿²» ·³¿¹»- in the Preferences menu.
For other exits and junctions, your GO shows the lane you should take in the
Status bar. To turn this guidance off, tap ݸ¿²¹» °®»º»®»²½»- in the Main
Menu, then tap ͬ¿¬«- ¾¿® °®»º»®»²½»-. Clear the checkbox for ͸±© ´¿²»
¹«·¼¿²½».
99
Page 100

ر© ¼±»- ²¿ª·¹¿¬·±² ©±®µáîëò
How does navigation work?
Щ´±¾¿´ Р±-·¬·±²·²¹ Н§-¬»³ шЩРНч
In order to navigate you to your destination, your TomTomGO must know
where you are now. To find your current position, your GO uses the Global
Positioning System (GPS). GPS is available for free and without subscription.
The GPS uses satellites to transmit signals to GPS receivers. Your
TomTomGO has a built-in GPS receiver. Using the GPS signal, your GO can
work out where you are and how fast you are going. GPS signals work in all
weather, anywhere in the world.
Ò±¬»æ DZ«® ̱³Ì±³ÙÑ ¼±»- ²±¬ ¬®¿²-³·¬ §±«® °±-·¬·±²ô -± ±¬¸»®- ½¿²²±¬ «-»
·¬ ¬± ¬®¿½µ §±« ©¸·´» §±« ¿®» ¼®·ª·²¹ò DZ« ½¿² ¸±©»ª»® -»²¼ §±«® °±-·¬·±² ¬±
̱³Ì±³ Þ«¼¼·»-ò Ú±® ³±®» ·²º±®³¿¬·±²ô ª·-·¬ ¬±³¬±³ò½±³ñ-»®ª·½»-
Ú·²¼·²¹ §±«® °±-·¬·±² º¿-¬»®
If you use your TomTomGO in combination with TomTom HOME, your GO
will download information about where the GPS satellites are going to be for
the next 7 days.
Ó¿°-
With this information, your GO will be able to find your current position very
quickly when it is first switched on.
Once your TomTomGO knows where you are and you have told it where you
want to go, it uses the digital map on the memory card or hard disk to work
out the best route to your destination.
100
 Loading...