

Page 1
R-Link
Cyan Magenta Jaune Noir Noir texte
QUICK GUIDE
-
=
Page 2
Cyan Magenta Jaune Noir Noir texte
1
WELCOME TO THE WORLD OF R-LINK
Congratulations on your choice. Thanks to its integrated touchscreen, steering wheel controls and voice recognition, you can carry on driving without taking your eyes
off the road.
These few pages will give you an introduction to the main features and settings of your R-Link navigation system. At the end of this guide you will find instructions on
how to create your account on R-Link Store to benefit from exclusive downloadable services.
DETAILED INFORMATION REGARDING YOUR VEHICLE’S USE, AS WELL AS VIDEOS, SIMULATORS AND FULL INSTRUCTIONS FOR THE E-GUIDE CARMINAT
TOMTOM®, IS AVAILABLE AT WWW.E-GUIDE.RENAULT.COM.
This document does not replace the driver’s handbook. For more detailed information on the functions featured in this guide, please read the complete instructions
for your R-Link navigation system.
Translated from French. Copying or translation, in part or in full, is forbidden unless prior written permission has been obtained from the vehicle manufacturer.
ENG_UD27304_1
Edito (XNX - Renault)ENG_RP_1032-2_RP_Renault_0
Page 3

Cyan Magenta Jaune Noir Noir texte
First use
Entering a destination
Listening to the radio
Multimedia
3
6
10
11
Bluetooth telephone connection
Making and receiving a call
Vehicle
Services
Favourites
System settings
16
18
20
21
13
14
ENG_UD29832_3
MID/Sommaire (XNX - Renault)ENG_RP_1032-2_RP_Renault_0
Page 4
Cyan Magenta Jaune Noir Noir texte
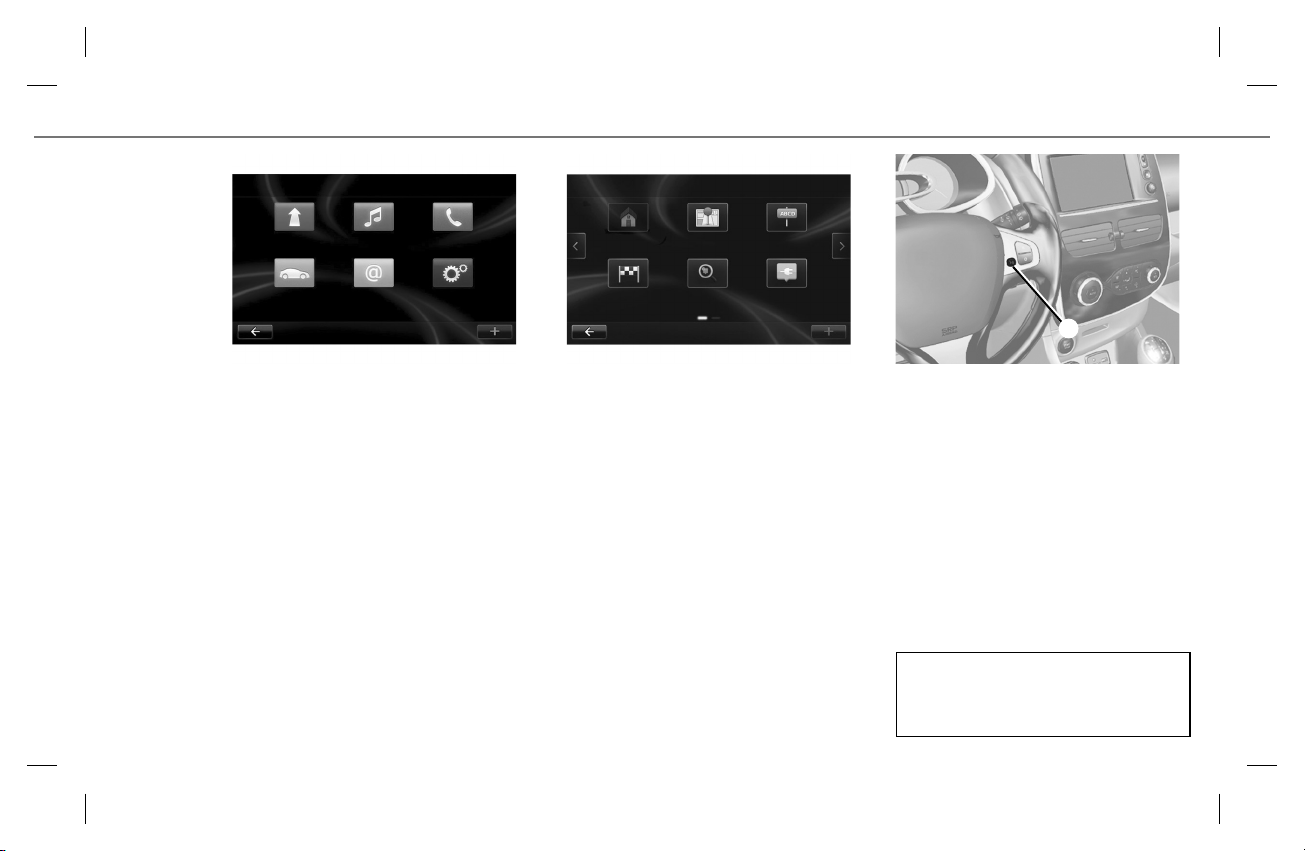
FIRST USE (1/3)
1
2
3
Switching on
The multimedia system switches on automatically
when the ignition is switched on. In other cases,
press the On/Off 1 button on your system.
Switching off
Press the On/Off 1 button on your multimedia
system to stop your system.
DESCRIPTION
An SD card is provided with the multimedia
system. Amongst other things, this includes maps
for your country.
UPDATES
Updates (especially of maps) are published regularly. They are available for download at R-Link
Store by inserting your SD card for your multimedia system into your computer, with an Internet
connection.
Following delivery of a new vehicle, you can update
your system free of charge for a set period. Once
this time has elapsed, you will need to pay for updates.
NB: We recommend creating an R-Link Store account on your computer and updating your system
regularly.
INSERTING OR REMOVING THE SD CARD
With the navigation system switched off, insert the
SD card into slot 2.
3
To remove the SD card from slot 2, press the card,
then release it. The card will jut out of the slot by
a few millimetres. Pull the card to remove it completely.
You can also press “System”, then “Remove SD
card” to remove the SD card safely.
Voice recognition
Depending on the vehicle, button 3 enables you
to use voice recognition to control the navigation,
telephone, etc.
Please see the system manual for further information.
SD cards are fragile – do not bend them. Insert
correctly.
Only use your SD card for operating and updating your multimedia system. Do not insert any
other device (camera, portable GPS, etc.). Do
not insert it in another vehicle.
MID/Première utilisation (XNX - Renault)ENG_RP_1032-2_RP_Renault_0
ENG_UD29825_3
Page 5
Cyan Magenta Jaune Noir Noir texte
FIRST USE (2/3)
A
1
45
Controls
Depending on the vehicle, the multimedia system
is fitted with screen controls A or a multimedia
screen B.
SCREEN CONTROLS A
1 On/Off.
4 Homepage.
5 Scroll through a list (MP3).
B
7 8 8 9 10
6
MULTIMEDIA SCREEN B
6 Press: On/Off.
Rotate: Adjust the source volume
while listening.
7 Listening to the radio.
8 Moving around the display zones.
Moving around the various zones of the
screen.
9 Choice of external source.
10 Ejecting a CD.
11 Main menu.
12 Pop-up menu.
13 Search for stations or radio
frequencies.
Change a track on a CD.
14 Return to the previous menu.
15 Homepage.
4
1112131415
MID/Première utilisation (XNX - Renault)ENG_RP_1032-2_RP_Renault_0
ENG_UD29825_3
Page 6

Cyan Magenta Jaune Noir Noir texte
FIRST USE (3/3)
16 17 1918 20 21
Preset 3FM1
BNR - Dancefloor
Flows
Menu
Welcome screen
16 Audio information (radio or multimedia).
17 Application notifications.
18 Outside air quality level information.
19 Telephone information.
20 Outside temperature.
21 Time.
22 Options.
5
C
22232425262728
23 Instructions for navigation and distance to
next direction change.
24 Traffic information.
25 Navigation maps.
Touchscreen
The multimedia system is fitted with a touchscreen C. Select a function or a button on the
screen by touching it.
26 Favourites.
27 Vehicle information (eco-driving or energy
flow).
28 Access to main menu.
Volume and voice
MULTIMEDIA AUDIO SETTINGS
To adjust the volume on your multimedia equipment, use the steering wheel control or the control
to the right of the screen.
NAVIGATION SETTINGS
To adjust the volume of the guidance instructions,
use the sound control for your system during a
You can change the arrangement of the B
voice instruction.
homepage. Please refer to your system handbook for further information.
MID/Première utilisation (XNX - Renault)ENG_RP_1032-2_RP_Renault_0
ENG_UD29825_3
Page 7
Cyan Magenta Jaune Noir Noir texte
ENTERING A DESTINATION (1/4)
Main Menu
Navigation Multimedia Phone
SystemServicesVehicle
Menu “Drive to...”
Press the “Menu” button to access the “Navigation”
menu, then “Drive to...”.
This menu offers you several ways to enter a destination:
– select an address from the “Address” menu;
– select “Home”;
– select a destination from the “Recent destina-
tions”;
– select “Local search”;
Drive to...
Home Saved locations Address
tions
Charging stationLocal searchRecent destina-
– select a “Charging station” (charging terminal or
station for electric vehicles);
– select an address from “Point of interest” (POI);
– select a “Point on map”;
– select GPS coordinates.
6
1
Voice controls
You can use the system voice controls to enter a
destination without having to use the screen controls.
Press 1 and follow the audio and visual instructions provided by the system and on the screen.
Please refer to the system instructions for further information.
MID/Entrer une destination (XNX - Renault)ENG_RP_1032-2_RP_Renault_0
ENG_UD29818_3
Page 8
Cyan Magenta Jaune Noir Noir texte
ENTERING A DESTINATION (2/4)
If these options don’t suit you, access the full
list corresponding to your search by pressing the
1
Display the list
2
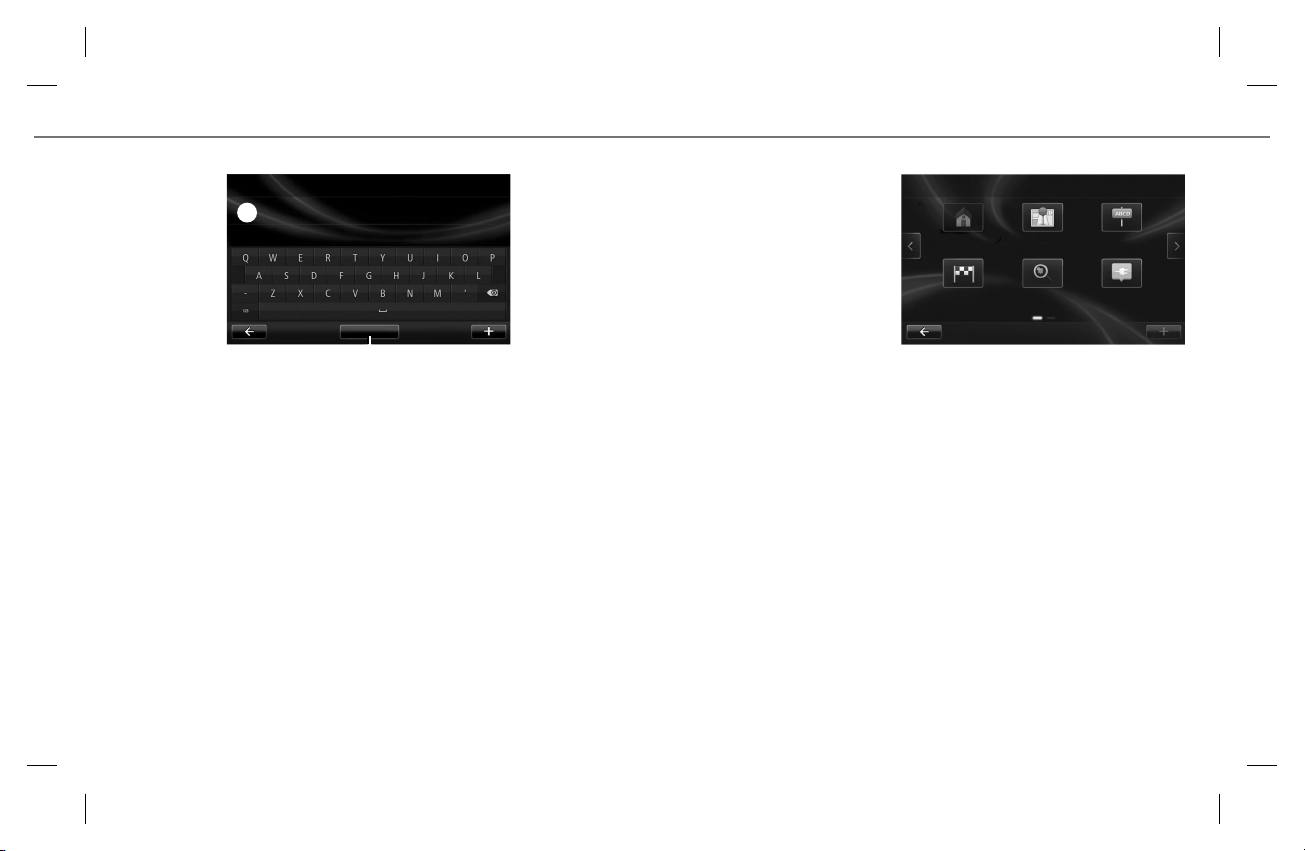
ENTERING A NEW “ADDRESS”
This section allows you to enter all or part of the
address: country, town, street and number.
– When using for the first time, choose your coun-
try and confirm.
– Enter the name or postcode of the town or city
using the keypad.
The system may suggest several town names in
the area 1. Press on the name of the town/city
displayed to confirm.
button 2 “Display the list”.
– Select the town or city.
– Follow the same procedure for screens: “Street”
and “No.”, as applicable.
If you do not want to enter a street number, or
if the system doesn’t recognize your number,
you can indicate an intersection by pressing the
“Junction” button on the “Street” screen and
then select the street.
Note: The system will store the last towns/cities
entered in its memory. You can select any of these
towns/cities directly by displaying the list or from
the “Recent destinations” menu.
7
Drive to...
Home Saved locations Address
nations
Charging stationLocal searchRecent desti-
“HOME”
This section can be used to start navigating your
way to your preset home destination. Press the
“Home” button.
To change your home address, you can enter an
address using the navigation menu, then select
“Change home address”.
MID/Entrer une destination (XNX - Renault)ENG_RP_1032-2_RP_Renault_0
ENG_UD29818_3
Page 9

Cyan Magenta Jaune Noir Noir texte
ENTERING A DESTINATION (3/4)
Drive to...
Home Saved locations Address
nations
Charging stationLocal searchRecent desti-
“RECENT DESTINATIONS”
This item enables you to select a destination from
the list of addresses last used.
Select “Drive to...” from the main menu, then
choose “Recent destinations”.
From the list of stored destinations, select an address then confirm this address as the destination.
“LOCAL SEARCH”
The “Local search” service enables you to find a
destination and plan a route to this location.
Note: this icon is only displayed if you have a subscription to LIVE Services.
“CHARGING STATION”
The “Charging station” menu enables you to find
a charging station for your electric vehicle and to
plan your route to this location. To obtain an up-todate version of the list of charging stations, update
your maps from your R-Link Store account.
NB: You can manage your personal charging stations via the “Favourites” menu, then select
“Manage my charging stations”.
8
“POINT OF INTEREST” (POI)
A point of interest (POI) is a service, establishment
or tourist area close to a location (start point, destination city, en route, etc.). POIs are classed in
different categories, e.g. restaurants, museums, car
parks, etc. There are several options to find a point
of interest:
– category;
– the name of the desired POI.
“POINT ON MAP”
This function allows you to define a destination
from the map.
From the navigation screen, move around the map
to position the cursor on your destination, then
confirm: the system calculates the route.
“LATITUDE LONGITUDE”
This function allows you to define a destination
using GPS coordinates.
MID/Entrer une destination (XNX - Renault)ENG_RP_1032-2_RP_Renault_0
ENG_UD29818_3
Page 10

Cyan Magenta Jaune Noir Noir texte
ENTERING A DESTINATION (4/4)
Drive to...
Point of interest Point on map Latitude
Longitude
“FAVOURITES”
To browse to a favourite, use the “Favourites”
button on the homepage.
For more information, refer to the “Favourites” section of this document.
Drive to...
Done
5
Route summary
Once the destination information has been entered,
the system calculates the route.
The screen has two tabs:
– journey tab 3 which shows a summary of the
route;
– the LIVE 4 tab displays traffic information and
warning areas in real time.
In certain countries it is illegal to download and
activate the warning areas and this could lead to
prosecution.
3 4
Avenue Du Golf - Aven...
Guyancourt
4:40 min
2 km
Fastest route
16 April, 19:46
9
Confirm trip
At the end of the calculation, the system displays
the route and suggests two options:
– “+” : allows you to view the route details,
change the route and save the destination;
– “Done” : navigation guidance begins.
NB: if you do not confirm, this page will close after
ten seconds and guidance will start automatically.
ELECTRIC VEHICLE DETAILS
Depending on the vehicle charge level:
– if the destination can be reached, guidance is
launched;
– if the charge level is not sufficient to reach the
destination, the system presents a selection of
recharging stations along the route.
The 5 flag represents your destination. Its colour
indicates whether the destination can be reached
(green) or not (red), depending on the vehicle’s
charge level.
MID/Entrer une destination (XNX - Renault)ENG_RP_1032-2_RP_Renault_0
ENG_UD29818_3
Page 11

Cyan Magenta Jaune Noir Noir texte
LISTENING TO THE RADIO
Multimedia
Radio Media Pictures
SettingsVideo
To access the radio menu, press “Menu” from the
welcome screen, then “Multimedia” and “Radio”.
Preset
To access the list of saved radio stations, press
the “Preset” tab, then select the station you want
on the screen A.
To add a station, select it from the “Frequency” or
“List” tab, then press and hold the relevant number
on the “Preset” tab.
List
To access the full list of stations, press button
“List”, then select the desired station.
A
ListPreset Frequency
10
1 32 4
ListPreset Frequency
Frequency
To search manually for a station, select
“Frequency”. To adjust the frequency, you have two
search options:
– manual search – press buttons 2 and 3;
– semi-automatic search – press buttons 1 and 4.
MID/Ecouter la radio (XNX - Renault)ENG_RP_1032-2_RP_Renault_0
ENG_UD29819_3
Page 12

Cyan Magenta Jaune Noir Noir texte
MULTIMEDIA (1/2)
Main Menu
Navigation Multimedia Phone
SystemServicesVehicle
Your vehicle is fitted with a multimedia system.
From the main menu, press “Multimedia” and
choose from the following list:
– Radio;
– Media;
– Pictures;
– Video;
– Settings.
Several input sources are available:
– USB;
– SD card;
– auxiliary socket;
– Bluetooth® connection.
Multimedia
Radio Media Pictures
SettingsVideo
Radio
Please refer to the Radio section in this document.
Media
Press “Media”, then select the connected source to
access the audio files. You can:
– access the audio files directly;
– access files, music, genres, artists, albums and
reading lists;
– access files and/or audio files.
11
Settings
Sound Radio Media
VideoPictures
Pictures
Press “Pictures”, then select the connected source
to access photos. The system offers you two options:
– “Visualize all the photos” allows you to run the
automatic photo playback;
NB: You can set the scrolling speed and transi-
tion type between each photo and the display.
– simple viewing of a photo, by pressing the de-
sired photo name.
Note: photo slideshows will only be shown when
the vehicle is stationary.
ENG_UD29820_3
MID/Multimédia (XNX - Renault)ENG_RP_1032-2_RP_Renault_0
Page 13

Cyan Magenta Jaune Noir Noir texte
MULTIMEDIA (2/2)
Multimedia
Radio Media Pictures
SettingsVideo
Video
Press “Video”, then select the connected source to
access videos. The system offers you two options:
– “play all videos” allows you to run a successive
video playback;
NB: You can set the display mode – normal or
full screen.
– simple video playback, by pressing the desired
video name.
Note: video playback is only available when the vehicle is stationary.
Settings
Sound Radio Media
VideoPictures
Settings
Press “Settings”, then the element you would like
to modify:
– Sound;
– Radio;
– Media;
– Pictures;
– Video.
SOUND
Adjusts the various audio settings (settings for
each loudspeaker, treble, bass, balance, etc.).
12
RADIO
You can perform an automatic station search and
activate or deactivate functions such as i-traffic...
MEDIA
You can configure a Bluetooth® connection and
activate or deactivate the following functions:
– repeat;
– shuffle.
PICTURES
You can access the following functions:
– photo scroll time;
– type of transition between each photo;
– display type (default or full screen).
VIDEO
You can adjust the type of display (default or full
screen).
Please see the system manual for further information.
ENG_UD29820_3
MID/Multimédia (XNX - Renault)ENG_RP_1032-2_RP_Renault_0
Page 14

Cyan Magenta Jaune Noir Noir texte
BLUETOOTH® TELEPHONE CONNECTION
1
Preset 3FM1
BNR - Dancefloor
Flows
Menu
Pairing a phone
Press the button 1. A message will indicate that
the phone is detected. Press “Yes” to pair the telephone.
Choose your telephone from the list. The telephone
is paired.
You are recommended only to use this function
while the vehicle is stationary.
NB: Depending on the telephone, the system will
request an authentication code.
Connecting a telephone
Once the system is initiated, the hands-free phone
system will search for any paired phones present
in the vicinity. The system automatically downloads
the data for the last telephone connected (directory, music, etc). To deactivate this option, please
refer to the section on “Making/receiving a call”.
NB: If a call is ongoing while the telephone is being
connected, it will automatically be transferred to
the vehicle loudspeakers.
Manage devices
To use the device features, you must first set up a Bluetooth
connection between your device and your R-Link.
Do you want to do that now?
No Yes
13
Telephone of Sandy
Turn Bluetooth off
CHANGING A CONNECTED TELEPHONE
The system can save up to five mobile telephones.
You can connect/disconnect any of these telephones at any time.
Press “Phone” on the main menu, then, “Settings”
and “Manage devices” to manage your telephone
connection.
You can use the voice control to place a call without having to use the screen. Please see your system handbook for further information.
MID/Connecter/déconnecter un téléphone Bluetooth (XNX - Renault)ENG_RP_1032-2_RP_Renault_0
ENG_UD29823_3
Page 15

Cyan Magenta Jaune Noir Noir texte
MAKING AND RECEIVING A CALL (1/2)
Phone
Phonebook Call logs Dial number
Voice mail
Settings
Making a call from the
phonebook
From the main menu, press “Phone”, then
“Phonebook”.
Press the contact name, then select the number to
place the call.
Phonebook
AAA
BBB
CCC
DDD
EEE
Making a call from the
call history
From the main menu, press “Phone”, then “Call
logs”.
Choose from the four contact lists. For each list,
the contacts are listed from the most recent to the
oldest. Select the contact to make the call.
14
Find
1
Voice controls
You can use the system voice control to place a call
without using the screen display.
Press 1 and follow the audio and visual instructions provided by the system and on the screen.
MID/ Emettre+Recevoir un appel (XNX - Renault)ENG_RP_1032-2_RP_Renault_0
ENG_UD29824_3
Page 16

Cyan Magenta Jaune Noir Noir texte
MAKING AND RECEIVING A CALL (2/2)
Dial number
Call
Entering a number
From the main menu, press “Phone”, then “Dial
number”.
Press the numbers to dial the number, then “Call”
to place the call.
You are recommended to perform these actions
only while the vehicle is stationary.
Voice mail
From the main menu, press “Phone”, then “Voice
mail” to reach your voice mailbox. Refer to the
“Settings” paragraph to enter the voice mail
number.
Phone
Phonebook Call logs
Voice mail
Settings
Dial number
Settings
MANAGE
This menu enables you to connect/disconnect a
telephone.
SOUND LEVELS
This menu enables you to change the sound settings fro your calls.
VOICE MAIL
This menu enables you to change the telephone
number for your voice mailbox.
15
Settings
Manage
Sound levels
Voice mail
Activating Bluetooth
Automatically download phone data
Confirm
5
6
BLUETOOTH® ACTIVATION/DEACTIVATION.
Select by pressing 5 to activate or deactivate your
Bluetooth® connection.
Press “Confirm”.
AUTOMATICALLY DOWNLOAD PHONE DATA
Select by pressing 6 to activate/deactivate the automatic telephone data download (directory, music,
etc).
Press “Confirm”.
MID/ Emettre+Recevoir un appel (XNX - Renault)ENG_RP_1032-2_RP_Renault_0
ENG_UD29824_3
Page 17

Cyan Magenta Jaune Noir Noir texte
VEHICLE (1/2)
Vehicle
Driving-Eco² Electrical Vehicle Care
SettingsOnboard computer
Your system has menus that enable you to monitor
your fuel and electrical power consumption.
Driving-Eco²
The “Driving-Eco²” menu has three things to help
save energy:
– Trip report;
– My preference trips;
– Eco-coaching.
Driving-Eco²
Trip report My preference trips Eco-coaching
TRIP REPORT
This menu shows you the data saved from your
last journey:
– average fuel consumption;
– total consumption;
– average speed;
– recovered energy or mileage completed;
– average environmental driving performance (A
zone);
– braking anticipation (B zone);
– environmental rating of the vehicle speed (C
zone).
To save your data, use the “+”.
16
Trip report
Average consumption
Average speed
Total consumption
Energy saved
Distance:
Duration:
Save Reset
Anticipation
Speed
A
B
C
MY PREFERENCE TRIPS
Once you have saved a specific journey, this menu
will show you the changes in your driving style.
Select the type of route saved to access the two
tabs:
– summary;
– details.
ECO-COACHING
This menu assesses your driving style and gives
you the best possible advice to optimise your fuel
or energy consumption.
ENG_UD29826_3
MID/Véhicule (XNX - Renault)ENG_RP_1032-2_RP_Renault_0
Page 18

Cyan Magenta Jaune Noir Noir texte
VEHICLE (2/2)
Vehicle
Driving-Eco² Electrical Vehicle Care
SettingsOnboard computer
Electrical Vehicle
The “Electrical Vehicle” menu is made up of four
sub-menus:
– energy flow;
– consumption details;
– charge schedule;
– heating levels.
ENERGY FLOW
This menu shows you a diagram of the vehicle and
indicates the points where the vehicle is consuming energy or is generating energy to recharge the
traction battery.
CONSUMPTION DETAILS
This graphic shows the flow of energy in the vehicle and compares this with the last 15 minutes
of driving.
CHARGE SCHEDULE
This menu allows you to set the start time for
charging based on a time or a weekly calendar. For
further information, please see the vehicle instructions.
HEATING LEVELS
This menu enables you to programme the start
time for your air conditioning, based on a weekly
calendar. For further information, please see the
vehicle instructions.
Onboard computer
This menu shows you vehicle information (averages, distances, etc.)
Care
This menu enables you to adjust the fragrance diffuser and the ioniser and view the outside air quality.
17
Settings
This menu grants access to the parking distance
control/reversing camera settings (depending on
the vehicle) and enables you to activate/deactivate
the following options:
– automatic door mirror fold-back (depending on
the vehicle);
– automatic door locking;
– automatic rear windscreen wiping in reverse
gear;
– daytime running light;
– only deactivate driver’s side unlocking;
– driving style indicator on the instrument panel
(electric vehicle);
– instrument panel lighting during charging (elec-
tric vehicle);
– Eco rating.
Press “Confirm” to confirm your selection.
Note: the “Settings” menu is only available if the
vehicle stationary.
ENG_UD29826_3
MID/Véhicule (XNX - Renault)ENG_RP_1032-2_RP_Renault_0
Please see your driver’s handbook for further information.
Page 19
Cyan Magenta Jaune Noir Noir texte
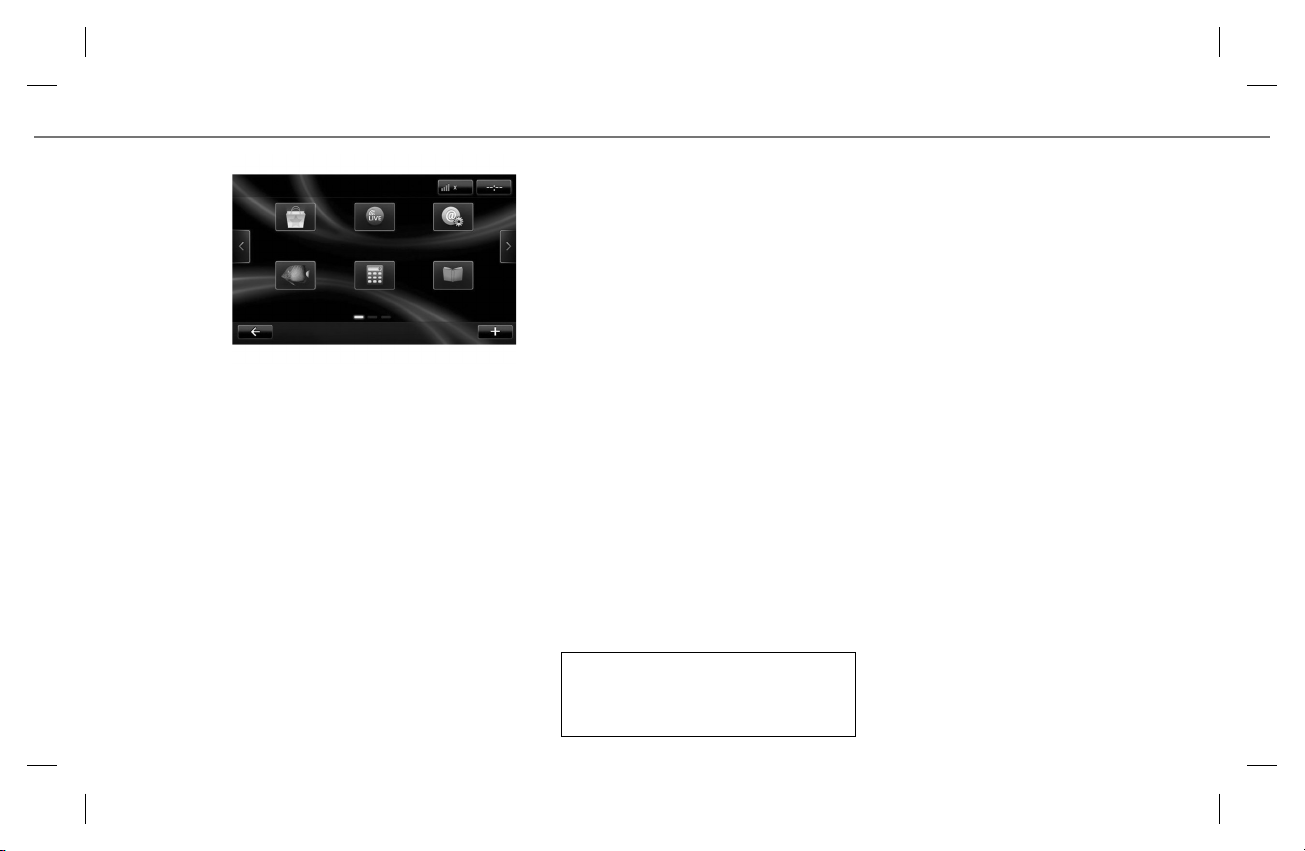
SERVICES (1/2)
Services
R-Link Store Navigation services Settings
ReaderCalculatriceAquarium
Services menu
The “Services” menu grants access to your multimedia system live menus;
– R-Link Store;
– Navigation services;
– Settings;
– Your applications;
– Application manager.
Some functions can be accessed free of charge
during a trial period. You can extend your subscription or buy other products via the vehicle
R-Link Store (accessible under certain conditions),
the R-Link Store accessible on a computer with an
Internet connection (www.renault.com) or at your
local Renault dealer (depending on the country and
the product).
Please see your system instructions for further
information about these services.
18
R-LINK STORE
This menu enables you to purchase LIVE services,
applications and more. From the “Services” menu,
press “R-Link Store”, then browse through the
menu to find your service/application and download.
You can also download applications from your PC
(particularly useful for large files) and transfer
them to your system via the SD card.
Note: some applications must be paid for. You will
be requested to enter your MyRenault.com username and password or pay by credit or debit card.
APPLICATIONS
This menu enables you to access applications purchased from the R-Link Store.
ENG_UD29828_3
MID/Services (XNX - Renault)ENG_RP_1032-2_RP_Renault_0
Page 20

Cyan Magenta Jaune Noir Noir texte
SERVICES (2/2)
Navigation services
Traffic Cameras Local search
LIVE
SERVICES LIVE
LIVE services include:
– HD Traffic;
– Fixed and mobile speed camera alerts or hazard-
ous area alerts (based on local legislation);
– local searches;
– Weather;
– Access to the “My TomTom LIVE" menu.
Z.E.ServicesWeatherMy TomTom
Settings
Application manager Connectivity
Update applications
manager
Data sharing
settings
LIVE navigation
services
Turn
Bluetooth
off
SETTINGS
You can access the following menus from the
“Settings” menu:
– Application manager;
– Connectivity manager;
– LIVE navigation services;
– Update applications;
– Data sharing settings;
– Bluetooth® activation/deactivation.
Some products can only be purchased using a
computer over an Internet connection at R-Link
Store. When you need to download an application,
you will be requested to insert your SD card into
the computer and install the R-Link Toolbox software.
19
APPLICATION MANAGER
From the “Application manager” menu, you can
delete applications on the service pages.
Please refer to your system instructions for further information about these services.
ENG_UD29828_3
MID/Services (XNX - Renault)ENG_RP_1032-2_RP_Renault_0
Page 21

Cyan Magenta Jaune Noir Noir texte
FAVOURITES
Favourites - Navigation
1 2 3 4
From the main screen, press “Favourites”: the ‘favourites’ menu enables you to create shortcuts and
manage your favourites in four sub-sections:
1 Navigation
2 Media
3 Phone
4 Services
Favourites - Navigation
Add Favourite
Remove a Favourite
Remove all Favourites
ADD A NAVIGATION FAVOURITE
Select an empty slot or the softkey “Add Favourite”.
Select the favourite from the following list to add:
– your current position;
– a point of interest;
– an itinerary.
ADD FAVOURITE MEDIA
Select the favourite from the following list to add:
– a preset radio channel;
– a menu shortcut.
20
ADD A FAVOURITE TELEPHONE NUMBER
Select the favourite from the following list to add:
– a telephone number/contact;
– a menu shortcut.
ADD A FAVOURITE SERVICE
Select the favourite from the following list to add:
– a widget/application;
– a menu shortcut.
Delete favourites
To delete a favourite, select the favourite you want
to delete, then press “+” and “Remove a Favourite”.
A confirmation message is displayed on the screen
– press “Delete” to confirm.
You can delete all favourites by pressing “+”, then
“Remove all Favourites”. A confirmation message
is displayed on the screen – press “Delete” to confirm.
ENG_UD29829_3
MID/Favoris (XNX - Renault)ENG_RP_1032-2_RP_Renault_0
Page 22

Cyan Magenta Jaune Noir Noir texte
SYSTEM SETTINGS (1/2)
System settings
Language Display Sound
Home screenSafety warnings Clock
Accessing the system
settings
From the main menu, press “System” to access the
following settings:
– Language;
– Display;
– Sound;
– Clock;
– Safety warnings ;
– Home screen;
– keypads;
– define units;
– status and information;
– remove SD card;
– restoring factory settings;
– help.
“LANGUAGE”
To select a system language, select “Language”
from the preferences menu. Select the desired language from the list.
“DISPLAY”
This menu provides access to the following settings:
– “Brightness” enables you to adjust the day/night
brightness and the activation/deactivation of the
automatic switch to night-mode;
– “Night-time/daytime” enables you to switch be-
tween night display and day display.
“SOUND”
“Sound” adjusts the audio level for the following
elements:
– main volume;
– navigation instructions;
– hands-free telephone;
– telephone ringtone;
– voice message;
– system sounds;
– parking distance control sound;
– applications.
Please refer to the instructions for your system for further information.
21
“Warnings”
This menu enables you to adjust the audio level for
alerts (hazardous areas, etc.) and to activate/deactivate the alert with the screen switched off.
“Voice Announcements”
This menu enables you to set the type of message
you wish to hear (traffic, street names, etc.).
NB: Depending on the type of voice selected, the
number of options may vary.
“Voice”
This menu enables you to select the type of voice
(robot or human).
“CLOCK”
The system automatically adjusts the date and time
by default.
You can adjust the date and time manually. To do
this, use the “Date settings” and “Time settings”
menus.
MID/Réglages système (XNX - Renault)ENG_RP_1032-2_RP_Renault_0
ENG_UD29830_3
Page 23

Cyan Magenta Jaune Noir Noir texte
SYSTEM SETTINGS (2/2)
“SAFETY WARNINGS”
When navigation is activated, the system can warn
the driver about certain events (speed alert near
schools, etc.). From the “Safety warnings” menu,
select the alerts, press “Next” to select the sound
to be linked to these alerts, then confirm by pressing “Confirm”.
Depending on the alerts, you can also set the vehicle speed to the speed at which you wish to be
alerted.
“HOME SCREEN”
This menu allows you to configure the location and
the display of menus visible on the homepage.
System settings
“KEYPADS”
This menu enables you to configure the type of
keypad (AZERTY, QWERTY, etc).
“DEFINE UNITS”
This menu enables you to configure the system
measurement units (degrees, metres, etc).
Keypads Define units Status and infor-
Remove the
SD card
settings
mation
22
“STATUS AND INFORMATION”
This menu shows the following information:
– system version;
– GPS information;
– network information;
– software licence information;
HelpRestore factoring
– copyright.
“REMOVE SD CARD"
This menu enables you to eject the SD card safely.
“RESTORE FACTORY SETTINGS”
This menu allows you to completely reset the
system. In this case, all saved information will be
deleted.
“HELP”
This menu grants access to the help and explanations for the various menus (Navigation,
Multimedia, etc).
MID/Réglages système (XNX - Renault)ENG_RP_1032-2_RP_Renault_0
ENG_UD29830_3
Page 24

RP TTY | 1032
2 | ENG | Dos
0 mm | 22 pages | 1 de Couv
W0
=
à259106747Rïïîä
-
RP 1032-2 – 25 91 067 47R – 09/2012 – Edition anglaise
92100 BOULOGNE-BILLANCOURT R.C.S. NANTERRE 780 129 987 — SIRET 780 129 987 03591 / TÉL. : 0810 40 50 60
RENAULT S.A.S. SOCIÉTÉ PAR ACTIONS SIMPLIFIÉE AU CAPITAL DE 533 941 113 € / 13-15, QUAI LE GALLO
)
) (
www.renault-multimedia.com
Cyan Magenta Jaune Noir Noir texte
(
www.e-guide.renault.com
 Loading...