

Page 1
OWNER’S MANUAL
Model No. GRB48B
GEORGE FOREMAN
®
G + BROIL
Page 2

2
IMPOR TANT SAFEGUARDS
When using electrical appliances, basic safety precautions should
always be followed, including the following:
1. Read all instructions.
2. Do not touch hot surfaces. Use handles or knobs. Use oven mitts or
pot holders.
3. To protect against electric shock, do not immerse cord, plugs, or
appliance in water or other liquid.
4. Close supervision is necessary when any appliance is used by or
near children.
5. Unplug from outlet when not in use and before cleaning. Allow to
cool before putting on or taking off parts, and before cleaning the
appliance.
6. Do not operate any appliance with a damaged cord or plug or after
the appliance malfunctions, or has been damaged in any manner.
Contact Consumer Service for examination, repair or adjustment.
7. The use of accessory attachments not recommended by the appliance manufacturer may cause injuries.
8. Do not use outdoors.
9. Do not let cord hang over edge of table or counter, or touch hot surfaces.
10. Do not place on or near a hot gas or electric burner, or in a heated
oven.
11. Extreme caution must be used when moving an appliance containing
hot oil or other hot liquids. Allow liquid to cool before removing and
emptying drip tray.
12. To disconnect, grasp plug and remove from wall outlet.
13. Do not use appliance for other than intended use.
SAVE THESE INSTRUCTIONS
This Appliance is for Household Use Only
Page 3

3
Additional Important Safeguards
CAUTION HOT SURFACES: This appliance generates heat and escaping steam during use. Proper precautions must be taken to prevent the
risk of burns, fires or other injury to persons or damage to property.
CAUTION: This appliance is hot during operation and retains heat for
some time after turning off. Always use oven mitts when handling hot
materials and allow metal parts to cool before cleaning. Do not place
anything on top of the appliance while it is operating or while it is hot.
1. All users of this appliance must read and understand this Owner's
Manual before operating or cleaning this appliance.
2. The cord to this appliance should be plugged into a 120V AC electrical outlet only.
3. If this appliance begins to malfunction during use, immediately
unplug cord from outlet. Do not use or attempt to repair the malfunctioning appliance.
4. Do not leave this appliance unattended during use.
5. When using this appliance, provide adequate air space above and on
all sides for air circulation. Do not allow this appliance to touch curtains, wall coverings, clothing, dish towels or other flammable materials during use.
6. This appliance generates steam — do not operate in open position.
7. Using pot holder, hold the top cover (Lid) open while placing or
removing food on the cooking surface to prevent accidental closing
and injury.
Page 4

4
Polarized Plug
This appliance has a polarized plug (one blade is wider than the other).
To reduce the risk of electric shock, this plug is intended to fit into a
polarized outlet only one way. If the plug does not fit fully in the outlet,
reverse the plug. If it still does not fit, contact a qualified electrician. Do
not attempt to modify the plug in any way.
Short Cord Instructions
A short power-supply cord is provided to reduce the risk resulting from
becoming entangled in or tripping over a longer cord.
Do not use an extension cord with this product.
Electric Power
If the electrical circuit is overloaded with other appliances, your appliance may not operate properly. It should be operated on a separate
electrical circuit from other appliances.
Plasticizer Warning
CAUTION: To prevent Plasticizers from migrating from the finish of the
counter top or table top or other furniture, place NON-PLASTIC coasters
or placemats between the appliance and the finish of the counter top or
table top.
Failure to do so may cause the finish to darken, permanent blemishes
may occur or stains can appear.
Page 5
5
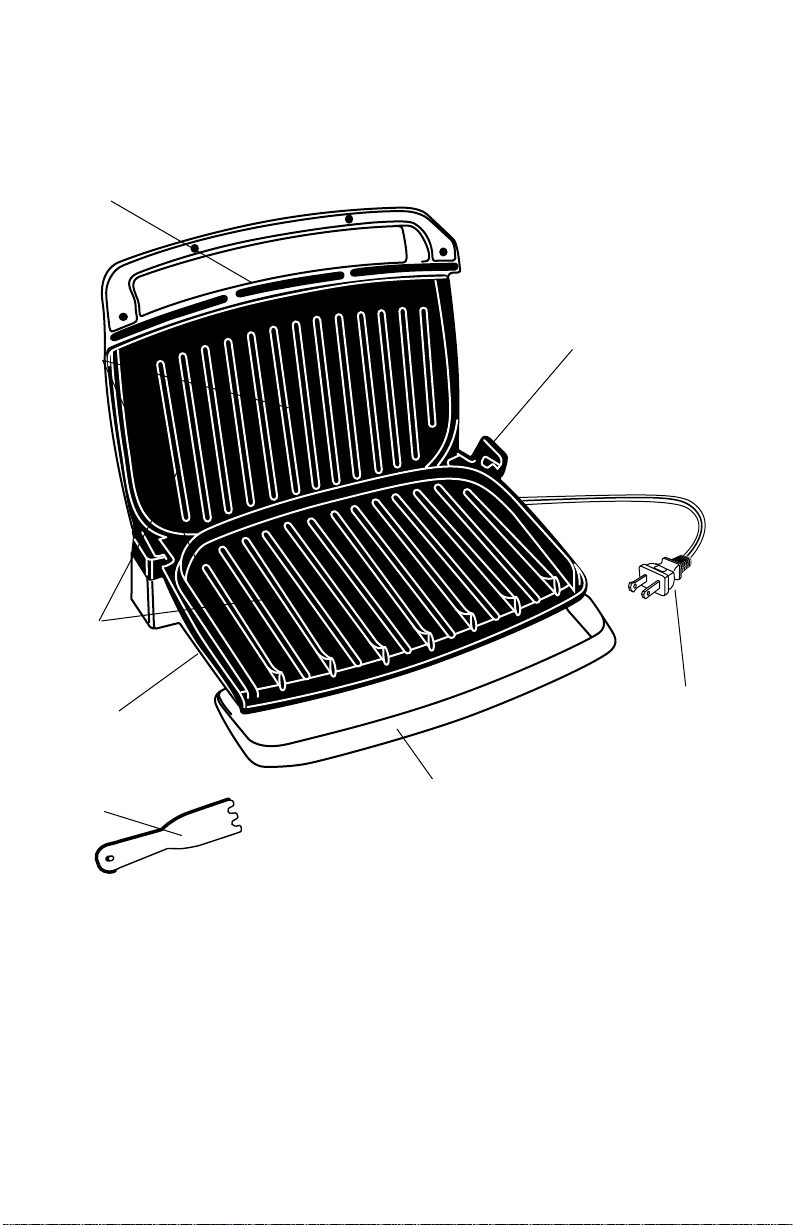
Getting To Know Your
GRB48B G + Broil Grilling Machine
4
2
6
5
3
1
1. Grilling Machine Body
2. Grilling Machine Grilling Plates
3. Power Light
4. G + Broil Floating Hinge/Locking Hinge
5. Drip Tray (P/N 22804)
6. Power Cord
7. Spatula (P/N 20147)
4.
7
Page 6

6
How To Use George Foreman’s Lean Mean
Fat Reducing Grilling Machine
The floating hinge position allows for grilling extra thick foods.
1. Before using the Grilling Machine for the first time, wipe the Grilling
Plates with a damp cloth to remove all dust.
2. To preheat: Close the Lid and plug cord into a 120V AC outlet. The
Power Light will go on indicating that the elements are heating.
Allow Grilling Machine to preheat for 5 minutes.
3. Use a pot holder to carefully open the Lid.
4. Slide the grease catching Drip Tray under the front of the unit.
5. Carefully place the items to be cooked on the bottom cooking plate.
6. Close the Lid in the
Floating Hinge Position,
see illustration, and
allow the food to cook
for the desired time.
(Consult the Cooking
Chart at the back of this
book for some suggestions.) The Power Light
will go on when the Lid
is closed to indicate that
the elements are heating up to cook. Do not leave appliance unat-
tended during use!
7. After the desired amount of time, the food should be done.
8. Disconnect the plug from the wall outlet.
CAUTION: To avoid any sparks at the outlet while disconnecting
plug, make sure the "Power Light" is off (not illuminated) before
disconnecting the plug from the outlet.
9. Use a pot holder to carefully open the Lid.
10. Remove the food using the Plastic Spatula provided. Be sure to
always use either heat resistant plastic or wooden utensils so as not
to scratch the non-stick surface. Never use metal tongs, forks or
knives as these can damage the coating on the cooking plates.
11. When cool, the Drip Tray may be removed and emptied. Be sure the
liquid is cooled before removing Drip Tray.
Floating
Hinge
Position
Page 7

7
How To Use George Foreman’s Lean Mean
Fat Reducing G + Broiling Machine
The G + Broil locking hinge keeps the top cooking plate above the food
on the bottom cooking plate.
1. Before using the G + Broiling Machine for the first time, wipe the Grilling
Plates with a damp cloth to remove all dust.
2. To preheat: Close the Lid and plug cord into a 120V AC outlet. The Power
Light will go on indicating that the elements are heating. Allow Grilling
Machine to preheat for 5 minutes.
3. Use a pot holder to carefully open the Lid.
4. Slide the grease catching Drip Tray under the front of the unit.
5. Carefully center the items to be cooked directly on the bottom cooking plate,
one to two servings of food usually. Do not overload the cooking plate and
the food should not touch the top grilling plate once the Lid is closed.
6. Lift the Handle of the Lid
straight up and forward
into the G + Broil Locking
Hinges. See illustration.
Lower the Lid into the G +
Broiling position above the
food. Allow the food to
cook for the desired time.
(Consult the G + Broiling
Cooking Chart at the back
of this book for some suggestions.) The Power Light
will cycle off and on during cooking to indicate that the elements are heating up to cook. Do not leave appliance unattended during use!
7. After the desired amount of time, the food should be done.
8. Disconnect the plug from the wall outlet.
CAUTION: To avoid any sparks at the outlet while disconnecting plug,
make sure the "Power Light" is off (not illuminated) before disconnecting
the plug from the outlet.
9. Use a pot holder to carefully open the Lid.
10. Remove the food using the Plastic Spatula provided. Be sure to always use
either heat resistant plastic or wooden utensils so as not to scratch the nonstick surface. Never use metal tongs, forks or knives as these can damage
the coating on the cooking plates.
11. When cool, the Drip Tray may be removed and emptied. Be sure the liquid is
cooled before removing Drip Tray.
G + Broil Hints:
• To prevent heat loss, avoid opening the Lid excessively.
• Select foods that will not touch the top grilling plate.
• Do not over fill the grill with food, one to two servings.
•
Check the food a few minutes before the end of the cooking time for doneness. Then continue cooking if necessary.
Locking
Hinge
Position
Page 8

8
Floating Hinge Grilling Chart
Fish, Meat and Poultry
The following times are meant to be used as guidelines only. The times reflect a
full grill of food. Place the fish skin side down if possible. Times will vary due to
the cut and thickness of the meat being cooked. To be sure that the food is
done, use a cooking thermometer. If the food does need more time to cook,
check periodically so you do not over cook. Some cooked food temperatures
are not recommended.
Med/Rare Med/Med Well Well
Food (145˚F)* (160˚F)* (170˚F)*
Bratwurst, 5 total N/R 16-18 min. 18-20 min.
Chicken Breast
(boneless/skinless)
1 1/2" thick, 6-8 oz each N/R N/R 8-11 min.
Chicken Breast (Frozen
boneless/skinless)
1 1/2" thick, 5-7 oz each N/R N/R 10-12 min.
Filet Mignon, 1 1/2" thick
5 oz each 9-11 min. 11-13 min. N/R
Fajita Beef (1/2" thick slices) 1 1/2-2 min. 2-2 1/2 min. N/R
Fajita Chicken (1/2" thick slices) N/R N/R 2-3 min.
Ham Steak, 1/2" thick
4 oz each N/R 2-3 min. 3-4 min.
Hamburgers, 3/4" thick
4 oz each N/R 6-7 min. 7-8 min.
Hamburgers, 1" thick
8 oz each N/R 9-10 min. N/R
Hot Dogs (Jumbo)
1 lb. total N/R 5-6 min. 6-7 min.
Kabobs Beef 7-8 min. 8-10 min. N/R
Kabobs Chicken N/R N/R 7-10 min.
Marlin Steaks, 1" thick
8 oz each 5-6 min. 7-8 min. N/R
NY/KC Strip, 1" thick
12 oz each 6-7 min. 7-8 min. 9-10 min.
NY/KC Strip, (frozen) 1" thick
12 oz each 12-13 min. 14-15 min. 16-17 min.
*Internal Food Temperatures N/R - Not Recommended
Page 9

9
Floating Hinge Grilling Chart (Cont.)
Fish, Meat and Poultry
Med/Rare Med/Med Well Well
Food (145˚F)* (160˚F)* (170˚F)*
Pork Top Loin, 1/2" thick
4 oz each N/R 4-5 min. 6-7 min.
Pork Chop, 1 1/4" thick
7 oz each N/R 9-11 min. 12-14 min.
Rib Eye Steak, 3/4" thick
6 oz each 5-6 min. 6-7 min. 7-8 min.
Rib Eye Steak (frozen), 3/4" thick
6 oz each 9-10 min. 11-12 min. 13-14 min.
Rib Eye Steak, 1 1/4" thick
14 oz each 12-14 min. 15-16 min. 17-18 min.
Rib Eye Steak (frozen), 1 1/4" thick
14 oz each 14-16 min. 16-19 min. N/R
Salmon Filet, 1" thick
6 oz. each 8-10 min. 11-13 min. N/R
Sausage Links N/R 5-6 min. 6-7 min.
Sausage Patties, 1/2" thick N/R 4-5 min. 6-7 min.
Sea Scallops, 10-20 count/pound 3-5 min. N/R
Shrimp, deveined, 26-30 count/pound N/R 3-4 min. N/R
Shrimp, deveined, 16-20 count/pound N/R 4-5 min. N/R
Swordfish, 1" thick
11 oz. each 9-10 min. 11-12 min. N/R
Tuna Steak, 3/4" thick
6 oz. each 3-5 min. 5-6 min. N/R
Turkey Burger, 3/4" thick
4 oz. each N/R N/R 6-9 min.
Turkey Burger (frozen), 3/4" thick
4 oz. each N/R N/R 8-10 min.
PLEASE NOTE: The USDA recommends that meats such as beef and lamb, etc.
should be cooked to an internal temperature of 145˚F. Pork should be cooked to
an internal temperature of 160˚F and poultry products should be cooked to an
internal temperature of 170˚F - 180˚F to be sure any harmful bacteria has been
killed. When reheating meat/poultry products, they should also be cooked to
an internal temperature of 165˚F.
*Internal Food Temperatures N/R - Not Recommended
Page 10

10
Floating Hinge Grilling Chart (Cont.)
Fruits and Vegetables
The following times are meant to be used as guidelines only. Brush with olive oil
or butter. The times reflect a full grill of food. The times may vary due to the cut
or thickness of the food being cooked. If the food does need more time to cook,
check periodically so you do not over cook.
Food Grill Time
Asparagus Spears 4-8 min.
Bell Peppers (green, yellow, red) 1/2" slices 5-7 min.
Mushrooms, sliced 4-5 min.
Onion Slices, 1/2" slices 5-7 min.
Potato Wedges, 1/2" thick 20-25 min.
Portabella Mushrooms, whole, 2-3" in diameter 4-5 min.
Sandwiches (Cheese, Ham, Turkey, Roast Beef) 3-5 min.
Quesadillas, 6-8" flour tortilla folded in half 3-4 min.
Zucchini slices, 1/2" slices 5-7 min.
Page 11

11
Locking Hinge G + Broiling Chart
The G + Broil locked hinge position is so versatile! You can melt cheese on top
of your grilled hamburger in 30 seconds or on top of a deli sandwich in 2-3 minutes. Use the G + Broil feature to cook most frozen convenience foods such as
mini pizzas, French bread pizza, fish sticks, chicken tenders, Hot Pockets®, Lean
Pockets®, Poppers®, and French fries with oven like results. Food will cook in
about the same time as indicated on the package directions for conventional
ovens. The G + Broil will also cook delicate flaky fish in minutes. Place the fish
skin side down if possible.
The following times are meant to be used as guidelines only. Times will vary due
to amount and thickness of the food being cooked. Fill the grill with 1 to 2 servings of food. To be sure that the food is done, use a cooking thermometer. If the
food does need more time to cook, check periodically so you do not over cook.
Food Broil Time
Bagel Bites®, frozen oven package time
Chicken Tenders, frozen oven package time
French Fries, frozen oven package time
Fish Sticks, frozen oven package time
Hamburger, grilled then topped with cheese 30 seconds
Hot Pockets
®
oven package time
Lean Pockets
®
oven package time
Pineapple Slices with brown sugar, 1/2" thick 7 min.
Pizza, frozen mini or singles oven package time
Pizza Rolls, frozen oven package time
Poppers®, frozen oven package time
Sandwich open faced topped with cheese 2-3 min.
Taquitos
®
oven package time
Tostada, topped with shredded cheese 2 min.
Tuna Melt Sandwiches 2 min.
Tomato Slices with Parmesan cheese, 1" thick 4 min.
Fish
Catfish Filets, 1/2" thick, 5 oz. each 7-9 min.
Cod Filet, 1" thick, 11 oz. each 5-7 min.
Halibut (frozen), 1" thick, 6 oz. each 13-16 min.
Maui Maui (frozen), 1" thick, 7 oz. each 18-23 min.
Rainbow Trout Filets, 3/4" thick, 7 oz. each 11-13 min.
Salmon Filets, 1 1/2" thick, 5 oz. each 18-23 min.
Tilapia Filets, 3/4" thick, 4 oz. each 5-7 min.
Page 12

12
User Maintenance Instructions
CAUTION: To avoid accidental burns, allow your Grilling Machine to
cool thoroughly before cleaning.
1. Before cleaning, unplug the appliance from the wall outlet and allow
to cool.
2. Inside cleaning: Place the Drip Tray under the front of the Grilling
Machine. Using the specially designed Spatula, scrape off any
excess fat and food particles. Wipe the plates with absorbent paper
towel or a sponge. Run off will drip into the Drip Tray.
3. Stubborn build-up: Use a non-metallic scrubbing pad to clean the
plates.
4. Empty the Drip Tray and clean with warm soapy water. Wipe dry.
5. Outside cleaning: Wipe with a warm, wet sponge and dry with a
soft, dry cloth.
6. Do not use steel wool, scouring pads, or abrasive cleansers on any
part of the appliance.
7. DO NOT IMMERSE IN WATER OR OTHER LIQUID.
8. Any servicing requiring disassembly other than the above cleaning
must be performed by a qualified electrician.
9. Make sure to hold the top cover (Lid) by hand while cleaning to prevent accidental closing and injury.
4.
Page 13

13
Frequently Asked Questions
Question
1. Can I cook frozen food on
my George Foreman Grill?
2. Why does the Power Light
turn ON & OFF?
3. Can I cook kabobs on the
George Foreman Grill?
4. After cooking with garlic,
how can I remove the smell
of the garlic from the surface of my George Foreman
Grill?
5. How can I cook hot dogs
on my George Foreman
Grill?
6. Can hash browns be prepared on my George
Foreman Grill?
7. Any other cooking suggestions?
Response
It is preferable that food be defrosted before
placing on the George Foreman Grill. Make
sure that the Grill is preheated, see preheat
instructions, before placing food on the grilling
plate.
As stated in the manual, the Power Light goes
ON to indicate when the Grill's elements are
heating. The Power Light goes OFF when the
proper temperature has been reached. The
thermostat will cycle ON & OFF throughout the
cooking process to maintain proper temperature.
Yes. In order to protect the non-stick surface
use wooden skewers. We recommend that
you soak the skewers first in water for about
20 minutes. This will keep the skewers from
burning.
After cleaning your George Foreman Grill
according to the "User Maintenance
Instructions" make a paste of baking soda and
water and spread on the surface of the Grill.
Allow it to sit for a few minutes and then wipe
away with a damp sponge or cloth.
Preheat your Grill for 5-minutes. Place the hot
dogs lengthwise on the Grill. Close the Lid and
cook for 2-1/2 minutes or until desired browning is achieved.
Yes, self-browning hash browns can be prepared by preheating the Grill for 5 minutes.
Add hash browns onto the Grill surface, close
the Lid, and cook for approximately half the
time stated on the package for oven preparation.
Fresh peppers can be grilled for 5-7 minutes
for skinning purposes.
Grilled cheese sandwiches can also be
cooked on your George Foreman Grill.
Page 14

14
Page 15

15
Page 16

LIMITED ONE-YEAR WARRANTY
Warranty Coverage: This product is warranted to be free from defects in materi-
als or workmanship for a period of one (1) year from the original purchase date.
This product warranty is extended only to the original consumer purchaser of the
product and is not transferable. For a period of one (1) year from the date of original purchase of the product, our Repair Center will, at its option, either (1) repair
the product or (2) replace the product with a reconditioned comparable model.
These remedies are the purchaser's exclusive remedies under this warranty.
Warranty Service: To obtain warranty service, you must call our warranty service
number at 1-800-233-9054 for return instructions on how to deliver the product, in
either the original packaging or packaging affording an equal degree of protection to the Repair Center specified below. You must enclose a copy of your sales
receipt or other proof of purchase to demonstrate eligibility for warranty coverage.
To return the appliance, ship to: To contact us, please write to, call, or email:
ATTN: Repair Center Consumer Relations Department
708 South Missouri Street PO Box 7366
Macon, MO 63552 USA Columbia MO 65205-7366 USA
1-800-233-9054
E-mail:
consumer_relations@toastmaster.com
What Is Not Cover
ed:
This warranty does not cover damage resulting from misuse, accident, commercial use, improper service or any other damage caused by
anything other than defects in material or workmanship during ordinary consumer use. This warranty is invalid if the serial number has been altered or
removed from the product. This warranty is valid only in the United States and
Canada.
LIMITATION ON DAMAGES: THERE SHALL BE NO LIABILITY FOR ANY INCIDENTAL OR CONSEQUENTIAL DAMAGES FOR BREACH OF ANY EXPRESS OR
IMPLIED WARRANTY OR CONDITION ON THIS PRODUCT.
DURATION OF IMPLIED WARRANTIES: EXCEPT TO THE EXTENT PROHIBITED BY
APPLICABLE LAW, ALL IMPLIED WARRANTIES AND CONDITIONS, INCLUDING,
WITHOUT LIMITATION, IMPLIED WARRANTIES AND CONDITIONS OF MERCHANTABILITY AND FITNESS FOR A PARTICULAR PURPOSE OR USE ON THIS
PRODUCT ARE LIMITED IN DURATION TO THE DURATION OF THIS WARRANTY.
Some jurisdictions do not allow the exclusion or limitation of incidental or consequential damages, or allow limitations on how long an implied warranty lasts, so
the above limitations or exclusions may not apply to you. This warranty gives you
specific legal rights and you may have other rights under the laws of your jurisdiction.
For more information on our products, visit our website: www.maxim-toastmaster.com
"© 2006 Salton, Inc. All Rights Reserved" P/N XXXXX
Printed in China
 Loading...