

Page 1
OWNER’S MANUAL
Model No. GR38SILCAN
GEORGE FOREMAN
TM
®
Page 2

IMPORTANT SAFEGUARDS
READ AND SAVE THESE INSTRUCTIONS
WARNING: A risk of fire and electrical shock exists in all electrical
appliances and may cause personal injury or death. Please follow all
safety instructions.
When using electrical appliances, basic safety precautions should
always be followed, including the following:
1. Read all instructions before using appliance.
2. Do not touch hot surfaces. Use handles or knobs and oven mitts or
pot holders.
3. To protect against electric shock do not immerse cord, plugs, or
cooking unit in water or other liquid.
4. Close supervision is necessary when any appliance is used near
children.
5. This appliance is not for use by children.
6. Unplug from outlet when not in use and before cleaning. Allow to
cool before putting on or taking off parts, and before cleaning the
appliance.
7. Do not operate any appliance with a damaged cord or plug or after
the appliance malfunctions, or has been dropped or damaged in any
manner. Contact consumer service for return authorization, examination, repair or adjustment.
8. The use of accessory attachments not recommended by the appliance manufacturer may cause injuries.
9. Do not use outdoors or while standing in a damp area.
10. Do not let cord hang over edge of table or counter, or touch hot surfaces.
11. Do not place on or near a hot gas or electric burner, or in a heated
oven.
12. To disconnect, turn Variable Temperature Control Knob to Low (L),
grasp plug and remove from wall outlet.
13. Do not use appliance for other than intended use.
14. Extreme caution must be used when moving an appliance containing
hot oil or other hot liquids. Allow liquid to cool before removing and
emptying drip tray.
SAVE THESE INSTRUCTIONS
THIS APPLIANCE IS FOR HOUSEHOLD USE ONLY
2
Page 3

Additional Important Safeguards
1. CAUTION - HOT SURFACES: This appliance generates heat and
escaping steam during use. Proper precautions must be taken to
prevent the risk of burns, fires or other damage to persons or property.
2. All users of this appliance must read and understand this Owner's
Manual before operating or cleaning this appliance.
3. The cord to this appliance should be plugged into a 120V AC electrical outlet only.
4. When using this appliance, provide adequate air space above and on
all sides for air circulation. Do not allow this appliance to touch curtains, wall coverings, clothing, dish towels or other flammable materials during use.
5. Do not leave this appliance unattended during use.
6. This appliance generates steam—do not operate in open position.
7. If this appliance begins to malfunction during use, immediately
unplug cord from outlet. Do not use or attempt to repair the malfunctioning appliance.
8. Using pot holder, hold the top cover (Lid) open while placing or
removing food on the cooking surface to prevent accidental closing
and injury.
3
Page 4

Consumer Safety Information
This appliance is equipped with a grounded-type 3-wire cord (3-prong
plug). This plug will only fit into an electrical outlet made for a 3-prong
plug. This is a safety feature. If the plug should fail to fit the outlet, contact an electrician to replace the obsolete outlet. Do not attempt to
defeat this safety feature.
Short Cord Instructions
A short power-supply cord is provided to reduce the risk resulting from
becoming entangled in or tripping over a longer cord. Longer detachable
power-supply cords or extension cords are available and may be used if
care is exercised in their use.
If a longer detachable power-supply cord or extension cord is used, (1)
the marked electrical rating of the extension cord should be at least as
great as the electrical rating of the appliance, and (2) the longer cord
should be arranged so that it will not drape over the counter top or table
top where it can be pulled on by children or tripped over unintentionally.
Since the appliance is of the grounded type, the extension cord should
be a grounding type 3 wire cord.
Electric Power
If the electric circuit is overloaded with other appliances, your appliance
may not operate properly. It should be operated on a separate electrical
circuit from other appliances.
CAUTION: To prevent Plasticizers to migrate from the finish of the
counter top or table top or other furniture, place NON-PLASTIC coasters
or placemats between the appliance and the finish of the counter top or
table top.
Failure to do so may cause the finish to darken, permanent blemishes
may occur or stains can appear.
4
Page 5
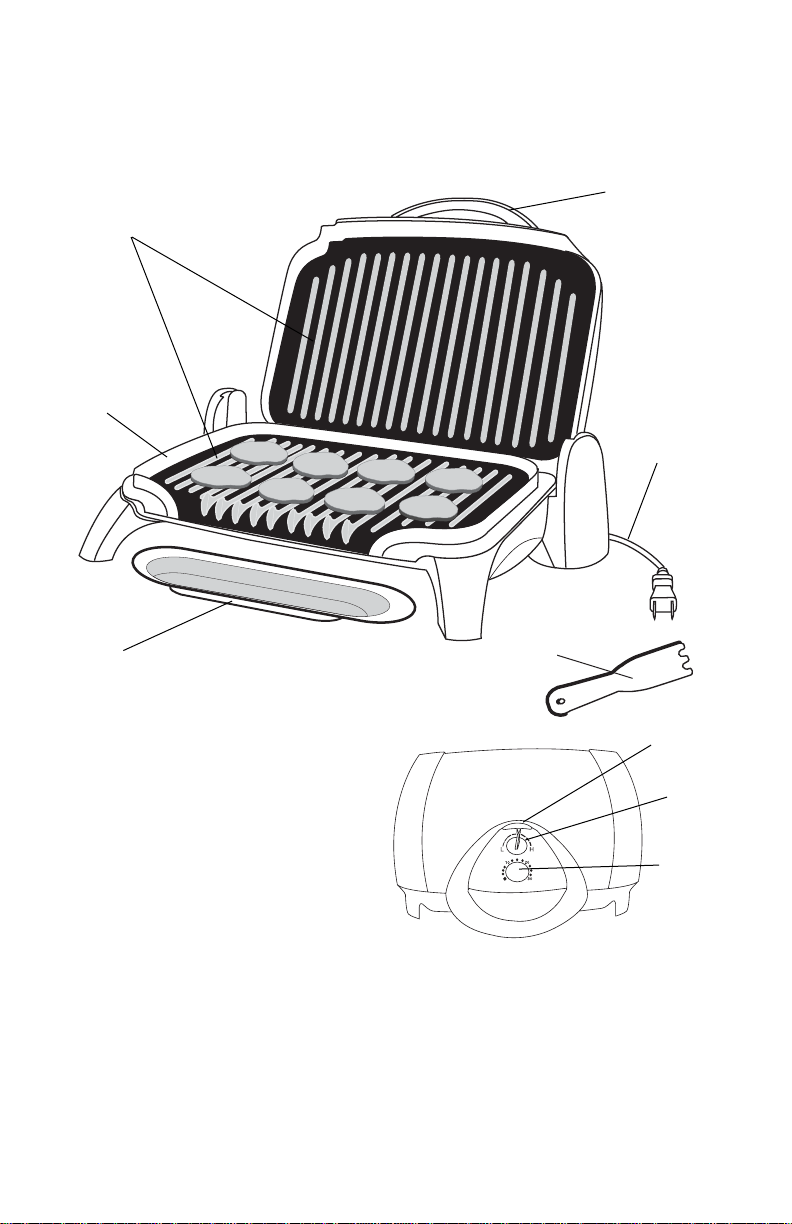
Getting To Know Your
GR38SILCAN Grilling Machine
3.
2.
1.
4.
5.
1. Grill Machine Body
2. Grilling Plates
6.
7.
8.
3. Handle
4. Cord
5. Drip Tray (P/N 21781)
9.
6. Plastic Spatula (P/N 20147)
7. Power “On” Indicator (LED)
8. Variable Temperature Control
Knob (P/N 21782)
9. Timer Control Knob (P/N 21783)
NOTE: Allow the Timer Control to automatically count down to 0 minutes.
Manually turning the Timer Control to 0 minutes may damage the
Timer mechanism.
5
Page 6

How To Use George Foreman’s Lean Mean
Fat Reducing Grilling Machine
1. Before using the Grill for the first time, wipe the Grilling Plates with a
damp cloth to remove any dust. Wash the drip tray in warm, soapy
water. Rinse thoroughly and wipe dry.
2. To preheat: Use the Handle to close the Lid and plug cord into a 120V
AC outlet. Turn the Variable Temperature Control to High (H) then turn
the Timer Control to set a preheat time of about 10 minutes. The LED
light will go on and the Grilling Plates will begin heating. Allow unit to
pre-heat for the set time. The LED light will remain on during use.
3. Use a "pot holder" to carefully lift the Handle and open the Lid.
4. Slide the grease catching Drip Tray under the front of the Grill.
5. Carefully place the items to be cooked on the bottom Grilling Plate.
6. Use the Handle to close the Lid.
7. The Variable Temperature Control allows you to select any heat setting between Low (L), Medium (M) or High (H). Adjust the Variable
Temperature Control to your desired setting. See "Suggested Cooking
Chart" on following page for specific details.
8. Turn the Timer Control to set the desired grilling time. The LED light
will go on.
9. Allow the food to cook until done. (Consult the Cooking Chart and
Recipe Section in this book.) Do not leave Grill unattended during
use! During grilling, the Timer Control will count down the minutes.
Once the time has elapsed, the Timer Control will “ding”, the LED light
will turn off, and the Grill will shut off automatically.
NOTE: Allow the Timer Control to automatically count down to
0 minutes. Manually turning the Timer Control to 0 minutes may
damage the Timer mechanism.
10. When finished cooking, turn Temperature Control to Low (L).
Disconnect the plug from the wall outlet.
NOTE: Some sparks may be visible while disconnecting from wall
outlet. This is quite normal.
11. Use a "pot holder" to carefully lift the Handle and open the Lid.
12. Remove the food using the supplied spatula or a plastic or wooden
utensil. Be sure to always use either plastic or wooden utensils so as
not to scratch the non-stick surface. Never use metal tongs, forks or
knives as these can damage the coating on the cooking plates.
13. When cool, the Drip Tray may be removed and emptied. Be sure the
liquid has cooled before removing Drip Tray.
6
Page 7

Suggested Cooking Chart
The following times are meant to be used as guidelines only. Times will vary due to the cut or thickness of the meat being cooked. To be sure that the food is truly done, use a cooking thermometer. If
the food does need more time to cook, reset the timer and check periodically so you do not overcook.
When cooking the following items, we recommend setting your Grilling Machine to LOW (L):
Rare 145°F* Medium 160°F* Well 170°F*
Salmon Filet, 1" thick, 4 oz each 6 min. 7 min.
Salmon Steak, 1" thick, 10 oz each 8 min. 9 min.
Sword Fish, 1" thick, 6 oz each 8 min. 9 min.
Tuna Steak, 1" thick, 6 oz each 7 min. 9 min.
White Fish, 1/2" thick, 6 oz each 5 min. 6 min.
Turkey Burger, 3/4" thick, 4 oz each 8 min.
Turkey Burger, 3/4" thick, 8 oz each 12 min.
Frozen Turkey Burgers, 1" thick, 4 oz each 12 min.
Frozen Turkey Burgers, 1" thick, 8 oz each 15 min.
Sea Scallops, 1" thick, 1 oz each 31/2min. 41/2min.
Shrimp, Split Shell, med. size, 1/2 lb. 4 min.
When cooking the following items, we recommend setting your Grilling Machine to MEDIUM (M):
Center Cut Pork Chops, 1/2" thick, 6 oz each 10 min. 11 min.
Pork Tenderloin, 1/2" thick, 2 oz each 5 min. 6 min.
Hamburger, 3/4" thick, 4 oz each 8 min. 9 min.
Hamburger, 3/4" thick, 8 oz each 9 min. 10 min.
Frozen Hamburger, 3/4" thick, 4 oz each 12 min. 13 min.
Frozen Hamburger, 1" thick, 8 oz each 15 min. 16 min.
Chicken Breast (boneless/skinless)11/2" thick, 6-8 oz each 9 min.
Frozen Chicken Breast (boneless/skinless) 13 min.
1
1
/2" thick, 6-8 oz each
Chicken Breast bone-in (up to 21/2" thick) 23 min.
Link Sausage 5 min. 7 min.
Sliced Sausage (1/2" thick) 6 min. 7 min.
When cooking the following items, we recommend setting your Grilling Machine to HIGH (H):
Fajita Beef (1/2" thick slices) 11/2min. 2 min. 21/2min.
T-Bone Steak, 3/4" thick, 12 oz each 4 min. 5 min. 6 min.
Frozen T-Bone, 3/4" thick, 12 oz each 6 min. 7 min. 8 min.
NY/KC Strip Steak, 1" thick, 8 oz each 5 min. 6 min. 7 min.
Frozen NY/KC Strip Steak, 1" thick, 8 oz each 10 min. 111/2min. 13 min.
Ribeye Steak, 1" thick, 12 oz each 6 min. 71/2min. 9 min.
Frozen Ribeye Steak, 1" thick, 10 oz each 101/2min. 111/2min. 121/2min.
Onions and Peppers (brush with olive oil) 81/2min. 15 min.
PLEASE NOTE: The USDA recommends that meats such as beef and lamb, etc. should be cooked to
an internal temperature of 145°F. Pork should be cooked to an internal temperature of 160°F and
poultry products should be cooked to an internal temperature of 170°F - 180°F to be sure any harmful bacteria has been killed. When reheating meat/poultry products, they should also be cooked to
an internal temperature of 165°F.
* Internal Food Temperatures
7
Page 8

Grilling Hints and Tips
• Use tender cuts of meat for grilling.
• Marinate tougher cuts of meat to tenderize them before grilling.
•To avoid drying out meat and fish, do not pierce with a utensil.
• Adjust heat setting gradually and only as necessary. Cooking foods at
too high a temperature can cause them to dry out.
• Better cooking results will be achieved with boneless cuts of meat,
chicken and fish.
• If grilling more than one item, select foods of even thickness. This will
promote consistant doneness and appearance.
• For grilling small portions, make sure meat is centered on Grill. When
grilling larger portions, distribute evenly and allow one inch space
between foods to promote uniform cooking.
• When grilling fish or chicken breast fillets, tuck extremely thin parts
under to prevent overcooking.
•If food is under-cooked when removed from Grill, simply return to Grill
for additional cooking time.
User Maintenance Instructions
CAUTION: To avoid accidental burns, allow your Grilling Machine to cool
thoroughly before cleaning.
1. Before cleaning, unplug the Grilling Machine from the wall outlet and
allow to cool.
2. Inside cleaning: Place the Drip Tray under the front of the Grilling
Machine. Using the specially designed spatula, scrape off any excess
fat and food particles. Wipe the plates with absorbent paper towel or a
sponge. Run off will drip into the Drip Tray.
3. Stubborn build-up: Use a non-metallic scrubbing pad to clean the
plates.
4. Empty the Drip Tray and clean with warm soapy water. Wipe dry.
5. Outside cleaning: Wipe with a warm, wet sponge and dry with a soft,
dry cloth.
6. Do not use steel wool, scouring pads, or abrasive cleaners on any part
of the Grilling Machine.
7. DO NOT IMMERSE IN WATER OR OTHER LIQUID.
8. Any servicing requiring disassembly other than the above cleaning must
be performed by a qualified electrician.
9. Make sure to hold the top cover (Lid) by hand while cleaning to prevent
accidental closing and injury.
10. Once the Grilling Machine is completely cooled and cleaned, the Power
Cord may be wound using the Cord Storage area on the bottom of the
unit. Do not put any stress on the cord where it enters the unit, as it
could cause the cord to fray and break.
8
Page 9

Recipes
NOTE: For all recipes, please remember to place Drip Tray in front of the
Grilling Machine
The Champ’s Sausage Without Guilt
You can start your day with a sizzling sausage patty that not only tastes
good, but is also good for you. This moist, flavorful sausage, served with
a country-style biscuit, makes the complete breakfast. Choose ground
turkey breast, which is lower in fat than ground turkey containing dark
meat and skin. Turkey, especially the light meat, is a good source of
niacin, which is an important B vitamin needed to maintain a healthy nervous system.
1 slightly beaten egg white
1/3 cup finely chopped onion
1/4 cup finely snipped dried apples OR
1/2 cup finely chopped fresh red Delicious apple
1/4 cup seasoned bread crumbs
2 Tbsp. snipped fresh parsley
1/2 tsp. sea salt
1/2 tsp. ground sage
1/4 tsp. ground nutmeg
1/4 tsp. black pepper
1/8 tsp. cayenne pepper
1/2 lb. lean ground turkey breast
to catch drippings from the cooking process.
•In a medium size mixing bowl, combine the egg white, onion, dried or
fresh apples, bread crumbs, parsley, salt, sage, nutmeg, black pepper,
and cayenne pepper. Add the ground turkey and mix well.
• Shape the mixture into nine 2-inch wide patties.
•Preheat the Grilling Machine on High for 5 - 10 minutes. Place the
patties on the grill. Close the Lid. Cook on Medium for 5 minutes or
until the meat is no longer pink and the juices run clear, turning once
or twice.
•Yield: 8 - 9 patties
This recipe is from "The Healthy Gourmet" (Clarkson Potter) by Cherie
Calbom.
9
Page 10

George’s Sausage Texas Style
A spicy sausage with true Southwestern zip! These breakfast sausages
are great served with a sautéed vegetable or fresh salsa and egg
scramble. Buy 90% lean ground beef for the least-fat sausage. Ninety
percent lean beef has 9 grams of fat with 4 of those grams being saturated fat; whereas 73% lean beef has 18 grams of fat with 7 of the grams
being saturated.
1 slightly beaten egg white
1/3 cup finely chopped onion
1/4 cup seasoned bread crumbs
1/4 cup diced green chili peppers
1 clove (large) garlic, finely minced
2 Tbsp. snipped fresh cilantro
1 Tbsp. apple cider vinegar
1-1/2 tsp. chili powder
1/4 tsp. sea salt
1/8 tsp. cayenne pepper
1/2 lb. lean ground beef
• In a medium-size mixing bowl, combine the egg white, onion, bread
crumbs, green chili peppers, garlic, cilantro, vinegar, chili powder,
salt and cayenne pepper. Add the ground beef and mix well.
• Shape the mixture into eight 3-inch wide patties.
•Preheat the Grilling Machine on High for 5 - 10 minutes. Place the
patties on the grill eight at a time. Close the Lid.
• Cook on Medium for 4 - 5 minutes or until the meat is no longer pink
and the juices run clear, turning once or twice.
•Yield: 8 patties
This recipe is from "The Healthy Gourmet" (Clarkson Potter) by Cherie
Calbom.
10
Page 11

George Foreman’s PowerBurger
A flavorful hamburger that we think tastes even better than its all-meat
cousin! It pays to eat meals that minimize meat. To reduce saturated fat
in a typical burger, you can cut back on the amount of meat and make up
for it with plant-based ingredients. Bread crumbs and chopped vegetables have been added in this recipe. You could also try cooked rice, other
grains or cereal. In addition, choose whole wheat buns; they typically
contain one less fat gram than regular or even reduced-calorie buns.
If you settle for nothing less than a cheeseburger, Swiss cheese
is 1 gram lower in fat than Cheddar, American or Monterey Jack with 8
grams of fat versus 9 in each ounce of cheese. However, reduced fat
cheeses like Cheddar or Swiss contain half the fat with 4 grams per
ounce. Mustard contains 1 gram of fat per tablespoon versus a whopping 11 grams of fat in a tablespoon of mayonnaise.
Top your burger in healthful style with dark, leafy green lettuce, shredded
cabbage, fresh cilantro, basil or spinach.
1/2 cup chopped vegetables such as yellow onions,
green onions, zucchini, parsley (can be sautéed)
1/2 cup seasoned bread crumbs
1 1/2 lbs. lean ground beef
•In a medium-size mixing bowl, combine the vegetables and bread
crumbs. Add the ground beef and mix well.
• Shape the mixture into eight 4-inch wide patties.
•Preheat the Grilling Machine on High for 5 - 10 minutes. Place the
patties on the grill eight at a time. Close the Lid.
• Cook on Medium for 8 - 9 minutes or until the meat is no longer pink
and the juices run clear, turning once.
•Yield: Serves 8
This recipe is from "The Healthy Gourmet" (Clarkson Potter) by Cherie
Calbom.
11
Page 12

Grilled Vegetables
6 slices eggplant, 1/2” thick (or use 2 baby eggplants)
2 small onions, sliced 1/2” thick
2 small tomatoes, diced
2 small zucchini, sliced
4 large cloves of garlic, peeled and sliced
4-6 mushrooms, sliced
1 tsp. olive oil (optional)
•Preheat the Grilling Machine on High for 5 - 10 minutes. At this time,
also spread on olive oil if desired.
• Add the sliced eggplant and garlic, cover and cook 3 minutes.
• Add the slices of onion, zucchini, and mushrooms. Cover and cook
3 - 5 minutes.
• Remove the eggplant and zucchini and mushroom slices to a plate.
• Add tomatoes to the onion and garlic. Cover and cook for 1 minute.
• Remove and serve over the eggplant, zucchini, and mushrooms.
•Yield: Serves 2 - 4
Serve as an accompaniment to meat and pasta. Or stuff them into a
piece of pita or french bread for a grilled vegetable sandwich.
Rosemary Lamb Chops
4 lamb chops, shoulder or loin
2 tsp. fresh chopped rosemary (or 1/2 tsp.dried)
ground black pepper to taste
• Coat chops with rosemary and pepper.
•Preheat the Grilling Machine on High for 5 - 10 minutes.
• Close Lid and cook on High for 7 - 9 minutes for medium (a hint of pink
in the middle) and 11 minutes for well done.
• Serve immediately
•Yield: Serves 4
12
Page 13

Mustard Lemon Chicken Breast
2 Tbsp. mustard
2 Tbsp. balsamic vinegar
3 Tbsp. lemon juice
2 cloves garlic, minced
1 tsp. paprika
4 6 oz. chicken breasts halved with the skin taken off
•Mix first 5 ingredients.
• Add chicken breast and let it marinate for at least 1/2 hour in the
refrigerator.
•Preheat the Grilling Machine on High for 5 - 10 minutes.
•Place marinated chicken on Grilling Machine and close Lid. Let cook
on Medium for 8 - 9 minutes or until the meat is no longer pink and
the juices run clear.
• Remove and serve.
•Yield: Serves 4
Sole with Tomatoes
2 tsp. olive oil
2 small onions, diced
2 cloves garlic, minced
2 small tomatoes, chopped
2 Tbsp. fresh basil or 1/2 tsp. dried, chopped
1 Tbsp. fresh parsley, chopped
1 Tbsp. ground pepper
1 Tbsp. lemon juice
1 lb. fillet of sole (or any white fish fillet)
•Preheat the Grilling Machine on High for 5 - 10 minutes.
• Sauté the onion and garlic in oil for 2 minutes, stirring occasionally.
• Add the tomato, half of the herbs and a few grinds of pepper. Lay the
fish on top, add the lemon juice and remaining herbs.
• Cover and let cook on Medium for 5 - 6 minutes.
• Lift the fish and the vegetables onto a plate. If any juices have
dripped into the Drip Tray, use as a sauce to pour on top of the fillet.
• Serve with fresh bread or rice.
•Yield: Serves 3 - 4
13
Page 14

Strip Steak Polynesian
4 Tbsp. soy sauce
2 cloves garlic, minced
2 tsp. honey
4 - 8 oz. strip steaks
• Combine first 3 ingredients.
• Marinate the strip steak in the mixture for approximately one hour in
the refrigerator.
•Preheat the Grilling Machine on High for 5 - 10 minutes.
• Place the marinated strip steaks onto the preheated grill. Close the
Lid.
• Grill on High for 6 minutes, open grill, add the rest of the marinade
sauce to the top of the steaks. Close the Lid.
• Grill for 1 - 2 minutes, open grill and serve on a bed of rice.
•Yield: Serves 4
Burritos
2 small onions, chopped
2 cloves garlic, minced
4 cups ground meat, shredded beef, or chicken cubed
2 1/2 cups canned red chili sauce
2 tsp. salt
1 tsp. cinnamon & cumin
•Preheat the Grilling Machine on High for 5 - 10 minutes.
• Add onions and garlic and sauté for 1 minute.
• Add meat/chicken, close the Lid, and cook for 3 minutes or until
cooked through.
• Add red chili sauce and seasoning until mixed through and hot.
• Remove from Grill.
•Yield: Makes 8 burritos
Roll into warmed flour tortilla and top with your choice of guacamole,
sour cream, shredded Jack cheese.
14
Page 15

Frequently Asked Questions
Question
1. Can I cook frozen food on
my George Foreman Grill?
2. Can I cook kabobs on the
George Foreman Grill?
3. After cooking with garlic,
how can I remove the smell
of the garlic from the surface of my George Foreman
Grill?
4. How can I cook hot dogs
on my George Foreman
Grill?
5. Can hash browns be prepared on my George
Foreman Grill?
Response
Yes, but of course the cooking time will be
longer. And it is preferable that food be
defrosted before placing on the George
Foreman Grill. Please refer to the Suggested
Cooking Chart in this manual for examples.
Yes. In order to protect the non-stick surface
use wooden skewers. We recommend that
you soak the skewers first in water for about
20 minutes. This will keep the skewers from
burning.
After cleaning your George Foreman Grill
according to the "User Maintenance
Instructions" make a paste of baking soda and
water and spread on the surface of the Grill.
Allow it to sit for a few minutes and then wipe
away with a damp sponge or cloth.
Preheat your Grill for 5-minutes. Place the hot
dogs lengthwise on the Grill. Close the Lid and
cook for 2-1/2 minutes or until desired browning is achieved.
Yes, self-browning hash browns can be prepared by preheating the Grill for 5 minutes.
Add hash browns onto the Grill surface, close
the Lid, and cook for approximately half the
time stated on the package for oven preparation.
6. Any other cooking suggestions?
Fresh peppers can be grilled for 2-3 minutes
for skinning purposes.
Grilled cheese sandwiches can also be
cooked on your George Foreman Grill.
15
Page 16

ONE-YEAR LIMITED WARRANTY
This Maxim®product warranty extends to the original consumer purchaser of the product.
Warranty Duration: This product is warranted to the original consumer purchaser for a period of
one (1) year from the original purchase date.
Warranty Coverage: This product is warranted against defective materials or workmanship. This
warranty is void if the product has been damaged by accident, in shipment, unreasonable use, misuse, neglect, improper service, commercial use, repairs by unauthorized personnel or other causes
not arising out of defects in materials or workmanship. This warranty is effective only if the product
is purchased and operated in the USA and Canada, and does not extend to any units which have
been used in violation of written instructions furnished by Maxim
®
, or to units which have been
altered or modified or to damage to products or parts thereof which have had the serial number
removed, altered, defaced or rendered illegible.
Warranty Disclaimers: This warranty is in lieu of all warranties expressed or implied and no representative or person is authorized to assume for Maxim
®
any other liability in connection with the
sale of our products. There shall be no claims for defects or failure of performance or product failure under any theory of tort, contract or commercial law including, but not limited to, negligence,
gross negligence, strict liability, breach of warranty and breach of contract.
®
Maxim
is not responsible or liable for indirect, special or consequential damages arising out of or
in connections with the use or performance of the product or other damages with respect to loss
of property, or loss of revenues or profit.
Warranty Performance: During the above one-year warranty period, a product with a defect will
be either repaired or replaced with a reconditioned comparable model (at Maxim
the product is returned to the Maxim
®
facility. The repaired or replacement product will be in war-
®
's option) when
ranty for the balance of the one-year warranty period and an additional one-month period. No
charge will be made for such repair or replacement.
Service and Repair
If service is required, you should first call toll-free 1-800-937-3883 between the hours of 8:00 am
and 5:00 pm Central Standard Time and ask for CONSUMER SERVICE. Please refer to model
GR38SILCAN when you call.
In-Warranty Service (USA) for an appliance covered under the warranty period, no charge is
made for service or postage. Contact Consumer Service for return authorization.
In-Warranty Service (Canada) for an appliance covered under the warranty period, no charge is
made for service or postage. Please return the product insured, packaged with sufficient protection, and postage and insurance prepaid to the address listed below. Customs duty/brokerage fee,
if any, must be paid by the consumer.
Out-of-Warranty Service: A flat rate charge by model is made for out-of-warranty service. Include
$10.00 (U.S.) for return shipping and handling.
®
Maxim
cannot assume responsibility for loss or damage during incoming shipment. For your protection, carefully package the product for shipment and insure it with the carrier. Be sure to enclose
the following items with your appliance: any accessories related to your problem; your full return
address and daytime phone number; a note describing the problem you experienced; a copy of your
sales receipt or other proof of purchase to determine warranty status. C.O.D. shipments cannot be
accepted.
Return the appliance to:
For more information on MAXIM®products:
visit our
website:
http://www.maxim-toastmaster.com, or you can email us at:
consumer_relations@toastmaster.com
Printed in China
© 2002 Maxim
®
/Toastmaster®Inc. P/N 61077
Repair Center, 708 South Missouri Street,
Macon, MO 63552, U.S.A.
 Loading...