

Page 1
USE & CARE INSTRUCTIONS
CONVECTION TOASTER OVEN
FAC850SS
Page 2

IMPORTANT SAFEGUARDS
When using electrical appliances, basic safety precautions should
always be followed including the following:
1. Read all instructions.
2. Do not touch hot surfaces. Use handles or knobs.
3. To protect against electrical shock do not immerse cord, plugs, or
appliance in water or other liquid.
4. Close supervision is necessary when any appliance is used by or
near children.
5. Unplug from outlet when not in use and before cleaning. Allow to
cool before putting on or taking off parts.
6. Do not operate any appliance with a damaged cord or plug or
after the appliance malfunctions or has been damaged in any
manner. Contact Consumer Service for examination, repair or
adjustment.
7. The use of accessory attachments not recommended by the
appliance manufacturer may cause injuries.
8. Do not use outdoors.
9. Do not let cord hang over edge of table or counter, or touch hot
surfaces.
10. Do not place on or near a hot gas or electric burner, or in a
heated oven.
11. Extreme caution must be used when moving an appliance
containing hot oil or other hot liquids.
12. To disconnect, turn the Temperature Control to OFF; turn the
Timer Control to 0, then remove plug from wall outlet.
13. Oversize foods or metal utensils must not be inserted in a Toaster
Oven as they may create a fire or risk of electric shock.
14. A fire may occur if the Convection Toaster Oven is covered or
touching flammable material, including curtains, draperies, walls,
and the like, when in operation. Do not store any item on top of
the appliance when in operation.
15. Do not clean with metal scouring pads. Pieces can break off the
pad and touch electrical parts, involving a risk of electric shock.
16. Extreme caution should be exercised when using containers
constructed of other than metal or glass.
17. Do not store any materials, other than manufacturers
recommended accessories, in this Convection Toaster Oven when
not in use.
1
Page 3

18. Do not place any of the following materials in the Toaster Oven:
paper, cardboard, plastic, and the like.
19. Do not cover Crumb Tray or any part of the Toaster Oven with
metal foil. This will cause overheating of the Toaster Oven.
20. Use extreme caution when removing tray or disposing of
hot grease.
21. Do not use appliance for other than intended use.
SAVE THESE INSTRUCTIONS
THIS PRODUCT IS FOR HOUSEHOLD USE ONLY
ADDITIONAL IMPORTANT SAFEGUARDS
CAUTION: HOT SURFACES: This appliance generates heat and
escaping steam during use. Proper precautions must be taken to
prevent the risk of burns, fires, or other injury to persons or
damage to property.
1. A person who has not read and understood all operating and
safety instructions is not qualified to operate this appliance. All
users of this appliance must read and understand these Use & Care
Instructions before operating or cleaning this appliance.
2. If this appliance falls or accidentally becomes immersed in water,
unplug it from the wall outlet immediately. Do not reach into
the water!
3. When using this appliance, provide adequate air space above and
on all sides for air circulation. Do not operate this appliance while
it is touching or near curtains, wall coverings, clothing, dishtowels
or other flammable materials.
4. To reduce the risk of fire, do not leave this appliance unattended
during use.
5. If this appliance begins to malfunction during use, immediately
unplug the cord. Do not use or attempt to repair a malfunctioning
appliance!
6. The cord to this appliance should only be plugged into a 120V AC
electrical wall outlet.
7. Do not use this appliance in an unstable position.
2
IMPORTANT SAFEGUARDS
(CONTINUED)
Page 4

GROUNDED 3-CONDUCTOR PLUG
This appliance is equipped with a grounded-type 3-wire cord (3-prong
plug). This plug will only fit into an electrical outlet made for a 3prong plug. This is a safety feature. If the plug should fail to fit the
outlet, contact an electrician to replace the obsolete outlet. Do not
attempt to defeat this safety feature.
SHORT CORD INSTRUCTIONS
A short power-supply cord is provided to reduce the risk resulting from
becoming entangled in or tripping over a longer cord.
Do not use an extension cord with this product.
ELECTRIC POWER
If the electrical circuit is overloaded with other appliances, your
appliance may not operate properly. It should be operated on a
separate electrical circuit from other appliances.
PLASTICIZER WARNING
CAUTION: To prevent Plasticizers from migrating from the
finish of the counter top or table top or other furniture, place
NON-PLASTIC coasters or place mats between the appliance
and the finish of the counter top or table top.
Failure to do so may cause the finish to darken. Permanent blemishes
may occur or stains can appear.
INTRODUCTION
A convection oven circulates heated air continuously throughout the
Oven cavity to maintain uniform temperature around the food. This
constant, gentle air flow is what seals in juices, promotes browning
and may shorten cooking time without turning and basting. Your
FARBERWARE® Convection Oven can TOAST, BAKE, SLOW COOK,
ROAST, BROIL, DEFROST and KEEP WARM. The Oven has a special
recessed area to accommodate a 12” pizza.
3
Page 5
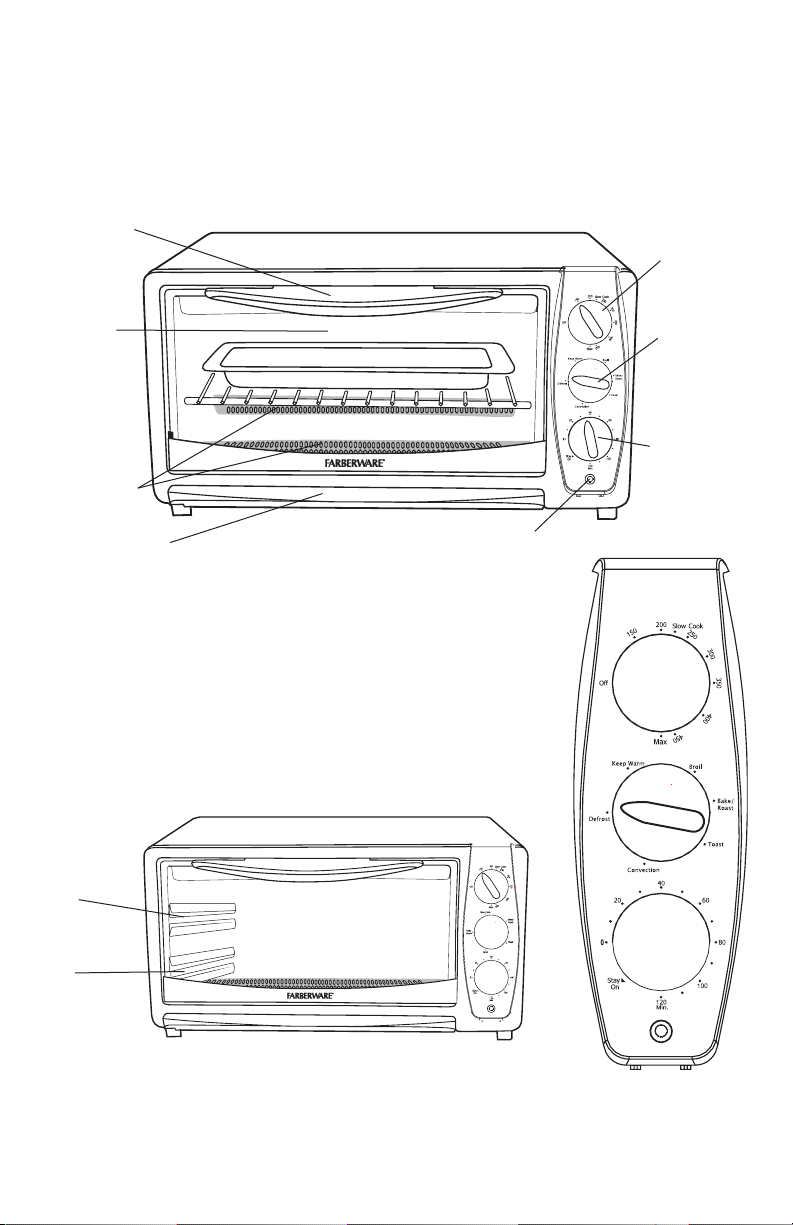
Glass
Door
Door
Handle
Temperature
Control
Timer Control
with 120 min.
(2 hour) Timer
and STAY ON
feature
Crumb Tray
(P/N 22709B) Black
Lower
Heating
Elements
Power ON Light
Function
Control
FIGURE 2
Lower Shelf
Rail
Upper Shelf
Rail
FIGURE 1
4.
4
GETTING TO KNOW YOUR FARBERWARE
®
CONVECTION TOASTER OVEN
PRODUCT MAY VARY SLIGHTLY FROM ILLUSTRATIONS
Control Panel
Page 6
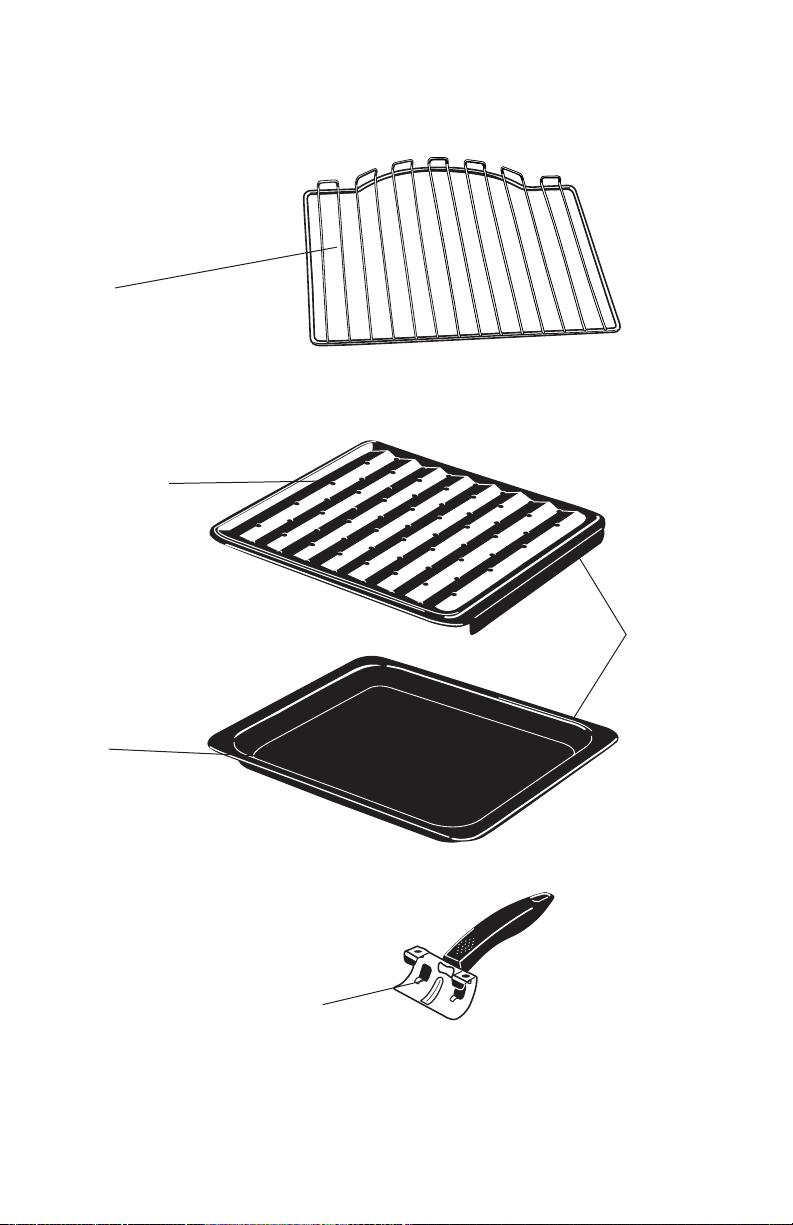
ACCESSORIES
Wire Pizza
Rack
(P/N 22710)
Broil Insert
(P/N 22711)
Bake/Broil
Assembly
Bake/Broil
Pan
(P/N 22712)
Tray/Rack
Handle
(P/N 22713)
FIGURE 3
5
Page 7

BEFORE USING YOUR CONVECTION
TOASTER OVEN FOR THE FIRST TIME
1. Read all Use & Care Instructions carefully.
2. Carefully unpack your Convection Toaster Oven and remove all
packaging materials.
3. Place your Convection Toaster Oven on a level surface such as a
countertop or table. Be sure the sides, back, and top of the
Convection Toaster Oven are at least four inches away from any
walls, cabinets, or objects on the counter or table.
4. Remove all stickers from the Convection Toaster Oven except the
rating label located on the back.
5. Remove Broil Insert, Bake/Broil Pan, Wire Pizza Rack and Crumb
Tray and wash in warm, soapy water. Rinse and dry thoroughly
before placing in the Convection Toaster Oven.
6. To remove any dust that may have accumulated during packaging,
simply wipe the Convection Toaster Oven exterior with a clean,
damp cloth.
7. Do not use abrasive cleansers.
8. Do not put the Convection Toaster Oven, cord or plug in water.
9. When you are ready to use the Convection Toaster Oven, plug the
cord into a 120V AC electrical wall outlet.
10. To eliminate any protective substance or oil that may have been
used for packing and shipping, turn the Function Control to
TOAST; turn the Timer Control to 15 minutes. As soon as the
Timer Control is engaged, both the Upper and Lower Heating
Element will turn ON. A small amount of smoke and odor may be
detected. This is normal.
11. To avoid scratching, marring, or discoloration, do not store
anything on top of the Convection Toaster Oven during operation.
CAUTION: Appliance surfaces are hot during and after use.
CAUTION: Always wear protective, insulated oven mitts on hands
when touching hot Convection Toaster Oven or hot dishes and
food or when inserting or removing Wire Pizza Rack, baking dish
and food.
NOTE: The Convection Toaster Oven will not operate unless the
Timer Control has been set.
NOTE: After using the Convection Toaster Oven, turn the Timer
Control to OFF; then remove plug from wall outlet.
6
Page 8

TEMPERATURE CONTROL
Your Convection Toaster Oven has an adjustable Temperature Control
with temperatures 150° to MAX with a special preset mark for
Slow Cook.
FUNCTION CONTROL
The Convection Toaster Oven has 6 different functions:
• Bake/Roast: Pizza, cakes, pies, cookies, poultry, beef, pork, etc.
• Toast: Bread, muffins, frozen waffles, etc.
• Broil: Fish, steak, poultry, pork chops, etc.
• Keep Warm: Keeps cooked foods warm.
• Defrost: Should take 1/3 of the time required for room temperature
thawing.
• Convection: Seals in juices, promotes browning and may shorten
cooking time without turning and basting.
TIMER CONTROL
The Timer Control also acts as the Oven’s ON and OFF switch. Turn
the Timer Control clockwise to select appropriate cooking time. The
Control is marked in 10 minute increments up to 2 hours. If cooking
less than 1 hour, turn the Timer Control past 60 minutes, then back to
desired cooking time. When cooking time is complete, a signal will
sound and the unit will turn OFF automatically.
STAY ON
If you are cooking for less than 10 minutes or do not wish to use the
Timer feature, turn the Timer Control to STAY ON to turn Oven ON.
Turn Timer Control to the 0 (OFF) position when cooking is complete.
The Power ON Light will go off.
POWER ON LIGHT
The Power ON Light will remain ON any time the Timer Control (and
the Convection Toaster Oven) is turned ON.
HEATING ELEMENTS
On the SLOW COOK setting, low wattage heat is provided by the top
and bottom elements. On the BAKE setting, the top and bottom
elements will turn OFF and ON as the thermostat cycles to control the
cooking temperature. On the BROIL setting, only the upper elements
cycle on and OFF. The Power ON Light will remain on while the unit
is ON.
NOTE: Some elements will appear black during certain heating
functions. This is normal.
PIZZA RACK POSITIONS
The Wire Pizza Rack can be inserted into either the Upper or Lower
Shelf Rail Positions.
7
Page 9

HINTS FOR BEST RESULTS
• To prevent heat loss, avoid opening the door excessively.
• To speed up browning, brush lean cuts of meat, chicken and fish
with oil, margarine or melted butter.
COOKING CONTAINERS
• The Bake/Broil Pan included with the Convection Toaster Oven is
suitable for items such as cookies, rolls, biscuits, nachos and pork
chops.
• A variety of standard baking dishes, such as an 8" round or square
cake pan, or a 6-cup muffin pan and 1 and 2 quart round, square, or
rectangular casserole dishes may be used for other foods.
• Choose bakeware made of either metal or glass/ceramic without lids.
• Dark or dull pans absorb heat faster; foods will bake more rapidly
and crust will brown more easily than in shiny
bake pans.
• Check package directions on the container or contact the ovenware
manufacturer to determine the container’s suitability for use in a
Convection Toaster Oven.
• Do not use oven roasting bags in this Convection Toaster Oven, as
they may come in contact with the Heating Elements.
CAUTION: Do not use glass covers on baking pans. If using a glass or
glass-ceramic baking container, make sure it is at least 1 inch away
from the Upper Heating Element.
FOR ALL COOKING FUNCTIONS
NOTE: To set the Timer Control for less than 1 hour, turn to
60 minutes and then turn back to the appropriate amount of time.
CAUTION: As soon as the Timer Control is engaged, the Convection
Toaster Oven will turn ON. Both the top and the bottom Heating
Elements may cycle ON and OFF to maintain temperature for the
entire cooking time (except for the BROIL function).
CAUTION: As soon as the Timer Control is engaged both Heating
Elements (except for the BROIL function) will become hot
immediately. Use care not to place anything on top of the
Convection Toaster Oven. Do not touch the Convection Toaster
Oven or any part of the Convection Toaster Oven without wearing
oven mitts.
NOTE: If you are ready to remove the food from the Convection
Toaster Oven before the Timer Control shuts the Convection
Toaster Oven OFF, you may shut the Convection Toaster Oven OFF
manually by turning the Timer Control to the 0 position. The Power
ON Light will go off. If the STAY ON position has been selected,
the Convection Toaster Oven must be shut off manually by turning
the Timer Control to the 0 position. The Power ON Light will
go off.
8
Page 10

TOAST
1. Make sure the Crumb Tray is firmly in place in the bottom of the
Convection Toaster Oven.
2. Plug into a 120V AC electrical wall outlet.
3. Open the Glass Door and center bread or food on the Wire Pizza
Rack. Close the Glass Door.
4. Turn the Function Control to TOAST.
5. Turn the Timer Control to approximately 5 minutes. The Power
Light will illuminate.
NOTE: Do not set the Timer Control to the STAY ON position when
using the TOAST function.
NOTE: Watch toast until desired color is achieved.
6. When TOAST time is complete, a signal will sound, and the Timer
Control will finish in the 0 position; the Convection Toaster Oven
will shut off automatically; the Power Light will go off.
NOTE: If toasting is completed before the Timer Control shuts the
Convection Toaster Oven OFF, you may shut the Convection
Toaster Oven OFF manually by turning the Timer Control to the 0
position. The Power Light will go off.
7. Open the Glass Door. Wear protective oven mitts and use the
Tray/Rack Handle to pull the Wire Pizza Rack out from the
Convection Toaster Oven. Be careful when removing toast from
the back of the Pizza Rack. The inside of the Convection Toaster
Oven is very hot. Close Glass Door.
8. Unplug unit and allow to cool before cleaning.
WARNING: DO NOT LEAVE Convection Toaster Oven
UNATTENDED DURING TOASTING.
See User Maintenance Instructions. Unplug when not in use.
9
Page 11

HINTS FOR TOAST
• Remove all protective wrappings from food before placing in
Convection Toaster Oven. Follow toaster food directions.
• Frozen and heavy bread require a longer time setting (e.g. bagels
and English muffins).
NOTE: Use extra caution when using this Convection Toaster Oven
for toasting pastry items with runny-type frosting or open fillings.
• When toasting more than one slice of bread, use slices of similar
size, thickness and freshness.
• One slice of bread requires a lighter setting than several slices
of bread.
• Stale bread, thin bread or sweet bread products, such as tea cakes
and fruit loaf, brown much more quickly than ordinary bread, so
they should be toasted for less time.
• Different breads require different toasting times. Turn Timer
Control to the 0 position and open the Glass Door to check toast
color. Close Glass Door and reset Timer Control if more toasting
time is needed.
• For best results, clean Crumb Tray frequently.
10
Page 12

PIZZA
Your Convection Toaster Oven has been specially designed to
accommodate a 12” fresh or frozen pizza.
1. Remove the Bake/Broil Pan and the Wire Pizza Rack from the
Convection Toaster Oven.
2. Plug into a 120V AC electrical wall outlet.
3. Position Function Control to BAKE. Set the Temperature Control to
the suggested temperature listed on pizza box. Allow Toaster Oven
to preheat for 10 minutes.
4. Wearing protective, insulated oven mitts, place pizza directly on
Wire Pizza Rack provided and then insert the Wire Pizza Rack into
either the Upper or Lower Shelf Rail.
5. Close the Glass Door.
6. Set Timer Control for the recommended time.
7. When BAKE time is complete, a signal will sound, and the Timer
Control will finish in the 0 position; the Convection Toaster Oven
will shut off automatically; the Power Light will go off.
8. Wearing protective oven mitts, use the Tray/Rack Handle to pull the
Wire Pizza Rack out from the Convection Toaster Oven. Remove
cooked pizza carefully and transfer to a serving plate.
9. Turn Temperature Control to OFF. Make sure the Timer Control is
in the 0 position.
10. Unplug and allow to cool completely before cleaning.
BAKE
1. Place Wire Pizza Rack onto the Lower Shelf Rail.
2. Plug into 120V AC electrical wall outlet.
3. Turn Temperature Control to the desired temperature setting.
4. Position Function Control to BAKE/ROAST.
5. Set Timer Control to STAY ON or desired baking time. The
Convection Toaster Oven will shut OFF automatically if Timer is
set. Preheat if necessary.
6. Wearing protective, insulated oven mitts, carefully center baking
dish directly on Wire Pizza Rack and close the Glass Door. You may
place foods such as biscuits directly onto Bake/Broil Pan.
7. If you are using the Timer, when the BAKE time is complete, a signal
will sound, and the Timer Control will finish in the 0 position; the
Convection Toaster Oven will shut off automatically; the Power Light
will go off.
11
Page 13

8. If the Timer Control is set to STAY ON, or if the food is finished
cooking before the Timer has signaled, turn Temperature Control
to OFF and the Timer Control to the 0 position.
9. Wearing protective oven mitts, use the Tray/Rack Handle to pull
the Wire Pizza Rack out from the Convection Toaster Oven.
10. Unplug and allow to cool completely before cleaning.
ROAST
1. Remove the Bake/Broil Pan and the Wire Pizza Rack from
the Convection Toaster Oven.
2. Insert the Wire Pizza Rack into the Lower Shelf Rail.
3. The Bake/Broil Pan Assembly is very useful for roasting. When
roasting meats and poultry, this prevents the meat from cooking in
the drippings and allows adequate air circulation for even cooking
and browning. Place the Broil Insert onto the Bake/Broil Pan.
Place food on Broil Insert and center onto the Wire Pizza Rack.
Juices and/or fat will drip into the pan and decrease spattering
while roasting.
4. If you choose to use your own baking container, place it directly
on top of the Wire Pizza Rack. Make sure the dish is deep enough
to hold any drippings caused from the roasting process. Add the
food to the dish and roast uncovered according to the recipe.
CAUTION: Make sure the baking container is at least 1 inch away
from the Upper Heating Element.
5. Close the Glass Door. Plug Oven into 120V AC electrical wall outlet.
6. Position Function Control to BAKE/ROAST. Turn Temperature
Control to 325° to 350°F (standard roasting temperature). It is not
necessary to preheat your Oven. A meat thermometer should
always be used to gauge internal temperature. The thermometer
should be inserted into thickest portion of roast away from bones
or fatty areas. Check progress two-thirds into the cooking process
to ensure food does not over cook.
7. Set Timer Control to STAY ON or desired roasting time.
8. If you are using the Timer, when the ROAST time is complete, a
signal will sound, and the Timer Control will finish in the 0
position; the Convection Toaster Oven will shut off automatically;
the Power Light will go off.
9. If the Timer Control is set to STAY ON, or if the food is finished
cooking before the Timer has signaled, turn Temperature Control
to OFF and the Timer Control to the 0 position.
10. Wearing protective oven mitts, use the Tray/Rack Handle to pull
the Wire Pizza Rack out from the Convection Toaster Oven.
11. Unplug and allow to cool completely before cleaning.
12
BAKE
(Continued)
Page 14

INTERNAL TEMPERATURE ROASTING CHART
CUT INTERNAL TEMPERATURE
Beef 145°F Rare
160°F Medium
170°F Well Done
Ham (fresh) 160°F
Ham (precooked) 140°F Rare
Lamb 160°F Medium Well
Pork 160°F Medium
170°F Well Done
Turkey or Chicken, Whole 180°F
Turkey or Chicken, Breast 170°F
HINTS FOR ROAST
• A meat thermometer inserted into the center of the meat should
always be used to ensure desired doneness.
• Roasting is recommended for large, tender cuts of meat and
poultry. Seasoning prior to cooking adds to the flavor and the
aroma during cooking.
• A layer of fat on the top of the roast promotes better browning and
provides natural basting.
• When roasting meats with a high fat content, the Bake/Broil Pan
may fill with grease before cooking is completed. Carefully remove
the Bake/Broil Pan using oven mitts and empty. Replace for
continued roasting.
USDA RECOMMENDED TEMPERATURES
The United States Department of Agriculture recommends that meat
and poultry be cooked to the following internal temperatures to be
sure any harmful bacteria has been killed. Ground turkey and
chicken should be cooked to an internal temperature of 165° F
and ground beef, veal, lamb and pork be cooked to an internal
temperature of 160° F. Chicken and turkey should be cooked to an
internal temperature of 170° F for white meat and 180° F for dark
meat. Goose and duck should be cooked to an internal temperature
of 180° F. Fresh beef, veal and lamb, etc. should be cooked to an
internal temperature of at least 145° F. Fresh pork should be cooked
to an internal temperature of at least 160° F. When re- heating meat
and poultry products, they should also be cooked to an internal
temperature of 165° F.
13
Page 15

CONVECTION BAKING/ROASTING
Convection cooking circulates heated air throughout the Oven Cavity
to maintain uniform temperature around the food. This constant, gentle
air flow promotes browning and seals in juices when cooking meats
and may shorten cooking time. Check your food prior to the time it
should be done and continue cooking as necessary.
As a general rule, baked goods require a lower temperature in a
Convection Oven than a convectional oven. Lower the temperature by
50°F to a minimum of 300°F when baking cakes, pies, cookies, and
bread. Follow package instructions for time and temperature when
cooking convenience foods. Check food about 3/4 way through
cooking cycle and adjust time or temperature if necessary.
1. Place Wire Pizza Rack onto the Lower Shelf Rail.
2. Plug into 120V AC electrical wall outlet.
3. Turn Temperature Control to the desired temperature setting.
4. Position Function Control to CONVECTION.
5. Set Timer Control to STAY ON or desired baking time. The
Convection Toaster Oven will shut OFF automatically if Timer is
set. Preheat if necessary.
6. Carefully center baking dish directly on Wire Pizza Rack and close
the Glass Door. You may place foods such as biscuits directly onto
Bake/Broil Pan.
NOTE: Check baked goods for doneness 5 to 10 minutes before
expected completion and continue cooking as necessary.
7. If you are using the Timer, when the BAKE time is complete, a
signal will sound, and the Timer Control will finish in the 0
position; the Convection Toaster Oven will shut off automatically;
the Power Light will go off.
8. If the Timer Control is set to STAY ON, or if the food is finished
cooking before the Timer has signaled, turn Temperature Control
to OFF and the Timer Control to the 0 position.
9. Wearing protective oven mitts, use the Tray/Rack Handle to pull
the Wire Pizza Rack out from the Convection Toaster Oven.
10. Unplug and allow to cool completely before cleaning.
14
Page 16

CONVECTION BAKING GUIDE
Food Temp. Time Comments
Cookies 300-325°F per recipe Check 2-3 min. before time is up
Cakes 300-325°F per recipe Grease pan if recipe calls for
Pies 325-350°F per recipe Check 5-10 min. before time is up
Pizza 400°F per recipe Homemade
Potatoes 350°F per recipe 1 to 6 large
Brownies 300°F per recipe Check 5 min. before time is up
BROIL
1. Insert the Wire Pizza Rack into the Upper Shelf Rail.
2. Place the Broil Insert onto the Bake/Broil Pan. Always use the
Bake/Broil Pan Assembly when broiling. Place food on Broil Insert
and center onto the Wire Pizza Rack. Juices and fat will drip into the
pan and decrease spattering while broiling. Close the door.
3. Plug into 120V AC electrical wall outlet.
4. Position Function Control to BROIL. Turn Temperature Control to
450ºF or MAX.
5. Set Timer Control to STAY ON or desired broiling time. The Convection Toaster Oven will shut OFF automatically if Timer is set.
6. Broil food until done, turning half way through cooking time. Wear
protective oven mitts and use the Tray/Rack Handle to pull the Wire
Pizza Rack out from the Convection Toaster Oven.
7. When finished, turn the Temperature Control to OFF. Make sure the
Timer Control is in the 0 position.
8. Unplug and allow to cool completely before cleaning.
WARNING: DO NOT LEAVE Convection Toaster Oven UNATTENDED
DURING BROILING.
See User Maintenance Instructions. Unplug when not in use.
BROIL RECOMMENDATIONS
Broiling is used for tender cuts of meats or marinated meats, fish
and some fruits and vegetables. Cooking time is determined by the
desired doneness and the distance between the food and the element.
HINTS FOR BROIL
• Do not place aluminum foil on top of Broil Insert. This traps grease
and can cause a fire.
• Trim excess fat from meat and score edges to prevent curling
and thaw frozen meats before broiling. This will reduce smoke
during broiling.
15
Page 17

SLOW COOK
1. Remove Bake/Broil Pan from oven. Place Wire Pizza Rack onto
the Lower Shelf Rail. No preheat is necessary.
2. Cover baking container and place on Wire Pizza Rack.
3. Plug into 120V AC electrical wall outlet.
4. Position Function Control to SLOW COOK. Turn Temperature
Control to SLOW COOK. The Power ON Light will remain on.
Because of the low wattage being used, the heating elements will
remain dark while maintaining the proper temperature.
5. Set Timer to STAY ON.
6. Do not open the Glass Door during the first 2 hours of the slow
cook period.
7. When finished, make sure the Timer Control is in the 0 position.
8. Wearing protective oven mitts, use the Tray/Rack Handle to pull
the Wire Pizza Rack out from the Convection Toaster Oven.
9. Unplug and allow to cool completely before cleaning.
HINTS FOR SLOW COOK
Most slow cooker recipes may be used in Slow Cook by using the
following guidelines.
• All baking dishes should be covered. Heavy duty aluminum foil
may be used if ends are tucked against edge of pan.
• Oven-proof glass and ceramic dishes are recommended.
• Aluminum foil pans and pans that will rust, such as cast iron or tin
should not be used.
• Separate dishes can cook simultaneously, yet food retains its own
flavor. Select foods that will take the same amount of time to cook.
• Milk, cream and sour cream may curdle. It is best to add them in
the last hour of cooking. If a recipe specifies one of these
ingredients as the only liquid in the cooking process, try
substituting evaporated milk, water or condensed soup, such as
cream of mushroom or chicken soup.
• Slow cook enhances the flavor of spices and salt. We recommend
you reduce seasoning in your own recipes.
• Pre-cooked spaghetti and pasta products should be added in the
last hour of slow cooking.
16
Page 18

KEEP WARM
1. Make sure the Crumb Tray is firmly in place in the bottom of the
Convection Toaster Oven.
2. Plug into a 120V AC electrical wall outlet. Close the Glass Door.
3. Remove all protective wrappings from food before placing in
Convection Toaster Oven.
4. Open the Glass Door. Insert the Wire Pizza Rack into either the
Upper or Lower Shelf Rail.
5. Center a baking container or food on the Wire Pizza Rack or use
Bake/Broil Pan and close the Glass Door.
6. Turn the Function Control to Bake/Roast.
7. Set the Temperature Control to 150°F or 200°F.
8. Turn the Timer to the desired time or to the STAY ON position.
The Power Light will illuminate.
9. If the Timer Control has been set, when the KEEP WARM time is
complete, a signal will sound, and the Timer Control will finish in
the OFF position. The Power ON Light will go off.
10. Open the Glass Door. Wear protective oven mitts to remove food
from Convection Toaster Oven. Close the Glass Door.
11. Unplug unit and allow to cool completely before cleaning.
WARNING: DO NOT LEAVE Convection Toaster Oven
UNATTENDED DURING THE KEEP WARM FUNCTION.
See User Maintenance Instructions. Unplug when not in use.
17
Page 19

DEFROST
1. Plug into 120V AC electrical wall outlet. Close the Glass Door.
2. Remove all protective wrappings from food before placing in
Convection Toaster Oven.
3. Open the Glass Door. Insert the Wire Pizza Rack into the Lower
Shelf Rail.
4. Center a baking container or food on the Wire Pizza Rack or use the
Bake/Broil Pan and close the Glass Door.
5. Turn the Function Control to Bake/Roast.
6. Set the Temperature Control to 200°F.
7. Turn the Timer to the desired time or to the STAY ON position. The
Power Light will illuminate.
8. If the Timer Control has been set, when the Defrost time is complete, a
signal will sound, and the Timer Control will finish in the OFF
position. The Power ON Light will go off.
9. Open the Glass Door. Wear protective oven mitts to remove food from
Convection Toaster Oven. Be careful when removing food. Close the
Glass Door.
10. Unplug unit and allow to cool completely before cleaning.
WARNING: DO NOT LEAVE Convection Toaster Oven UNATTENDED.
See User Maintenance Instructions. Unplug when not in use.
HINTS FOR DEFROST
• Do not use this method for defrosting meat, poultry or fish.
• Do not cover food.
• Brush frozen dough with vegetable oil to prevent drying out and
remove to preheat Convection Toaster Oven before baking.
18
Page 20

USER MAINTENANCE INSTRUCTIONS
This appliance requires little maintenance. It contains no user serviceable
parts. Do not try to repair it yourself. Any servicing requiring disassembly
must be performed by a qualified appliance repair technician.
CARE AND CLEANING
1. Turn Temperature Control to OFF. Make sure the Timer Control is in
the 0 position. Unplug the Convection Toaster Oven before cleaning.
2. Allow Convection Toaster Oven and all accessories to cool completely
before cleaning.
3. Clean the outside of the Convection Toaster Oven with a damp cloth
and dry thoroughly. A non-abrasive liquid cleaner may be used for
stubborn stains. Rinse and dry thoroughly. Do not use metal scouring
pads or abrasive cleaners that will scratch the surface.
4. Clean the Glass Door with a cloth or sponge dampened with warm,
sudsy water. Dry thoroughly.
5. Remove Broil Insert, Bake/Broil Pan, Wire Pizza Rack, Tray/Rack
Handle, and Crumb Tray. Wash in soapy water and dry thoroughly.
6. If crumbs and spills have accumulated on the Crumb Tray, wipe with a
damp cloth. Always dry the Crumb Tray thoroughly before replacing.
7. DO NOT use abrasive cleaners or metal scouring pads to clean Broil
Insert, Bake/Broil Pan, Wire Pizza Rack, Tray/Rack Handle, or Crumb
Tray. For stubborn stains, clean with a nylon or polyester mesh pad
and a mild, non-abrasive cleaner. Rinse and dry thoroughly.
CAUTION: DO NOT use spray-on or other oven cleaners. Using these
types of cleaners may cause electrical damage.
19
Page 21

INTERIOR CLEANING
1. Always unplug unit and allow to cool completely before cleaning
or moving.
2. Remove Broil Insert, Bake/Broil Pan, Wire Pizza Rack, and
Crumb Tray.
3. Clean interior with a mild or non-abrasive cleaner and plastic
scouring pad after each use to avoid build-up. Do not rub too hard
as surface can be scratched.
4. To remove baked-on food, pour a small amount of cooking oil
onto the food and allow to stand for 5 to 10 minutes. Remove the
softened food with a soft cloth. Do not use steel wool, scouring
pads or abrasive cleaners.
5. Rinse and dry thoroughly before closing the Glass Door.
TO STORE
Unplug unit, allow to cool, and clean before storing. Store in its box in
a clean, dry place. Never store it while it is hot or still plugged in.
Never wrap cord tightly around the appliance. Do not put any stress
on the cord where it enters the unit, as it could cause the cord to fray
and break.
20
Page 22

NOTES
21
Page 23

NOTES
22
Page 24

LIMITED ONE-YEAR WARRANTY
Warranty Coverage: This product is warranted to be free from defects in
materials or workmanship for a period of one (1) year from the original purchase
date. This product warranty is extended only to the original consumer purchaser
of the product and is not transferable. For a period of one (1) year from the date
of original purchase of the product, our Repair Center will, at its option, either
(1) repair the product or (2) replace the product with a reconditioned comparable
model. These remedies are the purchaser's exclusive remedies under
this warranty.
Warranty Service: To obtain warranty service, you must call our warranty
service number at 1-800-233-9054 for return instructions on how to deliver the
product, in either the original packaging or packaging affording an equal degree
of protection to the Repair Center specified below. You must enclose a copy of
your sales receipt or other proof of purchase to demonstrate eligibility for
warranty coverage.
To return the appliance, ship to: To contact us, please write to, call, or email:
ATTN: Repair Center Consumer Relations Department
708 South Missouri Street PO Box 7366
Macon, MO 63552 USA Columbia MO 65205-7366 USA
What Is Not Covered: This warranty does not cover damage resulting from
misuse, accident, commercial use, improper service or any other damage
caused by anything other than defects in material or workmanship during
ordinary consumer use. This warranty is invalid if the serial number has been
altered or removed from the product. This warranty is valid only in the United
States and Canada.
LIMITATION ON DAMAGES: THERE SHALL BE NO LIABILITY FOR ANY
INCIDENTAL OR CONSEQUENTIAL DAMAGES FOR BREACH OF ANY
EXPRESS OR IMPLIED WARRANTY OR CONDITION ON THIS PRODUCT.
DURATION OF IMPLIED WARRANTIES: EXCEPT TO THE EXTENT
PROHIBITED BY APPLICABLE LAW, ALL IMPLIED WARRANTIES AND
CONDITIONS, INCLUDING, WITHOUT LIMITATION, IMPLIED WARRANTIES
AND CONDITIONS OF MERCHANTABILITY AND FITNESS FOR A PARTICULAR
PURPOSE OR USE ON THIS PRODUCT ARE LIMITED IN DURATION TO THE
DURATION OF THIS WARRANTY.
Some jurisdictions do not allow the exclusion or limitation of incidental or
consequential damages, or allow limitations on how long an implied warranty
lasts, so the above limitations or exclusions may not apply to you. This warranty
gives you specific legal rights and you may have other rights under the laws of
your jurisdiction.
1-800-233-9054
E-mail:consumer_relations@toastmaster.com
FARBERWARE® and Millennium® are registered trademarks of Farberware Inc.®
Manufactured and sold pursuant to a license from Farberware Inc.®
For more information on our products, visit our website:
www.maxim-toastmaster.com.
©2006 All rights reserved. P/N 61862
Made in China 4/06
 Loading...