

Toa N-CC1000 NTSC, N-CC1000 PAL, N-CC1110 NTSC, N-CC1110 PAL, N-VT1010 L Instruction Manual
...
Thank you for purchasing TOA’s Network devices. Please carefully follow the instructions in this manual
in order to ensure long, trouble-free use of your devices.
NETWORK CAMERA
N-CC1000 NTSC
N-CC1000 PAL
N-CC1110 NTSC
N-CC1110 PAL
NETWORK VIDEO TRANSMITTER
N-VT1010 L
N-VT1010 H
INSTRUCTION MANUAL
(Applications)

2
N-CC1000/CC1110/VT1010 INSTRUCTION MANUAL (Applications)
TABLE OF CONTENTS
1.1. OPERATIONS THAT CAN BE PERFORMED .......................................................... 1-2
1.2. ABOUT DIGITAL CERTIFICATES ............................................................................ 1-3
1.3. SOFTWARE DECODER OPERATION ...................................................................... 1-4
2.1. CONNECTIONS .......................................................................................................... 2-2
2.2. NAVIGATION .............................................................................................................. 2-3
2.3. WHEN A PASSWORD HAS BEEN SET .................................................................... 2-4
2.4. VIDEO IMAGES .......................................................................................................... 2-5
2.4.1. Text Display on Video Images ............................................................................ 2-5
2.4.2. Screen Display .................................................................................................... 2-6
2.4.3. Alarm .................................................................................................................. 2-6
2.5. BMP SNAPSHOT ...................................................................................................... 2-7
2.6. CAMERA CONTROL (N-VT1010 ONLY) .................................................................. 2-8
2.7. JPEG SNAPSHOTS ................................................................................................ 2-10
3.1. LIST OF SETTING ITEMS .......................................................................................... 3-2
3.2. NAVIGATION .............................................................................................................. 3-6
3.3. SETTING PROCEDURES
3.3.1. Edit of Settings .................................................................................................... 3-7
3.3.2. Execution of Changes ........................................................................................ 3-7
3.4. GENERAL SETTING SCREEN .................................................................................. 3-8
3.4.1. ID ........................................................................................................................ 3-9
3.4.2. Title .................................................................................................................... 3-9
3.4.3. Password ............................................................................................................ 3-9
3.4.4. Date/ Time ........................................................................................................ 3-10
3.4.5. Version Information .......................................................................................... 3-11
CHAPTER 3. Performing Settings with Internet Explorer
CHAPTER 2. Operation With Internet Explorer
CHAPTER 1. Foreword

N-CC1000/CC1110/VT1010 INSTRUCTION MANUAL (Applications)
3
3.5. NETWORK SETTING SCREEN .............................................................................. 3-12
3.5.1. IP ......................................................................................................................3-13
3.5.2. Multicast ............................................................................................................ 3-13
3.5.3. FTP .................................................................................................................. 3-15
3.5.4. E-mail ................................................................................................................ 3-15
3.6. VIDEO SETTING SCREEN
3.6.1. Video Encoder .................................................................................................. 3-16
3.7. CAMERA SETTING SCREEN (N-CC1000 Camera Only) ...................................... 3-18
3.8. ALARM SETTING SCREEN
3.8.1. Alarm Trigger .................................................................................................... 3-24
3.8.2. Alarm Action ...................................................................................................... 3-25
3.8.3. Alarm Output...................................................................................................... 3-27
3.9. SERIAL PORT SETTING SCREEN
3.9.1. Serial Port ........................................................................................................ 3-28
4.1.IMPORTANT INFORMATION
4.1.1. File Backup ........................................................................................................ 4-2
4.1.2. About the Video Networking Device .................................................................... 4-2
4.2.FOREWORD
4.2.1. What is JetManager? .......................................................................................... 4-2
4.2.2. Using On-Line Help ............................................................................................ 4-3
4.2.3. Other Information ................................................................................................ 4-3
4.3. BASIC OPERATIONS
4.3.1. JetManager Activation and Exit .......................................................................... 4-4
4.3.2. Menu .................................................................................................................. 4-5
4.3.3. Button Operations .............................................................................................. 4-6
4.3.4. Changing Operation Environments .................................................................... 4-7
4.4. USING JETMANAGER
4.4.1. Scanning for Devices on the Network ................................................................ 4-8
4.4.2. Defining an IP Pool ............................................................................................ 4-9
4.4.3. Assigning the IP Address to the Device ............................................................ 4-10
4.4.4. Viewing Device Properties ................................................................................ 4-11
4.4.5. Changing Device Names .................................................................................. 4-11
4.4.6. Changing IP Addresses .................................................................................... 4-12
4.4.7. Identifying Devices ............................................................................................ 4-13
CHAPTER 4. JetManager

4
N-CC1000/CC1110/VT1010 INSTRUCTION MANUAL (Applications)
4.4.8. Connection Status Description .......................................................................... 4-14
4.4.9. Setting Devices with Internet Explorer .............................................................. 4-14
4.4.10. Uploading Configuration Files ........................................................................ 4-15
4.4.11. Uploading the Firmware .................................................................................. 4-17
4.4.12. Adding Colors to the Color Pool ...................................................................... 4-17
4.4.13. JetManager System Setting File .................................................................... 4-18
5.1. DEVICE CHECK USING THE TERMINAL PROGRAM
5.1.1. Communications with a PC ................................................................................ 5-2
5.1.2. PC COM Port Settings ........................................................................................ 5-2
5.1.3. Command Input .................................................................................................. 5-3
5.1.4. Parameter Description ........................................................................................ 5-4
5.2. CHECKING THE NETWORK .................................................................................... 5-5
5.3. TROUBLESHOOTING ................................................................................................ 5-6
CHAPTER 5. Appendix

CHAPTER 1.
Foreword

1-2
N-CC1000/CC1110/VT1010 INSTRUCTION MANUAL (Applications)
CHAPTER 1. Foreword
1.1. OPERATIONS THAT CAN BE PERFORMED
Perform settings after confirming the following contents depending on the intended purpose of use.
Title settings and display on images.
• Title Settings (Refer to p. 3-9.)
Date and time display on images.
• Date/Time Settings (Refer to p. 3-10.)
• Time Server Settings (Refer to p. 3-10.)
Password protection of settings.
• Password Settings (Refer to p. 3-9.)
Video image adjustment.
• Transmission Data Rate Settings (Refer to p. 3-17.)
• Video Quality Settings (Refer to p. 3-16.)
• Video Resolution Settings (Refer to p. 3-16.)
Image display on multiple PCs (Multilink function).
• Multicast IP Address Settings (Refer to p. 3-13.)
• Multilink Settings (Refer to p. 3-14.)
Automatic transfer of JPEG format still pictures to an FTP server.
• FTP Server Address Settings (Refer to p. 3-15.)
• Login Name Settings (Refer to p. 3-15.)
• Password Settings (Refer to p. 3-15.)
• JPEG Size Settings (Refer to p. 3-15.)
• Post Time Slice Settings (Refer to p. 3-15.)
• Filename Settings (Refer to p. 3-15.)
Alarm E-mail transmission.
• SMTP Server Address Settings (Refer to p. 3-15.)
• E-mail Transmission Settings (Refer to p. 3-25.)
• Send-To Address Settings (Refer to p. 3-27.)
Alarm connection to a PC
• Automatic Connection Settings (Refer to p. 3-25.)
• Automatic Connection Receiver IP Address Settings (Refer to p. 3-25.)
• Automatic Connection Receiver Password Settings (Refer to p. 3-25.)
External equipment control by way of the alarm output (relay output)
• Alarm Output Settings (Refer to p. 3-27.)
N-CC1000/CC1110/VT1010 INSTRUCTION MANUAL (Applications)
1-3
CHAPTER 1. Foreword
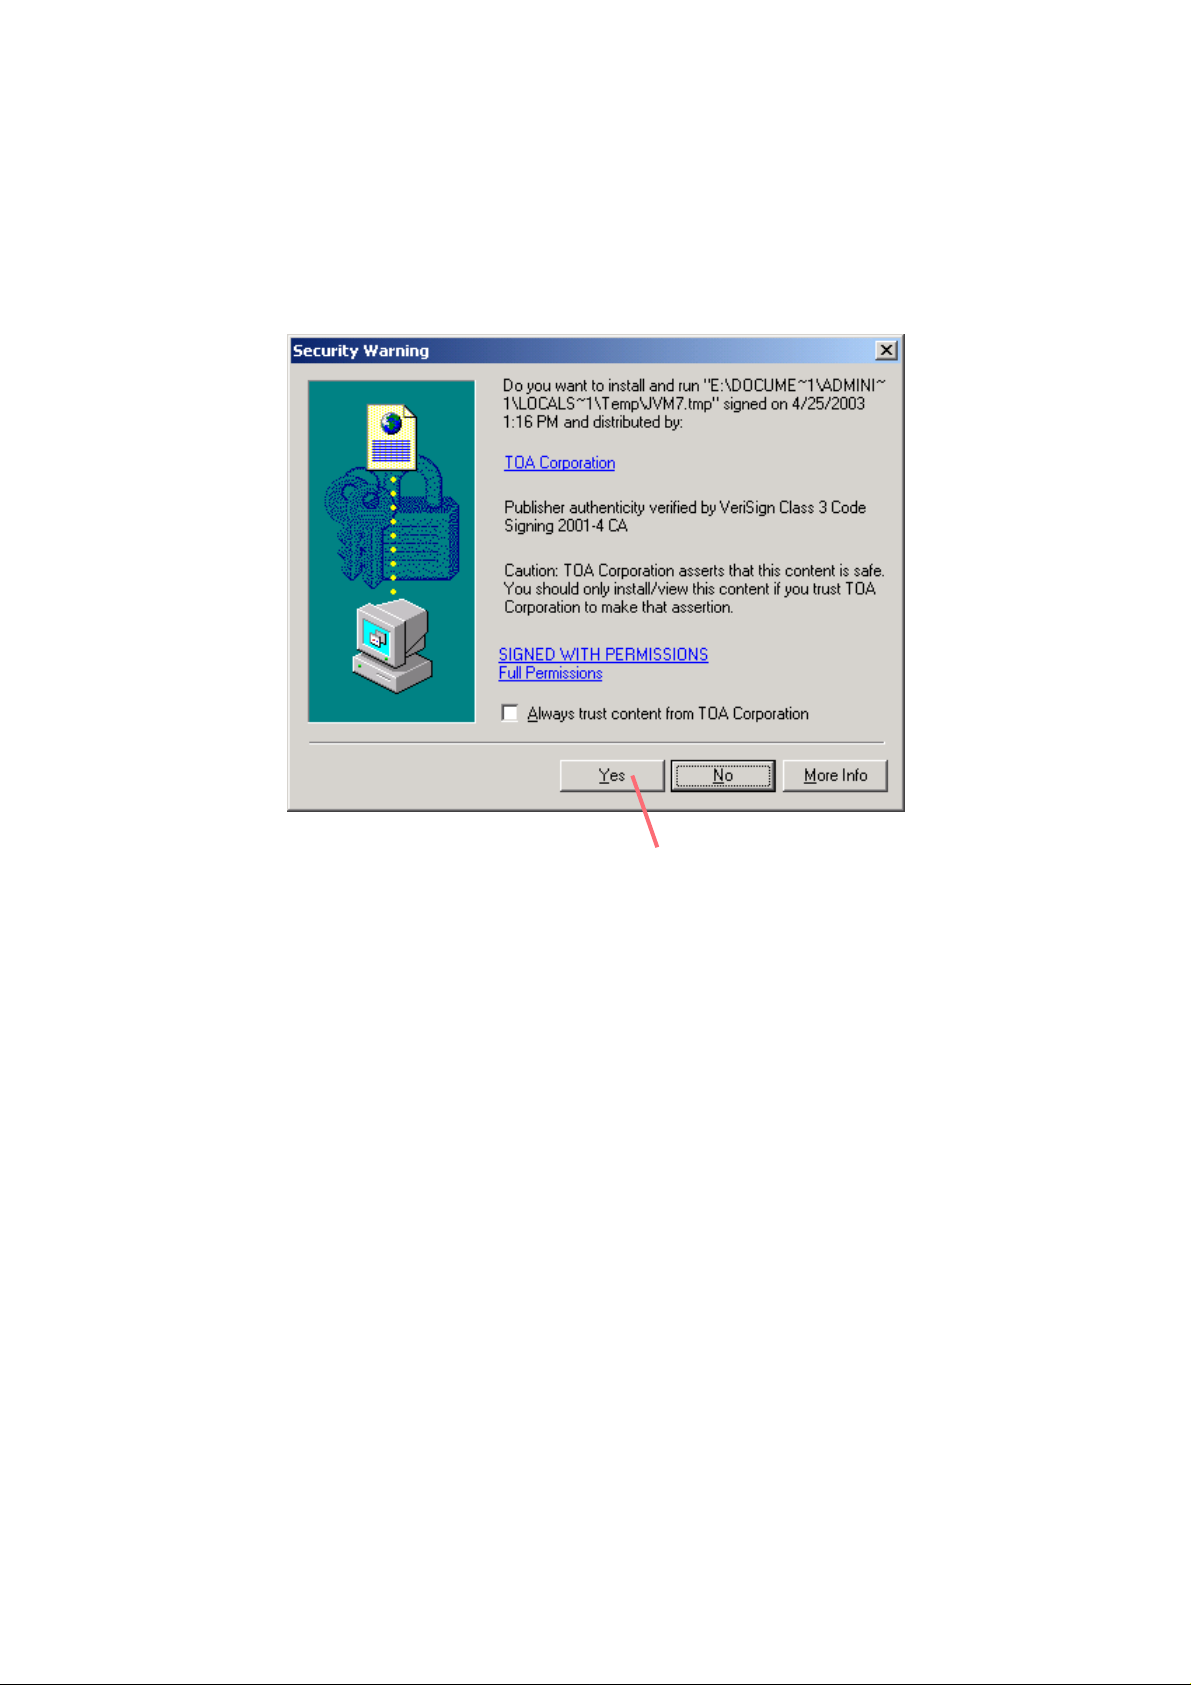
1.2. ABOUT DIGITAL CERTIFCATES
To display the camera control and camera setting screens, the Java Applet program needs to be downloaded.
The following screen is displayed several seconds after the camera control or camera setting button is clicked.
Click "Yes" to download.
Click "Yes".

1-4
N-CC1000/CC1110/VT1010 INSTRUCTION MANUAL (Applications)
CHAPTER 1. Foreword
1.3. SOFTWARE DECODER OPERATION
System operations can be made more effective when used in combination with the supplied N-SD1010 1Channel Software Decoder or optional N-SD1040 4-Channels Software Decoder.
Both the N-SD1010 and N-SD1040 Software Decoders are used to operate, control, and administer such
CCTV systems as video surveillance systems from remote locations. These software programs are designed
to operate with the Windows OS, and are primarily used to decode data received from the Network Cameras
installed in remote locations.
Using the Network Camera in conjunction with the software decoder makes possible a wide range of
operations and settings. For more information, please read the instruction manual of the software decoder.

CHAPTER 2.
Operation With
Internet Explorer
2-2
N-CC1000/CC1110/VT1010 INSTRUCTION MANUAL (Applications)
CHAPTER 2. Operation With Internet Explorer
2.1. CONNECTIONS
Real-time images transmitted from the Network Camera can be received by a personal computer (PC)
installed with Microsoft Internet Explorer (Ver. 5.0 or later).
Note:
• To display live video images, the ActiveX Control must be installed in the PC from the supplied CD-ROM.
• For precautions in regarding the operation of Internet Explorer, please refer to the program’s on-line help.
The Network Camera’s operation on the network to be used requires appropriate IP address assignments.
The following IP address and subnet mask are preset when the Network Camera is supplied from the factory:
192.168.0.1, 255.255.255.0
1. Start Internet Explorer.
2. Enter the Network Camera’s IP address in URL format. (http://IP address)
A live image from the connected camera is then displayed. In the figure, the N-VT1010 Transmitter is used.
N-CC1000/CC1110/VT1010 INSTRUCTION MANUAL (Applications)
2-3
CHAPTER 2. Operation With Internet Explorer
2.2. NAVIGATION
Function buttons are located on the left side of the live image screen.
Normal :Images displayed in standard screen size (352 x 288).
Large :Images displayed in enlarged screen size (704 x 576).
Camera Control :Displays a screen to control Combination Cameras
C-CC500/ 700 series. (N-VT1010 only.)
Configuration :Opens a screen to perform individual settings.
Please read "Chapter 3; Settings With Internet Explorer."
BMP Snapshot
Snapshot operation buttons are located under the live video screen. (Refer to p. 2-7.)
Designates a save destination folder path for the BMP file.
Saves still pictures in BMP formats.
Note: The BMP snapshot function cannot be used when the live video image is set to MJPEG. For live video
settings, refer to p. 3-17.

2-4
N-CC1000/CC1110/VT1010 INSTRUCTION MANUAL (Applications)
CHAPTER 2. Operation With Internet Explorer
2.3. WHEN A PASSWORD HAS BEEN SET
When the access to the Network Camera is protected with a [user] password in order to prevent unauthorized
use of the camera, the password entry message is first displayed.
1. Enter the password level (user) in the User Name text field.
2. Enter a password in the Password text field.
3. Click the "OK" button
If the entered password is correct, the Network Camera can be accessed, displaying the main screen and
live video images.
If the camera is protected with a [service] password when switching from the main screen to the setting
screen, the password input message is displayed.
1. Enter the password level (service) in the User Name text field.
2. Enter a password in the Password text field.
3. Click the "OK" button.
If the entered password is correct, the Network Camera can be set and the general setting screen is
displayed.
N-CC1000/CC1110/VT1010 INSTRUCTION MANUAL (Applications)
2-5
CHAPTER 2. Operation With Internet Explorer
2.4. VIDEO IMAGES
After connections are completed, a live video image is displayed in the center of the browser screen.
Depending upon the settings, such data as a title or date and time can be displayed on the screen.
Live video images are transmitted in forms of moving pictures by ActiveX or in JPEG format.
If connections are not completed, the selected Network Camera may be first connected to another receiver.
Up to 5 PCs can be made to simultaneously receive live images from a single Network Camera by setting the
network and individual equipment.
(1)
(2)
(4)
(3)
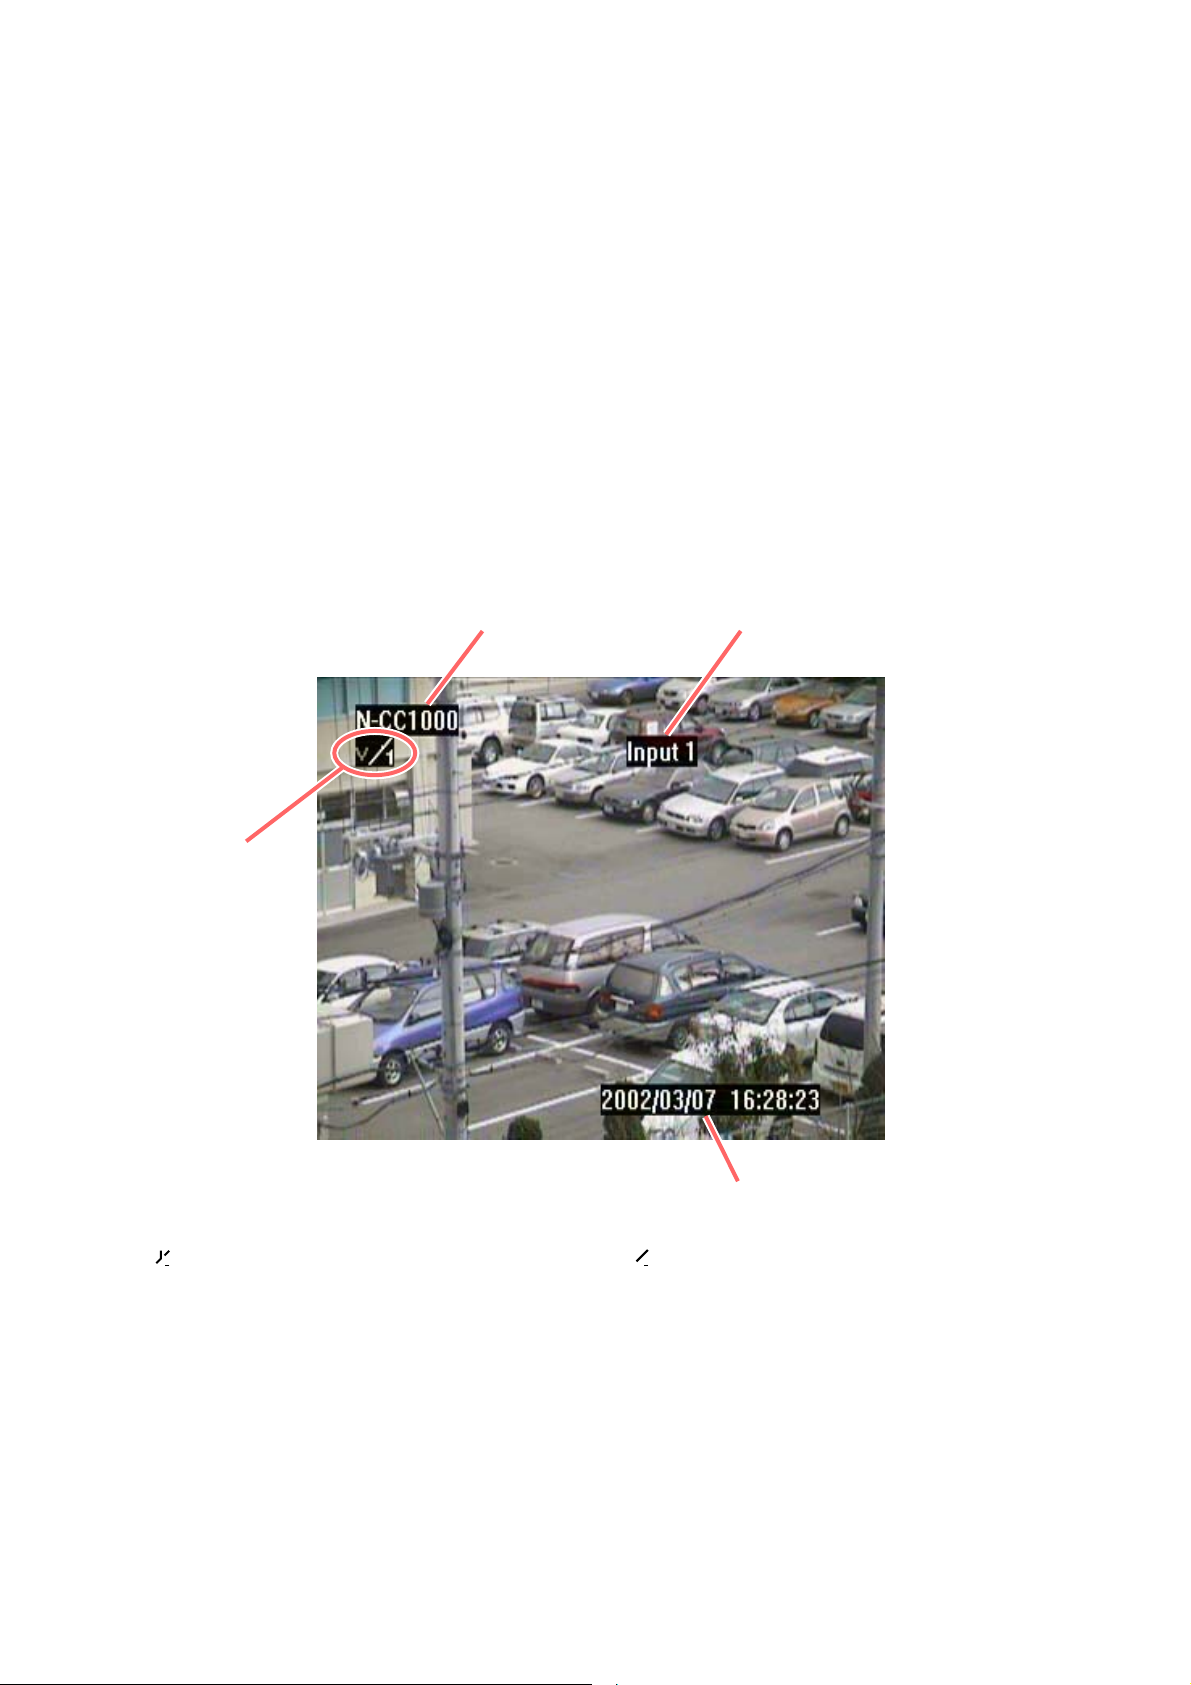
2.4.1. Text Display on Video Images
Data can be displayed on the screen by means of settings.
(1) Alarm symbol
v: Video loss alarm
: Active alarm input (the indication switches to the " " indication when an alarm signal is received).
(2) Title
(3) Date and time
(4) Alarm message
11

2-6
N-CC1000/CC1110/VT1010 INSTRUCTION MANUAL (Applications)
CHAPTER 2. Operation With Internet Explorer
2.4.2. Screen Display
The picture display size can be selected by way of the two buttons located on the left side of the screen.
Normal (352 x 288) Large (704 x 576)
• Click the "Large" button to view enlarged images.
• Click the "Normal" button to return the screen to the standard display.
Note:
• This operation does not change resolution when images are displayed by way of the compression system of
H.261 or H263.
• Resolution is also changed by this operation when images are displayed in MJPEG format.
2.4.3. Alarm
Alarm symbols and messages are displayed together with camera images during alarm operation. Display
details are determined by the Network Camera’s settings. (Refer to p. 2-5; "Text Display on Images.")
N-CC1000/CC1110/VT1010 INSTRUCTION MANUAL (Applications)
2-7
CHAPTER 2. Operation With Internet Explorer
2.5. BMP SNAPSHOT
Live video images can be converted to BMP format to save snapshots.
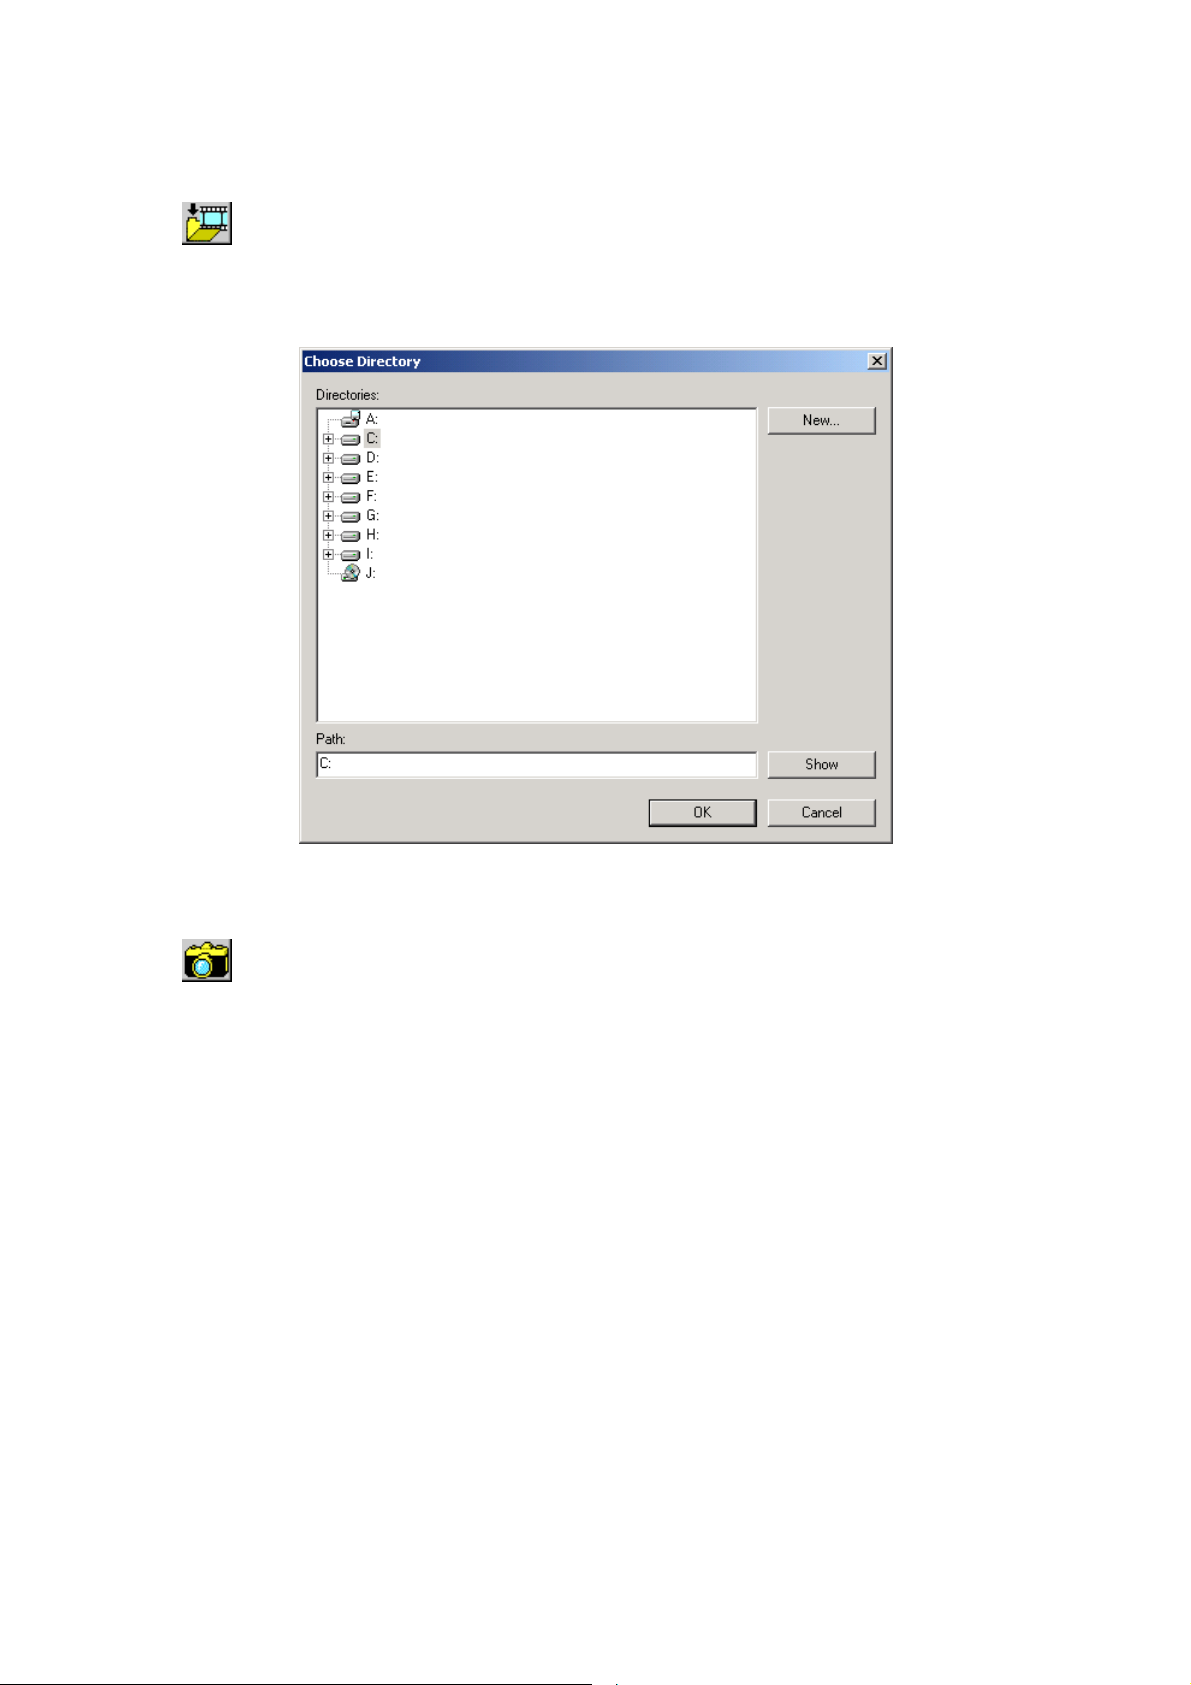
1. Click to open the following screen and set the path for a save destination.
Note: The save destination path is not saved. Perform the setting each time the BMP snapshot function is
used.
2. Click .
When clicked, the image is converted to BMP format and saved as a still picture.
The BMP file with the file creation date and time entered in the filename is created.
[Example] 1-4-2002-12-45-10.bmp = File creation date/time: 12:45:10 on April 1, 2002
Note: The creation date and time entered in the filename are based on a PC clock.
2-8
N-CC1000/CC1110/VT1010 INSTRUCTION MANUAL (Applications)
CHAPTER 2. Operation With Internet Explorer
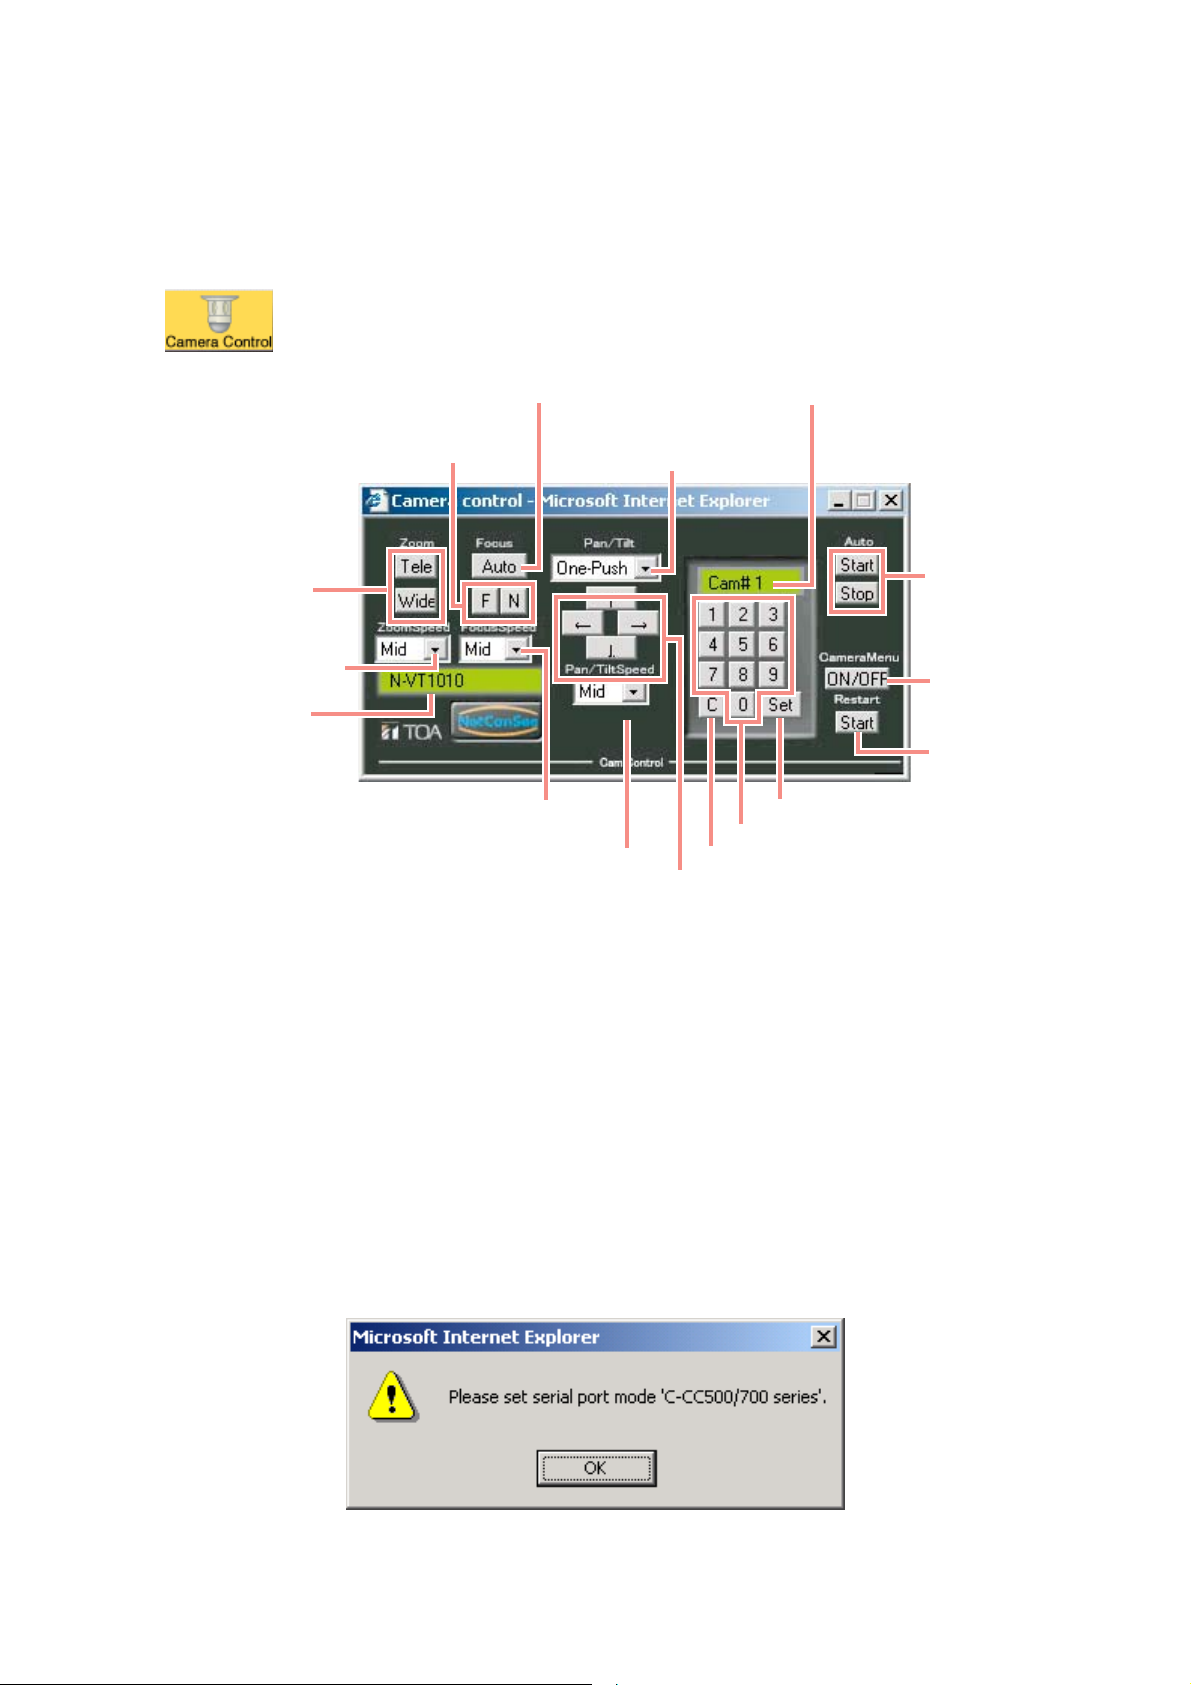
2.6. CAMERA CONTROL (N-VT1010 ONLY)
Cameras can be controlled by connecting the N-VT1010’s serial port directly to the Combination Camera’s (CCC500/700 series) control connector.
For the connection method, refer to the N-VT1010 Instruction Manual (Foundation).
Note:
• Pan/tilt speed "Fast" is only valid when pan/tilt operation is set to "Continuous Operation."
• For more information on the camera menu, read the Combination camera instruction manual.
Click to display the control dialog box.
IMPORTANT
Only 1 Combination Camera can be connected to the N-VT1010 Transmitter. Perform the following settings
using the switch located on the bottom of the camera base unit. For details, refer to the Combination Camera
instruction manual.
• Set the camera address to "001."
• Set the transmission rate to the same rate as that of the N-VT1010 Transmitter.
• Set the termination switch to ON.
When the following warning message is displayed, set the serial port mode to "C-CC500/700 series" on the
serial port setting screen. For details, refer to p. 3-28 of this manual.
Sets the zoom lens to
“Telescope” or “Wide angle.”
Sets zoom speed to “Very Slow,”
“ Slow,”“Midium,” or “Fast.”
Displays the connected
Transmitter’s IP Address and title.
Sets focus speed to “Very Slow,” “Slow,”
“Midium,” or “Fast.”
Sets auto-focus.
Focuses a camera on
far or near objects.
Sets pan/tilt rotation speed to “Very Slow,”
“Slow,” “Midium” or “F ast.”
Sets pan/tilt operation to
“One-push” or
“Continuous operation.”
Indicates an entered number.
Starts or stops
automatic operation.
Turns the camera menu
ON or OFF.
Restarts the camera.
“Set” button
10-key numerical pad
Clear key
Controls pan/tilt operations.

N-CC1000/CC1110/VT1010 INSTRUCTION MANUAL (Applications)
2-9
CHAPTER 2. Operation With Internet Explorer
Camera Pan/Tile Operations
When pan/tilt operations are set to "One-Push"
Clicking the arrow button causes the pan/tilt drive to stop after operating the fixed amount. The amount of
movement can be changed in "Pan/Tilt Speed."
When pan/tilt operation is set to "Continuous Operation"
The pan/tilt drive continues to move while the arrow button is clicked ON. Movement stops when the arrow
button is clicked OFF.
Zoom/Focus Operations
Designated operations are performed while the "Telescope," "Wide Angle," "Far," or "Near" buttons are clicked
ON, and these operations stop when the button is clicked OFF. The "Auto" (Focus) button automatically
adjusts the focus when merely clicked.
Note: During Auto-Focus operation, subsequent operations cannot be performed for an interval of 5 seconds
after the button is clicked.
Moving the Preset Positions
1. Enter the preset position number to be moved with the 10-key numerical pad.
The number is displayed in the green box over the numerical pad.
To cancel the entered number, click the "C" key.
2. Click the "Set" button. The camera begins to change the preset position.
Activating and Resetting the Camera Menu
The camera menu alternately turns on and off as the "ON/OFF" key is clicked. If the ID number has been set,
it needs to be entered when activating the camera menu.
Control at the Keyboard
Control can also be performed at the PC keyboard as well by clicking buttons with the mouse.
The following table shows the relationship between available commands and their corresponding keys.
Note: Only valid when the control dialog box is situated in the front.
Arrow button
10-key button
Set
C (clear)
Zoom (telescope)
Zoom (wide angle)
Auto (focus)
Focus (far)
Focus (near)
Auto (start)
Auto (stop)
Control Dialog Button
Arrow key
10 numerical keys
Enter
Esc
T
W
A
F
N
S
E
Corresponding Key

2-10
N-CC1000/CC1110/VT1010 INSTRUCTION MANUAL (Applications)
CHAPTER 2. Operation With Internet Explorer
2.7. JPEG SNAPSHOTS
Current on-screen images can be saved to the PC hard disk as snapshots.
1. Enter the camera IP address in Internet Explorer’s address field, followed by "/snap.jpg."
[Example] http://192.168.0.1/snap.jpg
2. Press the PC Enter key. An image is displayed on Internet Explorer as a snapshot.
3. Right-click to select "Save images as."
4. In the "Save image" dialog box, assign a filename and save the image.
Note: Snapshot resolution can be changed. To change, add the following parameters after a "snap.jpg"
command.
snap.jpg?JpegSize=XS NTSC : 128 x 80 pixels, PAL : 128 x 96 pixels
snap.jpg?JpegSize=S NTSC : 176 x 120 pixels, PAL : 176 x 144 pixels
snap.jpg?JpegSize=M NTSC : 352 x 240 pixels, PAL : 352 x 288 pixels
snap.jpg?JpegSize=L NTSC : 704 x 240 pixels, PAL : 704 x 288 pixels
snap.jpg?JpegSize=XL NTSC : 704 x 480 pixels, PAL : 704 x 576 pixels

CHAPTER 3.
Performing Settings With
Internet Explorer

3-2
N-CC1000/CC1110/VT1010 INSTRUCTION MANUAL (Applications)
CHAPTER 3. Performing Settings with Internet Explorer
General Setting Screen (Refer to p. 3-8.)
ID
ID (Refer to p. 3-9.)
ID settings
Title settings
Password level settings
Date settings
Hardware version number display
Firmware version number display
Firmware upload
Configuration download
Configuration upload
Title display stamping settings
Title (Refer to p. 3-9.)
Password Level (Refer to p. 3-9.)
Date (Refer to p. 3-10.)
Hardware Version (Refer to p. 3-11.)
Firmware Version (Refer to p. 3-11.)
Firmware Upload (Refer to p. 3-11.)
Configuration Download(Refer to p. 3-11.)
Configuration Upload (Refer to p. 3-11.)
Time settings
Time (Refer to p. 3-10.)
Date display format settings
Date Format (Refer to p. 3-10.)
Date/time display position settings
Display Stamping (Refer to p. 3-10.)
Time zone settings when using the timer server
Time Zone (Refer to p. 3-10.)
Time Server (Refer to p. 3-10.)
Time server address
Password settings
Password (Refer to p. 3-9.)
Display Stamping (Refer to p. 3-9.)
Title
Password
Date/ Time
Version Information
3.1. LIST OF SETTING ITEMS

N-CC1000/CC1110/VT1010 INSTRUCTION MANUAL (Applications)
3-3
CHAPTER 3. Performing Settings with Internet Explorer
IP
Multicast
FTP
E-mail
IP Address (Refer to p. 3-13.)
Multicast IP (Refer to p. 3-13.)
FTP Server (Refer to p. 3-15.)
SMTP Server (Refer to P. 3-15.)
Login Name (Refer to p. 3-15.)
Password (Refer to p. 3-15)
Pash (Refer to p. 3-15.)
JPEG Size (Refer to p. 3-15.)
Posting Time Slice
(Refer to p. 3-15.)
File name (Refer to p. 3-15.)
Multi-link (Refer to p. 3-14.)
Streaming (Refer to p. 3-14.)
TTL (Refer to p. 3-14.)
Video Port (Refer to p. 3-14.)
Subnet Mask (Refer to p. 3-13.)
Default Gateway (Refer to p. 3-13.)
DHCP (Refer to p. 3-13.)
Base Port (Refer to p. 3-13.)
IP address settings
Multicast IP settings
FTP server address settings
Mail server (SMTP) address settings
FTP account login name settings
FTP account password settings
Selection of folder to which JPEG images are transferred.
Setting of size of JPEG files to be transferred
Posting time slice settings
JPEG file name settings
Multi-link ON/OFF settings
Streaming ON/OFF settings
TTL settings
Video packet port number display
Subnet mask settings
Default gateway settings
DHCP ON/OFF settings
Port number settings
Network Setting Screen (Refer to p. 3-12.)

3-4
N-CC1000/CC1110/VT1010 INSTRUCTION MANUAL (Applications)
CHAPTER 3. Performing Settings with Internet Explorer
Video Encoder
Video Quality (Refer to p. 3-16.)
Lens Select (Refer to p. 3-18.)
Anti-Flicker (Refer to p. 3-18.)
Shutter Speed (Refer to p. 3-18.)
Bright Level (Refer to p. 3-19.)
Wide Dynamic Range (Refer to p. 3-19.)
Backlight Compensation (Refer to p. 3-21.)
Gain Control (Refer to p. 3-23.)
Sensitivity UP (Refer to p. 3-23.)
White Balance (Refer to p. 3-23.)
Chroma Level (Refer to p. 3-23.)
Enhancer (Refer to p. 3-23.)
Reset (Refer to p. 3-23.)
Video Resolution (Refer to p. 3-16.)
Max. Bit Rate (Refer to p. 3-17.)
Encoding Standard (Refer to p. 3-17.)
Live Video on I.E.* (Refer to p. 3-17.)
Color/B & W (Refer to p. 3-17.)
Priority settings for live video picture, "sharp" or "fast"
Lens selection
Flicker reduction settings
Electronic shutter speed settings
Camera bright level settings
Wide dynamic range settings
Backlight compensation settings
Gain adjustment settings
High-sensitivity slow shutter limit settings
White balance settings
Chroma level adjustment
Enhancer settings
Return camera setting screen items to factory-preset settings
Live video image resolution settings
Transmission rate upper limit settings
Encoding standard settings for live video images
Live video image decoding system settings
Live video image color/black&white settings
Video Setting Screen (Refer to p. 3-16)
Camera Setting Screen (N-CC1000 Only) (Refer to p. 3-18.)
* Internet Explorer
 Loading...