

Page 1
Pro V55
Heat Gun
Owner’s Manual
Read all instructions and product labels. When using electrical tools,
follow all precautions to reduce the risk of re, electric shock, and
other personal injury.
Questions?
Call Titan Technical Service at:
1-800-526-5362
Register your product online at:
www.titantool.com
Double-insulated
1015 • Form No. 0503667B
EnglishFrançaisEspañol
Page 2
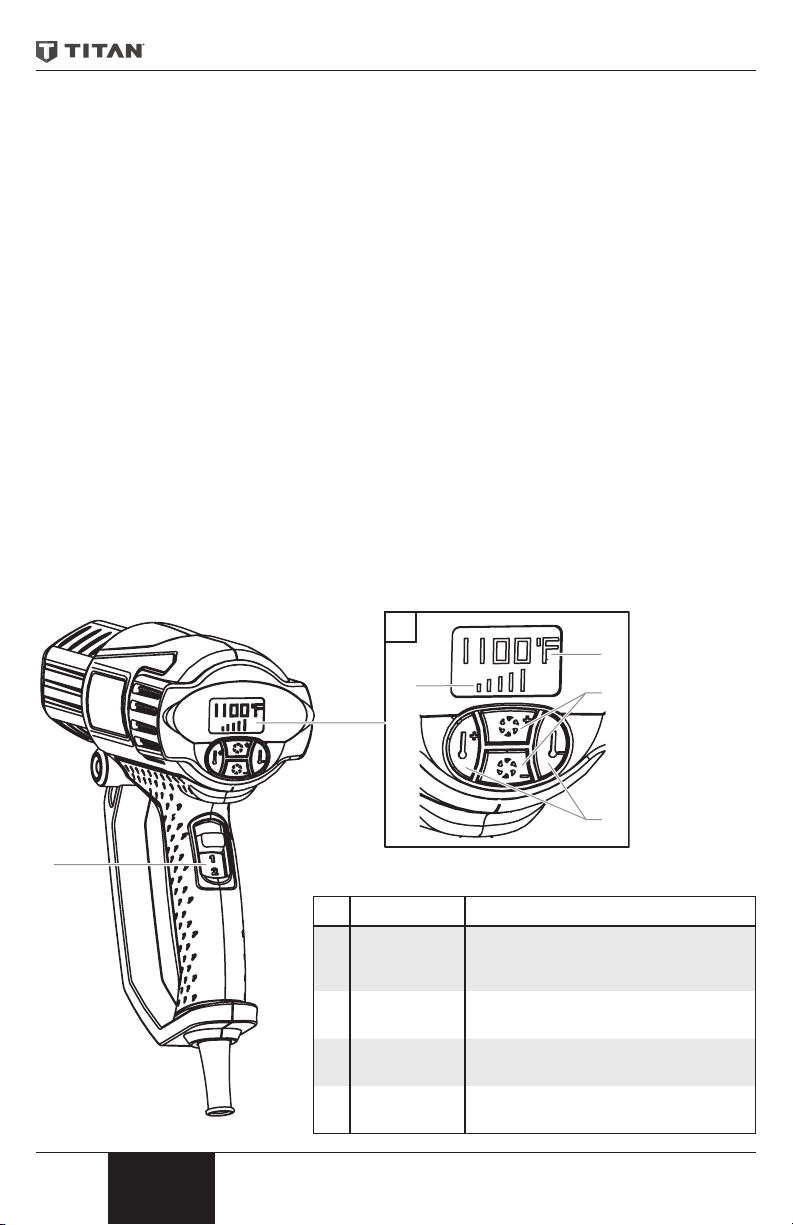
General Description
1
2
This heat gun is a quality power tool. Like any power tool, it can be dangerous when misused.
Read the following instructions carefully and follow all safety precautions. It is the responsibility
of the owner to use the heat gun properly.
Specications
Housing: ..............................................Engineered high-impact corrosion and heat-resistant polymers
Wattage: ......................................................................1500 watts on highest setting, 150 watts on lowest
Heat Output: ..................
BTU: ...........................................................................................Approximately 5100 BTUs on highest setting
Weight: ...................................................................................................................................................... 1.5 pounds
Approximately 1200°F on highest setting, approximately 120°F on lowest
Uses
• Soften paint, caulking and putty for easier removal
• Soften adhesives to help remove oor tiles
• Bend plastic pipes
• Shrink tubing for electrical work
• Shrink plastic lm for wrapping or weatherproong
• Loosen rusted nuts, bolts and ttings
Temperature Control
The temperature control gives you a wide temperature range to choose from, depending upon
the type of project. The temperature can be adjusted in 20ºF increments from 120ºF to 1200ºF.
a
b
4
3
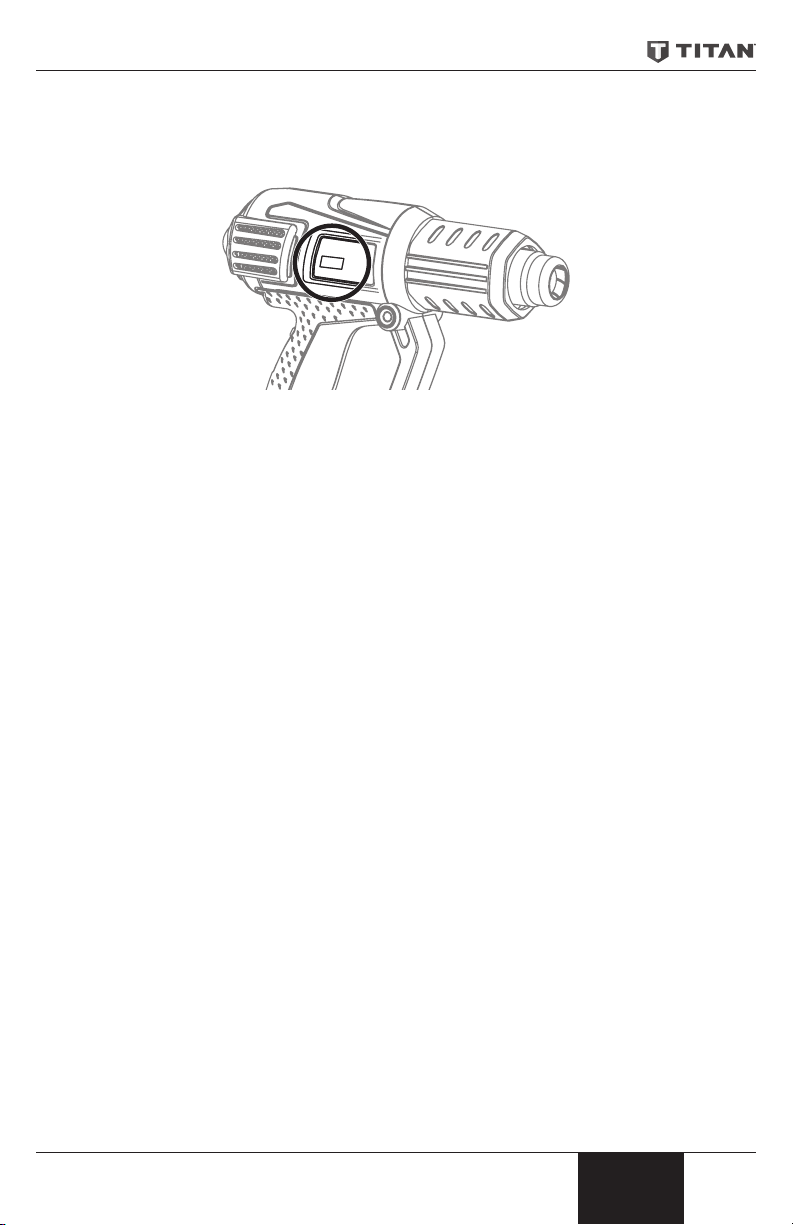
# Item Description
1 Switch Switches the heat gun OFF (0),
2 Display Shows the current heat output (a)
3 Temperature
adjustment
4 Air ow
adjustment
2
English
to Cool Down Mode (1) or Usage
setting (2).
and air ow (b) of the heat tool.
Increases or decreases the
temperature output of the heat tool.
Increases or decreases the air ow
output of the heat tool.
Page 3

Important Safety Information • Read all safety information
before operating the equipment. Save these instructions
To reduce the risks of re or explosion, electrical shock and the injury to persons, read
and understand all instructions included in this manual. Be familiar with the controls and
proper usage of the equipment.
Indicates a hazardous situation which, if not avoided, could result in death or
serious injury.
HAZARD: POISON
Extreme care should be taken when stripping paint. The peelings, residue and
vapors of paint may contain lead, which is poisonous. Any paint applied to homes
before 1950 is likely to contain lead. Any paint manufactured before 1977 may
contain lead. Once the paint is deposited on surfaces, hand-to-mouth contact
can result in the ingestion of lead. Exposure to even low levels of lead can cause
irreversible brain and nervous system damage. Young and unborn children are
particularly vulnerable to lead poisoning.
Before beginning any paint removal process you should determine whether the
paint you are removing contains lead. This can be done by your local health
department or by a professional who uses a paint analyzer to check the lead
content of the paint to be removed. Lead-based paint should only be removed by
a professional and should not be removed using a heat gun.
PREVENTION:
1. Move the work piece outdoors. If this is not possible, keep the work area well ventilated.
Open the windows and put an exhaust fan in one of them. Be sure the fan is moving the
air from inside to outside.
2. Remove or cover any carpets, rugs, furniture, clothing, cooking utensils and air ducts.
3. Place drop cloths in the work area to catch any paint chips or peelings. Wear protective
clothing such as extra work shirts, overalls and hats.
4. Work in one room at a time. Furnishings should be removed or placed in the center of
the room and covered. Work areas should be sealed o from the rest of the dwelling by
sealing doorways with drop cloths.
5. Children, pregnant or potentially pregnant women and nursing mothers should not be
present in the work area until the work is done and all cleanup is complete.
6. Wear a dust respirator mask of a dual lter respirator mask for dust and fumes which
has been approved by the Occupational Safety and Health Administration (OSHA) the
National Institute of Safety and Health (NIOSH), or the United States Bureau of Mines.
These masks and replaceable lters are readily available at major hardware stores. Be
sure that the mask ts properly. Beards and facial hair may keep masks from sealing
properly. Change the lters often. Disposable paper masks are not adequate.
7. Use caution when operating the heat gun. Keep the heat gun moving as excessive heat
will generate fumes which can be inhaled by the operator.
8. Keep food and drink out of the work area. Wash hands, arms and face and rinse mouth
before eating or drinking. Do not smoke or chew gum or tobacco in the work area.
9. Clean up all removed paint and dust by wet mopping the oors. Use a wet cloth to clean
all walls, sills and any other surface where paint dust is clinging. Do not sweep, dry dust
or vacuum. Use a high phosphate detergent of trisodium phosphate (TSP) to wash and
mop areas.
10. At the end of each work session, put the paint chips and debris in a double plastic bag,
close it with tape or twist ties and dispose of properly.
11. Remove protective clothing and work shoes in the work area to avoid carrying dust into
the rest of the building. Wash work clothes separately. Wipe shoes o with a wet rag
and then wash it with the work clothes. Wash hair and body thoroughly with soap and
water.
3
English
Page 4
Important Safety Information • Read all safety information
before operating the equipment. Save these instructions
HAZARD: EXPLOSION OR FIRE
This heat gun produces extremely high temperatures (as high as 1200º F). It must
be used with caution to prevent combustible material from igniting.
PREVENTION:
1. Keep the gun in constant motion. Do not stop or dwell in one spot.
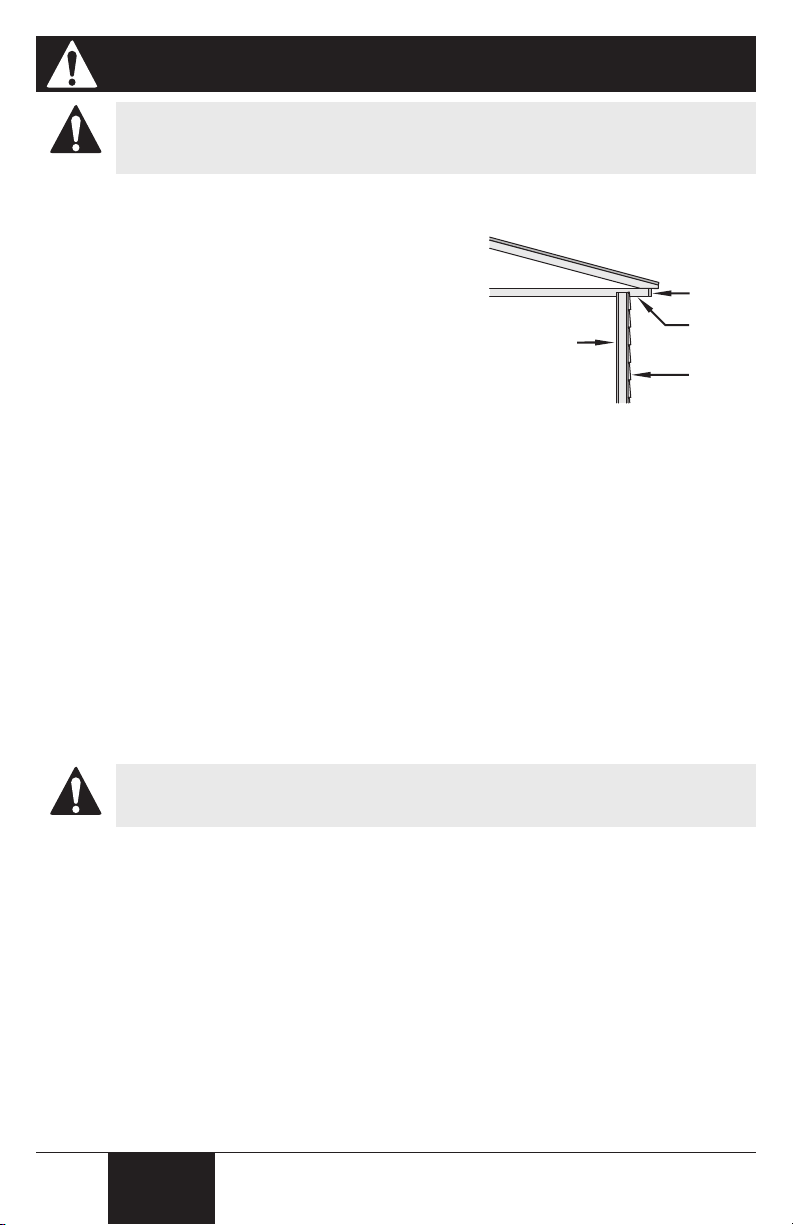
2. Use extreme caution if the other side of the
material being scraped is inaccessible, such as
house siding. The hidden side could catch on re
if it becomes too hot. Some buildings contain
highly ammable materials behind siding, oors,
facia, sot boards and other panels. Check these
areas before applying heat and do not use a heat
tool if ammable materials are present or if you are
unsure of the hidden material.
3. Do not use near surfaces with cracks or near metal
pipes or ashing. Heat may be conducted behind the work surface and ignite hidden
material. The ignition of hidden materials may not be readily apparent and can result in
property damage and injury.
4. Do not use electric tools in the presence of ammable liquids or gases.
5. Do not use near combustible materials such as dry grass, leaves, and paper which can
scorch and catch re.
6. The nozzle becomes very hot. Do not lay the heat gun on ammable surfaces when
operating the gun or immediately after shutting the gun o. Always set the gun on a at,
level surface so that the nozzle tip is directed upwards and away from the supporting
surface.
7. Do not touch the nozzle until the tool has cooled.
8. Do not use the heat gun as a hair dryer.
9. Tools and paint scrapings become very hot. To avoid burns, use work gloves when
scraping.
10. Always treat the hot air units with the same respect as an open ame.
Inside
Wall
Facia
Sot
Siding
HAZARD: ELECTRIC
May cause property damage, severe injury or loss of life.
PREVENTION:
1. Do not disassemble the heat gun.
2. Do not work in wet areas or expose the heat gun to rain.
3. Guard against electric shock by preventing body contact with grounded surfaces such as
pipes, radiators, ranges, aluminum ladders or other grounded devices.
4. Do not abuse the electric cord. Never carry the heat gun by the cord or yank on the cord
to disconnect if from the power supply. Keep the electric cord away from heat, oil and
sharp edges. Inspect the cord for wear or damage regularly.
5. Use only extension cords rated for outdoor use. If an extension cord is damaged or
otherwise unsuitable for use, replace it with a new cord.
6. This heat gun has a polarized plug. One blade is wider than the other. To reduce the risk
of electric shock, this plug is intended to t in a polarized outlet only one way. If the plug
does not t fully into the outlet, reverse the plug. If it still does not t, contact a qualied
electrician. Do not modify the plug in any way.
4
English
Page 5

Important Safety Information • Read all safety information
before operating the equipment. Save these instructions
HAZARD: GENERAL
May cause property damage or severe injury.
PREVENTION:
1. Disconnect the heat gun from the power supply when not in use. Store indoors in a dry
place and out of the reach of children.
2. Keep your work area well lighted and clean.
3. Do not overreach, especially when working on ladders. Keep proper footing and balance
at all times. Be certain any ladders being used are sturdy, stable, on a rm surface and
erected at safe working angles.
4. Avoid power lines.
5. Keep moveable items secured and steady while scraping.
6. Always use protective eyewear when working.
7. Stay alert and use common sense when operating any tool.
Some dust, peelings, residue, and vapors caused by paint removal activities
contain chemicals known to the state of California to cause birth defects or
other reproductive harm. An example of a chemical would be lead from leadbased paints (do not use a heat tool to remove lead-based paint). Your risk
from exposure varies, depending on how often you do this type of work. To
reduce your exposure to these chemicals: work in a ventilated area, and work
with approved safety equipment, such as those dust masks that are specially
designed to lter out microscopic particles.
Servicing of a double-insulated product
In a double-insulated product, two systems of insulation are provided instead of grounding.
No grounding means is provided on a double-insulated product, nor should a means for
grounding be added to the product. Servicing of a double-insulated product requires extreme
care and knowledge of the system, and should be done only by qualied service personnel.
Replacement parts for a double-insulated product must be identical to those parts in the
product.
5
English
Page 6

Using the Heat Gun
Many variables aect heating applications, such as the material being heated, ambient
temperature, the distance from the gun to the substrate and the heating technique. For this
reason, Wagner has provided temperature guidelines for certain applications. Always start the
heat gun at the lowest temperature in the range then raise the temperature until the optimum
temperature is achieved. Always keep the heat gun in motion and at least 2” from the substrate
when applying heat.
Use Temp. Setting
Removing:
Drying:
Heating:
Loosening: Rusted bolts/nuts 900º F - 1200º F
Molding and
Bending:
Waxing: Skis and snowboards 250° - 450º F
Sealing: Ends of nylon rope 450° - 650º F
Defrosting: Refrigerator 450° - 750º F
Floor coverings (adhesive backed) 350º - 750º F
Paint 900º - 1200° F
Paint 450° - 750º F
Plaster 450° - 750º F
Shrink-tube (electrical) 350° - 500º F
Shrink-wrap (windows, crafts) 250º - 550º F
Frozen locks 350° - 650º F
Frozen water pipes 750º F - 1200º F
Plastics 250° - 450º F
Plexiglass and Formica 250° - 450º F
Always read the safety information included in
this manual before using the heat gun.
1. Plug the unit into a standard wall outlet.
2. Turn on the heat gun by sliding the switch to (2) (the 2
should be visible).
Note: Smoke may appear during the initial start up due to the
burning of manufacturing oils. The smoke should disappear in
less than a minute.
3. Press the temperature adjustment buttons until the display
reads the desired temperature. Press the air ow adjustment buttons to increase (+) or
decrease (-) the air ow.
IMPORTANT: If the blower motor in the heat gun does not turn on when the switch is
activated, turn the switch OFF (0) immediately. The heating element will burn out if it is
not cooled by the blower.
4. During rest periods or when you are nished with your project, slide the switch to Cool
Down Mode (1), set the gun down in an upright position (nozzle pointing up), and allow
to cool for a minimum of 15 minutes. After 15 minutes, turn the switch OFF (0) if you are
nished, or turn switch to Usage setting (2) to continue.
6
English
Page 7
Note: Always set the heat gun upright (nozzle pointed up) after it is turned o, either for a
ABCD
short break or for storage. Avoid laying the unit on the side after shutdown. The heat will
remain in the unit and cooling will take longer. Store the unit only after the nozzle is cool.
Unplug the unit before storing to prevent accidental startup.
IMPORTANT: Always protect glass when working near windows.
Do not touch nozzle or the scraper blade when working. These become
extremely hot and will cause severe burns. Wear gloves to protect hands
from hot scrapings.
Stripping Paint
The heat gun heats up the surface and causes the paint to soften, at which time it can be
scraped o easily without damaging the surface. Some paints may soften even though they do
not blister; some may become rubbery, and some may require higher heat.
When working with several layers of paint, it speeds up the scraping process to heat the surface
thoroughly, all the way to the wood. Then all the layers can be scraped at one time.
A soft wire brush may be the best tool to use for very intricate surfaces. Mineral paints and
nishes, such as cement paint and porcelain, do not soften with heat, so using a heating tool will
not work for paint removal.
The best method of paint removal
Move the gun slowly and steadily forward at an angle
to the surface, pointing the nozzle in the direction of
motion. This allows you to scrape safely outside the hot
air stream and keeps the scraper and the scraped surface
cooler.
A. Warm air preheats the surface.
B. Paint is softened by hot air.
A + B. Deep penetration of heat over total area.
C. Paint can be easily scraped o as soon as it is
D. Stripped surface allowed to cool.
softened and the gun is moved forward.
Note: Do not use the heat gun on surfaces that can be damaged by heat, such as vinylcoated paneling, siding or window frames.
When removing paint from window frames, the heat gun will soften the putty. Be careful
not to gouge the putty with the scraper. The putty will rm up after it cools.
Do not use the heat gun on insulating laminated window glass such as Thermopane. The
glass edge expansion may break the edge seal.
When scraping fascia, do not overheat the edges of the asphalt shingles protruding over
the edge of the sheathing. Too much heat will melt the asphalt.
IMPORTANT: The removal of paint by heat gun is safe if the above guidelines are used,
but always keep either a container of water or an ABC re extinguisher within reach.
IMPORTANT: Read the general operating and safety information sections of this owner’s
manual before using the heat gun.
7
English
Page 8
Cleaning and Maintenance
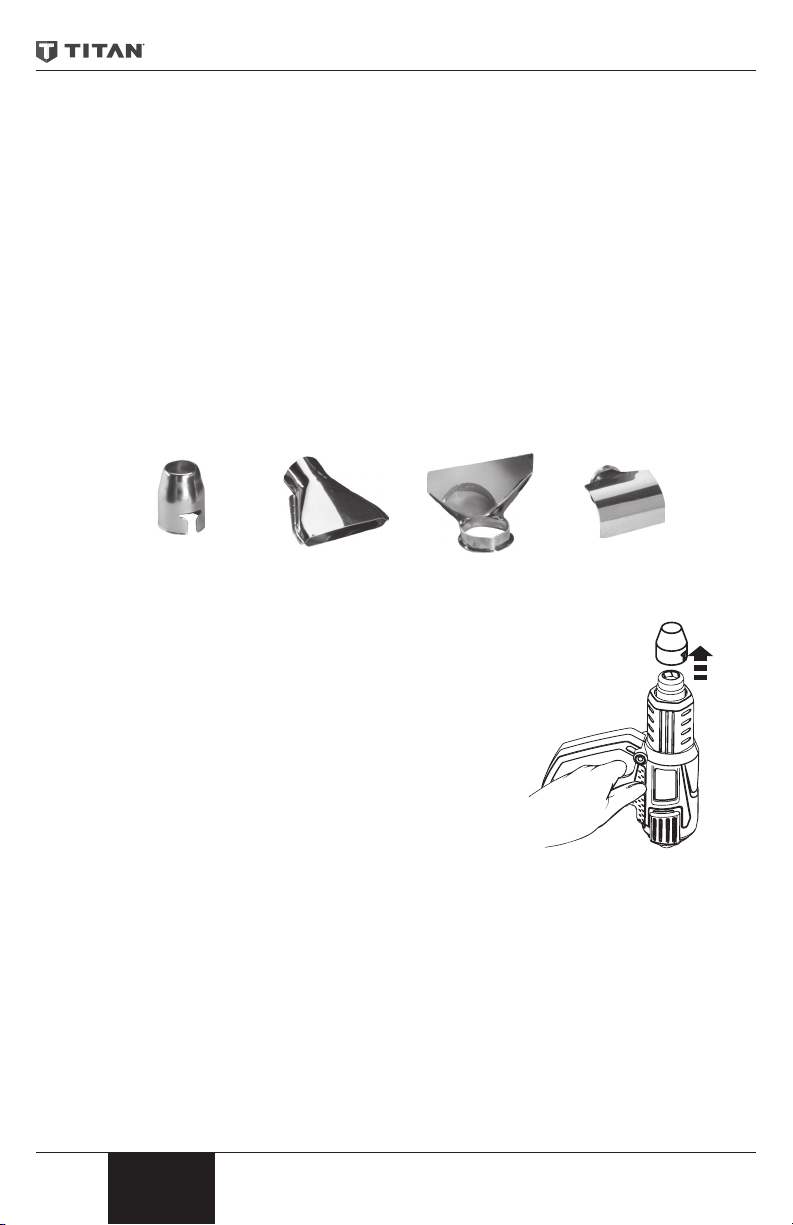
Concentrator Nozzle
Flare Nozzle
Glass Protector
Reector Nozzle
Keep the intake openings on the housing clean and free of obstructions. Use a soft, dry brush
to clean the openings periodically. Use only mild soap and a damp cloth to clean the heat gun.
Many household cleaners contain chemicals which could seriously damage the housing.
Do not use gasoline, turpentine, lacquer or paint thinner, dry cleaning uids or similar products
when cleaning the heat gun. Never allow any liquid to get inside the tool or immerse any part of
the tool into a liquid.
Storage
Allow the heat gun nozzle to cool to room temperature before placing in storage.
The nozzle will turn dark over time because of the high heat. This is normal and will not aect
the performance or life of the unit.
Accessories
The following accessories may come with the gun or may be purchased separately by calling
1-800-526-5362.
P/N 0503674
IMPORTANT: Always use gloves when handling the heat gun. Use of nozzle accessories
will produce hotter gun temperatures which may result in decreased durability of the gun.
To attach an optional item to the gun:
1. Set the heat gun upright on a level surface until
the tip is cool.
2. Set the item onto the tip of the heat gun and push
rmly into place by hand.
To remove an optional item:
1. Set the heat gun upright on a level surface until
the tip is cool.
2. Pull the item o of the tip.
P/N 0503675
P/N 0503676
P/N 0503677
8
English
Page 9
Product Registration
Register your product online at www.titantool.com.
Date Code Location
9
English
Page 10

Limited Warranty — Heat Gun
What Is Covered By This Warranty:
This product, manufactured by Titan, is warranted against defects in material and workmanship
for two (2) years following date of purchase if operated in accordance with Titan’s printed
recommendations and instructions.
Within the applicable warranty period, Titan will repair or replace, at our option, defective parts
without charge if such parts are returned with transportation charges prepaid to the nearest
Authorized Service Center or to Titan Tool Corporation, 1770 Fernbrook Lane, Minneapolis, MN
55447. If Titan is unable to repair this product as to conform to this Limited Warranty after a
reasonable number of attempts, Titan will provide, at our option, either a replacement for this
product or a full refund of the purchase price of this product. These remedies are the sole and
exclusive remedies available for breach of express and implied warranties.
What is Not Covered By This Warranty:
1. This Waranty does not cover any defects or damages caused by either:
a) the use or installation of repair or replacement parts or accessories not manufactured
by Titan, or
b) repair performed by anyone other than a Titan Authorized Service Center.
2. The Warranty does not cover equipment and accessories supplied to Titan from an
original equipment manufacturer, including but not limited to: hoses, tips, accessories
or hand tools. Titan will provide the purchaser with copies of the original equipment
manufacturer’s express warranties provided to Titan along with the name and address of
the appropriate manufacturer.
3. This Warranty does not cover damage or defects caused by or related to abrasion,
corrosion, abuse, misuse, negligence, accident, normal wear, faulty installation, or
tampering in a manner which impairs normal operation.
Limitation of Remedies:
IN NO CASE SHALL TITAN BE LIABLE FOR ANY INCIDENTAL, SPECIAL OR CONSEQUENTIAL
DAMAGES OR LOSS, INCLUDING TRANSPORTATION COSTS, WHETHER SUCH DAMAGES ARE
BASED UPON A BREACH OF EXPRESS OR IMPLIED WARRANTIES, BREACH OF CONTRACT,
NEGLIGENCE, STRICT TORT, OR ANY OTHER LEGAL THEORY.
Disclaimer Of Implied Warranties:
THE FOREGOING WARRANTIES ARE IN LIEU OF ALL OTHER WARRANTIES, EXPRESS OR IMPLIED,
INCLUDING BUT NOT LIMITED TO THE IMPLIED WARRANTIES OF MERCHANTABlLlTY AND
FITNESS FOR A PARTICULAR PURPOSE.
No Ability To Transfer:
This warranty is extended to the original purchaser only and is not transferable.
Your Rights Under State Law:
Some states do not allow limitations on how long an implied warranty lasts or the exclusion of
incidental or consequential damages, so the above limitation and exclusion may not apply to
you. This warranty gives you specic legal rights, and you may also have other rights which vary
from state to state.
10
English
Page 11

Pro V55
Pistolet à Air Chaud
Guide d’utilisation
Lire toutes les directives et les étiquettes de produits. Suivre toutes les
mesures de sécurité lors de l’utilisation d’outils électriques an de réduire
tout risque d’incendie, de choc électrique ou de blessure.
Besoin d’aide?
Appelez le service technique Titan
1-800-526-5362
Enregistrement du produit en ligne sur le site :
www.titantool.com
Double isolation
Français
Page 12

Description générale
1
2
Le pistolet à air chaud est un outil électrique de qualité. Comme tout autre outil électrique, une
utilisation non adéquate de l’appareil pourrait s’avérer dangereuse. Il est donc important de lire
attentivement les directives présentées ci-dessous et de respecter toutes les mesures de sécurité
indiquées. Il incombe au propriétaire d’utiliser cet appareil correctement.
Spécications
Boitier ............................................fabrication en polymère hautement résistant à la corrosion et à la chaleur
Tension ..........................................1500 W au réglage le plus élevé, 150 W au réglage le plus faible
Puissance calorique ...............Environ 650 °C (1200 °F) au réglage le plus élevé, environ 49°C (120 °F) au
BTU .................................................Environ 5100 BTU au réglage le plus élevé
Poids ...............................................0,7 kg (1,5 lb)
réglage le plus faible
Utilisation
• Ramollir la peinture, les produits de calfeutrage et les mastics, an que ces derniers
puissent être enlevés plus facilement.
• Ramollir les adhésifs, an de faciliter l’enlèvement des tuiles de plancher
• Plier des tuyaux en plastique
• Rétrécir des conduits lors d’un travail au niveau du système électrique
• Réduire les pellicules en plastique utilisées en tant que produits de recouvrement et
d’étanchéité
• Desserrer les boulons, les écrous et les dispositifs de xation rouillés
• Sécher la peinture et le plâtre.
Contrôle de température
Le contrôle de température permet de choisir parmi une vaste gamme de températures
selon la nature du travail à eectuer. La température peut être réglée de 120 ºF à 1200 ºF par
augmentation de 20 ºF.
a
b
4
3
# Article Description
1 Interrupteur Change le mode du pistolet à air chaud
2 Achage Indique la chaleur produite (a) et le débit
3 Boutons de
réglage de
température
4 Boutons de
réglage du
débit d’air
12
Français
du mode ARRÊT (0) à REFROIDISSEMENT
(1) ou UTILISATION (2).
d'air (b) du pistolet à air chaud.
Augmente ou diminue la chaleur
produite par le pistolet.
Augmente ou diminue le débit d'air du
pistolet à air chaud.
Page 13

Importantes consignes de sécurité • Lire toutes ces consignes
avant d’utiliser l’appareil. Garder ces consignes.
Pour réduire les risques d’incendie ou d’explosion, de choc électrique et de blessure, vous
devez lire et comprendre les directives gurant dans ce manuel. Familiarisez-vous avec les
commandes et l’utilisation adéquate de l’équipement.
Indique une situation à risque, laquelle, si elle n’est pas évitée, peut entraîner
des blessures graves, voire la mort.
RISQUE D’EMPOISONNEMENT
Il est essentiel de faire preuve d’une extrême prudence lors du décapage d’une
surface peinte. Les pellicules, les résidus et les émanations de peinture peuvent
contenir du plomb, un produit toxique. Toute peinture ayant été appliquée sur des
maisons avant 1950 est susceptible de contenir du plomb; et toute peinture ayant
été fabriquée avant 1977 peut aussi contenir du plomb. Une fois que la peinture
est déposée sur une surface, le fait de porter la main à la bouche peut entraîner
l’ingestion d’une quantité de plomb. Cette quantité, si minime soit-elle, peut causer
des dommages irréversibles sérieux au cerveau ou au système nerveux. Les jeunes
enfants et les foetus sont particulièrement vulnérables à ce type d’empoisonnement.
Avant de commencer tout décapage d’une surface peinte, il est essentiel de vérier
si la peinture contient du plomb. Cette opération peut être eectuée par un service
de la santé local, ou par un professionnel, à l’aide d’un analyseur de peinture
servant à vérier le contenu en plomb de la peinture. LES PEINTURES CONTENANT
DU PLOMB NE DOIVENT ÊTRE ENLEVÉES QUE PAR UN PROFESSIONNEL; LE
PISTOLET À AIR CHAUD NE PEUT ÊTRE, DANS UN TEL CAS, UTILISÉ.
MESURES PRÉVENTIVES :
1. Déplacer l’objet à décaper à l’extérieur. Si cela n’est pas possible, s’assurer que la zone de
travail reçoit un bon apport d’air. Ouvrir les fenêtres et placer un ventilateur d’évacuation à
l’intérieur de l’une d’elles. S’assurer que le ventilateur déplace l’air de l’intérieur à l’extérieur.
2. Enlever ou recouvrir tout tapis, toute carpette, tout meuble, tout vêtement, tout
ustensile de cuisine et tout conduit d’air.
3. Placer des toiles de protection à l’intérieur de la zone de travail, an de recueillir toute
pellicule ou tout éclat de peinture. Porter des vêtements de protection, tels qu’une
chemise de travail supplémentaire, une combinaison et un chapeau.
4. Ne travailler que dans une seule pièce à la fois. Les meubles doivent être retirés ou placés
au centre de la pièce et recouverts. La pièce dans laquelle s’eectue le travail doit être
isolée du reste de l’édice à l’aide de toiles de protection placées sur les portes.
5. Les enfants, les femmes enceintes ou possiblement enceintes, ainsi que les mères qui
allaitent, ne doivent pas pénétrer dans la pièce tant et aussi longtemps que le travail
n’est pas terminé et que le nettoyage n’a pas été eectué.
6. Porter un masque anti-poussière ou un masque à deux ltres contre la poussière et les
émanations, ayant été approuvé par l’Occupational Safety and Health Administration
(OSHA), le National Institute of Safety and Health (NIOSH), ou le United States Bureau of
Mines. Ces masques, ainsi que les ltres jetables, peuvent être facilement obtenus chez les
principaux quincailliers. S’assurer que le masque s’adapte bien aux formes du visage. La
barbe et les poils faciaux peuvent empêcher le masque de bien adhérer au visage. Changer
les ltres régulièrement. LES MASQUES EN PAPIER JETABLES NE SONT PAS ACCEPTÉS.
7. Faire preuve de prudence lors de l’utilisation du pistolet. Garder ce dernier constamment
en mouvement, étant donné qu’une chaleur excessive engendre des vapeurs pouvant
être inhalées par l’opérateur.
8. Conserver toute nourriture et tout breuvage à l’extérieur de la pièce où s’eectue le
travail. Se laver les mains, les bras et le visage, et se rincer la bouche avant de manger ou
de boire. Ne pas fumer ou mastiquer de la gomme à mâcher ou du tabac dans la pièce
dans laquelle on eectue le travail.
9. Enlever tous les résidus de peinture et toute la poussière en essuyant le plancher à l’aide
d’un balai à franges humide. Utiliser aussi un linge humide pour nettoyer tous les murs,
tous les rebords et toute autre surface pouvant comporter des résidus de peinture. NE
PAS BALAYER, ÉPOUSSETER OU UTILISER D’ASPIRATEUR. Au cours de l’opération de
13
Français
Page 14

Importantes consignes de sécurité • Lire toutes ces consignes
vêtements
extérieurs
avant d’utiliser l’appareil. Garder ces consignes.
nettoyage, utiliser un détergent à haute teneur de phosphate trisodique.
10. À la n de chaque session de travail, placer les éclats et les débris de peinture dans un sac
en plastique double, le fermer à l’aide d’un ruban adhésif ou d’attaches, puis en disposer
d’une manière adéquate.
11. Retirer les vêtements de protection et les chaussures de travail avant de quitter la zone
de travail, an d’éviter de transporter de la poussière dans le reste de l’édice. Laver les
vêtements de travail séparément. Essuyer les chaussures avec un linge humide, puis les
laver avec les vêtements de travail. Se laver les cheveux et le corps entièrement avec de
l’eau et du savon.
RISQUE D’EXPLOSION OU D’INCENDIE
Le pistolet à air chaud génère des températures extrêmement élevées (pouvant
atteindre 1200°F, ou 650°C). Il doit donc être utilisé avec prudence, an d’éviter
toute inammation de matériau combustible.
MESURES PRÉVENTIVES :
1. Garder le pistolet constamment en mouvement. Ne pas s’arrêter ou s’attarder à un
endroit précis.
2. Agir avec une extrême prudence lorsque la
partie se trouvant à l’arrière du matériau devant
être enlevé est inaccessible, tel le revêtement
extérieur d’une maison. La partie cachée pourrait
prendre feu sous l’eet d’une chaleur trop
intense. Certains édices comprennent des
matériaux hautement inammables se trouvant
derrière des revêtements extérieurs, sous des
planchers, derrière des panneaux, sous des
planchers de sote, etc... Vérier ces endroits
avant d’appliquer de la chaleur, et ne pas utiliser un outil à air chaud lorsque l’un de ces
endroits comporte un matériau inammable, ou lorsque l’on n’est pas sûr de la nature du
matériau caché.
3. Ne pas utiliser l’appareil à proximité de surfaces présentant des ssures ou à proximité
de conduits en métal ou de bandes d’étanchéité. La chaleur peut traverser la surface de
travail et enammer le matériau caché. L’inammation d’un matériau caché n’étant pas
toujours facile à déceler, des blessures ou des dommages matériels peuvent en résulter.
4. Ne pas utiliser d’outils électriques à proximité de liquides ou de gaz inammables.
5. Ne pas utiliser l’appareil à proximité de matériaux combustibles, tels que de l’herbe
ou des feuilles sèches, ou encore, du papier, étant donné que ces derniers peuvent
s’enammer rapidement.
6. La buse devient très chaude. Par conséquent, ne pas déposer le pistolet sur des surfaces
inammables lors de son utilisation ou immédiatement après l’avoir arrêté. Toujours
déposer le pistolet sur une surface plate et de niveau de façon que le bec de la buse soit
dirigé vers le haut et, de par le fait même, éloigné de la surface.
7. Ne pas toucher la buse avant que l’outil ne soit refroidi.
8. Ne pas utiliser le pistolet en tant que séchoir à cheveux.
9. Les outils et les raclures de peinture deviennent très chauds. Pour éviter toute brûlure,
porter des gants de travail lors de l’opération de raclage.
10. Toujours traiter les unités d’air chaud avec la même précaution que s’il s’agissait d’une
amme nue.
Mur
intérieur
Panneaux
Sotes
Re
RISQUES AU NIVEAU DES ÉLÉMENTS ÉLECTRIQUES
Peut causer des dommages matériels, des blessures graves ou même mortelles.
MESURES PRÉVENTIVES :
1. Ne démontez pas le pistolet à air chaud.
2. Ne pas travailler dans un endroit humide ou exposer le pistolet à la pluie.
14
Français
Page 15

Importantes consignes de sécurité • Lire toutes ces consignes
avant d’utiliser l’appareil. Garder ces consignes.
3. Se protéger contre les chocs électriques en évitant tout contact du corps avec des
éléments mise à la terre, telles que des conduits, des radiateurs, des cuisinières, des
échelles en aluminium, ou tout autre dispositif mis à la terre.
4. Ne pas faire un usage abusif du cordon électrique. Ne jamais transporter le pistolet à
l’aide du cordon électrique, ou tirer sur ce dernier pour débrancher l’appareil. Garder le
cordon électrique éloigné des sources de chaleur, des contenants d’huile ou des arêtes
vives. Vérier régulièrement le cordon, an de s’assurer que ce dernier n’est pas usé ou
endommagé.
5. N’utiliser que les rallonges appropriées à un usage extérieur. Si une rallonge est
endommagée ou autrement inadéquate, la remplacer.
6. Le pistolet à air chaud est muni d’une che polarisée. Une pale est plus large que l’autre.
An de réduire le risque de choc électrique, la che a été conçue pour se brancher dans
une prise polarisée d’une seule manière. Si vous ne pouvez insérer la che à fond dans la
prise, inversez-la. Si elle ne s’enfonce toujours pas correctement, consultez un électricien
qualié. Veillez n’apporter aucune modication à la che.
RISQUES D’ORDRE GÉNÉRAL
Peut causer des dommages matériels ou des blessures graves.
MESURES PRÉVENTIVES :
1. Débrancher le pistolet à air chaud lorsque ce dernier n’est pas utilisé. L’entreposer à
l’intérieur dans un endroit sec et hors de la portée des enfants.
2. Maintenir la zone de travail propre et assurer un bon éclairage.
3. Ne pas trop étirer le corps, surtout lorsque l’on travaille sur une échelle. Se maintenir
dans une position stable en tout temps. S’assurer que les échelles sont solides, bien en
équilibre et érigées sur une surface plate et à un angle sécuritaire.
4. Éviter les ls électriques.
5. Garder les articles amovibles stables et en lieu sûr lors de l’opération de décapage.
6. Toujours utiliser des lunettes de protection au cours de l’opération.
7. Toujours être vigilant et faire preuve de jugement lors de l’utilisation de n’importe quel
outil.
Certains fragments, résidus, poussières et vapeurs engendrés par l’enlèvement
de peinture contiennent des produits chimiques que l’état de la Californe
reconnaît comme générateurs d’anomalies congénitales ou de troubles
reproductifs. On peut notamment penser à l’élément principal des peintures
à base de plomb, en présence desquelles on ne doit pas utiliser de décamper
thermique. Les risques varient en fonction de la fréquence et du degré
d’exposition; pour réduire ce dernier, on doit toujours travailler dans un endroit
bien ventilé et être muni d’équipment de sécurité approuvé, comme un masque
antipoussières spécialment conçu pour ltrer les particules microscopiques.
Entretien d’un produit à double isolation
Dans un produit à double isolation, deux ensembles isolants sont fournis au lieu d’une mise à
la terre. Aucun moyen de mise à la terre n’est fourni sur un produit à double isolation, et aucun
moyen de mise à la terre ne doit être ajouté à ce dernier. L’entretien d’un produit à double
isolation demande de grandes précautions ainsi qu’une bonne connaissance du système et ne
devrait être exécuté que par un technicien de service qualié. Les pièces de remplacement pour
un produit à double isolation doivent être identiques à celles que l’on retrouve dans le produit.
15
Français
Page 16

Utilisation du Pistolet à Air Chaud
Plusieurs facteurs peuvent avoir un eet sur les appareils de chauage, tel que le matériel
chaué, la température ambiante, la distance du pistolet au substrat et la technique de
chauage. C’est pour cette raison que Wagner fournit des directives de température pour
certains appareils. Démarrez toujours le pistolet thermique à la plus basse température qui
soit, puis augmentez la température jusqu’à ce que vous ayez atteint la température désirée.
Toujours de garder le pistolet thermique en mouvement et de le tenir à au moins 5 cm (2 po) du
substrat, lorsque vous appliquez de la chaleur.
Utilisation Réglage de temp.
Enlever :
Sécher :
Chauer :
Dégager : Boulons et les écrous rouillés 900º F - 1200º F
Mouler et
plier :
Cirer : Skis et des planches à neige 250° - 450º F
Sceller : Bords d’une corde en nylon 450° - 650º F
Dégivrer : Réfrigérateur 450° - 750º F
Revêtements de sol (avec revers adhésif) 350º - 750º F
Peinture 900º - 1200° F
Peinture 450° - 750º F
Plâtre 450° - 750º F
Tube thermo-rétrecissable (électrique) 350° - 500º F
Emballage thermorétractable (fenêtres, art artisanal) 250º - 550º F
Verrous gelés 350° - 650º F
Conduites d’eau gelées 750º F - 1200º F
Plastiques 250° - 450º F
Plexi-verre et le Formica 250° - 450º F
Toujours lire les consignes de sécurité incluses
dans le présent manuel avant d’utiliser le pistolet
à air chaud.
1. Branchez l’outil dans une prise standard.
2. Mettez le pistolet à air chaud en marche en glissant
l’interrupteur à (2) (le 2 devrait être visible).
Remarque : De la fumée causée par la combustion des huiles
de fabrication peut se manifester au cours du démarrage initial.
Cette fumée devrait disparaître en moins d’une minute.
3. Appuyez sur les boutons de réglage de température jusqu’à ce que l’achage indique
la température souhaitée. Appuyez sur les boutons de réglage du débit d’air pour
augmenter (+) ou diminuer (-) le débit d’air.
IMPORTANT : Si le moteur de ventilateur du pistolet thermique ne se met pas en marche
lorsque la interrupteur est activée, faites immédiatement passer l’interrupteur à OFF.
L’élément chauant sera grillé s’il n’est pas refroidi par le ventilateur.
4. Pendant les périodes de repos ou à la n du projet, glissez l’interrupteur au mode
refroidissement (1), placez le pistolet en position verticale et laissez-le refroidir pendant
au moins 15 minutes. Après 15 minutes, glissez l’interrupteur à ARRÊT (0) si vous avez
terminé, ou glissez l’interrupteur à UTILISATION (2) pour continuer.
16
Français
Page 17

Remarque : Lorsqu’on arrête le pistolet soit momentanément ou pour le ranger, toujours le
placer à la verticale (éviter de le mettre sur le côté). L’outil reste chaud pendant un moment
avant de se refroidir; on doit donc attendre que la buse se soit refroidie avant de le ranger, et
le débrancher, an d’éviter les démarrages accidentels.
IMPORTANT: Toujours protéger la surface vitrée lorsqu’on travaille près des fenêtres.
Au cours du travail, éviter de toucher à la buse du pistolet ou à tout outil métallique
exposé à l’air chaud. Ceux-ci deviennent extrêmement chauds et peuvent entraîner
de graves brûlures. Porter des gants en cuir pour protéger vos mains.
Décapage d’une surface peinte
Le pistolet chaue la surface, ramollissant ainsi la peinture. À ce stade, cette dernière peut être
enlevée. Certaines peintures peuvent se ramollir sans se boursouer, d’autres peuvent adopter
une consistance de caoutchouc, et d’autres encore, exiger plus de chaleur. Lorsque l’on doit
retirer plusieurs couches de peinture, il est préférable de chauer la surface en profondeur,
jusqu’au bois, an d’accélérer le processus de décapage. Ainsi toutes les couches peuvent être
retirées en une seule fois.
Une brosse métallique douce est probablement l’outil idéal pour travailler sur des surfaces
complexes. Les peintures et les nis minéraux, telles les peintures et les porcelaines à base
de ciment, ne se ramollissent pas sous l’eet de la chaleur; un outil à air chaud ne sera donc
d’aucune utilité pour ce type de produits.
La meilleure méthode pour enlever de la peinture
Déplacer le pistolet lentement et d’une façon régulière vers
l’avant en le plaçant de façon qu’il forme un angle avec la
surface et pointer la buse dans la direction du mouvement. Ce
procédé permet de décaper en toute sécurité en dehors du
jet d’air chaud et de conserver le grattoir et la surface décapée
plus froide.
A. Au préalable, l’air chaud chaue la surface.
B. La peinture se ramolli sous l’eet de l’air chaud.
A+B. La chaleur pénètre toute la surface en profondeur.
C. La peinture peut être enlevée aussitôt que celle-ci
s’est ramollie et que le pistolet a été déplacé vers l’avant.
D. La surface ayant été décapée doit refroidir.
ABCD
Remarque : Ne pas utiliser le pistolet sur des surfaces susceptibles de s’endommager par la
chaleur, comme les panneaux, les parements et les cadres de fenêtres recouverts de vinyle.
Si on utilise le pistolet pour enlever la peinture de cadres de fenêtres, la chaleur émise peut
faire ramollir le mastic; s’assurer de ne pas endommager ce dernier avec le grattoir utilisé; le
mastic se raermira une fois refroidi.
Ne pas utiliser le pistolet sur des vitres feuilletées isolantes (comme celles de marque
Thermopane par exemple); les bords risuent de se dilater et de percer le calfeutrage.
Lorsque’on gratte les bordures de toit, s’assurer de ne pas surchauer les bords des
bardeaux d’asphalte qui font sailiie sur le support de couverture; une chaleur excessive peut
faire fondre l’asphalte.
IMPORTANT : Le décapage d’une surface peinte à l’aide d’un pistolet à air chaud est une
opération ne présentant aucun danger, pourvu que les directives présentées ci-dessus
soient respectées. Il est néanmoins recommandé de conserver un contenant d’eau ou un
extincteur ABC à portée de la main.
17
Français
Page 18

IMPORTANT : Lire la section comportant des renseignements généraux sur l’utilisation
Buse concentrateur
Buse évasé
Protecteur verre
Buse réecteur
de l’appareil, ainsi que sur la sécurité, présentés dans le présent manuel de l’utilisateur,
avant toute utilisation du pistolet à air chaud.
Nettoyage et entretien
Garder les ouvertures d’alimentation du boîtier propres et libres de toute obstruction. Utiliser
une brosse douce et sèche pour nettoyer les ouvertures régulièrement. Pour nettoyer le
pistolet, utiliser uniquement un linge humide. Plusieurs nettoyants domestiques contiennent
des produits chimiques qui pourraient endommager sérieusement le boîtier du pistolet.
Nes pas utiliser d’essence, de térébenthine, de vernis-laque, de diluant pour peintures, de
solution à sec (ou tout autre produit semblable) pour nettoyer le pistolet. Ne jamais laisser de
liquide s’inltrer à l’intérieur de l’outil et ne jamais immerger ce dernier, en tout ou en partie
dans quelque liquide que ce soit.
Entreposage
Conserver ce manuel avec le pistolet à air chaud.
Attendre que la buse du pistolet se soit refroidie à la température de la pièce avant de
l’entreposer. Au bout d’un certain temps d’utilisation, la buse devient noire à cause de la
chaleur élevée produite par l’appareil. Ceci est tout à fait normal et ne nuira aucunement à la
performance ou à la durée de vie de l’unité.
Accessoires
Les accessoires suivants peuvent être fourni avec le pistolet à air chaud ou peuvent être
séparément achetés en appelant 1-800-526-5362.
P/N 0503674
IMPORTANT : Toujours porter des gants lorsqu’on manipule le pistolet à air chaud.
L’utilisation des accessoires de bec produira les températures plus chaudes de pistolet qui
peuvent avoir comme conséquence la longévité diminuée du pistolet.
Pour xter un accessoire au pistolet:
1. Placer le pistolet à la verticale sur une surface plane et
attendre que l’extrémité se soit refroidie.
2. Fixer l’accessories sur l’extrémité due pistolet et
l’enfoncer fermement en place.
Pour retirer un accessoire:
1. Placer le pistolet à la verticale sur une surface plane et
attendre que l’extrémité se soit refroidie.
2. Retirer l’accessoire xé sur l’extrémité.
18
P/N 0503675
Français
P/N 0503676
P/N 0503677
Page 19

Enregistrement du produit
Enregistrement du produit en ligne sur le site www.titantool.com.
L’emplacement du code de dateur
19
Français
Page 20

Garantie Limitée — Pistolet à Air Chaud
Ce qui est couvert par la présente garantie :
Ce produit, fabriqué par Titan, est garanti contre tout vice de matières et toute malfaçon
pendant deux (2) ans suivant la date d’achat, lorsqu’il est utilisé conformément aux
recommandations et directives imprimées de Titan.
Pendant la période de la dite garantie, Titan réparera ou remplacera, à son choix, les pièces
défectueuses sans frais si ces dernières sont envoyées, port payé, au centre d’entretien autorisé
le plus près, ou directement chez elle, au 1770 Fernbrook Lane, Minneapolis, MN 55447 (É.-U.).
Si Titan ne peut, après un nombre raisonnable de tentatives, réparer le produit de manière à ce
qu’il soit conforme à la présente garantie limitée, elle devra, à son choix, remplacer le produit
ou en rembourser le prix d’achat. Seuls les recours exclusifs qui précèdent sont oerts en cas de
violation des garanties expresses et implicites.
Ce qui n’est pas couvert par la présente garantie :
1. La présente garantie ne couvre pas les défauts ou dommages entraînés par :
a) l’utilisation ou l’installation de pièces ou d’accessoires de rechange ou de réparation
n’étant pas fabriqués par Titan;
b) les réparations eectuées par qui que ce soit d’autre qu’un centre d’entretien autorisé
par Titan.
2. La présente garantie ne couvre pas l’équipement et les accessoires fournis à Titan par
un fabricant de matériel original (OEM) incluant ,sans toutefois s’y limiter, les tuyaux
exibles, les embouts les accessoires et le outils de mains . Titan fournira à l’acheteur
un exemplaire des garanties expresses oertes par le fabricant, de même que le nom et
l’adresse de ce dernier.
3. La présente garantie ne couvre pas les défauts ou les dommages découlant de l’abrasion,
de la corrosion, de l’usage abusif, de l’emploi incorrect, de négligence, d’accidents,
de l’usure normale, d’une installation fautive ou d’une intervention non autorisée
susceptible de nuire au fonctionnement normal de l’équipement.
Limitation des recours :
Titan NE PEUT EN AUCUN CAS ÊTRE TENUE RESPONSABLE DE TOUT DOMMAGE OU DE
TOUTE PERTE DE NATURE INDIRECTE, SPÉCIALE OU CONSÉCUTIVE, INCLUANT LES FRAIS DE
TRANSPORT, QUE CES PERTES OU DOMMAGES SOIENT FONDÉS SUR UNE VIOLATION DES
GARANTIES EXPRESSES ET IMPLICITES, UNE RUPTURE DE CONTRAT, DE LA NÉGLIGENCE, UN
DÉLIT CIVIL OU TOUTE AUTRE THÉORIE JURIDIQUE.
Stipulation d’exonération de garanties implicites :
LES GARANTIES PRÉCÉDENTES REMPLACENT TOUTE AUTRE GARANTIE, EXPRESSE OU IMPLICITE,
INCLUANT, SANS TOUTEFOIS S’Y LIMITER, LES GARANTIES IMPLICITE DE VENDABILITÉ ET DE
CONVENANCE À UNE DESTINATION PARTICULIÈRE.
Aucune possibilité de transfert :
La présente garantie est oerte à L’acheteur original seulement et n’est pas transférable.
Droits en vertu de lois locales :
Certains états ou provinces ne permettant pas la limitation de la durée de garanties implicites
ou l’exclusion de dommages indirects ou consécutifs, les limitations et exclusions ci-dessus
pourraient ne pas s’appliquer à l’acheteur. Si la présente garantie lui accorde des droits
particuliers, l’acheteur pourrait en disposer d’autres en vertu de lois variant entre provinces et
états.
20
Français
Page 21

Pro V55
Pistola de aire caliente
Manual del propietario
Lea todas las instrucciones y etiquetas que tenga el producto. Cuando use
herramientas eléctricas, siga todas las precauciones para reducir el riesgo de
incendio, electrocución y otras lesiones personales.
¿Necesita ayuda?
Llame Titan Technical Service al:
1-800-526-5362
Regístrelo del producto en línea en:
www.titantool.com
Español
Aislamiento doble
Page 22

Descripción General
1
2
La pistola de aire caliente es una herramienta eléctrica de calidad. Como cualquier herramienta
eléctrica, puede ser peligrosa cuando no se usa correctamente. Lea las instrucciones siguientes
con cuidado y siga todas las advertencias de seguridad. Será responsabilidad del usuario usar la
pistola de aire caliente de manera apropiada.
Especicaciones
Cubierta: ....................................Polímeros resistentes a fuertes impactos, corrosión y altas temperatures
Vatiaje: ..................................................................1500 vatios en el ajuste más alto, 150 vatios en el más bajo
Salidad de calor .....................Aproximadamente 1200 °F en el ajuste más alto y 120 °F en el más bajo
BTU ..........................................................................................Aproximadamente 5100 BTU en el ajuste más alto
Peso: ............................................................................................................................................................... 0,7 kg (1,5 lb)
Usos
• Ablandar pinturas, barnices, masillas de calafateo y mastiques para removerlos más
fácilmente
• Reblandezca los adhesivos para poder quitar losetas de piso
• Doble tubos de plástico
• Reduzca la tubería para trabajos eléctricos
• Contraiga película de plástico para envolver o proteger contra el clima
• Aoje tuercas, pernos y conexiones oxidadas
Control de temperatura
El control de temperatura le otorga una amplia gama de temperaturas entre las que puede
elegir, de acuerdo con el tipo de proyecto. La temperatura se puede ajustar en incrementos de
20 ºF, desde los 120 ºF hasta los 1200 ºF.
a
b
4
3
# Artículo Descripción
1 Interruptor Cambia la pistola de calor
22
2 Pantalla Muestra la salida de calor actual (a)
3 Ajuste de
temperatura
4 Ajuste del
ujo de aire
Español
entre APAGADO (0), Modo de
enfriamiento (1) o Ajuste de uso (2).
y el ujo de aire (b) de la pistola de
calor.
Incrementa o disminuye la salida de
temperatura de la pistola de calor.
Incrementa o disminuye la salida del
ujo de aire de la pistola de calor.
Page 23

Información de seguridad importante • Lea toda la información de
seguridad antes de operar el equipo. Guarde estas instrucciones.
Para reducir los riesgos de incendios, explosiones, descargas eléctricas o lesiones a las
personas, lea y entienda todas las instrucciones incluidas en este manual. Familiarícese
con los controles y el uso adecuado del equipo.
Indica una situación peligrosa que, de no evitarse, puede causar la muerte o
lesiones graves.
PELIGRO DE ENVENENAMIENTO
Se debe tener un cuidado extremo cuando se esté raspando pintura. Las escamas,
residuos y vapores de pintura pueden contener plomo, el cual es venenoso.
Cualquier pintura que se haya aplicado en las casas antes de 1950 es probable
que contenga plomo. Cualquier pintura fabricada antes de 1977 es probable que
contenga plomo. Una vez que la pintura se ha depositado sobre la supercie,
cualquier contacto que haya de la mano a la boca puede traer como resultado la
ingestión de plomo. El estar expuesto a incluso niveles bajos de plomo puede
causar daños irreversibles en el cerebro y el sistema nervioso. Los niños pequeños
y los fetos son particularmente vulnerables al envenenamiento por plomo.
Antes de iniciar cualquier proceso para quitar pintura debe determinar si la pintura
que va a quitar contiene plomo. Esto puede hacerlo el departamento de salud
de su localidad o un profesional que utilice un analizador de pintura para vericar
el contenido de plomo de la pintura que se va a quitar. LA PINTURA A BASE DE
PLOMO LA DEBE QUITAR SOLAMENTE UN PROFESIONAL Y NO DEBE QUITARSE
USANDO UNA PISTOLA DE AIRE CALIENTE.
PARA PREVENIR:
1. Saque la pieza de trabajo al exterior. Si esto no es posible, mantenga entonces el área
de trabajo bien ventilada. Abra las ventanas y ponga un ventilador aspirante en una de
ellas. Asegúrese de que el ventilador transporte el aire del interior hacia el exterior.
2. Saque o cubra todas las alfombras, tapetes, muebles, prendas de ropa, utensilios para
cocinar y conductos de aire.
3. Ponga unas mantas protectoras en el área de trabajo para que se recoja cualquier pizca
o escama de pintura. Póngase ropa protectora como son las camisas, overoles y cascos
para trabajos extraordinarios.
4. Trabaje en un sólo cuarto a la vez. Los muebles se deben sacar o poner en el centro del
cuarto y cubrirse. Las áreas de trabajo deben cerrarse herméticamente, para aislarlas del
resto del inmueble, sellando los arcos de las puertas con mantas protectoras.
5. Los niños, las mujeres que estén embarazadas o que potencialmente puedan estarlo y las
mamás que estén amamantando no deberán presentarse en el área de trabajo hasta que
el trabajo esté terminado y se haya completado la limpieza.
6. Póngase una mascarilla respiradora de polvos de tipo mascarilla respiradora de polvos y
vapores de doble ltro que esté aprobada por la Administración de la Seguridad y Salud
Ocupacionales (OSHA por sus siglas en inglés), el Instituto Nacional de la Seguridad y
Salud (NIOSH por sus siglas en inglés) o la Ocina de Minas de los Estados Unidos. Estas
mascarillas y ltros reemplazables se pueden conseguir fácilmente en las ferreterías
principales. Asegúrese de que la mascarilla quede ajustada debidamente. Las barbas y
demás pelo facial podrían evitar que las mascarillas sellaran apropiadamente. Cambie
los ltros frecuentemente. Las mascarillas de papel desechables no son adecuadas.
7. Sea precavido cuando tenga funcionando la pistola de aire caliente. Mantenga la pistola
de aire caliente en movimiento ya que el calor excesivo generará vapores que el operario
podría inhalar.
8. Mantenga los alimentos y bebidas fuera del área de trabajo. Lávese las manos, los brazos
y la cara y enjuáguese la boca antes de comer o beber algo. No fume ni mastique chicle
ni tabaco cuando esté en el área de trabajo.
9. Limpie y recoja toda la pintura que se raspó y el polvo trapeando los pisos. Use un trapo
mojado para limpiar todas las paredes, bases de ventanas y cualquier otra supercie
23
Español
Page 24

Información de seguridad importante • Lea toda la información de
estimiento
seguridad antes de operar el equipo. Guarde estas instrucciones.
en donde haya polvo de pintura adherido. NO BARRA, NI LIMPIE EL POLVO EN SECO O
USANDO UNA ASPIRADORA. Use un detergente de fosfato trisódico (TSP por sus siglas
en inglés) con alto contenido de fosfato, para lavar y trapear las áreas.
10. Al nal de cada sesión de trabajo, ponga las pizcas y residuos de pintura en una bolsa
doble de plástico, ciérrela con una cinta o ataduras de retorsión y elimínela en forma
apropiada.
11. Quítese la ropa protectora y los zapatos de trabajo en el área de trabajo para evitar
meter el polvo al resto del edicio. Lave las prendas de ropa de trabajo por separado.
Limpie los zapatos frotándolos con un trapo mojado y lave después el trapo junto con
las prendas de ropa de trabajo. Lávese perfectamente el cabello y el cuerpo con agua y
jabón.
PELIGRO DE EXPLOSIÓN O INCENDIO
Esta pistola de aire caliente produce temperaturas extremadamente altas (tan altas
como 1200º F [650° C]). Se debe usar con precaución para prevenir que el material
combustible se encienda.
PARA PREVENIR:
1. Mantenga la pistola con un movimiento constante. No se pare o detenga en un solo sitio.
2. Sea extremadamente precavido si el otro
lado del material que se está raspando
está inaccesible, como es la fachada de la
casa. El lado oculto podría incendiarse si se
pone demasiado caliente. Algunos edicios
contienen materiales altamente inamables
por detrás de la fachada, pisos, imposta,
paneles del techo y otros. Revise estas
áreas antes de aplicarles calor y no use una
herramienta de aire caliente si hay materiales
inamables o si desconoce el material oculto.
3. No la use cerca de supercies con grietas ni cerca de tubería de metal o donde haya
destellos. El calor podría transmitirse por detrás de la supercie de trabajo y encender el
material oculto. La combustión de los materiales ocultos podría no notarse rápidamente,
lo que puede traer como consecuencia daños en la propiedad y lesiones.
4. No use herramientas eléctricas cuando haya líquidos o gases inamables.
5. No la use cerca de materiales combustibles, como son el pasto y hojas secas y el papel,
que pueden chamuscarse e incendiarse.
6. La boquilla se pone muy caliente. No recueste la pistola de aire caliente sobre supercies
inamables cuando la tenga funcionando ni inmediatamente después de haberla
apagado. Fije siempre la pistola sobre una supercie nivelada y plana de modo que la
punta de la boquilla quede apuntando hacia arriba y alejada de la supercie de apoyo.
7. No toque la boquilla hasta que la herramienta se haya enfriado.
8. No use la pistola de aire caliente como secadora de pelo.
9. Las herramientas y la raspadura de pintura se ponen muy calientes. Para evitar las
quemaduras, use guantes de trabajo cuando raspe.
10. Trate siempre a las unidades de aire caliente con el mismo respeto con el que trataría a
las llamas abiertas.
Pared
interna
Bandas
Techo rasos
Rev
PELIGRO ELÉCTRICO
Podría causar daños en la propiedad, lesiones severas o la pérdida de la vida.
PARA PREVENIR:
1. No desensamble la pistola de aire caliente.
2. No trabaje en áreas mojadas ni exponga la pistola de aire caliente a la lluvia.
24
Español
Page 25

Información de seguridad importante • Lea toda la información de
seguridad antes de operar el equipo. Guarde estas instrucciones.
3. Protéjase contra choques eléctricos previniendo el contacto corporal con las supercies
conectadas a tierra como son las tuberías, radiadores, estufas, escaleras de aluminio y
demás dispositivos conectados a tierra.
4. No abuse del cordón eléctrico. No transporte nunca la pistola de aire caliente tomándola
del cordón ni jale el cordón para desconectarla de la fuente de energía. Mantenga el
cordón eléctrico lejos del calor, lubricantes y bordes losos. Inspeccione el cordón
regularmente para ver que no esté desgastado ni dañado.
5. Use solamente cordones de extensión especicados para uso en exteriores. Si una
extensión se daña o de algún modo resulta inapropiada para usarse, reemplácela con
una nueva.
6. Esta pistola de aire caliente cuenta con un enchufe polarizado. Una de sus paletas
es más ancha que la otra. Para reducir el riesgo de descarga eléctrica, este enchufe
está diseñado para adaptarse al tomacorriente polarizado de sólo una manera. Si el
enchufe no encaja completamente en el tomacorriente, inviértalo. Si aún así no encaja,
comuníquese con un electricista calicado. No modique el enchufe de ninguna
manera.
PELIGROS GENERALES
Podría causar daños en la propiedad o lesiones severas.
PARA PREVENIR:
1. Desconecte la pistola de aire caliente de la fuente de energía si no la está usando.
Guárdela en el interior, en un lugar seco y fuera del alcance de los niños.
2. Mantenga el área donde trabaje bien iluminada y limpia.
3. No se estire, en especial cuando esté trabajando subido en una escalera. Mantenga una
pisada y equilibrio apropiados en todo momento. Cerciórese de que cualquier escalera
que se esté usando esté rme, estable, sobre una supercie sólida y parada a un ángulo
de trabajo seguro.
4. Evite las líneas de energía.
5. Mantenga los artículos que puedan moverse asegurados y rmes mientras esté
raspando.
6. Use siempre unas gafas protectoras cuando esté trabajando.
7. Permanezca alerta y use su sentido común cuando tenga funcionando cualquier
herramienta.
El polvo, el descascarillado, los residuos y los vapores creados al quitar la
pintura contienen químicos que el estado de California ha determinado causan
defectos congénitos u otros daños al sistema reproductor. Un ejemplo de esos
químicos es el plomo de las pinturas a base de plomo (no use la pistola de aire
caliente para quitar pintura a base de plomo). El riesgo de exposición varía,
dependiendo de la frecuencia con que realiza este tipo de trabajo. Para reducir
la exposición a esos químicos: trabaje en áreas bien ventiladas y trabaje con
equipo de seguridad aprobado, por ejemplo, mascarillas antipolvo diseñadas
especialmente para ltrar partículas microscópicas.
Mantenimiento de un producto con doble aislamiento
En un producto con doble aislamiento se cuenta con dos sistemas de aislamiento en lugar de
una conexión a tierra. En un producto con doble aislamiento no se ha instalado una conexión a
tierra y no se le debe agregar conexión a tierra. En el mantenimiento de un producto con doble
aislamiento se debe tener especial cuidado y conocimiento del sistema, y lo debe realizar un
técnico de servicio capacitado. Las piezas que se usen de repuesto para el producto con doble
aislamiento deben ser idénticas a las que el producto tenía originalmente.
25
Español
Page 26

Para usar la pistola de aire caliente
Los trabajos de aplicación de calor pueden verse afectados por algunos factores, como por
ejemplo, el material que se está calentando, la temperatura ambiente, la distancia comprendida
entre la pistola y el substrato y la técnica de calentamiento. Por este motivo, Wagner ofrece
pautas de temperaturas para determinadas aplicaciones. Siempre encienda la pistola de aire
caliente con la temperatura más baja de la gama y luego aumente la temperatura hasta alcanzar
la temperatura máxima. Mantenga siempre la pistola de aire caliente en movimiento constante
y al menos a 2 pulgadas de distancia del substrato cuando se aplica aire caliente.
Usos Temp. Ajuste
Remoción de:
Secado de:
Calentamiento de:
Aojar: Tuercas y pernos oxidados 900º F - 1200º F
Moldear y doblar:
Encerado: Esquíes y tablas para snowboard 250° - 450º F
Sellado: Puntas de sogas de nylon 450° - 650º F
Descongelamiento: Refrigeradores 450° - 750º F
Revestimientos para pisos (con reverso adhesivo) 350º - 750º F
Pintura 900º - 1200° F
Pintura 450° - 750º F
Yeso 450° - 750º F
Tubo termorretráctil (electricidad) 350° - 500º F
Envoltura plástica (ventanas, manualidades) 250º - 550º F
Cerraduras congeladas 350° - 650º F
Tuberías de agua congeladas 750º F - 1200º F
Plástico 250° - 450º F
Plexiglás y Formica 250° - 450º F
Lea siempre la información de seguridad que se
incluye en este manual antes de utilizar la pistola
de aire caliente.
1. Enchufe la unidad en cualquier tomacorriente de pared estándar.
2. Para encender la pistola de calor, deslice el interruptor hacia
la posición (2) (el número 2 debería ser visible).
Nota: Es posible que observe humo al usar la pistola por primera
vez debido al calentamiento de los aceites usados durante la
fabricación. El humo debería desaparecer en menos de un minuto.
3. Presione los botones de ajuste de temperatura hasta que la pantalla muestre la
temperatura deseada. Presione los botones de ajuste del ujo de aire para incrementar
(+) o disminuir (-) el ujo de aire.
IMPORTANTE: Si el motor soplador de la pistola de aire caliente no se enciende cuando
se activa el interruptor, coloque inmediatamente el interruptor en la posición OFF
(Apagado). El componente de calefacción se quemará si el soplador no lo enfría.
4. Durante los períodos de descanso o cuando haya terminado su proyecto, deslice el
interruptor hacia la posición Modo de enfriamiento (1), coloque la pistola en posición
vertical y déjela enfriar por un mínimo de 15 minutos. Después de 15 minutos, mueva
el interruptor a la posición APAGADO (0) si es que ha terminado o deslícelo a la posición
Ajuste de uso (2) para continuar.
26
Español
Page 27

Nota: Enderece la pistola térmica cada vez que la apague, ya sea por un corto período
o para almacenarla. Evite acostarla después de haberla apagado ya que la unidad
permanecerá caliente y tardará más enfriarse. Almacene la unidad sólo después de que se
haya enfriado la tobera y desenchúfela antes de almacenarla para evitar que se encienda
accidentalmente.
IMPORTANTE: Proteja siempre los vidrios cuando trabaje cerca de las ventanas.
No toque la boquilla de la pistola o cualquier herramienta metálica
que se exponga al aire caliente cuando use la pistola. Estas se ponen
extremadamente calientes y ocasionarán quemaduras severas. Use guantes
de cuero para proteger sus manos.
Para raspar pintura
La pistola de aire caliente calienta la supercie y hace que la pintura se reblandezca, en
cuyo momento fácilmente se le puede quitar raspando. Algunas de estas pinturas pueden
reblandecerse aunque no se formen ampollas en ellas; algunas otras pueden volverse elásticas y
otras más podrían requerir un calor más elevado.
Cuando se trabaja con varias capas de pintura, el proceso de raspado se acelerará calentando
la supercie completamente, hasta llegar a la madera. En seguida, todas las capas se pueden
raspar a la vez.
La mejor herramienta que puede usarse en las supercies intrincadas es un cepillo de alambre
suave. Las pinturas y acabados minerales, como son la pintura de cemento y la porcelana, no se
reblandecen con el calor, de manera que el usar una herramienta de calentamiento no servirá
para quitar la pintura.
El mejor método para quitar la pintura
Mueva la pistola lentamente y con rmeza hacia adelante, en
ángulo recto con la supercie, dirigiendo la punta de la boquilla
en la dirección del movimiento. Esto le permite raspar con
seguridad, fuera de la corriente de aire caliente, además de que
mantiene tanto al raspador como a la supercie raspada más
fríos.
A. El aire caliente calienta previamente la supercie.
B. La pintura se reblandece por medio de aire caliente.
A+B. Una penetración profunda del calor sobre toda el
área.
C. La pintura se puede quitar raspando fácilmente tan pronto como se reblandezca y la
pistola se mueva hacia adelante.
D. La supercie raspada se deja enfriar.
ABCD
Nota: No utilice la pistola térmica sobre supercies que se puedan dañar con el calor, como
paneles revestidos con vinilo, chapas de paredes y marcos de ventanas.
Cuando se elimina la pintura de los marcos de ventanas, la masilla se reblandece. Trate de
no arrancar la masilla con el raspador, ésta se volverá a endurecer cuando se haya enfriado.
No utilice la pistola térmica sobre láminas de vidrio aislante, como el Thermopane. La
expansión de los cantos del vidrio podría romper el sello de éstos.
Cuando raspe impostas, no sobrecaliente los bordes de los tejamaniles de asfalto que
sobresalgan por encima del revestimiento exterior. Demasiado calor derretirá el asfalto.
IMPORTANTE: Quitar la pintura con una pistola de aire caliente será un proceso seguro si
se siguen las directrices anteriores, pero mantenga siempre tanto un recipiente con agua
como un extintor de incendios de clasicación ABC al alcance.
27
Español
Page 28

IMPORTANTE: Lea las secciones de operación general y de información de seguridad de
Boquilla
concentrador
Boquilla
Protector de
Boquilla
este manual del propietario antes de usar la pistola de aire caliente.
Limpieza y mantenimiento
Mantenga la toma de aire de la cubierta limpia y libre de obstrucciones. Use un cepillo suave
y seco para limpiar regularmente las tomas. Use solamente un trapo húmedo para limpiar
la pistola de aire caliente. Muchos detergentes domésticos tienen sustancias químicas que
podrían causar serios daños a la cubierta.
No utilice gasolina, trementina, lacas o disolventes de pintura, sustancias químicas para la
limpieza de ropa o productos similares para limpiar la pistola térmica. Jamás permita que
penetren líquidos en la herramienta ni sumerja parte alguna de esta en algún líquido.
Almacenamiento
Mantenga este manual junto a la pistola de aire caliente.
Deje que la boquilla de la pistola de aire se enfríe a la temperatura ambiente antes de dejarla
almacenada.
La boquilla se obscurecerá con el tiempo a causa del elevado calor. Esto es normal y no afectará
el funcionamiento ni la duración de la unidad.
Accesorios
Los accesorios siguientes pueden venir con el pistola de aire caliente o pueden ser comprados
separadamente llamando al 1-800-526-5362.
La pistola térmica puede incluir una o más de las siguientes piezas opcionales.
P/N 0503674
a
IMPORTANTE: Use siempre guantes cuando utilice la pistola térmica. El uso de accesorios
de boquilla producirá temperaturas del arma más calientes que pueden resultar en
disminución de la durabilidad de la arma.
Para colocar una pieza opcional en la pistola:
1. Enderece la pistola y colóquela sobre una supercie
horizontal hasta que se enfríe la punta.
2. Coloque la pieza en la punta de la pistola y empújela
rmemente con la mano hasta que calce en posición.
Para retirar una pieza opcional:
1. Enderece la pistola y colóquela sobre una supercie
horizontal hasta que se enfríe la punta.
2. Tire de la pieza para retirarla.
abocinada
P/N 0503675
vidrio
P/N 0503676
reector
P/N 0503677
28
Español
Page 29

Registro del producto
Regístrelo del producto en línea en www.titantool.com.
Ubicación código de la fecha
29
Español
Page 30

Garantía Limitada — Pistola de aire caliente
Lo que está cubierto por esta garantía:
Este producto, fabricado por Titan, está garantizado por dos (2) años a partir de la fecha de
compra, contra los defectos de material y mano de obra que haya cuando se utilice de acuerdo
con las recomendaciones e instrucciones impresas de Titan.
Dentro del período de garantía con validez, Titan reparará o reemplazará, a opción nuestra y
sin cargo, las piezas defectuosas si dichas piezas se devuelven, con el costo de transportación
pagado de antemano, al Centro de Servicio Autorizado más cercano o a Titan Corporation, 1770
Fernbrook Lane, Minneapolis, MN 55447. Si Titan es incapaz de reparar este producto conforme
se establece en esta Garantía Limitada después de un número razonable de intentos, Titan
proporcionará, a opción nuestra, ya sea un repuesto de este producto o bien el reembolso total
del precio de compra de este producto. Estos remedios son los únicos y exclusivos remedios de
que se dispone cuando se violen las garantías expresas o implícitas.
Lo que no está cubierto por esta garantía:
1. Esta garantía no cubre ningún defecto o daño que haya surgido a causa de:
a) usar o instalar piezas de reparación o reemplazo o accesorios que no haya fabricado
Titan, o
b) una reparación realizada por alguien que no pertenezca al Centro de Servicio
Autorizado de Titan.
2. La garantía no cubre el equipo ni los accesorios que se le hayan suministrado a Titan a
través de un fabricante de equipo original, que incluyen sin quedar limitados a ser sólo
estos: mangueras, boquillas, accesorios o herramientas manuales. Titan le proporcionará
al comprador copias de las garantías expresas del fabricante del equipo que se le hayan
proporcionado, junto con el nombre y dirección del fabricante apropiado.
3. Esta garantía no cubre los daños ni defectos que hayan sido causados por la abrasión,
corrosión, abuso, uso erróneo, negligencia, accidentes, desgaste normal, una instalación
defectuosa o una alteración por la que se impida el funcionamiento normal, o que
tengan relación con éstos.
Limitación de remedios:
Titan NO SE HARÁ RESPONSABLE EN NINGÚN CASO DE LA PÉRDIDA NI DE NINGÚN DAÑO,
INCIDENTAL, ESPECIAL O DE CONSECUENCIA, INCLUYENDO LOS COSTOS DE TRANSPORTACIÓN,
SI LOS DAÑOS SE ORIGINAN POR VIOLAR LAS GARANTÍAS EXPRESAS O IMPLÍCITAS, VIOLAR EL
CONTRATO, NEGLIGENCIA, ESTRICTO PERJUICIO O CUALQUIER OTRA TEORÍA LEGAL.
Renuncia de garantías implícitas:
LAS GARANTÍAS ANTERIORMENTE MENCIONADAS SON EN LUGAR DE TODAS LAS DEMÁS
GARANTÍAS, EXPRESAS O IMPLÍCITAS, QUE INCLUYEN SIN QUEDAR LIMITADAS A SER SÓLO LAS
GARANTÍAS IMPLÍCITAS DE COMERCIABILIDAD E IDONEIDAD PARA UN PROPÓSITO PARTICULAR.
Sin posibilidad de ser transferida:
Esta garantía se le extiende al comprador original solamente y no es transferible.
Sus derechos bajo la ley estatal:
Algunos estados no permiten limitaciones en cuanto a la duración de una garantía implícita o
la exclusión de daños incidentales o de consecuencia, de manera que la limitación y exclusión
anteriores podrían no ser válidas para usted. Esta garantía le concede derechos legales
especícos, pero podría tener derecho a otros, los que varían de estado a estado.
30
Español
Page 31

Notes / Remarques / Notas
31
Page 32

Titan Tool
1770 Fernbrook Lane
Plymouth, MN 55447
Tel: 1-800-526-5362
32
Copyright © Titan Tool. All rights reserved, including right of
reproduction in whole or in part, in any form.
© Droits d’auteur Titan Tool. Tous droits réservés, y compris le droit de
reproduction, en entier ou en partie, sous quelque forme que ce soit.
Copyright © Titan Tool. Reservados todos los derechos, incluyendo el
derecho de reproducción de cualquier clase, ya sea total o parcial.
 Loading...