

Page 1
Owner’s Manual
Notice d’utilisation
Manual del Propietario
Do not use this equipment before
reading this manual!
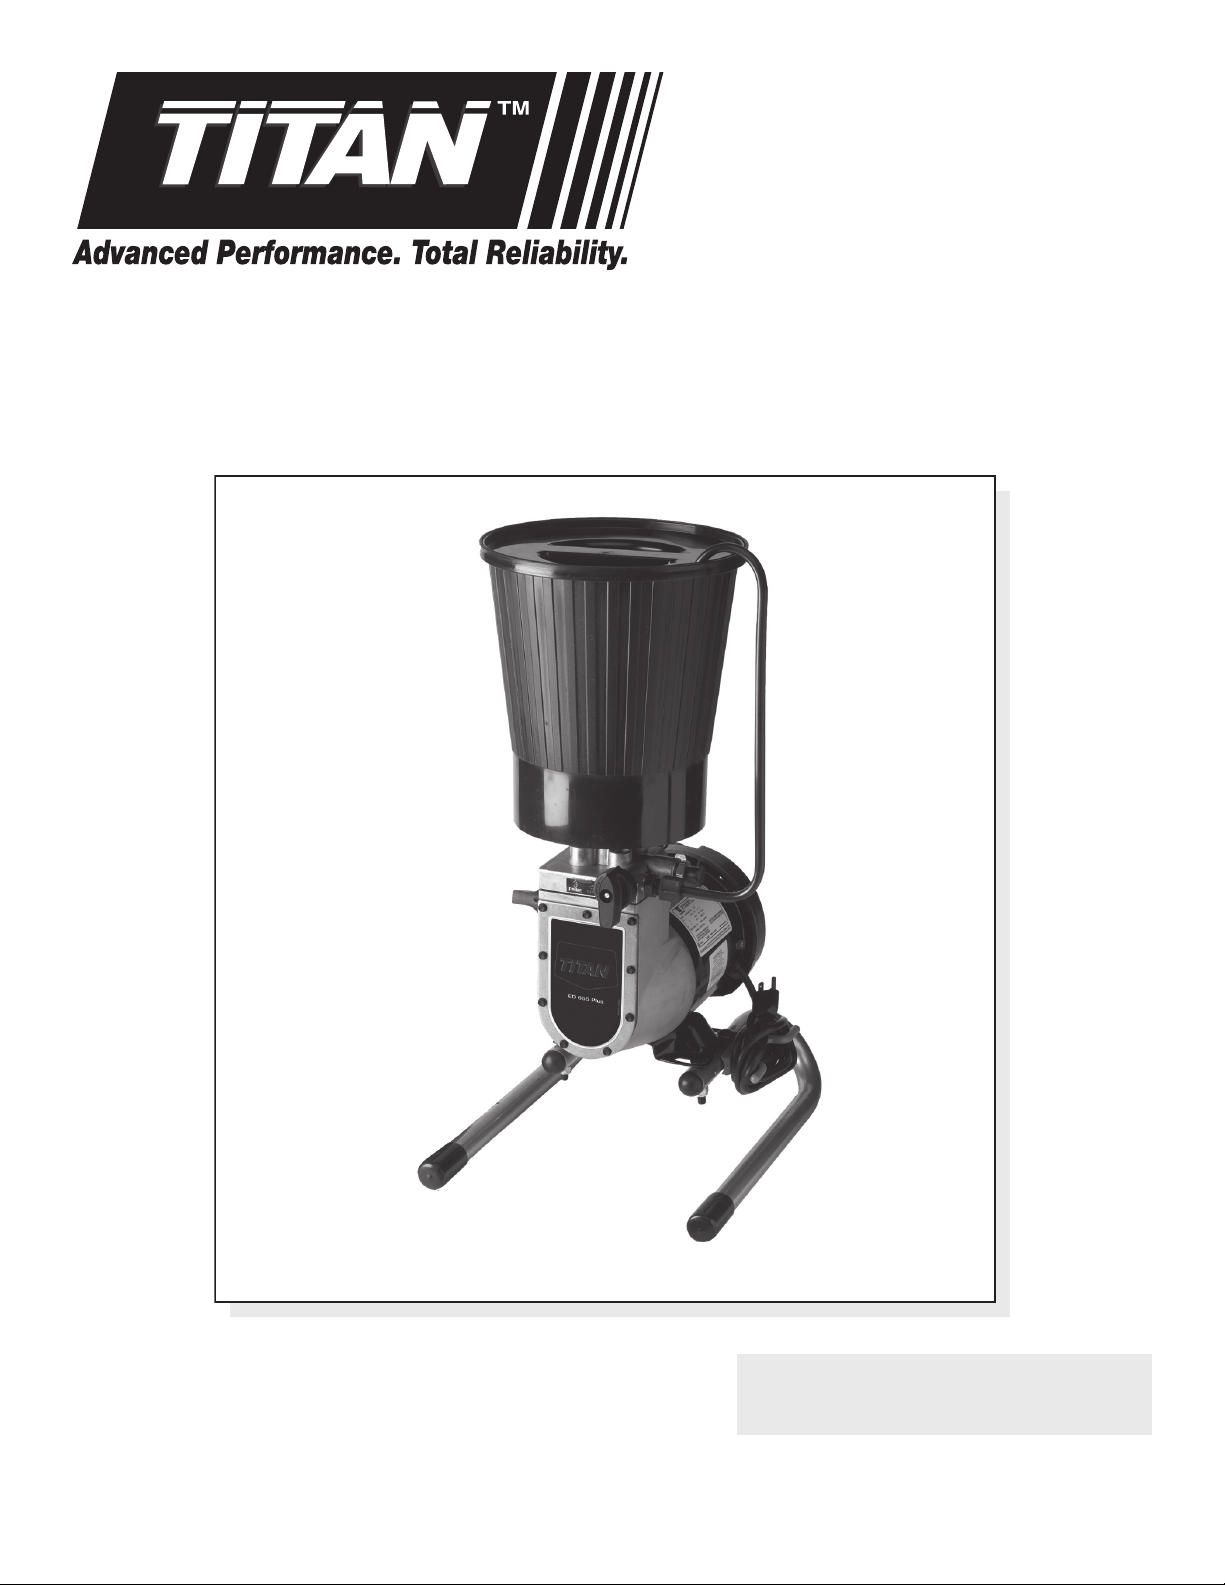
ED655
Airless Diaphragm Pump
Model
0508090
Register your product online at:
www.titantool.com
Serial Number* _ _ _ _ _ _ _ _ _ _
* See page 33 for location
NOTE: This manual contains important
warnings and instructions. Please read
and retain for reference.
1016 • © Titan Tool Inc. All Rights Reserved. Form No. 0528937H
Page 2
Important Safety Information
Grounded Outlet
Grounding Pin
Cover for grounded outlet box
Read all safety information before operating the
equipment. Save these instructions.
Indicates a hazardous situation which, if not avoided,
could result in death or serious injury.
To reduce the risks of re or explosion, electrical shock
and the injury to persons, read and understand all
instructions included in this manual. Be familiar with the
controls and proper usage of the equipment.
Grounding Instructions
This product must be grounded. In the event of an electrical short
circuit, grounding reduces the risk of electric shock by providing an
escape wire for the electric current. This product is equipped with a
cord having a grounding wire with an appropriate grounding plug.
The plug must be plugged into an outlet that is properly installed and
grounded in accordance with all local codes and ordinances.
WARNING - Improper installation of the grounding plug
can result in a risk of electric shock.
If repair or replacement of the cord or plug is necessary, do not
connect the green grounding wire to either at blade terminal. The
wire with insulation having a green outer surface with or without
yellow stripes is the grounding wire and must be connected to the
grounding pin.
Check with a qualied electrician or serviceman if the grounding
instructions are not completely understood, or if you are in doubt as
to whether the product is properly grounded. Do not modify the plug
provided. If the plug will not t the outlet, have the proper outlet
installed by a qualied electrician.
This product is for use on a nominal 120 volt circuit and has a
grounding plug that looks like the plug illustrated below. Make
sure that the product is connected to an outlet having the same
conguration as the plug. No adapter should be used with this
product.
sparks. Use only conductive or grounded high-pressure airless
paint sprayer hoses specied by the manufacturer.
• Verify that all containers and collection systems are grounded
to prevent static discharge.
• Connect to a grounded outlet and use grounded extension
cords (electric models only). Do not use a 3 to 2 adapter.
• Do not use a paint or solvent containing halogenated
hydrocarbons. Such as chlorine, bleach mildewcide,
methylene chloride and trichloroethane. They are not
compatible with aluminum. Contact the coating supplier
about compatibility of material with aluminum.
• Keep spray area well ventilated. Keep a good supply of fresh
air moving through the area to keep the air within the spray
area free from accumulation of ammable vapors. Keep
pump assembly in well ventilated area. Do not spray pump
assembly.
• Do not smoke in the spray area.
• Do not operate light switches, engines, or similar spark
producing products in the spray area.
• Keep area clean and free of paint or solvent containers, rags,
and other ammable materials.
• Know the contents of the paint and solvents being sprayed.
Read all Material Safety Data Sheets (MSDS) and container
labels provided with the paints and solvents. Follow the paint
and solvent manufacture’s safety instructions.
• Place pump at least 25 feet (7.62 meters) from the spray
object in a well ventilated area (add more hose if necessary).
Flammable vapors are often heavier than air. Floor area must
be extremely well ventilated. The pump contains arcing parts
that emit sparks and can ignite vapors.
• Plastic can cause static sparks. Never hang plastic to enclose
spray area. Do not use plastic drop cloths when spraying
ammable material.
• Fire extinguisher equipment shall be present and working.
WARNING: EXPLOSION OR FIRE
Solvent and paint fumes can explode or ignite. Property
damage and/or severe injury can occur.
PREVENTION:
• Do not spray ammable or combustible materials near an
open ame, pilot lights or sources of ignition such as hot
objects, cigarettes, motors, electrical equipment and electrical
appliances. Avoid creating sparks from connecting and
disconnecting power cords.
• Do not spray materials with a ashpoint below 100ºF (38ºC).
Flashpoint is the temperature that a uid can produce enough
vapors to ignite.
• Paint or solvent owing through the equipment is able to
result in static electricity. Static electricity creates a risk of re
or explosion in the presence of paint or solvent fumes. All
parts of the spray system, including the pump, hose assembly,
spray gun and objects in and around the spray area shall be
properly grounded to protect against static discharge and
2 © Titan Tool. All rights reserved.
WARNING: INJECTION INJURY
A high pressure paint stream produced by this equipment
can pierce the skin and underlying tissues, leading to
serious injury and possible amputation. See a physician
immediately.
PREVENTION:
• Do not aim the gun at, or spray any person or animal.
• Keep hands and other body parts away from the discharge.
For example, do not try to stop leaks with any part of the
body.
• NEVER put your hand in front of the gun. Gloves will not
provide protection against an injection injury.
• ALWAYS keep the tip guard in place while spraying. The tip
guard provides some protection but is mainly a warning
device.
• Only use a nozzle tip specied by the manufacturer.
• Use caution when cleaning and changing nozzle tips. In the
case where the nozzle tip clogs while spraying, ALWAYS lock
gun trigger, shut pump o, and release all pressure before
servicing, cleaning tip or guard, or changing tip. Pressure
will not be released by turning o the motor. The PRIME/
SPRAY valve or pressure bleed valve must be turned to their
appropriate positions to relieve system pressure. Refer to
PRESSURE RELIEF PROCEDURE described in the pump manual.
• Do not leave the unit energized or under pressure while
unattended. When the unit is not in use, turn o the unit and
relieve the pressure in accordance with the manufacturer’s
instructions.
English
Page 3
Important Safety Information
• High-pressure spray is able to inject toxins into the body and
cause serious bodily injury. In the event that injection occurs,
seek medical attention immediately.
• Check hoses and parts for signs of damage, a leak can inject
material into the skin. Inspect hose before each use. Replace
any damaged hoses or parts. Only use TITAN original-high-
pressure hoses in order to ensure functionality, safety and
durability.
• This system is capable of producing 2800 PSI / 193 Bar. Only
use replacement parts or accessories that are specied by the
manufacturer and that are rated a minimum of 2800 PSI. This
includes spray tips, nozzle guards, guns, extensions, ttings,
and hose.
• Always engage the trigger lock when not spraying. Verify the
trigger lock is functioning properly.
• Verify that all connections are secure before operating the
unit.
• Know how to stop the unit and bleed pressure quickly. Be
thoroughly familiar with the controls. Pressure will not be
released by turning o the motor. The PRIME/SPRAY valve
or pressure bleed valve must be turned to their appropriate
positions to relieve system pressure. Refer to PRESSURE
RELIEF PROCEDURE described in the pump manual.
• Always remove the spray tip before ushing or cleaning the
system.
NOTE TO PHYSICIAN:
Injection into the skin is a traumatic injury which can lead
to possible amputation. It is important to treat the injury as
soon as possible. DO NOT delay treatment to research toxicity.
Toxicity is a concern with some coatings injected directly
into the blood stream. Consultation with a plastic surgeon or
reconstructive hand surgeon may be advisable.
• Do not expose the hose to temperatures or pressures in excess
of those specied by manufacturer.
• Do not use the hose as a strength member to pull or lift the
equipment.
• Use lowest possible pressure to ush equipment.
• Follow all appropriate local, state and national codes
governing ventilation, re prevention and operation.
• The United States Government Safety Standards have been
adopted under the Occupational Safety and Health Act
(OSHA). These standards, particularly part 1910 of the General
Standards and part 1926 of the Construction Standards should
be consulted.
• Before each use, check all hoses for cuts, leaks, abrasion
or bulging of cover. Check for damage or movement
of couplings. Immediately replace hose if any of those
conditions exist. Never repair a paint hose. Replace with a
conductive high-pressure hose.
• Do not spray outdoors on windy days.
• Always unplug cord from outlet before working on equipment
(electric models only).
IMPORTANT: The diaphragm pump is provided with a thermally
protected automatic reset. If an overload occurs the thermally
protected automatic reset disconnects the motor from the power
supply.
• The motor will restart without warning when the protector
automatically resets.
• Always disconnect the motor from the power supply before
working on the equipment.
• When the thermally protected automatic reset disconnects
the motor from the power supply, relieve pressure by turning
the PRIME/SPRAY valve to PRIME.
• Turn the pump ON/OFF switch to OFF.
WARNING: HAZARDOUS VAPORS
Paints, solvents, insecticides, and other materials can
be harmful if inhaled or come in contact with the body.
Vapors can cause severe nausea, fainting, or poisoning.
PREVENTION:
• Use a respirator or mask if vapors can be inhaled. Read all
instructions supplied with the mask to be sure it will provide
the necessary protection.
• Wear protective eyewear.
• Wear protective clothing as required by coating manufacturer.
WARNING: GENERAL
Can cause severe injury or property damage.
PREVENTION:
• Always wear appropriate gloves, eye protection, clothing and
a respirator or mask when painting.
• Do not operate or spray near children. Keep children away
from equipment at all times.
• Do not overreach or stand on an unstable support. Keep
eective footing and balance at all times.
• Stay alert and watch what you are doing.
• Do not operate the unit when fatigued or under the inuence
of drugs or alcohol.
• Do not kink or over-bend the hose. Airless hose can develop
leaks from wear, kinking and abuse. A leak can inject material
into the skin.
© Titan Tool. All rights reserved. 3
NOTE: The cause of the overload should be corrected
before restarting. Refer to the Troubleshooting
section.
NOTE: Make sure to check for grounding continuity after
service is performed on any electrical components.
Use an ohmmeter to determine that there is
continuity between accessible dead-metal parts
of the product and the grounding blade of the
attachment plug.
Specications
Weight .....................................................27 lbs
Capacity ..................................................Up to .35 gallon (1.25 liters) per
minute
Power source ........................................Electric motor, totally enclosed, fan
cooled
Power requirement.............................15 amp minimum circuit on 115
VAC, 60 Hz current.
Generator ...............................................5000 Watts
Spraying pressure ...............................Up to 2800 PSI
Capabilities ............................................Sprays a variety of oil-based and
latex paints, primers, and stains
English
Page 4
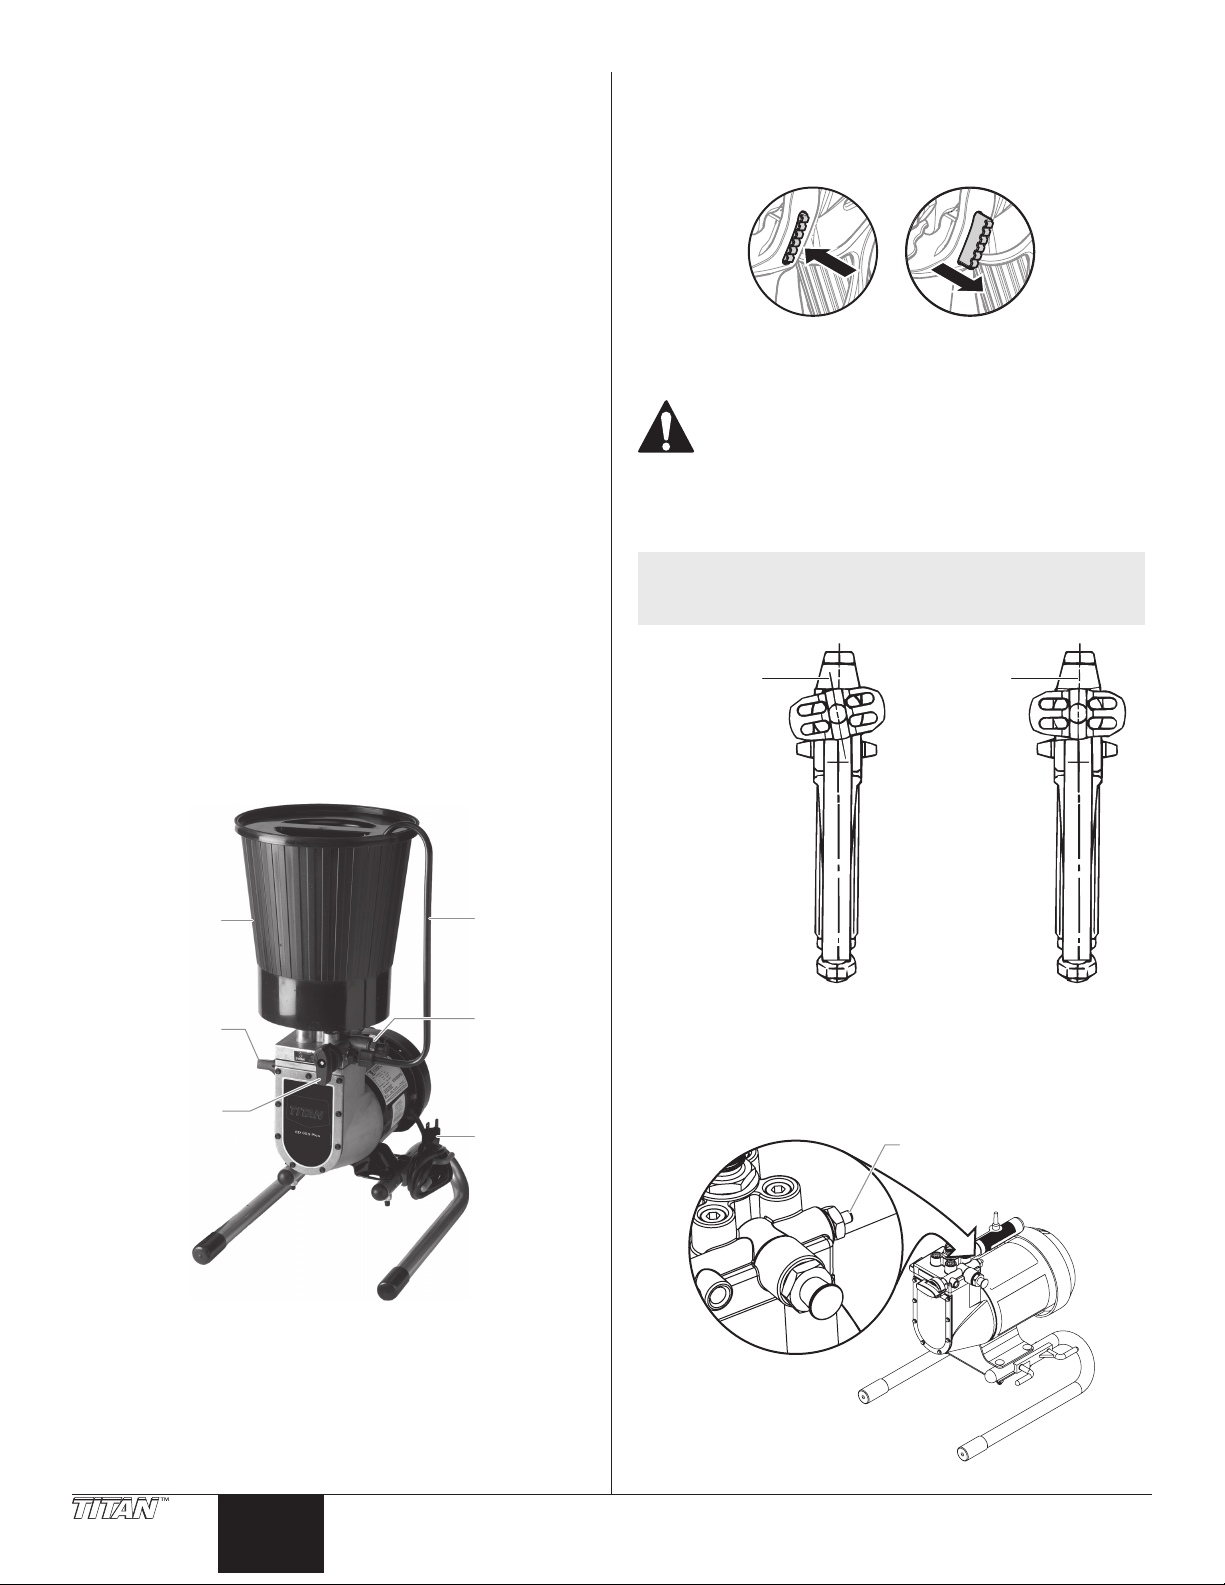
Table of Contents
Pressure Control
Return Tube
Outlet Valve
the tip guard
Pusher Valve Button
Safety Precautions ........................................................................... 2
Grounding Instructions .............................................................................. 2
General Description ........................................................................ 4
Specications ................................................................................................. 4
Preparing to Paint ........................................................................... 4
Attaching the Tip to the Gun....................................................................4
Checking the Outlet Valve (optional) .................................................... 4
Attaching the Paint Hose ........................................................................... 5
Pressure Relief Procedure ............................................................... 5
Priming ............................................................................................. 5
Preparing to Prime ....................................................................................... 5
Mounting the Paint Hopper......................................................................6
Attaching the Return Tube........................................................................6
Priming the Pump ........................................................................................ 6
Spraying ........................................................................................... 7
Spraying Technique ..................................................................................... 7
Practice ............................................................................................................. 7
Cleanup ............................................................................................ 8
Overnight Storage ........................................................................................ 8
Long-Term Storage ...................................................................................... 8
Maintenance .................................................................................. 10
Removing and Cleaning the Inlet Valves ...........................................10
Removing and Cleaning the Outlet Valve .........................................10
Cleaning the Hopper Screen ..................................................................10
Troubleshooting ............................................................................ 11
Parts Listings .................................................................................. 32
Main Assembly ............................................................................................32
Diaphragm Pump .......................................................................................34
Pump Head Assembly ...............................................................................36
Hopper Assembly .......................................................................................37
Limited Warranty ........................................................................... 40
General Description
This high performance airless sprayer is a precision power tool used
for spraying many types of materials. Read and follow this instruction
manual carefully for proper operating instructions, maintenance and
safety information.
Preparing to Paint
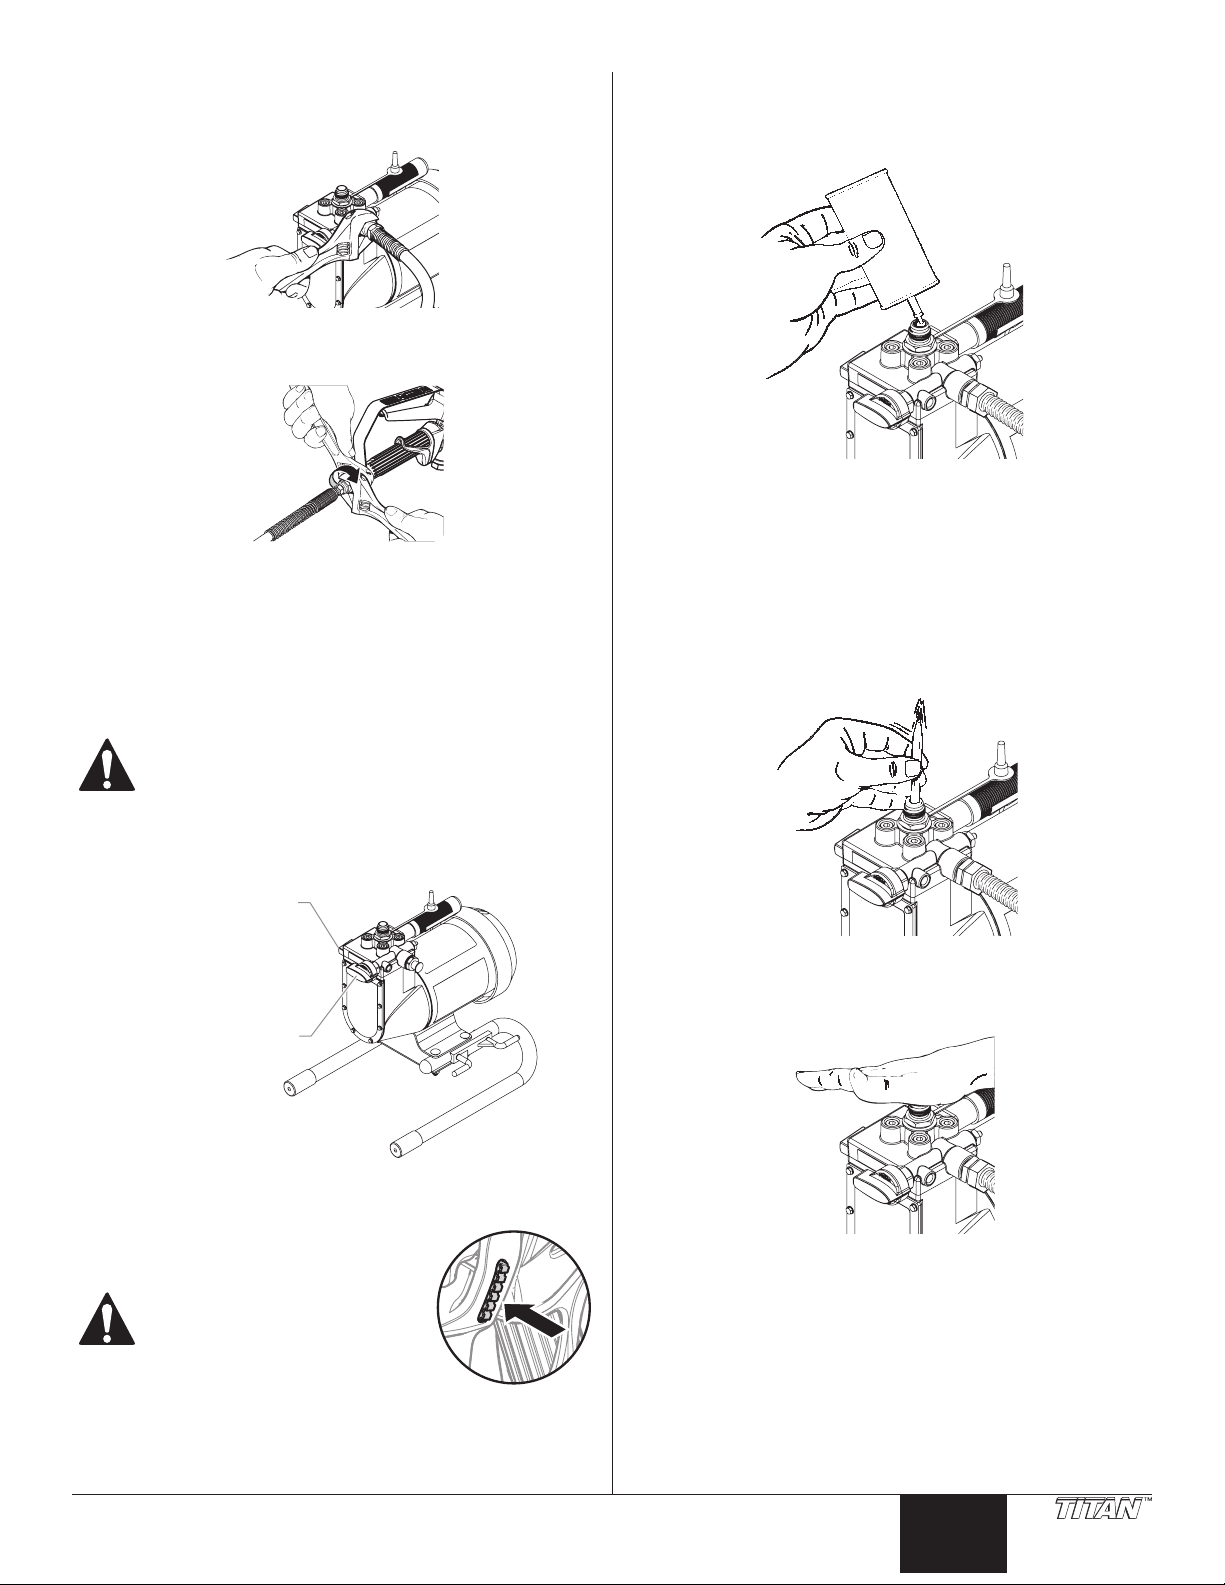
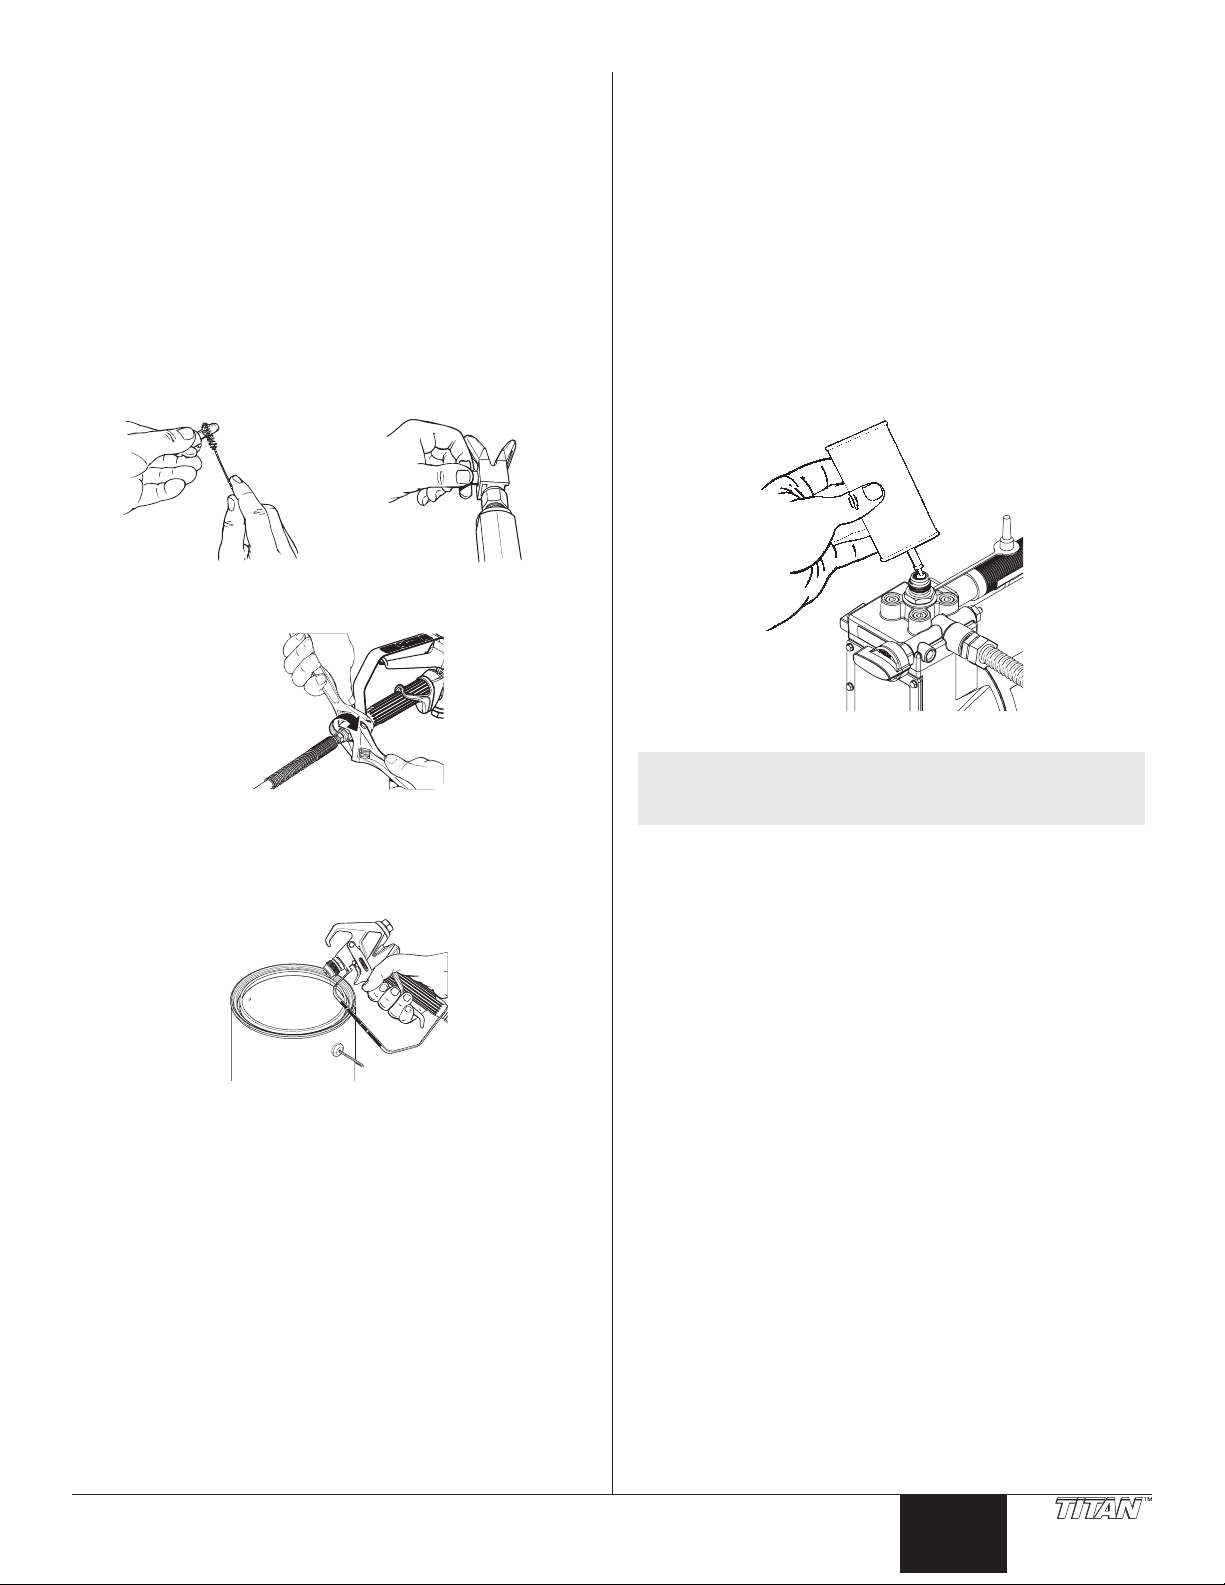
Attaching the Tip to the Gun
1. To lock the trigger, push in the trigger lock from left to right,
when looking at the rear of the gun.
Gun locked
(gun will not spray)
POSSIBLE INJECTION HAZARD. Do not spray without
the tip guard in place. Never trigger the gun unless the
tip is in either the spray or the unclog position. Always
engage the gun trigger lock before removing, replacing
or cleaning tip.
2. Thread the tip guard onto the gun. Tighten the nut rst by
hand, then tighten more rmly with a wrench.
NOTE: When attaching the tip guard to the gun, align the
tip guard as shown in the gure below, then tighten
with a wrench.
Begin
tightening
at this angle
Gun unlocked
(gun will spray)
to achieve
the desired
spray angle
when tight.
Paint Hopper
Knob
PRIME/SPRAY
Knob
Checking the Outlet Valve (optional)
1. Firmly press the optional pusher valve button on the side of
the pump housing to make sure the outlet ball valve moves
freely.
Power Cord
(optional)
4 © Titan Tool. All rights reserved.
English
Page 5
Attaching the Paint Hose
Pressure Control Knob
1. Attach the high pressure hose to the paint sprayer. Use a
wrench to tighten the paint hose securely.
2. Attach the spray gun to the other end of the high pressure
hose. Tighten the hose securely to the gun using two
wrenches.
3. Plug the sprayer into a properly grounded outlet or heavy
duty grounded extension cord. Do not use more than 100
feet of cord. If you must spray a long distance from a power
source, use more paint hose, not more extension cords. Use a
minimum size of 16 gauge extension cord for up to 50 feet in
length, or 12 to 14 gauge for extension cords between 50 and
100 feet in length.
Priming
Preparing to Prime
1. Fill the inlet valve with water or with a light household oil.
2. Make sure the PRIME/SPRAY knob is set to PRIME and that
the pressure control knob is turned counterclockwise to the
lowest pressure setting.
3. Turn the motor switch to ON.
4. Increase the pressure by turning the pressure control knob
clockwise 1/2 turn.
5. Force the inlet valve to open and close by pushing on it with
a screwdriver or the eraser end of a pencil. It should move up
and down about 1/16 of an inch. Continue until water or oil
is sucked into the sprayer. This will wet the moving parts and
break loose any old paint residue.
Pressure Relief Procedure
Be sure to follow the pressure relief procedure when
shutting the unit down for any purpose, including
servicing or adjusting any part of the spray system,
changing or cleaning spray tips, or preparing for
cleanup.
1. Turn the pressure control knob counterclockwise to its lowest
setting.
PRIME/SPRAY Knob
2. Turn the PRIME/SPRAY knob to PRIME.
3. Trigger the gun to remove any pressure which may still be in
the hose.
4. Lock the gun by pushing the gun trigger
lock to the locked position.
INJECTION HAZARD. Do not spray
without the tip guard in place.
NEVER trigger the gun unless the
tip is completely turned to either
the spray or the unclog position.
ALWAYS engage the gun trigger
lock before removing, replacing or
cleaning tip.
6. Put the palm of your hand over the inlet. Turn the pressure
control knob clockwise to its maximum setting. You should
feel suction coming from the inlet valve. If you do not, see the
section on cleaning and servicing the outlet valve.
7. Turn the pressure control knob counterclockwise to the
minimum pressure setting.
8. Turn the motor switch to OFF.
© Titan Tool. All rights reserved. 5
English
Page 6
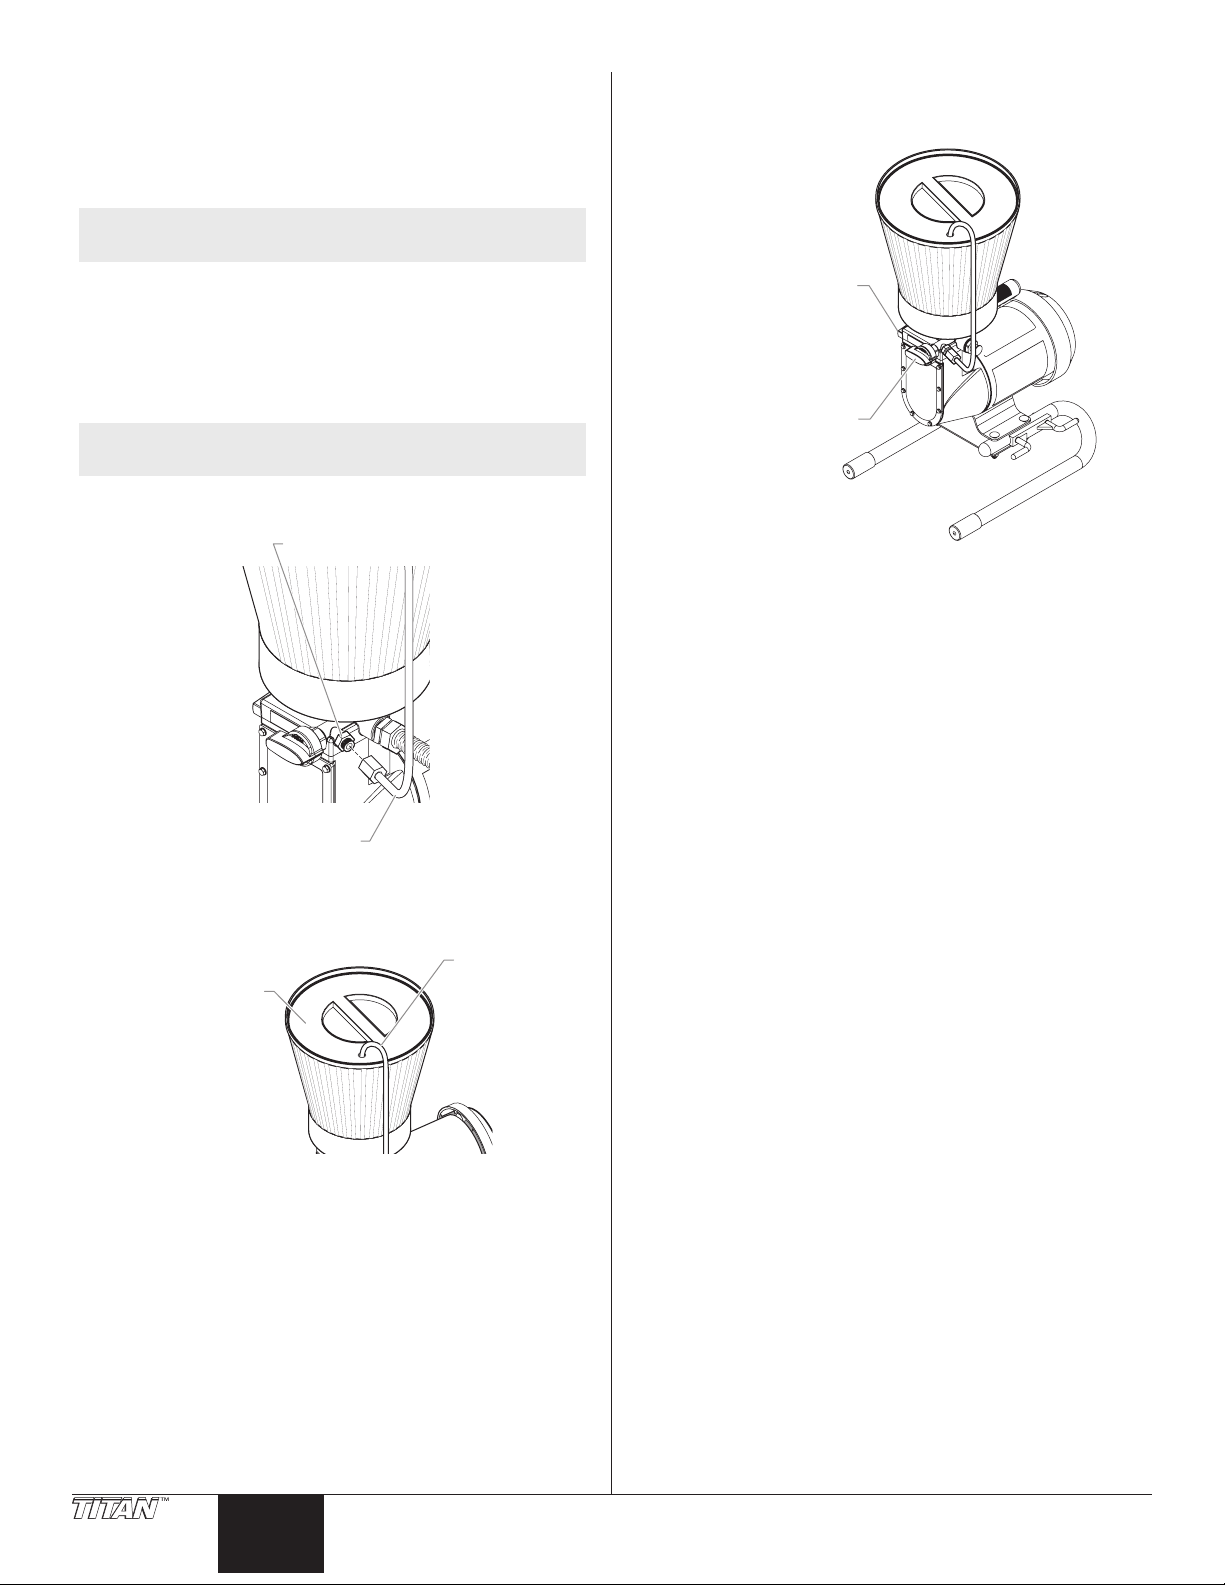
Mounting the Paint Hopper
Return Tube Fitting
Return Tube
E
Return Tube
P
Pressure Control Knob
1. Align the bottom of the paint hopper with the threaded inlet
valve on the paint pump block.
2. Turn the paint hopper clockwise to thread it onto the inlet
valve. Continue to turn the paint hopper until it is secure on
the inlet valve.
Priming the Pump
1. Turn the pressure control knob counterclockwise to its lowest
pressure setting.
NOTE: Make sure the threads are straight and the hopper
turns freely on the inlet valve. Do not cross-thread.
3. Place the lter screen into the bottom of the paint hopper and
snap it in position.
Attaching the Return Tube
1. Make sure that the motor switch is turned to OFF.
2. Screw the return tube tting found in the literature set into
the return tube port on the side of the pump.
NOTE: Do not over-tighten. Hand-tighten only. Some
threads will be visible even when fully tightened.
3. Place the straight end of the return tube into the return tube
tting.
4. Thread the nut on the return tube onto the return tube tting
and tighten until the return tube is secure.
5. Place the hook end of the return tube into the hole in the
paint hopper cover.
PRIME/SPRAY Knob
2. Remove the paint hopper cover and ll the paint hopper with
material.
3. Turn the PRIME/SPRAY knob to PRIME.
4. Turn the motor switch to ON.
5. Turn the pressure control knob clockwise to between half and
full pressure. Let the unit prime 1 to 2 minutes after material
begins to ow through the return tube.
IMPORTANT: Always reduce the pressure to zero before
changing the position of the PRIME/SPRAY knob. Failure to do so
may cause damage to the paint pump diaphragm.
IMPORTANT: If the pressure control knob is reduced to zero
and the PRIME/SPRAY knob is still on SPRAY while the sprayer is
operating, there will be high pressure in the hose and spray gun
until the PRIME/SPRAY knob is turned to PRIME or until the spray
gun is triggered to relieve the pressure.
aint Hopper Cover
6 © Titan Tool. All rights reserved.
English
Page 7
Spraying
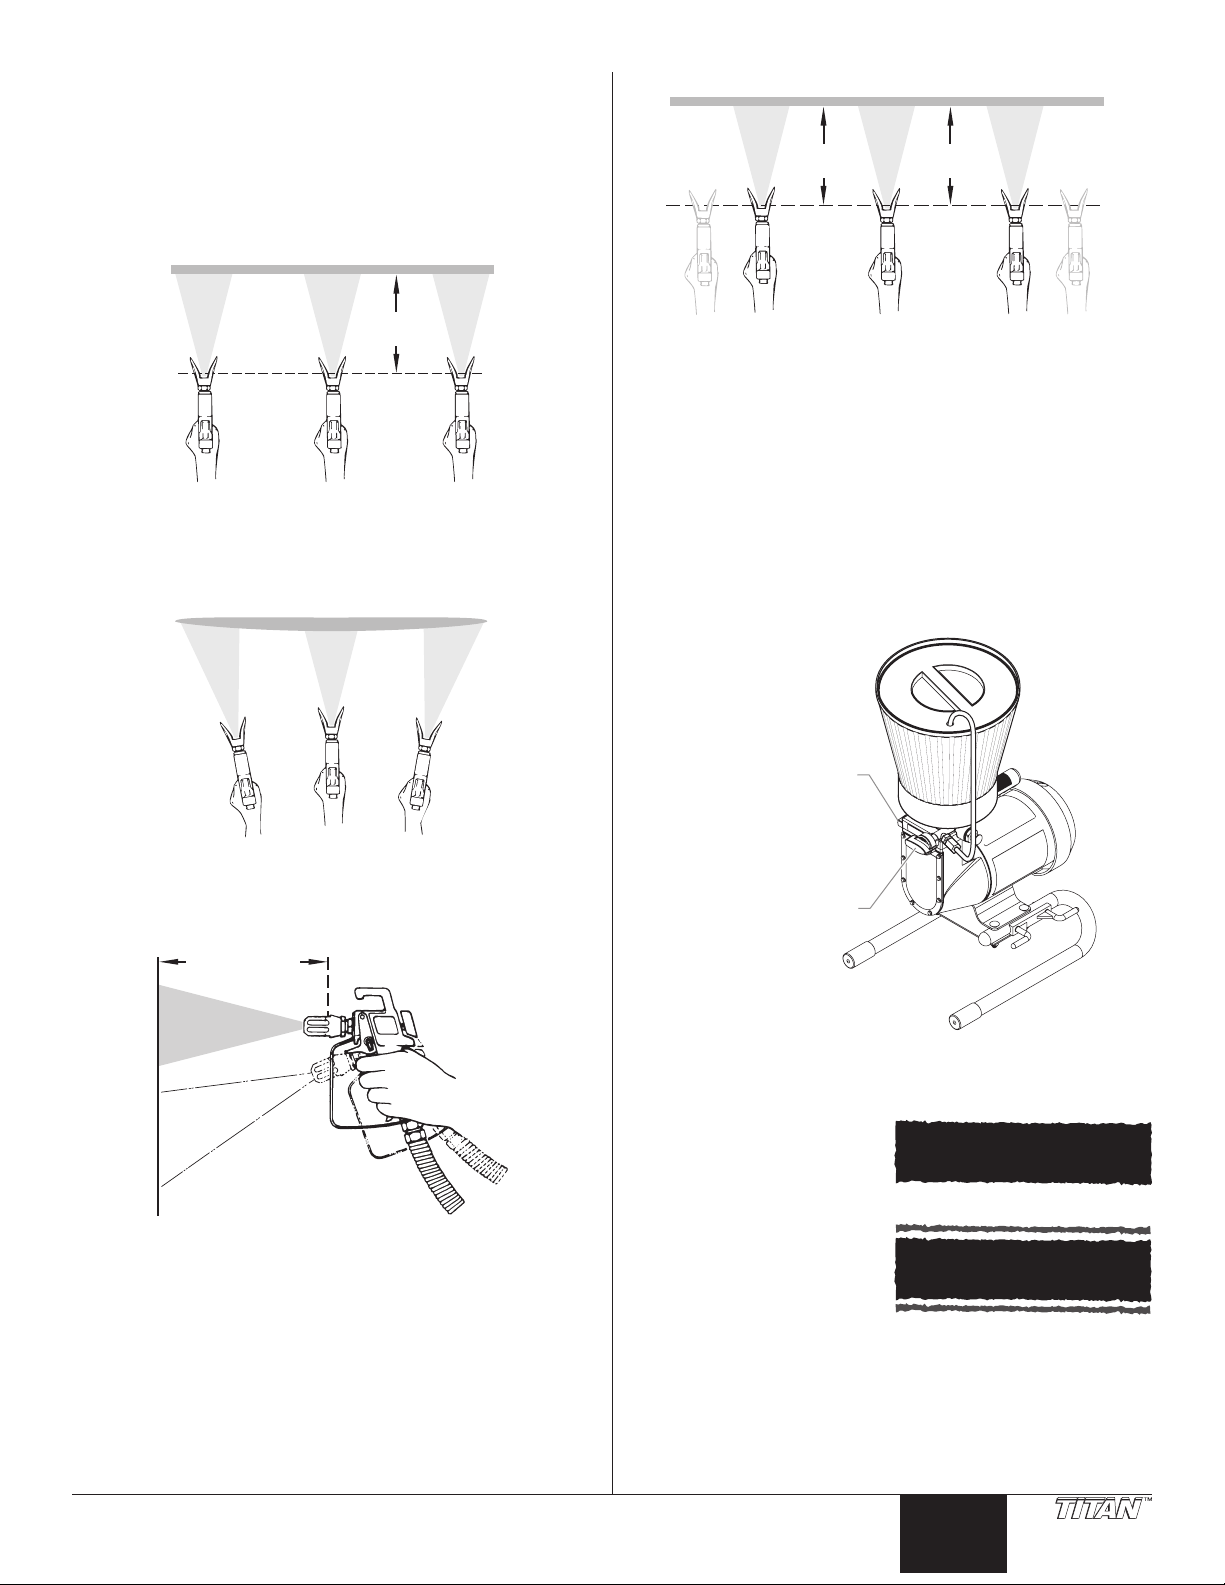
Keep stroke smooth and at an even speed.
Even coat throughout
Heavy Coat
Do not ex wrist while spraying.
Light CoatLight Coat
Approximately
Proper way to trigger the spray gun
Start stroke End strokePull trigger Release triggerKeep steady
Pressure Control Knob
Spraying Technique
The key to a good paint job is an even coating over the entire surface.
This is done by using even strokes. Keep your arm moving at a
constant speed and keep the spray gun at a constant distance from
the surface. The best spraying distance is 10 to 12 inches between
the spray tip and the surface.
Approximately
10 to 12 inches
Keep the spray gun at right angles to the surface. This means moving
your entire arm back and forth rather than just exing your wrist.
Keep stroke
even
Aproximately
10 to 12 inches
Overlap each stroke by about 50%. This will ensure an even coating.
When you stop painting, lock the gun trigger lock, turn the pressure
control knob counterclockwise to its lowest setting and set the
PRIME/SPRAY knob to PRIME. Turn the motor switch to OFF and
unplug the sprayer.
If you expect to be gone more than 1 hour, follow the short term
clean up procedure described in the CLEANUP section of this manual.
Practice
1. Be sure that the paint hose is free of kinks and clear of objects
with sharp cutting edges.
2. Turn the pressure control knob counterclockwise to its to its
lowest setting.
Keep the spray gun perpendicular to the surface, otherwise one end
of the pattern will be thicker than the other.
10 to 12 inches
Right way
Wrong way
The spray gun should be triggered by turning it on and o with each
stroke. This will save paint and avoid paint buildup at the end of the
stroke. Do not trigger the gun during the middle of a stroke. This will
result in an uneven spray and splotchy coverage.
PRIME/SPRAY Knob
3. Turn the PRIME/SPRAY knob to SPRAY.
4. Turn the pressure control knob clockwise to its highest
setting. The paint hose should stien as material begins to
ow through it.
5. Unlock the gun trigger
lock by turning the
switch so that it is
parallel to the handle.
6. Trigger the spray gun
Good spray pattern
to bleed air out of the
hose.
7. When paint reaches the
spray tip, spray a test
area to check the spray
pattern.
Paint tailing pattern
8. Use the lowest pressure
setting necessary to get a good spray pattern. If the pressure
is set too high, the spray pattern will be too light. If the
pressure is set too low, tailing will appear or the paint will
spatter out in gobs rather than in a ne spray.
© Titan Tool. All rights reserved. 7
English
Page 8
Cleanup
Long-Term Storage
Overnight Storage
Shutdown
1. Turn the pressure control knob counterclockwise to the
minimum setting.
2. Turn the PRIME/SPRAY knob to PRIME to release system
pressure.
3. Trigger the gun to remove any pressure that may still be in the
hose.
4. Lock the gun by pushing the gun trigger
lock to the locked position.
5. Turn the motor switch to OFF and
unplug the sprayer.
6. For latex materials only, pour 1/2 cup
water slowly on the top of the paint to
prevent the paint from drying. For other
materials, seal the paint hopper with the
hopper cover keeping the return tube in
the paint.
7. Wrap the spray gun assembly in a damp cloth and place it in a
plastic bag. Seal the bag shut.
8. Place the sprayer in a safe place out of the sun for short-term
storage.
Startup
1. Remove the gun from the plastic bag.
2. Stir the water into the paint for latex materials. Remove the
hopper cover from the paint hopper and stir the paint for all
other materials.
Do not allow paint to build up on the motor or the
motor will overheat. Do not allow flammable solvents
to come in contact with the motor or they could ignite.
NOTE: You will need a bucket, cleaning solution, a
toothbrush, a wrench and cleaning rags.
NOTE: If spraying with latex paint, use warm soapy water
for cleaning. If using oil or alkyd-based paints, use
mineral spirits or paint thinner.
IMPORTANT: Do not use mineral spirits or paint thinner on latex
paint, or the mixture will turn into a jelly-like substance which is
difficult to remove.
Clearing the Paint Hopper
1. Lock the gun by pushing the gun trigger
lock to the locked position.
2. Turn the pressure control knob
counterclockwise to the minimum
setting.
3. Turn the PRIME/SPRAY knob to PRIME.
4. Turn the motor switch to OFF.
5. Direct the return tube into the original
paint bucket.
6. Turn the motor switch to ON.
7. Turn the pressure control knob to 1/2 maximum pressure.
This will draw the remaining paint in the paint hopper
through the pump, up the return tube, and into the paint
bucket.
8. Turn the pressure control knob counterclockwise to the
minimum pressure setting.
9. Trigger the gun to relieve pressure and lock the gun.
10. Remove the spray tip and guard and place them into a
container of water or appropriate solvent for the type of
material with which you are painting.
11. Fill the paint hopper with water or an appropriate solvent for
the type of material with which you are painting.
12. Direct the return tube into a waste bucket.
13. Increase the pressure to 1/2 the maximum pressure. Let the
water or solvent circulate for 2-3 minutes to ush paint out of
the pump, the paint hopper, and the return tube.
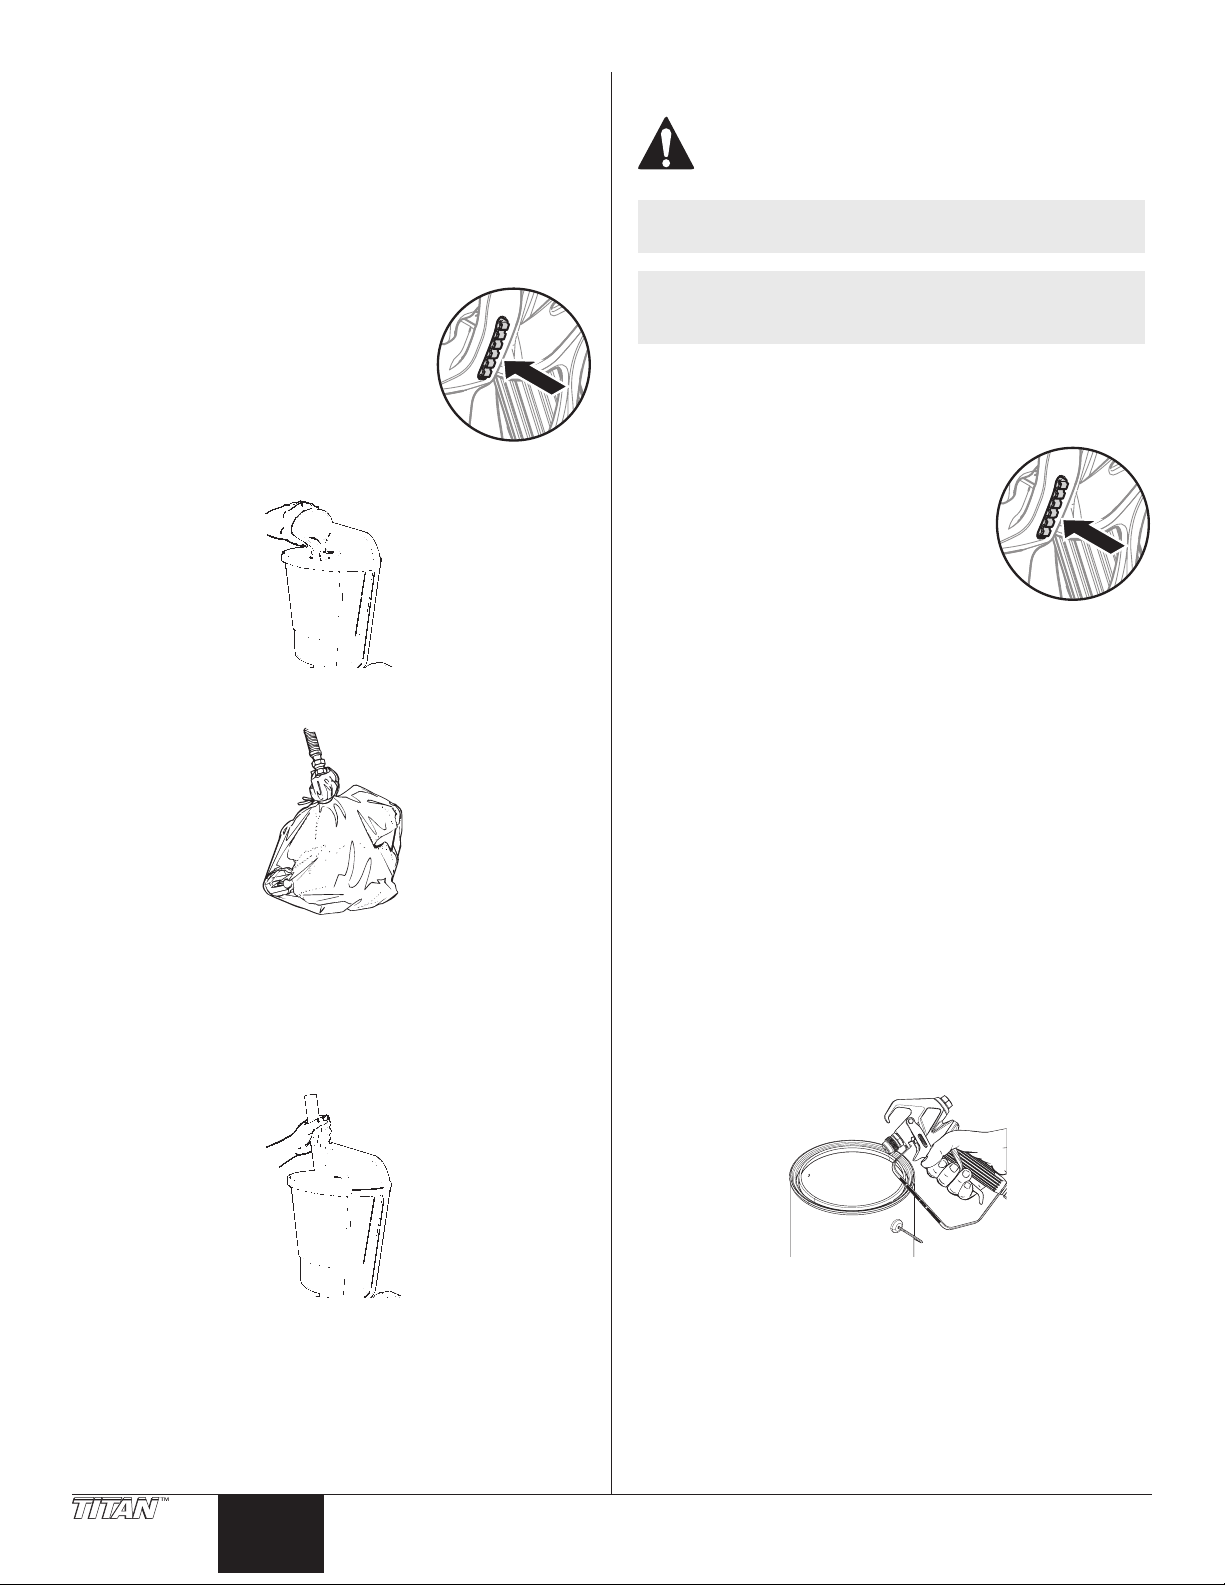
Clearing the Paint Hose
1. To save paint left in the hose, release the gun trigger lock and
carefully trigger the gun with the spray tip removed against
the inside of the paint container.
2. Turn the pressure control knob counterclockwise to the
minimum pressure setting.
3. Check to be sure that the PRIME/SPRAY knob is set to PRIME
and that the pressure is completely reduced.
4. Plug sprayer in and turn the motor switch to ON.
5. After the sprayer is primed, turn the PRIME/SPRAY knob to
SPRAY and gradually turn the pressure control knob clockwise
to increase the pressure.
6. Test the sprayer on a practice piece and begin spraying.
8 © Titan Tool. All rights reserved.
English
3. Turn the PRIME/SPRAY knob to SPRAY.
4. Turn the pressure control knob slowly until paint starts to
ow into the bucket. As soon as the water or solvent starts to
come into the bucket, release the trigger.
5. Change to clean water or solvent, point the gun to the side
of the waste bucket, and continue circulating for another 5
minutes to thoroughly clean the hose, pump and spray gun.
6. Turn the pressure control knob counterclockwise to its lowest
setting.
Page 9
7. Turn the PRIME/SPRAY knob to PRIME.
8. Trigger the gun to remove any pressure which may still be in
the hose.
9. Lock the gun trigger by rotating the trigger lock forward until
it stops.
10. Turn the motor switch to OFF.
Clearing the Gun
1. Remove the spray gun from the paint hose using two
adjustable wrenches.
2. Remove the lter housing from the gun. Place the gun and
the lter assembly into a container of water or solvent to soak.
3. Clean the spray tip and gun lter with a soft brush.
4. Reassemble the gun and lter. Assemble the spray tip in the
cleaning position with the arrow pointing to the back of the
gun.
5. Attach the paint hose to the gun and tighten using two
wrenches.
Final Cleanup
1. Remove the tip assembly.
2. Turn the motor to ON.
3. Turn the PRIME/SPRAY knob to SPRAY.
4. Turn the pressure control knob clockwise to 1/2 power.
5. Trigger the gun into the cleaning bucket until the hopper is
empty.
6. Rell the hopper and continue ushing the system until the
solution coming out of the gun appears clean.
7. Lock the gun and turn the pressure control knob
counterclockwise to its lowest setting.
8. Turn the PRIME/SPRAY knob to PRIME.
9. Remove the hopper from the inlet valve.
10. Clean the threads of the inlet valve with a damp cloth.
11. Fill the inlet valve with a light household oil.
6. Turn the motor switch to ON.
7. Unlock gun trigger by turning the gun trigger lock so that it is
parallel to the gun handle.
8. Turn the PRIME/SPRAY knob to SPRAY and point the gun to
the side of the waste bucket.
9. Trigger the gun and gradually turn the pressure control knob
clockwise to 1/2 pressure. Continue to trigger the gun for
approximately 30 seconds.
10. Turn the pressure control knob counterclockwise to its lowest
setting.
11. Turn the PRIME/SPRAY knob to PRIME.
12. Trigger the gun to remove any pressure which may still be in
the hose.
13. Lock the gun trigger by rotating the trigger lock forward until
it stops.
14. Turn the motor switch to OFF.
12. Turn the PRIME/SPRAY knob to SPRAY to distribute the oil.
NOTE: Proper cleaning and oiling of the pump after use
are the most important steps you can take to insure
proper operation after storage.
13. Turn the pressure control knob counterclockwise to its lowest
setting.
14. Turn the PRIME/SPRAY knob to PRIME.
15. Trigger the gun to remove any pressure that may still be in the
hose.
16. Lock the gun trigger by rotating the trigger lock forward until
it stops..
17. Turn the motor switch to OFF.
18. Remove the hopper lter and clean in clean water or the
appropriate solvent. Use a soft brush.
19. Return the hopper lter to its position in the hopper and
replace the hopper on the inlet valve.
20. Wipe the entire unit, hose and gun with a damp cloth to
remove accumulated paint.
© Titan Tool. All rights reserved. 9
English
Page 10
Maintenance
Valve Body
Seal
Follow these procedures when encountering problems indicated in
the troubleshooting section.
Removing and Cleaning the Inlet Valves
1. Be certain that the sprayer is o.
2. Remove the inlet valve assembly using a 27 millimeter socket
or box end wrench.
NOTE: This spring is manufactured to a very specic
tension. Do not put in an unauthorized substitute.
See the paint pump assembly parts diagram for the
proper replacement part number.
3. Remove the seat and ball assembly.
4. Clean all parts thoroughly. If the ball or seat show any sign of
wear or damage, replace them with new parts. This carbide
ball must seal tightly against its seat for the valve to function
properly.
5. Cover all parts with a thin coat of light oil before reassembling.
3. Test movement of the valve by pushing on it from the open
end of the valve housing with a screwdriver or the eraser end
of a pencil. It should move about 1/16 of an inch. If it does
not move, it should be cleaned or replaced.
NOTE: The inlet valve must be oiled after every job. This
will reduce or eliminate priming problems the next
time the sprayer is used.
4. Thoroughly clean the valve assembly with water or the
appropriate solvent. Use a small brush.
5. If you have properly cleaned the valve and water drips out of
the bottom, the valve is worn and needs to be replaced. A
properly seated valve lled with water and held vertically will
not drip.
6. Install a new or cleaned valve in the pump block and then ll
the valve with light oil or solvent.
NOTE: You will need to align the ridge on the seat with the
groove in the pump housing when reassembling.
6. Drop in the valve ball.
7. Insert the ball stop and spring and replace the valve body. Be
sure that the o-ring is positioned properly and that the tongue
on the cap ts inside the spring.
8. Tighten the valve body securely with an adjustable wrench.
Do not over-tighten.
Seat
Ball
Spring
Ball Stop
O-ring
Cleaning the Hopper Screen
The screen at the bottom of the paint hopper may need cleaning
periodically. Check it every time you add paint. Remove the screen
by pulling it out of the hopper with a pliers. Clean the screen with
water or solvent and a soft-bristle brush, if necessary.
Removing and Cleaning the Outlet Valve
It may be necessary to remove and clean the outlet valve or to
replace parts inside the valve worn out through normal use.
1. Remove the outlet valve body with a wrench.
2. Remove and clean the ball stop and small spring inside the
valve using a wire hook or tweezers. Replace the spring if it is
broken or worn.
10 © Titan Tool. All rights reserved.
English
Page 11

Troubleshooting
Problem
A. The sprayer does not start up.
B. The sprayer starts up but does
not draw in paint when the
PRIME/SPRAY knob is set to
PRIME.
C. The sprayer draws up paint but
the pressure drops when the
gun is triggered.
D. The sprayer will not build
pressure.
Cause
1. The sprayer is not plugged in.
2. The ON/OFF switch is set to OFF.
3. Low or no voltage is coming from the wall
plug.
4. The sprayer was turned o while still under
pressure.
5. The extension cord is damaged or has too low
a capacity.
6. The thermal overload on the sprayer is
tripped.
7. There is a problem with the motor.
1. The unit will not prime properly or has lost
prime.
2. The paint hopper is empty
3. The hopper lter is clogged.
4. The inlet valve is stuck.
5. The outlet valve is stuck.
6. The PRIME/SPRAY valve is plugged.
7. The inlet valve is worn or damage.
8. There is a problem with the diaphragm.
9. The hydraulic oil level is low or empty.
1. The spray tip is worn.
2. The hopper lter is clogged.
3. The gun or spray tip lter is plugged.
4. The paint is too heavy or coarse.
5. The outlet valve assembly is dirty or worn.
6. The inlet valve assembly is damaged or worn.
1. The inlet or outlet valve ball or ball seat is
worn.
2. Foreign matter or paint has built up between
the ball and the seat.
3. Foreign matter or paint has built up in PRIME/
SPRAY valve
Solution
1. Plug the sprayer in.
2. Turn the ON/OFF switch to ON.
3. Properly test the power supply voltage.
4. Turn the PRIME/SPRAY knob to PRIME.
5. Replace the extension cord.
6. Allow the motor to cool and move the sprayer to a
cooler spot.
7. Take the sprayer to a Titan Authorized Service Center.
1. Try to prime the unit again.
2. Fill the paint hopper with paint.
3. Clean the hopper lter.
4. Clean the inlet valve.
5. Clean the outlet valve and replace any worn parts.
6. Take the sprayer to a Titan Authorized Service Center.
7. Replace the inlet valve.
8. Take the sprayer to a Titan Authorized Service Center.
9. Take the sprayer to a Titan Authorized Service Center.
1. Replace the spray tip with a new tip.
2. Clean the hopper lter.
3. Clean or replace the proper lter. Always keep extra
lters on hand.
4. Thin or strain the paint.
5. Clean or replace the outlet valve assembly.
6. Replace the inlet valve.
1. Take the sprayer to a Titan Authorized Service Center.
2. Take the sprayer to a Titan Authorized Service Center.
3. Replace PRIME/SPRAY valve or take the sprayer to a Titan
Authorized Service Center.
E. The spray gun leaks.
F. The tip assembly leaks.
G. The spray gun will not spray.
H. The paint pattern is tailing.
I. The thermal overload tripped
and shut o the sprayer.
1. Internal parts of the gun are worn or dirty.
1. The tip was assembled incorrectly.
2. A seal is worn.
1. The spray tip, the gun lter or the tip lter is
plugged.
2. The spray tip is in the CLEAN position.
1. The pressure is set too low.
2. The gun, the tip, or the hopper lter is
plugged.
3. The tip is worn.
4. The paint is too thick.
1. The motor overheated.
2. The extension cord is too long or is too small
a gauge.
3. Paint has built up on the motor.
4. The motor was started while the sprayer was
under pressure.
5. The sprayer was sitting in the hot sun.
NOTE: The electric motor should always be kept clean and
dry. Paint acts as an insulator. Too much paint on the
motor will cause the motor to overheat.
NOTE: Make sure to check for grounding continuity after
service is performed on any electrical components.
Use an ohmmeter to determine that there is
continuity between accessible dead-metal parts
of the product and the grounding blade of the
attachment plug.
1. Take the sprayer to a Titan Authorized Service Center.
1. Check the tip assembly and assemble properly.
2. Replace the seal.
1. Clean the spray tip, gun lter or tip lter.
2. Put the tip in the SPRAY position.
1. Increase the pressure.
2. Clean the lters.
3. Replace the spray tip.
4. Thin the paint.
1. Allow to cool for 30 minutes.
2. Allow to cool for 30 minutes and replace the extension
cord with a shorter extension or a thicker gauge cord.
3. Clean the paint from the motor.
4. Restart the sprayer in the PRIME mode.
5. Move the sprayer out of the sun.
© Titan Tool. All rights reserved. 11
English
Page 12
Consignes de sécurite important
Prise trilaire
Lire toutes ces consignes avant d’utiliser l’appareil.
Garder ces consignes.
Indique une situation à risque, laquelle, si elle n’est pas
évitée, peut entraîner des blessures graves, voire la mort.
Pour réduire les risques d’incendie ou d’explosion,
de choc électrique et de blessure, vous devez lire et
comprendre les directives gurant dans ce manuel.
Familiarisez-vous avec les commandes et l’utilisation
adéquate de l’équipement.
Directives de mise à la terre
Cet appareil doit être mis à la terre. En cas de court-circuit, cette
précaution réduit les risques de choc en procurant un parcours
au courant électrique. Le cordon de l’appareil est doté d’un l de
terre relié à la troisième broche de sa che. Cette dernière doit être
branchée dans une prise correctement câblée et mise à la terre
conformément aux codes et règlements locaux.
MISE EN GARDE - Le fait de ne pas brancher
correctement la che trilaire de l’appareil peut
entraîner des risques de choc électrique.
Si on doit réparer ou remplacer le cordon ou la che, ne pas raccorder
le l de terre à la borne des broches plates (lames) de cette dernière.
Ce l, normalement vert (avec ou sans rayures jaunes), doit être relié
à la broche de terre.
Consulter un technicien ou un électricien qualié à défaut de
comprendre l’ensemble des présentes directives ou en cas
d’incertitude quant à la mise à terre de l’appareil. Ne pas modier la
che de l’appareil; si elle ne s’adapte pas dans la prise voulue, la faire
remplacer par un électricien qualié.
Conçu pour les circuits de 120 V, cet appareil est doté d’une che
ressemblant à celle illustrée ci-dessous. S’assurer que le produit est
connecté à une prise électrique ayant la même conguration que la
che mâle. Ne pas utiliser d’adaptateur avec ce produit.
Broche de mise à la terre
Plaque murale de la prise
MISE EN GARDE : EXPLOSION OU INCENDIE
Les émanations de certains produits peuvent exploser
ou s’enammer, et risquent d’entraîner des dommages
matériels ou de graves blessures.
MESURES PRÉVENTIVES :
• Ne pulvérisez pas de matières inammables ou combustibles
près d’une amme nue, de voyants lumineux ou de sources
d’ignition telles que des objets chauds, cigarettes, moteurs,
matériel et appareils électriques. Évitez de produire des étincelles
en connectant et en déconnectant les cordons électriques.
• Ne pulvérisez pas et ne les nettoyez pas avec des liquides
ayant un point d’éclair inférieur à 38°C (100°F). Le point
d’éclair est la température à laquelle le liquide peut créer
susamment de vapeurs et s’enammer.
• L’écoulement de peinture ou de solvant dans l’équipement
peut produire de l’électricité statique. L’électricité statique
crée un risque d’incendie ou d’explosion en présence de
fumées de peinture ou de solvant. Toutes les pièces du
système du pulvérisateur, y compris la pompe, l’ensemble
du tuyau, le pistolet de pulvérisation et les objets dans et
autour de la zone de pulvérisation doivent être correctement
reliés à la terre pour protéger contre les décharges
d’électricité statique et les étincelles. N’utilisez que des
12 © Titan Tool Inc. Tous droits réservés.
Français
tuyaux conducteurs ou reliés à la terre pour pulvérisateurs de
peinture sous vide à haute pression, spéciés par le fabricant.
• Vériez que tous les conteneurs ou systèmes de stockage sont
reliés à la terre pour éviter les décharges d’électricité statique.
• Connectez à une prise électrique avec prise de terre et utilisez
des rallonges électriques reliées à la terre. N’utilisez pas
d’adaptateur 3 à 2.
• N’utilisez pas de peinture ou de solvant contenant du halon,
par exemple, le chlore, les agents antimoisissure à l’eau
de Javel, le chlorure de méthylène et le trichloroéthane.
Ils ne sont pas compatibles avec l’aluminium. Contactez le
fournisseur de revêtements pour connaître la compatibilité du
matériau avec l’aluminium.
• La zone de pulvérisation doit toujours être bien aérée. Une
bonne quantité d’air frais doit constamment traverser la zone
de pulvérisation pour éviter les accumulations de vapeurs
inammables. Le système de pompage doit être placé dans une
zone bien aérée. Ne pulvérisez pas le système de pompage.
• Ne fumez pas dans la zone de pulvérisation.
• N’actionnez pas d’interrupteurs électriques, de moteurs ou
autres dispositifs produisant des étincelles dans la zone de
pulvérisation.
• Maintenez la propreté de la zone et veillez à ce qu’elle ne
contienne pas de conteneurs de peinture ou de solvant, de
chions et autres matières inammables.
• Sachez ce que contiennent la peinture et les solvants
pulvérisés. Lisez les ches de sécurité du matériel (MSDS) et
les étiquettes apposées sur les conteneurs de peintures et de
solvants. Respectez les consignes de sécurité du fabricant de
peinture et de solvant.
• Placez la pompe à une distance minimum de 7,62 mètres
(25 pieds) de l’objet à pulvériser, dans une zone bien aérée
(ajoutez de la longueur de tuyau si besoin est). Les vapeurs
inammables sont souvent plus lourdes que l’air. La zone près
du sol doit être très bien aérée. La pompe contient des pièces
qui produisent des arcs et émettent des étincelles pouvant
enammer les vapeurs.
• Le plastique peut causer des étincelles d’électricité statique.
N’accrochez aucun plastique dans une zone de pulvérisation
fermée. N’utilisez pas de toiles de protection en plastique
quand vous pulvérisez une matière inammable.
• Ayez un extincteur en bon état de fonctionnement à portée de main.
MISE EN GARDE : INJECTION CUTANÉE
Le jet de haute pression produit par cet appareil peut
transpercer la peau et les tissus sous-jacents, causant des
blessures graves pouvant entraîner l’amputation.
MESURES PRÉVENTIVES :
• Ne dirigez pas le pistolet sur et ne pulvérisez pas les personnes
ou les animaux.
• N’approchez pas les mains ni d’autres parties du corps de la
sortie du produit. Par exemple, ne tentez pas d’arrêter une
fuite avec une partie du corps.
• NE JAMAIS mettre la main, même gantée, devant le pistolet
(les gants n’orent aucune protection contre les blessures par
injection).
• TOUJOURS s’assurer que le protège-embout est en place avant
de pulvériser. Il est cependant à noter que, s’il assure une
certaine protection, ce dispositif joue surtout un rôle préventif.
• Utilisez exclusivement un embout de buse spécié par le fabricant.
• Prenez garde quand vous nettoyez ou que vous changez les
embouts de buse. Si l’embout se bouche pendant que vous
pulvérisez, verrouillez TOUJOURS la détente du pistolet, arrêtez
la pompe et libérez toute la pression avant de réparer ou
de nettoyer l’embout ou le protecteur ou avant de changer
d’embout. La pression n’est pas libérée par l’arrêt du moteur.
La poignée du robinet-valve PRIME/SPRAY doit être placée sur
PRIME pour libérer la pression. Consultez la PROCÉDURE DE
DÉCOMPRESSION décrite dans le manuel de la pompe.
Page 13

Consignes de sécurite important
• Ne laissez pas l’appareil sous tension ou sous pression
quand vous vous en éloignez. Quand vous n’utilisez pas
l’appareil, éteignez-le et libérez la pression conformément aux
instructions du fabricant.
• La pulvérisation à haute pression peut injecter des toxines dans
le corps et causer de graves blessures corporelles. Si une telle
injection se produisait, consultez immédiatement un médecin.
• Vériez les tuyaux et les pièces pour détecter des signes
d’endommagement : une fuite peut injecter le produit dans la peau.
Inspectez le tuyau avant chaque emploi. Changez tous les tuyaux
ou pièces endommagés. Pour des raisons de fonctionnement,
de sécurité et de durée de vie, utiliser exclusivement des tuyaux
exibles à haute pression d‘origine de TITAN.
• Ce système peut produire une pression de 2 800 PSI / 193
Bar. N’utilisez que les pièces de rechange ou les accessoires
spéciés par le fabricant et ayant une pression nominale
minimum de 2 800 PSI. Ceci est valable pour les embouts
de pulvérisation, les protecteurs de buse, les pistolets, les
rallonges, les raccords et le tuyau.
• Verrouillez toujours la détente quand vous ne pulvérisez pas.
Vériez que le verrou de la détente fonctionne correctement.
• Vériez que toutes les connexions sont bien serrées avant
d’utiliser l’appareil.
• Sachez comment arrêter l’appareil et le dépressuriser
rapidement. Soyez bien familiarisé avec les commandes. La
pression n’est pas libérée lorsque le moteur est arrêté. La
poignée du robinet-valve PRIME/SPRAY doit être placée sur
PRIME pour libérer la pression. Consultez la PROCÉDURE DE
DÉCOMPRESSION décrite dans le manuel de la pompe.
• Retirez toujours l’embout de pulvérisation avant de rincer ou
de nettoyer le système.
REMARQUE À L’INTENTION DES MÉDECINS : Les injections
cutanées sont des lésions traumatiques; il importe donc de
les traiter sans délai. On NE DOIT PAS retarder ce traitement
sous prétexte de vérier la toxicité du produit en cause, celle-ci
n’étant conséquente que dans le cas d’injection directe de
certains produits dans le système sanguin. Il pourrait s’avérer
nécessaire de consulter un plasticien ou un spécialiste en
chirurgie reconstructive de la main.
MISE EN GARDE : ÉMANATIONS DANGEREUSES
Certains produits (peintures, solvants, insecticides ou
autres) peuvent être nocifs s’ils sont inhalés ou entrent en
contact avec l’organisme. Les émanations de ces produits
peuvent provoquer de graves nausées, évanouissements
ou empoisonnements.
MESURES PRÉVENTIVES :
• Se servir d’un masque ou d’un respirateur s’il y a risque
d’inhalation (lire toutes les directives concernant ces
dispositifs an de s’assurer qu’ils orent la protection requise).
• Porter des lunettes de protection.
• Porter les vêtements de protection prescrits par le fabricant
du produit utilisé.
MISE EN GARDE : GÉNÉRALITÉS
D’autres dangers peuvent entraîner des dommages
matériels ou des blessures graves.
MESURES PRÉVENTIVES :
• Portez toujours les gants, la protection oculaire, les vêtements
et un respirateur ou masque appropriés quand vous peignez.
• Ne travaillez pas et ne pulvérisez pas près d’enfants. Éloignez
toujours les enfants de l’équipement.
• Ne travaillez pas avec les bras au-dessus de la tête ni sur un
support instable. Appuyez-vous bien sur les deux pieds pour
toujours conserver l’équilibre.
• Soyez attentif et regardez ce que vous faites.
© Titan Tool Inc. Tous droits réservés. 13
• N’utilisez pas l’appareil quand vous êtes fatigué ou sous
l’inuence de drogues ou d’alcool.
• Ne faites pas de nœuds avec le tuyau et ne le tordez pas trop.
Le tuyau à vide peut présenter des fuites suite à l’usure, les
nœuds ou les mauvais traitements. Une fuite risque d’injecter
du produit dans la peau.
• N’exposez pas le tuyau à des températures ou des pressions
supérieures à celles spéciées par le fabricant.
• N’utilisez pas le tuyau pour tirer ou soulever l’équipement.
• Utilisez la plus basse pression possible pour rincer l’équipement.
• Respectez tous les codes locaux, étatiques et nationaux
qui régulent la ventilation, la prévention d’incendies et le
fonctionnement.
• Les normes de sécurité du gouvernement des États-Unis ont
été adoptées dans la loi Occupational safety and Health Act
(OSHA). Ces normes, en particulier la partie 1910 des Normes
générales et la partie 1926 des Normes de construction,
doivent être consultées.
• Avant chaque emploi, vériez tous les tuyaux pour détecter
d’éventuelles coupures, fuites, abrasion ou couvercle bombé.
Vériez l’état ou le mouvement des accouplements. Changez
immédiatement le tuyau si l’une de ces conditions est vériée.
Ne réparez jamais un tuyau de peinture. Remplacez-le par un
tuyau conducteur à haute pression.
• Ne pulvérisez pas à l’extérieur par temps venteux.
• Débranchez toujours le cordon électrique de la prise avant de
travailler sur l’équipement.
IMPORTANT: La pompe à diaphragme est dotée d’un dispositif
de remise en marche automatique avec protection thermique.
En cas de surcharge, ce dispositif débranche le moteur du bloc
d’alimentation.
• Le moteur se remet en marche sans avertissement lorsque le
protecteur est réarmé automatiquement.
• Débranchez toujours le moteur du bloc d’alimentation avant
d’utiliser l’équipement.
• Lorsque le dispositif de remise en marche automatique débranche
le moteur du bloc d’alimentation, libérez de la pression en
tournant la soupape de PRIME/SPRAY à la position PRIME.
• Placez l’interrupteur MARCHE/ARRÊT (ON/OFF) de la pompe
en position ARRÊT (OFF).
NOTA : Il faut remédier à la cause de la surcharge avant
de faire redémarrer la pompe. Voir la section
Dépannage.
NOTA : Assurez-vous de vérier la continuité du terre après
le service est eectuée sur tous les composants
électriques. Utilisez un ohmmètre pour déterminer
s’il y a une continuité entre les pièces de métal
inerte accessibles du produit et la lame de mise à la
terre de la che de branchement.
Caractéristiques techniques
Poids .........................................................11,3 kg
Débit maximum ...................................1,25 liters/min
Source de puissance...........................Moteur électrique, totalement
fermé, refroidi par un ventilateur
Tension ....................................................Circuit d’une intensité minimale de
15 A, sous tension de 115 V c.a., à
fréquence de 60 Hz
Génératrice ............................................5000 W
Pression de service maximale .........2800 PSI (193 bar)
Capacités ................................................Pulvériser une grande variété
de peintures à huile ou au latex,
d’apprêts et de teintures
Français
Page 14

Table des matières
PRIME/SPRAY
d'alimentation
Commencer
Bouton du clapet de poussée
Consignes de sécurité ................................................................... 12
Directives de mise à la terre ....................................................................12
Description générale ..................................................................... 14
Caractéristiques techniques ...................................................................14
Installation ..................................................................................... 14
Fixation de l’embout sur le pistolet .....................................................14
Vérication du robinet de sortie (en option) ....................................14
Assemblage du exible de peinture ....................................................15
Procédure de décompression ....................................................... 15
Amorçage ....................................................................................... 15
Préparation à l’amorçage .........................................................................15
Assemblage de la trémie de peinture .................................................16
Fixation de tube de retour ......................................................................16
Amorçage de la pompe ............................................................................16
Pulvérisation .................................................................................. 17
Technique de pulvérisation ....................................................................17
Pratique ..........................................................................................................17
Nettoyage ...................................................................................... 18
Rangement pour la nuit ...........................................................................18
Rangement à long terme .........................................................................18
Maintenance .................................................................................. 20
Démontage et nettoyage de la soupape d’admission ..................20
Démontage et nettoyage de la soupape de sortie ........................20
Nettoyage du tamis ...................................................................................20
Dépannage ..................................................................................... 21
Liste de pièces ................................................................................ 32
Ensemble principal ....................................................................................32
Pompe à membrane ..................................................................................34
Ensemble tête de pompe ........................................................................36
Ensemble de trémie ...................................................................................37
Garantie Limitée ............................................................................ 38
Installation
Fixation de l’embout sur le pistolet
1. Pour verrouiller la détente, appuyez sur le verrou de la détente
de gauche à droite, en regardant l’arrière du pistolet.
Détente bloquée (le
pistolet ne pulvérise pas)
RISQUE ÉVENTUEL D’INJECTION. Ne vaporisez pas si la
protection d’embout n’est pas montée. Ne déclenchez
jamais le pistolet si l’embout n’est pas en position
de vaporisation ou débouché. Engagez toujours
le verrouillage de la gâchette du pistolet avant de
démonter, de remplacer ou de nettoyer l’embout.
2. Fileter l’embout sur le pistolet. Serrer d’abord l’écrou
manuellement, puis plus fermement au moyen d’une clé.
NOTA : Lorsqu’on xe l’embout au pistolet, il faut en
aligner le dispositif de protection tel qu’illustré à la
gure ci-dessous, puis le serrer au moyen d’une clé.
Détente débloquée
(le pistolet pulvérise)
Description générale
Ce pulvérisateur sous vide à hautes performances est un outil
électrique de précision utilisé pour pulvériser de nombreux types
de peintures. Lisez ce manuel et respectez-en les instructions
d’utilisation et de maintenance ainsi que l’information relative à la
sécurité.
Ensemble
de trémie
Bouton de
commande
de pression
Robinet
Tube de
retour
Soupape
de sortie
Cordon
à serrer le
protection
à l'angle
indiqué
pour pulvériser
dans la direction
voulue une fois
l'embout serré
Vérication du robinet de sortie (en option)
1. Appuyez fortement sur le bouton du clapet de poussée,
fourni en option, placé sur le côté du logement de la pompe,
pour vous assurer que le robinet à bille de sortie bouge sans
problème.
(en option)
14 © Titan Tool Inc. Tous droits réservés.
Français
Page 15

Assemblage du exible de peinture
Bouton de
PRIME/SPRAY
1. Fixez le exible à haute pression sur le pulvérisateur de peinture.
Utilisez une clé pour bien serrer le exible de peinture.
2. Fixez le pistolet de pulvérisation à l’autre extrémité du exible
à haute pression. Serrez fermement le tuyau sur le pistolet en
utilisant deux clés.
3. Branchez le pulvérisateur à une prise correctement reliée à la
terre ou à une rallonge pour service intensif reliée à la terre.
N’utilisez pas plus de 100 pieds (3 m) de cordon. Si vous devez
pulvériser loin d’une source d’électricité, utilisez un exible de
peinture plus long et non pas des rallonges plus longues. Utilisez
une rallonge d’un calibre minimum de 16 pour une longueur
maximum de 50 pieds (1,5 m) ou d’un calibre de 12 à 14 pour des
rallonges de longueur comprise entre 50 et 100 pieds (1,5 et 3 m).
Procédure de décompression
Assurez-vous de bien suivre la procédure de limitation
de pression lorsque vous arrêtez l’appareil pour une
raison quelconque, y compris lors de l’entretien ou
du réglage d’une pièce du circuit de vaporisation,
du remplacement ou du nettoyage des embouts de
vaporisation ou lors de la préparation au nettoyage.
1. Tournez le bouton de commande de pression dans le sens
contraire des aiguilles d’une montre jusqu’au réglage le plus bas.
Amoçage
Préparation à l’amorçage
1. Remplissez le soupape d’admission avec de l’eau ou avec une
huile ménagère uide.
2. Assurez-vous que le robinet PRIME/SPRAY est réglé sur PRIME
et que le bouton de commande de pression est tourné dans
le sens contraire des aiguilles d’une montre sur le réglage de
pression le plus bas.
3. Placez l’interrupteur ON/OFF du moteur sur ON.
4. Augmentez la pression en tournant le bouton de commande
de pression dans le sens des aiguilles d’une montre d’1/2 tour.
5. Forcez l’ouverture le soupape d’admission et fermez en
poussant dessus avec un tournevis ou le côté gomme d’un
crayon. Il doit s’enfoncer et ressortir d’environ 1/16 de pouce
(1,5 mm). Continuez jusqu’à ce que l’eau ou l’huile soit aspirée
par le pulvérisateur, ce qui humidiera les pièces mobiles et
détachera tout résidu de vieille peinture.
2. Tournez le robinet de PRIME/SPRAY sur PRIME.
3. Appuyez sur la détente du pistolet pour éliminer toute
4. Verrouiller le pistolet en mettant
© Titan Tool Inc. Tous droits réservés. 15
commande
de pression
Robinet
pression éventuellement restante dans le tuyau.
le verrou de détente à la position
appropriée.
RISQUE ÉVENTUEL D’INJECTION.
Ne vaporisez pas si la protection
d’embout n’est pas montée. Ne
déclenchez jamais le pistolet si
l’embout n’est pas en position de
vaporisation ou débouché. Engagez
toujours le verrouillage de la gâchette
du pistolet avant de démonter, de
remplacer ou de nettoyer l’embout.
6. Placez la paume de votre main sur l’entrée. Tournez le bouton
de commande de pression dans le sens des aiguilles d’une
montre jusqu’au réglage maximum. Vous devez sentir une
aspiration provenant du soupape d’entrée. Si ce n’est pas le
cas, reportez-vous au chapitre sur le nettoyage et la réparation
du soupape de sortie.
7. Tournez le bouton de commande de pression dans le
sens contraire des aiguilles d’une montre jusqu’au réglage
minimum de pression.
8. Placez l’interrupteur ON/OFF du moteur sur OFF.
Français
English
Page 16

Assemblage de la trémie de peinture
Raccord du tube de retour
Tube de retour
Tube de retour
C
PRIME/SPRAY
1. Alignez le bas de la trémie de peinture avec le soupape
d’admission leté du bloc de la pompe à peinture.
2. Tournez la trémie dans le sens des aiguilles d’une montre
pour la visser sur le soupape d’admission. Continuez à tourner
la trémie jusqu’à ce qu’elle soit bloquée sur le soupape
d’admission.
Amorçage de la pompe
1. Tournez le bouton de commande de pression dans le sens
contraire des aiguilles d’une montre jusqu’au réglage de
pression le plus bas.
NOTA : Vériez que les lets sont droits et que la trémie est
libre de tourner sur le robinet d’entrée. Veillez à ne
pas visser de travers.
3. Placez le tamis dans le bas de la trémie de peinture. Il se met
en place par un coup sec.
Fixation de tube de retour
1. Assurez-vous que l’interrupteur ON/OFF du moteur est placé
sur OFF.
2. Vissez le raccord du tube de retour fourni avec les manuels
dans l’orice du tube de retour, sur le côté de la pompe..
NOTA : Ne serrez pas trop. Serrez seulement à la main.
Certains lets seront visibles même après avoir
serré à fond.
3. Placez l’extrémité droite du tube de retour dans le raccord du
tube.
4. Vissez l’écrou du tube de retour sur le raccord du tube de
retour et serrez jusqu’à ce que le tube soit xé.
5. Placez l’extrémité en forme de crochet du tube de retour dans
le trou du couvercle de la trémie de peinture.
Bouton de
commande
de pression
Robinet
2. Retirez le couvercle de la trémie de peinture et remplissez la
trémie.
3. Tournez le robinet de PRIME/SPRAY sur PRIME.
4. Placez l’interrupteur ON/OFF du moteur sur ON.
5. Tournez le bouton de commande de pression dans le sens
des aiguilles d’une montre sur la position intermédiaire entre
demi-pression et pression totale. Laissez l’unité s’amorcer
pendant 1 à 2 minutes après que la peinture commence à
s’écouler dans le tube de retour.
IMPORTANT : Abaissez toujours la pression à zéro avant de
modifier la position du robinet de PRIME/SPRAY. Vous pourriez
sinon endommager la membrane de la pompe à peinture.
IMPORTANT : Si le bouton de commande de pression est placé
sur zéro et que le robinet dde PRIME/SPRAY est encore sur
SPRAY pendant que le pulvérisateur est en marche, il y aura une
pression élevée dans le tuyau et dans le pistolet de pulvérisation
jusqu’à ce que le robinet de PRIME/SPRAY soit placé sur la
position PRIME ou jusqu’à ce que la pression soit dégagée sur le
pistolet.
ouvercle de la trémie
16 © Titan Tool Inc. Tous droits réservés.
E
Français
Page 17

Pulvérisation
Revêtement également répartit
régulier et à vitesse constante.
Couche épaisse
Ne échissez pas votre poignet pendant la pulvérisation.
Couche légèreCouche légère
Environ 25 à 30 cm
Manière correcte d'enclencher le pistolet de pulvérisation
Début du
assage
du passage
sur la gâchette
la gâchette
itesse constante
PRIME/SPRAY
Technique de pulvérisation
Pour obtenir une peinture d’un ni impeccable il est essentiel que le
produit soit également réparti sur toute la surface. Pour y parvenir,
procédez par applications régulières. Déplacez votre bras à vitesse
constante et gardez toujours le pistolet de pulvérisation à une
distance constante de la surface. Placez votre pistolet de telle sorte
que la tête de pulvérisation soit à une distance d’environ 25 à 30 cm
(10 à 12 po) de la surface.
Environ 25 à 30 cm
(10 à 12 po)
Déplacez votre bras d’un mouvement
Gardez le pistolet de pulvérisation à angle droit par rapport à la
surface. Il vous faut pour cela déplace tout votre bras de haut en bas
et non pas seulement échir votre poignet.
Déplacez votre
bras d’un
mouvement régulier
Appuyez
Environ 25 à 30 cm
Gardez une
(10 à 12 po)
Relâchez
Fin
Chevauchez chaque passage d’environ 50 %. Vous obtiendrez ainsi
un revêtement uniforme.
Lorsque vous avez terminé de peindre, bloquez le pistolet, tournez le
bouton de commande de pression dans le sens contraire des aiguilles
d’une montre sur la pression la plus faible et placez le robinet de PRIME/
SPRAY sur PRIME. Placez l’interrupteur du moteur en position ARRÊT
(OFF) puis débranchez le pulvérisateur.
Si vous pensez être absent pendant plus d’une heure, suivez la
procédure de nettoyage rapide décrite dans la section Nettoyage du
présent manuel.
Pratique
1. Assurez-vous que le exible de peinture ne comporte pas de
nœuds et n’est pas près d’objets coupants.
2. Tournez le bouton de commande de pression dans le sens
contraire des aiguilles d’une montre jusqu’au réglage le plus bas.
Placez le pistolet de pulvérisation perpendiculaire à la surface, an
d’éviter qu’une extrémité de chaque passage soit plus épaisse que
l’autre.
(10 à 12 pi)
Bonne
technique
Mauvaise
technique
Appuyez sur la gâchette au début et à la n de chaque passage. Vous
éviterez de gaspiller de la peinture ou d’avoir une accumulation de
peinture à l’extrémité du passage. N’enclenchez pas le pistolet au
milieu d’un passage. Ceci entraînerait une pulvérisation inégale et un
revêtement irrégulier.
© Titan Tool Inc. Tous droits réservés. 17
Bouton de
commande
de pression
Robinet
3. Tournez le robinet de PRIME/SPRAY sur SPRAY.
4. Tournez le bouton de commande de pression (2) dans le
sens des aiguilles d’une montre jusqu’au réglage maximum.
Le exible de peinture doit se raidir quand la peinture
commence à s’écouler.
5. Débloquez le verrou de
la détente du pistolet en
tournant le commutateur
de sorte qu’il soit parallèle
Forme de pulvérisation correcte
à la poignée.
6. Appuyez sur la détente
du pistolet pour purger le
tuyau d’air.
7. Quand la peinture
arrive dans l’embout de
pulvérisation, faites un
Traînées de peinture
test pour en vérier les résultats.
8. Utilisez le réglage de pression le plus bas possible pour
obtenir une bonne pulvérisation. Si la pression est trop élevée,
la pulvérisation sera trop ne. Si la pression est trop basse, des
traînées apparaîtront ou alors la peinture s’étalera en faisant
des taches au lieu d’une ne pulvérisation.
Français
English
Page 18

Nettoyage
Rangement pour la nuit
Arrêt
1. Tournez le bouton de commande de pression dans le sens
contraire des aiguilles d’une montre jusqu’au réglage minimum.
2. Tournez le robinet de PRIME/SPRAY sur PRIME pour enlever la
pression du système.
3. Appuyez sur la détente du pistolet pour éliminer toute
pression éventuellement restante dans le exible.
4. Verrouiller le pistolet en mettant
le verrou de détente à la position
appropriée.
5. Placez l’interrupteur ON/OFF du moteur
sur OFF et débranchez le pulvérisateur.
6. Pour les peintures au latex, versez
lentement tasse d’eau sur la peinture
pour éviter qu’elle ne sèche. Pour les
autres types de peintures, scellez le
récipient ou la trémie (avec son couvercle) de peinture en
laissant le tube de retour dans la peinture.
7. Enveloppez le pistolet pulvérisateur dans un chion humide
et placez-le dans un sac en plastique. Fermez bien le sac
hermétiquement.
8. Placez le pulvérisateur dans un endroit sûr à l’abri du soleil
pour un rangement à court terme.
Reprise du travail
1. Retirez le pistolet du sac en plastique.
2. Remuez l’eau dans la peinture pour les peintures au latex.
Retirez le couvercle de la trémie ou du récipient de peinture et
remuez la peinture pour tous les autres types de peinture.
6. Testez le pulvérisateur sur une chute et commencez à
pulvériser.
Stockage à long terme
Ne laissez pas la peinture s’accumuler sur le moteur,
sous peine de le faire surchauer. Ne mettez pas de
solvants inammables en contact avec le moteur car ils
pourraient s’enammer.
NOTA : Vous aurez besoin d’un seau, d’une solution de
nettoyage, d’une brosse à dents, d’une clé et de
chions.
NOTA : Si vous pulvérisez avec de la peinture au latex,
utilisez de l’eau tiède savonneuse pour le
nettoyage. Si vous utilisez une peinture alkyde
ou à l’huile, utilisez des essences minérales ou un
produit diluant pour peinture.
IMPORTANT : N’utilisez pas d’essences minérales ni de diluants
avec une peinture au latex car le mélange se transformerait en
une substance gélatineuse difficile à enlever.
Nettoyage de la trémie de peinture
1. Verrouiller le pistolet en mettant
le verrou de détente à la position
appropriée.
2. Tournez le bouton de commande de
pression dans le sens contraire des
aiguilles d’une montre jusqu’au réglage
minimum.
3. Tournez le robinet de PRIME/SPRAY sur
PRIME.
4. Placez l’interrupteur ON/OFF du moteur sur OFF.
5. Dirigez le tube de retour dans le récipient de peinture
d’origine.
6. Placez l’interrupteur ON/OFF du moteur sur ON.
7. Tournez le bouton de commande de pression sur la moitié
de la pression maximum. De cette manière, la peinture
restante dans la trémie de peinture est aspirée dans la pompe
et remonte dans le tube de retour et dans le récipient de
peinture.
8. Tournez le bouton de commande de pression dans le
sens contraire des aiguilles d’une montre jusqu’au réglage
minimum de pression.
9. Actionnez le pistolet pour supprimer la pression et verrouillez-le.
10. Retirez le protège-embout et l’embout de pulvérisation et
placez-les dans un récipient d’eau ou de solvant approprié
pour le type de peinture utilisée.
11. Remplissez la trémie de peinture d’eau ou d’un solvant
approprié pour le type de peinture que vous utilisez.
12. Dirigez le tuyau de retour dans un seau pour résidus.
13. Augmentez la pression à la moitié de la pression maximale.
Laissez l’eau ou le solvant circuler pendant 2-3 minutes pour
évacuer la peinture hors de la pompe, de la trémie et du tuyau
de retour.
Nettoyage du tuyau de peinture
1. Pour économiser la peinture restée dans le tuyau, débloquez
le verrou de la détente du pistolet et actionnez le pistolet avec
précautions, avec l’embout enlevé, à l’intérieur du récipient de
peinture.
3. Vériez que le robinet de PRIME/SPRAY est réglé sur PRIME et
que la pression est réduite au maximum.
4. Branchez le pulvérisateur et placez l’interrupteur ON/OFF du
moteur sur ON.
5. Une fois le pulvérisateur amorcé, tournez le robinet de PRIME/
SPRAY sur SPRAY et tournez progressivement le bouton
de commande de pression dans le sens des aiguilles d’une
montre pour faire monter la pression.
18 © Titan Tool Inc. Tous droits réservés.
Français
Page 19

2. Tournez le bouton de commande de pression dans le
sens contraire des aiguilles d’une montre jusqu’au réglage
minimum de pression.
3. Tournez le robinet de PRIME/SPRAY sur SPRAY.
4. Tournez lentement le bouton de commande de pression
jusqu’à ce que la peinture commence à couler dans le seau.
Dès que l’eau ou le solvant commence à arriver dans le seau,
lâchez la détente.
5. Remplacez l’eau ou le solvant par de l’eau ou du solvant
propre, dirigez le pistolet sur la paroi du seau pour résidus
et continuez à faire circuler le liquide pendant 5 minutes
pour bien nettoyer le tuyau, la pompe et le pistolet de
pulvérisation.
6. Tournez le bouton de commande de pression dans le sens
contraire des aiguilles d’une montre jusqu’au réglage le plus bas.
7. Tournez le robinet de PRIME/SPRAY sur PRIME.
8. Appuyez sur la détente du pistolet pour éliminer toute
pression éventuellement restant dans le exible.
9. Bloquez la détente du pistolet en tournant le verrou de la
détente à fond vers l’avant.
10. Placez l’interrupteur ON/OFF du moteur sur OFF.
Nettoyage du pistolet
1. Retirez le pistolet de pulvérisation du tuyau de peinture en
vous servant de deux clés réglables.
2. Retirez le logement de ltre du pistolet. Placez le pistolet et le
ltre dans un récipient rempli d’eau ou de solvant.
3. Nettoyez l’embout de pulvérisation et le ltre du pistolet avec
une brosse douce.
4. Remontez le pistolet et le ltre. Assemblez l’embout de
pulvérisation dans la position de nettoyage avec le èche
dirigée vers l’arrière du pistolet.
10. Tournez le bouton de commande de pression dans le sens
contraire des aiguilles d’une montre jusqu’au réglage le plus
bas.
11. Tournez le robinet de PRIME/SPRAY sur PRIME.
12. Appuyez sur la détente du pistolet pour éliminer toute
pression éventuellement restant dans le tuyau.
13. Bloquez la détente du pistolet en tournant le verrou de la
détente à fond vers l’avant.
14. Placez l’interrupteur ON/OFF du moteur sur OFF.
Nettoyage nal
1. Retirez l’ensemble de l’embout.
2. Placez le moteur sur ON.
3. Tournez le robinet de PRIME/SPRAY sur SPRAY.
4. Tournez le bouton de commande de pression dans le sens des
aiguilles d’une montre sur la moitié de la pression.
5. Actionnez le pistolet dans le seau à déchets jusqu’à ce que la
trémie ou le seau de solvant soit vide.
6. Remplissez la trémie ou le seau de solvant et continuez à
rincer le système jusqu’à ce que la solution sortant du pistolet
soit propre.
7. Verrouillez le pistolet et tournez le bouton de commande de
pression dans le sens contraire des aiguilles d’une montre
jusqu’au réglage le plus bas.
8. Tournez le rrobinet de PRIME/SPRAY sur PRIME.
9. Retirez la trémie ou le groupe d’aspiration du robinet d’entrée.
10. Nettoyez le letage du robinet d’entrée à l’aide d’un chion
humide.
11. Remplissez le soupape d’admission avec de l’huile ménagère
uide.
5. Fixez le exible de peinture sur le pistolet et serrez à l’aide de
deux clés.
6. Placez l’interrupteur ON/OFF du moteur sur ON.
7. Débloquez la détente du pistolet en tournant le verrou de
la détente de façon à ce qu’il soit parallèle à la poignée du
pistolet.
8. Tournez le robinet de PRIME/SPRAY sur SPRAY et dirigez le
pistolet sur la paroi du seau à déchets.
9. Déclenchez le pistolet et tournez progressivement le bouton
de commande de pression dans le sens des aiguilles d’une
montre jusqu’à la moitié de la pression. Continuez à actionner
le pistolet pendant environ 30 secondes.
12. Tournez le robinet de PRIME/SPRAY sur SPRAY pour répartir
l’huile.
NOTA : Le nettoyage et l’huilage corrects de la pompe après
l’emploi sont les principales mesures à prendre pour
garantir le fonctionnement correct du pulvérisateur
après son stockage.
13. Tournez le bouton de commande de pression dans le sens
contraire des aiguilles d’une montre jusqu’au réglage le plus
bas.
14. Tournez le robinet de PRIME/SPRAY sur PRIME.
15. Appuyez sur la détente du pistolet pour éliminer toute
pression éventuellement restante dans le tuyau.
16. Bloquez la détente du pistolet en tournant le verrou de la
détente à fond vers l’avant.
17. Placez l’interrupteur ON/OFF du moteur sur OFF.
18. Retirez le ltre de la trémie et nettoyez-le dans de l’eau propre
ou un solvant approprié. Utilisez une brosse douce.
19. Ré-installez la trémie ou le groupe d’aspiration sur le robinet
d’entrée et ré-installez la trémie ou le groupe d’aspiration sur
le robinet d’entrée.
20. Essuyez toute l’unité, le tuyau et le pistolet avec un chion
humide pour enlever les dépôts de peinture.
© Titan Tool Inc. Tous droits réservés. 19
Français
English
Page 20

Maintenance
Corps du soupape
Joint
Suivez ces instructions si vous rencontrez des problèmes indiqués
dans la section dépannage.
Dépose et nettoyage de soupape d’admission
1. Placez l’interrupteur ON/OFF du moteur sur OFF.
2. Retirez le robinet d’entrée à l’aide d’une clé à douille de 27
millimètres ou d’une clé polygonale.
NOTA : Ce ressort est fabriqué selon une tension spécique.
Ne le remplacez pas par un ressort non homologué.
Reportez-vous au schéma des pièces de la pompe
à peinture pour obtenir la référence de la pièce de
rechange.
3. Retirez l’ensemble siège et bille .
4. Nettoyez soigneusement toutes les pièces. Si la bille ou le
siège montrent des signes d’usure ou d’endommagement,
remplacez-les par des pièces neuves. Cette bille en carbure
doit s’accoupler étroitement à son siège pour que le robinet
fonctionne correctement.
5. Enduisez toutes les pièces d’une ne couche d’huile uide
avant de les remonter.
3. Testez le mouvement du robinet en poussant dessus, sur le
côté ouvert du logement du robinet, avec un tournevis ou
le côté gomme d’un crayon. Il doit bouger d’environ 1/16 de
pouce (0,15 mm). Si ce n’est pas le cas, le robinet doit être
nettoyé ou changé.
NOTA : Le soupape d’admission doit être huilé après
chaque utilisation. Cela réduit, voire supprime les
problèmes d’amorçage lors de l’utilisation suivante
du pulvérisateur.
4. Nettoyez bien le soupape à l’eau ou avec un solvant
approprié. Utilisez une petite brosse.
5. Si le soupape a été correctement nettoyé et que de l’eau
goutte de la partie inférieure, c’est qu’il est usé et doit être
changé. Un robinet à bonne assise rempli d’eau et tenu à la
verticale ne goutte pas.
6. Installez un soupape neuf ou nettoyé dans le bloc de la
pompe et remplissez-le avec de l’huile uide ou du solvant.
NOTA : Vous devrez aligner la strie du siège avec la rainure
du logement de la pompe au remontage.
6. Laissez la bille du soupape tomber dedans.
7. Insérez la butée de la bille et le ressort et replacez le corps du
soupape. Assurez-vous de placer correctement le joint torique
et que la languette du bouchon s’adapte bien dans le ressort.
8. Serrez fermement le corps du soupape avec une clé réglable.
Ne serrez pas trop.
Siége
Bille
Ressort
Butée de
la bille
Joint torique
Nettoyage du tamis
Le tamis placé dans le bas de la trémie de peinture peut exiger un
nettoyage périodique. Vériez-le à chaque fois que vous ajoutez de
la peinture. Retirez le tamis en le tirant hors de la trémie avec des
pinces. Nettoyez-le à l’eau ou au solvant et avec une brosse à poils
doux si besoin est.
Dépose et nettoyage de soupape de sortie
Il peut s’avérer nécessaire de déposer et de nettoyer le soupape de
sortie ou de remplacer certaines de ses pièces intérieures si elles sont
usées.
1. Retirez le corps du soupape de sortie avec une clé.
2. Retirez et nettoyez la butée de la bille et le petit ressort à
l’intérieur du robinet en vous servant d’un crochet métallique
ou d’une pince. Remplacez le ressort s’il est cassé ou usé.
20 © Titan Tool Inc. Tous droits réservés.
Français
Page 21

Dépannage
Problème
A. Le pulvérisateur ne démarre
pas.
B. Le pulvérisateur démarre mais
n’aspire pas la peinture lorsque
le robinet de PRIME/SPRAY est
réglé sur PRIME.
C. Le pulvérisateur aspire la
peinture mais la pression tombe
lorsque le pistolet est actionné.
D. Le pulvérisateur ne s’éteint pas.
E. Le pistolet de pulvérisation fuit.
F. L’embout fuit.
G. Le pistolet de pulvérisation ne
pulvérise pas.
H. Il y a des traînées dans la couche
de peinture.
I. La surcharge thermique
se déclenche et arrête le
pulvérisateur.
Cause
1. Le pulvérisateur n’est pas branché.
2. L’interrupteur ON/OFF est placé sur OFF.
3. La tension provenant de la prise murale est
trop basse ou il n’y a pas de tension.
4. Le pulvérisateur a été éteint alors qu’il était
encore sous pression.
5. La rallonge est endommagée ou sa capacité
est trop faible.
6. La surcharge thermique du pulvérisateur s’est
déclenchée.
7. Il y a un problème de moteur.
1. L’appareil ne s’amorce pas correctement ou
perd de l’amorçage.
2. La trémie de peinture est vide
3. Le ltre de la trémie est bouché.
4. Le souape d’admission est coincé.
5. Le soupape de sortie est coincé.
6. Le robinet de PRIME/SPRAY est bouché.
7. Le robinet d’entrée est usé ou endommagé.
8. Il y a un problème de membrane.
9. Le niveau d’huile hydraulique est trop bas ou
il n’y a pas d’huile.
1. L’embout du pulvérisation est usé.
2. Le ltre de la trémie est bouché.
3. Le pistolet ou le ltre de l’embout de
pulvérisation est bouché.
4. La peinture est trop épaisse ou trop
grumeleuse.
5. Le soupape de sortie est sale ou usé.
6. Le soupape d’admission est endommagé ou
usé.
1. La bille ou le siège de la bille du robinet
d’entrée ou de sortie est usé.
2. Des corps étrangers ou de la peinture se sont
accumulés entre la bille et le siège.
3. Des corps étrangers ou de la peinture se sont
accumulés entre la robinet de PRIME/SPRAY.
1. Des pièces internes du pistolet sont usées ou
sales.
1. L’embout est mal assemblé.
2. Un joint est usé.
1. L’embout de pulvérisation, le ltre du pistolet
ou le ltre de l’embout est bouché.
2. L’embout de pulvérisation est sur la position
Nettoyage.
1. Le réglage de pression est trop bas.
2. Le pistolet, l’embout ou le ltre de la trémie
est bouché.
3. L’embout est usé.
4. La peinture est trop épaisse.
1. Le moteur a surchaué.
2. La rallonge est trop longue ou d’un calibre
trop petit.
3. De la peinture s’est accumulée sur le moteur.
4. Le moteur a été démarré alors que le
pulvérisateur était sous pression.
5. Le pulvérisateur est resté au soleil.
Solution
1. Branchez le pulvérisateur.
2. Placez l’interrupteur ON/OFF sur ON.
3. Testez correctement la tension de l’alimentation
électrique.
4. Tournez le robinet de PRIME/SPRAY sur PRIME.
5. Remplacez la rallonge.
6. Laissez le moteur refroidir et placez le pulvérisateur à un
endroit plus frais.
7. Emmenez le pulvérisateur à un Centre technique agréé
Titan.
1. Tentez de nouveau d’amorcer l’appareil.
2. Remplissez la trémie de peinture.
3. Nettoyez le ltre de la trémie.
4. Nettoyez le souape d’admission.
5. Nettoyez le souape de sortie et changez les pièces usées.
6. Emmenez le pulvérisateur à un Centre technique agréé
Titan.
7. Changez le souape d’admission.
8. Emmenez le pulvérisateur à un Centre technique agréé
Titan.
9. Emmenez le pulvérisateur à un Centre technique agréé
Titan.
1. Remplacez l’embout de pulvérisation par un embout
neuf.
2. Nettoyez le ltre de la trémie.
3. Nettoyez ou remplacez le ltre qui convient. Conservez
toujours des ltres supplémentaires à portée de main.
4. Diluez ou ltrez la peinture.
5. Nettoyez ou remplacez le robinet de sortie.
6. Changez le souape d’admission.
1. Emmenez le pulvérisateur à un Centre technique agréé
Titan.
2. Emmenez le pulvérisateur à un Centre technique agréé
Titan.
3. Remplacez le robinet de PRIME/SPRAY ou emmenez le
pulvérisateur à un Centre technique agréé Titan.
1. Emmenez le pulvérisateur à un Centre technique agréé
Titan.
1. Vériez l’ensemble de l’embout et assemblez-le
correctement.
2. Remplacez le joint.
1. Nettoyez l’embout de pulvérisation, le ltre du pistolet
ou le ltre de l’embout.
2. Placez l’embout sur la position SPRAY.
1. Augmentez la pression.
2. Nettoyez les ltres.
3. Changez l’embout de pulvérisation.
4. Diluez la peinture.
1. Laissez refroidir pendant 30 minutes.
2. Laissez refroidir pendant 30 minutes et remplacez la
rallonge par une rallonge plus courte ou avec un cordon
de calibre plus élevé.
3. Nettoyez la peinture sur le moteur.
4. Redémarrez le pulvérisateur sur le mode PRIME.
5. Mettez le pulvérisateur à l’abri du soleil.
NOTA : Le moteur électrique doit toujours rester propre et sec. La peinture agit comme un
isolant. Trop de peinture sur le moteur fait surchauer ce dernier.
NOTA : Assurez-vous de vérier la continuité du terre après le service est eectuée sur tous
les composants électriques.
Utilisez un ohmmètre pour déterminer s’il y a une continuité entre les pièces de métal
inerte accessibles du produit et la lame de mise à la terre de la che de branchement.
© Titan Tool Inc. Tous droits réservés. 21
Français
English
Page 22

Información de seguridad importante
Receptáculo conectado a tierra
Tapa de la caja de receptáculo conectada a tierra
Lea toda la información de seguridad antes de
operar el equipo. Guarde estas insturcciones.
Indica una situación peligrosa que, de no evitarse,
puede causar la muerte o lesiones graves.
Para reducir los riesgos de incendios, explosiones,
descargas eléctricas o lesiones a las personas, lea y
entienda todas las instrucciones incluidas en este
manual. Familiarícese con los controles y el uso
adecuado del equipo.
Instrucciones para la conexión a tierra
Este producto debe conectarse a tierra. En caso de un cortocircuito
eléctrico, la conexión a tierra reduce el riesgo de choque eléctrico
al aportar un alambre de escape para la corriente eléctrica. Este
producto está equipado con un cable que tiene alambre a tierra con
un enchufe a tierra adecuado. Debe usarse el enchufe para conectar a
un receptáculo que esté debidamente instalado y conectado a tierra
en conformidad con los códigos y las ordenanzas locales.
ADVERTENCIA - La instalación incorrecta del enchufe a
tierra puede ocasionar un riesgo de choque eléctrico.
Si es necesario reparar o cambiar el cable o el enchufe, no conecte
el cable verde a tierra a ninguno de las terminales de espiga plana.
El cable con aislamiento de color verde por fuera con o sin rayas
amarillas es el alambre a tierra y debe conectarse a la espiga a tierra.
Consulte a un electricista o técnico de servicio capacitado si las
instrucciones para la conexión a tierra no se entienden claramente
o si tiene dudas en cuanto a que el producto esté debidamente
conectado a tierra. No modique el enchufe que se incluye. Si
el enchufe no encaja en el receptáculo, pida a un electricistas
capacitado que instale un receptáculo adecuado.
Este producto es para utilizarse en un circuito de 120 voltios
nominales y tiene un enchufe a tierra que tiene un aspecto similar al
ilustrado más abajo. Asegúrese que el producto esté conectado a un
tomacorriente que tenga la misma conguración que el enchufe. No
deben utilizarse adaptadores para este producto.
alrededor de la zona de pulverización se conectarán a tierra
para protegerlos frente a descargas estáticas y chispas. Utilice
solamente mangueras para pulverizadores de pintura airless
(sin aire) de alta presión conductoras o con toma a tierra
especicadas por el fabricante.
• Compruebe que todos los recipientes y sistemas de recogida
están conectados a tierra para evitar descargas eléctricas.
• Conecte a una salida con toma a tierra y utilice cables
alargadores puestos a tierra. No utilice un adaptador de 3 a 2.
• No utilice pintura o disolvente que contenga hidrocarburos
halogenados, como cloro, fungicida blanqueador, cloruro de
metileno y tricloroetano. No son compatibles con el aluminio.
Póngase en contacto con el proveedor del material para
conocer su compatibilidad con el aluminio.
• Mantenga la zona de pulverización bien ventilada. Asegúrese
de que circula aire fresco por la zona para evitar que se
acumulen vapores inamables en el aire de la zona de
pulverización. Ponga el conjunto de la bomba en una zona
bien ventilada. No pulverice el conjunto de la bomba.
• No fume en la zona de pulverización.
• No encienda interruptores de luces, motores ni productos
similares que puedan producir chispas en la zona de
pulverización.
• Mantenga la zona limpia y despejada de botes de pintura y
disolventes, trapos y otros materiales inamables.
• Infórmese del contenido de la pintura y de los disolventes
que pulverice. Lea las hojas de datos sobre seguridad de los
materiales (MSDS) y las etiquetas en los botes de pintura y
disolvente. Siga las instrucciones de seguridad del fabricante
de la pintura y del disolvente.
• Coloque la bomba al menos a 7,62 metros (25 pies) del objeto
que se va a pulverizar en una zona bien ventilada (añada más
manguera si fuera necesario). Los vapores inamables suelen
ser más pesados que el aire. La zona del suelo debe estar muy
bien ventilada. La bomba contiene piezas que forman arcos
que producen chispas y pueden inamar los vapores.
• El plástico puede producir chispas estáticas. Nunca utilice
plástico para cercar la zona de pulverización. No utilice
cortinas de plástico mientras pulveriza material inamable.
• Deberá contar con equipos extintores de incendios que
funcionen correctamente.
ADVERTENCIA: EXPLOSIÓN O INCENDIO
Los vapores de solventes y pinturas pueden explotar o
inamarse. Pueden producirse daños materiales, lesiones
graves o ambos.
PREVENCIÓN:
• No pulverice materiales inamables ni combustibles cerca
de llamas desnudas, pilotos o fuentes de ignición como
objetos calientes, cigarrillos, motores, equipos eléctricos
o electrodomésticos. Evite producir chispas al conectar y
desconectar los cables de alimentación.
• No pulverice ni limpie con líquidos que tengan un punto
de inamación por debajo de 38 ºC (100 °F). El punto de
inamación es la temperatura a la que un uido puede
producir vapor suciente como para incendiarse.
• La pintura o disolvente que pase por el equipo puede
producir electricidad estática. La electricidad estática
supone un riesgo de incendio o explosión en presencia de
emanaciones de pintura o disolvente. Todas las piezas del
sistema pulverizador, incluyendo la bomba, el conjunto de
mangueras, la pistola pulverizadora y los objetos dentro y
22 © Titan Tool Inc. Todos los derechos reservados.
Pata a tierra
ADVERTENCIA: LESIÓN POR INYECCIÓN
El ujo de pintura a alta presión que produce este
equipo puede perforar la piel y los tejidos subyacentes,
ocasionando lesiones graves y posible amputación.
CONSULTE A UN MÉDICO INMEDIATAMENTE.
PREVENCIÓN:
• No apunte con la pistola ni pulverice sobre ninguna persona ni
animal.
• Mantenga las manos y el resto del cuerpo lejos de la descarga.
Por ejemplo, no trate de detener fugas con ninguna parte de
su cuerpo.
• NUNCA ponga la mano frente a la pistola. Los guantes no
protegen contra una lesión por inyección.
• SIEMPRE mantenga la protección de la boquilla en su sitio al
rociar. La protección de la boquilla sirve principalmente de
dispositivo de advertencia.
• Utilice solamente la boquilla especicada por el fabricante.
• Tenga cuidado al limpiar y cambiar las boquillas. Si la boquilla
se atasca durante la pulverización, ponga SIEMPRE el seguro
del gatillo de la pistola, apague la bomba y libere toda la
presión antes de reparar, limpiar el protector o la boquilla o
cambiar la boquilla. La presión no se libera apagando el motor.
Para liberar la presión hay que poner la manija de la válvula
PRIME/SPRAY en PRIME. Consulte el Procedimiento de Alivio
de Presión que se describe en el manual de la bomba.
Español
Page 23

Información de seguridad importante
• No deje el aparato con corriente ni con presión cuando nadie
esté pendiente de ella. Cuando no utilice el aparato, apáguelo
y libere la presión siguiendo las instrucciones del fabricante.
• La pulverización a alta presión puede inyectar toxinas en el
cuerpo y producir daños graves en el mismo. En caso de que
esto ocurra, visite a un médico inmediatamente.
• Compruebe las mangueras y las piezas en busca de daños;
una fuga puede inyectar material en la piel. Inspeccione la
manguera antes de cada uso. Sustituya las mangueras o las
piezas dañadas. Por razones de funcionamiento, seguridad
y duración, emplear únicamente mangueras de alta presión
originales de TITAN.
• Este sistema es capaz de producir 2800 PSI / 193 Bar. Utilice
solamente piezas de repuesto o accesorios especicados por
el fabricante y con una capacidad nominal de 2800 PSI como
mínimo. Entre ellos se incluyen boquillas pulverizadoras,
protectores para las boquillas, pistolas, alargadores, racores y
mangueras.
• Ponga siempre el seguro del gatillo cuando no esté
pulverizando. Verique que el seguro del gatillo funciona
correctamente.
• Antes de utilizar el aparato, verique que todas las conexiones
son seguras.
• Aprenda a detener el aparato y a liberar la presión
rápidamente. Familiarícese a conciencia con los controles. La
presión no se libera apagando el motor. Para liberar la presión
hay que poner la manija de la válvula PRIME/SPRAY en
PRIME. Consulte el Procedimiento de Alivio de Presión que se
describe en el manual de la bomba.
• Quite siempre la boquilla pulverizadora antes de enjuagar o
limpiar el sistema.
NOTA PARA EL MÉDICO: La inyección a través de la piel es una
lesión traumática. Es importante tratar la lesión tan pronto sea
posible. NO retrase el tratamiento para investigar la toxicidad.
La toxicidad es un factor a considerar con ciertos revestimientos
inyectados directamente en la corriente sanguínea. Puede ser
aconsejable consultar con un cirujano plástico o un cirujano
especialista en reconstrucción de las manos.
ADVERTENCIA: VAPORES PELIGROSOS
Las pinturas, solventes, insecticidas y demás materiales
pueden ser nocivos si se inhalan o toman contacto con
el cuerpo. Los vapores pueden causar náuseas graves,
desmayos o envenamiento.
PREVENCIÓN:
• Use un respirador o mascarilla si pueden inhalarse los vapores.
Lea todas las instrucciones suministradas con la mascarilla
para revisar que brinde la protección necesaria.
• Use lentes protectores.
• Use ropa protectora según lo indique el fabricante del
revestimiento.
• No retuerza ni doble la manguera en exceso. En la manguera
airless pueden aparecer fugas a causa del desgaste, de
retorcimientos o de un mal uso. Una fuga puede inyectar
material en la piel.
• No exponga la manguera a temperaturas o presiones que
superen las especicadas por el fabricante.
• No utilice la manguera como elemento de fuerza para tirar del
equipo o levantarlo.
• Utilice la presión más baja posible para enjuagar el equipo.
• Cumpla todos los reglamentos locales, estatales y nacionales
pertinentes relativos a ventilación, prevención de incendios y
funcionamiento.
• Las normas sobre seguridad del gobierno de los Estados
Unidos se han adoptado al amparo de la Ley de salud y
seguridad ocupacional (OSHA). Deben consultarse tres
normas, particularmente la sección 1910 de las Normas
generales y la sección 1926 de las Normas sobre construcción.
• Cada vez que vaya a utilizar el equipo, compruebe antes todas
las mangueras en busca de cortes, fugas, abrasión o bultos en
la cubierta. Compruebe el movimiento de los acoplamientos
y si están dañados. Sustituya inmediatamente una manguera
si descubre alguna de estas anomalías. No repare nunca
una manguera de pintura. Sustitúyala por una manguera
conductora a alta presión.
• No pulverice al aire libre si hace viento.
• Desenchufe siempre el cable antes de trabajar en el equipo.
IMPORTANTE: La bomba del diafragma se proporciona con
un reinicio automático de protección térmica. Si ocurre una
sobrecarga, el reinicio automático de protección térmica
desconecta el motor del suministro de energía eléctrica.
• Cuando el protector se reinicie automáticamente, el motor
volverá a arrancar sin advertencia.
• Desconecte siempre el motor del suministro de energía
eléctrica antes de trabajar en el equipo.
• Cuando el reinicio automático de protección térmica
desconecte el motor del suministro de energía eléctrica,
libere la presión girando la válvula PRIME/SPRAY (CEBAR/
PULVERIZAR) a la posición PRIME.
• Gire el interruptor ON/OFF (ENCENDIDO/ APAGADO) de la
bomba a la posición OFF.
NOTA: La causa de la sobrecarga se debe corregir antes de
volver a arrancar. Consulte la sección de Solución
de problemas.
NOTA: Asegúrese de revisar la continuidad de la puesta a
tierra después del servicio se realiza en cualquiera
de los componentes eléctricos.
Use un ohmímetro para determinar que haya
continuidad entre las piezas accesibles sin corriente
del producto y la clavija de conexión a tierra del
enchufe de acoplamiento.
ADVERTENCIA: GENERAL
Puede causar daños materiales o lesiones graves.
PREVENCIÓN:
• Cuando pinte, lleve siempre guantes, protección para los ojos,
ropa y un respirador o máscara adecuados.
• Nunca utilice el aparato ni pulverice cerca de niños. Mantenga
el equipo alejado de los niños en todo momento.
• No se estire demasiado ni se apoye sobre un soporte
inestable. Mantenga los pies bien apoyados y el equilibrio en
todo momento.
• No se distraiga y tenga cuidado con lo que hace.
• No utilice el aparato si está fatigado o se encuentra bajo la
inuencia del alcohol o de las drogas.
© Titan Tool Inc. Todos los derechos reservados. 23
Datos técnicos
Peso ..........................................................11,3 kg
Intensidad volumétrica máx............1,25 l/min
Suminstro eléctrico .............................Motor eléctrico, totalmente
cerrado, se enfría con un ventilador
Tensión ....................................................Circuito de 15 amp minimo y
corriente de 115 VAC, 60 Hz.
Generado ................................................5000 W
Presión de servicio máxima .............2800 PSI (193 bar)
Capacidades ..........................................Atomiza una variedad de pinturas,
a base de aceite y de látex,
imprimadores y tintes.
Español
Page 24

Tabla de contenido
PRIME/SPRAY
alimentación
la protector
Botón de la válvula de empuje
Precauciones de seguridad ........................................................... 22
Instrucciones de conexión a tierra .......................................................22
Descripción general ...................................................................... 24
Datos técnicos .............................................................................................24
Conguración ................................................................................ 24
Acople de la boquilla a la pistola ..........................................................24
Comprobación de la válvula de salida (opcional) ...........................24
Acople de la manguera de pintura ......................................................25
Procedimiento de Alivio de Presión ............................................. 25
Cebado ........................................................................................... 25
Preparación para cebar ............................................................................25
Montaje de la tolva de pintura ..............................................................26
Acople del tubo de retorno ....................................................................26
Cebado de la bomba .................................................................................26
Pulverización ................................................................................. 27
Técnica de pulverización .........................................................................27
Práctica ...........................................................................................................27
Limpieza ......................................................................................... 28
Almacenamiento durante la noche .....................................................28
Almacenamiento a largo plazo ..............................................................28
Mantenimiento .............................................................................. 30
Retiro y limpieza de la válvula de admisión ......................................30
Retiro y limpieza de la válvula de salida .............................................30
Limpieza de la malla de la tolva ............................................................30
Solución de problemas ................................................................. 31
Lista de piezas ................................................................................ 32
Conjunto principal .....................................................................................32
Bomba de diafragma .................................................................................34
Conjunto del cabezal de la bomba ......................................................36
Conjunto de la tolva ..................................................................................37
Garantía limitada ........................................................................... 39
Conguración
Acople de la boquilla a la pistola
1. Para bloquear el gatillo, mueva el seguro del gatillo de
izquierda a derecha, desde la parte posterior de la pistola.
Gatillo bloqueado
(la pistola no pulveriza)
POSIBILIDAD DE PELIGRO POR INYECCIÓN. No
pulverice si el protector de la boquilla no está en
su sitio. No apriete nunca el gatillo de la pistola a
menos que la boquilla esté destapada o en posición
de pulverización. Ponga siempre el seguro del gatillo
antes de desmontar, sustituir o limpiar la boquilla.
2. Enrosque la boquilla en la pistola. Apriete la tuerca primero,
luego apriete más rme con una llave para tuercas.
NOTA: Cuando acople la boquilla a la pistola, alinee el
protector de la boquilla como se muestra en la
gura de abajo, luego apriete con una llave.
Gatillo desbloqueado
(la pistola sí pulveriza)
Descripción general
Este pulverizador airless (sin aire) de alto rendimiento es una
herramienta de precisión que se utiliza para pulverizar varios tipos de
materiales. Lea y siga cuidadosamente este manual de instrucciones
para conocer las instrucciones de funcionamiento y la información de
mantenimiento y seguridad adecuadas.
Conjunto
de la tolva
Válvula de
control de
presión
Válvula
Tubo de
retorno
Válvula
de salida
Cable de
Comierce
a apretar
con este
ángulo
para obtener
el ángulo
adecuado
al estar
apretado
Comprobación de la válvula de salida (opcional)
1. Presione rmemente el botón de la válvula de empuje
opcional en el lado del alojamiento de la bomba para
asegurarse de que la válvula de bola de salida se mueve
libremente.
(opciónal)
24 © Titan Tool Inc. Todos los derechos reservados.
Español
Page 25

Acople de la manguera de pintura
Válvula de
PRIME/SPRAY
1. Acople la manguera de alta presión
al pulverizador de pintura. Use una
llave para apretar la manguera de
pintura de forma segura.
2. Acople la pistola pulverizadora en
el otro extremo de la manguera de
alta presión. Apriete la manguera
de forma segura a la pistola
usando dos llaves.
3. Conecte el pulverizador a una toma de corriente con puesta a
tierra adecuada o a un cable alargador con puesta a tierra de
alto rendimiento.
No use más de 30 metros de cable. Si debe pulverizar a
una gran distancia de la fuente de alimentación, use más
mangueras de pintura, pero no más cables alargadores. Use
un cable alargador del calibre 16 como mínimo para hasta 15
metros de longitud, o de un calibre del 12 al 14 para cables
alargadores de entre 15 y 20 metros de longitud.
Procedimiento para el alivio de la presión
No olvide seguir el procedimiento para alivio
de la presión cuando pare el pulverizador por
cualquier motivo, incluyendo labores de reparación,
mantenimiento o ajuste de cualquier pieza del sistema
pulverizador, sustitución o limpieza de boquillas o
preparación para limpieza.
1. Gire la válvula de control de presión en contra del sentido de
las agujas del reloj al ajuste mínimo.
Cebado
Preparación para cebar
1. Llene la válvula de admisión con agua o con un aceite
domestico ligero.
2. Asegúrese de que la válvula PRIME/SPRAY esté ajustada en
PRIME y de que la válvula de control de presión esté girada en
contra del sentido de las agujas del reloj a su menor ajuste de
presión.
3. Encienda la bomba al mover el interruptor ON/OFF
(ENCENDIDO/APAGADO) de la bomba a la posición ON.
4. Aumente la presión al girar la válvula de control de presión
1/2 vuelta en el sentido de las agujas del reloj.
5. Fuerce la apertura y cierre de la válvula de admisión
presionándola con un destornillador o con el extremo para
borrar de un lápiz. Debería subir y bajar cerca de 1/16 de
pulgada (1,58 mm). Continúe hasta que el agua o el aceite
sea aspirado hacia la bomba. Esto humedecerá las partes en
movimiento y soltará todos los residuos de pintura antigua.
2. Gire la válvula PRIME/SPRAY a la posición PRIME.
3. Oprima el gatillo de la pistola para retirar cualquier presión
4. Bloquee la pistola mueva el seguro
© Titan Tool Inc. Todos los derechos reservados. 25
control de
presión
Válvula
que todavía pueda quedar en la manguera.
del gatillo de la pistola a la posición
bloqueada.
Peligro de inyección. No realice
pulverizaciones sin haber
instalado la protección de la
punta. NUNCA oprima el gatillo de
la pistola a menos que la punta se
encuentre girada completamente
a la posición para pulverizar o
en aquella destrabada. SIEMPRE
enganche el bloqueo del gatillo
de la pistola antes de retirar, de
reemplazar o de limpiar la punta.
6. Ponga la palma de su mano sobre la entrada: gire la válvula
de control de presión en el sentido de las agujas del reloj
al ajuste máximo. Debe sentir la aspiración que proviene
de la válvula de admisión. Si esto no ocurre, consulte el
procedimiento de “Retiro y limpieza de la válvula de salida”,
presente en la sección Mantenimiento.
7. Gire la válvula de control de presión en contra del sentido de
las agujas del reloj al ajuste de presión mínima.
8. Gire el interruptor ON/OFF de la bomba a la posición OFF.
Español
Page 26

Montaje de la tolva de pintura
Racor del tubo de retorno
T
ubo de retorno
Tubo de retorno
T
PRIME/SPRAY
1. Alinee la parte inferior de la tolva de pintura con la válvula de
entrada roscada en el bloque de la bomba de pintura.
2. Gire la tolva de pintura en el sentido de las agujas del reloj
para enroscarla en la válvula de entrada. Continúe girando
la tolva de pintura hasta que quede jada en la válvula de
entrada.
Cebado de la bomba
1. Gire la válvula de control de presión en contra del sentido de
las agujas del reloj al ajuste mínimo.
NOTA: Asegúrese de que las roscas están rectas y de que la
tolva gira libremente sobre la válvula de entrada.
No cruce las roscas.
3. Coloque el ltro en la parte inferior de la tolva de pintura y
encájelo en su posición.
Acople del tubo de retorno
1. Asegúrese de que el interruptor de encendido/apagado del
motor está en la posición OFF (apagado).
2. Coloque el extremo recto del tubo de retorno en el racor de
dicho tubo.
NOTA: No lo apriete demasiado. Apriételo sólo con la
mano. Algunas roscas seguirán visibles aunque se
aprieten del todo.
3. Coloque el extremo recto del tubo de retorno en el racor de
dicho tubo.
Válvula de
control de
presión
Válvula
2. Retire la tapa de la válvula de pintura y llene la tolva de
pintura.
3. Coloque la válvula PRIME/SPRAY en la posición PRIME.
4. Coloque el interruptor encendido/apagado del motor en la
posición ON.
5. Gire el mando de control de presión en el sentido de las
agujas del reloj hasta la posición entre la presión media y
máxima. Deje que la unidad se cebe durante 1 ó 2 minutos
una vez que el material empiece a uir por el tubo de retorno.
IMPORTANTE: Reduzca siempre la presión a cero antes de
cambiar la posición de la válvula PRIME/SPRAY. Si no lo hace,
podrían producirse daños en el diafragma de la bomba de
pintura.
IMPORTANTE: Si el mando de control de presión se pone a cero y
la válvula PRIME/SPRAY (cebar/pulverizar) no está en la posición
SPRAY mientras el pulverizador está funcionando, habrá una
gran presión en la manguera y la pistola pulverizadora hasta que
se ponga la válvula PRIME/SPRAY en la posición PRIME o hasta
que se apriete el gatillo de la pistola para liberar la presión.
4. Enrosque la tuerca del tubo de retorno en el racor de dicho
5. Coloque el extremo del gancho del tubo de retorno en el
apa de la tolva de pintura
26 © Titan Tool Inc. Todos los derechos reservados.
tubo y apriete hasta que quede bien jado.
oricio de la tapa de la tolva de pintura.
E
Español
Page 27

Pulverización
Cubra completamente con una capa uniforme
Mantenga la descarga suave y a una velocidad constante.
Capa pesada
No exione la muñeca al momento de pulverizar.
Capa ligeraCapa ligera
Aproximadamente de
la descarga
la descarga
el gatillo
el gatillo
Forma adecuada de oprimir el gatillo de la pistola pulverizadora
PRIME/SPRAY
Patrón de pintura con colas
Técnica de pulverización
La clave de un buen trabajo de pintura es proporcionar una capa
uniforma sobre la totalidad de la supercie. Esto se logra dando
descargas uniformes. Mantenga el brazo en movimiento a una
velocidad constante y mantenga la pistola pulverizadora a una
distancia constante de la supercie. La mejor distancia para realizar
pulverizaciones es de 10 a 12 pulgadas (de 25 a 30 cm) entre la punta
de pulverización y la supercie.
Aproximadamente
10 a 12 pulgadas
Mantenga la pistola pulverizadora en ángulo recto respecto a la
supercie. Esto quiere decir que debe mover hacia delante y hacia
atrás el brazo completo en lugar de sólo exionar la muñeca.
Aproximadamente
10 a 12 pulgadas
Manténgala ja
Suelte
Termine
Comience
Mantenga uniforme
la descarga
Tire
Sobreponga cada descarga en alrededor de un 50%. Esto garantizará
una capa uniforme.
Cuando pare de pintar, cierre el bloqueo del gatillo de la pistola, gire
al válvula de control de presión de aire en contra del sentido de las
agujas del reloj hasta su ajuste mínimo y ajuste el botón de cebado
en PRIME. Gire el interruptor del motor hasta OFF y desenchufe la
pulverizadora.
Si cree que se alejará durante más de una hora, siga el procedimiento
de limpieza a corto plazo descrito en la sección Limpieza de este
manual.
Práctica
1. Asegúrese de que la manguera de pintura no esté retorcida y
de que no haya cerca objetos de bordes alados.
2. Gire la válvula de control de presión en contra del sentido de
las agujas del reloj al ajuste mínimo.
Mantenga la pistola pulverizadora perpendicular a la supercie, de
otro modo un extremo del patrón será más grueso que el otro.
10 a 12
pulgadas
Forma
correcta
Forma
incorrecta
Se debe oprimir el gatillo de la pistola pulverizadora encendiéndola
y apagándola con cada descarga. Esto ahorrará pintura y evitará
que ésta se acumule al nal de la descarga. No oprima el gatillo de
la pistola a la mitad de una descarga. Esto dará como resultado una
pulverización desigual y una cobertura llena de manchones.
© Titan Tool Inc. Todos los derechos reservados. 27
Válvula de
control de
presión
Válvula
3. Coloque la válvula PRIME/SPRAY en la posición SPRAY.
4. Gire el válvula de control de presión en el sentido de las
agujas del reloj hasta su posición máxima. La manguera
de pintura debería ponerse rígida a medida que el material
comienza a circular por ella.
5. Desbloquee el gatillo
de la pistola girando el
interruptor de modo
que quede paralelo a la
empuñadura.
Buen patrón de pulverización
6. Apriete el gatillo de la
pistola pulverizadora
para purgar el aire de la
manguera.
7. Cuando llegue el material
a la boquilla, pulverice
una zona de prueba para
comprobar el patrón de pulverización.
8. Use la posición de presión mínima necesaria para obtener
un buen patrón de pulverización. Si se ajusta una presión
demasiado alta, el patrón de pulverización será demasiado
no. Si la presión es demasiado baja, la pintura formará
regueros o burbujas en lugar de lograr una pulverización
adecuada.
Español
Page 28

Limpieza
Almacenamiento durante la noche
Detención
1. Gire la válvula de control de presión en contra del sentido de
las agujas del reloj al ajuste mínimo.
2. Gire la válvula PRIME/SPRAY a PRIME.
3. Accione la pistola para eliminar la presión que pueda quedar
en la manguera.
4. Bloquee la pistola mueva el seguro
del gatillo de la pistola a la posición
bloqueada.
5. Ponga el interruptor de encendido/
apagado del motor en la posición OFF
(apagado) y desenchufe el pulverizador.
6. Sólo en caso de trabajar con materiales
a base de látex, vierta 1/2 taza de agua
en la parte superior de la pintura a n
de evitar que ésta se seque. Para otros materiales, selle el
recipiente de material, manteniendo la manguera de retorno
en la pintura.
7. Envuelva la pistola pulverizadora en un paño húmedo y
póngala en una bolsa plástica. Selle herméticamente la bolsa.
8. Ubique la unidad en un lugar seguro alejado del sol que sirva
de almacenamiento a corto plazo.
Arranque
1. Retire la pistola de la bolsa plástica.
2. Remueva el agua en la pintura en caso de que ésta sea al látex.
Retire la tapa de la tolva de pintura o del recipiente con el
material y remueva la pintura para mezclarla con los demás
materiales.
Almacenamiento a largo plazo
No permita que se acumule pintura en el motor o
éste se sobrecalentará. No permita que entren en
contacto solventes inflamables con el motor o podrían
inflamarse.
NOTA: Necesitará un cubo, una solución de limpieza, un
cepillo de dientes, una llave y trapos para limpiar.
NOTA: Si pulveriza con pintura de látex, use agua jabonosa
tibia para limpiar. Si usa aceite o pinturas a base
de alquid, use volátiles minerales o diluyente de
pintura.
IMPORTANTE: No use volátiles minerales o diluyente de pintura
en pintura de látex o la mezcla se convertirá en una sustancia
como jalea que es difícil de quitar.
Limpieza de la tolva de pintura
1. Bloquee la pistola mueva el seguro
del gatillo de la pistola a la posición
bloqueada.
2. Gire el mando de control de presión en
el sentido contrario a las agujas del reloj
hasta la posición mínima.
3. Coloque la válvula PRIME/SPRAY (cebar/
pulverizar) en la posición PRIME.
4. Coloque el interruptor de encendido/
apagado en la posición OFF (apagado).
5. Dirija el tubo de retorno hacia el interior del recipiente del
material original.
6. Coloque el interruptor encendido/apagado del motor en la
posición ON.
7. Gire el válvula de control de presión hasta la mitad de la
presión máxima. Así se eliminará el material restante de la
tolva de pintura por la bomba, hacia arriba por el tubo de
retorno hasta el recipiente con el material.
8. Gire el mando de control de presión en el sentido contrario a
las agujas del reloj hasta la posición de presión mínima.
9. Apriete el gatillo de la pistola para liberar presión y bloquee la
pistola.
10. Retire la boquilla pulverizadora y el protector y colóquelos en
un recipiente con agua o un disolvente adecuado para el tipo
de material con el que esté pintando.
11. Rellene la tolva de pintura con agua o con un disolvente
adecuado para el tipo de material con el que esté pintando.
12. Dirija el tubo de retorno hacia el cubo de residuos.
13. Aumente la temperatura hasta la mitad de la presión máxima.
Deje que el agua o el disolvente circulen durante 2-3 minutos
para expulsar el material de la bomba, la tolva de pintura y el
tubo de retorno.
Limpieza de la manguera de pintura
1. Para guardar el material que queda en la manguera, quite el
seguro del gatillo de la pistola y apriete con cuidado el gatillo
con la boquilla pulverizadora quitada hacia el interior del
recipiente con el material.
3. Asegúrese de que la válvula PRIME/SPRAY (cebar/pulverizar)
está en la posición PRIME y que la presión se ha reducido
completamente.
4. Enchufe el pulverizador y coloque el interruptor de
encendido/apagado en la posición ON (encendido).
5. Tras la imprimación, gire la válvula PRIME/SPRAY a la posición
SPRAY y gire gradualmente el válvula de control presión en el
sentido de las agujas del reloj para aumentar la presión.
6. Pruebe el pulverizador sobre una pieza de prueba y empiece a
pulverizar.
28 © Titan Tool Inc. Todos los derechos reservados.
Español
2. Gire el válvula de control de presión en el sentido contrario a
las agujas del reloj hasta la posición de presión mínima.
3. Coloque la válvula PRIME/SPRAY (cebar/pulverizar) en la
posición SPRAY.
Page 29

4. Gire el mando de control de presión lentamente hasta que
empiece a circular material hasta el cubo. Tan pronto como
el agua o el disolvente comience a caer en el cubo, suelte el
gatillo.
5. Ponga agua o disolvente limpios, apunte con la pistola hacia
el lateral del cubo de residuos y deje que circule el líquido
durante otros 5 minutos para limpiar a fondo la manguera, la
bomba y la pistola pulverizadora.
6. Gire el válvula de control de presión en el sentido contrario a
las agujas del reloj hasta la posición mínima.
7. Coloque la válvula PRIME/SPRAY (cebar/pulverizar) en la
posición PRIME.
8. Apriete el gatillo de la pistola para eliminar cualquier presión
que pudiera permanecer en la manguera.
9. Bloquee el gatillo de la pistola girando el seguro hacia delante
hasta su tope.
10. Coloque el interruptor de encendido/apagado en la posición
OFF (apagado).
Limpieza de la pistola
1. Retire la pistola pulverizadora de la manguera de pintura
usando dos llaves inglesas.
2. Retire el soporte del ltro de la pistola. Coloque la pistola y
el conjunto del ltro a remojo en un recipiente con agua o
disolvente.
3. Limpie la boquilla pulverizadora y el ltro de la pistola con un
cepillo suave.
4. Vuelva a montar la pistola y el ltro. Monte la boquilla
pulverizadora en la posición de limpieza con la echa
apuntando hacia la parte trasera de la pistola.
11. Coloque la válvula PRIME/SPRAY en la posición PRIME.
12. Apriete el gatillo de la pistola para eliminar cualquier presión
que pudiera permanecer en la manguera.
13. Bloquee el gatillo de la pistola girando el seguro hacia delante
hasta su tope.
14. Coloque el interruptor de encendido/apagado en la posición
OFF (apagado).
Limpieza nal
1. Retire el montaje de la boquilla.
2. Ponga el motor en la posición ON.
3. Coloque la válvula PRIME/SPRAY (cebar/pulverizar) en la
posición SPRAY.
4. Gire el válvula de control de presión en el sentido de las
agujas del reloj hasta la mitad de la potencia.
5. Apriete el gatillo de la pistola apuntando hacia el cubo de
limpieza hasta que la tolva o el cubo de disolvente estén
vacíos.
6. Vuelva a llenar la tolva o el cubo de disolvente y continúe
enjuagando el sistema hasta que la solución que salga de la
pistola parezca limpia.
7. Bloquee la pistola y gire el válvula de control de presión en
el sentido contrario a las agujas del reloj hasta la posición
mínima.
8. Coloque la válvula PRIME/SPRAY en la posición PRIME.
9. Retire la tolva o el conjunto de aspiración de la válvula de
entrada.
10. Limpie las roscas de la válvula de entrada con un paño
húmedo.
11. Llene la válvula de entrada con un aceite doméstico suave.
5. Acople la manguera de pintura a la pistola y apriete usando
dos llaves.
6. Coloque el interruptor encendido/apagado del motor en la
posición ON.
7. Desbloquee el gatillo de la pistola girando el seguro de modo
que quede paralelo a la empuñadura de la pistola.
8. Coloque la válvula PRIME/SPRAY (cebar/pulverizar) en la
posición SPRAY y apunte con la pistola hacia el lateral del
cubo de residuos.
9. Apriete el gatillo de la pistola y gire gradualmente el mando
de control de presión en el sentido de las agujas del reloj
hasta media presión. Continúe pulsando el gatillo de la
pistola durante aproximadamente 30 segundos.
10. Gire el mando de control de presión en el sentido contrario a
las agujas del reloj hasta la posición mínima.
12. Coloque la válvula PRIME/SPRAY en la posición SPRAY para
distribuir el aceite.
NOTA: La limpieza y engrasado adecuados de la bomba
tras su uso son las medidas más importantes que
puede tomar para garantizar un funcionamiento
correcto tras su almacenaje.
13. Gire el válvula de control de presión en el sentido contrario a
las agujas del reloj hasta la posición mínima.
14. Coloque la válvula PRIME/SPRAY (cebar/pulverizar) en la
posición PRIME.
15. Accione la pistola para eliminar la presión que pueda quedar
en la manguera.
16. Bloquee el gatillo de la pistola girando el seguro hacia delante
hasta su tope.
17. Coloque el interruptor de encendido/apagado en la posición
OFF (apagado).
18. Retire el ltro de la tolva y lávelo con agua limpia o con un
disolvente adecuado. Use un cepillo suave.
19. Devuelva el ltro de la tolva a su posición en la tolva y
vuelva a colocar la tolva o el conjunto de aspiración en la
válvula de entrada.
20. Limpie toda la unidad, la manguera y la pistola con un paño
húmedo para eliminar el material acumulado.
© Titan Tool Inc. Todos los derechos reservados. 29
Español
Page 30

Mantenimiento
Adaptador de salida
Sello
Siga estos procedimientos cuando encuentre los inconvenientes que
se indican en la sección de solución de problemas.
Retiro y limpieza de la válvula de admisión
1. Realice el procedimiento para el alivio de la presión, luego
apague y desenchufe la unidad.
2. Retire el conjunto de la válvula de admisión usando una llave
de cubo de 27 milímetros.
NOTA: El resorte se fabrica a una tensión muy especíca.
No lo estire. No coloque un sustituto no autorizado.
Consulte el diagrama de las piezas del conjunto de
la bomba de pintura para obtener el número de las
piezas de repuesto adecuadas.
3. Retire el conjunto de asiento y bola.
4. Limpie a fondo todas las piezas. Si la bola o el asiento
muestran cualquier señal de desgaste o daño, reemplácelos
con piezas nuevas. Esta bola de carburo se debe sellar
rmemente contra su asiento para que la válvula funcione
adecuadamente.
5. Antes de volver a ensamblar cubra todas las piezas con una
delgada capa de aceite ligero.
3. Pruebe el movimiento de la válvula empujándola desde
el extremo abierto del alojamiento de la válvula con un
destornillador o con el extremo para borrar de un lápiz.
Debería moverse cerca de 1/16 de pulgada (1,58 mm). Si no
se mueve, debe ser limpiada o reemplazada.
NOTA: Se debe lubricar la válvula de admisión después de
cada trabajo. Esto reducirá o eliminará problemas
de cebado la próxima vez que se use la unidad y
además prolongará la vida útil de la válvula.
4. Limpie completamente el conjunto de la válvula con agua o
con el solvente adecuado. Use un cepillo pequeño.
5. Si se limpió adecuadamente la válvula y el agua gotea del
fondo, la válvula se desgastó y es necesario reemplazarla. Una
válvula adecuadamente asentada, llena de agua y mantenida
en posición vertical no goteará.
6. Instale una válvula nueva o limpia en el bloque de la bomba y
luego llénela con aceite ligero o con solvente.
NOTA: Debe alinear el saliente del asiento con la ranura en
el soporte de la bomba al volver a montarla.
6. Deje caer la bola de la válvula.
7. Inserte el protector y el resorte y vuelva a colocar el cuerpo de
la válvula. Asegúrese de que la junta tórica esté bien colocada
y de que la lengua de la tapa se ajuste en el interior del
resorte.
8. Apriete rmemente el cuerpo de la válvula con una llave
ajustable. No apriete excesivamente.
Asiento
Bola
Resorte
Tope
esférico
Junta torica
Limpieza de la malla de la tolva
Es posible que la malla al fondo de la tolva de pintura deba limpiarse
periódicamente. Compruébelo cada vez que añada pintura. Quite
la malla tirando de la tolva hacia fuera con unos alicates. Limpie la
malla con agua o disolvente y con un cepillo de cerdas suaves, si
fuera necesario.
Retiro y limpieza de la válvula de salida
Puede ser necesario retirar y limpiar la válvula de salida o reemplazar
las piezas del interior de la válvula desgastada por el uso normal.
1. Retire el adaptador de salida con una llave.
2. Retire y limpie el tope esférico y el pequeño resorte en el
interior de la válvula por medio de un gancho metálico o
pinzas. Reemplace el resorte si está roto o desgastado.
30 © Titan Tool Inc. Todos los derechos reservados.
Español
Page 31

Solución de problemas
Problema
A. El pulverizador no se pone en
marcha.
B. El pulverizador se pone en
marcha pero no tira pintura
cuando la válvula PRIME/SPRAY
(cebar/pulverizar) está en la
posición PRIME.
C. El pulverizador tira pintura pero
la presión desciende al apretar
el gatillo de la pistola.
D. El pulverizador no se apaga.
E. La pistola pulverizadora tiene
fugas.
F. El conjunto de la boquilla tiene
fugas.
G. La pistola pulverizadora no
pulveriza.
H. El patrón de pintura forma
regueros.
I. Se ha producido una sobrecarga
térmica que hizo que el
pulverizador se apagase.
Causa
1. El pulverizador no está conectado.
2. El interruptor de encendido/apagado está en
la posición OFF.
3. La tensión del enchufe de la pared es muy
baja o nula.
4. Alguien apagó el pulverizador mientras aún
estaba sometido a presión.
5. El cable alargador está dañado o tiene una
capacidad demasiado baja.
6. Se ha producido una sobrecarga térmica en el
pulverizador.
7. Hay un problema con el motor.
1. La unidad no se cebará correctamente o ha
perdido calidad.
2. La tolva de pintura está vacía.
3. El ltro de la tolva está atascado.
4. La válvula de entrada está atascada.
5. La válvula de salida está atascada.
6. La válvula PRIME/SPRAY (cebar/pulverizar)
está taponada.
7. La válvula de entrada está desgastada o
dañada.
8. Hay un problema con el diafragma.
9. El nivel de aceite hidráulico es bajo o nulo.
1. La boquilla pulverizadora está desgastada.
2. El ltro de la tolva está atascado.
3. La pistola o la boquilla pulverizadora están
taponadas.
4. La pintura es demasiado pesada o espesa.
5. El conjunto de la válvula de salida está sucio o
desgastado.
6. El conjunto de la válvula de entrada está sucio
o desgastado.
1. La bola o el asiento de bola de las válvulas de
entrada o de salida están desgastados.
2. Se ha acumulado pintura o algún material
extraño entre la bola y el asiento.
3. Se ha acumulado pintura o algún material
extraño entre la válvula PRIME/SPRAY.
1. Las piezas internas de la pistola están
desgastadas o sucias.
1. La boquilla no se ha montado correctamente.
2. Hay una junta de estanqueidad desgastada.
1. La boquilla pulverizadora, el ltro de la pistola
o el ltro de la boquilla están taponados.
2. La boquilla pulverizadora está en la posición
CLEAN (limpieza).
1. La presión ajustada es demasiado baja.
2. La pistola, la boquilla pulverizadora o el ltro
de la tolva están taponados.
3. La boquilla está desgastada.
4. La pintura es demasiado espesa.
1. El motor se ha sobrecalentado.
2. El cable alargador es demasiado largo o el
calibre es demasiado bajo.
3. Se ha acumulado pintura en el motor.
4. Se arrancó el motor mientras el pulverizador
estaba sometido a presión.
5. El pulverizador se ha dejado expuesto al sol.
Solución
1. Enchufe el pulverizador.
2. Coloque el interruptor de encendido/apagado en la
posición ON.
3. Compruebe la tensión de la fuente de alimentación.
4. Coloque la válvula PRIME/SPRAY (cebar/pulverizar) en la
posición PRIME.
5. Sustituya el cable alargador.
6. Deje enfriar el motor y coloque el pulverizador en un
lugar más fresco.
7. Lleve el pulverizador a un centro de servicio autorizado
de Titan.
1. Trate de cebar de nuevo la unidad.
2. Llene la tolva con pintura.
3. Limpie el ltro de la tolva.
4. Limpie la válvula de entrada.
5. Limpie la válvula de salida y sustituya las piezas
desgastadas.
6. Lleve el pulverizador a un centro de servicio autorizado
de Titan.
7. Sustituya la válvula de entrada.
8. Lleve el pulverizador a un centro de servicio autorizado
de Titan.
9. Lleve el pulverizador a un centro de servicio autorizado
de Titan.
1. Sustituya la boquilla pulverizadora por otra nueva.
2. Limpie el ltro de la tolva.
3. Limpie o sustituya el ltro convenientemente. Tenga
siempre ltros adicionales a mano.
4. Diluya o ltre la pintura.
5. Limpie o sustituya el conjunto de la válvula de salida.
6. Sustituya la válvula de entrada.
1. Lleve el pulverizador a un centro de servicio autorizado
de Titan.
2. Lleve el pulverizador a un centro de servicio autorizado
de Titan.
3. Sustituya la válvula PRIME/SPRAY o lleve el pulverizador
a un centro de servicio autorizado de Titan.
1. Lleve el pulverizador a un centro de servicio autorizado
de Titan.
1. Compruebe el conjunto de la boquilla y móntelo
correctamente.
2. Sustituya la junta de estanqueidad.
1. Limpie la boquilla pulverizadora, el ltro de la pistola o el
ltro de la boquilla.
2. Coloque la boquilla en la posición SPRAY (pulverizar).
1. Aumente la presión.
2. Limpie los ltros.
3. Sustituya la boquilla pulverizadora.
4. Diluya la pintura.
1. Déjela enfriar durante 30 minutos.
2. Déjela enfriar durante 30 minutos y sustituya el cable
alargador por otro más corto o con un calibre más
grueso.
3. Limpie la pintura del motor.
4. Reinicie el pulverizador en el modo PRIME (cebar).
5. Aparte el pulverizador del sol.
NOTA: El motor eléctrico debe mantenerse siempre
NOTA: Asegúrese de revisar la continuidad de la puesta a tierra
limpio y seco. La pintura actúa como aislante.
Demasiada pintura en el motor puede
producir un sobrecalentamiento del mismo.
© Titan Tool Inc. Todos los derechos reservados. 31
Use un ohmímetro para determinar que haya continuidad
después del servicio se realiza en cualquiera de los
componentes eléctricos.
entre las piezas accesibles sin corriente del producto y la
clavija de conexión a tierra del enchufe de acoplamiento.
Español
Page 32

Parts List • Liste de pièces • Lista de piezas
Main Assembly • Montage principal • Conjunto principal
1
8
9
10
2
3
4
5
6
7
11
12
13
14
15
16
32 © Titan Tool Inc. All rights reserved.
Page 33

Item
Art.
Art.
Part No.
Nº de piéce
Pieza No.
English
Description
Français
Description
Español
Descripción
1 0288144 Hopper assembly Ensemble de trémie Conjunto de tolva 1
2 9802533 Carriage screw Vis du chariot Tornillo del carro 4
3 ---------- Pump head Tête de pompe Altura de la bomba 1
4 ---------- Diaphragm pump Pompe à diaphragme Bomba de diafragma 1
5 0508271 Left leg Patte, gauche Pata, izquierda 1
6 9885546 Plug Bouchon Tapon 2
7 0555513 Tube cap Bouchon de tube Tapa del tubo 2
8 0508259 Handle assembly Poignée Mango 1
9 590-068 Handle grip Poignée de main Puño 1
10 0508276 Screw Vis Tornillo 2
11 9820206 Washer Rondelle Arandela 2
12 700-069 Screw Vis Tornillo 2
13 0508270 Right leg Patte, droite Pata, derecha 1
14 700-761 Cord wrap Embobineur de cordon Soporte para envolver el cable eléctrico 1
15 0508267 Mounting plate Plate de montage Placa de montaje 1
16 9811122 Lock nut Écrou de blocage Contratuerca 4
Qty.
Qte.
Cant.
Product Registration
Register your product online at www.titantool.com.
Enregistrement du produit
Enregistrer votre appareil en ligne à www.titantool.com.
Registro del producto
Registre su producto en línea en www.titantool.com.
Serial Number Location • Emplacement du numéro de série • Ubicación del número de serie
© Titan Tool Inc. All rights reserved. 33
Page 34

Diaphragm Pump • Pompe à diaphragme • Bomba de diafragma
1
2
20
21
10
11
12
13
14
15
16
17
18
19
3
4
5
6
7
8
9
18
22
23
24
25
26
34 © Titan Tool Inc. All rights reserved.
Page 35

Item
Art.
Art.
Part No.
Nº de piéce
Pieza No.
English
Description
Français
Description
Español
Descripción
1 ------- Pump head Tête de pompe Altura de la bomba 1
2 0270494 Diaphragm ring Bague du diaphragme Anillo del diafragma 1
3 0278240 Diaphragm Diaphragme Diafragma 1
4 0288775 Pressure control knob Bouton de réglage de la pression Válvula de control de presión 1
5 9801109 Set screw Vis de réglage Tornillo sujetador 2
6 0270529 Valve stem Tige de soupape Vástago de válvula 1
7 0047373 Pressure regulating spring Ressort de réglage de la pression Resorte regulador de presión 1
8 0089518 O-ring Joint torique Junta tórica 1
9 0089475 Pressure valve needle Pointeau de soupape de pression Aguja de la válvula de suministro 1
10 0278339 Hydraulic piston Piston hydraulique Pistón hidráulico 1
11 0005311 Piston spring Ressort du piston Resorte del pistón 1
12 0270548 Piston washer Rondelle du piston Arandela del pistón 1
13 0089456 Retainer Dispositif de retenue Aro de tope 1
14 0278359 Gasket Joint Junta 1
15 0278341 Hydraulic cover Couvercle de la pompe hydraulique Cubierta hidráulica 1
16 9800049 Screw Vis Tornillo 9
17 0047393 Retaining ring Bague de retenue Anillo de retención 1
18 0090031 Eccentric sleeve and bearing
assembly
Manchon excentrique et roulement Conjunto de manguito excéntrico y
rodamiento
19 0089829 Shaft key Clé de l’arbre Chaveta del eje 1
20 9900355 Socket screw Vis creuse Tornillo de cubo 4
21 9921601 Lock washer Rondelle d’arrêt Arandela de presión 4
22 0270546A Motor (includes items 27
Moteur (comprend les articles 27 et 28) Motor, 1/3 HP (incluye artículos 27 y 28) 1
and 28)
23 0089930 Seal Joint Sello 1
24 0270477 Spacer Espaceur Separador 1
25 0089929 Ball bearing Roulement à billes Rodamiento de bolas 1
26 0278237 Hydraulic housing assembly
(includes items 23 - 25)
Carter hydraulique (comprend les
articles 23 - 25)
Conjunto del alojamiento hidráulico
(incluye artículos 23-25)
Not pictured / Non illustré / Sin imagen:
27 0270462 Fan (not shown) Ventilateur (non illustré) Ventilador (no se muestra) 1
28 0270612 Fan cover (not shown) Couvercle du ventilateur (non illustré) Cubierta del ventilador (no se muestra) 1
Qty.
Qte.
Cant.
1
1
© Titan Tool Inc. All rights reserved. 35
Page 36

Pump Head Assembly • Ensemble de tête de pompe • Conjunto de la altura de la bomba
11
1
2
12
13
3
14
15
16
4
5
6
7
8
9
10
Item
Art.
Art.
Part No.
Nº de piéce
Pieza No.
English
Description
1 0278242 Inlet valve assembly
(includes item 2)
Français
Description
Ensemble de soupape d’admission
(comprend le article 2)
Español
Descripción
Conjunto de la válvula de admisión
(incluye artículo 2)
2 0089482 Sealing washer, nylon Rondelle d’étanchéité, nylon Arandela de estanqueidad, nylon 1
3 0278334 Paint pump Pompe à peinture Bomba de pintura 1
4 0555850 PRIME/SPRAY valve
assembly
Ensemble de soupape de PRIME/SPRAY Conjunto de la válvula PRIME/SPRAY
(CEBAR/PULVERIZAR)
5 0278362 Outlet seal Joint de sortie Sello de salida 1
6 0278241 Ball seat Joint à billes Asiento de la bola 1
7 0093635 Ball Bille Bola 1
8 0047485 Outlet spring Ressort de sortie Resorte de salida 1
9 0278361 Ball guide Butée de la bille Tope esférico 1
10 9871114 O-ring Joint torique Junta torica 1
11 0278335 Outlet tting Raccord de sortie Adaptador de salida 1
12 0278337 Pusher body Corps de poussée Cuerpo del empujador 1
13 0278250 Pusher stem assembly Ensemble tige de poussée Conjunto del vástago del empujador 1
14 0278368 Pusher spring Ressort de poussée Resorte del empujador 1
15 0278340 Pusher washer Rondelle de poussée Arandela del empujador 1
16 0156646 Seal Joint Sello 1
Qty.
Qte.
Cant.
1
1
36 © Titan Tool Inc. All rights reserved.
Page 37

Hopper Assembly • Ensemble de trémie • Conjunto de tolva
7
1
2
3
4
6
5
Item
Art.
Art.
Part No.
Nº de piéce
Pieza No.
English
Description
Français
Description
Español
Descripción
1 0279591 Cover, hopper Couvercle, trémie Tapa de tolva 1
2 0089917 Filter screen, ne (shown) Crépine du ltre, n (montre) Pantalla de ltro, no (muestra) 1
0088871 Filter screen, coarse Crépine du ltre, grossiers Pantalla de ltro, gruesas
3 0090283 Hopper Trémie Tolva 1
4 0093865 Return tube Tube de retour Tubo de retorno 1
5 0090617 Fitting Raccord Montaje 1
6 0090560 Return tube assembly
(includes items 4-5)
7 0288144 Hopper complete (includes
Ensemble de tube de retour (comprend
l’articles 4-5)
Trémie, complet (comprend l’articles 1-6)
Conjunto de tubo de retorno (incluye el
articulos 4-5)
Tolva, completo (incluye el articulos 1-6
) 1
items 1-6)
Qty.
Qte.
Cant.
1
© Titan Tool Inc. All rights reserved. 37
Page 38

Garantie
Titan Tools, inc. (« Titan ») garantit qu’au moment de la livraison à l’acheteur original (« Utilisateur »), l’appareil couvert par la présente garantie
sera exempt de défauts de matériaux et de fabrication. Les responsabilités de Titan en vertu de cette garantie se limitent au remplacement ou à
la réparation sans frais des pièces dont on aura, à la satisfaction raisonnable de Titan, démontré la défectuosité dans un délai de 12 mois après
la date d’achat par l’Utilisateur. Cette garantie ne s’applique que si l’appareil a été installé et utilisé conformément aux recommandations et
directives de Titan.
Cette garantie ne s’applique pas dans les cas d’endommagement ou d’usure engendrés par de l’abrasion, de la corrosion, un mauvais usage, de
la négligence, un accident, une installation incorrecte, un remplacement par des composants non fournis par Titan ou toute intervention non
autorisée apte à nuire au fonctionnement normal de l’appareil.
Les pièces défectueuses doivent être envoyées à un centre de service/vente Titan autorisé; les frais de transport, incluant le retour à l’usine, le cas
échéant, doivent être défrayés à l’avance par l’Utilisateur. Une fois remplacées ou réparées, les pièces seront renvoyées à ce dernier par transport
prépayé.
AUCUNE AUTRE GARANTIE EXPLICITE N’EST DONNÉE. PAR LES PRÉSENTES, TITAN SE DÉGAGE DE TOUTE AUTRE GARANTIE IMPLICITE, INCLUANT,
SANS TOUTEFOIS S’Y LIMITER, LES GARANTIES DE COMMERCIABILITÉ ET D’ADAPTATION À UN USAGE PARTICULIER, DANS LES LIMITES PERMISES
PAR LA LOI. LA DURÉE DES GARANTIES IMPLICITES NE POUVANT ÊTRE DÉCLINÉES SE LIMITE À LA PÉRIODE INDIQUÉE DANS LA GARANTIE
EXPLICITE. LES RESPONSABILITÉS DE TITAN NE SAURAIENT EN AUCUN CAS SE CHIFFRER À UN MONTANT SUPÉRIEUR À CELUI DU PRIX D’ACHAT,
ET CELLES RELATIVES AUX DOMMAGES CONSÉCUTIFS, ACCESSOIRES OU PARTICULIERS EN VERTU DE TOUTE GARANTIE SONT ÉGALEMENT
DÉCLINÉES, DANS LES LIMITES PERMISES PAR LA LOI.
TITAN NE DONNE AUCUNE AUTRE GARANTIE EXPLICITE ET DÉCLINE TOUTE GARANTIE IMPLICITE DE COMMERCIABILITÉ ET D’ADAPTATION À
UN USAGE PARTICULIER RELATIVEMENT AUX ACCESSOIRES, À L’ÉQUIPEMENT, AUX MATÉRIAUX OU AUX COMPOSANTS VENDUS MAIS NON
FABRIQUÉS PAR ELLE; CES ÉLÉMENTS (MOTEURS À ESSENCE, COMMUTATEURS, FLEXIBLES, ETC.) SONT PLUTÔT SOUMIS, LE CAS ÉCHÉANT, AUX
GARANTIES DE LEUR FABRICANT. TITAN S’ENGAGE À OFFRIR UN SOUTIEN RAISONNABLE AUX UTILISATEURS QUI FERONT DES RÉCLAMATIONS
RELATIVES À L’INOBSERVATION DE CES GARANTIES.
Des ches techniques de sécurité des produits (FTSS) sont disponibles sur le site Internet de Titan ou par téléphone en vous adressant au Service Client.
United States Sales & Service
Phone:
1-800-526-5362
Fax:
1-800-528-4826
1770 Fernbrook Lane
Minneapolis, MN 55447
www.titantool.com
38 © Titan Tool Inc. All rights reserved.
International
international@titantool.com
Fax: 1-763-519-3509
1770 Fernbrook Lane
Minneapolis, MN 55447
Page 39

Garantía
Titan Tool, Inc., (“Titan”) garantiza que en el momento de la entrega al comprador original para su uso (“Usuario nal”), el equipo cubierto por
esta garantía está exento de defectos en material y fabricación. La obligación de Titan en virtud de esta garantía se limita a sustituir o reparar
sin cargo las piezas que; a la entera satisfacción de Titan, demuestren estar defectuosas dentro de 12 meses después de la venta al usuario nal.
Esta garantía corresponde solamente cuando la unidad se instala y funciona según las recomendaciones e instrucciones de Titan.
Esta garantía no corresponde en el caso de daños o desgaste causados por abrasión, corrosión o uso indebido, negligencia, accidente,
instalación errada, sustitución de piezas con componentes que no sean Titan o alteraciones con la unidad de tal modo que se vea afectado el
funcionamiento normal.
Las piezas defectuosas deben devolverse a un centro de ventas y servicio autorizado de Titan. Todos los cargos de transporte, incluso la
devolución a la fábrica, si es necesario, debe pagarlos previamente el usuario nal. El equipo reparado o cambiado se devolverá al usuario nal
con porte prepagado.
NO EXISTE NINGUNA OTRA GARANTÍA EXPRESA. TITAN DESCONOCE POR LA PRESENTE TODA OTRA GARANTÍA IMPLÍCITA INCLUSIVE ENTRE
OTRAS, LAS DE COMERCIABILIDAD E IDONEIDAD PARA UN FIN PARTICULAR, EN LA MEDIDA QUE LO PERMITA LA LEY. LA DURACIÓN DE LAS
GARANTÍAS IMPLÍCITAS QUE NO PUEDEN DESCONOCERSE SE LIMITA AL PLAZO ESPECIFICADO EN LA GARANTÍA EXPRESA. EN NINGÚN CASO
EXCEDERÁ LA RESPONSABILIDAD DE TITAN EL MONTO DEL PRECIO DE COMPRA. LA RESPONSABILIDAD CIVIL POR DAÑOS Y PERJUICIOS
RESULTANTES, FORTUITOS O ESPECIALES BAJO TODA GARANTÍA QUEDA EXCLUIDA EN LA MEDIDA QUE LO PERMITA LA LEY.
TITAN NO OFRECE GARANTÍAS Y DESCONOCE TODA GARANTÍA IMPLÍCITA DE COMERCIABILIDAD E IDONEIDAD PARA UN FIN PARTICULAR
REFERENTE A ACCESORIOS, EQUIPO, MATERIALES O COMPONENTES VENDIDOS PERO NO FABRICADOS POR TITAN. AQUELLOS ARTÍCULOS
VENDIDOS, PERO NO FABRICADOS POR TITAN (COMO LOS MOTORES DE GAS, INTERRUPTORES, MANGUERAS, ETC.) ESTÁN PROTEGIDOS POR
LA GARANTÍA DE SU PROPIO FABRICANTE, SI LA HAY. TITAN PROPORCIONARÁ AL COMPRADOR ASISTENCIA RAZONABLE PARA EFECTUAR
RECLAMOS EN CASO DE INCUMPLIMIENTO DE ESTAS GARANTÍAS.
Las Hojas de Datos de Seguridad (Material Safety Data Sheets - MSDS) se encuentran disponibles en el sitio web de Titan o llamando al Servicio al Cliente.
United States Sales & Service
Phone:
Fax:
1770 Fernbrook Lane
Minneapolis, MN 55447
www.titantool.com
© Titan Tool Inc. All rights reserved. 39
1-800-526-5362
1-800-528-4826
International
international@titantool.com
Fax: 1-763-519-3509
1770 Fernbrook Lane
Minneapolis, MN 55447
Page 40

Warranty
Titan Tool, Inc., (“Titan”) warrants that at the time of delivery to the original purchaser for use (“End User”), the equipment covered by this
warranty is free from defects in material and workmanship. With the exception of any special, limited, or extended warranty published by Titan,
Titan’s obligation under this warranty is limited to replacing or repairing without charge those parts which, to Titan’s reasonable satisfaction, are
shown to be defective within twelve (12) months after sale to the End User. This warranty applies only when the unit is installed and operated in
accordance with the recommendations and instructions of Titan.
This warranty does not apply in the case of damage or wear caused by abrasion, corrosion or misuse, negligence, accident, faulty installation,
substitution of non-Titan component parts, or tampering with the unit in a manner to impair normal operation.
Defective parts are to be returned to an authorized Titan sales/service outlet. All transportation charges, including return to the factory, if
necessary, are to be borne and prepaid by the End User. Repaired or replaced equipment will be returned to the End User transportation
prepaid.
THERE IS NO OTHER EXPRESS WARRANTY. TITAN HEREBY DISCLAIMS ANY AND ALL IMPLIED WARRANTIES INCLUDING, BUT NOT LIMITED TO,
THOSE OF MERCHANTABILITY AND FITNESS FOR A PARTICULAR PURPOSE, TO THE EXTENT PERMITTED BY LAW. THE DURATION OF ANY IMPLIED
WARRANTIES WHICH CANNOT BE DISCLAIMED IS LIMITED TO THE TIME PERIOD SPECIFIED IN THE EXPRESS WARRANTY. IN NO CASE SHALL
TITAN LIABILITY EXCEED THE AMOUNT OF THE PURCHASE PRICE. LIABILITY FOR CONSEQUENTIAL, INCIDENTAL OR SPECIAL DAMAGES UNDER
ANY AND ALL WARRANTIES IS EXCLUDED TO THE EXTENT PERMITTED BY LAW.
TITAN MAKES NO WARRANTY AND DISCLAIMS ALL IMPLIED WARRANTIES OF MERCHANTABILITY AND FITNESS FOR A PARTICULAR PURPOSE
WITH RESPECT TO ACCESSORIES, EQUIPMENT, MATERIALS OR COMPONENTS SOLD BUT NOT MANUFACTURED BY TITAN. THOSE ITEMS SOLD,
BUT NOT MANUFACTURED BY TITAN (SUCH AS GAS ENGINES, SWITCHES, HOSES, ETC.) ARE SUBJECT TO THE WARRANTY, IF ANY, OF THEIR
MANUFACTURER. TITAN WILL PROVIDE THE PURCHASER WITH REASONABLE ASSISTANCE IN MAKING ANY CLAIM FOR BREACH OF THESE
WARRANTIES.
Material Safety Data Sheets (MSDS) are available on Titan’s website or by calling Customer Service.
United States Sales & Service
Phone:
1-800-526-5362
Fax:
1-800-528-4826
1770 Fernbrook Lane
Minneapolis, MN 55447
www.titantool.com
40 © Titan Tool Inc. All rights reserved.
International
international@titantool.com
Fax: 1-763-519-3509
1770 Fernbrook Lane
Minneapolis, MN 55447
 Loading...