

Page 1
Owner’s Manual
For professional use only
Do not use this equipment
before reading this manual!
SPEEFLO Admiral
Air Powered Airless Sprayer
Model Numbers:
830-331 860-451
830-451 941-441
Printed in the U.S.A.
NOTE: This manual contains important
warnings and instructions. Please
read and retain for reference.
1014 • © Titan Tool Inc. All Rights Reserved. Form No. 0528923E
Page 2
Important Safety Information · Read all safety information before
operating the equipment. SAVE THESE INSTRUCTIONS.
This symbol indicates a hazardous situation,
which, if not not avoided could result in death or
serious injury.
To reduce the risks of fire or explosion, electrical
shock and the injury to persons, read and
understand all instructions included in this manual.
Be familiar with the controls and proper usage of
the equipment.
HAZARD: INJECTION INJURY
A high pressure paint stream produced by this
equipment can pierce the skin and underlying
tissues, leading to serious injury and possible
amputation. See a physician immediately.
DO NOT TREAT AN INJECTION INJURY AS A SIMPLE
CUT! Injection can lead to amputation. See a physician
immediately.
PREVENTION:
• NEVER aim the gun at any part of the body.
• Do not aim the gun at, or spray any person or animal.
• NEVER allow any part of the body to touch the uid stream.
DO NOT allow body to touch a leak in the uid hose.
• NEVER put your hand in front of the gun. Gloves will not
provide protection against an injection injury.
• ALWAYS lock the gun trigger, shut the pump off, and
release all pressure before servicing, cleaning the tip or
guard, changing tip, or leaving unattended. Pressure will
not be released by turning off the motor. The PRIME/
SPRAY valve or pressure bleed valve must be turned to
their appropriate positions to relieve system pressure.
Refer to the PRESSURE RELIEF PROCEDURE
described in this manual.
• ALWAYS keep the tip guard in place while spraying. The
tip guard provides some protection but is mainly a warning
device.
• ALWAYS remove the spray tip before ushing or cleaning
the system.
• Paint hose can develop leaks from wear, kinking and
abuse. A leak can inject material into the skin. Inspect
the hose before each use. Do not use hose to lift or pull
equipment.
• NEVER use a spray gun without a working trigger lock and
trigger guard in place.
• All accessories must be rated at or above the maximum
spraying pressure of the unit. This includes spray tips,
guns, extensions, and hose.
• Do not leave the unit energized or under pressure while
unattended. When the unit is not in use, turn off the unit and
relieve the pressure in accordance with the PRESSURE
RELIEF PROCEDURE described in this manual.
• Verify that all connections are secure before operating the
unit. Unsecured parts may eject at great force or leak a
high pressure uid stream causing severe injury.
• Always engage the trigger lock when not spraying. Verify
the trigger lock is functioning properly.
NOTE TO PHYSICIAN:
Injection into the skin is a traumatic injury. It is
important to treat the injury as soon as possible. DO
NOT delay treatment to research toxicity. Toxicity is a
concern with some coatings injected directly into the
blood stream. Consultation with a plastic surgeon or
reconstructive hand surgeon may be advisable.
HAZARD: HAZARDOUS VAPORS
Paints, solvents, insecticides, and other materials
can be harmful if inhaled or come in contact with the
body. Vapors can cause severe nausea, fainting, or
poisoning.
PREVENTION:
• Use a respirator or mask if vapors can be
inhaled. Read all instructions supplied
with the mask to be sure it will provide the
necessary protection.
• Wear protective eyewear.
• Wear protective clothing as required by coating manufacturer.
HAZARD: EXPLOSION OR FIRE
Solvent and paint fumes can explode or ignite.
Property damage and/or severe injury can occur.
PREVENTION:
• Provide extensive exhaust and fresh air
introduction to keep the air within the spray area free from
accumulation of ammable vapors. Solvent and paint
fumes can explode or ignite.
• Do not spray in a conned area.
• Avoid all ignition sources such as static electric sparks,
open ames, pilot lights, electrical appliances, and hot
objects. Connecting or disconnecting power cords or
working light switches can make sparks. Paint or solvent
owing through the equipment is able to result in static
electricity.
• Do not smoke in spray area.
• Fire extinguisher must be present and in good working
order.
• Place pump at least 25 feet (7.62 meters) from the
spray object in a well ventilated area (add more hose if
necessary). Flammable vapors are often heavier than air.
Floor area must be extremely well ventilated. The pump
contains arcing parts that emit sparks and can ignite vapors.
• The equipment and objects in and around the spray area
must be properly grounded to prevent static sparks.
• Keep area clean and free of paint or solvent containers,
rags and other ammable materials.
• Use only conductive or grounded high pressure uid hose.
Gun must be grounded through hose connections.
• For electric units — power cord must be connected to a
grounded circuit.
• Always ush unit into a separate metal container, at low
pump pressure, with spray tip removed. Hold gun rmly
against side of container to ground container and prevent
static sparks.
• Follow the material and solvent manufacturer’s warnings
and instructions. Know the contents of the paints and
solvents being sprayed. Read all Material Safety Data
Sheets (MSDS) and container labels provided with
the paints and solvents. Follow the paint and solvent
manufacturer’s safety instructions.
• Use extreme caution when using materials with a
ashpoint below 100ºF (38ºC). Flashpoint is the
temperature that a uid can produce enough vapors to
ignite.
• Plastic can cause static sparks. Never hang plastic to
enclose a spray area. Do not use plastic drop cloths when
spraying ammable materials.
• Use lowest possible pressure to ush equipment.
• Do not spray onto pump assembly.
2 © Titan Tool Inc. All rights reserved.
English
Page 3
Important Safety Information · Read all safety information before
operating the equipment. SAVE THESE INSTRUCTIONS.
HAZARD: EXPLOSION HAZARD DUE TO
INCOMPATIBLE MATERIALS
Will cause property damage or severe injury.
PREVENTION:
• Do not use materials containing bleach or chlorine.
• Do not use halogenated hydrocarbon solvents such
as bleach, mildewcide, methylene chloride and 1,1,1 trichloroethane. They are not compatible with aluminum.
• Contact your coating supplier about the compatibility of
material with aluminum.
HAZARD: GENERAL
Can cause severe injury or property damage.
PREVENTION:
• Read all instructions and safety precautions before
operating equipment.
• Follow all appropriate local, state, and national codes
governing ventilation, re prevention, and operation.
• The United States Government Safety Standards have
been adopted under the Occupational Safety and Health
Act (OSHA). These standards, particularly part 1910 of
the General Standards and part 1926 of the Construction
Standards should be consulted.
• Use only manufacturer authorized parts. User assumes
all risks and liabilities when using parts that do not meet
the minimum specications and safety requirements of the
pump manufacturer.
• All hoses, ttings, and lter parts must be secured before
operating spray pump. Unsecured parts can eject at great
force or leak a high pressure uid stream causing severe
injury.
• Before each use, check all hoses for cuts, leaks, abrasion
or bulging of cover. Check for damage or movement of
couplings. Immediately replace the hose if any of these
conditions exist. Never repair a paint hose. Replace it with
another grounded high-pressure hose.
• Do not kink or over-bend the hose. Airless hose can
develop leaks from wear, kinking and abuse. A leak can
inject material into the skin.
• Do not expose the hose to temperatures or pressures in
excess of those specied by manufacturer.
• Do not spray outdoors on windy days.
• Wear clothing to keep paint off skin and hair.
• Do not operate or spray near children. Keep children
away from the equipment at all times.
• Do not overreach or stand on an unstable support. Keep
effective footing and balance at all times.
• Use lowest possible pressure to ush equipment.
• Stay alert and watch what you are doing.
• Do not operate the unit when fatigued or under the
inuence of drugs or alcohol.
• For electric units — Always unplug cord from outlet before
working on equipment.
• Do not use the hose as a strength member to pull or lift the
equipment.
• Do not lift by cart handle when loading or unloading.
Grounding Instructions
This product must be grounded. In the event of an electrical
short circuit, grounding reduces the risk of electric shock by
providing an escape wire for the electric current. This product is
equipped with a cord having a grounding wire with an appropriate
grounding plug. The plug must be plugged into an outlet that
is properly installed and grounded in accordance with all local
codes and ordinances.
WARNING - Improper installation of the grounding plug can
result in a risk of electric shock.
If repair or replacement of the cord or plug is necessary, do not
connect the green grounding wire to either at blade terminal.
The wire with insulation having a green outer surface with
or without yellow stripes is the grounding wire and must be
connected to the grounding pin.
Check with a qualied electrician or serviceman if the grounding
instructions are not completely understood, or if you are in doubt
as to whether the product is properly grounded. Do not modify
the plug provided. If the plug will not t the outlet, have the
proper outlet installed by a qualied electrician.
Grounded Outlet
Grounding Pin
Cover for grounded outlet box
IMPORTANT: Use only a 3-wire extension cord that has
a 3-blade grounding plug and a 3-slot receptacle that will
accept the plug on the product. Make sure your extension
cord is in good condition. When using an extension cord,
be sure to use one heavy enough to carry the current your
product will draw. An undersized cord will cause a drop in
line voltage resulting in loss of power and overheating. A 12
gauge cord is recommended. If an extension cord is to be
used outdoors, it must be marked with the suffix W-A after
the cord type designation. For example, a designation of
SJTW-A would indicate that the cord would be appropriate
for outdoor use.
© Titan Tool Inc. All rights reserved. 3
Page 4

Table of Contents
Safety Precautions ................................................................... 2
Grounding Instructions ........................................................ 3
Specications ........................................................................... 4
Introduction ............................................................................... 5
Setup .......................................................................................... 5
Operation ................................................................................... 7
Pressure Relief Procedure .................................................. 7
Cleaning a Clogged Tip ....................................................... 8
Color Change / Clean Out ................................................... 8
Air Motor Maintenance ........................................................ 9
Fluid Pump Maintenance..................................................... 9
Troubleshooting ..................................................................... 10
Airless Spraying ................................................................ 10
Spray Patterns................................................................... 10
Air Motor ............................................................................ 11
Fluid Sections .................................................................... 11
Parts Lists and Service Instructions .................................... 12
Admiral™ Series Portable Models .................................... 12
Admiral™ Series Wall Mount and Drum Mount Models .... 14
Air Motors .......................................................................... 16
Fluid Pump, 155-559 ......................................................... 18
Fluid Pump, 181-556 ......................................................... 20
Fluid Pump, 185-551 ......................................................... 22
Fluid Pump, 245-556 ......................................................... 24
Air Assembly ..................................................................... 26
Heavy Duty Cart ................................................................ 27
Pump Mount Drum Cover.................................................. 28
Pump Mounts .................................................................... 29
920 Outlet Manifold Filter Assembly.................................. 30
Fluid Accessories .............................................................. 32
Outlet Accessories ............................................................ 35
Accessories and Service Kits ............................................... 36
Warranty .................................................................................. 36
Specications
30:1
Gallons per minute (GPM) ............. 6.0
Liters per minute (LPM) ................. 22.7
Cycle rate per gallon...................... 13
Cycle rate per liter ......................... 3.4
Maximum tip size @2000 psi ........ 0.72”
Pressure ratio ................................ 30:1
Maximum pressure ........................ 3000 psi (20.7 MPa, 207 bar)
Fluid inlet ....................................... 1 1/4” NPT(F)
Fluid outlet ..................................... 3/4” NPT(F)
Hose connection ............................ 3/8” NPSM (M)
Approximate air requirement
per gallon of output @ 100 psi
air pressure.................................... 29 SCFM (0.82m3/min)
Air inlet ......................................... 3/4” NPT (F)
40:1
Gallons per minute (GPM) ............. 4.0
Liters per minute (LPM) ................. 15.1
Cycle rate per gallon...................... 20
Cycle rate per liter ......................... 5.3
Maximum tip size @2000 psi ........ 0.57”
Pressure ratio ................................ 40:1
Maximum pressure ........................ 4000 psi (27.6 MPa, 276 bar)
Fluid inlet ....................................... 1” NPT(F)
Fluid outlet ..................................... 1/2” NPT(F)
Hose connection:
941-331 .................................... 1/4” NPSM (M)
941-441 .................................... 1/4” NPSM (M)
941-183 .................................... 3/8” NPSM (M)
941-421 .................................... 3/8” NPSM (M)
Approximate air requirement
per gallon of output @ 100 psi
air pressure.................................... 40 SCFM (1.13m
Air inlet ......................................... 3/4” NPT (F)
3
/min)
60:1
Gallons per minute (GPM) ............. 2.6
Liters per minute (LPM) ................. 10.1
Cycle rate per gallon...................... 30
Cycle rate per liter ......................... 7.9
Maximum tip size @2000 psi ........ 0.47”
Pressure ratio ................................ 60:1
Maximum pressure ........................ 6000 psi (41.4 MPa, 414 bar)
Fluid inlet ....................................... 1” NPT(F)
Fluid outlet ..................................... 1/2” NPT(F)
Hose connection ............................ 3/8” NPSM (M)
Approximate air requirement
per gallon of output @ 100 psi
air pressure.................................... 53 SCFM (1.50m3/min)
Air inlet ......................................... 3/4” NPT (F)
4 © Titan Tool Inc. All rights reserved.
Page 5

Introduction
Automatic
Congratulations on having selected the nest airless sprayer
available in the world. This Admiral™ represents the latest in
airless technology. Its ability to efciently apply a wide range
of coatings makes it an excellent buy. We thank you for your
purchase and welcome you to our large and growing family of
Titan users.
Titan pumps are proven performers for all types of jobs. There
are models for virtually any application, including architectural,
nishing, industrial maintenance, corrosion control, cold applied
roong, waterproong and marine protective coatings. More than
75,000 Titan pumps are in operation around the world, providing
their owners with dependable, efcient operation.
Pumps are specically designed for easy application of today’s
low VOC, high solids and abrasive coatings.
Standard features assure superior reliability. Famous Titan
Severe Service™ paint pumps and high efciency air motors are
standard on all models.
Severe Service paint pumps mean twice the life, half the
maintenance.
• Hard-chrome precision polished rods and cylinders give
maximum abrasion and corrosion resistance with minimum
friction. Result: long life.
• Tungsten carbide valve seats with hardened stainless
steel check balls prevent uid cutting and resist plugging.
Admiral™ Series
Long-Life Packings are also standard.
• Self adjusting, pressure compensated spring loaded
packings ensure proper seal and long life.
• Standard packing sets of leather and UHMWPE (ultra
high molecular weight polyethylene) provide the industry’s
longest packing life.
• Wiper seal on lower packings keeps abrasive materials
from hardening on cylinder wall.
• Alternate packing materials are available fro specialized
applications.
Standard air motor features include:
High-efciency -
• Maximum output per cubic foot of air input.
• More work with less air than competitive air motors.
No motor icing -
• Continuous operation without icing even at high cycle
rates.
• Oversized valving and exhaust porting.
You have made an excellent choice. We know you will be
pleased with your new Admiral™. Thanks again for selecting
Titan. We appreciate your business.
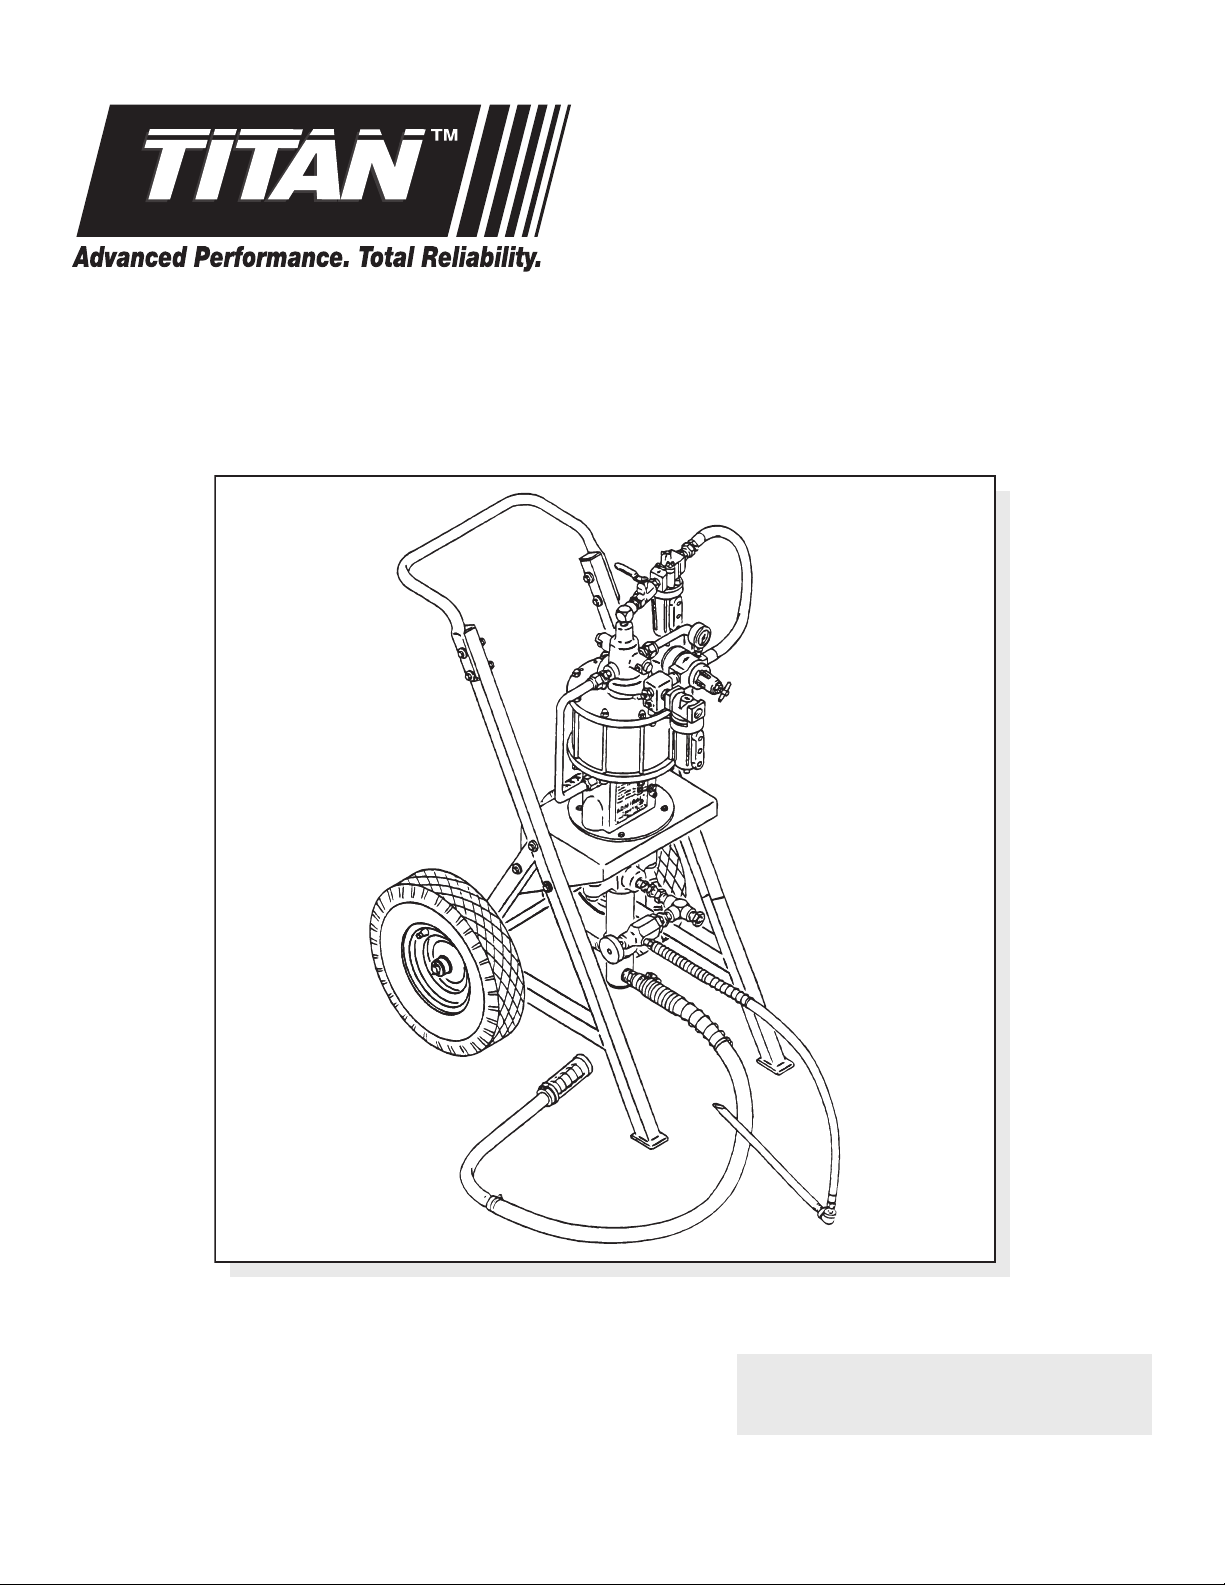
Vented shutoff valve
Cart assembly
Air motor
Pressure bleed
valve
lubricator
Air pressure gauge
Air regulator
Air filter /
moisture separator
Grounding lug
Outlet assembly
Gun hose connection
Bleed line
Fluid pump
Siphon hose
© Titan Tool Inc. All rights reserved. 5
Page 6
Setup
The flow from the spray tip is at very high pressure.
Contact with any body part may be dangerous. Do
not place finger on gun outlet. Do not point the
gun at any person.
Read, understand, and follow all warnings before
starting or operating this sprayer.
Required tools: Crescent wrench and screwdriver
1. Compressor Requirements:
Consult the Technical Specications on each model for
the approximate air requirements.
NOTE: The requirements will vary on each model.
Proper grounding in important. This applies to
gas, electric and air powered models. The passage
of some materials through the nylon hose will build
up a static electric charge, which if discharged,
could ignite solvent vapors present and create an
explosion.
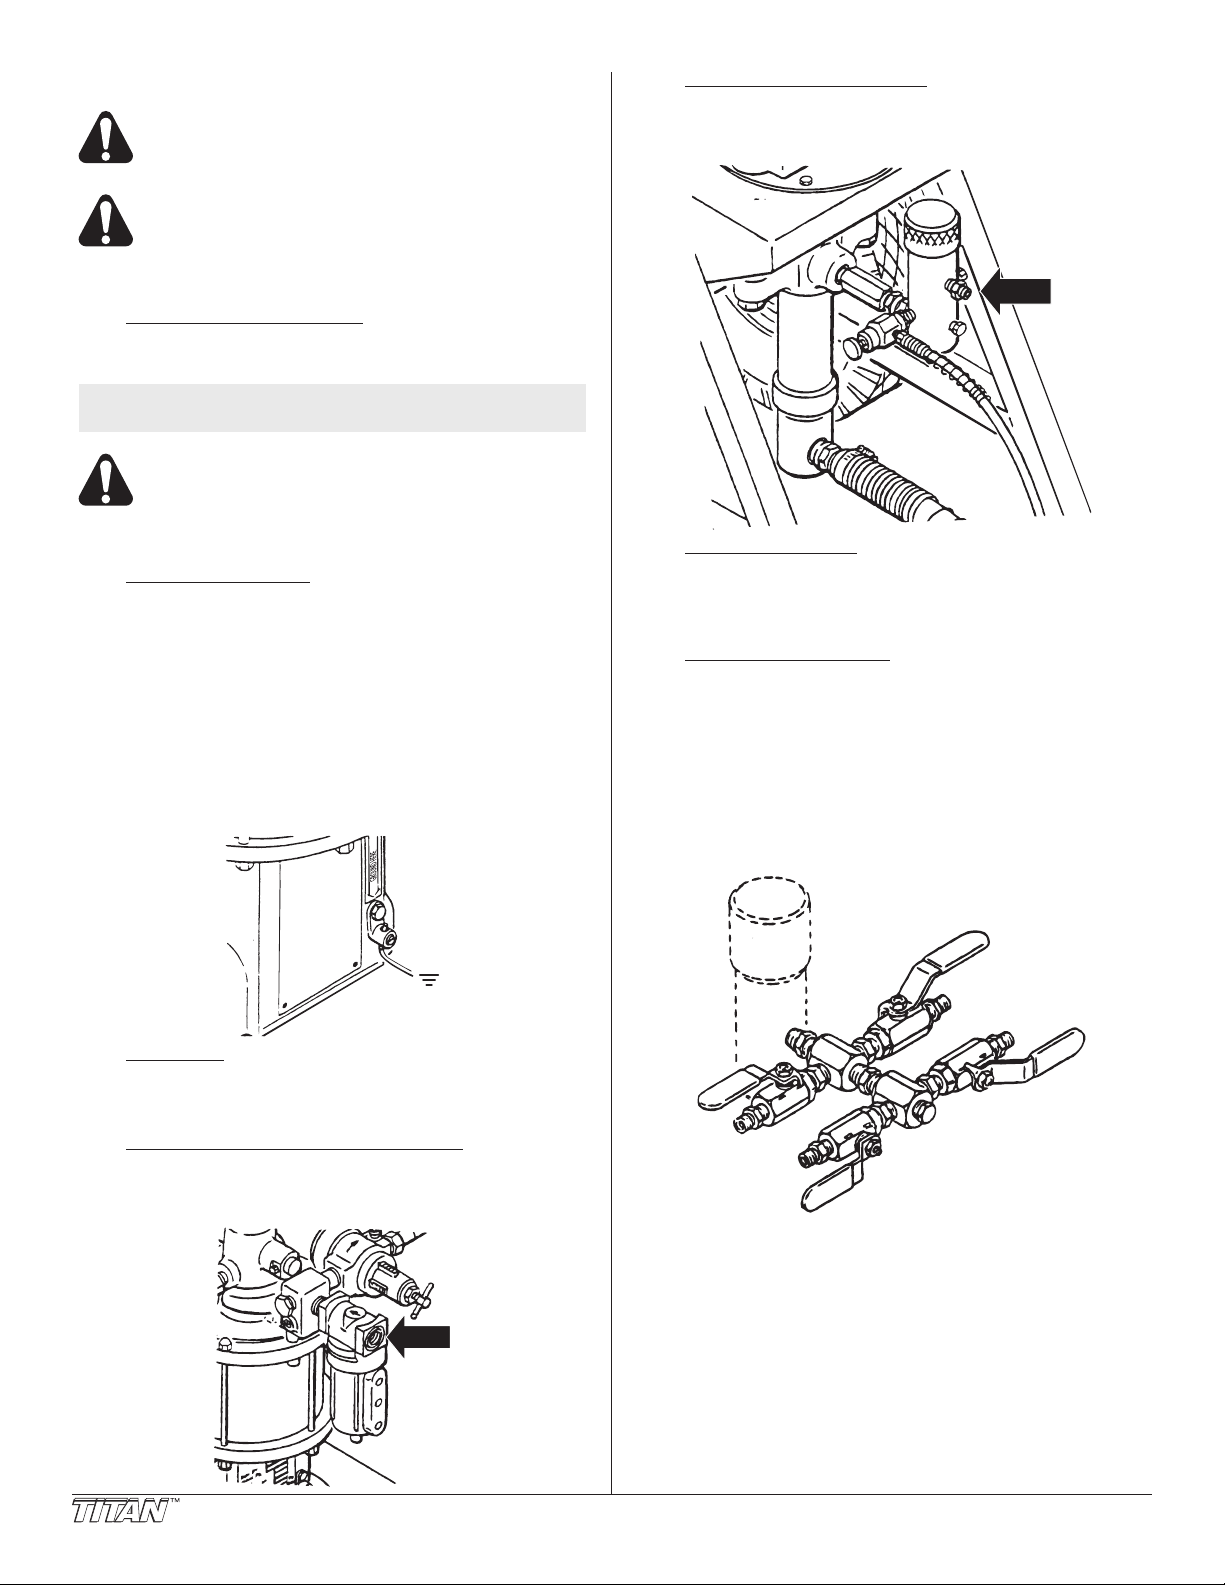
2. Grounding the pump:
Be sure the Admiral™ system is grounded. All Titan units
are equipped with a grounding lug. A Grounding Clamp,
Part No. 101-208 and Ground Wire, Part No. 101-212
should be used to connect the unit to a true earth ground.
These accessories can be ordered from your local
distributor.
a. Loosen the Grounding Screw.
b. Insert one end of the Grounding Wire into the slot in the
Grounding Lug. Tighten the screw.
c. Connect the other end of the Grounding Wire to a true
earth ground. Check local electrical regulations for
detailed grounding instructions.
5. Connecting the paint hoses:
The siphon hose and the bleed line hose have factory
installed PTFE tape on the male end of the hoses.
Tigthen the siphon hose and bleed line wrench tight.
6. One Gun Operation:
Attach the gun and hose. Always use a spray hose at
least 50 feet long. Do not use PTFE or thread sealant on
this assembly. Do not install the spray tip.
7. Multiple Gun Operation:
For models equipped with a second gun outlet, remove
the plug from the outlet and connect a second hose and
gun to the outlet.
Multigun manifolds with shut-off valves can be used when
more than two guns are needed. Never use this second
gun outlet for a one-gun operation.
For guns without a second gun outlet, connect a multi-
gun manifold at the single gun outlet. These manifolds
are either 2, 3, or 4 gun manifolds with shut-off valves.
Connect a hose and gun to each outlet.
3. Ventilation:
Areas must be well ventilated to prevent hazardous
operation with volatile solvents or exhaust fumes.
4. Connecting compressor to the sprayer:
Tighten the air hose wrench tight. The air hose has
factory installed PTFE ape on the male end of the hose.
See gure below.
8. Fill the Wet-Cup 1/2 full with Titan’s Lubrisolv, supplied
by the factory. This extends packing life.
9. Strain all paints with Titan’s 5 gallon Nylon strainer, Part
No. 160-500 or 1 gallon Nylon strainer, Part No. 160100 to assure trouble-free operation and freedom from
frequent cleaning of inlet screen and gun strainer.
6 © Titan Tool Inc. All rights reserved.
Page 7
Startup
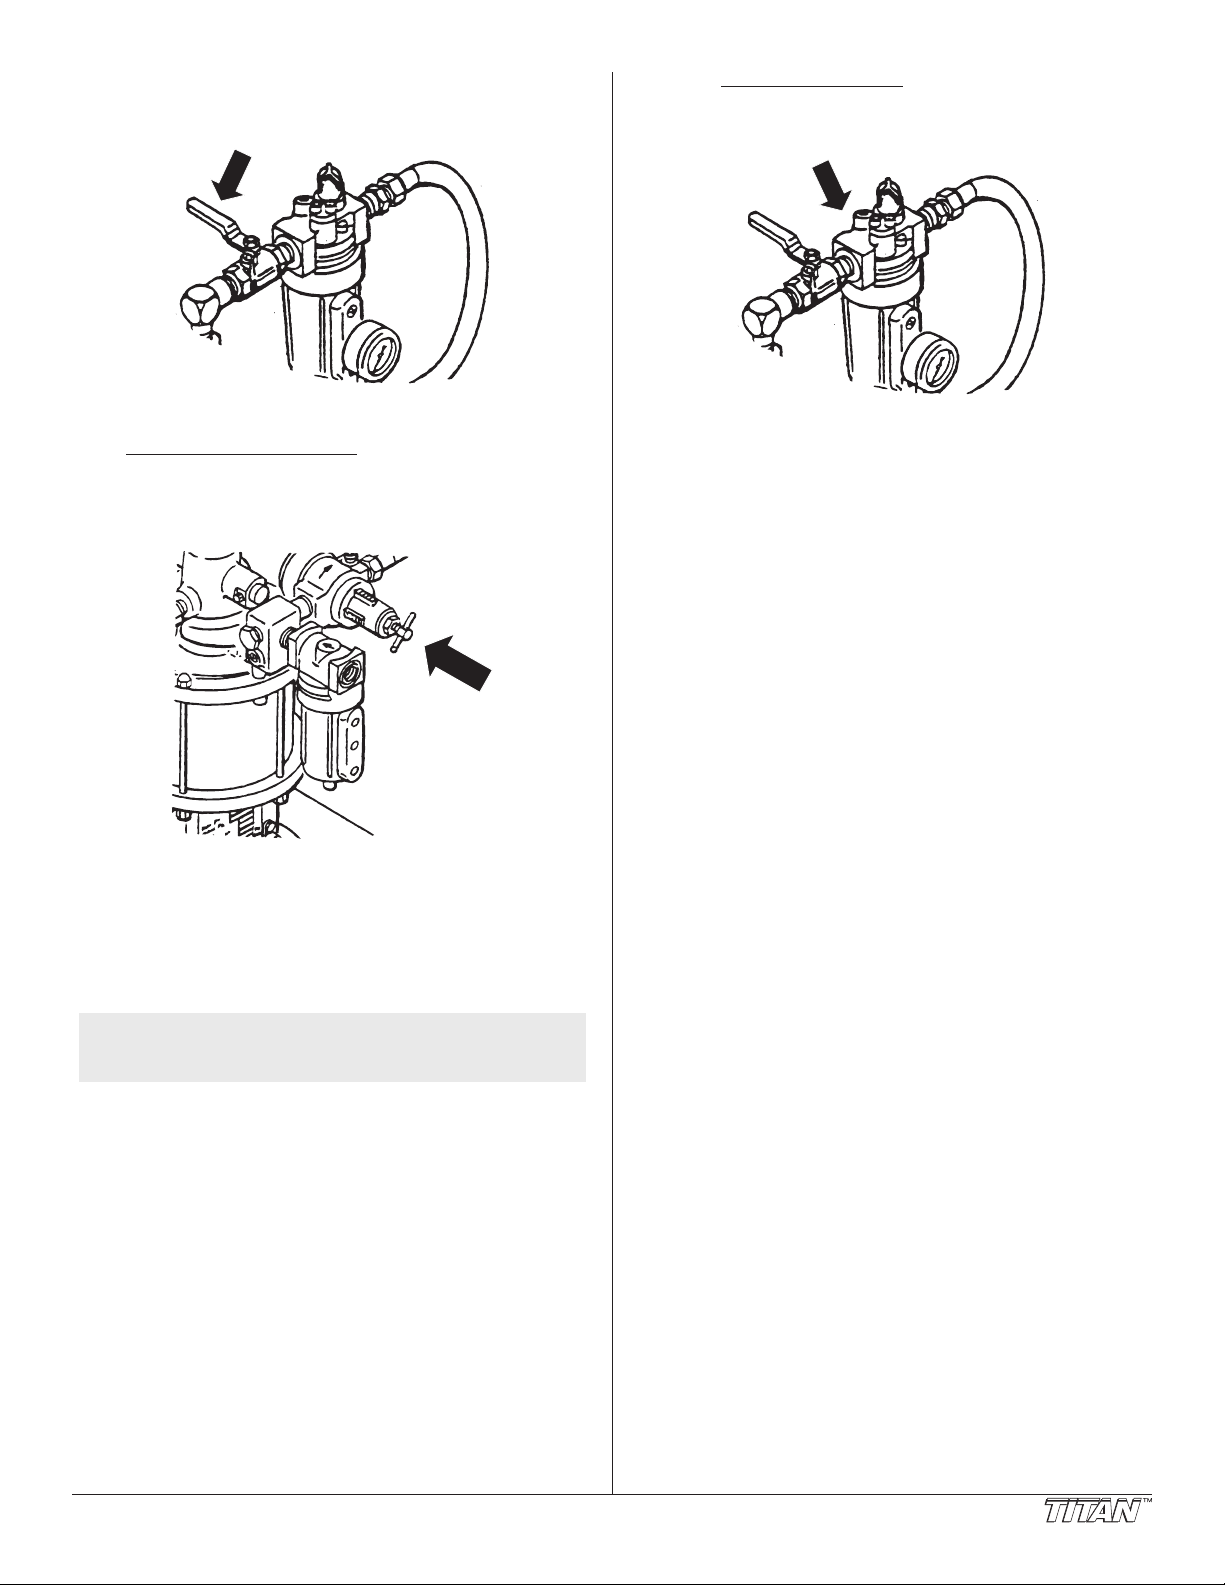
1. Close the self relieving shutoff valve. The gure below
shows the handle in the closed position.
9. The Automatic Lubricator was set at the factory for the
correct injection rate. Do not adjust the lubricator until it is
necessary to rell the reservoir. The lubricator is lled with
AirCare™ lubricant. See gure below.
2. Start the compressor.
3. Drain the Petcock by pushing it off center.
4. Adjusting the air regulator:
The air motor is designed for a maximum air input of 120
psi. Turn the T-Handle clockwise to increase pressure
and counter-clockwise to decrease pressure. Verify the
amount of air pressure by reading the air gauge.
Paint pressure is directly proportional to the amount of air
pressure.
Example: Admiral 30:1
100 psi reading at air gauge = 3000 psi at pump outlet.
Consult the materials manufacturer for guidelines in establishing
the correct air pressure.
10. After relling the reservoir, the automatic lubricator will
need adjusting. Turn the adjusting screw clockwise
to increase the AirCare™ injection rate and counterclockwise to decrease it.
Check the injection rate by observing the ow through the
sight dome. The proper ow rate is 1 drop of AirCare™
per minute or every 90-125 cycles. In cold weather when
icing may occur, increase to one drop every 50-60 cycles.
Operation at very high cycle rates (i.e. greater than 60) will
require a higher AirCare™ injection rate.
IMPORTANT: Use only Titan AirCare™ Part No. 311-011
lubricant. Use of any detergent-type lubricants will cause a
serious problem with the pump and void the warranty.
11. Close the pressure bleed valve. The system is now under
pressure.
NOTE: Using a higher pressure than required will only
Once the correct air pressure has been established, lock the air
regulator by tightening the lock nut.
5. Place the siphon hose in the compatible ushing uid.
A water soluble oil was used to test your new sprayer at
• If you are spraying a water-based latex, ush with warm
• If you are using any other coating, ush with warm
6. Place waste container below bleed line.
7. Open pressure bleed valve.
8. Open self-relieving vented shutoff valve. The handle
© Titan Tool Inc. All rights reserved. 7
wear out tips. Use the guidelines in establishing
the lowest pressures for proper atomization.
the factory. You must clean the system before spraying to
avoid contamination of the sprayed material.
soapy water followed by a clean water rinse.
soapy water followed by a solvent. Check with the
material manufacturer for a compatible solvent.
should now be in line with the valve.
Page 8
Operation
1. Repeat above Startup procedure with paint material. Lock
gun trigger and attach spray tip. See the Technical Data
Sheet on the gun provided for installation and selection of
the proper tip size.
2. Test spray pattern. Operate the pump at the lowest air
gauge reading which provides good atomization.
See the Troubleshooting guide if you are not getting the
proper pattern.
3. When restarting the unit, reduce the pressure at the air
regulator and open the pressure bleed valve.
Pressure Relief Procedure
Always reduce fluid pressure when you are
cleaning a clogged tip, changing a tip, servicing
any part of the system, or shutting down. Follow
the steps below.
1. Engage the gun trigger lock.
2. Close the self-relieving vented shutoff valve.
3. Open the pressure bleed valve by turning it counterclockwise three full turns.
4. Disengage the gun trigger lock and hold trigger open until
owof material stops.
Cleaning a Clogged Tip
The flow from the spray tip is at very high pressure.
Contact with any body part may be dangerous. Do
not place finger on gun outlet. Do not point the
gun at any person. Never operate the spray gun
without the proper tip guard.
1. Follow the Pressure Relief Procedure outlined above.
2. Lock the gun trigger.
3. Unscrew the nozzle cap and remove the spray tip. Wash
the tip in solvent and use a tip probe to remove any
clogged material.
4. If the gun is equipped with a Titan TAC 5™ Assembly, see
Technical Data Manual 150:99 for instructions.
5. Release the gun trigger lock and spray briey into a waste
container to ush out any clogged particles.
6. Reset the trigger lock in the “Trigger Locked” position.
Release the trigger lock and resume spraying.
Color Change / Clean Out
IMPORTANT: Use only compatible solvents when cleaning
out oil based enamels, lacquers, coal tar, and epoxies.
Check with the fluid manufacturer for a recommended
solvent.
1. Reduce pressure by following the Pressure Relief
Procedure.
The pressure bleed valve should be turned counter-
clockwise three full turns.
2. Pull the siphon tube out of the material container.
3. Remove the spray tip from the gun. Hold the gun trigger
open until material ow stops.
4. Put siphon tube into wash solvent or water as applicable,
and operate pump slowly at low pressure until solvent
ows freely from pressure bleed valve line.
5. Close pressure bleed valve and hold gun trigger open
until solvent ows freely from gun. If solvent is not too
dirty, recirculate it by owing gun stream back into solvent
container. Use additional clean solvent and repeat
procedure if necessary.
6. If your model is equipped with a gun strainer screen and
pump outlet lter, check them daily. Use 50 mesh screens
with spray tip size .018 and larger. Use 100 or 200 mesh
screens with spray tip sizes .015 and smaller. Always
check the materials manufacturer’s recommendations for
proper ltration requirements.
7. On models with a outlet paint lter, replace paint lter cap
by turning clockwise. The lter cover should be hand
removable after the rst or second use with a new PTFE
O-ring.
IMPORTANT: O-ring must have PTFE backup washer to seal
properly.
8. If unit has been spraying a water soluble material, ush
with water and then repeat procedure with mineral spirits
or similar solvent.
9. Wash spray tip and preorice in solvent. Blow tip clean
with air pressure directed through the tip in the reverse
direction. Store preorice and tips in clean place.
8 © Titan Tool Inc. All rights reserved.
Page 9

Air Motor Maintenance
Air motors require a normal maintenance and service inspection
at 1500 hours service. Service procedure includes replacement
of motor service kit, minor. It is suggested that one motor
service kit, major (which includes the minor kit) be kept on hand
for normal maintenance and emergency repairs. Check the
individual model’s specications for correct part numbers.
Air motors should be served with moisure free air and for this, an
airline lter / moisture separator, such as Titan Part No. 141-057
is recommended. Very cold and humid air conditions combined
with high speed and high operating pressure may require a
moisture separator and an automatic lubricator to avoid icing.
NOTE: Anairlinelter/moistureseparatorarestandard
on many models.
Best lubrication will be obtained with an automatic lubricator such
as Titan Part No. 151-055.
Fluid Pump Maintenance
If the uid pump is going to be out of service for an extended
period of time, it is recommended that following cleanup, a
kerosene and oil mixture be introduced as a preservative.
Packings may tend to dry out from lack of use. The is particularly
true of the upper packing set for which upper packing lubricant,
Lubrisolv, Titan Part No. 310-200, is recommended in normal
usage. A sample of Lubrisolv accompanies each new unit. Do
not substitute water or paint solvent for Lubrisolv. Ordinary oil
may contaminate the paint material and is not recommended.
If the uid pump has been out of service for an extended period
of time, it may be necessary to prime the suction by pouring
some of the paint solvent into the inlet siphon tube to restart.
IMPORTANT: It is very important that the threads on the
inlet siphon hose coupling are properly sealed. Any air
leakage will produce erratic operation of pump and may
damage the system.
The up and down strokes should be approximately equal in
time. That is, one should not be faster than the other. A fast up
or down stroke may indicate air in the system or malfunctioning
valve seats. See Troubleshooting guide.
Hydraulic Motor and Paint Pump Service
See the individual Technical Data Manual Sheets for
maintenance and service instructions on the reciprocating
hydraulic motor and for mechanical service and maintenance on
the uid pump.
© Titan Tool Inc. All rights reserved. 9
Page 10
Troubleshooting - Airless Spraying
Condition Possible Cause Correction
A. Poor spray pattern and / or tails at
top and bottom of the spray pattern.
B. The gun drips or throws a drop at
the beginning or end of the spray
pattern.
C. Spray tip stops up frequently. Particles too large for spray tip are passing
D. Spray pattern changes with pump
cycle.
E. Irregular ow of material. One
stroke faster than the other.
F. Spitting. Air in system.
G. Gun does not spray any uid. Suction hose leak.
Worn or incorrect tip and/or insufcient
atomization.
Hose size or length is too small or too
long.
Dirty lter.
Needle may not be seating correctly.
Increase spring tension.
lter and/or gun screen.
Restrictions in the uid system. Check gun and pump lter screens.
Packings are worn or valve balls are not
seating.
Restriction in the siphon system.
Dirty gun.
No paint.
Plugged foot valve.
Plugged lters or tip.
Ball check valve stuck open.
Be sure the tip is not worn. Increase
pressure. Lower viscosity. Reduce
surface tension by increasing hose size to
minimize pressure drop through hose and/
or reduce hose lengths. Use preorice
disc (H disc).
Needle-orice combination should be
factory relapped. Needle packing may
be too tight. Loosen as much as possible
without leakage.
Turn adjusting screw on back of gun
clockwise to increase tension or use the
green HP spring Part # 701-098.
Use 100 mesh gun screen instead of 50
mesh for small spray tips. Use 100 mesh
screen in pump lter. Strain paint.
Always clean screens before they load up.
Check siphon hose assembly to be sure no
air is entering, then recheck all threaded
ttings for leakage. See Troubleshooting
- Fluid Section for additional service
information.
Inspect for siphon hose leak.
Disassemble and clean gun.
Inspect for siphon hose leak.
Check uid supply.
Remove, clean, inspect foot valve.
Clean lters or tip.
Clean and inspect pump ball check valve.
Troubleshooting - Spray Patterns
Condition Possible Cause Correction
A. Tails Inadequate uid delivery.
Fluid not atomizing correctly.
B. Hour glass Inadequate uid delivery. Same as above.
C. Distorted Plugged or worn nozzle tip. Clean or replace nozzle tip.
D. Pattern expanding and contracting
(surge)
E. Round pattern. Worn tip.
Suction leak.
Pulsating uid delivery.
Fluid too heavy for tip.
Increase uid pressure. Change to small
tip orice size. Reduce uid viscosity.
Reduce hose length.
Clean gun and lter(s). Reduce number of
guns using pump.
Inspect for siphon hose leak.
Change to a smaller tip orice size.
Install pulsation dampener in system or
drain existing one. Reduce number of
guns using pump.
Remove restrictions in system, clean tip
screen if lter is used.
Replace tip.
Increase pressure. Thin material. Change
nozzle tip.
10 © Titan Tool Inc. All rights reserved.
Page 11

Troubleshooting - Air Motor
Condition Possible Cause Correction
A. Motor stops at top or bottom of
stroke - air does not exhaust when
gun is open.
B. Motor stops, blows air from exhaust
when gun is open.
Piston rod is loose where it connects to the
uid section.
Trip springs or valve spring broken.
Motor is frozen due to icing or lack of
lubrication.
See above.
Air valve is in dead stall position.
O-rings were worn or damaged.
Tighten connection.
Inspect and replace where neessary.
Add 30 weight nondetergent oil to manual
oiler. If condition persists, install moisture
separator and automatic lubricator.
See above.
Remove one trip spring retainer, trip spring
and ball. Push spool valve up or down,
lubricate, reassemble and restart.
Install minor service kit and follow
instructions in General Maintenance and
Service section of manual.
If dust or dirt is found inside motor, check
air supply for contamination.
Troubleshooting - Fluid Sections
Condition Possible Cause Correction
A. Pump delivers on upstroke only
or goes up slowly and down fast
(commonly called downstroke dive).
B. Pump delivers on down stroke only
or goes up fast and down slowly.
C. Pump moves up and down fast, not
delivering material.
D. Pump moves up and down slowly
when spray gun is shut off.
E. Not enough uid pressure at gun. Spray tip is worn.
F. Pump chatters on up or down stroke Solvent has caused upper packing to
Lower foot valve ball is not seating due to
trash or wear.
Material to viscous to siphon.
Air leaking in on siphon side or damaged
siphon hose. Siphon may be too small for
heavy material.
Upper packing nut (if applicable) is loose
or upper packings are worn.
Upper ball is not seating due to trash or
wear.
Lower packing set is worn.
Material container is empty or material is
too thick to ow through the siphon hose.
Bottom ball stuck to foot valve seat.
Siphon hose is kinked or loose.
Loose connections. Bleed valve is open
partially or bleed valve is worn. Lower
packing set is worn.
Upper and/or lower ball not seating.
Compressor (air operated units only) too
small. Outlet lter or gun lter is clogged.
Low voltage and/or inadequate amperage.
Hose size or length is too small or too
long.
swell, or packing is too tight.
Remove foot valve assembly. Clean and
inspect. Test foot valve by lling with
water. If ball fails to seal the seat, replace
ball.
Thin material - contact manufacturer for
proper thinning procedures.
Tighten all connections between pump
and paint container. If damaged, replace.
Switch to bigger siphon set.
If tightening upper packing nut does not
correct, change upper packings.
Check upper seat and ball with water. If
ball fails to seal seat, replace.
Replace packing set is worn.
Rell with new material. If too thick,
remove siphon hose and immerse pump or
add thinner to material. Change to bigger
siphon set. Open bleed valve to remove air
and restart pump.
Remove foot valve. Clean ball and seat.
Straighten.
Check all connections between pump and
gun. Tighten as necessary. If material is
owing from bleed hose, close bleed valve
or replace if necessary. Should none of
above be evident, replace lower packing.
Reset balls by cleaning.
Replace.
Clean or replace lter. Recommend proper
hose size and/or air compressor size.
Check electrical service. Correct as required.
Increase hose size to minimize pressure
drop through hose and/or reduce hose
lengths.
Back off upper packing nut 1/4 turn (if
applicable) and restart pump. Repeat if
necessary.
© Titan Tool Inc. All rights reserved. 11
Page 12

Admiral™ Series Portable Models
1
3
2
8
5
6
2
1
7
3
8
4
7
12 © Titan Tool Inc. All rights reserved.
Page 13

Admiral™ Series Portable Models
ALL MODELS WITH HEAVY DUTY CART 30:1 40:1 60:1
ITEM NO. PART NO. DESCRIPTION 830-451 941-421 941-441 860-451 860-461
1 850-245
850-557
142-104
245-556
1a 850-185
850-555
142-100
185-551
1b 860-559
850-555
142-102
155-559
2 928-835 Airline assembly, 3/4” 1 1 1 1 1
3 590-301 Cart assembly, heavy duty 1 1 1 1 1
4 840-205 Outlet assembly, 1/2” 1 1 1
5 920-554 Filter assembly, outlet 1
5a 920-605 Filter assembly, outlet manifold, 6000 psi 1
6 840-209 Bleed line assembly w/valve 1 1
7 103-807 Siphon hose assembly, 1” w/lter screen 1 1 1
7a 103-810 Siphon hose assembly, 1” w/strainer 1 1
8 219-100 Mounting kit 1 1
8a 219-200 Mounting kit 1 1 1
Motor pump assembly
Air motor
Assembly set
Fluid pump assembly
Motor pump assembly
Air motor
Assembly set
Fluid pump assembly
Motor pump assembly
Air motor
Assembly set
Fluid pump assembly
1
1 1
1 1
© Titan Tool Inc. All rights reserved. 13
Page 14

Admiral™ Series Wall Mount and Drum Mount Models
2
1
4
9
5
6
8
1
3
2
6
14 © Titan Tool Inc. All rights reserved.
Page 15

Admiral™ Series Wall Mount and Drum Mount Models
30:1 40:1 60:1
Wall
Mount
ITEM NO. PART NO. DESCRIPTION 830-331 941-183 941-331 941-431 860-355
1 850-245
850-557
142-104
245-556
1a 850-187
850-555
183-101
185-551
1b 850-186
850-555
142-101
181-556
1c 850-185
850-555
142-100
185-551
1d 860-559
850-555
142-102
159-559
2 928-835 Airline assembly, 3/4” 1 1 1 1 1
3 219-600 Drum cover assembly, 55 Gal. 1
4 590-300 Bracket assembly, wall mount 1 1 1 1
5 219-504 Plate, adapter 1
6 840-205 Outlet assembly, 1/2” 1
6a 920-605 Filter assembly, outlet 1
7 920-554 Filter assembly, outlet 1
7a 920-556 Filter assembly, outlet 1 1
8 840-209 Bleed line assembly w/valve 1 1 1 1
9 103-806 Siphon hose assembly, 3/4” w/rock catcher 1 1
9a 103-808 Siphon hose assembly, 1” w/lter screen 1 1
Motor pump assembly, drum mount
Air motor
Assembly set
Fluid pump assembly
Motor pump assembly
Air motor
Assembly set
Fluid pump assembly
Motor pump assembly
Air motor
Assembly set
Fluid pump assembly
Motor pump assembly
Air motor
Assembly set
Fluid pump assembly
Motor pump assembly
Air motor
Assembly set
Fluid pump assembly
1
Drum
Mount
1
Wall
Mount
1
Wall
Mount
1
Wall
Mount
1
© Titan Tool Inc. All rights reserved. 15
Page 16

Admiral™ 850-555 and 850-557 Air Motor
17
10
11
12
31
32
18
19
20
21
22
23
24
25
26
27
28
29
30
33
34
33
35
36
37
38
39
40
41
1
2
3
4
5
9
6
78
14
13
16
15
ITEM
NO.
1 818-010 Elbow 1 1
2 738-026 Bolt 8 8
3 742-007 Adapter 4 4
4 742-943 Air line 2 2
5 850-997 Head, cylinder 1 1
6 928-103 Adapter 2 2
7 850-967 Plate, exhaust 2 2
8 862-701 Nut 2 2
9 138-340 Ball 2 2
10 738-213 Spring, trip 2 2
11 742-001 O-ring 2 2
12 742-905 Retainer, trip spring 2 2
13 742-913 Sleeve, valve 1 1
14 742-223 O-ring 4 4
15 858-611 Nut 2 2
16 858-660 Screw 2 2
17 858-812 Nut, stop 1 1
18 738-218 Keeper, upper valve 1 1
19 740-925 Valve 1 1
20 738-224 O-ring 2 2
21 740-985 Keeper, lower valve 1 1
PART
NO.
DESCRIPTION
850-555 850-557
QTY. QTY.
ITEM
NO.
22 742-011 Bushing 1 1
23 742-223 O-ring 1 1
24 890-114 O-ring 1 1
25 742-016 Clip, retainer 1 1
26 738-985 Nut, piston 1 1
27 742-005 Washer, piston 1 1
28 743-011 Valve rod assembly 1 1
29 850-917 PIston 1 1
30 850-016 O-ring 1 1
31 743-227 Collar, valve trip 1 1
32 738-937 Rod, piston 1 1
33 850-004 Gasket 2 2
34 850-952 Cylinder 1 1
35 738-021 O-ring 1 1
36 742-224 Ring, wear 1 1
37 850-947 Base, motor 1 1
38 101-205 Lug, ground 1 1
39 858-624 Screw 1 1
40 862-701 Nut 8 8
41 138-007 Nut, coupling 1
41a 138-017 Nut, coupling 1
PART
NO.
DESCRIPTION
850-555 850-557
QTY. QTY.
16 © Titan Tool Inc. All rights reserved.
Page 17

Air Motor Service Procedure
This Air Motor requires a normal mantenance inspection at 1500
hours of service on the non-circulating models and 800 hours of
service on the circulating models. Service procedure includes
replacement of the Motor Service Kit, Minor Part # 850-050 listed
below. It is suggested that one Motor Service Kit, Major Part
# 850-550 (which includes the minor kit) be kept on hand for
normal maintenance and emergency repairs.
Maintenance
The 850 Series Air Motor should be served with moisture-free
air. A water trap, Titan Part #141-057, is recommended. For use
under very cold and humid conditions a moisture separator and
an automatic oiler may be necessary to avoid icing.
Disassembly Procedure
1. Disconnect air hose from elbow (1).
2. Remove locking bolts and nuts (15, 16), trip spring
retainers (12), O-rings (11), trip springs (10), and balls (9)
from both sides of the cylinder head (5).
3. Disconnect air line (4) from adaptors (3) top and bottom.
4. Remove eight nuts (40) and eight bolts (2).
5. With piston (29) in down position, place wrench on ats
of piston rod (32) and disconnect piston rod from pump
connecting rod.
6. With piston (29) at top of stroke, raise cylinder head (5)
and remove retainer (25). Lift off cylinder head (5). Valve
sleeve (13) may pull out of cylinder head. If so, lift valve
sleeve off separately.
7. Remove stop nut (17) and then unthread upper valve
keeper (18).
8. Remove air valve (19) followed by lower valve keeper (21)
and bushing (22).
9. If valve sleeve (13) is still in cylinder head, leave it there
unless it is necessary to change O-rings. To remove, use
Sleeve Removal Tool Part # 900-021 to remove sleeve
(13).
10. Remove cylinder (34).
11. Remove piston rod (32) and piston (29) from motor base
(37).
12. Secure piston (29) in vise and remove piston nut (26) and
piston washer (27).
IMPORTANT: Do not clamp on O.D. of the piston.
13. Remove valve rod assembly (28) and valve trip collar (31).
14. Unscrew piston rod (32) from piston (29).
15. Remove O-ring (30) from piston (29).
16. Remove O-rings (23, 24) from bushing (22), O-ring (35)
and wear ring (36) from motor base (37).
Reassembly Procedure
Wash all replaceable parts thoroughly with kerosene and
lubricate with Lubri-Plate or similar non-water soluble grease.
For routine servicing, use new parts from the Air Motor Servic
Kit Part # 850-500. Inspect all other parts for abnormal wear or
damage and replace if necessary.
1. Install new O-ring (35) and new wear ring (36) into motor
base (37) and new O-rings (23, 24) into bushing (22). Use
care to avoid damaging O-rings and make sure they are
properly seated in the O-ring grooves.
2. Place valve trip collar (31) into piston rod (32) followed by
valve rod assembly (28).
3. Screw piston rod (32) into piston (29). Replace piston nut
and washer (26, 27).
4. Install new piston O-ring (30) into piston (29).
5. Place new gasket (33) into position in motor base (37).
6. Place piston assembly (29, 32) into motor base (37). Do
not damage O-ring.
7. Place new O-rings (20) on air valve (19).
8. Mount air valve assembly onto valve rod (29) by placing
bushing (22) over valve rod (28), followed by keeper (21),
air valve (19) and upper valve keeper (18). Thread upper
valve keeper (18) down on air valve hand tight. Then
loosen approximately 1/4 turn. Place wrench on ats of
valve rod (28) and hold to prevent valve rod (28) from
turning. Thread stop nut (17) down on valve rod (28) to
lock upper valve keeper (18) in position. Be sre upper
valve keeper (18) does not change position.
9. Grease inside of cylinder (34) and work cylinder down
over piston gently in order to avoid damage to piston
O-ring (30).
10. Install new O-rings (14) on valve sleeve (13). Grease
valve sleeve and install into cylinder head (5) so large
holes in sleeve line up with trip retainer holes in cylinder
head (5). Put one trip retainer (12) with new O-ring (11)
into cylinder head without ball (9) or spring (10) and hold
in position temporarily with locking bolt (16) and nut (15).
11. Place new gasket (33) into position in cylinder head (5)
and hold with gasket cement or grease.
12. Carefully position air valve assembly up into cylinder head
(5).
13. Push bushing (22) up into bottom of cylinder head (5) to
sufciently permit installation of retainer (25).
14. To install trip spring retainer be sure one of the detents
of valve (19) is properly lined up with hole in the cylinder
head (5). Place new trip spring retainer O-ring (11) onto
remaining trip spring retainer (12). Install new ball (9)
followed by trip spring (10) and trip spring retainer (12) into
hole of cylinder head (5). Lock into position with bolt (16)
and nut (15).
15. For opposite trip spring retainer (12) replacement, repeat
step #14.
16. Connect air line (4) to adapters (3) top and bottom.
17. Replace bolts (2) and nuts (40). Always tighten nuts
180 degrees apart in order to obtain proper and even
compression.
18. Place wrench on the ats of piston rod (32) and connect
pump connecting rod.
19. Reconnect air hose to elbow (1).
Service Kits
Part No. Description
743-012 Valve rod and spring assembly
Includes items 17, 28 and 31
850-050 Motor service kit, minor
Includes items 9-11, 14, 17, 20, 23-24. 30, 33, 35-
36.
850-500 Motor service kit, major
Includes minor service kit 850-050, and items 13,
18-19, 21, 28 and 31.
742-942 Air line assembly
Includes item 4, and compression nut, part #
742-009 and ferrule, part # 742-010 (each is a
component of item 3, adapter part # 742-007).
© Titan Tool Inc. All rights reserved. 17
Page 18

Admiral™ 155-559 Fluid Pump Assembly
18
21
22
ITEM
NO.
PART
NO.
DESCRIPTION QTY.
1 431-007 Nut, coupling *
4
2 155-907 Block, pump 1
3 155-053 Packing set, Poly/Lthr. 2
19
5
11
4 155-906 Upper packing spring 1
5 155-010 Washer 1
6 155-982 Rod, displacement 1
6
12
7 155-009 Washer, piston 1
8 155-001 Lower packing spring 1
9 155-225 Ball, S.S. 1
1
10 155-921 Piston seat assembly 1
11 891-373 O-ring 2
20
2
7
11
8
12 155-932 Cylinder 1
13 174-113 Stop, ball 1
14 174-102 Cage, ball 1
15 178-700 Ball, S.S. 1
13
16 155-991 Valve, foot 1
3
14
142-102 Assembly Set
9
3
10
15
16
ITEM
NO.
PART
NO.
DESCRIPTION QTY.
18 140-016 Stanchion 2
19 441-956 Rod, connecting 1
20 868-101 Nut 1
21 870-004 Washer 6
22 870-401 Nut 2
Displacement
Rod
2
IN
CM
Stroke Length Displacement Volume /
Stroke
2
IN CM IN
3
CM3LITER IN
Displacement Volume / 40 Cycles
/ 80 Strokes
3
GAL. CM3LITER
Motor
Selection
Motor Pump
ratio
850 Series 60:1.976 6.3 4 10.2 3.9 63.9 .0639 312 1.35 5113 5.113
18 © Titan Tool Inc. All rights reserved.
Page 19

155-559 Fluid Pump Service Information
IMPORTANT: Use of non-Titan manufactured service parts
may void warranty.
The 155 Series Pump should receive a routine servicing after
approximately 1000 hours of use or earlier if there is excessive
leakage from the top packing, or if pump strokes become faster
on one stroke or another. The use of Titan Lubrisolv Part #
310-200 is recommended as an upper packing lubricant. DO
NOT SUBSTITUTE oil, water or solvent for an upper packing
lubricant.
Disassembly Procedure
1. Remove siphon hose assembly.
2. If the pump is connected to air motor, hold motor piston
rod at wrench ats and unthread coupling nut (1) to
separate pump from motor.
3. Unthread and remove foot valve (16) and pump cylinder
(12) to separate from pump block (2) and remove ball (15),
ball stop (13), ball cage (14) and O-ring (11).
4. Secure piston seat assembly (10) in a vise and unthread
displacement rod (6) to remove packing set (3), spring (8)
and washer (7).
5. Inspect and clean all parts. Reject cylinder (12) and/or
displacement rod (6) if hard chrome is grooved or worn
through to gray metal.
Reassembly Procedure
Service Kits
Pump service kits, minor
ITEM
NO.
3a 155-053 Packing set, Leather/Poly 2
11 891-373 O-ing 2 2
15 178-700 Ball, S.S. 1 1
ITEM
NO.
12 155-932 Cylinder 1 1
PART
NO.
3 155-052 Packing set, leather 2
9 155-225 Ball, S.S. 1 1
426-051 Loctite sealant 1 1
PART
NO.
155-051 Minor service kit 1
155-055 Minor service kit 1
6 155-981 Rod, displacement 1 1
DESCRIPTION
Pump service kits, major
DESCRIPTION
155-
051
155-
051
155-
055
155-
055
NOTE: If cylinder (12) and displacement rod (6) are
1. Place new packing set (3) over piston seat (10) with “V”
2. Insert new upper packing set (3) into pump block (2).
IMPORTANT: Peak of “V” packings must point upwards on
reassembly.
Install upper packing spring (4) and washer.
3. Insert displacement rod assembly (6) through pump block
4. Lubricate the threaded ends of cylinder (12) including the
5. Thread cylinder (12) into pump block (2). Do not
6. Replace ball (15), ball cage (14) and ball stop (13) into
NOTE: It is not necessary to overtighten foot valve and
NOTE: For siphon hose attachment, it is critically
reusable, then only a minor kit part # 155-051 or
155-055 may be required for reassembly.
packings point downward (V) and reassemble with ball
(9), spring (8),washer (7) and displacement rod (6) in that
order. Tighten and use Loctite on clean threads.
(2) holding upper packing set (3) in place with ngers.
O-rings (11) to protect them on reassembly.
overtigthen.
foot valve (16) and thread into cylinder (12). The O-rings
(11) should be lubricated to protect it on replacement of
foot valve. It is not necessary to overtighten as seal is
obtained when parts are fully threaded together.
cylinder into pump block. O-ring seals perform
sealing function without excessive tightening.
Fullthreadengagementissufcient.Thefoot
valve may be rotated back up to 1/2 turn from full
engagement for convenient hose position.
importantthatthethreadsofthesiphonhoset
snugly into the foot valve with the hose assembly
couplings PTFE taped and sealed to prevent air
inlet leakage.
© Titan Tool Inc. All rights reserved. 19
Page 20

Admiral™ 181-556 Fluid Pump Assembly
23
22
21
20
25
24
ITEM
NO.
PART
NO.
DESCRIPTION QTY.
1 185-981 Pin, roll 1
2 185-984 Rod, displacement 1
3 181-906 Block, pump 1
4 175-001 Upper packing set, Lthr. 1
5 182-906 Spring, packing 1
6 228-002 Nipple, hex 1
1
2
8 185-011 Retainer, spring 1
9 185-010 Spring, packing 1
7 182-007
O-ring, PTFE
1
10 180-002 Lower packing set, Lthr. 1
3
4
5
11 182-921 Seat, piston 1
12 182-932 Cylinder 1
13 174-113 Stop, ball 1
14 174-102 Cage, ball 1
15 178-700 Ball, S.S. 1
16 155-981 Valve, foot 1
6
7
18 174-001
19 920-103 Ball 1
17 742-223
O-ring
O-ring, PTFE
1
1
Displacement
Rod Area
2
IN
CM
19
18
17
16
Stroke Length Displacement Volume /
Stroke
2
IN CM IN
3
CM3LITER IN
8
9
10
11
12
13
14
15
Displacement Volume / 40 Cycles
3
ITEM
NO.
PART
NO.
DESCRIPTION QTY.
20 868-101 Nut 2
21 870-004 Washer 2
22 870-005 Washer, spacer 4
23 140-016 Stanchion 2
24 441-956 Rod, connecting 1
25 138-007 Nut, coupling *
* Not included in this assembly
/ 80 Strokes
GAL. CM3LITER
142-101 Assembly Set
Motor
Selection
850 Series 40:11.38 8.90 4 10.2 5.55 90.9 0.091 444 1.92 7272 7.27
Motor Pump
ratio
20 © Titan Tool Inc. All rights reserved.
Page 21

181-556 Fluid Pump Service Information
IMPORTANT: Use of non-Titan manufactured service parts
may void warranty.
The 181 Series Pump should receive a routine servicing after
approximately 1000 hours of use or earlier if there is excessive
leakage from the top packing, or if pump strokes become faster
on one stroke or another. The use of Titan Lubrisolv Part #
310-200 is recommended as an upper packing lubricant. DO
NOT SUBSTITUTE oil, water or solvent for an upper packing
lubricant.
Disassembly Procedure
1. Test pump before disassembly. Follow test procedure in
Troubleshooting Guide - Fluid Section.
2. Remove siphon hose assembly.
3. Remove stanchion nuts (20) and washers (21).
4. If the uid section is connected to an air motor, hold the air
motor piston rod at the wrench ats and unthread coupling
nut (25) to separate pump from motor.
If the motor is connected to a hydraulic motor, remove
allen set screw between the two ats on hydraulic motor
rod. Hold the hydraulic motor rod at the wrench ats
and unthread coupling nut (25) to separate pump from
hydraulic motor.
IMPORTANT: Never use a pipe wrench, pliers, etc. on the
chrome part of hydraulic, air or fluid section rod.
5. Remove roll pin (1) on connecting rod (24). Remove
connecting rod from displacement rod (2).
6. Unthread and remove foot valve (16).
7. Remove PTFE O-ring (18), O-ring (17), ball stop ring (13),
ball cage (14) and ball (15).
8. Remove cylinder (12).
9. Remove displacement rod (2).
10. Place piston seat (11) in a vise and use a wrench on the
ats to remove the displacement rod (2) from the piston
seat (11).
11. Remove lower packing set (10), spring (9), spring retainer
(8) and ball (19).
12. Remove upper packing spring (5), O-ring (7) and packing
set (4) from pump block (3).
13. Clean and inspect all parts. Inspect rod or pump tube’s
hard chrome for grooves, dents or worn areas. Replace if
hard chrome is damaged. Inspect valve seats and replace
if cracked or worn.
8. Insert ball (15), ball cage (14), ball stop retainer ring (13),
O-ring (17) and PTFE O-ring (18) into foot valve.
IMPORTANT: Lubricate all O-rings.
9. Thread foot valve (16) back into cylinder (12).
NOTE: It is not necessary to overtighten foot valve and
10. Insert coupling nut (25) back onto connecting rod (24) and
cylinder into pump block. O-ring seals perform
sealing function without excessive tightening.
Fullthreadengagementissufcient.Thefoot
valve (16) may be rotated back up to 3/4 turn from
full engagement for convenient hose position.
thread connecting rod (24) back onto displacement rod
(2).
Service Kits
Pump service kit, minor (Part # 182-050)
ITEM
NO.
10 180-002 Packing set, leather 1
15 178-700 Ball 1
17 742-223 O-ring 1
18 174-001
19 920-103 Ball 1
ITEM
NO.
11 182-921 Seat, piston 1
12 182-932 Cylinder 1
PART
NO.
4 175-001 Packing set, leather 1
7 182-007
Pump service kit, major (Part # 182-520)
PART
NO.
182-050 Pump service kit, minor 1
2 185-984 Rod, displacement 1
DESCRIPTION QTY.
O-ring, PTFE
O-ring, PTFE
DESCRIPTION QTY.
1
1
Reassembly Procedure
1. Insert upper packing set (4) into pump block (7)
IMPORTANT: Peak of “V” packings must point upwards on
reassembly.
2. Insert upper spring (5); small end of spring must go toward
the packing set.
3. Place packing set (10) over piston seat (11).
IMPORTANT: Peak of “V” packings must point downward
on reassembly.
4. Replace spring (9), spring retainer (8) and ball on piston
seat (11).
5. Thread seat back onto displacement rod (2).
IMPORTANT: Use Loctite on clean threads.
6. Insert displacement rod (2) assembly through upper
packing set (4) in pump block (3).
7. Place O-ring (7) on end of cylinder (12) and thread back
into pump block (3).
IMPORTANT: Lubricate all O-rings before assembly.
© Titan Tool Inc. All rights reserved. 21
Page 22

Admiral™ 185-551 Fluid Pump Assembly
21
20
23
22
ITEM
NO.
PART
NO.
DESCRIPTION QTY.
1 185-981 Pin, roll 1
2 185-984 Rod, displacement 1
3 181-906 Block, pump 1
1
2
3
4 178-001 Packing set, upper 1
5 228-002 Nipple, hex 1
6 182-906 Spring, packing 1
7 182-007
O-ring, PTFE
1
8 183-930 Cylinder 1
4
5
6
9 185-011 Retainer, spring 1
10 185-010 Spring, packing 1
11 180-001 Packing set, lower 1
12 920-103 Ball 1
13 182-921 Seat, piston 1
14 183-230
15 182-007
O-ring,
O-ring, PTFE
1
1
16 183-992 Valve, foot 1
7
8
9
10
11
12
13
17 314-180 Ball 1
18 240-022 Cage, ball 1
18a 241-109 Pin 1
142-100 Assembly Set
ITEM
NO.
19 870-401 Nut 2
20 870-004 Washer 6
PART
NO.
DESCRIPTION QTY.
21 140-016 Stanchion 2
22 442-956 Rod, connecting 1
14
868-101 Nut (not shown) 1
183-101 Assembly Set** (for 55 gallon drum
15
16
17
cover)
ITEM
NO.
19a 870-401 Nut 2
20 870-004 Washer 6
21a 314-024 Stanchion 2
22 442-956 Rod, connecting 1
22a 180-979 Extension, connecting
23 868-101 Nut 1
24 840-214 Riser pipe assembly 1
PART
NO.
DESCRIPTION QTY.
rod
1
** Not shown
Displacement
Rod Area
2
IN
CM
Stroke Length Displacement Volume /
Stroke
2
IN CM IN
3
CM3LITER IN
Displacement Volume / 40 Cycles
/ 80 Strokes
3
GAL. CM3LITER
Motor
Selection
Motor Pump
ratio
850 Series 40:11.38 8.90 4 10.2 5.55 90.9 0.091 444 1.92 7272 7.27
22 © Titan Tool Inc. All rights reserved.
Page 23

185-551 Fluid Pump Service Information
IMPORTANT: Use of non-Titan manufactured service parts
may void warranty.
The 185 Series Pump should receive a routine servicing after
approximately 1000 hours of use or earlier if there is excessive
leakage from the top packing, or if pump strokes become faster
on one stroke or another. The use of Titan Lubrisolv Part #
310-200 is recommended as an upper packing lubricant. DO
NOT SUBSTITUTE oil, water or solvent for an upper packing
lubricant.
Disassembly Procedure
1. Test pump before disassembly. Follow test procedure in
Troubleshooting Guide - Fluid Section.
2. Remove siphon hose assembly.
3. Remove stanchion nuts (19) and washers (20).
4. Hold the air motor piston rod at the wrench ats and
unthread coupling nut to separate pump from motor.
IMPORTANT: Never use a pipe wrench, pliers, etc. on the
chrome part of hydraulic, air or fluid section rod.
5. Remove roll pin (1) or jam nut on connecting rod (22).
Remove connecting rod (22) from displacement rod (2).
6. Unthread and remove foot valve (16).
7. Remove PTFE O-ring (15), O-ring (14), ball cage
assembly (18) and ball (17).
8. Remove cylinder (8).
9. Remove displacement rod (2).
10. Place piston seat (13) in a vise and use a wrench on the
ats to remove the displacement rod (2) from the piston
seat (13).
11. Remove lower packing set (11), spring (10), spring
retainer (9) and ball (12).
12. Remove upper packing spring (6), packing set (4) and
O-ring (7).
13. Clean and inspect all parts. Inspect displacement rod’s
(2) and cylinder’s (8) chrome for grooves, dents or worn
areas. Replace if hard chrome is damaged. Inspect valve
seats and replace if cracked or worn.
Reassembly Procedure
1. Insert upper packing set (4) into pump block (3)
IMPORTANT: Peak of “V” packings must point upwards on
reassembly.
2. Insert upper spring (6); small end of spring must go toward
the packing set.
3. Insert spring retainer (9).
4. Place new lower packing set (11) over piston seat (13).
IMPORTANT: Peak of “V” must point downward on
reassembly.
5. Replace spring (10), spring retainer (9) and new ball (12)
on piston seat (13).
6. Thread piston seat (13) back onto displacement rod (2).
IMPORTANT: Use Loctite on clean threads.
7. Insert displacement rod (2) assembly through upper
packing set (4) in pump block (3).
8. Place new O-ring (7) on end of cylinder (8) and thread
back into pump block (3).
IMPORTANT: Lubricate all O-rings before assembly.
9. Insert new ball (17), ball cage (18), and new O-ring (14)
into foot valve.
NOTE: Ball cage pin (18a) to be in lower position unless
10. Place new PTFE O-ring (15) on cylinder (8) and then
NOTE: It is not necessary to overtighten foot valve and
11. Insert connecting rod (22) through coupling nut and thread
12. Insert roll pin (1) into connecting rod (22).
For siphon hose attachment, it is critically important that
pumpistobeusedforheavyblocklleror
roongmaterials.
install foot valve assembly (16)
cylinder into pump block. O-ring seals perform
sealing function without excessive tightening.
Fullthreadengagementissufcient.Thefoot
valve (16) may be rotated back up to 3/4 turn from
full engagement for convenient hose position.
connecting rod (22) into displacement rod (2).
the thread of the siphon hose t snugly into the foot valve
with the hose assembly couplings PTFE-taped and sealed
to prevent air inlet leakage.
Service Kits
NOTE: Minor service kit # 185-050 has polyethylene/
Minor service kit # 180-051 has leather packings.
Minor service kit # 185-052 has PTFE packings.
ITEM
NO.
11 180-002 Packing set, lower 1
11 180-322 Packing set, lower 1
11 183-001 Packing set, lower 1
12 920-103 Ball 1 1 1
14 183-230 O-ring 1 1 1
15 182-007
17 314-180 Ball 1 1 1
ITEM
NO.
leather packings.
Pump service kit, minor CTR IND
PART
NO.
4 175-001 Packing set, upper 1
4 178-001 Packing set, upper 1
4 178-320 Packing set, upper 1
7 182-007
426-051 Loctite Sealant 1 1 1
Pump service kit, major CTR IND
PART
NO.
185-050 Minor kit 1
185-051 Minor kit 1
185-052 Minor kit 1
2 182-984 Displacement rod 1 1 1
6 182-906 Spring, packing 1 1 1
8 183-930 Cylinder 1 1 1
DESCRIPTION
O-ring, PTFE
O-ring, PTFE
DESCRIPTION
185-
050
185-
500
185-
1 1 1
1 1 1
185-
051
501
PTFE
185-
052
PTFE
185-
502
© Titan Tool Inc. All rights reserved. 23
Page 24

Admiral™ 245-556 Fluid Pump Assembly
10
11
24
23
22
1
2
3
ITEM
NO.
1 245-907 Block, pump 1
2 240-001 Packing set, Poly/Lthr. 1
3 245-005 Packing spring, upper 1
4 245-013 Retainer, spring 1
5 892-323 O-ring, Telfon 1
PART
NO.
DESCRIPTION QTY.
6 245-012 Cylinder 1
7 920-103 Ball, S.S. 1
8 245-020 Retainer, spring 1
4
5
6
18
9 245-014 Spring, packing 1
10 240-001 Packing set, Poly/Lthr 1
11 241-007 Seat, piston 1
12 240-022 Cage, ball 1
7
8
9
12a 241-109 Pin, ball stop 1
13 891-403
14 892-281
O-ring, PTFE
O-ring
15 245-018 Valve, foot 1
16 314-180 Ball, S.S. 1
1
1
17 245-021 Retainer, cage 1
18 245-009 Rod, displacement 1
Displacement
Rod Area
2
IN
CM
12
12
13
14
Stroke Length Displacement Volume /
Stroke
2
IN CM IN
3
CM3LITER IN
17
16
15
ITEM
NO.
PART
NO.
DESCRIPTION
19 870-401 Nut 2
20 870-004 Washer 6
21 140-016 Stanchion 2
22 245-109 Roll pin 1
23 442-959 Connecting rod 1
24 138-007 Nut, coupling *
* Not included in this assembly
Displacement Volume / 40 Cycles
/ 80 Strokes
3
GAL. CM3LITER
Motor
Selection
850 Series 30:12.08 13.42 4 10.2 8.38 137.32 0.137 670 2.9 10.986 11
142-
104
Motor Pump
ratio
24 © Titan Tool Inc. All rights reserved.
Page 25

245-556 Fluid Pump Service Information
IMPORTANT: Use of non-Titan manufactured service parts
may void warranty.
The 245 Series Pump should receive a routine servicing after
approximately 1000 hours of use or earlier if there is excessive
leakage from the top packing, or if pump strokes become faster
on one stroke or another. The use of Titan Lubrisolv Part #
310-200 is recommended as an upper packing lubricant. DO
NOT SUBSTITUTE oil, water or solvent for an upper packing
lubricant.
Disassembly Procedure
1. Test pump before disassembly. Follow test procedure in
Troubleshooting Guide - Fluid Section.
2. Remove siphon hose assembly.
3. Remove stanchion nuts (19) and washers (20).
4. If the uid section is connected to an air motor, hold the air
motor piston rod at the wrench ats and unthread coupling
nut (24) to separate pump from motor.
If the uid section is connected to a hydraulic motor,
remove allen set screw between the two ats on hydraulic
motor rod. Hold the hydraulic motor rod at the wrench
ats and unthread coupling nut (24) to separate pump
from hydraulic motor.
IMPORTANT: Never use a pipe wrench, pliers, etc. on the
chrome part of hydraulic, air or fluid section rod.
5. Remove roll pin (22) or jam nut on connecting rod (23).
Remove connecting rod (23) from displacement rod (18).
6. Unthread and remove foot valve (15).
7. Remove PTFE O-ring (13), O-ring (14), ball cage retainer
(17), ball cage (12) and ball (16).
8. Remove cylinder (6).
9. Remove displacement rod (18).
10. Place piston seat (11) in a vise and use a wrench on the
ats to remove the displacement rod (18) from the piston
seat (11).
11. Remove lower packing set (10), spring (9), spring retainer
(8) and ball (7).
12. Remove upper spring retainer (4), spring (3), PTFE O-ring
(5) and packing set (2).
13. Clean and inspect all parts. Inspect rod’s and cylinder’s
hard chrome for grooves, dents or worn areas. Replace if
hard chrome is damaged. Inspect valve seats and replace
if cracked or worn.
Reassembly Procedure
1. Insert new upper packing set (2) into pump block (1)
IMPORTANT: Peak of “V” packings must point upwards on
reassembly.
2. Insert upper spring (3); small end of spring must go toward
the packing set.
3. Insert spring retainer (4) and new O-ring (5) into pump
block (1).
IMPORTANT: Lubricate all O-rings before assembly.
4. Place new lower packing set (2) over piston seat (11).
IMPORTANT: Peak of “V” must point downward on
reassembly.
5. Replace spring (9), spring retainer (8) and ball (7) on
piston seat (13).
6. Thread piston seat back onto displacement rod (18).
IMPORTANT: Use Loctite on clean threads.
7. Insert displacement rod assembly through upper packing
set (2) in pump block (1).
8. Thread cylinder (6) back into into pump block (1).
9. Insert new ball (16), ball cage (12), ball cage retainer (17)
new O-ring (14) and new PTFE O-ring (13).
IMPORTANT: Lubricate all O-rings into foot valve (15).
NOTE: Ball cage pin (12a) to be in lower position unless
10. Thread foot valve (15) back into cylinder (6).
11. Place connecting rod (23) through coupling nut (24) and
12. Replace roll pin (23) into displacement rod (18).
NOTE: It is not necessary to overtighten foot valve and
For siphon hose attachment, it is critically important that
pumpistobeusedforheavyblocklleror
roongmaterials.
thread connecting rod (23) into displacement rod (18).
cylinder into pump block. O-ring seals perform
sealing function without excessive tightening.
Fullthreadengagementissufcient.Thefoot
valve (16) may be rotated back up to 1/2 turn from
full engagement for convenient hose position.
the thread of the siphon hose t snugly into the foot valve
with the hose assembly couplings PTFE-taped and sealed
to prevent air inlet leakage.
Service Kits
Pump service kit, minor
ITEM
NO.
ITEM
NO.
PART
NO.
2 240-001 Packing set, upper,
2 240-101 Packing set, upper,
2 240-201
5 892-323
7 920-103 Ball 1 1 1
10 240-001 Packing set, lower,
10 240-101 Packing set, lower,
10 240-201
13 891-403
14 182-007
16 314-180 Ball 1 1 1
426-051 Loctite Sealant 1 1 1
PART
NO.
245-050 Minor kit 1
245-051 Minor kit 1
245-052 Minor kit 1
6 245-012 Cylinder 1 1 1
9 245-014 Spring, packing 1 1 1
18 245-009 Displacement rod 1 1 1
DESCRIPTION
Poly/Lthr
Leather
Packing set, upper,
PTFE
O-ring, PTFE
Poly/Lthr
leather
Packing set, lower,
PTFE
O-ring, PTFE
O-ring
Pump service kit, major
DESCRIPTION
245-
050
245-
500
245-
051
1
1
1 1 1
1
1
1 1 1
1 1 1
245-
501
245-
052
245-
502
1
1
© Titan Tool Inc. All rights reserved. 25
Page 26

Admiral™ 928-835 Air Assembly
4
2
3
1
5
1
Air Assembly 928-835
ITEM
NO.
10 929-062 Bushing, hex 1
11 227-027 Plug, pipe, 1/2” 3
12 858-647 Screw 2
13 141-159 Moisture separator, 3/4” 1
PART
NO.
1 112-302 Nipple, 3/4” 2
2 940-562 Valve, vented, 3/4” 1
3 151-157 Lubricator, 3/4” 1
4 138-037 Adapter, swivel 1
5 542-035 Air hose assembly 1
6 227-100 Gauge, air 1
7 921-734 Regulator, air, 3/4” 1
8 112-301 Nipple, 3/4” 2
9 928-916 Air block, 3/4” 1
311-100 Lubricant, Air Care™ *
DESCRIPTION QTY.
11
6
9
10
8
12
For 921-734 Air regulator order 924-054
For 141-159 Moisture separator order 141-050
For 151-157 Lubricator order 151-050
7
11 13
Repair Kits
Repair Kit
Part No.
* Filled at factory
26 © Titan Tool Inc. All rights reserved.
Page 27

Admiral™ Heavy Duty Cart
A
B
Cart Dimensions
A 17 3/8”
J
I
C
D
F
E
H
B 26 3/4”
C 24 1/2”
D 8”
E 24 1/4”
F 9 1/4”
G 34 1/4”
H 2”
I 43 5/8”
J CL of pump
G
1
2
3
7
Part No. 590-301
Heavy Duty Cart Assembly
ITEM
NO.
10 870-003 Washer 2
11 570-010 Cotter key 2
PART
NO.
1 590-352 Handle 1
2 935-014 End cap 2
3 590-350 Frame 2
4 862-410 Nut, 3/8” - 16 10
5 862-001 Washer, 3/8” 14
6 862-472 Screw, 3/8” - 16 x 2 1/4” 10
7 590-351 Bracket 1
8 590-353 Axle 1
9 670-105 Wheel, 16 inch 2
DESCRIPTION QTY.
4
3
8
6
5
9
11
10
© Titan Tool Inc. All rights reserved. 27
Page 28

Admiral™ Pump Mount Drum Cover
1
11
6
7
2
3
4
5
8
9
10
55 Gal. Drum Cover Assembly, Part No. 219-600
ITEM
NO.
10 862-411 Nut, Flex Lock, 3/8 - 16 1
11* 219-504 Plate, adapter *
* Not included in this assembly
PART
NO.
1 860-535 Screw, HH, 5/16 - 18 x 7/8” 4
2 862-452 Screw, HH, 3/8 - 16 x 1.5” 1
3 219-506 Knob, plastic 1
4 219-505 Plate, inspection 1
5 219-555 Cover, 55 Gal. Drum 1
6 860-003 Washer, at, 5/16 4
7 860-502 Nut, Ela. Stp 5/16 - 18 4
8 738-213 Spring 1
9 862-001 Washer, at, 3/8” 1
DESCRIPTION QTY.
28 © Titan Tool Inc. All rights reserved.
Page 29

Admiral™ Pump Mounts
1
Mounting kit for 2 stanchion pump
ITEM
NO.
2
3
4
5
* For use with outlet lters and surge chambers
PART
NO.
1 860-535 Screw 4 4
2 219-504 Adapter plate 1 1
3 860-003 Washer 4 4
4 860-502 Nut 4 4
5 191-444 Nipple, extension 1
DESCRIPTION QTY. QTY.
Part #
219-100*
Part #
219-200
3
ITEM
NO.
4
1
7
6
5
PART
NO.
1 590-351 Bracket 1
2
219-100
3
860-535
4
219-504
5
860-502
6
860-003
7
191-444
Wall Bracket 590-300
DESCRIPTION QTY.
Mounting kit
Screw (4)
Adapter plate (1)
Nut (4)
Washer (4)
Nipple (1)
1
© Titan Tool Inc. All rights reserved. 29
Page 30

Admiral™ Outlet Accessories - 920 Outlet Manifold Filter Assembly
1
2
3
4
5
6
10
7
8
Outlet Manifold Filter Assembly
ITEM
NO.
1a 920-930 Cap, lter (6000 psi) 1
3a 920-005 Screen, lter, 100 mesh 1
6a 920-931 Body, lter (6000 psi) 1
10 200-555 Adapter, swivel 1 1
10a 200-554 Adapter, swivel 1
PART
NO.
1 920-917 Cap, lter (5000 psi) 1 1
2 920-103 Ball, S.S. 1 1 1
3 920-004 Screen, lter, 50 mesh 1 1
4 920-006
5 920-070
6 920-927 Body, lter (5000 psi) 1 1
7 812-003 Nipple, hex 1 1 1
8 227-027 Plug, pipe 1 1
9 227-033 Plug, pipe 1 1 1
DESCRIPTION
Gasket, PTFE (thick)
Gasket, PTFE (thin)
9
5000 psi 5000 psi 6000 psi
920-554 920-556 920-605
1 1 1
1 1 1
30 © Titan Tool Inc. All rights reserved.
Page 31

Admiral™ 920 Outlet Manifold Filter Assembly Service Instructions
Cleaning
Clean lter regularly. Dirty or clogged lters can greatly reduce
ltering ability and cause a number of system problems including
poor spray patterns, clogged spray tips, etc.
To clean the lter, shutoff system and relieve all system pressure.
See the Pressure Relief Procedure on page 7.
1. Remove lter cap (1).
2. Pull lter element with check ball (3) straight out of the
lter body (6).
3. Thoroughly clean inside lter body (6), lter element with
check ball (3) and lter cap (1) with appropriate solvent.
Use care in handling parts as dirt, debris, scratches or
nicks may prevent O-rings or gaskets from sealing.
The 920 Series Filter Elements lter from the inside out. Be
certain to clean the screen element thoroughly on the inside.
Soak in solvent to loosen hardened paint, etc. or replace.
Part No. 920-050 Filter Service Kit
ITEM
NO.
PART
NO.
2 920-103 Ball 1
4 920-006
5 920-070
DESCRIPTION QTY.
Gasket, PTFE
Gasket, PTFE
1
1
Specications
Max. Working Pressure 5000 psi
(345 bar)
2
Filter Area 18in
Outlet Ports (1) 1/4” NPT (F) for
Wetted parts
(116 cm2)
bleed valve
(1) 3/8” NPT (F) with
1/4 NPSM (M) hose
connection
(1) 3/8” NPT (F) plug for
additional gun hookup.
Carbon steel with
electroless nickel
and cadmium plating,
stainless steel, PTFE
6000 psi
(413 bar)
© Titan Tool Inc. All rights reserved. 31
Page 32

Admiral™ Fluid Accessories - Siphon Hoses
3
2
1
Siphon Hose Assemblies
ITEM
NO.
1a 710-046 Filter screen 1 1
1b 103-665 Strainer, 30 mesh 1
2a 103-595 Siphon tube, 3/4” x 36” 1
2b 0509763 Siphon tube, 1” x 17” 1 1
3a 103-679 Clamp, hose, 1” 2 2 2
4a 420-700 Hose, uid, 1” 6’ 4’
7a 194-771 Adapter 1 1 1
PART
NO.
1 103-625 Rock Catcher 1
2 103-585 Siphon tube, 1” x 36” 1
3 103-682 Clamp, hose, 1/2” 2
4 420-650 Hose, uid, 3/4” 6’ 1’
5 103-130 Spring 1
6 103-119 Clip, hose guard 1 1 1 1
7 194-661 Adapter 1
8 205-559 Elbow 1
DESCRIPTION 103-806 103-807 103-808 103-810
4
5
6
3
7
32 © Titan Tool Inc. All rights reserved.
Page 33

Admiral™ Fluid Accessories
1
2
3
5
4
Outlet Tee Assembly with Pressure Bleed Valve
Part # 840-205
ITEM
NO.
PART
NO.
1 200-554 Adapter, swivel 1
2 817-003 Tee 1
3 945-600 Pressure bleed valve 1
4 103-106 Bleed line assembly 1
5 813-555 Nipple, hex 1
DESCRIPTION QTY.
840-209 Bleed Line Assembly
ITEM
1
2
3
4
2
1
3
NO.
ITEM
NO.
PART
NO.
1 944-620 Valve, bleed 1
2
103-101
3
103-117
4
538-030
PART
NO.
1 103-317 Tube 1
2 201-555 Elbow 1
3 538-031 Hose assembly 1
DESCRIPTION QTY.
Bleed line assembly
Tube (1)
Hose assembly (1)
103-106 Bleed Line Assembly
DESCRIPTION QTY.
1
© Titan Tool Inc. All rights reserved. 33
Page 34

Admiral™ Outlet Accessories
1 2 3 4 5 6 7 8 9
Service Instructions
The 944-620 Series Bleed Valve has a tungsten carbide seat
(9) and should not require frequent replacement. The tungsten
carbide ball (7), in normal service, will last a long time because it
rotates and wears evenly. If there is leakage, replace the ball.
IMPORTANT: Open the adjustment knob (1) to full
counterclockwise position before unthreading valve seat (9)
from valve body (4).
If the valve stem (3) is rotated inwardly with the ball removed,
the PTFE O-ring (5) may require replacement. If there has
been leakage from the valve stem, the PTFE O-ring should be
replaced.
IMPORTANT: The valve stem stop (6) must be unthreaded
from the valve stem (3) with a socket screwdriver, then the
valve stem can be threaded out of the valve body.
IMPORTANT: All non-moving threads must be assembled
with Loctite sealant, Titan part # 426-051.
944-620 Bleed Valve Assembly
ITEM
NO.
PART
NO.
1 944-005 Knob 1
2 860-721 Nut, lock 1
3 944-023 Valve stem 1
4 944-020 Valve body 1
5 944-004 O-ring 1
6 944-026 Valve stem stop 1
7 569-170 Ball, T.C. 1
8 945-003 Gasket, copper 1
9 944-904 Valve seat 1
DESCRIPTION QTY.
944-050 Bleed Valve Service Kit
ITEM
NO.
34 © Titan Tool Inc. All rights reserved.
PART
NO.
5 944-005 O-ring 1
7 569-170 Ball, T.C. 1
8 945-003 Gasket, copper 1
DESCRIPTION QTY.
Page 35

Admiral™ Outlet Accessories - Gun Manifold Assemblies
4-Gun
2-Gun
3
4
1
4
1
5
2
3
2
7
3
2
5
5
2
4
3
7
1
3
2
5
2
1 Gun Add-On
3
2
5
Gun Manifold Assemblies
975-102 975-104 975-111 975-302 975-304 975-311
ITEM
NO.
2a 941-555 Valve, ball 2 4 1
© Titan Tool Inc. All rights reserved. 35
PART
NO.
1 970-100 Manifold 1 2 1 2
2 940-553 Valve, ball 2 4 1
3 814-002 Nipple, hex 2 4 1
4 814-004 Nipple, hex 1 2 3 6 1
5 227-006 Nipple, hex 2 4 1
6 808-555 Nipple, hex 2 4 1
7 227-033 Plug, pipe 1 1 1 1
DESCRIPTION
2 - GUN
1/4”
4 - GUN
1/4”
1 - GUN
ADD-ON
1/4”
2 - GUN
3/8”
4 - GUN
3/8”
1 - GUN
ADD-ON
3/8”
Page 36

Admiral™ Key Accessories and Service Kits
These items may be purchased separately from your local Titan
distributor.
Part No. Description
103-806 Siphon hose assembly with rock catcher 3/4” x 6’
103-807 Siphon hose assembly with rock catcher 1” x 4’
103-810 Siphon hose assembly with 30 mesh strainer 1” x 4’
103-625 Rock catcher
103-627 Rock catcher
103-665 Strainer, 30 mesh
920-001 Paint lter element, 5 mesh (for multicolors and heavy materi-
920-004 Paint lter element, 50 mesh (for latex and normal architec-
920-005 Paint lter element, 100 mesh (for stains, lacquers and ne
711-001 Gun and hose kit - for architectural coatings (includes 520-
711-002 Gun and hose kit - for architectural coatings (includes 520-
160-124 Nylon paint strainer - 1 gallon (pack of 24)
160-524 Nylon paint strainer - 5 gallon (pack 24)
als)
tural materials)
nish materials)
100 gun with 641-517 SC-5 reversible tip and 250-514 1/4” x
50’ 3300 psi airless hose assembly)
100 gun with 641-517 SC-5 reversible tip and 250-114 1/4” x
50’ 5000 psi airless hose assembly)
Part No. Description
101-208 Grounding clamp
101-212 Grounding wire, 12 gauge x 25’
310-203 Lubrisolv™ upper packing lubricant, 8 ounces
310-200 Lubrisolv™ upper packing lubricant, 1 quart
920-050 Service kit for paint lter
850-050 Service kit for air motor
155-055 Service kit for uid pump 155-559
182-050 Service kit for uid pump 181-556
185-050 Service kit for uid pump 185-551
245-051 Service kit for uid pump 245-556
975-102 2-gun manifold with ball valves, 1/4”
975-104 4-gun manifold with ball valves, 1/4”
975-111 1-gun add-on, 1/4”
975-302 2-gun manifold with ball valves, 3/8”
975-304 4-gun manifold with ball valves, 3/8”
975-311 1-gun add-on, 3/8”
Titan Warranty for the Admiral™ Airless Sprayers
Titan Tool, Inc., (“Titan”) warrants that at the time of delivery to the original purchaser for use (“End User”), the equipment covered
by this warranty is free from defects in material and workmanship. With the exception of any special, limited, or extended warranty
published by Titan, Titan’s obligation under this warranty is limited to replacing or repairing without charge those parts which, to Titan’s
reasonable satisfaction, are shown to be defective within twelve (12) months after sale to the End User. This warranty applies only
when the unit is installed and operated in accordance with the recommendations and instructions of Titan.
This warranty does not apply in the case of damage or wear caused by abrasion, corrosion or misuse, negligence, accident, faulty
installation, substitution of non-Titan component parts, or tampering with the unit in a manner to impair normal operation.
Defective parts are to be returned to an authorized Titan sales/service outlet. All transportation charges, including return to the
factory, if necessary, are to be borne and prepaid by the End User. Repaired or replaced equipment will be returned to the End User
transportation prepaid.
THERE IS NO OTHER EXPRESS WARRANTY. TITAN HEREBY DISCLAIMS ANY AND ALL IMPLIED WARRANTIES INCLUDING,
BUT NOT LIMITED TO, THOSE OF MERCHANTABILITY AND FITNESS FOR A PARTICULAR PURPOSE, TO THE EXTENT
PERMITTED BY LAW. THE DURATION OF ANY IMPLIED WARRANTIES WHICH CANNOT BE DISCLAIMED IS LIMITED TO
THE TIME PERIOD SPECIFIED IN THE EXPRESS WARRANTY. IN NO CASE SHALL TITAN LIABILITY EXCEED THE AMOUNT
OF THE PURCHASE PRICE. LIABILITY FOR CONSEQUENTIAL, INCIDENTAL OR SPECIAL DAMAGES UNDER ANY AND ALL
WARRANTIES IS EXCLUDED TO THE EXTENT PERMITTED BY LAW.
TITAN MAKES NO WARRANTY AND DISCLAIMS ALL IMPLIED WARRANTIES OF MERCHANTABILITY AND FITNESS FOR
A PARTICULAR PURPOSE WITH RESPECT TO ACCESSORIES, EQUIPMENT, MATERIALS OR COMPONENTS SOLD BUT
NOT MANUFACTURED BY TITAN. THOSE ITEMS SOLD, BUT NOT MANUFACTURED BY TITAN (SUCH AS GAS ENGINES,
SWITCHES, HOSES, ETC.) ARE SUBJECT TO THE WARRANTY, IF ANY, OF THEIR MANUFACTURER. TITAN WILL PROVIDE
THE PURCHASER WITH REASONABLE ASSISTANCE IN MAKING ANY CLAIM FOR BREACH OF THESE WARRANTIES.
Material Safety Data Sheets (MSDS) are available on Titan’s website or by calling Customer Service.
United States Sales & Service
Phone:
1-800-526-5362
Fax:
1-800-528-4826
1770 Fernbrook Lane
Minneapolis, MN 55447
www.titantool.com
international@titantool.com
International
Fax: 1-763-519-3509
1770 Fernbrook Lane
Minneapolis, MN 55447
36 © Titan Tool Inc. All rights reserved.
 Loading...