

Page 1

W-219 608-095000 NA
©2005 Timex Corporation
performance watch user guide
Performance Watch User Guide
BODYLINK SYSTEM
®
English page 1
Français page 75
Español página 153
Português pàgina 231
Page 2

T ABLE OF CONTENTS
Register your product at www.timex.com
Introduction ............................................................................3
Welcome! ....................................................................................3
Before you begin ........................................................................4
Performance Watch Overview ..............................................5
Watch terminology......................................................................5
The chronograph ........................................................................6
Resources ....................................................................................7
Watch buttons ............................................................................8
Display icons ............................................................................11
Starting the Bodylink® System ..............................................12
Messages ..................................................................................15
Display formatting....................................................................16
Preparing to use your Watch ..................................................16
Watch Modes ..........................................................................19
Time of Day Mode ....................................................................20
Chronograph Mode ..................................................................25
Vertical Mode ............................................................................29
Page 3

Finish Mode ..............................................................................31
Interval Timer Mode ................................................................36
Lap Data Mode ........................................................................42
Summary Mode ........................................................................45
Basic Timer Mode ....................................................................50
Alarm Mode ..............................................................................53
Configure Mode ......................................................................55
Care & Maintenance ............................................................64
Changing the battery ..............................................................64
INDIGLO® night-light ............................................................65
Water resistance ......................................................................65
Legal information..................................................................66
International warranty (U.S. limited warranty) ....................66
FCC Notice (U.S.) / IC Notice (Canada)..................................69
Declaration of Conformity ......................................................71
INTRODUCTION
Welcome!
Congratulations! With your purchase of the Timex
System you have hired your new personal trainer. Using your
Performance Watch in partnership with your digital Heart Rate
and Speed + Distance Sensors offers you an unprecedented ability
to track, store, and analyze key indicators of your personal fitness
level.
We dedicate this manual to information regarding your
Performance Watch. This sport watch functions as the brain for
your Bodylink System, providing you comprehensive, real-time
workout data gathered from your digital Heart Rate Sensor, Speed
+ Distance Sensor, or both.
You will find your Performance Watch provides very user-friendly
fitness technology. But, like any new technology, you should take
the time to familiarize yourself with its features and functions to
optimize the usefulness of your purchase.
So, have fun exploring! Check out the Performance Watch modes.
Review the Quick Start Guide to develop a basic understanding of
your Bodylink System. Most of all, enjoy your new fitness partner
on your road to increased performance!
®
Bodylink
®
3
Page 4

Before you begin
This manual contains information about, and instructions for,
setting up your new Performance Watch and using it with the
digital Heart Rate and Speed + Distance Sensors. To assist you in
learning about your Performance Watch, this manual contains
several elements to increase your understanding.
➤ An overview of the Performance Watch buttons, display icons,
and modes
➤ Sectional glossaries that explain many of the references used for
the Performance Watch and the Performance Watch modes
➤ Complete, comprehensive instructions for setting up and using
your Performance Watch in each mode
➤ A primer covering the links between your Performance Watch
and each of the Fitness Sensors for each appropriate mode
➤ Real-world scenarios, appearing in grey text boxes, that explain
how you might use your Performance Watch as part of your
activity routine
4 54
PERFORMANCE W A TCH OVERVIEW
Watch terminology
Your Bodylink
as you become proficient in operating it. As you learn this
language, you will encounter some important words and phrases.
We promise; no one will make you take a vocabulary test!
But, reviewing key terminology will help you more quickly
understand how your Bodylink System operates. So, take a
minute to review some of the words that will appear throughout
this manual.
➤ Bodylink System: The Bodylink System allows you to track
and store real time data using a family of wireless devices in
conjunction with your Performance Watch.
➤ Performance Watch: The Performance Watch, (Watch) houses
the data center for the Bodylink System.
➤ Fitness Sensors: The Bodylink System includes two digital
sensors: the Heart Rate Sensor and the Speed + Distance
Sensor.
➤ Heart Rate Sensor: The Heart Rate Sensor (HR Sensor)
measures your heart rate. The Fitness Sensor User Guide
provides detailed information for setting up and using your
HR Sensor.
®
System has its own language that you will learn
Page 5
➤ Speed + Distance Sensor: The Speed + Distance Sensor
Chronograph
Mode
Vertical
Mode
Finish
Mode
(GPS-3D Sensor) tracks speed, pace, distance traveled, altitude,
and more, using GPS based technology. The Fitness Sensor User
Guide provides detailed instructions for setting up and using
your GPS-3D Sensor. Note that sometimes the Watch will refer
to the GPS-3D Sensor as the S+D Sensor.
➤ GPS: The GPS-3D Sensor uses information gathered from
global positioning satellites (GPS) to calculate your speed,
distance, and elevation.
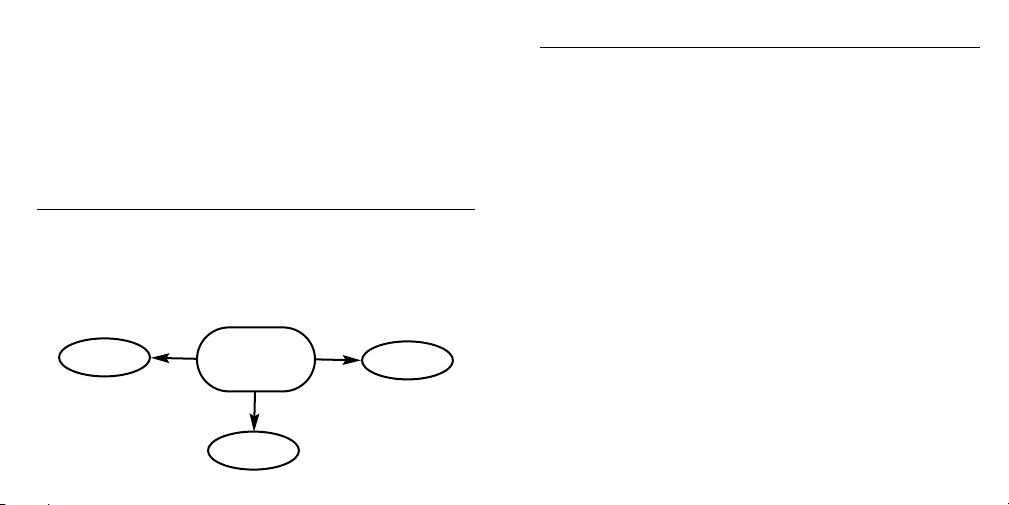
The chronograph
As you learn about your Watch, the word chronograph may cause
confusion. Remember this: a chronograph is a tool for measuring
time. You will notice a Chronograph Mode, but Vertical and Finish
Modes operate from the chronograph. Any time your Watch
functions as a timing tool, it operates using chronograph (or
timing) functionality.
chronograph
measures time
Resources
Print resources
In addition to this manual, your Bodylink®System includes these
valuable resources:
➤ Bodylink System Quick Start Guide: Information to help you set
up and begin using your Performance Watch in conjunction with
your Fitness Sensors, and an overview map of the different
Performance Watch modes
➤ Fitness Sensors User Guide: Information for set-up, operation,
and maintenance of your Fitness Sensors
➤ Heart Zones® Tools for Success: Information to use your digital
Heart Rate Sensor in conjunction with the Heart Zones Training
System fitness program, meant to help you to increase the
strength and endurance of your heart
Web resources
The Timex® Websites offer beneficial information to help you
optimize your Bodylink System.
➤ www.timex.com/bodylink/: Information about Bodylink System
features and product simulations
➤ www.timex.com/software/: Current software releases for Timex
products
➤ www.timex.com/fitness/: Fitness and training tips for using the
Bodylink System
6 7
Page 6

9
Additionally, in any mode where you can view your heart rate, you
can hold the INDIGLO®button to quickly silence an audible target
zone alert. Once you push the button to change the alert, it will
remain silent until you change it to another target zone alert type.
See “TZ zone and alert” on page 57 for more information.
Setting buttons
Use Watch setting buttons to set Watch functions (for example,
setting the time or a target heart rate zone). When the + and –
symbols appear at the edge of the Watch display, you have initiated
the setting process.
The steps listed here allow you to set Watch functions.
1. Press and hold the SET button until the word SET briefly appears
on the display, followed by a flashing value.
2. Set the first value by pressing + (DISPLAY) or – (STOP/RESET).
8
In addition to the Timex sites, you may also want to visit the
Website referred to in Heart Zones® Tools for Success. At
www.heartzones.com you will find information to complement
the material provided in the booklet.
Watch buttons
The Watch offers multi-functional buttons that serve three
purposes. You do not have to memorize button functions for each
mode. Let the Watch serve as your guide.
Most of the time, the Watch buttons function according to the
labels printed on the Watch case. If you do not see any symbols
around the edge of the display, follow the information printed on
the Watch case to guide you in using the buttons.
MODE
Press to go to
the next mode
START/SPLIT
Press to start timing
or take a split
INDIGLO®
night-light; Press
to light the watch;
hold to silence
target zone alert
DISPLAY
Press to display
performance data
SET/FORMAT
Press to set or
change the display
format
STOP/RESET
Press to stop or
press and hold to
reset
DONE
Press when
finished setting
INDIGLO
night-light
Press to light
the watch
+
Press to increase the
displayed value
SELECT
Press to move to the
next value
–
Press to decrease
the displayed value
Page 7

3. Press SELECT (SET/FORMAT) to move to the next
MODE
Press to go to
the next mode
INDIGLO®
night-light
Press to light
the watch
▲
Press to display
next data value
▼
Press to display
previous data value
Interval or basic
timer running
Chronograph
running
Night Mode enabled
GPS-3D Sensor
battery low
Sensor(s) activated
(blinks when trouble)
Alarm armed
Hourly chime
enabled
Watch display icons
value to set.
4. Repeat steps 3 and 4 for all the values that need adjustment.
5. Press DONE (MODE) to save your changes and complete the setting
process.
Viewing buttons
Watch buttons can help you navigate through viewing options.
Seeing the ▲ and ▼ triangles on the edge of the display lets you
know there is information to view.
Display icons
10 11
Page 8

Starting the Bodylink®System
When using the Performance Monitor, you can view real-time data
from a Heart Rate Sensor or Speed + Distance Sensor, or both, in
Time of Day, Chrono and Timer. The procedure to do this is the
same in all modes, though the data that you can view and their
position on the display in each mode will vary.
1. Make sure you’re wearing your Heart Rate Sensor or Speed +
Distance Sensor, or both, and that they are powered up and
functional.
2. Stand at least 6 feet (2 meters) away from any other users of
fitness monitor systems and from any source of radio interference
such as electrical equipment, power lines, etc.
NOTE: Though the Bodylink®system has a working range of
about 3 feet (1 meter) from the sensors to the watch, for the most
reliable operation, make sure that the watch is as close to the
sensors as possible when starting the system up.
3. Press and release the DISPLAY button. This tells the watch to
look for any Bodylink®sensors nearby; it will search for one
minute. The antenna icon will appear on the watch display,
indicating that the Bodylink®system is active.
NOTE: As a convenience, Chrono and Timer will automatically
search for Bodylink®sensors for fifteen seconds upon entering
the mode.
4. When the watch has successfully detected transmissions from the
sensors, the watch display will switch to a new format showing
some or all of the sensor data, depending on the mode. Time of
Day and Timer show the data in the lower line exclusively, while
Chrono allows up to three lines of performance data.
Viewing Performance Data
Press and release the DISPLAY button to select the data or
combination of data that you wish to view during your workout. For
your convenience, a “banner” showing the names of the information
and their position on the display is shown briefly before showing the
data itself.
Here are a few more things you should know to use the watch
effectively:
• While in the Chrono, press and release SET/FORMAT to swap
the positions of the information in the upper and middle display
lines. This allows you to view the data most important in the
larger middle display line.
12
13
Page 9

• If you want to stop monitoring data from your Bodylink®sensors,
hold the DISPLAY button down until the message HOLD TO
SHUT OFF RCVR is displayed on the watch display. Continue
holding the DISPLAY button for a few more seconds; the watch
will beep indicating that the radio link between the watch and the
sensors has been shut down.
TIP: If you are already viewing data from one sensor, for example,
the Heart Rate Sensor, and you wish to also view data from the
Speed + Distance Sensor, simply press and hold the DISPLAY
button until the watch emits a short beep and the antenna icon
begins flashing. The watch is now searching for a second
Bodylink®sensor. When it detects this second device, the antenna
icon will stop flashing and the display may change to a new
format that includes the new information. Press and release the
DISPLAY button (as detailed previously) to view various
combinations of two sensor’s data.
14
Messages
When using the Watch with the Fitness Sensors, the Watch may
display messages to communicate the status of either of the
Sensors in conjunction with the Watch. Messages include:
NO DATA FROM HRM (GPS) The Watch is not receiving data
from either the HR or GPS-3D Sensor. Ensure the Sensor is not
more than 3 feet (1 meter) away from the Watch, is operating, or
has not inadvertently locked on to someone else’s Sensor. The
Watch will attempt to establish a connection for one minute after
this message displays.
NOISY DATA FROM HRM (GPS) The Watch is experiencing
radio interference. Try to move away from any potential sources of
interference (for example, televisions, monitors, or motorized
devices). The Watch will attempt to establish a connection for
30 seconds after this message displays.
SEARCHING The GPS-3D Sensor is still trying to link to GPS
data. You cannot view speed, pace, distance, or positional
information until the Sensor locates GPS satellites.
WEAK GPS SIGNAL The GPS-3D Sensor lost its link with GPS
satellites. The GPS-3D Sensor operates more accurately in more
open areas (such as an area without a lot of tree or cloud cover)
and at quicker speeds.
FATAL GPS ERROR The GPS-3D Sensor has encountered a
severe internal error. Contact Timex Customer Service.
15
Page 10
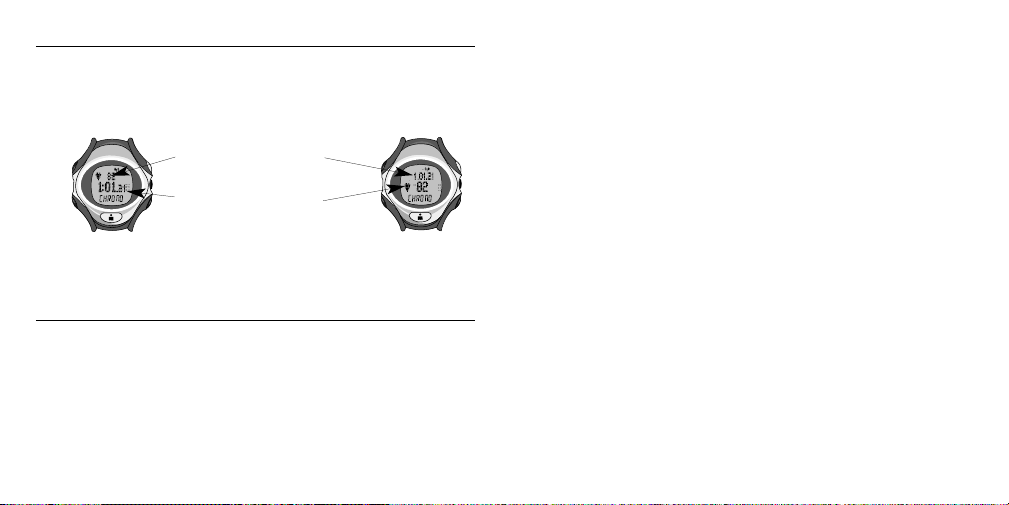
Display formatting
Time
Heart Rate
Time
Heart Rate
In Chronograph Mode, you can press and release SET/FORMAT
to switch the data values displayed in the upper and middle display
lines. This allows you to display the value most important to you in
the larger, middle display.
Switching the display formatting does not apply to ascent rate
which always appears in the middle line of the display. For more
information on ascent rate, see “Vertical Mode” on page 29.
Preparing to use your Watch
Determining your heart rate
In addition to many other useful features, your Watch uses
technology that helps you track detailed information about your
heart rate. But, before you can track this information, you first
need to determine your maximum heart rate. You can use many
methods to estimate your maximum heart rate.
The booklet Heart Zones® Tools For Success included in your Watch
packaging provides excellent procedures and Timex® recommends
you use one of these methodologies. However, if you cannot use any
of the procedures described in Heart Zones Tools for Success, you
might consider using the widely used, though highly debated, agebased method. Begin with the number 220 and then subtract your
age. For instance, a 35 year old would begin with 220 and subtract
35 (the person’s age) which gives an estimated maximum heart rate
of 185.
Setting your Watch for first use
Once you determine your heart rate, set the following parameters
prior to using your Watch:
1. Set the time of day. For detailed information on Time of Day Mode,
including instructions for setting time of day, refer to page 20.
2. Enter your maximum heart rate. In Configure Mode, select
HRM SETTINGS and then MAX HR. Your maximum heart rate
setting determines your five preset heart rate target zones. For more
information refer to “Max heart rate” on page 58.
3. Select your desired heart rate display units. In Configure Mode,
select HRM SETTINGS and then HRM DISPLAY. Your Watch gives
you the option to view your heart rate in beats per minute (BPM) or
as a percentage of your maximum heart rate (PERCENT). For more
information refer to “Heart rate display” on page 58.
1716
Page 11

4. Determine your target heart rate zone and alert. In Configure
Mode, select HRM
zone alert to keep your heart rate within a defined range to maximize
your performance and prevent either over exertion or under
utilization of your heart during exercise.For more information refer
to “TZ zone and alert” on page 57.
5. Choose the unit display for your Watch. In Configure Mode set
length, speed, pace and altitude units to your liking. Refer to “Unit
settings” on page 62 for further information.
6. Set the ascent rate update. This setting in the ALTITUDE
SETTINGS group calculates how quickly you change altitude during
you workout (also known as vertical speed). Set this feature shorter
for faster vertical activities such as skiing or longer for slower vertical
activities such as climbing. Refer to “Update ascent rate” on page 60
for detailed information.
SETTINGS and then TZ ALERT. Use the target
Though not necessary to adjust before your first workout, you may
want to review and configure the speed or pace target zones
(page 59), distance alert (page 59) or additional hands-free features
(page 60).
W A TCH MODES
You can cycle through each of the ten modes by pressing MODE.
➤ Time of Day allows you to display the time, date, and day of the
week for two different time zones.
➤ Chronograph tracks and displays performance data.
➤ Vertical features vertical data such as ascent rate, altitude, and
elevation.
➤ Finish lets you to predict a time for a specified distance and set
alerts if you are off pace.
➤ Interval Timer allows you to set the Watch up for interval
workouts.
➤ Lap Data presents stored lap information.
➤ Summary displays data recorded while the chronograph runs.
➤ Basic Timer enables you to time an event that counts down
from a specific time to zero.
➤ Alarm manages up to five alarms.
➤ Configure permits you to customize Watch functions to meet
your needs.
1918
Page 12
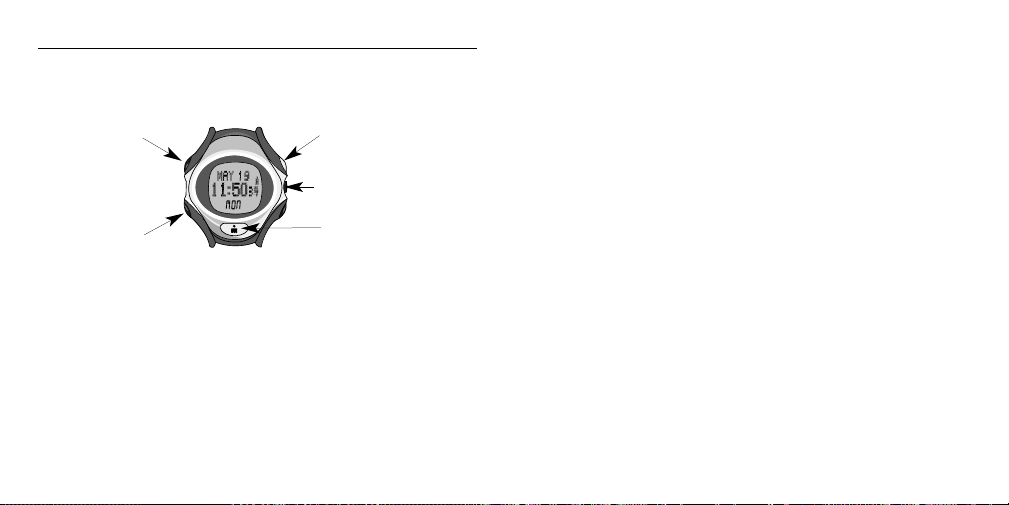
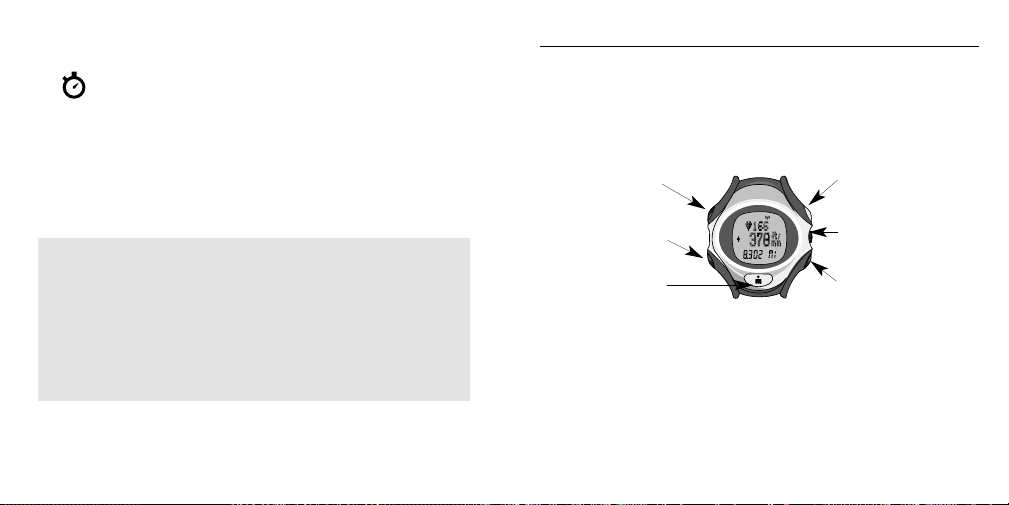
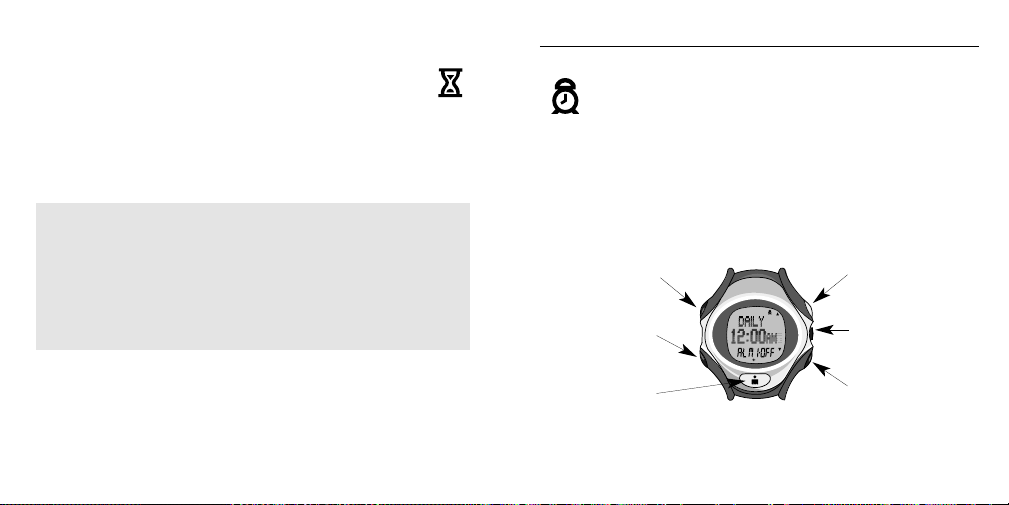
Time of Day Mode
View performance
data
View or switch to
secondary time
Hold to set
INDIGLO®
night-light
To
Chronograph
Mode
Your Watch can act as an ordinary watch to display the time,
date, and day for two different time zones, using a 12- or
24-hour format.
Time of Day Mode terminology
UTC: When you use the Watch in conjunction with the GPS-3D
Sensor, it will align with UTC (Universal Time, Coordinated
formerly known as GMT). This describes the local time zone in
relationship to the Greenwich Meridian. For example, New York
City is in the -5 UTC zone, since New York is five hours earlier than
Greenwich Meridian; Moscow is +3 UTC, since it is three hours
later than Greenwich Meridian.
Setting the time
1. Press MODE until Time of Day Mode appears.
2. Press and hold the SET button until the word SET briefly appears
on the display, followed by a flashing value.
3. Set the first value by pressing + (DISPLAY) or – (STOP/RESET).
4. Press SELECT (SET/FORMAT) to move to the next
value for setting.
5. Repeat steps 3 and 4 for all the values that need adjustment.
6. Press DONE (MODE) to save your changes and complete the setting
process.
For Time of Day, you can set the following values:
• Hour
• Minute
• Seconds
• Year
• Month
• Date (automatically
sets the day of
week when you set
the date)
• Hour format
(i.e., AM/PM
versus 24-hours)
2120
Page 13
Switching time zones
The Watch can track two time zones (T1 and T2). Look at the
second zone by pressing START/SPLIT or, switch from T1 to T2
using these steps:
1. Press and hold START/SPLIT until HOLD FOR TIME 2 appears.
2. Continue to hold until the time switches and the Watch beeps.
3. Repeat steps 1 and 2 to switch back to T1. The message will read
HOLD FOR TIME 1.
Note that you must independently set the time of day for each
time zone.
Synchronizing the Watch with the GPS-3D Sensor
When you first activate the GPS-3D Sensor with your Watch, you
can expect one of the following scenarios:
➤ If you activate the GPS -3D Sensor before setting time of day, the
Watch will synchronize both T1 and T2 with UTC. You will need
to adjust the hour for both time zones to your local time.
➤ If you activate the GPS -3D Sensor after setting the time of day,
the Watch maintains the hour and date settings and
synchronizes minutes and seconds to UTC for each time zone.
➤ Note that you cannot adjust the seconds when you enable the
GPS features; they will always remain synchronized to UTC
time.
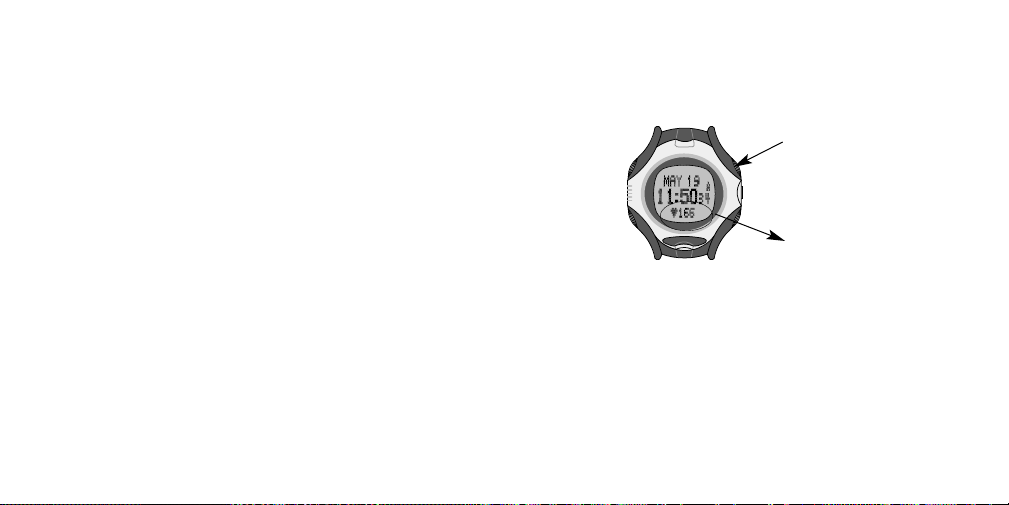
Viewing performance data in Time of Day Mode
When using the Fitness Sensors with your Watch, you can scroll
through performance data by pressing and releasing DISPLAY.
You may elect to continue viewing the day of the week instead by
pressing DISPLAY until the day of the week becomes visible.
Press to view
performance data
Performance data
You can view:
➤ Heart Rate: Current heart rate expressed as either percent of
your maximum heart rate (PERCENT) or beats per minute
(BPM)
➤ Speed: Current velocity
➤ Pace: Current velocity, expressed in minutes per selected distance
unit, such as miles or kilometers
➤ Distance: Distance traveled since you began operating the
chronograph
➤ Altitude: Current elevation above sea level
2322
Page 14

Time of Day Mode tips & tricks
➤ You can return to Time of Day Mode from any other mode on the
Watch by pressing and holding MODE until the time of
day displays.
➤ The Watch does not automatically adjust for Daylight Savings
Time. When switching between Standard Time and Daylight
Savings Time, you must manually adjust the hour value.
➤ If the Watch does not detect either of the Fitness Sensors, the day
of the week will appear on the bottom line of the display.
➤ You can only reset the seconds value to zero if you use the Watch
in conjunction with the HR Sensor.
➤ You may adjust the minutes value ahead or behind the correct
time and the watch will remember your setting. This feature
helps people who like to set their watches a little ahead to keep
them on time.
Time of Day Mode example
Assume that you live in San Francisco and work with a client in
Singapore. Like all busy people, it is imperative you keep track of
time, so you set T1 to your local time. But it is also important to
have a quick reminder of your client’s time, so you set T2 to
Singapore time. With both time zones available, you can quickly
check your client’s time or even switch your monitor to display T2
when you travel to Singapore.
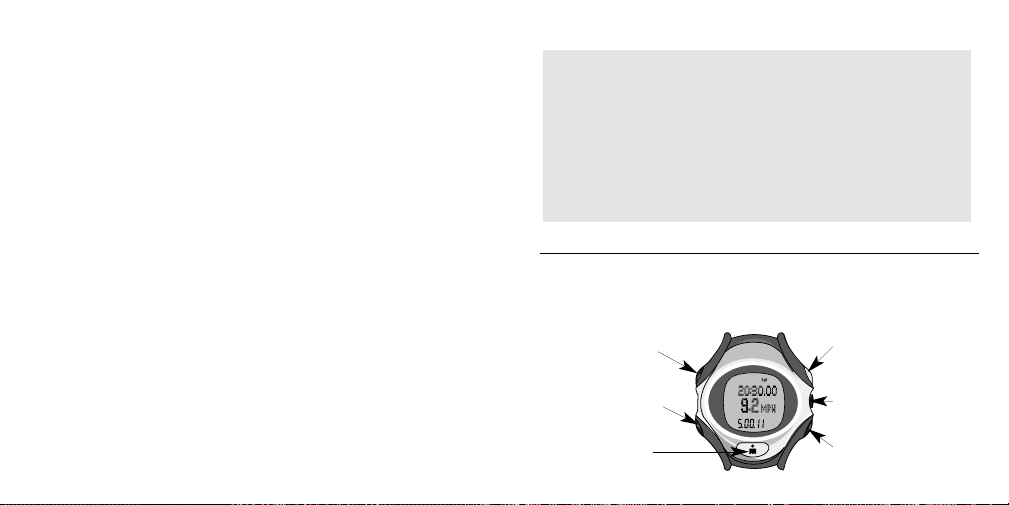
Chronograph Mode
Chronograph Mode operates as the main workout data center for
your Watch. It can record elapsed time for up to 100 hours. It can
also register data from the Fitness Sensors for up to 100 laps.
INDIGLO®
night-light
To Vertical
Mode or hold
for time
Start timing
or take a split
Chronograph Mode terminology
Chronograph: The chronograph records time segments for the
duration of your activity.
Lap: Lap time records the time for one segment of your activity.
Split: Split time records the total elapsed time since the beginning
of your current activity.
Taking a split: When you take a split, the chronograph will
complete timing one lap and begin timing a new one.
View performance
data
Swap upper and
middle lines
Stop or reset the
chronograph
2524
Page 15

Operating Chronograph Mode
When using Chronograph Mode, take splits manually by pressing
START/SPLIT or you can set the Watch to automatically take
splits by time or distance. For more information on setting the
Watch to automatically take splits, refer to “Hands-free settings”
on page 60.
Use these steps to operate the chronograph in Chronograph Mode.
1. Press MODE until Chronograph Mode appears.
2. Press START/SPLIT to begin timing.
3. Press START/SPLIT again to take a split and automatically begin
timing a new lap. Press MODE to immediately display new lap
information or wait for a few seconds and the Watch will
automatically begin to display data for a new lap.
4. Press STOP/RESET to stop timing when you want to take a break
or you reach the end of your activity.
5. Press START/SPLIT to continue timing or
6. Press and hold STOP/RESET to reset the chronograph display to
zero.
Viewing performance data in Chronograph Mode
When using the Fitness Sensors with your Watch, you can scroll
through performance data for each lap of your workout by pressing
and releasing DISPLAY. For Chronograph Mode, viewing options
include:
➤ Heart Rate: Current heart rate expressed as either percent of
your maximum heart rate (PERCENT) or beats per minute
(BPM)
➤ Speed: Current velocity
➤ Average Speed: Average velocity for the period that
chronograph has been running
➤ Pace: Current velocity, expressed in minutes per selected distance
unit, such as miles or kilometers
➤ Average Pace: Average per-minute speed for the period that
chronograph has been running
➤ Distance: Distance traveled since you began operating the
chronograph
2726
Page 16
Chronograph Mode tips & tricks
➤ If you press MODE to switch the Watch to a different mode while
the chronograph continues to run, the stopwatch icon will
appear to indicate the chronograph still operates.
➤ If you use the Watch with the HR Sensor you can set it to
automatically begin taking a heart rate recovery calculation each
time you press STOP/RESET to stop the chronograph. However,
if you press START/SPLIT again before the recovery cycle has
completed, you will cancel the recovery. For more information,
refer to “Recovery” on page 58.
Chronograph Mode example
Recently you heard that a training method for long distance
runners called the run/walk method can help increase your
overall endurance and burn more calories. This method calls for
running for a period of time followed by a short period of walking.
You decide to use Chronograph Mode to help you try this method.
You press START/SPLIT
when you begin running and then after
10 minutes of running you press START/SPLIT again and walk
for 2 minutes. You continue using these two sequences until you
have completed a 60 minute run/walk.
Vertical Mode
Vertical Mode operates as a viewing mode in conjunction with the
GPS-3D Sensor with a focus on displaying information about
altitude. In particular, Vertical Mode tailors the Watch to allow you
to view data related to vertical activities (for example, climbing or
skiing). If you do not use the GPS-3D Sensor, you will see the
message NO GPS DATA and you cannot enter Vertical Mode.
INDIGLO®
night-light
To Finish Mode
or hold for
time
Start lap or
take a split
Vertical Mode terminology
Ascent rate: How quickly you climb or descend.
Vertical speed: Another term for ascent rate.
Operating Vertical Mode
1. Press MODE until Vertical Mode appears.
2. Press START/SPLIT to begin timing.
View
performance data
Swap upper and
middle lines
Stop or reset the
chronograph
2928
Page 17
Hold to set
You are heli-skiing in Banff on a run estimated at 2,700 vertical
feet (823 vertical meters). Curious about the accuracy of the
estimate as well as how long it will take you to make your run,
you start your GPS-3D Sensor, navigate to Vertical Mode and
press START as you take off down the mountain. At the end of
your run, you press STOP and then DISPLAY until you see
Ascent Rate and Elevation (expressed in a negative number since
you traveled downhill). Use this information to see how fast you
skied and compare the Watch expression of elevation to the
estimate given to you by your guide.
3. Press START/SPLIT again to take a split and automatically begin
timing a new lap.
4. Press STOP/RESET to stop timing when you reach the end of your
activity.
5. Press START/SPLIT to continue timing or
6. Press and hold STOP/RESET again to reset the display to zero.
Viewing performance data in Vertical Mode
When using the Fitness Sensors with your Watch, you can scroll
through performance data for each lap of your workout by pressing
and releasing DISPLAY. For Vertical Mode, viewing options
include:
➤ Heart Rate: Current heart rate
➤ Ascent Rate: Vertical speed
➤ Pace: Current velocity, expressed in minutes per selected distance
unit, such as miles or kilometers
➤ Speed: Current velocity
➤ Distance: Distance traveled while you run the chronograph
➤ Altitude: Current height above sea level
➤ Elevation: Difference between your current altitude and the
altitude when you started the chronograph
Vertical Mode example
Finish Mode
Finish Mode allows you to predict how much time it will take to
finish a specified event distance (marathon or 5K race, for
example) based on current GPS-3D Sensor data. To help you stay
INDIGLO®
night-light
To Interval
Timer Mode or
hold for time
Start timing or
take a split.
View
performance
data
Stop timing
3130
Page 18

on pace for your predicted finish, you can set the Watch to alert
you if you are moving either too quickly or too slowly for your
desired pace.
If you do not use the GPS-3D Sensor, you will see the message NO
GPS DATA and you cannot enter Finish Mode. Additionally, you
must reset the chronograph to zero prior to operating Finish Mode
or it will not operate properly.
Finish Mode Terminology
Target time: Your desired time to complete the race or workout.
The Watch uses this time to alert you if you are going too slowly to
complete the event within the selected time.
Setting Finish Mode
You must stop and reset the chronograph to allow the configuration
of Finish Mode. However, you can still configure Finish Mode even
when you see the message NO GPS DATA displayed.
1. While in Finish Mode, press and hold the SET button until the word
SET briefly appears on the display, followed by a flashing value.
2. Set the first value by pressing + (DISPLAY) or – (STOP/RESET).
3. Press SELECT (SET/FORMAT) to move to the next value to set.
4. Repeat steps 2 and 3 for all the values that need adjustment.
5. Press DONE (MODE) to save your changes and complete the setting
process.
For Finish Mode, you can set the following values:
➤ Pre-set or custom event distance (for custom, you can set the
distance up to 999.99)
➤ Unit (NM, KM, or MI)
➤ Target time
➤ Alert option (an audible alert will cause the Watch to both beep
and flash the predicted finish time and a silent alert will only
flash the predicted finish time)
Operating Finish Mode
1. Press MODE until Finish Mode appears.
2. Press START/SPLIT to begin timing.
3. Press START/SPLIT
timing a new lap.
4. Press STOP/RESET to stop timing when you reach the end of your
activity.
5. Press START/SPLIT to continue timing or
6. Press and hold STOP/RESET again to reset the display to zero.
again to take a split and automatically begin
3332
Page 19

Viewing performance data in Finish Mode
When using the Fitness Sensors with your Watch, you can scroll
through performance data for each lap of your workout by pressing
and releasing DISPLAY. For Finish Mode, viewing options include:
➤ Finish Time: The predicted finish time based on your current
speed and distance. The finish time will flash if your current pace
will not allow you to finish within your selected target time. If
you stop moving, the Watch display replaces the finish time with
the word STOPPED.
➤ Heart Rate: Current heart rate
➤ Pace: Current velocity, expressed in minutes per selected distance
unit, such as miles or kilometers
➤ Average Pace: Average per-minute speed for the period that
chronograph has been running
➤ Speed: Current velocity
➤ Average Speed: Average velocity for the period that you run the
chronograph
➤ Distance: Distance traveled while you run the chronograph
Finish Mode example
You are training for a 100 KM bicycle race. Last year you rode in
the same race and finished in 4 hours, 15 minutes. This year your
goal is to finish in less than 4 hours. You read in a training
magazine that, when training for a race, you should devote one
day a week to riding at a distance equal to your event, working
toward your goal time. To help keep you on pace, you set Finish
Mode to 100 KM for a distance and 4 hours for a time. You set the
Watch to alert you audibly when you go slower than your required
pace to help keep you on track as you ride.
3534
Page 20
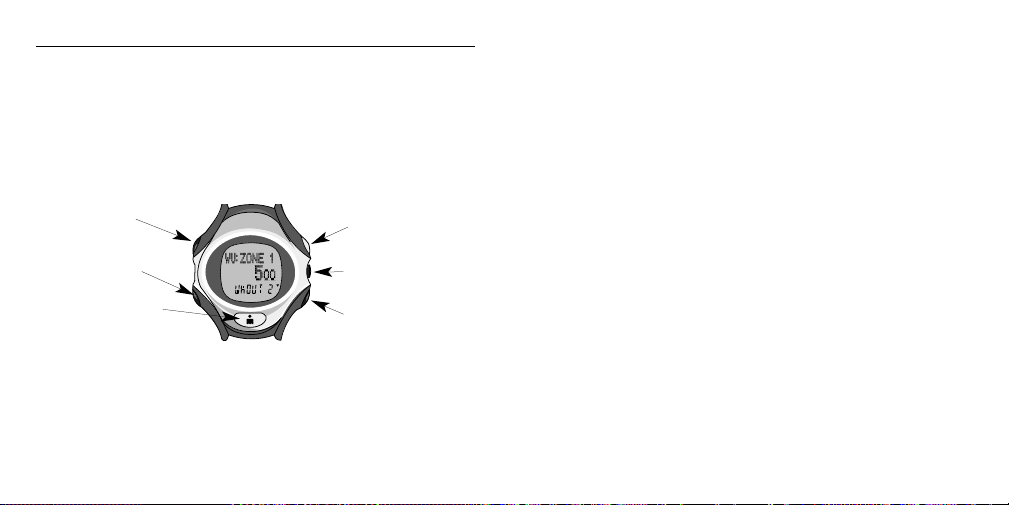
Interval Timer Mode
Hold to set
View performance
data
Interval Timer Mode offers a flexible six-interval countdown timer,
and can retain settings for up to five different training sessions. It
includes warm up and cool down intervals and four training
intervals for each training session. You can set the group of four
training intervals to repeat up to 99 times. You can set the warmup interval to run one time at the beginning of your training
session and the cool down interval to run one time at the end of
your training session.
INDIGLO®
night-light
To Lap Data
Mode or hold
for time
Start timing the
interval workout
Interval Mode terminology
Interval Training: You can use interval training to help you vary
the intensity level within one workout, ultimately helping you work
out longer and harder.
▼
Select, stop, or
reset a workout
Interval: Intervals relate your exercise to specific periods of time.
For instance, you can run for ten minutes, walk for two, run for
twenty minutes, and then walk for five – this would represent four
training intervals.
Reps: The number of times you choose to perform an interval
group. In the example above, if you choose to run the interval group
three times, you will go through your series of ten, two, twenty, and
five minute timings three times in sequence. This would represent 3
reps.
Warm-up: The period at the beginning of your workout that helps
prepare your body for a more intensive training session.
Cool Down: The period at the end of your work out that helps
your body to recover to a state of normal functioning.
Selecting an interval workout
You can use the Watch to set and store up to five workouts labeled
WKOUT 1 though WKOUT 5.
1. Press MODE until Interval Mode appears.
2. Press ▼ (STOP/RESET) to choose the workout you want to set
(WKOUT 1 through WKOUT 5).
Since you must reset the interval timer to select a new workout,
you may need to press the STOP/RESET button more than once
before you can view a new workout.
3736
Page 21

Setting up an interval workout
1. Press and hold the SET button until the word SET briefly appears on
the display. The setting screen will appear with the word WARM-UP
flashing.
▲ (DISPLAY) or ▼ (STOP/RESET) to review settings for
2. Press
each workout interval. Settings include WARM-UP, INTVL 1 – 4, #
OF REPS, and COOL-DOWN.
3. Select an interval to set and press SELECT (SET/FORMAT). Press
+ (DISPLAY) or - (STOP/RESET) to select one of five preset or
three custom heart rate zones. You can also select no target zone or a
manual target zone alert for this interval only. Once you choose your
zone, press SELECT (SET/FORMAT).
If you did not select MANUAL in step 3, go to step 5.
4. Set the upper and then the lower heart rate values for the MANUAL
zone. Press + (DISPLAY) or - (STOP/RESET) change the values
and SELECT (SET/FORMAT) to move through the digits. When
you finish setting the limits, press SELECT (SET/FORMAT).
5. Press + (DISPLAY) or - (STOP/RESET) to change the time values
and SELECT (SET/FORMAT) to move through hours, minutes,
and seconds. If you set an interval to zero (00:00:00), the Watch will
automatically skip this interval during your workout.
6. When you scroll past the final value in the interval time, the Watch
automatically advances the next interval (or # OF REPS if setting
the WARM-UP or COOL DOWN intervals). Repeat steps 2 to 5 to set
all intervals and reps for the selected workout.
7. Press DONE (MODE) to save your workout and complete the
setting procedure.
For Interval Timer Mode, you can set the following values:
➤ Warm up (set target heart rate zone and time)
➤ Intervals 1 through 4 (set target heart rate zone and time)
➤ Number of Reps (does not include warm-up or cool down
intervals)
➤ Cool down (set target heart rate zone and time)
Operating Interval Timer Mode
Use these steps to operate the interval timer for a workout.
1. Press MODE until Interval Timer Mode appears.
2. Press START/SPLIT to begin timing.
3. Press STOP/RESET to stop timing when you want to take a break
or you reach the end of your activity.
4. Press START/SPLIT to continue timing or
5. Press and hold STOP/RESET to reset the chronograph display
to zero.
Heart rate target zones and alerts
During the setting process, you have the option to use one of the
five standard, three custom, or a unique heart rate target zone alert
for each interval. You may also choose to use no target zone alert.
While you run the interval timer, the target zone alert settings you
select will override the heart rate target zone alert you set in
Configure Mode (see page 55).
3938
Page 22

However, the setting for the alert type (AUDIBLE, VISUAL,
or NO ALRT) in Configure mode will still operate while you run
the interval timer. The Watch only ignores the limit settings.
Keep in mind that these settings affect the target zone alert only.
The target zone alert settings used in the interval timer do not
affect the heart rate statistical data tracked and displayed in
Summary Mode.
Viewing performance data in Interval Timer Mode
When using the Fitness Sensors with your Watch, you can scroll
through performance data for each lap of your workout by pressing
and releasing DISPLAY. For Interval Timer Mode, viewing options
include:
➤ Heart Rate: Current heart rate expressed as either percent of
your maximum heart rate (PERCENT) or beats per minute
(BPM)
➤ Speed: Current velocity
➤ Pace: Current velocity, expressed in minutes per selected
distance unit, such as miles or kilometers
➤ Distance: Distance traveled since you began operating the
interval timer
➤ Altitude: Current height above sea level
Interval Mode tips & tricks
You can set the Watch to take a split when an interval ends by using
SYNC TIMER & CHRONO (see page 61). This will override the
auto split function and allow you to have a record of your
performance for each interval.
Interval Mode example
For cross training purposes, you decide to add a one-hour spin
class to your workout routine one time per week. You decide to
use Interval Mode to help you track both time and heart rate for
your class. You set up WKOUT 1 as follows: WARM-UP for 5
minutes with NO TZ (indicating no heart rate goal), INTVL 1 for
5 minutes at Z4: 156 – 175 (in beats per minute), INTVL 2 for 1
minute in Z3: 136 – 156, INTVL 3 for 10 minutes in Z4 and
INTVL 4 for 2 minutes in Z3. You then set the # OF REPS to 3,
indicating you want to repeat INTVL 1 through INTVL 4 three
times. Finally, you set the COOL DOWN to 5 minutes with NO
TZ. This entire workout takes you approximately 60 minutes and
helps you track both time and endurance goals.
4140
Page 23

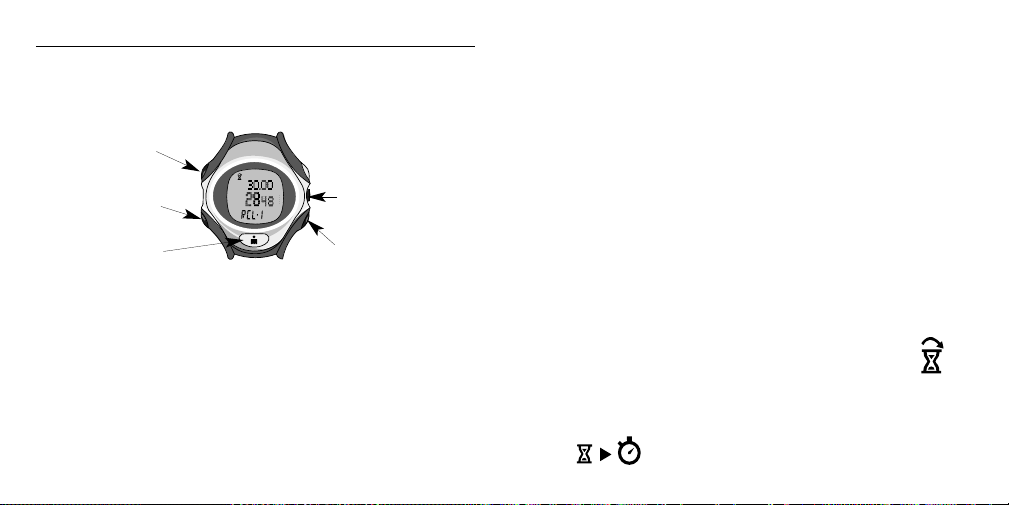
Lap Data Mode
Lap Data Mode allows you to review stored lap information for
time and heart rate information. To record lap data, you must run
the chronograph in one of the chronograph modes.
INDIGLO®
night-light
To Summary
Mode or hold
for time
When you use Lap Data Mode, each recalled lap will display three
lines of data. The lower line will show the lap number labeled RCL
(for recall) for each lap you stored in the chronograph.
Access this information using these steps.
1. Press MODE until the Lap Data Mode appears.
2. Press ▲ (DISPLAY) or ▼ (STOP/RESET) to navigate through
data for each lap.
▲
data value
▼
data value
Viewing performance data in Lap Data Mode
When using the Fitness Sensors with your Watch, you can scroll
through performance data for each lap of your workout by pressing
and releasing DISPLAY. For Lap Data Mode, viewing options
include:
➤ Lap and Split Time: Lap time includes data for each segment of
your activity, and split time shows data for the overall activity.
➤ Lap Average Heart Rate and Time in Average Heart Rate:
Average heart rate displays the average heart rate for the lap, and
time in average heart rate shows how much time during the lap
you spent at the average heart rate.
➤ Lap Average Speed: Average velocity for the period that
chronograph has been running
➤ Lap Average Pace: Average per-minute speed for the period
that chronograph has been running
➤ Lap Distance: Distance traveled for the lap
➤ Lap Altitude: Altitude displays the height above sea level at the
end of your lap
➤ Lap Elevation Change: Elevation is the net change in altitude
during the lap
4342
Page 24

Lap Data Mode tips & tricks
➤ Once you restart the chronograph from zero for your next activity,
you erase lap data from your previous activity.
➤ If you want to view information for your entire activity refer to
Summary Mode in the next section.
➤ If you have activated SYNC TIMER & CHRONO (see page 61)
then your lap data is equivalent to your performance for each
interval.
Lap Data Mode example
You love to ride your bike, but you just finished a long ride and
you are exhausted! In your exhaustion, you forget to look at the
lap data for your ride and you reset the chronograph to zero. You
think you have lost your data, but then you remember. You can
still view lap data for your ride, as long as you do not restart the
chronograph first.
Summary Mode
Summary Mode allows you to review overall information recorded
by the chronograph for your most recent activity. Data does not
update while displayed.
INDIGLO®
night-light
To Basic Timer
Mode or hold
for time
Summary Mode terminology
Zone: A predetermined heart rate range for your activity.
Recovery: A measure of your level of fitness and fatigue based on
rate at which your heart rate drops over a short period of time after
strenuous exercise. For further information, refer to Heart Zones®
Tools for Success.
Operating Summary Mode
1. Press MODE until the Summary Mode appears.
2. Press ▲ (DISPLAY) or ▼ (STOP/RESET) to navigate through
summary data.
▲
data value
▼
data value
4544
Page 25

Viewing performance data in Summary Mode
If you do not use your Fitness Sensors, the only information you
can view in Summary Mode is the total time for your activity while
the chronograph was running. Total time is equivalent to split time
in Chronograph Mode.
When using the Fitness Sensors with your Watch, you can view
performance data for the following five data groups:
Heart Rate
➤ Average Heart Rate: Your average heart rate calculated over
the period the chronograph was running.
➤ Peak Heart Rate: The highest recorded heart rate during your
activity.
➤ Minimum Heart Rate: The lowest recorded heart rate during
your activity.
➤ Time in Zones: Taking into account your total workout time,
the Watch displays how much time you spent in each of the
heart rate zones during your activity, including all five preset
zones, all three custom zones, and below Zone 1 (sometimes
referred to as “Zone 0”) (refer to “HRM settings” on page 57 for
information on setting up this feature).
➤ Average Heart Rate in Zones: The average heart rate in each
of the heart rate zones, including all five preset zones, all three
custom zones, and below Zone 1.
➤ Recovery: Your heart rate change over a selected period
of time recorded at the end of your activity (refer to “Recovery”
on page 58 for information on setting up this feature).
Speed
➤ Average Speed: Your average speed calculated by dividing
distance by time.
➤ Maximum Speed: Your quickest speed.
➤ Average Pace:
Your average speed expressed as minutes per
distance unit traveled.
➤ Best Pace: Your fastest time traveled per minute.
While Average Speed and Average Pace are the same value
expressed two different ways, Best Pace and Maximum Speed are
not. Best Pace is determined by analyzing all the pace values of
your activity; Maximum Speed is the fastest speed calculated by
the GPS-3D Sensor during your activity. While closely related,
these two values are not equivalent and may not agree.
Distance
➤ Event Distance: Your accumulated distance traveled during the
activity while the chronograph was running.
➤ Odometer: Your accumulated distance traveled since you last
manually reset the odometer. Since the odometer does not
operate in conjunction with the chronograph, you can use this
feature to track accumulated distance over several workouts.
4746
Page 26

Time
➤ Event Time: The total time for your activity while the
chronograph was running. Event time is equivalent to split time
in the chronograph modes.
GPS
➤ GPS Battery Level: The current voltage level for the GPS -3D
Sensor displayed in bar graph format. You must be receiving
data from the GPS-3D Sensor to view this information. When
the graph displays only one segment and you see the battery
icon on the Watch display, you should change the battery.
Summary Mode tips & tricks
➤ Once you restart the chronograph from zero for your next
activity, you erase summary data from your previous activity.
➤ If you are wearing the HR Sensor, you can initiate a recovery
calculation while in Summary Mode by pressing and holding
START/SPLIT while viewing your recovery data.
➤ If you want to view information for each segment of your activity
refer to Lap Data Mode in the previous section.
Summary Mode example
Recently, you have decided to focus on your heart rate during your
workouts. In Configure Mode, set your maximum heart rate at
195 BPM. When you finish any of your workouts (whether
running, biking, swimming, or any other type of activity), you can
refer to Summary Mode to review your heart rate information.
This information includes your average, peak, and minimum
heart rates as well as average heart rate and time spent in each of
the heart rate zones. Using this feature will help indicate the
levels at which you worked your heart throughout your workout
and serve as an indicator of whether or not you need to adjust the
intensity of your workout.
4948
Page 27
Basic Timer Mode
Basic Timer Mode allows you to set a fixed time from which the
Watch counts down to zero (for example, 10, 9, 8, …). You can set
the timer to stop, repeat or switch to Chronograph, Vertical, or
Finish Mode after the countdown.
Setting the timer
1. Press MODE until Basic Timer Mode appears.
2. Press and hold the SET button until the word SET briefly appears on
the display, followed by a flashing value.
3. Set the first value by pressing + (DISPLAY) or – (STOP/RESET).
4. Press SELECT (SET/FORMAT) to move to the next value to set.
5. Repeat steps 3 and 4 for all the values that need adjustment.
6. Press DONE (MODE) to save your changes and complete the setting
process.
Set timer
Stop or reset
the timer
INDIGLO®
night-light
Start the
timer
To Alarm
Mode or hold
for time
For Timer Mode, you can set the following values:
➤ Time (hours, minutes, seconds for up to 99 hours, 59 minutes,
and 59 seconds)
➤ End action (STOP, REPEAT, or CHRONO)
Operating the timer
1. Press START/SPLIT to start the timer countdown.
2. Pause the countdown by pressing STOP/RESET. You may resume
the countdown by pressing START/SPLIT again, or reset the timer
by pressing and holding STOP/RESET.
3. When the timer reaches zero, a brief alert sounds.
4. The timer will stop after the alert if set to STOP
OR
the timer will begin another countdown if set to REPEAT and
continue until you press STOP/RESET.
The lower line of the display will show RPT and a number (for
example, RPT 2). RPT indicates the timer is repeating and
the number indicates how many times the timer has cycled
through the repeat countdown. You will also see the repeat
icon, indicating the timer is set to repeat.
OR
The timer will switch to Chronograph, Vertical, or Finish Mode if set
to one of those modes. You will see the switch mode
icon, indicating the timer will switch modes at the end
of the countdown.
5150
Page 28
▲
alarm
Set alarm
▼
alarm
INDIGLO
night-light
Turn alarm
ON or OFF
To Configure
Mode or hold for
time
Basic Timer Mode tips & tricks
➤ You can press MODE within Timer Mode to switch the
display to another mode without disrupting the operation
of the timer. The timer icon will appear indicating timer
operation.
➤ The timer will only switch to Chronograph, Vertical, or Finish
Mode if you reset the chronograph to zero and turn off Sync
Timer & Chrono (see “Hands-free settings” on page 60).
Basic Timer Mode example
As part of your overall health plan, you decide to take a 30-minute
walk during your lunch hour two times a week. To help keep
track of time so you do not return late from your lunch hour, you
set the timer to 15 minutes and then set it to repeat one time.
After 15 minutes the Watch beeps telling you to begin walking
back to your office. Since you set the timer to repeat, the Watch
begins timing another 15 minute session helping you track how
much time you have to return to your office.
Alarm Mode
You can use your Watch as an alarm clock for up to five separate
alarms. When you set an alarm, the alarm clock icon appears
in Time of Day Mode. You can set an alarm to ring at the
same time every day, or only weekdays, weekends, or even
only one time (useful for appointment reminders).
When the Watch reaches a scheduled alarm, the alarm tone sounds
and the INDIGLO® night-light flashes for a period of
20 seconds. You can silence the alarm during this period by
pressing any button on the Watch, or, if you do not silence the
alarm before the alert finishes, a backup alarm will sound after
five minutes.
5352
Page 29
Selecting an alarm
You can use the Watch to set and store up to five alarms labeled
ALM1 though ALM5
1. Press MODE until Alarm Mode appears.
2. Press ▲ (DISPLAY) or ▼ (STOP/RESET) to choose the alarm
you want to set (ALM1 through ALM5).
Setting an alarm
1. Press MODE until Alarm Mode appears.
2. Press and hold the SET button until the word SET briefly appears on
the display, followed by a flashing value.
3. Set the first value by pressing + (DISPLAY) or – (STOP/RESET).
4. Press SELECT (SET/FORMAT) to move to the next value to set.
5. Repeat steps 3 and 4 for all the values that need adjustment.
6. Press DONE (MODE) to save your changes and complete the setting
process.
For Alarm Mode, you can set the following values:
➤ Alarm type (WEEKDAYS, WEEKENDS, ONCE, or DAILY).
A DAILY alarm will ring every day at the selected time,
a WEEKDAYS alarm will ring Monday through Friday at the
same selected time, a WEEKENDS alarm will ring Saturday and
Sunday at the same selected time, and a ONCE alarm will only
ring one time at the selected time and then automatically
turn off.
➤ Alarm time (hours, minutes and AM/PM if the time is set to
12-hour format).
➤ Alarm status (OFF or ON). You can also press START/SPLIT to
switch the alarm status.
Note that if you change any alarm settings, you automatically turn
on the alarm.
Configure Mode
INDIGLO®
night-light
Press when
done viewing
options
Activate a
Quick Set
Use Configure Mode to set options that enhance the performance
of other Watch modes, for the following six setting groups:
HRM settings: Heart rate settings allow you to set target zones
for your heart rate.
S+D settings: Speed and distance settings affect the Watch
response to data received from the GPS-3D Sensor.
Altitude settings: Altitude settings configure target altitude and
set smoothing and ascent rate calculations.
▲
Option
Select an item
▼
Option
5554
Page 30

Hands-free settings: Hands-free settings provide options to
configure the Watch to operate automatically in conjunction with
the GPS-3D Sensor.
Watch settings: Watch settings provide options for customizing
the general operation of the Watch, including hiding data
or modes.
Unit settings: Unit settings allow you to determine distance
(for example miles versus kilometers) and heart rate (beats versus
percentage) display units.
Operating Configure Mode
Unlike other setting functions in the Watch, Configure Mode
includes a menu hierarchy for the setting groups.
1. Press MODE until Configure Mode appears.
2. Press ▲ (DISPLAY) or ▼ (STOP/RESET) to move to the next or
previous setting group.
3. Press SELECT (SET/FORMAT) to enter a setting group.
4. Press ▲ (DISPLAY) or ▼ (STOP/RESET) to navigate through
the options within a setting group.
5. Press SELECT (SET/FORMAT) to select an option within a
setting group. This may allow you to change a setting or take you
to another level.
6. Press + (DISPLAY) or - (STOP/RESET) to set the option within
a setting group.
7. Press DONE (MODE) when you have finished setting an option
within a setting group.
8. Press DONE (MODE) again to return to the setting group level.
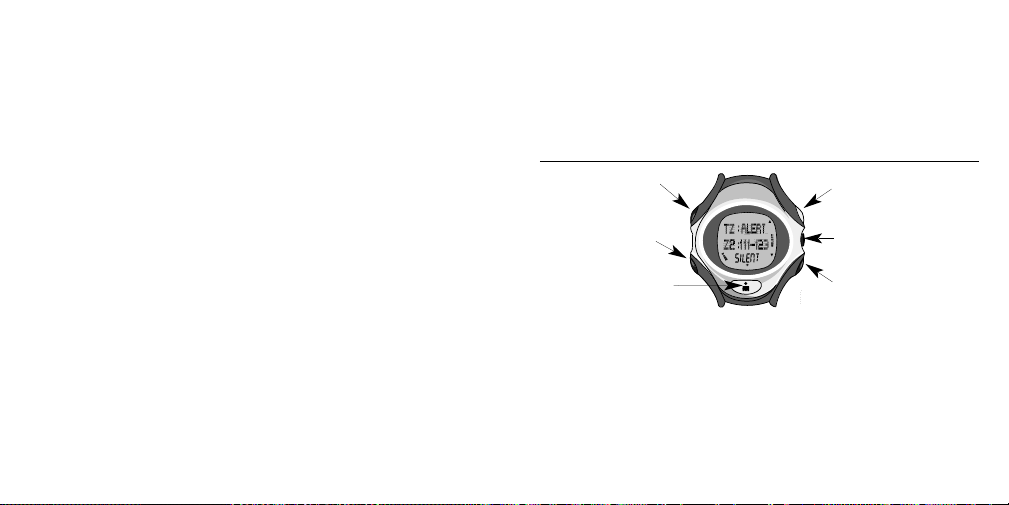
HRM settings
Prior to configuring your heart rate settings, refer to Heart Zones®
Tools for Success for information on the importance of tracking
your heart rate and how to determine your maximum heart rate.
Then, configure the following heart rate settings:
➤ TZ zone and alert: You may select from one of five preset heart
rate zones (labeled Z1 to Z5) or three custom heart rate zones
(labeled C1 to C3). You may also choose whether or not to have
the Watch alert you if your heart rate goes outside of your target
zone. Options for alerts include NO ALRT, AUDIBLE, or SILENT.
NO ALRT turns off the alert completely, SILENT warns you with
a visual indication (an up or down arrow on the Watch display) if
you go above or below your target heart rate zone, and AUDIBLE
combines a warning melody with the visual alert. You will hear an
ascending melody if you go above your zone and a descending
melody if you go below your zone.
➤ Custom zones: You may set the upper and lower target zone
number or percentage (depending on how you choose to show
your heart rate) for up to three custom heart rate zones, labeled
CUSTOM 1, CUSTOM 2, and CUSTOM 3.
5756
Page 31

➤ Recovery: This feature helps you determine how quickly your
heart rate returns to a lower heart rate value at the end of your
activity; the quicker you return, the better your fitness level. You
can set the Watch to calculate a recovery heart rate when you
stop the chronograph for one minute, two minutes, or off.
Selecting OFF will prevent the Watch from automatically
calculating a recovery heart rate when you stop the chronograph.
You may still manually calculate your recovery rate in Summary
Mode, set to one minute, if you select OFF in Configure Mode.
➤ Max heart rate: Enter your Maximum Heart Rate. The Watch
uses this value to calculate the five preset heart rate zones and
serves as a reference for displaying your heart rate as a percent of
your maximum heart rate (PERCENT).
➤ Heart rate display: You can set the Watch to display your
heart rate as either a percentage of your maximum heart rate
(PERCENT) or in beats per minute (BPM). The setting you
choose will determine how your heart rate displays in all other
Watch settings.
S+D settings
➤ Zone type: Similar in concept to a heart rate target zone alert,
you can set the Watch to track your speed or your pace and to
alert you if you move too slowly or too quickly (alert types include
an audible alert that beeps or a silent alert that flashes). You can
set speed and pace limits independently. For instance, set pace
limits to control pace for your run and set speed limits to values
useful for cycling. Then simply switch between the settings for
each activity.
➤ Distance alert: Set the Watch to alert you for distance intervals.
For example, you can set the Watch to alert you for every mile
you travel. The distance alert will only function when you run the
chronograph. If you would like the Watch to take a split based on
distance traveled, refer to the Hands-Free Settings on page 60.
Smoothing: Smoothing is useful if you feel that the displayed
speed or pace values appear to be too erratic. Smoothing applies an
averaging filter and may cause the displayed speed or pace values to
respond more slowly to changes.
➤ Speed smoothing: Turn speed smoothing off or on.
➤ Pace smoothing: Turn pace smoothing off or on.
5958
Page 32

Altitude settings
➤ Smoothing: Smoothing is useful if you feel that the displayed
altitude value appears to be too erratic. Smoothing applies an
averaging filter and may cause the displayed altitude value to
respond more slowly to changes. You can turn altitude smoothing
off or on.
➤ Update ascent rate: Set the Watch to update the period at
which the ascent rate is calculated. You can choose intervals of 30
seconds, or 1, 10, 30, or 60 minutes. Set this feature shorter for
faster vertical activities such as skiing or longer for slower
vertical activities such as climbing.
Hands-Free settings
Hands-free features automate chronograph features, freeing you to
focus on your workout instead of operating your Watch. Even when
enabled, you can still take manual splits without affecting the
hands-free operation. Configure the following hands-free settings:
➤ Auto split: This feature enables the chronograph to
automatically take splits based on elapsed distance or time. For
instance, you can configure the Watch to take a split every 10
minutes, or, if you set Auto Split to 1 MI, then the Watch will
automatically take a split every mile.
➤ Auto start: This feature enables the chronograph to start when
you start moving. It may take a few seconds for the GPS-3D
Sensor to detect movement, causing a slight delay in start time.
➤ Auto stop: This feature enables the chronograph to stop when
you stop moving. It may take a few seconds for the GPS-3D
Sensor to detect that you have stopped moving, causing a slight
delay in stop time.
➤ Sync timer & chrono: This feature allows you to set the
interval timer and the chronograph to start and stop
simultaneously so you can record chronograph data when you use
the interval timer. The completion of an interval in Interval
Timer Mode will cause the Watch to take a split in the
chronograph. Use this feature if you want a record of your
performance for each interval in your workout. Each interval
corresponds to one lap or segment in Lap Data Mode.
You must turn the sync timer & chrono setting off if you want the
timer to switch to Chronograph Mode at the end of a countdown
in Basic Timer Mode.
Watch settings
Configure the following Watch settings:
➤ Night-Mode® feature: When enabled, the INDIGLO® night-
light turns on when you press any button. This feature disables
itself after eight hours.
➤ Hourly chime: When enabled, the Watch will chime at the top of
every hour.
➤ Button beep: When enabled, the Watch will emit a beep when
you press any button.
6160
Page 33

➤ Mode hiding: You can choose to show or disable the following
modes: Interval, Lap Data, Summary, Timer, or Alarm. For
example, if you disable Lap Data Mode it will not show up at all
until you enable it again from Configure Mode. You can also
choose to show, hide, or disable Vertical Mode or Finish Mode.
➤ Data hiding: You can choose to show or hide blank data from
the Fitness Sensors. For instance, if you do not use the HR
Sensor for your workout and you choose to hide blank HR Sensor
data, you will not see any information related to heart rate since
this data relies on the use of the HR Sensor.
Unit settings
Configure the following unit settings:
➤ Distance: Set the Watch to display distance in terms of miles,
kilometers (KM), or nautical miles (NM).
➤ Speed: Set the Watch to display speed in terms of miles per hour
(MPH), kilometers per hour (KPH), nautical miles (NM), or auto.
➤ Pace: Set the Watch to display pace in terms of miles (MPH),
kilometers (KPH), nautical miles (NM), or auto.
➤ Altitude: Set the Watch to display altitude in terms of feet,
meters, or auto.
In unit settings you can set speed, pace, and altitude to any unit
independently or to the default auto setting. When set to auto, each
setting automatically follows the distance unit setting. This allows
you to quickly change units for all your data displays without
having to adjust every setting every time, yet allows flexibility for
certain situations.
For example, a runner typically chooses kilometers for her unit
settings. However, when running a marathon, she changes her
distance unit to miles (a marathon is always 26.2 miles), but she
chooses the kilometers unit setting for pace. During the
marathon, the runner can view her distance in miles to match
the course markers of the race, but she can view her pace in the
more familiar minutes per kilometers for a greater
understanding of how quickly she is running.
6362
Page 34

CARE & MAINTENANCE
Changing the battery
WARNING: CHANGING THE BATTERY YOURSELF MAY
RESULT IN DAMAGE TO THE WATCH. TIMEX
RECOMMENDS YOU HAVE A WATCH RETAILER OR
JEWELER REPLACE THE BATTERY.
If you choose to replace the battery yourself, check the back of the
Watch (caseback) for the specific battery type and size required for
your Watch. Carefully follow the steps below:
1. Place the Watch face-down on a flat work surface.
2. Separate both halves of the Watch band or strap using a small flat
screwdriver.
You must install the caseback in the same direction you removed it or
the buzzer element will not function after reassembly.
3. Using a 00 Phillips-head screwdriver, remove the four screws that
secure the caseback and set them aside. Carefully remove the
caseback and set it aside.
WARNING: ALWAYS KEEP THE WATCH FACE DOWN ON
YOUR WORK SURFACE. IF YOU TURN THE WATCH OVER TO
REMOVE THE SCREWS OR CASEBACK YOU MAY LOSE THE
SMALL ELECTRICAL CONNECTORS INSIDE THE WATCH.
4. Carefully open the battery clamp and remove the battery.
5. Place a new battery in the battery compartment, making sure the
side with the + marking faces you.
6. Reattach the battery clamp.
7. Replace the caseback, making sure the black gasket sits firmly in the
case groove and the caseback properly aligns with the Watch to
ensure the buzzer will line up with the internal connections (see note
after Step 2).
8. Carefully reattach the bands or straps so that the shorter piece with
the buckle attaches to the upper set of lugs.
INDIGLO® night-light
Patented (U.S. Patent Numbers 4,527,096 and 4,775,964)
electroluminescent technology illuminates the entire Watch face at
night and in low light conditions.
Water resistance
Your Watch withstands water pressure up to 86 psi (equals
immersion to 164 feet or 50 meters below sea level). This 50-meter
resistance remains intact so long as you keep the lens, push
buttons, and case intact.
WARNING: TO MAINTAIN WATER RESISTANCE, DO NOT
PRESS ANY BUTTONS WHILE UNDER WATER.
While your Watch will resist water, you should not use this Watch
for diving, as it is not a diver’s Watch and you should rinse your
Watch with fresh water after exposure to salt water. The Watch
will not display Sensor data when operated under water.
6564
Page 35

LEGAL INFORMATION
TIMEX and NIGHT-MODE are registered trademarks of Timex
Corporation. BODYLINK is a registered trademark of Timex
Group, B.V. INDIGLO is a registered trademark of Indiglo
Corporation in the U.S. and other countries. HEART ZONES is a
trademark of Sally Edwards.
International warranty
(U.S. limited warranty)
Your Watch is warranted against manufacturing defects by Timex
Corporation for a period of ONE YEAR from the original purchase
date. Timex and its worldwide affiliates will honor this
International Warranty.
Please note that Timex may, at its option, repair your Watch by
installing new or thoroughly reconditioned and inspected
components or replace it with an identical or similar model.
WARNING: THIS WARRANTY DOES NOT COVER DEFECTS
OR DAMAGES TO YOUR PRODUCT BASED ON THESE
CONDITIONS:
1. after the warranty period expires;
2. if the product was not originally purchased from an authorized
retailer;
3. from repair services not performed by the manufacturer;
4. from accidents, tampering or abuse; and
5. case, attachments or battery. You may be charged for replacing any of
these parts.
THIS WARRANTY AND THE REMEDIES CONTAINED HEREIN
ARE EXCLUSIVE AND IN LIEU OF ALL OTHER
WARRANTIES, EXPRESS OR IMPLIED, INCLUDING ANY
IMPLIED WARRANTY OF MERCHANTABILITY OR FITNESS
FOR PARTICULAR PURPOSE. TIMEX IS NOT LIABLE FOR
ANY SPECIAL, INCIDENTAL OR CONSEQUENTIAL
DAMAGES.
Some countries and states do not allow limitations on implied
warranties and do not allow exclusions or limitations on damages,
so these limitations may not apply to you. This warranty gives you
specific legal rights and you may also have other rights which vary
from country to country and state to state.
To obtain warranty service, please return your Watch to the
manufacturer, one of its affiliates or the retailer where the product
was purchased, together with a completed original Product Repair
Coupon or, in the U.S. and Canada only, the completed original
Product Repair Coupon or a written statement identifying your
name, address, telephone number and date and place of purchase.
Please include the following with your Watch to cover postage and
handling (this is not a repair charge): a US$ 7.00 check or money
order in the U.S.; a CAN$6.00 cheque or money order in Canada;
and a UK£ 2.50 cheque or money order in the U.K. In other
countries, you will be charged for postage and handling.
6766
Page 36

WARNING: NEVER INCLUDE ANY ARTICLE OF PERSONAL
VALUE IN YOUR SHIPMENT.
U.S.: call 1-800-328-2677 for additional warranty information.
Canada: call 1-800-263-0981. Brazil: call 0800-168787. Mexico:
call 01-800-01-060-00. Central America, the Caribbean,
Bermuda and the Bahamas: call (501) 370-5775 (U.S.). Asia:
call 852-2815-0091. The U.K.: call 44 020 8687 9620. Portugal:
call 351 212 946 017. France: call 33 3 81 63 42 00. Germany: call
+43 662 88 92130. The Middle East and Africa: call 971-4-
310850. Other Areas: contact your local Timex retailer or
distributor for warranty information.
TIMEX INTERNATIONAL WARRANTY — WATCH REPAIR COUPON
Original Purchase Date:
(Attach copy of sales receipt, if available)
Purchased by:
(Name, address and telephone number)
Place of Purchase:
(Name and address)
Reason for Return:
THIS IF YOUR WATCH REPAIR COUPON; PLEASE KEEP IT IN A SAFE PLACE.
68
FCC Notice (U.S.) / IC Notice (Canada)
Timex Corporation declares that the following products, which
include all components of the Timex Bodylink System, are
compliant to the relevant FCC Part 15 and Industry Canada rules
for Class B devices as follows:
Product Name: Speed + Distance System: GPS Transceiver
Product Type: Intentional Radiator
M850/M576 Speed+Distance Monitor EP9TMXM850 3348A-12181
M185/M187 Speed+Distance Monitor EP9TMXM185 3348A-TMXM185
M515/M579 Heart Rate Monitor EP9TMXM515 3348A-M515
M640 Heart Rate Monitor EP9TMXM640 3348A-TMXM640
These devices comply with Part 15 of the FCC rules. Operation is
subject to the following two conditions: (1) The device may not
cause harmful interference, and (2) the device must accept any
interference received, including interference that may cause
undesired operation.
Series M5xx/M1xx
Heart Rate Monitor System: HRM Transmitter
Series M6xx/M5xx
Model FCC ID No.
IC Cert. No.
69
Page 37

Product Name: Watch Receivers: HRM/Speed+Distance Series
M6xx/M5xx/M1xx
Data Recorders: HRM/Speed+Distance Series
M5xx/M1xx
Product Type: Unintentional Radiator
This equipment has been tested and found to comply with the
limits for a Class B digital device, pursuant to Part 15 of the FCC
rules. These limits are designed to provide reasonable protection
against harmful interference in a residential environment. This
equipment generates, uses, and can radiate radio frequency energy
and, if not used in accordance with the instruction manual, may
cause harmful interference to radio communications. If this
equipment does cause harmful interference to radio or television
reception, which can be determined by turning the equipment off
and on, the user is encouraged to try to correct the interference by
reorienting or relocating the receiving antenna; or by increasing
the separation between the equipment and receiver.
Caution: Any changes or modifications to the equipment listed
above, not expressly approved by Timex Corporation, could void
the user’s authority to operate this equipment.
Industry Canada Notice: This Class B digital apparatus
complies with Canadian ICES-003. Cet appariel numérique de la
classe B est conforme à la norme NMB-003 du Canada.
Declaration of Conformity
Manufacturers Name: Timex Corporation
Manufacturers Address: 555 Christian Road
Middlebury, CT 06762
United States of America
declares that the following products, which include all components
of the Timex Bodylink System, are compliant to the relevant EU
Directives as follows:
Product Name:
Speed + Distance System: GPS Transceiver Series M5xx/M1xx
Heart Rate Monitor System: HRM Transmitter Series M6xx/M5xx
conforms to the following product specifications:
LVD: 72/23/EEC
Safety: IEC 60950
EMC: 89/336/EEC and amendments 92/31/EEC, 93/68/EEC,
and 98/13/EEC
Emissions: EN300-330-1, -2
Radiated Emission 9kHz to 30MHz H-Field
(magnetic)
Radiated Emission 30MHz to 1000MHz E-Field
(electric), Ref. EN55022
7170
Page 38

7372
Immunity: EN300-683
Radiated Immunity 80MHz to 1000MHz, Ref.
EN61000-4-3
ESD Electrostatic discharge, Ref. EN61000-4-2
Supplemental Information: The above products comply with
the requirements of the Low-Voltage Directive 72/23/EEC and the
EMC Directive 89/336/EEC (including amendments 92/31/EEC,
93/68/EEC, and 98/13/EEC) and carry the 0983(!) marking
accordingly. Notifying Body – Underwriters Laboratories Inc.,
CAB# - 0983; 1285 Walt Whitman Road, Melville, NY 11747.
Timex Corporation declares that these low power radio equipment
devices are in compliance with the essential requirements and
other relevant provisions of R&TTE Directive 1999/5/EC.
Product Name:
Watch Receivers: HRM/Speed+Distance Series M6xx/M5xx/M1xx
Data Recorders: HRM/Speed+Distance Series M5xx/M1xx
conforms to the following product specifications:
Generic Emissions Standard EN 55022: 1998
Generic Immunity Standard EN 55024: 1998
Supplemental Information:
The above products comply with the requirements of
Electromagnetic Compatibility (EMC) Directive 89/336/EEC
(including amendments 92/31/EEC, 93/68/EEC, and 98/13/EEC)
and carry the marking accordingly. Conformity Assessment
Body (CAB) – Underwriters Laboratories Inc., CAB# 0983; 1285
Walt Whitman Road, Melville, NY 11747.
Timex Corporation declares that these low power electronic devices
are in compliance with the essential requirements and other
relevant provisions of the EMC Directive.
Agent:
Brian J. Hudson
Director, Test Engineering and Module Development
Date: 22 June 2005, Middlebury, Connecticut, U.S.A.
Page 39

T ABLE DES MATIÈRES
Enregistrez votre produit à www.timex.com
Introduction ..........................................................................77
Bienvenue ! ..............................................................................77
Avant de commencer................................................................78
Vue d’ensemble de la montre ..............................................79
Performance ..........................................................................79
Terminologie relative à la montre ..........................................79
Le chronographe ......................................................................80
Ressources ................................................................................81
Boutons de la montre ..............................................................82
Icônes d’affichage ....................................................................86
Démarrer le système Bodylink® ............................................87
Messages ..................................................................................90
Formats d’affichage..................................................................91
Préparatifs d’utilisation de la montre ....................................91
Modes de la montre ..............................................................94
Mode Heure de la journée........................................................95
Mode Chronographe ..............................................................101
74
Page 40

Mode Vertical ..........................................................................105
Mode Arrivée ..........................................................................108
Mode Minuterie par intervalles ............................................113
Mode Données au tour ..........................................................120
Mode Récapitulatif ................................................................123
Mode Minuterie de base ........................................................128
Mode Alarme ..........................................................................132
Mode Configuration................................................................134
Soin et entretien..................................................................144
Changer la pile........................................................................144
Veilleuse INDIGLO®..............................................................145
Étanchéité ..............................................................................145
Mentions légales ..................................................................146
Garantie internationale (Garantie limitée États-Unis) ......146
Avis FCC (États-Unis) / Avis IC (Canada)............................150
INTRODUCTION
Bienvenue !
Félicitations ! En achetant le système Bodylink®de Timex®, vous
avez embauché votre nouvel entraîneur personnel. L’utilisation de
la montre Performance en association avec le cardiofréquencemètre et le capteur de vitesse + distance vous offre une capacité
sans précédent à suivre, enregistrer et analyser les indicateurs
essentiels de votre propre niveau de forme.
Ce manuel contient tous les renseignements nécessaires sur votre
montre Performance. Cette montre de sport est le cerveau du
système Bodylink, vous fournissant en temps réel des données
d’exercice complètes collectées depuis le cardiofréquencemètre, le
capteur de vitesse + distance ou les deux.
Vous constaterez que la montre Performance est une technologie
d’aide à la mise en forme très conviviale. Mais, comme avec toute
technologie nouvelle, prenez le temps de vous familiariser avec ses
caractéristiques et ses fonctions afin d’optimiser l’utilité de votre
investissement.
Bon plaisir dans votre exploration ! Passez en revue les différents
modes de la montre Performance. Consultez le Guide de démarrage
pour acquérir une connaissance de base de votre Système Bodylink.
Mais avant tout, profitez pleinement de votre nouveau partenaire
pour une mise en forme toujours plus performante !
77
Page 41

Avant de commencer
Ce manuel contient des informations et des instructions relatives
au réglage de votre nouvelle montre Performance et à son
utilisation avec le cardiofréquencemètre et le capteur de vitesse
+ distance numériques. Il présente plusieurs éléments qui vous
permettront d’approfondir votre compréhension de la montre
Performance.
➤ Une vue d’ensemble des boutons, icônes d’affichages et modes de
la montre Performance
➤ Des glossaires par sections expliquant un certain nombre de
termes utilisés en rapport avec la montre Performance et ses
modes
➤ Des instructions complètes et approfondies pour le réglage et
l’utilisation de la montre Performance dans chacun des modes
➤ Un guide simplifié des liens entre la montre Performance et les
capteurs de forme dans chaque mode approprié
➤ Des cas de figure réels, dans des encadrés à fond gris, montrant
comment la montre Performance peut être utilisée dans le cadre
de votre séance d’exercice
78 7978
VUE D’ENSEMBLE DE LA MONTRE
PERFORMANCE
Terminologie relative à la montre
Le système Bodylink®possède son propre langage, que vous
apprendrez au fur et à mesure que vous vous familiariserez avec
son fonctionnement. Durant l’apprentissage de cette langue, vous
découvrirez des expressions et des termes importants. Personne ne
vous fera subir un test de vocabulaire, c’est promis !
Cependant, une révision de la terminologie de base vous aidera à
comprendre plus rapidement le fonctionnement de votre système
Bodylink. Veuillez donc prendre un instant pour vous familiariser
avec certains des termes qui figurent dans ce manuel.
➤ Système Bodylink : Le système Bodylink permet le suivi et le
stockage de données en temps réel par l’utilisation de divers
instruments sans fil en association avec la montre Performance.
➤ Montre Performance : La montre Performance (montre)
assure le traitement des données du système Bodylink.
➤ Capteurs de forme : Le système Bodylink comprend deux
capteurs numériques : le cardiofréquencemètre et le capteur de
vitesse + distance.
➤ Cardiofréquencemètre : Le cardiofréquencemètre (CFM)
mesure votre fréquence cardiaque. Le Mode d’emploi des
Page 42

capteurs de forme contient des indications détaillées pour le
Mode
Chronographe
Mode
Vertical
Mode
Arrivée
réglage et l’utilisation du CFM.
➤ Capteur de vitesse + distance : Le capteur de vitesse +
distance (capteur GPS-3D) mesure la vitesse, l’allure, la distance
parcourue, l’altitude et plus encore, à l’aide de la technologie
GPS. Le Mode d’emploi des capteurs de forme contient des
instructions détaillées de réglage et d’utilisation du capteur
GPS-3D. Notez que la montre désigne parfois le capteur GPS-3D
sous le nom de capteur V+D.
➤ GPS : Le capteur GPS-3D utilise des données émises par des
satellites du système mondiale de localisation (GPS) pour
calculer vitesse, distance et altitude.
Le chronographe
Lorsque vous vous familiarisez avec le fonctionnement de la
montre, le terme chronographe peut susciter une certaine
chronographe
mesure la durée
confusion. Rappelez-vous ceci : un chronographe est un outil de
mesure de durée. La montre comporte un mode Chronographe,
mais les modes Vertical et Arrivée fonctionnent à partir du
chronographe. Chaque fois que la montre fonctionne en tant
qu’outil de mesure de durée, elle utilise sa fonction chronographe.
Ressources
Ressources imprimées
En plus du présent manuel, votre système Bodylink ®comprend la
documentation suivante :
➤ Guide de démarrage du système Bodylink : Des informations qui
vous aident à régler et commencer à utiliser la montre en
association avec les capteurs de forme, ainsi qu’un plan
d’ensemble des différents modes de la montre Performance
➤ Mode d’emploi des capteurs de forme : Des instructions de réglage,
d’utilisation et d’entretien des capteurs de forme
➤ Heart Zones® Tools for Success : Des informations sur l’emploi du
cardiofréquencemètre numérique en association avec le
programme de forme Heart Zones Training System, conçu pour
aider à accroître la force et la résistance de votre cœur
80 81
Page 43

83
De plus, vous pouvez appuyer sur le bouton INDIGLO®pour
couper rapidement une alerte de zone cible depuis tout mode
permettant d’afficher la fréquence cardiaque. Une fois que vous
avez appuyé sur le bouton pour changer l’alerte, celle-ci reste
silencieuse tant qu’elle n’a pas été réglée sur un autre type d’alerte
de zone cible. Reportez-vous à la rubrique « Zone cible et alerte »
à la page 136 pour plus de renseignements.
82
Ressources sur le Web
Les sites Web Timex® proposent de précieux renseignements
permettant d’optimiser le système Bodylink.
➤ www.timex.com/bodylink/ : Caractéristiques du système
Bodylink et simulations de produit.
➤ www.timex.com/software/ : Dernières versions des logiciels
pour les produits Timex
➤ www.timex.com/fitness/ : Conseils de mise en forme et
d’exercice avec le système Bodylink
En plus des sites Timex, nous vous conseillons de visiter le site Web
indiqué dans Heart Zones® Tools for Success. Sur
www.heartzones.com, vous trouverez des renseignements
complémentaires au contenu de la brochure.
Boutons de la montre
La montre offre des boutons multi-fonctions remplissant trois
rôles. Il n’est pas nécessaire de se souvenir de la fonction des
boutons dans chaque mode. Il suffit de se laisser guider par la
montre.
La plupart du temps, les fonctions des boutons de la montre
correspondent aux marquages sur le boîtier de la montre. S’il n’y a
pas de symboles sur les bords de l’écran, suivez les indications
imprimées sur le boîtier de la montre pour vous guider dans
l’utilisation des boutons.
MODE
Appuyer pour
passer au
mode suivant
START / SPLIT
Appuyer pour commencer
à chronométrer ou pour
marquer un temps
intermédiaire
Veilleuse
INDIGLO® ;
Appuyer pour
illuminer la montre ;
tenir enfoncé pour
couper l’alerte de
zone cible
AFFICHAGE
Appuyer pour
afficher les données
de performance
STOP / RESET
Appuyer pour arrêter
ou appuyer et tenir
enfoncé pour remettre
à zéro
SET/FORMAT
Appuyer pour régler
ou changer le format
de l’affichage
Page 44

Boutons de réglage
DONE (Validé)
Appuyer lorsque
le réglage est
terminé
Veilleuse
INDIGLO
Appuyer pour
éclairer
la montre
+
Appuyer pour
augmenter
la valeur affichée
SELECT
Appuyer pour passer
à la valeur suivante
–
Appuyer pour
diminuer
la valeur affichée
MODE
Appuyer pour
passer au mode
suivant
Veilleuse
INDIGLO®
Appuyer pour
éclairer
la montre
▲
Appuyer pour
afficher la valeur
des données
suivantes
▼
Appuyer pour
afficher la valeur
des données
précédente
Utilisez les boutons de réglage de la montre pour en régler les
fonctions (réglage de l’heure ou d’une zone de fréquence cardiaque,
par exemple). Lorsque les symboles + et - s’affichent au bord de
l’écran de la montre, c’est que le processus de réglage est activé.
Les étapes ci-dessous indiquent comment régler les fonctions de la
montre.
1. Maintenez le bouton SET enfoncé jusqu’à ce que le mot SET s’affiche
brièvement, suivi d’une valeur clignotante.
2. Réglez la première valeur en appuyant sur + (DISPLAY) ou –
(STOP/RESET).
3. Appuyez sur SELECT (SET/FORMAT) pour passer à la valeur
suivante.
4. Répétez les étapes 3 et 4 pour toutes les valeurs que vous devez
modifier.
5. Appuyez sur DONE (MODE) pour valider les modifications et
quitter le mode de réglage.
Boutons de visualisation
Les boutons de la montre permettent de naviguer à travers les
options de visualisation. L’affichage des triangles ▲ et ▼ au bord
de l’écran signifie qu’il y a des données à visualiser.
84 85
Page 45

Icônes d’affichage
Minuterie par
intervalles ou de base
en marche
Chronographe
en marche
Night Mode activé
La tension de la pile
du capteur GPS-3D
est basse
Capteur(s) activé(s)
(clignote lorsqu’il y a
un problème)
Alarme activée
Carillon horaire
activé
Icônes d’affichage de
la montre
86
Démarrer le système Bodylink
®
Lorsque vous utilisez le contrôleur de performances, vous pouvez
afficher en temps réel les données d’un cardiofréquencemètre ou
d’un capteur de vitesse + distance, ou les deux, dans les modes
Heure de la journée, Chrono et Minuterie. La procédure est la
même dans tous les modes, bien que les données pouvant être
affichées et leur position à l’écran varient d’un mode à l’autre.
1. Veillez à porter votre cardiofréquencemètre ou votre capteur de
vitesse + distance, ou les deux, et à ce qu’ils soient en marche et
opérationnels.
2. Tenez-vous à au moins 2 mètres de tout autre utilisateur de
systèmes de contrôle de forme et de toute source de brouillage
radio, notamment les appareils électriques, lignes de haute
tension, etc.
REMARQUE : Bien que le système Bodylink® ait une portée
utile de 1 mètre environ entre les capteurs et la montre, pour
assurer un fonctionnement fiable, maintenez la montre le plus
près possible des capteurs lors du démarrage du système.
3. Enfoncez et relâchez le bouton DISPLAY. Ceci commande à la
montre de détecter tout capteur Bodylink® proche ; elle cherche
pendant une minute. L’icone d’antenne s’affiche sur l’écran de la
montre, indiquant que le système Bodylink® est activé.
87
Page 46

REMARQUE : En pratique, la montre recherche automatique
d’éventuels capteurs Bodylink® pendant quinze secondes
ment
lors de l’accès aux modes Chrono et Minuterie.
4. Lorsque la montre a détecté des émissions en provenance de
capteurs, l’affichage passe à un nouveau format incluant une
partie ou l’ensemble des données de capteurs en fonction du
mode. Heure de la journée et Minuterie affichent les données sur
la ligne inférieure uniquement, alors que Chrono comporte
jusqu’à trois lignes pour les données de performances.
-
Afficher les données de performances
Enfoncez et relâchez le bouton DISPLAY pour sélectionner les
données ou la combinaison de données que vous souhaitez afficher
durant la séance. Pour simplifier, une « bannière » indiquant le nom
des données et leur position sur l’écran s’affiche brièvement avant
les données elles-mêmes.
Ce qu’il faut également savoir pour utiliser la montre de façon
efficace :
• En mode Chrono, enfoncez et relâchez SET/FORMAT pour
inverser les positions des données des lignes du haut et du milieu.
Ceci permet d’afficher les données qui vous importent le plus au
milieu, dans la ligne la plus grande.
• Si vous souhaitez interrompre le contrôle des données des
capteurs Bodylink®, tenez le bouton DISPLAY enfoncé jusqu’à
l’affichage du message HOLD TO SHUT OFF RCVR. Continuez à
tenir le bouton DISPLAY pendant quelques secondes
supplémentaires ; la montre émet un bip pour indiquer que la
liaison radio entre la montre et les capteurs a été coupée.
CONSEIL PRATIQUE : Si vous affichez déjà les données d’un
capteur, le cardiofréquencemètre par exemple, et souhaitez
afficher les données du capteur de vitesse + distance, il vous
suffit de tenir le bouton DISPLAY enfoncé jusqu’à ce que la
montre émette un court bip et que l’icone d’antenne commence à
clignoter. La montre recherche alors un second capteur
Bodylink®. Lorsqu’elle détecte ce second appareil, l’icone
d’antenne arrête de clignoter et le format de l’affichage peut
changer pour inclure les nouvelles données. Enfoncez et relâchez
le bouton DISPLAY (comme expliqué plus haut) pour afficher
diverses combinaisons des données des deux capteurs.
88
89
Page 47

Heure
Fréquence
cardiaque
Heure
Fréquence
cardiaque
Messages
Lors de l’utilisation de la montre avec les capteurs de forme, la
montre peut afficher des messages pour communiquer l’état de l’un
ou l’autre capteur en association avec la montre. Ces messages sont :
NO DATA FROM HRM (GPS) La montre ne reçoit pas de
données du CFM ou du capteur GPS-3D. Vérifiez que le capteur
est à moins de 1 mètre de la montre, qu’il fonctionne et qu’il n’a
pas accroché le signal d’un autre capteur par accident. Après avoir
affiché ce message, la montre tente d’établir une connexion
pendant une minute.
NOISY DATA FROM HRM (GPS) La montre connaît un
brouillage radio. Éloignez-vous de toute source potentielle de
brouillage (téléviseurs, moniteurs ou appareils à moteur, par
exemple). Après avoir affiché ce message, la montre tente d’établir
une connexion pendant 30 secondes.
SEARCHING Le capteur GPS-3D tente d’établir une liaison GPS.
Les données de vitesse, allure, distance ou position ne peuvent être
affichées que si le capteur détecte des satellites GPS.
WEAK GPS SIGNAL Le capteur GPS-3D a perdu sa liaison avec
les satellites GPS. Le capteur GPS-3D fonctionne avec plus de
précision et plus rapidement dans les espaces ouverts (zone peu
boisée et ciel dégagé, par exemple).
FATAL GPS ERROR Le capteur GPS-3D a connu une erreur
interne grave. Contactez le Service clientèle de Timex.
Formats d’affichage
En mode Chronographe, enfoncez et relâchez SET/FORMAT pour
inverser les valeurs affichées sur les lignes du haut et du milieu.
Ceci permet d’afficher les données qui vous importent le plus au
milieu, dans la ligne la plus grande.
La modification du format d’affichage ne s’applique pas à la vitesse
ascensionnelle, qui est toujours affichée sur la ligne du milieu.
Pour plus de renseignements sur la vitesse ascensionnelle,
reportez-vous à la rubrique « Mode vertical » à la page 105.
Préparatifs d’utilisation de la montre
Déterminer votre fréquence cardiaque
En plus de ses nombreuses autres fonctions pratiques, votre montre
possède une technologie permettant d’obtenir des renseignements
détaillés sur votre fréquence cardiaque. Mais avant de pouvoir
obtenir ces renseignements, vous devez d’abord déterminer votre
fréquence cardiaque maximale. Il y a plusieurs méthodes
d’estimation de celle-ci.
9190
Page 48

La brochure Heart Zones® Tools For Success comprise dans
l’emballage de la montre en propose d’excellentes et Timex vous
conseille d’utiliser une de celles qui y sont décrites. Toutefois, si
vous ne pouvez utiliser aucune des méthodes suggérées dans Heart
Zones Tools for Success, vous pourriez envisager de recourir à une
méthode populaire mais fortement controversée basée sur l’âge.
Partez du chiffre 220 puis soustrayez-en votre âge. Par exemple,
une personne âgée de 35 ans commencerait avec le chiffre 220 puis
en soustrairait 35 (son âge) ce qui donne une fréquence cardiaque
maximale de 185.
Régler la montre pour la première fois
Une fois que vous avez calculé votre fréquence cardiaque, réglez les
paramètres suivants avant d’utiliser votre montre :
1. Régler l’heure de la journée. Pour plus de renseignements sur le
mode Heure de la journée, notamment les instructions de réglage de
l’heure de la journée, veuillez vous reporter à la page 95.
2. Entrez votre fréquence cardiaque maximale. Passez en mode
Configuration et sélectionnez « HRM Settings » puis « Max HR ». Le
réglage de votre fréquence cardiaque maximale détermine vos cinq
zones cibles de fréquence cardiaque préréglées. Pour plus de
renseignements, voir la rubrique « Fréquence cardiaque maximale » à
la page 138.
3. Sélectionnez les unités d’affichage de la fréquence cardiaque. Passez
en mode Configuration et sélectionnez « HRM SETTINGS »
(réglages du CFM) puis « HRM DISPLAY » (affichage CFM). Vous
pouvez régler la montre pour afficher la fréquence cardiaque en
battements par minute (BPM) ou en pourcentage de la fréquence
cardiaque maximale (PERCENT). Pour plus de renseignements, voir
la rubrique « Affichage de la fréquence cardiaque » à la page 138.
4. Réglez votre zone cible de fréquence cardiaque ainsi que
l’alerte. Passez en mode Configuration et sélectionnez « HRM
SETTINGS » (réglages du CFM) puis « TZ ALERT » (affichage ZC).
Utilisez l’alerte de zone cible pour maintenir votre fréquence cardiaque
à l’intérieure d’une plage déterminée afin d’optimiser votre performance
et d’éviter un effort cardiaque soit trop intense soit insuffisant durant la
séance d’exercice. Pour plus de renseignements, veuillez vous reporter à
la rubrique « Zone cible et alerte » à la page 136.
5. Choisissez les unités d’affichage de votre montre. Depuis le
mode Configuration, réglez la vitesse, l’allure et l’altitude qui vous
conviennent. Reportez-vous à la rubrique « Paramètres d’unités » à la
page 142 pour de plus amples renseignements.
6. Régler l’actualisation de vitesse ascensionnelle Ce réglage du
groupe PARAMÈTRES D’ALTITUDE calcule la rapidité à laquelle vous
changez d’altitude durant la séance d’exercice (aussi appelée vitesse
verticale). Choisissez un intervalle court pour les activités verticales
rapides, comme le ski, et long pour les activités verticales lentes,
comme l’escalade. Pour plus de renseignements, voir la rubrique
« Régler l’actualisation de vitesse ascensionnelle » à la page 139.
Bien qu’il ne soit pas nécessaire de les modifier avant de commencer
votre première séance d’exercice, vous pouvez vérifier et configurer
les zones cibles de vitesse ou d’allure (page 139), l’alerte de distance
(page 138) ou toute autre fonction mains libres (page 140).
9392
Page 49

Visualiser les
données de
performance
Visualiser ou passer
au fuseau horaire
secondaire
Tenir pour
régler
Veilleuse
INDIGLO®
Mode
Chronographe
MODES DE LA MONTRE
Pour passer successivement à chacun des dix modes, appuyez sur
MODE.
➤ Heure de la journée permet d’afficher l’heure, la date et le jour
de la semaine pour deux fuseaux horaires différents.
➤ Chronographe mesure et affiche les données de performances.
➤ Vertical présente des données verticales, notamment vitesse
ascensionnelle, altitude et dénivelé.
➤ Arrivée permet de prédire la durée de parcours pour une
distance donnée et de prévoir des alertes en cas d’écart d’allure.
➤ Alerte de minuterie par intervalles permet de régler la montre
pour les séances d’exercices par intervalles.
➤ Données au tour présente les données au tour enregistrées.
➤ Récapitulatif affiche les données enregistrées durant la marche
du chronographe.
➤ Minuterie de base permet de mesurer un événement par compte
à rebours depuis une durée donnée jusqu’à zéro.
➤ Alarme gère jusqu’à cinq alarmes.
➤ Configuration permet de personnaliser les fonctions de la
montre en fonction des besoins.
Mode Heure de la journée
La montre fonctionne comme une montre ordinaire pour afficher
l’heure, la date et le jour dans deux fuseaux horaires différents, au
format sur 12 ou 24 heures.
Terminologie du mode Heure de la journée
UTC : Lorsque la montre est utilisée avec le capteur GPS-3D,
elle s’aligne sur l’heure UTC (Temps universel coordonné,
anciennement GMT). Celle-ci correspond au fuseau horaire local
par rapport au méridien de Greenwich. Par exemple, la ville de
New York est dans le fuseau -5 UTC, car il est cinq heures plus tôt
à New York qu’au méridien de Greenwich ; Moscou est à +3 UTC,
car il y est trois heures plus tard qu’au méridien de Greenwich.
9594
Page 50

Réglage de l’heure
1. Appuyez sur MODE jusqu’à afficher le mode Heure de la journée.
2. Maintenez le bouton SET enfoncé jusqu’à ce que le mot SET s’affiche
brièvement, suivi d’une valeur clignotante.
3. Réglez la première valeur en appuyant sur + (DISPLAY) ou –
(STOP/RESET).
4. Appuyez sur SELECT (SET/FORMAT) pour passer à la valeur
suivante.
5. Répétez les étapes 3 et 4 pour toutes les valeurs que vous devez
modifier.
6. Appuyez sur DONE (MODE) pour valider les modifications et
quitter le mode de réglage.
Dans Heure de la journée, vous pouvez régler les valeurs suivantes :
• Heure
• Minute
• Secondes
• Année
• Mois
•Date (règle
automatiquement le
jour de la semaine
en réglant la date)
• Format heure
(c.-à-d. AM/PM
ou 24 heures)
Changer de fuseau horaire
La montre peut gérer deux fuseaux horaires (T1 et T2). Pour
consulter l’autre fuseau, appuyez sur START/SPLIT ou, pour
passer de T1 à T2 :
1. Tenez START/SPLIT enfoncé jusqu’à ce que HOLD FOR TIME 2
s’affiche.
2. Maintenez le bouton enfoncé jusqu’au changement de fuseau et au
bip sonore.
3. Répétez les étapes 1 et 2 pour revenir à T1. Le message affiché est
HOLD FOR TIME 1.
Notez que l’heure de chaque fuseau horaire se règle
individuellement.
Synchroniser la montre avec le capteur GPS-3D
Lors de la première mise en marche du capteur GPS-3D avec la
montre, il se présente l’un des cas de figure suivants :
➤ Si vous activez le capteur GPS-3D avant de régler l’heure, la
montre synchronise les deux fuseaux T1 et T2 avec l’heure UTC.
Vous devrez alors régler les deux fuseaux horaires sur des heures
locales.
➤ Si vous activez le capteur GPS-3D après avoir réglé l’heure de la
journée, la montre conserve les réglages de l’heure et de la date
et cale les minutes et les secondes de chaque fuseau horaire sur
l’heure UTC.
9796
Page 51

➤ Notez que les secondes ne peuvent être réglées lorsque les
fonctions GPS sont activées ; elles restent synchronisées sur
l’heure UTC.
Visualiser les données de performances en mode
Heure de la journée
Lors de l’utilisation des capteurs de forme avec la montre, vous
pouvez faire défiler les données de performances en appuyant
brièvement sur DISPLAY. Vous pouvez choisir de continuer à
afficher le jour de la semaine à la place en appuyant sur DISPLAY
jusqu’à afficher le jour de la semaine.
Vous pouvez afficher les informations suivantes :
➤ Fréquence cardiaque : Fréquence cardiaque actuelle exprimée
en pourcentage de votre fréquence cardiaque maximale
(PERCENT) ou battements par minute (BPM)
➤ Vitesse : Vitesse instantanée
Appuyer pour
afficher les données
de performance
Données de
performance
➤ Allure : Vitesse instantanée, exprimée en minutes par unité de
distance choisie, mille ou kilomètre, par ex.
➤ Distance : Distance parcourue depuis que vous avez démarré le
chronographe
➤ Altitude : Altitude courante au-dessus du niveau de la mer
Mode Heure de la journée : astuces et conseils
pratiques
➤ Vous pouvez revenir au mode Heure de la journée depuis tout
autre mode en tenant MODE enfoncé jusqu’à afficher l’heure de
la journée.
➤ La montre ne passe pas automatiquement à l’heure d’été. Pour
alterner entre l’heure d’été et l’heure d’hiver, vous devez régler la
montre manuellement.
➤ Si la montre ne détecte pas le cardiofréquencemètre, le jour de la
semaine s’affiche sur la ligne inférieure de l’écran.
➤ Les secondes ne peuvent être ramenées qu’à zéro lorsque vous
utilisez la montre en association avec le cardiofréquencemètre.
➤ Vous pouvez faire avancer ou reculer les minutes par rapport à
l’heure exacte et la montre retiendra ce réglage. Cette fonction
est utile pour ceux qui aiment avancer leur montre de quelques
minutes pour s’assurer d’être à l’heure.
9998
Page 52

Commencer à
chronométrer ou
marquer un temps
intermédiaire
Exemple d’utilisation du mode Heure
de la journée
Supposez que vous vivez à San Francisco et travaillez avec un
client à Singapour. Comme toute personne très occupée, il est
impératif que vous sachiez toujours l’heure qu’il est et vous réglez
T1 sur votre heure locale. Mais il est aussi important de pouvoir
vous rappeler rapidement l’heure qu’il est chez votre client, c’est
pourquoi vous réglez T2 sur l’heure de Singapour. Ces deux
fuseaux horaires étant réglés, vous pouvez rapidement consulter
l’heure qu’il est chez votre client, voire changer d’affichage pour
visualiser T2 lorsque vous vous rendez à Singapour.
Mode Chronographe
Le mode Chronographe fait office de centre de traitement principal
des données d’exercice. Il peut mesurer jusqu’à 100 heures de
durée écoulée. Il peut également enregistrer les données des
capteurs de forme pour jusqu’à 100 tours.
Veilleuse
INDIGLO®
Au mode vertical
ou tenir enfoncé
pour l’heure
Terminologie du mode Chronographe
Chronographe : Le chronographe enregistre des segments de
temps pendant la durée de votre activité.
Tour : Le temps au tour (Lap) est la durée d’une portion de
l’activité.
Intermédiaire : Le temps intermédiaire (Split) est la durée totale
écoulée depuis le début de l’activité en cours.
Marquer un temps intermédiaire : Cette action consiste à
terminer le chronométrage d’un tour et à débuter celui du suivant.
Visualiser
les données
de performances
Échanger les lignes
du haut et du milieu
Arrêter ou
remettre à zéro
le chronographe
101100
Page 53

Fonctionnement du mode Chronographe
Lors de l’utilisation du mode Chronographe, vous pouvez marquer
les temps intermédiaires manuellement en appuyant sur
START/SPLIT
marque automatiquement en fonction de la durée écoulée ou de la
distance parcourue. Pour plus de renseignements sur le réglage de
la montre pour marquer automatiquement les temps
intermédiaires, voir « Paramètres mains libres » à la page 140.
Suivre les étapes ci-dessous pour utiliser le chronographe depuis le
mode Chronographe.
1. Appuyez sur MODE jusqu’à afficher le mode Chronographe.
2. Appuyez sur START/SPLIT pour démarrer le chronométrage.
3. Appuyez de nouveau sur START/SPLIT pour marquer un temps
intermédiaire et démarrer le chronométrage d’un nouveau tour.
Appuyez sur MODE pour afficher immédiatement les données du
nouveau tour ou attendez quelques secondes et la montre passera
automatiquement à l’affichage des données du nouveau tour.
4. Appuyez sur STOP/RESET pour arrêter le chronométrage lorsque
vous souhaitez vous reposer ou que vous avez terminé l’activité.
5. Appuyez sur START/SPLIT pour reprendre le chronométrage ou
6. Tenez STOP/RESET enfoncé pour remettre le chronographe à zéro.
ou vous pouvez régler la montre pour qu’elle les
Visualiser les données de performances
en mode Chronographe
Lors de l’utilisation des capteurs de forme avec la montre, vous
pouvez faire défiler les données de performances de chaque tour
d’une séance d’exercice en appuyant brièvement sur DISPLAY.
En mode Chronographe, les options d’affichage sont les suivantes :
➤ Fréquence cardiaque : Fréquence cardiaque actuelle exprimée
en pourcentage de votre fréquence cardiaque maximale
(PERCENT) ou battements par minute (BPM)
➤ Vitesse : Vitesse instantanée
➤ Vitesse moyenne : Vitesse moyenne sur la durée pendant
laquelle le chronographe fonctionne
➤ Allure : Vitesse instantanée, exprimée en minutes par unité de
distance choisie, mille ou kilomètre, par ex.
➤ Allure moyenne : Vitesse moyenne en minutes sur la durée
pendant laquelle le chronographe fonctionne
➤ Distance : Distance parcourue depuis que vous avez démarré le
chronographe
103102
Page 54

Mode Chronographe : astuces et conseils
pratiques
➤ Si vous appuyez sur MODE pour changer de mode alors que le
chronographe est en marche, l’icône du chronographe s’affiche
pour indiquer que le chronographe fonctionne toujours.
➤ Si vous utilisez la montre avec le cardiofréquencemètre, vous
pouvez la régler pour qu’elle effectue automatiquement le calcul
de la fréquence cardiaque de récupération chaque fois que vous
appuyez sur STOP/RESET pour arrêter le chronographe.
Toutefois, si vous appuyez sur START/SPLIT de nouveau avant
que le cycle de récupération ne soit terminé, celle-ci est annulée.
Pour plus de renseignements, voir la rubrique « Récupération »
à la page 137.
Exemple d’utilisation du mode Chronographe
Vous avez récemment entendu dire qu’une méthode
d’entraînement pour les coureurs de longue distance, appelée
course/marche, peut aider à augmenter votre endurance et à
brûler plus de calories. Cette méthode consiste en une période de
course suivie d’une brève période de marche. Vous décidez
d’utiliser le mode Chronographe pour en faire l’essai. Vous
appuyez sur START/SPLIT au début de votre course et au bout
de 10 minutes, vous appuyez de nouveau sur START/SPLIT
et
marchez pendant 2 minutes. Vous continuez à utiliser ces deux
séquences jusqu’à ce que vous ayez terminé une course/marche de
60 minutes.
104
Mode Vertical
Le mode Vertical est un mode d’affichage associé au capteur
GPS-3D qui privilégie les informations sur l’altitude. En
particulier, le mode Vertical adapte l’affichage de la montre pour
permettre de visualiser des données relatives à des activités
verticales (escalade ou ski, par exemple). Si vous n’utilisez pas le
capteur GPS-3D, le message NO GPS DATA (pas de données GPS)
s’affiche et vous n’avez pas accès au mode Vertical.
INDIGLO®
Veilleuse
Mode Arrivée
ou tenir enfoncé
pour l’heure
Commencer à
chronométrer ou
marquer un temps
intermédiaire
Terminologie du mode Vertical
Vitesse ascensionnelle : Vitesse à laquelle vous grimpez ou
descendez.
Vitesse verticale : Autre terme pour vitesse ascensionnelle.
Visualiser les
données de
performance
Échanger les
lignes du haut
et du milieu
Arrêter ou
remettre à zéro
le chronographe
105
Page 55

107106
➤ Distance : Distance parcourue pendant que le chronographe est
en marche
➤ Altitude : Altitude courante au-dessus du niveau de la mer
➤ Dénivelé : Différence entre l’altitude courante et l’altitude au
moment du démarrage du chronographe.
Exemple d’utilisation du mode Vertical
Vous pratiquez le ski héliporté dans les Rocheuses canadiennes
sur une descente estimée à 823 mètres verticaux. Curieux de
connaître la précision de cette estimation ainsi que le temps qui
vous sera nécessaire pour la descente, vous démarrez le capteur
GPS-3D, passez dans le mode Vertical et appuyez sur START au
moment où vous entamez la descente. À l’arrivée, vous appuyez
sur STOP puis sur DISPLAY jusqu’à afficher votre vitesse
ascensionnelle et votre dénivelé (exprimés par des valeurs
négatives car il s’agit d’une descente). Ces données vous
permettent de savoir à quelle vitesse vous avez skié et de
comparer le dénivelé mesuré par la montre à l’estimation de
votre guide.
Fonctionnement du mode Vertical
1. Appuyez sur MODE jusqu’à afficher le mode Vertical.
2. Appuyez sur START/SPLIT pour démarrer le chronométrage.
3. Appuyez de nouveau sur START/SPLIT pour marquer un temps
intermédiaire et démarrer le chronométrage d’un nouveau tour.
4. Appuyez sur STOP/RESET pour arrêter le chronométrage à la fin de
l’activité.
5. Appuyez sur START/SPLIT pour reprendre le chronométrage ou
6. Tenez STOP/RESET enfoncé une nouvelle fois pour remettre
l’affichage à zéro.
Visualiser les données de performances
en mode Vertical
Lors de l’utilisation des capteurs de forme avec la montre, vous
pouvez faire défiler les données de performances de chaque tour
d’une séance d’exercice en appuyant brièvement sur DISPLAY. En
mode Vertical, les options d’affichage sont les suivantes :
➤ Fréquence cardiaque : Fréquence cardiaque actuelle
➤ Vitesse ascensionnelle : Vitesse verticale
➤ Allure : Vitesse instantanée, exprimée en minutes par unité de
distance choisie, mille ou kilomètre, par ex.
➤ Vitesse : Vitesse instantanée
Page 56

Mode Arrivée
Tenir pour
régler
Commencer à
chronométrer ou
marquer un temps
intermédiaire
Le mode Arrivée permet de prédire la durée requise pour parvenir
au bout de la distance d’un événement (un marathon ou une
course de 5K, par exemple) sur la base des données du capteur
GPS-3D. Pour vous permettre de maintenir l’allure prévue, vous
pouvez régler la montre pour qu’elle vous alerte si vous avancez
trop vite ou trop lentement par rapport à l’allure souhaitée.
Veilleuse
INDIGLO®
Mode Minuterie
par intervalles ou
tenir enfoncé
pour l’heure
Si vous n’utilisez pas le capteur GPS-3D, le message NO GPS
A (pas de données GPS) s’affiche et vous n’avez pas accès au
DAT
mode Arrivée. En outre, le chronographe doit être remis à zéro
avant d’utiliser le mode Arrivée pour que celui-ci fonctionne
correctement.
Visualiser les
données de
performance
Arrêter le
chronographe
Terminologie du mode Arrivée
Durée cible : La durée souhaitée de la course ou de la séance
d’exercice. La montre utilise cette durée pour vous avertir si vous
allez trop vite ou trop lentement pour terminer l’événement dans
les délais fixés.
Réglage du mode Arrivée
Vous devez vous arrêter et remettre le chronographe à zéro pour
pouvoir configurer le mode Arrivée. Toutefois, celui-ci peut être
configuré même lorsque le message NO GPS DATA (pas de données
GPS) est affiché.
1. Depuis le mode Arrivée, maintenez le bouton SET enfoncé jusqu’à ce
que le mot SET s’affiche brièvement, suivi d’une valeur clignotante.
2. Réglez la première valeur en appuyant sur + (DISPLAY) ou –
(STOP/RESET).
3. Appuyez sur SELECT (SET/FORMAT) pour passer à la valeur
suivante.
4. Répétez les étapes 2 et 3 pour toutes les valeurs que vous devez
modifier.
5. Appuyez sur DONE (MODE) pour valider les modifications et
quitter le mode de réglage.
109108
Page 57

En mode Arrivée, vous pouvez régler les valeurs suivantes :
➤ Distance de l’événement préréglée ou personnalisée (pour le
réglage de la distance personnalisée, vous pouvez régler la
distance jusqu’à 999,99)
➤ Unité (NM, KM, ou MI)
➤ Durée cible
➤ Option d’alerte (avec l’alerte audio, la montre produit un bip
sonore et fait clignoter le temps d’arrivée prévu, avec l’alerte
silencieuse elle fait uniquement clignoter le temps d’arrivée)
Fonctionnement du mode Arrivée
1. Appuyez sur MODE jusqu’à afficher le mode Arrivée.
2. Appuyez sur START/SPLIT pour démarrer le chronométrage.
3. Appuyez de nouveau sur START/SPLIT pour marquer un temps
intermédiaire et démarrer le chronométrage d’un nouveau tour.
4. Appuyez sur STOP/RESET pour arrêter le chronométrage à la fin de
l’activité.
5. Appuyez sur START/SPLIT pour reprendre le chronométrage ou
6. Tenez STOP/RESET enfoncé une nouvelle fois pour remettre
l’affichage à zéro.
Visualiser les données de performances
en mode Arrivée
Lors de l’utilisation des capteurs de forme avec la montre, vous
pouvez faire défiler les données de performances de chaque tour
d’une séance d’exercice en appuyant brièvement sur DISPLAY. En
mode Arrivée, les options d’affichage sont les suivantes :
➤ Temps d’arrivée : Le temps d’arrivée prévu sur la base de la
vitesse et la distance mesurées. Le temps d’arrivée clignote
lorsque votre allure courante ne vous permet pas de terminer
dans les limites de la durée cible sélectionnée. Si vous vous
arrêtez, le temps d’arrivée est remplacé par le mot STOPPED sur
l’affichage de la montre.
➤ Fréquence cardiaque : Fréquence cardiaque actuelle
➤ Allure : Vitesse instantanée, exprimée en minutes par unité de
distance choisie, mille ou kilomètre, par ex.
➤ Allure moyenne : Vitesse moyenne en minutes sur la durée
pendant laquelle le chronographe fonctionne
➤ Vitesse : Vitesse instantanée
➤ Vitesse moyenne : Vitesse moyenne sur la durée pendant
laquelle le chronographe fonctionne
➤ Distance : Distance parcourue pendant que le chronographe est
en marche
111110
Page 58

Tenir pour régler
Visualiser les
données de
performance
Mode données
au tour ou tenir
enfoncé pour l’heure
Démarrer la minuterie
de la séance d’exercice
par intervalles
Exemple d’utilisation du mode Arrivée
Vous vous entraînez pour une course cycliste de 100 km. L’an
dernier, vous avez pris part à la même épreuve et avez terminé en
4 heures 15 minutes. Cette année, votre objectif est de finir en
moins de 4 heures. Vous lisez dans un magazine spécialisé que,
lors de l’entraînement pour une course, il convient de consacrer
un jour par semaine à couvrir une distance égale à celle de
l’épreuve en visant votre temps cible. Pour vous aider à maintenir
votre allure, vous réglez le mode Arrivée sur une distance de
100 km et un temps de 4 heures. Vous réglez la montre pour
qu’elle produise une alerte sonore lorsque vous perdez l’allure
nécessaire pour rester dans les temps.
Mode Minuterie par intervalles
Le mode Minuterie par intervalles comporte une minuterie de
compte à rebours à six intervalles d’une grande flexibilité, et peut
retenir les paramètres de jusqu’à cinq séances d’exercice. Il
comprend des intervalles de réchauffement et de récupération ainsi
que quatre intervalles d’exercice pour chaque séance. Vous pouvez
régler le groupe de quatre intervalles pour qu’il se répète jusqu’à
99 fois. Vous pouvez régler l’intervalle de réchauffement pour qu’il
effectue un cycle au début de la séance d’exercice et l’intervalle de
récupération pour qu’il effectue un cycle à la fin de celle-ci.
Veilleuse
INDIGLO®
Terminologie du mode Minuterie par intervalles
Exercice par intervalles : Vous pouvez utiliser cette fonction
pour modifier le degré d’intensité d’un exercice au cours d’une
séance d’exercice, ce qui vous permettra, à terme, de travailler plus
intensément et plus longtemps.
▼
Sélectionner, arrêter,
ou réinitialiser une
séance d’exercice
113112
Page 59

Intervalle : Les intervalles associent vos exercices à des durées
particulières. Par exemple, vous pouvez courir dix minutes, marcher
deux minutes, courir vingt minutes, puis marcher cinq minutes –
ceci correspondrait à quatre intervalles d’exercice.
Répétitions : Le nombre de fois que vous souhaitez effectuer un
groupe d’intervalles. Dans l’exemple ci-dessus, si vous choisissez de
répéter trois fois le groupe d’intervalles, vous effectuerez la série de
dix, deux, vingt et cinq minutes trois fois de suite. Ceci correspond à
trois répétitions.
Réchauffement : La période du début de la séance d’exercice qui
aide à préparer l’organisme à l’effort plus intensif qui suivra.
Récupération : La période de la fin de la séance d’exercice qui aide
l’organisme à retrouver son rythme de fonctionnement normal.
Sélection d’une séance d’exercice par intervalles
Vous pouvez utiliser la montre pour régler et stocker jusqu’à cinq
séances d’exercice intitulées WKOUT 1 à WKOUT 5.
1. Appuyez sur MODE jusqu’à afficher Interval Mode (mode Minuterie
par intervalles).
2. Appuyez sur ▼ (STOP/RESET) pour choisir la séance d’exercice
que vous souhaitez régler (WKOUT 1 à WKOUT 5).
Comme vous devez remettre la minuterie par intervalles à zéro pour
sélectionner une nouvelle séance d’exercice, il se peut que vous
deviez appuyer sur le bouton STOP/RESET à plus d’une reprise
avant qu’une nouvelle séance ne s’affiche.
Réglage d’une séance d’exercice par intervalles
1. Tenez le bouton SET enfoncé jusqu’à ce que SET s’affiche
brièvement à l’écran. L’écran de réglage s’affiche, sur lequel clignote
le mot WARM-UP.
2. Appuyez sur
la configuration des intervalles de chaque séance. Les réglages
comprennent WARM-UP (réchauffement), INTVL 1 – 4, # OF REPS
(nombre de répétitions), et COOL-DOWN (récupération).
3. Sélectionnez l’intervalle que vous souhaitez régler et appuyez sur
SELECT (SET/FORMAT). Appuyez sur + (DISPLAY) ou sur -
(STOP/RESET) pour sélectionner une des cinq zones de fréquence
cardiaque préréglées ou trois des zones de fréquence cardiaque
personnalisées. Vous pouvez également ne sélectionner aucune zone
cible ou une alerte de zone cible manuelle pour cet intervalle
uniquement. Après avoir sélectionné votre zone, appuyez sur
SELECT (SET/FORMAT).
Si vous n’avez pas sélectionné MANUAL à l’étape 3, passez à l’étape 5.
4. Réglez les valeurs de fréquence cardiaque supérieures, puis
inférieures, pour la zone MANUAL (réglée manuellement). Appuyez
sur + (DISPLAY) ou - (STOP/RESET) modifiez les valeurs et
SELECT (SET/FORMAT) pour faire défiler les chiffres. Après avoir
réglé les limites, appuyez sur SELECT (SET/FORMAT).
5. Appuyez sur + (DISPLAY) ou - (STOP/RESET) pour modifier les
valeurs de durée et SELECT (SET/FORMAT) pour faire défiler les
heures, les minutes et les secondes. Si vous réglez un intervalle à zéro
(00:00:00), la montre sautera automatiquement cet intervalle durant
la séance d’exercice.
▲ (DISPLAY) ou ▼ (STOP/RESET) pour vérifier
115114
Page 60

6. Lorsque vous défilez au-delà de la dernière valeur de la durée de
l’intervalle, la montre poursuit avec l’intervalle suivant [ou # OF
REPS (nombre de répétitions) s’il s’agit des intervalles WARM-UP
(réchauffement) ou COOL DOWN (récupération)]. Répétez les étapes
2 à 5 pour régler la totalité des intervalles et des répétitions pour la
séance sélectionnée.
7. Appuyez sur DONE (MODE) pour enregistrer votre séance et
quitter le mode de réglage.
En mode Minuterie par intervalles, vous pouvez régler les valeurs
suivantes :
➤ Réchauffement (réglage de la zone cible de fréquence cardiaque
et de l’heure)
➤ Intervalles 1 à 4 (réglage de la zone cible de fréquence cardiaque
et de l’heure)
➤ Nombre de répétitions (n’inclut pas les intervalles de
réchauffement et de récupération)
➤ Récupération (réglage de la zone cible de fréquence cardiaque et
de l’heure)
Fonctionnement du mode Minuterie
par intervalles
Suivre les étapes ci-dessous pour utiliser la minuterie par
intervalles durant une séance d’exercice.
1. Appuyez sur MODE jusqu’à afficher Interval Timer Mode (mode
Minuterie par intervalles).
2. Appuyez sur START/SPLIT pour démarrer le chronométrage.
3. Appuyez sur STOP/RESET pour arrêter le chronométrage lorsque
vous souhaitez vous reposer ou que vous avez terminé l’activité.
4. Appuyez sur START/SPLIT pour reprendre le chronométrage ou
5. Tenez STOP/RESET enfoncé pour remettre le chronographe à zéro.
Zones cibles de fréquence cardiaque et alertes
Lors du processus de réglage des zones cibles de fréquence
cardiaque, vous avez le choix entre cinq zones standard, trois zones
personnalisées ou une alerte unique pour chaque intervalle. Vous
pouvez également ne sélectionner aucune alerte de zone cible.
Lorsque la minuterie par intervalles est en marche, les réglages de
l’alerte de zone cible que vous sélectionnez annulent celle que vous
avez réglée en mode Configuration (voir page 135).
Toutefois, le réglage du type d’alerte [AUDIBLE (sonore), VISUAL
(visuelle), ou NO ALRT (pas d’alerte)] sélectionné en mode
Configuration reste activé lorsque la minuterie par intervalles est
en marche. La montre n’ignore que la configuration des limites.
N’oubliez pas que ces réglages modifient uniquement l’alerte de
zone cible. Les réglages de l’alerte de zone cible effectués depuis la
minuterie par intervalle n’ont pas d’incidence sur les données
statistiques relatives à la fréquence cardiaque enregistrées et
affichées en mode Récapitulatif.
117116
Page 61

Visualiser les données de performances en mode
Minuterie par intervalles
Lors de l’utilisation des capteurs de forme avec la montre, vous
pouvez faire défiler les données de performances de chaque tour
d’une séance d’exercice en appuyant brièvement sur DISPLAY. En
mode Minuterie par intervalles, les options d’affichage sont les
suivantes :
➤ Fréquence cardiaque : Fréquence cardiaque actuelle exprimée
en pourcentage de votre fréquence cardiaque maximale
(PERCENT) ou battements par minute (BPM)
➤ Vitesse : Vitesse instantanée
➤ Allure : Vitesse instantanée, exprimée en minutes par unité de
distance choisie, mille ou kilomètre, par ex.
➤ Distance : Distance parcourue depuis que vous avez activé la
minuterie par intervalles
➤ Altitude : Altitude courante au-dessus du niveau de la mer
Mode Minuterie par intervalles : astuces et
conseils pratiques
Vous pouvez régler la montre pour qu’elle marque un temps
intermédiaire à l’aide de la fonction SYNCHRO MINUTERIE &
CHRONO (voir page 141). Ceci annule la fonction Temps
intermédiaire auto et permet de recueillir vos données d’exercice
pour chaque intervalle.
Exemple d’utilisation du mode Minuterie
par intervalles
À des fins de cross-training, vous ajoutez à votre entraînement
actuel un cours de « spin » d’une heure par semaine. Vous décidez
d’utiliser le mode Minuterie par intervalles pour vous aider à
mesurer la durée et la fréquence cardiaque pendant cette heure de
cours. Vous réglez WKOUT 1 de la manière suivante : WARM-UP
(réchauffement) de 5 minutes sans cible de fréquence cardiaque
(NO TZ), INTVL 1 de 5 minutes à Z4 : 156 – 175 (en battements
par minute), INTVL 2 de 1 minute à Z3: 136 – 156, INTVL 3 de
10 minutes à Z4 et INTVL 4 de 2 minutes à Z3. Vous réglez
ensuite le nombre de répétitions (# OF REPS) à 3, pour indiquer
que vous voulez répéter les INTVL 1 à INTVL 4 trois fois de suite.
Enfin, vous réglez la période de récupération (COOL DOWN) à 5
minutes sans cible de fréquence cardiaque (NO TZ). Cette séance
dure environ 60 minutes au total et vous aide à mesurer la durée
de l’exercice ainsi que de vos objectifs d’endurance.
119118
Page 62

Mode Données au tour
Le mode Données au tour vous permet d’examiner les valeurs de
durée et de fréquence cardiaque en mémoire sur des tours
individuels. Pour enregistrer des données au tour, le chronographe
doit fonctionner depuis l’un des modes de chronométrage.
Veilleuse
INDIGLO®
récapitulatif ou
Mode
tenir enfoncé
pour l’heure
En mode Données au tour, chaque tour visualisé présente trois
lignes de données. La ligne inférieure affiche RCL (pour « Recall »,
ou rappel) suivi du numéro d’ordre du tour gardé en mémoire.
Pour avoir accès à ces informations, suivez les étapes ci-dessous.
1. Appuyez sur MODE jusqu’à afficher le mode Données au tour.
2. Appuyez sur ▲ (DISPLAY) ou ▼ (STOP/RESET) pour faire
défiler les données de chaque tour.
▲
valeur des données
▼
valeur des données
Visualiser les données de performance en mode
Données au tour
Lors de l’utilisation des capteurs de forme avec la montre, vous
pouvez faire défiler les données de performances de chaque tour
d’une séance d’exercice en appuyant brièvement sur DISPLAY. En
mode Données au tour, les options d’affichage sont les suivantes :
➤ Temps intermédiaire et au tour : Les temps au tour
concernent les segments individuels de l’activité, les temps
intermédiaires l’ensemble de l’activité.
➤ Fréquence cardiaque moyenne pour le tour et durée de la
fréquence cardiaque moyenne : Fréquence cardiaque
moyenne affiche la fréquence cardiaque moyenne pour le tour ;
Durée de la fréquence cardiaque moyenne indique la portion du
tour effectuée à la fréquence cardiaque moyenne.
➤ Vitesse moyenne au tour : Vitesse moyenne sur la durée
pendant laquelle le chronographe fonctionne
➤ Allure moyenne au tour : Vitesse moyenne en minutes sur la
durée pendant laquelle le chronographe fonctionne
➤ Distance au tour : Distance parcourue en un tour
➤ Altitude sur le tour : L’altitude correspond à la hauteur par
rapport au niveau de la mer à la fin d’un tour
➤ Dénivelé sur le tour : Le dénivelé correspond à la variation
nette d’altitude sur le tour.
121120
Page 63

Mode Données au tour : astuces et conseils
pratiques
➤ Lorsque le Chronographe est redémarré à zéro pour une nouvelle
activité, les données au tour de l’activité précédente sont effacées.
➤ Si vous souhaitez visualiser les données récapitulatives de
l’activité complète, reportez-vous à « Mode Récapitulatif » à la
section suivante.
➤ Si vous avez activé SYNCHRO MINUTERIE & CHRONO
(voir page 141), vos données au tour correspondent à votre
performance pour chaque intervalle.
Exemple d’utilisation du mode Données au tour
Vous adorez faire du vélo, mais vous venez juste de finir un long
trajet et vous êtes épuisé ! Tellement épuisé que vous oubliez de
consulter les données au tour avant de remettre le chronographe à
zéro. Vous pensez avoir perdu vos données puis vous vous
souvenez. Vous pouvez toujours voir vos données au tour, aussi
longtemps que vous n’avez pas redémarré le chronographe.
Mode Récapitulatif
Le mode Récapitulatif vous permet d’examiner des données
générales enregistrées par le chronographe durant l’activité la plus
récente. Les données affichées ne se réactualisent pas.
Veilleuse
INDIGLO®
Mode données
de base ou
tenir enfoncé
pour l’heure
Terminologie du mode Récapitulatif
Zone : Plage de fréquence cardiaque pré-établie pour l’activité.
Récupération : Une mesure de votre forme et votre fatigue basée
sur le rythme auquel votre fréquence cardiaque baisse sur une
courte période après un effort vigoureux. Vous trouverez de plus
amples renseignements dans la brochure Heart Zones® Tools for
Success.
Fonctionnement du mode Récapitulatif
1. Appuyez sur MODE jusqu’à afficher le mode Récapitulatif.
2. Appuyez sur ▲ (DISPLAY) ou ▼ (STOP/RESET) pour faire
défiler les données récapitulatives.
▲
valeur des données
▼
valeur des données
123122
Page 64

Visualiser les données de performances
en mode Récapitulatif
Si vous n’utilisez pas les capteurs de forme, la seule donnée que
vous pouvez afficher depuis le mode Récapitulatif est la durée totale
de votre activité pendant que le chronographe était en marche. La
durée totale est équivalente au temps intermédiaire en mode
Chronographe.
Lors de l’utilisation des capteurs de forme avec la montre, vous
pouvez afficher les données de performance des cinq groupes de
données suivants :
Fréquence cardiaque
➤ Fréquence cardiaque moyenne : Calculée sur la durée de
fonctionnement du chronographe.
➤ Fréquence cardiaque de pointe : La plus haute fréquence
cardiaque enregistrée durant l’activité.
➤ Fréquence cardiaque minimale : La plus basse fréquence
cardiaque enregistrée durant l’activité.
➤ Durée dans les zones : Par rapport à la durée d’exercice totale,
la montre affiche le temps passé dans chacune des zones de
fréquence cardiaque durant l’activité, notamment les cinq zones
préréglées, les trois zones personnalisées et en dessous de la
Zone 1 (parfois appelée « Zone 0 ») (reportez-vous au réglage de
cette fonction sous « Paramètres CFM » à la page 136).
➤ Fréquence cardiaque moyenne dans les zones : La
fréquence cardiaque moyenne dans chacune des zones de
fréquence cardiaque, les cinq zones préréglées, les trois zones
personnalisées et en dessous de la Zone 1.
➤ Récupération : La variation de fréquence cardiaque sur une
durée choisie enregistrée à la fin de l’activité (reportez-vous au
réglage de cette fonction sous « Récupération » à la page 137).
Vitesse
➤ Vitesse moyenne : Calculée en divisant la distance par le
temps.
➤ Vitesse maximale : Votre vitesse la plus élevée.
➤ Allure moyenne : Vitesse moyenne exprimée en minutes par
unité de distance parcourue.
➤ Meilleure allure : Le temps de déplacement le plus court par
unité de distance.
Bien que Vitesse moyenne et Allure moyenne représentent la
même valeur exprimée de deux façons différentes, ce n’est pas le
cas pour Meilleure allure et Vitesse maximale. La meilleure allure
est le résultat d’une analyse de l’ensemble des valeurs d’allure
d’une activité ; la vitesse maximale est la vitesse la plus rapide
calculée par le capteur GPS-3D au cours de cette activité. Bien que
ces deux valeurs soient étroitement reliées, elles ne sont pas
équivalentes et peuvent diverger.
125124
Page 65

Distance
➤ Distance de l’événement : La distance cumulée parcourue
durant l’activité pendant la marche du chronographe.
➤ Odomètre : La distance cumulée parcourue depuis la dernière
remise à zéro manuelle de l’odomètre. Comme l’odomètre ne
fonctionne pas en association avec le chronographe, cette
fonction peut servir à mesurer la distance cumulée sur plusieurs
séances d’exercice.
Heure
➤ Durée de l’événement : Durée totale de fonctionnement du
chronographe pour l’activité. La durée d’événement est
équivalente au temps intermédiaire dans les modes
chronométrés.
GPS
➤ Niveau des piles GPS : La tension actuelle du capteur GPS-3D
affichée sous forme de graphique à barres. Vous devez recevoir
les données du capteur GPS-3D pour visualiser ces données.
Changez la pile lorsque le graphique ne comporte plus qu’une
seule barre et que la montre affiche l’icône de la pile.
Mode Récapitulatif : astuces et conseils pratiques
➤ Lorsque le chronographe est remis à zéro pour une nouvelle
activité, les données récapitulatives de l’activité précédente sont
effacées.
➤ Si vous portez le CFM, vous pouvez lancer un calcul de la
récupération depuis le mode Récapitulatif en tenant
START/SPLIT enfoncé alors que les données de récupération
sont affichées.
➤ Si vous souhaitez visualiser les données récapitulatives de
l’activité par segments, reportez-vous à « Mode Données au tour
» à la section précédente.
Exemple d’utilisation du mode Récapitulatif
Récemment, vous avez décidé de vous concentrer sur votre
fréquence cardiaque durant vos séances d’exercice. En mode
Configuration, réglez votre fréquence cardiaque maximale à 195
BPM. Lorsque vous avez terminé l’une ou l’autre de vos séances
d’exercices (course, cyclisme, natation ou tout autre type
d’activité), vous pouvez vous reporter au mode Récapitulatif pour
examiner vos données de fréquence cardiaque. Celles-ci
comprennent votre fréquence cardiaque moyenne, de pointe et
minimale ainsi que la fréquence cardiaque moyenne et le temps
passé dans chacune des zones de fréquence cardiaque.
L’utilisation de cette fonction aide à déterminer le niveau d’effort
cardiaque durant la séance d’exercice et vous indique si vous
devez ou non en modifier l’intensité.
127126
Page 66

Mode Minuterie de base
Le mode Minuterie de base permet de choisir une durée fixée à
partir de laquelle la montre compte à rebours jusqu’à zéro
(10, 9, 8, … par exemple). La minuterie peut être réglée pour
s’arrêter, se répéter ou passer en mode Chronographe, Vertical
ou Arrivée à l’issue du compte à rebours.
Régler la minuterie
1. Appuyez sur MODE jusqu’à afficher le mode Minuterie de base.
2. Maintenez le bouton SET enfoncé jusqu’à ce que le mot SET s’affiche
brièvement, suivi d’une valeur clignotante.
3. Réglez la première valeur en appuyant sur + (DISPLAY) ou –
(STOP/RESET).
4. Appuyez sur SELECT (SET/FORMAT) pour passer à la valeur
suivante.
Régler la
minuterie
Arrêter ou remettre
la minuterie à zéro
Veilleuse
INDIGLO®
Démarrer
la minuterie
Mode
Alarme ou tenir
enfoncé pour
l’heure
5. Répétez les étapes 3 et 4 pour toutes les valeurs que vous devez
modifier.
6. Appuyez sur DONE (MODE) pour valider les modifications et
quitter le mode de réglage.
En mode Minuterie, vous pouvez régler les valeurs suivantes :
➤ Durée (heures, minutes, secondes jusqu’à 99 heures, 59 minutes
et 59 secondes)
➤ Action de fin (STOP, REPEAT ou CHRONO)
Fonctionnement de la minuterie
1. Appuyez sur START/SPLIT pour démarrer le compte à rebours.
2. Arrêtez le compte à rebours en appuyant sur STOP/RESET. Vous
pouvez le reprendre en appuyant de nouveau sur START/SPLIT ou
réinitialiser la minuterie en tenant STOP/RESET enfoncé.
3. Lorsque la minuterie arrive à zéro, une brève alerte sonore se produit.
4. La minuterie s’arrête après l’alerte si elle est réglée sur STOP
OU
la minuterie démarre un nouveau compte à rebours si elle est réglée
sur REPEAT jusqu’à son arrêt à l’aide du bouton STOP/RESET.
La ligne inférieure affiche RPT et un nombre (RPT 2, par exemple).
RPT signifie que le minuterie se répète et le nombre
correspond au nombre de fois où le compte à rebours a été
effectué. L’icône de répétition s’affiche également pour
indiquer que la minuterie est réglée pour se répéter.
129128
Page 67

OU
La minuterie passe en mode Chronographe, Vertical ou Arrivée si elle
est réglée sur l’un de ces modes. L’icône du mode prévu
s’affiche pour indiquer que la minuterie changera de
mode à la fin du compte à rebours.
Mode Minuterie de base : astuces
et conseils pratiques
➤ Appuyez sur MODE depuis le mode Minuterie pour afficher un
autre mode sans perturber le fonctionnement de la
minuterie. L’icône de la minuterie s’affiche pour indiquer
qu’elle est en marche.
➤ La minuterie passera en mode Chronographe, Vertical ou Arrivée
uniquement si le chronographe est remis à zéro et que la fonction
Synchro minuterie & chrono est désactivée (voir « Paramètres
mains libres » à la page 140).
Exemple du mode Minuterie de base
Dans le cadre d’un programme de forme global, vous vous êtes
fixé l’objectif de courir 30 minutes à l’heure du déjeuner, deux
jours par semaine. Pour vous assurer de retourner au travail à
l’heure, vous réglez la minuterie à 15 minutes et vous la réglez de
nouveau pour qu’elle se répète une fois. Au bout de 15 minutes, la
montre émet un bip vous avertissant de faire demi-tour et de
revenir au bureau. Comme vous avez réglé la minuterie pour
qu’elle se répète, la montre commence à chronométrer une
nouvelle séance de 15 minutes pour indiquer le temps dont vous
disposez pour retourner au travail.
131130
Page 68

133132
Sélectionner une alarme
Vous pouvez utiliser la montre pour régler et stocker jusqu’à cinq
alarmes intitulées ALM1 à ALM5.
1. Appuyez sur MODE jusqu’à afficher le mode Alarme.
2. Appuyez sur ▲ (DISPLAY) ou ▼ (STOP/RESET) pour choisir
l’alarme que vous souhaitez régler (ALM1 à ALM5).
Régler une alarme
1. Appuyez sur MODE jusqu’à afficher le mode Alarme.
2. Maintenez le bouton SET enfoncé jusqu’à ce que le mot SET s’affiche
brièvement, suivi d’une valeur clignotante.
3. Réglez la première valeur en appuyant sur + (DISPLAY) ou –
(STOP/RESET).
4. Appuyez sur SELECT (SET/FORMAT) pour passer à la valeur
suivante.
5. Répétez les étapes 3 et 4 pour toutes les valeurs que vous devez
modifier.
6. Appuyez sur DONE (MODE) pour valider les modifications et
quitter le mode de réglage.
En mode Alarme, vous pouvez régler les valeurs suivantes :
➤ Type d’alarme (WEEKDAYS, WEEKENDS, ONCE ou DAILY).
Une alarme DAILY (quotidienne) sonne chaque jour à l’heure
fixée, une alarme WEEKDAYS (jours de semaine) sonne du lundi
au vendredi à la même heure, une alarme WEEKENDS sonne le
Mode Alarme
La montre permet de configurer jusqu’à cinq alarmes séparées.
Lorsqu’une alarme est activée, l’icône du réveil s’affiche en
mode Heure de la journée. Vous pouvez régler l’alarme pour
qu’elle se déclenche à la même heure chaque jour ou
seulement les jours de semaine, le week-end, voire même une seule
fois (pratique pour rappeler un rendez-vous).
Lorsque la montre arrive à l’heure de l’alarme, l’alerte sonore se
déclenche et la veilleuse INDIGLO® clignote pendant 20 secondes.
Appuyez sur l’un quelconque des boutons de la montre pour
couper l’alarme ou, si vous ne faites rien durant ce délai, une
alerte de rappel se déclenche au bout de cinq minutes.
▲
alarme
Réglage de
l’alarme
▼
alarme
Veilleuse
INDIGLO
Mode
Configuration ou
tenir enfoncé
pour l’heure
Pour activer ou
désactiver
l’alarme
ON ou OFF
Page 69

samedi et le dimanche à la même heure et une alarme ONCE
(unique) ne sonne qu’une fois à l’heure fixée puis se désactive
automatiquement.
➤ Heure de l’alarme (heures, minutes et AM/PM en cas de format
d’affichage sur 12 heures).
➤ État de l’alarme (OFF ou ON). Vous pouvez également appuyer
sur START/SPLIT pour changer l’état de l’alarme.
Notez que lorsque vous modifiez les réglages d’une alarme, celle-ci
est automatiquement activée.
Mode Configuration
Veilleuse
INDIGLO®
Appuyer lorsque la
visualisation des
options est terminée
Activer un
réglage rapide
Le mode Configuration sert à régler des options qui améliorent
l’utilisation d’autres modes de la montre pour les six groupes de
paramètres suivants :
Paramètres CFM : Ils permettent de définir les zones cibles de
fréquence cardiaque.
▲
Options
Sélectionner
un élément
▼
Options
Paramètres V+D : Les réglages de la vitesse et de la distance
déterminent la réponse de la montre aux données reçues du
capteur GPS-3D.
Paramètres d’altitude : Ces paramètres définissent l’altitude
cible et les calculs de lissage et de vitesse d’ascension.
Paramètres mains libres : Ces paramètres servent à configurer
la montre pour qu’elle fonctionne automatiquement en association
avec le capteur GPS-3D.
Paramètres montre : Ces paramètres permettent de
personnaliser le fonctionnement général de la montre, notamment
le masquage de données ou de modes.
Paramètres d’unités : Ces paramètres permettre de choisir les
unités d’affichage de la distance (milles ou km, par exemple) et de
la fréquence cardiaque (battements ou pourcentage).
Fonctionnement du mode Configuration
Contrairement aux autres fonctions de réglage de la montre, le
mode Configuration organise groupes de paramètres sous forme
hiérarchique.
1. Appuyez sur MODE jusqu’à afficher le mode Configuration.
2. Appuyez sur ▲ (DISPLAY) ou ▼ (STOP/RESET) pour passer au
groupe de paramètres suivant ou précédent.
3. Appuyez sur SELECT (SET/FORMAT) pour accéder à un groupe de
paramètres.
135134
Page 70

4. Appuyez sur ▲ (DISPLAY) ou ▼ (STOP/RESET) pour naviguer
à l’intérieur d’un groupe de paramètres.
5. Appuyez sur SELECT (SET/FORMAT) pour choisir une option
dans un groupe de paramètres. Ceci permet de modifier un réglage ou
de passer à un niveau suivant.
6. Appuyez sur + (DISPLAY) ou - (STOP/RESET) pour régler
l’option dans le groupe de paramètres.
7. Appuyez sur DONE (MODE) pour valider le réglage d’une option
dans un groupe de paramètres.
8. Appuyez une nouvelle fois sur DONE (MODE) pour revenir au
niveau des groupes de paramètres.
Paramètres CFM
Avant de configurer les paramètres de fréquence cardiaque,
reportez-vous à la brochure Heart Zones® Tools for Success pour de
plus amples renseignements sur l’importance du suivi des mesures
de fréquence cardiaque et sur la façon de déterminer votre
fréquence cardiaque maximale. Puis, configurez les paramètres de
fréquence cardiaque suivants :
➤ Zone cible et alerte : Vous pouvez choisir l’une des cinq zones
de fréquence cardiaque préréglées (intitulées Z1 à Z5) ou trois
zones personnalisées (intitulées C1 à C3). Vous avez également le
choix de régler ou non une alerte indiquant que votre fréquence
cardiaque n’est plus en zone cible. Les options d’alertes
comprennent NO ALRT, AUDIBLE, ou SILENT.
NO ALRT coupe complètement l’alerte, SILENT vous avertit au
moyen d’un indicateur visuel (flèche haut ou bas sur l’écran de la
montre) lorsque vous sortez de votre zone cible de fréquence
cardiaque et AUDIBLE comprend une mélodie d’alerte ainsi
qu’une alerte visuelle. Une mélodie ascendante ou descendante se
fait entendre selon que vous êtes au-dessus ou au-dessous de
votre zone.
➤ Zones personnalisées : Les limites supérieures et inférieures de
la zone cible peuvent être réglées en chiffres ou en pourcentages
(selon le choix d’affichage de la fréquence cardiaque) pour jusqu’à
trois zones cibles personnalisées, intitulées CUSTOM 1, CUSTOM
2 et CUSTOM 3.
➤ Récupération : Cette fonction vous aide à déterminer la rapidité
avec laquelle votre fréquence cardiaque revient à sa valeur
inférieure à la fin de votre activité ; plus ce retour est rapide et
meilleur est votre niveau de forme. À l’arrêt du chronographe, la
montre peut être réglée pour calculer la fréquence cardiaque de
récupération sur une minute, deux minutes ou pour ne pas la
calculer (off). La sélection de OFF (désactivé) empêche le calcul
automatique de la fréquence cardiaque de récupération lorsque
vous arrêtez le chronographe. Vous pouvez toutefois calculer
manuellement la fréquence de récupération depuis le mode
Récapitulatif, réglée à une minute, lorsque vous sélectionnez
OFF en mode Configuration.
137136
Page 71

➤ Fréquence cardiaque maxi : Entrez votre fréquence cardiaque
maximale. Cette valeur sert au calcul des cinq zones de fréquence
cardiaque pré-établies ainsi que de point de référence pour
l’affichage de la fréquence cardiaque en pourcentage de la
fréquence cardiaque maximale (PERCENT).
➤ Affichage de la fréquence cardiaque : Vous pouvez régler la
montre pour afficher la fréquence cardiaque en pourcentage de la
fréquence cardiaque maximale (PERCENT) ou en battements par
minute (BPM). Le réglage choisi détermine le mode d’affichage de
la fréquence cardiaque pour tous les autres réglages de la montre.
Paramètres V+D
➤ Type de zone : Sur un principe similaire à celui de l’alerte de
zone cible de fréquence cardiaque, la montre peut être réglée pour
mesurer votre vitesse ou allure et vous alerter si vous avancez
trop lentement ou trop vite (les types d’alerte sont soit un bip
sonore, soit un clignotement silencieux). Vous pouvez fixer des
limites de vitesse et d’allure indépendantes l’une de l’autre. Vous
pouvez par exemple fixer des limites d’allure pour contrôler votre
allure à la course et des limites de vitesse pour le cyclisme. Il
suffit ensuite de choisir entre ces paramètres selon l’activité.
➤ Alerte de distance : Réglez la montre pour vous alerter à des
intervalles de distance. Par exemple, elle peut vous alerter à
chaque kilomètre parcouru. L’alerte de distance fonctionne
uniquement si le chronographe est en marche. Pour des
instructions sur la façon de marquer un temps intermédiaire à
partir de la distance parcourue, voir « Paramètres mains libres »
à la page 140.
Lissage : Le lissage est utile lorsque les valeurs de vitesse ou
d’allure affichées semblent trop irrégulières. Le lissage applique un
filtre moyenneur, qui peut faire que les valeurs de vitesse ou
d’allure réagissent moins vite aux variations.
➤ Lissage de vitesse : Active ou désactive le lissage de vitesse.
➤ Lissage d’allure : Active ou désactive le lissage d’allure.
Paramètres d’altitude
➤ Lissage : Le lissage est utile lorsque les valeurs d’altitude
affichées semblent trop irrégulières. Le lissage applique un filtre
moyenneur, qui peut faire que la valeur d’altitude affichée réagit
moins vite aux variations. Vous pouvez activer ou désactiver le
lissage d’altitude.
➤ Actualisation de la vitesse ascensionnelle : Fixez la
fréquence à laquelle la montre recalcule la vitesse ascensionnelle.
Vous pouvez choisir un intervalle de 30 secondes, 1, 10, 30 ou 60
minutes. Choisissez un intervalle court pour les activités
verticales rapides, comme le ski, et long pour les activités
verticales lentes, comme l’escalade.
139138
Page 72

Paramètres mains libres
Les paramètres mains libres automatisent les fonctions du
chronographe, vous permettant de vous concentrer sur votre
exercice plutôt que sur les commandes de la montre. Lorsque la
fonction mains libres est activée, vous pouvez toujours marquer des
temps intermédiaires manuellement sans la perturber. Les
paramètres mains libres sont les suivants :
➤ Temps intermédiaire auto : Cette fonction permet au
chronographe de marquer automatiquement des temps
intermédiaires en fonction de la distance ou de la durée écoulée.
Par exemple, vous pouvez configurer la montre pour qu’elle
marque un temps intermédiaire toutes les 10 minutes ou, si le
temps intermédiaire auto est réglé sur 1 MI, la montre marque
automatiquement un temps intermédiaire à chaque kilomètre.
➤ Démarrage auto : Cette fonction commande le démarrage du
chronographe lorsque vous commencez à vous déplacer. La
détection du déplacement par le capteur GPS-3D peut nécessiter
quelques secondes, causant un léger retard au démarrage.
➤ Arrêt auto : Cette fonction commande l’arrêt du chronographe
lorsque vous vous immobilisez. La détection de l’immobilisation
par le capteur GPS-3D peut nécessiter quelques secondes, causant
un léger retard à l’arrêt.
➤ Synchro minuterie & chrono : Cette fonction commande le
démarrage et l’arrêt simultanés de la minuterie par intervalles et
du chronographe pour permettre l’enregistrement de données de
chronométrage lorsque vous utilisez la minuterie par intervalles.
À la fin d’un intervalle en mode Minuterie par intervalles, le
chronographe de la montre marque un temps intermédiaire.
Utilisez cette fonction pour conserver vos données d’exercice pour
tous les intervalles d’une séance. Chaque intervalle correspond à
un tour ou segment en mode Données au tour.
Le paramètre Synchro minuterie & chrono doit être désactivé
(off) si vous voulez faire passer la montre en mode Chronographe
à la fin du compte à rebours en mode Minuterie de base.
Paramètres montre
Les paramètres de montre sont les suivants :
➤ Fonction Night-Mode® : Lorsque cette fonction est activée, la
veilleuse INDIGLO® s’allume si vous appuyez sur l’un
quelconque des boutons. Cette fonction se désactive d’elle-même
au bout de huit heures.
➤ Carillon horaire : Lorsque cette fonction est activée, la montre
sonne en début de chaque heure.
➤ Bip boutons : Lorsque cette fonction est activée, la montre émet
un bip chaque fois que vous appuyez sur l’un des boutons.
➤ Masquage des modes : Vous avez le choix d’afficher ou de
désactiver les modes suivants : Intervalle, Données au tour,
141140
Page 73

Récapitulatif, Minuterie ou Alarme. Par exemple, si le mode
Données au tour est désactivé, il n’est pas visible tant qu’il n’a
pas été réactivé depuis le mode Configuration. Vous pouvez opter
de montrer, masquer ou désactiver les modes Vertical et Arrivée.
➤ Masquage des données : Vous avez le choix d’afficher ou de
masquer les données vides des capteurs de forme. Par exemple, si
vous n’utilisez pas le CFM pour votre séance d’exercice et
choisissez de masquer les données vides du CFM, vous ne verrez
aucune donnée de fréquence cardiaque car celles-ci supposent
l’utilisation du CFM.
Paramètres d’unités
Les paramètres d’unités sont les suivants :
➤ Distance : Réglez la montre pour afficher la distance en milles,
kilomètres (KM) ou milles marins (NM).
➤ Vitesse : Réglez la montre pour afficher la vitesse en milles par
heure (MPH), kilomètres par heure (KPH), milles marins (NM)
ou unité auto.
➤ Allure : Réglez la montre pour afficher l’allure en minutes par
mille à l’heure (MPH), kilomètre à l’heure (KPH), mille marin
(NM) ou en unité auto.
➤ Altitude : Réglez la montre pour afficher l’altitude en pieds,
mètres ou unités auto.
Dans les paramètres d’unités, la vitesse, l’allure et l’altitude
peuvent être réglées séparément sur toute unité ou sur le mode
auto par défaut. En mode Auto, chaque unité est automatiquement
réglée en fonction de l’unité choisie pour la distance. Ceci permet le
passage rapide d’une unité à l’autre pour afficher vos données sans
devoir modifier chaque fois les paramètres, tout en gardant une
certaine souplesse.
Supposons qu’une coureuse de fond choisisse habituellement le
kilomètre en tant qu’unité de distance. Lorsqu’elle court un
marathon, toutefois, elle opte pour exprimer les distances en
milles (un marathon est toujours de 26,2 milles) mais choisit le
kilomètre comme unité d’allure. Durant le marathon, la coureuse
peut voir sa distance en milles pour que cela corresponde aux
jalons du parcours, tout en mesurant son allure en minutes par
kilomètres, l’unité qui lui est plus familière, afin d’avoir une
meilleure idée de son rythme de course.
143142
Page 74

SOIN ET ENTRETIEN
Changer la pile
ATTENTION : CHANGER SOI-MÊME LA PILE PEUT
ENDOMMAGER LA MONTRE. TIMEX CONSEILLE DE FAIRE
CHANGER LA PILE PAR UN HORLOGER OU UN BIJOUTIER.
Si vous souhaitez changer la pile vous-même, veuillez vérifier au dos
de la montre (boîtier) le type et la taille de pile recommmandés pour
votre montre. Suivez avec attention les instructions suivantes :
1. Posez la montre face vers le bas sur une surface plane.
2. Séparez les deux demi-bracelets de montre à l’aide d’un petit
tournevis plat.
Le dos du boîtier doit être remis en place dans la même position qu’il
a été enlevé pour que le ronfleur fonctionne après le remontage.
3. À l’aide d’un tournevis à tête Phillips 00, enlevez les quatre vis de
fixation du dos de boîtier et mettez-les de côté. Enlevez le dos de
boîtier avec précaution et mettez-le de côté.
ATTENTION : GARDEZ TOUJOURS LA MONTRE FACE VERS
LE BAS SUR LA SURFACE DE TRAVAIL. SI VOUS
RETOURNEZ LA MONTRE POUR ENLEVER LES VIS OU LE
DOS DE BOÎTIER, VOUS RISQUEZ DE PERDRE LES PETITS
CONNECTEURS ÉLECTRIQUES PLACÉS À L’INTÉRIEUR DE
LA MONTRE.
4. Ouvrez avec précaution la bride de maintien de la pile et sortez
la pile.
5. Placez une pile neuve dans le logement de pile en veillant à ce que le
côté marqué + soit tourné vers vous.
6. Remettez la bride en place.
7. Reposez le dos de boîtier en vérifiant que le joint noir soit bien en
place dans la rainure du boîtier et que le dos de boîtier soit
correctement orienté afin de bien aligner le ronfleur sur les
connexions internes (voir la remarque de l’étape 2).
8. Rattachez le bracelet avec précaution en veillant à fixer la sangle
courte avec la boucle sur les attaches du haut.
Veilleuse INDIGLO®
Une technologie électroluminescente brevetée (brevets américains
n° 4,527,096 et 4,775,964) permet d’illuminer la face entière de la
montre la nuit et dans des conditions de faible éclairage.
Étanchéité
La montre résiste à une pression d’eau maximale de 86 psi
(équivalent à une immersion de 164 pieds ou 50 mètres sous le
niveau de la mer). Cette résistance à 50 mètres est conservée aussi
longtemps que le verre, les boutons et le boîtier sont intacts.
ATTENTION : POUR PRÉSERVER L’ÉTANCHÉITÉ,
N’ENFONCEZ PAS LES BOUTONS SOUS L’EAU.
145144
Page 75

Bien que la montre soit étanche à l’eau, ne l’utilisez par pour la
plongée car ce n’est pas une montre de plongée et veillez à la
rincer à l’eau douce après tout contact avec l’eau de mer. La
montre n’affiche pas les données du capteur lorsqu’elle est utilisée
sous l’eau.
MENTIONS LÉGALES
TIMEX et NIGHT-MODE sont des marques déposées de Timex
Corporation. BODYLINK est une marque déposée de Timex
Group, B.V. INDIGLO est une marque déposée d’Indiglo
Corporation aux États-Unis et dans d’autres pays. HEART ZONES
est une marque déposée de Sally Edwards.
Garantie internationale
(Garantie limitée États-Unis)
Votre montre est garantie contre les défauts de fabrication par
Timex Corporation pendant une durée de UN AN à compter de la
date d’achat. Timex ainsi que ses filiales du monde entier
honoreront cette garantie internationale.
Timex se réserve le droit de réparer votre montre en y installant
des composants neufs ou révisés, ou bien de la remplacer avec un
modèle identique ou similaire.
ATTENTION : CETTE GARANTIE NE COUVRE PAS LES
DÉFAUTS OU DOMMAGES DE VOTRE PRODUIT DANS LES
SITUATIONS SUIVANTES :
1. après l’expiration de la période de garantie ;
2. si le produit n’a pas été acheté initialement chez un revendeur agréé ;
3. s’ils résultent de travaux de réparation non effectués par le fabricant ;
4. s’il s’agit d’un accident, falsification ou abus ;
5. s’il s’agit du boîtier, des accessoires ou de la pile. Le remplacement de
ces pièces peut être payant.
CETTE GARANTIE ET LES RECOURS AUX PRÉSENTES
SONT EXCLUSIFS ET REMPLACENT TOUTE AUTRE
GARANTIE, EXPRESSE OU IMPLICITE, Y COMPRIS TOUTE
GARANTIE IMPLICITE DE QUALITÉ MARCHANDE OU
D’ADAPTATION À UN USAGE PARTICULIER. TIMEX N’EST
RESPONSABLE D’AUCUN DOMMAGE PARTICULIER,
ACCESSOIRE OU INDIRECT.
Certains états ou provinces n’autorisent pas les limitations de
garanties implicites et n’autorisent pas les exclusions ou
limitations pour des dommages, auquel cas lesdites limitations
pourraient ne pas vous concerner. Les modalités de la présente
garantie vous donnent des droits légaux précis et vous pouvez
également vous prévaloir d’autres droits qui varient d’un état ou
d’une province à l’autre.
146
147
Page 76

Pour recourir à la garantie, veuillez renvoyer votre montre au
fabricant, à l’une de ses filiales ou au détaillant chez lequel le
produit a été acheté, accompagnée de l’original du Coupon de
réparation de produit dûment rempli ou, aux États-Unis et au
Canada seulement, de l’original du Coupon de réparation de
produit dûment rempli ou d’une déclaration écrite indiquant votre
nom, adresse et numéro de téléphone ainsi que la date et le lieu
d’achat. Veuillez inclure la somme suivante avec votre montre pour
couvrir les frais de poste et de manutention (ce ne sont pas des
frais de réparation) : un chèque ou mandat de 7,00 $ É.U. aux
États-Unis ; un chèque ou mandat de 6,00 $ CAN au Canada ; un
chèque ou mandat de 2,50 £ au Royaume-Uni. Dans les autres
pays, vous serez facturé pour l’affranchissement et la
manutention.
ATTENTION : N’INCLUEZ JAMAIS D’ARTICLES DE VALEUR
PERSONNELLE DANS VOTRE ENVOI.
148
É.-U.: appelez le 1-800-328-2677 pour plus de renseignements sur
la garantie. Canada : appelez le 1-800-263-0981. Brésil : appelez
le 0800-168787. Mexique : appelez le 01-800-01-060-00. En
Amérique Centrale, dans les les Caraïbes, aux Bermudes
et aux Bahamas : appelez le (501) 370-5775 (U.S.). En Asie :
appelez le 852-2815-0091. Au Royaume-Uni : appelez le
44 020 8687 9620. Au Portugal : appelez le 351 212 946 017. En
France : appelez le 33 3 81 63 42 00. En Allemagne : appelez le
+43 662 88 92130. Moyen-Orient et Afrique : appelez le
971 -4 -310850. Dans les autres régions : veuillez contacter
votre détaillant ou distributeur Timex local pour des
renseignements sur la garantie.
GARANTIE INTERNATIONALE TIMEX — COUPON DE RÉPARATION
Date d’achat initiale :
(Joindre si possible une copie du reçu)
Acheté par :
(Nom, adresse et numéro de téléphone)
Lieu d’achat :
(Nom et adresse)
Raison du renvoi :
CECI EST VOTRE COUPON DE RÉPARATION ;
CONSERVEZ-LE DANS UN ENDROIT SÛR.
149
Page 77

Avis FCC (États-Unis) / Avis IC (Canada)
Timex Corporation déclare que les produits suivants, qui
comprennent tous les composants du système Timex Bodylink,
sont conformes au règlement applicable de FCC Partie 15 et
d’Industrie Canada pour les appareils de Classe B comme suit :
Nom du produit : Système de vitesse + distance : Système de
Type de produit : Source de rayonnement intentionnelle
Contrôleur de vitesse + distance
M850/M576
Contrôleur de vitesse + distance
M185/M187
Moniteur de fréquence cardiaque
M515/M579
Moniteur de fréquence cardiaque
M640
cardiofréquencemètre
Émetteur-récepteur GPS Série M5xx/M1xx :
Émetteur CFM Série M6xx/M5xx
Modèle N°
matricule FCC
EP9TMXM850 3348A-12181
EP9TMXM185 3348A-TMXM185
EP9TMXM515 3348A-M515
EP9TMXM640 3348A-TMXM640
N°
Cert. IC
Ces appareils sont conformes à la Partie 15 du règlement de la
FCC. L’utilisation est sujette aux deux conditions suivantes :
(1) L’appareil ne doit pas causer de brouillage nuisible et (2)
l’appareil doit accepter tout brouillage reçu, y compris tout
brouillage susceptible de causer un fonctionnement indésirable.
Nom du produit : Récepteurs de montre : CFM/Vitesse+distance
Série M6xx/M5xx/M1xx
Enregistreurs de données : CFM/Vitesse
+distance Série M5xx/M1xx
Type de produit : Source de rayonnement involontaire
Cet équipement a été vérifié et déclaré conforme aux limites fixées
pour un appareil numérique de classe B, en vertu de la Partie 15
du règlement de la FCC. Ces limites servent à assurer une
protection raisonnable contre le brouillage préjudiciable dans un
environnement résidentiel. Cet équipement produit, utilise et peut
rayonner de l’énergie radiofréquence et, s’il n’est pas utilisé
conformément au mode d’emploi, peut causer un brouillage
préjudiciable aux communications radio. Si cet équipement cause
un brouillage préjudiciable à la réception radio ou télévisuelle, ce
qui peut être déterminé en éteignant l’équipement et en le
rallumant, l’utilisateur est invité à tenter d’éliminer le brouillage
en réorientant ou en déplaçant l’antenne de réception ou en
augmentant la distance séparant l’équipement et le récepteur.
150
151
Page 78

Attention : Tout changement ou modification non expressément
autorisé par Timex Corporation peut entraîner l’annulation du
droit d’utilisation de ce matériel.
Avis Industrie Canada : Cet appareil numérique de la classe B
est conforme à la norme NMB-003 du Canada.
152
Page 79

ÍNDICE DE CONTENIDOS
Registre su producto en www.timex.com
Introducción ........................................................................155
¡Bienvenido! ............................................................................155
Antes de que empiece ............................................................156
Descripción del reloj Performance ..................................157
Terminología del reloj ............................................................157
El cronógrafo ..........................................................................158
Recursos ..................................................................................159
Botones del reloj ....................................................................160
Símbolos en la pantalla..........................................................164
Cómo usar el sistema Bodylink® ..........................................165
Mensajes..................................................................................168
Formato de la pantalla ..........................................................169
Disponiéndose a usar su reloj ................................................170
Modos del reloj ....................................................................172
Modo Hora del Día ................................................................173
Modo Cronógrafo....................................................................179
Modo Vertical ..........................................................................183
Page 80

155
Modo Finalizar........................................................................185
Modo Temporizador Interválico ............................................190
Modo Datos de Vuelta ............................................................197
Modo Resumen ......................................................................200
Modo Temporizador Básico....................................................205
Modo Alarma ..........................................................................209
Modo Configurar ....................................................................211
Cuidado y mantenimiento..................................................221
Cambiando la pila ..................................................................221
Luz nocturna INDIGLO®......................................................222
Resistencia al agua ................................................................222
Información legal ................................................................223
Garantía internacional (garantía limitada para EUA) ........223
Aviso de FCC (EE.UU.) / Aviso de IC (Canadá)....................227
INTRODUCCIÓN
¡Bienvenido!
¡Felicitaciones! Con la compra de su sistema Bodylink
®
de Timex
®
usted ha contratado a su nuevo entrenador personal. Usando su
reloj Performance acompañado con sus medidores digitales de
frecuencia cardiaca y de velocidad + distancia, usted está en
condición excepcional de registrar, guardar y analizar indicadores
claves de su nivel personal de estado físico.
Dedicamos este manual a la información relativa a su reloj
Performance. Este reloj deportivo funciona como el cerebro de su
sistema Bodylink, suministrándole información integral en tiempo
real de su ejercicio recopilada desde el medidor de frecuencia
cardiaca, el medidor de velocidad + distancia o desde ambos.
Usted notará que su reloj Performance le suministra tecnología de
fácil manejo sobre estado físico. Pero, como con cualquier nueva
tecnología, usted debe tomar el tiempo para familiarizarse con sus
características y funciones para optimizar la utilidad de su compra.
Por lo tanto, ¡diviértase explorando! Revise los modos del reloj
Performance. Revise la Guía Rápida para obtener una
comprensión básica de su sistema Bodylink. Principalmente,
¡disfrute de su nuevo compañero de estado físico en su ruta hacia
un mejor desempeño!
Page 81

Antes de que empiece
Este manual contiene información acerca de su nuevo reloj
Performance, e instrucciones para programarlo y usarlo con los
medidores de frecuencia cardiaca y de velocidad + distancia. Para
asesorarle en el conocimiento de su reloj Performance, este manual
contiene varios elementos para mejorar su comprensión.
➤ Una descripción de los botones del reloj Performance, símbolos
en la pantalla y modos
➤ Un glosario para cada sección que explica muchas de las
referencias usadas para el reloj Performance y los modos del
mismo
➤ Instrucciones amplias y completas para programar y usar su reloj
Performance en cada modo
➤ Una introducción sobre los vínculos entre su reloj Performance y
cada uno de los medidores de estado físico en cada modo
➤ Ejemplos de la vida real, presentados en cajas de texto grises,
que explican cómo puede usted usar su reloj Performance
integrado a su actividad usual
156 157156
DESCRIPCIÓN DEL RELOJ PERFORMANCE
Terminología del reloj
Su sistema Bodylink®tiene su propio idioma que usted aprenderá a
medida que se haga un experto en manejarlo. A medida que lo
aprende, usted encontrará algunas palabras y frases importantes. ¡Le
prometemos que nadie le tomará un examen sobre el vocabulario!
Pero, repasar la terminología clave le ayudará a entender con más
rapidez cómo funciona su sistema Bodylink. Por consiguiente,
tómese unos minutos para repasar algunas de las palabras que
aparecen a lo largo de este manual.
➤ Sistema Bodylink: el sistema Bodylink le permite registrar y
guardar información en tiempo real utilizando un grupo de
dispositivos inalámbricos en forma conjunta con su reloj
Performance.
➤ Reloj Performance
central de datos del sistema Bodylink.
➤ Medidores de estado físico: el sistema Bodylink incluye dos
medidores digitales: el medidor de frecuencia cardiaca y el
medidor de velocidad + distancia.
➤ Medidor de frecuencia cardiaca: el medidor de frecuencia
cardiaca (medidor HR) mide su ritmo cardiaco (pulso). La Guía
del usuario del medidor de estado físico suministra instrucciones
detalladas para programar y usar su medidor HR.
: el reloj Performance, (reloj) contiene la
Page 82

➤ Medidor de velocidad + distancia: el medidor de velocidad +
Modo
Cronógrafo
Modo
Vertical
Modo
Finalizar
distancia (medidor GPS-3D) registra la velocidad, paso, distancia
recorrida, altitud y más, utilizando tecnología GPS. La Guía del
usuario del medidor de estado físico suministra instrucciones
detalladas para programar y usar su medidor GPS-3D. Observe
que algunas veces el reloj mencionará al medidor GPS-3D como
medidor S+D.
➤ GPS: El medidor GPS-3D usa información recopilada desde los
satélites de posicionamiento global (GPS) para calcular su
velocidad, distancia y ascensión.
El cronógrafo
A medida que conoce su reloj, la palabra cronógrafo pudiera causar
confusión. Recuerde esto: un cronógrafo es un instrumento para
medir el tiempo. Por lo tanto, usted observará un modo
Chronograph, pero los modos Vertical y Finish también funcionan
cronógrafo
mide el tiempo
desde el cronógrafo. A cualquier momento en que su reloj funciona
como un instrumento de medición del tiempo, lo hace usando la
función cronógrafo (o temporización).
Recursos
Recursos impresos
Complementando este manual, su sistema Bodylink®incluye estos
valiosos recursos:
➤ Guía rápida del sistema Bodylink: información para ayudarle a
programar y comenzar a usar su reloj Performance sincronizado
con sus medidores de estado físico, y un mapa descriptivo de los
diferentes modos de su reloj Performance
➤ Guía del usuario de los medidores de estado físico: información
para la programación, operación y mantenimiento de sus
medidores de estado físico
➤ Heart Zones® Tools for Success: información para usar su
medidor de frecuencia cardiaca con el programa de estado físico
Heart Zones Training System (sistema de entrenamiento de zonas
cardiacas), como ayuda para aumentar la fortaleza y resistencia
de su corazón
158 159
Page 83

161
Además, en cualquier modo en el que pueda observar su pulso,
usted puede sostener el botón INDIGLO®para silenciar
rápidamente una alerta audible de rango determinado. Cuando
pulse el botón para cambiar la alerta, ésta seguirá inaudible hasta
cuando usted cambie el tipo de alerta para otro rango determinado.
Ver “rango TZ y alerta” en la página 213 para información
adicional.
160
Recursos en la Internet
El sitio web de Timex® ofrece información útil para ayudarle a
optimizar su sistema Bodylink.
➤ www.timex.com/bodylink/: información acerca de las
características del sistema Bodylink y simulaciones del producto
➤ www.timex.com/software/: software actualmente distribuido
para productos Timex
➤ www.timex.com/fitness/: sugerencias sobre entrenamiento y
estado físico para usar con el sistema Bodylink
Además del sitio web de Timex, usted desearía también visitar el
sitio web referido en Heart Zones® Tools for Success. En
www.heartzones.com usted encontrará información para
complementar el material proporcionado en el folleto.
Botones del reloj
El reloj ofrece botones con funciones múltiples que sirven para tres
propósitos. Usted no necesita memorizar las funciones del botón
para cada modo. Permita que el reloj sea su guía.
La mayoría de las veces, los botones del reloj funcionan de acuerdo
a las marcas impresas en la caja. Si usted no observa alguno de los
símbolos al borde de la pantalla, siga la información impresa sobre
la caja del reloj como guía para usar los botones.
MODE
Pulsar para ir al
modo siguiente
START/SPLIT
Pulsar para empezar
cronometraje o
tomar tiempo
parcial
Luz nocturna
INDIGLO®; pulsar
para iluminar el
reloj; sostener
para silenciar la
alerta de rango
determinado
DISPLAY
Pulsar para ver datos
de desempeño
SET/FORMAT
Pulsar para
programar o cambiar
el formato de la
pantalla
STOP/RESET
Pulsar para
detener o pulsar y
sostener para
reiniciar
Page 84

Programación de los botones
DONE
Pulsar después
de programar
Luz nocturna
INDIGLO
Pulsar para
iluminar
el reloj
+
Pulsar para
incrementar el valor
expuesto
SELECT
Pulsar para ir al
siguiente valor
–
Pulsar para
disminuir el valor
expuesto
MODE
Pulsar para ir
al siguiente
modo
▲
Pulsar para ver
los siguientes
datos
▼
Pulsar para ver los
datos anteriores
Luz nocturna
INDIGLO®
Pulsar para
iluminar
el reloj
Use los botones del reloj también para programar funciones del reloj
(por ejemplo, ajustar la hora o un rango de pulso determinado).
Cuando los símbolos + y – aparecen al borde de la pantalla del reloj,
usted ha iniciado el proceso de programación.
Los pasos indicados aquí le permiten programar las funciones
4. Repita los pasos 3 y 4 para todos los valores que necesite ajustar.
5. Pulse DONE (MODE) para guardar sus cambios y completar el
proceso de programación.
Visualización de los botones
Los botones del reloj le ayudan a navegar a través de las distintas
opciones de visualización. Cuando observe los triángulos ▲ y ▼ al
borde de la pantalla, usted sabe que hay información para ver.
del reloj.
1. Pulse y sostenga el botón SET hasta que la palabra SET aparezca
brevemente en la pantalla, seguida por un valor que destella.
2. Ajuste el primer valor pulsando + (DISPLAY) o – (STOP/RESET).
3. Pulse SELECT (SET/FORMAT) para ir al siguiente valor a ser
ajustado.
162 163
Page 85

Símbolos en la pantalla
Temporizador
interválico o básico
funcionando
Cronógrafo en
marcha
Modo nocturno
activado
Carga baja en la pila
del medidor GPS-3D
Medidor(es)
activado(s) (destella si
hay problema)
Alarma activada
Timbre a cada hora
activado
Símbolos en el visor
del reloj
Cómo usar el sistema Bodylink
®
Cuando use el Monitor de desempeño, podrá ver datos del Medidor
de pulso o del Medidor de velocidad + distancia (o de ambos)
en tiempo real, en Hora del Día, Cronógrafo y Temporizador. El
procedimiento para ello es el mismo en todos los modos, aunque
los datos que se ven y su posición en la esfera en cada modo será
diferente.
1. Use el Medidor de pulso o el Medidor de velocidad + distancia,
o ambos, y verifique que estén funcionando.
2. Aléjese al menos 6 pies (casi 2 metros) de otras personas que
estén usando otros sistemas de monitorización de estado físico y
de toda fuente de radiointerferencia, como por ejemplo, equipo
eléctrico, líneas de alta tensión, etc.
NOTA: Si bien el sistema Bodylink® puede funcionar a unos
3 pies (casi 1 metro) de los medidores del reloj, para lograr un
funcionamiento óptimo trate de que el reloj esté lo más próximo
posible a los medidores cuando ponga en funcionamiento
el sistema.
3. Oprima una vez el botón DISPLAY. Esto indica al reloj que
busque los medidores Bodylink® próximos; buscará por un minuto. En la esfera del reloj aparecerá el símbolo de una antena,
para indicar que el sistema Bodylink® está activado.
164
165
Page 86

NOTA: Para su conveniencia, Cronógrafo y Temporizador
automáticamente
quince segundos cuando ingrese el modo.
4. Cuando el reloj haya detectado las transmisiones de los
medidores, la esfera del reloj cambiará a un nuevo formato
para mostrar algunos o todos los datos del medidor, dependiendo
del modo. Hora del Día y Temporizador muestran los datos
exclusivamente en la línea inferior, en tanto que Cronógrafo
permite ver hasta tres líneas de datos de desempeño.
buscarán los medidores Bodylink® durante
Cómo ver Datos de desempeño
Oprima una vez el botón DISPLAY para seleccionar los datos o
combinación de datos que desea ver durante su entrenamiento. Se
mostrará brevemente un "titular" con los nombres de la información
y su posición en la esfera antes de mostrar los datos mismos.
Para usar el reloj en forma más eficaz, recuerde lo siguiente:
• En Cronógrafo, oprima una vez SET/FORMAT para intercambiar
las posiciones de la información en las líneas media y superior de
la esfera, así podrá ver los datos más importantes en la línea del
medio, que es la más grande.
• Si desea dejar de ver los datos de los medidores de Bodylink®,
mantenga oprimido el botón DISPLAY hasta que se muestre el
mensaje HOLD TO SHUT OFF RCVR en la esfera del reloj.
Mantenga oprimido el botón DISPLAY unos segundos más; el
reloj emitirá una señal que indica que el enlace de radio entre el
reloj y los medidores se ha desactivado.
SUGERENCIA: si ya está viendo datos de un medidor
(por ejemplo, el Medidor de pulso) y desea ver también los datos
del Medidor de velocidad + distancia, simplemente mantenga
oprimido el botón DISPLAY hasta que el reloj emita una breve
señal sonora y el símbolo de la antena se vea destellando. El reloj
busca ahora un segundo medidor Bodylink®. Cuando lo detecta,
el símbolo de la antena dejará de destellar y la pantalla cambiará
a otro formato con la nueva información. Oprima una vez el
botón DISPLAY (como se indicó previamente) para ver las
diversas combinaciones de los datos de dos medidores.
166
167
Page 87

Hora
Pulso
Hora
Pulso
Mensajes
Cuando use el reloj con los medidores de estado físico, el reloj
puede mostrar mensajes para comunicar el status de cualquiera de
los medidores sincronizado con el reloj. Los mensajes incluyen:
NO DATA FROM HRM (GPS) El reloj no recibe información del
medidor HR o del medidor GPS-3D. Asegúrese que el medidor se
encuentre a un máximo de 3 pies (1 metro) de distancia del reloj,
que esté funcionando o que no se haya bloqueado
inadvertidamente con el medidor de alguien más. El reloj intentará
establecer una conexión por un minuto después de mostrar este
mensaje.
NOISY DATA FROM HRM (GPS) El reloj tiene interferencias
de radio. Trate de alejarse de posibles fuentes de interferencia (por
ejemplo televisores, monitores o aparatos con motor). El reloj
intentará establecer una conexión por 30 segundos después de
mostrar este mensaje.
SEARCHING El medidor GPS-3D aún intenta enlazarse con la
información de GPS. Usted no puede ver información de velocidad,
paso, distancia o de posición hasta que el medidor localice los
satélites GPS.
WEAK GPS SIGNAL El medidor GPS-3D perdió su enlace con
los satélites GPS. El medidor GPS-3D funciona mejor en zonas
más abiertas (como en el caso de una zona sin muchos árboles o
despejada de nubes) y a mayores velocidades.
FATAL GPS ERROR El medidor GPS-3D ha encontrado un
grave error interno. Comuníquese con Servicio al Cliente de
Timex.
Formato de la pantalla
En el modo Cronógrafo, usted puede pulsar y soltar
SET/FORMAT para pasar a los datos expuestos en la línea
superior y en la del medio de la pantalla. Esto permite mostrar el
valor más importante para usted en el medio de la pantalla, en
mayor tamaño.
El cambio en el formato de la pantalla no se aplica a la tasa de
ascenso que siempre aparece en la línea media de la pantalla. Para
información adicional sobre la tasa de ascenso, ver “Modo vertical”
en la página 183.
169168
Page 88

Disponiéndose a usar su reloj
Determinando su pulso
Además de muchas otras funciones útiles, su reloj usa tecnología
que le ayuda a registrar información detallada sobre su pulso. Pero,
antes que pueda registrar esta información, usted necesita
determinar primero su pulso máximo. Puede usar muchos métodos
para calcular su pulso máximo.
El folleto Heart Zones® Tools For Success incluido en el empaque de
su reloj proporciona procedimientos excelentes y Timex® le
recomienda que use una de esas metodologías. Sin embargo, si no
puede usar ninguno de los procedimientos descritos en Heart
Zones® Tools for Success, usted puede considerar el uso del método
con base en la edad, de uso popular aunque bastante discutido.
Comience con el número 220 y luego reste su edad. Por ejemplo,
alguien de 35 años comenzaría con 220 y restaría 35 (la edad de la
persona) lo que da un pulso máximo estimado de 185.
Programando su reloj por primera vez
Una vez usted determine su pulso, ajuste los siguientes parámetros
antes de usar su reloj:
1. Ajustar la hora del día. Para información detallada sobre el modo
Hora del Día, incluyendo instrucciones para fijar la hora del día, ir a
la página 173.
2. Ingrese su pulso máximo. En el modo Configurar, seleccione HRM
SETTINGS (programación del HRM) y luego MAX HR (pulso
máximo). Su ajuste de pulso máximo determina sus cinco rangos de
pulso preestablecidos. Para información adicional ver “Pulso máximo”
en la página 214.
3. Escoja las unidades para mostrar su rango de pulso deseado.
En el modo Configurar, seleccione HRM SETTINGS y luego HRM
DISPLAY. Su reloj le da la opción de presentar su pulso en
pulsaciones por minuto (BPM) o como un porcentaje de su máxima
pulsación (POR CIENTO). Para información adicional ver
“Presentación del pulso” en la página 215.
4. Determine su rango de pulso deseado y la alerta. En el modo
Configurar, seleccione HRM SETTINGS y luego TZ ALERT. Use la
alerta para mantener su pulso dentro de un rango definido para
optimizar su desempeño y prevenir tanto el sobreejercicio como la poca
exigencia para su corazón durante un ejercicio. Para más información
sobre el modo configurar, ir a “Rango TZ y alerta” en la página 213.
5. Escoja la unidad de presentación para su reloj. En el modo
Configurar establezca unidades de longitud, velocidad, paso y altitud
de acuerdo a su preferencia. Ver “Programación de unidad” en la
página 219 para información adicional.
6. Programe la actualización de la tasa de ascenso. Este ajuste en
el grupo ALTITUDE SETTINGS (programación de altitud) calcula
cuán rápido cambia usted de altitud durante su ejercicio (también
conocida como velocidad vertical). Programe esta función a una
menor duración para actividades verticales más rápidas como esquiar,
o a una mayor duración para actividades verticales más lentas como
escalar. Ver “Actualización de la tasa de ascenso” en la página 216
para información detallada.
171170
Page 89

Ver datos de
desempeño
Ver o cambiar a la
hora secundaria
Sostener para
programar
Luz
nocturna
INDIGLO®
Modo
Cronógrafo
Aunque no es necesario ajustarlos antes de su primer ejercicio,
usted pudiera desear revisar y configurar los rangos de pulso
deseados de velocidad o paso (página 215), alerta de distancia
(página 215) o funciones adicionales de “manos libres” (página 217).
MODOS DEL RELOJ
Usted puede pasar por cada uno de los diez modos pulsando
MODE.
➤ Time of Day (hora del día) le permite ver la hora, fecha y día de
la semana para dos diferentes zonas horarias.
➤ Chronograph (cronógrafo) registra y presenta los datos de
desempeño.
➤ Vertical (vertical) da una visión de datos verticales tales como
tasa de ascenso, altitud y ascensión.
➤ Finish (finalizar) le permite predecir un tiempo para una
distancia específica y programar alertas si usted no va al ritmo.
➤ Interval Timer (temporizador interválico) le permite programar
su reloj para ejercicios interválicos.
➤ Lap Data (datos de vuelta) presenta la información de vuelta
registrada.
➤ Summary (resumen) presenta la información grabada mientras
el cronógrafo está en marcha.
➤ Basic Timer (temporizador básico) le permite cronometrar un
evento con cuenta regresiva desde un tiempo específico hasta cero.
➤ Alarm (alarma) controla hasta cinco alarmas.
➤ Configure (configurar) le permite programar su reloj de acuerdo
a sus necesidades.
Modo Hora del Día
Su reloj puede funcionar como un reloj convencional para mostrar
la hora, fecha y día para dos diferentes zonas horarias, usando un
formato de 12 o 24 horas.
173172
Page 90

Terminología del modo Hora del Día
UTC: Cuando usted usa el reloj sincronizado con el medidor GPS-
3D, éste se alineará con la hora UTC (tiempo universal coordinado,
conocido anteriormente como GMT). Este describe la zona horaria
local en relación con el meridiano de Greenwich. Por ejemplo, la
ciudad de Nueva York se encuentra en la zona UTC -5, puesto que
Nueva York está ubicada cinco horas antes del meridiano de
Greenwich; Moscú se encuentra en la zona UTC +3 al estar tres
horas después del meridiano de Greenwich.
Ajustando la hora
1. Pulse MODE hasta que el modo Hora del día aparezca.
2. Pulse y sostenga el botón SET hasta que la palabra SET aparezca
brevemente en la pantalla, seguida por un valor que destella.
3. Ajuste el primer valor pulsando + (DISPLAY) o – (STOP/RESET).
4. Pulse SELECT (SET/FORMAT) para ir al siguiente valor a ser
ajustado.
5. Repita los pasos 3 y 4 para todos los valores que necesite ajustar.
6. Pulse DONE (MODE) para guardar sus cambios y completar el
proceso de programación.
Para Hora del Día, usted puede ajustar los siguientes valores:
• Hora
• Minuto
• Segundos
• Año
• Mes
• Fecha (ajusta
automáticamente el
día de la semana
cuando usted ajusta
la fecha)
• Formato de hora
(p.e., AM/PM
versus 24 horas)
Cambio de zona horaria
El reloj puede seguir dos zonas horarias (T1 y T2). Observe la
segunda zona pulsando START/SPLIT o, pase de T1 a T2 usando
estos pasos:
1. Pulse y sostenga START/SPLIT hasta que aparezca HOLD FOR
TIME 2.
2. Continúe sosteniendo hasta que la hora cambie y el reloj emita un
sonido.
3. Repita los pasos 1 y 2 para regresar a T1. El mensaje será HOLD
FOR TIME 1.
Usted debe fijar por separado la hora del día para cada zona horaria.
175174
Page 91

Sincronizando el reloj con el medidor GPS-3D
Cuando active por primera vez el medidor GPS-3D sincronizado
con su reloj, usted puede esperar una de las siguientes
posibilidades:
➤ Si activa el medidor GPS-3D antes de ajustar la hora del día, el
reloj sincronizará a la vez T1 y T2 con el UTC. Usted necesitará
ajustar la hora para ambas zonas horarias a su hora local.
➤ Si activa el medidor GPS-3D después de ajustar la hora del día,
el reloj mantiene el ajuste de hora y fecha y sincroniza minutos y
segundos con el UTC para cada zona horaria.
➤ Observe que usted no puede ajustar los segundos cuando habilita
las funciones GPS; estos seguirán sincronizados siempre con la
hora UTC.
Para ver los datos de desempeño en el modo
Hora del Día
Cuando usa los medidores de estado físico con su reloj, puede
explorar los datos de desempeño pulsando y soltando DISPLAY.
Puede elegir seguir viendo el día de la semana pulsando a cambio
DISPLAY hasta que el día de la semana se haga visible.
Pulsar para ver
datos de desempeño
Datos de
desempeño
Usted puede observar:
➤ Pulso: el pulso actual representado como porcentaje de su
pulsación máxima (POR CIENTO) o como latidos por minuto
(BPM)
➤ Velocidad: velocidad actual
➤ Paso: velocidad actual, expresada en minutos por unidad de
distancia seleccionada, como millas o kilómetros
➤ Distancia: la distancia recorrida desde cuando puso en marcha el
cronógrafo
➤ Altitud: la altura actual sobre el nivel del mar
177176
Page 92

Modo Vertical
o sostener para
ver la hora
Sugerencias y trucos para el modo Hora del Día
➤ Usted puede regresar al modo Hora del Día desde cualquier otro
modo en el reloj pulsando y sosteniendo MODE hasta que
aparezca la hora en pantalla.
➤ El reloj no ajusta automáticamente la hora de verano. Cuando se
cambia entre la hora estándar y la hora de verano, ajuste la hora
manualmente.
➤ Si el reloj no detecta cualquiera de los medidores de estado físico,
el día de la semana aparecerá en la línea inferior de la pantalla.
➤ Usted sólo puede reajustar el valor de los segundos a cero si
utiliza el reloj sincronizado con el medidor HR.
➤ Puede ajustar el valor de los minutos adelantándolos o
atrasándolos de la hora correcta y el reloj conservará su ajuste.
Esta característica es útil para la gente que prefiere ajustar sus
relojes un poco adelantados para mantenerse a tiempo.
Ejemplo del modo Hora del Día
Suponga que usted vive en San Francisco y trabaja con un cliente
en Singapur. Como toda persona ocupada, es imperativo que lleve
cuenta de la hora, de modo que ajusta T1 a su hora local. Pero
también es importante tener un rápido recordatorio de la hora de
su cliente, por lo tanto usted ajusta T2 a la hora de Singapur. Con
ambas zonas horarias disponibles, puede revisar rápidamente la
hora de su cliente o incluso cambiar su monitor para mostrar T2
cuando usted viaje a Singapur.
178
Modo Cronógrafo
El modo Cronógrafo funciona como la central principal de datos de
ejercicios de su reloj. Puede grabar el tiempo transcurrido hasta
por 100 horas. También puede registrar los datos de los medidores
de estado físico hasta por 100 vueltas.
Luz nocturna
INDIGLO®
Iniciar
cronometraje o
tomar tiempo
acumulativo
Terminología del Modo Cronógrafo
Cronógrafo: el cronógrafo registra fracciones de tiempo por la
duración de su actividad.
Vuelta: el tiempo de vuelta registra el tiempo para una parte de su
actividad.
Acumulativo: el tiempo acumulativo registra el total del tiempo
transcurrido desde el comienzo de su actividad actual.
Tomando un tiempo acumulativo: cuando usted toma un tiempo
acumulativo, el cronógrafo completará el cronometraje de una
vuelta y comienza a cronometrar una nueva.
Ver datos de
desempeño
Intercambiar líneas
superior y media
Parar o reiniciar
el cronógrafo
179
Page 93

Para operar el modo Cronógrafo
Cuando se usa el modo Cronógrafo, tome tiempos acumulativos
manualmente pulsando START/SPLIT o puede programar el reloj
para tomar automáticamente tiempos acumulativos según tiempo y
distancia. Para información adicional sobre la programación del
reloj para tomar tiempos acumulativos automáticamente, ver
“Programación de manos libres” en la página 217.
Siga estos pasos para utilizar el cronógrafo en el modo Cronógrafo.
1. Pulse MODE hasta que el modo Cronógrafo aparezca.
2. Pulse START/SPLIT para iniciar el cronometraje.
3. Pulse START/SPLIT de nuevo para tomar un tiempo parcial y
comenzar a cronometrar automáticamente una nueva vuelta. Pulse
MODE para mostrar inmediatamente la información de la nueva
vuelta o espere unos pocos segundos y el reloj comenzará a mostrar
automáticamente la información de la nueva vuelta.
4. Pulse STOP/RESET para detener el cronometraje cuando usted
quiere tomar un descanso o llega al final de su actividad.
5. Pulse START/SPLIT para continuar el cronometraje o
6. Pulse y sostenga STOP/RESET para regresar el cronógrafo a cero.
Para ver los datos de desempeño
en el modo Cronógrafo
Cuando usa los medidores de estado físico con su reloj, puede
explorar los datos de desempeño para cada vuelta de su ejercicio
pulsando y soltando DISPLAY. En el modo Cronógrafo, las opciones
de visualización incluyen:
➤ Pulso: el pulso actual representado como porcentaje de su
pulsación máxima (POR CIENTO) o como latidos por minuto
(BPM)
➤ Velocidad: velocidad actual
➤ Velocidad promedio: la velocidad promedio para el período en
que el cronógrafo ha estado funcionando
➤ Paso: velocidad actual, expresada en minutos por unidad de
distancia seleccionada, como millas o kilómetros
➤ Paso promedio: la velocidad promedio por minuto para el
período en que el cronógrafo ha estado funcionando
➤ Distancia: la distancia recorrida desde cuando usted puso en
marcha el cronógrafo
181180
Page 94

Sugerencias y trucos del modo Cronógrafo
➤ Si usted pulsa MODE para pasar el reloj a un modo diferente
mientras el cronógrafo continúa en marcha, aparecerá el
símbolo de cronómetro para indicar que el cronógrafo
todavía funciona.
➤ Si usa el reloj con el medidor HR usted puede programarlo para
que empiece automáticamente a tomar un cálculo del pulso de
recuperación cada que vez que usted pulsa STOP/RESET para
detener el cronógrafo. Sin embargo, si usted pulsa
START/SPLIT de nuevo antes de haberse completado el ciclo de
recuperación, cancelará la recuperación. Para información
adicional, ver “Recuperación” en la página 214.
Ejemplo del modo Cronógrafo
Escuchó recientemente que un método de entrenamiento para
corredores de larga distancia llamado el método de correr/caminar
puede ayudarle a incrementar su resistencia general y quemar
más calorías. Este método propone correr por un rato seguido por
una corta caminata. Usted decide utilizar el modo Cronógrafo
como ayuda para ensayar este método. Pulse START/SPLIT para
comenzar a correr y luego de 10 minutos de carrera pulse
START/SPLIT
de nuevo y camine por 2 minutos. Continúe
usando estas dos secuencias de cronometraje hasta que haya
completado 60 minutos de correr/caminar.
Modo Vertical
El modo Vertical funciona como un modo de visualización
sincronizado con el medidor GPS-3D con énfasis en la presentación
de los datos de altitud. Particularmente, el modo Vertical adapta el
reloj para ver la información relacionada con actividades verticales
(por ejemplo escalar o esquiar). Si no usa el medidor GPS-3D,
usted no puede ingresar al modo Vertical y verá el mensaje
NO GPS DATA.
Luz nocturna
INDIGLO®
Modo Finalizar
o sostener
para ver la hora
Iniciar la vuelta o
tomar tiempo
acumulativo
Terminología del modo Vertical
Tasa de ascenso: lo rápido que usted escala o desciende.
Velocidad vertical: otro término para la tasa de ascenso.
Utilizando el modo Vertical
1. Pulse MODE hasta que el modo Vertical aparezca.
2. Pulse START/SPLIT para iniciar el cronometraje.
Ver datos de
desempeño
Intercambiar líneas
superior y media
Parar o reiniciar
el cronógrafo
183182
Page 95

Sostener para
programar
3. Pulse START/SPLIT de nuevo para tomar un tiempo parcial y
comenzar a cronometrar automáticamente una nueva vuelta.
4. Pulse STOP/RESET para detener el cronometraje cuando usted
llega al final de su actividad.
5. Pulse START/SPLIT para continuar el cronometraje o
6. Pulse y sostenga STOP/RESET de nuevo para poner la pantalla en
cero.
Observando los datos de desempeño
en el modo Vertical
Cuando usa los medidores de estado físico con su reloj, puede
explorar los datos de desempeño para cada vuelta de su ejercicio
pulsando y soltando DISPLAY. En el modo Vertical, las opciones de
visualización incluyen:
➤ Pulso: pulso actual
➤ Tasa de ascenso: velocidad vertical
➤ Paso: velocidad actual, expresada en minutos por unidad de
distancia seleccionada, como millas o kilómetros
➤ Velocidad: velocidad actual
➤ Distancia: distancia recorrida mientras tiene el cronógrafo en
marcha
➤ Altitud: la altura actual sobre el nivel del mar
➤ Ascensión: la diferencia entre su altitud actual y la altitud
cuando usted inició el cronógrafo
Ejemplo del modo Vertical
Usted está haciendo esquí extremo en Banff en un recorrido
estimado de 2.700 pies verticales (823 metros verticales). Con
interés en la precisión de lo estimado como también del tiempo
que le tomará hacer su recorrido, usted inicia su medidor
GPS-3D, va al modo Vertical y pulsa START cuando comienza a
descender la montaña. Al final de su trayecto, pulsa STOP y
luego DISPLAY hasta ver la Tasa de Ascenso y Ascensión
(expresados en números negativos ya que usted se desplazó
cuesta abajo). Utilice esta información para ver cuán rápido
esquió y comparar la ascensión expuesta por el reloj con la
estimación que le dió su guía.
Modo Finalizar
El modo Finalizar le permite predecir cuánto tiempo le tomará
terminar una distancia de un evento específico (una maratón o
Luz nocturna
INDIGLO®
Modo Temporizador
Interválico
o sostener
para ver la hora
Iniciar cronometraje
o tomar un
tiempo acumulativo
Ver datos de
desempeño
Parar el
cronometraje
185184
Page 96

competencia de 5K, por ejemplo) con base en la información actual
del medidor GPS-3D. Para ayudarle a mantener el paso para su
final previsto, puede también programar el reloj para que le avise
si usted va muy rápido o muy despacio para su paso deseado.
Si no usa el medidor GPS-3D, usted no puede ingresar al modo
Finalizar y verá el mensaje NO GPS DATA. De igual manera, debe
colocar el cronógrafo a cero antes de utilizar el modo Finalizar o de
lo contrario no funcionará apropiadamente.
Terminología del modo Finalizar
Tiempo previsto: su tiempo deseado para terminar la competencia
o ejercicio. El reloj emplea este tiempo para alertarle si usted va
muy despacio para completar el evento dentro del tiempo
seleccionado.
Programación del modo Finalizar
Usted debe parar y reiniciar el cronógrafo para permitir la
configuración del modo Finalizar. Sin embargo, puede todavía
configurar el modo Finalizar incluso cuando usted ve el mensaje NO
GPS DATA en la pantalla.
1. Estando en el modo Finalizar, pulse y sostenga el botón SET hasta
que la palabra SET aparezca brevemente en la pantalla, seguida por
un valor que destella.
2. Ajuste el primer valor pulsando + (DISPLAY) o – (STOP/RESET).
3. Pulse SELECT (SET/FORMAT) para ir al siguiente valor a ser
ajustado.
4. Repita los pasos 2 y 3 para todos los valores que necesite ajustar.
5. Pulse DONE (MODE) para guardar sus cambios y completar el
proceso de programación.
Para el modo Finalizar, usted puede ajustar los siguientes valores:
➤ Distancia del evento preestablecida o personalizada (puede
ajustarla a su preferencia hasta 999.99)
➤ Unidad (NM, KM o MI)
➤ Tiempo previsto
➤ Opción de alerta (una alerta audible hará que el reloj emita un
sonido y destelle a la vez sobre el tiempo previsto y una alerta
silenciosa hará que destelle solamente sobre el tiempo previsto
final)
Utilizando el modo Finalizar
1. Pulse MODE hasta que aparezca el modo Finalizar.
2. Pulse START/SPLIT para iniciar el cronometraje.
3. Pulse START/SPLIT de nuevo para tomar un tiempo parcial y
comenzar a cronometrar automáticamente una nueva vuelta.
4. Pulse STOP/RESET para detener el cronometraje cuando usted llega
al final de su actividad.
5. Pulse START/SPLIT para continuar el cronometraje o
6. Pulse y sostenga STOP/RESET de nuevo para poner la pantalla en
cero.
187186
Page 97

Observando los datos de desempeño
en el modo Finalizar
Cuando usa los medidores de estado físico con su reloj, puede
explorar los datos de desempeño para cada vuelta de su ejercicio
pulsando y soltando DISPLAY. En el modo Finalizar, las opciones
de visualización incluyen:
➤ Tiempo de finalización: el tiempo de finalización previsto
basado en su actual velocidad y distancia. El tiempo de
finalización destellará si su paso actual no le permitirá finalizar
dentro de su tiempo previsto seleccionado. Si usted se detiene, el
reloj reemplaza el tiempo de finalización por la palabra
STOPPED (detenido).
➤ Pulso: pulso actual
➤ Paso: velocidad actual, expresada en minutos por unidad de
distancia seleccionada, como millas o kilómetros
➤ Paso promedio: la velocidad promedio por minuto para el
período en que el cronógrafo ha estado funcionando
➤ Velocidad: velocidad actual
➤ Velocidad promedio: velocidad promedio para el periodo en el
que tiene el cronógrafo en marcha
➤ Distancia: distancia recorrida mientras tiene el cronógrafo en
marcha
Ejemplo del modo Finalizar
Usted se entrena para una competencia de ciclismo de 100 KM. El
año pasado corrió en la misma competencia y finalizó en 4 horas,
15 minutos. Su meta para este año es finalizar en menos de
4 horas. Lee en una revista de entrenamiento que, cuando se
entrena para una competencia, usted debe dedicar un día por
semana a recorrer una distancia igual a la de su evento para
lograr su tiempo. Para ayudarle a mantener el ritmo, usted ajusta
el modo Finalizar a 100 KM para distancia y 4 horas para tiempo.
Programa el reloj con una alerta audible para avisarle cuando va
más despacio que su ritmo para ayudarle a mantener su tren de
competencia a medida que corre.
189188
Page 98

Modo Temporizador Interválico
Sostener para
programar
Ver datos de
desempeño
Luz nocturna
INDIGLO®
Modo Datos de
Vuelta o
sostener
para ver la hora
El modo Temporizador Interválico ofrece un contador regresivo
flexible de seis intervalos, y puede conservar los ajustes hasta para
cinco sesiones diferentes de entrenamiento. Este incluye intervalos
de calentamiento y de relajación y cuatro intervalos de
entrenamiento para cada sesión. Usted puede programar el grupo
de cuatro intervalos de entrenamiento para que se repitan hasta
por 99 veces. Puede programar el intervalo de calentamiento para
iniciarse una vez al comienzo de su sesión de entrenamiento y el
intervalo de relajación para iniciarse una vez al final de su sesión.
Empezar a
cronometrar
el ejercicio
interválico
▼
Escoger, parar o
reiniciar un
ejercicio
Terminología del modo Intervalo
Entrenamiento interválico: usted puede usar el entrenamiento
interválico como ayuda para variar el nivel de intensidad dentro de
un ejercicio, lo que le facilita finalmente ejercitarse por más tiempo
y mayor exigencia.
Intervalo: los intervalos relacionan su ejercicio con períodos
específicos de tiempo. Por ejemplo, usted puede correr por diez
minutos, caminar por dos, correr por veinte minutos, y luego
caminar por cinco – lo cual representaría cuatro intervalos de
entrenamiento.
Repeticiones: el número de veces que usted elije para realizar un
grupo de intervalos. En el ejemplo anterior, si usted elije recorrer el
grupo de intervalos tres veces, usted pasará por sus series de
cronometrajes de diez, dos, veinte y cinco minutos tres veces en
secuencia. Esto representaría 3 repeticiones.
Calentamiento: el periodo al comienzo de su ejercicio que permite
a su cuerpo prepararse para una sesión de entrenamiento más
intensa.
Relajación: el periodo al final de su ejercicio que permite a su
cuerpo recuperar su estado de funcionamiento normal.
191190
Page 99

Escogiendo un ejercicio por intervalos
Usted puede usar el reloj para programar y conservar hasta cinco
ejercicios marcados del WKOUT 1 hasta WKOUT 5.
1. Pulse MODE hasta que el modo Intervalo aparezca.
2. Pulse ▼ (STOP/RESET) para escoger el ejercicio que desea
programar (WKOUT 1 hasta WKOUT 5).
Al tener que reiniciar el temporizador interválico para escoger un
nuevo ejercicio, usted necesitaría pulsar el botón STOP/RESET
más de una vez antes de poder observar un nuevo ejercicio.
Programando un ejercicio interválico
1. Pulse y sostenga el botón SET hasta que la palabra SET aparezca
brevemente en la pantalla. La pantalla de ajuste aparecerá con la
palabra WARM-UP destellando.
2. Pulse
▲ (DISPLAY) o ▼ (STOP/RESET) para revisar los ajustes
de cada ejercicio por intervalos. Los ajustes incluyen WARM-UP
(calentamiento), INTVL 1 – 4 (intervalos), # OF REPS (repeticiones)
y COOL-DOWN (relajación).
3. Escoja un intervalo para ajustar y pulse SELECT (SET/FORMAT).
Pulse + (DISPLAY) o - (STOP/RESET) para escoger uno de los
cinco rangos de pulso preestablecidos o tres personalizados. También
puede no escoger un rango determinado o escoger una alerta manual
de rango determinado para este intervalo únicamente. Una vez escoja
su rango, pulse SELECT (SET/FORMAT).
Si usted no escogió MANUAL en el paso 3, vaya al paso 5.
4. Establezca los valores del rango de pulso superior y luego del inferior
para el rango MANUAL. Pulse + (DISPLAY) o - (STOP/RESET)
para cambiar los valores y SELECT (SET/FORMAT) para cambiar los
dígitos. Cuando termine de establecer los límites, pulse SELECT
(SET/FORMAT).
5. Pulse + (DISPLAY) o - (STOP/RESET) para cambiar los valores de
tiempo y SELECT (SET/FORMAT) para recorrer las horas, minutos
y segundos. Si usted establece un intervalo a cero (00:00:00), el reloj
omitirá este intervalo en forma automática durante su ejercicio.
6. Cuando usted se pasa del valor final del tiempo del intervalo, el reloj
avanza automáticamente al siguiente intervalo (o # OF REPS si se
están programando los intervalos de CALENTAMIENTO o
RELAJACIÓN). Repita los pasos del 2 al 5 para establecer todos los
intervalos y repeticiones para el ejercicio escogido.
7. Pulse DONE (MODE) para guardar su ejercicio y completar el
proceso de programación.
Para el modo Temporizador Interválico, usted puede ajustar los
siguientes valores:
➤ Calentamiento (establece el rango de pulso deseado y tiempo)
➤ Intervalos del 1 al 4 (establece el rango de pulso deseado y
tiempo)
➤ Número de repeticiones (no incluye los intervalos de
calentamiento o de relajación)
➤ Relajación (establece el rango de pulso deseado y tiempo)
193192
Page 100

Utilizando el Modo Temporizador Interválico
Siga estos pasos para utilizar el temporizador interválico para un
ejercicio.
1. Pulse MODE hasta que el modo Temporizador Interválico aparezca.
2. Pulse START/SPLIT para iniciar el cronometraje.
3. Pulse STOP/RESET para detener el cronometraje cuando usted
quiere tomar un descanso o llega al final de su actividad.
4. Pulse START/SPLIT para continuar el cronometraje o
5. Pulse y sostenga STOP/RESET para regresar el cronógrafo a cero.
Alertas y rangos de pulso determinados
Durante el proceso de programación, usted tiene la opción de usar
uno de los cinco rangos de pulso estandarizados, tres personalizados
o una sola alerta de rango de pulso para cada intervalo. Puede
también no escoger alerta alguna de rango determinado. Cuando
usted pone en marcha el temporizador interválico, las
configuraciones de alerta de rango de pulso seleccionadas
sustituirán a la alerta de rango de pulso deseado que usted
estableció en el modo Configurar (ver página 213).
Sin embargo, los ajustes para el tipo de alerta (AUDIBLE, VISUAL
o SIN ALERTA) en el modo Configurar todavía funcionarán
mientras usted tiene en marcha el temporizador interválico. El reloj
sólo ignora los ajustes del límite.
Tenga presente que estos ajustes afectan la alerta del rango
determinado únicamente. Los ajustes de alerta de rango
determinado usados en el temporizador interválico no afectan los
datos estadísticos del pulso registrados y exhibidos en el modo
Resumen.
Observando los datos de desempeño en el modo
Temporizador Interválico
Cuando usa los medidores de estado físico con su reloj, puede
explorar los datos de desempeño para cada vuelta de su ejercicio
pulsando y soltando DISPLAY. En el modo Temporizador
Interválico, las opciones de visualización incluyen:
➤ Pulso: el pulso actual representado como porcentaje de su
pulsación máxima (POR CIENTO) o como latidos por minuto
(BPM)
➤ Velocidad: velocidad actual
➤ Paso: velocidad actual, expresada en minutos por unidad de
distancia seleccionada, como millas o kilómetros
➤ Distancia: la distancia recorrida desde cuando puso en marcha
el temporizador interválico
➤ Altitud: la altura actual sobre el nivel del mar
195194
 Loading...