

Timberk TEC.PF3 M 1000 IN, TEC.PF3 M 1500 IN, TEC.PF3 M 2000 IN, TEC.PF3 LE 1000 IN, TEC.PF3 LE 1500 IN Instruction Manual
...Page 1

Instruction manual
Руководство по эксплуатации
Электрический
конвектор
Модели/Models:
TEC.PF3 M 1000 IN
TEC.PF3 M 1500 IN
TEC.PF3 M 2000 IN
TEC.PF3 LE 1000 IN
TEC.PF3 LE 1500 IN
TEC.PF3 LE 2000 IN
Electric
convector
heater
Outlook of devices, aslo colour scores can be revised without any special advance
notices.
Производитель вправе менять внешний вид прибора и цветовую гамму прибора без специального уведомления.
Page 2

www.timberk.com • electric convector heater
2
Dear customer!
Thank you for your good choice and purchase of Timberk
domestic electric convector. It will serve you for a long time.
Timberk domestic electric convector is designed to heat and
create a comfortable environment indoors during cold season.
The convector can be installed vertically only in a place, where
it is possible to connect to 220V~, 50 Hz single-phase power
supply wiring. This heating unit is easy-to-use and easy-toinstall, and it is efficient and features operating economy due
to minimum electric power losses, improved heat transfer and
maximum comfort heat flow distribution.
Please, read this operation manual carefully prior to use of the convector.
This operation manual contains important information regarding your
safety, as well as recommendations on the proper operation of the unit and
its maintenance.
Save this operation manual together with the guarantee card, cash register
receipt, if possible, cardboard box and packing material.
The purchased convector can slightly differ from the one, described in the
manual, but that doesn’t affect the methods of its use and operation.
A number of precautions is to be observed upon operation of the fan
heater. Improper operation as a result of ignoring precautions may harm
health of the user and other people, as well as damage their property.
1. Read all instructions prior to operation of the convector.
2. When the convector is operating it heats up to a very high temperature.
To prevent burns, do not touch hot surfaces of the unit by hands or other
parts of the body.
3. The unit must be placed away from flammable and easily deformable
objects.
4. Make sure that the unit’s case and the heating element cooled down
prior to the unit is dismantled and packed for long-term storage.
5. When the unit is not operated for a long time, store it factory-packaged
in a dry and cool place.
6. DO NOT COVER THE UNIT when it is operated. Do not dry clothes and
any other fabrics and materials on the unit. It may cause its overheating,
failure or inflict significant damage to you and/or your property.
7. The unit must always be kept watched after, especially with children
nearby. Carefully watch children not to touch the unit by hand.
8. Always disconnect the convector from the mains when it is not used.
9. The unit is equipped with a European-standard plug with a ground pin.
The plug must match the European-standard outlet and enter it without
any effort. If the plug doesn’t enter the outlet or enters it too tightly, turn the
plug vertically 180° and try again. If you still cannot plug it then you need to
call for an electrician to replace the electric outlet. Never use the unit if the
plug is not fully connected to the outlet.
10. Do not connect the unit to the mains if its surface is damp (wet).
11. Never use the unit in a situation when it may contact water.
IMPORTANT!
Important precautions and instructions, contained in
this manual, do not account for all possible modes and
situations to be encountered. It is vital to understand
that common sense, caution and thoroughness are the
factors that are impossible to be built-in in any product.
These factors must be taken into consideration by man
who is interested in the proper operation of the unit.
The manufacturer does not bear any responsibility in
case when the unit or its parts are damaged during
transportation, as a result of improper installation,
voltage fluctuations, as well as if some part of the unit
was altered or modified.
IMPORTANT!
The manufacturer considers this type of failure a nonguaranteed event.
1. IMPORTANT INFORMATION
2. PRECAUTIONS
Page 3

www.timberk.com • electric convector heater
3
3. PERFORMANCE PARAMETERS
12. When the unit is switched on and operating, do not touch its surface and
the surface of the control block by wet hands and any parts of the body.
13. Do not switch on the convector if its power cord or plug is damaged.
To prevent electric shock, the damaged power cord must be repaired only
in authorized service centers of the manufacturer and by skilled specialists.
14. Never try to repair it on your own. This may harm your health and affect
the unit’s guarantee maintenance.
15. Do not use the convector in open spaces outside.
16. It is forbidden to install and use the unit in bathrooms, shower rooms or
swimming pools, in the very places, where water jets or drops may contact
its surface directly when it is switched on.
17. Do not lay the convector’s power cord under carpets and do not press
it by furniture. Lay the power cord in such a manner so that it is impossible
to trip over it.
18. To switch off the unit, set the heating power mode selector into position
«OFF» and unplug the power cord. Never pull the power cord and do not
unplug it abruptly.
19. Do not thrust fingers and prevent entering of foreign objects into any
ventilation, air intakes or air outlets, since it may cause electric shock or
damage of the convector.
20. To prevent a potential fire, do not block air intakes and air outlets. Do
not hang and dry things on the convector! Use the convector only on a dry
smooth surface.
21. The convector contains internal hot and sparkling components. Do not
use the convector in places, where petroleum, paint or any other flammable
liquids are used or stored.
22. Use this convector only in the manner, set forth in this manual. Any
other use, not recommended by the manufacturer, can result in a fire,
electric shock or injuring of people.
23. By no means clean the convector when it is connected to the mains.
Do not submerge the convector into water. Never pull the power cord.
24. To prevent overheating and fire, as well as damage of internal electric
mains, do not change the length of the power cord and do not connect the
unit through electric extenders. However, if necessary, an extender may be
used if its parameters comply with the unit’s power and if it is not used by
other power energy consumers.
25. For normal operation of the unit the mains voltage must be sufficient
and its technical parameters must be in strict compliance with technical
parameters indicated on the unit. If necessary, verify characteristics of your
mains at the power energy supplier.
26. Install and operate the unit vertically only. It is forbidden to use the unit
in a horizontal or inclined position.
27. The unit must be installed in such a way so that the control panel would
be unavailable for a person, situated directly in a bathroom (in contact with
water) or a person taking a shower.
28. It is forbidden to install the unit directly under an outlet or under a laid
electric cable when outgoing heat flows come in contact with it. It may
cause their overheating and create an emergency.
29. The unit is not intended to be used by people (including children) with
limited physical, sensory or intellectual capabilities, having insufficient
experience and knowledge, unless they are supervised or received
instructions on how to use the unit from a person, responsible for their
safety. It is necessary to be careful that children do not play with the
convector.
Operation principle
Cold air in the lower part of a room at the level of feet goes through the
convector’s heating element. Expanding at the moment of heating, heat
flow runs upwards through the outlet grill louver and smoothly spreads
along the room. At that the flow’s direction, set by louver’s inclination,
creates a favorable, accelerated circulation of warm air inside a room, not
concentrating it on walls and windows.
Key features
1. Combination of a convection effect (hence the name “convector”) with
mild thermal radiation makes the heater an economical thermal energy
source, significantly increasing the number of its followers year by year.
2. Simple and efficient ways to control a temperature mode.
3. A high-precision controlled thermostat.
4. Fast self-repayment due to a high performance factor and speed of
reaching the set temperature.
5. Ease of installation, operating reliability and ease of maintenance.
6. Three-mode heating for power energy saving.
7. A built-in air ionizer (for models TEC. PF3 LE...IN).
Page 4
www.timberk.com • electric convector heater
4
NOTE:
The manufacturer reserves the right to change the
set-list of the device (including liquid and powder
components) for different supplies without prior
notice. The changes either in no way influence the
basic technical parameters of the device or may
improve them, and also not violate the legislation or
quality standards of the countries of manufacture,
transit and selling.
The changes in the set-list may result in changing
of the weight and dimensions of the device, but not
more than by +\- 5-20% (depending on the product
category).
8. Support legs for the convector to be installed in any convenient place.
9. A built-in carrying handle.
10. A built-in fall sensor will switch off the convector if it is turned away
from a vertical position, for example, if it is accidentally tipped over when
operated on legs (for models TEC. PF3 LE...IN).
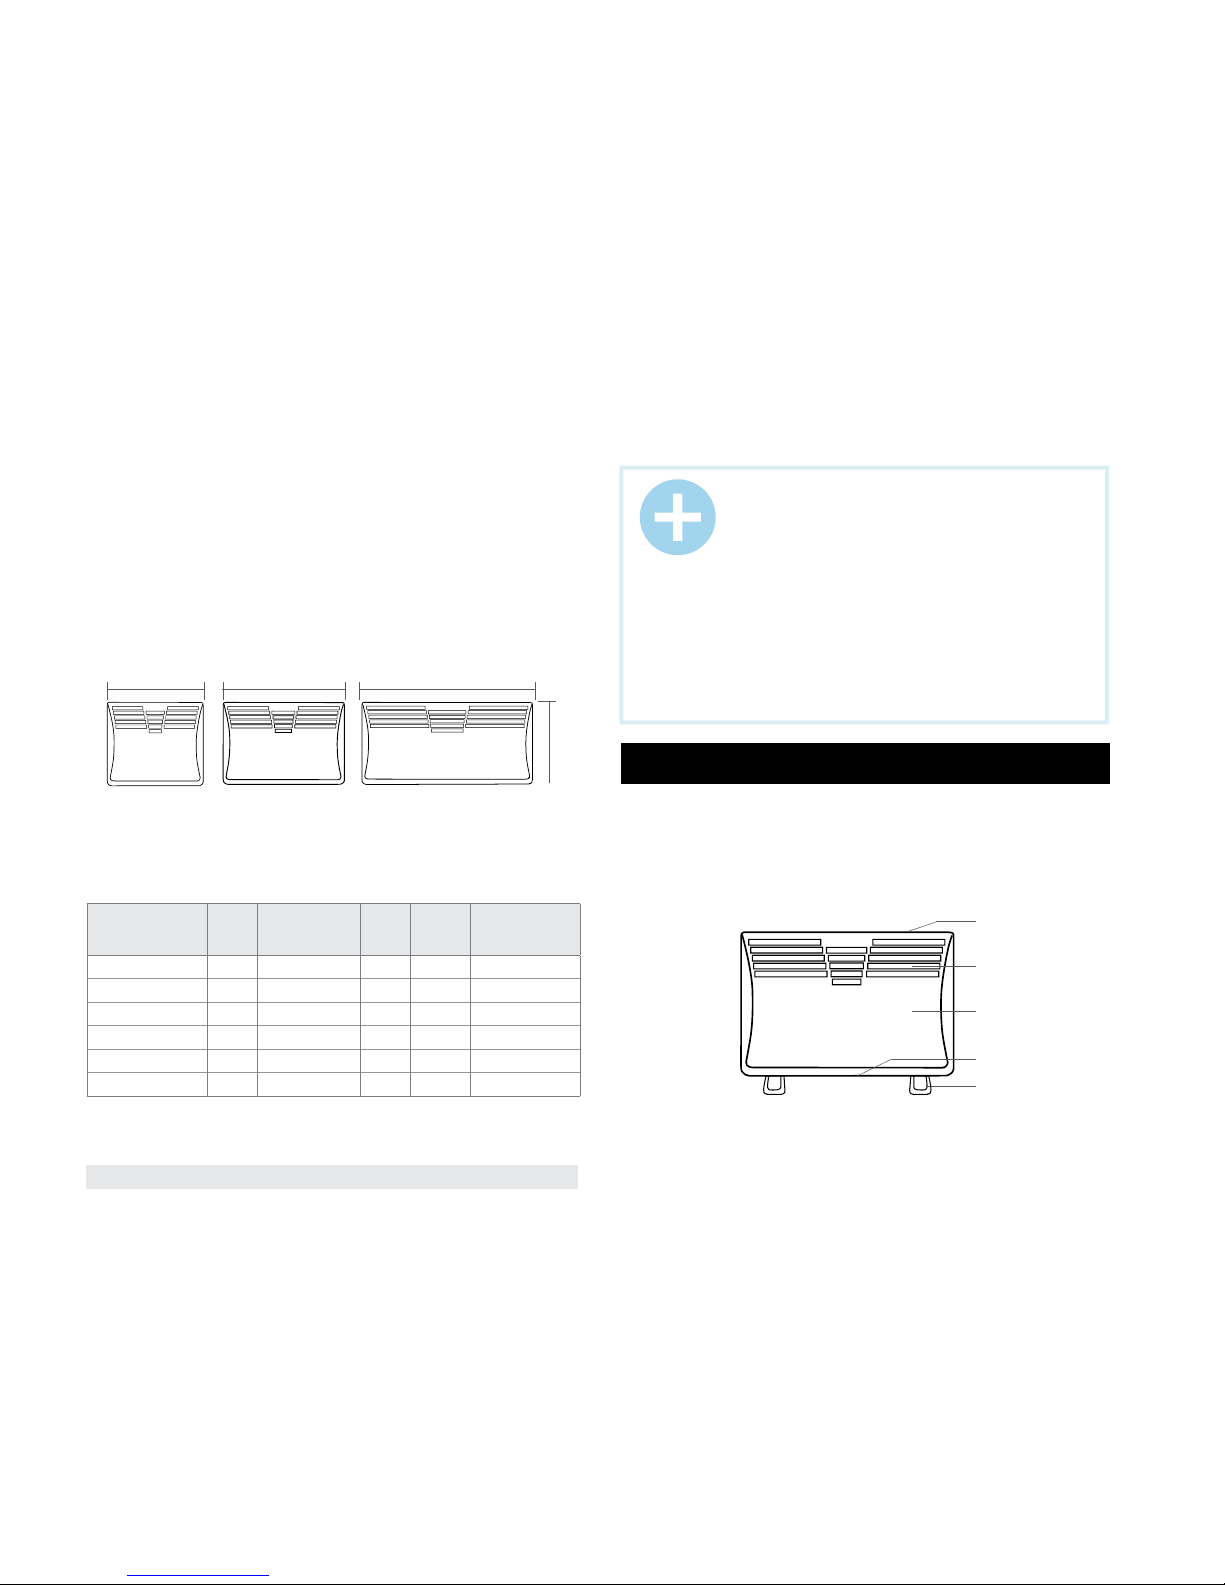
Dimensions of convectors depending on power (Fig. 1)
Timberk series convectors are distinguished on maximum consumed
power of the heating element and differ from each other by the unit’s length
at equal height and depth. (Standard overall height of all units is equal to
400 mm). This pattern in forming overall dimensions allows the consumer
to use Timberk convectors of different power in one room next to each
other without breaking regular symmetries, and perfectly integrating several
units into your interior at the same time.
1000 w
460 mm 595 mm 830 mm
400 mm
1500 w 2000 w
Fig. 1
Technical characteristics
Table 1
Model
Power
supply,
V/Hz
Operating power
consumption (on
modes), W
Rated
curren, A
Net weight,
kg
Overall dimensions, mm
TEC.PF3 M 1000 IN 220~/50 400/600/1000 4.5 3.6 460х400х69
TEC. PF3 M 1500 IN 220~/50 500/1000/1500 6.8 4.4 595х400х69
TEC. PF3 M 2000 IN 220~/50 800/1200/2000 9.1 5.6 830х400х69
TEC. PF3 LE 1000 IN 220~/50 400/600/1000 4.5 3.6 460х400х69
TEC. PF3 LE 1500 IN 220~/50 500/1000/1500 6.8 4.4 595х400х69
TEC. PF3 LE 2000 IN 220~/50 800/1200/2000 9.1 5.6 830х400х69
For a detailed description of technical parameters and characteristics go to
www.timberk.com or contact TIMBERK official dealers.
1. Control panel
2. Outlet grill louver
3. Unit’s case (front part)
4. Cold air inlet
5. Support legs
Fig. 2
4. DESCRIPTION OF THE CONVECTOR
1
4
5
2
3
Page 5
www.timberk.com • electric convector heater
5
Fig. 4 Fig. 5
NOTE:
To improve products quality, design and technical
characteristics of the convector, as well as its scope
of delivery may be altered by the manufacturer
without prior notification.
1.Convector, with a bracket and a carrying handle – 1 pc.
2.Moounting set – 1 pcs.
3.Support leg – 2 pcs.
4.Operation manual – 1 pc.
5.Guarantee card – 1 pc.
6.Packing – 1 pc.
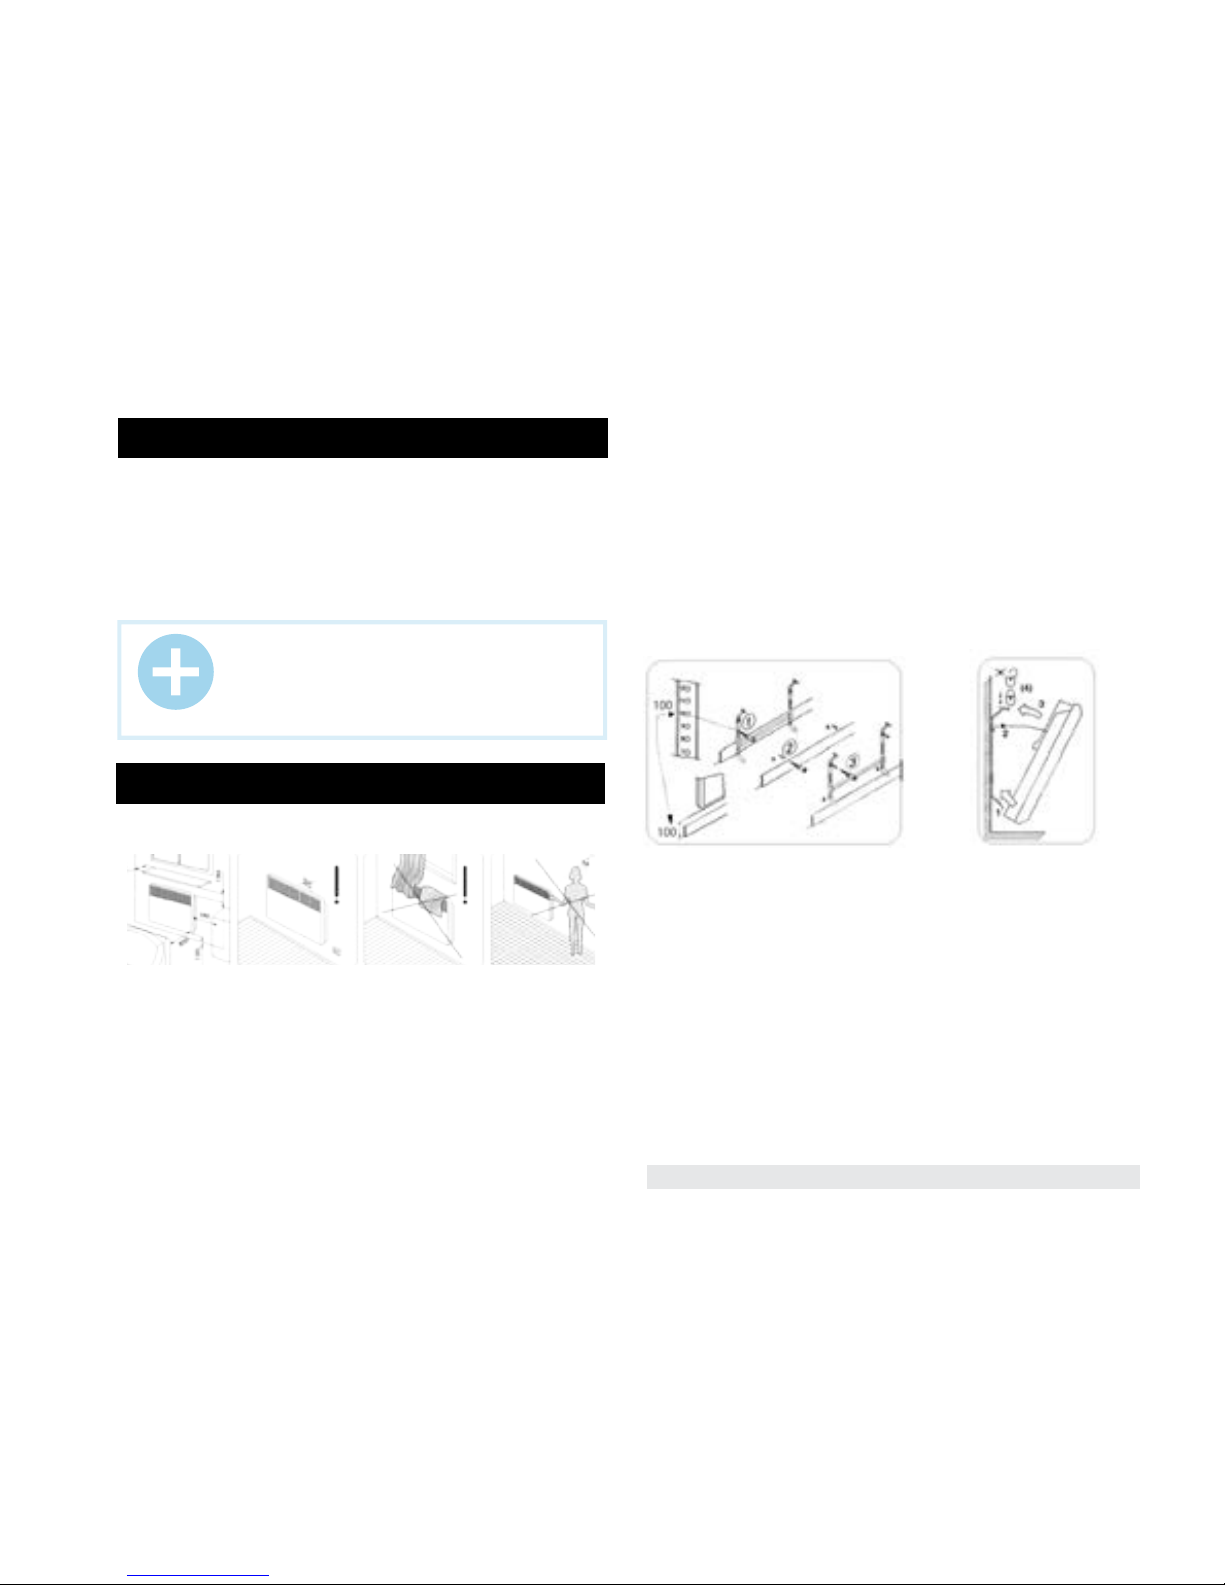
Wall mounting of the convector
5. SCOPE OF DELIVERY
6. INSTALLATION
Fig. 3
1. Open the factory package and carefully remove the unit out of it.
2. Remove seals out of foamed plastic on sides of the unit and take it out
of polyethylene.
3. Determine the place of convector’s installation observing minimum
distances from objects and minimum distance from the floor.
4. Mark the height, at which the convector is to be mounted, then attach
a bracket to the wall.
5. Put visible marks in mounting holes.
6. Drill holes of the required diameter on the mounting holes, insert dowels*,
attach the mounting bracket and fasten adjusting screws*, thereby securing
the bracket on the wall.
7. Mount the convector on the bracket by connecting 4 slots on the
back part of the convector with 4 lugs on the bracket (Fig. 4) and pull it
downwards.
8. To fix the convector, turn the clamp in the upper part of the bracket
clockwise so that it enters a slot in the back panel of the convector.
9. To dismount the convector, repeat the abovementioned actions in the
reverse order.
*May not be included in delivery set
Leg mounting of the convector
1. Take the legs out of a package box (a set of legs has individual package
box, standard Timberk electric convector is not equipped with legs you
can purchase them, if necessary, as an additional accessory).
2. Turn over the unit so that its lower part was at the top.
3. Attach legs to the lower part of the unit so that the mounting holes
coincide with holes on the unit’s case.
4. Fasten mounting screws in the present holes, exerting enough force.
Check security of mounting.
5. Turn over the unit to the right position and place it on a smooth,
horizontal surface strictly in a vertical position.
The unit is ready to use!
Page 6
www.timberk.com • electric convector heater
6
Connection to electric mains
1. The convector is designed to be connected to 220V~, 50Hz singlephase voltage mains with a grounding circuit.
2. Prior to connection make sure that parameters of electric mains
in the place of connection comply with parameters, indicated on the
identification plate with technical data of the unit.
3. t is necessary to follow active electrical safety precautions, connecting
the convector to electric mains.
4. An electric outlet must be properly grounded. The outlet must be
designed for rated current not less than 10A. Electric outlet and plug must
always stay dry to prevent current leakage. Regularly check if the electric
plug is tightly connected to the outlet. It must be done in the following
order: connect an electric plug into an outlet, after half hour operation turn
off the convector and disconnect the plug from the outlet, check if the
plug is heated by your hand. If the plug heated over 50°C then replace
the outlet by a new one to prevent damages, incidents, fire as a result of
bad electric contact. A specialist must do the job.Нословтому
Fig. 6
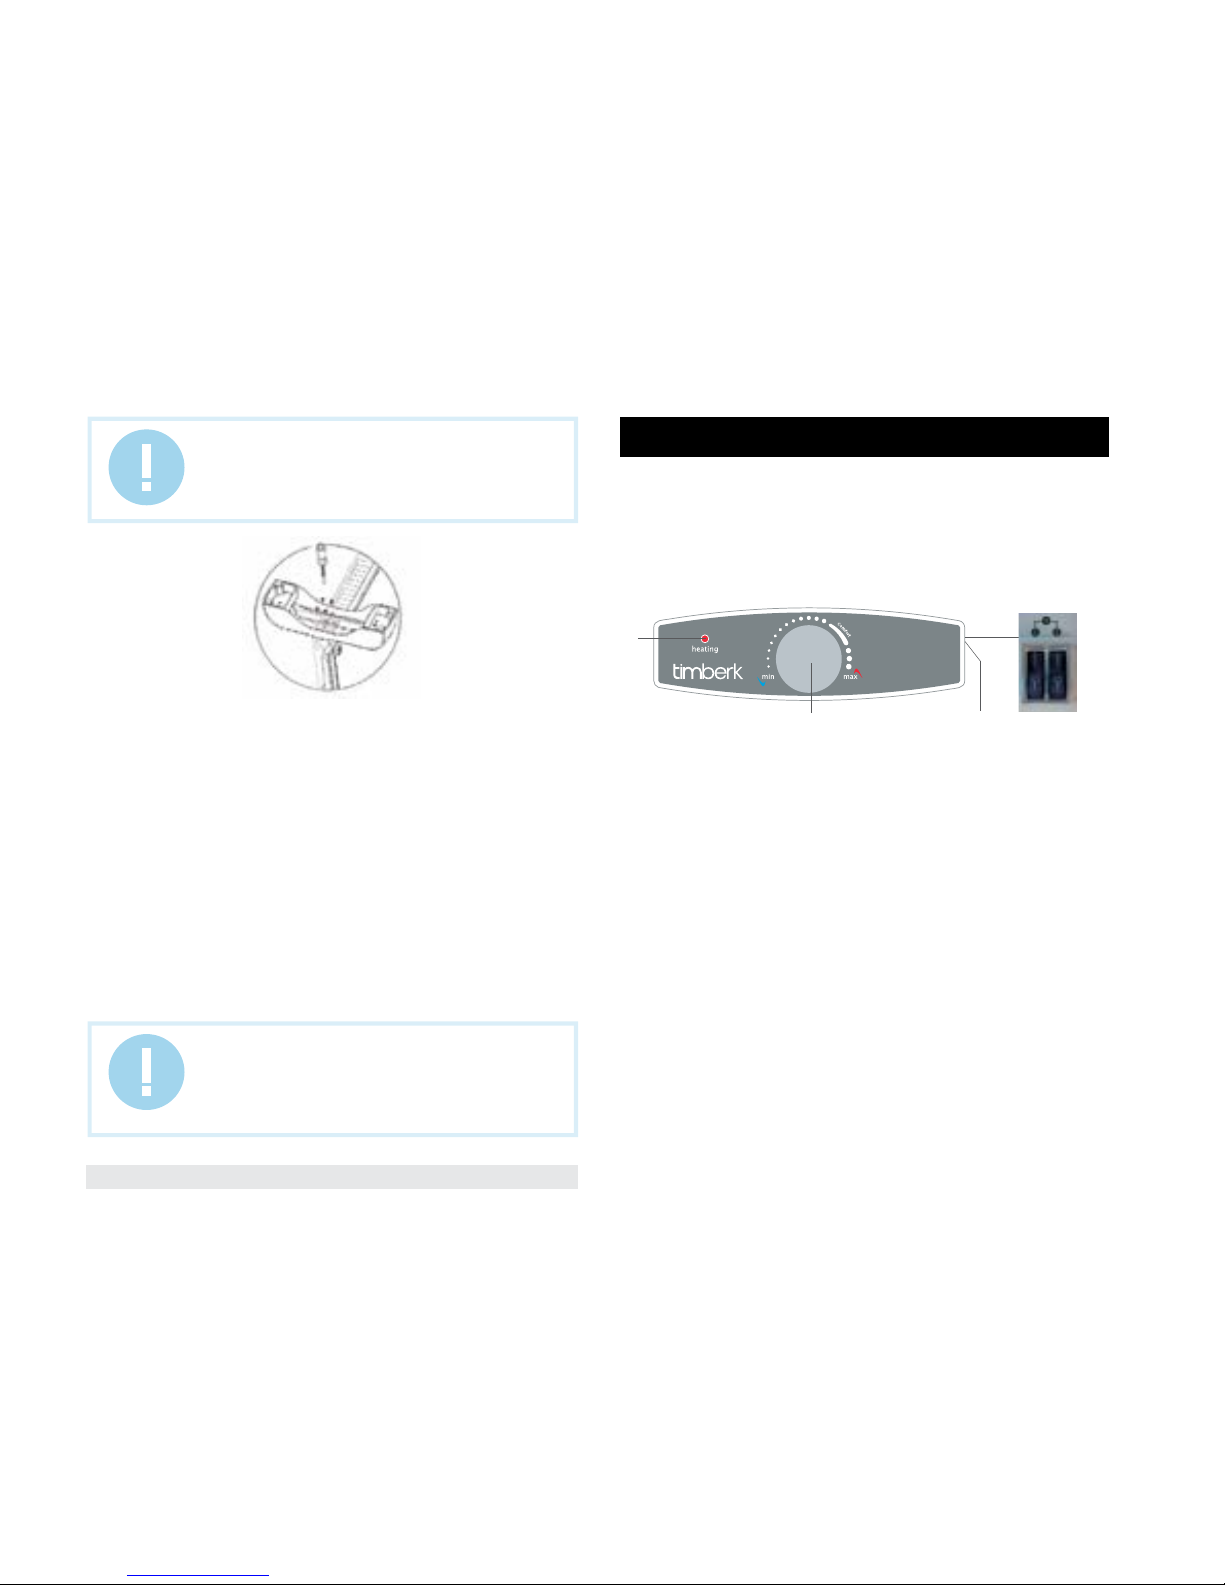
TEC.PF3 M…IN series convectors are equipped with a mechanical
thermostat.
TEC.PF3 LE…IN series convectors are equipped with a high-precision
electronic thermostat with a LED-display.
1.«Heating» indicator light
It is illuminated when the unit’s heating is on.
2. Thermostat handle
It is used to set the desired room temperature.
3. Two-button switch, with display
It is used to select the following heating power modes: I mode (low power),
II mode (medium power), III mode (high power).
Operation of TEC.PF3 M…IN series convector
1.Switch on the convector
Connect the convector to electric mains by plugging the power cord into
an electric outlet.
2.Select the heating power
2.1. Press button «1» to select the low heating power, at that the indicator
light of button «1» will be illuminated.
2.2. Press button «2» to select the medium heating power, at that the
indicator light of button «2» will be illuminated.
2.3. Press button «1» and «2» to select the high heating power, at that
indicator lights of both buttons will be illuminated.
Fig. 7
IMPORTANT!
The electric outlet must be rated for not less than 10A,
electric cable with a strand with cross section not less
than 3x1.5 mm2 (for copper).
IMPORTANT!
Warning! It is forbidden to use convector on the floor
or any other horizontal surface without casters!
7. CONTROL OF THE CONVECTOR
1
2 4
TEC.PF3 M...IN series control panel (Fig. 7)
Page 7
www.timberk.com • electric convector heater
7
Fig. 8
1098
3 4 7 12 5 6 2
11311
3.Set temperature
3.1. Temperature can be set within the range +5 to +30°C.
3.2. Turn the thermostat handle clockwise to the stop to position “max”, at
that if room temperature is below the set one, then the “heating” indicator
light must be illuminated. When the room temperature reaches the desired
level, turn the thermostat handle counterclockwise until the unit is switched
off, the “heating” indicator light will go out. Now the thermostat will maintain
the set temperature, switching on and off the convector from time to time.
During especially cold weather the convector may not be able to provide
the required room heating. In this case set the thermostat to the level
somewhat higher than the desired one.
4.«Antifreeze» mode
Turn the thermostat handle counterclockwise to position “min”. The
thermostat will automatically switch on heating of the convector, if the room
temperature goes below +5°C and the unit is connected to electric mains
and the heating mode is on.
5. «Comfort» mode
«Comfort» mode, which can be selected by means of the thermostat
handle, corresponds to the most comfortable room temperature.
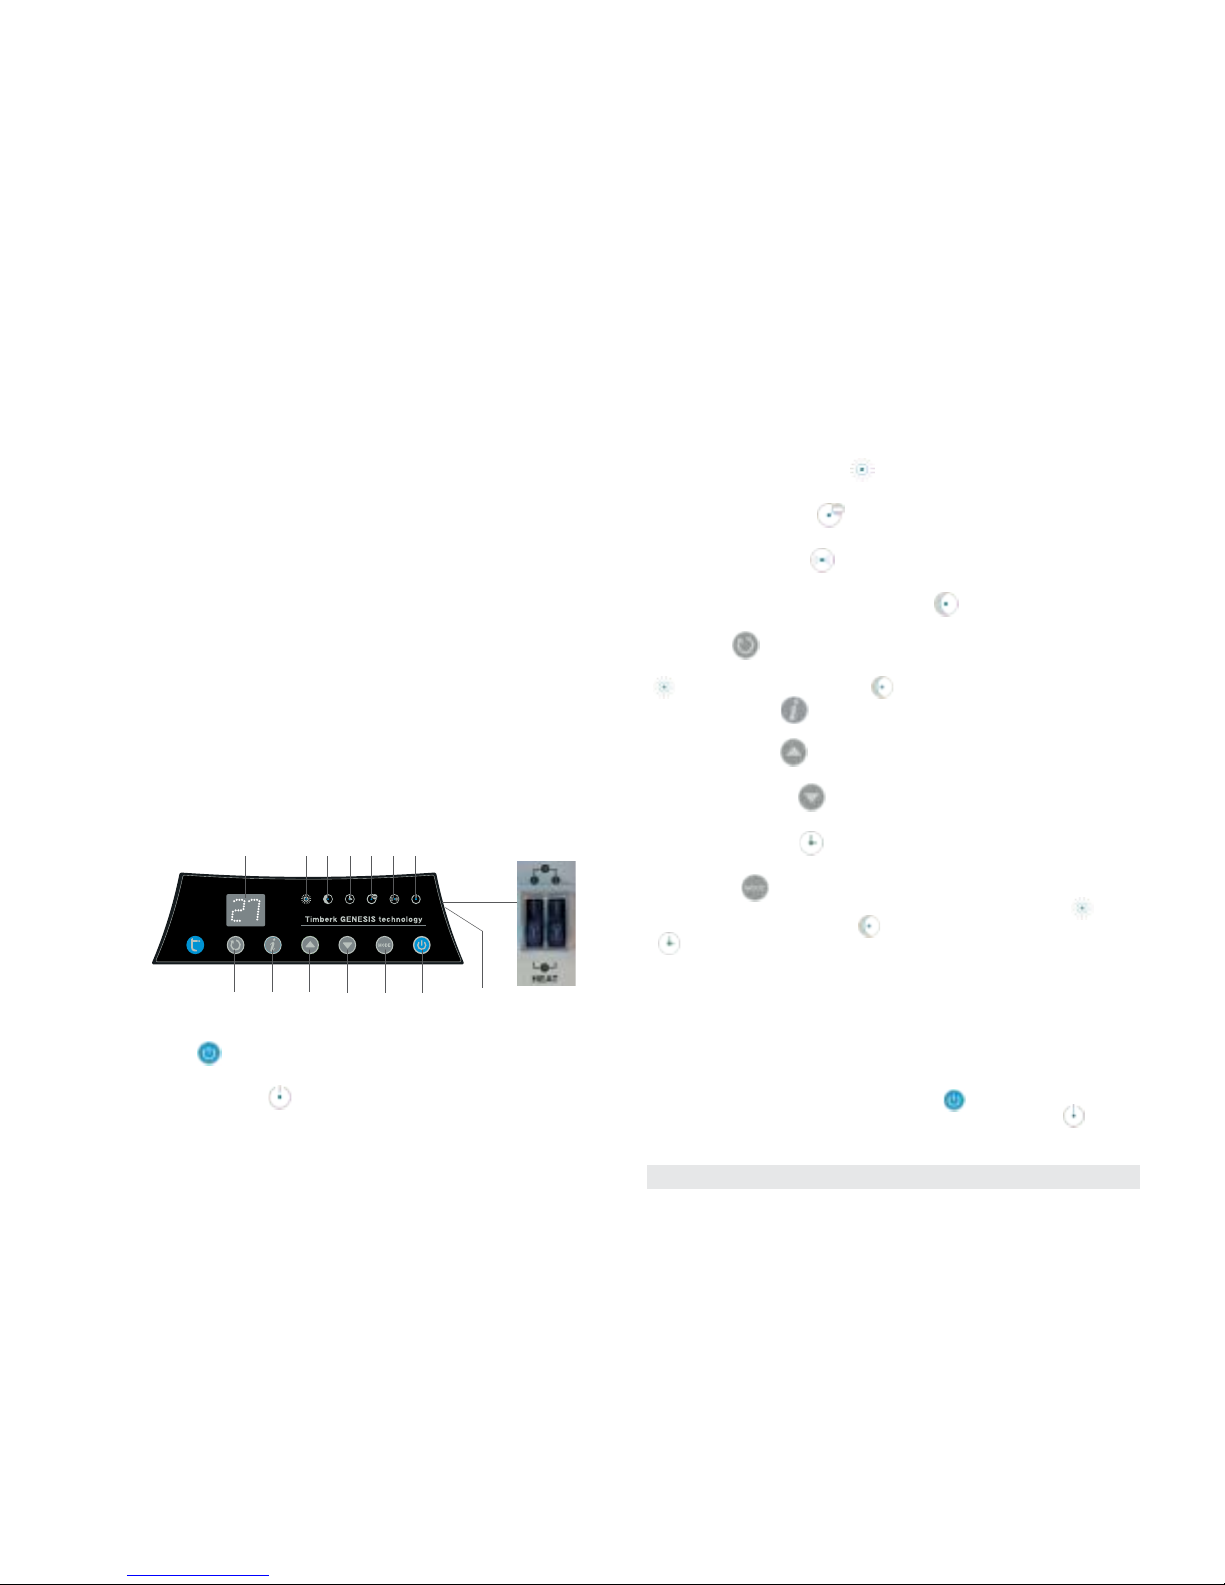
1.Button « »
It is used to switch on and off the convector.
2.Power indicator « »
It is illuminated when the unit is connected to electric mains.
TEC.PF3 EL...IN series control panel (Fig. 8)
14
3.LED-display
LED-display can show temperature and timer settings.
4.Comfort mode indicator « »
It is illuminated when the convector is operating in the comfort mode.
5.Air ionizer indicator « »
It is illuminated when the air ionizing function is activated.
6.Heating indicator « »
It is illuminated when the convector is operating in the heating mode.
7.Economy operation mode indicator « »
It is illuminated when the convector is operating in the economy mode.
8.Button « »
It is used to select the following operation modes: comfort mode (indicator
« »), economy mode (indicator« »), antifreeze mode (symbol «AF»).
9.Ionizer button « »
It is used to turn on/off air ionizing.
10.Button «up» (« »)
It is used to increase the selected value.
11.Button “down” (« »)
It is used to decrease the selected value.
12.Timer indicator « »
It is illuminated when the convector switch off timer function is activated.
13. Button « »
It is used to set temperature in the comfort mode (indicator « »), in
the economy mode (indicator « »), as well as to set the timer (indicator
« »).
14. Two-button switch, with display
It is used to select the following heating power modes: 1 mode (low power),
2 mode (medium power), 3 mode (high power).
Operation of TEC.PF3 LE…IN series convector
1.Switch on the convector
Connect the convector to electric mains by plugging the power cord into an
electric outlet, at that a red power indicator « » will be illuminated on the
control panel and a sound signal will be given, then press button « ».
Page 8
www.timberk.com • electric convector heater
8
2.Select the heating power mode
2.1. Press button «1» to select the low heating power, at that the indicator
light of button «1» will be illuminated.
2.2. Press button «2» to select the medium heating power, at that the
indicator light of button «2» will be illuminated.
2.3. Press button «1» and «2» to select the high heating power, at that
indicator lights of both buttons will be illuminated.
3.Set temperature
3.1. Temperature can be set within the range +5 to +30°C, in increments
of 1°C.
3.2. Factory setting of the comfort mode temperature is +24°C, factory
setting of the economy mode temperature is +17°C.
3.3. To change the comfort mode temperature, press button « » once,
at that the comfort mode indicator « » and value of the set temperature
on LED-display will be blinking, then press button « » or « » to set
the desired temperature.
3.4. To change the economy mode temperature, press button « » twice,
at that the economy mode indicator « » and value of the set temperature
on LED-display will be blinking, then press button « » or « » to set
the desired temperature.
3.5. After the desired temperature is set, the last set value will be stored
and LED-display will show the current temperature, at that if room
temperature is less than the set one, then the heating indicator « »
must be illuminated. When room temperature reaches the desired level,
the heating indicator « » will go out. The convector will maintain the set
temperature, switching on and off heating from time to time.
4.Select the operation mode
4.1. Press button « » once to select the comfort operation mode, at that
indicator « » will be illuminated on the control panel. In this mode the
convector will automatically maintain the set comfort mode temperature,
switching on and off heating from time to time.
4.2. Press button « » twice to select the economy operation mode, at
that indicator « » will be illuminated on the control panel. In this mode the
convector will automatically maintain the set economy mode temperature,
switching on and off heating from time to time.
4.3. Press button « » three times to select the antifreeze mode, at
that symbol «AF» will be shown on the LED-display. The convector will
automatically maintain temperature within the range +5°C to +7°C,
switching on and off heating from time to time.
5.Set the convector switch off timer function
5.1. When the convector is operating press button « » three times, at that
indicator « » will be blinking on the control panel, and LED-display will
show blinking value [0.0] or the last set value of the timer.
5.2. Press button « » or « »to set the convector switch off time, in
increments of 1 hour, from 0 to 24 hours. The LED-display will show the
countdown of time left until the convector is switched off.
5.3. The set time value will be stored and in 3 seconds the system will
automatically return to indicating the temperature value, at that indicator
« » will be illuminated on the control panel.
5.4. The convector will be switched off after the timer expires, indicators on
the control panel and temperature indication on the LED-display will go out,
at that red power indicator « » will be illuminated.
5.5. Switching off the unit or setting the timer value [0.] will cancel the
convector switch off timer function.
6. Set the convector switch on timer function
6.1. When the convector is switched off and only red power indicator
« » is be illuminated, press button « » and « » simultaneously,
at that a sound signal will be given, indicator « » will start blinking on the
control panel, and sense [0.] Will blink on LED display .
6.2. Press button « » or « » to set the convector switch off time, in
increments of 1 hour, from 0 to 24 hours. Setuped time value will be saved.
The LED-display will show time left until the convector is switched on will
be shown on the display and indicator « » will be illuminated on the
control panel.
6.3. The convector will be switched on to operate in the economy mode
after the timer expires, and will maintain the set temperature.
7.Audio signal
An audio signal is given when the convector is switched on and off, as well
as the buttons are pressed.
8.Lock
8.1. When the convector is operating, to lock the system simultaneously
press and hold buttons « » and « » for 3 seconds, after that symbol
«[ ]» will be shown on the LED-display. In 3 seconds temperature Value will
be shown, at that buttons on the control panel will be locked, and symbol
«[ ]» will be shown when they are pressed.
8.2. To unlock the system, press and hold buttons « » and « » for 3
seconds or switch off the convector.
Page 9

www.timberk.com • electric convector heater
9
9.Air ionizing function
The convector is equipped with an air ionizer.
9.1.You can switch on and off the air ionizer by means of the ionizer button
« ».
9.2.Air ionizer indicator « » is illuminated when the air ionizer is switched
on.
9.3.The air ionizer is a completely independent device and can operate
even when the unit’s heating mode is off.
10.«RESTART» function
In case of a short-term power outage, the convector will be automatically
switched on and will operate with the last user settings (except for timer
settings) after power supply is restored.
11.Switch off the convector
To switch off the convector, press and hold button « » for 3 seconds.
NOTE:
A small static electric charge may be accumulated on
metal surfaces of a case in units, equipped with an
air ionizer.
If your electric main has no grounding circuit or it is
damaged. In this case there is a small possibility of
electric shock from static voltage.
IMPORTANT!
If the unit is operated without a grounding circuit or it
is damaged, it is not recommended to switch on and
operate the air ionizer.
8. AIR IONIZER OPERATION PRINCIPLE AND PURPOSE
Table 2
Rated indices
Concentration
n+ (ion/cm3)
Concentration
n- (ion/cm3)
Unipolarity
coefficient Y
Minimum
permissible
N+>=400 n->=400
0,4=<Y=<1,0
Maximum
permissible
n+<=50000 n-<=50000
The unit must be cleaned regularly to remove dust and dirt from external
surfaces, since it affects its operation efficiency and temperature
parameters of room heating. Prior to preventive operations, switch off the
unit and disconnect it from electric mains, let it cool down, then wipe its
surface by a soft and slightly damp duster. It is not recommended to use
detergents for washing, including materials with abrasive elements. Prevent
damaging the unit by sharp objects, since scratches on a painted surface
may cause rusting.
Rear surface of the convector must also be regularly cleaned from dust and
dirt. For this purpose it is necessary to dismount the unit from the bracket,
and after cleaning it is necessary to return it to the initial position.
Preventive cleaning should be performed regularly to maintain technical
condition of the convector and preserve its external appearance for a long time.
9. MAINTENANCE
capture these electrons, receiving a negative charge and become negative
air ions, thus, a high concentration of light negative air ions of oxygen is
generated in the air.
The Ionizer is designed for sanitation and prevention of different diseases; to
reduce fatigability, to improve ability to work and immunity; to clean air
from airborne pollutions, allergens and microorganisms; to neutralize harmful
impact of operating computers, TV sets, office equipment on man; to restore
biological activity of the air, coming to a room through air conditioners, filters,
air-ducts; to create a comfortable environment and good mood.
Besides, air ionizers are intended to clean the air from tobacco smoke, smells,
resins, dust, pollen, plant spores, animal hair, viruses and bacteria. Air ionizers
will help to preserve your health, prevent infectious diseases, allergies and
create a comfortable environment at home and/or in the office.
Applied air ionizer complies with the current SanPiN dated 2003. Values of
rated indices of air ion concentrations and the unipolarity coefficient are given
in Table 3 (as per SanPiN 2.2.4.1294-03):
For models TEC.PF3 LE... IN
Principle of operation of the ionizer is generally reduced to the fact that under
high voltage, applied to metal needles with diameter of the point equal to
5…10 m, there is electron flowing-off electric efflux. Molecules of air oxygen
Page 10

www.timberk.com • electric convector heater
10
Upon completion of service life, the convector must be disposed in
compliance with regulations, rules and by means, currently in force at a
disposal station. Detailed information on disposal of the convector you can
obtain at the representative of local authorities.
Models TEC.PF3 M 1000 IN, TEC. PF3 M 1500 IN, TEC. PF3 M 2000 IN
Models TEC. PF3 LE 1000 IN, TEC. PF3 LE 1500 IN, TEC. PF3 LE 2000 IN
Fig. 9
Fig. 10
10. CIRCUIT DIAGRAMS
11. DISPOSAL
* This product must have storage in dry, well-ventilated space of warehouse
at the temperature not lower than -30°
Possible malfunctions and remedies for them:
If you are not able to remedy a malfunction according to the
recommendations or other malfunctions occur, contact the authorized
service center of Timberk.
12. TROUBLESHOOTING
Malfunction Cause Remedy
1. The heater heats poorly
1. The heating element is faulty
1. Contact the authorized service center
of Timberk
2. Low voltage in the electric mains 2. Check voltage in the electric mains
2. The heater does not work
1. No voltage in the electric mains
1. Check presence of voltage in the
electric mains
2. Breakdown of the electric cable
2. Check integrity of the electric cable and
replace it if necessary
3. The automatic circuit breaker of the
electric mains is faulty
3. Check operability of the automatic circuit
breaker of the electric mains and replace
the faulty circuit breaker if necessary
4. Breakdown in the heating element circuit
4. Contact the authorized service center
of Timberk
13. TRANSPORTATION AND STORAGE
Temperature
requirements*
Humidity
requirements*
We are exploring new technologies and we constantly improving the quality
of our products. That’s why specifications, design and accessories are
subject to change without any specific notice.
Transportation and
storage
From -30° to +50°
From 15% to 85%
(without a condensate)
Page 11

www.timberk.com • электрический конвектор
11
Уважаемый покупатель!
Благодарим Вас за удачный выбор и приобретение бытового электрического конвектора Тimberk. Он прослужит Вам
долго.
Бытовой электрический конвектор Timberk предназначен
для обогрева и создания комфортной атмосферы в помещении в холодное время года. Конвектор может быть установлен только в вертикальном положении в местах, где есть
возможность подключения к электропроводке с однофазным электропитанием 220В~, 50 Гц. Данный нагревательный
прибор удобен и прост в установке, эффективен и экономичен в использовании в связи с минимальными потерями
электроэнергии, повышенной теплоотдачей и максимально
комфортным распределением теплового потока.
Просим внимательно ознакомиться с руководством по эксплуатации
перед использованием конвектора.
В данном руководстве по эксплуатации содержится важная информация, касающаяся Вашей безопасности, а также рекомендации по
правильному использованию прибора и уходу за ним.
Сохраните руководство по эксплуатации, вместе с гарантийным талоном, кассовым чеком, и, по возможности, картонной упаковкой и
упаковочным материалом.
Приобретенный Вами конвектор может несколько отличаться от
описанного в руководстве, что не влияет на способы использования
и эксплуатации.
При использовании конвектора, необходимо соблюдать ряд мер предосторожности. Неправильная эксплуатация в силу игнорирования
мер предосторожности может привести к причинению вреда здоровью пользователя и других людей, а также нанесения ущерба их
имуществу.
1. Прочитайте все инструкции перед использованием конвектора.
2. Конвектор при работе нагревается до очень высокой температуры.
Чтобы избежать ожогов, не прикасайтесь руками и другими частями
тела к горячим поверхностям прибора.
3. Прибор должен располагаться вдали от легковоспламеняющихся
и легкодеформируемых объектов.
4. Удостоверьтесь, что корпус прибора и его нагревательный элемент
остыл, прежде чем прибор будет демонтирован и уложен в упаковку
для длительного хранения.
5. Когда прибор не используется долгое время, храните его в сухом
прохладном месте в заводской картонной упаковке.
6. НЕ НАКРЫВАЙТЕ ПРИБОР, когда он работает. Не сушите на нём
одежду и любые другие ткани и материалы. Это может привести к его
перегреву, выходу из строя или причинить значительный ущерб Вам
и/или Вашему имуществу.
ВНИМАНИЕ!
Эти факторы должен учитывать человек, который
заинтересован в надлежащей эксплуатации устрой
ства. Изготовитель не несет ответственности в случае повреждения прибора или его отдельных частей
во время транспортировки, в результате неправиль
ной установки, в результате колебаний напряжения,
а также в случае, если какая-либо часть прибора
была изменена или модифицирована.
ВНИМАНИЕ!
Важные меры предосторожности и инструкции, содержащиеся в данном руководстве, не включают
всех возможных режимов и ситуаций, которые мо
гут встречаться. Необходимо понимать, что здравый смысл, осторожность и тщательность являются
факторами, которые невозможно «встроить» ни в
один продукт.
1. ВАЖНАЯ ИНФОРМАЦИЯ
2. МЕРЫ ПРЕДОСТОРОЖНОСТИ
ВНИМАНИЕ!
Производитель рассматривает данный вид поломки, как негарантийный случай.
Page 12

www.timberk.com • электрический конвектор
12
7. Прибор всегда должен находиться под наблюдением, особенно если
неподалеку от прибора находятся дети. Внимательно следите за тем,
чтобы дети не прикасались к прибору руками.
8. Всегда отключайте конвектор от электрической сети, когда он не
используется.
9. Прибор оснащен евровилкой с контактом заземления. Вилка должна подходить к стандартной евророзетке и входить в нее без особых
усилий. Если вилка не входит в розетку или входит туго, переверните ее
по вертикали на 180 градусов и повторите попытку. Если и после этого
Вы не можете легко вставить вилку в розетку, вызовите электрика, для
замены розетки. Никогда не используйте прибор, если вилка вставлена в розетку не до конца.
10. Никогда не подключайте прибор к электросети, если его поверхность влажная (мокрая).
11. Никогда не используйте прибор в ситуации, когда он может соприкасаться с водой.
12. Когда прибор включен и работает, не касайтесь его поверхности
и поверхности блока управления мокрыми руками и любыми частями
тела.
13. Не включайте конвектор, если его сетевой шнур или вилка имеют повреждения. Во избежание опасности поражения электрическим
током, поврежденный сетевой шнур должен меняться только в авторизованных сервисных центрах производителя, квалифицированными
специалистами.
14. Никогда не пытайтесь производить ремонт конвектора самостоятельно. Это может причинить вред Вашему здоровью и повлиять на
гарантийное обслуживание прибора.
15. Не используйте конвектор на открытых пространствах вне помещения.
16. Запрещено устанавливать и использовать прибор в ванных комнатах, душевых или бассейнах, именно в тех местах, где есть вероятность
прямого попадания струй и капель воды на его поверхность во время,
когда прибор включен.
17. Не прокладывайте сетевой шнур конвектора под ковровыми покрытиями и не прижимайте его предметами мебели. Прокладывайте
сетевой шнур так, чтобы об него невозможно было споткнуться.
18. Для выключения прибора установите выключатель сбоку на панели
управления в положение «О» («выключено») и отсоедините вилку сетевого шнура от розетки. Для приборов серии TEC.PF3 LE...IN также
нажмите и удерживайте кнопку « » на панели управления. Никогда
не тяните за сетевой шнур и не отсоединяйте вилку резко.
19. Не просовывайте пальцы и исключите попадание посторонних
предметов в какие-либо вентиляционные, воздухозаборные или выходные отверстия, так как это может привести к поражению электрическим током или повреждению конвектора.
20. Для предотвращения возможного пожара не загораживайте ничем
воздухозаборные и выходные отверстия. Не вешайте и не сушите вещи
на конвекторе! Используйте конвектор только на ровной сухой поверхности.
21. Конвектор содержит внутри горячие и искрящие компоненты. Не
используйте конвектор в местах использования или хранения бензина,
краски или других легковоспламеняющихся жидкостей.
22. Используйте данный конвектор только так, как описано в данном
руководстве. Любое другое использование, не рекомендуемое изготовителем, может привести к пожару, поражению электрическим током
или травмированию людей.
23. Ни в коем случае не выполняйте очистку конвектора, когда он
включен в розетку. Не погружайте конвектор в воду. Никогда не тяните
за сетевой шнур.
24. Во избежание перегрева и риска возникновения пожара, а также повреждения внутренней электрической сети, не изменяйте
длину сетевого шнура и не подключайте прибор через электрические удлинители. Однако при необходимости можно использовать
удлинитель, если его параметры соответствуют мощности прибора и
если он не используется другими потребителями электроэнергии.
25. Для нормальной работы прибора уровень напряжения электросети должен быть достаточен, а ее технические параметры должны быть
в строгом соответствии с техническими параметрами, указанными на
корпусе прибора. При необходимости выясните характеристики своей
сети у поставщика электроэнергии.
26. Устанавливайте и эксплуатируйте прибор в строго вертикальном
положении. Запрещено эксплуатировать прибор в горизонтальном или
наклонном положениях.
27. Прибор должен быть установлен так, чтобы панель управления не
могла быть доступна человеку, находящемуся непосредственно в ванной (в контакте с водой) или принимающему душ.
28. Запрещено устанавливать прибор непосредственно под электрической розеткой или под проведенным электрическим кабелем, когда
выходящие тепловые потоки попадают на них. Это может привести к их
перегреву, что создаст аварийную ситуацию.
Page 13

www.timberk.com • электрический конвектор
13
3. РАБОЧИЕ ХАРАКТЕРИСТИКИ
Принцип работы
Холодный воздух, находящийся в нижней части комнаты на уровне
ног, проходит через нагревательный элемент конвектора. Увеличиваясь в объеме в момент нагрева, теплый поток устремляется вверх
через жалюзи выходной решетки и плавно распространяется по комнате. При этом направление потока, заданное наклоном жалюзи, создает благоприятную, ускоренную циркуляцию теплого воздуха внутри
помещения, не рассредоточивая его на стены и окна.
Основные особенности
1. Сочетание эффекта конвекции (отсюда и название «конвектор»)
с мягким тепловым излучением делает обогреватель экономичным
источником тепловой энергии, с каждым годом значительно увеличивая число своих приверженцев.
2. Простые и эффективные возможности управления температурным
режимом.
3. Высокоточный управляемый термостат.
4. Быстрая самоокупаемость за счет высокого КПД и скорости набора задаваемой температуры.
5. Простота установки, надежность в эксплуатации и легкость обслуживания.
6. Трехрежимный нагрев для экономии электроэнергии.
7. Встроенный датчик падения отключит конвектор, если он будет
отклонен от вертикального положения, например, если его случайно
опрокинут при использовании на ножках (для моделей TEC PF3 LE...IN).
8. Встроенный ионизатор воздуха (для моделей TEC PF3 LE...IN).
Размеры конвекторов в зависимости от мощности (рис.1)
Конвекторы в линейке Timberk разделяются по максимально потре-
29. Прибор не предназначен для использования лицами (включая детей)
с ограниченными физическими, сенсорными или умственными возможностями, обладающими недостаточным опытом и знаниями, если они не
находятся под наблюдением и не получили инструкций по использованию
устройства от лица, ответственного за их безопасность. Необходимо следить, чтобы дети не играли с конвектором.
Технические характеристики
Таблица 1
Модель
Параметры
электропи-
тания,
В/Гц
Номинальная
потребляемая
мощность
(по режимам), Вт
Номи-
нальная
сила
тока, А
Вес
нетто, кг
Габаритные размеры,
мм
TEC. PF3 M 1000 IN 220~/50 400/600/1000 4.5 3.6 460х400х69
TEC. PF3 M 1500 IN 220~/50 500/1000/1500 6.8 4.4 595х400х69
TEC. PF3 M 2000 IN 220~/50 800/1200/2000 9.1 5.6 830х400х69
TEC. PF3 LE 1000 IN 220~/50 400/600/1000 4.5 3.6 460х400х69
TEC. PF3 LE 1500 IN 220~/50 500/1000/1500 6.8 4.4 595х400х69
TEC. PF3 LE 2000 IN 220~/50 800/1200/2000 9.1 5.6 830х400х69
бляемой мощности нагревательного элемента и в этом отличаются
друг от друга длиной прибора при равных значениях высоты и глубины. (Стандартная габаритная высота всех приборов равна 400 мм.)
Данная схема построения габаритных размеров позволяет потребителю использовать конвекторы Timberk разных мощностей в одном
помещении рядом друг с другом, не нарушая при этом привычных
симметрий и идеально вписывая несколько приборов одновременно
в созданный Вами интерьер.
1000 w 1500 w 2000 w
460 mm 595 mm 830 mm
400 mm
Рис. 1
Более подробное описание технических параметров и характеристик
смотрите на сайте www.timberk.com или спрашивайте у официальных
дилеров TIMBERK.
Page 14

www.timberk.com • электрический конвектор
14
1. Панель управления
2. Жалюзи выходной решетки
3. Корпус прибора (лицевая часть).
4. Вход холодного воздуха
5. Опорные ножки
4. ОПИСАНИЕ КОНВЕКТОРА
Рис. 2
ВНИМАНИЕ!
Производитель оставляет за собой право для разных партий поставок без предварительного уведомления изменять комплектующие части изделия
(включая заливаемые \ засыпаемые составляющие),
не влияя при этом на основные технические параметры изделия или улучшая их, а также не нарушая
изменениями принятые на территории страны производства \ транзита \ реализации стандарты качества и нормы законодательства.
Это может повлечь за собой изменение веса и габа
ритов изделия, но не более чем на +\- 5-20% (могут
отличаться для разного вида изделий).
Установка конвектора на стену - размеры указаны в миллиметрах.
1. Конвектор, с кронштейном и ручкой для перемещения – 1 шт.
2. Установочный комплект – 1 шт.
3. Опорная ножка – 2 шт.
4. Руководство по эксплуатации – 1 шт.
5. Гарантийный талон – 1 шт.
6. Упаковка – 1 шт.
ПРИМЕЧАНИЕ:
Для улучшения качества продукции, конструкция
и технические характеристики конвектора, а так
же его комплектация могут быть изменены производителем без предварительного уведомления.
6. УСТАНОВКА
5. КОМПЛЕКТ ПОСТАВКИ
1. Раскройте заводскую упаковку и аккуратно извлеките из неё прибор.
2. Удалите уплотнители из пенопласта с краёв прибора и освободите
его от полиэтилена.
Рис. 3
1
4
5
2
3
Page 15

www.timberk.com • электрический конвектор
15
Рис. 4 Рис. 5
3. Определите место установки конвектора с соблюдением минимальных расстояний от предметов и минимального расстояния от
пола.
4. Отметьте высоту, на которой необходимо установить конвектор,
после чего приложите кронштейн к стене.
5. Поставьте видимые метки в крепёжных отверстиях.
6. Просверлите отверстия необходимого диаметра по меткам крепления, вставьте дюбели, приложите кронштейн крепления и закрутите установочные винты кронштейна, закрепив тем самым кронштейн на стене (рис. 4), также выкрутите винты в верхних выпусках
кронштейна.
7. Подвесьте конвектор на кронштейн, для чего приложите нижнюю
часть прибора к нижним выпускам кронштейна и вставьте их в имеющиеся в нижней части задней панели прибора вырезы. Выполняя
данные действия необходимо держать прибор под углом примерно
50-60 градусов (рис. 5).
8. Поверните прибор в горизонтальной плоскости до совмещения
верхних выпусков кронштейна с верхними вырезами в задней панели
прибора и слегка нажмите на прибор до щелчка верхних выпусков
(рис. 5), после чего закрутите в них винты.
9. Для демонтажа прибора открутите винты в верхних выпусках кронштейна и нажмите на рычажки верхних выпусков кронштейна и отсоедините прибор от него. Далее проделайте выше перечисленные
операции в обратной последовательности.
Установка конвектора на ножки (рис. 6)
1. Достаньте 2 опорные ножки из упаковки конвектора.
2. Переверните прибор так, что бы его нижняя часть находилась вверху.
3. Приложите опорные ножки к нижней части прибора с левой и с
правой стороны таким образом, чтобы крепежные отверстия совпадали с отверстиями на корпусе прибора.
4. Закрутите крепежные винты в имеющиеся отверстия, прилагая при
этом достаточные усилия. Проверьте надежность крепления.
5. Переверните прибор в правильное положение и установите его на
ровную, горизонтальную поверхность строго в вертикальном положении.
Прибор готов к работе!
Подключение к электрической сети
1. Конвектор рассчитан на подключение к электрической сети с однофазным напряжением 220В~, 50 Гц.
2. Перед подключением убедитесь, что параметры электросети в месте подключения соответствуют параметрам, указанным на маркировочной табличке с техническими данными прибора.
3. При подключении конвектора к электрической сети следует соблюдать действующие правила электробезопасности.
ВНИМАНИЕ!
Использование конвектора на полу или другой горизонтальной поверхности без опорных ножек запрещено!
Рис. 6
Page 16

www.timberk.com • электрический конвектор
16
4. Электрическая розетка должна быть правильно заземлена. Розетка должна быть рассчитана на номинальный ток не менее 10А для
моделей с максимальной мощностью до 2000 Вт и не менее 12А для
моделей с максимальной мощностью 2500 Вт. Электрические розетка и вилка должны всегда оставаться сухими во избежание утечки
электрического тока. Регулярно проверяйте, что электрическая вилка плотно подключена к розетке. Проверку производите в следующем порядке: вставьте электрическую вилку в розетку, через полчаса
работы выключите конвектор и выньте вилку из розетки, проверьте
рукой, не нагрелась ли вилка. Если вилка нагрелась до температуры
выше 50°С, во избежание повреждений, происшествий, возникновения пожара в результате плохого электрического контакта замените
розетку на другую. Это должен делать специалист.
ВНИМАНИЕ!
Электрическая розетка должна быть рассчитана
на номинальный ток не ниже 10А, электрический
кабель с жилой сечением не менее 3х1,5 мм2 (для
меди)
Конвекторы серии TEC.PF3 M...IN оборудованы механическим термостатом.
Конвекторы серии TEC.PF3 LE...IN оборудованы высокоточным электронным термостатом c LED-дисплеем.
Панель управления для серии TEC.PF3 M...IN
7. УПРАВЛЕНИЕ КОНВЕКТОРОМ
Рис. 7
1
2 3
1. Индикаторная лампа «heating»
Загорается при включении нагрева прибора.
2. Ручка термостата
Используется для установки желаемой температуры в помещении.
3. Двухклавишный выключатель, с индикацией
Используется для выбора следующих режимов мощности нагрева:
1режим (низкая мощность), 2 режим (средняя мощность), 3 режим
(высокая мощность).
Эксплуатация конвектора серии TEC.PF3 M...IN
1. Включение конвектора.
Подключите конвектор к электрической сети, вставив вилку сетевого
шнура в сетевую розетку.
2. Выбор режима мощности нагрева.
2.1. Нажмите на клавишу «1» чтобы выбрать низкую мощность нагрева, при этом загорится индикаторная лампочка клавиши «1».
2.2. Нажмите на клавишу «2», чтобы выбрать среднюю мощность нагрева, при этом загорится индикаторная лампочка клавиши «2».
2.3. Нажмите на клавиши «1» и «2», чтобы выбрать высокую мощность
нагрева, при этом загорятся индикаторные лампочки обоих клавиш.
3. Установка температуры.
3.1. Температуру можно установить в диапазоне от +5 до +30 °С.
3.2. Поверните ручку термостата по часовой стрелке до упора в
положение «max», при этом, если температура в помещении ниже
установленной, должна загореться индикаторная лампочка «heating».
Когда температура в помещении достигнет желаемого уровня, поверните ручку термостата против часовой стрелки до отключения прибора, индикаторная лампочка «heating» погаснет. Теперь термостат
будет поддерживать заданную температуру, периодически включая и
отключая конвектор.
В особенно холодную погоду конвектор может не полностью справляться с обогревом помещения. В этом случае установите ручку термостата на уровень несколько выше желаемого.
4. Режим «Антизамерзание».
Поверните ручку термостата против часовой стрелки в положение
«min». Термостат автоматически включит нагрев конвектора, если
температура в помещении опустится ниже +5°С, и при этом прибор
Page 17

www.timberk.com • электрический конвектор
17
будет подключен к электрической сети и будет включен режим нагрева.
5. Режим «comfort»
Режим «comfort», который вы можете выбрать с помощью ручки термостата, соответствует наиболее комфортной температуре в помещении.
6. Выключение конвектора.
Установите клавиши выключателя режимов мощности нагрева в положение «0» и отключите прибор от электрической сети.
Рис. 8
1098
3 4 7 12 5 6 2
11311
Панель управления для серии TEC.PF3 LE...IN
14
1. Кнопка « »
Используется для включения и отключения конвектора.
2. Индикатор питания « »
Загорается при подключении конвектора к электрической сети.
3. LED-дисплей
На дисплее может отображаться значение температуры, а также
установки таймера.
4. Индикатор комфортного режима « »
Загорается при работе конвектора в комфортном режиме.
5. Индикатор ионизатора воздуха « »
Загорается при активации функции ионизации воздуха.
6. Индикатор нагрева « »
Загорается при работе конвектора в режиме нагрева.
7. Индикатор экономичного режима « »
Загорается при работе конвектора в экономичном режиме.
8. Кнопка « »
Используется для выбора следующих режимов работы: комфортный режим (индикатор « »), экономичный режим (индикатор
« »), режим антизамерзания (символ «AF»)
9. Кнопка ионизатора « »
Используется для включения/выключения функции ионизации воздуха.
10. Кнопка «up» (« »)
Используется для увеличения выбранного значения.
11. Кнопка «down» (« »)
Используется для уменьшения выбранного значения.
12. Индикатор таймера « »
Загорается при активации функции таймера на отключение конвектора.
13. Кнопка « »
Используется для установки температуры в комфортном режиме (индикатор « »), экономичном режиме (индикатор « »), а также для
установки значения времени таймера (индикатор « »).
14. Двухклавишный выключатель, с индикацией
Используется для выбора следующих режимов мощности нагрева:
1 режим (низкая мощность), 2 режим (средняя мощность), 3 режим
(высокая мощность).
Эксплуатация конвектора серии TEC.PF3 LE...IN
1. Включение конвектора
Подключите конвектор к электрической сети, вставив вилку сетевого
шнура в сетевую розетку, при этом загорится красный индикатор питания « » на панели управления и прозвучит звуковой сигнал, после
чего нажмите кнопку « ».
2. Выбор режима мощности нагрева.
2.1. Нажмите на клавишу «1» чтобы выбрать низкую мощность нагрева, при этом загорится индикаторная лампочка клавиши «1».
2.2. Нажмите на клавишу «2», чтобы выбрать среднюю мощность нагрева, при этом загорится индикаторная лампочка клавиши «2».
Page 18

www.timberk.com • электрический конвектор
18
2.3. Нажмите на клавиши «1» и «2», чтобы выбрать высокую мощность
нагрева, при этом загорятся индикаторные лампочки обоих клавиш.
3. Установка температуры
3.1. Температуру можно установить в диапазоне от +5 до +30 °С, с
шагом 1°С.
3.2. Заводская установка температуры комфортного режима +24°С,
заводская установка температуры экономичного режима +17°С.
3.3. Для изменения температуры комфортного режима нажмите
кнопку « » один раз, при этом будет мигать индикатор комфортного режима « » и значение установленной температуры на LED-дисплее, после чего нажмите кнопку « » или « », чтобы установить
желаемую температуру.
3.4. Для изменения температуры экономичного режима нажмите
кнопку « » два раза, при этом будет мигать индикатор экономичного режима « » и значение установленной температуры на LED-дисплее, после чего нажмите кнопку « » или « », чтобы установить
желаемую температуру.
3.5. После установки желаемой температуры последнее установленное значение будет запомнено, а на LED-дисплее будет отображаться текущая температура, при этом, если температура в помещении,
ниже установленной, должен загореться индикатор нагрева « ».
Когда температура в помещении достигнет желаемого уровня, индикатор нагрева « » погаснет. Конвектор будет поддерживать заданную температуру, периодически включая и отключая нагрев.
4. Выбор режима работы
4.1. Нажмите кнопку « » один раз, чтобы выбрать комфортный
режим работы, при этом на панели управления загорится индикатор
« ». В данном режиме конвектор будет автоматически поддерживать заданную температуру комфортного режима, периодически
включая и отключая нагрев.
4.2. Нажмите кнопку « » два раза, чтобы выбрать экономичный
режим работы, при этом на панели управления загорится индикатор
« ». В данном режиме конвектор будет автоматически поддерживать заданную температуру экономичного режима, периодически
включая и отключая нагрев.
4.3. Нажмите кнопку « » три раза, чтобы выбрать режим антизамерзания, при этом на LED-дисплее отобразится символ «AF».Конвектор будет автоматически поддерживать температуру в диапазоне
от+5°С до +7°С, периодически включая и отключая нагрев.
5. Установка функции таймера на отключение конвектора
5.1. Во время работы конвектора, нажмите кнопку « » три раза,
при этом на панели управления замигает индикатор « », а на
LED-дисплее отобразиться и будет мигать значение [0.] или последнее установленное значение времени таймера.
5.2. Нажмите кнопку « » или « » для установки времени отключения конвектора, с шагом 1 час, от 0 до 24 часов. На LED-дисплее
будет показан обратный отсчет времени, оставшегося до момента
отключения конвектора.
5.3. Установленное значение времени будет запомнено и через 3 секунды система автоматически вернется к отображению температурного значения, при этом индикатор « » на панели управления
будет гореть.
5.4. По истечению времени таймера конвектор выключится, индикаторы на панели управления и отображение температуры на LED-дисплее погаснут, при этом будет гореть красный индикатор питания
« ».
5.5. Выключение прибора или установка значения таймера [0.] отменит функцию таймера на отключение конвектора.
6. Установка функции таймера на включение конвектора
6.1. При выключенном конвекторе, когда горит только красный индикатор питания « », нажмите одновременно кнопку « » и кнопку
« », при этом должен раздаться звуковой сигнал, замигать индикатор « » на панели управления, а на LED-дисплее отобразиться и
будет мигать значение [0.].
6.2. Нажмите кнопку « » или « » для установки времени включения конвектора, с шагом 1 час, от 0 до 24 часов. Установленное
значение времени будет запомнено. На LED-дисплее будет показано
время, оставшееся до момента включения конвектора и будет гореть
индикатор « » на панели управления.
6.3. По истечении времени таймера конвектор включится в экономичном режиме, и будет поддерживать установленную температуру.
7. Звуковое оповещение
При включении и выключении конвектора, а также при нажатии на
кнопки издается звуковой сигнал.
8. Блокировка
8.1. При включённом конвекторе, для блокировки системы одновременно нажмите и удерживайте кнопки « » и « » в течение 3 секунд,
после чего на LED-дисплее отобразится символ «[ ]». Через 3 секунды
отобразится значение температуры, при этом кнопки на панели управ-
Page 19

www.timberk.com • электрический конвектор
19
ления будут заблокированы, а при их нажатии будет отображаться
символ «[ ]».
8.2. Чтобы разблокировать систему нажмите и удерживайте кнопки
« » и « » в течение 3 секунд или отключите конвектор.
9. Функция ионизации воздуха
Конвектор оснащён ионизатором воздуха.
9.1. Включение и отключение ионизатора воздуха осуществляется с
помощью кнопки ионизатора « ».
9.2. При включении ионизатора воздуха загорается индикатор ионизатора воздуха « ».
9.3. Ионизатор воздуха является автономным устройством и может
работать даже тогда, когда выключен режим нагрева прибора.
10. Функция «RESTART».
В случае кратковременного отключения электроэнергии, конвектор
автоматически включится, и будет работать с последними пользовательскими настройками (кроме установок таймера), при возобновлении подачи электроэнергии.
11. Выключение конвектора
Для выключения конвектора нажмите и удерживайте кнопку « » в
течение 3 секунд
ПРИМЕЧАНИЕ:
В приборах, укомплектованных ионизатором
воздуха, возможно накопление незначительного
статического электрического заряда на металли
-
ческих поверхностях корпуса.
Если ваша электрическая сеть не имеет заземля
ющего контура или если он повреждён, то в этом
случае существует небольшая вероятность элек
трического удара от статического напряжения.
ВНИМАНИЕ!
Если прибор используется без заземляющего контура или он повреждён, не рекомендуется включать и эксплуатировать ионизатор воздуха.
Для моделей TEC.PF3 LE... IN
Принцип действия ионизатора в основном сводится к тому, что под
воздействием высокого напряжения, приложенного к металлическим
иглам с диаметром острия 5…10 микрометров, происходит стекание
электронов - электрический эффлювий. Молекулы кислорода воздуха захватывают эти электроны, приобретая отрицательный заряд, и
становятся отрицательными аэроионами (АИ), таким образом, обеспечивая образование в воздухе высокой концентрации легких отрицательных аэроионов (АИ) кислорода.
ИОНИЗАТОР предназначен для: оздоровления и профилактики различных болезней, снижения утомляемости, повышения работоспособности и иммунитета, очистки воздуха от аэрозольных загрязнений,
аллергенов и микроорганизмов, нейтрализации вредного влияния на
человека работающих компьютеров, телевизоров, офисной техники,
восстановления биологической активности воздуха, поступающего в
помещение через кондиционеры, фильтры, воздуховоды, создания
комфортной обстановки и хорошего настроения.
Кроме того, ионизаторы воздуха служат еще для очистки воздуха от:
табачного дыма, запахов, смол, пыли, цветочной пыльцы, спор расте-
ний, шерсти животных, вирусов и бактерий.
Ионизатор воздуха поможет сохранить ваше здоровье, избежать ин-
фекционных заболеваний, аллергии и создаст комфортную атмосферу в доме и/или офисе.
Используемый ионизатор воздуха соответствует действующим
СанПиН от 2003 года. Значения нормируемых показателей концентраций аэроионов и коэффициента униполярности приведены
в таблице 3 (согласно СанПиН 2.2.4.1294-03):
Табл. 2
Нормируемые
показатели
Концентрация
n+(ион/см3)
Концентрация
n-(ион/см3)
Коэффициент
униполярности Y
Минимально
допустимые
N+>=400 n->=400
0,4=<Y=<1,0
Максимально
допустимые
n+<=50000 n-<=50000
8. ПРИНЦИП ДЕЙСТВИЯ И НАЗНАЧЕНИЕ
ИОНИЗАТОРА ВОЗДУХА
Page 20

www.timberk.com • электрический конвектор
20
Прибор необходимо регулярно мыть для удаления пыли и загрязнений с внешних поверхностей, т.к. это влияет на эффективность его
работы и температурные параметры обогрева помещения. Перед
проведением профилактических работ выключите прибор и отсоедините его от электрической сети, дайте ему остыть, затем протрите его
поверхность мягкой слегка влажной тряпкой. Для мытья не рекомендуется использовать моющие средства, в т.ч. средства с абразивными составами. Не допускайте повреждения прибора острыми предметами, т.к. царапины на окрашенной поверхности могут привести к
появлению ржавчины.
Заднюю поверхность конвектора так же необходимо периодически
очищать от пыли и грязи. Если конвектор установлен на стене, его
нужно отсоединить от кронштейна, нажав на рычажки верхних выпусков кронштейна, а после чистки вернуть его в исходное положение.
Процедуру профилактической очистки следует производить периодически для поддержания технического состояния конвектора и сохранения его внешнего вида на долгие годы.
9. ОБСЛУЖИВАНИЕ
Модели TEC.PF3 M 1000 IN, TEC. PF3 M 1500 IN, TEC. PF3 M 2000 IN
Модели TEC.PF3 LE 1000 IN, TEC. PF3 LE 1500 IN, TEC. PF3 LE 2000 IN
10. ПРИНЦИПИАЛЬНЫЕ ЭЛЕКТРИЧЕСКИЕ СХЕМЫ
Рис. 9
Рис. 10
Возможные неисправности и методы их устранения:
Если неисправность не удается устранить в соответствии с рекомендациями или при возникновении других неисправностей обратитесь в
авторизованный сервисный центр Timberk.
11. УСТРАНЕНИЕ НЕИСПРАВНОСТЕЙ
Неисправность Причина Способ устранения
1. Обогреватель плохо греет
1. Неисправен нагревательный элемент
1. Обратиться в авторизованный сервис
-
ный центр «Timberk»
2. Низкое напряжение в электросети 2. Проверить напряжение в электросети
2. Обогреватель не работает
1. Отсутствует напряжение в электросети
1. Проверить наличие напряжения в
электросети
2. Обрыв электрического кабеля
2. Проверить целостность электриче
ского кабеля и при необходимости
заменить его
3. Неисправен автоматический выключа
-
тель электрической сети
3. Проверить работоспособность автоматического выключателя электрической
сети и при необходимости неисправный выключатель заменить
4. Обрыв в цепи нагревательного
элемента
4. Обратиться в авторизованный сервис
-
ный центр «Timberk»
Page 21

www.timberk.com • электрический конвектор
21
Уважаемый покупатель!
Timberk предоставляет вам специальный сервис в рамках
программы клиентской поддержки. Теперь вы всегда сможете
заказать и оформить доставку на запасные части и расходные
материалы, необходимые для оптимальной, качественной работы
техники Timberk в течение всего срока службы на едином портале
www.btpart.ru.
Всю информацию о работе портала вы также всегда сможете
увидеть на сайте www.timberk.com. Мы искренне надеемся, что
этот уникальный дополнительный сервис поможет вам сделать
жизнь с Timberk еще удобнее!
www.btpart.ru
Все расходные материалы для
продукции Timberk вы можете
приобрести на сайте www.btpart.ru
Page 22

www.timberk.com • электрический конвектор
22
В целях информирования покупателей техники Timberk, мы дополнительно сообщаем, что русский
является государственным языком
в следующих государствах:
• в Российской Федерации
• в Республике Беларусь
наряду с белорусским языком
• в частично признанной
Южной Осетии наряду
с осетинским языком
Русский язык является официальным языком (во всех случаях
другой язык или другие языки
выступают как государственный
или второй официальный) в следующих государствах и на территориях:
• в Республике Казахстан
• в Киргизской Республике
• в административных
единицах Украины, где доля
носителей русского языка
cоставляет более 10%, при
соответствующем решении
местных советов
• в Автономной Республике
Крым
В Республике Таджикистан русский язык признан по Конституции
языком межнационального общения.
Официальным языком
международной организации
Содружество Независимых
Государств (СНГ) является
русский язык.
Page 23

www.timberk.com • электрический конвектор
23
Если вы заметили ошибку в инструкции, пожалуйста, сообщите нам
об этом, связавшись с нами по электронной почте, указанной на
сайте www.timberk.com
If you found any mistake in this manual please let us know by email listed
on www.timberk.com
Page 24

www.timberk.com
 Loading...