

Page 1
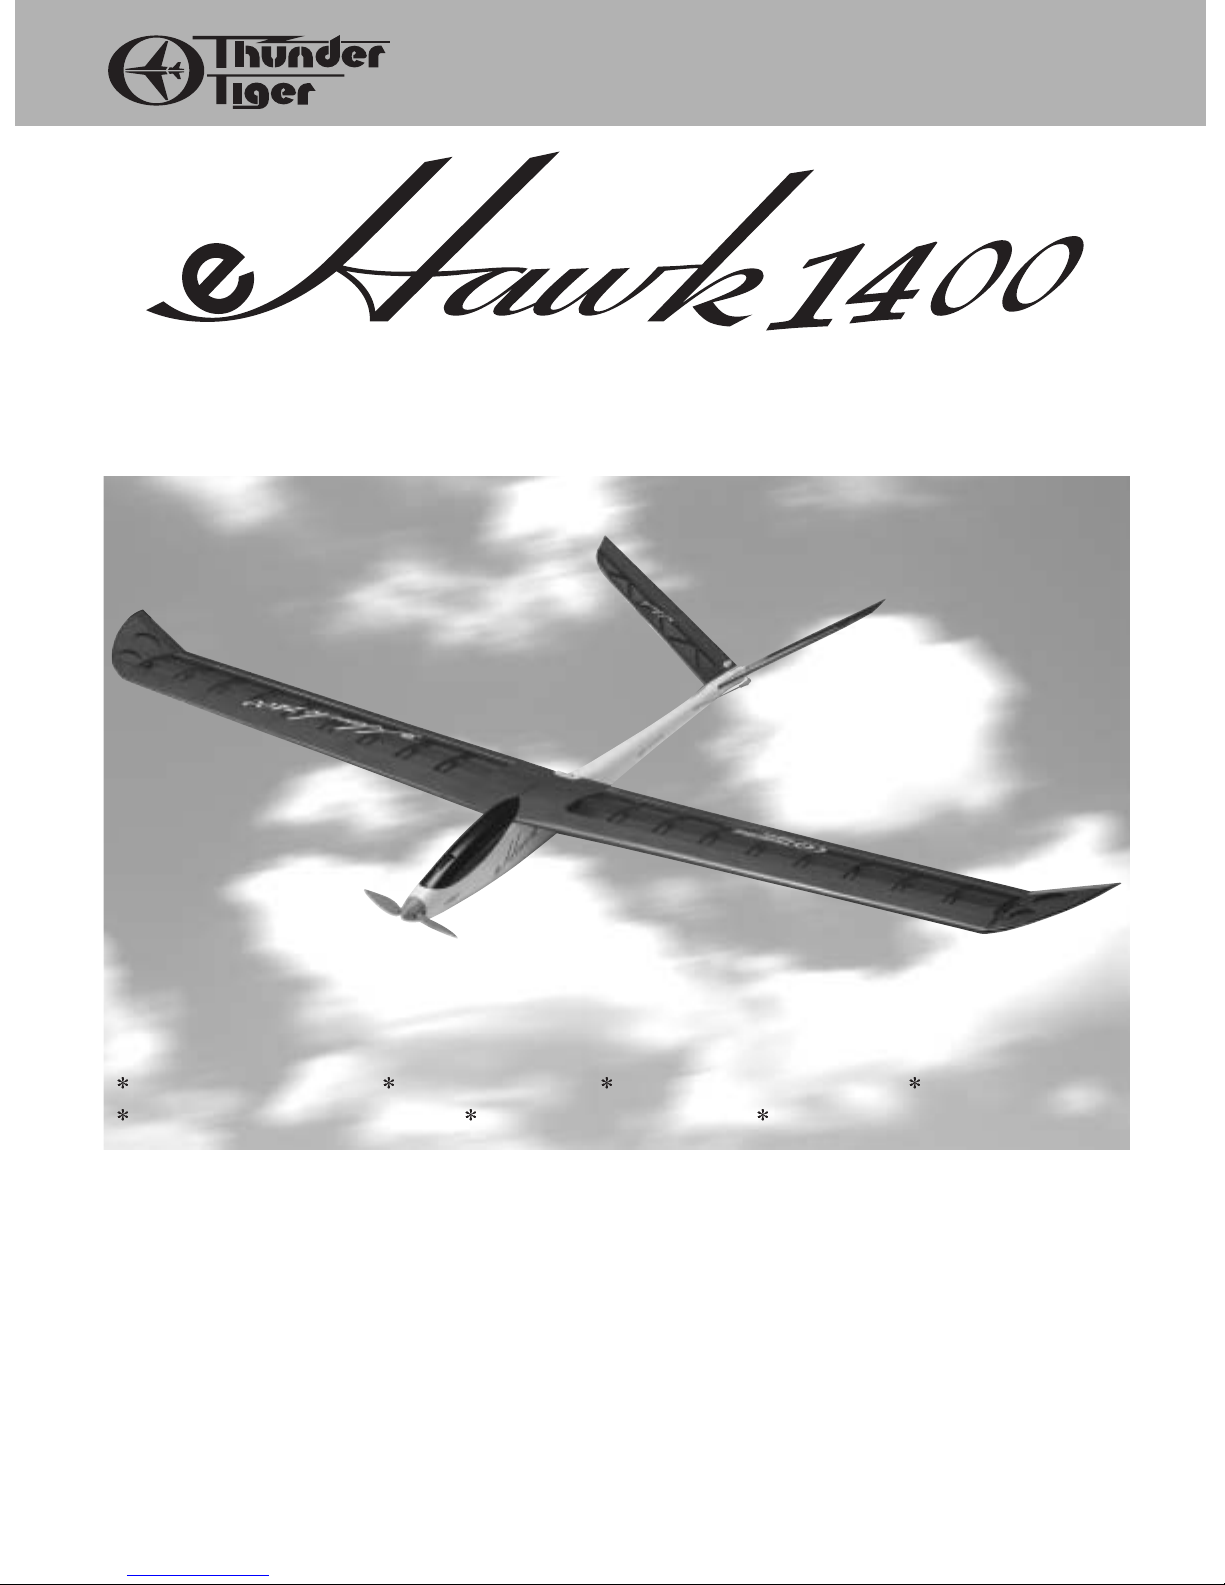
AAllmmoosstt RReeaaddyy TToo FFllyy
1.4M Electric Powered R/C Sailplane
Warranty:This kit is guaranteed to be free from defects in material and workmanship at the date of
purchase. It does not cover any damage caused by use or modification. The warranty does not extend
beyond the product itself and is limited only to the original cost of the kit. By the act of building this userassembled kit, the user accepts all resulting liability for damage caused by the final product. If the buyer
is not prepared to accept this liability, it can be returned new and unused to the place of purchase for a
refund.
Notice: Adult Supervision Required:This is not a toy. Assembly and flying of this
product requires adult supervision. Read through this book completely and become familiar with the
assembly and flight of this airplane. Inspect all parts for completeness and damage. Customers in North
America please call 1-949-833-7498 for help if you encounter any problems.
No.4312 E-HAWK 1400
Wing Span: 55" (1400mm) Length: 31” (787mm) Wing Area: 300 sq.in.(19.4dm2) Weight: 21oz.(600g)
Wing Loading: 10oz./sq.ft.(31g/dm2) Motor: 380PH Motor included Prop: 6 x 3 Folding Prop included
Page 2

Table of Contents
Introduction
Pre-Assembly Notes...............................1
Other Items Required .............................1
Tools and Supplies Needed ...................1
Parts Drawing ........................................2
Assembly
Wing........................................................3
Tail..........................................................4
Motor.......................................................5
Servo......................................................6
ASSEMBLY INSTRUCTION
INTRODUCTION
All of us at Thunder Tiger want to thank you for choosing theE-Hawk.This Kit has been engineered to go together
quickly and easily while still providing you with great looks and exceptional flying performance. The world of electric
powered sailplanes can be an extremely challenging and rewarding experience. Your skill along with the design
capabilities of your model will combine to defy the laws of gravity and produce flights of unbelievable distance or
duration. Under proper conditions your E-Hawk can stay aloft for hours from a single battery charge! As you gain
experience with your model you will be able to
?
?
?
?
?
?
?
?
W.eW.hg?
?W.Y?W.Yhg?
?7U??7U?hg?
?@1??@1?hg?
?@@??@@?hg?
?
?
?
?
?
?
?
?
?
?
?
?
?
?
?
?
?
?
?
?
?
?
?
?
?
feel
?
?
?
?
?
?
?
?
@@e@@hg?
3@e3@hg?
S5eS5hg?
?W.Y?W.Yhg?
?.Y??.Y?hg?
?
?
?
?
?
?
?
?
?
?
?
?
?
?
?
?
?
?
?
?
?
?
?
?
?
the wing and lift conditions that affect it enabling you to
greatly extend your flight times.
The E-Hawk is an electric powered 1.4-meter sailplane which is intended for use in light wind and lift conditions.
Its airfoil, motor package and design planform are intended to maximize performance under those flying conditions
and will provide great results for pilots of all skill levels.
We suggest that before beginning to assemble this kit you thoroughly read this assembly instruction manual to
familiarize yourself with the complete assembly procedure. This will insure that your assembly process will be as
smooth and uneventful as possible.
We are confident that you will enjoy flying your E-Hawk and that it will provide many hours of challenging and
rewarding flight.
Canopy ...............................................8
Control Throws....................................8
Balancing Your E-Hawk......................8
First Flights
Checks You Should Make.....................9
Flying Your E-Hawk..............................9
Safety Precautions................................9
Lauching & Landing............................10
Page 3
PRE-ASSEMBLY NOTES
1. If you are not an experienced R/C pilot plan to have a fully
competent pilot help you to learn to fly your E-Hawk. This
will help you to be successful much faster and also avoid
potential damage to your model.
2. Please assemble your model exactly according to these
instructions. Do not attempt to modify or change the E-Hawk
in any way as doing so may adversely change its flying
characteristics.
3. Before you begin please check the entire contents of this
kit against the parts list and par t drawings to be sure that no
parts are missing or damaged. This will also help you to
become familiar with each component of your E-Hawk. If you
find that any of the parts are either missing or damaged
please contact your dealer immediately for replacement.
Note: Your dealer cannot accept kits for return if construction
has begun.
For customers in the US and Canada please call or write to
ACE Hobby Distributors, Inc for replacement of missing or
damaged parts.
ACE Hobby Distributors, Inc.
2055 Main Street, Irvine, CA 92614
Tel: 949.833.0088
Fax: 949.833.0003
E-Mail: service@acehobby.com
Remember. We have worked very hard to make this model
as easy to assemble as possible while still maintaining our
high standards of quality. Your assembly of this model is very
important and will determine the final flight capabilities of
your E-Hawk, so use extra care and follow the assembly
procedure exactly.
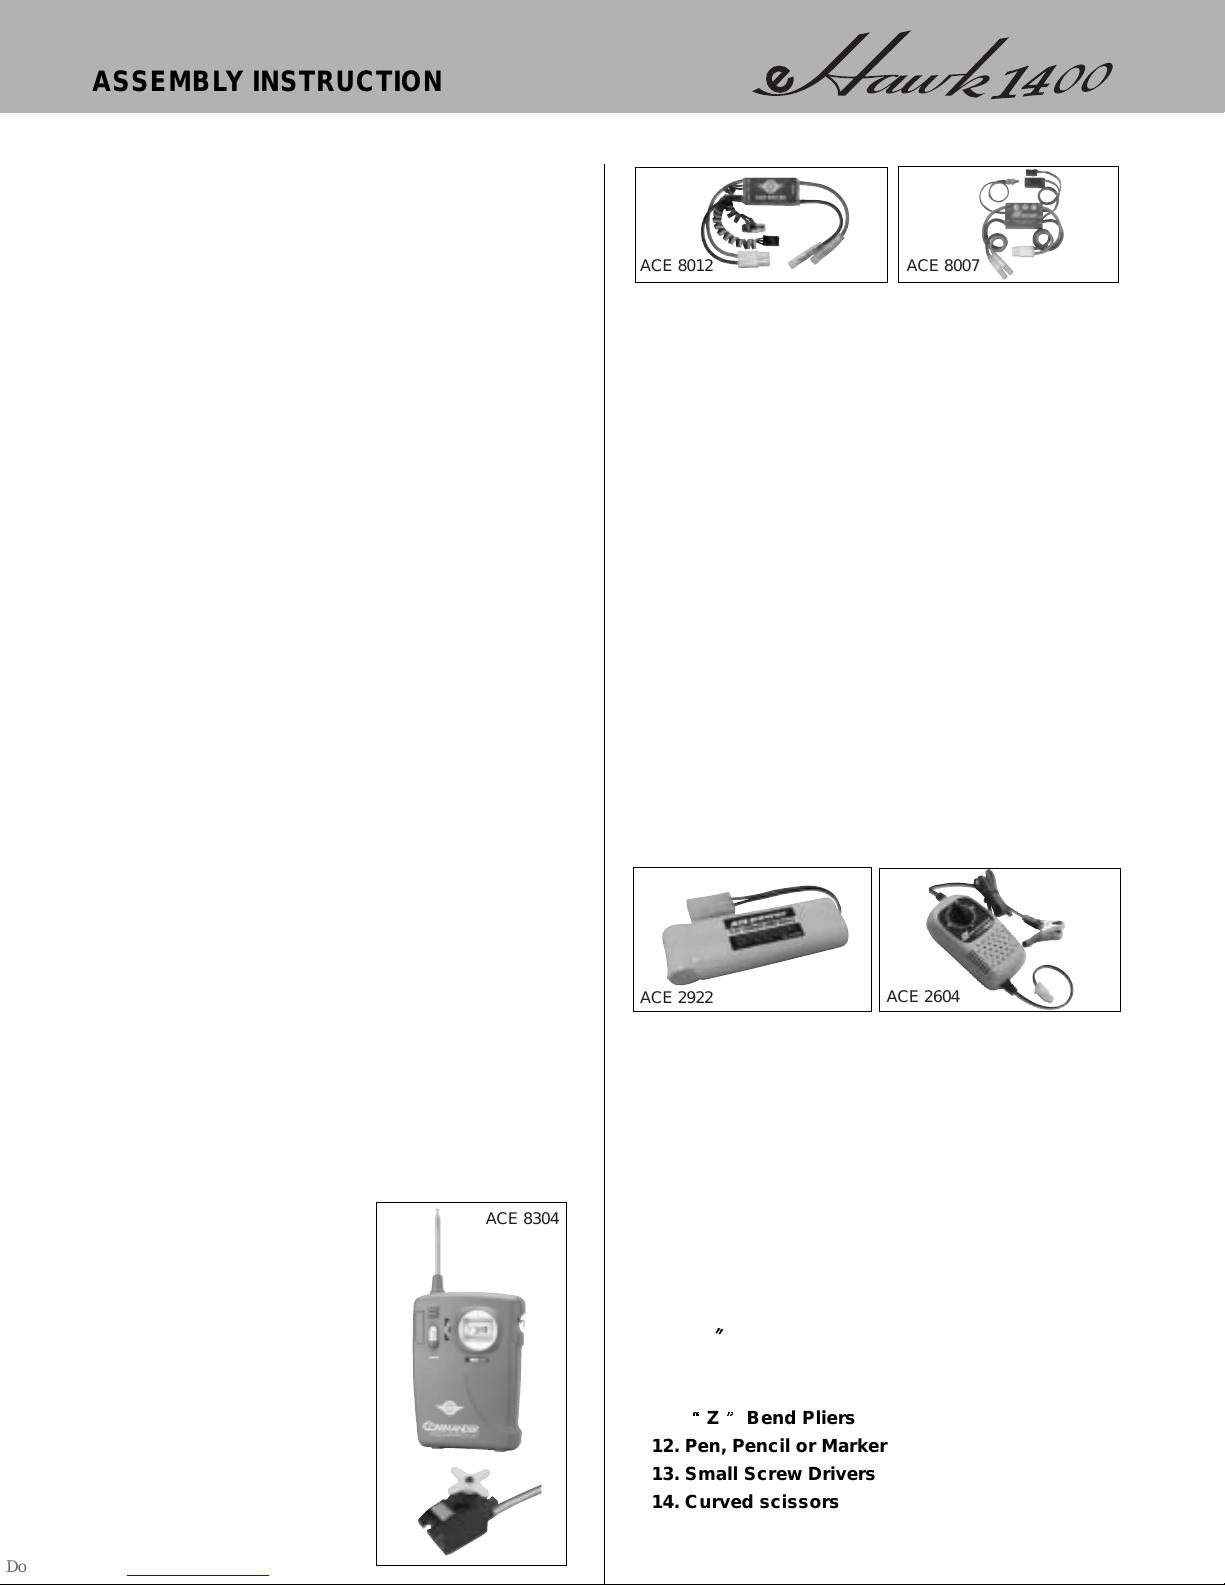
OTHER ITEMS REQUIRED
Radio: You will need at least a
2~3 channel radio control system
on an aircraft frequency for use in
your E-Hawk. Recommend ACE
Commander 3ch single stick raido
(P/N ACE 8304) which comes with
2 Micro Servos and Mini Receiver.
However, if you are really looking
for every bit of extra performance
then you should consider using
one of the miniature radio systems
available which would lower the
weight and increase the
performance of your E-Hawk.
Electronic motor controller: We recommend the ACE8007
Auto Cut-Off Device (work with 2CH radio) or ACE8012
ESC-30 with BEC (work with 3CH radio) for controlling the
power of your E-Hawk as well as eliminating the need for a
separate radio battery. The BEC (Battery Eliminator
Circuitry) in this controller will automatically tur n off the
power to the motor when the battery reaches a factory
present discharge level leaving about 20-25 minutes of flight
time for the radio system. Note: Some radio manufacturers
offer a lightweight radio system with a built-in motor
controller with BEC especially for this type of model.
Flight Battery: We recommend the use of ACE 2922 7 cell
8.4V 1000 mAh NiMH battery pack for maximum
performance.
Charger: You will need a batter y charger to charge your
power battery. We recommend our ACE2604 8.4V DC Time
Charger for 7-cell bettery pack. Note: When charging your
flight battery be sure to very carefully follow the instructions
provided with the charger.
Extension Wire: 2 servo extensions in 6” long are required.
TOOLS AND SUPPLIES NEEDED
1. 12 Minute Epoxy
2. Thin CA Glue
3. Mixing Stick for Epoxy
4. Medium Grit Sandpaper
5. Rubbing Alcohol
6. Paper Towels
7. Hobby Knife
8. 3/16
Drill
9. 1/16” Drill
10. Ruler
11.
?
?
?
?
?
?
?
?
?W2@6T2@@? ?
?7@X;@@X ?
?@@1?@@1 ?
?@@@?@@@ ?
?
?
?
?
?
?
?
?
?
?
?
?
?
?
?
?
?
?
?
?
?
?
?
?
Z
?
?
?
?
?
?
?
?
@@@?@@@? ?
?@5??@5? ?
?W&(YW&(Y? ?
?&0Y?&0Y ?
?
?
?
?
?
?
?
?
?
?
?
?
?
?
?
?
?
?
?
?
?
?
?
?
Bend Pliers
12. Pen, Pencil or Marker
13. Small Screw Drivers
14. Curved scissors
ASSEMBLY INSTRUCTION
ACE 2604
ACE 2922
ACE 8012 ACE 8007
ACE 8304
Page 4
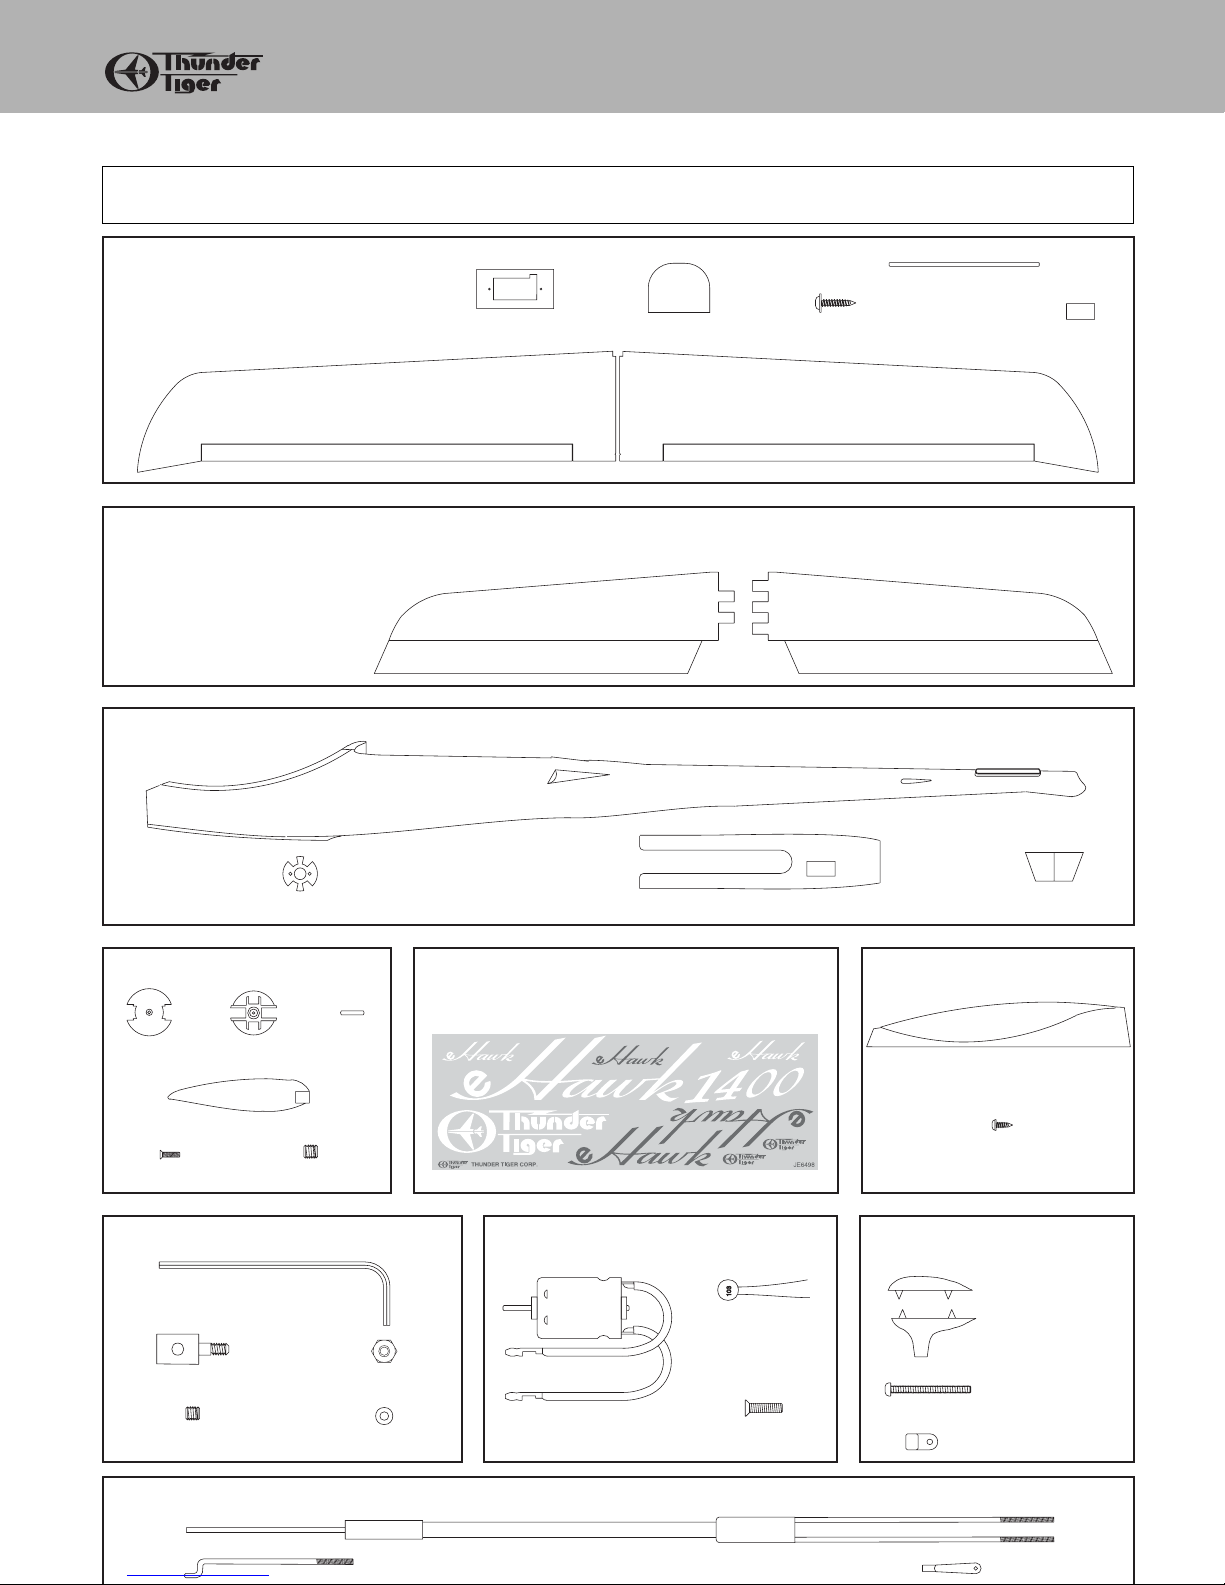
AS6240 Tail Feathers (T. Magenta)
AS6240L Tail Feathers (T. Blue)
AS6240Y Tail Feathers (T. Yellow)
AS6239 Main Wing (T. Magenta)
AS6239L Main Wing (T. Blue)
AS6239Y Main Wing (T. Yellow)
PE0009 Hardware Set
AS6242 Motor
AS6241 Canopy
AS6026 6x3 Folding Prop
AS6238 FRP Fuselage
AS6245 Pushrods
Aileron Servo Tray(1)
Wing Protector(1)
Wing Join Wire(1)
CA Hinge(6)
3x12mm Wood Screw(2)
Servo Tray(1)Motor Mount(1) Wing Mount(2)
Fuselage(1)
Left Wing(1) Right Wing(1)
Left V Tail(1) Right V Tail(1)
Canopy(1)
2x5mm
Wood Screw(3)
3x3mm Set Screw(2)
Pin(2)
Blade(2)
2x8mm Screw(1)
Spinner(1) Back Plate(1)
380 Motor(1)
Aileron Pushrod(2)
Hex Wrench(1)
EZ Connector(2)
M2 Nut(2)
3x3mm Set Screw(2)
Clevis(4)
Capacitor(2)
2.5x5mm Screw(2)
M2 Washer(2)
AS6244 Decal (T. Magenta)
AS6244L Decal (T. Blue)
AS6244Y Decal (T. Yellow)
Decal(1)
Elevator Pushrod(1)
AS6243 Control Horn
2x22mm Screw(2)
Nylon Horn(2)
Backplate(2)
Control Horn Base(2)
Open the box and check that you have all the parts as shown below.
If anything is missing please contact your dealer
PARTS DRAWING
Page 5

ASSEMBLY / WING
1. Locate CA Hinges and use pins to center the
hinges in place.
2. Install the aileron and remove all pins then apply
thin CA to all hinge areas.
3. Remove the portion of center wing rib to allow
clearance for aileron servo. Repeat the same
process on the other wing .
4. Trial fit two wing halves with Wing Join Wire. When
satisfied, apply epoxy to two center wing ribs then
accurately aligned and firmly press with each other
until it cured.
5. Cut plywood Wing Mount into two pieces with
hobby knife. Trail fit the wing mounts in fuselage.
Sand the glue area in fuselage to enhance
adhesion. Upside down the fuselage then glue
wing mounts in place with epoxy.
Wing Assembly
Page 6

6. Mark a centerline and wing mounting holes on
Wing Protector as shown.
7. Place wing protector on the main wing and make
sure it is centered and level with trailing edge. Use
fine tip marker to make mark along the wing
protector.
8. Use hobby knife to cut away the covering inside the
line about 1/8"(3mm). Be carefully do not hurt the
wood structure.
9. CA the wing protector. Trial fit the main wing onto
the fuselage, then drill 3/64"(2mm) holes at the
marks you drew before. Secure the main wing
with furnished wing mounting wood screws.
Tail Installation
10.Trail fit two tails to the fuselage, sand it if
necessary. Epoxy the tails as shown, use
furnished template to make sure the two tails is
angled 110-degree.
ASSEMBLY / TAIL
110˚
Page 7

11. Locate Elevator Control Horn (Back Plate, Control
Horn Base, 2 x 25mm Screw, Nylon Horn).
Position Back Plate on elevator then drill 3/64"
(2mm) holes.
12. Secure and install the control horns as shown.
13. Locate the Y Pushrod then bend the wire as
required in the photo.
14. Insert Y Pushrod through fuselage and exit two
ends at two pushrod exit holes. Thread Clevises
on two threaded pushrod ends then connect to the
elevator control horns. Slice two pieces of
furnished tube then apply on clevises to prevent
clevis snapping off when in flight.
Motor / Prop Installation
15. Locate Motor, Motor Mount, Folding Prop and
Screws as shown.
16. Apply very very little CA glue to keep motor mount
on motor. Be careful do not apply any glue at
mounting holes and motor shaft. Trail fit motor in
fuselage, sand the contact area if necessary.
When satisfied, apply very thin epoxy on motor
mount then secure motor in fuselage with two 2.5
x 5mm Sink Screws.
ASSEMBLY / TAIL / MOTOR
Page 8

19. Install the nylon horn to aileron torque rod.
Thread clevis to pushrod then connect the clevis
to nylon horn. Z-bend the pushrod at the proper
position then connect to the servo horn. You will
have to remove the servo horn from the servo to
do this step.
Enlarge the servo horn holes for pushrod to go in
might be necessary.
Adjust the clevises when servo in neutral position,
apply tube to hold clevis in place when satisfied.
20. Secure the elevator servo on the servo tray as
shown.
17. Install the Folding Propeller. Make sure there is
1/16"(1.5mm) clearance between back plate and
fuselage.
Servo Installation
18. Locate Aileron Servo Tray, cut away the covering
then glue the servo tray and install the aileron
servo.
21. Glue the servo tray in fuselage with CA as
required position.
ASSEMBLY / SERVO
Page 9

22. Install EZ Connector on servo horn.
24. Locate Vecro and cut it into two pieces. Attach the
vecro to battery pack and attach the other halves
of vecro to the fuselage as shown.
25. Refer to manufacturer's Receiver and ESC manual
then connect all connectors properly. The ESC
and RX are located between battery and motor.
You might need two servo extensions at this step.
Install the switch on fuselage as shown. Thread
the antenna though fuselage and explode at least
5"(10cm) in length out of of fuselage.
26. The attached two pictures are the examples for
using ESC-30 and auto cut-off.
23. Insert the pushrod through the EZ connector,
make sure elevator is level with the tail then secure
the servo horn and set screw when servo is in
neutral position.
ASSEMBLY / SERVO
ACE R/C
TR-402A
BATT
4CHAM RECEIVER
CH.1
CH.2
MHZ
27
CH.3
NARROWBAND
CH.4
Sw
ACE
Rx
ESC-30
Batt
0N
OFF
7.2-8.4V Battery
Motor
7.2-8.4V Battery
ACE R/C
TR-202A
BATT
4CHAM RECEIVER
CH.1
MHZ
27
CH.2
NARROWBAND
START
Auto Cutoff
CONTINOUSCURRENT :30A(MAX)
INPUTVOLTAGE:7.2-8.4V
M-
B+M+
SW
BEC
B-
OFF
ON
Page 10

Canopy Installation
27. Tr im the Canopy alone with the molded line. Cut a
hole at front top canopy so air could go in to cool
motor and battery when in the air.
28.Position the canopy in place. Drill three 1/16" (
1.5mm) holes then secure the canopy with
furnished 2 x 5mm Black Wood Screws.
Control Throws
These control throws are merely a starting point for
your radio setup and can be tailored to fit your flying
style.
Balance
29.Balancing your model is very important and must
not be overlooked. The center of gravity (CG) is
2-3/8" behind the leading edge of the wing near
the wing root. You can adjust the battery pack
forward or backward to reach the right CG.
2 3/8" (
60mm
CANOPY / CONTROL THROWS & BALANCING
2-3/8" (6cm)
Aileron-Low Rate
Aileron-High Rate
Elevator-Low Rate
Elevator-High Rate
1/4" (6mm)
1/4" (6mm)
1/2" (12mm)
1/2" (12mm)
1/4" (6mm)
1/4" (6mm)
3/8" (9mm)
3/8" (9mm)
Page 11

FIRST FLIGHTS
Checks You Should Make
Before you attempt to fly your model you should
perform some final checks:
1. Fully charge your radio and flight batteries following
the manufacturers instructions.
2.Check the direction of travel of your control surfaces
and the operation of the motor controller per the
manufacturers instructions.
3.Range check your radio system per the
manufacturers instructions.
4. Double check that you have installed the screws in
the servo control arms and that the clevis are
snapped tightly on the control horns.
We strongly recommend that you get help from an
experienced R/C pilot to learn to fly if you are just
beginning. You should be able to find help at your
local dealer or club field.
Flying Your E-Hawk
First of all, if you are flying with other flyers, check to
make sure they are not operating on the same
frequency as you. If they are, do not turn on your
radio until they have safely landed and have turned
their radios off.
Secondly, even though the E-Hawk is very easy to fly,
if you are a novice modeler/pilot, we highly
recommend that you seek the help of an experienced
modeler for your first few flights. He can save you a
lot time and possible disappointment by helping you
get your model in the air safely and getting it trimmed
out for you.
Important: The radio control system is set up to
operate the control surfaces just like a real airplanes
as if the pilot (you) are sitting in cockpit controlling the
airplane. When you want the plane to dive, you push
the elevator stick forward (up), to climb you pull the
stick back (down), to turn right, you move the aileron
stick to right with elevator up and visa versa. When
you want to turn the motor on you push the throttle
stick forward and when you want to turn the motor off
you pull the stick back. It is the turning that causes
the most problems with novice pilots because when
the plane is flying towards you a right turn command
on the transmitter cause the plane to turn to your left
(which is the planes right). Get the picture?
For tunately the up and down commands do not
change. The easiest way to conquer this problem is to
try and always face your body near the direction the
planes is flying. This means that you will have to look
over your shoulder at times, but many modelers find
this an easy way to learn.
THE FIRST FLIGHTS
You should always use the first few flights to get
accustomed to your new airplane and its flying
characteristics. Keep the model upwind and climb to a
good comfortable altitude to cut off the motor and trim
your E-Hawk for a glide. At altitude cut the motor and
start your glide. Have an experienced modeler adjust
the trims of the transmitter for you until the plane will
glide straight and level without any other control input.
Once the trims are set practice making smooth turns
in both directions while losing as little altitude as
possible. When the E-Hawk starts to get too low for
comfort turn the motor back on and climb back up to
altitude. Practice this climbing and gliding until you
are comfortable with the airplane.
Depending on the battery you use the E-Hawk will
make 2 to 3 good climbs up to a nice thermal
searching altitude from single battery charge. Once
the Auto Cut-off Device or ESC shuts off the power to
the motor you will need to set up for your landing.
Continue to make smooth gently turns while lining up
the E-Hawk with your landing strip. Once you are set
up to land keep the wings level and let the model
settle in for an nice gentle landing while adding up
elevator to keep the nose up slightly as the plane
slows down. Make several flights like this to really
familiarize yourself with the characteristics of your
model and to learn the glide and distance covering
abilities of the E-Hawk. Once you have mastered a
good “comfort level” you are ready to start searching
for thermals which will really increase your flight times.
Safety Precautions
You as the pilot of this radio controlled model are
responsible for any accidents that may occur during its
use. We recommend that you fly your model at a
model club field which is specially set up for model
flying. But always be sure that you operate the model
in a safe and careful manner and observe the
FIRST FLIGHTS
Page 12

Following Suggestions:
1. Do not fly your model close to buildings, power
lines, roads, or other obstacles.
2. Do not fly in congested areas . Select wide, flat
and open area to fly with no obstructions and
plenty of room for learning to fly.
3. Do not fly without help from an experienced model
pilot until you have learned how to fly. Your local
model club or hobby shop can recommend an
instructor if you do not already know one.
4. Always check for other modelers in the area and be
sure that your frequency is not in use by someone
else which might cause you model to crash.
Always observe frequency control systems at
flying fields and wait your turn to fly.
5. Never fly your model directly toward spectators,
autos, other modelers or their models.
6. Always abide by the rules for model flying provided
by your club and the governing agency for model
aircraft in your country.
Congratulations
Now that you have completed the assembly of your EHawk model we feel that have a very capable and
good looking 1.4-meter electric sailplane. We hope
that you will enjoy this model and get many hours of
flying pleasure from its use. Thank you for purchasing
this E-Hawk from Thunder Tiger and we look forward
to providing you with other great R/C products in the
future.
LAUNCHING & LANDING
Wind Direction
Straight
Correct
and level with ground
Incorrect
Wind Direction
Landing
Wind
3ft.
Launching & Landing
Launch firmly into wind straight and level.
Do not throw upwards or the plane will
stall and crash!
 Loading...