

THRUSTMASTER
S
P
®
QUICK INSTALL
U
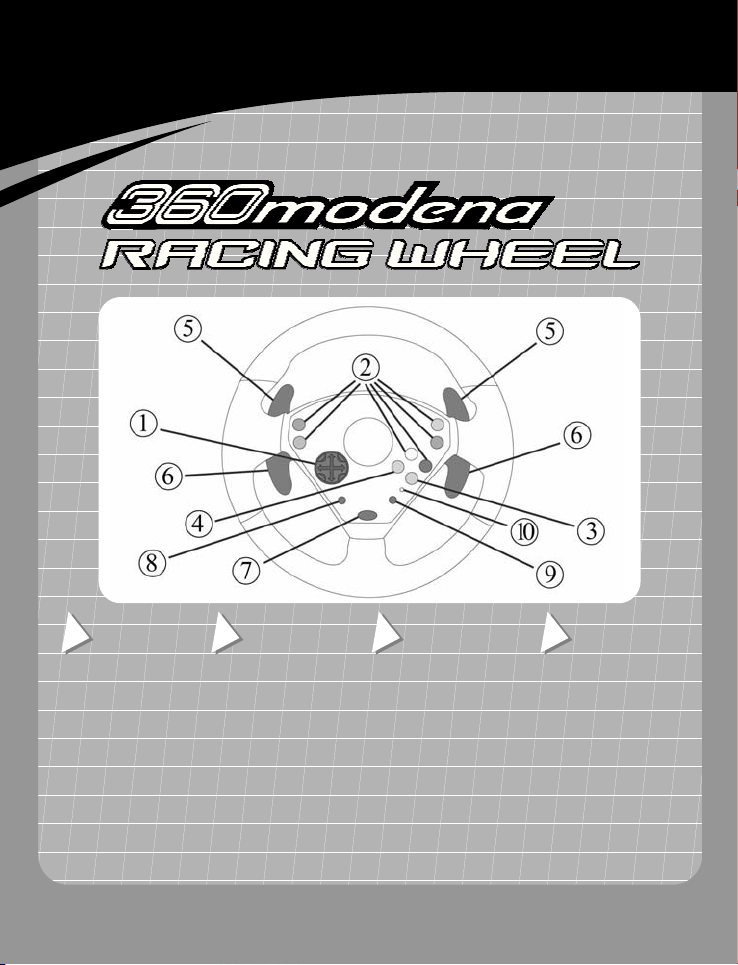
1. 8-Way D-Pad
2. Action buttons
(X, Y, A, B, Black, White)
3. Vibration button
4. Sensitivity button
5. Gearshift levers
6. Progressive gas & brake
levers
7. Start button
8. Back button
9. Program button
10. LED
For use with Xbox™ video game system. IMPORTANT! Before using this product, read the Xbox™ video game system
TECHNICAL
FEATURES
D
TECHNISCHE
MERKMALE
1. 8-Wege-Richtungskreuz
2. Aktionstasten
(X, Y, A, B, Schwarz, Weiß)
3. Vibration-Taste
4. Sensitivity-Taste
5. Schalthebel
6. Progressive Gas- und
Bremshebel
7. Start-Taste
8. Back-Taste
9. Program-Taste
10. LED
instruction manual for safety, health and other information.
E
CARACTERÍSTICAS
TÉCNICAS
1. D-Pad de 8 direcciones
2. Botones de acción
(X, Y, A, B, Negro, Blanco)
3. Botón Vibration
4. Botón Sensitivity
5. Palancas de cambio
6. Palancas progresivas
de gas y freno
7. Botón Start
8. Botón Back
9. Botón Program
10. LED
CARACTERÍSTICAS
TÉCNICAS
1. Almofada digital de
8 direcções
2. Botões de acção
(X, Y, A, B, Preto, Branco)
3. Botão Vibration
4. Botão Sensitivity
5. Alavancas de mudanças
6. Alavancas de aceleração e
travagem progressivas
7. Botão Start
8. Botão Back
9. Botão Program
10. LED
US
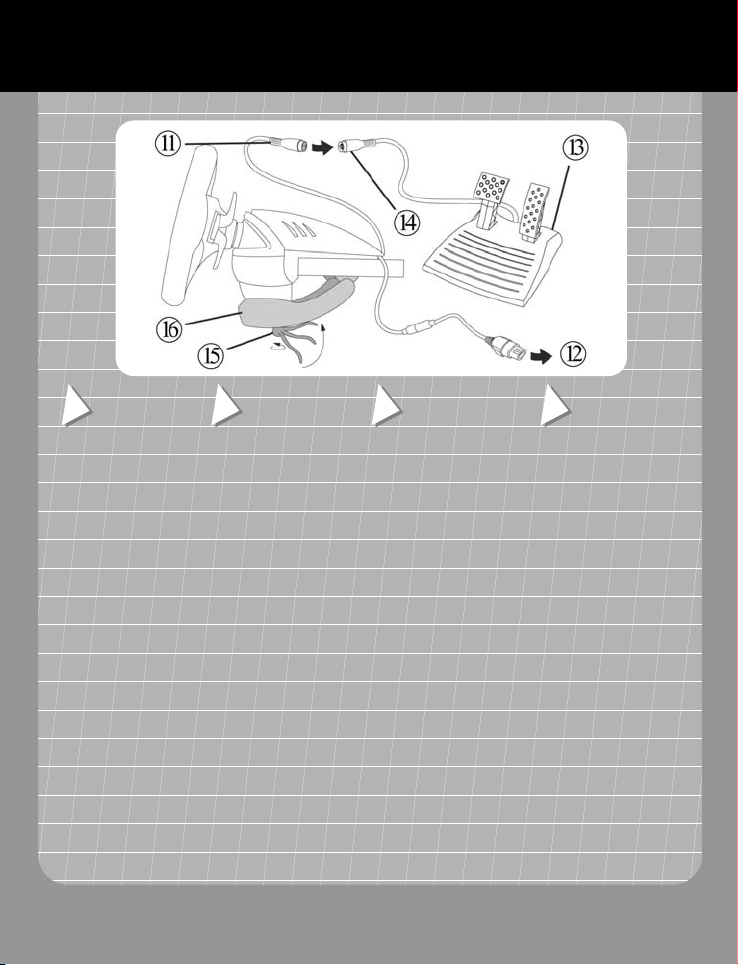
11. Pedal connector
12. Xbox™ connector
13. Progressive pedals set
14. Pedal receptor cable
15. Clamp screw
16. Clamp
© Guillemot Corporation 2001. All
rights reserved. Thrustmaster® is a
registered trademark of Guillemot
Corporation S.A. Ferrari® and
360 Modena® are registered
trademarks of Ferrari Idea S.A. This
product is officially licensed by
Microsoft Corporation. Microsoft®,
Xbox™ and the Xbox™ logo are
either registered trademarks or
trademarks of Microsoft Corporation
in the U.S. and/or other countries
and are used under license from
Microsoft. All other nationally and
internationally recognized
trademarks and brand names are
hereby acknowledged. Illustrations
not binding. Contents, designs and
specifications are subject to change
without notice and may vary from
one country to another.
Für das Xbox™ Videospiele System Xbox™. WICHTIG! Lesen Sie bitte bezüglich Sicherheit, Gesundheit und anderer
TECHNICAL
FEATURES
D
TECHNISCHE
MERKMALE
11. Pedalanschluss
12. Xbox™-Anschlusskabel
13. Progressive Pedale
14. Anschlusskabel für Pedale
15. Befestigungsschraube
16. Befestigungsvorrichtung
© Guillemot Corporation 2001. Alle
Rechte vorbehalten. Thrustmaster®
ist ein eingetragenes Warenzeichen
der Guillemot Corporation S.A.
Ferrari® und 360 Modena® sind
eingetragene Warenzeichen der
Ferrari Idea S.A. Dieses Produkt ist
offiziell lizensiert durch die Microsoft
Corporation. Microsoft®, Xbox™ und
das Xbox™-Logo sind eingetragene
Warenzeichen oder Warenzeichen
der Microsoft Corporation in den
Vereinigten Staaten und/oder
anderen Länder und werden mit der
Lizenz von Microsoft genutzt. Alle
anderen nationalen und international
anerkannten Warenzeichen oder
Markennamen werden hierdurch
anerkannt. Fotos und Abbildungen
nicht bindend. Inhalt, Design und
Eigenschaften des Produkts können
ohne Bekanntmachung geändert
werden und variieren von Land zu
Land.
E
CARACTERÍSTICAS
TÉCNICAS
11. Cable de conexión de los
pedales
12. Conector Xbox™
13. Pedales progresivos
14. Cable recept. de los pedales
15. Tornillo de anclaje
16. Anclaje
© Guillemot Corporation 2001.
Reservados todos los derechos.
Thrustmaster® es una marca
registrada de Guillemot Corporation
S.A. Ferrari® y 360 Modena® son
marcas registradas de Ferrari Idea
S.A. Este producto está licenciado
oficialmente por Microsoft
Corporation. Microsoft®, Xbox™ y
el logotipo de Xbox™ son marcas
comerciales registradas o marcas
comerciales de Microsoft
Corporation en los Estados Unidos
y/o en otros paises y se utilizan con
licencia de Microsoft. Todas las
demás marcas comerciales
reconocidas nacional e
internacionalmente también se
reconocen aquí. Fotografías no
contractuales. Los contenidos,
diseños y especificaciones están
sujetos a cambios sin previo aviso y
pueden variar de un país a otro.
P
CARACTERÍSTICAS
TÉCNICAS
11. Cabo do conector do pedal
12. Conector Xbox™
13. Pedais progressivos
14. Cabo do receptor do pedal
15. Parafuso do grampo
16. Grampo
© Guillemot Corporation 2001.
Reservados todos os direitos.
Thrustmaster® é uma marca
registada da Guillemot Corporation
S.A. Ferrari® e 360 Modena® são
marcas registadas da Ferrari Idea
S.A. Este produto é licenciado
oficialmente pela Microsoft
Corporation. Microsoft®, Xbox™ e
o logotipo Xbox™ são marcas
registadas ou marcas comerciais da
Microsoft Corporation nos EUA e/ou
noutros países, sendo usadas sob
licença da Microsoft. Todas as
outras marcas comerciais e nomes
de marcas reconhecidas nacional e
internacionalmente são por este
meio aceites. As ilustrações não são
vinculativas. Os conteúdos,
desenhos e especificações estão
sujeitos a alteração sem aviso
prévio, e poderão variar dum país
para outro.
Informationen die Anweisungen im Handbuch des Xbox™ Videospiele Systems, bevor Sie das Produkt benutzen!

U
S
t
r
P
TABLE CLAMP SETUP (for laptop setup instructions, please refer to the back of the product packaging)
1. Place the wheel on a table or flat surface.
2. Place the clamp screw (15) into the clamp (16) and then screw the clamping unit into the hole on the underside of the wheel until
firmly fixed into place. Be careful not to over-tighten the clamp to avoid damaging either the clamp or the table.
3. Connect the pedal connector cable (11) to the pedal receptor cable (14) and connect the Xbox™ connector (12) to the controller por
of your console. You are now ready to play.
CHANGING SENSITIVITY AND VIBRATION SETTINGS
Default settings: LED (10) is off; sensitivity is medium, vibration is 100%.
Sensitivity button (4): controls sensitivity when turning the wheel. To change the default setting:
1. Press the button once: the LED turns green, and then turns off (sensitivity = low).
2. Press the button again: the LED turns yellow, and then turns off (sensitivity = high).
3. Press the button once more: the LED turns red, and then turns off (sensitivity = medium).
D
TISCHBEFESTIGUNG (Anweisungen für die Verwendung als Labtop-Lenkrad finden Sie auf der Rückseite der Verpackung)
1. Stellen Sie das Lenkrad auf einen Tisch oder eine ebene Oberfläche.
2. Führen Sie die Befestigungsschraube (15) in die Befestigung (16) ein und schrauben Sie die Befestigungsvorrichtung an de
Unterseite des Lenkrads fest. Überdrehen Sie die Schrauben nicht, um einen Schaden an Klemmen oder Tisch zu vermeiden.
3. Verbinden Sie den Pedalanschluss (11) mit dem Anschlusskabel für die Pedale (14) und dies dann mit Xbox™-Anschlusskabel (12)
(über den entsprechenden Controller-Anschluss an der Konsole). Sie können jetzt spielen.
EMPFINDLICHKEIT UND VIBRATION ANPASSEN
Standardeinstellungen: LED (10) ist aus; Empfindlichkeit ist mittel, Vibration ist 100 %.
Sensitivity-Taste (4): reguliert die Empfindlichkeit beim Drehen des Lenkrads. Die Standardeinstellungen ändern Sie so:
1. Drücken Sie die Taste einmal: die LED leuchtet grün und ist dann aus (Empfindlichkeit = niedrig).
2. Drücken Sie die Taste noch einmal: die LED leuchtet gelb und ist dann aus (Empfindlichkeit = hoch).
3. Drücken Sie die Taste noch einmal: die LED leuchtet rot und ist dann aus (Empfindlichkeit = mittel).
E
CONFIGURACIÓN DE ANCLAJE EN MESA (consulta el embalaje del producto para ver instrucciones de configuración portátil)
1. Coloca el volante en la mesa o en una superficie plana.
2. Coloca el tornillo de anclaje (15) en el anclaje (16), y seguidamente atornilla la fijación en el agujero situado en la parte inferior del
volante hasta que quede firmemente fijado en el sitio. Ten cuidado de no apretar demasiado en el momento de relizar la fijación ya
que podrías dañar el volante o la mesa.
3. Conecta el cable conector del pedal (11) en el cable receptor del pedal (14) y conecta el conector Xbox™ (12) en el puerto de tu
consola. Ya puedes empezar a jugar.
CAMBIAR VALORES DE SENSIBILIDAD Y VIBRACIÓN
Valores por defecto: LED (10) está apagado; sensibilidad es media; vibración es al 100%.
Botón Sensitivity (4): controla la sensibilidad cuando se gira el volante. Para cambiar el valor por defecto:
1. Pulsa el botón una vez: el LED se pone en verde, y después se apaga (sensibilidad = baja).
2. Pulsa el botón de nuevo: el LED se pone amarillo, y después se apaga (sensibilidad = alta).
3. Pulsa el botón una vez más: el LED se pone rojo, y después se apaga (sensibilidad = media).
FIXAÇÃO DO GRAMPO À MESA (para as instruções de configuração do laptop, consulte a retaguarda da embalagem do produto)
1. Coloque o volante numa mesa ou superfície plana.
2. Coloque o parafuso (15) no grampo (16) e em seguida aparafuse a unidade de fixação no orifício situado no lado inferior do volante
até que este esteja firmemente seguro no lugar. Tenha cuidado para não apertar demasiado o grampo, a fim de evitar danificar tanto
o grampo como a mesa.
3. Ligue o cabo do conector do pedal (11) ao cabo do receptor do pedal (14), e ligue o conector Xbox™ (12) à porta dos controladores
de jogos da consola. Pode agora começar a jogar.
ALTERAÇÃO DAS DEFINIÇÕES SENSITIVITY E VIBRATION
Definições Normais: o LED (10) está apagado; a sensibilidade é média; a vibração é 100%.
Botão Sensitivity (4): controla a sensibilidade quando se roda o volante. Para mudar a definição padrão:
1. Prima uma vez o botão: o LED fica verde, apagando-se em seguida (sensibilidade = baixa).
2. Prima novamente o botão: o LED fica amarelo e depois apaga-se (sensibilidade = alta).
3. Prima uma vez mais o botão: o LED fica vermelho, apagando-se em seguida (sensibilidade = média).
Para utilizar con el sistema de juego Xbox™. ¡IMPORTANTE! Antes de utilizar este producto, lee el manual de
instrucciones del videojuego Xbox™ para conocer información relativa a la seguridad, salud y otros temas.

U
S
P
r
Vibration button (3): sets the degree of vibration for the motors. To change the default setting:
1. Press the button once: the LED turns green, and then turns off (vibration = 0%).
2. Press the button again: the LED turns yellow, and then turns off (vibration = 50%).
3. Press the button once more: the LED button turns red, and then turns off (vibration = 100%).
BUTTON AND AXIS PROGRAMMING
The function of every analog button (A, B, X, Y, Black, Whit e) can be applied to another analog button, D-Pad direction or axis (axes
include the brake and gas levers, as well as the left and right directions on the steering wheel).
The function of every axis can be applied to another axis, analog button or D-Pad direction.
If a D-Pad direction is programmed onto an analog button, that analog button then becomes digital.
If an analog button is programmed onto a D-Pad direction, that D-Pad direction remains digital.
N.B. The Start, Back, Program, Vibration and Sensitivity buttons, as well as the brake and gas pedals, cannot be programmed.
D
Vibration-Taste (3): Stellt den Grad der Vibration für die Motoren ein. Um die Einstellung zu ändern verfahren Sie wie folgt:
1. Drücken Sie die Taste einmal: die LED leuchtet grün auf, und geht dann ausand (Vibration = 0%).
2. Drücken Sie die Taste noch einmal: die LED leuchtet gelb auf und geht dann aus (Vibration = 50%).
3. Drücken Sie die Taste noch einmal: die LED leuchtet rot auf und geht dann aus (Vibration = 100%).
TASTEN- UND ACHSENPROGRAMMIERUNG
Die Funktion jeder analogen Taste (A, B, X, Y, Schwarz, Weiß) kann für eine andere analoge Taste, Richtungskreuz oder Achse
angewandt werden. (Achsen beinhalten sowohl Brems- und Gaswippen als auch die Links- und Rechts-Richtungen des Lenkrades).
Die Funktion jeder Achse kann für eine andere Achse, analoge Taste oder Richtungskreuz-Richtung angewandt werden.
Wenn eine Richung des Richtungskreuzes auf eine analoge Taste gelegt wird, dann wird diese Taste digital.
Wenn eine analoge Taste auf ein Richtungskreuz gelegt wird, bleibt das Richtungskreuz digital.
N.B. Die Start-, Back-, Program-, Vibration- und Sensitivitytasten, sowie Brems- und Gaspedal können nicht programmiert werden.
E
Botón Vibration (3): controla el grado de vibración de los motores. Para cambiar el valor por defecto:
1. Pulsa el botón una vez: el LED se pone en verde, y después se apaga (vibración = 0%).
2. Pulsa el botón de nuevo: el LED se pone amarillo, y después se apaga (vibración = 50%).
3. Pulsa el botón una vez más: el LED se pone rojo, y después se apaga (vibración = 100%).
PROGRAMACIÓN EJES Y BOTONES
La función de cada botón analógico (A, B, X, Y, Negro, Blanco) puede aplicarse a otro botón analógico, a una dirección del D-Pad o a
un eje (los ejes incluyen las palancas de freno y gas, además de las direcciones izquierda y derecha en el volante).
La función de cada eje puede aplicarse a otro eje, botón analógico o dirección del D-Pad.
Si una dirección del D-Pad se programa en un botón analógico, ese botón analógico se convierte en digital.
Si un botón analógico se programa en una dirección del D-Pad, esa dirección permanece digital.
N.B.: los botones Start, Back, Program, Vibration y Sensitivity, además de los pedales de freno y gas, no pueden programarse.
Botão Vibration (3): ajusta o grau de vibração para os motores. Para mudar a definição padrão:
1. Prima uma vez o botão: o LED fica verde, apagando-se em seguida (vibração = 0%).
2. Prima novamente o botão: o LED fica amarelo e depois apaga-se (vibração = 50%).
3. Prima uma vez mais o botão: o LED fica vermelho, apagando-se em seguida (vibração = 100%).
PROGRAMAÇÃO DOS BOTÕES E EIXOS
A função de cada botão analógico (A, B, X, Y, Preto, Branco) pode ser aplicada noutro botão analógico, numa direcção da almofada
digital ou num eixo (os eixos incluem as alavancas de aceleração e travagem, bem como as direcções esquerda e direita no volante).
A função de cada eixo pode ser aplicada noutro eixo, botão analógico ou direcção da almofada digital.
Se uma direcção da almofada digital for programada num botão analógico, este passará então a ser digital.
Se um botão analógico for programado numa direcção da almofada digital, essa direcção permanecerá digital.
Nota: os botões Start, Back, Program, Vibration e Sensitivity, bem como os pedais de aceleração e travagem, não podem se
programados.
Para usar com o sistema de videojogos Xbox™. IMPORTANTE! Antes de usar este produto, leia o manual de instruçoes do
sistema de videojogos Xbox™ para obter informações sobre segurança, saúde e outras.

U
S
r
t
r
P
1. Press the Program (9) button: the LED (10) turns red*.
2. Press the button/axis that you wish to program elsewhere: the LED flickers red* (for axes, this means turning the wheel all the way to
the left or right, or pressing a lever all the way in).
3. Press the button/axis that you wish to program with the same function as the button/axis pressed in Step 2, above: the LED turns
green, and then turns off.
4. The button/axis pressed in Step 3 now has the same function as the button/axis pressed in Step 2. The button/axis pressed in Step 2
retains its original function.
* If you do not press any other button/axis within 5 seconds, the LED will turn off and no changes will have been made.
To return to the default configuration:
Hold down the Program (9) button for more than 3 seconds: the LED (10) will turn red during this time, and will then turn green fo
2 seconds. The default configuration is restored.
D
1. Drücken Sie die Program-Taste (9): die LED (10) leuchtet rot*.
2. Drücken Sie die Taste/Achse, deren Funktion sie auf eine andere Taste legen möchten: die LED blinkt rot* (Für Achsen bedeute
dies, das Lenkrad ganz nach rechts oder links zu drehen oder die Brems- bzw. Gaswippe ganz durchzudrücken).
3. Drücken Sie die Taste/Achse, die Sie mit der Funktion der Taste aus Schritt 2 programmieren möchten: die LED leuchtet grün und
geht dann aus.
4. Die Taste/Achse, die in Schritt 3 gedrückt wurde, hat jetzt die gleiche Funktion, wie die Taste/Achse, die in Schritt 2 gedrückt wurde.
Die Taste/Achse, die in Schritt 2 gedrückt wurde, behält ihre originale Funktion.
* Wenn Sie innerhalb von 5 Sekunden keine andere Taste/Achse drücken, dann geht die LED aus und es werden keine Änderungen
vorgenommen.
Um zur Einstellungs-Konfiguration zurückzukehren:
Halten Sie die Program-Taste (9) für mehr als 3 Sekunden gedrückt: die LED (10) wir während dieser Zeit rot leuchten und wird dann fü
2 Sekunden grün aufleuchten. Die Konfiguration ist wiederhergestellt.
E
1. Pulsa el botón Program (9): el LED (10) se pone rojo*.
2. Pulsa el botón/eje que quieras programar: el LED parpadea en rojo* (para los ejes, esto implica girar el volante todo a la izquierda o a
la derecha, o pulsar una palanca a fondo).
3. Pulsa el botón/eje que quieras programar con la misma función que el botón/eje pulsado en el Paso 2 anterior: el LED se pone verde
y después se apaga.
4. El botón/eje pulsado en el Paso 3 tiene ahora la misma función que el botón/eje pulsado en el Paso 2. El botón/eje pulsado en el
Paso 2 conserva su función original.
* Si no pulsas cualquier otro botón/eje en 5 segundos, el LED se apagará y no se realizará ningún cambio.
Para volver a la configuración por defecto:
Mantén pulsado el botón Program (9) durante más de 3 segundos: el LED (10) se pondrá rojo durante este tiempo, y después se pondrá
verde durante 2 segundos. Se restaura la configuración por defecto.
1. Prima o botão Program (9): o LED (10) fica vermelho*.
2. Prima o botão/eixo que pretende programar noutro lado: o LED pisca a vermelho* (para os eixos, isto significa rodar o volante
completamente para a esquerda ou direita, ou carregar numa alavanca completamente para a frente).
3. Prima o botão/eixo que pretende programar com a mesma função do que o botão/eixo premido no Passo 2, acima: o LED fica verde
e depois apaga-se.
4. O botão/eixo premido no Passo 3 tem agora a mesma função do que o botão/eixo premido no Passo 2. O botão/eixo premido no
Passo 2 conserva a sua função original.
* Se não premir outro botão/eixo ao fim de 5 segundos, o LED apagar-se-á e não serão efectuadas alterações.
Para repor a configuração padrão:
Pressione o botão Program (9) por mais de 3 segundos: o LED (10) ficará vermelho nesse curto espaço de tempo, passando depois
para verde durante 2 segundos. A configuração padrão é reposta.
 Loading...