

Page 1
VCR
Page 2
1
1
1
1
2
3
1
I
mportante
F
F
10 cm
7 cm
10 cm
10 cm
7 cm
Apropos
de cette
notice
- Ce document
est commun
à plusieurs
modèles
de magnétoscope.
Par
conséquent
certaines
fonctions
ou certains
réglages
peuvent
être absents
du modèle
que vous
avez
acheté.
K
Avant
de commencer
. . . . . . . . . . .2
Brancher
. . . . . . . . . . . . . . . . . . . . .3
Prépar
erle magnétoscope
. . . . . . .4
Prépar
erle téléviseur
. . . . . . . . . . .4
Installer
les
chaînes
. . . . . . . . . . . . .5
Installation
automatique
. . . . . . . . .5
Classer
les chaînes
. . . . . . . . . . . . .5
Compléter
l'installation
. . . . . . . . .6
Régler
l'horloge
. . . . . . . . . . . . . . . .6
Nouvelle
chaîne
. . . . . . . . . . . . . . . .6
Récepteur
satellite
/câble
. . . . . . . .7
Branchements
. . . . . . . . . . . . . . . . .7
Réglage
du magnétoscope
. . . . . . . .8
Codes
satellites/câble
. . . . . . . . . . .9
Autr
es appar
eils . . . . . . . . . . . . . .11
Prises
AV1
/ AV2 . . . . . . . . . . . . . .11
Prise
AV3 . . . . . . . . . . . . . . . . . . . .11
Prise
AV4 . . . . . . . . . . . . . . . . . . . .12
Utiliser
le télécommande
. . . . . . . .13
Contrôler
le fonctionnement
. . . . .14
Regarder
. . . . . . . . . . . . . . . . . . . .15
Enr
egistr
er . . . . . . . . . . . . . . . . . .16
Programmer
un
enregistr
ement
. .17
Contrôle
de bande
. . . . . . . . . . . . .18
Contrôle
d'images
. . . . . . . . . . . . .19
Contrôle
du
son . . . . . . . . . . . . . . .20
Réglage
des
préfér
ences
. . . . . . . .21
Autr
es fonctions
. . . . . . . . . . . . . .22
Plus
d'infos
. . . . . . . . . . . . . . . . . .23
Caractéristiques
techniques
. . . . .25
Réglage
des
préfér
ences
. . . . . . . 21
Autr
fonctions
. . . . . . . . . . . . . 22
Plus
d'infos
. . . . . . . . . . . . . . . . . 23
Réglage
des
préfér
ences
. . . . . . . 21
Autr
fonctions
. . . . . . . . . . . . . 22
Plus
d'infos
. . . . . . . . . . . . . . .
. . 23
Caractéristiques
techniques
. . . . 25
Le
certificat
de garantie
livré
avec
votre
magnétoscope
porte
le type
et le numéro
de fabrication
de votre
appareil.
Conservez-le
avec
la facture.
Ils constituent
les
documents
indispensables
pour
faire
valoir
vos droits
à la
garantie.
Toute
réparation
pendant
la période
de garantie
doit
être
effectuée
par
un
technicien
agréé
représentant
notre
marque.
Toute
dérogation
à cette
règle
entraîne
l'annulation
de vos
droits
à la garantie.
N'ouvrez
jamais
votre
appareil
vous-même.
Cela
peut
être
dangereux
pour
vous,
ou
pourrait
endommager
l’appareil.
Thomson
Multimédia
dégage
sa responsabilité
en cas
d’utilisation
non
conforme
aux
indications
de cette
notice.
Garantie
I
NST
ALLA
TION
- Assurez-vous
que
la tension-secteur
de
votre
habitation
est
conforme
à celle
indiquée
sur
l'étiquette
d'identification,
située
à l'arrière
de votre
appareil.
Installez
le magnétoscope
horizontalement,
loin
de
toute
source
de
chaleur
importante
(cheminée...)
ou d'app areils
produisant
des cham ps
magnétiques
ou électriques
élevés.
Les
composants
de cet
appareil
sont
sensibles
à la chaleur
. La températur
e maximale
ambiante
ne doit
pas dépasser
35°
Celsius.
Laissez
suffisamment
d’espace
autour
pour
assurer
une
ventilation
correcte.
Laissez
10
cm minimum
de
chaque
côté
ainsi
qu’à
l’arrière
de l’appareil
et 7 cm
minimum
au dessus.
L’humidité
des locaux
où
est placé
l’appareil
ne doit
pas
dépasser
un taux
hygrométrique
de 85 %. Si vous
devez
utiliser
votre
appareil
à l’extérieur
, évitez
de
l’exposer
à l’eau
de pluie
ou aux éclaboussures.
Le
passage
d’une
atmosphère
froide
à une
ambiance
chaude
peut
provoquer
de la
condensation
sur
l’écran
(et
sur certains
composants
à l’intérieur
de l’appareil).
Laissez-la
disparaître
d’elle-même
avant
de
remettre
l’appareil
en marche.
U
TILISA
TION
- Si votre
appareil,
ou si une
cassette,
a séjourné
dans
une
atmosphère
froide
quelque
temps,
comme
par
exemple
après
un
transport
l’hiver
, attendez
environ
2 heures
avant
d’utiliser
votre
magnétoscope.
Les
ouvertures
situées
au-
dessus
et en-dessous
sont
prévues
pour
la ventilation.
Elles
ne doivent
pas
être
obstruées.
En cas
d’orage,
il est
recommandé
d’isoler
l’appareil
du réseau
électrique
et de l’antenne
afin
de ne pas le soumettre
à des
surchar
ges
électriques
ou électromagnétiques
qui
peuvent
l’endommager
. Acette
fin,
laissez
la fiche
secteur
et la fiche
d’antenne
accessibles
pour
les débrancher
. En
cas
d’absence
prolongée
, éteignez
l’appareil
avec
l’interrupteur
marche/arrêt.
Même
à l’arrêt,
certains
composants
restent
en contact
avec
le réseau
électrique.
Pour
l’isoler
complètement
vous
devez
débrancher
la fiche
d’alimentation
de la prise
secteur
.
Débranchez
immédiatement
l’appareil
si vous
constatez
qu’il
dégage
une
odeur
de brûlé
ou de la fumée.
En aucun
cas
vous
ne devez
ouvrir
l’appareil
vous-
même,
vous
risquez
l’électr
ocution.
Cet
appareil
ne doit
en
aucun
cas être
utilisé
à des
fins
industrielles.
Il est uniquement
prévu
pour
un
usage
domestique.
La
recopie
totale
ou partielle
d’enregistrements
protégés
par la législation
sur
les
droits
d’auteur
, sans
autorisation
explicite
du titulaire
des
droits,
contrevient
à la
législation
en vigueur
. E
NTRETIEN
- Utilisez
un chiffon
doux,
sec
et propre,
en
excluant
tout
produit
décapant,
solvant,
abrasif,
etc...
Dépoussiérez
régulièrement
les
ouvertures
de ventilation
à l’arrière
ou sur
le côté.
L’utilisation
de
solvants,
de
produits
abrasifs
ou de
produits
à base
d’alcool
risque
d’endommager
l’appareil.
Si un objet
ou un
liquide
pénètre
dans
l’appareil,
débranchez-le
immédiatement
et
faites-le
vérifier
par
un technicien
agréé.
Pour
ne
pas
endommager
les têtes
de
votre
magnétoscope,
n’utilisez
jamais
de cassette
de nettoyage.
Précautions
Sommair
e
Installation
Utilisation
Avant
d’utiliser
votre
magnétoscope
vous
devez
suivre
la procédure
d’installation
et de réglages
décrite
dans
les
pages
2 à 8.
ENGLISH . . . . . . . . . . . . . . . . .
GB
GB
F
Page 3
10
13
15
11
12
18
16
17
19
20
21
22
26
28
9
14
2 4 5 6 7 81 3
23
29
25
24
27
Page 4
1112
1
3
Page 5
Safety information
3A
Mains connection
This video is suitable for use on A.C. mains supply, 220-240 V - 50 Hz only.
It must not be connected to D.C. mains.
Note: The mains lead of the video is fitted with a moulded plug. If the mains sockets are not compatible or if for any reason
the plug is removed please follow the directions below.
The moulded plug cannot be rewired and if removed must be disposed of safely. Remove the fuse to make it safer.
under any circumstances plug the severed plug into any mains socket as this could result in an electric shock.
Do NOT
Important!
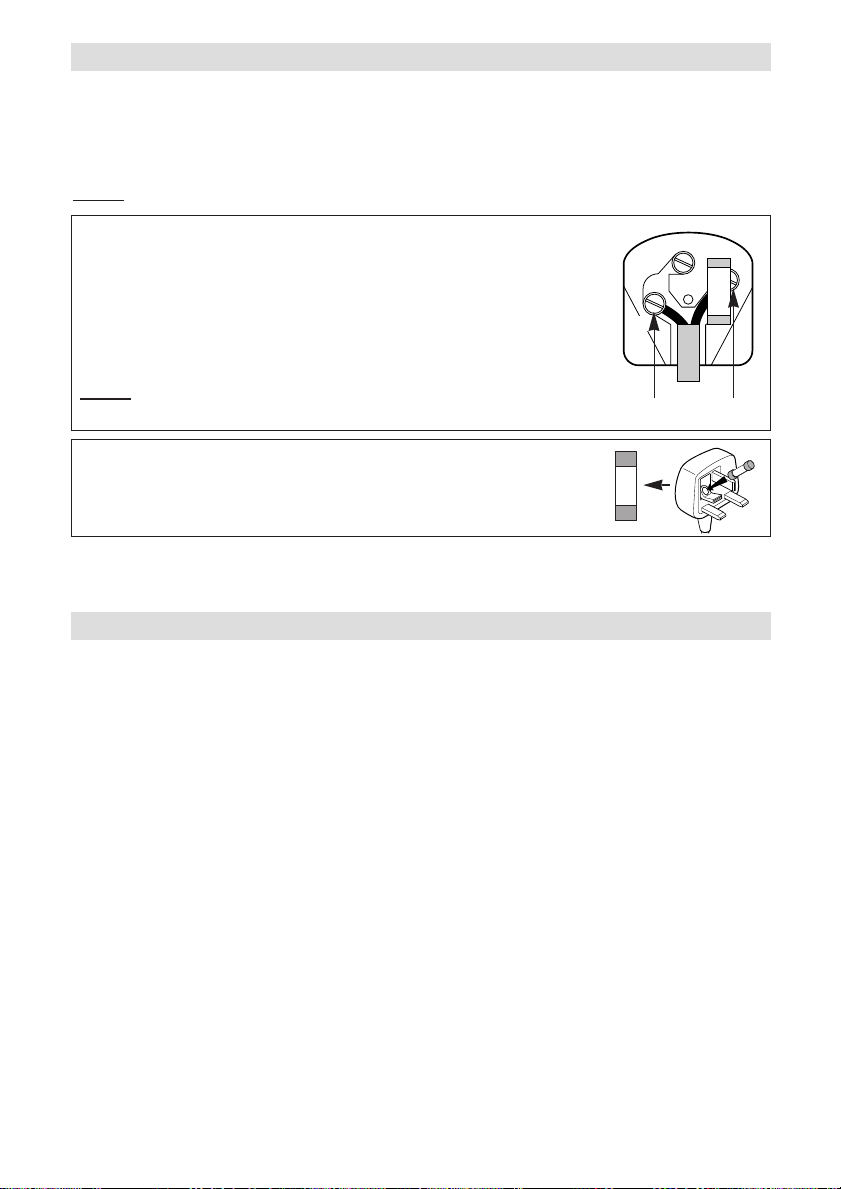
If the plug is removed rewire new plug as follows: The wires in the mains plug are coloured
E
in accordance with the following code:
BLUE - NEUTRAL
BROWN - LIVE
As the colours of the wires in the mains lead of this apparatus may not correspond with the
N
3A
coloured markings identifying the terminals in your plug, proceed as follows:
BLUE wire to the terminal coded N (Neutral) or coloured black.
BROWN wire to the terminal coded L (Live) or coloured red.
make any connection to the terminal in the plug which is marked by the letter
Do NOT
E or by the safety symbol
l or coloured green and yellow.
BLUE BROWN
A fused plug must be fitted with a 3Afuse approved by ASTAor BSI to BS 1362 and fuse
covers must always be securely replaced.
If the fuse blows, check the mains cable for damage or call a qualified technician. Do
3A
not try to bridge the fuse or increase its rating!
The OFF button BBon the remote control and the video recorder does not completely disconnect the unit from the
mains supply but switches operating power on and off.
!
Your guarantee
Dear Customer,
Thank you for purchasing this THOMSON multimedia product and for your confidence in our company. This product meets applicable safety requi-
rements and has undergone stringent testing during manufacture.
However, should there occur a defect, the product or its defective part(s) (excluding accessories and consumables) will be repaired free of
charge (labor and parts) or, at THOMSON multimedia’s discretion, exchanged for a similar item, provided that it has been returned within
12 (twelve) months from the date of original purchase (date of receipt), is defective in materials and/or workmanship and has been bought
in any of the following countries: F, I, E, P, GB, IRL, D, CH, A, B, L, NL (Territory) or in a Duty-free shop in the named countries.
This guarantee will be granted only upon presentation of the original invoice or cash receipt, indicating the date of purchase and dealer’s name,
and of this guarantee card with the product type and serial number. The benefits of this guarantee may be refused if the invoice, cash receipt or
guarantee card has been altered in any way, deleted or made illegible after the original purchase.
This guarantee does not apply to any of the following:
1. Damage caused by accidents including, but not limited to, lightning, fire, water;
2. Transport costs between the home and place of service and other costs and risks of transport relating directly or indirectly to this guarantee;
3. Damage to the product resulting from neglect, misuse, including but not limited to, failure to use, repair and/or install the product for its
normal domestic purposes and/or in accordance with the operating instructions on its proper installation and use;
4. Modifications, adaptations and alterations of the product to operate in a country other than that for which it was originally designed and
manufactured, or any damage resulting from such modifications;
These statements do not affect your statutory rights as a consumer under applicable national legislation in force, nor your consumer’s rights
against the dealer from whom you bought the product.
If you need service, whether or not under guarantee, please approach the dealer who sold you the product.
In your own interest we advise you to read the instruction booklet for your THOMSON multimedia product carefully before contacting your dealer or service center.
If you need service while in a country (within the named Territory) other than the one where you bought your product, please contact the nearest
THOMSON multimedia InfoCenter.
Should you have any questions which your dealer is unable to answer, please contact:
THOMSON InfoCenter (UK,IRL)
THOMSON multimedia Sales UK Ltd.,
30 Tower View
Kings Hill
West Malling
Kent ME19 4NQ
tel. 44 (0) 173 252 0920
fax. 44 (0) 173 252 0921
http://www.thomson-europe.com
L
Page 6
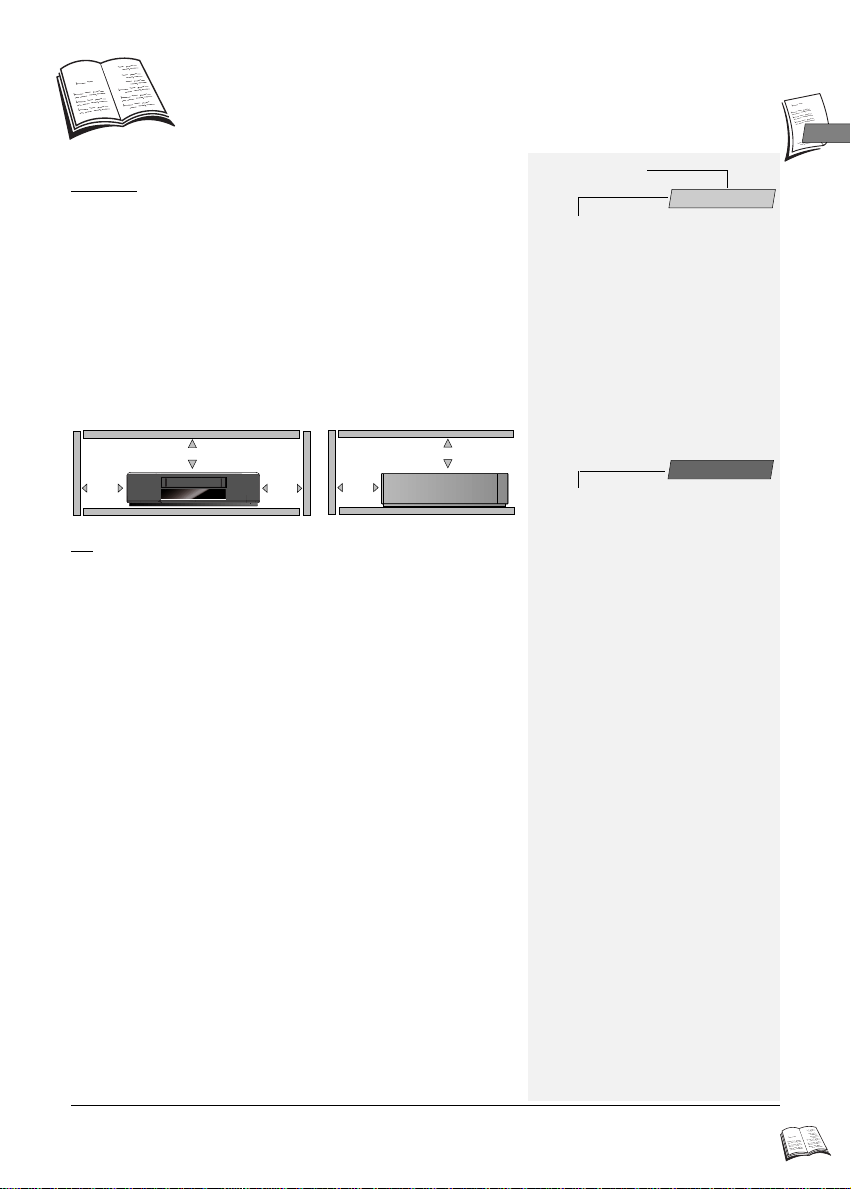
Important
10 cm
7 cm
10 cm
10 cm
7 cm
GB
GB
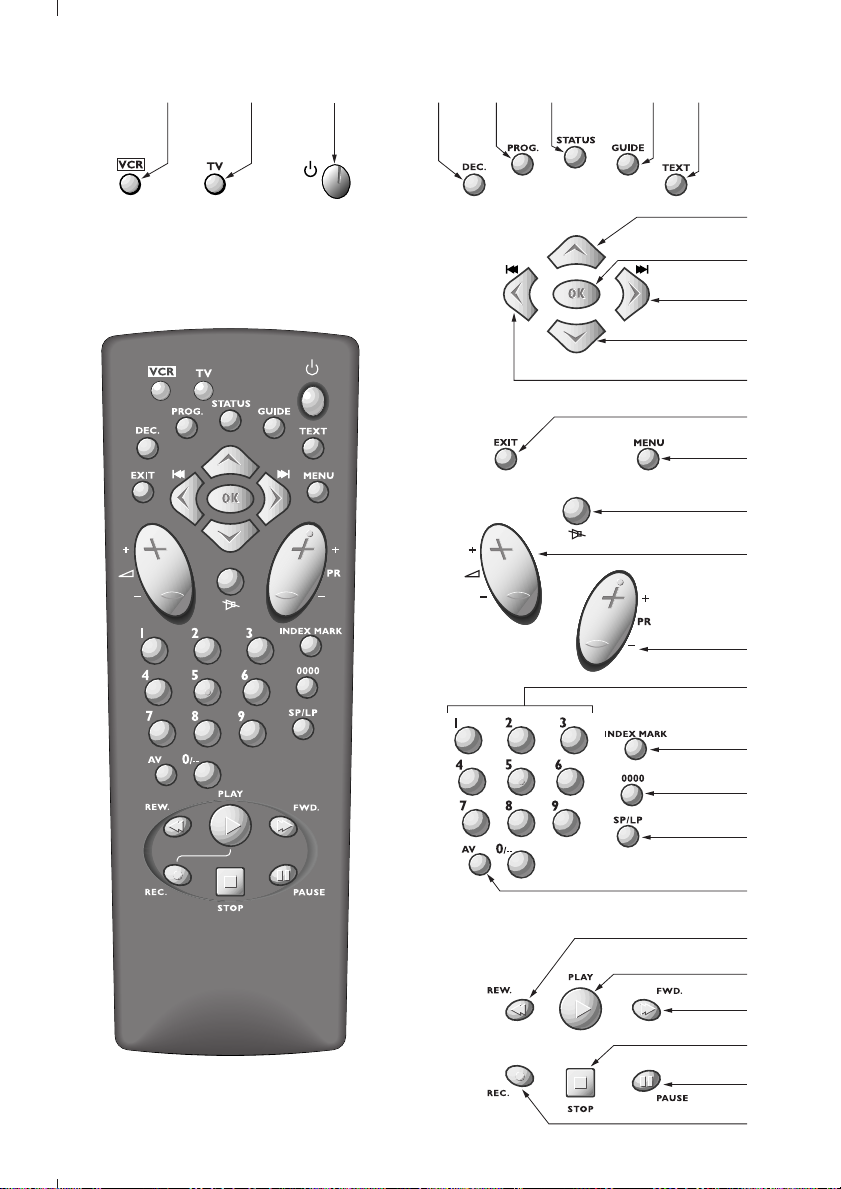
Precautions
SETTING UP - Ensure that the mains supply in your house complies with
that indicated on the identification sticker located on the back of your
appliance. Install the video recorder horizontally, away from any source of
heat (fireplace) or appliances creating strong magnetic or electric fields.
The components of this video recorder are sensitive to heat. The
maximum ambient temperature should not exceed 40° Celsius. Leave
sufficient space around the video recorder to allow adequate ventilation:
10 cm on either side and at the rear, as well as 7 cm above the top are
minimum requirements. The humidity of the room should not exceed
80%. If you have to use the video recorder outdoors, do not expose it to
water from rain or splashing. Moving it from a cold atmosphere into a
warm one is likely to cause condensation on some components inside the
video recorder. Let the condensation disappear by itself before turning the
video recorder on again.
USE - If your appliance, or a cassette, has been stored in a very cold
atmosphere for a certain amount of time (transported during winter for
example), wait approximately 2 hours before using your video recorder.
The openings located on the top and the bottom are for ventilation
purposes. They should not be obstructed. During thunder storms, we
recommend that you disconnect the video recorder from the mains and
aerial so that it is not affected by electrical or electromagnetic surges that
could damage it. For this reason, keep the mains socket and aerial socket
accessible so they can be disconnected. When the unit is on standby,
some components remain connected to the mains. To fully disconnect
your set, you have to unplug the mains connector from the mains socket.
Immediately disconnect the video recorder if you notice it giving off a
smell of burning or smoke. Under no circumstances whatsoever must
you open the video recorder yourself. You risk electrocution if you do so.
CLEANING – Use a soft, dry and clean cloth. Regularly dust the vents at the
back or sides. Using solvents, abrasive or alcohol based products risks
damaging the set. If an object or liquid enters inside the appliance, unplug
it immediately and have it checked by an authorised technician. To avoid
deterioration of your video recorder’s heads, never use a cleaning tape.
Guarantee
The type and production number of your appliance are printed on the
guarantee certificate delivered with your video recorder. Keep this
certificate as well as the invoice. These documents are indispensable for
claiming your guarantee rights. All repairs during the guarantee period
must be carried out by an authorised technician representing our brand. If
this condition is not met, your rights will no longer be valid. Never open
the appliance yourself, since this may be dangerous for you or damage the
equipment. Thomson Multimédia is not liable if the television is used
other than in accordance with this manual.
Prior to using your video recorder, you'll have to follow the set-up
procedure and make the settings described on pages 2 to 5.
ON THIS USER MANUAL: This user manual being common to several VCR models, some
J
functions or settings may not be available on the model you have bought.
Contents
Set-up
Before you start . . . . . . . . . . . . . . . . . .2
Concerning video tapes
Making the connections . . . . . . . . . . . .3
Basic connections
Programme set-up . . . . . . . . . . . . . . . .4
Settings to be made on the video recorder
(modulator)
Settings to be made on the television
(video channel number)
Automatic channel search
Clock setting
Sorting the channels
New or encoded channel
Further connections . . . . . . . . . . . . . . .6
AV1 / AV2
Hi-Fi video recorder and stereo effect
(depending on the model)
Using the remote control . . . . . . . . . . .7
Controlling the video recorder
Programming the remote control
with the TV code
Controlling the television set
Viewing a tape
Playing a tape
Accelerated play
Still image - Pause
Variable slow motion
Stop
Rewind or Fast forward
Ejection of the tape
Index search
Time counter
Recording
Getting prepared
Simple recording
Recording with automatic stop
Continuous play / recording
Programming a recording . . . . . . . . .10
With the VideoPlus+ codes
Storage of the programme numbers with the
VideoPlus+ feature
VideoPlus+ and the satellite demodulator
Without the VideoPlus+ codes
When the video recorder is programmed
Deleting a programmed recording
Recording programmed on a connected set
Adjusting the sound . . . . . . . . . . . . . .12
Adjusting the sound in play mode
Setting the type of sound to be recorded
Preferences . . . . . . . . . . . . . . . . . . . . .13
Eco mode
Auto clock
VideoPlus+ +10 mn
Format
More information . . . . . . . . . . . . . . . .14
Playing NTSC tapes
Tracking and stability in the play mode
Technical data
. . . . . . . . . . . . . . . . . . . . . . . . . . .9
Use
. . . . . . . . . . . . . . . . . . . . . . .8
1
Page 7

Set-up
-
+
SIZE AA 1,5 V 0%MERCURY
GREENELL
EXTRA HEAVY DUTY
-
+
SIZE AA 1,5 V 0%MERCURY
GREENELL
EXTRA HEAVY DUTY
VCR
VHS
VHS
VHS
Before you start
Thank you for purchasing one of our videos.
J
Unpack the set completely and tear off the protection films.
Video recorder
Remote control of the video recorder or
of the television set, depending on the
selection of either VCR or TV.
2 non-rechargeable batteries, type AA
Power cord
Coaxial cable (75 Ω)
Set-up and user manual
To respect the environment, we have printed
this document on unbleached recycling paper.
Please respect the environment and prevailing regulations. Before you dispose of batteries
or accumulators, ask your dealer whether they are subject to special recycling and if they
will accept them for disposal.
Concerning video tapes
Tapes are sensitive to utilisation and storage conditions. Keep them away from dust, humidity or
excessive heat. Do not place them next to appliances producing strong magnetic or electrical fields
(electro-magnet, motor, etc.). Tapes may vary in quality. The difference in quality not only concerns
the tape itself but also the different mechanical elements of the video cassette. Apoor quality tape can
damage your video recorder. You should therefore use quality brand tapes.
Unprotected Protected
To avoid erasing one of your tapes by accident, we recommend you to protect them by breaking the
security tab. To reuse a protected tape, just stick a piece of adhesive tape on this place.
2
Re-recordable
Page 8

Set-up
AUDIO/VIDEO 1
AUDIO/VIDEO 2 DECODER
OUT
ANTENNA
L R
VIDEO AUDIO
IN
OUT
220V/240V - 50Hz
AV1
EXT1
AUX1
AV1
Making the connections
Basic connections
1 Disconnect the aerial cable from your TV set and reconnect it to the IN socket of your
video recorder.
2 By means of the coaxial cable supplied, connect the video recorder’s OUT socket to the
gg
television’s aerial socket
3 Connecting your VCR to your television set with a SCART cable (not supplied)
facilitates operation and considerably improves the image and sound quality. Should
you have such a cable, connect the video recorder AV 1 socket (Audio/Video 1) to the
television's SCART socket (labelled AV 1, EXT 1 or AUX 1, depending on the make).
4 Connect the video recorder to the mains with the power cord supplied by first plugging
in the connector at the video recorder rear.
.
GB
GB
J
1
234
Refer to page 6 for further possible connection schemes.
(cable not supplied)
3
Page 9

Set-up
Programme set-up
The video recorder is not pr e-set to r eceive the programmes available in your region. Therefore, you'll
J
have to carry out channel set-up yourself with the automatic channel set-up procedure described
below. First of all, you'll have to prepare the video recorder and television.
Settings to be made on the video recorder (modulator)
1 Switch the video recorder on by pressing key
2 Press key VCR (1) on the remote control.
3 Hold down key MENU (15) on the remote control until display shows
ð Please wait: the video recorder is searching for a channel, within the range 21 to 69,
available for transmitting its pictures to the television via the coaxial cable. After a
while, the video recorder display indicates the channel that will be used for this
purpose. Note down the number here .
4 If your video recorder is connected to the television via a SCART cable, you can
immediately start the Automatic channel search; otherwise, you'll first have to follow
the instructions given in the following section “Settings to be made on the television”.
Settings to be made on the television (video channel number)
J
Take the user manual of your television and carry out the steps below.
5 Switch on your television set.
6 Select an available channel number (a channel which has no picture).
7 Follow the instructions of your television user manual to find the video channel of the
video recorder (the one you noted down above).
ð Once the television has found the video channel of the video recorder, the following
message will be displayed on the screen ( VCR,
If the picture is poor (snowy, torn), change the communication channel of the video
J
recorder with keys
8 Store channel and its number on the television set.
From now on, to watch the video recorder pictures or menus, you’ll have to switch on the
J
television on the channel assigned to the video recorder, i.e. the channel number chosen in
step 6.
9 Continue with the steps below.
CC /BB
(11/13).
BB
(ON) on its front side.
CC
CH 60
BB
CCHH -- --
.
).
Automatic channel search
1 Press key VCR (1) on your remote control.
2 Press the OK (10) key.
ð You will be informed by a message that your VCR is searching and storing the
channels that can be received in your region. You’ll have to wait a while until this
procedure is completed, before being able to set the clock.
When tuning the video recorder, it is essential that channels are stored in the correct order e.g.
J
BBC 1 on number 1, BBC 2 on number 2, so that the accurate timer recordings can be made.
In very isolated cases two of these programmes may be transposed. If this happens it is simply
a matter of retuning the two affected programmes.
To check the automatic tuning of the channels, go to page 5.
4
The sound from a TV channel or a cassette transmitted via the coaxial cable is monophonic. To
J
make the television reproduce stereo sound, you must use a SCART cable.
Page 10

Set-up
Clock setting
3a If date and time are correct, press EXIT (14) to leave the menus.
3b If the displayed time is incorrect or was not transmitted, set the clock with the number
keys 0 to 9 (19): press key
hour, minute, day, month, year.
4 Store with OK (10).
5 Quit with EXIT (14).
BB
(11), then enter time and date in the following order:
Sorting the channels
The automatic channel set-up assigns the numbers to the channels in a predefined order. These
J
numbers may therefore not match the actual channel numbers. Should this be the case, change
these numbers by carrying out the instructions below. For easy channel identification, we suggest
that you have a TV magazine at hand.
1 With key MENU (15) call up the SUMMARY menu.
2 The Installation line is already selected, press OK (10).
3 With key
4a If the proposed channel number matches the picture displayed, press OK (10) to switch
over to the next channel.
4b Should the channel number not match the TV picture, scroll the channels with the keys
C (13) or B (11).
5 When the channel number matches the TV picture, press OK (10) to validate and
switch over to the next channel.
6 To delete a channel, press 0000 (21).
7 When all channels are sorted, press EXIT (14) to leave the menus.
WW
(12) select the Channel swapping line and confirm with OK (10).
New or encoded channel
J To complete the set-up of your video recorder when the automatic channel set-up has not stored all
of the channels or when you wish to store a new channel.
1 Press key VCR (1) on your remote control.
2 With key MENU (15) call up the
3 The Installation line is already selected, press OK (10).
4 With key
5 The Reception line is already selected. Choose CH (for the channels received via your
roof aerial) or CC (for the cable network channels) with C (13) or B (11).
6 Press W (12) to select the Autosearch line.
7 Press C (13) or B (11) several times to search for the channel of a programme (you
may also directly enter a number with keys 0 to 9 (19)).
ð When a channel is found, the pictures come up on the screen.
8 When the programme is encoded (and you have a decoder connected to socket AV2),
press the DEC (4) on the remote control (the symbol is then displayed on the
screen).
9 When the picture is poor, try the Fine tuning (</>) with W (12),
then C (13) or B (11).
10 Position the cursor on Store on PR and assign a channel number by means of the
number keys 0 to 9 (19) (example: 0, 1 for Pr1).
11 Press OK (10) to store this number.
12 If you wish to continue with TV channel set-up, repeat the steps 6 to 11. Otherwise
press EXIT (14).
W (12), select the Manual set up line and confirm with OK (10).
SUMMARY menu.
GB
GB
Should the picture of a channel be poor or encrypted, please refer to the section “New or
L
encoded channel”.
5
Page 11

Set-up
OUTL R
VIDEO AUDIO
AUDIO/VIDEO 1
AUDIO/VIDEO 2 DECODER
FURTHER CONNECTIONS
To view and/or copy pictures from a connected AV unit.
J
Press the STATUS (6) key to call up the control screen and select the socket
J
AV1 or AV2 with key AV (23) of the remote control.
OUT
AUDIO/VIDEO 2 DECODER
AUDIO/VIDEO 1
(cables not supplied)
AV2 AV1 / AV2
Decoder
Other video recorder
L R
VIDEO AUDIO
ANTENNA
Camcorder
6
Video disk player
TV set
DVD
The pictures from another set operating in the play mode and connected to AV2 are
conveyed to the socket AV1. When your television is connected to this socket, you can
watch the pictures from the set connected.
Satellite receiver
Hi-Fi video recorder and stereo effect (depending on the model)
Audio/Video or Dolby
Hi-Fi system
The two cinch sockets AUDIO OUT (red and white)
enable you to connect your video recorder to the Hi-Fi
stereophonic system. Thus, you’ll be able to reproduce
all the sound effects of your tapes (musicals, films…)
on your Hi-Fi system.
Pro Logic amplifier
The two cinch sockets AUDIO OUT
(red and white) and the cinch socket
VIDEO OUT (yellow) enable you to
connect your video recorder to an
Audio/Video amplifier.
Page 12

Use
Using the remote control
Your remote control enables you to operate the video recorder or television set without leaving your
J
seat. All you have to do is to press either key VCR for the video recorder or TV for the television.
For the television set, you’ll have to programme the remote control as explained below.
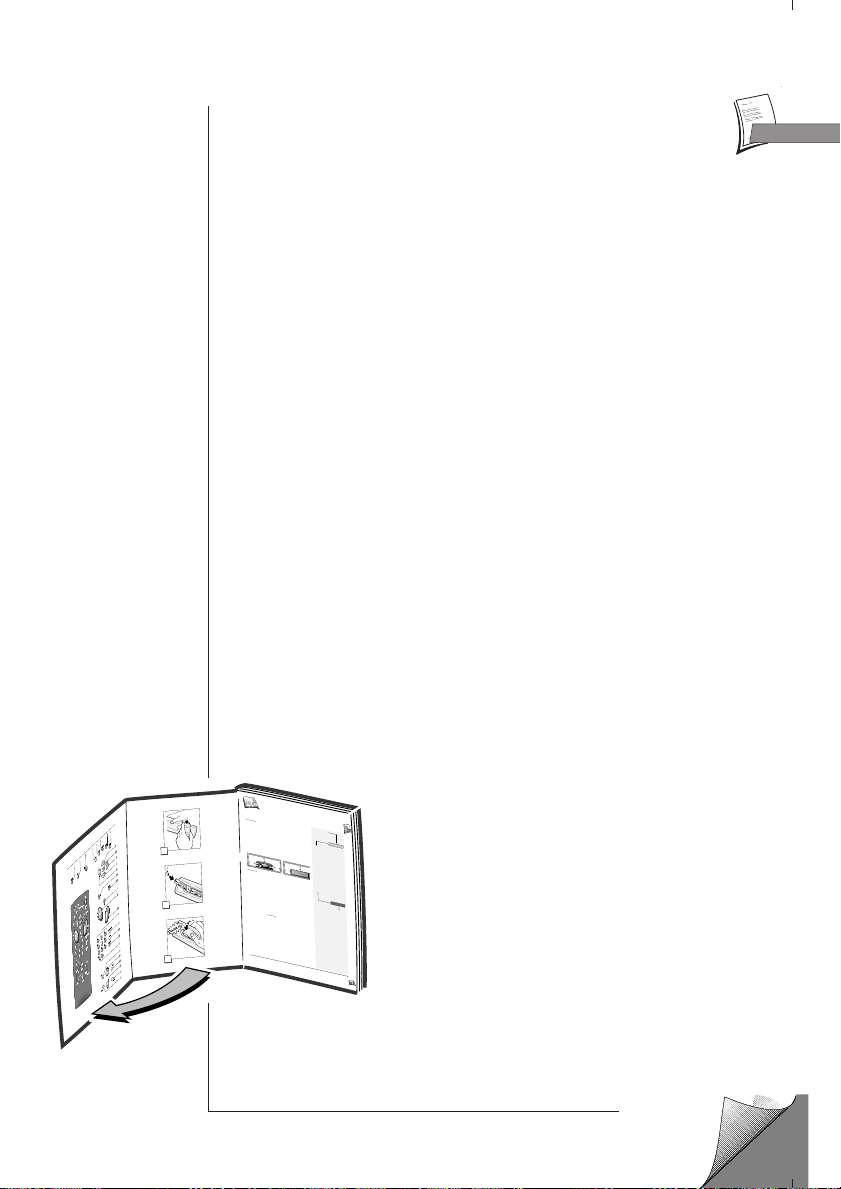
Controlling the video recorder
Press key VCR to control your video
1
recorder.
To switch your video recorder on and off.
3
To select the decoder function.
4
5
To call up the VIDEOPLUS+ menu.
To display the information screen.
6
inactive.
and
7
To navigate through the menus
to
9813
and validate with OK.
14
To exit a menu at any time.
To call up the
15
SUMMARY menu.
Programming the remote control with the TV code
Your remote control can be used for controlling certain functions of most of the TV sets of our make.
J
To this end, you will have to programme it with one of the following codes: 000 for TV sets of the
last generation and 001 for the others. Depending on the type of TV set you own, this remote control
may not be compatible or certain functions may not be available.
1 Press key TV on the remote control
2 Hold down the MENU (15) key on your remote control and key in one of the following
codes: 000 or 001.
3 Release key MENU (15) and try to control the television set.
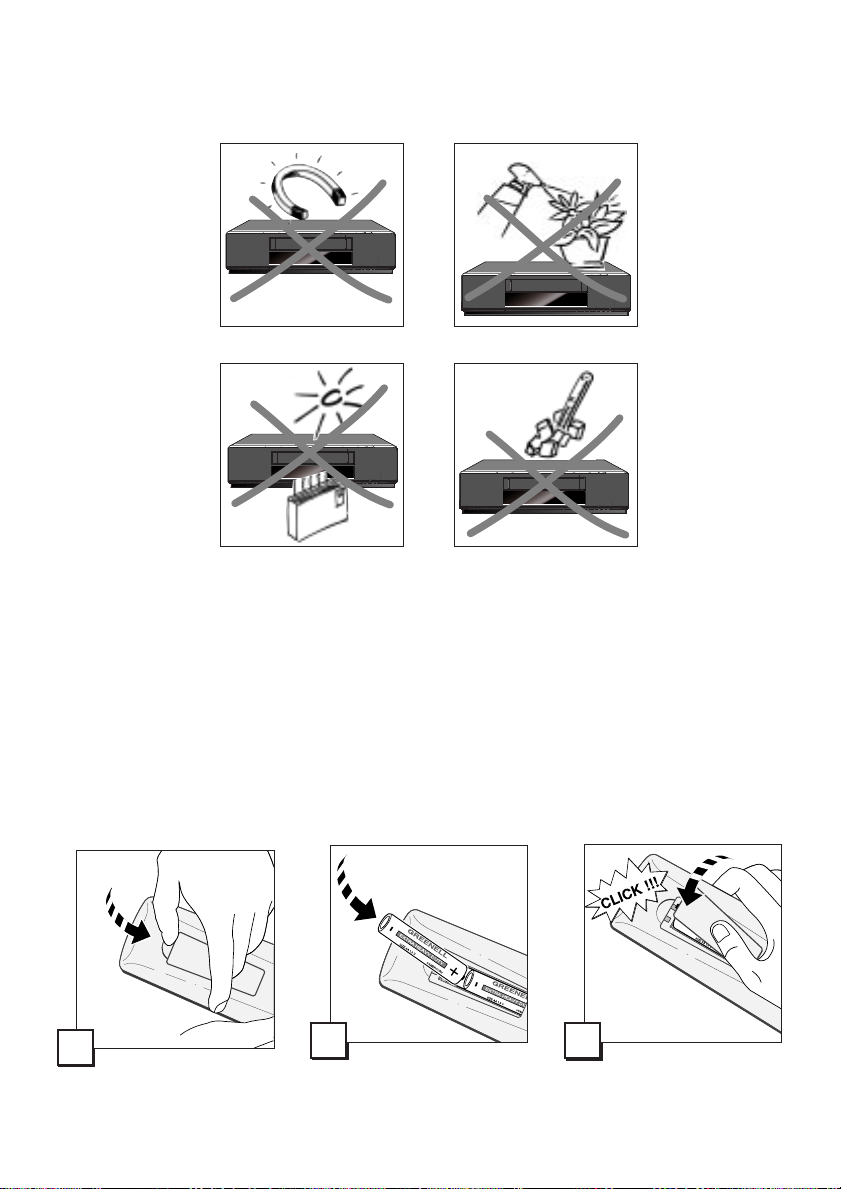
When you replace the batteries of the remote control, you have to programme it again.
J
18
To switch over to another channel.
To select a channel.
For 2-digit channels, first press 0/--
19
(0, 1, 2 for Pr12).
Not active.
20
21
Counter reset.
To double the recording time with LP.
22
To select the units connected to the
23
Audio/Video sockets (AV1, AV2).
Rewind.
24
Play.
25
Fast forward.
26
Stop.
27
28
Pause / Still image.
Recording.
29
GB
GB
Controlling the television set
2
Press key TV to control your television set.
3
To switch your television on* or off.
These keys have the same functions as the
4
corresponding keys of the remote control of
to
your television set (when the latter is of our
15
make).
Mute.
16
To adjust the sound volume.
17
key(s) for switching the television on and off depending on the model.
*
The main functions of your remote control can be found on the VCR frontside.
J
To zoom in / zoom+
11
13
To zoom out / zoomTo switch over to another channel.
18
To switch the television set on*
19
or to select another channel.
To select a SCART socket and watch the
23
pictures of the set connected to this socket.
7
Page 13

Use
Viewing a tape
To view a tape and explore the recordings, to view a still
J
image and retrieve particular scenes in the accelerated
play mode, to rewind to the beginning or wind fast
forward to the end of a tape.
Playing a tape
1 Load a tape.
2 Press key PLAY (25).
ð The video recorder display indicates
J
Should the image be poor, please refer to page 14 (Tracking and stability in the play mode).
PPLLAAYY
.
Accelerated play
Press key REW. (24) or FWD. (26) repeatedly to change the speed and direction of
accelerated play.
ð The message
PPLLAAYY
on the video recorder display flashes.
Still image - Pause
Press key PAUSE (28) repeatedly to wind forward image by image.
ð The message
PPLLAAYY
on the video recorder display flashes.
Variable slow motion
1 Press key PAUSE (28).
2 Press key REW. (24) or FWD. (26) repeatedly to change the speed and direction of slow
motion.
ð The message
PPLLAAYY
on the video recorder display flashes.
Stop
Press key STOP (27).
ð The video recorder display indicates .
Rewind or Fast forward
1 Press key STOP (27).
2 Press key REW. (24) or FWD. (26).
ð The video recorder display indicates or .
Ejection of the tape
1 Switch the video recorder to STOP.
2 Press key STOP/EJECT on the video recorder front.
Index search
Indices allow you to mark particular tape sections (beginning of films, sequences, etc.) to retrieve
J
them quickly. At the beginning of every recording, the video recorder automatically marks an index
on the tape.
To retrieve the previous or next index mark, press C (13) or B (11); this function
requires the video recorder to be on STOP.
Time counter
When you press the STATUS (6) key while the video recorder is either on Play, Pause or Record,
J
the time counter indicates the elapsed time in hours, minutes and seconds in the STATUS menu.
Counting is initiated either by loading a tape or by re-setting the counter to 00h00m00s.
To reset the counter, call up the STATUS menu with the STATUS (6) key and press key
0000 (21) (re-setting the counter requires a tape to be loaded).
8
When a menu is displayed on the screen, you cannot activate your VCR’s main functions (play,
J
rewind...).
The remote control doesn’
work? Press key VCR.
t
Page 14

Use
VHS
Recording
You can record the pictures and the sound of the TV
J
programmes or the pictures and the sound of a unit
connected to one of the available AV sockets.
The remote control doesn’
work? Press key VCR.
Getting prepared
1 Load a tape and position it to the desired section with keys REW., FWD., STOP, PLAY
(24, 26, 27, 25).
2 You may call up the information on the television screen by pressing key STATUS (6).
With key STATUS (6), you can display the information concerning video recorder operation (tape
J
type, time remaining before end of tape, type of sound, image format, tape speed, channel,
time...).
3a Choose a programme with the keys PR+/- (18) or 1, 2, …9 (19).
3b Or make use of key PR+/- (18) or AV (23) to select the AV socket of the external set
connected.
For 2-digit channels, first press 0/-- (19) (0, 1, 2 or PR 12).
J
4 Select standard play (SP) or long play (LP) with key SP/LP (22).
LP doubles the length of your tape (240 minutes in SP become 480 minutes, i.e. 8 hours in LP).
J
Simple recording
1 Press key REC (29).
ð The video recorder switches on Record Pause.
2 Press key PLAY (25).
ð The video recorder starts the recording.
The video recorder display indicates REC.
Interrupt recording with key PAUSE (28); resume recording with PLAY (25)
J
or end with STOP (27).
t
GB
GB
Recording with automatic stop
1 Press key REC (29) twice.
ð The video recorder starts recording for a 30-minute period.
An information screen comes up on your TV, but it will not be recorded on the tape.
J
2 Press key REC (29) again to increase the recording by another 30-minute period: press
once for 30 minutes, press twice for 60 minutes, and so on…
3 Press EXIT (14) to erase the information screen.
Continuous play / recording
J You can permanently play or record a tape. When the end of the tape is reached, it is automatically
rewound until the beginning and play or recording is resumed. This function, used in combination
with the LP feature, provides you with a recording of 8 hours when using an E240 tape.
- Continuous play: press PLAY (25) for 6 seconds.
- Continuous recording: press REC (29) and then PLAY (25) for 5 seconds.
ð The message
Is recording impossible? Check whether the protection tab of the tape
L
is not broken. Should this be the case, cover the opening with a piece
of thick adhesive tape.
PPLLAAYY
on the video recorder display flashes.
9
Page 15

Use
Programming a recording
You can programme a recording with the VideoPlus+ codes indicated in your TV magazine or by
J
means of timer programming if you don’t know these codes. Your video recorder has 4 programming
memories. Thus, you’ll be able to programme 4 recording over a 1-year period.
Load a tape and position it to the desired section with keys REW., FWD., STOP, PLAY
(24, 26, 27, 25).
With the VideoPlus+ codes
1 Call up the VIDEOPLUS+ menu with key PROG. (5).
2
Enter the code of the programme with the number keys
3 Confirm with OK (10).
ð The
ð You may complete your programming by choosing daily or weekly repetition, double
J
4 Leave the menu with EXIT (14).
5 Switch the video recorder on standby with key BB(3).
ð The indication , appears on the display of your video recorder to tell you that your
TIMER menu comes up.
length or VPS- or PDC-signal triggered recording.
When programming for the first time, the cursor positions itself on PR; confirm or enter the
desired programme number.
programming was successful.
(19).
Storage of the programme numbers with the VideoPlus+ feature
To spare yourself from having to enter the corresponding programme number in addition to the
J
VideoPlus+ code, the video recorder automatically stores the numbers of the channels you have
chosen to record with the VideoPlus+ feature.
This is to say that on your FIRST selection of a channel to programme a recording with the
VideoPlus+ feature, the video recorder will prompt you to confirm or enter the channel number.
When programming your next VideoPlus+ recording, the video recorder will automatically identify
the channel concerned.
VideoPlus+ and the satellite demodulator
If you use the VideoPlus+ codes to record a programme broadcast by satellite, the VideoPlus+
J
programmer can ask you to confirm the channel number (Pr99 / AV1 / AV2).
• Connection by the aerial cable - During the automatic channel set-up, the video recorder
has assigned channel number 99 to the satellite receiver connected by the aerial socket. Select
this number to view the pictures of the satellite channels. Should these pictures not come up on
the screen, refer to the chapter “New or encoded channel” (page 5).
• Connection by the AUDIO/VIDEO 1 or2 socket - If your satellite receiver is connected to
the video recorder by the audio video socket, do not choose a number but select the
AV1 or AV2 socket.
VideoPlus+ is a registered trademark of Gemstar Development Corporation.
10
The VideoPlus+ system is manufactured under licence from Gemstar Development Corporation.
Page 16

Use
Without the VideoPlus+ codes
If you don’t know the VideoPlus+ code of the telecast you wish to record, you’ll have to use
J
the
TIMER menu.
1 Display the SUMMARY menu with key MENU (15).
Select Record timer with key WW(12).
2
3 Confirm with OK (10).
TIMER menu comes up.
ð The
4 With key W (12) and V (9) select a blank line in the recording programming menu.
If there no empty line, please read the explanations below to find out how to free a line through
J
the deletion of a programming.
5 Make use of the number keys (19) to enter the channel number or select the
corresponding AV socket if you want to record a satellite and / or encoded programme.
6 With the number keys (19), enter the following information:
• start time of the programme,
• end time of the programme,
• the date, if the recording is not to take place on the same day.
7 Press OK (10) key to select between Once, Monday to Friday (5/7) or Weekly (1/7)
timer recording.
8 Press SP/LP (22) key to select between Standard Play or Long Play recording.
Long Play recording may enable you to record up to twice the length of the tape.
J
9 Activate the VPS/PDC feature (þ) with OK (10) to make sure that recording starts at
the exact start time of the programme, provided that the channel concerned broadcasts
VPS or PDC signals (the television screen then displays this information).
10 Switch the video recorder on standby with key
ð The indication appears on the display of your video recorder to tell you that your
programming was successful.
B (3).
GB
GB
When the video recorder is programmed
When the video recorder is on standby, waiting for the time at which the recording shall be
J
triggered, a special indication ( ) is to be seen on its display. Then you can’t operate the video
recorder any longer unless you quit this mode by pressing key B(3).
Deleting a programmed recording
1 Display the SUMMARY menu with key MENU (15), select Record timer with keyW (12)
and confirm with OK (10).
2 With keys W (12) and V (9) select the programming to be deleted. Press key 0000 (21).
ð The programming is now deleted.
3 Leave the menu with EXIT (14).
Recording programmed on a connected set
The recording of a programme can be triggered by a satellite receiver or another appliance
J
designed for the purpose and connected to socket AV1 or AV2 with a SCART cable. This avoids
having to programme both units.
Programme the connected set and select AV1 or AV2 as appropriate in the video recorder
Record timer menu.
With a tape loaded, on the display confirms your successful programming.
J
11
Page 17

Use
Adjusting the sound
Your video recorder receives and records the digital NICAM sound
J
broadcast by some channels in Europe. This sound remains
compatible with the analogue stereo sound system broadcast in the
other European countries.
HIFI CONTR
HIFI CONTR
IIIIIIIIIIIIIIIIIIII
L
IIIIIIIIIIIIIIIIIIII
L
IIIIIIIIIIIIIIIIIIII
R
R
IIIIIIIIIIIIIIIIIIII
el
LeLevvel
Sound mode B Stereo
OLS
OLS
IIIIIIIIIIIIIII
IIIIIIIIIIIIIII
Adjusting the sound in play mode
In everyday use, these settings need not be modified.
J
1 Load a tape and press PLAY (25).
2 Display the
SUMMARY menu with key MENU (15), then select HiFi controls with
key WW(12).
3 Confirm with OK (10).
HIFI CONTROLS menu comes up.
ð The
4 With key C(13) or B(11) select the sound track(s).
ð If the tape was recorded in Dolby Surround or Dolby Pro Logic Surround, connection
of a special audio/video amplifier will allow you to reproduce these sound effects:
- STEREO: stereo sound of the Hi-Fi tracks,
- MONO: mono sound of the linear track,
- TRACK 1: sound of the left track
- TRACK 2: sound of the right track,
- MIX: sound of the mixed Hi-Fi and mono tracks.
Setting the type of sound to be recorded
The broadcast sound types are different from channel to channel. It can be: mono, stereo, bilingual.
J
Your video recorder uses 3 tracks to record the sound:
- two Hi-Fi tracks for stereo or bilingual sound (track 1 and 2),
- one normal track for mono sound or track 1 for a bilingual telecast.
Depending on the actual sound type of the TV channel (stereo, NICAM or mono), the video recorder
will distribute the sound on these different tracks.
1 Load a tape and press REC (29).
2 Display the
with key WW(12).
3 Confirm with OK (10).
ð The
4 With key WW(12), select the sound mode line, then choose either Stereo or Mono or
else, Track 1 or Track 2.
5 Set the cursor on Level line, then adjust with key C (13) or B (11).
In everyday use, these settings need not be modified.
J
SUMMARY menu with key MENU (15) then select HiFi controls
HIFI CONTROLS menu comes up.
“DOLBY”, “Prologic” and the double-D symbol are trademarks of DOLBY Laboratories
12
Licensing Corporation.
Page 18

Use
Preferences
With the functions provided in the menu
J
PREFERENCES, you may customise your control of
the video recorder, automate some functions, complete
your programming or modify settings.
Display the SUMMARY menu with key MENU (15),
then select Preferences with key W (12). Confirm with OK (10).
Eco mode
Your video recorder can save energy thanks to its ECO feature, that decreases power consumption
J
(down to approx. 3 W) when switched on standby, by only leaving a red indicator on (on some
models only). With this mode activated, time is no longer displayed.
1 Select Eco mode with key W (12).
2 To activate the function (þ), tick off the box with key OK (10).
Auto clock (depending on the model)
Should the daily broadcast automatic clock-setting feature not match the official time in the area
J
where you live:
1 Select Auto clock with key W (12).
2 Deactivate the function (¨) by pressing key OK (10).
3 Set your video recorder clock manually (see page 5).
PREFERENCES
Eco mode B
Auto clock
VideoPlus+ +10
Format Auto
GB
GB
o
o
o
VideoPlus+ + 10
Select this option to add 10 minutes to the end time of your Videoplus+ recordings. Thus you will
J
avoid defective recordings due to programme time shifting or programmes exceeding the scheduled
time (within the 10-minute limit).
1 Select the VideoPlus+ + 10 line with key W (12).
2 To activate the function (þ), tick off the box with key OK (10).
Format
Auto: for automatic recognition of the 16:9 recording format.
J
16:9 : to record or play in 16:9 (D2 MAC, Visiopass, PAL+ decoder, digital television, DVBS) from
the AV2 or AV1 socket (the video recorder display must not indicate VCR).
4:3 : to record or view in another picture format.
Make use of the keys C (13) / B (11).
13
Page 19

Use
More information
In our efforts to improve the quality of our products, we reserve the right to change their features.
J
The information contained in these instructions are therefore liable to change and are not
contractual.
Playing NTSC tapes
NTSC is the colour television standard used in the United States, in Japan and other countries. Your
J
video recorder is capable of playing VHS-NTSC tapes, but you must have a television set compliant
with the PAL standard. Most of the PAL television sets provide proper reproduction of the pictures
from NTSC tapes.
Tracking and stability in the play mode
The pictures of some tapes (hired or other) may flicker, show interference lines on the bottom of the
J
screen or be altered by other undesirable effects. With the Tracking or Stability adjustments, you'll
be able to eliminate or to reduce these image faults.
1 Load a tape.
2 Either start playing with key PLAY (25) or switch into slow motion with PAUSE (28)
and F.FWD. (26) or else, press PAUSE (28).
3 Press W (12): a menu comes up.
ð In the play
ð While in pause
4 Adjust with key
5 Restore the standard setting with key 0000 (21).
In the other modes, TRACKING or STABILITY are not displayed.
J
or slow motion mode TRACKING comes up.
mode, STABILITY replaces TRACKING.
C
(13) or B(11).
Technical data
Mains supply 200 to 240 V ±10% - 50/60 Hz
Consumed power 22 W when ON - 3 W watts in the eco mode
Clock autonomy approx. 30 minutes
Dimensions (W/H/D) / Weight 393 x 94 x 278 mm / approx. 4.0 kg
Functioning conditions +5°C à + 40°C - Surrounding humidity: 80 % maximum
Tape heads video - 4 rotary heads
HiFi pass-band 20 to 20 000 Hz
Dynamic 80 dB
Tuner PLL, VPS/PDC Type
Reception band I-III-IV Hertzian (aerial) - Inter-band / Hyper-band (cable network)
Frequency ranges 45 to 855,25 MHz
Colour TV standards PAL
Reception standards I
Number of storable channels 99
Modulator UHF - Channel 21 to 69 - Pre-set at the factory on channel 60
Remote control Infrared 33 Khz - Batteries 2 x 1,5 V(AA)
Automatic functions On (using any key)
Tapes VHS format - Rewinding time = 130s with E 180
Conception : Rensonnet / Déchamps - Réalisation : Morell / Morvan / Arbogast R9000 - Pack 1 / GB- EP / VD - BEI / 02-2000
audio - 2 rotary heads (HiFi) - 1 fixed head (mono linear track)
Playing of an NTSC tape on TV PAL 60Hz
Standards I
Play (with protected tape) - Rewinding (at the end of the tape)
Long Play (LP) - Super Long Play (SLP)
14
Page 20

THOMSON multimedia
30 Tower View
Kings Hill
West Malling
Kent ME19 4NQ
http://www.thomson-multimedia.com
Réalisation B.E.I. Communication
http://www.ste-bei.com
2106275A
© Copyright THOMSON multimedia 2000
R9000 PACK 1 / UK
 Loading...