

Page 1

FR GUIDE D’INSTALLATION ET D’UTILISATION
EN INSTRUCTIONS FOR INSTALLATION AND USE
DE MONTAGE- UND GEBRAUCHSANWEISUNG
Hotte aspirante
Cooker hood
Dunstabzugshaube
Page 2

FR 01
Chère Cliente, Cher Client,
EN 16
DE 30
Vous venez d’acquérir une hotte THOMSON et nous vous en remercions.
Nous avons mis dans cet appareil toute notre passion, notre savoirfaire pour qu’il réponde au mieux à vos besoins. Innovant, performant,
nous l’avons conçu pour qu’il soit aussi toujours facile à utiliser.
Vous trouverez également dans la gamme des produits THOMSON,
un vaste choix de fours, de fours à micro-ondes, de tables de cuisson,
de hottes aspirantes, de lave-vaisselle, de lave-linge, de sèche-linge,
de réfrigérateurs et congélateurs que vous pourrez coordonner à votre
nouvelle hotte THOMSON.
Bien entendu, dans un souci permanent de satisfaire le mieux possible
vos exigences vis à vis de nos produits, notre service consommateurs
est à votre disposition et à votre écoute pour répondre à toutes vos
questions ou suggestions (coordonnées à la fin de ce livret).
Et connectez-vous aussi sur notre site où vous trouverez tous nos produits,
ainsi que des informations utiles et complémentaires.
THOMSON
Dans le souci d’une amélioration constante de nos produits, nous nous réservons le droit
d’apporter à leurs caractéristiques techniques, fonctionnelles ou esthétiques toutes modifications
liées à leur évolution.
Important : Avant de mettre votre appareil en marche, veuillez lire
attentivement ce guide d’installation et d’utilisation afin de vous familiariser
plus rapidement avec son fonctionnement.
1
Page 3

SOMMAIRE
1 / A L’ATTENTION DE L’UTILISATEUR
• Consignes de sécurité _____________________________________ 03
• Respect de l’environnement ________________________________ 04
• Description de votre appareil ________________________________ 05
2 / INSTALLATION DE VOTRE APPAREIL
• Utilisation en version évacuation _____________________________ 06
• Utilisation en version recyclage ______________________________ 06
• Raccordement électrique ___________________________________ 07
• Montage de la hotte _______________________________________ 08
• Evacuation extérieure ______________________________ 09
• Recyclage _______________________________________ 09
3 / UTILISATION DE VOTRE APPAREIL
• Description des commandes ________________________________ 10
4 / ENTRETIEN ET NETTOYAGE DE VOTRE APPAREIL
• Nettoyage des filtres à graisse ______________________________ 11
• Changement des filtres charbon _____________________________ 11
• Nettoyage et entretien de la carrosserie _______________________ 12
• Changement de lampe _____________________________________ 12
• Comment enlever le verre___________________________________ 12
• Entretenir votre appareil ____________________________________ 13
FR
5 / ANOMALIES DE FONCTIONNEMENT ___________________________ 14
6 / SERVICE APRES-VENTE
• Interventions _____________________________________________ 15
• Relations consommateurs __________________________________ 15
2
Page 4
FR
1 / A L’ATTENTION DE L’UTILISATEUR
Important
Conservez cette notice d'utilisation avec
votre appareil. Si l'appareil devait être vendu
ou cédé à une autre personne, assurez-vous
que la notice d'utilisation l'accompagne.
Merci de prendre connaissance de ces
conseils avant d'installer et d'utiliser votre
appareil. Ils ont été rédigés pour votre
sécurité et celle d'autrui.
• CONSIGNES DE SÉCURITÉ
- Cet appareil a été conçu pour être utilisé par
des particuliers dans leur lieu d'habitation.
- Cet appareil doit être utilisé par des adultes.
Veillez à ce que les enfants n'y touchent pas et
ne l'utilisent pas comme un jouet. Assurez-vous
qu'ils ne manipulent pas les commandes de
l'appareil.
- A la réception de l'appareil, déballez-le ou faites
le déballer immédiatement. Vérifiez son aspect
général. Faites les éventuelles réserves par écrit
sur le bon de livraison dont vous gardez un
exemplaire.
- Votre appareil est destiné à un usage domestique
normal. Ne l'utilisez pas à des fins commerciales
ou industrielles ou pour d'autres buts que celui
pour lequel il a été conçu.
- Ne modifiez pas ou n'essayez pas de modifier
les caractéristiques de cet appareil. Cela
représenterait un danger pour vous.
- Les réparations doivent être exclusivement
effectuées par un spécialiste agréé.
- Débranchez toujours la hotte avant de procéder
à son nettoyage ou à son entretien.
- Aérez convenablement la pièce en cas de
fonctionnement simultané de la hotte et d'autres
appareils alimentés par une source d'énergie
différente de l'énergie électrique. Ceci afin que la
hotte n'aspire pas les gaz de combustion.
- Il est interdit de flamber des mets ou de faire
fonctionner des foyers gaz sans récipients de
cuisson, au dessous de la hotte (les flammes
aspirées risqueraient de détériorer l'appareil).
- Les fritures effectuées sous l'appareil doivent
faire l'objet d'une surveillance constante.
Les huiles et graisses portées à très haute
température peuvent prendre feu.
- Respectez la fréquence de nettoyage et de
remplacement des filtres. L'accumulation de
dépôts de graisse risque d'occasionner un
incendie.
- Le fonctionnement au dessus d'un foyer à
combustible (bois, charbon…) n'est pas autorisé.
- N'utilisez jamais d'appareils à vapeur ou à haute
pression pour nettoyer votre appareil (exigences
relatives à la sécurité électrique).
- Dans le souci d’une amélioration constante de
nos produits, nous nous réservons le droit
d’apporter à leurs caractéristiques techniques,
fonctionnelles ou esthétiques toutes modifications
de leurs caractéristiques liées à l’évolution
technique.
- Afin de retrouver aisément à l’avenir les
références de votre appareil, nous vous
conseillons de les noter en page “Service AprèsVente et Relations Consommateurs”. (Cette page
vous explique également où les trouver sur votre
appareil).
-Suivre impérativement les instructions de cette
notice. Le constructeur décline toute
responsabilité pour tous les inconvénients,
dommages ou incendies provoqués à l’appareil
et dûs à la non observation des instructions de
la présente notice.
Attention
Dans le cas d’une cuisine chauffée avec
un appareil raccordé à une cheminée (ex :
poêle), il faut installer la hotte en version
recyclage. Ne pas utiliser la hotte sans les
filtres à graisse.
Une ventilation convenable de la pièce doit
être prévue lorsqu’une hotte de cuisine est
utilisée simultanément avec des appareils
utilisants du gaz ou un autre combustible.
3
Page 5
1 / A L’ATTENTION DE L’UTILISATEUR
• RESPECT DE L’ENVIRONNEMENT
- Les matériaux d’emballage de cet appareil sont recyclables. Participez à leur recyclage et contribuez
ainsi à la protection de l’environnement en les déposant dans les conteneurs municipaux prévus à
cet effet.
- Votre appareil contient également de nombreux matériaux recyclables. Il est donc marqué de ce
logo afin de vous indiquer que les appareils usagés ne doivent pas être mélangés avec
d’autres déchets. Le recyclage des appareils qu’organise votre fabricant sera ainsi
réalisé dans les meilleures conditions, conformément à la directive européenne 2002/96/
CE sur les déchets d’équipements électriques et électroniques. Adresser vous à votre
mairie ou à votre revendeur pour connaître les points de collecte des appareils usagés
les plus proches de votre domicile.
- Nous vous remercions pour votre collaboration à la protection de l’environnement.
Attention
L’installation est réservée aux installateurs et techniciens qualifiés.
Attention
Avant la première utilisation du filtre à graisse, retirez le film de protection.
FR
4
Page 6
FR
1 / A L’ATTENTION DE L’UTILISATEUR
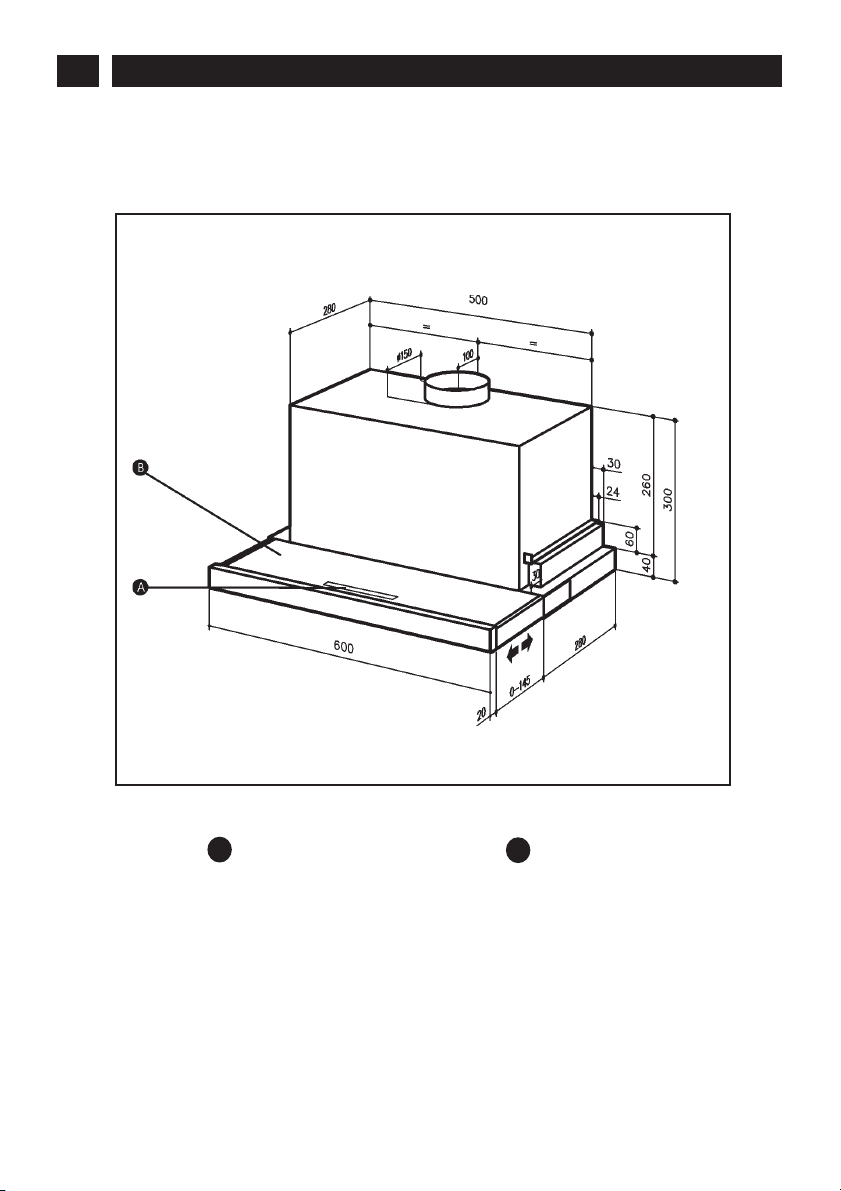
• DESCRIPTION DE VOTRE APPAREIL
Commandes
A
TiroirB
5
Page 7
2 / INSTALLATION DE VOTRE APPAREIL
- L’appareil doit être débranché pendant l’installation ou dans l’éventualité d’une intervention.
- Vérifiez que la tension du réseau correspond à la tension mentionnée sur la plaque signalétique
située à l’intérieur de la hotte.
- Si l’installation électrique de votre habitation nécessite une modification pour le branchement de
votre appareil, faites appel à un électricien qualifié.
- Si la hotte est utilisée en version évacuation, ne raccordez pas l’appareil à un conduit d’évacuation
de fumées de combustion (chaudière, cheminée, etc...) ou à une VMC (ventilation mécanique
contrôlée).
- Le conduit d’évacuation, quel qu’il soit ne doit pas déboucher dans les combles.
- Installez la hotte à une distance de sécurité d’au moins 65 cm d’un plan de cuisson.
L'appareil peut être utilisé soit en version à évacuation extérieure soit en version à recyclage.
L’appareil est livré pour fonctionner en recyclage, les filtres à charbon actif son montés d’origine (Option
Ref. AH4010E1).
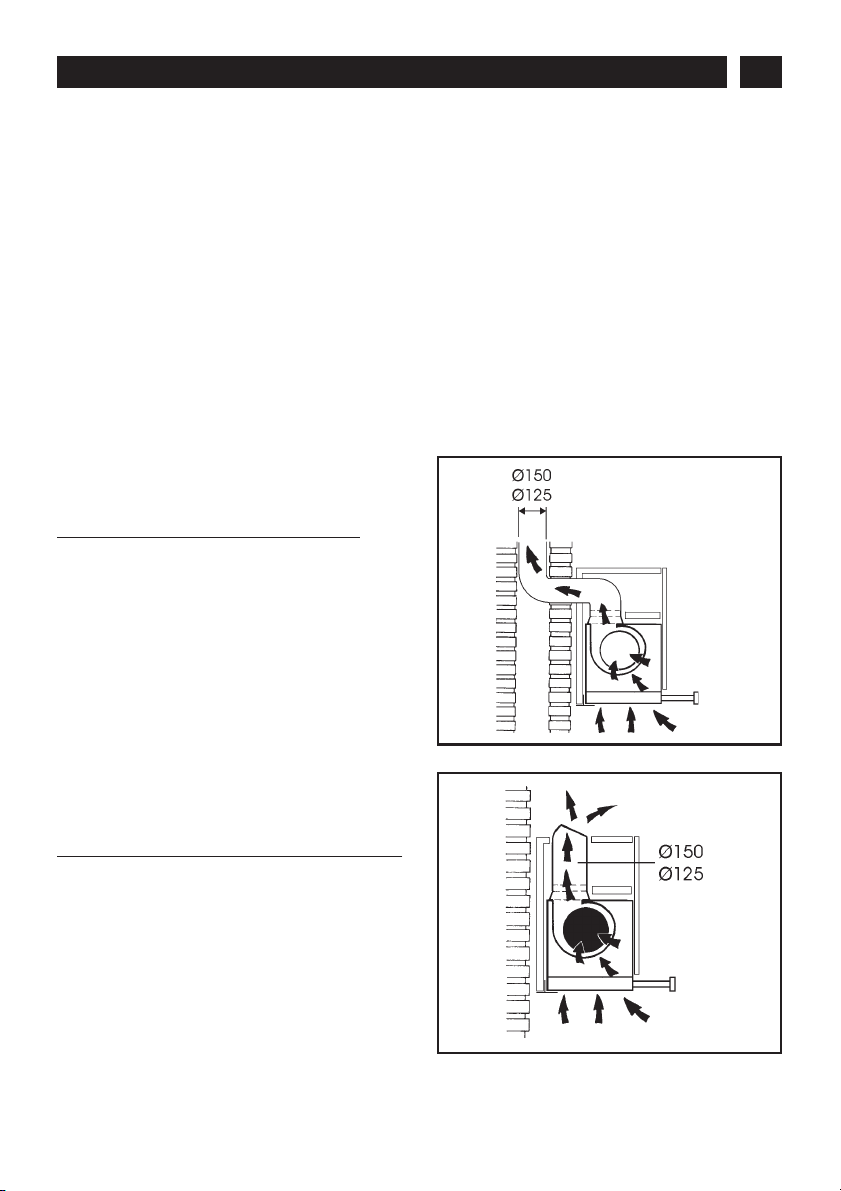
• UTILISATION EN VERSION
FR
EVACUATION
Vous possédez une sortie vers l’exterieur
(fig. 1)
Votre hotte peut être raccordée sur celle-ci par
l’intérmedaire d’une gaine d’évacuation (minimum
Ø 125mm, émaillée, en alu, flexible ou en matière
ininflammable).
Votre hotte étant livrée en version recyclage, vous
devez préalablement retirer les filtres à charbon
actifs.
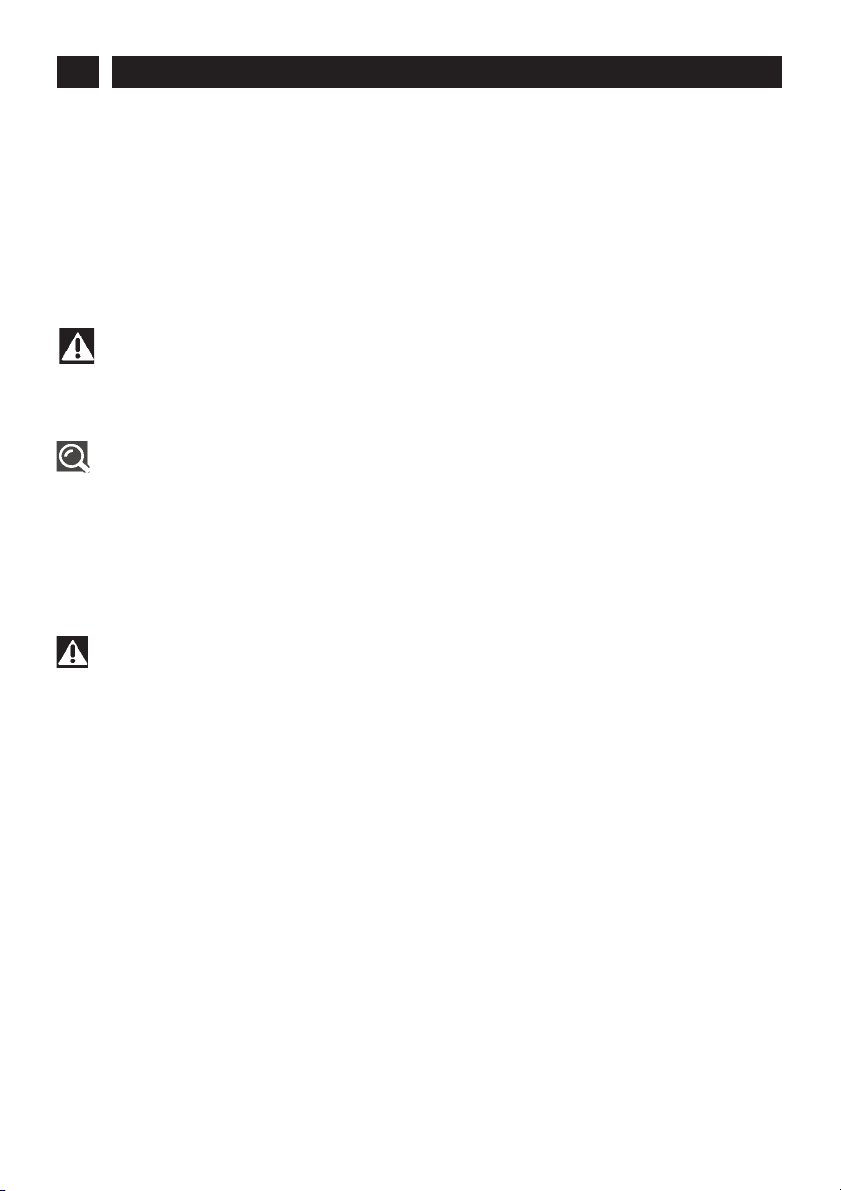
• UTILISATION EN VERSION
RECYCLAGE
Vous ne possédez pas de sortie vers l’exterieur
(fig. 2)
Tous nos appareils ont la possibilité de fonctionner
en mode recyclage.
L’air et les vapeurs convoyés par l’appareil
sont épurés par les filtres à charbon et remis
en circulation dans la pièce.
fig. 1
fig. 2
6
Page 8

FR
2 / INSTALLATION DE VOTRE APPAREIL
• RACCORDEMENT ELECTRIQUE
Lors de l'installation et des opérations d'entretien,
l'appareil doit être débranché du réseau
électrique, les fusibles doivent être coupés ou
retirés.
Le raccordement électrique est à réaliser avant
la mise en place de l'appareil dans le meuble.
Vérifiez que:
- la puissance de l'installation est suffisante,
- les lignes d'alimentation sont en bon état
- le diamètre des fils est conforme aux règles
d'installation.
Attention
Cet appareil doit être relié à la terre.
Notre responsabilité ne saurait être engagée
en cas d’accident consécutif à une mise à la
terre inexistante ou incorrecte.
Si votre appareil, n'a pas de câble flexible qui ne
peut pas être séparé ni de prise, ou bien d'autre
dispositif qui garantisse le débranchement de tous
les pôles du réseau, avec une distance d'ouverture entre les contacts d'au moins 3 mm, ces
dispositifs de séparation du réseau doivent alors
être prévus dans l'installation fixe.
Cet appareil est livré avec un câble d’alimentation
H 05 VVF à 3 conducteurs de 0,75 mm2 (neutre,
phase et terre). Il doit être branché sur réseau
230-240 V monophasé par l’intermédiaire d’une
prise de courant normalisée CEI 60083 qui doit
rester accessible après installation,
conformément aux règles d’installation.
Si le câble d’alimentation est endommagé, faites
appel au service après-vente afin d’éviter un
danger.
Attention
Si l'installation électrique de votre
habitation nécessite une modification pour
le branchement de votre appareil, faites
appel à un électricien qualifié.
Attention
Si la hotte présente une quelconque
anomalie, débranchez l'appareil ou enlevez
le fusible correspondant à la ligne de
branchement de l'appareil.
7
Page 9
2 / INSTALLATION DE VOTRE APPAREIL
• MONTAGE DE LA HOTTE
Attention
L’installation doit être conforme aux
règlements en vigueur pour la ventilation
des locaux. En France, ces règlements sont
indiqués dans le DTU 61.1 du CSTB. En
particulier, l’air évacué ne doit pas être
envoyé dans un conduit utilisé pour évacuer
les fumées d’appareils utilisant du gaz ou
autre combustible. L’utilisation de conduits
désaffectés ne peut se faire qu’après accord
d’un spécialiste compétent.
La distance minimum entre la surface de support
des casseroles sur le plan de cuisson et la partie
inférieure de la hotte doit être de 650 mm. Si les
consignes, pour l’installation du plan de cuisson,
indiquent une plus grande distance, il faut en tenir
compte.
ATTENTION : Pour ne pas détériorer le produit,
pendant l’installation, N’UTILISER QUE LES
VIS FOURNIES EN EQUIPEMENT et
correctement, comme indiqué dans les
consignes à suivre.
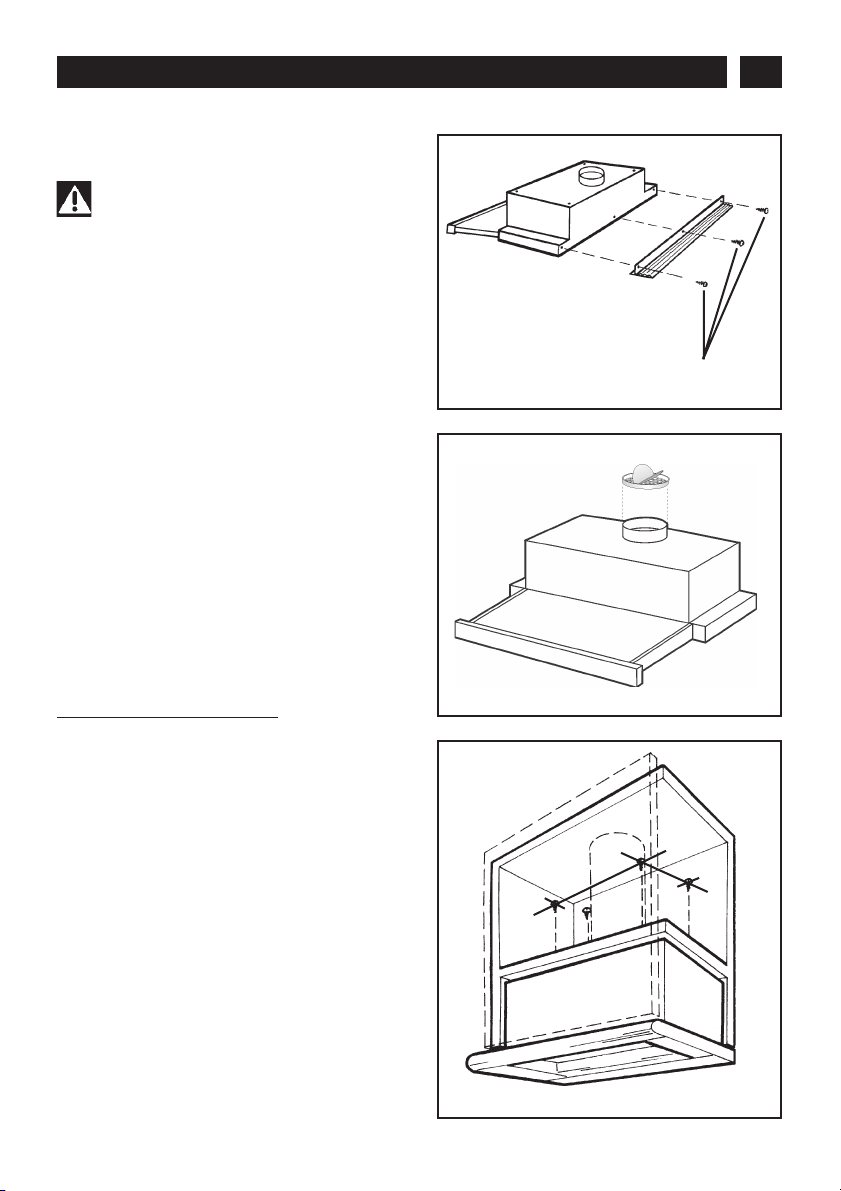
Afin de compenser des vides éventuels de
profondeur entre l'appareil et le mur, une
PIÈCE D'ENTRETOISEMENT en plastique a
été prévue; elle doit être fixée sur l'arrière de
l'appareil au moyen des trois vis A (fig. 3). Les
3 vis A à utiliser se trouvent dans le sachet des
accessoires joint à l’entretoise. Couper la
pièce d'entretoisement suivant la distance
qui doit être compensée.
FR
A
fig. 3
fig. 4
Monter la flange sur la sortie d’air de l’appareil en
exerçant une légère pression (fig. 4).
INSTALLATION SOUS UN PLACARD MURAL
Conditions essentielles pour le montage:
– Prévoyez l’alimentation électrique.
– Si l'appareil doit être installé en version
évacuation, prévoyer le trou d’évacuation de l’air.
Fixation (fig. 5):
Faites les quatre trous de fixation prévus pour
votre modèle dans la base de votre placard
mural, et découpez l'ouverture nécessaire
pour l'évacuation de l'air.
Approcher la hotte au fond de l’élément mural
450
217
fig. 5
8
Page 10
FR
2 / INSTALLATION DE VOTRE APPAREIL
et l’assurer à ce dernier à l’aide de 4 vis
autotaraudées fournies en équipement avec
l’appareil.
• Evacuation extérieure
Faites la liaison entre la bride de raccordement de
la hotte et le trou d'évacuation de l'air préparé dans
le mur/plafond au moyen d'un tube spécial.
Faites la connexion électrique.
Attention
Votre hotte étant livrée en version
recyclage, vous devez préalablement retirer
les filtres à charbon actif.
Conseil
Pour une utilisation optimale de votre
appareil, nous vous conseillons le
raccordement à une gaine diamètre 150 mm
(non livrée). Limiter au maximum le nombre
de coude et la longueur de la gaine. Dans le
cas où la hotte fonctionne en évacuation
extérieure, il convient d’assurer une arrivée
d’air frais suffisante pour éviter de mettre la
pièce en dépression.
Clapet anti-retour
Dans le cas d’une installation en évacuation
extérieure, l’installation du clapet anti-retour
empêche l’entrée du vent et le retour d’air.
Attention: avant de fixer la gaine d’évacuation
au moteur, s’assurer que le clapet anti-retour,
qui se trouve sur la sortie d’air, puisse tourner
librement.
• Recyclage
Reliez à la bride de raccordement de l’ appareil un
tube spécial qui portera l’air jusqu’au sommet du
placard mural (le tuyau n’est pas fourni).
Faites la connexion électrique.
9
Page 11
3 / UTILISATION DE VOTRE APPAREIL
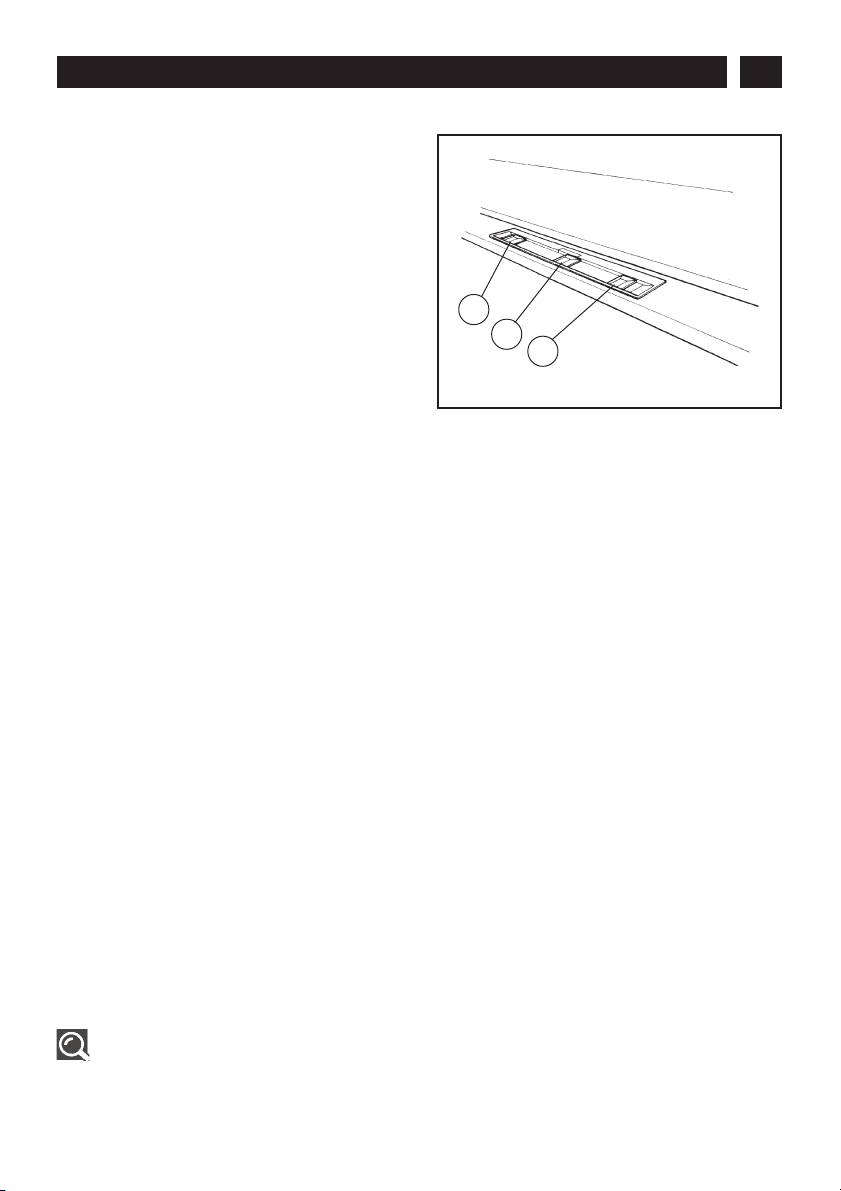
• DESCRIPTION DES COMMANDES
MOTEUR - Interrupteur A
En sélectionnant la position "1" l'allumage du
moteur sera réglé automatiquement par l'ouverture et la fermeture du tiroir télescopique.
En position "0" le moteur sera toujours éteint.
FR
VITESSE - Interrupteur B
Permet le réglage des vitesses de fonctionnement
du moteur à l'aide d'un transformateur éléctronique.
LUMIERE - Interrupteur C
En mettant l'interrupteur "lumière" en position
"AUT", l'allumage de la lumière sera
automatiquement réglé par l'ouverture et la
fermeture du tiroir.
En choisissant la position "0" la lumière restera
toujours éteinte indépendamment de la position du
tiroir.
La position "MAN" permet l'allumage
indépendamment de la position du tiroir.
A
B
C
fig. 6
Conseil
Ce guide d’installation et d’utilisation est valable pour plusieurs modèles. De légères
différences de détails et d’équipements peuvent apparaître entre votre appareil et les
descriptions présentées.
10
Page 12
FR
4 / ENTRETIEN ET NETTOYAGE DE VOTRE APPAREIL
Attention
Débranchez l'appareil avant de procéder à l'entretien et au nettoyage de l'appareil. Un
entretien régulier de votre appareil est une garantie de bon fonctionnement, de bon
rendement et de durabilité.
Attention
Le non-respect des instructions de nettoyage de l'appareil et des filtres peut occasionner
des incendies. Veuillez respecter strictement les consignes d'entretien.
• NETTOYAGE DES FILTRES A
GRAISSE
Il est important de veiller à nettoyer
périodiquement les filtres à graisse.
Intervalle de nettoyage du filtre:
le filtre à graisse doit être nettoyé périodiquement,
en fonction de l’utilisation (au moins tous les deux
mois).
Laver les filtres avec un nettoyant ménager du
commerce puis rincer abondamment et sécher.
Ce nettoyage peut être effectué dans un lavevaisselle en prenant soin de ne pas mettre le
filtre en contact avec de la vaisselle sale ou
avec couverts en argent.
fig. 7
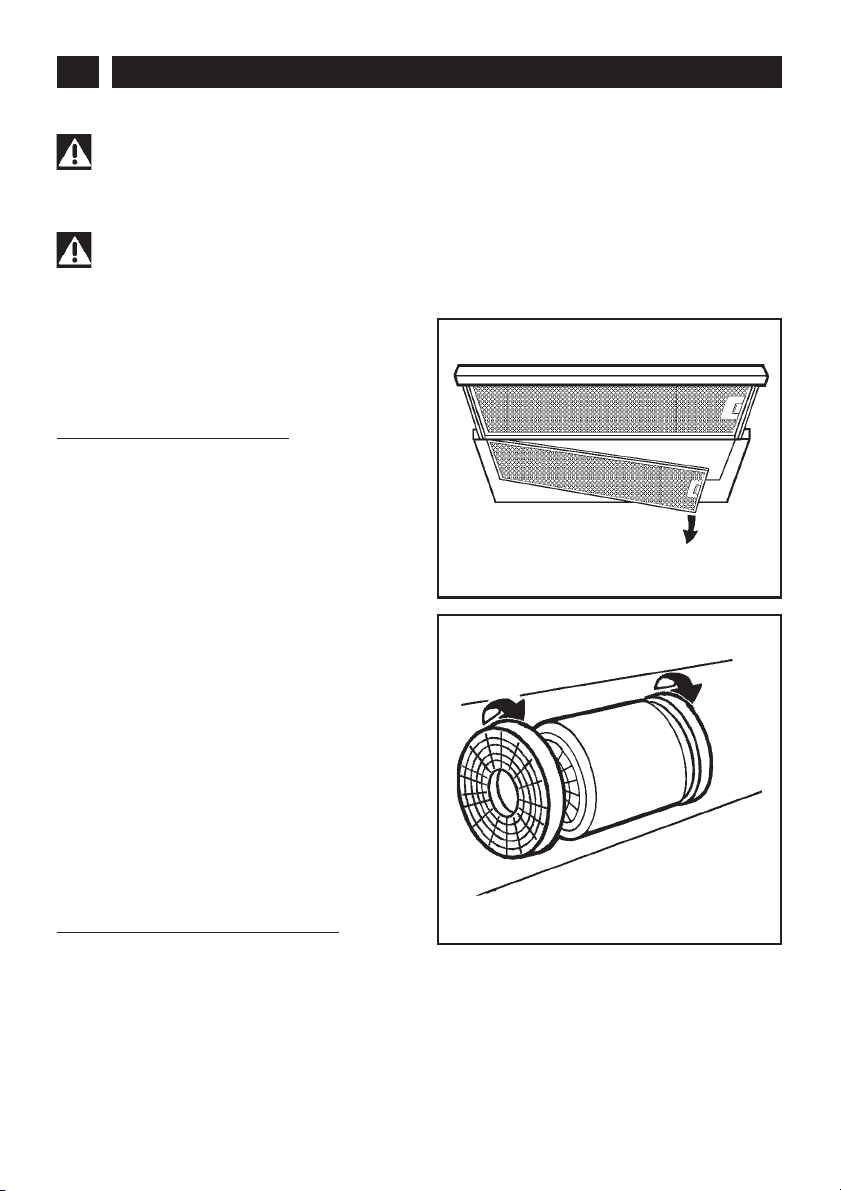
• Démontage des filtres à graisse (fig.7)
À l'aide de la poignée, pousser l’arrêt vers
l’intérieur et tirer le filtre vers le bas; ouvrir le tiroir
et enlever l’autre filtre de la même façon.
• CHANGEMENT DES FILTRES A
CHARBON
Si l’appareil est utilisé en version recyclage, il faut
remplacer les filtres à charbon périodiquement.
Intervalle de remplacement des filtres:
Vous devrez remplacer les filtres à charbon en
fonction de l’utilisation, en moyenne tous les 6
mois.
• Démontage du filtre à charbon (fig.8)
À l'aide de la poignée, pousser l’arrêt vers
l’intérieur et tirer le filtre vers le bas (fig.7); ouvrir
le tiroir et enlever l’autre filtre de la même façon.
fig. 8
11
Page 13
4 / ENTRETIEN ET NETTOYAGE DE VOTRE APPAREIL
Les filtres à charbon s’enlèvent en les faisant
tourner et ils s’accrochent toujours en les faisant
tourner dans le sens inverse (fig. 8).
Réf. filtre à charbon:
AH4010E1
• NETTOYAGE ET ENTRETIEN DE LA
CARROSSERIE
Pour le nettoyage de la carrosserie de l'appareil,
éviter l'emploi de produits contenant des abrasifs.
FR
• CHANGEMENT DE LAMPE
Attention
Avant toute intervention, la hotte doit
être mise hors tension, soit en retirant la
prise, soit en actionnant le disjoncteur.
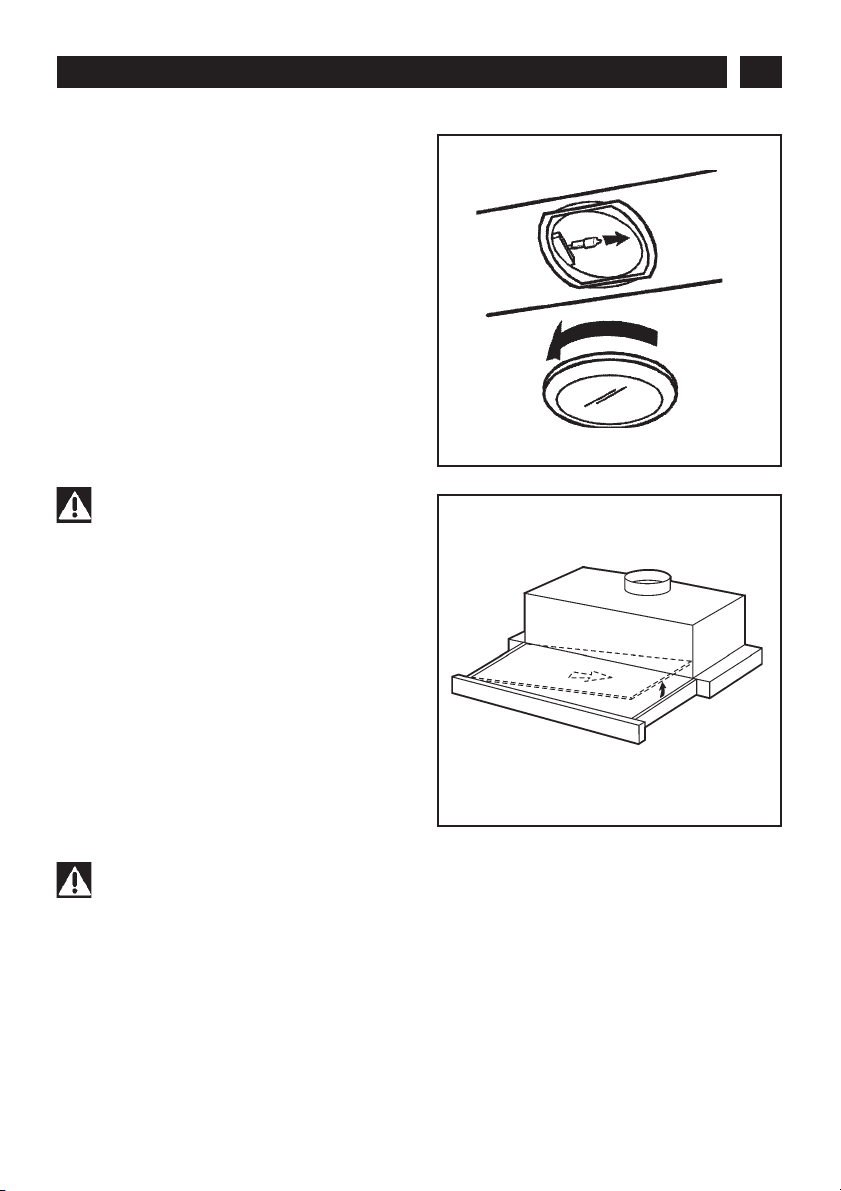
Pour le remplacement des lampes halogènes,
dévissez la bague dans le sens contraire aux
aiguilles d’une montre et ôtez l’ampoule (fig. 9).
Montez une ampoule de même type.
ATTENTION: Ne pas toucher l'ampoule à main
nue.
Si, après avoir remplacé la lampe halogène,
celle-ci ne fonctionne pas, débranchez votre
appareil pendant quelques secondes.
• COMMENT ENLEVER LE VERRE
Attention
Avant toute intervention, la hotte doit
être mise hors tension, soit en retirant la
prise, soit en actionnant le disjoncteur.
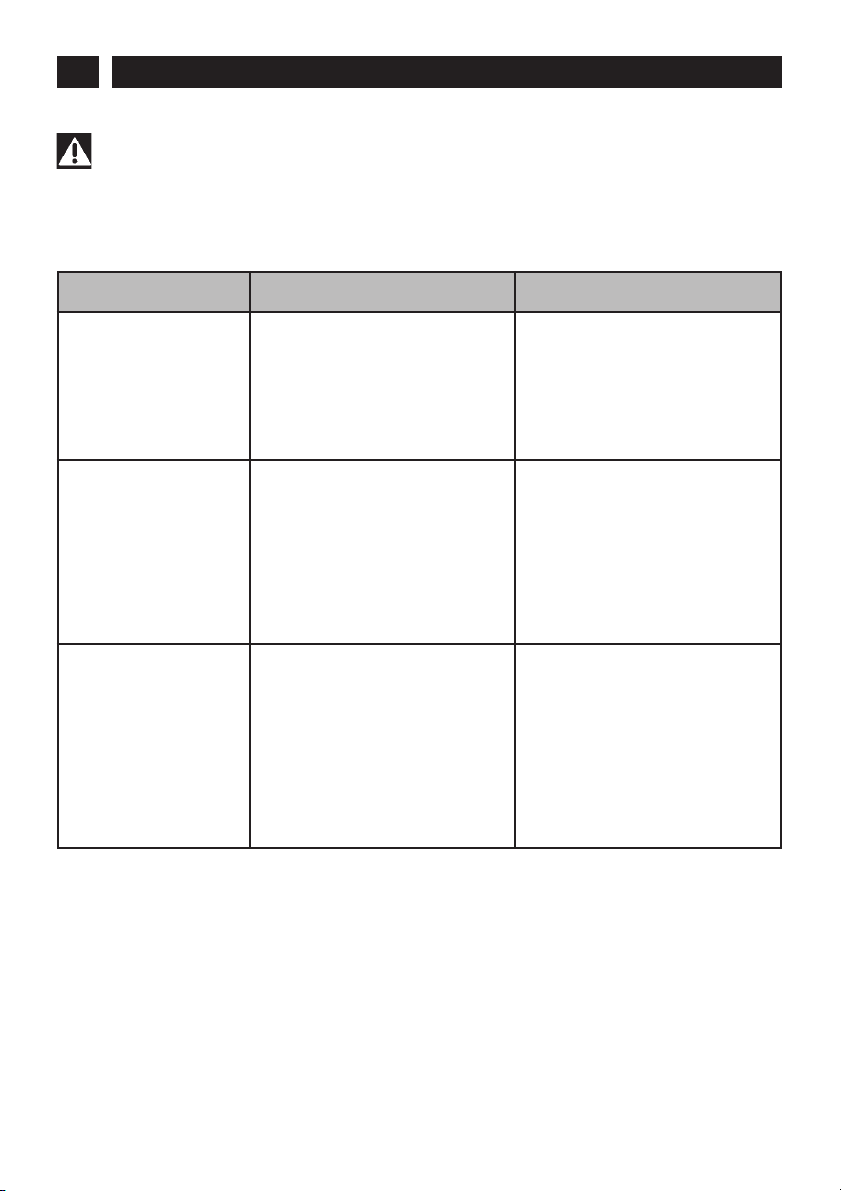
Pour enlever le verre, ouvrir le tiroir en le tirant vers
l'avant; déplacer le verre vers la gauche (ou la
droite) et en soulever un côté vers le haut, comme
est illustré sur la figure 10.
fig. 9
fig. 10
12
Page 14
FR
4 / ENTRETIEN ET NETTOYAGE DE VOTRE APPAREIL
Attention
Avant toute intervention, la hotte doit être mise hors tension, soit en retirant la prise,
soit en actionnant le disjoncteur.
• ENTRETENIR VOTRE APPAREIL
ENTRETIEN... COMMENT PROCEDER ?
N’utilisez jamais de tampons
métalliques, de produits
Enveloppe et
accessoires
Filtre à graisse
Filtre à charbon actif
abrasifs ou de brosses trop
dures.
Ce filtre retient les vapeurs
grasses et les poussières.Il est
l’élément assurant une part importante de l’efficacité de votre
hotte. Dans le cas de taches
persistantes, utilisez une crème
non abrasive, puis rincez à l’eau
claire.
Ce filtre retient les odeurs et doit
être changé au moins tous les
six mois en fonction de votre
utilisation.
Commandez ces filtres chez
votre revendeur (sous la
référence indiquée sur la plaque
signalétique située à l’intérieur de
la Hotte) et notez la date de
changement.
PRODUITS/ACCESSOIRES
A UTILISER
Pour nettoyer la carrosserie et le
hublot d’éclairage, utilisez
exclusivement des nettoyants
ménagers du commerce dilués
dans de l’eau, puis rincez à l’eau
claire et essuyez avec un chiffon
doux.
Avec un nettoyant ménager du
commerce, puis rincez
abondamment et séchez. Ce
nettoyage peut être effectué
dans votre lave-vaisselle en
position verticale (ne pas mettre
en contact avec de la vaisselle
sale ou des couverts en
argent).
13
Page 15

5 / ANOMALIES DE FONCTIONNEMENT
SYMPTOMES SOLUTIONS
Vérifiez que:
La hotte ne fonctionne
pas...
La hotte a un rendement
insuffisant...
• il n’y a pas de coupure de courant.
• une vitesse a été effectivement sélectionnée.
Vérifiez que:
• la vitesse moteur sélectionnée est suffisante pour
la quantité de fumée ou de vapeur dégagée.
• la cuisine est suffisamment aérée pour permettre
une prise d’air.
• le filtre à charbon n’est pas usagé (hotte en
version recyclage).
Vérifiez que:
FR
La hotte s’est arrêtée
au cours du
fonctionnement
• il n’y a pas de coupure de courant.
• le dispositif à coupure omnipolaire ne s’est pas
enclenché.
14
Page 16

FR
6 / SERVICE APRÈS-VENTE ET RELATIONS CONSOMMATEURS
• INTERVENTIONS
Les éventuelles interventions sur votre appareil
doivent être effectuées par un professionnel
qualifié dépositaire de la marque. Lors de votre
appel, mentionnez la référence complète de votre
appareil (modèle, type, numéro de série). Ces
renseignements figurent sur la plaque
signalétique (fig.11).
fig. 11
• RELATIONS CONSOMMATEURS
• Pour en savoir plus sur tous les produits
de la marque :
informations, conseils.
• Consulter votre facture pour connaître les
contacts SAV.
PIÈCES D’ORIGINE
Lors d’une intervention d’entretien, demandez
l’utilisation exclusive de pièces détachées
certifiées d’origine.
Fagor Brandt SAS, société par actions simplifiée au capital de 20.000.000 euros,
5/7 avenue des Béthunes, 95310 Saint Ouen l’Aumône - RCS Nanterre 440 303 196
15
Page 17

FR 01
Dear Customer,
EN 16
DE 30
You have just acquired a THOMSON hood and we would like to thank
you.
We have invested all our dedication and know-how in this appliance so
that it would best meet your needs. With innovation and performance,
we designed it to be always easy to use.
In the THOMSON product range, you will also find a wide choice of
ovens, microwaves, cooking hobs, cookers, dishwashers, washing
machines, driers, fridges and freezers, that you can coordinate with
your new THOMSON hood
Visit our website where you will find all of our products, as well as useful
and complementary information.
THOMSON
As part of our commitment to constantly improving our products, we reserve the right to make
changes to them based on technical advances to their technical and functional features and
appearance.
Warning: Before installing and using your appliance, please carefully
read this Guide to Installation and Use, which will allow you to quickly
familiarise yourself with its operation.
16
Page 18

EN
TABLE OF CONTENTS
1 / NOTICES TO THE USER
• Safety recommendations ___________________________________ 18
• Environmental protection ___________________________________ 19
• Description of your appliance ________________________________ 20
2 / INSTALLING YOUR APPLIANCE
• Using the ducting mode ____________________________________ 21
• Using the filtering mode ____________________________________ 21
• Electrical connections ______________________________________ 22
• Assembling the hood _______________________________________ 23
• Ducting mode _____________________________________ 24
• Filtering mode ____________________________________ 24
3 / USING YOUR APPLIANCE
• Description of the control panel ______________________________ 25
4 / CARING FOR AND CLEANING YOUR APPLIANCE
• Cleaning the grease filters __________________________________ 26
• Changing the charcoal filters ________________________________ 26
• Cleaning and caring of the casing ____________________________ 27
• Changing the light bulb _____________________________________ 27
• How to take off the glass ___________________________________ 27
• Maintaining your appliance __________________________________ 28
5 / TROUBLESHOOTING _________________________________________ 29
6 / AFTER SALES SERVICE _____________________________________ 29
17
Page 19

1 / NOTICES TO THE USER
EN
Attention
Keep this user guide with your appliance. If
the appliance is ever sold or transferred to
another person, ensure that the new owner
receives the user guide. Please become
familiar with these recommendations before
installing and using your oven. They were
written for your safety and the safety of
others.
• SAFETY RECOMMENDATIONS
- This oven was designed for use by private
persons in their homes.
- This appliance is to be used by adults.
Make sure that children do not touch and that
they do not treat it as a toy. Make sure that they
do not touch the appliance's control panel.
- When you receive the appliance, unpack or
have it unpacked immediately. Give it an over-all
general inspection. Make note of any concerns
or reservations on the delivery slip and make
sure to keep a copy of this form.
- Your appliance is intended for standard
household use. Do not use it for commercial or
industrial purposes or for any other purpose than
that for which it was designed.
- Do not modify or attempt to modify any of the
characteristics of this appliance. This would be
dangerous to your safety.
- Repairs must only be carried out by an approved
specialist.
- Always unplug the hood before cleaning it or
performing other maintenance acts.
- Provide adequate ventilation for the room in the
case of simultaneous use of the hood and other
appliances powered by an energy source other
than electricity. This will prevent the hood from
aspirating the combustion gases.
- You should never "flambé" dishes under the
hood or operate gas rings under the hood without
placing cookware on them (the flames sucked
up into the hood can damage the appliance).
- When frying food under the appliance, you must
carefully monitor the preparation at all times.
Oils and grease brought to very high
temperatures can catch fire.
- Respect the recommended frequency of
cleanings and filter replacements. The
accumulation of grease deposits may cause a
fire.
- The hood should never be used over a
combustible fuel burning stove (wood, coal, etc.).
- Never use steam or high-pressure devices to
clean your appliance (requirement imposed by
electrical safety).
- With a view to constantly improving our products,
we reserve the right to modify their technical,
functional or aesthetic characteristics, making any
changes to their features considered necessary
or desirable in view of technical progress.
- In order to easily locate the reference information
for your appliance, we recommend that you note
these data on the "After-Sales Service Department
and Customer Relations" page.
(This page also explains to you where to find this
information on your appliance.)
-Carefully follow the instructions contained in this
user guide. The manufacturer declines all
responsibility for any problems, damage or fire
caused by the appliance if failing to observe the
instructions contained in this user guide.
Warning
In the case of a kitchen heated by a
device connected to a chimney (a stove, for
example) the "filtering" version of the hood
should be installed. Do not use the hood
without grease filters.
Suitable ventilation should be provided in
the room when the hood is used at the same
time as appliances operated by gas or another
combustible fuel.
18
Page 20

EN
1 / NOTICES TO THE USER
• ENVIRONMENTAL PROTECTION
- This appliance’s packaging material is recyclable. Help recycle it and protect the environment by
dropping it off in the municipal receptacles provided for this purpose.
- Your appliance also contains a great amount of recyclable material. It is marked with this label to
indicate the used appliances that should not be mixed with other waste. This way, the
appliance recycling organised by your manufacturer will be done under the best possible
conditions, in compliance with European Directive 2002/96/EC on Waste Electrical and
Electronic Equipment. Contact your town hall or your retailer for the used appliance
collection points closest to your home.
- We thank you doing your part to protect the environment.
Warning
Installation should only be performed by installers and qualified technicians
Warning
Remove the protective film from the grease filter before use.
19
Page 21

1 / NOTICES TO THE USER
• DESCRIPTION OF YOUR APPLIANCE
EN
ControlsA
TrolleyB
20
Page 22

EN
2 / INSTALLING YOUR APPLIANCE
- The appliance must be unplugged during installation or when any repairs or maintenance work is
being performed.
- Ensure that the network voltage corresponds to the voltage noted on the identification plate located
inside the hood.
- If the electrical installation at your residence requires any changes in order to hook up your
Appliance, call upon a professional electrician.
- If the hood is being used in evacuation mode, do not connect the appliance to a combustion gas
exhaust duct (boiler, chimney, etc.) or to a CMV (controlled mechanical ventilation) system.
- Under no circumstances should the exhaust duct empty into the attic.
- Install the hood at safe distance of at least 65 cm from an cooking hob.
This appliance can be installed in either duction version or filtering version.
The appliance is supplied in the filtering version, the charcoal filter is installed (Ref.AH4010E1).
• USING THE DUCTING MODE
If you posses an outlet to the exterior
(fig. 1)
Your hood can be connected to this outlet using a
flue (minimum Ø 125mm that is enamelled, in
aluminium, flexible or made of inflammable
material).
Your cooker hood is a filtering version. All you
need to do is to remove the charcoal filters first.
• USING THE FILTERING MODE
If you do not posses an oulet to the exterior
(fig. 2)
All of our appliances can be used in recycling
mode.
The air and steam taken up by the unit are
purified with charcoal filters and returned to the
environment.
fig. 1
fig. 2
21
Page 23

2 / INSTALLING YOUR APPLIANCE
• ELECTRICAL CONNECTIONS
During installation and maintenance operations,
the appliance must be unplugged from the
electrical grid; fuses must be cut off or removed.
The electrical connections are made before the
appliance is installed in its housing.
Ensure that
- the electrical installation has sufficient voltage,
- the electrical wires are in good condition,
- the diameter of the wires complies with the
installation requirements.
Warning
This appliance must be grounded.
We cannot be held responsible for any
accident resulting from an inexistent,
defective or incorrect ground lead.
In case your appliance is not furnished with a non
separating flexible cable and has no plug, or has
not got any other device ensuring omnipolar
disconnection from the electricity main, with a
contact opening distance of at least 3mm, such
separating device ensuring disconnection from
the main must be included in the fixed installation.
This appliance is delivered with a H05VVF power
cord that has three-0.75mm2 conductors (neutral,
phase and ground). It must be connected to the
main power supply (which should be a 230-240V
single phase current) via a CEI60083
standardised socket that should remain
accessible after installation, in keeping with
installation guidelines.
If the power cable is damaged, call the after-sales
service department in order to avoid danger.
EN
Warning
If the electrical installation at your
residence requires any changes in order to
hook up your appliance, call upon a
professional electrician.
Warning
If the hood displays any malfunctions,
unplug the appliance or remove the fuse
corresponding to the electrical socket where
your appliance is plugged in.
22
Page 24

EN
2 / INSTALLING YOUR APPLIANCE
• ASSEMBLING THE HOOD
Warning
The hood must be installed in
compliance with all applicable regulations
concerning the ventilation of premises. In
France these regulations are described in
DTU 61.1 from the CSTB. In particular, the
evacuated air should never be conveyed to
a duct used to evacuate smoke from
appliances that use gas or other
combustible fuels. Unused ducts may only
be used after approval from a competent
specialist.
The distance between the supporting surface for
the cooking vessels on the hob and the lower part
of the hood must be at least 650 mm. If the
instructions for installation for the hob specify a
greater distance, this has to be taken into account.
IMPORTANT: So as not to damage your
product, during installation USE ONLY THE
SCREWS PROVIDED. Make sure these are
used as shown in the following instructions.
To compensate possible depth voids between
the appliance and the wall, a plastic SPACING
BAR to be fixed at the back of the appliance
by means of the three screws A is included
(fig. 3). The 3 screws A to be used are contained
in the accessory bag attached to the plastic
spacing bar. Cut the spacing bar according to
the distance to be adjusted.
A
fig. 3
fig. 4
Install the flange in the device air outlet and press
slightly (fig.4).
ASSEMBLY UNDER A PENSILE CUPBOARD
The following operations are essential for
assembly:
– Install the wiring system
– Prepare the air venting hole if your appliance
is to be installed in the ducting mode.
Fixation (fig. 5):
Make the 4 necessary fixing holes in the
bottom of the cupboard and cut the air venting
hole. Move the hood close to the bottom of
the wall unit and then connect the two units
by means of the 4 self-tapping screws supplied
together with the appliance.
23
450
217
fig. 5
Page 25

2 / INSTALLING YOUR APPLIANCE
• Ducting mode
Connect the flange of the hood with the air venting
hole made previously in the wall/ceiling by means
of an adequate tube.
Make the electrical connections.
Warning
This is the filtering version of your
cooker hood; you must first remove the
charcoal filters.
Tip
For optimal use of your appliance, we
recommend that you connect the hood to a
150 mm-diameter flue (not delivered with the
appliance). Minimise the number of angles
and bends and the lengths of the flue. In
the event that the hood will be operated
using out-door evacuation, you should
ensure a sufficient inflow of fresh air to
avoid a pressure deficiency in the room.
Non-return valve
In the case of installation with air evacuation
to the outside, fitting the non-return valve
prevents the wind from entering and the air
from returning.
Caution: Before fastening the air exhaust
pipe to the motor, check that the non-return
valve on the air vent can move freely.
EN
• Filtering mode
Connect an adequate pipe to the connecting
flange of the appliance so that it conveys the air up
to the top of the pensile cupboard (pipe is not
provided).
Make the electrical connections.
24
Page 26

EN
3 / USING YOUR APPLIANCE
• DESCRIPTION OF CONTROL PANEL
MOTOR - Switch A. When set on position "1" the
motor will be switched on and off automatically by
opening and closing the trolley. When set on
position "0" the motor will remain off at all times.
SPEED - Switch B. Allows the operating speed of
the motor to be regulated by means of an electronic
speed variator.
LIGHT - Switch C. When light switch is on "AUT"
position the light will be turned on and off
automatically by opening and closing the trolley.
When set to "0" position, the light will remain off,
regardless of position of trolley.
On "MAN" position the light will be switched on
regardless of position of trolley.
A
B
C
fig. 6
Tip
This guide to installation and use is valid for several models. Minor differences in
details and fittings may emerge between your appliance and the descriptions provided.
25
Page 27

4 / CARING FOR AND CLEANING YOUR APPLIANCE
EN
Warning
Always unplug the hood before cleaning it or performing other maintenance acts.
Regular maintenance of your appliance is a guarantee of proper functioning, good performance and durability.
Warning
Failure to respect the guidelines for cleaning the appliance and filters may cause fires.
Please carefully adhere to the maintenance recommendations.
• CLEANING THE GREASE FILTERS
Pay special attention to the grease filters, that
must be cleaned at regular intervals.
Filter cleaning frequency:
exactly how often depends on use (at least once
every other month).
Wash the filters with a commercial household
cleanser, then rinse fully and dry. They may be
cleaned in a dishwasher making sure that the
filter does not come into contact with dirty
dishes or silver tableware.
• Removing the grease filters (fig.7)
At the handle, push the stop inwards and pull the
filter downwards; open the trolley and take off the
other filter doing the same.
fig. 7
• CHANGING THE CHARCOAL
FILTERS
If using the hood in the filtering version, the
charcoal filters will periodically have to be
replaced.
Frequency of filter replacement:
The charcoal filters must be replaced according
to use: on the average once every 6 months.
• Replacing the charcoal filters (fig. 8).
At the handle, push the stop inwards and pull the
filter downwards (fig.7); open the trolley and take
off the other filter doing the same.
Remove the filters by rotating them and fit them
back on by rotating them in the opposite direction
(fig.8).
Charcoal filter ref. no.
AH4010E1
fig. 8
26
Page 28

EN
4 / CARING FOR AND CLEANING YOUR APPLIANCE
• CLEANING AND CARING OF THE
CASING
Avoid products containing abrasives when
cleaning the casing.
• CHANGING THE LIGHT BULB
Warning
Before carrying out any work, the
power supply to the hood must be turned
off, either by unplugging it or by using the
circuit breaker switch.
If the halogen lamps need changing, slacken the
ring nut in an anticlockwise direction and remove
the bulb itself (fig.9). Replace with a bulb of the
same type.
CAUTION: Do not handle glass bulb with bare
hands.
In case the new halogen bulb does not light
up once it is on, disconnect the apparatus for
a few seconds.
fig. 9
• HOW TO TAKE OFF THE GLASS
Warning
Before carrying out any work, the
power supply to the hood must be turned
off, either by unplugging it or by using the
circuit breaker switch.
To take off the glass, open the trolley pulling it
frontwards; pull the glass towards the left (or the
right) and lift one side upwards as it is indicated in
the figure 10.
fig. 10
27
Page 29

4 / CARING FOR AND CLEANING YOUR APPLIANCE
Warning
Before carrying out any work, the power supply to the hood must be turned off, either
by unplugging it or by using the circuit breaker switch.
• MAINTAINING YOUR APPLIANCE
EN
MAINTENANCE... WHAT TO DO ?
Never use metal scouring
pads, abrasive products or
Top surface and
accessoires
Grease filter
Charcoal filter
excessively stiff brushes.
This filter traps fatty vapours and
dust. This component plays an
important role in ensuring the
effectiveness of your hood. In the
event of tough stains, use a nonabrasive cream, then rinse with
clean water.
This filter traps odours and must
be changed at least once every
6 months depending on your level
of use. You should order these
filters from your dealer (quoting
the reference shown on the
identification plate located inside
the hood) and note the date the
filter was changed.
PRODUCTS/ACCESSORIES
TO USE
To clean the body and the lighting
port, you should use only
commercial household cleaning
products diluted in water and
then rinse using clean water,
drying with a soft cloth.
Use a commercial household
cleaning product then rinse
abundantly and dry. These filters
can be cleaned in a vertical
position in your dishwasher. (Do
not alow them touch dirty
dishes or silverware).
28
Page 30

EN
5 / TROUBLESHOOTING
SYMPTOMS SOLUTIONS
The hood is not
working...
The hood is not
operating effectively...
Ensure that:
• The power is not cut off.
• A speed has been selected.
Ensure that:
• The selected motor speed is sufficient for the
quantity of smoke or vapours to be cleared.
• The kitchen is sufficiently ventilated to allow une
for fresh air intake.
• The charcoal filter is not worn (hood operating in
filtering mode).
Ensure that:
The hood stopped
working
EN
6 / AFTER SALES SERVICE
Any maintenance on your equipment should be undertaken by:
- either your dealer,
- or another qualified mechanic who is an authorized agent for the brand appliances.
When making an appointment, state the full reference of your equipment (model, type and
serial number). This information appears on the manufacturer’s nameplate attached to your
equipment.
• The power is not cut off.
• The single-pole cut-off device was not activated.
29
Page 31

FR 01
Liebe Kundin, lieber Kunde,
EN 16
DE 30
Sie haben soeben eine THOMSON Dunstabzugshaube erworben, und
wir danken Ihnen dafür.
Wir haben in dieses Gerät unsere ganze Leidenschaft und unser Knowhow einfließen lassen, damit es Ihre Bedürfnisse bestmöglich erfüllt.
Es ist innovativ, leistungsfähig, und wir haben es so konzipiert, daß
auch seine Benutzung immer einfach bleibt.
In der THOMSON Produktpalette finden Sie auch eine breite Auswahl
an Backöfen, Mikrowellenherden, Kochfeldern, Küchenherden,
Waschmaschinen, Wäschetrocknern, Kühlschränken, Gefrierschränke
Tiefkühltruhen), die Sie mit Ihrer neuen THOMSON Dunstabzugshaube
abstimmen können.
Sie können uns auch im Internet unter besuchen, wo Sie unsere jüngsten
Innovationen sowie nützliche und ergänzende Informationen finden.
THOMSON
Da wir unsere Produkte ständig verbessern möchten, behalten wir uns das Recht vor, ihre
technischen, funktionellen und ästhetischen Merkmale zu verändern, damit sie mit der
technischen Weiterentwicklung Schritt halten.
Wichtig: Bitte lesen Sie vor der Inbetriebnahme des Gerätes diese
Einbau- und Gebrauchsanleitung aufmerksam durch, damit Sie sich sehr
rasch mit seinem Betrieb vertraut machen können.
30
Page 32

DE
ZUSAMMENFASSUNG
1 / FÜR DEN BENUTZER
• Sicherheitshinweise _______________________________________ 32
• Umweltschutz ___________________________________________ 33
• Beschreibung des Geräts ___________________________________ 34
2 / INSTALLATION DES GERÄTS
• Verwendung in Abluftversion ________________________________ 35
• Verwendung in Umluftversion ________________________________ 35
• Stromanschluss __________________________________________ 36
• Montage der Abzugshaube __________________________________ 37
• Abluftversion _____________________________________ 38
• Umluftversion ____________________________________ 38
3 / VERWENDUNG DES GERÄTS
• Beschreibung der Bedienelemente ____________________________ 39
4 / PFLEGE UND REINIGUNG DES GERÄTS
• Reinigung des Fettfilters ____________________________________ 40
• Wechsel die Kohlefilter _____________________________________ 40
• Reinigung und Instandhaltung der Außenfläche __________________ 41
• Wechsel der Lampe _______________________________________ 41
• Abmontieren des Kristalls __________________________________ 41
• Pflege des Geräts _________________________________________ 42
5 / BETRIEBSSTÖRUNGEN _______________________________________ 43
6 / KUNDENDIENST ______________________________________________ 43
31
Page 33

1 / FÜR DEN BENUTZER
DE
Wichtig
Diese Betriebsanleitung mit dem Gerät
aufbewahren. Sollte das Gerät an eine andere
Person verkauft oder veräussert werden,
sichergehen, dass sie auch die
Betriebsanleitung bekommt. Vor der
Installation und Benutzung des Geräts
sollten folgende Ratschläge zur Kenntnis
genommen werden. Sie sind für die
Sicherheit des Benutzers und anderer
Personen verfasst worden.
• SICHERHEITSHINWEISE
- Dieses Gerät ist für die Benutzung durch
Privatpersonen in ihrem Haushalt konzipiert
Worden.
- Dieses Gerät muss von Erwachsenen benutzt
werden.
Bitte darauf achten, dass Kinder es nicht berühren
und als Spielzeug benutzen. Sich vergewissern,
dass sie die Bedienelemente des Geräts nicht
berühren.
- Das Gerät beim Empfang sofort auspacken oder
auspacken lassen. Sein allgemeines Aussehen
prüfen. Eventuelle Vorbehalte schriftlich auf dem
Lieferschein vermerken, und ein Exemplar davon
behalten.
- Das Gerät ist für den normalen
Haushaltsgebrauch bestimmt. Es nicht für kaufmännische oder industrielle oder andere Zwecke
als diejenigen benutzen, für die es konzipiert
worden ist.
- Die Merkmale dieses Geräts nicht verändern
oder versuchen, sie zu verändern. Dies würde
eine ernste Gefahr für alle darstellen.
- Reparaturen dürfen nur von einem
zugelassenen Fachmann durchgeführt werden.
- Die Dunstabzugshaube vor dem Reinigen oder
der Pflege immer vom Stromnetz trennen.
- Bei gleichzeitigem Betrieb der
Dunstabzugshaube und anderer nicht mit Strom
betriebener Geräte den Raum angemessen
belüften. Dies, damit die Dunstabzugshaube
keine Verbrennungsgase ansaugt.
- Es ist verboten, unter der Dunstab-zugshaube
Gerichte zu flambieren oder die Gaskochstellen
einzuschalten, ohne dass ein Kochgeschirr darauf
steht (die angesaugten Flammen könnten das
Gerät beschädigen).
- Frittiervorgänge unter der Dunstab-zugshaube
müssen ständig überwacht werden.
Die auf sehr hohe Temperaturen aufgeheizten
Öle und Fette können Feuer fangen.
- Die Häufigkeit der Reinigung und des Ersatzes
der Filter einhalten. Die Ansammlung von
Fettablagerungen kann einen Brand auslösen.
- Der Betrieb über einer BrennstoffFeuerstelle
(Holz, Kohle, usw.) ist nicht zulässig.
- Niemals Dampf- oder Hochdruckgeräte zur
Reinigung des Geräts benutzen (Forderungen
bezüglich der elektrischen Sicherheit).
- Bei der Sorge um die ständige Verbesserung
unserer Produkte behalten wir uns das Recht
vor, ihre technischen, funktionellen oder
ästhetischen Merkmale im Zusammenhang mit
der technischen Fortentwicklung zu ändern.
- Für das spätere leichte Auffinden der
Produktreferenzen des Geräts raten wir, sie auf
der Seite „Kundendienst und
Kundenbeziehungen" zu notieren.
(Auf dieser Seite wird auch erklärt, wo sie sich
auf dem Gerät befinden.)
- Die in diesem Handbuch enthaltenen
Anweisungen sind genau zu befolgen.
Der Hersteller verweigert jede Haftung für
Störungen, Schäden oder Brände am Gerät,
wenn diese auf die Missachtung der
Gebrauchsanweisung zurückzuführen sind.
Achtung
In einer Küche, die mit einem an einen
Kamin angeschlossenen Gerät (z.B.: Ofen)
beheizt wird, muss die Dunstabzugshaube
als Umlufthaube installiert werden. Die
Dunstabzugshaube darf nicht ohne die
Fettfilter benutzt werden.
Wenn die Dunstabzugshaube in der Küche
gleichzeitig mit Geräten benutzt wird, die mit
Gas oder einem anderen Brennstoff
betrieben werden, muss eine angemessene
Belüftung des Raums vorgesehen werden.
32
Page 34

DE
1 / FÜR DEN BENUTZER
• UMWELTSCHUTZ
- Die Verpackungsmaterialien dieses Geräts sind recyclebar. Entsorgen Sie sie in den von den
Gemeinden eigens zur Verfügung gestellten Containern und trage Sie auf diese Weise zu ihrem
Recycling und zum Umweltschutz bei.
- Ihr Gerät enthält zahlreiche recyclingfähige Materialien. Es wurde deshalb mit diesem Zeichen
versehen, um Sie darauf hinzuweisen, dass diese Geräte nach ihrem Gebrauch nicht mit
dem übrigen Hausmüll entsorgt werden dürfen. Das von Ihrem Hersteller in die Wege
geleitete Recycling kann somit in Übereinstimmung mit der europäischen Richtlinie 2002/
96/CE über Elektro- und Elektronik-Altgeräte unter optimalen Bedingungen erfolgen. Ihre
Gemeindebehörden oder Ihr Händler informieren Sie gerne über die zu Ihrem Wohnort
am nächsten liegenden Sammelstellen.
- Wir danken Ihnen für Ihren Beitrag zum Umweltschutz.
Achtung
Die Installation muss durch Installateure und fachkundiges Personal erfolgen.
Achtung
Bei der erstmaligen Verwendung des Fettfilters die Schutzfolie abziehen.
33
Page 35

1 / FÜR DEN BENUTZER
• BESCHREIBUNG DES GERÄTS
DE
BedienelementeA
SchiebegestellB
34
Page 36

DE
2 / INSTALLATION DES GERÄTS
- Das Gerät muss bei der Installation bzw. bei Reparaturmaßnahmen vom Netz genommen werden.
- Sicherstellen, dass die Netzspannung dem Spannungswert entspricht, der auf dem Schildchen im
Innern der Haube angegeben ist.
- Falls die Gegebenheiten der Stromleitungen in Ihrer Wohnung für den Anschluss Ihres Geräts
Änderungsmaßnahmen erforderlich machen sollten, wenden Sie sich bitte an einen qualifizierten
Elektriker.
- Falls die Abzugshaube in Abluftversion verwendet wird, darf das Gerät nicht an Abzugsleitungen
für Verbrennungsgase (Heizung, Kamin usw.) oder an mechanische Belüftungssysteme
angeschlossen werden.
- Auf keinen Fall darf die Abluftleitung auf dem Dach enden.
- Die Abzugshaube in einem Abstand von mindestens 65 cm über der Kochfläche montieren.
Dieses Gerät kann entweder in Abluft- oder in Umluftversion installiert werden.
Das Gerät wird in Umluftversion mit installiertem Kohlefilter (Kennz. AH4010E1) geliefert.
• VERWENDUNG IN ABLUFTVERSION
Abzug nach draußen
(Abb. 1)
Ihre Abzugshaube wird über eine Abluftleitung
(Mindest Ø 125 mm, emailliert, aus Aluminium,
flexibel oder aus nicht-entflammbarem Material)
mit der Abzugsöffnung verbunden.
Ihre Abzugshaube wird in Umluftversion geliefert.
Die Kohlefilter muss ausgebaut werden.
• VERWENDUNG IN UMLUFTVERSION
Ohne Abzug nach draußen
(Abb. 2)
Unsere Geräte können alle in Umluftversion
betrieben werden.
Bei Umluftversion werden die durch das Gerät
beförderten Dünste und die Abluft durch die
Kohlefilter gereinigt und wieder in den Raum
zurückgeführt.
fig. 1
fig. 2
35
Page 37

2 / INSTALLATION DES GERÄTS
• ELEKTROANSCHLUSS
Bei Installation und Wartung muss das Gerät vom
Netz genommen und die Sicherungen müssen
unterbrochen oder ausgesteckt werden.
Der Elektroanschluss ist vor dem endgültigen
Befestigen des Geräts am Schrankelement
vorzunehmen.
Dabei überprüfen, dass:
- die vorhandene elektrische Leistung ausreicht,
- die Stromkabel in einwandfreiem Zustand sind,
- der Kabeldurchmesser den Vorschriften
entspricht.
Achtung
Dieses Gerät muss geerdet werden.
Der Hersteller haftet nicht für Unfälle, die
auf fehlende Erdung zurückzuführen sind.
Falls Ihr Gerät nicht mit flexiblem, unabtrennbarem
Kabel und Stecker oder einer anderen Vorrichtung
ausgestattet ist, mit der eine allpolige Trennung
vom Netz mit einer Kontaktöffnungsweite von
mindestens 3 mm gewährleistet ist, dann müssen
diese Trennvorrichtungen im festen Installationsteil
vorgesehen werden.
Das Gerät wird mit einem Netzkabel des Typs H
05 VVF mit 3 Leitern mit 0,75 mm (Neutral, Phase
und Erde) geliefert. Es ist für den Anschluss an
Einphasennetz mit 230-240 V über genormte
Steckdose nach IEC 60083 vorgesehen, die
nach der Installation entsprechend den
Anlagenvorschriften zugänglich bleiben muss.
Falls das Netzkabel schadhaft sein sollte, wenden
Sie sich bitte an den Nachverkaufsservice, um
Risiken auszuschließen.
DE
Achtung
Falls die Gegebenheiten der
Stromleitungen in Ihrer Wohnung für den
Anschluss Ihres Geräts
Änderungsmaßnahmen erforderlich machen
sollten, wenden Sie sich bitte an einen
qualifizierten Elektriker.
Achtung
Falls die Abzugshaube Störungen
aufweist, das Gerät vom Netz trennen oder
die Sicherung der Anschlussleitung des
Geräts herausnehmen.
36
Page 38

DE
2 / INSTALLATION DES GERÄTS
• MONTAGE DER ABZUGSHAUBE
Achtung
Die Installation muss den geltenden
Normen für die Raumbelüftung entsprechen.
In Frankreich sind diese Normen im DTU 61.1
des CSTB enthalten. Das bedeutet konkret,
dass Abluft nicht in eine Leitung geführt
werden darf, über die Rauch von mit Gas
oder anderen Brennstoffen betriebenen
Geräten abgeleitet wird. Der Gebrauch
anderweitig verwendeter Leitungen darf nur
mit der Erlaubnis eines Fachtechnikers
erfolgen.
Der Mindestabstand zwischen der TopfTrägerfläche auf der Kochmulde und dem unteren
Teil der Abzughaube muss 65 cm betragen. Geben
die Installationsanleitungen der Kochmulde einen
höheren Abstand an, so ist dieser einzuhalten.
ACHTUNG: Während der Installation
AUSSCHLIESSLICH DIE MITGELIEFERTEN
SCHRAUBEN VERWENDEN und dabei in der
korrekten Weise vorgehen, wie in den zu
befolgenden Anweisungen beschrieben, um
eine Beschädigung Ihres Produkts zu
vermeiden.
Um etwaige Leerräume zwischen Gerät und
Wand auszugleichen, ist ein DISTANZSTÜCK
aus Kunststoff vorgesehen, das an der
Rückseite des Gerätes mittels der drei
Schrauben A anzubringen ist (Abb. 3). Die 3
zu benutzenden Schrauben A befinden sich
in dem Zubehörbeutel, der dem Distanzstück
beiliegt. Je nach dem auszugleichenden
Zwischenraum das Distanzstück nach
gewünschtem Maß zuschneiden.
Den Flansch am Luftaustritt des Gerätes
montieren, indem ein leichter Druck ausgeübt wird
(Abb.4).
450
A
fig. 3
fig. 4
217
INSTALLATION UNTER DEM
HÄNGESCHRANK:
Wichtige Vorbedingungen für das Montieren:
– Elektrischen Anschluß vorbereiten.
– Für die Abluftversion muß die Abluftöffnung
vorher vorbereitet werden.
Befestigung (Abb. 5): die 4 Fixierlöcher, die
für Ihr Modell vorgesehen sind, mit Hilfe der
fig. 5
37
Page 39

2 / INSTALLATION DES GERÄTS
speziellen Bohrvorrichtung einbohren und
die zur Entlüftung notwendige Öffnung
ausschneiden. Das Gerät in den Hängeschrank
einfügen und mittels der 4 beiliegenden
Feststellschrauben daran befestigen. Die
Haube gegen den Oberschrank drücken und
mit den 4 mit dem Gerät gelieferten
selbstschneidenden Schrauben befestigen.
• Abluftversion
Luftausgangsstutzen des Gerätes und
Lüftungsloch, das in der Wand vorbereitet wurde,
mit Hilfe eines geeigneten Schlauches verbinden.
Das Gerät an das Stromnetz anschließen.
Achtung
Dieses Gerät wird in Umluftversion
geliefert. Daher muss zunächst die
Kohlefilter ausgebaut werden.
Tipp
Zur Optimierung des Gerätebetriebs
empfehlen wir den Anschluss an ein
Leitungsrohr mit Durchmesser 150 mm
(nicht mitgeliefert). Zahl der Rohrbögen und
Länge der Leitung so weit wie möglich
begrenzen. Wenn die Abzugshaube in
Abluftversion betrieben wird, muss
gleichzeitig für eine ausreichende
Frischluftzufuhr gesorgt werden, um zu
vermeiden, dass der Luftdruck im Raum zu
stark absinkt.
DE
Rückschlagventil
Bei Installation mit Abführung der Luft nach
draußen verhindert ein Rückschlagventil,
dass Wind von außen eindringt bzw. dass
abgeleitete Luft zurückkehren kann.
Achtung: Vor Befestigung des Abluftrohrs
am Motor sicherstellen, dass sich das
Rückschlagventil an der Austrittsöffnung
frei bewegen lässt.
• Umluftversion
Der Luftkanal, der mit dem Luftausgangsstutzen
des Geräts verbunden wird, führt lediglich bis zur
Oberseite des Hängeschrankes und leitet dort die
Luft in die Küche zurück (Schlauch werden nicht
mitgeliefert).
Das Gerät an das Stromnetz anschließen.
38
Page 40

DE
3 / VERWENDUNG DES GERÄTS
• BESCHREIBUNG
DER BEDIENELEMENTE
MOTOR - Schalter A
Bei Einstellung auf "1" wird der Motor automatisch
durch das Öffnen/Schließen des ausziehbaren
Luftschirmes ein- bzw. ausgeschaltet.
Bei Stellung auf "0" bleibt der Motor ausgeschaltet.
GESCHWINDIGKEIT - Schalter B
Dieser Schalter ermöglicht die stufenlose Eistellung
der Bertiebschwindigkeit des Motors.
LICHT - Schalter C
Bei Einstellung des Lichtschalters auf "AUT" wird
das Licht automatisch durch Betätigen des
Schiebegestell ein- bzw. auseschaltet.
Bei Enstellung auf "0" bleibt das Licht unabhänging
von der Stellung des Schiebegestell ausgeschaltet.
Die Stellung "MAN" ermöglicht die Einschaltung
des Lichts unabhänging von der Stellung des
Schiebegestell.
A
B
C
fig. 6
Tipp
Dieses Installations- und Gebrauchshandbuch gilt für mehrere Modelle. Es kann
vorkommen, dass Ihr Gerät sich in einigen Details und Ausrüstungselementen von der
Beschreibung unterscheidet.
39
Page 41

4 / PFLEGE UND REINIGUNG DES GERÄTS
DE
Achtung
Das Gerät vor der Inangriffnahme von Wartungs- und Reinigungsmaßnahmen vom
Netz trennen. Die regelmäßige Wartung Ihres Geräts stellt eine Garantie für einwandfreien
Betrieb, gute Leistung und lange Lebensdauer dar.
Achtung
Mangelnde Einhaltung der Anweisungen für die Reinigung von Gerät und Filtern kann
Brände verursachen. Die sorgfältige Beachtung der Wartungsvorschriften ist daher von
größter Bedeutung.
• REINIGUNG DES FETTFILTERS
Die Fettfilter benötigen besondere Pflege und
müssen regelmäßig gereinigt werden.
Häufigkeit der Filterreinigung:
Der Fettfilter ist periodisch in Abhängigkeit vom
Gebrauch (mindestens jedoch alle zwei Monate)
zu ersetzen.
Den Filter mit normalem Haushaltsreiniger
waschen, gründlich ausspülen und abtrocknen.
Die Reinigung kann auch in der Spülmaschine
erfolgen. Dabei darauf achten, dass der Filter
weder schmutzige Teller noch Silberbesteck
berührt.
fig. 7
• Ausbau des Fettfilters (Abb.7)
In Übereinstimmung mit dem Handgriff den
Feststeller nach innen stossen und den Filter nach
unten ziehen; Schiebegestell öffnen und den
zweiten Filter auf dieselbe Weise entfernen.
• WECHSEL DIE KOHLEFILTER
Wird das Gerät in Umluftversion verwendet,
muss die Kohlefilter regelmäßig ausgetauscht
werden.
Häufigkeit des Filterwechsels:
Die Kohlefilter je nach Benutzung ersetzen; in der
Regel alle 6 Monate.
•Wechsel des Kohlefilters (Abb. 8)
In Übereinstimmung mit dem Handgriff den
Feststeller nach innen stossen und den Filter nach
unten ziehen (Abb. 7); Schiebegestell öffnen und
den zweiten Filter auf dieselbe Weise entfernen.
Die Kohlenfilter können mittels Drehung
fig. 8
40
Page 42

DE
4 / PFLEGE UND REINIGUNG DES GERÄTS
herausgenommen werden; zum Einsetzen sind
sie in die Gegenrichtung zu drehen (Abb. 8).
Kohlefilter Kennz. Nr.
AH4010E1
• REINIGUNG UND INSTANDHALTUNG
DER AUSSENFLÄCHE
Zum Reinigen der Außenfläche der
Abzugshaube sind nur Wasser und Seife - keine
Scheuermittel oder -schwämme - zu verwenden.
• WECHSEL DER LAMPE
Achtung
Vor Inangriffnahme die Abzugshaube
ausschalten, indem der Stecker gezogen
oder der Schalter betätigt wird.
Um Halogenlampen zu ersetzen, die Nutmutter
gegen den Uhrzeigersinn ausschrauben und die
Lampe entfernen (Abb.9). Mit Lampen derselben
Art ersetzen.
ACHTUNG: Glaskolben nicht mit bloßen
Händen anfassen.
Sollten die Halogenlampen, nachdem sie
ersetzt worden sind, nicht funktionieren, so
entziehe man dem Apparat einige Sekunden
lang die elektrische Zuführung.
• ABMONTIEREN DES KRISTALLS
Achtung
Vor Inangriffnahme die Abzugshaube
ausschalten, indem der Stecker gezogen
oder der Schalter betätigt wird.
Bevor man sich irgend an Pflege oder Wartung
macht, muss man die Netzspannung
unterbrechen. Kristalls öffnet man das
Schiebegesteil, indem man es nach vorne zieht,
schiebt den Kristall nach links (oder auch nach
rechts) und hebt ihn vie nach Abbildung hoch
(Abb. 10).
fig. 9
fig. 10
41
Page 43

4 / PFLEGE UND REINIGUNG DES GERÄTS
Achtung
Vor jedem Eingriff muss die Dunstabzugshaube vom Stromnetz getrennt werden,
entweder durch Ziehen des Netzsteckers oder durch Betätigen des Überlastschalters.
• PFLEGE DES GERÄTS
DE
PFLEGE... WIE VORGEHEN
Niemals Metallkratzer,
Scheuermittel oder zu harte
Gehäuse
und Zubehör
Fettfilter
Kohlefilter
Bürste benutzen.
Dieses Filter bindet Fettdämpfe
und Staubpartikel. Es ist ein wich
tiges Element zur Sicher-stellung
eines wichtigen Teils der
Wirksamkeit der Dunstabzugshaube. Bei hartnäckigen Flecken
eine nicht scheuernde Creme anwenden und dann mit klarem
Wasser abspülen.
Dieser Filter nimmt Gerüche auf
und muss - je nach Gebrauch mindestens jedoch alle sechs
Monate ausgetauscht werden.
Diese Filter im Fachgeschäft
kaufen (dabei den Code
angeben, der auf dem
Schildchen im Innern der Haube
steht) und das Datum des
Austauschs notieren.
ZU VERWENDENDE
PRODUKTE/ZUBEHÖR
Für die Reinigung von Gehäuse
und Leuchtblende ausschließlich
handelsübliche in Wasser gelöste
Reinigungsmittel, und dann mit
klarem Wasser abspülen und mit
einem weichen Lappen trocknen.
Mit einem handelsüblichen
Haushaltsprodukt, dann reichlich
abspülen und trocknen. Diese
Reinigung kann im Geschirrspüler in vertikaler Position
erfolgen (Nicht mit
schmutzigem Geschirr oder
mit Silberbesteck in
Berührung bringen).
42
Page 44

DE
5 / BETRIEBSSTÖRUNGEN
ANZEICHEN BEHEBUNG
Die Abzugshaube
funktioniert nicht ...
Die Leistung
der Abzugshaube
ist mangelhaft ...
Dabei überprüfen, dass:
• Es liegt kein Stromausfall vor.
• Es wurde eine Geschwindigkeit gewählt.
Dabei überprüfen, dass:
• Die gewählte Motorgeschwindigkeit reicht für die
anfallende Menge an Rauch oder Dämpfen aus.
• Die Küche ist ausreichend belüftet, um eine
Luftansaugöffnung zuzulassen.
• Der Kohlefilter ist verbraucht (Haube in
Umluftversion).
Die Haube ist im Laufe
des normalen Betriebs
von selbst
ausgegangen.
DE
6 /KUNDENDIENST
Eingriffe an Ihrem Gerät dürfen nur:
- von Ihrem Händler oder
- von einem sonstigen Fachmann und Vertragshändler der Marke durchgeführt werden.
Geben Sie bei der Meldung einer Störung die vollständige Typenbezeichnung Ihres Gerätes
an (Modell, Typ, Seriennummer). Diese Angaben finden Sie auf einem an Ihrem Gerät
angebrachten Schild.
Dabei überprüfen, dass:
• Es liegt kein Stromausfall vor.
• Der allpolige Schalter ist nicht gesprungen.
04307957
 Loading...