

Page 1

DTH8560E
User manual
Page 2
D
V
D
/ V
ID
E
O
C
D
/ C
D
P
L
A
Y
E
R
D
T
H
2
1
0
FR ATTENTION - RAYONNEMENT LASER EN CAS D'OUVERTURE.
NE PAS REGARDER DANS LE FAISCEAU.
EN CAUTION - LASER RADIATION WHEN OPEN.
DE VORSICHT - LASERSTRAHLUNG,WENN ABDECKUNG GEÖFFNET.
ES PRECAUCIÓN - RADIACIÓN LÁSER CUANDO ESTA ABIERTO.
IT ATTENZIONE - QUANDO E' APERTO EMETTE RADIAZIONI LASER.
DO NOT STARE INTO BEAM.
NICHT IN DEN STRAHL BLICKEN.
NO MIRAR FIJAMENTE AL RAYO DE LUZ.
NON GUARDARE DENTRO IL FASCIO .
CLASS 1
LASER PRODUCT
Page 3

To begin
About your device
Your appliance is a digital video player/recorder. It has a built-in
tuner so you can record TV programmes directly onto DVD+R
and DVD+RW discs or onto the built-in 250 Go hard disk. It can
play the majority of 8 cm and 12 cm discs, with the exception of
DVD Rom, DVD Ram, and DVD audio.
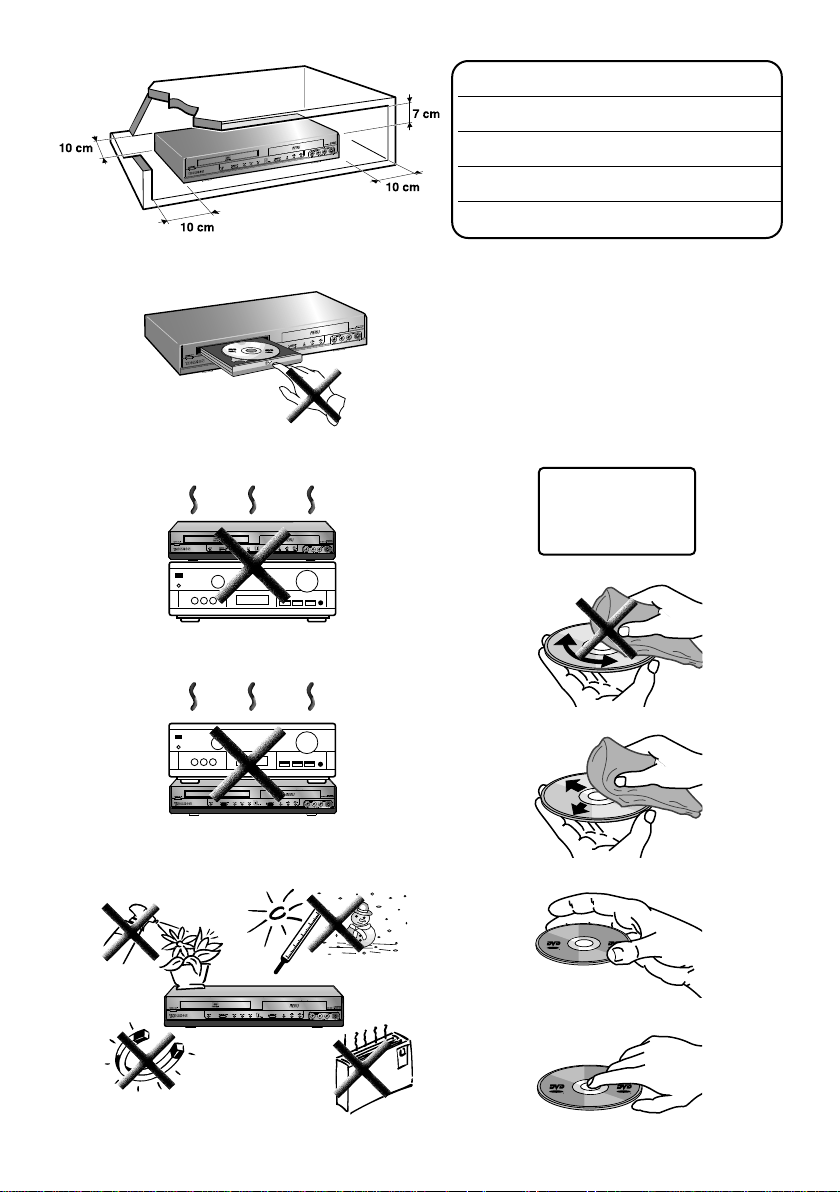
Precautions to take
• Ensure that the mains supply in your house complies with that indicated on the identification
sticker located at the back of your device • Install your device horizontally, on a suitable base
(furniture), with enough space around it for ventilation (7 to 10 cm) • Ensure that the ventilation
slots, and the device itself, are not covered by objects such as a mat, newspapers, curtain, etc. • Do
not stack any other equipment on top of your DVD recorder • Do not place the device on top of
an amplifier or any other equipment that gives off heat • The appliance should not be in contact
with liquids or exposed to the risk of dripping or splashing.Therefore be careful not to place any
object containing a liquid (vase, glass, bottle,...) on or near your appliance • The DVD recorder
must not be near or exposed to a flame. For instance, do not place a candle on or near the
device • Protect the DVD recorder from moisture and excess heat (e.g. fireplace) or equipment
creating strong magnetic or electric fields (i. e. speakers ...). Before moving the device, ensure the
disc tray is empty. Switching off the DVD recorder to the stand-by mode does not disconnect the
electricity supply. In order to separate the device completely from the mains, it has to be
disconnected by unplugging the mains plug.When connecting, ensure that the plugs of the various
cables are pushed securely into their corresponding sockets.Your DVD recorder is not intended
for industrial use but for domestic purposes only. Use of this product is for personal use only.
Copying CDs or downloading music files for sales or other business purpose is or may be a
violation of copyright law.
Important: Please take the time to read the further recommendations at the end of this handbook.
EN
EN
The content in brief...
• Connections and initial set up ..........2
Basic connections - Other Audio - Video connections
The front of your player recorder - Main messages on
display panel - About other displays (menus and banners)
• Recording functions...........................7
To watch TV Programmes - Taking a break (Time Shift
function) - Record the current programme - Programming
a recording or a transfer - Programming a transfer Automatic programming (Naviclick) - Recording from a
connected device - Library
THIS DVD RECORDER LETS YOU RECORD TV PROGRAMMES
IN DIGITAL QUALITY AND ARCHIVE YOUR OWN VIDEOS FROM VIDEO CAMERAS
OR VHS CASSETTES TO DVD DISCS.
YOU CANNOT COPY PRE-RECORDED FILMS
TO DVD IF THEY HAVE BEEN COPY PROTECTED.
MAKE SURE THAT YOU BUY DISCS
WITH THE «+» SYMBOL ON THE PACKAGING.
• Playing a disc....................................15
Readable discs - Interactive banners - Loading and playing a
disc - Displaying the information banner - Playing image
and audio (JPEG,mp3,wma) - To play DivX files
• Menus ...............................................22
Disc menu - Playlist - Title functions - Disc options Recording Options Menu - Selecting Languages - Parental
control - System Options - Naviclick Settings
• Further information ........................34
Recommendations and information concerning discs Troubleshooting guide - Other important informations Technical data
1
Page 4
Connections and initial set up
Basic connections
Consult the Quick Set-up Guide (A) supplied
with this handbook.
1
28 3 4 5 6 7
There are several ways you can incorporate your DVD player into its audio-video surroundings.
The simplest of these is described in detail in the Quick Set-up Guide supplied with this handbook.
This uses Scart-Peritel cables that combine Audio analogue connections for sound, and Video for
the RGB image.This connection ensures the optimum image quality (like Y, U,V). If you cannot use
Scart-Peritel sockets, the explanations on this and the followings pages should enable to you to
choose the method of connection best suited to the sockets and appliances you have. Sound and
image quality depend to a large extent on the types of connections used.
A
B
Consult the
Quick Set-up
Guide (B).
Peritel socket (scart)
1 - AV1 (audio - video Outputs)
This socket allows you to transfer Audio and Video (sound and images) from
your DVD recorder to a television set or other device (flat screen, audiovideo amplifier, etc.) that is fitted with the same type of socket. In order to
benefit from the best image quality, ensure that the
is positioned on
Note: if you use Y, Pb/Cb Pr/Pb sockets also known as YUV), select the Component
Interlaced or Component Progressive position depending on the possibilities of
the television set or monitor:
RGB (AV1).
• Component Interlaced for interlaced scan,
• Component Progressive for progressive scan.
OUTPUT SEL selector
2 - AV2 (audio - video Input and Output)
This socket allows the sending of Audio Video (sound and images) from your
DVD recorder to another device (satellite or cable receiver, …) fitted with
the same type of socket.
If you have connected a cable or satellite receiver to this connector, in the
system Options menu select the RGB (AV1) setting in order to benefit
from the best image quality for your recordings.
Note: the Péritel socket is also known by the name of Péritélévision or Scart.The
latter is an abbreviation of « Syndicat des Constructeurs d’Appareils Radioélectriques
et de Télévision ».
2
Page 5

Connections and initial set up
Other Audio - Video connections
If there is no Peritel-Scart socket available on the television, check to see if there are any other
Video sockets (Components, S-Video or Composite) to connect your player by using the
corresponding sockets. In this case, do not forget to also connect the player’s Audio outputs
(AUDIO OUT) to the Audio input sockets (AUDIO IN) on your television.
3 - Audio - Video Input
Audio (INPUT L, R) Video - Composite (CVBS) (COMPOSITE
VIDEO INPUT) inputs
The analogue sound of an operating device (television set or amplifier) can be
input via the 2 Audio sockets L and R of your DVD recorder.
The yellow video socket is also called composite video, or CVBS. the image
quality provided by this socket is less than all the other video sockets. Only
use this socket if all the other sockets are already in use.
4 - Audio - Video Output
Audio outputs (OUTPUT L, R) Composite Video Out socket
(CVBS) (COMPOSITE VIDEO OUTPUT)
Analogue sound output and composite images (CVBS) from the disc being
played are constantly available at your DVD recorder's two audio sockets
(L & R) and video socket.
5 - Composite Video Outputs (Y,Pb/Cb, Pr/Cr) (YUV)
The Y,Pb/Cb,Pr/Cr sockets deliver an optimum image quality due to the
separation of the video signal into three separate components (comparable
with RGB separation in a Scart-Peritel cable).
Note: the available video signal on these 3 sockets depends on the selection made at
the rear (Component Interlaced or Component Progressive) of your
player.The available signal can be Y, Cb, Cr (Component Interlaced) for a
progressive interlaced or Y, Pr, Pb (Component Progressive) for a non interlaced
progressive signal (no frame interleave).
In order to obtain the best possible image quality, always use very high quality
cables for the connections.Your dealer can provide YUV cables that are sold
together and come in the standard colour codes (red, green and blue) used
for these types of sockets and cables.
Note: do not forget to also connect the audio cables, because Component cables only
transmit images, and not sound.
EN
EN
3
Page 6
Connections and initial set up
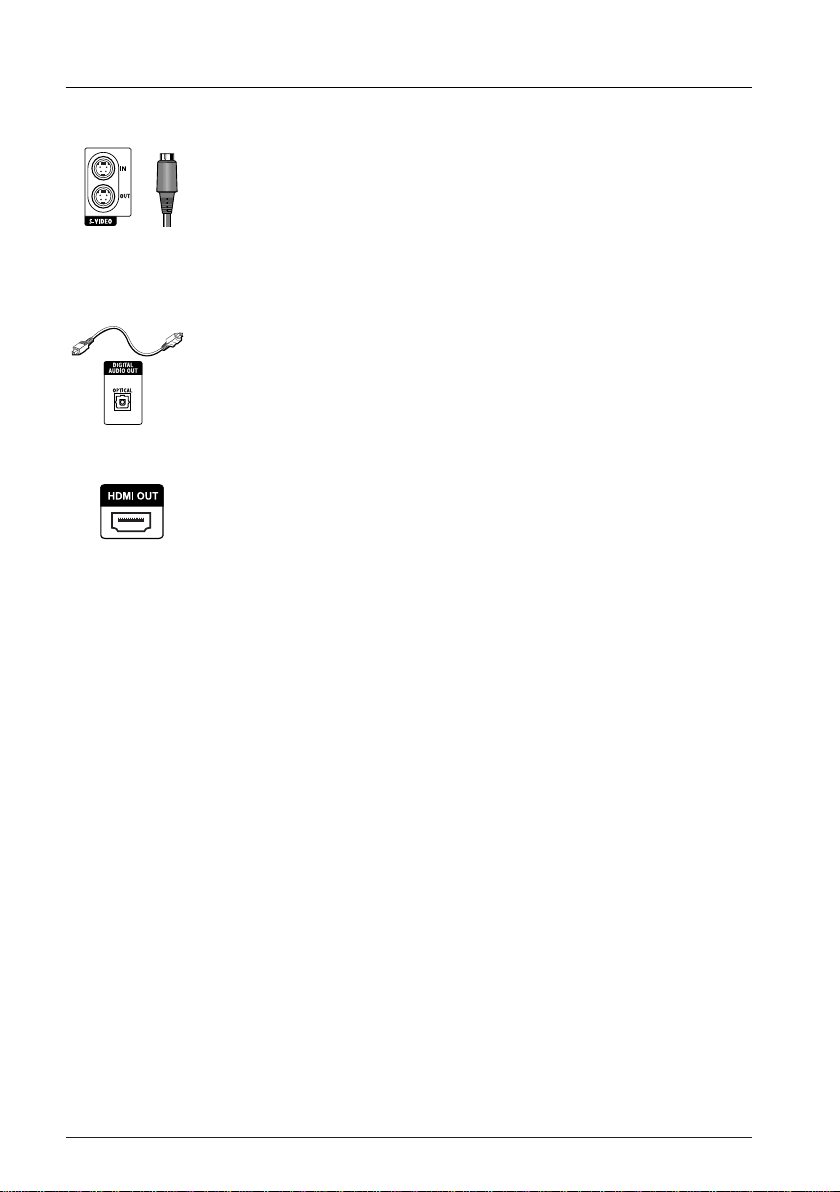
6 - S-Video Input and Output
S-Video input/output (Y/C) (S-VIDEO IN)
The S-Video signal is of a lesser quality than that of the RGB signal supplied
by the Peritel (Scart) socket.An S-Video signal however provides a better
quality image than a composite Video (CVBS) socket, because colour (C) is
separated from black and white (Y) in the video signal.
Note: do not forget to connect the audio cables since the S-Video cable transmits
only images, not sound.
7 - Optical Audio Output (digital sound)
The digital sound of a DVD Video disk when played is permanently available
on the optical socket of your player. Use this socket by connecting it to a
decoder or Dolby Digital amplifier or DTS.
8 - Digital Audio Video outputs
The HDMI socket permanently delivers very high quality digital sound and
pictures.This connection is strongly recommended with a digital television
which is fitted with the same socket and is compatible.
HDMI connection, image adjustment
If you connect your DVD recorder to a TV set using the HDMI OUT
socket, make sure the selector at the rear of your recorder is set to
Component Progressive.
If no image comes up on your TV screen and you're sure its set to HDMI (via
the on-screen menu or other means), try the following resolution adjustment:
- In STOP mode (with no disc in the appliance), press the ZOOM button on
the remote control several times to adjust the resolution of the HDMI OUT
socket output signals to 480p,720p, or 1080i.These changes are displayed on
your recorder’s read-out.
Note: for an S-video or normal video connection (yellow socket), leave the selector set
to RGB.
HDMI connection, sound adjustment
The sound available from the HDMI OUT output socket can be adjusted in
the Digital Audio Out menu (Dolby Digital, DTS, MPEG).
4
Page 7
Connections and initial set up
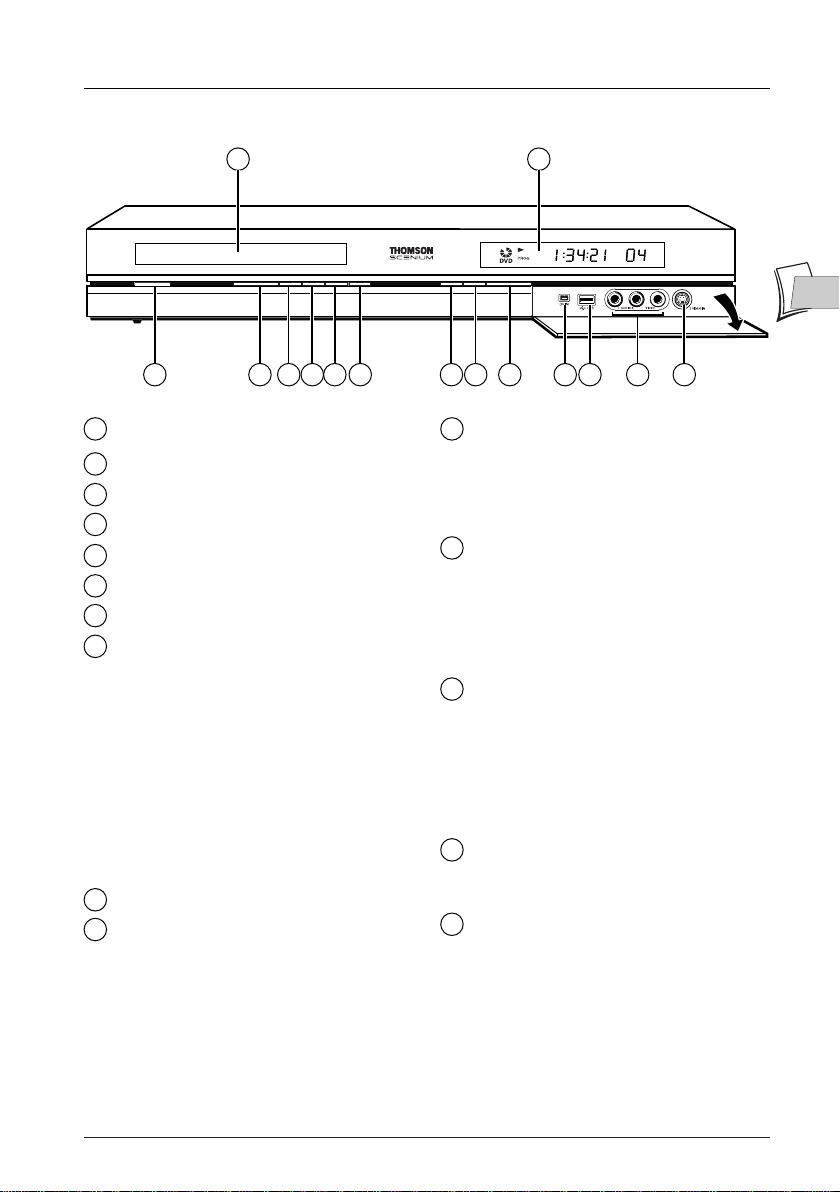
The front of your player recorder
15
14
EN
EN
2 3 4 5 6 7 8 91
1
On/Off.
Fast forward or reverse.
2
Play or Pause (freeze frame) (DVD).
3
4
To record to the DVD+R/+RW disc.
Stop playing or recording.
5
To open and close the disc tray.
6
7
To record to the hard disc.
8
To select the audiovisual sources (channels
or devices connected to the AV sockets):
PR 1 ,2 ,3 - Channel 1, 2, 3.
AV 1 - Device connected to AV1
(television set).
AV 2 - Device connected to AV2 (satellite
receiver, decoder, …).
AV 3 - Sockets AUDIO/VIDEO on the
front.
AV 4 - Sockets AV (S-VIDEO or
AUDIO/VIDEO) at the back.
9
Change channel or skip chapter.
10
DV IN (input) socket, also called IEEE
1394, for viewing and/or copying images
and sound from a digital camcorder.
Note: to display the images, select DV-CAM in
the main menu.
12 1310 11
11
USB socket for opening and copying JPEG
image files or mp3 files from a compatible
appliance.
Note: Recognised players: USB 1.1 MASS
STORAGE CLASS.
AUDIO-VIDEO
12
viewing and/or copying your video
sequences from a camcorder or any other
AV appliance that has a composite video
signal output and analogue stereo sound.
Note:View the images using the AV key.
13
S-Video socket (input) For the
connection of a Camcorder or other
S-Video device.
Note: do not forget to connect the audio cables
since the S-Video socket handles only images
and not sound.View the images using the AV
key.
Displays your DVD recorder’s modes of
14
operation.
• Adjusting the time.
Disc tray.
15
(input) sockets for
5
Page 8
Connections and initial set up
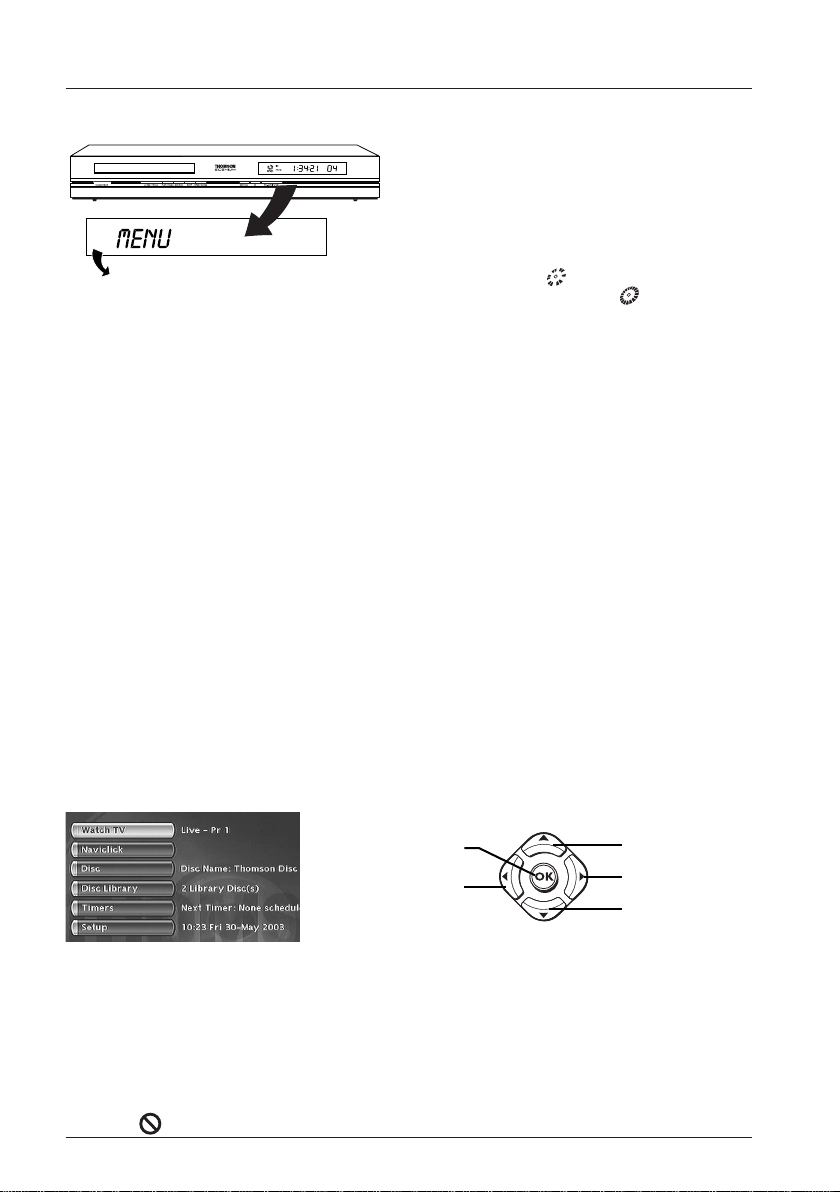
Main messages on display panel
- Main menu of the recorder on the screen (device
stopped). No function selected.
LIVE PR 1
LIVE AV, LIVE SAT, LIVE CABLE
RECORD
LIVE AV3
CAM, LIVE DV
About other displays (menus and banners)
• The disc menus – Each DVD video disc offers menus and for which the presentation and
organisation depends on the disc’s editor.The disc menu is displaye don te screen when a
DVD disc is loaded and it starts to play.You can also, at any time, display the main menu of
the disc by using the
•
Player banners – while a disc is playing back you can display or remove banners using the
INFO key on the remote control unit.The banners appear in the form of a succession of
icons at the top of the screen (page 42).
Player menus – your DVD recorder has menus enabling you to use functions that are not
•
accessible using the remote control unit keys.The main Menu of the player is displayed when
there is no disc playing (in STOP mode).
Browse through the menus with the navigation buttons and confirm your choice with the OK
button.
MENU button.
- Channel 1 being watched ( ).
- Channel 1 currently being recorded ( ).
- Example of a device connected to the AV1 or AV2
(SAT ou CABLE if a satellite installation has been
carried out).
- Start of recording of TV program on selected channel.
- Indication of the selected source:
AUDIO/VIDEO input connector at the rear.
• AV 2:
AUDIO/VIDEO input sockets on the front.
• AV 3:
AV/ S-VIDEO or AUDIO/ VIDEO input
• AV 4:
sockets at the rear.
- Display of digital video from a video camera connected
to the DV-IN socket on the front.
UpConfirmation/OK
Left
Note: settings will only function if the corresponding function has been provided by the editor. For instance, if
you select the subtitle icon in the banner, subtitles will only appear if they actually exist on the disc. Check
the sleeve to see what subtitles are provided. Check the jacket to see whether there are any subtitles. If a
menu or icon appears in “grey” it means that the function is not available.
Function indicator not available
elapsed is shown on the banner.
A question mark in the counter zone indicates an input error.
LThis symbol is sometimes displayed. It indicates that the function is not available or that the key used is
incorrect .
:
with certain discs, direct access to a scene is not possible even if the time
66
Right
Down
Page 9
Recording functions
To watch TV Programmes
1. Turn on your TV set.
2. Turn on your DVD recorder using the ON/STANDBY. The time displayed on your DVD
recorder is replaced by the word
• After a few seconds the main menu of the player appears on the television screen.
• The Watch TV function is already selected.
3. Press the OK key of the remote control or one of the PR+/PR-,keys on the front panel.
• The images of the last watched channel appear.
• Encrusted within the image for a few seconds is information on the current channel and
programme.This disappears after several seconds.
Note: when the information banner is displayed at the top of the screen you have the possibility of choosing
an audio channel (if this is provided by the channel) using the B key on the remote control.
To display information again, press the
MENU.
Note: turn off non used devices to avoid problems of selecting
sockets or other types.
If the main menu of the player is not displayed on the television
screen, check and/or select the Scart socket to which you
connected your DVD recorder (see page 4 - AV1 selection).
Generally the selection is carried out using the AV key on the
television set remote control.
If the THOMSON logo temporarily appears, it is because the
screen saver has been triggered; press the
the menu.
INFO key of the remote control.
OK button to display
EN
EN
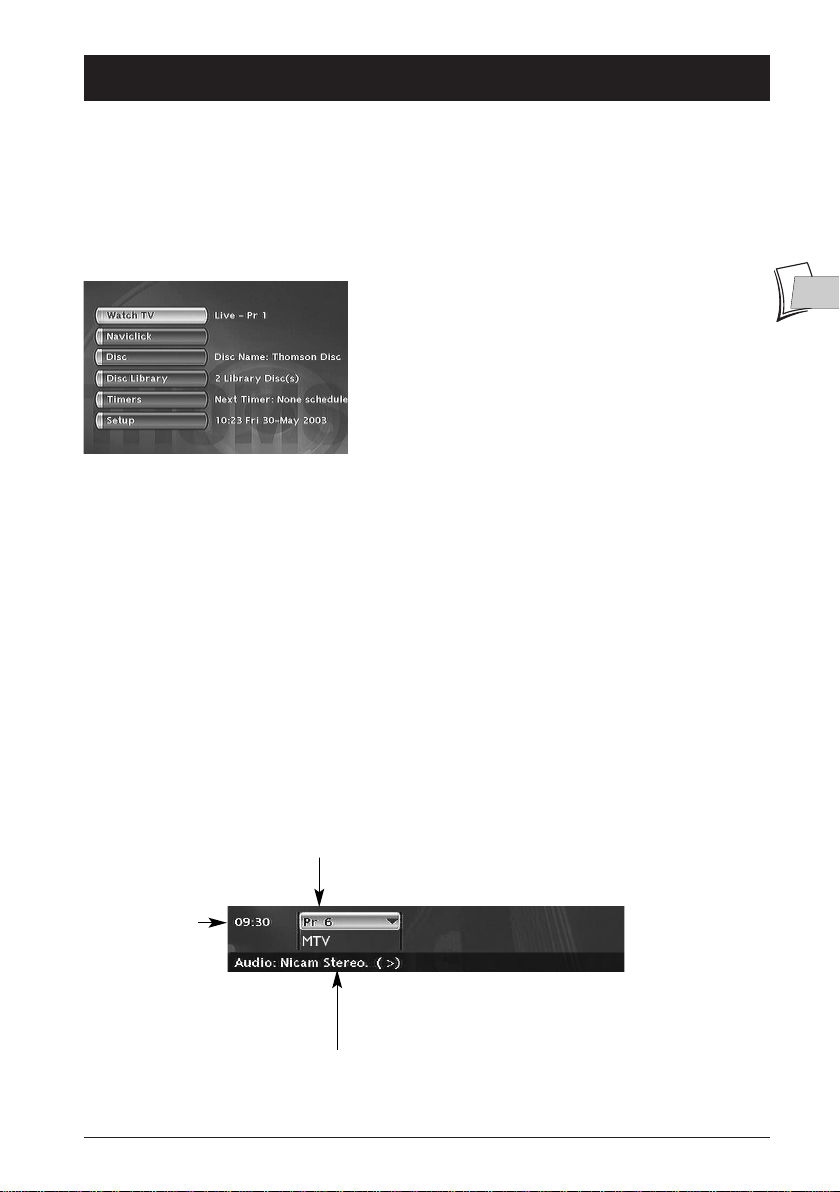
To change channel
Change the channel with the PR+/PR- - key or the remote control number keys.To select the
channel of a device connected to your DVD recorder (satellite reciever) or to view images from
a video recorder, use the AV button on the remote control or press the PR+/PR- button several
times to select one of the three connectors (AV1, AV2, AV3) to which the device is connected.
Note: refer to the connection diagrams in the Quick Set-up Guide (A) if necessary.
No. and name
of the channel selected
on the DVD recorder
Current time
Indications concerning the channel
sound and the selection of audio
channels. Selection is possible with the
B key on the remote control.
7
7
Page 10
Recording functions
Taking a break (Time Shift function)
Your recorder can save in its memory images of the last 60 or 120 minutes of the programmes
viewed. Use the scroll keys (
Note:This function, associated with the Save Buffer function lets you save a programme for which you
missed the start to the DVR hard disc.
Record the current programme
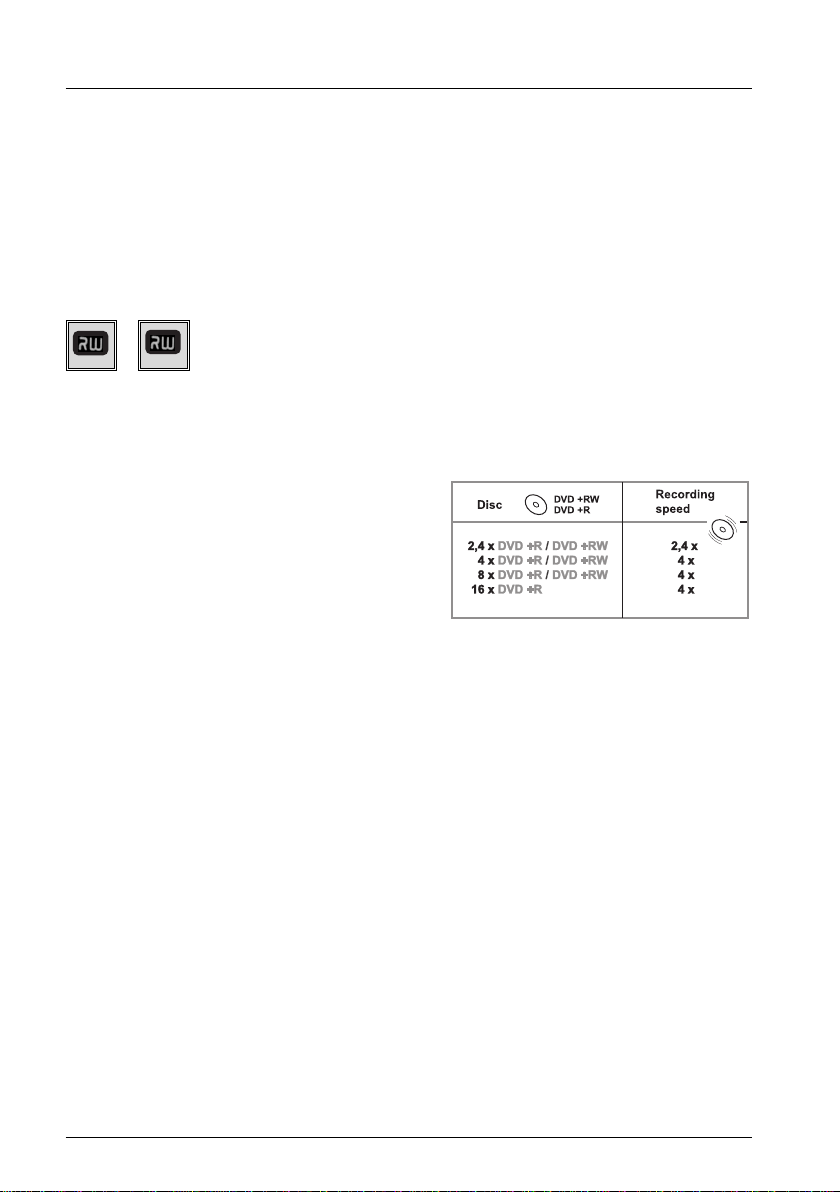
Recordable discs
PAUSE, PLAY, REVG/F...) to use this function.
DVD+R
DVD+Rewritable
• DVD+R,DVD+RW - The majority of DVD+R (write once) and DVD+RW
(write many) of 4.7 Gb capacity with the following characteristics.
Recommended brands and types
Certain brands of discs have been “approved” for your player. Other brands can be used but the
discs must be good quality to produce successful recordings. Recommended brands: Imation,
Maxell,Philips, Ricoh,Verbatim,TDK,Sony,etc.
The DVD discs are certified for certain recording
speeds.These speeds must correspond to the
capabilities of your player, i.e.:
Note:The brands mentioned in this manual
are registered trademarks.
Configured recording (on hard disc, DVR or DVD+R,+RW discs)
Configured recording lets you record the programme after a quick adjustment of the duration,
the quality and the destination of the programme to be recorded (to the hard disc or to a
DVD+R, +RW disc).
1. Load a disc - Open the disc tray by pressing OPEN/CLOSE. Put in a disc with the printed
side upwards. Close the tray using the
2. Press and release the REC button.
3. You can choose a duration using the Bkey. Each time you press the B key the duration is
increased by 30 minutes up until the maximum time remaining on the disc is attained.When
the maximum duration is reached, pressing again on B displays --h--min which indicates the
precise time remaining, for example 1 hour 12 min.
OPEN/CLOSE key.
4. The time remaining on the disc is indicated next to Recording quality. If you modify the
quality you will also modify the duration, which may be useful with a DVD+R,+RW disc
which has little space. Select Recording Quality with the
recording quality using the B key, this will increase the amount of time available on the disc.
However, for a recording to the hard disc that you can copy later to a DVD+R, +RW disc,
increase the quality.
8
▼ key, then select a lower
Page 11

Recording functions
5. Destination
The default recording destination is set for the DVR hard disc.To record to a DVD+R/+RW
disc, change the setting with the key B.
6. Start the recording by choosing Start record with the ▼ key then by pressing OK.
• Recording starts.
• The indication
The red lamp on the front lights up. It confirms that recording has started.
• The information banner appears for several seconds on the screen of your television.The
information that is displayed confirms the channel,the programme being recorded and the
time remaining on the disc.
Note: after several seconds the information banner disappears. You can redisplay it using the INFO key on
the remote control.
Changing the channel during recording is not possible.To watch another channel during the recording session,
select it directly on the television set, using its own remote control handset
Save Buffer
This function lets you start to record a programme to the DVR hard disc even if you missed the
start thanks to the Time Shift function.
Return to the start of the programme with the
press
REC.
In the recording menu which appears, select Save Buffer and confirm with
is recorded to the hard disc and its references (name, times, etc.) are stored in the video library.
Stop recording
RECORD is displayed for a few moments on the display of the DVD recorder.
REV key, change to play mode with PLAY then
OK.The programme
EN
EN
Press the STOP button twice.
• With a DVD+R disc, if you do not have another recording to make, you need to «Finalize»
the disc in order that it can be read by other DVD+R compatible players. Closing a DVD+R
disc is described in detail below.If you do not close a DVD+R disc, it will still be possible to
make other recordings on it later on,providing there is enough disc space.You can therefore
safely store it.You may also erase recordings but the corresponding duration will be lost.You
may not record other titles in their place
• With D
Note: if you only press once on the STOP key, the confirmation window appears. Press a second time to
definitively stop the recording or select continue using the▲ and OK keys. At the end of each recording, your
DVD recorder takes a few seconds to prepare the disc welcome menu.This menu is made up of pictures which
represent the first images of each title.
VD+RW discsdiscs this function does not exist.It is replaced by a function that
renders the disc compatible in such cases where you have added or removed chapter
bookmarks using the edit menu. For some players, it is necessary to render the disc
compatible even though you haven’t carried out modifications to the chapters.
9
Page 12
Recording functions
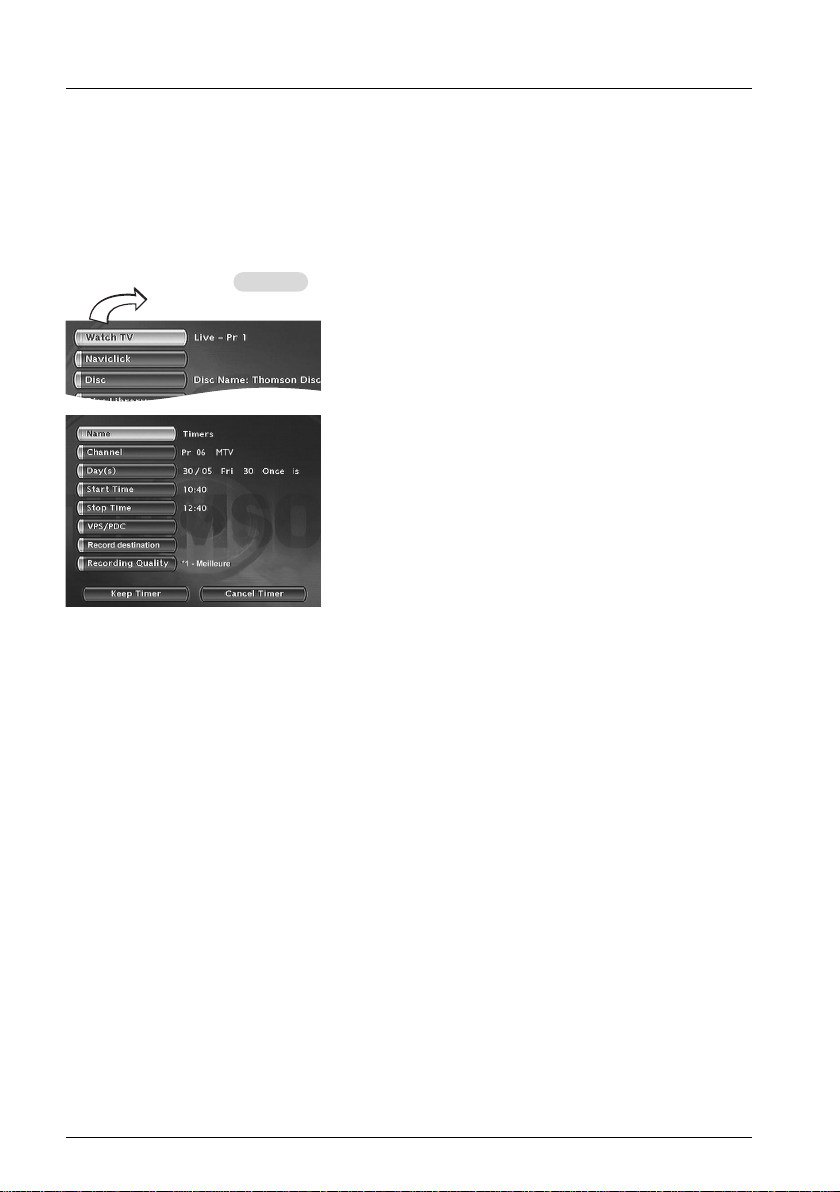
Programming a recording or a transfer
Your DVD recorder lets you program recordings or transfer. Programming several recordings is
really useful when it uses the high capacitu of the hard disc, thereby enabling you to go beyond
the limited capacities of DVD+R /+RW discs. You can programme recordings using the manual 9
step method or by choosing, for channels which broadcast the programme guide, the Navclick
programming.
Manual programming
MENU è Timers è OK è OK.
Note: your DVD recorder can memorise the parameters of 8
different programmings. In the case of double programming, a
warning message is displayed.
Name - Press the INFO button to access the character table. Enter the name of the recording,
one letter at a time, then confirm.
Channel - a) Enter the channel number using the digit keys of the remote control (Pr -- must
be displayed) or browse the list of channels in the memory of the DVD recorder using the
PR+/PR-key.
b) Or select one of the Audio-Video (AV2,AV3,AV4) sockets to which is connected a device
(satellite receiver or other) using the B key.
Note: selecting the AV2 connector allows you to program the recording of a satellite reciever programme
(either left switched on or also programmed) connected to this connector.The selecting of the AV2 connector
is activated by default by the AV Timer function (triggering of programming via the AV connector).
Day(s) -Type in the date using the number buttons on the remote control handset (if the
recording is not scheduled for the same day) and/or choose a repeat period with the B button.
Once: to record the selected programme according to the parameters you have defined.
Each Tue: to record the same programme the same day every week starting from today (supposing today
is Tuesday).
MON-FRI: to record the same programme, everyday at the same time from Monday to Friday.
Time - Enter the recording start time and then the stop time.
To this end,and according to the features of the receivers, you must:
- either program the receiver with the same beginning and end times,then switch off the DVD
recorder and the receiver,
- or leave the satellite receiver switched on, on the channel to record, program the DVD
recorder, then switch it off.
Note: if you selected AV2 during step 4, you do not need to enter the start and stop times, since it is the
device that is connected that triggers the start and stop of the recording at the times set via its
programming menu.
10
Page 13

Recording functions
VPS/PDC - If the channel also broadcasts VPS/PDC signals, activate the VPS/PDC function to
ensure recording begins at the actual time the programme starts.
Record destination - Select the disc where the programme will be recorded (DVD+R/+RW
or internal DVR).
Recording quality - choose the recording quality you want.
Note: selecting the quality enables you to adapt the recording time on the DVD disc.The lower the quality,
the longer the time available on the disc. For example, the time available with a clean 4.7 Gb disc with
“Low” quality will be approximately 8 hours while in “Best” quality the time will be approximately 60
minutes.The figure 1 to 6 is displayed in the information banner when playing the recording. The quality
selection will only be valid for this programming. For an automatic quality selection according to the time
remaining on the disc, activate the SmartRecord™ function.
Save your settings by selecting Keep Timer and confirm.
Return to the main menu using the
or turn it off using the
remaining time compatible with your programming.
ON/STANDBY key, after having loaded a DVD+R or DVD+RW disc with
Programming a transfer
MENU è Timers è OK è Set transfer è OK.
• The Timers screen appears. It contains the list list of the recordings and transfers you have
already programmed. If you didn’t programme anything, the screen displayed only indicated
Timers and Set transfer.
MENU key in order to continue to use your DVD recorder
EN
EN
1. Select Set transfer and confirm.
The transfer programming menu appears.This menu allows you to define all the parameters
necessary for a deferred transfer.
Note: your DVD recorder can memorise the parameters of 8 different programmings, but only one transfer. In
the case of double programming, a warning message is displayed.
2. Select Copy from / to then choose the source and destination of the recordings to copy.
3. Select Day(s) then type in the transfer date.
4. Select Star t time then type in the time you want the transfer to begin.
5. Memorise your settings by selecting Keep Timer and press OK to confirm.
11
Page 14
Recording functions
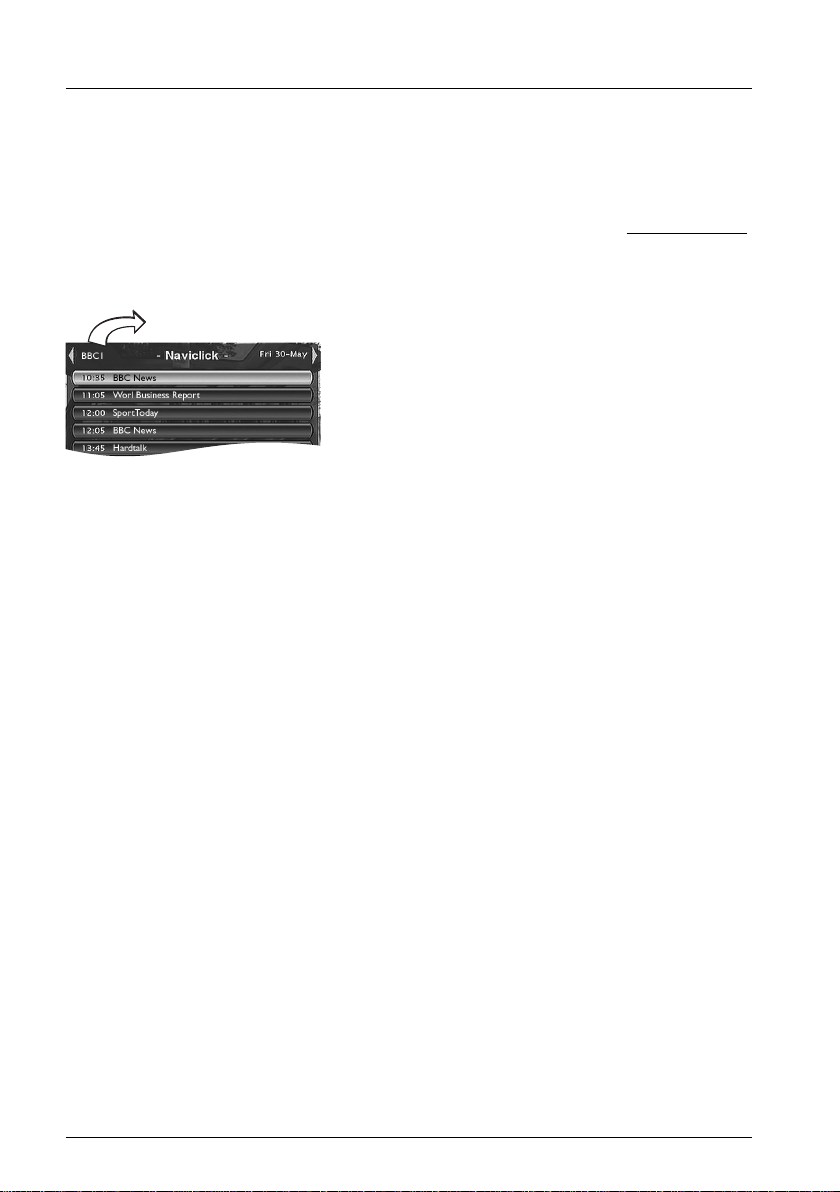
Automatic programming (Naviclick)
For certain channels your DVD recorder offers a daily and sometimes following day TV
programme guide.The information that it provides come from the Teletext and NexTView
services broadcast by certain channels.The updating of Naviclik information is carried out once
every 24 hours. Naviclick allows you to display on your screen the programmes of those channels
and to select the broadcasts you wish to record simply by clicking on them.
Consulting the TV guide with Naviclick
Channel è GUIDE
Use the C, B keys to move from one channel to another or to move around the list of
programmes for the channel (
(FWD, REV
To consult the programs of the channels at a given time, choose a program from the list (e.g.: 9
o’clock news) and use the (C, B) keys to move on to the programs of the other channels.
move from 10 to 10 programmes).
➔
▲, ▼
Recording through the Naviclick TV guide
1.
Select a channel on your DVD recorder.
2. Press the GUIDE key and wait for the Naviclick page to appear.
3. Go to the programme you want to record. Move between channels with PR+/PR- or C, B.
4. Confirm with OK.
5. You can turn off your DVD recorder or leave it turned on (don’t forget to load a DVD+R or
DVD+RW disc). In this case the DVD recorder will automatically seek the channel to
automatically record at the correct recording time.
Note:for the correct downloading of the programme guide, the clock of your DVD recorder must be set.
move from one programme to another)
➔
Recording from a connected device
1. Satellite or cable receiver - When you are watching a channel,select the AV2,AV3,or AV4
socket on the DVD recorder using the
CABL appears in the information banner and on the display panel on the recorder (
AV2
) for the SCART socket.
2. Camcorder or other appliance - When you are watching a channel, use AV to select
which sockets to use:AV3 if your camcorder is connected at the front of your DVD recorder
or AV4 if it is connected to the S-VIDEO IN or COMPOSITE INPUT sockets at the
back.
Record with
Stop the recording by pressing twice on the
REC (RECORD).
AV button on the remote control handset. AV2-SAT-
LIVE
STOP key.
12
Page 15

Recording functions
Library
The library lets you locate the various recordings present on the DVR hard disc or the different
DVD+R/+RW discs in your DVD library.The library groups together the recording names and
parameters and lets you look for them using the search functions.
The recording names are distributed according to the nature of the files and titles in four sublibraries. Each one will let you access functions specific to the nature of the recordings.The
contents of the library are not lost even if the recorder is no longer connected to the mains
supply for a while.
MENU è Library è OK.
The library screen comes up.This gives access to four sub-libraries and to the following
functions: Video librar y, Library (disc), Music library, Image library, Export.
Depending on the recording you are looking for, select the library and confirm with
The screen specific to the library appears.
Video library (on the hard disc)
To look for a video or DivX title.
The video library brings together all the names of titles of DivX files saved to the hard disc (TV
programmes or films in DivX format).
Note: Playing a Video and PIP title (picture in picture)
Select a title with the
While a video title (from a video DVD, DVD+R/+RW or DVR hard disc) is playing, you can superpose TV
pictures from your recorder’s tuner using the
while you are watching a video recording.You can change channel with the
Functions for managing your recordings (on the hard disk)
Select a title and press OK to confirm..
Among other things, the management functions let you rename, copy or delete a title.To access
them, when a title in the Video library is selected, press
title appear:
• Pla
y title, to play the title except for the hidden chapters.
• Pla
y all chapters, to play the title, even the hidden chapters.
Note: Indispensable if you want to split a recording up using the Edit menu.
• Modify the title to give it the name of your choice letter by letter using the character
grid.
• Delete the title
• Lock the title
• Cop
y to disc to conserve (archive) a title to a DVD+R/+RW disc and then erase it from
the hard disc.
• Erase cha
intervals in order to define others.
Note: Useful for copying only those chapters you wish to store on a DVD+R/+RW disc.
Note: Jpeg, mp3, wma and DivX files cannot be copied using this menu.To do this, use the library’s Export
function (see below).
▼ key and change to play mode with the PLAY key.
LIVE key.This will let you monitor programmes on a channel
PR+/PR- key.
OK.The functions to manage the chosen
to free up space on the hard disc.
(or unlock it) to avoid (or enable) its erasure.
pter to delete all the electronic bookmarks positioned automatically at regular
13
OK.
EN
EN
Page 16

Recording functions
Library (disc)
The (disc) library brings together the names of all the titles recorded to the different
DVD+R/+RW discs in your DVD collection.
Note: if a disc appears in front of the name of a title it means that the disc is loaded in your DVD recorder.
Note: For recordings that you have made directly or for those you have programmed, without providing them
with names, appear along with the name of the channel, the time and date.
Note: the Library may be accessed even if there is no disc in the recorder.
Note:The titles and names of programmes (Pr1, Pr2,AV2, ..) and times correspond to those recordings that
you have not renamed (Modify title function).
Note: Depending on the duration of the recordings, the number of titles and/or the number of discs, we may
estimate that the library may contain the names of 400 titles created on the different discs in your DVD
collected (DVD+R or +RW discs only) on the internal DVR hard disc. In order to assist you to find a title, the
library offers a range of functions (sort by title, sort by type, etc.).
Musical library (on the hard disc)
The musical library brings together the names of all the MP3 or WMA files recorded on the hard
disc.When the musical library screen is displayed, you can play a title or file, create or edit playlists,
rename a title, delete it or sort titles.
Picture library (on the hard disc)
The picture library lets you look for and view photos one by one or look at them using a
slideshow.The library displays the last six photos recorded on a screen which brings together the
six snapshots with selection buttons.The other photos can be accessed using the
photo using the C, B,
▲, ▼ keys and confirm with OK or start the slideshow with the PLAY key.
Export
You can copy one or more titles to a DVD+R/+RW disc.
Note: EXPORT Function
Your recorder has separate adjustments for the recording quality on the DVR hard disk and on the
DVD+R/+RW discs you use.This means you can copy titles that have been recorded with very high quality
on the hard disk (e.g., *1: Best), and make sure they fit on the DVD+R/+RW disc by selecting a lower
quality for the copy (e.g., *3: Good).
Title and disc management functions
The management functions let you sort titles according to the criteria proposed by your
recorder.To access them, when a title in the Video library is selected, press
manage the chosen title appear:
Note: If you delete a disc, it is still possible to “reload” the titles of the disc by adding a new recording.
Note: Deleting a title or a disc is not immediate, it may take several seconds.Wait until the «Please wait»
message at the bottom of the screen disappears.
Note:The number of the disc to load may appear in a superimposed window.To remove the window press
the
EXIT/CLEAR or OK.key..
The management functions can be accessed by selecting the button in the frame with the B
key then by displaying another choice with this same key. Confirm your choice with
Other disc managemetn functions
Access: Main Menu, Disc, OK, Disc action and OK.You can:
• Rename the title
• Erase the disc
• Unlock or Lock the disc to enable or avoid an accidental erasure.
e the disc compatible to enable it to be read by other players.
• Mak
y to DVR to copy one or more titles on the hard disc.
• Cop
Copying to DVR
To copy one or all the titles to the hard disc.
to give it the name of your choice letter by letter using the character grid.
▼ key. Select a
OK.The functions to
OK.
14
Page 17

Readable discs
• DVD - Video - 12 cm and 8 cm, single or double sided, single or dual
Note: for your information: the other areas are - 1: USA, Canada - 3: Southeast Asia,Taiwan
- 4: Central America, South America,Australia, Mexico, New Zealand - 5: Russian
federation,Africa (except Egypt and Rep. of South Africa), India, Pakistan - 6: China.
• DVD+/-R,DVD+/-RW - Most DVD-R and DVD+R (one recording
DVD+Rewritable
• Audio CDs - Audio Compact Discs (8 and 12 cm).
• CD-R, CD-RW - Most CD-R (one recording only) and CD-RW discs
• Video CD (VCD) - Video Compact Disc. Disc which enables you to
Playing a disc
layer. DVDs are high density optical discs on which high quality picture and
audio are recorded by means of digital signals.
Region code number - Your DVD recorder responds to the regional
management information recorded on DVDs.The regional code of your
DVD recorder is 2. Before buying a DVD, make sure that it bears the
correct logo.ALL means all regions.
only), and DVD-RW and DVD+RW discs (rewritable).Recordings on DVDR and DVD-RW discs must be made in Video DVD mode. Recordings on
DVD+RW discs must be made in accordance with the specifications for the
4.7 Gb capacity DVD+RW disc format.
(rewritable). Compatibility is dependent on which DVD writer, writer
software and discs are used.
record to a CD up to 74 minutes of VHS quality video associated with fixed
pictures, audio tracks and interactive menus.
EN
EN
• Super Video CD (S VCD) - Most S-VCD discs conform to the IEC
62107 standard.They can be used to record up to 70 minutes of digital
sound and video, with MPEG-2 standard video and MPEG-1 standard audio.
S-VCD disc compatibility is dependent on which MPEG coding software,
disc design software and disc writer software are used,and the discs
themselves.
Note: in spite of progress made to ensure playability of all disc types, it is not possible to
guarantee playback of discs which are not in conformity with DVD, CD,VCD or S-VCD
standards. Moreover, this unit may not play some recordings or files on CD-R, CD-RW,
DVD-R, DVD-RW, DVD+R, DVD+RW due to differences in recordings formats, software
used & Disc types.
The files which your player can read
- Discs containing sound files in MP3 format.
- Discs containing images in JPEG format. Compatibility is dependent on the
disc creation software used and file sizes, stated in millions of pixels. Certain
JPEG files such as Progressive JPEG files cannot be read by this equipment.
- Discs containing sound files in WMA format.
- Discs containing audio and image files in the certified DivX format.
15
Page 18

Playing a disc
Interactive banners
In addition to menus, your DVD recorder has interactive information banners with icons
representing functions or information. Some banners provide access to disc playback functions (for
DVDs, CDs,VCDs, etc.) while others give you information on the channels and related functions.
While watching a channel
Access: INFO button.
Recording Function in progress.
- Current time.
- Clock setting.
No. of the channel
selected on the
DVD recorder.
- Press REC once.To select recording time press
the key several times (while banner is displayed) to
extend recording time by 30 minutes up to a total
of 3 hours.
- Name of channel and details of the programme
viewed if the programme guide (Naviclick)
is available on this channel.
Indications concerning the channel sound and the
selection of audio channels. Selection is possible
with the
B key on the remote control.
Remaining recording time available on the
disc according to the quality selected.
While playing a disc
Access: INFO button.
1. Select an icon using the C,B keys, or enter a number using the number buttons to access a
chapter, a title or a track depending on the disc being played (when the corresponding T,C,
P icon is selected).
2. Remove the banner using the yellow INFO key or the CLEAR key, or wait a few seconds
until it disappears.
With a DVD
Chapter 1 currently being played
Title 3 currently being played
Time elapsed.
Play mode.
To choose the dialogue
language and audio format.
With an audio CD / a VCD (Video CD)
Track/Title/Play index.
To select the play mode Standard,
Random.
To control the repeat reading of a disc,
a musical track or repeating of a music
track between 2 points A and B.
PLAY MODES (PLAY, PAUSE, REV, FWD buttons)
B
PLAY (Play) Fast forward (B x3, x6…), or reverse (C -x3, -x6…).
K PAUSE (Pause) Slow motion, forward (KBB 1/2 , 1/6 …), or backward (CCK -1/2 , -1/6 …).
For standard playing, repeating of a title, a scene
between 2 points A an B, or an entire disc.
To change the viewing angle
for video DVD discs.
To select the language of the subtitles
for video DVD discs.
To access the edit menu for
DVD+R/+RW discs.
Introscan - To play the first seconds
of each track.
To select the Stereo, Mono, Left
or Right audio channel.
To select the PBC function where
available on the disc.
16
Page 19

Playing a disc
Loading and playing a disc
Switch on your TV set and DVD recorder. It may be necessary to turn off other appliances.
If the player menu is not displayed on TV screen, select the TV set Scart Peritel socket to which
you connected your DVD recorder.
Note: the Disc heading is shown as transparent when there is no disc in the device or if the disc is not
compatible.
Note: the disc label must face upwards (double sided discs have a small label on both sides around the centre).
Playback functions
The playback functions depend on the discs and/or files being played.
Quick search
PLAY button then FWD or REV (press once or several times).
Normal playback with
Still picture and frame advance
PLAY button then PAUSE.During playback press PAUSE once to freeze the image. Press
PAUSE again to go into “frame” mode (the PAUSE icon is then replaced by the FRAME icon on
the TV screen).Press
resume normal playback press
Slow motion (in Pause mode on an image)
PLAY button then PAUSE then FWD/REV.Press once or several times.
Normal playback with
Skipping a chapter or a track
PLAY button then PR F
Note: Forward or backward skips can also be made by using the
DVD recorder.
Scene Again™ (DVD)
PLAY button then AGAIN (skips back approximately 10 seconds).
Advance (DVD)
PLAY button then ADVANCE (skip forward 30 approximately secondes).
Enlarging an image (zoom)
PLAY button then ZOOM. Move the zoomed image around using ▲, ▼, C and B to view a
particular spot. If this does not work, try again after pressing
press the key several times to return to the original format.
PLAY.
FWD or REV to view images one after the other forward or backward.To
PLAY.
l
PLAY.
/PR lG.
G SKIP and SKIP F
l
PAUSE.To resume normal playback
keys on the
l
EN
EN
Titles, chapters, time elapsed, audio and subtitles
From the banner, you can access certain functions directly using the C, B keys. Choose a title or
a chapter (DVD), or a track (CD,VIDEO CD). Change the language of DVD dialogues or subtitles.
For direct access to a specific scene on the disc, select the first
icon with the C B keys. Enter the requested place in the scene
(expressed in hour, minutes, seconds) with the remote control
number keys.(enter 001205 to access a scene which is 12 minutes
and 5 seconds away from the start of the disc (DVD) or track
(Video CD)).
17
Page 20

Playing a disc
Playing discs - Displaying the information banner
To access the information banner, press INFO on your remote
control unit during playback
the remote control unit to select the various icons.When an
icon is selected it is highlighted.The line under the banner is an
information and instruction line.When small arrows appear
above and below the selected icon these point to other
possible options. Now use the
the various options.
Banner with a DVD video disc.
Note: the icons displayed in the banner depend on the type of disc being
played.
The functions displayed depend on the type of discs and files being played.
Important: the icons displayed in the information banner depend on the type of disc
being played.The icons shown in the banners and their use depend on the type of discs
and files being played. In all cases, follow the help line at the bottom of the screen.
.
Use the arrow keys CandBon
▲
and ▼keys to scroll through
Timer
Title or Track
Chapter
The timer provides direct access to a scene or a musical passage by keying in
the starting time. Select the time elapsed icon and use the numbered keys on
the remote control unit to access the place from which you want to play
back. Use two digits for each field. For instance,if you enter 01:35:12, you will
access the sequence beginning 1 hour, 35 minutes and 12 seconds after the
start of the title.
Note: for audio VCDs, the timer refers to the track currently being played.
Most DVD discs only contain one title. However some discs may contain
several titles each of which is itself divided into several chapters.
Select the T icon then use
Most DVD discs contain several chapters.
Select the C icon then use
Note: follow your progress below the banner.
▲ or ▼ to scroll through the titles or tracks.
▲ or ▼ to scroll through the chapters.
18
Page 21

Playing a disc
Subtitle and dialogue language
Choose a language for the subtitles or dialogues if these are available on the
disc.The selected language name appears beneath the banner.
Note: selecting the language of subtitles only involves the disc being played. If you
Selecting the
language of
subtitles
Selecting the
language of
dialogues
Play modes of discs
Play modes
Repeat playback between two points A and B
A-B Repeat mode allows you to select exactly the sequence you wish to repeat.
1. Choose repetition mode A-B with the ▲ or ▼ button and confirm to memorise the start of a
passage you want to play again later.
2. Wait a few seconds then press OK to mark the end of the passage you want to repeat (point
B).To stop the repetition, select another mode using the
Note: repeat functions remain active until you turn them off, open the disc tray or turn off the power. Repeat
play only works with discs that show the elapsed time on the display.This may not work correctly with
certain discs (Video CDs in PBC mode).
remove the disc or if you switch off the DVD recorder your selection will be cancelled.
In this case the default language, chosen when your DVD recorder was first installed,
will be reactivated. If the preferred language is not available on the DVD disc the
preferred language of the disc (default language) will be selected automatically.With
some discs you can only access the dialogue or subtitle languages through the menu
provided on the disc.
The DVD recorder has several play modes that depend on the type of disc
being played: standard play respects the order of the titles and chapters on
the disc; repeat between 2 points or repeat a disc, a title.The icon of the play
mode is accessible via the information banner during playback.
▲ or ▼ buttons or press STOP.
EN
EN
19
Page 22

Playing a disc
Camera angles
A few DVD discs contain scenes shot from various different angles. If a disc
being played back offers different camera angles the icon in the banner will
show the number of the angle on the screen.With the disc in playback, press
ANGLE on the remote control unit and choose the angle using the same key
▲ or ▼ keys.
Changing camera
angles
PBC - Playback control menu
Selecting a play
mode
Play mode for Audio CDs
Standard play
IntroScan
IntroScan
Repetition
or the
This function enables you to make interactive selections of some scenes or
information through an on-screen menu.Moreover, high resolution images
may be viewed if they are included on the disc. During playing of a disc, press
INFO key (the information banner is displayed). Press C or B to select
the
the PBC icon. Uses the
functions on offer...
Your player has several play modes for Audio CDs:
standard play that respects the order of the tracks; random play that reads
music tracks in a random order; repeat play: Repeat A-B, Repeat track, Repeat
disc, Repeat de-activated.
The IntroScan function enables you to listen to the first few seconds of each
track of an audio CD.
Note: when the first few seconds of all tracks have been played the player starts
playback from track one.
▲ or ▼ key to see other screens or deactivate the
Rotating an image
90°, 180°, 270°
Zooming in on an image (zoom)
X1, X2, X3, X4
Speed of the slide show
20
Page 23

Edit menu (DVD+RW disc and DVR hard disc)
The edit menu can be accessed from the information banner while you are
playing a title on a DVD+RW or +R disc or on the internal DVR. It lets you
intervene in recordings, especially:
Access to the edit menu
1. DVD+R/+RW disc being played, INFO then OK.
2. Select the edit icon then press OK.
Playing a disc
EN
EN
This is where the context sensitive help text is located.
Insert Chapter Marker
Delete Chapter Marker
Hide Chapter
New Title Frame
• Insert chapter bookmarks (DVD+RW)
To position marks in order to easily find your favourite passages. Since it is
not possible to delete a passage in title, you can use this function to mark
the start and end of undesirable sequences (e.g. advertising) in order to
mask it from being played using the Hide Chapter function (see further on).
• Delete chapter bookmarks (DVD+RW)
To delete undesirable markers in order to form longer chapters within a
title, or to redefine the position of bookmarks to your own requirements.
• Hide Chapter (DVD+RW)
To mask the chapter being played (the passage between two bookmarks) in
order not to play an undesirable passage (advertising, violent scenes...). If
you do not wish to play the masked chapters, you must select Play Title in
the title menu. If you wish to play all the chapters, including those you have
masked, select Play Full Title in the title menu.
• Create a new title image (DVD+R,DVD+RW)
Replaces the title image (on the Play menu) displayed by your DVD
recorder with an image of your choice.
Note: the edit menu cannot be accessed while playing a title or
chapter list.To delete the list being played, eject the disc or delete
the list.
Seek out your chosen passages in a recording by using the
PLAY, PAUSE, REV, FWD, or STOP buttons then choosing
a function.
21
Page 24

Playing a disc
Playing image and audio (JPEG,mp3, wma)
Your player can play JPEG files with a resolution of up to five million pixels.However beyond
400,000 pixels there is no perceptible improvement in the quality of pictures displayed on your
TV screen.
MENU è Disc è OK è OK.
Note: the play menu depends on the content of the disc being played.
Select a folder or title, along with a playback function if desired, and press OK. Choose a playback
mode and press
Note: Play options: Standard Play, Play All, Random, Random All.
OK to confirm.
Playback of files begins with the file selected and
continues with the following files. Where there are subfolders in the folder, these are also played.Playback then
moves to the next folder located at the same level in the
tree diagram as the folder containing the first file you
selected.
Stop playback using the
STOP key.
Changing images
During the picture sequence change images using the PR
F
l
or PR
G
keys on the remote
l
control unit.According to the type of image (Kb or Mb) the change may take several seconds.
To play DivX files
Your player is an Officially Certified DivX™ device. It can play DivX®5, DivX®4, DivX®3 and
®
DivX
VOD files according to the DivX Certified™ technical specifications.
The correct playing of DivX in your player, depends on the preparation and production of the
audio and video files, the codecs used, the type of recording equipment employed and the
parameters of your computer. It is therefore possible that you cannot play a DivX file or that part
or all of it is defective. It can also sometimes happen that you can play the images
(video) but not the sound (audio).
Note:To guarantee playback of DivX files the audio must be mp3 format. DivX Certified devices can play
back any interleaved mp3 audio at any bitrate, both CBR and VBR. The audio must be sampled at standard
frequencies, such as 32 khz, 44.1khz, and 48khz, and must conform to the AVI file specification. Apart from
mp3, the audio formats recognised by your player are MPEG layer 1/2,AC3, DTS, PCM.The most common is
mp3. Formats such as AAC and Ogg Vorbis are not supported by this player.
22
Page 25

Playing a disc
To rent (purchase) DivX® VOD files
DivX VOD files are comparable to rental video DVD discs.They both allow you to view the video
(film).The difference lies in the access to the media. DivX VOD files are downloaded after paying
a rental from certain commercial Internet sites. In order to permit the downloading of VOD you
need to input on the purchase form of the site, the registration number of your DVD player.
You can find your player's registration number using the System Options (DivX) menu.
Write down this VOD 8 character recording number, in order to complete the form on the web
site where you purchase your DivX
Note: If you cannot play a DivX VOD file, recorded on a CD-R disc after downloading, it is possible that the
rental period allocated during purchasing from the web site has expired. It may also be that the recorded file
is incompatible with your player because of different versions or incorrect download parameters.The
parameters used during the copying to CD-R may also be a cause. Since it is not possible here to supply all
the information, parameters and advice relating to the use of DivX®VOD files, we recommend that you visit
a specialised web site such as www.divx.com/vod.
Concerning DivX files
You can find DivX files for download as well as generating them your self from your own content.
In the same way as mp3 files are used for audio, DivX and mpeg4 can be used for video. Files can
be recorded from your computer on to a CD-R or RW disc, which, owing to the much higher
compression than that used for DVDs can contain a complete movie.
The DivX, XviD and RV9 formats are all file formats using the same type of compression known
as MPEG-4.Though these formats all utilize a different codec.
A note on copying: before making use of DivX or mpeg4 files, please be sure of their origin and that you
have legally purchased or rented the content. Pirate copying is illegal and may result in sanctions. Private
copies of your own material for your own use may be legal in some countries. Make sure you are aware of
applicable laws.
®
VOD files.
EN
EN
23
Page 26

Menus
Disc menu
The Disc menu is only accessible if a disc is inserted in your DVD recorder.
This menu allows access to the list of titles of the Disc Title Menu or the images menu of the
Player Menu for your recorded discs (DVD+R, +RW).
With DVD video discs you directly access the disc menu, the selection of the language, chapter,
play order and contents varies depending on the disc.
Note: if no disc has been inserted the line Disc remains greyed out.
Access: Main Menu, Disc,then
Note: depending on the discs and/or files, all functions may not be available.
Play Disc
• To start playing a disc from the beginning, press the OK key.
Note:this function allows the playing of the last title on a DVD+R/DVD+RW disc.
If your DVD recorder is locked (small padlock displayed), a message appears asking you to enter your secret
code.
Disc Title menu (DVD+R,DVD+RW)
This menu allows you to access recordings that you have made on your DVD+R or DVD+RW
discs, or those carried out by other DVD recorders if they are compatible with your device.
Playlist
Allows you to customize the playing order of a disc by changing the play order of titles and/or
chapters on DVD, DVD+R and +RW discs, or the play order of music tracks on Audio CDs.
Note: to remove a chapter from the list, select it and press OK. To delete the list, press the STOP button and
confirm your request in the following screen using the C key and OK.
OK.
Disc functions
Rename Disc, allows you to change the name chosen by the DVD recorder for a name of
your choice selected using a table of alphabetic characters.
Erase Disc, deletes all the titles on the disc.
Lock Disc (or Unlock Disc) protects the disc against accidental recording.This is not an
irreversible choice;you can unlock the disc later if required.
Finalize Disc / Make compatible (depending on the DVD+R or +RW disc inserted in
your DVD recorder).
Your DVD recorder, closes the disc session and prepares a home screen made up from images
representing each recorded title.
disappears once the disc is ready.
Note: you need to make a DVD+RW disc compatible if you have added or deleted chapter bookmarks in
order that the disc can be played on other DVD players.
Note: the space occupied by titles on the disc are represented by coloured bands at the bottom of the Title
menu.
Copying to DVR enables you to copy titles and files to your recorder’s hard disc.
FINALIZING Remains displayed during this operation and
24
Page 27

Menus
Title functions
Rename Title
Using a character chart your DVD recorder allows you to change the names of discs or titles
allocated when the recording was made.
Select Rename Title in the Rename Title or Rename Disc in the Disc menu using the
▼ keys and press the OK key. In the following screen select YES and confirm with OK.The
character chart is displayed. Use the C, B,
compose the name of the disc or title you want.
1. Delete the default name with DEL and OK.
2. Enter the new name by selecting one letter at a time. Confirm with OK.
• Delete a letter by selecting DEL and
• Add a space by selecting SPACE and
3. When you are happy with the name, select Done and OK.
4. Exit the menu using the RETURN key.
Play title, to play the title except for the hidden chapters.
Play Full Title, allows you to play all the chapters of the selected title, even those you have
masked using the Edit disc; Hide chapter function.
Delete Title, allows you to delete the corresponding recording.
Clear Chapters, allows you to delete all the bookmarks (electronic markers) related to the
recording.This function deletes the bookmarks automatically positioned by your DVD recorder and
those thay you may have added.
Note:The available functions differ depending on the type of disc.
Copy to DVR, lets you copy the selected title to the hard disc. COPYING is displayed while the
copying is in progress.
▲, ▼ and OK keys to move around in this chart to
Note:The CLEAR/EXIT key on the remote control or Clear
in the menu allows the displayed name to be deleted.
OK.
OK.
▲ ou
EN
EN
25
Page 28

Menus
Disc options
From the Setup menu, this menu offers you 2 functions to maximise the discs you want to play.
Autoplay
• Select Autoplay On, if you want the disc to be played automatically once the DVD
recorder tray is closed.
Screen Format - (DVD / VCD)
Depending on the format of the DVD disc being played, select the image format that corresponds
best to the format of your television screen - cinema screen 16 x 9, classic screen 4 x 3 (Letter
Box or Standard).
Note:on certain DVDs, the picture format cannot be changed.
Caution: the Automatic Format function of certain television sets may malfunction in 16x9. Set the Auto-
Format of your television to Off in order to avoid conflicts.
• With a letterbox format TV (16x9) select 16 x 9 widescreen. Films in 16x9 will be fully
displayed. Films in 4x3 will have vertical black bands on each side of the picture.
• With a 4x3 television, select 4 x 3 Letterbox to take advantage of the pictures recorded in
that format or 16x9. Select 4 x 3 standard to take advantage of a 4x3 Letterbox without
distortion. For films in 16x9, the edges of the picture may extend beyond the edges of the
screen.
26
Page 29

Menus
Recording Options Menu
Buffer duration (TV memory duration)
Your recorder may save the last 60 or 120 minutes of TV programmes in its memory.You can
define this duration here.
Access: Main Menu, Setup,
OK, Record options, then OK.
Default quality
Your DVD recorder may record several hours of TV programmes or video sequences from a
device connected to DVD+R/+RW discs or the internal DVR hard disc.This capacity depends on
the space available and the quality set in the Default quality menu.
SmartRecord™
By activating the SmartRecord™ function of your DVD recorder it will adapt the quality of
your programmed recordings to one of the 6 settings so that you can record the entire desired
programme on a disc that has already been partially recorded.
Note: deactivate this function if you want to split up a recording during playback from the library (via the
edit menu).
Chapter Markers
When recording a title, your recorder organises the chapters by creating chapters of 5 minutes in
length.This then allows you to explore your recordings by jumping from chapter to chapter using
the
Pr+ / Pr- key.You may select chapter lengths of 10 minutes if you wish, by positioning the
function to 10 minutes.You may also decide not to create chapters by selecting
activated).
NO (function de-
VPS/PDC
Triggers all your programming at the actual broadcast times (if the channel broadcasts VPS/PDC
signals).
Note: the VPS (Video Programming System) and PDC (Program Delivery Control) signals are transmitted at
the same time as certain programmes, by certain channels and in certain European countries. Leave this
function active to benefit from its benefits for all your programming. If the channel does not broadcast VPS or
PDC signasl, your DVD recorder will record at the start and stop times selected during the programming of
the recording.
EN
EN
27
Page 30

Menus
Selecting Languages (DVD)
Your DVD recorder gives you a selection of languages to choose from.You can change the language
of the DVD recorder menus, the language of the disc menus, the language of the dialogues and that
of the subtitles. In the menu, choose your preferred language for dialogues and subtitles.If it is
available on the DVD you will be playing,it will be selected automatically.The default language is the
one which is selected in the main menu. During playback, you can display or remove the subtitles
and change the language of the subtitles using the banners.
Access: Main Menu, Setup,
Note: DVD disc menu language
The preferred language for the disc menus was selected during the installation. If the DVD disc that you are
watching does not provide this language, you can select another language from the disc menus.
Display (Language of DVD recorder menus)
The language of the DVD recorder menus was determined upon installation.You can nevertheless
change it by following the procedure given on this page
Selecting the Audio language for dialogue boxes of DVD discs
Certain discs offer several different languages for the dialogues.The default language is the one
you selected during installation (page 6) if this language is offered on the disc being played.To
change the language of the dialogues your DVD recorder provides two possibilities:
From the menu of the DVD recorder
Select Audio and press OK to confirm. Choose your preferred language and press OK to
confirm..
Note:if the language chosen is also available on the DVD, it will be selected as the dialogue language. If it is
not available, the preferred disc language will be selected.
From the banner
During PLAYBACK display the information banner using INFO key and select the Audio.
Choose a language from those shown by the disc.
Note:with DVDs which have a DVD menu, we recommend that you use the disc menus rather
than the DVD recorder menu.You can also change the language of the dialogues and subtitles
(if they are available on the disc).
OK, Display then OK.
28
Page 31

Menus
Selecting the Sub-title language for DVD discs
Certain discs propose several languages for subtitles.The default language is the the one you
selected during installation if this language is also offered on the disc being played.To change the
subtitles language, your DVD recorder provides two possibilities:
From the menu of the DVD recorder
Select Subtitles, OK. Choose your preferred language and press OK to confirm.
Note:if there is no English on the disc for menus, dialogues, and / or subtitles, the player selects the default
language of the disc.
Original corresponds to the original soundtrack language of the film on the disc.
If you select the “Automatic” option, the default language of the subtitles will be the one you selected for
the dialogues (see above). Because of this, if the default language for the dialogues is not available, but
subtitles are available in this language, the subtitles will automatically display.
From the banner
During PLAYBACK,display the information banner with the INFO button and select the
Subtitles
icon. Choose a language from those shown by the disc or else switch subtitles off.
Note: with DVDs which have a DVD menu, we recommend that you use the disc menus rather
than the DVD recorder menu.
If you chose “English” during the initial setting: the main menu will appear in English, the
menus of the disc, in English (if available), the language of the dialogues, in English (if
available).
EN
EN
DivX subtitle selection
For files which offer them, select a language from the list which appears.
29
Page 32

Menus
Parental control
Your DVD recorder has a child lock function which enables you to restrict access to certain DVDs.
The discs whose content may be deemed unsuitable for your children will therefore not be visible
unless a code that you have previously chosen is entered.
MENU è Setup è Parental Control è OK.
Choose one of the options shown and confirm with
Note:the padlock tells you whether or not the DVD recorder is
locked.When the Lock function is activated, a padlock is
displayed on the DVD recorder display.
Note:Your DVD recorder is delivered in the unlocked, position without any rating limit. If you want to use the
Child lock function, you have to set a rating limit and position the Lock, function on On.
OK.
Locked: you must enter the secret code to play the
discs whose rating limits exceed the limit you have
allocated.
Unlocked: you don’t need the secret code the play
the discs, even if you have set a rating limit.
Locking
1. The Lock line is already selected. Press OK to validate.
If no secret code has been chosen, your DVD recorder asks you to choose one.
2. Type in four figures then confirm with OK.
Note:choose a four-digit number that you will be able to
remember easily or note it down.
3. The first time a confirmation of the code is asked for. Enter the code again, then confirm with
OK.
Changing the code
To change the code, you must deactivate the Lock function to be able to return afterwards.
1. From the Parental Control menu enter the 4 figure code, then confirm with OK.
2. The Lock line is selected. Press OK.
3. Choose Off and confirm with OK.
4. Exit the menu by pressing 3 times on the RETURN key.
5. See steps 1, 2 and 4, 5, 6 to allocate a new password.
6. See the Locking paragraph to enter a new code.
Note: if you forget your secret code, see the Trouble Shooting Guide at the end of this manual.
30
Page 33

Menus
Ratings limits
This function makes it possible to restrict viewing of certain DVD discs by programming a
restriction on your DVD recorder.This function can only be used with DVD discs provided with
the function.Your DVD recorder provides ratings limits on a scale of 1 to 8.The Ratings Limit
function does not work if the disc being played does not have a rating limit.In Europe ratings
limits are as yet uncommon on DVD discs on sale.
1. Access: Main Menu, Setup
2. Select Ratings Limit and press OK.
3. Set the adjustment bar to the desired level.
4. Press OK.
5. To return to the DVD recorder menu, press C until the menu is displayed on the screen.
Non categorized titles
Certain commercially available DVD video discs have restrictions. Unfortunately few discs in
Europe have one.You can nevertheless restrict viewing of such discs with the Unrated Titles
function by selecting the Password Required, option then locking the DVD recorder. When this
is done the password will be requested before playing any DVD disc, including those that would
not normally need a restriction.
OK, Parental Control then OK.
,
Note: the DVD recorder is delivered with no restriction settings. If
you want to prevent certain discs from being played you must
select a restriction level.
EN
EN
For DVD+R, +RW
❍
Note: you may also restrict your own discs that you have
recorded yourself by checking the For DVD+R, +RW box. In
this case, the code will be requested for all the discs you have
recorded.
31
Page 34

Menus
System Options
MENU è Setup è System Options è OK.
The System Options menu in the Setup menu offers
you settings to configure certain useful functions and
optimise the performances of your DVD recorder to
match those of the devices connected to it.
Note: the explanation of the various functions of this menu are detailed below.The associated illustrations
show the corresponding adjustments or functions.
DivX
Selecting Divx displays the authorisation number.
Digital output (audio)
Depending on the amplifier or television (with or without integrated
decoder) connected to your DVD recorder, you will need to set the
DIGITAL AUDIO OUT sockets (coaxial or optical) so that they deliver
the Dolby Digital, DTS or MPEG digital signals supported by the other
Audio
output socket
Your television set
Scart connector
device.Tick Dolby Digital or DTS if the amplifier or TV set has a Dolby
Digital or DTS decoder (or both, depending on devices). MPEG must be
ticked to play a DVD disc on which the sound was recorded using MPEG
standard.
QSound/Qxpander
This function provides you with virtual reproduction of the multichannel
sound of a Dolby or DTS film onto the two channels of your TV or stereo
amplifier.The sound effects of a 5.1 system are then simulated .
Note:The name and logo are registered trademarks of Qsounds Labs Inc.
Laboratories.The TruSuround®technology is used under license from SRS
Labs Inc. laboratories.
Standby mode
Your DVD recorder has an Eco Standby to reduce its power consumption
when on stand-by. Select Eco. Standby to enable this function.
Note:the Eco function does not allow the display of programming warning messages
on the display panel. Only the record icon will flash.
AV link
Allows a television set to control your DVD recorder and download the
same channels to the same numbers during installation of channels.
Note:this function is positioned by default on On.
AV2 Input
Choose the S-Video or Video signal, depending on the device connected to
the AV2 Scart socket (usually a satellite or cable receiver), select RGB,
Pour les DVD+R, +RW
❍
S-Video or CVBS. If you do not know the type of signal supplied by the
connected device, try each of the settings to obtain the best result.
Note:format of image signals:
RGB: English signal colour code (Red - Green - Blue).This is best quality.
S-Video S-VHS (Y/C), signals with separate colour components and brightness.This is
average quality.
CVBS: composite video signals.This is poor quality.
32
Page 35

Menus
Settings
The information relating to the Naviclick TV guide programmes comes from a combination of the
TV programmes guide,Teletext and NexTView service transmitted by certain channels.To
optimise the Naviclick programmes guide of your DVD recorder, you have the possibility of
changing certain settings as shown below.The information from the NexTView service is more
reliable than Teletext.
Download time
The programs are downloaded either at 3 AM or 8 AM.
1. Access: Main Menu, Setup
2. The line Update Time is already selected, press OK.
3. Select 3 a.m or 8 a.m.
Note: For those countries offering the NexTView service we recommend that you set the downloading time to
3am. For all other countries set it to 8am.
Installation, Naviclick then OK.
,
Choice of NexTView channel
The downloading of programmes, via the NexTView service, is only possible on certain channels.
Access: Main Menu, Setup,Installation, Naviclick then
Select NexTView Channel and choose a channel that broadcasts a programmes guide. Hold
the key down for a rapid selection.See the list of channels on the following page.
OK.
Updating Naviclick (via Teletext)
Sometimes certain channels modify the organisation of their Teletext journal. In this case, unless
there has been a total modification of the structure, you must update the number of the first
page of Teletext allocated to the programmes guide.The list of pages is generally broadcast with
the Teletext journal. Use the Teletext function of your television set to find this information.Look
for the number of the page for the current day programmes and the number of the page for the
following day programmes. See also the limited list on the following page.
Access: Main Menu, Setup,Installation, Naviclick then
The menu that is displayed indicates,channel by channel, 2 Teletext page numbers (the first for
current day programmes, the second for the following day programmes).
NexTView Channels
The number of channels offering the NexTView service is constantly increasing.At the time of
printing these instructions, the channels diffusing NexTView were as shown below. For your
information: there is an Internet web site in English and German that allows you to consult the
list of the channels providing NexTView service (http://nxtvepg.sourceforge.net, then consult
the link List of NexTView providers).
France :
Germany/Austria : RTL2,KABLE 1, 3 SAT, EuroNews
Switzerland :
Turkey : TRT 1.
M6, Canal+, EuroNews,TV5
SF1,TSR 1, TSI 1, KABLE 1, 3 SAT, EuroNews
OK.
EN
EN
33
Page 36

Further information
Recommendations and information
concerning discs (12 cm)
Choice of CD-R / CD-RW discs
This player can play most CD-R and CD-RW
discs. However, depending on the recorder of
your personal computer, the type of disc and
recording method used, it may be that some discs
cannot be played, or that the performance does
not meet the expected standard of quality.When
playing a CD-R disc, it is completely normal for
the unit to take up to 20 seconds to recognize
the disc before starting to play. If the disc is not
recognized after a period of 20 seconds, remove
the disc, and then insert it again.
• Whatever the actual recording capacity of a
disc, do not fill it to maximum capacity.
• Use CD-R discs rather than CD-RW (re-
recordable CDs), as replay of CD-RWs may
sometimes not work properly.
• Use a reliable and good quality recording
software.
• Before recording on a disc, close all applications
on you personal computer in order to optimise
the quality and reliability of recordings on the
disc.
Video CD (VCD) discs)
VCD (Video Compact Disc) discs enable up to 74
minutes of VHS quality video associated with still
pictures, audio tracks and interactive menus to be
recorded on a CD.
About DVD+R,+RW discs
Choose good quality discs.To avoid any problems,
choose brands such as: Imation, Maxell, Philips,
Ricoh,Verbatim, Sony, etc...
Disc Formatting
When you insert a DVD+RW disc for the first
time, your DVD recorder must format the disc.
This operation will take several minutes,but you
may begin recording onto the disc shortly after
the formatting process starts (around 10 to 20
seconds). During these few seconds, the display
indicates FORMAT DSC.
Care of discs
Always handle your discs with care. Hold a disc
with fingers on the border or hole.Always place
disc with the label facing upward (in case of a
single-sided disc).Always place the disc properly
into the tray using the proper guide area.Always
use a soft cloth to clean discs if necessary, wipe
from the centre to the border.Always put discs
back into their cases after playing and store in a
vertical position. Never use record cleaning
sprays, benzine, static electricity liquids or any
other solvent, if the disc surface is dirty.Wipe
gently with a soft damp (water only) cloth, never
wipe the disc in a circular motion, since circular
scratches are likely to occur and could cause
noise during playback.
Image files and CD-R / CD-RW discs
To view your JPEG images on a TV set you do not
need to record your photographs with a
resolution above 400,000 pixels (which
corresponds to an image format of about 720 x
576 dots), for television screens do not allow a
higher quality given their limited characteristics. In
this case ensure that you reduce the quality of
your photographs before recording on a disc in
order not to impede the proper running of your
player.This is because excessively loaded pictures
would slow down or might prevent the proper
functioning of the slide show during playback on
your player. Compatibility of JPEG files depends
on the software on which they were created and
on the size of files expressed in pixels. Some JPEG
files, including Progressive JPEG files (display in
stages) cannot be played on this appliance.
Audio files and CD-R / CD-RW discs
In the case of discs that include mp3 files, follow
not only the general recommendations for CD-R
and CD-RW discs,but also the following specific
recommendations.
• The format of your mp3 files must be ISO 9660
or JOLIET.These files are compatible with DOS
and Windows applications, as well as with Mac
OS.
• Your mp3 files must have a name no longer than
12 characters as well as the suffix “.mp3”.They
must be recorded in the form: title.mp3. Ensure
that you do not leave spaces or use special
characters such as ( . , / , \ , = ,+) in the name.
• Use a decompression transfer rate of at least
128 kb/sec (kilobytes/second) when recording
mp3 files. Sound quality with mp3 files basically
depends on the rate of
compression/decompression you choose.To
obtain sound quality equivalent to that of an
audio CD,use files for which the sampling rate
during conversion from analogue audio to mp3
format is between 128 kbps and 160 kbps.
Higher compression rates, such as 192 kbps or
more, will only rarely improve sound quality.
Conversely, files with sampling rates below 128
kb/sec will not be played properly.
• Do not attempt to record protected mp3 files.
Such files are coded and protected.
Important:The above recommendations cannot
be taken as a guarantee that the DVD player will
play mp3 recordings,or as an assurance of sound
quality.You should note that certain technologies
and methods for mp3 file recording on CD-Rs
prevent optimal playback of these files on your
DVD player (that is degraded sound quality and
even, in some cases, inability of the player to read
the file or files).
34
Page 37

Further information
DivX files and CD-R / CD-RW discs
DivX is a compression format answering the
MPEG-4 standard and that allows an entire film to
be contained on a single CD.
The compatibility of DivX formats depends on
MPEG-4 coding software, disc design software and
the recording software employed, as well as the
discs themselves.
What codecs can your player read?
• Playback of DivX 3.11 content • Playback of
DivX 4 files (MPEG-4 simple profile) • Playback
of DivX 5 files (MPEG-4 simple profile and
additional functions such as bi-directional
frames. Qpel and GMC are not supported) •
Resolutions up to 720 x 480 at 30fps and 720 x
576 at 25fps are supported • Macroblocks per
second 40500 • Maximum average bitrate 4000
kbps • Maximum peak bitrate during any 3
seconds of video 10000 kbps • Minimum VBV
buffer size (kbytes) 384k bytes.
For DivX 3.11 content at Home Theater Profile,
the required average bitrate is 1000 kbps, and the
required maximum peak bitrate is 4000 kbps.
Mpeg4 and Xvid content may or may not play
back depending on the exact recording method
and codec used.
Using the remote control unit correctly
When you use remote control,point the unit at
the appliance you want to control (DVD recorder,
TV set or satellite receiver). Ensure that there is
no obstacle between the remote control unit and
the appliance, otherwise the infrared signal
carrying the remote control commands will be
blocked.To control your DVD recorder, ensure
that the remote control unit is in DVD mode by
pressing once on the DVD key before using any
other keys.
AV Link function
Your DVD recorder is equipped with the
function.This function simplifies channel set-
Link
up by downloading them from an AV Link or
similar television set (Easy Link, Smart Link,
Megalogic, etc.) which is already set up.The
channels downloaded in this way keep the same
characteristics as those of your TV set (same
number, name, etc.).Your DVD recorder’s AV Link
downloading function is enabled (factory setting).
When first turning on the DVD recorder, if the
television is turned on, it will download the
channels already installed in your television set.
AV
Adjusting the G-LINK CABLE
The IR (infrared) controller cell must face the
receiver cell of the satellite receiver.You can
locate the receiver cell of the satellite receiver by
bringing its remote control as close as possible to
the front of the device and trying to change
channels. Move the remote control one
centimetre and try again.When the channel of the
satellite receiver changes, locate the position on
the front of the unit.Then install the IR controller
cell as shown on the diagram below, facing the cell
of the satellite receiver (1 or 2 cm away). If need
be, use the adhesive supplied to stick the cell in
place.
Record
Your DVD recorder has recording functions
similar to a video recorder. It lets you record
programmes to a disc in the DVD family DVD
(DVD+R, DVD+RW) or to the internal hard disc
(DVR or HDD). For the same disc, the recording
time depends on the quality settings that you can
adjust according to the time left on the disc.The
recording may be immediate or deferred.The
recording may be immediate or deferred.
NICAM sound
NICAM sound is digital, compatible with analogue
tv sets. It is broadcast by certain channels and
relayed by certain emmiters in some European
countries. NICAM (Near Instantaneously
Companded Audio Multiplex) is also used to
broadcast Dolby Surround stereophonic
programmes or for simultaneous broadcasting in
two languages or for two different sounds
(intended for blind and poorly sighted people).
Downloading of Naviclick data
the downloading of Naviclick data (at 3am or
8am) can be quite long (up to 2 hours). During
this time you should not use your DVD recorder,
nor turn it on or have a programme programmed
for recording during this updating time (from 3am
to 5am or 8am to 10am) otherwise the
information will be lost. For countries that
provide the NexTView service we recommend
that you set the downloading time to 3am.The
full guide of TV programmes can only be
consulted the following day after an initial
installation. It is necessary to allow your DVD
recorder to download the guide at the time set in
the
Naviclick Setup menu .
35
EN
EN
Page 38

Further information
Troubleshooting guide
You can contact THOMSON by dialling: 0871 712 1312
(For Great-Britain,all calls will be charged 0,10£ / mn)
Please, help us to conserve the environment we live in!
www.thomson-europe.com
This THOMSON product is designed and manufactured with high quality materials and components
which can be recycled and reused.
This symbol means that electrical and electronic equipment, at their end-of-life, should be disposed
of separately from your household waste.
Please, dispose of this equipment at your local community waste collection/recycling centre.
In the European Union there are separate collection systems for used electrical and electronic
product.
If you encounter difficulties
Advisors are at your disposal to help you solve
your problems at this telephone number.
MAJ 02/2004
Remote control
The remote control doesn’t work
• To control your DVD recorder, you must first
press the DVD key of the remote control.
• Point the remote control at the front of your
DVD recorder, not at your TV set.
• The operating range of the remote control is 6
to 8 metres. It gradually decreases as the
batteries wear down.This is a good indicator of
the state of the batteries.When the batteries
require replacing, the signal lamp on the remote
control flashes when you use it.
• Make sure no objects (or animals) are in the
path of the infrared beam between the remote
control and your DVD recorder.They may
block the beam and thereby cause a
malfunction of your DVD recorder.
• The recorder is in copy mode. COPYING
appears on the display.
The remote control of your DVD
recorder also controls another device
• Some DVD players made by the Thomson
group (Thomson, Brandt, Ferguson, Saba,
Telefunken) react to the same codes.To avoid
this inconvenience, you can program your DVD
recorder and its remote control so they have a
different code to those of the other devices.
The remote control and the DVD recorder
don’t work anymore: everything seems
blocked
• Unplug your DVD recorder from the mains for
a few moments and plug it back in.
Image problems
You don’t see any picture
• Turn on your TV set and your DVD recorder.
• On your TV set, select the socket which
receives the signals from your DVD recorder
(AV1,TV1,AUX1,etc., depending on the make,
if connected).
• Make sure that all sockets are well pushed into
the various sockets.
The colours aren’t natural
• Check that the scart cables are well pushed
into the sockets of the various devices.
• Check the settings Output AV1, Input AV2 and
Output PAL/NTSC (System Options menu).
The image format doesn’t match the
screen format of your TV set
• The image format is adjustable.With certain
discs, the format is pre-set and cannot be
changed.
Sound problems
No sound
• Check that the DTS,Dolby Digital and MPEG
settings are suited to the specifications of the
device connected to the digital audio sockets
(coaxial or optical).
The sound is very low or inaudible
• The sound of the TV set has been cut or set at
a very low level. Press the ( ) key on your TV
set’s remote control and/or adjust the volume
on your TV set (or amplifier,if such is the case).
36
Page 39

Further information
You can’t change the camera angle
• Most DVDs do not have multiple viewing angles.
When this option is available, it usually only
applies to a few scenes.
There is no sound with the image
• Is the volume turned down? The audio codec of
your player cannot play DivX files with the
most recent codecs.
• The majority of applications on your computer
require the video and audio to be coded
separately.The two flows are mixed after
coding. More information on this can be found
using the various Internet search engines.
Playing problems
The DVD doesn’t play,even when you press
the PLAY button
• The disc rating is higher than the limit that you
have set.
Fast forward or rewind doesn’t work
• Some discs have scenes which do not allow fast
forwarding, rewinding or chapter skips.When a
command is prohibited or is not available for
the current section or operating mode, a
prohibition sign ( ) appears on-screen for a
few moments.
Your DivX files won’t play
• Check that the file is actually DivX.
When you encounter problems make sure that:
the file that you are trying to play actually
contains DivX video.The files often use the term
“DivX” in their filename even though they have in
fact been coded in another format.
Problems playing DivX version 5.1 and
the version 2.5 player
• With certain recent version,coding problems
may arise with DivX files which are related
directly to the capacities of your computer. The
coding may require the entire capacity of the
microprocessor and alter the quality of the
image or desynchronise the image and the
sound.
The display or reading of digital images
in JPEG format is slow
• Image display can take a fairly long time,
depending on the size of the images. If the
images are too “bulky”, your DVD recorder
may not be able to display them correctly.
Recording problems
You cannot record on the disc
• If a message is displayed on the screen, press
the CLEAR/EXIT key of the remote control
to remove it.
• Check that you are using a DVD+R or
DVD+RW disc.
• Perhaps the DVD+R disc is temporarily locked
or definitively locked.If it is definitively locked
you can no longer record on it.If it is
temporarily locked you can unlock it.
• You cannot record on the same disc both video
images and JPEG photos or mp3 music. Use
different DVD+R/+RW discs for each type of
recording.
• Dirt and finger prints may affect the recording
and playback. Please see page 68 of your User
Manual for information about proper handling
of discs and proper disc cleaning.
Other operating problems
Your DVD recorder doesn’t switch on
• Did you move the DVD recorder? Check the
power plug: is it well plugged into the mains
socket? Also check the power cable jack at the
rear of the DVD recorder; is it well pushed in.
• Is the mains socket to which you DVD
recorder is connected receiving current? Try to
plug in a lamp or other electrical device: do
they work? Check the corresponding fuse in
your house’s fuse box.
The menus or subtitles do not appear in
the language you want
• With a DVD: the DVD menus are not displayed
in your language. Check the disc jacket to see
which languages are available. Choose the
language of your choice, if available.
• With a DVD: there are no subtitles. Check the
disc jacket to see whether subtitles are
available. Choose the subtitles of your choice, if
available.
• The preferred language for DVD dialogues and
subtitles was set upon initial installation of your
DVD recorder.
• You can also change the language while a disc is
playing by pressing the INFO key and selecting
the icon for dialogues or for subtitles.
This choice is only valid for the disc if it has not
been removed from the disc drawer.
37
EN
EN
Page 40

Further information
The menus of your DVD recorder do not
appear in the language you want
• Check that your language is available in the
settings menu. If not, choose another language.
You can’t access the selected menu, even
when you press OK
• If the name of the menu appears on a
transparent background, it means that the
corresponding menu or function is not
available.The Disc, Titles, Playlist and Card
menus are contextual menus: they depend on
operations performed beforehand such as:
• Disc is only accessible if there is a disc in the
disc tray of your DVD recorder.
• Titles is only accessible once you have
recorded a TV program or video sequence
(from an external device).
• Play list is only accessible with a CD.
• Card is only accessible once you have
connected a card reader to the front USB
socket and inserted a card in it.
Your DVD recorder menu disappears
• As with computers, your DVD recorder has a
screen saver which replaces the fixed menu by
a mobile THOMSON logo.Press on a navigation
key to bring back the fixed menu.
You can’t switch channels
• During the recording of a TV program (or video
sequence from a connected device), switching
channels is impossible.To change channels, you
have to stop the recording completely.
In quiet moments, you hear a slight hum
coming from your DVD recorder
• Your DVD recorder is equipped with a fan. It
releases heat in order to ensure proper
cooling. It switches on as soon as your DVD
recorder is turned on and produces a slight
hum.
The TV guide (NAVICLICK) is not
displayed
• Downloading may be disabled. Make sure that
Off is not ticked .
• Does the channel broadcast a TV guide?
Other problems
Reconfiguring your player’s initial set-up
• Open the disc tray and make sure there is no
disc in it. Close the disc tray.Hold down the
STOP key of your DVD recorder, then press
the ON/STANDBY key by holding it down
for 3 seconds, until INIT is displayed on the
screen of your DVD recorder.When MENU
reappears on your display,turn off and then
turn on your DVD recorder using the
ON/STANDBY button on the front.The
menu displayed on-screen is the menu which
enables you to choose your DVD recorder’s
display language. It confirms that all settings
made since initial installation have been deleted.
The DVD recorder has been reconfigured as it
was when purchased (factory settings). Refer to
page 5 of this manual to restart the installation
of your DVD recorder.
If you forget your password
• Open the player’s disc tray and ensure that
there is no disc on it. Close the tray.The player
menu is now displayed on the TV screen. Now
press the STOP key on your player and hold
the STOP key on the remote control unit
down for 3 seconds.The password that you
chose for parental control is cancelled.
38
Page 41

Further information
Other important informations
For your safety
Never open the player or any of its
components. It can be dangerous for you or
for certain fragile components.You could
receive an electric shock or touch the laser
beam. Do not place your eyes close to the
opening of the disc tray or any other opening
to look inside the player.
Disclaimer of warranty!
To the extent allowed by applicable law,
representations and warranties of noninfringement of copyrights or other intellectual
property rights resulting from the use of this
product under conditions other than as
specified above, are hereby excluded.
DVD copy protection
In accordance with the DVD standard, your
DVD recorder is equipped with a Copy
Protection system, which can be triggered on
and off by the DVD disc itself,in order to
make any recording of the concerned DVD
disc onto a videotape of very poor picture
quality, or even impossible. “This product
incorporates copyright protection technology
that is protected by method claims of certain
U.S. patents and other intellectual property
rights owned by Macrovision Corporation and
other rights owners. Use of this copyright
protection technology must be authorized by
Macrovision Corporation, and is intended for
home use only unless otherwise authorized by
Macrovision Corporation. Reverse engineering
or disassembly is prohibited.”
Condensation / moisture / heat
If your DVD recorder or a disc have been
stored in a cold atmosphere, as for example
during transportation in the winter, wait for
approximately 2 hours until they have reached
room temperature.
Protect the DVD recorder from moisture and
excess heat (e.g. fireplace) or equipment
creating strong magnetic or electric fields (i. e.
speakers...). Disconnect the power cable from
the mains electricity supply if the DVD
recorder malfunctions.
Note: Dolby Digital is a sound compression
technique developed by Dolby for multi-channel
digital audio signals.The Dolby Digital system
enables any audio channel configuration, from a
stereo sound (2 channels) up to the digital
“surround” sound 5.1.
Manufactured under license from Dolby
Laboratories. «Dolby» and the double-D symbol
are trademarks of Dolby Laboratories.
DTS - is a digital sound compression technique
developed by Digital Theater Sound Systems for
digital audio multichannel signals.
“DTS” and “DTS Digital Out” are registered
trademarks of Digital Theater Systems inc
PCM - If the device connected to the DIGITAL
AUDIO OUT sockets does not support Dolby, DTS
or MPEG signals, your DVD recorder will deliver
PCM (Pulse Code Modulation) signals. In this case
Dolby Digital, DTS or MPEG must not be
selected.
The linear PCM is a signal recording format used
for CDs. CDs are recorded in 44.1kHz /16bits.
DVDs are recorded in 48kHz / 16 bits, or even
up to 96kHz / 24 bits.
EN
EN
39
Page 42

Further information
Technical data
Power requirements 220 to 240 V - 50/60 Hz
Power consumption:
• Operating = 36 W
• Standby = 5 W
• Standby, ECO mode = 4 W
Hard disc capacity: 250 Go
Functioning conditions +5°C to + 35°C surrounding humidity: 80 % maximum
Playback system Laser diodes - Wave length: 655 / 780 nm, Laser power CLASSE 2
Reception norms LL’ - BG - I - DKK’
Number of storable channels 99
Remote control Infrared 33 Khz - Batteries 2 x 1.5 V (AAA)
Nominal Specification - THOMSON reserves the right to change the specifications without notice. The
characteristics and aspect of the product may be changed without prior notification.The colour and aspect of
the product may differ from that represented in this manual..
40
DTH 8560 / SOFT 5.06 / EN - RST - Epheme / 09-2005
Page 43

1 2 3
EN
Respect the polarities.
Do not mix different types of batteries or new and
old batteries. Do not use rechargeable batteries. Do
not expose batteries to excessive heat, do not
incinerate them and do not recharge them. Do not
try to open them as they may leak or explode.
Remove the batteries from the remote control unit if
you are not going to use it for several weeks.
Immediately remove any leaking batteries.Take care
in doing this, as leaking batteries may cause burns
to the skin or other physical injury.
Please respect the environment and
prevailing regulations.
Before you dispose of batteries ask your dealer
whether they are subject to special recycling and if
he accepts to take them back.
Concerning batteries
Remote control and Codes
RCT 615 DBMLI
Page 44

The remote control
The remote control handset lets you control up to 6 appliances by means of the 6 mode buttons:
your DVD recorder, a TV set, a satellite or cable receiver, a VCR, and an amplifier or other
appliance.
Note: the functions described below depend on the type of disc and/or file being played.
On/Off (standby).
EN
EN
this shows the status of the remote
Signal lamp
control when it is being used to
program or to control another
device. It also indicates that the
batteries level is low by flashing
several times when a key is pressed.
Skip backward, skip forward,
direct view.
Hide the menu.
Sound volume control.
Select channel, enter numerical
values, select connected
appliances (AV sockets).
Select the appliance to be controlled.
Specific functions (zoom, view
angle, recording quality, library,
sound, subtitles, lighting).
Information display.
Naviclick programme guide.
Menu activation and
navigation buttons.
Display the menu.
Skip backward, skip forward
(chapter), return to previous menu.
Transport buttons (play, fast
forward/return, pause, stop, record).
I
Page 45

Programming the remote control
If your remote control does not control your satellite receiver (or cable) or your television set you will
need to configure it using one of the two methods proposed:automatic code search or manual
programming.
Automatic code search
This method can be used to automatically find the
most appropriate code for your appliance.
1. Switch on the appliance you wish to use the
remote control with.
2. Press the relevant button for this appliance on
the remote control, and while holding this
button down, press theBBstandby button until
the remote control light comes on. Release the
two buttons.
3. Point the remote control at the appliance and
press PLAY.Wait until the light stops flashing.
If the appliance has not gone into standby
mode after five seconds, press the PLAY
button again to continue the search for the
next set of codes. Repeat this operation until
the appliance goes into standby mode.There
are 20 sets of codes
4. When the device changes to standby, press the
standby button BBon the front to switch it
back on again.Then press the REV key to set
it to standby again and, if necessary, retry until
the device changes to standby.
5. Press the STOP button and hold it down until
the remote control light goes off.
Manual programming
This method involves carrying out a manual
search for the codes to be used for controlling
your other appliances.
1. Switch on the appliance you wish to use the
remote control with.
2. Press the corresponding key on the remote
control, while holding it pressed down, enter
one of the codes corresponding to the make of
the device.
If the remote control light flashes you have entered
the wrong code or it is not possible to program the
remote control.
3. Point the remote control at the appliance and
press the relevant button. Press the BB. If the
appliance does not go into standby mode, try
another code.
Depending on the year of manufacture and the type
of appliance, some functions may not be available.
Certain codes may cover more functions than
others.Test the functions you can control and, if
appropriate, try other codes.
Note: when you change the remote control’s
batteries, remember to reprogram it.
Remote control - Code A-B
With certain devices (combined TV/DVD or other DVD player) it may happen that your DVD
recorder controls the DVD player of the other device. In this case you can adjust your remote
control and the DVD recorder on another code known as code B.
Remote control setting on code B
Note: the remote control of your DVD recorder is set to code A
(3000).To set it to code B (3001) follow the procedure
described below.
Code A
Code B
3000
3001
On display panelNo. to key in
DVD A
DVD B
1. Press and hold the DVD key.
2. With the number keys, press 3, 0, 0, 1.
3. Release the DVD key.
DVD recorder setting on code B
1.
Switch on your DVD recorder.
2. Check that there is no disc in the disc tray.
3. Simultaneously press the PLAY/PAUSE, AV keys at the front of your DVD recorder and
release them when your DVD recorder displays
DVD B.
4. Try to control your DVD recorder with the remote control.
Note: in the event of a problem, redo the setting of both components: the remote control and your DVD
recorder.
II
Page 46

TV Codes
Admiral........................1016, 1128
Akai...............................1029, 1136
Akura............................1030, 1039, 1141
Alba...............................1003, 1030, 1032,1058
Amplivision .................1062
Amstrad.......................1003, 1023, 1054, 1058, 1064,1141
Anitech ........................1003,1012,1015
ASA...............................1016, 1018,1047
Asberg..........................1015
Atlantic ........................1028
Autovox.......................1015, 1016,1028, 1033, 1047, 1145
Baird.............................1148
Bang & Olufsen..........1016
Barco............................1147
Baur ..............................1004, 1075, 1077, 1081,1083, 1135, 1145
Beko .............................1057, 1073
Blaupunkt ....................1025, 1027,1037, 1048, 1081, 1083
BPL................................1040
Brandt ..........................1051, 1129, 1130
Brionvega.....................1016
Bruns............................1016
BSR ...............................1046
BTC ..............................1030
Bush..............................1003, 1030, 1032, 1040,1046,1055, 1058, 1060,
Cascade .......................1003
Century .......................1016
CGE..............................1015, 1147
Cimline.........................1003, 1032
Clatronic......................1015, 1057
Condor........................1057
Contec.........................1003
Continental Edison ...1051, 1129,1130
Crosley ........................1015, 1016
Crown..........................1003, 1015,1057, 1059, 1065
Daewoo.......................1003, 1060
Dainichi........................1030
Daytron........................1003
Decca ...........................1014, 1035, 1036
Dixi...............................1003
Dual..............................1079, 1145
Dumont .......................1013, 1016, 1018, 1047
Elbe...............................1038
Elin ................................1018, 1146
Elite...............................1030
Elta................................1003
Emerson ......................1016
Erres.............................1005
Expert ..........................1028
Ferguson......................1024, 1041
Fidelity..........................1140, 1145
Finlandia.......................1029, 1140
Finlux............................1013, 1014, 1016, 1018, 1019,1047
Firstline........................1003, 1032, 1046, 1049, 1080
Fisher............................1018, 1029,1057, 1084, 1145
Formenti......................1016, 1147
Frontech......................1039, 1128, 1140, 1142
Fujitsu...........................1014, 1028
Funai.............................1039, 1046
GBC..............................1147
GEC..............................1008, 1014, 1148
Geloso .........................1003
Genexxa ......................1030, 1128
GoldStar ......................1044, 1140
Goodmans...................1014, 1032,1058,1060
Gorenje........................1057
GPM..............................1030
1079, 1135, 1140,1147
Graetz..........................1128, 1148
Granada.......................1010, 1014, 1029, 1053,1136,1140
Grandin........................1040
Grundig........................1013, 1025, 1027, 1033, 1081, 1083,1143
Hanseatic.....................1067, 1085, 1145
HCM.............................1003, 1040,1064
Hinari ...........................1003, 1030,1032, 1063
Hisawa..........................1040, 1062,1070
Hitachi..........................1008, 1009, 1019, 1031, 1069, 1086,1128, 1129,
Huanyu.........................1060
ICE................................1039, 1058
Imperial........................1015, 1057, 1065, 1147
Indesit...........................1033
Inno Hit .......................1014, 1078
Interbuy .......................1012
Interfunk......................1077,1128, 1148
Intervision ...................1012, 1039
ITC................................1147
ITS.................................1058
ITT................................1128, 1136, 1145, 1146, 1148
JVC................................1011, 1024,1026, 1058
Kaisui............................1003, 1030, 1040
Kapsch..........................1018, 1028,1128,1148
Kathrein.......................1085
Kendo...........................1032
Kennedy.......................1147
Kneissel........................1038, 1068
Korting.........................1016, 1042
Lenco............................1018
Loewe...........................1016, 1043, 1077
Luma.............................1028, 1140
Luxor............................1033, 1135,1137, 1138, 1140
M Electronic ...............1003, 1012, 1018, 1019,1041, 1060, 1072, 1128
Magnadyne ..................1016, 1145
Magnafon.....................1015
Marantz........................1085
Matsui...........................1003, 1007, 1014, 1023, 1029, 1032,1046, 1054,
Memorex.....................1003
Metz..............................1016, 1056,1081
Minerva........................1013,1033, 1081, 1083, 1143
Minoka .........................1064, 1141
Mitsubishi ....................1006, 1016, 1020,1033, 1054, 1077, 1081
Mivar ............................1044,1045,1078
MTC .............................1077, 1135
Multitech .....................1003, 1015,1140
Murphy.........................1018
National.......................1033
NEC..............................1022
Neckermann...............1016, 1025, 1075, 1083, 1085,1135, 1140
NEI................................1052, 1142
Nikkai...........................1007, 1014, 1030, 1039,1052
Nokia............................1072, 1146
Oceanic........................1128
Orion ...........................1032, 1046,1049, 1055, 1144
Osaki............................1014, 1030, 1039, 1064
Oso...............................1030
Osume .........................1014, 1021
Otto Versand..............1004, 1025, 1032, 1075,1077, 1081, 1083, 1085,
Palladium .....................1057, 1065,1140
Panasonic.....................1033, 1037, 1056, 1087, 1128, 1148
Pathe Cinema.............1147
Pathe Marconi............1051,1129, 1130
Philco............................1015, 1016,1147
Philips...........................1005, 1008, 1016, 1050,1060,1083, 1085
Phoenix........................1016
Phonola........................1005, 1016
Pioneer ........................1041,1128
1130, 1135, 1137,1140, 1146, 1148
1055, 1058, 1140,1143, 1145
1135, 1147
III
Page 47

Profex...........................1003, 1015,1140
Proline..........................1049
Protech........................1003, 1039, 1052,1065,1142, 1147
Pye ................................1005
Quelle ..........................1004,1013, 1018, 1047, 1075,1077, 1081, 1083,
Radiola .........................1005
Radiomarelli................1016, 1144
Rediffusion ..................1136
Rex................................1028, 1038, 1039, 1128
RFT...............................1016, 1067
Roadstar ......................1003, 1030, 1039,1065
Saba...............................1016, 1041,1128, 1129, 1130,1148
Saisho ...........................1003, 1006, 1023,1032, 1039, 1054, 1142,1144,
Salora ...........................1071,1128, 1135, 1137,1140,1146
Sambers .......................1015, 1078, 1144
Samsung.......................1003,1039, 1044, 1057, 1078,1085, 1125
Sanyo............................1010,1014, 1018, 1021, 1029,1053
SBR ...............................1005,1008
Schaub Lorenz............1148
Schneider.....................1030, 1058,1061, 1145
SEG...............................1015,1039, 1147
SEI .................................1004, 1016, 1023,1046,1144, 1145
Seleco...........................1028, 1038, 1128
Sentra...........................1007
Sharp ............................1017
Shorai...........................1046
Siarem ..........................1016, 1144
Siemens........................1021, 1025, 1027, 1081, 1083
Singer ...........................1016
Sinudyne ......................1004, 1016, 1023,1032, 1144, 1145
Skantic..........................1137, 1138
Solavox.........................1128, 1136
Sonitron.......................1029
Sonoko.........................1003
Sonolor........................1029, 1128
Sony..............................1004, 1075
Stern.............................1028, 1038, 1128
Sunkai...........................1032,1046, 1049, 1055
Susumu.........................1030
Tandberg......................1047
Tandy............................1014,1030, 1128, 1132
Tashiko.........................1008, 1140
Tatung...........................1014, 1035, 1036
Tec.................................1147
Technics.......................1037,1087
Teleavia.........................1051
Teletech.......................1003
Teleton.........................1028, 1135, 1140
Tensai............................1018, 1030, 1046
Texet.............................1030
Thomson.....................1000, 1001, 1002, 1033,1041,1051, 1088, 1089,
Thorn...........................1007, 1014, 1018, 1024,1026,1075, 1077, 1081,
Toshiba.........................1007, 1013, 1034, 1076, 1082
Towada.........................1147
Triumph .......................1023, 1034
Uher .............................1028
Ultra .............................1026
Ultravox.......................1136
Universum...................1018, 1019, 1039, 1057, 1066, 1074,1081, 1147
Voxson.........................1016, 1128
Waltham......................1137
Watt Radio.................1145, 1147
Wega............................1016
Yoko..............................1039, 1142
Zanussi.........................1028, 1140
1145, 1147
1145
1129, 1130, 1135
1082
VCR
Aiwa..............................2053, 2061, 2062,2065, 2072, 2074, 2089, 2094,
Akai...............................2021, 2022,2033, 2034, 2049, 2050, 2054,2068,
Akura............................2074, 2081
Alba...............................2009, 2026, 2042,2048, 2051, 2054, 2059, 2060,
Ambassador................2009, 2068
Amstrad.......................2048, 2057, 2058, 2065, 2081,2087
Anitech ........................2026,2081
Ansonic........................2066
ASA...............................2012, 2028,2072
Audiosonic..................2087
AudioTon.....................2068
Baird.............................2031, 2065, 2074, 2082, 2087
Blaupunkt ....................2002, 2004,2008,2035, 2039, 2044, 2045,2067,
Brandt ..........................2037, 2055, 2074,2091, 2098
Bush..............................2026, 2042, 2048, 2051,2059,2060, 2062, 2065,
Carrefour....................2077
Casio ............................2065
Cathay..........................2087
CGE..............................2065, 2074
Cimline.........................2026, 2081
Clatronic......................2009, 2068, 2081
Condor........................2009, 2068, 2087
Crown..........................2009, 2026,2048, 2068, 2081, 2087
Cyrus............................2028
Daewoo.......................2009, 2048, 2068, 2077,2087, 2095
Dansai ..........................2026, 2081,2087
Daytron........................2087
Decca ...........................2028, 2065, 2074, 2080
Denon..........................2015
Dual..............................2065, 2074, 2087
Dumont .......................2028, 2031, 2032, 2065,2082
Elbe...............................2013,2073, 2087
Elcatech........................2026, 2081
Elin ................................2086
Elta................................2081,2087
Emerson ......................2077, 2081
ESC ...............................2047, 2048, 2068, 2086,2087
Europhon.....................2068
Ferguson......................2029, 2055, 2065, 2074, 2091,2098
Fidelity..........................2065, 2081
Finlandia.......................2028, 2031, 2065, 2075, 2079,2082
Finlux............................2015, 2028, 2031, 2032, 2065,2075, 2082
Firstline........................2012, 2016, 2017, 2026, 2042,2072, 2075, 2076,
Fisher............................2018, 2019,2023, 2031, 2068, 2073, 2078,2082
Frontech......................2009, 2068
Fujitsu...........................2065
Funai.............................2065
GBC..............................2068
GEC..............................2028
Genexxa ......................2082
GoldHand....................2026, 2081
GoldStar ......................2012, 2043, 2065, 2072
Goodmans...................2009, 2012,2024,2026, 2048, 2065, 2068, 2072,
Graetz..........................2031, 2047, 2074, 2082, 2086
Granada.......................2018, 2028, 2031, 2065,2067,2072, 2075, 2079,
Grandin........................2012, 2026, 2065, 2068, 2072, 2081,2087
Grundig........................2002, 2004, 2005, 2008, 2026, 2028,2039, 2041,
Hanseatic.....................2012, 2072, 2087
IV
2095
2074, 2090, 2095
2062, 2065, 2068,2081, 2087, 2090, 2092, 2093,
2094, 2095
2071, 2083, 2085
2081, 2087, 2088,2090, 2092, 2093, 2094, 2095
2077, 2081, 2088,2094
2081, 2086, 2087,2088, 2094
2082, 2086
2044, 2051, 2067,2085, 2091
Page 48

Harwood.....................2081
HCM.............................2026, 2051, 2081
Hinari ...........................2003,2026, 2047, 2051, 2062,2066, 2074, 2081,
Hisawa..........................2095
Hitachi..........................2003, 2015, 2032, 2036,2046, 2047, 2065, 2066,
Imperial........................2065, 2086
Ingersol........................2003, 2066, 2086
Inno Hit .......................2068, 2081, 2086,2087
Interbuy .......................2072, 2081
Interfunk......................2028,2082
Intervision ...................2065, 2072, 2087,2094
Irradio ..........................2072, 2081
ITT................................2009, 2012, 2018, 2031, 2033,2047, 2048, 2063,
ITV................................2068, 2072, 2087
JVC................................2006, 2025,2029, 2040, 2041, 2063,2074,2080
Kaisui............................2026, 2081
Kendo...........................2033, 2042, 2061,2072, 2081, 2090, 2094
Kenwood.....................2074
Kneissel........................2094, 2095
Kuba..............................2078
Lenco............................2048
LG .................................2065, 2072
Loewe...........................2003, 2004, 2012, 2028,2035
Loewe Opta................2066, 2067, 2072,2083, 2097
Logik.............................2003, 2047, 2066, 2081,2086
Lumatron.....................2087
Luxor............................2016, 2018,2020, 2024, 2031, 2033,2076,2078,
M Electronic ...............2013, 2065, 2072
Marantz........................2002, 2004, 2024, 2028, 2067,2073
Matsui...........................2003, 2011, 2030, 2038, 2042, 2061,2062, 2065,
Medion.........................2094
M-Electronic...............2065, 2072, 2073
Memorex.....................2012, 2018, 2031, 2065, 2072, 2078,2079, 2082
Metz..............................2002, 2004,2012, 2035, 2039, 2045, 2067,2083,
Migros ..........................2065
Minerva........................2004,2008, 2039, 2085
Mitsubishi ....................2016, 2025, 2027,2028, 2076, 2080
Multitech .....................2026, 2065,2068, 2081, 2082
Murphy.........................2065
National.......................2083
NEC..............................2013, 2014, 2025, 2073, 2074, 2080
Neckermann...............2028, 2067, 2074
Nesco...........................2026, 2065, 2081, 2095
Nikkai...........................2068, 2081, 2087
Nokia............................2018, 2031,2033, 2047, 2074, 2075, 2079,2082,
Nordmende................2052, 2055, 2063, 2074, 2084,2091, 2099
Oceanic........................2065, 2074,2079, 2082
Okano..........................2054, 2061, 2081, 2087, 2090,2094
Orion ...........................2003, 2011,2030, 2042, 2059, 2060, 2061,2062,
Orson...........................2065
Osaki............................2012, 2026, 2065, 2072,2081
Osume .........................2088
Otake ...........................2092, 2093
Otto Versand..............2028
Palladium .....................2004, 2012,2026, 2066, 2067, 2072, 2074,2081,
Panasonic.....................2035, 2044, 2045, 2083, 2097
Pathe Cinema.............2011,2066, 2076
Pathe Marconi............2074
Pentax ..........................2015, 2032
Perdio...........................2065
Philco............................2013, 2073,2081
2087, 2088,2095
2074, 2075,2082, 2086
2074, 2082, 2086
2079, 2081, 2082
2066, 2072, 2086,2094, 2095
2085, 2097
2086, 2087, 2090
2066, 2092, 2093,2094, 2095
2086, 2090
Philips...........................2028, 2063, 2067
Phonola........................2028
Pioneer ........................2025,2028,2046, 2075, 2080
Portland.......................2009, 2068, 2087
Prinz .............................2065
Profex...........................2056
Profi-Tronic.................2086
Proline..........................2051, 2065,2088
Pye ................................2028
Quelle ..........................2028, 2067
Radiola .........................2028
Rex................................2063, 2074
RFT...............................2068, 2081
Roadstar ......................2012, 2026, 2047, 2048,2072, 2081, 2086, 2087
Saba...............................2040, 2041, 2052,2055, 2063, 2074, 2091
Saisho ...........................2003, 2011, 2030, 2038,2042, 2066, 2094
Salora ...........................2016,2018,2033, 2076, 2082
Samsung.......................2047,2064, 2086, 2096
Sansui ...........................2025
Sanwa ...........................2066
Sanyo............................2018,2031, 2078, 2079, 2082
SBR ...............................2028
Schaub Lorenz............2031, 2065,2074, 2082
Schneider.....................2026, 2028,2065, 2072, 2081, 2086, 2087
SEG...............................2047,2056, 2081, 2086, 2087
SEI .................................2003, 2028
SEI-Sinudyne ...............2066
Seleco...........................2068, 2072, 2074
Sentra...........................2009,2068, 2081, 2088
Sharp ............................2020, 2024,2079
Shintom........................2026, 2031,2081, 2082
Shivaki ..........................2072
Shorai...........................2003, 2066
Siemens........................2002, 2004, 2008, 2012, 2023,2028,2031, 2039,
Singer ...........................2017
Sinudyne ......................2003, 2028, 2066
Solavox.........................2009
Sonitron.......................2078
Sonoko.........................2087
Sonolor........................2018, 2024, 2079
Sontec ..........................2012, 2072
Sony..............................2007, 2010, 2069, 2070,2071
Starlite..........................2072, 2082
Stern.............................2087
Sunkai...........................2061,2094
Sunstar.........................2065
Suntronic.....................2065
Supra ............................2072, 2086
Symphonic...................2065, 2081
Tandberg......................2087
Tashiko.........................2065, 2072, 2079, 2086
Tatung...........................2028, 2065, 2074,2076, 2079
Teac...............................2065, 2074, 2087
Tec.................................2009, 2068, 2081, 2087
Technics.......................2035,2044
Teleavia.........................2074
Telefunken...................2037, 2055, 2063, 2074, 2091, 2098,2100
Teletech.......................2081, 2087
Tensai............................2056, 2065, 2066, 2072,2081
Thomson.....................2000, 2001, 2063, 2074,2091,2098, 2099
Thorn...........................2011, 2029, 2031, 2072,2074,2082
Toshiba.........................2016, 2017, 2028, 2063, 2074, 2076,2077
Towada.........................2056, 2081
Uher .............................2047, 2072, 2086
Ultravox.......................2021, 2087
Unitech ........................2086
Universum...................2004, 2008, 2012, 2021, 2028, 2033,2039, 2047,
Yoko..............................2009, 2047, 2068, 2072, 2081,2086
2067, 2072, 2082,2085
2057, 2065, 2067,2072, 2085, 2086, 2094
V
Page 49

SAT
AB Sat ..........................5079
Akai...............................5091
Alba...............................5032, 5063, 5093
Allsat.............................5037, 5043, 5091
Alltech..........................5066
Alpha ............................5091
Altai ..............................5052
Ampere........................5052
Amstrad.......................5035, 5046, 5052, 5067, 5069,5073, 5080, 5092,
Ankaro.........................5044,5047, 5094
Anttron........................5032, 5043, 5063
Apollo ..........................5032
Arcon...........................5071
Armstrong...................5091
ASA...............................5053
Asat...............................5091
AST...............................5048
Astra.............................5033, 5050, 5057
Astro............................5041, 5063, 5094, 5095
AudioTon.....................5063
Best...............................5094
Blaupunkt ....................5041
Brain Wave..................5049, 5071
BSkyB ...........................5080
BT Satellite..................5072
Bush..............................5037, 5043, 5093
Cambridge...................5031, 5068
Canal Satellite.............5088, 5096
Channel Master .........5093
CityCom......................5077
Clatronic......................5049
Comtec........................5047, 5051
Condor........................5033, 5094
Conrad.........................5033, 5060, 5061, 5094
Contec.........................5051, 5061
Daewoo.......................5032
Dansat..........................5037, 5043
D-Box...........................5083
DNR.............................5071
DNT.............................5052, 5091
Echostar.......................5052, 5082, 5088, 5096
Einhell...........................5032, 5046, 5047
Elsat ..............................5069
Elta................................5032,5091, 5094
Emme Esse..................5082, 5094
Europa..........................5044, 5061,5091
Eurosky........................5030,5033, 5094
Eurostar.......................5033, 5084
Ferguson......................5037, 5043, 5064
Fidelity..........................5046, 5067
Finlux............................5031, 5055, 5060
Fracarro.......................5032, 5082
Freesat .........................5066
FTE................................5061, 5068,5094
Fuba..............................5032, 5052, 5094
Galaxis .........................5047,5051,5057, 5081, 5094
Grandin........................5038
Grundig........................5035, 5040, 5041, 5074, 5076, 5080,5092, 5100
G-Sat ............................5043
Hanseatic.....................5062
Hinari ...........................5032, 5043,5093
Hirschmann.................5030, 5041,5052, 5053, 5054, 5056, 5060
Hisawa..........................5049
Huth .............................5033, 5044,5047,5049, 5050, 5051, 5061
Intervision ...................5033, 5065
ITT/Nokia....................5053, 5060,5083
Johansson ....................5049
5100
Kathrein.......................5041, 5056, 5063, 5077, 5086,5091,5095
Kolon............................5032
Kosmos........................5056
KR.................................5063,5066
Kreiselmeyer ..............5041
Kyostar.........................5032, 5063
Lasat .............................5033, 5051,5068,5094
Lemon..........................5071
Lenco............................5032, 5044,5057, 5071, 5094
Lexus............................5091
Lorenzen .....................5033, 5044,5071,5073
Luxor............................5060, 5083,5092, 5100
Manata..........................5072
Manhattan ...................5072
Mascom .......................5056
Maspro.........................5039, 5041, 5066, 5071,5074
Matsui...........................5031, 5041, 5072, 5093
Mediabox.....................5096
Mediasat.......................5057, 5088,5096
Medion.........................5094
Metronic......................5032, 5038, 5047, 5063,5077
Metz..............................5041
Micro Technology......5057
Morgan's......................5061, 5068, 5091
NEC..............................5042
Network......................5043
Neuhaus ......................5033,5044,5057, 5061, 5071
Neusat..........................5071
Nokia............................5053, 5060,5083
Nordmende................5032, 5049, 5064, 5093
Novis............................5049
Octagon.......................5032, 5044, 5051, 5063
Ondigital......................5045,5089, 5090
Orbitech......................5032,5058, 5059, 5061
Pace ..............................5035, 5037, 5043,5045, 5075, 5080
Palcom .........................5093
Palladium .....................5032
Panasonic.....................5035, 5080
Panda............................5033,5037
Philips...........................5041, 5043, 5044, 5061,5063,5072, 5074, 5076,
Phoenix........................5043, 5051
Phonotrend.................5047, 5081
Pioneer ........................5087,5088,5096
Predki...........................5032,5049
Premiere......................5096
Prosat...........................5047, 5065, 5093
Quadral........................5047, 5061, 5065, 5072, 5093, 5094
Quelle ..........................5033, 5046
Radiola .........................5091
Radix ............................5052,5066,5085
Redpoint......................5057
RFT...............................5044, 5047, 5058, 5091
Rover............................5065
Saba...............................5033, 5043, 5064,5070, 5071, 5072
Sagem...........................5034, 5078
Sakura...........................5051
Samsung.......................5030,5032
Satcom .........................5033, 5050, 5062
Satelco..........................5094
Satford..........................5050
Satline...........................5065
SatPartner ...................5032, 5049
Schneider.....................5076
Sedea Electronique ...5032
Seemann ......................5057, 5094
SEG...............................5032,5049, 5062, 5073, 5094
Seleco...........................5082
Siemens........................5041, 5068
Skardin.........................5057
5077, 5086, 5088,5089, 5090, 5091, 5096
VI
Page 50

Skymaster....................5047, 5062, 5065, 5084
SL ..................................5071
Sony..............................5031, 5035
Strong...........................5032, 5094
Sunny Sound...............5094
Sunstar.........................5094
Techniland ...................5050
TechniSat .....................5036, 5058, 5059, 5091
Telasat..........................5062
Teleciel.........................5063
Telefunken...................5032, 5072
Teleka...........................5052,5056, 5063, 5071, 5074
Telesat..........................5062
Teletech.......................5084
Thomson.....................5000, 5033, 5064, 5088
Tonna............................5050
Triad..............................5048
Triasat...........................5055
Triax..............................5055
Uniden .........................5067
Unisat...........................5051, 5091
Universum...................5033, 5041, 5053, 5067, 5073
Variosat........................5041
Vestel............................5073
Visiosat.........................5070
Viva...............................5044
Vortec ..........................5030,5032,5045
Wela.............................5061
Winersat......................5049
Wisi ..............................5041, 5048, 5052,5061,5070
World...........................5049
Zaunkonig....................5071
Zehnder.......................5048, 5073, 5077, 5094
CABLE
Alcatel..........................5025, 5026
BT Cable .....................5004
Cabletime....................5007, 5010, 5014, 5019,5021, 5023
Filmnet Cablecrypt ...5022
France Telecom..........5024, 5027, 5029
General Instrument ..5020
Grundig........................5013
Jerrold..........................5002,5008, 5017, 5020
Macab...........................5024
M-Net ..........................5022
Nokia............................5015
Philips...........................5024, 5028, 5029
Pioneer ........................5005
Sagem...........................5016, 5024
Salora ...........................5011
Scientific Atlanta ........5003, 5009
Tele+1 ..........................5012, 5022
Telepiu..........................5022
United Cable ..............5002, 5017
Videoway.....................5006, 5018
Visiopass......................5024,5029
Westminister Cable..5004
AUDIO
Amplifier
Aiwa..............................4014
Bush..............................4015
Denon..........................4010, 4011
Panasonic.....................4012
Pioneer ........................4008
Roadster......................4016
Technics.......................4012
Yamaha.........................4009, 4013
Audio Cassette
Thomson.....................4006
CD
Thomson.....................4007
Phono
Thomson.....................4005
Receiver/Tuner
Aiwa..............................4026, 4028, 4044
Akai...............................4025, 4046,4050
Brandt ..........................4053
Carver..........................4021, 4043
Clatronic......................4051
Denon..........................4017
Elta................................4051
Fisher............................4021, 4043
Genexxa ......................4030
GoldStar ......................4035
Goodmans...................4046, 4050,4051
Grundig........................4031, 4033, 4035, 4036
Harman Kardon.........4024, 4031
Harwood.....................4051
Intersound...................4051
JVC................................4022, 4047
Kenwood.....................4019, 4030, 4034, 4039, 4040
LG .................................4035
Marantz........................4031, 4033
Matsui...........................4051
Memorex.....................4018
Micromega ..................4031
Mitsubishi ....................4046
NAD.............................4041
Okano..........................4046
Onkyo..........................4027
Panasonic.....................4020, 4038, 4049, 4052
Philips...........................4031
Pioneer ........................4018,4023,4030, 4037
Quasar .........................4020
Revox...........................4030, 4031
Saisho ...........................4042
Samsung.......................4036
Sansui ...........................4031, 4042,4050
Sanyo............................4021,4033, 4043
Sharp ............................4030
Sherwood....................4048
Siemens........................4050
Sony..............................4028, 4045
Teac...............................4024, 4050
Technics.......................4020,4032, 4038, 4049, 4052
Telefunken...................4053
Thomson.....................4003, 4004
Thorens .......................4031
Thorn...........................4051
Uher .............................4042
Universum...................4035, 4036, 4046, 4050, 4051
Yamaha.........................4029, 4030
DVD
Thomson.....................3000, 3001
VII
RCT615DBMLI / codes TM-08-08 / RST - Epheme / 09-2005
Page 51

Safety information - UK socket
3A
E
N
L
3A
Equipment for the UK is supplied with a mains cable fitted with a moulded plug.
Mains connection
This appliance is suitable for use on A.C. mains supply,220-240 V - 50/60 Hz only. It must not be
connected to D.C. mains.
Note:The mains lead of the appliance is fitted with a moulded plug. If the mains sockets are not
compatible or if for any reason the plug is removed please follow the directions below.
The moulded plug cannot be rewired and if removed must be disposed of safely.Remove the fuse to
make it safer.
Do NO
T under any circumstances plug the severed plug into any mains socket as this could
result in an electric shock.
Important!
If the plug is removed,rewire new plug as follows:The wires in the mains plug are
coloured in accordance with the following code:
BLUE - NEUTRAL
BROWN - LIVE
As the colours of the wires in the mains lead of this apparatus may not
correspond with the coloured markings identifying the terminals in your plug,
proceed as follows:
BLUE wire to the terminal coded N (Neutral) or coloured black.
BROWN wire to the terminal coded L (Live) or coloured red.
Do NO
T make any connection to the terminal in the plug which is marked by the letter E
or by the safety symbol llor coloured green and yellow.
A fused plug must be fitted with a 3A fuse approved by ASTA or BSI to BS
1362 and fuse covers must always be securely replaced.
If the fuse blows,check the mains cable for damag e or call a qualified
technician.Do not try to bridge the fuse or increase its rating!
3A
BLUE
BROWN
The OFF button BBon the remote control and appliance does not completely disconnect the unit from
!
the mains supply, but switches operating power on and off.
DECLARATION DE CONFORMIDAD CON NORMAS
El que suscribe, en nombre y representación de Thomson
multimedia (Dongguan) Ltd. declara bajo su propia
responsabilidad que el:
Fabricado por: Thomson multimedia (Dongguan) Ltd.
En: P.R.C.
Marca: Ver portada
Modelo: Ver portada
objeto de esta declaración, cumple con la normativa
siguiente:
- Artículo 9.2 del Reglamento Técnico del Servicio de
Difusión de Televisión aprobado en el Real Decreto
1160/89.
- Anexo V del Reglamento sobre perturbaciones
radioeléctricas aprobado en el Real Decreto 138/89.
Quality Assurance Manager
DICHIARAZIONE DI CONFORMITA
Si dichiara che l’apparecchio DVD RECORDER,
(la cui marca ed il codice commerciale
sono indicati in copertina)
risponde alle prescrizioni dell’art. 2
comma 1 del D.M. 28 Agosto 1995 n° 548.
Fatto a MILANO, il 8/08/2005.
THOMSON Multimedia Sales - Italy S.p.A.
Via L. Da Vinci, 43
20090 Trezzano sul Naviglio (MI).
Page 52

DTH8560E
Model and serial number
Dealer's address
THOMSON Sales Europe
46, quai A.Le Gallo
92648 Boulogne Cedex
FRANCE
322 019 464 RCS NANTERRE
http://www.thomson-europe.com
35994170 © Copyright THOMSON 2005
 Loading...