Thomas & Betts EZL-100 User Manual

EZL-100 Thermal Label Printer
User Guide
French and Spanish versions of the User Guide are available at www.tnb.com.
www.tnb.com

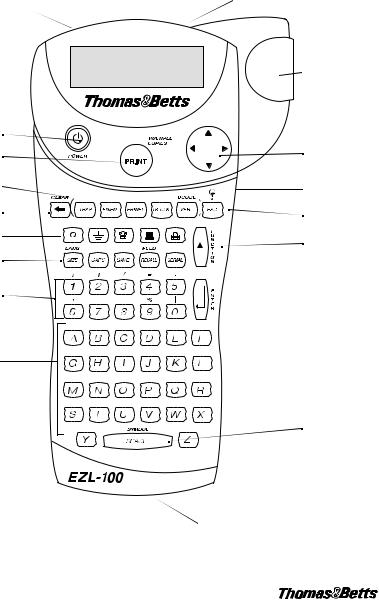
Tape Exit
AC Power Connector |
LCD Display |
|
Cutter Lever |
Power Button |
|
Print Button |
Navigation Key |
Hot Keys |
Thumb Latch for Tape |
|
Compartment |
Backspace/Clear All |
Escape/Backlight |
Symbol Keys |
Function/Shift |
|
|
Function Keys |
|
Numeric Keys |
Enter/OK |
|
|
Alpha Keys |
|
|
Space Bar/ |
|
Symbol Key |
|
Thumb Latch for |
|
Battery Compartment |
|
Figure 1 Thomas & Betts EZL-100 Thermal Label Printer |
2

About Your New Printer
With your new Thomas & Betts EZL-100 thermal label printer, you can create a wide variety of highquality, self-adhesive labels. You can choose to print your labels in many different sizes and styles. The printer uses Thomas & Betts label cassettes in widths of 1/4” (6 mm), 3/8” (9 mm), 1/2” (12 mm), or 3/4” (19 mm). Label cassettes are also available in a wide range of materials.
Warranty Registration
Please complete the warranty registration card and return it to the appropriate customer service address within seven days.
Getting Started
Follow the instructions in this section to get started by printing your first label.
Power Supply
The printer can operate on AC or battery power. To save power, the printer will automatically turn off after five minutes of inactivity.
Inserting the Batteries
The printer uses six AA batteries.
To insert the batteries
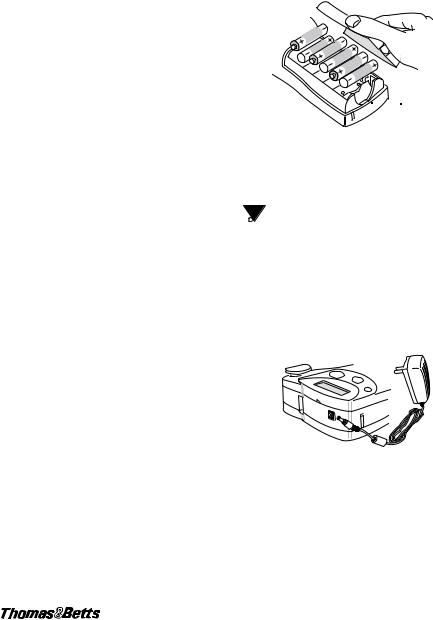
1.Press the thumb latch on the bottom of the labelmaker to open the battery compartment door. See Figure 2.
Press thumb latch
Figure 2
2.Insert the batteries following the polarity markings (+ and –).
3.Close the compartment door.
 Remove the batteries if the printer will not be used for a long period of time.
Connecting the AC Adapter
Connecting the AC adapter to the printer disconnects the batteries as a power source.
To connect the AC adapter
1.Plug the power adapter into the power connector on the top, left side of the printer.
Figure 3
2.Plug the other end of the power adapter into a power outlet.
Inserting the Tape Cassette
Your printer comes with one label tape cassette. Additional label cassettes can be purchased from an authorized Thomas & Betts distributor.
3

To insert the tape cassette
1.Press the thumb catch on the right side of the printer to open the tape cassette door.
 The first time you use the printer, remove the protective cardboard insert from between the print head and pinch roller. See Figure 4.
Remove cardboard 
 insert
Tighten tape
 = 6 mm


 = 9/12 mm
= 19 mm
Set cassette switch
Figure 4
2.Set the cassette switch for the size of the tape cassette that you are inserting. See Figure 4.
A notch in the cassette fits over the switch when the cassette is in the correct position.
3.Make sure the tape and ribbon are taut across the mouth of the cassette and that the tape passes between the guideposts. If necessary, turn the spool clockwise to tighten the ribbon.
4.Insert the cassette with the tape and ribbon positioned between the print head and pinch roller. See Figure 5.
4
Push down gently
Print Head
Pinch Roller 
Figure 5
5.Press firmly until cassette clicks into place. Make sure tape and ribbon are positioned correctly.
6.Close the tape cassette door and press  to turn on the power.
Selecting a Language
Several language-related features on the printer are determined by the language setting, such as availability of special characters, units of measure, menu text, and so on.
By default the language is set to English.
To select a language
1. |
Press |
+ |
|
. |
SIZE |
||||
|
||||
2. |
Use |
and |
to select the language. |
|
3. |
Press |
to set the language. |
||
 Select Universal as the language for the units of measure to be in millimeters.
Printing Your First Label
You are now ready to print your first label.
To print a label
1.Enter text to create a simple label.
2.Press Print .
 Loading...