

Page 1

Teile-Nr. 188 246
Kundendienststellen
Deutschland:
Robert Thomas
Metall- und Elektrowerke
GmbH & Co. KG
Hellerstrasse 6
57290 Neunkirchen
Telefon 0 2735 - 788 - 581-583
Telefax 0 27 35 - 788 - 599
e-mail: r-wilke@robert-thomas.de
België:
ACEDEM SPRL
Rue Vanderkindere 87
B-1180 Bruxelles (Uccle)
Tél. 0032 (0) 2 344 47 12
Fax 0032 (0) 2 343 43 49
e-mail: acedem@skynet.be
BVBA New ETP
Passtraat 121
B-9100 Sint-Niklaas
Tél. 0032 (0) 3 777 39 63
Fax 0032 (0) 3 777 26 11
e-mail: info@newetp.be
Servinter bvba
Zeilstraat 12
B-3500 Hasselt
Tél.
0032-(0)1128-1780
Fax
0032-(0)1128-1791
e-mail:
info@servilux.be
France:
Mister ATOM Pieces
97, rue H-Durre
B. P. 113
F-59590 Raismes
Tél. 03.27.45.82.82
Fax 03.27.45.82.99
e-mail: atom.mp@wanadoo.fr
Mena Toulouse Service
4, rue Jules Raimu
F-31200 Toulouse
Tel. 05.61.58.26.93
Fax 05.61.58.40.55
L.B.S. Le Bon Service
4, rue de l’Industrie
F-67450 Mundolsheim
Tel. 03.88.18.17.16
Fax 03.88.18.17.20
Niederlande:
A. u. M. Whiteparts B.V.
Takkeblijsters 37a
NL 4817 BL Breda
Tel. 076 - 5720505
Fax 076 - 5 72 07 00
Schweiz:
Saluda Technik AG
Marchstein 173
CH-56234 Triengen
Tel./Fax 041 93/3 3075
e-mail: info@saluda.ch
Schweden:
Olsson & Co.
Box 106
42722 Billdal
Tel. 031 - 9100 85
Fax 031 - 0152 90
e-mail: chr.olsson@telia.com
Österreich:
Wukovits
Kaiser-Joseph-Straße 64
A-3002 Purkersdorf
Tel./Fax 02231/63467
Ernst Wallnöfer
Elektro-Industrievertretung
Bundesstraße 29, Neu-Rum
A-6003 Innsbruck
Tel. 0512/263838,
Fax 0512/26383826
e-mail: office@wallnoefer-elektro.at
Pölz GmbH
Brünner Straße 5
A-1210 Wien
Tel. 01/2 78 53 65
Fax 01/278536 55
e-mail: poelz@aon.at
Reicher
Elektro-Service
Hohenegg 17
A-8262 Ilz
Tel. 03385/583
Fax 03385/22040
e-mail: thomas.service@aon.at
Josef Pircher Betriebs GmbH
Belruptstraße 44
A-6900 Bregenz
Tel. 05574/42721-0
Fax 0 55 74 /42 72 15
e-mail: elektrotechnik@pircher.at
Johann Grössing
Autorisierter Kundendienst
Flötzerweg 156
A-4030 Linz
Tel. 0732 /38 53 31
Fax 07 32 /38 53 59
e-mail: karin.g@haushaltsgeraete-service.at
Wörndl Elektro Ges.mbH
Hausgeräte Kundendienst
Gniglerstr. 18
A-5020 Salzburg
Tel. 0662-8727 14
Fax 0662-882487
e-mail: woerndl-kundendienst@aon.at
Quelle Zentralservice
Industriezeile 47, A-4021 Linz
Tel. 0732 / 78 09-6312,
Fax 07 32 / 78 09-86312
sowie alle Quelle
Technik Center Servicestellen
Türkiye
Sanikom Uluslar arası Paz. A.Ş.
Perpa Tic. Mrk. B Blok Kat:11
No: 1747 Okmeydanı/İstanbul
Tel: +90212 320 98 50 (pbx)
Fax: +90212 320 98 53
www.sanikom.com
info@sanikom.com
Russland:
«Совинсервис»
107140 г. Москва
Русаковская ул., д. 7
тел. 264-41-61, факс 264-93-68,
e-mail: ru_service@mtu-net.ru
«Совинсервис»
129081 г. Москва
Ясный проезд, 10
тел. 473-90-03, факс 473-12-49,
e-mail: jasny_pr@mtu-net.ru
«Совинсервис» - Региональный отдел
103064 г. Москва
ул. Казакова, д. 8а, стр. 3
тел. 267-92-62, факс 261-72-81,
e-mail: pomyanska@mtu-net.ru
«Совинсервис»
193144, г. Санкт-Петербург
Суворовский пр-т, 35
тел. 812-275-01-21,
факс 812-275-01-21,
e-mail: spservis@mail.wplus.net
«Совинсервис»
344006, г. Ростов-на-Дону
пр. Соколова, 11
тел./факс 8-8632-405782,
e-mail: sowinservis@mail.ru
«Совинсервис»
630091 г. Новосибирск
Красный проспект 50
Дом быта, 5 этаж
тел./факс 83832-230661
Kazachstan:
ЦКО THOMAS
Казахстан, Алматы
Ул. Гагарина 238
Тел: +7 727 327 25 45
+7 727 299 80 70
+7 777 224 90 11
E-mail: Alisa.Vilgelm@list.ru
Internet: www.thomas.com.kz
Ukraine:
THOMAS-UA
Strojindustrij Str. 5
01013 Kiev
Tel. +38 044 239 0777
Fax +38 044 254 2065
E-mail: info@thomas-ua.de
Internet: www.thomas.ua
Techn. Änderungen vorbehalten
DIE SAUBERE LÖSUNG
Robert Thomas
Metall- und Elektrowerke GmbH & Co. KG
Postfach 1820, 57279 Neunkirchen
Hellerstraße 6, 57290 Neunkirchen
Telefon +49 - 2735 - 788 - 0
Telefax +49 - 2735 - 788 - 519
e-mail: service@robert-thomas.de
www.robert-thomas.de
GERMANY
GA 04/09
Teile Nr 188 031
GA 02/11
Techn. Änderungen vorbehalten
Polska:
APRA SERWIS Sp. z o.o.
AI.Krakowska 179
02-180 Warszawa,
Tel. (022) 428 27 74
mail: apraserwis@apraserwis.pl
/ After Sales Service Addresses
Page 2
GEBRAUCHSANWEISUNG
INSTRUCTIONS FOR USE ·
KULLANMA KILAVUZU · INSTRUKCJA OBSŁUGI
INSTRUCŢIUNE DE FOLOSIRE ·
Руководство по эксплуатации
E
n
g
i
n
e
e
r
i
n
g
·
D
e
s
i
g
n
·
·
Q
u
a
l
i
t
y
·
P
r
o
d
u
c
t
i
o
n
HYGIENE PLUS T2
Page 3
2
Inhaltsverzeichnis
Wir gratulieren Ihnen … . . . . . . . . . . . . . . . . . . . . . . . . . 3
Der Umwelt zuliebe . . . . . . . . . . . . . . . . . . . . . . . . . . . . . . 3
Vor der ersten Inbetriebnahme . . . . . . . . . . . . . . . . . . . . . 3
Sicherheitshinweise. . . . . . . . . . . . . . . . . . . . . . . . . . . . . . . 3
Kurzanleitung . . . . . . . . . . . . . . . . . . . . . . . . . . . . . . . . . . . 4-5
Erstes Kennenlernen. . . . . . . . . . . . . . . . . . . . . . . . . . . . . . 6
Zubehör . . . . . . . . . . . . . . . . . . . . . . . . . . . . . . . . . . . . . . . 7
Tabelle Anwendungs-/Einsatzmöglichkeiten. . . . . . . . . . . 7
Allgemeine Hinweise . . . . . . . . . . . . . . . . . . . . . . . . . . . . . 8
Staubsaugen. . . . . . . . . . . . . . . . . . . . . . . . . . . . . . . . . 8
Informationen für den Gebrauch . . . . . . . . . . . . . . . . . . . 8
Flüssigkeiten saugen. . . . . . . . . . . . . . . . . . . . . . . . . 8
Informationen für den Gebrauch . . . . . . . . . . . . . . . . . . 8/9
Reinigung und Pflege . . . . . . . . . . . . . . . . . . . . . . . . . . . . . . 9
Nach dem Flüssigkeiten saugen. . . . . . . . . . . . . . . . . . . . . 9
Waschsaugen. . . . . . . . . . . . . . . . . . . . . . . . . . . . . . . . 9
Informationen für den Gebrauch . . . . . . . . . . . . . . . . . . . 9
Vor der Teppichreinigung. . . . . . . . . . . . . . . . . . . . . . . . . 9/10
– Teppichreinigung . . . . . . . . . . . . . . . . . . . . . . . . . . . . . . . 10
– Hartbodenreinigung . . . . . . . . . . . . . . . . . . . . . . . . . . . . . 10
– Fensterreinigung . . . . . . . . . . . . . . . . . . . . . . . . . . . . . . . 11
– Polsterreinigung. . . . . . . . . . . . . . . . . . . . . . . . . . . . . . . . 11
Reinigung und Pflege . . . . . . . . . . . . . . . . . . . . . . . . . . . 11/12
Nachfolgebedarf / Sonderzubehör . . . . . . . . . . . . . . . . . 12
Kundendienst . . . . . . . . . . . . . . . . . . . . . . . . . . . . . . . . . . . 12
Garantie . . . . . . . . . . . . . . . . . . . . . . . . . . . . . . . . . . . . . . 12
Was tun, wenn … . . . . . . . . . . . . . . . . . . . . . . . . . . . . . . . 13
D
We congratulate you ... . . . . . . . . . . . . . . . . . . . . . . . . . . . 14
For the sake of the environment . . . . . . . . . . . . . . . . . . . . 14
Before putting into operation for the first time . . . . . . . . . 14
Safety instructions. . . . . . . . . . . . . . . . . . . . . . . . . . . . . . . . 14
Brief instructions for use. . . . . . . . . . . . . . . . . . . . . . . . . . . 4-5
Product familiarisation . . . . . . . . . . . . . . . . . . . . . . . . . . . . 15
Accessories . . . . . . . . . . . . . . . . . . . . . . . . . . . . . . . . . . . . . 16
Table: Examples of use and application . . . . . . . . . . . . . . 16
General instructions . . . . . . . . . . . . . . . . . . . . . . . . . . . . . . 17
Dust vacuuming. . . . . . . . . . . . . . . . . . . . . . . . . . . . . . 17
Information for use . . . . . . . . . . . . . . . . . . . . . . . . . . . . . . 17
Sucking up liquids. . . . . . . . . . . . . . . . . . . . . . . . . . . . 18
Information for use . . . . . . . . . . . . . . . . . . . . . . . . . . . . . . 18
Cleaning and care . . . . . . . . . . . . . . . . . . . . . . . . . . . . . . . 18
After sucking up liquids . . . . . . . . . . . . . . . . . . . . . . . . . . . 18
Wash cleaning . . . . . . . . . . . . . . . . . . . . . . . . . . . . . . . 18
Information for use . . . . . . . . . . . . . . . . . . . . . . . . . . . . . . 18
Before cleaning carpets . . . . . . . . . . . . . . . . . . . . . . . . . . . 19
- Carpet cleaning . . . . . . . . . . . . . . . . . . . . . . . . . . . . . . . . . 19
- Hard floor cleaning . . . . . . . . . . . . . . . . . . . . . . . . . . . . . 19
- Window cleaning. . . . . . . . . . . . . . . . . . . . . . . . . . . . . . . 20
- Upholstery cleaning. . . . . . . . . . . . . . . . . . . . . . . . . . . . . 20
Cleaning and care . . . . . . . . . . . . . . . . . . . . . . . . . . . . . . . .20
Further supplies/special accessories . . . . . . . . . . . . . . . . . 21
Customer service/guarantee. . . . . . . . . . . . . . . . . . . . . . . 21
Guarantee . . . . . . . . . . . . . . . . . . . . . . . . . . . . . . . . . . . . . 21
What to do when .... . . . . . . . . . . . . . . . . . . . . . . . . . . . . . 22
Contents:
GB
İçindekiler
Sizi Tebrik Ederiz ... . . . . . . . . . . . . . . . . . . . . . . . . . . . . . . . 23
Çevrenin Korunması . . . . . . . . . . . . . . . . . . . . . . . . . . . . . . 23
İlk Kullanım Öncesi . . . . . . . . . . . . . . . . . . . . . . . . . . . . . . .23
Güvenlik Uyarıları . . . . . . . . . . . . . . . . . . . . . . . . . . . . . . . 23
Kısa Kılavuz . . . . . . . . . . . . . . . . . . . . . . . . . . . . . . . . . . . 4-5
Elektrikli Süpürgenin Parçaları . . . . . . . . . . . . . . . . . . . . . . 24
Aksesuarlar . . . . . . . . . . . . . . . . . . . . . . . . . . . . . . . . . . . . .25
Tablo: Uygulama ve Kullanım Olanakları . . . . . . . . . . . . . 25
Genel Bilgiler . . . . . . . . . . . . . . . . . . . . . . . . . . . . . . . . . . .26
Kuru Süpürme . . . . . . . . . . . . . . . . . . . . . . . . . . . . . . . . 26
Kullanıma İlişkin Açıklamalar . . . . . . . . . . . . . . . . . . . . . . . 26
Sıvıların Emilmesi . . . . . . . . . . . . . . . . . . . . . . . . . . . . . 26
Kullanıma İlişkin Açıklamalar . . . . . . . . . . . . . . . . . . . . . . . 26
Temizleme ve Bakım . . . . . . . . . . . . . . . . . . . . . . . . . . . . . . 27
Sıvılar Emildikten Sonra . . . . . . . . . . . . . . . . . . . . . . . . . . .27
Yıkama . . . . . . . . . . . . . . . . . . . . . . . . . . . . . . . . . . . . . . .27
Kullanıma İlişkin Açıklamalar . . . . . . . . . . . . . . . . . . . . . . . 27
Halı Temizliği Öncesi . . . . . . . . . . . . . . . . . . . . . . . . . . . . . 27
– Halı Temizliği . . . . . . . . . . . . . . . . . . . . . . . . . . . . . . . . . .28
– Sert Taban Temizliği . . . . . . . . . . . . . . . . . . . . . . . . . . . . 28
– Pencere Temizliği . . . . . . . . . . . . . . . . . . . . . . . . . . . . . . . 28
– Döşeme Temizliği . . . . . . . . . . . . . . . . . . . . . . . . . . . . . . . 28
Temizleme ve Bakım . . . . . . . . . . . . . . . . . . . . . . . . . . . . . .29
Ardıl İhtiyaçlar / Özel Aksesuarlar . . . . . . . . . . . . . . . . . .29
Müşteri Hizmetleri . . . . . . . . . . . . . . . . . . . . . . . . . . . . . . . .30
Garanti. . . . . . . . . . . . . . . . . . . . . . . . . . . . . . . . . . . . . . . . .30
Sorunların Giderilmesi . . . . . . . . . . . . . . . . . . . . . . . . . . . . . 31
TR
Spis treści
Gratulujemy … . . . . . . . . . . . . . . . . . . . . . . . . . . . . . . . . . . 32
W trosce o ochronę środowiska naturalnego. . . . . . . . . . . 32
Zanim po raz pierwszy skorzystasz z urządzenia . . . . . . . 32
Wskazówki dotyczące bezpieczeństwa. . . . . . . . . . . . . . . 32
Krótka instrukcja użytkowania. . . . . . . . . . . . . . . . . . . . . . .4-5
Rysunki . . . . . . . . . . . . . . . . . . . . . . . . . . . . . . . . . . . . . . . . 33
Akcesoria . . . . . . . . . . . . . . . . . . . . . . . . . . . . . . . . . . . . . . . 34
Tabela: Przykład użycia odkurzacza . . . . . . . . . . . . . . . . . 34
Wskazówki ogólne . . . . . . . . . . . . . . . . . . . . . . . . . . . . . . . 35
Odkurzanie . . . . . . . . . . . . . . . . . . . . . . . . . . . . . . . . . . . 35
Informacje dla użytkownika. . . . . . . . . . . . . . . . . . . . . . . . . 35
Zbieranie płynów . . . . . . . . . . . . . . . . . . . . . . . . . . . . . 35
Informacje dla użytkownika. . . . . . . . . . . . . . . . . . . . . . . . . 35
Czyszczenie i obsługa. . . . . . . . . . . . . . . . . . . . . . . . . . . . . 36
Obsługa urządzenia po procesie zbierania płynów . . . . . 36
Pranie. . . . . . . . . . . . . . . . . . . . . . . . . . . . . . . . . . . . . . . . . 36
Informacje dla użytkownika. . . . . . . . . . . . . . . . . . . . . . . . . 36
Zanim przystąpisz do czyszczenia dywanów. . . . . . . . . . . 37
- czyszczenie dywanów. . . . . . . . . . . . . . . . . . . . . . . . . . . . 37
- czyszczenie podłóg twardych. . . . . . . . . . . . . . . . . . . . . . 37
- czyszczenie okien . . . . . . . . . . . . . . . . . . . . . . . . . . . . . . . 37
- czyszczenie tapicerki . . . . . . . . . . . . . . . . . . . . . . . . . . . . . 37
Czyszczenie i obsługa. . . . . . . . . . . . . . . . . . . . . . . . . . . . . 38
Akcesoria specjalne . . . . . . . . . . . . . . . . . . . . . . . . . . . . . . 38
Serwis i gwarancja . . . . . . . . . . . . . . . . . . . . . . . . . . . . . . . 39
PL
Содержание
Мы поздравляем Вас .... . . . . . . . . . . . . . . . . . . . . . . . . 50
Ради окружающей среды . . . . . . . . . . . . . . . . . . . . . . . 50
Перед первым включением . . . . . . . . . . . . . . . . . . . . . 50
Указания по технике безопасности . . . . . . . . . . . . . . . 50
Краткое руководство в картинках . . . . . . . . . . . . . . .4 – 5
Первое знакомство . . . . . . . . . . . . . . . . . . . . . . . . . . . . 51
Принадлежности . . . . . . . . . . . . . . . . . . . . . . . . . . . . . . 52
Таблица возможностей применения. . . . . . . . . . . . . . . 52
Общие указания . . . . . . . . . . . . . . . . . . . . . . . . . . . . . . . 53
Уборка пыли . . . . . . . . . . . . . . . . . . . . . . . . . . . . . . . . 53
Информация для использования . . . . . . . . . . . . . . . . . 53
Сбор жидкостей . . . . . . . . . . . . . . . . . . . . . . . . . . . . . . 53
Информация для использования . . . . . . . . . . . . . . . 53/54
Очистка и уход . . . . . . . . . . . . . . . . . . . . . . . . . . . . . . . . 54
После сбора жидкостей. . . . . . . . . . . . . . . . . . . . . . . . . 54
Влажная уборка . . . . . . . . . . . . . . . . . . . . . . . . . . . . . 54
Информация для использования . . . . . . . . . . . . . . . . . 54
Перед чисткой ковров . . . . . . . . . . . . . . . . . . . . . . . . . . 54
- Чистка ковров. . . . . . . . . . . . . . . . . . . . . . . . . . . . . .54/55
- Чистка полов с твердым покрытием . . . . . . . . . . . 55/56
- Чистка мягкой мебели. . . . . . . . . . . . . . . . . . . . . . . . . 56
- Мойка окон . . . . . . . . . . . . . . . . . . . . . . . . . . . . . . . . . . 56
Сбор жидкостей . . . . . . . . . . . . . . . . . . . . . . . . . . . . . . . 56
Очистка и уход . . . . . . . . . . . . . . . . . . . . . . . . . . . . . . . . 56
Сопутствующие товары /
специальные принадлежности . . . . . . . . . . . . . . . . . . . 57
Служба сервиса . . . . . . . . . . . . . . . . . . . . . . . . . . . . . . . 57
Гарантия . . . . . . . . . . . . . . . . . . . . . . . . . . . . . . . . . . . . . . 57
Что делать, если. . . . . . . . . . . . . . . . . . . . . . . . . . . . . . . 58
RS
Cuprins
Pentru protecţia mediului . . . . . . . . . . . . . . . . . . . . . . . . . . . . 41
Înainte de prima punere în funcţiune . . . . . . . . . . . . . . . . . . .42
Indicaţii de securitate. . . . . . . . . . . . . . . . . . . . . . . . . . . . . . . .42
Ghid sumar . . . . . . . . . . . . . . . . . . . . . . . . . . . . . . . . . . . . . . 4-5
Primul contact cu aparatul . . . . . . . . . . . . . . . . . . . . . . . . . . .43
Accesorii . . . . . . . . . . . . . . . . . . . . . . . . . . . . . . . . . . . . . . . . . .43
Tabel cu posibilităţi aplicative/de utilizare . . . . . . . . . . . . . . 43
Indicaţii generale . . . . . . . . . . . . . . . . . . . . . . . . . . . . . . . . . . .44
Aspirarea prafului
Informaţii pentru folosire . . . . . . . . . . . . . . . . . . . . . . . . . . . . .44
Aspirarea de lichide
Informaţii pentru folosire . . . . . . . . . . . . . . . . . . . . . . . . . . . . .45
Curăţarea și îngrijirea . . . . . . . . . . . . . . . . . . . . . . . . . . . . . . .45
După aspirarea de lichide. . . . . . . . . . . . . . . . . . . . . . . . . . . .45
Aspirarea cu spălare
Informaţii pentru folosire . . . . . . . . . . . . . . . . . . . . . . . . . . . . .45
Înainte de curăţarea mochetelor. . . . . . . . . . . . . . . . . . . . . . .46
Curăţare și îngrijire . . . . . . . . . . . . . . . . . . . . . . . . . . . . . . . . . .46
– Curăţarea mochetelor . . . . . . . . . . . . . . . . . . . . . . . . . . . .46
– Curăţarea dușumelelor .. . . . . . . . . . . . . . . . . . . . . . . 46/47
– Curăţarea ferestrelor . . . . . . . . . . . . . . . . . . . . . . . . . . . . .47
– Curăţarea capitonajului . . . . . . . . . . . . . . . . . . . . . . . . . .47
Curăţarea și îngrijirea . . . . . . . . . . . . . . . . . . . . . . . . . . . . . .47
Consumabile / accesorii speciale . . . . . . . . . . . . . . . . . . . .48
Serviciul de asistenţă pentru clienţi . . . . . . . . . . . . . . . . . . . .48
Garanţia pentru produs . . . . . . . . . . . . . . . . . . . . . . . . . . . . . .48
Ce este de făcut când … . . . . . . . . . . . . . . . . . . . . . . . . . . .49
RO
Page 4
3
Wir gratulieren Ihnen …
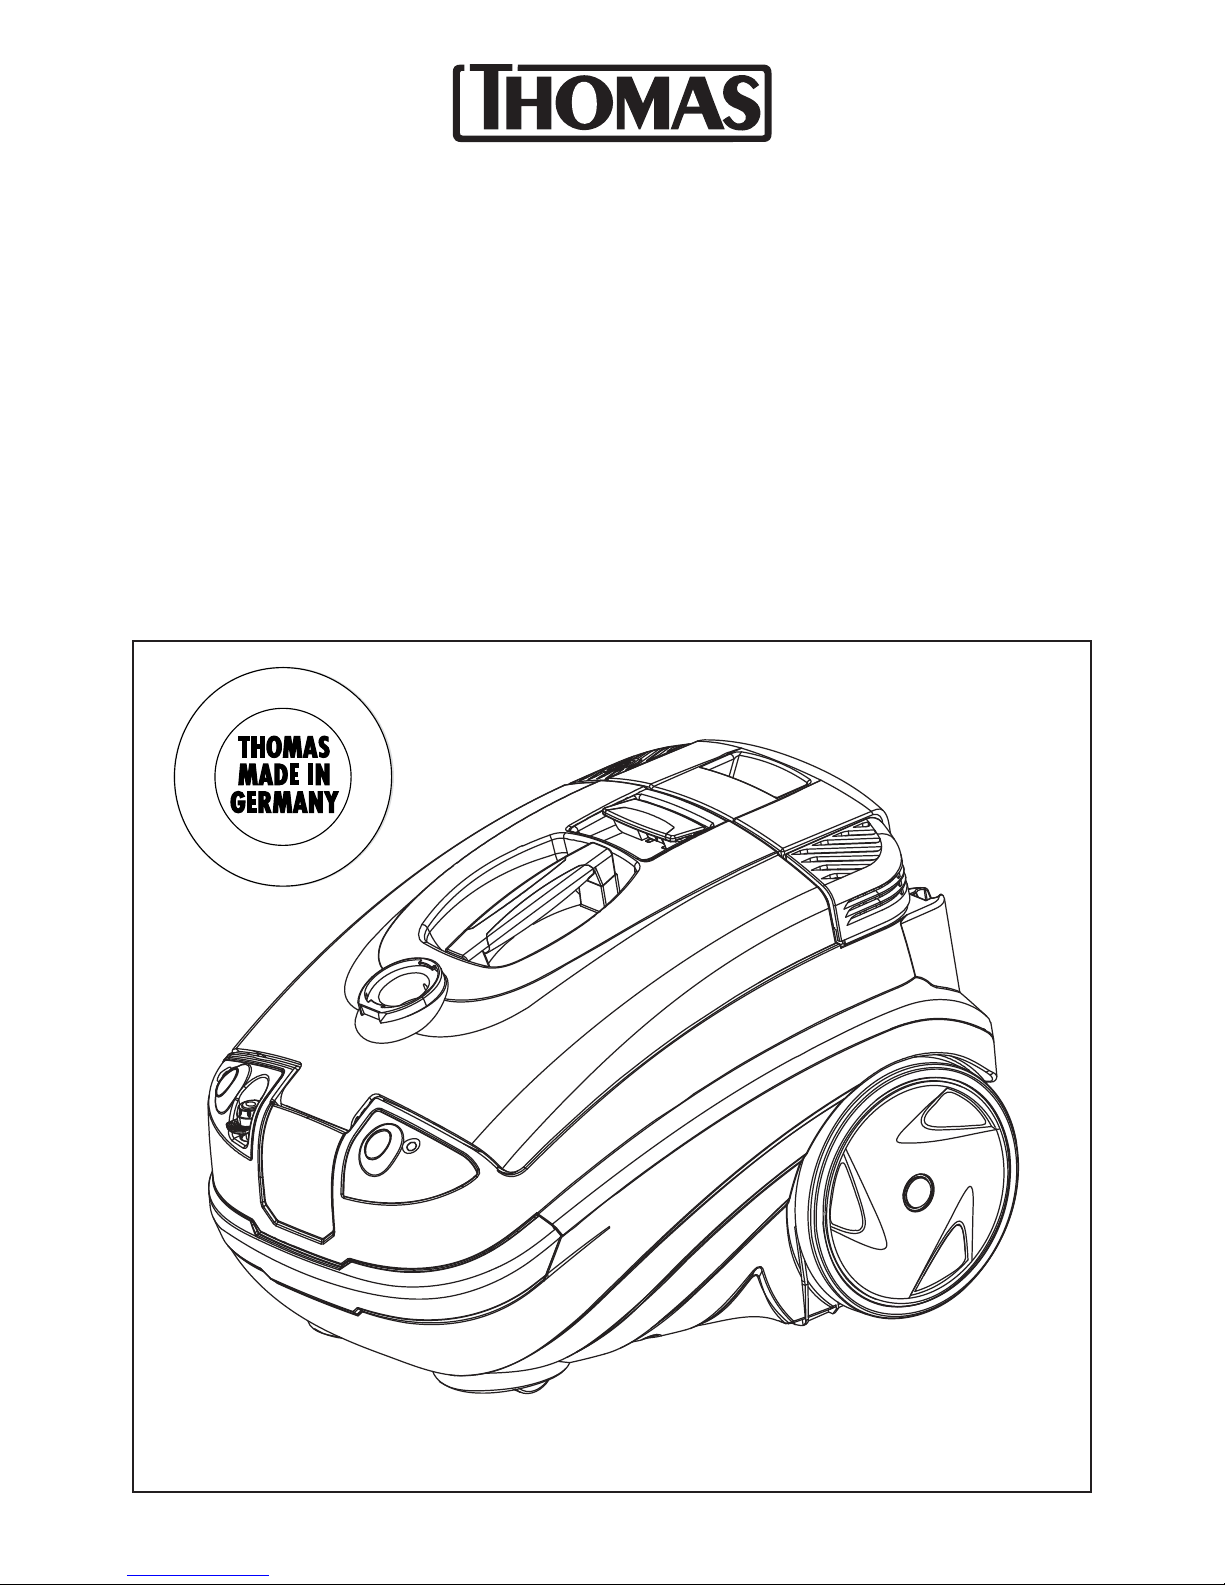
… zum Erwerb des THOMAS HYGIENE PLUS T2, einem
Waschsauger der Extraklasse, mit dem Sie Ihre Teppich-,
Hartböden und Polstermöbel reinigen können.
Mit dem Kauf Ihres neuen THOMAS HYGIENE PLUS T2
haben Sie sich für ein exclusives Produkt entschieden,
das neue Maßstäbe in der Haushaltsreinigung setzt.
Ein außergewöhnlicher Hochleistungs-Staubsauger mit souveräner
Technologie, der dafür sorgt, daß das Reinigen von unter schiedlichen
Flächen wie Hartboden, Teppich boden oder Polstermöbeln jetzt schneller, zeit sparender, gründlicher und mühe loser wird.
In seiner Funktion als Staubsauger eignet er sich zur Beseitigung von
trockenem Schmutz und Staub und beim Naßsaugen von Flüssigkeiten auf Wasser basis. Beim Einsatz als Waschsauger zur Grundreinigung Ihrer Teppich-, Hartböden und Polster möbel zeigt er seine
ganze Stärke.
Bitte lesen Sie die Gebrauchsanweisung aufmerksam, damit Sie mit
Ihrem Gerät schnell vertraut werden und seine Vielseitigkeit im vollen
Umfang nutzen können. Ihr neues THOMAS Gerät dient Ihnen viele
Jahre lang, wenn Sie es sachgerecht be handeln und pflegen. Wir wünschen Ihnen viel Freude beim Gebrauch.
Ihr THOMAS-Team
Der Umwelt zuliebe
Verpackungsmaterial und ausgediente Geräte nicht einfach wegwerfen!
Geräteverpackung:
● Der Verpackungskarton kann der Altpapier-Sammlung
zugeführt werden.
● Den Kunststoffbeutel aus Polyethylen (PE) zur
Wiederverwertung an Sammelstellen abgeben.
Verwertung des Gerätes nach dem Ende seiner
Lebenszeit:
● Entsorgen Sie das Gerät nach den örtlichen Vorschriften und
schneiden Sie vorher den gezogenen Netzstecker ab.
Das Symbol auf dem Produkt oder seiner Verpackung weist
darauf hin, dass dieses Produkt nicht als normaler Haus-
haltsabfall zu behandeln ist, son dern an einem Sammelpunkt für das Recycling von elektrischen und elektronischen Geräten
abgegeben werden muss.
Durch Ihren Beitrag zum korrekten Entsorgen dieses Produkts schützen
Sie die Umwelt und die Gesundheit Ihrer Mit menschen. Umwelt und
Gesundheit werden durch falsches Entsorgen gefährdet.
Weitere Informationen über das Recycling dieses Produkts erhalten
Sie von Ihrem Rathaus, Ihrer Müllabfuhr oder dem Geschäft, in dem
Sie das Produkt gekauft haben.
Vor der ersten Inbetriebnahme
Bitte lesen Sie alle im folgenden aufgeführten Informationen aufmerksam durch. Sie geben wichtige Hinweise
für die Sicherheit, den Gebrauch und die Wartung des
Gerätes. Bewahren Sie die Gebrauchs anweisung sorgfältig auf und geben Sie diese an Nachbesitzer weiter.
Sicherheitshinweise
● Der THOMAS HYGIENE PLUS T2 dient ausschließlich der Nutzung
im Haushalt durch Erwachsene.
● Das Gerät auf keinen Fall in Betrieb nehmen, wenn:
– die Netzanschlußleitung beschädigt ist ,
– es sichtbare Schäden aufweist,
– es einmal heruntergefallen sein sollte.
● Die Spannungsangabe auf dem Typenschild muss mit der Versorgungsspannung übereinstimmen.
● Benutzen Sie das Gerät nie in Räumen, in denen feuergefährliche
Stoffe lagern oder sich Gase gebildet haben.
● Lassen Sie das Gerät im eingeschalteten Zustand nie unbeaufsichtigt
und achten Sie darauf, daß Kinder nicht am Gerät spielen.
● Dieses Gerät ist nicht dafür bestimmt durch Personen (einschließlich
Kinder), mit eingeschränkten physischen, sensorischen oder
geistigen Fähigkeiten oder mangels Erfahrung und /oder mangels
Wissen benutzt zu werden, es sei denn sie werden durch eine für
ihre Sicherheit zuständige Person beaufsichtigt oder erhielten von
ihr Anweisungen, wie das Gerät zu benutzen ist.
Kinder sollten beaufsichtigt werden, um sicherzustellen, dass sie
nicht mit dem Gerät spielen.
● Besondere Vorsicht ist geboten, wenn Sie Treppenstufen reinigen.
Stellen Sie sicher, daß das Gerät eine feste Stellung auf dem Boden
der Treppe hat und sorgen Sie dafür, daß der Schlauch nicht über
seine bestehende Länge hinaus angespannt wird. Stellen Sie das
Gerät während des Betriebes nie hochkant auf.
● Benutzen Sie im Betrieb den HYGIENE PLUS T2 nicht für
Trockensaugen, wenn die Hygienebox oder der AQUAFilter nicht entsprechend der Gebrauchsanleitung montiert
ist. Das Gerät kann Schaden nehmen.
● Stellen Sie sich nicht auf das Gerät und überdehnen oder knicken
Sie das Schlauchsystem nicht.
● Düsen und Rohre dürfen (im Betriebszustand) nicht in Kopfnähe
kommen, z.B. Gefahr für Augen und Ohren.
● Nie den Reinigungsstrahl auf Menschen oder Tiere, auf Steckdosen
oder elektrische Geräte richten.
● Personen mit empfindlicher Haut sollten direkten Kontakt mit
der Reinigungslösung vermeiden, bei Kontakt mit Schleimhäuten
(Auge, Mund etc..), ist sofort mit viel Wasser nachzuspülen.
● In Naßräumen kein Verlängerungskabel verwenden.
● Achtung! Diese Geräteausführung ist nicht zum Absaugen
gesundheitsgefährdender Stoffe sowie lösungsmittelhaltiger
Flüssigkeiten wie z.B: Lackverdünnung, Öl, Benzin und ätzender
Flüssigkeiten geeignet.
● Saugen Sie keine Feinststäube, wie Toner oder Ruß auf, um
die Filterleistung des Gerätes nicht zu beeinträchtigen und
um Schäden zu vermeiden.
● Nach dem Naß-/Feuchtbetrieb Behälter entleeren. Chemikalien
(Reinigungsmittel für Hart- und Teppichböden) gehören nicht in die
Hände von Kindern.
● Nur bei Verwendung der Original-THOMAS-Reinigungsmittel
können Gerätefunktionen und Reinigungswirkung gewährleistet
werden.
● Vor Reinigung / Pflege / Befüllen / Entleeren sowie
bei Störungen, alle Schalter ausschalten und
Netzstecker herausziehen.
● Gerät nicht im Freien stehenlassen und keiner direkten Feuchtigkeit
aussetzen oder in Flüssigkeiten eintauchen, und nicht direkt neben
Heizaggregaten aufbewahren.
● Schäden am THOMAS HYGIENE PLUS T2, am Zu behör
oder an der Netzanschlußleitung (Sonderleitung erforderlich)
niemals selbst reparieren, sondern nur durch eine autorisierte
Kundendienststation instand setzen lassen, denn Veränderungen
am Gerät können Ihre Gesundheit gefährden. Sorgen Sie dafür,
daß nur Orginal-Ersatzteile und Zubehör verwendet werden.
● Beachten Sie außerdem die unter den Einzelkapiteln
aufgeführten „Informationen für den Ge brauch“.
● Nutzen Sie den vollen Gegenwert durch richtigen
Gebrauch.
● Der Hersteller haftet nicht für evtl. Schäden, die durch nicht
bestimmungsgemäßen Gebrauch oder falsche Bedienung
verursacht werden.
● Niemals den Stecker am Kabel aus der Steckdose ziehen, sondern
ausschließlich am Stecker.
● Sorgen Sie dafür, daß die Netzanschlußleitung weder Hitze noch
chemischen Flüssigkeiten ausgesetzt ist und nicht über scharfe Kanten oder Oberflächen gezogen wird.
Page 5
Trockensaugen
!
1.
2.
1.
2.
Power On/Off
+
Variable Power MIN/MAX
13b
etc.
Trockensaugen · Dry vacuuming · Kuru Süpürme · Odkurzanie ·
Aspirarea uscată
·
Сухая уборка с помощью системы АКВА-фильтра
4
1.
2.
1.
2.
Power On/Off
+
Variable Power MIN/MAX
Flüssigkeiten saugen · Sucking up liquids · Sıvıların Emilmesi · Zbieranie płynów · Aspirarea de lichide · Сбор жидкостей
햲 햳
햴
햴
햵
햵
optional AQUA-Filter
햲햳
햲햳
Page 6

5
Pump
On/Off
Power On/Off
+
Variable Power MIN/MAX
1.
2.
1.
2.
Waschsaugen
Waschsaugen · Wash cleaning · Yıkama · Odkurzanie na mokro · Aspirarea cu spălare
·
Влажная уборка
Page 7
6
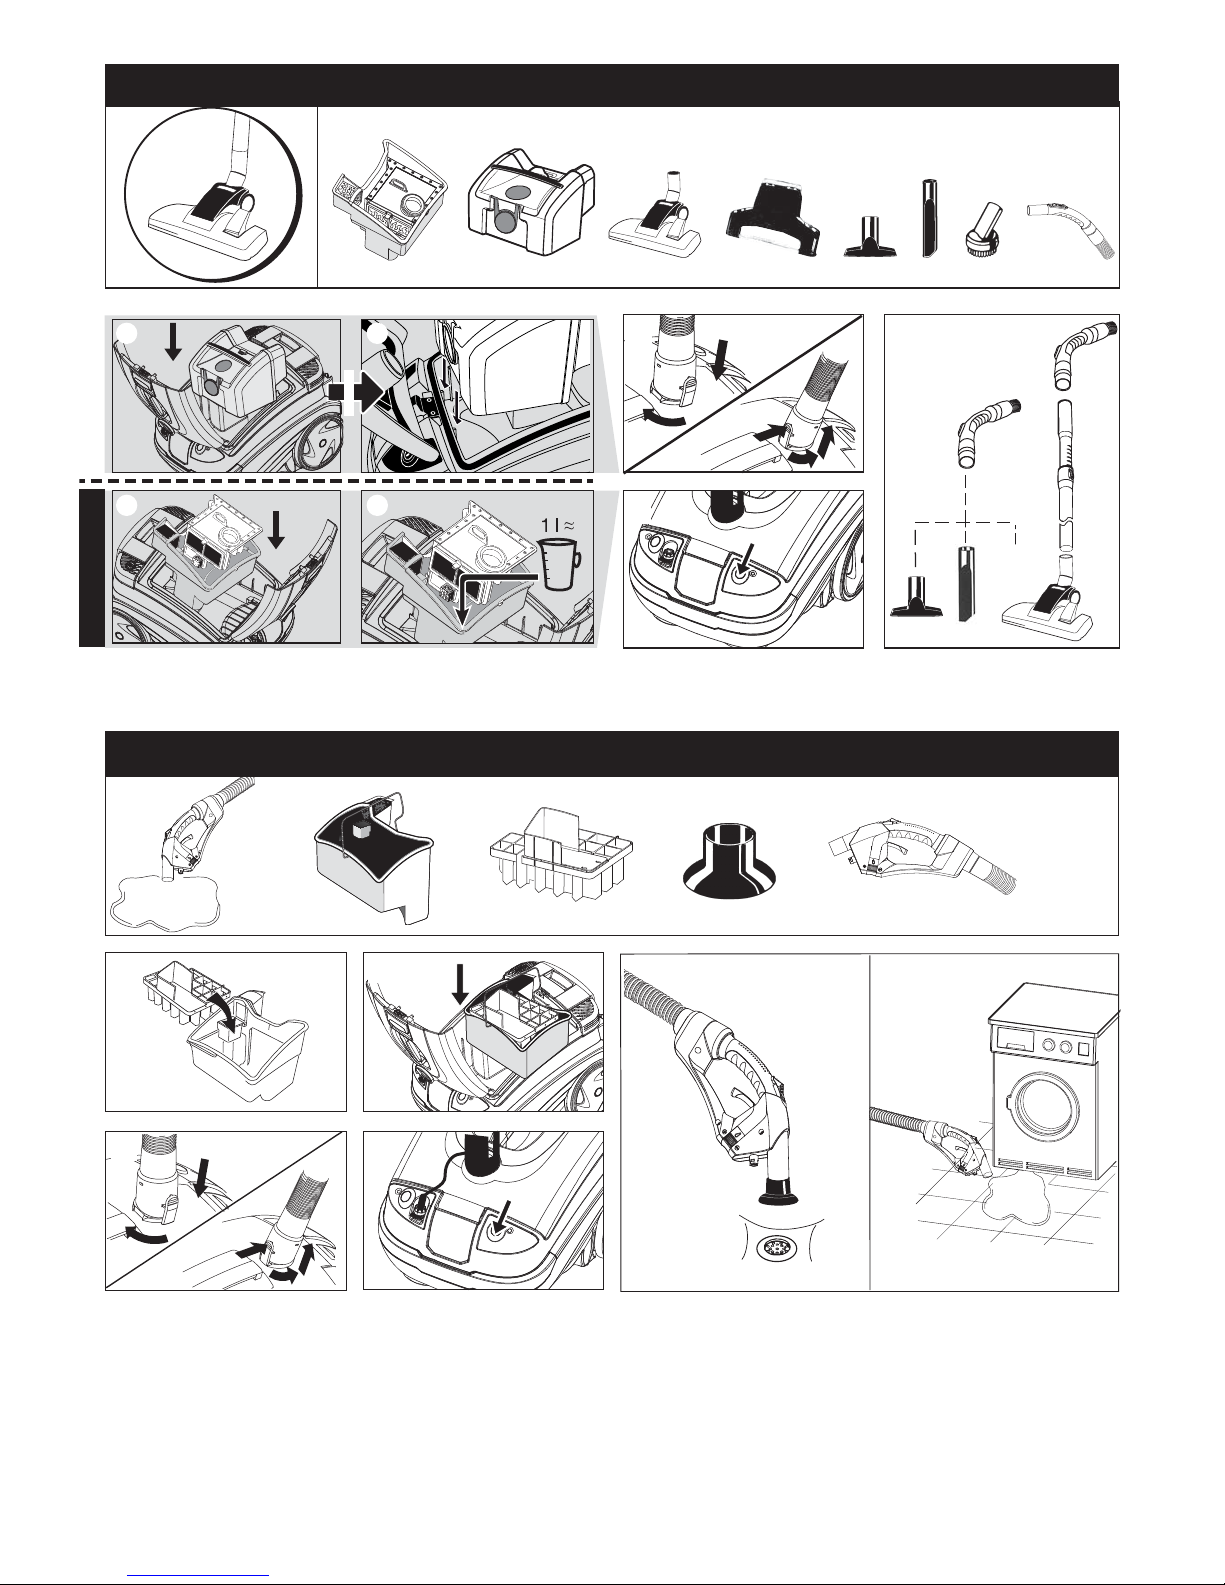
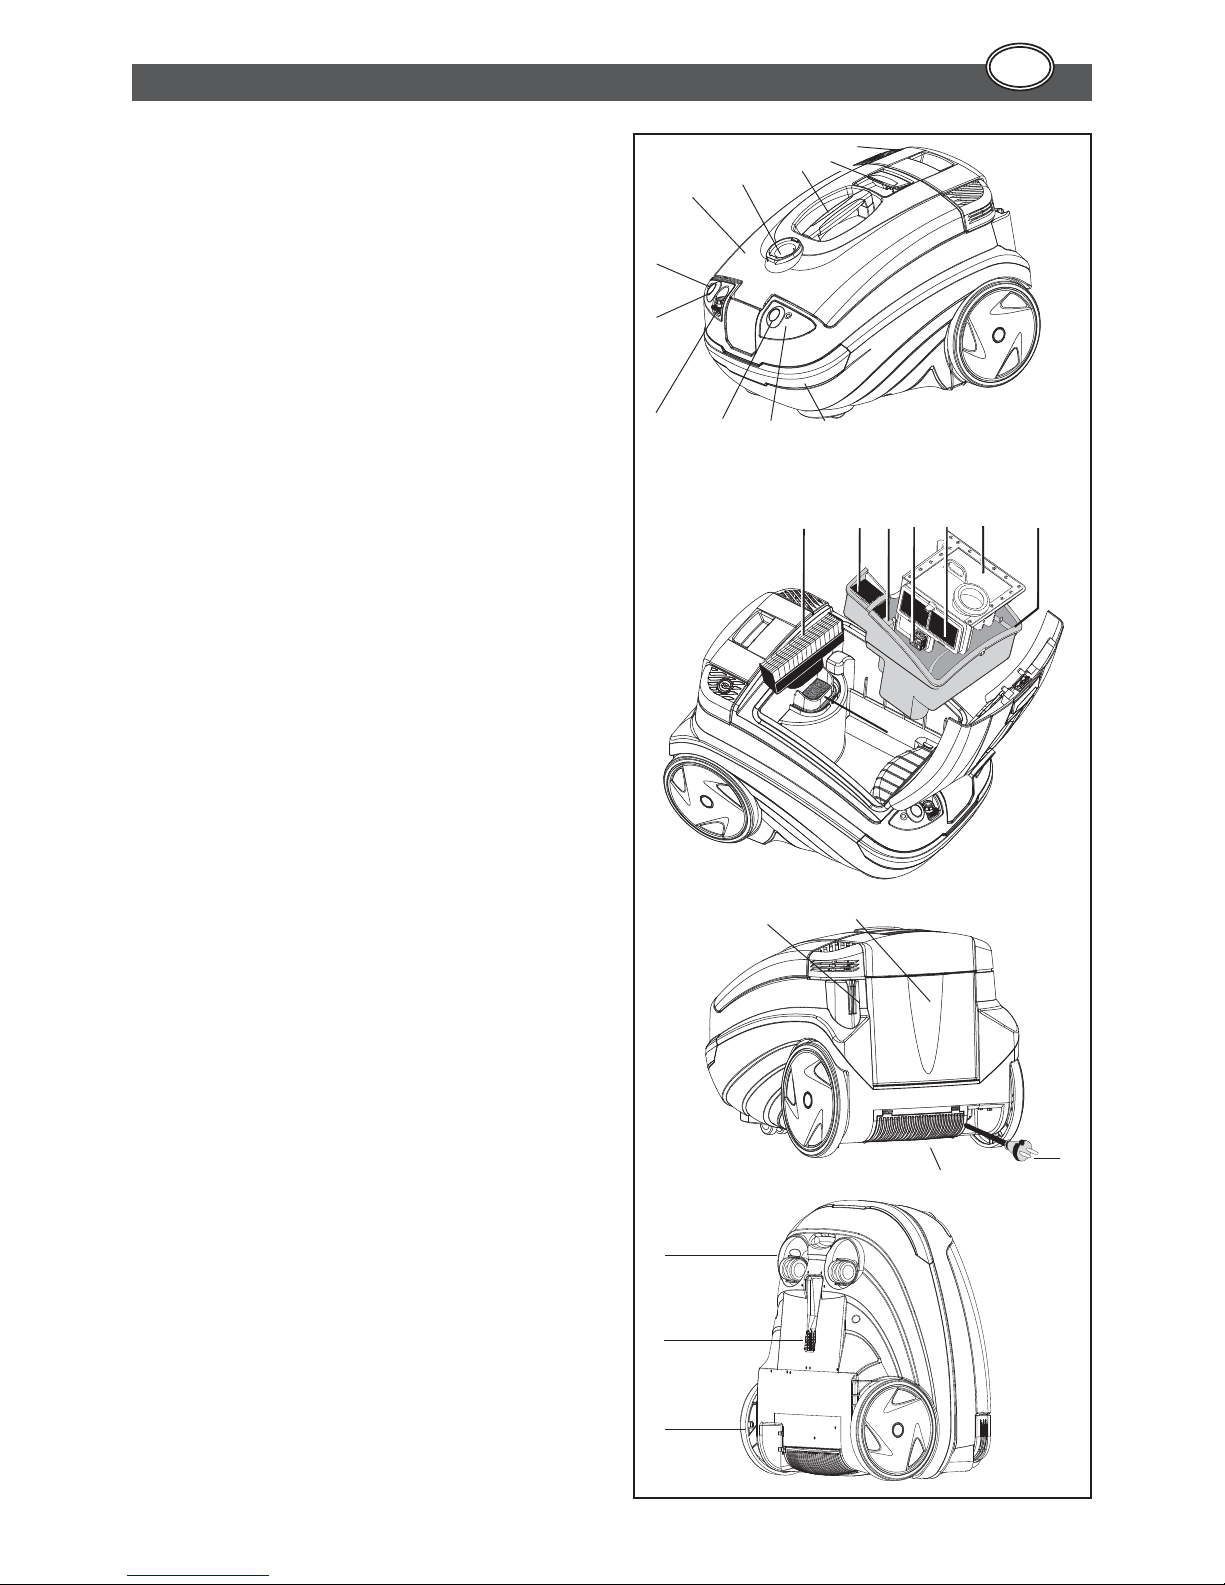
1. Gehäusedeckel
2. Ansaugstutzen
3. Tragegriff
4. Deckelver- und entriegelung
5. Taste Kabelaufwicklung
6. Ein-/Ausschalter Pumpe
7. Leuchtanzeige Pumpe
8. Schnellkupplung Sprühleitung
9. Geräte Ein-Ausschalter inkl. elektronischer
Saugkraftregelung (One-Touch-Taste)
10. Leuchtanzeige elektr. Saugkraftregulierung
11. Möbelschutzleiste
12. AQUA-Filter (12) mit Schaumstofffilter (12a)
und Ansaugfilter (12b)
13. Schmutzwasserbehälter (13) mit Naßfilter (13a) und
Schwimmer (13b)
14. HEPA- Filter
15. Motorschutzfilter
16. Saugrohrhalterung (Parkstellung)
17. Frischwassertank mit abnehmbarem Deckel
18. Netzstecker
19. MKA-Microfilter
20. Kleine bewegliche Laufräder
21. Saugrohrhalterung (Parkstellung)
22. Große Laufräder
Erstes Kennenlernen
3
4
5
1
2
7
6
8
20
21
22
9 10 11
16 17
18
19
D
15
13b
1213a 12a12b14 13b 13
Page 8

59
Page 9

7
Saugschlauch (23) mit integrierter Sprühleitung, Rohrbogen mit
integriertem Absperrventil (24),
Wassermengenregelung (25) u.
mech. Saugkraftregulierung (26)
Saugschlauch (27) für Trockensaugen inkl. Handgriff mit
mech. Saugkraftregulierung
(28)
Höhenverstellbares Teleskopsaugrohr mit Parkhalterung
Teppich- und Hartbodendüse
incl. Parkettschuh
(speziell für die Parkett-Pflege)
Polsterdüse
(Stühle, Sofa, Auto)
Fugendüse
(Fugen, Rillen, Ritze)
Saugpinsel
(Möbel, Telefon, Tastatur)
Siphondüse (Abflussreinigung
von Waschbecken und Dusche)
HEPA- Filter *
AQUA-Filter kpl. (12)
mit Schaumstofffilter (12a)
und Ansaugfilter (12b) *
Hygienebox (12) zur hygienischen Aufnahme und
Entsorgung des HEPABeutels
Schmutzwasserbehälter
(13) inkl. Nassfilter (13a)
und Schwimmer (13b)*
Anti-Schwappeinsatz*
Teppich-Sprüh-Düse mit
klapp- und abnehmbarem
Hartbodenadapter (HBA)
inkl. Sprühleitung
Polster-Sprüh-Düse
inkl. kurzer Sprühleitung
Wischadapter + Microfaserpad für Laminat/
Parkett (weiss, 2 Stück) +
Microfaserpad für Fenster
(grau, 1 Stück)
THOMAS ProTex TeppichReinigungskonzentrat,
THOMAS ProFloor
Hartboden-Reinigungskonzentrat
2 Rohrclipse für Sprühschlauchbefestigung am
Saugrohr
Zubehör
Reinigungsmethode
Anwendungsfall Zubehör
Filterung mit
AQUA-Filter
Filterung mit
Hygiene-Box
Staubsaugen • Teppich und Hartboden Teppichdüse m/o Parkettschuh Schmutzwasserbehälter
(13) inkl. Naß filter (13a) mit
AQUA-Filter kpl. (12) +
HEPA-Filter (14)
+ Motorschutzfilter (15)
+ 1 Liter Wasser einfüllen
Hygienebox mit
HEPA-Beutel
• Polster, Kfz etc. Polsterdüse
• Fugen, Ecken, Kfz, allgemein schwer
zugängliche Stellen
Fugendüse
Waschsaugen • Teppichtiefenreinigung +
Fleckentfernung
Teppichsprühdüse
Schmutzwasserbehälter (13)
inkl. Naßfilter (13a)
+ Antischwappeinsatz
+ Motorschutzfilter (15)
Schmutzwasserbehälter (13)
inkl. Naßfilter (13a)
+ Antischwappeinsatz
+ Motorschutzfilter (15)
• Polstertiefenreinigung +
Fleckentfernung
Polstersprühdüse
• Steinbodenreinigung Teppichsprühdüse
+ Hartbodenadapter
• Parkett- und Laminat-Reinigung Teppichsprühdüse + Wischadapter
+ Microfaserpad
• Fenster putzen Teppichsprühdüse + Wischadapter +
Microfaserpad + kurzer Sprühschlauch
Naßsaugen • Aufsaugen von Flüssigkeiten auf Was-
ser-basis wie Saft, Kaffee, Wasser etc.
– Teppich
– Steinboden (Fliesen, PVC)
– Parkett und Laminat
Teppichsprühdüse
Teppichsprühdüse + Hartboden-
adapter
Teppichsprühdüse + Wischadapter
+ Pad
Schmutzwasserbehälter
inkl. Naßfilter (13a)
+ Antischwappeinsatz
+ Motorschutzfilter (15)
Schmutzwasserbehälter
inkl. Naßfilter (13a)
+ Antischwappeinsatz
+ Motorschutzfilter (15)
Tabelle Anwendungs-/Einsatzmöglichkeiten
*) im Gerät verbaut
12
26
23
25
24
13b
13a
13
28
27
12
12a
12b
Page 10

8
Staubsaugen mit AQUA-Filter
Informationen für den Gebrauch
● Benutzen Sie den HYGIENE PLUS T2 nicht für
Trockensaugen, wenn das AQUAFILTER-System
oder die Hygiene-Box nicht entsprechend der
Ge brauchsanleitung montiert ist. Das Gerät kann
sonst Schaden nehmen.
● Saugen Sie im Trockensaugbetrieb keine großen
Mengen Flüssigkeiten auf.
● Saugen Sie keine großen Mengen von Feinstaub,
z.B. Kakaopulver, Mehl usw.
AQUA-Filter startklar machen
Ab Werk ist Ihr HYGIENE PLUS T2 für den Trockensaugbetrieb bereits
vorgerüstet.
G Gehäusedeckel durch Anheben der Deckelent riegelung öffnen.
AQUA-Filter am Griff aus dem Schmutzwasserbehälter ent-
nehmen. 1 Liter klares Wasser in den Schmutz wasserbehälter
füllen.
D AQUA-Filter kpl. hinter die beiden Führungsrippen des
Schmutzwasserbehälters bis auf Anschlag einsetzen. Darauf
achten, daß die umlaufende Dichtung des AQUA-Filters an
der Innenseite des Schmutzwasserbehälters anliegt und der
Naßfilter montiert ist.
Saugschlauch für Trockensaugen (27) anschließen und Teleskop-Saugrohr montieren. Das gewünschte Zubehör anbringen.
Um eine optimale Filterwirkung zu erzielen, empfehlen wir,
nach ca. 40–60 Minuten Dauerbetrieb oder dann, wenn sich
sehr viele Wassertropfen an der Deckelunterseite zeigen, den
AQUA-Filter kurz mit klarem Wasser auszuspülen und das
Wasser im Schmutzwasserbehälter zu wechseln.
Bei größeren Staubmengen (z. B. Intensivreinigung oder Erst-
einsatz) muss der AQUA-FILTER ggf. frühzeitiger ausgespült
und das Wasser gewechselt werden.
Aus Hygienegründen das AQUAFILTER-Sys tem nach
jedem Gebrauch entleeren und reinigen. Schmutziges
Wasser und feuchte Teile begünstigen die Vermehrung
von Bakterien und Pilzen (s. Reinigung und Pflege).
Staubsaugen mit Hygiene-Box
Informationen für den Gebrauch
● Benutzen Sie den HYGIENE PLUS T2 nicht für Trockensaugen, wenn die Hygienebox nicht entsprechend
der Ge brauchsanleitung montiert ist. Das Gerät
kann sonst Schaden nehmen.
● Saugen Sie im Trockensaugbetrieb keine Flüssigkeiten auf.
● Saugen Sie keine großen Mengen von Feinstaub,
z.B. Kakaopulver, Mehl usw.
Gerät startklar machen:
Schmutzwasserbehälter herausnehmen, Hygienebox incl. HEPA-Beutel einsetzen.
Saugschlauch für Trockensaugen (27) anschließen und Teleskop-Saugrohr montieren. Das gewünschte Zubehör anbringen.
Allgemeine Hinweise
Saugschlauch anschließen
– Anschlussstück des Saugschlauches in den Ansaugstutzen stecken
und bis zum Einrasten nach hinten drehen.
– Sprühleitung in die Schnellkupplung schieben und einrasten .
Saugschlauch abnehmen
– Taste am Anschlussstück drücken. Anschlussstück eine
1
⁄4 Drehung
zur Seite drehen und herausziehen.
– Sprühleitung lösen; dazu Taste der Schnellkupplung drücken.
Elektronische Saugkraftregelung
Gerät durch leichten Druck auf die Power ON/OFF Taste ein-/ausschalten.
– Taste kurz gedrückt:
Gerät schaltet sich ein; Leistung, 900 Watt (ECO-Stufe);
Leuchtanzeige leuchtet grün
– Taste gedrückt lassen:
stufenlose elektronische Saugkraftregelung
zwischen 650 und 1600 Watt
Leuchtanzeige grün: MIN. 650 Watt bis 1125 Watt;
Leuchtanzeige gelb: 1125 Watt bis MAX. 1600 Watt.
Beim jeweiligen Erreichen der MIN bzw. MAX Leistung erlischt die
Leuchtanzeige kurz.
– Taste erneut kurz gedrückt:
Gerät schaltet sich aus.
Das AQUAFILTER-System filtert besonders gut bei einer
Leistung zwischen 900 W (ECO-Stufe) und MAX 1600 W.
Die MIN-Leistung (650 W) daher nur kurzzeitig wählen
(z.B. beim Absaugen von Gardinen).
Mechanische Saugkraftregelung
Mit der mech. Saugkraftregulierung (Nebenluftschieber) lässt sich die
Saugkraft ebenfalls verringern.
Nebenluftschieber geschlossen = volle Saugkraft,
Nebenluftschieber offen = verringerte Saugkraft.
Bei einer elektronischen Saugkraftregulierung und beim
Wasch- oder Wassersaugen muss der Nebenluftschieber
immer geschlossen sein.
Mechanische
Sprühmengenregulierung
Hinweis: findet nur Anwendung
beim Waschsaugen.
Mit der mech. Sprühmengenregulierung am Handgriff des Saugschlauchs können Sie mittels des
Stellrädchens die Sprühmenge von
250 ml (min.) bis 800 ml (max.) stufenlos einstellen.
Parkstellung
– Saugrohr komplett mit Düse und Schlauch in die Saugrohrhalte-
rung an der Gehäuserückseite einhängen.
Wird das Gerät hochkant weggestellt, das Saugrohr an der
Geräteunterseite einhängen (nur im leeren Zustand möglich).
Zubehöraufbewahrung
• Im Trockensaugbetrieb kann der Frischwassertank als Zubehörbox
genutzt werden.
800 ml
max.
250 ml
min.
Page 11

9
Filterwechsel und -Entsorgung:
Hygienebox entnehmen, Ansaugöffnung mit Klappdeckel schließen.
Vorderdeckel über Abfalltonne öffnen und Filter entsorgen. Neuen
HEPA- Beutel einsetzen und Vorderdeckel verschließen, Klapp deckel
der Ansaugöffnung öffnen, Hygienebox wieder einsetzen.
1.
2.
3.
Flüssigkeiten saugen
Informationen für den Gebrauch
Mit dem THOMAS HYGIENE PLUS T2 können Sie
verschüttete, un gefährliche Flüssigkeiten auf Wasserbasis
(z. B. Wasser, Kaffee o.ä.) aufsaugen.
● Achtung! Benzin, Verdünnung, Heizöl, usw. können durch Ver-
wirbeln mit der Saugluft explosive Dämpfe und Gemische bilden.
● Azeton, Säuren und Lösungsmittel können die am Gerät verwen-
deten Materialien angreifen. Putz- und Schmutzwasser können
unbedenklich aufgesaugt werden.
● Nach dem Saugen von Flüssigkeiten den Schmutz wasserbehälter
und alle verwendeten Teile reinigen und trocknen lassen.
● Niemals ohne Schmutzwasserbehälter Flüssig keiten
aufsaugen.
● Ihr THOMAS HYGIENE PLUS T2 ist nicht dafür geeignet, größere
Flüssigkeitsmengen aus Behältnissen oder Becken ab zusaugen.
● Nach jedem Naßbetrieb das Gerät entleeren und reinigen.
Schmutziges Wasser und feuchte Teile begünstigen die Vermehrung von Bakterien und Pilzen (s. Reinigung und Pflege).
Gerät startklar machen:
Hygienebox aus dem Gerät nehmen bzw. AQUA-Filter am Griff aus
dem Schmutzwasserbehälter ziehen und Antischwappeinsatz einsetzen sowie HEPA- Filter aus dem Gerät nehmen.
Antischwappeinsatz und Schmutzwasserbehälter in das Gerät einsetzen. Achten Sie darauf, daß der Naßfilter (13a) sowie der Motorschutzfilter (15) eingesetzt sind.
Saugschlauch anschließen.
Wählen Sie eine geeignete Düse und stecken Sie diese auf das Saugrohr bzw. den Handgriff auf.
Netzstecker aus dem Gerät herausziehen und anschließen.
Gerät einschalten und max. Saugkraft einstellen.
Achten Sie darauf, daß die mechanische Saugkraft regulierung (26)
ganz geschlossen ist.
Damit bei Arbeitsunterbrechung ein Zurücklaufen der im Saugrohr
befindlichen Flüssigkeit vermieden wird, Saugrohr und -schlauch noch
bei laufendem Motor einige Sekunden schräg nach oben halten. Erst
danach das Gerät ausschalten.
Der Schwimmer im Schmutzwasserbehälter unterbricht auto-
matisch das An saugen, wenn der Schmutzwasserbehälter
gefüllt ist (deutlich höhere Drehzahl des Motors wird hörbar).
Gerät ausschalten, Netzstecker ziehen und Schmutz wasser-
behälter entleeren.
Reinigung und Pflege
Wartungs- und Reinigungsarbeiten immer nur bei ausgeschaltetem
Gerät und gezogenem Netzstecker durchführen.
Nach dem Flüssigkeiten saugen
Um das Gehäuse des Gerätes zu pflegen, verwenden Sie bitte
ein feuchtes, weiches Tuch.
Keine scheuernden Reinigungsmittel oder Lösungsmittel
verwenden.
J Schmutzwasserbehälter entleeren.
Antischwappeinsatz, Schmutzwasserbehälter und Naßfilter mit
klarem, evtl. warmen Wasser reinigen.
I Motorschutzfilter auf Verschmutzungen überprüfen und
ge geben falls unter fließendem Wasser reinigen, bei Bedarf
erneuern.
Schwimmer (13b) im Schmutzwasserbehälter stets sauber und
gangbar halten. Er unterbricht das Ansaugen, wenn der
Schmutzwasserbehälter voll ist.
Spritzwasser im Saugraum mit weichem Tuch abtrocknen.
Verunreinigungen am Ansaugstutzen und an der Innenseite des
Gehäusedeckels entfernen.
● Zum leichten Reinigen kann der Gehäusedeckel vom Gerät abgenommen werden.
Dazu den Deckel öffnen und senkrecht aufschwenken. Den Deckel
nach vorne drücken, bis dieser aus dem Scharnier rutscht. Anschließend den Deckel nach oben wegheben.
● Zum Befestigen den Gehäusedeckel senkrecht einsetzen und
schließen. Der Deckel rastet automatisch im Scharnier ein.
Nach der Reinigung das Gerät und Zubehörteile gut trocknen lassen.
Waschsaugen
Informationen für den Gebrauch
● Achtung! Benzin, Verdünnung, Heizöl, usw. können durch Ver-
wirbeln mit der Saugluft explosive Dämpfe und Gemische bilden.
● Azeton, Säuren und Lösungsmittel können die am Gerät verwendeten Materialien angreifen. Putz- und Schmutzwasser können
unbedenklich aufgesaugt werden.
● Nach dem Saugen von Flüssigkeiten oder Waschsaugen den
Schmutz wasserbehälter und alle verwendeten Teile reinigen und
trocknen lassen.
● Niemals ohne Schmutzwasserbehälter Waschsau-
gen oder Flüssig keiten aufsaugen.
● Ihr THOMAS HYGIENE PLUS T2 ist nicht dafür geeignet, größere
Flüssigkeitsmengen aus Behältnissen oder Becken ab zusaugen.
● Achtung! Die Pumpe nie ohne Flüssigkeit betreiben.
Page 12

10
● Nach jeder Naßreinigung das Gerät entleeren und reinigen.
Schmutziges Wasser und feuchte Teile begünstigen die Vermehrung von Bakterien und Pilzen (s. Reinigung und Pflege).
Verwenden Sie zur Sicherstellung eines einwandfreien Ergeb nisses
nur die Originalmittel.
Ihren Nachfolgebedarf an Reinigungskonzentrat erhalten
Sie bei Ihrem Fachhändler oder THOMAS Werkskundendienst.
Vor der Teppichreinigung
● Vergewissern Sie sich, daß alles, was Sie naß reinigen wollen, auch
dafür geeignet ist, z. B. keine zarten, handgewebten oder farbunechten Teppiche naßreinigen.
Zur Prüfung geben Sie etwas Reinigungsmittellösung auf einen
weißen Lappen und reiben diesen an einer weniger gut sichtbaren
Stelle auf den Teppich. Zeigen sich auf dem Lappen keine Farbspuren, kann von einer Farbechtheit ausgegangen werden.
Im anderen Fall darf der Teppich nicht naß gereinigt werden.
Haben Sie Zweifel, wenden Sie sich diesbezüglich an einen
Teppichfachhändler.
Wenn der Teppich zu einem früheren Zeitpunkt shampooniert wur-
de, kann es bei erstmaligem Gebrauch des THOMAS HYGIENE
PLUS T2 zu stärkerer Schaumbildung im Schmutz wasser behälter
kommen. Um weitere Schaumbildung zu ver meiden, geben Sie
1
⁄2
Tasse Essig in den Schmutz wasserbehälter.
Falls Schaum aus dem Luftauslaß austreten sollte, schalten Sie das
Gerät sofort ab und entleeren den Schmutzwasserbehälter.
Erhöhte Schaumbildung ist nach einmaliger Grundreinigung mit
einem THOMAS Reinigungskonzentrat ausgeschlossen, da diese
mit einem speziellen Schaumstop ausgerüstet sind.
Solange der Teppich noch feucht ist, sollten Sie ihn nicht begehen.
Während des Reinigens und danach sollte der Raum gut belüftet
werden, um eine rasche Trocknung zu ermöglichen.
Teppichreinigung
Hygienebox aus dem Gerät nehmen bzw. AQUA-Filter am Griff aus
dem Schmutzwasserbehälter ziehen und Antischwappeinsatz einsetzen sowie HEPA- Filter aus dem Gerät nehmen.
Ansaugöffnung Hygienebox mit Klappdeckel verschließen.
Antischwappeinsatz und Schmutzwasserbehälter in das Gerät einset-
zen. Achten Sie darauf, daß der Naßfilter (13a) sowie der Motorschutzfilter (15) eingelegt sind.
Frischwassertank zum Befüllen entnehmen (senkrecht nach oben herausziehen), oder einfach direkt im Gerät befüllen, dazu Frischwassertank-Deckel abheben.
Beim Befüllen darauf achten, daß keine Ver unreinigungen in den Frischwassertank gelangen, um die
Funktion des Verschluß ventils nicht zu stören.
Mit Reinigungskonzentrat und Wasser bis zur Grifflasche
auffüllen (max. 2,4 Liter).
Für die Teppichreinigung empfehlen wir THOMAS ProTex
Reinigungskonzentrat.
Anwendung und Dosierung siehe Etikett der Reinigungs-
konzentratflasche.
Handwarmes Wasser (max. 30 °C) verwenden.
Saugschlauch anschließen und Teleskop-Saugrohr montieren.
M Teppichsprüh düse mon tieren, Sprühleitung mit Schnellkupplung
am Saugrohr nach oben führen, am Absperrventil ansetzen
und durch Drehen verriegeln. Sprühleitung mit den 2 Rohrclipsen am Saugrohr befestigen.
J Netzstecker aus dem Gerät herausziehen und anschließen.
Gerät einschalten und max. Saugkraft einstellen. Pumpe einschalten.
Das Sprühextraktions-System
● Reinigungslösung mit Druck tief einsprühen
● Schmutz lösen und fasertief auswaschen
● Schmutzwasser kraftvoll absaugen und Teppichflor wieder
aufrichten.
Alles in einem Arbeitsgang.
Absaugen und
Aufrichten
Arbeitsrichtung
Einsprühen
Saugrohr
Druckleitung
Lösen und Auswaschen
쑸
Sprühleitung
Die Kontrolllampen leuchten auf.
Den Hebel des Absperrventils (24) drücken, bis Reinigungs-
flüssigkeit austritt und die auf dem Teppich aufliegende Düse
in gerader Bahn über den Teppich ziehen. Sprühmenge
kann am Handgriff mittels Stellrädchen stufenlos eingestellt
werden. Am Ende einer Bahn oder bei Unterbrechungen den
Ventilhebel loslassen, um den Sprühstrahl zu stoppen. Wenn die
aufgesprühte Flüssigkeit abgesaugt ist, die Düse anheben und
mit leichter Überlappung eine neue Bahn beginnen. So kann
Streifen für Streifen die gesamte Fläche behandelt werden.
Sollten auf den gereinigten Bahnen noch Flüssigkeitsspuren
zurückbleiben, können diese Stellen ohne zu Sprühen nochmals
abgesaugt werden.
Achten Sie darauf, daß die mechanische Saugkraft regulierung
(26) ganz geschlossen ist.
Bei stark verschmutzten Stellen können Sie schon bei der
Vorwärtsbewegung der Teppich-Sprühdüse Reini gungs flüssigkeit auftragen. Auch läßt sich eine Vorbehand lung durchführen, indem Sie nur die Pumpe in Betrieb nehmen.
Achten Sie darauf nicht zu viel Flüssigkeit zu verteilen, weil hierdurch
Wellen oder Beulen im Teppich entstehen können, die sich erst nach
längerem Trocknungsvorgang wieder zurückbilden.
Um eine Unterbrechung des Saugvorganges zu vermeiden, Schmutzwasserbehälter entleeren, nachdem eine komplette Reinigungsmittelfüllung aus dem Frischwassertank aufge braucht wurde.
Bei Nichtbeachtung des o.g. Hinweises unterbricht der
Schwimmer im Schmutzwasserbehälter automatisch das
An saugen, wenn der Schmutzwasserbehälter gefüllt ist (deutlich
höhere Drehzahl des Motors wird hörbar).
Gerät ausschalten, Netzstecker ziehen und Schmutz wasser-
behälter entleeren.
Hartbodenreinigung
Den Hartbodenadapter an der
Teppich-Sprühdüse umklappen
und durch Schieberbetätigung
sichern.
Mit diesem System können Sie
Ihre Hartbodenbeläge wie Fliesen,
Steinböden, PVC reinigen und im
gleichen Arbeitsgang trocknen.
Vorgehensweise siehe Teppichreinigung.
Zur Hartbodenreinigung empfehlen wir THOMAS ProFloor
Reinigungskonzentrat.
2.
1.
Page 13

11
Unterhaltsreinigung von glatten Bodenbelägen wie
z.B. Linoleum, PVC, Fliesen, polierten Steinböden und
Laminatböden mit dem Microfaserpad
– Allgemeine Hinweise:
Die richtige Bodenpflege ist ein wichtiger
Bestandteil unserer Garantiebestimmungen !
Spezielle Pflegehinweise des Bodenbelag-
Herstellers sind unbedingt zu beachten.
Bei der Reinigung und Pflege mit aggressiven Universalreinigern kann
der Oberflächenschutz geschädigt oder zerstört werden.
Die Unterhaltsreinigung erfolgt durch Staubsaugen oder durch nebelfeuchtes Wischen.
Nebelfeuchtes Wischen bedeutet: Der Boden muss nach 3-5 Minuten
komplett trocken sein. Diese Methode bei Laminatböden nur anwenden, wenn der Hersteller dies empfiehlt.
Microfaserpad vor dem ersten Gebrauch waschen, um Rückstände,
die durch den Fertigungsprozess entstehen, zu entfernen.
Zur Unterhaltsreinigung von glatten Bodenbelägen wie Linoleum,
PVC, Fliesen, polierten Steinböden und Laminatböden empfehlen wir
THOMAS ProFloor Reinigungskonzentrat.
Demontage/Montage:
1.
2.
3.
5.
4.
6.
Demontieren Sie den klappbaren Hartbodenadapter von der Teppich-Sprühdüse, indem Sie den Schieber nach oben ziehen und dann
den roten Sperrriegel der Düse nach innen drücken. Den Hartbodenadapter aus seiner Scharnierung lösen und abnehmen.
Die Montage des Wischadapters erfolgt in umgekehrter Reihenfolge.
Das Microfaserpad auf die Leiste kletten, so dass der Saugkanal der
Düse offen / frei bleibt.
250 ml
min.
Wassermengenregler (25) auf
„min" stellen. Sprühvorgang für
2–3 Sekunden auslösen und
Microfaserpad (weiß) anfeuchten.
Eine Durchnässung der Oberfläche muss generell vermieden
werden, da unter Umständen der
Kantenbereich der Parkett- bzw.
Dielenelemente keinen ausreichenden Feuchtigkeitsschutz besitzt.
Fensterreinigung
Den Wischadapter an der Teppich-Sprühdüse anbringen. Montage
siehe Unterhaltsreinigung von glatten Böden.
Das Microfaserpad für Fensterreinigung (grau) an die Leiste kletten.
Mit diesem System können Sie Ihre Fenster- und Glasflächen reinigen
und im gleichen Arbeitsgang trocknen.
Vorgehensweise siehe Teppichreinigung
Polsterreinigung
Zur Reinigung von Polstermöbeln, Autositzen o.ä. verwenden Sie die
Polstersprühdüse. Diese auf den Handgriff aufschieben. Den Sprüh-
schlauch am Absperrventil befestigen.
Achten Sie bei Polstern darauf, daß nicht zuviel Flüssigkeit aufgetragen wird, da je nach Unterbau mit einer längeren Trocknungszeit zu
rechnen ist. Mengenregulierung am Handgriff.
Vorgehensweise siehe Teppichreinigung
Zur Polsterreinigung empfehlen wir THOMAS ProTex Reinigungskonzentrat.
Reinigung und Pflege
Wartungs- und Reinigungsarbeiten immer nur bei ausgeschaltetem
Gerät und gezogenem Netzstecker durchführen.
Nach dem Trockensaugen
– Hygienebox kann – bei Bedarf – gereinigt werden.
Dazu HEPA- Beutel entnehmen, Aktivkohlefilter demontieren.
Die Hygienebox kann nun mit einem feuchten Tuch innen gereinigt
werden, bei stärkerer Verschmutzung kann die Hygienebox auch
in der Spülmaschine gereinigt werden.
Vor Wiedereinsetzen der kompletten Filter die Hygienebox kom-
plett trocknen lassen.
Wechselintervall für den Aktivkohlefilter: alle 12 Monate,
HEPA- Beutel nach Bedarf ersetzen.
Nach dem Waschsaugen
Um das Gehäuse des Gerätes zu pflegen, verwenden Sie bitte
ein feuchtes, weiches Tuch.
Keine scheuernden Reinigungsmittel oder Lösungsmittel
verwenden.
K Frischwassertank entnehmen und entleeren.
J Schmutzwasserbehälter entleeren.
Antischwappeinsatz, Schmutzwasserbehälter und Naßfilter mit
klarem, evtl. warmen Wasser reinigen.
I Motorschutzfilter auf Verschmutzungen überprüfen und
ge geben falls unter fließendem Wasser reinigen, bei Bedarf
erneuern.
Schwimmer (13b) im Schmutzwasserbehälter stets sauber und
gangbar halten. Er unterbricht das Ansaugen, wenn der
Schmutzwasserbehälter voll ist.
Spritzwasser im Saugraum mit weichem Tuch abtrocknen.
Verunreinigungen am Ansaugstutzen und an der Innenseite des
Gehäusedeckels entfernen.
Zum leichten Reinigen kann der Gehäusedeckel vom Gerät
abgenommen werden.
Dazu den Deckel öffnen und senkrecht aufschwenken. Den
Deckel nach vorne drücken, bis dieser aus dem Scharnier
rutscht. Anschließend den Deckel nach oben wegheben.
Zum Befestigen den Gehäusedeckel senkrecht einsetzen und
schließen. Der Deckel rastet automatisch im Scharnier ein.
Zur Pflege der Pumpe und Ventile den Frischwas-
sertank mit klarem Wasser befüllen und Gerät
betriebsbereit machen.
M Sprühsystem z. B. über einem Spülbecken
in Be trieb nehmen (Hebel am Absperrventil
be tätigen).
Nach der Reinigung das Gerät und Zubehörteile gut trocknen
lassen.
B Hebel des Absperventils betätigen, um den Restdruck im
System abzubauen.
Page 14

12
Nach dem Staubsaugen
1. AQUA-Filter-System
Gehäusedeckel durch Anheben der Deckelent riegelung öffnen.
Schmutzwasserbehälter herausnehmen.
AQUA-Filter (12) am Griff aus dem Schmutzwasserbehälter ziehen
und Schmutzwasser ausgießen (z.B. in die Toilette).
Schaumstofffilter (12a) herausnehmen. Dazu den Rahmen am AQUA-
Filter leicht nach oben ziehen und dann seitlich wegklappen.
AQUA-Filter, Schaumstoffilter, Naßfilter und den
Schmutzwasserbehälter mit klarem Wasser, ohne Verwendung von Reinigungsmittel, gründlich abspülen.
Aquafilter-Einheit vor erneutem Gebrauch trocknen
lassen.
Wenn Verunreinigungen und Flusen den Ansaugfilter (12b) zugesetzt
haben, kann dieser zum leichteren Reinigen auch abgenommen werden; danach Ansaugfilter wieder montieren.
Verunreinigungen und Flusen am Ansaugstutzen
entfernen.
2. HEPA- Filter
Ihr HYGIENE PLUS T2 verfügt über einen hochwertigen HEPAFilter (14), der bei Bedarf und je nach Art Ihres Hausstaubes mehrmals
gereinigt werden kann.
Reinigung je nach Gebrauch und nachlassender Saugkraft (spätestens
jedes
1
⁄2 Jahr) vornehmen.
H HEPA-Filter aus dem Gerät nehmen und auf einer festen
Unter lage ausklopfen.
Ist die Verschmutzung stärker, kann der Filter auch mit klarem
Wasser, ohne Reinigungsmittel, abgespült und anschließend
ausgeklopft werden.
Keine Bürste zum Reinigen verwenden. Den Filter
vor dem Wiedereinsetzen gut trocknen lassen.
Beim Reinigen des HEPA-Filters die Filterlamellen nicht
be schädigen.
Wenn sich durch das Reinigen des HEPA- Filters die Saugkraft des
Gerätes nicht wesentlich erhöht, sollte der Filter gegen einen neuen
ausgetauscht werden.
3. MKA-Microfilter
Der MKA-Microfilter (19) sollte jedes halbe Jahr ausgetauscht werden.
Dazu die beiden Kunststofflaschen am Ausblasdeckel nach unten
drücken und den Ausblasdeckel wegklappen.
Den MKA-Microfilter austauschen. Ausblasdeckel wieder verschliessen.
Nachfolgebedarf / Sonderzubehör
Für Ihren THOMAS HYGIENE PLUS T2 ist ein umfangreiches Sortiment an Sonderzubehör und Nachfolgebedarf erhältlich.
Informieren Sie sich dazu anhand beiliegender Antwortkarte oder bei
Ihrem Fachhändler, sowie direkt beim THOMAS-Werkskundendienst.
Hinweis!
Nur bei Verwendung von Original-THOMAS-Zubehör können
Gerätefunktionen und Reinigungswirkung gewährleistet werden.
Kundendienst
Fragen Sie Ihren Händler nach dem für Sie zuständigen
THOMAS-Kundendienst.
Bitte geben Sie Ihm zugleich die Angaben vom Typenschild Ihres THOMAS HYGIENE PLUS T2 an.
Zur Aufrechterhaltung der Sicherheit des Gerätes sollten Sie die Reparaturen, insbesondere an stromführenden Teilen, nur durch Elektro-Fachkräfte durchführen lassen.
Im Störungsfall sollten Sie sich daher an Ihren Fachhändler oder direkt an den Werkskundendienst wenden.
Tel.: 0 27 35 / 788-581 oder 582
Fax: 0 27 35/788-599
GARANTIE
Unabhängig von den Gewährleistungsverpflichtungen des Händlers
aus dem Kaufvertrag leisten wir für dieses Gerät Garantie gemäß
nachstehenden Bedingungen:
1. Die Garantiezeit beträgt 24 Monate - gerechnet vom Liefertag
an den ersten Endabnehmer. Sie reduziert sich bei gewerblicher
Benutzung oder gleichzusetzender Beanspruchung auf 12 Monate. Zur Geltendmachung des Anspruchs ist die Vorlage eines Kaufbeleges erforderlich.
2. Innerhalb der Garantiezeit beseitigen wir alle wesentlichen
Funktionsmängel, die nachweislich auf mangelhafte Ausführung
oder Materialfehler zurückzuführen sind durch Instandsetzung
der mangelhaften Teile oder Teilersatz nach unserer Wahl; ausgetauschte Teile gehen in unser Eigentum über. Die Garantie
erstreckt sich nicht auf leicht zerbrechliche Teile, wie z. B. Glas,
Kunststoffe, Lampen. Mängel sind uns innerhalb der Garantiezeit
unverzüglich nach Feststellung zu melden. Während der Garantiefrist werden die zur Behebung von aufgetretenen Funktionsfehlern benötigten Ersatzteile sowie die Kosten der angefallenen
Arbeitszeit nicht berechnet. Bei unberechtigter Inanspruchnahme
unseres Kundendienstes gehen die damit verbundenen Kosten zu
Lasten des Kunden. Instandsetzungsarbeiten beim Kunden oder
am Aufstellungsort können nur für Großgeräte verlangt werden.
Andere Geräte sind unserer nächstgelegenen Kundendienststelle
oder Vertragswerkstatt zu übergeben bzw. ins Werk zu senden.
3. Eine Garantiepflicht wird nicht ausgelöst durch geringfügige Abweichungen, die für Wert und Gebrauchstauglichkeit des Gerätes
unerheblich sind, durch Schäden aus chemischen und elektrochemischen Einwirkungen von Wasser sowie allgemein aus anomalen
Umweltbedingungen. Ein Garantieanspruch besteht nicht bei Schäden als Folge normaler Abnutzung, ferner nicht bei Nichtbeachtung
der Gebrauchsanweisung oder unsachgemäßer Verwendung.
4. Der Garantieanspruch verliert seine Gültigkeit, wenn von uns
nicht bevollmächtigte Personen Eingriffe oder Reparaturen an
den Geräten vornehmen.
5. Garantieleistungen bewirken weder für das Gerät noch für die
eingebauten Ersatzteile eine Verlängerung oder Erneuerung der
Garantiefrist: die Garantiefrist für eingebaute Ersatzteile endet
mit der Garantiefrist für das ganze Gerät.
6. Weitergehende oder andere Ansprüche, insbesondere solche
auf Ersatz außerhalb des Gerätes entstandener Schäden sind –
soweit eine Haftung nicht zwingend gesetzlich angeordnet ist –
ausgeschlossen.
Auch nach Ablauf der Garantiefrist bieten wir Ihnen unsere Kundendienstleistungen an. Bitte wenden Sie sich an Ihren Händler oder
direkt an unsere Kundendienst-Abteilung.
Page 15

13
Falls Ihr THOMAS HYGIENE PLUS T2 wider Erwarten einmal nicht zufriedenstellend funktioniert, prüfen Sie zunächst anhand der nachfolgenden
Aufstellung, ob die Störung nur eine kleine Ursache hat, bevor Sie den Kundendienst einschalten.
Aufgetretene Störungen/
Fehlfunktionen – Grund / Abhilfe
Allgemein (alle Funktionen)
Das Gerät läßt sich nicht – Sind Netzanschlußkabel, Stecker und Steckdose intakt?
in Betrieb nehmen ➔ Vor Prüfung Netzstecker ziehen, evtl. Reparaturen nur durch autorisiertes Fachpersonal
durchführen lassen
– Ist das Gerät eingeschaltet? ➔ überprüfen
Staubsaugen (Trockensaugen)
Beim Saugen tritt Staub aus – Ist das AQUAFILTER-System entsprechend der Gebrauchsanleitung montiert?
– Ist die Hygienebox incl. HEPA-Beutel entsprechend der Gebrauchsanleitung montiert?
– Ist der HEPA-Beutel voll oder defekt? ➔ neuen einsetzen.
Saugkraft läßt allmählich nach – Ist der HEPA-Filter verstopft? ➔ Reinigung des HEPA-Filters
– Sind Düse, Saugrohr oder Saugschlauch mit grobem Schmutz verstopft?
➔ Dehnung des Schlauches im Betrieb lockert die Verstopfung, Verstopfung beseitigen
Saugkraft ist zu gering – Ist die Aquaeinspritzdüse im Ansaugstutzen verstopft? ➔ demontieren und reinigen bzw. mit
Wasser durchspülen.
– Ist der HEPA-Filter verstopft? ➔ Reinigung des HEPA-Filters.
– Sind Düse, Saugrohr oder Saugschlauch mit grobem Schmutz verstopft?
➔ Dehnung des Schlauches im Betrieb lockert die Verstopfung, Verstopfung beseitigen.
– Ist der Gehäusedeckel richtig verschlossen? ➔ überprüfen
– Ist die elektronische Saugkraftregulierung auf MIN eingestellt? ➔ Saugkraft auf MAX einstellen
(Lampe leuchtet orange)
– Ist die mechanische Saugkraftregulierung am Handgriff geöffnet? ➔ Schiebetaste am Handgriff
schließen
Viele Wassertropfen an der – Das AQUAFILTER-System ist wahrscheinlich mit zu viel Staub gefüllt
Innenseite des Gehäusedeckels ➔ AQUAFILTER-System reinigen, Wasser austauschen
Waschsaugen
Die Saugkraft läßt plötzlich nach – Ist der Schmutzwasserbehälter voll (Schwimmer hat angesprochen)? ➔ entleeren.
– Steht das Gerät in Schrägstellung (Schwimmer hat angesprochen)? ➔ Gerät auf gerade Ebene
bringen, Gerät ausschalten und erneut einschalten.
Es tritt Wasser aus den Ausblas- – Ist der Schwimmer im Schmutzwasserbehälter verschmutzt und nicht mehr gangbar, d.h. er kann
öffnungen des Gerätes aus nicht mehr ansprechen, wenn der Behälter gefüllt ist? ➔ Schwimmer und Scharnier reinigen
– Ist der Schmutzwasserbehälter mit Antischwappeinsatz, Naßfilter und Motorschutzfilter einge-
setzt? ➔ Gerät sofort abschalten und trocknen, fehlende Teile montieren
Im Saugraum sammelt sich eine un- – Sind Dichtungen und Dichtflächen stark verschmutzt? ➔ reinigen
gewöhnlich große Wasserlache,
– Wurde der Naßfilter oder der Antischwappeinsatz vergessen? ➔ überprüfen
(einige Tropfen sind durchaus normal)
Es kommt zu ungewöhnlich starker – Wurde Original-THOMAS-Reinigungskonzentrat verwendet? ➔ austauschen
Schaumbildung im Schmutzwasserbehälter
Es tritt keine Reinigungsflüssigkeit aus, – Ist Reinigungsflüssigkeit im Sprühmitteltank? ➔ nachfüllen
obwohl die Pumpe eingeschaltet ist
– Ist die Sprühdüse verstopft? ➔ Düse einige Zeit in lauwarmes Wasser legen und danach kräftig
durchblasen
– Ist die Tankanschlußöffnung verstopft? ➔ Frischwasserbehälter entnehmen und die Tankanschluß-
öffnung (Verbindungsstelle Frischwassertank-Gehäuse) mit der Fugendüse gründlich absaugen
um evtl. Verschmutzungen zu entfernen
Zu hohe Restfeuchte, Reinigungsflüssig- – Ist die elektronische Saugkraftregulierung auf MIN eingestellt? ➔ Saugkraft auf MAX einstellen
keit wird nicht richtig aufgesaugt (Lampe leuchtet orange)
– Ist die mechanische Saugkraftregulierung am Handgriff geöffnet? ➔ Schiebetaste am Handgriff
schließen
– Liegt die Düse richtig am Boden auf? ➔ Düse zum Absaugen etwas senkrechter stellen
Was tun, wenn …
Page 16

14
• The voltage given on the rating plate must comply with mains
power supply voltage.
• Never use the appliance in rooms where fire hazardous materials
are stored or where there is a risk of escaping gas.
• Never leave the appliance unattended when switched on and
make sure that children do not play around with the appliance.
• This appliance is not for use by persons (including children) with
restricted physical and mental ability or lacking either experience
or knowledge or who are not in possession of their full senses
unless supervised by a person responsible for their safety or have
been instructed by such a person how to use the appliance.
Children should be supervised to ensure that they do not play with
the appliance.
• Particular care has to be taken when cleaning stairway steps.
Make sure that the appliance stands firmly on the step or floor and
the hose is not overstretched. Do not keep the appliance
upright when in use.
• Never use the HYGIENE PLUS T2 for dry vacuuming
without the fitted hygiene box. The hygiene box
must be fitted according to the directions given in
the operating instructions. Otherwise the appliance
can be damaged.
• Never stand on the appliance. Never overstretch and squeeze the
hose.
• Keep the nozzles and tubes well away from your head (while working) because this is dangerous both for your eyes and ears.
• Never point the cleaning jet in the direction of people or animals,
plugboxes or electrical appliances.
• Persons with sensitive skin should avoid direct contact with the
cleaning liquid. Rinse out immediately with plenty of water upon
contact with the mucous membrane (eyes, mouth, etc.)
• Never use an extension cable in wet rooms.
• Caution! This version of the appliance is not suitable for sucking
up health hazardous substances or liquids containing solvents such
as paint thinners, oil, petrol and etching liquids.
• Never use the appliance to vacuum up fine dust such
as toner or soot because this will reduce the capacity of the filter. Moreover, you avoid damaging the
appliance.
• Empty the tank after wet, moist operation. Chemicals (cleaning
detergents for hard floors and carpets) are to be kept away from
children.
• Only by using Original THOMAS cleaning detergent you can
assure perfect function of the appliance and effective cleaning.
• Turn off all the switches on the appliance before
cleaning, servicing, filling and emptying, also pull
out the mains power plug in case of irregularities.
• Do not leave the appliance outdoors and never directly expose
the appliance to moisture or immerse it in liquids. Never store the
appliance directly next to heating appliances.
• Never repair any damage to the THOMAS HYGIENE PLUS T2,
accessories or mains connection cable yourself (you need a special cable) but always have such repairs done by an authorised
customer service station since any changes made to the appliance
can be hazardous to your health. Make sure that only original
THOMAS spare parts and accessories are used.
• Above all, observe the "Information for use" in the
stipulated areas.
• Utilise the appliance to its full extent by using it properly.
• The manufacturer shall not be liable for any possible damage
caused by improper use or using the appliance for any purpose
other than for what it was designed and built.
• Never tug on the cable to disconnect the plug from the plugbox
but always pull it out of the socket by means of the plug.
• Make sure that the mains connection cable is never exposed to
heat or comes into contact with liquid chemicals. Never pull the
appliance over sharp edges or across rough surfaces.
We congratulate you …
... on buying the THOMAS HYGIENE PLUS T2, a topclass wash vacuum cleaner with which you can clean
your carpets, hard floors and upholstered furniture.
By purchasing your new THOMAS HYGIENE PLUS T2
you have decided in favour of an exclusive product that
sets new standards for every day vacuum cleaning.
This is an unusually powerful vacuum cleaner with superior technology
which ensures that you can now clean various surfaces such as hard
floors, carpet flooring or upholstered furniture more thoroughly and
with less effort.
In its function as a dust vacuum cleaner it is suitable for getting rid of
dry dirt and dust. Moreover, it can be used to clean up water-based
liquids. When using this appliance as a wash vacuum cleaner it really
comes into its own for thoroughly cleaning your carpet and hard floors
(tiles, parquet, laminate, PVC), upholstered furniture and windows.
Please read the operating instructions carefully. This will enable you to
become quickly familiar with your appliance and its manifold features
and, in turn, ensures that you can use it to its full extent. Your new
THOMAS appliance will give you many years of good service if you
treat it properly and give it the necessary care and attention. We wish
you a great deal of pleasure when using this appliance.
Your THOMAS Team
For the sake of the environment
Do not just throw away packaging material and worn out appliances!
Appliance packaging:
• The packaging carton can be placed in the waste paper collection
bin
• The plastic bag made of polyethylene (PE) should be placed in the
appropriate disposal bin for recycling.
Appliance disposal at the end of service life:
• Appliance disposal in accordance with the local regulations but
before doing so disconnect and cut off the mains plug.
The symbol on the respective product or its packaging indicates that this product must not be disposed of as household
waste. Instead it should be handed into the collection point
for recycling electrical and electronic equipment.
By ensuring the proper disposal of this product, you will help to pre-
vent potential adverse consequences for the environment and human
health, which could otherwise be caused by inappropriate disposal
of this product.
For more explicit information about recycling of this product, please
contact your local town council office, your household waste disposal
service or the shop where you purchased the product.
Before putting into operation for the first time
Read the following instructions thoroughly. They will
give you information about safety, use, maintenance
and servicing the appliance. Keep the operating
instructions in a safe place ready to hand at all times
and always pass these on to the next owner.
Safety instructions
• The THOMAS HYGIENE PLUS T2 is only to be used in the home
by adults.
• Never use the appliance if:
– the mains connection cable is damaged,
– you can see that the appliance has been damaged
– it has been dropped on any occasion.
Page 17

15
1. Housing cover
2. Intake connection
3. Carry grip
4. Cover lock and release catch
5. Button, cable rewind
6. Pump on/off switch
7. Pump illuminated display
8. Fast coupling, spray hose
9. Appliance on and off switch including electronic suction
power controller (ONE-TOUCH key)
10. Illuminated display, electric suction power control
11. Furniture protection strip
12. AQUA filter (12) with foam filter (12a)
and suction filter (12b)
13. Waste water tank (13) with wet filter (13a) and float (13b)
14. HEPA filter
15. Motor protection filter
16. Suction tube holder (parking position)
17. Fresh water tank with removable cover
18. Mains cable plug
19. MKA microfilter
20. Swivelling wheels to change direction
21. Suction tube holder (parking position)
22. Large running wheels
Product familiarisation
GB
3
4
5
1
2
7
6
8
20
21
22
9 10 11
16 17
18
19
15
13b
1213a 12a12b14 13b 13
Page 18

16
Accessories
Cleaning
method
Application Accessories
Filter system:
AQUA filter
Filter system:
Hygiene Box
Dust vacuuming
• Carpet and hard flooring
Carpet nozzle + parquet adapter Waste water tank (13) including
wet filter (13a) with complete
AQUA filter (12) + HEPA filter
(14) + motor protection filter
(15) + filled with 1 litre water
Hygiene box with
HEPA bag
• Furniture and car upholstery, etc.
Upholstery nozzle
• Crevices, corners, car cleaning,
generally not easy accessible points
Crevice nozzle
Wash cleaning
• Deep carpet cleaning
+ stains removing
Carpet spraying nozzle
Waste water tank (13) including
wet filter (13a)
+ anti-splash grid
+ motor protection filter (15)
Waste water tank (13)
including wet filter (13a)
+ anti-splash grid
+ motor protection filter
(15)
• Upholstery deep cleaning
+ stains removing
Upholstery spraying nozzle
• Stone floor cleaning
Carpet spraying nozzle
+ hard floor adapter
• Parquet and laminate floor cleaning
Carpet spraying nozzle
+ wipe adapter + microfibre pad
• Window cleaning
Carpet spraying nozzle + wipe
adapter + microfibre pad
+ short spray hose
Wet cleaning
• Sucking up water-based liquids
such as juice, coffee, water, etc.
– Carpet
– Stone floors (tiles, PVC)
– Parquet and laminate
Carpet spraying nozzle
Carpet spraying nozzle + hard
floor adapter
Carpet spraying nozzle + wipe
adapter + pad
Waste water tank including
wet filter (13a)
+ anti-splash grid
+ motor protection filter (15)
Waste water tank
including wet filter (13a)
+ anti-splash grid
+ motor protection filter
(15)
Table: Examples of use and application
Suction hose (23) with integrated
sprayer, pipe bend with integrated
shut-off valve (24), water volume
controller (25) and mechanical
suction power controller (26)
Vacuum hose (27) for dry vacuum cleaning incl. hand grip with
mech. suction power controller
(28)
Height adjustable telescopic
suction tube with parking
holder
Carpet and solid floor nozzle
incl. parquet adapter
(specially for parquet care)
Upholstery nozzle (chairs,
sofa, car)
Crevice nozzle (joints,
grooves, cracks)
Suction brush (furniture,
telephone, keyboard)
Siphon nozzle (cleaning
wash basin and shower
drains)
HEPA filter (14) *
AQUA filter complete
(12) with foam filter
(12a) and suction filter
(12b) *
Hygiene box (12) for hygienically fitting and disposing
of the HEPA bag
Waste water tank (13)
including wet filter (13a)
and float (13b) *
Anti-splash grid
Carpet spraying nozzle with
hinged (fold up and removable) hard floor adapter
including spray hose
Upholstery spraying nozzle
with short spray hose
Wipe adapter + microfibre
pad for laminate / parquet
(white, 2 units)
+ microfibre pad for windows (grey,
1 unit)
THOMAS ProTex concentrated carpet cleaning
detergent
THOMAS ProFloor hard
floor cleaning detergent
Two tube clips for fastening
spray hose to suction tube
*) installed in appliance
12
26
23
25
24
13b
13a
13
28
27
12
12a
12b
Page 19

17
General instructions
To connect up suction hose
– Insert the suction hose connection piece in the appliance connector
and turn backwards until it locks.
– Push spray hose in the fast coupling until it engages.
To remove suction hose
– Press the button on the connection piece. Turn the connection piece
one quarter of a turn to the side and draw out.
– To release spray hose: press the fast coupling button.
Electronic suction power control
Switch the appliance on/off by gently pressing the power ON/OFF
key.
1. Press down the key briefly:
Appliance switches on; rating 850 Watt (ECO stage); green indicator lamp comes on
2. Hold-down key:
Infinitely variable electronic suction power control
between 650 and 1600 Watt
Signal lamp green: MIN. 650 Watt to 1125 Watt;
Signal lamp yellow: 1125 Watt to MAX. 1600 Watt.
The signal lamp goes out briefly if the appliance is running at minimum
or maximum capacity.
3. Press key briefly again:
Appliance turns off.
The AQUAFILTER system offers particularly good filtration at
a rating between 850 W (ECO stage) and MAX 1600 W.
Consequently only use the appliance at MIN rating (650 Watt)
for a short time (when vacuuming curtains, for example).
Mechanical suction power control
The suction power can also be adjusted by means of the mechanical
suction power controller (auxiliary air slide).
Auxiliary air slide closed = full suction power
Auxiliary air slide open = reduced suction power.
The auxiliary air slide must always be closed in case of using the
electronic suction power control system and during sucking up.
Mechanical spraying quantity regulating
Note: Only to be used during wash
cleaning.
You can mechanically vary the
spraying volume from 250 ml (min)
to 800 ml (max) infinitely by means
of the setting wheel on the handle of
the suction hose.
Parking position
– Hang the complete suction tube with nozzle and hose in the suction
tube holder on the back of the appliance.
Hang the suction tube on the bottom of the appliance should the
appliance be stored in the upright position (only possible if appliance is empty).
Accessory storage
• The fresh water tank can be used to store accessories during using
the cleaner for dry cleaning
Dust vacuuming with AUQA-Filter
Information for use
• Do not use the TWIN HYGIENE PLUS T2 for dry
vacuuming if the AQUAFILTER system has not been
appropriately fitted according to the operating instructions. This could cause damage to the appliance.
• Do not suck up any liquids during dry vacuuming.
• Do not suck up any large quantity of fine dust, for
example, chocolate powder, flour, etc.
To make the AQUA filter ready for use
THOMAS has set your TWIN HYGIENE PLUS T2 ready for dry
vacuuming.
Open appliance cover by lifting up the cover catch.
Draw out the AQUA filter from the waste water tank by means
of the grip. Fill up the waste water tank with 1 litre clean water.
Insert the complete AQUA filter up to the stop behind the two
guide ribs of the waste water tank. At the same time make sure
that the wet filter is fitted and the circumventing AQUA filter
seal is tight up against the inside of the waste water tank.
Connect up suction hose and fit telescopic suction tube. Connect the
required accessory.
To achieve optimal filtration we recommend rinsing out the
AQUA filter quickly with clear water after approx. 40-60
minutes continuous operation or if a large number of drops of
water can be seen on the underside of the cover. You should
also change the water in the waste water tank.
In case of larger volumes of dust (for example when cleaning
intensively or for the first time) the Aquafilter may possibly
have to be flushed out and the water changed earlier.
For hygienic reasons the AQUAFILTER system is to be
emptied and cleaned every time the appliance is used.
Waste water and moist parts propagate the growth
of bacteria and fungi (see cleaning and maintenance
instructions).
Dust vacuuming with Hygiene-Box
Information for use
• Do not use the TWIN HYGIENE PLUS T2 for dry vacuuming if the hygiene box has not been appropriately fitted according to the operating instructions. This
could cause damage to the appliance.
• Do not suck up liquids when dry vacuuming.
• Do not suck up any large quantity of fine dust, for
example, chocolate powder, flour, etc.
Getting the appliance going:
Take out the waste water tank and insert the hygiene box incl. HEPA
bag.
Connect up suction hose (27) and fit telescopic suction tube. Connect
the required accessory.
800 ml
max.
250 ml
min.
Page 20

18
Filter change and disposal:
Take out hygiene box, close intake opening with the hinged cap.
Open front cover above waste bin and dispose of filter. Insert another HEPA bag and close front cover. Undo hinged cap of the intake
opening and put back the hygiene box.
1.
2.
3.
Sucking up liquids
Information for use
You can suck up spilled, non-hazardous liquids on water basis
(for example water, coffee, etc.) with the THOMAS HYGIENE
PLUS T2.
• Caution! Petrol, thinners, heating oil, etc., can develop explosive
vapours and mixtures if mixed with the intake air.
• Acetone, acids and solvents can attack the materials used in the
production of the appliance. Both clean and waste water can be
sucked up without any hesitation.
• Clean and dry the waste water tank and all the parts used after
sucking up liquids.
• Never suck up liquids without the waste water tank.
• Your THOMAS HYGIENE PLUS T2 is not suitable for sucking up
larger quantities of liquid from containers or basins.
• Empty and clean the appliance every time it is used for wet
cleaning. Waste water and moist parts propagate the growth of
bacteria and fungi (see cleaning and maintenance instructions).
Getting the appliance going:
Take the hygiene box out of the appliance resp. pull the AQUA-filter
by its handle out of the waste water tank, and insert the anti-splash
grid. Also take the HEPA filter out of the appliance.
Insert the anti-splash grid and waste water tank in the appliance.
Make sure that both the wet filter (13a) and the motor protection filter
(15) are fitted.
Connect up suction hose.
Choose a suitable nozzle and fit it on the suction pipe or hand grip,
respectively.
Pull out the mains plug from the appliance and connect up to the
power supply.
Switch on the appliance and set for maximum suction power.
Make sure that the mechanical suction power controller (26) is completely closed.
Hold the suction tube and hose upwards at an angle for a few
seconds while the motor is still running to prevent the liquid still in the
suction tube for running back into the appliance during a break in use.
Switch off the appliance afterwards.
The float in the waste water tank automatically interrupts the
sucking up operation if the waste water tank is full (you can
clearly hear this from the higher running speed of the motor).
Switch off appliance, disconnect the mains plug and empty the
waste water tank.
Cleaning and care
Only carry out cleaning and servicing operations with the appliance
switched off and disconnected mains plug.
After sucking up liquid
Please use a moist soft cloth to clean the housing. Do not use
any scouring cleaning agent or solvent.
Empty the waste water tank.
Wash the anti-splash grid, waste water tank and wet filter with
clean and possibly warm water.
Check the motor protection filter for contamination and, if
necessary, clean under flowing water and renew if necessary.
Always keep the float (13b) in the waste water tank clean
and serviceable. It interrupts the sucking operation if the waste
water tank is full.
Dry any spray water in the suction space with a soft cloth.
Remove any dirt on the intake connection and on the inside of
the housing cover.
• The housing cover can be removed from the appliance to make
cleaning easier.
To do this open the cover and swing up vertically. Press the cover
forwards until it slides out of the hinge. Afterwards lift off the cover
upwards.
• Insert the housing cover vertically and close to lock it in position.
The cover automatically engages in the hinge.
Dry the appliance and accessory parts thoroughly after cleaning.
Wash cleaning
Information for use
• Caution! Petrol, thinners, heating oil, etc., can develop explosive
vapours and mixtures if mixed with the intake air.
• Acetone, acids and solvents can attack the materials used in the
production of the appliance. Both clean and waste water can be
sucked up without any hesitation.
• After sucking up liquids always clean and dry the waste water tank
and all the parts used.
• Never suck up liquids without the waste water tank.
• Your THOMAS HYGIENE PLUS T2 is not suitable for sucking up
larger quantities of liquid from containers or basins.
• Caution! Never operate the pump without liquid.
• Always empty and clean the appliance every time it is used for
wash cleaning. Waste water and moist parts propagate the growth
of bacteria and fungi (see cleaning and maintenance instructions).
Page 21

19
Absaugen und
Aufrichten
Arbeitsrichtung
Einsprühen
Saugrohr
Druckleitung
Lösen und Auswaschen
Suction tube
Releasing and washing out
Spraying
Sucking up and
straightening
Pressure line
Working direction
Spray extraction system
• Spray the cleaning agent deep into the carpet under pressure
• This releases the dirt and washes out deep down into the fibres
• Suck up the dirty water at full power and straighten up the
carpet pile again.
This should be always carried out in a single operation.
Press the lever on the shut-off valve (24) until the cleaning
agent escapes. Draw the nozzle straight over the carpet and
press it down at the same time. The spraying volume can be
set as required by means of the setting wheel on the handle.
Release the valve lever to stop spraying at the end of one run
or if stopping work. If the sprayed liquid has been sucked up,
lift the nozzle and begin a new run but overlap slightly. In this
way you can clean the entire area section by section.
Should there still be traces of liquid remaining on the cleaned
areas this liquid can be sucked up without spraying again.
Make sure that the mechanical suction controller (25) is
completely closed.
In the case of very stubborn dirt you can apply the cleaning
agent while moving the carpet spraying nozzle forwards. The
same treatment can also be applied by just putting the pump
into operation.
Ensure that you do not spread too much liquid over the carpeting
since this may cause waves or bumps in the carpet. However, these
will disappear again after being allowed to dry for a longer period
of time.
Empty the waste water tank after you have used up all the
cleaning agent from the fresh water tank to prevent the
appliance being switched off automatically.
Should you not observe the above-mentioned instructions the
float will automatically switch off the appliance as soon as the
waste water tank is full. (You will clearly hear the motor be
running at a higher speed.)
Switch off appliance, disconnect the mains plug and empty the
waste water tank.
Hard floor cleaning
Drop the hard floor adapter over
the carpet spraying nozzle and
lock by means of the slide.
By using this system you can clean
and dry your hard floor coverings
such as tiles, stone floors and PVC
at one and the same time.
See carpet cleaning for
procedure.
We recommend THOMAS ProFloor cleaning agent for hard
floor cleaning.
Only use THOMAS original products and parts to ensure
perfect cleaning results.
You can get further supplies of the cleaning agent from
your specialist dealer or the THOMAS Customer Service Department.
Before cleaning carpets
• Make sure that everything you want to wet clean is also suitable
for wet cleaning. Do not wet clean your sensitive, hand-woven or
non-fast dyed carpets, for example.
To check this put a little cleaning agent on a white cloth and rub on
the carpet at a not too obvious spot. It can be assumed that the dye
is colourfast should no traces of dye appear on the cloth.
Should this not be the case do not wet clean the carpet.
Please consult your specialist carpet dealer should you have any
doubts.
Should the carpet have been shampooed earlier on it may well
be that increased foaming will occur in the waste water tank when
using the THOMAS HYGIENE PLUS T2 for the first time. Add half
a cup of vinegar to the waste water tank to prevent any further
foaming.
Immediately switch off the appliance and empty the waste water
tank should foam escape from the air outlet.
When using the THOMAS cleaning concentrate for thorough
cleaning there will be no increased foaming because this cleaning
detergent contains a special anti-foaming agent.
You should not walk over your cleaned carpet as long as it is wet.
The room should be well ventilated both while cleaning and after-
wards to ensure quick drying.
Carpet cleaning
Take the hygiene box out of the appliance resp. pull the
AQUA-filter by its handle out of the waste water tank, and
insert the anti-splash grid. Also take the HEPA filter out of the
appliance.
Close intake opening of the hygiene box with the hinged cap.
Fit the anti-splash grid and waste water tank on the appliance.
Make sure that both the wet filter (13a) and the motor protection
filter (15) are fitted.
Remove the fresh water tank for filling (draw tank straight
upwards and out of the cleaner) or fill up directly in the
appliance. In this case you have to lift up fresh water tank cover.
When filling make sure that no impurities get
into the fresh water tank which will prevent the
closing valve from functioning properly.
Fill up with cleaning agent and water through the grip lug
(max. 2.4 litres).
We recommend THOMAS ProTex original cleaning
detergent for cleaning carpets.
See label on the cleaning agent bottle for application and
dosage.
Use hand warm water (max. 30°C).
Connect up suction hose and fit telescopic suction tube.
Fit carpet spray nozzle, spray hose to the suction tube with
fast coupling and move upwards and place on the shut-out
valve and lock by turning. Afterwards fasten the spray hose
by means of the two tube clips on the suction tube.
Pull out the mains power supply plug and cable from the
appliance and connect up.
Switch on the appliance and set for maximum suction power. Switch
on pump. Control lamp comes on.
2.
1.
Page 22

20
Maintenance cleaning of smooth floor coverings such
as linoleum, PVC, tiles, polished stone floors and
laminate floors with the microfibre pad
– General instructions:
Proper care of floors is an essential component
under our terms of guarantee!
To be observed without fail are the special care
instructions of the manufacturer of the floor
coverings.
The surface protection finish can be damaged or destroyed if cleaning
and using aggressive universal cleaners.
Maintenance cleaning is to be carried out by dust suction or by wiping
over with moist cloth.
Atomised moisturisation means: The floor must be completely dry
after 3-5 minutes. This method is only to be used on laminate floors if
recommended by manufacturer.
Wash the microfibre pad before using it for the first time to remove
any possible residue given as a result of the production process.
We recommend THOMAS ProFloor cleaning agent for maintenance cleaning of smooth floor coverings such as linoleum, PVC,
tiles, polished stone floors and laminate floors.
Dismantling/assembling:
1.
2.
3.
5.
4.
6.
To remove the fold back hard floor adapter from the carpet spraying
nozzle, push the slide upwards and then press the red nozzle lock
towards the inside. Release the hard floor adapter from its hinge and
remove.
Proceed in the reverse order to fit the wipe adapter.
The microfibre pad is to be run over the strip so that the nozzle suction
channel is open or remains open.
250 ml
min.
Set the water volume controller
(25) to “min”. Start spraying operation for 2–3 seconds and moisturise microfibre pad (white).
Wetting the surface has to be
avoided because under these circumstances wetting of edge area
of parquet or floor elements is
not adequately protected against
moisture.
Window cleaning
Fit the wipe adapter to the carpet spray nozzle. To assemble see
maintenance cleaning instructions for smooth floors.
The microfibre pad for window cleaning (grey) is to be connected to
the wiper.
You can clean and dry your windows and glass surfaces at the same
time by this method.
Procedure see carpet cleaning
Upholstery cleaning
Use the upholstery spraying nozzle to clean upholstered furniture, car
seats, etc. Push this nozzle on the grip. Connect the spraying hose to
the shut-off valve.
If cleaning upholstery make sure that not too much liquid is applied
because you will have to take a longer drying time into account
depending on the floor underneath.
Flow rate control on the hand grip.
See carpet cleaning for procedure.
We recommend THOMAS ProTex cleaning agent for upholstery cleaning.
Cleaning and care
Only service and clean the appliance if it is switched off and the mains
power plug has been disconnected from the mains power supply.
After dry vacuuming
– The hygiene box can, if needed, be cleaned.
For this, take out the HEPA bag and dismantle the activated car-
bon filter.
The inside of the hygiene box can now be cleaned with a damp
cloth. If it is very dirty, it can be cleaned in the dishwasher.
Allow the hygiene box to completely dry before putting back the
complete filter.
Replacement interval for the activated carbon filter: every 12
months, replace the HEPA bag if required.
After wash cleaning
Please use a moist soft cloth to clean the appliance housing.
Do not use any aggressive cleaning detergent or solvents.
Remove fresh water tank and empty.
Empty waste water tank.
Clean anti-splash grid, waste water tank and wet filter using
clear, possibly warm water.
Check motor protection filter for contamination and clean
under flowing water and renew, if necessary.
Keep float (13b) in the waste water tank clean and fully
functional at all times. This float interrupts the suction operation
if the waste water tank is full.
Dry up spray water in suction chamber with soft cloth.
Remove contamination on the intake connector and on the
inside of the housing cover.
The housing cover can be taken off the appliance
for easier cleaning.
To do this open the cover and swing down vertically. Press the
cover forwards until it slides out of the hinge. Afterwards swing
the cover upwards and out of the way.
Insert in the housing cover vertically and close it to fasten. The
cover automatically clicks into the hinge.
Fill the fresh water tank with clear water to service
the pump and valves and to make the appliance
ready for operation.
Put the spraying system into operation (operate
the lever on the shut-off valve) over a wash basin,
for example.
The appliance and accessory parts are to be thoroughly dried
after being used for cleaning.
Page 23

21
Press the shut-off valve lever to make the system completely
pressureless.
After vacuuming
1. AQUA filter system
Open housing cover by lifting up the cover catch.
Remove waste water tank.
Pull the AQUA filter (12) out of the waste water tank by means of the
grip and pour the waste water away (for example in the toilet).
Remove foam filter (12a). To do this pull the AQUA filter frame slightly
upwards and then fold it over to the side out of the way.
Now thoroughly rinse the AQUA filter, foam filter, wet
filter and the waste water tank with clear water. Do not
use any cleaning agents.
It is essential to ensure that the parts are dry before
using again.
The filter can be also removed for easier cleaning if dirt and fluff have
blocked the suction filter (12b); refit the suction filter after cleaning.
Remove contamination and fluff on the suction connector.
2. HEPA filter
Your TWIN HYGIENE PLUS T2 is provided with a high quality HEPA
filter (14), which can be cleaned several times depending on your
needs and the type of dust found in your home.
Clean your appliance if needed (at the latest every six months) and
if the suction power decreases.
Remove the HEPA filter from the appliance and knock out the
dirt on a firm surface.
If the filter is strongly contaminated it can also be rinsed out
with clear water (without cleaning agent) and be subsequently
cleaned by knocking out the dirt.
Do not use any brushes for cleaning. Always
allow the filter to dry thoroughly before fitting it
back into the appliance again.
Do not damage the filter fins during cleaning the HEPA
filter.
The filter is to be replaced by a new filter should the suction power of
the appliance not be improved to a considerably extent after cleaning
the HEPA filter.
3. MKA microfilter
The MKA microfilter (19) is to be replaced every six months.
To do this press down the two plastic lugs on the blow-out cover and
fold it back.
Replace the MKA microfilter. Close the blow-out cover again.
Further supplies / special accessories
An extensive range of special accessories and further supplies are
available for your THOMAS HYGIENE PLUS T2.
Get further details by returning the accompanying reply card to us or
get further information from your specialist dealer or directly from the
THOMAS Customer Service Department.
Note!
You can only assure a properly functioning appliance and efficient
cleaning by using original THOMAS accessories.
Customer service
Ask your dealer to tell you the THOMAS Customer
Service Area Centre responsible for you.
At the same time please tell your dealer the details
given on the rating plate of the THOMAS HYGIENE
PLUS T2.
Repairs more especially to electrical parts are only
carried out by a qualified electrician. This, in turn,
ensures that your appliance remains fully functional
and safe in operation.
As a consequence, in the case of irregularities you
should get in touch with your specialist dealer or
contact the Customer Service Department directly.
Tel. <0049>(0)2735/788-581 or 582
Fax: <0049>(0)2735/788-599
GUARANTEE
Independent of the guarantee commitment of the dealer resulting
from the purchase contract we give a guarantee for this appliance
subject to the following conditions:
1. The period of guarantee is 24 months – calculated from the first
day of delivery to the first user. It is reduced to 12 months in the
case of commercial use or when subject to similar wear and tear.
A purchase receipt must be presented to lodge a claim under our
guarantee.
2. Within the guarantee period we will eliminate all main function
deficiencies that can be proved to be due to deficient execution or
material faults either by repairing the deficient parts or by replacement of parts to our choice; replaced parts become our property.
The guarantee does not cover easily breakable parts such as glass,
plastic and lamps, for example. Deficiencies are to be reported to
us without any further delay within the guarantee period. During
the period of guarantee the necessary spare parts as well as the
costs for the incurred working time will not be charged for the
elimination of incurred faults in function. In the case of unjustified
claim for the services of our customer service department the costs
incurred will be to the account of the customer. Repair work on
the customers premises or at the installation location can only be
demanded for large appliances. Other appliances are to be handed in to our next customer service station or work shop under
contract or sent into the works, respectively.
3. A commitment to provide services under guarantee will not be
given as a result of minimal deviations inconsiderable in respect
of the value or functionability of the appliance or damage as a
result of chemical and electro-chemical influences of water and
generally as a result of abnormal environmental conditions. No
guarantee claim is given in the case of damage as a result of
normal wear and tear and, above all, as a result of improper use
of the appliance as a result of non-observance of the operating
instructions.
4. The guarantee claim shall become invalid should any person not
empowered by us tamper or repair the appliances.
5. Guarantee performances shall neither extend nor renew the gua-
rantee period for either the appliance or for the installed spare
parts: the guarantee period for installed spare parts shall end with
the guarantee period for the complete appliance.
6. Claims going beyond this or other claims, and more especially such
claims for compensation of damage incurred outside the appliance shall be excluded – in so far as liability is not compulsory in
accordance with law.
We offer you the services provided by our customer service department even after elapse of the guarantee period. For information please approach your dealer or get in touch directly with our customer
service department.
Page 24

22
If your THOMAS TWIN HYGIENE PLUS T2 does not work to your satisfaction first use the check list given below whether the cause of the irregularity
is just a small matter before you contact the Customer Service Department.
Occurring irregularities,
faulty functions - Reasons, elimination
General (all functions)
The appliance cannot be started up
Are the mains connection cable, plug and plugbox in order? → Before checking disconnect the
main power supply plug; any necessary repairs are only to be carried out by an authorised
specialist
Is the appliance switched on? → Check
Dust vacuuming (dry vacuuming)
Dust is discharged when vacuuming
Has the AQUAFILTER system been installed in accordance with the operating instructions?
Has the hygiene box incl. HEPA bag been fitted in keeping with the instructions for use?
If the HEPA bag is full or has a defect → put in another one.
Suction power slowly decreases
Is the HEPA filter blocked? → Clean the HEPA filter.
Are nozzles, suction tube or suction hose blocked by coarse dirt? → Flexing the tube during
operation will release any dust and dirt blocking the tube and clear the stoppage.
Suction power is too low
Is the Aqua injection nozzle blocked in the intake connector? → Dismantle and clean or rinse
out with water.
Is the HEPA filter blocked? → Clean HEPA filters.
Are nozzles, suction tube or suction hose blocked by coarse dirt? → Flexing the tube during
operation will release any dust and dirt blocking the tube and remove the stoppage.
Is the housing cover properly locked? → Check.
Is the electronic suction power controller set to MIN? → Set suction power to MAX (orange
lamp lights up).
Is the mechanical suction power controller on the hand grip open? → Close the slider on the
hand grip.
A large number of drops of water have
collected on the inside of the housing cover
In all probability there is too much dust in the AQUAFILTER system
→ Clean the AQUAFILTER system, renew the water
Wash cleaning
The suction power decreases suddenly
Is the waste water tank full (float has responded)? → Empty the tank.
Is the appliance standing at an angle (has the float responded)? → Stand the appliance up
straight and switch the appliance off and on again.
Water is escaping from the blow-out
openings on the appliance
Is the float in the waste water tank dirty and is the float switch no longer functional, i.e. it
does not respond when the tank is full? Clean float and hinge.
Has the waste water tank been fitted together with the anti-swash insert, wet filter and motor
protection filter? → Switch off the appliance immediately, dry the appliance and fit missing parts.
Large amounts of water gather in the
suction area (a few drops are absolutely
normal)
Are seals and sealing surfaces extremely dirty? → Clean.
Did you forget to fit the wet filter for the anti-splash grid.
Excessive foam formation in the waste
water tank
Did you use the Original THOMAS cleaning agent? → Replace
No cleaning agent is provided although
the pump is switched on
Is there any cleaning agent in the fresh water tank? →
Refill
Is the spraying nozzle blocked? → Place nozzle in luke-warm water and afterwards draw out
strongly.
Is the tank connection opening blocked? → Remove fresh water tank and thoroughly suck out
the tank connection opening (connection point between fresh water tank and housing) with
the crevice nozzle to remove any possible contamination and dirt.
There is too much residual moisture in the
system and liquid is no longer sucked up
properly
Is the electronic suction power controller set to MIN? → Set suction power to MAX (orange
lamp lights up).
Is the mechanical suction power controller on the hand grip open? → Close the slider on the
hand grip.
Is the nozzle really flat on the floor? → Hold nozzle at a slightly greater incline.
Troubleshooting
 Loading...