

Page 1

Kundendienststellen
T
T
T
T
T
T
A
T
T
T
T
Techn. Änderungen vorbehalten
GA 10/04
Teile-Nr. 185 316
Deutschland:
Robert Thomas
Metall- und Elektrowerke
GmbH & Co. KG
Hellerstrasse 6
57290 Neunkirchen
elefon 0 2735 - 788- 581-583
elefax 02735 - 788 - 599
e-mail: r-wilke@robert-thomas.de
Belgien/Belgique/België:
Schiffer - Beriault S.p.r.l.
Rue Bois Libert 25
B-4053 Embourg
él./Fax 043 - 41 15 18
e-mail: thomas@rivers.de
France:
Mister ATOM Pieces
97, rue H-Durre
B. P. 113
F-59590 Raismes
él. 03.27.45.82.82
Fax 03.27.45.82.99
Mena Toulouse Service
4, rue Jules Raimu
F-31200 Toulouse
el. 05.61.58.07.70
Fax 05.61.11.98.44
L.B.S. Le Bon Service
4, rue de l’Industrie
F-67450 Mundolsheim
el. 03.88.18.17.16
Fax 03.88.18.17.20
Niederlande:
. u. M. Whiteparts B.V.
akkeblijsters 37a
NL 4817 BL Breda
el. 076 - 5 7205 05
Fax 076 - 5 72 07 00
Schweiz:
Saluda Technik AG
Marchstein 173
CH-56234 Triengen
el./Fax 041 93/ 3 30 75
Schweden:
Olsson & Co.
Kungsporten 4A
42750 Billdal
el. 031 - 93 9575
Fax 031 - 91 42 46
Österreich:
Wukovits
Kaiser-Joseph-Straße 64
A-3002 Purkersdorf
Tel./Fax 0 22 31/6 3467
Ernst Wallnöfer
Elektro-Industrievertretung
Bundesstraße 29, Neu-Rum
A-6003 Innsbruck
Tel. 05 12/26 3838,
Fax 05 12 /26 38 38 26
Fa. Pölz
Brünner Straße 5
A-1210 Wien
Tel. 01/2 78 53 65
Fax 01/27 8536 55
Quelle Zentralservice:
Industriezeile 47
A-4021 Linz
Tel. 07 32 / 78 09-15,
Fax 07 32 / 7809-584
sowie alle Quelle
Technik Center Servicestellen
DIE SAUBERE LÖSUNG
Robert Thomas
Metall- und Elektrowerke GmbH & Co. KG
Postfach 18 20, 57279 Neunkirchen
Hellerstraße 6, 57290 Neunkirchen
Telefon +49 - 27 35 - 7 88 -0
Telefax +49 - 2735 - 788 - 519
e-mail: info@robert-thomas.de
www.robert-thomas.de
GERMANY
Fa. Reicher
Hohenegg 17
A-8262 Ilz
Tel. 0 33 85 /5 83
Fax 0 33 85 / 2 20 40
Fa. Pircher
Belruptstraße 44
A-6900 Bregenz
Tel. 0 55 74 /4 27 21-0
Fax 0 55 74/42 72 15
Johann Grössing
Autorisierter Kundendienst
Seidelbastweg 10
A-4030 Linz
Page 2

THOMAS BRAVO 20
BRAVO 20 S
________________
AQUAFILTER
Gebrauchsanweisung · Instructions for Use · Mode d’emploi · Gebruiksaanwijzing
Modo de empleo · Használati utasítás · Kullanma Kılavuzu
Instrukcja obsługi
· Rukovodstvo po qkspluatacii
Page 3
Inhalt Seite
Geräteabbildung/Teileidentifizierung 3/6
Montageabbildungen 4/5
Sicherheitshinweise 6
Montage 7
Trockensaugen 7
Naßsaugen 8
Sprühextrahieren (Waschsaugen) 8
Hilfe bei eventuellen Störungen 10
Kundendienst 10
Contents Page
Illustration of appliance/identification of parts 3/11
Assembly diagrams 4/5
Safety points 11
Assembling the appliance 12
Dry vacuuming 12
Wet vacuuming 13
Spray extraction (shampooing) 13
If unexpected difficulties arise 15
Customer service 15
Table des matières Page
Schéma de l’appareil/identification des pièces 3/16
Schémas pour le montage 4/5
Consignes de sécurité 16
Montage 17
Aspiration à sec 17
Aspiration humide 18
Injection-extraction (aspiration-lavage) 18
Aide en cas de dysfonctionnements éventuels 20
Service après vente 20
Inhoud Pagina
Apparaatafbeelding/Deelidentificatie 3/21
Montageafbeeldingen 4/5
Veiligheidsaanwijzingen 21
Montage 22
Droogzuigen 22
Natzuigen 23
Sproeiextraheren (waszuigen) 23
Hulp bij eventuele storingen 25
Klantenservice 25
Índice Página
Ilustraciones del aparato
/Identificación de piezas
3/26
Ilustraciones de montaje 4/5
Advertencias de seguridad 26
Montaje 27
Aspiración seca 27
Aspiración húmeda 28
Extraer el pulverizado (aspiración con lavado) 28
Ayuda en caso de posibles fallos 30
Servicio Postventa 30
Tartalomjegyzék Oldal
A készülék és tartozékai 3
Tartozékok felsorolása 31
Összeszerelési rajzok 4/5
Biztonsági előírások 31
A készülék összeállítása 32
Száraz porszívózás 32
Nedves felszívás 33
Folyadékos takarítás 33
Hibaelhárítás 35
Minőségtanúsítás 35
Fihrist Sayfa
Aletin / Parçaların Tanıtımı 3 / 36
Montaj Æekilleri 4 / 5
Güvenlik Uyarıları 36
Montaj 37
Kuru Süpürme 37
Yaæ Süpürme 38
Püskürterek Emme (Yıkama-Süpürme) 38
Olası Arızalarda Yardım 40
Müæteri Hizmetleri 40
Spis treści Strona
Rysunek odkurzacza / Oznaczenie części 3/41
Rysunki montażowe 4/5
Wskazówki bezpieczeństwa 41
Montaż 42
Odkurzanie suche 42
Odkurzanie mokre 43
Ługowanie
natryskowe (odkurzanie pralnicze)
43
Środki zaradcze przy ewentualnej awarii 45
Serwis 45
Содержание Страница
Изображения прибора и идентификация деталей
3/46
Изображения в помощь при сборке прибора 4/5
Указания по технике безопасности 46
Сборка 47
Сухое всасывание 47
Мокрое всасывание 48
Оросительное экстрагирование (мойка/всасывание)
48
Помощь при возможных неполадках 50
Сервисная служба 50
2
D H
TR
PL
GUS
E
GB
F
NL
Page 4
3
Geräteabbildung ·
Appliance diagram · Schéma de l’appareil · Apparaatafbeelding · Ilustraciones
del aparato · A készülék és tartozékai ·
AAlleettiinn TTaannııttıımmıı ··
Rysunek odkurzacza
··
Изображения
прибора
BRAVO 20S Aquafilter
BRAVO 20
30 31 32 33
22 23* 24 25 26*
19 20 21
29* 32 34* 35*
5
13
18
9
6
7
2
8
1
15
11
16
12
14
38
3
37
4
17
37
1.
2.
3.
10
19 23* 22
*) THOMAS BRAVO 20S Aquafilter
39*
Page 5
4
Montageabbildungen · Assembling the Appliance · Illustrations pour le montage ·
Montageafbeeldingen ·
Ilustraciones de montaje · Montaj · Összeszerelési rajzok ·
MMoonnttaajj ÆÆeekkiilllleerrii ••
Rysunki montażowe •
Изображения
в помощь при сборке прибора
A B C
D E * F *
G H J
K L M
*) THOMAS BRAVO 20S Aquafilter
24
Click
2 L
clack“
„
36
Page 6

5
Montageabbildungen · Assembling the Appliance · Illustrations pour le montage ·
Montageafbeeldingen ·
Ilustraciones de montaje · Montaj · Összeszerelési rajzok ·
MMoonnttaajj ÆÆeekkiilllleerrii ••
Rysunki montażowe •
Изображения
в помощь при сборке прибора
N O P
Q R * S
6 7
5
Page 7

6
Vor der ersten Achtung!
Inbetriebnahme
Bitte lesen Sie alle im folgenden
aufgeführten Informationen aufmerksam
durch. Sie geben wichtige Hinweise für die
Sicherheit, den Gebrauch und die Wartung
des Gerätes. Bewahren Sie die
Gebrauchsanweisung sorgfältig auf und
geben Sie diese an Nachbesitzer weiter.
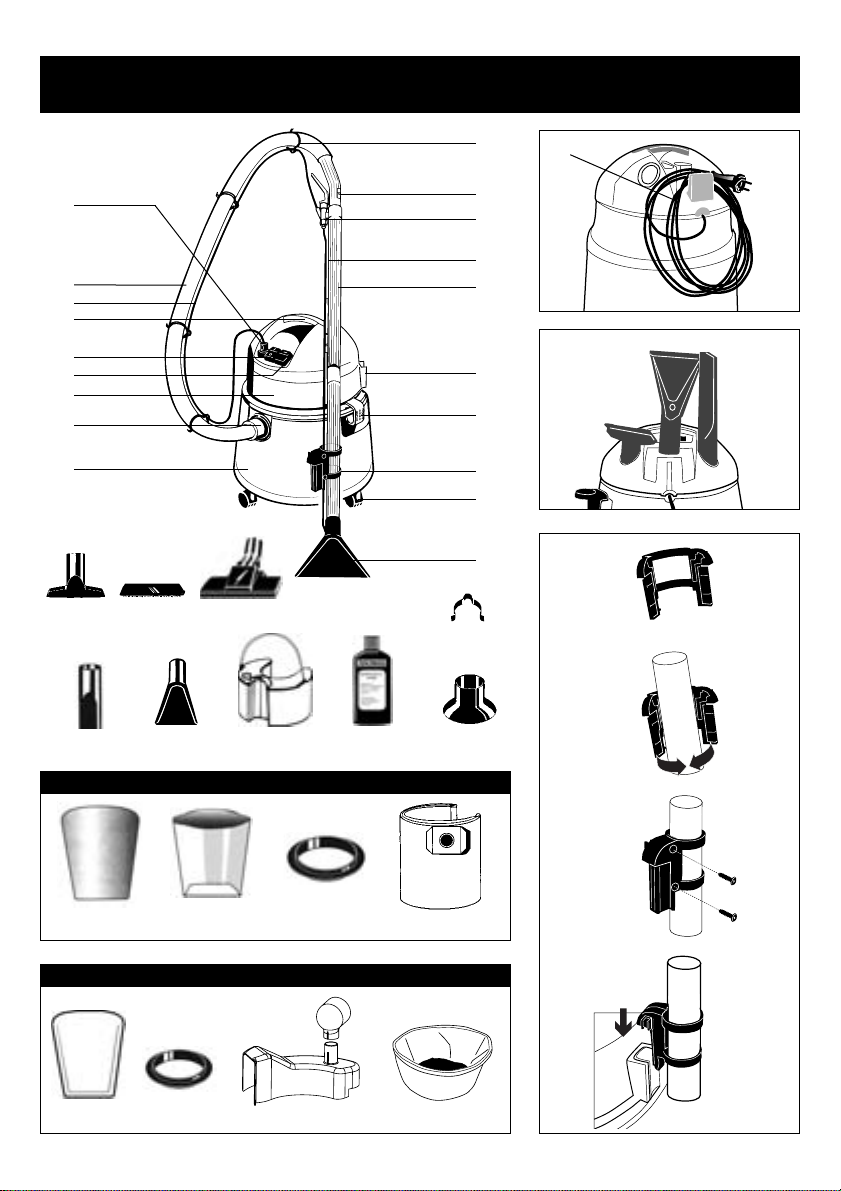
Teileidentifizierung
1 = Behälter
2 = Motorkopf
3 = Verschlußschnapper
4 = Lenkrollen
5 = Schnellkupplung
6 = EIN/AUS-Schalter
7 = EIN/AUS-Pumpenschalter (beleuchtet)
8 = Ansaugstutzen
9 = Tragegriff
10 = Netzanschlußleitung
11 = Saugkraftregulierung
12 = Reinigungsmittelschlauch (oberer Teil)
13 = Saugschlauch
14 = Saugrohre
15 = Schlauchclips
16 = Absperrventil
17 = Teppich-Sprühextraktionsdüse
18 = Reinigungsmittelschlauch (unterer Teil)
19 = Polsterdüse
20 = Hartbodenadapter
21 = Teppichdüse
22 = Fugendüse
23 = Polstersprühextraktionsdüse
24 = Reinigungsmitteltank
25 = Textilreinigungskonzentrat (ProTex)
26 = Siphondüse*
29 = Filtervlies*
30 = Schaumstoffilter
31 = Papierschutzfilter
32 = Spannring
33 = Papierfiltersack
34 = AQUA-Filter*
35 = Feinstaub-Textilfilter*
36 = Ansaugschlauch für Reinigungsmittel
37 = Saugrohrhalterung
38 = Parkstellung Saugrohr
39 = Rohrclips*
*) = nur THOMAS BRAVO 20 SAquafilter
1.2 Sicherheitshinweise
• THOMAS BRAVO dient ausschließlich der Nutzung
im Haushalt durch Erwachsene.
• Das Gerät auf keinen Fall in Betrieb nehmen, wenn:
– die Netzanschlußleitung beschädigt ist,
– es sichtbare Schäden aufweist,
– es einmal heruntergefallen sein sollte.
• Die Spannungsangabe auf dem Typenschild muss
mit der Versorgungsspannung übereinstimmen.
• Düsen und Rohre dürfen bei eingeschaltetem Gerät
nicht in Kopfnähe gelangen, da sonst Verletzungsgefahr insbesondere für Augen und Ohren besteht.
• Das Gerät ist nicht zum Absaugen gesundheits-
gefährdender, ätzender und lösungsmittelhaltiger
Stoffe geeignet.
• Das Gerät darf nicht in Räumen betrieben werden,
in denen feuergefährliche Stoffe lagern oder sich
Gase gebildet haben.
• Stoffe wie Benzin, Farbverdünner und Heizöl
können durch Verwirbelung mit der Saugluft
explosive Dämpfe oder Gemische bilden.
• Niemals heiße Asche oder glühende Gegenstände
aufsaugen.
• Überprüfen Sie vor jedem Gebrauch, ob die jeweils
benötigten Filter richtig eingesetzt sind.
• Saugen Sie keinen Tonerstaub auf! Toner, der zum
Beispiel bei Druckern oder Kopiergeräten
verwendet wird, kann elektrisch leitfähig sein!
Außerdem wird der Toner vom Filtersystem des
Staubsaugers evtl. nicht vollständig ausgefiltert und
kann so über das Sauggebläse wieder in die
Raumluft gelangen.
• Azeton, Säuren und Lösungsmittel können die am
Gerät verwendeten Materialien angreifen.
• Äußerste Umsicht ist beim Reinigen von Treppen
geboten. Sorgen Sie für eine ausreichende
Standsicherheit des Gerätes. Der Schlauch darf nicht
über seine Ursprungslänge hinaus gedehnt werden.
Halten Sie das Gerät stets mit einer Hand fest.
• Lassen Sie das Gerät im eingeschalteten Zustand nie
unbeaufsichtigt und achten Sie darauf, dass Kinder
nicht am Gerät spielen.
• Der Netzstecker ist zu ziehen:
➝
bei Störungen während des Betriebes,
➝
vor jeder Reinigung und Pflege,
➝
nach dem Gebrauch,
➝
bei jedem Filterwechsel.
• Niemals den Stecker am Kabel aus der Steckdose
ziehen, sondern ausschließlich am Stecker.
• Sorgen Sie dafür, daß die Anschlußleitung weder
Hitze und chemischen Flüssigkeiten ausgesetzt ist,
noch über scharfe Kanten oder Oberflächen
gezogen wird.
D
Page 8

7
• Die Verwendung von Verlängerungskabeln in
Naßräumen ist zu vermeiden.
• Schäden am Gerät, am Zubehör, oder an der
Netzanschlußleitung (Sonderleitung erforderlich)
niemals selbst reparieren, sondern nur durch eine
autorisierte Kundendienststation instand setzen
lassen, denn Veränderungen am Gerät können Ihre
Gesundheit gefährden. Sorgen Sie dafür, daß nur
Original-Ersatzteile und Zubehör verwendet wird.
• Das Gerät keinen Witterungseinflüssen, keiner
Feuchtigkeit und keinen Hitzequellen aussetzen.
• Nie den Reinigungsstrahl auf Menschen oder Tiere,
auf Steckdosen oder elektrische Geräte richten.
• Entleeren und reinigen Sie den Behälter nach dem
Naßsaugen oder Sprühextrahieren sofort.
• Chemikalien wie die Reinigungsmittelkonzentrate
gehören nicht in die Hände von Kindern.
• Nur bei Verwendung der Original THOMAS
Reinigungsmittel kann die Gerätefunktion und die
volle Reinigungswirkung gewährleistet werden.
• Personen mit empfindlicher Haut sollen direkten
Kontakt mit der Reinigungslösung vermeiden.
• Sollte das Reinigungskonzentrat auf die
Schleimhäute (Auge, Mund, etc.) gelangen, ist sofort
mit Wasser nachzuspülen.
Der Umwelt zuliebe
Verpackungsmaterial und ausgediente Geräte nicht
einfach wegwerfen!
Geräteverpackung:
• Der Verpackungskarton kann der AltpapierSammlung zugeführt werden.
• Den Kunststoffbeutel aus Polyethylen (PE) zur
Wiederverwertung an Sammelstellen abgeben.
Verwertung des Gerätes nach dem Ende
seiner Lebenszeit:
• Entsorgen Sie das Gerät nach den örtlichen
Vorschriften und schneiden Sie vorher den
gezogenen Netzstecker ab.
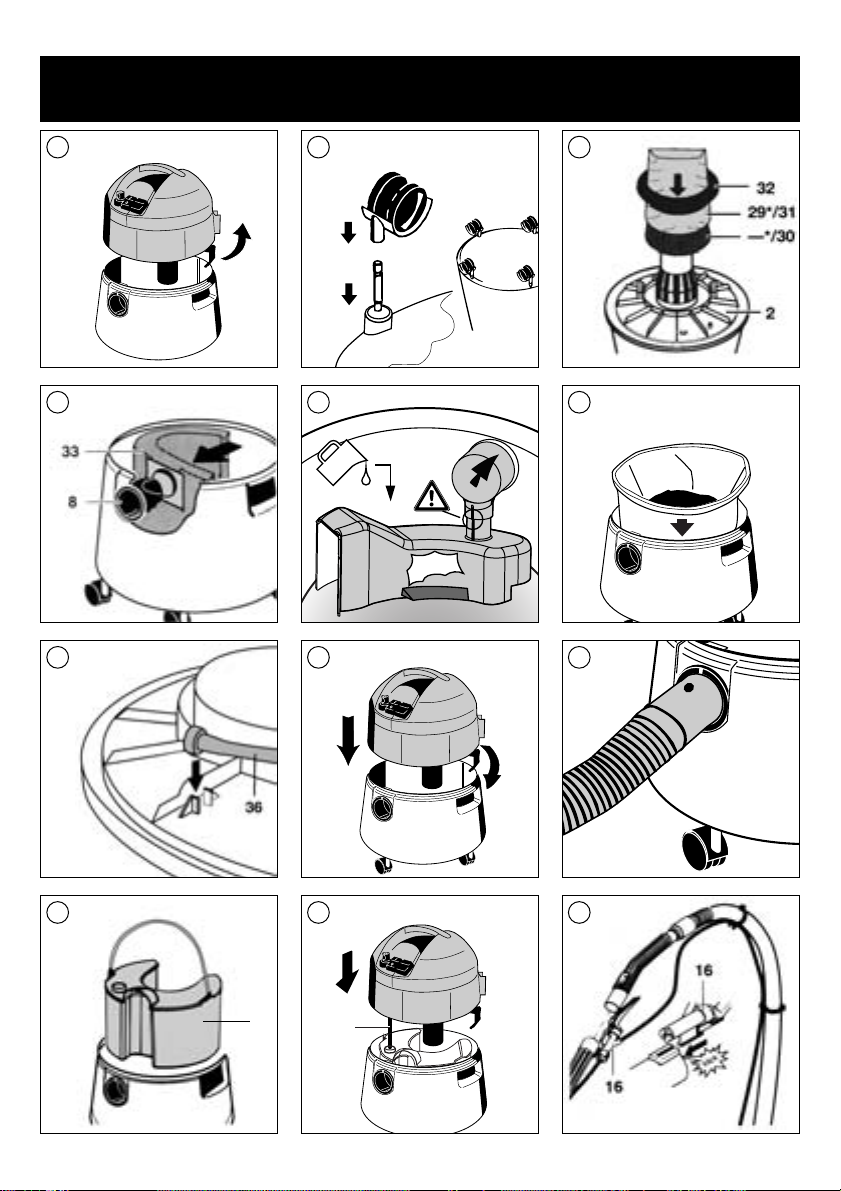
Montage Lenkrollen
A Verschlussschnapper öffnen und Motorkopf
abnehmen.
B Lenkrollen und Bolzen fest in den Behälterboden
eindrücken.
Trockensaugen
THOMAS BRAVO 20
Nach vorherigem Nasssaugen muss das Gerät
absolut trocken sein; auch Schlauch oder Rohre
gegebenenfalls vorher trocknen.
Nie ohne oder mit beschädigten Filtern
trockensaugen.
K Reinigungsmitteltank entnehmen.
C Schaumstofffilter, Papierschutzfilter und Spannring
montieren und mit Drehklammern sichern.
D Filtersack fest auf den Ansaugstutzen drücken und
an die Behälterwand anlegen.
G Ansaugschlauch für Reinigungsmittel an der
Unterseite des Motorkopfes einclipsen.
H Motorkopf aufsetzen und Verschlussschnapper
schließen.
J Saugschlauch anschließen. Zum Abnehmen den
Sauganschluß zur Seite drehen und herausziehen.
Montieren Sie das gewünschte Zubehör.
Netzstecker anschließen.
N Gerät mit EIN/AUS-Schalter (6) einschalten.
Pumpenschalter (7) darf nicht aufleuchten.
Mit der Saugkraftregulierung (11, Abb. P ) lässt
sich die Saugkraft verändern.
– Nebenluftschieber geschlossen
= volle Saugkraft
– Nebenluftschieber geöffnet
= verringerte Saugkraft
THOMAS BRAVO 20S Aquafilter
Benutzen Sie Ihr AQUAFILTER-Gerät im
Trockensaugbetrieb niemals ohne Aquafilter,
Feinstaubtextilfilter und entsprechender
Wasserfüllung.
Saugen Sie keine großen Mengen von Feinstaub,
z.B. Mehl, Kakaopulver, Zement usw.
Page 9
8
K Reinigungsmitteltank entnehmen.
E 2-teiligen AQUA-Filter bis auf Anschlag
zusammenstecken und fest auf den
Ansaugstutzen aufschieben.
Achten Sie dabei auf die
Markierungen.
Der AQUA-Filter muß am Saugtonnenboden
einrasten und am Boden gleichmäßig aufliegen.
Füllen Sie 2 Liter klares Wasser in den
Saugbehälter.
F Feinstaubtextilfilter durch Umlegen des oberen
Randes in den Saugbehälter einhängen.
G Ansaugschlauch für Reinigungsmittel an der
Unterseite des Motorkopfes einclipsen.
C Filtervlies (29) mittels Spannring (32) montieren
und mit den Drehklammern sichern.
H Motorkopf aufsetzen und Verschlussschnapper
schließen.
J Saugschlauch anschließen. Zum Abnehmen den
Sauganschluß zur Seite drehen und herausziehen.
Montieren Sie das gewünschte Zubehör.
Netzstecker anschließen.
N Gerät mit EIN/AUS-Schalter (6) einschalten.
Pumpenschalter (7) darf nicht aufleuchten.
Mit der Saugkraftregulierung (11, Abb. P ) lässt
sich die Saugkraft verändern.
– Nebenluftschieber geschlossen
= volle Saugkraft
– Nebenluftschieber geöffnet
= verringerte Saugkraft
Reinigung und Pflege des AQUAFiltersystems
Aus Hygienegründen das AQUAFILTERSystem und den Saugbehälter nach jedem
Gebrauch entleeren, reinigen und trocknen.
Schmutziges Wasser und feuchte Teile
begünstigen die Vermehrung von Bakterien
und Pilzen.
Feinstaubtextilfilter je nach Verschmutzung mit einem
trockenen oder feuchten Tuch abwischen. Bei stärkerer
Verschmutzung mit klarem Wasser, ohne Wasch- und
Reinigungsmittelzusätze, auswaschen. Achten Sie darauf, dass der Filter beim nächsten Saugeinsatz ganz
durchgetrocknet ist.
Naßsaugen
Schwimmerventil (40, Abb. S ) stets sauber und
gangbar halten. Es unterbricht automatisch das
Ansaugen, wenn der Saugbehälter voll ist.
Beim Absaugen aus Behältern, deren Flüssigkeitsspiegel
höher liegt als die Oberkante des Saugbehälters und
deren Füllinhalt größer ist als das Fassungsvermögen
des Saugbehälters, kann bei geschlossenem
Schwimmerventil weiter Flüssigkeit nachfließen.
In solchen Fällen nur Teilmengen absaugen und
Saugbehälter zwischendurch entleeren.
Zuerst Saugrohr und -schlauch aus der Flüssigkeit
heben und danach das Gerät ausschalten, um ein
Nachlaufen von Flüssigkeit zu verhindern.
A Verschlussschnapper öffnen und Motorkopf
abnehmen.
Filter aus dem Gerät nehmen, da diese sonst
beschädigt werden (Abb. C und D). Bei
AQUAFLTER-Geräten den AQUA-Filter und
Feinstaubtextilfilter herausnehmen
(Abb. C, E und F).
Falls der Reinigungsmitteltank montiert ist, diesen
herausnehmen (Abb. K ).
H Motorkopf aufsetzen und Verschlussschnapper
schließen.
Netzstecker anschließen.
J Saugschlauch anschließen. Zum Abnehmen den
Sauganschluß zur Seite drehen und herausziehen.
P Saugkraftregulierung (11) am Handgriff
schließen.
N Gerät mit EIN/AUS-Schalter (6) einschalten.
Pumpenschalter (7) darf nicht aufleuchten.
Nach Beendigung des Nasssaugens das Gerät
und verwendete Zubehörteile reinigen und
trocknen.
Sprühextrahieren (Waschsaugen)
von Teppichen und Hartböden
Nur Teppiche reinigen, die für die Nassreinigung
geeignet sind.
Zarte handgewebte oder farbunechte Teppiche
dürfen nicht nassgereinigt werden.
Wenn der Teppich zu einem früheren Zeitpunkt
shampooniert wurde, kann es bei erstmaligem
Gebrauch des THOMAS BRAVO zu stärkerer
Schaumbildung kommen.
Gerät dann abschalten und Saugbehälter
entleeren.
Page 10

9
Um weitere Schaumbildung zu vermeiden, geben
Sie eine 1⁄2 Tasse Essig in den Saugbehälter.
Erhöhte Schaumbildung ist nach einmaliger
Grundreinigung mit dem THOMAS Reinigungskonzentrat ausgeschlossen, da dieses mit einem
speziellen Schaumstopp ausgerüstet ist.
Achten Sie darauf, dass sich bei eingeschalteter Sprühfunktion immer Flüssigkeit
im Frischwasserbehälter befindet, um eine
eventuelle Beschädigung der Pumpe zu
vermeiden.
Teppichreinigung
A Verschlussschnapper öffnen und Motorkopf
abnehmen.
K Deckel vom Reinigungsmitteltank abnehmen und
THOMAS ProTex Reinigungsmittel in den Tank
einfüllen.
Dosierung siehe Flaschenetikett.
Handwarmes Wasser (max. 30° C)
verwenden.
Deckel wieder aufsetzen und befüllten
Reinigungsmitteltank in das Gerät einsetzen.
G Ansaugschlauch für Reinigungsmittel aus der
Halterung am Motorkopf nehmen.
L Motorkopf so aufsetzen, dass der Ansaug-
schlauch (36) bis auf den Grund des Reinigungsmitteltanks eintaucht und nicht abgeknickt wird.
J Saugschlauch anschließen. Zum Abnehmen den
Sauganschluß zur Seite drehen und herausziehen.
M Absperrventil in die Aufnahme am Saugrohr
einschieben. Handgriff in das Saugrohr stecken
und den Reinigungsmittelschlauch mit den
Kunststoffclips am Saugschlauch befestigen.
N Reinigungsmittelschlauch in die Schnellkupplung
am Motorkopf einrasten.
O Teppich-Sprühextraktionsdüse auf das Saugrohr
aufstecken.
P Reinigungsmittelschlauch der Teppich-Sprühdüse
am Absperrventil ansetzen und durch Drehen
verriegeln. Reinigungsmittelschlauch in die
Schlauchhalterung an den Saugrohren drücken
bzw. bei Edelstahlrohren mit den kleineren
Rohrclipsen (39) am Saugrohr befestigen.
Netzstecker anschließen.
N EIN/AUS-Schalter (6) und beleuchteten
Pumpenschalter (7) einschalten.
P Hebel am Absperrventil (16) drücken.
Reinigungsmittel wird aufgesprüht.
Bevor der Reinigungsmitteltank erneut
befüllt wird, immer das Schmutzwasser im
Saugbehälter entleeren.
Hartbodenreinigung
Q Hartbodenadapter montieren.
Vorgehensweise siehe „Teppichreinigung“
Zur Hartbodenreinigung empfehlen wir das
THOMAS ProFloor Reinigungskonzentrat.
Polsterreinigung (je nach Modell)
Zur Reinigung Ihrer Polstermöbel oder Autositze verwenden Sie die Polster-Sprühextraktionsdüse (23).
Achten Sie darauf, dass nicht zuviel Flüssigkeit
aufgetragen wird, da je nach Unterbau mit einer
längeren Trocknungszeit zu rechnen ist.
R Die Polster-Sprühextraktionsdüse montieren.
Reinigungsmittelschlauch durch Drehen
befestigen. Düse auf den Handgriff aufschieben.
Reinigung und Pflege des Sprühextraktions-Systems
K Zur Pflege der Pumpe und Ventile den
Reinigungsmitteltank mit klarem Wasser
befüllen und einsetzen.
Netzstecker anschließen, Ein-/Ausschalter
(6) sowie Pumpen-Schalter (7) einschalten.
P Sprühsystem z.B. über einem Spülbecken in
Betrieb nehmen (Hebel am Absperrventil
(16) betätigen).
N Vor dem Lösen des Reinigungsmittelschlauches
den Hebel am Absperrventil (16, Bild
P )
betätigen, um den Restdruck im System
abzubauen, dann Taste an der Schnellkupplung
(5) drücken.
Netzstecker ziehen!
Anschließend das Gerät und verwendete Zubehörteile
reinigen und trocknen.
Den Motorkopf nie in Wasser tauchen!
Motorgehäuse mit feuchtem Tuch abwischen und nachtrocknen.
Page 11
10
Wichtige Tips
Ziehen Sie beim Nassreinigen die TeppichSprühdüse immer Bahn für Bahn auf sich zu.
Um eine Neuverschmutzung zu vermeiden, sollten
gereinigte Teppichböden erst betreten werden,
wenn sie wieder trocken sind.
Um ein schnelleres Abtrocknen der gereinigten
Flächen zu erzielen, ist es sinnvoll, durch
nochmaliges Absaugen – ohne Drücken des
Ventilhebels – verbleibende Restfeuchtigkeit
weitgehend zu entfernen.
Zur Reinigung von Parkettböden verfahren Sie
gemäß den Anweisungen des ParkettbodenHerstellers.
Hilfe bei eventuellen Störungen
Falls Ihr Gerät wider Erwarten einmal nicht zufriedenstellend funktioniert, brauchen Sie nicht gleich den Kundendienst einzuschalten. Bitte prüfen Sie zunächst, ob
die Störung nur kleine Ursachen hat:
Wenn beim Saugen Staub austritt:
• Ist das Filtersystem richtig befestigt und ohne
Defekt?
• Wurde ein Original THOMAS-Filter verwendet?
Wenn die Saugkraft allmählich nachläßt:
• Sind die Filterporen durch Feinstaub verstopft?
• Ist der Papierfiltersack voll?
• Sind Düse, Verlängerungsrohr oder Saugschlauch
durch Schmutz verstopft? (Saugschlauch bei
eingeschaltetem Gerät auseinanderziehen –
Dehnung lockert Verstopftes).
Wenn beim Saugen Wasser aus den
Ausblasöffnungen des Gerätes tritt:
• Ist der Schwimmer (Bild S) beim Saugen von
Flüssigkeiten blockiert und kann nicht ansprechen?
• Wurde ein Original THOMAS Reinigungskonzentrat
zum Waschsaugen benutzt?
• Sind AQUAFILTER und Feinstaubtextilfilter (je nach
Modell) gemäß Anleitung montiert?
Wenn die Saugkraft plötzlich nachläßt:
• Hat das Schwimmerventil die Saugluft gestoppt? Das
kann passieren bei extremer Schrägstellung oder
beim Umkippen des Gerätes. Sauger ausschalten –
der Schwimmer fällt nach unten – das Gerät ist
wieder betriebsbereit.
Wenn der Motor nicht läuft:
• Sind Kabel, Stecker und Steckdose intakt?
• Vor Prüfung Stecker ziehen.
• Niemals selbst den Motor öffnen!
Wenn keine Reinigungsflüssigkeit austritt:
• Ist die Pumpe eingeschaltet (Schalter (7)) muß
aufleuchten?
• Ansaugfiltersieb am Ansaugschlauch (36) reinigen.
• Hängt der Ansaugschlauch ordnungsgemäß im
Reinigungsmitteltank?
• Ist die Sprühdüse verstopft? Falls die Sprühdüse
einmal verstopft ist, Düse einige Zeit ins Wasser
legen. Danach kräftig durchblasen.
Kundendienst
Wenden Sie sich an Ihren Fachhändler, der Ihnen im
Bedarfsfall auch gerne die Adresse oder Telefonnummer des für Sie zuständigen THOMAS-Kundendienstes
miteilt.
Bitte geben Sie dabei stets die Angaben auf dem
Typenschild Ihres Saugers an.
Zur Aufrechterhaltung der Sicherheit des Gerätes
sollten Sie Reparaturen insbesondere an stromführenden Teilen nur durch Elektro-Fachkräfte
durchführen lassen. Im Störungsfall sollten sie sich
daher an Ihren Fachhändler ader direkt an den
Thomas Kundendienst wenden.
CE-KONFORMITÄTSERKLÄRUNG
Wir erklären in alleiniger Verantwortung, dass dieses
Produkt mit den folgenden Normen oder normalen
Dokumenten übereinstimmt.
– EG-Niederspannungsrichtlinie (73/23/EWG),
geändert durch 93/68/EWG
– EG-Richtlinie Elektromagnetische Verträglichkeit
(89/336/EWG), geändert durch 91/263/EWG,
92/31/EWG, 93/68/EWG
Angewandte harmonisierte Normen:
DIN EN 60335-1, DIN EN 60335-2-2;
DIN EN 61000-3-2: 1995; DIN EN 61000-3-3: 1995;
DIN EN 55014-1: 1993; DIN EN 55014-2: 1997
Page 12

Before operating
appliance for the first time
Please read through all of the information
below carefully. The information provides
important points for the safe use and the
maintenance of the appliance. Please
keep these operating instructions in a safe
place and provide them to the next
owner.
Part identification
1 = Collecting bin
2 = Motor block
3 = Snap fastener
4 = Cover wheels
5 = Quick coupling
6 = On/Off switch
7 = On/Off pump switch (illuminated)
8 = Suction socket
9 = Carrying handle
10 = Mains cable
11 = Suction control
12 = Cleaning fluid hose (upper section)
13 = Flexible hose
14 = Suction tubes
15 = Hose clips
16 = Cut-off valve
17 = Carpet spray extraction nozzle
18 = Cleaning fluid hose (lower section)
19 = Upholstery nozzle
20 = Hard floor adapter
21 = Carpet nozzle
22 = Gap nozzle
23 = Upholstery spray extraction nozzle
24 = Cleaning fluid tank
25 = Textile cleaning fluid concentrate (ProTex)
26 = Siphon nozzle*
29 = Tissue filter*
30 = Foam rubber filter
31 = Tissue filter
32 = Clamping ring
33 = Tissue filter bag
34 = AQUA filter*
35 = Fine particle textile filter*
36 = Suction hose for cleaning fluid
37 = Suction tube
38 = Suction tube – park position
39 = Tube clips*
*) only THOMAS BRAVO 20 S Aquafilter
1.2 Safety points
• THOMAS BRAVO is intended for household use by
adults.
• The appliance must not be put into operation if:
– the mains cable is damaged
– the appliance shows clear signs of damage
– the appliance has fallen or been dropped.
• The voltage data on the appliance’s rating plate
must conform to the power supply.
• Do not allow nozzles and tubes (when the appliance
is switched on) to come within the proximity of the
head – danger for eyes and ears, for example.
• Do not vacuum noxious substances or corrosive or
solvent liquids.
• Never operate the appliance in rooms where
inflammable materials are stored or where gases
have formed.
• Materials such as petrol, paint thinner and heating
oil can form explosive gases or mixtures by being
subjected to centrifugal air from the appliance.
• Never vacuum hot ash or glowing objects.
• Check before every use to be sure that you have
correctly fitted the filters required for the specific
application.
• Do not vacuum toner dust! Toners such as those
used in printers and copiers, can be electric
conductors! Furthermore, it is possible that the
appliance’s filter system will not completely filter out
toner dust, and in this way it can enter the air
supply of the room.
• Acetone, acids and solvents can attack the materials
used in this appliance.
• Extreme care is required when vacuuming stair
carpets with your appliance. Ensure that the
vacuum cleaner stands firmly on the step and take
care that the flexible hose is not stretched beyond its
actual length. When using the vacuum cleaner on
stairs, always ensure that you hold the appliance
steady with one hand.
• Do not leave the appliance unattended whilst it is
switched on and ensure that children do not play
around with the appliance.
• Always pull out the plug
– if the appliance malfunctions during operation
– before cleaning and maintenance
– after use
– when changing the filter.
• Never unplug the appliance by pulling at the cable,
but only by removing the plug directly from the
socket.
• Ensure that the main cable is not exposed to either
heat or chemical substances, nor that it is pulled
across sharp edges or surfaces.
• Avoid using extension cables in wet rooms.
• Never repair damage to the appliance, to the
11
GB
Page 13
accessories or to the cable (special cable required);
have repairs done only by an authorised customer
service station, because modifications to the
appliance can pose a risk to your health. Ensure
that only original spare parts and accessories are
used.
• Do not expose the appliance to the elements,
humidity or heating sources.
• Never aim the cleaning jet at people or animals, at
electrical sockets or electrical appliances.
• After wet vacuuming, empty the collecting bin
immediately.
• Chemicals such as the cleaning fluid concentrates
should not be handled by children.
• The functionality and complete effectiveness of the
appliance can only be warranted if you use original
THOMAS cleaning fluids.
• Persons with sensitive skins should avoid direct
contact with the cleaning fluid.
• If cleaning fluid comes into contact with mucous
membranes (eyes, mouth, etc.), immediately flush
with water.
We care about the environment
Do not simply throw out packing materials and old
appliances!
Packing materials:
Take the packing carton to paper recycling collection
points.
Take the polyethylene (PE) plastic bag to collection
points to be reused.
What to do with the appliance after the end
of its useful life:
Dispose of the appliance according to local regulations
and pull out and cut off the mains cable beforehand.
Assembly of castor wheels
A Undo the snap-on fasteners and lift the motor
block.
B Push the castor wheels and the pegs into the base
of the collecting bin until they snap into place.
Dry vacuuming
THOMAS BRAVO 20
After wet vacuuming, the appliance must be
absolutely dry; dry off the flexible hose or tubes
if necessary beforehand.
Never dry vacuum without filters or
with damaged filters.
K Remove the cleaning fluid tank.
C Assemble the foam rubber filter, tissue filter and
clamping ring and fasten them with the turning
clips.
D Press the filter sack on the suction connection
firmly and lay it against the wall of the collecting
bin.
G Clip the hose for the cleaning fluid to the
underside of the motor block.
H Place the motor block on top and secure it by
means of snap-on fasteners.
J Connecting the flexible hose. Remove the hose by
turning the hose connecting piece and
withdrawing the hose.
Assemble the accessories you require.
Connect the mains cable.
N Turn the appliance on with the On/Off switch.
The pump switch (7) must not light up.
Suction control (11, figure P) allows you to vary
the suction power.
– Sliding air trap closed = full suction power
– Sliding air trap open = reduced suction power
THOMAS BRAVO 20S Aquafilter
Never use your AQUAFILTER appliance in dry
vacuum mode without the Aquafilter, the fine
particle textile filter and an appropriate water
level.
Do not vacuum up large quantities of particle
dust, e.g. flour, cocoa powder, cement, etc.
12
Page 14

K Remove the cleaning fluid tank.
E Connect up the two-piece AQUA filter, pushing it
together until the two parts fit snugly, and push it
firmly onto the suction socket.
Note the marker
guides!
The AQUA filter has to snap into place on the
floor of the suction canister and has to lie there
evenly.
Fill 2 litres of clear water into the collecting bin.
F Hang the fine particle filter in the collecting bin by
turning down the top edge.
G Clip the suction hose for cleaning fluid to the
underside of the motor block.
C Fit tissue filter (29) by means of the clamping ring
(32) and fasten with turning clips.
H Place the motor block onto the collecting bin and
snap shut with snap-on fasteners.
J Connect flexible hose. Remove the hose by
turning the hose connecting piece to the side and
withdrawing the hose.
Assemble the desired accessories.
Connect the mains cable.
N Switch on the appliance with the On/Off (6)
switch.
The pump switch (7) must not light up.
Suction control (11, figure P) allows you to vary
the suction power.
– Sliding air trap closed = full suction power
– Sliding air trap open = reduced suction power
Cleaning and care of the AQUA filter
system
For reasons of hygiene, empty, clean
and dry the AQUAFILTER system and
the collecting bin after each use. Dirty
water and damp parts will promote the
growth of bacteria and mildew.
Clean the fine particle filter – according to how dirty it
is – with a dry or damp cloth. If it is very dirty, clean it
out with clear water, without adding any detergents or
cleaning fluids. Please make sure that the filter is
completely dry before next using the vacuum cleaner.
Wet vacuuming
Keep the float valve (40, fig. S) clean and
accessible at all times. It automatically interrupts
vacuuming when the collecting bin is full.
When vacuuming out containers in which the liquid
level is higher than the top of the collecting bin and
which have a larger volume than the capacity of the
collecting bin, liquid can continue to be vacuumed
beyond the capacity of the collecting bin if the float
valve is closed.
In such cases, vacuum only in partial amounts and
intermittently empty the collecting bin.
Lift the tube and flexible hose out of the liquid first and
then turn off the appliance afterwards, in order to
prevent an afterflow of liquid.
A Open the snap-on fasteners and lift the motor
block.
Remove the filters from the appliance, because
they will otherwise be damaged (figures C and
D). If your appliance is an AQUAFILTER
appliance, remove the AQUA filter and the fine
particle filter (figures C, E and F).
If the cleaning fluid tank is fitted, remove it (figure
K).
H Place the motor block onto the collecting bin and
snap shut with snap-on fasteners.
Connect the mains cable.
J Connect flexible hose. Remove the hose by
turning the hose connecting piece to the side and
withdrawing the hose.
P Close the suction power control (11) on the
handle.
N Switch on the appliance with the On/Off (6)
switch.
The pump switch (7) must not light up.
After completion of wet vacuuming, please clean
and dry the appliance and the accessories used.
Spray extraction (shampooing) of
carpets and hard floor coverings
Shampoo only carpets which can be cleaned wet.
Fine, hand-woven or non-colour-fast carpets
should not be shampooed.
If the carpet has been shampooed before, it is
possible that you will obtain a great deal of foam
when you use THOMAS BRAVO for the first time.
If this is the case, switch off the appliance and
empty the collecting bin.
13
Page 15
Thereafter, in order to prevent excess foam, put
1
⁄2 cup of vinegar into the collecting bin.
Excess foaming will not occur after you have
thoroughly cleaned the carpet once with
THOMAS cleaning concentrate, because it
contains a special anti-foam substance.
Ensure that there is always liquid in the
fresh water container when the
spraying function is switched on, in
order to avoid possible damage to the
pump.
Carpet cleaning
A Open the snap-on fasteners and lift the motor
block.
K Remove the lid of the cleaning fluid tank and fill
the tank with THOMAS ProTex Cleaning Fluid.
See the bottle label for dosage instructions.
Use only lukewarm (max. 30 °C) water.
Replace the lid and insert the filled cleaning fluid
tank into the appliance.
G Take the suction hose for cleaning fluid out of its
holder on the motor block.
L Place the motor block onto the collecting bin such
that the suction hose (36) is immersed all the way
to the bottom of the cleaning fluid tank and is not
bent..
J Connect flexible hose. Remove the hose by
turning the hose connecting piece to the side and
withdrawing the hose.
M Insert the cut-off valve into its receptacle on the
suction tube. Snap the handle into the suction
tube and fasten the cleaning fluid hose to the
flexible hose by means of the plastic clips.
N Snap the cleaning fluid hose into the quick
coupling on the motor block.
O Fit the carpet spray extraction nozzle onto the
suction tube.
P Place the cleaning fluid hose of the carpet
spraying nozzle onto the cut-off valve and lock it
in place by turning it. Press the cleaning fluid
hose into the hose receptacle on the suction
tubes, or in the case of stainless steel tubes, fasten
it to the tube with the smaller tube clips (39).
Connect the mains cable.
N Switch on the appliance with the On/Off (6)
switch.
Switch on the pump switch (7).
P Press the hook on the cut-off valve (16).
Cleaning fluid spray will begin.
Before refilling the cleaning fluid tank,
always empty the dirty water from the
collecting bin.
Cleaning hard floors
Q Assemble hard floor adapter.
See ”Carpet cleaning” procedure.
We recommend THOMAS ProFloor cleaning
concentrate for cleaning hard floors.
Cleaning upholstery (according to model)
For cleaning your upholstery or car seats, please use
the upholstery spray extraction nozzle (23).
Take care not to apply too much liquid;
depending on the upholstery sublayer, you may
experience significant drying times.
R Assemble the upholstery spray extraction nozzle.
Fasten the cleaning fluid hose by turning it. Fit the
nozzle onto the handle.
Cleaning and care of the spray extraction
system
K To care for the pump and valves
properly, fill the cleaning fluid tank
with clear water and insert it.
Connect the mains cable. Switch on the
On/Off switch (6) as well as the pump
switch (7).
P Operate the spraying system, e.g. over
a sink (disengage the hook on the cutoff valve (16)).
N Before removing the cleaning fluid hose, engage
the hook on the cut-off valve (16, figure P) in
order to release the remaining pressure in the
system, and then press the key on the quick
coupling (5).
Remove mains cable!
Afterwards, clean and dry the appliance and the
accessories you have used.
Never immerse the motor block in water!
Clean the motor block casing with a damp cloth and
wipe dry.
14
Page 16
Important tips
When wet vacuuming, always vacuum by
drawing the carpet spray nozzle in straight
parallel strokes across the surface towards you.
In order to avoid soiling the carpet again, you
should not walk on shampooed carpets until they
have dried.
In order to achieve quicker drying of shampooed
surfaces, it is helpful to remove residual liquid
remaining in the carpet by vacuuming it again –
without engaging the valve hook.
When cleaning parquet floors, please observe
the instructions of the parquet floor manufacturer.
If unexpected difficulties arise
If your appliance does not operate to your satisfaction,
you do not have to contact customer service straight
away. Please check first as to whether the fault is due
one of the following minor causes:
Dust escaping from suction sockets:
- Has the filter system been fitted in accordance with
the instructions?
- Has an original THOMAS filter been used?
Gradual reduction in suction power:
- Are the pores of the tissue filter clogged up by dust
or soot?
- Is the collecting bin full?
- Is there a blockage in the nozzle, extension tube or
flexible hose?/Stretch the flexible hose while the
appliance is switched on – this will loosen the
obstruction.)
Water is coming out of the air expulsion
openings of the appliance during
vacuuming:
- Is the float (figure S) blocked when vacuuming liquid
and unable to operate?
- Was original THOMAS cleaning concentrate used
for shampooing?
- Have AQUAFILTER and fine particle textile filter
(according to model) been fitted according to the
instructions?
Sudden reduction in suction power
- Has the float stopped the flow of air? This can
happen if the appliance is standing at a slant or if
the appliance falls over. Turn off the vacuum
cleaner – the float will fall back into place – the
appliance is ready for use again.
The motor does not function:
- Is there damage to the mains cable, plug or socket?
- Pull out the plug before checking.
- Never open the motor yourself!
No cleaning fluid is coming out:
- Is the pump switched on (switch (7) has to light up)?
- Clean the filter catch on the suction hose (36).
- Has the suction hose been correctly fitted in the
cleaning fluid tank?
- Is the spray nozzle clogged? If the spray nozzle
becomes clogged, lay the nozzle into water for a
while and then blow strongly through it.
Customer Service:
Ask your dealer for the address or telephone number
of your nearest THOMAS Customer Service.
Specify your model number and type when contacting
your dealer – you will find these details on the rating
plate.
To maintain the safety of your appliance,
you should have repairs, especially on live
parts, carried out by a trained electrician
only. In the event of a fault, you should
therefore approach your dealer or the
THOMAS Customer Service directly.
15
CE Declaration of Conformity
We declare upon our sole liability that this product
conforms to the following norms or norm documents.
EC low voltage guideline (73/23/EEC),
modified by 93/68/EEC
EC guideline electromagnetic compatibility
(89/336/EEC), modified by 91/263/EEC,
92/31/EEC, 93/68/EEC
Applied harmonised norms:
DIN EN 60335-1, DIN EN 60335-2-2;
DIN EN 61000-3-2: 1995; DIN EN 61000-3-3: 1995;
DIN EN 55014-1: 1993; DIN EN 55014-2: 1997
Page 17

Avant la première
mise en service
Veuillez s.v.p. lire attentivement toutes les
informations indiquées ci-après. Elles
fournissent d’importantes consignes et
remarques pour la sécurité, l’emploi et la
maintenance de l’appareil. Veuillez
également conserver soigneusement le
présent mode d’emploi et le remettre au
propriétaire suivant.
Identification des pièces
1 = Cuve
2 = Tête du moteur
3 = Fermeture à déclic
4 = Roues de guidage
5 = Raccord rapide
6 = Bouton MARCHE/ARRET
7 = I
nterrupteur de la pompe MARCHE/ARRET (allumé)
8 = Raccord d’aspiration
9 = Poignée
10 = Câble de raccordement au secteur
11 = Bouton de régulation de la puissance d’aspiration
12 = Tuyau flexible pour détergent (partie supérieure)
13 = Tuyau flexible d’aspiration
14 = Tube d’aspiration
15 = Clips de flexible
16 = Soupape d’arrêt
17 = Injecteur-extracteur pour tapis et moquettes
18 = Tuyau flexible pour détergent (partie inférieure)
19 = Suceur pour meubles rembourrés
20 = Adaptateur pour sols durs
21 = Suceur pour tapis et moquettes
22 = Suceur pour joints
23 = Injecteur-extracteur pour meubles rembourrés
24 = Réservoir à détergent
25 = Détergent concentré pour textiles (ProTex)
26 = Tête siphon*
29 = Partie textile du filtre*
30 = Filtre mousse
31 = Filtre de protection papier
32 = Collier de serrage
33 = Sac à poussière
34 = Filtre AQUA *
35 = Filtre textile pour poussières fines *
36 = Flexible d’aspiration pour détergent
37 = Dispositif d’accrochage du tube d’aspiration
38 = Support du tube d’aspiration
39 = Clips du tube*
* seulement avec THOMAS BRAVO 20 S Aquafilter
1.2 Consignes de sécurité
• THOMAS BRAVO est un appareil électro-ménager
qui ne doit être utilisé que par des adultes.
• L’appareil ne doit jamais être mis en service :
– si le câble de raccordement au secteur est
endommagé,
– s’il présente des dommages visibles
– et s’il est tombé.
• La tension d’alimentation doit correspondre aux
indications données sur la plaque signalétique.
• Suceurs, injecteurs et tubes ne doivent jamais être
tenus au niveau de la tête lorsque l’appareil est en
marche, risque de lésion pour les yeux et les oreilles.
• L’appareil n’est pas approprié pour l’aspiration de
substances nocives, corrosives ou contenant des
solvants.
• L’appareil ne doit pas être utilisé dans des pièces où
sont entreposées des substances inflammables ou
dans des locaux où des gaz se dégagent.
• Les substances comme l’essence, les solvants de
peinture et le fuel peuvent, lorsqu’elles sont brassées
avec l’air d’aspiration, engendrer des vapeurs ou
des mélanges explosifs.
• Ne jamais aspirer de cendres chaudes ou des objets
incandescents
• Ne jamais aspirer des poussières de toner, tel que
contenues par exemple dans les cartouches pour
imprimantes ou photocopieurs. De telles poussières
peuvent en effet être conductrices d’électricité ! Par
ailleurs, il est éventuellement possible que le système
de filtration de l’aspirateur ne puisse pas filtrer
intégralement ces poussières de toner qui sont alors
susceptibles d’être à nouveau refoulées dans l’air
ambiant.
• L’acétone, les acides et les solvants peuvent avoir un
effet corrosif sur les matériaux entrant dans la
composition de l’appareil.
• Une très grande prudence est recommandée lors du
nettoyage d’escaliers. Veiller à ce que l’appareil
dispose d’une place suffisante. Ne jamais tirer les
flexibles au-delà de leur longueur initiale. Toujours
maintenir l’appareil d’une main.
• Ne jamais laisser l’appareil allumé sans surveillance
et veiller à ce que les enfants ne puissent pas jouer
avec l’appareil.
• Le connecteur de branchement au secteur doit être
retiré:
- en cas de dysfonctionnement de l’appareil
- avant chaque nettoyage et entretien de l’appareil
- après chaque utilisation
- à chaque changement de filtre
• Ne jamais tirer sur le câble pour débrancher le
connecteur de la prise, toujours tirer sur le
connecteur lui-même
• Veiller à ce que le câble de branchement ne soit
jamais exposé à de fortes températures ou à des
16
F
Page 18

fluides chimiques et à ce qu’il ne soit jamais tiré sur
des arêtes ou surfaces tranchantes.
• L’utilisation de rallonges dans les locaux humides est
déconseillée
• Ne jamais réparer soi-même les dommages
éventuels qui peuvent éventuellement se présenter
sur l’appareil, les accessoires ou le câble de
raccordement au secteur (câble spécial nécessaire).
De telles réparations doivent toujours être confiées
au service technique après vente.
• Ne pas exposer l’appareil aux intempéries, à
l’humidité ou à des sources de chaleur quelconques.
• Ne jamais diriger un jet de détergent sur des
personnes, des animaux ou encore sur des prises de
courants ou des appareils électriques.
• Vider et nettoyer immédiatement la cuve après
aspiration humide ou injection-extraction.
• Les agents chimiques, comme tous les concentrés
détergents, doivent toujours être tenus hors de la
portée des enfants.
• Les fonctions de l’appareil et l’effet de nettoyage ne
peuvent être intégralement garantis que sous
réserve de l’utilisation du produit détergent
THOMAS.
• Les personnes à peau sensible doivent éviter tout
contact direct avec la solution de nettoyage.
• En cas de contact du concentré détergent avec les
muqueuses (yeux, bouche etc.), rincer
immédiatement à l’eau.
Pour l’amour de l’environnement
Ne vous débarrasser pas des emballages et appareils
usagés en les jetant tout simplement!
Emballage de l’appareil:
• Le carton d’emballage peut être recyclé avec les
vieux papiers.
• Le sac en plastique (polyéthylène – PE) peut être
porté sur une déchetterie pour recyclage.
Recyclage de l’appareil à la fin de sa
durée de vie:
• Eliminer l’appareil usagé conformément aux
prescriptions locales sans oublier de couper
auparavant le connecteur du câble de
raccordement au secteur.
Montage des roues de guidage
A Ouvrir le dispositif de fermeture à déclic et retirer
la tête du moteur.
B Bien enfoncer les roues de guidage et goujons
dans le fond de la cuve
Aspiration à sec
THOMAS BRAVO 20
L’appareil doit être absolument sec, c’est-à-dire
que si vous avez auparavant effectué une
aspiration humide, il vous faut tout d’abord séché
l’appareil ainsi que les flexibles et tubes.
Ne jamais aspirer à sec sans filtre ou
avec des filtres endommagés
K Retirer le réservoir à détergent
C Monter le filtre mousse, le filtre de protection
papier et le collier de serrage puis verrouiller
avec les agrafes rotatives.
D Enfoncer le sac à poussières sur le raccord
d’aspiration puis le disposer contre la paroi de la
cuve.
G Enclencher le flexible d’aspiration pour détergent
sur la face inférieure de la tête du moteur.
H Monter la tête du moteur et fermer le dispositif
de fermeture à déclic
J Raccorder le flexible. Pour retirer le flexible
tourner le raccord sur le côté puis tirer.
Insérer l’accessoire désiré
Brancher le connecteur sur le secteur
N Mettre l’appareil en marche avec le bouton
MARCHE/ARRET (6)
La puissance d’aspiration peut être modifiée avec
le bouton de régulation (11, Schéma P).
– Coulisseau d’aération secondaire fermé
= pleine puissance
– Coulisseau d’aération secondaire ouvert
= puissance réduite
THOMAS BRAVO 20S AQUAFILTER
En mode aspiration à sec, l’appareil AQUAFILTER
ne doit jamais être utilisé sans filtre AQUA et sans
filtre textile pour poussières fines. De même, il
faut toujours veiller auparavant à ce qu’il soit
rempli correctement avec de l’eau.
N’aspirez jamais de grandes quantités de
poussières fines, telles que par exemple de la
farine, du cacao en poudre, du ciment etc.
17
Page 19

K Retirer le réservoir à détergent.
E Insérer le filtre AQUA deux pièces jusqu’à la
butée puis le pousser complètement jusqu’au
raccord d’aspiration.
Lors de cette opération, respecter les
marques apposées .
Le filtre AQUA doit s’enclencher sur le fond de la
cuve et reposer de façon uniforme au fond.
Remplir la cuve de l’aspirateur avec 2 litres d’eau
claire.
F Accrocher le filtre textile pour poussières fines sur
le bord de la cuve en retournant le bord
supérieur du filtre.
G Enclencher le flexible d’aspiration pour détergent
sur la face inférieure de la tête du moteur.
C Monter la partie textile du filtre (29) à l’aide de
l’anneau de serrage (32) et fixer avec les brides
tournantes.
H Monter la tête du moteur et fermer le dispositif
de fermeture à déclic
J Raccorder le flexible. Pour retirer le flexible
tourner le raccord sur le côté puis tirer.
Insérer l’accessoire désiré
Brancher le connecteur sur le secteur
N Mettre l’appareil en marche avec le bouton
MARCHE/ARRET (6)
L’interrupteur de la pompe (7) ne doit pas
s’allumer
La puissance d’aspiration peut être modifiée avec
le bouton de régulation (11, Schéma P).
– Coulisseau d’aération secondaire fermé
= pleine puissance
– Coulisseau d’aération secondaire ouvert
= puissance réduite
Nettoyage et entretien du système
AQUAfilter
Pour des raisons d’hygiène, le système
AQUAfilter et la cuve de l’aspirateur
doivent être vidés, nettoyés et séchés
après chaque utilisation. Eau sale et
pièces humides favorisent en effet la
prolifération des bactéries et des
champignons.
Essuyer le filtre textile pour poussières fines, en fonction de son encrassement, avec un chiffon sec ou humide. S’il est fortement encrassé, le rincer à l’eau claire,
sans addition de produits de lavage ou de détergents.
Veiller à ce que le filtre soit entièrement sec lors de la
prochaine utilisation de l’aspirateur.
Aspiration humide
Toujours maintenir la soupape à flotteur (40,
schéma S) entièrement propre et en parfait état
de fonctionnement. Cette soupape interrompt
immédiatement l’aspiration lorsque la cuve de
l’aspirateur est pleine.
En cas d’aspiration à partir de cuves dont le niveau de
liquide est supérieur au bord supérieur de la cuve de
l’aspirateur et dont la capacité est supérieure à celle
de la cuve, il se peut que le liquide continue de
s’écouler même lorsque la soupape à flotteur est
fermée.
Dans de tels cas, nous vous recommandons de
n’aspirer qu’une certaine quantité de liquides et de
vider entre chaque opération la cuve de l’aspirateur.
Relever tout d’abord le tube et le flexible d’aspiration
au-dessus de la surface du liquide puis éteindre
l’appareil afin d’éviter une fuite de liquide.
A Ouvrir le dispositif de fermeture à déclic et retirer
la tête du moteur.
Retirer les filtres de l’appareil, car ils risqueraient
sinon d’être endommagés (Schémas C et D). Avec
les appareils AQUAFILTER, retirer le filtre AQUA
et le filtre textile pour poussières fines (Schémas
C, E et F).
Si le réservoir à détergent est monté sur
l’appareil, le retirer (Schéma K)
H Monter la tête du moteur et fermer le dispositif
de fermeture à déclic
J Raccorder le flexible. Pour retirer le flexible
tourner le raccord sur le côté puis tirer.
P Fermer le dispositif de régulation de la puissance
d’aspiration (11) sur la poignée.
N Mettre l’appareil en marche avec le bouton
MARCHE/ARRET (6)
L’interrupteur de la pompe (7) ne doit pas
s’allumer
Après aspiration humide, nettoyer et sécher
l’appareil et les accessoires utilisés
Injection-extraction (aspiration lavage)
pour tapis, moquettes et sols durs
Ne nettoyer que les tapis et moquettes résistants
à un nettoyage humide
Les tapis finement tissés main ou dont les couleurs
risquent de déteindre ne doivent pas être
nettoyés par voie humide.
Si le tapis ou la moquette a déjà été shampooiné
à une époque précédente, il peut y avoir
formation importante de mousse lors de la
première utilisation de THOMAS BRAVO.
18
Page 20

Dans un tel cas, arrêter l’appareil et vider la cuve
de l’aspirateur.
Pour inhiber ensuite la formation de mousse,
ajouter
1
⁄2 tasse de vinaigre dans la cuve de
l’aspirateur.
Une formation importante de mousse après un
nettoyage à fond avec le détergent concentré
THOMAS est exclue étant donné que ce produit
contient un anti-mousse spécial.
Lorsque la fonction injection est
activée, veiller à ce qu’il y ait toujours
assez de liquide dans le réservoir d’eau
claire, afin d’éviter un endommagement éventuel de la pompe.
Nettoyage des tapis et moquettes
A Ouvrir le dispositif de fermeture à déclic et retirer
la tête du moteur.
K Retirer le couvercle du réservoir à détergent et
remplir le réservoir avec le détergent THOMAS
ProTex.
Pour le dosage, voir étiquette sur le flacon
Utiliser de l’eau tiède (max. 30°C).
Remettre le couvercle et insérer le réservoir
rempli dans l’appareil.
G Retirer le flexible d’aspiration pour détergent de
son support sur la tête du moteur.
L Monter la tête du moteur de façon telle que le
flexible d’aspiration (36) soit immergé jusqu’au
fond du réservoir à détergent en évitant toute
formation de coudures.
J Raccorder le flexible. Pour retirer le flexible
tourner le raccord sur le côté puis tirer.
M Insérer la soupape d’arrêt dans le logement
prévu sur le tube d’aspiration. Enficher la poignée
dans le tube d’aspiration et fixer le flexible pour
détergent sur le flexible d’aspiration avec le clips
en plastique.
N Enclencher le flexible pour détergent dans le
raccord rapide sur la tête du moteur.
P Placer le flexible pour détergent de l’injecteur
pour tapis sur la soupape d’arrêt puis le
verrouiller en tournant. Pousser le flexible pour
détergent dans le support pour flexible sur les
tubes d’aspiration ou, dans le cas de tube en
acier inox, le fixer avec les petits clips (39) sur le
tube d’aspiration.
Brancher le connecteur sur le secteur
N Actionner le bouton MARCHE/ARRET (6) et
l’interrupteur de la pompe allumé (7)
P Pousser sur le levier de la soupape d’arrêt (16)
pour pulvériser le détergent.
Avant de remplir à nouveau le
réservoir à détergent, il faut toujours
vider l’eau sale qui se trouve dans la
cuve de l’aspirateur.
Nettoyage des sols durs
Q Monter l’adaptateur pour sols durs
Méthode opératoire: voir “Nettoyage
des tapis et moquettes”
Pour le nettoyage des sols durs, nous vous
conseillons d’utiliser le détergent concentré
THOMAS ProFloor.
Nettoyage des meubles rembourrés
(suivant modèle)
Pour le nettoyage de vos meubles rembourrés ou
sièges auto, utilisez l’injecteur-extracteur pour meubles
rembourrés (23).
I Veiller à ne pas pulvériser trop de liquide étant
donné qu’en fonction du rembourrage, vous
devrez vous attendre alors à un temps de
séchage relativement long.
R Monter l’injecteur-extracteur pour meubles
rembourrés. Fixer le flexible pour détergent en
tournant. Pousser l’injecteur-extracteur sur la
poignée.
Nettoyage et entretien du système
d’injection-extraction
K Pour l’entretien de la pompe et des soupapes,
remplir le réservoir à détergent avec de l’eau
claire puis l’insérer dans l’appareil.
Raccorder le connecteur au secteur, actionner le
bouton Marche/arrêt (6) ainsi que l’interrupteur
de la pompe (7)
P Mettre le système d’injection en marche par
exemple au-dessus d’un lavabo [actionner le
levier sur la soupape d’arrêt (16)].
N Avant de dégager le flexible pour détergent,
actionner le levier (16, schéma P) pour éliminer le
reste de pression dans le système, ensuite
appuyer sur la touche sur le raccord rapide (5)
Retirer le connecteur du secteur!
Ensuite nettoyer et sécher l’appareil ainsi que les
accessoires utilisés
Ne jamais tremper la tête du moteur dans
l’eau!
Essuyer le carter du moteur avec un chiffon humide
puis avec sécher un chiffon sec.
19
Page 21

Conseils importants
En aspiration humide, effectuer des passes de
nettoyage en tirant toujours l’injecteur pour
moquettes vers vous, passe par passe.
Pour éviter un nouvel encrassement, attendre
avant de marcher sur la moquette qu’elle soit à
nouveau complètement sèche.
Pour que la surface nettoyée sèche rapidement, il
est judicieux de repasser l’aspirateur sur la
moquette sans actionner le levier de la soupape.
L’humidité restante peut ainsi être largement
éliminée.
Pour le nettoyage de parquets, veuillez s.v.p.
respecter les instructions du fabriquant du
parquet.
Aide en cas de
dysfonctionnements éventuels
S’il arrive que votre appareil ne fonctionne pas comme
il se doit, vous n’avez peut être pas besoin de recourir
immédiatement au service après vente. Nous vous
conseillons de vérifier auparavant si le
dysfonctionnement constaté ne s’explique pas par une
raison toute simple.
Si de la poussière sort de l’aspirateur, en
mode aspiration, il est possible
• que le système filtre soit mal fixé et/ou défectueux,
• que vous n’ayez pas utilisé un filtre de la marque
THOMAS:
Si la puissance d’aspiration diminue peu à
peu, il est possible :
• que les pores du filtre soient bouchés par des
poussières fines.
• que le sac à poussières soit plein,
• que les suceurs, tubes rallonges ou flexibles soient
obstrués par des saletés (tirer alors sur le flexible,
l’appareil étant en marche – Cet allongement
permet de débloquer les matières qui l’obstruent).
Si, en mode aspiration, de l’eau sort des
orifices d’échappement d’air, il est possible:
• que le flotteur (Schéma S) soit bloqué par des
liquides et ne puisse ainsi pas répondre,
• que vous ayez, en mode aspiration-lavage, utilisé
un produit autre que le détergent concentré
THOMAS,
• que le filtre AQUA et le filtre textile pour poussières
fines (suivant modèle) ne soient pas montés
correctement, suivant les instructions de montage.
Si la puissance d’aspiration diminue
brutalement, il est possible :
• que la soupape à flotteur ait stoppé l’air d’aspiration.
Ceci peut se produire lorsque l’appareil se trouve en
position fortement inclinée ou lorsqu’il a basculé.
Eteindre alors l’aspirateur – le flotteur retombe –
l’appareil est alors à nouveau prêt à fonctionner.
Si le moteur ne tourne plus, il est possible:
• qu’un câble, des connecteurs ou une prise de
courant soit défectueux.
• Avant de vérifier, retirez le connecteur du secteur.
• N’ouvrez jamais le moteur vous-même!
Si le détergent ne peut pas sortir, il est possible:
• que la pompe ne soit pas activée [Interrupteur (7)],
vérifier que l’interrupteur soit bien allumé,
• que le tamis de filtration sur le flexible d’aspiration
(36) ait besoin d’un nettoyage,
• que le flexible d’aspiration ne soit pas bien accroché
dans le réservoir à détergent,
• que l’injecteur soit bouché. Si l’injecteur est bouché,
tremper le pendant un certain temps dans l’eau. Puis
souffler fortement pour éliminer les saletés.
Service après vente
Veuillez s.v.p. vous adresser à votre commerçant
spécialisé. En cas de besoin, il vous indiquera volontiers
l’adresse ou le numéro de téléphone du service après
vente THOMAS compétent dans votre cas.
Lorsque vous recourez au service après vente, veuillez
toujours indiquer les renseignements qui se trouvent sur
la plaque signalétique de votre aspirateur.
Afin de garantir le maintien de la sécurité de
votre appareil, nous vous recommandons
expressément de confier toutes les
réparations et, en particulier, les réparations
sur les pièces conductrices d’électricité à des
ouvriers électriciens spécialisés. En cas de
dysfonctionnement, adressez-vous par
conséquent à votre commerçant spécialisé ou
directement au service après vente THOMAS:
20
Déclaration de conformité CE
Nous déclarons, en assumant l’entière responsabilité de
cette déclaration, que ce produit satisfait aux normes et
documents normalisés suivants
- Directive CE pour appareils basse tension (73/23/CEE)
- Directive CE de compatibilité électromagnétique
(89/336/CEE), modifiée par les directives 91/263/CEE,
92/31/CEE, 93/68/CEE
Normes harmonisées appliquées
DIN EN 60335-1, DIN-EN 60335-2-2;
DIN EN 61000-3-2: 1995; DIN EN 61000-3-3: 1995
DIN EN 55014-1: 1993; DIN EN 55014-2: 1997
Page 22

Voor de eerste
ingebruikneming
Leest U alstublieft alle volgende
aangevoerde informaties opmerkzaam
door. Zij geven belangrijke aanwijzingen
voor de veiligheid, het gebruik en het
onderhoud van het apparaat. Bewaart U
de gebruiksaanwijzing zorgvuldig en
geeft U deze aan de volgende bezitter
verder.
Deelidentificatie:
1 = Reservoir
2 = Motorkop
3 = Sluitsnapschoot
4 = Zwenkwielen
5 = Snelkoppeling
6 = IN/UIT-schakelaar
7 = IN/UIT-pompschakelaar (verlicht)
8 = Toevoeropeningen
9 = Handgreep
10 = Netaansluitingsleiding
11 = Zuigkrachtregeling
12 = Reinigingsmiddelslang (bovenste deel)
13 = Zuigslang
14 = Zuigbuis
15 = Slangkliks
16 = Afsluitventiel
17 = Tapijt-sproeiextractiemondstuk
18 = Reinigingsmiddelslang (onderste deel)
19 = Kleine zuigmond
20 = Harte vloeradapter
21 = Tapijtmondstuk
22 = Kierenzuigmond
23 = Sproeiextractiemondstuk voor kleine zuigmond
24 = Reinigingsmiddeltank
25 = Textielreinigingsconcentraat (ProTex)
26 = Sifinmondstuk *)
29 = Filtervlies*
30 = Schuimstoffilter
31 = Papierbeschermfilter
32 = Spanring
33 = Papieren filterzak
34 = AQUA-filter *)
35 = Fijne stof textielfilter *)
36 = Aanzuigslang voor reinigingsmiddel
37 = Zuigbuishouder
38 = Plaatspositie zuigbuis
39 = Buisclips *)
*) = slechts THOMAS BRAVO 20 S Aquafilter
1.2 Veiligheidsaanwijzingen
• THOMAS BRAVO dient uitsluitend voor het gebruik
in de huishouding door volwassenen
• Het apparaat in geen geval in gebruik nehmen,
wanneer:
- de netaansluitingsleiding beschadigd is,
- er zichtbare schaden te zien zijn,
- het eens naar beneden gevallen zou zijn.
• De spanningsopgaaf op het typebordje moet met
de voedingsspanning overeenstemmen.
• Mondstukken en buizen mogen bij ingeschakeld
apparaat niet in de buurt van het hoofd geraken,
omdat anders een blessurerisico voor ogen en oren
bestaat.
• Het apparaat niet voor het afzuigen van
gezondheidsgevaarlijke, bijtende en
oplossingsmiddelbevattende stoffen geschikt.
• Het apparaat mag niet in ruimtes worden gebruikt,
warin brandgevaarlijke stoppen zijn opgeslagen of
zich gassen hebben gevormd.
• Stoffen zoals benzine, verfverdunningsmiddelen en
brandstofolie kunnen door wervelen met de
zuiglucht explosieve dampen of mengsels vormen.
• Nooit hete as of gleiende voorwerpen opzuigen.
• Controleert U voor ieder gebruik, of de telkens
benodigde filters juist zijn ingezet.
• Zuigt U geen tonerstof op! Toner, die bijvoorbeeld
bij printers en kopieerapparaten wordt gebruikt,
kan elektrisch geleidbaar zijn! Bovendien wordt de
toner door het filtersysteem van de stofzuiger
eventueel niet geheel uitgefilterd en kann zo door
de zuigventilator weer in de ruimtelucht geraken.
• Aceton, zuren en oplossingsmiddelen kunnen de
aan het apparaat gebruikte materialen aantasten.
• Er moet met uiterste omzichtigheid bij het reinigen
van trappen te werk worden gegaan. Zorgt U voor
een toereikende standveiligheid van het apparaat.
De slang mag niet boven zijn oorspronkelijke lengte
uit worden gerekt. Houdt U het apparaat altijd met
één hand vast.
• Laat U het apparaat nooit in ingeschakelde
toestand zonder toezicht staan en let U erop, dat
kinderen niet aan het apparaat spelen.
• De netstekker moet worden uitgetrokken:
bij storingen gedurende het bedrijf,
voor iedere reiniging en onderhoud,
na het gebruik,
bij iedere verwisseling van de stofzak.
• Nooit de stekker aan de kabel uit de contactdoos
trekken, maar uitsluitend aan de stekker.
• Zorgt U ervoor, dat de aansluitingsleiding noch aan
hitte en chemische vloeistoffen worden blootgesteld
21
NL
Page 23

noch over scherpe kanten en oppervlakken wordt
getrokken.
• Het gebruik van verlengkabels in vochtige ruimtes
moet worden vermeden.
• Schade an het apparaat, an de toebehoren of aan
de netaansluitingsleiding (speciale leiding
noodzakelijk) nooit zelf repareren, maar alleen door
een geautoriseerde klantenservice laten herstellen,
want veranderingen aan het apparaat kunnen
gevaarlijk voor Uw gezondheid zijn. Zorgt U
ervoor, dat alleen originele reserveonderdelen en
toebehoren woren gebruikt.
• Het apparaat aan geen weersinvloeden, geen
vochtigheid en geen hittebronnen blootstellen.
• Ledigt en reinigt U de reservoir onmiddellijk na het
natzuigen of sproeiextraheren.
• Chemicaliën, zoals de reinigingsmiddelconcentraten,
behoren niet in de handen van kinderen.
• Alleen bij gebruik van het originele THOMAS
reinigingsmiddel kan de functie van het apparaat en
de volle reinigingswerking gegarandeerd worden.
• Personen met gevoelige huid moeten direct contact
met de reinigings-middeloplossing vermijden.
• Zou het renigingsmiddelconcentraat op de
slijmvliezen (oog, mond, enz.) geraken, moet
onmiddellijk met water worden nagespoeld.
Ter wille van het milieu
Verpakkingsmateriaal en uitgediende apparaten niet
eenvoudig wegwerpen!
Apparaatverpakking:
- Het verpakkingskarton kan de verzameling van oud
papier bezorgd worden.
- De kunststofzak uit polyethyleen (PE) voor een
recycling aan verzamelplaatsen afgeven.
Recycling van het apparaat na het einde
van zijn levensduur
• Verwijdert U het apparaat naar de plaatselijke
voorschriften en snijdt U vooraf de getrokken
netstekker af.
Montage zwenkwielen
A Sluitsnapschoot openen den de motorkop
afnemen.
B Zwenkwielen en bouten vast in de
reservoirbodem indrukken.
Droogzuigen
THOMAS BRAVO 20
! Na een voorafgaand natzuigen moet het
apparaat absoluut droog zijn; ook de slang of
buis eventueel vooraf drogen..
Nooit zonder of met beschadigde filters
droogzuigen!
K Reinigingsmiddeltank afnemen.
C Schuimstoffilter, paperbeschermfilter en spanring
monteren en met draaiklemmen beveiligen.
D Filterzak vast op de toevoeropening drukken en
aan de reservoirwand aanleggen.
G Aanzuigslang voor reinigingsmiddel aan de
onderkant van de motorkop inklikken.
H Motorkop opzetten en sluisnapschoot sluiten.
J Zuigslang aansluiten. Voor het afnemen de
zuigaansluiting opzij draaien en eruit trekken.
Monteert U de gewensde toebehoren.
Netstekker aansluiten.
N Apperaat met IN/UIT-schakelaar (6) inschakelen.
Pompschakelaar (7) mag niet oplichten.
i Met de zuigkrachtregeling (11, afb. P) laat zich de
zuigkracht veranderen.
– Nevenbeluchtingsklep gesloten =
volle zuigkracht
– Nevenbeluchtingsklep geopend =
verminderde zuigkracht
THOMAS BRAVO 20S Aquafilter
i Benut U Uw AQUAFILTER-apparaat in een
droogzuigbedrijf nooit zonder aquafilter, fijne
stof textielfilter en pasende watervulling.
Zuigt u nooit grotere hoeveelheden van fijne stof
bijv. Meel, cacaopoeder, cement enz.
22
Page 24

K Reinigingsmiddeltank afnemen.
E 2-delige AQUA-filter tot aan de aanslag
samensteken en vast op de toevoeropening
apschuiven.
Let U daarbij op de
markeringen.
De AQUA-filter moet op de zuigtonbodem
inklikken en gelijkmatig op de bodem liggen.
Vult U 2 liter helder water in de zuigreservoir.
F Fijne stof textielfilter door omleggen van de
bovenste rand in de zuigreservoir inhangen.
G Aanzuigslang voor het reinigingsmiddel aan de
onderkant van de motorkop inklikken.
C Het filtervlies (29) met behulp van de spanring
(32) monteren en met de draaiklemmen
beveiligen.
H Motorkop opzetten en sluitsnapschoot sluiten.
J Zuigslang aansluiten. Voor het afnemen de
zuigaansluiting opzij draaien en eruit trekken.
Monteert U de gewensde toebehoren.
Netstekker aansluiten.
N Apperaat met IN/UIT-schakelaar (6) inschakelen.
Pompschakelaar (7) mag niet oplichten.
i Met de zuigkrachtregeling (11, afb. P) laat zich de
zuigkracht veranderen.
– Nevenbeluchtingsklep gesloten
= volle zuigkracht
– Nevenbeluchtingsklep geopend
= verminderde zuigkracht
Reiniging en onderhoud van het AQUAfiltersysteem
! Om hygiëneredenen het AQUAFILTER-systeem
en de zuigreservoir na ieder gebruik ledigen,
reinigen en drogen. Vuil water en vochtige delen
begunstigen de vermeerdering van bacteriën en
schimmel.
Fijne stof tectielfilter al naar vervuiling met een droog
of vochtig doek afwissen. Bij sterkere verontreiniging
met helder water, zonder toevoeging van was- en reigigingsmiddelen, uitwassen. Let U erop, dat de filter bij
de volgende zuiginzet geheel is gedroogd.
Natzuigen
! Vlotterklep (40, afb. S) altijd zuiver en gangbaar
houden. Hij onderbreekt automatisch het
aanzuigen, wanneer de zuigreservoir vol is.
Bij het afzuigen uit reservoirs, waarvan de vloeistofspiegel hoger ligt als de bovenkant van de zuigreservoir en hun inhoud groter is dan de capaciteit van de
zuigreservoir, kann bij gesloten vlotterklep verder
vloeistof navloeien.
In zulke gevallen alleen deelhoeveelheden afzuigen en
de zuigreservoir tussendoor ledigen.
Allereerst zuigbuis en –slang uit de vloeistof nehmen
en daarna het apparaat uitschakelen om een navloeien van vloeistof te verhinderen.
A Sluitsnapschoot openen en motorkop afnemen.
! Filters uit het apparaat nemen, omdat deze
anders worden beschadigd. (afb. C en D). Bij
AQUAFILTER-apparaten de AQUA-filter en de
fijne stof textielfilter eruit nemen. (afb. C, E en F).
Indien de reinigingsmiddeltank is gemonteerd,
deze eruit nemen (afb. K).
H Motorkop opzetten en sluitsnapschoot sluiten.
Netstekker aansluiten.
J Zuigslang aansluiten. Voor het afnemen de
zuigslang opzij draaien en eruit trekken.
P Zuigkrachtregeling (11) aan de handgreep
sluiten.
N Appraat met IN/UIT-schakelaar (6) inschakelen,
pompschakelaar (7) mag niet oplichten.
! Na beeindiging van het natzuigen het apparaat
en de gebruikte toebehoren reinigen en drogen.
Sproeiextraheren (waszuigen)
van tapijten en harde vloeren
! Alleen tapijten reinigen die voor een natte
reiniging geschikt zijn.
Zachte met de hand geweefde of kleuronechte
tapijten mogen niet natgereinigd worden.
Wanneer de tapijt op een vroeger tijdpunt wird
geshampooneerd, kan het bij een eerstmalig
gebruik van de THOMAS BRAVO tot een
sterkere schuimvorming komen.
Apparaat dan uitschakelen en zuigreservoir
ledigen.
Om verdere schuimvorming te vermijden, doet U
1
⁄2 kopje azijn in de zuigreservoir.
23
Page 25

Een verhoogde schuimvorming is na en eenmalig
grondreiniging met het THOMAS
reinigingsconcentraat uitgesloten, omdat dit met
een speciale schuimstop is uitgerust.
Let U erop, dat zich bij een
ingeschakelde sproeifunctie altijd
vloeistof in de vers waterreservoir
bevindt, om een eventuele
beschadiging van de pomp te
vermijden.
Tapijtreiniging
A Sluitsnapschoot openen en motorkop afnemen.
K Deksel van de reinigingsmiddeltank afnemen en
THOMAS ProTex reinigingsmiddel in de tank
vullen.
Dosering zie flesetiket.
Lauwarm water (max. 30° C) gebruiken.
Deksel weer opzetten en gevulde
reinigingsmiddeltank in het apparaat inzetten.
G Aanzuigslang voor renigingsmiddel uit de houder
van de motorkop nemen.
L Motorkop zo opzetten, dat de aanzuigslang (36)
tot op de bodem van de renigingsmiddeltank
onderdompelt en niet wordt afgebogen.
J Zuigslang aansluiten. Voor het afnemen de
zuigaansluiting opzij draaien en eruit trekken.
M Afsluitklep in de opneming aan de zuigbuis
inschuiven. Handgreep in de zuigbuis steken en
de reinigingsmiddelslang met de kunststofclips
aan de zuigslang bevestigen.
N Reinigingsmiddelslang in de snelkoppeling aan de
motorkop inklikken.
O Tapijt-sproeiextractiemondstuk op de zuigbuis
opsteken.
P Reinigingsmiddelslang van het
tapijtsproeimondstuk aan de afsluitklep aanzetten
en door draaien vergrendelen.
Reinigingsmiddelslang in de slanghouder aan de
zuigbuizen drukken resp. Bij edelstaalbuizen met
de kleinere buisclipsen (39) aan de zuigbuis
bevestigen.
Netstekker aansluiten.
N IN/UIT-schakelaar (6) en verlichte
pompschakelaar (7) inschakelen.
P Hefboom aan de afsluitklep (16) drukken.
Reinigingsmiddel wordt opgesproeid.
! Alvorens de reinigingsmiddeltank
opnieuw wordt gevuld, altijd het vuil
water in de zuigreservoir ledigen.
Reiniging van harde vloeren
Q Harde vloeradapter monteren
Handelwijze zie ”tapijtreiniging”
i Voor de reiniging van harde vloeren reden wij
het THOMAS ProFloor reinigingsconcentraat aan.
Kussenreiniging (al naar model)
Voor de reiniging van Uw gestoffeerde meubelen of
autozetels gebruikt U het kussen-sproeiextractiemondstuk (23).
i Let U erop, dat niet teveel vloeistof wordt
aangebracht, omdat al naar onderbouw met een
langere droogtijd rekening moet worden
gehouden.
R Het kussen-sproeiextractiemondstuk monteren.
Reinigingsmiddelslang door draaien bevestigen.
Mondstuk op de handgreep opschuiven.
Reiniging en onderhoud van het
sproeiextractiesysteem
K Voor het onderehoud van de pump en
ventielen de reinigingsmiddeltank met
helder water vullen en inzetten.
P Sproeisysteem bijv. over een spoelbak
in gebruik nemen (hefboom aan
afsluitklep (16) bedienen).
N Voor het lossen van de reinigingsmiddelslang de
hefboom aan de afsluitklep (16, afb. P)
bediennen, om de restdruk in het systeem af te
bouwen, dan de toets aan de snelkoppeling (5)
drukken.
Netstekker trekken!
Aansluitend het apparaat en de gebruikte toebehoren
reinigen en drogen.
De motorkop nooit in water dompelen!
Motorhuis met een vochtig doek afwissen en nadrogen.
24
Page 26

Belangrijke aanwijzingen
i Trekt U bij het natreinigen het
tapijtsproeimondstuk altijd baan voor baan naar
U toe.
i Om een nieuwe vervuiling te vermijden, mogen
gereinigde vaste vloerbedekkingen eerst
betreden worden, wanneer deze weer droog
zijn.
i Om een sneller drogen van de gereinigde
vlakken te bereiken, is het zinvol door een
tweede afzuigen – zonder drukken van de
ventielhefboom – de verblijvende restvochtigheid
zoveel mogelijk te verwijderen.
I Voor de reiniging van parketvloeren handelt U
volgens de aanwijzingen van de
parketproducent.
Hulp bij eventuele storingen
Indien Uw apparaat tegen alle verwachtingen eens
niet tevredenstellend functioneert, hoeft U niet dadelijk
de klantenservice in te schakelen. Controleert U
alstublieft vooreerst, of de storing slechts kleine oorzaken heeft:
Wanneer gedurende het zuigen stof
vrijkomt:
• Is het filtersysteem juist bevestigd en zonder defect?
• Werd een originele THOMAS-filter gebruikt?
Wanneer de zuigkracht geleidelijk
verzwakt?
• Zijn de filterporiën door fijn stof verstopt?
• Is de papieren filterzak vol?
• Zijn mondstuk, verlengingsbuis of zuigslang door
vuil verstopt? (Zuigslang bij ingeschakeld apparaat
uit elkaar trekken – uitrekking lost de verstopping).
Wanneer bij het zuigen water uit de
uitblaasopeningen van het apparaat
komt:
• Is de vlotter (af. S) bij het zuigen van vloeistoffen
geblokkeerd en kan niet reageren?
• Werd een origineel THOMAS-reinigingsconcentraat
voor het was zuigengebruikt?
• Zijn AQUAFILTER en fijne stof textielfilter(al naar
model) volgens de aanwijzing gemonteerd?
Wanneer de zijkracht plotseling verzwakt:
• Heeft het vlotterventiel de zuiglucht gestopt? Dat
kan gebeuren bij extreme schuine stand of bij het
omkippen van het apparaat. Zuiger uitschakelen –
de vlotter valt naar beneden – het apparaat is weer
bedrijfsklaar.
Wanneer de motor niet loopt:
• Zijn kabel, stekker en contactdoos intact?
• Voor controle de stekker trekken.
• Nooit zelf de motor openen.
Wanneer geen reinigingsvloeistof
vrijkomt:
• Is de pomp ingeschakeld (schakelaar (7) moet
oplichten)?
• Aanzuigfilterzeef aan de aanzuigslang (36) reiigen.
• Hangt de aanzuigslang reglementair in de
reinigingsmiddeltank?
• Is het sproeimondstuk verstopt? Indien het
sproeimondstuk eens verstopt is, het mondstuk enige
tijd in het water leggen. Daarna krachtig
doorblazen.
Klantenservice
Wenst U zich aan Uw vakhandelaar, die U zo nodig
ook graag het adres of telefoonnummer van de voor
U bevoegde THOMAS-klantenservice meedeelt.
Geeft U daarbij altijd de gegevens op het tybeplaatje
van Uw stofzuiger aan.
Voor de instandhouding van de veiligheid
van het apparaat mag U reparaties,
vooral aan stroomvoerende delen, alleen
door een elektro-vakman laten uitvoeren.
In geval van storing moet U zich daarom
direct aan Uw vakhandelaar of direct aan
de THOMAS klantenservice wenden.
25
CE-CONFORMITEITSVERKLARING
Wij verklaren in einige verantwoordelijkheid, dat dit
product met de volgende normen of normale
documenten overeenstemd.
– EG-laagspanningsrichtlijn (73/23/EEG) veranderd
door 93/68/EEG
– G-richtlijn elektromagnetische verdraagzaamheid
(89/336/EEG) veranderd door 91/263/EEG,
92/31/EEG, 93/68/EEG.
Toegepaste geharmoniseerde normen:
DIN EN 60335-1, DIN EN 60335-2-2;
DIN EN 61000-3-2; 1995, DIN EN 61000-3-3, 1995;
DIN EN 55014-1: 193; DIN EN 55014-2. 1997
Page 27

Antes de la primera
puesta en servicio
Por favor, leer atentamente todas las
informaciones indicadas a continuación.
Proporcionan advertencias importantes
para la seguridad, el uso y el
mantenimiento del aparato. Guardar
cuidadosamente las instrucciones del
Modo de Empleo y entregarlas al
siguiente propietario.
Identificación de piezas
1
= Depósito
2 = Cabeza del motor
3 = Pestillo de cierre
4 = Ruedas giratorias
5 = Acoplamiento rápido
6 = Interruptor MARCHA/PARADA
7 = Interruptor de la bomba MARCHA/PARADA
8 = Manguito de aspiración
9 = Asa de transporte
10 = Cable de conexión a la red
11 = Regulación de la fuerza de aspiración
12 = Manguera central de limpieza (parte superior)
13 = Manguera de aspiración
14 = Tubo de aspiración
15 = Pinzas para manguera
16 = Válvula de cierre
17 = Boquilla de extracción del pulverizado para alfombras
18 = Manguera para producto de limpieza (parte inferior)
19 = Boquilla para tapizados
20 = Adaptador para suelos duros
21 = Boquilla para alfombras
22 = Boquilla para juntas
23 = Boquilla de extracción del pulverizado para tapizados
24 = Depósito para producto de limpieza
25 = Concentrado para limpieza de tejidos (Protext)
26 = Boquilla sifón *
29 = Filtro de material no tejido*
30 = Filtro de material celular
31 = Filtro protector de papel
32 = Aro de apriete
33 = Saco para el filtro de papel
34 = AQUA-Filter *
35 = Filtro de tejido para polvo fino *
36 = Manguera de aspiración para producto de limpieza
37 = Soporte del tubo de aspiración
38 = Posición para guardar el tubo de aspiración
39 = Pinzas
para tubos *
*) THOMAS BRAVO 20 S Aquafilter
1.2 Advertencias de seguridad
• El aparato THOMAS BRAVO sirve exclusivamente
para su utilización por adultos a nivel doméstico.
• En ningún caso poner el aparato en servicio,
cuando:
- está dañado el cable de conexión a la red,
- presenta daños visibles,
- se haya caído alguna vez.
• La indicación de tensión en la placa de
características debe coincidir con la tensión de
alimentación.
• Las boquillas y los tubos no deben llegar a las
proximidades de la cabeza con el aparato
conectado, pues de lo contrario existe peligro de
accidentes, en particular para ojos y oídos.
• El aparato no es apropiado para la aspiración de
sustancias que pongan en peligro la salud, sean
corrosivas o que contengan disolventes.
• El aparato no se debe poner en funcionamiento en
locales en los cuales se almacenen sustancias
inflamables o en los que se formen gases.
• Sustancias como gasolina, diluyentes de pinturas y
gasóleo, pueden formar vapores o mezclas
explosivas por fluidizado con el aire de aspiración.
• No aspirar nunca cenizas calientes u objetos
incandescentes.
• Comprobar antes de cada uso si están colocados
correctamente cada uno de los filtros necesarios.
• ¡No aspirar ninguna clase de polvo de toner! ¡Los
polvos de toner que, por ejemplo, se emplean en
impresoras o en aparatos de copiado, pueden ser
conductivos eléctricamente! Además, es posible que
el toner no se filtre por completo por el sistema de
filtrado del aspirador de polvo y debido a esto
puede volver al aire del local a través de la
soplante de aspiración.
• La acetona, los ácidos y los disolventes pueden
corroer los materiales empleados en el aparato.
• Se ruega la máxima prudencia en la limpieza de
escaleras. Tener cuidado de conseguir una
estabilidad suficiente del aparato. La manguera no
se debe extender más allá de su longitud primitiva.
Mantener el aparato siempre bien sujeto con una
mano.
• No dejar nunca involuntariamente el aparato en
estado conectado y prestar atención a que los niños
no jueguen cerca del mismo.
• Hay que retirar la clavija de enchufe a la red:
en caso de fallos durante el servicio,
antes de cada limpieza y cuidado del aparato,
después del uso,
en cada cambio de filtros.
• No extraer nunca la clavija de la base de enchufe
tirando del cable, sino exclusivamente de la clavija.
• Tener cuidado de no exponer el cable de conexión
ni al calor ni a líquidos químicos y de que no sea
26
E
Page 28

arrastrado sobre aristas o superficies cortantes.
• Hay que evitar el empleo de cables alargadores en
locales húmedos.
• No reparar nunca uno mismo los daños en el
aparato, en los accesorios o en el cable de
conexión a la red (es necesario un cable especial),
sino permitir hacer la reparación por un taller de
Servicio Postventa autorizado, pues las
modificaciones en el aparato pueden poner en
peligro la salud. Tener cuidado de que sólo se
empleen piezas de recambio y accesorios originales.
• No exponer el aparato a ninguna influencia
climática, a ninguna humedad ni a ninguna fuente
de calor.
• No dirigir nunca el chorro de limpieza hacia
personas o animales, a bases de enchufe o hacia
aparatos eléctricos.
• Vaciar y limpiar el depósito inmediatamente
después de la aspiración húmeda o de la extracción
del pulverizado.
• Los productos químicos, como los concentrados de
productos de limpieza, no deben estar al alcance
los niños.
• Sólo con empleo del producto de limpieza original
THOMAS se puede garantizar la función del
aparato y la completa acción de limpieza.
• Las personas con piel sensible deben evitar el
contacto directo con la solución de limpieza.
• En caso de que el concentrado de limpieza entre en
contacto con las mucosas (ojos, boca, etc.), hay que
enjuagarlas inmediatamente con agua.
Respetar el medio ambiente
¡No tirar de forma indiscriminada el material de
embalaje y los aparatos usados!
Embalaje del aparato:
• Depositar el cartón del embalaje en el contenedor
correspondiente.
• Depositar la bolsa de plástico de polietileno (PE) en
el contenedor correspondiente.
Reciclado del aparato después de su vida
útil:
• Depositar el aparato según las ordenanzas
municipales (en el Punto Verde) y cortar
previamente la clavija de enchufe a la red.
Montaje de las ruedas giratorias
A Abrir el pestillo de cierre y levantar la cabeza del
motor.
B Introducir los bulones y las ruedas giratorias
fijándolos en el suelo del depósito.
Aspiración seca
THOMAS BRAVO 20
! Después de una aspiración en húmedo anterior,
el aparato debe estar absolutamente seco; en
caso necesario secar también previamente la
manguera o el tubo.
No aspirar nunca en seco con los filtros dañados.
K Extraer el depósito de producto de limpieza.
C Montar el filtro de material celular, el filtro
protector de papel y el aro de apriete y asegurar
con las grapas giratorias.
D Presionar y fijar el saco para el filtro sobre el
manguito de aspiración y colocar en la pared del
depósito.
G Sujetar la manguera de aspiración para el
producto de limpieza en la cara inferior de la
cabeza del motor.
H Poner encima la cabeza del motor y cerrar el
pestillo de cierre.
J Enchufar la manguera de aspiración. Para retirar
la conexión de aspiración girar hacia un lado y
tirar hacia afuera.
Montar el accesorio deseado.
Conectar la clavija de enchufe a la red.
N Conectar el aparato con el interruptor
MARCHA/PARADA (6).
No se debe encender el interruptor de la bomba
(7).
i Con la Regulación de la fuerza de aspiración (11,
figura P) se puede variar la fuerza de aspiración.
– corredera de aire adicional cerrada
= fuerza de aspiración total
– corredera de aire adicional abierta
= fuerza de aspiración reducida.
THOMAS BRAVO 20S Aquafilter
! No emplear nunca el aparato AQUAFILTER en
servicio de aspiración seca sin el Aquafilter, el
filtro de tejido para polvo fino y el
correspondiente llenado de agua.
27
Page 29

No aspirar ninguna cantidad grande de polvo
fino, por ejemplo, harina, cacao en polvo,
cemento, etc.
K Retirar el depósito de producto de limpieza.
E Encajar juntas las 2 partes del AQUA-Filter hasta
el tope y deslizarlas fijándolas sobre el manguito
de aspiración.
Para esto prestar atención
a las marcas.
El AQUA-Filter debe encajar en el suelo
bombeado de aspiración y apoyar con
uniformidad en el suelo. Echar 2 litros de agua
limpia en el depósito de aspiración.
F Colgar el filtro de tejido para polvo fino en el
depósito de aspiración doblando el borde superior.
G Sujetar la manguera de aspiración para el
producto de limpieza en la cara inferior de la
cabeza del motor.
C Montar el filtro de material no tejido (29) por
medio de la abrazadera (32) y asegurar con la
grapa giratoria.
H Poner encima la cabeza del motor y cerrar el
pestillo de cierre.
J Enchufar la manguera de aspiración. Para retirar
la conexión de aspiración girar hacia un lado y
tirar hacia afuera.
Montar el accesorio deseado.
Conectar la clavija de enchufe a la red.
N Conectar el aparato con el interruptor
MARCHA/PARADA (6).
No se debe encender el interruptor de la bomba
(7).
i Con la Regulación de la fuerza de aspiración (11,
figura P) se puede variar la fuerza de aspiración.
- corredera de aire adicional cerrada
= fuerza de aspiración total
- corredera de aire adicional abierta
= fuerza de aspiración reducida.
Limpieza y cuidados del sistema AQUAFilter
! Por motivos de higiene, después de cada uso
vaciar, limpiar y secar el sistema AQUA-Filter y el
depósito de aspiración.
El agua sucia y las piezas húmedas favorecen el
aumento de bacterias y hongos.
Limpiar el filtro de tejido para polvo fino, según sea el
ensuciamiento, con un trapo seco o húmedo. Con
ensuciamiento fuerte lavar con agua limpia, sin añadir
productos de lavado o de limpieza. Prestar atención a
que el filtro esté totalmente seco en el siguiente
empleo para la aspiración.
Aspiración húmeda
! Mantener siempre limpia y viable la válvula de
flotador (40, figura S). Esta válvula interrumpe
automáticamente la aspiración cuando el
depósito de aspiración está lleno.
Cuando se aspira desde depósitos cuyo nivel de
líquido está más alto que el borde superior del
depósito de aspiración y su contenido de llenado es
mayor que la capacidad del depósito de aspiración,
puede seguir fluyendo líquido con la válvula de
flotador cerrada.
En tales casos aspirar sólo cantidades parciales y de
vez en cuando vaciar el depósito de aspiración.
Primero levantar el tubo y la manguera de aspiración
del líquido y a continuación desconectar el aparato,
para impedir que siga fluyendo líquido.
A Abrir el pestillo de cierre y levantar la cabeza del
motor.
! Retirar el filtro del aparato, pues en caso
contrario se daña (figuras C y D). En aparatos
AQUAFILTER extraer el AQUA-Filter y el filtro de
tejido para polvo fino (figuras C, E y F).
En caso de que esté montado el depósito para
producto de limpieza, extraer este depósito
(figura K).
H Poner encima la cabeza del motor y cerrar el
pestillo de cierre.
Conectar la clavija de enchufe a la red.
J Enchufar la manguera de aspiración. Para retirar
la conexión de aspiración girar hacia un lado y
tirar hacia afuera.
P Cerrar la regulación de la fuerza de aspiración
(11) en la empuñadura.
N Conectar el aparato con el interruptor
MARCHA/PARADA (6).
No se debe encender el interruptor de la bomba
(7).
! Después de finalizada la aspiración húmeda
limpiar y secar el aparato y los accesorios
empleados.
Extraer el pulverizado (aspiración con
lavado) de alfombras y de suelos duros
! Limpiar sólo las alfombras que sean apropiadas
para la limpieza en húmedo.
Las alfombras delicadas tejidas a mano o de
colores poco sólidos no se deben limpiar en
húmedo. Cuando la alfombras han sido tratadas
con jabón en un momento anterior, puede
suceder que en el primer uso del THOMAS
BRAVO se forme demasiada espuma.
28
Page 30

En este caso desconectar el aparato y vaciar el
depósito de aspiración.
Para evitar más formación de espuma, verter 1⁄2
taza de vinagre en el depósito de aspiración.
Queda excluida una gran formación de espuma
después de una limpieza a fondo con el
concentrado de limpieza THOMAS, pues este
producto está provisto con una parada especial
de la espuma.
Prestar atención para que con la
función de pulverización conectada se
encuentre siempre líquido en el
depósito de agua limpia, para evitar
un posible dañado de la bomba.
Limpieza de alfombras
A Abrir el pestillo de cierre y levantar la cabeza del
motor.
K Levantar la tapa del depósito del producto de
limpieza y echar en el depósito producto de
limpieza Pro Tex THOMAS .
Para la dosificación ver la etiqueta del frasco.
Emplear agua tibia (30 °C como máx.).
Volver a colocar la tapa y poner el depósito de
producto de limpieza dentro del aparato.
G Extraer la manguera de aspiración para
producto de limpieza del soporte en la cabeza
del motor.
L Poner la cabeza del motor de tal modo que la
manguera de aspiración (36) se sumerja hasta el
fondo del depósito para producto de limpieza y
no se doble.
J Enchufar la manguera de aspiración. Para retirar
la conexión de aspiración girar hacia un lado y
tirar hacia afuera.
M Introducir la válvula de cierre en el alojamiento
en el tubo de aspiración. Encajar la empuñadura
en el tubo de aspiración y sujetar la manguera
del producto de limpieza con la pinza de plástico
en la manguera de aspiración.
N Encajar la manguera de producto de limpieza en
el acoplamiento rápido situado en la cabeza del
motor.
O Enchufar la boquilla de extracción del
pulverizado en el tubo de aspiración.
P Colocar la manguera del producto de limpieza
de la boquilla de pulverización de alfombras en
la válvula de cierre y enclavar girando. Presionar
la manguera de producto de limpieza en los
soportes de manguera situados en los tubos de
aspiración, o con tubos de acero inoxidable,
sujetar con las pequeñas pinzas para tubos (39)
en el tubo de aspiración.
Conectar la clavija de enchufe a la red.
N Conectar el interruptor MARCHA/PARADA (6) y
el interruptor de la bomba (7) encendido.
P Presionar la palanca en la válvula de cierre
(16).El producto de limpieza se pulveriza.
! Antes de rellenar de nuevo el depósito para
producto de limpieza, vaciar siempre el agua
sucia contenida en el depósito de aspiración.
Limpieza de suelos duros
Q Montar el adaptador para suelos duros.
Para la forma de proceder véase “Limpieza
de alfombras”
i Para la limpieza de suelos duros recomendamos
el concentrado para limpieza ProFloor THOMAS.
Limpieza de tapizados (según sea el modelo)
Para la limpieza de muebles tapizados o de asientos
de coches, emplear la boquilla de extracción del
pulverizado para tapizados (23).
i Prestar atención para que no se aplique
demasiado líquido, pues según sea la estructura
hay que contar con un tiempo de secado más o
menos largo.
R Montar la boquilla de extracción del pulverizado
para tapizados. Sujetar girando la manguera de
producto de limpieza. Encajar la boquilla sobre la
empuñadura.
Limpieza y cuidados del sistema de
extracción del pulverizado
K Para el cuidado de la bomba y de la
válvula, llenar el depósito de producto
de limpieza con agua limpia y emplear
este agua.
Conectar la clavija de enchufe a la red,
conectar el interruptor MARCHA/
PARADA (6), así como el interruptor de
la bomba (7).
P Poner en servicio el sistema de
pulverización, por ejemplo, sobre un
lavabo (accionar la palanca en la
válvula de cierre (16)).
N Antes de soltar la manguera del producto de
limpieza accionar la palanca en la válvula de
cierre (16, figura P), a fin de reducir la presión
residual en el sistema, a continuación presionar el
pulsador en el acoplamiento rápido (5).
¡Extraer la clavija de enchufe a la red!
A continuación limpiar y secar el aparato y los
accesorios empleados.
¡No sumergir nunca en agua la cabeza del motor!
Limpiar la carcasa del motor con un trapo húmedo y a
continuación secar.
29
Page 31

Consejos importantes
i En la limpieza en húmedo mover la boquilla de
pulverización de alfombras siempre pasada a
pasada hacia uno.
i Para evitar un nuevo ensuciamiento, sólo se
deberían pisar los suelos enmoquetados
limpiados, cuando estén otra vez secos.
i Para lograr un secado más rápido de las
superficies limpiadas, es conveniente eliminar
ampliamente la humedad residual que haya
quedado mediante una nueva aspiración – sin
presionar la palanca de la válvula.
i Para la limpieza de suelos de parquet, proceder
según las instrucciones del fabricante de los
suelos.
Ayuda en caso de posibles fallos
En caso de que el aparato en contra de lo esperado
alguna vez no funcione satisfactoriamente, no se
necesita avisar inmediatamente al Servicio Postventa.
Por favor, comprobar primero si el fallo sólo es debido
a pequeñas causas.:
Cuando en la aspiración sale polvo:
• ¿Está el sistema de filtros sujeto correctamente y sin
defectos?
• ¿Ha sido empleado un filtro original THOMAS?
Cuando la fuerza de aspiración disminuye
poco a poco:
• ¿Están atascados los poros del filtro por polvo fino?
• ¿Está lleno el saco para el filtro de papel?
• ¿Están atascadas las boquillas, el tubo de
prolongación o la manguera de aspiración por
suciedad? (estirar la manguera de aspiración con el
aparato conectado – el alargado afloja los
atascos).
Cuando en la aspiración sale agua por los
orificios de soplado del aparato:
• ¿Está bloqueado el flotador (figura S) en la
aspiración de líquido y no puede responder?
• ¿Ha sido empleado un concentrado de limpieza
original THOMAS para la aspiración con lavado?
• ¿Están montados según las instrucciones el
AQUAFILTER y el filtro de tejido para polvo fino
(según sea el modelo)?
Cuando la fuerza de aspiración disminuye
súbitamente:
• ¿Ha detenido la válvula de flotador el aire de
aspiración? Esto puede suceder con posición muy
inclinada o cuando se invierte el aparato. Conectar
el aspirador – el flotador cae hacia abajo – el
aparato está otra vez dispuesto para el servicio.
Cuando el motor no funciona:
• ¿Están en buen estado el cable, la clavija y la base
de enchufe?
• Antes de comprobar retirar la clavija de la base de
enchufe.
• ¡No abrir nunca uno mismo el motor!
Cuando no sale nada de líquido de
limpieza:
• ¿Está conectada la bomba? El interruptor (7) debe
estar encendido.
• Limpiar el tamiz del filtro de aspiración en la
manguera de aspiración (36)
• ¿Cuelga la manguera de aspiración correctamente
en el depósito de producto de limpieza?
• ¿Está atascada la boquilla de pulverización? En
caso de que esté atascada la boquilla de
pulverización, sumergir la boquilla en agua durante
un tiempo. A continuación soplar con fuerza.
Servicio Postventa
Diríjase a su comerciante especializado, el cual le proporcionará la dirección o el número de teléfono del
Servicio Postventa THOMAS competente para su zona.
Por favor, comunicar siempre las indicaciones de la
placa indicadora del tipo del aspirador.
Para mantener la seguridad del aparato,
sólo se deberían permitir realizar
reparaciones, en particular en partes
conductoras de corriente, a electricistas
especializados. Por tanto, en caso de fallo
se debería dirigir a su comerciante
especializado o directamente al Servicio
Postventa THOMAS.
30
CERTIFICADO DE CONFORMIDAD CE
Certificamos con responsabilidad propia, que este
producto cumple las siguientes normas o documentos
normales.
– Directiva de Baja Tensión CE (73/23/CEE),
modificada por la 93/68/CEE
– Directiva CE sobre Compatibilidad Electromagnética
(89/336/CEE), modificada por las 91/263/CEE,
92/31/CEE, 93/68/CEE
Normas armonizadas empleadas:
DIN EN 60335-1, DIN EN 60335-2-2;
DIN EN 61000-3-2: 1995; DIN EN 61000-3-3: 1995;
DIN EN 55014-1: 1993; DIN EN 55014-2: 1997
Page 32

Tartozékok felsorolása
1 = tartály
2 = motorblokk
3 = zárókallantyú
4 = görgő
5 = gyorscsatlakozó
6 = ki / be kapcsoló
7 = nyomószivattyú ki / be kapcsolója
(megvilágított)
8 = szívó csőcsonk
9 = hordozó fogantyú
10 = hálózati csatlakozózsinór
11 = szívóerő szabályozó tolóka
12 = tisztítófolyadék nyomócsöve (felső rész)
13 = gégecső
14 = szívócső
15 = nyomócső felerősítő pánt (gégecsőhöz)
16 = nyomószelep
17 = szőnyegtisztító fej
18 = tisztítófolyadék nyomócsöve (alsó rész)
19 = kárpit szívófej
20 = fejkiegészítő adapter szilárd padlózathoz
21 = szőnyegszívó fej
22 = fuga szívófej (résszívófej)
23 = kárpittisztító fej
24 = tisztítófolyadék tartálya
25 = tisztítófolyadék koncentrátum (ProTex)
26 = szifon szívófej*
29 = Motorvédő szűrősapka*
30 = motorvédő habszivacs szűrő
31 = motorvédő papír szűrősapka
32 = rögzítő gyűrű
33 = papír porzsák
34 = aquafilter (vízzel szűrő) rendszer*
35 = textil szűrőbetét*
36 = tisztítófolyadék felszívó csöve
37 = szívócső felakasztó kengyele
38 = szívócső elhelyezése
39 = nyomócső felerősítő pánt (fém
szívócsőhöz)*
*=csak THOMAS BRAVO 20 S Aquafilter típushoz
Biztonsági előírások
Kérjük, olvassa el figyelmesen a használati
utasítást, amely fontos információkat tartalmaz a
takarítógép biztonságosságára, üzembe
helyezésére, használatára és karbantartására
vonatkozóan. Őrizze meg az utasítást és ha
használt készülékét eladja, adja ezt is át az új
tulajdonosnak.
A gyártó és kereskedő nem vállal felelősséget, ha
a továbbiakban felsorolt előírásokat figyelmen kívül
hagyja.
A takarítógépet a rendeltetéstől eltérően
üzemeltetni nem szabad, csak háztartási célokra
alkalmas.
A takarítógépet 230 V hálózati feszültség
működteti, a biztosíték min. 16 A.
• A készüléket nem szabad üzembe helyezni, ha
– a csatlakozózsinór sérült,
– maga a készülék láthatóan sérült,
– a motorblokkot valaha leejtették.
• A takarítógépet felnőtt személyek használják.
• Ügyeljen arra, hogy gyermekek felügyelet nélkül
ne játsszanak a készülékkel,
• változtatásokat a készüléken csak arra
feljogosított szakszerviz végezhet,
• nem szabad a gépet olyan helyiségben
használni, ahol tűzveszélyes anyagok találhatók
ill. különböző veszélyes és gyúlékony gázok
képződhetnek,
• óvatosan járjon el lépcsők tisztításakor.
Győződjön meg róla, hogy a gép biztosan áll a
lépcsőfokon és a gégecsövet ne feszítse túl
nagy távolságra. Legjobb, ha munka közben
egyik kezével magát a készüléket fogja, rögzíti,
• a kívánt szűrő rendszer behelyezését minden
használat előtt ellenőrizze, ez különösen
száraz porszívózáskor kötelező,
• ez a készülék nem alkalmas egészségre káros
porszerű anyagok felszívására,
• oldószertartalmú folyadékokat, ú.m.
festékhígító, benzin, olaj, valamint maró
folyadékokat nem szabad a készülékkel
felszívatni,
• másológépek, nyomtatók festékporát (toner) ne
szívassa fel, mert az elektromosan vezetővé
válhat, másrészt a szűrőrendszert eltömheti és
egy része a helyiség légterébe visszajuthat,
• soha ne szívasson fel forró hamut vagy izzó
anyagokat,
• aceton, savak és oldószerek a készülék anyagát
károsíthatják,
• a takarítógépet nem szabad a szabadban
tárolni, sem közvetlen nedvességhatásnak
kitenni,
31
H
Page 33

• a szívócsövet ill. fejet (bekapcsolt készülék
esetén) ne emelje feje közvetlen közelébe - ez
szemre, fülre veszélyes lehet,
• a tisztítófolyadék sugarat ne irányítsa emberre,
állatra, elektromos készülékre vagy fali aljzatra,
• ne a zsinórt húzza ki az aljzatból, mindig a
dugasznál fogja meg,
• a csatlakozózsinórt ne húzza magas hőfokú hely
közelében, sem vegyszeres folyadékban; éles
peremen való átvezetése is kerülendő,
• a készülék forró tűzhely vagy fűtőtest közelében
nem tárolható,
• A meghibásodott készüléket - beleértve a
hálózati csatlakozózsinórt is - csak
szakember (szerviz) javíthatja!
• Nedves helyiségben, saját biztonsága
érdekében, ne használjon hosszabbító zsinórt,
• a hálózati csatlakozót ki kell húzni:
- üzemelés közben észlelt hiba esetén,
- minden tisztítás előtt,
- használat után mindenkor,
- szűrőbetét cserélésekor,
• folyadékos takarítás után tegyen legalább 1 liter
tiszta vizet a folyadéktartályba és a
nyomószivattyú bekapcsolásával kád vagy
mosogató felett öblítse át a szivattyút,
• nedves felszívás vagy folyadékos takarítás után
a tartályt haladéktalanul ürítse ki és tisztítsa
meg,
• érzékeny bőrűek kerüljék a tisztítófolyadékkal
való érintkezést. Ha a koncentrátum
nyálkahártyára kerül (szem, száj stb.), azonnal
öblítsék le bő vízzel,
• csak eredeti THOMAS tisztítószerek
használatával biztosítható a takarítógép
kifogástalan használata és a tökéletes tisztító
hatás.
A készülék összeállítása
A görgők felhelyezése
A Nyissa ki a két zárókallantyút és a
motorblokkot vegye le.
B A tartályt fordítsa fel, az alján található
furatokba üsse be a görgőtengelyeket, majd
a görgőket ütközésig nyomja rá a kiálló
tengelycsonkokra. Végül a tartályt állítsa a
talpára, azaz a görgőkre.
Száraz porszívózás
THOMAS BRAVO 20
Ha a készüléket előzőleg nedves
üzemmódban használta, a csöveket és a
tartályt ki kell szárítani.
Soha ne végezzen száraz porszívózást
sérült szűrővel vagy szűrő nélkül!
K Vegye ki a tisztítófolyadék-tartályt.
C Helyezze fel a motorvédő habszivacs szűrőt,
a papír szűrősapkát és a rögzítőgyűrűt, az
alaplapon lévő két kis kallantyú ráhajtásával
pedig rögzítse.
D A porzsák kemény kartonból kialakított kör
alakú nyílását szorosan húzza rá a tartályban
lévő beszívó csőcsonkra, majd a porzsákot
körben simítsa rá a tartály belső oldalára.
G A tisztítófolyadék felszívó csövét, mivel most
nincs rá szükség, csíptesse be a motorblokk
belső alaplapján kialakított helyre.
J A gégecsövet nyomja be a bemeneti
csőcsonkba. Levételkor a csövet csavaró
mozgatással húzza kifelé.
H Ezután helyezze fel a motorblokkot és a két
zárókallantyúval rögzítse.
N A készüléket a ki / be kapcsolóval (6)
kapcsolja be. A nyomószivattyú
kapcsolójának (7) ekkor nem szabad
világítania.
Végül a gégecsőhöz csatlakoztatott merev
szívócső végére helyezze fel a kívánt szívófejet és
dugja be a hálózati csatlakozót, így a készülék
üzemkész.
i A szívóerő szabályozó tolókával (P ábra, 11)
a szívóerő változtatható.
- tolóka zárva = teljes szívóerő
- tolóka nyitva = csökkentett szívóerő
THOMAS BRAVO 20 S Aquafilter
Aquafilter készülékét száraz porszívózásra
soha ne használja Aquafilter (vízzel szűrő
egység), a finom port felfogó textil
szűrőbetét és a megfelelő víztöltés nélkül.
Ne szívasson fel nagy mennyiségben finom
port, pl. lisztet, kakaóport, cementet , stb.
32
Page 34

K A tisztítófolyadék tartályát emelje ki.
E A két részes aquafiltert dugja össze és a
tartály belső oldalán lévő szívócső csonkra
erősítse fel.
Ügyeljen
a jelzésekre.
Az Aquafilter betétnek a szívótartály alján
bepattanva, vízszintesen kell elhelyezkednie.
Töltsön 2 liter tiszta vizet a szívótartályba.
F A textil szűrőbetétet a szívótartály felső
peremére felfektetve helyezze be.
G A tisztítófolyadék felszívó csövét (amelyre
ekkor nincs szükség) a motorblokk alján lévő
műanyag körmök közé csíptesse fel.
C A motorvédőszűrősapkát (29) és rá a
rögzít
őgyű
r
ű
t (32) az ábra szerint helyezze
fel, végül a két szorítókallantyú ráfordításával
rögzítse.
H Helyezze fel a motorblokkot és a
zárókallantyúkkal rögzítse.
J Helyezze be a gégecsövet. Levételkor
csavaró mozgással húzza kifelé.
Helyezze fel a kívánt szívófejet, majd a
hálózati csatlakozót dugja be.
N A gépet a ki / be kapcsolóval (6) kapcsolja
be. A nyomószivattyú kapcsolójának (7) nem
szabad világítania.
I A szívóerő szabályozó tolókával (P ábra, 11)
a szívóerő változtatható.
- tolóka zárva = teljes szívóerő
- tolóka nyitva = csökkentett szívóerő
Az Aquafilter rendszer tisztítása és
karbantartása
Az Aquafilter rendszert és a szívótartályt
minden használat után higiéniai okokból
ürítse ki, tisztítsa és szárítsa meg, ugyanis
a szennyes víz és a nedves alkatrészek
elősegítik a baktériumok és gombák
elszaporodását.
A textil szűrőbetétet a szennyezettség mértékének
megfelelően száraz vagy nedves kendővel törölje
át. Erős szennyezettség esetén tiszta vízzel, mosóés tisztítószer alkalmazása nélkül, mossa át.
Ügyeljen arra, hogy a szűrőbetétet csak teljesen
megszáradt állapotban használja ismét.
Nedves felszívás
Az úszószelepet (S ábra, 40) tartsa mindig
tisztán és mozgathatóan, mivel ez
automatikusan megszakítja a felszívást,
amikor a tartály megtelik.
Ha a porszívó tartályánál nagyobb térfogatú ill.
magasabb folyadékszintű tartályból szívat át
folyadékot, akkor a porszívó tartályának
megteltével zárt úszószelep esetén továbbra is
átfolyik a folyadék a közlekedőedény-elv alapján.
Éppen ezért egyszerre csak részmennyiségeket
szívasson át és időnként ürítse ki a
porszívótartályt. Felszívás után először a
szívócsövet emelje ki a folyadékból, csak ezután
kapcsolja ki a motort.
A Nyissa fel a zárókallantyúkat és vegye le a
motorfedelet.
A különböző szűrőket vegye ki a gépből,
mivel azok károsodást szenvedhetnek (C és
D ábra). Aquafilterrel üzemelő készülékeknél
az Aquafilter egységet és a textil
szűrőbetétet vegye ki (C, E és F ábra).
Ha a tisztítófolyadék-tartály a készülékben
van, ezt is vegye ki (K ábra).
H Helyezze vissza a motorblokkot és a
zárókallantyúkkal rögzítse. Dugja be a
hálózati csatlakozót.
J Helyezze be a gégecsövet. Levételkor
csavaró mozgással húzza kifelé.
P A szívóerő szabályozó tolókát (11) állítsa zárt
helyzetbe.
N A gépet a ki / be kapcsolóval (6) kapcsolja
be. A nyomószivattyú kapcsolójának (7) nem
szabad világítania.
! A nedves felszívás végeztével a készüléket
és a használt tartozékokat tisztítsa és
szárítsa meg.
Folyadékos takarítás (szőnyegek,
szőnyegpadlók és szilárd padlózatok)
Csak nedves tisztításra alkalmas
szőnyegeket tisztítson.
Gyenge, kézi szövött vagy nem színtartó
szőnyegeket ne vessen alá nedves
tisztításnak.
Ha a szőnyeget korábban samponnal
kezelték, a folyadékporlasztós
tisztítórendszer első alkalmazásakor
erőteljesebb habképződésre kerülhet sor.
33
Page 35

Ekkor kapcsolja ki a készüléket és a
szívótartályt ürítse ki. További habképződés
meggátlására ajánljuk fél csésze ecet
beöntését a szívótartályba. Fokozott
habképződés a THOMAS tisztítófolyadék
koncentrátumok egyszeri használata után
kizárt, mivel a folyadék speciális
habzásgátlót tartalmaz.
Ügyeljen arra, hogy folyadékporlasztós
üzemmódban mindig legyen
tisztítófolyadék a tartályban a
nyomószivattyú esetleges
meghibásodásának elkerülése érdekében.
Szőnyegtisztítás
A A hálózati csatlakozó kihúzása után vegye le
a motorblokkot.
K A tisztítófolyadék-tartály fedelét nyissa fel és
töltsön THOMAS ProTex folyadékot a
tartályba. A hígítást és adagolást a palackon
lévő címke tartalmazza.
Csak kézmeleg vizet használjon
(max. 30°C).
A tartály fedelét zárja le és a feltöltött
tisztítófolyadék-tartályt helyezze vissza a
készülékbe.
H Húzza ki a motorblokk alsó felén a
tisztítófolyadék felszívó csövét a
vakfoglalatból.
L Úgy helyezze vissza a motorblokkot a
készülékre, hogy a felszívó cső (36) egészen
az aljáig belelógjon a tisztítóoldatos
tartályba, de ne törjön meg.
J Helyezze be a gégecsövet. Levételkor
csavaró mozgással húzza kifelé.
M Csúsztassa a nyomószelep részt a merev
szívócső felső darabjának végén található
vezetősínbe, majd a gégecsövet a szabályzó
tolóka felőli végdarabjával tolja össze a
merev szívócsővel. A vékony nyomócsövet
ezután a pántokkal erősítse a gégecsőhöz.
N A nyomócső végét helyezze be a
motorblokkon található gyorscsatlakozóba.
O A szőnyegtisztító fejet helyezze fel a
szívócsőre.
P A szőnyegtisztító fejhez kötött nyomócsövet,
amelynek végén bajonett csatlakozó van,
csatlakoztassa a nyomószelephez és a
bajonett elfordításával rögzítse. A
nyomócsövet a merev szívócsőhöz az azon
található vezetőhornyokba nyomja be. Acél
szívócsöves kivitel esetén a nyomócsövet a
kisebb műanyag pántokkal (39) erősítse a
szívócsőhöz.
Dugja be a hálózati csatlakozót.
N A ki / be kapcsolót (6) és a megvilágított
nyomószivattyú kapcsolót (7) kapcsolja be.
P Nyomja meg a nyomószelep fogantyúját (16)
és ezzel a tisztítófolyadék kiporlasztása
megkezdődik.
Mielőtt a tisztítófolyadék-tartályt ismét
feltölti, a szennyezett vizet a
szívótartályból mindig ürítse ki.
Szilárd padlózatok tisztítása
Q A tisztítófejre tolja rá a fejkiegészítő adaptert.
A továbbiakban a "Szőnyegtisztítás" fejezet
szerint járjon el.
I Szilárd padlózatok tisztításához a THOMAS
ProFloor tisztítófolyadék alkalmazását
ajánljuk.
Kárpittisztítás (kiviteltől függően) , a tisztítófej
egyébként külön is kapható
Bútorkárpitok vagy autóülések tisztításához a
kárpittisztító fejet használja (23).
i Ügyeljen arra, hogy ne hordjon fel túl sok
tisztítóoldatot, mivel a bútor felépítésétől
függően jóval hosszabb száradási időre kell
számítania.
R A kárpittisztító fejet közvetlenül a gégecső
végére tegye fel, majd a nyomócsövet a
bajonett csatlakozóval rögzítse.
A folyadékporlasztós rendszer tisztítása és
karbantartása
K A nyomószivattyú és a szelepek
tisztításához a tisztítófolyadék-tartályt
töltse meg tiszta vízzel és helyezze be.
Dugja be a hálózati csatlakozót, a ki / be
kapcsolót (6) és a nyomószivattyú
kapcsolóját (7) kapcsolja be.
P A porlasztó rendszeren fúvassa át a tiszta
vizet mosdókagylóba vagy kádba
(nyomja a nyomószelep kallantyúját (16).
N A tisztítófolyadék nyomócsövének levétele
előtt nyomja le a nyomószelep kallantyúját (P
ábra, 16), hogy a maradék nyomás a
rendszerből eltávozzon, majd nyomja meg a
készüléken található gyorscsatlakozó (5)
kioldó gombját.
Végül húzza ki a hálózati csatlakozót.
Tisztítsa és szárítsa meg a készüléket és a
használt tartozékokat.
A motorblokkot soha nem szabad vízbe
meríteni!
A motorházat nedves kendővel törölje le és utána
szárítsa meg.
34
Page 36

Hasznos tanácsok
I A tisztítófej segítségével mindig szorosan
egymás mellett következő sávokban tisztítsa
a szőnyeget vagy szőnyegpadlót.
i Az ismételt beszennyeződés elkerülése
érdekében csak akkor járjon a kitisztított
szőnyegpadlón, ha már megszáradt.
i A tisztított felületek gyorsabb száradása
érdekében érdemes legalább még egyszer a nyomószelep lenyomása, tehát
kiporlasztás nélkül - a maradék nedvességet
felszívatni, eltávolítani.
i Parketta padlózatok tisztításakor a gyártó
előírásainak megfelelően járjon el.
HIBAELHÁRÍTÁS
Ha az alábbi hibák jelentkeznek az üzemelés
során, ezek esetleg közvetlenül elháríthatók,
egyébként forduljon szervizhez:
Működés közben por száll ki a készülékből
• vizsgálja meg, hogy a szűrőrendszer hibátlan-e,
felhelyezése megfelelő és szorosan illeszkedő
legyen,
• ellenőrizze, hogy nem szakadt-e ki a porzsák,
• csak eredeti THOMAS szűrőt használjon.
A szívóerő fokozatosan csökken
• a szűrőbetétet esetleg finom por, korom, stb.
tömte el,
• esetleg megtelt a porzsák,
• a szívófejet, a szívócsövet vagy a gégecsövet
eltömte a szennyeződés. (Bekapcsolt
készülékkel húzza szét a gégecsövet, így a
szennyeződés fellazulhat és kifúvódhat.)
Felszíváskor a készülék légkifúvó nyílásain víz
folyik ki
• az úszószelep (S ábra) folyadék felszívásakor
megszorult és nem tudja a felszívást leállítani,
• nedves tisztításhoz nem eredeti THOMAS
tisztítófolyadékot használtak,
• az aquafiltert és a textil szűrőbetétet (kiviteltől
függően) nem az előírásnak megfelelően
szerelték be.
A szívóerő hirtelen lecsökken
• az úszószelep elzárja a szívólevegőt, amely
leginkább akkor fordulhat elő, ha a készüléket
erősen ferde helyzetben használja vagy feldönti.
A készüléket kapcsolja ki, az úszószelep ekkor
visszaesik és a készülék ismét használható.
A motor nem működik
• vizsgálja meg a csatlakozózsinór, dugasz és
aljzat sértetlenségét,
• vizsgálat előtt a hálózati csatlakozót húzza ki,
• semmi esetre sem szabad a motort felnyitni!
Nem jön ki a tisztítóoldat
• bekapcsolta-e a nyomószivattyút ((7) kapcsoló),
a kapcsolónak világítania kell,
• tisztítsa meg a felszívócső (36) végén levő kis
szűrőt,
• a felszívócső szabadon belóg-e a tisztítóoldat
tartályába,
• esetleg eltömődött a porlasztó nyílás. Ebben az
esetben a fúvókát illesztéséből vegye ki, áztassa
vízben, utána erősen fújja át.
Minőségtanúsítás BRAVO 20 BRAVO 20 S
Hálózati feszültség 230 V 230 V
Biztosíték 16 A 16 A
Teljesítményfelvétel 1400 W max. 1600 W max.
Szivattyúnyomás 4 bar max. 4 bar max.
Tartály befogadóképessége 20 liter 20 liter
Szennyvízbefogadó képesség
folyadékporlasztásos tisztításnál 6 liter 6 liter
Tisztítóoldat tartálya 3,6 liter 3,6 liter
Zajteljesítményszint LWA 74 dB 74 dB
Fenti adatokért a gyártó felelősséget vállal,
műszaki változtatás joga fenntartva.
Kizárólagos képviselő és importőr:
WELTECH Kft
1097 Budapest, Pápay István u. 3.
Tel/Fax: 215-0096
Tel: 215-8924; 218-0666
E-mail: info@weltech.hu
35
CE Konformitási nyilatkozat
Kizárólagos felelősségünk tudatában
kijelentjük, hogy ez a termék megfelel a
következő szabványoknak vagy szabványdokumentumoknak:
- EG alacsony feszültségi ajánlás (73/23/EWG),
(93/68/EWG) dokumentummal módosítva
- EG ajánlás: elektromágneses tűrés
(89/336/EWG), módosítva (91/263/EWG),
(92/31/EWG), (93/68/EWG)
Alkalmazott harmonizált szabványok:
DIN EN 60335-1, DIN EN 60335-2-2;
DIN EN 61000-3-2, 1995; DIN EN 61000-3-3, 1995;
DIN EN 55014-1, 1993; DIN EN 55014-2, 1997
Page 37

¤¤llkk KKuullllaannıımm ÖÖnncceessii
AAææaaœœııkkii bbiillggiilleerrii llüüttffeenn ddiikkkkaattllee ookkuuyyuunn.. BBuu bbiillggiilleerr
aalleettiinn ggüüvveennlliiœœii,, kkuullllaannıımmıı vvee bbaakkıımmıı kkoonnuussuunnddaa
öönneemmllii aaççııkkllaammaallaarr iiççeerrmmeekktteeddiirrlleerr.. KKuullllaannmmaa
kkııllaavvuuzzuunnuu iittiinnaayyllaa ssaakkllaayyıınn vvee aalleettiinn ssiizzddeenn
ssoonnrraakkii ssaahhiibbiinnee tteesslliimm eeddiinn..
Parçaların Tanıtımı
1 = Kap
2 = Motor baælıœı
3 = Kilit mekanizması
4 = Tekerlekler
5 = Hızlı kuplaj
6 = AÇMA/KAPAMA ºalteri
7 = AÇMA/KAPAMA pompa æalteri (ıæıklı)
8 = Emme manºonu
9 = Taæıma kulpu
10 = Elektrik kablosu
11 = Emme gücü regülâtörü
12 = Deterjan hortumu (üst kısım)
13 = Emme hortumu
14 = Emme boruları
15 = Hortum klipsleri
16 = Kapatma ventili
17 = Püskürtücü-emici halı baælıœı
18 = Deterjan hortumu (alt kısım)
19 = Döæeme baælıœı
20 = Sert taban adaptörü
21 = Halı baælıœı
22 = Dar aralık baælıœı
23 = Püskürtücü-emici döæeme baælıœı
24 = Deterjan deposu
25 = Konsantre tekstil deterjanı (ProTex)
26 = Sifon baælık*
29 = Filtre keçesini*
30 = Sünger filtre
31 = Koruyucu kâœıt filtre
32 = Germe diski
33 = Kâœıt filtre torbası
34 = AQUA filtre*
35 = ¤nce toz tekstil filtresi*
36 = Deterjan emme hortumu
37 = Emme borusu tutacaœı
38 = Emme borusu askı yeri
39 = Boru klipsi*
*) = sadece THOMAS BRAVO 20 S Aquafiltre
Güvenlik Uyarıları
• THOMAS BRAVO yetiækin kiæiler tarafından
sadece evlerde kullanıma mahsustur.
• Aletin kesinlikle çalıætırılmamasını gerektiren
durumlar:
- Elektrik kablosunda hasar olması,
- Alette gözle görülür hasar olması,
- Aletin yere düæmesi.
• Æebeke gerilimi model etiketindeki gerilime
uygun olmalıdır.
• Özellikle göz ve kulaklar için tehlike
oluæturabileceœinden alet çalıæır vaziyetteyken
emici baælık ve boruların kafa yakınlarına
getirilmemeleri gerekir.
• Saœlıœa zararlı, yakıcı ve çözgen içeren
maddeler aletle emilmemelidir.
• Alet, yanma tehlikesi olan maddelerin
depolandıœı veya gaz oluæan mekânlarda
iæletilmemelidir.
• Benzin, boya inceltici ve yakma yaœı gibi
maddeler emme havasıyla girdap teæekkülü
yoluyla patlayıcı buhar veya bileæimler
oluæturabilirler.
• Sıcak kül veya kızgın cisimler kesinlikle
emerek süpürülmemelidirler.
• Her kullanım öncesi gerekli filtrenin doœru
æekilde takılı olduœunu kontrol edin.
• Toner tozlarını emerek süpürmeyin! Örneœin
yazıcı veya fotokopi cihazlarında kullanılan
tonerler iletken olabilirler! Ayrıca, aspiratörün
filtre sistemi toner taneciklerini bir ihtimal tam
olarak süzemeyeceœinden emici vantilâtör
tarafından tekrar dıæarıya aktarılmaları
olasıdır.
• Aseton, asit veya çözgenler aletin yapımında
kullanılan materyellere zarar verebilirler.
• Merdivenler temizlenirken özellikle dikkatli
olmak gerekir. Aletin saœlam æekilde
durmasına özen gösterin. Hortum çekilerek
kendi uzunluœundan fazla uzatılmamalıdır.
Düæmemesi için daima bir elinizle aleti tutun.
• Çalıæan aleti kesinlikle gözetimsiz bırakmayın
ve çocukların aletle oynamamalarına dikkat
edin.
• Elektrik fiæinin çekilmesini gerektiren durumlar:
– ¤æletme esnasında arıza halinde,
– Aletin bakım ve temizliœinden önce,
– Her kullanım sonrası,
– Filtre deœiætirirken.
• Elektrik fiæini prizden çıkarırken kabloyu deœil
fiæi tutarak çekin.
• Elektrik kablosunun ısıya ve kimyevî sıvılara
maruz kalmamasına ve keskin kenarlar veya
yüzeyler üzerinden çekilmemesine özen
gösterin.
36
TR
Page 38

• Banyolarda uzatma kabloları
kullanılmamalıdır.
• Alette, aksesuarlarda veya elektrik
kablosunda (özel kablo gereklidir) meydana
gelen hasarları kesinlikle kendiniz onarmayın.
Hasarın yetkili müæteri servisinde giderilmesini
saœlayın. Alette yapacaœınız deœiæiklikler
saœlıœınıza zarar verebilir. Sadece orijinal
yedek parça ve aksesuarların kullanılmalarını
saœlayın.
• Aleti hava tesirlerine, nem veya ısı
kaynaklarına maruz bırakmayın.
• Püskürtülen sıvıyı kesinlikle insanlara veya
hayvanlara, prizlere veya elektrikli aletlere
yöneltmeyin.
• Yaæ süpürme veya püskürterek emme
iæleminden sonra kabı derhal boæaltın ve
temizleyin.
• Konsantre deterjan gibi kimyevî maddeler
çocukların ellerine geçmemelidirler.
• Ancak THOMAS deterjanları kullanıldıœında
aletin fonksiyonu ve tam temizleme etkisi
saœlanabilir.
• Hassas cilde sahip kiæiler deterjanlı sıvılarla
temastan kaçınmalıdırlar.
• Konsantre deterjan mukoza zarlarına (göz,
aœız vb.) ulaætıœında söz konusu yeri derhal
bol suyla yıkayın.
ÇÇeevvrreemmiizz ¤¤ççiinn
Ambalaj malzemelerini ve eski aletleri geliæigüzel
atmayın!
AAmmbbaallaajj mmaallzzeemmeelleerrii::
• Ambalaj kartonu kullanılmıæ kâœıt toplama
konteynerlerine atılabilir.
• Polietilen (PE) plâstik torba tekrar iælenmesi
için toplama yerlerine teslim edilebilir.
EEsskkiiyyeenn aalleettlleerriinn ddeeœœeerrlleennddiirriillmmeekk üüzzeerree iimmhhaassıı::
• Aleti yerel yönetmelikler doœrultusunda imha
etmeden önce prizden çıkarmıæ olduœunuz
elektrik fiæini kesin.
Tekerleklerin Montajı
AA
Kilit mekanizmasını açın ve motor baælıœını
çıkarın.
BB
Tekerlek ve pimleri bastırarak kabın
tabanına geçirin.
Kuru Süpürme
THOMAS BRAVO 20
Daha önce yaæ süpürüldüyse aletin
tamamen kuru olması gerekir; gerekirse
hortum ve boruları da kurulayın.
KKuurruu ssüüppüürrmmeeyyii kkeessiinnlliikkllee ffiillttrreessiizz vveeyyaa
hhaassaarrllıı ffiillttrreelleerrllee yyaappmmaayyıınn..
KK
Deterjan deposunu çıkarın.
CC
Sünger filtre, koruyucu kâœıt filtre ve germe
diskini monte edin ve döner kancalarla
sabitleyin.
DD
Filtre torbasını sıkıca emme manæonuna
bastırın ve kaba yerleætirin.
GG
Deterjan emme hortumunu motor
baælıœının alt tarafına geçirin.
HH
Motor baælıœını takın ve kilit mekanizmasını
kapatın.
JJ
Emme hortumunu baœlayın. Çıkarmak için
emme hortumunu yana çevirirerek çekin.
Gerekli aksesuarı monte edin.
Elektrik fiæini takın.
NN
AÇMA/KAPAMA æalteri (6) ile aleti
çalıætırın.
Pompa æalterinin (7) ıæıœı yanmamalıdır.
Emme gücü regülâtörüyle (11, æekil P)
aletin emme gücü ayarlanır.
– ¤lâve hava sürgüsü kapalı
= tam kapasite emme gücü
– ¤lâve hava sürgüsü açık
= düæük kapasite emme gücü
TTHHOOMMAASS BBRRAAVVOO 2200SS AAqquuaaffiillttrree
AQUAF¤LTRE cihazınızı kuru süpürme
modunda kesinlikle aqua filtresiz, ince toz
tekstil filtresiz ve susuz kullanmayın.
Büyük miktarlarda örn. un, kakao tozu,
çimento vb. gibi ince tozları emerek
süpürmeyin.
37
Page 39

KK
Deterjan deposunu çıkarın.
EE
2 parçadan oluæan AQUA filtreyi birleætirin
ve sıkıca emme manæonunun üzerine
geçirin.
Bunu yaparken iæaretlere dikkate
edin.
AQUA filtre emme bidonunun tabanında
yerine oturmalı ve düzgün æekilde tabana
yerleæmelidir.
Emme kabına 2 litre saf su doldurun.
FF
Üst kenarını katlayarak ince toz tekstil
filtresini emme kabına asın.
GG
Deterjan emme hortumunu motor
baælıœının alt tarafına geçirin.
CC
Filtre keçesini (29) germe halkası (32)
yardımıyla monte ediniz ve döner
kelepçelerle iyice tutturunuz.
HH
Motor baælıœını takın ve kilit mekanizmasını
kapatın.
JJ
Emme hortumunu baœlayın. Çıkarmak için
emme hortumunu yana çevirirerek çekin.
Gerekli aksesuarı monte edin.
Elektrik fiæini takın.
NN
AÇMA/KAPAMA æalteri (6) ile aleti
çalıætırın.
Pompa æalterinin (7) ıæıœı yanmamalıdır.
Emme gücü regülâtörüyle (11, æekil P)
aletin emme gücü ayarlanır.
– ¤lâve hava sürgüsü kapalı
= tam kapasite emme gücü
– ¤lâve hava sürgüsü açık
= düæük kapasite emme gücü
AAQQUUAA ffiillttrree ssiisstteemmiinniinn tteemmiizzlleennmmeessii vvee bbaakkıımmıı
AAQQUUAAFF¤¤LLTTRREE ssiisstteemmiinnii vvee eemmmmee kkaabbıınnıı
hhiijjyyeenniikk nneeddeennlleerrddeenn ddoollaayyıı hheerr kkuullllaannıımm
ssoonnrraassıı bbooææaallttıınn,, tteemmiizzlleeyyiinn vvee kkuurruullaayyıınn..
KKiirrllii ssuu vvee nneemmllii ppaarrççaallaarr bbaakktteerrii vvee mmaannttaarr
oolluuææuummuunnaa sseebbeepp oolluurrllaarr..
¤nce toz tekstil filtresini kirlenme derecesine göre
kuru veya nemli bir bezle silin. Aæırı kirlenmelerde
deterjan vb. kullanmadan saf suyla yıkayın. Bir
sonraki kullanıma kadar filtrenin tamamen
kurumuæ olmasına özen gösterin.
YYaaææ SSüüppüürrmmee
Æamandıra ventilin (40, æekil S) daima
temiz ve çalıæır vaziyette olmasını
saœlayın. Bu ventil, kap dolduœunda emme
iælemini otomatik olarak durdurur.
Sıvı seviyesi emme kabının üst kenarından daha
yüksek olan veya hacmi emme kabının
hacminden daha büyük olan kaplardan sıvı
emildiœinde æamandıra ventili kapalı olsa dahi sıvı
akmaya devam edebilir.
Böylesi durumlarda sıvıyı ancak kısmî miktarlarda
emin ve emme kabını arada bir boæaltın.
Sıvının akmaya devam etmesini önlemek için
emme borusu ve hortumunu sıvının içinden
kaldırdıktan sonra aleti kapatın.
AA
Kilit mekanizmasını açın ve motor baælıœını
çıkarın.
Aksi takdirde hasar görecekleri için filtreleri
aletten çıkarın (æekil C ve D).
AQUAF¤LTRE aletlerde AQUA filtreyi ve
ince toz tekstil filtresini çıkarın (æekil C,
E ve F).
Deterjan deposu takılı ise çıkarın (æekil K).
HH
Motor baælıœını takın ve kilit mekanizmasını
kapatın.
Elektrik fiæini takın.
JJ
Emme hortumunu baœlayın. Çıkarmak için
emme hortumunu yana çevirirerek çekin.
PP
Kulptaki emme gücü regülâtörünü (11)
kapatın.
NN
AÇMA/KAPAMA æalteri (6) ile aleti
çalıætırın.
Pompa æalterinin (7) ıæıœı yanmamalıdır.
Yaæ süpürme iælemi sona erdikten sonra
aleti ve kullanılan aksesuarı temizleyin ve
kurulayın.
Halı ve sert tabanlarda püskürterek
emme (yıkama-süpürme)
Sadece yaæ temizlenmeye uygun halıları
temizleyin.
Hassas elde dokuma halılar ve boyası
çıkan halılar yaæ temizlenmemelidirler.
Halıya daha önceleri æampuan
uygulandıysa, THOMAS BRAVO ilk defaya
mahsus kullanıldıœında alıæılmıætan çok
köpük oluæabilir.
Bu durumda aleti kapatın ve emme kabını
boæaltın.
38
Page 40

Daha fazla köpük oluæumunu önlemek için
kaba yarım fincan sirke dökün.
Özel antiköpük formüllü THOMAS
konsantre deterjanlarla ana temizlik
yapıldıktan sonra artık aæırı köpük
oluæmaz.
PPoommppaannıınn hhaassaarr ggöörrmmeemmeessii iiççiinn
ppüüsskküürrttmmee ffoonnkkssiiyyoonnuu ççaallııææıırr vvaazziiyyeetttteeyykkeenn
ttaazzee ssuu kkaabbıınnddaa ddaaiimmaa s
sııvvıı bbuulluunnmmaassıınnaa
ddiikkkkaatt eeddiinn..
HHaallıı tteemmiizzlliiœœii
AA
Kilit mekanizmasını açın ve motor baælıœını
çıkarın.
KK
Deterjan deposunun kapaœını kaldırın ve
THOMAS Pro Tex deterjanı depoya
doldurun.
Dozaj için æiæe etiketine bkz.
IIllııkk ssuu ((mmaaxx.. 3300°° CC)) kkuullllaannıınn..
Kapaœı kapatın ve dolu deterjan deposunu
alete yerleætirin.
GG
Deterjan emme hortumunu motor
baælıœındaki tutacaœından çıkarın.
LL
Motor baælıœını emme hortumu (36)
deterjan deposunun dibine kadar inecek ve
katlanmayacak æekilde yerleætirin.
JJ
Emme hortumunu baœlayın. Çıkarmak için
emme hortumunu yana çevirirerek çekin.
MM
Kapatma ventilini emme borusundaki
yerine geçirin. Kulpu emme borusuna takın
ve deterjan hortumunu plâstik klipslerle
emme hortumuna baœlayın.
NN
Deterjan hortumunu motor baælıœındaki
hızlı kuplaja takın.
OO
Püskürtücü-emici halı baælıœını emme
borusuna geçirin.
PP
Halı püskürtme baælıœının deterjan
hortumunu kapatma ventiline yaklaætırın ve
çevirerek sabitleyin. Deterjan hortumunu
bastırarak emme borularındaki hortum
tutuculara geçirin; çelik borularda küçük
boru klipsleriyle (39) emme borusuna
sabitleyin.
Elektrik fiæini takın.
NN
AÇMA/KAPAMA æalteri (6) ile ıæıklı pompa
æalterini (7) açın.
PP
Kapatma ventilindeki (16) kola basın.
Deterjan püskürtülür.
DDeetteerrjjaann ddeeppoossuunnuu tteekkr
raarr ddoolldduurrmmaaddaann
öönnccee eemmmmee kkaabbıınnddaakkii kkiirrllii ssuuyyuu ddaaiimmaa
bbooææaallttıınn..
SSeerrtt ttaabbaannllaarrıınn tteemmiizzlliiœœii
QQ
Sert taban adaptörünü monte edin.
MMoonnttaajj iiççiinn bbkkzz.. ““HHaallıı tteemmiizzlliiœœii””
Sert taban temizliœi için THOMAS ProFloor
konsantre deterjan tavsiye olunur.
DDööææeemmeelleerriinn tteemmiizzlliiœœii ((mmooddeellee ggöörree))
Döæemelerin veya araba koltuklarının temizliœi
için püskürtücü-emici döæeme baælıœını (23)
kullanın.
Döæeme türüne göre kuruma süresi
uzadıœından fazla sıvı püskürtmemeye
özen gösterin.
RR
Püskürtücü-emici döæeme baælıœını monte
edin.
Deterjan hortumunu çevirerek sabitleyin.
Baælıœı sürerek kulpa geçirin.
PPüüsskküürrttüüccüü--eemmiiccii ssiisstteemmiinn tteemmiizzlleennmmeessii vvee
bbaakkıımmıı
KK PPoommppaa vvee vveennttiilliinn bbaakkıımmıı iiççiinn ddeetteerrjjaann
ttaannkkıınnıı ssaaff ssuuyyllaa ddoolldduurruunn vvee aalleettee
yyeerrlleeæættiirriinn..
EElleekkttrriikk ffiiæ
æiinnii ttaakkıınn,, aaççmmaa//kkaappaammaa ææaalltteerriinnii
((66)) vvee ppoommppaa ææaalltteerriinnii ((77)) aaççıınn..
PP PPüüsskküürrttmmee ssiisstteemmiinnii öörrnn.. llaavvaabboo ü
üzzeerriinnddee
ççaallııæættıırrıınn ((kkaappaattmmaa vveennttiilliinnddeekkii ((1166)) kkoollaa
bbaassıınn))..
NN
Deterjan hortumunu çözmeden önce
sistemdeki artık basıncı çıkarmak için
kapatma ventilinin (16, æekil (P)) koluna
bastıktan sonra hızlı kuplajdaki (5) tuæa
basın.
Elektrik fiæini çıkarın!
Aleti ve kullanılan aksesuarı temizleyin ve
kurulayın.
MMoottoorr bbaaæællııœœıınnıı kkeessiinnlliikkllee ssuuyyaa bbaattıırrmmaayyıınn!!
Motor gövdesini nemli bir bezle silin ve kurulayın.
39
Page 41

ÖÖnneemmllii TTaavvssiiyyeelleerr
Yaæ temizleme modunda püskürtücü halı
baælıœını kısım kısım kendinize doœru
çekerek kullanın.
Yeniden kirlenmelerini önlemek için
temizlenen halılara ancak kuruduktan
sonra basılmalıdır.
Temizlenen yüzeylerin daha çabuk
kurumaları için ventil koluna basmadan
yüzeyi tekrar süpürerek kalan sıvının
büyük ölçüde emilmesini saœlayabilirsiniz.
Parke zeminlerin temizliœi, parke zemin
üreticisinin talimatları doœrultusunda
yapılmalıdır.
OOllaassıı AArrıızzaallaarrddaa YYaarrddıımm
Aletiniz beklenenin aksine gerektiœi gibi
çalıæmadıœında hemen müæteri hizmetlerine
baævurmanıza gerek yoktur. ¤lk önce lütfen
arızanın basit bir nedenden
kaynaklanmadıœından emin olun:
EEmmeerreekk ssüüppüürrüürrkkeenn ttoozz ççııkkııyyoorrssaa::
• Filtre sistemi doœru æekilde takılmamıæ veya
arızalı olabilir.
• Kullanılan filtre orijinal THOMAS filtre mi?
EEmmmmee ggüüccüü ggiittggiiddee ddüüææüüyyoorrssaa::
• ¤nce tozlar filtre gözeneklerini tıkamıæ olabilir.
• Kâœıt filtre torbası dolmuæ olabilir.
• Baælık, uzatma borusu veya emme hortumu
kirden tıkanmıæ olabilir. (Emme hortumunu
alet çalıæırken çekerek uzatın. Hortumun
uzaması sıkıæan kiri gevæetir).
EEmmeerreekk ssüüppüürrüürrkkeenn aalleettiinn hhaavvaallaannddıırrmmaa
ddeelliikklleerriinnddeenn ssuu ççııkkııyyoorrssaa::
• Emerek süpürme esnasında aletin
æamandırası (æekil S) sıvı tarafından bloke
edilmiæ ve devredıæı bırakılmıæ olabilir.
• Yıkama-emme iælemi için orijinal THOMAS
konsantre deterjan kullanıldı mı?
• AQUAF¤LTRE ve ince toz tekstil filtresi
(modele göre) talimat doœrultusunda monte
edildi mi?
EEmmmmee ggüüccüü aanniiddeenn ddüüææeerrssee::
• Æamandıralı ventil emme havasını kesmiæ
olabilir. Aletin aæırı eœri durması veya
devrilmesi halinde bu durum görülebilir. Aleti
kapatın. Æamandıra aæaœıya düæer ve alet
tekrar kullanıma hazırdır.
MMoottoorr ççaallııææmmııyyoorrssaa::
• Kablo, fiæ ve priz saœlam mı?
• Kontrol etmeden önce fiæi çekin.
• Motoru kesinlikle kendi baæınıza açmayın!
DDeetteerrjjaann ççııkkmmııyyoorrssaa::
• Pompa açık mı? æalterin (7) ıæıœı yanmalıdır.
• Emme hortumundaki (36) emme filtre
tablasını temizleyin.
• Emme hortumu deterjan deposuna gerektiœi
gibi asılı mı?
• Püskürtme baælıœı tıkanmıæ olabilir. Bu
durumda baælıœı belirli bir süre için suya
koyduktan sonra kuvvetle üfleyerek tıkanıklıœı
giderin.
MMüüæætteerrii HHiizzmmeettlleerrii
Lütfen uzman satıcınıza baævurun. Gerektiœinde
uzman satıcınızdan yetkili THOMAS müæteri
servisinin adresini ve telefon numarasını
öœrenebilirsiniz.
Baævuru esnasında lütfen daima aspiratörünüzün
model etiketindeki bilgileri hazır bulundurun.
AAlleett ggüüvveennlliiœœiinniinn ssaaœœllaannmmaassıı iiççiinn oonnaarrıımm
ççaallııææmmaallaarrıınnıınn,, öözzeelllliikkllee eelleekkttrriikk ttaaææııyyaann
ppaarrççaallaarrddaa y
yaappııllaaccaakk ççaallııææmmaallaarrıınn aannccaakk uuzzmmaann
eelleekkttrriikkççiilleerr ttaarraaffıınnddaann yyaappııllmmaassıınnıı ssaaœœllaayyıınn.. BBuu
nneeddeennllee,, aarrıızzaa hhaalliinnddee uuzzmmaann ssaattııccıınnıızzaa vveeyyaa
TThhoommaass mmüüæætteerrii sseerrvviissiinnee bbaaæævvuurrmmaannıızzddaa ffaayyddaa
vvaarrddıırr..
40
CCEE -- UUyygguunnlluukk BBeeyyaannıı
Ürünümüzün aæaœıda yazılı normlara veya norm
niteliœinde belgelere uygun olduœunu münhasır
sorumlu olarak beyan ederiz.
– 93/68/EWG ile deœiæikliœe uœrayan AB Alçak
Gerilim Yönetmeliœi (73/23/EWG)
– 91/263/EWG, 92/31/EWG ve 93/68/EWG ile
deœiæikliœe uœrayan AB Elektromanyetik
Uygunluk Yönetmeliœi
Uygulanan armonize normlar:
DIN EN 60335-1, DIN EN 60335-2-2;
DIN EN 61000-3-2: 1995; DIN EN 61000-3-3:
1995;
DIN EN 55014-1: 1993; DIN EN 55014-2: 1997
Page 42

Przed pierwszym
uruchomieniem
Prosimy o dokładne zapoznanie się z niżej
opisanymi informacjami. One zawierają
ważne wskazówki dotyczące
bezpieczeństwa, obsługi i konserwacji
urządzenia. Prosimy o zachowanie poniższej
instrukcji obsługi i przekazanie jej
następnemu użytkownikowi.
Oznaczenie części
1 = Pojemnik
2 = Głowica silnika
3 = Zamknięcie zatrzaskowe
4 = Rolki zwrone
5 = Sprzęgło szybkodziałające
6 = Włącznik / wyłącznik
7 = Włącznik / wyłącznik pompy
(podświetlony)
8 = Nasadka ssąca
9 = Uchwyt nośny
10 = Kabel zasilający
11 = Regulator siły ssącej
12 = Przewód środka piorącego (część górna)
13 = Wąż ssący
14 = Rura ssąca
15 = Opaski węża
16 = Zawór blokujący
17 =
Dysza do ługowania natryskowego dywanów
18 = Przewód środka piorącego (część dolna)
19 = Dysza do powłók tapicerskich
20 = Adapter dla podłoża twardego
21 = Dysza dywanowa
22 = Dysza spoinowa
23 = Dysza do ługowania natryskowego
powłók tapicerskich
24 = Zbiornik dla środka piorącego
25 =
Koncentrat środka czyszczącego (ProTex)*
26 = Dysza syfonowa*
29 = Worek filtracyjny*
30 = Filtr z tworzywa piankowego
31 = Ochronny filtr papierowy
32 = Pierścień zaciskowy
33 = Worek filtra papierowego
34 = Filtr AQUA*
35 = Filtr przeciwpyłowy*
36 = Wąż zasysający środek piorący
37 = Zamocowanie rury ssącej
38 = Zawieszenie rury ssącej
39 = Zatrzaski*
*) THOMAS BRAVO 20 S Aquafilter
1.2 Wskazówki bezpieczeństwa
• THOMAS BRAVO przeznaczony jest dla
korzystania w gospodarstwie domowym
wyłącznie przez dorosłych
• Nie należy uruchamiać urządzenia jeżeli:
- kabel zasilający jest uszkodzony
- są widoczne uszkodzenia
- urządzenia spadło
• Podane na tabliczce znamionowej napięcie
musi odpowiadać danemu napięciu w siecu
• Dysz i rur przy włączonym urządzeniu nie
należy przybliżać do głowy ponieważ zagraża
to oczom i uszom.
• Urządzenie nie jest przeznaczone do
czyszczenia środków zagrażającym zdrowiu
oraz zawierającym rozpuszczalniki lub aceton
• Urządzenie nie może być stosowane w
pomieszczeniach gdzie składowane są
materiały lub gazy łatwopalne.
• Środki jak benzyna, rozpuszczalnik farb, olej
grzewczy przy zmieszaniu się z powietrzem
ssącym mogą wytworzyć opary ekslodujące.
• Nie odkurzać gorącego popiołu lub
materiałów żarzących.
• Sprawdzić przed każdorazowym użyciem czy
jest zastosowany odpowiedni filtr.
• Nie odkurzać wywoływaczy kserograficznych.
Taki wywoływacz, który jst stosowany przy
drukarkach lub kopiarkych może przewodzić
prąd! Oprócz tego wywoływacz może
ewentualnie nie zostać całkowicie
przechwycony przez filtr i następnie
ponownie dostać się poprzez dmuchawę
odkurzacza z powrotem do atmosfery.
• Aceton, kwasy i rozpuszczalniki mogą zajść w
reakcję ze środkiem piorącym znajdującym
się w odkurzaczu.
• Szczególną ostrożność należy zachować przy
czyszczeniu schodów. Odkurzacz musi stać
w bezpiecznym miejscu. Wąż nie może być
rozciągnięty na odległość większą od jego
długości. Odkurzacz należy bez przerwy
przetrzymywać jeną ręką.
• Włączonego odkurzycza nie wolno
pozostawiać bez nadzoru i należy
przestrzegać aby nie bawiły się nim dzieci.
• Należy wyciągnąć wtyczkę z gniazdka:
przy awarii w czacie eksploatacji
przy każdorazowym czyszczeniu i
konserwacji
po użyciu
przy każdorazowej wymianie filtra.
• Nie wyciągać wtyczki poprzez ciągnienie
kabla lecz wyłącznie samą wtyczkę.
• Należy zwrócić uwagę aby kabel zasilający
nie został poddany wysokim temperaturom i
41
PL
Page 43

cieczom chemicznym jak również nie był
przeciągany przez ostre krawędzie.
• W pomieszczeniach wilgotnych należy unikać
stosowania przedłużaczy.
• Awarie urządzenia, osprzętu lub kabla
zasilającego (konieczny jest kabel specjalny)
nie należy nigdy naprawiać samemu lecz
wyłącznie poprzez specjalny zakład
serwisowy. Wszelkie reparatury dokonywane
we własnym zakresie mogą zagrozić
własnemu zdrowiu. Należy przestrzegać aby
zawsze były używane oryginalne części
zamienne i osprzęt.
• Urządzenia nie poddawać wpływom
atmosferycznym, wilgoci i nie stawiać w
pobliżu Ŕródła ciepła.
• Strumień natrysku piorącego nie skierowywać
migdy w kierunku innych osób lub zwierząt,
gniazdek prądowych lub urządzeń
elektrycznych.
• Po każdorazowym odkurzaniu mokrym lub
ługowaniu natryskowym natychmiast
opróżnić zbiornik odkurzacza.
• Należy przestrzegać aby czyszczące środki
chemiczne nie dostały się w ręce dzieci.
• Pełna sprawność i skuteczność urządzenia
zagwrantowana jest wyłącznie przy
stosowaniu oryginalnych środków
czyszczących firmy THOMAS
• Osoby z wrażliwą skórą powinne unikać
bezpośredniego kontaktu ze środkami
czyszczącymi.
• Jeżeli koncentrat środka czyszczącego
dostanie się do oczu, ust, ltp., wówczas dane
miejsce należy natychmiast przepłukać wodą.
Ochrona środowiska
Opakowania i zużyte urządzenie nie należy po
prostu wyrzucać!
Opakowanie urządzenia:
• Karton opakowanie należy oddać na zbiór
makulatury.
• Worki plastikowe z polietyleniu (PE) na zbiór
odpadów specjalnych.
Wykorzystanie urządzenia po upływie czasu
jego eksploatacji:
• Urządzenie należy usunąć na śmieci zgodnie
z obowiązującymi przepisami odcinając
wcześniej wtyczkę prądową.
Montaż rolek zwrotnych
A Otworzyć zamknięcie zatrzaskowe i zdjąć
głowicę silnika.
B Rolki zwrotne i trzpiene wcisnąć dokładnie
w podtstawę pojemnika.
Odkurzanie suche
THOMAS BRAVO 20
Po uprzednim odkurzaniu mokrym
odkurzacz musi być całkowicie
wysuszony; również wąż lub rurę
ewentualnie uprzednio wysuszyć.
Nie należy nigdy odkurzać na sucho bez
filtra lub z uszkodzonym filtrem.
K Odłączyć zbiornik ze środkiem
czyszczącym
C Umocować filtr piankowy, filtr papierowy i
pierścień zaciskowy i zabezpieczyć klamrą
obrotową.
D Worek filtracyjny wcisnąć na nasadkę
ssącą i umocować na ściance pojemnika.
G Wąż ssący środek czyszczący zaczepić na
dolnej części głowicy silnika.
H Nasadzić głowicę silnika i zamknąć
zatrzaski.
J Podłączyć wąż ssący. W celu odłączenia
przekręcić złączkę ssącą a następnie ją
wyciągnąć.
Umocować żądany osprzęt.
Włożyć wtyczkę do kontaktu.
N Za pomocą włącznika / wyłącznika (6)
uruchomić odkurzacz. Przełącznik pompy
(7) nie może się świecić.
i Za pomocą regulatora siły ssania (11, rys.
P) można zmieniać moc zasysania.
— suwak napowietrzania bocznego
zamknięty = pełna moc ssania
— suwak napowietrzania bocznego
otwarty = moc ssania zmniejszona
THOMAS BRAVO 20S Aquafilter
Podczas odkurzania suchego, odkurzacza
nie należy nigdy używać bez filtra AQUA,
filtra przeciwpyłowego i odpowiedniego
wypełnienia go wodą.
42
Page 44

Nie odkurzać większych ilości pyłów, np.
mąki, kakao w proszku, cementu, itp.
K Odłączyć zbiornik ze środkiem
czyszczącym.
E 2-częściowy filtr AQUA złączyć ze sobą i
nasunąć na nasadkę ssącą.
Należy przy tym zwrócić uwagę na
oznaczenia.
Filtr AQUA musi zaskoczyć na podłożu
pojemnika i być na podłożu równomiernie
rozłożony.
Do pojemnika ssącego nalać 2 litry czystej
wody.
F Filtr przeciwpyłowy poprzez przełożenie
górnej krawędzi zaczepić na pojemniku
ssącym.
G Wąż zasysający środek czyszczący
zaczepić na dolnej części głowicy silnika.
C Przy pomocy pierścienia dociskowego (29)
nałożyć worek filtracyjny (26) i zamocować
go klamrami obrotowymi (31).
H Nałożyć głowicę silnika i zamknąć
zatrzaski.
J Podłączyć wąż ssący. W celu odłączenia
przekręcić złączkę ssącą a następnie ją
wyciągnąć.
Umocować żądany osprzęt.
Włożyć wtyczkę do kontaktu.
N Za pomocą włącznika / wyłącznika (6)
uruchomić odkurzacz. Przełącznik pompy
(7) nie może się świecić.
i Za pomocą regulatora siły ssania (11, rys.
P) można zmieniać moc zasysania.
- suwak napowietrzania bocznego
zamknięty = pełna moc ssania
- suwak napowietrzania bocznego otwarty
= moc ssania zmniejszona.
Czyszczenie i konserwacja systemu
filtrowego AQUA
Z uwagi na higienę po każdorazowym
urzyciu opróżnić, oczyścić i wysuszyć
system filtrowy AQUA. Brudna woda i
wilgotne części sprzyjają powstawaniu
bakterii i grzybów.
Filtr przeciwpyłowy w zależności od jego
zabrudzenia oczyścić za pomocą wilgotnej
szmatki. Przy większym zabrudzeniu wymyć
czystą wodą bez dodatku środków
czyszczących. Przestrzegać aby przy
następnym odkurzaniu filtr był całkowicie suchy.
Odkurzanie mokre
Zawór pływakowy utrzymywać stale w
czystym stanie. On przerywa
automatycznie zasysanie jeżeli pojemnik
ssący jest pełen.
Przy zasysaniu z pojemników, w których poziom
cieczy znajduje się wyżej od górnej krawędzi
pojemnika ssącego i którego pojemność jest
większa od pojemności pojemnika ssącego,
może dojść do przelewu jeżeli zawór pływakowy
jest zamknięty.
W takim przypadku odprowadzić tylko część
cieczy i w międzyczasie opróżnić pojemnik
ssący.
Najpierw wyciągnąć z cieczy rurę i wąż ssący a
następnie wyłączyć odkurzacz w celu uniknięcia
przelewu.
A Odworzyć zatrzaski zamykające i zdjąć
głowicę silnika.
Filtry wyjąć z odkurzacza, ponieważ w
przeciwnym razie mogą one zostać
uszkodzone (rys. C i D ). Przy
urządzeniach typu AQUAFILTER wyjąć fltr
Aqua i filtr przeciwpyłowy (rys. C, E i F).
Jeżeli zamocowany jest zbiornik na środek
czyszczący, wówczas należy go wyjąć
(rys. K).
H Nałożyć glowicę silnika i zamknąć
zatrzaski.
Włożyć wtyczkę do kontaktu.
J Podłączyć wąż ssący. W celu odłączenia
przekręcić złączkę ssącą a następnie ją
wyciągnąć.
P Regulator siły ssania (11) zamknąć.
N Za pomocą włącznika / wyłącznika (6)
uruchomić odkurzacz. Przełącznik pompy
(7) nie może się świecić.
Po zakończeniu odkurzania mokrego
odkurzacz i użyte części oczyścić i
wysuszyć.
Ługowanie natryskowe (odkurzanie
pralnicze) dywanów i podłóg.
Czyścić jedynie dywany, które nadają się
do czyszczenia mokrego.
Dywany plecione ręcznie lub sztucznie
farbione nie mogą być czyszczone na
mokro.
Jeżeli dywan już wcześniej był
szamponowany, wówczas przy pierwszym
zastosowaniu THOMAS BRAVO może
dojść do tworzenia się dużej ilości piany.
43
Page 45

Należy wówczas odkurzacz wyłączyć i
pojemnik ssący opróżnić.
W celu uniknięcia dalszego tworzenia się
piany naleyy do pojemnika ssącego wlač _
filiyanki octu. Tworzenie sić nadmiernej
iloúci piany po jednorazowym czyszczeniu
przy uyyciu koncentratu úrodka
czyszczącego THOMAS jest wykluczone,
ponieway ten úrodek zawiera specjalny
dodatek hamujący powstawanie piany.
W celu uniknięcia uszkodzenia pompy
nałeży przestrzegać, aby przy
włączonej funkcji natryskowej w
pojemniku z czystą wodą zawsze
znajdowała się woda.
Czyszczenie dywanów
A Otworzyć zamknięcie zatrzaskowe i zdjąć
głowicę silnika.
K Odłączyć zbiornik ze środkiem
czyszczącym i wlać środek czyszczący
THOMAS ProTex.
Dozowanie patrz na etykiecie butelki.
Stosować wodę lekko ogrzaną (max. 30° C).
Nałożyć pokrywkę i wypełniony zbiornik
umocować na odkurzaczu.
G Wąż zasysający środek czyszczący zdjąć
z umocowania na głowicy silnika.
L Głowicę silnika nałożyć w ten sposób,
żeby wąż zasysający (ł6) był zanużony do
dna zbiornika ze środkiem czyszczącym i
nie był załamany.
J Podłączyć wąż ssący. W celu odłączenia
przekręcić złączkę ssącą a następnie ją
wyciągnąć.
M Zawór blokujący nasunąć na rurę ssącą.
Wsunąć uchwyt do rury ssącej i przewód
środka czyszczącego umocować za
pomocą zatrzasków na wężu ssącym.
N Przewód środka czyszczącego zaczepić
na sprzęgle szybkodziałającym na głowicy
silnika.
O Dyszę natryskową nasadzić na rurę ssącą.
P Przewód środka czyszczącego dyszy
natryskowej podłączyć do zaworu
blokującego i zabezpieczyć poprzez
dokręcenie. Przewód środka
czyszczącego wcisnąć na umocowanie
rury ssącej, względnie przy rurach ze stali
szlachetnej za pomocą zatrzasków (39)
umocować na rurze ssącej.
Włożyć wtyczkę do kontaktu.
N Przełączyć włącznik / wyłącznik (6) i
przełącznik pompy (7).
P Wcisnąć suwak na zaworze blokującym
(16). Środek czyszczący wytryskuje.
Zanim zbiornik na środek czyszczący
zostanie ponownie napełniony należy
usunąć brudną wodę z pojemnika
ssącego.
Czyszczenie podłóg
Q Zamocować adapter do czyszczenia
podłóg.
Sposób postępowania patrz “Czyszczenie
dywanów”
i Do czyszczenia podłóg zalecamy
stosowanie koncentratu środka
czyszczącego typu THOMAS ProFloor.
Czyszczenie powłók tapicerskich
( w zależności od modelu )
Do czyszczenia mebli tapicerskich i siedzeń
samochodowych należy zastosować dyszę do
ługowania natryskowego powłók tapicerskich (23).
i Należy zwrócić uwagę aby powłók
tapicerskich nie zmoczyć za mocno,
ponieważ w zależności od modelu różnie
one wysychają.
R Zamontować dyszę tapicerską. Poprzez
wkręcenie zamocować przewód środka
czyszczącego. Dyszę nasunąć na uchwyt.
Czyszczenie i konserwacja systemu
ługowania natryskowego
K W celu konserwacji pompy i zaworów
zbiornik środka czyszczącego wypełnić
czystą wodą.
Włożyć wtyczkę do kontaktu, włączyć
przełącznik (6) jak rówież przełącznik
pompowy (7).
P System natryskowy uruchomić np. w
umywalce (przesunąć suwak na
zaworze blokującym (16))
N Przed wyciągnięciem przewodu środka
czyszczącego przesunąć suwak na
zaworze blokującym (16, rys. P), w celu
odprowadzenia reszty ciśnienia w
systemie, poczym przycisnąć przycisk (5)
na sprzęgle szybkodziałającym.
Wyciągnąć wtyczkę z kontaktu !
Po użyciu odkurzacz i zastosowane części
oczyścić i wysuszyć.
Głowicę silnika nie zanurzać w wodzie !
Obudowę silnika oczyścić wilgotną szmatką.
44
Page 46

Ważne uwagi
i Przy czyszczeniu na mokro dyszę
natryskową prowadzić zawsze w kierunku
do siebie.
i W celu uniknięcia ponownego
zabrudzenia, po wyczyszczonych
dywanach powinno się chodzić dopiero
po ich wysuszeniu.
i W celu przyspieszenie wysuszenia
oczyszczonej powierzchni zaleca się
ponowne odkurzenie tej powierzchni bez
wciskania suwaka zaworu.
i Przy odkurzaniu parkietu należy
postępować według wskazuwek
producenta parkietu.
Środki zaradcze przy
ewentualnej awarii
Jeżeli się zdarzy, iż odkurzacz nie funkcjonuje
zgodnie z oczekiwaniami, wówczas nie trzeba
koniecznie natychmiast zawiadamiać zakładu
serwisowego. Prosimy najpierw sprawdzić czy
powodem usterki są drobne przyczyny:
Jeżeli podczas odkurzania wydostaje się kurz:
• sprawdzić czy system filtrowy jest
prawidłowo umocowany i nieuszkodzony.
• sprawdzić czy papierowy worek filtrowy jest
pełen.
• sprawdzić czy dysze, rury i wąż ssący nie są
zapchane (wąż ssący przy włączonym
odkurzaczu rozciągnąć – wyciągnięcie
powoduje poluzowanie zapchania).
Jeżeli podczas odkurzania z otworów
wydmuchujących wycieka woda:
• sprawdzić czy pływak (rys. S) podczas
odkurzania jest zablokowany cieczą i nie
funkcjonuje.
• sprawdzić czy do odkurzania piorącego
został użyty originalny koncentrat środka
czyszczącego THOMAS.
• sprawdzić czy filtr Aqua i filtr przeciwpyłowy
(w zależności od modelu) zostały umocowane
zgodnie z instrukcją.
Jeżeli moc zasysania nagle słabnie:
• sprawdzić czy zawór pływakowy zablokował
powietrze ssące. Może się to zdarzyć przy
nadmiernym pochyleniu odkurzacza lub przy
jego przewróceniu się. Odkurzacz wyłączyć –
pływak spada na dół – odkurzacz jest
ponownie sprawny.
Jeżeli silnik nie działa:
• sprawdzić czy kabel, wtyczka i kontakt są
sprawne.
• przed sprawdzeniem wyciągnąć wtyczkę.
• nie otwierać silnika nigdy samemu!
Jeżeli nie wycieka środek czyszczący:
• sprawdzić czy pompa jest włączona (
przełącznik (7) musi się świecić )
• sito filtra ssącego na wężu ssącym (ł6)
oczyścić.
• sprawdzić czy wąż ssący jest należycie
podwieszony w zbiorniku środka
czyszczącego.
• sprawdzić czy dysza natryskowa nie jest
zapchana. Jeżeli dysza jest zatkana,
wówczas zanurzyć ją na pewien czas w
wodzie a następnie przedmuchać.
Serwis
Prosimy zwrócić się do sprzedawcy, który poda
adres lub telefon przynależnego zakładu
serwisowego THOMAS.
Należy przy tam podać dane zapisane na
tabliczce typu odkurzacza.
W celu zachowania bezpiecznego
funkcjonowania odkurzacza należy wszelkie
naprawy, a w szczególności naprawy części
prądowych dokonywać w zakładzie
elektroserwisowym. W przypadku awarii
należy się zwrócić do sprzedawcy lub
zakładu serwisowego THOMAS.
45
Oświadczenie wiarygodności CE
Niniejszym oświadczamy na własną
odpowiedzialność, iż dane urządzenie odpowiada
wymogom następujących norm lub dokumentom
normowym:
– Wytyczne EG dotyczące niskiego napięcia
(73/23/EWG), zastąpione 93/68/EWG
– Wytyczne EG dotyczące wytrzymałości
elektromagnetycznej (89/336/EWG), zastąpione
91/263/EWG, 92/31/EWG, 93/68/EWG
Zastosowane normy zgodności:
DIN EN 60335-1, DIN EN 60335-2-2;
DIN EN 61000-3-2: 1995; DIN EN 61000-3-3: 1995;
DIN EN 55014-1: 1993; DIN EN 55014-2: 1997
Page 47

Перед первым пуском
в эксплуатацию
Пожалуйста, прочтите внимательно всю
нижеследующую информацию. Она содержит
важные указания относительно безопасности,
использования и технического обслуживания
прибора. Сберегайте данное руководство по
эксплуатации и передайте его дальше новому
пользователю.
Обозначения
1 = бак
2 = блок двигателя
3 = запирающая защёлка
4 = рулевые ролики
5 = быстроразъёмное соединение
6 = выключатель
7 = выключатель насоса (с подсветкой)
8 = всасывающие штуцеры
9 = ручка для переноски
10 = кабель для подключения к электросети
11 = регулятор мощности всасывания
12 = шланг для моющего средства (верхняя часть)
13 = всасывающий шланг
14 = всасывающие трубы
15 = шланговые фиксаторы
16 = запорный клапан
17 = оросительная экстракционная насадка для чистки
ковров*
18 = шланг для моющих средств (нижняя часть)
19 = насадка для чистки мягкой мебели
20 = адаптер для жёстких половых покрытий
21 = ковровая насадка
22 = узкая насадка
23 = оросительная экстракционная насадка для чистки
мягкой мебели
24 = бак для моющих средств
25 =
концентрат для чистки текстильных изделий (ProTex)
26 = сифонная насадка*
29 = вопокнистый фильтр*
30 = пенопластовый фильтр
31 = бумажный защитный фильтр
32 = обечайка
33 = мешок для бумажного фильтра
34 = AQUA-фильтр*
35 = тонкодисперсный текстильный фильтр*
36 = всасывающий шланг для моющих средств
37 = крепление всасывающей трубы
38 = положение “запаркованной” всасывающей трубы
39 = трубные пружинные зажимы*
*) = только для модели THOMAS BRAVO 20 S Aquafilter
1.2 Указания по технике безопасности
• Пылесос THOMAS BRAVO служит
исключительно для использования в домашнем
хозяйстве и должен обслуживаться только
взрослыми.
• Ни в коем случае не пользоваться прибором,
если:
– неисправен электрокабель,
– имеются очевидные неисправности,
– Bы нечаянно уронили прибор.
• Напряжение, указанное на заводской табличке
прибора, должно соответствовать напряжению
питающей сети.
• Насадки и трубки при включённом приборе не
должны находиться вблизи головы, так как
иначе имеется опасность ранения, особенного
глаз и ушей.
• Прибор не пригоден для всасывания опасных
для здоровья, едких и содержащих
растворители веществ.
• Прибор не должен эксплуатироваться в
помещениях, в которых храняться огнеопасные
вещества или образовались газы.
• Вещества, как бензин, растворители красок и
котельное масло, могут при турбулизации с
всасываемым воздухом образовывать
взрывоопасные пары или смеси.
• Никогда не всасывайте горячую золу или
раскалённые предметы.
• Перед каждым использованием прибора
проверьте, правильно ли насажены
необходимые фильтры.
• Никогда не всасывайте рассыпавшийся
красящий порошок, который используется,
например, в печатных устройствах и
копировальных приборах, может быть
электропродимым! Кроме того, красящий
порошок может не полностью
отфильтровываться системой фильтров
пылесоса и таким образом снова попадает в
воздух помещения.
• Ацетон, кислоты и растворители могут
разъедать используемые в конструкции
прибора материалы.
• При уборке лестниц требуется особая
осторожность. Вы должны обеспечить
достаточно устойчивое положение прибора.
Щланг не должен растягиваться более своей
изначальной длины. Всегда придерживайте
прибор одной рукой.
• Никогда не оставляйте без присмотра
работающий прибор и следите за тем, чтобы с
ним не игрались дети.
• Электрокабель следует отключить от сети:
– при помехах во время работы,
– перед каждой чисткой и уходом,
– после использования,
– при каждой смене фильтра.
46
GUS
Page 48

• При отключении от сети никогда не тяните за
кабель, а только за штепсельную вилку.
• Следите за тем, чтобы электрокабель прибора
не подвергался воздействию повышенных
температур и химических жидкостей, а также
не перетягивался через острые края или
поверхности.
• Избегайте использовать удлинители
электрокабеля в сырых помещениях.
• Никогда не ремонтируйте сами неисправности
прибора, принадлежностей или электрокабеля
(требуется особая проводка), а предоставляйте
это делать только мастерам уполномоченной
мастерской по обслуживанию клиентов, потому
что изменения на приборе могут создавать
угрозу Вашему здоровью. Следите за тем,чтобы
использовались только оригинальные запчасти
и принадлежности.
• Не подвергайте прибор воздействиям погодных
условий, влаги и источников теплового
излучения.
• Никогда при чистке не направляйте струю на
людей или животных, электророзетки или
электроприборы.
• Опорожняйте и чистите бак сразу после
мокрого всасывания или орошеннияэкстрагирования.
• Химикаты, как концентраты моющих средств,
не должны попадать в руки детям.
• Только при использовании оригинальных
моющих средств фирмы THOMAS может быть
обеспечена функциональность прибора и
полная мощность всасывания.
• Лица с восприимчивой кожей должны избегать
прямого контакта с раствором моющего
средства.
• Если моющий концентрат попадёт на слизистые
оболочки (глаза, рот и т. п.), то эти места
следует сразу промыть водой.
Берегите окружающую среду!
Упаковочный материал и отслужившие приборы
не должны выбрасываться на улицу!
Упаковка прибора:
• Упаковочная картонная коробка может быть
сдана на макулатуру.
• Пластиковый пакет из полиэтилена (ПY)
сдаётся в местах сбора на переработку.
Использование прибора после окончания его
срока службы:
• Утилизируйте прибор согласно местных
предписаний и предварительно срежьте
вытянутую штепсельную вилку.
Монтаж рулевых роликов
А Откройте запирающую защёлку и снимите
головную часть прибора.
В Крепко вдавите рулевые ролики и оси в дно
ёмкости.
Сухое всасывание
THOMAS BRAVO 20
После предварительного процесса мокрого
всасывания прибор должен быть абсолютно
сухим; при необходимости также
предварительно следует просушить шланг и
трубки.
Никогда не делайте сухую уборку с
повреждённым фильтром или без него.
К Снимите бак для моющего средства.
С Монтируйте пенопластовый фильтр,
бумажный защитный фильтр и обечайку и
закрепите их поворотными зажимами.
D Крепко насадите мешок для фильтра на
всасывающий штуцер и приложите к стенке
резервуара.
G Защёлкните всасывающий шланг для
моющего средства на нижней стороне
головной части прибора.
Н Насадите головную часть прибора и
защёлкните запирающие защёлки.
J Подсоедините всасывающий шланг.
Для снятия поверните его в сторону и
отсоедините.
Монтируйте желаемые принадлежности.
Вставьте штепсельную вилку в розетку.
N Включите прибор нажатием кнопки для
включения/выключения (6).
Выключатель насоса (7) не должен
светиться.
i С помощью кнопки регулирования мощности
(11, рис. Р) можно изменять мощность
всасывания.
- шибер дополнительного подсоса воздуха
закрыт = полная мощность всасывания
-
шибер дополнитеьного подсоса воздух
открыт = пониженная мощность всасывания
THOMAS BRAVO 20S Aquafilter
! Никогда при сухой уборке не пользуйтесь
Вашим прибором Aquafilter без аквафильтра,
тонкодисперсного текстильного фильтра и
соответствующей заправки водой.
Не всасывайте большие количества
тонкодисперсной пыли, напр., муки, порошка
какао, цемента и т. п.
47
Page 49

К Снять бак для моющего средства.
Е Состыковать до упора аквафильтр,
состоящий из 2 частей, и крепко насадить
его на всасывающий штуцер.
При этом следите за
маркировкой.
Аквафильтр должен быть защёлкнут на дне
всасывающего резервуара и равномерно
лежать на дне.
Залейте 2 литра чистой воды во
всасывающий бак.
F Путём перекладывания верхнего края
подвесить тонкодисперсный текстильный
фильтр во всасывающем резервуаре.
G Защёлкнуть на нижней стороне головной
части прибора всасывающий шланг для
моющего средства.
С Установить вопокнистый фильтр (29) с
помощью зажимного кольца (32) и закрепить
его поворотными скобами.
Н Насадить головную часть прибора и
защёлкнуть запирающие защёлки.
J Вставить всасывающий шланг. Для снятия
следует повернуть в сторону соединение
всасывающего шланга и вынуть его.
Монтируйте желаемые принадлежности.
Вставьте штепсельную вилку электрокабеля в
розетку.
N Включите прибор нажатием кнопки для
включения/выключения (6). Выключатель
насоса (7) не должен светиться.
i С помощью кнопки регулирования мощности
(11, рис. Р) можно изменять мощность
всасывания.
- шибер дополнительного подсоса воздуха
закрыт = полная мощность всасывания
- шибер дополнительного подсоса воздуха
открыт = пониженная мощность всасывания
Технический уход за системой аквафильтра.
! По гигиеническим причинам систему
аквафильтра и всасывающий резервуар
после каждого использования следует
опорожнить, почистить и просушить.
Грязная вода и мокрые части
благоприятствуют размножению
бактерий и грибков.
Тонкодисперсный текстильный фильтр в
зависимости от степени загрязнения нужно
протереть сухой или слегка влажной суконкой.
При сильном загрязнении его следует промыть
чистой водой без добавления моющих и
чистящих средств. Следите за тем, чтобы при
следующем использовании фильтр был
полностью просушен.
Мокрое всасывание
! Поплавковый клапан (40, рис. S) должен
всегда содержаться в чистоте и свободно
двигаться в проходе. Он автоматически
прерывает процесс всасывания, если
всасывающий бак полный.
При всасывании из ёмкостей, уровень жидкости
которых находится выше верхнего края
всасывающего бака, и объём которых больше
рабочего объёма пылесоса, при закрытом
поплавковом клапане жидкость может и далее
затекать внутрь.
В подобных случаях следует отсасывать только по
частям и в промежутках опорожнять
всасывающий бак.
Сначала извлечь из жидкости всасывающую
трубку и шланг и затем выключить прибор, чтобы
предотвратить затекание жидкости.
А Открыть запорные защёлки и снять
головную часть прибора.
i Извлечь из прибора фильтр, так как иначе
он будет повреждён (рис. C и D). В приборов
с аквафильтром нужно вынуть аквафильтр и
тонкодисперсный текстильный фильтр (рис.
C, Е и F).
Если монтирован бак для моющих средств,
то его нужно извлечь (рис. К).
Н Насадить головную часть прибора и
защёлкнуть запорные защёлки.
J Вставить всасывающий шланг. Для снятия
следует повернуть в сторону соединение
всасывающего шланга и вынуть его.
Р Закрыть регулятор мощности (11) на
рукоятке.
N Включите прибор нажатием кнопки для
включения/выключения (6). Выключатель
насоса (7) не должен светиться.
! После окончания процесса мокрого
всасывания прибор и использованные части
следует почистить и просушить.
Экстрагирование с распылением (мокрое
всасывание) ковров и твёрдых половых покрытий
! Чистить только те ковры, которые пригодны
для влажной уборки.
Тонкие ковры ручной работы или ковры с
непрочными красками не должны
подвергаться влажной чистке.
Если ковёр ранее подвергался стирке с
применением шампуни, то при первом
использовании пылесоса THOMAS BRAVO
может иметь место обильное
пенообразование.
Тогда прибор следует выключить и
48
Page 50

опорожнить всасывающий бак.
Чтобы избежать дальнейшего
пенообразования, добавьте 1/2 чашки
уксуса во всасывающий бак. Повышенное
пенообразование после одноразовой общей
химической чистки с применением моющего
концентрата фирмы THOMAS исколючено,
так как он содержит специальные вещества,
препятствующие пенообразованию.
Во избежание возможного повреждения
насоса следите за тем, чтобы при
включённой функции орошения бак для
свежей воды всегда был наполнен.
Чистка ковров
А Открыть запорные защёлки и снять
головную часть прибора.
К Снять крышку с бака для моющего средства
и залить в бак моющее средство THOMAS
ProTex.
Дозировка указана на этикетке бутылки.
Использовать только слегка тёплую воду
(макс. 30°С).
Снова насадить крышку и вставить в прибор
бак для моющего средства.
Н Вынуть всасывающий шланг для моющего
средства из крепления на головной части
прибора.
L Головную часть прибора насадить таким
образом, чтобы всасывающий шланг (36)
был погружён до самого дна бака для
моющего средства и не перегибался.
J Вставить всасывающий шланг. Для снятия
следует повернуть в сторону соединение
всасывающего шланга и вынуть его.
М Задвинуть запорный клапан в крепление на
всасывающей трубе. Вставить рукоятку во
всасывающую трубу и закрепить на
всасывающем шланге с помощью
пластмассовых пружинных зажимов шланг
для моющего средства.
N Зафиксировать шланг для моющего
средства в быстродействующем сцеплении
на головной части прибора.
О Насадить на всасывающую трубу ковровую
насадку для оросительного экстрагирования.
Р Насадить на запорный клапан шланг для
моющего средства от ковровой оросительной
насадки и закрепить поворотом вокруг оси.
Шланг для моющего средства вдавить в
крепление шланга на всасывающих трубках
или у приборов с нержавеющими трубками
закрепить его на всасывающей трубе
пружинными зажимами (39).
N Нажать на кнопку включения/выключения
(6) и на подсвеченную кнопку включения
насоса (7).
Р Нажать рычаг на запорном клапане (16).
При этом распыляется моющее средство.
! Прежде чем вновь будет заполнен бак
для моющего средства, всегда сливайте
грязную воду из всасывающего бака.
Чистка твёрдых половых покрытий
Q Монтировать адаптер для твёрдых половых
покрытий.
Порядок действий указан в главе “Чистка
ковров”.
i Для чистки твёрдых половых покрытий мы
рекомендуем пользоваться концентратом
THOMAS ProFloor.
Чистка мягкой мебели (в зависимости от
модели)
Для чистки Вашей мягкой мебели или сидений
автомобиля используйте оросительноэкстракционную насадку для мягкой мебели (23).
i Следите за тем, чтобы жидкости
распылялось не слишком много, так как в
зависимости от подкладки следует
считаться с более длительным временем
просыхания.
R Монтировать оросительно-экстракционную
насадку для мягкой мебели. Вкрепить шланг
для моющего средства поворотом вокруг
оси. Насадить насадку на рукоятку.
Чистка и уход за оросительно-экстракционной
системой
К Для чистки насоса и клапанов следует
наполнить чистой водой бак для
моющего средства и вставить его на
место.
Вставить в розетку вилку электрокабеля,
нажать на кнопку включения/
выключения (6), а также на кнопку
включения насоса (7).
Р Оросительную систему включать, напр.,
над раковиной (нажать рычаг (16) на
запорном клапане).
N Перед откреплением шланга для моющего
средства сначала надо нажать рычаг на
запорном клапане (16, рис. P), чтобы
разрядить остаточное давление в системе,
затем нажать кнопку на бустродействующем
сцеплении (5).
Отсоединить электрокабель от сети!
Затем почистить и просушить прибор и
использованные принадлежности.
Никогда не погружайте в воду головную часть
прибора!
Корпус мотора протрите влажной суконкой и
затем просушите.
49
Page 51

Полезные советы
i При влажной чистке всегда проводите
ковровой распылительной насадкой по
ковру полоса за полосой в направлении к
себе.
i Чтобы вновь не запачкать ковры, после
чистки ходить по ним нужно только тогда,
когда они уже подсохли.
i Чтобы достичь быстрого подсыхания
очищенной поверхности, имеет смысл
тщательно удалить остаточную влагу путём
повторного всасывания без нажимания на
рычаг клапана.
i Для чистки паркета Вам следует
придерживаться указаний изготовителя
паркета.
Помощь при возможных неполадках
Если Ваш прибор вопреки ожиданиям работает
неудовлетворительно, то Вам не нужно сразу
обращаться в службу сервиса. Пожалуйста,
проверьте сначала, не является ли причиной
неисправности какой-нибудь пустяк:
Если при всасывании пыль выступает наружу:
• Правильно ли закреплена система фильтров и
нет ли в ней неисправностей?
• Используется ли оригинальный фильтр фирмы
THOMAS?
Если мощность всасывания значительно
понижена:
• Не засорились ли поры фильтра
тонкодисперсной пылью?
• Не переполнен ли мешок для бумажного
фиьтра?
• Не засорены ли грязью насадка, труба или
всасывающий шланг? (При включённом
приборе растяните всасывающий шланг, это
способствует расслаблению пробки.)
Если при всасывании выступает вода из
выпускных отверстий прибора:
• Не заблокирован ли при всасывании жидкости
поплавок (рис. S) и не может срабатывать?
• Использовался ли при мокром всасывании
оригинальный моющий концентрат фирмы
THOMAS?
• Согласно ли руководства монтированы
аквафильтр и тонкодисперсный текстильный
фильтр (в зависимости от модели)?
Если внезапно снизилась мощность
всасывания:
• Не перекрыл ли поплавковый клапан
всасываемый воздух? Это может случиться при
экстремальном вертикальном положении или
при опрокидывании прибора. Пылесос
выключить – поплавок падает вниз – прибор
снова готов к работе.
Если мотор не работает:
• В порядке ли кабель, штепсельная вилка и
розетка?
• Перед проверкой вынуть штепсельную вилку из
розетки.
• Никодна не вскрывайте мотор сами!
Если не выступает моющая жидкость:
• Включён ли насос (7)? Подсветка на кнопке
должна светить.
• Почистить сито всасывающего фильтра на
всасывающем шланге (36).
• Правильно ли лежит всасывающий шланг в
баке для моющего средства?
• Не засорилась ли оросительная насадка? Если
засорилась оросительная насадка, то её на
некоторое время следует поместить в воду.
Затем основательно продуть.
Сервисная служба
Обращайтесь к Вашему торговому представителю,
который также охотно предоставит Вам адреса
или номера телефонов ответственной для Вас
сервисной службы фирмы THOMAS.
Пожалуйста, при этом всегда сообщайте данные,
указанные на заводской табличке Вашего
пылесоса.
Для поддержания должного уровня
безопасности Вашего прибора ремонт прибора
и особенно его токопроводящих узлов должен
проводиться только специалистамиэлектриками. Поэтому в случае неисправности
Вы должны обращаться к Вашему торговому
представителю или прямо в сервисную службу
фирмы THOMAS.
50
Декларация соответствия нормам СЕ
Мы заявляем под личную ответственность, что
данное изделие соответствует следующим
нормам или нормативным документам:
- нормативам ЕС для низковольтных приборов
(37/23/EWG), изменено на 93/68/EWG,
- нормативам ЕС на электромагнитную
совместимость (89/336/EWG), изменено на
91/263/EWG, 92/31/EWG, 93/68/EWG.
Использованные гармонизированные нормы:
DIN EN 60335-1, DIN EN 60335-2-2;
DIN EN 61000-3-2: 1995; DIN EN 61000-3-3: 1995;
DIN EN 55014-1: 1993; DIN EN 55014-2: 1997.
Page 52

51
Page 53

Teile-Nr. 185 316
Kundendienststellen
Belgien/Belgique/België:
Schiffer - Beriault S.p.r.l.
Rue Bols Libert 25
B-4053 Embourg
Tél./Fax 043 - 41 15 18
e-mail: thomas@rivers.de
France:
Mister ATOM Pieces
97, rue H-Durre
B. P. 113
F-59590 Raismes
Tél. 03.27.45.82.82
Fax 03.27.45.82.99
Mena Toulouse Service
4, rue Jules Raimu
F-31200 Toulouse
Tel. 05.61.58.07.70
Fax 05.61.11.98.44
L.B.S. Le Bon Service
4, rue de l’Industrie
F-67450 Mundolsheim
Tel. 03.88.18.17.16
Fax 03.88.18.17.20
Niederlande:
A. u. M. Whiteparts B.V.
Takkeblijsters 37a
NL 4817 BL Breda
Tel. 076 - 5 7205 05
Fax 076 - 5 72 07 00
Schweiz:
Saluda Technik AG
Marchstein 173
CH-56234 Triengen
Tel./Fax 041 93/ 3 30 75
Schweden:
LUNA Service AB
Kristineholm
44180 ALINGAS
Tel. 03 22/60 61 50
Norwegen:
LUNA NORGE SERVICE
Postboks 43
Berghagan Langhus
1401 SKI
Tel. 64 - 85 75 00
Österreich:
Wukovits
Kaiser-Joseph-Straße 64
A-3002 Purkersdorf
Tel./Fax 0 22 31/6 3467
Ernst Wallnöfer
Elektro-Industrievertretung
Bundesstraße 29, Neu-Rum
A-6003 Innsbruck
Tel. 05 12/ 26 38 38,
Fax 05 12 /26 38 38 26
Fa. Pölz
Brünner Straße 5
A-1210 Wien
Tel. 01/2 7853 65
Fax 01/27 8536 55
Quelle Zentralservice:
Industriezeile 47
A-4021 Linz
Tel. 07 32/ 78 09-15,
Fax 07 32 / 7809-584
Fa. Reicher
Hohenegg 17
A-8262 Ilz
Tel. 0 3385/ 5 83
Fax 0 33 85 / 5 83
Fa. Pircher
Belruptstraße 44
A-6900 Bregenz
Tel. 0 5574/4 2721-0
Fax 0 55 74/42 72 15
Techn. Änderungen vorbehalten
DIE SAUBERE LÖSUNG
Robert Thomas
Metall- und Elektrowerke GmbH & Co. KG
Postfach 18 20, 57279 Neunkirchen
Hellerstraße 6, 57290 Neunkirchen
Telefon +49 - 27 35 - 7 88 - 0
Telefax +49 - 2735 - 788 - 519
e-mail: info@robert-thomas.de
www.robert-thomas.de
GERMANY
GA 03/03
 Loading...